Embed Size (px)
Citation preview

Public
SAP CPQ
June 2019
English
SAP CPQ Integration with SAP S/4HANA: Basic Integration setup using Cloud Platform Integration (3ZQ))
SAP SE Dietmar-Hopp-Allee 16 69190 Walldorf Germany
Configuration Guide

SAP Best Practices SAP CPQ integration with SAP S/4HANA (3ZQ): Configuration Guide
© SAP SE Public Page 2 of 62
Copyright © 2019 SAP SE or an SAP affiliate company. All rights reserved.
No part of this publication may be reproduced or transmitted in any form or for any purpose without the express permission of SAP SE. The information contained herein may be changed without prior notice.
Some software products marketed by SAP SE and its distributors contain proprietary software components of other software vendors.
National product specifications may vary.
These materials are provided by SAP SE and its affiliated companies ("SAP Group") for informational purposes only, without representation or warranty of any kind, and SAP Group shall not be liable for errors or omissions with respect to the materials. The only warranties for SAP Group products and services are those that are set forth in the express warranty statements accompanying such products and services, if any. Nothing herein should be construed as constituting an additional warranty.
SAP and other SAP products and services mentioned herein as well as their respective logos are trademarks or registered trademarks of SAP SE in Germany and other countries. Please see http://www.sap.com/corporate-en/legal/copyright/index.epx#trademark for additional trademark information and notices.

SAP Best Practices SAP CPQ integration with SAP S/4HANA (3ZQ): Configuration Guide
© SAP SE Public Page 3 of 62
Revision Change Date Description
0 June,2019
SAP Best Practices SAP CPQ integration with SAP S/4HANA (3ZQ): Configuration Guide
© SAP SE Public Page 4 of 62
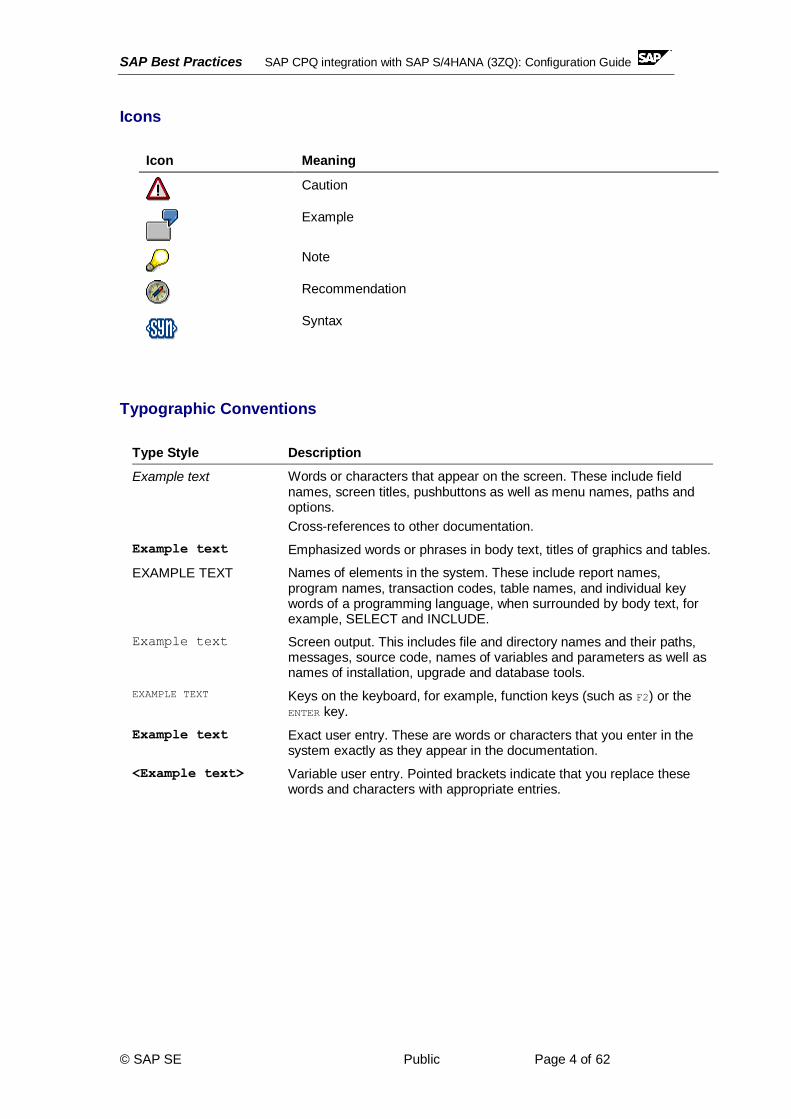
Icons
Icon Meaning
Caution
Example
Note
Recommendation
Syntax
Typographic Conventions
Type Style Description
Example text Words or characters that appear on the screen. These include field names, screen titles, pushbuttons as well as menu names, paths and options.
Cross-references to other documentation.
Example text Emphasized words or phrases in body text, titles of graphics and tables.
EXAMPLE TEXT Names of elements in the system. These include report names, program names, transaction codes, table names, and individual key words of a programming language, when surrounded by body text, for example, SELECT and INCLUDE.
Example text Screen output. This includes file and directory names and their paths, messages, source code, names of variables and parameters as well as names of installation, upgrade and database tools.
EXAMPLE TEXT Keys on the keyboard, for example, function keys (such as F2) or the ENTER key.
Example text Exact user entry. These are words or characters that you enter in the system exactly as they appear in the documentation.
<Example text> Variable user entry. Pointed brackets indicate that you replace these words and characters with appropriate entries.

SAP Best Practices SAP CPQ integration with SAP S/4HANA (3ZQ): Configuration Guide
© SAP SE Public Page 5 of 62
Content
1 Purpose ......................................................................................................................... 6
2 Preparation .................................................................................................................... 6
2.1 Required Information ............................................................................................ 6
2.2 Prerequisites ........................................................................................................ 6
3 Configuration .................................................................................................................. 7
3.1 Configuration in SAP S/4HANA ............................................................................ 7
3.1.1 Create User ...................................................................................................... 7
3.1.2 Certificate Management in SAP S/4HANA ........................................................ 8
3.1.3 Release Inbound Interfaces ............................................................................ 14
3.1.4 Create Business System for SAP S/4HANA .................................................... 16
3.1.5 Define Logical System .................................................................................... 17
3.1.6 Business Partner Replication from SAP S/4HANA to SAP CPQ ...................... 18
3.1.7 Material Replication from SAP S/4HANA to SAP CPQ using SOAP ................ 22
3.1.8 Configuration for Filter Values......................................................................... 25
3.1.9 Business Configuration Set............................................................................. 26
3.1.10 Automatically Generate Integration Settings for Data Exchange ...................... 30
3.1.11 Pricing Condition Filter.................................................................................... 35
3.2 Configuration in SAP Cloud Platform Integration ................................................. 36
3.2.1 How to get the SAP CPI client certificate......................................................... 36
3.2.2 View prepackaged iFlows using SAP CPI Web UI ........................................... 36
3.2.3 Creating User Credentials in CPI System........................................................ 37
3.2.4 Configure and Deploy the iFlows Using Web UI .............................................. 39
3.2.5 Value Mapping for CPQ integration with SAP S/4HANA .................................. 41
3.3 Configuration in SAP CPQ .................................................................................. 43
3.3.1 Define Provider settings .................................................................................. 43
3.3.2 Create CPQ Communication User .................................................................. 45
3.3.3 Product Replication Setup .............................................................................. 46
3.3.4 Customer Replication Setup ........................................................................... 48
3.3.5 Pricing/ Discounting Setup .............................................................................. 50
3.3.6 Sales Quote to Order Setup ............................................................................ 54
3.4 Data Loading ...................................................................................................... 56
3.4.1 Initial Data Load ............................................................................................. 56
4 Manual Build Steps ...................................................................................................... 60
4.1 Ticket Component .............................................................................................. 60
4.2 Appendix ............................................................................................................ 60
4.2.1 How to find CPQ API URL .............................................................................. 60
4.2.2 How to setup Cloud Connector ....................................................................... 61
4.2.3 Troubleshooting.............................................................................................. 62

SAP Best Practices SAP CPQ integration with SAP S/4HANA (3ZQ): Configuration Guide
© SAP SE Public Page 6 of 62
SAP CPQ Integration with SAP S/4HANA: Basic Integration setup using Cloud Platform Integration: Configuration Guide (3ZQ)
1 Purpose The purpose of this document is to describe the procedure to configure the Basic Integration between SAP S/4HANA and SAP CPQ using SAP Cloud Platform Integration (CPI).
Network Security team takes the responsibility of preparing the network environment across different systems and its security aspects.
Important:
If you have any queries or feedback on this document, please create a ticket for the CSN component SV-RDS-CFC
2 Preparation
2.1 Required Information We recommend that the consultant performing the implementation has the following
implementation and configuration knowledge:
● SAP S/4HANA
● SAP Cloud Platform Integration (CPI)
● SAP CPQ
● SAP CPS (optional)
2.2 Prerequisites
Before you set up SAP CPQ Integration with SAP S/4HANA, ensure that you have:
1. SAP CPQ instance.
Ensure that your SAP CPQ instance is in place before you start implementing SAP
CPQ integration with SAP S/4HANA.
2. SAP S/4HANA System.
Ensure that your S/4HANA system is of 1809 release and latest release.
3. SAP Cloud Platform Integration tenant.
The SAP Cloud Platform Integration (CPI) Runtime URL is included in the SAP CPI provisioning e-mail.
URL. Example https://<tenant>-iflmap.hana.ondemand.com
4. SAP CPS instance (optional)

SAP Best Practices SAP CPQ integration with SAP S/4HANA (3ZQ): Configuration Guide
© SAP SE Public Page 7 of 62
Ensure that your SAP CPS instance is integrated to SAP S/4HANA system.
And your configured products are replicated between SAP S/4HANA and SAP
CPS.
3 Configuration The following sections describes all the settings required for this scope item. These can be divided into below groups:
• Configuration in SAP S/4HANA
• Configuration in SAP Cloud Platform Integration (CPI)
• Configuration in SAP CPQ
3.1 Configuration in SAP S/4HANA
3.1.1 Create User
1. Access the following transaction:
Transaction Code SU01
2. On the User Maintenance: Initial screen, enter the following values:
Field Name Value
User CPQS4HINTEG
3. Choose Create.
4. On the Maintain User screen, maintain the following values and Choose Save.
Address tab page
Last Name <user name> example: CPQS4HINTEG
E-Mail <valid E-Mail Address to send
Request for Quotations and Orders>
Comm.Meth Remote Mail
5. Logon data tab page

SAP Best Practices SAP CPQ integration with SAP S/4HANA (3ZQ): Configuration Guide
© SAP SE Public Page 8 of 62
User Type Communication Data
Password <password>
Note
Ensure the user is assigned relevant authorizations to execute Idoc, web service messaging calls like external pricing and print preview.
6. Click Save.
3.1.2 Certificate Management in SAP S/4HANA
Prerequisite
• The customer network environment should be prepared. The SSL should be enabled on SAP
S/4HANA ABAP Server. SAP S/4HANA Server/Client Certificates should be signed by the
supported CA which is trusted by SAP Cloud Solution and SAP Cloud Managed Services.
• For preparing the network environment, network security team that takes care of the customer
network is responsible.
• SSL needs to be enabled on SAP ABAP server by SAP Basis Consultant.
Note
Ensure all the certificates used are valid and are not expired.
Note
For details refer to Note 510007 - Setting up SSL on Web Application Server ABAP
For requesting signed certificates by SAP, go to https://support.sap.com/tcs
• There are mainly two partners in the landscape, SAP side and Customer side.
• SAP Cloud Solution certificates are signed by SAP Passport CA or TC Trust Center.
3.1.2.1 Download ROOT CA Certificates
1. Go to https://support.sap.com/en/offerings-programs/support-services/trust-
center-services.html web site.
2. Navigate to Download →Root Certificates,
3. Download the SAP Passport CA Certificates and Save.

SAP Best Practices SAP CPQ integration with SAP S/4HANA (3ZQ): Configuration Guide
© SAP SE Public Page 9 of 62
Note
Save the certificates in .cer format
4. Go to Cloud Platform Integration URL Ex: https://xxxx-
tmn.hci.int.sap.hana.ondemand.com/itspaces/ and Login with admin user. Navigate using the following path.
Monitor → Keystore under Manage Security
5. Download the ROOT Certificates of CPI with following names:
• Baltimore CyberTrust Root
• Verizon Public SureServer CA G14-SHA2
Note
In case of error downloading certificates, go to Internet explorer ->Tools->Internet options->content -> Certificates -> Trusted Root Certification authorities). Export the relevant certificate from the list.
3.1.2.2 Maintain SSL Server Standard Trusted Cert List
1. In the SAP S/4HANA system access the following transaction:

SAP Best Practices SAP CPQ integration with SAP S/4HANA (3ZQ): Configuration Guide
© SAP SE Public Page 10 of 62
Transaction Code STRUST
2. Double-click SSL server standard PSE folder.
3. In the Certificate area, click the Import Certificate button to add the SAP Passport CA.
4. Add the imported certificate to the certificate list by clicking Add to Certificate List.

SAP Best Practices SAP CPQ integration with SAP S/4HANA (3ZQ): Configuration Guide
© SAP SE Public Page 11 of 62
5. Choose Save.
3.1.2.3 Maintain SSL System Client Cert and Trusted Cert List
1. Choose SSL client SSL Client(Standard) PSE folder
2. From Menu Path choose Certificate→Import to import the SAP Passport CA certificate
3. Switch from Display to Change mode.
4. From Menu Path choose Edit→Add Certificate to add the imported certificate to the
chosen certification list.
5. Repeat previous 2 steps for Cloud Platform Integration Trust Root CA Certificates.
6. Choose Save on the standard tool bar
Note
In case no supported CA signed client certificates for SAP S/4HANA is available, it could be downloaded from the SAP CPI Certificate store, and then imported into SAP Trust Manager for use.
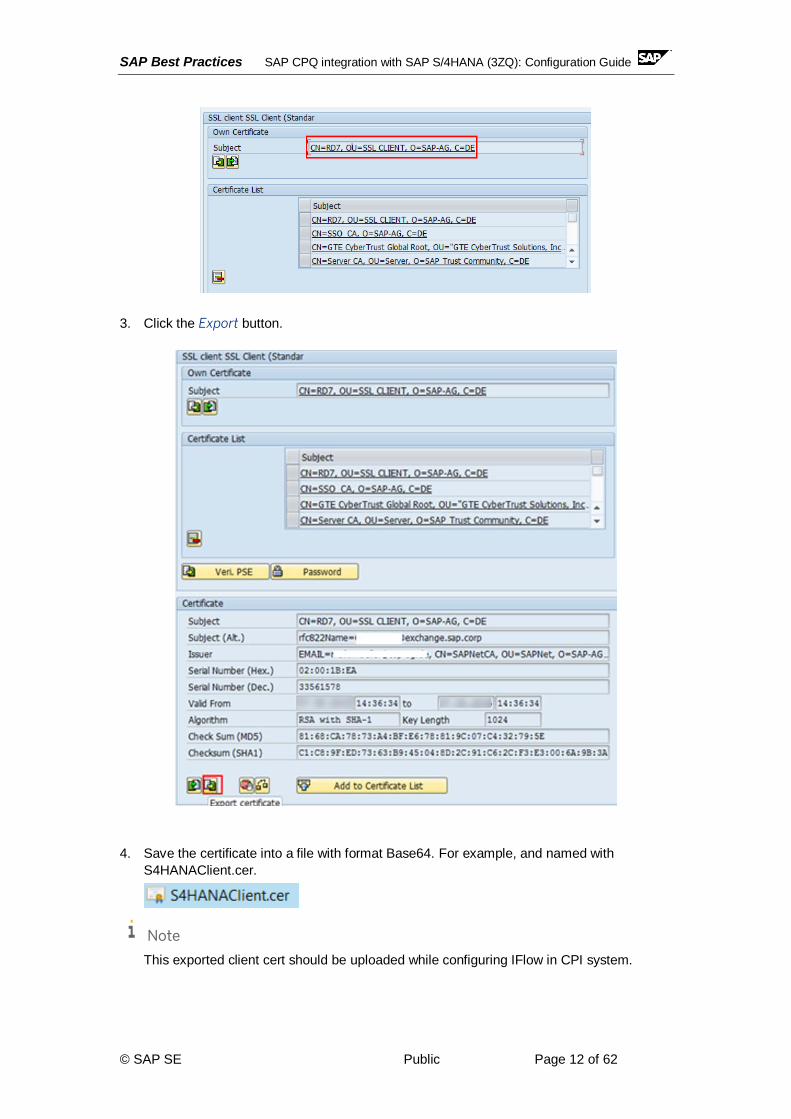
3.1.2.4 Export SAP S/4HANA Client Certificate
1. Expand SSL client SSL Client (Standard) PSE folder.
a. Double-click target instance in the folder.
2. Select the field Owner, in the Own Certificate section by double clicking.
SAP Best Practices SAP CPQ integration with SAP S/4HANA (3ZQ): Configuration Guide
© SAP SE Public Page 12 of 62
3. Click the Export button.
4. Save the certificate into a file with format Base64. For example, and named with
S4HANAClient.cer.
Note
This exported client cert should be uploaded while configuring IFlow in CPI system.

SAP Best Practices SAP CPQ integration with SAP S/4HANA (3ZQ): Configuration Guide
© SAP SE Public Page 13 of 62
3.1.2.5 Mapping Cloud Connector Certificate to Integration
User in SAP S/4HANA
Prerequisite
Obtain the SAP CPI client certificate from your administrator. The certificate is available when the tenant is provisioned by SAP. You can also receive it on creating an incident in the component for your respective SAP Middleware (LOD-CPI/LOD-PI).
Procedure
1. Access the transaction using one of the following navigation options:
Transaction Code SM30
2. In the Maintain Table Views screen, enter VUSREXTID in the Table/View field.
3. Choose Maintain.
4. In the External ID type field, enter DN.
5. Choose New Entries.

SAP Best Practices SAP CPQ integration with SAP S/4HANA (3ZQ): Configuration Guide
© SAP SE Public Page 14 of 62
6. Next to the External ID field, choose Import.
7. Import the Cloud Connector certificate obtained from your administrator.
Example
cloudconnectorclient.cer
8. Enter the sequence number, by example 000.
9. In the User field, enter the technical S/4HANA user you have created in the S/4HANA
system.
For example: CPQINTEG
10. Activate the user by checking the Activated field.
11. Click Save.
3.1.3 Release Inbound Interfaces
3.1.3.1 Activate Inbound SOAP for IDoc 1. Access the following transaction:
Transaction Code SICF
2. In the Service Path field enter /sap/bc/srt/IDoc.

SAP Best Practices SAP CPQ integration with SAP S/4HANA (3ZQ): Configuration Guide
© SAP SE Public Page 15 of 62
3. Choose Execute.
4. Check if the Service is Active; If not then right click the IDoc service and select Activate
Service.
5. If it has been activated, it will be like below:
6. Otherwise you need to Activate Service.
3.1.3.2 Register Service for IDoc Inbound 1. Access the following transaction:
Transaction Code SRTIDOC
2. Select the Register Service radio button.
3. In the Service Attributes section, enter the following parameters:

SAP Best Practices SAP CPQ integration with SAP S/4HANA (3ZQ): Configuration Guide
© SAP SE Public Page 16 of 62
Parameter Value
URI SOAP Application urn:sap-com:soap:runtime:application:idoc
Name of Web Service Definition GENERIC
Call Address (ICF Path) /sap/bc/srt/idoc
4. Choose Execute.
5. Create a new Request for this action and input the short description with meaningful
value.
6. Click Ok.
3.1.4 Create Business System for SAP S/4HANA
Purpose
This chapter describes the procedure to create a Business system that represents the SAP S/4HANA system.
We can perform this task in following way.

SAP Best Practices SAP CPQ integration with SAP S/4HANA (3ZQ): Configuration Guide
© SAP SE Public Page 17 of 62
Procedure
1. Access the following transaction:
Transaction Code IDMIMG
2. Navigate to BAdI, Determination of Local System Name from Define Technical Settings.
3. Execute the BAdI, Determination of Local System Name to create a Local Business
System.
Note
Check IMG Activity Documentation for more detail how to perform this task.
3.1.5 Define Logical System
Purpose
This describes the procedure to create a logical system that represents the SAP CPQ system in SAP S/4HANA system. Logical systems are defined as cross-client systems.
Procedure
1. Access the following transaction:
Transaction Code BD54
2. Choose New Entries.
3. Create a logical system that identifies the on-demand system, as given in the table below:
following:
Field Entry
Logical System*
<logical system name of SAP CPQ tenant> Ex: CPQINTS4H

SAP Best Practices SAP CPQ integration with SAP S/4HANA (3ZQ): Configuration Guide
© SAP SE Public Page 18 of 62
4. Choose Save
5. Choose Ok to confirm the pop-up for saving the details in the transport request.
3.1.6 Business Partner Replication from SAP S/4HANA to SAP CPQ
3.1.6.1 Configure Data Replication Framework
Procedure
1. Open transaction DRFIMG.
2. Navigate to Define Custom Settings for Data Replication →Define Technical Settings
→Define Technical Systems for Business Systems.
3. Choose New Entries to add Business System for SAP CPQ. Add Business System
name as logical system and Logical System name using input help. Choose Save,
Name <Description> for example: SAP CPQ integration with S/4HANA.

SAP Best Practices SAP CPQ integration with SAP S/4HANA (3ZQ): Configuration Guide
© SAP SE Public Page 19 of 62
4. Select the Business System and double click on Define Bus. Systems, BOs in the
Dialog structure.
5. Choose New Entries and add BO Type 986 (Business Partner including relationships)
using input help and check field Sys. Filt. In case this entry exists, skip the step.
6. Select the entry BO type and double click on Define Bus. Systems, BOs,
Communication Channel in the left dialog structure.
7. Choose New Entries to add the Communication Channel as 1 Replication via Services.
In case the entry exists, skip this step.
8. Choose Save.
9. Navigate back.
10. Select the IMG activity Define Replication Models.

SAP Best Practices SAP CPQ integration with SAP S/4HANA (3ZQ): Configuration Guide
© SAP SE Public Page 20 of 62
11. Choose New Entries and define Replication Model Name and Description and Log
days as 50.
12. Choose Enter.
13. Select the entry created and double click on Assign Outbound Implementation.
14. Choose New Entries.
15. Select Outbound Implementation as Outbound Impl. for BP/REL via Services (986_3)
using the input help and choose Enter.
16. Enter Sequence as 1.
17. Select the row added and double click on Assign Target Systems for Repl.
Model/Outb.Impl in dialog structure.
18. Choose New Entries and add the Business system created above using the input help.
19. Select the Business system row and double click on the node Assign Outbound
Parameter in the dialog structure.
20. Choose New Entries to add the Outbound parameter PACK_SIZE_BULK using the
input help, check field Mandatory and enter outbound parameter value as 20.

SAP Best Practices SAP CPQ integration with SAP S/4HANA (3ZQ): Configuration Guide
© SAP SE Public Page 21 of 62
Note
Outbound Parameter value for PACK_SIZE_BULK can be set as per most efficient package size, which will differ from system to system.
21. Choose Save, details will be saved in the transport request.
22. Click Activate to activate the replication model after selecting the folder Define
Replication Model.
3.1.6.2 Activate Function Modules
Procedure
1. Open transaction SPRO.
2. In IMG menu structure, navigate to Cross-Application Components→SAP Business
Partner →Data Distribution → Activate Function Modules.
3. Activate the function module MDG_BS_BP_OUTBOUND_DRF by checking the field
Call as shown below.

SAP Best Practices SAP CPQ integration with SAP S/4HANA (3ZQ): Configuration Guide
© SAP SE Public Page 22 of 62
4. Choose Save
3.1.7 Material Replication from SAP S/4HANA to SAP CPQ using SOAP
3.1.7.1 Configure Data Replication Framework
Procedure
1. Open transaction DRFIMG.
2. Navigate to Define Custom Settings for Data Replication →Define Technical Settings
→Define Technical Systems for Business Systems.
3. Choose New Entries to add Business System for SAP CPQ. If the Business system is
already created, Select Business System and Logical System name using input help.
Choose Save,
4. Select the Business System and double click on Define Bus. Systems, BOs in the Dialog
structure.

SAP Best Practices SAP CPQ integration with SAP S/4HANA (3ZQ): Configuration Guide
© SAP SE Public Page 23 of 62
5. Choose New Entries and add BO Type 194 (Material) using input help and check field
Sys. Filt. Select Outp.Mode as Direct Output. In case this entry exists, skip the step.
Note
If Output Mode is selected as Direct Output, idocs will be triggered immediately on Save. In this case, DRFOUT is not required to replicate changes to customer hierarchy. If Output Mode is selected as Pooled Output, idocs are sent using DRF change pointers and DRFOUT has to be executed or scheduled to create and send the Idoc.
6. Select the entry BO type and double click on Define Bus. Systems, BOs, Communication
Channel in the left dialog structure.
7. Choose New Entries to add the Communication Channel as Replication via Services. In
case the entry exists, skip this step.
8. Choose Save,
9. Navigate back.
10. Select the IMG activity Define Replication Models.
11. Choose New Entries and define Replication Model Name and Description and Log days
as 50.
12. Choose Enter.
13. Select the entry created and double click on Assign Outbound Implementation.

SAP Best Practices SAP CPQ integration with SAP S/4HANA (3ZQ): Configuration Guide
© SAP SE Public Page 24 of 62
14. Choose New Entries.
15. Select Outbound Implementation as Outbound Impl. for Product via Services (194_3)
using the input help and choose Enter.
16. Select the row added and double click on Assign Target Systems for Repl.
Model/Outb.Impl in dialog structure.
17. Choose New Entries and add the Business system created above using the input help.
18. Select the Business system row and double click on the node Assign Outbound
Parameter in the dialog structure.
19. Choose New Entries to add the Outbound parameter PACK_SIZE_BULK using the input
help. Enter outbound parameter value as 20 and click enter to check field Mandatory.
20. Choose Save.
21. Go back to Define Replication Model Screen and Select the row for Define Replication
Model.
22. Click Activate to activate the replication model.

SAP Best Practices SAP CPQ integration with SAP S/4HANA (3ZQ): Configuration Guide
© SAP SE Public Page 25 of 62
3.1.8 Configuration for Filter Values
3.1.8.1 Filter Code Values
Purpose
Filter objects is used to remove the S/4HANA outbound processing code values which are not supported by the receiver system. During S/4HANA inbound processing these code values are added again.
These below steps are optional and should be performed based on your requirement.
Procedure
1. To setup Filter Objects for Code value, navigate to below path.
Transaction Code DRFF
2. Execute Replication Model Filters Activity, it will open a pop up screen.
3. Enter the Login credential for your S/4HANA system.
4. Select the relevant Replication Model and choose display. It will open a different window
to Display Filter Criteria.
5. Click on Edit and Choose the Filter Criteria to Include Business Objects.
6. Select the BP role to be Include in your business Partner replication to SAP CPQ.
For Example: FLCU01
7. Click on Show Segment filter and choose the Filter Object Business Partner Role-98601.
8. Click on Edit and Choose the Filter Criteria to Include Business Objects.
9. Select the BP role to be Include in your business Partner replication to SAP CPQ.

SAP Best Practices SAP CPQ integration with SAP S/4HANA (3ZQ): Configuration Guide
© SAP SE Public Page 26 of 62
For Example: ‘FLCU01’
10. Choose Save.
3.1.9 Business Configuration Set
Purpose
Business Configuration Set C4C_INTEGRATION_CS and C4C_INTEGRATION_CC contains additional customizing setting for SAP CPQ and SAP S/4HANA integration.
BC set C4C_INTEGRATION_CC contains client-independent customizing entries for the ALE message types. Activate this BC set in the SAP S/4HANA client you use for cross-client customizing.
3.1.9.1 Procedure to activate Client Specific BC SET
1. Open transaction SCPR3
2. Choose New BC Set Selection→Select by Texts.
3. In the dialog box enter BC Set name C4C_INTEGRATION_CS and choose Execute.

SAP Best Practices SAP CPQ integration with SAP S/4HANA (3ZQ): Configuration Guide
© SAP SE Public Page 27 of 62
4. Double click on the BC Set ID and choose Continue in the BC Set Consistency Check
pop-up window.
5. Choose Copy BC Set
6. In the following dialog box, enter the new BC Set name and short text. Example
Z_CPQ_INTEGRATION_CS and SET CPQ Integration Customizing - client specific.
7. Choose Local Object or select a transport request if required.
8. Choose Define Favorites
9. Choose Change mode and choose Continue in the BC Set Consistency Check dialog
box.
10. Right click on the node Maintenance View Variant for C4C CO Scenario in the structure
and choose Remove Cust. Object from BC Set.
11. Right click on the node Business Transaction Events in the structure and choose Remove
IMG Activity from BC Set.
12. Choose Save.
13. Open transaction SCPR20
14. In the field BC Set, input the BC Set Name Z_CPQ_INTEGRATION_CS.
15. Choose Activate BC Set (F7) on the application tool bar

SAP Best Practices SAP CPQ integration with SAP S/4HANA (3ZQ): Configuration Guide
© SAP SE Public Page 28 of 62
16. Save it in a customizing request if there is a dialog box
17. In the next pop-up, choose Continue Activation with default value.
Note
Ignore if there are any warning messages during the activation of the BC set.
3.1.9.2 Procedure to Activate Cross Client BC SET
1. Open transaction SCPR3
2. Choose New BC Set Selection→Select by Texts.

SAP Best Practices SAP CPQ integration with SAP S/4HANA (3ZQ): Configuration Guide
© SAP SE Public Page 29 of 62
3. In the dialog box enter BC Set name C4C_INTEGRATION_CC and choose Execute.
4. Double click on the BC Set ID and choose Continue in the BC Set Consistency Check
pop-up window.
5. Choose Copy BC Set
6. In the following dialog box, enter the new BC Set name and short text. Example
Z_CPQ_INTEGRATION_CC and SET CPQ Integration Customizing – cross client.
7. Choose Local Object or select a transport request if required.
8. Open transaction SCPR20
9. In the field BC Set, input the BC Set name Z_CPQ_INTEGRATION_CC.
10. Choose Activate BC Set (F7) on the application tool bar, and create a new request for
this.

SAP Best Practices SAP CPQ integration with SAP S/4HANA (3ZQ): Configuration Guide
© SAP SE Public Page 30 of 62
Note
Ignore if there are any warning messages during the activation of the BC set.
3.1.10 Automatically Generate Integration Settings for Data Exchange
1. To Automatically Generate Connectivity settings for Data Exchange navigate using one of
the following paths.
Transaction code RCOD_CONNECTIVITY
2. Generate Integration Settings: Step 1: Select SAP Cloud Platform Integration as the
middleware and click Next.
3. Generate Integration Settings: Step 2: Select the scope of Integration exactly as scoped
in the SAP CPQ Solution and choose Next.
• Business Partners
• Products
• Sales Quotes
• Pricing Conditions

SAP Best Practices SAP CPQ integration with SAP S/4HANA (3ZQ): Configuration Guide
© SAP SE Public Page 31 of 62
4. Generate Integration Settings: Step 3: Maintain the following and choose Next
Field Entry
Logical System Do one of the following:
• Enter the logical system of the CPQ
system or
• Click Create Logical System to create
new logical system.
Job Schedule Interval Enter the frequency with which the inbound and outbound IDocs should be processed in the S/4HANA system.
Job User Enter the user using which batch jobs are scheduled.

SAP Best Practices SAP CPQ integration with SAP S/4HANA (3ZQ): Configuration Guide
© SAP SE Public Page 32 of 62
5. Generate Integration Settings: Step 4: Enter the connection information about the CPI
system to generate the RFC destinations. Choose Next
Field Entry
Runtime URL Worker node URL of the SAP Cloud Platform Integration tenant (without HTTPS ://)
Proxy details (Optional) Host name, service name, and the access details of the forward or reverse proxy?
Authentication (basic or certificate)
Either import the certificate or enter the user credentials.
6. In Generate Integration Settings: Step 5 of 6-Consumer Proxy Settings screen, enter the
URL Access path for Business Partner and Product Replication. Enter the CPI system
details in Connection Parameters and choose Certificate based authentication of CPI
system.
Note
You can take the URL Access Path from relevant IFlow of your CPI Web UI and for that service path add /cxf and maintain against the respective service.

SAP Best Practices SAP CPQ integration with SAP S/4HANA (3ZQ): Configuration Guide
© SAP SE Public Page 33 of 62
7. Choose Next.
8. In the Summary screen, select the Generate button to generate the configuration entities.

SAP Best Practices SAP CPQ integration with SAP S/4HANA (3ZQ): Configuration Guide
© SAP SE Public Page 34 of 62
9. In the confirm pop- up screen choose Yes
10. In the log you can check which entities were created

SAP Best Practices SAP CPQ integration with SAP S/4HANA (3ZQ): Configuration Guide
© SAP SE Public Page 35 of 62
3.1.11 Pricing Condition Filter
Purpose
This describes the procedure to create an IDoc filter in SAP S/4HANA system. To allow only PPR0 Pricing Condition data to flow to SAP CPQ system.
Procedure
1. Access the following transaction:
Transaction Code BD64
2. The Distribution Model for CPQ will be created by connectivity report, Search and Expand
the Distribution Model ‘SAP CPQ Integration with S/4HANA’.
3. Expand the COND_A message type and double click on No filter set.
4. In a Change Filter popup, click on Create Filter Group button.
5. Expand the Filter Group and select the field Condition Type,
6. Click on Add button to add a value to filter field PPR0.

SAP Best Practices SAP CPQ integration with SAP S/4HANA (3ZQ): Configuration Guide
© SAP SE Public Page 36 of 62
7. Click Ok button in popup windows and Save the Distribution Model.
3.2 Configuration in SAP Cloud Platform Integration
SAP provides prepackaged, generic integration content called integration flows (iFlows) for the integration of SAP CPQ with SAP S/4HANA using SAP Cloud Platform Integration(CPI).
Prerequisites
To be able to import and deploy iFlows, you need the AuthGroup.IntegrationDeveloper role assigned in your tenant.
Upload SAP CPQ SSL Certificates in SAP Cloud Platform Integration.
3.2.1 How to get the SAP CPI client certificate In the SAP CPI provisioning e-mail follow the link under Certificate Information. In the resulting screen choose X509 Certificate with option Binary CER. Download it to your local machine.
3.2.2 View prepackaged iFlows using SAP CPI Web UI 1. Access the web UI URL from the provisioning e-mail. It should be in the format:
https://<hcitenant>.hana.ondemand.com/itspaces.
2. View all pre-packaged integration flows delivered by SAP in the Discover tab.
3. Click on the package SAP CPQ Integration with SAP S/4HANA
4. You can see all the artifacts for this Integration Package.
SAP Best Practices SAP CPQ integration with SAP S/4HANA (3ZQ): Configuration Guide
© SAP SE Public Page 37 of 62
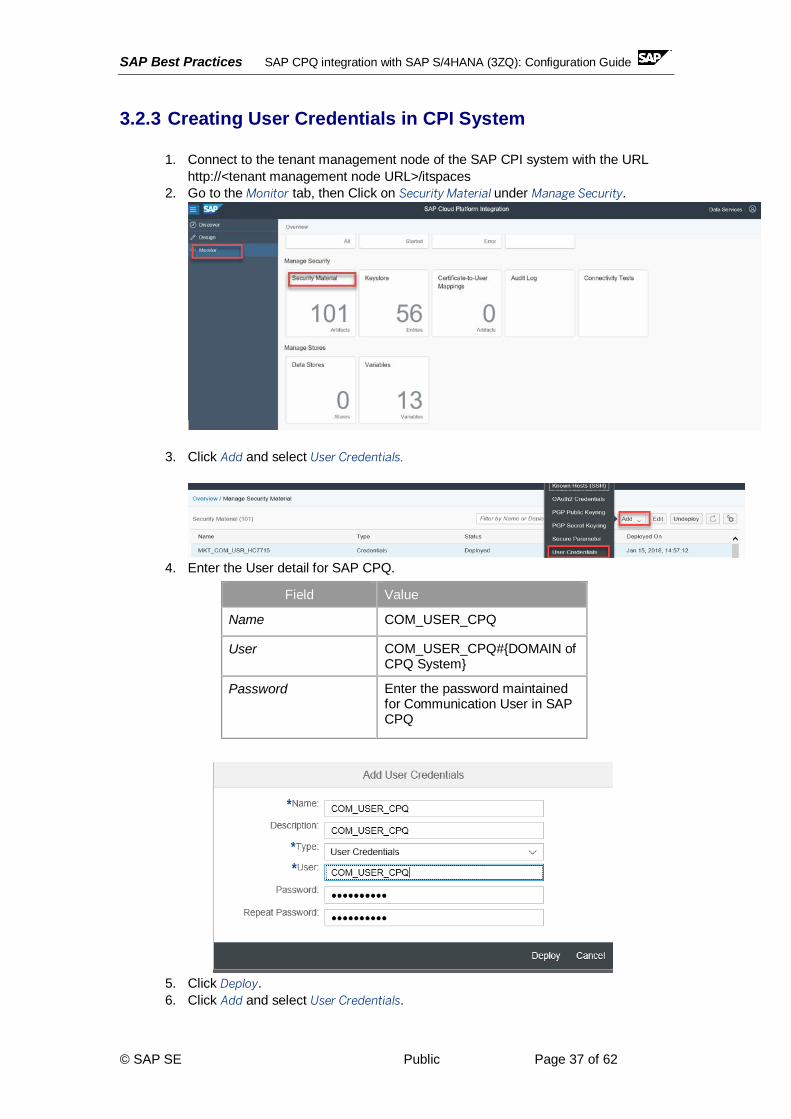
3.2.3 Creating User Credentials in CPI System
1. Connect to the tenant management node of the SAP CPI system with the URL
http://<tenant management node URL>/itspaces
2. Go to the Monitor tab, then Click on Security Material under Manage Security.
3. Click Add and select User Credentials.
4. Enter the User detail for SAP CPQ.
Field Value
Name COM_USER_CPQ
User COM_USER_CPQ#{DOMAIN of CPQ System}
Password Enter the password maintained for Communication User in SAP CPQ
5. Click Deploy.
6. Click Add and select User Credentials.

SAP Best Practices SAP CPQ integration with SAP S/4HANA (3ZQ): Configuration Guide
© SAP SE Public Page 38 of 62
7. Enter details for user of SAP S/4HANA.
Field Value
Name CPQS4HINTEG
User CPQS4HINTEG
Password Enter the password of User CPQS4HINTEG
8. Click Deploy.
Note
In case you have SAP CPS Integrated with SAP S/4HANA, then
1. Click Add and select OAuth2 Credentials
2. Enter details for OAuth2 Credentials of SAP CPS.
Field Value
Name CPSSERVICE
Grant Type Client Credentials
Description CPSSERVICE
Authentication URL
Maintain CPS authentication URL e.g. https://cpsservices.authentication.eu10.hana.ondemand.com/oauth/token
Client ID Client ID of CPS system e.g. sb-cpsservices-cpscalliduscloud!t0001
Client Secret Enter the password of the client
Client Authentication
Send as Body Parameter
Include Scope Should be ticked
Scope Maintain the scope e.g. uaa.resource
Content Type Application/x-www-form-urlencoded
3. Click Deploy.

SAP Best Practices SAP CPQ integration with SAP S/4HANA (3ZQ): Configuration Guide
© SAP SE Public Page 39 of 62
3.2.4 Configure and Deploy the iFlows Using Web UI
If you have re-deployed key store (system.jks) in your SAP CPI tenant, you need to re-deploy all the iFlows to avoid the caching issues or re-start them to avoid caching related issues.
Procedure
1. Connect to the tenant management node of the SAP CPI system with the URL
http://<tenant management node URL>/itspaces
2. Under the Discover tab, Click on the package SAP CPQ Integration with SAP
S/4HANA.
3. Choose Copy on the top-right corner of the package overview page.
4. If the Integration package were being created for the first time, then you would see the
message ‘Integration Package Created’. If not, you will see the below dialog box
asking to either create a new copy of the package or to overwrite the existing
integration package content. Choose Overwrite.
5. Select the Design mode to configure the iFlows.
6. Select the Integration Package copied

SAP Best Practices SAP CPQ integration with SAP S/4HANA (3ZQ): Configuration Guide
© SAP SE Public Page 40 of 62
7. All the iFlows will be shown/ listed under the ARTIFACTS tab of the package
8. Choose the iFlows mentioned in the table below (one after the other) by choosing
Actions → Configure option.
9. Configure the sender system (in this example S/4HANA) and receiver system (in this
example CPQ) details as explained below:
a. Choose Sender Tab: Choose Authentication Method as Client Certificate
b. Browse for the certificate. See chapter: Certificate Management in SAP
S/4HANA for the client Certificate.
c. Choose Receiver Tab: Enter the Address as CPQ API URL. Check section How
to find CPQ API URL in appendix.
d. Choose the Authentication as Basic
e. Enter the Communication User Credential in Credential Name.
f. Choose Save and Choose Deploy
g. Repeat the same procedure for all the iFlows that have the same sender system
as S/4HANA and Receiver System as CPQ.
10. Choose iFlow to configure the sender system (in this example CPQ) and receiver system
(in this example S/4HANA) details.
a. Choose Sender Tab: Choose Authorization as User Role.
b. Add Address as /CPQ/S4/Quote2Order.
c. Choose Receiver Tab: Select Receiver as S/4HANA.
d. Enter the host name as Cloud Connector URL, check section How to setup Cloud
Connector or Contact your system administrator for these details.
e. Enter Client as the SAP S/4HANA system client. Proxy Type as On-Premise.
f. Choose the Authentication as Basic
g. Enter the S/4HANA User Credential in Credential Name.
h. Choose More Tab: Enter <SID>CLNT<Client> in Recipient Partner Number. For
Example: QKXCLNT260.
i. Enter SAP<SID> in Recipient Port. For Example: SAPQKX.
j. Enter Logical System you have created in S/4HANA in Sender Partner Number
and Sender Port. For Example: CPQINTS4H.
k. Choose Save and Choose Deploy

SAP Best Practices SAP CPQ integration with SAP S/4HANA (3ZQ): Configuration Guide
© SAP SE Public Page 41 of 62
iFlows to be configured
Name of the iFlow Description of the iFlow
Create Sales Quote Follow Up Document in SAP Business Suite
Creation of Sales Quote Follow Up Document in SAP Business Suite
Replicate Business Partner from SAP Business Suite
Business Partner Replication from SAP Business Suite
Replicate Material from SAP Business Suite
Material Replication from SAP Business Suite
Replicate Price Condition from SAP Business Suite
Price Condition Replication from SAP Business Suite
Replicate Sales Order Confirmation from SAP Business Suite
Creation of Sales Quote Follow Up Document in SAP Business Suite
Note In case you have SAP CPS Integrated with SAP S/4HANA, And Product replication done from SAP S/4HANA to SAP CPS. You can configure the Iflow “Create Sales Quote Follow Up Document in SAP Business Suite” for receiver CPS as well to check configurable product characteristics in SAP CPS follow the below steps.
a. Choose Receiver Tab: Select Receiver as CPS.
b. Enter the host name as SAP CPS URL or Contact your system administrator for
these details.
c. Enter Proxy Type as Internet and Select Method as GET.
d. Choose the Authentication as OAuth2 Client Credentials
e. Enter the CPS OAuth2 Credential in Credential Name.
3.2.5 Value Mapping for CPQ integration with SAP S/4HANA 1. Connect to the tenant management node of the CPI system with the url: http://<tenant
management node>/itspaces
2. Go to Design view.
3. Select the Integration Package in your workspace.
4. All the iFlows will be shown/ listed under the Artifacts section of the page.
5. Select the iFlows with name Value Mapping for SAP CPQ integration with SAP S4HANA
and choose Actions button on the right and select Configure.
All the Mapping Values will be shown/ listed.

SAP Best Practices SAP CPQ integration with SAP S/4HANA (3ZQ): Configuration Guide
© SAP SE Public Page 42 of 62
6. Map all the Value mapping fields as per below sections.
7. Choose Save and then Deploy.
3.2.5.1 Product Type
1. Mention the Material Group in SAP S/4HANA system in left side.
2. Enter the respective Product Type in CPQ system in right side. Maintain the Product
Type created in 3.3.3.1 Maintain Product Type section.
3.2.5.2 Product Category 1. Mention the Product Hierarchy in SAP S/4HANA system in left side.
2. Enter the respective Product Category in CPQ system in right side. Maintain the
Product Category created in 3.3.3.2 Maintain Product Category section
3.2.5.3 Role Code 1. Mention the Business partner role code in SAP S/4HANA system in left side.
2. Enter the respective Business partner role code in CPQ system in right side. Maintain
the Business partner roles available in CPQ system Customer Role Default under
Customer/ Customer Role.

SAP Best Practices SAP CPQ integration with SAP S/4HANA (3ZQ): Configuration Guide
© SAP SE Public Page 43 of 62
3.2.5.4 Country 1. Mention the Country Code in SAP S/4HANA system on left side. You can check
Country Code in S/4HANA in T005 Table.
2. Enter the respective Country Code in CPQ system in right side. Maintain the
Countries Abrev3 available in CPQ system under General as Countries.
3.2.5.5 Region 1. Mention the Region Code in SAP S/4HANA system on left side. You can check
Region Code in S/4HANA in T005S Table.
2. Enter the respective Region Code in CPQ system in right side. Maintain the
States Abrev2 available in CPQ system under General as States.
3.2.5.6 Pricing Condition 1. Mention the Pricing Condition Code in SAP S/4HANA system on left side.
2. Enter the respective Pricing Description to be used in CPQ system in right side.
3.3 Configuration in SAP CPQ
3.3.1 Define Provider settings
Procedure
1. Login to your SAP CPQ system using an Administrator User.

SAP Best Practices SAP CPQ integration with SAP S/4HANA (3ZQ): Configuration Guide
© SAP SE Public Page 44 of 62
2. Click on SETUP in menu bar and choose Setup.
3. Select Providers in left navigation bar and then select SAP.
4. Select SAP Cloud Platform in Available SAP Providers.
5. In Common Settings tab, Switch on Enable Integration.
6. Select BasicAuth in Authentication Mode dropdown.
7. Maintain Integration Username and password as the username and password of
Cloud Platform Integration User.

SAP Best Practices SAP CPQ integration with SAP S/4HANA (3ZQ): Configuration Guide
© SAP SE Public Page 45 of 62
8. Under General Setting, Switch on Send customers along with quote payload.
9. Enter the Cloud Platform URL in REST API base URL address and a postfix /http to
connect to http adapter.
10. Click Save.
11. Navigate to S/4 ERP Settings tab, maintain the endpoint as
/CPQ/S4/Quote2Order.
12. Click Save.
13. Select SAP ERP in Available SAP Providers.
14. Select Connect SAP ERP as TRUE.
15. Click Save.
3.3.2 Create CPQ Communication User
Purpose
A Communication user need to be created in SAP CPQ System, which will be used in Cloud Platform Integration for basic authentication to CPQ.
Procedure 1. Login to your SAP CPQ system using an Administrator User.
2. Click on SETUP in menu bar and choose Setup.
3. In left navigation bar, select Users under Users.
4. Click on Add New User Button.
5. Enter the First Name, Last Name and Email Address for Communication User.
6. Enter Username as COM_USER_CPQ and maintain the Initial Password.
7. Choose User Type as Sales.

SAP Best Practices SAP CPQ integration with SAP S/4HANA (3ZQ): Configuration Guide
© SAP SE Public Page 46 of 62
8. Select Administrator.
9. Select Company as CallidusCloud (CALD).
10. Click Save.
Note
Login to CPQ system using the above user and reset the password and use same password to be used in CPI at the time of Creating User Credentials.
3.3.3 Product Replication Setup
3.3.3.1 Maintain Product Types
Purpose
Follow below procedure to create Product Type in SAP CPQ. This Product Type is mapped to S/4HANA Material Group in SAP CPI middleware.
Procedure 1. Login to your SAP CPQ system using an Administrator User.
2. Click on SETUP in menu bar and choose Setup.
3. In left navigation bar, select Product Types under Product Catalog.
4. Click on Add New Button.
5. Maintain the Product Type Name and Product Type Rank.
Example:
6. Click Save.
3.3.3.2 Maintain Product Categories
Purpose
In below steps, product catalog is created, which will help user to differentiate the product based on their category. If product doesn’t have any Product Category, it is considered as DRAFT. The Product Category is mapped with S/4HANA Product Hierarchy in CPI middleware.
Product Type Product Type Rank
Metal Processing 10
Electronics 11

SAP Best Practices SAP CPQ integration with SAP S/4HANA (3ZQ): Configuration Guide
© SAP SE Public Page 47 of 62
Procedure 1. In left navigation bar, select Categories under Product Catalog.
2. Click on Add New Button.
3. Maintain the Product Category by giving Category Name, Category Description, Rank
and check the Active checkbox.
Example:
4. Click Save.
3.3.3.3 Maintain Unit of Measurement
Procedure 1. In left navigation bar, select Unit of Measurement under Product Catalog.
2. Click on Add New Button.
3. Enter the Description as Measurement Name and Code as Unit of Measurement.
4. Click on Add New Button.
Category Name Category Description Rank Active
Machines Machines 10 X
Vehicles Vehicles 11 X

SAP Best Practices SAP CPQ integration with SAP S/4HANA (3ZQ): Configuration Guide
© SAP SE Public Page 48 of 62
5. Click Save.
3.3.4 Customer Replication Setup
3.3.4.1 Maintain Customer Role
Procedure 1. Login to your SAP CPQ system using an Administrator User.
2. Click on SETUP in menu bar and choose Setup.
3. In left navigation bar, select Customer Role Defaults under Customers/ Customer
Roles.
4. Click on Add New Button.
5. Select the User Type and Customer Role.
Example:
User Type Customer Role User Info User’s
Company Info
Partner Bill To X
Sales Ship To X

SAP Best Practices SAP CPQ integration with SAP S/4HANA (3ZQ): Configuration Guide
© SAP SE Public Page 49 of 62
6. Click Save.
Note Customer Role Defaults settings has a significance in maintaining the Bill To and Ship To in the Customer Info tab of the CPQ quote hence maintain this setting as the User Type used for creating the quote.
3.3.4.2 Maintain Customer Field Permissions
Purpose
Business can define which fields of customer to be made mandatory and which should be read only. Below steps deals with minimum fields needed for customer replication from SAP S/4HANA system.
Procedure 1. In left navigation bar, select Customer Field Permissions under
Customers/Customer Roles.
2. Go to Ship To tab, click on the permission field and Select Required for below fields:
Note
Maintain the field permissions as per your business needs, setting field permission as Required will make the field mandatory in the customer master, hence make sure that all the mandatory field values are available while business partner master data replication from S/4HANA system.
Fields
First Name
Company
Country

SAP Best Practices SAP CPQ integration with SAP S/4HANA (3ZQ): Configuration Guide
© SAP SE Public Page 50 of 62
3. Click Save.
4. In similar way, the mentioned fields can be made mandatory for Bill To and End User.
3.3.5 Pricing/ Discounting Setup
3.3.5.1 Create Markets
Purpose
A market is created in SAP CPQ against every Sales Organization of SAP S/4HANA system.
This will help in pricing determination in Sales Quote in CPQ system.
Procedure 1. Login to your SAP CPQ system using an Administrator User.
2. Click on SETUP in menu bar and choose Setup.
3. In left navigation bar, select Markets under Pricing/Calculations.
4. Click on Add New Button.
5. Enter the Market Code field as a Sales Organization of S/4HANA system.
6. Enter Marketing Name, Currency and Market Factor.
Example:
Market Code Market Name Currency Market Factor
1710 Sales Org US USD 1
1010 Sales Org DE EUR 1

SAP Best Practices SAP CPQ integration with SAP S/4HANA (3ZQ): Configuration Guide
© SAP SE Public Page 51 of 62
7. Click Save.
8. In left navigation bar, select Market Visibility under Pricing/Calculations.
9. Click on Add New Button.
10. Select Market Name created in above step in Step 2 Section
11. In Step 3 section enter Visibility Condition as 1.
12. Click Save.
3.3.5.2 Create Pricebooks
Purpose
Pricing in the Sales Quote is determined based on market, pricebook and product in CPQ system. Pricebook comprises of Distribution Channel and Product entries with their respective prices.
Procedure 1. In left navigation bar, select Pricebooks under Pricing/Calculations.
2. Under Pricebooks tab, search for the Market Name created in above steps.
3. Click on Add New Pricebook button.
4. Enter the Pricebook name.
5. Enter the Distribution Channel similar to the distribution Channel of S/4HANA
system against the Sales Organization. Example: 10
6. Check the Visible to everyone checkbox.

SAP Best Practices SAP CPQ integration with SAP S/4HANA (3ZQ): Configuration Guide
© SAP SE Public Page 52 of 62
7. Click Save.
8. Pricing for the products in Entries tab will be created by Pricing Replication IDoc
from S/4HANA system.
3.3.5.3 Discounting
Purpose
One of the major functionalities of SAP CPQ is on the fly discounts based on products, product types, product categories, users and user types. You can setup discounting in Sales Quote in your SAP CPQ system following below procedure.
Procedure 1. In left navigation bar, select Discounts/Multipliers under Pricing/Calculations.
2. Click on Add New button.
3. Click on Select button to maintain USER TYPE as Sales in Step 1 section.
Note The above selection will allow users with user type ‘Sales’ to give discounts in Sales Quote which we will be defining in next step. You can create any condition for discount selection with User, User Type, Product, Product Type or Category.
4. In Step 2 section, maintain multiplier as 1 for Minimal Value, Default Value and
Maximum Value.
5. Maintain Maximum Value for Discount as 10. It will allow your Sales User to give
maximum of 10 percent discount. Above 10 percent will be subject to approval.

SAP Best Practices SAP CPQ integration with SAP S/4HANA (3ZQ): Configuration Guide
© SAP SE Public Page 53 of 62
6. In Step 3 section, maintain Condition as 1. You can create conditions using scripting
language also.
7. Click Save.
3.3.5.4 Discounting Priorities
Purpose
In SAP CPQ, you can provide discount to customer in Sales Quote based on User, User Type, Product, Product Type or Product Category conditions. There might come a case with two or more valid conditions. In such situation, which condition will take priority.
Procedure 1. In left navigation bar, select Discounting Priorities under Pricing/Calculations.
2. As we want Product to have highest Priority. Select Rank as 1.
3. Further Select Rank for Product Type as 2, Category as 3, User as 4 and User Type
as 5.
4. Click Save.

SAP Best Practices SAP CPQ integration with SAP S/4HANA (3ZQ): Configuration Guide
© SAP SE Public Page 54 of 62
3.3.6 Sales Quote to Order Setup
3.3.6.1 Add Action for External Sales Order in ERP
Purpose
The Action for creating Sales Order in your ERP External System and the same need to be assigned to Sales Quote in SAP CPQ.
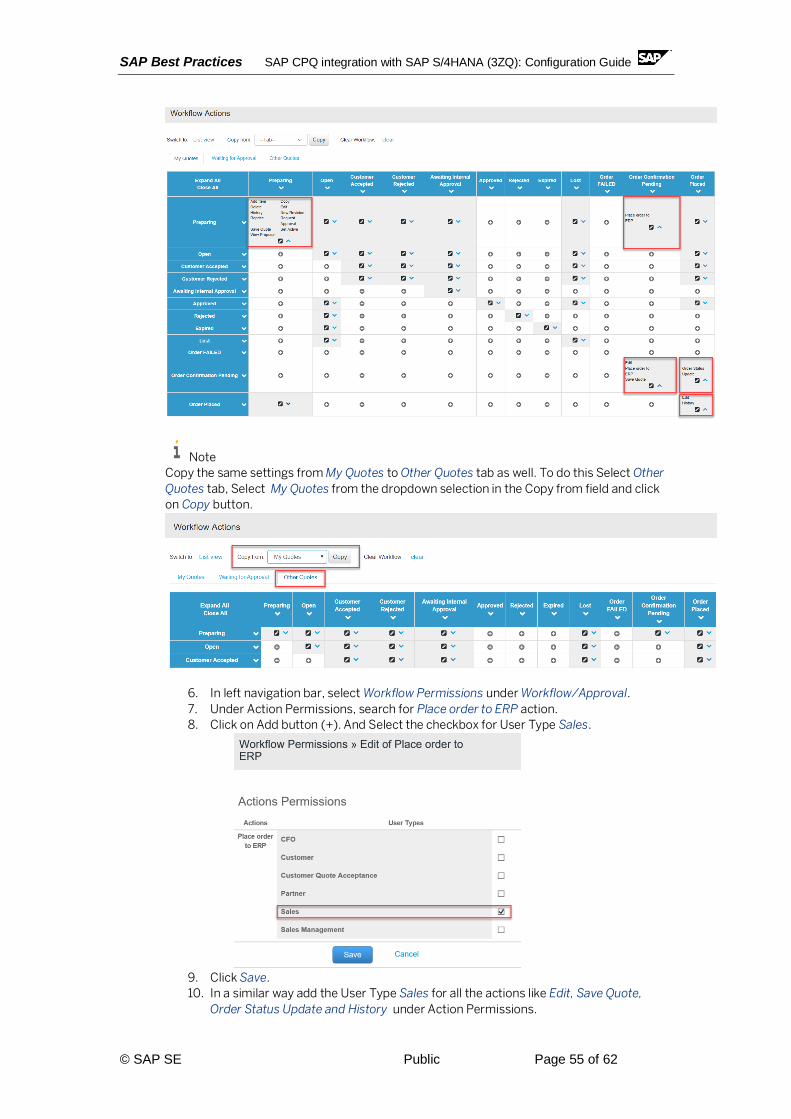
Procedure 1. In left navigation bar, select Workflow under Workflow/Approval.
2. In My Quotes tab, Click on Start Status is Preparing, and End Status is Order
Confirmation pending.
3. Click on , Scroll to the Place order to ERP Action, Click the checkbox Selected.
4. Click Save.
5. In a similar way configure all the below actions in workflow
Start Status End Status Action
Order Confirmation pending
Order Confirmation pending Edit, Place Order to ERP, Save Quote
Order Confirmation pending
Order Placed Order Status Update
Order Placed Order Placed Edit, History
SAP Best Practices SAP CPQ integration with SAP S/4HANA (3ZQ): Configuration Guide
© SAP SE Public Page 55 of 62
Note
Copy the same settings from My Quotes to Other Quotes tab as well. To do this Select Other
Quotes tab, Select My Quotes from the dropdown selection in the Copy from field and click
on Copy button.
6. In left navigation bar, select Workflow Permissions under Workflow/Approval.
7. Under Action Permissions, search for Place order to ERP action.
8. Click on Add button (+). And Select the checkbox for User Type Sales.
9. Click Save.
10. In a similar way add the User Type Sales for all the actions like Edit, Save Quote,
Order Status Update and History under Action Permissions.

SAP Best Practices SAP CPQ integration with SAP S/4HANA (3ZQ): Configuration Guide
© SAP SE Public Page 56 of 62
3.3.6.2 Create Custom field in Sales Quote
Purpose
Custom field is needed in SAP CPQ in Sales Quote to capture PO Number in Sales Order.
Procedure 1. Login to your SAP CPQ system using an Administrator User.
2. Click on SETUP in menu bar and choose Setup.
3. In left navigation bar, select Custom Fields under Quotes.
4. Click on Add New Button.
5. In the Definition tab, maintain the Name as PO Number (case sensitive).
6. Choose Type as Free Form and Tab as Additional Info.
7. Select Save quote on change.
8. Enter Default Label as PO Number
9. Click Save.
3.4 Data Loading
3.4.1 Initial Data Load
Purpose
This section describes how to execute the initial data load of material, customer master and Pricing Condition data from your SAP S/4HANA system to the SAP CPQ system.

SAP Best Practices SAP CPQ integration with SAP S/4HANA (3ZQ): Configuration Guide
© SAP SE Public Page 57 of 62
3.4.1.1 Business Partner (Customer Master)
1. Open transaction DRFOUT.
2. Select the Replication Model and Outbound Implementation created in S/4HANA
section.
3. Choose Replication Mode as Manual, in case you want to replicate specific business
partners.
4. Click Manual Replication Filter Criteria in top menu.
5. Enter the Business Partner ID and choose Back.
6. Choose Yes in the following pop-up.
7. Choose Execute.

SAP Best Practices SAP CPQ integration with SAP S/4HANA (3ZQ): Configuration Guide
© SAP SE Public Page 58 of 62
3.4.1.2 Product Master
1. Open transaction DRFOUT.
2. Select the Replication Model and Outbound Implementation created in S/4HANA
section.
3. Choose Replication Mode as Manual, in case you want to replicate specific Material.
4. Click Manual Replication Filter Criteria in top menu.
5. Enter the Material (For example: TG11) and choose Back.
6. Choose Yes in the following pop-up.
7. Choose Execute.

SAP Best Practices SAP CPQ integration with SAP S/4HANA (3ZQ): Configuration Guide
© SAP SE Public Page 59 of 62
3.4.1.3 Product Pricing
1. Access the transaction SE38.
2. Enter the report name RCOD_CONDITIONS_EXTRACT and click on Execute.
3. Enter the following details and click Execute:
4. Enter the following details:
Field Value
Sales Organization For example: 1000
Distribution Channel For example: 10
Valid from A valid date
Valid to A valid date
Logical System <Logical system of the SAP CPQ>
Test Mode Unchecked
Table 304(Material with release status)
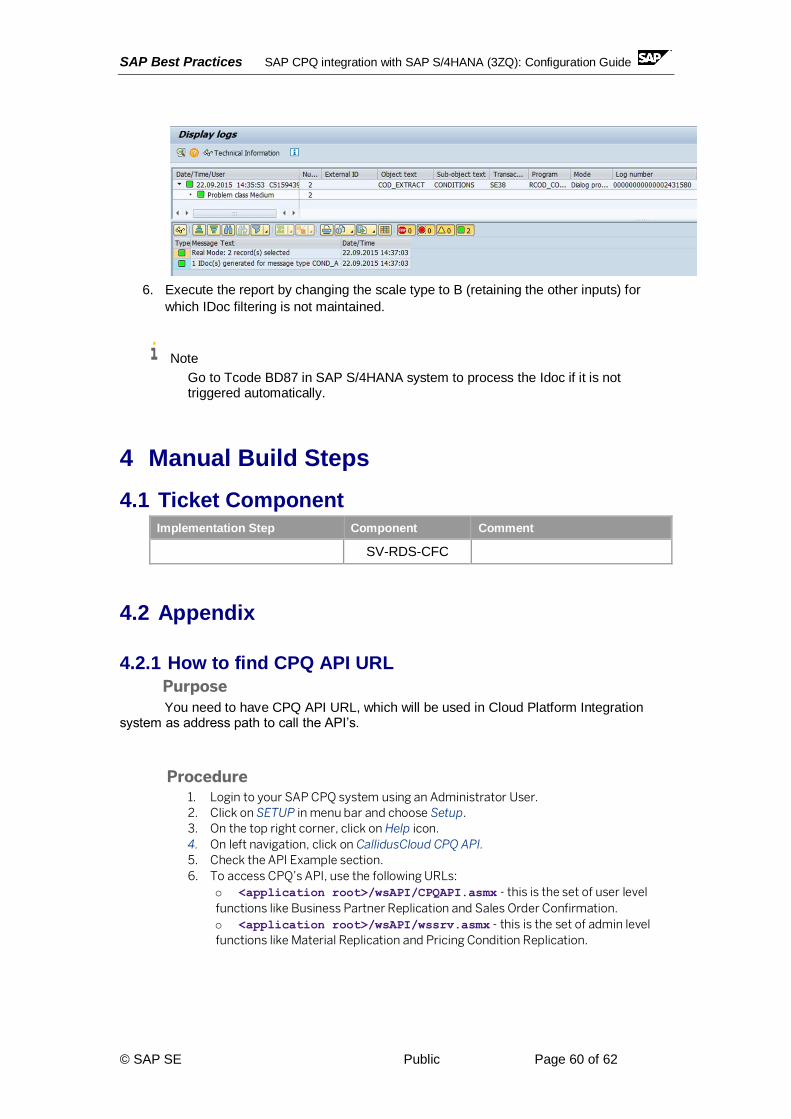
5. The condition records created with the provided data are replicated to SAP CPQ.
SAP Best Practices SAP CPQ integration with SAP S/4HANA (3ZQ): Configuration Guide
© SAP SE Public Page 60 of 62
6. Execute the report by changing the scale type to B (retaining the other inputs) for
which IDoc filtering is not maintained.
Note
Go to Tcode BD87 in SAP S/4HANA system to process the Idoc if it is not triggered automatically.
4 Manual Build Steps
4.1 Ticket Component Implementation Step Component Comment
SV-RDS-CFC
4.2 Appendix
4.2.1 How to find CPQ API URL
Purpose
You need to have CPQ API URL, which will be used in Cloud Platform Integration system as address path to call the API’s.
Procedure 1. Login to your SAP CPQ system using an Administrator User.
2. Click on SETUP in menu bar and choose Setup.
3. On the top right corner, click on Help icon.
4. On left navigation, click on CallidusCloud CPQ API.
5. Check the API Example section.
6. To access CPQ’s API, use the following URLs:
o <application root>/wsAPI/CPQAPI.asmx - this is the set of user level
functions like Business Partner Replication and Sales Order Confirmation.
o <application root>/wsAPI/wssrv.asmx - this is the set of admin level
functions like Material Replication and Pricing Condition Replication.

SAP Best Practices SAP CPQ integration with SAP S/4HANA (3ZQ): Configuration Guide
© SAP SE Public Page 61 of 62
4.2.2 How to setup Cloud Connector
Purpose You need to have Cloud Connector Virtual Host URL for SAP S/4HANA system, which will be used in Cloud Platform Integration system as address path to call the S/4HANA system.
Procedure 1. Login to your SAP HANA Cloud Connector system using an Administrator User.
2. Select the Account of your Cloud Platform Integration system.
3. Click on Access Control to add Mapping Virtual to Internal System.
4. Click on Add button.
5. Select ABAP System in Back-end Type and Click Next.
6. Select HTTPS as Protocol and Click Next.
7. Enter the Internal Host and Click Next. You can find HTTPS host and port of your
system in SMICM transaction Goto -> Services.
8. Enter the Internal Port and Click Next.
9. Enter the Virtual Host which you must maintain in Cloud Platform Iflows and Click
Next.
10. Enter the Virtual Port which you must maintain in Cloud Platform Iflows and Click
Next.
11. Select Principal Type as none and Click Next.
12. Enter the Description and Click Next.
13. Click on Finish button.
14. Select the Entry for Virtual Host Mapping created in above steps.
15. Click on Add in Resource Accessible and Add / as URL Path.

SAP Best Practices SAP CPQ integration with SAP S/4HANA (3ZQ): Configuration Guide
© SAP SE Public Page 62 of 62
16. Click Save.
4.2.3 Troubleshooting