Embed Size (px)
Citation preview
Liability Notice
Information in this manual may change without notice and does not represent a commitment on the part of SecureWave.
The software described in this manual is provided by SecureWave, S.A. under a license agreement. The software may only be used in accordance with the terms of the agreement.
No part of this publication may be reproduced, transmitted, or translated in any form or by any means, electronic, mechanical, manual, optical, or otherwise, without the prior written permission of SecureWave.
SecureWave claims copyright in this program and documentation as an unpublished work, revisions of which were first licensed on the date indicated in the foregoing notice. Claim of copyright does not imply waiver of other rights by SecureWave.
Copyright 2000-2007© SecureWave, S.A.. All rights reserved.
Trademarks
Sanctuary is a trademark of SecureWave, S.A. All other trademarks recognized.
SecureWave, S.A. Atrium Business Park 23, rue du Puits Romain L-8070 Bertrange Luxembourg
Phone: +352 265 364-11 (add prefix 011 when calling from USA or Canada) Fax: +352 265 364-12 (add prefix 011 when calling from USA or Canada) Web: www.securewave.com
Technical Support hours are Monday to Friday, 8:00 to 20:00 CET/CEST in Europe and 8:00 AM to 8:00 PM ET/EDT in North America. You can contact our technical support team by calling: +352 265 364 300 (International), +1-877-713-8600 (US Toll Free), +44-800-012-1869 (UK Toll Free) or by sending an email to [email protected]
Published on: August 2007

Sanctuary's Quick Setup and Configuration Guide 4.2.2 1
Contents
Introduction ................................................................................................ 5 Process ......................................................................................................................... 6 Additional information .................................................................................................... 7 Symbol explanation ....................................................................................................... 8 Typefaces ..................................................................................................................... 9 Support and contact information .................................................................................... 9
Chapter 1: Sanctuary Architecture ........................................................... 11 Small, medium, and large networks ............................................................................. 13
Trusted domains ................................................................................................... 13 Basic security rules ..................................................................................................... 14
CD/DVD burning ................................................................................................... 15 The boot sequence ............................................................................................... 15 The seal/chassis intrusion protector ...................................................................... 15 Password protect the BIOS ................................................................................... 15 Administrative rights .............................................................................................. 16 Power Users ......................................................................................................... 16 Access Policy ........................................................................................................ 16 NTFS Partition (mandatory to install our product) .................................................. 16 Recovery Console ................................................................................................. 17 Safe mode............................................................................................................. 17 Service packs and hot fixes ................................................................................... 17 Firewalls ................................................................................................................ 17 Password policies ................................................................................................. 17 Access policy ........................................................................................................ 18 Private and Public Key Generation ........................................................................ 18
Chapter 2: Installation steps .................................................................... 19 System requirements................................................................................................... 20 Installing all server components onto a single computer .............................................. 21
Before you install ................................................................................................... 22 Part 1: Installing the SQL database engine............................................................ 22 Part 2: Installing the SecureWave Sanctuary Database ......................................... 23 Part 3: Installing the SecureWave Application Server ............................................ 24 Part 4: Installing the Sanctuary Management Console .......................................... 29 Part 5: Installing the Sanctuary Client Driver ......................................................... 30 Part 6: Testing your installation ............................................................................. 32
Installing Sanctuary in a Workgroup ............................................................................ 32
Chapter 3: Testing your Sanctuary Device Control installation ............... 33 Permissions ................................................................................................................. 33 Temporary permissions ............................................................................................... 34

Contents
2 Sanctuary's Quick Setup and Configuration Guide 4.2.2
Scheduled permissions ................................................................................................ 35 CD authorization .......................................................................................................... 36 Shadowing ................................................................................................................... 37 Auditing ....................................................................................................................... 38 Reporting ..................................................................................................................... 38 Summary ..................................................................................................................... 39
Chapter 4: Testing your Sanctuary Application Control Suite installation ................................................................................................ 41
Performing an initial scan ............................................................................................. 41 Creating a Scan Template ..................................................................................... 42 Utilizing your new template .................................................................................... 42 Authorizing your new file hashes ........................................................................... 43
Authorizing Files .......................................................................................................... 43 Try to log on a machine with the client installed ........................................................... 45 Auditing ....................................................................................................................... 45
Log Explorer .......................................................................................................... 46 Database Exploration .................................................................................................. 47 Local Authorization ...................................................................................................... 48
Chapter 5: Practical setup examples ....................................................... 51 Assigning permissions to groups instead of users ........................................................ 51 Sanctuary Device Control ............................................................................................ 52
DVD/CD burner permissions assignments ............................................................. 52 Removable permissions assignments .................................................................... 53 Shadowing notes ................................................................................................... 54
Sanctuary Application Control Suite ............................................................................. 54 Sanctuary in an organization-wide strategy ........................................................... 54 Setting up your new Sanctuary solution ................................................................. 55 Routine system administration ............................................................................... 56 Verifying new software .......................................................................................... 56 Tips for maximum security ..................................................................................... 57
Appendix A: Troubleshooting ................................................................... 59 Contacting SecureWave Support ................................................................................. 59 Troubleshooting Tips ................................................................................................... 59 SecureWave Sanctuary Database backup ................................................................... 62 SecureWave Application Server backup ...................................................................... 62 Other common issues .................................................................................................. 63
Appendix B: Detailed System Requirements and Limitations ................. 67 System requirements ................................................................................................... 67 Sanctuary Device Control ............................................................................................ 70
Terminal services limitations .................................................................................. 70 The RunAs command limitations ........................................................................... 70

Contents
Sanctuary's Quick Setup and Configuration Guide 4.2.2 3
Glossary ................................................................................................... 73
Index of figures ........................................................................................ 79
Index of Tables ........................................................................................ 81
Index ........................................................................................................ 83


Sanctuary's Quick Setup and Configuration Guide 4.2.2 5
Introduction This quick guide explains how to install and configure your Sanctuary solution:
> Chapter 1: Sanctuary Architecture offers a brief description of Sanctuary’s architecture and security tips
> Chapter 2: Installation steps guides you through the process of installing the Sanctuary components
> Chapter 3: Testing your Sanctuary Device Control installation describes post-installation tests to ensure the functionality of Sanctuary Device Control
> Chapter 4: Testing your Sanctuary Application Control Suite installation describes post-installation tests to ensure the functionality of Sanctuary Application Control Suite functionality when license for Sanctuary Application Control Server Edition, Sanctuary Application Control Terminal Services Edition, or Sanctuary Application Control Custom Edition
> Chapter 5: Practical setup examples explains how to configure Sanctuary to meet your day to day endpoint security requirements
> Appendix A: Troubleshooting gives you general guidelines on how to diagnose problems that may occur during Sanctuary installation
> Appendix B: Detailed System Requirements and Limitations details the hardware and software to fully leverage the complete functionality of Sanctuary
> The Glossary provides definitions of standard terms used throughout the guide
> The Index of figures, Index of Tables, and Index provide quick access to specific figures, tables, information, items, or topics
Some of these chapters are only relevant specific components of our product suite. For example, Chapter 3: Testing your Sanctuary Device Control installation is only applicable, obviously, if you are licensed for Sanctuary Device Control.
The information contained in this guide is not included in the help file.

Introduction
6 Sanctuary's Quick Setup and Configuration Guide 4.2.2
Process

Introduction
Sanctuary's Quick Setup and Configuration Guide 4.2.2 7
Additional information In addition to this quick setup and configuration guide, SecureWave also provides the following:
> Detailed administrator guides are provided with the installation CD
> Product specific help is available with your licensed Sanctuary products
> Current information is also available on our web site at: further information is available on our web site at:
www.securewave.com
In this regularly updated Web site, you can find:
> The latest software upgrades and patches (for registered users)
> The very latest troubleshooting tips and answers to Frequently Asked Questions (FAQ)
> Other general support material that you may find useful
> New information about Sanctuary
> Our Knowledge Base (KB), with FAQ (Frequent Asked Questions) and practical information of your everyday use of Sanctuary solutions

Introduction
8 Sanctuary's Quick Setup and Configuration Guide 4.2.2
You also have the following e-books available:
Publication name Publication type
Sanctuary's Quick Setup and Configuration Guide
Printed booklet Sanctuary's Architecture Guide
eBook
Sanctuary's Setup Guide Sanctuary Device Control Administrator's Guide Sanctuary Application Control Suite Administrator's Guide Installing Sanctuary Application Control Terminal Services Edition on Citrix Environments Sanctuary Device Control Stand-Alone Decryption Tool Sanctuary's WEPOS & Windows XPe Setup Guide Sanctuary’s Help file Understanding Sanctuary Device Control's Encryption Schemas Readme file License agreement
Table 1: Available publications
Symbol explanation We use the following symbols to emphasize important points about the information you are reading throughout this guide:
Special note. This symbol identifies additional information about the topic reading. These notes may also relate to other parts of the system or be points that need particular attention.
Time saver. This symbol describes ‘short-cuts’ or tips that may save you time.
Caution. This symbol identifies potential risk when working with certain aspects of Sanctuary, e.g. loss of data or potential problems with the operation of your system.

Introduction
Sanctuary's Quick Setup and Configuration Guide 4.2.2 9
Typefaces We use the following typefaces to differentiate between certain types of contents throughout this guide:
> Italic Represent fields, menu options, and cross-references
> Fixed width Shows messages or commands that should be typed at the command prompt
> SMALL CAPS Represents buttons you select
Support and contact information If you still have a question after reviewing the online help, documentation, or SecureWave knowledge base, you can contact your SecureWave customer support team by telephone, fax, email, or regular mail.
Technical Support hours are Monday to Friday, 8:00 to 20:00 CET/CEST in Europe and 8:00 AM to 8:00 PM ET/EDT in North America. You can contact our technical support team by calling: +352 265 364 300 (International), +1-877-713-8600 (US Toll Free), +44-800-012-1869 (UK Toll Free)
or by sending an email to [email protected]
Alternatively, you can write to customer support at:
SecureWave, S.A. Atrium Business Park 23, rue du Puits Romain L-8070 Bertrange Luxembourg


Sanctuary's Quick Setup and Configuration Guide 4.2.2 11
Chapter 1: Sanctuary Architecture The information in this chapter applies to all Sanctuary software suite products.
This chapter guides you through the procedure for installing the various server side components.
A Sanctuary solution includes the following four main components:
> One SecureWave Sanctuary Database (SX): serves as the central repository of authorization information (devices/applications)
> One or more SecureWave Application Server (also known as SXS) with one or (optionally) more Data File Directory (DFD) and one, shared if needed, Audit File Directory (AFD): used to communicate between the SecureWave Sanctuary Database and the protected clients
> The Sanctuary Client Driver (SK): installed on each computer you want to protect
> Administrative tools – especially the Sanctuary Management Console (SMC): provides the administrative interface to the SecureWave Application Server. This interface — that can be installed on one or more computers — is used to configure the solution and perform a range of day-to-day administrative tasks
An implementation can have one or more SecureWave Application Server and one SecureWave Sanctuary Database connected over a wide area, therefore making SecureWave software very scalable.
Please refer to the Sanctuary's Setup Guide if you are using a Novell network.
The diagram on the following page shows these relations:

Chapter 1: Sanctuary Architecture
12 Sanctuary's Quick Setup and Configuration Guide 4.2.2
Figure 1: Sanctuary’s architecture
Detailed descriptions for all Sanctuary components are provided in the Sanctuary's Architecture Guide.
We assume that the TCP/IP protocol is configured properly prior to the installation and testing processes:
Figure 2: Sanctuary's setup

Chapter 1: Sanctuary Architecture
Sanctuary's Quick Setup and Configuration Guide 4.2.2 13
Small, medium, and large networks In the context of this document, we define:
> A small network typically has only one Sanctuary server that is connected to a single domain. The Sanctuary server can be an existing machine, including a workstation that is used as a server. For the small network, we recommend using SQL Server 2005 Express Edition as the database repository and installing all Sanctuary components including the database server, application server, and console on the same machine. This network has, typically, less than 500 client machines.
> A medium sized network typically has two or more Sanctuary related servers, one of which is a dedicated SQL database server, and possibly installed in a complex directory environment containing two or more Active Directory domains or Novell eDirectory trees. For the medium sized network, we recommend installing the SecureWave Application Server on at least two dedicated computers to provide load balancing and fail-over redundancy. This network typically support between 500 to approximately 5,000 client machines.
> A large network always has multiple Sanctuary related servers and domains with complex trust relations. The environment requires a high-end SQL server environment that is typically clustered and SAN attached. The SecureWave Application Server is installed on at least two servers centrally and possibly more servers to support geographically dispersed clients. This environment typically support between 5,000 and 20,000 client machines. Larger networks are easily support by installing additional SecureWave Application Servers.
Trusted domains
In the case where you want use several domains and forests , to manage Sanctuary policies centrally, you should create trust relationships between them. Sanctuary will not work across domains and/or forest if you do not establish first these relations:

Chapter 1: Sanctuary Architecture
14 Sanctuary's Quick Setup and Configuration Guide 4.2.2
Figure 3: Trust relationships
Basic security rules This section lists a series of basic security rules that are highly recommended prior to deploying the Sanctuary Client Driver on a production network.

Chapter 1: Sanctuary Architecture
Sanctuary's Quick Setup and Configuration Guide 4.2.2 15
CD/DVD burning
Windows’ CD recording capacity is controlled by a service called Image Mastering Applications Programming Interface (IMAPI; run by LocalSystem). You should not give R/W access to LocalSystem for the ‘DVD/CD Drive’ class or music CDs. If you do so and the service is running, then the user can create CD/DVD copies — using Windows Media Player, Windows Explorer, or any other program that uses this service — of any file from the hard disk, including private data, proprietary information, music, etc. See details in Sanctuary Device Control Administrator's Guide. Some third-party burning software do not need the IMAPI service and can be controlled using our Sanctuary Application Control Suite..
The boot sequence
Change the boot sequence so that the machine boots from the Hard Disk Drive first. If the Floppy or the DVD/CD-ROM is the first boot device, someone can use a bootable medium that can directly access the hard disk drive and quickly reset the administrator password.
This does not apply for SCSI setups, since you can simply change the boot ID or LUN boot and bypass any boot sequence. Adaptec PCI BIOS are not password protected, but recent PC BIOS versions give you the extra choice to boot from a "SCSI DEVICE", overriding SCSI controller settings.
The seal/chassis intrusion protector
Protect the hardware with a seal and/or chassis intrusion protection hardware. Otherwise, an intruder could obtain administrator level access to the system using an external boot device to bypass workstation security software.
Password protect the BIOS
Although this is important, its effectiveness is greatly reduced useless without chassis intrusion security (see above), since someone just needs to locate the CMOS reset jumper to gain access to data on the local hard drive. Full hard disk encryption can also be used to reduce the threat if you cannot ensure reasonable physical security for your systems.
Some workstations have an intrusion trigger which is stored in the BIOS and displayed when the machine cover has been removed.

Chapter 1: Sanctuary Architecture
16 Sanctuary's Quick Setup and Configuration Guide 4.2.2
Administrative rights
Even though Sanctuary can enforce policies for local administrators and limit their ability to change or remove the Sanctuary Client Driver through client hardening, users should NEVER be members of the local group called Administrators. If a user is the administrator of his own computer, then he has complete, unrestricted access to this computer. There are many ways to uninstall, disable, or change the configuration of programs and services (and time settings) when you are a local administrator. For example, one could delete files, registry keys, uninstall the product, delete the driver entries, and use the recovery console. In addition to this, viruses will execute using administrative privileges unless you are using a component of our Sanctuary Application Control Suite (Sanctuary Application Control Server Edition, Sanctuary Application Control Terminal Services Edition, or Sanctuary Application Control Custom Edition).
Consequently, it is not a good practice to grant the users administrative rights to their computers. It is impossible to control/manage a desktop when the user has local administrative rights (thus higher TCO). Nevertheless, some special programs require administrative rights to run properly. You can easily find tools that allow users to run programs with administrative rights only when needed. ‘RunAs Professional’ is one of them.
Power Users
Users who are members of the built-in ‘Power Users’ group are a special case which requires careful consideration. Power Users have elevated permissions and privileges on their local machines - depending on the operating system version – and can generally install and run applications, change permissions, customize settings, modify and create accounts, etc. This may give them an unwanted direct or indirect ability to bypass or tamper with standard Windows based system policies. Non-trusted users should never be members of the Power Users group, unless you secure the execution environment by using Sanctuary Application Control Suite.
Access Policy
In general, you should have an network and file access policy as restrictive as possible including using only NTFS partitions. By default, you should deny all access and then, give access only when/if necessary..
NTFS Partition (mandatory to install our product)
NTFS (New Technology File System) is an update of the FAT32 (File Allocation Table), FAT12 (initial version of FAT), FAT16, and VFAT systems which, in turn, are

Chapter 1: Sanctuary Architecture
Sanctuary's Quick Setup and Configuration Guide 4.2.2 17
also updates from the old MS-DOS FAT system. NTFS offers several security and performance enhancements and advantages over older file systems. Among them, we can quote a superior architecture, support for larger files, enhanced reliability, automatic encryption and decryption, disk quota tracking and limiting, change journals, disk defragmenter, sparse file support, and improved security and permissions when managing files.
Recovery Console
The Recovery Console, which is available on the Windows DVD/CD-ROM or via a MSDN subscription, allows the user to disable any driver related to Sanctuary. However, this requires the local administrator password. This is one of the reasons why you should change the boot sequence as described above. If you fail to do this, then a user may be able to boot the system using a different operating system bypassing system security. The user can, for example, boot from the CD with a Linux OS and manipulate the NTFS partitions to gain access to the stored data.
Safe mode
Safe mode boot causes no threat to Sanctuary drivers, which continue to run even when you boot in this mode.
Service packs and hot fixes
In general, you should always install the latest service packs and hot fixes for the operating system and the different applications you use.
Firewalls
Traditional perimeter-based security systems, like firewalls, are complementary to the endpoint protection provided by Sanctuary Software.
Password policies
You should have a strong security policy, in particular regarding the choice of the passwords. You should refuse blank, short, and simple passwords, enforcing long and complex character sequences.

Chapter 1: Sanctuary Architecture
18 Sanctuary's Quick Setup and Configuration Guide 4.2.2
Access policy
In general, you should have an access policy as restrictive as possible (using NTFS, permissions, etc.). By default, deny all access, and then just give access if and when necessary.
Private and Public Key Generation
You should deploy Sanctuary software in a production environment using a securely generated key pair. Use the KEYGEN.EXE tool that is included on your installation CD to create your own unique private and public key. The private key (sx-private.key) is literally the ‘key’ to the security that is provided by Sanctuary solutions. As with all private keys, extra diligence should be used to ensures its confidentiality.

Sanctuary's Quick Setup and Configuration Guide 4.2.2 19
Chapter 2: Installation steps The Sanctuary setup process is very straightforward and includes the following stages once all prerequisites have been met:
1. Install the SecureWave Sanctuary Database on the computer that is to hold devices and/or executables authorization information.
2. Install the SecureWave Application Server on the computers that will serve as intermediate between the Sanctuary Client Driver and the SecureWave Sanctuary Database distributing the list of device/software permissions for each client computer and/or User/group.
3. Install the Sanctuary Management Console on the computer(s) you are going to use to configure Sanctuary, and subsequently carry out your day-to-day administrative tasks and procedures.
4. Install the Sanctuary Client Driver on a test machine using the predefined permissions to devices and/or executables. The Sanctuary Client Driver can be installed on the same machine as the one used for the SecureWave Sanctuary Database, SecureWave Application Server, and Sanctuary Management Console.
5. Define test permissions for devices and/or executables using the console installed on step 3 and test them on the client machine. See page 33 (Sanctuary Device Control) and/or page 41 (Sanctuary Application Control Suite).
6. Define your Device and/or Application use company’s policies (permissions, rules, and settings) by defining which users get access to which devices and/or executables. This step is must be done prior to deploying the Sanctuary Client Driver to your production environment. If you install clients without a good policy definition, this will result in a loss of productivity.
7. Plan the client deployment strategy.
8. Deploy the Sanctuary Client Driver in your production machines.
Consult the Sanctuary's Setup Guide and the corresponding Administrator Guides to find detailed explanations of the features found in the Sanctuary solution. We recommend that you read them thoroughly before starting to use the program in a production environment.
Chapter 2: Installation steps
20 Sanctuary's Quick Setup and Configuration Guide 4.2.2
At any time after installing the SecureWave Sanctuary Database, SecureWave Application Server, Sanctuary Management Console, or the Sanctuary Client Driver you can modify or uninstall the components by running their respective setup.exe files or using the Windows Add/Remove Programs (ARP).
If any setup routine stops, (e.g. if a severe error is encountered or if it is canceled by user request) the routine will attempt to clean up and roll back any modifications that have been made to your computer. It also produces log files containing the reason why the setup failed. They are placed in %TMP% directory and named sxdbi.log, setupcltsu.log, setupsmc.log, and setupsxs.log. Please have these files available if you call SecureWave support regarding your installation.
Once the component installation is completed, the next step is the Policy Definition phase, where you will define which users get access to which devices and/or executables. This step is very important to complete prior to deploying any clients to your production environment.
If policies are not defined or incorrectly defined, it could prevent users from accessing authorized application and/or devices. Define policies BEFORE installing any clients!
System requirements Prior to installing the server side components: SecureWave Sanctuary Database (SX), SecureWave Application Server (SXS), and Sanctuary Management Console, you should consider the following points.
In a large environment, within a test setting, we recommend installing the database on a different computer than that of the SecureWave Application Server (SXS). However, for a production network, we recommend installing them on the same computer that also includes the Sanctuary Management Console component.
Therefore, taking this in consideration, your environment must meet the following requirements:
> One or more computers to run the DB, SXS, and Sanctuary Management Console components
> One or more client computers to install the Sanctuary Client Driver
> TCP/IP networking protocols on both servers and clients. The Sanctuary Client Driver and the server side communicate only over TCP/IP and, optionally, can use TLS to encrypt all messages
> Appropriate firewall settings to ensure communications between the clients and servers. See the Sanctuary's Setup Guide for mandatory open ports details

Chapter 2: Installation steps
Sanctuary's Quick Setup and Configuration Guide 4.2.2 21
> If you are installing:
Sanctuary Device Control: the client can be running on Windows 2000 (Service Pack 3 or later), XP Professional, or Windows Server 2003
Sanctuary Application Control Server Edition & Sanctuary Application Control Custom Edition: The server computers can be running on Windows 2000 (Service Pack 3 or later) Server or Windows 2003 Server
> MDAC 2.6 SP1 (or later) required for the SecureWave Application Server in order to communicate with the database
> If used in large environments, it is strongly recommended to use Microsoft SQL Server 2000/2005 instead of MSDE 2000 or SQL Server 2005 Express Edition. See our online knowledgebase on www.securewave.com for more details
> The Sanctuary license file that you received from SecureWave. Please contact technical support ([email protected]) to obtain a new license key or re-applying for an Evaluation License at our main website (www.securewave.com)
> A Microsoft CA installed and published to your Active Directory structure if you will be implementing encrypted communications (TLS for client-SXS and/or SXS-SXS) using Automatic Certificate Generation or enforcing Centralized Encryption using Media Authorizer. Please note that most SecureWave customers do NOT require a Microsoft CA. Please contact SecureWave technical support if you have questions regarding Sanctuary’s use of the Microsoft CA.
If you are working on a Novell environment, you should activate the ‘File and Print Sharing to Microsoft Networks’ service & ‘Microsoft Client’ in all your machines. These services are used for the endpoint driver deployment, eDirectory synchronization, and if you are planning to install SQL Server 2005 Express Edition.
Installing all server components onto a single computer This section describes how to install all server side components on the same computer. This is the recommended configuration for evaluation purposes.
Please refer to the Sanctuary's Setup Guide for detailed instructions on how to configure complex, multi-server environments including implementation of TLS based encrypted communications.

Chapter 2: Installation steps
22 Sanctuary's Quick Setup and Configuration Guide 4.2.2
Although you can use Windows XP for the database or/and console, you cannot use it for the SecureWave Application Server (or client component in the case of Sanctuary Application Control Server Edition). If you are planning to deploy Sanctuary components among several machines, one of them in an XP operating system — database and/or management console —, you should read carefully the Sanctuary's Setup Guide before proceeding.
If you are planning to install several SecureWave Application Server — each one of them on a different machine, including the SecureWave Sanctuary Database — using Workgroups instead of Domains, there is NO domain administrator account to create a trusted database connection between them. In this case, the connection to your SecureWave Sanctuary Database is done using Windows Authentication instead of SQL Authentication; thus, the communication fails if the Administrator’s names and passwords are not the same on each one of these machines. You should always use the same Administrator’s name AND password for all SXS and DB servers in this kind of scenario.
Before you install
You must make sure that the computer meets the minimum requirements before you begin the installation process. See Appendix B: Detailed System Requirements on page 67 for more details. The Sanctuary's Setup Guide describes in detail all components’ installation.
Part 1: Installing the SQL database engine
This part of the setup will install SQL Server 2005 Express Edition. You can skip this step if you have an existing SQL Server 2005 Express Edition, or SQL Server 2000/2005 running on the machine that will be used to host the SecureWave Sanctuary Database.
You should activate the ‘Server’ service (File and Print Sharing to Microsoft Networks) before trying to install SQL Server 2005 Express Edition on your machine. This is especially true for Novell users that do not necessary need this service running on their machines.
If you do not have a SQL server installed in your organization, the first step is to
determine your SecureWave Sanctuary Database needs. In this phase you will

Chapter 2: Installation steps
Sanctuary's Quick Setup and Configuration Guide 4.2.2 23
determine which SQL version to install (SQL Server 2005 Express/MSDE or the full
SQL Server 2000/2005). Consult the Sanctuary's Setup Guide where you can find
some basic guidelines to make your decision.
The installation of SQL Server 2005 Express Edition requires Microsoft’s DotNet Framework 2.0 and Windows Installer 3.1 or later.
1. Log on to the computer — as a local administrator — that is going to hold the SQL Database engine.
2. Close all programs running on the computer.
Insert the Sanctuary CD in your DVD/CD drive. Execute RUN.VBS, found in
the \SERVER\SQL2005 folder of the installation CD. The installation
cannot continue unless you have the proper versions of service packs, .Net, and Windows Installer installed on your computer.
3. After accepting the End User License Agreement, click NEXT and Install to continue.
Make sure that the TCP/IP protocol is enabled for your SQL database. You can use the ‘SQL Server Configuration Manager’ tool that you can find in the ‘Start Programs Microsoft SQL Server 2005’ menu to check/enable/disable protocols.
Part 2: Installing the SecureWave Sanctuary Database
The database component requires a Microsoft SQL Server database. This can be either SQL Server 2000/2005 or SQL Server 2005 Express Edition. The SecureWave Sanctuary Database setup process will add a single database called ‘sx’.
If you are updating from a previous version of our software or if you already have another one of our products, you should backup of your database (‘sx’) before proceeding.
1. Log on — as a local administrator — to the computer where the Microsoft SQL server (SQL Server 2000/2005, SQL Server 2005 Express Edition, or MSDE 2000) is running
2. Close all programs running on the computer.
3. Insert the Sanctuary CD in your DVD/CD drive. Run the setup.exe file located on the \SERVER\db folder.

Chapter 2: Installation steps
24 Sanctuary's Quick Setup and Configuration Guide 4.2.2
4. The Welcome dialog is displayed. Click Next to continue.
5. The next dialog displays the License Agreement. The Sanctuary software is protected under Copyright laws and international treaties. Read the license agreement carefully and, providing you agree with its conditions, click I ACCEPT THE TERMS IN THE
LICENSE AGREEMENT, next click OK, and then NEXT.
6. Choose the destination folder and click NEXT. By default, the application is installed in the C:\PROGRAM FILES\SECUREWAVE\SANCTUARY folder.
7. Click INSTALL to perform the setup. This will take less than 2 minutes, depending on the hardware, while creating the database. Once completed, the final screen appears.
8. Click FINISH to close the Installation Wizard.
Part 3: Installing the SecureWave Application Server
The SecureWave Application Server (SXS) manages Sanctuary client connections and is the only component that connects to the database.
SecureWave Application Server (SXS) should not be installed on Windows XP operating systems.
To install the SecureWave Application Server:
1. Log on as a local administrator to the computer that is going to run the SecureWave Application Server component. This server must be able to access the SQL server.
2. Close all programs running on the computer.
3. Insert the Sanctuary CD in your DVD/CD drive. Run the setup.exe file located in the \SERVER\sxs folder.
4. The Welcome dialog is displayed. Click NEXT to continue.
5. The next dialog displays the License Agreement.
The Sanctuary software is protected under Copyright laws and international treaties. Read the license agreement carefully and, providing you agree with its conditions, click on I ACCEPT THE TERMS IN THE
LICENSE AGREEMENT button.
Chapter 2: Installation steps
Sanctuary's Quick Setup and Configuration Guide 4.2.2 25
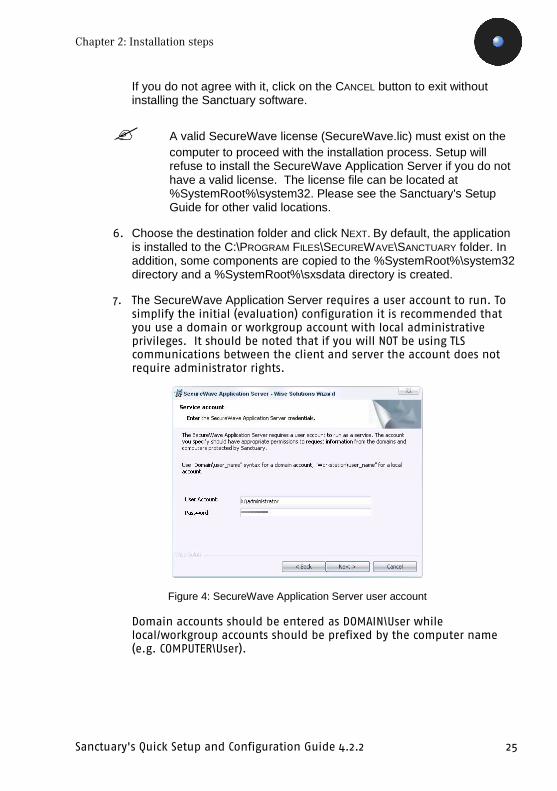
If you do not agree with it, click on the CANCEL button to exit without installing the Sanctuary software.
A valid SecureWave license (SecureWave.lic) must exist on the computer to proceed with the installation process. Setup will refuse to install the SecureWave Application Server if you do not have a valid license. The license file can be located at %SystemRoot%\system32. Please see the Sanctuary's Setup Guide for other valid locations.
6. Choose the destination folder and click NEXT. By default, the application is installed to the C:\PROGRAM FILES\SECUREWAVE\SANCTUARY folder. In addition, some components are copied to the %SystemRoot%\system32 directory and a %SystemRoot%\sxsdata directory is created.
7. The SecureWave Application Server requires a user account to run. To
simplify the initial (evaluation) configuration it is recommended that
you use a domain or workgroup account with local administrative
privileges. It should be noted that if you will NOT be using TLS communications between the client and server the account does not
require administrator rights.
Figure 4: SecureWave Application Server user account
Domain accounts should be entered as DOMAIN\User while
local/workgroup accounts should be prefixed by the computer name
(e.g. COMPUTER\User).

Chapter 2: Installation steps
26 Sanctuary's Quick Setup and Configuration Guide 4.2.2
If you are planning to install several SecureWave Application Servers — each one of them on a different machine, including the SecureWave Sanctuary Database— using Workgroups instead of Domains, there is NO domain administrator account to create a trusted database connection between them. In this case, the connection to your database is done using Windows Authentication instead of SQL Authentication, thus, the communication fails if the Administrator’s names and passwords are not the same on each one of these machines. You should always use the same Administrator’s name AND password for all SXS and DB servers in this kind of scenario.
8. You are asked which SQL Server instance the SecureWave Application Server should connect. Since you are installing all components on the same machine, you will be able to accept the default SQL Server instance. If the database is not on the same machine or does not use the default instance, suffix the name with a backslash and the SQL Server instance name where you installed the SecureWave Sanctuary Database (see Table 2)
The syntax you should use to enter the name of your database server
depends on where you installed your database. Here is a summary of
the different cases:
SecureWave
Sanctuary Database
location
The database is created in
the default instance
The database is created in a
Named instance
The
database is on the local
computer
ServerName or leave the
field blank
ServerName\InstanceName
The database is
on another server
ServerName ServerName\InstanceName
The
database is on a cluster
(local or remote)
VirtualServerName VirtualServerName\InstanceN
ame
Table 2: SecureWave Sanctuary Database location syntax
9. Click NEXT to continue.
Setup will now prompt you to select the folder where the SecureWave Application Server scans, log, and shadow files are to be stored. Setup suggests a directory named DataFileDirectory (DFD) under the system’s drive root. For evaluation purposes, a unique, local directory is recommended.

Chapter 2: Installation steps
Sanctuary's Quick Setup and Configuration Guide 4.2.2 27
A permanent network share can also be used when planning to use more than one SecureWave Application Server. All servers can optionally write to the same, shared, directory or you can opt for having different ones for each server by implementing distributed DataFileDirectories (see Figure 1). If plan to use a shared directory, you should apply the required NTFS and share permissions with full access at least for the account under which the ‘SecureWave Application Server’ runs.
Figure 5: Data file directory
10. Specify the directory, by clicking CHANGE if necessary, and click NEXT.
Do not use Novell Shares for the DataFileDirectory. Please see the Sanctuary's Setup Guide for more information.
Always use a UNC (Universal/Uniform Naming Convention) path name, e.g. \\server\volume\directory. Do NOT use a mapped drive.
If you are installing Sanctuary Device Control and do not have a Certification Authority installed, you will see a warning message.
11. In the next step, you need to define the Audit File Directory (AFD). This is where all audit and history files are stored. There is only one AFD defined for each Sanctuary installation. An alternative location can be selected by clicking the Change button. Click on the NEXT button to continue with the installation.
12. Setup will now prompt you to select which Sanctuary Client Driver versions to support. Select from the list the one corresponding to the type

Chapter 2: Installation steps
28 Sanctuary's Quick Setup and Configuration Guide 4.2.2
of client you already have installed. If this is a new installation, select the latest one. Click NEXT.
13. You will now be prompted to choose the type of communication channel to use. If this is a test installation, you can opt for choosing a non–encrypted implementation. If you want to use secure TLS channels for all client-SXS and intra SXS-SXS communication, you should first have a valid Certificate Authority (or valid machine’s certificates) installed. This is all described in detail, including an easy to follow flowchart, in the Setup Guide.
TLS is an advance configuration option and should only be used after you have successfully deployed and tested Sanctuary using non-TLS communications. Please see the Sanctuary's Setup Guide for more information regarding TLS configuration options. Once you decide to use encrypted communications, it is very difficult to roll this back and you will need to completely uninstall all Sanctuary’s components and modify registry keys.
14. The last step in configuring the client communication protocol consists on configuring the communication ports. Initially we recommend you accept the defaults. Click on NEXT to continue. The following screen allows you to import Standard File Definitions (SFD) files. This dialog is only displayed if you have a valid Sanctuary Application Control Suite license (Sanctuary Application Control Server Edition, Sanctuary Application Control Terminal Services Edition, or Sanctuary Application Control Custom Edition). These files contain the required information needed by the program to authorize running OS files. See the Sanctuary's Setup Guide for more information. To minimize the amount of time required to import SFD files, we recommend only selecting the ones you need (where the Sanctuary Client Driver are going to be installed). Click on NEXT to continue.
15. Finish the installation. The final dialog indicates that the installation
has been successfully completed.
You should have a running server connected to a local database at this stage.
Prior to deploying Sanctuary to a production environment, it is
strongly recommended that you generate a custom key pair using the KEYGEN.EXE tool. Please refer to the Sanctuary's Setup Guide for more information about this topic.

Chapter 2: Installation steps
Sanctuary's Quick Setup and Configuration Guide 4.2.2 29
Part 4: Installing the Sanctuary Management Console
The Sanctuary Management Console (SMC) is the application that is used to centrally manage your Sanctuary installation. The SMC can be installed on as many computers as you wish.
Follow these steps to install the Sanctuary Management Console:
1. Log on to the computer in which you are installing the Sanctuary Management Console.
2. Close all programs running on the computer.
3. Insert the Sanctuary CD in your DVD/CD drive. Run the SETUP.EXE file
located in the \SERVER\SMC folder of the installation CD. The Welcome
dialog is displayed.
4. Click NEXT to continue. The next dialog displays the License Agreement.
The Sanctuary software is protected under Copyright laws and international treaties. Read the license agreement carefully and, providing you agree with its terms, click I ACCEPT THE TERMS IN THE
LICENSE AGREEMENT to proceed with the setup.
If you do not agree with its conditions, click on the CANCEL button to exit without installing your Sanctuary product.
The license agreement is copied to the local hard drive when
Sanctuary is installed. If you want to review it later, select ‘License agreement’ from the START PROGRAMS
SANCTUARY menu.
5. Select the COMPLETE INSTALLATION option and click NEXT. Setup will install the Sanctuary Management Console and other components including the Sanctuary Client Deployment tool.
6. Complete the installation. The final dialog indicates if the installation is successful. Click FINISH.
By default, only users who are members of the local Administrators group of the computer running the SecureWave Application Server can connect via the Sanctuary Management Console. It is also possible to specify who can manage and define Sanctuary’s policies using the User Access Manager dialog from the Sanctuary Management Console Tools menu. Please refer to the appropriate Administrator Guide for further information.
Chapter 2: Installation steps
30 Sanctuary's Quick Setup and Configuration Guide 4.2.2
It is strongly recommended to install the Sanctuary Client Driver
on all computers that will run the Sanctuary Management Console. The Sanctuary Client Driver is required by the SMC to use centralized media encryption; authorize multi-session DVD/CDs using the Media Authorizer; or authorize local files using Scan Explorer or FileTool.exe. Please refer to the Sanctuary's Setup Guide for more details.
Part 5: Installing the Sanctuary Client Driver
The Sanctuary Client Driver is the enforcement engine that ensures that only authorized devices and applications are allowed within your organization. The client can be deployed in a number of ways including using existing software distribution tools to automate the deployment process. Consult the Sanctuary's Setup Guide for more details
To simplify the client deployment the following will describe the manual installation process.
You do not have to install the client on the SecureWave Application Server unless you plan to use that machine to centrally encrypt devices using the Sanctuary Management Console.
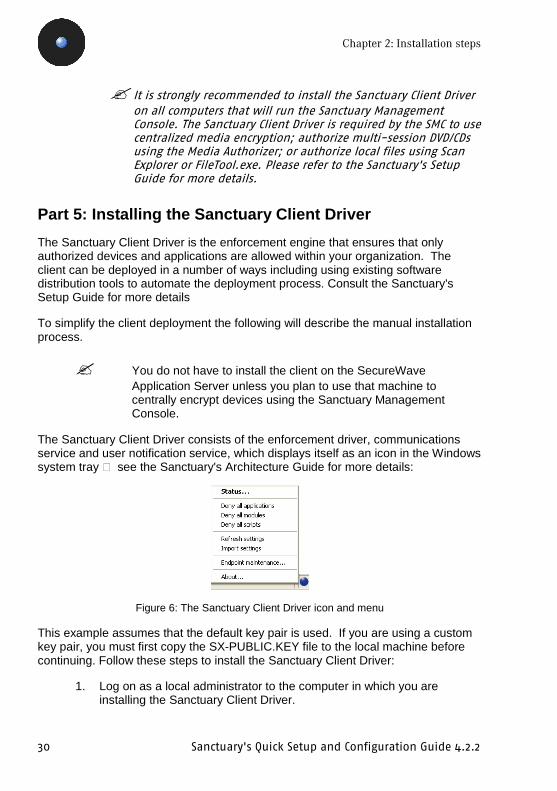
The Sanctuary Client Driver consists of the enforcement driver, communications service and user notification service, which displays itself as an icon in the Windows system tray — see the Sanctuary's Architecture Guide for more details:
Figure 6: The Sanctuary Client Driver icon and menu
This example assumes that the default key pair is used. If you are using a custom key pair, you must first copy the SX-PUBLIC.KEY file to the local machine before continuing. Follow these steps to install the Sanctuary Client Driver:
1. Log on as a local administrator to the computer in which you are installing the Sanctuary Client Driver.

Chapter 2: Installation steps
Sanctuary's Quick Setup and Configuration Guide 4.2.2 31
2. Close all programs running on the computer.
3. Insert the Sanctuary CD in your DVD/CD drive. Run the SETUP.EXE file
located in the \CLIENT directory. The Welcome dialog is displayed.
4. Click NEXT to continue. The next dialog displays the License Agreement.
The Sanctuary software is protected under Copyright laws and international treaties. Read the license agreement carefully and, providing you agree with its terms, click I ACCEPT THE TERMS IN THE
LICENSE AGREEMENT to proceed with the setup.
If you do not agree with its conditions, click on the CANCEL button to exit without installing your Sanctuary product.
The license agreement is copied to the local hard drive when
Sanctuary is installed. If you want to review it later, select ‘License agreement’ from the START PROGRAMS
SANCTUARY menu.
5. In the next step, you will determine how the Sanctuary Client Driver will communicate with the server components. Even though we recommend using encrypted communications, you can initially use non-encrypted (signed) communications for testing purposes. Click NEXT. Please consult the Sanctuary's Setup Guide for instructions on how to implement encrypted communications.
6. Next you will enter a valid SXS server name. You can use either an IP address or DNS name.
The decision to use or not TLS is not to be taken lightly. Once you decide to use TLS for your client-SecureWave Application Server (SXS) and/or SXS-SXS communications and install Sanctuary in this mode, it is very difficult to roll this back and you will need to completely uninstall all Sanctuary’s components and modify registry keys.
7. Click on TEST. If the test is successful click on NEXT. Although you can still continue without a valid server, we do not recommend it for a test installation. See the Sanctuary's Setup Guide for details of those cases where you can continue without having a valid server available.
8. Click on NEXT to accept the default installation directory.
9. Accept the default options and click on NEXT.

Chapter 2: Installation steps
32 Sanctuary's Quick Setup and Configuration Guide 4.2.2
10. Click FINISH to close the dialog and complete the procedure. The Sanctuary Client Driver setup prompts you to reboot. The reboot is required to allow the Sanctuary Client Driver to properly start. Click YES to restart the computer.
Part 6: Testing your installation
The final step of this process is to test your installation before defining your policies and deploying all your clients. Please refer to Chapter 3: Testing your Sanctuary Device Control installation on page 33 and Chapter 4: Testing your Sanctuary Application Control Suite installation on page 41 for further instructions.
Installing Sanctuary in a Workgroup If you are installing Sanctuary in a workgroup network instead of a domain, you must perform a synchronization of each computer’s Administrator’s account. This is the only way that the SecureWave Application Server can read the Security Identified (SID) of every workstation. You will also need to open the correct firewall ports if using Windows XP with SP2 (or Windows 2003 SP1 if the firewall is enabled) and disable the Simple File Sharing feature (if enabled) on the workstations you wish to synchronize.
Furthermore, if you are planning to install several SecureWave Application Servers and the Database Server on a separate machine using Workgroups instead of Domains, there is NO domain administrator account to create a trusted database connection between them. In this case, the connection to your Database Server uses Windows Authentication instead of SQL Authentication; thus, the communication fails if the Administrator’s names and passwords are not the same on each one of these machines. You should always use the same Administrator’s name AND password for all SXS and DB servers in this kind of scenario.

Sanctuary's Quick Setup and Configuration Guide 4.2.2 33
Chapter 3: Testing your Sanctuary Device Control installation
This chapter describes how to quickly test the Sanctuary Device Control key functionality. Please refer to the Sanctuary Device Control Administrator's Guide for details.
After reading this chapter, you will have a basic understanding of how Sanctuary Device Control works and how to apply and revoke permissions.
We use the following conventions in this chapter:
> WKS = is the name of the workstation with the Sanctuary Client Driver installed
> SRV = is the name of server where all server-side components are installed The Sanctuary Management Console is running on SRV and connected to the SecureWave Application Server
> A user called ‘EndPointUser’ has been created in the Domain or Workgroup environment with either Domain Users or Users rights
> A user call ‘AdminUser’ has been created in the Domain or Workgroup environment with Administrator rights.
Permissions Permissions determine access to devices for authorized users or groups on any computer protected by Sanctuary. You should refer to the Sanctuary Device Control Administrator's Guide.
1. Put a CD in the DVD/CD reader of WKS.
2. Log on to WKS with the ‘EndPointUser’ account. If you try to browse the DVD/CD, you get an “Access Denied” message. You are not authorized to access this device.
3. From the Sanctuary Management Console, click on the ‘Device Explorer’ icon located on the Modules section of the Control Panel navigation panel of the main window. The central panel of the window contains a tree with ‘Default Settings’ as the topmost item. Expand this branch using

Chapter 3: Testing your Sanctuary Device Control installation
34 Sanctuary's Quick Setup and Configuration Guide 4.2.2
the + key of your numeric keyboard or click on the + sign in front of the item.
4. Right click on the DVD/CD-ROM item and choose Permissions (or use the CTRL+D shortcut key).
5. In the Permissions dialog, choose ADD. Type ‘EndPointUser’ in the Name field or click on the SEARCH or BROWSE button, find the user and then click on OK.
6. Back in the Permissions dialog, select the READ checkbox and click on the OK button.
7. In the TOOLS application menu, choose SEND UPDATES TO ALL
COMPUTERS.
You have now given the user ‘EndPointUser’ read-only access to the DVD/CD drive on all computers in the Sanctuary managed environment.
If you are logged on to WKS with the ‘EndPointUser’ account when the updated policy is deployed, a popup message appears in the system tray icon bar notifying the user the newly granted rights. To display a summary of all rights that apply to EndPointUser double-click on the Sanctuary icon. EndPointUser can now read any DVD/CD-ROM.
Temporary permissions Temporary permissions allow access to devices for users or groups on a specific computer for a specific period. You can refer to the Sanctuary Device Control Administrator's Guide for more details.
1. Put a floppy disk in the floppy reader of WKS.
2. hoose one user (let us call him ‘EndPointUser’), log on WKS with the ‘EndPointUser’ account. If you try to browse the floppy, you get an “Access Denied” message. EndPointUser is not authorized to access this device..
3. Click on the ‘Device Explorer’ icon located on the Modules section of the Control Panel navigation panel of the main window. The central panel of the window contains a tree with ‘Microsoft Windows Network’ as the bottommost item of one of the branches of the tree. Right click on it and choose INSERT COMPUTER (or use the CTRL+A shortcut key).
Chapter 3: Testing your Sanctuary Device Control installation
Sanctuary's Quick Setup and Configuration Guide 4.2.2 35
4. In the Select Computer dialog, choose ADD. Type ‘WKS’ in the Name field or click on the SEARCH or BROWSE button, find the computer and then click on OK.
5. WKS appears in the tree. Expand this branch using the + key of your numeric keyboard or by clicking on the + sign in front of the item.
6. Right click on the Floppy Disk Drives item and choose ADD TEMPORARY
PERMISSIONS (or use the CTRL+L shortcut key) to launch the wizard.
7. Add the user ‘EndPointUser’ and click on NEXT.
8. Select WRITE on the next dialog. This will also select the Read option. Apply the permission for 5 minutes (FROM and UNTIL fields). Click on the NEXT button and then on FINISH in the last page of the wizard.
9. From the Device Explorer, right click on ‘WKS’ computer and choose SEND UPDATES TO WKS.
Now you have given ‘EndPointUser’ read/write access to the floppy disk drive located on WKS for the next 5 minutes.
If you are logged on to WKS with the ‘EndPointUser’ account when the updated policy is deployed, a popup message appears in the system tray icon bar notifying the user the newly granted rights. To display a summary of all rights that apply to EndPointUser double-click on the Sanctuary icon. EndPointUser can now use the floppy drive. It will be automatically locked after 5 minutes.
Scheduled permissions Scheduled permissions allow access to devices for users or groups on all or specific computer following a pre-defined calendar. Please refer to the Sanctuary Device Control Administrator's Guide for more details.
1. Put a floppy disk in the floppy drive of WKS.
2. Choose one user (let us call him ‘EndPointUser’), log on WKS with the ‘EndPointUser’ account. If you try to browse the floppy, you get an “Access Denied” message. You are not authorized to access this device.
3. Click on the Device Explorer icon located on the Modules section of the Control Panel navigation panel of the main window. The central panel of the window contains a tree with ‘Default Settings’ as the topmost item. Expand this branch using the + key of your numeric keyboard.

Chapter 3: Testing your Sanctuary Device Control installation
36 Sanctuary's Quick Setup and Configuration Guide 4.2.2
4. Right click on the Floppy Disk Drive item and choose Add Schedule (or use the CTRL+N shortcut key).
5. In the Choose User dialog, click on the ADD button. Type ‘Domain Users’ in the Name field and click on the SEARCH button and then on OK.
6. Back in the Choose User dialog, click on NEXT.
7. Select ALL on the next dialog and click on NEXT. In the Choose Permission dialog, select the READ checkbox . Click on the NEXT button.
8. In the Choose Timeframe dialog, select all checkboxes except Saturday and Sunday. Leave the default hours, click on NEXT and then on FINISH.
9. In the TOOLS application menu choose SEND UPDATES TO ALL COMPUTERS.
Now you have given all members of the ‘Domain Users’ group read-only access to the floppy disk drive from Monday to Friday on any computer they may be logged onto.
If you are logged on WKS with the ‘EndPointUser’ account or any other Domain User, a popup appears in the system tray icon bar notifying you of the new rights that you have been granted through ‘Domain Users’. You can click on the Sanctuary Device Control icon to have a summary of all rights that apply to you. Providing that you are on the schedule that has been chosen, you get a read-only access to the floppy.
Scheduled rights and temporary permissions only work properly when the different computer clocks are synchronized. Bear this in mind when using Sanctuary Device Control in multiple time zones.
CD authorization This functionality lets you give access only to authorized DVD/CD-ROMs to users or groups. You can refer to the Sanctuary Device Control Administrator's Guide for more details.
1. Put a DVD/CD-ROM (in this example, we will use the Microsoft Office CD) in the CD drive of WKS.
2. Log on to WKS with EndPointUser’s account. If you try to browse the CD, you get an ‘Access Denied’ message. You are not authorized to access this device.

Chapter 3: Testing your Sanctuary Device Control installation
Sanctuary's Quick Setup and Configuration Guide 4.2.2 37
3. Click on Media Authorizer icon located on the Modules section of the Control Panel navigation panel of the main window. Put the Microsoft Office CD in the SRV DVD/CD-ROM drive. Click on ADD DVD/CD button. In the Media Name dialog, type in a meaningful name (we use Microsoft Office CD in this case), click OK.
4. Select the Microsoft Office CD on the upper pane of the window. Click on the ADD USER button and select a domain user from the Select Group, User, Local Group, Local User dialog; for our example we will use ‘EndPointUser’. This allows you to grant John access to the Microsoft Office CD.
5. In the TOOLS application menu, choose SEND UPDATES TO ALL
COMPUTERS.
Log on WKS with EndPointUser’s account. If you put Microsoft Office CD in the drive, you now have access. Access to any other DVD/CD will be denied.
Shadowing This functionality allows you to get a copy of what your users have copied or read from their devices. You can refer to the Sanctuary Device Control Administrator's Guide for more details.
1. On SRV, launch the Sanctuary Management Console in the Sanctuary program group.
2. Click on the Device Explorer icon located on the Modules section of the Control Panel navigation panel of the main window. Select the Floppy Disk Drives in the Default Settings section. Right-click and choose Shadow or use the CTRL+W shortcut key.
3. In the Choose User dialog, click the ADD button and search for a known user. In this example, we use Marketing. Then click OK and NEXT.
4. Select ALL on the next dialog and click on NEXT.
5. Activate the Enabled option on the Write Permission panel. Click on NEXT and then on FINISH.
6. In the TOOLS application menu, choose SEND UPDATES TO ALL
COMPUTERS.
7. Give ‘Marketing’ read/write access to the floppy as explained above.

Chapter 3: Testing your Sanctuary Device Control installation
38 Sanctuary's Quick Setup and Configuration Guide 4.2.2
8. Log on any computer (WKS in our case) with the ‘Marketing’ account. If you double-click on the Sanctuary Client Driver icon in the Tray icon bar, you will see that there is a Read/Write access to the floppy and that shadowing for write operations is enabled for this device.
9. Copy some files to the floppy.
10. On SRV, use the Default Options item of the Tools menu and check that the Centralized Device Control Logging is enabled. Click on the Log Explorer module of the Sanctuary Management Console.
11. Select the ‘Shadowing Today’ template and, from the EXPLORER menu, choose FETCH LATEST LOG FILES.
12. In the Select computer dialog, enter WKS then click OK.
If you click on the QUERY button, the files that have been copied to the floppy by ‘Marketing’ appear in the list. You will notice that the “Attachment” field is set to “True” for the shadowed file. A right click on the file allows you to view, save, or open its content.
Shadowing can also be set on a per-computer basis.
Auditing With Auditing, a record of all actions made by Sanctuary administrators is taken. You can refer to the Sanctuary Device Control Administrator's Guide for more details.
1. Click on the Log Explorer icon located on the Modules section of the Control Panel navigation panel of the main window.
2. Select one of the available templates or create a new one as needed.
3. Fetch the log and then click on QUERY.
You will see a record of each relevant action taken by the Sanctuary administrators. For example, you can find out when and which administrator granted a user access to some devices.
Reporting For full details, you can refer to the Sanctuary Device Control Administrator's Guide.

Chapter 3: Testing your Sanctuary Device Control installation
Sanctuary's Quick Setup and Configuration Guide 4.2.2 39
User Permissions:
1. From the Sanctuary Management Console Reports menu, choose User Permissions.
2. In the Select Domain User or Group dialog, enter ‘EndPointUser’, and click SEARCH.
3. Click OK.
You receive a report with all rights that apply to ‘EndPointUser’. This is useful when you want to check the privileges that apply to a specific user (local permissions are not included.)
Device Permissions:
From the Reports menu, simply choose Device Permissions.
You get a per device list of access permissions.
Computer permissions:
1. From the Reports menu, choose Computer Permissions.
2. In the Select Computer(s) dialog, enter ‘WKS’.
3. Click OK.
You get a per computer list of access. This is useful when you want to know the rights that have been defined on one specific computer.
Summary Administrating a Sanctuary Device Control installation is relatively easy assuming policy definition has been achieved at the beginning of the process.
Detailed explanations of all the functionalities of Sanctuary Device Control are available in the Sanctuary Device Control Administrator's Guide.


Sanctuary's Quick Setup and Configuration Guide 4.2.2 41
Chapter 4: Testing your Sanctuary Application Control Suite installation
The information on this chapter applies only to the Sanctuary Application Control Suite (Sanctuary Application Control Server Edition, Sanctuary Application Control Terminal Services Edition, or Sanctuary Application Control Custom Edition).
This chapter describes how to quickly test the Sanctuary Application Control Suite key functionality. Please refer to the Sanctuary Application Control Suite Administrator's Guide for details.
After reading through and carrying out the steps in this section, you should have a basic understanding of how Sanctuary works and how to authorize/revoke permissions to run applications in your production environment.
We use the following conventions in this chapter:
> WKS = is the name of the workstation with the Sanctuary Client Driver installed
> SRV = is the name of server where all server-side components are installed The Sanctuary Management Console is running on SRV and connected to the SecureWave Application Server
> A user called ‘EndPointUser’ has been created in the Domain or Workgroup environment with either Domain Users or Users rights
> A user call ‘AdminUser’ has been created in the Domain or Workgroup environment with Administrator rights.
Performing an initial scan An initial scan allows you to quickly populate the database with the files required to operate the client computer. All files not included in the database will be denied execution as being unknown. Please refer to the Sanctuary Application Control Suite Administrator's Guide for more details.
To do this initial scan, follow these steps:

Chapter 4: Testing your Sanctuary Application Control Suite installation
42 Sanctuary's Quick Setup and Configuration Guide 4.2.2
Creating a Scan Template
1. Click on the Scan Explorer icon located on the Modules section of the Control Panel navigation panel of the main window of Sanctuary Management Console.
2. Select PERFORM NEW SCAN from the bottom right side of the main screen.
3. In the next window, select CREATE NEW TEMPLATE, this will allow you to select which files and drives you would like to scan.
4. Type the name for the new template. For this example, we will use ‘Scan One’.
5. Click on ADD button to insert a rule for the scanning procedure.
6. Select the drive on which you would like to carry out the scan. Type in the drive letter and path where your operating system is installed. We will use C:\ for this example. Leave the pattern as default ‘*’. Check the INCLUDE
SUBDIRECTORIES option. If you do not activate this option, only the c:\ directory will be scanned, letting out crucial files that reside in the OS installation directory. Do not forget to also check the SCAN EXECUTABLE option.
7. Click OK and SAVE to preserve your newly created template.
Utilizing your new template
In order use your scan, you will now need to select a client computer on which to run it.
1. In the Perform New Scan dialog, still open after creating the template of the previous section, click on the ellipsis button — or type in a name — to select a client on which to carry out the scan. If you close the dialog after step 7, open it again by clicking on the PERFORM NEW SCAN button and select the ‘Scan one’ scan. If you use the ellipsis button or if you type a wrong or partial name, a new search dialog opens — Select Computer — where you can select the correct computer.
2. Once you select the desired computer, click on the START SCAN button.
You need to define a comment to identify this scan. The scan will run to full completeness, giving you a status notification at the Output window (located at the bottom left of the main screen). Scanning an entire hard drive will take several minutes.

Chapter 4: Testing your Sanctuary Application Control Suite installation
Sanctuary's Quick Setup and Configuration Guide 4.2.2 43
If you do not see the Output window, open it by using the OUTPUT item of the VIEW menu.
Authorizing your new file hashes
Once the scan is completed, you will need to authorize the new hashes to a File Group. This is done by first viewing the scan you have created.
1. Click on the SELECT SCANS button located on the bottom right part of the main window and select the scan in the SHOW SCANS MADE FROM TEMPLATE field by name (typing or selecting from the pull-down list ‘Scan one’). You will notice that this will also fill the SECOND SCAN section below. This is used when two (or more) scans exist in the database allowing you to compare them.
2. Once the scan is displayed, select all the unauthorized unknown files. Unknown files are shown as <not authorized>.
3. Once the files are selected, right click on them and then on the ASSIGN TO
FILE GROUPS contextual menu item. You will be presented with a new dialog, click on FILE GROUPS button.
4. In the next window, click on the ADD FILE GROUP button to create a new file group. Create a group called ‘My Files’.
5. Once the group created, the Assign Files to File Groups dialog shows. At this stage, if you import known file definitions for your Operating System, you should see that many files actually have a File Group suggestion. You need to manually assign those files for which the system makes no suggestion to the newly created ‘My Files’ file group. Once finished, click on the OK button.
6. The files are added to the database and are now ready to be used in the User Explorer and DB Explorer module to manage and authorize.
Authorizing Files Now that you have a file group (‘My Files’), which has been populated by the Scan Explorer, you need to grant users the right to use these files on their computers. Notice that each file only needs to be scanned once to add its hash to the database. The following steps demonstrate how to add files to the Domain Users group. Please refer to the Sanctuary Application Control Suite Administrator's Guide for more details.

Chapter 4: Testing your Sanctuary Application Control Suite installation
44 Sanctuary's Quick Setup and Configuration Guide 4.2.2
1. Click on the User Explorer icon located on the Modules section of the Control Panel navigation panel of the main window of Sanctuary Management Console.
2. In the central panel of the window, you will see the various user groups, domains, and common user groups (highlighted in red). Only those Users/Groups/Computers/Domains that have File Groups directly/indirectly assigned are shown. Click on the Users/Groups/Computers/Domains check boxes to further filter your search. You can add objects by typing the name or searching with the ADD button. These groups have common SID’s amongst all computers, hence their existence at the top of the list. You can authorize your My Files file group to everyone if you want any user to use files on a desktop. We will be giving access to the Domain Users.
3. The right upper and lower panels will show you the directly, indirectly and non-authorized file groups.
4. Once the Domain Users group is selected, choose ‘My Files’ file group from the Not Unauthorized panel list and click on the AUTHORIZE button located below the panel. The file group moves to the Authorized panel list.
5. Changes made only modify the database and have no effect on the client side. To inform your clients, select the Send Updates to All Computers or Send Updates to item from the Tools menu. This will push the new information to all drivers or a specific computer on the network so that your new settings take effect immediately.
A number of File Groups have been created when importing the known file definitions. We suggest that you make the following assignments:
File group Recommended assignment(s) Boot Files LocalSystem, network service, local service all File Groups (except Common Files, Logon Files and Boot files)
Administrators
Common Files Everyone Logon Files Everyone SecureWave support files Everyone Accessories Everyone
Table 3: Recommended File group assignments
Files can also be authorized by using the EXE Explorer module. This module allows an administrator to browse a CD-ROM drive on a particular computer to permit users to run specific files from a CD.

Chapter 4: Testing your Sanctuary Application Control Suite installation
Sanctuary's Quick Setup and Configuration Guide 4.2.2 45
Try to log on a machine with the client installed If you logon in a computer (for example, with a user called ‘EndPointUser’), you can, normally, execute all programs because they have been previously authorized following the steps of the preceding sections.
If you logon to a machine and receive a message saying that an application or DLL is denied or that it is not a valid Windows image, you probably forgot to fill up the database with some files or did not authorize them. Launch once more the ‘Sanctuary Management Console’ and select the ‘Log Explorer’ module from the side bar. Select ‘Fetch New Log’ from the ‘Explorer’ menu, and choose the machine. If you do not remember the name or you want to search for it, use the SEARCH button, select it and then click on the OK button. Back in the ‘Log Explorer’, click on SEARCH. The program will give you a list of files. All files not assigned to a File Group are identified as ‘<Not authorized>’ in the File Group column. All files not authorized, directly or indirectly through Domain groups, to the user are either identified as ‘Access denied’, ‘ok-non-BlockUser’, or ‘ok-nonBlocking’. If you double click on those files, the ‘Assign Files to a File Group’ dialog opens. You can choose to create a new group by clicking on FILE
GROUPS button. You must then proceed to associate the files to the corresponding File Group (use the ‘Suggested File Group’ drop-down list, and click on OK). Activate the ‘User Explorer’ module on the left side bar and grant ‘EndPointUser’, ‘LocalSystem’, and ‘Administrators’ the access to your new ‘File Group’. Please refer to the Sanctuary Application Control Suite Administrator's Guide.
Auditing There are two types of auditing carried out within Sanctuary Management Console: a review of the Audit Logs of administrative actions and an analysis of the execution logs of client actions. You can refer to the Sanctuary Application Control Suite Administrator's Guide for a full description. You can review this information using the Log Explorer module.

Chapter 4: Testing your Sanctuary Application Control Suite installation
46 Sanctuary's Quick Setup and Configuration Guide 4.2.2
Log Explorer
The Log Explorer is the module that consolidates all logging information sent from the clients and done by the administrators. Within this view, you can analyze which files users have been using, track access denied messages, and see if any users have been trying to run files unknown to the system on any of the clients. You can also see all Administrators’ actions in this module.
You can apply various filters within the Log Explorer module to utilize its full capabilities. You can see an example screen on Figure 7 .
Logs are sent as per the defined options from the Sanctuary Client Driver to the SecureWave Application Server. You may retrieve the latest logs from any client by using the Fetch Log item located on the Explorer menu.
Please refer to the Sanctuary Application Control Suite Administrator's Guide for a full description.
Figure 7: Log Explorer data window

Chapter 4: Testing your Sanctuary Application Control Suite installation
Sanctuary's Quick Setup and Configuration Guide 4.2.2 47
Database Exploration You can use the DB Explorer module of the Sanctuary Management Console to explore your database. This module was created to allow administrators to move files between File Groups in the database. To create additional File Groups follow these steps (you can refer to the Sanctuary Application Control Suite Administrator's Guide for full details):
1. Use the DB Explorer module of the Sanctuary Management Console. Change to the Files tab. The main window of this module is empty.
2. Type a file name or File Group in the corresponding field (you can use wildcards) and click on the SEARCH button.
3. Click the File Name header to sort the database by that column.
4. Locate one or more executables in the ‘My Files’ File Group by typing the name (or part of it) in the corresponding field and clicking on SEARCH. This file group was created following the steps outlined at previous sections of this chapter. Select one or more files assigned to that group.
5. Right click on the selected file(s) and choose the Assign to File Group item. The Assign Files to File Groups dialog opens.
6. Click on the FILE GROUPS button. Click the on the ADD FILE GROUP button and create a group named ‘Other Files’. Click on the OK button to close the dialog.
7. Once the group is created, click on CLOSE.
8. Select the file and click on the arrowhead at the right of the Suggested File Group field. Select the newly created ‘Other Files’ file group.
9. Click on the OK button. You can now see that the file belongs to ‘Other Files’ file group.
10. Changes made only modify the database and have no effect on the client. To inform your clients, select the Send Updates to All Computers or Send Updates to item from the Tools menu. This will push the new information to all drivers or a specific computer on the network so that your new settings take effect immediately.
11. If you logon to the machine with the ‘EndPointUser’ account, you cannot execute the authorized file since it has been assigned to the ‘Other Files’ file group. The user has not been granted the rights to use those files. You can authorize the use of the ‘Other Files’ file group by using the User

Chapter 4: Testing your Sanctuary Application Control Suite installation
48 Sanctuary's Quick Setup and Configuration Guide 4.2.2
Explorer module. Do not forget to use the Send Updates to All Computers command. ‘EndPointUser’ will then be able to use the file(s).
As you can see from the previous example, it is easy to use the DB Explorer module. You can also select multiple files and assign them to a file group in the same way. You also have the possibility of creating parent-child relationships between File Groups. This helps clarify those cases where some files are used by several applications and, thus, create indirect authorizations for these parent-child relationships.
Local Authorization Local Authorization provides the means to delegate to users the right and ability to locally authorize those applications not been centrally authorize. The user can then use that software locally. This provides users with the flexibility to run a particular program required to carry on doing business.
1. Click on the User Explorer icon in the Sanctuary Management Console.
2. Select the Default options item of the Tools menu. The Default Options dialog opens.
3. Choose the Computer tab, and verify that the Local Authorization option is Enabled (default value). You can also use this option to disable local authorization on all computers. Click on the OK button to close the dialog.
4. Back in the User Explorer; click on the Users checkbox and select the user ‘EndPointUser’. If the user is not in the list, use the ADD button to insert it or type its name, or part of it, on the Users, Groups, Computers, and Domains field. Right click on the user’s name and select the Options item from the popup menu to open the corresponding dialog.
5. Configure the Blocking mode option to Ask user for *exe only and click OK.
6. Changes made only modify the database and have no effect on the client. To inform your clients, select the Send Updates to All Computers or Send Updates to item from the Tools menu. This will push the new information to all drivers or a specific computer on the network so that your new settings take effect immediately.
Proceed to logon on the server with the ‘EndPointUser’ account. If you now attempt to execute an application not centrally authorized, you receive an alert message explaining that you are about to run an

Chapter 4: Testing your Sanctuary Application Control Suite installation
Sanctuary's Quick Setup and Configuration Guide 4.2.2 49
application that has not been authorized. The dialog shows detailed information about the application that is about to run.
Figure 8: Local authorization dialog
> If you are not sure that the application source is a trusted one, click on DENY preventing its execution (default behavior). You are prompted again next time this application tries to run.
> You can click on DENY ALL if you do not want to receive execution notifications again. This setting can be reverted using Sanctuary’s tray icon contextual menu.
> If you click on AUTHORIZE, the application executes. This authorizes the program locally only for that specific computer.
A progress bar appears at the bottom of the dialog. The file is denied and the dialog closed if you do not respond within the timeout period.
7. All local authorization decisions are logged centrally. The administrator can monitor them using the Log Explorer module and can also decide to centrally authorize those locally authorized applications. This operation will allow all selected users to run a given application.
Administration of a Sanctuary installation is relatively easy assuming policy definition has been achieved at the beginning of the process.
Detailed explanations of all the functionalities of your Sanctuary solution are available in the Sanctuary Application Control Suite Administrator's Guide.

Sanctuary's Quick Setup and Configuration Guide 4.2.2 51
Chapter 5: Practical setup examples
Assigning permissions to groups instead of users When you begin to use Sanctuary, you will probably be tempted to traverse the Device Explorer module or scan all machines assigning permissions to individual users for different classes and devices or looking for software to authorize as you go. Although this is practical when the number of assigned permissions is kept small and while you get accustom to the inner works of the program, this becomes quickly unmanageable as the deployment grows and you control more and more users and devices/applications in your organization. You will have the double task of maintaining Windows’ users and their possible Sanctuary assignations.
A more pragmatic approach is to invest more time in the designing phase deciding which devices/applications and classes should be restricted beforehand. The object of this exercise is to define Windows’ Groups to control device/application access. Once this determined, you should proceed to define a naming convention, the actual groups, and all necessary group nesting so that it meets your business requirements. You should aim to create the fewest possible groups. This first phase design pays off as you can define Windows’ user groups precisely and then proceed to grant permissions to these groups instead of assigning them directly to specific users. The user, of course, should then be member of one or more of these previously defined groups.
As soon as your groups are determined, you can then proceed to define permissions for them in Sanctuary Management Console. You get the distinguished advantage of controlling device/application access by assigning permissions directly to one or more specific Windows’ groups. You can also use these same groups to do all kind of housekeeping (Windows’ public folder and mailboxes permissions for example).
By defining a small number of user groups in your domain, granting those groups permissions, and then assigning users to groups, you can manage a small number of groups instead of a large number of users.
Another benefit of this approach is that you are keeping User Management where it belongs: in your Directory structure (Windows’ Active Directory or Novell’s eDirectory).

Chapter 5: Practical setup examples
52 Sanctuary's Quick Setup and Configuration Guide 4.2.2
As a possible naming convention, you can use the following examples:
> Group’s name based on the device classes, ex. ‘SDC_Floppy_Grp’
> Group’s name based on the ‘Access-Profile’, ex. ‘SDC_Standard’ or ‘SDC_Laptop’
> Groups’ name based on the application’s name, ex. ‘SAC_CAD’ or ‘SAC_Accountable’
Sanctuary Device Control We will illustrate different common uses of Sanctuary Device Control in this section. We will learn, for example, how to:
> Control device use and installation
> Regain employer’s lost productivity due to intensive use of games, MP3 players, video players, etc.
> Enforce the compliance with internal security policies and those external regulations that the enterprise must face in its everyday work.
DVD/CD burner permissions assignments
We will illustrate the sheer power Sanctuary Device Control offers you, in simple every-day situations. In our first example, an employee — let us call him Bob — without the permission to use a DVD/CD writer assigned to him or the groups he belongs to, buys a new DVD USB burner and wants to share it with all his colleagues at work. Next day he arrives at the company and connects it directly to his computer. In a ‘standard’ situation, he can immediately begin burning DVDs with all kind of data, even your precious information. Fortunately enough, Sanctuary Device Control protects you and access is denied. He now has to ask the administrator for this permission. The administrator has several choices:
> He can grant Bob access to the DVD by making him a member of an Active Directory Group that has received access to the device class (DVD/CD drives, in this case). To do this, it is only necessary to change the domain group membership using the Microsoft Management Console (MMC) —no modification to the Sanctuary permission rules is required
> If a computer group exists (a one-click operation to create using our Sanctuary) and access to DVD/CD drives has been defined, the administrator can move Bob's computer into this group. His machine will receive automatically the permissions that apply to the existing computer group

Chapter 5: Practical setup examples
Sanctuary's Quick Setup and Configuration Guide 4.2.2 53
> Assign Bob the necessary permissions (temporarily, scheduled, or definitive ones)
> Grant Bob Read & Write access on his new DVD burner
> Give permissions for using the device, except during working hours
> Allow access to the device only when the computer is offline (or online)
> Decide that Bob can only use specific DVD/CD media
> Allow Bob to read but not to write data
> Give Read/Write permissions but store the contents (shadow) of the copied/read files to control what has been done
> The administrator can decide to do NOTHING. Bob has no right to use the DVD/CD burner and it should stay that way…
As you can see from this simple example, the possibilities are endless and flexible enough to adapt to each kind of imaginable situation.
Removable permissions assignments
For our second example, we will take another real-life case:
Rather than grant permissions to all removable media in exactly the same way, you may want to allow access only to a specific company approved model. For example, if the corporate standard USB memory stick is a SanDisk 2GB, it is possible to define it in the Sanctuary Device Control and assign group or user permissions to that specific model. Access is denied to any other type of removable media connected. In this way, it is possible to build up a ‘White List’ of corporate-approved devices and deny everything else. Permissions for a newly defined device can be assigned without having to log off/log on.
You can apply device class permissions and device type permissions at the same time.
You can go a step further by managing unique user devices identified by their exclusive serial number. This way, your control boils down to a specific device.
Chapter 5: Practical setup examples
54 Sanctuary's Quick Setup and Configuration Guide 4.2.2
Shadowing notes
The ‘Shadowing’ — a copy of transferred data — of removable devices gives you a clear advantage when trying to decide who has to be controlled more closely. As you have a complete control of the copied/read data or the file names, you can quickly decide corrective or preventive actions or limit access to certain groups or users.
Although this is a very powerful feature, it should be used with care. The hard disk drive assigned to contain the data file directory should be ample enough to receive all copied data. This can amount to several Mbytes, read Gbytes, very quickly not to mention the possible network saturation in case of using slow lines. A judicious compromise between receiving all data or just the file name should be made. As there is no rule or thumb here, there has to be a case-by-case analysis for each organization’s needs.
Since secondary hard disks are considered as removable devices, you should consider shadowing repercussion — as described in the previous paragraph — when applying a general rule to the ‘Removable Storage Devices’ class.
Sanctuary Application Control Suite
Sanctuary in an organization-wide strategy
As your organization grows, you will need to implement appropriate security policies when implementing your network. Addressing these issues early in your preparation ensures that security cannot be breached. Using the right tools for the job guarantees that your security controls are pro-active, consistent, and automatic. The evaluation of your network security risks, the training of your staff, and the early identification of potential breaches and security risks play an important part in your global security strategy.
As part of this global protection strategy, Sanctuary products provides the most basic, and important, services of them all: Protecting your software and hardware investment by impeding illegal use of programs, external and internal attacks, and data theft of your valuable and sensitive information.
Gone are those days where it was enough to have a proper firewall and anti-virus program to protect your organization from external and internal attacks. Users get more sophisticated, equipment evolves, and there are new ways to do old things. Sanctuary products will protect you of present and future attacks in a very simple

Chapter 5: Practical setup examples
Sanctuary's Quick Setup and Configuration Guide 4.2.2 55
way: denying or limiting all access to programs and devices unless told to do so explicitly.
Setting up your new Sanctuary solution
Follow these simple steps to setup your Sanctuary protection:
> Create a software inventory
> Define organizational security policies (permissions, file groups, administrators, roles, etc.).
> Plan the system architecture and sizing requirements.
> Install system components (SecureWave Sanctuary Database, SecureWave Application Server, Sanctuary Management Console, key pair, and schedule domain sync).
> Populate the database application’s hashes.
> Create and assign your applications to File Groups and then these File Groups to the required users/user groups.
> Install a client machine.
> Validate permissions.
> Prepare to make a smooth transition from an uncontrolled environment to a protected one.
By defining a small number of user groups in your domain, granting those groups permissions, and then assigning users to groups, you can manage a small number of groups instead of a large number of users.
Setting the default option ‘Execution Blocking’ to ‘non-blocking’ and ‘Execution Notification’ to notify those applications ‘Non-blocked access-denied’ is a very effective way of managing the transition of an organization from an uncontrolled environment. The logs created this way can be used to indicate files regularly utilized which are good candidates to add to File Groups. The logs can indicate two possible cases:
> Files you forgot to authorize
> Viruses that tried to execute
Use the logs carefully and authorize only those files that come from reliable sources.

Chapter 5: Practical setup examples
56 Sanctuary's Quick Setup and Configuration Guide 4.2.2
The Sanctuary Client Driver is used on the client computer to provide notifications to the user about blocked files. It is essential that you authorize all its components for all users. When first installing the program, these files are classified under the ‘SecureWave Support Files’ File Group. You can directly assign this File Group to the user or to the group the user belongs.
Routine system administration
In your everyday administration, you should:
> Monitor logs of application execution watching for illegal activity (executable trying to run without authorization).
> Run new scans, create scan templates, and gather new executables and authorize them if necessary.
> Modify authorizations for new software/devices or service packs.
> Do daily maintenance, backups, and machine updates.
Verifying new software
After installing new software on a computer and authorizing it — see the Sanctuary Application Control Suite Administrator's Guide for more information on how to do this — you may want to verify that new applications authorizations are working correctly and that new drivers are not obstructing other software on the machine. Consult the Sanctuary Application Control Suite Administrator's Guide for a set of strategies you can use when authorizing your new Sanctuary installation.
To verify the performance of new software on a client
> Launch the software on the target client, use it for a while, and then close it down.
> Open the Log Explorer module (click on the corresponding icon located in the Modules section of the Control Panel of the main window or use the ViewModules command).
> Select Fetch New Log from the Explorer menu.
> Select the appropriate machine and fetch the up-to-date logs in the dialog.
> Click on the Access column header to sort the files by this field. You may have to use the lower navigation bar to find it.

Chapter 5: Practical setup examples
Sanctuary's Quick Setup and Configuration Guide 4.2.2 57
> Make sure that no files have Denied, ok-nonBlocking, or ok-nonBlockUser shown in the Access column. If there are no such files, the new software has been properly authorized, included in the appropriate File Groups, and has not upgraded any files used by other applications.
Tips for maximum security
If your organization has extremely stringent requirements for client protection, confidentiality, and reliability, you will want to use Sanctuary to its maximum power. Here are some option settings and practices to consider using the solution at maximum strength.
Preventing Local Authorization
If you leave a user the chance to locally authorize applications, you are exposing your network to a security risk. The user may authorize a malicious application on the computer. To prevent the spreading of such malicious applications throughout the company, you should disable the local authorization option. This global machine option, if disabled, will prevent local authorization altogether. See the Sanctuary's Setup Guide for more details. The Blocking mode enabled is the default option (no local authorization allowed).
Preventing ‘Relaxed logon’
Blocking can also be activated at the workstation at the end of the logon script by running the EndLogon.exe command at the end of the script. Endlogon.exe is a utility that activates blocking immediately, even if the relaxed logon time has not yet expired. Endlogon.exe is included in the installation of the Sanctuary. The Relaxed logon disabled is the default setting.
If you want to prevent logon scripts from running asynchronously, then you need to make the following change in the registry of each client computer.
HKEY_LOCAL_MACHINE\SOFTWARE\Microsoft\Windows NT\CurrentVersion\Winlogon
RunLogonScriptSync should be set as a REG_DWORD with a value of ‘1’.
Doing this will mean that users are unable to run unauthorized files by double clicking them on the desktop while an asynchronous logon script is running in the background during a relaxed logon. However, you should note that it is still possible to start applications from the ‘New task’ button in Task Manager. You can disable this behavior by setting the blocking mode for Local System and Administrators. Beware that this is dangerous if the file groups have not been assigned to the local system because you can block the whole system.

Chapter 5: Practical setup examples
58 Sanctuary's Quick Setup and Configuration Guide 4.2.2
You can also do this using Group Policies. This entry corresponds to the “Run logon scripts synchronously” group policy that you can find in the User Configuration Administrative Templates System Logon.
Using encrypted communication protocols
When installing SecureWave Application Server you are given the chance to activate TLS protocol for intra-SecureWave Application Server communications — if you are installing more than one — and then once more when you deploy the Sanctuary Client Driver to define an encrypted protocol for client- SecureWave Application Server communications. The extra investment of time and resources can pay-off if your company has very strict standards or is subjected to very tight regulations.

Sanctuary's Quick Setup and Configuration Guide 4.2.2 59
Appendix A: Troubleshooting The information in this appendix applies to all Sanctuary products.
Your normal use of Sanctuary should be trouble free. However, if you do encounter any problems, then refer to this chapter. It explains some of the more common problems, provides solutions for them and ways of preventing them recurring.
You can find more troubleshooting information and tips on our Web site at: www.securewave.com
Contacting SecureWave Support If you have a problem not covered by this guide, then you can contact SecureWave Technical Support by sending an email to [email protected]. Make sure that you include the following information:
1. A description of the problem, as complete as possible, including details of the circumstances when the problem occurred. Please visit our Knowledgebase on www.securewave.com to get more details on how to obtain the necessary technical information.
2. The exact version of the Sanctuary product you are using. This can be found if you open the Sanctuary Management Console, select the Help menu, and then select About. You can copy the “Version information” directly from the dialog and paste it into your email.
Troubleshooting Tips Check that SecureWave Application Server is running
You may need, from time to time, to ensure that the SecureWave Application Server is running. This task can be achieved in a number of ways as shown below:
1. Using SC.EXE from the resource kit.
SC.EXE allows you to query the status and configure systems services.
C:\>sc query sxs SERVICE_NAME: sxs

Appendix A: Troubleshooting
60 Sanctuary's Quick Setup and Configuration Guide 4.2.2
TYPE : 10 WIN32_OWN_PROCESS STATE : 4 RUNNING (STOPPABLE,PAUSABLE,ACCEPTS_SHUTDOWN) WIN32_EXIT_CODE : 0 (0x0) SERVICE_EXIT_CODE : 0 (0x0) CHECKPOINT : 0x0 WAIT_HINT : 0x0
2. Using the 'services' control panel applet.
Under Windows 2003, select Start Programs Administrative Tools Services. Under Windows 2000, select Start Control panel and choose Administrative Tools and then Services. Scroll down the list to SXS and check its status.
3. Using the Sanctuary Management Console.
A simple method to check that the server is running properly is to use the Sanctuary Management Console and try to connect to the server in question.
Client driver ignores updates from server
There can be a number of causes of this problem:
1. Mismatched keys between the server and the client.
2. Server not running (or not reachable).
3. IP address of server has changed.
4. Client computer not in the server’s online table.
Looking at each cause in turn:
1. The key pair generation should be carried out only once to ensure that there is only one key pair in the company as the files look identical and they can easily be mixed up. If the public key on the client does not match the private key on the server then all updates will be ignored. The safest solution is to use on the client a copy of the sx-public.key file that is on the %SYSTEMROOT%\SXSData of the computer running the SecureWave Application Server.
2. The server may not be running and the client loads cached data from its local cache. Check that the SecureWave Application Server is running.
3. If you change the IP address — or DNS name — of the server and fail to update the clients then they will not be able to pick up any changes from the server. There are a number of solutions:

Appendix A: Troubleshooting
Sanctuary's Quick Setup and Configuration Guide 4.2.2 61
Set the address — or name — back to what it was when you first installed the Sanctuary component
Change the client’s IP address located in the 'Servers' registry key (see the Sanctuary's Setup Guide)
The key can also be changed at logon with group policies or by setting the Server Address field in Default Options, from the Tools menu in the Sanctuary Management Console
The Default Options dialog applies to all computers. You could also make changes to the registry and set directly the key to hold more than one address (one per SecureWave Application Server).
4. When the computer is not in the SXS online table, the easiest way to correct this is to ask the client to logoff and logon again on his computer. If this does not work, you can eventually reboot the computer. If it is still not working, it probably means that there are communication problems between the server and the client.
You can use the application called PingSXS.exe that is located in the BIN\Tools subfolder of the Sanctuary CD or in the SSF folder where Sanctuary was installed. Running this application on the client would tell you more information on what goes wrong.
5. Check if the firewall is not blocking the required ports — especially if you install Sanctuary’s components in Window XP or Windows 2003 SP1. Please consult the Sanctuary's Setup Guide for more information.
Sanctuary Client Driver components cannot be uninstalled or modified
The main reason for this is not having emitted the proper “Endpoint Maintenance Ticket” from the console and copying it to the required directory of the client machine. As an alternative, you can also relax the “Client Hardening” option before trying to do any maintenance. See any of the Administrator’s Guides for more information. If this maintenance is done from the Sanctuary Client Deployment Tool, do not forget to specify a valid application server from where to generate and retrieve the ticket.

Appendix A: Troubleshooting
62 Sanctuary's Quick Setup and Configuration Guide 4.2.2
SecureWave Sanctuary Database backup Backing up your databases is not just a good idea, it is a necessity. This section lists important points about carrying out a database backup with Microsoft SQL Server.
> You can refer to Microsoft SQL Server 2000/2005/2005 Express Edition documentation for guidelines on how to backup a database.
> Ensure that your backup software is capable of performing live Microsoft SQL Server database backups before attempting a live backup. Please consult your backup documentation regarding live SQL backups.
> Ensure that both ‘sx’ and ‘master’ databases are backed up.
> If the backup software cannot handle live SQL backups, then an SQL dump to disk of the databases ‘sx’ and ‘master’ can be performed, and then archived onto tape (or other backup media) as part of the regular server backup.
SecureWave Application Server backup The backup of the application server is straightforward. Backup the following files, directories and registry keys:
1. The public and private keys: sx-private.key and sx-public.key. These are located in either %SYSTEMROOT%\SYSTEM32 or %SYSTEMROOT%\SXSDATA (recommended location)
2. The license key SecureWave.lic. This is located in either %SYSTEMROOT%\SYSTEM32 or the directory where SXS.EXE is located.
3. The datafiledirectory. Its location can be determined from the value of the registry parameter: HKEY_LOCAL_MACHINE\SYSTEM\CURRENTCONTROLSET\SERVICES\SXS
\PARAMETERS\ ”DATAFILEDIRECTORY”
4. The registry key with all its associated values: HKEY_LOCAL_MACHINE\SYSTEM\CURRENTCONTROLSET\SERVICES\SXS\
5. The contents of the directory %SYSTEMROOT%\SXSDATA.
This list does not include SecureWave application binaries since these can be reinstalled for the original CD if corrupted or lost.

Appendix A: Troubleshooting
Sanctuary's Quick Setup and Configuration Guide 4.2.2 63
The storage*.* files, found in the %SYSTEMROOT%\SXSDATA directory, can be discarded without backup (they are regenerated each time the SXS service starts).
Other common issues I am an administrator. I can view access privileges but not change them. Why?
The Sanctuary system recognizes two types of administrators: Enterprise Administrators, who have complete administrative privileges, and regular Administrators who have restricted privileges. Your access privileges have probably been set as read-only in the system to limit access to this function. An Administrator or Enterprise Administrator with appropriate privileges must change this setting. You can see your privileges in the Connection Windows of the Sanctuary Management Console.
To change access privileges for an Administrator
1. Select User Access from the Tools menu (or from the Control Panel). The system displays the User Access Manager dialog.
2. Enter a user name in the User Name field.
3. Click SEARCH to locate the user or group to whom you want to grant administrative rights.
4. When that user’s name appears in the Users list box, select it. The Settings (App.Control) field will probably be set to None, which means that application control is in force. Remember that you should set the Access field to Administrator.
5. Change this attribute to Yes, so that the application control measures are not in force. The selected Administrator can now change permissions and system options for the objects for which he/she has write permission in the Active Directory.
Another cause for this could be that you do not have the appropriate rights for the object you are trying to manage in the Active Directory. Please see our Control Access Tool (CtrlAcx.vbs) file located on the installation CD and consult the Sanctuary's Setup Guide for further instructions on how to use this tool (also included in the help file).

Appendix A: Troubleshooting
64 Sanctuary's Quick Setup and Configuration Guide 4.2.2
The information in the User Explorer display is not up-to-date. I know we have added users, User Groups, or computers that are not showing up on the list.
When you make changes to a domain, such as adding users, User Groups, or computers, you should explicitly synchronize this information in the SecureWave Sanctuary Database. You can do this from any module of the Sanctuary Management Console.
Select Synchronize Domain Members from the Tools menu (or from the Control Panel). Type the name of the domain to synchronize and click the OK button. The system updates the database records for all users and computers in the specified domain. You can automate this task — see details in the Sanctuary's Setup Guide or help file.
Some perfectly harmless applications authorized using Sanctuary Application Control Suite are now being denied.
If a user informs you that one of their applications will not run while it should, follow this procedure to identify and correct the problem:
1. In the Log Explorer module, select Fetch Log (from the Explorer menu or clicking on the button). Choose the appropriate computer and retrieve the up-to-date logs.
2. Select the ‘Applications denied today’ template and click on QUERY.
3. Click on the Reason column header. All files that have been denied will be shown at the top of the list.
If the client is running in ‘Non-Blocking’ mode, files that are not members of an appropriate File Group are permitted to run. When this happens, the entry in the Reason column is either ‘<ok nonBlockUser>‘ or ‘<ok nonBlocking>‘, depending on whether ‘Non Blocking’ mode has been set for the user or for the computer.
If the client is running in ‘Ask user for *.exe only’ or ‘Ask user always’ mode, files that are not authorized can be permitted to run if the user decides to do so. When this happens, the entry in the Reason column is ‘ok-localAuth’. You should pay attention to these records as they are related to applications that were not approved by you and that the user decided to run anyway.
4. Check whether any of these are required for the application that will not run. If they are required, you should:

Appendix A: Troubleshooting
Sanctuary's Quick Setup and Configuration Guide 4.2.2 65
> See the File Group column to check whether the files are assigned to the appropriate File Group. If they are not, assign them. Only assign those files that come from reliable sources. See Assigning File Groups to Users in the Sanctuary Application Control Suite Administrator's Guide.
> See the User Explorer to check whether the user is permitted to use the File Group. If not, grant the user — or a group the user is a member of — permission to use it.
If the blocking mode option is active, any application that is not centrally authorized will not run. This remark is particularly important if the Spread check option (Tools menu) is activated since it will change automatically the global computer Local Authorization option from ‘Enabled’ to ‘Disabled’ once the spreading threshold is reached. When the Local Authorization option is set to Disabled, the Ask user for *.exe only and Ask user always user options are ignored and the blocking mode option is applied by the client. This is why is extremely important to centralize application authorization.
I use the management console to grant users local authorization rights (for unknown files, scripts, or macros), but the alert/authorize/deny dialog does not pop up. They just get a denial message.
Make sure the correct options have been set. In particularly, activate the Ask user for *.exe only (Blocking mode) and Local authorization global options.
There are no files showing when I switch to the Exe Explorer module in the management console and traverse the disk tree.
You have not defined the options specifying which type of files to scan for (exe, com, dll, etc.). Select the desired options (see the Sanctuary Application Control Suite Administrator's Guide) and try again.


Sanctuary's Quick Setup and Configuration Guide 4.2.2 67
Appendix B: Detailed System Requirements and Limitations
The information in this appendix applies to all Sanctuary products unless otherwise specified.
This appendix specifies the minimum system requirements for the different components used in a Sanctuary implementation and details the limitations of installing Sanctuary Client Driver on Terminal Servers and Citrix environments for some products of our suite.
System requirements Table 4 specifies the minimum system requirements for the different components used in a Sanctuary implementation.
You should resolve all hardware conflicts before installing Sanctuary solutions. You can use Windows’ Device Manager to troubleshoot and fix software-configurable devices. All hardware devices that use jumper pins or dip switches must be configured manually.

Appendix B: Detailed System Requirements and Limitations
68 Sanctuary's Quick Setup and Configuration Guide 4.2.2
SecureWave Application
Server
SecureWave Sanctuary Database
Admin Tools Sanctuary Client Driver
Operating system
Windows 2000 Server (Service Pack 4 or later) or Windows Server 2003 SP1 or SR2
Windows 2000 Server (Service Pack 4 or later) or Professional, Windows XP Professional (Service Pack 2 or later), Windows Server 2003 SP1 or SR2
Windows 2000 Server (Service Pack 4 or later) or Professional, Windows XP Professional (Service Pack 2 or later), Windows Server 2003 SP1 or SR2
Sanctuary Device Control, Sanctuary
Application Control
Custom
Edition
Windows 2000 Professional
(Service Pack 4
or later), Windows XP
Professional
(SP2 or later), Windows XPe,
Windows
Embedded for Point of Service
(WEPOS), Windows XP
Tablet PC
Edition. Sanctuary Application Control Server Edition, Sanctuary Application Control Terminal Services Edition
1Windows 2000
Server (SP4 or later) or
Windows Server
2003 SP1 or SR2.
Hard disk space
40 Mb free disk
space for program
files and 15 Mb for the installation
5 Mb free disk space
for program files, 40
Mb for the installation, and 20
Mb+ for data
(depends on the number of users)
140 Mb free disk
space for program
files and 40 Mb for the installation
6 Mb free disk space for
program files and 15 Mb for the
installation. If using SDC, the local data requirements
depend on whether you chose
to do “Shadow” or not and goes from 10 MB to several GB
Memory 128 Mb (256 Mb recommended)
Display Not applicable 1024x768 Not applicable
File System NTFS
Other MDAC v2.6 SP1 or later if you are
using Windows
2000
Microsoft SQL Server 2000/2005, SQL Server
2005 Express Edition
(requires Microsoft .Net Framework 2.0),
or MSDE 2000. MDAC
V2.6 SP1 if using Windows 2000.
Adobe PDF Reader v5.0 or later to
consult the on-line
manuals.
Novell client v4.91 or later if connected to a Novell
environment
If using central encryption or TLS communication protocol
You need a valid Certificate Authority installed to issue and manage certificates if you
want encrypted Sanctuary Client Driver -SecureWave Application Server (SXS) and intra
SXS-SXS TLS communications. This authority is also needed if you plan to centrally
encrypt removable devices (if using Sanctuary Device Control). If no certificate
authority is found, you can still encrypt devices (with some limitations) and the
communication channel is assured by signing messages with a private key.
When using Novell
You will need the following elements installed on the computer used to synchronize
Novell’s objects: Novell — and optionally ZENworks — client v4.91 or later; LDAP and
NDAP (for workstation object synchronization); the synchronization script; an access to
the SecureWave Sanctuary Database. We recommend installing all these components
on the same machine as the one used to host the database.
1 There are limitations to the installation of the Sanctuary Client Driver on Terminal Server, as described in the next section.

Appendix B: Detailed System Requirements and Limitations
Sanctuary's Quick Setup and Configuration Guide 4.2.2 69
SecureWave Application
Server
SecureWave Sanctuary Database
Admin Tools Sanctuary Client Driver
For 64 bits systems
The Sanctuary Client Driver can also be installed on Windows Vista 64
Table 4: System requirements
If you plan to use encrypted devices — when installing Sanctuary Device Control —, you will need Active Directory and DNS installed and properly configured. The Microsoft Certificate Authority must be installed, properly configured, and published. You will also need this Certificate Authority when using encrypted communications between SecureWave Application Servers (SXS) or SXS-Sanctuary Client Driver.
You can find the LDAP and NDAP components required for Novell synchronization in the installation CD or in Novell’s Web site.
For the SecureWave Sanctuary Database installation, we strongly recommend that you install the latest Service Packs. You should not bring a database into use without installing at least MSDE 2000 or SQL 2000 SP4. Otherwise, your database is not protected against the slammer worm.

Appendix B: Detailed System Requirements and Limitations
70 Sanctuary's Quick Setup and Configuration Guide 4.2.2
Sanctuary Device Control
Terminal services limitations
The Terminal Services administration mode and the remote desktop functionality allow access to computers remotely. This section details how the Sanctuary Client Driver enforces security when devices are accessed remotely.
Sanctuary Device Control normally applies the permission of the user accessing the device, be it a remote user or the user working interactively with the computer. This is the case for the device classes for which the device access is performed in the context of the user who initiated the access: BlackBerry (USB), DVD/CD (READ access), Com, LPT (NOT when used for printing), Palm OS Handheld Devices (USB), Removable, Tape, Unauthorized Encrypted Media, Windows CE Devices (USB).
Certain kinds of device accesses are not performed in the context of the user who initiated the access. Instead, a proxy that normally has privileged access to the system (a service or a driver) carries them out. DVD/CD WRITING is one example; there are a few other ones: modems, scanners, smart card readers, printers (either USB or connected to the LPT port) and unknown devices.
When the Sanctuary Client Driver detects such ‘proxy’ access, it tries to determine the identity of the user who initiated the access. This is done successfully when there is only one interactive user.
When there is one interactive user and one remote user on the same computer (i.e., when there are more than one logon sessions with different session IDs), the client cannot determine reliably the identity of the user that initiated the access. In such conditions and only for the DVD/CD burning, modems, scanners, smart card readers, printers (USB or LPT) and unknown devices classes, the Sanctuary Device Control will deny all proxy access. It means for example that the users will not be able to write DVDs/CDs when somebody accesses their machine remotely even if both the interactive user and the remote user have a Read/Write access to the DVD/CD drive. The user accessing the machine remotely will not be able to write DVDs/CDs either.
The RunAs command limitations
There is a situation similar to the Terminal Services issue when using the RunAs Commands or equivalent. This type of command is often used in logon scripts.
Certain kinds of device access are not performed in the context of the user who initiated the access. Instead, a proxy that normally has privileged access to the

Appendix B: Detailed System Requirements and Limitations
Sanctuary's Quick Setup and Configuration Guide 4.2.2 71
system (a service or a driver) carries them out. DVD/CD WRITING is one example; there are a few other ones: modems, scanners, smart card readers, printers (either USB or connected to the LPT port) and unknown devices.
When the Sanctuary Client Driver detects such ‘proxy’ access, it tries to determine the identity of the user who initiated the access. This is done successfully when there is only one interactive user. The user cannot be determined when there are active RunAs logon sessions.
When the Sanctuary Client Driver detects RunAs logon sessions, and only for DVD/CD burning, modems, scanners, smart card readers, printers (USB or LPT) and unknown devices classes, the RunAs Logon sessions are mapped to the interactive logon session with the same session ID. Thus, all RunAs processes will have exactly the same access as the interactive user who launched them. Using the RunAs command to change the level of access to these devices is not possible.
Example 1: Bill has no access to DVD/CD. John has Read/Write access to DVD/CD. If Bill uses a RunAs command to run the DVD/CD burning software under the credentials of John he will NOT be able to create new CDs. Bill will have to log off and log on as John to create new DVDs/CDs. Since writing a DVD/CD requires a proxy, it is subject to the limitation described in this section.
Writing a DVD/CD requires a proxy and is subject to the RunAs limitation, whereas reading a DVD/CD is not.
Example 2: Bill has no access to the Floppy. John has Read/Write access to the Floppy. If Bill uses a RunAs command to run the Windows File Explorer under the credentials of John, he will be able to read and write to the Floppy. Indeed, access to the Floppy is done without a proxy. The limitation described in this section does not apply to this device.


Sanctuary's Quick Setup and Configuration Guide 4.2.2 73
Glossary ACE
Access Control Entries. An entry of the Access Control List (ACL). It contains a set of access rights and a security identifier (SID) identifying a trustee.
ACL
Access Control List. A list of security protections that apply to an object (file, process, event, or anything else having a security descriptor).
ADC
Advanced Data Connector. See RDC.
CAB
File extension for cabinet files, which are multiple files LZx-compressed into a single file and extractable with the extract.exe utility. Such files are frequently found on Microsoft software distribution packages.
Client Computer
The computers on your network that Sanctuary protects/controls.
Direct cable connection (DCC)
A RAS networking connection between two computers, or between a computer and a Windows CE/PPC–based device, which uses a serial or parallel cable directly connected between the systems instead of a modem and a phone line.
DNS
Domain Name System (also Service or Server). A service that translates common names (easy for human to remember) into IP addresses.
Executable Program
A computer program that is ready to run. The term usually applies to a compiled program translated into computer code in a format that can be loaded in memory and executed by a computer’s processor.

Glossary
74 Sanctuary's Quick Setup and Configuration Guide 4.2.2
FAT
The File Allocation Table defines a reserved zone on a magnetic media containing the list of clusters it occupies.
File Group
Organizational groups used to cluster authorized executable files. Files must be assigned to ‘File Groups’ before users can be granted permission to use them. You can choose to assign files to ‘File Groups’ from various modules throughout the Sanctuary Management Console, e.g. by double-clicking on a file in the DB Explorer, EXE Explorer, Log Explorer or Scan Explorer.
Hash
A complex digital signature calculated by Sanctuary Application Control Suite components to uniquely identify each executable file that can be run. The hash is calculated using the SHA-1 algorithm that takes into account the entire contents of the file.
IOCP
I/O Completion Port.
IMAPI
Image Mastering Applications Programming Interface. A Windows’ operating system service used by CD/DVD burning software. It should be disabled so that users cannot use Windows Explorer or Windows Media Player to create CD/DVD copies in Windows XP & above.
MDAC
Microsoft Data Access Components. Required by Windows computers to connect to SQL Server and MSDE databases.
MSDE
Microsoft SQL Server Desktop Engine. You can use MSDE 2000 with Sanctuary.

Glossary
Sanctuary's Quick Setup and Configuration Guide 4.2.2 75
MSI
Microsoft's Windows Installer engine (Sanctuary supports MSI from version 2.0 up to v3.1). It is also the extension of the file used by this component.
NTFS
New Technology File System offers several enhancements and advantages over older FAT systems. Among them, we can quote a superior architecture, support for larger files, enhanced reliability, automatic encryption and decryption, disk quota tracking and limiting, change journals, disk defragmenter, sparse file support, improved security and permissions, etc.
Private Key
One of two keys used in public key encryption. The user keeps the private key secret and uses it to encrypt digital signatures and to decrypt received messages.
Public Key
One of two keys in public key encryption. The user releases this key to the public, who can use it for encrypting messages to be sent to the user and for decrypting the user's digital signature.
RAS
Remote Access Services is a Windows’ program that allows most of the available network facilities to be accessed over a modem link.
RDC
Remote Data Connector. Formerly know as Advanced Data Connector. Technology used in conjunction with ActiveX Data Objects (ADO) to retrieve a set of data from a database server.
RPC
Remote Procedure Call. A protocol that allows a computer program running on one host to run a subroutine located on another one. RPC is used to implement the client-server model of distributed computing.
SCC
Sanctuary Command Control. Component that is in charge of all communication between server and client(s).

Glossary
76 Sanctuary's Quick Setup and Configuration Guide 4.2.2
SFD
SecureWave provides a number of pre-computed file hashes for most versions of suites and Windows Operating Systems, in several languages, and for all the available Service Packs. The file hashes are referred to as Standard File Definitions or SFD. They are installed during the setup, but you can import them as soon as SecureWave releases new ones. You can find the latest ones on our Web site.
SID
The Security Identifier is a unique alphanumeric character string that identifies each operating system and user in a network.
SQL Server
The industry standard database server, supported by Sanctuary. Either MSSQL 2000, MSSQL 2005, or SQL Server 2005 Express Edition, can be used with Sanctuary.
SK
The Sanctuary Kernel Driver, the client component that runs as a kernel driver.
SMC
Sanctuary Management Console. The console used to define the device permissions and default options. Its functions are described in the corresponding Administrator’s Guide.
SUS
Software Update Services is a tool provided by Microsoft to assist Windows administrators with the distribution of security fixes and critical update releases.
SXS
SecureWave Application Server. Component that serves as a link between the SecureWave Sanctuary Database (where all permissions and hashes are stored) and the Sanctuary Client Driver.
TCP/IP
The protocol used by the client computers to communicate with the SecureWave Application Servers.

Glossary
Sanctuary's Quick Setup and Configuration Guide 4.2.2 77
TLS
Acronym for Transport Layer Security. The Transport Layer Security (TLS) protocol (based on SSL — Secure Socket Layers) addresses security issues related to message interception during communication between hosts. The deployment of TLS, client and server side, is the primary defense against compromised clients or mixed networks where is possible to intercept transmitted messages.
UNC
Universal/Uniform Naming Convention. A path convention that originated in Unix and uses a \\server\volume\directory\file convention instead of arbitrary mapped letters to describe the actual location of a file or directory.
WINS
Windows Internet Naming Service. A system that determines the IP address associated with a particular network computer (called name resolution). WINS uses a distributed database that is automatically updated with the names of computers currently available and the IP address assigned to each one.
WSUS
Windows Server Update Services (previously SUS v2.0) is a new version of Software Update Services (SUS).


Sanctuary's Quick Setup and Configuration Guide 4.2.2 79
Index of figures Figure 1: Sanctuary’s architecture ......................................................................................... 12 Figure 2: Sanctuary's setup ................................................................................................... 12 Figure 3: Trust relationships .................................................................................................. 14 Figure 4: SecureWave Application Server user account ........................................................ 25 Figure 5: Data file directory .................................................................................................... 27 Figure 6: The Sanctuary Client Driver icon and menu ............................................................ 30 Figure 7: Log Explorer data window ...................................................................................... 46 Figure 8: Local authorization dialog ....................................................................................... 49


Sanctuary's Quick Setup and Configuration Guide 4.2.2 81
Index of Tables Table 1: Available publications ................................................................................................ 8 Table 2: SecureWave Sanctuary Database location syntax ................................................... 26 Table 3: Recommended File group assignments ................................................................... 44 Table 4: System requirements ............................................................................................... 69


Sanctuary's Quick Setup and Configuration Guide 4.2.2 83
Index
A
ACE; 73 ACL; 73 ADC; 73 Additional Information; 7 Administration tools; 11 AFD; 11 Architecture
Server-side; 11 Audit file directory; 11 Auditing; 38
B
Basic Security Rules; 14 Access policy; 16, 18 Administrative rights; 16 BIOS password; 15 Boot sequence; 15 Firewalls; 17 Hot fixes; 17 NTFS partition; 16 Password policies; 17 Power users; 16 Private and public key generation; 18 Recovery console; 17 Safe mode; 17 Seal/chassis intrusion protection; 15 Service packs; 17
C
Cab; 73 CD Authorization; 36 CD/DVD burning; 15 Client computer; 73 Cluster; 26
Common problems; 59 Contact Information; 9 CtrlAcx.vbs; 63
D
Data File Directory; 11, 26 Database; 19, 20
Engine; 22 DFD; 11 Direct cable connection; 73 DNS; 73
E
Encryption Decentralized
Examples; 51
EndLogon.exe; 57 Executable
Program; 73 Explanation of Symbols; 8
F
FAT; 74 File groups; 74
G
Glossary; 73
H
Hash; 74
I
IMAPI; 15, 74 Instance; 26 IOCP; 74

Index
84 Sanctuary's Quick Setup and Configuration Guide 4.2.2
L
Local authorization Prevent; 57, 58
M
MDAC; 68, 74 Microsoft Certificate Authority; 69 MSDE; 74 MSI; 75
N
Named Instance; 26 NTFS; 75
O
Overview; 11
P
Permissions; 33 PingSXS.exe; 61 Power users; 16 Private Key; 75 Public key; 75
R
RAS; 75 RDC; 75 Relaxed logon
Prevent; 57 Reporting; 38 RPC; 75 RTNotify.exe; 56 RunAs; 70
S
Sanctuary Client Driver Installing on 64-bit OS; 69
Sanctuary Client Driver; 11, 30, 68 Sanctuary Management Console; 19, 29 SCC; 75
Sanctuary Command Control; 75 Scheduled Permissions; 35 SecureWave Application Server
Backup; 62 SecureWave Application Server; 11, 19, 20, 24 SecureWave Application Server; 68 SecureWave Application Server; 76 SecureWave Sanctuary Database
Backup; 62 SecureWave Sanctuary Database; 11 SecureWave Sanctuary Database; 68 Server-side; 21 SFD; 76 SHA-1; 74 Shadowing; 37 SID; 73 SID Server; 76 SK; 11, 76 SMC; 76 SQL Server; 68, 74, 76 Standard File Definitions; 76 Support; 59 SUS; 76 sx; 26
Database; 23 SXS; 11, 76 System Requirements; 20, 67
T
TCP/IP; 76 Temporary Permissions; 34 Terminal Services; 70
Limitations; 70 Testing; 33, 41
Authorizing file hashes; 43 Authorizing files; 43 Create template; 42 Initial scan; 41 Logging to a client; 45 Using a template; 42
The RunAs command limitation; 70 TLS; 77 Transport Layer Security; 77
Index
Sanctuary's Quick Setup and Configuration Guide 4.2.2 85
Troubleshooting; 59 Troubleshooting tips; 59
U
UNC; 77
V
Verify new software; 56 VirtualServerName; 26
W
Windows Installer; 75 WINS; 77 Workgroup; 32
Installing Sanctuary in a; 32 WSUS; 77


