Embed Size (px)
Citation preview

Sample Application
• Multi Layered Architecture (n-tier):– Graphical User Interface (GUI):
• Forms, components, controls• The Visual Designer in Visual Studio
– Application:• Model• Controllers
– Database
FEN 2012 1UCN Technology: Computer Science

Architecture
• So far we have had our “user interface” in the Main method
• This won’t do with reel users!• Normally one will use what is known
as a layered (or n tier) architecture, for instance:– UI– Controller– Model– Database
FEN 2012 UCN Technology: Computer Science 2
Application
Until now we have focused on the
application layer
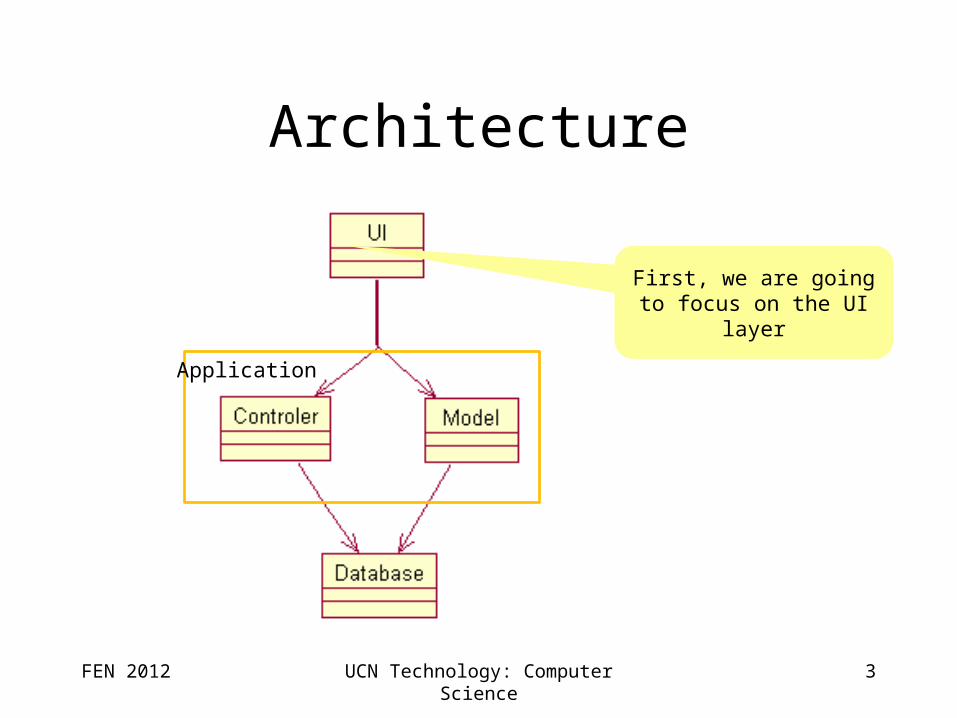
Architecture
FEN 2012 UCN Technology: Computer Science 3
Application
First, we are going to focus on the UI layer
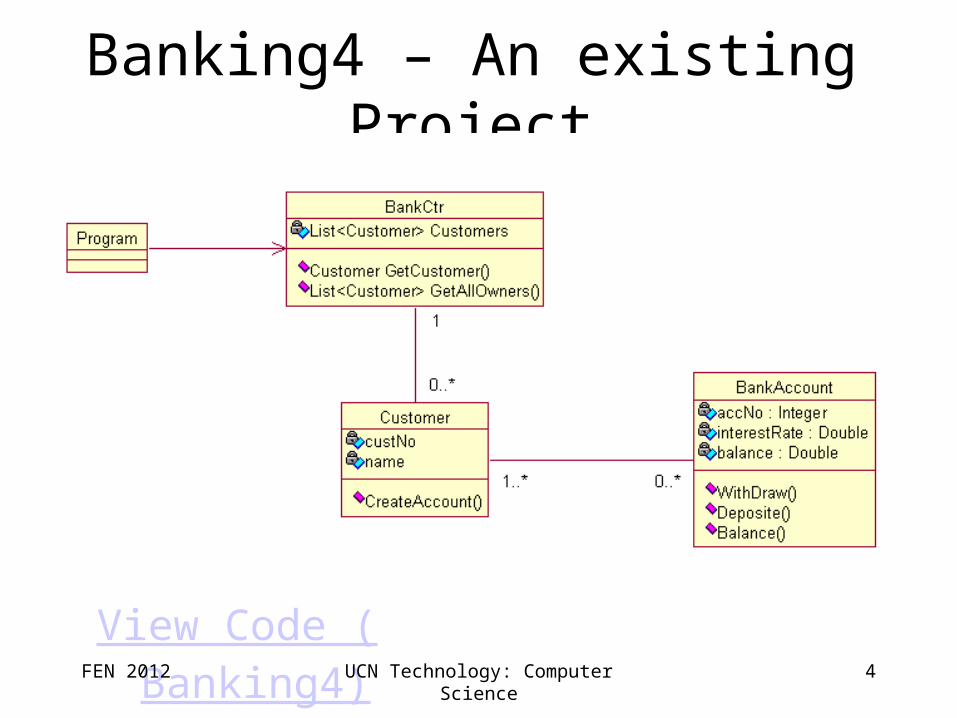
Banking4 – An existing Project
View Code (Banking4)FEN 2012 UCN Technology: Computer Science 4

Banking4 with GUI (Banking5)
View Code (Banking5)FEN 2012 UCN Technology: Computer Science 5

How to Create a GUI for an Existing Project
• Firstly you must have a working project with model and controller, for instance Banking4.
• First step is to create a new solution in Visual Studio:
FEN 2012 UCN Technology: Computer Science 6
It must be a “Windows Form Application”
Give it a good name.
And choose a location for it.
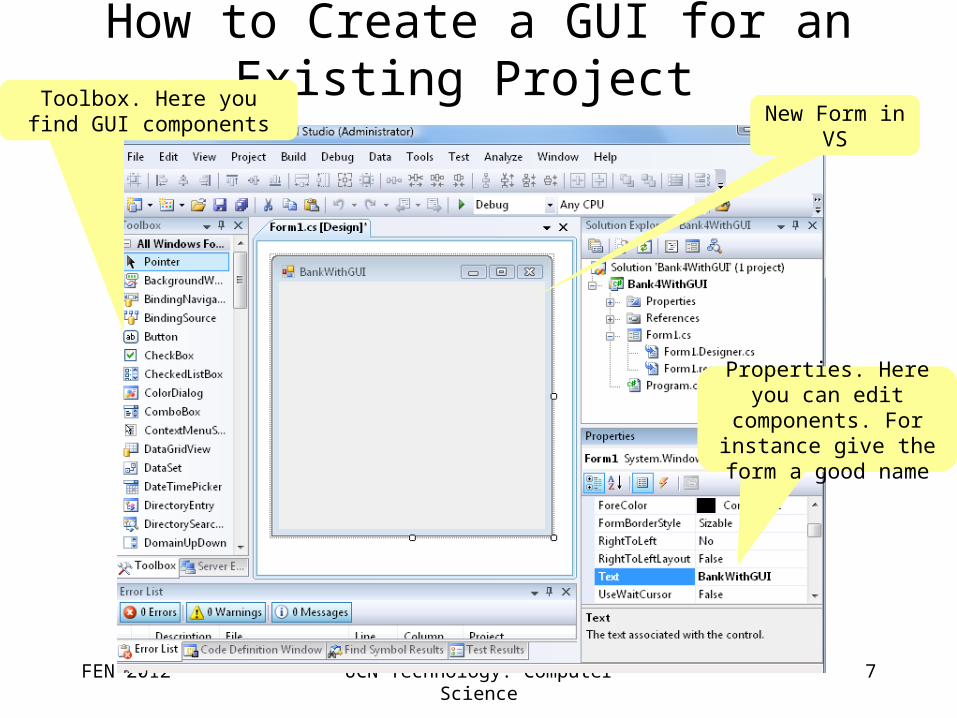
How to Create a GUI for an Existing Project
FEN 2012 UCN Technology: Computer Science 7
New Form in VS
Toolbox. Here you find GUI components
Properties. Here you can edit components. For instance give the
form a good name

How to Create a GUI for an Existing Project
• Right click on the solution. Choose ‘Add’ and ‘Existing Project’.• Locate the project you want to add the GUI to:
FEN 2012 UCN Technology: Computer Science 8
Here is the project file for
‘Banking4’
Choose that.
How to Create a GUI for an Existing Project
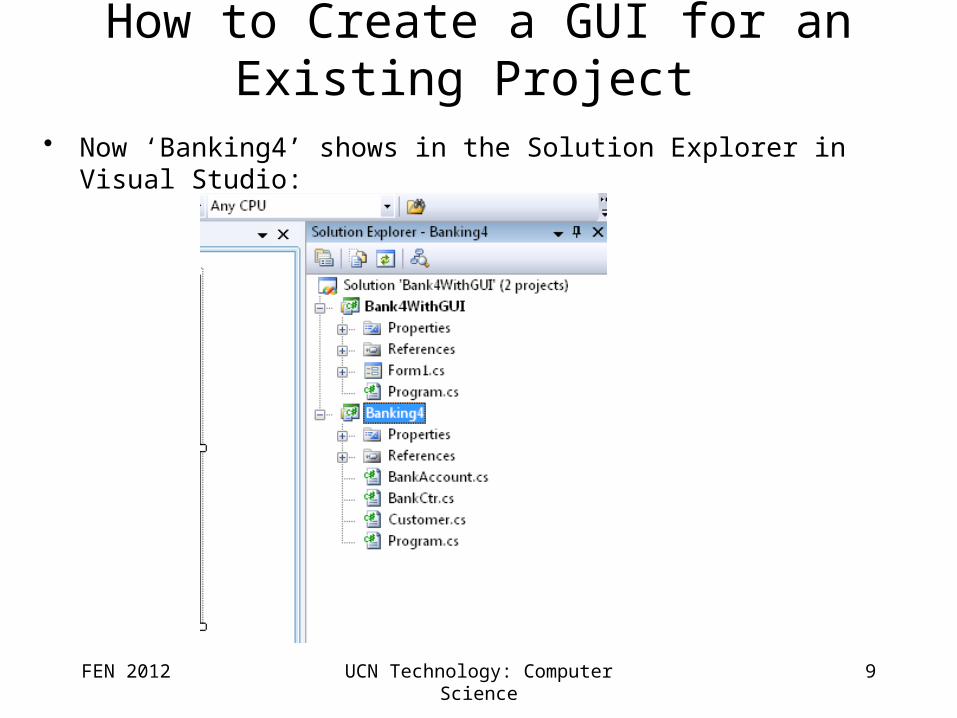
• Now ‘Banking4’ shows in the Solution Explorer in Visual Studio:
FEN 2012 UCN Technology: Computer Science 9

How to Create a GUI for an Existing Project
• Next we want to make the project (‘Banking4’) known to our GUI project:
• You must use the namespace of Banking4:• Right click on the form and choose ‘View Code’• Type this using:
FEN 2012 UCN Technology: Computer Science 10
But the compiler doesn’t recognises
it?
Right click on ‘References’ for the GUI project in the Solution Explorer and choose ‘Add
Reference’

How to Create a GUI for an Existing Project
FEN 2012 UCN Technology: Computer Science 11
Choose the project tab.
Choose the project you want – Banking4
...and ‘OK’
Now the compiler recognises ‘Banking4’
namespace and we are ready.
Using the Existing Project
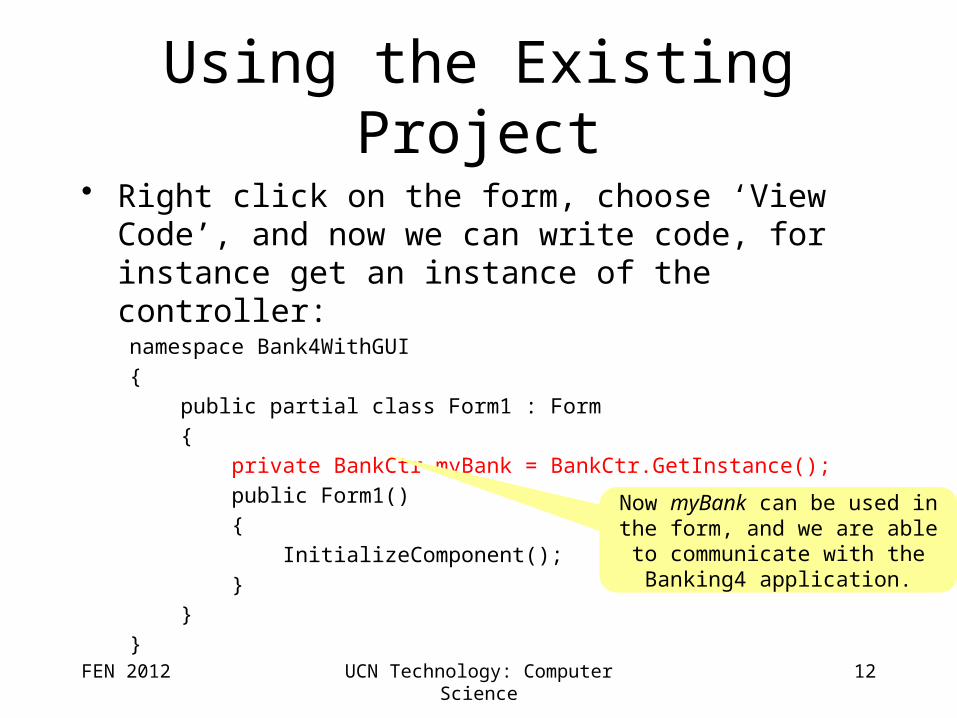
• Right click on the form, choose ‘View Code’, and now we can write code, for instance get an instance of the controller:
namespace Bank4WithGUI
{
public partial class Form1 : Form
{
private BankCtr myBank = BankCtr.GetInstance();
public Form1()
{
InitializeComponent();
}
}
}
FEN 2012 UCN Technology: Computer Science 12
Now myBank can be used in the form, and we are able to
communicate with the Banking4 application.
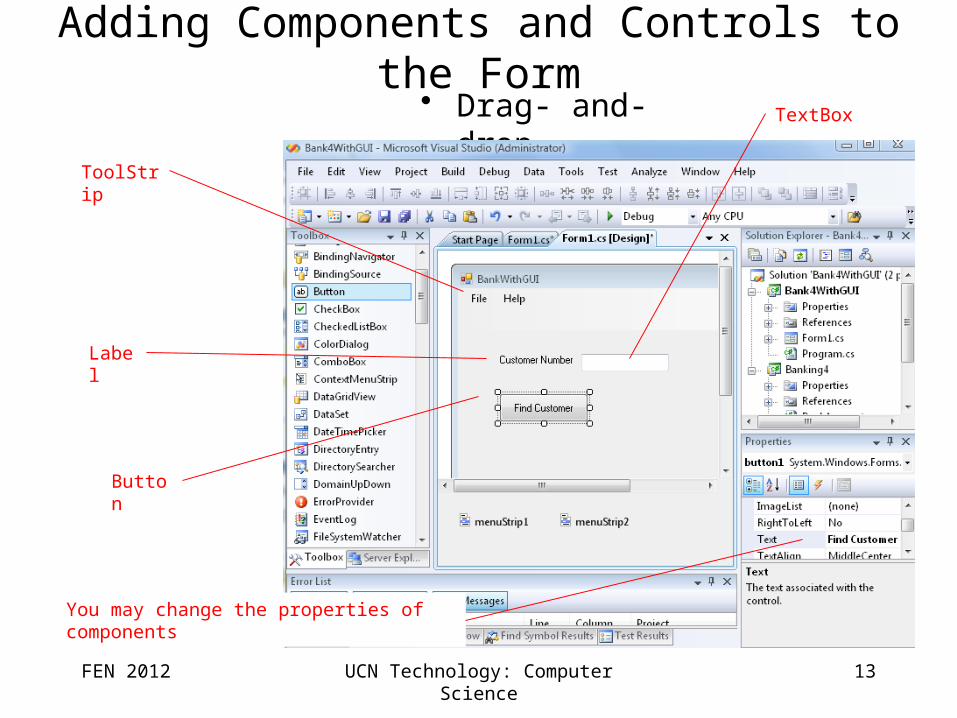
Adding Components and Controls to the Form• Drag- and-drop.
FEN 2012 UCN Technology: Computer Science 13
Label
ToolStrip
TextBox
Button
You may change the properties of components
Adding Code
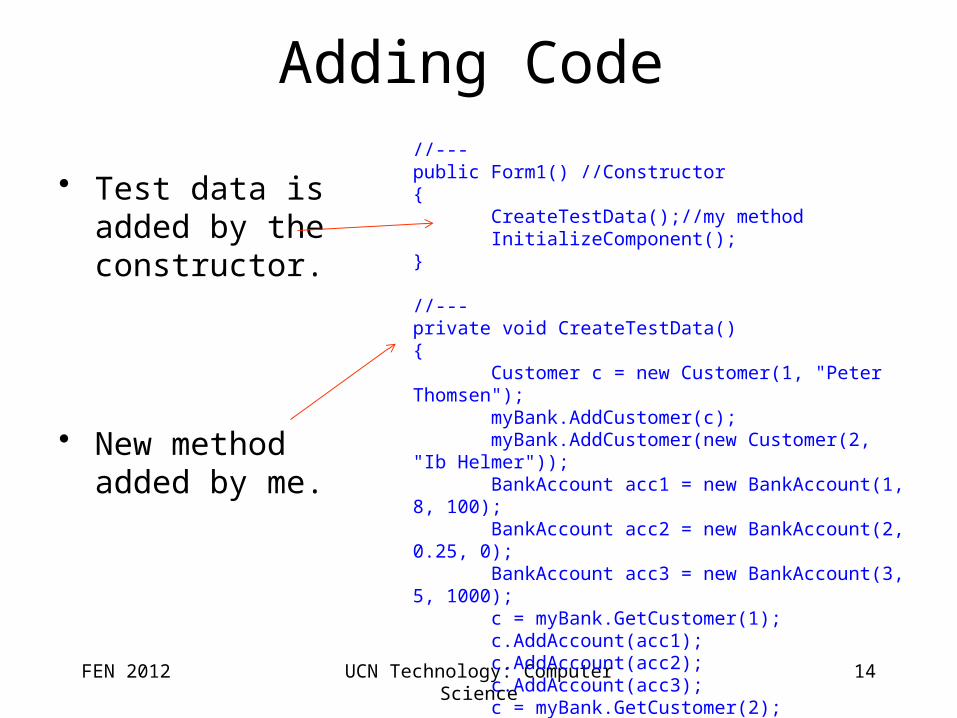
• Test data is added by the constructor.
• New method added by me.
FEN 2012 UCN Technology: Computer Science 14
//---public Form1() //Constructor{ CreateTestData();//my method InitializeComponent();}
//---private void CreateTestData(){ Customer c = new Customer(1, "Peter Thomsen"); myBank.AddCustomer(c); myBank.AddCustomer(new Customer(2, "Ib Helmer")); BankAccount acc1 = new BankAccount(1, 8, 100); BankAccount acc2 = new BankAccount(2, 0.25, 0); BankAccount acc3 = new BankAccount(3, 5, 1000); c = myBank.GetCustomer(1); c.AddAccount(acc1); c.AddAccount(acc2); c.AddAccount(acc3); c = myBank.GetCustomer(2); c.AddAccount(acc2);}
Getting some Action
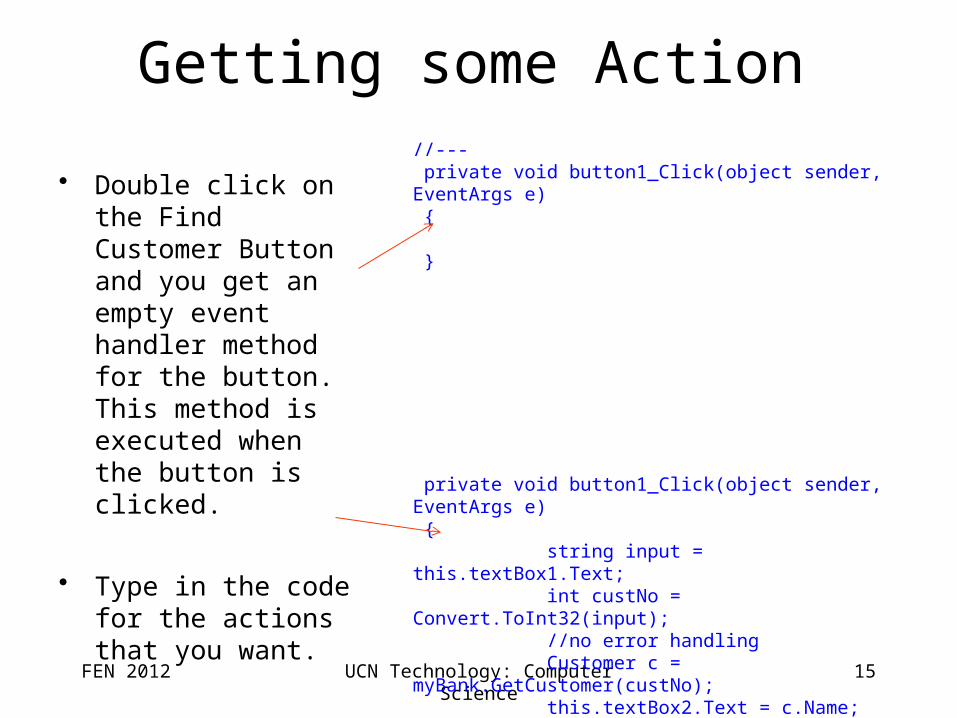
• Double click on the Find Customer Button and you get an empty event handler method for the button. This method is executed when the button is clicked.
• Type in the code for the actions that you want.
FEN 2012 UCN Technology: Computer Science 15
//--- private void button1_Click(object sender, EventArgs e) {
}
private void button1_Click(object sender, EventArgs e) { string input = this.textBox1.Text; int custNo = Convert.ToInt32(input); //no error handling Customer c = myBank.GetCustomer(custNo); this.textBox2.Text = c.Name; }
Getting some Action
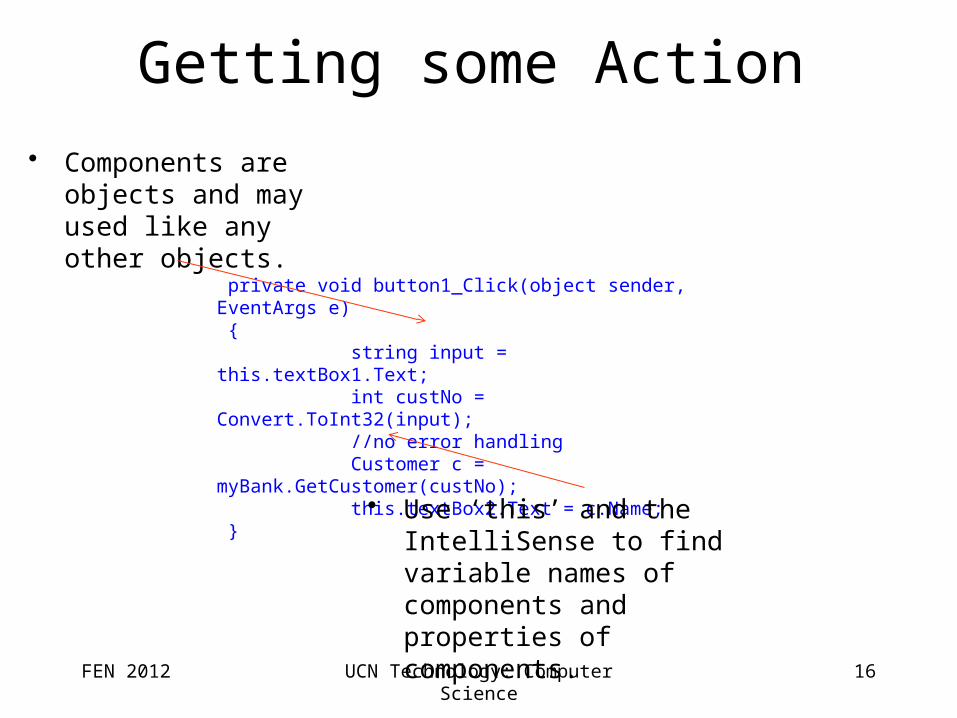
• Components are objects and may used like any other objects.
FEN 2012 UCN Technology: Computer Science 16
private void button1_Click(object sender, EventArgs e) { string input = this.textBox1.Text; int custNo = Convert.ToInt32(input); //no error handling Customer c = myBank.GetCustomer(custNo); this.textBox2.Text = c.Name; }
• Use ‘this’ and the IntelliSense to find variable names of components and properties of components.
Error Handling - Exceptions
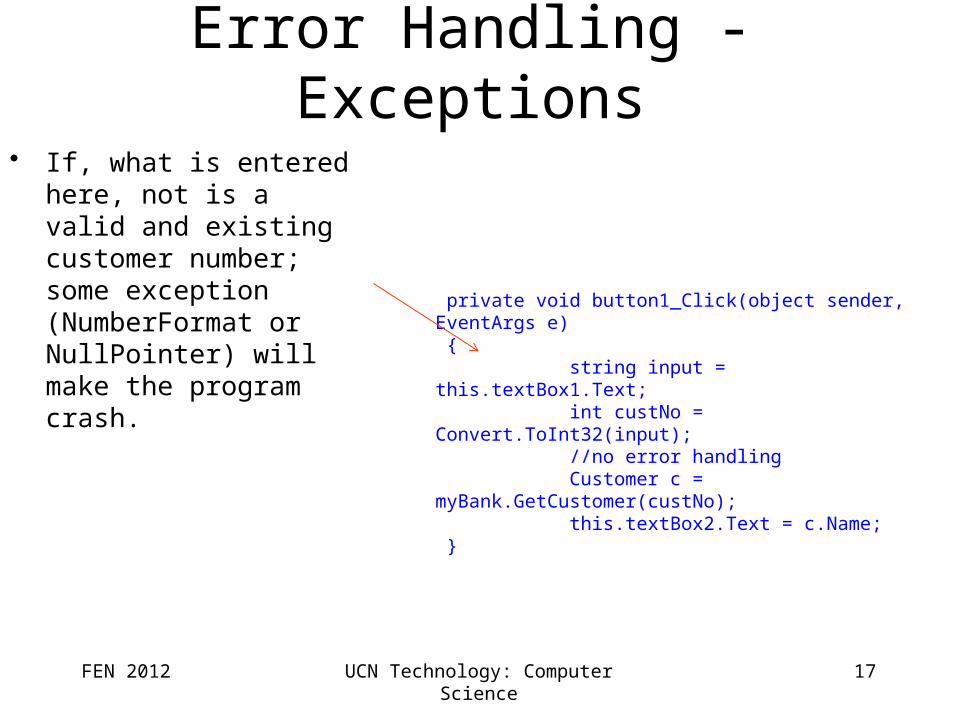
• If, what is entered here, not is a valid and existing customer number; some exception (NumberFormat or NullPointer) will make the program crash.
FEN 2012 UCN Technology: Computer Science 17
private void button1_Click(object sender, EventArgs e) { string input = this.textBox1.Text; int custNo = Convert.ToInt32(input); //no error handling Customer c = myBank.GetCustomer(custNo); this.textBox2.Text = c.Name; }
Error Handling - Exceptions
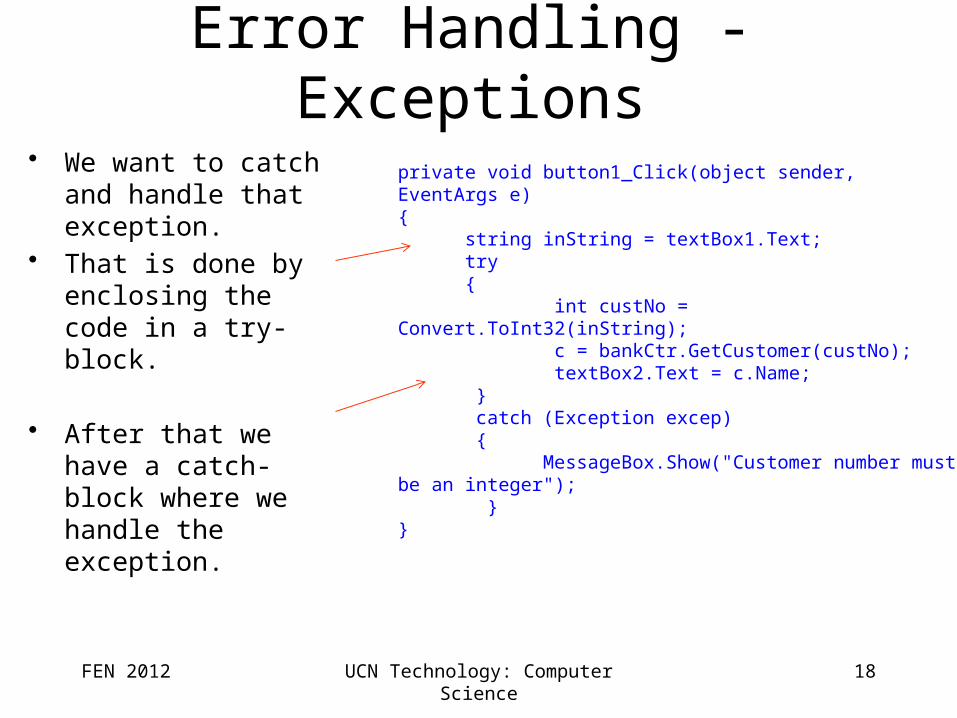
• We want to catch and handle that exception.
• That is done by enclosing the code in a try-block.
• After that we have a catch-block where we handle the exception.
FEN 2012 UCN Technology: Computer Science 18
private void button1_Click(object sender, EventArgs e){ string inString = textBox1.Text; try { int custNo = Convert.ToInt32(inString); c = bankCtr.GetCustomer(custNo); textBox2.Text = c.Name; } catch (Exception excep) { MessageBox.Show("Customer number must be an integer"); }}

Adding a Database
• So far we have create some test data and kept them in memory.
• This won’t do for real application!• Normally one will use what is known
as a layered (or n tier) architecture, for instance:– UI– Controller– Model– Database
• And the databasewill be some kind of SQLserver.
FEN 2012 UCN Technology: Computer Science 19
Application
Now we focus on adding a database

A Side: Creating the Database
• First we define our database tables (this is done using SQL Server Management Studio, but can also be done from Visual Studio (not Express):– One table per domain object:– Customer– (Bank)Account
– View the database in SQL Server Management Studio
– SQL scripts for creating the database and inserting test data can be found here.
FEN 2012 UCN Technology: Computer Science 20
The 1- n association from Customer toBankAccount is implemented in the database by including custNo as a foreign key in Account
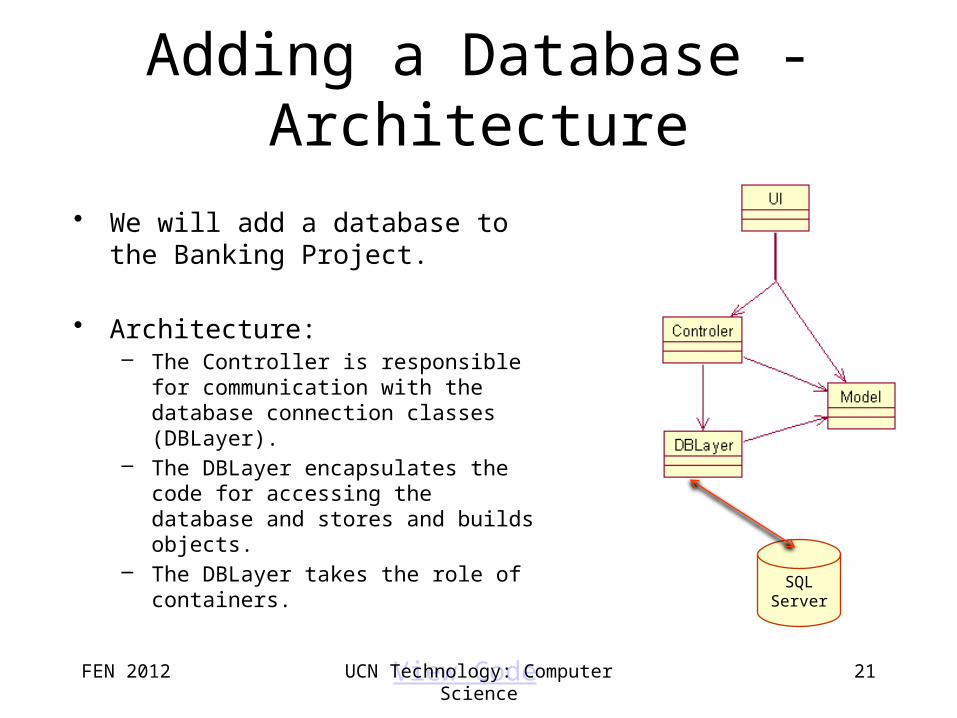
Adding a Database - Architecture
• We will add a database to the Banking Project.
• Architecture:– The Controller is responsible for
communication with the database connection classes (DBLayer).
– The DBLayer encapsulates the code for accessing the database and stores and builds objects.
– The DBLayer takes the role of containers.
View Code
FEN 2012 UCN Technology: Computer Science 21
SQL Server

Architecture – in Visual Studio
• One Solution – 5 projects, each project having its own namespace.
• Architecture:– Model: (old Banking4). The
controller is put in its own project: Controller.
– Banking5 is the old GUI.– The DBLayer has classes for
accessing the database and storing and building objects.
– BankingWithFullMonty is the main project with the new start-up form
FEN 2012 UCN Technology: Computer Science 22
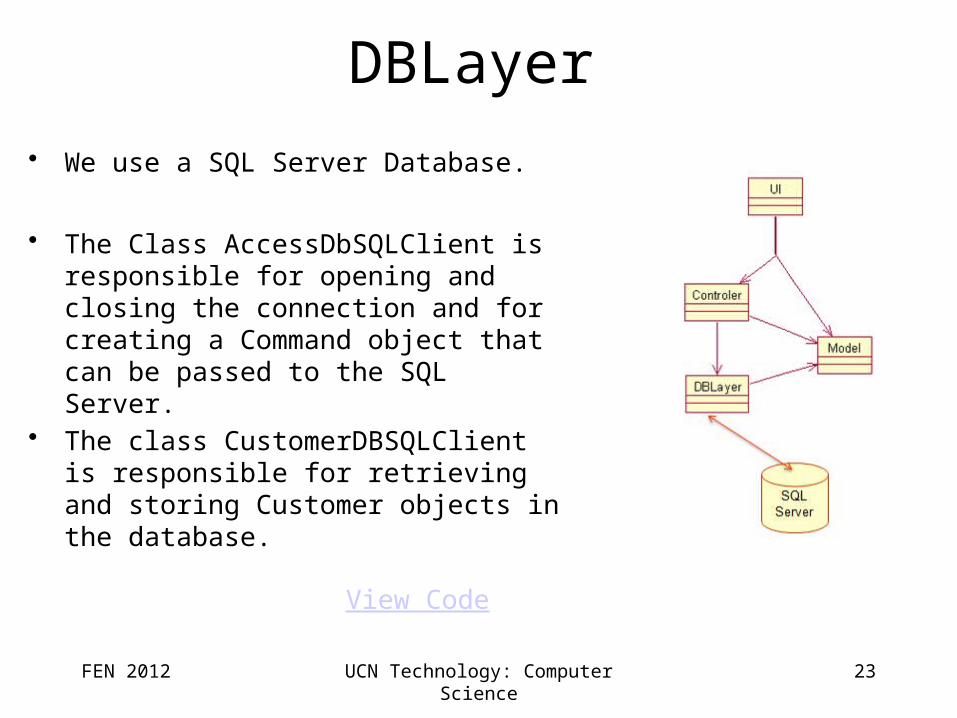
DBLayer
• We use a SQL Server Database.
• The Class AccessDbSQLClient is responsible for opening and closing the connection and for creating a Command object that can be passed to the SQL Server.
• The class CustomerDBSQLClient is responsible for retrieving and storing Customer objects in the database.
FEN 2012 UCN Technology: Computer Science 23
View Code
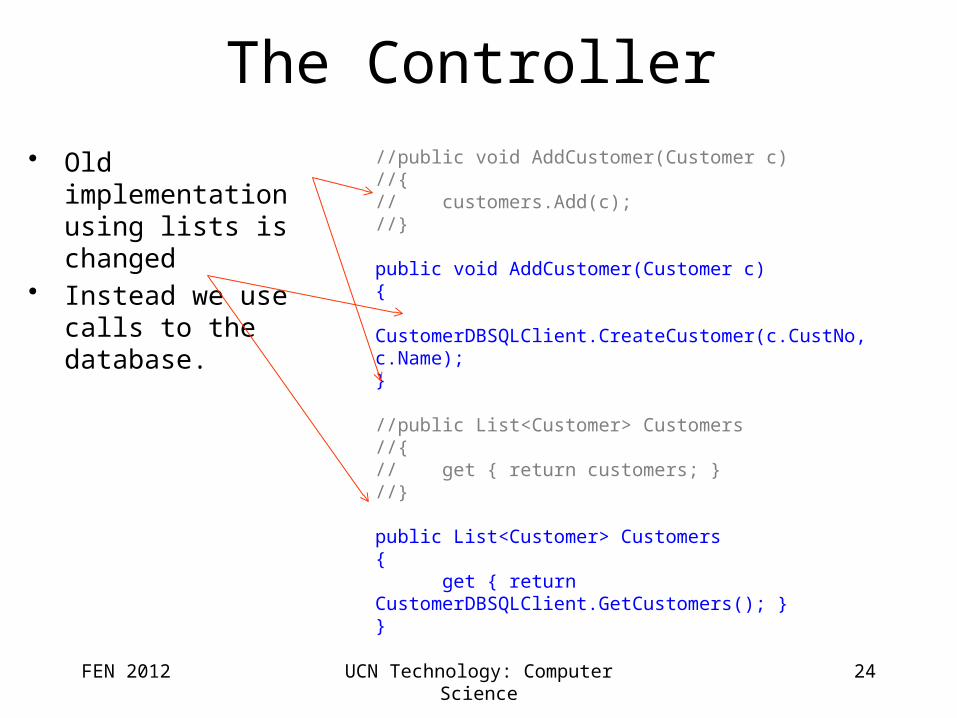
The Controller
• Old implementation using lists is changed
• Instead we use calls to the database.
FEN 2012 UCN Technology: Computer Science 24
//public void AddCustomer(Customer c)//{// customers.Add(c);//}
public void AddCustomer(Customer c){ CustomerDBSQLClient.CreateCustomer(c.CustNo, c.Name);}
//public List<Customer> Customers//{// get { return customers; }//}
public List<Customer> Customers{ get { return CustomerDBSQLClient.GetCustomers(); }}
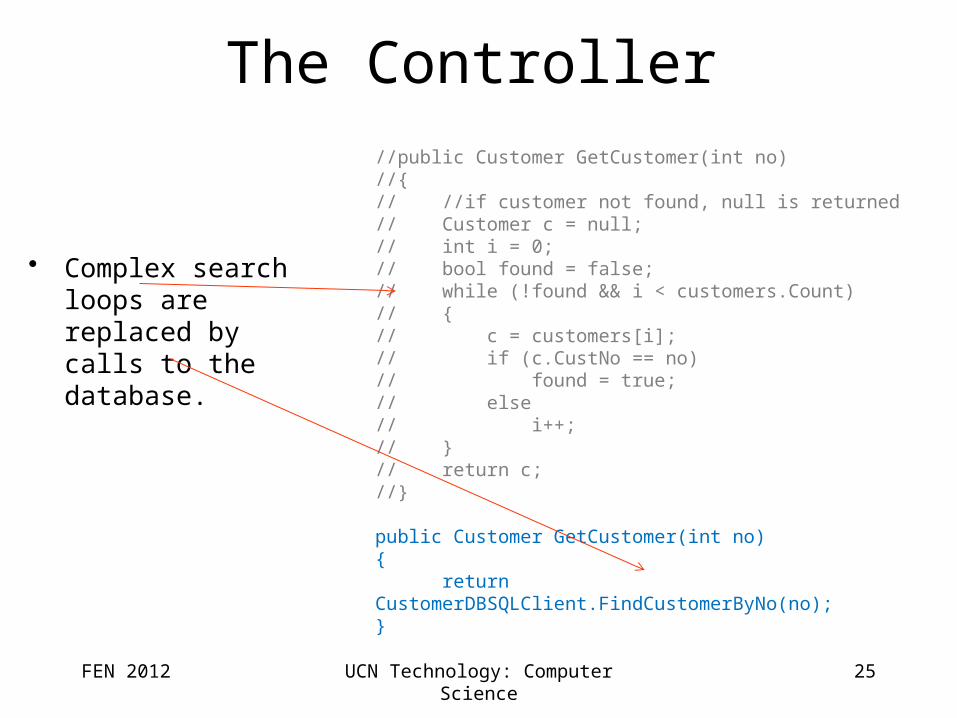
The Controller
• Complex search loops are replaced by calls to the database.
FEN 2012 UCN Technology: Computer Science 25
//public Customer GetCustomer(int no)//{// //if customer not found, null is returned// Customer c = null;// int i = 0;// bool found = false;// while (!found && i < customers.Count)// {// c = customers[i];// if (c.CustNo == no)// found = true;// else// i++;// }// return c;//}
public Customer GetCustomer(int no){ return CustomerDBSQLClient.FindCustomerByNo(no);}
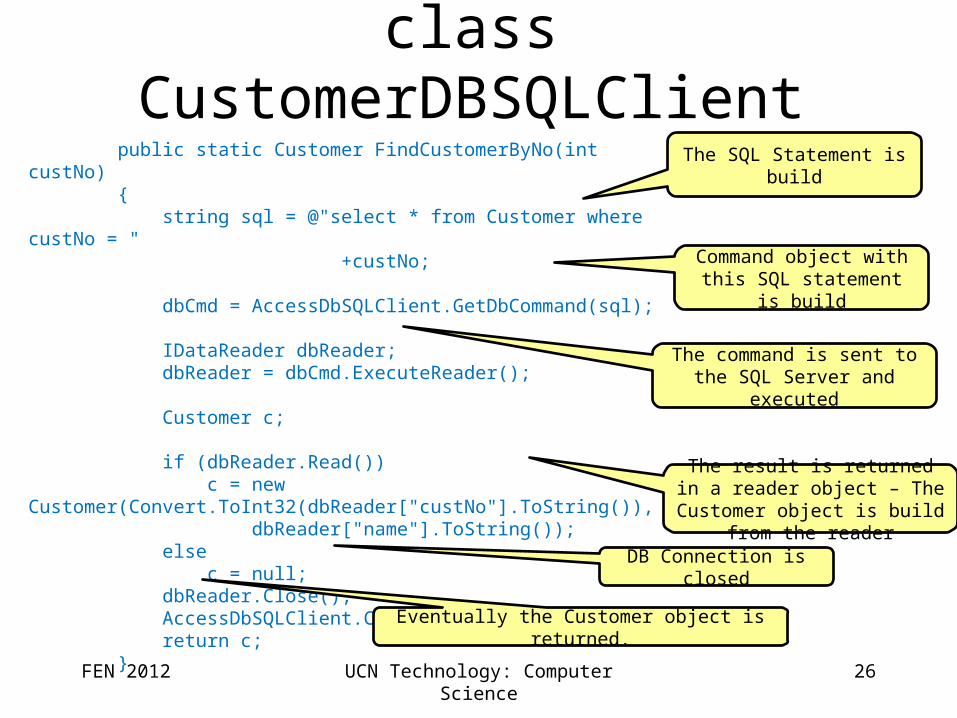
class CustomerDBSQLClient
FEN 2012 UCN Technology: Computer Science 26
public static Customer FindCustomerByNo(int custNo) { string sql = @"select * from Customer where custNo = " +custNo;
dbCmd = AccessDbSQLClient.GetDbCommand(sql); IDataReader dbReader; dbReader = dbCmd.ExecuteReader();
Customer c;
if (dbReader.Read()) c = new Customer(Convert.ToInt32(dbReader["custNo"].ToString()), dbReader["name"].ToString()); else c = null; dbReader.Close(); AccessDbSQLClient.Close(); return c; }
The SQL Statement is build
Command object with this SQL statement is build
The command is sent to the SQL Server and executed
The result is returned in a reader object – The Customer object is build from the reader
DB Connection is closed
Eventually the Customer object is returned.

Exercises
• Make the “Show total bal” button work (some refactoring may be necessary).
• Add some more interesting functionality to the application (you may use some of the methods in the controller).
• Refactor the application, so that the different layers (tiers) become components (.dll).
FEN 2012 UCN Technology: Computer Science 27