Embed Size (px)
Citation preview

Salesforce
i

Salesforce
i
About the Tutorial
Salesforce is a leading CRM (Customer Relationship Management) software which is
served form cloud. It has more than 800 applications to support various features like
generating new leads, acquiring new leads, increasing sales and closing the deals. It is
designed to manage the organization's data focused on customer and sales details. It also
offers features to customize its inbuilt data structures and GUI to suit the specific needs
of a business. More recently, it has started offering the IOT (internet of things) connectivity
to the CRM platform.
Audience
Anyone who manages sales and customer relationship will find this software highly useful
as an end user. This tutorial will also benefit the software developers and cloud computing
enthusiasts who wish to learn customizing software for specific business needs.
Prerequisites
Knowledge of cloud computing is essential to understand the environment and its
architecture. Knowledge of databases is essential to understand how the data is stored,
retrieved and manipulated.
Copyright & Disclaimer
Copyright 2017 by Tutorials Point (I) Pvt. Ltd.
All the content and graphics published in this e-book are the property of Tutorials Point (I)
Pvt. Ltd. The user of this e-book is prohibited to reuse, retain, copy, distribute or republish
any contents or a part of contents of this e-book in any manner without written consent
of the publisher.
We strive to update the contents of our website and tutorials as timely and as precisely as
possible, however, the contents may contain inaccuracies or errors. Tutorials Point (I) Pvt.
Ltd. provides no guarantee regarding the accuracy, timeliness or completeness of our
website or its contents including this tutorial. If you discover any errors on our website or
in this tutorial, please notify us at [email protected]

Salesforce
ii
Table of Contents
About the Tutorial .................................................................................................................................... i
Audience .................................................................................................................................................. i
Prerequisites ............................................................................................................................................ i
Copyright & Disclaimer ............................................................................................................................. i
Table of Contents .................................................................................................................................... ii
1. SALESFORCE – OVERVIEW ................................................................................................... 1
2. SALESFORCE – ARCHITECTURE ............................................................................................ 3
Architecture of Salesforce ....................................................................................................................... 3
3. SALESFORCE – ENVIRONMENT ............................................................................................ 5
4. SALESFORCE – SALES CLOUD ............................................................................................... 7
Key Features of Sales Cloud ..................................................................................................................... 7
5. SALESFORCE – SERVICE CLOUD ........................................................................................... 9
Key Features of Service Cloud ................................................................................................................. 9
6. SALESFORCE – NAVIGATING SETUP ................................................................................... 11
7. SALESFORCE – STANDARD OBJECTS .................................................................................. 15
Standard Objects ................................................................................................................................... 15
Important Standard Objects .................................................................................................................. 18
8. SALESFORCE – CUSTOM OBJECTS ...................................................................................... 19
9. SALESFORCE – MASTER DETAIL RELATIONSHIP ................................................................. 24
Features of Master-detail Relationship ................................................................................................. 24
Creating Master-detail Relationship ...................................................................................................... 24
Salesforce
iii
10. SALESFORCE – LOOKUP RELATIONSHIP ............................................................................. 29
11. SALESFORCE – SCHEMA BUILDER ...................................................................................... 32
12. SALESFORCE – CONTROL ACCESS ORGANIZATION ............................................................. 37
Levels of Data Access ............................................................................................................................ 37
Create and Manage Users ..................................................................................................................... 37
Set Password Policies ............................................................................................................................ 39
Restricting Access from IP Address ........................................................................................................ 40
13. SALESFORCE – CONTROL ACCESS OBJECTS ........................................................................ 41
User Profiles .......................................................................................................................................... 41
Permission Sets ..................................................................................................................................... 43
14. SALESFORCE – CONTROL ACCESS FIELDS ........................................................................... 46
15. SALESFORCE – CONTROL ACCESS RECORDS ...................................................................... 48
Record Sharing Mechanism ................................................................................................................... 48
16. SALESFORCE – CREATE A ROLE HIERARCHY ....................................................................... 50
Defining a Role Hierarchy ...................................................................................................................... 50
17. SALESFORCE – DEFINE SHARING RULES ............................................................................. 54
Steps to Create Sharing Rules ................................................................................................................ 54
18. SALESFORCE – AUTOMATE BUSINESS PROCESSES ............................................................. 59
19. SALESFORCE – IMPORTING DATA ...................................................................................... 63
20. SALESFORCE – EXPORTING DATA....................................................................................... 67
21. SALESFORCE – REPORTS .................................................................................................... 70
22. SALESFORCE – DASHBOARDS............................................................................................. 72

Salesforce
iv
23. SALESFORCE – USING FORMULA FIELDS ............................................................................ 76
24. SALESFORCE – VISUALFORCE PAGES ................................................................................. 80
Creating a Visualforce Page ................................................................................................................... 80
Adding Components .............................................................................................................................. 81
25. SALESFORCE – VARIABLES & FORMULAS ........................................................................... 83
26. SALESFORCE – STANDARD CONTROLLERS ......................................................................... 86
27. SALESFORCE – RECORDS, FIELDS & TABLES ....................................................................... 89
Display Fields ........................................................................................................................................ 89
28. SALESFORCE – USING FORMS ............................................................................................ 92
Creating Input Form .............................................................................................................................. 92
29. SALESFORCE – LIST CONTROLLERS .................................................................................... 93
30. SALESFORCE – STATIC RESOURCES .................................................................................... 95
31. CREATE & EDIT LIGHTNING COMPONENTS........................................................................ 99
32. SALESFORCE – ATTRIBUTES & EXPRESSIONS.................................................................... 101

Salesforce
1
Salesforce started as a cloud based solution for CRM. CRM stands for Customer
Relationship Management. It involves managing all aspects of relationship between an
organization and its customers. For example, the contact details of the customer, the deals
that are in progress or already completed, the support requests from a customer or a new
lead from a new customer. Beyond the customer related information, it also involves
storing and managing the details of the people and the concerned department from the
seller organization that is managing the customer’s account and needs. This makes it easy
to manage and enhance the relationship with the customer and hence better growth for
the organization.
Following are the different features of the Salesforce platform:
Contact Management
To view customer contact details, activity history, customer communications, and internal
account discussions, etc. In short, it manages all the data pertaining to the contact with a
customer.
Opportunity Management
It provides the details of the stage a deal is in, the products involved in the deal, the
quotation for the deal etc. In short it manages all the data that helps in identifying,
progressing and closing a deal.
Salesforce Engage
This feature is focused on making personalized contact with a customer for various
campaigns designed by the marketing team. It also provides real-time sales alerts based
on the level of engagement with a customer.
Sales Collaboration
This feature helps in quickly finding experts who can help in closing a deal based on
customer queries and feedback. In short, it helps in bringing in a collaborative effort to
engage an entire team in the deal and make the deal happen.
Sales Performance Management
It provides a metric-based goal setting, and also continuous feedback and rewards and
recognition for the sales team. This helps in enhancing the performance of the sales team.
Lead Management
This feature initiates and tracks the leads that are in progress. It also helps in continually
optimizing campaigns across every channel.
1. Salesforce – Overview

Salesforce
2
Partner Management
This feature helps in building a community with partners. It also helps in connecting
directly with channel partners to share goals, objectives, and activities.
Salesforce Mobile App
This is the mobile platform to carry out all the above activities on a mobile platform.
Workflow and Approvals
It is a visual design to automate the business processes. The interface provides simple
drag and drop options to make this design. It helps in creating a flexible approval process
with deal discounts and expense management etc.
Email Integration
Salesforce can integrate to an existing email platform. This helps in providing flexibility to
the existing team with no additional learning curve.
Files Sync and Share
This feature provides the sales team the power to easily share various files, discuss them
and update them as needed. Also receive alerts when something in the file changes.
Reports and Dashboards
Dashboards offer a real-time picture of the business at a glance. With this, anyone can
create detailed reports which can be accessed from anywhere.
Sales Forecasting
This feature helps in getting a real time view of the forecast of a sales team. It provides
multi-currency support and an in-line editing mode to manage the sales forecast well.
Territory Management
This feature is used to create multiple territory models, preview them before rollout, and
continually optimize and balance territories throughout the year.

Salesforce
3
Salesforce delivers a highly customized experience to the customers, employees, and
partners of an organization. Such a platform is used to customize standard functionality
and create custom pages, components, apps, etc. Also it is done faster, mainly because
of the superb architecture on which it is built. Below is a brief introduction to the Salesforce
Architecture.
Architecture of Salesforce
The architecture of Salesforce can be put into layers for better understanding. The purpose
and function of each layer is described below:
Trusted Multitenant Cloud
Here multiple instances of one or multiple applications operate independently in a shared
environment. The instances are referred as tenants and they logically separate from each
other while physically remaining in the same hardware. It is called trusted because of both
its robust nature and high security.
Scalable Metadata Platform
The metadata driven platform makes it easy for customization and scaling up as the
amount of data or concurrent user instances increase.
Enterprise Ecosystem
The Enterprise Ecosystem of Sales is very large as a large number of partners contribute
by creating and maintaining applications in this platform.
2. Salesforce – Architecture

Salesforce
4
CRM and Related Functionality
Salesforce includes all aspects of CRM in its list of features and also extends it by providing
features for creation of apps and integrating analytics, etc.
APIs
Salesforce provides powerful suite of APIs. This helps to develop and customize the
Salesforce1 Mobile App.

Salesforce
5
As Salesforce is a cloud based system it does not need any software installation on your
part. All you have to do is signup for a free trial and get started. The free trial account
provides nearly all features which you need to learn to understand the basics of Salesforce
platform. Let us now discuss the steps to get started with the Salesforce environment.
Step 1
Go to the link Salesforce and click on Free Trial.
It takes you to a window where you have to fill in some details and sign up.
Step 2
You will receive an activation mail for your account which also contains the details of your
account and the duration of the trial period. Click on the link in the email to verify your
email ID and activate the account.
Step 3
Again visit the link Salesforce and click on login. Give the login credentials which you just
created. You will be directed to the following screen.
3. Salesforce – Environment

Salesforce
6
You are ready to learn as your environment is set up now. You may click on Take Tour
of Salesforce to familiarize yourself with the user interface.

Salesforce
7
Sales Cloud part of the Salesforce.com platform which is focused on enhancing the
effectiveness of the sales team of an organization and hence increases the amount of
sales. It stands unique when compared to other sales methods as it provides both the
account information of the customer as well as the information gathered from the social
platforms about the product and customer. This helps in judging the potential of a sales
lead and closing the sales faster.
Following are the key business Goals achieved by using the Sales Cloud.
Close more deals
The availability of all the account information as well as product information for customer’s
needs makes it easier to drive more number of leads to closure.
Close deals faster
Mobile apps and visual design of the workflows for business process approvals makes it
faster to close the deals.
Get more deals
Continuous optimization of campaigns depending on the market response and closure
interaction with channel partners gets more deals.
Quicker decisions
The availability of reports and dashboards gives a very detailed picture of the business
scenario and also increases accuracy of sales forecasting. So the business decisions are
taken quickly.
Key Features of Sales Cloud
In this section, we will discuss the key features of Sales Cloud. The features are described
below:
Contact Management
Gives complete information on customers including previous communications, discussions,
key contact numbers and emails.
Opportunity Management
It helps create and change quotes in response to sales interaction and deal scenario.
Salesforce Engage
Gives alerts on active leads and create personalized campaigns.
4. Salesforce – Sales Cloud
Salesforce
8
Lead Management
Helps assign leads to right people and track the campaigns.
Reports and Dashboards
Helps create dashboards which can be drilled down for further information. This leads to
faster decisions.
Sales Forecasting
Gives accurate view of sales forecasting which can be adjusted based on real-time data.
Workflow and Approvals
Helps simplify the approval process and automate any business process using visual drag
and drop interface.
Territory Management
Helps create different territory models and apply rules to them.
Files Sync and Share
Search, share and find files faster. This leads to a greater collaboration.
Sales Performance Management
Helps create a link between sales data and sales goals. It also helps in creating
performance summaries.
Partner Management
Easily connect with partners and give them a view of sales performance. It also helps in
easy onboarding, training and supporting sales partners.
Salesforce
9
This part of Salesforce platform is focused on providing support and help to the customers.
This helps in retaining the customers, increasing their satisfaction and loyalty. Its
uniqueness lies in providing faster service compared to traditional methods, giving
individual attention to each customer needs and taking a proactive approach to customer
issues. That ultimately enhances the customer’s experience hence loyalty which in turn
creates a good impact on sales.
Following are the key business Goals achieved by using the Service Cloud:
Personalized Service: Give each customer a good service experience based on
their unique problems and history of purchases and complaints.
Always-on Service: Make the service available 24/7
Multi-channel support: Meet the customers on their preferred channels like
mobile, phone, chat etc.
Faster support: Managing various service needs from a single console helps in
delivering support services faster.
Key Features of Service Cloud
In this section, we will discuss the key features of Service Cloud. These features help in
accomplishing the business goals mentioned above. The features are described below:
Console for Service
It is a unified platform for managing all cases assigned to an agent so that it can help in
prioritizing the tasks at hand. This also helps give personalized experience to the customer
of each case.
Knowledge base
Customer interactions and resolutions are captured and organized into a knowledgebase.
This helps in faster issue resolution.
Social Customer Service
As more and more customers connect with the organization through social media, this
feature helps deliver service on the social media platform itself without asking the
customer to visit separate web pages for interaction.
Live Agent
This feature provides real-time online help with its unique chat service.
5. Salesforce – Service Cloud

Salesforce
10
Mobile Platform
Salesforce1 platform is the mobile platform to manage customer service from any device
and any place.
Service Cloud Communities
It allows customers to help themselves by helping each other. Many tools are available for
self service on various trouble shooting requirements.

Salesforce
11
The Salesforce developer uses the setup area to configure and customize the interface. It
is also used to add and support other users, and build various other functionalities. There
are many paths to reach the same setup button. In this tutorial, we will see the most
commonly used setup paths and configurations.
The Salesforce Home page has both classic and modern Lighting User Interface. We are
referring to the modern lighting interface. All most all the features are available in both
The classic and Lighting User Interface come with many features that prove beneficial to
the users.
Setup Location
The setup link is located in the top right corner of the page as shown in the screenshot
below. Clicking on the setup home takes us to the setup home page.
6. Salesforce – Navigating Setup
Salesforce
12
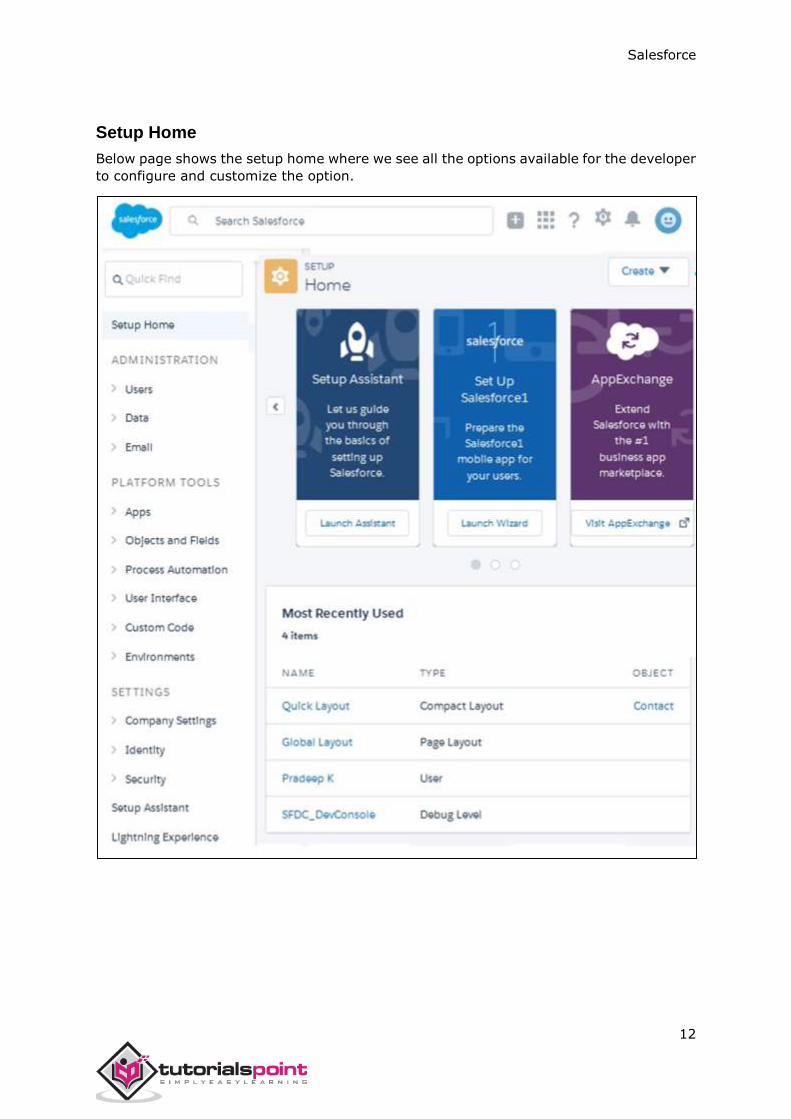
Setup Home
Below page shows the setup home where we see all the options available for the developer
to configure and customize the option.

Salesforce
13
Setup Options
The following table lists down the important features which are frequently used in setup
activity.
Setting Purpose
Users Create, Remove Users. Manage User profiles and Permissions.
Company
Settings
Information related to your org. Like - Language, Maps and
Locations, Domain etc.
Security Expire Passwords, Access Policies, Session Management and Setup
Audit Trails.
Environment Jobs, Logs and Sandboxes.
Objects and
Fields Object Manager and Schema Builder.
User Interface App Menu, Custom Labels and Lighting App Builder.
Custom Code Custom Metadata Types, Email Services, Remote Access etc.
Analytics Reports and Dashboards.

Salesforce
14
Salesforce Objects

Salesforce
15
The Salesforce Platform stores data in relational tables. The records in these tables contain
data for the structure of the platform itself as well as user created data. For example, the
data about the configuration and settings of an account are already in-built as a relational
table. But you can also create your own tables to store data specific to your business like
the 'dispatch schedule' for a week assuming you are a courier company.
These relational tables are roughly referred to as API Objects or only objects in Salesforce.
There are three kinds of Salesforce objects.
Standard Objects: The objects already created for you by the Salesforce platform.
Custom Objects: These are the objects created by you based on your business
processes.
External Objects: The objects which you create map to the data stored outside
your organization.
In this tutorial, we will focus on the standard objects in Salesforce platform.
Standard Objects
These are the objects which already exist in the Salesforce platform to manage the
configurations and settings of the environment. Once you log in to the salesforce platform,
you can see the available objects.
Example
The most commonly referred standard object is called the Account Object. It is the object
which stores the preliminary information about a customer, partner, competitor or another
organization. We can explore the account object by following the steps below.
Step 1
Login to the Salesforce platform and follow the link path Settings -> Setup Home ->
Object Manager - Account.
7. Salesforce – Standard Objects

Salesforce
16
Step 2
In this step, click on the Schema Builder. It shows the complete Account table with field
names and data types. There are fields marked red. The fields marked red indicate that it
is mandatory to fill the fields when an account is created.

Salesforce
17
Using the similar steps as above we can explore all the standard objects available.
Salesforce
18
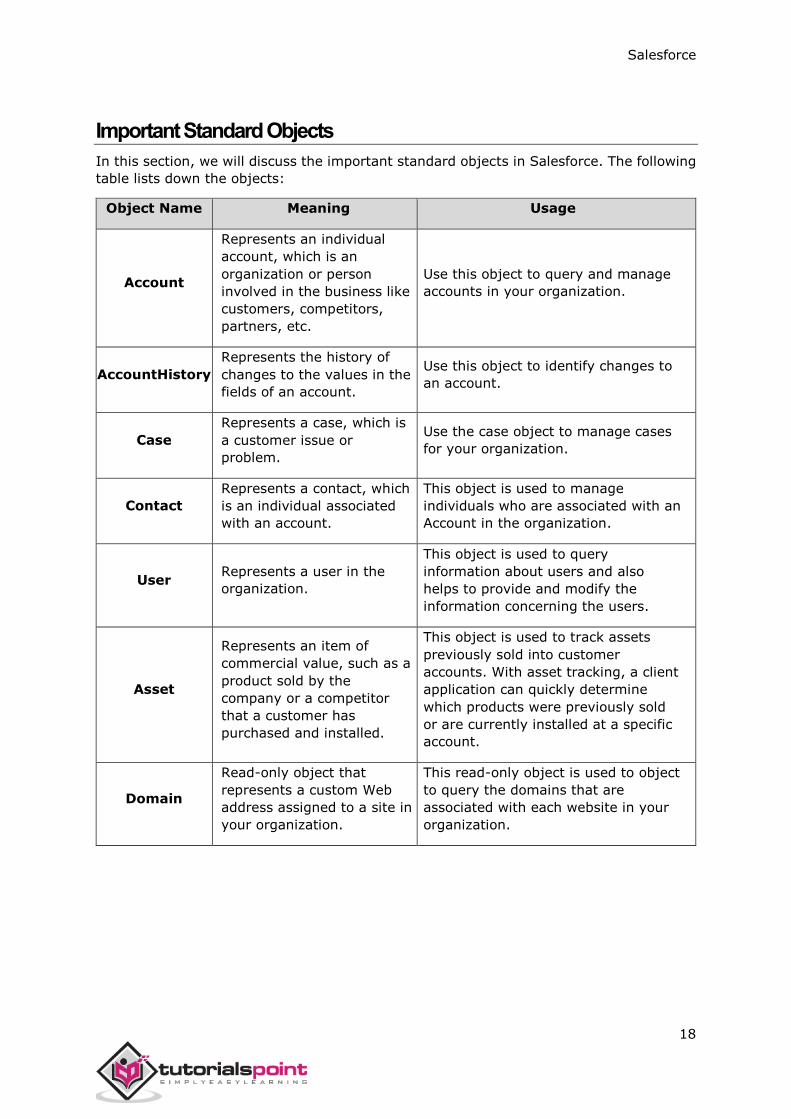
Important Standard Objects
In this section, we will discuss the important standard objects in Salesforce. The following
table lists down the objects:
Object Name Meaning Usage
Account
Represents an individual
account, which is an
organization or person
involved in the business like
customers, competitors,
partners, etc.
Use this object to query and manage
accounts in your organization.
AccountHistory
Represents the history of
changes to the values in the
fields of an account.
Use this object to identify changes to
an account.
Case
Represents a case, which is
a customer issue or
problem.
Use the case object to manage cases
for your organization.
Contact
Represents a contact, which
is an individual associated
with an account.
This object is used to manage
individuals who are associated with an
Account in the organization.
User Represents a user in the
organization.
This object is used to query
information about users and also
helps to provide and modify the
information concerning the users.
Asset
Represents an item of
commercial value, such as a
product sold by the
company or a competitor
that a customer has
purchased and installed.
This object is used to track assets
previously sold into customer
accounts. With asset tracking, a client
application can quickly determine
which products were previously sold
or are currently installed at a specific
account.
Domain
Read-only object that
represents a custom Web
address assigned to a site in
your organization.
This read-only object is used to object
to query the domains that are
associated with each website in your
organization.
Salesforce
19
The organization’s data will always not fit into the existing standard objects. So we can
extend and customize many sales force objects to meet this need. For example, a courier
company can create a custom object to store the schedule and dispatch details for every
week. So these objects store the data that is unique to the business. The custom objects
can also have custom fields along with the standard fields available in Salesforce.
Custom Object Features
Following are the features available on Custom Objects. The features help you perform the
following features:
Build page layouts to control which fields users can view and edit when entering
data for the custom object record.
Import custom object records.
Create reports and dashboards to analyze custom object data.
Create a custom tab for the custom object, to display the object’s data.
Track tasks and events for custom object records.
Import custom object records.
8. Salesforce – Custom Objects

Salesforce
20
Create a Custom Object
To create a custom object, we go to the line path as shown in the following screenshot:

Salesforce
21
Now we fill in the details of the custom object we want to create. There are mandatory
fields which should be filled before the object can be saved. In our case, we give the object
a name called Delivery schedule and save it.

Salesforce
22
Create a Custom Field
To Add more granularity to the business data, we can add custom fields on the custom
object we created. In this case, let us add a field called delivery date to the custom object
named Delivery schedule. To do this, we follow the path Setup Home -> Objects and
Fields -> Object Manager -> Deliver Schedule. Later, scroll down to the Fields and
Relationship tab and click New. The page to add custom field appears wherein, we fill the
details as shown below.

Salesforce
23
Next, we can verify the successful addition of the above custom field by following the same
link path as above. The custom field appears as shown in the following screenshot:

Salesforce
24
Unlike the relationships in relational database, the relationships in Salesforce are not
through Primary and Foreign Keys. The relationships are maintained by using the
Relationship Fields. It is a custom field which links one object record to another. Through
the creation of relationships, we can display the data of all the related records in the
record's details page.
The Master Detail relationship is used when we want to control the display of detail
records based on the value in the master record. For example, in the courier company
model a delivery schedule is always linked to a delivery location. If we remove a delivery
location from our list, then all the related delivery schedules should also be eliminated.
Such a dependency can be achieved through Master-detail relationship between the sales
force objects.
Features of Master-detail Relationship
In this section, we will discuss the features of Master-detail Relationship. The features are
listed below:
Deleting a Master Record, deletes all the detail records.
A detail record cannot be created without a Master record.
The permission on the detail record cannot be set. It inherits the permission from
the master record.
The detail record also inherits the sharing rule from master records.
Both the master and detail records are automatically included in the report record
types.
Creating Master-detail Relationship
In the courier company example, we will consider the relationship between delivery
location and delivery schedule. There is a many-to-one relationship between the delivery
schedule records and the delivery location record.
Following are the steps followed to create this relationship:
Choose the Relationship Type
In setup home, find the object named Delivery Schedule. In it under the Custom Fields
and Relationships related list, click New. Choose the Master-detail Relationship as shown
in the screenshot below.
9. Salesforce – Master Detail Relationship

Salesforce
25
Choose the Related Object
In the next step, select the object with which this relationship will be created. We choose
DeliveryLocation.
Salesforce
26
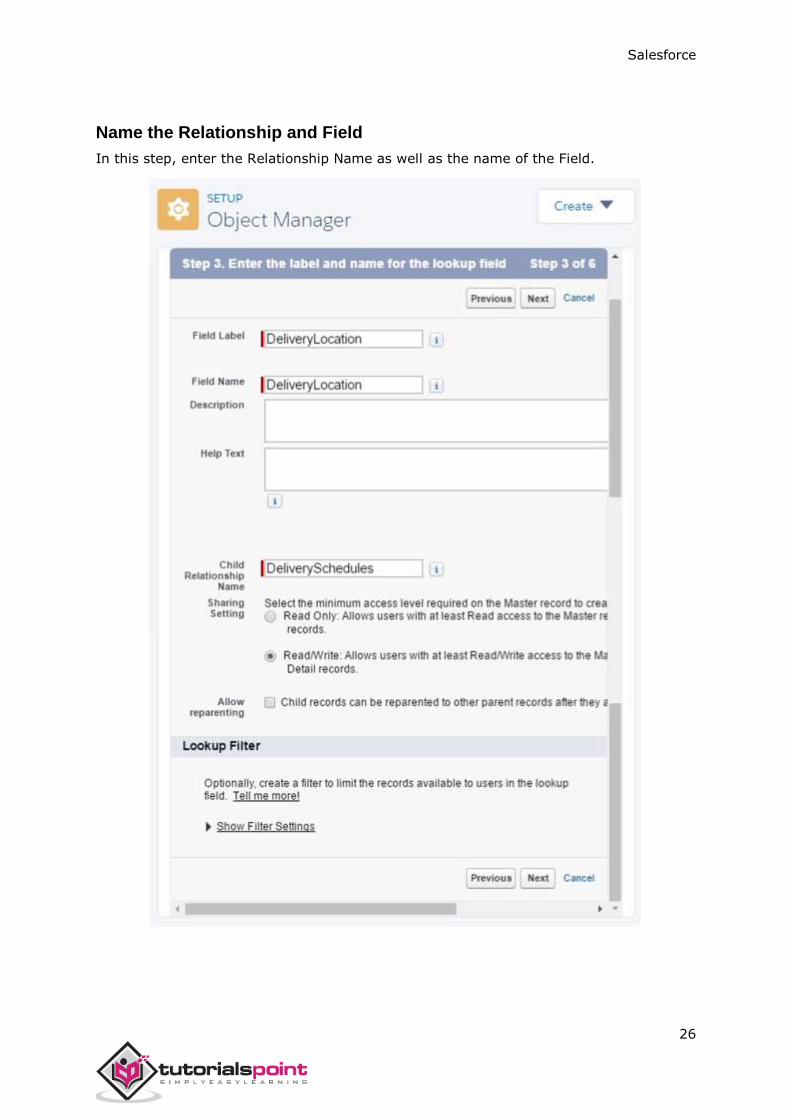
Name the Relationship and Field
In this step, enter the Relationship Name as well as the name of the Field.
Salesforce
27
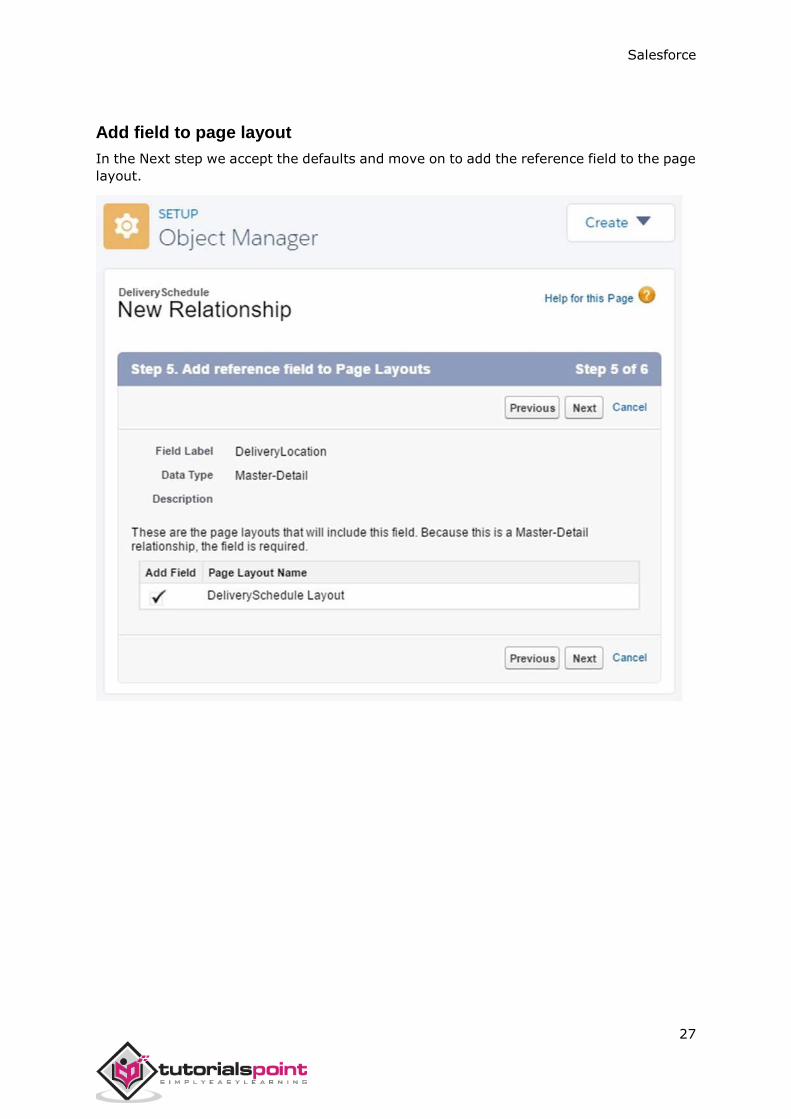
Add field to page layout
In the Next step we accept the defaults and move on to add the reference field to the page
layout.

Salesforce
28
Add Custom Related Lists
Next, we specify the title for the related list that is associated layout with the parent.
This completes the creation of Master-Detail relationship between DeliveryLocation and
Deliveryschedule.

Salesforce
29
A Lookup relationship involves finding value of a field based on the value in another field
in another object. It is mostly used in the case of commonly shared data between two
objects.
Example
In the courier company, we have a delivery location which must be related to a delivery
schedule. So we have a field "DeliverySchedule" in the object Delivery location that looks
up for values from the other custom Object named "Delivery Schedule". Let us now see
the steps to create such a lookup relation.
Step 1
First we identify the objects and the fields which need to have the relationship. In our
example, these two objects are Delivery Schedule and Delivery Location.
Step 2
Create a Custom Object named DeliveryLocation as we did in the previous chapter. In it,
go to the tab fields and relationships. Click New -> Custom Filed -> Lookup
Relationship. Choose the field type as lookup field and enter the details as shown below.
10. Salesforce – Lookup Relationship

Salesforce
30

Salesforce
31
Step 3
You can verify the lookup relationship created by going to the schema builder and choosing
the two objects for display.

Salesforce
32
The various objects and their relationships of a Salesforce application can be easily viewed
using the Schema builder. And just not viewing, but we can also design, modify and
implement new data models using schema builder.
Schema builder has a drag and drop interface which is used to perform all the activities.
It shows all the relevant details like - field values, data types, relationship with directions
etc.
Accessing Schema Builder
From Setup Home, navigate to Objects and Fields -> Object Manager -> Schema
Builder.
11. Salesforce – Schema Builder

Salesforce
33
Viewing Objects
We can see the various objects by selecting them form the left pane. The Element tab
represents fields and relationships while the Objects tab represents the standard as well
as custom objects.
We have selected three objects named - Account, Delivery Schedule and Delivery Location
as shown in the following screenshot.

Salesforce
34
Changing Objects
We can work on various schema objects by showing them in the canvas in the right pane.
We can only modify the custom objects and cannot modify the standard objects as they
are part of the Salesforce platform structure.
In the following screenshot, we can see various actions we can take on the custom schema
objects.
Salesforce
35
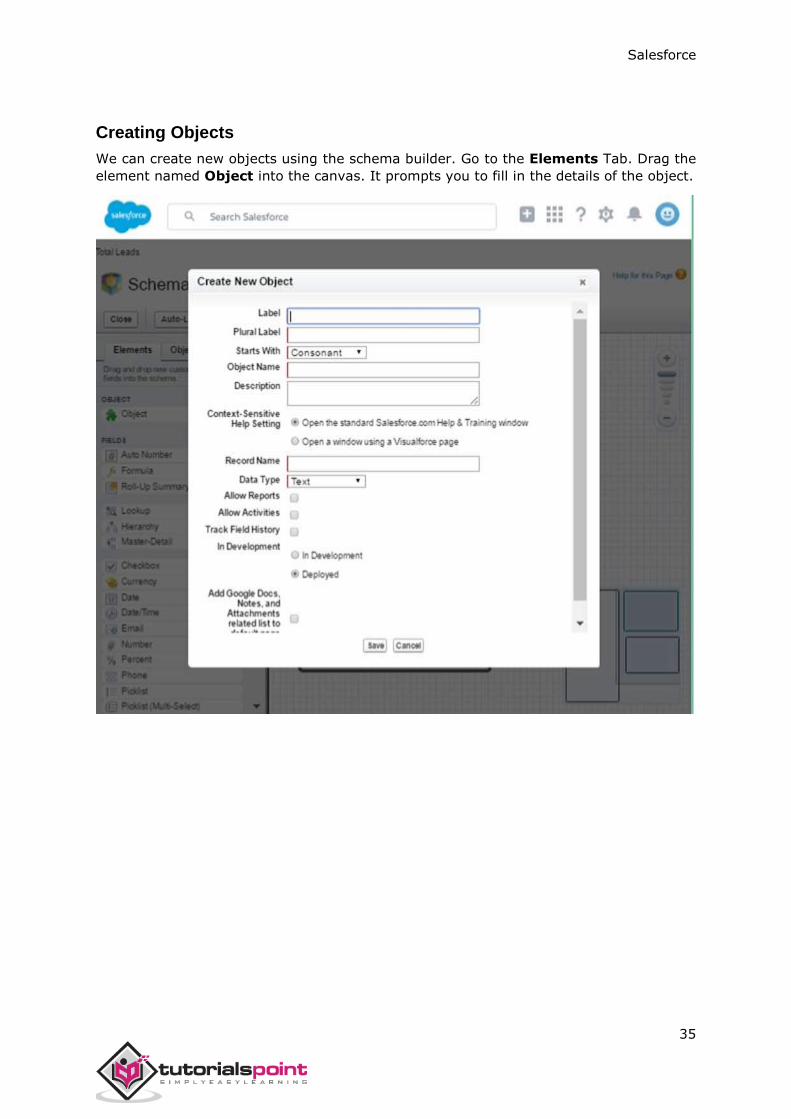
Creating Objects
We can create new objects using the schema builder. Go to the Elements Tab. Drag the
element named Object into the canvas. It prompts you to fill in the details of the object.

Salesforce
36
Data Security

Salesforce
37
In an organization, different kinds of data are accessible by different types of users.
Salesforce has the mechanism to limit the data access in the platform to both individual
users as well as groups of users. There is a flexible but layered sharing model that makes
it easy to assign different data sets to different sets of users. Also the access can be
defined at the level of organization, objects, fields, or individual records.
Levels of Data Access
In this section, we will discuss the different levels of Data Access. There are four levels of
data access.
Organization Level
It is created by maintaining a list of authorized users, setting password policies, and
limiting login access to certain hours and certain locations.
Objects Level
It is done by setting permission on a particular object by allowing selective viewing, editing
or deleting of any object in that record.
Fields Level
It is used to restrict access of users to certain fields even when the user has access to the
object containing the field.
Records Level
This access level permits the user to access only certain records of an object.
In this chapter, we are going to focus on Control Access to the Organization using the
three mechanisms described below.
Create and Manage Users
The administrators can create one or many users using the Admin Interface. Navigate to
setup home -> Administration -> Users. It shows the options for adding one user or
many.
12. Salesforce – Control Access Organization

Salesforce
38
It further asks for details of each users like Name, email Address, Role, Profile, etc. On
filling those details, the users get created.

Salesforce
39
Set Password Policies
Password policies refer to the way the passwords are managed in the organization. For
example, setting the expiry date of a password, the complexity requirement of a password
and so on. All these options are customizable and we can also control the lock of policies.
These password policies are set by navigating to setup home -> Security -> Password
Policies.

Salesforce
40
Restricting Access from IP Address
This is an added security which allows only specific range of IP addresses to access the
Salesforce platform of the organization. But if a valid user accesses the restricted page
outside the trusted IP range then the system asks for additional challenge questions which
should have been already configured. This is set by navigating to setup home ->
Security -> Network Access..

Salesforce
41
The access restriction for different objects is managed by using profiles and permissions.
The type of access (view, edit, create, etc.) can also customized thorough this mechanism.
A user can have only one profile, but can have multiple permission sets. So through profiles
the minimum basic permissions for the selected objects is granted while, through
permission sets additional permissions beyond the profile can be granted.
Let us now see the details of the profiles creation and granting permission to understand
how the object access is managed.
User Profiles
Profiles are created to address the requirements of a particular business function. For
example, the HR department needs a profile which will have access to work history,
medical history and attendance of employees. While the finance department will need
profile which will access the attendance and remuneration details of an employee. Now
depending on the user’s job role, the profile is attached to the user. Only one profile can
be allocated for a user.
Creating a Profile
Go to the link path Setup HOme -> Users -> Profiles. You can see some existing profiles
which are pre-built in the salesforce platform. We can create new profiles by cloning the
existing profiles and customizing them further based on our requirements.
13. Salesforce – Control Access Objects

Salesforce
42
Let us now see an existing profile named the standard user. It shows all the types of
settings available to this profile. For example, we can set object permissions for both
standard objects as well as custom objects. We can also set different administrative
permissions and general user permissions and so on.
In order to control the permission to each of the objects through this profile, we can scroll
down and find the list of both standard objects and custom objects. Here we can use the
check boxes to customize the object access.

Salesforce
43
Assigning a Profile
Once a new profile has been created, it can be assigned to users by going to the link path
Setup Home -> Users -> Users. Now click on the edit to the left of the user name. You
will be directed to a new window wherein, you can change the profile from the dropdown.
Permission Sets
Permission sets are additional access given to a user on some objects which are not
covered through their profiles. So it just extends users access to some objects based on
their profiles. For example, when a new custom object is created, we create a permission
set for those objects and attach those permission sets to the users who will need access
to those objects. The same logic applies when we want to grant temporary access to
specific objects for a user.

Salesforce
44
Creating a Permission Set
We create a permission set by going to the link path Setup Home -> Users ->
Permission Sets. Click on the New button to create a new permission set.

Salesforce
45
Once created, we can edit the permission set and choose Object Settings. Here we can
see the list of objects and the level of access to these objects. We can edit the access
types for each of these objects.

Salesforce
46
There are scenarios in which we grant access to an object to a user but we also want to
restrict the access to certain fields of that object. So using field level security, we can
control the user's access to see, edit or delete certain fields of an object.
Field level access settings are achieved in two ways:
Edit a single permission set or profile containing all the fields which require access
restriction.
Edit permission on a single field to be applied in multiple profiles.
Example
To give edit access to the field DeliverySchedule on the object DeliveryLocations, we go
to the permission set named CourierObjects which we created in the last chapter. Then
go to the Object settings and choose the object named DeliveryLocations. Click Edit and
select the field wherein, we need to set the permission.
14. Salesforce – Control Access Fields

Salesforce
47
To set the field permission for one field across all profiles we open the object through
schema builder and then right click on the specific field, choose manage Manage Field
Permissions. We will now get the option to set the field permissions for many profiles for
this single field.
Salesforce
48
In this chapter, we will learn about the Control Access Records in Salesforce. Many times,
beyond the access restriction for the objects and fields, we also need to restrict access to
certain records of an object. This requires setting up of access restriction for a user based
on the values in the records.
Record Ownership
A unique feature of Salesforce is the ownership of every stored record. Every record in
every object has a field which marks the ownership of that record. A user who needs
access to this record becomes part of the profile which is same as the profile of the owner
of that record.
Restriction Mechanism
Access is granted at multiple levels like Object, Field and Records. Conflicts might come
up between the access levels. There may be a read access on a record but the object
containing it might not have read access for a user. In such case, the access type which
is more restrictive (gives less access) will be applied. So a record without access
permission will remain inaccessible even when the object containing it is accessible and
an Object without access permissions will remain inaccessible even when it has some
records to which the user has read access.
Record Sharing Mechanism
The Saleforce platform provides four distinct mechanisms to share the records of an object
with the users.
Organization-wide defaults
Manual sharing
Role hierarchies
Sharing rules
Organization-wide defaults
In this mechanism, a minimal access level is created and granted to all the users. So every
user who is part of the organization, gets access to these records. Then, the access for
additional records is customized by clubbing the users into role hierarchies, sharing rules
and also through manual sharing with each of the user.
15. Salesforce – Control Access Records

Salesforce
49
There are four types of sharing models which implement the organization-wide default
settings.
Settings Result
Public
Read/Write All users can view, edit, and report on all records.
Public Read
Only
All users can view and report on records but not edit them. Only the
owner and users above that role in the hierarchy, can edit those
records.
Private Only the record owner, and users above that role in the hierarchy,
can view, edit, and report on those records.
Controlled by
Parent
A user can perform an action (such as view, edit, or delete) on a
contact based on whether he or she can perform that same action
on the record associated with it.
Manual Sharing
In this access model, the record owners give the read and edit permissions to specific
users. So it is a manual process in which individual or group of records are handled by the
record owners. This is to be done for each user profile that needs the access.
In our subsequent chapters, we will discuss role hierarchies and sharing rules.

Salesforce
50
Role hierarchy is a mechanism to control the data access to the records on a salesforce
object based on the job role of a user. For example, a manager needs to have access to
all the data pertaining to the employees who report to him, but the employees have no
access to the data that is only owned by their manager. In this manner, the access model
looks similar to the org chart in an organization but it need not be exactly same as the
Org chart.
The role hierarchy automatically grants record access to users above the record owner
in the hierarchy. This option is enabled for all objects by default. To change this, we take
help of custom objects and manual aces grants.
Defining a Role Hierarchy
In this section, we will discuss how to define a role hierarchy. The steps are described
below:
Step 1
To create a Role Hierarchy, we go to the link path Setup Home -> Users -> Roles ->
Setup Roles. The default role hierarchy appears as shown below.
The default view is Tree View, which is easiest to use. The other two views are sorted list
view and list view. You can change this view as per your need.
16. Salesforce – Create a Role Hierarchy

Salesforce
51
Step 2
In the next step, we add a role to the existing hierarchy by filling in the role details. Click
on Add Role. The next window appears asking for the following details.
While filling these details, we also take care to define if the users can only view the
opportunities or can also edit the opportunities. On clicking save we get the Role created
as shown below.

Salesforce
52
Step 3
In this step, you can assign users to the roles. Click on Assign Users to Role. Upon
clicking, you will be directed to a window where you can select All users form the
dropdown and move users from the left box to the right box.

Salesforce
53
In this way, you can create roles within the role hierarchy and add users to them. So the
users can have access to the objects and data as per their roles.

Salesforce
54
In this chapter, we will discuss how to define sharing rules in Salesforce. Though we can
manage the access to different objects and records through organization-wide settings
and role hierarchies, we come across situations wherein, exceptions are required. We need
to grant access to specific data to specific users who are not able to access the required
data because of their roles. For example, to see the case history when a user has only
access to the current case details. In such scenarios, we take help of sharing rules.
Through this mechanism, we create a public group which will accommodate all the users
who need such exception and then add sharing rules to such a group.
Steps to Create Sharing Rules
In this section, we will discuss the steps to create sharing rules. The steps are described
below.
Step 1
Create a public group which will have the users who need specific access. Go to the link
path, Setup home -> Users -> Public Groups -> New Group. We need to fill the
required details. Also choose the group of users who will need to use the sharing rules.
Keep the Grant access using Hierarchies checked so that the other users listed below in
this hierarchy can inherit the access. Click Save.
17. Salesforce – Define Sharing Rules

Salesforce
55
Step 2
Now we create the sharing rule for the above public group. Go to the link path Setup
Home -> Security -> Sharing settings. From the dropdown of Manage Sharing
settings for, choose Campaigns.

Salesforce
56
Then under Campaign sharing rules, click on the button New. Provide the details for the
new sharing rule as shown below. We select a criteria to give access to records for which
the value of the field Campaign name is camp_x.

Salesforce
57
So now all the users under the newly created public group will get access to those records
of campaign object where the campaign name is camp_x.
Salesforce
58
Process Builder

Salesforce
59
The process builder tool helps in automating business processes. For example, all that
goes into a record when a courier delivery is completed. This automation involves creating
the following three steps:
Select an Object to start the process.
Add criteria to the object to allow the start of the process.
Add action to the criterial to trigger the execution of the process
Let us now create a sample process which will add a record when the courier delivery is
completed.
Add Object to Start The Process
Go to the link Setup home -> Platfrom Tools -> Process Automation -> Process
Builder. Click New. Upon clicking New, the following window appears which asks for
name of the process and description. We fill in the details as shown and click Save.
18. Salesforce – Automate Business Processes

Salesforce
60
Next we get a process automation window. Click New to go to the next step. And choose
the Object delivery schedule as shown below. Click Save.
Add Criteria
Click on the Add Criteria button in the canvas to add a condition for the process to be
allowed to execute. Here we choose the delivery date as filed which when updated will
trigger the process. Click Save to save the criteria.

Salesforce
61
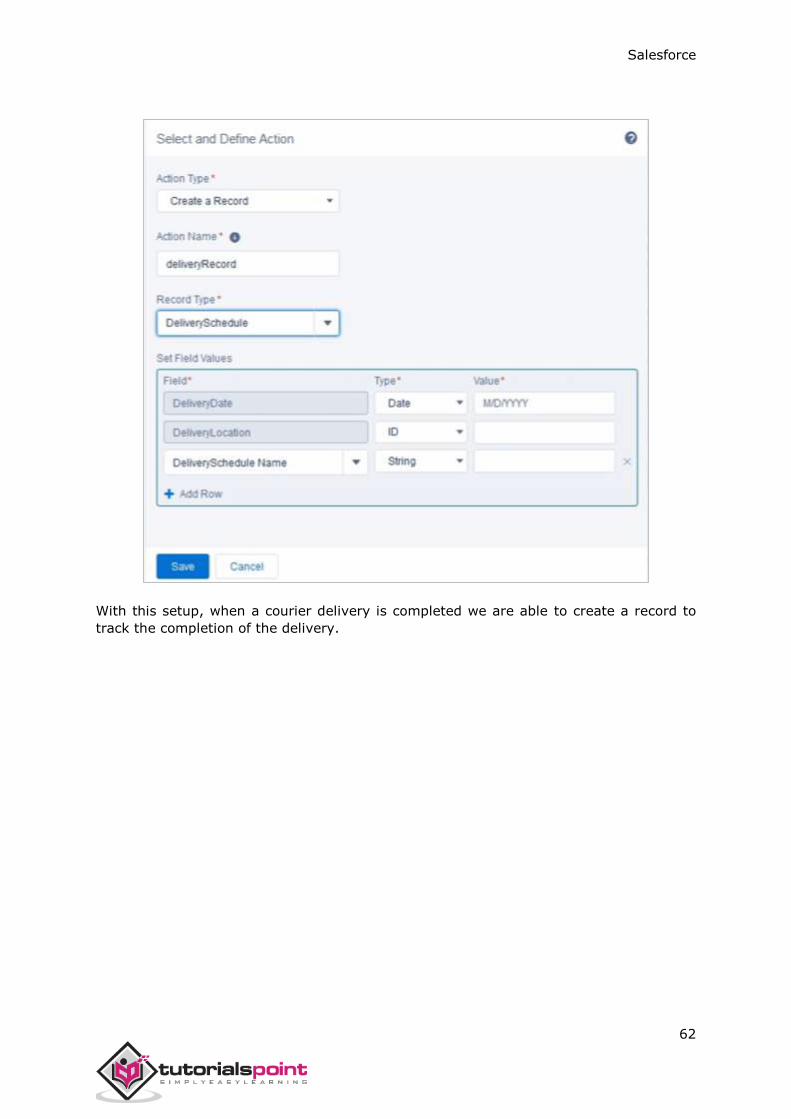
Add Action
Next, we add action to trigger the start of the process when the condition is met.
Salesforce
62
With this setup, when a courier delivery is completed we are able to create a record to
track the completion of the delivery.

Salesforce
63
In this chapter, we will learn how to import data in Salesforce. Salesforce provides a robust
platform for data manipulation. We can Insert, View, Edit and Delete the relevant data
with proper user permissions. At times, we need to add a large number of records to the
respective Saleforce object in one go. Most likely these records have come from another
source. The format of the incoming data has to match with the format in which the
salesforce object is expecting it.
The import feature is available with CSV file structures from four sources. The sources are
CSV, Outlook CSV, ACT! CSV and GMail CSV. In the example given below, we will use the
normal csv file for importing data to the Salesforce platform.
The import happens in the following three steps:
Step 1
Navigate to Setup Home -> Data -> Data Import Wizard. A page opens which gives
instruction on how to proceed with the Wizard. The most important point to remember is
the record limits which restricts the number of records to be imported in one go to 50000.
Click the Launch Wizard button to start the import process. The following screen appears,
asking us to choose the kind of object to which we can import the data.
19. Salesforce – Importing Data

Salesforce
64
We select Accounts and Contacts in the above screen and click Next.
Step 2
In this step, we choose the file containing the data to be imported. Also we are presented
with the option of Adding New Records or Updating the Existing Records or both.
We choose adding the new records as shown below.

Salesforce
65
We also select the field used to match the existing record with the incoming record. For
this, we choose Account name and site under the dropdown Match Account by, and then
we click Next.
Salesforce
66
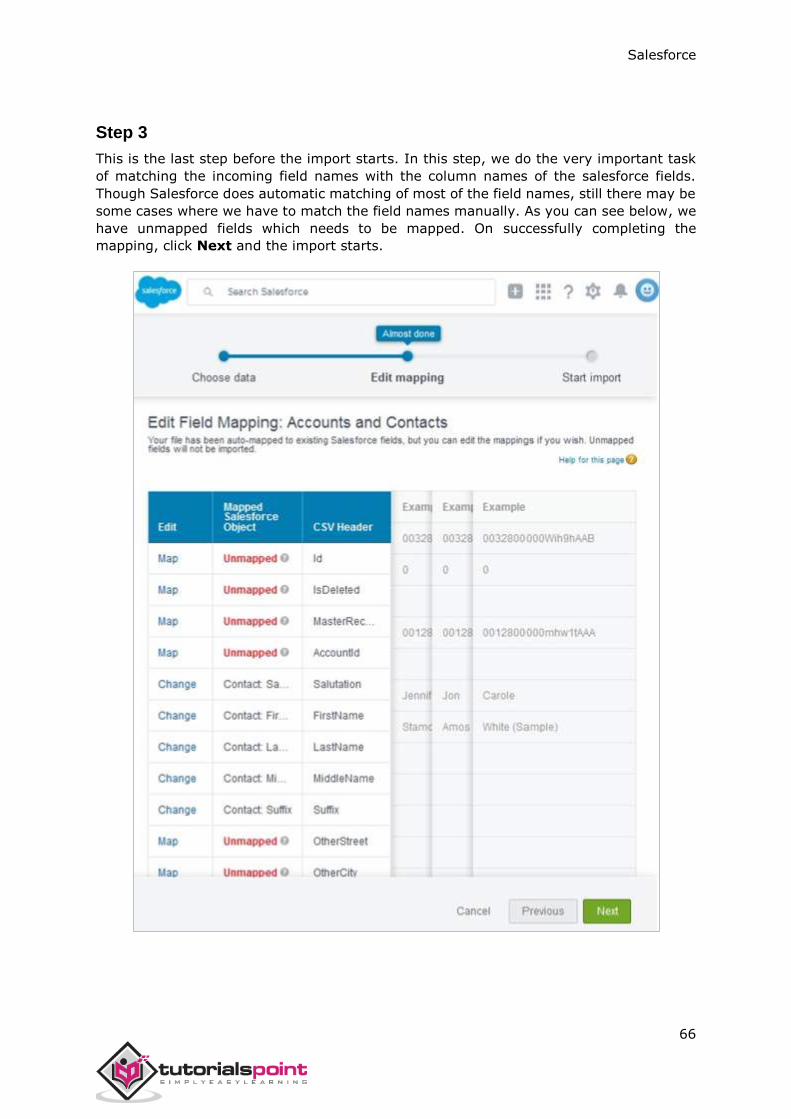
Step 3
This is the last step before the import starts. In this step, we do the very important task
of matching the incoming field names with the column names of the salesforce fields.
Though Salesforce does automatic matching of most of the field names, still there may be
some cases where we have to match the field names manually. As you can see below, we
have unmapped fields which needs to be mapped. On successfully completing the
mapping, click Next and the import starts.

Salesforce
67
In this chapter, we will discuss how to export data from Salesforce. You can choose the
objects from which data needs to be exported and also schedule a regular export form
those objects. There is also a filtering option on how much data to export based on the
age of the record.
Let us now see the steps to export data from Salesforce:
Step 1
Navigate to the link Setup Home -> Data -> Data Export. It will present a window to
schedule an export by mentioning the frequency along with the start and end date to select
the records to be exported.
20. Salesforce – Exporting Data

Salesforce
68
Step 2
In the next step, we choose the Salesforce objects the data of which need to be exported
by selecting the check boxes as shown below.
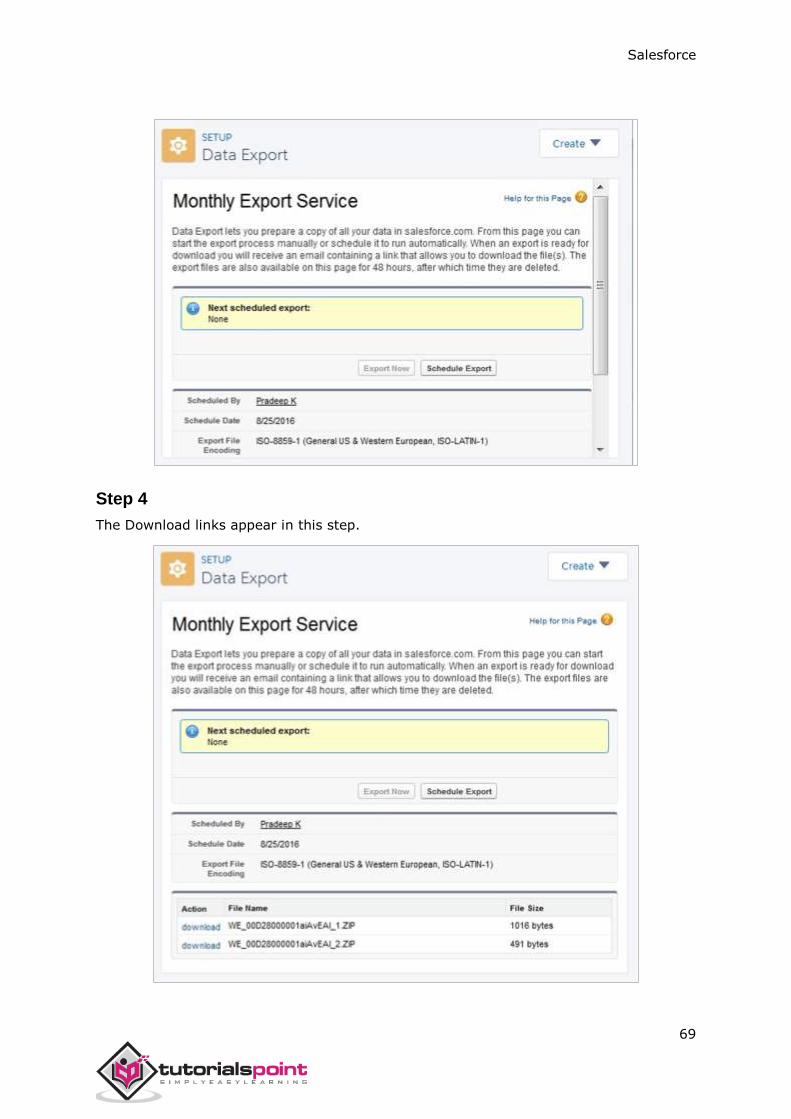
Step 3
Upon clicking Next as in the above step, you will be directed to a window which mentions
that you have to wait for some time for the exported data to be ready for download. So in
this step, we wait for the download link to appear in the same screen. Also a hyperlink to
download the data is sent to the email id of the person who scheduled the export.
Salesforce
69
Step 4
The Download links appear in this step.

Salesforce
70
Creating reports in Salesforce is not a very complicated process. The reports are created
on top of one or more Salesforce objects. It has the flexibility of applying filters and joining
data sets to create sophisticated reports. The interface is called the Report builder.
Go to the Reports icon in the left bar menu of the Lightning Experience Home Page. Follow
the steps below to create a report.
Step 1
Click on Create New Report. Upon clicking, the following screen appears. We choose
Accounts and click Create.
21. Salesforce – Reports

Salesforce
71
Step 2
In this step ,we define certain settings for the report and get the resulting rows. We choose
"My Accounts" from the dropdown Show. It brings all the records owned by the creator of
the report. Next we choose the created date filter as All Time as shown below. We proceed
by saving the report with the name - Accounts report.
Step 3
Now, we will apply a filter to the above report. Click on the Add filter option in the white
space just below the date filed filter. Choose the field Billing State/Provinces. Choose
the equal to operator and type the value NY in the next text box. This filters out the row
for NY as shown below.

Salesforce
72
Dashboards provide more insights than reports as they combine the data from many
reports and show a summarized result. Looking at many reports at a time gives the
flexibility of combining the results from them quickly. Also summaries in dashboards help
us decide on action plans quicker. The dashboards can contain charts, graphs and Tabular
data.
Let us now see the steps to create a dashboard.
Step 1
Go to the Dashboard button on the left menu bar in the Salesforce Home Page. Now, click
on the New Dashboard and the following window appears. Fill in the name and description.
22. Salesforce – Dashboards

Salesforce
73
Step 2
Next we add components to the dashboards. Components are graphical objects which
present the summarized or tabular data with visual indicators like colors, etc. In our case
we add two components as shown below.
Choose the Opportunity Amount by Stage report and present it as a line chart.
Salesforce
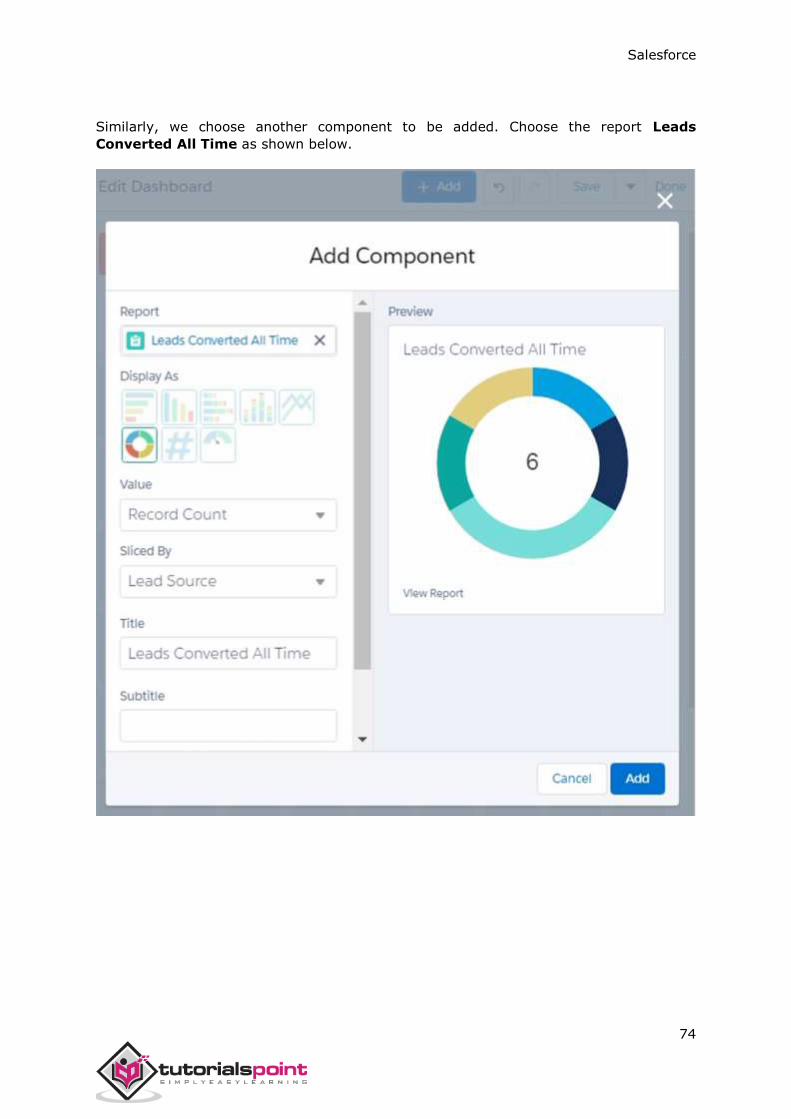
74
Similarly, we choose another component to be added. Choose the report Leads
Converted All Time as shown below.

Salesforce
75
Step 3
In this step, we see both the components are visible in the dashboard. We can resize the
components for better visibility. And there is still more place for additional components.

Salesforce
76
Many times we need to manipulate the values of the fields stored in the Salesforce object
by applying a few conditions or calculations. For example, we need to get the Account
number value linked to the contact object, so that we can find the Account number from
the contact name. In such scenarios, we create formula field in addition to the existing
fields in the object.
Let us now see the steps to create formula field.
Step 1
Go to the link path Setup Home -> Object Manager -> Contact. Then scroll down to
the Fields and Relations tab and add New. Choose Formula as the data type and click
Next. The following window appears. Here we choose the return type as Text and also fill
in the Field Name and Field Label.
23. Salesforce – Using Formula Fields

Salesforce
77
Step 2
Clicking on Next brings takes you to the next window wherein, you have to select the field
based on which the formula will be built. Let us now choose Account number from the
Account table. Click Insert to insert this field into the Contact object.

Salesforce
78
Step 2
In this step, we can see the field Account Number appear under the fields of the Contact
object as shown below.

Salesforce
79
Visualforce

Salesforce
80
Visualforce pages are webpages that belong to Salesforce. These webpages are created
using a unique tag-based Mark-up language. It is similar to HTML but it's primary use is
to access, display and update the organization’s data. The page is accessed by using a
URL similar to that of a traditional webserver page.
Each tag in visual force language corresponds to some user interface component like
section of a page, a list view or a field of an object. Interestingly, it can be easily mixed
up with HTML markup, CSS style and Java libraries, etc.
Creating a Visualforce Page
Go to the link developer console -> File -> New -> Visualforce page. The new window
opens asking for a page name. Let us now call it HelloworldPage. Let us now write the
code as shown in the following diagram.
Click Save. Then, click on Preview. This opens a new webpage showing the result as
shown in the following screenshot.
24. Salesforce – Visualforce Pages

Salesforce
81
Adding Components
In this section, we will learn how to add components to a program that is already created.
Let us add some user interface components to the program created above. We add a block
and a section in that block by using the following code.

Salesforce
82
On previewing the page, we get the following output.
Setting Preferences
We can set the various settings for easy navigation by going to Help->Preferences.

Salesforce
83
The data from the Salesforce objects can be brought into the Visualforce page using
variables and expressions. Like other normal programming language, the Visualforce
language has expressions, operators and literals, etc. The basic building block of this
language is expressions.
The syntax of a Visualforce expression is as below.
{! expression }
Example
Let us use the global variable $user. We can write the following code to get the username,
First name and login name.
25. Salesforce – Variables & Formulas

Salesforce
84
On previewing the output, we get the following details.

Salesforce
85
Similarly, we can use many other variables and manipulate them using formula as shown
in the code below.
On previewing the output, we get the following details.
Salesforce
86
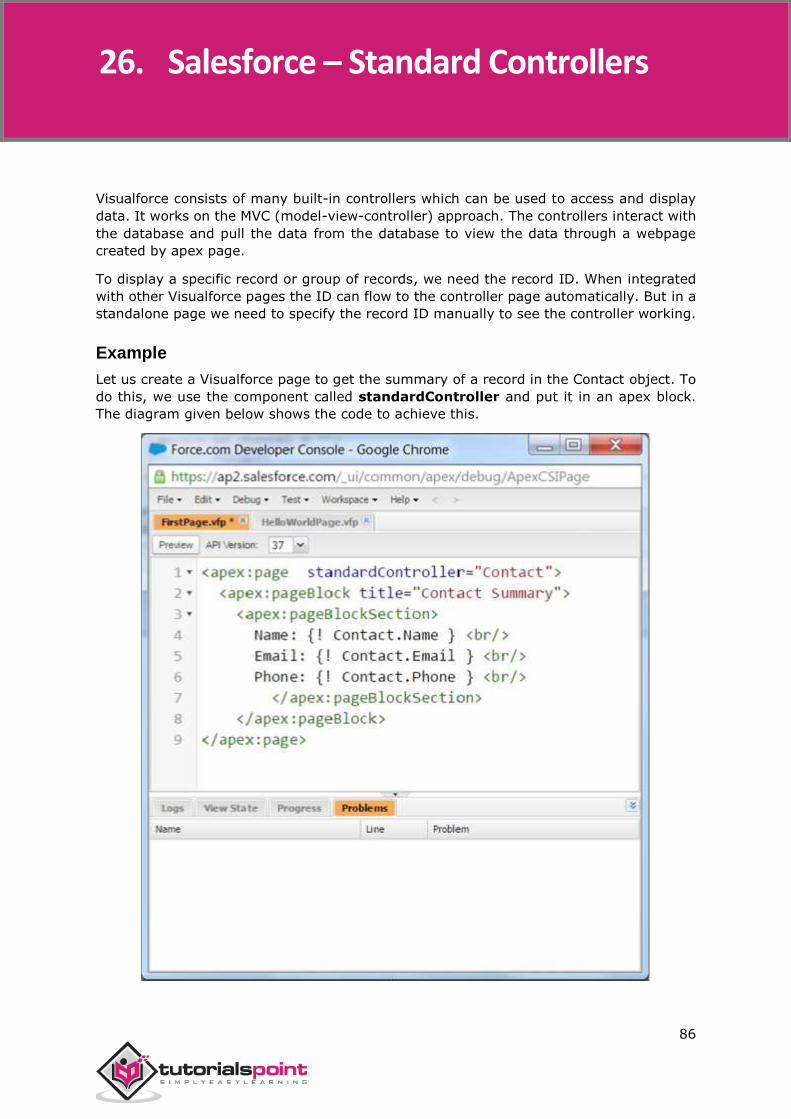
Visualforce consists of many built-in controllers which can be used to access and display
data. It works on the MVC (model-view-controller) approach. The controllers interact with
the database and pull the data from the database to view the data through a webpage
created by apex page.
To display a specific record or group of records, we need the record ID. When integrated
with other Visualforce pages the ID can flow to the controller page automatically. But in a
standalone page we need to specify the record ID manually to see the controller working.
Example
Let us create a Visualforce page to get the summary of a record in the Contact object. To
do this, we use the component called standardController and put it in an apex block.
The diagram given below shows the code to achieve this.
26. Salesforce – Standard Controllers

Salesforce
87
Here we display some select fields from the Object. They are Name, Email and phone. If
we go to the Preview window, we find that the page only displays the labels but no data.
That is because we have not associated the result from the controller with any specific
record.
So next we identify a record form the Contact Object to be attached to the result from
the controller. Open the contacts object and click on any of contact name. It will open the
following window from which we capture the ID of the record. The ID is highlighted in the
URL. In your environment, it will be a similar string of characters.

Salesforce
88
Finally, we add this ID of the record to the YRL of the preview window of the Visualforce
standard controller page we created. In the current example, the ID of the record is added
as shown below.
https://c.ap2.visual.force.com/apex/FirstPage?core.apexpages.request.devconsole
=1&id=0032800000Wih9kAAB
On visiting the above URL from the Organization's salesforce account, we get the details
of the record as shown below.

Salesforce
89
We have already seen how to get the values of a record using the standard controller. But
we can also display the field values in a more formatted way by using additional controllers.
In this chapter, we will see how to display the fields of an object and the data of a details
table in a Master-detail relation.
Display Fields
When we want to display the fields of a record in a formatted manner with column headers,
rather than just the labels and values, we can use the OutputField option. The code given
below shows the apex program to display the filled data from Contact. As you can see, we
do not need the labels to be in place to indicate the field values.
27. Salesforce – Records, Fields & Tables

Salesforce
90
To preview the result of the above code, we use the ID of the record as described in the
previous chapter. The result shows the following output showing the field values of the
records along with column headers.
Display Tables
We can display all the records of a details table by taking a value from a master table. For
example, we can display all the contacts associated with an account. In such case, we use
the iteration component which in our case is the contacts table linked to account. Below
is the code to display all the contacts associated with the Account table.

Salesforce
91
On previewing the output form the above code, we get the following result.

Salesforce
92
Salesforce is a data-driven platform. So viewing and editing data in its apps is a
fundamental requirement. Like the traditional HTML forms, we can create similar forms in
Saleforce for editing the data in Salesforce.
Creating Input Form
The Input forms are created using a Visualforce page. We open a new Visualforce page by
using the path Developer Console -> File -> New -> Visualforce Page. We write the
code as shown below which uses Contact as the standard controller and the purpose is to
edit the values in the 3 fields - Name, Email and Phone.
Upon running the above code for the Visualforce page, we get the following output.
But we can improve the above form further by aligning the fields to one column and putting
all the input fields and labels into a block. The code given below shows how we add a
section and block to the form and also put the fields in one column.
Upon running the above code for the Visualforce page, we receive the following output.
28. Salesforce – Using Forms

Salesforce
93
In this chapter, we will discuss List Controllers in Salesforce. At times, we need to view a
given set of records from a Salesforce object by applying filter criteria. This is achieved by
using list controllers which allow you to create Visualforce pages that can display or act on
a set of records. The standard list controllers can be used in the following set of objects.
Account
Asset
Campaign
Case
Contact
Contract
Idea
Lead
Opportunity
Order
Solution
User
Custom objects
Example
We take the example of contact object. We fetch the records from this object and display
it using list controllers. To achieve this, we create an apex page with the following code.
The code creates a pageblock with column values matching the column names of the
contact object.
29. Salesforce – List Controllers

Salesforce
94
Upon running the above code, we receive the following output.

Salesforce
95
The user interface in a Visualforce base can display dynamic content the value of which
keeps changing based on user responses. But there are times when we need some content
which should not change with the change in values of other components in the page. For
example, an image file may be required to remain constant. Such content which cannot
be changed in a page is known as a static resource.
Following are a few static resources in Salesforce:
Images
JavaScript Files
Flash files
CSS files
The steps to create a static resource are as below.
Create a Static Resource container
Go to Develop -> Static resource and mention the values for name, description and file
location for the static resource.
30. Salesforce – Static Resources

Salesforce
96
Upload a Static Resource
Click Save in the above screen to get the file attached to the User Interface controller.
Reference the Static Resource
Next we create the apex code as in the following screenshot to reference the static object
we created above.

Salesforce
97
Output
Running the above apex code will generate the following output. The output shows a static
resource.

Salesforce
98
Lightning Components

Salesforce
99
31. Create & Edit Lightning Components

Salesforce
100

Salesforce
101
32. Salesforce – Attributes & Expressions