Embed Size (px)
Citation preview
Salesforce CRM Admin Cookbook
Paul Goodey
Chapter No. 1 "Working with Home Page Components and
Custom Links"
In this package, you will find: A Biography of the author of the book
A preview chapter from the book, Chapter NO.1 "Working with Home Page Components and Custom Links"
A synopsis of the book’s content
Information on where to buy this book
About the Author Paul Goodey is the author of Salesforce CRM: The Definitive Admin Handbook by Packt Publishing.
He has over 15 years of experience in developing web technology solutions for companies of all sizes across a variety of industries, and has been building solutions with Salesforce CRM since 2006.
Paul has enjoyed a variety of roles while working with Salesforce CRM, having worked as a System Administrator, Developer, Business Analyst and Consultant to provide solutions for both in-house and consultancy-based end users.
Based in the UK, near London, Paul's professional qualifications include Salesforce.com Certified Developer DEV-401. In his spare time, he is a keen runner, having run several marathons and half-marathons since 2001.
Paul is a keen and active member of the salesforce.com administrator and developer online community and can be found at LinkedIn at http://www.linkedin.com/in/paulgoodey.
For More Information: www.packtpub.com/salesforce-crm-admin-cookbook/book
Salesforce CRM Admin Cookbook As an industry-leading customer relationship management (CRM) application, Salesforce CRM helps the enterprise to improve client relations. It greatly enhances sales performance and provides your business with a robust CRM system.
In order to achieve optimum performance and benefits from Salesforce CRM, there are many functional areas and techniques for you, as the Salesforce Administrator, to consider. This is the only cookbook-style publication that provides recipes which focus specifically on configuring and extending this powerful CRM system.
Salesforce CRM Admin Cookbook provides step-by-step instructions that enable you to instantly extend and unleash the power of Salesforce CRM. This practical cookbook contains recipes that are presented using clear and comprehensive instructions along with detailed screenshots, code, and comments.
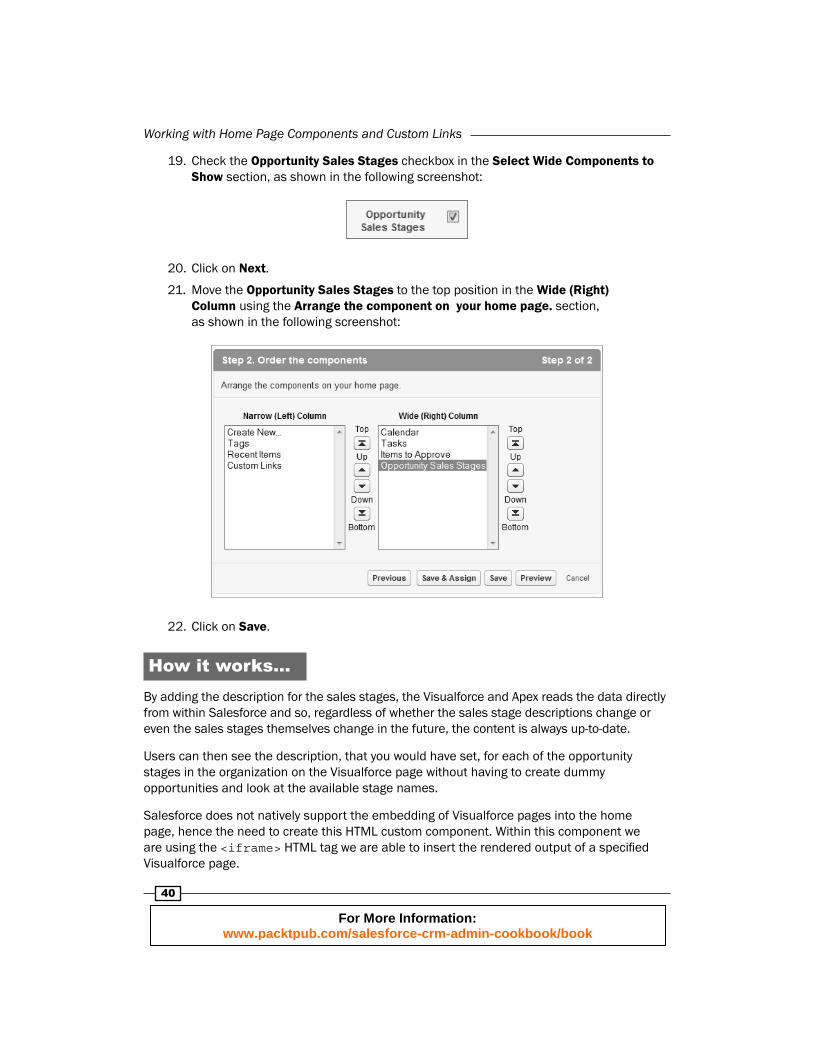
Whether you are looking for solutions to enhance the core features or are looking for ideas for advanced customization techniques, this book will provide you with immediate, practical, and exciting real-world recipes.
What This Book Covers Chapter 1, Working with Home Page Components and Custom Links, covers recipes that enhance and extend the features and functionality associated with the Salesforce home page by using Home Page Components along with HTML, CSS, and JavaScript code.
Chapter 2, Advanced User Interface, includes advanced techniques and solutions that can be used to enhance and override the native Salesforce user interface and add graphical elements by using images, HTML, CSS, JavaScript, and Visualforce.
Chapter 3, Exposing Hacks and Hidden Features, introduces recipes that modify the behavior of standard functionality and elements of Salesforce CRM (such as extending the year range selection on the calendar pop-up control) using HTML and JavaScript.
Chapter 4, Automating Salesforce CRM, provides standard Salesforce mechanisms that automate the Salesforce CRM system and helps to deliver best practice data management using Salesforce workflow and formulas.
Chapter 5, Improving Data Quality in Salesforce CRM, covers recipes that provide record validation and improve data quality using advanced Salesforce CRM validation rule mechanisms.
For More Information: www.packtpub.com/salesforce-crm-admin-cookbook/book
Chapter 6, Implementing Approval Processes, uses step-by-step instructions to describe the configuration of a complete approval process using the standard Salesforce CRM approval mechanism.
Chapter 7, Productivity Tools for Superusers and Advanced Administration, offers techniques and solutions to improve admin productivity (for example, when mass-deleting records) by using custom buttons, formulas, and Visualforce.
Chapter 8, Configuring and Installing Salesforce for Outlook E-mail Integration, provides complete step-by-step instructions for the configuration and installation of Outlook e-mail integration with the Salesforce CRM application.
Chapter 9, Integrating Salesforce CRM with External Online Tools, contains advanced recipes that add data and functionality from external online systems that are served within Salesforce CRM using HTML, CSS, JavaScript, and Visualforce.
For More Information: www.packtpub.com/salesforce-crm-admin-cookbook/book
1Working with Home
Page Components and Custom Links
In this chapter, we will cover the following recipes:
Creating a Personal Setup link using the standard Custom Links on the sidebar
Using Custom Links to open Training in a new window from the sidebar
Creating a news-ticker message on the home page
Automatically collapsing Chatter feeds on the home page
Removing Chatter feeds on the home page
Adding a Send An Email button on the home page
Showing Opportunity Sales Stage descriptions on the home page
IntroductionThe Home tab in Salesforce CRM is generally set as the opening page for users when they fi rst log in to the application and provides a great way for users to view Chatter posts, access their calendar, tasks, items to approve, and so on.
For More Information: www.packtpub.com/salesforce-crm-admin-cookbook/book
Working with Home Page Components and Custom Links
6
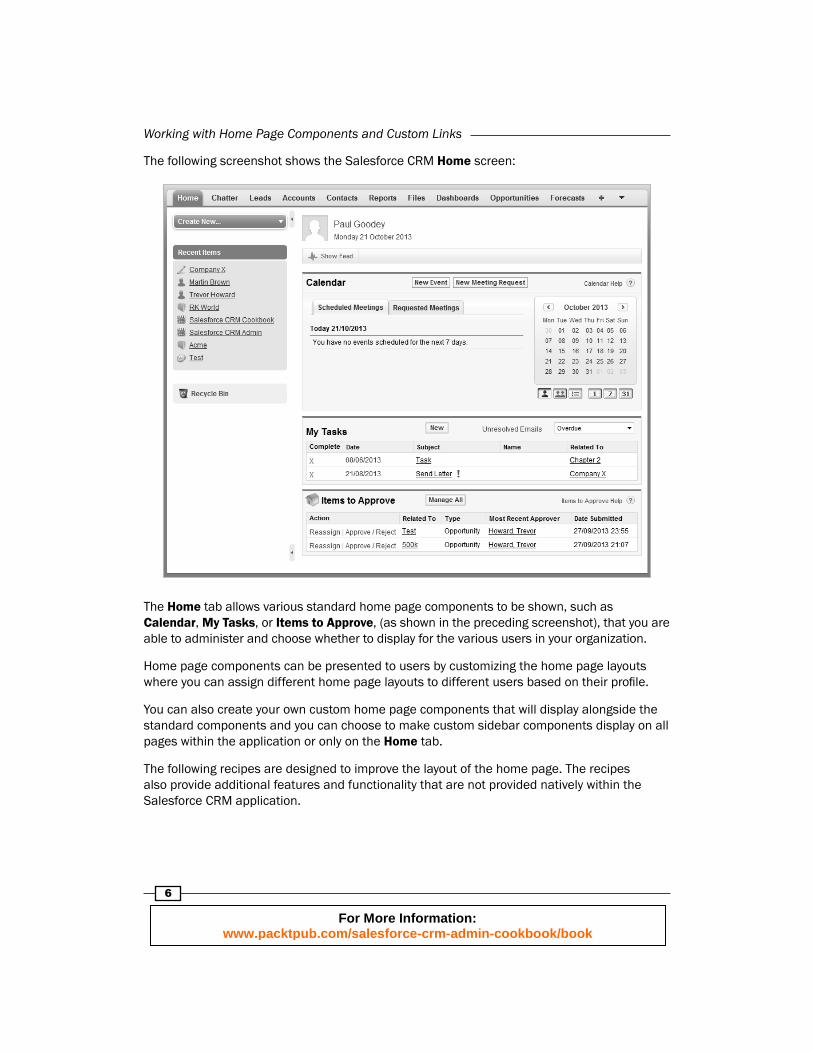
The following screenshot shows the Salesforce CRM Home screen:
The Home tab allows various standard home page components to be shown, such as Calendar, My Tasks, or Items to Approve, (as shown in the preceding screenshot), that you are able to administer and choose whether to display for the various users in your organization.
Home page components can be presented to users by customizing the home page layouts where you can assign different home page layouts to different users based on their profi le.
You can also create your own custom home page components that will display alongside the standard components and you can choose to make custom sidebar components display on all pages within the application or only on the Home tab.
The following recipes are designed to improve the layout of the home page. The recipes also provide additional features and functionality that are not provided natively within the Salesforce CRM application.
For More Information: www.packtpub.com/salesforce-crm-admin-cookbook/book
Chapter 1
7
Creating a Personal Setup link using the standard Custom Links on the sidebar
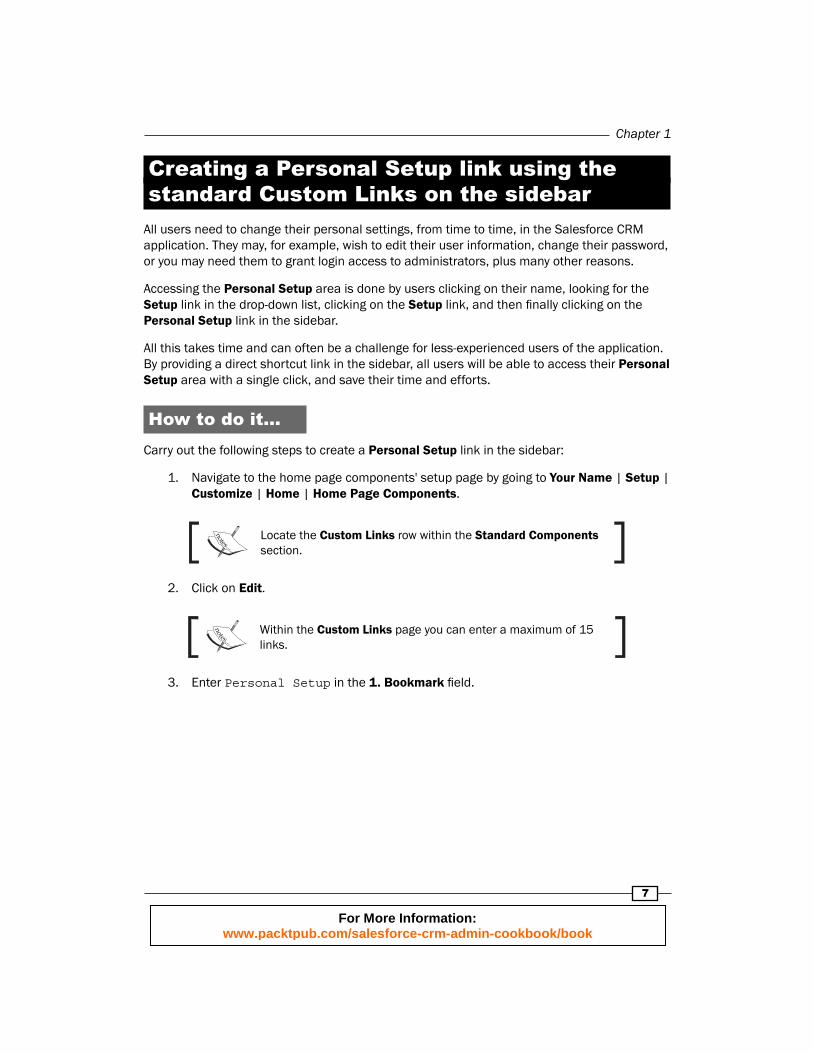
All users need to change their personal settings, from time to time, in the Salesforce CRM application. They may, for example, wish to edit their user information, change their password, or you may need them to grant login access to administrators, plus many other reasons.
Accessing the Personal Setup area is done by users clicking on their name, looking for the Setup link in the drop-down list, clicking on the Setup link, and then fi nally clicking on the Personal Setup link in the sidebar.
All this takes time and can often be a challenge for less-experienced users of the application. By providing a direct shortcut link in the sidebar, all users will be able to access their Personal Setup area with a single click, and save their time and efforts.
How to do it...Carry out the following steps to create a Personal Setup link in the sidebar:
1. Navigate to the home page components' setup page by going to Your Name | Setup | Customize | Home | Home Page Components.
Locate the Custom Links row within the Standard Components section.
2. Click on Edit.
Within the Custom Links page you can enter a maximum of 15 links.
3. Enter Personal Setup in the 1. Bookmark fi eld.
For More Information: www.packtpub.com/salesforce-crm-admin-cookbook/book
Working with Home Page Components and Custom Links
8
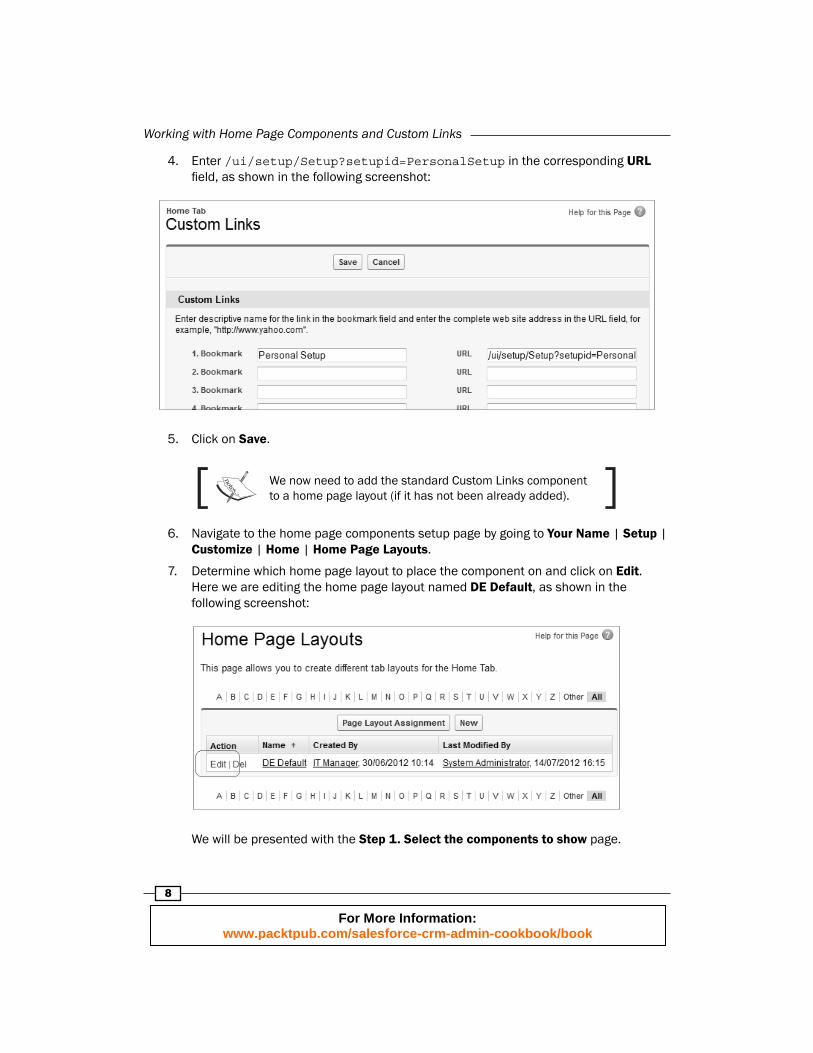
4. Enter /ui/setup/Setup?setupid=PersonalSetup in the corresponding URL fi eld, as shown in the following screenshot:
5. Click on Save.
We now need to add the standard Custom Links component to a home page layout (if it has not been already added).
6. Navigate to the home page components setup page by going to Your Name | Setup | Customize | Home | Home Page Layouts.
7. Determine which home page layout to place the component on and click on Edit. Here we are editing the home page layout named DE Default, as shown in the following screenshot:
We will be presented with the Step 1. Select the components to show page.
For More Information: www.packtpub.com/salesforce-crm-admin-cookbook/book
Chapter 1
9
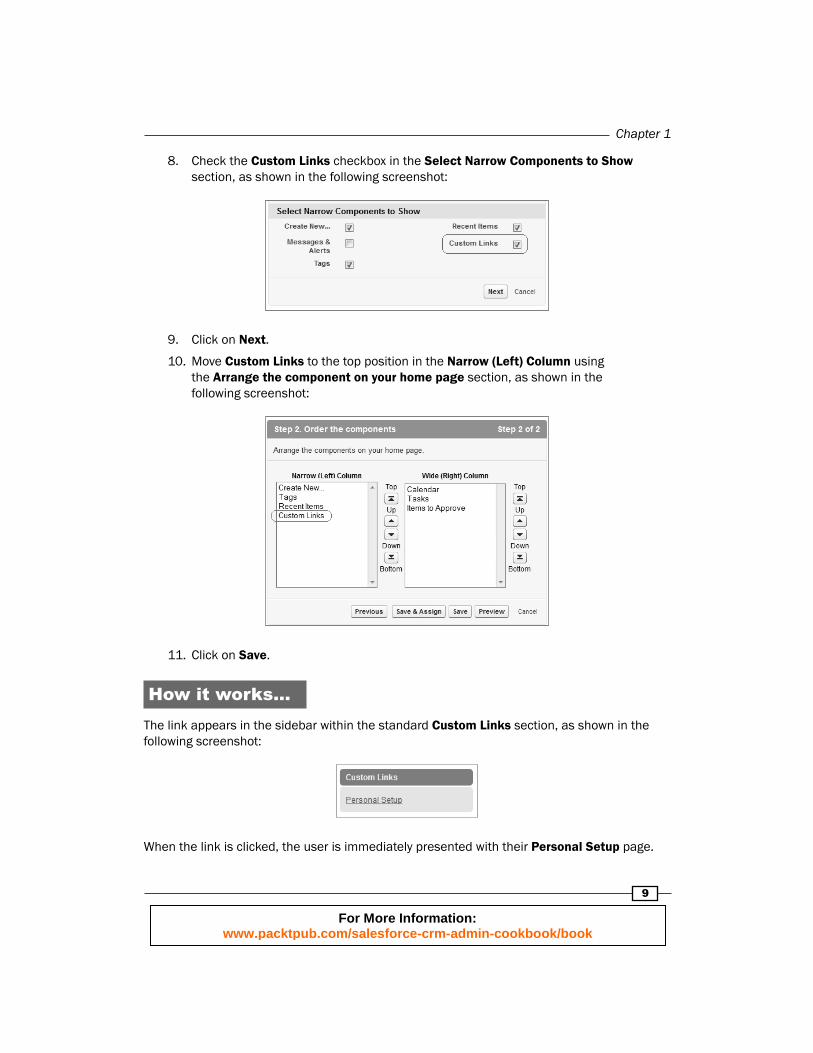
8. Check the Custom Links checkbox in the Select Narrow Components to Show section, as shown in the following screenshot:
9. Click on Next.
10. Move Custom Links to the top position in the Narrow (Left) Column using the Arrange the component on your home page section, as shown in the following screenshot:
11. Click on Save.
How it works...The link appears in the sidebar within the standard Custom Links section, as shown in the following screenshot:
When the link is clicked, the user is immediately presented with their Personal Setup page.
For More Information: www.packtpub.com/salesforce-crm-admin-cookbook/book
Working with Home Page Components and Custom Links
10
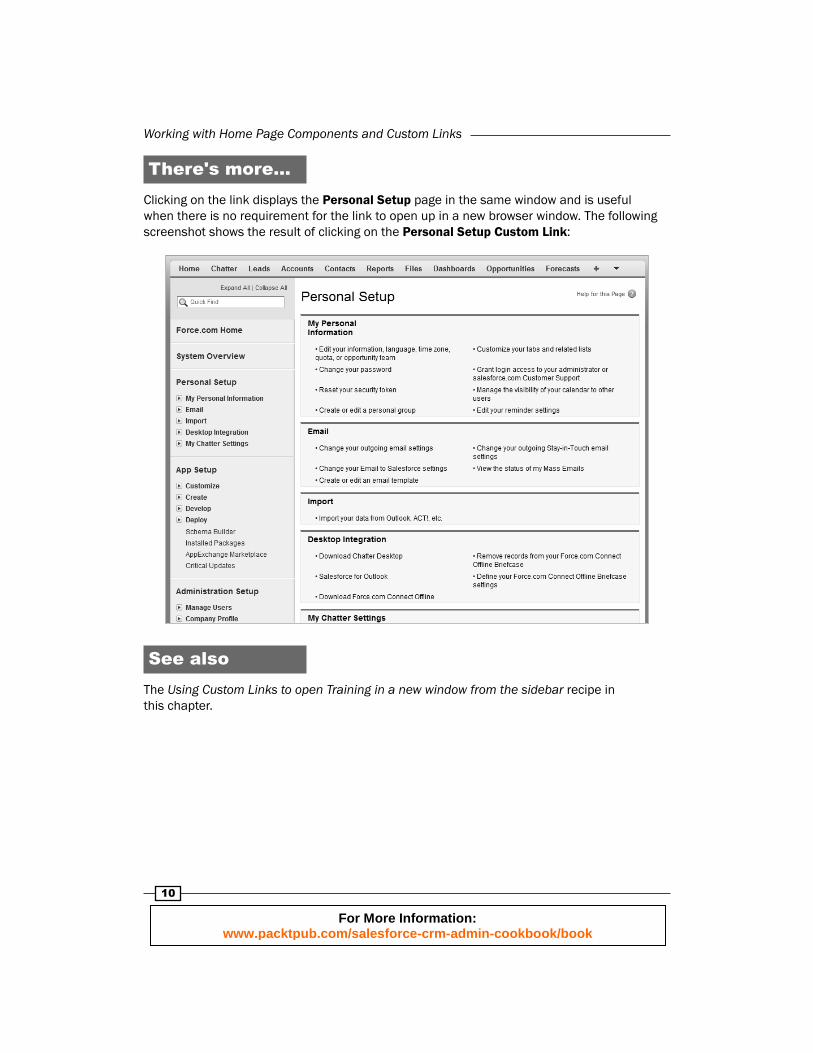
There's more...Clicking on the link displays the Personal Setup page in the same window and is useful when there is no requirement for the link to open up in a new browser window. The following screenshot shows the result of clicking on the Personal Setup Custom Link:
See alsoThe Using Custom Links to open Training in a new window from the sidebar recipe in this chapter.
For More Information: www.packtpub.com/salesforce-crm-admin-cookbook/book

Chapter 1
11
Using Custom Links to open Training in a new window from the sidebar
In the Salesforce CRM application, there are various options for help and training.
Accessing the training area is done by the users by clicking on the Help link at the top of the page (which then opens in a new browser window). Users then need to look for the Training tab within the new page and then click on the tab.
All this takes a little time and can often be a challenge for less-experienced users of the application. By providing a direct shortcut link in the sidebar, all users will be able to open Training automatically in a new window with a single click, thus saving time and effort.
How to do it...Carry out the following steps to create a link in the sidebar to open Training in a new window:
1. Navigate to the Custom Links home page by going to Your Name | Setup | Customize | Home | Custom Links.
2. Click on New.
3. Enter the label of the Custom Link in the Label fi eld. Here, type the text Training.
4. Accept the default name of the Custom Link in the Name fi eld, Training.
5. Leave the Protected Component checkbox unchecked.
The Protected Component option is used by developers to mark the Custom Link as protected in managed packages. This then allows the developer to delete the link in any future releases of the managed package without worrying about causing package installations to fail.
6. Enter the following description in the Description fi eld: This a link to Salesforce Training.
7. Choose the Display in new window option from the Behavior picklist. Choose the URL option from the Content Source picklist.
For More Information: www.packtpub.com/salesforce-crm-admin-cookbook/book
Working with Home Page Components and Custom Links
12
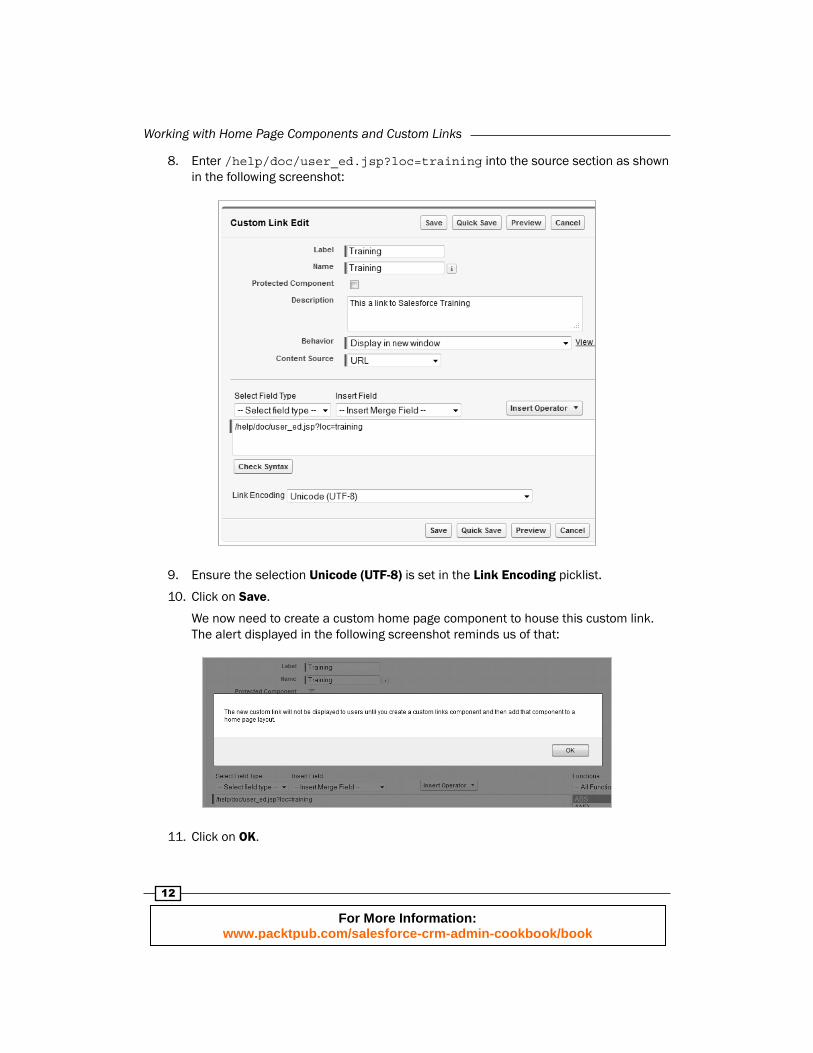
8. Enter /help/doc/user_ed.jsp?loc=training into the source section as shown in the following screenshot:
9. Ensure the selection Unicode (UTF-8) is set in the Link Encoding picklist.
10. Click on Save.
We now need to create a custom home page component to house this custom link. The alert displayed in the following screenshot reminds us of that:
11. Click on OK.
For More Information: www.packtpub.com/salesforce-crm-admin-cookbook/book
Chapter 1
13
12. Now navigate to the home page components setup page by going to Your Name | Setup | Customize | Home | Home Page Components.
13. Click on New.
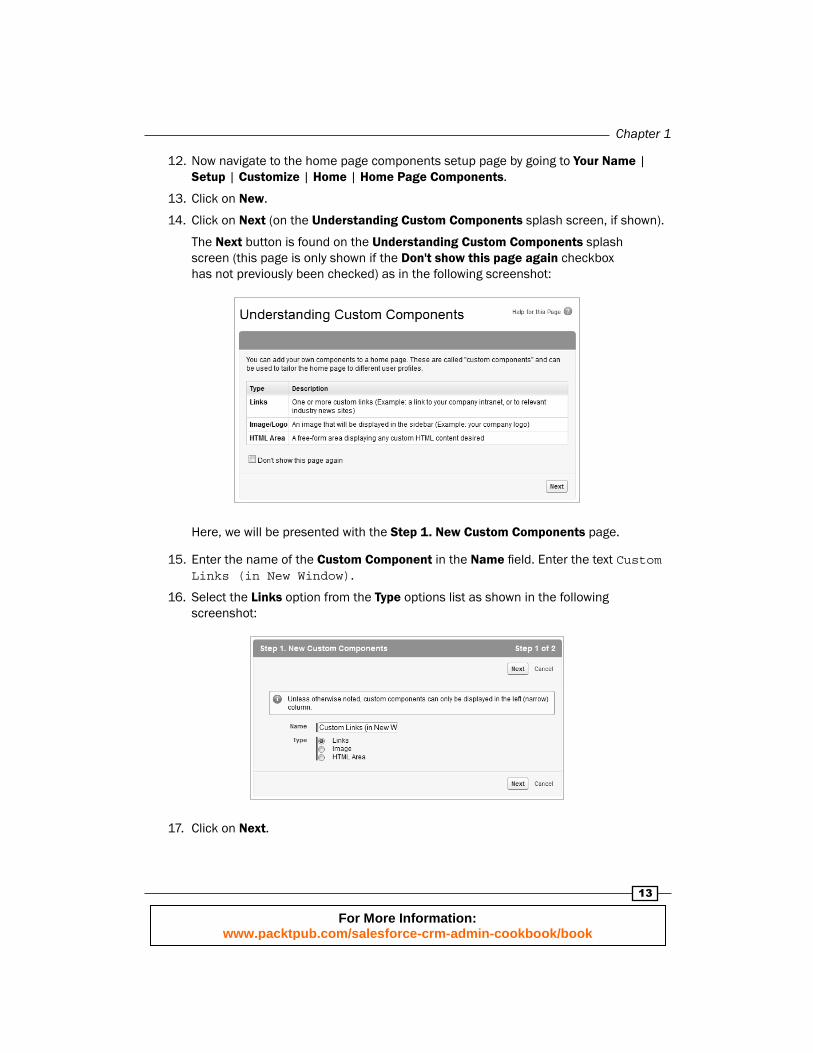
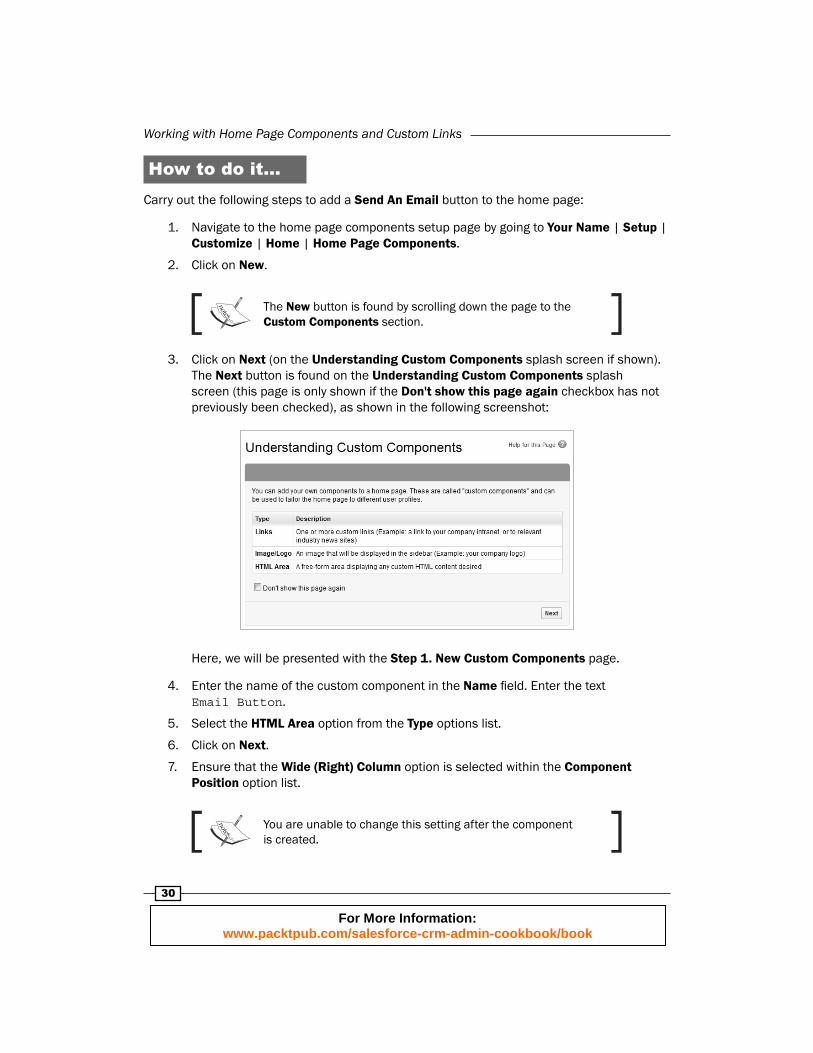
14. Click on Next (on the Understanding Custom Components splash screen, if shown).
The Next button is found on the Understanding Custom Components splash screen (this page is only shown if the Don't show this page again checkbox has not previously been checked) as in the following screenshot:
Here, we will be presented with the Step 1. New Custom Components page.
15. Enter the name of the Custom Component in the Name fi eld. Enter the text Custom Links (in New Window).
16. Select the Links option from the Type options list as shown in the following screenshot:
17. Click on Next.
For More Information: www.packtpub.com/salesforce-crm-admin-cookbook/book

Working with Home Page Components and Custom Links
14
18. Now add the Training link to the list of Custom Links to show as shown in the following screenshot:
19. Click on Save
We have created our Training link's custom home page component but we are not finished yet. We now need to add the custom home page component to a home page layout.
20. Navigate to the home page components setup page by going to Your Name | Setup | Customize | Home | Home Page Layouts.
21. Determine which home page layout to place the component on and click on Edit. Here we are editing the home page layout named DE Default, as shown in the following screenshot:
We will be presented with the Step 1. Select the components to show page.
For More Information: www.packtpub.com/salesforce-crm-admin-cookbook/book
Chapter 1
15
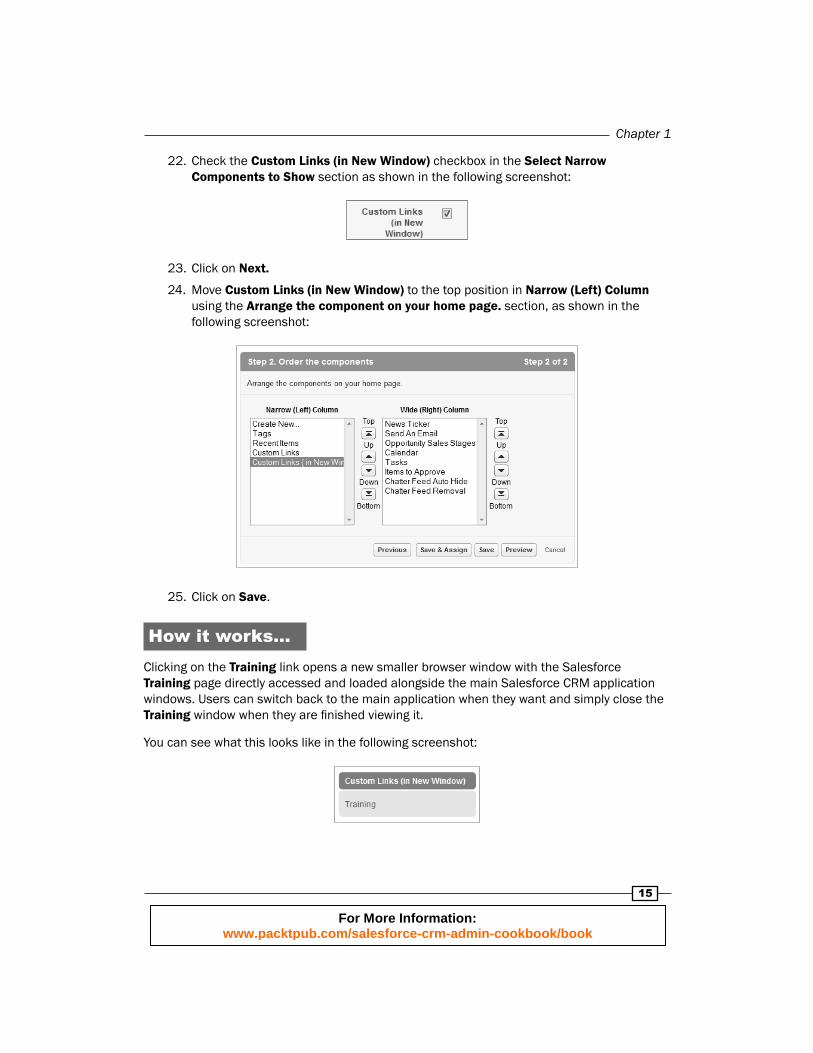
22. Check the Custom Links (in New Window) checkbox in the Select Narrow Components to Show section as shown in the following screenshot:
23. Click on Next.
24. Move Custom Links (in New Window) to the top position in Narrow (Left) Column using the Arrange the component on your home page. section, as shown in the following screenshot:
25. Click on Save.
How it works...Clicking on the Training link opens a new smaller browser window with the Salesforce Training page directly accessed and loaded alongside the main Salesforce CRM application windows. Users can switch back to the main application when they want and simply close the Training window when they are fi nished viewing it.
You can see what this looks like in the following screenshot:
For More Information: www.packtpub.com/salesforce-crm-admin-cookbook/book
Working with Home Page Components and Custom Links
16
See alsoThe Creating a Personal Setup link using the standard Custom Links on the sidebar recipe in this chapter.
Creating a news-ticker message on the home page
Animated text messages and custom HTML styling can be very effective in gaining users' attention.
Not only do they allow a reasonably large number of characters to be presented on a single line of text but they also provide a visually dynamic "headline news" style of message delivery for what can otherwise be overlooked static text.
You can draw attention to your news message on the Salesforce home page using this custom home page component recipe with the steps listed in the following section.
How to do it...Carry out the following steps to create a news-ticker message on the home page:
1. Navigate to the home page components setup page, by clicking the following: Your Name | Setup | Customize | Home | Home Page Components.
2. Click on New.
The New button is found by scrolling down the page to the Custom Components section.
3. Click on Next (on the Understanding Custom Components splash screen if shown). The Next button is found on the Understanding Custom Components splash screen (this page is only shown if the Don't show this page again checkbox has not previously been checked) as in the following screenshot:
For More Information: www.packtpub.com/salesforce-crm-admin-cookbook/book

Chapter 1
17
Here, we are presented with the Step 1. New Custom Components page.
4. Enter the name of the custom component in the Name fi eld. Enter the text News Ticker.
5. Select the HTML Area option from the Type options list.
6. Click on Next.
7. Ensure that the Wide (Right) Column option is selected within the Component Position option list.
You are unable to change this setting after the component is created.
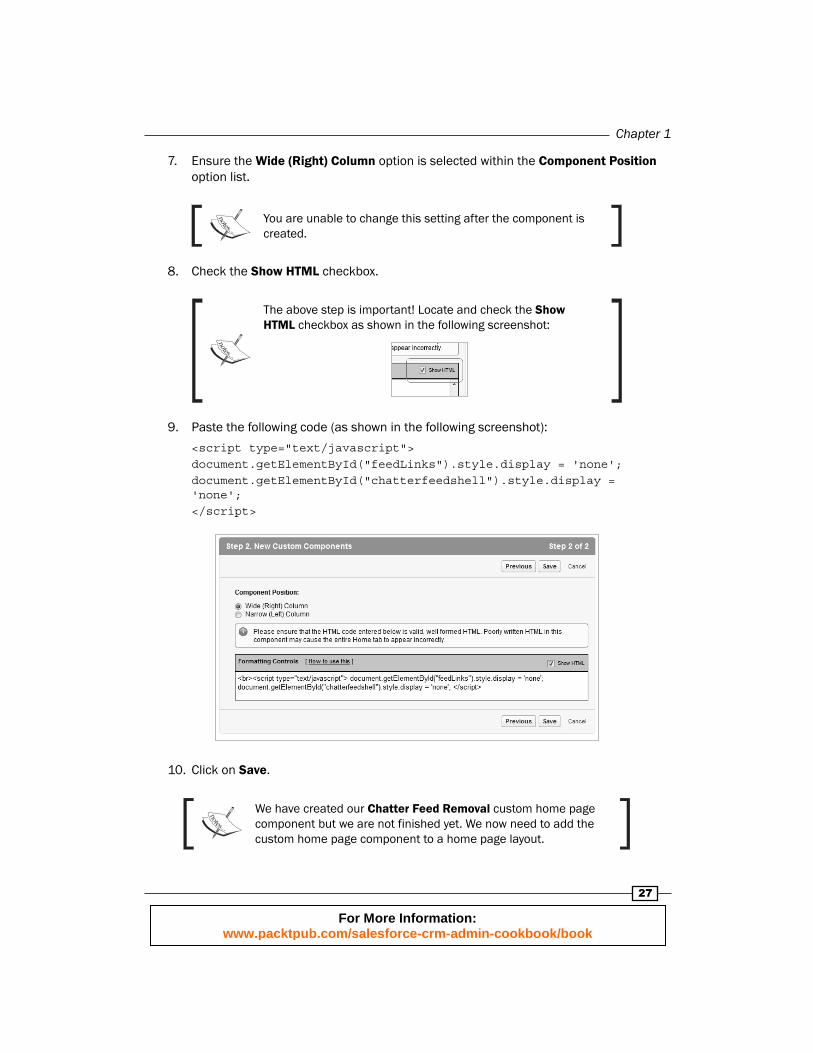
8. Check the Show HTML checkbox.
The above step is important! Locate and check the Show HTML checkbox, as shown in the following screenshot:
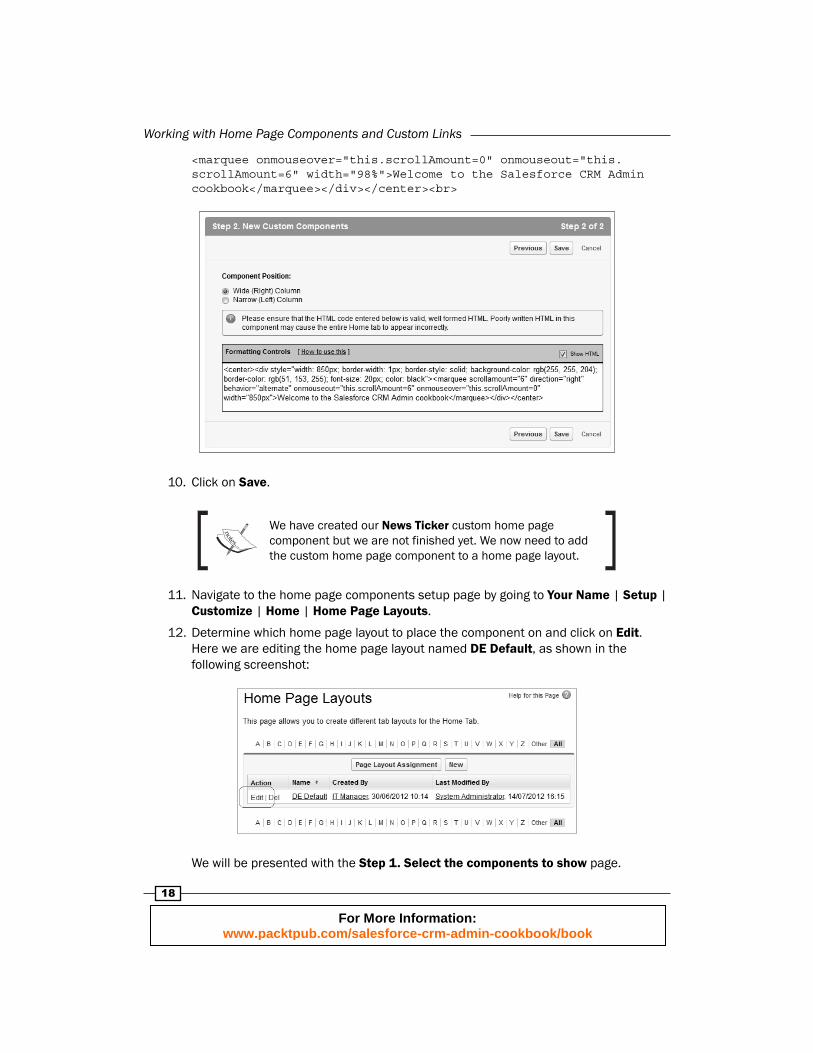
9. Paste the following code (as shown in the following screenshot):
<center><div style="border: 1px solid rgb(51, 153, 255); width: 96%; color: black; font-size: 18px; background-color: rgb(255, 255, 204);" id="NewsTicker">
For More Information: www.packtpub.com/salesforce-crm-admin-cookbook/book
Working with Home Page Components and Custom Links
18
<marquee onmouseover="this.scrollAmount=0" onmouseout="this.scrollAmount=6" width="98%">Welcome to the Salesforce CRM Admin cookbook</marquee></div></center><br>
10. Click on Save.
We have created our News Ticker custom home page component but we are not finished yet. We now need to add the custom home page component to a home page layout.
11. Navigate to the home page components setup page by going to Your Name | Setup | Customize | Home | Home Page Layouts.
12. Determine which home page layout to place the component on and click on Edit. Here we are editing the home page layout named DE Default, as shown in the following screenshot:
We will be presented with the Step 1. Select the components to show page.
For More Information: www.packtpub.com/salesforce-crm-admin-cookbook/book
Chapter 1
19
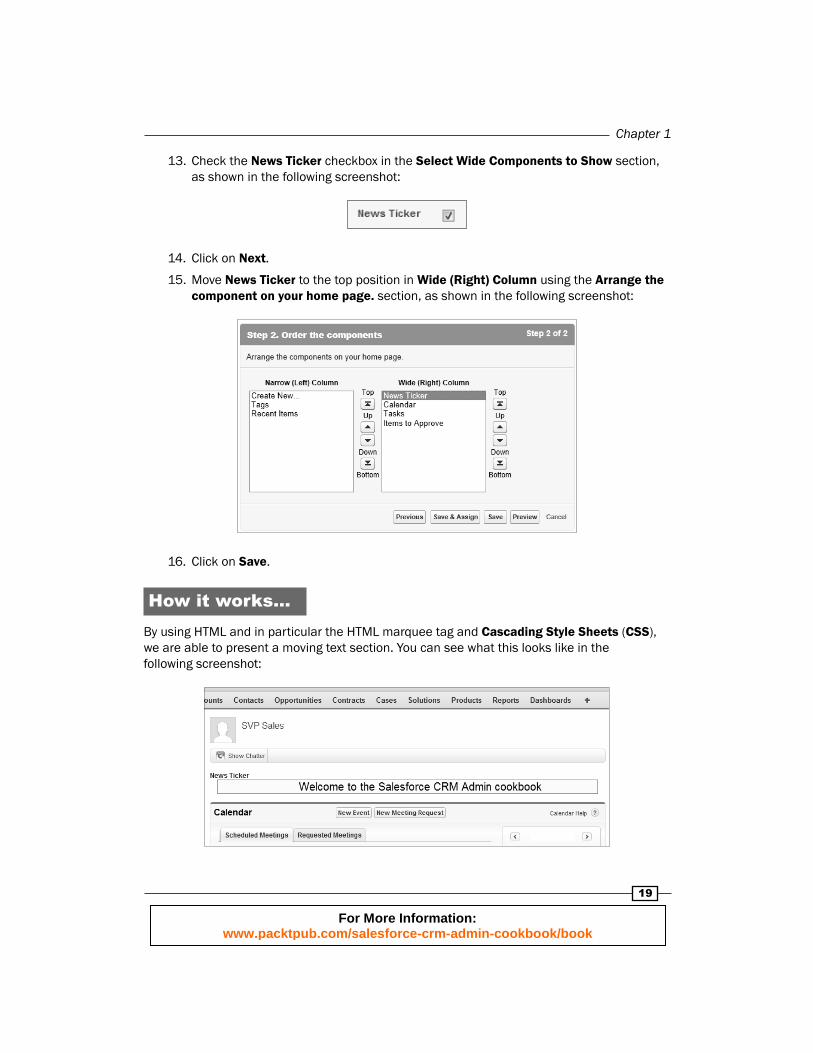
13. Check the News Ticker checkbox in the Select Wide Components to Show section, as shown in the following screenshot:
14. Click on Next.
15. Move News Ticker to the top position in Wide (Right) Column using the Arrange the component on your home page. section, as shown in the following screenshot:
16. Click on Save.
How it works...By using HTML and in particular the HTML marquee tag and Cascading Style Sheets (CSS), we are able to present a moving text section. You can see what this looks like in the following screenshot:
For More Information: www.packtpub.com/salesforce-crm-admin-cookbook/book
Working with Home Page Components and Custom Links
20
There's more...Replace the text Welcome to the Salesforce CRM Admin cookbook with a suitable message of your choice.
When entering HTML and JavaScript code into the HTML editor section (in step 2 of the New Custom Component wizard) you must ensure that the code is valid.
Pay particular attention to the displayed warning message:
Please ensure that the HTML code entered below is valid, well formed HTML. Poorly written HTML in this component may cause the entire Home tab to appear incorrectly
There is a maximum of 20 custom components that can be added to a Home Page layout.
The marquee tag is a non-standard HTML element which causes text to scroll up, down, left or right automatically. From http://en.wikipedia.org/wiki/Marquee_element:
The marquee element was fi rst invented for Microsoft's Internet Explorer and is still supported by it. Firefox, Opera, Chrome, and Safari web browsers support it for compatibility with legacy pages.
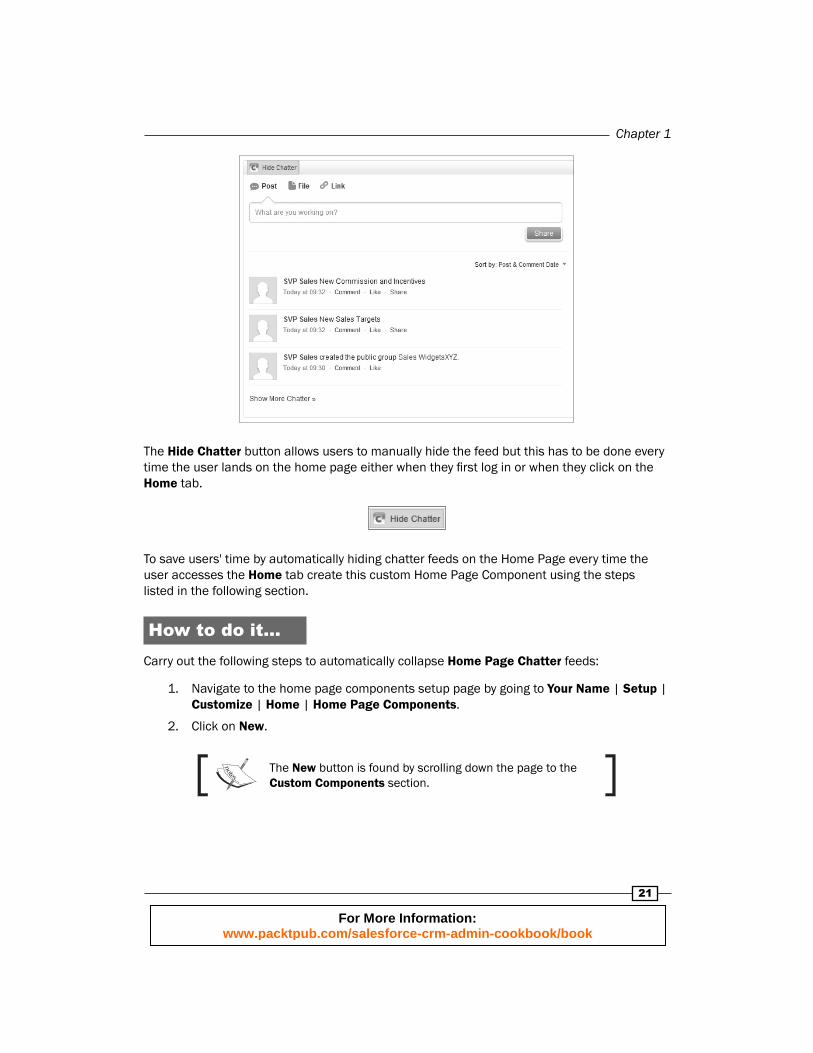
Automatically collapsing Chatter feeds on the home page
The Chatter feed on the home page appears at the top of the home page layout (as shown in the screenshot in the Introduction section) and is a great place for presenting the feed of Chatter posts.
However, since the Chatter feed is always shown at the top of the home page, users fi nd themselves having to scroll down the home page to get to their calendar, items to approve, or anything else that has been confi gured on their home page, as shown in the following screenshot:
For More Information: www.packtpub.com/salesforce-crm-admin-cookbook/book
Chapter 1
21
The Hide Chatter button allows users to manually hide the feed but this has to be done every time the user lands on the home page either when they fi rst log in or when they click on the Home tab.
To save users' time by automatically hiding chatter feeds on the Home Page every time the user accesses the Home tab create this custom Home Page Component using the steps listed in the following section.
How to do it...Carry out the following steps to automatically collapse Home Page Chatter feeds:
1. Navigate to the home page components setup page by going to Your Name | Setup | Customize | Home | Home Page Components.
2. Click on New.
The New button is found by scrolling down the page to the Custom Components section.
For More Information: www.packtpub.com/salesforce-crm-admin-cookbook/book
Working with Home Page Components and Custom Links
22
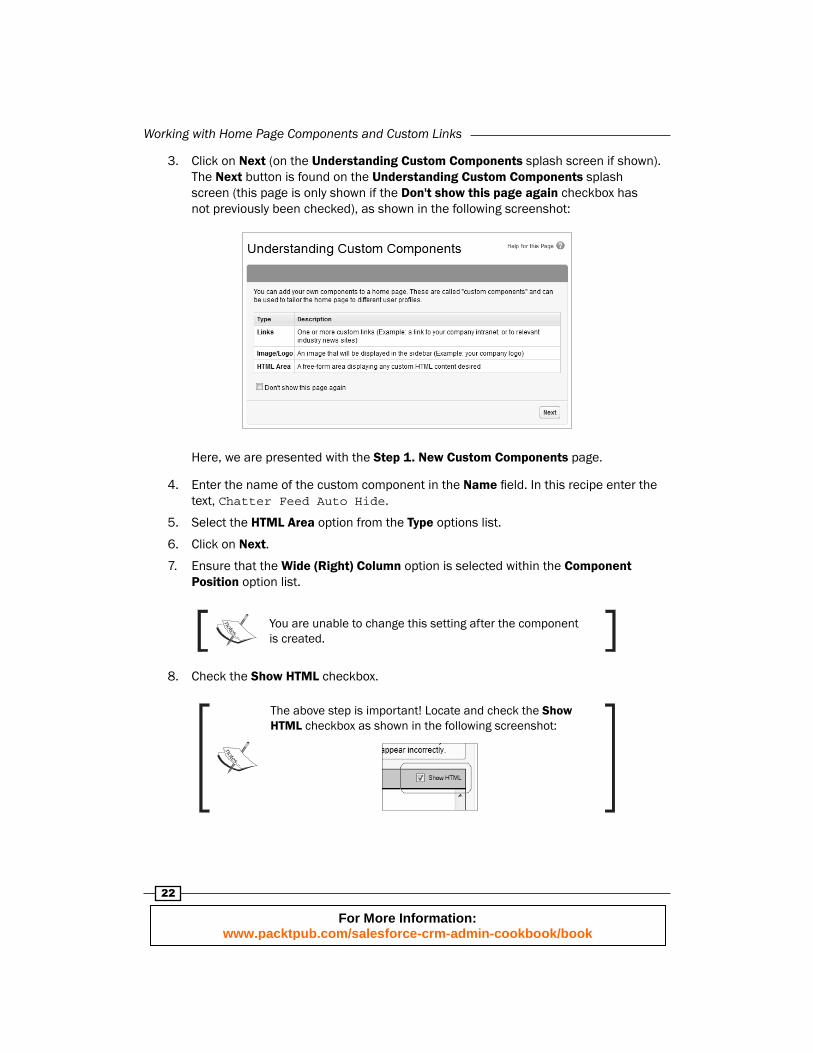
3. Click on Next (on the Understanding Custom Components splash screen if shown). The Next button is found on the Understanding Custom Components splash screen (this page is only shown if the Don't show this page again checkbox has not previously been checked), as shown in the following screenshot:
Here, we are presented with the Step 1. New Custom Components page.
4. Enter the name of the custom component in the Name fi eld. In this recipe enter the text, Chatter Feed Auto Hide.
5. Select the HTML Area option from the Type options list.
6. Click on Next.
7. Ensure that the Wide (Right) Column option is selected within the Component Position option list.
You are unable to change this setting after the component is created.
8. Check the Show HTML checkbox.
The above step is important! Locate and check the Show HTML checkbox as shown in the following screenshot:
For More Information: www.packtpub.com/salesforce-crm-admin-cookbook/book

Chapter 1
23
9. Paste the following code (as shown in the following screenshot):
<br><script> var e = document.getElementById("showFeedLink"); if(e.style.display == "none") chatter.getFeed().toggle(); </script>
10. Click on Save.
We have created our Chatter Feed Auto Hide custom home page component but we are not finished yet. We now need to add the custom home page component to a home page layout.
11. Navigate to the home page components setup page by going to Your Name | Setup | Customize | Home | Home Page Layouts.
12. Determine which home page layout to place the component on and click on Edit. Here we are editing the home page layout named DE Default.
We will be presented with the Step 1. Select the components to show page.
13. Check the Chatter Feed Auto Hide checkbox in the Select Wide Components to Show section, as shown in the following screenshot:
14. Click on Next.
For More Information: www.packtpub.com/salesforce-crm-admin-cookbook/book

Working with Home Page Components and Custom Links
24
15. Move the Chatter Feed Auto Hide to the top position in Wide (Right) Column using the Arrange the component on your home page section, as shown in the following screenshot:
16. Click on Save.
There's more...When entering HTML and JavaScript code into the HTML editor section (in step 2 of the New Custom Component wizard) you must ensure that the code is valid.
Pay particular attention to the displayed warning message:
Please ensure that the HTML code entered below is valid, well formed HTML. Poorly written HTML in this component may cause the entire Home tab to appear incorrectly
There is a maximum of 20 custom components that can be added to a home page layout.
This recipe introduces an element of risk and is not supported by salesforce.com.
If salesforce.com chooses to rename the HTML ID, used for the Hide Chatter button, this recipe will cease to function. This recipe code would need to be changed to incorporate the new ID; hence this technique is not generally recommended by Salesforce.
For More Information: www.packtpub.com/salesforce-crm-admin-cookbook/book
Chapter 1
25
See alsoThe Removing Chatter feeds on the home page recipe in this chapter.
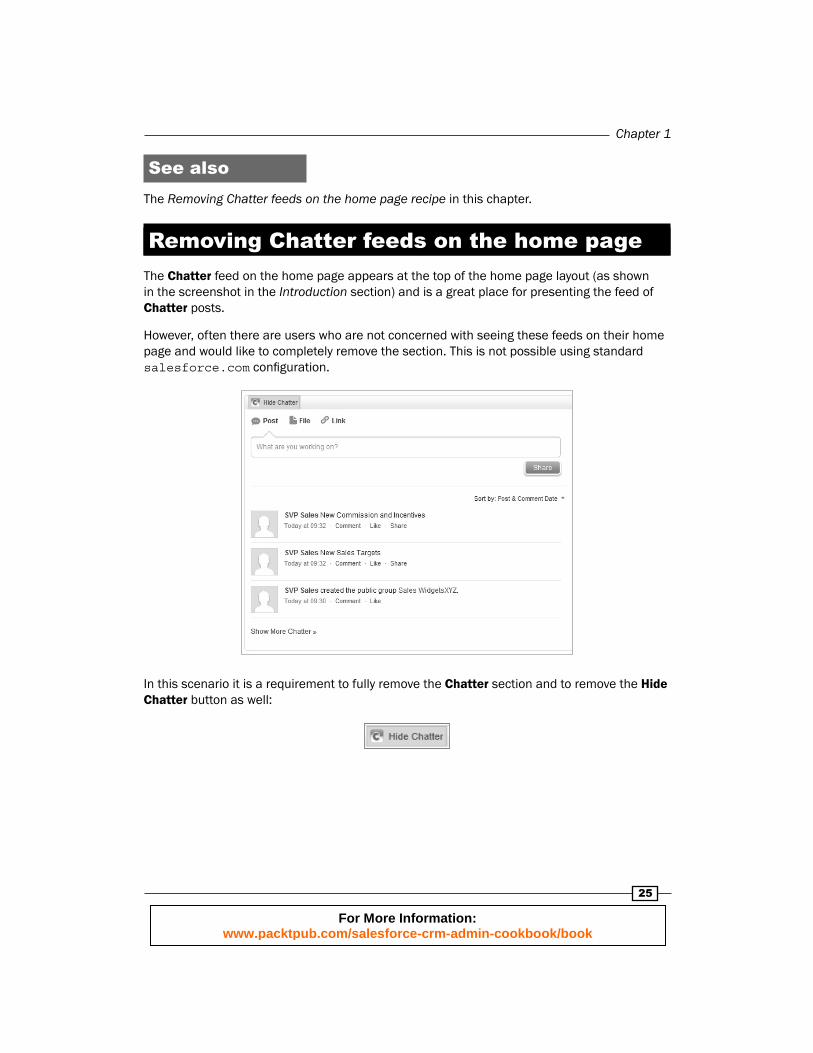
Removing Chatter feeds on the home pageThe Chatter feed on the home page appears at the top of the home page layout (as shown in the screenshot in the Introduction section) and is a great place for presenting the feed of Chatter posts.
However, often there are users who are not concerned with seeing these feeds on their home page and would like to completely remove the section. This is not possible using standard salesforce.com confi guration.
In this scenario it is a requirement to fully remove the Chatter section and to remove the Hide Chatter button as well:
For More Information: www.packtpub.com/salesforce-crm-admin-cookbook/book

Working with Home Page Components and Custom Links
26
You can remove Chatter feeds as well as the Chatter Hide/Show button on the home page using this custom home page component recipe with the set of steps listed in the following section.
How to do it...Carry out the following steps to remove Chatter feeds from the home page:
1. Navigate to the home page components setup page, by clicking the following: Your Name | Setup | Customize | Home | Home Page Components.
2. Click on New.
The New button is found by scrolling down the page to the Custom Components section.
3. Click on Next (on the Understanding Custom Components splash screen if shown). The Next button is found on the Understanding Custom Components splash screen (this page is only shown if the Don't show this page checkbox again has not previously been checked) as in the following screenshot:
Here, we are presented with the Step 1. New Custom Components page.
4. Enter the name of the custom component in the Name fi eld. In this recipe, enter the text Chatter Feed Removal.
5. Select the HTML Area option from the Type options list.
6. Click on Next.
For More Information: www.packtpub.com/salesforce-crm-admin-cookbook/book
Chapter 1
27
7. Ensure the Wide (Right) Column option is selected within the Component Position option list.
You are unable to change this setting after the component is created.
8. Check the Show HTML checkbox.
The above step is important! Locate and check the Show HTML checkbox as shown in the following screenshot:
9. Paste the following code (as shown in the following screenshot):
<script type="text/javascript">document.getElementById("feedLinks").style.display = 'none'; document.getElementById("chatterfeedshell").style.display = 'none';</script>
10. Click on Save.
We have created our Chatter Feed Removal custom home page component but we are not finished yet. We now need to add the custom home page component to a home page layout.
For More Information: www.packtpub.com/salesforce-crm-admin-cookbook/book

Working with Home Page Components and Custom Links
28
11. Navigate to the home page components setup page by going to Your Name | Setup | Customize | Home | Home Page Layouts.
12. Determine which home page layout to place the component on and click on Edit. Here we are editing the home page layout named DE Default.
We will be presented with the Step 1. Select the components to show page.
13. Check the Chatter Feed Removal checkbox in the Select Wide Components to Show section, as shown in the following screenshot:
14. Click on Next.
15. Position the News Ticker as the top position in the Wide (Right) Column using the Arrange the component on your home page. section, as shown in the following screenshot:
16. Click on Save.
How it works...In the following screenshot, you can see the effects of having the Chatter section removed from the home page:
For More Information: www.packtpub.com/salesforce-crm-admin-cookbook/book

Chapter 1
29
There's more...When entering HTML and JavaScript code into the HTML editor section (in step 2 of the New Custom Component wizard) you must ensure that the code is valid.
Pay particular attention to the displayed warning message:
Please ensure that the HTML code entered below is valid, well formed HTML. Poorly written HTML in this component may cause the entire Home tab to appear incorrectly
There are a maximum of 20 custom components that can be added to a Home Page layout.
This recipe introduces an element of risk and is not supported by salesforce.com.
If salesforce.com chooses to rename the HTML IDs, used for the Chatter section, this recipe will cease to function. This recipe's code would need to be changed to incorporate the new ID, hence this technique is not generally recommended by Salesforce.
Adding a Send An Email button on the home page
Within the Salesforce CRM application you can natively add custom links to the home page, which can be confi gured to call web URLs. These URLs can be either external to Salesforce or internal, such as a link to the Salesforce CRM Training pages (covered in an earlier recipe within this chapter).
Salesforce does not, however, natively provide a way of adding custom buttons onto the home page in order to call web URLs.
Often it is preferable to provide a button to invoke certain behavior (rather than a URL link). One such example is a Send An Email button.
For More Information: www.packtpub.com/salesforce-crm-admin-cookbook/book
Working with Home Page Components and Custom Links
30
How to do it...Carry out the following steps to add a Send An Email button to the home page:
1. Navigate to the home page components setup page by going to Your Name | Setup | Customize | Home | Home Page Components.
2. Click on New.
The New button is found by scrolling down the page to the Custom Components section.
3. Click on Next (on the Understanding Custom Components splash screen if shown). The Next button is found on the Understanding Custom Components splash screen (this page is only shown if the Don't show this page again checkbox has not previously been checked), as shown in the following screenshot:
Here, we will be presented with the Step 1. New Custom Components page.
4. Enter the name of the custom component in the Name fi eld. Enter the text Email Button.
5. Select the HTML Area option from the Type options list.
6. Click on Next.
7. Ensure that the Wide (Right) Column option is selected within the Component Position option list.
You are unable to change this setting after the component is created.
For More Information: www.packtpub.com/salesforce-crm-admin-cookbook/book
Chapter 1
31
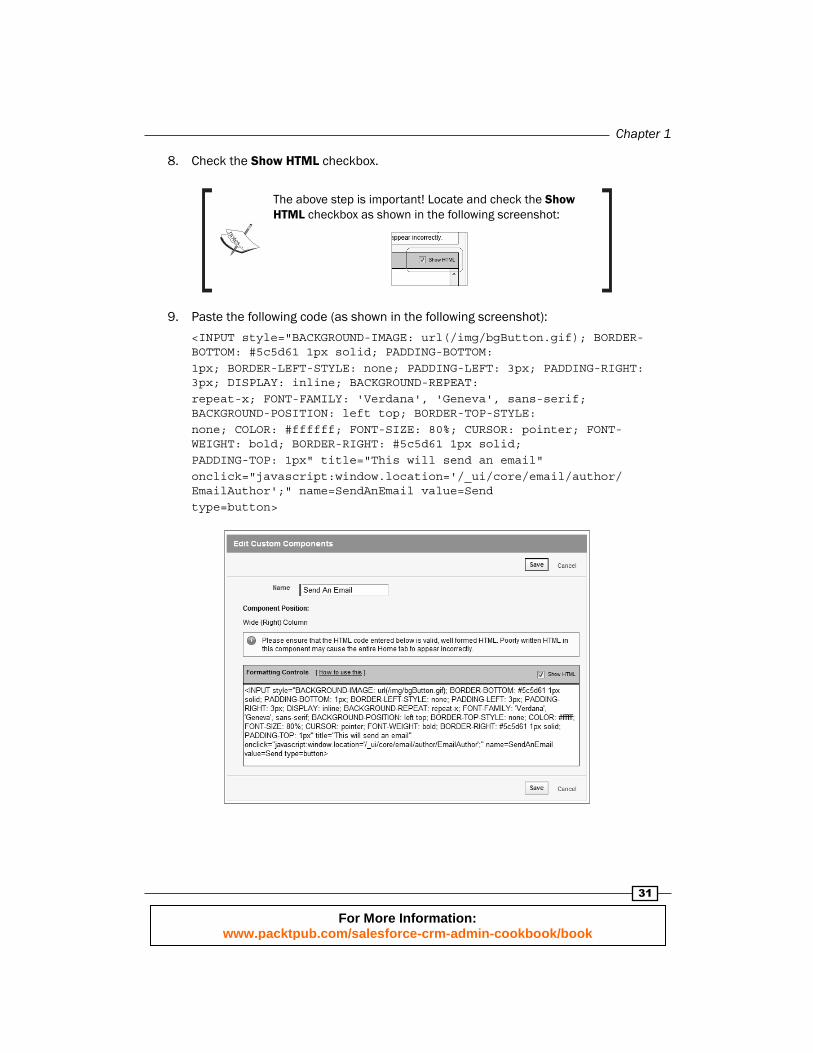
8. Check the Show HTML checkbox.
The above step is important! Locate and check the Show HTML checkbox as shown in the following screenshot:
9. Paste the following code (as shown in the following screenshot):
<INPUT style="BACKGROUND-IMAGE: url(/img/bgButton.gif); BORDER-BOTTOM: #5c5d61 1px solid; PADDING-BOTTOM: 1px; BORDER-LEFT-STYLE: none; PADDING-LEFT: 3px; PADDING-RIGHT: 3px; DISPLAY: inline; BACKGROUND-REPEAT: repeat-x; FONT-FAMILY: 'Verdana', 'Geneva', sans-serif; BACKGROUND-POSITION: left top; BORDER-TOP-STYLE: none; COLOR: #ffffff; FONT-SIZE: 80%; CURSOR: pointer; FONT-WEIGHT: bold; BORDER-RIGHT: #5c5d61 1px solid; PADDING-TOP: 1px" title="This will send an email" onclick="javascript:window.location='/_ui/core/email/author/EmailAuthor';" name=SendAnEmail value=Send type=button>
For More Information: www.packtpub.com/salesforce-crm-admin-cookbook/book
Working with Home Page Components and Custom Links
32
10. Click on Save.
We have created our Send An Email button's custom home page component but we are not finished yet. We now need to add the custom home page component to a home page layout.
11. Navigate to the home page components setup page, by clicking the following: Your Name | Setup | Customize | Home | Home Page Layouts.
12. Determine which home page layout to place the component on and click Edit. Here we are editing the home page layout named DE Default.
We will be presented with the Step 1. Select the components to show page.
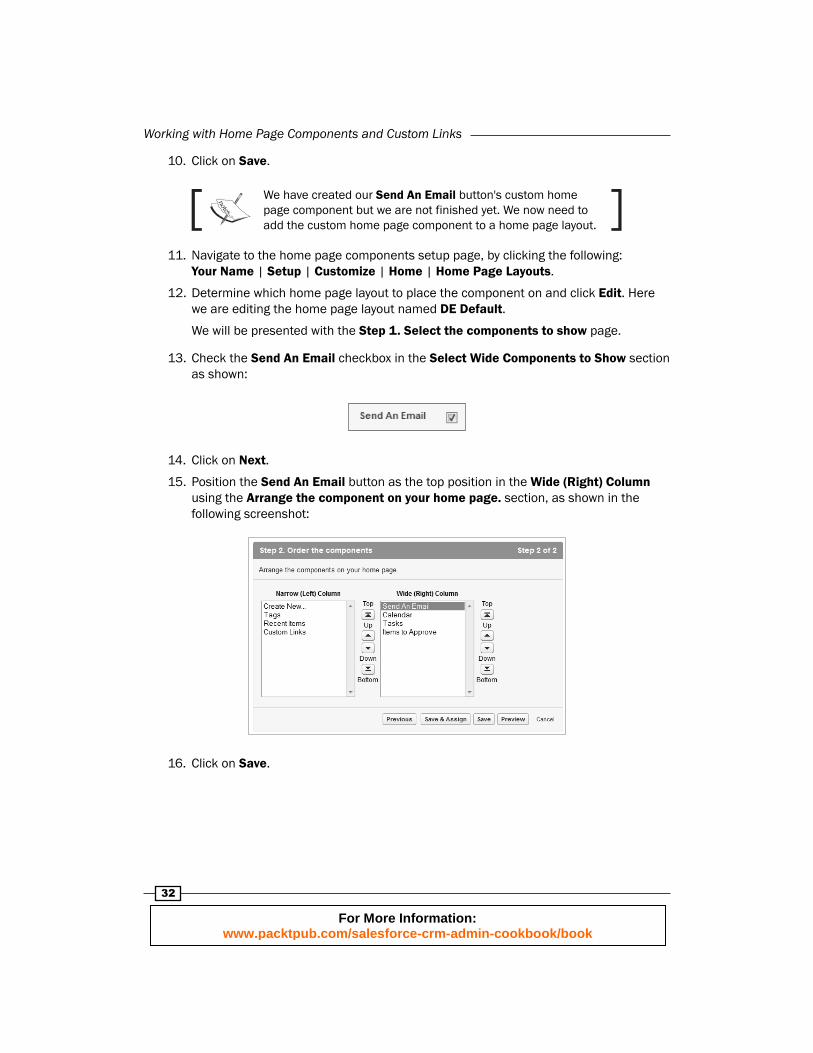
13. Check the Send An Email checkbox in the Select Wide Components to Show section as shown:
14. Click on Next.
15. Position the Send An Email button as the top position in the Wide (Right) Column using the Arrange the component on your home page. section, as shown in the following screenshot:
16. Click on Save.
For More Information: www.packtpub.com/salesforce-crm-admin-cookbook/book

Chapter 1
33
How it works...You can see what this looks like in the following screenshot:
When the button is clicked the task's e-mail page is displayed, as shown in the following screenshot:
There's more...When entering HTML and JavaScript code into the HTML editor section (in Step 2 of the New Custom Component wizard) you must ensure that the code is valid.
For More Information: www.packtpub.com/salesforce-crm-admin-cookbook/book

Working with Home Page Components and Custom Links
34
Pay particular attention to the displayed warning message:
Please ensure that the HTML code entered below is valid, well formed HTML. Poorly written HTML in this component may cause the entire Home tab to appear incorrectly
There are a maximum of 20 custom components that can be added to a home page layout.
Showing Opportunity Sales Stages descriptions on the home page
The Opportunity Sales Stages confi gured in a Salesforce organization are important for pipeline and performance measurement. The stages should be clearly described and communicated to the sales team and across the business. In this a recipe we will describe the stages in Salesforce and make these descriptions available on the home page.
Getting readyCarry out the following steps to add sales stages descriptions:
1. Navigate to the home page components setup page by going to Your Name | Setup | Customize | Opportunities | Fields | Stage.
2. Click on Edit on the Stage Name.
3. Enter text in the Description fi eld.
Now continue to add descriptions for all your sales stages by following the steps above.
For More Information: www.packtpub.com/salesforce-crm-admin-cookbook/book

Chapter 1
35
How to do it...Carry out the following steps to create an Apex class to show Opportunity Sales Stages descriptions on the home page:
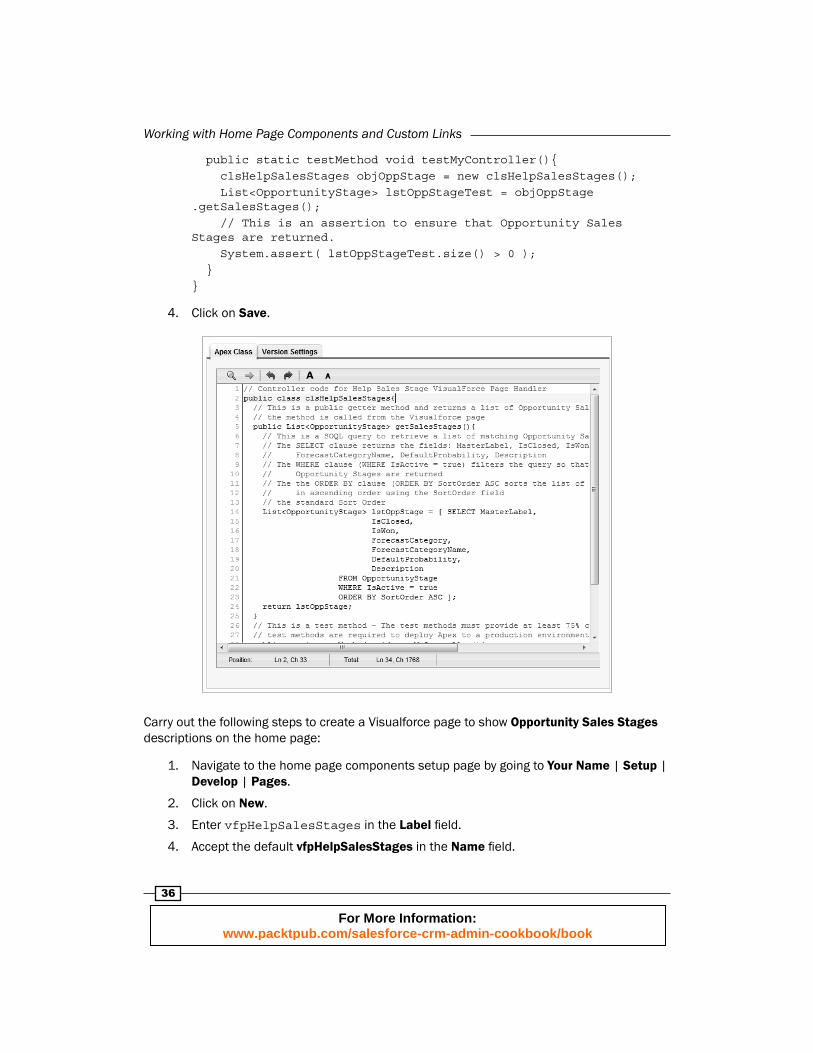
1. Navigate to the home page components setup page by going to Your Name | Setup | Develop | Apex Classes.
2. Click on New.
3. Paste the following code ( as shown in the following screenshot):
// Controller code for Help Sales Stage VisualForce Page Handlerpublic class clsHelpSalesStages{ // This is a public getter method and returns a list of Opportunity Sales Stages // the method is called from the Visualforce page public List<OpportunityStage> getSalesStages(){ // This is a SOQL query to retrieve a list of matching Opportunity Sales Stages // The SELECT clause returns the fields: MasterLabel, IsClosed, IsWon, ForecastCategory, // ForecastCategoryName, DefaultProbability, Description // The WHERE clause (WHERE IsActive = true) filters the query so that only Active // Opportunity Stages are returned // The the ORDER BY clause (ORDER BY SortOrder ASC sorts the list of Opportunity Stages // in ascending order using the SortOrder field // the standard Sort Order List<OpportunityStage> lstOppStage = [ SELECT MasterLabel, IsClosed, IsWon, ForecastCategory, ForecastCategoryName, DefaultProbability, Description FROM OpportunityStage WHERE IsActive = true ORDER BY SortOrder ASC ]; return lstOppStage; } // This is a test method - The test methods must provide at least 75% code coverage // test methods are required to deploy Apex to a production environment
For More Information: www.packtpub.com/salesforce-crm-admin-cookbook/book
Working with Home Page Components and Custom Links
36
public static testMethod void testMyController(){ clsHelpSalesStages objOppStage = new clsHelpSalesStages(); List<OpportunityStage> lstOppStageTest = objOppStage .getSalesStages(); // This is an assertion to ensure that Opportunity Sales Stages are returned. System.assert( lstOppStageTest.size() > 0 ); }}
4. Click on Save.
Carry out the following steps to create a Visualforce page to show Opportunity Sales Stages descriptions on the home page:
1. Navigate to the home page components setup page by going to Your Name | Setup | Develop | Pages.
2. Click on New.
3. Enter vfpHelpSalesStages in the Label fi eld.
4. Accept the default vfpHelpSalesStages in the Name fi eld.
For More Information: www.packtpub.com/salesforce-crm-admin-cookbook/book
Chapter 1
37
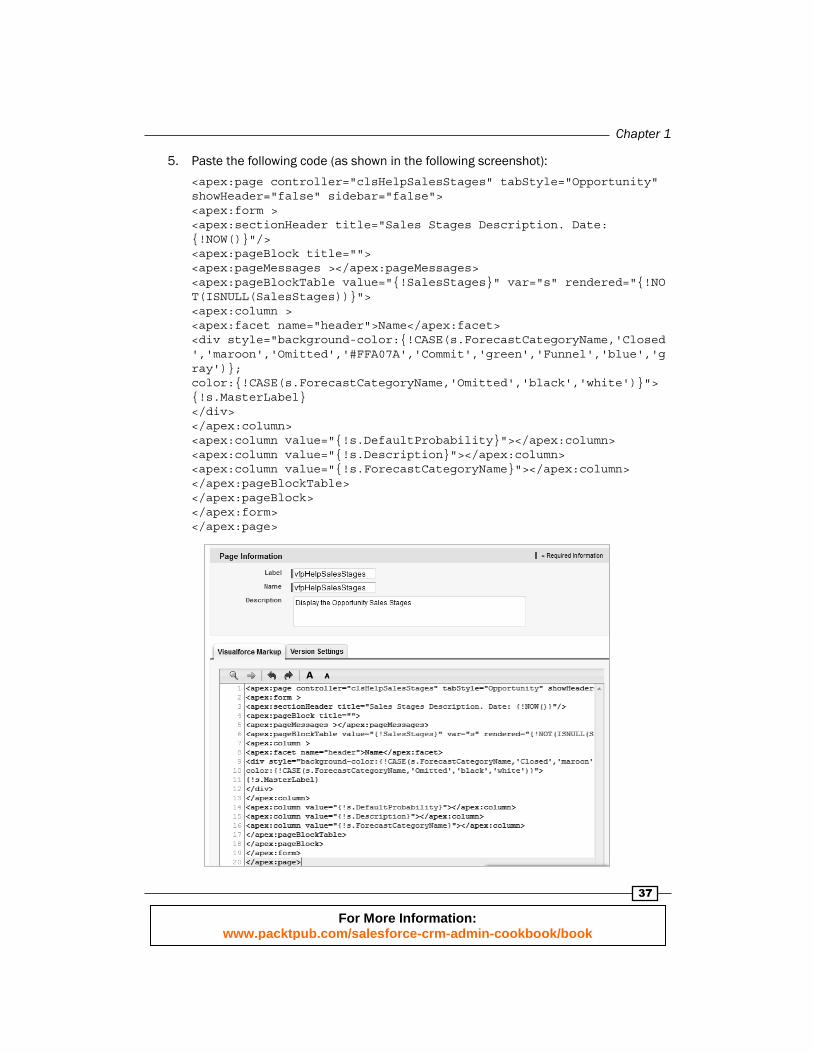
5. Paste the following code (as shown in the following screenshot):
<apex:page controller="clsHelpSalesStages" tabStyle="Opportunity" showHeader="false" sidebar="false"><apex:form ><apex:sectionHeader title="Sales Stages Description. Date: {!NOW()}"/><apex:pageBlock title=""><apex:pageMessages ></apex:pageMessages><apex:pageBlockTable value="{!SalesStages}" var="s" rendered="{!NOT(ISNULL(SalesStages))}"><apex:column ><apex:facet name="header">Name</apex:facet><div style="background-color:{!CASE(s.ForecastCategoryName,'Closed','maroon','Omitted','#FFA07A','Commit','green','Funnel','blue','gray')}; color:{!CASE(s.ForecastCategoryName,'Omitted','black','white')}">{!s.MasterLabel}</div></apex:column><apex:column value="{!s.DefaultProbability}"></apex:column><apex:column value="{!s.Description}"></apex:column><apex:column value="{!s.ForecastCategoryName}"></apex:column></apex:pageBlockTable></apex:pageBlock></apex:form></apex:page>
For More Information: www.packtpub.com/salesforce-crm-admin-cookbook/book
Working with Home Page Components and Custom Links
38
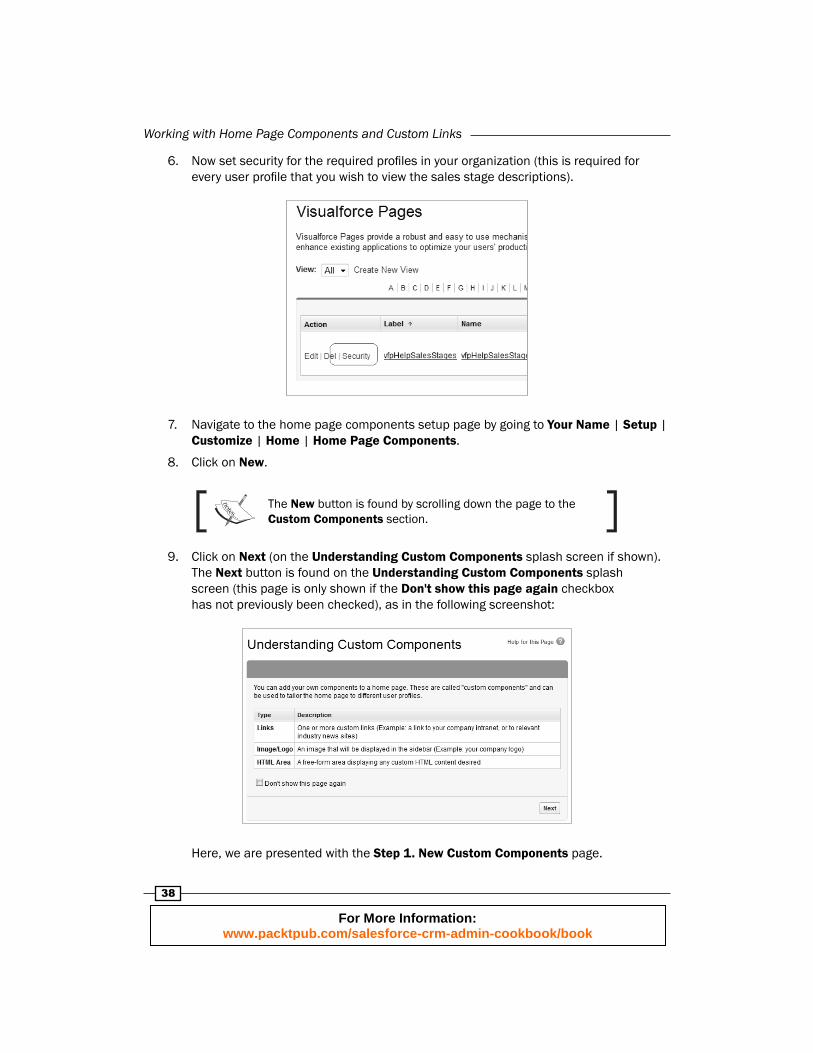
6. Now set security for the required profi les in your organization (this is required for every user profi le that you wish to view the sales stage descriptions).
7. Navigate to the home page components setup page by going to Your Name | Setup | Customize | Home | Home Page Components.
8. Click on New.
The New button is found by scrolling down the page to the Custom Components section.
9. Click on Next (on the Understanding Custom Components splash screen if shown). The Next button is found on the Understanding Custom Components splash screen (this page is only shown if the Don't show this page again checkbox has not previously been checked), as in the following screenshot:
Here, we are presented with the Step 1. New Custom Components page.
For More Information: www.packtpub.com/salesforce-crm-admin-cookbook/book
Chapter 1
39
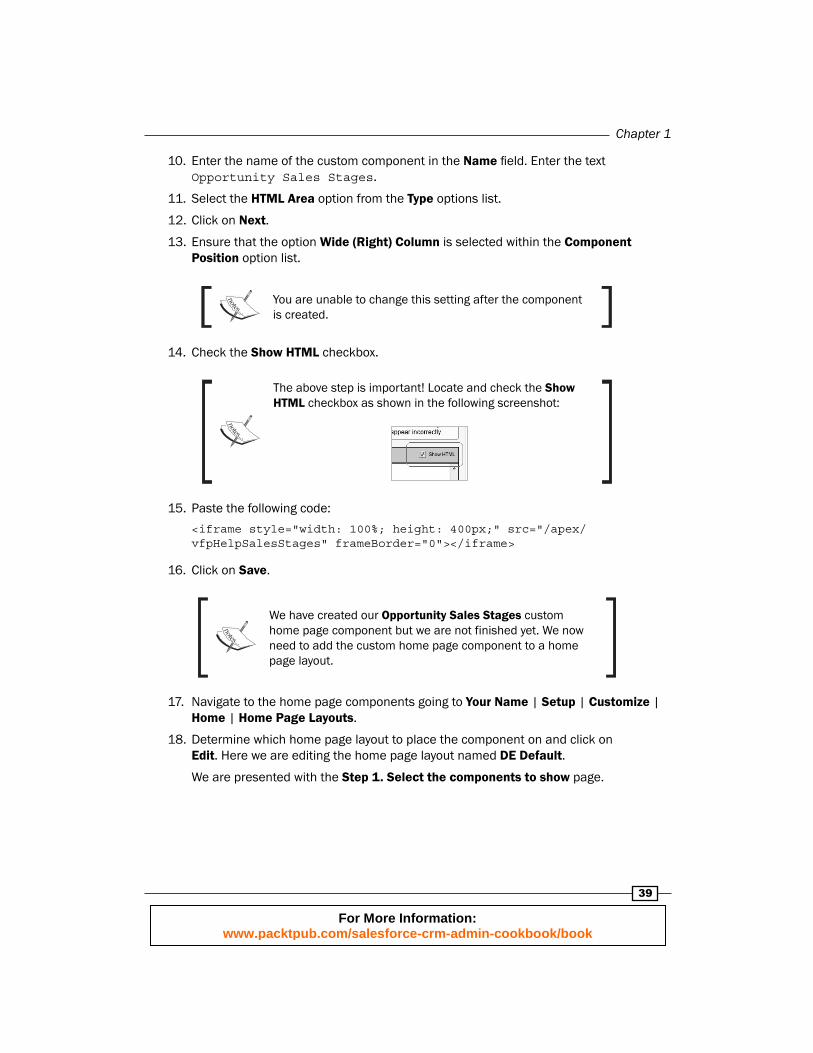
10. Enter the name of the custom component in the Name fi eld. Enter the text Opportunity Sales Stages.
11. Select the HTML Area option from the Type options list.
12. Click on Next.
13. Ensure that the option Wide (Right) Column is selected within the Component Position option list.
You are unable to change this setting after the component is created.
14. Check the Show HTML checkbox.
The above step is important! Locate and check the Show HTML checkbox as shown in the following screenshot:
15. Paste the following code:
<iframe style="width: 100%; height: 400px;" src="/apex/vfpHelpSalesStages" frameBorder="0"></iframe>
16. Click on Save.
We have created our Opportunity Sales Stages custom home page component but we are not finished yet. We now need to add the custom home page component to a home page layout.
17. Navigate to the home page components going to Your Name | Setup | Customize | Home | Home Page Layouts.
18. Determine which home page layout to place the component on and click on Edit. Here we are editing the home page layout named DE Default.
We are presented with the Step 1. Select the components to show page.
For More Information: www.packtpub.com/salesforce-crm-admin-cookbook/book
Working with Home Page Components and Custom Links
40
19. Check the Opportunity Sales Stages checkbox in the Select Wide Components to Show section, as shown in the following screenshot:
20. Click on Next.
21. Move the Opportunity Sales Stages to the top position in the Wide (Right) Column using the Arrange the component on your home page. section, as shown in the following screenshot:
22. Click on Save.
How it works...By adding the description for the sales stages, the Visualforce and Apex reads the data directly from within Salesforce and so, regardless of whether the sales stage descriptions change or even the sales stages themselves change in the future, the content is always up-to-date.
Users can then see the description, that you would have set, for each of the opportunity stages in the organization on the Visualforce page without having to create dummy opportunities and look at the available stage names.
Salesforce does not natively support the embedding of Visualforce pages into the home page, hence the need to create this HTML custom component. Within this component we are using the <iframe> HTML tag we are able to insert the rendered output of a specifi ed Visualforce page.
For More Information: www.packtpub.com/salesforce-crm-admin-cookbook/book
Chapter 1
41
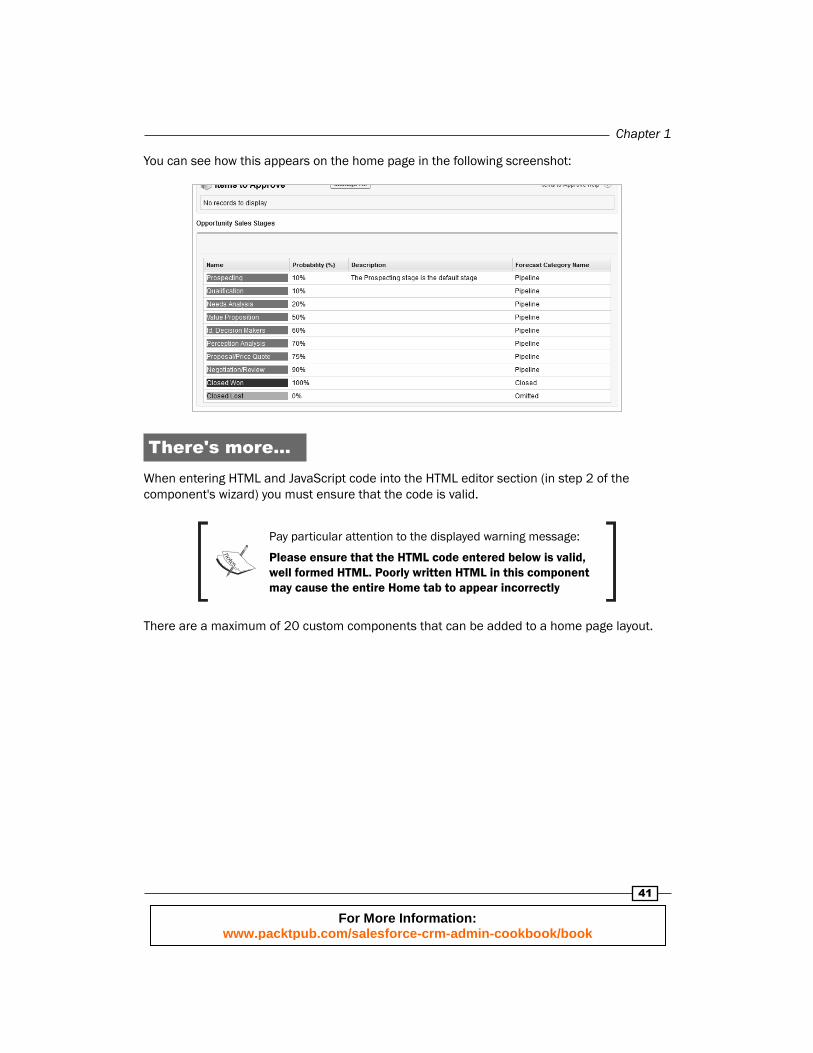
You can see how this appears on the home page in the following screenshot:
There's more...When entering HTML and JavaScript code into the HTML editor section (in step 2 of the component's wizard) you must ensure that the code is valid.
Pay particular attention to the displayed warning message:
Please ensure that the HTML code entered below is valid, well formed HTML. Poorly written HTML in this component may cause the entire Home tab to appear incorrectly
There are a maximum of 20 custom components that can be added to a home page layout.
For More Information: www.packtpub.com/salesforce-crm-admin-cookbook/book

Where to buy this book You can buy Salesforce CRM Admin Cookbook from the Packt Publishing website: http://www.packtpub.com/salesforce-crm-admin-cookbook/book. Free shipping to the US, UK, Europe and selected Asian countries. For more information, please read our shipping policy.
Alternatively, you can buy the book from Amazon, BN.com, Computer Manuals and most internet book retailers.
www.PacktPub.com
For More Information: www.packtpub.com/salesforce-crm-admin-cookbook/book


![[아이투맥스] 2015.07_세일즈포스 crm 이노베이션 세미나 최신자료 salesforce crm innovation](https://img.dokumen.tips/doc/110x75/55c49345bb61ebf60c8b46b4/-201507-crm-.jpg)