Embed Size (px)
Citation preview

Product Documentation PUBLICSAP Business ByDesign February 2017
Sales


Table Of Contents
1 Sales . . . . . . . . . . . . . . . . . . . . . . . . . . . . . . . . . . . . . . . . . . . . . . . . . . . . . . . . . . . . . . . . . . 7
2 Business Background . . . . . . . . . . . . . . . . . . . . . . . . . . . . . . . . . . . . . . . . . . . . . . . . . . . . 82.1 Tax Deferral for Customer Invoicing . . . . . . . . . . . . . . . . . . . . . . . . . . . . . . . . . . . . . . . . . . . . . . 82.2 Tax Determination . . . . . . . . . . . . . . . . . . . . . . . . . . . . . . . . . . . . . . . . . . . . . . . . . . . . . . . . . . 9
Tax Determination . . . . . . . . . . . . . . . . . . . . . . . . . . . . . . . . . . . . . . . . . . . . . . . . . . . . . . . . 9Tax Determination Details . . . . . . . . . . . . . . . . . . . . . . . . . . . . . . . . . . . . . . . . . . . . . . . . . . . 14Tax Determination — US . . . . . . . . . . . . . . . . . . . . . . . . . . . . . . . . . . . . . . . . . . . . . . . . . . . . 28
2.3 Party Processing . . . . . . . . . . . . . . . . . . . . . . . . . . . . . . . . . . . . . . . . . . . . . . . . . . . . . . . . . . . 292.4 Activity Management . . . . . . . . . . . . . . . . . . . . . . . . . . . . . . . . . . . . . . . . . . . . . . . . . . . . . . . . 452.5 Kits Process Flow . . . . . . . . . . . . . . . . . . . . . . . . . . . . . . . . . . . . . . . . . . . . . . . . . . . . . . . . . . . 482.6 ISR Payments - Switzerland . . . . . . . . . . . . . . . . . . . . . . . . . . . . . . . . . . . . . . . . . . . . . . . . . . . . 512.7 Payment Processing Using ISR — Switzerland . . . . . . . . . . . . . . . . . . . . . . . . . . . . . . . . . . . . . . . 512.8 Approval for Manual Customer Invoice and Credit Memo . . . . . . . . . . . . . . . . . . . . . . . . . . . . . . . 51
3 Account Management . . . . . . . . . . . . . . . . . . . . . . . . . . . . . . . . . . . . . . . . . . . . . . . . . . . 533.1 Business Background . . . . . . . . . . . . . . . . . . . . . . . . . . . . . . . . . . . . . . . . . . . . . . . . . . . . . . . . 53
Account Management . . . . . . . . . . . . . . . . . . . . . . . . . . . . . . . . . . . . . . . . . . . . . . . . . . . . . . 53Activity Management . . . . . . . . . . . . . . . . . . . . . . . . . . . . . . . . . . . . . . . . . . . . . . . . . . . . . . 55Down Payments From Customers . . . . . . . . . . . . . . . . . . . . . . . . . . . . . . . . . . . . . . . . . . . . . 58Address Management . . . . . . . . . . . . . . . . . . . . . . . . . . . . . . . . . . . . . . . . . . . . . . . . . . . . . . 59Business Partner Duplicate Check . . . . . . . . . . . . . . . . . . . . . . . . . . . . . . . . . . . . . . . . . . . . . 61
3.2 Accounts View . . . . . . . . . . . . . . . . . . . . . . . . . . . . . . . . . . . . . . . . . . . . . . . . . . . . . . . . . . . . . 63Accounts Quick Guide . . . . . . . . . . . . . . . . . . . . . . . . . . . . . . . . . . . . . . . . . . . . . . . . . . . . . . 63Business Background . . . . . . . . . . . . . . . . . . . . . . . . . . . . . . . . . . . . . . . . . . . . . . . . . . . . . . 71Tasks . . . . . . . . . . . . . . . . . . . . . . . . . . . . . . . . . . . . . . . . . . . . . . . . . . . . . . . . . . . . . . . . . 79
3.3 Account Hierarchies . . . . . . . . . . . . . . . . . . . . . . . . . . . . . . . . . . . . . . . . . . . . . . . . . . . . . . . . . 94Account Hierarchies Quick Guide . . . . . . . . . . . . . . . . . . . . . . . . . . . . . . . . . . . . . . . . . . . . . . 94Business Background . . . . . . . . . . . . . . . . . . . . . . . . . . . . . . . . . . . . . . . . . . . . . . . . . . . . . . 97
3.4 Contacts View . . . . . . . . . . . . . . . . . . . . . . . . . . . . . . . . . . . . . . . . . . . . . . . . . . . . . . . . . . . . . 98Quick Guide for Contacts in Account Management . . . . . . . . . . . . . . . . . . . . . . . . . . . . . . . . . 98Business Background . . . . . . . . . . . . . . . . . . . . . . . . . . . . . . . . . . . . . . . . . . . . . . . . . . . . . . 101Tasks . . . . . . . . . . . . . . . . . . . . . . . . . . . . . . . . . . . . . . . . . . . . . . . . . . . . . . . . . . . . . . . . . 104
3.5 Partners View . . . . . . . . . . . . . . . . . . . . . . . . . . . . . . . . . . . . . . . . . . . . . . . . . . . . . . . . . . . . . . 106Partners Quick Guide . . . . . . . . . . . . . . . . . . . . . . . . . . . . . . . . . . . . . . . . . . . . . . . . . . . . . . 106
3.6 Activities View . . . . . . . . . . . . . . . . . . . . . . . . . . . . . . . . . . . . . . . . . . . . . . . . . . . . . . . . . . . . . 108Activities Quick Guide . . . . . . . . . . . . . . . . . . . . . . . . . . . . . . . . . . . . . . . . . . . . . . . . . . . . . . 108Business Background . . . . . . . . . . . . . . . . . . . . . . . . . . . . . . . . . . . . . . . . . . . . . . . . . . . . . . 120Tasks . . . . . . . . . . . . . . . . . . . . . . . . . . . . . . . . . . . . . . . . . . . . . . . . . . . . . . . . . . . . . . . . . 129
SAP Business ByDesign February 2017Table Of Contents P U B L I C • © 2017 SAP SE or an SAP affiliate company. All rights reserved. 3

3.7 Reports View . . . . . . . . . . . . . . . . . . . . . . . . . . . . . . . . . . . . . . . . . . . . . . . . . . . . . . . . . . . . . . 130Activity History . . . . . . . . . . . . . . . . . . . . . . . . . . . . . . . . . . . . . . . . . . . . . . . . . . . . . . . . . . . 130Sales Order Volume . . . . . . . . . . . . . . . . . . . . . . . . . . . . . . . . . . . . . . . . . . . . . . . . . . . . . . . 132Account Collaboration Data . . . . . . . . . . . . . . . . . . . . . . . . . . . . . . . . . . . . . . . . . . . . . . . . . . 133Account Contact Data . . . . . . . . . . . . . . . . . . . . . . . . . . . . . . . . . . . . . . . . . . . . . . . . . . . . . . 135Account Details . . . . . . . . . . . . . . . . . . . . . . . . . . . . . . . . . . . . . . . . . . . . . . . . . . . . . . . . . . 136Account Responsibility Data . . . . . . . . . . . . . . . . . . . . . . . . . . . . . . . . . . . . . . . . . . . . . . . . . 138
4 Customer Invoicing . . . . . . . . . . . . . . . . . . . . . . . . . . . . . . . . . . . . . . . . . . . . . . . . . . . . . . 1404.1 Business Background . . . . . . . . . . . . . . . . . . . . . . . . . . . . . . . . . . . . . . . . . . . . . . . . . . . . . . . . 140
Customer Invoice Processing . . . . . . . . . . . . . . . . . . . . . . . . . . . . . . . . . . . . . . . . . . . . . . . . 140Customer Invoicing for Golden Tax - China . . . . . . . . . . . . . . . . . . . . . . . . . . . . . . . . . . . . . . . 144Down Payments From Customers . . . . . . . . . . . . . . . . . . . . . . . . . . . . . . . . . . . . . . . . . . . . . 145Flexible Document Numbering - India . . . . . . . . . . . . . . . . . . . . . . . . . . . . . . . . . . . . . . . . . . . 146Invoice Processing - Mexico . . . . . . . . . . . . . . . . . . . . . . . . . . . . . . . . . . . . . . . . . . . . . . . . . . 148Mass Data Runs (MDR) . . . . . . . . . . . . . . . . . . . . . . . . . . . . . . . . . . . . . . . . . . . . . . . . . . . . . 148Multiple Tax Registration – India . . . . . . . . . . . . . . . . . . . . . . . . . . . . . . . . . . . . . . . . . . . . . . 152Numbering of Customer Invoicing Documents . . . . . . . . . . . . . . . . . . . . . . . . . . . . . . . . . . . . 153Pricing in Customer Relationship Management . . . . . . . . . . . . . . . . . . . . . . . . . . . . . . . . . . . . 154Tax Determination with Reverse Charge Mechanism . . . . . . . . . . . . . . . . . . . . . . . . . . . . . . . . 160Upload Approval Information for Invoicing Documents Using Microsoft Excel® – Mexico . . . . . . . 163Usage of Bar Codes in Print Forms for Invoice Documents - Mexico . . . . . . . . . . . . . . . . . . . . . . 163Tracking of Customs Document – Mexico . . . . . . . . . . . . . . . . . . . . . . . . . . . . . . . . . . . . . . . . 165
4.2 Credit Card Authorization Runs View . . . . . . . . . . . . . . . . . . . . . . . . . . . . . . . . . . . . . . . . . . . . . 165Quick Guide for Credit Card Authorization Runs . . . . . . . . . . . . . . . . . . . . . . . . . . . . . . . . . . . 165
4.3 Golden Tax Invoices View . . . . . . . . . . . . . . . . . . . . . . . . . . . . . . . . . . . . . . . . . . . . . . . . . . . . . 172Golden Tax Invoices Quick Guide - China . . . . . . . . . . . . . . . . . . . . . . . . . . . . . . . . . . . . . . . . . 172
4.4 Invoice Runs View . . . . . . . . . . . . . . . . . . . . . . . . . . . . . . . . . . . . . . . . . . . . . . . . . . . . . . . . . . . 172Invoice Runs Quick Guide . . . . . . . . . . . . . . . . . . . . . . . . . . . . . . . . . . . . . . . . . . . . . . . . . . . 172
4.5 Invoice Documents . . . . . . . . . . . . . . . . . . . . . . . . . . . . . . . . . . . . . . . . . . . . . . . . . . . . . . . . . . 178Quick Guide for Invoice Documents . . . . . . . . . . . . . . . . . . . . . . . . . . . . . . . . . . . . . . . . . . . . 178
4.6 Invoice Requests View . . . . . . . . . . . . . . . . . . . . . . . . . . . . . . . . . . . . . . . . . . . . . . . . . . . . . . . 187Quick Guide for Invoice Requests . . . . . . . . . . . . . . . . . . . . . . . . . . . . . . . . . . . . . . . . . . . . . . 187Create a Customer Invoice — Mexico . . . . . . . . . . . . . . . . . . . . . . . . . . . . . . . . . . . . . . . . . . . 197
4.7 Point-of-Sale Transactions View . . . . . . . . . . . . . . . . . . . . . . . . . . . . . . . . . . . . . . . . . . . . . . . . 197Point-of-Sale Transactions Quick Guide . . . . . . . . . . . . . . . . . . . . . . . . . . . . . . . . . . . . . . . . . 197Business Background . . . . . . . . . . . . . . . . . . . . . . . . . . . . . . . . . . . . . . . . . . . . . . . . . . . . . . 199Tasks . . . . . . . . . . . . . . . . . . . . . . . . . . . . . . . . . . . . . . . . . . . . . . . . . . . . . . . . . . . . . . . . . 201
4.8 Project Invoicing View . . . . . . . . . . . . . . . . . . . . . . . . . . . . . . . . . . . . . . . . . . . . . . . . . . . . . . . . 208Project Invoicing Quick Guide . . . . . . . . . . . . . . . . . . . . . . . . . . . . . . . . . . . . . . . . . . . . . . . . 208
4.9 Recurring Invoice Templates View . . . . . . . . . . . . . . . . . . . . . . . . . . . . . . . . . . . . . . . . . . . . . . . 214Quick Guide for Recurring Invoice Templates . . . . . . . . . . . . . . . . . . . . . . . . . . . . . . . . . . . . . 214
4.10 Reports View . . . . . . . . . . . . . . . . . . . . . . . . . . . . . . . . . . . . . . . . . . . . . . . . . . . . . . . . . . . . . . 220Open Documents Customer Invoicing . . . . . . . . . . . . . . . . . . . . . . . . . . . . . . . . . . . . . . . . . . . 220Invoice Volume . . . . . . . . . . . . . . . . . . . . . . . . . . . . . . . . . . . . . . . . . . . . . . . . . . . . . . . . . . . 221Customer Project Overview . . . . . . . . . . . . . . . . . . . . . . . . . . . . . . . . . . . . . . . . . . . . . . . . . . 223
4 © 2017 SAP SE or an SAP affiliate company. All rights reserved. • P U B L I CSAP Business ByDesign February 2017
Table Of Contents

5 New Business . . . . . . . . . . . . . . . . . . . . . . . . . . . . . . . . . . . . . . . . . . . . . . . . . . . . . . . . . . . 2255.1 Business Background . . . . . . . . . . . . . . . . . . . . . . . . . . . . . . . . . . . . . . . . . . . . . . . . . . . . . . . . 225
Pricing in Customer Relationship Management . . . . . . . . . . . . . . . . . . . . . . . . . . . . . . . . . . . . 225Profit Margin . . . . . . . . . . . . . . . . . . . . . . . . . . . . . . . . . . . . . . . . . . . . . . . . . . . . . . . . . . . . 231
5.2 Leads View . . . . . . . . . . . . . . . . . . . . . . . . . . . . . . . . . . . . . . . . . . . . . . . . . . . . . . . . . . . . . . . . 233Quick Guide for Leads (in New Business) . . . . . . . . . . . . . . . . . . . . . . . . . . . . . . . . . . . . . . . . 233Business Background . . . . . . . . . . . . . . . . . . . . . . . . . . . . . . . . . . . . . . . . . . . . . . . . . . . . . . 237Tasks . . . . . . . . . . . . . . . . . . . . . . . . . . . . . . . . . . . . . . . . . . . . . . . . . . . . . . . . . . . . . . . . . 245
5.3 Opportunities View . . . . . . . . . . . . . . . . . . . . . . . . . . . . . . . . . . . . . . . . . . . . . . . . . . . . . . . . . . 247Opportunities Quick Guide . . . . . . . . . . . . . . . . . . . . . . . . . . . . . . . . . . . . . . . . . . . . . . . . . . . 247Business Background . . . . . . . . . . . . . . . . . . . . . . . . . . . . . . . . . . . . . . . . . . . . . . . . . . . . . . 253Tasks . . . . . . . . . . . . . . . . . . . . . . . . . . . . . . . . . . . . . . . . . . . . . . . . . . . . . . . . . . . . . . . . . 258
5.4 Sales Quotes View . . . . . . . . . . . . . . . . . . . . . . . . . . . . . . . . . . . . . . . . . . . . . . . . . . . . . . . . . . 262Sales Quotes Quick Guide . . . . . . . . . . . . . . . . . . . . . . . . . . . . . . . . . . . . . . . . . . . . . . . . . . . 262Business Background . . . . . . . . . . . . . . . . . . . . . . . . . . . . . . . . . . . . . . . . . . . . . . . . . . . . . . 271
5.5 Reports View . . . . . . . . . . . . . . . . . . . . . . . . . . . . . . . . . . . . . . . . . . . . . . . . . . . . . . . . . . . . . . 273Lead Funnel . . . . . . . . . . . . . . . . . . . . . . . . . . . . . . . . . . . . . . . . . . . . . . . . . . . . . . . . . . . . . 273Number of Leads . . . . . . . . . . . . . . . . . . . . . . . . . . . . . . . . . . . . . . . . . . . . . . . . . . . . . . . . . 275Opportunity Funnel . . . . . . . . . . . . . . . . . . . . . . . . . . . . . . . . . . . . . . . . . . . . . . . . . . . . . . . . 276Opportunity Pipeline . . . . . . . . . . . . . . . . . . . . . . . . . . . . . . . . . . . . . . . . . . . . . . . . . . . . . . . 277Opportunity Volume . . . . . . . . . . . . . . . . . . . . . . . . . . . . . . . . . . . . . . . . . . . . . . . . . . . . . . . 279Sales Pipeline . . . . . . . . . . . . . . . . . . . . . . . . . . . . . . . . . . . . . . . . . . . . . . . . . . . . . . . . . . . . 280Sales Quote Funnel and Success Rate . . . . . . . . . . . . . . . . . . . . . . . . . . . . . . . . . . . . . . . . . . 282Sales Quote Volume . . . . . . . . . . . . . . . . . . . . . . . . . . . . . . . . . . . . . . . . . . . . . . . . . . . . . . . 283Won/Lost Opportunities . . . . . . . . . . . . . . . . . . . . . . . . . . . . . . . . . . . . . . . . . . . . . . . . . . . . 285
6 Product and Service Portfolio . . . . . . . . . . . . . . . . . . . . . . . . . . . . . . . . . . . . . . . . . . . . 2876.1 Business Background . . . . . . . . . . . . . . . . . . . . . . . . . . . . . . . . . . . . . . . . . . . . . . . . . . . . . . . . 287
Pricing in Customer Relationship Management . . . . . . . . . . . . . . . . . . . . . . . . . . . . . . . . . . . . 287Working with Pricing in Sales and Service Documents . . . . . . . . . . . . . . . . . . . . . . . . . . . . . . . 293Tax Determination . . . . . . . . . . . . . . . . . . . . . . . . . . . . . . . . . . . . . . . . . . . . . . . . . . . . . . . . 295
6.2 Products View . . . . . . . . . . . . . . . . . . . . . . . . . . . . . . . . . . . . . . . . . . . . . . . . . . . . . . . . . . . . . 301Quick Guide for Products (in the Product and Service Portfolio) . . . . . . . . . . . . . . . . . . . . . . . . 301Business Background . . . . . . . . . . . . . . . . . . . . . . . . . . . . . . . . . . . . . . . . . . . . . . . . . . . . . . 305
6.3 Services View . . . . . . . . . . . . . . . . . . . . . . . . . . . . . . . . . . . . . . . . . . . . . . . . . . . . . . . . . . . . . . 311Quick Guide for Services (in the Product and Service Portfolio) . . . . . . . . . . . . . . . . . . . . . . . . . 311Business Background . . . . . . . . . . . . . . . . . . . . . . . . . . . . . . . . . . . . . . . . . . . . . . . . . . . . . . 313
6.4 Product Catalogs View . . . . . . . . . . . . . . . . . . . . . . . . . . . . . . . . . . . . . . . . . . . . . . . . . . . . . . . 317Product Catalogs Quick Guide . . . . . . . . . . . . . . . . . . . . . . . . . . . . . . . . . . . . . . . . . . . . . . . . 317
6.5 Pricing View . . . . . . . . . . . . . . . . . . . . . . . . . . . . . . . . . . . . . . . . . . . . . . . . . . . . . . . . . . . . . . . 318Quick Guide for Pricing in Customer Relationship Management . . . . . . . . . . . . . . . . . . . . . . . . 318Business Background . . . . . . . . . . . . . . . . . . . . . . . . . . . . . . . . . . . . . . . . . . . . . . . . . . . . . . 324
6.6 Reports View . . . . . . . . . . . . . . . . . . . . . . . . . . . . . . . . . . . . . . . . . . . . . . . . . . . . . . . . . . . . . . 342Changed Materials . . . . . . . . . . . . . . . . . . . . . . . . . . . . . . . . . . . . . . . . . . . . . . . . . . . . . . . . 342
SAP Business ByDesign February 2017Table Of Contents P U B L I C • © 2017 SAP SE or an SAP affiliate company. All rights reserved. 5

Changed Services . . . . . . . . . . . . . . . . . . . . . . . . . . . . . . . . . . . . . . . . . . . . . . . . . . . . . . . . . 343New Materials . . . . . . . . . . . . . . . . . . . . . . . . . . . . . . . . . . . . . . . . . . . . . . . . . . . . . . . . . . . 344New Services . . . . . . . . . . . . . . . . . . . . . . . . . . . . . . . . . . . . . . . . . . . . . . . . . . . . . . . . . . . . 345
6.7 Tasks . . . . . . . . . . . . . . . . . . . . . . . . . . . . . . . . . . . . . . . . . . . . . . . . . . . . . . . . . . . . . . . . . . . 346Create Exchange Rates Using Microsoft Excel® . . . . . . . . . . . . . . . . . . . . . . . . . . . . . . . . . . . . 346
7 Sales Orders . . . . . . . . . . . . . . . . . . . . . . . . . . . . . . . . . . . . . . . . . . . . . . . . . . . . . . . . . . . . 3497.1 Business Background . . . . . . . . . . . . . . . . . . . . . . . . . . . . . . . . . . . . . . . . . . . . . . . . . . . . . . . . 349
Customer Returns Processing . . . . . . . . . . . . . . . . . . . . . . . . . . . . . . . . . . . . . . . . . . . . . . . . 349Sales Order Processing . . . . . . . . . . . . . . . . . . . . . . . . . . . . . . . . . . . . . . . . . . . . . . . . . . . . . 352Pricing in Customer Relationship Management . . . . . . . . . . . . . . . . . . . . . . . . . . . . . . . . . . . . 354Working with Pricing in Sales and Service Documents . . . . . . . . . . . . . . . . . . . . . . . . . . . . . . . 361Approval for Sales Order . . . . . . . . . . . . . . . . . . . . . . . . . . . . . . . . . . . . . . . . . . . . . . . . . . . . 362Credit Limit Check . . . . . . . . . . . . . . . . . . . . . . . . . . . . . . . . . . . . . . . . . . . . . . . . . . . . . . . . 363Invoice Schedule . . . . . . . . . . . . . . . . . . . . . . . . . . . . . . . . . . . . . . . . . . . . . . . . . . . . . . . . . 365Party Processing . . . . . . . . . . . . . . . . . . . . . . . . . . . . . . . . . . . . . . . . . . . . . . . . . . . . . . . . . 372
7.2 Sales Orders View . . . . . . . . . . . . . . . . . . . . . . . . . . . . . . . . . . . . . . . . . . . . . . . . . . . . . . . . . . . 388Sales Orders Quick Guide . . . . . . . . . . . . . . . . . . . . . . . . . . . . . . . . . . . . . . . . . . . . . . . . . . . 388Sales Order Credit Worth Run . . . . . . . . . . . . . . . . . . . . . . . . . . . . . . . . . . . . . . . . . . . . . . . . 400
7.3 Customer Contracts View . . . . . . . . . . . . . . . . . . . . . . . . . . . . . . . . . . . . . . . . . . . . . . . . . . . . . 402Customer Contracts Quick Guide . . . . . . . . . . . . . . . . . . . . . . . . . . . . . . . . . . . . . . . . . . . . . . 402
7.4 Returns View . . . . . . . . . . . . . . . . . . . . . . . . . . . . . . . . . . . . . . . . . . . . . . . . . . . . . . . . . . . . . . 413Quick Guide for Returns (in Sales Orders) . . . . . . . . . . . . . . . . . . . . . . . . . . . . . . . . . . . . . . . . 413
7.5 Reports View . . . . . . . . . . . . . . . . . . . . . . . . . . . . . . . . . . . . . . . . . . . . . . . . . . . . . . . . . . . . . . 417Sales Order Volume . . . . . . . . . . . . . . . . . . . . . . . . . . . . . . . . . . . . . . . . . . . . . . . . . . . . . . . 417Sales Order Volume History . . . . . . . . . . . . . . . . . . . . . . . . . . . . . . . . . . . . . . . . . . . . . . . . . . 418Sales Order Returns Rate . . . . . . . . . . . . . . . . . . . . . . . . . . . . . . . . . . . . . . . . . . . . . . . . . . . 419
8 Sales Planning . . . . . . . . . . . . . . . . . . . . . . . . . . . . . . . . . . . . . . . . . . . . . . . . . . . . . . . . . . 4228.1 Business Background . . . . . . . . . . . . . . . . . . . . . . . . . . . . . . . . . . . . . . . . . . . . . . . . . . . . . . . . 422
Sales Planning . . . . . . . . . . . . . . . . . . . . . . . . . . . . . . . . . . . . . . . . . . . . . . . . . . . . . . . . . . . 4228.2 Sales Planning Quick Guide . . . . . . . . . . . . . . . . . . . . . . . . . . . . . . . . . . . . . . . . . . . . . . . . . . . . 423
6 © 2017 SAP SE or an SAP affiliate company. All rights reserved. • P U B L I CSAP Business ByDesign February 2017
Table Of Contents

1 Sales
OverviewThe SAP Business ByDesign solution gives you comprehensive access to customer-related information aboutopportunities, quotes, orders, and invoices. Your employees can use data in SAP Business ByDesign to verify productavailability, perform accurate forecasting, predict future sales, and identify cross-selling and up-sellingopportunities. SAP Business ByDesign supports smooth interactions with customers and helps your sales staff fillthe sales pipeline, focus on the most promising leads, and accelerate the sales process.
RelevanceThe Sales business area is relevant if you need support for:
● Account and activity management ● New business ● Selling products and services ● Product and service portfolio ● Customer invoicing
Benefits ● Your employees have a 360-degree view of your customers.
The SAP Business ByDesign solution uses customer-related information from different areas of yourcompany – such as marketing, sales, and financials – to build online fact sheets that provide a comprehensive,360-degree view of your customers. Your employees see all customer-related information, such asopportunities, quotes, orders, invoices, and service requests, in a single place. And using the reports andmetrics included within fact sheets, they can make effective decisions in their work.
● Your employees get the customer information they need, when they need it.SAP Business ByDesign supports the integration of customer relationship management processes with yourother core business processes, so that employees across your organization have immediate access torelevant information from customer-facing activities for which they have authorization. Employees can alsosee an overview of the status of each order. When a sales order is created within SAP Business ByDesign,your supply chain group is notified automatically so it can initiate the order fulfillment process. After salesorders are delivered and invoiced, your financial department can analyze the booked transactions todetermine earned profit, and your sales management team can evaluate sales orders to determine expectedprofit.
● You can standardize your pricing.SAP Business ByDesign lets you define price lists with flexible pricing policies, so that appropriate approvedprices and discounts are calculated automatically and applied to quotes, orders, and invoices. An integratedmanagerial approval process helps you maintain full control over quote and order processing and price listsetup.
SAP Business ByDesign February 2017Sales P U B L I C • © 2017 SAP SE or an SAP affiliate company. All rights reserved. 7

2 Business Background
2.1 Tax Deferral for Customer Invoicing
OverviewWhen you create a customer invoice for services, part of the tax amount can be deferred, and used as a tax creditby the customer. When you apply a tax deferral scheme, the payment of total tax for which you are liable is postponedto the end of the period in which you receive the payment for the supply or services invoiced.If a customer pays only for a part of the invoice amount, the deferred tax payable is in proportion to the invoiceamount paid. For example, if your customer pays a third of the gross invoice amount, your company is required topay a third of the tax amount in the invoice.
Prerequisites ● For France and Switzerland, you have selected the Authorized to Defer Tax checkbox in the Defered Tax tab
under Tax Management Tax Authorities Company Tax Arrangements ● For Italy, you have selected Public administration under Accounts General Industry , to indicate that
the taxes for this account should be deferred. ● For France, preconfigured settings for deferred tax are delivered with the system. You can change the settings
in the Business Configuration work center in the tuning activity Tax on Goods and Services — France
The following table gives a clear idea about the calculation rules and configuration for the different countries:
Country CompanyTaxArrangement
ProductType:Services
BusinessPartnerRelevance
Remarks
France X X In France, you have an option to apply to the authorities to defer taxpayments for all service transactions.
Italy X Business partner belongs to Public administration Sector.
India X
Mexico In Mexico, it is a legal requirement to defer tax payments for alltransactions. VAT and IEPS taxes are always deferred, except ifinvoice creation and payment are made at the same time (only retailcompanies).
Switzerland X
Process FlowThe process flow for tax payment deferral is outlined below.
1. Create a customer invoicing document (such as a customer invoice or a credit memo) with items to whichdeferred tax applies.
8 © 2017 SAP SE or an SAP affiliate company. All rights reserved. • P U B L I CSAP Business ByDesign February 2017
Business Background

If you are creating an invoicing document from a preceding document such as a sales order or a servicesorder, the system transfers the statuses of the tax deferral check boxes from the preceding document to theinvoicing document.
The system sets the tax deferral check for each line item according to the configuration. If you need tochange the tax deferral status of certain line items in your invoices, you can select or clear this checkbox under View All Items Taxes .For Mexico, you can only check the status. You cannot make any changes to the setting.
2. Release the invoicing document.The system posts the invoicing document to the general ledger.
Since the tax is not yet payable, the system cannot post this tax to the regular output tax account, so,for the time being, it posts it to a separate account for deferred tax.
3. The company forwards the invoicing document to the customer who processes it as follows: ● For an invoice, the customer makes the payment, and the accounting clerk at your company records
this payment in the system.The system clears the tax amount from the deferred tax account and transfers it to the regular outputtax account.The taxes are now due and is reported in the tax return for the current reporting period.
● For a credit memo, the customer records this credit amount so that he can use it against future payments.
2.2 Tax Determination
2.2.1 Tax Determination
Overview
Business ByDesign provides a tax event and uses the resulting figures to generate tax reports. Thisautomatically-created report does not replace the customer or user’s own tax appraisal. SAP does notassume liability for the accuracy of the automatically-created report or the tax report that is generated.
As a rule, companies are legally required to calculate taxes on products that they buy or sell or services used, andto levy these taxes on their customers. After the products or services have been provided, the taxes must be declaredand paid to the relevant tax authorities.The taxes are calculated for business documents such as orders, invoices, credit memos or down payments.Since taxation laws differ in each country, your company is faced with the challenge of calculating the correct taxfor a particular business transaction. The system supports you by automatically calculating the tax for the followingtax types:
● Value-Added Tax (VAT)This tax is levied in many countries, especially countries in the European Union. Many regional differencesexist. For example, in some countries such as Canada and Australia, value-added tax is levied as "Goods andServices Tax".
● Sales and Use TaxThis tax is levied, for example, in the United States, and in a similar form in Canada (Provincial Sales Tax).
● Withholding Tax
SAP Business ByDesign February 2017Business Background P U B L I C • © 2017 SAP SE or an SAP affiliate company. All rights reserved. 9

This tax is levied in different forms in different countries. The system is able to calculate withholding tax forthe United States.
The system also offers a reporting tool that gives you effective control over your mandatory declaration of thesetaxes.
Prerequisites ● You have created the Master Data for Tax Determination [page 14]. ● Defining the Solution Scope for Taxation
The following activities are necessary to define the solution scope for taxation: ○ The solution scope for taxation is specified in the system in Business Configuration under Built-In Services
and Support. The Tax Calculation business topic is located in the Business Environment businesspackage.
○ If you are also required to have taxes calculated in your quotes, activate the relevant option inScoping. In the Questions step, navigate to the Sales business area, and choose New Business > Quoteswith Tax Calculation.
ElementsThe system collects the relevant data from the available business documents to correctly calculate the taxesapplicable. As the user, you have to configure your system with the information that is required for your businesscases. A lot of standard business cases are pre-configured by SAP, but in some cases you have to enhance yoursystem.For more detailed information about tax determination and how the system merges and classifies data, see Elementsfor Tax Determination [page 17].
Tax Number DeterminationIn the following cases the tax number is determined again:
● Tax date has been changed ● Buyer, seller or tax reporting group has been changed ● Tax number is wrong ● Tax country has been changed
Value-Added Tax (VAT) NumbersFor Export DeliveriesTo obtain tax exemption for intra-community deliveries, you need to record, among other things, the servicerecipient’s VAT number to be used for the receipt of goods.If several VAT numbers are assigned to a customer master record, the system selects the VAT number accordingto the following criteria:
● The VAT number of the country in which the ship-to party is located. ● If the VAT number of the ship-to country is not entered in the master data, the system searches for other
numbers entered in the master data and selects a number that is different from the number of the countryfrom which the goods are sent.
10 © 2017 SAP SE or an SAP affiliate company. All rights reserved. • P U B L I CSAP Business ByDesign February 2017
Business Background

● If there is only one VAT number for the country where the transport of goods starts, or if there is no numberat all, the prerequisites for an intra-community delivery have not been fulfilled, and the delivery must be taxedat the relevant tax rate.
If a VAT number is entered in the master data, it will be automatically displayed on the invoice. You canoverwrite it on the Taxes tab in the document. However, you can only overwrite using those numbers thathave been previously entered in the account master record.
For Other Services, Performed AbroadAccording to the EU directive 2008/8/EG and country-specific tax legislation, there is a new regulation, particularlyfor B2B commissions relating to the place in which services are performed.Generally, the place in which services are provided serves as the 'service recipient’ address. If the country where the'Ship-To' address is located differs from the address of the account, then the 'Ship-To' location is understood to bethe location where the service is performed. This directly influences how taxes are determined, in that the “Ship-To'address is used to determine where the services will be taxed. For example, § 3a (2) UStG in Germany can beconsulted. If this is not correct for each and every case, then applicable tax data must be manually adapted, mainlythe tax country and the tax code.In order to distinguish between companies and individuals as the service recipient, the system (tax decision tree)checks whether a VAT number has been entered in the account master data. If the VAT number is missing, thebusiness case is regarded as a service that was performed for an individual.
Therefore, it is important to remember to include the VAT number when entering the account master data.
Reverse Charge MechanismReverse charge mechanism means that, in certain cases, the customer is required by law to be liable for VAT, andto pay it to the relevant tax authority. In this case, the entrepreneur issues an invoice without VAT, but with anotification indicating that the tax debt is being transferred to the customer. The customer must calculate and paythe VAT to the tax authority, and can claim input tax deduction at the same time as usual. The transfer of tax debtto the service recipient is called reverse charge mechanism.For more information, see Tax Determination with Reverse Charge Mechanism [page 23].
Third-Party Order Processing TaxationIn typical sales scenarios, transactions take place directly between a company and an account, both businesspartners are located in the same country, and the company produces and delivers a good or service directly to theaccount. In such scenarios, there is no need for special tax regulations. However, in the event that one or moreparameters of this business scenario differ from the typical situation and, for example, account address and ship-to addresses are not the same, special regulations apply, depending on how complex the scenarios are.For more information, see Third-Party Order Processing and Chain Transaction Taxation [page 25].
Relevant Date for the VAT Tax ReturnThe date used for the VAT tax return depends on the business document. For example, in the supplier invoice theReceipt Date is used, and in the customer invoice the Posting Date is used. But if you want, you can also enter a TaxDue Date.For more information on the tax due date, see Tax Due Date of Tax Items.
SAP Business ByDesign February 2017Business Background P U B L I C • © 2017 SAP SE or an SAP affiliate company. All rights reserved. 11

Entering or Changing Tax Codes in Journal Entry VouchersYou can enter or change tax codes in journal entry vouchers as follows:
● Sales OrdersGo to the Sales Orders work center and choose New Sales Order or an existing sales order for editing. ChooseView All. Go to the Items tab page and from there to the Taxes tab page. Choose an appropriate entry for theorder item selected under Tax Code.
● Invoices or Credit MemosGo to the Customer Invoicing work center and choose New Manual Invoice or an existing invoice or creditmemo for editing. Go to the Items tab page and from there to the Taxes tab page. Choose an appropriateentry for the invoice item selected under Tax Code.
● Purchase OrderGo to the Purchase Requests and Orders work center and choose New Purchase Order or an existing purchaseorder for editing. Choose View All Items . In the Basic Data tab page, select under Taxes the appropriatetax code for the selected purchase order item.
● Supplier InvoiceGo to the Supplier Invoice work center and choose New Invoice Without Purchase Order or an existing invoicefor editing. In the Overview tab page, select the appropriate tax code for the selected invoice item.
Tax Decision TreeThe system uses a tax decision tree to correctly determine a tax event. The tax decision tree consists of a sequenceof logically connected questions that the system determines as being true or false by comparing them with dataentered in the documents. In this way, the facts are narrowed down until the tax event and the correct taxationmethod has been determined.The questions are answered by comparing data entered in the document, and the underlying process can berepresented as a process flow. The questions in the following example are used to determine the tax event “Exportto Third Country” for a company based in Germany.
A tax decision tree is assigned to each country.
12 © 2017 SAP SE or an SAP affiliate company. All rights reserved. • P U B L I CSAP Business ByDesign February 2017
Business Background

Process Flow
The process flow for tax determination describes a sample of how the tax event is determined for an invoice:1. The sales representative creates and saves a manual invoice.2. After the required data is entered, the system transfers tax-relevant data to tax determination, such as:
● Location of supplier and buyer ● Tax attributes of the business partner
One of these attributes is the tax exemption reason that depends on certain country-specific laws. ● Tax attributes of products
Tax rate type and tax exemption reason can be different for each country, region, and tax type. In theUnited States, for example, services are not normally subject to tax, so the tax exemption reason shouldbe assigned in the product master data. Products are normally taxed at the standard tax rate and noother entries are required.
3. The system uses the tax-relevant data to activate tax determination, and the data is processed automaticallyin a tax decision tree.
4. The system calculates tax on the basis of the following components: ● Tax event ● Tax types ● Tax rate types such as standard value-added tax rate ● Tax rate as a percentage ● Taxable amount
5. The system includes the result of the tax determination and calculation in the sales order. The calculated taxis displayed on the Pricing tab and on the Taxes tab of the Items tab.
SAP Business ByDesign February 2017Business Background P U B L I C • © 2017 SAP SE or an SAP affiliate company. All rights reserved. 13

All tax details determined by the system are displayed on the Tax tab. Examples are: ● Tax country ● Tax code ● Tax jurisdiction code in case the tax country is United States ● Tax region in case the tax country is Canada ● Tax date ● A table with one row for each tax type that lists the following:
○ Tax base ○ Tax rate type ○ Tax rate ○ Tax exemption reason, if necessary ○ Tax amount ○ Deductibility type (only for purchasing documents) ○ Country-specific parameters (if necessary), such as indicators for deferred tax (in France or India),
tax jurisdiction code (United States), or region (Canada).
However, not all tax-relevant transactions can be recognized automatically and correctly by thesystem.Therefore, we recommend that you overwrite the data manually in the document, in case the systemdoes not determine the correct tax country or the correct tax code for the transaction. If you have tochange the tax country in the document manually, the input help displays only the countries for whicha tax authority is created and tax arrangements are maintained for your company. However, you canalso enter another tax country in which sales need to be reported for tax purposes. The system thendisplays the specific tax codes for this country. Remember that you need to create the tax authorityfor this country. You then need to trigger tax determination again in the document so that the correcttax number of your company is found for the transaction. For countries that have multiple tax rates,you can enter the tax criteria manually.Note that if tax-relevant data such as the country of the service location or of the goods recipient hasbeen changed in a follow-up document of a business transaction, the Tax Country and Tax Code is notredetermined. This affects, for example, changes in the address data in a service confirmation that iscreated for a service order, or in a project invoice that is created for a sales order.
See AlsoParty Processing [page 29]Tax Determination — US [page 28] (This document covers topics specific for the United States, such as deliverytaxation in Texas and California, Nexus.)
2.2.2 Tax Determination Details
2.2.2.1 Master Data for Tax Determination
To ensure that the determination within your sales processes is running properly, you have created the followingmaster data:
14 © 2017 SAP SE or an SAP affiliate company. All rights reserved. • P U B L I CSAP Business ByDesign February 2017
Business Background

Tax AuthorityIn the Tax Management work center, you have created a master data record for each tax authority that is responsiblefor your company.
Company Tax ArrangementsYou have assigned a company tax arrangement in the master data record for the tax authority. You enter your taxnumber for the tax type to confirm that your company is registered and that you have declared tax to the relevanttax authority.
Tax Exemption Certificate in Account Master DataIn countries such as the United States, France, and Italy, accounts such as non-profit organizations can be exemptfrom tax payments for a certain period of time. For these accounts, you define the appropriate exemption certificatenumber and the validity date in the account master data. The Tax Exemption Certificates are taken into account insales transactions and are required to determine both the correct customer payment, and the proper payment tothe appropriate tax authority. If the tax exemption certificate is valid on the tax date, no tax is calculated. Theexemption certificate number is automatically entered in the payment document. You should enter a reason for thetax exemption in the account master data.
Tax Jurisdiction Code in Account Master Data for the United StatesYou have created a tax jurisdiction in the account master data.
CompanyCompany data, such as the company, address, and the tax jurisdiction code is entered in organizationalmanagement.
ProductsIf you do not enter any other information in a product master record, the product is taxed at a standard tax rate. Ifyou want to change the standard tax rate for certain countries, you must assign the tax rate type and, if necessary,a tax exemption reason to the relevant product in the master data.
ServicesFor taxes, you must specify which types of services you offer, and how these are to be taxed, or who is liable for taxfor a particular business transaction, so that the system determines the relevant tax code. Enter your services in theServices view of the Product and Service Portfolio work center under the Service Description tab, and if necessary,assign them to the relevant tax exemption reason on the Taxes tab, or specify whether the service is taxable at thelocation where the service is to be provided:
SAP Business ByDesign February 2017Business Background P U B L I C • © 2017 SAP SE or an SAP affiliate company. All rights reserved. 15

If a repair part is either implemented or installed, then the tax implication can either be a work delivery or workperformance. The system can't automatically determine these cases. In each individual instance, verify theapplicable tax code on the Taxes tab for the service and part item.
Specifics for European Union ● Certain services are always taxed at the head office of the company that provides the services, even if these
services are provided for an account located outside the borders where the head office is located. In themaster data records of such services, ensure that nothing has been entered in the Tax Exemption Reasonfield on the Taxes tab, and that the Taxable at Destination indicator has not been set. According to Directive2008/8/EC and its implementation under the Annual Tax Act 2009 from January 1, 2010 onwards, this is thebasic rule for services that are provided for a private end consumer located outside the borders where thehead office is located.
● Certain services must always be taxed at the location where the service is provided, such as constructionworks on buildings. For such services, set the Taxable at Destination indicator on the Taxes tab. Here, thesystem checks where the service is provided. The transaction is not taxable domestically if the location atwhich the service is provided is abroad. If this indicator is selected, then the address of the service locationis used to determine where the services will be taxed. In such a case, the company providing the goods orservices must tax the business transaction in the receiving country and also be registered there. Accordingto Directive 2008/8/EC and its implementation under the Annual Tax Act 2009 from January 1, 2010onwards. An example of this is work performed on movable tangible property for a private end consumerabroad.
● To ensure that automatic tax determination works correctly, you must set the indicators and enter the taxexemption reasons for all relevant countries. It is especially necessary to maintain the Taxable at Destinationindicator for both the issuing and receiving countries. In comparison, if goods or services are taxable atdestination, it is the seller's responsibility to calculate and pay the tax in the receiving country. Therefore, itis not enough to maintain the tax details just for the issuing country; you also need to maintain them for thereceiving countries.However, certain circumstances may lead to non-taxation or double taxation. Non-taxation occurs if a serviceis indicated as Taxable at Destination in the issuing country but not in the receiving country. Double taxationoccurs if a service is indicated as Taxable at Destination in the receiving country but not in the issuing country.These legislative inaccuracies also exist in reality. However, the system does not support double taxation. Forservices that are not taxable in the issuing country (namely those indicated Taxable at Destination), thesettings for the receiving countries should be checked carefully to avoid accidentally leading to non-taxation.
The Taxable at Destination indicator is only utilized in CRM-related transactions, and not in SRM-relatedtransactions.
● Other services such as those provided by a company located abroad or specific work deliveries are taxedaccording to the reverse charge mechanism. For more information, see Reverse Charge Mechanism[page 23].From the seller's perspective, the transaction must be reported, but the tax debt transfers to the account. Ifthis tax exemption reason is entered in the services master record, the system applies the reverse chargerule for a corresponding sales transaction. The note referring to the reversal of tax debt (reverse chargemechanism) is printed on the invoice. The relevant tax exemption reason must be entered for the service onthe Taxes tab. According to Directive 2008/8/EC and its implementation under the Annual Tax Act 2009from January 1, 2010 onwards, this is the basic rule for services that are provided for a company abroad. Thisbasic rule is determined automatically, if the head office of the company providing the goods or services is inany EU member state. In the case of domestic accounts, however, the system does not automaticallyrecognize the reverse charge rule. Where applicable, the user must manually overwrite the tax code in thesales document (§13b (1) No. 2 - 5). For this you can create your own tax code and legal phrase in business
16 © 2017 SAP SE or an SAP affiliate company. All rights reserved. • P U B L I CSAP Business ByDesign February 2017
Business Background

configuration. For more information, see Tax on Goods and Services — Configuration Guide [page 26]. Thecorresponding tax event and tax exemption reason code are already available in the system.
Specifics for the United States of America ● The service location is always used for tax determination for services in the USA. The Taxable at Destination
indicator is not relevant for the USA.
See AlsoTax on Goods and Services — Configuration Guide [page 26]Tax Determination [page 9]
2.2.2.2 Elements of Tax Determination
OverviewThe following sections provide you with an overview of the tax determination elements and their relations:
Tax Type and Tax Rate TypeEvery tax type in a tax event has a tax rate type and a tax rate that is applied to the tax base (in most cases the netamount) to calculate the tax amount for the relevant tax type.Tax rates are represented in the system by tax rate types – in the example of Germany, the tax rate of 19% for value-added tax corresponds to the Standard tax rate type. This makes it easy to represent time-dependencies. If the taxrate for this tax type changes because of a new law, you can define a new tax rate in the system for a specific validitydate without having to create a new tax code.Country Specifics
● India and CanadaFor tax jurisdictions such as India and Canada, where more than one tax type exists, the following fields canbe used: Tax Rate Type and Tax Exemption Reason, as well as Deductibility Type for purchasing documents.
● GermanyThe Standard tax rate type is calculated for the Value-Added Tax tax type on the basis of the net amount. Thismeans that if the tax rate is 19%, a tax amount of EUR 19 is calculated for a net amount of EUR 100.
Tax RateCountry Specifics
● Canada and United StatesFor Canada, tax rates are preconfigured for each province and territory in Canada, and for each state in theUnited States. However, before using the system, you must check whether these tax rates are still validaccording to any recent legislative amendments.
Tax EventIn the tax event, the system determines the method of taxation to be used for the business transaction accordingto:
SAP Business ByDesign February 2017Business Background P U B L I C • © 2017 SAP SE or an SAP affiliate company. All rights reserved. 17

● Which tax types are applicable ● Whether the business transaction is taxable or not ● Whether the business transaction is subject to tax or not ● Which tax rate is applicable
For transnational business transactions, the system uses a tax decision tree for both the ship-from country and theship-to country to determine the taxation method used in the tax event for each country. The relevant decision treesare determined by the tax countries entered in the document, in particular by the countries of the supplier and thegoods recipient. Other tax jurisdictions can be the:
● Location of the business residence of the seller who provides a service ● Location of the business residence of the buyer for whom a service is provided ● Location where the service is to be provided
Implications of the tax event for other areas: ● To calculate tax, the tax event takes the following into account:
○ Due tax type ○ Procedure for tax calculation ○ Tax exemption reasons, if required
● To determine tax, the tax event specifies the following: ○ Allocation criteria for the tax reports ○ The field in which the tax is displayed on the tax return:
You can assign tax events to the fields of the tax return form for the relevant country. For moreinformation see, Tax Returns for Goods and Services.
● In accounting, the tax event controls account determination.
There are, of course, more tax events in the system for other common business transactions. However, you cannotcreate your own tax events.Country Specifics
● GermanyExamples of tax events ○ 10: Domestic Acquisition (§15 I 1 Nr. 1) ○ 100: Intra-Community Acquisition ○ 310: Domestic Supply Of Goods And Services ○ 400: Intra-Community Supply (§4 Nr. 1b UStG)
In accordance with Directive 2008/8/EC and its implementation under the Annual Tax Act 2009, intra-community service provision must also be declared in VAT tax returns as of January 1, 2010. For this purpose,new fields have been introduced in the VAT tax return: fields 21, 46, and 47. To use these fields for servicesprovided in a foreign member state of the European Union, there are two new tax events for Germany and allother EU member valid as of January 1, 2010. ○ Sale 455 "EU Sale of Services, Reverse Charge" ○ 155 "EU Purchase of Services, Reverse Charge"
Errors may occur, if you use these tax events with an earlier tax date.
Deductibility TypeIn addition to the tax rate, the percentage rate at which input tax is deductible plays a part. Depending on the typeof company or the type of outgoing sales volume in which a certain incoming sales volume is incorporated, input taxcan be deducted at a rate of 100%, 0% or a rate determined specifically for the company. For this purpose, you
18 © 2017 SAP SE or an SAP affiliate company. All rights reserved. • P U B L I CSAP Business ByDesign February 2017
Business Background

define deductibility types that represent the percentage rate. The two most frequently used deductibility types areFully Deductible (100%) and Not Deductible (0%).
Tax CodeThe appropriate method for calculating tax is determined by a combination of tax type, tax event, and tax rate type,and by the deductibility type for the input tax of the sales volume. You can define tax codes in the system to avoiderrors when these parameters are entered manually.Each tax code represents a unique combination of the following parameters:
● In sales ○ Tax event ○ Tax types ○ Related tax rate types
● In purchasing ○ Tax event ○ Tax types ○ Related tax rate types ○ Deductibility types
This makes it possible to define all parameters represented by a tax code in the document by selecting a tax code,without having to enter each parameter individually.Taxes can be calculated automatically only for those products in the product master. This is why you may sometimeshave to enter the tax code manually, especially in purchasing. Alternatively, you may enter a product category sothat the tax rate type for this category can be used, thus enabling automatic tax calculation.The system uses one unique tax code for a tax event only for those countries that have one tax type.Country Specifics
● Canada and IndiaIn both countries several tax types can be taken into consideration for a tax event. India, for example, usesmultiple tax types, and each tax type has multiple tax rate types and deductibility types. The number ofpossible combinations resulting from this makes it impossible to work efficiently with tax codes. In thesecountries, the tax code corresponds to the tax event.
● GermanyIn accordance to Directive 2008/8/EC and its implementation under the Annual Tax Act 2009, intra-community service provision must also be declared in VAT tax returns as of January 1, 2010. For this purpose,new fields have been introduced in the VAT tax return: fields 21, 46, and 47.To use these fields for services provided in a foreign member state of the European Union, there are two newtax codes for Germany and all other EU member valid as of January 1, 2010: ○ Purchasing: 430 "EU Purchase of Services, Reverse Charge, standard rate, fully deductible ○ Sale: 530 "EU Sale of Services, Reverse Charge" ○ Exception for Italy: There the tax code for sales is: 540 "EU Sale of Services, Reverse Charge"
Exempted RegionIn many countries there are regions and areas that have special status under tax law. For example, Büsingen andHelgoland are exempt from German value-added tax. In business configuration you can define the regions that areexempt from national tax regulations, or have a special status. Such regions can correspond to political regions,communities, or tax-free zones and are derived directly from the postal code.
SAP Business ByDesign February 2017Business Background P U B L I C • © 2017 SAP SE or an SAP affiliate company. All rights reserved. 19

Tax Jurisdiction CodeTax jurisdiction levels are taken into account in tax calculation when taxes are in states, counties, and cities, but noton national levels of government. The different levels in a tax jurisdiction code represent different administrativelevels. Fine-tuning this activity ensures that the system uses all administrative levels to determine the tax rate foreach authority.In some countries, however, other government levels have tax jurisdiction. In these cases, you can adapt them.Define tax rates after you have maintained jurisdiction code.Country Specifics
● United StatesIn the United States, taxes are collected not only by states, but also by counties and cities; for domestic sales,taxation therefore depends on the state, county, and city in which your company and the goods recipient arelocated. For this purpose, you can enter a tax jurisdiction code in the master data of the company and thecustomer.The tax jurisdiction code represents the location of your company, your customer, or your supplier in ahierarchical structure, so that one country can have multiple states that, in turn, can have multiple cities andmunicipalities.The tax jurisdiction code is structured as follows: ○ 2 alphanumeric characters for the first level; this is the standard state code ○ 6 alphanumeric characters for the second level; for example, the county ○ 6 alphanumeric characters for the third level; for example, the city ○ 1 alphanumeric character for the fourth level, for example, the location or the area
It is not necessary to use all four levels. The number of levels used depends on the state.This function is currently used only in the United States.For the United States, tax jurisdiction codes have been preconfigured in the system on U.S. state level. Youmust enter further levels as required. If a tax jurisdiction code has not been assigned to a customer, the systemuses the U.S. state in the address as a tax jurisdiction code.Example
Tax Jurisdiction Code - Description Tax Jurisdiction Code Taxation in %
New York State NY 4%
Albany County NYAL0181 4%
Allegany County NYAL0221 4,5%
In the NYAL0181 tax jurisdiction code, NY stands for New York State, AL0181 stands for Albany County in NewYork State. For Albany County, two levels of the tax jurisdiction code are taken into consideration, and 8%(4% + 4%) of tax is levied. For Allegany County, 8.5% (4% + 4.5%) tax is levied.
● CanadaOther countries such as Canada have tax rates that depend on regions. This is because Canada is divided intoprovinces and territories. In these cases, use the Region field.
Tax ExemptionTax exemption is an exemption from all or certain taxes that are levied in a country. In most cases, the basis for taxexemption is determined by legal requirements. In some cases, these may apply without having to account for them.
20 © 2017 SAP SE or an SAP affiliate company. All rights reserved. • P U B L I CSAP Business ByDesign February 2017
Business Background

To ensure transparency, many legislators require that the reason for tax exemption be specified on relevantdocuments such as invoices. Tax exemption reasons are provided in the system, cannot be changed, and areassigned to a tax type.A customer's direct payment and exempt organization certificates are applicable until they are revoked.The tax exemption certificates are determined automatically in a sales document.You can assign relevant tax exemption reasons to product and customer master data by selecting the relevant entryin the Tax Exemption Reason fields.For more information, see Tax Exemption Certificate Processing [page 21].Country Specifics
● United StatesFor the United States, several tax exemption certificate types are available: ○ Direct Payment Certificate - continuous ○ Exempt Organization Certificate - continuous ○ Exempt Use Certificate - continuous ○ Exempt Use Certificate - single ○ Resale Certificate - continuous ○ Resale Certificate - single
The state must be added also.Only the following tax exemption certificate types can be found automatically, since only in these cases is itcertain that the exemption certificates always apply: ○ Direct Payment Certificate – continuous ○ Exempt Organization Certificate – continuous
For all the other certificate types, you need the information from the customer whether the certificate can beused for the current transaction.You must then assign the types manually in a sales transaction.
Legal Text InformationLegal text information is a textual explanation of the exemption reasons printed on invoices. These texts explain whycertain transactions are exempt from tax, thus allowing you to meet legal requirements.The legal text information is printed on a customer invoice, if, for example, a tax exemption is applicable. However,if the texts are not available in the required language, the system uses the English text for the invoice.
2.2.2.3 Tax Exemption Certificate Processing
OverviewA tax exemption is an exemption from all or certain taxes of a state or nation in which part of the taxes that wouldnormally be collected from an individual or an organization are instead foregone.A tax exemption certificate is a certificate sent by a customer to a company claiming exemption from tax on sales.In this system, the tax exemption certificate:
● Indicates the period of time during which the tax exemptions can apply ● Indicates if the tax exemptions apply to a single sales transaction or multiple sales transactions
SAP Business ByDesign February 2017Business Background P U B L I C • © 2017 SAP SE or an SAP affiliate company. All rights reserved. 21

● Indicates if the exempted (cumulated) amount exceeds a maximum amount when the exemptions apply inmultiple sales transactions
This applies to the Tax Exemption Certificates for France only.
● Indicates the reason for tax exemption
In France, a customer can apply to the authorities for exemption from VAT. If the exemption is granted,the customer receives a letter of confirmation including a license number and the period for which he isexempt from VAT. The customer sends this letter to a vendor, who must then take the tax exemption intoaccount when invoicing the customer. The vendor may not include any tax in customer invoices for thevalidity period of the tax exemption license.
PrerequisitesYour customer has registered with the tax authority for tax exemption and received a tax exemption certificate fromthem. This certificate has been assigned to the account.
Process FlowThe following steps explain the typical process flow for the Customer Tax Exemption Certificate in customerinvoicing.
1. When you create a sales/service order or customer invoice, the system searches for existing tax exemptioncertificates and automatically assigns a valid certificate. You have an option of rejecting the proposal andprevent the exemption to apply at header/line item level.You can manually assign an existing certificate and the relevant exemption reason at header/line item level.
You can see a set of elements (fields, links, push button, check box) related to tax exemption certificateswhen you create or view a sales/service order or a customer invoice. These elements are only visibleif the seller company is located in the US or France.
2. You can also create a new certificate if it does not exist and assign it immediately to the sales/invoicingdocument. The system allows you to enter the relevant tax exemption information sent by the customerdirectly in the business document.For more information, see, Create Tax Exemption Certificates [page 91]
3. The certificate records and shows the sum of the amounts which were exempted. The amount exempted byeach certificate during the invoicing process is cumulated on the corresponding certificate.
In France, you can set a maximum tax amount that cannot be exceeded. The system prevents thecumulated amount to exceed the limit during the invoice creation process if a certificate only allows alimited amount to be exempted. The cancellation of invoices including certificates reverts theaccumulation performed previously.
In the Account Management work center, under the Reports view, you can monitor in real time the tax exemptioncertificates created in the system and sent to the company.
22 © 2017 SAP SE or an SAP affiliate company. All rights reserved. • P U B L I CSAP Business ByDesign February 2017
Business Background

2.2.2.4 Tax Determination with Reverse Charge Mechanism
OverviewValue-added tax (VAT) is charged revenue from the sale of goods and services. This means that an entrepreneurissues a customer (as the service recipient) with an invoice that includes VAT, and pays the VAT to the responsibletax authority. As a result of this, the entrepreneur is the tax payer who is liable for VAT.In certain cases, however, the customer is required by law to be liable for VAT, and to pay it to the relevant taxauthority. In this case, the entrepreneur issues an invoice without VAT, but with a notification indicating that the taxdebt has been transferred to the customer. The customer must calculate and pay the VAT to the tax authority, andcan claim input tax deduction at the same time as usual. The transfer of tax debt to the service recipient is calledReverse Charge Mechanism and reverses the tax liability.
Automatic Tax Determination with Reverse Charge MechanismCountry Specifics for GermanySome services, such as those provided by a company located abroad, or services that are provided for a servicerecipient located abroad are taxed according to the reverse charge mechanism. From the perspective of the seller,the transaction must be reported, but the tax debt transfers to the account. According to Directive 2008/8/EC andits implementation under the Annual Tax Act 2009 as of January 1, 2010, this is the basic rule for services that areprovided for a company abroad. This basic rule is determined automatically, if the head office of the companyproviding the goods or services is in any EU member state. No tax exemption reason code must be entered in theservice master.For Germany, the system currently only covers the transfer of tax debt for other services provided by an entrepreneurlocated abroad if these services are provided domestically (§ 13b Abs. 1 Nr. 1 UStG), or if a German company providesother such services for a service recipient located abroad.The process flow for tax determination describes the determination of tax event 240 – Reverse Charge Acquisition§13b II 1 Nr. 1 UStG, tax event 312 – Export of Service, Reverse Charge, and the anomalies to be taken into account:
1. Create a sales order, a purchase order, or an invoice.2. While the document is being processed, the system transfers the tax relevant data to tax determination.
Examples of tax relevant data for reverse charge mechanism are: ● Location of supplier and buyer
○ Sale of a service ○ The seller company must be located in Germany.
The address of the seller is used, and the system normally uses the standard address of yourcompany unless you have overwritten the address in the sales order on the Involved Parties tab.
○ The service recipient must be located abroad.The location where the service provision takes place is used and must not be in Germany. Ifthe recipient is a private individual, the service can only be subject to reverse chargemechanism if it is provided in the European Union (EU). If items in an invoice contain servicesthat have been provided at different locations (according to the address of the service or goodsrecipient on the Involved Parties tab), these addresses are used first.
○ Purchasing a Service
SAP Business ByDesign February 2017Business Background P U B L I C • © 2017 SAP SE or an SAP affiliate company. All rights reserved. 23

○ The supplier must be located abroad.The address of the supplier is used as a basis, and the system uses the standard address.
○ The service recipient must be located in Germany.The location where the service is provided is decisive. It is also possible that individual invoiceitems contain different locations where the services have been provided (according to theaddress of the goods recipient). In this case, this is used as a priority.
● Tax attributes of productsTax rate type and tax exemption reason can be different for each country, region, and tax type. In theUnited States, for example, services are not normally subject to tax, so the tax exemption reason shouldbe assigned in the product master data.Enter the following settings for reverse charge mechanism in the master data for services on the Sales > Taxes and Purchasing > Taxes tabs as required: ○ Tax Exemption Reason: Buyer liable for VAT
○ The Taxable at destination checkbox must not be selected.3. The system processes all tax-relevant data in tax determination.4. The system calculates tax using the following components:
● Tax event, for example 240 – Reverse Charge Acquisition §13b II 1 Nr 1 UStG for purchasing or 312 –Export of Service, Reverse Charge for sales
● Tax codes ● Tax type ● Tax rate type such as the complete value-added tax rate with which the tax rate is determined as a
percentage, for example 19% ● Taxable amount
5. The system enters the result of the tax determination and the tax calculation in the document currently beingprocessed. The calculated tax is displayed on the Pricing tab. All tax details determined by the system aredisplayed on the Tax Details tab, such as the Tax Country and the Tax Code of the tax country.
If reverse charge is determined for a sales order or a manual invoice, a note is displayed on the printedinvoice that the customer must pay tax.
For more information on the general process of tax determination, see Tax Determination [page 9].The system cannot process other reverse charge mechanism scenarios in the automatic tax determination, so thesemust be checked manually.
Manual Control for Reverse Charge MechanismFor some countries there are also other sales or purchasing processes that are subject to reverse charge but cannotbe determined automatically by the system, as for example, in Germany sales according to §13b (5) UStG orpurchases according to §13b (2).Country Specifics for Germany
● For mobile radio units and integrated circuits with a tax date as of July 1, 2011 and an invoice amount of atleast 5000 Euros, reverse charge applies according to § 13b (2) Nr.10 UStG.In this case you have to change the tax code manually to one of the following: ○ 15 – Reverse Charge Acquisition §13b II 1 Nr. 10 UStG ○ 515 – Reverse Charge Supply §13b II 1 Nr. 10 UStG
● For these processes, the system provides the tax events 313 – Reverse Charge Supply §13b V UStG and 50– Reverse Charge Acquisition §13b II 1 Nr 4, 6 - 9 UStG, 11 – Reverse Charge Acquisition §13b II 1 Nr 2 UStG,
24 © 2017 SAP SE or an SAP affiliate company. All rights reserved. • P U B L I CSAP Business ByDesign February 2017
Business Background

12 – Reverse Charge Acquisition §13b II 1 Nr 3 UStG, 13 – Reverse Charge Acquisition §13b II 1 Nr 5 UStG and240 – Reverse Charge Acquisition §13b II 1 Nr 1 UStG. But you need to create your own tax code in your system.
● If you obtain your sales revenue according to §13b (5) UStG, you must enter the tax code manually.
Tax Events Stored in the SystemCountry Specifics for GermanyThe following tax events are currently stored in the system and can be used to create tax codes for Germany:
● Purchase: ○ 11 – Reverse Charge Acquisition §13b II 1 Nr. 2 UStG ○ 12 – Reverse Charge Acquisition §13b II 1 Nr. 3 UStG ○ 13 – Reverse Charge Acquisition §13b II 1 Nr. 5 UStG ○ 50 – Reverse Charge Acquisition §13b II 1 Nr. 4, 6 – 9 UStG ○ 240 – Reverse Charge Acquisition §13b II 1 Nr.1 UStG ○ 15 – Reverse Charge Acquisition §13b II 1 Nr. 10 UStG
● Sales: ○ 312 – Export of Service, Reverse Charge ○ 313 – Reverse Charge Supply § 13b V UStG ○ 315 – Reverse Charge Supply §13b II 1 Nr. 10 UStG
The following tax code and tax events combinations are provided by the system and determined automatically: ● Tax code 504 – Not taxable (reverse charge mechanism) is linked to tax event 312 – Export of Service, Reverse
Charge ● Tax code 530 – EU Sales of Service, Reverse Charge is linked to tax event 455 – EU Sale of Service, Reverse
Charge
For purchasing, tax code 430 – EU Purchase of Services, Reverse Charge, Standard Rate, Fully Deductible with taxevent 155 is available.If you need further tax codes, you can create them under Define Tax Codes of the Tax on Goods and Services activityin Business Configuration Implementation Projects Activity List Fine-Tune .
When you create a tax code, ensure that you provide the tax type under Details.
2.2.2.5 Third-Party Order Processing Taxation
OverviewThird-party order processing scenarios involve at least three parties: Seller, account, and supplier.A Third-Party Order Processing is a sales transaction that is conducted by several parties for one item, where theitem is shipped directly from the supplier to the account or ship-to party.For more information concerning the general processing in the system, see Third-Party Order Processing.Chain transaction means consecutive supplies of goods between three or more legal entities, where the contractualobligations of all parties in the chain are discharged by a single movement of goods from the first supplier in thechain to the final customer.
SAP Business ByDesign February 2017Business Background P U B L I C • © 2017 SAP SE or an SAP affiliate company. All rights reserved. 25

From a taxation point of view, the scenarios where the sales transaction crosses borders and the subject to tax hasto be determined, are of interest.This also has an impact onto the country where the taxes have to be paid. In the following processes, the systemsupports the user by displaying warning messages and triggering a check of the tax codes:
● You are a supplier in a chain transaction and you enter a ship-to party that is different from the account. Thesystem displays the message if the head offices of the ship-to party and your company are in differentcountries.
● In a third-party deal, you are the company that creates a sales order to which an external supplier is assigned.The external supplier delivers the goods directly to the customer. These transactions are generally notinvoiced automatically during an invoice run.
Country Specifics in case the seller and supplier are different: ● Germany: These transactions are not invoiced automatically during an invoice run if the head office of your
company is in Germany.
Value-added tax for chain transactions is treated differently, especially if the item is transported across a stateborder. It is necessary to decide on a case-by-case basis, which of the companies involved is allowed to issue a tax-exempt invoice. If the tax has not automatically been calculated correctly in this transaction, or if tax has beencalculated even though the transaction is tax-exempt, change the tax code and, if necessary, the tax country, on theTaxes tab accordingly.
Intra-Community Triangular TradeAn Intra-Community Triangular Trade is a special kind of third-party order processing, where all three participantsare located in different EU member states. Under certain circumstances, a simplification can be applied to intra-community triangular trades. The prerequisites for the application of this process are:
● The three companies transact business for the same item. ● All participating companies are registered in different EU member states for value-added tax purposes. ● The item goes straight from the first supplier to the final account. ● The item goes from one EU member state to another. ● The first supplier or the first company is responsible for the transport of the item.
Country Specifics ● Germany: If the simplification can be applied to the triangular transaction, then the 512 - Triangular
Transaction tax code can be entered manually in the invoice.
2.2.2.6 Tax on Goods and Services - Configuration Guide
In this configuration activity, you can create and change parameters required for the tax determination in sales,purchasing, and service processes such as tax jurisdictions, currency conversions, exempted regions, legal textinformation, and tax codes. These parameters are required for the system to determine the tax due for a businessdocument.To comply with country specific legal requirements, currency conversion types are required. This includes theexchange rate type and conversion types that must be used to convert tax amounts from the document currencyto the reporting currency.To find the Tax on Goods and Services activity, go to the Business Configuration work center and choose theImplementation Projects view. Select your implementation project and click Open Activity List . Select the Fine-Tune phase, then select the Tax on Goods and Services activity from the activity list.
26 © 2017 SAP SE or an SAP affiliate company. All rights reserved. • P U B L I CSAP Business ByDesign February 2017
Business Background

PrerequisitesYou have completed the Tax Settings for Purchasing activity for purchasing processes.To find this activity, go to the Business Configuration work center and choose the Implementations Projects view.Select your implementation project and click Open Activity List . Select the Fine-Tune phase, then select the TaxSettings for Purchasing activity from the activity list.
Business Background
Tax DeterminationAs a rule, companies are legally required to calculate taxes on products that they buy or sell, and to levy these taxesfrom their customers. After the products have been provided, the taxes must be declared and levied to the respectivetax authorities. The system supports you by providing a substantially automated tax calculation for the following taxtypes: Value-Added Tax (VAT), Sales and Use Tax, Withholding Tax. The system also provides a reporting tool thatgives you effective control over your obligatory declaration of these taxes.For more information, see Tax Determination [page 9].
Master Data for Tax DeterminationFor more information, see Master Data for Tax Determination [page 14].
Tasks
Define Currency Conversion Type1. To create a new currency conversion, click Add Row .2. Select the country for which the exchange rate is valid.3. Enter the date for the end of the validity period for the exchange rate type and
conversion type.4. Enter the type of exchange rate used such as Historical Currency Rate or EMU
Regulation Fixed Exchange Rate.5. If necessary, change the conversion type which is defaulted to Mid Value to either Bid
Value or Ask Value.6. Save your entries.
Define Exempted Regions1. To define an exempted region, click Add Row .2. Select the country of the exempted region.3. Enter a code for the exempted region.4. Enter a description for the region.5. Select the status of the exempted region.6. Optional: Under Details, enter the Postal Code.7. Save your entries.
SAP Business ByDesign February 2017Business Background P U B L I C • © 2017 SAP SE or an SAP affiliate company. All rights reserved. 27

Define Tax Rate Schedules1. To define tax rates and validity dates, click Add Row .2. Select a country for which you want to create a tax rate schedule.3. Select the applicable tax type of the taxes that must be declared and paid to the
respective tax authorities such as value-added tax, sales and use tax, and withholdingtax.
4. Select the tax rate type, for example, Standard, Reduced, or Exempt Rate.5. Enter the date from which the tax rate is valid.6. Enter the rate as a percentage.7. Save your entries.
Define Standard Phrases for Legal Text Information
We recommend that you create a standard phrase specifically for each country sinceexemption reasons can differ for each country. If a standard phrase is not available forthe required language, the English text is printed in the invoices. All languages aredisplayed in this view.To enter the legal texts for a specific language, you must be logged on to the system inthat language.
1. To define standard phrases for legal text information, click Add Row .2. Select the country for which the legal text information is valid.3. Select the applicable tax type for which legal texts are required such as value-added
tax, sales and use tax, and withholding tax.4. Select the number of the Tax Exemption Reason.5. Check the selection of the Language field. It is preset according to the language in which
you are logged on and must correspond to the language of your legal text.6. Enter the legal text explaining the legal basis of the exemption.
This text is then included on the invoices where required.7. Save your entries.
Define Tax CodesFor more information, see here.
Follow-On ActivitiesAfter you have completed the tasks here, we recommend that you check the tasks of the country-specific activitiesthat are required for countries that you have scoped.
2.2.3 Tax Determination — US
Here you can find tax information specifically for the United States.
28 © 2017 SAP SE or an SAP affiliate company. All rights reserved. • P U B L I CSAP Business ByDesign February 2017
Business Background

Delivery TaxationTaxes on materials deliveries within the United States are levied according to the law of the destination state (Ship-to). Only in California and Texas are the deliveries taxed according to the state of origin (Ship-from). Taxes on servicedeliveries are levied according to the law of the state of destination.You can add your own combinations in business configuration and decide which combination is origin-based ordestination-based for an intrastate transaction, which means that ship-to and ship-from are the same US state. Tofind the activity, go to the Business Configuration work center and choose the Implementation Projects view. Selectyour implementation project and click Open Activity List . Select the Fine-tune phase, then select the Tax on Goodsand Services — US activity from the activity list.
NexusNexus is a connection between a taxpayer and a state where the taxpayer has to pay taxes. The rules to establishthe connection between the two differs from state to state. However, with this nexus a state is required to collectsales tax for sales.Therefore a sale within a particular state is only taxable in the system if the seller company has nexus in the state.If the seller does not have a nexus, no sales tax will be determined and the system assigns tax code 507 – Non TaxableSale Under Nexus Rules to the sales document.This means the seller company issues an invoice without tax for nexus reasons. The transaction is recordedstatistically in the tax register.If your company has nexus in a state, you must have the following settings prepared:
● You created a tax authority for this state in the Tax Management work center. For more information, see QuickGuide for Tax Authorities (Tax Management).
● You created entries in the system for every tax authority to which tax returns have to be submitted. ● You created a company tax arrangement for every tax authority that is relevant. ● You entered a tax registration number for the company tax arrangement. This documents that the company
is registered in the state where the tax authority is located, and provides the basis for nexus determinationin the tax determination.
If a company tax arrangement has been created properly for a state, and a sale takes place in this state, the taxdetermination works as described in Tax Determination [page 9].
2.3 Party Processing
Business Partner and Parties
Business PartnersBusiness partners are all the companies and people with whom you are in contact in your daily business. When youbegin your work, you first create master data in the system by entering the business partners that you require foryour daily work. These business partners can have one or multiple business partner roles in the system, dependingon how they are used in your business.The business partner roles, such as business partner role account, supplier or contact, are assigned automaticallywhen you create business partners in the context of your work center view. You can also add them manuallydepending on work center.
SAP Business ByDesign February 2017Business Background P U B L I C • © 2017 SAP SE or an SAP affiliate company. All rights reserved. 29

Examples for entering business partner data: ● In the Account Management work center, you can create business partners with the roles Account, Contact
or Partner. To do this, click on the corresponding quick activity, for example Create Contact. ● You can also create a new account or contact using the Create Account or Create Contact quick activity.
Entering the data for the business partner once in master data means: ● That you only have to enter the data once for each new document for this business partner ● That automatic proposals for parties in that document can be derived from the master data when creating
documents ● You can check whether usage in the document is consistent with the master data ● That business processes are running in harmony according to your company’s structure. For example, in the
master data you can determine that a specific employee be automatically proposed as the employeeresponsible for any new sales orders.
● That you can also use the master data for reports. For example, if you classify an account as a customer, youcan cluster reports result based on this master data.
For more information about business partners, see Business Partners.Business partners can also be used for:
● Storage and display of information in a business transaction. The information collected from the businesspartner and the business partner role do not affect the behavior of the system.
● Relevance in business processes: The way a business process performs depends on the business partner.This means that the system behaves differently or uses different data depending on the selected businesspartner.
Depending on the account or the region of the account, ● different sales units become relevant ● different prices may be determined ● other payment and delivery terms are used as default ● another ship-to or ship-from location is determined by the system ● different taxes are calculated
● Analytics and Reporting: Here you can drill down by several business partner attributes and party roles. Forexample, sales manager Bob Menson wants to drill down the sales per sales office in reporting. He assignseach sales order the party role Sales Unit to enable the drill down.
Business Partner RolesCustomers are typically external business partners for your company. For example, you enter Silverstar WholesalesInc. as an account since they want to buy a heating installation from you (sales order).First create the business partner Silverstar Wholesales Inc. with the Account role and specify the account by selectingthe quick activity Create Corporate Account. This clarifies whether Silverstar Wholesales Inc. is a private account(person) or a corporate account (organization).Business partner roles include:
● Accounts (Private or Corporate Accounts) ● Contacts ● Partners ● Suppliers ● Employees
30 © 2017 SAP SE or an SAP affiliate company. All rights reserved. • P U B L I CSAP Business ByDesign February 2017
Business Background

Other external business partners can also be entered for use in other application areas, for example, suppliers. Thebusiness partner created then is given an additional business partner role and some additional fields are required.The same real world instance can occur in your master data, for example, a business partner can be both a corporateaccount and a supplier.
PartiesIf you create a document, for example, a sales order, service order or a customer invoice, you can indicate thatbusiness partners you created in the master data are involved parties for this specific document. Parties use businesspartners that have a special purpose in a document. Party roles are assigned to each party to define the party’spurpose.
Silverstar Wholesales Inc. is a Business Partner with the business partner role Account. However, thisAccount can be used in many different documents, such as sales orders, service orders and so on. Inthose documents Silverstar can have one or multiple party roles. For example, if Silverstar WholesalesInc. buys 100 tubes from your company it is given the party role “Account” in the corresponding salesorder. Silverstar Wholesales Inc. can have also multiple party roles in the same document. For example,once the company receives and pays the bill it. Silverstar Wholeales Inc. is given the party roles “Bill-to”and “Payer” for this sales order.
Party RolesBusiness partner often take on multiple party roles in a business document such as a business document sales orderor service order. Business Partners are assigned to party roles in a specific document to indicate the purpose thebusiness partner serves in that document. For example, it is often the case in a sales order that the account, ship-to, bill-to, and payer are identical: If Silverstar Wholesales Inc. buys the heating installation, receives the goods, getsthe bill, and pays it, has all four party roles in the sales order.Typical examples for party roles are:
● Account ● Ship-to ● Payer ● Freight Forwarder ● Employee Responsible ● Sales Unit ● Seller ● Service and Execution Team
For further information about the relevant party roles and necessary business partner roles, refer to the chapterUsage of Business Partner Roles Related to Party RolesParty Role for EmployeesWith the Employee Responsible role you can define which employee in your organization is responsible oraccountable for a single document. Often this employee also has tasks to fulfill or is responsible for updating thedocument in case of issues.This means it is important that you need to define which employee is “doing the job” and what his or her role is inthe business document. An employee is always a person.Assigning an employee a certain role in a business document is important for
● Indicating the responsibility/accountability of the employee, for example, employee responsible for a salesorder.
SAP Business ByDesign February 2017Business Background P U B L I C • © 2017 SAP SE or an SAP affiliate company. All rights reserved. 31

● Indicating who takes on certain tasks related to this business document, that is “who does the job”, forexample, the person fixing the heating in a service order.
● Reporting purposes, for example, sales volume of the sales representative Kate Jacob.
Employees are not only people who have an employment contract with your company (“internal” employees),they can also be service agents from another supplier who are working for you based on a contract.
Examples of Employee party roles include ● Employee Responsible ● Sales Employee: the employee Angela Baines from the marketing department is normally the employee
responsible for a certain lead, but Kate Jacob is taking over the party role as the sales employee for this lead. ● Service Performer in a service or sales order: this is the employee who actually performs a service.
Party Roles for Organizational UnitsOrganizational units reflect the organizational structure of the company. Organizational units can define companies,sales organization, and cost centers. An organizational unit with function sales or service can then take over a partyrole in a business document for the following reasons:
● If the information is required for legal reasons, for example, a company is required in a sales order. ● To indicate the responsibility and accountability of the organizational center, its employees and its managers
within this particular business process, for example, the responsible service execution team for a serviceprocess
● For reporting purposes, for example, to aggregate the sales volume per sales unit
Organizational units are created in the Organizational Management work center.Examples of party roles for Organizational Units include:
● The sales unit party role in a sales order ● The service execution team party role in a service order ● The seller (company) party role in a sales order (seller party role represents the company)
Special Case: CompaniesCompanies are a special case, since the same real world instance occurs both as an internal and external businesspartner in your master data.Once you enter a company into the organizational hierarchy, a corresponding business partner with Account andSupplier as business partner roles is created automatically. This is particularly required for inter-company business,since depending on the role the company is taking on, different data is required.
The company ID in organizational management does not need be the same as the account ID in the masterdata.
In documents the related party role of the company is called Seller. This role is always assigned to an organizationalunit.
Akron heating Inc. has the organizational center ID MC10000, but the account ID 101 Note: Changes toCompany data are not reflected in the business partner data (except DUNS number).
32 © 2017 SAP SE or an SAP affiliate company. All rights reserved. • P U B L I CSAP Business ByDesign February 2017
Business Background

Contact Role in Documents and Master DataYou can enter one or several contacts for a corporate account in your master data. This allows you, for example, tocall the right person in a particular company directly instead of using the central company phone number. However ,it might also be helpful to enter a contact person for a party into the document as well.
At Silverstar Heating Inc. Susan Manson and Bill Taylor are the responsible contact persons forpurchasing. You have entered both of them as contacts for Silverstar Heating Inc. in the master data.However, when Susan phones to place a sales order, you want to make Susan the relevant contact for thesales order.
Contacts are always related to a party in a document. That means this person is the one you contact if you havequestions about this party for the party role. You can add more than one contact person in the Involved Parties viewfor different party roles.
As mentioned above, Susan Manson is the purchasing contact for Silverstar Heating Inc. If Susan placesan order for Silverstar Heating Inc., you want to make Susan the contact for Silverstar Heating Inc.,assigned to the role Account. The goods are also shipped to Silverstar Warehouse. However, Susan willnot be responsible for receiving the goods. The best person to call for any questions regarding receivingthe goods at Silverstar Warehouse is Jim Jason, so you enter him as the contact for Silverstar Warehouseassigned to the party role Ship-to.
In master data you can enter multiple contacts for a corporate account and indicate one of them as the main contact.This main contact then automatically becomes the default contact for the account when a new business transactiondocument is created. Automatic determination of a contact is currently restricted to the account party role in adocument. However, you can still enter contacts manually for the other parties. Note that a Contact can serve asmain contact for a specific document such as a Sales Quote without having been indicated as the main contact inthe account master data.
Parties in DocumentsOn the General view you typically see only the most important parties for a certain document. For example, theAccount and Contact party roles are displayed if they deviate from Account, Ship-to and Bill-to.You can change the party for a special party role in a document. For example, if Silverstar Logistics is to receive thegoods in place of Silverstar Wholesales Inc. , you can change the Ship-to party by entering Silverstar Logistics directlyinto the “Ship-to” field or selecting this business partner from the value help.If you want to see all parties together with their party roles for a document, click on “View All” to open the editor(remark: there is no editor for leads.) and navigate to the “Involved Parties” tab.Here you can do the following:
● Get a complete overview of all parties involved and their party roles ● Change, add or delete parties and party roles ● Select a party for detailed address information ● Assign another master data address for a party role or contact ● Add a document-specific address that is only valid for this document and should not be part of the master
data. ● Change the address or entering a document specific address is required, if the default address is not suitable
for this particular document and no master data address should be added ● Add, change or delete contacts for a party role in this document
SAP Business ByDesign February 2017Business Background P U B L I C • © 2017 SAP SE or an SAP affiliate company. All rights reserved. 33

Silverstar Wholesales Inc. has two addresses in New York, one on Kingston Road, and one on Circus Drive.The Kingston Road address is the main one, and it is also marked as standard address in the accountmaster data for Silverstar Wholesales Inc. This means that if a new sales order is placed for SilverstarWholesales Inc. as Ship-to, the address at Kingston Road becomes the default. However, if for thisparticular order the goods is to be shipped to Circus Drive, you can change this on the “Involved Parties”tab.
Consistency Checks on Parties Used in DocumentsThere are several consistency checks performed when a business partner is used in a party role for a document.These checks ensure that the document created is correct and consistent and are done for the following reasons:
● The checks guarantee that the complete business process runs smoothly without interruption, for example,due to missing data
● Legal compliance for corporate accounts ● The checks help the employee creating the document adhere to the business rules entered in master data
Our sales representative Kate creates a sales order and enters Yellowstone Supermarket as an account.However, Yellowstone Supermarket is only a subsidiary of another company and is not allowed to act asa buyer from a legal point of view, which means that financial booking would be incorrect. Therefore anerror message is displayed if Yellow Supermarket is not flagged as “Legal Competence”.Sales representative Kate heard that there are serious financial problem with CarDealers Inc. She wantsto prevent new goods from being delivered to this account by setting a delivery block in the account masterdata. The next day Steve Miller receives a call from CarDealers Inc. saying that they want to order 10 moreheating installations. When he created the sales order, Steve gets a message stating that CarDealers isblocked from having goods delivered by us.
There are other checks that affect whether you can change a party role. Some of the parties are never changeable,which means the field is always read-only or the field will become read-only under certain conditions or in a certaindocument status. In some cases parties that were once read-only can become editable, for example, if a change wasreverted. Parties are set to read-only to guarantee the consistency of the business processes.Error and Warning Messages from Consistency ChecksA check can raise one or several error or warning messages, which are then displayed on the UI. You can distinguishbetween the following types of messages:
● Warning messages are messages that only come up once. These are typically warnings that indicate apotential problem or give you a tip to check something. For example, if the weight is missing for a productfreight cannot be determined if it is based on the weight of the product. However, you can still proceed withthe document if you do not make changes.
● Error messages are messages that remain until the problem is solved. In almost all cases you can still savethe document so that at least the current status of the document is saved. However, the document will remainincorrect until you solve the problem. This can be done by changing the business transaction document itselfor adapting the master data. For example, if the service performer in a service order is missing, then you mightenter her or him manually. Note that as long as the document is incorrect, no follow-up processes such asdelivery are triggered.
Determination of PartiesIf you are creating a new document in the system, such as a sales order, the document initially has no parties assigned.Once the account party has been entered, other party roles such as employee responsible, ship-to or bill-to aredetermined automatically. These automatically determined parties are only proposals and you can change them ifthe status of the document allows it.
34 © 2017 SAP SE or an SAP affiliate company. All rights reserved. • P U B L I CSAP Business ByDesign February 2017
Business Background

Parties are automatically re-determined when a document is changed. Re-determining means that a party in a partyrole has been already found. When the user changes certain data, the system determines that another party is bettersuited for this party role.Automatic re-determination of parties is disabled in the following cases:
● Parties for this party role cannot be changed anymore. For example, the ship-to party can no longer bechanged once the delivery process has started.
● If a party role has been changed manually by the user. This is based on the following: If the user changed thedata manually, he or she does not want to make some automatism change it again, because this would notbe transparent. Thus the system does not change parties of a party role that were changed manually by theuser.
This determination has the following benefits: ● It prevents requesting and entering data over and over again. You only enter the data once in master data. ● Prevents errors when reentering data manually ● Saves time because copied documents can serve as templates, for example, when the Account party role is
changed, the other involved parties are re-determined ● Supports the employee in his or her daily work ● The employee entering the document might not actually know which parties have to be entered, for example
whether sales or organizational data depends on the account.
It might be difficult for Susan Miller to say which service performer will actually take on a servicetask. If this was centrally defined in responsibilities by service manager Barbara Smith, then Susan,who is taking the order on the phone does not need to have this information.
● Help the employee creating the document adhere to the business rules entered in master data.
If Kate is set as the responsible employee for all accounts in California, the system finds her whena sales order is created for an account in California. The manager actually defining the responsibilityalso wants orders taken in a call center to be correctly assigned.
Error HandlingIf you often encounter the problem that the system finds the wrong party or none at all, here are a few suggestions:
● The configuration of the party determination steps is not appropriate to your business case. In this case youcan enable and disable party determination rules. For more information, see Define Partner Schema.
You do not want the employee who enters the document to automatically be the employeeresponsible for a sales order. The orders are entered by a shared service center employee andshe/he will never be responsible for the order. If no employee is found via responsibilities, then noemployee will be found by the system, which means that the shared service center employee takingthe order must enter it manually.
● The master data required to automatically determine the parties is missing, insufficient, or inconsistent:Check the different steps for determining a party role for a certain document type in the correspondingbusiness configuration and enhance or correct the master data as described for the different determinationrules.
You can create a new document based on an existing document in two ways: ● Follow-up document: You create a sales order from a sales quote. With this function you are able to display
the follow-up document in the document flow. The same function is provided if you choose the “Create withReference” action.
SAP Business ByDesign February 2017Business Background P U B L I C • © 2017 SAP SE or an SAP affiliate company. All rights reserved. 35

● Copy of a document: You copy an existing sales order to a new sales order. With this function document flowis not supported.
In both cases data, including the parties from the existing document, is copied to the new document. However, thereare fixed rules for copying parties from one document to another document. You cannot change the rules. Theydepend on:
● What kind of document the source document is, for example, sales order, service request, opportunity, or e-mail activity.
● What kind of document the target document is ● Which party roles exist in the source document, for example, an e-mail activity has no bill-to party to be copied. ● Which party roles exist in the target document, if there is no Bill-to in the target document.
The rules are as follows: ● A party role is copied one.-to-one from the source document to the target document, for example, the ship-
to party of a sales quote is copied to the ship-to party of the sales order. ● A party role is not copied to the target document due to organizational reassignment. This is basically the
case for the party roles employee responsible or sales unit. The employee responsible or sales unit of a salesquote is not copied to any follow-up or copied sales order. The system will trigger a new party determinationfor those roles.
Parties on Header and Item LevelThere are several document types that have header and item information. For example, a sales order or a serviceorder consists of header parties and can have one or several items. The item party defaults from the header parties.Some items can have a different Ship-to party or Service Performer. In this case the party roles are also providedon the user interface on item level.In most cases the parties that are relevant for an item coincide with those of the header. Here we do not simplydisplay these parties in the user interface. As a basic rule we consider parties that are not visible on the item as havingbeen copied from the header parties, for example, the Freight Forwarder party or Bill-to party becomes valid for allitems in a sales order. The parties are copied from the parties entered in the header and are visible on the InvolvedParties tab.
Usage of AddressesIn order to describe how addresses are used, it is useful to distinguish between three groups of addresses:
● Address of a business partner that is only valid for this business partner ● Relationship address, which makes sense on a relationship between two business partners. ● Document address that is specific to a specific party role in an individual document
Types of Addresses ● Address of a Party
Address of a party mean that this address is related to one party only: ○ There is no relation to a second party for this address. ○ The address can have several purposes. For example, an address might be suitable for delivering goods
or it might be the relevant address for sending invoices to a customer. ○ An address might also have several simultaneous uses.
● Relationship AddressRelationship addresses are never for only one party, but describe an address for a relationship between twoparties. The relationship address data comes from both parties. There are two kinds of relationship address:
36 © 2017 SAP SE or an SAP affiliate company. All rights reserved. • P U B L I CSAP Business ByDesign February 2017
Business Background

○ Employee relationship addressThis describes the address where an employee works. The first party of the relationship is theorganizational unit, for example, a company, a sales unit, or a service unit. The second party is theemployee. Address data, such as country, city or postal code, is derived from the organizational unit.Address data, such as building, e-mail address or direct telephone number belong to the employee.Together they build the relationship address of the employee at this organizational unit.
○ Contact relationship addressThis is similar to the employee relationship address, but represents the external view. That is the personin the relationship is a contact in another company. The first party is typically an account or a supplier.The second party is the contact. The contact relationship address describes where this contact worksin this company and how you can contact him or her. Note that account and contact can have more thanone relationship address to another party. For example, a consultant works for several accounts and hasseveral workplaces at those companies and an account or supplier can have several contacts.
● Document AddressDocument address is a kind of “one-time address” that you do not want to enter in master data, since thereis, for example, no likelihood for reuse or this address will not be visible in master data.
Our account Silverstar Wholesales Inc. sends an invitation to a summer party at Greenhill Golf Club.A freezer is to be delivered to this Golf club. However, it is unlikely that there will be follow-up orderfrom Silverstar with delivery to Greenhill. Therefore, sales representative Kate Jacob prefers toenter the ship-to address for this one sales order as a document address instead of adding anothermaster data address. You can enter a document address on the involved parties tab shown in thedocument editor.
Note that if you frequently enter the same address as a document address in several documents, it makesense to add this address to the business partner in the master data, for example, at the account. You canthen reuse the same address in multiple documents. If the business partner has several addresses enteredin master data and the one you want is not the one the system determines, you can change the default addresssettings in the master data. This is valid for both the standard address and the ship-to or bill-to address.Note that document addresses can be only entered for parties with external party roles. You can enter adocument address for a Ship-to, Account or a Bill-to. It is not possible to enter document addresses for internalparties such as employees responsible or sales units.
Location in DocumentsThe Location is the place of supply or delivery or the place where the service is performed. A location always refersto an address. The location is also relevant for taxation to determine where the delivery or the service is taxable. Alocation can have different roles in a business process, for example, ship-from location, ship-to location, and servicelocation.The role can also change from one business document to the next. Note that by default the Ship-to location is derivedfrom the Ship-to party address.
Automatically Defaulted Address of a PartyWhenever you enter a party into a document or a party is automatically determined by the system, the systemdefaults to the standard address that is generally the most suitable. This address depends on the party role of theparty within the document. The system tries to determine the address of a party depending on the availableaddresses of the business partner in the master data.
SAP Business ByDesign February 2017Business Background P U B L I C • © 2017 SAP SE or an SAP affiliate company. All rights reserved. 37

Fred Miller is to receive the goods in a sales order. He represents the ship-to party. ● First the system checks whether Fred is an employee of one of our companies. If that is the case,
his employee workplace address is used as the default. That is by default the goods are shippedto the address of Fred’s employment (one of our companies). Such a scenario typically happensas part of inter-company processes, for example when one of our companies sells to another ofour companies.
● If Fred is not an employee, the system checks whether Fred has a contact relationship address tothe account. For example, the goods were ordered by Silverstar Wholesales Inc. and Fred has acontact relationship address for Silverstar in New York, Blueberry Road. In this case thisrelationship address becomes the default address. If there is no relationship address for thisaccount, and there is one for another account, the address does not become the default since itdoes not match the requirements.
● If Fred is neither an employee nor has a suitable contact relationship address, then his own addressis used as the default.
The address determined by the system is only a proposal and can be changed as follows: ● Choose one of the other alternative addresses entered for this party in master data. This can be the address
or the relationship address. You can choose an alternative address for a party by changing the correspondingaddress on the Involved Parties tab of the selected party by clicking on the value help for the Address field ofthe document.
● Enter a document address. A document address is only valid for this one document.
Note that if no address is entered for a business partner in master data or none of the addresses is suitable, then noaddress is used for the party in the document. In this case only the name is available in the document.If you want to add an address for the party in the document, you can
● Enter the address for the business partner in master data. To add this address to the party in the document,just clear the field and reenter the party.
● If there is already an address available in master data for this party, but it was not found by the system, sinceit usually would not be suitable, you can choose an address manually for a party. To do this, change thecorresponding address on the Involved Parties tab of the selected party by clicking on the value help of theAddress field of the document.
● Enter a document-specific address for the party in this document.
Creation and Usage of New Party Roles
Create a New Party RoleWith the Define New Party Roles fine-tuning activity you are able to define new party roles, such as internal andexternal involved parties. These new roles can be used for specific documents, for example, sales quote oropportunity, as additional involved parties. A party role describes a person or an organization that is involved in yourspecific transaction.The configuration delivers pre-defined party roles that are marked as Responsibility Role, which contains frequentlyused internal party roles such as employee responsible or service performer.SettingsThe controls and possible settings in this activity are explained below.
38 © 2017 SAP SE or an SAP affiliate company. All rights reserved. • P U B L I CSAP Business ByDesign February 2017
Business Background

Settings Explanations Task
Party Role Code The code, which can be up to ten digits, used to identify the partyrole.
Enter the code to identify the partyrole. This code must start with Z, forexample, Z123456789.
Description The text to describe the party role used in a document and accountassignment.
Enter text to describe the party role.
ResponsibilityRole
A flag indicates that an internal party role can be used for employeeassignments to accounts.Pre-defined party roles from SAP marked with the ResponsibilityRole flag cannot be deleted or renamed. These party roles areavailable for responsibility assignment of employees. The pre-defined roles are also already defined in the party schemas andcannot be added or changed.In addition, the assignment of responsibility roles can be definedin two ways, directly through manual assignment in the accountmaster data or indirectly through rule based definitions, forexample, regional attributes such as postal or ZIP code.
Indicate if a party role should be usedto assign employees to accounts.The flag should only be used forinternal party roles such asemployees.Responsibility roles used in the partyschema will be determined based onthe account assignments.
Follow-up TasksTo support the automatic determination of the party roles in you party schema:
1. Define new party roles.2. Add these party roles to your party schema, for example, add the party roles to for sales quotes in the fine-
tuning option Involved Parties for Sales Quotes.3. If you use the flag Responsibility Role, maintain the account assignment of employees in master data.
Normally, as Kate Jacob is responsible for the Silverstar Inc. account, you assign her the responsibilityrole, Employee Responsible. Once this assignment is done, each time a new sales quote or sales order iscreated, the system automatically assigns Kate with the role employee responsible in the sales document.However, you decide to create a new party role. You define the new role as Customer ServiceRepresentative and flag it as a responsibility role. Then you add the party role to the party schema in thefine tuning option Involved Parties for Sales Quotes. Next you create an additional account assignmentfor Silverstar. For example, Jack Sigo is assigned as the Customer Service Representative, and from thenon all new sales quote documents automatically show Jack Sigo as the Customer Service Representativefor quotes created for the Silverstar account.If you don’t flag the Customer Service Representative role as a responsibility role, the role can bemaintained manually in the sales quote on the involved party screen in the sales quote if the new partyrole has been assigned to the party schema.
Assign Party Role as Involved Party to DocumentsA party role describes a person or an organization that is involved in your specific transaction and is visible andselectable on the Involved Parties tab of a document. Party roles can be used for internal and external involved parties.The configuration provides a predefined party schema containing standard party roles that are required or usedfrequently in the following documents:
● Sales order ● Sales quote ● Customer return
SAP Business ByDesign February 2017Business Background P U B L I C • © 2017 SAP SE or an SAP affiliate company. All rights reserved. 39

● Service confirmation ● Service order ● Opportunity
You can modify this party schema, with certain restrictions, as follows: ● Specify whether certain party roles can or should occur in your documents under Party Role Assignment. ● Create your own party roles that can be added manually to your documents or accounts. To do this, click
Define New Party Role . ● Specify the sequence in which parties are automatically determined in the documents. To do this, click
Maintain Determinations .
PrerequisitesBefore adding your own party roles to a party schema, you must first create and name them by clicking Define NewParty Role. When you define such a party role, you can then add it also to other configurable party schemas, suchas Involved Parties for Sales Quotes or Involved Parties for Service Orders.
Party roles pre-delivered by SAP cannot be renamed or assigned to other party schemas.
SettingsThe controls and possible settings in this activity are explained below. Note that some party roles have been providedwith standard settings. You cannot change these settings.Party Role Assignment
Settings Explanation Task
Active A flag that indicates whether aparty role is used in thedocuments.
Select the Active field to make the party role visible on the Involved Partiestab. (Click View All to reach this tab.)
Party Role The name of the party role usedin the documents. Party rolespredefined by SAP cannot berenamed or deleted.
Add a new party role by clicking Add .Note that the party role must be either a standard predefined party role, oryou must define it first by clicking Define New Party Role .
Mandatory A flag that indicates whetherthe party role is a mandatoryparty role. If a document issaved without this party role,the system informs you that it isinconsistent.If this check box has beenselected by default, you cannotdeselect it.
If you want to make the party role mandatory, select the Mandatory checkbox.
Unique A flag that indicates that onlyone party role can bemaintained in the document. Ifa document is saved withmultiple parties, the systeminforms you that it isinconsistent.
If you want to ensure that only one party role can be maintained in thedocument, select the Unique check box.
40 © 2017 SAP SE or an SAP affiliate company. All rights reserved. • P U B L I CSAP Business ByDesign February 2017
Business Background

Settings Explanation Task
ForbidManualChanges
A flag that indicates whetherthe party role may be changedin the documents.
If you want to forbid changes to the party role in the documents, select theForbid Manual Changes check box.
Define New Party Role
Setting Explanation Task
Party Role Code A code for the party role that you want to add to aparty schema.
Enter your party role code for your party role. Thiscode must begin with the letter Z, for example,Z01.
Description A description of your party role. Enter a description for your party role.
Responsibility Role A flag that indicates is relevant for responsibilitymaintenance.
Select this check box if this is required.
If the Responsibility Role flag has been selected, you can maintain two types of responsibilities for this party role asfollows:
● Maintain a direct responsibility for an account. The party role is proposed in a drop down list in account masterdata, under Responsibilities. For example, employee Kate Jacob is directly responsible in a party role for theaccount Silverstar Wholesale Corp.
● Maintain an indirect responsibility for accounts. For example, employee Susan Thomas is responsible for allaccounts in US, Nevada. You do this in the Application and User Management work center, Utilities view,Employee Work Distribution subview.
If Silverstar Wholesale Corp has its main address in US, Nevada, then both Kate Jacob and Susan Thomas aredisplayed in the account master data under Responsibilities as follows:
● Kate Jacob: Direct Responsible is selected. You can change or delete this entry, if required. ● Susan Thomas: Direct Responsible is not selected.
You cannot change or delete this entry. If the Responsibility Role flag has been selected for this party role, and thisparty role has been assigned to a party schema, then the system automatically determines the party role on theInvolved Parties tab. The system first tries to determine the direct responsible for the account. If no direct responsiblehas been maintained, then the indirect responsible is determined, if one exists. In the example above, Kate Jacobwould be determined.Note that the Responsibility Role flag should only be applied to party roles for employees.Maintain DeterminationsDetermination of a party can consist of several steps. If a step succeeds in automatically finding a party for this partyrole, then the subsequent steps are not executed. You can deactivate the steps that you do not need, but you cannotchange the sequence of steps or configure the steps themselves.
Settings Explanation Task
Active A flag that indicates that a determinationstep has been activated. An activateddetermination step is taken intoconsideration when the systemdetermines the involved parties for adocument.
Select the Active check box to have this determination step betaken into consideration.
SAP Business ByDesign February 2017Business Background P U B L I C • © 2017 SAP SE or an SAP affiliate company. All rights reserved. 41

Settings Explanation Task
Step A number that is used to specify thesequence of the determination steps. Thelowest number is taken into considerationfirst.
The step numbers are provided by the system.
Determination A text that specifies how the party role isdetermined.
The texts are provided by the system.
For more information, see Work Distribution.
This example shows how party roles could be configured for a document. A standard partner schema fora document contains the following party roles:
● Party Role: Account; Mandatory: Yes; Unique: Yes ● Party Role: Sales Partner; Mandatory: No; Unique: Yes
The system defines the party roles in the document as follows: ● Account
The document must contain an account. Only one account may exist in the document. ● Sales Partner
The document may contain a sales partner. Only one sales partner may exist in the document.
This example shows how determination of an employee responsible could be configured for a document: ● Party Role: Employee Responsible; Active: Yes; Step: 10; Determination: Responsibility for Account ● Party Role: Employee Responsible; Active: No; Step: 20; Determination: Responsibility Employee
Responsible by Region - Sales for Account ● Party Role: Employee Responsible; Active: Yes; Step: 30; Determination: Logged on user
In this example, the system tries to carry out step 10 to determine the employee responsible entered inthe account. If an employee responsible has not been maintained for the account, then the system willskip step 20 (because it is not active). It then goes to step 30 and determines the logged on user asemployee responsible for the document, that is, the user actually creating the document.
Determination RulesYou can display the determination rules of a document in the corresponding fine-tuning activity as described in theprevious section. The various rules are explained in the following chapters. These chapters also describe how toinfluence the determination by entering master data, if applicable, for the determination rule.
● Business partner relationship of 'party role'Example: Business partner relationship of AccountIn the Contact view in the master data of accounts, you can enter different relationships types, such as HasShip-to Party, for other business partners. The relationships are then used to automatically determine relatedbusiness partners when a document is created.What to do if the wrong party or no party is found with this step: ○ Add or remove a relationship in the master data of the account. ○ Change the default relationship in the master data of the account. ○ Disable the determination rule in the Business Partner Relationship of 'party role' fine-tuning activity.
● Functional organizational unit of ‘party role’Example: Functional organizational unit of Employee Responsible
42 © 2017 SAP SE or an SAP affiliate company. All rights reserved. • P U B L I CSAP Business ByDesign February 2017
Business Background

You can determine the sales unit by the sales unit assigned to the employee responsible for a document; forexample, Kate Jacob is assigned to the reporting line unit “Sales Office New York”. With this step, the partyrole “Sales Unit” is preset for the employee responsible.
● Company of ‘organizational party role’Example: Company of Sales UnitYou can determine the Seller party role by assigning a company for the sales unit entered or determined bythe system. Each sales unit can only belong to one company. If a sales unit has been entered in the document,the company relevant for this sales unit becomes the default seller party.
● Copied from ‘party role’Example: Copied from AccountThis determination step copies the business partner from one party role to another party role, as required.For example, the Ship-to, Bill-to or Payer party is automatically derived from the Account party.
● Logged on userThis determination is relevant for employee roles. The party role becomes the default when the logged-onuser who initially creates a document performs this determination step. For example, Kate Jacob creates asales order. With this determination step she would become assigned to the Employee Responsible party role.
● Responsibility “Employee (Direct Account)” from ’party role’This determination step sets the default for the employee role to the employee entered directly in accountmaster data under Contacts > Relationships and Responsibilities.
● Responsibility “name of responsibility”Example: Responsibility “Employee Responsible for Sales”This determination step sets the default for the organizational unit or employee role according to the rulesdefined in the responsibilities for employees and organizational units. For example, you defined adetermination rule by region for customers located in New York. For these customers only, a certain salesunit or certain employee is responsible. Then all documents with accounts that have an address in “New York”are assigned to this sales unit or employee responsible according to the determination rule entered previously.For more information, see Responsibility to Determine Employee Responsible – Sales.
● Organizational unit from org model if only one suitable functional unit existsIf only one organizational unit is set up in organizational management with the relevant functional unit theorganizational unit is selected as the relevant party.Example: Only one sales unit is set up in the organizational model. This single sales unit is automaticallydetermined as the relevant sales unit in a sales order.
Using a New Party Role in a DocumentThe prerequisite for using a party role in a document is adding it to the parties relevant for this document type. Youcan then add a party with the newly created party role on the Involved Parties tab of the corresponding document.Automatic determination occurs when the flag Responsibility is set in the party role.You then have to maintain a responsibility as follows:
● Maintain a directly responsible party in account master data ● Maintain an employee who is indirectly responsible: This can be achieved if the employees are not directly
responsible (manual assignment) for the accounts. Responsibility depends on customer attributes such ascountry, region or postal code. You enter a responsibility for the employee party role, such as a region. If asales order is created with a region that matches this responsibility, the corresponding employee becomesthe default.
Direct responsibilities are more important than indirect relationships. That is, if there is a direct responsibility enteredfor an account in the corresponding party role, the indirect responsibility becomes irrelevant.For more information, see Work Distribution.
SAP Business ByDesign February 2017Business Background P U B L I C • © 2017 SAP SE or an SAP affiliate company. All rights reserved. 43

New Party Roles in Copied or Follow-Up DocumentsA new party role that you introduce can be copied from one document to another. This is valid for copying a documentand creating a follow-up document and similar to parties in copied and follow-up documents. The prerequisite issimply that the new party role you defined has been added to both the source and target document.
Usage of Business Partner Roles Related to Party RolesThe following table describes which party roles can be combined with which business partner roles and the meaningof the party role.
Party Role Description Party Role Business Partner Role
Account A party that buys goods or services. Account
Seller A party that sells goods or services. Company
Ship-to A party where goods or services are supplied to. Business Partner
Supplier A party that supplies goods or services. Company or Supplier
Payer A party that pays for goods or services. Business Partner
Payee A party that receives the payment for thesupplied goods or services.
Business Partner
Bill-to A party that receives the bill for the suppliedgoods or services.
Business Partner
Recipient (CC) A party that is to receive a copy of a message. Business Partner
Recipient (BCC) A party that is to receive a copy of a messagewithout the other recipients’ knowledge.
Business Partner
Service and Support Team A party that is responsible for the processing ofservice requests and customer complaints, aswell as for the planning and preparation ofservices orders.
Organizational Center with Function 'Service'
Sales Partner A party that initiates and performs businesstransactions for another company.
Business Partner
Competitor A party with whom a company competes inbusiness.
Business Partner Entered as 'Competitor'
Recipient A party that is to receive a message. Business Partner
Sender A party from whom the message originates. Business Partner
Account A party to which an activity is assigned. Business Partner
Organizer A party that is responsible for the organization ofan appointment.
Business Partner
Attendee A party that is required as an attendee of anappointment.
Business Partner
Employee Responsible A party that is responsible for something. Theparty can be an internal or external employee.
Employee
Processor A party that processes something. Employee
44 © 2017 SAP SE or an SAP affiliate company. All rights reserved. • P U B L I CSAP Business ByDesign February 2017
Business Background

Party Role Description Party Role Business Partner Role
Activity Contact A party that has a reference to the currentactivity.
Business Partner
Service Execution Team A party that is responsible for executing serviceorders.
Organizational Center with Function 'Service'
Service Performer A party that performs services. Employee
Sales Unit An organizational unit that is responsible for thesales and distribution of products in businessprocesses.
Organizational Center with Function 'Service'
Call Participant A party that participates in real-timecommunication, for example, a phone call orinternet chat.
Business Partner
Sales Employee A party that is included in the sales departmentof an enterprise, or that carries out sales tasks.
Employee
Freight Forwarder A party that supplements their own service bysubcontracting transportation and otherassociated services, and offers the combinedservices to customers in a single package.
Business Partner
Organizational Unit An organizational unit assigned to an activity. Organizational Center
Contact A party that is the contact in a document. Contact
2.4 Activity Management
OverviewAs part of your daily work you need to deal with various activities throughout the day, such as tasks, appointments,phone calls, letters, faxes, or e-mails. To ensure productivity and efficiency, Activity Management enables you tooptimize all activities relating to Customer Relationship Management and ensures that you do not spend too muchprecious sales time on coordinating routine tasks and activities.With Activity Management you can create and keep track of activities such as appointments or e-mails, eitherindependently or related to your business transactions and business partners. It provides you with a structured viewof all activities as well as a complete interaction history between your company and your company's businesspartners. Sales representatives, for example, can view the outcome of a telephone call with a business partner, andsales managers can gain an overview of all the activities that have taken place in their department during a certainperiod of time. Activity Management ensures that every employee of a company has the same information about abusiness partner, so that issues related to the business partner can be processed in an optimal way. ActivityManagement can increase your sales volume since it is fully integrated in all business transactions and can thereforebe used at any time.The system can automatically determine the account and the main contact of this account. For example, for an e-mail activity, these parties are determined based on the sender or the recipient of the e-mail, depending on whetherit is an inbound or outbound e-mail.If your company works with opportunities, you can use the Sales Assistant, a tool to support pre-sales processes.The Sales Assistant provides sales persons with a checklist of recommended activities or tasks that should beexecuted in each phase of an opportunity.For more information, see Sales Assistant [page 256].
SAP Business ByDesign February 2017Business Background P U B L I C • © 2017 SAP SE or an SAP affiliate company. All rights reserved. 45

Microsoft Outlook® Integration (Groupware) allows you to exchange information between Microsoft Outlook and theCRM application of your system. You can synchronize your contacts, e-mails, appointments, and tasks to and fromOutlook; create service requests in the system from incoming e-mails; and associate e-mails, tasks andappointments with SAP Business ByDesign accounts, campaigns, opportunities, and leads.For more information, see Quick Guide for Microsoft Outlook Integration [page 120].
Prerequisites
Configuration settings are usually performed by an administrator. If you do not have the requiredauthorization, contact your administrator.
Activity Management is enabled in your solution configuration. To find this business option, go to the BusinessConfiguration work center and choose the Implementation Projects view. Select your implementation project andclick Edit Project Scope . In the Scoping step of the project, ensure that Account and Activity Management is selectedin Sales.In the Questions step, expand the Sales scoping element and select Account and Activity Management, and answerthe questions related to Activity Management.This enables the Activity Categories and Visit Reports fine-tuning activities. To find these activities, click
Open Activity List in your implementation project. Select the Fine Tune phase, then select the Activity Categoriesand Visit Reports activities from the activity list.
Features
Activity TypesActivity Management covers the following activity types:
● E-mailE-mail enables you to record business correspondence through electronic mail. The activity is createdautomatically when you send an e-mail from the system. E-mail activities can include text and attachments,and automatic sending of e-mails to different groups. You can also synchronize e-mails using MicrosoftOutlook.
● AppointmentAppointment enables you to plan and track your customer-related appointments, such as sales calls andmeetings. Information is maintained regarding accounts and contacts involved, as well as the date andlocation of the appointment. You can display your appointment activities in a Calendar or synchronize yourappointments using Microsoft Outlook. You can also assign a visit report to the relevant appointments. Theinformation in the visit report may or may not be product-related.
● TaskTask enables you to record information about activities that one or more employees need to perform by adue date. Task activities can cover a wide range of possibilities, such as the preparation of a customerpresentation or a reminder to send a birthday card. You can also synchronize tasks using Microsoft Outlook.
● LetterLetter enables you to record and track information about incoming and outgoing written businesscorrespondence. You need to scan inbound letters in order to store them in the system as attachments toyour letter activity. For outbound letters, you click a button in the letter activity to open Microsoft Word. Detailsof the letter activity such as account, address, subject, and notes are copied into a template that you can edit,store locally, and print out. The notes that you write in the letter activity are used for the body of the letter.You save the letter locally on your computer, and then add it to the letter activity as an attachment.
46 © 2017 SAP SE or an SAP affiliate company. All rights reserved. • P U B L I CSAP Business ByDesign February 2017
Business Background

● FaxFax enables you to record business correspondence through the fax channel. The activity is createdautomatically when you send a fax from the system.
● Phone callPhone call enables you to record all business exchange through telecommunication. This activity is integratedin the system and is created automatically when you make a phone call from the system.
ViewsActivity Management covers the following views within the Account Management work center:
● OverviewYou can prioritize Account Management tasks by gaining access to a work list of open tasks with predefinedfilters.
● ActivitiesYou can manage all your account related activities and effectively manage and prioritize your time and tasks.You can create activities and maintain important information, such as date, time, location, status, and priority.
● ReportsYou can access your activity history to validate the impact and effectiveness of your sales activities.
Process FlowActivity Management helps you to manage and control sales projects. The following steps show how ActivityManagement can assist in turning a qualified lead into a sales opportunity and improve sales volume.
1. Create appointment activityYour customer shows interest in a product or service and calls you requesting a personal visit anddemonstration. Your sales person creates an appointment activity to visit the customer, and invites a salesassistant to come along. When the sales person enters the attendee in the appointment activity, the systemdetermines the account and contact details automatically.
2. Create task list, gather information, and prepare visitYour sales person creates a task list for preparing the meeting. The presentation and marketing collateralhave already been made, and product and service information is available. The sales person attaches thesedocuments to the task activity.
3. Visit customerYour sales person visits the customer and demonstrates the product or service. The customer shows interestin your product or service and asks for a quotation.
4. Create and send quotationBack in the office, your sales person creates a quotation as a follow-up document to the appointment, andsends the quotation to the customer.
5. Write visit report and create follow-up activityThe sales person writes the visit report. He or she also creates a follow-up activity for the customer, forexample, a letter.
6. Analyze activitiesYour sales manager finally reviews all sales activities.
You can also create an activity as a follow-up document to a business document such as an opportunity. An activityas a follow-up document can also be created automatically if an e-mail, appointment, or task has been associatedto the opportunity using Microsoft Outlook Integration. This information is displayed in the Document Flow tab ofboth the activity and the business document. Note that for the business document you need to select ExtendedView in the Show field. In some business documents, this information is also displayed in other places. For example,
SAP Business ByDesign February 2017Business Background P U B L I C • © 2017 SAP SE or an SAP affiliate company. All rights reserved. 47

for an opportunity, the follow-up activity is displayed under Sales Activities; for a lead it is displayed under RelatedActivities.
2.5 Kits Process Flow
OverviewA kit is defined as a logical group of items that can be sold or purchased together as one unit. Wholesale andcomponent manufacturing industries like to offer product bundles as single selling units. In the Business ByDesignsystem a single selling or purchasable unit comprising of various components is called a kit .For example, a laptop and an adaptor are two different products that can be grouped together to be sold or purchasedas a single unit. This combination of the laptop and adaptor is available on paper as a unit and has a price associatedwith it. However, the kit itself does not exist as a physical entity.The various components of a kit are listed in the kit item list. In the case of the laptop and adaptor, both the individualproducts exist as physical entities. They are stored and transported, and so have inventory value. However, sincethey are a part of a kit, their individual prices are not relevant and only the price of the kit as a whole is considered.
Create a Kit1. Create a Kit
To create a kit, go to Products view under Product and Service Portfolio work center. Click New , and selectKit.You can also create a kit from the New Kit common task in the Product and Service Portfolio work center andthe Product Data work center.The kit you create represents a group of items that is sold or purchased together as one unit.For more information, see Create a Kit.
2. Add purchasing information to the KitIf you want to create a purchasing kit, you can add purchasing information for this kit. To do so, in the Purchasing tab under General Information , select the status In Preparation. This activates the Purchasingindicator under Relevant Processes.
3. Add sales information to the KitIf you want to create a sales kit, you can add sales details for the sales kit in the Sales tab under General Information . This includes information such as the sales organization, distribution channel, and soon. You can also assign advanced sales details to each distribution chain, for example, a specific sales unit ofmeasure, warranties, internal comments, sales notes, customer part numbers, tax information and so on.However, you must enter a sales organization and distribution channel for the sales kit.This activates the Sales indicator under Relevant Processes.For more information, see Assign Sales Details to the Kit.
4. Add valuation information to the KitYou can add valuation details for the kit which includes information such as basic valuation details, and astatus to each company and business residence that provide financial data for a kit. You can also assignadvanced valuation details such as a specific inventory valuation unit of measure, and cost information foreach relevant set of books.You can do so, in the Valuation tab under General Information . This activates the Valuation indicator underRelevant Processes.For more information, see Assign Valuation Details to the Kit.
5. Add tax information to the Kit
48 © 2017 SAP SE or an SAP affiliate company. All rights reserved. • P U B L I CSAP Business ByDesign February 2017
Business Background

If you create a purchasing kit, by default the highest value added tax (VAT) is applied as the standard tax rate.You can maintain separate tax rates for the kit in the Taxation tab under General Information .
6. Create a Kit Item ListUsing the kit ID created during the process of creating a kit, you can create a kit item list, which consists ofall the items that are included in that particular kit. Each of these items has an inventory process associatedwith it, but is not price relevant within the kit.For more information, see Create a Kit Item List in the Tasks section of the Kits Quick Guide.
Kits in Sales1. Create and Release a Sales Order
You can create a sales order with a sales kit as a line item and release it.For more information, see Sales Orders Quick Guide [page 388].
2. Release a Customer InvoiceYou can create and release a customer invoice document.For more information, see Quick Guide for Invoice Requests [page 187].
3. Determine Ship-From Information and Check AvailabilityOnce the sales order containing a sales kit has been released, the system displays a customer demand persales kit in the Customer Demand view of the Outbound Logistics Control work center. You can determine theshipment scheduling, ship-from information, and the availability for sales orders that contain sales kits. Youcan also use this view to release confirmed sales kits to logistics execution.For more information, see Customer Demand Quick Guide.
4. Release a Sales KitApart from the Customer Demand view, you can also release sales kits in the Delivery Due List view of theOutbound Logistics Control work center, where the sales orders are listed based on confirmed schedule lines.In this delivery due list, the supply planner can release the sales kits to hand them over to logistics execution.Once the sales kit has been released, you cannot change data such as product, date, quantity, ship-to partyin the corresponding sales order.For more information about delivery due lists, see Delivery Due List Quick Guide.
5. Process an Outbound DeliveryThe system displays the released sales kits as delivery proposals in the Delivery Proposals sub-view and asdelivery requests in the Delivery Requests sub-view of the Delivery Control view in the Outbound Logisticswork center. In this view, you can process an outbound delivery for the sales kit with tasks by creating awarehouse request or without tasks by posting a goods issue.For more information about delivery proposals and delivery requests, see Delivery Control Quick Guide.If you process the outbound delivery with tasks, you can create a warehouse task in the Warehouse Requestsview and confirm the task in the Task Control view.For more information about warehouse requests, see Warehouse Requests Quick Guide.For more information about task control, see Task Control Quick Guide.Whether you post the goods issue in one step directly or use the task support, the outbound delivery isprocessed and inventory changes are communicated to invoicing, accounting, and supply control.
6. Post Costs/RevenuesThe delivery of a sales kit and its components triggers the creation of a journal entry in the system which poststhe costs of components delivered. The valuation and the account determination are based on the componentproducts delivered as part of the sales kit. The invoicing of the sales kit triggers the creation of a journal entrywhich posts the revenues. You can view the entry in the Journal Entries view of the General Ledger work center.For more information, see Journal Entries Quick Guide
SAP Business ByDesign February 2017Business Background P U B L I C • © 2017 SAP SE or an SAP affiliate company. All rights reserved. 49

There is no change in the account determination logic for the sales kit items and the component items.Revenue recognition is not allowed for sales order items with sales kit products. For more information see,Sales Document Items Quick Guide
Kits in Purchasing1. Create and Release a Purchase Order
You can create a purchase order with a kit as a line item and release it.For more information, see Purchase Orders Quick Guide.
2. Create a Purchase Order AcknowledgementFor more information, see Purchase Order Acknowledgement.
3. Process an Inbound DeliveryWhen you receive a kit, you can use inbound processing to coordinate the inbound logistic activities.
Kits are only supported for inbound supplier deliveries.
For more information, , see Supplier Delivery Processing.4. Post Goods Receipt
On delivery of a kit, you can create a goods receipt to track it. The goods and services receipt can be createdwith reference to purchase orders with same or different suppliers.For more information, see, Directly Post a Goods Receipt with Label Creation.The valuation and the account determination are based on the component products delivered as part of thepurchase kit.The system sends the goods and services receipt to Supplier Invoicing for invoice verification, exceptionhandling, and payment processes. It also forwards the data to Financials, posts the goods return receipt there,and updates individual materials and fixed asset assignments if applicable. You can view the entry in theJournal Entries view of the General Ledger work center. For more information, see Journal Entries Quick Guide
5. Release a Supplier InvoiceYou can create and release a supplier invoice document.For more information, see Supplier Invoice Processing with Reference.
LimitationsKits are not supported in the following scenarios:
● Subsequent debit and subsequent credit memo items, customs duty, down payments, recurring invoices,invoice templates, and invoices without reference to purchase orders scenarios in supplier invoicing.
● Materials in Progress ● Intracompany stock transfer ● Supplier or customer returns ● Service and repair scenarios ● Strategic sourcing (contracts, quotes, shopping cart) ● Self- service procurement (non-stock materials) ● Invoices
50 © 2017 SAP SE or an SAP affiliate company. All rights reserved. • P U B L I CSAP Business ByDesign February 2017
Business Background

2.6 ISR Payments - Switzerland
OverviewInpayment slip with reference (ISR) is one of the main payment methods in Switzerland. It is a service provided bySwiss PostFinance and by Swiss banks. An ISR payment order requires that all invoices must have an inpaymentslip attached; this slip gives the supplier's bank details including a special ISR reference number.
Documentation is available on this topic that is specifically relevant for Switzerland. To ensure that the relevantcountry-specific document version is displayed, select Personalize My Settings . Select OnscreenHelp and, under Country choose Switzerland. Save your settings.
2.7 Payment Processing Using ISR — Switzerland
Documentation is available on this topic that is specifically relevant for Switzerland. To ensure that the relevantcountry-specific document version is displayed, select Personalize My Settings . Select OnscreenHelp and, under Country choose Switzerland. Save your settings.
2.8 Approval for Manual Customer Invoice and Credit Memo
OverviewYou can activate and define an approval process for manual customer invoice and credit memo.Activate Approval ProcessYou can enable the approval process for customer invoice and credit memo in Business Configuration work center,Implementation Projects view.
Configuration settings are usually performed by an administrator. If you do not have the requiredauthorization, contact your administrator. Before enabling this feature, you need to ensure that there are nomanual customer invoice and credit memo documents with status Not Released.
Select your project and click Edit Project Scope . In the Questions step of the guided activity, select the businessoption Approvals on Manual Customer Invoicing under Sales Customer Invoicing Miscellaneous Invoicing .Define Approval ProcessIn the Application and User Management you can define an approval process for customer invoice and credit memowith the following possibilities:
● A multistep approval considering several approving parties ● Defining conditions for the following values:
○ ABC Classification
SAP Business ByDesign February 2017Business Background P U B L I C • © 2017 SAP SE or an SAP affiliate company. All rights reserved. 51

○ Absolute Gross Total ○ Buyer Party ○ Net Value ○ Sales Unit
If the defined conditions are met, the document will require approval. This will create an approval task for theapprover in Approvals view under Managing My Area work center.
The approval task can be seen, only if the approver has access to Managing My Area work center,Approvals view.
For more information, see the documentation on creating and editing approval processes.
52 © 2017 SAP SE or an SAP affiliate company. All rights reserved. • P U B L I CSAP Business ByDesign February 2017
Business Background

3 Account Management
3.1 Business Background
3.1.1 Account Management
OverviewEffective management of accounts is vital to the success of a company. Account management enables you to captureand manage extensive data relating to accounts, contacts, and partners. It also allows you to manage the relatedaccount activities.The Account Management work center offers you a central location for accessing all information about accounts,contacts, and sales and service partners. This vital information is stored in the system and can be reused in varioussales and service activities.
BenefitsAccount management ensures the productivity and effectiveness of your sales people. It also helps you to improvedata quality, consistency, and reliability. You can use the work center to establish a consistent and collaborativeaccount management system across teams and offer your employees an insight into permissible customer data,business documents, activities, and their interactions. Careful monitoring of accounts helps to streamline the salesand service processes, resulting in increased sales and profitability, and improved customer satisfaction and loyalty.Account management allows you to view customer-specific prices and discounts. It also provides an insight into thechange history of a particular account. Your sales people can focus on profitable accounts, provide customizedproduct solutions, and identify the customers’ key decision makers. Similarly, your service people can quickly andeasily access account information while dealing with service requests and orders. Account management helps todecrease the cost of sales and services, accelerates response time, and shortens the ramp-up time for newemployees. The system is particularly useful for sales people and managers who work occasionally in the systemfor carrying out preparatory and follow-up activities.
Account Management in DetailAccount management is fully integrated into all customer relationship management processes and offers anorganized database for all sales figures. You can maintain relevant sales information, such as sales organization,Incoterms, customer groups, and payment terms.Account management also acts as an organized financial database. You can maintain bank data as well as creditcard information and company dependent data such as payment information, dunning, and accounting attributes.It further helps in the maintenance of tax data, tax exemptions, and tax exemption certificates.The work center also enables easy maintenance of customer addresses. All you need to do is define a standardaddress, and the system assigns addresses to the relevant business process. Postal data and information on differentcommunication types - such as phone numbers, fax numbers, and e-mail - can be assigned to the address. You canuse web services such as map and guide functionality and also maintain contact hours.
SAP Business ByDesign February 2017Account Management P U B L I C • © 2017 SAP SE or an SAP affiliate company. All rights reserved. 53

Account management concentrates on customer collaboration and uses customized templates and channels forsending business documents. You can maintain a systematic database for all notes and attachments and integrateall activities with the respective sales and service documents.
ViewsAccount management covers the following views within the Account Management work center:
● OverviewYou can prioritize account management tasks by gaining access to a work list of open tasks with predefinedfilters.
● AccountsYou can create and access accounts. You can also view and maintain important account-related informationsuch as address and communication data, sales figures, and financial data.
● ContactsYou can maintain essential contact information. You can create new contacts, search for existing contactsand view important contact information including e-mail, telephone number, department, and personaldetails.
● PartnersYou can create new partners, search for existing partners, and maintain important information such ascompany and main contact details, the status of the partner, and ABC analysis. You can also form a business-relevant connection between two partners.
● ActivitiesYou can manage all your account-related activities such as letters, faxes, and telephone calls. You can alsomaintain important information, such as date, time, location, status, and priority.
● ReportsYou can search, view, and run the reports associated with the Account Management work center.
Typical ProcessAccount management, along with business development, is a part of the sales function. The following sectionsprovide a detailed description of how Account Management assists you to improve the efficiency and turn-aroundtime of your sales people.
1. Contact customerThe sales manager passes the information about an account to a sales person by creating a task.
2. Accept visitThe sales person checks the account interaction history and relevant contacts before contacting thecustomer. As a response to the call, your customer agrees to a visit.
3. Create activityThe sales person summarizes the planned visit information including the date and the hour of the visit andsends an e-mail to the customer to confirm it.
4. Prepare visit and review account informationThe day before the customer visit, the sales person prepares for the visit and reviews all account informationavailable, such as the interaction history.The sales person reviews sales information for the account, including opportunities, sales orders, or possiblecomplaints. He or she also reviews key logistics and financial information, including back orders, credit limitinformation, and current payment situation. The sales person is now equipped with optimal and updatedinformation about the account.
5. Visit the accountFinally, the sales person visits the account and evaluates the possibility of new sales opportunities. Duringthe visit, the customer introduces the sales person to their new operations manager.
54 © 2017 SAP SE or an SAP affiliate company. All rights reserved. • P U B L I CSAP Business ByDesign February 2017
Account Management

6. Write visit reportAfter the visit, the sales person documents the results of the visit.
7. Enter new contact personThe sales person enters the details of the operations manager as the new contact person for the company.
8. Create opportunityThe sales cycle concludes with the sales person creating an opportunity in its first phase in the AccountManagement report.
AnalysisAccount management provides a range of reports, which provide in-depth information related to the AccountManagement work center and its functionalities.
ExampleKate Jacob is a new sales recruit for Akron Heating Technologies Inc. Next week she has to visit one of their mostprominent customers, Home Corp in Oklahoma City. Kate is feeling helpless, trying to gather information about thecompany from various sources. Bob Menson, Kate’s manager, understands her dilemma and volunteers to walk herthrough the details of Home Corp.Bob guides Kate through the Home Corp account in the Account Management work center. They find that MichaelEvans is Kate’s main contact person in Home Corp, but on checking the other contacts for the account they find thatthere is a new contact, Susane Bower. Bob points out the contact fact sheets for Michael and Susane and asks Kateto call them and schedule appointments.Kate now checks the overview and identifies the areas that are critical for Home Corp. She locates a new partner,Illinois Home Heating, and notes the telephone number and e-mail address of her contact persons, Simon Flenningsand Jack Forman. She studies the ABC classification for the company and decides to call Simon and Jack forappointments.Satisfied with her progress, Bob asks Kate to check her schedule for the next two days. Kate selects the Activitiesview, enters the relevant dates, and checks her work list. She has three appointments lined up with EconomyPlumbing and Heating Co. and five follow-up phone calls to make over the next two days.
3.1.2 Activity Management
OverviewAs part of your daily work you need to deal with various activities throughout the day, such as tasks, appointments,phone calls, letters, faxes, or e-mails. To ensure productivity and efficiency, Activity Management enables you tooptimize all activities relating to Customer Relationship Management and ensures that you do not spend too muchprecious sales time on coordinating routine tasks and activities.With Activity Management you can create and keep track of activities such as appointments or e-mails, eitherindependently or related to your business transactions and business partners. It provides you with a structured viewof all activities as well as a complete interaction history between your company and your company's businesspartners. Sales representatives, for example, can view the outcome of a telephone call with a business partner, andsales managers can gain an overview of all the activities that have taken place in their department during a certainperiod of time. Activity Management ensures that every employee of a company has the same information about abusiness partner, so that issues related to the business partner can be processed in an optimal way. ActivityManagement can increase your sales volume since it is fully integrated in all business transactions and can thereforebe used at any time.
SAP Business ByDesign February 2017Account Management P U B L I C • © 2017 SAP SE or an SAP affiliate company. All rights reserved. 55

The system can automatically determine the account and the main contact of this account. For example, for an e-mail activity, these parties are determined based on the sender or the recipient of the e-mail, depending on whetherit is an inbound or outbound e-mail.If your company works with opportunities, you can use the Sales Assistant, a tool to support pre-sales processes.The Sales Assistant provides sales persons with a checklist of recommended activities or tasks that should beexecuted in each phase of an opportunity.For more information, see Sales Assistant [page 256].Microsoft Outlook® Integration (Groupware) allows you to exchange information between Microsoft Outlook and theCRM application of your system. You can synchronize your contacts, e-mails, appointments, and tasks to and fromOutlook; create service requests in the system from incoming e-mails; and associate e-mails, tasks andappointments with SAP Business ByDesign accounts, campaigns, opportunities, and leads.For more information, see Quick Guide for Microsoft Outlook Integration [page 120].
Prerequisites
Configuration settings are usually performed by an administrator. If you do not have the requiredauthorization, contact your administrator.
Activity Management is enabled in your solution configuration. To find this business option, go to the BusinessConfiguration work center and choose the Implementation Projects view. Select your implementation project andclick Edit Project Scope . In the Scoping step of the project, ensure that Account and Activity Management is selectedin Sales.In the Questions step, expand the Sales scoping element and select Account and Activity Management, and answerthe questions related to Activity Management.This enables the Activity Categories and Visit Reports fine-tuning activities. To find these activities, click
Open Activity List in your implementation project. Select the Fine Tune phase, then select the Activity Categoriesand Visit Reports activities from the activity list.
Features
Activity TypesActivity Management covers the following activity types:
● E-mailE-mail enables you to record business correspondence through electronic mail. The activity is createdautomatically when you send an e-mail from the system. E-mail activities can include text and attachments,and automatic sending of e-mails to different groups. You can also synchronize e-mails using MicrosoftOutlook.
● AppointmentAppointment enables you to plan and track your customer-related appointments, such as sales calls andmeetings. Information is maintained regarding accounts and contacts involved, as well as the date andlocation of the appointment. You can display your appointment activities in a Calendar or synchronize yourappointments using Microsoft Outlook. You can also assign a visit report to the relevant appointments. Theinformation in the visit report may or may not be product-related.
● TaskTask enables you to record information about activities that one or more employees need to perform by adue date. Task activities can cover a wide range of possibilities, such as the preparation of a customerpresentation or a reminder to send a birthday card. You can also synchronize tasks using Microsoft Outlook.
56 © 2017 SAP SE or an SAP affiliate company. All rights reserved. • P U B L I CSAP Business ByDesign February 2017
Account Management

● LetterLetter enables you to record and track information about incoming and outgoing written businesscorrespondence. You need to scan inbound letters in order to store them in the system as attachments toyour letter activity. For outbound letters, you click a button in the letter activity to open Microsoft Word. Detailsof the letter activity such as account, address, subject, and notes are copied into a template that you can edit,store locally, and print out. The notes that you write in the letter activity are used for the body of the letter.You save the letter locally on your computer, and then add it to the letter activity as an attachment.
● FaxFax enables you to record business correspondence through the fax channel. The activity is createdautomatically when you send a fax from the system.
● Phone callPhone call enables you to record all business exchange through telecommunication. This activity is integratedin the system and is created automatically when you make a phone call from the system.
ViewsActivity Management covers the following views within the Account Management work center:
● OverviewYou can prioritize Account Management tasks by gaining access to a work list of open tasks with predefinedfilters.
● ActivitiesYou can manage all your account related activities and effectively manage and prioritize your time and tasks.You can create activities and maintain important information, such as date, time, location, status, and priority.
● ReportsYou can access your activity history to validate the impact and effectiveness of your sales activities.
Process FlowActivity Management helps you to manage and control sales projects. The following steps show how ActivityManagement can assist in turning a qualified lead into a sales opportunity and improve sales volume.
1. Create appointment activityYour customer shows interest in a product or service and calls you requesting a personal visit anddemonstration. Your sales person creates an appointment activity to visit the customer, and invites a salesassistant to come along. When the sales person enters the attendee in the appointment activity, the systemdetermines the account and contact details automatically.
2. Create task list, gather information, and prepare visitYour sales person creates a task list for preparing the meeting. The presentation and marketing collateralhave already been made, and product and service information is available. The sales person attaches thesedocuments to the task activity.
3. Visit customerYour sales person visits the customer and demonstrates the product or service. The customer shows interestin your product or service and asks for a quotation.
4. Create and send quotationBack in the office, your sales person creates a quotation as a follow-up document to the appointment, andsends the quotation to the customer.
5. Write visit report and create follow-up activityThe sales person writes the visit report. He or she also creates a follow-up activity for the customer, forexample, a letter.
6. Analyze activities
SAP Business ByDesign February 2017Account Management P U B L I C • © 2017 SAP SE or an SAP affiliate company. All rights reserved. 57

Your sales manager finally reviews all sales activities.
You can also create an activity as a follow-up document to a business document such as an opportunity. An activityas a follow-up document can also be created automatically if an e-mail, appointment, or task has been associatedto the opportunity using Microsoft Outlook Integration. This information is displayed in the Document Flow tab ofboth the activity and the business document. Note that for the business document you need to select ExtendedView in the Show field. In some business documents, this information is also displayed in other places. For example,for an opportunity, the follow-up activity is displayed under Sales Activities; for a lead it is displayed under RelatedActivities.
3.1.3 Down Payments From Customers
OverviewDown payment requests are created when an agreement has been made with the customer to provide a downpayment for a product before it has been delivered or for a service before it has been provided. The customer paysa part of the total amount at the time of purchase or before delivery. When invoicing takes place, this down paymentis deducted from the invoice. The customer then pays the balance.
Process Flow1. The user creates a sales order or service order in the system and selects Down Payment Required, either in
the Delivery Block field for the sales order or in the Execution Block field for the service order. The order isreleased.
2. In the Customer Invoicing work center in the Common Tasks, the user creates one or several down paymentrequests.The user maintains a gross or net amount as down payment. The user can also specify the reconciliationaccount to be used for down payments that are made by the customer (by clicking View All and selecting itin the Reconciliation Account field, located on the General tab under Accounting).
Only one tax rate can be maintained for a down payment. If you require several tax rates, create a downpayment request for each tax rate.
3. The user assigns the sales order or service order ID to the down payment request by entering the order ID inthe Description field of the Agreement tab. For example, the user can enter Down payment of 10% forsales order 42233340314.This information makes it clear to the customer which business transaction the down payment request isbased on. You can also use this information to search for the down payment request later on in the process.
4. The user releases the down payment request. The down payment request is printed automatically. Print theorder confirmation for the related sales order or service order. Send both of them together to the customer.
5. The system creates an open item receivable in cash flow management. In the Receivables work center, thisopen item receivable can be cleared when the customer pays.
6. At regular intervals, the user chooses Open Down Payment Requests in the Customer Invoicing work center,Invoice Documents view. The user can work through the list, checking the down payment requests and notingthe sales or service order IDs (from the texts mentioned in step 3), or use the sales or service order ID tosearch for a particular down payment request. The user then ensures that the delivery block is removed fromthe relevant sales orders, and the execution block is removed from the relevant service orders.
58 © 2017 SAP SE or an SAP affiliate company. All rights reserved. • P U B L I CSAP Business ByDesign February 2017
Account Management

7. In the next step, the employee responsible ensures that all required subsequent steps, such as the deliveryof goods, provision of services, and project work, and so on, have been carried out, and that the system hascreated the invoice requests.
8. After the goods have been delivered or services have been provided, the down payment request must beassigned to the relevant invoice request so that the down payment can be deducted accordingly. To do this,the user searches in the Customer Invoicing work center, Invoice Requests view, for all invoice requests thathave the corresponding order number as preceding document ID. The user selects an invoice request andclicks Edit . Now the user can assign the required down payment requests under Reference Document.
9. The user now creates the customer invoice for the invoice requests. There are three ways to create invoices: ● Directly from the invoice request, click Release (immediately after step 6). ● In Invoice Requests click Invoice - Advanced . Ensure that the Down Payment Transfer check box has been
selected. This check box is selected automatically in simple invoice creation. ● Use the invoice run. Ensure that the Down Payment Transfer check box has been selected.
● If the Down Payment Transfer check box has not been selected, invoice requests to whichdown payments have been assigned or could be assigned are not considered when invoicesare created.
● Of the three methods of creating invoices, we recommend the first one. If this method isused, it is clear to see the relationship between the assigned down payments and theinvoices that have been created afterwards.
10. In the customer invoice created in the previous step, the down payment amount is deducted. The user cannow check the invoice amount, tax, allocated down payment, and payment amount. The resulting invoicedocument can now be sent to the customer and displays the total invoice amount, down payment made, andremaining due payment amount.
11. Upon payment of the remaining due amount, the corresponding open item in the customer invoice is clearedautomatically. This can be seen in the Receivables work center.
3.1.4 Address Management
OverviewYou can create, view, and update the details you need to communicate with your business partners. You can maintaindetailed postal and communication data for persons and organizations.
Postal DataYou can maintain general postal address data for a business partner. You have to select the country before theaddress details can be added.The layout of the postal address fields is country-specific.
The country-specific layout is not available for all countries.
You can maintain further postal address details for organizations and persons in the additional fields, such as: ● P.O. box number ● Time zone ● Address lines
SAP Business ByDesign February 2017Account Management P U B L I C • © 2017 SAP SE or an SAP affiliate company. All rights reserved. 59

We recommend that you create a separate address entry for a P.O. box address that contains P.O. box dataonly.
In human resources, address data is time-dependent, allowing you to maintain accurate address details foremployees. Private address data maintained in human resources is protected in other application areas.
Communication DataYou can maintain communication data for a business partner. The fields available for communication data varydepending on whether you maintain data for persons or organizations.
Maintaining communication data is optional.
You can enter communication details, such as: ● Phone number ● Fax number ● E-mail address ● Web site address (organization only) ● Mobile phone (person only)
You can also specify the business partner’s language and preferred method of contact.
Multiple AddressesYou can maintain multiple addresses for a business partner. You must specify the main address when you assignmore than one address to a business partner.If you enter multiple addresses for accounts, you can specify the ship-to, bill-to, dunning-to, and remittance adviceto addresses. For suppliers, you can specify the ship-from, invoicer, payee, and remittance advice to addresses.You can specify business and personal addresses for contacts and service agents. You can add further details to abusiness address, such as the building, floor, room, and further in-house mail details. If you want to select a businessaddress for a contact or service agent, you have to assign the relevant business partner organization first whoseaddress is then used as the business address.Additionally you can also maintain validity period for the address of an account master data.
The time dependent address can be created and maintained through migration or service.
Deletion of AddressesYou can delete the address of a business partner. The deletion of a business partner address will not lead to errorsin business documents, since business documents always refer to a copy of the business partner address that theyuse.
Credit Card Holder Addresses for AccountsIn some countries, the authorization check of a credit card service provider includes an address check. In this case,a credit card holder address is required. The clearing house checks the address of the payer against the address ofthe credit card holder that is stored at the credit card service provider. If the addresses do not match, the credit cardpayment fails.
60 © 2017 SAP SE or an SAP affiliate company. All rights reserved. • P U B L I CSAP Business ByDesign February 2017
Account Management

You can maintain a credit card holder address or copy one of the existing addresses of the account to the credit cardholder address.
In the quick activity you can only copy the main address of the account to the credit card holder address.
Additional FeaturesThe features listed below and other features are available if they have been activated in the Mashup Authoring view.For more information, see the Mashup Authoring Quick Guide in the Help Center.
● Map/DirectionsYou can view an address on a map.
● Reverse Phone Look-UpYou can enter the phone number of a supplier, an account, or a contact to display the details of the personor organization to which this number belongs.
3.1.5 Business Partner Duplicate Check
OverviewThe business partner duplicate check allows you to find business partners that exist more than once in the system,thus avoiding having redundant data in your system and helping you to reduce efforts and save costs when managingyour business partner master data.You can use the duplicate check when performing the following activities:
● When creating a new business partner in a business partner view ● When creating business partners from Microsoft Excel®
For example, the duplicate check is available when creating accounts using Microsoft Excel. For moreinformation, see Create Accounts Using Microsoft Excel® [page 79].
The duplicate check is available in various business processes where business partners, accounts, suppliers, or anyother types of business partners and their respective business partner roles are used.The check is carried out when you create a new business partner. While saving the data the system checks whetherthe business partner already exists. Each check is carried out for business partners with any kind of status.
The check will also list business partner data that you might not be able to access due to missing access rights.The main address is only displayed if you have authorization to access it.
You have the following options when checking for duplicate business partners: ● The duplicate check is carried out automatically when you save the data you entered. ● You can also carry out the duplicate check manually by clicking Check for Duplicates .
The check is always done by comparing existing business partner data with the data of a business partner youare about to create.
SAP Business ByDesign February 2017Account Management P U B L I C • © 2017 SAP SE or an SAP affiliate company. All rights reserved. 61

Prerequisites
Configuration Settings
Configuration settings are usually performed by an administrator. If you do not have the requiredauthorization, contact your administrator.
To deactivate the duplicate check and to select the type of check you want to use, you have selected the requiredfunctions in your solution configuration. To find this business option, go to the Business Configuration work centerand choose the Implementation Projects view. Select your implementation project and click Edit Project Scope . Inthe Scoping step of the project, ensure that Business Partners is selected within General Business Data.In the Questions step, expand the General Business Data scoping element and select Business Partners. SelectHandling of Business Partners and answer the questions related to the duplicate check for business partners.
Features
Searching for Duplicate Business PartnersThe search for duplicate business partners is carried out based on the following search criteria:
● Name of a business partner and related data ○ First name, last name, and date of birth of a person ○ Name and additional name of an organization
● Address data ○ Postal address data such as country, city, postal code, street, and house number
● Communication data ○ Phone, fax, mobile number, and e-mail
The system carries out a fuzzy search that finds business partners even when the data you enter containstypographical errors or is incomplete.
The duplicate check result displays the following information about potential duplicate business partners: ● ID ● Name ● Address ● Status ● Ranking information about the probability of a match with a potential duplicate business partner in percent ● An indication of whether the related role of the current view has already been assigned to the business partner
in questionFor example, when checking for duplicate suppliers in the Suppliers view, the Existing as Supplier check boxis selected if the business partner has been created as a supplier.
62 © 2017 SAP SE or an SAP affiliate company. All rights reserved. • P U B L I CSAP Business ByDesign February 2017
Account Management

You can choose one of the following profiles for the duplicate check during scoping: ● Strong check if you want to search for duplicate business partners with high similarity only
If you select this type of check, business partners will be displayed as duplicates if the similarity is atleast 85 %.
● Medium check if you want to search for duplicate business partners with medium to high similarityIf you select this type of check, business partners will be displayed as duplicates if the similarity is atleast 80 %.
● Weak check if you want to search for duplicate business partners with low to high similarityIf you select this type of check, business partners will be displayed as duplicates if the similarity is atleast 70 %.You can also deactivate the duplicate check.
Handling Duplicate Business PartnersIn the duplicate check result, you can do the following:
● Ignore the duplicate business partners and save your entries ● Create the new business partner based on the data of the duplicate business partner
Depending on whether the existing business partner has already been created with a certain role, you can usethe existing data or create the new business partner with the new role.
3.2 Accounts View
3.2.1 Accounts Quick Guide
As a sales or service professional, you need complete and easy access to the account information of your customersand potential customers. This enables you to provide quality sales and service solutions.The Accounts view provides you with an overview of all the accounts that are currently in your system. You canmaintain important information about an account, such as address and communication data, status, classification,contact hours, sales data, and financial data.You can access the Accounts view from the following locations:
● Business Partner Data work center ● Account Management work center
Business Background
Accounts and ContactsYou can view, create, and maintain information about your accounts and contacts in more than one work center.The data you create is shared by several work centers. You only need to maintain the information in one work centerfor it to be updated automatically in all relevant work centers.For more information, see Maintenance of Accounts and Contacts [page 71].
SAP Business ByDesign February 2017Account Management P U B L I C • © 2017 SAP SE or an SAP affiliate company. All rights reserved. 63

Address ManagementYou can create, view, and update the details you need to communicate with your business partners. You can maintaindetailed postal and communication data for persons and organizations.For more information, see Address Management [page 59].
Access Rights and RestrictionsYou can control which account data a user can access in the Accounts view of the Account Management and BusinessPartner Data work centers. Depending on the access rights and restrictions you define for a user, the user can viewand edit only selected accounts. This allows you to manage your users based on your company’s requirements.Thus, you can allow selected users to view more confidential account data while reducing the data that can beaccessed by other users.For more information, see Access Rights and Restrictions for Accounts [page 74] and Overviews of BusinessPartners [page 76].
Business Partner Duplicate CheckThe business partner duplicate check allows you to find business partners that exist more than once in the system,thus avoiding having redundant data in your system and helping you to reduce efforts and save costs when managingyour business partner master data.For more information, see Business Partner Duplicate Check [page 61].
Tasks
Create and Edit an Account1. In the worklist of the Accounts view, click New , then choose Private Account or Corporate Account.
You can also create a new account by starting the New Corporate Account or New Private Accountcommon task, which belongs to the Business Partner Data or Account Management work center.
2. Enter the account’s name, address, and communication details and other account-specific data, such as theABC classification or the Nielsen ID, depending on whether the account is a private or corporate account.
Although the Name field is the only one that is mandatory, we recommend that you also enter the mainaddress, contact, and communication details. We also recommend that you enter sales data andfinancial data, as this information is required within other processes, such as creating a sales order.To enter sales and financial data, such as bank account or payment card details, click View All and then Sales Data or Financial Data .
If the account details do not include all the information required for the sale, delivery, and invoicing ofproducts and services to the account we recommend you add the required information to the account.The information required for the complete sales process includes:
● General data, for example, account name, main address, and language ● Sales data, for example, sales organization, distribution channel, delivery priority, incoterms,
payment terms, and currency ● Financial data, for example, company ID, and account determination group
64 © 2017 SAP SE or an SAP affiliate company. All rights reserved. • P U B L I CSAP Business ByDesign February 2017
Account Management

You can check if an account already exists in the system if you have chosen this option during scoping.When you enter the details of an account, click Check For Duplicates . The system also notifies you ofpotential duplicates when you save the details of a new account. You can view the potential duplicateslisted.
3. To enter additional information about the account, click View All to open the editor. You can also clickMore to navigate directly to the tab relevant for the data you require.
You can also add more information to a particular account by selecting the account in the worklistand clicking Edit → General.
4. Click Save to save the new account.
Create Accounts Using Microsoft Excel®You can create accounts using a predefined Microsoft Excel template. For more information, see Create AccountsUsing Microsoft Excel [page 79].
Assign Multiple Addresses to an Account1. In the editor of the Accounts view, click Communication and then Addresses .2. Click Add Row .3. Enter the address details.4. If you require additional address fields, click Additional Fields.
You can also select a different main address and indicate how the address should be used, such as the ship-to address.
5. Enter one or more addresses, and save the address details.
You can also assign additional addresses to a particular account by selecting the account in theworklist and clicking Edit → Addresses.
Maintain Output Settings for an Account1. In the editor of the Accounts view, click Communication and then Collaboration .2. You have the following options:
● To specify output settings for a specific document, select a document from the list.a. Select E-Mail, Fax, or Printer from the dropdown list.
If you want to use fax as an output channel, you have to select this option during scoping.For more information, see Configuration: E-Mail and Fax Settings.
b. Enter the e-mail address, fax number, or enter the number of copies required.
You can select a form template for accounts, if available.
By default, the advanced shipping notification is not sent to accounts. If you want to sendadvanced shipping notifications to a particular account, select the checkbox in the Activecolumn, enter an output channel and click Save ..
SAP Business ByDesign February 2017Account Management P U B L I C • © 2017 SAP SE or an SAP affiliate company. All rights reserved. 65

● To maintain an output channel to be used for all business documents sent to this business partner,select the Use for all Business Documents checkbox.a. Select E-Mail, Fax, or Printer from the dropdown list.
b. Enter the e-mail address, fax number, or enter the number of copies required.c. Press ENTER.
If you use e-mail as an output channel and do not enter an e-mail address, the e-mailaddress of the main address of the business partner will be used.
● To maintain XML settings, click Maintain XML Settings . This brings you to the CommunicationArrangement quick activity.
Business partner-specific output settings overwrite any default output settings that have been maintained in theOutput Channel Selection and Form Template Selection views of the Application and User Management work center.
The business partner-specific settings can also be overwritten if the employee responsible for a documentchanges the output settings by clicking You Can Also and choosing Edit Output Settings.
For more information, see Process-Integrated Output Settings [page 78].
Assign a Contact to a Corporate Account1. In the editor of the Accounts view, click Contacts and then Contacts .2. Click Assign Contact if you want to use an existing business partner as the contact for the account.
1. In the dialog box, search for a business partner using the value selection.2. Select a business partner and click OK.
The existing address, communication, function, and department details for the business partner appear.You can edit the details or add information.
3. To create a new contact, click Add Row .4. Enter the details about the new contact.
You can assign multiple contacts to an account . You must select a main contact by selecting the Maincheckbox.
5. Click Save to save the contact.
You can also assign a contact to a particular account by selecting the account in the worklist andclicking Edit → Contacts.
Assign Corporate Account to a Target Group1. In the new or existing corporate account editor under Accounts view, click Marketing Data .2. Click Assign Target Group to assign an existing target group.3. In the dialog box, select a target group. You can search for a target group using the value selection.4. You can assign a contact by selecting a contact id if required. You can search for contacts using the value
selection.
The Contact ID value selection will display the contacts which are assigned to the account.
5. Click Save to save the target group assignment to the account.
66 © 2017 SAP SE or an SAP affiliate company. All rights reserved. • P U B L I CSAP Business ByDesign February 2017
Account Management

6. You can assign a corporate account to more than one target group. To remove target group assignments,select a target group assignment and click Remove Target Group Assignment .
Specify Relationships of an Account ● If you want to specify relationships for corporate accounts, do the following:
1. In the editor of the Accounts view, click Contacts and then Contacts to enter your details about thecontact relationships for a corporate account.
You can also specify contact relationships for a particular corporate account by selecting theaccount in the worklist and clicking Edit → Contacts.
2. In the editor of the Accounts view, click Contacts and then Relationships and Responsibilities to enteryour details about other relationships for a corporate account.
3. Click Add Row under Relationships and select the relationship type and the business partner with whomthe corporate account has a relationship.
4. Save your data. ● If you want to specify relationships for private accounts, do the following:
1. In the editor of the Accounts view, click Relationships to enter your details about relationships for aprivate account.
2. Click Add Row under Relationships and select the relationship type and the business partner with whomthe private account has a relationship.
3. Save your data.
Assign Direct Responsibilities to Accounts1. In the editor of the Accounts view, click Contacts and then Responsibilities for corporate accounts or
Relationships and then Responsibilities for private accounts.
You can also maintain the employee directly responsible in the quick activity. If you want to edit thefields under Responsibility in the quick activity, you have to do the following:
1. To make the fields visible, click on Personalize This Screen in the title bar in the quickactivity.
2. Select the Visible checkbox for the Responsibility section and save your changes.
2. Click Add Row under Responsibilities.3. Select an employee.
The Direct Responsible checkbox will automatically be selected.
The value selection where you can select the employee will provide all employees and service agentsin your SAP Business ByDesign system regardless of your user’s access rights.
4. Select Employee Responsible-Sales as the party role.
5. Save your data.
The responsibilities shown in the list for which the Direct Responsible checkbox is not selected are determinedbased on the employee work distribution rule defined for individual party roles and cannot be edited.For more information about employee work distribution, see Employee Work Distribution Quick Guide.
SAP Business ByDesign February 2017Account Management P U B L I C • © 2017 SAP SE or an SAP affiliate company. All rights reserved. 67

Set Document Blocks for an Account1. In the editor of the Accounts view, click Sales Data .2. To set a block, select a block reason from the dropdown list for the block you require under Document
Blocks.To block an account for sales processes, you can set the following blocks: ● Order block ● Delivery block ● Invoice block
3. Save your data.
You can also set blocks for a particular account by selecting the account in the worklist and clicking Edit →Sales Data.
When you set or remove a delivery or invoice block for an account, this change will only apply to newlycreated orders for that account. For existing sales or service orders, you need to set or remove the blockin the related order itself.
Add Sales Data to an Account1. In the editor of the Accounts view, click Sales Data .
You can also maintain the sales data in the quick activity.2. Click Add Row under Sales Data.3. Select your sales data details, such as the Incoterms, for the distribution chains that are used to sell products
or services to an account.If you select complete delivery for an account, this information is automatically transferred to the relatedsales or service orders for that account and results in one delivery of the full quantity. In the quick activity,you have to select a sales organization and a distribution channel for this field to become visible. For moreinformation about complete delivery orders, see Complete Delivery Orders.You have the following options for sales data: ● Create sales data for an individual account ● Use cross-account sales data
If cross-account sales data is available, the relevant checkbox is selected in the sales data.
For more information about cross-account sales data, see here [page 81].4. Save your data.
The sales data that you enter for an account will be used in the related business document for that account.
You can also add sales data to a particular account by selecting the account in the worklist andclicking Edit → Sales Data.
5. Save your data.
Add Payment Data to an Account1. In the editor of the Accounts view, click Financial Data and then Payment Data .
You can also maintain payment data in the quick activity. After you have selected the company ID and theaccount determination group, you can maintain further data depending on the payment method you selected.
68 © 2017 SAP SE or an SAP affiliate company. All rights reserved. • P U B L I CSAP Business ByDesign February 2017
Account Management

2. Under Companies, click Add Row and select the company using the value selection.3. Select the account determination group.
You can select a payment block reason and a payment block expiry date. You can also select a dunning blockreason and a dunning block expiry date.
4. Under Payment Methods, click Add Row and select a payment method from the dropdown list.5. Depending on the payment method you selected, enter other applicable data, such as SEPA mandates and
direct debit, credit card, and bill of exchange information.If required, you can also add instructions to the bank for international payments.
6. If remittance advice is required, select the appropriate checkbox.7. Enter the debtor ID at DATEV in the appropriate field, if you use DATEV.8. Save your data.
Add Bank Data to an Account1. In the editor of the Accounts view, click Financial Data and then Bank Data .2. Select a bank using the value selection.
The country and national bank code are added automatically.
If the relevant bank does not appear in the value selection, click New Bank and enter the bank'sdetails to add the bank to the bank directory.
3. Enter the bank account details.4. Save your data.
Assign and Register Credit Cards for an Account1. In the editor of the Accounts view, click Financial Data and then Bank Data .2. Under Credit Cards, you can do the following:
● To assign an existing credit card to an account, click Assign . ● To create a new credit card, click Register with <Credit Card Service Provider> depending on which credit
card service provider you want to use.
You can only use this function if the respective credit card service has been enabled in your solutionconfiguration.To find this business option, go to the Business Configuration work center and choose theImplementation Projects view. Select your implementation project and click Edit Project Scope .In the Scoping step of the project, ensure that Payment and Liquidity Management is selectedwithin Cash Flow Management.In the Questions step, expand the Cash Flow Management scoping element and select Paymentand Liquidity Management. Select Payment Methods and answer the questions related to creditcard service providers.
Configuration settings are usually performed by an administrator. If you do not have the requiredauthorization, contact your administrator.
This business option is a third party service or functionality and for use by customers inpossession of a valid license or service agreement with the respective third party only. Anyscoping and use of this functionality is subject to a written agreement between the customerand the respective third party.
SAP Business ByDesign February 2017Account Management P U B L I C • © 2017 SAP SE or an SAP affiliate company. All rights reserved. 69

For more information about payments by credit card and any related prerequisites, see CustomerPayments by Credit Card [page 84].
● You can remove a credit card that has been assigned to an account. ● You can maintain a credit card holder address for a selected credit card or copy one of the addresses of
the account to the credit card address by clicking Copy Address.In the quick activity, you can also copy the main address of the account to the credit card address.
3. Save your data.
You can also add credit card data to a particular account by selecting the account in the worklist andclicking Edit → Financial Data.
Add Tax Data to an Account1. In the editor of the Accounts view, click Financial Data and then Tax Data .2. Under Tax Numbers, click Add Row and select the country, tax number type, and tax number from the
dropdown lists.3. Under Tax Exemptions, click Add Row and select the country, state, tax type, and tax exemption reason from
the dropdown lists.4. Save your data.
Edit Customer-Specific Prices and DiscountsIf you want to maintain customer-specific prices or discounts, you need to go to the Pricing view of the Product andService Portfolio work center.You need to create a price or discount list first.For more information about price and discount lists and pricing in general, see Quick Guide for Pricing in CustomerRelationship Management [page 318].
The information shown under Prices in the editor of the Accounts view is for display purposes only.
Create a Tax Exemption Certificate for an AccountFor more information about this task, see here [page 91].
Create a SEPA Direct Debit Mandate for an AccountFor more information about this task, see here [page 92].
Create a Target Group From an Accounts WorklistYou can use a worklist as a basis to create a target group.For marketing purposes you can create a target group of accounts listed in a worklist. To do this:
1. Call up the required worklist, and modify it to your needs.2. Click Export followed by To Target Group.
The New Target Group screen opens.3. Check the details and save the target group.
Export Accounts Using Microsoft Excel®For more information, see Export Business Data Using Microsoft Excel [page 82].
70 © 2017 SAP SE or an SAP affiliate company. All rights reserved. • P U B L I CSAP Business ByDesign February 2017
Account Management

Maintain Mass Account DataFor more information, see here.
3.2.2 Business Background
3.2.2.1 Maintenance of Accounts and Contacts
OverviewYou can view, create, and maintain information about your accounts and contacts in more than one work center.The data you create is shared by several work centers. You only need to maintain the information in one work centerfor it to be updated automatically in all relevant work centers.You can access the Accounts and the Contacts views from the following locations:
● Account Management work center ● Business Partner Data work center
The Contacts view of the Account Management work center shows the following contacts: ● Contacts for accounts ● Contacts that are not assigned to a business partner
The Contacts view of the Business Partner Data work center shows all types of contacts.The Accounts view shows both existing customers and prospects.
In the Customers view of the Receivables work center you can also view, create, and maintain existingcustomers and prospects.
Accounts and ContactsThe Accounts view provides you with an overview of all the accounts that are currently in your system. You canmaintain important information about an account, such as address and communication data, status, classification,contact hours, sales data, and financial data.The Contacts view provides you with an overview of all the contacts that are currently in your system. You canmaintain essential information about a contact, such as the business address and communication data and status.You can also enter a contact’s personal details, such as the date of birth, marital status, and home address.
Prerequisites
Configuration Settings
Configuration settings are usually performed by an administrator. If you do not have the requiredauthorization, contact your administrator.
You have checked and adapted the pre-delivered settings for account-specific and contact-specific data.
SAP Business ByDesign February 2017Account Management P U B L I C • © 2017 SAP SE or an SAP affiliate company. All rights reserved. 71

To find these activities, go to the Business Configuration work center and choose the Implementation Projects view.Select your implementation project and click Open Activity List . Select the Fine-Tune phase, then select theAccounts or the Contacts activity from the activity list.
Features
Private and Corporate AccountsAccounts can be of the following types:
● Corporate accountsYour account is an organization.
● Private accountsYour account is an individual.
Depending on whether your account is a corporate or a private account, you will be shown different account fields.For example, private accounts require person-related fields, such as name fields, whereas corporate accountsrequire fields for organizations, such as the Nielsen ID or the legal form of a company.
General Data for AccountsYou can maintain the following general data for an account that is specific to accounts:
● ABC classificationsABC classifications are used to rate accounts based on the significance they have for your business.
● Nielsen IDsNielsen IDs indicate the geographic region to which an account belongs. The Nielsen ID can be used to classifyaccounts according to their consumer behavior.
Sales Data for AccountsYou can maintain sales-specific data, such as Incoterms or customer groups, for an account. The data you maintainfor the account will be transferred to the related sales or service document. You can maintain the following data:
● Document blocks ● Sales data that is dependent on distribution chains
You can maintain the following sales-specific data: ● Document Blocks
○ Order blocksOrder blocks prevent new sales or service documents from being created. If an order block is set in theaccount master data, no new sales or service documents can be created for this account.
○ Delivery blocksDelivery blocks prevent an order from being delivered. If a delivery block is set in the account masterdata, it is copied to any new sales orders. It can also be set, edited, or removed within a sales order.
○ Invoice blocksInvoice blocks prevent an order from being invoiced. If an invoice block is set in the account master data,it is copied to any new sales orders. It can also be set, edited, or removed within a sales order.Return documents receive an invoice block by default in order to provide consistent invoicing.
● Sales Data ○ Customer groups
Customer groups are used for pricing and statistical purposes. You can maintain customer groups inthe account master data record for each organizational assignment.
72 © 2017 SAP SE or an SAP affiliate company. All rights reserved. • P U B L I CSAP Business ByDesign February 2017
Account Management

○ Payment termsPayment terms are used for arrangements made with a customer for financial settlement with respectto goods supplied and services performed. They represent agreed conditions for the payment of theprice charged for products and services, such as the due date and credit terms.A payment term can be maintained as account master data. If a payment term has been maintained foran account, this will then be copied into documents, such as a new sales order or a new sales quote asthe default value.
Financial Data for AccountsThis data is relevant for accounting. It covers the following:
● Bank DataHere you edit the customer’s bank details and payment card (credit card) data.
● Payment-Relevant DataYou can see which dunning and clearing strategy is assigned to the customer.Here you specify the company in your organization that collaborates with this customer, and the accountdetermination group to determine the G/L account. For more information, see Configuration of AccountDetermination for Business Transactions.You can block the customer for the automatic payment process by specifying a payment block reason. Youcan also exclude this customer from the dunning process by using a dunning block and by specifying a dunningblock reason.Furthermore, you specify the payment method to be used to clear customer invoices, the person responsiblefor the payment fees, the payment instruction(s) for the bank for international payments, and the methodrequired to send a payment advice to the customer. You can indicate receivables from a customer as doubtful.The Doubtful Debtor checkbox is only used for information purposes.You edit this data under Financial Data in the Payment Data area.
● Tax DataHere you define the tax numbers and the data for customer tax exemption. Tax exemption is only permittedin some countries, such as in the United States. For more information, see Tax Determination [page 9].
Ensure that the information under Financial Data is complete. You can create a customer without enteringany financial data, for example, if a customer is initially only a prospect. The system does not prevent thecreation of an invoice for this customer in the Customer Invoicing work center. For this reason, it doesnot issue a corresponding message. The customer invoice is not posted, but the system creates a taskfor the accountant in which data can be edited or any missing financial data added.
General Data for ContactsYou can maintain the following general data for a contact that is specific to contacts:
● DepartmentsThe department in which a contact works can be specified.
● FunctionsThe function describes the job of a contact.
● VIP contactsA contact can be classified as a VIP contact according to his or her importance in a company.
See AlsoAdditional Identifiers for Business Partners
SAP Business ByDesign February 2017Account Management P U B L I C • © 2017 SAP SE or an SAP affiliate company. All rights reserved. 73

3.2.2.2 Access Rights and Restrictions for Accounts
OverviewYou can control which account data a user can access in the Accounts view of the Account Management and BusinessPartner Data work centers. Depending on the access rights and restrictions you define for a user, the user can viewand edit only selected accounts. This allows you to manage your users based on your company’s requirements.Thus, you can allow selected users to view more confidential account data while reducing the data that can beaccessed by other users.You give access rights to a user at the level of work centers and work center views. Access to data in assigned workcenter views can be restricted using various attributes called access contexts, which are dependent on the businessprocess in question. For more information about access rights and restrictions in SAP Business ByDesign and howto assign them, see the documentation about Business Users.Employees can be assigned to accounts for which they are directly responsible. This assignment is used as a basisfor defining access restrictions for viewing and editing accounts. You can define access restrictions for one or moreemployees or for one or more org units. After you have defined access restrictions for an account in the BusinessUsers view, a user can only view or edit the account if the employee directly responsible for that account has alsobeen assigned to that user with the appropriate read or write access.In addition to these access rights and restrictions, you can also restrict the display of data in the account-relatedoverviews. For more information about access rights and restrictions in overviews, see here [page 76].
The access restrictions defined for the Accounts view do not apply to the Customers view of theReceivables work center. For the Customers view, the Company access context is used.
Prerequisites
Configuration Settings
Configuration settings are usually performed by an administrator. If you do not have the requiredauthorization, contact your administrator.
You have enabled the business areas that you require for your sales and service processes in your solutionconfiguration.
Direct ResponsibilitiesOne or more employees who are directly responsible for an account have been assigned in the Accounts view.
Access Rights and Restrictions for Business UsersYou have assigned access rights to a user for the Accounts view of the Account Management and Business PartnerData work centers.
To do so, you have to go to Application and User Management User and Access Management BusinessUsers , click Edit → Access Rights for a selected business user, and go to Work Center and View Assignment .In the same view, you have restricted the read and write access to the Accounts view under Access Restrictions using the Employee access context.
74 © 2017 SAP SE or an SAP affiliate company. All rights reserved. • P U B L I CSAP Business ByDesign February 2017
Account Management

The list shown under Detailed Restrictions depicts the org structure hierarchy of your company. You defineaccess restrictions by selecting the following from the list:
● One or more employees or service agentsThese employees also have to be assigned as employees directly responsible for an account in theAccounts view.
● One or more org unitsThe employees belonging to these org units also have to be assigned as employees directly responsiblefor an account in the Accounts view.
● The Read Access or Write Access checkboxes next to the selected employee or org unit
Access Rights and Restrictions in Account Worklists and EditorsA user can view and edit only selected corporate or private accounts in editors or worklists of the AccountManagement or Business Partner Data work center, depending on the access rights and restrictions defined for thatuser.The user can view and edit the following data:
● If you define unrestricted read and write access, the user can view all accounts in the worklist and view andedit the data in all accounts.
● If you restrict the read or write access, the user can do the following: ○ View those accounts in the worklist for which the user has been given at least read access and where
one or more selected employees or employees of a specific org unit are directly responsible ○ View or edit those accounts for which the user has been given read or write access and where one or
more selected employees or employees of a specific org unit are directly responsible ○ View the reports assigned to the Account Management or Business Partner Data work center for accounts
for which the user has been given read or write access
If a user’s access is restricted and the employee directly responsible for the account in question has not been selectedfor that user, the user will not be able to access that account.If no employee directly responsible has been assigned to an account, any user can view this account regardless ofthe users' access rights.
You have to make sure that for each account in your SAP Business ByDesign system you have defined at leastone user who has the required access rights.
A user has access to all accounts for whom Kate Jacob is the employee directly responsible. The usersearches for the account Akron Heating Technologies Inc. in the worklist of the Accounts view and selectsthis account. He opens the editor and replaces Kate Jacob with Jack Ingersoll as the employee directlyresponsible for that account. After he has saved the data, he will no longer be able to view and select thisaccount in the worklist.
A user has access to all accounts for which an employee of a specific org unit is the employee directlyresponsible. The user creates a new account and adds an employee as the directly responsible employeewho belongs to a different org unit in his company. After he has saved the data, he will not be able to viewand select this account in the worklist.
SAP Business ByDesign February 2017Account Management P U B L I C • © 2017 SAP SE or an SAP affiliate company. All rights reserved. 75

Access Rights and Restrictions for Accounts Used in Other Work CentersA user can view and edit only selected corporate or private accounts in work centers other than the AccountManagement or Business Partner Data work center, depending on the access rights and restrictions defined for thatuser.The user can view and edit the following data:
● If you define unrestricted read and write access, the user can view all accounts in the worklist and view andedit the data in all accounts.
● If you restrict the read or write access, the user can do the following: ○ View all accounts in the worklist regardless of the access restrictions for those accounts ○ View or edit those accounts for which the user has been given read or write access and where a selected
employee or employees of a specific org unit are directly responsible
The Enterprise Search and the value selection for accounts will show all accounts regardless of theuser’s access rights for those accounts.
See AlsoAccounts Quick Guide [page 63]
3.2.2.3 Overviews of Business Partners
OverviewThe overview provides a summary of essential data for a selected business partner.It includes general information, such as address data, relationships, and further business partner details dependingon the type of business partner.The overview also shows all business partner interactions in sales, service, and financial processes. For example,you can display open sales orders and open invoicing documents for an account, and other information for sales,service, and financials. You can also run reports related to the particular business partner.To go to the overview of a business partner, you have to select the business partner in the worklist of the relevantbusiness partner view.You can restrict the display of documents in the overviews of the following views in the Account Management andMarketing work centers:
● Accounts ● Contacts ● Partners ● Competitors in the Marketing work center
76 © 2017 SAP SE or an SAP affiliate company. All rights reserved. • P U B L I CSAP Business ByDesign February 2017
Account Management

Prerequisites
Configuration Settings
Configuration settings are usually performed by an administrator. If you do not have the requiredauthorization, contact your administrator.
To restrict the display of documents in the overviews of accounts, contacts, partners, and competitors, you haveenabled the restriction of the overviews for account management in your solution configuration. To find this businessoption, go to the Business Configuration work center and choose the Implementation Projects view. Select yourimplementation project and click Edit Project Scope . In the Scoping step of the project, ensure that Account andActivity Management is selected within Sales.In the Questions step, expand the Sales scoping element and select Account and Activity Management. SelectAccount Management and answer the question related to the overviews.
Access Rights and Restrictions in Overviews of Account Management andMarketingA user can view different information in the overviews for corporate and private accounts, contacts, partners, andcompetitors, depending on the access rights assigned to that user and on what you select during scoping.These restrictions apply if the user opens the overview from the respective view in the Account Management,Business Partner Data, or Marketing work center or from any other work center view, such as the Sales Orders view.These restrictions affect the following information:
● Private or corporate account overview: ○ Reports under General
○ All data under Sales , Service , and Financials ● Contact overview:
○ Campaigns and activities ● Partner overview:
○ Activities ● Competitor overview:
○ Related opportunities
The user can view the following data: ● If you do not restrict the data displayed in the overview, all general data and all documents related to a specific
account, contact, partner, or competitor will be displayed in the overview regardless of a user’s access rights.You do not have to assign access rights to the user for the work center views required for these documents.
● If you restrict what is displayed in the overview, the user will see the following: ○ All account, contact, partner, or competitor data if the user has been given at least read access for the
relevant view ○ All documents related to those work center views for which the user has been assigned the corresponding
access rights.
The documents will be displayed according to the access restrictions that have been defined forthe relevant work center view.
SAP Business ByDesign February 2017Account Management P U B L I C • © 2017 SAP SE or an SAP affiliate company. All rights reserved. 77

3.2.2.4 Process-Integrated Output Settings
OverviewThe output settings used for the process-integrated output of documents can be configured on multiple levels. Thesesettings can be made for each business document type, for a specific business partner, or, individually, for a businessdocument instance. Output settings are used by the system to determine which output channel and form templateto use when a document is output.
Output Channel Rules and Form Template RulesOutput channel and form template rules are used by the system to select the output channel and form template thatshould be used for a specific combination of document and parameters that you define. For example, you can specifythat for department A, all requests for quotes (RFQs) should be sent by fax, whereas for all other departments, RFQsshould be sent by e-mail. You could also define a similar rule for the form template to be used in each case. Thisallows you, for example, to define a default output channel or form template for each business document as well asdefining multiple alternative output channels and form templates for exceptions.Output channel and form template rules can be defined in the Application and User Management work center, underInput and Output Management. For more information, see the Output Channel Selection Quick Guide and the FormTemplate Selection Quick Guide in the Help Center of your solution.
Business Partner-Specific Output SettingsBusiness partner-specific output settings allow you to define how business documents are sent to your accounts orsuppliers. These settings override any output channel and form template rules. You define these settings as follows:
● Navigate to the Account Management work center, Accounts view. Select an account and choose Generalfrom the Edit menu. Navigate to the Collaboration section of the Communication tab.
● Navigate to the Supplier Base work center, Suppliers view. Select a supplier and choose General from theEdit menu. Navigate to the Collaboration section of the Communication tab.
Under Collaboration, you can view all documents that are valid for the selected business partner. You can eitherdefine an output channel that is valid for all business documents belonging to this business partner, or you can specifyan output channel for one or more individual business documents. For accounts, you can also specify a form templatethat should be used for a business document instead of the default form template.For more information, see the Accounts Quick Guide and the Suppliers Quick Guide in the Help Center of yoursolution.
Output Settings for a Business Document InstanceUsers can change the output settings for business documents that they are authorized to edit before the documentis submitted for process-integrated output. These settings are only valid for the next output of the current documentand override any other output settings that have been made for the type of document or the business partner. Userscan edit a document’s output settings by selecting Edit Output Settings from the You Can Also menu. This option istypically available when editing a business document.For example, an employee wants to ensure that a business partner gets a document as soon as possible. Instead ofusing the default output channel, printing, which would require the document to be sent by post, the employeedecides to overwrite the existing output settings and send the document by e-mail.
78 © 2017 SAP SE or an SAP affiliate company. All rights reserved. • P U B L I CSAP Business ByDesign February 2017
Account Management

Output Setting DeterminationWhen the process-integrated output of a business document is triggered, the system determines which outputchannel and form template settings to use based on the following level of prioritization:
1. Output settings for a business document instance2. Business partner-specific output settings3. Output channel rules and form template rules
The system checks whether settings are available at each level in the list. If a setting exists then this is used, otherwisethe next available setting in the order defined in the list is taken.
Form Template Country and Language DeterminationYou do not have to configure any settings for the selection of country and language form template variants. Instead,they are determined automatically based on the following rules:
● Country variants are determined based on the location of the sender’s company. For example, if an employeein a German company creates a sales order, the system searches for a German country variant of the salesorder form template and uses this to generate the document. If a country-specific variant is not available, thegeneric form template is used.
● Language variants are determined by the communication language of the receiving business partner: ○ For private accounts, the communication language is taken from the Account editor, General tab,
Account section, Language field. ○ For corporate accounts and suppliers, the communication language is taken from the Account or
Supplier editor, General tab, Main Communication section, Language field.
For example, if an employee in a German company sends a sales order to a business partner in France forwhom the communication language French has been maintained, the system searches for a French languagevariant of the form template and uses this to generate the document. If a language variant is not available inthe recipient’s communication language, then the form template in the fallback language English is used.
3.2.3 Tasks
3.2.3.1 Create Accounts Using Microsoft Excel®
OverviewYou can create accounts by entering them in a predefined Microsoft Excel template and uploading them to the SAPBusiness ByDesign system.
You can create corporate or private accounts using Microsoft Excel.
SAP Business ByDesign February 2017Account Management P U B L I C • © 2017 SAP SE or an SAP affiliate company. All rights reserved. 79

PrerequisitesYou have installed the latest Add-In for Microsoft Excel. Depending on your solution set-up, you can do this from theSelf Services Overview in the Home work center, from the Download Center in the Application and UserManagement work center, or from the Download link that is available directly on the user interface.Also, the settings for your browser must be set correctly. You can check this by clicking Check My ComputerSettings on the logon screen.
StepsIn the SAP Business ByDesign system in the Accounts view of the Business Partner Data or the Account Managementwork center, click New and choose Private Accounts from Microsoft Excel or Corporate Accounts from MicrosoftExcel.Get the Template
1. Select the template.Choose the template in the required language and click Download.
You can choose any language that you have selected during scoping. If you have selected only onelanguage during scoping, you will not get a selection of language versions to choose from.
2. Decide what you want to do with the template. Choose one of the following options: ● If you want to use the template only once, you can open the template without saving it. Click Open. ● If you want to save the template so that you can use it again, choose a location to save the file to, enter
an appropriate file name, and click Save. Then click Open.
If you have previously downloaded and saved this template on your computer, navigate to the location whereyou have saved the template, and open it.
Log on to the solution from Microsoft Excel1. In the SAP Add-In ribbon in Microsoft Excel, click Logon.
If the SAP Add-In ribbon is not displayed, check to make sure that the Add-In for Microsoft Excel hasbeen installed correctly (see Prerequisites in this document).
A dialog box opens where you can enter the logon details. The system URL is proposed automatically. Thesystem URL is the URL of the system that you are working with.
2. Enter your user ID and your password, and click Logon.
After initial logon to the system, the ribbon text is changed from SAP Add-In to the name of yoursolution.
Enter Details in the Microsoft Excel Template
80 © 2017 SAP SE or an SAP affiliate company. All rights reserved. • P U B L I CSAP Business ByDesign February 2017
Account Management

Note the following: ● The Microsoft Excel template is presented with a number of rows where you can enter or copy your
data. If you need more, add the number of rows you need before you start entering or copying yourdata.
● Ensure that mandatory fields (those marked with an asterisk) are filled. ● To help you fill in the details:
○ Some fields have dropdown lists. ○ In some fields you can search the system for data, for example, countries. Place the cursor on the
field, and click Lookup in your solution's tool bar or ribbon to search the system. A search field isavailable in the Lookup dialog box that appears. When you start to type text in the search field, therelevant entries are filtered in the ID and Description columns, meaning that you do not have toscroll through the whole list. If the Lookup button is not active in the ribbon or toolbar, then it isnot possible to perform a search.
Enter the account data in the appropriate columns, such as the general account data, the address data, the accountdetails, and the sales data.If you do not select a status, the system will use the In Preparation status.
The system will then carry out a duplicate check for names, addresses, and communication data if this function hasbeen selected during scoping. If there is duplicate data it cannot be saved to the SAP Business ByDesign system,and an error message displays. If you do not want to carry out a duplicate check for selected accounts, select No inthe Duplicate Check column for the relevant accounts.For more information about the duplicate check, see Business Partner Duplicate Check [page 61].Save Your Data
1. After you have finished entering all the data, save the Microsoft Excel file.2. Click Save Data to .
A dialog box opens, informing you that the data is being saved to the solution.After the upload, a message informs you that your data has been saved in the solution.
If you do not provide all the required information, or if you provide incorrect information, somerecords will not be saved. Error messages will highlight the problems so that you can correct themand save the data again.
3. You can then log off by clicking Logoff .
ResultThe new accounts are saved in the SAP Business ByDesign system and added to the list in the Accounts view.If you need to make changes to these accounts, you can change them in the Microsoft Excel template and uploadthem again to the SAP Business ByDesign system.
3.2.3.2 Maintain Cross-Account Sales Data
OverviewYou can create sales data that can be used as default data for all accounts.
SAP Business ByDesign February 2017Account Management P U B L I C • © 2017 SAP SE or an SAP affiliate company. All rights reserved. 81

Procedure1. Start the Maintain Cross-Account Sales Data common task, which belongs to the Business Partner Data or
Account Management work center.2. To maintain cross-account sales data, click Add Row .3. Select the sales organization and the distribution channel that you require.4. Select the sales data under Details, such as the delivery priority, the Incoterms, and the payment terms, and
enter an Incoterms location for the Incoterms you selected.If you select complete delivery, this results in one delivery of the full quantity.For more information about complete delivery orders, see Complete Delivery Orders.
5. Click Save and Close to save your data and return to the work center.The data you entered will be proposed as default data in the sales data for each account that you create.
You cannot overwrite the default sales data with account-specific sales data entered in the Accountsview. However, if you add account-specific sales data, the system will give preference to this data overthe default sales data and use it in the related business documents. If you want to change the actualdefault sales data, you have to change the cross-account sales data that you entered earlier.
3.2.3.3 Export Business Data Using Microsoft Excel®
OverviewYou can export reports and worklists to Microsoft Excel® documents. You can use these documents for furtheranalysis, and in some cases, edit and upload them to the solution.You can export data from a report or from a worklist.
Prerequisites ● You have installed the latest Add-In for Microsoft Excel®. Depending on your solution set-up, you can do this
from the: ○ Self Services Overview in the Home work center ○ Download Center in the Application and User Management work center ○ Download link that is available directly on the user interface
● The settings for your browser must be set correctly. You can review the information about computer settingsby clicking Check My Computer Settings on the logon screen.
● You must be authorized to perform an export to Microsoft Excel®.
Procedure1. Go to the screen with the data you want to export.2. Depending on the type of data, choose one of these options:
● For a report, you can either export a chart or a table. To do so, select the report, and click Switch toChart or Switch to Table.
82 © 2017 SAP SE or an SAP affiliate company. All rights reserved. • P U B L I CSAP Business ByDesign February 2017
Account Management

● For a worklist, select the worklist and click Go.3. Click Export , then choose To Microsoft Excel.4. Optional: Personalizing your excel export
1. To select the columns in your exported excel, do the following:a. In the title bar, click Personalize This screen b. In the side panel, select Display Settings.c. In the Display Settings dialog box, you can export all the columns in the view by selecting All in
the Export Columns field
The default value for this field is Visible, which exports only the currently displayed columns.
2. To select the language for your excel export, do the followinga. In the Display Settings dialog box, set the Language Selection field to Show and click OK
b. Click Save .c. Click Export , then choose To Microsoft Excel®d. Select a language in the dialog box that opens.
The column selection preference in this dialog box allows you to override the personalizedsetting. This selection is valid for the current export only.
5. Select the template in the dialog box that is displayed.
● If there is only one template that has the logged in language variant, then the export will beperformed in the logged in language, and no user interaction is required.
● If there is only one template in the system for this export scenario, but the logged in languagevariant is not available, then export will be performed in the English language.
● If there is more than one template in the system for this export scenario, the Template List dialogbox is displayed. In this dialog, you can select the Microsoft Excel template that you want to usefor the export. The template will dictate how your exported data will be formatted. The MicrosoftExcel version that is relevant for each template is displayed.
6. Click Download.7. A message shows that you can open or save the file which contains the data that you have just exported from
the solution. Click Open or Save depending on what you want to do with the exported data.Depending on whether you click Open or Save, there are two possible results:
● If you click Open, a worksheet opens with the data in Microsoft Excel. The file has a temporary name,but it is not saved. You can use all the functions of Microsoft Excel to organize the data and to savethat worksheet.
● If you click Save, a Save As dialog box opens. You can specify an appropriate file name and a locationto save the exported Microsoft Excel file to. A message will inform you when the download hascompleted successfully.You can later navigate to the location where you have saved the template and open it .
SAP Business ByDesign February 2017Account Management P U B L I C • © 2017 SAP SE or an SAP affiliate company. All rights reserved. 83

3.2.3.4 Customer Payments by Credit Card
OverviewThe system enables you to process customer payments made by credit card, including incoming payments fromyour customers and credit memos to your customers. To be able to use the credit card process, you need to completea few preliminary steps and, most importantly, sign a contract with a service provider (who has to be an SAP Partner).This document deals with both the preliminary steps that must be taken in order to use credit cards and with thecredit card payment process itself.
Prerequisites
Configuration Settings
Configuration settings are usually performed by an administrator. If you do not have the requiredauthorization, contact your administrator.
Scoping (required)You have activated Customer Payments by Credit Card in your solution configuration. To find this business option,go to the Business Configuration work center and choose the Implementation Projects view. Select yourimplementation project and click Edit Project Scope . In the Scoping step of the project, ensure that Payment andLiquidity Management is selected within Cash Flow Management.In the Questions step, expand the Cash Flow Management scoping element, then expand Payment and LiquidityManagement. Select Payment Methods and activate the option for customer payments using credit cards byselecting the Yes radio button in the Incoming Payments section. Make sure to select the correct service provider inthe Credit Card Service Providers section.For more information on the service provider and how to set up the credit card functionality, see About Credit CardService Provider Computop or About Credit Card Service Provider Paymetric.Integrate and Extend (required)
● Master Data for Your Credit Card Service ProviderYou have created a supplier master data entry for your chosen credit card service provider and subsequentlyestablished the communication arrangement. To find this activity, go to the Business Configuration workcenter and choose the Implementation Projects view. Select your implementation project and click
Open Activity List . Select the Integrate and Extend phase, then select Credit Card Service Provider —Paymetric or Credit Card Service Provider — Computop from the activity list and enter the relevant details.Be sure to include the Dun & Bradstreet (D-U-N-S) number (to be found using the Additional Identifiers link).Alternatively, you can navigate to the Payables or Supplier Base work center and enter the supplier masterdata using the Suppliers view.For more information, see Computop Supplier Master Data Entry or Paymetric Supplier Master Data Entry.
● New Clearing House and New Clearing House AccountYou have created a clearing house record and a clearing house account. To find this activity, go to the BusinessConfiguration work center and choose the Implementation Projects view. Select your implementation projectand click Open Activity List . Select the Integrate and Extend phase, then select Credit Cards — CustomerPayment from the activity list. On the activity details screen, choose the Create new clearing house link text,and enter the relevant details. When you are finished, return to the activity details screen, choose the Create
84 © 2017 SAP SE or an SAP affiliate company. All rights reserved. • P U B L I CSAP Business ByDesign February 2017
Account Management

new clearing house account link text, and enter the relevant details. Do not forget to enter the merchant IDyou received from your credit card service provider!
This activity can also be completed in the Liquidity Management work center. To find this activity,choose Master Data Clearing Houses and Master Data Clearing House Accounts .
For more information, see Clearing Houses and Clearing House Accounts.
Fine-Tuning (first is required; second is optional)You have established a communication arrangement with a service provider; you have specified how credit cardauthorizations are performed by the system; you have specified in which form the settlement of individual creditcard payments will be processed by the system. To find these two prerequisite Fine-Tune activities, go to the BusinessConfiguration work center and choose the Implementation Projects view. Select your implementation project andclick Open Activity List . Select the Fine-Tune phase, then perform the following activities in the activity list:
● Computop – Communication Arrangement or the Paymetric– Communication Arrangement — choose theappropriate activity from the activity list in order to establish the communication arrangement with your creditcard service provider.For more information, see Computop - Communication Arrangement or Paymetric - CommunicationArrangement.
● Credit Card Authorization and SettlementChoose this optional activity to review and adapt the predefined profiles that control the credit cardauthorization horizon and to assign a settlement profile to your company.
The standard settings delivered with the system allow you to use the credit card process and mayalready meet your business needs. If you decide to adapt these settings, be sure to align all user-definedsettings with your service provider.
1. Determine for which period of time the payment amount is reserved on the customer's credit cardaccount. On the activity details screen, click the link below Credit Card Authorization Profiles.
2. After having specified the authorization details, ensure that you assign this profile to your company. Clickthe second link below Credit Card Authorization Profiles. For more information, see Configuration: CreditCard Authorization Profiles
3. Assign one of the predefined profiles (single payment settlement or batch settlement) to your company.On the activity details screen, click on the Assign settlement profiles to your company link text.
Additional Prerequisite (required)You have entered credit card data for your customer in the system and have chosen credit card as the paymentmethod to be used for automatic payments. In addition, you have defined credit card as payment method. To meetthese prerequisites, complete the following:
● Customer Account with Credit Card DataYou have created a customer account including credit card data. The credit card data for your customer mustexist in the system before you can settle customer invoices using the payment method Credit Card. To dothis, complete the following steps:1. Go to the Account Management, Business Partner Data, or Receivables work center and choose the
Accounts view (in the Receivables work center choose the Customers view).2. Select the customer whose credit card data you want to enter. On the Corporate Account Overview
screen, click Edit then Financial Data .Optional: If the customer does not yet exist in the system, create a new customer record in this view.For more information, see Create and Edit an Account in the Tasks section of the Accounts Quick Guide
[page 63].
SAP Business ByDesign February 2017Account Management P U B L I C • © 2017 SAP SE or an SAP affiliate company. All rights reserved. 85

3. On the Financial Data tab, click Bank Data . In the Credit Card section, clickRegister with <Service Provider Name> . You are forwarded to your service provider’s system
4. Enter the credit card information provided to you by your customer. Confirm your entry to send yourdata to the service provider and generate the credit card token. After the service provider has confirmedyour entries, close the service provider's screen. Note that the credit card number is saved only in theservice provider’s system and not in the SAP Business ByDesign system. The credit card token and themasked credit card number are saved within the SAP Business ByDesign system.
5. The credit card, including the masked number that was generated by the service provider, is added tothe table. The Default indicator is active as standard. This means that the system proposes this creditcard by default when credit card is selected as payment method on sales orders, service orders, andinvoices. In case you need to block the credit card for payments at any point in time, select an appropriatereason from the dropdown list in the Blocking Reason column. If you leave this field empty, the creditcard is not blocked. Remember to save your customer account master data!
6. Optional: If the credit card data already exists in the system and you wish to use it for your customer (forexample, if you need to re-enter customer master data that has been deleted), click Assign . In theAssign Credit Card dialog box, select the relevant credit card using the value help. Click OK .
7. Optional: Credit Card Payment as Default Payment Method: If your customer has agreed to pay allinvoices with the same credit card, you can enter this credit card as the default payment method in thePayment Data on the Corporate Account - Financial Data screen. The system will automatically bill thiscredit card even you have not entered it on the sales order or on the customer invoice. Note that thesystem only prints a note informing the customer that the invoice amount will be collected if the paymentmethod Credit Card is also specified on the customer invoice.To choose credit card payment as the default payment method, return to the Financial Data tab, andthis time click Payment Data . In the Payment Methods section, click Add Row and select Credit Cardfrom the dropdown list. In the Credit Card section, you can select a credit card from the ones that wereassigned to the customer in the corresponding bank data and define a validity period for this paymentmethod.
Credit card data must exist in the system even if your customer only wants to pay once using this paymentmethod. If this is the case, you can remove or block the credit card data after the transaction has beencompleted so that it cannot be accidentally used or proposed as payment method by the system afterwards.
Process FlowThe credit card process involves four parties: Your company, your customer, the credit card service provider andthe acquirer, hereinafter referred to as the clearing house. The service provider is responsible for the encryption,tokenization, and authorization of the credit card data in order to ensure Payment Card Industry (PCI) complianceat all times. Furthermore, the service provider acts as the connection between your company and the clearing houseresponsible for making the actual payments.You Create the Sales or Service Order and the Manual Invoice
1. A customer has requested services or ordered goods from you in your role as the company's sales employeeusing a sales order from the Sales Orders or Service Orders work centers. In the sales order or service order,you click View All , and then select the payment method Credit Card and the corresponding credit card. Ifnecessary, you can also enter the data for a new credit card.
2. Before releasing the sales order or service order, initiate the authorization of the credit card data and thepayment amount in question by clicking Check Authorization . The data is sent to the service provider, whoperforms the necessary checks and authorizes the amount. This reduces the credit limit of the customer’scredit card account by the authorized amount. This amount is blocked for the number of days specified in the
86 © 2017 SAP SE or an SAP affiliate company. All rights reserved. • P U B L I CSAP Business ByDesign February 2017
Account Management

clearing house account data (for 14 days, for example). Note that at this point the credit card is not yet debited.You can review the authorization details by clicking the link next to the Check Authorization button.
Authorizations will only be cancelled automatically by the system as a result of the following scenarios:A document that contained authorizations is deleted or cancelled, the credit card used to make thepayment is changed, the customer placing the order is changed, or the payment method is changedfrom “credit card” to any other method (only alternative currently available is direct debit).If an authorization is cancelled, it will be deleted from the system and a request to release the reservedfunds will be automatically sent to the service provider. If the automatic cancellation fails, you will notbe notified.
3. After delivery of the services or goods the invoicing process takes place. The payment method andauthorization information is automatically transferred to the invoice with a note stating that the given creditcard will be charged with the amount.
4. Optional Manual Invoice: If there are no preceding documents, such as a sales order or service order, you cancreate an invoice manually. You do this in the Customer Invoicing work center where your company’s salesemployee issues the relevant manual invoice for the customer. When entering the invoice, the sales employeeselects the payment method Credit Card. The invoice then automatically contains a note stating that the creditcard will be charged with the amount. Before releasing the invoice, be sure to click Check Authorization torequest the authorization. The sales employee then sends the invoice to the customer.
To automatically ensure that the invoice contains a valid authorization, you can create and schedule creditcard authorization runs in the Customer Invoicing work center. For more information, see Quick Guide forCredit Card Authorization Runs [page 165].
You Initiate the Automatic Credit Card PaymentIn your role as accounts receivable accountant, and after an invoice has been created, you can clear the open itemsof the invoice by initiating either the automatic credit card payment or creating the manual credit card payment.
1. Create and Perform the Payment Runa. Go to the Receivables work center and choose Periodic Tasks Payment Runs .b. Click New . On the New Payment Run screen, you enter your company and if necessary, restrict the run
to specific customers, for example.c. Save and activate the run. Click Schedule to enter the time when the run should be performed. You can
also schedule recurring runs on a regular basis. The system starts the payment run at the time youspecified and generates a payment proposal.
For more information, for example on scheduling payment runs, see Automatic Incoming Payments.2. Check the Payment Proposal and Execute the Payment
a. Navigate to the Automatic Payments view and open the previously generated payment proposal byselecting the proposal and clicking Edit .
b. Check and correct the payment proposal, if necessary.If no payment method was chosen in the preceding documents, the system defaults the payment methodspecified in the Payment Data section of the customer data (see above) for internally-initiated paymentsin the payment proposal. If more than one payment method was specified in the payment data, thesystem proposes the most common payment method of the respective country. It is possible to overwritethe payment method given in the payment proposal. If your customer asks you, for example, to useanother payment method instead of their credit card, you can change this in the payment proposal.
SAP Business ByDesign February 2017Account Management P U B L I C • © 2017 SAP SE or an SAP affiliate company. All rights reserved. 87

If there is an issue with the customer account and the status of the payment proposal isPostpone as a result, correct the account settings and ensure that you choose Actions Reset Postpone before executing the payment.
c. Initiate the automatic credit card payment by clicking Execute Payment .On the basis of your configuration settings, the payment runs through an approval process. After thepayment has been executed, an authorization of the full payment amount and the credit card data isperformed. If the authorization has already taken place on the sales or service order or on the manualinvoice, it will only be repeated if the authorization has expired in the meantime.For more information, see Configuration: Credit Card Authorization Profiles (only relevant for salesorders and service orders).In the Payment Management work center in the Payment Monitor view, the status of the payment is nowdisplayed as Ready for Transfer. Note that the Payment Monitor view is also available in the LiquidityManagement work center.
You can cancel a credit card payment only while it has the status Ready for Transfer. To do so, goto the Payment Management work center and choose the Payment Monitor view. Select thepayment you want to cancel and click Reverse . Once the payment status is In Transfer, youcannot cancel the payment, but must initiate a credit memo to your customer’s credit cardinstead.For more information, for example on payment proposals, see Automatic Incoming Payments.
You Create the Manual Credit Card Payment1. Go to the Receivables work center and choose the Customers view, then select the customer whose payable
should be cleared by credit card.2. Click View and select the open item(s) to be cleared, then choose Pay Manually By and select Credit
Card from the list.a. If you select an open item for which the payment method credit card was already chosen, this information
will be used to create the payment. You can review the payment and, if necessary, change the credit cardinformation. When you are finished, click Post .
b. If you select one or more open items on which no agreed payment method is chosen, the default creditcard of the customer will be selected. You can review the payment and, if necessary, change the creditcard information. When you are finished, click Post .
3. On the basis of your configuration settings, the payment will run through an approval process. As soon as theapproval is completed, the open item is cleared with the payment. If you want to track the status of yourpayment, switch to the Payment Management work center and choose the Payment Monitor view.
Cancellation of PaymentsIf you have authorized a payment directly from a sales order, service order, or manual invoice and latercancel the payment, these authorizations will not be cancelled and the service provider will not benotified. The authorizations will be re-used as soon as the open item is paid.If you have requested the authorizations directly from the New Credit Card Payment screen (not directlyfrom the sales order, service order, or manual invoice) and later cancel the payment, the authorizationswill be cancelled and the service provider will be notified.Payment Amount IncreaseIf the amount to be paid is greater than the amount authorized, you can request an additionalauthorization for the difference by clicking on the Check Authorization button.
Alternative: Pay Manually By Other Payment MethodsFrom the open item list select the item(s) to be cleared, then choose Pay Manually By and select OtherPayment Methods. On the New Payment screen, select Credit Card as payment method if it is not already the
88 © 2017 SAP SE or an SAP affiliate company. All rights reserved. • P U B L I CSAP Business ByDesign February 2017
Account Management

default. Review the payment, and then click Execute Payment . The approval process and payment statustracking are described in step three above.
You Create and Perform the Credit Card Settlement RunAfter you have initiated the credit card payment automatically or manually, you want to inform your provider thatthe payment should be made now.To create and edit credit card settlement runs, go to the Payment Management work center. In the Periodic Tasksview, choose the Credit Card Settlements subview. You can schedule your runs according to your business needs,for example to be performed every day or week or once only. If you, for example, specified batch settlement inbusiness configuration, all payments from a run will be bundled in one message that is sent to the provider. For moreinformation, see Quick Guide for Credit Card Settlement Runs.When the settlement run is done, the status of the settled credit card payments changes to In Transfer and thepayment message is sent to the provider (in a batch or individually, according to the settings you have made inbusiness configuration). The service provider will then forward the message to the clearing house. The clearing housewill check the request and send a reply via the provider as to whether it will credit (or debit) the amount of the creditcard payments bundled in the message to your account. This reply is automatically updated to the system in theform of the appropriate settlement status. The bank statement will then show you that the payment has beenreceived. Note that the bank statement will show only one item representing the total amount of all the credit cardpayments that were settled together. But if you have arranged for the clearing house to send you a statement listingall individual credit card payment items, you can check whether the total amount corresponds to these items.You can track the settlement processing status by navigating to the Payment Monitor view and then to the Detailssection of the screen. The status is displayed under Current Settlement Data.The following settlement statuses exist:
● PendingThis status means that the message has been sent to the service provider and the system is waiting for aconfirmation of the settlement. If no problems occur, the settlement status normally changes to Acceptedwithin a few minutes.If the status does not change within the next 24 hours, you should check whether there has been an errortransferring the message.
● AcceptedThis status means that the message has been successfully sent to the service provider and from the serviceprovider to the clearing house. The clearing house in turn has confirmed that it will settle the payment andsends this information to the system via the service provider.
● RejectedThis status means that the clearing house rejects the settlement of the payment. The payment status in thePayment Monitor changes back from In Transfer to Ready for Transfer. In this case, contact the serviceprovider or the clearing house to find out the reason for rejection, indicating either the provider ID or theclearing house ID.
Optional: You Settle the Payment Manually1. To initiate the settlement of a credit card payment manually, switch to the Payment Management work center
and choose the Payment Monitor view.2. In the list, select the required credit card payment with the status Ready for Transfer that was initiated in the
Receivables work center. You can select more than one payment if you want to settle several at the sametime.
To speed up the search process, you can use the extended search function. For this, click Advancedand enter your search criteria. For example, in the Payment Method field, select Incoming PaymentCard Payment and in the Show field, select Ready for Transfer. Click Go . Only payments thatcorrespond to the selected search criteria are displayed.
SAP Business ByDesign February 2017Account Management P U B L I C • © 2017 SAP SE or an SAP affiliate company. All rights reserved. 89

3. Click Actions for Credit Cards and then Settle.The system generates a message that is sent to the service provider. The status of the payment changes toIn Transfer. Once the settlement data has been transferred to the service provider and from the serviceprovider to the clearing house, which agrees that the payment will be made, the settlement status changesto Accepted in the Details section of the screen under Current Settlement Data.
Alternatively, in order to settle an individual credit card payment, you can also go to the PaymentMonitor view and open the corresponding payment. On the credit card payment screen, click
Start Settlement .
4. The clearing house will credit (or debit) the total amount of the credit card payments bundled in the messageto your bank account. The bank statement will then show you that the payment has been received.Note that the bank statement will show only one item representing the total amount of all the credit cardpayments that were settled together. If you have arranged for the clearing house to send you a statementlisting all individual credit card payment items, you can check whether the total amount agrees with theseitems.
You Enter a Bank Statement Containing Credit Card Payments ● Select New Bank Statement from the Common Tasks view of the Liquidity Management work center, if you
want to manually enter bank statement data that has been submitted in paper form.1. In the Create and Edit Items step, click Add Row and select Incoming Credit Card Payment.2. Enter the credit card payment amount (from the clearing house) that is printed on your bank statement,
then post the bank statement.
● Select the File Management view from the Liquidity Management work center, if you want to enter bankstatement data that has been submitted electronically.1. Choose Inbound Files to upload a locally saved bank statement file to the system. For more information,
see File Management Quick Guide.2. Check the bank statement data in the Bank Statements view of the Liquidity Management work center,
and then post the bank statement.
The system creates a payment allocation task for the credit card payments, because it cannot align the totalamount from the bank statement with the individual credit card payments. This task must be completed beforecreating a liquidity forecast.
For more information on how to confirm payments with your bank statement, see Confirm Payments with Your BankStatementYou Process the Credit Card Payment from Your Bank Statement in the Payment AllocationIf you want to edit the payment allocation immediately after posting the bank statement, click on the Post-processbank statement link on the released bank statement. On the bank statement overview screen, click View All . In theTransactions section of the screen, click on the Required link in the Postprocessing column for the relevant paymentfrom the clearing house. This takes you to the Payment Allocation screen.
1. The Payment Assignment tab displays the credit card payments with the status In Transfer and Pre-Confirmed by default. Select all items contained in the payment (and shown on the clearing house statement)and copy them to the lower screen area using the down arrow. You can identify them using the settlementnumber in the External Reference column.
90 © 2017 SAP SE or an SAP affiliate company. All rights reserved. • P U B L I CSAP Business ByDesign February 2017
Account Management

If your service provider is able to generate electronic clearing house statements, then you can alsocomplete this step more quickly by clicking on Actions and selecting Import Clearing HouseStatement from the drop-down menu. For more information on how to upload clearing housestatements, see Upload a Clearing House Statement. If your service provider is not able to generatean electronic clearing house statement, we recommend you ask for a printed statement containing theindividual credit card payment items. You can use this statement to find the items that exist in thesystem.
2. On the Other Allocation Tab, you need to enter the service provider’s charges and assign a G/L account. TheOpen Amount should now be zero. When you are finished, click Post .
See AlsoAbout Credit Card Service Provider ComputopAbout Credit Card Service Provider Paymetric
3.2.3.5 Create a Tax Exemption Certificate (Accounts view)
OverviewYou can create tax exemption certificates in the SAP Business ByDesign system and assign them to thecorresponding account master in the system.
You can also create tax exemption certificates when you create a new sales/service order or customer invoiceand assign it immediately to the sales/invoicing document. For more information, see:
● Create Tax Exemption Certificate (Service Order Processing view) ● Create Tax Exemption Certificate (Sales Orders Processing view)
Procedure1. Open An Existing Account
1. Go to the Accounts Management work center and then choose the Accounts view.2. Select All Accounts from the Show field. The system retrieves and displays the status, account ID,
account name, city, and main contact for all the accounts.3. Select an account to create a new tax exemption certificate.4. Click Edit and then choose Financial Data to open the master data for the account.
2. Enter IDs and Dates1. In the master data, select Tax Exemption Certificates .2. Add a row to fill in the tax exemption certificate details.3. Enter the company ID and the tax exemption certificate ID in the respective fields.4. Select the Certificate Type from the drop down menu. The system retrieves and displays the Tax
Type and Country.5. Enter the dates. The start date and end date is the validity period of the certificate.
SAP Business ByDesign February 2017Account Management P U B L I C • © 2017 SAP SE or an SAP affiliate company. All rights reserved. 91

6. Enter the External ID and Maximum Tax Exemption Amount as stated on the certificate. If theinformation is not available, leave the respective fields empty.
● For France: The system retrieves and displays the tax exemption reason.
● For US: Go to Tax Exemption Reason and select the tax exemption reason.
3. Save and Activate Tax Exemption Certificate1. Click Save to save the data.2. Click Change Status and then choose Activate to set the status of the tax exemption certificate to
Active.3. Click Close to return to the Accounts view.
ResultYou have an activated tax exemption certificate that is ready for use.
3.2.3.6 Create a SEPA Direct Debit Mandate
OverviewIf you want to make payments using the SEPA direct debit procedure, you must obtain automatic debit authorization(in the form of a mandate) for each customer. You create and print out the mandate then send it to your customerfor signing. The customer then completes and returns the signed copy of the mandate. You update the data in thesystem and send the information in the mandate with each direct debit to the bank.
PrerequisitesYou have a unique creditor identifier (UCI), which you obtained from the national bank. You have entered the UCI inyour company master data in the Organizational Management work center.
Procedure1. Create a Preliminary SEPA Mandate
a. In the Receivables work center, navigate to the Customers view. In the Customers subview, select theappropriate customer and click Edit then Financial Data .
b. Under SEPA Mandates, click New .c. In the Direct Debit Mandate window, enter the required data for your customer, including:
● Mandate IDIf you want the system to generate a sequential number, leave this field empty. If you want tocreate a mandate that already exists in the system, enter its number in the field.
● Single-UseIf you want to use the mandate for one payment transaction only, set this indicator.
● Payer DataCheck the data displayed for your customer and use the input help to select their bank.
92 © 2017 SAP SE or an SAP affiliate company. All rights reserved. • P U B L I CSAP Business ByDesign February 2017
Account Management

● Mandate TypeCheck that the preselected mandate type is correct, displaying either SEPA Business–to–Business or SEPA Core. The system derives this from the customer account information,depending on whether you are dealing with a corporate or private customer.
● Optional: Alternative PayerIf the payables are not settled by the customer but by an unknown payer in the system, set thisindicator. Enter the required payer data. In this case, the alternative payer must agree to the directdebit and sign the mandate.
d. Once you have entered all the required data, click Save . Then print the mandate by choosing Actions >Print Mandate so that you can send it to your customer for signing.
When you print the form, the mandate status changes from In Preparation to Waiting forConfirmation. This status means that the customer has not yet sent the signed mandate backto you or that you have not yet entered it in the system.
2. Finalize a SEPA Mandatea. After your customer has sent back a signed version of the SEPA direct debit mandate, select your
customer in the system and choose Edit > Financial Data.b. Under SEPA Mandates, click Edit .
On the Direct Debit Mandate screen, enter the data that the customer added to the form, as wall asthe date and place of signature in the Signature Details area.Click Save .The mandate assumes the status Active and can now be used for direct debits.
When the mandate is first used for a direct debit , the system enters the mandate data in the paymentfile and submits it to the bank. Whenever the mandate is used again, only the mandate ID is sent to thebank since the other information is already stored.
3. Enter an Existing Mandate in the System
This step only applies if a mandate already exists and is already signed by a customer, but does notyet exist in the system.
a. In the Receivables work center, navigate to the Customers view. In the Customers subview, select theappropriate customer and click Edit then Financial Data .
b. Under SEPA Mandates, click New .c. Enter the data for the SEPA mandate as described under Create a Preliminary SEPA Mandate but with
the following difference: Enter the existing mandate ID in the Mandate ID field as well as the date andsignature.Click Save .The mandate assumes the status Active and can now be used for direct debits. You can print themandate as often as you want.
4. Amend an Existing Mandate in the Systema. If you need to make changes to a SEPA direct debit mandate with the status Active, select your
customer in the system and choose Edit > Financial Data.b. You can edit the following fields (of which the bank must then be informed):
● Mandate ID ● Creditor ID
This entry has to be changed in the Organizational Management work center.
SAP Business ByDesign February 2017Account Management P U B L I C • © 2017 SAP SE or an SAP affiliate company. All rights reserved. 93

● Company NameThis entry has to be changed in the Organizational Management work center.
● Payer IBAN or BICThese entries have to be changed on the Bank Data subtab of the Financial Data tab for thecustomer.
If you want to block the mandate for use with direct debits, you can set the Blocked indicator.If you change a mandate, the mandate data is sent by payment file to the bank when the next directdebit is made.
ResultOnce a mandate has the status Active, you can use it for SEPA direct debit payments. Note, however, that if a mandateis not used for more than 36 months, it can no longer be used.
You cannot delete mandates. If the validity of a mandate expires, the system prevents payment using thismandate. If you no longer want to use a mandate or it is no longer valid, you can set its status manually fromMark as Obsolete to Obsolete.
3.3 Account Hierarchies
3.3.1 Account Hierarchies Quick Guide
As a sales or service professional, you need complete and easy access to the account hierarchy information of yourcustomers. The Account Hierarchies view of the Account Management work center provides you with an overviewof all the account hierarchies that are currently in your system. You can display, create, and edit account hierarchies.
Business Background
Account HierarchiesCompanies often deal with customers that have many subsidiaries. The multiple levels of subsidiaries that make upthe complex organizational structure of large customers can be represented by an account hierarchy.For more information, see Account Hierarchies [page 97].
Tasks
Create an Account Hierarchy1. In the worklist of the Account Hierarchies view, click New , then Hierarchy.2. Enter the hierarchy node name and hierarchy node ID. You can also enter notes for the hierarchy node.
If you do not enter a hierarchy node ID, it is assigned automatically by the system.
94 © 2017 SAP SE or an SAP affiliate company. All rights reserved. • P U B L I CSAP Business ByDesign February 2017
Account Management

3. To add an account to the hierarchy, click Add Row under Accounts.4. Use the value help or value selection to choose an account from the list.
Edit an Account Hierarchy in Basic Mode1. To edit an account hierarchy, select any node in the hierarchy and click Edit .
To view all nodes of a hierarchy, click the arrow next to it or click Actions , then Expand. To expandall hierarchies, click Expand All. To return to the original view, click Collapse or Collapse All.
The account hierarchy editor opens.2. In the editor, you can do the following:
● Create a new hierarchy node1. Select a node in the account hierarchy to which you want to add a subordinate node.2. Click New , then Hierarchy Node, and enter the required data.
The node you have just created is now one level below the node you selected. ● To edit a hierarchy node within the editor, select a node and click Edit . You have the following options:
○ Convert to HierarchyThe node you have selected becomes the top node of a new hierarchy, retaining all subordinatenodes.
○ DeleteYou can delete a hierarchy node only if no subordinate nodes exist.
○ Cut and PasteTo cut and paste hierarchy nodes within a single hierarchy, select a hierarchy node and click Cut.Then select the node above the position you want to paste the node you have cut and click Paste.The node you have just pasted is now one level below the node you selected.
In the hierarchy node editor, you can also edit the hierarchy node names of all nodes in the hierarchy. You canedit notes and add and remove accounts under Details.
Edit Account Hierarchies in Advanced Mode1. In the editor or quick activity of an account hierarchy, click Advanced Mode .2. Add additional hierarchies you want to edit to the list under Account Hierarchies. To do this, you have the
following options: ● Create a new account hierarchy
Click New and enter the required information under Hierarchy Nodes. ● Select an account hierarchy already in your system.
Click Select and choose an account hierarchy using the value selection.The account hierarchy you have selected is added to the list under Account Hierarchies.
3. Once you have added the account hierarchies you want to edit to the list under Account Hierarchies, you havethe following options: ● Edit individual account hierarchies
Select an account hierarchy and edit the information under Hierarchy Nodes.
The functions under Edit are the same as those in basic mode.
● Cut and paste hierarchy nodes between hierarchies
SAP Business ByDesign February 2017Account Management P U B L I C • © 2017 SAP SE or an SAP affiliate company. All rights reserved. 95

1. Select a hierarchy node from the account hierarchy you are viewing under Hierarchy Nodes andclick Edit and then Cut.
2. Select an account hierarchy in the list under Account Hierarchies. Then select the node above theposition you want to paste the node you have cut and click Edit and then Paste.
Navigate to an Account Hierarchy Node DirectlyTo navigate to a hierarchy node directly, do the following:
1. Click Locate .A dialog box opens.
2. Enter search data and click Go .
For more search options, use the Advanced search mode.
3. Select a hierarchy node from the generated list.4. Click Locate .
The dialog box closes and the system takes you to the node you selected in its respective account hierarchy.
Export Account Hierarchies Using Microsoft Excel®For more information, see Export Business Data Using Microsoft Excel [page 82].
Display an Account Hierarchy in Graphical ViewTo display an account hierarchy in graphical view, click the hierarchy node name or hierarchy node ID of any nodein the hierarchy.The account hierarchy overview opens in graphical view. In this view, you can do the following:
● Step In and Step OutTo display a node without its superordinate nodes, select the node and click Actions , then Step In. Tonavigate away from this view, click Actions , then Step Out.
● Zoom in and out, or fit to page ● Toggle between graphical and tabular view
Click the Switch to graph or Switch to table button at the top right corner of the screen.
In both the graphical and the tabular view, you can do the following: ● Expand and collapse hierarchy nodes
In the graphical view, you can expand hierarchy nodes by clicking the plus sign (+), and collapse hierarchynodes by clicking the minus sign (-).
● Print the account hierarchy displayed on your screen ● Create a new hierarchy ● View all data of an account hierarchy
Click View All or Edit to navigate to the editor of an account hierarchy.
96 © 2017 SAP SE or an SAP affiliate company. All rights reserved. • P U B L I CSAP Business ByDesign February 2017
Account Management

3.3.2 Business Background
3.3.2.1 Account Hierarchies
OverviewCompanies often deal with customers that have many subsidiaries. The multiple levels of subsidiaries that make upthe complex organizational structure of large customers can be represented by an account hierarchy.
American Heatings has three subsidiaries, West Coast, Central, and East Coast. The West Coastsubsidiary also has two further subsidiaries, Northwest and Southwest. Each of these subsidiaries wouldbe represented by an account hierarchy node.
Prerequisites
Configuration Settings
Configuration settings are usually performed by an administrator. If you do not have the requiredauthorization, contact your administrator.
To create and edit account hierarchies, you have enabled the use of account hierarchies in your solutionconfiguration. To find this business option, go to the Business Configuration work center and choose theImplementation Projects view. Select your implementation project and click Edit Project Scope . In the Scoping stepof the project, ensure that Business Partners is selected within General Business Data.In the Questions step, expand the General Business Data scoping element and select Business Partners. SelectHandling of Business Partners and answer the question related to account hierarchies.
Nodes in Account HierarchiesThe hierarchy structure is flexible. The user can assign an unlimited number of accounts to a node or have nodeswithout accounts assigned to them.You can create new account hierarchies and lower level hierarchy nodes For each hierarchy node, you can maintainproperties such as the hierarchy node ID, a description, and a long text (note). You can reassign nodes, includingreassignment between hierarchies, by using cut and paste.
SAP Business ByDesign February 2017Account Management P U B L I C • © 2017 SAP SE or an SAP affiliate company. All rights reserved. 97

Graphical ViewThe graphical view provides a clear visual representation of each individual account hierarchy. You can expand andcollapse hierarchy nodes in the graphical view.
Basic and Advanced ModeYou have the option of working in basic or advanced mode. The advanced mode allows you to cut and paste nodesbetween account hierarchies.
See AlsoAccount Hierarchies Quick Guide [page 94]
3.4 Contacts View
3.4.1 Quick Guide for Contacts in Account Management
The Contacts view provides you with an overview of all the contacts related to a corporate account or partner alongwith other contacts that are not related to any business partner. You can maintain essential information about acontact, such as address, e-mail, telephone number, department, and function within the company. You can alsoenter a contact’s personal details, such as date of birth, marital status, and home address.You can access the Contacts view from the Account Management work center.
Business Background
Accounts and ContactsYou can view, create, and maintain information about your accounts and contacts in more than one work center.The data you create is shared by several work centers. You only need to maintain the information in one work centerfor it to be updated automatically in all relevant work centers.For more information, see Maintenance of Accounts and Contacts [page 71].
Address ManagementYou can create, view, and update the details you need to communicate with your business partners. You can maintaindetailed postal and communication data for persons and organizations.For more information, see Address Management [page 59].
Business Partner Duplicate CheckThe business partner duplicate check allows you to find business partners that exist more than once in the system,thus avoiding having redundant data in your system and helping you to reduce efforts and save costs when managingyour business partner master data.For more information, see Business Partner Duplicate Check [page 61].
98 © 2017 SAP SE or an SAP affiliate company. All rights reserved. • P U B L I CSAP Business ByDesign February 2017
Account Management

Tasks
Create and Edit a Contact1. In the worklist of the Contacts view, click New , then choose Contact.
You can also create a new contact by starting the New Contact common task,which belongs to the Account Management work center.
2. Enter the contact's name, addresses, communication and other details.If you create a new contact for an existing account, you can enter the account ID of theexisting account in the Account/Partner field and enter relevant information underBusiness Address, Business Details, and Business Communication.
You can check if a contact already exists in the system if you have chosen thisoption during scoping. When you enter the details of the contact, click
Check For Duplicates . The system also notifies you of potential duplicates whenyou save the details of a new contact. You can view the potential duplicates listed.
3. To enter additional information about the contact, click View All to open the editor.
You can also add more information to a particular contact by selecting thecontact in the worklist and clicking Edit → General.
4. Click Save to save the new contact.
Create Contacts Using Microsoft Excel®For more information, see here [page 104].
Assign Multiple Addresses to a Contact1. In the editor of the Contacts view, click Addresses .2. Click Add Row .3. Select the address type, and enter the address details.
The business address is determined based on the related account.4. If you require additional address fields, click Additional Fields.5. Enter one or more addresses, and save the address details.
You can also assign additional addresses to a particular contact by selectingthe contact in the worklist and clicking Edit → Addresses.
Specify Relationships of a Contact1. In the editor of the Contacts view, click Relationships to enter your details about the
relationships for a contact.2. Click Add Row under Relationships and select the relationship type and the business
partner with whom the contact has a relationship.If your contact is the contact for more than one business partner (relationship type IsContact Person For), select Main under Details for the main relationship for thiscontact.
SAP Business ByDesign February 2017Account Management P U B L I C • © 2017 SAP SE or an SAP affiliate company. All rights reserved. 99

The main business partner to which a contact is assigned is also displayed in theworklist.
3. Save your data.
Assign Direct Responsibilities to Contacts1. In the editor of the Contacts view, click Relationships and then Responsibilities .2. Click Add Row under Responsibilities.
You can only assign direct responsibilities if you have selected this functionduring scoping by answering the question related to responsibilities for contacts.If you have not selected that function, the responsibilities (direct and indirect)for the related account will be shown on the Responsibilities tab.
3. Select an employee.
The value selection where you can select the employee will provide all employeesand service agents in your SAP Business ByDesign system regardless of youruser’s access rights.
4. Select the Groupware Synchronization checkbox, if you want to synchronize the contactdata of the assigned employee with Microsoft Outlook®.
5. Select Contact Responsible as the party role.If you have already assigned an employee responsible for the contact, you can alsoselect Additional Contact Responsible for an additional employee responsible.For each additional entry, this role is automatically selected by the system.
How many employees can be responsible for an account depends on the settingsfor the related party roles that you made in the Party Role Definition fine-tuningactivity.
6. Save your data.In the advanced search, you can search for the contacts for whom you or a selectedemployee are directly responsible. My Contacts in the worklist shows you a list of allthe contacts for whom you are directly responsible.
Assign Contact to Target Group
As a prerequisite, you should have the new or existing contact saved with an associatedaccount. It is not possible to assign a contact without an associated account ID to atarget group.
1. In the new or existing contact editor in Contacts view, click Marketing Data .2. Click Assign Target Group to assign an existing target group.3. In the dialog box, select a target group. You can search for a target group using the
value selection.4. Assign an account by selecting an account ID. You can search for accounts using the
value selection.
100 © 2017 SAP SE or an SAP affiliate company. All rights reserved. • P U B L I CSAP Business ByDesign February 2017
Account Management

The Account ID value selection will display the accounts which are associatedwith the contact.
5. Click Save to save the target group assignment to the contact.6. You can assign a contact to more than one target group. To remove target group
assignments, select a target group and click Remove Target Group Assignment .
Export Contacts Using Microsoft Excel®For more information, see Export Business Data Using Microsoft Excel® [page 82] .
Create a Target Group from a Contacts WorklistFor marketing purposes you can create a target group of accounts listed in a worklist. To dothis:
1. Call up the required worklist, and modify it to your needs.2. Click Export followed by To Target Group.
The New Target Group screen opens.3. Check the details and save the target group.
See AlsoOverviews of Business Partners [page 76]
3.4.2 Business Background
3.4.2.1 Maintenance of Accounts and Contacts
OverviewYou can view, create, and maintain information about your accounts and contacts in more than one work center.The data you create is shared by several work centers. You only need to maintain the information in one work centerfor it to be updated automatically in all relevant work centers.You can access the Accounts and the Contacts views from the following locations:
● Account Management work center ● Business Partner Data work center
The Contacts view of the Account Management work center shows the following contacts: ● Contacts for accounts ● Contacts that are not assigned to a business partner
The Contacts view of the Business Partner Data work center shows all types of contacts.The Accounts view shows both existing customers and prospects.
In the Customers view of the Receivables work center you can also view, create, and maintain existingcustomers and prospects.
SAP Business ByDesign February 2017Account Management P U B L I C • © 2017 SAP SE or an SAP affiliate company. All rights reserved. 101

Accounts and ContactsThe Accounts view provides you with an overview of all the accounts that are currently in your system. You canmaintain important information about an account, such as address and communication data, status, classification,contact hours, sales data, and financial data.The Contacts view provides you with an overview of all the contacts that are currently in your system. You canmaintain essential information about a contact, such as the business address and communication data and status.You can also enter a contact’s personal details, such as the date of birth, marital status, and home address.
Prerequisites
Configuration Settings
Configuration settings are usually performed by an administrator. If you do not have the requiredauthorization, contact your administrator.
You have checked and adapted the pre-delivered settings for account-specific and contact-specific data.To find these activities, go to the Business Configuration work center and choose the Implementation Projects view.Select your implementation project and click Open Activity List . Select the Fine-Tune phase, then select theAccounts or the Contacts activity from the activity list.
Features
Private and Corporate AccountsAccounts can be of the following types:
● Corporate accountsYour account is an organization.
● Private accountsYour account is an individual.
Depending on whether your account is a corporate or a private account, you will be shown different account fields.For example, private accounts require person-related fields, such as name fields, whereas corporate accountsrequire fields for organizations, such as the Nielsen ID or the legal form of a company.
General Data for AccountsYou can maintain the following general data for an account that is specific to accounts:
● ABC classificationsABC classifications are used to rate accounts based on the significance they have for your business.
● Nielsen IDsNielsen IDs indicate the geographic region to which an account belongs. The Nielsen ID can be used to classifyaccounts according to their consumer behavior.
Sales Data for AccountsYou can maintain sales-specific data, such as Incoterms or customer groups, for an account. The data you maintainfor the account will be transferred to the related sales or service document. You can maintain the following data:
● Document blocks
102 © 2017 SAP SE or an SAP affiliate company. All rights reserved. • P U B L I CSAP Business ByDesign February 2017
Account Management

● Sales data that is dependent on distribution chains
You can maintain the following sales-specific data: ● Document Blocks
○ Order blocksOrder blocks prevent new sales or service documents from being created. If an order block is set in theaccount master data, no new sales or service documents can be created for this account.
○ Delivery blocksDelivery blocks prevent an order from being delivered. If a delivery block is set in the account masterdata, it is copied to any new sales orders. It can also be set, edited, or removed within a sales order.
○ Invoice blocksInvoice blocks prevent an order from being invoiced. If an invoice block is set in the account master data,it is copied to any new sales orders. It can also be set, edited, or removed within a sales order.Return documents receive an invoice block by default in order to provide consistent invoicing.
● Sales Data ○ Customer groups
Customer groups are used for pricing and statistical purposes. You can maintain customer groups inthe account master data record for each organizational assignment.
○ Payment termsPayment terms are used for arrangements made with a customer for financial settlement with respectto goods supplied and services performed. They represent agreed conditions for the payment of theprice charged for products and services, such as the due date and credit terms.A payment term can be maintained as account master data. If a payment term has been maintained foran account, this will then be copied into documents, such as a new sales order or a new sales quote asthe default value.
Financial Data for AccountsThis data is relevant for accounting. It covers the following:
● Bank DataHere you edit the customer’s bank details and payment card (credit card) data.
● Payment-Relevant DataYou can see which dunning and clearing strategy is assigned to the customer.Here you specify the company in your organization that collaborates with this customer, and the accountdetermination group to determine the G/L account. For more information, see Configuration of AccountDetermination for Business Transactions.You can block the customer for the automatic payment process by specifying a payment block reason. Youcan also exclude this customer from the dunning process by using a dunning block and by specifying a dunningblock reason.Furthermore, you specify the payment method to be used to clear customer invoices, the person responsiblefor the payment fees, the payment instruction(s) for the bank for international payments, and the methodrequired to send a payment advice to the customer. You can indicate receivables from a customer as doubtful.The Doubtful Debtor checkbox is only used for information purposes.You edit this data under Financial Data in the Payment Data area.
● Tax DataHere you define the tax numbers and the data for customer tax exemption. Tax exemption is only permittedin some countries, such as in the United States. For more information, see Tax Determination [page 9].
SAP Business ByDesign February 2017Account Management P U B L I C • © 2017 SAP SE or an SAP affiliate company. All rights reserved. 103

Ensure that the information under Financial Data is complete. You can create a customer without enteringany financial data, for example, if a customer is initially only a prospect. The system does not prevent thecreation of an invoice for this customer in the Customer Invoicing work center. For this reason, it doesnot issue a corresponding message. The customer invoice is not posted, but the system creates a taskfor the accountant in which data can be edited or any missing financial data added.
General Data for ContactsYou can maintain the following general data for a contact that is specific to contacts:
● DepartmentsThe department in which a contact works can be specified.
● FunctionsThe function describes the job of a contact.
● VIP contactsA contact can be classified as a VIP contact according to his or her importance in a company.
See AlsoAdditional Identifiers for Business Partners
3.4.3 Tasks
3.4.3.1 Create Contacts Using Microsoft Excel®
OverviewYou can create contacts by entering them in a predefined Microsoft Excel template and uploading them to the SAPBusiness ByDesign system.
You can only use this function in the Contacts view of the Account Management work center.
PrerequisitesYou have installed the latest Add-In for Microsoft Excel. Depending on your solution set-up, you can do this from theSelf Services Overview in the Home work center, from the Download Center in the Application and UserManagement work center, or from the Download link that is available directly on the user interface.Also, the settings for your browser must be set correctly. You can check this by clicking Check My ComputerSettings on the logon screen.
StepsIn the SAP Business ByDesign system in the Contacts view, click New and choose Contacts from MicrosoftExcel.Get the Template
104 © 2017 SAP SE or an SAP affiliate company. All rights reserved. • P U B L I CSAP Business ByDesign February 2017
Account Management

1. Select the template.Choose the template in the required language and click Download.
You can choose any language that you have selected during scoping. If you have selected only onelanguage during scoping, you will not get a selection of language versions to choose from.
2. Decide what you want to do with the template. Choose one of the following options: ● If you want to use the template only once, you can open the template without saving it. Click Open. ● If you want to save the template so that you can use it again, choose a location to save the file to, enter
an appropriate file name, and click Save. Then click Open.
If you have previously downloaded and saved this template on your computer, navigate to the location whereyou have saved the template, and open it.
Log on to the solution from Microsoft Excel1. In the SAP Add-In ribbon in Microsoft Excel, click Logon.
If the SAP Add-In ribbon is not displayed, check to make sure that the Add-In for Microsoft Excel hasbeen installed correctly (see Prerequisites in this document).
A dialog box opens where you can enter the logon details. The system URL is proposed automatically. Thesystem URL is the URL of the system that you are working with.
2. Enter your user ID and your password, and click Logon.
After initial logon to the system, the ribbon text is changed from SAP Add-In to the name of yoursolution.
Enter Details in the Microsoft Excel Template
Note the following: ● The Microsoft Excel template is presented with a number of rows where you can enter or copy your
data. If you need more, add the number of rows you need before you start entering or copying yourdata.
● Ensure that mandatory fields (those marked with an asterisk) are filled. ● To help you fill in the details:
○ Some fields have dropdown lists. ○ In some fields you can search the system for data, for example, countries. Place the cursor on the
field, and click Lookup in your solution's tool bar or ribbon to search the system. A search field isavailable in the Lookup dialog box that appears. When you start to type text in the search field, therelevant entries are filtered in the ID and Description columns, meaning that you do not have toscroll through the whole list. If the Lookup button is not active in the ribbon or toolbar, then it isnot possible to perform a search.
Enter the contact data in the appropriate columns.If you do not select a status, the system will use the In Preparation status.
The system will then carry out a duplicate check for the contact data if this function has been selected during scoping.If there is duplicate data it cannot be saved to the SAP Business ByDesign system, and an error message displays.If you do not want to carry out a duplicate check for selected contacts, select No in the Duplicate Check column forthe relevant contacts.For more information about the duplicate check, see Business Partner Duplicate Check [page 61].
SAP Business ByDesign February 2017Account Management P U B L I C • © 2017 SAP SE or an SAP affiliate company. All rights reserved. 105

Save Your Data1. After you have finished entering all the data, save the Microsoft Excel file.2. Click Save Data to .
A dialog box opens, informing you that the data is being saved to the solution.After the upload, a message informs you that your data has been saved in the solution.
If you do not provide all the required information, or if you provide incorrect information, somerecords will not be saved. Error messages will highlight the problems so that you can correct themand save the data again.
3. You can then log off by clicking Logoff .
ResultThe new contacts are saved in the SAP Business ByDesign system and added to the list in the Contacts view.If you need to make changes to these contacts, you can change them in the Microsoft Excel template and uploadthem again to the SAP Business ByDesign system.
3.5 Partners View
3.5.1 Partners Quick Guide
The Partners view provides you with an overview of all the partners that are currently in your system. You can maintainimportant information about a partner, such as the industry and the main contact details, the status of the partner,and the ABC classification.You can access the Partners view from the Account Management work center.
Business Background
Address ManagementYou can create, view, and update the details you need to communicate with your business partners. You can maintaindetailed postal and communication data for persons and organizations.For more information, see Address Management [page 59].
Business Partner Duplicate CheckThe business partner duplicate check allows you to find business partners that exist more than once in the system,thus avoiding having redundant data in your system and helping you to reduce efforts and save costs when managingyour business partner master data.For more information, see Business Partner Duplicate Check [page 61].
106 © 2017 SAP SE or an SAP affiliate company. All rights reserved. • P U B L I CSAP Business ByDesign February 2017
Account Management

Tasks
Create and Edit a Partner1. In the worklist of the Partners view, click New , then choose Partner.
You can also create a new partner by starting the New Partner common task,which belongs to the Account Management work center.
2. Enter the partner’s name, address, and communication details and other partner-specific data, such as the ABC classification or the industry.
You can check if a partner already exists in the system if you have chosen thisoption during scoping. When you enter the details of a partner, click
Check For Duplicates . The system also notifies you of potential duplicates whenyou save the details of a new partner. You can view the potential duplicates listed.
3. To enter additional information about the partner, click View All to open the editor.
You can also add more information to a particular partner by selecting thepartner in the worklist and clicking Edit → General.
4. Click Save to save the new partner.
Assign Multiple Addresses to a Partner1. In the editor of the Partners view, click Communication and then Addresses .2. Click Add Row .3. Enter the address details.4. If you require additional address fields, click Additional Fields.
You can also select a different main address and indicate how the address should beused, such as the ship-to address.
5. Enter one or more addresses, and save the address details.
You can also assign additional addresses to a particular partner by selectingthe partner in the worklist and clicking Edit → Addresses.
Assign a Contact to a Partner1. In the editor of the Partners view, click Contacts and then Contacts .2. Click Assign Contact if you want to use an existing business partner as the contact for
the account.1. In the dialog box, search for a business partner using the value selection.2. Select a business partner and click OK.
The existing address, communication, function, and department details for thebusiness partner appear. You can edit the details or add information.
3. To create a new contact, click Add Row .4. Enter the details about the new contact.
You can assign multiple contacts to a partner. You must select a main contact byselecting the Main checkbox.
5. Click Save to save the contact.
SAP Business ByDesign February 2017Account Management P U B L I C • © 2017 SAP SE or an SAP affiliate company. All rights reserved. 107

You can also assign a contact to a particular partner by selecting the partnerin the worklist and clicking Edit → Contacts.
Specify Relationships of a Partner1. In the editor of the Partners view, click Contacts and then Contacts to enter your
details about the contact relationships for a partner.
You can also specify contact relationships for a particular partner by selectingthe partner in the worklist and clicking Edit → Contacts.
2. In the editor of the Partners view, click Contacts and then Additional Relationships toenter your details about other relationships for a partner.
3. Click Add Row and select the relationship type and the business partner with whomthe partner has a relationship.
4. Save your data.
Export Partners Using Microsoft Excel®For more information, see Export Business Data Using Microsoft Excel [page 82].
See AlsoOverviews of Business Partners [page 76]
3.6 Activities View
3.6.1 Activities Quick Guide
The Activities view allows you to effectively manage and prioritize your time and tasks. The Activities with AccountRestriction view allows you to restrict the access to only activities of the accounts for which the user has access .You can access both Activities view and the Activities with Account Restriction view from the AccountManagement work center.
All tasks are available for both the Activities view and the Activities with Account Restriction view. You and theuser should be assigned to either of the views, and not both. For more information about assigning work centerviews, see Assign Access Rights in the Tasks section of the Business Users Quick Guide.
You can create activities and maintain important information, such as date, time, location, and status of the activity.In addition, you can prioritize your activities so that you can allocate sufficient preparation time. Activities that involveyour accounts and contacts are automatically updated in the account and contact master data, so that you can easilysee which activities a particular account or contact is involved in.
108 © 2017 SAP SE or an SAP affiliate company. All rights reserved. • P U B L I CSAP Business ByDesign February 2017
Account Management

Business Background
Activity ManagementAs part of your daily work you need to deal with various activities throughout the day, such as tasks, appointments,phone calls, letters, faxes, or e-mails. To ensure productivity and efficiency, Activity Management enables you tooptimize all activities relating to Customer Relationship Management and ensures that you do not spend too muchprecious sales time on coordinating routine tasks and activities.For more information, see Activity Management [page 45].
Account ManagementEffective management of accounts is vital to the success of a company. Account management enables you to captureand manage extensive data relating to accounts, contacts, and partners. It also allows you to manage the relatedaccount activities.The Account Management work center offers you a central location for accessing all information about accounts,contacts, and sales and service partners. This vital information is stored in the system and can be reused in varioussales and service activities.For more information, see Account Management [page 53].
Quick Guide for Microsoft Outlook® IntegrationMicrosoft Outlook® Integration allows you to exchange information between Microsoft Outlook and the CRMapplication of your system. You can synchronize your contacts, e-mails, appointments, and tasks; create servicerequests in the system from incoming e-mails; and associate e-mails, tasks and appointments with SAP BusinessByDesign accounts, campaigns, and opportunities. For more information, see Quick Guide for Microsoft OutlookIntegration [page 120].
Tasks
Create an Activity: Appointment1. Click New , then choose Appointment.
You can also click Common Tasks in the taskbar and choose New Appointment.
2. Your name and ID are proposed as Organizer and Employee Responsible. If necessary,you can change them.
3. To enter one or more attendees, enter an attendee or click on Attendee .A dialog box is displayed.
4. Select one or more business partners and click OK .The names of the business partner are displayed next to the Attendee field. If you haveadded a business partner by mistake, you can remove this business partner by clickingon the X next to the name.
If the attendee does not exist as a business partner in the system, you can simplyenter a name or an e-mail address. If you need to enter several attendees, youcan separate them by using a semi-colon, or press ENTER after entering eachattendee.
SAP Business ByDesign February 2017Account Management P U B L I C • © 2017 SAP SE or an SAP affiliate company. All rights reserved. 109

5. Enter a subject. You can also enter a location, if necessary.6. If required, enter an account and contact.
When the appointment is saved, the account and contact master data will then beupdated with this appointment.
7. The system proposes the start and end dates and times. If required, you can overwritethem.
8. If required, you can nominate a sales or service document as a preceding document ofthis activity. To do this, click View All and Add Reference , then select the appropriatedocument in the dialog box and click OK .
Only one preceding document can be added as a reference to an activity. If theAdd Reference button is not active, it means that a preceding document already
exists for this activity.
The sales or service document is then displayed on the Document Flow tab of thisactivity after you click Refresh .The activity is displayed as a follow-up document in the document flow of the sales orservice document. You can view this by editing or displaying the sales or servicedocument, and choosing Document Flow .
9. If required, you can add a visit report to your appointment.a. Click Add Visit Report . If this button is not active, check that you have entered an
attendee.b. Go to the Attachments tab.c. Edit the visit report template by clicking on its hyperlink.d. Fill in the details.e. Click the Save icon and navigate to a suitable location on your computer to save
your visit report. Also give the visit report an appropriate file name so that you canfind it easily.
f. Exit the visit report template by clicking X on the top right hand side of the screen.10. To add the visit report to your appointment, click Add followed by File.11. Click Browse and navigate on your computer to the location where you saved the visit
report.12. Select it and click Add .13. The visit report template is still displayed. If you like, you can delete it by selecting it
and clicking Delete .
If you need to edit the visit report at a later stage, you must save it on yourcomputer (either under the same file name or using a new file name), and thenadd it again to the appointment.
14. Save and close the appointment.The status of the appointment is set to Open. When the start date of the appointmentis reached, the status changes automatically to In Process.If required, you can change the status manually by clicking Change Status followedby In Process.
You must save before you can change the status.
110 © 2017 SAP SE or an SAP affiliate company. All rights reserved. • P U B L I CSAP Business ByDesign February 2017
Account Management

Create an Activity: Activity Task1. Click New , then choose Activity Task.
You can also click Common Tasks in the taskbar and choose New Activity Task.
2. Your name and ID are proposed as Employee Responsible. If necessary, you can changethem.
3. Enter a subject.4. If required, enter an account and contact.
When the activity task is saved, the account and contact master data will then beupdated with this activity task.
5. Enter information such as the category, priority or notes. You can also specify howmuch of the activity task has been completed.
6. If required, you can nominate a sales or service document as a preceding document ofthis activity. To do this, click View All and Add Reference , then select the appropriatedocument in the dialog box and click OK .
Only one preceding document can be added as a reference to an activity. If theAdd Reference button is not active, it means that a preceding document already
exists for this activity.
The sales or service document is then displayed on the Document Flow tab of thisactivity after you click Refresh .The activity is displayed as a follow-up document in the document flow of the sales orservice document. You can view this by editing or displaying the sales or servicedocument, and choosing Document Flow .
7. The status of the activity task is set to Open. You can change the status in one of thefollowing ways: ● By clicking Change Status followed by In Process or Complete. When you sent
the status to Completed, the percentage figure in the Completion (%) field ischanged automatically to 100%.
● By entering a percentage figure in the Completion (%) field. The status is thenchanged automatically as follows: ○ Less than 100%: In Process ○ Exactly 100%: Completed
You must save before you can change the status.If necessary, you can reopen an activity task that has been set to Completed. Todo this, change the status back to In Process. The percentage figure in theCompletion (%) field is set back to 0%.
8. Save and close the activity task.
Create an Activity: E-Mail (Outbound)1. Click New , then choose E-Mail.
You can also click Common Tasks in the taskbar and choose New E-Mail.
SAP Business ByDesign February 2017Account Management P U B L I C • © 2017 SAP SE or an SAP affiliate company. All rights reserved. 111

2. Your name and ID are proposed in the From and Employee Responsible fields. Ifnecessary, you can change them.
3. To enter one or more e-mail recipients, enter a business partner or click on To tosearch for a business partner.A dialog box is displayed.
4. Select one or more business partners, click on the single downward arrow, and thenOK .
The names of the business partners are displayed next to the To field. If you haveadded a business partner by mistake, you can remove this business partner by clickingon the X next to the name.
If the recipient of the e-mail does not exist as a business partner in the system,you can simply enter an e-mail address. If you need to enter several e-mailrecipients, you can separate them by using a semi-colon, or press ENTER afterentering each e-mail recipient.
5. Enter a subject.6. If required, enter an account and contact.
When the e-mail is saved, the account and contact master data will then be updatedwith this e-mail.
7. Enter information such as the category, priority or notes. The text that you write underNotes is the content of your e-mail.
8. If required, you can nominate a sales or service document as a preceding document ofthis activity. To do this, click View All and Add Reference , then select the appropriatedocument in the dialog box and click OK .
Only one preceding document can be added as a reference to an activity. If theAdd Reference button is not active, it means that a preceding document already
exists for this activity.
The sales or service document is then displayed on the Document Flow tab of thisactivity after you click Refresh .The activity is displayed as a follow-up document in the document flow of the sales orservice document. You can view this by editing or displaying the sales or servicedocument, and choosing Document Flow .
9. Click Send to send the e-mail.The status changes from Open / Not transmitted to Completed / Sent.Alternatively, you can simply save the e-mail now, and send it later.
Create an Activity: E-Mail (Inbound)
Before you start, save the e-mail on your computer.
1. Click New , then choose E-Mail.
You can also click Common Tasks in the taskbar and choose New E-Mail.
2. Your name and ID are proposed in the From and Employee Responsible fields. Tooverwrite this, specify an external partner in the From field. Your name and ID are thenproposed automatically in the To field. If required, you can change this.
112 © 2017 SAP SE or an SAP affiliate company. All rights reserved. • P U B L I CSAP Business ByDesign February 2017
Account Management

If you have added a business partner by mistake, you can remove this business partnerby clicking on the X next to the name.
3. Enter a subject.4. If required, enter an account and contact.
When the e-mail is saved, the account and contact master data will then be updatedwith this e-mail.
5. Enter information such as the category, priority or notes.6. If this activity is related to a campaign, enter the campaign ID in the Campaign field.
The subject of this activity is overwritten automatically by the subject of the campaign.If response options have been assigned to the campaign, you can select the appropriateresponse in the Response Option field.When you save this activity, it is recorded in the campaign as a response. For moreinformation, see the Campaigns Quick Guide.
7. If required, you can nominate a sales or service document as a preceding document ofthis activity. To do this, click View All and Add Reference , then select the appropriatedocument in the dialog box and click OK .
Only one preceding document can be added as a reference to an activity. If theAdd Reference button is not active, it means that a preceding document already
exists for this activity.
The sales or service document is then displayed on the Document Flow tab of thisactivity after you click Refresh .The activity is displayed as a follow-up document in the document flow of the sales orservice document. You can view this by editing or displaying the sales or servicedocument, and choosing Document Flow .
8. Under Attachments, click Add followed by File.9. Click Browse to navigate to the location on your computer where you have saved the
e-mail.10. Select the file and click Add .11. Save the e-mail. The status is set to Open / Not transmitted.
The status is set to Open / Not transmitted. You can change the status by clickingChange Status followed by In Process or Received, as required. In the latter case, the
status changes to Completed / Received.
You must save before you can change the status.
Create an Activity: Letter (Outbound)1. Click New , then choose Letter.
You can also click Common Tasks in the taskbar and choose New Letter.
2. Your name and ID are proposed in the From field and as Employee Responsible. Ifnecessary, you can change them.
3. In the To field, enter the business partner who is to receive the letter.4. Enter a subject.5. If required, enter an account and contact.
SAP Business ByDesign February 2017Account Management P U B L I C • © 2017 SAP SE or an SAP affiliate company. All rights reserved. 113

When the letter is saved, the account and contact master data will then be updated withthis letter.
6. Enter information such as the category, priority or notes. The text that you write underNotes are used for the body of the letter.
7. If required, you can nominate a sales or service document as a preceding document ofthis activity. To do this, click View All and Add Reference , then select the appropriatedocument in the dialog box and click OK .
Only one preceding document can be added as a reference to an activity. If theAdd Reference button is not active, it means that a preceding document already
exists for this activity.
The sales or service document is then displayed on the Document Flow tab of thisactivity after you click Refresh .The activity is displayed as a follow-up document in the document flow of the sales orservice document. You can view this by editing or displaying the sales or servicedocument, and choosing Document Flow .
8. Save the letter activity.
Write and Print the Letter1. In the letter activity, click Write Letter .
If the Write Letter button is not active, save the letter activity first.
2. In the File Download dialog box that is displayed, click Open.Microsoft Word® opens, and a template for the letter is displayed. Details such as theaccount, recipient, address, subject, date, and body of the letter are copied to thetemplate.
If this dialog box is not displayed, check whether the settings for your browserhave been set correctly. You can find information about computer settings in theCheck My Computer Settings help document.If you do not need to make any changes to the letter, you can simply click Savein the dialog box, and save the letter locally on your computer.
3. Enter any additional text that you want to include in the letter.
The body of the letter is copied from the text entered under Notes in the letteractivity. You can add text in the letter template, but this text will not be copiedback to the notes.
4. Save the letter locally on your computer, and remember the file path.
You can also print the letter at this stage.
5. Close Microsoft Word.6. This letter template is used for printing purposes only, and is not stored with the letter
activity. If you want to store the letter template with the activity, add it as an attachmentas follows:a. Under Attachments, click Add followed by File.
114 © 2017 SAP SE or an SAP affiliate company. All rights reserved. • P U B L I CSAP Business ByDesign February 2017
Account Management

b. Click Browse to navigate to the location on your computer where you have savedthe letter.
c. Select the file and click Add .7. Save and close the letter activity.
The status is set to Open / Not transmitted. You can change the status by clickingChange Status followed by In Process or Complete, as required. In the latter case, the
status changes to Completed / Sent.
You must save before you can change the status.
For more information about the templates used, see Maintain Microsoft Word® Templates.
Create an Activity: Letter (Inbound)
Before you start, scan and save the letter on your computer.
1. Click New , then choose Letter.
You can also click Common Tasks in the taskbar and choose New Letter.
2. Your name and ID are proposed in the From field and as Employee Responsible. Tooverwrite this, specify an external partner in the From field. Your name and ID are thenproposed automatically in the To field. If required, you can change this.
3. Enter a subject.4. If required, enter an account and contact.
When the letter is saved, the account and contact master data will then be updated withthis letter.
5. Enter information such as the category, priority or notes.6. If this activity is related to a campaign, enter the campaign ID in the Campaign field.
The subject of this activity is overwritten automatically by the subject of the campaign.If response options have been assigned to the campaign, you can select the appropriateresponse in the Response Option field.When you save this activity, it is recorded in the campaign as a response. For moreinformation, see the Campaigns Quick Guide.
7. If required, you can nominate a sales or service document as a preceding document ofthis activity. To do this, click View All and Add Reference , then select the appropriatedocument in the dialog box and click OK .
Only one preceding document can be added as a reference to an activity. If theAdd Reference button is not active, it means that a preceding document already
exists for this activity.
The sales or service document is then displayed on the Document Flow tab of thisactivity after you click Refresh .The activity is displayed as a follow-up document in the document flow of the sales orservice document. You can view this by editing or displaying the sales or servicedocument, and choosing Document Flow .
SAP Business ByDesign February 2017Account Management P U B L I C • © 2017 SAP SE or an SAP affiliate company. All rights reserved. 115

8. Under Attachments, click Add followed by File.9. Click Browse to navigate to the location on your computer where you have saved the
letter.10. Select the file and click Add .11. Save and close the letter activity.
The status is set to Open / Not transmitted. You can change the status by clickingChange Status followed by In Process or Received, as required. In the latter case, the
status changes to Completed / Received.
You must save before you can change the status.
Create an Activity: Fax (Outbound)1. Click New, then choose Fax.
You can also click Common Tasks in the taskbar and choose New Fax.
2. Your name and ID are proposed in the From field and as Employee Responsible. Ifnecessary, you can change them.
3. In the To field, enter the business partner who is to receive the fax.4. Enter a subject.5. If required, enter an account and contact.
When the fax is saved, the account and contact master data will then be updated withthis fax.
6. Enter information such as the category, priority or notes. The text that you write underNotes is the content of your fax.
7. If this activity is related to a campaign, enter the campaign ID in the Campaign field.The subject of this activity is overwritten automatically by the subject of the campaign.If response options have been assigned to the campaign, you can select the appropriateresponse in the Response Option field.When you save this activity, it is recorded in the campaign as a response. For moreinformation, see the Campaigns Quick Guide.
8. If required, you can nominate a sales or service document as a preceding document ofthis activity. To do this, click View All and Add Reference , then select the appropriatedocument in the dialog box and click OK .
Only one preceding document can be added as a reference to an activity. If theAdd Reference button is not active, it means that a preceding document already
exists for this activity.
The sales or service document is then displayed on the Document Flow tab of thisactivity after you click Refresh .The activity is displayed as a follow-up document in the document flow of the sales orservice document. You can view this by editing or displaying the sales or servicedocument, and choosing Document Flow .
9. Click Send to send the fax. Its status changes automatically to Completed / Sent.Alternatively, you can simply save the fax now, and send it later.
116 © 2017 SAP SE or an SAP affiliate company. All rights reserved. • P U B L I CSAP Business ByDesign February 2017
Account Management

The status is set to Open / Not transmitted. You can change the status by clickingChange Status followed by In Process or Complete, as required. In the latter case, the
status changes to Completed / Sent.
You must save before you can change the status.
The fax must be sent by an external provider.
Create an Activity: Fax (Inbound)
Before you start, save the fax on your computer.
1. Click New , then choose Fax.
You can also click Common Tasks in the taskbar and choose New Fax.
2. Your name and ID are proposed in the From field and as Employee Responsible. Tooverwrite this, specify an external partner in the From field. Your name and ID are thenproposed automatically in the To field. If required, you can change this.
3. Enter a subject.When the fax is saved, the account and contact master data will then be updated withthis letter.
4. Enter information such as the category, priority or notes. The text that you write underNotes is the content of your fax.
5. If this activity is related to a campaign, enter the campaign ID in the Campaign field.The subject of this activity is overwritten automatically by the subject of the campaign.If response options have been assigned to the campaign, you can select the appropriateresponse in the Response Option field.When you save this activity, it is recorded in the campaign as a response. For moreinformation, see the Campaigns Quick Guide.
6. If required, you can nominate a sales or service document as a preceding document ofthis activity. To do this, click View All and Add Reference , then select the appropriatedocument in the dialog box and click OK .
Only one preceding document can be added as a reference to an activity. If theAdd Reference button is not active, it means that a preceding document already
exists for this activity.
The sales or service document is then displayed on the Document Flow tab of thisactivity after you click Refresh .The activity is displayed as a follow-up document in the document flow of the sales orservice document. You can view this by editing or displaying the sales or servicedocument, and choosing Document Flow .
7. Under Attachments, click Add followed by File.8. Click Browse to navigate to the location on your computer where you have saved the
fax.
SAP Business ByDesign February 2017Account Management P U B L I C • © 2017 SAP SE or an SAP affiliate company. All rights reserved. 117

9. Select the file and click Add .10. Save and close the fax.
The status is set to Open / Not transmitted. You can change the status by clickingChange Status followed by In Process or Received, as required. In the latter case, the status
changes to Completed / Received.
You must save before you can change the status.
Create an Activity: Phone Call (Outbound)1. Click New , then choose Phone Call.
You can also click Common Tasks in the taskbar and choose New Phone Call.
2. Enter a Call Participant .3. Select one or more business partners and click OK .4. Enter a subject.5. If required, enter an account and contact.
When the phone call is saved, the account and contact master data will then be updatedwith this phone call.
6. Your name is proposed as Employee Responsible. If necessary, you can change this.7. Enter information such as the category, priority or notes.8. Under Direction, select Outbound.9. If required, you can nominate a sales or service document as a preceding document of
this activity. To do this, click View All and Add Reference , then select the appropriatedocument in the dialog box and click OK .
Only one preceding document can be added as a reference to an activity. If theAdd Reference button is not active, it means that a preceding document already
exists for this activity.
The sales or service document is then displayed on the Document Flow tab of thisactivity after you click Refresh .The activity is displayed as a follow-up document in the document flow of the sales orservice document. You can view this by editing or displaying the sales or servicedocument, and choosing Document Flow .
10. Save and close the phone call.The status is set to Open / Not transmitted. You can change the status by clicking
Change Status followed by In Process or Complete, as required. In the latter case, thestatus changes to Completed / Sent.
You must save before you can change the status.
Create an Activity: Phone Call (Inbound)1. Click New , then choose Phone Call.
118 © 2017 SAP SE or an SAP affiliate company. All rights reserved. • P U B L I CSAP Business ByDesign February 2017
Account Management

You can also click Common Tasks in the taskbar and choose New Phone Call.
2. Enter a Call Participant .3. Select one or more business partners and click OK .4. Enter a subject.5. If required, enter an account and contact.
When the phone call is saved, the account and contact master data will then be updatedwith this phone call.
6. Your name is proposed as Employee Responsible. If necessary, you can change this.7. Enter information such as the category, priority or notes.8. If this activity is related to a campaign, enter the campaign ID in the Campaign field.
The subject of this activity is overwritten automatically by the subject of the campaign.If response options have been assigned to the campaign, you can select the appropriateresponse in the Response Option field.When you save this activity, it is recorded in the campaign as a response. For moreinformation, see the Campaigns Quick Guide.
9. Under Direction, select Inbound.10. If required, you can nominate a sales or service document as a preceding document of
this activity. To do this, click View All and Add Reference , then select the appropriatedocument in the dialog box and click OK .
Only one preceding document can be added as a reference to an activity. If theAdd Reference button is not active, it means that a preceding document already
exists for this activity.
The sales or service document is then displayed on the Document Flow tab of thisactivity after you click Refresh .The activity is displayed as a follow-up document in the document flow of the sales orservice document. You can view this by editing or displaying the sales or servicedocument, and choosing Document Flow .
11. Save and close the phone call.The status is set to Open / Not transmitted. You can change the status by clicking
Change Status followed by In Process or Received, as required. In the latter case, thestatus changes to Completed / Received.
You must save before you can change the status.
Create Activities Using Microsoft ExcelYou can create activities by entering them in a predefined Microsoft Excel template anduploading them to the SAP Business ByDesign system.
Complete an ActivitySelect an activity in the work list and click Change Status followed by Complete.You can also edit the activity to view the details first, and then click Change Status .
SAP Business ByDesign February 2017Account Management P U B L I C • © 2017 SAP SE or an SAP affiliate company. All rights reserved. 119

Export Activities to Microsoft ExcelYou can export activities to Microsoft Excel. For more information, see Export Business DataUsing Microsoft Excel.
Create a Target Group from an Activities WorklistFor marketing purposes you can create a target group of accounts listed in a worklist. To dothis:
1. Call up the required worklist, and modify it to your needs.2. Click Export followed by To Target Group.
The New Target Group screen opens.3. Check the details and save the target group.
3.6.2 Business Background
3.6.2.1 Quick Guide for Microsoft Outlook® Integration
Microsoft Outlook® Integration (Groupware) allows you to exchange information between Microsoft Outlook and theCRM application of your system. You can synchronize your contacts, e-mails, appointments, and tasks to and fromOutlook; create service requests in the system from incoming e-mails; and associate e-mails, tasks andappointments with SAP Business ByDesign accounts, campaigns, opportunities, and leads.Microsoft Outlook Integration supports Microsoft Outlook 2007, 2010 and 2013.
Business Background
Microsoft Outlook Integration Security Advice and Troubleshooting GuideFor more information, see the Microsoft Outlook Integration Security Advice and Troubleshooting Guide.
Activity ManagementAs part of your daily work you need to deal with various activities throughout the day, such as tasks, appointments,phone calls, letters, faxes, or e-mails. To ensure productivity and efficiency, Activity Management enables you tooptimize all activities relating to Customer Relationship Management and ensures that you do not spend too muchprecious sales time on coordinating routine tasks and activities.For more information, see the Activities Quick Guide [page 108] and Activity Management [page 45].
Tasks
Pre-Installation ActivitiesBefore you can install and use the Microsoft Outlook Integration functions, you must be granted authorization to theAccount Management work center where all data relevant to Microsoft Outlook Integration is maintained. For furtherinformation on this work center, refer to documentation available in the Help Center.
120 © 2017 SAP SE or an SAP affiliate company. All rights reserved. • P U B L I CSAP Business ByDesign February 2017
Account Management

Ensure that an administrator makes the following settings in Business Configuration:1. Activate Microsoft Outlook Integration.
In the standard system, Microsoft Outlook Integration is not in scope. Activate this function in the scopingphase by selecting Communication and Information Exchange then the Office and Desktop Integrationbusiness option. Select the Outlook Integration check box. Microsoft Outlook Integration with ActivityManagement, Account Synchronization to Microsoft Outlook and Account Synchronization from MicrosoftOutlook are now automatically included in your scope.Answer the related scoping questions for synchronizing accounts and contacts to and from Outlook. Two-way synchronization is proposed as default. The settings here are valid for all Microsoft Outlook Integrationusers.
2. Select Service Request Management.This step is optional. You can enable manual or automatic creation of service requests from incoming e-mailsby going to scoping for Service Customer Care and selecting Service Request Management. Answerthe related scoping questions under E-Mail Integration with Service Request Management and AutomaticCreation of Service Requests.
3. Assign accounts to Microsoft Outlook Integration users.In order to synchronize an account, or associate activities to that account, the user must be the employeeresponsible. For this step, there is an optional fine-tuning activity as well as a required activity for assigningaccounts to users.Optional — If you want to assign accounts without using or changing normal employee responsibledetermination, go to fine-tuning for Sales Party Role Definition (Business Option Sales: Account andActivity Management: Account Management: Party Role Definition). Create a new party role withresponsibility role, ensuring that the description indicates that it is specifically for Microsoft OutlookIntegration users.Required — There are two ways to assign an account. ● Create a responsibility rule (recommended)
Go to the Task Distribution view (Application and User Management work center). In Employee WorkDistribution, mark the Account Responsibility by Party Role line and click Edit . Add a rule for eachresponsibility role relevant to Microsoft Outlook Integration.
● Edit the responsibility directly in the accountGo to the Accounts view in the Account Management work center. Click Edit then select Contacts. Onthe Relationships and Responsibilities tab, add a new row in the Responsibilities section. Select aresponsibility type, enter the user ID of the user for whom this account should appear in My Accounts,and set the Direct Responsible checkbox.
Finally, you must maintain a business e-mail address in the Home work center ( Home Self Service Edit MyContact Data ).
Ensure that this e-mail address is assigned to one and only one user.
Install and Log On to the SAP Business ByDesign Add-In for Microsoft Outlook Integration1. Install the add-in.
Go to Home > Self Services. Under My Computer, you can check your computer settings to ensure you havethe minimum requirements, and install the add-in.
2. Restart Outlook.Restart Outlook to activate the add-in. When you restart Outlook, the SAP Business ByDesign tool bar is addedto your Outlook screen. This tool bar contains buttons for logging in and out of the Business ByDesign system,adding activities, creating service requests, and for accessing the SAP Business ByDesign Help Center.
SAP Business ByDesign February 2017Account Management P U B L I C • © 2017 SAP SE or an SAP affiliate company. All rights reserved. 121

3. Log on to the SAP Business ByDesign system.From Outlook, log on to the SAP Business ByDesign system by clicking Log on in the SAP tool bar.The logon is certificate-based and runs automatically in the background.If there is a problem with the certificate for your user, or if you are not working with certificates, a dialog boxopens where you can enter your user ID and password. Enter your URL in the SAP System URL field, leavingout the /irj/portal/ portion. For example, you log on with URL http://Test.sap.corp:7000 and not http://Test.sap.corp:7000/irj/portal.
When you are working offline and cannot log on to the system, any changes to relevant e-mails,appointments, and tasks, or new items for synchronization to the SAP Business ByDesign system arekept in a pool in Outlook. Actual synchronization of these items occurs automatically as soon as youlog on to the SAP Business ByDesign system via the add-in.
If you are logged on to the SAP Business ByDesign system via the add-in for many hours withoutany action, you may receive an authorization error when trying to use a Microsoft OutlookIntegration function. In this case, your user cookies may have expired. Simply log off and log onagain.
4. Check the SAP Business ByDesign folder locationsFrom the Outlook menu, choose Tools > SAP Business ByDesign Settings in Outlook 2007, or click on theAdd-Ins ribbon then SAP Business ByDesign Settings in Outlook 2010.Here, the add-in automatically creates the folders used for synchronization, including the: ● Default folder:
This is the main SAP Business ByDesign folder, where error and conflict information is stored. ● Accounts folder:
This folder contains the accounts downloaded from the SAP Business ByDesign system. ● Contacts folder
This folder contains the contacts downloaded from the SAP Business ByDesign system.
To change any of these folders, click on the folder link, choose a new folder, and click OK .5. In the Advanced Settings section, set the following:
a. Flag the Display Synchronization Notifications checkbox if you want the system to displaysynchronization related notifications in a message pop-up in the Microsoft Windows task bar.
b. Flag the Display Synchronization Errors checkbox if you want the system to display synchronizationrelated errors in a message pop-up in the Microsoft Windows task bar.
c. Flag the Enable automatic account filtering for Emails checkbox if you want the system to display onlythose active accounts which are associated with email addresses of the sender and recipients of an email.
6. Click Download Contacts to perform an initial synchronization.The system synchronizes only accounts in your direct responsibility, so you must ensure that, for the contactsyou wish to synchronize, the relevant accounts are listed in My Accounts in the Accounts view (AccountManagement work center).Hereafter, accounts and their contacts in your direct responsibility are synchronized automatically to Outlookwhen added or changed.
Downloading contacts may not work when there is a high load of contacts and accounts in thesystem due to memory constraint issues. We recommend you synchronize only those contactsthat are needed in Outlook, for example by ensuring that proper responsibilities are assigned.
122 © 2017 SAP SE or an SAP affiliate company. All rights reserved. • P U B L I CSAP Business ByDesign February 2017
Account Management

Right click on the SAP Business ByDesign Add-In icon in the Microsoft toolbar. Here, you can displaysynchronization errors and notifications directly, access the error and conflict folders, open theactivities list, and send meeting requests.
Synchronize ContactsThe system synchronizes to and from Outlook those contacts that have been assigned to your accounts in the SAPBusiness ByDesign system.To synchronize a contact to Outlook do the following:
1. In the Account Management work center, go to the Contacts view and show All Contacts.2. Click on the required account and select View All .3. Go to Relationships tab.4. In the Responsibilities section, add a row.5. Enter a party role.
You may want to choose a role that is specific to Microsoft Outlook Integration.6. Enter your employee ID.7. Save and refresh.
This contact and the account associated with it will now show in My Contacts and My Accounts. The systemsynchronizes the account and contact, as well as any attachments, to Outlook where you can find them in thecontact list under Contacts SAP Business ByDesign Accounts or SAP Business ByDesign Contacts. Anyfuture changes to this contact in the system are synchronized automatically.. However there is no automatic synchronization if you change a contact in Outlook that has already beensynchronized. In this case, you must add it again from the plug-in to trigger synchronization to the system.
To subscribe to groupware synchronization of contacts to Outlook, do the following:
Configuration settings are normally performed by an administrator. If you do not have the requiredauthorization, contact your administrator.You can subscribe to groupware synchronization of contacts in Outlook only if Responsibilities for Contactsbusiness option is selected in your solution configuration. To find this business option, go to the BusinessConfiguration work center and choose the Implementation Projects view. Select your implementation projectand click Edit Project Scope . In the Scoping step of the project, ensure that Business Partners is selectedwithin General Business Data.In the Questions step, expand the General Business Data scoping element and select Business Partners. SelectHandling of Business Partners and answer the questions related to Responsibilities for Contacts.
If you have scoped for Contact Management for the synchronization of contacts to Outlook, you will have todownload the latest installer of the SAP Business ByDesign Add-In for Microsoft Outlook Integration from theSelf Services view.
1. In the Account Management work center, go to the Contacts view and repeat all the steps for synchronizinga contact to Outlook.
2. Select the Groupware Synchronization checkbox for all the contacts you want synchronized to Outlook.3. Save and refresh.
To synchronize a contact to the system, do the following:1. Select a contact in the contact list view in Outlook and click Add Contact .
SAP Business ByDesign February 2017Account Management P U B L I C • © 2017 SAP SE or an SAP affiliate company. All rights reserved. 123

You can select multiple contacts for synchronization.
2. Associate the contact to an account.3. Click Submit .
Synchronization information for this contact is displayed In the bottom frame of the contact in Outlook.Simply select the Click here for more details link to open a CRM system session navigated directly to theselected contact.
To unsubscribe a contact from the system, select a contact in the contact list view in Outlook and click UnsubscribeContact.You can also unsubscribe a contact by unchecking the Groupware Synchronization check box in the Contacts viewof the Account Management work centerOnce the contact is unsubscribed, synchronization between Outlook and SAP Business ByDesign , and vice-versa,will not happen further. The contact will be removed from Outlook.
Only contacts subscribed for Groupware synchronization will be shown in Outlook.
To create a contact or account for synchronization to the system do the following:1. Create a new contact, for example by selecting SAP Business ByDesign Contacts in the Outlook contacts list
view. Right click and choose New Contact.2. Enter your data, save and select the SAP Business ByDesign tab directly in the contact screen. Click
Add Contact .3. In the Add Contact pop-up, you can associate the contact to an existing account by clicking Associate With
and selecting an account from the list, or entering a search term to find a specific account.If the account does not exist in your system, you can create a new one from Outlook by clicking Create then
Account .Enter your details and click Create . Associate the contact with this new account.The new contact and new account are synchronized to the system. Any future changes to the contact oraccount in the system are synchronized automatically.However the changes done to the contact in Outlook needs to be synchronized from the plug-in. Updating anaccount from Outlook and synchronizing to the system is not possible.
Contacts must be assigned to an account in order to synchronize.The ability to create and synchronize accounts and contacts depends on your system authorizations, as wellas your synchronization settings. Contact an administrator if you have any questions or difficulties.The user who creates and synchronizes a new account from Outlook is automatically the employeeresponsible for that account.Although it is possible to delete a contact in Outlook the deletion is not synchronized. To remove the contact,the contact should be removed from the assigned responsibility in the system, this would trigger delete in theOutlook.After you synchronize contacts from Business ByDesign to Outlook, the street number may appear beforethe street address.
For shared contact synchronization do the following:
124 © 2017 SAP SE or an SAP affiliate company. All rights reserved. • P U B L I CSAP Business ByDesign February 2017
Account Management

Only contacts subscribed for Groupware synchronization will be shown in Outlook.
1. From your Outlook click SAP Business ByDesign Contacts , select Share and then select Share Contacts. Amail giving sharing rights for contacts opens. Send the mail to the required user. The contacts in your Outlookare now visible to all the users in the Shared Contacts section.
2. The user with whom you have shared your contact list, can now add a contact to your contact list; you will beresponsible for these new contacts.The user adding the contacts to you contact list can view this contact in his Shared Contacts folder.
3. You will also be responsible for the account created under the Shared Contact section, by a user with whomyou have shared your contact list.
4. You can manage the subscription of contacts for a user who has shared his contact list with you.To do this:a. Select the shared contact folderb. In the SAP Business ByDesign tab, click c. Click Manage Subscriptions
In the Manage Subscription screen (for the shared contact) that opens, you can subscribe or unsubscribecontacts for synchronization.
Synchronize E-MailsYou can designate any e-mail for two-way synchronization between the SAP Business ByDesign system andMicrosoft Outlook.To add an e-mail for synchronization, do the following in Outlook:
1. Select and open the e-mail in your inbox.2. Click Add E-mail in the SAP Business ByDesign Add-In toolbar.
Note that you can add an e-mail directly, without opening it. Right click on the e-mail in your inbox, and chooseAdd E-mail from the displayed options. Or simply select the e-mail or multiple e-mails in the list and click
Add E-mail .3. Associate an account if desired.4. Click Submit .
An e-mail activity is created in the SAP Business ByDesign system based on information in the Outlook e-mail.
To open an e-mail activity in the system that was added from Outlook, go to the Account Management work centerand choose the Activities view.To view your synchronized e-mails in the fact sheet of the relevant account:
1. Go to the Account Management work center and choose the Accounts view.2. Select the account of the contact whose e-mail you want to review.3. Click on View All , then You Can Also Open Overview .
You can find the e-mail in the Activities section.
E-mails in the system contain information taken directly from the Outlook e-mail header and body, and includeattachments. They are ordered by date. Filter and search options are available.
To create an e-mail activity in the system for synchronization to Outlook, do the following:1. Go to the Account Management work center.2. Click on Common Tasks and select New E-Mail.
SAP Business ByDesign February 2017Account Management P U B L I C • © 2017 SAP SE or an SAP affiliate company. All rights reserved. 125

3. Fill in the required and optional fields and save.Your new e-mail activity is synchronized to Outlook.
Synchronize AppointmentsYou can designate any calendar appointment for two-way synchronization between the SAP Business ByDesignsystem and Microsoft Outlook.To add an appointment for synchronization, do the following in Outlook:
1. Select and open the appointment in your calendar.2. Click Add Appointment .
Note that you can add an appointment directly, without opening it. Right click on the appointment in yourcalendar, and choose Add Appointment from the displayed options. Or simply select the appointment ormultiple appointments and click Add Appointment .
3. Associate an account if desired.4. Click Submit .
An appointment activity is created in the system based on information in the Outlook appointment.
To open an appointment activity in the system that was added from Outlook, go to the Account Management workcenter and choose the Activities view.Synchronized appointments can also be viewed in the fact sheet of the respective account:
1. Go to the Account Management work center and choose the Accounts view.2. Select the account of the contact whose appointment you want to review.3. Click on View All , then You Can Also Open Overview .
You can find the appointment in the Activities section.
To create an appointment activity in the system for synchronization to Outlook, do the following:1. Go to the Account Management work center.2. Click on Common Tasks and select New Appointment.3. Fill in the required and optional fields
If you maintain attendees in this appointment, once the a meeting request is synchronized toOutlook, you can send invites to the attendees, either manually or by using the ByDesign icon in thesystem tray and choosing the Send Meeting Requests to Attendees option from Outlook when theappointment is synchronized.
4. Save.Your new appointment activity is synchronized to Outlook.
It is not possible to synchronize recurring appointments.
Any future changes to the appointment in the system are synchronized automatically.However any changes in Outlook are not automatically synchronized and need to be synchronized from theplug-in.To deactivate synchronization, click Untrack in the SAP Business ByDesign Add-In tool-bar in Outlook.To delete the appointment entirely, click Remove in the SAP Business ByDesign Add-In tool-bar in Outlook.
126 © 2017 SAP SE or an SAP affiliate company. All rights reserved. • P U B L I CSAP Business ByDesign February 2017
Account Management

Synchronize TasksYou can designate any task for two-way synchronization between the SAP Business ByDesign system and MicrosoftOutlook.To add a task for synchronization, do the following in Outlook:
1. Select and open the task in your To-Do List.2. Click Add Task .
Note that you can add a task directly, without opening it. Right click on the task in your task list and chooseAdd Task from the displayed options. Or simply select the task or multiple tasks and click Add Task .
3. Associate an account if desired.4. Click Submit .
A task activity is created in the system based on information in the Outlook appointment.
To open a task activity in the system that was added from Outlook, go to the Account Management work center andchoose the Activities view.To view synchronized tasks in the fact sheet of the respective account:
1. Go to the Account Management work center and choose the Accounts view.2. Select the account of the contact whose task you want to review.3. Click on View All , then You Can Also Open Overview ..
You can find the task in the Activities section.
To create a task activity in the system for synchronization to Outlook, do the following:1. Go to the Account Management work center.2. Click on Common Tasks and select New Task.3. Fill in the required and optional fields and save.
Your new task activity is synchronized to Outlook.
If you change a task in the system, the changes are automatically synchronized to Outlook. However, there isno automatic synchronization if you change a task in Outlook that has already been synchronized! In this case,you must add it again to trigger synchronization to the system.To deactivate synchronization, click Untrack in the SAP Business ByDesign Add-In tool-bar in Outlook.To delete the task entirely, click Remove in the SAP Business ByDesign Add-In tool-bar in Outlook.
Associate ActivitiesYou can associate e-mails, appointments and tasks to any of your Business ByDesign accounts, campaigns,opportunities, or leads.To associate an activity to an account (in this example, an e-mail activity), do the following:
1. Click Add E-mail in Outlook to synchronize an incoming e-mail to the system.2. In the following pop-up, click on Associate With and choose Account. Here you can search for the account
that you want to associate with the email.
If Enable automatic account filtering for Emails checkbox is enabled in the Settings, the system displaysonly those active accounts which are associated with email addresses of the sender and recipients ofan email.
3. Click Associate Account to link the selected account to the e-mail, or choose another account from the list.
SAP Business ByDesign February 2017Account Management P U B L I C • © 2017 SAP SE or an SAP affiliate company. All rights reserved. 127

4. An e-mail activity is created automatically in the system for the account that you choose. The system derivesthe contact for this e-mail activity from the e-mail address.
To associate an activity to a business document (in this example, an e-mail activity), do the following:1. Click Add E-mail in Outlook to synchronize an incoming e-mail to the system.2. Associate the e-mail to an account if desired.3. Click Associate With .
Choose the type of business document, for example campaign, opportunity, or lead, and select the relevantdocument ID from the resulting list. Or enter a search term to find a specific document.
4. An e-mail activity is created automatically in the system as a follow-up document to the campaign,opportunity, or lead that you have selected.
Synchronization information is displayed In the bottom frame of the activity in Outlook. Simply select theClick here for more details link to open a CRM system session navigated directly to the selected document.
Create Activities for an OpportunityYou can create, update, and synchronize activities for an opportunity. This can be done from your system, as outlinedin this example, or from Outlook.
1. In the New Business work center, go to the Opportunity List view, select an opportunity and click Edit .2. On the Sales Activities tab, create a new task, for example, or add one from Suggested Activities if proposed
by the system.3. Save the activity.
Your new activity is automatically synchronized to Outlook with an association to the opportunity.
For more information on creating activities in an opportunity, see the Opportunities Quick Guide [page 247].
Create Service Requests from E-MailsIf your system has been configured for this function, you can create a service request directly from an e-mail inMicrosoft Outlook. The details from the e-mail are added to a new service request and a new e-mail activity in thesystem.To create a service request, do the following:
1. From your Outlook inbox, identify the e-mail that you want to follow-up with a service request.2. Select and open the e-mail.3. Click Create Service Request .
Note that you can create a service request directly, without opening the e-mail. Right click on the e-mail inyour inbox, and choose Create Service Request from the displayed options. Or simply select the e-mail ormultiple e-mails and click Create Service Request .
4. An activity and service request are synchronized to the system, and associated to each other. You can checkthis association in the document flow.Details in the e-mail activity and service request are taken from the Outlook e-mail: ● The title of the e-mail activity is taken from the subject of the Outlook e-mail. ● The notes of the e-mail activity are taken from the body text of the Outlook e-mail. ● The incident description of the service request is taken from the body text of the Outlook e-mail.
To open a service request, go to the Service Requests view of the Service Desk work center.You can also open the document in the fact sheet of the relevant account.
1. Go to the Account Management work center and choose the Accounts view.
128 © 2017 SAP SE or an SAP affiliate company. All rights reserved. • P U B L I CSAP Business ByDesign February 2017
Account Management

2. Filter and select the relevant account.3. Click on View All , then You Can Also Open Overview , and navigate to the Services tab.
See AlsoBusiness Configuration for Microsoft Outlook IntegrationBusiness Configuration for Automatic Creation of Service Requests
3.6.3 Tasks
3.6.3.1 Export Business Data Using Microsoft Excel®
OverviewYou can export reports and worklists to Microsoft Excel® documents. You can use these documents for furtheranalysis, and in some cases, edit and upload them to the solution.You can export data from a report or from a worklist.
Prerequisites ● You have installed the latest Add-In for Microsoft Excel®. Depending on your solution set-up, you can do this
from the: ○ Self Services Overview in the Home work center ○ Download Center in the Application and User Management work center ○ Download link that is available directly on the user interface
● The settings for your browser must be set correctly. You can review the information about computer settingsby clicking Check My Computer Settings on the logon screen.
● You must be authorized to perform an export to Microsoft Excel®.
Procedure1. Go to the screen with the data you want to export.2. Depending on the type of data, choose one of these options:
● For a report, you can either export a chart or a table. To do so, select the report, and click Switch toChart or Switch to Table.
● For a worklist, select the worklist and click Go.3. Click Export , then choose To Microsoft Excel.4. Optional: Personalizing your excel export
1. To select the columns in your exported excel, do the following:a. In the title bar, click Personalize This screen b. In the side panel, select Display Settings.
SAP Business ByDesign February 2017Account Management P U B L I C • © 2017 SAP SE or an SAP affiliate company. All rights reserved. 129

c. In the Display Settings dialog box, you can export all the columns in the view by selecting All inthe Export Columns field
The default value for this field is Visible, which exports only the currently displayed columns.
2. To select the language for your excel export, do the followinga. In the Display Settings dialog box, set the Language Selection field to Show and click OK
b. Click Save .c. Click Export , then choose To Microsoft Excel®d. Select a language in the dialog box that opens.
The column selection preference in this dialog box allows you to override the personalizedsetting. This selection is valid for the current export only.
5. Select the template in the dialog box that is displayed.
● If there is only one template that has the logged in language variant, then the export will beperformed in the logged in language, and no user interaction is required.
● If there is only one template in the system for this export scenario, but the logged in languagevariant is not available, then export will be performed in the English language.
● If there is more than one template in the system for this export scenario, the Template List dialogbox is displayed. In this dialog, you can select the Microsoft Excel template that you want to usefor the export. The template will dictate how your exported data will be formatted. The MicrosoftExcel version that is relevant for each template is displayed.
6. Click Download.7. A message shows that you can open or save the file which contains the data that you have just exported from
the solution. Click Open or Save depending on what you want to do with the exported data.Depending on whether you click Open or Save, there are two possible results:
● If you click Open, a worksheet opens with the data in Microsoft Excel. The file has a temporary name,but it is not saved. You can use all the functions of Microsoft Excel to organize the data and to savethat worksheet.
● If you click Save, a Save As dialog box opens. You can specify an appropriate file name and a locationto save the exported Microsoft Excel file to. A message will inform you when the download hascompleted successfully.You can later navigate to the location where you have saved the template and open it .
3.7 Reports View
3.7.1 Activity History
OverviewThis report shows the number of all appointments, activity tasks, e-mails, letters, faxes, and phone calls.
130 © 2017 SAP SE or an SAP affiliate company. All rights reserved. • P U B L I CSAP Business ByDesign February 2017
Account Management

ViewsThe following views are available with this report:
● Activity HistoryShows the number of all appointments, activity tasks, e-mails, letters, faxes, and phone calls.
● Activity History by AccountShows the number of all appointments, activity tasks, e-mails, letters, faxes, and phone calls by account.
Features
Running the ReportBefore running the report, you can specify the data you want to see by selecting specific variables. You must specifya value for all mandatory variables. In the system, mandatory variables are indicated by an asterisk (*).
Analyzing the ReportTo further analyze data in this report, you can drag characteristics to rows and columns.
Characteristics indicating periods such as Calendar Year or Calendar Year/Month aggregate by: ● Start date for appointments, phone calls, and activity tasks ● Sent or received date for e-mails, letters, and faxes
From this report, you can navigate to: ● Account (only in the view Activity History by Account) ● Activity Appointment ● Activity E-mail ● Activity Fax ● Activity Letter ● Activity Phone Call ● Activity Task
For marketing purposes you can create a target group of the accounts listed in this report. To do this:1. Call up the report and select the criteria according to your needs.2. Add the Account characteristic to Rows.3. Click on an account ID or an account name, then click on the arrow that appears next to the ID or name, and
select Export all Accounts to new Target Group in the dropdown menu.The Target Group screen opens. The target group contains all accounts that are shown in the report. Inaddition, the system automatically determines the main contacts of these accounts, based on the accountmaster data, and includes these in the target group. If the master data for a particular account does not havea main contact, then only the account is included in the target group.
Note that the system determines the main contacts that are currently entered in the master data ofthe accounts. Therefore it is possible that some contacts in the target group differ from the contactsshown in the report.
4. Check the details and save the target group.
SAP Business ByDesign February 2017Account Management P U B L I C • © 2017 SAP SE or an SAP affiliate company. All rights reserved. 131

Note that if you copy a report, it is not possible to create a target group based on the new report.
See AlsoReports ViewOverview of Reports in Customer Relationship Management
3.7.2 Sales Order Volume
OverviewThis report shows the values in sales orders. By default, the year-to-date net values for the current year are displayed.This report is also available as a mobile report. For more information, see the documentation about working withmobile reports..
ViewsThe following views are available with this report:
● Sales order volume by accountShows the sales order volume by account
● Sales order volume by originShows the sales order volume by origin
The displayed net value of sales orders includes only the released sales orders.
Features
Running the ReportBefore running the report, you can specify the data you want to see by selecting specific variables. You must specifya value for all mandatory variables. In the system, mandatory variables are indicated by an asterisk (*).
Analyzing the ReportTo analyze the data in this report:
● Use the filters to manipulate the display of data in the content pane.For this report, you can add these key figures: ○ Requested Quantity of Sales Orders ○ Total Value of Sales Orders
● To further analyze data in this report, you can drag characteristics to rows and columns.
132 © 2017 SAP SE or an SAP affiliate company. All rights reserved. • P U B L I CSAP Business ByDesign February 2017
Account Management

Characteristics indicating periods such as Calendar Year or Calendar Year/Month aggregate byposting date for sales orders.
From this report, you can navigate to: ● Account ● Sales Order ID
For marketing purposes you can create a target group of the accounts listed in this report. To do this:1. Call up the report and select the criteria according to your needs.2. Add the Account characteristic to Rows.3. Click on an account ID or an account name, then click on the arrow that appears next to the ID or name, and
select Export all Accounts to new Target Group in the dropdown menu.The Target Group screen opens. The target group contains all accounts that are shown in the report. Inaddition, the system automatically determines the main contacts of these accounts, based on the accountmaster data, and includes these in the target group. If the master data for a particular account does not havea main contact, then only the account is included in the target group.
Note that the system determines the main contacts that are currently entered in the master data ofthe accounts. Therefore it is possible that some contacts in the target group differ from the contactsshown in the report.
4. Check the details and save the target group.
Note that if you copy a report, it is not possible to create a target group based on the new report.
To can also check for Sales Orders (with sales orders kit) by checking the Parent Product column. If it is filled in, itimplies that the sales order has sales kit product in its item, and if it has the value # it implies that it is a non sales kitproduct.You could verify the data displayed with the Sales Order view by navigating to the respective Sales Order Documentand selecting the navigation icon View Sales Order
See AlsoOverview of Reports in Customer Relationship Management
3.7.3 Account Collaboration Data
OverviewProvides an overview of collaboration data for accounts that can be used by sales managers and representatives fora synopsis of their account master data. It provides business-partner specific output settings, such as the businessdocument name and the output channel, along with information about the related accounts.
SAP Business ByDesign February 2017Account Management P U B L I C • © 2017 SAP SE or an SAP affiliate company. All rights reserved. 133

PrerequisitesYou have selected the report in your solution configuration. To find this business option, go to the BusinessConfiguration work center and choose the Implementation Projects view. Select your implementation project andclick Edit Project Scope . In the Scoping step of the project, ensure that Business Partners is selected within GeneralBusiness Data.In the Questions step, expand the General Business Data scoping element and select Business Partners. SelectReporting and Analytics for Business Partners and answer the question related to the reports for accounts.
Features
Running the ReportBefore running the report, you can specify the data you want to see by making value selections for variables.The following variables are available for this report:
● Account ● City ● Country ● Status
Analyzing the ReportThe report displays the following data:
● Collaboration data of an account, including the following: ○ Business document name ○ Output channel ○ Number of copies ○ Template ○ Indication of whether output settings are active for a particular business document and account
● Basic data of the related corporate account, including the following: ○ Account name and ID ○ Address data
To further analyze data in this report, you can drag characteristics to rows and columns.
See AlsoOverview of Reports in General Business DataOverview of Data Sources in General Business Data
134 © 2017 SAP SE or an SAP affiliate company. All rights reserved. • P U B L I CSAP Business ByDesign February 2017
Account Management

3.7.4 Account Contact Data
OverviewProvides an overview of contact master data for corporate accounts that can be used by sales managers andrepresentatives for a synopsis of their account master data. It provides basic contact data, such as address data,and other contact-specific information along with information about the related accounts.
PrerequisitesYou have selected the report in your solution configuration. To find this business option, go to the BusinessConfiguration work center and choose the Implementation Projects view. Select your implementation project andclick Edit Project Scope . In the Scoping step of the project, ensure that Business Partners is selected within GeneralBusiness Data.In the Questions step, expand the General Business Data scoping element and select Business Partners. SelectReporting and Analytics for Business Partners and answer the question related to the reports for accounts.
Features
Running the ReportBefore running the report, you can specify the data you want to see by making value selections for variables.The following variables are available for this report:
● Contact ● Account ● City ● Country ● Status
Analyzing the ReportThe report displays the following data:
● Basic data of the contact, including the following: ○ Contact name and ID ○ Address and communication data ○ Indication of whether a contact is the main contact for an account
● Contact-specific business details, including the following ○ Function of the contact ○ Department of the contact
● Basic data of the related corporate account, including the following: ○ Account name and ID ○ Address data
● Data for direct responsibilities, including the following: ○ Contact Responsible party role
SAP Business ByDesign February 2017Account Management P U B L I C • © 2017 SAP SE or an SAP affiliate company. All rights reserved. 135

○ Employee responsible for a contact ○ Party role
To further analyze data in this report, you can drag characteristics to rows and columns.
See AlsoOverview of Reports in General Business DataOverview of Data Sources in General Business Data
3.7.5 Account Details
OverviewProvides an overview of account master data that can be used by sales managers and representatives for a synopsisof delivery and payment terms of their accounts. It provides basic account data, such as address data, along withsales-specific and financial information.
The BUPCSDB data source formerly used for this report is being phased out and will be replaced by BPCSDB.We recommend using the new data source when you create or copy reports or when you create combined orjoined data sources.
PrerequisitesYou have selected the report in your solution configuration. To find this business option, go to the BusinessConfiguration work center and choose the Implementation Projects view. Select your implementation project andclick Edit Project Scope . In the Scoping step of the project, ensure that Business Partners is selected within GeneralBusiness Data.In the Questions step, expand the General Business Data scoping element and select Business Partners. SelectReporting and Analytics for Business Partners and answer the question related to the reports for accounts.
ViewsThe following views are available with this report:
● Account DataDisplays all available characteristics for an account.
● Account General DataDisplays selected general data of an account, such as name, address, and communication data along withthe industry, the legal form, and the blocks that have been maintained for this account.
● Account Sales DataDisplays selected general data and the data that is related to the sales process, such as the sales organizationname and ID, the delivery priority, the payment terms, the currency, and the Incoterms.This view is also the pre-delivered default view of the report.
● Account Bank Data ● Account Credit Card Data ● Account Tax Data
136 © 2017 SAP SE or an SAP affiliate company. All rights reserved. • P U B L I CSAP Business ByDesign February 2017
Account Management

Features
Running the ReportBefore running the report, you can specify the data you want to see by making value selections for variables.The following variables are available for this report:
● Account ● City ● Country ● Status
Analyzing the ReportThe report displays the following data for an account:
● Basic data of an account, including the following: ○ Account name and ID ○ Address and communication data ○ Additional identifiers, such as the D-U-N-S and the Global Location Number
● Sales data of an account, including the following: ○ Sales organization ○ Distribution channel ○ Delivery priority ○ Payment terms ○ Currency ○ Incoterms ○ Customer group ○ Order, delivery, and invoice blocks
● Financial data of an account ○ Bank data, such as the bank name and the bank account data ○ Credit card data, such as the type, the holder and the expiration date of the credit card ○ Tax data, such as the tax country, the tax jurisdiction code, and the tax number
To further analyze data in this report, you can drag characteristics to rows and columns.
See AlsoOverview of Reports in General Business DataOverview of Data Sources in General Business DataReports ViewMaintain Mass Account Data
SAP Business ByDesign February 2017Account Management P U B L I C • © 2017 SAP SE or an SAP affiliate company. All rights reserved. 137

3.7.6 Account Responsibility Data
OverviewProvides an overview of responsibility data for accounts that can be used by sales managers and representativesfor a synopsis of their account master data. It provides data of employees directly responsible for an account, suchas the employee ID, name, and address, along with information about the related accounts.
PrerequisitesYou have selected the report in your solution configuration. To find this business option, go to the BusinessConfiguration work center and choose the Implementation Projects view. Select your implementation project andclick Edit Project Scope . In the Scoping step of the project, ensure that Business Partners is selected within GeneralBusiness Data.In the Questions step, expand the General Business Data scoping element and select Business Partners. SelectReporting and Analytics for Business Partners and answer the question related to the reports for accounts.
Features
Running the ReportBefore running the report, you can specify the data you want to see by making value selections for variables.The following variables are available for this report:
● Employee ● Account ● City ● Country ● Status
Analyzing the ReportThe report displays the following data:
● Basic data of the employee directly responsible for an account and other specific data, including the following: ○ Employee name and ID ○ Address and communication data ○ Party role
● Basic data of the related account, including the following: ○ Account name and ID ○ Address data
To further analyze data in this report, you can drag characteristics to rows and columns.
See AlsoOverview of Reports in General Business DataOverview of Data Sources in General Business Data
138 © 2017 SAP SE or an SAP affiliate company. All rights reserved. • P U B L I CSAP Business ByDesign February 2017
Account Management

Reports ViewMaintain Mass Account Data
SAP Business ByDesign February 2017Account Management P U B L I C • © 2017 SAP SE or an SAP affiliate company. All rights reserved. 139

4 Customer Invoicing
4.1 Business Background
4.1.1 Customer Invoice Processing
OverviewInvoices are created, either manually or as part of an invoice run, for the delivery of products or the provision ofservices and are used for charging customers. They result from predecessor documents such as sales orders, serviceorders, and service confirmations. It is also possible to create manual invoicing documents such as manual invoice,credit memo, and down payment requests without reference to preceding business transaction documents outsideCustomer Invoicing.Normally, an order or a delivery is created, and the data is transferred automatically to the Customer Invoicing workcenter to create an invoice request. The items are collected and at the scheduled time an invoice run converts theinvoice requests into invoicing documents and releases the invoices for sending to the customer. Also, the releasedinvoices are automatically posted as receivables in financial accounting and an open item is created in the customeraccount. This is tracked until the corresponding payment is received. The payment is posted as a cash receipt infinancial accounting.
Down Payment RequestFor some sales processes, a ratio of the gross amount needs to be paid by the customer in advance for products orservices that are delivered at a later date. For this purpose, a down payment request is created and sent out to thecustomer.
Correction InvoiceSometimes invoices need to be corrected after they have been sent to the customer, for example, if the invoicecontained the wrong quantity, price, or tax rate. A correction invoice contains both the wrong and the correcteditems, so the customer is invoiced or credited with the difference.You can cancel regular invoices that contain errors or issue credit memos, however a correction invoice representsan alternative way of correcting an invoice.
Additional ChargeYou can create an additional invoice, for example, for a sales order or service order that has already been invoiced,and the invoice posted. This is referred to as an additional charge. When this additional charge is posted to financialaccounting a posting document is also created. The document flow for this posting document clearly shows thereference to the additional charge in the related document, for example, sales order, and to the posted invoice. Theadditional charge is shown as an outgoing invoice in the document flow.
Handling of Taxable and Non-Taxable Freights in InvoicesTo handle taxable and non-taxable freights in sales processes, you need to create separate service items for freights.Freights can then be treated as taxable or non-taxable, depending on the master data of the service product.If the freights are known when the sales or service order is created, it is possible to distinguish between taxable andnon-taxable freights. However, if you are using external carrier software, such as Pacejet, the freights are not known
140 © 2017 SAP SE or an SAP affiliate company. All rights reserved. • P U B L I CSAP Business ByDesign February 2017
Customer Invoicing

until the outbound delivery is released. In this case, the external carrier software updates the outbound delivery withthe freight data. You then need to update the sales order manually with the freight information from the outbounddelivery.For the invoice request, a link is provided so that you can navigate directly to the preceding document (DocumentID field). This enables you to enter freights in the preceding document. In the standard system, the Document IDfield is hidden; you can display it by using personalization.In addition, the Internal Comment field contains the header texts of the preceding document. The freight informationprovided by the external carrier software is stored as a text in the outbound delivery. This information is transferredto invoicing and shown in the Internal Comment field.
Split CriteriaIn general, the system always tries to combine as many invoice requests as possible into one invoice. This can onlybe achieved as long as the invoice requests have identical split parameters.The invoice requests split into several invoice documents based on both the SAP delivered split criteria and the activesplit rule which is defined by the user.If even one of the parameters from the SAP delivered split criteria or active split rule is not identical for all the invoicerequests, the invoice requests split into several invoices.The split parameters which are a part of the SAP delivered split criteria are listed in the table below:
Split Parameter
System-Basedor User-Defined? Description
Parties system-based Parties on header level are: Seller, Account, Payer, and Bill-To.If there are invoice requests with different parties on header level, these items aresplit into several invoices.If parties on header level have addresses that have been changed and are no longerthe same as the master data addresses, a split always occurs - even if the ID isidentical.
Currency system-based Invoice requests with different currencies are split into several invoices.
Price in system-based Invoice requests with different pricing procedure codes (Price in), are split intoseveral invoices.
Payment Terms system-based Invoice requests with different payment terms are split into several invoices.
Payment Method system-based Invoice requests with different payment methods are split into several invoices.
Invoice Date system-based If the invoice date of the invoice requests differs, the system creates several invoicedocuments. It is possible to overwrite the invoice date in the Invoice, but this doesnot change the fact that several invoices are created.In the Invoice — Advanced and in the Invoice Run, you can overwrite the invoice dateof the invoice requests manually and this means that you can influence whetherseveral invoices are created or whether several invoice requests are invoiced withthe same invoice date.
Posting Date system-based If the posting date of the invoice requests differs, the system creates several invoicedocuments. It is possible to overwrite the posting date in the Invoice, but this doesnot change the fact that several invoices are created.
Tax Due Date system-based Invoice requests with different tax due date are split into several invoices.
Invoicing Unit system-based Invoice requests with different invoicing units are split into several invoices.
SAP Business ByDesign February 2017Customer Invoicing P U B L I C • © 2017 SAP SE or an SAP affiliate company. All rights reserved. 141

Split Parameter
System-Basedor User-Defined? Description
Invoice Type system-based There are four invoice types: Customer Invoice, Customer Down Payment, CorrectionInvoice, and Customer Credit Memo. As soon as the invoice type of the items selectedfor invoicing differs, the invoice requests are split into several invoices.
Country of Ship-To system-based Invoice requests with different ship-to countries on item level are split into severalinvoices.
Tax Country system-based Invoice requests that have different tax countries on item level are split into severalinvoices.
Seller's TaxNumber and TaxNumber Type
system-based Invoice requests with different sellers’ tax numbers on item level are split into severalinvoices for Germany, France, United Kingdom, Austria, Mexico, and India.
Customer’s TaxNumber and TaxNumber Type
system-based Invoice requests with different customers’ tax numbers on item level are split intoseveral invoices.
PrecedingDocument
user-defined In Invoice — Advanced and Invoice Run, you can split invoice requests by theirimmediate preceding document. If the checkbox is selected, an invoice is created foreach invoice request.
Related Sales orService Order
user-defined In Invoice — Advanced and Invoice Run, you can split the invoice requests by theirrelated sales or service order, for example, by sales or service order ID. In this case,a separate invoice is created for each order irrespective of whether products aredelivered or produced, or whether project-based services are performed.
Provision Date user-defined In Invoice — Advanced an Invoice Run, you can split the invoice requests by the dateon which the ordered good was delivered or the service was performed.
In addition to the parameters mentioned in the table above, the extension fields added in the invoice requestsunder General and a few more factors (not visible on the UI) are considered for the invoice split as a part ofthe standard split criteria.
The customized split rules are created from the Customer Invoice Split Rule fine-tune activity in BusinessConfiguration work center with one or more of the below split parameters:
● Ship-To party of the invoice request item ● Sales Unit ● Sales Employee ● Employee Responsible
In addition to the parameters mentioned above, the extension fields added to invoice request items will also appearin the list of split parameters on the fine-tuning activity.
Sales Unit DeterminationA sales unit is also required for invoicing documents that are created manually without any preceding document.Manually created invoicing documents are, for example, manual invoice, recurring invoice template, down paymentrequest, or credit memo.To determine the sales unit, the system checks parameters in the following order until a sales unit is found:
142 © 2017 SAP SE or an SAP affiliate company. All rights reserved. • P U B L I CSAP Business ByDesign February 2017
Customer Invoicing

1. According to the Sales Unit for Manual Invoices work category, the system determines the sales unit by theemployee responsible. For more information, see Sales Unit for Manual Invoice.
2. According to the Sales Unit for Sales work category, the system determines the sales unit by the account.For more information, see Sales Unit for Sales.
3. Sales unit assigned to the employee responsible in organizational management.4. In case only one sales unit can be found in organizational management, it is used in the invoicing document.
Date LogicThe issue date of the invoice, the invoice date, is displayed on the output form, and determines the invoice documentnumber determination. It serves as the base date for the payment terms. Furthermore the following logic is used bythe system:
Invoice Date Posting Date Tax Due Date Result
Set -- -- Invoice date is used for accounting and tax reporting
Set Set -- Posting date is used for tax reporting
Set -- Set Invoice date is used for accounting, and the tax due date for tax reporting
Set Set Set Posting date is used for accounting, and the tax due date for tax reporting
External PaymentThe invoice can already have been paid externally, for example, using an external payment provider. If this is thecase the Payment Method is preset with External Payment in the invoice document.
If you want to use external payment in your company you have to create a new invoice form as follows: ● Use the Adobe® LiveCycle® Designer. ● Create a script with the logic: If payment method is external payment, then do not print the payment terms,
add a sentence that the payment is received.
For more information, see Edit a Form Template Using Adobe® LiveCycle® Designer.
Prerequisites ● To use this integration scenario, the Customer Invoicing and General Ledger business packages, and the
Receivables and Payment Management business topics, must be in scope. ● You have checked the settings for output management, because there are specifics for customer invoicing:
In the Application and User Management work center choose the Output Channel Selection, as well as theForm Template Selection view.Then select in the Show rules For: field Customer Invoice and check the following entries: ○ Form Template: Ideally the entries here are equal to the Business Document field. ○ Business Document: Enter business document type; valid entries are Customer Invoice, Customer
Down Payment, Customer Credit Memo, Customer Correction Invoice.
○ Organizational Unit: Enter invoicing unit or seller ○ Business Partner: Enter bill-to or buyer ○ Customer Group: Leave it empty
SAP Business ByDesign February 2017Customer Invoicing P U B L I C • © 2017 SAP SE or an SAP affiliate company. All rights reserved. 143

Process FlowThe following steps explain the typical process flow for the Customer Invoicing process. During this process, youaccess the Customer Invoicing, Outbound Logistics, General Ledger, Receivables, and Payment Management workcenters.
1. The outbound logistics request is released in the Outbound Logistics work center. The system thenautomatically creates an invoice request, based on the information in the preceding sales order.
2. In the Customer Invoicing work center, the customer invoice processor can now check the invoice requestsin order to create and release the invoice manually or wait until the next scheduled invoice run when thesystem will automatically process the invoice requests and create and release the invoice.
3. When the invoicing document is released, the system automatically informs Sales Order Processing thatinvoicing has taken place and sends it to the customer by letter, e-mail, or fax.
4. The invoice data is transferred to financials. An open item is created in the customer account and is trackeduntil the corresponding payment is received. This can be viewed by the accounts receivable accountant inthe Receivables work center.The invoice is posted as a receivable in the general ledger. The general ledger accounts for receivables canbe monitored by the accountant in the General Ledger work center.
5. The incoming payment is monitored by the accounts receivable accountant in the Payment Managementwork center.
6. When the payment is received, the open item in the customer account is cleared. This can be viewed by theaccounts receivable accountant in the Receivables work center.The payment is posted as cash receipt in the general ledger. The general ledger accounts for cash can bemonitored by the accountant in the General Ledger work center.
When you release the customer invoice, the system automatically forwards the data to financials andposts it there. Before forwarding the data, the system checks whether the relevant accounting periodin financials is open. If the accounting period is closed, you cannot release the customer invoice, butinstead receive an error message. You have to change the invoice date in the customer invoice.The accountant can change this system behavior in the process control. You find the process controlin the General Ledger work center in the Companies view. Choose Set Process Control. For moreinformation, see Process Control for Operational Postings.
4.1.2 Customer Invoicing for Golden Tax - China
This document contains text that is relevant for China. To ensure that the system displays the correct text,select Personalize My Settings . Select Onscreen Help and, under Country, choose China. Save yoursettings and logout to ensure these changes are made.
144 © 2017 SAP SE or an SAP affiliate company. All rights reserved. • P U B L I CSAP Business ByDesign February 2017
Customer Invoicing

4.1.3 Down Payments From Customers
OverviewDown payment requests are created when an agreement has been made with the customer to provide a downpayment for a product before it has been delivered or for a service before it has been provided. The customer paysa part of the total amount at the time of purchase or before delivery. When invoicing takes place, this down paymentis deducted from the invoice. The customer then pays the balance.
Process Flow1. The user creates a sales order or service order in the system and selects Down Payment Required, either in
the Delivery Block field for the sales order or in the Execution Block field for the service order. The order isreleased.
2. In the Customer Invoicing work center in the Common Tasks, the user creates one or several down paymentrequests.The user maintains a gross or net amount as down payment. The user can also specify the reconciliationaccount to be used for down payments that are made by the customer (by clicking View All and selecting itin the Reconciliation Account field, located on the General tab under Accounting).
Only one tax rate can be maintained for a down payment. If you require several tax rates, create a downpayment request for each tax rate.
3. The user assigns the sales order or service order ID to the down payment request by entering the order ID inthe Description field of the Agreement tab. For example, the user can enter Down payment of 10% forsales order 42233340314.This information makes it clear to the customer which business transaction the down payment request isbased on. You can also use this information to search for the down payment request later on in the process.
4. The user releases the down payment request. The down payment request is printed automatically. Print theorder confirmation for the related sales order or service order. Send both of them together to the customer.
5. The system creates an open item receivable in cash flow management. In the Receivables work center, thisopen item receivable can be cleared when the customer pays.
6. At regular intervals, the user chooses Open Down Payment Requests in the Customer Invoicing work center,Invoice Documents view. The user can work through the list, checking the down payment requests and notingthe sales or service order IDs (from the texts mentioned in step 3), or use the sales or service order ID tosearch for a particular down payment request. The user then ensures that the delivery block is removed fromthe relevant sales orders, and the execution block is removed from the relevant service orders.
7. In the next step, the employee responsible ensures that all required subsequent steps, such as the deliveryof goods, provision of services, and project work, and so on, have been carried out, and that the system hascreated the invoice requests.
8. After the goods have been delivered or services have been provided, the down payment request must beassigned to the relevant invoice request so that the down payment can be deducted accordingly. To do this,the user searches in the Customer Invoicing work center, Invoice Requests view, for all invoice requests thathave the corresponding order number as preceding document ID. The user selects an invoice request andclicks Edit . Now the user can assign the required down payment requests under Reference Document.
9. The user now creates the customer invoice for the invoice requests. There are three ways to create invoices:
SAP Business ByDesign February 2017Customer Invoicing P U B L I C • © 2017 SAP SE or an SAP affiliate company. All rights reserved. 145

● Directly from the invoice request, click Release (immediately after step 6). ● In Invoice Requests click Invoice - Advanced . Ensure that the Down Payment Transfer check box has been
selected. This check box is selected automatically in simple invoice creation. ● Use the invoice run. Ensure that the Down Payment Transfer check box has been selected.
● If the Down Payment Transfer check box has not been selected, invoice requests to whichdown payments have been assigned or could be assigned are not considered when invoicesare created.
● Of the three methods of creating invoices, we recommend the first one. If this method isused, it is clear to see the relationship between the assigned down payments and theinvoices that have been created afterwards.
10. In the customer invoice created in the previous step, the down payment amount is deducted. The user cannow check the invoice amount, tax, allocated down payment, and payment amount. The resulting invoicedocument can now be sent to the customer and displays the total invoice amount, down payment made, andremaining due payment amount.
11. Upon payment of the remaining due amount, the corresponding open item in the customer invoice is clearedautomatically. This can be seen in the Receivables work center.
4.1.4 Flexible Document Numbering - India
OverviewThe flexible document numbering feature helps you to select the numbering rule for your invoicing documents basedon the sales document type. You can set a sales document type for a tax event in the Advanced NumberingConfiguration - India table during the fine-tuning activity.
Determination of Sales Document TypeTo apply the document numbering rule to an invoicing document, the system needs the following parameters:company ID, tax country, document type, tax registration number, tax reporting unit, date and the sales documenttype of the invoicing document. All of the parameters are present in the invoicing document, except the salesdocument type.Sales document type is determined based on the tax event in the invoicing document. However, an invoicingdocument can have more than one tax event if it has multiple line items with different tax codes. Therefore the systemsplits the invoice so that all the line items in each invoicing document corresponds to one sales document type. Thesystem numbers the individual invoicing document depending upon the sales document type. It checks the AdvancedNumbering Configuration - India table if any sales document type is assigned to this tax event. If yes, the systemapplies the numbering rule assigned to this sales document type in the Document Numbering Formats Specific toIndia table. Else, it determines the sales documents type based on the following table:
146 © 2017 SAP SE or an SAP affiliate company. All rights reserved. • P U B L I CSAP Business ByDesign February 2017
Customer Invoicing

Determination of Sales Document Type
Tax code Tax Code Description Tax Event Tax Event Description SalesDocumentType
501 Non Taxable Sale (Service) 301 Non Taxable Sale (Service) ServiceInvoice
500 Non Taxable Sale (Product) 302 Non Taxable Sale (Other Reasons) BillofSale
531 Dom. Sales - Goods (VAT 314 Intrastate Sale (VAT only) TaxInvoice
534 Dom. Sales-Goods(CST) 315 Interstate Sale With C-Form (CST only) BillofSale
536 Dom.Sales-Goods(CST w/o CForm) 316 Interstate Sale Without C-Form (CST only BillofSale
541 Dom. Sales - Services (ST) 351 Domestic Sale of Service ServiceInvoice
546 Exempted Sales - Services (Zero) 371 Exempted Sale of Service ServiceInvoice
545 Sales (VAT & ST) 391 Sale with VAT and Service tax TaxInvoice
547 Exempted Sales - Services (Standard) 392 Exempted Sales - Services (Standard) ServiceInvoice
548 Sale with CST and Serv Tax (With C-Form) 393 Sale with CST and Serv Tax( With C form) BillofSale
549 Sale with CST and Serv Tax (W/o C-Form) 394 Sale with CST and Serv Tax (W/o C-Form) BillofSale
SAP Business ByDesign February 2017Customer Invoicing P U B L I C • © 2017 SAP SE or an SAP affiliate company. All rights reserved. 147

550 Sale with Serv Tax (Reduced Rate) 395 Sale with Serv Tax (Reduced Rate) ServiceInvoice
535 Exp. Sales - Goods (VAT) 502 Export Sale (VAT) BillofSale
543 Exp. Sales - Services (ST) 551 Export of Service ServiceInvoice
Example: An invoice has two line items with different tax codes. First line item has Domestic Sales - Goods(VAT) as tax code and the second line item has Domestic Sales - Services (service tax) as tax code. Thesystem splits the invoice it into two as follows:
● Invoice with tax invoice as the sales document type and the system will follow the numbering rulefor tax invoice.
● Invoice with service invoice as the sales document type and the system will follow the numberingrule for service invoice.
However, if you want the system to follow the numbering rule for bill of sale for the first invoice you haveto assign bill of sale as the sales document type for the corresponding tax event in the AdvancedNumbering Configuration - India table during the fine-tuning activity. Similarly, if you want to apply thenumbering rule for tax invoice for the second invoice, you have to assign tax invoice as the sales documenttype for the corresponding tax event in the same table during the fine-tuning activity.
See AlsoDocument Numbering Formats for Customer Invoicing - Configuration Guide
4.1.5 Invoice Processing - Mexico
This document contains text that is relevant for Mexico. To ensure that the system displays the correct text,select Personalize My Settings . Select Onscreen Help and, under Country, choose Mexico. Save yoursettings and logout to ensure these changes are made.
4.1.6 Mass Data Runs (MDR)
OverviewA Mass Data Run (MDR) is the automatic mass processing of a task or a business transaction. MDRs enable massprocessing of business data and are used in business processes, for example, invoice runs, payment authorization
148 © 2017 SAP SE or an SAP affiliate company. All rights reserved. • P U B L I CSAP Business ByDesign February 2017
Customer Invoicing

runs, or balance confirmation runs. When a user schedules an MDR the system represents it as a background job.During scoping, it is possible to provide default variants of the MDRs.MDRs are created and maintained in the work centers. Using the Job Scheduler, users schedule the run to executeonce or regularly at specified times.In the Background Jobs view of theApplication and User Management work center, you can monitor and rescheduleMDR jobs that are created by users in other work centers.
Background processing of smaller business data volumes are managed through BTM automatic tasks.
Mass Data Run Features ● MDRs can be created, updated and scheduled by an end user. Scheduling can be done once, with a recurrence
pattern (including factory calendar support), or event-based as a follow-on activity after an other MDR. Youcan also initiate a run to start immediately from the work center.
● With MDRs, you can automate repetitive business tasks or activities, for example, batch jobs that are run atnight when there is low activity in the system. MDRs are useful for defining asynchronous, long-term,resource-consuming jobs such as overnight runs and mass printing.
● You can define the amount of control and automation in MDRs. For example, you might automatically releaseoutbound requests for certain customers, while for others you might manually check the information beforereleasing it.
● The system automatically schedules parallel work packages to speed up the processing time for a MDR.
Mass Data Run Process FlowMass data runs can be created by end users in the individual work centers. The following steps explain the typicalprocesses for creating an MDR and scheduling it as a job. During this process, you access the work center, and theJob Scheduler.
1. The user creates or schedules a new MDR in their work center, entering a unique name in the Mass Data RunID field, and defining parameters for the run. For example, in the Outbound Logistics work center, the userselects Automated Release and then creates a new MDR.
2. In the generic Job Scheduler, the user can start the MDR immediately, or schedule it to run at a specific time,or be triggered by a specified event: ● Time based: The MDR can be scheduled to run immediately in the background, to run once at a particular
date and time, or can be scheduled as a recurring event.
Do note that processing of mass data runs in the background adversely affects the performanceof your system. SAP recommends that the MDRs are scheduled to run at a minimum frequencyof every four hours. The frequency can be reduced to one hour in case it is absolutely essential.We do not recommend scheduling of mass data runs at any frequency under one hour.
● Event based: The MDR is triggered to run after another job has completed.3. At any time, you can monitor, reschedule or cancel the background job related to the MDR from the
Background Jobs view in the Application and User Management work center. The Background Jobs view allowsthe you to view all jobs in the system.
4. The user can go to the Application Log for any MD run to view the time and status of each run and to verifyany errors, warnings and messages. When an error occurs during a mass data run execution, there may bea business impact. The user can refer to the application log messages to find the exact cause of the error.
SAP Business ByDesign February 2017Customer Invoicing P U B L I C • © 2017 SAP SE or an SAP affiliate company. All rights reserved. 149

Mass Data RunsIn the following table you can see some of the various MDRs that can be defined in the system, and the work centersthat they are defined in.
Work Center Work Center View Subview Mass Data Run
Application and UserManagement
Business Data Consistency Data Flow Verification Runs Data Flow Verification Run
Application and UserManagement
Input and OutputManagement
File Input File Input Run
Cash and LiquidityManagement
Cash Position and Forecast Liquidity Forecast Runs Liquidity Forecast Run
Cost and Revenue Periodic Tasks Overhead Distribution Distribution Run
Cost and Revenue Periodic Tasks Direct Cost Projects —Overhead Absorption
Overhead Run for Direct CostProjects
Cost and Revenue Periodic Tasks Overhead Cost Projects —Overhead Absorption
Overhead Run for OverheadProjects
Cost and Revenue Periodic Tasks Service Orders — OverheadAbsorption
Overhead Run for ServiceOrders
Cost and Revenue Periodic Tasks Revenue Recognition Revenue Recognition Run
Customer Invoicing Invoice Runs Invoice Run
Customer Invoicing Credit Card AuthorizationRun
Credit Card AuthorizationRun
Demand Planning Automated Actions Forecasting Run Forecasting Run
Demand Planning Automated Actions Preparation Run Preparation Run
Demand Planning Automated Actions Release Run Release Run
Demand Planning Automated Actions Rolling Run Rolling Run
E-Commerce Account Export Runs Account Export Runs
E-Commerce Internet Order Deletion Runs Internet Order Deletion Runs
Fixed Asset Periodic Tasks Depreciation Depreciation Run
General Ledger Periodic Tasks Balance Carryforward Carry Forward Run
General Ledger Periodic Tasks Post Recurring Journal EntryVouchers
Recurring Journal EntryVoucher Run
General Ledger Periodic Tasks Statutory Reports Journal Entry Report Run
Internal Logistics Automated Actions Inventory Level AdjustmentRun
Inventory Level AdjustmentRun
Inventory Valuation Periodic Tasks Goods Receipt and InvoiceReceipt Clearing
Goods Receipt and InvoiceReceipt Clearing Run
Inventory Valuation Periodic Tasks Overhead Absorption forProduction Lots
Overhead Run for ProductionLots
150 © 2017 SAP SE or an SAP affiliate company. All rights reserved. • P U B L I CSAP Business ByDesign February 2017
Customer Invoicing

Work Center Work Center View Subview Mass Data Run
Inventory Valuation Periodic Tasks WIP Clearing Work-in-Process ClearingRun
Inventory Valuation Inventory Unit Cost ChangeRun
Outbound Logistics Control Automated Actions Confirmation Update Run
Outbound Logistics Control Automated Actions Release Due Deliveries Run
Payables Periodic Tasks Balance Confirmation Runs Balance Confirmation Run
Payables Periodic Tasks Foreign CurrencyRemeasurement
Foreign CurrencyRemeasurement Run
Payables Periodic Tasks Payment Runs Payment Run
Payables Periodic Tasks Reclassification of Payables Reclassification of PayablesRun
Payment Management Periodic Tasks Credit Card Settlement Runs Credit Card Settlement Run
Payment Management Periodic Tasks Foreign CurrencyRemeasurement
Foreign CurrencyRemeasurement for Cash
Payment Management Periodic Tasks Payment Media Payment Media Runs
Production Control Automated Actions Mass Lot Closure Run
Production Control Automated Actions Mass Order Creation Run
Production Control Automated Actions Mass Order Release Run
Project Management Change Management Snapshot Run Definitions Snapshot Run Definitions
Project Management Projects Project Purchase RequestRuns
Project Purchase RequestRuns
Receivables Periodic Tasks Balance Confirmation Runs Balance Confirmation Run
Receivables Periodic Tasks Dunning Runs Dunning Run
Receivables Periodic Tasks Foreign CurrencyRemeasurement
Foreign CurrencyRemeasurement forReceivables Run
Receivables Periodic Tasks Payment Runs Payment Run
Receivables Periodic Tasks Reclassification ofReceivables
Reclassification ofReceivables Run
Supplier Invoicing Evaluated Receipt Settlement Evaluated Receipt Settlement
Supplier Invoicing Recurring Invoices view Recurring Invoices Recurring Invoice Run
Supply Control Automated Release Production Proposal Run Release ProductionProposals Run
Supply Control Automated Release Purchase Proposal Run Release Purchase ProposalsRun
Supply Planning Automated Planning Confirmation Update Run Confirmation Update Run
Supply Planning Automated Planning Planning Run New Planning Run
SAP Business ByDesign February 2017Customer Invoicing P U B L I C • © 2017 SAP SE or an SAP affiliate company. All rights reserved. 151

Work Center Work Center View Subview Mass Data Run
Tax Management Periodic Tasks EC Sales List Reports Runs EC Sales List Report Run
Tax Management Periodic Tasks Sales and Use Tax ReturnRuns
Sales and Use Tax Return Run
Tax Management Periodic Tasks VAT Return Runs VAT Return Run
Tax Management Periodic Tasks Withholding Tax Returns Withholding Tax Return Run
Tax Management Common Tasks New Tax Return Run Tax Return Run
Time Administration Day Closures Day Closure Run Employee Time ValuationPeriod Closure Run
4.1.7 Multiple Tax Registration – India
OverviewIn India, companies can have multiple tax registrations based on business residences. In the SAP Business ByDesignsystem, a business residence that has been registered with a tax authority is called a Tax Reporting Unit (TRU).A company is liable to pay various taxes based on goods and services. Each type of tax is administered by a differenttax authority. VAT is applicable on goods and is administered by the state government . Service tax and withholdingtax are applicable on services and are administered by the central government.In India, companies can have multiple registrations for the following tax types:
● For VAT the company gets the same registration number for all business residences in a state. When youregister your company with the state government for VAT, you will receive a unique Tax Identification Number(TIN) for all the locations for your company within the state.
● For service tax, the company can have more than one registration number. When you register your companywith the central government for service tax, you will receive a unique Service Tax Code (STC) for yourcompany.
● For withholding tax, the company can have more than one registration number. When you register yourcompany with the central government for withholding tax, you will receive a unique Tax Deduction andCollection Account Number (TAN) for your company.
A company has org units at Bangalore, Mysore and Mumbai. It can have multiple tax registration for thesame tax type for different org units, as follows:
● For VAT, Mysore and Bangalore have the same TIN, while Mumbai has a different TIN. ● For service tax, Mysore, Mumbai and Bangalore org units can have the same STC. ● For withholding tax, Mysore, Mumbai and Bangalore org units can have the same TAN.
PrerequisitesYou have:
● Chosen India as your country of business during scoping.
152 © 2017 SAP SE or an SAP affiliate company. All rights reserved. • P U B L I CSAP Business ByDesign February 2017
Customer Invoicing

● Marked the org unit as a business residence when creating your organizational unit in the system, For moreinformation see, Create and Edit the Org Structure.
● Assigned the relevant tax reporting unit to the company tax arrangement when creating the company taxarrangement. For more information see, Create a company tax arrangement – India.
Determination of Tax Reporting UnitIn order to report the different taxes to the tax authorities, the system needs to determine the TRU. The systemderives the TRU based on whether the items are goods or services.Sales Process
● For goods, the system determines the TRU from the Ship-from location. ● For services, the system determines the TRU from the Bill-from party/ Invoicing Unit. ● For projects and third party shipments, TRU is determined from Bill-from party /Invoicing unit.
Purchase Process ● For goods, the system determines the TRU from the Ship-to location. ● For services, the system determines the TRU from the Bill-to party.
The system then sends the TRU to financials, where it is used for determining the tax payable to the respective taxauthority.
4.1.8 Numbering of Customer Invoicing Documents
OverviewCustomer invoicing documents (such as customer invoices, credit memos and down payment requests) must haveunique identifying numbers. The document numbering process ensures that you comply with the legal requirementsin each country such as sequential and gapless numbering.The format of the document number in the system consists of a prefix, the numeric part of the document numberand, in some countries, a suffix. You can set up rules to define these formats so that the system assigns differentformats to document numbers by company, tax country and document type.
In certain countries, you must define your document numbering rules according to further criteria as follows: ● In France, you must define numbering rules also by customer location. ● In India, you must define numbering rules also by sales document type, tax registration number and
tax reporting unit.
In some situations sequentially numbered documents are not issued, therefore the system can also generatedocument numbering gap reports. These reports are legally required in certain countries to report gaps in thenumbering sequence.
PrerequisitesDuring the fine tuning process, you have set up the rules for the document numbering formats.For more information, see Document Numbering Formats for Customer Invoicing - Configuration Guide
SAP Business ByDesign February 2017Customer Invoicing P U B L I C • © 2017 SAP SE or an SAP affiliate company. All rights reserved. 153

Process FlowThe process flow for document numbering formats for invoicing documents is outlined below.
1. Create a customer invoicing document such as an invoice, a credit memo or a down payment request.2. Save the invoicing document.
The system generates a unique number according to the formatting rules already defined and applies it tothe invoicing document. This number is now displayed on the screen.
In India, for preceding documents that contain items with different tax types, the system generatesseparate customer invoicing documents for each tax type. The system assigns separate documentnumbers to these invoicing documents according to the configuration settings for documentnumbering formats.For example, you have a sales order with separate items to which service tax, value-added tax andcentral sales tax apply individually. When you do an invoicing run, the system creates three separateinvoices from this sales order, a service invoice, a tax invoice and bill of sale respectively. Each invoicehas the relevant items from the sales order according to the tax type and has a separate documentnumber according to the rules you set up for each invoice type.
3. Click the release button to post the invoicing document.The system transfers the numbered invoicing document to the general ledger.
4.1.9 Pricing in Customer Relationship Management
OverviewPricing is based on price master data such as price lists and discount lists, which are used to automatically calculatepricing within all business documents for sales and service processes. A predefined pricing procedure is used todetermine the gross value the customer has to pay for certain products or services to be received on a certain dayat a certain place. The pricing procedure consists of price components, such as list price, discounts, surcharges,freights, taxes, and costs. The order of these price components is essential for the calculation of the total value.
Price ComponentsSAP Business ByDesign contains a predefined set of price components, most of which you can activate through thebusiness configuration. Price components can be:
● Automatically determined by the system and non-editable, for example, tax ● Automatically determined by the system and able to be overwritten by the user, for example, list price or
automatically-determined product discounts ● Manually entered by the user, for example, a restocking fee or a manually-entered product discount
The manual behavior is influenced by the Manual flag in the business configuration for pricing. If the Manual flag isset, the system does not find the price component automatically and it must be added manually by the user.The following sections show the set of price components that may display depending on your configuration.
List PriceThis price component is naturally the first step of a pricing procedure, because many price components such asdiscounts or surcharges depend on it. To determine the net list price, the system checks all price lists that fit the
154 © 2017 SAP SE or an SAP affiliate company. All rights reserved. • P U B L I CSAP Business ByDesign February 2017
Customer Invoicing

parameters passed from the sales or service document. These parameters are customer, customer group,distribution chain, and date.Price lists can be customer specific, distribution chain specific, and base price lists. The price lists are maintainedas price master data, have a validity period, and need to be released before they are active.Because the customer may have special prices, the system checks first for a customer-specific price list. If there isno customer-specific price found, then it checks for a distribution chain specific price list. Finally, if there is nodistribution-chain-specific price, it checks for the base price list. You have to ensure that the system can find a pricefor all products or services you sell in the base price list at the very least. Prices can be manually revised within asales or service document, allowing you to flexibly adjust your net prices.
An approval procedure can be activated for price lists and discount lists which is done in the businessconfiguration in the scoping (under General Business Data Product and Service Pricing ). If this settingis active, the line manager automatically receives an approval task should his or her employee try to releasea price or a discount list. The price list or discount list cannot be released and included in all businessdocuments for sales and service processes until the line manager (or representative) approves the price listor discount list. If a manager is authorized to approve price and discount lists, he can directly release the priceor discount list in the price master data view. This automatic approval is done without creating a business taskif the manager himself releases the prices.For more general information on Business Task Management, see Business Task Management.
Product Discount (%)To determine the discount, the system checks all discount lists that fit the parameters passed from the sales orservice document. The parameters are customer, distribution chain, customer group, product, and date. All founddiscounts are considered in the price calculation.Discount lists can be Customer Specific Discount Product, General Customer Discount, Overall Customer GroupDiscount, and Customer Specific Discount Product Category discount lists.Because the customer may have a special discount for a certain product, the system checks for a discount list withcustomer product discounts.Discounts can always be revised manually within a sales or service document, allowing you to flexibly adjustdiscounts.
An approval procedure can be activated for price lists and discount lists which is done in the businessconfiguration in the scoping (under General Business Data Product and Service Pricing ).If this settingis active, the line manager automatically receives an approval task should his or her employee try to releasea price or a discount list. The price list or discount list cannot be released and included in all businessdocuments for sales and service processes until the line manager (or representative) approves the price listor discount list. If a manager is authorized to approve price and discount lists, he can directly release the priceor discount list in the price master data view. This automatic approval is done without creating a business taskif the manager himself releases the prices.For more general information on Business Task Management, see Business Task Management.
Working Condition (%)This price component is important for service scenarios. If service performers work at nights or on weekends orpublic holidays, a surcharge can be invoiced to the customer.
SurchargeTwo different price components are available for surcharges. You can define surcharges as percentages or fixedamounts according to your needs. All surcharges can be used side by side.
SAP Business ByDesign February 2017Customer Invoicing P U B L I C • © 2017 SAP SE or an SAP affiliate company. All rights reserved. 155

Warranty/GoodwillThese price components are important within service scenarios. For example, in a service document, services orspare parts may be covered by a warranty. The warranty or goodwill discount will be calculated based on the Coveragefield in the service document.
Quality Loss FeeThis price component is used for return scenarios. This element displays only if the Returns business topic is includedin your business configuration. If your customer returns goods which are damaged or opened, you can manuallydefine a deduction on item level.
Restocking FeeThis price componentis used for return scenarios. This element displays only if the Returns business topic is includedin your business configuration. If your customer returns goods, you can manually define a restocking fee for eachindividual return document.
Migration PriceThe migration price is needed for open sales and service documents that are migrated from a legacy system intoSAP Business ByDesign. To ensure that prices are the same in both systems, there will not be any additionalcalculation of this price.
Total Item Net ValueThis is calculated by adding all the item net values. This value cannot be edited.
FreightThis price component covers the freight amount determined automatically or entered manually. Depending on thebusiness configuration settings it is possible to determine a fixed freight amount or to make the freight dependenton the net weight of the goods you sell.
Cost and Profit MarginCost displays only if profit margin is included in your business configuration. Cost is basically derived from financialsand makes the calculation of the profit margin possible.
Overall Discount (%)The overall discount (%) is an additional general discount applied to the total item net value. This can only be appliedmanually.
Total Net ValueThis is calculated by adding all the item net values plus freight, without considering taxes. This value cannot be edited.
Total Given DiscountsThis is calculated by adding all the relevant product discounts given. This value cannot be edited directly by the user.It can be influenced by editing the product discounts at item level.
Rounding DifferenceThis is a value that has been lost or gained through rounding. This value is used only for currencies that do not havelow denomination coins such as 1c or 2c – for example, Swiss francs or Australian dollars. For these currencies, theprice must be rounded to the nearest available value, such as 0c or 5c.
156 © 2017 SAP SE or an SAP affiliate company. All rights reserved. • P U B L I CSAP Business ByDesign February 2017
Customer Invoicing

TaxThis price component covers all requirements in regards to taxation. All taxes are calculated according to legalrequirements and the results of this calculation are put into this price component.
TotalThis is calculated by adding the total net value plus tax.
Price CalculationPricing is centrally implemented in SAP Business ByDesign and linked to all relevant business processes. Theprocedure is predefined and you cannot modify the procedure or create a new one.The pricing procedure controls which price components are automatically calculated for the relevant businessdocuments, such as sales quotes, sales orders, and service orders. It contains the most commonly-used pricecomponents, including product prices, discounts, surcharges, and tax. These various kinds of price components canbe combined and control the price calculation process.The pricing procedure also contains the sequence in which the system takes these price components into accountduring pricing. It calculates the gross and net prices and taxes. The pricing procedure also determines:
● Which subtotals will be considered during pricing ● To what extent pricing can be processed manually ● Which method the system uses to calculate percentage discounts and surcharges ● Which requirements for a particular price component must be fulfilled before the system takes the element
into account. For example, freights are not considered for service items.
Currency and Quantity ConversionDuring the price calculation, currency conversion occurs if the currency of the price master data differs from thedocument currency, depending on the exchange rates maintained as master data. The document currency isdefaulted from the account master sales data.In addition, during the price calculation, quantity conversion occurs if the unit of measure requested in the documentdiffers from the price unit maintained in the price list. A prerequisite is that the quantity conversions are maintainedin the product or service master data. For example, product master data maintains a quantity conversion “1 pallet= 20 each”, the price list specifies a price unit of “$50/1 each”, and the sales order requests 5 pallets - in this case,the 5 pallets are converted to 100 units and price is calculated at $5000.
ScalesYou can define scales for prices which depend on different quantities. The scale you use determines how values arecalculated. For example, you can use a scale to define that a single boiler costs $500, but if you buy at least 10 boilersthe price decreases to only $450 per unit. You can also define scales for freights, which depend, for example, on thesales order value.You can also define scales for product discounts.There is also an additional feature where the system proposes the values for scales for every additional line that isadded by the user while maintaining scales. The following example explains the logic for calculation of the proposedvalue for scales:
Logic for determining the proposed scale value during price or discount scale maintenance.
SAP Business ByDesign February 2017Customer Invoicing P U B L I C • © 2017 SAP SE or an SAP affiliate company. All rights reserved. 157

ValueofScales Percentage Calculation of Percentage
0 0 0 0
10
– 10% 11/10=1.1
10*1.1 = 11
20
– 11% 11/10=1.1
11*1.1 = 12.1
30
– 12.1% 12.1/11=1.1
12.1*1.1 = 13.31
158 © 2017 SAP SE or an SAP affiliate company. All rights reserved. • P U B L I CSAP Business ByDesign February 2017
Customer Invoicing

ValueofScales Percentage Calculation of Percentage
40
– 13.31% 13.31/12.1=1.1
13.31*1.1 = 14.641
50
– 14.641% 14.641/13.31=1.1
14.641*1.1 = 16.105
SAP Business ByDesign February 2017Customer Invoicing P U B L I C • © 2017 SAP SE or an SAP affiliate company. All rights reserved. 159

ValueofScales Percentage Calculation of Percentage
60
– 16.105% 16.105/14.641=1.1
16.105*1.1 = 17.716
See AlsoConfigure Price Strategy [page 335]Price Agreements for Customer Contracts [page 326]Gross Pricing [page 326]
4.1.10 Tax Determination with Reverse Charge Mechanism
OverviewValue-added tax (VAT) is charged revenue from the sale of goods and services. This means that an entrepreneurissues a customer (as the service recipient) with an invoice that includes VAT, and pays the VAT to the responsibletax authority. As a result of this, the entrepreneur is the tax payer who is liable for VAT.In certain cases, however, the customer is required by law to be liable for VAT, and to pay it to the relevant taxauthority. In this case, the entrepreneur issues an invoice without VAT, but with a notification indicating that the taxdebt has been transferred to the customer. The customer must calculate and pay the VAT to the tax authority, andcan claim input tax deduction at the same time as usual. The transfer of tax debt to the service recipient is calledReverse Charge Mechanism and reverses the tax liability.
160 © 2017 SAP SE or an SAP affiliate company. All rights reserved. • P U B L I CSAP Business ByDesign February 2017
Customer Invoicing

Automatic Tax Determination with Reverse Charge MechanismCountry Specifics for GermanySome services, such as those provided by a company located abroad, or services that are provided for a servicerecipient located abroad are taxed according to the reverse charge mechanism. From the perspective of the seller,the transaction must be reported, but the tax debt transfers to the account. According to Directive 2008/8/EC andits implementation under the Annual Tax Act 2009 as of January 1, 2010, this is the basic rule for services that areprovided for a company abroad. This basic rule is determined automatically, if the head office of the companyproviding the goods or services is in any EU member state. No tax exemption reason code must be entered in theservice master.For Germany, the system currently only covers the transfer of tax debt for other services provided by an entrepreneurlocated abroad if these services are provided domestically (§ 13b Abs. 1 Nr. 1 UStG), or if a German company providesother such services for a service recipient located abroad.The process flow for tax determination describes the determination of tax event 240 – Reverse Charge Acquisition§13b II 1 Nr. 1 UStG, tax event 312 – Export of Service, Reverse Charge, and the anomalies to be taken into account:
1. Create a sales order, a purchase order, or an invoice.2. While the document is being processed, the system transfers the tax relevant data to tax determination.
Examples of tax relevant data for reverse charge mechanism are: ● Location of supplier and buyer
○ Sale of a service ○ The seller company must be located in Germany.
The address of the seller is used, and the system normally uses the standard address of yourcompany unless you have overwritten the address in the sales order on the Involved Parties tab.
○ The service recipient must be located abroad.The location where the service provision takes place is used and must not be in Germany. Ifthe recipient is a private individual, the service can only be subject to reverse chargemechanism if it is provided in the European Union (EU). If items in an invoice contain servicesthat have been provided at different locations (according to the address of the service or goodsrecipient on the Involved Parties tab), these addresses are used first.
○ Purchasing a Service ○ The supplier must be located abroad.
The address of the supplier is used as a basis, and the system uses the standard address. ○ The service recipient must be located in Germany.
The location where the service is provided is decisive. It is also possible that individual invoiceitems contain different locations where the services have been provided (according to theaddress of the goods recipient). In this case, this is used as a priority.
● Tax attributes of productsTax rate type and tax exemption reason can be different for each country, region, and tax type. In theUnited States, for example, services are not normally subject to tax, so the tax exemption reason shouldbe assigned in the product master data.Enter the following settings for reverse charge mechanism in the master data for services on the Sales > Taxes and Purchasing > Taxes tabs as required: ○ Tax Exemption Reason: Buyer liable for VAT
○ The Taxable at destination checkbox must not be selected.3. The system processes all tax-relevant data in tax determination.4. The system calculates tax using the following components:
SAP Business ByDesign February 2017Customer Invoicing P U B L I C • © 2017 SAP SE or an SAP affiliate company. All rights reserved. 161

● Tax event, for example 240 – Reverse Charge Acquisition §13b II 1 Nr 1 UStG for purchasing or 312 –Export of Service, Reverse Charge for sales
● Tax codes ● Tax type ● Tax rate type such as the complete value-added tax rate with which the tax rate is determined as a
percentage, for example 19% ● Taxable amount
5. The system enters the result of the tax determination and the tax calculation in the document currently beingprocessed. The calculated tax is displayed on the Pricing tab. All tax details determined by the system aredisplayed on the Tax Details tab, such as the Tax Country and the Tax Code of the tax country.
If reverse charge is determined for a sales order or a manual invoice, a note is displayed on the printedinvoice that the customer must pay tax.
For more information on the general process of tax determination, see Tax Determination [page 9].The system cannot process other reverse charge mechanism scenarios in the automatic tax determination, so thesemust be checked manually.
Manual Control for Reverse Charge MechanismFor some countries there are also other sales or purchasing processes that are subject to reverse charge but cannotbe determined automatically by the system, as for example, in Germany sales according to §13b (5) UStG orpurchases according to §13b (2).Country Specifics for Germany
● For mobile radio units and integrated circuits with a tax date as of July 1, 2011 and an invoice amount of atleast 5000 Euros, reverse charge applies according to § 13b (2) Nr.10 UStG.In this case you have to change the tax code manually to one of the following: ○ 15 – Reverse Charge Acquisition §13b II 1 Nr. 10 UStG ○ 515 – Reverse Charge Supply §13b II 1 Nr. 10 UStG
● For these processes, the system provides the tax events 313 – Reverse Charge Supply §13b V UStG and 50– Reverse Charge Acquisition §13b II 1 Nr 4, 6 - 9 UStG, 11 – Reverse Charge Acquisition §13b II 1 Nr 2 UStG,12 – Reverse Charge Acquisition §13b II 1 Nr 3 UStG, 13 – Reverse Charge Acquisition §13b II 1 Nr 5 UStG and240 – Reverse Charge Acquisition §13b II 1 Nr 1 UStG. But you need to create your own tax code in your system.
● If you obtain your sales revenue according to §13b (5) UStG, you must enter the tax code manually.
Tax Events Stored in the SystemCountry Specifics for GermanyThe following tax events are currently stored in the system and can be used to create tax codes for Germany:
● Purchase: ○ 11 – Reverse Charge Acquisition §13b II 1 Nr. 2 UStG ○ 12 – Reverse Charge Acquisition §13b II 1 Nr. 3 UStG ○ 13 – Reverse Charge Acquisition §13b II 1 Nr. 5 UStG ○ 50 – Reverse Charge Acquisition §13b II 1 Nr. 4, 6 – 9 UStG ○ 240 – Reverse Charge Acquisition §13b II 1 Nr.1 UStG ○ 15 – Reverse Charge Acquisition §13b II 1 Nr. 10 UStG
162 © 2017 SAP SE or an SAP affiliate company. All rights reserved. • P U B L I CSAP Business ByDesign February 2017
Customer Invoicing

● Sales: ○ 312 – Export of Service, Reverse Charge ○ 313 – Reverse Charge Supply § 13b V UStG ○ 315 – Reverse Charge Supply §13b II 1 Nr. 10 UStG
The following tax code and tax events combinations are provided by the system and determined automatically: ● Tax code 504 – Not taxable (reverse charge mechanism) is linked to tax event 312 – Export of Service, Reverse
Charge ● Tax code 530 – EU Sales of Service, Reverse Charge is linked to tax event 455 – EU Sale of Service, Reverse
Charge
For purchasing, tax code 430 – EU Purchase of Services, Reverse Charge, Standard Rate, Fully Deductible with taxevent 155 is available.If you need further tax codes, you can create them under Define Tax Codes of the Tax on Goods and Services activityin Business Configuration Implementation Projects Activity List Fine-Tune .
When you create a tax code, ensure that you provide the tax type under Details.
4.1.11 Upload Approval Information for Invoicing Documents UsingMicrosoft Excel® – Mexico
This document contains text that is relevant for Mexico. To ensure that the system displays the correct text,select Personalize My Settings . Select Onscreen Help and, under Country, choose Mexico. Save yoursettings and logout to ensure these changes are made.
4.1.12 Usage of Bar Codes in Print Forms for Invoice Documents -Mexico
OverviewIn Mexico, it is a legal requirement that printed invoice documents display the following information in bar codeimages:
● Company's certificate: This bar code contains the tax number of the company and must be displayed in allpages of the invoice document.
● Invoice Approval Information: This bar code contains the approval number given by the Servicio deAdministración Tributária, SAT, the Mexican tax authority, and must be displayed in the last page of theinvoice.
If you have selected in scoping the paper invoice processing method, you must maintain the bar code images in theprint forms manually, so that the printed invoices or credit memos are displayed in accordance to the legalrequirement in this country. For more information on all invoice processing methods available for Mexico, see InvoiceProcessing - Mexico [page 148].
SAP Business ByDesign February 2017Customer Invoicing P U B L I C • © 2017 SAP SE or an SAP affiliate company. All rights reserved. 163

Invoice documents generated with the traditional paper method must be issued using one of the numbers containedin the official number range provided for your company by SAT. This official number range is valid for two years andyou must maintain it in the system so that every invoice generated by your company uses one of this numbers. Formore information on document numbering specific for Mexico, see the Document Numbering Formats for Mexicosection in the Document Numbering Formats for Customer Invoicing - Configuration GuideAlong with the official number range, SAT provides your company with the images for the bar codes above mentioned.They are valid for all invoices using the same official number range, which means that every time a new number rangeis requested at SAT and you configure it in the system, you must exchange the bar codes accordingly in the printform.
There is only one print form valid at a time in the system. Since there are no validations available to checkif the invoice document information and the bar code image correspond to each other, to avoid the systemattaching the wrong image to the invoice document, you must release all invoice documents generatedwith the old official number range before inserting the bar code image of the new official number rangein the print form.
Prerequisites
Configuration settings are usually performed by an administrator. If you do not have the requiredauthorization, contact your administrator.
During scoping, you have selected the following: ● Mexico as one of the countries in which you do business ● Customer Invoice business area ● Paper Invoice as the processing method to issue invoices in your company
You have requested at SAT the official number range to issue paper invoices and have the respective bar code imagessaved in your local system.Additionally, you must have installed in your local system the Adobe LiveCycle Designer for SAP Business ByDesignsoftware. You download it from Application and User Management Business Flexibility Download Center Install Additional Software . This is the tool that you use to edit the print forms.
Process Flow
1. You request at SAT the official number range to be used when issuing invoices in the traditional paper format.2. SAT sends you the official number range and the corresponding bar code images in PNG format.3. You configure in the Document Numbering Formats for Customer Invoice fine tune activity that defines that
paper invoices generated by your company must be issued within this official number range.4. In Application and User Management Business Flexibility Form Template Maintenance you search
for the print form template by selecting Template Group c41 and Country Mexico and click inDownload to save the ZIP file in your local system.
There are different print form templates for Credit Memos and Customer Invoices, that means youmust maintain the bar code images in both templates.
5. Extract the ZIP file to your local system and open the file with the xdp extension. The Adobe LiveCycle Designertool opens.
164 © 2017 SAP SE or an SAP affiliate company. All rights reserved. • P U B L I CSAP Business ByDesign February 2017
Customer Invoicing

In this tool you must browse and maintain the following images by indicating the path (or URL) where theimages have been saved: ● Company's certificate: The pic_Tax_ID_Certificate image has to be maintained twice: To display the
information in the first page of the invoice, maintain the bar code image inFormInvoiceRequest.mstPage1.pic_Tax_ID_Certificate. To display the information in thesecond and next pages, maintain the bar code image inFormInvoiceRequest.mstPage2.pic_Tax_ID_Certificate.
● Invoice approval information: The pic_Paper_Inv_BarCode image has to be maintained inFormInvoiceRequest.bdyMain.frmInfoTermsConditions.pic_Paper_Inv_BarCode
If you are exchanging the bar code images for the ones corresponding to a new official numberrange, you must release all invoices generated with the previous official number range first.
Save the form with the new bar code images. If you encounter problems during the upload of the bar codeimages, see the help information of the Adobe LiveCycle Designer tool.
All invoice documents generated in the system from now on will display the bar code images of the current officialnumber range. Whenever you are viewing an invoice document in the Customer Invoicing work center and click
Preview in the header of the screen, the system retrieves the current bar code images saved in the print form anddisplay the invoice with these images. This might not be the correct images for an invoice which has been generatedwith a previous official number range and therefore with the previous bar code images. To preview the correct barcode images, you open the invoice and go to Output History . The PDF attachment you find there displays the barcode image which was the current image at the time when the invoice has been generated.
4.1.13 Tracking of Customs Document – Mexico
This document contains text that is relevant for Mexico. To ensure that the system displays the correct text,select Personalize My Settings . Select Onscreen Help and, under Country, choose Mexico. Save yoursettings and logout to ensure these changes are made.
4.2 Credit Card Authorization Runs View
4.2.1 Quick Guide for Credit Card Authorization Runs
In the Credit Card Authorization Runs view of the Customer Invoicing work center you can schedule and monitor thestatus of credit card authorization runs for sales or service orders and where required start a run before the scheduledtime. During a credit card authorization run the system sends the credit card details to a clearing house and theclearing house either grants or denies authorization. Once the card is authorized the payment is guaranteed. Thejob log accurately records the transactions that occurred during a credit card authorization run and you can use thejob log to track the credit card authorization requests processed.
The Credit Card Authorization Run is created for sales or service orders, so the authorization run is carriedout as early as possible.
SAP Business ByDesign February 2017Customer Invoicing P U B L I C • © 2017 SAP SE or an SAP affiliate company. All rights reserved. 165

Since your company has selected the Buy, Sell, and Administrate implementation focus, there will be slightdifferences between your solution and the standard as outlined below. For more information, see WhatWorks Differently in Buy, Sell, and Administrate.If your system has not been deployed, all information is shown because there is no scoping-relevant filter.
Business Background
Customer Invoice ProcessingInvoices are created, either manually or as part of an invoice run, for the delivery of products or the provision ofservices and are used for charging customers. They result from predecessor documents such as sales orders, serviceorders, and service confirmations. It is also possible to create manual invoicing documents such as manual invoice,credit memo, and down payment requests without reference to preceding business transaction documents outsideCustomer Invoicing.For more information, see Customer Invoice Processing [page 140].
Mass Data RunsFor general information about mass data runs see: Mass Data Runs [page 148]
Tasks
Create a Credit Card Authorization Run1. To create a credit card authorization run you have the following possibilities:
● In the Credit Card Authorization Runs view click New and select Credit CardAuthorization Run.
● Under Common Tasks choose New Credit Card Authorization Run.2. Under General Data, enter the general information used to identify the credit card
authorization run: ● In the Run ID field enter the run ID.
● In the Run Definition field enter the run definition.3. In the Source Document field enter the document type you want to include in the run
such as a sales order or a service order.4. Enter the business partner selection parameters for the business partners you want to
include in the credit card authorization run.5. Click Save .6. Click Actions and select Set to Active to activate the new credit card authorization
run.The system saves the new credit card authorization run, activates it, and adds it to thelist in the Credit Card Authorization Runs view. To open one from the list, click theappropriate credit card authorization run ID link.
Create a Task, Notification, or AlertFor information about this task, see here.Perform Common Tasks
166 © 2017 SAP SE or an SAP affiliate company. All rights reserved. • P U B L I CSAP Business ByDesign February 2017
Customer Invoicing

Create a Manual Invoice1. Under Common Tasks choose New Manual Invoice and the system opens a New Manual
Invoice Request.2. Enter the account details.
In the Account field, enter the account number. The system automatically displays therelated master data under Account, Main Contact, Employee Responsible, and PaymentTerms. To see this you have to click on View All . If necessary, click Open SelectDialog icon to search for the account.
● If the invoice is associated with a new account, click New to generate anaccount number and enter the relevant data.
● The system automatically enters the current date. You can change thisdate providing the accounting period is open and other restrictions aremet. When you save the invoice, the new date appears on the invoice andis used by financials. The invoice date is taken at the Tax Due Date. If youwant to declare taxes for a different period, you can enter a date thatdeviates from the invoice date in the Deviating Tax Due Date. For moreinformation about the tax due date, see Tax Due Date.
● If payment details such as direct debit are available for the account, thesystem displays the corresponding payment details and you can changethem if required. For more information about direct debit, see IncomingPayments by SEPA Direct Debit.
3. Enter the product details.Under Items, enter the details of the products associated with the invoice.1. Click Add Row to create a new row in the table.2. Enter a product ID. The system displays the related product description and
category.3. Enter the required quantity of the product. The system calculates and displays the
expected value. Repeat the steps outlined above to add information about otherproducts.
Tax is always calculated on the basis of the net price; the net price alsoincludes freight charges. Non-taxable freights must be entered in thepreceding document as service items to ensure that they are excluded whentax is calculated. For more information about non-taxable freights ininvoices, see Handling of Taxable and Non-Taxable Freights in Invoices inCustomer Invoice Processing [page 140].
4. At the top of the New Manual Invoice Request you can click Release , Save orSave as Invoice .
● If you want the invoice to be released to financials and the customer, clickRelease . The system saves the manual invoice, releases it to financials, and adds
it to the list in the Invoice Documents view with status Released. To open the invoicefrom this list, click the appropriate invoice ID link.
SAP Business ByDesign February 2017Customer Invoicing P U B L I C • © 2017 SAP SE or an SAP affiliate company. All rights reserved. 167

If there is a threshold defined, and the invoice exceeds that threshold, thesystem initiates, depending on the business configuration, an approvalprocess. In this case when the invoice is released, the invoice document issaved in Invoice Documents view with status In Approval. When the approvalprocess is finished the invoice is automatically released.
● If you want to preview the document as a PDF before releasing and sending it tothe customer, click Save . The manual invoice request is given an officialdocument number and is saved in the Invoice Requests view with the status To BeInvoiced.
● If you want to save the manual invoice as a draft, click Save as Invoice . Thecustomer invoice document is given a document number and saved in the InvoiceDocuments view with the status Not Released.
Create a Manual Credit Memo With or Without Reference
1. To create a manual credit memo, you have the following possibilities: ● Under Common Tasks choose the New Manual Credit Memo. ● In the Invoice Documents view you can copy an existing credit memo as a template.
The system automatically retrieves the values and content from the original creditmemo and opens a New Manual Credit Memo Request. You can change the valuesentered in all the fields.
● Create a manual credit memo based on an existing invoice:In the Invoice Documents view select the invoice for which you want to create acredit memo, click Follow-Up and select Manual Credit Memo.All the content is automatically filled out in the New Manual Credit MemoRequest screen.
2. Now you can enter or change the data as required:1. Click View All to view more detailed information on the down payment request.2. On the General screen, enter an account.
The system displays the address of the company as well as the currency, paymentterms, and the employee responsible for the account. You can change any of thesefields, if required.
3. Enter a reason for the credit memo under Internal Comment or, if you want thisinformation to be printed on the credit memo, enter it in the CustomerInformation section.
4. Add attachments to the manual credit memo, if required. These can be printedout later and sent with the manual credit memo form.
5. On the Items screen, enter one or more product IDs, or select the items that arenot relevant to the credit memo and click Delete .The system retrieves the data for the entered products such as Description, ListPrice, and currency. You can overwrite this information, if necessary and you canalso add a Discount.
6. Check whether the Tax Code proposed by the system is what you require.7. On the Involved Parties screen, check the organizational assignments such as bill-
to party or ship-to party.3. Then you can click Release , Save , or Save As Credit Memo .
168 © 2017 SAP SE or an SAP affiliate company. All rights reserved. • P U B L I CSAP Business ByDesign February 2017
Customer Invoicing

● If you want to release the manual credit memo to send it to the customer andaccounts receivable immediately, click Release . The manual credit memo issaved and sent to the customer and accounts receivable. It appears in the InvoiceDocuments view with the status Released.
If there is a defined threshold, and the credit memo exceeds that threshold,the system initiates, depending on your business configuration, an approvalprocess. When the approval process is finished the credit memo isautomatically released.
● If you want to preview the document as a PDF before releasing and sending it tothe customer, click Save . The manual credit memo request is given an officialdocument number and is saved in the Invoice Requests view with the status To BeInvoiced.
● If you want to save the credit memo as a draft, click Save As Credit Memo . Themanual credit memo is given a temporary document number and is saved in theInvoice Documents view with the status Not Released.
Create a Down Payment Request
1. Under Common Tasks choose New Down Payment Request.2. Click View All to view more detailed information on the down payment request.3. Enter an account. The system fills in the general data, tax details, and payment terms.
Only one tax rate can be entered for a down payment. If you require several taxrates, create a down payment request for each tax rate.
4. On the General tab, check the information on organizational assignments such as thebill-to party and ship-to party.
5. You can specify the reconciliation account to be used for down payments that are madeby the customer. To do this, select it in the Reconciliation Account field underAccounting.
6. Enter an Internal Comment or Customer Information. The information you enter in theCustomer Information section is included in the down payment request form that is tothe customer.
7. Add attachments to the down payment request. These can be printed out and sentalong with the down payment request form.
8. On the Agreement tab, assign the sales order or service order ID to the down paymentrequest by entering the sales or service order ID in the Description field. For example,you can enter Down payment of 10% for sales order 42233340314.
This information makes it clear to the customer which business transaction thedown payment request is based on. You can also use this information to searchfor the down payment request later on in the Invoice Documents view.
9. Enter the amount and specify whether this amount is net or gross.10. Check whether the tax code proposed by the system is the one you require. You can
change it, if necessary.11. Release the down payment request.
SAP Business ByDesign February 2017Customer Invoicing P U B L I C • © 2017 SAP SE or an SAP affiliate company. All rights reserved. 169

The down payment request form is printed out automatically. Print out the orderconfirmation of the sales or service order to which the down payment is related. Sendthem both to the customer.
Create an Invoice Run
1. To create an invoice run you have the following possibilities: ● In the Invoice Runs view click New , then select Invoice Run. ● Under Common Tasks click New Invoice Run.
2. Under General Data, enter the general data used to identify the invoice run.1. In the Run ID field enter the run ID.2. In the Run Description filed enter the run description.
3. Under Split By, you can select how the invoice documents shall be split up.4. Under Invoice Properties, you can define how the invoice documents shall be
processed.1. Enter the Invoice Date Offset to calculate the dates for your invoice documents.2. Select the Automatic Release checkbox to automatically release the invoice
document to financials.5. Under Selection Criteria, you can set a Date Offset and filter for Accounts, Sellers, and
Preceding Documents by using search patterns.6. At the top of the New Invoice Run, click Save .7. To activate the invoice run, click Actions and select Set To Active.
Under Execution Details, you can view the invoices created and the exceptionsgenerated in an invoice run.
Create a Recurring Invoice Template1. To create a recurring invoice template you have the following possibilities:
● In the Recurring Invoice Templates view click New , then select Recurring InvoiceTemplate.
● Under Common Tasks click New Recurring Invoice Template.
2. Enter account and product-related data. ● Under Account in the Name field enter the name of the account. The system
automatically displays the address, currency, payment terms and the employeeresponsible for the account. You can change any of these fields if required. Ifnecessary, click the Open Select Dialog icon to search for the account.
● Under General, in the Description field enter a description for your recurringinvoice.
● Under Items, enter one or more product IDs.The system automatically retrieves the product data: description and list price. Ifrequired, you can change both these fields.
● If necessary, enter a quantity and a discount. The system adjusts the net price andtotal net value accordingly.
170 © 2017 SAP SE or an SAP affiliate company. All rights reserved. • P U B L I CSAP Business ByDesign February 2017
Customer Invoicing

You can also maintain a recurring invoice with an item without a product ID. Inthis case, you must maintain the following fields:
● Description (for example, monthly leasing rate) ● List Price (amount of the monthly leasing rate) ● Tax Code ● G/L Account
3. Enter the recurrence details.Under Recurrence, specify the recurrence type by choosing either a recurrence patternor individual dates.Depending on your selection, additional fields appear dynamically. ● If you choose a recurrence pattern, under Recurrence Pattern, enter the details of
the pattern, for example, the start and end dates, the recurrence, and the day ofthe month.
● If you choose individual dates, under Individual Dates, enter particular dates forthe recurring invoice.
4. Save the recurring invoice template.a. Click Save to save the recurring invoice.
The system sets the status of the recurring invoice to In Preparation.b. Click Release .
The system sets the status of the recurrence invoice to Released and createsinvoice requests until the end date or until the maximum occurrences defined bythe user is reached.
c. Click Close to return to the Recurring Invoice Templates view.
The new recurring invoice is saved in the system and added to the list in the RecurringInvoice Templates view. To open the recurring invoice from the list, click the appropriaterecurring invoice template ID link. This opens the Recurring Invoice TemplateOverview that displays the requests that have already been invoiced and those that areforecast.
● The recurring invoice requests appear in the Invoice Requests view. The numberof the invoice requests listed here is limited by a horizon defined by the system.Once the last listed request has been invoiced, the other appear automatically.Invoice requests further than one year in the future are not created.
● You can find the requests related to a specific invoice in the Invoice Requestsview by entering the recurring invoice template ID into the basic search.
SAP Business ByDesign February 2017Customer Invoicing P U B L I C • © 2017 SAP SE or an SAP affiliate company. All rights reserved. 171

4.3 Golden Tax Invoices View
4.3.1 Golden Tax Invoices Quick Guide - China
This document contains text that is relevant for China. To ensure that the system displays the correct text,select Personalize > My Settings . Select Onscreen Help and, under Country, choose China. Save your settingsand logout to ensure these changes are made.
4.4 Invoice Runs View
4.4.1 Invoice Runs Quick Guide
In the Invoice Runs view of the Customer Invoicing work center you can monitor the status of invoice runs and whererequired start a run before the scheduled time. The job log accurately records the transactions that occurred duringan invoice run and you can use the job log to track the invoices that were created.Also, you can display data in the Invoice Runs worklist as a chart using the analytical view function. This functionhelps you to get a quick overview of all data in the worklist.
Since your company has selected the Buy, Sell, and Administrate implementation focus, there will be slightdifferences between your solution and the standard as outlined below. For more information, see WhatWorks Differently in Buy, Sell, and Administrate.If your system has not been deployed, all information is shown because there is no scoping-relevant filter.
Business Background
Customer Invoice ProcessingInvoices are created, either manually or as part of an invoice run, for the delivery of products or the provision ofservices and are used for charging customers. They result from predecessor documents such as sales orders, serviceorders, and service confirmations. It is also possible to create manual invoicing documents such as manual invoice,credit memo, and down payment requests without reference to preceding business transaction documents outsideCustomer Invoicing.For more information, see Customer Invoice Processing [page 140].
Mass Data RunsFor general information about mass data runs see: Mass Data Runs [page 148]
172 © 2017 SAP SE or an SAP affiliate company. All rights reserved. • P U B L I CSAP Business ByDesign February 2017
Customer Invoicing

Tasks
Create an Invoice Run
1. To create an invoice run you have the following possibilities: ● In the Invoice Runs view click New , then select Invoice Run. ● Under Common Tasks click New Invoice Run.
2. Under General Data, enter the general data used to identify the invoice run.1. In the Run ID field enter the run ID.2. In the Run Description filed enter the run description.
3. Under Split By, you can select how the invoice documents shall be split up.4. Under Invoice Properties, you can define how the invoice documents shall be
processed.1. Enter the Invoice Date Offset to calculate the dates for your invoice documents.2. Select the Automatic Release checkbox to automatically release the invoice
document to financials.5. Under Selection Criteria, you can set a Date Offset and filter for Accounts, Sellers, and
Preceding Documents by using search patterns.6. At the top of the New Invoice Run, click Save .7. To activate the invoice run, click Actions and select Set To Active.
Under Execution Details, you can view the invoices created and the exceptionsgenerated in an invoice run.
Display Graphical Analysis of an Invoice Runs Worklist1. In the worklist, from the Group By dropdown list, choose a criterion by which to group
data.2. To view all data from the worklist in the Analytical View section, click the chart icon next
to the filter icon.3. In the Analytical View section, choose a chart type to display the data.4. Double-click a data section in the chart to filter the original worklist.
You can clear the filter by clicking Back to Full Chart in the Analytical Viewsection or deleting the filter content in the worklist.
For some worklists, such as the Opportunities worklist in the Opportunity List view inthe New Business work center, you can aggregate the grouped data using differentcriterion (for example, expected value). You can then select different analysis methods(for example, count, sum, average, maximum, or minimum) to sort the data, and choosedifferent chart types to present the data from the worklist.
Create a Task, Notification, or AlertFor information about this task, see here.
Export Invoice Runs to Microsoft Excel®For information about this task, see here [page 82].
SAP Business ByDesign February 2017Customer Invoicing P U B L I C • © 2017 SAP SE or an SAP affiliate company. All rights reserved. 173

Perform Common Tasks
Create a Manual Invoice1. Under Common Tasks choose New Manual Invoice and the system opens a New Manual
Invoice Request.2. Enter the account details.
In the Account field, enter the account number. The system automatically displays therelated master data under Account, Main Contact, Employee Responsible, and PaymentTerms. To see this you have to click on View All . If necessary, click Open SelectDialog icon to search for the account.
● If the invoice is associated with a new account, click New to generate anaccount number and enter the relevant data.
● The system automatically enters the current date. You can change thisdate providing the accounting period is open and other restrictions aremet. When you save the invoice, the new date appears on the invoice andis used by financials. The invoice date is taken at the Tax Due Date. If youwant to declare taxes for a different period, you can enter a date thatdeviates from the invoice date in the Deviating Tax Due Date. For moreinformation about the tax due date, see Tax Due Date.
● If payment details such as direct debit are available for the account, thesystem displays the corresponding payment details and you can changethem if required. For more information about direct debit, see IncomingPayments by SEPA Direct Debit.
3. Enter the product details.Under Items, enter the details of the products associated with the invoice.1. Click Add Row to create a new row in the table.2. Enter a product ID. The system displays the related product description and
category.3. Enter the required quantity of the product. The system calculates and displays the
expected value. Repeat the steps outlined above to add information about otherproducts.
Tax is always calculated on the basis of the net price; the net price alsoincludes freight charges. Non-taxable freights must be entered in thepreceding document as service items to ensure that they are excluded whentax is calculated. For more information about non-taxable freights ininvoices, see Handling of Taxable and Non-Taxable Freights in Invoices inCustomer Invoice Processing [page 140].
4. At the top of the New Manual Invoice Request you can click Release , Save orSave as Invoice .
● If you want the invoice to be released to financials and the customer, clickRelease . The system saves the manual invoice, releases it to financials, and adds
it to the list in the Invoice Documents view with status Released. To open the invoicefrom this list, click the appropriate invoice ID link.
174 © 2017 SAP SE or an SAP affiliate company. All rights reserved. • P U B L I CSAP Business ByDesign February 2017
Customer Invoicing

If there is a threshold defined, and the invoice exceeds that threshold, thesystem initiates, depending on the business configuration, an approvalprocess. In this case when the invoice is released, the invoice document issaved in Invoice Documents view with status In Approval. When the approvalprocess is finished the invoice is automatically released.
● If you want to preview the document as a PDF before releasing and sending it tothe customer, click Save . The manual invoice request is given an officialdocument number and is saved in the Invoice Requests view with the status To BeInvoiced.
● If you want to save the manual invoice as a draft, click Save as Invoice . Thecustomer invoice document is given a document number and saved in the InvoiceDocuments view with the status Not Released.
Create a Manual Credit Memo With or Without Reference
1. To create a manual credit memo, you have the following possibilities: ● Under Common Tasks choose the New Manual Credit Memo. ● In the Invoice Documents view you can copy an existing credit memo as a template.
The system automatically retrieves the values and content from the original creditmemo and opens a New Manual Credit Memo Request. You can change the valuesentered in all the fields.
● Create a manual credit memo based on an existing invoice:In the Invoice Documents view select the invoice for which you want to create acredit memo, click Follow-Up and select Manual Credit Memo.All the content is automatically filled out in the New Manual Credit MemoRequest screen.
2. Now you can enter or change the data as required:1. Click View All to view more detailed information on the down payment request.2. On the General screen, enter an account.
The system displays the address of the company as well as the currency, paymentterms, and the employee responsible for the account. You can change any of thesefields, if required.
3. Enter a reason for the credit memo under Internal Comment or, if you want thisinformation to be printed on the credit memo, enter it in the CustomerInformation section.
4. Add attachments to the manual credit memo, if required. These can be printedout later and sent with the manual credit memo form.
5. On the Items screen, enter one or more product IDs, or select the items that arenot relevant to the credit memo and click Delete .The system retrieves the data for the entered products such as Description, ListPrice, and currency. You can overwrite this information, if necessary and you canalso add a Discount.
6. Check whether the Tax Code proposed by the system is what you require.7. On the Involved Parties screen, check the organizational assignments such as bill-
to party or ship-to party.3. Then you can click Release , Save , or Save As Credit Memo .
SAP Business ByDesign February 2017Customer Invoicing P U B L I C • © 2017 SAP SE or an SAP affiliate company. All rights reserved. 175

● If you want to release the manual credit memo to send it to the customer andaccounts receivable immediately, click Release . The manual credit memo issaved and sent to the customer and accounts receivable. It appears in the InvoiceDocuments view with the status Released.
If there is a defined threshold, and the credit memo exceeds that threshold,the system initiates, depending on your business configuration, an approvalprocess. When the approval process is finished the credit memo isautomatically released.
● If you want to preview the document as a PDF before releasing and sending it tothe customer, click Save . The manual credit memo request is given an officialdocument number and is saved in the Invoice Requests view with the status To BeInvoiced.
● If you want to save the credit memo as a draft, click Save As Credit Memo . Themanual credit memo is given a temporary document number and is saved in theInvoice Documents view with the status Not Released.
Create a Down Payment Request
1. Under Common Tasks choose New Down Payment Request.2. Click View All to view more detailed information on the down payment request.3. Enter an account. The system fills in the general data, tax details, and payment terms.
Only one tax rate can be entered for a down payment. If you require several taxrates, create a down payment request for each tax rate.
4. On the General tab, check the information on organizational assignments such as thebill-to party and ship-to party.
5. You can specify the reconciliation account to be used for down payments that are madeby the customer. To do this, select it in the Reconciliation Account field underAccounting.
6. Enter an Internal Comment or Customer Information. The information you enter in theCustomer Information section is included in the down payment request form that is tothe customer.
7. Add attachments to the down payment request. These can be printed out and sentalong with the down payment request form.
8. On the Agreement tab, assign the sales order or service order ID to the down paymentrequest by entering the sales or service order ID in the Description field. For example,you can enter Down payment of 10% for sales order 42233340314.
This information makes it clear to the customer which business transaction thedown payment request is based on. You can also use this information to searchfor the down payment request later on in the Invoice Documents view.
9. Enter the amount and specify whether this amount is net or gross.10. Check whether the tax code proposed by the system is the one you require. You can
change it, if necessary.11. Release the down payment request.
176 © 2017 SAP SE or an SAP affiliate company. All rights reserved. • P U B L I CSAP Business ByDesign February 2017
Customer Invoicing

The down payment request form is printed out automatically. Print out the orderconfirmation of the sales or service order to which the down payment is related. Sendthem both to the customer.
Create a Recurring Invoice Template1. To create a recurring invoice template you have the following possibilities:
● In the Recurring Invoice Templates view click New , then select Recurring InvoiceTemplate.
● Under Common Tasks click New Recurring Invoice Template.
2. Enter account and product-related data. ● Under Account in the Name field enter the name of the account. The system
automatically displays the address, currency, payment terms and the employeeresponsible for the account. You can change any of these fields if required. Ifnecessary, click the Open Select Dialog icon to search for the account.
● Under General, in the Description field enter a description for your recurringinvoice.
● Under Items, enter one or more product IDs.The system automatically retrieves the product data: description and list price. Ifrequired, you can change both these fields.
● If necessary, enter a quantity and a discount. The system adjusts the net price andtotal net value accordingly.
You can also maintain a recurring invoice with an item without a product ID. Inthis case, you must maintain the following fields:
● Description (for example, monthly leasing rate) ● List Price (amount of the monthly leasing rate) ● Tax Code ● G/L Account
3. Enter the recurrence details.Under Recurrence, specify the recurrence type by choosing either a recurrence patternor individual dates.Depending on your selection, additional fields appear dynamically. ● If you choose a recurrence pattern, under Recurrence Pattern, enter the details of
the pattern, for example, the start and end dates, the recurrence, and the day ofthe month.
● If you choose individual dates, under Individual Dates, enter particular dates forthe recurring invoice.
4. Save the recurring invoice template.a. Click Save to save the recurring invoice.
The system sets the status of the recurring invoice to In Preparation.b. Click Release .
The system sets the status of the recurrence invoice to Released and createsinvoice requests until the end date or until the maximum occurrences defined bythe user is reached.
c. Click Close to return to the Recurring Invoice Templates view.
SAP Business ByDesign February 2017Customer Invoicing P U B L I C • © 2017 SAP SE or an SAP affiliate company. All rights reserved. 177

The new recurring invoice is saved in the system and added to the list in the RecurringInvoice Templates view. To open the recurring invoice from the list, click the appropriaterecurring invoice template ID link. This opens the Recurring Invoice TemplateOverview that displays the requests that have already been invoiced and those that areforecast.
● The recurring invoice requests appear in the Invoice Requests view. The numberof the invoice requests listed here is limited by a horizon defined by the system.Once the last listed request has been invoiced, the other appear automatically.Invoice requests further than one year in the future are not created.
● You can find the requests related to a specific invoice in the Invoice Requestsview by entering the recurring invoice template ID into the basic search.
Create a Credit Card Authorization Run1. To create a credit card authorization run you have the following possibilities:
● In the Credit Card Authorization Runs view click New and select Credit CardAuthorization Run.
● Under Common Tasks choose New Credit Card Authorization Run.2. Under General Data, enter the general information used to identify the credit card
authorization run: ● In the Run ID field enter the run ID.
● In the Run Definition field enter the run definition.3. In the Source Document field enter the document type you want to include in the run
such as a sales order or a service order.4. Enter the business partner selection parameters for the business partners you want to
include in the credit card authorization run.5. Click Save .6. Click Actions and select Set to Active to activate the new credit card authorization
run.The system saves the new credit card authorization run, activates it, and adds it to thelist in the Credit Card Authorization Runs view. To open one from the list, click theappropriate credit card authorization run ID link.
4.5 Invoice Documents
4.5.1 Quick Guide for Invoice Documents
The Invoice Documents view in the Customer Invoicing work center enables you to access all released and notreleased invoices, and release the not released ones. You can also cancel invoices in this view.You can organize your worklist by using filters to specify which invoice documents you want to display, and by sortingand grouping them.
178 © 2017 SAP SE or an SAP affiliate company. All rights reserved. • P U B L I CSAP Business ByDesign February 2017
Customer Invoicing

Documentation is available on this topic that is specifically relevant for Denmark, the Netherlands, Mexico,and Switzerland. To ensure that the relevant country-specific document version is displayed, select Personalize My Settings . Select Onscreen Help and, under Country, choose the relevant country. Saveyour settings.
Business Background
Customer Invoice ProcessingInvoices are created, either manually or as part of an invoice run, for the delivery of products or the provision ofservices and are used for charging customers. They result from predecessor documents such as sales orders, serviceorders, and service confirmations. It is also possible to create manual invoicing documents such as manual invoice,credit memo, and down payment requests without reference to preceding business transaction documents outsideCustomer Invoicing.For more information, see Customer Invoice Processing [page 140].
ISR Processing — SwitzerlandInpayment slip with reference (ISR) is one of the main payment methods in Switzerland. When a user creates amanual invoice containing ISR relevant data and releases it, the new invoice will include an ISR payment slip.For more information, see ISR Payments — Switzerland [page 51].
Numbering of Customer Invoicing DocumentsFor more information, seeNumbering of Customer Invoicing Documents [page 153].
Tax DeterminationAs a rule, companies are legally required to calculate taxes on products that they buy or sell, and to levy these taxesfrom their customers. After the products have been provided, the taxes must be declared and levied to the respectivetax authorities. The system supports you by providing a substantially automated tax calculation for the following taxtypes: Value-Added Tax (VAT), Sales and Use Tax, Withholding Tax. The system also provides a reporting tool thatgives you effective control over your obligatory declaration of these taxes.For more information, see Tax Determination [page 9]
Tasks
Create a Correction Invoice
This document contains text that is specific to Germany only.
1. Select the released invoice you want to correct.2. Click Follow-Up and then Correction Invoice. The items of the released invoice are
transferred to a new correction invoice request.
SAP Business ByDesign February 2017Customer Invoicing P U B L I C • © 2017 SAP SE or an SAP affiliate company. All rights reserved. 179
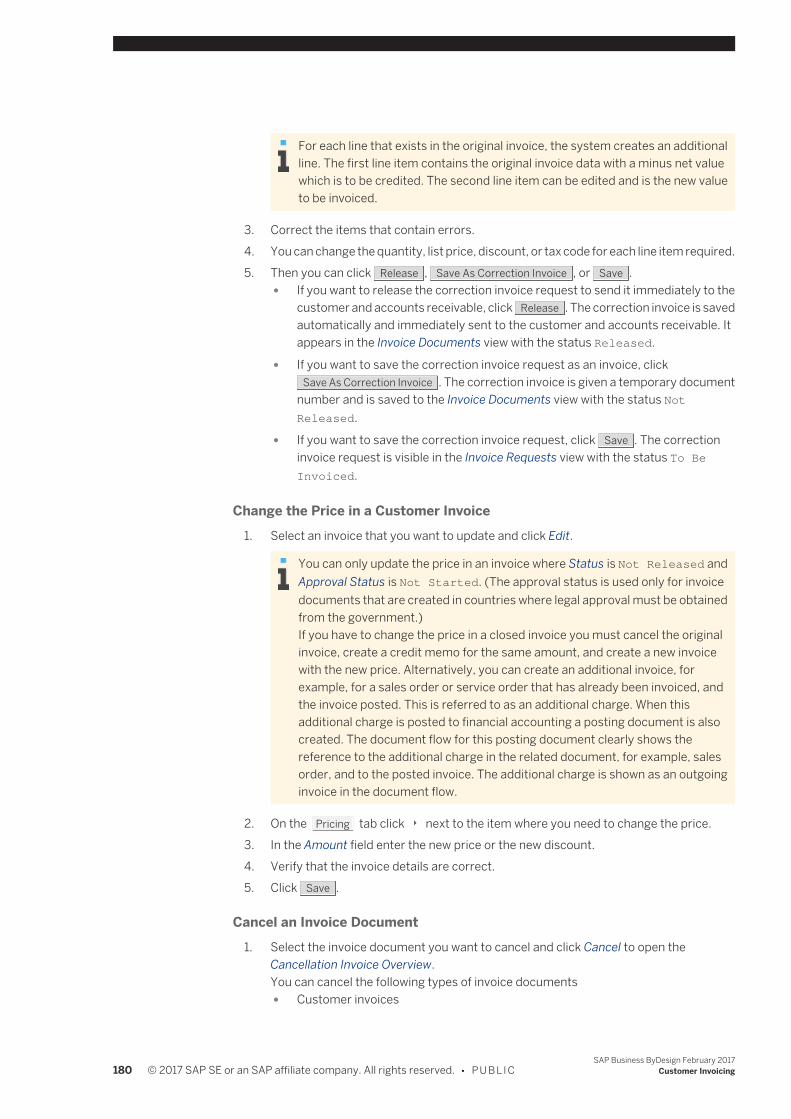
For each line that exists in the original invoice, the system creates an additionalline. The first line item contains the original invoice data with a minus net valuewhich is to be credited. The second line item can be edited and is the new valueto be invoiced.
3. Correct the items that contain errors.4. You can change the quantity, list price, discount, or tax code for each line item required.5. Then you can click Release , Save As Correction Invoice , or Save .
● If you want to release the correction invoice request to send it immediately to thecustomer and accounts receivable, click Release . The correction invoice is savedautomatically and immediately sent to the customer and accounts receivable. Itappears in the Invoice Documents view with the status Released.
● If you want to save the correction invoice request as an invoice, clickSave As Correction Invoice . The correction invoice is given a temporary document
number and is saved to the Invoice Documents view with the status NotReleased.
● If you want to save the correction invoice request, click Save . The correctioninvoice request is visible in the Invoice Requests view with the status To BeInvoiced.
Change the Price in a Customer Invoice1. Select an invoice that you want to update and click Edit.
You can only update the price in an invoice where Status is Not Released andApproval Status is Not Started. (The approval status is used only for invoicedocuments that are created in countries where legal approval must be obtainedfrom the government.)If you have to change the price in a closed invoice you must cancel the originalinvoice, create a credit memo for the same amount, and create a new invoicewith the new price. Alternatively, you can create an additional invoice, forexample, for a sales order or service order that has already been invoiced, andthe invoice posted. This is referred to as an additional charge. When thisadditional charge is posted to financial accounting a posting document is alsocreated. The document flow for this posting document clearly shows thereference to the additional charge in the related document, for example, salesorder, and to the posted invoice. The additional charge is shown as an outgoinginvoice in the document flow.
2. On the Pricing tab click next to the item where you need to change the price.3. In the Amount field enter the new price or the new discount.4. Verify that the invoice details are correct.5. Click Save .
Cancel an Invoice Document1. Select the invoice document you want to cancel and click Cancel to open the
Cancellation Invoice Overview.You can cancel the following types of invoice documents ● Customer invoices
180 © 2017 SAP SE or an SAP affiliate company. All rights reserved. • P U B L I CSAP Business ByDesign February 2017
Customer Invoicing

● Customer correction invoices ● Customer credit memos ● Customer down payments
2. Click View All to open the Cancellation Invoice editor.3. Check that the details in the cancellation invoice are correct and make any necessary
changes.4. Click Save to save your changes and release the cancellation invoice.
The system creates a new cancellation invoice with its own ID. The invoice documentis canceled and a new cancellation invoice is created with its own document number.The original invoice document is displayed with status Canceled in the InvoiceDocuments worklist, and a cancellation invoice is added to the Invoice Documentsworklist: ● If the canceled invoice is released, the system changes the status of the original
invoicing document to Release Canceled. Check the document flow to see thecancellation invoice document number. The cancellation invoice has the statusReleased.
● If the canceled invoice is not released, the system changes the status of the originalinvoicing document and the cancellation invoice to Release Discarded.
If you want to cancel an invoice that has already been paid, the corresponding clearingneeds to be canceled first. To do this, go to the Receivables work center and click Customers Customer Accounts (Customer Account Monitor) . Select therespective clearing that involves the invoice you want to cancel, and cancel it. After this,you can cancel your invoice as described above. For more information, see Cancelinga Customer Invoice
Process Down Payment RequestsThis task is relevant if you and your customer have agreed that the customer pay a part of thetotal amount at the time of purchase or before order fulfillment, and a down payment requesthas been created for this purpose. After the customer has paid the down payment and theopen item receivable has been cleared, the down payment request is listed here in the InvoiceDocuments view under Open Down Payment Requests. You need to check this list so that youcan continue the fulfilment process by removing the delivery block from the related sales orderor the execution block from the related service order.
The sales or service order number must have been entered previously in theDescription field on the Agreement tab of the down payment request.
1. In the Invoice Documents view, choose Open Down Payment Requests in the dropdownlist box.
2. Click the Down Payment Status column heading to sort the documents. You can thengo through those documents where the Down Payment Status is Not Planned orPartially Planned.
3. Select a document and click Edit .4. Click View All and go to the Agreement tab. Note down the sales order or service order
ID in the Description field.
SAP Business ByDesign February 2017Customer Invoicing P U B L I C • © 2017 SAP SE or an SAP affiliate company. All rights reserved. 181

5. Go to the Sales Orders or Service Orders work center to edit the order, and remove theDelivery Block or Execution Block so that the order can be fulfilled.
You can also use this worklist to search for a particular down payment request. To dothis, click , and enter the sales order or service order ID in the Down PaymentDescription field.
For more information on working with down payments, see Down Payments From Customers [page 58].
Create a Task, Notification, or AlertFor information about this task, see here.
Export Invoice Documents to Microsoft ExcelFor information about this task, see here [page 82].Perform Common Tasks
Compare InvoicesYou can use Split Analysis to view the difference between the selected invoices based on thesplit criteria before creating a single invoice document.
Create a Manual Invoice1. Under Common Tasks choose New Manual Invoice and the system opens a New Manual
Invoice Request.2. Enter the account details.
In the Account field, enter the account number. The system automatically displays therelated master data under Account, Main Contact, Employee Responsible, and PaymentTerms. To see this you have to click on View All . If necessary, click Open SelectDialog icon to search for the account.
● If the invoice is associated with a new account, click New to generate anaccount number and enter the relevant data.
● The system automatically enters the current date. You can change thisdate providing the accounting period is open and other restrictions aremet. When you save the invoice, the new date appears on the invoice andis used by financials. The invoice date is taken at the Tax Due Date. If youwant to declare taxes for a different period, you can enter a date thatdeviates from the invoice date in the Deviating Tax Due Date. For moreinformation about the tax due date, see Tax Due Date.
● If payment details such as direct debit are available for the account, thesystem displays the corresponding payment details and you can changethem if required. For more information about direct debit, see IncomingPayments by SEPA Direct Debit.
3. Enter the product details.Under Items, enter the details of the products associated with the invoice.1. Click Add Row to create a new row in the table.
182 © 2017 SAP SE or an SAP affiliate company. All rights reserved. • P U B L I CSAP Business ByDesign February 2017
Customer Invoicing

2. Enter a product ID. The system displays the related product description andcategory.
3. Enter the required quantity of the product. The system calculates and displays theexpected value. Repeat the steps outlined above to add information about otherproducts.
Tax is always calculated on the basis of the net price; the net price alsoincludes freight charges. Non-taxable freights must be entered in thepreceding document as service items to ensure that they are excluded whentax is calculated. For more information about non-taxable freights ininvoices, see Handling of Taxable and Non-Taxable Freights in Invoices inCustomer Invoice Processing [page 140].
4. At the top of the New Manual Invoice Request you can click Release , Save orSave as Invoice .
● If you want the invoice to be released to financials and the customer, clickRelease . The system saves the manual invoice, releases it to financials, and adds
it to the list in the Invoice Documents view with status Released. To open the invoicefrom this list, click the appropriate invoice ID link.
If there is a threshold defined, and the invoice exceeds that threshold, thesystem initiates, depending on the business configuration, an approvalprocess. In this case when the invoice is released, the invoice document issaved in Invoice Documents view with status In Approval. When the approvalprocess is finished the invoice is automatically released.
● If you want to preview the document as a PDF before releasing and sending it tothe customer, click Save . The manual invoice request is given an officialdocument number and is saved in the Invoice Requests view with the status To BeInvoiced.
● If you want to save the manual invoice as a draft, click Save as Invoice . Thecustomer invoice document is given a document number and saved in the InvoiceDocuments view with the status Not Released.
Create a Manual Credit Memo With or Without Reference
1. To create a manual credit memo, you have the following possibilities: ● Under Common Tasks choose the New Manual Credit Memo. ● In the Invoice Documents view you can copy an existing credit memo as a template.
The system automatically retrieves the values and content from the original creditmemo and opens a New Manual Credit Memo Request. You can change the valuesentered in all the fields.
● Create a manual credit memo based on an existing invoice:In the Invoice Documents view select the invoice for which you want to create acredit memo, click Follow-Up and select Manual Credit Memo.All the content is automatically filled out in the New Manual Credit MemoRequest screen.
2. Now you can enter or change the data as required:1. Click View All to view more detailed information on the down payment request.2. On the General screen, enter an account.
SAP Business ByDesign February 2017Customer Invoicing P U B L I C • © 2017 SAP SE or an SAP affiliate company. All rights reserved. 183

The system displays the address of the company as well as the currency, paymentterms, and the employee responsible for the account. You can change any of thesefields, if required.
3. Enter a reason for the credit memo under Internal Comment or, if you want thisinformation to be printed on the credit memo, enter it in the CustomerInformation section.
4. Add attachments to the manual credit memo, if required. These can be printedout later and sent with the manual credit memo form.
5. On the Items screen, enter one or more product IDs, or select the items that arenot relevant to the credit memo and click Delete .The system retrieves the data for the entered products such as Description, ListPrice, and currency. You can overwrite this information, if necessary and you canalso add a Discount.
6. Check whether the Tax Code proposed by the system is what you require.7. On the Involved Parties screen, check the organizational assignments such as bill-
to party or ship-to party.3. Then you can click Release , Save , or Save As Credit Memo .
● If you want to release the manual credit memo to send it to the customer andaccounts receivable immediately, click Release . The manual credit memo issaved and sent to the customer and accounts receivable. It appears in the InvoiceDocuments view with the status Released.
If there is a defined threshold, and the credit memo exceeds that threshold,the system initiates, depending on your business configuration, an approvalprocess. When the approval process is finished the credit memo isautomatically released.
● If you want to preview the document as a PDF before releasing and sending it tothe customer, click Save . The manual credit memo request is given an officialdocument number and is saved in the Invoice Requests view with the status To BeInvoiced.
● If you want to save the credit memo as a draft, click Save As Credit Memo . Themanual credit memo is given a temporary document number and is saved in theInvoice Documents view with the status Not Released.
Create a Down Payment Request
1. Under Common Tasks choose New Down Payment Request.2. Click View All to view more detailed information on the down payment request.3. Enter an account. The system fills in the general data, tax details, and payment terms.
Only one tax rate can be entered for a down payment. If you require several taxrates, create a down payment request for each tax rate.
4. On the General tab, check the information on organizational assignments such as thebill-to party and ship-to party.
5. You can specify the reconciliation account to be used for down payments that are madeby the customer. To do this, select it in the Reconciliation Account field underAccounting.
184 © 2017 SAP SE or an SAP affiliate company. All rights reserved. • P U B L I CSAP Business ByDesign February 2017
Customer Invoicing

6. Enter an Internal Comment or Customer Information. The information you enter in theCustomer Information section is included in the down payment request form that is tothe customer.
7. Add attachments to the down payment request. These can be printed out and sentalong with the down payment request form.
8. On the Agreement tab, assign the sales order or service order ID to the down paymentrequest by entering the sales or service order ID in the Description field. For example,you can enter Down payment of 10% for sales order 42233340314.
This information makes it clear to the customer which business transaction thedown payment request is based on. You can also use this information to searchfor the down payment request later on in the Invoice Documents view.
9. Enter the amount and specify whether this amount is net or gross.10. Check whether the tax code proposed by the system is the one you require. You can
change it, if necessary.11. Release the down payment request.
The down payment request form is printed out automatically. Print out the orderconfirmation of the sales or service order to which the down payment is related. Sendthem both to the customer.
Create an Invoice Run
1. To create an invoice run you have the following possibilities: ● In the Invoice Runs view click New , then select Invoice Run. ● Under Common Tasks click New Invoice Run.
2. Under General Data, enter the general data used to identify the invoice run.1. In the Run ID field enter the run ID.2. In the Run Description filed enter the run description.
3. Under Split By, you can select how the invoice documents shall be split up.4. Under Invoice Properties, you can define how the invoice documents shall be
processed.1. Enter the Invoice Date Offset to calculate the dates for your invoice documents.2. Select the Automatic Release checkbox to automatically release the invoice
document to financials.5. Under Selection Criteria, you can set a Date Offset and filter for Accounts, Sellers, and
Preceding Documents by using search patterns.6. At the top of the New Invoice Run, click Save .7. To activate the invoice run, click Actions and select Set To Active.
Under Execution Details, you can view the invoices created and the exceptionsgenerated in an invoice run.
Create a Recurring Invoice Template1. To create a recurring invoice template you have the following possibilities:
● In the Recurring Invoice Templates view click New , then select Recurring InvoiceTemplate.
● Under Common Tasks click New Recurring Invoice Template.
SAP Business ByDesign February 2017Customer Invoicing P U B L I C • © 2017 SAP SE or an SAP affiliate company. All rights reserved. 185

2. Enter account and product-related data. ● Under Account in the Name field enter the name of the account. The system
automatically displays the address, currency, payment terms and the employeeresponsible for the account. You can change any of these fields if required. Ifnecessary, click the Open Select Dialog icon to search for the account.
● Under General, in the Description field enter a description for your recurringinvoice.
● Under Items, enter one or more product IDs.The system automatically retrieves the product data: description and list price. Ifrequired, you can change both these fields.
● If necessary, enter a quantity and a discount. The system adjusts the net price andtotal net value accordingly.
You can also maintain a recurring invoice with an item without a product ID. Inthis case, you must maintain the following fields:
● Description (for example, monthly leasing rate) ● List Price (amount of the monthly leasing rate) ● Tax Code ● G/L Account
3. Enter the recurrence details.Under Recurrence, specify the recurrence type by choosing either a recurrence patternor individual dates.Depending on your selection, additional fields appear dynamically. ● If you choose a recurrence pattern, under Recurrence Pattern, enter the details of
the pattern, for example, the start and end dates, the recurrence, and the day ofthe month.
● If you choose individual dates, under Individual Dates, enter particular dates forthe recurring invoice.
4. Save the recurring invoice template.a. Click Save to save the recurring invoice.
The system sets the status of the recurring invoice to In Preparation.b. Click Release .
The system sets the status of the recurrence invoice to Released and createsinvoice requests until the end date or until the maximum occurrences defined bythe user is reached.
c. Click Close to return to the Recurring Invoice Templates view.
The new recurring invoice is saved in the system and added to the list in the RecurringInvoice Templates view. To open the recurring invoice from the list, click the appropriaterecurring invoice template ID link. This opens the Recurring Invoice TemplateOverview that displays the requests that have already been invoiced and those that areforecast.
186 © 2017 SAP SE or an SAP affiliate company. All rights reserved. • P U B L I CSAP Business ByDesign February 2017
Customer Invoicing

● The recurring invoice requests appear in the Invoice Requests view. The numberof the invoice requests listed here is limited by a horizon defined by the system.Once the last listed request has been invoiced, the other appear automatically.Invoice requests further than one year in the future are not created.
● You can find the requests related to a specific invoice in the Invoice Requestsview by entering the recurring invoice template ID into the basic search.
Create a Credit Card Authorization Run1. To create a credit card authorization run you have the following possibilities:
● In the Credit Card Authorization Runs view click New and select Credit CardAuthorization Run.
● Under Common Tasks choose New Credit Card Authorization Run.2. Under General Data, enter the general information used to identify the credit card
authorization run: ● In the Run ID field enter the run ID.
● In the Run Definition field enter the run definition.3. In the Source Document field enter the document type you want to include in the run
such as a sales order or a service order.4. Enter the business partner selection parameters for the business partners you want to
include in the credit card authorization run.5. Click Save .6. Click Actions and select Set to Active to activate the new credit card authorization
run.The system saves the new credit card authorization run, activates it, and adds it to thelist in the Credit Card Authorization Runs view. To open one from the list, click theappropriate credit card authorization run ID link.
4.6 Invoice Requests View
4.6.1 Quick Guide for Invoice Requests
In the Invoice Requests view of the Customer Invoicing work center you are able to see all the items requiring attention,including those that can be dealt with through automatic processing and those that require your individual attention.You also want to be able to track the origin of each request.You can process all requests which are ready for invoicing and create invoicing documents by using the simple oradvanced creation.Also, you can display data in the Invoice Requests worklist as a chart using the analytical view function. This functionhelps you to get a quick overview of all data in the worklist.
SAP Business ByDesign February 2017Customer Invoicing P U B L I C • © 2017 SAP SE or an SAP affiliate company. All rights reserved. 187

Since your company has selected the Buy, Sell, and Administrate implementation focus, there will be slightdifferences between your solution and the standard as outlined below. For more information, see WhatWorks Differently in Buy, Sell, and Administrate.If your system has not been deployed, all information is shown because there is no scoping-relevant filter.
This document contains text that is relevant for Mexico only. To ensure that the system displays the correct text,select Personalize My Settings . Select the On-screen Help and choose Mexico in the Country drop-down menu.Save your settings and logout to ensure the changes are made.
Business Background
Customer Invoice ProcessingInvoices are created, either manually or as part of an invoice run, for the delivery of products or the provision ofservices and are used for charging customers. They result from predecessor documents such as sales orders, serviceorders, and service confirmations. It is also possible to create manual invoicing documents such as manual invoice,credit memo, and down payment requests without reference to preceding business transaction documents outsideCustomer Invoicing.For more information, see Customer Invoice Processing [page 140].
Kits Process FlowFor more information, see Kits Process Flow [page 48]
Approval for Manual Customer Invoice and Credit MemoThe approval process for manual customer invoice and credit memo documents can be enabled and defined. Whena manual customer invoice or credit memo is released, it is submitted for an approval. For more information see,Approval for Manual Customer Invoice and Credit Memo [page 51].
Down Payments from CustomersDown Payment from Customers [page 58]
Numbering of Customer Invoicing DocumentsFor more information, seeNumbering of Customer Invoicing Documents [page 153].
Tax DeterminationAs a rule, companies are legally required to calculate taxes on products that they buy or sell, and to levy these taxesfrom their customers. After the products have been provided, the taxes must be declared and levied to the respectivetax authorities. The system supports you by providing a substantially automated tax calculation for the following taxtypes: Value-Added Tax (VAT), Sales and Use Tax, Withholding Tax. The system also provides a reporting tool thatgives you effective control over your obligatory declaration of these taxes.For more information, see Tax Determination [page 9]
188 © 2017 SAP SE or an SAP affiliate company. All rights reserved. • P U B L I CSAP Business ByDesign February 2017
Customer Invoicing

Tasks
Create a Customer Invoice1. Choose the Invoice Requests view.2. Select an invoice request.
You can also select more than one invoice requests for invoicing.
3. Click Invoice .You can also click Invoice — Advanced if you want to use advanced adjustments. Forexample, you can use advanced adjustments if you want to select several invoicerequests, maintain a common invoice date, but you want to split the invoice by relatedsales or service order.A New Invoice screen appears which displays the new invoice document or a list ofinvoice documents created as a result of invoice split.
● The splitting of invoice takes place if the values of even one of the splitparameters is not identical for the selected invoice requests, and it isbased on both the SAP delivered split criteria and the customized splitrule.
● You can create the customized split rules using a fine-tuning activity inBusiness Configuration work center.To find this activity, go to the Business Configuration work center andchoose the Implementation Projects view. Select your implementationproject and click Open Activity List . Select the Fine-Tuning phase, thenselect the Customer Invoice Split Rule activity from the activity list. Youcan create split rules with one or more split parameters, however notmore than one rule can contain the same set of split parameters. Theextension fields added to the invoice request items in Invoice Requestwork center view can also be used as split parameters in the customizedsplit rules. The extension fields of the invoice request items show up inthe list of split parameters on Customer Invoice Split Rule activity. Youcan set only one split rule to active at any given instance and the activesplit rule which caused the invoice split is displayed on New Invoicescreen.
● You can also use Split Analysis to view the difference between theselected invoice requests based on the split criteria. The parameters withdifferent values, on the basis of which the invoice requests are split intoseveral invoices, will be displayed. This button will only be visible if thereare differences between the selected invoice requests. For moreinformation on SAP delivered split criteria and list of split parametersspecific to customized split rules, see Customer Invoice Processing[page 140].
4. For a kit item check the Item tab to see if the Parent Line and Product ID are filled outand then click View All
SAP Business ByDesign February 2017Customer Invoicing P U B L I C • © 2017 SAP SE or an SAP affiliate company. All rights reserved. 189

● The kit components cannot be edited. You can display the hidden columnParent Line in items table from Personalize This Screen to view thekit hierarchy (relationship between kit and its components).
● Pricing and taxing is applicable only on the kit header. ● If predecessor documents such as sales orders, service orders, and
service confirmations were created before master data change in bill-toaddress, then the change is not reflected in the invoices. The changeswould be visible if it is scoped.
5. If necessary, change the invoice date of the invoice to a future date. ● To change the invoice date, click the button on the right of the Invoice Date field
and choose the new date from the calendar. ● In case you want to change the Deviate Tax Due Date, click View All .
The logic of the deviate tax due date field is as follows: ○ If you enter a date in this field, this date is used as the tax due date. ○ If this field remains empty, the invoice date is used as the tax due date.
Example of accruals and deferrals during a change of fiscal year: A service wasprovided on December 28, 2008, and the customer invoice was issued on January5, 2009. If no deviate tax due date is entered, the tax is reported in January. If youwant the tax to be reported in December, you have to enter a deviate tax due date.For more information about the tax due date see: Tax Due Date.
6. At the top of the new invoice click Release to release the new invoice.
You can also click Save to save the new invoice. This saves the invoice to thesystem but does not release the invoice to the customer.
7. The invoice request is processed and a new invoice is saved to the system, released tofinancials, and added to the list in the Invoice Documents view. To open the invoice fromthis list, click the appropriate invoice ID link.
When an invoice request for a kit is released, the financial posting will happenonly at the kit header, that is, the header price is posted.For manual customer invoice, if there is a threshold defined, and the invoiceexceeds that threshold, the system initiates, depending on the businessconfiguration, an approval process. In this case when the invoice is released, theinvoice document is saved in Invoice Documents view with status In Approval.When the approval process is finished the invoice is automatically released.
Delete a Manually Created Invoice Request1. Choose the Invoice Requests view.2. Select the manually created invoice request that you want to delete, such as a manual
invoice, a manual credit memo, or a down payment invoice request.3. Click Delete .
The status of the invoice request changes to Processed and after you refresh thescreen, the request disappears.
190 © 2017 SAP SE or an SAP affiliate company. All rights reserved. • P U B L I CSAP Business ByDesign February 2017
Customer Invoicing

Display Graphical Analysis of an Invoice Requests Worklist1. In the worklist, from the Group By dropdown list, choose a criterion by which to group
data.2. To view all data from the worklist in the Analytical View section, click the chart icon next
to the filter icon.3. In the Analytical View section, choose a chart type to display the data.4. Double-click a data section in the chart to filter the original worklist.
You can clear the filter by clicking Back to Full Chart in the Analytical Viewsection or deleting the filter content in the worklist.
For some worklists, such as the Opportunities worklist in the Opportunity List view inthe New Business work center, you can aggregate the grouped data using differentcriterion (for example, expected value). You can then select different analysis methods(for example, count, sum, average, maximum, or minimum) to sort the data, and choosedifferent chart types to present the data from the worklist.
Create a Task, Notification, or AlertFor information about this task, see here.
Export Invoice Requests to Microsoft ExcelFor information about this task, see here [page 82].
Perform Common Tasks
Preview an InvoiceYou can use Preview for all Invoice Request Type with the status To be Invoiced. The previewof the invoice is only a simulation of the customer invoice.
Create a Manual Invoice1. Under Common Tasks choose New Manual Invoice and the system opens a New Manual
Invoice Request.2. Enter the account details.
In the Account field, enter the account number. The system automatically displays therelated master data under Account, Main Contact, Employee Responsible, and PaymentTerms. To see this you have to click on View All . If necessary, click Open SelectDialog icon to search for the account.
SAP Business ByDesign February 2017Customer Invoicing P U B L I C • © 2017 SAP SE or an SAP affiliate company. All rights reserved. 191

● If the invoice is associated with a new account, click New to generate anaccount number and enter the relevant data.
● The system automatically enters the current date. You can change thisdate providing the accounting period is open and other restrictions aremet. When you save the invoice, the new date appears on the invoice andis used by financials. The invoice date is taken at the Tax Due Date. If youwant to declare taxes for a different period, you can enter a date thatdeviates from the invoice date in the Deviating Tax Due Date. For moreinformation about the tax due date, see Tax Due Date.
● If payment details such as direct debit are available for the account, thesystem displays the corresponding payment details and you can changethem if required. For more information about direct debit, see IncomingPayments by SEPA Direct Debit.
3. Enter the product details.Under Items, enter the details of the products associated with the invoice.1. Click Add Row to create a new row in the table.2. Enter a product ID. The system displays the related product description and
category.3. Enter the required quantity of the product. The system calculates and displays the
expected value. Repeat the steps outlined above to add information about otherproducts.
Tax is always calculated on the basis of the net price; the net price alsoincludes freight charges. Non-taxable freights must be entered in thepreceding document as service items to ensure that they are excluded whentax is calculated. For more information about non-taxable freights ininvoices, see Handling of Taxable and Non-Taxable Freights in Invoices inCustomer Invoice Processing [page 140].
4. At the top of the New Manual Invoice Request you can click Release , Save orSave as Invoice .
● If you want the invoice to be released to financials and the customer, clickRelease . The system saves the manual invoice, releases it to financials, and adds
it to the list in the Invoice Documents view with status Released. To open the invoicefrom this list, click the appropriate invoice ID link.
If there is a threshold defined, and the invoice exceeds that threshold, thesystem initiates, depending on the business configuration, an approvalprocess. In this case when the invoice is released, the invoice document issaved in Invoice Documents view with status In Approval. When the approvalprocess is finished the invoice is automatically released.
● If you want to preview the document as a PDF before releasing and sending it tothe customer, click Save . The manual invoice request is given an officialdocument number and is saved in the Invoice Requests view with the status To BeInvoiced.
● If you want to save the manual invoice as a draft, click Save as Invoice . Thecustomer invoice document is given a document number and saved in the InvoiceDocuments view with the status Not Released.
192 © 2017 SAP SE or an SAP affiliate company. All rights reserved. • P U B L I CSAP Business ByDesign February 2017
Customer Invoicing

Create Invoice Request with Invoice Items and Credit Memo Items ● The invoice request can contain both invoice and credit memo items, you can do so by
specifying the item type to be either Invoice Item or Credit Memo Item in the Type fieldwhile creating an invoice request.
You can enable Type field from Personalize >> This Screen, under Items section.
● The customer invoice requests and credit memo requests can be combined into a singleinvoice document, provided the invoice-split parameters match. You can do this byselecting the invoice requests and credit memo requests in To Be Invoiced status in theInvoice Requests view and clicking on Invoice .
● You can enable this feature from the Business Configuration work center,Implementation Projects view, by scoping-in the business option Invoice and CreditMemo Items in Customer Invoice Request under the scoping element MiscellaneousInvoicing in Customer Invoicing under Sales.
Configuration settings are usually performed by an administrator. If you do nothave the required authorization, contact your administrator.
The customer invoice requests or invoices containing both invoice items and creditmemo items have the following limitations:
● Cash discount is not allowed during payment of invoice documents containinginvoice and credit memo items.
● Creating follow-up documents is not permitted. ● Copy operation is not allowed.
Create a Manual Credit Memo With or Without Reference
1. To create a manual credit memo, you have the following possibilities: ● Under Common Tasks choose the New Manual Credit Memo. ● In the Invoice Documents view you can copy an existing credit memo as a template.
The system automatically retrieves the values and content from the original creditmemo and opens a New Manual Credit Memo Request. You can change the valuesentered in all the fields.
● Create a manual credit memo based on an existing invoice:In the Invoice Documents view select the invoice for which you want to create acredit memo, click Follow-Up and select Manual Credit Memo.All the content is automatically filled out in the New Manual Credit MemoRequest screen.
2. Now you can enter or change the data as required:1. Click View All to view more detailed information on the down payment request.2. On the General screen, enter an account.
The system displays the address of the company as well as the currency, paymentterms, and the employee responsible for the account. You can change any of thesefields, if required.
SAP Business ByDesign February 2017Customer Invoicing P U B L I C • © 2017 SAP SE or an SAP affiliate company. All rights reserved. 193

3. Enter a reason for the credit memo under Internal Comment or, if you want thisinformation to be printed on the credit memo, enter it in the CustomerInformation section.
4. Add attachments to the manual credit memo, if required. These can be printedout later and sent with the manual credit memo form.
5. On the Items screen, enter one or more product IDs, or select the items that arenot relevant to the credit memo and click Delete .The system retrieves the data for the entered products such as Description, ListPrice, and currency. You can overwrite this information, if necessary and you canalso add a Discount.
6. Check whether the Tax Code proposed by the system is what you require.7. On the Involved Parties screen, check the organizational assignments such as bill-
to party or ship-to party.3. Then you can click Release , Save , or Save As Credit Memo .
● If you want to release the manual credit memo to send it to the customer andaccounts receivable immediately, click Release . The manual credit memo issaved and sent to the customer and accounts receivable. It appears in the InvoiceDocuments view with the status Released.
If there is a defined threshold, and the credit memo exceeds that threshold,the system initiates, depending on your business configuration, an approvalprocess. When the approval process is finished the credit memo isautomatically released.
● If you want to preview the document as a PDF before releasing and sending it tothe customer, click Save . The manual credit memo request is given an officialdocument number and is saved in the Invoice Requests view with the status To BeInvoiced.
● If you want to save the credit memo as a draft, click Save As Credit Memo . Themanual credit memo is given a temporary document number and is saved in theInvoice Documents view with the status Not Released.
Create a Down Payment Request
1. Under Common Tasks choose New Down Payment Request.2. Click View All to view more detailed information on the down payment request.3. Enter an account. The system fills in the general data, tax details, and payment terms.
Only one tax rate can be entered for a down payment. If you require several taxrates, create a down payment request for each tax rate.
4. On the General tab, check the information on organizational assignments such as thebill-to party and ship-to party.
5. You can specify the reconciliation account to be used for down payments that are madeby the customer. To do this, select it in the Reconciliation Account field underAccounting.
6. Enter an Internal Comment or Customer Information. The information you enter in theCustomer Information section is included in the down payment request form that is tothe customer.
194 © 2017 SAP SE or an SAP affiliate company. All rights reserved. • P U B L I CSAP Business ByDesign February 2017
Customer Invoicing

7. Add attachments to the down payment request. These can be printed out and sentalong with the down payment request form.
8. On the Agreement tab, assign the sales order or service order ID to the down paymentrequest by entering the sales or service order ID in the Description field. For example,you can enter Down payment of 10% for sales order 42233340314.
This information makes it clear to the customer which business transaction thedown payment request is based on. You can also use this information to searchfor the down payment request later on in the Invoice Documents view.
9. Enter the amount and specify whether this amount is net or gross.10. Check whether the tax code proposed by the system is the one you require. You can
change it, if necessary.11. Release the down payment request.
The down payment request form is printed out automatically. Print out the orderconfirmation of the sales or service order to which the down payment is related. Sendthem both to the customer.
Create an Invoice Run
1. To create an invoice run you have the following possibilities: ● In the Invoice Runs view click New , then select Invoice Run. ● Under Common Tasks click New Invoice Run.
2. Under General Data, enter the general data used to identify the invoice run.1. In the Run ID field enter the run ID.2. In the Run Description filed enter the run description.
3. Under Split By, you can select how the invoice documents shall be split up.4. Under Invoice Properties, you can define how the invoice documents shall be
processed.1. Enter the Invoice Date Offset to calculate the dates for your invoice documents.2. Select the Automatic Release checkbox to automatically release the invoice
document to financials.5. Under Selection Criteria, you can set a Date Offset and filter for Accounts, Sellers, and
Preceding Documents by using search patterns.6. At the top of the New Invoice Run, click Save .7. To activate the invoice run, click Actions and select Set To Active.
Under Execution Details, you can view the invoices created and the exceptionsgenerated in an invoice run.
Create a Recurring Invoice Template1. To create a recurring invoice template you have the following possibilities:
● In the Recurring Invoice Templates view click New , then select Recurring InvoiceTemplate.
● Under Common Tasks click New Recurring Invoice Template.
2. Enter account and product-related data. ● Under Account in the Name field enter the name of the account. The system
automatically displays the address, currency, payment terms and the employee
SAP Business ByDesign February 2017Customer Invoicing P U B L I C • © 2017 SAP SE or an SAP affiliate company. All rights reserved. 195

responsible for the account. You can change any of these fields if required. Ifnecessary, click the Open Select Dialog icon to search for the account.
● Under General, in the Description field enter a description for your recurringinvoice.
● Under Items, enter one or more product IDs.The system automatically retrieves the product data: description and list price. Ifrequired, you can change both these fields.
● If necessary, enter a quantity and a discount. The system adjusts the net price andtotal net value accordingly.
You can also maintain a recurring invoice with an item without a product ID. Inthis case, you must maintain the following fields:
● Description (for example, monthly leasing rate) ● List Price (amount of the monthly leasing rate) ● Tax Code ● G/L Account
3. Enter the recurrence details.Under Recurrence, specify the recurrence type by choosing either a recurrence patternor individual dates.Depending on your selection, additional fields appear dynamically. ● If you choose a recurrence pattern, under Recurrence Pattern, enter the details of
the pattern, for example, the start and end dates, the recurrence, and the day ofthe month.
● If you choose individual dates, under Individual Dates, enter particular dates forthe recurring invoice.
4. Save the recurring invoice template.a. Click Save to save the recurring invoice.
The system sets the status of the recurring invoice to In Preparation.b. Click Release .
The system sets the status of the recurrence invoice to Released and createsinvoice requests until the end date or until the maximum occurrences defined bythe user is reached.
c. Click Close to return to the Recurring Invoice Templates view.
The new recurring invoice is saved in the system and added to the list in the RecurringInvoice Templates view. To open the recurring invoice from the list, click the appropriaterecurring invoice template ID link. This opens the Recurring Invoice TemplateOverview that displays the requests that have already been invoiced and those that areforecast.
● The recurring invoice requests appear in the Invoice Requests view. The numberof the invoice requests listed here is limited by a horizon defined by the system.Once the last listed request has been invoiced, the other appear automatically.Invoice requests further than one year in the future are not created.
● You can find the requests related to a specific invoice in the Invoice Requestsview by entering the recurring invoice template ID into the basic search.
196 © 2017 SAP SE or an SAP affiliate company. All rights reserved. • P U B L I CSAP Business ByDesign February 2017
Customer Invoicing

Create a Credit Card Authorization Run1. To create a credit card authorization run you have the following possibilities:
● In the Credit Card Authorization Runs view click New and select Credit CardAuthorization Run.
● Under Common Tasks choose New Credit Card Authorization Run.2. Under General Data, enter the general information used to identify the credit card
authorization run: ● In the Run ID field enter the run ID.
● In the Run Definition field enter the run definition.3. In the Source Document field enter the document type you want to include in the run
such as a sales order or a service order.4. Enter the business partner selection parameters for the business partners you want to
include in the credit card authorization run.5. Click Save .6. Click Actions and select Set to Active to activate the new credit card authorization
run.The system saves the new credit card authorization run, activates it, and adds it to thelist in the Credit Card Authorization Runs view. To open one from the list, click theappropriate credit card authorization run ID link.
4.6.2 Create a Customer Invoice — Mexico
Overview
This document contains text that is relevant for Mexico. To ensure that the system displays the correct text,select Personalize My Settings . Select Onscreen Help and, under Country, choose Mexico. Save yoursettings and logout to ensure these changes are made.
4.7 Point-of-Sale Transactions View
4.7.1 Point-of-Sale Transactions Quick Guide
The Point-of-Sale Transactions view allows you to process external product sales and cash transactions.You can access the Point-of-Sale Transactions view from the Customer Invoicing work center.The Point-of-Sale Transactions view contains the following subviews:
Sales TransactionsIn the Sales Transactions subview you can check individual sales transactions for consistency, and correct andrelease them to Inventory Management and Financial Management as appropriate. If required, you can also cancela sales transaction.
SAP Business ByDesign February 2017Customer Invoicing P U B L I C • © 2017 SAP SE or an SAP affiliate company. All rights reserved. 197

Sales SummariesIn the Sales Summaries subview you can check for missing sales transactions by comparing the total number ofsales transactions listed in a specific summary transaction, with the total number of individual sales transactionsthat you actually received.
Cash TransactionsIn the Cash Transactions subview you can check individual cash transactions such as cash transfer or cash balancingtransactions for consistency, and correct and release them to Financial Management as appropriate. If required,you can also cancel a cash transaction.
Business Background
Point-of-Sale Transaction ProcessingThe Point-of-Sale Transactions view enables you to process sales transactions and cash transactions, such as, cashtransfer or cash balancing transactions, from an external system. A point-of-sale transaction is typically a businesstransaction that is performed at the point of sale, and subsequently entered in an external (remote) system beforebeing transferred at a point later in time to the SAP Business ByDesign system.If a sales transaction or cash transaction is complete and consistent, it is automatically processed by the systemand forwarded to Financial Management and Inventory Management. However, should the sales transaction or cashtransaction be incomplete or inconsistent, you can use the Sales Transactions and Cash Transactions view to receive,analyze, and process the sales or cash transaction data. You can then display and correct the data before it is releasedto Financial Management and Inventory Management.
For more information, see Point-of-Sale Transaction Processing [page 199].
Tasks
Correct and Release a Sales TransactionFor more information about this task, see here [page 201].
Correct and Release a Cash TransactionFor more information about this task, see here [page 203].
Make a Mass ChangeFor more information about this task, see here [page 204].
Check a Sales SummaryFor more information about this task, see here [page 205].
Export Business Data Using Microsoft Excel®For more information about this task, see here [page 82].
198 © 2017 SAP SE or an SAP affiliate company. All rights reserved. • P U B L I CSAP Business ByDesign February 2017
Customer Invoicing

4.7.2 Business Background
4.7.2.1 Point-of-Sale Transaction Processing
OverviewThe Point-of-Sale Transactions view enables you to process sales transactions and cash transactions, such as, cashtransfer or cash balancing transactions, from an external system. A point-of-sale transaction is typically a businesstransaction that is performed at the point of sale, and subsequently entered in an external (remote) system beforebeing transferred at a point later in time to the SAP Business ByDesign system.If a sales transaction or cash transaction is complete and consistent, it is automatically processed by the systemand forwarded to Financial Management and Inventory Management. However, should the sales transaction or cashtransaction be incomplete or inconsistent, you can use the Sales Transactions and Cash Transactions view to receive,analyze, and process the sales or cash transaction data. You can then display and correct the data before it is releasedto Financial Management and Inventory Management.
If required, you can use the Sales Summaries subview to check for missing sales transactions by viewing salessummaries that are periodically sent by the external system. You can access the Sales Summaries subview from theCustomer Invoicing work center under Sales Summaries.Note that a customer can pay for a sales transaction (purchase) using cash, credit card, or invoice (the customerreceives an invoice that is created in the external system).
If a customer returns a sold item to the point of sale, a new sales transaction will be sent containing a salesitem with associated return reason code, and negative amounts and quantities.The procedure used to process the sales transaction is exactly the same as that for a sales transactioncontaining positive amounts and quantities.
Point-of-Sale Transactions processing supports the sale and redemption of gift certificates.
Prerequisites
Configuration settings are usually performed by an administrator. If you do not have the requiredauthorization, contact your administrator.
● You have obtained a written agreement with SAP or a written agreement between the customer and an SAPapproved third party solution provider for this particular functionality, as it is not included in the SAP BusinessByDesign license.Point of Sales Transactions are enabled in your solution configuration. To find this business option, go to theBusiness Configuration and choose the Implementation Projects view. Select your implementation projectand click Edit Project Scope . In the Scoping step of the project, ensure that the Point-of-Sale is selected withinCustomer Invoicing.In the Questions step, expand the Sales scoping element and select Customer Invoicing. Select Point-of-Sale and answer the questions related to Point-of-Sale integration.
● Verify that all the required master data has been created, for example:
SAP Business ByDesign February 2017Customer Invoicing P U B L I C • © 2017 SAP SE or an SAP affiliate company. All rights reserved. 199

○ Account data
Account data must be regularly synchronized between the external (remote) system, and the SAPBusiness ByDesign system.
○ Material data (for sales of inventory-managed articles)
Material data must be regularly synchronized between the external (remote) system, and the SAPBusiness ByDesign system.
○ Petty cash ○ Clearing house ○ Clearing house account ○ G/L accounts for revenues ○ Projects and corresponding tasks for events that are mapped by the external system ○ Site (for sales of inventory-managed articles) ○ Logistics Area (for sales of inventory-managed articles) ○ Payment terms ○ Credit card data for customers (if needed) ○ Bank account data for the representation of accounts with online payment services (if needed)
Process FlowScenario 1: Sales Transactions
1. The customer makes a purchase from an external distribution channel.The following standard purchase variants are available: ● Purchase using a cash payment ● Purchase by credit card ● Purchase by invoice ● Purchase by credit card without customer data and other payment cards ● Purchase using an online payment service ● Mixed purchase. For example, using a combination of credit card and cash payment
2. The external system starts a batch upload and sends the data to Point-of-Sale Transaction Processing.3. Point-of-Sale Transaction Processing does one of the following:
● If the sales transaction data is inconsistent, the sales transaction is not automatically released, andmanual correction of the data is required before releasing to Financial Management and InventoryManagement.
● If the sales transaction data is consistent, it is automatically released to Financial Management andInventory Management.
Scenario 2: Cash Transactions — Cash Transfer1. The cashier makes a cash transfer from one petty cash to another, for example, from the cash register to the
main safe, and enters the transfer amount in the point-of-sale device.2. The external system starts a batch upload and sends the data to Point-of-Sale Transaction Processing.3. Point-of-Sale Transaction Processing does one of the following:
200 © 2017 SAP SE or an SAP affiliate company. All rights reserved. • P U B L I CSAP Business ByDesign February 2017
Customer Invoicing

● If the cash transfer transaction data is inconsistent, the transaction is not automatically released, andmanual correction of the data is required before releasing to Financial Management.For more information about manual correction, see Correct and Release a Cash Transaction[page 203].
● If the cash transfer transaction data is consistent, it is automatically released to Financial Management.
Scenario 3: Cash Transactions — Cash Balancing1. The cashier counts the amount of cash in a petty cash and enters it in the point-of-sale device. Usually this
happens regularly at the end of a certain time period, for example, a day.2. The external system calculates the difference between the counted amount and the expected amount and
transfers it to Point-of-Sale Transaction Processing.
The absolute amounts (counted and expected) are not transferred to Point-of-Sale TransactionProcessing.
3. Point-of-Sale Transaction Processing does one of the following: ● If the cash balancing transaction data is inconsistent, the transaction is not automatically released, and
manual correction of the data is required before releasing to Financial Management.For more information about manual correction, see Correct and Release a Cash Transaction[page 203].
● If the cash balancing transaction data is consistent, it is automatically released to Financial Management.
See AlsoPoint-of-Sale Transactions Quick Guide [page 197]Point-of-Sale Transaction Processing in Financial Management
4.7.3 Tasks
4.7.3.1 Correct and Release a Sales Transaction
OverviewYou can display and manually correct an incomplete or inconsistent sales transaction before releasing it to FinancialManagement.
If a customer returns a sold item to the point of sale, the sales transaction will contain negative amounts andquantities for the particular item returned. The procedure used to process the transaction is exactly the sameas that for a transaction containing positive amounts and quantities.
A sales transaction can have one of the following statuses: ● Consistent –– the sales transaction is ready for release to Financial Management and Inventory Management ● Inconsistent –– the sales transaction must be analyzed and processed ● Canceled –– the sales transaction is no longer available for processing ● Released –– the sales transaction has been released to Financial Management and Inventory Management
SAP Business ByDesign February 2017Customer Invoicing P U B L I C • © 2017 SAP SE or an SAP affiliate company. All rights reserved. 201

Procedure1. Select Customer Invoicing Point-of-Sale Transactions Sales Transactions .2. In the Show list box, select Sales Transactions That Require Processing (default), and then click Go .3. Select the sales transaction that you wish to process, and then click Edit .
The sales transactions editor screen is displayed.4. Click Check to check the consistency of your sales transaction.
The system displays the errors in your sales transaction.
To check several sales transactions at once, select them from the list and click Check . The systemthen displays the errors for all selected transactions, and you can make a mass change to correct them.
5. Check for any inconsistencies and correct them as appropriate (for example, an invalid Project ID or an invalidG/L Account) :
a. Click the General tab, and review and correct any inconsistencies in the general details.b. Click the following item type tabs, and review and correct the associated item details:
● Sales Items ● Invoice Item ● Tax Items
c. If required, click the Changes tab and review the manual change history of the sales transaction. Notethat changes are only visible if the Changed flag is set to Yes.
If you need certain fields that are not displayed on the screen, click Personalize This Screen . Inthe side panel that opens, select the section where you need the fields, and then select the requiredfields.If the field that you have selected is used for a description, for example iStock Description, and thedescription itself is not displayed on the screen, please check that the description has been maintainedin the master data record in the language that you have logged on with.For more information on personalization, see About Personalization.
6. Click Check to recheck the consistency of your sales transaction.
If for any reason you cannot resolve a particular inconsistency, you can clickCancel Sales Transaction .
If you cancel a sales transaction, you must inform the external system administrator of the cancellation.The external system administrator should then resolve the inconsistency, and retransmit the salestransaction.
7. When your sales transaction passes the consistency check without error, click Save and then Release .
ResultYou have successfully corrected and released your sales transaction to Financial Management, or you have canceledthe transaction and informed the external system administrator of the cancellation.If you have released the sales transaction, if required, the system creates a goods and activity confirmation inInventory Management to post the goods issue and creates a corresponding journal entry in Financial Management.
202 © 2017 SAP SE or an SAP affiliate company. All rights reserved. • P U B L I CSAP Business ByDesign February 2017
Customer Invoicing

To check whether Financial Management documents have been created, search for the sales transaction in the AllSales Transactions view, open the sales transaction, and check the Document Flow .
If an error occurs during processing in Financial Management, a task is created in the General Ledger workcenter (Work view).
See AlsoPoint-of-Sale Transaction Processing [page 199]
4.7.3.2 Correct and Release a Cash Transaction
OverviewYou can display and manually correct an incomplete or inconsistent cash transaction such as a cash transfer or cashbalancing transaction, before releasing it to Financial Management.A cash transaction can have one of the following statuses:
● Consistent –– the cash transaction is ready for release to Financial Management ● Inconsistent –– the cash transaction must be analyzed and processed ● Canceled –– the cash transaction is no longer available for processing ● Released –– the cash transaction has been released to Financial Management
Procedure1. Select Customer Invoicing Point-of-Sale Transactions Cash Transactions .2. In the Show list box, select Cash Transactions That Require Processing, and then click Go .3. Select the cash transaction that you wish to process, and then click Edit .4. Click Check to check the consistency of your cash transaction.
The system displays the errors in your cash transaction.
To check several cash transactions at once, select them from the list and click Check . The systemthen displays the errors for all selected transactions, and you can make a mass change to correct them.
5. Check for any inconsistencies and correct them as appropriate.
If you need certain fields that are not displayed on the screen, click Personalize This Screen . Inthe side panel that opens, select the section where you need the fields, and then select the requiredfields.If the field that you have selected is used for a description, for example iStock Description, and thedescription itself is not displayed on the screen, please check that the description has been maintainedin the master data record in the language that you have logged on with.For more information on personalization, see About Personalization.
6. Click Check to recheck the consistency of your cash transaction.
SAP Business ByDesign February 2017Customer Invoicing P U B L I C • © 2017 SAP SE or an SAP affiliate company. All rights reserved. 203

If for any reason you cannot resolve a particular inconsistency, you can click Cancel to cancel thecash transaction.If you cancel a cash transaction, you must inform the external system administrator of the cancellation.The external system administrator should then resolve the inconsistency, and retransmit the cashtransaction.
7. When your cash transaction passes the consistency check without error, click Save and then Release tosend your transaction to Financial Management.
8. Click Close .
ResultYou have successfully corrected and released your cash transaction to Financial Management, or you have canceledthe transaction and informed the external system administrator of the cancellation.
See AlsoPoint-of-Sale Transaction Processing [page 199]
4.7.3.3 Make a Mass Change
OverviewIf required, you can make appropriate mass changes to multiple selected sales or cash transactions.
Procedure1. Select Customer Invoicing Point-of-Sale Transactions .2. Select Sales Transactions or Cash Transactions, depending on where you want to make the mass change.3. In the Show list box, choose Sales Transactions That Require Processing (or Cash Transactions That Require
Processing), and then click Go .4. Select the group of transactions to which you want to make a mass change.5. Click Mass Change .
The Mass Change editor screen is displayed.6. In the Show list box, choose from the following tab names and enter your changes in the appropriate empty
fields at the top of the table : ● General - to change the following fields:
○ Sales Unit ID ○ Document Header Text ○ Site ID ○ Distribution Channel
● Sales Items – to change the following fields: ○ Project Task ID
204 © 2017 SAP SE or an SAP affiliate company. All rights reserved. • P U B L I CSAP Business ByDesign February 2017
Customer Invoicing

○ G/L Account ○ Sales Item Text ○ Logistics Area ID ○ Product ID ○ Return Reason
● Sales Item Price Components – to change the following fields: ○ Purpose
● Payment Items – to change the following fields: ○ Payment Item Text ○ Petty Cash ID ○ External Payment Bank Account ID
● Invoice Items – to change the following fields: ○ Payment Blocking Reason Code ○ Invoice Item Text
● Cash Items – to change the following fields: ○ Petty Cash ID ○ Payment Item Text ○ G/L Account
You can also directly enter your changes into the editable fields that comprise the table.
7. Select the transactions to which you want to apply your changes.8. Click Apply Mass Change , and choose To Selected Entries.9. Click Save and Close .
ResultYou have applied a set of mass changes to selected sales or cash transactions.
4.7.3.4 Check a Sales Summary
OverviewYou can check sales summaries for inconsistencies and deviations, and accept them or cancel the sales summaryas appropriate.
If you receive an inconsistent sales summary, your only option is to cancel it. You must then inform the externalsystem administrator of the cancellation.
A sales summary can have one of the following statuses: ● Deviation – you must check the reason for the deviation. ● Deviation Accepted – the sales summary contains deviations that you consider acceptable. ● No Deviation – the sales summary data matches the sales transactions in the system.
SAP Business ByDesign February 2017Customer Invoicing P U B L I C • © 2017 SAP SE or an SAP affiliate company. All rights reserved. 205

● Inconsistent – the sales summary must be canceled and retransmitted. ● Canceled – the sales summary is no longer available for processing.
Procedure1. Select Customer Invoicing Point-of-Sale Transactions Sales Summaries .2. In the Show list box, select Sales Summaries That Require Processing, and then click Go .3. Select the sales summary that you wish to check, and then click Edit .
The Sales Summary editor screen is displayed.
If you do not want to review the sales summary in detail, you can also select the sales summary fromthe list and click Accept Deviation or Cancel Sales Summary .
4. Check the sales summary for deviations: ● On the General tab, check whether there are any deviations regarding the received and the released
sales transactions that are available in the system. ● On the Received tab, you can find further details about the received sales transactions. ● On the Not Released tab, the sales transactions that have not been released yet are listed.
The result of the sales summary can differ if corrections occurred, or new sales transactions werereceived. To refresh the deviation status of the sales summary, click Check . To update the SalesTransaction table, click Refresh .
5. If possible, correct the deviations in the sales summary, for example: ● Check for pending sales transactions, and correct as appropriate. ● Check for missing sales transactions, and request retransmission as appropriate. ● Check for sales transactions that have not yet been released, and release or cancel them as
appropriate.
If for any reason you cannot resolve a particular deviation, you can: ● Click Accept Deviation to accept a particular deviation ● Click Cancel Sales Summary to cancel the sales summary
If you choose to cancel a sales summary, you must inform the external system administratorof the cancellation. The external system administrator should then resolve the deviation andretransmit the sales summary.
6. Click Close .
ResultYou have checked the sales summary and have corrected, accepted, or rejected deviations as appropriate.
206 © 2017 SAP SE or an SAP affiliate company. All rights reserved. • P U B L I CSAP Business ByDesign February 2017
Customer Invoicing

4.7.3.5 Export Business Data Using Microsoft Excel®
OverviewYou can export reports and worklists to Microsoft Excel® documents. You can use these documents for furtheranalysis, and in some cases, edit and upload them to the solution.You can export data from a report or from a worklist.
Prerequisites ● You have installed the latest Add-In for Microsoft Excel®. Depending on your solution set-up, you can do this
from the: ○ Self Services Overview in the Home work center ○ Download Center in the Application and User Management work center ○ Download link that is available directly on the user interface
● The settings for your browser must be set correctly. You can review the information about computer settingsby clicking Check My Computer Settings on the logon screen.
● You must be authorized to perform an export to Microsoft Excel®.
Procedure1. Go to the screen with the data you want to export.2. Depending on the type of data, choose one of these options:
● For a report, you can either export a chart or a table. To do so, select the report, and click Switch toChart or Switch to Table.
● For a worklist, select the worklist and click Go.3. Click Export , then choose To Microsoft Excel.4. Optional: Personalizing your excel export
1. To select the columns in your exported excel, do the following:a. In the title bar, click Personalize This screen b. In the side panel, select Display Settings.c. In the Display Settings dialog box, you can export all the columns in the view by selecting All in
the Export Columns field
The default value for this field is Visible, which exports only the currently displayed columns.
2. To select the language for your excel export, do the followinga. In the Display Settings dialog box, set the Language Selection field to Show and click OK
b. Click Save .c. Click Export , then choose To Microsoft Excel®d. Select a language in the dialog box that opens.
SAP Business ByDesign February 2017Customer Invoicing P U B L I C • © 2017 SAP SE or an SAP affiliate company. All rights reserved. 207

The column selection preference in this dialog box allows you to override the personalizedsetting. This selection is valid for the current export only.
5. Select the template in the dialog box that is displayed.
● If there is only one template that has the logged in language variant, then the export will beperformed in the logged in language, and no user interaction is required.
● If there is only one template in the system for this export scenario, but the logged in languagevariant is not available, then export will be performed in the English language.
● If there is more than one template in the system for this export scenario, the Template List dialogbox is displayed. In this dialog, you can select the Microsoft Excel template that you want to usefor the export. The template will dictate how your exported data will be formatted. The MicrosoftExcel version that is relevant for each template is displayed.
6. Click Download.7. A message shows that you can open or save the file which contains the data that you have just exported from
the solution. Click Open or Save depending on what you want to do with the exported data.Depending on whether you click Open or Save, there are two possible results:
● If you click Open, a worksheet opens with the data in Microsoft Excel. The file has a temporary name,but it is not saved. You can use all the functions of Microsoft Excel to organize the data and to savethat worksheet.
● If you click Save, a Save As dialog box opens. You can specify an appropriate file name and a locationto save the exported Microsoft Excel file to. A message will inform you when the download hascompleted successfully.You can later navigate to the location where you have saved the template and open it .
4.8 Project Invoicing View
4.8.1 Project Invoicing Quick Guide
In the Project Invoicing view in the Customer Invoicing work center, you can create and edit project invoice requestsfor time and expenses incurred on a customer project. You can create a project invoice request either from a salesorder assigned to a customer project or from a customer project directly. In addition, you can view and edit all ofyour project invoice requests.This view contains the following subviews:
Sales Order SubviewIn the Sales Order subview, you can create a project invoice request for a selected sales order. The Sales Ordersubview displays all released sales orders that contain at least one item that has been assigned to a customer projecttask and which are therefore relevant for invoicing. If a project invoice request has already been created and releasedfor part or all of the work in a sales order, you can view the invoice date of the previous project invoice request in theLast Invoiced On column. A sales order can have one of the following invoicing statuses:
● In Process
208 © 2017 SAP SE or an SAP affiliate company. All rights reserved. • P U B L I CSAP Business ByDesign February 2017
Customer Invoicing

One or more project invoice requests have been created for this sales order. This status is set by the systemwhen you create the first project invoice request for a sales order.
● Not StartedNo project invoice requests have been created for this sales order.
● FinishedNo further project invoice requests are expected for this sales order. You can set the invoicing status of asales order to finished to indicate that invoicing should now be complete for this sales order. It is, however,still possible to create a project invoice request for sales orders with the status Finished. You can also changethe status back to In Process by selecting Revoke Finish from the Change Status menu.
Projects SubviewIn the Projects subview, you can create a project invoice request for a selected project. The Projects subview displaysall projects that are billable and therefore relevant for invoicing.
Project Invoice Requests SubviewIn the Project Invoice Requests subview, you can get an overview of all project invoice requests for your projects. Youcan edit, release, cancel, and delete project invoice requests. A project invoice request can have one of the followingstatuses:
● In PreparationThe project invoice request has been created but not yet released. You can edit and release the project invoicerequest.
● ReleasedThe project invoice request has been released to customer invoicing. You can cancel the project invoicerequest.
● InvoicedA customer invoice has been created for the project invoice request. You can cancel the project invoicerequest.
● CanceledThe project invoice request has been canceled.
● In ApprovalThe project invoice request is waiting for approval.
● In RevisionThe project invoice request has been sent back by the approver for revision.
● ApprovedThe project invoice request has been approved.
● Approval RejectedThe project invoice request has been rejected by the approver.
● Withdrawn from ApprovalThe project invoice request has been sent for approval but has been withdrawn.
Business Background
Project InvoicingProject invoicing is a process that allows you to invoice customers for project-based time and expenses or fixed-price services.The process consists of the following steps:
SAP Business ByDesign February 2017Customer Invoicing P U B L I C • © 2017 SAP SE or an SAP affiliate company. All rights reserved. 209

● Project invoice preparation ● Creating a project invoice request ● Releasing a project invoice request
For more information, see Project Invoicing.
Order-to-Cash (Project-Based Services)The Order-to-Cash (Project-Based Products and Services) business scenario is used to manage the complete end-to-end process of selling project-based products and services to customers. This scenario integrates sales quotesand sales orders with project management allowing you to create customer invoices for time and expenses recordedagainst a project. Invoices can be created on a time and material basis, a fixed-price basis, or a combination of both.After the customer invoice has been issued, customer payments can be monitored. This scenario also supports theanalysis of project profitability based on project costs and revenues.For more information, see Order-to-Cash (Project-Based Services).
Tasks
Create a Manual Project Invoice Request
You can only have one unreleased project invoice request for a sales order and project.If there is an unreleased project invoice request, the transaction New Project InvoiceRequest is not available. Instead, the Edit Project Invoice Request button allows you toedit the existing project invoice request.
For information about this task, see Create a Project Invoice Request for a Customer Project.
Create an Automatic Project Invoice RequestAn automatic project invoice request automatically includes invoice items for fixed price items.After creating the automatic project invoice request, you can review it and manually addinvoice items for time and expense items.You can create automatic project invoice requests in one of the following views:
● Customer Invoicing Project Invoicing Sales Orders ● Customer Invoicing Project Invoicing Projects ● Project Management Projects
Navigate to the view from which you want to start this activity, select the sales order or projectfrom which you want to create the project invoice request, click New and choose AutomaticProject Invoice Request.This brings you to an editor screen which offers you the same entry fields as the New ProjectInvoice Request guided activity.For information about the field in the project invoice request, refer to the Create a ProjectInvoice Request for a Customer Project step-by-step instruction.
You can only have one unreleased project invoice request for a sales order and project.If there is an unreleased project invoice request, the transaction New AutomaticProject Invoice Request is not available. Instead, the Edit Project Invoice Requestbutton allows you to edit the existing project invoice request.
210 © 2017 SAP SE or an SAP affiliate company. All rights reserved. • P U B L I CSAP Business ByDesign February 2017
Customer Invoicing

Release a Project Invoice Request1. In the Project Invoice Requests subview, select a project invoice request with the status
In Process.2. Click Release .
The project invoice request is released to invoicing. The invoice items are displayed inthe Invoice Requests [page 187] view where the follow-on customer invoice is created.After the follow-on customer invoice has been created and sent to the customer, theproject invoice request status is set to Invoiced.
Edit a Project Invoice RequestYou can only edit unreleased project invoice requests. If there is an unreleased project invoicerequest, you can edit it starting from the following views:
● Customer Invoicing Project Invoicing Sales Orders ● Customer Invoicing Project Invoicing Projects ● Customer Invoicing Project Invoicing Project Invoice Requests ● Project Management Projects ● Project Management Invoice Preparation Not Invoiced Time and Expenses ● Project Management Invoice Preparation Project Invoice Requests
To edit a project invoice request, proceed as follows: ● In one of the Project Invoice Requests views, select a project invoice request with the
status In Process and choose Edit . ● In one of the other views, select a sales order or a project with an unreleased project
invoice request and choose Edit Project Invoice Request .
This brings you to an editor screen which offers you the same entry fields as the New ProjectInvoice Request guided activity. If the project invoice request has been released or invoiced,the fields are for display only.For information about the field in the project invoice request, refer to the Create a ProjectInvoice Request for a Customer Project step-by-step instruction.
Display a Preview of a Project Invoice Request1. In the Sales Orders subview, select a project invoice request with the status In
Preparation, Released, or Invoiced.2. Click New → Automatic Project Invoice Request. The Project Invoice Request screen
appears.3. Click Preview .
If an invoice does not exist yet, the Invoice Document ID field remains empty anda simulation with the current data is performed.
4. Select Invoice. The invoice, or a simulation, is displayed.
Cancel a Project Invoice Request1. In the Project Invoice Requests subview, select a project invoice request with the status
Released or Invoiced.
SAP Business ByDesign February 2017Customer Invoicing P U B L I C • © 2017 SAP SE or an SAP affiliate company. All rights reserved. 211

2. Click Cancel .The project invoice request is canceled and the invoice request items are removed fromthe Invoice Requests view of the Customer Invoicing work center. All time and expenseitems that were assigned to the project invoice request will be made available forinvoicing when you next create a project invoice request for the project. If you cancel aproject invoice request for which a customer invoice has already been created, thecustomer invoice is canceled and a credit memo is sent to the customer.
Cancel and Copy a Project Invoice Request1. In the Project Invoice Requests sub-view, select a project invoice request with the status
Released2. Click Cancel and Copy
When you cancel and copy a project invoice request, the invoice items of the selectedinvoice request are copied into a new project invoice request and the old project invoicerequest is cancelled. You can access the Cancel and Copy feature in Project InvoiceRequests view from both Project Management and Project Invoicing work center.
Cancel and Copy is enabled only for released status of customer project invoicerequests.
● To be invoiced quantity in the new project invoice request will be the sumof to be invoiced quantity and deferred quantity from the previous projectinvoice request. Whereas written off quantity will remain the same.For example, in a total of 5 hours of to be invoiced quantity, 2 hours is thedeferred quantity in the previous project invoice request. Now, when youclick cancel and copy, the system will propose the addition of the deferredquantity that is 2 hours, in the to be invoiced quantity in the new customerproject invoice request.
● Cancel and copy saves the new project invoice request and the cancelledproject invoice request.
Delete a Project Invoice Request1. In the Project Invoice Requests sub-view, select a project invoice request with the status
In Process.2. Click Delete .
The project invoice request is deleted and all time and expense items that were assignedto the project invoice request will be made available for invoicing when you next createa project invoice request for the project.
Change the Invoicing Status of a Sales OrderIn the Sales Orders view, you can manually change the invoicing status of all items in a salesorder, as long as no open follow on documents exist for those items. If an invoice scheduleexists, the invoice schedule status must be invoiced, cancelled or open.If it is possible to manually change the invoicing status, the Change Status button is active.Otherwise, it is grayed out.To manually change the invoicing status, proceed as follows:
1. In the Sales Orders subview, select a sales order with the status In Process or NotStarted.
2. From the Change Status menu, select Finish.
212 © 2017 SAP SE or an SAP affiliate company. All rights reserved. • P U B L I CSAP Business ByDesign February 2017
Customer Invoicing

The invoicing status is set to Finished, which indicates that you do not expect any furtherinvoices to be created for this sales order.
If you later decide that you want to create a further project invoice request forthis sales order you can change the status back to In Process by selecting thesales order and selecting Revoke Finish from the Change Status menu.
Change the Invoicing Status of individual items in a Sales OrderIn the Sales Orders view, you can manually change the invoicing status of individual items ina sales order, as long as no open follow on documents exist for those items. If an invoiceschedule exists, the invoice schedule status must be invoiced, cancelled or open.To change the invoicing status, proceed as follows:
1. In the Sales Orders subview, select the required sales order.2. Select the Items tab in the details section; the various items in the sales order are
listed here.3. Select the sales order item whose status you want to change.4. From the Change Status menu, select Finish Invoicing.
If it is possible to change the invoicing status of a sales order item, the Change Status buttonis active. Otherwise, it is grayed outThe invoicing status is set to Finished, which indicates that you do not expect any furtherinvoices to be created for this item in the sales order.
If you later decide that you want to create a further project invoice request for this salesorder item you can change the status back to In Process by selecting the sales orderitem and selecting Revoke Finish Invoicing from the Change Status menu.
Change the Fulfillment Status of individual items in a Sales OrderIn the Sales Orders view, you can manually change the fulfillment status of individual items ina sales order. The fulfillment status of a sales order item can be set to Finished when no morework, which is performed for the linked project task is expected to be invoiced via this salesorder item (the work might be invoiced via another sales order item).To change the fulfillment status, proceed as follows:
1. In the Sales Orders subview, select the required sales order.2. Select the Items tab in the details section; the various items in the sales order are
listed here.3. Select the sales order item whose status you want to change.4. From the Change Status menu, select Finish Fulfillment.
The fulfillment status is set to Finished.
If you later decide that there is further work to be done for the project task linked to thissales order item, which is to be invoiced via this sales order item, you can change thestatus back to In Process by selecting the sales order item and selecting Revoke FinishFulfillment from the Change Status menu. If the linked project task was completedmeanwhile, the finish fulfillment cannot be revoked. If necessary, the completion of theproject task is revoked.
SAP Business ByDesign February 2017Customer Invoicing P U B L I C • © 2017 SAP SE or an SAP affiliate company. All rights reserved. 213

4.9 Recurring Invoice Templates View
4.9.1 Quick Guide for Recurring Invoice Templates
The Recurring Invoice Templates view in the Customer Invoicing work center enables you to create and accessrecurring invoices. Also you can see the status of these recurring invoice templates and see which invoice requestsand invoices have been created so far.You can display data in the Recurring Invoice Templates worklist as a chart using the analytical view function. Thisfunction helps you to get a quick overview of all data in the worklist.
Since your company has selected the Buy, Sell, and Administrate implementation focus, there will be slightdifferences between your solution and the standard as outlined below. For more information, see WhatWorks Differently in Buy, Sell, and Administrate.If your system has not been deployed, all information is shown because there is no scoping-relevant filter.
Business Background
Customer Invoice ProcessingInvoices are created, either manually or as part of an invoice run, for the delivery of products or the provision ofservices and are used for charging customers. They result from predecessor documents such as sales orders, serviceorders, and service confirmations. It is also possible to create manual invoicing documents such as manual invoice,credit memo, and down payment requests without reference to preceding business transaction documents outsideCustomer Invoicing.For more information, see Customer Invoice Processing [page 140].
Tasks
Create a Recurring Invoice Template1. To create a recurring invoice template you have the following possibilities:
● In the Recurring Invoice Templates view click New , then select Recurring InvoiceTemplate.
● Under Common Tasks click New Recurring Invoice Template.
2. Enter account and product-related data. ● Under Account in the Name field enter the name of the account. The system
automatically displays the address, currency, payment terms and the employeeresponsible for the account. You can change any of these fields if required. Ifnecessary, click the Open Select Dialog icon to search for the account.
● Under General, in the Description field enter a description for your recurringinvoice.
● Under Items, enter one or more product IDs.
214 © 2017 SAP SE or an SAP affiliate company. All rights reserved. • P U B L I CSAP Business ByDesign February 2017
Customer Invoicing

The system automatically retrieves the product data: description and list price. Ifrequired, you can change both these fields.
● If necessary, enter a quantity and a discount. The system adjusts the net price andtotal net value accordingly.
You can also maintain a recurring invoice with an item without a product ID. Inthis case, you must maintain the following fields:
● Description (for example, monthly leasing rate) ● List Price (amount of the monthly leasing rate) ● Tax Code ● G/L Account
3. Enter the recurrence details.Under Recurrence, specify the recurrence type by choosing either a recurrence patternor individual dates.Depending on your selection, additional fields appear dynamically. ● If you choose a recurrence pattern, under Recurrence Pattern, enter the details of
the pattern, for example, the start and end dates, the recurrence, and the day ofthe month.
● If you choose individual dates, under Individual Dates, enter particular dates forthe recurring invoice.
4. Save the recurring invoice template.a. Click Save to save the recurring invoice.
The system sets the status of the recurring invoice to In Preparation.b. Click Release .
The system sets the status of the recurrence invoice to Released and createsinvoice requests until the end date or until the maximum occurrences defined bythe user is reached.
c. Click Close to return to the Recurring Invoice Templates view.
The new recurring invoice is saved in the system and added to the list in the RecurringInvoice Templates view. To open the recurring invoice from the list, click the appropriaterecurring invoice template ID link. This opens the Recurring Invoice TemplateOverview that displays the requests that have already been invoiced and those that areforecast.
● The recurring invoice requests appear in the Invoice Requests view. The numberof the invoice requests listed here is limited by a horizon defined by the system.Once the last listed request has been invoiced, the other appear automatically.Invoice requests further than one year in the future are not created.
● You can find the requests related to a specific invoice in the Invoice Requestsview by entering the recurring invoice template ID into the basic search.
Display Graphical Analysis of a Recurring Invoice Templates Worklist1. In the worklist, from the Group By dropdown list, choose a criterion by which to group
data.
SAP Business ByDesign February 2017Customer Invoicing P U B L I C • © 2017 SAP SE or an SAP affiliate company. All rights reserved. 215

2. To view all data from the worklist in the Analytical View section, click the chart icon nextto the filter icon.
3. In the Analytical View section, choose a chart type to display the data.4. Double-click a data section in the chart to filter the original worklist.
You can clear the filter by clicking Back to Full Chart in the Analytical Viewsection or deleting the filter content in the worklist.
For some worklists, such as the Opportunities worklist in the Opportunity List view inthe New Business work center, you can aggregate the grouped data using differentcriterion (for example, expected value). You can then select different analysis methods(for example, count, sum, average, maximum, or minimum) to sort the data, and choosedifferent chart types to present the data from the worklist.
Create a Task, Notification, or AlertFor information about this task, see here.
Export Recurring Invoice Templates to Microsoft Excel®For information about this task, see here [page 82].Perform Common Tasks
Create a Manual Invoice1. Under Common Tasks choose New Manual Invoice and the system opens a New Manual
Invoice Request.2. Enter the account details.
In the Account field, enter the account number. The system automatically displays therelated master data under Account, Main Contact, Employee Responsible, and PaymentTerms. To see this you have to click on View All . If necessary, click Open SelectDialog icon to search for the account.
● If the invoice is associated with a new account, click New to generate anaccount number and enter the relevant data.
● The system automatically enters the current date. You can change thisdate providing the accounting period is open and other restrictions aremet. When you save the invoice, the new date appears on the invoice andis used by financials. The invoice date is taken at the Tax Due Date. If youwant to declare taxes for a different period, you can enter a date thatdeviates from the invoice date in the Deviating Tax Due Date. For moreinformation about the tax due date, see Tax Due Date.
● If payment details such as direct debit are available for the account, thesystem displays the corresponding payment details and you can changethem if required. For more information about direct debit, see IncomingPayments by SEPA Direct Debit.
3. Enter the product details.Under Items, enter the details of the products associated with the invoice.1. Click Add Row to create a new row in the table.
216 © 2017 SAP SE or an SAP affiliate company. All rights reserved. • P U B L I CSAP Business ByDesign February 2017
Customer Invoicing

2. Enter a product ID. The system displays the related product description andcategory.
3. Enter the required quantity of the product. The system calculates and displays theexpected value. Repeat the steps outlined above to add information about otherproducts.
Tax is always calculated on the basis of the net price; the net price alsoincludes freight charges. Non-taxable freights must be entered in thepreceding document as service items to ensure that they are excluded whentax is calculated. For more information about non-taxable freights ininvoices, see Handling of Taxable and Non-Taxable Freights in Invoices inCustomer Invoice Processing [page 140].
4. At the top of the New Manual Invoice Request you can click Release , Save orSave as Invoice .
● If you want the invoice to be released to financials and the customer, clickRelease . The system saves the manual invoice, releases it to financials, and adds
it to the list in the Invoice Documents view with status Released. To open the invoicefrom this list, click the appropriate invoice ID link.
If there is a threshold defined, and the invoice exceeds that threshold, thesystem initiates, depending on the business configuration, an approvalprocess. In this case when the invoice is released, the invoice document issaved in Invoice Documents view with status In Approval. When the approvalprocess is finished the invoice is automatically released.
● If you want to preview the document as a PDF before releasing and sending it tothe customer, click Save . The manual invoice request is given an officialdocument number and is saved in the Invoice Requests view with the status To BeInvoiced.
● If you want to save the manual invoice as a draft, click Save as Invoice . Thecustomer invoice document is given a document number and saved in the InvoiceDocuments view with the status Not Released.
Create a Manual Credit Memo With or Without Reference
1. To create a manual credit memo, you have the following possibilities: ● Under Common Tasks choose the New Manual Credit Memo. ● In the Invoice Documents view you can copy an existing credit memo as a template.
The system automatically retrieves the values and content from the original creditmemo and opens a New Manual Credit Memo Request. You can change the valuesentered in all the fields.
● Create a manual credit memo based on an existing invoice:In the Invoice Documents view select the invoice for which you want to create acredit memo, click Follow-Up and select Manual Credit Memo.All the content is automatically filled out in the New Manual Credit MemoRequest screen.
2. Now you can enter or change the data as required:1. Click View All to view more detailed information on the down payment request.2. On the General screen, enter an account.
SAP Business ByDesign February 2017Customer Invoicing P U B L I C • © 2017 SAP SE or an SAP affiliate company. All rights reserved. 217

The system displays the address of the company as well as the currency, paymentterms, and the employee responsible for the account. You can change any of thesefields, if required.
3. Enter a reason for the credit memo under Internal Comment or, if you want thisinformation to be printed on the credit memo, enter it in the CustomerInformation section.
4. Add attachments to the manual credit memo, if required. These can be printedout later and sent with the manual credit memo form.
5. On the Items screen, enter one or more product IDs, or select the items that arenot relevant to the credit memo and click Delete .The system retrieves the data for the entered products such as Description, ListPrice, and currency. You can overwrite this information, if necessary and you canalso add a Discount.
6. Check whether the Tax Code proposed by the system is what you require.7. On the Involved Parties screen, check the organizational assignments such as bill-
to party or ship-to party.3. Then you can click Release , Save , or Save As Credit Memo .
● If you want to release the manual credit memo to send it to the customer andaccounts receivable immediately, click Release . The manual credit memo issaved and sent to the customer and accounts receivable. It appears in the InvoiceDocuments view with the status Released.
If there is a defined threshold, and the credit memo exceeds that threshold,the system initiates, depending on your business configuration, an approvalprocess. When the approval process is finished the credit memo isautomatically released.
● If you want to preview the document as a PDF before releasing and sending it tothe customer, click Save . The manual credit memo request is given an officialdocument number and is saved in the Invoice Requests view with the status To BeInvoiced.
● If you want to save the credit memo as a draft, click Save As Credit Memo . Themanual credit memo is given a temporary document number and is saved in theInvoice Documents view with the status Not Released.
Create a Down Payment Request
1. Under Common Tasks choose New Down Payment Request.2. Click View All to view more detailed information on the down payment request.3. Enter an account. The system fills in the general data, tax details, and payment terms.
Only one tax rate can be entered for a down payment. If you require several taxrates, create a down payment request for each tax rate.
4. On the General tab, check the information on organizational assignments such as thebill-to party and ship-to party.
5. You can specify the reconciliation account to be used for down payments that are madeby the customer. To do this, select it in the Reconciliation Account field underAccounting.
218 © 2017 SAP SE or an SAP affiliate company. All rights reserved. • P U B L I CSAP Business ByDesign February 2017
Customer Invoicing

6. Enter an Internal Comment or Customer Information. The information you enter in theCustomer Information section is included in the down payment request form that is tothe customer.
7. Add attachments to the down payment request. These can be printed out and sentalong with the down payment request form.
8. On the Agreement tab, assign the sales order or service order ID to the down paymentrequest by entering the sales or service order ID in the Description field. For example,you can enter Down payment of 10% for sales order 42233340314.
This information makes it clear to the customer which business transaction thedown payment request is based on. You can also use this information to searchfor the down payment request later on in the Invoice Documents view.
9. Enter the amount and specify whether this amount is net or gross.10. Check whether the tax code proposed by the system is the one you require. You can
change it, if necessary.11. Release the down payment request.
The down payment request form is printed out automatically. Print out the orderconfirmation of the sales or service order to which the down payment is related. Sendthem both to the customer.
Create an Invoice Run
1. To create an invoice run you have the following possibilities: ● In the Invoice Runs view click New , then select Invoice Run. ● Under Common Tasks click New Invoice Run.
2. Under General Data, enter the general data used to identify the invoice run.1. In the Run ID field enter the run ID.2. In the Run Description filed enter the run description.
3. Under Split By, you can select how the invoice documents shall be split up.4. Under Invoice Properties, you can define how the invoice documents shall be
processed.1. Enter the Invoice Date Offset to calculate the dates for your invoice documents.2. Select the Automatic Release checkbox to automatically release the invoice
document to financials.5. Under Selection Criteria, you can set a Date Offset and filter for Accounts, Sellers, and
Preceding Documents by using search patterns.6. At the top of the New Invoice Run, click Save .7. To activate the invoice run, click Actions and select Set To Active.
Under Execution Details, you can view the invoices created and the exceptionsgenerated in an invoice run.
Create a Credit Card Authorization Run1. To create a credit card authorization run you have the following possibilities:
● In the Credit Card Authorization Runs view click New and select Credit CardAuthorization Run.
● Under Common Tasks choose New Credit Card Authorization Run.
SAP Business ByDesign February 2017Customer Invoicing P U B L I C • © 2017 SAP SE or an SAP affiliate company. All rights reserved. 219

2. Under General Data, enter the general information used to identify the credit cardauthorization run: ● In the Run ID field enter the run ID.
● In the Run Definition field enter the run definition.3. In the Source Document field enter the document type you want to include in the run
such as a sales order or a service order.4. Enter the business partner selection parameters for the business partners you want to
include in the credit card authorization run.5. Click Save .6. Click Actions and select Set to Active to activate the new credit card authorization
run.The system saves the new credit card authorization run, activates it, and adds it to thelist in the Credit Card Authorization Runs view. To open one from the list, click theappropriate credit card authorization run ID link.
4.10 Reports View
4.10.1 Open Documents Customer Invoicing
OverviewThis report shows the value and quantity of customer invoices, credit memos, and correction invoices with the statusnot released or partially released.
Features
Running the ReportBefore running the report, you can specify the data you want to see by selecting specific variables. You must specifya value for all mandatory variables. In the system, mandatory variables are indicated by an asterisk (*).
Analyzing the ReportTo analyze the data in this report:
● Use the filters to manipulate the display of data in the content pane.For this report, you can add these key figures: ○ Correction Invoice Quantity ○ Invoiced Net Value ○ Credit Memo Quantity ○ Invoice Quantity ○ Gross Value of Correction Invoices ○ Gross Value of Credit Memos ○ Gross Value of Invoices
220 © 2017 SAP SE or an SAP affiliate company. All rights reserved. • P U B L I CSAP Business ByDesign February 2017
Customer Invoicing

○ Net Value of Correction Invoices ○ Net Value of Credit Memos ○ Net Value of Invoices ○ Tax
The following key figures are calculated as follows: ● Invoiced Net Value = Net Value of Invoices + Net Value of Credit Memo + Net Value of Correction
Invoices ● Gross Value = Net Value + Tax
Cancellation invoices are counted with negative value.
● To further analyze data in this report, you can drag characteristics to rows and columns.
From this report, you can navigate to: ● Account ● Invoice ID ● Sales Organization ● Sales Unit ● Seller
See AlsoReports ViewOverview of Reports in Customer Relationship Management
4.10.2 Invoice Volume
OverviewThis report shows the value and quantity of invoices, credit memos, and correction invoices with the status releasedor release cancelled.This report is also available as a mobile report. For more information, see the documentation about working withmobile reports.
Features
Running the ReportBefore running the report, you can specify the data you want to see by making value selections for variables. Youmust make a value selection for all mandatory variables. In the system, mandatory variables are indicated by anasterisk (*).
Analyzing the ReportTo analyze the data in this report:
● Use the filters to manipulate the display of data in the content pane.
SAP Business ByDesign February 2017Customer Invoicing P U B L I C • © 2017 SAP SE or an SAP affiliate company. All rights reserved. 221

You can add more key figures to the initial filters shown in the content pane.For this report, you can add these key figures: ○ Correction Invoice Quantity ○ Invoiced Net Value ○ Credit Memo Quantity ○ Invoice Quantity ○ Gross Value of Correction Invoices ○ Gross Value of Credit Memos ○ Gross Value of Invoices ○ Net Value of Correction Invoices ○ Net Value of Credit Memos ○ Net Value of Invoices ○ Tax
The following key figures are calculated as follows: ● Invoiced Net Value = Net Value of Invoices + Net Value of Credit Memo + Net Value of Correction
Invoices ● Gross Value = Net Value + Tax ● Manual Credit Memo without a reference to another customer invoice: Quantity is extracted
negative, for example, Quantity = Quantity *(-1) ● Manual Invoice/Manual Credit Memo with a reference to another customer invoice: Quantity =
0 is extracted. ● Correction Invoice: For cancelled items the quantity is extracted negative otherwise positive. ● Cancellation of an Invoice or Credit Memo which has itself a reference to another customer
invoice: Quantity = 0 is extracted. ● Cancellation of an invoice that does not have a reference to another customer invoice: Quantity
is extracted negative.
Cancellation invoices are counted with negative value.
● To further analyze data in this report, you can drag characteristics to rows and columns.
From this report, you can navigate to: ● Account ● Bill-to ● Invoice ● Invoicing Unit ● Project ● Project Task ● Sales Order ● Sales Organization ● Sales Unit ● Seller
222 © 2017 SAP SE or an SAP affiliate company. All rights reserved. • P U B L I CSAP Business ByDesign February 2017
Customer Invoicing

See AlsoReports ViewOverview of Reports in Customer Relationship Management
4.10.3 Customer Project Overview
OverviewProvides customer project-related key figures from sales orders and invoices including quantities and net values.
PrerequisitesThe report is available for customer projects only. At least one of the following conditions must be fulfilled:
● Time and expenses have been recorded to the project. ● Invoice requests or invoices related to the project have been created.
ViewsThe following views are available with this report:
● Net Values from Sales Orders and Project Invoices ● Quantities from Sales Orders and Project Invoices
Features
Running the ReportBefore running the report, you can specify the data you want to see by making value selections for variables. Youmust make a value selection for all mandatory variables. In the system, mandatory variables are indicated by anasterisk (*).
Analyzing the ReportThis report shows an analysis of ordered or invoiced quantities or net values by project.Additional information is available for the following:
● Net Value — OrderedShows the net value of all sales orders that are assigned to a project or project task
● Net Value — InvoicedShows the invoiced net values
● Quantity — OrderedShows the quantities of all sales orders that are assigned to a project or project task
● Quantity — InvoicedShows the invoiced quantities for services and materials.
● Quantity — Written-Off
SAP Business ByDesign February 2017Customer Invoicing P U B L I C • © 2017 SAP SE or an SAP affiliate company. All rights reserved. 223

Shows the quantities from services and materials which have been written-off ● Quantity — Not Yet Invoiced
Shows the quantities from services and materials that are confirmed but not yet invoiced or written-off
To further analyze data in this report, you can drag characteristics to rows and columns.From this report, you can navigate to:
● Project Overview ● Project Cost and Revenue by Project Structure ● Project Costs — Line Items ● Project Profitability by Project Structure ● Project Performance by Project Structure
224 © 2017 SAP SE or an SAP affiliate company. All rights reserved. • P U B L I CSAP Business ByDesign February 2017
Customer Invoicing

5 New Business
5.1 Business Background
5.1.1 Pricing in Customer Relationship Management
OverviewPricing is based on price master data such as price lists and discount lists, which are used to automatically calculatepricing within all business documents for sales and service processes. A predefined pricing procedure is used todetermine the gross value the customer has to pay for certain products or services to be received on a certain dayat a certain place. The pricing procedure consists of price components, such as list price, discounts, surcharges,freights, taxes, and costs. The order of these price components is essential for the calculation of the total value.
Price ComponentsSAP Business ByDesign contains a predefined set of price components, most of which you can activate through thebusiness configuration. Price components can be:
● Automatically determined by the system and non-editable, for example, tax ● Automatically determined by the system and able to be overwritten by the user, for example, list price or
automatically-determined product discounts ● Manually entered by the user, for example, a restocking fee or a manually-entered product discount
The manual behavior is influenced by the Manual flag in the business configuration for pricing. If the Manual flag isset, the system does not find the price component automatically and it must be added manually by the user.The following sections show the set of price components that may display depending on your configuration.
List PriceThis price component is naturally the first step of a pricing procedure, because many price components such asdiscounts or surcharges depend on it. To determine the net list price, the system checks all price lists that fit theparameters passed from the sales or service document. These parameters are customer, customer group,distribution chain, and date.Price lists can be customer specific, distribution chain specific, and base price lists. The price lists are maintainedas price master data, have a validity period, and need to be released before they are active.Because the customer may have special prices, the system checks first for a customer-specific price list. If there isno customer-specific price found, then it checks for a distribution chain specific price list. Finally, if there is nodistribution-chain-specific price, it checks for the base price list. You have to ensure that the system can find a pricefor all products or services you sell in the base price list at the very least. Prices can be manually revised within asales or service document, allowing you to flexibly adjust your net prices.
SAP Business ByDesign February 2017New Business P U B L I C • © 2017 SAP SE or an SAP affiliate company. All rights reserved. 225

An approval procedure can be activated for price lists and discount lists which is done in the businessconfiguration in the scoping (under General Business Data Product and Service Pricing ). If this settingis active, the line manager automatically receives an approval task should his or her employee try to releasea price or a discount list. The price list or discount list cannot be released and included in all businessdocuments for sales and service processes until the line manager (or representative) approves the price listor discount list. If a manager is authorized to approve price and discount lists, he can directly release the priceor discount list in the price master data view. This automatic approval is done without creating a business taskif the manager himself releases the prices.For more general information on Business Task Management, see Business Task Management.
Product Discount (%)To determine the discount, the system checks all discount lists that fit the parameters passed from the sales orservice document. The parameters are customer, distribution chain, customer group, product, and date. All founddiscounts are considered in the price calculation.Discount lists can be Customer Specific Discount Product, General Customer Discount, Overall Customer GroupDiscount, and Customer Specific Discount Product Category discount lists.Because the customer may have a special discount for a certain product, the system checks for a discount list withcustomer product discounts.Discounts can always be revised manually within a sales or service document, allowing you to flexibly adjustdiscounts.
An approval procedure can be activated for price lists and discount lists which is done in the businessconfiguration in the scoping (under General Business Data Product and Service Pricing ).If this settingis active, the line manager automatically receives an approval task should his or her employee try to releasea price or a discount list. The price list or discount list cannot be released and included in all businessdocuments for sales and service processes until the line manager (or representative) approves the price listor discount list. If a manager is authorized to approve price and discount lists, he can directly release the priceor discount list in the price master data view. This automatic approval is done without creating a business taskif the manager himself releases the prices.For more general information on Business Task Management, see Business Task Management.
Working Condition (%)This price component is important for service scenarios. If service performers work at nights or on weekends orpublic holidays, a surcharge can be invoiced to the customer.
SurchargeTwo different price components are available for surcharges. You can define surcharges as percentages or fixedamounts according to your needs. All surcharges can be used side by side.
Warranty/GoodwillThese price components are important within service scenarios. For example, in a service document, services orspare parts may be covered by a warranty. The warranty or goodwill discount will be calculated based on the Coveragefield in the service document.
226 © 2017 SAP SE or an SAP affiliate company. All rights reserved. • P U B L I CSAP Business ByDesign February 2017
New Business

Quality Loss FeeThis price component is used for return scenarios. This element displays only if the Returns business topic is includedin your business configuration. If your customer returns goods which are damaged or opened, you can manuallydefine a deduction on item level.
Restocking FeeThis price componentis used for return scenarios. This element displays only if the Returns business topic is includedin your business configuration. If your customer returns goods, you can manually define a restocking fee for eachindividual return document.
Migration PriceThe migration price is needed for open sales and service documents that are migrated from a legacy system intoSAP Business ByDesign. To ensure that prices are the same in both systems, there will not be any additionalcalculation of this price.
Total Item Net ValueThis is calculated by adding all the item net values. This value cannot be edited.
FreightThis price component covers the freight amount determined automatically or entered manually. Depending on thebusiness configuration settings it is possible to determine a fixed freight amount or to make the freight dependenton the net weight of the goods you sell.
Cost and Profit MarginCost displays only if profit margin is included in your business configuration. Cost is basically derived from financialsand makes the calculation of the profit margin possible.
Overall Discount (%)The overall discount (%) is an additional general discount applied to the total item net value. This can only be appliedmanually.
Total Net ValueThis is calculated by adding all the item net values plus freight, without considering taxes. This value cannot be edited.
Total Given DiscountsThis is calculated by adding all the relevant product discounts given. This value cannot be edited directly by the user.It can be influenced by editing the product discounts at item level.
Rounding DifferenceThis is a value that has been lost or gained through rounding. This value is used only for currencies that do not havelow denomination coins such as 1c or 2c – for example, Swiss francs or Australian dollars. For these currencies, theprice must be rounded to the nearest available value, such as 0c or 5c.
TaxThis price component covers all requirements in regards to taxation. All taxes are calculated according to legalrequirements and the results of this calculation are put into this price component.
SAP Business ByDesign February 2017New Business P U B L I C • © 2017 SAP SE or an SAP affiliate company. All rights reserved. 227

TotalThis is calculated by adding the total net value plus tax.
Price CalculationPricing is centrally implemented in SAP Business ByDesign and linked to all relevant business processes. Theprocedure is predefined and you cannot modify the procedure or create a new one.The pricing procedure controls which price components are automatically calculated for the relevant businessdocuments, such as sales quotes, sales orders, and service orders. It contains the most commonly-used pricecomponents, including product prices, discounts, surcharges, and tax. These various kinds of price components canbe combined and control the price calculation process.The pricing procedure also contains the sequence in which the system takes these price components into accountduring pricing. It calculates the gross and net prices and taxes. The pricing procedure also determines:
● Which subtotals will be considered during pricing ● To what extent pricing can be processed manually ● Which method the system uses to calculate percentage discounts and surcharges ● Which requirements for a particular price component must be fulfilled before the system takes the element
into account. For example, freights are not considered for service items.
Currency and Quantity ConversionDuring the price calculation, currency conversion occurs if the currency of the price master data differs from thedocument currency, depending on the exchange rates maintained as master data. The document currency isdefaulted from the account master sales data.In addition, during the price calculation, quantity conversion occurs if the unit of measure requested in the documentdiffers from the price unit maintained in the price list. A prerequisite is that the quantity conversions are maintainedin the product or service master data. For example, product master data maintains a quantity conversion “1 pallet= 20 each”, the price list specifies a price unit of “$50/1 each”, and the sales order requests 5 pallets - in this case,the 5 pallets are converted to 100 units and price is calculated at $5000.
ScalesYou can define scales for prices which depend on different quantities. The scale you use determines how values arecalculated. For example, you can use a scale to define that a single boiler costs $500, but if you buy at least 10 boilersthe price decreases to only $450 per unit. You can also define scales for freights, which depend, for example, on thesales order value.You can also define scales for product discounts.There is also an additional feature where the system proposes the values for scales for every additional line that isadded by the user while maintaining scales. The following example explains the logic for calculation of the proposedvalue for scales:
Logic for determining the proposed scale value during price or discount scale maintenance.
228 © 2017 SAP SE or an SAP affiliate company. All rights reserved. • P U B L I CSAP Business ByDesign February 2017
New Business

ValueofScales Percentage Calculation of Percentage
0 0 0 0
10
– 10% 11/10=1.1
10*1.1 = 11
20
– 11% 11/10=1.1
11*1.1 = 12.1
30
– 12.1% 12.1/11=1.1
12.1*1.1 = 13.31
SAP Business ByDesign February 2017New Business P U B L I C • © 2017 SAP SE or an SAP affiliate company. All rights reserved. 229

ValueofScales Percentage Calculation of Percentage
40
– 13.31% 13.31/12.1=1.1
13.31*1.1 = 14.641
50
– 14.641% 14.641/13.31=1.1
14.641*1.1 = 16.105
230 © 2017 SAP SE or an SAP affiliate company. All rights reserved. • P U B L I CSAP Business ByDesign February 2017
New Business

ValueofScales Percentage Calculation of Percentage
60
– 16.105% 16.105/14.641=1.1
16.105*1.1 = 17.716
See AlsoConfigure Price Strategy [page 335]Price Agreements for Customer Contracts [page 326]Gross Pricing [page 326]
5.1.2 Profit Margin
OverviewFor sales quotes, sales orders, and service orders you can calculate a profit margin. You can display the profit marginfor each product and service and for the total document under the Pricing tab (for service order Pricing and Invoicing tab). An employee can use this information to make decisions regarding price and discountsadjustments. The information regarding profit margin and profitability can also be very useful for managementdecisions. When approving a sales quote, the responsible manager can use the profit margin as threshold to approvea sales quote.
SAP Business ByDesign February 2017New Business P U B L I C • © 2017 SAP SE or an SAP affiliate company. All rights reserved. 231

Prerequisites ● The calculation and display of profit margin in sales and service documents can be activated in the Business
Configuration work center under Scoping Questions General Business Data Product and ServicePricing .
● In addition in the Fine Tuning of the Business Configuration work center under the Configure Price Strategyactivity you can define the display of the profit margin and cost in all relevant documents.
● For sales quotes: In the fine-tune activity Approval for Sales Quote a threshold value for the profit margin canbe maintained.
● For sales orders: In the Application and User Management work center a threshold value for the profit margincan be maintained.
● In the Cost and Revenue work center, the profit margin data can be analyzed, monitored and evaluated basedon different criteria, such as customer, customer group, country and product. This can be activated in theScoping of the Business Configuration work center under Financial and Management Accounting Management Accounting Reporting and Analysis for Sales and Profit Analysis .
CalculationThe total profit margin of the sales document is calculated by the system as follows: The difference between thetotal net value based on the net price per product or service and the total costs based on the product valuation perproduct or service.
If an approval process for sales quote and/or sales orders is set up in the system, the responsible managercan receive a task to approve the sales quote and/or sales order before it is communicated to the customerbased on a threshold like profit margin. Based on this information, the manager can carry out one of thefollowing steps:
● Approve the sales quote/sales order ● Send the sales quote/sales order back to the employee responsible for reworking
ExampleKate Jacob has just been contacted by a customer requesting five hot water cylinders and one heater, and entersthe sales quote in the New Business work center.After she has entered the products in the sales quote, the system displays the product sales price and the productvaluation for each item. If necessary, Kate can adjust the sales price or provide an discount. The profit margin isautomatically calculated by subtracting product valuation from the net price per item in the sales quote, and isdisplayed in the Pricing tab. Kate decides to grant the customer a product discount of 5% on the five hot watercylinders.Bob Menson, Kate’s manager, checks the sales quote before it is issued to the customer. He chooses the ManagingMy Area work center to open the approval task, checks the data in the linked sales quote, including the profit margin.The sales quote is then sent to the customer with the approval of the manager.
232 © 2017 SAP SE or an SAP affiliate company. All rights reserved. • P U B L I CSAP Business ByDesign February 2017
New Business

5.2 Leads View
5.2.1 Quick Guide for Leads (in New Business)
The Leads view in the New Business work center allows you as a sales employee to manage your leads efficiently,enabling you to maintain relationships with your customers and prospects, and to close sales.If your leads are created by marketing, you can view these leads after they have been qualified and handed over. Youthen accept or reject these leads. After you have accepted a lead, you can create an opportunity or other follow-updocuments such as a sales quote or a sales order. You can also track and analyze the success of your leads over acertain time frame. In addition, you can display data in a worklist as a chart using the analytical view function. Thisfunction helps you to get a quick overview of all data in the worklist.If your marketing department does not create leads, you can create, manage, and qualify them using this view in theNew Business work center.You can create leads on the basis of phone calls or campaign responses, for example. You can also create your leadsusing a predefined Microsoft Excel® template and upload them to the SAP Business ByDesign system. In addition,you can specify the source of your leads, classify them according to a particular interest, and qualify them as cold,warm, or hot. Afterwards you can view them, and track and analyze their success over a certain time frame.
If the Lead Processing With Handover from Marketing business option has been selected for your solution,then an employee working in marketing creates leads in the Leads view in the Marketing work center andsubsequently hands them over to sales. An employee working in sales then processes the leads further in theLeads view in the New Business work center. In this case it is not possible to create leads in the New Businesswork center.If the Lead Processing Without Handover from Marketing business option has been selected for your solution,then an employee working in sales creates leads in the Leads view in the New Business work center. In thiscase, the Leads view is not visible in the Marketing work center.
Business Background
Lead ProcessingLead processing is used to describe, store, update, manage, and qualify a business partner’s potential interest in aparticular product or service. It is also used to handle and record all interactions with business partners based ontheir interest in a product or service over a period of time. The creation of a lead document can be the starting pointwithin the Marketing-to-Opportunity scenario, with the objective of transforming this lead into an opportunity.For more information, see Lead Processing [page 237].
Target Groups and Campaign ManagementTarget Groups and Campaign Management provide an effective way for sales and marketing professionals withinyour company to target specific prospects or customer groups in order to generate new business or strengthenrelationships.For more information, see Target Groups and Campaign Management [page 239].
SAP Business ByDesign February 2017New Business P U B L I C • © 2017 SAP SE or an SAP affiliate company. All rights reserved. 233

Opportunity ProcessingOpportunity Processing allows you to identify and follow through on the possibility of selling goods or services to aparticular customer. The opportunity can store all relevant information to help you win, such as the account and allrelevant communication, products and prices, members of the sales team and your sales partners who are workingon the opportunity, and competitors for this opportunity. In addition, you can classify your opportunity by setting apriority and specifying the source (for example, a trade fair).For more information, see Opportunity Processing [page 253].
Activity ManagementAs part of your daily work you need to deal with various activities throughout the day, such as tasks, appointments,phone calls, letters, faxes, or e-mails. To ensure productivity and efficiency, Activity Management enables you tooptimize all activities relating to Customer Relationship Management and ensures that you do not spend too muchprecious sales time on coordinating routine tasks and activities.For more information, see Activity Management [page 45].
Business Scenario: Marketing-to-OpportunityThe Marketing-to-Opportunity business scenario enables you to manage marketing and pre-sales activities with thegoal of generating new business for customers and prospects. You can run campaigns, capture responses, generateleads, manage opportunities, and initiate and track related sales activities. Alternatively, you can use this businessscenario without campaigns, which means that no marketing department is involved, and leads and opportunitiescan be created without using a campaign.There is also an enhanced function for Microsoft Outlook® integration that allows you to directly assign e-mails tospecific campaigns in Outlook and synchronize this information with the SAP Business ByDesign system. In addition,the pipeline simulation feature provides an interactive combination of graphic and table list of the opportunities. TheWhat-if analysis simulates how changes would affect your pipeline.For more information, see Marketing-to-Opportunity.
Tasks
Create a Lead1. Click New , then choose Lead.
You can also click Common Tasks in the taskbar and choose New Lead.
2. Under Account, enter details of the account associated with the lead. In the Name field,enter the account name or ID. If necessary, you can search for an account or click
New to create a new account.The system will automatically display the related master data.You can maintain address details for a lead without an account by clicking on AddressDetails.
3. Enter details of the lead such as the description and, if necessary, overwrite the startand end dates. You can enter the prospect's interests under Notes. In particular, qualifyand classify the lead by selecting the appropriate entries in the Qualification,Category, and Source fields.
234 © 2017 SAP SE or an SAP affiliate company. All rights reserved. • P U B L I CSAP Business ByDesign February 2017
New Business

The system proposes the Employee Responsible – Marketing and EmployeeResponsible – Sales automatically, based on system settings.
4. Under Contacts, enter the contacts associated with the lead as follows: ● To assign an existing contact to the lead, click Add Row . Enter the contact, or
search for it.The system automatically displays the related contact information.
● If you need to create a new contact, click New . In the New Contact editor, fill inall contact details, then click Save and Close .The new contact is automatically taken over into the lead.
5. Save the lead.The new lead is saved to the system and added to the list in the Leads view. To openthe lead from this list, click on the link of the relevant lead.
You can also create leads by entering them in a predefined Microsoft Excel templateand uploading them to the SAP Business ByDesign system. For more information, seeCreate Leads Using Microsoft Excel [page 245].
Create Leads Using Microsoft ExcelYou can create leads by entering them in a predefined Microsoft Excel template and uploadingthem to the SAP Business ByDesign system. For information on this task, see here[page 245].
Edit a LeadYou can display and work on all leads for which you are responsible. If you are working in theNew Business work center, and you need to work on leads that are assigned to colleagues, youneed to request authorization from an administrator.
Certain restrictions apply when editing leads that have been accepted or rejected: ● Leads that have been accepted or rejected by a sales employee in the New
Business work center can no longer be edited by a marketing employee in theMarketing work center. However, if required, a sales employee can edit such alead in the New Business work center.
● Leads that have been rejected by a marketing employee in the Marketing workcenter can no longer be edited.
1. In the Leads view, select the lead that you want to change and click Edit .2. You can then do the following:
● Change details of the lead ● Hand the lead over to sales by clicking Hand Over . ● Accept the lead by clicking Accept . ● Reject the lead by clicking Reject .
3. Save your changes.
You can see more details, for example Document Flow , by selecting View All .
SAP Business ByDesign February 2017New Business P U B L I C • © 2017 SAP SE or an SAP affiliate company. All rights reserved. 235

Accept or Reject a Lead1. Under Show choose Open Tasks.2. In the list, select the lead you wish to work on.
In the bottom half of the screen you can see the most important details. If you want tosee all the details, click Edit .
3. Click Accept or Reject .
You can also accept the lead on the following screens: ● When you click Edit to edit the lead ● When you select the lead in the Leads worklist
In addition, you can accept the lead and create a follow-up quote or opportunityin a single step by clicking Accept followed by Accept and Follow-UpOpportunity or Accept and Follow-Up Sales Quote. Note that this feature isavailable when you select My Leads or All Leads in the Show field, but not whenyou select Open Tasks.
The Set Reason for Status dialog box opens.4. In the Reason for Status field, select the reason you are accepting or rejecting the lead.5. Click OK to save your changes.
Certain restrictions apply when editing leads that have been accepted or rejected: ● Leads that have been accepted or rejected by a sales employee in the New
Business work center can no longer be edited by a marketing employee in theMarketing work center. However, if required, a sales employee can edit such alead in the New Business work center.
● Leads that have been rejected by a marketing employee in the Marketing workcenter can no longer be edited.
Delete a Lead1. In the list of leads, select the lead to be deleted.2. Click Delete .
Display a Graphical Analysis for a Leads Worklist1. In the worklist, from the Group By dropdown list, choose a criterion by which to group
data.2. To view all data from the worklist in the Analytical View section, click the chart icon next
to the filter icon.3. In the Analytical View section, choose a chart type to display the data.4. Double-click a data section in the chart to filter the original worklist.
You can clear the filter by clicking Back to Full Chart in the Analytical Viewsection or deleting the filter content in the worklist.
236 © 2017 SAP SE or an SAP affiliate company. All rights reserved. • P U B L I CSAP Business ByDesign February 2017
New Business

For some worklists, such as the Opportunities worklist in the Opportunity List view inthe New Business work center, you can aggregate the grouped data using differentcriterion (for example, expected value). You can then select different analysis methods(for example, count, sum, average, maximum, or minimum) to sort the data, and choosedifferent chart types to present the data from the worklist.
Create a Target Group from a Leads WorklistFor marketing purposes you can create a target group of accounts listed in a worklist. To dothis:
1. Call up the required worklist, and modify it to your needs.2. Click Export followed by To Target Group.
The New Target Group screen opens.3. Check the details and save the target group.
Generate Leads Automatically from Campaign Response Upload TemplateYou can generate leads automatically through campaigns using campaign response uploadtemplate.The leads are generated automatically when the Response Option ID is enabled for leadgeneration or the response type is Lead in the template.For more information, see Importing Campaign Responses using Microsoft Excel andResponse Options Quick Guide.
5.2.2 Business Background
5.2.2.1 Lead Processing
OverviewLead processing is used to describe, store, update, manage, and qualify a business partner’s potential interest in aparticular product or service. It is also used to handle and record all interactions with business partners based ontheir interest in a product or service over a period of time. The creation of a lead document can be the starting pointwithin the Marketing-to-Opportunity scenario, with the objective of transforming this lead into an opportunity.You can create leads when you participate in trade fairs or conduct e-mail marketing, for example. Lead processinghelps to automate the presales process, enabling sales representatives to focus on the most promising prospectsand opportunities. It also accelerates the stages from a business partner’s initial interest in a product or service tothe subsequent selling of that product or service.Depending on the way your business is run, you specify in scoping whether leads should be created by the marketingdepartment, and subsequently handed over to the sales department for further processing, or whether leads shouldbe created and processed by the sales department only.
RelevanceLead processing establishes and subsequently influences the potential interest of a business partner in your productor service. It also enables you to transform a qualified lead into an opportunity, thereby directly impacting the revenue
SAP Business ByDesign February 2017New Business P U B L I C • © 2017 SAP SE or an SAP affiliate company. All rights reserved. 237

of your company. It offers your sales representatives a pre-filtered database of open leads. Lead generation andqualification is the first step of a structured and well-defined sales cycle.
Prerequisites
Configuration settings are usually performed by an administrator. If you do not have the requiredauthorization, contact your administrator.
Lead Generation and/or Lead Management is enabled in your solution configuration, depending on whether youcreate leads in marketing or sales . To find these business options, go to the Business Configuration work center andchoose the Implementation Projects view. Select your implementation project and click Edit Project Scope . In theScoping step of the project, one of the following business packages must be selected:
● To create leads in marketing and hand them over to sales:Ensure that Campaign Management is selected within Marketing. Then choose Lead Generation.
The Lead Management business topic under Sales New Business is selected automatically.
● To create leads in sales (without handing leads over):Ensure that New Business is selected within Sales. Then choose Lead Management.
The Lead Generation business topic under Marketing Campaign Management should not beselected.
Under Questions you can see whether lead processing has been selected to work with or without handoverfrom marketing to sales. To do this, select All Elements in the Show field, then navigate to Sales NewBusiness Lead Management . The following business options are displayed:
● Lead Processing With Handover from Marketing ● Lead Processing Without Handover from Marketing
For the active business option, Yes has been selected automatically.
You can display and work on all leads for which you are responsible. If you are working in the New Business workcenter, and you need to work on leads that are assigned to colleagues, you need to request authorization from anadministrator.
FeaturesDepending on how your solution has been scoped, leads are created and processed as follows:
● If Lead Processing With Handover From Marketing has been scoped for your solution, leads are created in theMarketing work center. The leads are qualified as cold, warm, and hot by the marketing department. Once alead has been qualified as warm or hot, it can be handed over to the sales department. A task is then sentautomatically to the sales representative. The responsible sales representative accepts or rejects the leadsthat have been handed over to him or her. If a lead is accepted, the sales representative can create a follow-up opportunity or a sales quote.
● If Lead Processing Without Handover from Marketing has been scoped for your solution, leads are created inthe New Business work center. The responsible sales representative qualifies the leads, accepts or rejectsthem, and can create a follow-up opportunity or a sales quote for accepted leads.
238 © 2017 SAP SE or an SAP affiliate company. All rights reserved. • P U B L I CSAP Business ByDesign February 2017
New Business

When you create a lead, you classify it by selecting a category in the Category field, and specify its origin in theSource field. If a Lead is created as a follow-up document to a campaign, the Source field will automatically be filledwith the value Campaign. You can also qualify it by selecting a qualification in the Qualification field. After the leadhas been worked on, you accept or reject it and enter a reason why it has been accepted or rejected. The standardsystem has been preconfigured with sources, qualifications, categories, and reasons, but you can define your ownin fine-tuning for Leads. In addition to manually creating leads, you can upload leads using a Microsoft Excel®template.
Process FlowThe following steps explain the typical process flow based on the standard process, which gradually progresses intoopportunity management. However, variants of the standard process are also possible.
1. A lead is identified as a result of your company’s marketing attempts. For example, a sales representative ormarketing employee can generate leads from a marketing campaign or a trade fair.
2. After repeated business interactions, the sales representative creates a detailed lead for the interestedbusiness partner. You can also create maintain the details of a lead without creating an account for thebusiness partner.
3. Over a period of time, the lead is followed repeatedly with a view to establish and improve the level of interest.The lead is qualified as either cold, warm, or hot.
4. If a lead reaches a certain qualification level, such as warm or hot, it can be handed over to the sales departmentfor further business activities.
5. The sales representative uses the information gained in the lead to decide whether to generate a follow-upopportunity.
See AlsoQuick Guide for Leads (in Marketing)Quick Guide for Leads (in New Business) [page 233]Leads — Configuration Guide
5.2.2.2 Target Groups and Campaign Management
OverviewTarget Groups and Campaign Management provide an effective way for sales and marketing professionals withinyour company to target specific prospects or customer groups in order to generate new business or strengthenrelationships.A key strategy in successful marketing is the ability to query your customer database and create different targetgroups, thus enabling you to target your customers more effectively during your marketing campaigns. Targetgroups are lists of accounts and contacts that have at least one search parameter in common. It is also possible tomanually add accounts and contacts that do not match the search parameters, but still need to be included in thetarget group.Your company can then assign a target group to a campaign in order to plan, execute and measure the campaignresults from within SAP Business ByDesign. Campaign execution generates a Microsoft Excel® template that caneither be distributed to a marketing agency which then contacts the target group members, or as an input source inMicrosoft mail merge or other mailing systems.
SAP Business ByDesign February 2017New Business P U B L I C • © 2017 SAP SE or an SAP affiliate company. All rights reserved. 239

BenefitsTarget Groups and Campaign Management is relevant for all sales and marketing companies, whose employees canuse this function to segment their market and target the right customers or prospects.Target Groups and Campaign Management enables you to:
● Create new target groups in an easy step-by-step approach by selecting accounts and contacts based ondifferent search parameters or based on response information
● Check addressability of your target group members for different communication channels ● Search, view, create, edit, and execute campaigns ● Automatically create activities for account and contact history from a campaign ● Create and add responses to a campaign or use response codes to easily capture campaign responses ● Monitor campaign key performance indicators (KPIs) and check at a glance who has been contacted, who
has not been contacted and why, who has responded using which channel, and who has not yet responded
PrerequisitesThe following prerequisites apply:
● Campaign management is enabled in your solution configuration. ● For creating automatic campaign responses via e-mail synchronization, office and desktop integration must
be enabled.
Configuration settings are usually performed by an administrator. If you do not have the requiredauthorization, contact your administrator.
To find these business options, go to the Business Configuration work center and choose the ImplementationProjects view. Select your implementation project and click Edit Project Scope . In the Scoping step of the project,ensure that the following packages are selected:
● Campaign Management within Marketing ● Office and Desktop Integration within Communication and Information Exchange
FeaturesTarget Groups and Campaign Management consists of the following steps:
Planning a CampaignBefore creating a campaign, you typically define a target group to contact during the campaign. You create targetgroups in the Target Groups view in the Marketing work center or by choosing New Target Group under CommonTasks.Target groups are created by drawing on your existing customer and prospect database in SAP Business ByDesignusing different selection criteria. You specify the target group members by clicking Maintain Members, selecting therelevant query in the Show field, and entering the required selection criteria.If you want to create target groups of accounts or accounts with contacts based on selection criteria that are notavailable in the standard SAP Business ByDesign system, extension fields can be created and added these to theaccount or contact screens. For example, you want to create a target group based on the number of employees ofa corporate account. To enable you to do this, an administrator first creates the extension field Number ofEmployees for the Account screens where your company wants to use it (for example, New Corporate Account,
240 © 2017 SAP SE or an SAP affiliate company. All rights reserved. • P U B L I CSAP Business ByDesign February 2017
New Business

Corporate Account Overview). After that the administrator makes this extension field available also in the selectioncriteria used for creating target groups. The following steps outline in brief how the administrator can make theextension field visible in the selection criteria for a particular query:
1. In the Target Groups view, click New , then choose Target Group.2. From the Adapt menu, select Enter Adaptation Mode.3. In the guided activity, click Next to go to Step 2: Select Members.4. On the Select Members screen, in the Show field, choose the query that should contain this extension field.5. Click Adapt, then choose Edit Screen.6. In the adaptation panel that opens, click Extension Fields.7. Select the section for which the extension field is relevant.8. Select the Visible checkbox next to the Number of Employees extension field to make it visible on the current
screen.9. You can now try out the field while still in adaptation mode and, if satisfied, publish your changes to all users.10. If you need this field in other queries that you use for creating new target groups, repeat these steps.
For more information, see the following document: Extension Fields Quick Guide..You can also create target groups in the following ways:
● Upload a new target group using Microsoft Excel®You can create a target group by entering accounts and contacts in a predefined Microsoft Excel templateand uploading this list to the SAP Business ByDesign system.
● Based on a worklistIn some work center views you can create a target group based on a worklist. For example, you can create atarget group based on a worklist of service orders that have been completed, in order to send an e-mail to thetarget group members and ask them whether they are satisfied with the service that they have received.You can create target groups from worklists in the following work center views:
Work Center View Work Center
Accounts Account Management
Activities Account Management
Contacts Account Management
Leads MarketingNew Business
Opportunities New Business
Sales Quotes New Business
Sales Orders Sales Orders
Returns Sales Orders
Registered Products Service Entitlements
Contracts Service Entitlements
Service Requests Service Desk
Service Order Processing Service Orders
First you prepare your worklist by selecting the relevant query in the Show field, or by clicking Advanced andentering the relevant search criteria. Then you create the target group from this worklist by clicking
SAP Business ByDesign February 2017New Business P U B L I C • © 2017 SAP SE or an SAP affiliate company. All rights reserved. 241

Export followed by To Target Group. The target group will then contain all accounts and contacts that matchthis search and are shown as search results in the worklist.
● Based on a reportIn some reports you can create a target group based on the results of the report. For example, you can createa target group that contains all accounts with whom you have achieved more than $50,000 revenue for aspecific product within the last six months.You can create target groups from the following reports:
● Activity History ● Number of Leads ● Opportunity Pipeline ● Opportunity Volume ● Won/Lost Opportunities ● Sales Quote Volume ● Sales Order Volume ● Sales Pipeline ● Service Order Statistics ● Service Categories Analysis ● Return Sales Rate
First you call up a report and add the Account characteristic to the rows or columns. Then you click on anaccount ID or an account name, click on the arrow that appears next to the ID or name, and select Export allAccounts to new Target Group in the dropdown menu. The target group will then contain all accounts that areshown in the report. In addition, the system automatically determines the main contacts of these accounts,based on the account master data, and includes these in the target group. If the master data for a particularaccount does not have a main contact, then only the account is included in the target group.
Note that the system determines the main contacts that are currently entered in the master data ofthe accounts. Therefore it is possible that some contacts in the target group differ from the contactsshown in the report.
● Based on response optionsYou can create a new target group of all accounts and contacts that have responded with a specific responseoption to your campaign . When you select members for the target group, choose Campaign Responses inthe Show field. For more information on response options, see below.
Before creating your campaign, you can check in the target group itself whether all members can be contacted bya certain communication channel.On the Contact Overview screen under Target Groups, it is possible to see in which target groups the contact is amember.
Creating a new Campaign
Campaigns can be created by going to Campaign Management Campaigns , or by clicking Common Tasks andchoosing New Campaign. You can also create a campaign directly from a specific target group as a follow-up action.In this way, this target group is assigned automatically to the campaign.You can then enter a campaign description and specify a campaign type. Available campaign types are E-mail, Letter,Phone Call, and Fax campaigns.You can also enter a start date to specify when the campaign is planned to be active, and an end date to specify whenthe campaign is planned to be finished. You can use these dates to help plan your campaigns.Then you assign an existing target group at whom this campaign is aimed, or you can create a new target group.
242 © 2017 SAP SE or an SAP affiliate company. All rights reserved. • P U B L I CSAP Business ByDesign February 2017
New Business

Optionally you can decide whether to enable the automatic creation of activities from the campaign itself for accountand contact history, to include blocked accounts or contacts, or whether to use the personal address of contactsfor letter campaigns.If you need to specify how target group members can respond to a campaign, you can assign response options toit. You first define the response options in the Campaign Management view by clicking New on one of the followingscreens:
● In the Response Options view, in the worklist ● In the Campaigns view, directly in the campaign itself, on the Response Options tab of the campaign
These response options are then assigned automatically to your campaign. For example, you can define the followingresponse options:
● Yes ● No ● Not sure
You can also define more specific response options, such as: ● Will attend ● Will attend with 2 people ● Will not attend
You can classify response options as positive, negative, or neutral responses.After you have defined the response options, you can assign them to the campaign on the Response Options tab ofthe campaign.
Executing a CampaignBefore a campaign can be executed, a target group must be assigned to it, and a campaign type must be selected.Campaign execution generates a Microsoft Excel template containing all addressable target group members. ThisMicrosoft Excel file can either be distributed to a marketing agency that then contacts the target group members,or used as an input source in Microsoft mail merge or other mailing systems.All addressable target group members are exported to the Microsoft Excel file, depending on the campaign type thathas been assigned to the campaign. A member is addressable if the following conditions are met:
● The member can be contacted by the selected campaign type. For example, for the E-mail campaign type, alltarget group members for whom e-mail addresses have been maintained are addressable by e-mail and aretherefore exported to the Microsoft Excel file.
● The status of the target group member is set to Active. ● The member is allowed to be contacted; that is, the Contact Permission field is set to Allowed or is blank.
In addition to the address data of the members, the Microsoft Excel file includes response codes. These are uniquecodes that have been generated automatically for each target group member. The use of response codes can speedup the manual creation of campaign responses; they determine which accounts/contacts have responded, and towhich campaign they have responded.After you have executed a campaign you can immediately check who has been contacted successfully, and also whocould not be contacted and the reason why contact was not possible.
Contacted in this sense means the members who have been exported to the Microsoft Excel file to be usedfor campaign execution, and are therefore ready to be contacted by whichever communication channel ischosen.
SAP Business ByDesign February 2017New Business P U B L I C • © 2017 SAP SE or an SAP affiliate company. All rights reserved. 243

Managing Campaign ResponsesYou capture responses by creating activities of the type e-mail, letter, fax, or phone call, and assigning a campaignto them.SAP Business ByDesign provides several methods of creating responses, depending on whether they are createdmostly by marketing or sales employees. Marketing employees can create responses in the following ways:
● Manually by selecting a campaign in the Campaigns worklist, and clicking Add Response followed by e-mail,fax, letter, or phone call
● Manually by adding a response in the campaign itself
In both cases, the relevant activity opens. The campaign description is proposed automatically in the Campaign field.All you need to do is to enter the person who has responded.Sales or other employees can create responses in the following ways:
● Manually in the Activities view by creating an activity of the type e-mail, fax, letter, or phone call, and assigninga campaign to it
● Automatically using Microsoft Outlook® Integration. Responses received via e-mail in your personal inbox canbe assigned to a campaign and synchronized with SAP Business ByDesign.
When you create a response manually, you can enter one of the following: ● Campaign ID
You then need to manually add the person who has responded. ● Response code
The campaign and the person who has responded are determined automatically.
If response options have been assigned to the campaign, you can select the appropriate response from a dropdownlist in the Response Options field in the activity. This field is visible if a valid campaign has been entered in theCampaign field.The Campaign Overview screen displays all the important information, such as the campaign execution date, thecampaign key performance indicators (KPIs), the number of members contacted, and the number of non-responders.From the Campaign Overview screen you can navigate directly to the execution and response details, such as whohas responded and who has not. This information can be easily used, for example, to trigger follow-up actions likecontacting all responders via a new campaign. To help you access such information quickly, you can use the AdvancedSearch in a campaign to search for:
● Members of a campaign who have not been contactedThe search results can then be exported to a new target group or campaign, for example, and be used forfurther processing. Click Execution Details and choose Members Not Contacted in the Show field.
● Particular responses to a campaignFor example, you wish to see who would like to participate at an upcoming event. Click Response Details , andchoose Responses in the Show field.
On the Account Overview and Contact Overview screens it is possible to display all campaigns in which an accountor a contact has been contacted. On the Contact Overview screen you can also see the response that the contacthas given to a particular campaign and the response classification. You can view this information in the AccountManagement work center:
● Choose Accounts and open an account. On the Account Overview screen click Sales . ● Choose Contacts and open a contact.
The details are displayed under Campaigns.
244 © 2017 SAP SE or an SAP affiliate company. All rights reserved. • P U B L I CSAP Business ByDesign February 2017
New Business

See AlsoTarget Groups Quick GuideCampaigns Quick GuideResponse Options Quick Guide
5.2.3 Tasks
5.2.3.1 Create Leads Using Microsoft Excel®
OverviewYou can create leads by entering them in a predefined Microsoft Excel template and uploading them to the SAPBusiness ByDesign system.
PrerequisitesYou have installed the latest Add-In for Microsoft Excel. Depending on your solution set-up, you can do this from theSelf Services Overview in the Home work center, from the Download Center in the Application and UserManagement work center, or from the Download link that is available directly on the user interface.Also, the settings for your browser must be set correctly. You can check this by clicking Check My ComputerSettings on the logon screen.
If the Lead Processing With Handover from Marketing business option has been selected for your solution,then an employee working in marketing creates leads in the Leads view in the Marketing work center andsubsequently hands them over to sales. An employee working in sales then processes the leads further in theLeads view in the New Business work center. In this case it is not possible to create leads in the New Businesswork center.If the Lead Processing Without Handover from Marketing business option has been selected for your solution,then an employee working in sales creates leads in the Leads view in the New Business work center. In thiscase, the Leads view is not visible in the Marketing work center.
StepsIn the SAP Business ByDesign system, in the Leads view of the Marketing or New Business work center, click
New and Leads from Microsoft Excel.Get the Template
1. Select the template.Choose the template in the required language and click Download.
You can choose any language that you have selected during scoping. If you have selected only onelanguage during scoping, you will not get a selection of language versions to choose from.
2. Decide what you want to do with the template. Choose one of the following options:
SAP Business ByDesign February 2017New Business P U B L I C • © 2017 SAP SE or an SAP affiliate company. All rights reserved. 245

● If you want to use the template only once, you can open the template without saving it. Click Open. ● If you want to save the template so that you can use it again, choose a location to save the file to, enter
an appropriate file name, and click Save. Then click Open.
If you have previously downloaded and saved this template on your computer, navigate to the location whereyou have saved the template, and open it.
Log on to the solution from Microsoft Excel1. In the SAP Add-In ribbon in Microsoft Excel, click Logon.
If the SAP Add-In ribbon is not displayed, check to make sure that the Add-In for Microsoft Excel hasbeen installed correctly (see Prerequisites in this document).
A dialog box opens where you can enter the logon details. The system URL is proposed automatically. Thesystem URL is the URL of the system that you are working with.
2. Enter your user ID and your password, and click Logon.
After initial logon to the system, the ribbon text is changed from SAP Add-In to the name of yoursolution.
Enter Details in the Microsoft Excel Template
Note the following: ● The Microsoft Excel template is presented with a number of rows where you can enter or copy your
data. If you need more, add the number of rows you need before you start entering or copying yourdata.
● Ensure that mandatory fields (those marked with an asterisk) are filled. ● To help you fill in the details:
○ Some fields have dropdown lists. ○ In some fields you can search the system for data, for example, countries. Place the cursor on the
field, and click Lookup in your solution's tool bar or ribbon to search the system. A search field isavailable in the Lookup dialog box that appears. When you start to type text in the search field, therelevant entries are filtered in the ID and Description columns, meaning that you do not have toscroll through the whole list. If the Lookup button is not active in the ribbon or toolbar, then it isnot possible to perform a search.
Enter the leads into the rows, and in the appropriate columns. You can also enter leads without account.Save Your Data
1. After you have finished entering all the data, save the Microsoft Excel file.2. Click Save Data to .
A dialog box opens, informing you that the data is being saved to the solution.After the upload, a message informs you that your data has been saved in the solution.
If you do not provide all the required information, or if you provide incorrect information, somerecords will not be saved. Error messages will highlight the problems so that you can correct themand save the data again.
3. You can then log off by clicking Logoff .
246 © 2017 SAP SE or an SAP affiliate company. All rights reserved. • P U B L I CSAP Business ByDesign February 2017
New Business

ResultThe new leads are saved in the SAP Business ByDesign system and added to the list in the Leads view.If you need to make changes to these leads, you must change them directly in the system.
5.3 Opportunities View
5.3.1 Opportunities Quick Guide
The Opportunities view allows you to create, edit, and analyze your opportunities. You can access this view from theNew Business work center. There are two subviews:
Opportunity ListThe Opportunity List allows you to create, edit, and view opportunities and related information from one centrallocation. When you create an opportunity, you typically specify the account and product or service, enter details forforecasting, and you can classify it for analysis purposes.If the Sales Assistant has been scoped for your solution, then you are provided with a set of recommended activitiesand tasks for each phase. You can then select the activities you need to carry out to increase your chance of winningthis opportunity. For more information, see Sales Assistant [page 256].In addition, you can add competitors to opportunities. This information can be used later in reporting.Traffic lights inform you about the progress of your opportunities. Once you have decided that an opportunity hasbeen won or lost, you set the appropriate status and provide a reason as to why the opportunity has been won orlost. You can use this information to analyze the success or failure of your opportunities.You can display data in an Opportunities worklist as a chart using the analytical view function. This function helpsyou to get a quick overview of all data in the worklist.
Opportunity PipelineThe Opportunity Pipeline allows you to analyze your opportunities in a graph combined with an interactive table. Italso allows you to simulate how changes in your opportunities would influence your pipeline. The following analysesare provided:
● Won vs. Expected OpportunitiesThis analysis compares the values of your won opportunities with the value of your expected opportunitiesfrom a quarterly perspective.
● Pipeline Bar ChartThis analysis displays all your opportunities that are open or in process, together with their values by salesphase, and according to whether they are stalled, slow, or on track.
● Pipeline Bubble ChartThis analysis is similar to the pipeline bar chart, but in the form of a bubble chart. The size of the bubble relatesto the expected value of the opportunity. The position on the Y-axis shows the chance of success.
SAP Business ByDesign February 2017New Business P U B L I C • © 2017 SAP SE or an SAP affiliate company. All rights reserved. 247

Business Background
Opportunity ProcessingOpportunity Processing allows you to identify and follow through on the possibility of selling goods or services to aparticular customer. The opportunity can store all relevant information to help you win, such as the account and allrelevant communication, products and prices, members of the sales team and your sales partners who are workingon the opportunity, and competitors for this opportunity. In addition, you can classify your opportunity by setting apriority and specifying the source (for example, a trade fair).For more information, see Opportunity Processing [page 253].
Sales AssistantThe Sales Assistant helps sales employees to establish a structured sales process when they process opportunities.It supports the employee in defining the required sales activities that have to be performed in an opportunity salescycle.For more information, see Sales Assistant [page 256].
Business Scenario: Marketing–to-OpportunityThe Marketing-to-Opportunity business scenario enables you to manage marketing and pre-sales activities with thegoal of generating new business for customers and prospects. You can run campaigns, capture responses, generateleads, manage opportunities, and initiate and track related sales activities. Alternatively, you can use this businessscenario without campaigns, which means that no marketing department is involved, and leads and opportunitiescan be created without using a campaign.There is also an enhanced function for Microsoft Outlook® integration that allows you to directly assign e-mails tospecific campaigns in Outlook and synchronize this information with the SAP Business ByDesign system. In addition,the pipeline simulation feature provides an interactive combination of graphic and table list of the opportunities. TheWhat-if analysis simulates how changes would affect your pipeline.For more information, see Marketing-to-Opportunity.
Tasks
Create an Opportunity1. Click New , then choose Opportunity.
You can also click Common Tasks in the taskbar and choose New Opportunity.
2. On the General tab under Account, enter the account associated with the opportunity.In the Name field, enter the account name or ID. If necessary, you can search for anaccount or click New to create a new corporate or private account.The system will automatically display the related master data.
3. Enter details of the opportunity such as the description and, if necessary, overwrite thestart and end dates.
Note that reports for opportunities, such as Won/Lost Opportunities orOpportunity Pipeline, are based on the end date of an opportunity.
248 © 2017 SAP SE or an SAP affiliate company. All rights reserved. • P U B L I CSAP Business ByDesign February 2017
New Business

You can also enter the following details: ● If the Sales Assistant has been configured correctly, the Sales Cycle and Sales
Phase are proposed. If required, you can select a different sales cycle or salesphase.
● Under Forecast you can enter the chance of success and the expected value, andspecify whether the opportunity is relevant for forecasting.
The chance of success is proposed depending on the current sales phase.You can overwrite the chance of success. However, if you overwrite it, andyou select a new sales phase afterwards, the system does not propose anew chance of success based on the new sales phase. So you must changethe chance of success manually, if required.
● Under Classification you can classify and prioritize the opportunity.4. Click Items and enter details of the products or services associated with the
opportunity as follows:a. Click Add Row to create a new row in the table.b. Enter or select a product or service. The system automatically displays the related
description and category.If the product or service you need to enter does not exist in the system yet, justenter a description under Product Description.If you want to enter only a product category, you can select or enter a productcategory in the appropriate field.
c. Enter the required quantity and unit of measure. The system calculates the itemvalue.If you have entered only a product description or a product category, then you canenter an item value.
d. Repeat these steps to add information about other products or servicesassociated with this opportunity.
5. You can now specify sales activities that should be carried out for this opportunity. Todo this, click Sales Activities .If the Sales Assistant has been scoped for your system, a list of possible activities isdisplayed under Suggested Activities.
6. Select the required activity or activities under Suggested Activities and click Add .The selected activities are added under Sales Activities and can be carried out.
7. If required, you can create additional sales activities by clicking New and thenchoosing the appropriate activity type. To activate this button, save the opportunityfirst.
If the Sales Assistant has not been configured for your system, no sales activitiesare displayed under Suggested Activities. However, you can enter sales activitiesmanually under Sales Activities.
8. You can enter your competitors for this opportunity on the Competitors tab. You canspecify which competitor should be treated as the main competitor and used inreporting by selecting the Main checkbox for the relevant competitor.
9. You can add an external party who is involved in this opportunity as follows:a. Click View All and select Involved Parties .b. On the External Parties tab, click Add Row .
SAP Business ByDesign February 2017New Business P U B L I C • © 2017 SAP SE or an SAP affiliate company. All rights reserved. 249

c. In the Party Role column, choose, for example, Sales Partner, and enter the salespartner.
You can also view or change the members of your internal sales team on the Sales Team tab.
10. Save the opportunity.The status of the opportunity is set automatically to Open.
You can also create opportunities by entering them in a predefined Microsoft Excel®template and uploading them to the SAP Business ByDesign system. For moreinformation, see Create Opportunities Using Microsoft Excel® [page 258].
Create Opportunities Using Microsoft Excel®You can create opportunities by entering them in a predefined Microsoft Excel® template anduploading them to the SAP Business ByDesign system. For information on this task, see here
[page 258].
Edit an OpportunityYou can display and work on all opportunities for which you are responsible. If you need towork on opportunities that are assigned to colleagues, you need to request authorization froman administrator.To edit an opportunity, select it in the work list and click Edit . When you work on anopportunity during its life cycle, you would typically do the following:
● Change details on the General tab.For example, you can change the sales phase under Pipeline Status.
A traffic light icon tells you whether the opportunity is On Track, Slow, orStalled. When you change the sales phase, the traffic light icon changes togreen, and the opportunity is shown as being On Track. In addition, the valuein the Days in Phase field is reset to 0.
Whenever you choose the next sales phase, the percentage value in the Chance ofSuccess field increases automatically.
The chance of success is proposed depending on the current sales phase. Youcan overwrite the chance of success. However, if you overwrite it, and you selecta new sales phase afterwards, the system does not propose a new chance ofsuccess based on the new sales phase. So you must change the chance ofsuccess manually, if required.
You can also change the expected value under Forecast or you specify whether theopportunity is relevant for forecast or not.
● Change the product on the Items tab. ● Check and process your activities on the Sales Activities tab as follows:
1. Click on the subject of a sales activity to open or edit an activity.2. Enter details for this activity, if required. To track the processing of an activity, you
can specify its status by clicking Change Status followed by the appropriatestatus.
3. Save and close the activity.
250 © 2017 SAP SE or an SAP affiliate company. All rights reserved. • P U B L I CSAP Business ByDesign February 2017
New Business

4. You can click Refresh under Sales Activities, to update the activity data.
You can delete a sales activity that you do not require by selecting it andclicking Delete .
● Add or delete a competitor for this opportunity on the Competitors tab. ● Add or change the sales team or external parties on the Involved Parties tab.
Save the opportunity after making the changes.
End an OpportunityYou end an opportunity by changing its status to Won, Lost, or Stopped.
An opportunity must have the status In Process before you change it to Won or Lost.Opportunities that have the status Stopped are not displayed in the OpportunityPipeline or in the Won/Lost Opportunities report, and they are not taken into accountfor forecasting.
1. Select an opportunity in the work list and click Change Status followed by theappropriate status.
You can also edit the opportunity to view the details first.
If you have selected the status Won or Lost, a dialog box is displayed.2. In the dialog box, select a reason why the opportunity was won or lost and click OK .
This reason is displayed in the opportunity as Reason for Status under Pipeline Status,and it is also used in reporting for further analysis.
Delete an OpportunityYou can delete an opportunity, regardless of its status. However, you cannot delete anopportunity if a follow-up document exists such as an activity or a sales quote.
1. In the Opportunities work list, select an opportunity and click Delete .The system displays a message, asking you whether you want to delete the selectedrecord.
2. Confirm the message by clicking Delete .
The opportunity is removed from your work list, and a system message confirms that yourentries have been saved.
Display a Graphical Analysis of an Opportunities Worklist1. In the worklist, from the Group By dropdown list, choose a criterion by which to group
data.2. To view all data from the worklist in the Analytical View section, click the chart icon next
to the filter icon.3. In the Analytical View section, choose a chart type to display the data.4. Double-click a data section in the chart to filter the original worklist.
You can clear the filter by clicking Back to Full Chart in the Analytical Viewsection or deleting the filter content in the worklist.
SAP Business ByDesign February 2017New Business P U B L I C • © 2017 SAP SE or an SAP affiliate company. All rights reserved. 251

For some worklists, such as the Opportunities worklist in the Opportunity List view inthe New Business work center, you can aggregate the grouped data using differentcriterion (for example, expected value). You can then select different analysis methods(for example, count, sum, average, maximum, or minimum) to sort the data, and choosedifferent chart types to present the data from the worklist.
Analyze Opportunities With the Opportunity PipelineYou can analyze the opportunity pipeline based on the current situation. Alternatively, you canperform a simulation by changing certain parameters and then analyzing how these changeswould affect the opportunity pipeline. You can then choose to cancel the simulation or saveyour changes in the opportunities.Analyzing the Opportunity Pipeline
1. Default selection criteria are used to display the opportunity analyses. To base youranalysis on different selection criteria, click Advanced.
2. Depending on the analysis you have chosen in the Show field, you can specify differentselection criteria, for example: ● The currency in which the data should be displayed ● Aggregation of data according to a quarter, month, or year ● Time frame of when opportunities end ● The values to be displayed: expected value, item value, or weighted value. ● Whether the opportunities are relevant for forecast or not ● Category, source, or priority of the opportunities
3. To ensure consistent company-wide reporting, sales phases used throughout thecompany can be assigned to analysis phases that are used exclusively for reporting. Ifyou want to see your pipeline according to analysis phases, select the Display AnalysisPhase check box.
4. Click Go .The graph is built based on this selection criteria, and a list including the relevantopportunities is displayed below the graph.
5. Click on an element in a graph to filter the list of opportunities as follows: ● An element in the legend
For example, you can click on Won in the legend to display only those opportunitiesthat have been won.
● A bar or a bubble in the graph itselfFor example, you can click on the red bar in the Identify opportunity sales phaseto display those opportunities that are stalled.
● For the Won vs. Expected and Pipeline Bar Chart analyses: an element on the X-axis of the graphFor example, you can click on Qualify opportunity to display only thoseopportunities that are currently in the Qualify opportunity sales phase.
Simulating the Opportunity PipelineYou can simulate the opportunity pipeline by changing the following parameters:
● Chance of success ● Relevance for forecast ● Expected value
252 © 2017 SAP SE or an SAP affiliate company. All rights reserved. • P U B L I CSAP Business ByDesign February 2017
New Business

● Sales phase ● End date ● Priority
1. Click Start Simulation and make your changes.Your changes are immediately reflected in the graph as well.
2. After you have analyzed your results, you can perform one of the following actions: ● Click Cancel Simulation to cancel the simulation. Your changes are not saved. ● Click Save Changed Opportunities to incorporate and save your changes in the
opportunities.
Export Opportunities to Microsoft Excel®You can export opportunities to Microsoft Excel. For more information, see Export BusinessData Using Microsoft Excel® [page 82].
Create a Target Group from an Opportunities WorklistFor marketing purposes you can create a target group of accounts listed in a worklist. To dothis:
1. Call up the required worklist, and modify it to your needs.2. Click Export followed by To Target Group.
The New Target Group screen opens.3. Check the details and save the target group.
5.3.2 Business Background
5.3.2.1 Opportunity Processing
OverviewOpportunity Processing allows you to identify and follow through on the possibility of selling goods or services to aparticular customer. The opportunity can store all relevant information to help you win, such as the account and allrelevant communication, products and prices, members of the sales team and your sales partners who are workingon the opportunity, and competitors for this opportunity. In addition, you can classify your opportunity by setting apriority and specifying the source (for example, a trade fair).
RelevanceOpportunity processing is relevant if:
● You have long sales cycles ● The expected sales volume is high ● You want to monitor sales cycles and track stalled opportunities
SAP Business ByDesign February 2017New Business P U B L I C • © 2017 SAP SE or an SAP affiliate company. All rights reserved. 253

Prerequisites
Configuration settings are usually performed by an administrator. If you do not have the requiredauthorization, contact your administrator.
You have enabled Opportunities in your system configuration. To find this business option, go to the BusinessConfiguration work center and choose the Implementation Projects view. Select your implementation project andclick Edit Project Scope . In the Scoping step of the project, ensure that New Business is selected within Sales.In the Questions step, expand the Sales scoping element and select New Business. Select Opportunities and answerthe question related to Sales Methodology.You can define settings for opportunities, sales cycles, and sales phases. For your implementation project click
Open Activity List . Select the Fine-Tune phase, then select the Opportunities and Sales Cycles and Phases activitiesfrom the activity list.You can display and work on all opportunities for which you are responsible. If you need to work on opportunitiesthat are assigned to colleagues, you need to request authorization from an administrator.
FeaturesAn opportunity can be created with or without reference to a lead or a campaign, and can be followed up by a servicequote, a sales quote, a sales order or a sales quote for contract. The relevant parties involved and items are copiedfrom the opportunity into the service quote, sales quote, sales order or sales quote for contract. If an Opportunityis created as a follow-up document to a campaign, the Source field will automatically be filled with the valueCampaign.If you enter a product in an opportunity for which a price list exists, the price will be determined automatically, basedon the price list master data. Discount lists and surcharges defined as master data will also be considered for theprice determination. If required, you can overwrite the price that has been determined. Note, however, that no pricinginformation is copied to sales quotes or sales orders when you create them as follow-up documents from anopportunity. Instead, pricing is carried out again in the sales quote or sales order.In an opportunity you can also enter a product that does not exist as master data in your system. You simply entera text for a product description. If required, you can also enter a price. However, these product descriptions andprices are not copied to follow-up sales quotes or sales orders.As with other business documents, involved parties are proposed automatically in an opportunity. In fine-tuning forOpportunities, you can define new party roles and influence how some of the party roles are determined in theopportunity. For more information, see Party Processing [page 29].An opportunity runs through a sales cycle that is typically broken down into sales phases where specific salesactivities are carried out. To ensure consistent company-wide reporting, sales phases used throughout the companycan be assigned to analysis phases that are used exclusively for reporting.A sales cycle is broken down into sales phases. In the standard system, the General opportunity sales cycle consistsof the following sales phases:
Sales Phases
001 Identify opportunity
002 Qualify opportunity
003 Develop value proposition
254 © 2017 SAP SE or an SAP affiliate company. All rights reserved. • P U B L I CSAP Business ByDesign February 2017
New Business

004 Quotation
005 Decision
006 Close
The system keeps track of how many days an opportunity is in a certain phase. In fine-tuning for Sales Cycles andPhases, you can specify for each sales phase after how many days an opportunity is said to be making slow progressor has stalled when no updates have been saved in this opportunity. The system then determines whether theopportunity is On Track, Slow, or Stalled. A traffic light icon visualizes this. In addition, the number of days thatthe opportunity has remained in a particular phase is displayed in the Days in Phase field.When you change the sales phase in the opportunity, the value in the Days in Phase field is reset to zero. If anopportunity is stalled, a notification can be sent automatically to the manager of the employee responsible of thisopportunity.In addition, when you choose the next sales phase of an opportunity, your chance of success of winning thisopportunity increases. That is, the percentage value in the Chance of Success field increases automatically,depending on settings in fine-tuning.In fine-tuning you can also specify a default value to be proposed in the opportunity as the chance of success. Inaddition, you can specify in the opportunity whether it should be taken into account for forecasts.You can enter activities that need to be carried out for this opportunity. For appointments, you can enter visit reportsusing a predefined template. If the Sales Assistant has been scoped for your solution, then a set of suggestedactivities is proposed for each phase of the opportunity. You can then select the activities you require for thisparticular opportunity, and carry them out. For more information, see Sales Assistant [page 256].You can set a status for the opportunity and track its progress. The following statuses are provided in the standardsystem:
Statuses
Open This status is proposed when you create an opportunity.
In Process You must set this status manually. It enables you to set all subsequent statuses.
Won You must set this status manually, and provide a reason why this opportunity has been won.
Lost You must set this status manually, and provide a reason why this opportunity has been lost.
Stopped You must set this status manually.
These statuses are preconfigured and cannot be changed.You end an opportunity by specifying whether it has been won or lost, and providing a reason as to why it has beenwon or lost. For example, an opportunity is lost, and you find out that the reason was because a competitor hadoffered a better price. You then change the status of the opportunity to Lost, and set the Reason field to Lost due toPrice. In fine-tuning for Opportunities, you can define your own reasons and assign them to the Won or Lost statusas required.The Opportunity Pipeline provides you with a graphical representation of the opportunities that have been woncompared with those that you still expect to win. You can simulate certain changes to your opportunities such asthe chance of success or the expected value, directly in the Opportunity Pipeline, and then decide to save or cancelthese changes.
Process FlowThe following steps explain the typical process flow:
SAP Business ByDesign February 2017New Business P U B L I C • © 2017 SAP SE or an SAP affiliate company. All rights reserved. 255

1. In the New Business work center, create the opportunity in one of the following ways: ● As a follow-up to a lead in the Leads view. The system copies details from the lead to the new opportunity. ● Without reference to a lead, in the Opportunities view.
2. The sales cycle and sales phase are proposed automatically, depending on settings in fine-tuning, The chanceof success is also proposed automatically, depending on the sales cycle. You can overwrite these details, ifrequired.
3. Enter details such as the account, the products or product descriptions, the expected value, and whether ornot the opportunity should be taken into account for forecasts.
4. You can navigate to the Involved Parties tab to display your sales team and external parties that are dealingwith the opportunity.
5. If the Sales Assistant has been configured for your system, you can navigate to the Sales Activities tab andselect the activities to be carried out for each phase.
6. When you save the opportunity, it has the status Open. You can change this status to In Process, Stopped,Won, or Lost, according to the actual progression of the opportunity. If you have set the status of theopportunity to Won or Lost, you can enter a reason as to why it was won or lost.
7. If an opportunity is successful, you can create a follow-up service quote, sales quote, sales order or salesquote for contract.
See AlsoOpportunities Quick Guide [page 247]Opportunities – Configuration GuideSales Cycles and Phases – Configuration GuideSales Cycles and PhasesSales Assistant [page 256]Party Processing [page 29]
5.3.2.2 Sales Assistant
OverviewThe Sales Assistant helps sales employees to establish a structured sales process when they process opportunities.It supports the employee in defining the required sales activities that have to be performed in an opportunity salescycle.The Sales Assistant provides a structured sales methodology organized by sales cycles. Each sales cycle consistsof sales phases. Activities can be defined in fine-tuning for each sales phase; these activities control, document, andmonitor the sales process.For every phase of an opportunity, the Sales Assistant provides the user with a set of suggested activities and tasksto increase the chance of success. When you as an employee responsible in sales create an opportunity, the SalesAssistant displays the suggested activities on the Sales Activities tab. You can then select the activities you requirefor this opportunity.We recommend that you include all mandatory activities of a sales phase in the opportunity and execute themaccordingly. However, even though an activity is mandatory, you can move to the next sales phase without executingthe mandatory activity. You can also manually enter additional activities. Moreover, even if activities are notcompleted, the opportunity can still move into the next phase, and it is still possible to create a follow-up sales quoteor sales order.
256 © 2017 SAP SE or an SAP affiliate company. All rights reserved. • P U B L I CSAP Business ByDesign February 2017
New Business

When you save the opportunity, individual activities are generated from the Sales Assistant. These activities areassigned to you as the responsible employee and are automatically linked to the opportunity.All suggested activities that are activated in the opportunity are automatically filled with the following data:
Data Proposed in Activities
Activity type Specified in fine tuning
Partner (account, contact, and employee responsible) Copied from the opportunity
Subject Specified in fine-tuning
Details description Specified in fine-tuning
Start and end date Proposed automatically by the system
Using the Sales Assistant is optional. The Sales Assistant is especially relevant for organizations that have a longsales process in which the chance of success, that is, of converting an opportunity into a sales quote or order, dependson a number of activities that need to be executed and monitored. The content can be adapted to suit the specificsales process of your organization.
Prerequisites
Configuration settings are usually performed by an administrator. If you do not have the requiredauthorization, contact your administrator.
Sales Assistant is enabled in your solution configuration. To find this business option, go to the BusinessConfiguration work center and choose the Implementation Projects view. Select your implementation project andclick Edit Project Scope . In the Scoping step of the project, ensure that the following business packages and businesstopics are selected in the Sales business area:
● Account and Activity Management Activity Management ● New Business Opportunities
In the Questions step, expand the Sales scoping element and select New Business. Select Opportunities and answerthe question related to the Sales Assistant under Sales Methodology.This enables the Sales Assistant fine-tuning activity. To find this activity, click Open Activity List in yourimplementation project. Select the Fine Tune phase, then select the Sales Assistant activity from the activity list. Youcan then specify your settings as follows:
● ActivitiesYou can either use the activities provided in the standard system, or create new ones for your definedopportunity sales phases. These activities are then proposed in the opportunity on the Sales Activities taband can be used as guidance throughout your sales process. To provide further assistance, you can maintaina detailed description and assign an activity type for each activity in fine-tuning.
● Assignment of Activities to Sales PhasesYou can select an opportunity sales cycle with its sales phase and assign your predefined activities to yoursales phase. You can also define the sequence in which the suggested activities should be displayed in theopportunity.In addition, you can specify whether the activities are mandatory. These are the activities that should becarried out for an opportunity; however, the employee responsible for the opportunity can still decide not tocarry out a mandatory activity.
The following table shows an example of activities that is provided in the standard system for the sales phase IdentifyOpportunity:
SAP Business ByDesign February 2017New Business P U B L I C • © 2017 SAP SE or an SAP affiliate company. All rights reserved. 257

Activities for Identify Opportunity Sales Phase
Sequence Activities Mandatory
1 Gather information on customer Yes
2 Identify most suitable entry point Yes
3 Obtain and prepare visit Yes
4 Initial need analysis Yes
Process FlowThe following steps explain the typical process flow:
1. As an employee responsible, create an opportunity and enter the necessary details such as the account,product, expected value, chance of success, and so on.
2. Click Sales Activities .3. Under Suggested Activities, select the activities you need for each phase and add them to the Sales
Activities. We recommend that you include the mandatory activities.4. When you save the opportunity, the activities are created. They are assigned to you and linked to this
opportunity
See AlsoOpportunity Processing [page 253]Activity Management [page 45]
5.3.3 Tasks
5.3.3.1 Create Opportunities Using Microsoft Excel®
OverviewYou can create opportunities by entering them in a predefined Microsoft Excel template and uploading them to theSAP Business ByDesign system.
PrerequisitesYou have installed the latest Add-In for Microsoft Excel. Depending on your solution set-up, you can do this from theSelf Services Overview in the Home work center, from the Download Center in the Application and UserManagement work center, or from the Download link that is available directly on the user interface.Also, the settings for your browser must be set correctly. You can check this by clicking Check My ComputerSettings on the logon screen.
258 © 2017 SAP SE or an SAP affiliate company. All rights reserved. • P U B L I CSAP Business ByDesign February 2017
New Business

StepsIn the SAP Business ByDesign system, go to New Business Opportunities , then click New and Opportunitiesfrom Microsoft Excel.Get the Template
1. Select the template.Choose the template in the required language and click Download.
You can choose any language that you have selected during scoping. If you have selected only onelanguage during scoping, you will not get a selection of language versions to choose from.
2. Decide what you want to do with the template. Choose one of the following options: ● If you want to use the template only once, you can open the template without saving it. Click Open. ● If you want to save the template so that you can use it again, choose a location to save the file to, enter
an appropriate file name, and click Save. Then click Open.
If you have previously downloaded and saved this template on your computer, navigate to the location whereyou have saved the template, and open it.
Log on to the solution from Microsoft Excel1. In the SAP Add-In ribbon in Microsoft Excel, click Logon.
If the SAP Add-In ribbon is not displayed, check to make sure that the Add-In for Microsoft Excel hasbeen installed correctly (see Prerequisites in this document).
A dialog box opens where you can enter the logon details. The system URL is proposed automatically. Thesystem URL is the URL of the system that you are working with.
2. Enter your user ID and your password, and click Logon.
After initial logon to the system, the ribbon text is changed from SAP Add-In to the name of yoursolution.
Enter Details in the Microsoft Excel Template
Note the following: ● The Microsoft Excel template is presented with a number of rows where you can enter or copy your
data. If you need more, add the number of rows you need before you start entering or copying yourdata.
● Ensure that mandatory fields (those marked with an asterisk) are filled. ● To help you fill in the details:
○ Some fields have dropdown lists. ○ In some fields you can search the system for data, for example, countries. Place the cursor on the
field, and click Lookup in your solution's tool bar or ribbon to search the system. A search field isavailable in the Lookup dialog box that appears. When you start to type text in the search field, therelevant entries are filtered in the ID and Description columns, meaning that you do not have toscroll through the whole list. If the Lookup button is not active in the ribbon or toolbar, then it isnot possible to perform a search.
Enter the opportunities into the rows, and in the appropriate columns.
SAP Business ByDesign February 2017New Business P U B L I C • © 2017 SAP SE or an SAP affiliate company. All rights reserved. 259

Save Your Data1. After you have finished entering all the data, save the Microsoft Excel file.2. Click Save Data to .
A dialog box opens, informing you that the data is being saved to the solution.After the upload, a message informs you that your data has been saved in the solution.
If you do not provide all the required information, or if you provide incorrect information, somerecords will not be saved. Error messages will highlight the problems so that you can correct themand save the data again.
3. You can then log off by clicking Logoff .
ResultThe new opportunities are saved in the SAP Business ByDesign system and added to the list in the Opportunitiesview.If you need to make changes to these opportunities, you must change them directly in the system.
5.3.3.2 Export Business Data Using Microsoft Excel®
OverviewYou can export reports and worklists to Microsoft Excel® documents. You can use these documents for furtheranalysis, and in some cases, edit and upload them to the solution.You can export data from a report or from a worklist.
Prerequisites ● You have installed the latest Add-In for Microsoft Excel®. Depending on your solution set-up, you can do this
from the: ○ Self Services Overview in the Home work center ○ Download Center in the Application and User Management work center ○ Download link that is available directly on the user interface
● The settings for your browser must be set correctly. You can review the information about computer settingsby clicking Check My Computer Settings on the logon screen.
● You must be authorized to perform an export to Microsoft Excel®.
Procedure1. Go to the screen with the data you want to export.2. Depending on the type of data, choose one of these options:
● For a report, you can either export a chart or a table. To do so, select the report, and click Switch toChart or Switch to Table.
● For a worklist, select the worklist and click Go.3. Click Export , then choose To Microsoft Excel.4. Optional: Personalizing your excel export
260 © 2017 SAP SE or an SAP affiliate company. All rights reserved. • P U B L I CSAP Business ByDesign February 2017
New Business

1. To select the columns in your exported excel, do the following:a. In the title bar, click Personalize This screen b. In the side panel, select Display Settings.c. In the Display Settings dialog box, you can export all the columns in the view by selecting All in
the Export Columns field
The default value for this field is Visible, which exports only the currently displayed columns.
2. To select the language for your excel export, do the followinga. In the Display Settings dialog box, set the Language Selection field to Show and click OK
b. Click Save .c. Click Export , then choose To Microsoft Excel®d. Select a language in the dialog box that opens.
The column selection preference in this dialog box allows you to override the personalizedsetting. This selection is valid for the current export only.
5. Select the template in the dialog box that is displayed.
● If there is only one template that has the logged in language variant, then the export will beperformed in the logged in language, and no user interaction is required.
● If there is only one template in the system for this export scenario, but the logged in languagevariant is not available, then export will be performed in the English language.
● If there is more than one template in the system for this export scenario, the Template List dialogbox is displayed. In this dialog, you can select the Microsoft Excel template that you want to usefor the export. The template will dictate how your exported data will be formatted. The MicrosoftExcel version that is relevant for each template is displayed.
6. Click Download.7. A message shows that you can open or save the file which contains the data that you have just exported from
the solution. Click Open or Save depending on what you want to do with the exported data.Depending on whether you click Open or Save, there are two possible results:
● If you click Open, a worksheet opens with the data in Microsoft Excel. The file has a temporary name,but it is not saved. You can use all the functions of Microsoft Excel to organize the data and to savethat worksheet.
● If you click Save, a Save As dialog box opens. You can specify an appropriate file name and a locationto save the exported Microsoft Excel file to. A message will inform you when the download hascompleted successfully.You can later navigate to the location where you have saved the template and open it .
SAP Business ByDesign February 2017New Business P U B L I C • © 2017 SAP SE or an SAP affiliate company. All rights reserved. 261

5.4 Sales Quotes View
5.4.1 Sales Quotes Quick Guide
As a competitive and successful sales professional, one must understand the benefits of an effective quotemanagement system. In the New Business work center, under the Sales Quote view, you can create sales quotes (formaterials and services), and quotes for contracts (for materials only), enabling you to capture the desired productor service requests of your potential customers in the system, to strengthen the competitive position of yourcompany.
Since your company has selected the Buy, Sell, and Administrate implementation focus, there will be slightdifferences between your solution and the standard as outlined below. For more information, see WhatWorks Differently in Buy, Sell, and Administrate.If your system has not been deployed, all information is shown because there is no scoping-relevant filter.
Since your company has selected the Manage and Control Projects implementation focus, there will beslight differences between your solution and the standard as outlined below. For more information, seeWhat Works Differently in Manage and Control Projects.If your system has not been deployed, all information is shown because there is no scoping-relevant filter.
Business Background
Sales Quotes ProcessingSales quote processing is used to offer products or services to customers according to specific terms with fixedconditions. The seller is bound by the sales quote for a specific period of time. The sales quote is usually created bya sales representative of the company. The system supports pricing functionality and an optional check of theavailability of the goods.Sales quote processing enables you to offer a valid price and attractive discounts on your products. This is a commonway of inviting your customers to purchase your products or services, thereby growing your business. If the customeraccepts the sales quote, a sales order can be generated from the sales quote. You can also create contract specificsales quotes which can be used as predecessor documents to create sales contracts.For more information, see Sales Quotes Processing [page 271].
Approval for QuotesFor more information, see Approval for Quotes [page 272].
PricingPricing is based on price master data such as price lists and discount lists, which are used to automatically calculatepricing within all business documents for sales and service processes. A predefined pricing procedure is used todetermine the gross value the customer has to pay for certain products or services to be received on a certain dayat a certain place. The pricing procedure consists of price components, such as list price, discounts, surcharges,freights, taxes, and costs. The order of these price components is essential for the calculation of the total value.For more information, see Pricing in Customer Relationship Management [page 154].
262 © 2017 SAP SE or an SAP affiliate company. All rights reserved. • P U B L I CSAP Business ByDesign February 2017
New Business

Working with PricingIn sales and service documents there is a tab called Pricing or Pricing and Invoicing. It displays all related pricecomponents. If required you can modify these price components.For more information, see Working with Pricing in Sales and Service Documents [page 293].
Profit MarginThe information regarding profit margin and profitability can be very useful for management decisions. Thereforethe profit margin can be calculated in sales and service documents.For more information, see Profit Margin [page 231].
Tax DeterminationAs a rule, companies are legally required to calculate taxes on products that they buy or sell, and to levy these taxesfrom their customers. After the products have been provided, the taxes must be declared and levied to the respectivetax authorities. The system supports you by providing a substantially automated tax calculation for the following taxtypes: Value-Added Tax (VAT), Sales and Use Tax, Withholding Tax. The system also provides a reporting tool thatgives you effective control over your obligatory declaration of these taxes.For more information, see Tax Determination [page 9].
Order-to-Cash (Sell-from-Stock)The Order-to-Cash (Sell-from-Stock) business scenario enables you to sell goods from stock using a wide range ofstandard features to handle sales quotes, sales orders, deliveries, customer invoices, and payments. This scenarioincludes features, such as, available-to-promise (ATP) check, pricing, credit card, credit limit check, and automaticorder creation.For more information, see Order–to-Cash (Sell-from-Stock).
Order-to-Cash (Standardized Services)The Order-to-Cash (Standardized Services) business scenario enables you to sell services with functions to handlequotes, create sales orders with service items, plan service execution, and fulfill, confirm, and invoice services sold.The selling of services can be the main line of business or a value-added service for physical goods.For more information, see Order-to-Cash (Standardized Services).
Order-to-Cash (Project based Products and Services)The Order-to-Cash (Project-Based Products and Services) business scenario is used to manage the complete end-to-end process of selling project-based products and services to customers. This scenario integrates sales quotesand sales orders with project management allowing you to create customer invoices for time and expenses recordedagainst a customer project. Invoices can be created on a time and materials basis, a fixed-price basis, or acombination of both. After the customer invoice has been issued, customer payments can be monitored. Thisscenario also supports the analysis of project profitability based on project costs and revenues.For more information, see Order-to-Cash (Project based Product and Services).
Order-to-Cash ((Third-Party Order Processing – Material)The Order-to-Cash (Third-Party Order Processing - Material) business scenario enables your company to createsales orders that are used to ship products with or without a product specification to your customer directly from asupplier rather than from your own company. A third-party purchase request is created automatically when yourelease a sales order for a product to which purchasing contracts and/or list prices have been assigned in the system.The third-party purchase order can be created automatically or manually. You can enter the supplier's confirmationdata in the system when they send the delivery notification. Based on this third-party delivery, supplier invoicing and
SAP Business ByDesign February 2017New Business P U B L I C • © 2017 SAP SE or an SAP affiliate company. All rights reserved. 263

customer invoicing is triggered. You can use the Order-to-Cash (Third-Party Order Processing – Material) scenarioif you always ship directly from a supplier or if you only ship directly from a supplier in exceptional cases.For more information, see Order-to-Cash ((Third-Party Order Processing – Material).
Order-to-Cash (Make-to-Order)The Order-to-Cash (Specified Products) business scenario enables your company to produce and sell products fora specific customer demand.You can create a sales quote or sales order with a product specification that includes customer-specificrequirements, plan the multilevel demand for a sales order item, and create supply for the required products. Youcan order and receive materials based on requirements from the customer, release the production order, and createproduction tasks. During task confirmation, it is ensured that only those materials that were replenished for a specificcustomer demand are consumed. Output products are always confirmed as specified stock. A final inspectionidentifies if any of the units do not conform to the customer requirements.You can post a goods issue. The system creates an outbound delivery and the products are shipped to the customer.An invoice is created based on the outbound delivery and the system updates financial accounting.For more information, see Order-to-Cash (Make-to-Order).
Tasks
Create a Sales Quote1. Choose the Sales Quotes view.2. Click New and choose Sales Quote or click New Sales Quote under Common Tasks. A
New Sales Quote quick activity opens.3. Enter details of the account associated with the sales quote in the Account field, such
as, the account ID or account name. If necessary, click the Open Select Dialog icon tosearch for the account. The system automatically displays the related master data inAccount, Main Contact, Ship-To/Service Recipient, Bill-To, Employee Responsible andall default sales data.You can also create a sales quote as follow-up document from: ● An opportunity in the Opportunities view ● A lead in the Leads view ● A sales quote from the Sales Quotes view
If payment and delivery details are available for the account, the systemautomatically copies the corresponding data into the sales quote. The data iscopied from the Sales view of the account depending on the relevant distributionchain determined in the sales quote. Changes you make to these details in thesales quote only impact that sales quote and have no effect on the accountdetails.
Alternatively, if you have a reference you can add it by clicking on Create withReference. Sources for the reference can be leads, opportunities, projects, salesquotes, or sales orders. All actions provide a document flow displaying the sourcedocument.For more information about creating a sales quote with reference to a project, seeCreating a Sales Quote with Reference to a Project.In addition, you can copy a sales quote and change the account and other data ifnecessary. The copy action does not trigger a document flow.
264 © 2017 SAP SE or an SAP affiliate company. All rights reserved. • P U B L I CSAP Business ByDesign February 2017
New Business

4. If the sales quote is associated with a new account, click New to generate a uniqueaccount number and enter further details as required.
5. Under General, enter further details to identify the sales quote: ● In the Description field, enter a description of the sales quote. ● If necessary, in the External Reference field, enter the ID that the customer uses
to identify the quote.6. Enter the product or service details under Items .
Depending on your business configuration, the following functions are available: ● Available-To-Promise (ATP) check for products:
○ Green light confirms that the requested quantities are available onthe requested date
○ Red light indicates that the requested quantities are not available atall on the requested date
○ Yellow light indicates either a late delivery or an insufficientconfirmed quantity of the requested products available
● Optionally a credit limit check is executed for the account when the totalgross amount of the sales quote is changed. For more information aboutcredit limit checks, see Credit Limit Check [page 363].
a. In the Product ID field, enter the product or service ID. If necessary, click the OpenSelect Dialog icon to search for the product or service. The system automaticallydisplays its description and list price.
b. Enter the required quantity. The system calculates and displays the value. You canoptionally check whether the product is available on the requested date.
c. You can also suggest additional or alternative purchases to your customer. Whenyou add an item, select the Optional checkbox.The value of this item is displayed as usual, but it’s not added to the total value ofthis quote. If the customer agrees to purchase this item, you deselect thecheckbox. The item value is then added to the total value. Items marked as optionalare printed on the sales quote output form, but are not copied to the sales orderor displayed in sales quote reports.
d. Repeat the steps outlined above to enter additional items.e. If necessary, you can structure the items in the sales quote by entering text items
or changing their sequence: ● Creating Text Items
You can create text items that can be used as headings for the itemsunderneath, or to print additional texts in a sales quote or sales orderconfirmation. Simply enter a description without entering a product ID.Text items are not relevant for pricing or delivery. Text items are copied tosales quotes and sales orders in copy and follow-up scenarios.
● Changing Sequence of Items or Renumbering ItemsYou can change the sequence of items in a sales quote or a sales order, toensure that items are displayed in a logical sequence in the sales quote orsales order confirmation. For example, you want to keep a normal item anda related text item together. You can do this in the following ways:
SAP Business ByDesign February 2017New Business P U B L I C • © 2017 SAP SE or an SAP affiliate company. All rights reserved. 265

○ Move an item up or down by selecting it and clicking move up or move down.
○ Position an item between two existing items by manually entering aline number that is between the two line numbers of the existing items
After you have done this, you can let the system reset the line numbers sothat they are displayed consistently in the sales quote or sales orderconfirmation. To do this, click Renumber . The sequence of the items willremain as you have set it.You can change the sequence of items under the following conditions: ○ The sales quote or sales order is not based on a preceding sales
documents. ○ The sales quote or sales order does not have any follow-up sales
documents.
You can also change the sequence of items after you have submitted thesales quote or sales order.These features don’t work in the following cases: ○ For sales quotes and orders that have been migrated ○ For quotes for contracts ○ In sales quotes and orders that have A2A, B2B, or Internet in the
Origin field ○ For sales orders that have one or more items relevant for Available-
to-Promise (ATP) check ○ For sales orders that have been released
7. Then submit the sales quote.8. Now the new sales quote is submitted and saved to the system and added to the list in
the Sales Quotes view. To open the sales quote from this list, click the appropriate SalesQuote ID link.
If there is a defined threshold, and your quote exceeds that threshold, the systeminitiates, depending on your business configuration, an approval process bysubmitting the sales quote.
Create a Quote for Contract1. In the New Business work center, choose the Sales Quote view.2. Click New , and choose Quote for Contract. You can also choose New Quote for
Contract under Common Tasks. A New Quote for Contract quick activity opens.
266 © 2017 SAP SE or an SAP affiliate company. All rights reserved. • P U B L I CSAP Business ByDesign February 2017
New Business

Configuration settings are normally performed by an administrator. If you do nothave the required authorization, contact your administrator.You can create a quote for contract only if you have scoped contracts in businessconfiguration.To find this business option, go to the Business Configuration work center andchoose the Implementation Projects view. Select your implementation projectand click Edit Project Scope . In the Scoping step of the project, ensure thatSelling Products and Services is selected within Sales.In the Questions step, expand the Sales scoping element and select SellingProducts and Services. Select Customer Contracts and answer the questionsrelated to Materials in Customer Contracts.
3. Enter details of the account associated with the quote in the Account field, such as theaccount name. You can click the Open Select Dialog icon to search for the account. Thesystem automatically displays the related master data in Account, OrganizationalAssignment, and other default sales data.
4. If the quote is associated with a new account, click New , and select the relevant typeof account to generate a unique account number, and enter further details as required.
5. Under General , enter a description of the quote, the External Reference ID, the ContractStart/End dates, the Posting Date, and other necessary data.
6. Under Items, enter the following product details: ● The product ID. You can click the Open Select Dialog icon to search for the product.
The system automatically displays the related product description and the listprice of the product.
● The required quantity of the product. The system calculates and displays thevalue, and you can optionally check whether the products are available on therequested date.
7. Click View All , Items tab. Enter the relevant Price Agreement under Details.8. Submit the quote for contract.
The new quote for contract is submitted and saved in the system, and added to the list in theSales Quotes view.
If there is a defined threshold, and your quote exceeds that threshold, the systeminitiates, depending on your business configuration, an approval process by submittingthe quote.
To open the sales quote from this list, select the appropriate Sales Quote ID link.
Once you have created the Quote for Contract, all other tasks such as updating, orcancelling the quote remains the same.
Create a Sales Quote from an Opportunity1. Choose the Opportunities view.2. Select an opportunity and click Follow-Up and choose Sales Quote.3. In the New Sales Quote quick activity, check the details for the opportunity entered by
the system. Enter further information as required.
SAP Business ByDesign February 2017New Business P U B L I C • © 2017 SAP SE or an SAP affiliate company. All rights reserved. 267

4. On the Items tab view, check the products that are copied from the opportunity. A newprice determination is triggered in the sales quote with the current prices.
5. At the top of the New Sales Quote quick activity, click Save .6. Or click Submit to submit the sales quote to the customer. Then you return to the
Opportunities view.
If you require approval for the sales quote, the approval process starts when yousubmit the sales quote.
7. The new sales quote associated with the opportunity is added to the list in the SalesQuotes view. To open the sales quote from this list, click the appropriate Sales QuoteID link.
Cancel a Sales Quote1. Choose the Sales Quotes view.2. Select the sales quote you want to cancel from the list and click Edit to open the sales
quote quick activity. Click View All .3. To cancel the sales quote, you have the following options:
● You can cancel the complete quote:1. To do this, choose the General tab page and choose a value from Reason
for Rejection.This indicates that the complete sales quote is lost. No follow-up sales ordercan be created for a lost sales quote.
2. The Reason for Rejection is copied to all items, that have not already beencanceled separately.
● You can partially cancel a sales quote:1. To do this, choose the Items tab page and select the item that you whish to
cancel.2. On the Details tab page for the item, choose a Reason for Rejection.3. Repeat the steps for the other items that you want to cancel and save the
sales quote.
When a quote has been partially canceled, you are still able to create a follow-upsales order for the items that have not been canceled. A quote that is referencedto one or several sales orders is considered to be won.You can remove the reason for rejection on the General tab. The cancellationis then also removed from the items for the cancelled items with the same reasonfor rejection. Separate cancellations on item remain unaffected, but can also beremoved if header cancellation is removed.
Update a Sales Quote1. Choose the Sales Quotes view.2. To edit a sales quote
● Select a quote from the list and click Edit to open the sales quote quick activity ● Select the Sales Quote ID in the list to open the sales quote fact sheet and click
View All to open the sales quote editor.3. Change the sales quote details on the General tab page:
268 © 2017 SAP SE or an SAP affiliate company. All rights reserved. • P U B L I CSAP Business ByDesign February 2017
New Business

● You can view and change the Internal Comment and Customer InformationThe notes in the Internal Comment and Customer Information fields of the salesquote are copied from master data.On header level, notes are copied from account master data as follows: ○ Text entered under Internal Sales Note is copied to Internal Comment. ○ Text entered under External Sales Note is copied to Customer Information.
On item level, notes are copied from product or service master data as follows: ○ Text entered under Sales Notes is copied to Customer Information.
All text fields in the sales quote can be changed, but if the account is changed onheader level, the notes are overwritten with the texts from the new account,product or service.
4. To edit your items or add new products to the quote, choose the Items tab page:1. Click Add Row to create a new item in the table.2. In the Product ID field, enter the product ID. If necessary, click the Open Select
Dialog icon to search for the product. The system automatically displays therelated product description and prices. Optionally you can enter or change a priceor discount.
3. Enter the required quantity of the product. The system calculates and displays theexpected value.
4. In the Item table itself it is also possible to add the Product Specification columnto the table and assign a defined product specification to each item.
5. Repeat the steps outlined above to enter additional items.6. If you want to access the price history for an item, select the item in the list and
click Price History. The price history of other sales quotes or sales orders isdisplayed using the corresponding account, product, and product specification.You can also look at the price history for other products or accounts using theAdvanced Search.
5. To track the progress of the quote and access all related documents, such as anopportunity or sales order, choose the Document Flow tab page. In the extended viewof the document flow you can also see related activities such as appointments oractivity tasks. For more information, see Document Flow.
6. At the top of the Sales Quote editor, click Save to save the updated sales quote, thenclick Close to return to the Sales Quote view.The updated sales quote is saved to the system and can be accessed from the list ofsales quotes in the Sales Quotes view. To open the sales quote from this list, click theappropriate sales quote ID link.
If the sales quote is incorrect, it can be deleted in the sales quote work list.
Track the Life Cycle Status and Progress1. Choose the Sales Quotes view.2. Choose one of the predefined searches of the Show field and click Go .3. Now you can track the status of your sales quotes.
The valid status types are: ● Open
SAP Business ByDesign February 2017New Business P U B L I C • © 2017 SAP SE or an SAP affiliate company. All rights reserved. 269

● In Process: The quote is in process if it is partially cancelled or partially referencedto a sales order. The offered quantity in this case is still more then the orderedquantity.
● Completed: The quote is completed if it is fully rejected, or fully referenced to salesorders. The quantity offered is equal or less than the ordered quantity. Anotheroption is to manually complete the sales quote by the status action that indicatesthat the quote was won without a reference to a sales order.
4. You can also track the progressProgress icons display as follows: ● Grey stands for Not Relevant and means the quote is In Approval or not yet
submitted to the customer. ● Yellow stands for Pending and means the quote is submitted to customer. ● Green stands for Won and means that at least one item was referenced to a sales
order or the quote is manually completed by the Status action. ● Red stands for Lost and a Reason for Rejection is set on header level for the
complete sales quote.5. To track the progress of the quote and access all related documents, such as a
opportunity or sales orders, click on the Sales Quote ID and then on View All . On theDocument Flow tab page you see the related document flow. With the extended viewof the document flow you can also see related activities such as appointments oractivity tasks. For more information, see Document Flow.The document flow is also visible on the sales quote overview. To see it, click on theSales Quote ID and choose then the More tab.
Display a Graphical Analysis of a Sales Quotes Worklist1. In the worklist, from the Group By dropdown list, choose a criterion by which to group
data.2. To view all data from the worklist in the Analytical View section, click the chart icon next
to the filter icon.3. In the Analytical View section, choose a chart type to display the data.4. Double-click a data section in the chart to filter the original worklist.
You can clear the filter by clicking Back to Full Chart in the Analytical Viewsection or deleting the filter content in the worklist.
For some worklists, such as the Opportunities worklist in the Opportunity List view inthe New Business work center, you can aggregate the grouped data using differentcriterion (for example, expected value). You can then select different analysis methods(for example, count, sum, average, maximum, or minimum) to sort the data, and choosedifferent chart types to present the data from the worklist.
Create a Target Group from a Sales Quotes WorklistFor marketing purposes you can create a target group of accounts listed in a worklist. To dothis:
1. Call up the required worklist, and modify it to your needs.2. Click Export followed by To Target Group.
The New Target Group screen opens.
270 © 2017 SAP SE or an SAP affiliate company. All rights reserved. • P U B L I CSAP Business ByDesign February 2017
New Business

3. Check the details and save the target group.
Create an Invoice ScheduleYou can create an invoice schedule for a document by using an invoicing time frame:
1. Under Pricing and Invoicing choose Invoice Schedule .2. Click Edit Invoicing Time Frame . Now you can edit a new time frame or view an existing
time frame with a monthly recurrence pattern for the actual year, for example.Select the Applied check box to assign the selected invoicing time frame to the item.
3. ClickOK
The system creates monthly invoice dates for the applied items.
You can also create an invoice schedule step by step:1. Under Pricing and Invoicing choose Invoice Schedule .2. Click Add Item . Now you can select an item for which you want to create several
invoicing dates.3. Click
Add Dateto maintain several invoice dates for the selected item.
For more information about invoice schedules, see Invoice Schedule [page 365].
5.4.2 Business Background
5.4.2.1 Sales Quote Processing
OverviewSales quote processing is used to offer products or services to customers according to specific terms with fixedconditions. The seller is bound by the sales quote for a specific period of time. The sales quote is usually created bya sales representative of the company. The system supports pricing functionality and an optional check of theavailability of the goods.Sales quote processing enables you to offer a valid price and attractive discounts on your products. This is a commonway of inviting your customers to purchase your products or services, thereby growing your business. If the customeraccepts the sales quote, a sales order can be generated from the sales quote. You can also create contract specificsales quotes which can be used as predecessor documents to create sales contracts.
Process FlowThe following steps explain the typical process flow for sales quote processing. During this process, you access theNew Business work center.
1. The sales representative creates a sales quote, or quote for contract and enters first the account, and theproducts to be offered to the customer.
2. The system uses details such as account, products, date, and customer to calculate net value. The salesrepresentative can overwrite the automatically-determined prices and discounts or add further discountsand surcharges.
SAP Business ByDesign February 2017New Business P U B L I C • © 2017 SAP SE or an SAP affiliate company. All rights reserved. 271

3. Optionally, the sales quote, or quote for contract may need to be approved by an approver, if certain thresholdshave been exceeded such as total net value, or total given discounts.
You define the approval details in the Business Configuration work center, under the ImplementationProjects view. Select your implementation project and click Open Activity List . In the Fine-Tuning stepof the project, choose Approval for Quotes.
4. The sales quote, or quote for contract is sent to the customer.
If the customer accepts the sales quote, a sales order can be generated as a follow up. For a quote for contract, afterapproval, a sales contract can be created as a follow-up.
5.4.2.2 Approval for Quotes
OverviewYou can activate and define the approval process for quotes which would apply for all types of quotes such as salesquote, service quote and quote for contract. You can define the steps and conditions within the approval processfor each type of quote explicitly, to ensure the approval process behaves differently for different types of quotes.
Activate Approval ProcessYou can activate the approval process for quotes by scoping a business option in Business Configuration. This isdone by a Key User.To find this business option, go to the Business Configuration work center and choose the ImplementationProjects view. Select your implementation project and click Edit Project Scope . In the Scoping step of the project,ensure that New Business is selected within Sales.In the Questions step, expand the Sales scoping element and select New Business. Select Quotes and answer thequestion related to Approval for Quotes.
For technical reasons the approval process for quotes that are created via A2A or B2B processes is notsupported.
Define Approval ProcessIn the Application and User Management you can define an approval process for quotes with the followingpossibilities:
● A multi step approval considering several approving parties such as ○ Reporting Line Manager
The reporting line manager in case of sales quote and quote for contract is the manager ofemployee responsible, whereas, for service quote it is processor’s manager.
○ Direct Approver ○ Responsible Project Manager
272 © 2017 SAP SE or an SAP affiliate company. All rights reserved. • P U B L I CSAP Business ByDesign February 2017
New Business

Responsible Project Manager is only valid for sales quote and quote for contract. If you select thisfor service quotes, it results in unassigned BTM tasks.
● You can define conditions for certain values such as ○ profit margin ○ total discount ○ origin ○ quote type ○ sales unit ○ total ○ net value ○ ABC classification ○ project-based ○ credit status
While setting up conditions for Approval of Quotes, if you choose Project Manager as the approver, youmust choose the attribute Project-based = true, as well.
For more information, see the documentation on creating and editing approval processes.
The approval task can be seen, only if the approver has access to the following work centers and views:New Business work centerManaging My Area work center, Approvals viewManaging My Area work center, MMA_Sales view (The MMA_Sales option needs to be selected while assigningwork centers to the approver)
5.5 Reports View
5.5.1 Lead Funnel
OverviewThis report shows the leads the user is responsible for, and the opportunities, quotes, and orders that originate,either directly or indirectly, from these leads.This report is also available as a mobile report. For more information, see the documentation about working withmobile reports.
ViewsThe following views are available with this report:
● Lead Funnel by SourceShows the lead funnel by source
SAP Business ByDesign February 2017New Business P U B L I C • © 2017 SAP SE or an SAP affiliate company. All rights reserved. 273

● Lead Funnel Values by SourceShows the lead funnel values by source
● Lead Funnel by NumberShows the lead funnel by number
Features
Running the ReportBefore running the report, you can specify the data you want to see by selecting specific variables. You must specifya value for all mandatory variables. In the system, mandatory variables are indicated by an asterisk (*).
Analyzing the ReportThe default report displays the source and number of all the leads, and the number of opportunities, quotes, andsales orders that have been created on the basis of these leads.The data in this report is initially displayed in table format. You can also display the report as a chart.To analyze the data in this report:
● Use the filters to manipulate the display of the data in the content pane.For this report, you can add these key figures: ○ Item Value of Opportunities ○ Expected Value of Opportunities ○ Net Value of Sales Orders ○ Number of Leads ○ Number of Opportunities ○ Number of Sales Quote Items ○ Number of Sales Quotes ○ Number of Sales Order Items ○ Number of Sales Orders ○ Net Value of Sales Orders
● Drag and drop characteristics to add or remove data from the content pane.To further analyze data in this report, you can drag characteristics to rows and columns.
Characteristics indicating periods such as Calendar Year or Calender Year/Month aggregate by leadstart date.
From this report, you can navigate to the account.
See AlsoReports ViewOverview of Reports in Customer Relationship Management
274 © 2017 SAP SE or an SAP affiliate company. All rights reserved. • P U B L I CSAP Business ByDesign February 2017
New Business

5.5.2 Number of Leads
OverviewThis report shows the number of leads accepted by sales as well as the number of leads rejected by marketing orsales. This report lists those leads for which the user is the employee responsible.This report is also available as a mobile report. For more information, see the documentation about working withmobile reports.
ViewsThe following views are available with this report:
● Number of LeadsShows the number of leads
● Number of Leads by SourceShows the number of leads by source
Features
Running the ReportBefore running the report, you can specify the data you want to see by selecting specific variables. You must specifya value for all mandatory variables. In the system, mandatory variables are indicated by an asterisk (*).
Analyzing the ReportTo analyze the data in this report:
● Use the filters to manipulate the display of data in the content pane.For this report, you can add these key figures: ○ Number of Accepted Leads by Sales ○ Number of Rejected Leads by Sales ○ Number of Rejected Leads by Marketing ○ Total Number of Closed Leads
Number of Closed Leads = Number of Accepted Leads + Number of Rejected Leads
● To further analyze data in this report, you can drag characteristics to rows and columns.
Characteristics indicating periods such as Calendar Year or Calendar Year/Month aggregate by the lead startdate.
From this report, you can navigate to: ● Account ● Lead ID
SAP Business ByDesign February 2017New Business P U B L I C • © 2017 SAP SE or an SAP affiliate company. All rights reserved. 275

For marketing purposes you can create a target group of the accounts listed in this report. To do this:1. Call up the report and select the criteria according to your needs.2. Add the Account characteristic to Rows.3. Click on an account ID or an account name, then click on the arrow that appears next to the ID or name, and
select Export all Accounts to new Target Group in the dropdown menu.The Target Group screen opens. The target group contains all accounts that are shown in the report. Inaddition, the system automatically determines the main contacts of these accounts, based on the accountmaster data, and includes these in the target group. If the master data for a particular account does not havea main contact, then only the account is included in the target group.
Note that the system determines the main contacts that are currently entered in the master data ofthe accounts. Therefore it is possible that some contacts in the target group differ from the contactsshown in the report.
4. Check the details and save the target group.
Note that if you copy a report, it is not possible to create a target group based on the new report.
See AlsoReports ViewOverview of Reports in Customer Relationship Management
5.5.3 Opportunity Funnel
OverviewThis report shows the opportunities and the quotes and orders that originate, either directly or indirectly, from theseopportunities.This report is also available as a mobile report. For more information, see the documentation about working withmobile reports.
Features
Running the ReportBefore running the report, you can specify the data you want to see by selecting specific variables. You must specifya value for all mandatory variables. In the system, mandatory variables are indicated by an asterisk (*).
Note that the variable Time Frame is set by default to Current Year to Date. The time frame is based onthe end date of an opportunity. If you have an opportunity that has been won or lost, and its end date is aftertoday’s date, this opportunity will not be shown in this report. To see it in this report, you need to change thetime frame from Current Year to Date to Current Year, for example.
276 © 2017 SAP SE or an SAP affiliate company. All rights reserved. • P U B L I CSAP Business ByDesign February 2017
New Business

Analyzing the ReportThe default report displays the quotes and the sales orders that are successors of these opportunities. Theinformation is presented using the expected value of opportunities and the net value of the quotes and sales orders.This report is initially displayed in table format. You can also display the report as a chart.To analyze the data in this report Use the filters to manipulate the display of data in the content pane.For this report you can add the following key figures:
● Item Value of Opportunities ● Expected Value of Opportunities ● Net Value of Sales Quotes ● Number of Opportunities (Header) ● Number of Sales Quote (Item) ● Number of Sales Order (Item) ● Net Value of Sales Orders
To further analyze data in this report, you can drag characteristics to rows and columns.From this report, you can navigate to:
● Account ● Sales Unit
See AlsoOverview of Reports in Customer Relationship Management
5.5.4 Opportunity Pipeline
OverviewThis report shows open and in process opportunities by their number, value and product. For indicating the potentialsales volume you can filter by relevant for forecast.This report is also available as a mobile report. For more information, see the documentation about working withmobile reports.
ViewsThe following views are available with this report:
● Opportunity Pipeline ProgressShows the opportunity pipeline progress
● Opportunity Pipeline Progress by productShows the opportunity pipeline progress by product
SAP Business ByDesign February 2017New Business P U B L I C • © 2017 SAP SE or an SAP affiliate company. All rights reserved. 277

Features
Running the ReportBefore running the report, you can specify the data you want to see by selecting specific variables. You must specifya value for all mandatory variables. In the system, mandatory variables are indicated by an asterisk (*).
Note that the variable Time Frame is set by default to Current Year to Date. The time frame is based onthe end date of an opportunity. If you have an opportunity that has been won or lost, and its end date is aftertoday’s date, this opportunity will not be shown in this report. To see it in this report, you need to change thetime frame from Current Year to Date to Current Year, for example.
Analyzing the ReportThe default report displays the expected value of opportunities by opportunity phase and shows their progress. Thisreport is initially displayed in table format. You can also display the report as a chart.To analyze the data in this report:
● Use the filters to manipulate the display of data in the content pane.For this report, you can add these key figures: ○ Weighted Value ○ Expected Value ○ Item Value ○ Item Total Value (Header) ○ Quantity ○ Chance of Success (%) ○ Number of Opportunities ○ Number of Opportunity Items
● To further analyze data in this report, you can drag characteristics to rows and columns.
From this report, you can navigate to: ● Account ● Opportunity ID ● Sales Unit ● Sales Organization
For marketing purposes you can create a target group of the accounts listed in this report. To do this:1. Call up the report and select the criteria according to your needs.2. Add the Account characteristic to Rows.3. Click on an account ID or an account name, then click on the arrow that appears next to the ID or name, and
select Export all Accounts to new Target Group in the dropdown menu.The Target Group screen opens. The target group contains all accounts that are shown in the report. Inaddition, the system automatically determines the main contacts of these accounts, based on the accountmaster data, and includes these in the target group. If the master data for a particular account does not havea main contact, then only the account is included in the target group.
278 © 2017 SAP SE or an SAP affiliate company. All rights reserved. • P U B L I CSAP Business ByDesign February 2017
New Business

Note that the system determines the main contacts that are currently entered in the master data ofthe accounts. Therefore it is possible that some contacts in the target group differ from the contactsshown in the report.
4. Check the details and save the target group.
Note that if you copy a report, it is not possible to create a target group based on the new report.
See AlsoReports ViewOverview of Reports in Customer Relationship Management
5.5.5 Opportunity Volume
OverviewThis report shows you the number and value of opportunities.This report is also available as a mobile report. For more information, see the documentation about working withmobile reports.
Features
Running the ReportBefore running the report, you can specify the data you want to see by selecting specific variables. You must specifya value for all mandatory variables. In the system, mandatory variables are indicated by an asterisk (*).
Note that the variable Time Frame is set by default to Current Year to Date. The time frame is based onthe end date of an opportunity. If you have an opportunity that has been won or lost, and its end date is aftertoday’s date, this opportunity will not be shown in this report. To see it in this report, you need to change thetime frame from Current Year to Date to Current Year, for example.
Analyzing the ReportThe default report displays the number of opportunities in the months of the current year. This report is initiallydisplayed in table format. You can also display the report as a chart.To analyze the data in this report:
● Use the filters to manipulate the display of data in the content pane.For this report, you can add these key figures: ○ Expected Value ○ Weighted Value ○ Item Total Value ○ Number of Opportunities
SAP Business ByDesign February 2017New Business P U B L I C • © 2017 SAP SE or an SAP affiliate company. All rights reserved. 279

● To further analyze data in this report, you can drag characteristics to rows and columns.
From this report, you can navigate to: ● Account ● Opportunity ID ● Sales Organization ● Sales Unit
For marketing purposes you can create a target group of the accounts listed in this report. To do this:1. Call up the report and select the criteria according to your needs.2. Add the Account characteristic to Rows.3. Click on an account ID or an account name, then click on the arrow that appears next to the ID or name, and
select Export all Accounts to new Target Group in the dropdown menu.The Target Group screen opens. The target group contains all accounts that are shown in the report. Inaddition, the system automatically determines the main contacts of these accounts, based on the accountmaster data, and includes these in the target group. If the master data for a particular account does not havea main contact, then only the account is included in the target group.
Note that the system determines the main contacts that are currently entered in the master data ofthe accounts. Therefore it is possible that some contacts in the target group differ from the contactsshown in the report.
4. Check the details and save the target group.
Note that if you copy a report, it is not possible to create a target group based on the new report.
See AlsoOverview of Reports in Customer Relationship Management
5.5.6 Sales Pipeline
OverviewThis report shows open and in process opportunities by their number, value and product. For indicating the potentialrevenue sales quotes can be analyzed as well.This report is also available as a mobile report. For more information, see the documentation about working withmobile reports.
Features
Running the ReportBefore running the report, you can specify the data you want to see by selecting specific variables. You must specifya value for all mandatory variables. In the system, mandatory variables are indicated by an asterisk (*).
280 © 2017 SAP SE or an SAP affiliate company. All rights reserved. • P U B L I CSAP Business ByDesign February 2017
New Business

Analyzing the ReportThe default report is compares the weighted value to the net value of quotes.The data in this report is initially displayed in table format. You can also display the report as a chart.To analyze the data in this report:
● Use the filters to manipulate the display of data in the content pane.For this report, you can add these key figures: ○ Expected Value of Opportunities ○ Weighted Value of Opportunities ○ Item Total Value of Opportunities ○ Item Quantity of Opportunities ○ Item Value of Opportunities ○ Calculated Value of Opportunities ○ Total of Sales Quotes ○ Net value of Sales Quotes ○ Requested Quantity of Sales Quotes
● To further analyze data in this report, you can drag characteristics to rows and columns.
Characteristics indicating periods such as Calendar Year or Calendar Year/Month aggregate byposting date.
From this report, you can navigate to: ● Account ● Sales Unit
For marketing purposes you can create a target group of the accounts listed in this report. To do this:1. Call up the report and select the criteria according to your needs.2. Add the Account characteristic to Rows.3. Click on an account ID or an account name, then click on the arrow that appears next to the ID or name, and
select Export all Accounts to new Target Group in the dropdown menu.The Target Group screen opens. The target group contains all accounts that are shown in the report. Inaddition, the system automatically determines the main contacts of these accounts, based on the accountmaster data, and includes these in the target group. If the master data for a particular account does not havea main contact, then only the account is included in the target group.
Note that the system determines the main contacts that are currently entered in the master data ofthe accounts. Therefore it is possible that some contacts in the target group differ from the contactsshown in the report.
4. Check the details and save the target group.
Note that if you copy a report, it is not possible to create a target group based on the new report.
See AlsoOverview of Reports in Customer Relationship Management
SAP Business ByDesign February 2017New Business P U B L I C • © 2017 SAP SE or an SAP affiliate company. All rights reserved. 281

5.5.7 Sales Quote Funnel and Success Rate
OverviewThis report shows the sales quotes and the sales orders that originate from these quotes.This report is also available as a mobile report. For more information, see the documentation about working withmobile reports.
ViewsThe following views are available with this report:
● Sales Quote FunnelShows the sales quote funnel
● Success RateShows the success rate — net value of accepted quote items (%)
Features
Running the ReportBefore running the report, you can specify the data you want to see by selecting specific variables. You must specifya value for all mandatory variables. In the system, mandatory variables are indicated by an asterisk (*).
Analyzing the ReportThe default report displays the net value of quotes and the net value of sales orders that are successors of thesequotes in the current calendar year. This report is initially displayed in table format. You can also display the reportas a chart.To analyze the data in this report:
● Use the filters to manipulate the display of data in the content pane.For this report, you can add these key figures: ○ Expected Net Value ○ Net Value of Accepted Quote Items ○ Net Value of Quote Items ○ Net Value of Sales Orders ○ Success Rate — Number of Accepted Quote Items (%) ○ Success Rate — Net Value of Accepted Quote Items (% ○ Number of Accepted Quote Items ○ Number of Quote Items ○ Referenced Value of Sales Orders ○ Success Rate for Expected Net Value (%) ○ Success Rate for Net Value (%)
● To further analyze data in this report, you can drag characteristics to rows and columns.
282 © 2017 SAP SE or an SAP affiliate company. All rights reserved. • P U B L I CSAP Business ByDesign February 2017
New Business

Characteristics indicating periods such as Calendar Year, Calendar Year/Month aggregate by Posting Dateof Quote.
From this report, you can navigate to: ● Account
See AlsoOverview of Reports in Customer Relationship Management
5.5.8 Sales Quote Volume
OverviewThis report shows the value and success rate of sales quotes.This report is also available as a mobile report. For more information, see the documentation about working withmobile reports.
ViewsThe following views are available with this report:
● Sales Quote VolumeShows the sales quote volume
● Sales Quote Volume by AccountShows the sales quote volume by account
Features
Running the ReportBefore running the report, you can specify the data you want to see by selecting specific variables. You must specifya value for all mandatory variables. In the system, mandatory variables are indicated by an asterisk (*).
Analyzing the ReportThe default report displays the net value of quotes for the current year.To analyze the data in this report:
● Use the filters to manipulate the display of data in the content pane.For this report, you can add these extra key figures: ○ Net Value of Sales Quotes ○ Confirmed Quantity ○ Confirmed Quantity (Sales Unit of Measure) ○ Freight (Transactional Currency) ○ Freight
SAP Business ByDesign February 2017New Business P U B L I C • © 2017 SAP SE or an SAP affiliate company. All rights reserved. 283

○ Total (Transactional Currency) ○ Gross Value of Sales Quotes ○ Net Value (Transactional Currency) ○ Number of Sales Quotes ○ Ordered Quantity ○ Ordered Quantity (Sales Unit of Measure) ○ Requested Quantity ○ Requested Quantity (Sales Unit of Measure) ○ Tax (Transactional Currency) ○ Tax ○ Expected Net Value ○ Net Value without Freight (Transactional Currency) ○ Net Value without Freight
● To further analyze data in this report, you can drag characteristics to rows and columns.
Characteristics indicating periods such as Calendar Year, Calendar Year/Month aggregate by Posting Dateof Quote.
From this report, you can navigate to: ● Account ● Sales Unit
For marketing purposes you can create a target group of the accounts listed in this report. To do this:1. Call up the report and select the criteria according to your needs.2. Add the Account characteristic to Rows.3. Click on an account ID or an account name, then click on the arrow that appears next to the ID or name, and
select Export all Accounts to new Target Group in the dropdown menu.The Target Group screen opens. The target group contains all accounts that are shown in the report. Inaddition, the system automatically determines the main contacts of these accounts, based on the accountmaster data, and includes these in the target group. If the master data for a particular account does not havea main contact, then only the account is included in the target group.
Note that the system determines the main contacts that are currently entered in the master data ofthe accounts. Therefore it is possible that some contacts in the target group differ from the contactsshown in the report.
4. Check the details and save the target group.
Note that if you copy a report, it is not possible to create a target group based on the new report.
See AlsoReports ViewOverview of Reports in Customer Relationship Management
284 © 2017 SAP SE or an SAP affiliate company. All rights reserved. • P U B L I CSAP Business ByDesign February 2017
New Business

5.5.9 Won/Lost Opportunities
OverviewThis report shows the ratio of won and lost opportunities.
ViewsThe following views are available with this report:
● Won/Lost Opportunities by %Shows Won/Lost Opportunities by %
● Won/Lost Opportunities by AccountShows Won/Lost Opportunities by Account
● Won/Lost Opportunities by ProductShows Won/Lost Opportunities by Product
● Won/Lost Opportunities by Reason for StatusShows Won/Lost Opportunities by Reason for Status
Features
Running the ReportBefore running the report, you can specify the data you want to see by selecting specific variables. You must specifya value for all mandatory variables. In the system, mandatory variables are indicated by an asterisk (*).
Note that the variable Time Frame is set by default to Current Year to Date. The time frame is based onthe end date of an opportunity. If you have an opportunity that has been won or lost, and its end date is aftertoday’s date, this opportunity will not be shown in this report. To see it in this report, you need to change thetime frame from Current Year to Date to Current Year, for example.
Analyzing the ReportTo analyze the data in this report:
● Use the filters to manipulate the display of data in the content pane.For this report, you can add these key figures: ○ Item Total Value (Header) ○ Item Total Values Won (%) (Header) ○ Expected Value ○ Won by Expected Value ○ Lost by Expected Value ○ Won by Expected Value (%) ○ Item value Won ○ Item Values Lost ○ Item Values Won (%)
SAP Business ByDesign February 2017New Business P U B L I C • © 2017 SAP SE or an SAP affiliate company. All rights reserved. 285

○ Item Values Lost (%) ○ Opportunity Items Won by % ○ Opportunity Items Lost by % ○ Opportunity Items Won by Number ○ Opportunity Items Lost by Number ○ Number of Opportunity Items ○ Calculated Value ○ Calculated Value Lost ○ Calculated Value Won ○ Lost by Expected Value (%) ○ Item Values Lost (%) (Header) ○ Opportunities Won by % ○ Opportunities Lost by % ○ Opportunities Lost by Number ○ Opportunities Won by Number ○ Number of Opportunities
● To further analyze data in this report, you can drag and drop characteristics from the Not Currently Shownlist.
From this report, you can navigate to: ● Account ● Opportunity ID
For marketing purposes you can create a target group of the accounts listed in this report. To do this:1. Call up the report and select the criteria according to your needs.2. Add the Account characteristic to Rows.3. Click on an account ID or an account name, then click on the arrow that appears next to the ID or name, and
select Export all Accounts to new Target Group in the dropdown menu.The Target Group screen opens. The target group contains all accounts that are shown in the report. Inaddition, the system automatically determines the main contacts of these accounts, based on the accountmaster data, and includes these in the target group. If the master data for a particular account does not havea main contact, then only the account is included in the target group.
Note that the system determines the main contacts that are currently entered in the master data ofthe accounts. Therefore it is possible that some contacts in the target group differ from the contactsshown in the report.
4. Check the details and save the target group.
Note that if you copy a report, it is not possible to create a target group based on the new report.
See AlsoReports ViewOverview of Reports in Customer Relationship Management
286 © 2017 SAP SE or an SAP affiliate company. All rights reserved. • P U B L I CSAP Business ByDesign February 2017
New Business

6 Product and Service Portfolio
6.1 Business Background
6.1.1 Pricing in Customer Relationship Management
OverviewPricing is based on price master data such as price lists and discount lists, which are used to automatically calculatepricing within all business documents for sales and service processes. A predefined pricing procedure is used todetermine the gross value the customer has to pay for certain products or services to be received on a certain dayat a certain place. The pricing procedure consists of price components, such as list price, discounts, surcharges,freights, taxes, and costs. The order of these price components is essential for the calculation of the total value.
Price ComponentsSAP Business ByDesign contains a predefined set of price components, most of which you can activate through thebusiness configuration. Price components can be:
● Automatically determined by the system and non-editable, for example, tax ● Automatically determined by the system and able to be overwritten by the user, for example, list price or
automatically-determined product discounts ● Manually entered by the user, for example, a restocking fee or a manually-entered product discount
The manual behavior is influenced by the Manual flag in the business configuration for pricing. If the Manual flag isset, the system does not find the price component automatically and it must be added manually by the user.The following sections show the set of price components that may display depending on your configuration.
List PriceThis price component is naturally the first step of a pricing procedure, because many price components such asdiscounts or surcharges depend on it. To determine the net list price, the system checks all price lists that fit theparameters passed from the sales or service document. These parameters are customer, customer group,distribution chain, and date.Price lists can be customer specific, distribution chain specific, and base price lists. The price lists are maintainedas price master data, have a validity period, and need to be released before they are active.Because the customer may have special prices, the system checks first for a customer-specific price list. If there isno customer-specific price found, then it checks for a distribution chain specific price list. Finally, if there is nodistribution-chain-specific price, it checks for the base price list. You have to ensure that the system can find a pricefor all products or services you sell in the base price list at the very least. Prices can be manually revised within asales or service document, allowing you to flexibly adjust your net prices.
SAP Business ByDesign February 2017Product and Service Portfolio P U B L I C • © 2017 SAP SE or an SAP affiliate company. All rights reserved. 287

An approval procedure can be activated for price lists and discount lists which is done in the businessconfiguration in the scoping (under General Business Data Product and Service Pricing ). If this settingis active, the line manager automatically receives an approval task should his or her employee try to releasea price or a discount list. The price list or discount list cannot be released and included in all businessdocuments for sales and service processes until the line manager (or representative) approves the price listor discount list. If a manager is authorized to approve price and discount lists, he can directly release the priceor discount list in the price master data view. This automatic approval is done without creating a business taskif the manager himself releases the prices.For more general information on Business Task Management, see Business Task Management.
Product Discount (%)To determine the discount, the system checks all discount lists that fit the parameters passed from the sales orservice document. The parameters are customer, distribution chain, customer group, product, and date. All founddiscounts are considered in the price calculation.Discount lists can be Customer Specific Discount Product, General Customer Discount, Overall Customer GroupDiscount, and Customer Specific Discount Product Category discount lists.Because the customer may have a special discount for a certain product, the system checks for a discount list withcustomer product discounts.Discounts can always be revised manually within a sales or service document, allowing you to flexibly adjustdiscounts.
An approval procedure can be activated for price lists and discount lists which is done in the businessconfiguration in the scoping (under General Business Data Product and Service Pricing ).If this settingis active, the line manager automatically receives an approval task should his or her employee try to releasea price or a discount list. The price list or discount list cannot be released and included in all businessdocuments for sales and service processes until the line manager (or representative) approves the price listor discount list. If a manager is authorized to approve price and discount lists, he can directly release the priceor discount list in the price master data view. This automatic approval is done without creating a business taskif the manager himself releases the prices.For more general information on Business Task Management, see Business Task Management.
Working Condition (%)This price component is important for service scenarios. If service performers work at nights or on weekends orpublic holidays, a surcharge can be invoiced to the customer.
SurchargeTwo different price components are available for surcharges. You can define surcharges as percentages or fixedamounts according to your needs. All surcharges can be used side by side.
Warranty/GoodwillThese price components are important within service scenarios. For example, in a service document, services orspare parts may be covered by a warranty. The warranty or goodwill discount will be calculated based on the Coveragefield in the service document.
288 © 2017 SAP SE or an SAP affiliate company. All rights reserved. • P U B L I CSAP Business ByDesign February 2017
Product and Service Portfolio

Quality Loss FeeThis price component is used for return scenarios. This element displays only if the Returns business topic is includedin your business configuration. If your customer returns goods which are damaged or opened, you can manuallydefine a deduction on item level.
Restocking FeeThis price componentis used for return scenarios. This element displays only if the Returns business topic is includedin your business configuration. If your customer returns goods, you can manually define a restocking fee for eachindividual return document.
Migration PriceThe migration price is needed for open sales and service documents that are migrated from a legacy system intoSAP Business ByDesign. To ensure that prices are the same in both systems, there will not be any additionalcalculation of this price.
Total Item Net ValueThis is calculated by adding all the item net values. This value cannot be edited.
FreightThis price component covers the freight amount determined automatically or entered manually. Depending on thebusiness configuration settings it is possible to determine a fixed freight amount or to make the freight dependenton the net weight of the goods you sell.
Cost and Profit MarginCost displays only if profit margin is included in your business configuration. Cost is basically derived from financialsand makes the calculation of the profit margin possible.
Overall Discount (%)The overall discount (%) is an additional general discount applied to the total item net value. This can only be appliedmanually.
Total Net ValueThis is calculated by adding all the item net values plus freight, without considering taxes. This value cannot be edited.
Total Given DiscountsThis is calculated by adding all the relevant product discounts given. This value cannot be edited directly by the user.It can be influenced by editing the product discounts at item level.
Rounding DifferenceThis is a value that has been lost or gained through rounding. This value is used only for currencies that do not havelow denomination coins such as 1c or 2c – for example, Swiss francs or Australian dollars. For these currencies, theprice must be rounded to the nearest available value, such as 0c or 5c.
TaxThis price component covers all requirements in regards to taxation. All taxes are calculated according to legalrequirements and the results of this calculation are put into this price component.
SAP Business ByDesign February 2017Product and Service Portfolio P U B L I C • © 2017 SAP SE or an SAP affiliate company. All rights reserved. 289

TotalThis is calculated by adding the total net value plus tax.
Price CalculationPricing is centrally implemented in SAP Business ByDesign and linked to all relevant business processes. Theprocedure is predefined and you cannot modify the procedure or create a new one.The pricing procedure controls which price components are automatically calculated for the relevant businessdocuments, such as sales quotes, sales orders, and service orders. It contains the most commonly-used pricecomponents, including product prices, discounts, surcharges, and tax. These various kinds of price components canbe combined and control the price calculation process.The pricing procedure also contains the sequence in which the system takes these price components into accountduring pricing. It calculates the gross and net prices and taxes. The pricing procedure also determines:
● Which subtotals will be considered during pricing ● To what extent pricing can be processed manually ● Which method the system uses to calculate percentage discounts and surcharges ● Which requirements for a particular price component must be fulfilled before the system takes the element
into account. For example, freights are not considered for service items.
Currency and Quantity ConversionDuring the price calculation, currency conversion occurs if the currency of the price master data differs from thedocument currency, depending on the exchange rates maintained as master data. The document currency isdefaulted from the account master sales data.In addition, during the price calculation, quantity conversion occurs if the unit of measure requested in the documentdiffers from the price unit maintained in the price list. A prerequisite is that the quantity conversions are maintainedin the product or service master data. For example, product master data maintains a quantity conversion “1 pallet= 20 each”, the price list specifies a price unit of “$50/1 each”, and the sales order requests 5 pallets - in this case,the 5 pallets are converted to 100 units and price is calculated at $5000.
ScalesYou can define scales for prices which depend on different quantities. The scale you use determines how values arecalculated. For example, you can use a scale to define that a single boiler costs $500, but if you buy at least 10 boilersthe price decreases to only $450 per unit. You can also define scales for freights, which depend, for example, on thesales order value.You can also define scales for product discounts.There is also an additional feature where the system proposes the values for scales for every additional line that isadded by the user while maintaining scales. The following example explains the logic for calculation of the proposedvalue for scales:
Logic for determining the proposed scale value during price or discount scale maintenance.
290 © 2017 SAP SE or an SAP affiliate company. All rights reserved. • P U B L I CSAP Business ByDesign February 2017
Product and Service Portfolio

ValueofScales Percentage Calculation of Percentage
0 0 0 0
10
– 10% 11/10=1.1
10*1.1 = 11
20
– 11% 11/10=1.1
11*1.1 = 12.1
30
– 12.1% 12.1/11=1.1
12.1*1.1 = 13.31
SAP Business ByDesign February 2017Product and Service Portfolio P U B L I C • © 2017 SAP SE or an SAP affiliate company. All rights reserved. 291

ValueofScales Percentage Calculation of Percentage
40
– 13.31% 13.31/12.1=1.1
13.31*1.1 = 14.641
50
– 14.641% 14.641/13.31=1.1
14.641*1.1 = 16.105
292 © 2017 SAP SE or an SAP affiliate company. All rights reserved. • P U B L I CSAP Business ByDesign February 2017
Product and Service Portfolio

ValueofScales Percentage Calculation of Percentage
60
– 16.105% 16.105/14.641=1.1
16.105*1.1 = 17.716
See AlsoConfigure Price Strategy [page 335]Price Agreements for Customer Contracts [page 326]Gross Pricing [page 326]
6.1.2 Working with Pricing in Sales and Service Documents
OverviewThe Sales Order, Sales Quote, Customer Invoice, Return , Service Order and Service Confirmation editors contain atab called Pricing (Pricing and Invoicing for service order and service confirmation). This view allows you to flexiblydefine the price calculation within sales and service documents. It displays all related price components, such as listprice and product discount (%) or optionally as well cost or profit margin. Some of these components, such as profitmargin or cost, are read-only but you can modify other components such as list price, product discount (%) orsurcharges at item and an overall discount (%) at total level.
SAP Business ByDesign February 2017Product and Service Portfolio P U B L I C • © 2017 SAP SE or an SAP affiliate company. All rights reserved. 293

Editing Price Components at Item LevelUnder Item Pricing, you can view the details for each item in the sales or service document. To view the pricecomponents for an item, click the expand icon in the Item column. You can edit some price components or add arow to define another price component.The price components description can be manually changed. If such a description is changed, this description isconsidered in the output of forms and will also be copied to subsequent documents. Additionally, a rollover text onthe description in the pricing view reveals the price or discount list name from the price master data.Depending on your business configuration and settings, the item price components include:
● List Price: Determined from either a base price list, distribution-chain-specific price list, or customer-specificprice list. You can create price lists in the Price Lists sub view of the Pricing view in the Product and ServicePortfolio work center.
● Product Discount (%): Calculated either automatically from all relevant discount lists or alternatively,manually added as product discount. If you add a manual discount, the system adds the manually entereddiscount to the automatically determined discounts from the discount list. A discount can be created asmaster data in the Discount List sub view of the Pricing view in the Product and Service Portfolio work center.
● Cost: Retrieved from the product valuation. This value cannot be edited in the Pricing view. ● Cost Estimate: You can edit this price component manually in the Pricing view for profit analysis reasons for
project based services and entitlements. ● Profit Margin: Calculated by subtracting cost from revenue. This value cannot be edited. ● Tax: For example, State Sales Tax. These values cannot be edited in the Pricing view. Taxes can be edited
indirectly by changing the tax indicator in the Taxes tab of the Items view. ● Freight: The cost of transport for the item. Freight can be calculated by net weight of a product or as fixed
amount for the complete order depending on the business configuration. ● Migration Price: Only required for the migration of open sales and service documents from a legacy system. ● Quality Loss Fee: For return scenarios. If your customer sends goods back to you and claims money back,
you are able to manually define on item level a deduction for faults such as damaged goods or opened goods.This price component can only be applied manual.
● Surcharge: Defined either as a fixed amount or percentage. Surcharges can be created as master data inSurcharges sub view of the Pricing view in the Product and Service Portfolio work center .
● Warranty (%) : A discount used mainly within service documents to specify that part of the amount is coveredby warranty. Warranties can be created as master data in Special Surcharges, Special Discounts sub view ofthe Pricing view in the Product and Service Portfolio work center .
● Goodwill (%) : A discount used mainly within service documents to specify that part of the amount is coveredby goodwill. Goodwills can be created as master data in Special Surcharges, Special Discounts sub view ofthe Pricing view in the Product and Service Portfolio work center .
● Working Condition (%) : A surcharge applied for service items when an employee is working outside normalbusiness hours, for example, at the weekend. Working conditions can be created as master data in SpecialSurcharges, Special Discounts sub view of the Pricing view in the Product and Service Portfolio work center .
● Customer Expected Price: This is only relevant for sales orders created through A2A or B2B message (XMLdata transfer). The price is communicated from an external system and gets compared to the net pricecalculated in the SAP Business ByDesign system.
Editing Price Components at Total LevelThe Total Pricing section contains details about the pricing that is valid for the entire order or sales quote.Depending on your business configuration and settings, the total price components include:
294 © 2017 SAP SE or an SAP affiliate company. All rights reserved. • P U B L I CSAP Business ByDesign February 2017
Product and Service Portfolio

● Total Item Net Value: Calculated by adding all the item net values. This value cannot be edited. ● Overall Discount (%): Additional manual discount which applies to the total item net value. ● Restocking Fee: A fee charged to cover the cost of returning a product. This price component can only be
applied manual. ● Freight: The total cost of transport. Freight can be calculated by net weight or as fixed amount for the complete
order depending on the business configuration. ● Profit Margin: Calculated by subtracting total costs from total revenues. This value cannot be edited. ● Tax: For example, State Sales Tax. These values cannot be edited in the Pricing view. Taxes can be edited
indirectly by changing the tax indicator in the Taxes tab of the Items view. ● Total: Calculated by adding complete net value plus tax. This value cannot be edited. ● Total Given Discounts: Calculated by adding all the relevant product discounts given. This value cannot be
edited in the Total Pricing section. It can be influenced by editing the product discounts at item level or overalldiscount at total level.
● Rounding Difference: A value that has been lost or gained through rounding. This value is used only forcurrencies that do not have low denomination coins such as 1c or 2c – for example, Swiss francs or Australiandollars. For these currencies, the price must be rounded to the nearest available value, such as 0c or 5c.
Updating PricingYou can update the pricing using the following options:
● Completely, which removes all manual changes. ● Keep Manual Changes, which does not remove changes that you have made.
In each case, the system checks for any updates in pricing and recalculates the total.
See AlsoGross Pricing [page 326]
6.1.3 Tax Determination
Overview
Business ByDesign provides a tax event and uses the resulting figures to generate tax reports. Thisautomatically-created report does not replace the customer or user’s own tax appraisal. SAP does notassume liability for the accuracy of the automatically-created report or the tax report that is generated.
As a rule, companies are legally required to calculate taxes on products that they buy or sell or services used, andto levy these taxes on their customers. After the products or services have been provided, the taxes must be declaredand paid to the relevant tax authorities.The taxes are calculated for business documents such as orders, invoices, credit memos or down payments.Since taxation laws differ in each country, your company is faced with the challenge of calculating the correct taxfor a particular business transaction. The system supports you by automatically calculating the tax for the followingtax types:
● Value-Added Tax (VAT)
SAP Business ByDesign February 2017Product and Service Portfolio P U B L I C • © 2017 SAP SE or an SAP affiliate company. All rights reserved. 295

This tax is levied in many countries, especially countries in the European Union. Many regional differencesexist. For example, in some countries such as Canada and Australia, value-added tax is levied as "Goods andServices Tax".
● Sales and Use TaxThis tax is levied, for example, in the United States, and in a similar form in Canada (Provincial Sales Tax).
● Withholding TaxThis tax is levied in different forms in different countries. The system is able to calculate withholding tax forthe United States.
The system also offers a reporting tool that gives you effective control over your mandatory declaration of thesetaxes.
Prerequisites ● You have created the Master Data for Tax Determination [page 14]. ● Defining the Solution Scope for Taxation
The following activities are necessary to define the solution scope for taxation: ○ The solution scope for taxation is specified in the system in Business Configuration under Built-In Services
and Support. The Tax Calculation business topic is located in the Business Environment businesspackage.
○ If you are also required to have taxes calculated in your quotes, activate the relevant option inScoping. In the Questions step, navigate to the Sales business area, and choose New Business > Quoteswith Tax Calculation.
ElementsThe system collects the relevant data from the available business documents to correctly calculate the taxesapplicable. As the user, you have to configure your system with the information that is required for your businesscases. A lot of standard business cases are pre-configured by SAP, but in some cases you have to enhance yoursystem.For more detailed information about tax determination and how the system merges and classifies data, see Elementsfor Tax Determination [page 17].
Tax Number DeterminationIn the following cases the tax number is determined again:
● Tax date has been changed ● Buyer, seller or tax reporting group has been changed ● Tax number is wrong ● Tax country has been changed
Value-Added Tax (VAT) NumbersFor Export DeliveriesTo obtain tax exemption for intra-community deliveries, you need to record, among other things, the servicerecipient’s VAT number to be used for the receipt of goods.If several VAT numbers are assigned to a customer master record, the system selects the VAT number accordingto the following criteria:
296 © 2017 SAP SE or an SAP affiliate company. All rights reserved. • P U B L I CSAP Business ByDesign February 2017
Product and Service Portfolio

● The VAT number of the country in which the ship-to party is located. ● If the VAT number of the ship-to country is not entered in the master data, the system searches for other
numbers entered in the master data and selects a number that is different from the number of the countryfrom which the goods are sent.
● If there is only one VAT number for the country where the transport of goods starts, or if there is no numberat all, the prerequisites for an intra-community delivery have not been fulfilled, and the delivery must be taxedat the relevant tax rate.
If a VAT number is entered in the master data, it will be automatically displayed on the invoice. You canoverwrite it on the Taxes tab in the document. However, you can only overwrite using those numbers thathave been previously entered in the account master record.
For Other Services, Performed AbroadAccording to the EU directive 2008/8/EG and country-specific tax legislation, there is a new regulation, particularlyfor B2B commissions relating to the place in which services are performed.Generally, the place in which services are provided serves as the 'service recipient’ address. If the country where the'Ship-To' address is located differs from the address of the account, then the 'Ship-To' location is understood to bethe location where the service is performed. This directly influences how taxes are determined, in that the “Ship-To'address is used to determine where the services will be taxed. For example, § 3a (2) UStG in Germany can beconsulted. If this is not correct for each and every case, then applicable tax data must be manually adapted, mainlythe tax country and the tax code.In order to distinguish between companies and individuals as the service recipient, the system (tax decision tree)checks whether a VAT number has been entered in the account master data. If the VAT number is missing, thebusiness case is regarded as a service that was performed for an individual.
Therefore, it is important to remember to include the VAT number when entering the account master data.
Reverse Charge MechanismReverse charge mechanism means that, in certain cases, the customer is required by law to be liable for VAT, andto pay it to the relevant tax authority. In this case, the entrepreneur issues an invoice without VAT, but with anotification indicating that the tax debt is being transferred to the customer. The customer must calculate and paythe VAT to the tax authority, and can claim input tax deduction at the same time as usual. The transfer of tax debtto the service recipient is called reverse charge mechanism.For more information, see Tax Determination with Reverse Charge Mechanism [page 23].
Third-Party Order Processing TaxationIn typical sales scenarios, transactions take place directly between a company and an account, both businesspartners are located in the same country, and the company produces and delivers a good or service directly to theaccount. In such scenarios, there is no need for special tax regulations. However, in the event that one or moreparameters of this business scenario differ from the typical situation and, for example, account address and ship-to addresses are not the same, special regulations apply, depending on how complex the scenarios are.For more information, see Third-Party Order Processing and Chain Transaction Taxation [page 25].
SAP Business ByDesign February 2017Product and Service Portfolio P U B L I C • © 2017 SAP SE or an SAP affiliate company. All rights reserved. 297

Relevant Date for the VAT Tax ReturnThe date used for the VAT tax return depends on the business document. For example, in the supplier invoice theReceipt Date is used, and in the customer invoice the Posting Date is used. But if you want, you can also enter a TaxDue Date.For more information on the tax due date, see Tax Due Date of Tax Items.
Entering or Changing Tax Codes in Journal Entry VouchersYou can enter or change tax codes in journal entry vouchers as follows:
● Sales OrdersGo to the Sales Orders work center and choose New Sales Order or an existing sales order for editing. ChooseView All. Go to the Items tab page and from there to the Taxes tab page. Choose an appropriate entry for theorder item selected under Tax Code.
● Invoices or Credit MemosGo to the Customer Invoicing work center and choose New Manual Invoice or an existing invoice or creditmemo for editing. Go to the Items tab page and from there to the Taxes tab page. Choose an appropriateentry for the invoice item selected under Tax Code.
● Purchase OrderGo to the Purchase Requests and Orders work center and choose New Purchase Order or an existing purchaseorder for editing. Choose View All Items . In the Basic Data tab page, select under Taxes the appropriatetax code for the selected purchase order item.
● Supplier InvoiceGo to the Supplier Invoice work center and choose New Invoice Without Purchase Order or an existing invoicefor editing. In the Overview tab page, select the appropriate tax code for the selected invoice item.
Tax Decision TreeThe system uses a tax decision tree to correctly determine a tax event. The tax decision tree consists of a sequenceof logically connected questions that the system determines as being true or false by comparing them with dataentered in the documents. In this way, the facts are narrowed down until the tax event and the correct taxationmethod has been determined.The questions are answered by comparing data entered in the document, and the underlying process can berepresented as a process flow. The questions in the following example are used to determine the tax event “Exportto Third Country” for a company based in Germany.
298 © 2017 SAP SE or an SAP affiliate company. All rights reserved. • P U B L I CSAP Business ByDesign February 2017
Product and Service Portfolio

A tax decision tree is assigned to each country.
Process Flow
The process flow for tax determination describes a sample of how the tax event is determined for an invoice:1. The sales representative creates and saves a manual invoice.2. After the required data is entered, the system transfers tax-relevant data to tax determination, such as:
● Location of supplier and buyer ● Tax attributes of the business partner
One of these attributes is the tax exemption reason that depends on certain country-specific laws.
SAP Business ByDesign February 2017Product and Service Portfolio P U B L I C • © 2017 SAP SE or an SAP affiliate company. All rights reserved. 299

● Tax attributes of productsTax rate type and tax exemption reason can be different for each country, region, and tax type. In theUnited States, for example, services are not normally subject to tax, so the tax exemption reason shouldbe assigned in the product master data. Products are normally taxed at the standard tax rate and noother entries are required.
3. The system uses the tax-relevant data to activate tax determination, and the data is processed automaticallyin a tax decision tree.
4. The system calculates tax on the basis of the following components: ● Tax event ● Tax types ● Tax rate types such as standard value-added tax rate ● Tax rate as a percentage ● Taxable amount
5. The system includes the result of the tax determination and calculation in the sales order. The calculated taxis displayed on the Pricing tab and on the Taxes tab of the Items tab.All tax details determined by the system are displayed on the Tax tab. Examples are: ● Tax country ● Tax code ● Tax jurisdiction code in case the tax country is United States ● Tax region in case the tax country is Canada ● Tax date ● A table with one row for each tax type that lists the following:
○ Tax base ○ Tax rate type ○ Tax rate ○ Tax exemption reason, if necessary ○ Tax amount ○ Deductibility type (only for purchasing documents) ○ Country-specific parameters (if necessary), such as indicators for deferred tax (in France or India),
tax jurisdiction code (United States), or region (Canada).
However, not all tax-relevant transactions can be recognized automatically and correctly by thesystem.Therefore, we recommend that you overwrite the data manually in the document, in case the systemdoes not determine the correct tax country or the correct tax code for the transaction. If you have tochange the tax country in the document manually, the input help displays only the countries for whicha tax authority is created and tax arrangements are maintained for your company. However, you canalso enter another tax country in which sales need to be reported for tax purposes. The system thendisplays the specific tax codes for this country. Remember that you need to create the tax authorityfor this country. You then need to trigger tax determination again in the document so that the correcttax number of your company is found for the transaction. For countries that have multiple tax rates,you can enter the tax criteria manually.Note that if tax-relevant data such as the country of the service location or of the goods recipient hasbeen changed in a follow-up document of a business transaction, the Tax Country and Tax Code is notredetermined. This affects, for example, changes in the address data in a service confirmation that iscreated for a service order, or in a project invoice that is created for a sales order.
300 © 2017 SAP SE or an SAP affiliate company. All rights reserved. • P U B L I CSAP Business ByDesign February 2017
Product and Service Portfolio

See AlsoParty Processing [page 29]Tax Determination — US [page 28] (This document covers topics specific for the United States, such as deliverytaxation in Texas and California, Nexus.)
6.2 Products View
6.2.1 Quick Guide for Products (in the Product and Service Portfolio)
It is important to have complete and accurate information on all the products your company offers. The Productsview of the Product and Service Portfolio work center provides a central entry point for viewing all the products inyour system, creating new ones, and maintaining them throughout the product life cycle.
The Products view in Customer Relationship Management uses the term product but refers in many cases tofunctions in Master Data where the term material is prevalent. These terms are interchangeable.
Business Background
Assigning Statuses to a MaterialA material can be involved in various business processes. For example, a nail could be a component used inmanufacturing another product, or the nail could be sold as the end product itself. For this reason, a material isdivided into sections for purchasing, logistics, supply planning, availability confirmation, sales, and valuation. Eachsection includes details specific to the business process as well as one or more statuses indicating the completenessor readiness of the material for that process. Therefore, when creating a new material, it is important to apply thecorrect statuses to ensure that the relevant processes are assigned and that data in these areas is kept up-to-date.For more information, see Assigning Statuses to a Material [page 305]
PricingPricing is based on price master data such as price lists and discount lists, which are used to automatically calculatepricing within all business documents for sales and service processes. A predefined pricing procedure is used todetermine the gross value the customer has to pay for certain products or services to be received on a certain dayat a certain place. The pricing procedure consists of price components, such as list price, discounts, surcharges,freights, taxes, and costs. The order of these price components is essential for the calculation of the total value.For more information, see Pricing in Customer Relationship Management [page 154].
Tax DeterminationAs a rule, companies are legally required to calculate taxes on products that they buy or sell, and to levy these taxesfrom their customers. After the products have been provided, the taxes must be declared and levied to the respectivetax authorities. The system supports you by providing a substantially automated tax calculation for the following taxtypes: Value-Added Tax (VAT), Sales and Use Tax, Withholding Tax. The system also provides a reporting tool thatgives you effective control over your obligatory declaration of these taxes.For more information, see Tax Determination [page 9].
SAP Business ByDesign February 2017Product and Service Portfolio P U B L I C • © 2017 SAP SE or an SAP affiliate company. All rights reserved. 301

Materials Quick GuideFor more information on managing materials, see the Materials Quick Guide [page 306].
Tasks
Create a Material1. Choose the Materials subview in the Materials view of the Product Data work center.2. Click New and then Material to open the New Material quick activity.3. Enter the Material ID.
If internal number ranges have been configured for materials, you cannot enter a material ID manually;when you save the material, the system assigns the next available ID automatically.For more information, see Configuration: Number Ranges.
4. Enter the Material Description.For information about descriptions in other languages, see Add Material Descriptions in Other Languagesbelow.
5. Select the Product Category to which you want to assign the new material.6. In the Base UoM field, enter the default unit of measure for the material. It will be used for purchasing, logistics,
planning, availability confirmation, sales, and valuation unless different units of measure are selectedmanually for those processes.
The base UoM should be the smallest unit of measure for the material. Therefore, if you selectdifferent units of measure for any processes, make sure that the base UoM is always smaller.
7. Optional: On the General tab, enter the Net Weight, Gross Weight, Net Volume, and Gross Volume for thebase unit of measure. For example, if the base unit of measure is box, define the physical characteristics ofone box.For information about defining additional characteristics, see Add UoM Characteristics and GTIN to aMaterial below.
8. Enter the identified stock type for the material.a. Click View All .b. On the General tab, click General .c. To assign the material to a group of identified stock, select the Identified Stock Type.
Depending on the identified stock type you choose, the system determines if:1. The material is batch managed. If the material is batch managed, then creation of identified stock
is mandatory for capturing the stock in the system for this material.2. Product specification use is enabled for the material. If the product specification use is enabled for
the material, then the product specification created can be linked to identified stock.
This information can be determined viewing the Batch Managed and Product Specification Enabledcheckboxes. These checkboxes are read-only and cannot be edited.The identified stock type determines how the material is to be managed.
Identified Stock Type Batch Managed Product Specification Enabled
Mandatory Specified Stock Yes Yes
302 © 2017 SAP SE or an SAP affiliate company. All rights reserved. • P U B L I CSAP Business ByDesign February 2017
Product and Service Portfolio

Identified Stock Type Batch Managed Product Specification Enabled
Batch or Lot Yes No
Optional Specified Stock No Yes
For more information, see Changing Identified Stock Types.
● If the product is batch managed, and is primarily produced to stock (make-to-stock) andwill never be used in the make-to-order scenarios, then in such case, the identified stocktype has to be either Batch or Lot for that material
● If the product is batch managed, and can be produced either to stock (make-to-stock) orspecific to customer order using product specifications (make-to-order), then in such case,the identified stock type has to be Mandatory Specified Stock
● If the product is not batch managed, and can be produced either to stock (make-to-stock)or specific to customer order using product specifications (make-to-order), then in suchcase, the identified stock type has to be Optional Specified Stock
If you change the identified stock type once the material has already been created and is beingused, the associated logistic processes is lost. For example if you create a material and define theidentified stock type as Mandatory Specified Stock, it will be both batch managed and productspecification enabled. However, after the material is in use, if you then change the identified stocktype to Optional Specified Stock, then the batch management function for the material will be lost.
9. Optional: Enter the advanced general details for the materiala. Click View All .b. To choose a profile for serial number assignment, select a Serial Number Profile.c. To add, delete, or replace a product image for the material, click Image and select the appropriate
option.d. To specify the validity of the stock, enter the relevant number of days in the Minimum Required Shelf
Life field on the Planning tab. Stock will be unavailable for planning and execution after the completionof the number of days entered.
10. Click Save .
This document contains text that is relevant for India only. To ensure that the system displays thecorrect text, select Personalize → My Settings. Select Onscreen Help and, under Country, chooseIndia. Save your settings and logout to ensure these changes are made.
Assign Availability Confirmation Details to a MaterialFor information about this task, see here.
Assign Sales Details to a MaterialFor information about this task, see here.
Assign Valuation Details to a MaterialFor information about this task, see here.
Mass Change of MaterialsFor information about this task, see here.
SAP Business ByDesign February 2017Product and Service Portfolio P U B L I C • © 2017 SAP SE or an SAP affiliate company. All rights reserved. 303

Add Quantity Conversions to a MaterialFor information about this task, see here.
Add UoM Characteristics and GTIN to a Material1. Choose the Materials subview in the Materials view of the Product Data work center.2. Select the material and click Edit to open the Material quick activity.3. On the General tab, enter the Net Weight, Gross Weight, Net Volume, and Gross Volume for the base unit of
measure. For example, if the base unit of measure is box, define the characteristics of one box.4. Optional: Define additional characteristics and a GTIN (Global Trade Item Number) for the base unit of
measure and for other units of measure.a. Click View All .b. At the top of the General tab, click UoM Characteristics.
The first row of the table displays the physical characteristics you already entered for the base unit ofmeasure.
c. Enter the Length, Width, Height, and GTIN (Global Trade Item Number) for the base unit of measure.
A GTIN is an 8, 12, 13, or 14 digit number used to uniquely identify products worldwide. Each GTINmust conform to international standards and must be unique.
d. To define characteristics and a GTIN for another unit of measure, click Add Row.e. In the new row, select the UoM and enter the relevant characteristics and GTIN.f. Click Save to save your changes.
Add Material Descriptions in Other Languages1. Choose the Materials subview in the Materials view of the Product Data work center.2. Select the material and click Edit to open the Material quick activity.
The Material Description field displays the description of the material in your logon language.3. Click View All .4. At the top of the General tab, click Other Languages .5. To add a description of the material in another language, click Add Row .
If you do not maintain a material description for a language, a description will not appear on businessdocuments in that language.
6. In the new row, select a Language and enter the Material Description.7. In the Details section, enter additional information about the material and click Save .
Create Materials Using Microsoft Excel®You can create materials using a predefined Microsoft Excel template. For information about this task, see here.
Export Materials to Microsoft ExcelYou can export materials to Microsoft Excel. For more information about this task, see here [page 82].
304 © 2017 SAP SE or an SAP affiliate company. All rights reserved. • P U B L I CSAP Business ByDesign February 2017
Product and Service Portfolio

6.2.2 Business Background
6.2.2.1 Assigning Statuses to a Material
OverviewA material can be involved in various business processes. For example, a nail could be a component used inmanufacturing another product, or the nail could be sold as the end product itself. For this reason, a material isdivided into sections for purchasing, logistics, supply planning, availability confirmation, sales, and valuation. Eachsection includes details specific to the business process as well as one or more statuses indicating the completenessor readiness of the material for that process. Therefore, when creating a new material, it is important to apply thecorrect statuses to ensure that the relevant processes are assigned and that data in these areas is kept up-to-date.
Features
Changes to StatusesThe first status of a process is always Initial. You can then make the following changes in statuses before the materialis saved:
● Initial to In Preparation or In Preparation to Initial ● In Preparation to Active ● Active to Blocked or Blocked to Active ● Active to Initial
After a material is saved, you can make the following changes in status: ● Initial to In Preparation or In Preparation to Initial ● In Preparation to Active ● Active to Blocked or Blocked to Active
Changing from Active to Blocked is only possible for purchasing and sales.
Overall StatusIn cases where a process has multiple statuses, the status with the highest priority is always given as the overallstatus for a process. The hierarchy for status priority is as follows: Active, Blocked, In Preparation, and Initial. Forexample, if there is one status marked as Active, and there are multiple statuses marked as In Preparation, the overallstatus is given as Active. The logistics and purchasing processes each have only a single status, but all otherprocesses can have multiple statuses. Purchasing and sales are the only two processes with the Blocked status.The statuses for processes are as follows:
Statuses of Processes Overall Status Status Icon Status Combination Valid For
Initial Initial Grey Purchasing, Logistics, Planning, AvailabilityConfirmation, Sales, and Valuation
In Preparation In Preparation Yellow Purchasing, Logistics, Planning, AvailabilityConfirmation, Sales, and Valuation
SAP Business ByDesign February 2017Product and Service Portfolio P U B L I C • © 2017 SAP SE or an SAP affiliate company. All rights reserved. 305

Blocked Blocked Red Purchasing and Sales
Active Active Green Purchasing, Logistics, Planning, AvailabilityConfirmation, Sales, and Valuation
Initial and In Preparation In Preparation Yellow Planning, Availability Confirmation, Sales, andValuation
Initial and Blocked Blocked Red Sales
Initial, In Preparation, and Blocked Blocked Red Sales
Initial, In Preparation, and Active Active Green Planning, Availability Confirmation, Sales, andValuation
Initial, In Preparation, Blocked and Active Active Green Sales
In Preparation and Blocked Blocked Red Sales
In Preparation and Active Active Green Planning, Availability Confirmation, Sales, andValuation
In Preparation, Blocked, and Active Active Green Sales
Blocked and Active Active Green Sales
6.2.2.2 Materials Quick Guide
The Materials view in the Product Data work center has two subviews: Materials and Material Templates.The Materials view provides a central entry point for viewing all the materials in your system, creating new materials,and maintaining materials throughout the product life cycle ensuring you have complete and accurate informationon all the materials your company offers.The Material Templates subview allows you to create material templates for different product categories and tocreate and change multiple materials based on these templates.
You can access the Materials view from the following locations: ● Product Data work center ● Product Development work center
You can also access certain functions of the Materials view via the Products view of the Product and ServicePortfolio work center.
Business Background
Assigning Statuses to a MaterialA material can be involved in various business processes. For example, a nail could be a component used inmanufacturing another product, or the nail could be sold as the end product itself. For this reason, a material isdivided into sections for purchasing, logistics, supply planning, availability confirmation, sales, and valuation. Eachsection includes details specific to the business process as well as one or more statuses indicating the completenessor readiness of the material for that process. Therefore, when creating a new material, it is important to apply thecorrect statuses to ensure that the relevant processes are assigned and that data in these areas is kept up-to-date.For more information, see Assigning Statuses to a Material [page 305]
306 © 2017 SAP SE or an SAP affiliate company. All rights reserved. • P U B L I CSAP Business ByDesign February 2017
Product and Service Portfolio

Changing Identified Stock TypesYou can change the identified stock type of a product regardless of the process in which you use the product. Youcan specify a new identified stock type where previously there was none, you can remove the type completely, oryou can change the type from one type to another. You can change the identified stock type for a product even afterthe product is activated for logistics.The system allows you this flexibility in case that you need to change an identified stock type after you begin usinga product in your process. However, changing the identified stock type can have consequences and follow-up actions,depending on the status of the process in which you use the effected product. You should be aware of theseconsequences before you perform the identified stock type change. We recommend that you finish specifying yourproduct with the correct identified stock type before you start any process for a product.You can change the identified stock type in the General tab of the Material editor in the Product Data work center.You must access the General tab by clicking View All. You can also check if the product is activated in the Logisticstab.For more information, see Changing Identified Stock Types.
Pricing in Customer Relationship ManagementPricing is based on price master data such as price lists and discount lists, which are used to automatically calculatepricing within all business documents for sales and service processes. A predefined pricing procedure is used todetermine the gross value the customer has to pay for certain products or services to be received on a certain dayat a certain place. The pricing procedure consists of price components, such as list price, discounts, surcharges,freights, taxes, and costs. The order of these price components is essential for the calculation of the total value.For more information, see Pricing in Customer Relationship Management [page 154].
Tax DeterminationAs a rule, companies are legally required to calculate taxes on products that they buy or sell, and to levy these taxesfrom their customers. After the products have been provided, the taxes must be declared and levied to the respectivetax authorities. The system supports you by providing a substantially automated tax calculation for the following taxtypes: Value-Added Tax (VAT), Sales and Use Tax, Withholding Tax. The system also provides a reporting tool thatgives you effective control over your obligatory declaration of these taxes.For more information, see Tax Determination [page 9].
Availability ChecksAvailability checks enable you, as a supply planner, to answer the question of whether or not a requested quantityof a product is available at a certain place at a certain point in time. Confirmations as a result of these checks notonly give a reliable answer to this question, they are also required for the follow-on processes in logistics execution.Providing a reliable delivery date at the very time when a quote or order is entered in the system, helps you to improvecustomer satisfaction.The system allows you to check the availability for sales orders, service orders, stock transfer orders, project stockorders, and sales quotes.For more information, see Availability Checks.
Serial Number ProfilesSerial numbers are unique identifiers that are assigned to a single item of a tangible product. Serial numbers in SAPBusiness ByDesign are represented by registered products. These are integrated into subsequent service scenarios,for example, warranty handling. You can use serial number profiles to define in which processes it is mandatory oroptional to enter serial numbers. The profile determines the conditions for serial number recording in differentbusiness documents. For more information, see Working with Serial Numbers.
SAP Business ByDesign February 2017Product and Service Portfolio P U B L I C • © 2017 SAP SE or an SAP affiliate company. All rights reserved. 307

Tasks
Create a Material1. Choose the Materials subview in the Materials view of the Product Data work center.2. Click New and then Material to open the New Material quick activity.3. Enter the Material ID.
If internal number ranges have been configured for materials, you cannot enter a material ID manually;when you save the material, the system assigns the next available ID automatically.For more information, see Configuration: Number Ranges.
4. Enter the Material Description.For information about descriptions in other languages, see Add Material Descriptions in Other Languagesbelow.
5. Select the Product Category to which you want to assign the new material.6. In the Base UoM field, enter the default unit of measure for the material. It will be used for purchasing, logistics,
planning, availability confirmation, sales, and valuation unless different units of measure are selectedmanually for those processes.
The base UoM should be the smallest unit of measure for the material. Therefore, if you selectdifferent units of measure for any processes, make sure that the base UoM is always smaller.
7. Optional: On the General tab, enter the Net Weight, Gross Weight, Net Volume, and Gross Volume for thebase unit of measure. For example, if the base unit of measure is box, define the physical characteristics ofone box.For information about defining additional characteristics, see Add UoM Characteristics and GTIN to aMaterial below.
8. Enter the identified stock type for the material.a. Click View All .b. On the General tab, click General .c. To assign the material to a group of identified stock, select the Identified Stock Type.
Depending on the identified stock type you choose, the system determines if:1. The material is batch managed. If the material is batch managed, then creation of identified stock
is mandatory for capturing the stock in the system for this material.2. Product specification use is enabled for the material. If the product specification use is enabled for
the material, then the product specification created can be linked to identified stock.
This information can be determined viewing the Batch Managed and Product Specification Enabledcheckboxes. These checkboxes are read-only and cannot be edited.The identified stock type determines how the material is to be managed.
Identified Stock Type Batch Managed Product Specification Enabled
Mandatory Specified Stock Yes Yes
Batch or Lot Yes No
Optional Specified Stock No Yes
308 © 2017 SAP SE or an SAP affiliate company. All rights reserved. • P U B L I CSAP Business ByDesign February 2017
Product and Service Portfolio

For more information, see Changing Identified Stock Types.
● If the product is batch managed, and is primarily produced to stock (make-to-stock) andwill never be used in the make-to-order scenarios, then in such case, the identified stocktype has to be either Batch or Lot for that material
● If the product is batch managed, and can be produced either to stock (make-to-stock) orspecific to customer order using product specifications (make-to-order), then in such case,the identified stock type has to be Mandatory Specified Stock
● If the product is not batch managed, and can be produced either to stock (make-to-stock)or specific to customer order using product specifications (make-to-order), then in suchcase, the identified stock type has to be Optional Specified Stock
If you change the identified stock type once the material has already been created and is beingused, the associated logistic processes is lost. For example if you create a material and define theidentified stock type as Mandatory Specified Stock, it will be both batch managed and productspecification enabled. However, after the material is in use, if you then change the identified stocktype to Optional Specified Stock, then the batch management function for the material will be lost.
9. Optional: Enter the advanced general details for the materiala. Click View All .b. To choose a profile for serial number assignment, select a Serial Number Profile.c. To add, delete, or replace a product image for the material, click Image and select the appropriate
option.d. To specify the validity of the stock, enter the relevant number of days in the Minimum Required Shelf
Life field on the Planning tab. Stock will be unavailable for planning and execution after the completionof the number of days entered.
10. Click Save .
This document contains text that is relevant for India only. To ensure that the system displays thecorrect text, select Personalize → My Settings. Select Onscreen Help and, under Country, chooseIndia. Save your settings and logout to ensure these changes are made.
Create a Material Template and Create a Material from a TemplateFor more information about this task, see here.
Assign Purchasing Details to a MaterialFor information about this task, see here.
Assign Logistics Details to a MaterialFor information about this tasks, see here.
Assign Supply Planning Details to a MaterialFor information about this task, see here.
Assign Availability Confirmation Details to a MaterialFor information about this tasks, see here.
SAP Business ByDesign February 2017Product and Service Portfolio P U B L I C • © 2017 SAP SE or an SAP affiliate company. All rights reserved. 309

Assign Sales Details to a MaterialFor information about this task, see here.
Assign Valuation Details to a MaterialFor information about this task, see here.
Add Quantity Conversions to a MaterialFor information about this task, see here.
Add UoM Characteristics and GTIN to a Material1. Choose the Materials subview in the Materials view of the Product Data work center.2. Select the material and click Edit to open the Material quick activity.3. On the General tab, enter the Net Weight, Gross Weight, Net Volume, and Gross Volume for the base unit of
measure. For example, if the base unit of measure is box, define the characteristics of one box.4. Optional: Define additional characteristics and a GTIN (Global Trade Item Number) for the base unit of
measure and for other units of measure.a. Click View All .b. At the top of the General tab, click UoM Characteristics.
The first row of the table displays the physical characteristics you already entered for the base unit ofmeasure.
c. Enter the Length, Width, Height, and GTIN (Global Trade Item Number) for the base unit of measure.
A GTIN is an 8, 12, 13, or 14 digit number used to uniquely identify products worldwide. Each GTINmust conform to international standards and must be unique.
d. To define characteristics and a GTIN for another unit of measure, click Add Row.e. In the new row, select the UoM and enter the relevant characteristics and GTIN.f. Click Save to save your changes.
Add Material Descriptions in Other Languages1. Choose the Materials subview in the Materials view of the Product Data work center.2. Select the material and click Edit to open the Material quick activity.
The Material Description field displays the description of the material in your logon language.3. Click View All .4. At the top of the General tab, click Other Languages .5. To add a description of the material in another language, click Add Row .
If you do not maintain a material description for a language, a description will not appear on businessdocuments in that language.
6. In the new row, select a Language and enter the Material Description.7. In the Details section, enter additional information about the material and click Save .
Mass Change of MaterialsYou can quickly update the general and business area details of multiple materials at once. For information aboutthis task, see here.
310 © 2017 SAP SE or an SAP affiliate company. All rights reserved. • P U B L I CSAP Business ByDesign February 2017
Product and Service Portfolio

Create Materials Using Microsoft Excel®You can create materials using a predefined Microsoft Excel template. For information about this task, see here.
Export Materials to Microsoft ExcelYou can export materials to Microsoft Excel. For more information about this task, see here [page 82].
See AlsoCommodity Catalogs Quick Guide
6.3 Services View
6.3.1 Quick Guide for Services (in the Product and Service Portfolio)
It is important for you to have a deep understanding of all the services your company offers. The Services view ofthe Product and Service Portfolio work center provides a central entry point for viewing all the services in your system,creating new services, and maintaining important service-related information.
Business Background
Assigning Statuses to a ServiceA service can be involved in various business processes. For this reason, a service is divided into sections forpurchasing, sales, and valuation. Each section includes details specific to the business process as well as one ormore statuses indicating the completeness or readiness of the service for that process. Therefore, when creating anew service, it is important to apply the correct statuses to ensure that the relevant processes are assigned and thatdata in these areas is kept up-to-date.For more information, see Assigning Statuses to a Service [page 313].
PricingPricing is based on price master data such as price lists and discount lists, which are used to automatically calculatepricing within all business documents for sales and service processes. A predefined pricing procedure is used todetermine the gross value the customer has to pay for certain products or services to be received on a certain dayat a certain place. The pricing procedure consists of price components, such as list price, discounts, surcharges,freights, taxes, and costs. The order of these price components is essential for the calculation of the total value.For more information, see Pricing in Customer Relationship Management [page 154].
Tax DeterminationAs a rule, companies are legally required to calculate taxes on products that they buy or sell, and to levy these taxesfrom their customers. After the products have been provided, the taxes must be declared and levied to the respectivetax authorities. The system supports you by providing a substantially automated tax calculation for the following taxtypes: Value-Added Tax (VAT), Sales and Use Tax, Withholding Tax. The system also provides a reporting tool thatgives you effective control over your obligatory declaration of these taxes.For more information, see Tax Determination [page 9].
SAP Business ByDesign February 2017Product and Service Portfolio P U B L I C • © 2017 SAP SE or an SAP affiliate company. All rights reserved. 311

Services Quick Guide (Master Data)For more information on managing services in Master Data, see the Services Quick Guide [page 314].
Tasks
Create a Service1. Choose the Services subview in the Services view of the Product Data work center.2. Click New and then Service to open the New Service quick activity.3. Enter the Service ID.
If internal number ranges have been configured for services, you cannot enter a service ID manually;when you save the service, the system assigns the next available ID automatically.For more information, see Configuration: Number Ranges.
4. Enter the Service Description.For information about descriptions in other languages, see Add Service Descriptions in Other Languagesbelow.
5. Select the Product Category to which you want to assign the new service.6. In the Base UoM field, enter the default unit of measure for the service. It will be used for purchasing, sales,
and valuation unless different units of measure are selected manually for those processes.
The base UoM should be the smallest unit of measure for the service. Therefore, if you select differentunits of measure for any processes, make sure that the base UoM is always smaller.
7. Optional: Enter advanced general details for the service.a. Click View All .b. To indicate that the service should be treated as an expense for financial purposes, select the Expense
Indicator check box.
The check box is grayed out as soon as you save the service.
c. To add, delete, or replace a product image for the service, click Image and select the appropriateoption.
8. Click Save to save your changes.
Assign Sales Details to a ServiceFor information about this task, see here.
Assign Valuation Details to a ServiceFor information about this task, see here.
Add Quantity Conversions to a ServiceFor information about this task, see here.
Add Service Descriptions in Other Languages1. Choose the Services subview in the Services view of the Product Data work center.
312 © 2017 SAP SE or an SAP affiliate company. All rights reserved. • P U B L I CSAP Business ByDesign February 2017
Product and Service Portfolio

2. Select the service and click Edit to open the Service quick activity.The Service Description field displays the description of the service in your logon language.
3. Click View All .4. At the top of the General tab, click Other Languages .5. To add a description of the service in another language, click Add Row .
If you do not maintain a service description for a language, a description will not appear on businessdocuments in that language.
6. In the new row, select a Language and enter the Service Description.7. In the Details section, enter additional information about the service and click Save .
Create Services Using Microsoft Excel®You can create services using a predefined Microsoft Excel template. For information about this task, see here.
Export Services to Microsoft Excel®You can export services to Microsoft Excel. For more information about this task, see here [page 82].
6.3.2 Business Background
6.3.2.1 Assigning Statuses to a Service
OverviewA service can be involved in various business processes. For this reason, a service is divided into sections forpurchasing, sales, and valuation. Each section includes details specific to the business process as well as one ormore statuses indicating the completeness or readiness of the service for that process. Therefore, when creating anew service, it is important to apply the correct statuses to ensure that the relevant processes are assigned and thatdata in these areas is kept up-to-date.
Features
Changes to StatusesThe first status of a process is always Initial. You can then make the following changes in statuses before the serviceis saved:
● Initial to In Preparation or In Preparation to Initial ● In Preparation to Active ● Active to Blocked or Blocked to Active ● Active to Initial
After a service is saved, you can make the following changes in status: ● Initial to In Preparation or In Preparation to Initial ● In Preparation to Active ● Active to Blocked or Blocked to Active
SAP Business ByDesign February 2017Product and Service Portfolio P U B L I C • © 2017 SAP SE or an SAP affiliate company. All rights reserved. 313

Changing from Active to Blocked is only possible for purchasing and sales.
Overall StatusIn cases where a process has multiple statuses, the status with the highest priority is always given as the overallstatus for a process. The hierarchy for status priority is as follows: Active, Blocked, In Preparation, and Initial. Forexample, if there is one status marked as Active, and there are multiple statuses marked as In Preparation, the overallstatus is given as Active. The purchasing process has only a single overall status, but the other processes can havemultiple statuses. Purchasing and sales are the only two processes with the Blocked status.The statuses for processes are as follows:
Statuses of Processes Overall Status Status Icon Status Combination Valid For
Initial Initial Grey Purchasing, Sales, and Valuation
In Preparation In Preparation Yellow Purchasing, Sales, and Valuation
Blocked Blocked Purchasing and Sales
Active Active Green Purchasing, Sales, and Valuation
Initial and In Preparation In Preparation Yellow Sales and Valuation
Initial and Blocked Blocked Red Sales
Initial, In Preparation, and Blocked Blocked Red Sales
Initial, In Preparation, and Active Active Green Sales and Valuation
Initial, In Preparation, Blocked and Active Active Green Sales
In Preparation and Blocked Blocked Red Sales
In Preparation and Active Active Green Sales and Valuation
In Preparation, Blocked, and Active Active Green Sales
Blocked and Active Active Green Sales
6.3.2.2 Quick Guide for Services (in Product Data)
It is important for you to have a deep understanding of all the services your company offers. Thus, the Services viewprovides a central entry point for viewing all the services in your system, creating new services, and maintainingimportant service-related information.You can access this view from the Product Data work center.
Business Background
Assigning Statuses to a ServiceA service can be involved in various business processes. For this reason, a service is divided into sections forpurchasing, sales, and valuation. Each section includes details specific to the business process as well as one ormore statuses indicating the completeness or readiness of the service for that process. Therefore, when creating anew service, it is important to apply the correct statuses to ensure that the relevant processes are assigned and thatdata in these areas is kept up-to-date.For more information, see Assigning Statuses to a Service [page 313]
314 © 2017 SAP SE or an SAP affiliate company. All rights reserved. • P U B L I CSAP Business ByDesign February 2017
Product and Service Portfolio

Cost Center Management AccountingCost Center Management Accounting provides functions for managing and allocating overhead costs. Examples ofcosts that are generally classified as overhead include operating supplies, wages and salaries, social securitycontributions, and depreciation.In contrast to direct costs, overhead costs cannot be traced directly to a cost object but must first be accumulatedon the cost centers that requested the services. At the end of each period, you use the overhead distribution andoverhead absorption functions to credit the cost centers for the accumulated overhead and allocate it to the costobjects.For more information, see Cost Center Management Accounting.
Service Cost Allocation to Cost ObjectsWhen products are manufactured and delivered to customers, costs are incurred by the cost centers for the servicesand resources required to perform the work. A resource is a production factor such as labor, equipment, or vehicles,while a service is the activity performed by a resource.Production workers enter the consumption quantities of the services and resources into the system by means ofactivity confirmations. The confirmations result in the allocation of direct costs from the cost centers to the salesorders, service orders, projects, or production lots that requested the work.Service cost allocation is based on the resource and service cost rates defined in the Cost and Revenue work center,Resource Cost Rates and Service Cost Rates views.For more information, see Service Cost Allocation to Cost Objects.
Pricing in Customer Relationship ManagementPricing is based on price master data such as price lists and discount lists, which are used to automatically calculatepricing within all business documents for sales and service processes. A predefined pricing procedure is used todetermine the gross value the customer has to pay for certain products or services to be received on a certain dayat a certain place. The pricing procedure consists of price components, such as list price, discounts, surcharges,freights, taxes, and costs. The order of these price components is essential for the calculation of the total value.For more information, see Pricing in Customer Relationship Management [page 154].
Tax DeterminationAs a rule, companies are legally required to calculate taxes on products that they buy or sell, and to levy these taxesfrom their customers. After the products have been provided, the taxes must be declared and levied to the respectivetax authorities. The system supports you by providing a substantially automated tax calculation for the following taxtypes: Value-Added Tax (VAT), Sales and Use Tax, Withholding Tax. The system also provides a reporting tool thatgives you effective control over your obligatory declaration of these taxes.For more information, see Tax Determination [page 9].
Tasks
Create a Service1. Choose the Services subview in the Services view of the Product Data work center.2. Click New and then Service to open the New Service quick activity.3. Enter the Service ID.
SAP Business ByDesign February 2017Product and Service Portfolio P U B L I C • © 2017 SAP SE or an SAP affiliate company. All rights reserved. 315

If internal number ranges have been configured for services, you cannot enter a service ID manually;when you save the service, the system assigns the next available ID automatically.For more information, see Configuration: Number Ranges.
4. Enter the Service Description.For information about descriptions in other languages, see Add Service Descriptions in Other Languagesbelow.
5. Select the Product Category to which you want to assign the new service.6. In the Base UoM field, enter the default unit of measure for the service. It will be used for purchasing, sales,
and valuation unless different units of measure are selected manually for those processes.
The base UoM should be the smallest unit of measure for the service. Therefore, if you select differentunits of measure for any processes, make sure that the base UoM is always smaller.
7. Optional: Enter advanced general details for the service.a. Click View All .b. To indicate that the service should be treated as an expense for financial purposes, select the Expense
Indicator check box.
The check box is grayed out as soon as you save the service.
c. To add, delete, or replace a product image for the service, click Image and select the appropriateoption.
8. Click Save to save your changes.
Create a Service Template and Create a Service from a TemplateFor more information about this task, see here.
Assign Purchasing Details to a ServiceFor information about this task, see here.
Assign Sales Details to a ServiceFor information about this task, see here.
Assign Valuation Details to a ServiceFor information about this task, see here.
Add Quantity Conversions to a ServiceFor information about this task, see here.
Add Service Descriptions in Other Languages1. Choose the Services subview in the Services view of the Product Data work center.2. Select the service and click Edit to open the Service quick activity.
The Service Description field displays the description of the service in your logon language.3. Click View All .4. At the top of the General tab, click Other Languages .
316 © 2017 SAP SE or an SAP affiliate company. All rights reserved. • P U B L I CSAP Business ByDesign February 2017
Product and Service Portfolio

5. To add a description of the service in another language, click Add Row .
If you do not maintain a service description for a language, a description will not appear on businessdocuments in that language.
6. In the new row, select a Language and enter the Service Description.7. In the Details section, enter additional information about the service and click Save .
Mass Change of ServicesYou can quickly update the general and business area details of multiple services at once. For information about thistask, see here.
Create Services Using Microsoft Excel®You can create services using a predefined Microsoft Excel template. For information about this task, see here.
Export Services to Microsoft ExcelYou can export services to Microsoft Excel. For more information about this task, see here [page 82].
6.4 Product Catalogs View
6.4.1 Product Catalogs Quick Guide
The Product Catalogs view of the Product and Service Portfolio work center provides you with one central locationfor managing product catalogs. You can create new product catalogs, or view and maintain product cataloginformation, with full access to catalogs for all countries and in various languages.You can import catalogs to an E-Shop if your system is set up to communicate with an external E-Shop, or send yourlist of products in catalog form to an external provider, for example for printing.
The Product Catalogs view in Customer Relationship Management uses the term product but may refer tofunctions in Master Data where the term material is prevalent. These terms are interchangeable.
Business Background
Quick Guide for ProductsFor more information on managing products, see the Quick Guide for Products (in the Product and Service Portfolio)
[page 301].
Tasks
Create a Product Catalog1. Click New .
SAP Business ByDesign February 2017Product and Service Portfolio P U B L I C • © 2017 SAP SE or an SAP affiliate company. All rights reserved. 317

2. On General , enter the distinguishing features for the new product catalog, including the Name, SalesOrganization, Distribution Channel, Currency, Language, and Country. These are mandatory fields.Today's date is proposed as the Valid From date of the catalog. If you do not enter a Valid To date, the catalogis valid for an unlimited time.
3. On Categories , continue maintaining the product catalog by selecting your products.In the Categories section, click to open the hierarchy. Choose your category and click on the Selected checkbox. The related products are displayed in the Products in Category section. Select or deselect these productsaccording to your requirements for the product catalog. The system automatically adds to the catalog thedetailed product data and any images from the master data.To do a quick search for a product without having to enter the hierarchy, use Product Search . You can selectthe product directly from the search results to add it to the product catalog.To view a list of all the products in the product catalog, use Selected Products .
4. Click Save to save the new product catalog then Publish Catalog to publish the catalog.Once you have clicked Publish Catalog and if the catalog is stuck in publishing, with the publication status InProcess; you can reset the status of the product catalog by clicking Rollback Publishing . This will release anylock, or update correct value for corrupted products of that product catalog, and change the publication statusof the catalog to Error in Publishing.
The published catalog contains two xml files. One contains the catalog data, and the other the relatedimages.Also, when you change a catalog that has already been published, the system does not update theexisting catalog file. Instead it re-publishes the complete catalog and creates a new file.
5. To view and download the resulting xml files for export, click Close and reopen the catalog from the mainlist. You can find the files on General , in the Attachments section.
6.5 Pricing View
6.5.1 Quick Guide for Pricing in Customer Relationship Management
Effective management of product pricing is a key factor in improving your company’s financial performance. ThePricing view provides you with one central location for managing price components and allows you to streamlineyour pricing processes. These price components are then used throughout your system. For example, when you adda product to a sales order, the system uses the relevant price and all relevant discount lists to determine the pricefor the customer.The Pricing view consists of the following price master data:
● Price ListsPrice lists are used within sales and service documents to determine the list price. Depending on yourconfiguration, you can create and maintain base price lists, distribution chain specific price lists, and customerspecific price lists. It is recommended that you create at least a base price list for the products and servicesthat you sell to customers.
● Discount ListsDiscount lists are used within sales and service documents to determine all the discounts that apply.Depending on your configuration, you can create and maintain several discount lists such as overall customer,overall customer group, customer product, and customer product category specific discount lists.
318 © 2017 SAP SE or an SAP affiliate company. All rights reserved. • P U B L I CSAP Business ByDesign February 2017
Product and Service Portfolio

● FreightsYou can define freights according to your business needs, either at header level or item level. Depending onyour configuration, you can calculate freights depending on the net weight of the products or as fixed amounts.
● SurchargesDepending on your configuration, you can flexibly define surcharges, such as pallet or alloy surcharge. Thesesurcharges can be defined as either percentages or fixed amounts.
● Special Surcharges and Special DiscountsYou can use special surcharges and discounts to cover certain processes, such as warranty-dependentpricing in service orders, or working conditions in sales and service orders.
You can define scales for prices which depend on different quantities. The scale you use determines how values arecalculated. For example, you can use a scale to define that a single boiler costs $500, but if you buy at least 10 boilersthe price decreases to only $450 per unit. You can also define scales for freights, which depend, for example, on thesales order value.You can also define scales for product discounts.
You can also define scales for prices that depend on different combinations of quantity and net weight. To beable to do this you must have selected Sales Price and Discount Lists in your solution configuration.To find this business option, go to the Business Configuration work center and choose the ImplementationProjects view. Select the implementation project and click Edit Project Scope . In the Scoping step of theproject, ensure that Products and Service Pricing is selected within General Business Data. In the Questions step, expand the General Business Data scoping element, select Products and Service Pricing, andanswer the questions related to Sales Price and Discount Lists — Do you maintain prices in two-dimensions?(combination of quantity and net weight is supported).
All price master data can also be defined as gross prices. Therefore you choose the Pricing (Gross) view. Formore information about gross pricing, see Gross Pricing [page 326].
If you like to restrict access rights for price master data:Make sure that same access restrictions applies for gross and net price list and as well for discount list if bothviews for net and gross are available to the user. Otherwise the access rights won’t work. Consider that wecan only limit access to price master data based on sales organization. This is also valid for the pricespecifications like Surcharges, Freights, and Special Surcharges, Special Discounts. In case access should berestricted for surcharges based on sales organization, you need additionally also restrict the view freights andspecial surcharge, special discount if available for gross and net.For more information about access restrictions, see the documentation on Business Users.
Business Background
PricingPricing is based on price master data such as price lists and discount lists, which are used to automatically calculatepricing within all business documents for sales and service processes. A predefined pricing procedure is used todetermine the gross value the customer has to pay for certain products or services to be received on a certain dayat a certain place. The pricing procedure consists of price components, such as list price, discounts, surcharges,freights, taxes, and costs. The order of these price components is essential for the calculation of the total value.For more information, see Pricing [page 154].
SAP Business ByDesign February 2017Product and Service Portfolio P U B L I C • © 2017 SAP SE or an SAP affiliate company. All rights reserved. 319

Profit MarginThe information regarding profit margin and profitability can be very useful for management decisions. Thereforethe profit margin can be calculated in sales and service documents.For more information, see Profit Margin [page 231].
Working with Pricing in Sales and Service DocumentsIn sales and service documents there is a tab called Pricing or Pricing and Invoicing. It displays all related pricecomponents. If required you can modify these price components.For more information, see Working with Pricing in Sales and Service Documents [page 293].
Tasks
Create a Price List1. Go to the Product and Service Portfolio. work center, then choose the Pricing view, and
the Price Lists sub view.2. Click New , then choose Base Price List.3. In the General view, enter the name, currency and valid from/to date.
For unlimited value enter unlimited in the Valid To field.
There can be only one released base price list at a time. So if you have a newproduct price, you must update the current base price list with a new item forthe new product price.
4. In the Items view, edit the price list items as required.1. To add new items to the price list, click Add Single Item or Add Multiple Item . In
the new row or rows, enter the product ID, amount, and price unit. If you selectseveral rows, you can display a list of your products. Depending on your systemconfiguration, you can use the product category number as a filter. In the resultinglist, you can now select some or all products.
2. To remove an item from the price list, select the row and click Remove .3. To change multiple prices by the same fixed amount or percentage, click
Mass Change and follow the steps in the change prices guided activity.4. To make the price per unit dependant on the amount purchased, select the
relevant item and add rows to the Scales table. For each row, enter the number ofunits in the From column and the price in the Amount column. We recommendthat you define at least one scale from 0 units, as this will be the base price.Normally, you define scales in descending order: for example, you could defineone scale at $100 from 0 units, another at $95 from 50 units, and a third at $90from 50 units.
You can also define scales to make the price per unit dependant on differentcombinations of quantity and net weight purchased. To do this you musthave scoped Sales Price and Discount Lists in your solution configuration.
5. You can now save and release the price list.
320 © 2017 SAP SE or an SAP affiliate company. All rights reserved. • P U B L I CSAP Business ByDesign February 2017
Product and Service Portfolio

1. Click Save to save the updated base price list.2. If you want to make the price list available for use in the system, click Release .
Depending on your configuration, the price list may not released until it isapproved.
3. Click Close to return to the Price Lists sub view.6. The new base price list is saved to the system and added to the list in the Price Lists
sub view. To open the base price list from this list, click the appropriate price list ID link.
Upload Price or Discount List using Microsoft ExcelYou can save price or discount information in the Business ByDesign system by using the PriceList or Discount List template. For more information see, Upload Price or Discount List usingMicrosoft Excel
Update a Price List
You can also copy an existing price list for a new period and then make your changes inthe new price list.
1. Go to the Product and Service Portfolio. work center, then choose the Pricing view, andthe Price Lists sub view.
2. In the Price List sub view, select a price list that you wish to update, and click Edit toopen the Price List detailed view.
3. In the General view, you can edit the validity date and description, if required.4. In the Items view, edit the price list items as required.
1. To add new items to the price list, click Add Single Row or Add Multiple Rows . Inthe new row or rows, enter the product ID, amount, and price unit. If you selectseveral rows, you can display a list of your products. Depending on your systemconfiguration, you can use the product category number as a filter. In the resultinglist, you can now select some or all products.
2. To remove an item from the price list, select the row and click Remove .3. You can change prices directly in the item table or you can use the mass change
function to adapt prices for multiple items. Price changes can be executed throughthe mass change function by a fixed amount or percentage based.For mass change click Mass Change and follow the steps in the mass changeguided activity.
SAP Business ByDesign February 2017Product and Service Portfolio P U B L I C • © 2017 SAP SE or an SAP affiliate company. All rights reserved. 321

● To select several items for the mass change, you can use the shiftkey for selection.
● The result of the mass change is not updated until you have finishedthe guided activity and saved the price list.
● You can influence the result of the mass change with a RoundingRule: ○ Rounding rule Nearest 10c: The system rounds the amount
down or up to the next 10 cent.Example:Change price 555,55 USD by 1% ○ New price without rounding rule: 561,11 USD ○ New price with rounding rule Nearest 10c: 561,10 USD
○ Rounding rule Nearest 10c or 5c: This rule applies especially tocurrencies which do not consider 1 or 2 cent coins like forexample Switzerland for the Swiss franc. The system roundsthe amount to the nearest value of 10 cent or 5 cent .Example:Change price 12,10 CHF by 1% ○ New price without rounding rule: 12,22 CHF ○ New price with rounding rule Nearest 10 or 5c: 12,20 CHF
○ Rounding rule Nearest 99c: The amount is rounded down or upto the next 99 cent.Example:Change price 698,45 by 1% ○ New price without rounding rule: 705,43 USD ○ New price with rounding rule Nearest 99c: 704,99 USD
○ Rounding rule Nearest 9c: The amount is rounded down or upto the next 9 cent.Example:Change price 777,03 by 1% ○ New price without rounding rule: 748,80 USD ○ New price with rounding rule Nearest 9c: 748,79 USD
4. To make the price per unit dependant on the amount purchased, select therelevant item and add rows to the Scales table. For each row, enter the number ofunits in the From column and the price in the Amount column. We recommendthat you define at least one scale from 0 units, as this will be the base price.Normally, you define scales in descending order: for example, you could defineone scale at $100 from 0 units, another at $95 from 50 units, and a third at $90from 50 units.
5. You can now save and release the price list.1. Click Save to save the updated base price list.2. If you want to make the price list available for use in the system, click Release .
Depending on your configuration, the price list may be only partially released(unchanged items released, changed items not released) until it is approved. Forthe not released items the system shows you the released amount with the helpof a rollover text.
322 © 2017 SAP SE or an SAP affiliate company. All rights reserved. • P U B L I CSAP Business ByDesign February 2017
Product and Service Portfolio

3. Click Close to return to the Price Lists sub view.6. The updated base price list is saved to the system and added to the list in the Price
Lists sub view. To open the base price list from this list, click the appropriate price listID link.
Create a Discount List1. Go to the Product and Service Portfolio. work center, then choose the Pricing view, and
the Discount Lists sub view.2. Click New , then choose Customer Specific Discount Products.3. In the General view, enter the name, from/to date and the account ID.
For unlimited value enter unlimited in the Valid To field.
4. In the Items view, edit the customer specific discount products as required.1. To add new items to the discount list, click Add Single Item or Add Multiple Item .
In the new row or rows, enter the product ID, amount, and price unit. If you selectseveral rows, you can display a list of your products. Depending on your systemconfiguration, you can use the product category number as a filter. In the resultinglist, you can now select some or all products.
2. To remove an item from the discount list, select the row and click Remove .3. To change multiple prices by the same fixed amount or percentage, click
Mass Change and follow the steps in the change prices guided activity.4. To add Scales to an item, click Add Scale and enter the percentage discount. You
can also remove a scale by clicking Remove Scale.5. You can now save and release the discount list.
1. Click Save to save the updated discount list.2. If you want to make the discount list available for use in the system, click
Release . Depending on your configuration, the price list may not released until itis approved.
3. Click Close to return to the Discount Lists sub view.6. The new discount list is saved to the system and added to the list in the Discount
Lists sub view. To open the discount list from this list, click the appropriate discountlist ID link.
Create Freights1. Go to the Product and Service Portfolio. work center, then choose the Pricing view, and
the Freight sub view.
Freight can be calculated by net weight of a product or as fixed amount for thecomplete order depending on your business configuration.
2. Click New .3. In the General view, you can enter
a. Processing Typeb. Incotermsc. Incoterms Location
SAP Business ByDesign February 2017Product and Service Portfolio P U B L I C • © 2017 SAP SE or an SAP affiliate company. All rights reserved. 323

d. Valid From/Toe. Descriptionf. Amount
4. You can now save and release the freight.
Create Surcharges1. Go to the Product and Service Portfolio. work center, then choose the Pricing view, and
the Surcharges sub view.2. You can choose different surcharges. The surcharges are defined either as a fixed
amount or percentage.
Create Special Surcharges and Discounts1. Go to the Product and Service Portfolio. work center, then choose the Pricing view, and
the Special Surcharges, Special Discounts sub view.2. You can choose:
● Working ConditionA surcharge (%) applied for service items when an employee is working outsidenormal business hours, for example, at the weekend.
● Coverage WarrantyA discount (%) used mainly within service documents to specify that part of theamount is covered by warranty.
● Coverage GoodwillA discount used mainly within service documents to specify that part of theamount is covered by goodwill.
Ensure that the percentage fit to the chosen coverage indicator or workingcondition.
6.5.2 Business Background
6.5.2.1 Profit Margin
OverviewFor sales quotes, sales orders, and service orders you can calculate a profit margin. You can display the profit marginfor each product and service and for the total document under the Pricing tab (for service order Pricing and Invoicing tab). An employee can use this information to make decisions regarding price and discountsadjustments. The information regarding profit margin and profitability can also be very useful for managementdecisions. When approving a sales quote, the responsible manager can use the profit margin as threshold to approvea sales quote.
324 © 2017 SAP SE or an SAP affiliate company. All rights reserved. • P U B L I CSAP Business ByDesign February 2017
Product and Service Portfolio

Prerequisites ● The calculation and display of profit margin in sales and service documents can be activated in the Business
Configuration work center under Scoping Questions General Business Data Product and ServicePricing .
● In addition in the Fine Tuning of the Business Configuration work center under the Configure Price Strategyactivity you can define the display of the profit margin and cost in all relevant documents.
● For sales quotes: In the fine-tune activity Approval for Sales Quote a threshold value for the profit margin canbe maintained.
● For sales orders: In the Application and User Management work center a threshold value for the profit margincan be maintained.
● In the Cost and Revenue work center, the profit margin data can be analyzed, monitored and evaluated basedon different criteria, such as customer, customer group, country and product. This can be activated in theScoping of the Business Configuration work center under Financial and Management Accounting Management Accounting Reporting and Analysis for Sales and Profit Analysis .
CalculationThe total profit margin of the sales document is calculated by the system as follows: The difference between thetotal net value based on the net price per product or service and the total costs based on the product valuation perproduct or service.
If an approval process for sales quote and/or sales orders is set up in the system, the responsible managercan receive a task to approve the sales quote and/or sales order before it is communicated to the customerbased on a threshold like profit margin. Based on this information, the manager can carry out one of thefollowing steps:
● Approve the sales quote/sales order ● Send the sales quote/sales order back to the employee responsible for reworking
ExampleKate Jacob has just been contacted by a customer requesting five hot water cylinders and one heater, and entersthe sales quote in the New Business work center.After she has entered the products in the sales quote, the system displays the product sales price and the productvaluation for each item. If necessary, Kate can adjust the sales price or provide an discount. The profit margin isautomatically calculated by subtracting product valuation from the net price per item in the sales quote, and isdisplayed in the Pricing tab. Kate decides to grant the customer a product discount of 5% on the five hot watercylinders.Bob Menson, Kate’s manager, checks the sales quote before it is issued to the customer. He chooses the ManagingMy Area work center to open the approval task, checks the data in the linked sales quote, including the profit margin.The sales quote is then sent to the customer with the approval of the manager.
SAP Business ByDesign February 2017Product and Service Portfolio P U B L I C • © 2017 SAP SE or an SAP affiliate company. All rights reserved. 325

6.5.2.2 Gross Pricing
OverviewYou can use a gross pricing in either sales order or sales quote for products and standardized services. Activategross pricing for a sales order or a sales quote as follows:
● General in the sales order or sales quote ● Price in ● Click Gross
Price in is a hidden field. You must select these via Personalize on the General tab and for the Price History screenon item level.
You can default the pricing procedure from net to gross based on the distribution channel in the fine tuneactivity Configure Price Strategy.
For gross pricing, an automatic price determination with the help of master data takes place. You can maintain thegross price master data in the Product and Service Portfolio work center under Gross Pricing. The pricing procedurecan be configured from Net to Gross according to the distribution channel.
● Once an item is entered, the pricing strategy can no longer be changed. ● For updating ledgers in financials, only the item total gross value, item total tax value, and item total
net value can be distributed. Therefore, no data about given discounts as revenue deductions can bedistributed to financials. Also no data about charged freight costs can be analyzed in the reporting.
If you like to restrict access rights for price master data:Make sure that same access restrictions applies for gross and net price list and as well for discount list if bothviews for net and gross are available to the user. Otherwise the access rights won’t work. Consider that wecan only limit access to price master data based on sales organization. This is also valid for the pricespecifications like Surcharges, Freights, and Special Surcharges, Special Discounts. In case access should berestricted for surcharges based on sales organization, you need additionally also restrict the view freights andspecial surcharge, special discount if available for gross and net.
6.5.2.3 Price Agreements for Customer Contracts
OverviewIn a customer contract, you can edit contract-specific price agreements for:
● Services — time and material ● Entitled products for an entitlement — time and material ● Expenses — time and material
In the price agreements, you can edit: ● Time dependent list prices
326 © 2017 SAP SE or an SAP affiliate company. All rights reserved. • P U B L I CSAP Business ByDesign February 2017
Product and Service Portfolio

When maintaining price agreements in a contract item with the invoicing method time and material, thesystem proposes a list price automatically when you click Add Row . The system proposes list prices asfollows:1. For items of type Entitlement – Time and Material, the system proposes the list price of the corresponding
service or expense.2. For items of types Service – Time and Material and Expense – Time and Material, the system proposes
the list price of the item.
If you edit several list prices or discounts for the same product but for different time periods, ensurethat the time periods do not overlap.
● Product discounts in percent for products or for product categories (valid for all products in this productcategory)
● Scales for list prices
These price agreements define prices and discounts for service confirmations created with reference to a contract.
● Service confirmations created with reference to a contract get the list price from the price agreementand not from the price list (Product and Service Portfolio work center).
● Service confirmations get product discounts in percent from the discount list (Product and ServicePortfolio work center) AND from the price agreement in the contract.
● Pricing is determined for each service confirmation only. Scale prices are not determined cumulativelyover several service confirmations.
6.5.2.4 Pricing in Customer Relationship Management
OverviewPricing is based on price master data such as price lists and discount lists, which are used to automatically calculatepricing within all business documents for sales and service processes. A predefined pricing procedure is used todetermine the gross value the customer has to pay for certain products or services to be received on a certain dayat a certain place. The pricing procedure consists of price components, such as list price, discounts, surcharges,freights, taxes, and costs. The order of these price components is essential for the calculation of the total value.
Price ComponentsSAP Business ByDesign contains a predefined set of price components, most of which you can activate through thebusiness configuration. Price components can be:
● Automatically determined by the system and non-editable, for example, tax ● Automatically determined by the system and able to be overwritten by the user, for example, list price or
automatically-determined product discounts ● Manually entered by the user, for example, a restocking fee or a manually-entered product discount
The manual behavior is influenced by the Manual flag in the business configuration for pricing. If the Manual flag isset, the system does not find the price component automatically and it must be added manually by the user.The following sections show the set of price components that may display depending on your configuration.
SAP Business ByDesign February 2017Product and Service Portfolio P U B L I C • © 2017 SAP SE or an SAP affiliate company. All rights reserved. 327

List PriceThis price component is naturally the first step of a pricing procedure, because many price components such asdiscounts or surcharges depend on it. To determine the net list price, the system checks all price lists that fit theparameters passed from the sales or service document. These parameters are customer, customer group,distribution chain, and date.Price lists can be customer specific, distribution chain specific, and base price lists. The price lists are maintainedas price master data, have a validity period, and need to be released before they are active.Because the customer may have special prices, the system checks first for a customer-specific price list. If there isno customer-specific price found, then it checks for a distribution chain specific price list. Finally, if there is nodistribution-chain-specific price, it checks for the base price list. You have to ensure that the system can find a pricefor all products or services you sell in the base price list at the very least. Prices can be manually revised within asales or service document, allowing you to flexibly adjust your net prices.
An approval procedure can be activated for price lists and discount lists which is done in the businessconfiguration in the scoping (under General Business Data Product and Service Pricing ). If this settingis active, the line manager automatically receives an approval task should his or her employee try to releasea price or a discount list. The price list or discount list cannot be released and included in all businessdocuments for sales and service processes until the line manager (or representative) approves the price listor discount list. If a manager is authorized to approve price and discount lists, he can directly release the priceor discount list in the price master data view. This automatic approval is done without creating a business taskif the manager himself releases the prices.For more general information on Business Task Management, see Business Task Management.
Product Discount (%)To determine the discount, the system checks all discount lists that fit the parameters passed from the sales orservice document. The parameters are customer, distribution chain, customer group, product, and date. All founddiscounts are considered in the price calculation.Discount lists can be Customer Specific Discount Product, General Customer Discount, Overall Customer GroupDiscount, and Customer Specific Discount Product Category discount lists.Because the customer may have a special discount for a certain product, the system checks for a discount list withcustomer product discounts.Discounts can always be revised manually within a sales or service document, allowing you to flexibly adjustdiscounts.
An approval procedure can be activated for price lists and discount lists which is done in the businessconfiguration in the scoping (under General Business Data Product and Service Pricing ).If this settingis active, the line manager automatically receives an approval task should his or her employee try to releasea price or a discount list. The price list or discount list cannot be released and included in all businessdocuments for sales and service processes until the line manager (or representative) approves the price listor discount list. If a manager is authorized to approve price and discount lists, he can directly release the priceor discount list in the price master data view. This automatic approval is done without creating a business taskif the manager himself releases the prices.For more general information on Business Task Management, see Business Task Management.
Working Condition (%)This price component is important for service scenarios. If service performers work at nights or on weekends orpublic holidays, a surcharge can be invoiced to the customer.
328 © 2017 SAP SE or an SAP affiliate company. All rights reserved. • P U B L I CSAP Business ByDesign February 2017
Product and Service Portfolio

SurchargeTwo different price components are available for surcharges. You can define surcharges as percentages or fixedamounts according to your needs. All surcharges can be used side by side.
Warranty/GoodwillThese price components are important within service scenarios. For example, in a service document, services orspare parts may be covered by a warranty. The warranty or goodwill discount will be calculated based on the Coveragefield in the service document.
Quality Loss FeeThis price component is used for return scenarios. This element displays only if the Returns business topic is includedin your business configuration. If your customer returns goods which are damaged or opened, you can manuallydefine a deduction on item level.
Restocking FeeThis price componentis used for return scenarios. This element displays only if the Returns business topic is includedin your business configuration. If your customer returns goods, you can manually define a restocking fee for eachindividual return document.
Migration PriceThe migration price is needed for open sales and service documents that are migrated from a legacy system intoSAP Business ByDesign. To ensure that prices are the same in both systems, there will not be any additionalcalculation of this price.
Total Item Net ValueThis is calculated by adding all the item net values. This value cannot be edited.
FreightThis price component covers the freight amount determined automatically or entered manually. Depending on thebusiness configuration settings it is possible to determine a fixed freight amount or to make the freight dependenton the net weight of the goods you sell.
Cost and Profit MarginCost displays only if profit margin is included in your business configuration. Cost is basically derived from financialsand makes the calculation of the profit margin possible.
Overall Discount (%)The overall discount (%) is an additional general discount applied to the total item net value. This can only be appliedmanually.
Total Net ValueThis is calculated by adding all the item net values plus freight, without considering taxes. This value cannot be edited.
Total Given DiscountsThis is calculated by adding all the relevant product discounts given. This value cannot be edited directly by the user.It can be influenced by editing the product discounts at item level.
SAP Business ByDesign February 2017Product and Service Portfolio P U B L I C • © 2017 SAP SE or an SAP affiliate company. All rights reserved. 329

Rounding DifferenceThis is a value that has been lost or gained through rounding. This value is used only for currencies that do not havelow denomination coins such as 1c or 2c – for example, Swiss francs or Australian dollars. For these currencies, theprice must be rounded to the nearest available value, such as 0c or 5c.
TaxThis price component covers all requirements in regards to taxation. All taxes are calculated according to legalrequirements and the results of this calculation are put into this price component.
TotalThis is calculated by adding the total net value plus tax.
Price CalculationPricing is centrally implemented in SAP Business ByDesign and linked to all relevant business processes. Theprocedure is predefined and you cannot modify the procedure or create a new one.The pricing procedure controls which price components are automatically calculated for the relevant businessdocuments, such as sales quotes, sales orders, and service orders. It contains the most commonly-used pricecomponents, including product prices, discounts, surcharges, and tax. These various kinds of price components canbe combined and control the price calculation process.The pricing procedure also contains the sequence in which the system takes these price components into accountduring pricing. It calculates the gross and net prices and taxes. The pricing procedure also determines:
● Which subtotals will be considered during pricing ● To what extent pricing can be processed manually ● Which method the system uses to calculate percentage discounts and surcharges ● Which requirements for a particular price component must be fulfilled before the system takes the element
into account. For example, freights are not considered for service items.
Currency and Quantity ConversionDuring the price calculation, currency conversion occurs if the currency of the price master data differs from thedocument currency, depending on the exchange rates maintained as master data. The document currency isdefaulted from the account master sales data.In addition, during the price calculation, quantity conversion occurs if the unit of measure requested in the documentdiffers from the price unit maintained in the price list. A prerequisite is that the quantity conversions are maintainedin the product or service master data. For example, product master data maintains a quantity conversion “1 pallet= 20 each”, the price list specifies a price unit of “$50/1 each”, and the sales order requests 5 pallets - in this case,the 5 pallets are converted to 100 units and price is calculated at $5000.
ScalesYou can define scales for prices which depend on different quantities. The scale you use determines how values arecalculated. For example, you can use a scale to define that a single boiler costs $500, but if you buy at least 10 boilersthe price decreases to only $450 per unit. You can also define scales for freights, which depend, for example, on thesales order value.You can also define scales for product discounts.
330 © 2017 SAP SE or an SAP affiliate company. All rights reserved. • P U B L I CSAP Business ByDesign February 2017
Product and Service Portfolio

There is also an additional feature where the system proposes the values for scales for every additional line that isadded by the user while maintaining scales. The following example explains the logic for calculation of the proposedvalue for scales:
Logic for determining the proposed scale value during price or discount scale maintenance.
ValueofScales Percentage Calculation of Percentage
0 0 0 0
10
– 10% 11/10=1.1
10*1.1 = 11
20
– 11% 11/10=1.1
11*1.1 = 12.1
30
– 12.1% 12.1/11=1.1
12.1*1.1 = 13.31
SAP Business ByDesign February 2017Product and Service Portfolio P U B L I C • © 2017 SAP SE or an SAP affiliate company. All rights reserved. 331

ValueofScales Percentage Calculation of Percentage
40
– 13.31% 13.31/12.1=1.1
13.31*1.1 = 14.641
50
– 14.641% 14.641/13.31=1.1
14.641*1.1 = 16.105
332 © 2017 SAP SE or an SAP affiliate company. All rights reserved. • P U B L I CSAP Business ByDesign February 2017
Product and Service Portfolio

ValueofScales Percentage Calculation of Percentage
60
– 16.105% 16.105/14.641=1.1
16.105*1.1 = 17.716
See AlsoConfigure Price Strategy [page 335]Price Agreements for Customer Contracts [page 326]Gross Pricing [page 326]
6.5.2.5 Working with Pricing in Sales and Service Documents
OverviewThe Sales Order, Sales Quote, Customer Invoice, Return , Service Order and Service Confirmation editors contain atab called Pricing (Pricing and Invoicing for service order and service confirmation). This view allows you to flexiblydefine the price calculation within sales and service documents. It displays all related price components, such as listprice and product discount (%) or optionally as well cost or profit margin. Some of these components, such as profitmargin or cost, are read-only but you can modify other components such as list price, product discount (%) orsurcharges at item and an overall discount (%) at total level.
SAP Business ByDesign February 2017Product and Service Portfolio P U B L I C • © 2017 SAP SE or an SAP affiliate company. All rights reserved. 333

Editing Price Components at Item LevelUnder Item Pricing, you can view the details for each item in the sales or service document. To view the pricecomponents for an item, click the expand icon in the Item column. You can edit some price components or add arow to define another price component.The price components description can be manually changed. If such a description is changed, this description isconsidered in the output of forms and will also be copied to subsequent documents. Additionally, a rollover text onthe description in the pricing view reveals the price or discount list name from the price master data.Depending on your business configuration and settings, the item price components include:
● List Price: Determined from either a base price list, distribution-chain-specific price list, or customer-specificprice list. You can create price lists in the Price Lists sub view of the Pricing view in the Product and ServicePortfolio work center.
● Product Discount (%): Calculated either automatically from all relevant discount lists or alternatively,manually added as product discount. If you add a manual discount, the system adds the manually entereddiscount to the automatically determined discounts from the discount list. A discount can be created asmaster data in the Discount List sub view of the Pricing view in the Product and Service Portfolio work center.
● Cost: Retrieved from the product valuation. This value cannot be edited in the Pricing view. ● Cost Estimate: You can edit this price component manually in the Pricing view for profit analysis reasons for
project based services and entitlements. ● Profit Margin: Calculated by subtracting cost from revenue. This value cannot be edited. ● Tax: For example, State Sales Tax. These values cannot be edited in the Pricing view. Taxes can be edited
indirectly by changing the tax indicator in the Taxes tab of the Items view. ● Freight: The cost of transport for the item. Freight can be calculated by net weight of a product or as fixed
amount for the complete order depending on the business configuration. ● Migration Price: Only required for the migration of open sales and service documents from a legacy system. ● Quality Loss Fee: For return scenarios. If your customer sends goods back to you and claims money back,
you are able to manually define on item level a deduction for faults such as damaged goods or opened goods.This price component can only be applied manual.
● Surcharge: Defined either as a fixed amount or percentage. Surcharges can be created as master data inSurcharges sub view of the Pricing view in the Product and Service Portfolio work center .
● Warranty (%) : A discount used mainly within service documents to specify that part of the amount is coveredby warranty. Warranties can be created as master data in Special Surcharges, Special Discounts sub view ofthe Pricing view in the Product and Service Portfolio work center .
● Goodwill (%) : A discount used mainly within service documents to specify that part of the amount is coveredby goodwill. Goodwills can be created as master data in Special Surcharges, Special Discounts sub view ofthe Pricing view in the Product and Service Portfolio work center .
● Working Condition (%) : A surcharge applied for service items when an employee is working outside normalbusiness hours, for example, at the weekend. Working conditions can be created as master data in SpecialSurcharges, Special Discounts sub view of the Pricing view in the Product and Service Portfolio work center .
● Customer Expected Price: This is only relevant for sales orders created through A2A or B2B message (XMLdata transfer). The price is communicated from an external system and gets compared to the net pricecalculated in the SAP Business ByDesign system.
Editing Price Components at Total LevelThe Total Pricing section contains details about the pricing that is valid for the entire order or sales quote.Depending on your business configuration and settings, the total price components include:
334 © 2017 SAP SE or an SAP affiliate company. All rights reserved. • P U B L I CSAP Business ByDesign February 2017
Product and Service Portfolio

● Total Item Net Value: Calculated by adding all the item net values. This value cannot be edited. ● Overall Discount (%): Additional manual discount which applies to the total item net value. ● Restocking Fee: A fee charged to cover the cost of returning a product. This price component can only be
applied manual. ● Freight: The total cost of transport. Freight can be calculated by net weight or as fixed amount for the complete
order depending on the business configuration. ● Profit Margin: Calculated by subtracting total costs from total revenues. This value cannot be edited. ● Tax: For example, State Sales Tax. These values cannot be edited in the Pricing view. Taxes can be edited
indirectly by changing the tax indicator in the Taxes tab of the Items view. ● Total: Calculated by adding complete net value plus tax. This value cannot be edited. ● Total Given Discounts: Calculated by adding all the relevant product discounts given. This value cannot be
edited in the Total Pricing section. It can be influenced by editing the product discounts at item level or overalldiscount at total level.
● Rounding Difference: A value that has been lost or gained through rounding. This value is used only forcurrencies that do not have low denomination coins such as 1c or 2c – for example, Swiss francs or Australiandollars. For these currencies, the price must be rounded to the nearest available value, such as 0c or 5c.
Updating PricingYou can update the pricing using the following options:
● Completely, which removes all manual changes. ● Keep Manual Changes, which does not remove changes that you have made.
In each case, the system checks for any updates in pricing and recalculates the total.
See AlsoGross Pricing [page 326]
6.5.2.6 Configuration: Configure Price Strategy
Overview
This document contains details and instructions regarding configuration settings. Such settings arenormally performed by an administrator. If you do not have the required authorization, contact anadministrator.
To find this activity, go to the Business Configuration Implementation Projects view. Select your implementationproject and click Open Activity List . Select the Fine-Tune phase, then select the activity from the activity list.Companies use different strategies while pricing their products and services. Price strategy depends on production,labor, advertising expenses, and so on. Companies can alter the prices of their products as per their requirement.In the SAP Business ByDesign system, you can define the Standard Procedure price strategy, and the Standard GrossProcedure price strategy. The system places various price components such as list price, product discount, tax,surcharge, and so on, in a certain order for price calculation. This ensures consistent pricing throughout yourcompany.
SAP Business ByDesign February 2017Product and Service Portfolio P U B L I C • © 2017 SAP SE or an SAP affiliate company. All rights reserved. 335

You can manually default a pricing procedure as either net, or gross, according to the distribution channel.Else, the system automatically defaults the net pricing procedure.
PrerequisitesYou have selected Product and Service Pricing, under General Business Data during scoping.
ExampleYou are an employee working for a sporting equipment retailer, and you have a bulk order of 100 cricket bats forwhich you are creating a sales order. You are also giving the customer an additional discount on the total cost of thebats. In your sales order and the output form, you would like to see just the total list price amount, but not the itemizedbreak up of your price components. You also wish to give a further discount of Rs.500 for on the total list price forall 100 bats.While configuring the price strategy, you can change the following in order to:
● View the total value of your transaction in the sales order as well as the output form, set the Total Print andTotal Display to Yes
● Disable the view of the item level value of your price components in the sales order or the output form, setthe Item Print and Item Display to No
● Change the value of the total list price, to give a further discount of Rs. 500, even after it has been calculatedby the system, set the Manual Change Control to Manual Entry has Priority
Process FlowYou can view or change certain properties of price components used for price calculation as described below:
Title Description Action Conditions/Restrictions
Example
Step Displays the stepnumber for each pricecomponent.
NA Step numbers arepredefined, and cannotbe edited.
10 – List Price11 – Product Discount(%)
Price Component Displays the differentprice components.
You can change thedescription of a pricecomponent, and thesame is copied to theoutput forms andsubsequenttransactionaldocuments, such assales orders, salesquotes, and so on.
You can edit thedescription of a pricecomponent.
Surcharge can berenamed as AdditionalCharge.
336 © 2017 SAP SE or an SAP affiliate company. All rights reserved. • P U B L I CSAP Business ByDesign February 2017
Product and Service Portfolio

From Step... To Step Displays the stepsincluded in thecalculation of aparticular pricecomponent.
NA The From Step… ToStep column aredisplayed forinformation purposeonly. The missing stepsare kept for future useto provide more pricingflexibility.
To calculate Goodwill,the system uses theprice components fromStep 10 – List Price toStep 14 – Surcharge.For more information,see example – 1.1Calculation of FromStep and To Step.
Only Manual Displays if a pricecomponent should bemanually added to atransactionaldocument.
NA The indicator is forinformation purposeonly, and cannot beedited.
For Overall Discount,the Only Manualindicator is selected.This indicates that theprice component canonly be added manuallyin any of thetransactionaldocuments.
Total Display Allows you to definewhether the total valueof a price componentshould be displayed inthe transactionaldocuments.
You can select any oneof the following:
● Yes – Thesystemdisplays thevalue of thepricecomponent inthetransactionaldocument.
● No - Thesystem doesnot display thevalue of thepricecomponent inthetransactionaldocument.
You can change theindicator as required.
NA
SAP Business ByDesign February 2017Product and Service Portfolio P U B L I C • © 2017 SAP SE or an SAP affiliate company. All rights reserved. 337

Total Print Allows you to definewhether the total valueof a price componentshould be printed in theoutput forms.
You can change theindicator as required.
● Yes – Thesystem printsthe value of thepricecomponent onthe outputforms.
● No - Thesystem doesnot print thevalue of thepricecomponent onthe outputforms.
You can change theindicator as required.
NA
Item Display Allows you to define ifthe price component isdistributed anddisplayed at the itemheader level in thetransactionaldocuments.
You can select any oneof the following:
● Yes – Thesystemdisplays thevalue of thepricecomponent atitem level in thetransactionaldocument.
● No - Thesystem doesnot display thevalue of thepricecomponent atitem level in thetransactionaldocument.
You can change theindicator as required.
NA
338 © 2017 SAP SE or an SAP affiliate company. All rights reserved. • P U B L I CSAP Business ByDesign February 2017
Product and Service Portfolio

Item Print Allows you to define ifthe price component isdistributed and printedat the item header levelon the output forms.
You can select any oneof the following:
● Yes – Thesystemdisplays thevalue of thepricecomponent atitem level onthe outputform.
● No - Thesystem doesnot display thevalue of thepricecomponent atitem level onthe outputform.
You can change theindicator as required.
NA
SAP Business ByDesign February 2017Product and Service Portfolio P U B L I C • © 2017 SAP SE or an SAP affiliate company. All rights reserved. 339

Manual Change Control Allows you to define theflexibility of price for aprice component.
You can select any oneof the following:
● Automaticentry haspriority - Youcan onlychange thepricecomponentvalue if it hasnot alreadybeen defined inthe system.
● Manual entryhas priority -You can changethe pricecomponentvalue even afterit has beendefined in thesystem.
● No restrictions– You canchange thepricecomponentvalueirrespective ofit being definedor not.
● Not possible toprocessmanually – Youmust havedefined a pricecomponentvalue in thesystem masterdata. Thesystem doesnot allow you tochange thevalue manually.
This option can only beused for standardpricing procedure.
NA
Scale Base Type Displays the scale basetype for a pricecomponent.
NA The field is forinformation purposeonly, and cannot beedited.
For Freight, you canhave a weight-dependent scale basetype, which calculatesyour fixed freightsbased on the weightscale.
340 © 2017 SAP SE or an SAP affiliate company. All rights reserved. • P U B L I CSAP Business ByDesign February 2017
Product and Service Portfolio

Calculation Rule Allows you to define thecalculation rule for aprice component.
You can select anappropriate calculationrule based on yourrequirement.
This option is onlyavailable for standardpricing procedure.A change here affectsthe price master datamaintenance.If different master dataalready exists, aconsistency check mayprohibit you fromchanging thecalculation rule.
For Surcharge, if thecalculation rule is set asQuantity, then the pricecomponent value iscalculated based on thequantity ordered.
Special Features Allows you to define thediscount options for aprice component.
You can select any oneof the following:
● ChainedDiscount – Thesystem allowssuccessivediscounts to becalculated onthe discountedprice.
● AdditiveDiscount – Thesystem allowssuccessivediscounts to becalculated onthe originalprice
This option can only beused for standardpricing procedure.
For more information,see example – 1.2Calculation ofDiscounts for PriceComponents.
1.1 Calculation of From Step and To StepGoodwill % is calculated on the total sum from Step 10 to Step 15. Similarly, Warranty % is calculated onthe total sum from Step 10 to Step 15. However, the system excludes the value calculated in Step 20 forthe calculation of warranty.
Step Price Component From Step To Step
10 List Price
11 Product Discount %
12 Working Condition %
13 Surcharge
14 Surcharge %
20 Goodwill % 10 15
30 Warranty % 10 15
SAP Business ByDesign February 2017Product and Service Portfolio P U B L I C • © 2017 SAP SE or an SAP affiliate company. All rights reserved. 341

If the From Step… To Step field is empty, the calculated value from the previous step is considered for thecalculation of the next step.
1.2 Calculation of Discounts for Price Components
Types ofDiscounts
ListPrice(USD)
FirstDiscount(%)
SecondDiscount(%)
Price after FirstDiscount (USD)
Price after SecondDiscount (USD)
FinalPrice(USD)
ChainedDiscount
100 10 10 10% of 100 = 10100 – 10 = 90
10% of 90 = 990 – 9 = 81
81
AdditiveDiscount
10% of 100 = 10100 – 10 = 90
10% of 100 = 10100 – (10+10) = 80
80
6.6 Reports View
6.6.1 Changed Materials
OverviewThe Changed Materials report provides an overview of all materials that have been changed since they were created.You can view all changed materials or just those that were changed within the last 30, 60, or 90 days.
ViewsThe following views are available with this report:
● Changed MaterialsShows all materials that have been changed since they were created.
● Changed Materials Last 30 DaysShows all materials that were changed in the last 30 days.
● Changed Materials Last 60 DaysShows all materials that were changed in the last 60 days.
● Changed Materials Last 90 DaysShows all materials that were changed in the last 90 days.
Features
Report ContentThe default view of this report shows all changed materials. Alternatively, you can select to show only the materialsthat were changed within the last 30, 60, or 90 days. The report includes the material ID and description, base unitof measure (UoM), product category ID and description, date of creation, and date of last change of each material.The data in this report is initially displayed in table format. You can also display the report as a chart.
342 © 2017 SAP SE or an SAP affiliate company. All rights reserved. • P U B L I CSAP Business ByDesign February 2017
Product and Service Portfolio

Analyzing the ReportTo further analyze data in this report, you can drag characteristics to rows and columns.
● Material ID ● Base UoM ● Product Category ● Created On ● Changed On
From this report, you can navigate to overview details for materials. To open a material overview, select View MaterialOverview from the context menu of the material ID or description.
See AlsoReports ViewOverview of Reports in General Business DataOverview of Data Sources in General Business Data
6.6.2 Changed Services
OverviewThe Changed Services report provides an overview of all services that have been changed since they were created.You can view all changed services or just those that were changed within the last 30, 60, or 90 days.
Views ● Changed Services
Shows all services that have been changed since they were created. ● Changed Services Last 30 Days
Shows all services that were changed in the last 30 days. ● Changed Services Last 60 Days
Shows all services that were changed in the last 60 days. ● Changed Services Last 90 Days
Shows all services that were changed in the last 90 days.
Features
Report ContentThe default view of this report shows all changed services. Alternatively, you can select to show only the servicesthat were changed within the last 30, 60, or 90 days. The report includes the service ID and description, base unitof measure (UoM), product category ID and description, date of creation, and date of last change of each service.The data in this report is initially displayed in table format. You can also display the report as a chart.
SAP Business ByDesign February 2017Product and Service Portfolio P U B L I C • © 2017 SAP SE or an SAP affiliate company. All rights reserved. 343

Analyzing the ReportTo further analyze data in this report, you can drag characteristics to rows and columns.
● Service ID ● Base UoM ● Product Category ● Created On ● Changed On
From this report, you can navigate to overview details for services. To open a service overview, select View ServiceOverview from the context menu of the service ID or description.
See AlsoReports ViewOverview of Reports in General Business DataOverview of Data Sources in General Business Data
6.6.3 New Materials
OverviewThe New Materials report provides an overview of all materials that have not been changed since they were created.You can view all new materials or just those that were created within the last 30, 60, or 90 days.
ViewsThe following views are available with this report:
● New MaterialsShows all materials that have not been changed since they were created.
● New Materials Last 30 DaysShows all materials that were created and not changed in the last 30 days.
● New Materials Last 60 DaysShows all materials that were created and not changed in the last 60 days.
● New Materials Last 90 DaysShows all materials that were created and not changed in the last 90 days.
Features
Report ContentThe default view of this report shows all new materials that have not been changed. Alternatively, you can select toshow only the new materials that were created but not yet changed in the last 30, 60, or 90 days. The report includesthe material ID and description, base unit of measure (UoM), product category ID and description, date of creation,and date of last change of each material.The data in this report is initially displayed in table format. You can also display the report as a chart.
344 © 2017 SAP SE or an SAP affiliate company. All rights reserved. • P U B L I CSAP Business ByDesign February 2017
Product and Service Portfolio

Analyzing the ReportTo further analyze data in this report, you can drag characteristics to rows and columns.
● Material ID ● Base UoM ● Product Category ● Created On ● Changed On
From this report, you can navigate to overview details for materials. To open a material overview, select View MaterialOverview from the context menu of the material ID or description.
See AlsoReports ViewOverview of Reports in General Business DataOverview of Data Sources in General Business Data
6.6.4 New Services
OverviewThe New Services report provides an overview of all services that have not been changed since they were created.You can view all new services or just those that were created within the last 30, 60, or 90 days.
Views ● New Services
Shows all services that have not been changed since they were created. ● New Services Last 30 Days
Shows all services that were created and not changed in the last 30 days. ● New Services Last 60 Days
Shows all services that were created and not changed in the last 60 days. ● New Services Last 90 Days
Shows all services that were created and not changed in the last 90 days.
Features
Report ContentThe default view of this report shows all new services that have not been changed. Alternatively, you can select toshow only the new services that were were created but not yet changed within the last 30, 60, or 90 days. The reportincludes the service ID and description, base unit of measure (UoM), product category ID and description, date ofcreation, and date of last change of each service.The data in this report is initially displayed in table format. You can also display the report as a chart.
SAP Business ByDesign February 2017Product and Service Portfolio P U B L I C • © 2017 SAP SE or an SAP affiliate company. All rights reserved. 345

Analyzing the ReportTo further analyze data in this report, you can drag characteristics to rows and columns.
● Service ID ● Base UoM ● Product Category ● Created On ● Changed On
From this report, you can navigate to overview details for services. To open a service overview, select View ServiceOverview from the context menu of the service ID or description.
See AlsoReports ViewOverview of Reports in General Business DataOverview of Data Sources in General Business Data
6.7 Tasks
6.7.1 Create Exchange Rates Using Microsoft Excel®
OverviewYou can create exchange rates by entering them in a predefined Microsoft Excel template and uploading them toyour SAP solution.
PrerequisitesYou have installed the latest Add-In for Microsoft Excel. Depending on your solution set-up, you can do this from theSelf Services Overview in the Home work center, from the Download Center in the Application and UserManagement work center, or from the Download link that is available directly on the user interface.Also, the settings for your browser must be set correctly. You can check this by clicking Check My ComputerSettings on the logon screen.
StepsYou can create exchange rates using Microsoft Excel as follows, depending on your SAP solution:
● In the Exchange Rates for Foreign Currencies common task of the Product and Service Portfolio work center ● In the Exchange Rates for Foreign Currencies common task of the Products work center ● In the Edit Exchange Rates common task of the General Ledger work center ● In the Update Exchange Rates common task of the Travel Admin work center
Click Import , then From Microsoft Excel®.Get the Template
346 © 2017 SAP SE or an SAP affiliate company. All rights reserved. • P U B L I CSAP Business ByDesign February 2017
Product and Service Portfolio

1. Select the template.Choose the template in the required language and click Download.
You can choose any language that you have selected during scoping. If you have selected only onelanguage during scoping, you will not get a selection of language versions to choose from.
2. Decide what you want to do with the template. Choose one of the following options: ● If you want to use the template only once, you can open the template without saving it. Click Open. ● If you want to save the template so that you can use it again, choose a location to save the file to, enter
an appropriate file name, and click Save. Then click Open.
If you have previously downloaded and saved this template on your computer, navigate to the location whereyou have saved the template, and open it.
Log on to the solution from Microsoft Excel1. In the SAP Add-In ribbon in Microsoft Excel, click Logon.
If the SAP Add-In ribbon is not displayed, check to make sure that the Add-In for Microsoft Excel hasbeen installed correctly (see Prerequisites in this document).
A dialog box opens where you can enter the logon details. The system URL is proposed automatically. Thesystem URL is the URL of the system that you are working with.
2. Enter your user ID and your password, and click Logon.
After initial logon to the system, the ribbon text is changed from SAP Add-In to the name of yoursolution.
Enter Details in the Microsoft Excel Template
Note the following: ● The Microsoft Excel template is presented with a number of rows where you can enter or copy your
data. If you need more, add the number of rows you need before you start entering or copying yourdata.
● Ensure that mandatory fields (those marked with an asterisk) are filled. ● To help you fill in the details:
○ Some fields have dropdown lists. ○ In some fields you can search the system for data, for example, countries. Place the cursor on the
field, and click Lookup in your solution's tool bar or ribbon to search the system. A search field isavailable in the Lookup dialog box that appears. When you start to type text in the search field, therelevant entries are filtered in the ID and Description columns, meaning that you do not have toscroll through the whole list. If the Lookup button is not active in the ribbon or toolbar, then it isnot possible to perform a search.
Enter the exchange rates.Enter the required information, such as the rate type, the source and target currency along with the mid rate, andother optional data. In the Valid From field, enter the validity date and the time.To delete a record that you previously created using Microsoft Excel, select Yes in the Deleted field.Save Your Data
1. After you have finished entering all the data, save the Microsoft Excel file.
SAP Business ByDesign February 2017Product and Service Portfolio P U B L I C • © 2017 SAP SE or an SAP affiliate company. All rights reserved. 347

2. Click Save Data to .A dialog box opens, informing you that the data is being saved to the solution.After the upload, a message informs you that your data has been saved in the solution.
If you do not provide all the required information, or if you provide incorrect information, somerecords will not be saved. Error messages will highlight the problems so that you can correct themand save the data again.
3. You can then log off by clicking Logoff .
ResultThe new exchange rates are saved in your solution and added to the list in the relevant view.
348 © 2017 SAP SE or an SAP affiliate company. All rights reserved. • P U B L I CSAP Business ByDesign February 2017
Product and Service Portfolio

7 Sales Orders
7.1 Business Background
7.1.1 Customer Returns Processing
OverviewCustomer Return Processing is the management of products that are returned by customers. A customer can returna product purchased through a standard customer sales process or a third-party order process or an over-thecounter sale. All these returns are handled the same way in the Returns view. Products can be returned for a credit,replacement, or repair. When an inbound delivery for returns is created at the warehouse, the system automaticallycreates a customer return. For customer returns created either for repair or for a third-party order process, theproducts are placed in an externally-owned stock.You can access all the returns created for a credit or a replacement in the Sales Orders work center. If a return iscreated for a:
● Replacement - A sales order can be created from a customer return as a follow-up activity. ● Credit - Typically the products are inspected as part of the inbound delivery process. Next, a credit memo is
created in Customer Relationship Management and a refund is triggered. Financial Accounting is completelyintegrated into the whole process. For products that were returned based on a third-party order process, areturn to supplier activity is possible in the Outbound Logistics work center. For more information, see Third-Party Order Processing – Customer Return.Based on your logistics model settings, a quality inspection can be created automatically, except for customerreturns which were posted to externally-owned stock, for example, in a third-party order process. Theincoming goods can then be stored in a specially designated area (for example, quality inspection stock). Areturn in a third-party order processing context, is indicated by assigning the supplier, supplier notification,purchase order and the current externally-owned stock quantity.
You can access all the returns created for repair in the Service Orders work center. The standard product repairprocess at own service center applies for these returns. You can assign a service order as a reference document andtrigger an outbound delivery to return to the customer, once the product is repaired. You can also repair a productpurchased through a third-party order process. For more information, see the business scenario Service and Repair.
If the logged-in user has access to both Sales Orders and Service Orders work centers, then, the user can : ● View returns created for credit, replacement and repair in the Sales Orders work center. ● View returns created for credit, replacement and repair in the Service Orders work center.
Reference Documents and Price DeterminationWhen goods that have been sent back by the customer arrive at the warehouse, the warehouse employee enters theinformation about the delivery into the system. He or she has to enter the documents that have been sent togetherwith the goods as a reference in the customer return notification. You can access this view from the Sales Orderwork center under Returns.Possible reference documents could be:
SAP Business ByDesign February 2017Sales Orders P U B L I C • © 2017 SAP SE or an SAP affiliate company. All rights reserved. 349

● Sales Order ● Customer Invoice
○ Original Invoice: The invoice that has been sent to the customer ○ Correction Invoice: A document created, if changes have been made to the original invoice.
The following table shows which document was taken as a reference and used for price determination:
Sales Order Invoice
Reference Provided onInbound DeliveryNotification
Original InvoiceCancelled? Correction Invoice?
Reference for CustomerReturn PriceDetermination
Yes No Sales Order No No Sales Order
Yes Yes Sales Order No No Original Invoice
Yes Yes Original Invoice No No Original Invoice
Yes Yes Sales Order Yes No No Reference (*)
Yes Yes Original Invoice Yes No Original Invoice
Yes Yes Sales Order Yes Yes Correction Invoice
Yes Yes Original Invoice Yes Yes Original Invoice
Yes Yes Correction Invoice Yes Yes Correction Invoice
Yes Yes Sales Order No Yes Correction Invoice
Yes Yes Original Invoice No Yes Original Invoice
Yes Yes Correction Invoice No Yes Correction Invoice
(* In this case you have to check your tasks in the Returns view, because the return is inconsistent. For moreinformation about the handling of documents with missing references, see the Returns Quick Guide.
● If the cancelled invoice ID or follow-up credit memo ID is entered as reference in the Customer ReturnNotification the return will have no reference and no price determination and the sales employee has to entera suitable reference manually to enable further processing.
● If a follow-up invoice ID is provided in the Customer Return Notification the returns reference and pricedetermination will relate to this follow-up invoice.
● In case you are working with correction invoices, we recommend to enter only the sales order ID or thecorrection invoice ID as reference in the Customer Return Notification.
● In case you are working with the cancellation of invoices or follow-up invoices in sales order processingyou have to check the order document flow with regard to its impact on the reference and pricedetermination for the customer return.
In the second line of the table above the sales order was created (column Sales Order) and the relatedinvoice exists (column Invoiced?) in the system. This invoice was not cancelled (Column Original InvoiceCancelled?) and no correction invoice was sent to the customer (column Correction Invoice?).The customer sends back the sales order as a reference that was entered in the inbound deliverynotification (column Reference Provided on Inbound Delivery Notification) at the warehouse.In this case, the system determines the original invoice as a reference for the customer return pricedetermination to apply the latest prices (column Reference for Customer Return Price Determination).
350 © 2017 SAP SE or an SAP affiliate company. All rights reserved. • P U B L I CSAP Business ByDesign February 2017
Sales Orders

PrerequisitesA customer invoice or sales order needs to be available as a preceding document for the customer return document.
Process FlowDuring this process of providing a credit or replacement for a returned product, you access the following workcenters: Inbound Logistics, Sales Orders, Customer Invoicing, Payment, and Account Management. In the text below,the various steps involved in end-to-end handling of customer returns are described.
1. Products returned by a customer arrive at the company that originally sold the products, together with theirrelated documents. An employee processes an inbound delivery notification as a customer return.
2. In the Inbound Logistics work center, a restocking task appears. The warehouse employee processes this taskby putting away the products, which become property of the company again. The system automaticallyinforms financials of the goods receipt and a valuated goods receipt is posted, updating the inventory andcost of goods sold accounts.
3. Creation of an inbound delivery triggers a message that leads to the creation of a related Customer Returndocument in the Returns view of the Sales Orders work center. The system automatically checks whether allrelevant documents have been assigned to the return correctly, and derives all necessary data from the SalesOrder and Customer Invoice documents, such as prices and taxes valid for the return based on the originaldocuments.
4. The sales employee is able to provide the customer with information about goods receipt, references, andcontacts using the Confirmation to Customer form.You can include individual free text in a customer return confirmation form. You can enter free text in acustomer return, under General Customer Information . This text is copied to the customer returnconfirmation form, so that the customer can get further information directly printed in the form.
5. In the return, the sales employee can adjust the conditions, such as Reason for Return, Internal Comments,Restocking Fee, Quality Loss Fee, or Payment Method.
6. The sales employee checks the reported values and decides whether the customer should receive a creditmemo.
If an invoice block exists for a sales order or a business partner account, the system automatically setsa credit memo block in the corresponding customer return. You can unblock a credit memo block, andissue the credit memo if required. It is also possible to set a credit memo block [by assigning a reasonfor a credit memo] in a customer return, if no block was set in the related sales order and/or account.If an invoice block was not set in the related sales order and/or account, you can set a credit memoblock, by assigning a reason for a credit memo block in a customer return.
● If the customer is to be granted a credit, the sales employee creates a credit memo request by choosingRelease with Credit Memo. After credit memo creation the customer sub-ledger is adjusted automaticallyby the system. It saves the payable to the customer and the receivable from the tax office (sales tax andwithholding tax) in the appropriate central registers. The employee corrects the revenue obtained fromthe original sales transaction in the credit memo. Reduction or correction does not apply in case ofprofitability reporting.If the customer return concerns an invoice from a customer who is lives abroad, the system automaticallyinforms the Balance of Foreign Payment Management. The data transferred is saved for a central bankreport.
SAP Business ByDesign February 2017Sales Orders P U B L I C • © 2017 SAP SE or an SAP affiliate company. All rights reserved. 351

● If the customer is not to be granted a credit, the sales employee has to change the gross amount of thereturn to zero and can determine that a credit memo is not required by choosing Release Without CreditMemo. This has the following impact on the process: ○ Approval process is disabled and approval status remains not started. ○ Customer invoice request is not created and invoice status is set to not relevant. ○ Customer return status is set to completed, provided that the inbound delivery process was finished.
7. When the payment processor creates a payment run in the system, the open item payable that results fromthe credit memo is included in the payment proposal list, The item payable is refunded to the customer whenthe payment method is entered into his master data.
8. The open item payable that results from the granted credit memo has to be cleared manually with the openitem receivables on the customer account.
9. Once the payment proposal is accepted and released, the open item payable is cleared.10. The system automatically creates a payment order. For example, a bank transfer. The corresponding
payment media can be created and sent to the bank for bank transfer or to the customer for outgoing check.11. In addition to, or as an alternative to credit memo processing, the sales employee can create a follow up sales
order to process a substitute delivery to satisfy the customer. Relevant data from the return, such as productor account is copied to the new sales order.
See AlsoCustomer Return Processing (in Inbound Logistics)Quick Guide for Returns (in Sales Orders) [page 413]Quick Guide for Returns (in Service Orders)Third-Party Order Processing — Customer ReturnBusiness Scenario: Service and Repair
7.1.2 Sales Order Processing
OverviewThe sales order process involves creating sales orders for products or services according to specific terms with fixedconditions. The sales order is usually created by a sales employee, and can be generated out of a sales quote, a salescontract, or an opportunity. The system supports pricing functionality and a check of the availability of products.The cost of sales can be determined using product valuation, which enables the seller to evaluate the profitability ofthe sales order. If services are needed to fulfill the sales order, service items can be added. A service request can becreated directly from the order if required. In addition, sales order processing enables you to give customer-specificprices and discounts on your products.The sales order is either created manually in the system or automatically by business-to-business (B2B) messagefrom an external system. Sales orders can also be created during data migration, when open orders from a legacysystem are migrated before the target system goes live.Once the sales order has been created, the customer can optionally receive an order confirmation with the agreedconditions.Relevant sales data is simultaneously distributed to the following areas:
● Financial accounting for updating ledgers ● Logistics for updating customer demands and for creating the delivery
352 © 2017 SAP SE or an SAP affiliate company. All rights reserved. • P U B L I CSAP Business ByDesign February 2017
Sales Orders

● Customer invoicing for invoice creation
Delivery execution and invoice creation are reported back to the sales order, and the delivery and invoice statusesin the sales order are updated accordingly.
Process FlowThe following steps explain the typical process flow for sales order processing. During this process, you access theSales Orders work center.
1. The sales employee creates a sales order and enters first the account and the products ordered by thecustomer. The sales order can also be generated out of a sales quote, a sales contract, an opportunity or alead.
You can also create a sales order with reference to a contract by clicking Create with Reference Contract from the New Sales Order screen.
2. The system uses details such as accounts, products, and date to calculate the total value of the order. Thesales employee can overwrite the automatically-determined prices and discounts or add further discountsand surcharges.
If you enter a Product ID of a service item of type Service fixed price without actuals, and assign thesales order to a multi customer project, you will see a Service Fulfillment via Project check box underCost and Revenue Assignment. The indicator is unchecked by default. If you select the check box, thesystem will:
● Plan the costs from the project and not the sales order ● Make mandatory fields Labour Resource and Duration in the sales order item level non-
mandatory
If there are existing contracts with the same Account ID and Product ID as used in the sales order, thesystem suggests a list of sales contracts available, which you can enter in the Reference Contract ID –Contract Item ID field.
3. The system triggers an availability check, which returns a product availability status depending on therequested date and quantity maintained in the sales order. If the sales order is released the products arereserved in logistics and the confirmed delivery date for each product is displayed in the sales order.Nevertheless the warehouse manager can still overrule the availability confirmations. Customer demandprocessing can then trigger the actual procurement and delivery of the order. In addition, logistics will notifysales order processing when the availability situation changes.
4. Optionally, the sales order may need to be approved for example by a line manager, if certain thresholds havebeen exceeded such as total net value or total given discounts.
You define the approval details in the Application and User Management work center under ApprovalProcesses.
5. Relevant sales data is simultaneously distributed to invoicing for invoice creation and financial accounting forupdating ledgers.
6. Optionally, the order confirmation is sent to the customer by triggering a submit action.7. Delivery execution triggers a customer invoice request. The delivery execution and invoice creation based on
the delivery are reported back to the sales order, and the delivery and invoice statuses are updated accordinglyin the sales order.
SAP Business ByDesign February 2017Sales Orders P U B L I C • © 2017 SAP SE or an SAP affiliate company. All rights reserved. 353

FeaturesThe following features are provided:
Approve a Sales OrderYou can define an approval process for sales orders.For more information, see Approval for Sales Order [page 362].
Assigning a Source of SupplyA source of supply is proposed automatically for a sales order item. If required, you can change the source of supply.The Assign Source of Supply button in the sales order helps you to find a valid ship-from location or a valid supplierfor a sales order item.For more information, see Assigning a Source of Supply.
Changing a Labor ResourceA labor resource is proposed automatically for a service item. If required, you can change the labor resource for thisitem.For more information, see Labor Resources.
Creating a Project From a Sales OrderWork for services that you sell to a customer can be tracked internally in a customer project that is created directlyfrom a sales order.For more information, see Creating a Project from a Sales Order.
Editing an Invoice ScheduleYou can edit an invoice schedule for processing invoices with specifications concerning the invoice date and theamount.For more information, see Invoice Schedule [page 365].
7.1.3 Pricing in Customer Relationship Management
OverviewPricing is based on price master data such as price lists and discount lists, which are used to automatically calculatepricing within all business documents for sales and service processes. A predefined pricing procedure is used todetermine the gross value the customer has to pay for certain products or services to be received on a certain dayat a certain place. The pricing procedure consists of price components, such as list price, discounts, surcharges,freights, taxes, and costs. The order of these price components is essential for the calculation of the total value.
Price ComponentsSAP Business ByDesign contains a predefined set of price components, most of which you can activate through thebusiness configuration. Price components can be:
● Automatically determined by the system and non-editable, for example, tax
354 © 2017 SAP SE or an SAP affiliate company. All rights reserved. • P U B L I CSAP Business ByDesign February 2017
Sales Orders

● Automatically determined by the system and able to be overwritten by the user, for example, list price orautomatically-determined product discounts
● Manually entered by the user, for example, a restocking fee or a manually-entered product discount
The manual behavior is influenced by the Manual flag in the business configuration for pricing. If the Manual flag isset, the system does not find the price component automatically and it must be added manually by the user.The following sections show the set of price components that may display depending on your configuration.
List PriceThis price component is naturally the first step of a pricing procedure, because many price components such asdiscounts or surcharges depend on it. To determine the net list price, the system checks all price lists that fit theparameters passed from the sales or service document. These parameters are customer, customer group,distribution chain, and date.Price lists can be customer specific, distribution chain specific, and base price lists. The price lists are maintainedas price master data, have a validity period, and need to be released before they are active.Because the customer may have special prices, the system checks first for a customer-specific price list. If there isno customer-specific price found, then it checks for a distribution chain specific price list. Finally, if there is nodistribution-chain-specific price, it checks for the base price list. You have to ensure that the system can find a pricefor all products or services you sell in the base price list at the very least. Prices can be manually revised within asales or service document, allowing you to flexibly adjust your net prices.
An approval procedure can be activated for price lists and discount lists which is done in the businessconfiguration in the scoping (under General Business Data Product and Service Pricing ). If this settingis active, the line manager automatically receives an approval task should his or her employee try to releasea price or a discount list. The price list or discount list cannot be released and included in all businessdocuments for sales and service processes until the line manager (or representative) approves the price listor discount list. If a manager is authorized to approve price and discount lists, he can directly release the priceor discount list in the price master data view. This automatic approval is done without creating a business taskif the manager himself releases the prices.For more general information on Business Task Management, see Business Task Management.
Product Discount (%)To determine the discount, the system checks all discount lists that fit the parameters passed from the sales orservice document. The parameters are customer, distribution chain, customer group, product, and date. All founddiscounts are considered in the price calculation.Discount lists can be Customer Specific Discount Product, General Customer Discount, Overall Customer GroupDiscount, and Customer Specific Discount Product Category discount lists.Because the customer may have a special discount for a certain product, the system checks for a discount list withcustomer product discounts.Discounts can always be revised manually within a sales or service document, allowing you to flexibly adjustdiscounts.
SAP Business ByDesign February 2017Sales Orders P U B L I C • © 2017 SAP SE or an SAP affiliate company. All rights reserved. 355

An approval procedure can be activated for price lists and discount lists which is done in the businessconfiguration in the scoping (under General Business Data Product and Service Pricing ).If this settingis active, the line manager automatically receives an approval task should his or her employee try to releasea price or a discount list. The price list or discount list cannot be released and included in all businessdocuments for sales and service processes until the line manager (or representative) approves the price listor discount list. If a manager is authorized to approve price and discount lists, he can directly release the priceor discount list in the price master data view. This automatic approval is done without creating a business taskif the manager himself releases the prices.For more general information on Business Task Management, see Business Task Management.
Working Condition (%)This price component is important for service scenarios. If service performers work at nights or on weekends orpublic holidays, a surcharge can be invoiced to the customer.
SurchargeTwo different price components are available for surcharges. You can define surcharges as percentages or fixedamounts according to your needs. All surcharges can be used side by side.
Warranty/GoodwillThese price components are important within service scenarios. For example, in a service document, services orspare parts may be covered by a warranty. The warranty or goodwill discount will be calculated based on the Coveragefield in the service document.
Quality Loss FeeThis price component is used for return scenarios. This element displays only if the Returns business topic is includedin your business configuration. If your customer returns goods which are damaged or opened, you can manuallydefine a deduction on item level.
Restocking FeeThis price componentis used for return scenarios. This element displays only if the Returns business topic is includedin your business configuration. If your customer returns goods, you can manually define a restocking fee for eachindividual return document.
Migration PriceThe migration price is needed for open sales and service documents that are migrated from a legacy system intoSAP Business ByDesign. To ensure that prices are the same in both systems, there will not be any additionalcalculation of this price.
Total Item Net ValueThis is calculated by adding all the item net values. This value cannot be edited.
FreightThis price component covers the freight amount determined automatically or entered manually. Depending on thebusiness configuration settings it is possible to determine a fixed freight amount or to make the freight dependenton the net weight of the goods you sell.
356 © 2017 SAP SE or an SAP affiliate company. All rights reserved. • P U B L I CSAP Business ByDesign February 2017
Sales Orders

Cost and Profit MarginCost displays only if profit margin is included in your business configuration. Cost is basically derived from financialsand makes the calculation of the profit margin possible.
Overall Discount (%)The overall discount (%) is an additional general discount applied to the total item net value. This can only be appliedmanually.
Total Net ValueThis is calculated by adding all the item net values plus freight, without considering taxes. This value cannot be edited.
Total Given DiscountsThis is calculated by adding all the relevant product discounts given. This value cannot be edited directly by the user.It can be influenced by editing the product discounts at item level.
Rounding DifferenceThis is a value that has been lost or gained through rounding. This value is used only for currencies that do not havelow denomination coins such as 1c or 2c – for example, Swiss francs or Australian dollars. For these currencies, theprice must be rounded to the nearest available value, such as 0c or 5c.
TaxThis price component covers all requirements in regards to taxation. All taxes are calculated according to legalrequirements and the results of this calculation are put into this price component.
TotalThis is calculated by adding the total net value plus tax.
Price CalculationPricing is centrally implemented in SAP Business ByDesign and linked to all relevant business processes. Theprocedure is predefined and you cannot modify the procedure or create a new one.The pricing procedure controls which price components are automatically calculated for the relevant businessdocuments, such as sales quotes, sales orders, and service orders. It contains the most commonly-used pricecomponents, including product prices, discounts, surcharges, and tax. These various kinds of price components canbe combined and control the price calculation process.The pricing procedure also contains the sequence in which the system takes these price components into accountduring pricing. It calculates the gross and net prices and taxes. The pricing procedure also determines:
● Which subtotals will be considered during pricing ● To what extent pricing can be processed manually ● Which method the system uses to calculate percentage discounts and surcharges ● Which requirements for a particular price component must be fulfilled before the system takes the element
into account. For example, freights are not considered for service items.
SAP Business ByDesign February 2017Sales Orders P U B L I C • © 2017 SAP SE or an SAP affiliate company. All rights reserved. 357

Currency and Quantity ConversionDuring the price calculation, currency conversion occurs if the currency of the price master data differs from thedocument currency, depending on the exchange rates maintained as master data. The document currency isdefaulted from the account master sales data.In addition, during the price calculation, quantity conversion occurs if the unit of measure requested in the documentdiffers from the price unit maintained in the price list. A prerequisite is that the quantity conversions are maintainedin the product or service master data. For example, product master data maintains a quantity conversion “1 pallet= 20 each”, the price list specifies a price unit of “$50/1 each”, and the sales order requests 5 pallets - in this case,the 5 pallets are converted to 100 units and price is calculated at $5000.
ScalesYou can define scales for prices which depend on different quantities. The scale you use determines how values arecalculated. For example, you can use a scale to define that a single boiler costs $500, but if you buy at least 10 boilersthe price decreases to only $450 per unit. You can also define scales for freights, which depend, for example, on thesales order value.You can also define scales for product discounts.There is also an additional feature where the system proposes the values for scales for every additional line that isadded by the user while maintaining scales. The following example explains the logic for calculation of the proposedvalue for scales:
Logic for determining the proposed scale value during price or discount scale maintenance.
ValueofScales Percentage Calculation of Percentage
0 0 0 0
10
– 10% 11/10=1.1
10*1.1 = 11
358 © 2017 SAP SE or an SAP affiliate company. All rights reserved. • P U B L I CSAP Business ByDesign February 2017
Sales Orders

ValueofScales Percentage Calculation of Percentage
20
– 11% 11/10=1.1
11*1.1 = 12.1
30
– 12.1% 12.1/11=1.1
12.1*1.1 = 13.31
40
– 13.31% 13.31/12.1=1.1
13.31*1.1 = 14.641
SAP Business ByDesign February 2017Sales Orders P U B L I C • © 2017 SAP SE or an SAP affiliate company. All rights reserved. 359

ValueofScales Percentage Calculation of Percentage
50
– 14.641% 14.641/13.31=1.1
14.641*1.1 = 16.105
60
– 16.105% 16.105/14.641=1.1
16.105*1.1 = 17.716
See AlsoConfigure Price Strategy [page 335]Price Agreements for Customer Contracts [page 326]Gross Pricing [page 326]
360 © 2017 SAP SE or an SAP affiliate company. All rights reserved. • P U B L I CSAP Business ByDesign February 2017
Sales Orders

7.1.4 Working with Pricing in Sales and Service Documents
OverviewThe Sales Order, Sales Quote, Customer Invoice, Return , Service Order and Service Confirmation editors contain atab called Pricing (Pricing and Invoicing for service order and service confirmation). This view allows you to flexiblydefine the price calculation within sales and service documents. It displays all related price components, such as listprice and product discount (%) or optionally as well cost or profit margin. Some of these components, such as profitmargin or cost, are read-only but you can modify other components such as list price, product discount (%) orsurcharges at item and an overall discount (%) at total level.
Editing Price Components at Item LevelUnder Item Pricing, you can view the details for each item in the sales or service document. To view the pricecomponents for an item, click the expand icon in the Item column. You can edit some price components or add arow to define another price component.The price components description can be manually changed. If such a description is changed, this description isconsidered in the output of forms and will also be copied to subsequent documents. Additionally, a rollover text onthe description in the pricing view reveals the price or discount list name from the price master data.Depending on your business configuration and settings, the item price components include:
● List Price: Determined from either a base price list, distribution-chain-specific price list, or customer-specificprice list. You can create price lists in the Price Lists sub view of the Pricing view in the Product and ServicePortfolio work center.
● Product Discount (%): Calculated either automatically from all relevant discount lists or alternatively,manually added as product discount. If you add a manual discount, the system adds the manually entereddiscount to the automatically determined discounts from the discount list. A discount can be created asmaster data in the Discount List sub view of the Pricing view in the Product and Service Portfolio work center.
● Cost: Retrieved from the product valuation. This value cannot be edited in the Pricing view. ● Cost Estimate: You can edit this price component manually in the Pricing view for profit analysis reasons for
project based services and entitlements. ● Profit Margin: Calculated by subtracting cost from revenue. This value cannot be edited. ● Tax: For example, State Sales Tax. These values cannot be edited in the Pricing view. Taxes can be edited
indirectly by changing the tax indicator in the Taxes tab of the Items view. ● Freight: The cost of transport for the item. Freight can be calculated by net weight of a product or as fixed
amount for the complete order depending on the business configuration. ● Migration Price: Only required for the migration of open sales and service documents from a legacy system. ● Quality Loss Fee: For return scenarios. If your customer sends goods back to you and claims money back,
you are able to manually define on item level a deduction for faults such as damaged goods or opened goods.This price component can only be applied manual.
● Surcharge: Defined either as a fixed amount or percentage. Surcharges can be created as master data inSurcharges sub view of the Pricing view in the Product and Service Portfolio work center .
● Warranty (%) : A discount used mainly within service documents to specify that part of the amount is coveredby warranty. Warranties can be created as master data in Special Surcharges, Special Discounts sub view ofthe Pricing view in the Product and Service Portfolio work center .
SAP Business ByDesign February 2017Sales Orders P U B L I C • © 2017 SAP SE or an SAP affiliate company. All rights reserved. 361

● Goodwill (%) : A discount used mainly within service documents to specify that part of the amount is coveredby goodwill. Goodwills can be created as master data in Special Surcharges, Special Discounts sub view ofthe Pricing view in the Product and Service Portfolio work center .
● Working Condition (%) : A surcharge applied for service items when an employee is working outside normalbusiness hours, for example, at the weekend. Working conditions can be created as master data in SpecialSurcharges, Special Discounts sub view of the Pricing view in the Product and Service Portfolio work center .
● Customer Expected Price: This is only relevant for sales orders created through A2A or B2B message (XMLdata transfer). The price is communicated from an external system and gets compared to the net pricecalculated in the SAP Business ByDesign system.
Editing Price Components at Total LevelThe Total Pricing section contains details about the pricing that is valid for the entire order or sales quote.Depending on your business configuration and settings, the total price components include:
● Total Item Net Value: Calculated by adding all the item net values. This value cannot be edited. ● Overall Discount (%): Additional manual discount which applies to the total item net value. ● Restocking Fee: A fee charged to cover the cost of returning a product. This price component can only be
applied manual. ● Freight: The total cost of transport. Freight can be calculated by net weight or as fixed amount for the complete
order depending on the business configuration. ● Profit Margin: Calculated by subtracting total costs from total revenues. This value cannot be edited. ● Tax: For example, State Sales Tax. These values cannot be edited in the Pricing view. Taxes can be edited
indirectly by changing the tax indicator in the Taxes tab of the Items view. ● Total: Calculated by adding complete net value plus tax. This value cannot be edited. ● Total Given Discounts: Calculated by adding all the relevant product discounts given. This value cannot be
edited in the Total Pricing section. It can be influenced by editing the product discounts at item level or overalldiscount at total level.
● Rounding Difference: A value that has been lost or gained through rounding. This value is used only forcurrencies that do not have low denomination coins such as 1c or 2c – for example, Swiss francs or Australiandollars. For these currencies, the price must be rounded to the nearest available value, such as 0c or 5c.
Updating PricingYou can update the pricing using the following options:
● Completely, which removes all manual changes. ● Keep Manual Changes, which does not remove changes that you have made.
In each case, the system checks for any updates in pricing and recalculates the total.
See AlsoGross Pricing [page 326]
7.1.5 Approval for Sales Order
OverviewYou can activate and define an approval process for sales orders.
362 © 2017 SAP SE or an SAP affiliate company. All rights reserved. • P U B L I CSAP Business ByDesign February 2017
Sales Orders

Activate Approval ProcessIn the Scoping you can activate an approval process for sales orders.
For technical reasons the approval process for sales orders that are created via A2A or B2B processes is notsupported.
Define Approval ProcessIn the Application and User Management you can define an approval process for sales orders with the followingpossibilities:
● A multi step approval considering several approving parties ● You can define conditions for certain values such as
○ profit margin ○ total discounts ○ total ○ net value ○ ABC classification ○ project-based ○ credit status
For more information, see the documentation on creating and editing approval processes.
If you make any changes to an already defined and activated approval process for sales orders, the systemsets the approval status to Not Started. The system also blocks the corresponding invoice requests andcustomer demands till you submit the order for approval. To do this, click Release Submit forApproval to further process the sales order.
The approval task can be seen, only if the approver has access to the following work centers and views:Sales Orders work centerManaging My Area work center, Approvals viewManaging My Area work center, MMA_Sales view (The MMA_Sales option needs to be selected while assigningwork centers to the approver)
7.1.6 Credit Limit Check
OverviewThe optional credit limit check allows you to minimize credit risk by specifying a credit limit for customers in theaccount master data. This check is based on the customer balance and open items of documents such as salesorders, service orders, sales quotes, or customer contracts. A credit limit check is performed when the amount ofa document is changed, or the action Check Credit Limit is triggered.For example, a customer has a credit limit of USD 10,000 and the account balance considering payables andreceivables of USD 5,000. If you create a sales order with a total of USD 6,000, the credit limit is exceeded by USD
SAP Business ByDesign February 2017Sales Orders P U B L I C • © 2017 SAP SE or an SAP affiliate company. All rights reserved. 363

1,000 if no other open order items exist. The system displays a message indicating the exceeded credit limit and adelivery block for the order is set. This block prevents the release of the outbound delivery request or release for theservice confirmation. You can perform the action Check Credit Limit again if the account balance is settled. Thedelivery block is removed automatically if the credit limit is no longer exceeded. You can also remove it manually tocontinue the process regardless of the exceeded credit limit. Note that in the sales quote, the system only displaysa warning message indicating that the credit limit has been exceeded.If the customer is also a supplier, the check will consider the supplier balance as well in order to calculate the creditlimit.
● For service orders, there is no credit limit check button. The check is done automatically in thebackground according to the business configuration settings described below.
● For service orders the Execution Block (instead of the Delivery Block for sales orders) is set if the creditlimit is exceeded.
In the sales order approval process, you can add the credit status as a condition for a manual approval. In thiscase, a sales order may be approved by a manager when the Credit Status indicates Credit Limit Exceeded.The sales order cannot be edited within the approval process. It is unlocked for editing and released afterapproval. The status of this sales order is changed to Open. Note that the system does not automaticallyremove a delivery block after approval. Therefore, you must remove it manually for further processing. Formore information about the approval process, see Approval for Sales Order [page 362].
PrerequisitesThe company dependent credit limit amount has been maintained for corporate and private accounts in the workcenter Account Management Accounts Financial Data: Payment Data If there is no credit limit specified in the account master, no credit limit check will be performed on documents forthat account.
Configuration Settings
Configuration settings are usually performed by an administrator. If you do not have the requiredauthorization, contact your administrator.
● Credit limit check is activated in your solution configuration. To find this business option, go to the BusinessConfiguration work center and choose the Implementation Projects view. Select your implementation projectand click Edit Project Scope . In the Scoping step of the project, ensure that Account and ActivityManagement is selected within Sales.In the Questions step, expand the Sales scoping element and select Account and Activity Management. SelectAccount Management and answer the questions related to Credit Limit Check.
● The scope of the credit limit check has been defined in the Fine-Tune phase. To find this business option, goto the Business Configuration work center and choose the Implementation Projects view. Select yourimplementation project and click Open Activity List . Select the Fine-Tune phase, then select the Credit LimitCheck activity from the activity list. You can choose one of the three options below on the following screen: ○ Check Current Document
(This check considers only the value of the current document.) ○ Check Current Document and Other Open Orders
(This check considers other open sales order and service order items, which have not been invoiced.)
364 © 2017 SAP SE or an SAP affiliate company. All rights reserved. • P U B L I CSAP Business ByDesign February 2017
Sales Orders

○ Check Current Document and Other Open Orders Including Documents “In Preparation”(This check considers additionally sales orders and service orders in status In preparation.)
In Preparation is the initial status of a new created document. A document with this status can be editedor deleted without restrictions, while an open order is already released and the items in this ordercannot be removed anymore.
7.1.7 Invoice Schedule
OverviewAn invoice schedule consists of the invoice dates and the amounts that are used for the creation of invoices. You canedit the invoice schedule manually, or define an invoicing time frame. This is possible for customer contracts, salesorders, and sales quotes.There is only one invoice schedule available for the document but not several invoice schedules for each item. In theinvoice schedule, specified invoice dates are assigned to the document items. In addition, you can switch betweenthe date view and the item view.The invoice dates of an invoice schedule can have three different schedule types: Partial Fixed Price, Periodic FixedPrice, and Time and Material.
Schedule Type Definition Example
Partial Fixed Price The total net value isfixed and distributedto specific amountsat defined dates.
The price of software implementation is fixed at $400. ● A first invoice date contains $200 (50%)
● A second invoice date contains $100 (25%)
● A third invoice date contains $100 (25%)
Periodic Fixed Price(Only possible incustomer contracts)
The price is fixed perperiod. The invoicingamount is calculatedbased on aninvoicing period. Thetotal invoicedamount depends onthe duration of theagreement.
The price for a rented software is fixed at $100 monthly. For quarterly invoicedates, the system calculates an amount of $300 for each invoice date.
Time and Material At invoicing dates,the systemautomaticallyenables thecustomer invoicerequests based onactual values fromserviceconfirmations forinvoicing.
For a customer specific enhancement of software, a monthly invoicing isagreed. At the end of each month the actual values from the serviceconfirmations of the whole month are invoiced.
SAP Business ByDesign February 2017Sales Orders P U B L I C • © 2017 SAP SE or an SAP affiliate company. All rights reserved. 365

Invoice schedules can only be created for services, expenses, and entitlements - entitlements can only beused in contracts - but not for products to be delivered, only for products with an project based item type.
Prerequisites ● The use of invoice schedules must be activated in scoping for contracts, sales orders, and sales quotes:
○ Scope question for customer contracts under Sales Selling Products and Services CustomerContracts
○ Scope question for sales orders under Sales Selling Products and Services Sales Orders ○ Scope question for sales quotes under Sales New Business Sales Quotes
Only if invoice schedules are activated in scoping, the tab Invoice Schedule is shown in the affecteddocuments.
● Depending on the item type, it is possible to create an invoice schedule for an item. Note that a mixed scenariois possible. This means, that some items can have an invoice schedule, while others do not.You can create invoice schedules for the following item types:
Item Type Price per period (flag in the contract item) Schedule Type
Service - fixed priceService - fixed price without actualsService - fixed price (project)Expense - fixed price without actualsExpense - fixed price (project)Entitlement - fixed priceEntitlement - fixed price without actuals
no Partial fixed price
Service - fixed priceService - fixed price without actualsExpense - fixed price without actualsEntitlement - fixed priceEntitlement - fixed price without actuals
yes Periodic fixed price
Service - time and materialService - time and material (projects)Expense - time and materialEntitlement - time and materialProducts - project based
not relevant Time and material
Create Invoice DatesYou can either edit invoice schedules step-by-step by clicking Add Date , or by using an invoicing time frame byclicking Edit Invoicing Time Frame .
● For invoice dates with schedule type Partial Fixed Price, you can edit the invoice dates with an amount orpercentage.
● For invoice dates with schedule type Periodic Fixed Price, you can edit the invoice dates with an amount or aquantity of time unit.
366 © 2017 SAP SE or an SAP affiliate company. All rights reserved. • P U B L I CSAP Business ByDesign February 2017
Sales Orders

● For invoice dates with schedule type Time and Material, you can only edit the invoice dates. The amounts arebased on actual service confirmations values.
Edit Invoicing Time FrameTo edit an Invoicing Time Frame you can:
● Edit a start and end date. For example, at the beginning and end of the year. Or edit a start date andoccurrences. For example, at the beginning of the year for eight occurrences.
● Edit a recurrence pattern. For example, monthly, every second month, weekly, quarterly. ● Edit a week day. For example, biweekly – but always on Tuesday. ● Edit a specific day. For example monthly – but always on the third day of the month.
You can define multiple invoicing time frames. The invoicing time frame can be applied to different items. Theseitems are then invoiced using the respective invoicing time frame.If you want to change the invoicing time frame, you must first reset Apply to the applicable items. The invoicingtime frames are stored in the document.
Use of the Recurrence Pattern in the Invoicing Time FrameIf you use the recurrence pattern in the invoicing time frame for schedule type Periodic Fixed Price or for scheduletype Time and Material , the system automatically creates invoice dates within the time frame – however with thefollowing maximum number of dates:
● For yearly recurrence patterns: 10 invoice dates ● For monthly recurrence patterns: 24 invoice dates ● For weekly recurrence patterns: 26 invoice dates ● For daily recurrence patterns: 31 invoice dates
For schedule type Partial Fixed Price, you use Add Date and maintain the percent or amount. If you use the invoicingtime frame, the system automatically creates all dates within the time frame without a maximum number of dates.The sum is always 100 percent. The last invoice date includes any rounding differences.
Copying of an Invoice ScheduleIf you copy documents, the invoice schedule is also copied. You can copy an invoice schedule
● from a sales quote to a sales order or sales quote ● from a sales order to a sales order or sales quote ● from a customer contract to a customer contract
The corresponding invoice schedule dates are updated by shifting all dates with the difference of the posting datesof the source and the target document. For contracts the difference of the contract start date of the source andtarget document is taken.
InvoicingWhen the contract or sales order is released, the system creates a contract or sales order invoice request.This invoice request contains the invoice schedule dates. Every night, a regular job automatically runs and checksthe invoice dates. Three days before the invoice date, the job creates scheduled invoice requests for the scheduledinvoice dates.
SAP Business ByDesign February 2017Sales Orders P U B L I C • © 2017 SAP SE or an SAP affiliate company. All rights reserved. 367

Note that for schedule type Time and Material, the status Pending is set for service confirmation invoicerequests. Three days before the next invoice schedule date the regular nightly job resets the status Pendingto status To Be Invoiced for the service confirmation invoice requests.
In exceptional cases (for example, if you cannot wait for the next job run), a manually intervention to forceinvoicing is possible:
● In the sales order or contract invoice request, choose Edit->You can also->Create Scheduled InvoiceRequests
● In the service confirmation invoice request, choose Edit->You can also->Enable Invoicing.
When the invoice date is reached, an invoice run processes the invoices from the invoice requests. The status of theinvoice schedule date is set to Invoiced. After the first date in the invoice schedule is invoiced, the item in the documentcan no longer be changed.If you want to cancel a scheduled invoice date that has just been invoiced, you first have to cancel the invoice. Thenyou can cancel the invoice schedule date.Status overview of the scheduled invoice dates:
● Open - The invoice schedule date is created ● Invoiced - The invoice is released ● Invoice canceled - The invoice is canceled ● Canceled - The invoice schedule date is canceled (manual action only)
Create Invoice Dates with Schedule Type Partial Fixed Price1. Create a contract or a sales order item for a service (item type Service - fixed price) such as a software
implementation. Ensure that the Price per Period is not flagged, so that the amount can be distributed to theinvoice dates.
2. Under Pricing and Invoicing choose Invoice Schedule .3. Click Add Item . To select the item for which you want to edit invoice dates, click the Open Value Selection
icon in the Line field.4. Click Add Date . The default is the posting date for sales orders and sales quotes, or the contract start date
for contracts. You can change the invoice date or edit the amount and percentage.The default for the first invoice date is 100%. For example, you can change the first invoice date to 40%. Youadd a second invoice date one month later. The default is 60%. You change it to 30%. You add a third datefor 30% two months later.
5. Every night a regular job runs automatically. The job creates invoice requests with invoice request typeScheduled Invoice Request three days before the invoice date . If the job cannot create scheduled invoicerequests (for example, inconsistent sales order request), a processing log and application log entry is createdin the Customer Invoicing work center in the Invoice Schedule Processing Logs work center view. Here youcan analyze the issues.
Often, the issue is an inconsistent sales order invoice request. The reason why a sales order invoicerequest is inconsistent can be found in the Invoice Request view in the Customer Invoicing work center.Select the inconsistent invoice request, and click Check.
6. When the invoice date is reached, an invoice run processes the invoices based on the invoice requests. Thestatus of the invoice schedule date is set to Invoiced.
368 © 2017 SAP SE or an SAP affiliate company. All rights reserved. • P U B L I CSAP Business ByDesign February 2017
Sales Orders

● The system issues an error if the sum of the invoice dates exceed 100 % of the net value of the item(s). ● The system also issues a warning if 100 % is not reached ● The project invoice request, the invoice request, the invoice, and the print form of the invoice always
shows the whole quantity together with the percentage. However, the net value already correspondsto the partial amount. The print form can be changed to show the partial quantity (adapted quantity)in the Application and User Management work center under Form Template Maintenance for CustomerInvoice.
Create Invoice Dates with Schedule Type Partial Fixed Price for Project-BasedServicesPrerequisite: The sales order is assigned to a project.
1. Create an order item for a service (item type Service - fixed price (project) ) such as a project–based softwareimplementation.
2. Under Pricing and Invoicing choose Invoice Schedule .3. Click Add Item , and select the item for which you want to edit invoice dates.4. Click Add Date , and edit the invoice date with the amount or percentage.
You can also select a Milestone from the applied project. Then the invoice date gets the date of themilestone (Earliest Date of the Scheduled Dates). In this case, completion of the milestone triggers thecreation of the project invoice request.
For example, you can edit a first invoice date for 50% for the completion date of the milestone Blueprint; asecond invoice date half a year later for 25%; and a third invoice date three months later for 25%.
5. Every night a regular job runs automatically. The job automatically creates project invoice requests three daysbefore the invoice date. If a milestone is assigned to an invoice date, the job creates a project invoicerequest, when the milestone meanwhile was completed. The invoice date gets the status Project InvoiceRequested.
If you cannot wait for the next job run you can also trigger the job for the creation of project invoicerequests manually:
● Work Center Customer Invoicing: Project Invoicing Sales Orders: Select the sales order andchoose Create Scheduled Project Invoice Request in the context menu.
● Work Center Project Management: Projects: Select the project and choose Create ScheduledProject Invoice Request in the context menu.
6. For each project invoice request, a business task is created for the Work view in the Customer Invoice workcenter.
In some cases, the system cannot create project invoice requests (for example, because another openproject invoice request exists). In this case, the system creates an error business task in the Work viewin the Customer Invoice work center. The reason can be checked in the application log and has to besolved.
7. Review and release the project invoice requests manually.
You can use an automatic release for the project invoice requests if you set the flag AutomaticRelease in the sales order in the Project Invoicing section under General.
SAP Business ByDesign February 2017Sales Orders P U B L I C • © 2017 SAP SE or an SAP affiliate company. All rights reserved. 369

8. When the project invoice request is released, the system creates an invoice request with invoice requesttype Project Invoice Request.
9. When the invoice date is reached, an invoice run processes the invoices based on the invoice requests. Thestatus of the invoice schedule date is set to Invoiced.
The status of the invoice schedule dates in the sales order is set to Invoiced, when the invoice is released. Youare able to change the dates in the invoice schedule at any time prior to the status being set to Invoiced.If the date or percentage/amount in the invoice schedule is changed:
● An existing project invoice request with status In preparation is deleted. An updated project invoicerequest is created in the next nightly job run.
● An existing project invoice request with status Released is cancelled. An updated project invoicerequest is created in the next nightly job run.
● All open business tasks for this invoice schedule are deleted.
Create Invoice Dates with Schedule Type Periodic Fixed Price
Periodic Fixed Price schedule types are only possible in contracts.
1. Create a contract item with an entitlement (item type Entitlement - fixed price), such as rented software.Ensure that the item is flagged for Price per Period. Therefore, the schedule type is Periodic Fixed Price.
The flag Price Per Period means that the price is related to a quantity of time unit. If an invoicing timeframe is used, the amount is proposed from the invoicing period (difference between two invoice dates)multiplied by the price. The amount can be manually overwritten, especially for the first and/or lastinvoice date(s).Example: The price for a rented software is $ 100 monthly. The flag Price per Period is set in the item.
● For quarterly invoice dates, the system calculates an amount of $ 300 for each invoice date. ● For yearly invoice dates, the system calculates $ 1,200 for each invoice date.
2. Under Pricing and Invoicing choose Invoice Schedule .3. For example, click Edit Invoicing Time Frame , and edit a time frame with a monthly recurrence pattern for the
current year. Select the Applied check box to assign the selected invoicing time frame to the item.4. Click OK . The system creates monthly invoice dates for the rented software with a price per month.
If you want to change the invoicing time frame, you must first reset Apply to the applicable items.
5. Every night a regular job automatically runs. The job automatically creates invoice requests three days beforethe invoice date with invoice request type Scheduled Invoice Request.
6. When the invoice date is reached an invoice run processes the invoices based on the invoice requests. Thestatus of the invoice schedule date is set to Invoiced.
370 © 2017 SAP SE or an SAP affiliate company. All rights reserved. • P U B L I CSAP Business ByDesign February 2017
Sales Orders

Create Invoice Dates with Schedule Type Time and Material1. Create a contract or sales order item for a service with item type Service - time and material, such as a
customer–specific enhancement of software. Therefore, the schedule type is Time and Material.2. Under Pricing and Invoicing choose Invoice Schedule .3. For example, click Edit Invoicing Time Frame , and edit a time frame with a quarterly recurrence pattern for
the actual year. Select the Applied check box to assign the selected invoicing time frame to the item.4. Click OK . The system automatically creates quarterly invoice dates.
You only edit the invoice dates for the schedule type Time and Material in the sales order or contract.When the invoice date is reached, the actual values of the service confirmations are invoiced.
5. When the service confirmations are released, the system creates service confirmation invoice requests withstatus Pending.
6. Every night a regular job runs automatically. The job resets the status Pending of the service confirmationinvoice requests to status To Be Invoiced three days before the invoice date.
If a service confirmation invoice request has an invoice date within the next three days, the status ToBe Invoiced is automatically assigned.
7. When the invoice date is reached, an invoice run processes the invoices out of the service confirmation invoicerequests. The status of the invoice schedule date of the contract is set to Invoiced.
Create Invoice Dates with Schedule Type Time and Material for Project-BasedServicesPrerequisite: The sales order is assigned to a project.
1. Create an order item for a service (item type Service - time and material (project) ) such as a customer–specific software integration.
2. Under Pricing and Invoicing choose Invoice Schedule .3. Click Add Item , and select the item for which you want to edit invoice dates.4. Click Add Date , and edit the invoice dates.
You can also select a Milestone from the applied project. Then the invoice date gets the date of themilestone (Earliest Date of the Scheduled Dates). In this case completion of the milestone triggers thecreation of the project invoice request. For example, you can edit a first invoice date for the completionof the milestone Blueprint; a second invoice date half a year later and a third invoice date three monthslater.
5. Every night a regular job runs automatically. The job automatically creates project invoice requests on thenext day. If a milestone is assigned to an invoice date, the job creates a project invoice request, when themilestone meanwhile was completed. The invoice date gets the status Project Invoice Requested.
6. For each project invoice request, a business task is created for the Work view in the Customer Invoice workcenter.
SAP Business ByDesign February 2017Sales Orders P U B L I C • © 2017 SAP SE or an SAP affiliate company. All rights reserved. 371

In some cases, the system cannot create project invoice requests (for example, because another openproject invoice request exists). In this case, the system creates an error business task in the Work viewin the Customer Invoice work center. The reason can be checked in the application log and has to besolved.
7. Review and release the project invoice requests manually.
You can use an automatic release for the project invoice requests if you set the flag AutomaticRelease in the sales order in the Project Invoicing section under General.
8. When the project invoice request is released, the system creates an invoice request with invoice requesttype Project Invoice Request.
9. When the invoice date is reached, an invoice run processes the invoices based on the invoice requests. Thestatus of the invoice schedule date is set to Invoiced.
The status of the invoice schedule dates in the sales order is set to Invoiced, when the invoice is released. Youare able to change the dates in the invoice schedule at any time prior to the status being set to Invoiced.
See AlsoMilestone Invoicing for Customer ProjectsMilestone Invoicing for Multi-Customer Projects
7.1.8 Party Processing
Business Partner and Parties
Business PartnersBusiness partners are all the companies and people with whom you are in contact in your daily business. When youbegin your work, you first create master data in the system by entering the business partners that you require foryour daily work. These business partners can have one or multiple business partner roles in the system, dependingon how they are used in your business.The business partner roles, such as business partner role account, supplier or contact, are assigned automaticallywhen you create business partners in the context of your work center view. You can also add them manuallydepending on work center.Examples for entering business partner data:
● In the Account Management work center, you can create business partners with the roles Account, Contactor Partner. To do this, click on the corresponding quick activity, for example Create Contact.
● You can also create a new account or contact using the Create Account or Create Contact quick activity.
Entering the data for the business partner once in master data means: ● That you only have to enter the data once for each new document for this business partner ● That automatic proposals for parties in that document can be derived from the master data when creating
documents ● You can check whether usage in the document is consistent with the master data
372 © 2017 SAP SE or an SAP affiliate company. All rights reserved. • P U B L I CSAP Business ByDesign February 2017
Sales Orders

● That business processes are running in harmony according to your company’s structure. For example, in themaster data you can determine that a specific employee be automatically proposed as the employeeresponsible for any new sales orders.
● That you can also use the master data for reports. For example, if you classify an account as a customer, youcan cluster reports result based on this master data.
For more information about business partners, see Business Partners.Business partners can also be used for:
● Storage and display of information in a business transaction. The information collected from the businesspartner and the business partner role do not affect the behavior of the system.
● Relevance in business processes: The way a business process performs depends on the business partner.This means that the system behaves differently or uses different data depending on the selected businesspartner.
Depending on the account or the region of the account, ● different sales units become relevant ● different prices may be determined ● other payment and delivery terms are used as default ● another ship-to or ship-from location is determined by the system ● different taxes are calculated
● Analytics and Reporting: Here you can drill down by several business partner attributes and party roles. Forexample, sales manager Bob Menson wants to drill down the sales per sales office in reporting. He assignseach sales order the party role Sales Unit to enable the drill down.
Business Partner RolesCustomers are typically external business partners for your company. For example, you enter Silverstar WholesalesInc. as an account since they want to buy a heating installation from you (sales order).First create the business partner Silverstar Wholesales Inc. with the Account role and specify the account by selectingthe quick activity Create Corporate Account. This clarifies whether Silverstar Wholesales Inc. is a private account(person) or a corporate account (organization).Business partner roles include:
● Accounts (Private or Corporate Accounts) ● Contacts ● Partners ● Suppliers ● Employees
Other external business partners can also be entered for use in other application areas, for example, suppliers. Thebusiness partner created then is given an additional business partner role and some additional fields are required.The same real world instance can occur in your master data, for example, a business partner can be both a corporateaccount and a supplier.
PartiesIf you create a document, for example, a sales order, service order or a customer invoice, you can indicate thatbusiness partners you created in the master data are involved parties for this specific document. Parties use businesspartners that have a special purpose in a document. Party roles are assigned to each party to define the party’spurpose.
SAP Business ByDesign February 2017Sales Orders P U B L I C • © 2017 SAP SE or an SAP affiliate company. All rights reserved. 373

Silverstar Wholesales Inc. is a Business Partner with the business partner role Account. However, thisAccount can be used in many different documents, such as sales orders, service orders and so on. Inthose documents Silverstar can have one or multiple party roles. For example, if Silverstar WholesalesInc. buys 100 tubes from your company it is given the party role “Account” in the corresponding salesorder. Silverstar Wholesales Inc. can have also multiple party roles in the same document. For example,once the company receives and pays the bill it. Silverstar Wholeales Inc. is given the party roles “Bill-to”and “Payer” for this sales order.
Party RolesBusiness partner often take on multiple party roles in a business document such as a business document sales orderor service order. Business Partners are assigned to party roles in a specific document to indicate the purpose thebusiness partner serves in that document. For example, it is often the case in a sales order that the account, ship-to, bill-to, and payer are identical: If Silverstar Wholesales Inc. buys the heating installation, receives the goods, getsthe bill, and pays it, has all four party roles in the sales order.Typical examples for party roles are:
● Account ● Ship-to ● Payer ● Freight Forwarder ● Employee Responsible ● Sales Unit ● Seller ● Service and Execution Team
For further information about the relevant party roles and necessary business partner roles, refer to the chapterUsage of Business Partner Roles Related to Party RolesParty Role for EmployeesWith the Employee Responsible role you can define which employee in your organization is responsible oraccountable for a single document. Often this employee also has tasks to fulfill or is responsible for updating thedocument in case of issues.This means it is important that you need to define which employee is “doing the job” and what his or her role is inthe business document. An employee is always a person.Assigning an employee a certain role in a business document is important for
● Indicating the responsibility/accountability of the employee, for example, employee responsible for a salesorder.
● Indicating who takes on certain tasks related to this business document, that is “who does the job”, forexample, the person fixing the heating in a service order.
● Reporting purposes, for example, sales volume of the sales representative Kate Jacob.
Employees are not only people who have an employment contract with your company (“internal” employees),they can also be service agents from another supplier who are working for you based on a contract.
Examples of Employee party roles include ● Employee Responsible ● Sales Employee: the employee Angela Baines from the marketing department is normally the employee
responsible for a certain lead, but Kate Jacob is taking over the party role as the sales employee for this lead.
374 © 2017 SAP SE or an SAP affiliate company. All rights reserved. • P U B L I CSAP Business ByDesign February 2017
Sales Orders

● Service Performer in a service or sales order: this is the employee who actually performs a service.
Party Roles for Organizational UnitsOrganizational units reflect the organizational structure of the company. Organizational units can define companies,sales organization, and cost centers. An organizational unit with function sales or service can then take over a partyrole in a business document for the following reasons:
● If the information is required for legal reasons, for example, a company is required in a sales order. ● To indicate the responsibility and accountability of the organizational center, its employees and its managers
within this particular business process, for example, the responsible service execution team for a serviceprocess
● For reporting purposes, for example, to aggregate the sales volume per sales unit
Organizational units are created in the Organizational Management work center.Examples of party roles for Organizational Units include:
● The sales unit party role in a sales order ● The service execution team party role in a service order ● The seller (company) party role in a sales order (seller party role represents the company)
Special Case: CompaniesCompanies are a special case, since the same real world instance occurs both as an internal and external businesspartner in your master data.Once you enter a company into the organizational hierarchy, a corresponding business partner with Account andSupplier as business partner roles is created automatically. This is particularly required for inter-company business,since depending on the role the company is taking on, different data is required.
The company ID in organizational management does not need be the same as the account ID in the masterdata.
In documents the related party role of the company is called Seller. This role is always assigned to an organizationalunit.
Akron heating Inc. has the organizational center ID MC10000, but the account ID 101 Note: Changes toCompany data are not reflected in the business partner data (except DUNS number).
Contact Role in Documents and Master DataYou can enter one or several contacts for a corporate account in your master data. This allows you, for example, tocall the right person in a particular company directly instead of using the central company phone number. However ,it might also be helpful to enter a contact person for a party into the document as well.
At Silverstar Heating Inc. Susan Manson and Bill Taylor are the responsible contact persons forpurchasing. You have entered both of them as contacts for Silverstar Heating Inc. in the master data.However, when Susan phones to place a sales order, you want to make Susan the relevant contact for thesales order.
Contacts are always related to a party in a document. That means this person is the one you contact if you havequestions about this party for the party role. You can add more than one contact person in the Involved Parties viewfor different party roles.
SAP Business ByDesign February 2017Sales Orders P U B L I C • © 2017 SAP SE or an SAP affiliate company. All rights reserved. 375

As mentioned above, Susan Manson is the purchasing contact for Silverstar Heating Inc. If Susan placesan order for Silverstar Heating Inc., you want to make Susan the contact for Silverstar Heating Inc.,assigned to the role Account. The goods are also shipped to Silverstar Warehouse. However, Susan willnot be responsible for receiving the goods. The best person to call for any questions regarding receivingthe goods at Silverstar Warehouse is Jim Jason, so you enter him as the contact for Silverstar Warehouseassigned to the party role Ship-to.
In master data you can enter multiple contacts for a corporate account and indicate one of them as the main contact.This main contact then automatically becomes the default contact for the account when a new business transactiondocument is created. Automatic determination of a contact is currently restricted to the account party role in adocument. However, you can still enter contacts manually for the other parties. Note that a Contact can serve asmain contact for a specific document such as a Sales Quote without having been indicated as the main contact inthe account master data.
Parties in DocumentsOn the General view you typically see only the most important parties for a certain document. For example, theAccount and Contact party roles are displayed if they deviate from Account, Ship-to and Bill-to.You can change the party for a special party role in a document. For example, if Silverstar Logistics is to receive thegoods in place of Silverstar Wholesales Inc. , you can change the Ship-to party by entering Silverstar Logistics directlyinto the “Ship-to” field or selecting this business partner from the value help.If you want to see all parties together with their party roles for a document, click on “View All” to open the editor(remark: there is no editor for leads.) and navigate to the “Involved Parties” tab.Here you can do the following:
● Get a complete overview of all parties involved and their party roles ● Change, add or delete parties and party roles ● Select a party for detailed address information ● Assign another master data address for a party role or contact ● Add a document-specific address that is only valid for this document and should not be part of the master
data. ● Change the address or entering a document specific address is required, if the default address is not suitable
for this particular document and no master data address should be added ● Add, change or delete contacts for a party role in this document
Silverstar Wholesales Inc. has two addresses in New York, one on Kingston Road, and one on Circus Drive.The Kingston Road address is the main one, and it is also marked as standard address in the accountmaster data for Silverstar Wholesales Inc. This means that if a new sales order is placed for SilverstarWholesales Inc. as Ship-to, the address at Kingston Road becomes the default. However, if for thisparticular order the goods is to be shipped to Circus Drive, you can change this on the “Involved Parties”tab.
Consistency Checks on Parties Used in DocumentsThere are several consistency checks performed when a business partner is used in a party role for a document.These checks ensure that the document created is correct and consistent and are done for the following reasons:
● The checks guarantee that the complete business process runs smoothly without interruption, for example,due to missing data
● Legal compliance for corporate accounts ● The checks help the employee creating the document adhere to the business rules entered in master data
376 © 2017 SAP SE or an SAP affiliate company. All rights reserved. • P U B L I CSAP Business ByDesign February 2017
Sales Orders

Our sales representative Kate creates a sales order and enters Yellowstone Supermarket as an account.However, Yellowstone Supermarket is only a subsidiary of another company and is not allowed to act asa buyer from a legal point of view, which means that financial booking would be incorrect. Therefore anerror message is displayed if Yellow Supermarket is not flagged as “Legal Competence”.Sales representative Kate heard that there are serious financial problem with CarDealers Inc. She wantsto prevent new goods from being delivered to this account by setting a delivery block in the account masterdata. The next day Steve Miller receives a call from CarDealers Inc. saying that they want to order 10 moreheating installations. When he created the sales order, Steve gets a message stating that CarDealers isblocked from having goods delivered by us.
There are other checks that affect whether you can change a party role. Some of the parties are never changeable,which means the field is always read-only or the field will become read-only under certain conditions or in a certaindocument status. In some cases parties that were once read-only can become editable, for example, if a change wasreverted. Parties are set to read-only to guarantee the consistency of the business processes.Error and Warning Messages from Consistency ChecksA check can raise one or several error or warning messages, which are then displayed on the UI. You can distinguishbetween the following types of messages:
● Warning messages are messages that only come up once. These are typically warnings that indicate apotential problem or give you a tip to check something. For example, if the weight is missing for a productfreight cannot be determined if it is based on the weight of the product. However, you can still proceed withthe document if you do not make changes.
● Error messages are messages that remain until the problem is solved. In almost all cases you can still savethe document so that at least the current status of the document is saved. However, the document will remainincorrect until you solve the problem. This can be done by changing the business transaction document itselfor adapting the master data. For example, if the service performer in a service order is missing, then you mightenter her or him manually. Note that as long as the document is incorrect, no follow-up processes such asdelivery are triggered.
Determination of PartiesIf you are creating a new document in the system, such as a sales order, the document initially has no parties assigned.Once the account party has been entered, other party roles such as employee responsible, ship-to or bill-to aredetermined automatically. These automatically determined parties are only proposals and you can change them ifthe status of the document allows it.Parties are automatically re-determined when a document is changed. Re-determining means that a party in a partyrole has been already found. When the user changes certain data, the system determines that another party is bettersuited for this party role.Automatic re-determination of parties is disabled in the following cases:
● Parties for this party role cannot be changed anymore. For example, the ship-to party can no longer bechanged once the delivery process has started.
● If a party role has been changed manually by the user. This is based on the following: If the user changed thedata manually, he or she does not want to make some automatism change it again, because this would notbe transparent. Thus the system does not change parties of a party role that were changed manually by theuser.
This determination has the following benefits: ● It prevents requesting and entering data over and over again. You only enter the data once in master data. ● Prevents errors when reentering data manually ● Saves time because copied documents can serve as templates, for example, when the Account party role is
changed, the other involved parties are re-determined
SAP Business ByDesign February 2017Sales Orders P U B L I C • © 2017 SAP SE or an SAP affiliate company. All rights reserved. 377

● Supports the employee in his or her daily work ● The employee entering the document might not actually know which parties have to be entered, for example
whether sales or organizational data depends on the account.
It might be difficult for Susan Miller to say which service performer will actually take on a servicetask. If this was centrally defined in responsibilities by service manager Barbara Smith, then Susan,who is taking the order on the phone does not need to have this information.
● Help the employee creating the document adhere to the business rules entered in master data.
If Kate is set as the responsible employee for all accounts in California, the system finds her whena sales order is created for an account in California. The manager actually defining the responsibilityalso wants orders taken in a call center to be correctly assigned.
Error HandlingIf you often encounter the problem that the system finds the wrong party or none at all, here are a few suggestions:
● The configuration of the party determination steps is not appropriate to your business case. In this case youcan enable and disable party determination rules. For more information, see Define Partner Schema.
You do not want the employee who enters the document to automatically be the employeeresponsible for a sales order. The orders are entered by a shared service center employee andshe/he will never be responsible for the order. If no employee is found via responsibilities, then noemployee will be found by the system, which means that the shared service center employee takingthe order must enter it manually.
● The master data required to automatically determine the parties is missing, insufficient, or inconsistent:Check the different steps for determining a party role for a certain document type in the correspondingbusiness configuration and enhance or correct the master data as described for the different determinationrules.
You can create a new document based on an existing document in two ways: ● Follow-up document: You create a sales order from a sales quote. With this function you are able to display
the follow-up document in the document flow. The same function is provided if you choose the “Create withReference” action.
● Copy of a document: You copy an existing sales order to a new sales order. With this function document flowis not supported.
In both cases data, including the parties from the existing document, is copied to the new document. However, thereare fixed rules for copying parties from one document to another document. You cannot change the rules. Theydepend on:
● What kind of document the source document is, for example, sales order, service request, opportunity, or e-mail activity.
● What kind of document the target document is ● Which party roles exist in the source document, for example, an e-mail activity has no bill-to party to be copied. ● Which party roles exist in the target document, if there is no Bill-to in the target document.
The rules are as follows: ● A party role is copied one.-to-one from the source document to the target document, for example, the ship-
to party of a sales quote is copied to the ship-to party of the sales order. ● A party role is not copied to the target document due to organizational reassignment. This is basically the
case for the party roles employee responsible or sales unit. The employee responsible or sales unit of a sales
378 © 2017 SAP SE or an SAP affiliate company. All rights reserved. • P U B L I CSAP Business ByDesign February 2017
Sales Orders

quote is not copied to any follow-up or copied sales order. The system will trigger a new party determinationfor those roles.
Parties on Header and Item LevelThere are several document types that have header and item information. For example, a sales order or a serviceorder consists of header parties and can have one or several items. The item party defaults from the header parties.Some items can have a different Ship-to party or Service Performer. In this case the party roles are also providedon the user interface on item level.In most cases the parties that are relevant for an item coincide with those of the header. Here we do not simplydisplay these parties in the user interface. As a basic rule we consider parties that are not visible on the item as havingbeen copied from the header parties, for example, the Freight Forwarder party or Bill-to party becomes valid for allitems in a sales order. The parties are copied from the parties entered in the header and are visible on the InvolvedParties tab.
Usage of AddressesIn order to describe how addresses are used, it is useful to distinguish between three groups of addresses:
● Address of a business partner that is only valid for this business partner ● Relationship address, which makes sense on a relationship between two business partners. ● Document address that is specific to a specific party role in an individual document
Types of Addresses ● Address of a Party
Address of a party mean that this address is related to one party only: ○ There is no relation to a second party for this address. ○ The address can have several purposes. For example, an address might be suitable for delivering goods
or it might be the relevant address for sending invoices to a customer. ○ An address might also have several simultaneous uses.
● Relationship AddressRelationship addresses are never for only one party, but describe an address for a relationship between twoparties. The relationship address data comes from both parties. There are two kinds of relationship address: ○ Employee relationship address
This describes the address where an employee works. The first party of the relationship is theorganizational unit, for example, a company, a sales unit, or a service unit. The second party is theemployee. Address data, such as country, city or postal code, is derived from the organizational unit.Address data, such as building, e-mail address or direct telephone number belong to the employee.Together they build the relationship address of the employee at this organizational unit.
○ Contact relationship addressThis is similar to the employee relationship address, but represents the external view. That is the personin the relationship is a contact in another company. The first party is typically an account or a supplier.The second party is the contact. The contact relationship address describes where this contact worksin this company and how you can contact him or her. Note that account and contact can have more thanone relationship address to another party. For example, a consultant works for several accounts and hasseveral workplaces at those companies and an account or supplier can have several contacts.
● Document AddressDocument address is a kind of “one-time address” that you do not want to enter in master data, since thereis, for example, no likelihood for reuse or this address will not be visible in master data.
SAP Business ByDesign February 2017Sales Orders P U B L I C • © 2017 SAP SE or an SAP affiliate company. All rights reserved. 379

Our account Silverstar Wholesales Inc. sends an invitation to a summer party at Greenhill Golf Club.A freezer is to be delivered to this Golf club. However, it is unlikely that there will be follow-up orderfrom Silverstar with delivery to Greenhill. Therefore, sales representative Kate Jacob prefers toenter the ship-to address for this one sales order as a document address instead of adding anothermaster data address. You can enter a document address on the involved parties tab shown in thedocument editor.
Note that if you frequently enter the same address as a document address in several documents, it makesense to add this address to the business partner in the master data, for example, at the account. You canthen reuse the same address in multiple documents. If the business partner has several addresses enteredin master data and the one you want is not the one the system determines, you can change the default addresssettings in the master data. This is valid for both the standard address and the ship-to or bill-to address.Note that document addresses can be only entered for parties with external party roles. You can enter adocument address for a Ship-to, Account or a Bill-to. It is not possible to enter document addresses for internalparties such as employees responsible or sales units.
Location in DocumentsThe Location is the place of supply or delivery or the place where the service is performed. A location always refersto an address. The location is also relevant for taxation to determine where the delivery or the service is taxable. Alocation can have different roles in a business process, for example, ship-from location, ship-to location, and servicelocation.The role can also change from one business document to the next. Note that by default the Ship-to location is derivedfrom the Ship-to party address.
Automatically Defaulted Address of a PartyWhenever you enter a party into a document or a party is automatically determined by the system, the systemdefaults to the standard address that is generally the most suitable. This address depends on the party role of theparty within the document. The system tries to determine the address of a party depending on the availableaddresses of the business partner in the master data.
Fred Miller is to receive the goods in a sales order. He represents the ship-to party. ● First the system checks whether Fred is an employee of one of our companies. If that is the case,
his employee workplace address is used as the default. That is by default the goods are shippedto the address of Fred’s employment (one of our companies). Such a scenario typically happensas part of inter-company processes, for example when one of our companies sells to another ofour companies.
● If Fred is not an employee, the system checks whether Fred has a contact relationship address tothe account. For example, the goods were ordered by Silverstar Wholesales Inc. and Fred has acontact relationship address for Silverstar in New York, Blueberry Road. In this case thisrelationship address becomes the default address. If there is no relationship address for thisaccount, and there is one for another account, the address does not become the default since itdoes not match the requirements.
● If Fred is neither an employee nor has a suitable contact relationship address, then his own addressis used as the default.
The address determined by the system is only a proposal and can be changed as follows: ● Choose one of the other alternative addresses entered for this party in master data. This can be the address
or the relationship address. You can choose an alternative address for a party by changing the corresponding
380 © 2017 SAP SE or an SAP affiliate company. All rights reserved. • P U B L I CSAP Business ByDesign February 2017
Sales Orders

address on the Involved Parties tab of the selected party by clicking on the value help for the Address field ofthe document.
● Enter a document address. A document address is only valid for this one document.
Note that if no address is entered for a business partner in master data or none of the addresses is suitable, then noaddress is used for the party in the document. In this case only the name is available in the document.If you want to add an address for the party in the document, you can
● Enter the address for the business partner in master data. To add this address to the party in the document,just clear the field and reenter the party.
● If there is already an address available in master data for this party, but it was not found by the system, sinceit usually would not be suitable, you can choose an address manually for a party. To do this, change thecorresponding address on the Involved Parties tab of the selected party by clicking on the value help of theAddress field of the document.
● Enter a document-specific address for the party in this document.
Creation and Usage of New Party Roles
Create a New Party RoleWith the Define New Party Roles fine-tuning activity you are able to define new party roles, such as internal andexternal involved parties. These new roles can be used for specific documents, for example, sales quote oropportunity, as additional involved parties. A party role describes a person or an organization that is involved in yourspecific transaction.The configuration delivers pre-defined party roles that are marked as Responsibility Role, which contains frequentlyused internal party roles such as employee responsible or service performer.SettingsThe controls and possible settings in this activity are explained below.
Settings Explanations Task
Party Role Code The code, which can be up to ten digits, used to identify the partyrole.
Enter the code to identify the partyrole. This code must start with Z, forexample, Z123456789.
Description The text to describe the party role used in a document and accountassignment.
Enter text to describe the party role.
ResponsibilityRole
A flag indicates that an internal party role can be used for employeeassignments to accounts.Pre-defined party roles from SAP marked with the ResponsibilityRole flag cannot be deleted or renamed. These party roles areavailable for responsibility assignment of employees. The pre-defined roles are also already defined in the party schemas andcannot be added or changed.In addition, the assignment of responsibility roles can be definedin two ways, directly through manual assignment in the accountmaster data or indirectly through rule based definitions, forexample, regional attributes such as postal or ZIP code.
Indicate if a party role should be usedto assign employees to accounts.The flag should only be used forinternal party roles such asemployees.Responsibility roles used in the partyschema will be determined based onthe account assignments.
Follow-up TasksTo support the automatic determination of the party roles in you party schema:
1. Define new party roles.
SAP Business ByDesign February 2017Sales Orders P U B L I C • © 2017 SAP SE or an SAP affiliate company. All rights reserved. 381

2. Add these party roles to your party schema, for example, add the party roles to for sales quotes in the fine-tuning option Involved Parties for Sales Quotes.
3. If you use the flag Responsibility Role, maintain the account assignment of employees in master data.
Normally, as Kate Jacob is responsible for the Silverstar Inc. account, you assign her the responsibilityrole, Employee Responsible. Once this assignment is done, each time a new sales quote or sales order iscreated, the system automatically assigns Kate with the role employee responsible in the sales document.However, you decide to create a new party role. You define the new role as Customer ServiceRepresentative and flag it as a responsibility role. Then you add the party role to the party schema in thefine tuning option Involved Parties for Sales Quotes. Next you create an additional account assignmentfor Silverstar. For example, Jack Sigo is assigned as the Customer Service Representative, and from thenon all new sales quote documents automatically show Jack Sigo as the Customer Service Representativefor quotes created for the Silverstar account.If you don’t flag the Customer Service Representative role as a responsibility role, the role can bemaintained manually in the sales quote on the involved party screen in the sales quote if the new partyrole has been assigned to the party schema.
Assign Party Role as Involved Party to DocumentsA party role describes a person or an organization that is involved in your specific transaction and is visible andselectable on the Involved Parties tab of a document. Party roles can be used for internal and external involved parties.The configuration provides a predefined party schema containing standard party roles that are required or usedfrequently in the following documents:
● Sales order ● Sales quote ● Customer return ● Service confirmation ● Service order ● Opportunity
You can modify this party schema, with certain restrictions, as follows: ● Specify whether certain party roles can or should occur in your documents under Party Role Assignment. ● Create your own party roles that can be added manually to your documents or accounts. To do this, click
Define New Party Role . ● Specify the sequence in which parties are automatically determined in the documents. To do this, click
Maintain Determinations .
PrerequisitesBefore adding your own party roles to a party schema, you must first create and name them by clicking Define NewParty Role. When you define such a party role, you can then add it also to other configurable party schemas, suchas Involved Parties for Sales Quotes or Involved Parties for Service Orders.
Party roles pre-delivered by SAP cannot be renamed or assigned to other party schemas.
SettingsThe controls and possible settings in this activity are explained below. Note that some party roles have been providedwith standard settings. You cannot change these settings.Party Role Assignment
382 © 2017 SAP SE or an SAP affiliate company. All rights reserved. • P U B L I CSAP Business ByDesign February 2017
Sales Orders

Settings Explanation Task
Active A flag that indicates whether aparty role is used in thedocuments.
Select the Active field to make the party role visible on the Involved Partiestab. (Click View All to reach this tab.)
Party Role The name of the party role usedin the documents. Party rolespredefined by SAP cannot berenamed or deleted.
Add a new party role by clicking Add .Note that the party role must be either a standard predefined party role, oryou must define it first by clicking Define New Party Role .
Mandatory A flag that indicates whetherthe party role is a mandatoryparty role. If a document issaved without this party role,the system informs you that it isinconsistent.If this check box has beenselected by default, you cannotdeselect it.
If you want to make the party role mandatory, select the Mandatory checkbox.
Unique A flag that indicates that onlyone party role can bemaintained in the document. Ifa document is saved withmultiple parties, the systeminforms you that it isinconsistent.
If you want to ensure that only one party role can be maintained in thedocument, select the Unique check box.
ForbidManualChanges
A flag that indicates whetherthe party role may be changedin the documents.
If you want to forbid changes to the party role in the documents, select theForbid Manual Changes check box.
Define New Party Role
Setting Explanation Task
Party Role Code A code for the party role that you want to add to aparty schema.
Enter your party role code for your party role. Thiscode must begin with the letter Z, for example,Z01.
Description A description of your party role. Enter a description for your party role.
Responsibility Role A flag that indicates is relevant for responsibilitymaintenance.
Select this check box if this is required.
If the Responsibility Role flag has been selected, you can maintain two types of responsibilities for this party role asfollows:
● Maintain a direct responsibility for an account. The party role is proposed in a drop down list in account masterdata, under Responsibilities. For example, employee Kate Jacob is directly responsible in a party role for theaccount Silverstar Wholesale Corp.
● Maintain an indirect responsibility for accounts. For example, employee Susan Thomas is responsible for allaccounts in US, Nevada. You do this in the Application and User Management work center, Utilities view,Employee Work Distribution subview.
If Silverstar Wholesale Corp has its main address in US, Nevada, then both Kate Jacob and Susan Thomas aredisplayed in the account master data under Responsibilities as follows:
SAP Business ByDesign February 2017Sales Orders P U B L I C • © 2017 SAP SE or an SAP affiliate company. All rights reserved. 383

● Kate Jacob: Direct Responsible is selected. You can change or delete this entry, if required. ● Susan Thomas: Direct Responsible is not selected.
You cannot change or delete this entry. If the Responsibility Role flag has been selected for this party role, and thisparty role has been assigned to a party schema, then the system automatically determines the party role on theInvolved Parties tab. The system first tries to determine the direct responsible for the account. If no direct responsiblehas been maintained, then the indirect responsible is determined, if one exists. In the example above, Kate Jacobwould be determined.Note that the Responsibility Role flag should only be applied to party roles for employees.Maintain DeterminationsDetermination of a party can consist of several steps. If a step succeeds in automatically finding a party for this partyrole, then the subsequent steps are not executed. You can deactivate the steps that you do not need, but you cannotchange the sequence of steps or configure the steps themselves.
Settings Explanation Task
Active A flag that indicates that a determinationstep has been activated. An activateddetermination step is taken intoconsideration when the systemdetermines the involved parties for adocument.
Select the Active check box to have this determination step betaken into consideration.
Step A number that is used to specify thesequence of the determination steps. Thelowest number is taken into considerationfirst.
The step numbers are provided by the system.
Determination A text that specifies how the party role isdetermined.
The texts are provided by the system.
For more information, see Work Distribution.
384 © 2017 SAP SE or an SAP affiliate company. All rights reserved. • P U B L I CSAP Business ByDesign February 2017
Sales Orders

This example shows how party roles could be configured for a document. A standard partner schema fora document contains the following party roles:
● Party Role: Account; Mandatory: Yes; Unique: Yes ● Party Role: Sales Partner; Mandatory: No; Unique: Yes
The system defines the party roles in the document as follows: ● Account
The document must contain an account. Only one account may exist in the document. ● Sales Partner
The document may contain a sales partner. Only one sales partner may exist in the document.
This example shows how determination of an employee responsible could be configured for a document: ● Party Role: Employee Responsible; Active: Yes; Step: 10; Determination: Responsibility for Account ● Party Role: Employee Responsible; Active: No; Step: 20; Determination: Responsibility Employee
Responsible by Region - Sales for Account ● Party Role: Employee Responsible; Active: Yes; Step: 30; Determination: Logged on user
In this example, the system tries to carry out step 10 to determine the employee responsible entered inthe account. If an employee responsible has not been maintained for the account, then the system willskip step 20 (because it is not active). It then goes to step 30 and determines the logged on user asemployee responsible for the document, that is, the user actually creating the document.
Determination RulesYou can display the determination rules of a document in the corresponding fine-tuning activity as described in theprevious section. The various rules are explained in the following chapters. These chapters also describe how toinfluence the determination by entering master data, if applicable, for the determination rule.
● Business partner relationship of 'party role'Example: Business partner relationship of AccountIn the Contact view in the master data of accounts, you can enter different relationships types, such as HasShip-to Party, for other business partners. The relationships are then used to automatically determine relatedbusiness partners when a document is created.What to do if the wrong party or no party is found with this step: ○ Add or remove a relationship in the master data of the account. ○ Change the default relationship in the master data of the account. ○ Disable the determination rule in the Business Partner Relationship of 'party role' fine-tuning activity.
● Functional organizational unit of ‘party role’Example: Functional organizational unit of Employee ResponsibleYou can determine the sales unit by the sales unit assigned to the employee responsible for a document; forexample, Kate Jacob is assigned to the reporting line unit “Sales Office New York”. With this step, the partyrole “Sales Unit” is preset for the employee responsible.
● Company of ‘organizational party role’Example: Company of Sales UnitYou can determine the Seller party role by assigning a company for the sales unit entered or determined bythe system. Each sales unit can only belong to one company. If a sales unit has been entered in the document,the company relevant for this sales unit becomes the default seller party.
● Copied from ‘party role’Example: Copied from Account
SAP Business ByDesign February 2017Sales Orders P U B L I C • © 2017 SAP SE or an SAP affiliate company. All rights reserved. 385

This determination step copies the business partner from one party role to another party role, as required.For example, the Ship-to, Bill-to or Payer party is automatically derived from the Account party.
● Logged on userThis determination is relevant for employee roles. The party role becomes the default when the logged-onuser who initially creates a document performs this determination step. For example, Kate Jacob creates asales order. With this determination step she would become assigned to the Employee Responsible party role.
● Responsibility “Employee (Direct Account)” from ’party role’This determination step sets the default for the employee role to the employee entered directly in accountmaster data under Contacts > Relationships and Responsibilities.
● Responsibility “name of responsibility”Example: Responsibility “Employee Responsible for Sales”This determination step sets the default for the organizational unit or employee role according to the rulesdefined in the responsibilities for employees and organizational units. For example, you defined adetermination rule by region for customers located in New York. For these customers only, a certain salesunit or certain employee is responsible. Then all documents with accounts that have an address in “New York”are assigned to this sales unit or employee responsible according to the determination rule entered previously.For more information, see Responsibility to Determine Employee Responsible – Sales.
● Organizational unit from org model if only one suitable functional unit existsIf only one organizational unit is set up in organizational management with the relevant functional unit theorganizational unit is selected as the relevant party.Example: Only one sales unit is set up in the organizational model. This single sales unit is automaticallydetermined as the relevant sales unit in a sales order.
Using a New Party Role in a DocumentThe prerequisite for using a party role in a document is adding it to the parties relevant for this document type. Youcan then add a party with the newly created party role on the Involved Parties tab of the corresponding document.Automatic determination occurs when the flag Responsibility is set in the party role.You then have to maintain a responsibility as follows:
● Maintain a directly responsible party in account master data ● Maintain an employee who is indirectly responsible: This can be achieved if the employees are not directly
responsible (manual assignment) for the accounts. Responsibility depends on customer attributes such ascountry, region or postal code. You enter a responsibility for the employee party role, such as a region. If asales order is created with a region that matches this responsibility, the corresponding employee becomesthe default.
Direct responsibilities are more important than indirect relationships. That is, if there is a direct responsibility enteredfor an account in the corresponding party role, the indirect responsibility becomes irrelevant.For more information, see Work Distribution.
New Party Roles in Copied or Follow-Up DocumentsA new party role that you introduce can be copied from one document to another. This is valid for copying a documentand creating a follow-up document and similar to parties in copied and follow-up documents. The prerequisite issimply that the new party role you defined has been added to both the source and target document.
Usage of Business Partner Roles Related to Party RolesThe following table describes which party roles can be combined with which business partner roles and the meaningof the party role.
386 © 2017 SAP SE or an SAP affiliate company. All rights reserved. • P U B L I CSAP Business ByDesign February 2017
Sales Orders

Party Role Description Party Role Business Partner Role
Account A party that buys goods or services. Account
Seller A party that sells goods or services. Company
Ship-to A party where goods or services are supplied to. Business Partner
Supplier A party that supplies goods or services. Company or Supplier
Payer A party that pays for goods or services. Business Partner
Payee A party that receives the payment for thesupplied goods or services.
Business Partner
Bill-to A party that receives the bill for the suppliedgoods or services.
Business Partner
Recipient (CC) A party that is to receive a copy of a message. Business Partner
Recipient (BCC) A party that is to receive a copy of a messagewithout the other recipients’ knowledge.
Business Partner
Service and Support Team A party that is responsible for the processing ofservice requests and customer complaints, aswell as for the planning and preparation ofservices orders.
Organizational Center with Function 'Service'
Sales Partner A party that initiates and performs businesstransactions for another company.
Business Partner
Competitor A party with whom a company competes inbusiness.
Business Partner Entered as 'Competitor'
Recipient A party that is to receive a message. Business Partner
Sender A party from whom the message originates. Business Partner
Account A party to which an activity is assigned. Business Partner
Organizer A party that is responsible for the organization ofan appointment.
Business Partner
Attendee A party that is required as an attendee of anappointment.
Business Partner
Employee Responsible A party that is responsible for something. Theparty can be an internal or external employee.
Employee
Processor A party that processes something. Employee
Activity Contact A party that has a reference to the currentactivity.
Business Partner
Service Execution Team A party that is responsible for executing serviceorders.
Organizational Center with Function 'Service'
Service Performer A party that performs services. Employee
Sales Unit An organizational unit that is responsible for thesales and distribution of products in businessprocesses.
Organizational Center with Function 'Service'
SAP Business ByDesign February 2017Sales Orders P U B L I C • © 2017 SAP SE or an SAP affiliate company. All rights reserved. 387

Party Role Description Party Role Business Partner Role
Call Participant A party that participates in real-timecommunication, for example, a phone call orinternet chat.
Business Partner
Sales Employee A party that is included in the sales departmentof an enterprise, or that carries out sales tasks.
Employee
Freight Forwarder A party that supplements their own service bysubcontracting transportation and otherassociated services, and offers the combinedservices to customers in a single package.
Business Partner
Organizational Unit An organizational unit assigned to an activity. Organizational Center
Contact A party that is the contact in a document. Contact
7.2 Sales Orders View
7.2.1 Sales Orders Quick Guide
Knowing the status of your sales orders shows that you are on top of your customer requirements and gives thecustomer a good impression of your company. To respond to customer inquiries quickly and correctly, you need asystem that gives you access to accurate, timely, and complete information on all of your sales orders.
Since your company has selected the Manage and Control Projects implementation focus, there will beslight differences between your solution and the standard as outlined below. For more information, seeWhat Works Differently in Manage and Control Projects.If your system has not been deployed, all information is shown because there is no scoping-relevant filter.
Since your company has selected the Buy, Sell, and Administrate implementation focus, there will be slightdifferences between your solution and the standard as outlined below. For more information, see WhatWorks Differently in Buy, Sell, and Administrate.If your system has not been deployed, all information is shown because there is no scoping-relevant filter.
Business Background
Sales Order ProcessingThe sales order process involves creating sales orders for products or services according to specific terms with fixedconditions. The sales order is usually created by a sales employee, and can be generated out of a sales quote, a salescontract, or an opportunity. The system supports pricing functionality and a check of the availability of products.The cost of sales can be determined using product valuation, which enables the seller to evaluate the profitability ofthe sales order. If services are needed to fulfill the sales order, service items can be added. A service request can becreated directly from the order if required. In addition, sales order processing enables you to give customer-specificprices and discounts on your products.For more information, see Sales Order Processing [page 352].
388 © 2017 SAP SE or an SAP affiliate company. All rights reserved. • P U B L I CSAP Business ByDesign February 2017
Sales Orders

Kits Process FlowFor more information, see Kits Process Flow [page 48]
Approval for Sales OrderThe sales order process involves creating sales orders for products or services according to specific terms with fixedconditions. The sales order is usually created by a sales employee, and can be generated out of a sales quote, a salescontract, or an opportunity. The system supports pricing functionality and a check of the availability of products.The cost of sales can be determined using product valuation, which enables the seller to evaluate the profitability ofthe sales order. If services are needed to fulfill the sales order, service items can be added. A service request can becreated directly from the order if required. In addition, sales order processing enables you to give customer-specificprices and discounts on your products.For more information, see Approval for Sales Order [page 362].
PricingPricing is based on price master data such as price lists and discount lists, which are used to automatically calculatepricing within all business documents for sales and service processes. A predefined pricing procedure is used todetermine the gross value the customer has to pay for certain products or services to be received on a certain dayat a certain place. The pricing procedure consists of price components, such as list price, discounts, surcharges,freights, taxes, and costs. The order of these price components is essential for the calculation of the total value.For more information, see Pricing in Customer Relationship Management [page 154].
Working with PricingIn sales and service documents there is a tab called Pricing or Pricing and Invoicing. It displays all related pricecomponents. If required you can modify these price components.For more information, see Working with Pricing in Sales and Service Documents [page 293].
Profit MarginThe information regarding profit margin and profitability can be very useful for management decisions. Thereforethe profit margin can be calculated in sales and service documents.For more information, see Profit Margin [page 231].
Tax DeterminationAs a rule, companies are legally required to calculate taxes on products that they buy or sell, and to levy these taxesfrom their customers. After the products have been provided, the taxes must be declared and levied to the respectivetax authorities. The system supports you by providing a substantially automated tax calculation for the following taxtypes: Value-Added Tax (VAT), Sales and Use Tax, Withholding Tax. The system also provides a reporting tool thatgives you effective control over your obligatory declaration of these taxes.For more information, see Tax Determination [page 9].
Credit Limit CheckAs a rule, companies are legally required to calculate taxes on products that they buy or sell, and to levy these taxesfrom their customers. After the products have been provided, the taxes must be declared and levied to the respectivetax authorities. The system supports you by providing a substantially automated tax calculation for the following taxtypes: Value-Added Tax (VAT), Sales and Use Tax, Withholding Tax. The system also provides a reporting tool thatgives you effective control over your obligatory declaration of these taxes.For more information, see Credit Limit Check [page 363].
SAP Business ByDesign February 2017Sales Orders P U B L I C • © 2017 SAP SE or an SAP affiliate company. All rights reserved. 389

Order-to-Cash (Sell-from-Stock)The Order-to-Cash (Sell-from-Stock) business scenario enables you to sell goods from stock using a wide range ofstandard features to handle sales quotes, sales orders, deliveries, customer invoices, and payments. This scenarioincludes features, such as, available-to-promise (ATP) check, pricing, credit card, credit limit check, and automaticorder creation.For more information, see Order–to-Cash (Sell-from-Stock).
Order-to-Cash (Standardized Services)The Order-to-Cash (Standardized Services) business scenario enables you to sell services with functions to handlequotes, create sales orders with service items, plan service execution, and fulfill, confirm, and invoice services sold.The selling of services can be the main line of business or a value-added service for physical goods.For more information, see Order-to-Cash (Standardized Services).
Order-to-Cash (Project based Products and Services)The Order-to-Cash (Project-Based Products and Services) business scenario is used to manage the complete end-to-end process of selling project-based products and services to customers. This scenario integrates sales quotesand sales orders with project management allowing you to create customer invoices for time and expenses recordedagainst a customer project. Invoices can be created on a time and materials basis, a fixed-price basis, or acombination of both. After the customer invoice has been issued, customer payments can be monitored. Thisscenario also supports the analysis of project profitability based on project costs and revenues.For more information, see Order-to-Cash (Project based Product and Services).
Order-to-Cash (Third-Party Order Processing – Material)The Order-to-Cash (Third-Party Order Processing - Material) business scenario enables your company to createsales orders that are used to ship products with or without a product specification to your customer directly from asupplier rather than from your own company. A third-party purchase request is created automatically when yourelease a sales order for a product to which purchasing contracts and/or list prices have been assigned in the system.The third-party purchase order can be created automatically or manually. You can enter the supplier's confirmationdata in the system when they send the delivery notification. Based on this third-party delivery, supplier invoicing andcustomer invoicing is triggered. You can use the Order-to-Cash (Third-Party Order Processing – Material) scenarioif you always ship directly from a supplier or if you only ship directly from a supplier in exceptional cases.For more information, see Order-to-Cash (Third-Party Order Processing — Material).
Order-to-Cash (Make-to-Order)The Order-to-Cash (Specified Products) business scenario enables your company to produce and sell products fora specific customer demand.You can create a sales quote or sales order with a product specification that includes customer-specificrequirements, plan the multilevel demand for a sales order item, and create supply for the required products. Youcan order and receive materials based on requirements from the customer, release the production order, and createproduction tasks. During task confirmation, it is ensured that only those materials that were replenished for a specificcustomer demand are consumed. Output products are always confirmed as specified stock. A final inspectionidentifies if any of the units do not conform to the customer requirements.You can post a goods issue. The system creates an outbound delivery and the products are shipped to the customer.An invoice is created based on the outbound delivery and the system updates financial accounting.For more information, see Order-to-Cash (Make-to-Order).
390 © 2017 SAP SE or an SAP affiliate company. All rights reserved. • P U B L I CSAP Business ByDesign February 2017
Sales Orders

Customer Contract ManagementThe Customer Contract Management business scenario enables you to create and manage contracts related toservices in the framework of your support entitlements or managed services. In addition, the following features areprovided:
● Seamless integration with service request and service confirmation processing, allowing you to fulfill andconfirm services carried out for a contract.
● Invoice schedules for contract items ● Generation of (standard) contract out of sales order using a contract template ● Price agreements for items sold on a time and material basis
The scenario incorporates business functions from related areas that directly support service delivery for contracts,such as processing due items and payments in Financial Management.For more information, see Customer Contract Management.
Tasks
Create a Sales Order1. Choose the Sales Orders view.2. Click New and choose Sales Order or click New Sales Order under Common Tasks.
A New Sales Order quick activity opens.You can also create a sales order from: ● A sales quote, or a sales quote for contract in the Sales Quotes view ● A lead in the Leads view ● An opportunity in the Opportunities view ● A service request in the Service Request view
You can copy a Sales Order (with Kit ) by selecting the respective line item andclicking Copy . You can also create a Sales Order with reference to a Sales Order(with Kit) by clicking Create with Reference from the New Sales Order screen.
You can also create a sales order with reference to a contract by clicking Create with Reference Contract from the New Sales Order screen. Thesystem automatically copies details such as Account ID, Product ID, PriceAgreement, and so on from the contract to the sales order.
3. Enter details of the account associated with the sales order in the Account field, suchas, the account ID or account name. The system will automatically display the relatedmaster data in Account, Main Contact, Ship-To or Service Recipient, Bill-To, EmployeeResponsible and all default sales data. If necessary, click the Open Select Dialog iconto search for the account.
If the sales order is associated with a new account, click New to generate aunique account number.
4. Under General, enter further details to identify the sales order: ● In the Description field, enter a description of the sales order.
SAP Business ByDesign February 2017Sales Orders P U B L I C • © 2017 SAP SE or an SAP affiliate company. All rights reserved. 391

● If necessary, in the External Reference field, enter the ID customer uses to identifytheir order.
If payment and delivery details are available for the account, the systemautomatically copies the corresponding data to the sales order. The data iscopied from the Sales view of the account and depends on the relevantdistribution chain determined in the sales order.
5. Under Delivery or Fulfillment, you can define a delivery/fulfillment priority for the salesorder. This field may already contain a default value if the delivery/fulfillment prioritywas maintained in the account sales data for the relevant distribution chain(combination of sales organization and distribution channel). You can change thisdefault value, if necessary.
If you choose Immediate for the Delivery Priority, the sales order is treated as arush order and is released to the execution department automatically. That is,this order is set to Released automatically in the Customer Demand view of theOutbound Logistics Control work center and immediately appears in the DeliveryControl view of the Outbound Logistics work center.
6. Enter the product or service details under Items .
You can also enter kits as items.
1. In the Product ID field, enter the product or service ID. If necessary, click the OpenSelect Dialog icon to search for the product or service. The system automaticallydisplays its description and list price.
If you enter a Product ID of a service item of type Service fixed price withoutactuals, and assign the sales order to a multi customer project, you will seea Service Fulfillment via Project check box under Cost and RevenueAssignment. The indicator is unchecked by default. If you select the checkbox, the system will do the following steps:
● Plan the costs from the project and not the sales order ● Make mandatory fields Labour Resource and Duration in the sales
order item level non-mandatory
You can then release the service item for sales execution, and the invoicecan be generated.
If there are existing contracts with the same Account ID and Product ID asused in the sales order, the system suggests a list of contracts available thatyou can enter into the Reference Contract ID – Contract Item ID field.
2. Enter the required quantity. The system calculates and displays the value. It alsochecks whether the product is available on the requested date.
392 © 2017 SAP SE or an SAP affiliate company. All rights reserved. • P U B L I CSAP Business ByDesign February 2017
Sales Orders

● For kits, you can enter quantity at the kit header and quantity of thekit components will get adjusted accordingly. The quantity of kitcomponents cannot be edited.
● List price of the items is automatically fetched if it is maintained. Ifthe list price is not maintained, you can manually enter the list price.For a kit, you can enter list price at kit header, as pricing is applicableonly at kit header level.
● You can select the Fulfillment as External or Internal, for kits you cando so only at the kit header level.
3. Repeat the steps outlined above to enter additional items.
You can also use a fast entry to enter multiple items:Click Fast Entry to enter multiple items without triggering pricing orchecking product availability:
● The system generates ten blank lines. When five lines are filled newten blank lines are added automatically. It also disables some suchas copy, follow-up, or submit.
● After maintaining all items click Check Fast Entry or Save. Thesystem then checks all data created and performs pricing andproduct availability.
4. If necessary, you can structure the items in the sales order by entering text itemsor changing their sequence:
● Creating Text ItemsYou can create text items that can be used as headings for the itemsunderneath, or to print additional texts in a sales quote or sales orderconfirmation. Simply enter a description without entering a product ID.Text items are not relevant for pricing or delivery. Text items are copied tosales quotes and sales orders in copy and follow-up scenarios.
● Changing Sequence of Items or Renumbering ItemsYou can change the sequence of items in a sales quote or a sales order, toensure that items are displayed in a logical sequence in the sales quote orsales order confirmation. For example, you want to keep a normal item anda related text item together. You can do this in the following ways: ○ Move an item up or down by selecting it and clicking move up or
move down. ○ Position an item between two existing items by manually entering a
line number that is between the two line numbers of the existing items
After you have done this, you can let the system reset the line numbers sothat they are displayed consistently in the sales quote or sales orderconfirmation. To do this, click Renumber . The sequence of the items willremain as you have set it.You can change the sequence of items under the following conditions: ○ The sales quote or sales order is not based on a preceding sales
documents.
SAP Business ByDesign February 2017Sales Orders P U B L I C • © 2017 SAP SE or an SAP affiliate company. All rights reserved. 393

○ The sales quote or sales order does not have any follow-up salesdocuments.
You can also change the sequence of items after you have submitted thesales quote or sales order.These features don’t work in the following cases: ○ For sales quotes and orders that have been migrated ○ For quotes for contracts ○ In sales quotes and orders that have A2A, B2B, or Internet in the
Origin field ○ For sales orders that have one or more items relevant for Available-
to-Promise (ATP) check ○ For sales orders that have been released
Depending on your business configuration, the system performs the followingchecks:
● Available-To-Promise (ATP) check for products, either immediately orwhen you click the Check Availability button in the sales order: ○ A green light confirms that the requested quantities are available on
the requested date. ○ A red light indicates that the requested quantities are not available
at all on the requested date. ○ A yellow light indicates either a late delivery or that there is an
insufficient confirmed quantity of the requested products available.
If a product is not available you can choose Replace Product tosearch for alternative products, product specifications, or ship-from locations, in order to replace the selected item based onprojected product quantities.For the search you can maintain the Horizon, that represents thetime frame for which the projected product quantity iscalculated. The Projected Quantity is calculated by the availablestock plus supply minus demand, considering the horizon set(without considering the transport times and withoutconsidering the replenishment lead time).
● Credit limit checks when the account (debtor) or total gross amount of adocument is changed. For further information about credit limit checks,see Credit Limit Check [page 363].
7. Then submit the sales order.The following options are available for submitting a sales order: ● Release Order is for releasing the order. The status of the sales order changes from
In Preparation to Open. The order becomes active for supply planning andoutbound logistics control and project invoicing. ATP results become binding formaterial items.Project-based items are forwarded to project invoicing where invoicing and ordercompletion is done. For more information, see Project Invoicing [page 208].
394 © 2017 SAP SE or an SAP affiliate company. All rights reserved. • P U B L I CSAP Business ByDesign February 2017
Sales Orders

If an approval process for sales orders is activated, the system starts at firstthe approval process and when this process is finished the sales order isautomatically released.
● Send Order Confirmation to Account submits the order confirmation dependingon your output settings, such as sending an e-mail or fax to the account, or theorder is sent to the printer, and releases the order if it has not yet been released.
These options are only available for standardized service items: ● Release to Service Execution submits all service items to the Order Pipeline view
for service execution and releases the order if it has not yet been released. ● Confirm Service Execution opens the Service Confirmation screen for service items
that are relevant for confirmation if they already have been released for execution. ● Complete Service Execution sends all service items to the invoice proposal process
(for invoices that require no service confirmation).8. Now the new sales order is saved to the system and added to the list in the Sales
Orders view. To open the sales order from this list, click the appropriate sales order IDlink.
You can create a down payment request for a selected sales order from the listin the Sales Order view by clicking Create Down Payment . The system thenreleases the down payment automatically, and after clearing, the down paymentis considered in the invoice documents that are related to that particular salesorder.
If the sales order is In Preparation and you only save the order, the ATP checkbecomes non-binding.
Create a Complete Delivery Sales Order1. Click Complete Delivery under General in the sales order.2. You can choose the value for the Delivery Rule, for example Single-Delivery — Full
Quantity. This value is then copied to all product items.3. All products with the same requested date, ship-to address, and delivery rule gets
automatically the same Delivery Group and therefore will be shipped together.
If the delivery date for a delivery group is too late, you can optional show the simulateddelivery date in the item table using hidden field Simulated Schedule Line. Thissimulates the earliest delivery date and quantity for each product to show earlierpossible delivery dates. If only one product is responsible for a late delivery, you canremove this product from the delivery group by selecting the delivery rule MultipleDeliveries for this product (This triggers a new ATP check for all items). In this casethe product will be delivered at a later time.
For more information, see Complete Delivery Orders
Create a Sales Order Using Microsoft ExcelYou can create a sales order by entering it in a predefined Microsoft Excel template anduploading them to the SAP Business ByDesign system. For information on this task, see here.
SAP Business ByDesign February 2017Sales Orders P U B L I C • © 2017 SAP SE or an SAP affiliate company. All rights reserved. 395

Sell a Contract in a Sales OrderWhen you enter an entitlement product, that references a contract template, into a sales orderitem, a contract is automatically generated and linked to the sales order after you release it.For information on this task, see here.
Assign Source of SupplyFor more information, see here.
Create a Project from a Sales OrderWork for services that you sell to a customer can be tracked internally in a customer projectthat is created directly from a sales order.For more information, see here.
Create an Invoice ScheduleYou can create an invoice schedule for a document by using an invoicing time frame:
1. Under Pricing and Invoicing choose Invoice Schedule .2. Click Edit Invoicing Time Frame . Now you can edit a new time frame or view an existing
time frame with a monthly recurrence pattern for the actual year, for example.Select the Applied check box to assign the selected invoicing time frame to the item.
3. Click OK . The system creates monthly invoice dates for the applied items.
You can also create an invoice schedule step by step:1. Under Pricing and Invoicing choose Invoice Schedule .2. Click Add Item . Now you can select an item for which you want to create several
invoicing dates.3. Click Add Date to maintain several invoice dates for the selected item.
For more information about invoice schedules, see Invoice Schedule [page 365].
Create a Tax Exemption CertificateFor information about this task, see here.
Update a Sales Order1. Choose the Sales Orders view.2. To edit a sales order
● Select an order in the list and click Edit to open the sales order quick activity ● Select the Sales Order ID in the list to open the sales order fact sheet and click
View All to open the sales order editor.3. Change the sales order details on the General tab page:
● For a product, under Delivery, select the delivery priority, the required Incoterms,and the Incoterms location for the sales order. You can also temporarily block thedelivery process. For a service, select the fulfillment priority under Fulfillment.
● Under Payment, select the payment terms.If you have selected Credit Card from the Payment Method list, additional fieldsare shown.
396 © 2017 SAP SE or an SAP affiliate company. All rights reserved. • P U B L I CSAP Business ByDesign February 2017
Sales Orders

The credit card information defaults from the party role payer master data. Ifseveral credit cards are maintained, only the credit card token from the payer isselectable. If a new credit card needs to be assigned to the order, it must first becreated in the account master data. To check the authorization details, click
Authorization Status . ● You can view and change the Internal Comment and the Customer Information
The notes in the Internal Comment and Customer Information fields of the salesorder are copied from master data.On header level, notes are copied from account master data as follows: ○ Text entered under Internal Sales Note is copied to Internal Comment. ○ Text entered under External Sales Note is copied to Customer Information.
On item level, notes are copied from product or service master data as follows: ○ Text entered under Sales Notes is copied to Customer Information.
All text fields in the sales order can be changed, but if the account is changed onheader level, the notes are overwritten with the texts of the new account, productor service.
● Enter or change further information if required.
If payment and delivery details are available for the account, the systemautomatically copies the correspondent data to the sales order. The data iscopied from the Sales view of the account depending on the relevantdistribution chain determined in the sales order. Changes you make to thesedetails in the sales order only impact that sales order and have no impacton the account details.
4. To edit your items or add new products or services to the order choose Items :1. Click Add Row to create a new row in the table.2. In the Product ID field, enter the product or service ID. If necessary, click the
Open Select Dialog icon to search for the product or service. The systemautomatically displays its description and price. Optionally you can also enter orchange the price manually.
3. Enter the required quantity. The system calculates and displays the expectedvalue. It also checks whether the product is available in the requested quantity onthe requested date.
4. Optionally in the Item table itself it is possible to add the Product Specificationcolumn to the table and assign to each item a defined product specification.
5. Repeat the steps outlined above to enter additional items.
The system displays a green light if the products are available on therequested date, a red light if the products are not available at all, and a yellowlight if there is some stock available but it may not be enough to cover theorder. The system gives alternative options, for example it indicates thathalf the products are available on the requested date and that the otherswill be available later or that the full quantity of products can be deliveredlater than requested.
6. If you want to access the price history for an item, select the item in the list andclick Price History . The price history of other sales quotes or sales orders isdisplayed using the corresponding account, product, and product specification.
SAP Business ByDesign February 2017Sales Orders P U B L I C • © 2017 SAP SE or an SAP affiliate company. All rights reserved. 397

In addition you can have a look to the price history of other products by using theAdvanced Search.
5. To track the progress of the order and access all related documents, such as a salesquote, service request, customer invoice or delivery, choose the Document Flow tabpage. In the extended view of the document flow you see in addition related activitiessuch as appointments or activity tasks. For further information, see Document Flow.
6. At the top of the Sales Order editor, click Save to save the updated sales order, thenclick Close to return to the Sales Order view.The updated sales order is saved to the system, and can be accessed from the list ofsales orders in the Sales Orders view. To open the sales order from this list, select theappropriate sales order ID link.
Cancel a Sales Order1. Choose the Sales Orders view.2. Select a sales order in the list that you want to cancel and click Edit to open the sales
order quick activity, then click View All .3. To cancel the sales order you have the following options:
● You can cancel the complete order on header:1. To do this choose the General tab page and choose a value from Reason for
Rejection.2. After you saved the sales order, the Reason for Rejection is copied to the
items, that are not already canceled separately. ● You can cancel single items:
1. To do this choose Items and select the item that should be canceled.2. On the Details tab page of the item choose a value from Reason for
Rejection.3. Repeat the steps for all items that you want to cancel and save the sales order.
If the Delivery Status of an item is In Process, contact your warehouse beforeyou cancel the item, because it could be that the item is already being sentto the customer.
398 © 2017 SAP SE or an SAP affiliate company. All rights reserved. • P U B L I CSAP Business ByDesign February 2017
Sales Orders

● If you already canceled single items, it is possible to cancel the completesales order on the General tab for the remaining items. The reason forcancellation that is set on the General tab is also applied to the remainingitems .
● You can remove the reason for rejection on header and the cancellationis then ,removed on header and on all items that are canceled by header.Separate cancellations on item remain unaffected.
● If the sales order has the status In Preparation, you can also delete theorder in the Sales Order view.
● If the sales order is released for execution and the status is In Process,you should contact the warehouse to make sure that the cancellation hasbeen accepted.
● If a project is assigned to a sales order that has been canceled, you canclose or stop the project manually.
● If a project task is assigned to a sales order item that has been canceled,you can delete the project task if it has the status In Planning. Otherwise,the assignment to this project task remains for documentation purposes.
Delete a Sales Order1. Choose the Sales Orders view.2. Select a sales order in the list that you want to delete and click Delete .
You can only delete sales order which are created by intercompany process withoutany items or which are received from an external system.
Reverse a Sales OrderYou may want to cancel a sales order for several reasons. For example, your customer nolonger wants the product that they have ordered or something has gone wrong in yourexecution department and you are no longer able to deliver the product.For more information, see here.
Track the Life Cycle Status1. Choose the Sales Orders view.2. Choose one of the predefined searches of the Show: field and click Go .3. Now you can track the status of your sales orders.
The life cycle status for orders are: ● In Preparation
This is the initial status. You can edit without restriction the account and involvedparties. The order can be deleted in this status.
Orders originating from business-to-business or that have follow-upactivities cannot be deleted.
● Open
SAP Business ByDesign February 2017Sales Orders P U B L I C • © 2017 SAP SE or an SAP affiliate company. All rights reserved. 399

This status indicates that the order has been released. Ordered products aretransferred to logistics and can no longer be removed from the order.
● In ProcessThis status indicates that at least one line item has been released for execution.The following fields become read only: On item level Quantity, Ship-To, andRequested Date and Incoterms that have been copied from the General tab view.
● CompletedThis status indicates that the order has been invoiced or was canceled byentering a Reason for Rejection on the General view.
To change the status of a sales order to Completed, be sure that the items havebeen canceled properly or that the delivery status is Finished for at least one ofthe items.
4. In case you want to have a deeper look into the related documents, such as a salesquote, service request, customer invoice or delivery, you can also access them on thesales order fact sheet. To do this, click Sales Order ID and then choose the More tab.
Create a Target Group from a Sales Orders WorklistFor marketing purposes you can create a target group of accounts listed in a worklist. To dothis:
1. Call up the required worklist, and modify it to your needs.2. Click Export followed by To Target Group.
The New Target Group screen opens.3. Check the details and save the target group.
7.2.2 Sales Order Credit Worth Run
About this documentThe Sales Order Credit Worth Run allows you to automate the credit limit check on the orders which fulfills theselection criteria at the scheduled time.
Mass Data Runs (MDR)A Mass Data Run (MDR) is the automatic mass processing of a task or a business transaction. MDRs enable massprocessing of business data and are used in business processes, for example, invoice runs, payment authorizationruns, or balance confirmation runs. When a user schedules an MDR the system represents it as a background job.During scoping, it is possible to provide default variants of the MDRs.MDRs are created and maintained in the work centers. Using the Job Scheduler, users schedule the run to executeonce or regularly at specified times.In the Background Jobs view of theApplication and User Management work center, you can monitor and rescheduleMDR jobs that are created by users in other work centers.For more information, see Mass Data Runs (MDR) [page 148].
400 © 2017 SAP SE or an SAP affiliate company. All rights reserved. • P U B L I CSAP Business ByDesign February 2017
Sales Orders

Create a Sales Order Credit Worth Run1. In the Sales Orders work center, on the Sales Order Credit Worth Runs view, click New to open the New Sales
Order Credit Worth Run screen.2. Select Parameters
Enter a Run ID and, if required, a description for the run The following control parameters are needed forcreating the run: ● •Application Log Content: You can select the following:
○ All Details ○ No Details ○ Terminations ○ Terminations and errors ○ Terminations, Errors and Warnings
3. ReviewReview the details of theSales Order Credit Worth Run and click Save . Click Set to Active , to activate therun.
4. ConfirmationChoose one of the following options as required: ● Click Close if you do not want to schedule a run immediately. ● Choose Schedule Immediate Run to execute a run immediately. ● Choose Schedule Single Run to define a date and time for a run.
Setting Status for a RunIn the Project Purchase Request Runs view, Under Actions you can set the status as:
● Set to Obsolete sets the active run to Obsolete status ● Undo Obsolete sets the obsolete run to In Revision status and has to be activated again to set it to Active
status
Schedule a Project Purchase Request Run1. In the Sales Orders work center, on the Sales Order Credit Worth Runs view, select a run and click
Schedule to open the Schedule Job screen.2. Choose one of the following options as required:
● Choose Start Immediately to execute the run immediately. ● Choose Run After Job and select a job.
The run will then be executed immediately after the specified job. ● Choose Single Run to define a date and time for the run. ● If you want to execute the run at regular time intervals, choose Recurrence and choose a recurrence for
the run, for example, daily, weekly, or monthly.3. To save the run and return to the Sales Order Credit Worth Run view, click Save and Close . The run has been
scheduled and will be executed as specified4. To know more about each run, select the run on the Sales Order Credit Worth Run screen. Information of the
run will be present in the Details tab.
SAP Business ByDesign February 2017Sales Orders P U B L I C • © 2017 SAP SE or an SAP affiliate company. All rights reserved. 401

7.3 Customer Contracts View
7.3.1 Customer Contracts Quick Guide
Contracts are essential to daily business, where suppliers and customers regularly negotiate agreements andarrange invoicing and payment.The Contracts view allows you to create and manage contracts related to materials and services.Contracts are integrated seamlessly with sales order, service request and service confirmation processing, allowingyou to fulfill and confirm the sale of materials and services carried out for a contract. You can maintain invoiceschedules for contract items sold for a fixed price, or set price agreements for items sold on a time and materialbasis.
If your company has selected the implementation focus Buy, Sell, and Administrate, there will be slightdifferences between your solution and the standard as outlined below. For more information, see WhatWorks Differently in Sales for Buy, Sell, and Administrate.
Business Background
Quick Guide for Customer Contract TemplatesThe Contract Templates view allows you to list and process contract templates that are used by sales employees toquickly and efficiently create customer contracts. Here, you can, set up a contract template and link it to anentitlement. For more information, see Quick Guide for Customer Contract Templates.
Service Request ProcessingService request processing begins with the creation of a service request and ends when the service desk agentconfirms that the request has been resolved. A service request originates when a customer calls the service desk tosolve an issue, possibly with regard to a product. In addition to the description and the categorization of the issue,the service request contains the documentation and the results of the resolution. The goal of service requestprocessing is to solve these requests as efficiently as possible in order to maximize customer satisfaction.During the identification phase the system makes it easy to match the information provided by the customer withexisting customer and product data in the system. After identification the customer might refer to former, in process,and planned activities or interactions, such as previous requests or phone calls. The logging of customer issues isaccelerated by optimized notes, qualification, and categorization features.For more information, see Service Request Processing.
Services EssentialsThe Services Essentials provides a detailed review of the three business scenarios and their variants that containservice processes, as well as a detailed explanation of the system activities required to set up these scenarios.The Request-to-Resolve business scenario is mainly relevant for companies that provide services. It covers allaspects of customer service activities from communications, managing service requests, through to maintainingand updating the knowledge database.The business scenario Field Service and Repair is mainly relevant for manufacturing companies or service providerswho carry out after-sales services for one or more manufacturers. It covers all aspects of service and repair activities.
402 © 2017 SAP SE or an SAP affiliate company. All rights reserved. • P U B L I CSAP Business ByDesign February 2017
Sales Orders

Order-to-Cash (Services) is a sales scenario dedicated to these companies that are either providing product-relatedservices that are sold together with their products (a training package, for example) or providing services as aseparate line of business (for example, a builder offering independent architectural services). This business scenariocovers all aspects of order-to-cash processing, from the sales order for service sales, through to the invoice andother financial documents.For more information, see Services.
Request-to-ResolveThe Request-to-Resolve business scenario enables your service department to provide customer service andsupport to prospects and existing customers. It provides you with functions to receive inquiries via different inputchannels, and to create and handle service requests. You can provide solutions to your customer using various outputchannels, and trigger appropriate follow-up activities such as field services. There are also enhanced functions for:
● Knowledge base support to efficiently resolve service requests ● Customer warranties to meet legal requirements, and manage entitlements for product failures and defects ● Service levels for monitoring performance objectives and due dates
For more information, see Request-to-Resolve.
Customer Contract ManagementThe Customer Contract Management business scenario enables you to create and manage contracts related toservices in the framework of your support entitlements or managed services. In addition, the following features areprovided:
● Seamless integration with service request and service confirmation processing, allowing you to fulfill andconfirm services carried out for a contract.
● Invoice schedules for contract items ● Generation of (standard) contract out of sales order using a contract template ● Price agreements for items sold on a time and material basis
The scenario incorporates business functions from related areas that directly support service delivery for contracts,such as processing due items and payments in Financial Management.For more information, see Customer Contract Management.
Migration of Customer ContractsYou can migrate customer contracts from your legacy system to SAP Business ByDesign using the migrationtemplate.For more information, see Configuration Guide: Migration of Customer Contracts.
Tasks
Create a Contract1. Click New , then choose Contract to open the New Contract editor.
Or choose New Contract in Common Tasks. You can also create a sales contract as afollow up from a quote for contract.
2. On the General tab, Main Information enter relevant contract information:a. Enter the contract start and end dates, and the contract date that documents
when the contract was signed.
SAP Business ByDesign February 2017Sales Orders P U B L I C • © 2017 SAP SE or an SAP affiliate company. All rights reserved. 403

The contract header dates must include all item start and end dates, inparticular the header start date must come before all item start dates, andthe header end date must come after all item end dates.
When using the Copy and Extend function to renew an item, thecontract end date is extended automatically to fit the new end date ofthe item. The system displays a message informing you of this change.
b. If a formal contract renewal process is relevant to your business, you can enter arenewal rule In the Renewal Agreement section of the Renewal and Cancellation tab. This field is for information purposes only and may be left blank.Additionally, when you enter a duration in the Reminder field, for example 1Month, the system will automatically send an alert one month before contract endto remind you that renewal is imminent. The number of days left on the contractare also displayed as a reminder to carry out any necessary actions before thecontract ends.Renewal settings are valid for all items in the contract.
c. If you want to use a formal cancellation process, enter a cancellation rule in theCancellation Agreement section. This field is for information purposes only andmay be left blank.You can describe this rule further by entering a note in Details, and by setting aminimum contract validity period. This is the time period, for example 1 Year,during which the account must honor the agreement, and may be denied anycancellation requests.This cancellation rule and its related fields are set once on header level and arevalid for the whole contract. For more information, see the Cancel a Contract orContract Item task below.
d. Enter a service level. The service level maintained here is automaticallydetermined and applied by the system when a service request is created withreference to the contract.
For contracts with item type material, the Service Level field will be disabled.
3. On the Items tab, enter the product that you are selling. This can be a material, aservice, an expense, or an entitlement.Click Add Row to enter item information in the Details section on the various tabs. ● Specify the item type, which controls further processing of the item. You can
change the item type, even after saving the contract. However, it is not possibleto change the item type if the item has already been released.
● Check the Price per Period checkbox if the net price should cover the time periodentered in the price unit field, for example one month. If you are going to set thischeckbox, the unit of measure must be time-based.
Do not check this checkbox if you want invoice schedule dates to be basedon the item quantity.
For price per period items, we recommend you use an invoice schedule. Here, thequantity is informative in character and is used only to calculate net value. Thismeans that when maintaining an invoice schedule with the Edit Invoicing Time
404 © 2017 SAP SE or an SAP affiliate company. All rights reserved. • P U B L I CSAP Business ByDesign February 2017
Sales Orders

Frame button, the quantity is not relevant. Rather, the system uses only the priceper price unit and the time interval between two invoicing dates to calculate thenet value.
If you are creating an invoice schedule manually, the system proposesthe quantity, which you must then adjust manually. We recommend thatyou keep the quantity and price unit equal, for example by specifyingboth as 1 month.
The price for rented software is $10 per day. The validity period of thecontract is one year. Price per Period is checked for the item. The totalprojected net value is $10 multiplied by 365 days, or $3,650.
● Specify whether the item is to be fulfilled internally or externally in Executiondetails, and maintain additional information having to do with invoicing,cancellation, and cost and revenue assignment.
If you are assigning the costs and revenues of an item to a project task,although it is possible to do this with a direct cost project, we recommendthat you use a multi-customer project task.It is not possible to assign an item to a customer project or overhead costproject, and project invoicing cannot be used here.
● On the Entitled Products tab, list the products or product categories contained inthe entitlement item and to which the account is privileged. This tab is only activefor entitlements; not for materials, services, or expenses.
● On the Price Agreements tab, you review and maintain contract specific list prices,and discounts for materials and services. This tab is active only for time andmaterial items. It is not displayed for fixed-price items.For example, for an entitlement item of type time and material, you do not maintaina list price which remains blank. This is because the item itself is not invoiced,rather the underlying service maintained on the entitled products tab. Youmaintain discounts and list prices for this entitled product on the Price Agreements tab there.When maintaining price agreements in a contract item with the invoicing methodtime and material, the system proposes a list price automatically when you click
Add Row . The system proposes list prices as follows:1. For items of type Entitlement – Time and Material, the system proposes the
list price of the corresponding service or expense.2. For items of types Service – Time and Material and Expense – Time and
Material, the system proposes the list price of the item.3. For items of types Material – Product – contract, the system proposes the list
price of the corresponding materials.4. On the Covered Products tab, enter the products secured by the contract.
Here, you can specify coverage of the contract on product category, product, orregistered product levels. Alternatively, you can avoid unnecessary maintenance andsimply set the All Products Covered checkbox. In this case, all current and futureproducts for this account are covered by the contract.
SAP Business ByDesign February 2017Sales Orders P U B L I C • © 2017 SAP SE or an SAP affiliate company. All rights reserved. 405

For contracts with item type material – Product – contract, the system does notallow you enter any information under the Covered Products tab.
5. Enter pricing and invoicing information on the relevant tab. You can, for example, createan invoice schedule for processing invoices with specifications concerning the invoicedates and the amounts to be invoiced. For more information, see the Create InvoiceSchedules task below.
For contracts with item type material – Product- contract, you cannot createinvoice schedules.
6. Click Release on item level or Submit Release on header level to activate items inthe contract. Once items are released, they are live and ready to be applied in yourbusiness processes. You can for instance immediately invoice the fixed-price items.
If you want to release several contracts at a header level at once, then from theContracts view, select the various contracts you want to release, and click
Actions and select Release. If there are inconsistent contracts or alreadyreleased contracts amongst those selected, the release action will not be carriedout for all the contracts.
7. To save the new contract to the system, click Save .8. Click Submit Send Contract Confirmation to Account.
The confirmation can be printed, faxed, or sent to the customer as PDF attachment viae-mail.
For the United States, Mexico, and Canada, the local letter format issupported but no other country specifics are taken into account. ForGermany, Switzerland, and China, there are no restrictions. All othercountries have the same page size as Germany.
9. Click Close to return to the Contracts view. The new contract is added to the list in theContracts view. To reopen the contract, click the contract ID.The contract can now be used in follow-up material and service processes.For more information on determining contracts in service requests, see here.
The Life Cycle status of the contract is set to complete only when fulfillment andinvoicing is finished and the contract items are expired.
An entitlement product is one type of product that can be sold in the contract.Entitled products are a list of products that break down, or detail, the entitlementproduct.Covered products are those secured by the contract.
You buy a printer and a related protection plan that guarantees 24/7 support incase of technical problems with the printer. This support encompasses both remotesupport by e-mail and telephone, and on-site service.Here, the entitlement product is the 24/7 support; the entitled products are remotesupport and on-site service; and the covered product is the printer.
406 © 2017 SAP SE or an SAP affiliate company. All rights reserved. • P U B L I CSAP Business ByDesign February 2017
Sales Orders

Customer-specific extension fields can be transferred from master data for theaccount and/or the product to the customer contract, and from the customercontract to the service confirmation and customer invoice.The sections Covered Products on the contract header, and Entitled Products oncontract item level can also be extended with customer-specific fields.
Follow-up on a ContractRelease orders are not supported in Customer Contract processing at this time.
The standard document flow is Contract Service Request ServiceConfirmation Invoice .It is however possible to create as a follow-up to a contract, a service request, then a serviceorder. Note that, in this case, the service order is not a release order that calls off items directlyfrom the contract. Rather it is as an additional order that is separate from the contract, whenfor example you want to honor a request from the customer that is not covered by the contract.You can also create quote for contract as a follow-up to a contract.
Create a Contract from a Contract TemplateFor information, see here.
Cancel a Contract or Contract Item1. To stipulate when and under what conditions an account can cancel the contract, enter
a cancellation rule in Renewal and Cancellation on the General tab. This field is forinformation purposes only and may be left blank.You can describe this rule further by entering a note in Details, and by setting a minimumcontract validity period. This is the time period, for example 1 Year, during which theaccount must honor the agreement, and may be denied any cancellation requests.This cancellation rule and its related fields are set once on header level only and arevalid for all items in the contract.
2. Once the contract is released, the related cancellation fields are activated that allowyou to review incoming cancellation requests and decide whether they are valid andwhen they should be put into effect: ● Cancellation Received On ● Cancellation Requested For ● Cancellation Reason ● Cancellation Effective On ● Invoice Cancellation ● Cancellation Status
These fields are also available on item level for cancelling individual items instatus Released or In Process.
3. When the account calls, writes, faxes, or stops by to cancel the contract or an item,enter the date and time of this communication in the Cancellation Received on field.
4. Whether the account requests a valid cancellation date, an immediate cancellationdate, or a date that does not match your cancellation rule, you enter this informationin the Cancellation Requested For field.
SAP Business ByDesign February 2017Sales Orders P U B L I C • © 2017 SAP SE or an SAP affiliate company. All rights reserved. 407

5. Select a cancellation reason.6. In light of this information, you can now compare the requested cancellation date
against the cancellation rule and minimum contract validity end date to decide whenthe contract should be canceled.Enter the actual cancellation date in the Cancellation Effective On field.
7. Decide how you want to deal with the invoices for the cancelled contract.In the Invoice Cancellation field, choose Keep Invoice Requests to let existing invoicesproceed, that is, there is no cancellation of invoices. Or choose Cancel Pending InvoiceRequests to cancel planned invoices. The latter is relevant for example if you allow thecustomer a two-week cancellation period without charge. Invoices planned after thetwo-week period can be cancelled in this way.
8. Save.The system updates the cancellation status to Cancellation Requested.The contract end date is not changed immediately. Rather, the system monitors theEffective On date and when it is reached updates the status to Cancelled, and sets thecontract end date to the Effective On date.
Until the Effective On date is reached, the contract is still active and thecancellation can be reversed at any time.You can for example query all contracts that have a status of CancellationRequested and send the list to your field colleagues who can try to change thecustomer's mind. If they are successful, you can reverse the cancellation bysimply removing the cancellation reason. The cancellation is reversed and theprevious contract end date is restored.
Revoke Fulfillment of Contract ItemYou can revoke fulfillment of an item in a contract, by selecting an item in Items and clickingon Revoke Fulfillment .This is applicable for all types of items in a contract with fulfillment status Finished. Revokingitem fulfillment will set the fulfillment status to In Process and enable cancellation options forthe item.
Renew a Contract or Contract Item1. To stipulate when and under what conditions an account can renew the contract, enter
a renewal rule in Renewal and Cancellation on the General tab. This field is forinformation purposes only and may be left blank. You can describe this rule further byentering a note in Details.You can create contract renewal rules in Maintain Renewal Rules < Renewal andCancellation of Customer Contracts < Business Configuration work center. Once youspecify a renewal rule and set it to active, the rule is available in Renewal andCancellation under General in Contracts view.
You have to set a renewal rule to active to apply a renewal rule.
You can also set the following conditions for renewal rules in business configurationwork center. ● Auto Renewal: Selecting Auto Renew will enable automatic renewal of the
contracts.
408 © 2017 SAP SE or an SAP affiliate company. All rights reserved. • P U B L I CSAP Business ByDesign February 2017
Sales Orders

● Renewal Rule Status: You can set a rule to In-preparation, Active and Obsolete. ● You can choose to create a contract or sales quote for contract on renewal by
selecting Contract or Sales Quote for Contract under On Renewal Create. ○ If you choose Contract, the following conditions are available for selection:
○ Creating New Contract: You can create a new contract by selectingCreate New Contract. If it is not selected, only items within the samecontract will be renewed.
○ Auto Release: This will enable you to automatically release renewedcontract or item
○ If you choose Sales Quote for Contract, the following conditions are availablefor selection: ○ Auto Submission of Sales Quote for Contract: Selecting Auto Submit
Quote will enable submission of sales quote for contract automaticallyto the customer.
○ Advance Quote Creation Duration: You can enter the time period prior tocontract end date by which you want the sales quote for contract to becreated.
● Stopping Renewal on Header Cancellation: If you select Stop Renewal on HeaderCancellation, it will not renew the contract if the contract is cancelled.
This field is not applicable if Create New Contract is not selected.
● Stopping Renewal on Item Cancellation: This condition is applicable to bothdocument and item level renewal. If you select Stop Renewal on ItemCancellation, then it works as following depending on whether Create NewContract is selected or not:1. If Create New Contract is selected, then in renewed contract only those items
will be copied which are not cancelled.2. If Create New Contract is not selected, then only those items from the existing
contract will be renewed which are not cancelled. ● Renewal Duration: If you specify a renewal duration, the contract/item will be
renewed with this duration else it will copy duration from previous contract/item. ● Re-determining of Price: If you select Re-determine Price, the item price in the
renewed contract or contract item will be picked from the product master data.Otherwise, the item price will be copied from the previous contract or contractitem.
2. Set a Reminder if you want the system to monitor the contract end date andautomatically send you an alert before the contract expires, according to the timeperiod you enter here.Leave the Reminder field blank to deactivate alerts. You can still monitor the contractdate by reviewing the Days Left field on a regular basis.The renewal rule and its related fields are set once on header level only and are validfor all items in the contract.
3. To renew a contract, you can do one of the following: ● Create a follow-up contract
You can create a new contract with reference to an existing one by clicking Follow-Up and selecting Contract. The contract data is copied to a new contract where
SAP Business ByDesign February 2017Sales Orders P U B L I C • © 2017 SAP SE or an SAP affiliate company. All rights reserved. 409

you can adjust the contract dates. The document flow displays the associationbetween these contracts.
● Copy the contract and set a new versionIn Field Extensibility, set up two fields for contracts: an external contract numberand a version number. Now copy a contract by clicking Copy. Ensure that the newcontract has the same external contract number as the previous contract, butincrease the version number by 1.
4. To renew individual items within a contract, use the Copy and Extend button on itemlevel. All data is copied into the new item.Note that the new item can only be released within the validity dates that you havespecified.
When you extend an item end date, the system automatically adjusts thecontract end date to match the item end date, and displays a messageinforming you of this.It is not possible to extend the dates of an existing item that has already beenreleased. Changes to an existing item would be backdated, leading toinconsistent invoicing.
Determine Contracts in a Service RequestWhen an account requires support and a service request is created, the system checks if theaffected product in the service request is covered under contract. For more information, seehere.
Create a Service ConfirmationYou can process contract items with standard service confirmation functions if you areworking with confirmation-relevant service, expense, or entitlement items sold on a time andmaterial or fixed price basis.
Unlike for orders, there is no contract pipeline from which you can confirm serviceexecution. You can create a service confirmation only directly from the contract.For confirmations created on the basis of contracts, releasing items with or withoutcompletion is not possible as in standard service confirmations. There is only an implicitrelease without completion. You must finish the fulfillment in the contract itself.Also in service confirmations created on the basis of contracts, confirmed products aretreated as consumables. There is no posting of costs or inventory changes. In case ofconfirmed product of the type Direct Goods Issue (DIGI), the logistics area needs to bementioned and it results in inventory changes.
Contracts usually run over longer periods of time so that an employee who creates aconfirmation does so for one item only and not for all of the items in the contract. Forthis reason, contract items are not automatically proposed in the service confirmation.You must add them manually. Use the special value help on the product field whichproposes only items from the relevant contract.
For a step-by-step description of how to create a service confirmation, see here.
Invoice a ContractThere are several ways to invoice contract items:
410 © 2017 SAP SE or an SAP affiliate company. All rights reserved. • P U B L I CSAP Business ByDesign February 2017
Sales Orders

● Create an invoice request for fixed-price items that will then be the basis for a one-timeinvoiceFor more information, see here [page 187].
● Fixed-price items, and time and material based items, with invoice schedule using aninvoicing time frame1. Under Pricing and Invoicing choose Invoice Schedule .2. Click Edit Invoicing Time Frame . Now you can edit a new time frame or view an
existing time frame with a monthly recurrence pattern for the actual year, forexample.Select the Applied check box to assign the selected invoicing time frame to theitem.
3. ClickOK
The system creates monthly invoice dates for the applied items.4. For fixed-price items, the system creates a scheduled invoice request
automatically three days before the invoice schedule date is reached. You cantrigger this invoice request manually if you do not want to wait for the next job run.The system creates service confirmation invoice requests for time and materialitems.
● Fixed-price items, and time and material based items, with step-by-step invoiceschedule1. Under Pricing and Invoicing choose Invoice Schedule .2. Click Add Item . Now you can select an item for which you want to create several
invoicing dates.3. Click
Add Dateto maintain several invoice dates for the selected item.
4. For fixed-price items, the system creates a scheduled invoice requestautomatically three days before the invoice schedule date is reached. You cantrigger this invoice request manually if you do not want to wait for the next job run.The system creates service confirmation invoice requests for time and materialitems.
● Fixed-price items without invoice scheduleAfter you release the fixed-price item, the system creates a contract invoice request.You can find this invoice request in Today's Invoice Requests, if the invoice date of thedocument is today's date, otherwise in To be Invoiced Invoice Requests.
For more information about invoice schedules, see here [page 365].
SAP Business ByDesign February 2017Sales Orders P U B L I C • © 2017 SAP SE or an SAP affiliate company. All rights reserved. 411

Invoicing a contract for Managed Services:Item 10 Initial set-up – 5,000 USDItem 20 Regular service up to 1,000 service units/month – 10,000 USD/monthItem 30 Services over limit – 3 USD/service unitFor the above contract, Item 10, a fixed price item, would be invoiced using aninvoice request.Item 20, a fixed price item, would be invoiced using an invoice schedule.Item 30 would be invoiced only if there were more than 1,000 service units. If, forexample there are in one month 1,337 service units executed, the serviceconfirmation would confirm a quantity of 337 which could be invoiced using aninvoice request.
Revoke Invoicing of Customer Contract ItemsYou can revoke invoicing of items in a contract, by selecting an item in Items and clicking Revoke Invoicing .You can revoke invoicing of an item, if it meets all the below criteria:
● Item type as fixed price, fixed price without actuals or expense fixed price withoutactuals
● Invoicing status as Finished ● Associated with invoice schedule
Performing a revoke invoicing will change the invoicing status of the item to In Process andenable you to add dates in the invoice schedule for that item.
Create Down Payment Request for a Contract1. Select a contract from the list and click Create Down Payment in Contracts view.2. Enter all the necessary information on the Down Payment Request pop up and click
OK .
This will create a down payment invoice request in the Invoice Requests view under CustomerInvoicing work center, with To Be Invoiced status if it contains all the required information orInconsistent status if there is discrepancy in the information.For more information on Down Payment Requests, see Quick Guide for Invoice Requests[page 187].
Understand Price Agreements for ContractsFor information about price agreements, see here [page 326].
Sell a Contract in a Sales OrderFor information about selling contracts, see here.
412 © 2017 SAP SE or an SAP affiliate company. All rights reserved. • P U B L I CSAP Business ByDesign February 2017
Sales Orders

7.4 Returns View
7.4.1 Quick Guide for Returns (in Sales Orders)
The Returns view enables you to manage the return process with tools to create and track new returns, keep tabsof open tasks related to your returns, and research and amend incorrect returns. You can access this view from theSales Orders work center. A customer can return a product purchased through a standard customer sales processor a third-party order process or an over-the counter sale. All the returns created for a credit or a replacement aredisplayed in this view.
If the logged-in user has access to both Sales Orders and Service Orders work centers, then, the user can : ● View returns created for credit, replacement and repair in the Sales Orders work center. ● View returns created for credit, replacement and repair in the Service Orders work center.
Business Background
Customer Return ProcessingCustomer Return Processing is the management of products that are returned by customers. A customer can returna product purchased through a standard customer sales process or a third-party order process or an over-thecounter sale. All these returns are handled the same way in the Returns view. Products can be returned for a credit,replacement, or repair. When an inbound delivery for returns is created at the warehouse, the system automaticallycreates a customer return. For customer returns created either for repair or for a third-party order process, theproducts are placed in an externally-owned stock.For more information, see Customer Returns [page 349].
Third-Party Order Processing — Customer ReturnIf the customer does not accept the goods received in a third-party ordering process as they are damaged or do notmeet quality standards, for example, they can return the goods to you as the selling company. When receiving thereturned goods in inbound logistics, the warehouse manager triggers a follow-up activity and the system posts thereturned goods to your own stock or to your externally-owned stock accordingly. While in externally-owned stock,the owner of the goods is still the customer although, physically, they are stored on your premises. The returnedgoods stored in your externally-owned stock are to be sent back to your supplier.For more information, see Third-Party Order Processing — Customer Return.
Business Scenario: Customer Return ManagementThe Customer Return Management business scenario enables you to process the inbound delivery of physical goodsreturned by a customer for a replacement, a credit for the returned goods or for repair.There are also functions for:
● Collaboration between warehouse and sales or customer service ● Outbound delivery in case of returns received for repair at own service center. ● Returning the confirmation form to the customer
SAP Business ByDesign February 2017Sales Orders P U B L I C • © 2017 SAP SE or an SAP affiliate company. All rights reserved. 413

● Creation and approval of credit memo ● Pricing
For more information, see Customer Return Management.
Tasks
Check Your Open Returns1. Click on the My Uncompleted Returns link in the Overview view to open a list of all your
open returns.2. Select a return in the list to display the details in the preview pane.3. Click Edit to edit the return.4. You can display the details of the uncompleted return. Here you can check and update
the details.
If an invoice block exists for a sales order or a business partner account, thesystem automatically sets a credit memo block in the corresponding customerreturn. You can unblock a credit memo block, and issue the credit memo ifrequired.If an invoice block was not set in the related sales order and/or account, you canset a credit memo block, by assigning a reason for a credit memo block in acustomer return.
5. Click Submit if you want to send a return confirmation form (depending on the outputsettings), for example, to a printer or by E-mail, to the related account.
6. Click Release to create a credit memo request or to send a task for approval of thecredit memo amount.Depending on how you use this function, the approver determination works as follows:If a reporting line manager and/or additional approver(s) exist for the employeeresponsible for this return, the approval task is sent to:
● The corresponding user(s) who have been assigned to the Managing My Areawork center and Sales view.The task message at the bottom of your return contains the names of allrequested approvers.
● An administrator, if the Managing My Area work center and Sales view were notassigned to the responsible reporting line manager and/or additionalapprover(s). The administrator must dispatch the task to an appropriate usermanually in the Application and User Management work center.The task message at the bottom of your return does not contain any names ofapprovers.
If a reporting line manager or additional approvers do not exist for the employeeresponsible for this return, the approval task is sent to
● All users who have been assigned the Managing My Area work center andSales view.The task message at the bottom of your return does not contain any names ofapprovers.
● An administrator, if the Managing My Area work center and Sales view were notassigned to a user. The administrator must assign this work center, including
414 © 2017 SAP SE or an SAP affiliate company. All rights reserved. • P U B L I CSAP Business ByDesign February 2017
Sales Orders

the view, and dispatch the task manually in the Application and UserManagement work center to an appropriate user.The task message at the bottom of your return does not contain any names ofapprovers.
Update a Return1. Choose the Returns view and select the return in the list and click Edit to open the
editor.2. On the General tab, check the payment method and update it if necessary.
If the Payment Method for the original sales order or invoice was by Credit Card, thesystem proposes the same payment method and the same credit card number in thereturn and follow-up credit memo.If no payment method is displayed, the method is automatically determined accordingto the configuration in the Bank Account and Payment Method Determination andPrioritization for Automatic Payments fine-tuning activity.However, you can ● Change the Payment Method to Credit Card ● Select a different credit card in the Credit Card Token field. ● Select a different credit card token if the customer has multiple credit cards ● Assign a new credit card by clicking New.
In all these cases the amount is refunded to the selected credit card account.3. Check the data on the Items tab:
1. Select the line you want to edit.2. In the Invoice Quantity field, enter the number to be used in the credit memo
calculation.3. If necessary, enter the amount you want to deduct from the credit memo, for
example, damaged or missing products, in the Quality Loss Fee field.4. Open the Document Flow tab to check customer return references and all process-
related documents.5. Adjust pricing details on the Pricing tab.
From the Pricing tab, you can add an additional charge to the customer, for example,a restocking fee or freight to cover the cost of the return.The price determination is calculated according to the predecessor documents. Formore information, see Customer Return [page 349].
It could be that the inbound delivery for this return has changed in the meantime.If this is the case, review the credit memos or the credit memo requests issuedbefore this change, and make the necessary adjustments to prevent incorrectpayment to the customer.
6. Then save and release the return.If you want to release it with a credit memo, you have to level the value of the return byadjusting pricing parameters such as invoice quantity, restocking fee, quality loss fee,or freight, as described and click Release choosing With Credit Memo.If you want to release it without a credit memo, for example, when you have sent a freereplacement for the defective product to the customer; you have to level the grossamount of the return to zero. Then click Release and choose Without Credit Memo.
SAP Business ByDesign February 2017Sales Orders P U B L I C • © 2017 SAP SE or an SAP affiliate company. All rights reserved. 415

Check the Documents With Missing References1. Choose the Returns view.2. Select Incorrect Returns or Open Tasks to filter returns with missing references.3. Select the return in the list and click Edit to open the Return editor and check whether
there is no reference for the return or whether the reference given by the warehouse isincorrect.
4. On the Items tab, select the item and click Assign Reference . The Action Dialog opens.5. Select the Reference Type and enter the correct Reference ID and Reference Line.6. If you are referring to a document that is not in the system select the External
Indicator check box to indicate that the referenced document is not in the currentsystem. For example, it is in a legacy system.
7. Finish editing and click OK.
For more information about the reference and dependency on price determination, seeCustomer Return [page 349].
Check Your Open Tasks1. Choose the Returns view and select the Open Tasks query.2. If returns were revised by the responsible manager, you can find them in the Open
Tasks query of the Returns view.
Here you can also find the approved returns, and returns with missing data.
3. To complete the task, select the corresponding line and click Edit .4. For information on completing the task, see Business Task Management.
Cancel a ReturnA return can be cancelled. In this case the warehouse cancels the inbound delivery and thevalue Cancellation from Inbound Delivery appears in the Reason for Rejection field of thecustomer return.
Create a Target Group from a Returns WorklistFor marketing purposes you can create a target group of accounts listed in a worklist. To dothis:
1. Call up the required worklist, and modify it to your needs.2. Click Export followed by To Target Group.
The New Target Group screen opens.3. Check the details and save the target group.
416 © 2017 SAP SE or an SAP affiliate company. All rights reserved. • P U B L I CSAP Business ByDesign February 2017
Sales Orders

7.5 Reports View
7.5.1 Sales Order Volume
OverviewThis report shows the values in sales orders. By default, the year-to-date net values for the current year are displayed.This report is also available as a mobile report. For more information, see the documentation about working withmobile reports..
ViewsThe following views are available with this report:
● Sales order volume by accountShows the sales order volume by account
● Sales order volume by originShows the sales order volume by origin
The displayed net value of sales orders includes only the released sales orders.
Features
Running the ReportBefore running the report, you can specify the data you want to see by selecting specific variables. You must specifya value for all mandatory variables. In the system, mandatory variables are indicated by an asterisk (*).
Analyzing the ReportTo analyze the data in this report:
● Use the filters to manipulate the display of data in the content pane.For this report, you can add these key figures: ○ Requested Quantity of Sales Orders ○ Total Value of Sales Orders
● To further analyze data in this report, you can drag characteristics to rows and columns.
Characteristics indicating periods such as Calendar Year or Calendar Year/Month aggregate byposting date for sales orders.
From this report, you can navigate to: ● Account ● Sales Order ID
For marketing purposes you can create a target group of the accounts listed in this report. To do this:
SAP Business ByDesign February 2017Sales Orders P U B L I C • © 2017 SAP SE or an SAP affiliate company. All rights reserved. 417

1. Call up the report and select the criteria according to your needs.2. Add the Account characteristic to Rows.3. Click on an account ID or an account name, then click on the arrow that appears next to the ID or name, and
select Export all Accounts to new Target Group in the dropdown menu.The Target Group screen opens. The target group contains all accounts that are shown in the report. Inaddition, the system automatically determines the main contacts of these accounts, based on the accountmaster data, and includes these in the target group. If the master data for a particular account does not havea main contact, then only the account is included in the target group.
Note that the system determines the main contacts that are currently entered in the master data ofthe accounts. Therefore it is possible that some contacts in the target group differ from the contactsshown in the report.
4. Check the details and save the target group.
Note that if you copy a report, it is not possible to create a target group based on the new report.
To can also check for Sales Orders (with sales orders kit) by checking the Parent Product column. If it is filled in, itimplies that the sales order has sales kit product in its item, and if it has the value # it implies that it is a non sales kitproduct.You could verify the data displayed with the Sales Order view by navigating to the respective Sales Order Documentand selecting the navigation icon View Sales Order
See AlsoOverview of Reports in Customer Relationship Management
7.5.2 Sales Order Volume History
OverviewThis report shows the historical sales order volume by a specified key date.
Features
Running the ReportBefore running the report, you can specify the data you want to see by selecting specific variables. You must specifya value for all mandatory variables. In the system, mandatory variables are indicated by an asterisk (*).For this report you must specify the following variables:
● Key DateDate for that you analyze the sales order volume in the given time frame as it appeared in the system on thatdate.
● Time FrameTime frame for that you analyze the sales order volume as it appeared in the system on the given key date.
418 © 2017 SAP SE or an SAP affiliate company. All rights reserved. • P U B L I CSAP Business ByDesign February 2017
Sales Orders

The report shows the sales order volume for the given Time Frame as it appeared in the system on the given KeyDate.
Key Date: March 15Time Frame: March 01 until March 15You see the sales order volume as it appeared in the system on March 15 for the time frame march 01until march 15.If you run the report with the key date for each day of march, you can see exactly the progression of thesales order volume in march.
Analyzing the ReportTo analyze the data in this report:
● Use the filters to manipulate the display of data in the content pane.For this report, you can add these key figures: ○ Requested Quantity ○ Fulfilled Quantity ○ Net Value ○ Total ○ Invoice Amount ○ Invoiced Quantity ○ Confirmed Quantity ○ Confirmed Fulfilled Quantity ○ Duration of Validity of Node Instance ○ Counter
● To further analyze data in this report, you can drag characteristics to rows and columns.
Characteristics indicating periods such as Calendar Year or Calendar Year/Month aggregate byposting date for sales orders.
From this report, you can navigate to: ● Account ● Sales Order ID
See AlsoReports ViewOverview of Reports in Customer Relationship Management
7.5.3 Sales Order Returns Rate
OverviewShows the return rate sales orders, and allows you to monitor the quality of products and performance of salespersonnel.
SAP Business ByDesign February 2017Sales Orders P U B L I C • © 2017 SAP SE or an SAP affiliate company. All rights reserved. 419

This report is also available as a mobile report. For more information, see the documentation about working withmobile reports..
Features
Running the ReportBefore running the report, you can specify the data you want to see by selecting specific variables. You must specifya value for all mandatory variables. In the system, mandatory variables are indicated by an asterisk (*).
Analyzing the ReportTo analyze the data in this report:
● Use the filters to manipulate the display of data in the content pane.For this report, you can add these key figures: ○ Number of Return Items ○ Number of Sales Order Items ○ Invoiced Quantity of Returns ○ Invoiced Quantity of Sales Orders ○ Net Value of Returns (= (-)Total item net value + Pro rata overall discount + Pro rata restocking fee - Pro
rata freight) ○ Net Value of Sales Orders (= Total item net value - Pro rata overall discount - Pro rata restocking fee +
Pro rata freight) ○ Number of Return of Items from Number Sales Order Items Number (%) ○ Returns of Net Value from Sales Order Net Value (%) ○ Returned Quantity from Invoiced Sales Order Quantity (%)
● To further analyze data in this report, you can drag characteristics to rows and columns.
Characteristics indicating periods such as Calendar Year or Calendar Year/Month aggregate byposting date.
From this report, you can navigate to: ● Account ● Sales Unit
For marketing purposes you can create a target group of the accounts listed in this report. To do this:1. Call up the report and select the criteria according to your needs.2. Add the Account characteristic to Rows.3. Click on an account ID or an account name, then click on the arrow that appears next to the ID or name, and
select Export all Accounts to new Target Group in the dropdown menu.The Target Group screen opens. The target group contains all accounts that are shown in the report. Inaddition, the system automatically determines the main contacts of these accounts, based on the accountmaster data, and includes these in the target group. If the master data for a particular account does not havea main contact, then only the account is included in the target group.
Note that the system determines the main contacts that are currently entered in the master data ofthe accounts. Therefore it is possible that some contacts in the target group differ from the contactsshown in the report.
420 © 2017 SAP SE or an SAP affiliate company. All rights reserved. • P U B L I CSAP Business ByDesign February 2017
Sales Orders

4. Check the details and save the target group.
Note that if you copy a report, it is not possible to create a target group based on the new report.
See AlsoOverview of Reports in Customer Relationship Management
SAP Business ByDesign February 2017Sales Orders P U B L I C • © 2017 SAP SE or an SAP affiliate company. All rights reserved. 421

8 Sales Planning
8.1 Business Background
8.1.1 Sales Planning
OverviewSales planning offers a solution that enables you to define and monitor sales targets. It promotes seamlessmonitoring of sales targets, forecasts, and revenues and also makes it easy to create new plans.Sales employees can update and compare the sales data of the current year with that of previous years. Salesmanagers can select the time period for the plan and enter targets for individual, direct-reporting employees. Thesales manager can also use sales planning on all organizational hierarchies to report planned and actual values withaggregation of target, orders, opportunity pipeline, projected sales, and last year’s orders. Sales people can use thesolution to compare target and actual values in quick and full reports.
DetailsTo work with sales planning, you set your team’s targets by choosing the Managing My Area work center. You canaccess your team’s annual and monthly targets from the Reports view. The following sections provide a detaileddescription of how to work with Sales Planning in your system.
Top-down PlanningIn the top-down approach, you enter the total sales target and the system automatically distributes a new target toeach employee based on their previous targets. If no target has previously been assigned, the system distributes anequal portion of the overall target to each employee.
Status and VisibilityWhen creating and editing sales plans, bear in mind that the status has a direct influence on the visibility of the plansand planning data:
● Only one version can be active for each sales plan. ● The data of an active plan version is only visible if the whole sales plan is active. ● A sales plan is visible to others if it is active. ● A sales plan with the status In Preparation is only visible to the person who created it.
Monitoring Sales Target DataYou can monitor the sales target achievement data. Different reports are available for managers and employees:
● Sales Targets for Incoming Orders (Manager) ● Sales Targets for Incoming Orders (Employee) ● Sales Targets for Invoiced Orders (Manager) ● Sales Targets for Invoiced Orders (Employee)
Also in the Sales Planning view, you can find the target of the sales plan and of the direct manager.
422 © 2017 SAP SE or an SAP affiliate company. All rights reserved. • P U B L I CSAP Business ByDesign February 2017
Sales Planning

Planning DimensionsUsing planning dimensions, you can specify the level of detail of the planning itself. You can specify how you want tobreak down the targets:
● Account ● Employee ● Product ● Product Category ● Sales Unit
Sales Unit and Employee in General Data and Planning DimensionsSales unit and employee is used in different contexts in sales planning and therefore also the meaning of these termschanges according to the context:
● General Data ○ Sales Unit: The unit for which you want to define sales targets ○ Employee: Is the empoyee responsible that is logged in.
● Planning Dimensions ○ Sales Unit ○ Employee
8.2 Sales Planning Quick Guide
Sales planning offers a solution that enables you to define and monitor sales targets. It promotes seamlessmonitoring of sales targets, forecasts, and revenues and also makes it easy to create new plans.
Business Background
Business PlanningPlanning for your business involves three different elements: strategic planning, financial planning, and operationalplanning. While strategic planning is a high-level management task and therefore takes place outside of the system,financial and operational planning are supported by tools and applications that have been designed to guide andsupport you in mastering your company’s planning and budgeting tasks. Compared with traditional spreadsheet-based approaches, the system’s planning features improve the efficiency and quality of the planning process throughmeans such as enhancing collaboration between planners, ensuring the consistency of planning data, and enablingdrilldowns into different data dimensions.For more information, see Business Planning.
Sales PlanningSales planning offers a solution that enables you to define and monitor sales targets. It promotes seamlessmonitoring of sales targets, forecasts, and revenues and also makes it easy to create new plans.For more information, see Sales Planning. [page 422]
SAP Business ByDesign February 2017Sales Planning P U B L I C • © 2017 SAP SE or an SAP affiliate company. All rights reserved. 423

Tasks
Create a Plan1. To open a New Sales Target Plan guided activity click New .2. Enter data, such as Sales Unit, Horizon From/To, Plan Name, and Currency in the Set
General Properties screen and click Next .
● You can only have one plan for a certain Sales Unit and Horizon. Theoverlapping of horizons for the same Sales Unit is not allowed.
● By default the currency of the sales unit's company is used. However, youcan change this as long as the sales plan is in preparation.
3. Specify the granularity of your plan in the Select Planning Dimensions screen. You canselect the accounts, employees, product categories, products, and sales units that youwant in the plan. Furthermore, select the items to be planned, for example, certainemployees, accounts, or products. It is also possible to select Not Assigned as aplaceholder, if you do not want to select certain items. You can also combine NotAssigned with specific items, for example, Jim, Carl, Frank, Not Assigned. Then click
Next .4. You can enter a description for the active version or you can create a new version in the
Manage Plan Versions screen. Then click Next .5. You can select the data on which your planning is to be based and where it should be
copied to in the Copy Actual Data screen. First choose the plan data from existing salesplans that are created for the corresponding sales units in general data and the selectedplanning dimensions and time period that should be taken into account. Then selectthe plan version into which the data should be copied.
6. You can review your entries in the Review screen.7. To confirm your changes click Finish .8. You can open the plan data in Microsoft Excel® in the Confirmation screen or close the
guided activity.
Edit a Plan Structure1. To edit a plan, select it, click Edit and then Plan Structure.
The Sales Target Plan guided activity opens.2. Now you can edit the plan by following the guided activity.
Edit Plan Data in Microsoft Excel1. To edit plan data in Microsoft Excel, select a plan, click Edit and select Plan Data in
Excel.
To open the plan data you have to install the Microsoft Excel Add-In. You can findthe add-in in the Home work center under Self-Services Self-ServicesOverview Computer Install Additional Software and choose Add-In forMicrosoft Excel.
2. The targets are opened in Microsoft Excel.Now you can adjust the targets for your planning horizon.
424 © 2017 SAP SE or an SAP affiliate company. All rights reserved. • P U B L I CSAP Business ByDesign February 2017
Sales Planning

3. To show or hide dimensions, open the View pane on the right-hand side by clicking onthe arrow of View on the SAP Business ByDesign tab in the Microsoft Excel ribbon.
You can also open and save views with different dimensions and settings in thepanel.
4. Now you can select a desired dimension and drag and drop them to the rows andcolumns as necessary.
5. You can also define how the data should appear on the user interface for each planningdimension by selecting the row or column label in the panel and changing the selectionsunderneath.
6. Now you can enter your targets in the plan.7. After you have finished the planning, to recalculate the planning data in the workbook
click on Refresh on the SAP Business ByDesign tab in the Microsoft Excel ribbon.When you entered a total target for a dimension the sum is distributed to the unchangeditems. Changed items keep untouched during refresh.
8. To finalize the planning save the data by clicking on Save All on the SAP BusinessByDesign tab in the Microsoft Excel ribbon.
For more information, see the documentation about working with reports and plans inMicrosoft Excel®.
Activate a Plan1. Click on the Plan ID and the Sales Plan screen opens.2. Click on Change Status and select Active to release the selected sales plan.
Only activated sales plans are visible to other users.
Monitor Sales Target DataYou can monitor the sales target achievement data. Different reports are available formanagers and employees:
● Sales Targets for Incoming Orders (Manager) ● Sales Targets for Incoming Orders (Employee) ● Sales Targets for Invoiced Orders (Manager) ● Sales Targets for Invoiced Orders (Employee)
SAP Business ByDesign February 2017Sales Planning P U B L I C • © 2017 SAP SE or an SAP affiliate company. All rights reserved. 425

www.sap.com/contactsap
© 2017 SAP SE or an SAP affiliate company. All rightsreserved.No part of this publication may be reproduced ortransmitted in any form or for any purpose without theexpress permission of SAP SE or an SAP affiliatecompany.The information contained herein may be changedwithout prior notice. Some software productsmarketed by SAP SE and its distributors containproprietary software components of other softwarevendors. National product specifications may vary.These materials are provided by SAP SE or an SAPaffiliate company for informational purposes only,without representation or warranty of any kind, andSAP or its affiliated companies shall not be liable forerrors or omissions with respect to the materials. Theonly warranties for SAP or SAP affiliate companyproducts and services are those that are set forth inthe express warranty statements accompanying suchproducts and services, if any. Nothing herein should beconstrued as constituting an additional warranty.SAP and other SAP products and services mentionedherein as well as their respective logos are trademarksor registered trademarks of SAP SE (or an SAP affiliatecompany) in Germany and other countries. All otherproduct and service names mentioned are thetrademarks of their respective companies. Please seehttp://www.sap.com/corporate-en/legal/copyright/index.epx for additional trademark information andnotices.
icon courtesy of W3C, see http://creativecommons.org/licenses/by/3.0/ .