Safety instructions Removing the transport braces Water connection ... · PDF fileScrew a...
6
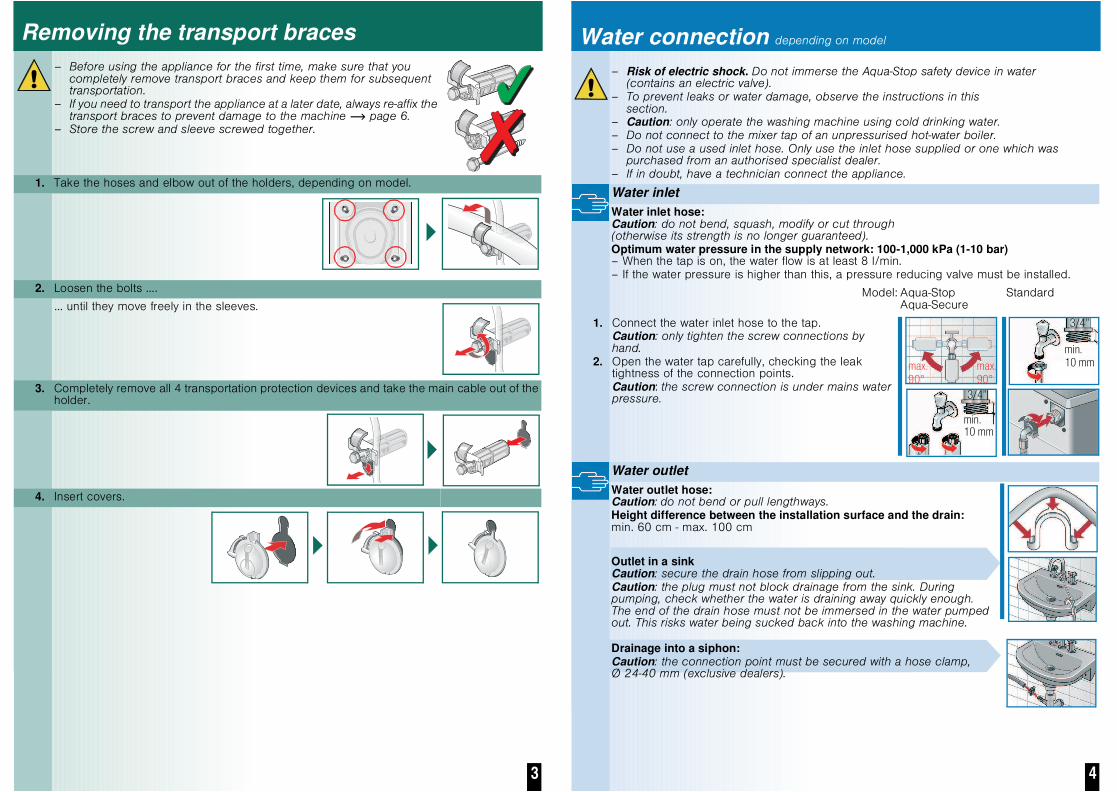
1 Safety instructions The washing machine is heavy - take care when lifting. Caution: frozen hoses may rip/burst. Do not install the washing machine in areas exposed to frost or outdoors. The washing machine could be damaged. Do not lift the appliance by protruding components (e.g. the washing machine door). In addition to the instructions provided in this document, special regulations from the relevant water and electric utility companies may apply. If in doubt, have a technician connect the appliance. Lay hoses and cables in such a way that there is no risk of tripping. Scope of delivery depending on model Also required, depending on the connection: 1 hose clamp Ø 24-40 mm (exclusive dealers) to connect to a siphon page 4; water connection. Useful tools Spirit level for installation. Spanner WAF 13 for undoing the transport safety bolts --> page 3 and Spanner WAF 17 for levelling the appliance feet --> page 5. Installation surface The machine must be stable so that it does not move around. The installation surface must be firm and level. Soft floors/floor coverings are not suitable. Installation on a pedestal The feet of the washing machine must be secured with holding brackets*. * order no. WMZ2200, WX9756, CZ110600, Z7080X0 Installation on a wood joist floor If possible, place the washing machine in a corner. Screw a water-resistant wooden board (min. 30 mm thick) to the floor. The feet of the washing machine must be secured with holding brackets*. * order no. see above. Mains cable Water outlet Water inlet Elbow for fixing the drainage hose in place Covers Aqua Stop Aqua Secure Standard Wrench (depending on model) Moisture inside the drum is due to final testing. 2 Hose and cable lengths depending on model Left-hand connection or Right-hand connection Available from specialist dealers/the after-sales service: Extension for Aqua-Stop or cold-water inlet hose (approx. 2.50 m). order no. WMZ2380, WZ10130, CZ11350, Z7070X0 Longer inlet hose (approx. 2.20 m) for standard model. Installing the appliance depending on model Install the appliance before connecting it to the power supply. Risk of electric shock. For models with a continuous appliance covering plate or a square service flap, the appliance covering plate can be replaced by a metal cover. Instead of the appliance covering plate, you must have a metal cover fitted by an expert. For models with a non-continuous appliance covering plate or a round service flap, the appliance covering plate must not be removed. Only install the washing machine underneath a continuous worktop that is securely connected to adjacent cabinets. Recess width of 60 cm required. ~ 145 cm ~ 100 cm ~ 95 cm ~ 135 cm ~ 145 cm min. * cm ~ 85 cm max. 100 cm 3 Removing the transport braces Before using the appliance for the first time, make sure that you completely remove transport braces and keep them for subsequent transportation. If you need to transport the appliance at a later date, always re-affix the transport braces to prevent damage to the machine page 6. Store the screw and sleeve screwed together. 1. Take the hoses and elbow out of the holders, depending on model. 2. Loosen the bolts .... ... until they move freely in the sleeves. 3. Completely remove all 4 transportation protection devices and take the main cable out of the holder. 4. Insert covers. 4 Water connection depending on model Risk of electric shock. Do not immerse the Aqua-Stop safety device in water (contains an electric valve). To prevent leaks or water damage, observe the instructions in this section. Caution: only operate the washing machine using cold drinking water. Do not connect to the mixer tap of an unpressurised hot-water boiler. Do not use a used inlet hose. Only use the inlet hose supplied or one which was purchased from an authorised specialist dealer. If in doubt, have a technician connect the appliance. Water inlet Water inlet hose: Caution: do not bend, squash, modify or cut through (otherwise its strength is no longer guaranteed). Optimum water pressure in the supply network: 100 1,000 kPa (1 10 bar) When the tap is on, the water flow is at least 8 l/min. If the water pressure is higher than this, a pressure reducing valve must be installed. Model: Aqua Stop Aqua Secure Standard 1. Connect the water inlet hose to the tap. Caution: only tighten the screw connections by hand. 2. Open the water tap carefully, checking the leak tightness of the connection points. Caution: the screw connection is under mains water pressure. Water outlet Water outlet hose: Caution: do not bend or pull lengthways. Height difference between the installation surface and the drain: min. 60 cm - max. 100 cm Outlet in a sink Caution: secure the drain hose from slipping out. Caution: the plug must not block drainage from the sink. During pumping, check whether the water is draining away quickly enough. The end of the drain hose must not be immersed in the water pumped out. This risks water being sucked back into the washing machine. Drainage into a siphon: Caution: the connection point must be secured with a hose clamp, Ø 24-40 mm (exclusive dealers). max. 90° max. 90° min. 10 mm min. 10 mm 3/4 3/4
Safety instructions Removing the transport braces Water connection ... · PDF fileScrew a water-resistant wooden board (min. 30 mm thick) to the floor. The feet of the washing machine