Embed Size (px)
Citation preview

SIOS Protection Suite for Linux in the AWS Cloud (SAP)
Application Configuration Guide
November 2018
SIOS Technology Corp.
Contents Overview 4
Additional steps to configure SAP on SPS 5
Follow the steps below to configure SAP on SPS. 5
Step 1. Test the Deployment 5
Code snippet for installing VNC Server 5
Run as root the command vncserver with the following options: 5
Step 2. Configure Virtual IP 6
Amazon AWS Elastic Compute Cloud (EC2) setup 6
Bugfix 6
Create the virtual IP resource 7
Step 3. Setup SAP 11
Page 1 of 65

Amazon Web Services – SIOS Protection Suite for Linux SAP on the AWS Cloud November 2018
ASCS without NFS 12
General setup overall steps 12
Installing SAP 12
Creating the SAP Resource Hierarchy 14
ASCS + ERS with NFS on separate instances 22
General setup overall steps 22
Installing SAP 23
Setting up NFS 25
Creating an NFS Resource Hierarchy 30
Creating the SAP Resource Hierarchy 33
Create the ERS Resource 40
ASCS + ERS With NFS on the same instance as ASCS 42
General setup overall steps 42
Installing SAP 44
Setting up NFS 45
Creating an NFS Resource Hierarchy 50
Creating the NFSmounter Generic Application Resource Hierarchy 53
Creating the SAP Resource Hierarchy 54
Create the ERS Resource 61
Switchover and failover testing 63
Additional Resources 65
Page 2 of 65
Amazon Web Services – SIOS Protection Suite for Linux SAP on the AWS Cloud November 2018
Send Us Feedback 65
Document Revisions 65
Page 3 of 65
Amazon Web Services – SIOS Protection Suite for Linux SAP on the AWS Cloud November 2018
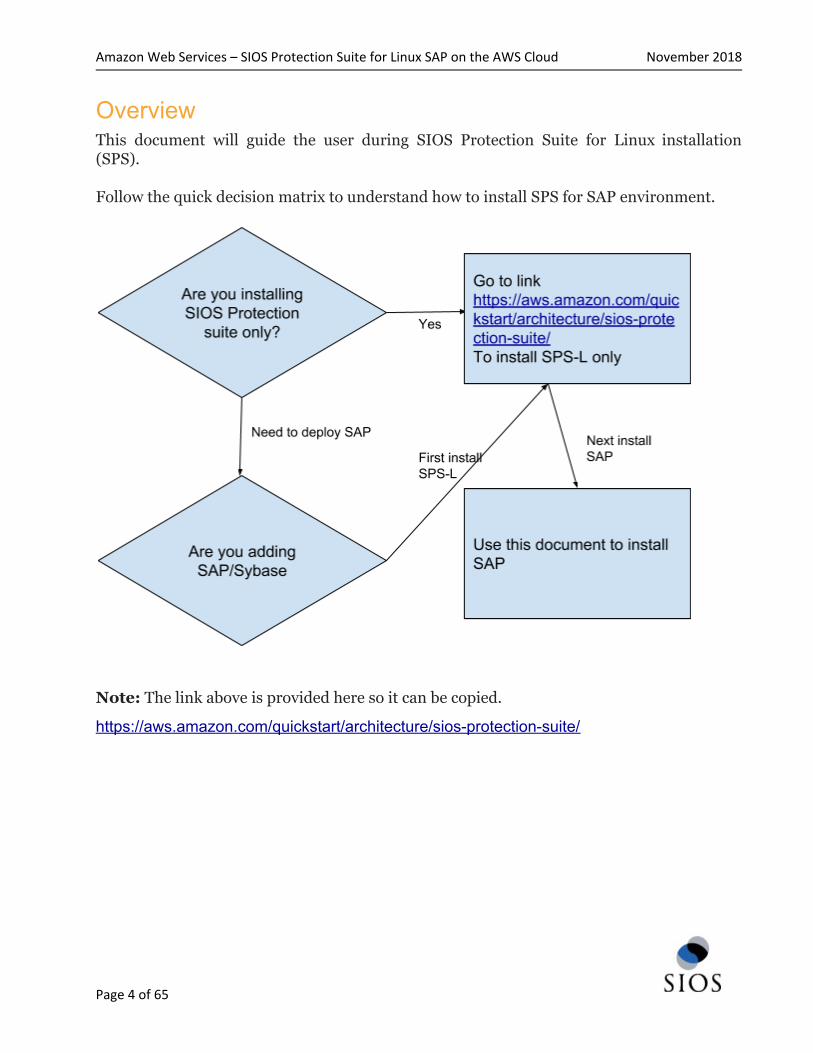
Overview This document will guide the user during SIOS Protection Suite for Linux installation
(SPS).
Follow the quick decision matrix to understand how to install SPS for SAP environment.
Note: The link above is provided here so it can be copied.
https://aws.amazon.com/quickstart/architecture/sios-protection-suite/
Page 4 of 65

Amazon Web Services – SIOS Protection Suite for Linux SAP on the AWS Cloud November 2018
Additional steps to configure SAP on SPS Follow the steps below to configure SAP on SPS. Step 1. Test the Deployment To connect to the SPS-L nodes, you need to connect to Windows jumpbox. To connect to a
Windows machine, you need to connect to remote desktop terminal.
In AWS console, select the windows jumpbox node that was created, click on Actions and
click on Connect. You can now download remote desktop program to connect. You will
also need to decrypt the password that will need to be used to login to the machine.
Once you are connected to Windows machine, we suggest you download Putty and VNC
Viewer. Download them from these sites.
● Putty - www.putty.org
● VNC Viewer - https://www.realvnc.com/en/connect/download/viewer/
You can now use Putty to connect to the private IP address of each node, as well as VNC
Viewer to connect to the node using the same private IP address. Note that the nodes are
not accessible outside the windows jumpbox, but the nodes should be able to access the
internet using the NAT gateway. (Note: If there are issues with the NAT gateway, make
sure to check the security group rules/main route).
Once you have connected to one of the nodes, you can su to root using the password you
created in the template earlier, and run the program vncserver. This will allow you to
connect using VNC Viewer to that node in a graphical interface.
Code snippet for installing VNC Server Run as root the command vncserver with the following options:
Enter password and repeat for confirmation
Set Read-Only password to No
Optionally edit /root/.vnc/config and add
securitytypes=none
vncserver -kill:1
Access to VNC is ipv4:5901 where 5901 is the port number specified.
Page 5 of 65

Amazon Web Services – SIOS Protection Suite for Linux SAP on the AWS Cloud November 2018
Right click on the desktop and click on Open Terminal, and enter the command
/opt/LifeKeeper/bin/lkGUIapp, that will connect to the LifeKeeper GUI. Login using
root and password setup previously. You will see the 2 nodes connected.
Now that you have reached this point, basic LifeKeeper 2 node is setup. Proceed with SAP
installation and protection of SAP services using LifeKeeper.
Step 2. Configure Virtual IP Now that SAP has been setup on the node, you can continue to setup LifeKeeper protecting
SAP services and filesystems.
Amazon AWS Elastic Compute Cloud (EC2) setup The AWS command line interface (cli) needs to be installed on each node. For details,
please refer to “AWS Command Line Interface Installation”. All the EC2 instances must be
able to access Amazon EC2 services endpoints using the protocols HTTP and HTTPS. In
order to obtain metadata of Amazon EC2 instance, it is necessary to have an access to IP
address 169.254.169.254 using the HTTP protocol.
In order for LifeKeeper to operate AWS, an IAM user or IAM role with the following access
privilege is required. Please configure an EC2 IAM role or configure AWS CLI appropriately
so that it can be accessed from root user of the EC2 instance.
● ec2:DisassociateAddress
● ec2:DescribeAddresses
● ec2:AssociateAddress
● ec2:DescribeRouteTables
● ec2:ReplaceRoute
Bugfix Before proceeding with creating the virtual IP, you need to download a critical fix.
Use this procedure to implement the fix. This fix will be put in a future release of the
product. Run these commands as user root.
● cd /tmp
● wget http://ftp.us.sios.com/pickup/EC2fix-bug7519/aws_role_check
● cd <LKROOT>/lkadm/bin – where <LKROOT> is typically /opt/LifeKeeper
Page 6 of 65

Amazon Web Services – SIOS Protection Suite for Linux SAP on the AWS Cloud November 2018
● mv aws_role_check aws_role_check.orig
● mv /tmp/aws_role_check .
● chmod +x aws_role_check
Create the virtual IP resource Determine the IP address. The IP address should be an IP address outside the CIDR block
range of the current IP of the nodes. The IP address should be placed in the VPC route table
for the node.
Note in the following diagram we placed the ip address of 10.1.0.10/32 and associated it to
one of the nodes, using the eni- network adapter.
Page 7 of 65

Amazon Web Services – SIOS Protection Suite for Linux SAP on the AWS Cloud November 2018
Edit /etc/default/LifeKeeper and set NOBCASTPING=1 to disable broadcast ping before
continuing.
Page 8 of 65

Amazon Web Services – SIOS Protection Suite for Linux SAP on the AWS Cloud November 2018
Click the green plus icon to create a new resource:
Follow the wizard to create the IP resource with these selections:
Select Recovery Kit: IP
Switchback Type: Intelligent
IP Resource: 10.1.0.10
Netmask: 255.255.255.0
Network Interface: eth0
IP Resource Tag: ip-10.1.0.10
Extend the IP resource with these selections:
Page 9 of 65

Amazon Web Services – SIOS Protection Suite for Linux SAP on the AWS Cloud November 2018
Switchback Type: Intelligent
Template Priority: 1
Target Priority: 10
IP Resource: 10.1.0.10
Netmask: 255.255.255.0
Network Interface: eth0
IP Resource Tag: ip-10.1.0.10
The cluster will now look like this, with both Mirror and IP resources created:
Page 10 of 65

Amazon Web Services – SIOS Protection Suite for Linux SAP on the AWS Cloud November 2018
Step 3. Setup SAP Download the SAP software and setup on the node. You can access the SAP marketplace to
download SAP software on each node.
There are a number of choices to setup SAP. The decision to implement one would depend
on various factors, such as cost, experience and RAS (Reliability, Availability and
Serviceability) factors.
● ASCS without NFS
● ASCS + ERS with NFS on separate instances
● ASCS + ERS with NFS on the same instance as ASCS
Each configuration has advantages and disadvantages. We recommend that you work with
SAP experts at your site, or you engage with SIOS Professional Services to determine the
best fit for your environment.
Note: Future documentation will detail installation for HANA, all-in-one, using EFS (AWS
Elastic File System) and Cloudwatch. There are also planned automated installation quick
start scripts and using SAP Landscape Manager (LaMa) to manage the installation.
Page 11 of 65

Amazon Web Services – SIOS Protection Suite for Linux SAP on the AWS Cloud November 2018
ASCS without NFS
General setup overall steps 1. Create Virtual IP, done in earlier steps
2. Create an EC2 resource and create as dependency for virtual IP, done in earlier steps
3. Install SAP on node 1 on “virtual hostname” based on “virtual IP”
4. Stopsap on node1
5. Use the LifeKeeper GUI to “In-service” the virtual IP to node 2, and Install SAP on
node 2 on “virtual hostname” based on “virtual IP”
6. Stopsap on node 2 and modify profile files on both nodes (see below)
7. Use the LifeKeeper GUI to “In-service” the virtual IP back to node 1
8. Create replication resource for the mount points needed for SAP, done in earlier
steps, as advised by SAP consultants
9. Startsap on node 1 and ensure SAP is working properly
10. In /etc/default/LifeKeeper add the follow entries to the end on both nodes –
SAP_EXPERTMODE=1
SAP_NFS_CHECK_IGNORE=1
SAP_DB_CHECK_IGNORE=1
11. Re-run the SPS setup program to add the SAP Recovery Kit
./setup -k
Select the recovery kit for SAP from the menu of available recovery kits using the arrow
keys and pressing the <spacebar> to select, press <enter> to continue and complete the
installation.
12. Create SAP resources following the SAP Recovery Kit guide
http://docs.us.sios.com/Linux/9.2.2/LK4L/SAP/index.htm
Simplified steps are given below in this documentation
Installing SAP 1. ASCS should be installed based on “virtual hostname” based on “virtual IP”, which
should have been added to host files during earlier installation steps. Please be sure
to do so if they have not already been done prior to installing SAP.
● Set the SAPinst property SAPINST_USE_HOSTNAME to specify the required
virtual host names before starting SAPinst. (Note: Document the
Page 12 of 65

Amazon Web Services – SIOS Protection Suite for Linux SAP on the AWS Cloud November 2018
SAPINST_USE_HOSTNAME virtual IP address as it will be used later during
creation of the SAP resources in LifeKeeper.)
Run ./sapinst SAPINST_USE_HOSTNAME={hostname}
● In seven phases, the Core Services should be created and started. If
permission errors occur on jdbcconnect.jar, go to
/sapmnt/STC/exe/uc/linuxx86_64 and make that directory as well as file
jdbcconnect.jar writable (chmod 777 ---).
ASCS profiles should be pointing to local mount point containing /usr/sap, sapmnt or any
other necessary for SAP files in your environment.
In the instance profiles of ASCS instances the entries must be changed, to prevent the
services from getting automatically restarted, after that you have to restart the
“sapstartsrv” of ASCS and e.g ----
Autostart = 1
Restart_Program_00 = local $(_ER) pf=$(_PFL) NR=$(SCSID)
to
Autostart = 0
Start_Program_00 = local $(_ER) pf=$(_PFL) NR=$(SCSID)
2. Sapstop SAP on node 1
3. Using the LifeKeeper GUI, right click on the IP address resource created for ASCS,
select “In-Service” and select node 2 to switch the IP onto node 2.
4. Repeat step 1 to install SAP onto node 2 and ensure that it’s able to run correctly
5. Sapstop SAP on node 2
6. Using the LifeKeeper GUI, right click on the IP address resource created for ASCS,
select “In-Service” and select node1 to switch the IP back onto node 1.
7. Sapstart SAP on node 1 and ensure that it’s able to run correctly
Page 13 of 65

Amazon Web Services – SIOS Protection Suite for Linux SAP on the AWS Cloud November 2018
Creating the SAP Resource Hierarchy
1. From the LifeKeeper GUI menu, select Edit, then Server. From the drop-down
menu, select Create Resource Hierarchy.
A dialog box will appear with a drop-down list box with all recognized recovery kits
installed within the cluster. Select SAP from the drop-down listing.
Click Next.
When the Back button is active in any of the dialog boxes, you can go back to the previous
dialog box. This is especially helpful should you encounter an error that might
require you to correct previously entered information.
If you click Cancel at any time during the sequence of creating your hierarchy, LifeKeeper
will cancel the entire creation process.
2. Select the Switchback Type. This dictates how the SAP instance will be switched
back to this server when it comes back into service after a failover to the backup
server. You can choose either intelligent or automatic. Intelligent switchback
requires administrative intervention to switch the instance back to the
primary/original server. Automatic switchback means the switchback will occur
as soon as the primary server comes back on line and re-establishes LifeKeeper
communication paths.
The switchback type can be changed later, if desired, from the General tab of the
Resource Properties dialog box.
Click Next.
Page 14 of 65

Amazon Web Services – SIOS Protection Suite for Linux SAP on the AWS Cloud November 2018
3. Select the Server where you want to place the SAP PAS, ASCS or SCS (typically this is
referred to as the primary or template server). All the servers in your cluster are
included in the drop-down list box.
4. Select the SAP SID. This is the system identifier of the SAP PAS, ASCS or SCS
system being protected.
Click Next.
5. Select the SAP Instance Name (ex. ASCS<No.>) (Core Instance first) for the SID
being protected.
Click Next.
Note: Additional screens may appear related to customization of Protection and Recovery
Levels.
6. Select the IP Child Resource. This is typically either the Virtual Host IP address
noted during SAP installation (SAPINST_USE_HOSTNAME) or the IP address
needed for failover.
Page 15 of 65

Amazon Web Services – SIOS Protection Suite for Linux SAP on the AWS Cloud November 2018
7. Select or enter the SAP Tag. This is a tag name that LifeKeeper gives to the SAP
hierarchy. You can select the default or enter your own tag name. The default tag is
SAP-<SID>_<ID>.
When you click Create, the Create SAP Resource Wizard will create your SAP
resource.
8. At this point, an information box appears and LifeKeeper will validate that you have
provided valid data to create your SAP resource hierarchy. If LifeKeeper detects a
problem, an ERROR will appear in the information box. If the validation is
successful, your resource will be created. There may also be errors or messages
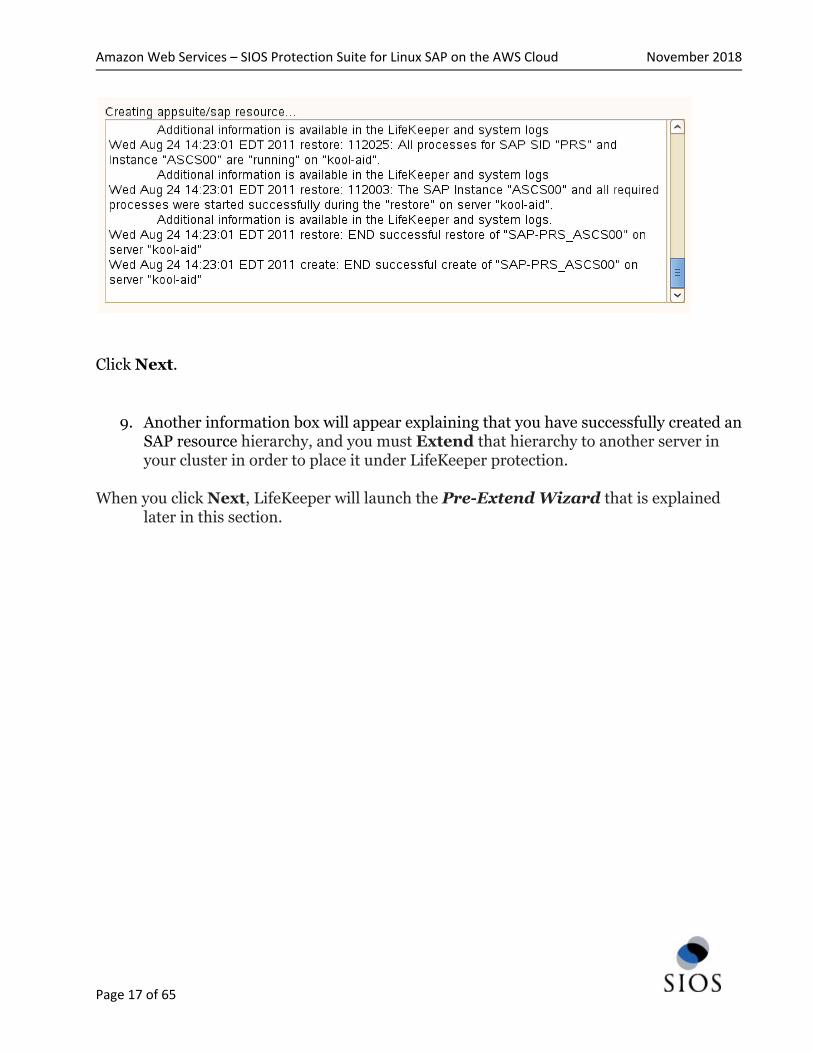
output from the SAP startup scripts that are displayed in the information box.
Page 16 of 65
Amazon Web Services – SIOS Protection Suite for Linux SAP on the AWS Cloud November 2018
Click Next.
9. Another information box will appear explaining that you have successfully created an
SAP resource hierarchy, and you must Extend that hierarchy to another server in
your cluster in order to place it under LifeKeeper protection.
When you click Next, LifeKeeper will launch the Pre-Extend Wizard that is explained
later in this section.
Page 17 of 65

Amazon Web Services – SIOS Protection Suite for Linux SAP on the AWS Cloud November 2018
If you click Cancel now, a dialog box will appear warning you that you will need to come
back and extend your SAP resource hierarchy to another server at some other time to
put it under LifeKeeper protection.
Page 18 of 65

Amazon Web Services – SIOS Protection Suite for Linux SAP on the AWS Cloud November 2018
10. The Extend Wizard dialog will appear stating Hierarchy successfully
extended. Click Finish.
The Hierarchy Integrity Verification dialog appears. Once Hierarchy Verification
finishes, click Done to exit the Create Resource Hierarchy menu selection.
Page 19 of 65

Amazon Web Services – SIOS Protection Suite for Linux SAP on the AWS Cloud November 2018
Hierarchy with the Core as the Top Level
Page 20 of 65

Amazon Web Services – SIOS Protection Suite for Linux SAP on the AWS Cloud November 2018
While SIOS Protection Suite can be used to protect the PAS and AAS servers, most
customers would simply use them as independent standby servers with no additional HA
on them. This guide does not cover their protection steps but you can refer to our SAP
recovery kit documentation for details and steps.
http://docs.us.sios.com/Linux/9.2.2/LK4L/SAP/index.htm
Page 21 of 65

Amazon Web Services – SIOS Protection Suite for Linux SAP on the AWS Cloud November 2018
ASCS + ERS with NFS on separate instances
General setup overall steps
1. Create Virtual IP, done in earlier steps on node1, extend, done in earlier steps
2. Create EC2 resource and create as dependency for virtual IP, done in earlier steps
3. Install SAP on node1 on “virtual hostname” based on “virtual IP”
4. Stopsap on node 1
5. Use the LifeKeeper GUI to “In-service” the virtual IP to node 2, and Install SAP on
node 2 on “virtual hostname” based on “virtual IP”
6. Stopsap on node 2 and modify profile files on both nodes (see below)
7. Use the LifeKeeper GUI to “In-service” the virtual IP back to node 1
8. Create replication resource for the mount points needed for SAP, done in earlier
steps, as advised by SAP consultants
9. Startsap on node1 and ensure SAP is working properly
10. in /etc/default/LifeKeeper on both nodes add the follow entries to the end –
SAP_EXPERTMODE=1
SAP_NFS_CHECK_IGNORE=1
SAP_DB_CHECK_IGNORE=1
11. Re-run the SPS setup program to add the SAP recovery kit
Mount the sps.img file (downloaded as per earlier steps) using the following command:
Page 22 of 65

Amazon Web Services – SIOS Protection Suite for Linux SAP on the AWS Cloud November 2018
mount <PATH/IMAGE_NAME> <MOUNT_POINT> -t iso9660 -o loop
Where PATH is the path to the image
IMAGE_NAME is the name of the image
MOUNT_POINT is the path to mount location
Change to the sps.img mounted directory and type the following:
./setup -k
You will now be shown a menu of recovery kits available. Select the recovery kit for SAP by
using the arrow keys and pressing the <spacebar> to select, press <enter> to continue
and complete the installation.
12. Setup NFS servers
13. Copy file systems onto the SAP server and create replication resources on the file
systems for redundancy and failover
14. Create NFS resources following the NFS recovery kit guide
http://docs.us.sios.com/Linux/9.2.2/LK4L/NFS/index.htm
Simplified steps are given below in this documentation
15. Create SAP resources following the SAP recovery kit guide
http://docs.us.sios.com/Linux/9.2.2/LK4L/SAP/index.htm
Simplified steps are given below in this documentation
Installing SAP
1. ASCS and ERS should be installed based on “virtual hostname” based on “virtual IP”,
which should have been added to hosts files during earlier installation steps. Be sure
to do so if they have not already been done prior to installing SAP.
Page 23 of 65

Amazon Web Services – SIOS Protection Suite for Linux SAP on the AWS Cloud November 2018
● Set the SAPinst property SAPINST_USE_HOSTNAME to specify the required
virtual host names before starting SAPinst. (Note: Document the
SAPINST_USE_HOSTNAME virtual IP address as it will be used later during
creation of the SAP resources in LifeKeeper.)
Run ./sapinst SAPINST_USE_HOSTNAME={hostname}
● In seven phases, the Core Services should be created and started. If
permission errors occur on jdbcconnect.jar, go to
/sapmnt/STC/exe/uc/linuxx86_64 and make that directory as well as file
jdbcconnect.jar writable (chmod 777 ---).
Enqueue replication should be configured and checked working based on SAP
documentation and best practices.
ASCS and ERS profiles should be pointing to local mount point containing /usr/sap,
sapmnt or any other necessary for SAP files in your environment, the actual files will be
moved onto NFS mount points after it is installed and configured.
In the instance profiles of ERS and ASCS instances you have to change the entries, to
prevent the services from getting automatically restart the program, after that you have to
restart the “sapstartsrv” of ASCS and ERS instances. e.g ----
Autostart = 1
Restart_Program_00 = local $(_ER) pf=$(_PFL) NR=$(SCSID)
to
Autostart = 0
Start_Program_00 = local $(_ER) pf=$(_PFL) NR=$(SCSID)
2. Sapstop SAP on node 1
3. Using the LifeKeeper GUI, right click on the IP address resource created for ASCS,
select “In-Service” and select node2 to switch the IP onto node 2.
4. Repeat step 1 to install SAP onto node 2 and ensure that it’s able to run correctly
5. Sapstop SAP on node 2
Page 24 of 65
Amazon Web Services – SIOS Protection Suite for Linux SAP on the AWS Cloud November 2018
6. Using the LifeKeeper GUI, right click on the IP address resource created for ASCS,
select “In-Service” and select node1 to switch the IP back onto node 1.
7. Sapstart SAP on node 1 and ensure that it’s able to run correctly
Setting up NFS
NFS server on both cluster nodes should have been installed prior to installation of SIOS as
a prerequisite.
Create the NFS exports based on the SAP’s requirements in your SAP design. Below are
examples that may be use as a guide but not a representation of your SAP environment.
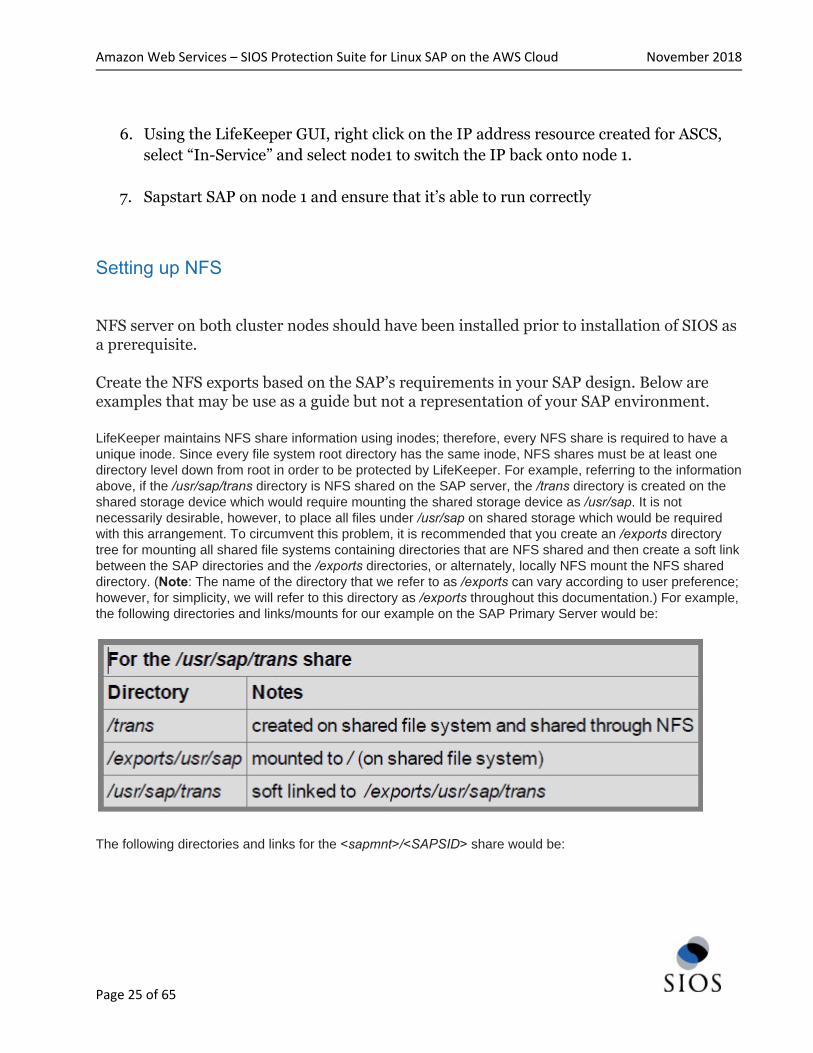
LifeKeeper maintains NFS share information using inodes; therefore, every NFS share is required to have a unique inode. Since every file system root directory has the same inode, NFS shares must be at least one directory level down from root in order to be protected by LifeKeeper. For example, referring to the information above, if the /usr/sap/trans directory is NFS shared on the SAP server, the /trans directory is created on the shared storage device which would require mounting the shared storage device as /usr/sap. It is not necessarily desirable, however, to place all files under /usr/sap on shared storage which would be required with this arrangement. To circumvent this problem, it is recommended that you create an /exports directory tree for mounting all shared file systems containing directories that are NFS shared and then create a soft link between the SAP directories and the /exports directories, or alternately, locally NFS mount the NFS shared directory. (Note: The name of the directory that we refer to as /exports can vary according to user preference; however, for simplicity, we will refer to this directory as /exports throughout this documentation.) For example, the following directories and links/mounts for our example on the SAP Primary Server would be:
The following directories and links for the <sapmnt>/<SAPSID> share would be:
Page 25 of 65

Amazon Web Services – SIOS Protection Suite for Linux SAP on the AWS Cloud November 2018
Local NFS Mounts
The recommended directory structure for SAP in a LifeKeeper environment requires a
locally mounted NFS share for one or more SAP system directories. If the NFS export point
for any of the locally mounted NFS shares becomes unavailable, the system may hang while
waiting for the export point to become available again. Many system operations will not
work correctly, including a system reboot. You should be aware that the NFS server for the
SAP cluster should be protected by LifeKeeper and should not be manually taken out of
service while local mount points exist.
To avoid accidentally causing your cluster to hang by inadvertently stopping the NFS
server, please follow the recommendations listed in the NFS Considerations topic. It is also
helpful to mount all NFS shares using the 'intr' mount option so that hung processes
resulting from inaccessible NFS shares can be killed.
Location of <INST> directories
Since the /usr/sap/<SAPSID> path is not NFS shared, it can be mounted to the root
directory of the file system. The /usr/sap/<SAPSID> path contains the SYS subdirectory
and an <INST> subdirectory for each SAP instance that can run on the server. For certain
configurations, there may only be one <INST> directory, so it is acceptable for it to be
located under /usr/sap/<SAPSID> on the shared file system. For other configurations,
however, the backup server may also contain a local AS instance whose <INST> directory
should not be on a shared file system since it will not always be available. To solve this
problem, it is recommended that for certain configurations, the PAS’s, ASCS's or SCS’s
/usr/sap/<SAPSID>/<INST>, /usr/sap/<SAPSID>/<ASCS-INST> or
/usr/sap/<SAPSID>/<SCS-INST> directories should be mounted to the shared file system
instead of /usr/sap/<SAPSID> and the /usr/sap/<SAPSID>/SYS and
/usr/sap/<SAPSID>/<AS-INST> for the AS should be located on the local server.
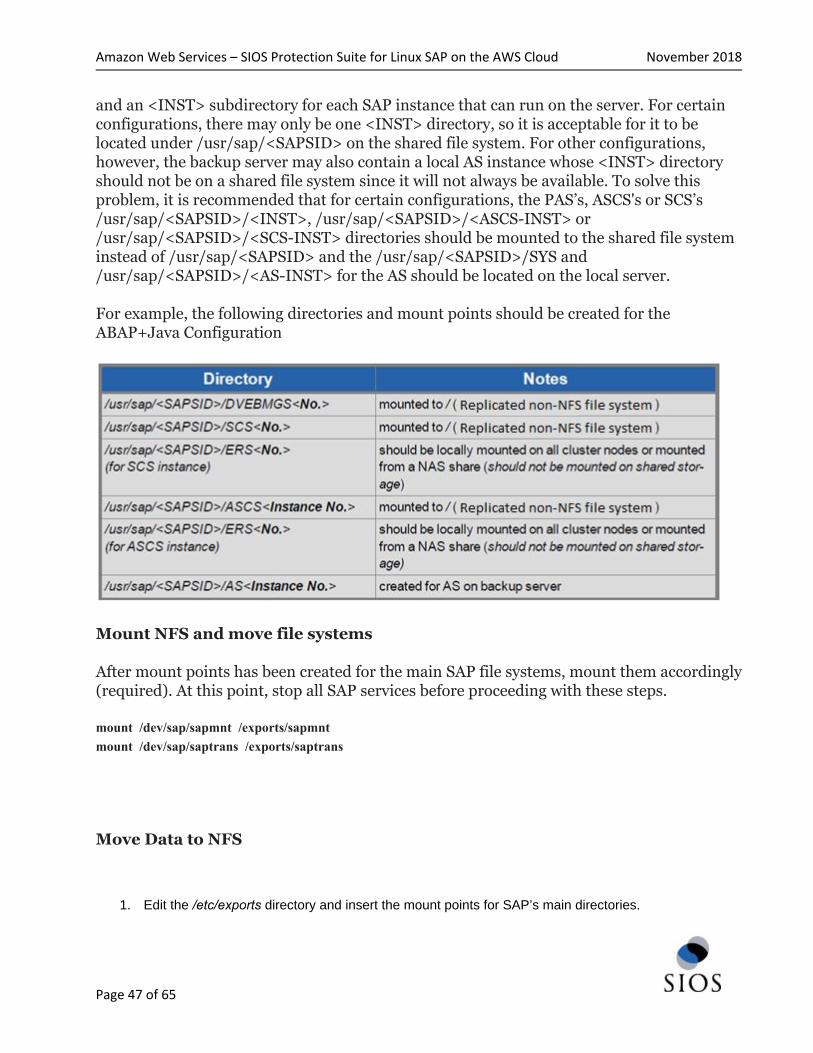
For example, the following directories and mount points should be created for the
ABAP+Java Configuration
Page 26 of 65

Amazon Web Services – SIOS Protection Suite for Linux SAP on the AWS Cloud November 2018
Mount NFS and move file systems
After mount points has been created for the main SAP file systems, mount them accordingly
(required). At this point, stop all SAP services before proceeding with these steps.
mount /dev/sap/sapmnt /exports/sapmnt mount /dev/sap/saptrans /exports/saptrans
Move Data to NFS
1. Edit the /etc/exports directory and insert the mount points for SAP’s main directories.
/exports/sapmnt *(rw,sync,no_root_squash) /exports/saptrans *(rw,sync,no_root_squash)
Example NFS export
# more /etc/exports
/exports/sapmnt 10.2.0.69(rw,sync,all_squash,anonuid=0,anongid=1001)
/exports/sapmnt 10.2.0.11(rw,sync,all_squash,anonuid=0,anongid=1001)
/exports/usr/sap/<instance name>/ASCS01
10.2.0.69(rw,sync,all_squash,anonuid=0,anongid=1001)
Page 27 of 65

Amazon Web Services – SIOS Protection Suite for Linux SAP on the AWS Cloud November 2018
/exports/sap/<instance name>/ASCS01
10.2.0.11(rw,sync,all_squash,anonuid=0,anongid=1001)
# more /etc/fstab
#
# /etc/fstab
# Created by anaconda on Mon Nov 9 20:20:10 2015
#
# Accessible filesystems, by reference, are maintained under '/dev/disk'
# See man pages fstab(5), findfs(8), mount(8) and/or blkid(8) for more info
#
UUID=367df610-4210-4a5a-8c8d-51ddf499fc17 / xfs defaults 0 0
/dev/xvdb swap swap defaults 0 0
/dev/xvdc /tmp xfs nodev,nosuid,noexec,relatime 0 0
/dev/xvdp1 /var xfs defaults 0 0
/dev/xvdp2 /var/log xfs defaults 0 0
/dev/xvdp3 /var/log/audit xfs defaults 0 0
/dev/xvdp4 /home xfs defaults,nodev 0 0
/tmp /var/tmp none bind,nodev,nosuid 0 0
/dev/xvdj /usr/sap xfs defaults 0 0
/dev/xvdg /exports/usr/sap/P4G/ASCS01 xfs defaults 0 0
/dev/xvdh /usr/sap/P4G/D00 xfs defaults 0 0
Page 28 of 65
Amazon Web Services – SIOS Protection Suite for Linux SAP on the AWS Cloud November 2018
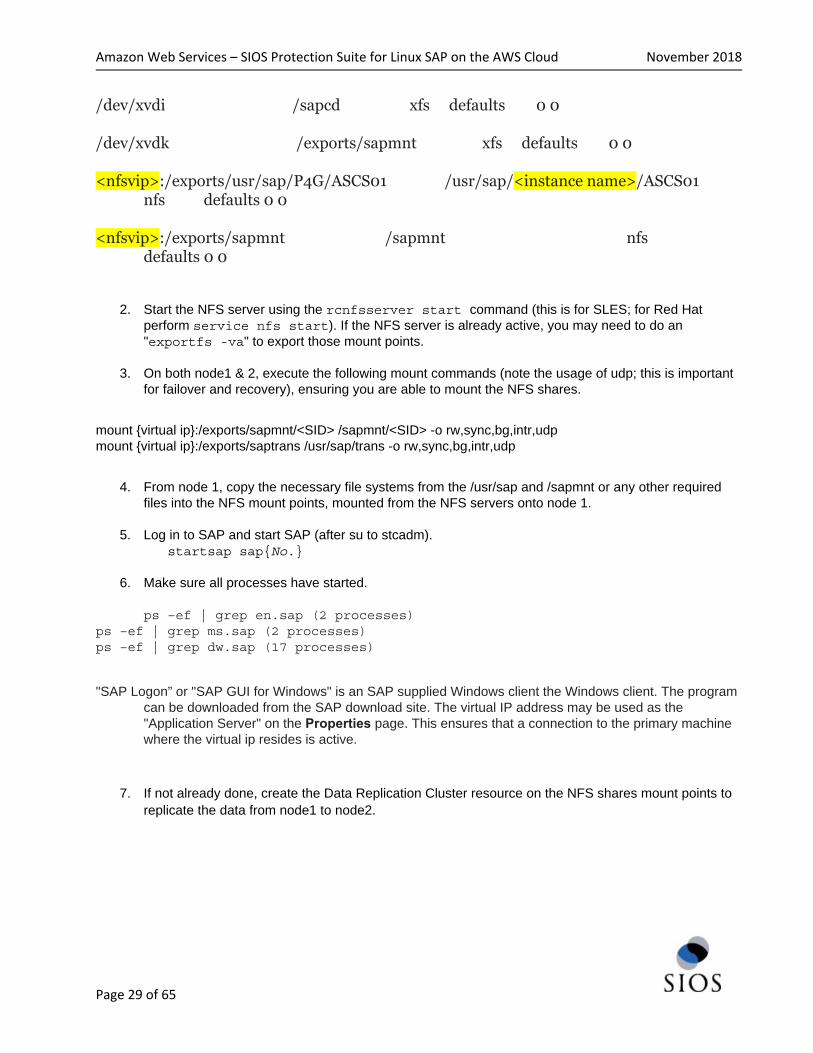
/dev/xvdi /sapcd xfs defaults 0 0
/dev/xvdk /exports/sapmnt xfs defaults 0 0
<nfsvip>:/exports/usr/sap/P4G/ASCS01 /usr/sap/<instance name>/ASCS01
nfs defaults 0 0
<nfsvip>:/exports/sapmnt /sapmnt nfs
defaults 0 0
2. Start the NFS server using the rcnfsserver start command (this is for SLES; for Red Hat
perform service nfs start). If the NFS server is already active, you may need to do an "exportfs -va" to export those mount points.
3. On both node1 & 2, execute the following mount commands (note the usage of udp; this is important
for failover and recovery), ensuring you are able to mount the NFS shares.
mount {virtual ip}:/exports/sapmnt/<SID> /sapmnt/<SID> -o rw,sync,bg,intr,udp mount {virtual ip}:/exports/saptrans /usr/sap/trans -o rw,sync,bg,intr,udp
4. From node 1, copy the necessary file systems from the /usr/sap and /sapmnt or any other required files into the NFS mount points, mounted from the NFS servers onto node 1.
5. Log in to SAP and start SAP (after su to stcadm).
startsap sap{No.}
6. Make sure all processes have started.
ps –ef | grep en.sap (2 processes) ps –ef | grep ms.sap (2 processes) ps –ef | grep dw.sap (17 processes)
"SAP Logon” or "SAP GUI for Windows" is an SAP supplied Windows client the Windows client. The program can be downloaded from the SAP download site. The virtual IP address may be used as the "Application Server" on the Properties page. This ensures that a connection to the primary machine where the virtual ip resides is active.
7. If not already done, create the Data Replication Cluster resource on the NFS shares mount points to replicate the data from node1 to node2.
Page 29 of 65

Amazon Web Services – SIOS Protection Suite for Linux SAP on the AWS Cloud November 2018
Creating an NFS Resource Hierarchy
You will need to repeat these steps to create multiple resource hierarchies for multiple NFS
shares.
To create a resource instance from the primary server, you should complete the following
steps:
1. From the LifeKeeper GUI menu, select Edit, then Server. From the drop-down menu, select Create Resource Hierarchy.
To change a selection already entered or if an error message is encountered during any step in the creation
of your NFS resource hierarchy, use the Back button to change your selection or make corrections (assuming the Back button is enabled).
A dialog box will appear with a drop-down menu listing all recognized Recovery Kits installed within the cluster. Select NFS from the drop-down menu.
Click Next to proceed to the next dialog box. Note: If you click the Cancel button at any time during the sequence of creating your hierarchy, LifeKeeper
will cancel the entire creation process.
2. Select the Switchback Type. This dictates how the NFS instance will be switched back to the primary server when it comes back into service after a failover to the backup server. Choose either Intelligent or Automatic. Intelligent switchback requires administrative intervention to switch the instance back to the primary/original server. Automatic switchback means the switchback will occur as soon as the primary server comes back on line and is under LifeKeeper protection
The switchback type can be changed later, if desired, from the General tab of the Resource Properties dialog box.
3. Select the Server where you want to create the NFS resource (typically this is referred to as the primary or template server). All the servers in your cluster are included in the drop-down menu.
Page 30 of 65

Amazon Web Services – SIOS Protection Suite for Linux SAP on the AWS Cloud November 2018
Click Next to proceed to the next dialog box.
4. The Export Point dialog displays a drop-down list of export points for NFS file systems that meet the following criteria:
● The export point has been exported by NFS. ● The export point is on a shared drive. ● If the underlying file system is LifeKeeper-protected, it must be in service and have
the highest priority on the server selected on the Server dialog.
● NFSv4 criteria: ○ For NFS v4 root export with bind mounts, bind mounts must be on a shared
drive just like the export, and if the file system is LifeKeeper-protected, it must be in service and have the highest priority on the server selected on the Server dialog.
○ If an NFS v4 root export is already being protected, no choices will be provided (there should only be one v4 and a mixture of V2/v3 with v4 cannot be protected).
○ If an NFS v2/v3 is already being protected, no NFS v4 will be listed in the choices.
○ If nothing is protected, then the list could contain both v2/v3 and v4.
Select the NFS export point to be protected from the drop-down list.
Click Next to proceed to the next dialog box.
5. The IP Tag dialog displays a drop-down list of tags corresponding to virtual IP addresses currently under LifeKeeper protection and in service on the server where the NFS resource is being created. Select the tag for the virtual IP address used by clients to access the protected NFS file system.
Note: At this point, LifeKeeper will check to ensure that there is a protected IP resource available. It will also validate that you have provided valid data to create your NFS resource hierarchy. If LifeKeeper
Page 31 of 65
Amazon Web Services – SIOS Protection Suite for Linux SAP on the AWS Cloud November 2018
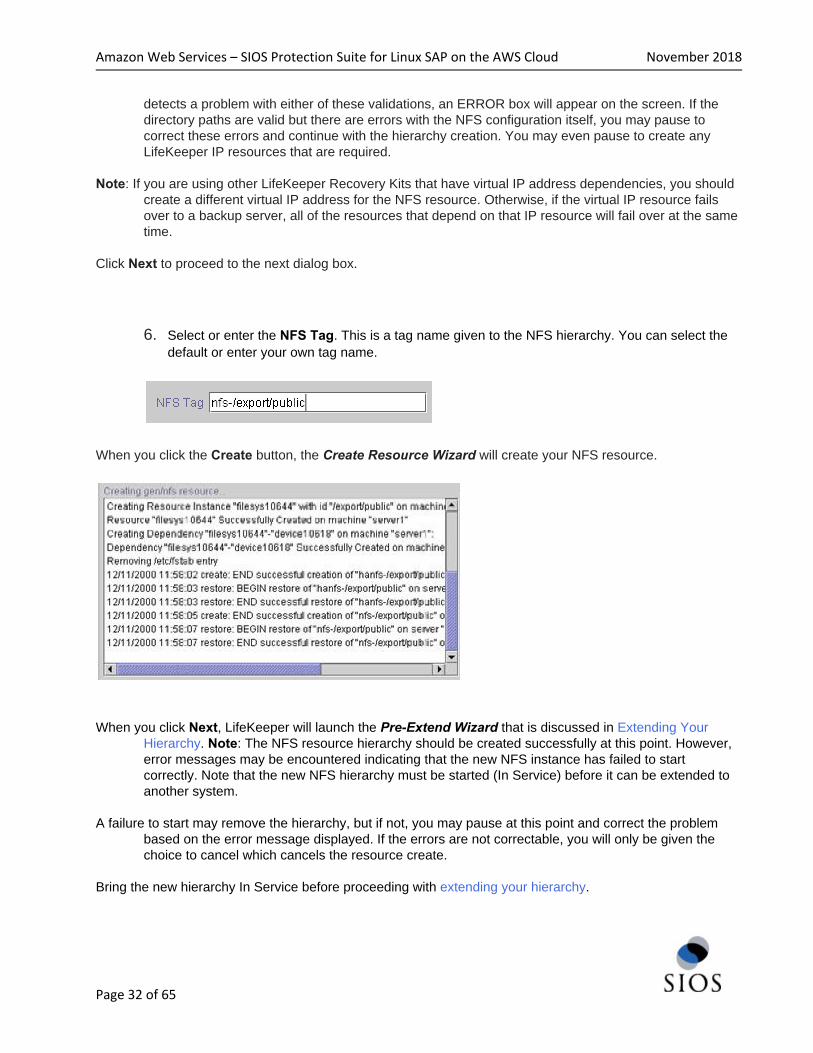
detects a problem with either of these validations, an ERROR box will appear on the screen. If the directory paths are valid but there are errors with the NFS configuration itself, you may pause to correct these errors and continue with the hierarchy creation. You may even pause to create any LifeKeeper IP resources that are required.
Note: If you are using other LifeKeeper Recovery Kits that have virtual IP address dependencies, you should
create a different virtual IP address for the NFS resource. Otherwise, if the virtual IP resource fails over to a backup server, all of the resources that depend on that IP resource will fail over at the same time.
Click Next to proceed to the next dialog box.
6. Select or enter the NFS Tag. This is a tag name given to the NFS hierarchy. You can select the default or enter your own tag name.
When you click the Create button, the Create Resource Wizard will create your NFS resource.
When you click Next, LifeKeeper will launch the Pre-Extend Wizard that is discussed in Extending Your
Hierarchy. Note: The NFS resource hierarchy should be created successfully at this point. However, error messages may be encountered indicating that the new NFS instance has failed to start correctly. Note that the new NFS hierarchy must be started (In Service) before it can be extended to another system.
A failure to start may remove the hierarchy, but if not, you may pause at this point and correct the problem
based on the error message displayed. If the errors are not correctable, you will only be given the choice to cancel which cancels the resource create.
Bring the new hierarchy In Service before proceeding with extending your hierarchy.
Page 32 of 65

Amazon Web Services – SIOS Protection Suite for Linux SAP on the AWS Cloud November 2018
*** Repeat the steps above to create additional resource hierarchy for each NFS share. Notes: Disable automatic startup of nfs-server.service after creating NFS resources on RHEL 7.1 or later and
SLES12 SP1 or later. Since it is necessary for rpcbind.service to be running at the startup of NFS resources, configure rpcbind.service to start automatically.
Creating the SAP Resource Hierarchy
1. From the LifeKeeper GUI menu, select Edit, then Server. From the drop-down
menu, select Create Resource Hierarchy.
A dialog box will appear with a drop-down list box with all recognized recovery kits
installed within the cluster. Select SAP from the drop-down listing.
Click Next.
When the Back button is active in any of the dialog boxes, you can go back to the previous
dialog box. This is especially helpful should you encounter an error that might
require you to correct previously entered information.
If you click Cancel at any time during the sequence of creating your hierarchy, LifeKeeper
will cancel the entire creation process.
2. Select the Switchback Type. This dictates how the SAP instance will be switched
back to this server when it comes back into service after a failover to the backup
server. You can choose either intelligent or automatic. Intelligent switchback
requires administrative intervention to switch the instance back to the
primary/original server. Automatic switchback means the switchback will occur
as soon as the primary server comes back on line and re-establishes LifeKeeper
communication paths.
The switchback type can be changed later from the General tab of the Resource
Properties dialog box.
Page 33 of 65
Amazon Web Services – SIOS Protection Suite for Linux SAP on the AWS Cloud November 2018
Click Next.
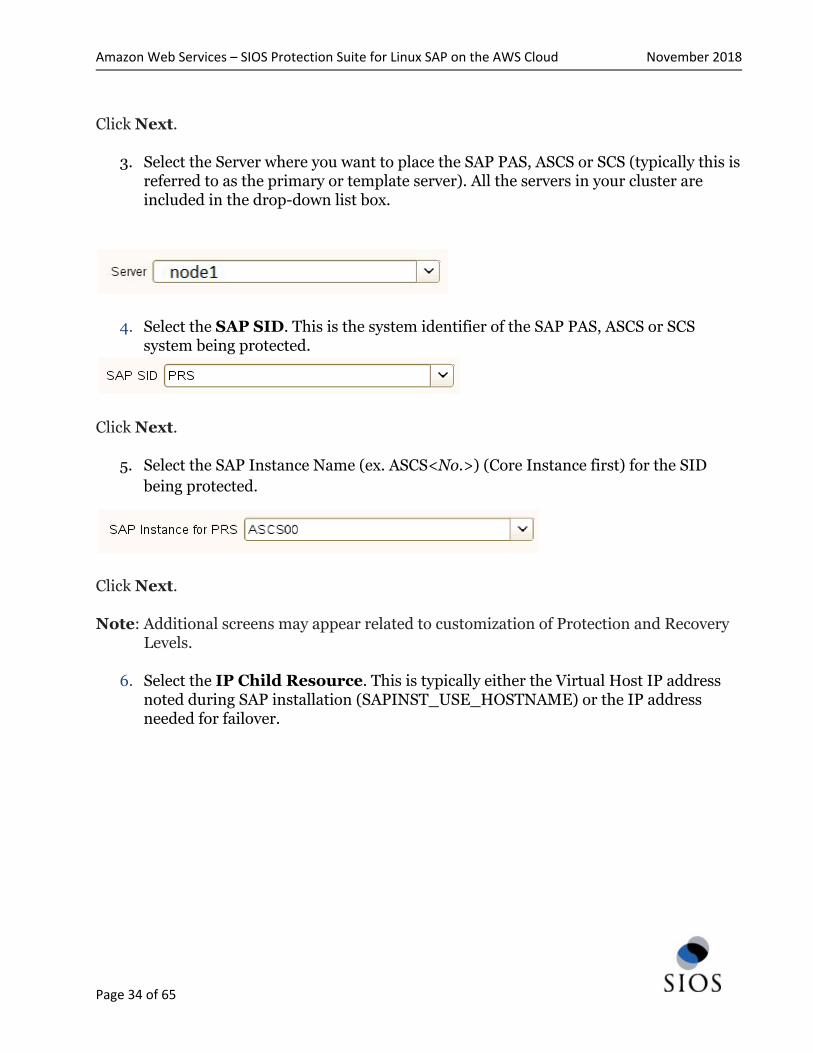
3. Select the Server where you want to place the SAP PAS, ASCS or SCS (typically this is
referred to as the primary or template server). All the servers in your cluster are
included in the drop-down list box.
4. Select the SAP SID. This is the system identifier of the SAP PAS, ASCS or SCS
system being protected.
Click Next.
5. Select the SAP Instance Name (ex. ASCS<No.>) (Core Instance first) for the SID
being protected.
Click Next.
Note: Additional screens may appear related to customization of Protection and Recovery
Levels.
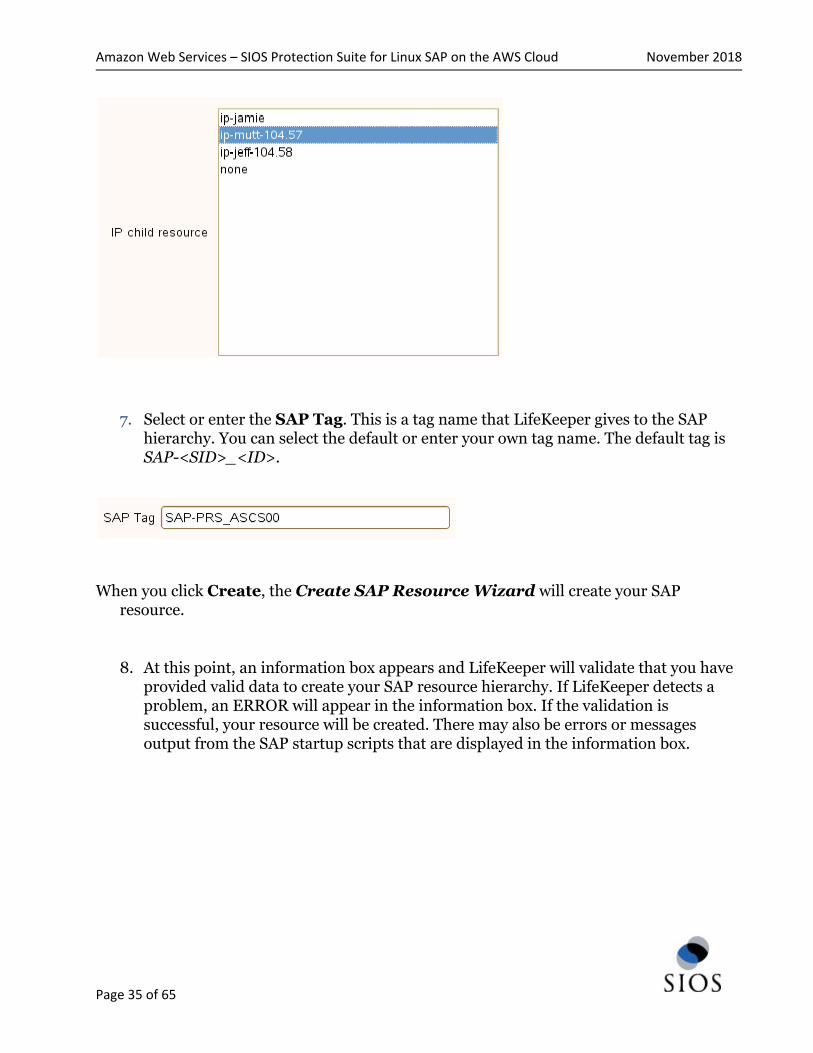
6. Select the IP Child Resource. This is typically either the Virtual Host IP address
noted during SAP installation (SAPINST_USE_HOSTNAME) or the IP address
needed for failover.
Page 34 of 65
Amazon Web Services – SIOS Protection Suite for Linux SAP on the AWS Cloud November 2018
7. Select or enter the SAP Tag. This is a tag name that LifeKeeper gives to the SAP
hierarchy. You can select the default or enter your own tag name. The default tag is
SAP-<SID>_<ID>.
When you click Create, the Create SAP Resource Wizard will create your SAP
resource.
8. At this point, an information box appears and LifeKeeper will validate that you have
provided valid data to create your SAP resource hierarchy. If LifeKeeper detects a
problem, an ERROR will appear in the information box. If the validation is
successful, your resource will be created. There may also be errors or messages
output from the SAP startup scripts that are displayed in the information box.
Page 35 of 65

Amazon Web Services – SIOS Protection Suite for Linux SAP on the AWS Cloud November 2018
Click Next.
9. Another information box will appear explaining that you have successfully created an
SAP resource hierarchy, and you must Extend that hierarchy to another server in
your cluster in order to place it under LifeKeeper protection.
When you click Next, LifeKeeper will launch the Pre-Extend Wizard that is explained
later in this section.
Page 36 of 65

Amazon Web Services – SIOS Protection Suite for Linux SAP on the AWS Cloud November 2018
If you click Cancel now, a dialog box will appear warning you that you will need to come
back and extend your SAP resource hierarchy to another server at some other time to
put it under LifeKeeper protection.
Page 37 of 65

Amazon Web Services – SIOS Protection Suite for Linux SAP on the AWS Cloud November 2018
10. The Extend Wizard dialog will appear stating Hierarchy successfully
extended. Click Finish.
The Hierarchy Integrity Verification dialog appears. Once Hierarchy Verification
finishes, click Done to exit the Create Resource Hierarchy menu selection.
Page 38 of 65

Amazon Web Services – SIOS Protection Suite for Linux SAP on the AWS Cloud November 2018
Hierarchy with the Core as the Top Level
Page 39 of 65

Amazon Web Services – SIOS Protection Suite for Linux SAP on the AWS Cloud November 2018
Create the ERS Resource
The ERS resource provides additional protection against a single point of failure of a Core
Instance (Central Services Instance) or enqueue server process. When a Core
Instance (Central Services Instance) fails and is restarted, it will retrieve the current
status of the lock table and transactions. The result is that, in the event of the
enqueue server failure, no transactions or updates are lost and the service for the
SAP system continues.
Perform the following steps to create this ERS Resource.
1. For this same SAP SID, repeat the above steps to create the ERS Resource selecting
your ERS instance when prompted.
2. You will then be prompted to select Dependent Instances. Select the Core
Resource that was created above, and then click Next. 3. Follow prompts to extend resource hierarchy. 4. Once Hierarchy Successfully Extended displays, select Finish. 5. Select Done.
Note: The Enqueue Replication Server (ERS) resource will be in-service (ISP) on the
primary node in your cluster. However, the architecture and function of the ERS
requires that the actual processes for the instance run on the backup node. This
allows the standby server to hold a complete copy of the lock table information for
the primary server and primary enqueue server instance. When the primary server
running the enqueuer server fails, it will be restarted by SIOS Protection Suite on the
backup server on which the ERS process is currently running. The lock table
(replication table) stored on the ERS is transferred to the enqueue server process
being recovered and the new lock table is created from it. Once this process is
complete, the active replication server is then deactivated (it closes the connection to
the enqueue server and deletes the replication table). SIOS Protection Suite will then
restart the ERS processes on the new current backup node (formerly the primary)
which has been inactive until now. Once the ERS process becomes active, it connects
to the enqueue server and creates a replication table. For more information on the
ERS process and SAP architecture features, visit http://help.sap.com and search for
Enqueue Replication Service.
Page 40 of 65

Amazon Web Services – SIOS Protection Suite for Linux SAP on the AWS Cloud November 2018
Hierarchy with ERS as Top Level
While SIOS Protection Suite can be used to protect the PAS and AAS servers, most
customers would simply use them as independent standby servers with no additional HA
on them. This guide does not cover their protection steps but you can refer to our SAP
recovery kit documentation for details and steps
http://docs.us.sios.com/Linux/9.2.2/LK4L/SAP/index.htm
Page 41 of 65

Amazon Web Services – SIOS Protection Suite for Linux SAP on the AWS Cloud November 2018
ASCS + ERS With NFS on the same instance as ASCS
The steps below are the same as installing ASCS + ERS With NFS on separate instances
except in this case, the NFS is running on the same instance as ASCS+ERS and an
additional custom script is to be used as generic application resource in Lifekeeper to
mount the NFS shared mount point after a switchover or failover, which contains the
profile files that are needed for SAP to start correctly on the current active node.
This is generally not a recommended configuration due to the complications of NFS not
mounting automatically on the node after NFS server switches over to the other server.
SIOS provides a custom genapp script to be used “as-is” and not as an official supported
resource kit to help customers overcome this issue.
General setup overall steps
1. Create Virtual IP, done in earlier steps on node1, extend, done in earlier steps
2. Create EC2 resource and create as dependency for virtual IP, done in earlier steps
3. Install SAP on node1 on “virtual hostname” based on “virtual IP”
4. Stopsap on node1
5. Use the LifeKeeper GUI to “In-service” the virtual IP to node 2, and Install SAP on
node2 on “virtual hostname” based on “virtual IP”
6. Stopsap on node 2 and modify profile files on both nodes (see below)
7. Use the LifeKeeper GUI to “In-service” the virtual IP back to node 1
Page 42 of 65

Amazon Web Services – SIOS Protection Suite for Linux SAP on the AWS Cloud November 2018
8. Create replication resource for the mount points needed for SAP, done in earlier
steps, as advised by SAP consultants
9. Startsap on node1 and ensure SAP is working properly
10. in /etc/default/LifeKeeper on both nodes add the follow entries to the end –
SAP_EXPERTMODE=1
SAP_NFS_CHECK_IGNORE=1
SAP_DB_CHECK_IGNORE=1
11. Re-run the SPS setup program to add the SAP Recovery Kit
Mount the sps.img file (downloaded as per earlier steps) using the following command:
mount <PATH/IMAGE_NAME> <MOUNT_POINT> -t iso9660 -o loop
Where PATH is the path to the image
IMAGE_NAME is the name of the image
MOUNT_POINT is the path to mount location
Change to the sps.img mounted directory and type the following:
./setup -k
You will now be shown a menu of recovery kits available. Select the recovery kit for SAP by
using the arrow keys and pressing the <spacebar> to select, press <enter> to continue
and complete the installation.
12. Setup NFS on the same server
13. Copy file systems on to SAP server and create replication resources on the file
systems for redundancy and failover
Page 43 of 65

Amazon Web Services – SIOS Protection Suite for Linux SAP on the AWS Cloud November 2018
14. Create NFS resources following the NFS recovery kit guide
http://docs.us.sios.com/Linux/9.2.2/LK4L/NFS/index.htm
Simplified steps are given below in this documentation
15. Create SAP resources following the SAP recovery kit guide
http://docs.us.sios.com/Linux/9.2.2/LK4L/SAP/index.htm
Simplified steps are given below in this documentation
Installing SAP
8. ASCS and ERS should be installed based on “virtual hostname” based on “virtual IP”,
which should have been added to hosts files during earlier installation steps. Please
be sure to do so if they have not already been done prior to installing SAP.
● Set the SAPinst property SAPINST_USE_HOSTNAME to specify the required
virtual host names before starting SAPinst. (Note: Document the
SAPINST_USE_HOSTNAME virtual IP address as it will be used later during
creation of the SAP resources in LifeKeeper.)
Run ./sapinst SAPINST_USE_HOSTNAME={hostname}
● In seven phases, the Core Services should be created and started. If
permission errors occur on jdbcconnect.jar, go to
/sapmnt/STC/exe/uc/linuxx86_64 and make that directory as well as file
jdbcconnect.jar writable (chmod 777 ---).
Enqueue replication should be configured and checked working based on SAP
documentation and best practices.
ASCS and ERS profiles should be pointing to local mount point containing /usr/sap,
sapmnt or any other necessary for SAP files in your environment, the actual files will be
moved onto NFS mount points after it is installed and configured.
In the instance profiles of ERS and ASCS instances you have to change the entries, to
prevent the services from getting automatically restart the program, after that you have to
restart the “sapstartsrv” of ASCS and ERS instances. e.g ----
Autostart = 1
Page 44 of 65

Amazon Web Services – SIOS Protection Suite for Linux SAP on the AWS Cloud November 2018
Restart_Program_00 = local $(_ER) pf=$(_PFL) NR=$(SCSID)
to
Autostart = 0
Start_Program_00 = local $(_ER) pf=$(_PFL) NR=$(SCSID)
9. Sapstop SAP on node 1
10. Using the LifeKeeper GUI, right click on the IP address resource created for ASCS,
select “In-Service” and select node2 to switch the IP onto node 2.
11. Repeat step 1 to install SAP onto node 2 and ensure that it’s able to run correctly
12. Sapstop SAP on node 2
13. Using the LifeKeeper GUI, right click on the IP address resource created for ASCS,
select “In-Service” and select node1 to switch the IP back onto node 1.
14. Sapstart SAP on node 1 and ensure that it’s able to run correctly
Setting up NFS
NFS server on both cluster nodes should have been installed prior to installation of SIOS as
a prerequisite.
Create the NFS exports based on the SAP’s requirements in your SAP design. Below are
examples that may be use as a guide but not a representation of your SAP environment.
LifeKeeper maintains NFS share information using inodes; therefore, every NFS share is required to have a unique inode. Since every file system root directory has the same inode, NFS shares must be at least one directory level down from root in order to be protected by LifeKeeper. For example, referring to the information above, if the /usr/sap/trans directory is NFS shared on the SAP server, the /trans directory is created on the shared storage device which would require mounting the shared storage device as /usr/sap. It is not necessarily desirable, however, to place all files under /usr/sap on shared storage which would be required with this arrangement. To circumvent this problem, it is recommended that you create an /exports directory tree for mounting all shared file systems containing directories that are NFS shared and then create a soft link between the SAP directories and the /exports directories, or alternately, locally NFS mount the NFS shared
Page 45 of 65

Amazon Web Services – SIOS Protection Suite for Linux SAP on the AWS Cloud November 2018
directory. (Note: The name of the directory that we refer to as /exports can vary according to user preference; however, for simplicity, we will refer to this directory as /exports throughout this documentation.) For example, the following directories and links/mounts for our example on the SAP Primary Server would be:
The following directories and links for the <sapmnt>/<SAPSID> share would be:
Local NFS Mounts
The recommended directory structure for SAP in a LifeKeeper environment requires a
locally mounted NFS share for one or more SAP system directories. If the NFS export point
for any of the locally mounted NFS shares becomes unavailable, the system may hang while
waiting for the export point to become available again. Many system operations will not
work correctly, including a system reboot. You should be aware that the NFS server for the
SAP cluster should be protected by LifeKeeper and should not be manually taken out of
service while local mount points exist.
To avoid accidentally causing your cluster to hang by inadvertently stopping the NFS
server, please follow the recommendations listed in the NFS Considerations topic. It is
additionally helpful to mount all NFS shares using the 'intr' mount option so that hung
processes resulting from inaccessible NFS shares can be killed.
Location of <INST> directories
Since the /usr/sap/<SAPSID> path is not NFS shared, it can be mounted to the root
directory of the file system. The /usr/sap/<SAPSID> path contains the SYS subdirectory
Page 46 of 65
Amazon Web Services – SIOS Protection Suite for Linux SAP on the AWS Cloud November 2018
and an <INST> subdirectory for each SAP instance that can run on the server. For certain
configurations, there may only be one <INST> directory, so it is acceptable for it to be
located under /usr/sap/<SAPSID> on the shared file system. For other configurations,
however, the backup server may also contain a local AS instance whose <INST> directory
should not be on a shared file system since it will not always be available. To solve this
problem, it is recommended that for certain configurations, the PAS’s, ASCS's or SCS’s
/usr/sap/<SAPSID>/<INST>, /usr/sap/<SAPSID>/<ASCS-INST> or
/usr/sap/<SAPSID>/<SCS-INST> directories should be mounted to the shared file system
instead of /usr/sap/<SAPSID> and the /usr/sap/<SAPSID>/SYS and
/usr/sap/<SAPSID>/<AS-INST> for the AS should be located on the local server.
For example, the following directories and mount points should be created for the
ABAP+Java Configuration
Mount NFS and move file systems
After mount points has been created for the main SAP file systems, mount them accordingly
(required). At this point, stop all SAP services before proceeding with these steps.
mount /dev/sap/sapmnt /exports/sapmnt mount /dev/sap/saptrans /exports/saptrans
Move Data to NFS
1. Edit the /etc/exports directory and insert the mount points for SAP’s main directories.
Page 47 of 65

Amazon Web Services – SIOS Protection Suite for Linux SAP on the AWS Cloud November 2018
/exports/sapmnt *(rw,sync,no_root_squash)
/exports/saptrans *(rw,sync,no_root_squash)
Example NFS export
# more /etc/exports
/exports/sapmnt 10.2.0.69(rw,sync,all_squash,anonuid=0,anongid=1001)
/exports/sapmnt 10.2.0.11(rw,sync,all_squash,anonuid=0,anongid=1001)
/exports/usr/sap/<instance name>/ASCS01
10.2.0.69(rw,sync,all_squash,anonuid=0,anongid=1001)
/exports/sap/<instance name>/ASCS01
10.2.0.11(rw,sync,all_squash,anonuid=0,anongid=1001)
# more /etc/fstab
#
# /etc/fstab
# Created by anaconda on Mon Nov 9 20:20:10 2015
#
# Accessible filesystems, by reference, are maintained under '/dev/disk'
# See man pages fstab(5), findfs(8), mount(8) and/or blkid(8) for more info
#
UUID=367df610-4210-4a5a-8c8d-51ddf499fc17 / xfs defaults 0 0
/dev/xvdb swap swap defaults 0 0
/dev/xvdc /tmp xfs nodev,nosuid,noexec,relatime 0 0
Page 48 of 65

Amazon Web Services – SIOS Protection Suite for Linux SAP on the AWS Cloud November 2018
/dev/xvdp1 /var xfs defaults 0 0
/dev/xvdp2 /var/log xfs defaults 0 0
/dev/xvdp3 /var/log/audit xfs defaults 0 0
/dev/xvdp4 /home xfs defaults,nodev 0 0
/tmp /var/tmp none bind,nodev,nosuid 0 0
/dev/xvdj /usr/sap xfs defaults 0 0
/dev/xvdg /exports/usr/sap/P4G/ASCS01 xfs defaults 0 0
/dev/xvdh /usr/sap/P4G/D00 xfs defaults 0 0
/dev/xvdi /sapcd xfs defaults 0 0
/dev/xvdk /exports/sapmnt xfs defaults 0 0
<nfsvip>:/exports/usr/sap/P4G/ASCS01 /usr/sap/<instance name>/ASCS01
nfs defaults 0 0
<nfsvip>:/exports/sapmnt /sapmnt nfs
defaults 0 0
2. Start the NFS server using the rcnfsserver start command (this is for SLES; for Red Hat
perform service nfs start). If the NFS server is already active, you may need to do an "exportfs -va" to export those mount points.
3. On both node1 & 2, execute the following mount commands (note the usage of udp; this is important
for failover and recovery), ensuring you are able to mount the NFS shares.
mount {virtual ip}:/exports/sapmnt/<SID> /sapmnt/<SID> -o rw,sync,bg,intr,udp mount {virtual ip}:/exports/saptrans /usr/sap/trans -o rw,sync,bg,intr,udp
4. From node 1, copy the necessary file systems from the /usr/sap and /sapmnt or any other required files into the NFS mount points, mounted from the NFS servers onto node1.
5. Log in to SAP and start SAP (after su to stcadm).
startsap sap{No.}
6. Make sure all processes have started.
Page 49 of 65

Amazon Web Services – SIOS Protection Suite for Linux SAP on the AWS Cloud November 2018
ps –ef | grep en.sap (2 processes)
ps –ef | grep ms.sap (2 processes) ps –ef | grep dw.sap (17 processes)
"SAP Logon” or "SAP GUI for Windows" is an SAP supplied Windows client the Windows client. The program can be downloaded from the SAP download site. The virtual IP address may be used as the "Application Server" on the Properties page. This ensures that a connection to the primary machine where the virtual ip resides is active.
7. If not already done, create the Data Replication Cluster resource on the NFS shares mount points to replicate the data from node1 to node2.
Creating an NFS Resource Hierarchy
You will need to repeat these steps to create multiple resource hierarchies for multiple NFS
shares.
To create a resource instance from the primary server, you should complete the following
steps:
1. From the LifeKeeper GUI menu, select Edit, then Server. From the drop-down menu, select Create Resource Hierarchy.
To change a selection already entered or if an error message is encountered during any step in the creation
of your NFS resource hierarchy, use the Back button to change your selection or make corrections (assuming the Back button is enabled).
A dialog box will appear with a drop-down menu listing all recognized Recovery Kits installed within the cluster. Select NFS from the drop-down menu.
Click Next to proceed to the next dialog box. Note: If you click the Cancel button at any time during the sequence of creating your hierarchy, LifeKeeper
will cancel the entire creation process.
2. Select the Switchback Type. This dictates how the NFS instance will be switched back to the primary server when it comes back into service after a failover to the backup server. Choose either Intelligent or Automatic. Intelligent switchback requires administrative intervention to switch the instance back to the primary/original server. Automatic switchback means the
Page 50 of 65

Amazon Web Services – SIOS Protection Suite for Linux SAP on the AWS Cloud November 2018
switchback will occur as soon as the primary server comes back on line and is under LifeKeeper protection
The switchback type can be changed later, if desired, from the General tab of the Resource Properties dialog box.
3. Select the Server where you want to create the NFS resource (typically this is referred to as the primary or template server). All the servers in your cluster are included in the drop-down menu.
Click Next to proceed to the next dialog box.
4. The Export Point dialog displays a drop-down list of export points for NFS file systems that meet the following criteria:
● The export point has been exported by NFS. ● The export point is on a shared drive ● If the underlying file system is LifeKeeper-protected, it must be in service and have
the highest priority on the server selected on the Server dialog.
● NFSv4 criteria: ○ For NFS v4 root export with bind mounts, bind mounts must be on a shared
drive just like the export, and if the file system is LifeKeeper-protected, it must be in service and have the highest priority on the server selected on the Server dialog.
○ If an NFS v4 root export is already being protected, no choices will be provided (there should only be one v4 and a mixture of V2/v3 with v4 cannot be protected).
○ If an NFS v2/v3 is already being protected, no NFS v4 will be listed in the choices.
○ If nothing is protected, then the list could contain both v2/v3 and v4.
Select the NFS export point to be protected from the drop-down list.
Page 51 of 65

Amazon Web Services – SIOS Protection Suite for Linux SAP on the AWS Cloud November 2018
Click Next to proceed to the next dialog box.
5. The IP Tag dialog displays a drop-down list of tags corresponding to virtual IP addresses currently under LifeKeeper protection and in service on the server where the NFS resource is being created. Select the tag for the virtual IP address used by clients to access the protected NFS file system.
Note: At this point, LifeKeeper will check to ensure that there is a protected IP resource available. It will also validate that you have provided valid data to create your NFS resource hierarchy. If LifeKeeper detects a problem with either of these validations, an ERROR box will appear on the screen. If the directory paths are valid but there are errors with the NFS configuration itself, you may pause to correct these errors and continue with the hierarchy creation. You may even pause to create any LifeKeeper IP resources that are required.
Note: If you are using other LifeKeeper Recovery Kits that have virtual IP address dependencies, you might
want to create a different virtual IP address for the NFS resource. Otherwise, if the virtual IP resource fails over to a backup server, all of the resources that depend on that IP resource will fail over at the same time.
Click Next to proceed to the next dialog box.
6. Select or enter the NFS Tag. This is a tag name given to the NFS hierarchy. You can select the default or enter your own tag name.
When you click the Create button, the Create Resource Wizard will create your NFS resource.
Page 52 of 65
Amazon Web Services – SIOS Protection Suite for Linux SAP on the AWS Cloud November 2018
When you click Next, LifeKeeper will launch the Pre-Extend Wizard that is discussed in Extending Your
Hierarchy. Note: The NFS resource hierarchy should be created successfully at this point. However, error messages may be encountered indicating that the new NFS instance has failed to start correctly. Note that the new NFS hierarchy must be started (In Service) before it can be extended to another system.
A failure to start may remove the hierarchy, but if not, you may pause at this point and correct the problem
based on the error message displayed. If the errors are not correctable, you will only be given the choice to cancel which cancels the resource create.
Bring the new hierarchy In Service before proceeding with extending your hierarchy. *** Repeat the steps above to create additional resource hierarchy for each NFS share. Notes: Disable automatic startup of nfs-server.service after creating NFS resources on RHEL 7.1 or later and
SLES12 SP1 or later. Since it is necessary for rpcbind.service to be running at the startup of NFS resources, please configure rpcbind.service to start automatically.
Creating the NFSmounter Generic Application Resource Hierarchy
This genapp is provided by SIOS as a custom genapp script to be used “as-is” and not as
an official supported resource kit to help customers overcome the issue of NFS shares
not re- mounting on the OS automatically following a switchover.
To use this script a gen/app resource must be created. The info field for the gen/app
resource must contain the information required to mount the share in the info field.
Application Info required: <system_mount_point> <nfs_host> <nfs_export>
<nfs_options>
Example from Node1:
/sapmnt/JS1 peter /exports/sapmnt/JS1 rw-sync-bg-nfsvers=4
Directions:
1. run the setup script in the local directory
# ./setup
2. Verify setup is complete:
# ls -l /opt/LifeKeeper/lkadm/subsys/gen/app/lib
# enhancedNasMounter.pm
3. Log into the LifeKeeper GUI. Use the UI to create the gen/app resource
specifying the proper script at each prompt and set the info field as explained
above.
4. Verify the file system is mounted when the app is restored
# df -h
Page 53 of 65

Amazon Web Services – SIOS Protection Suite for Linux SAP on the AWS Cloud November 2018
Tunable values in /etc/default/LifeKeeper:
GLOBAL_NAS_APP_SKIP_REMOVE (default=0)
- When set, the remove will skip unmounting all gen/app resources that use this gen/app
Library
SKIP_REMOVE_<tag> (default=0), where tag is the resource tag
Example: SKIP_REMOVE_share1=1
- When set, the remove will skip unmounting the specific gen/app resource specified by the
_<tag>
NAS_APP_DEBUG (default=0)
- When set, this will turn on additional messages in the output
*** Repeat the steps above for each mount point required
Creating the SAP Resource Hierarchy
1. From the LifeKeeper GUI menu, select Edit, then Server. From the drop-down
menu, select Create Resource Hierarchy.
A dialog box will appear with a drop-down list box with all recognized recovery kits
installed within the cluster. Select SAP from the drop-down listing.
Click Next.
When the Back button is active in any of the dialog boxes, you can go back to the previous
dialog box. This is especially helpful should you encounter an error that might
require you to correct previously entered information.
If you click Cancel at any time during the sequence of creating your hierarchy, LifeKeeper
will cancel the entire creation process.
2. Select the Switchback Type. This dictates how the SAP instance will be switched
back to this server when it comes back into service after a failover to the backup
server. You can choose either intelligent or automatic. Intelligent switchback
Page 54 of 65

Amazon Web Services – SIOS Protection Suite for Linux SAP on the AWS Cloud November 2018
requires administrative intervention to switch the instance back to the
primary/original server. Automatic switchback means the switchback will occur
as soon as the primary server comes back on line and re-establishes LifeKeeper
communication paths.
The switchback type can be changed later, if desired, from the General tab of the
Resource Properties dialog box.
Click Next.
3. Select the Server where you want to place the SAP PAS, ASCS or SCS (typically this is
referred to as the primary or template server). All the servers in your cluster are
included in the drop-down list box.
4. Select the SAP SID. This is the system identifier of the SAP PAS, ASCS or SCS
system being protected.
Click Next.
5. Select the SAP Instance Name (ex. ASCS<No.>) (Core Instance first) for the SID
being protected.
Click Next.
Note: Additional screens may appear related to customization of Protection and Recovery
Levels.
Page 55 of 65

Amazon Web Services – SIOS Protection Suite for Linux SAP on the AWS Cloud November 2018
6. Select the IP Child Resource. This is typically either the Virtual Host IP address
noted during SAP installation (SAPINST_USE_HOSTNAME) or the IP address
needed for failover.
7. Select or enter the SAP Tag. This is a tag name that LifeKeeper gives to the SAP
hierarchy. You can select the default or enter your own tag name. The default tag is
SAP-<SID>_<ID>.
When you click Create, the Create SAP Resource Wizard will create your SAP
resource.
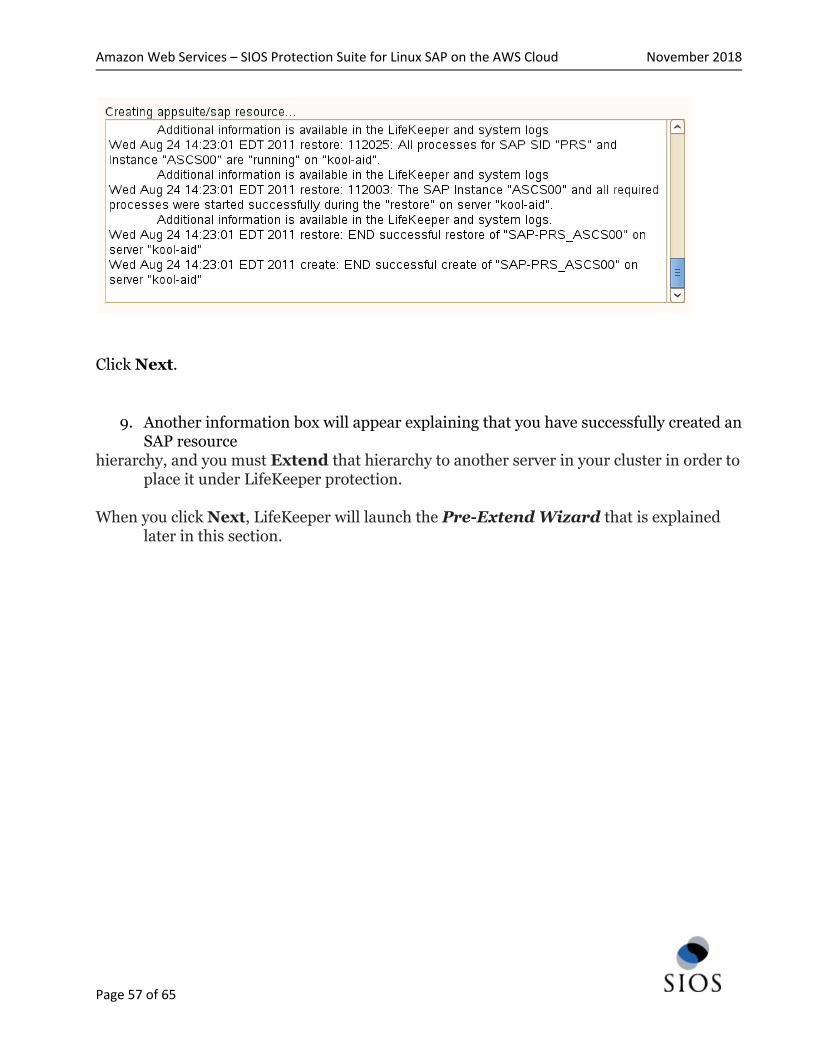
8. At this point, an information box appears and LifeKeeper will validate that you have
provided valid data to create your SAP resource hierarchy. If LifeKeeper detects a
problem, an ERROR will appear in the information box. If the validation is
successful, your resource will be created. There may also be errors or messages
output from the SAP startup scripts that are displayed in the information box.
Page 56 of 65
Amazon Web Services – SIOS Protection Suite for Linux SAP on the AWS Cloud November 2018
Click Next.
9. Another information box will appear explaining that you have successfully created an
SAP resource
hierarchy, and you must Extend that hierarchy to another server in your cluster in order to
place it under LifeKeeper protection.
When you click Next, LifeKeeper will launch the Pre-Extend Wizard that is explained
later in this section.
Page 57 of 65

Amazon Web Services – SIOS Protection Suite for Linux SAP on the AWS Cloud November 2018
If you click Cancel now, a dialog box will appear warning you that you will need to come
back and extend your SAP resource hierarchy to another server at some other time to
put it under LifeKeeper protection.
Page 58 of 65

Amazon Web Services – SIOS Protection Suite for Linux SAP on the AWS Cloud November 2018
10. The Extend Wizard dialog will appear stating Hierarchy successfully
extended. Click Finish.
The Hierarchy Integrity Verification dialog appears. Once Hierarchy Verification
finishes, click Done to exit the Create Resource Hierarchy menu selection.
Page 59 of 65

Amazon Web Services – SIOS Protection Suite for Linux SAP on the AWS Cloud November 2018
Hierarchy with the Core as the Top Level
Page 60 of 65

Amazon Web Services – SIOS Protection Suite for Linux SAP on the AWS Cloud November 2018
Create the ERS Resource
The ERS resource provides additional protection against a single point of failure of a Core
Instance (Central Services Instance) or enqueue server process. When a Core
Instance (Central Services Instance) fails and is restarted, it will retrieve the current
status of the lock table and transactions. The result is that, in the event of the
enqueue server failure, no transactions or updates are lost and the service for the
SAP system continues.
Perform the following steps to create this ERS Resource.
1. For this same SAP SID, repeat the above steps to create the ERS Resource selecting
your ERS instance when prompted.
2. You will then be prompted to select Dependent Instances. Select the Core
Resource that was created above, and then click Next. 3. Follow prompts to extend resource hierarchy. 4. Once Hierarchy Successfully Extended displays, select Finish. 5. Select Done.
Note: The Enqueue Replication Server (ERS) resource will be in-service (ISP) on the
primary node in your cluster. However, the architecture and function of the ERS
requires that the actual processes for the instance run on the backup node. This
allows the standby server to hold a complete copy of the lock table information for
the primary server and primary enqueue server instance. When the primary server
running the enqueuer server fails, it will be restarted by SIOS Protection Suite on the
backup server on which the ERS process is currently running. The lock table
(replication table) stored on the ERS is transferred to the enqueue server process
being recovered and the new lock table is created from it. Once this process is
complete, the active replication server is then deactivated (it closes the connection to
the enqueue server and deletes the replication table). SIOS Protection Suite will then
restart the ERS processes on the new current backup node (formerly the primary)
which has been inactive until now. Once the ERS process becomes active, it connects
to the enqueue server and creates a replication table. For more information on the
ERS process and SAP architecture features, visit http://help.sap.com and search for
Enqueue Replication Service.
Page 61 of 65

Amazon Web Services – SIOS Protection Suite for Linux SAP on the AWS Cloud November 2018
Hierarchy with ERS as Top Level
While SIOS Protection Suite can be used to protect the PAS and AAS servers, most
customers would simply use them as independent standby servers with no additional HA
on them. This guide does not cover their protection steps but you can refer to our SAP
recovery kit documentation for details and steps
http://docs.us.sios.com/Linux/9.2.2/LK4L/SAP/index.htm
Page 62 of 65

Amazon Web Services – SIOS Protection Suite for Linux SAP on the AWS Cloud November 2018
Switchover and failover testing
Steps below are for testing the switchover and failover of a SIOS cluster for SAP. Open "SAP Logon” or "SAP GUI for Windows", which is an SAP supplied Windows client the Windows client. The program can be downloaded from the SAP download site. The virtual IP address may be used as the "Application Server" on the Properties page. This ensures that a connection to the primary machine where the virtual ip resides is active.
1. Using the LifeKeeper GUI, failover from Node1 -> Node2″. Right click on the top
resource in the cluster underneath node2, and select “In Service…”. This
demonstrates that node 2 is able to take over from node1 during a failure
Page 63 of 65

Amazon Web Services – SIOS Protection Suite for Linux SAP on the AWS Cloud November 2018
After switchover has completed, check on the SAP GUI or reconnect where necessary and examine that SAP is still running normally.
You may also check if SAP processes are running in the OS.
2. Using the LifeKeeper GUI, failover from Node2 -> Node1″. Right click on the top
resource in the cluster underneath node2, and select “In Service…”This
demonstrates that node 1 is able to take over from node2 during a failure
After switchover has completed, check on the SAP GUI or reconnect where necessary and examine that SAP is still running normally.
You may also check if SAP processes are running in the OS.
3. On the command line interface on node 1 (active node), execute the following
command to perform a “hard crash” of the OS
# halt -fni
After failover has completed, use the LifeKeeper GUI on node 2 to check visually that the services are failed over normally
Check on the SAP GUI or reconnect where necessary and examine that SAP is still running normally.
You may also check if SAP processes are running in the OS.
Turn on node 1 again and use the LifeKeeper GUI on node 2 to check visually that the services are on node 1 becomes standby, and replication is started.
Note: Before attempting to do any more switchover or failover testing, ensure that the data replication resources have already completed their synchronization and are in sync.
4. Repeat step 2 or step 1 as necessary to switchover back to node 1, or to perform
another crash testing on node 2.
Page 64 of 65
Amazon Web Services – SIOS Protection Suite for Linux SAP on the AWS Cloud November 2018
Additional Resources AWS services
● Amazon EC2
https://aws.amazon.com/documentation/ec2/
● AWS CloudFormation
https://aws.amazon.com/documentation/cloudformation/
● Amazon VPC
https://aws.amazon.com/documentation/vpc/
SIOS Protection Suite for Linux
● Step-By-Step: How to configure a Linux failover cluster in Amazon EC2 without shared
storage
http://www.linuxclustering.net/2016/03/21/step-by-step-how-to-configure-a-linux-fail
over-cluster-in-amazon-ec2-without-shared-storage-amazon-aws-sanless-cluster/
Quick Start reference deployments
● AWS Quick Start home page
https://aws.amazon.com/quickstart/
Send Us Feedback We welcome your questions and comments, please email us.
Document Revisions
Date Change
November 2018 Initial publication
Page 65 of 65