Embed Size (px)
Citation preview

OM 041 GB Edition 05.2012 Original operating manual
Assembly and Operating Manual
RUBBISH CHUTE COMFORT

GEDA® Rubbish Chute
Assembly and Operating Manual Page 2 of 24 BL041GB Edition 05.2012

GEDA® Rubbish Chute
Assembly and Operating Manual Page 3 of 24 BL041GB Edition 05.2012
1 SAFETY INFORMATION / TECHNICAL SPECIFICATION 4
1.1 PROPER USE 4 1.2 OPERATION/LIMITATIONS OF THE RUBBISH CHUTE 4 1.3 MODIFICATIONS/ALTERATIONS 4 1.4 FORESEEABLE MISUSE 5 1.5 CHECKS 5 1.6 EXISTING RESIDUAL HAZARDS 5 1.7 REGARDING USE BY AUTHORISED PEOPLE 6
1.7.1 Operator/installer 6 1.8 ORDERING SPARE PARTS 6 1.9 STORAGE 6 1.10 DISPOSAL 6 1.11 DUST-PROTECTION MEASURES 7 1.12 WARRANTY 7 1.13 MANUFACTURER 7 1.14 COPYRIGHT 7
2 OBLIGATORY SAFETY INSTRUCTIONS 8
2.1 BASIC CONDUCT WHEN WORKING WITH THE RUBBISH CHUTE 8 2.2 TRANSPORT 9 2.3 ASSEMBLY 9 2.4 AVOIDING BLOCKAGES 9 2.5 REPAIR/MAINTENANCE 9 2.6 CLEANING 10 2.7 CONDUCT IN AN EMERGENCY 10
3 DUTIES OF THE OPERATING COMPANY 11 3.1 IDENTIFYING HAZARDS AT THE PLACE OF USE 11 3.2 DUTY TO PROVIDE TRAINING/QUALIFICATIONS 11 3.3 LIGHTING/PATHS 11 3.4 CHECKING CORRECT AND PROPER CONDITION AND USE 12 3.5 PROVISION OF PERSONAL PROTECTIVE EQUIPMENT 12
4 TECHNICAL DATA 13
4.1 RUBBISH CHUTE 13 4.2 FILLING FUNNEL 14 4.3 CHUTE BRANCH 14 4.4 HAND WINCH ITEM NO. 01907 14 4.5 HAND WINCH ITEM NO. 01908 15 4.6 CHUTE FRAME ITEM NO. 01904 15 4.7 PARAPET CLAMP KIT ITEM NO. 01902 15 4.8 SLOPING-ROOF FRAME ITEM NO. 01906 15 4.9 FLAT ROOF FRAME ITEM NO. 01911 16 4.10 CHAIN KIT ITEM NO. 01903 16 4.11 GUIDE RING ITEM NO. 01918 16 4.12 WEAR INSERT ITEM NO. 01919 16
5 INSTALLATION/DISASSEMBLY 17
5.1 DEFLECTION OF THE RUBBISH CHUTE 19 5.1.1 Maximum deflection 19 5.1.2 Make the distance between suspension points shorter in the area of the deflection 19 5.1.3 Use guide ring 19 5.1.4 Use wear insert 19
5.2 HAND WINCH 20 5.3 INSTALLATION ON THE SCAFFOLDING 21 5.4 INSTALLATION ON A WINDOW REVEAL OR PARAPET WALL 22 5.5 INSTALLATION ON A SLOPING ROOF 23 5.6 INSTALLATION ON A FLAT ROOF 24 5.7 DISASSEMBLY 24

GEDA® Rubbish Chute
Assembly and Operating Manual Page 4 of 24 BL041GB Edition 05.2012
1 Safety information / technical specification This safety information must be read and observed by all persons who are entrusted with work on the rubbish chute or with the installation/dismantling of the rubbish chute or who supervise or instruct such people. Non-compliance with the safety information releases GEDA from any liability.
1.1 Proper use • The disposal of solid, non-combustible, non-toxic rubbish which
is smaller in size in every dimension than the smallest diameterof the rubbish chute. Use is only permitted by persons authorisedby the operating company in non-public areas.
Non-intended use, non-compliance with the manual, staffing by insufficiently qualified personnel, and the use of non-approved spare parts releases the manufacturer from any liability.
1.2 Operation/limitations of the rubbish chute Use is only permitted when complying with: • the information on intended use• the technical data/features• all laws/regulations that must be complied with by the operating
company• all other information in this manual.
Installation/disassembly of the rubbish chute without having read the manual beforehand is prohibited. The manual must be kept safe for future use. GEDA shall not be liable for any damage arising from non-compliance with the instructions contained in this manual.
1.3 Modifications/Alterations Unauthorised modifications/alterations can have an unforeseeable influence on safety. For this reason, unauthorised modifications/alterations are prohibited.

GEDA® Rubbish Chute
Assembly and Operating Manual Page 5 of 24 BL041GB Edition 05.2012
1.4 Foreseeable misuse Any use of the rubbish chute that deviates from the conditions specified above and from the stated purpose is strictly prohibited.
In particular this applies to use: • in a publicly accessible area • in a potentially explosive area • without securing the filling points to guard against people/material
falling in • as an (emergency) chute for people • as an internal transport/logistics/conduit system, e.g. for transporting
foodstuffs, e.g. cereals, for humans/animals to a lower floor • for the disposal of burning, hot or combustible materials (including
cigarettes) or materials at risk of deflagration as a result of the release of solvents, for example
• for the disposal of hazardous substances such as materials containing asbestos, for example
• of a combination of parts from different rubbish chute systems.
1.5 Checks The rubbish chute must be inspected for damage each time before it is set up, following every blockage and at regular intervals (at least once a year). Replace damaged parts immediately. Continued use is prohibited until the damaged parts have been replaced.
1.6 Existing residual hazards GEDA rubbish chutes have been designed and manufactured according to the current state of the art. There are, however, – as with all products – residual hazards. These are: Energies • Potential energy of the components/potential energy of jammed
rubbish. Component failure • As a result of improper use, inadequate maintenance or incorrect
operation.

GEDA® Rubbish Chute
Assembly and Operating Manual Page 6 of 24 BL041GB Edition 05.2012
1.7 Regarding use by authorised people
1.7.1 Operator/installer A person who, as a result of his/her training and experience, is capable of carrying out the functions and activities associated with use. This also includes avoiding potential risks and hazards that may occur during operation.
1.8 Ordering spare parts Spare parts are ordered exclusively through the manufacturer/ representative. Only original GEDA spare parts may be used. Only original GEDA spare parts guarantee full function as well as safety and reliability. Please supply the following details with each order for spare parts: • Item no. / Model / Name / Order quantity
1.9 Storage • No jolts or vibrations. • No abrasive, corrosive substances. • Parts must be protected against pest damage (insects, rodents, etc.).
1.10 Disposal The rubbish chute must be professionally dismantled at the end of its service life and disposed of in an environmentally friendly way according to national regulations. Rubbish chute / filling funnel
Polyethylene
Frame / hand winch / chains / ropes / eyelets
Hot-dip galvanised steel Chromated steel (yellow)

GEDA® Rubbish Chute
Assembly and Operating Manual Page 7 of 24 BL041GB Edition 05.2012
1.11 Dust-protection measures GEDA provides the following components for reducing dust exposure. • Dust cover for covering the filler neck. • Protective covers for containers. • Dust collar for covering the bottom chute element.
1.12 Warranty This manual does not contain any warranty agreements. These can be found in the General Terms and Conditions of Business. Proper use is a precondition for the warranty.
1.13 Manufacturer GEDA Dechentreiter GmbH & Co. KG Street: Mertinger Strasse 60 Town/city: DE – 86663 Asbach-Bäumenheim Country: Germany Tel.: +49 (0)9 06 / 98 09-0 Fax: +49 (0)9 06 / 98 09-50 e-mail: [email protected] Website: www.geda.de
1.14 Copyright © GEDA Dechentreiter GmbH & Co. KG All rights reserved. No part of this manual may be reproduced in any form or processed, duplicated or disseminated using electronic media without the written consent of the manufacturer. The copyright and conditions of use of any user documentation from other manufacturers that may be included with the scope of delivery must be observed.

GEDA® Rubbish Chute
Assembly and Operating Manual Page 8 of 24 BL041GB Edition 05.2012
2 Obligatory safety instructions
2.1 Basic conduct when working with the rubbish chute • The rubbish chute must be used with an awareness of hazards, in a
technically fault-free condition and according to the instructions in this manual.
• If there is any lack of clarity regarding proper condition or correct operation, these points must be clarified. Operation is prohibited until the matter is clarified.
• Unauthorised persons must be kept away; if necessary set up warning notices.
• All safety regulations relevant to the respective job/activity must be adhered to.
• Responsibilities for different activities must be clearly identified and adhered to. Lack of clarity greatly compromises safety.
• Rectify any faults that occur which fall within the context of your responsibility.
• If faults occur outside your area of responsibility, inform your superior immediately.
• Wear personal protective equipment. • If there is soiling, take appropriate measures (e.g. dry and clean) for
all floors, steps, pedestals and platforms to prevent falling and slipping.
• It is prohibited to attach banners etc. that alter the wind load. • A fall-protection device must be worn when working at heights
> (2.0 m). • Avoid producing explosive dust. • The area surrounding the waste container must be secured against
entry by unauthorised individuals. If the rubbish chute is deflected, the area blocked off must be increased in size accordingly.
• Since the plastic of the rubbish chute is combustible, the usual safety precautions must be taken to avoid fires during storage/use.

GEDA® Rubbish Chute
Assembly and Operating Manual Page 9 of 24 BL041GB Edition 05.2012
2.2 Transport • During transport, the load must be secured according to international
transport guidelines.
2.3 Assembly • Precautionary measures stipulated by the company for avoiding fires,
explosions, dust, gas, steam and smoke must be observed. • Appropriate lifting gear must be used when working with heavy parts. • Adhere to the minimum requirements for thoroughfares, paths and
emergency exits.
2.4 Avoiding blockages • Observe the maximum deflection of the rubbish chute. • Observe the maximum size of the bulk material. Refer to the data for
tube diameter in then "Technical Data". • Constantly monitor the discharge opening for the rubble. • To eliminate blockages, do not work beneath the discharge opening
or distort the rubbish chute.
2.5 Repair/maintenance • All relevant persons must be informed about how to carry out the
work before work begins. • Use appropriate measures to ensure that dismantled parts do not fall
down. • Loss of balance as a result of handling heavy parts/tools. Only lift
heavy parts/tools with a second person or using appropriate lifting equipment.
• Only use new parts according to their intended use and within the specifications of the technical data.
• Test the parts to ensure that they are functioning correctly after the work. Make sure that no hazards will arise as a result of commissioning the rubbish chute.

GEDA® Rubbish Chute
Assembly and Operating Manual Page 10 of 24 BL041GB Edition 05.2012
2.6 Cleaning • Only use suitable, non-combustible cleaning agents. Risk of fire and
explosion as a result of using combustible cleaning materials. • Label damp areas with the appropriate warning signs. • Wear personal protective equipment. • Do not use any abrasive substances for cleaning. • Do not use steam-jet equipment/high-pressure cleaners.
2.7 Conduct in an emergency • Company instructions relating to conduct in an emergency and the
evacuation plan must be observed.

GEDA® Rubbish Chute
Assembly and Operating Manual Page 11 of 24 BL041GB Edition 05.2012
3 Duties of the operating company
3.1 Identifying hazards at the place of use The operating company must identify all hazards at the place of use and must take the necessary health and safety measures.
3.2 Duty to provide training/qualifications The operating company clearly defines the responsibilities of the personnel. The operating company is obliged to train all persons authorised to use the rubbish chute in the correct handling of the chute before using it for the first time, according to the respective area of activity and responsibility of the authorised individual and using practical exercises. Training will cover at least the following: • The scope and limitations of the area of activity and responsibility of
the respective group of people. • Safety-conscious conduct. • avoiding hazards / conduct in an emergency • correct use/installation/dismantling • the meaning of the warning signs, notices and pictograms at the
construction site • Use and inspection of the personal protective equipment. These instructions must be documented and repeated at regular intervals.
3.3 Lighting/paths The filling points and paths for transporting the rubbish to the chute must be lit appropriately and secured to safeguard against falls.

GEDA® Rubbish Chute
Assembly and Operating Manual Page 12 of 24 BL041GB Edition 05.2012
3.4 Checking correct and proper condition and use At regular intervals, the operating company must take appropriate measures to check that the rubbish chute is being used according to the intended use, that no modifications or manipulations have been made to the rubbish chute and that all parts are functioning fully.
3.5 Provision of personal protective equipment The operating company must provide personal protective equipment appropriate to the respective place of use and purpose. Protective equipment must be checked at regular intervals to ensure function and completeness. All national and trade association regulations relating to protective equipment must be observed in addition to this information.

GEDA® Rubbish Chute
Assembly and Operating Manual Page 13 of 24 BL041GB Edition 05.2012
4 Technical Data
4.1 Rubbish chute
COMFORT
Item number: 01920
Length Effec tive us able length
1.1 m 1.0 m
Weight 12 kg Tube d iamete r with wear ins e rt
500 x 400 mm 485 x 390 mm
As s embly he ight - Scaffo ld ing- Fla t roof frame- Parape t / window revea l- S loping-roof frame
max. 40 m max. 40 m
depending on qua lity 20/40 m max. 20 m

GEDA® Rubbish Chute
Assembly and Operating Manual Page 14 of 24 BL041GB Edition 05.2012
4.2 Filling funnel
Item No.: 08922
Opening width 76 cm Weight 8.5 kg
Item No.: 01921
Opening width 60 cm Weight 8.8 kg
4.3 Chute branch
Item No.: 01922
Opening width 60 cm Weight 10.5 kg
4.4 Hand winch Item No. 01907
Rope 5 mm, SE-Zn k – 1770 [sZ] Rope length 21 m Payload 250 kg Weight 26 kg

GEDA® Rubbish Chute
Assembly and Operating Manual Page 15 of 24 BL041GB Edition 05.2012
4.5 Hand winch Item No. 01908
Rope 6 mm, SE-Zn k – 1770 [sZ] Rope length 41 m Payload 500 kg Weight 33 kg
4.6 Chute frame Item No. 01904
Dimensions 750 x 370 x 660 mm Payload 820 kg Weight 14.7 kg
4.7 Parapet clamp kit Item No. 01902 Only to be used in connection with the chute frame
Quantity (per kit) 2 pcs Dimensions 95 x 555 x 790 mm Load capacity (each parapet clamp) 410 kg Weight (kit) 21 kg
4.8 Sloping-roof frame Item No. 01906
Payload 570 kg Weight 35 kg

GEDA® Rubbish Chute
Assembly and Operating Manual Page 16 of 24 BL041GB Edition 05.2012
4.9 Flat roof frame Item No. 01911
Payload 820 kg Weight 48 kg Ballast weight Item No.: 01912 each 12 kg
4.10 Chain kit Item No. 01903 Quantity (chains) 2 pcs Length (with carabiner hook) 2.0 m Weight 2.6 m Load capacity (each chain) 300 kg Test load (each chain) 8000 N Breaking strength (each chain) 18000 N
4.11 Guide ring Item No. 01918 To deflect the chutes
Dimensions (∅ / width) 460 mm / 530 Weight 3.5 kg
4.12 Wear insert Item No. 01919 To deflect the chutes
Dimensions 480/430 x 200 x 1110 mm Weight 8 kg

GEDA® Rubbish Chute
Assembly and Operating Manual Page 17 of 24 BL041GB Edition 05.2012
5 Installation/disassembly The GEDA rubbish chute is suitable for virtually all installation situations on account of the versatile mounting options. The rubbish chute is generally installed using the hand winch. When using other installation aids, it must be ensured that they are suitable for the intended purpose and for the loads which occur. Important information relating to installation: • Intermediate fastening points must be provided every 10 metres
(fastening = 2.5 kN). GEDA provides appropriate chains with carabiners for this purpose. The rubbish chute must not be deflected by the intermediate fastening points.
• When releasing the rope of the hand winch to pull up the rubbish chute, there must be at least two turns remaining on the rope drum.
• Only pull the rubbish chute up vertically. Otherwise there is the risk that the lifting equipment will be overloaded and damaged.
• The rubbish chute must hang freely. It must not rest against scaffolding tubes etc.
• Avoiding twisting the suspension chains. • If the rubbish chute is also intended to be filled from intermediate
storeys, the corresponding branching points must be provided when pulling up the rubbish chute. An intermediate fastening point must be provided at each branching point for filling.
• If fall protection (intermediate bar) must be removed to install the filling funnel, then tubes must be attached to the left and right up to the funnel as a replacement to ensure protection against falling.

GEDA® Rubbish Chute
Assembly and Operating Manual Page 18 of 24 BL041GB Edition 05.2012
Proceed as follows for installation of the rubbish chute:
Fasten chute frame according to the
specific installation situation (see there). Insert the hand winch into the installed
chute frame or sloping-roof frame or flat roof frame. Unwind the rope to approx. 1 metre above the ground (refer to relevant section).
Hang carabiners in the holes in the rubbish chute.
Use the hand winch to pull the rubbish chute up far enough so that the next element of the rubbish chute can be suspended. Repeat procedure until the assembly height is attained.
Suspend the top chute tube in the two eyelets of the chute frame or sloping-roof frame or flat roof frame.
Remove hand winch. Place the filling funnel on the top chute tube. Ensure that the filling
funnel rests against the edge of the chute. The filling funnel must be secured (firmly attached) to the building (scaffolding)
Chute branch If the chute is also to be filled from an intermediate level, when pulling up the waste tubes of the waste chute branch (1) must be attached at the required height. An intermediate tie (2) must also be
installed at each waste chute branch (1) (also refer to section 5.3).
2
1

GEDA® Rubbish Chute
Assembly and Operating Manual Page 19 of 24 BL041GB Edition 05.2012
5.1 Deflection of the rubbish chute Deflection leads to a high level of wear of the chute and the suspension structure. If the rubbish chute is to be deflected, the following points must be taken into consideration:
5.1.1 Maximum deflection As the deflection radius increases, there is an increase in the risk of a blockage in the rubbish chute. Deflection at a maximum ratio of 10:1 (i.e. max. 1 m deflection over 10 m, but not more than 2.5 m over the overall length of the rubbish chute.
5.1.2 Make the distance between suspension points shorter in the area of the deflection Make the distance between the suspension points of the rubbish chute shorter in the area of the deflection. (Effective length of an element only 0.7 – 0.8 m).
5.1.3 Use guide ring Use a guide ring on the bottom elements and fasten to the container using both ropes.
5.1.4 Use wear insert In the case of coarse / sharp-edges rubble (e.g. bricks), use wear inserts in the area of the deflection. It is also possible to install wear inserts retrospectively. CAUTION: Observe the max. weight; the full installation height may not be possible.
Guide ring
Scaffolding Deflection radius

GEDA® Rubbish Chute
Assembly and Operating Manual Page 20 of 24 BL041GB Edition 05.2012
5.2 Hand winch The hand winch is used
exclusively for pulling up/ lowering the rubbish chute.
The hand crank is inserted into the respective chute frame.
The hand winch can be pinned in two positions. When used with the parapet clamp, the hand winch must be moved to the lower position. To do this, loosen the screw, move the hand winch and screw the screw back in again.
Safety bolt

GEDA® Rubbish Chute
Assembly and Operating Manual Page 21 of 24 BL041GB Edition 05.2012
5.3 Installation on the scaffolding WARNING The suitability of the scaffolding for installation of a rubbish chute (strength and stability) must always be ensured. The following loading assumptions must be used as the basis for the calculation: Vertical load: Formula: 320 kg + 10 kg per metre installation height (320 kg corresponds to the weight of two congested waste chutes; 1.0 to/m³). This gives the following: 5 metre installation height = 370 kg 10 metre installation height = 420 kg 20 metre installation height = 520 kg 30 metre installation height = 620 kg 40 metre installation height = 720 kg Horizontal load through wind loading Intermediate ties every 10 metres to be provided (anchorage = 2.5 kN), refer to "Important instructions for assembly". Fastening Fasten the two scaffolding
areas to the building (2.5 kN).
Attach two scaffolding tubes to the outside of the scaffolding (48.3 x 4.0 mm provided by customer) approx. 400 mm apart from each other using rigid scaffolding couplers.
Fasten the chute frame to the two horizontal tubes using four rigid scaffolding couplers.
Brace the chute frame upwards using another two scaffolding tubes (48.3 x 4.0 mm provided by customer) and four swivel couplings.
CAUTION: Strengthen by installing scaffolding couplings on the scaffolding only in the area of the intersection points.
Further assembly of the rubbish chute as described above.
Tie
Scaffolding coupling Horizontal tube
Bracing

GEDA® Rubbish Chute
Assembly and Operating Manual Page 22 of 24 BL041GB Edition 05.2012
5.4 Installation on a window reveal or parapet wall Maximum installation height: Concrete = 40 m Masonry (min. 36 cm) = 20 m In the case of masonry, the forces must be dissipated into the masonry over a large area by sufficiently sized load-distributing substrate material, e.g. square timber or sectional steel. In areas with a reduced wall thickness (e.g. radiator recesses), the load-distributing substrate materials must accordingly be larger in size. Attaching parapet clamps Bolt parapet clamp to chute
frame. Ensure that the transverse
spar of the chute frame rests on the parapet clamp. Fasten square timbers to the parapet frame in according to the structural conditions.
Suspend the complete unit over the parapet and fasten to the tie bar.
Further assembly of the rubbish chute as described above.
Chute length
Force “F” Tubes suspended vertical
Tubes deflected
10 m 206 kg 527 kg 20 m 386 kg 665 kg 30 m 565 kg 803 kg 40 m 745 kg 941 kg
max. 25 cm
30 cm 75 cm
Squared wood
GEDA® Rubbish Chute
Assembly and Operating Manual Page 23 of 24 BL041GB Edition 05.2012
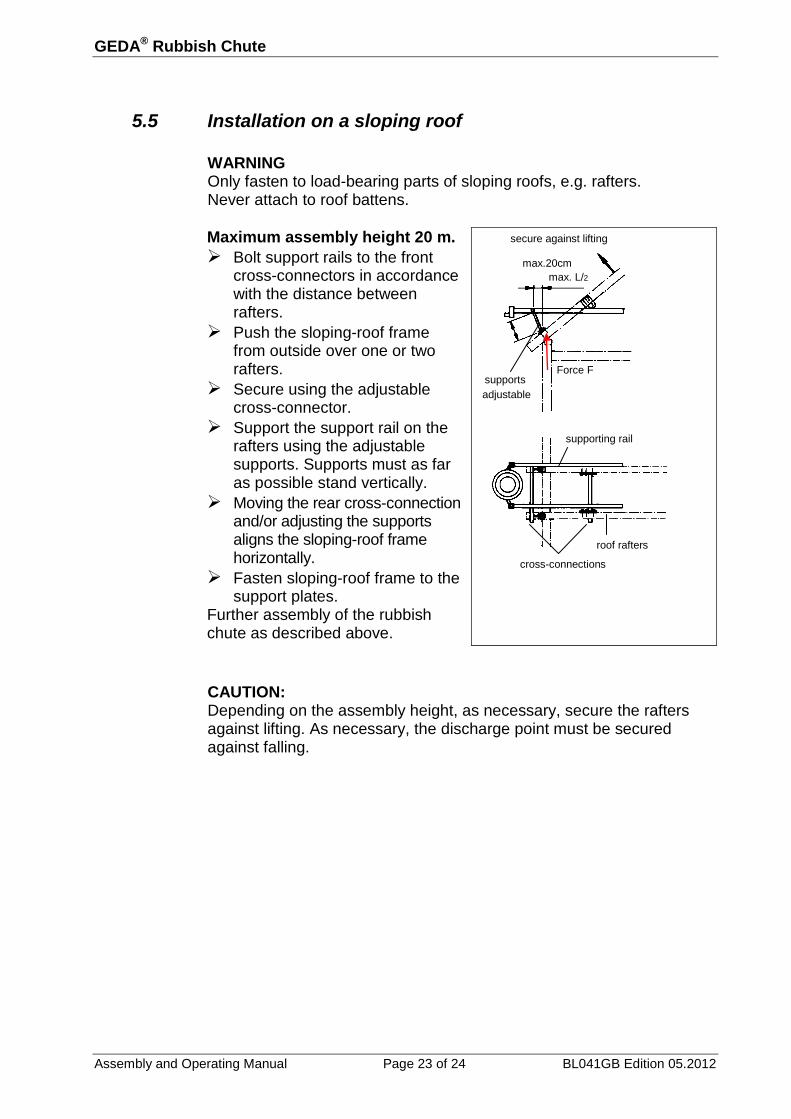
5.5 Installation on a sloping roof WARNING Only fasten to load-bearing parts of sloping roofs, e.g. rafters. Never attach to roof battens. Maximum assembly height 20 m. Bolt support rails to the front
cross-connectors in accordance with the distance between rafters.
Push the sloping-roof frame from outside over one or two rafters.
Secure using the adjustable cross-connector.
Support the support rail on the rafters using the adjustable supports. Supports must as far as possible stand vertically.
Moving the rear cross-connection and/or adjusting the supports aligns the sloping-roof frame horizontally.
Fasten sloping-roof frame to the support plates.
Further assembly of the rubbish chute as described above.
CAUTION: Depending on the assembly height, as necessary, secure the rafters against lifting. As necessary, the discharge point must be secured against falling.
secure against lifting
max. L/2
supports
supporting rail
cross-connections
roof rafters
max.20cm
adjustable
Force F

GEDA® Rubbish Chute
Assembly and Operating Manual Page 24 of 24 BL041GB Edition 05.2012
5.6 Installation on a flat roof WARNING When installing on a flat roof, the rubbish chute is installed at least two metres away from the building edge. If this is not possible, appropriate safety rails must be provided. Push the flat-roof frame outwards but only so far that the cross-connection still rests on the edge of the roof. The flat-roof frame must not lie concavely. Use load-distributing substrate materials. Counterweights (Item No.: 01912) place on the extension tubes according to the assembly height.
The flat-roof frame consists of two supporting tubes and one cross-connector with a safety guard.
Lay supporting tubes on the flat roof accordingly. Install cross-beam with safety railing. Insert extension tubes into the supporting tubes and secure using bolts.
Further assembly of the rubbish chute as described above.
5.7 Disassembly The same regulations and safety instructions as described for assembly apply for disassembly. Disassembly is generally carried out in the reverse order to assembly.
Assembly height
Number of counterweights
Bearing force "F" Tubes vertical
Tubes deflected downwards
up to 6 m 2 pcs 1.7 kN ---- up to 11 m 4 pcs 2.6 kN ---- up to 17 m 6 pcs 3.6 kN 5.5 kN up to 22 m 8 pcs 4.5 kN 6.8 kN up to 28 m 10 pcs 5.6 kN 8.3 kN up to 33 m 12 pcs 6.5 kN 9.0 kN up to 40 m 14 pcs 7.8 kN 9.8 kN