Embed Size (px)
Citation preview
Sewio Networks, s.r.o, www.sewio.net, email:[email protected]
1
RT
LS K
it S
tart
ing
Gui
de w
ith R
PI2
Dat
ashe
et
v0.2
RTLS Kit Starting Guide with Raspberry Pi 2 Real Time Location System This kit aims to demonstrate the Sewio RTLS system with full feature positioning environment including REST and Web Sockets API, data storage and visualization and monitoring web application. Such components are required to build up a scalable localization systems. In order to simplify installation process, the RTLS Kit is delivered with preconfigured software image for tiny ARM embedded system Raspberry Pi 2 with components such as PHP, MySQL database, RTLS server and SensMap monitoring application.
1 System Requirements ...................................................................................................................................................... 2
2 Installation Guide .............................................................................................................................................................. 2
2.1 Network Interface Settings Scheme ............................................................................................................................. 2
2.2 Connecting and Deployment RTLS Components ........................................................................................................ 2
3 Setting SensMap Visualization ......................................................................................................................................... 4
3.1 Sensmap Visualization Useful Tips ............................................................................................................................ 10
Anchor Placing ..................................................................................................................................................................... 10
Nodes Tracking and Statistics.............................................................................................................................................. 11
Tags Actual Data (Tooltip) ................................................................................................................................................... 12
4 Raspberry PI Shutdown .................................................................................................................................................. 12
5 RTLS Kit Default Settings Summary ............................................................................................................................... 12
6 Troubleshooting .............................................................................................................................................................. 13
6.1 Status/Restarting RTLS server and Sensmap Server ............................................................................................... 13
Via Web interface: http://10.0.0.1/sensmap/ or http://rtls.local/sensmap/ ............................................................................ 13
Via VMware (password:sensmap): ...................................................................................................................................... 13
6.2 Distance and signal strength measurement ............................................................................................................... 13
6.3 Cloning RPI2 image to SD card ................................................................................................................................. 14
7 Related Reading and Conditions .................................................................................................................................... 15

Sewio Networks, s.r.o, www.sewio.net, email:[email protected]
2
RT
LS K
it S
tart
ing
Gui
de w
ith R
PI2
Dat
ashe
et
v0.2
1 System Requirements Raspberry Pi 2 and WiFi USB adapter Ralink RT5370 802.11n
Computer with WiFi connectivity
Google Chrome browser
Bonjour service (optional)
2 Installation Guide
2.1 Connecting and Deployment RTLS Components
1) Firstly, please hook up WiFi adapter to RPI. Then hook up Master Anchor 0x0001 and RPI to power supply (USB adapter) and connect them together with Ethernet cable.
Fig. 1 Raspberry PI (left) and Master Anchor (right)
Both green LED in the center and Ethernet LEDs should light on Master Anchor.
Only Master Anchor with address 0x0001 is connected to the RPI2.
2) Wait for Raspberry Pi to fully boot 60s.
3) Connect host computer to “RTLS-AP” WiFi network (password “pisensmap”)
4) Now verify the connection from computer to Raspberry Pi using ping command. In Windows click on
Start and write cmd command in Run field. Write ping 10.0.0.1 or ping rtls.local
If you don’t see WiFi network RTLS-AP or can’t connect to server, SD card might be corrupted, please jump to 6.3.
Sewio Networks, s.r.o, www.sewio.net, email:[email protected]
3
RT
LS K
it S
tart
ing
Gui
de w
ith R
PI2
Dat
ashe
et
v0.2
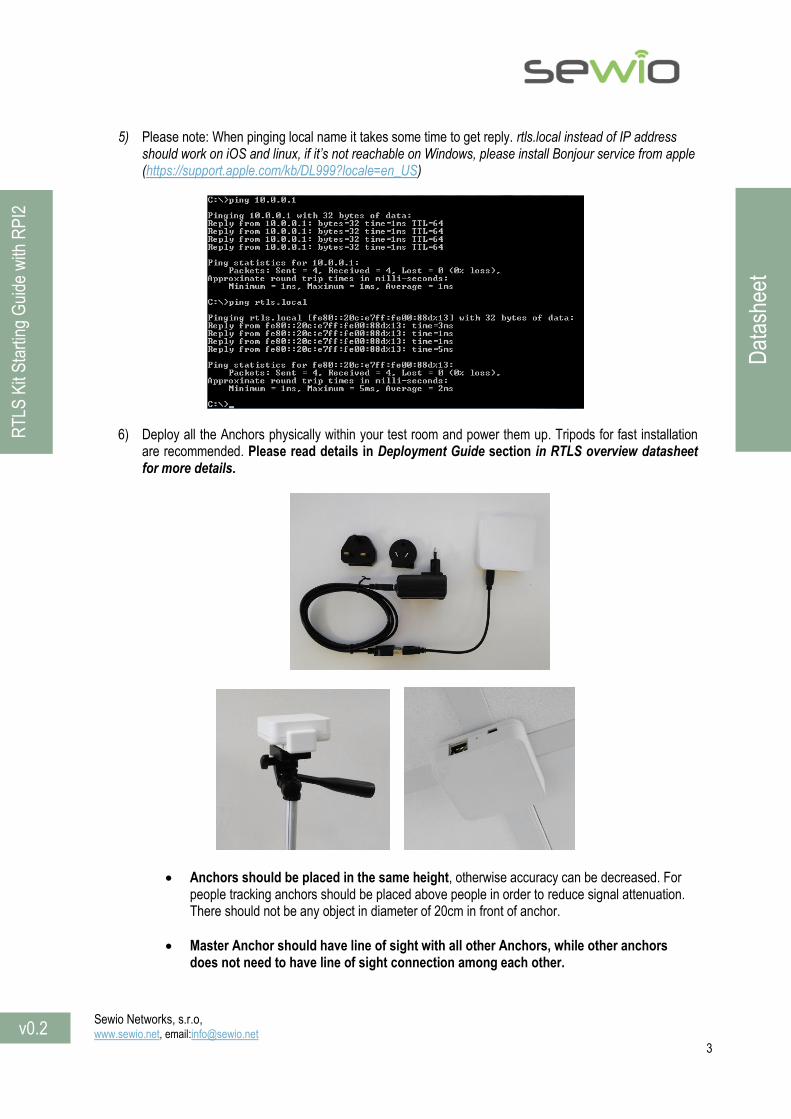
5) Please note: When pinging local name it takes some time to get reply. rtls.local instead of IP address
should work on iOS and linux, if it’s not reachable on Windows, please install Bonjour service from apple (https://support.apple.com/kb/DL999?locale=en_US)
6) Deploy all the Anchors physically within your test room and power them up. Tripods for fast installation are recommended. Please read details in Deployment Guide section in RTLS overview datasheet for more details.
Anchors should be placed in the same height, otherwise accuracy can be decreased. For people tracking anchors should be placed above people in order to reduce signal attenuation. There should not be any object in diameter of 20cm in front of anchor.
Master Anchor should have line of sight with all other Anchors, while other anchors does not need to have line of sight connection among each other.
Sewio Networks, s.r.o, www.sewio.net, email:[email protected]
4
RT
LS K
it S
tart
ing
Gui
de w
ith R
PI2
Dat
ashe
et
v0.2
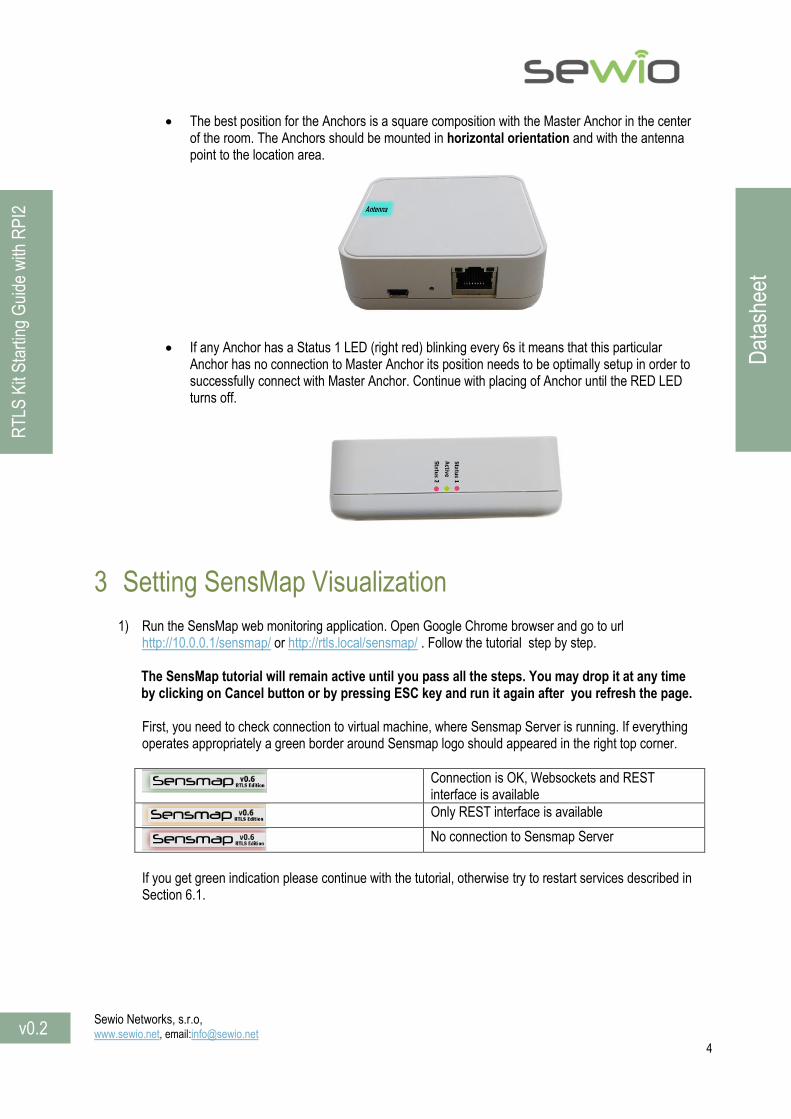
The best position for the Anchors is a square composition with the Master Anchor in the center of the room. The Anchors should be mounted in horizontal orientation and with the antenna point to the location area.
If any Anchor has a Status 1 LED (right red) blinking every 6s it means that this particular Anchor has no connection to Master Anchor its position needs to be optimally setup in order to successfully connect with Master Anchor. Continue with placing of Anchor until the RED LED turns off.
3 Setting SensMap Visualization
1) Run the SensMap web monitoring application. Open Google Chrome browser and go to url http://10.0.0.1/sensmap/ or http://rtls.local/sensmap/ . Follow the tutorial step by step. The SensMap tutorial will remain active until you pass all the steps. You may drop it at any time by clicking on Cancel button or by pressing ESC key and run it again after you refresh the page. First, you need to check connection to virtual machine, where Sensmap Server is running. If everything operates appropriately a green border around Sensmap logo should appeared in the right top corner.
Connection is OK, Websockets and REST interface is available
Only REST interface is available
No connection to Sensmap Server
If you get green indication please continue with the tutorial, otherwise try to restart services described in Section 6.1.
Sewio Networks, s.r.o, www.sewio.net, email:[email protected]
5
RT
LS K
it S
tart
ing
Gui
de w
ith R
PI2
Dat
ashe
et
v0.2
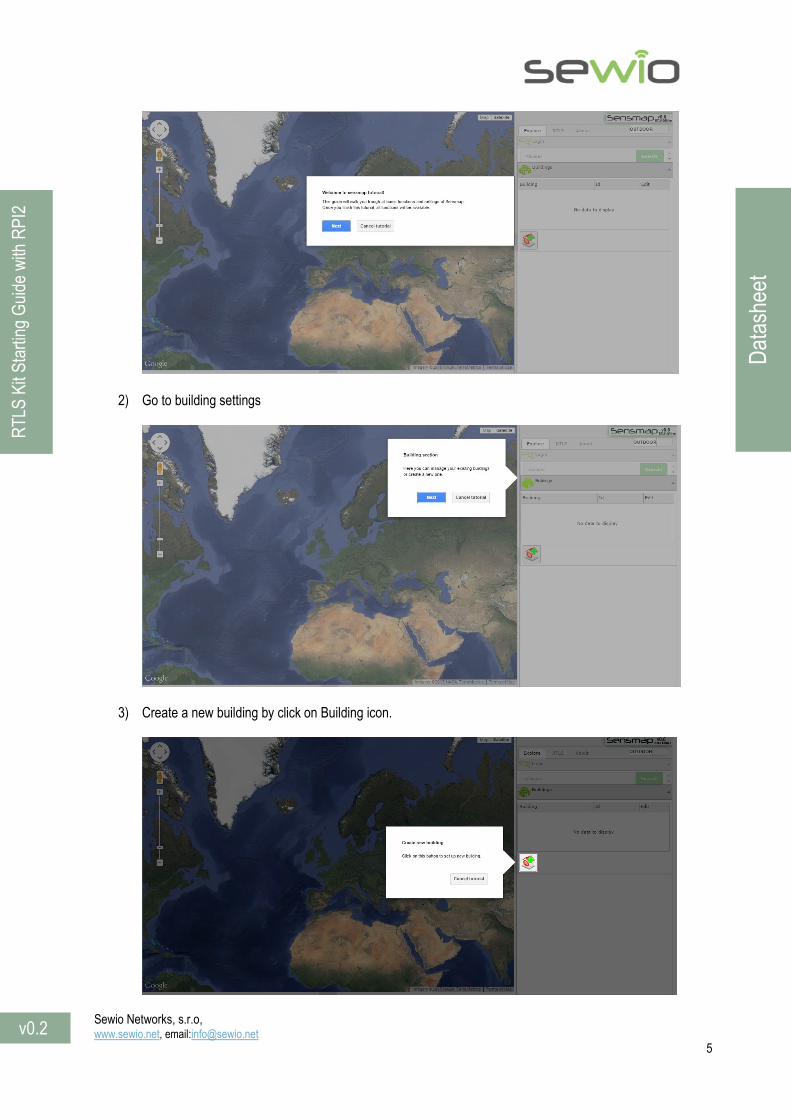
2) Go to building settings
3) Create a new building by click on Building icon.
Sewio Networks, s.r.o, www.sewio.net, email:[email protected]
6
RT
LS K
it S
tart
ing
Gui
de w
ith R
PI2
Dat
ashe
et
v0.2
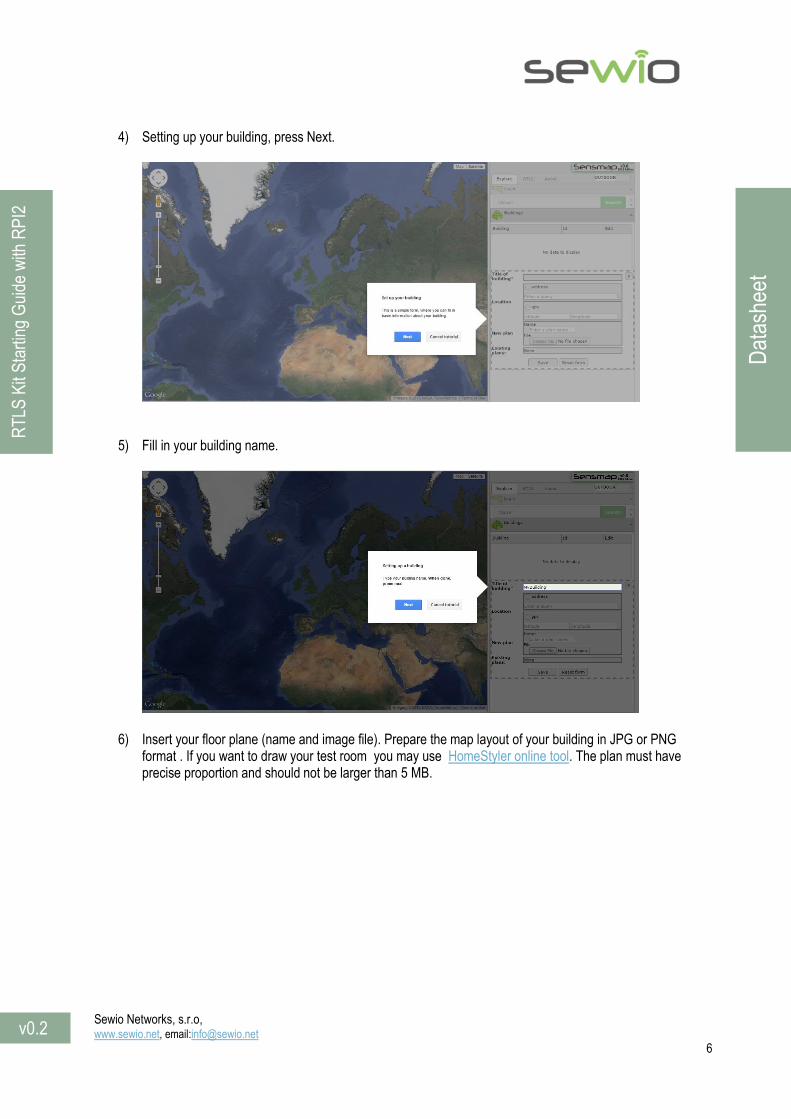
4) Setting up your building, press Next.
5) Fill in your building name.
6) Insert your floor plane (name and image file). Prepare the map layout of your building in JPG or PNG format . If you want to draw your test room you may use HomeStyler online tool. The plan must have precise proportion and should not be larger than 5 MB.

Sewio Networks, s.r.o, www.sewio.net, email:[email protected]
7
RT
LS K
it S
tart
ing
Gui
de w
ith R
PI2
Dat
ashe
et
v0.2
7) Relative distances and positions from RTLS need to be mapped to real coordinates of building’s floor plan. Set scale for your floor plan by setting distance between two points.
Set the points using left clicks on mouse. You should choose spots on plan which can be easily measured with the tape or laser measurement tool for verification.

Sewio Networks, s.r.o, www.sewio.net, email:[email protected]
8
RT
LS K
it S
tart
ing
Gui
de w
ith R
PI2
Dat
ashe
et
v0.2
8) Now you may either set zero point for Cartesian axis system or skip it.
9) Click on the save button in order to save your floor plan settings.
10) Select your building from dropdown list.
Sewio Networks, s.r.o, www.sewio.net, email:[email protected]
9
RT
LS K
it S
tart
ing
Gui
de w
ith R
PI2
Dat
ashe
et
v0.2
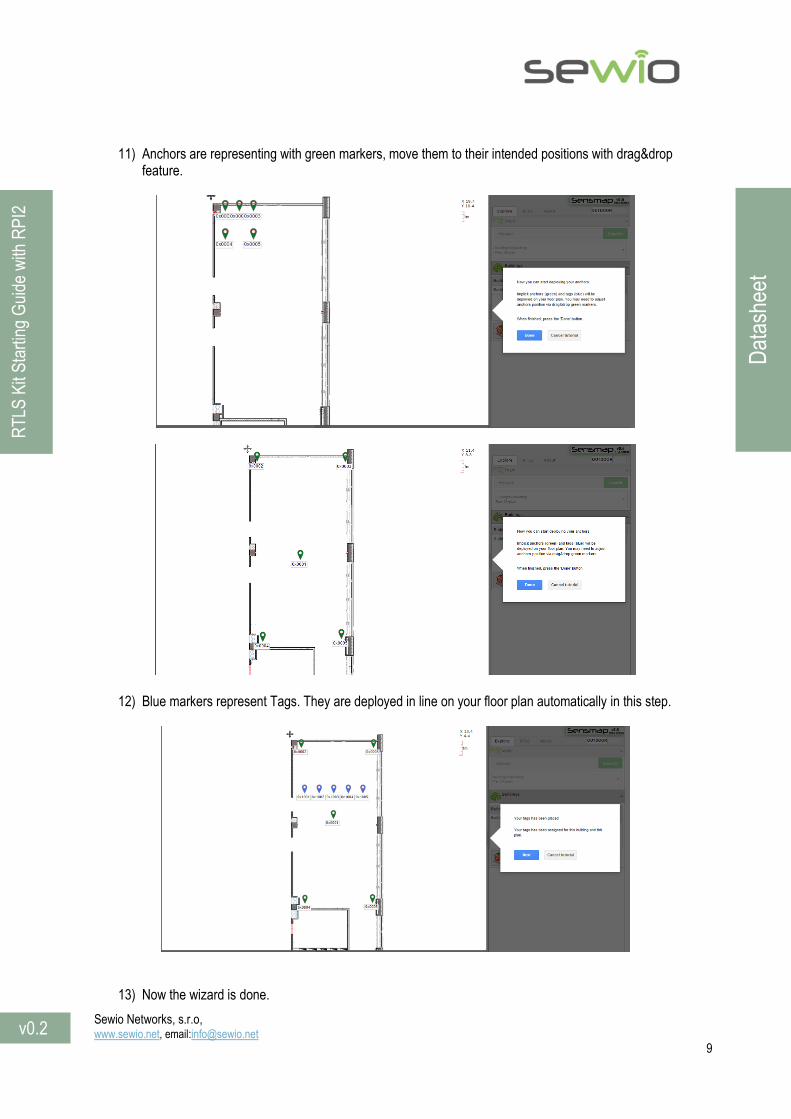
11) Anchors are representing with green markers, move them to their intended positions with drag&drop
feature.
12) Blue markers represent Tags. They are deployed in line on your floor plan automatically in this step.
13) Now the wizard is done.
Sewio Networks, s.r.o, www.sewio.net, email:[email protected]
10
RT
LS K
it S
tart
ing
Gui
de w
ith R
PI2
Dat
ashe
et
v0.2
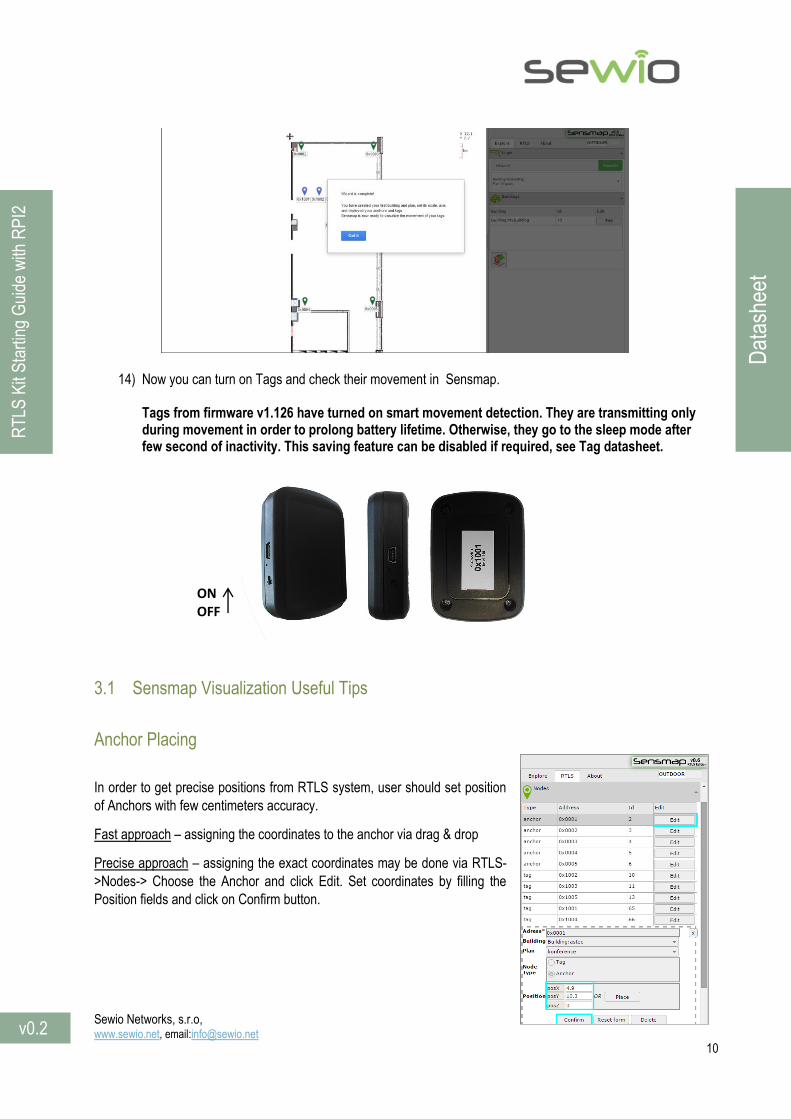
14) Now you can turn on Tags and check their movement in Sensmap. Tags from firmware v1.126 have turned on smart movement detection. They are transmitting only during movement in order to prolong battery lifetime. Otherwise, they go to the sleep mode after few second of inactivity. This saving feature can be disabled if required, see Tag datasheet.
3.1 Sensmap Visualization Useful Tips
Anchor Placing
In order to get precise positions from RTLS system, user should set position
of Anchors with few centimeters accuracy.
Fast approach – assigning the coordinates to the anchor via drag & drop
Precise approach – assigning the exact coordinates may be done via RTLS-
>Nodes-> Choose the Anchor and click Edit. Set coordinates by filling the
Position fields and click on Confirm button.
ON OFF

Sewio Networks, s.r.o, www.sewio.net, email:[email protected]
11
RT
LS K
it S
tart
ing
Gui
de w
ith R
PI2
Dat
ashe
et
v0.2
There are two tools which might help with precise deployment of anchors:
Current Cursor Position – Shows actual coordinates of mouse cursor over the floor plan (top right corner).
Distance Marker – Measures an actual distance between user defined point and mouse cursor over the floor plan.
Nodes Tracking and Statistics User can display trajectory and distance passed by any Tag by clicking on RTLS Tab -> menu Nodes Tracking Statistics and click on particular check box. Here you can also see the statistics of distances passed, average and maximal speed of Tags, see example below.
Sewio Networks, s.r.o, www.sewio.net, email:[email protected]
12
RT
LS K
it S
tart
ing
Gui
de w
ith R
PI2
Dat
ashe
et
v0.2
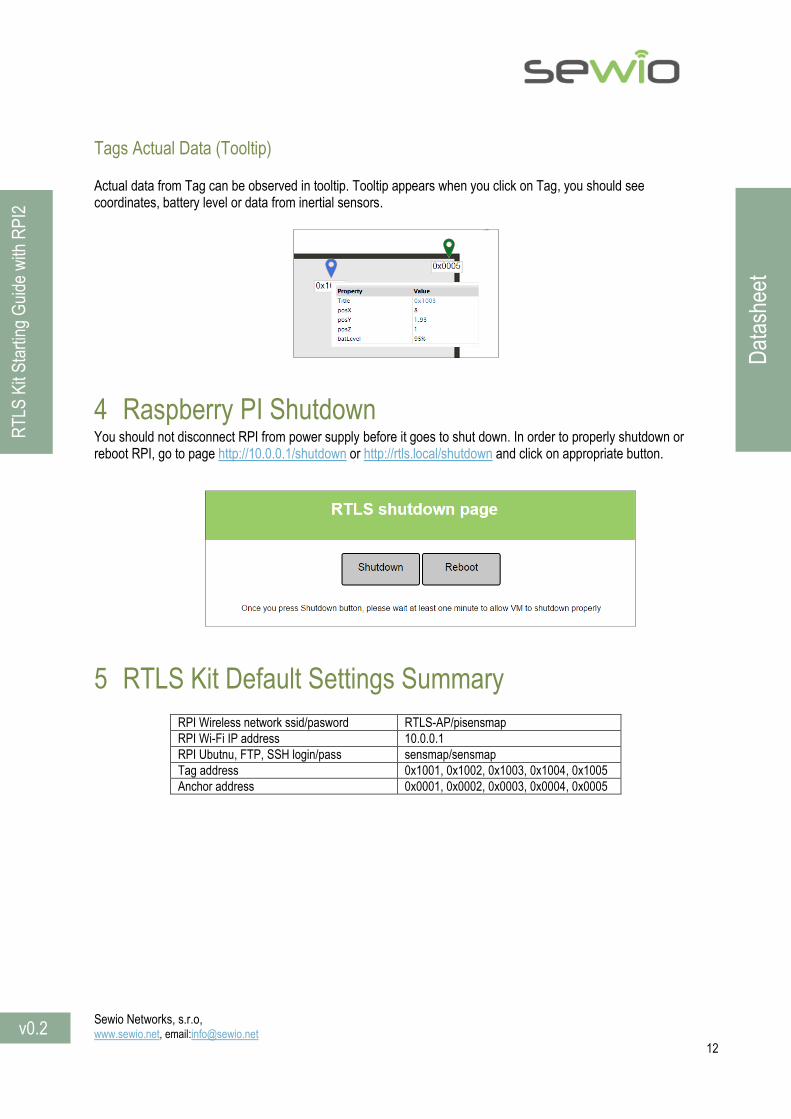
Tags Actual Data (Tooltip) Actual data from Tag can be observed in tooltip. Tooltip appears when you click on Tag, you should see coordinates, battery level or data from inertial sensors.
4 Raspberry PI Shutdown You should not disconnect RPI from power supply before it goes to shut down. In order to properly shutdown or reboot RPI, go to page http://10.0.0.1/shutdown or http://rtls.local/shutdown and click on appropriate button.
5 RTLS Kit Default Settings Summary
RPI Wireless network ssid/pasword RTLS-AP/pisensmap
RPI Wi-Fi IP address 10.0.0.1
RPI Ubutnu, FTP, SSH login/pass sensmap/sensmap
Tag address 0x1001, 0x1002, 0x1003, 0x1004, 0x1005
Anchor address 0x0001, 0x0002, 0x0003, 0x0004, 0x0005
Sewio Networks, s.r.o, www.sewio.net, email:[email protected]
13
RT
LS K
it S
tart
ing
Gui
de w
ith R
PI2
Dat
ashe
et
v0.2
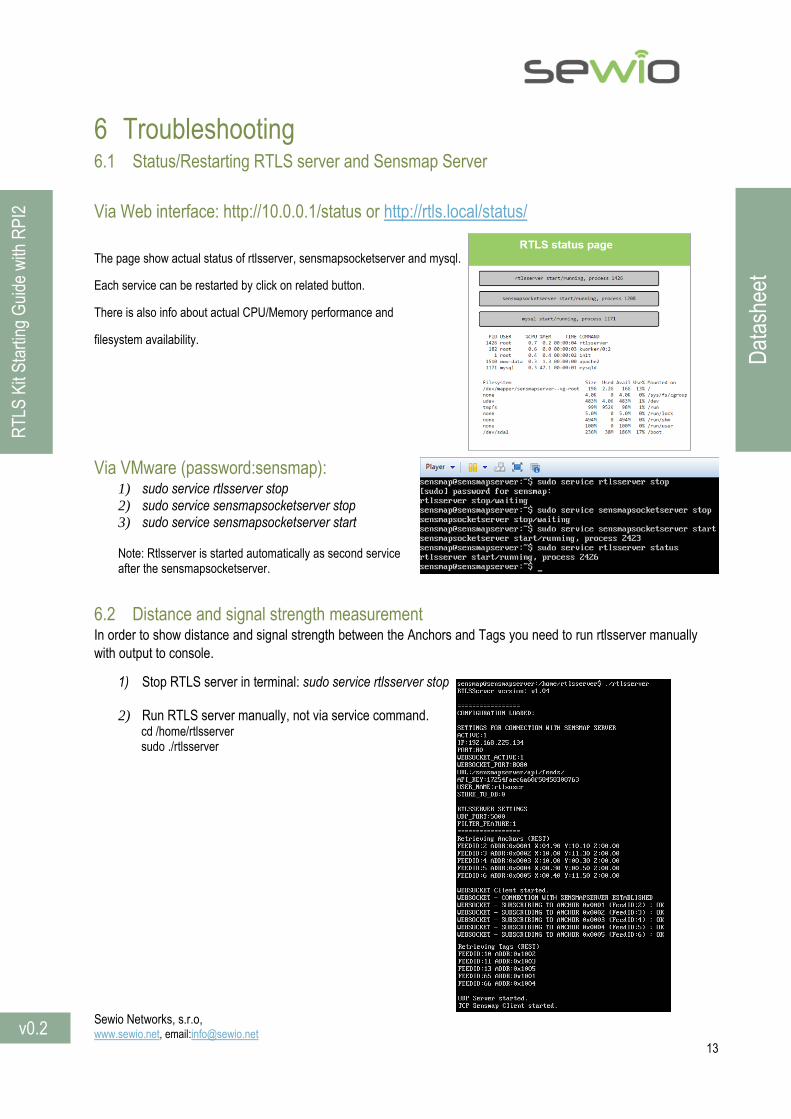
6 Troubleshooting 6.1 Status/Restarting RTLS server and Sensmap Server
Via Web interface: http://10.0.0.1/status or http://rtls.local/status/
The page show actual status of rtlsserver, sensmapsocketserver and mysql.
Each service can be restarted by click on related button.
There is also info about actual CPU/Memory performance and
filesystem availability.
Via VMware (password:sensmap): 1) sudo service rtlsserver stop 2) sudo service sensmapsocketserver stop
3) sudo service sensmapsocketserver start
Note: Rtlsserver is started automatically as second service after the sensmapsocketserver.
6.2 Distance and signal strength measurement In order to show distance and signal strength between the Anchors and Tags you need to run rtlsserver manually
with output to console.
1) Stop RTLS server in terminal: sudo service rtlsserver stop
2) Run RTLS server manually, not via service command. cd /home/rtlsserver sudo ./rtlsserver

Sewio Networks, s.r.o, www.sewio.net, email:[email protected]
14
RT
LS K
it S
tart
ing
Gui
de w
ith R
PI2
Dat
ashe
et
v0.2
TAG ADDR:0x1001 BATTERY LEVEL: 208 ANCHOR COUNT:5
ANCHOR ADDR:0x0001 DIST:1.12 m RSSI1:-86.00 RSSI2:-87.00 RSSI3:-86.00
ANCHOR ADDR:0x0002 DIST:1.21 m RSSI1:-85.00 RSSI2:-86.00 RSSI3:-84.00
ANCHOR ADDR:0x0003 DIST:1.18 m RSSI1:-80.00 RSSI2:-81.00 RSSI3:-80.00
ANCHOR ADDR:0x0004 DIST:1.73 m RSSI1:-84.00 RSSI2:-85.00 RSSI3:-83.00
ANCHOR ADDR:0x0005 DIST:1.13 m RSSI1:-87.00 RSSI2:-88.00 RSSI3:-93.00
3) Turn on a Tag by shifting the power button.
You should see distances from the Tag to Anchors in few seconds, signal strength data is composed by three samples with range <-80,-105>, the higher the better.
4) RTLS Server can be stopped with CTRL+C at any time.
6.3 Cloning RPI2 image to SD card In order to prepare valid SD card for RPI2 with RTLS software, please follow steps:
1) Download rtls-ap-rpi.img image, provided by Sewio.
2) Download Win32 Disk Imager from http://sourceforge.net/projects/win32diskimager/
3) Unzip and install Win32 Disk Imager
4) Connect SD card to PC and find out which letter it has been assigned
5) Open Win32 Disk Imager and choose rtls-ap-rpi.img as an image file
6) Choose SD card’s letter as a device and hit write
7) Wait until the process is done, then remove SD card from PC
8) Put SD card into Raspberry Pi and add power, system should boot now.
Sewio Networks, s.r.o, www.sewio.net, email:[email protected]
15
RT
LS K
it S
tart
ing
Gui
de w
ith R
PI2
Dat
ashe
et
v0.2
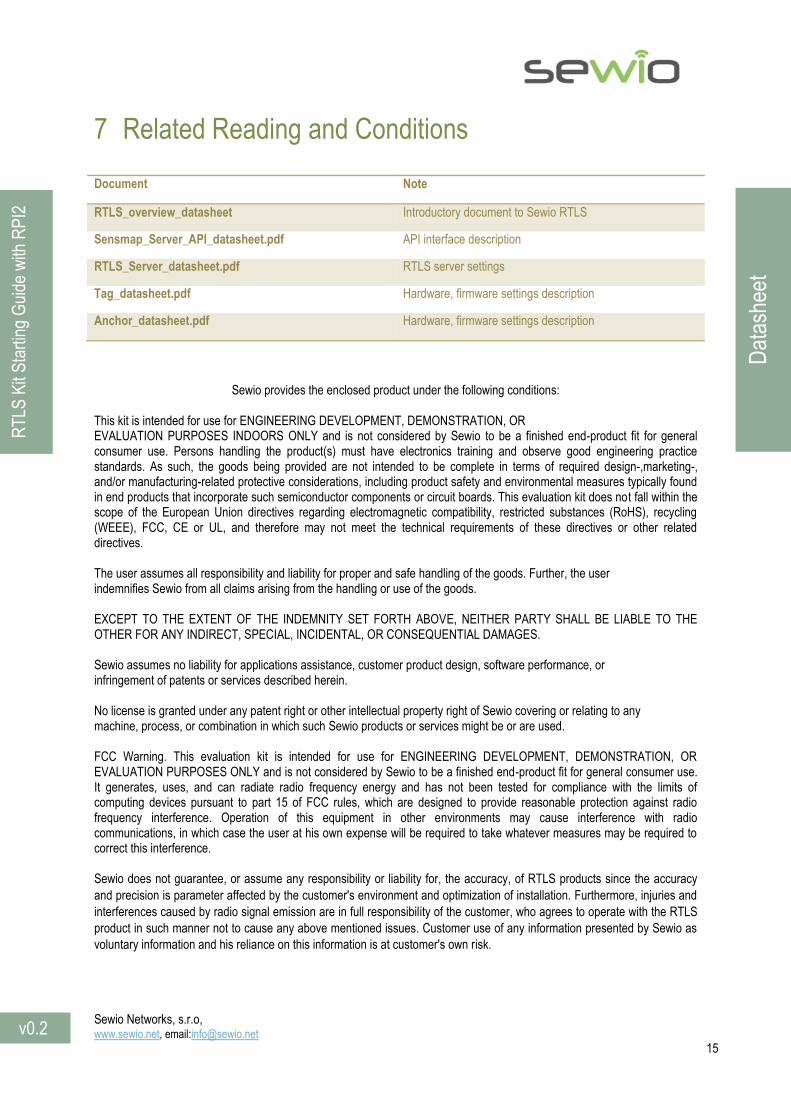
7 Related Reading and Conditions
Document Note
RTLS_overview_datasheet Introductory document to Sewio RTLS
Sensmap_Server_API_datasheet.pdf API interface description
RTLS_Server_datasheet.pdf RTLS server settings
Tag_datasheet.pdf Hardware, firmware settings description
Anchor_datasheet.pdf Hardware, firmware settings description
Sewio provides the enclosed product under the following conditions:
This kit is intended for use for ENGINEERING DEVELOPMENT, DEMONSTRATION, OR
EVALUATION PURPOSES INDOORS ONLY and is not considered by Sewio to be a finished end-product fit for general consumer use. Persons handling the product(s) must have electronics training and observe good engineering practice standards. As such, the goods being provided are not intended to be complete in terms of required design-,marketing-, and/or manufacturing-related protective considerations, including product safety and environmental measures typically found in end products that incorporate such semiconductor components or circuit boards. This evaluation kit does not fall within the scope of the European Union directives regarding electromagnetic compatibility, restricted substances (RoHS), recycling (WEEE), FCC, CE or UL, and therefore may not meet the technical requirements of these directives or other related directives.
The user assumes all responsibility and liability for proper and safe handling of the goods. Further, the user indemnifies Sewio from all claims arising from the handling or use of the goods.
EXCEPT TO THE EXTENT OF THE INDEMNITY SET FORTH ABOVE, NEITHER PARTY SHALL BE LIABLE TO THE OTHER FOR ANY INDIRECT, SPECIAL, INCIDENTAL, OR CONSEQUENTIAL DAMAGES.
Sewio assumes no liability for applications assistance, customer product design, software performance, or infringement of patents or services described herein.
No license is granted under any patent right or other intellectual property right of Sewio covering or relating to any
machine, process, or combination in which such Sewio products or services might be or are used.
FCC Warning. This evaluation kit is intended for use for ENGINEERING DEVELOPMENT, DEMONSTRATION, OR EVALUATION PURPOSES ONLY and is not considered by Sewio to be a finished end-product fit for general consumer use. It generates, uses, and can radiate radio frequency energy and has not been tested for compliance with the limits of computing devices pursuant to part 15 of FCC rules, which are designed to provide reasonable protection against radio frequency interference. Operation of this equipment in other environments may cause interference with radio communications, in which case the user at his own expense will be required to take whatever measures may be required to correct this interference. Sewio does not guarantee, or assume any responsibility or liability for, the accuracy, of RTLS products since the accuracy
and precision is parameter affected by the customer's environment and optimization of installation. Furthermore, injuries and
interferences caused by radio signal emission are in full responsibility of the customer, who agrees to operate with the RTLS
product in such manner not to cause any above mentioned issues. Customer use of any information presented by Sewio as
voluntary information and his reliance on this information is at customer's own risk.