Embed Size (px)
Citation preview
RSA Authentication Manager 6.1 for Windows
Installation Guide

Contact InformationSee our Web sites for regional Customer Support telephone and fax numbers.
RSA Security Inc. RSA Security Ireland Limitedwww.rsasecurity.com www.rsasecurity.ie
TrademarksACE/Agent, ACE/Server, Because Knowledge is Security, BSAFE, ClearTrust, Confidence Inspired, e-Titlement, IntelliAccess, Keon, RC2, RC4, RC5, RSA, the RSA logo, RSA Secured, the RSA Secured logo, RSA Security, SecurCare, SecurID, SecurWorld, Smart Rules, The Most Trusted Name in e-Security, Transaction Authority, and Virtual Business Units are either registered trademarks or trademarks of RSA Security Inc. in the United States and/or other countries. All other goods and/or services mentioned are trademarks of their respective companies.
License agreementThis software and the associated documentation are proprietary and confidential to RSA Security, are furnished under license, and may be used and copied only in accordance with the terms of such license and with the inclusion of the copyright below. This software and any copies thereof may not be provided or otherwise made available to any other person.
Neither this software nor any copies thereof may be provided to or otherwise made available to any third party. No title to or ownership of the software or any intellectual property rights thereto is hereby transferred. Any unauthorized use or reproduction of this software may be subject to civil and/or criminal liability.
This software is subject to change without notice and should not be construed as a commitment by RSA Security.
Note on encryption technologiesThis product may contain encryption technology. Many countries prohibit or restrict the use, import, or export of encryption technologies, and current use, import, and export regulations should be followed when exporting this product.
DistributionLimit distribution of this document to trusted personnel.
RSA Security NoticeProtected by U.S. Patent #4,720,860, #4,885,778, #4,856,062, and other foreign patents.
The RC5™ Block Encryption Algorithm With Data-Dependent Rotations is protected by U.S. Patent #5,724,428 and #5,835,600.
© 2005 RSA Security Inc. All rights reserved.First printing: September 2005

RSA Authentication Manager 6.1 for Windows Installation Guide
ContentsPreface................................................................................................................................... 7
Audience ............................................................................................................................. 7Directory Names ................................................................................................................. 7Documentation .................................................................................................................... 7
Documentation Provided as PDF Files ........................................................................ 7Help.............................................................................................................................. 8
Online Distribution of RSA Authentication Manager 6.1 ................................................. 8Getting Support and Service ............................................................................................... 9
Before You Call Customer Support............................................................................. 9
Chapter 1: RSA Authentication Manager Requirements ......................11Licensing Options ..............................................................................................................11
Base License ...............................................................................................................11Advanced License.......................................................................................................11
System Requirements.........................................................................................................11Supported Platforms ...................................................................................................11Hardware Requirements ............................................................................................ 12Disk Space Requirements .......................................................................................... 12Important Installation Guidelines .............................................................................. 12
Merging Multiple Realms ................................................................................................. 13Maintaining Accurate System Time Settings.................................................................... 13Changing the Language Used by the Database................................................................. 13Pre-Installation Checklist .................................................................................................. 14
Chapter 2: Installing the RSA Authentication Manager........................ 15Installing a New Primary .................................................................................................. 15
Starting and Stopping RSA Authentication Manager Processes ............................... 16Adding Token Seed Records to the Database................................................................... 17Pushing the Initial Database to the Replicas using Push DB............................................ 17Adding and Installing a New Replica ............................................................................... 18Next Steps ......................................................................................................................... 20
Chapter 3: Installing and Upgrading Remote Administration Software.............................................................................................................................. 21
Installation/Upgrade Checklist.......................................................................................... 21Installing Remote Administration for the First Time........................................................ 22Upgrading Remote Administration................................................................................... 23Adding a Server to Administer Remotely......................................................................... 24Configuring Remote Administration Ports ....................................................................... 25
Contents 3

RSA Authentication Manager 6.1 for Windows Installation Guide
Chapter 4: Upgrading to RSA Authentication Manager 6.1 ............... 27Pre-Upgrade Checklist ...................................................................................................... 27Pre-Upgrade Tasks for the Primary ................................................................................. 28Upgrading the Primary ..................................................................................................... 28Pre-Upgrade Tasks for the Replica ................................................................................... 29Upgrading a Replica ......................................................................................................... 30Starting and Stopping RSA ACE/Server 5.1 or 5.2 or RSA Authentication Manager 6.0
Services .......................................................................................................................... 31
Chapter 5: Installing the Quick Admin Software....................................... 33Quick Admin Architecture................................................................................................ 33System Requirements........................................................................................................ 34
Windows 2000 and Windows 2003 ........................................................................... 34Solaris ........................................................................................................................ 34
Pre-Installation Checklist and Tasks................................................................................. 35Installing and Configuring Quick Admin on Windows .................................................... 36Installing and Configuring Quick Admin on Solaris ........................................................ 39Upgrading to Quick Admin 6.1 from a Previous Version ................................................ 41
On a Windows Machine ............................................................................................ 41On a Solaris Machine................................................................................................. 41
Installing Quick Admin and Web Express On the Same System ..................................... 41On a Windows Machine ............................................................................................ 42On a Solaris Machine................................................................................................. 42
Changing Quick Admin Configuration Settings ............................................................... 43Quick Admin Configuration Settings ........................................................................ 43Password Token Lifetimes Settings........................................................................... 44How Password Token Lifetime Settings Affect Each Other ..................................... 46Quick Admin Timeout Settings ................................................................................. 47Debugging On/Off Settings ....................................................................................... 47Changing RSA Authentication Manager Communication Settings .......................... 48
Administering Multiple Primary Servers.......................................................................... 49Uninstalling Quick Admin ................................................................................................ 49
From a Windows Machine......................................................................................... 49From a Solaris Machine............................................................................................. 50
Appendix A: Migrating Your RSA RADIUS Server ................................... 51Migrating to RSA RADIUS Server 6.1 ............................................................................ 51Converting Your RSA RADIUS User Extension Data..................................................... 52
Running a Test Conversion........................................................................................ 52Running a Full Conversion ........................................................................................ 53Troubleshooting ......................................................................................................... 53
Appendix B: Transferring the RSA Authentication Manager from UNIX to Windows......................................................................................................... 55
4 Contents

RSA Authentication Manager 6.1 for Windows Installation Guide
Appendix C: Windows 2003 Server Minimum System Requirements ................................................................................................................ 57
Configuring Windows 2003 Server Services for Minimization ................................ 57Windows 2003 Server Service Packs ........................................................................ 58
Appendix D: Database Utilities ............................................................................ 59Dumping the Database ...................................................................................................... 59Creating a New Database.................................................................................................. 61Loading Dump Files.......................................................................................................... 61
Merge Logic............................................................................................................... 62Using the Dump and Load Utilities in DOS ..................................................................... 62
sdloadsrv .................................................................................................................... 62sddumpsrv.................................................................................................................. 63sdloadlog.................................................................................................................... 64sddumplog.................................................................................................................. 64
Using the Dumpreader Utility........................................................................................... 65Running Dumpreader from DOS............................................................................... 65Dumpreader Output Formats ..................................................................................... 66Schema Field Name Differences ............................................................................... 69Schema Versions in RSA Authentication Manager Releases.................................... 69Troubleshooting the Dumpreader Utility................................................................... 70
Appendix E: Creating User Records from a SAM Database .............. 73Extracting SAM User Records with dumpsamusers.exe .................................................. 73
Creating RSA Authentication Manager User Records with loadsamusers.exe ......... 75
Appendix F: Uninstalling the RSA Authentication Manager ............. 77
Glossary ............................................................................................................................. 79
Index ..................................................................................................................................... 81
Contents 5


RSA Authentication Manager 6.1 for Windows Installation Guide
Preface
This manual explains how to install RSA Authentication Manager 6.1 for Windows 2000 and Windows 2003.
AudienceThis manual is intended for Windows 2000 and Windows 2003 security system administrators. The person who installs RSA Authentication Manager must be familiar with your server platform, operating system version, and system peripherals.
Do not make this guide available to the general user population.
Directory NamesThe following table shows the convention used in this guide for referring to certain directory names.
DocumentationThe RSA Authentication Manager 6.1 software for Windows 2000, Windows 2003, and UNIX is provided on a single CD, which also includes:
• Help for RSA Authentication Manager 6.1 for Windows 2000 and Windows 2003
• Printable documentation files in PDF format for Windows 2000, Windows 2003, and UNIX
Documentation Provided as PDF FilesYou can access PDF files from either:
• \auth.mgrdoc on the RSA Authentication Manager CD.
• The local RSA Security\RSA Authentication Manager\doc directory on your hard drive, provided you opted to install the documentation as part of the installation process.
Term Used in Guide Definition Actual Directory Path
ACEDATA RSA Authentication Manager data directory
\RSA Authentication Manager\data
ACEDOC RSA Authentication Manager document directory
\RSA Authentication Manager\doc
ACEPROG RSA Authentication Manager executables directory
\RSA Authentication Manager\prog
Preface 7

RSA Authentication Manager 6.1 for Windows Installation Guide
Note: RSA Security provides an authentication instructions template in a Microsoft Word (.doc) file that you can customize and provide to your users.
If you are deploying the RSA SecurID Authenticator SID800, for end-user instructions, see the RSA Security Center Help and the RSA Authenticator Utility 1.0 User’s Quick Reference, both of which are provided with the RSA Authenticator Utility 1.0.
For security reasons, RSA Security recommends that you obtain the latest version of Adobe Reader for any platform at www.adobe.com.
HelpRSA Authentication Manager 6.1 includes an extensive Help system that you can access by either:
• Clicking the Help buttons in individual dialog boxes
• Selecting Help for Database Administration from the Database Administration application Help menu
Online Distribution of RSA Authentication Manager 6.1 Customers have the option of downloading RSA Authentication Manager 6.1 as a zip file. When unzipped, the file contains the same directory layout and contents as the RSA Authentication Manager 6.1 software CD.
In the documentation, where appropriate, substitute the term online distribution file for software CD. In procedures, you may need to adjust the details of some steps. For example, you might navigate to a directory rather than insert a CD.
The Welcome Kit and license media are in your original RSA Authentication Manager package.
8 Preface

RSA Authentication Manager 6.1 for Windows Installation Guide
Getting Support and Service
RSA SecurCare Online offers a Knowledgebase that contains answers to common questions and solutions to known problems. It also offers information on new releases, important technical news, and software downloads.
The RSA Secured Partner Solutions Directory provides information about third-party hardware and software products that have been certified to work with RSA Security products. The directory includes Implementation Guides with step-by-step instructions and other information about interoperation of RSA Security products with these third-party products.
Before You Call Customer SupportMake sure you have direct access to the computer running the RSA Authentication Manager software.
Have the following information available when you call:
Your RSA Security Customer/License ID. You can find this number on the license distribution medium or by running the Configuration Management application on the Windows 2000 or Windows 2003 platforms, or by typing ‘sdinfo’ on any UNIX platform.
RSA Authentication Manager software version number.
The name and version of the operating system under which the problem occurs.
Whether you are running a name resolution service (for example, DNS).
RSA SecurCare Online https://knowledge.rsasecurity.com
Customer Support Information www.rsasecurity.com/support
RSA Secured Partner Solutions Directory
www.rsasecured.com
Preface 9


RSA Authentication Manager 6.1 for Windows Installation Guide
1 RSA Authentication Manager Requirements
Licensing OptionsRSA Authentication Manager enforces the Base license and the Advanced license during installation and in the normal course of daily operation and administration. Both license types are permanent.
Base LicenseThe RSA Authentication Manager Base license provides the rights to use the RSA Authentication Manager software in the following environment:
• With as many active users in the RSA Authentication Manager database as specified by the active user tier that was purchased.
• On one Primary and one Replica in one realm.
Advanced LicenseThe RSA Authentication Manager Advanced license provides the rights to use the RSA Authentication Manager software in the following environment:
• With as many active users in the database as specified by the active user tier that was purchased.
• On 1 Primary and up to 10 Replicas in up to 6 realms.Multiple Advanced licenses may be purchased for customers who want to install the software in more than six realms.
For detailed information about licenses and active users, see the Administrator’s Guide.
System RequirementsFor information about requirements for your system, see Appendix C, “Windows 2003 Server Minimum System Requirements.”
Supported Platforms• Microsoft Windows 2000 Server or Advanced Server (Service Pack 4) running a
supported language• Microsoft Windows 2003 Enterprise Server running a supported language• Microsoft Windows 2003 Standard Server running a supported language
For information about supported languages, see the Administrator’s Guide.
1: RSA Authentication Manager Requirements 11

RSA Authentication Manager 6.1 for Windows Installation Guide
Hardware Requirements• Intel Pentium 266 MHz or faster processor (Windows 2000 Server)
• Intel Pentium 733 MHz or faster processor (Windows 2003 Server, Standard or Enterprise Edition)
• At least 256 MB of physical memory + 2 MB per 1,000 users
• Two times physical memory swap file
• Local CD drive
• NTFS File System
• Monitor display set to at least 800 x 600 pixels
To achieve the highest authentication rates possible, you need:
• Dual Intel Pentium 4 (3.2 GHz or faster) processors
• 2048 MB of physical memory per processor
Disk Space Requirements• 200 MB for RSA Authentication Manager software
• Additional 2 MB per 1,000 users
• 20 MB for RSA Authentication Manager Remote Administration software
• 5 MB for RSA Authentication Agent for Windows
For more information on disk space requirements, see the chapter “Database Maintenance” for your platform in the Administrator’s Guide.
Important Installation Guidelines• Use the Primary and Replica machines as RSA Authentication Manager only.
• The name of each machine must be a fully-qualified domain name on the network.
• Install RSA Authentication Manager on supported operating systems only.
• You cannot install more than one RSA Authentication Manager on the same system.
• You cannot install RSA Authentication Manager software on a network drive or a FAT (File Allocation Table) partition.
• Do not install RSA Authentication Manager on a domain controller.
• Make sure that the machines are located in a secure area so that only trusted personnel can access the Server console.
12 1: RSA Authentication Manager Requirements
RSA Authentication Manager 6.1 for Windows Installation Guide
Merging Multiple Realms
To merge databases from multiple realms into one 6.0 realm:
1. Upgrade one realm to RSA Authentication Manager 6.1.
2. Dump the other databases and merge them into the 6.0 database using the dump and load utilities sddump and sdload.
For more information, see Appendix D, “Database Utilities.”
Maintaining Accurate System Time SettingsRSA Authentication Manager relies on standard time settings known as Coordinated Universal Time (UTC). The time, date, and time zone settings on computers running RSA Authentication Manager must always be correct in relation to UTC.
Make sure the time on the computer on which you are installing RSA Authentication Manager is set to the local time and corresponds to the Coordinated Universal Time (UTC). For example, if UTC is 11:43 a.m. and the RSA Authentication Manager is installed on a computer in the Eastern Standard Time Zone in the United States, make sure the computer clock is set to 6:43 a.m.
To get UTC, call a reliable time service. In the U.S., call 303-499-7111.
Note: If you employ an NTP service, enable it only on the Primary. The Primary automatically maintains the Replica’s time synchronization.
Changing the Language Used by the DatabaseTo change the language used by the RSA Authentication Manager database, you must change the language and locale of the Windows 2000 or Windows 2003 machine that is running the RSA Authentication Manager software. Use the Regional Setting control panel to specify the language and locale you want your system to use. Once you change the language, you must reinstall the RSA Authentication Manager software. If your system is running a language other than English, the installation process will prompt you to choose the appropriate language.
CAUTION: Once you install the RSA Authentication Manager software on a non-English language system, you cannot change the language back to English. If you want to change the language from one supported ISO-Latin-1 language to another supported ISO-Latin-1 language, see your operating system documentation.
1: RSA Authentication Manager Requirements 13
RSA Authentication Manager 6.1 for Windows Installation Guide
Pre-Installation ChecklistBefore installing the RSA Authentication Manager software, review the Readme (readme.pdf), which contains important configuration and installation information.
You must have
The RSA Authentication Manager CD or download.
The license files stored in a directory on the Server machine.
Important: Make a backup copy of your license files (sdti.cer, server.cer, server.key, and license.rec) before beginning any installation procedures, and store the original files, the token seed records, the RSA Authentication Manager 6.1 CD, and the copies in a secure place.
Token record files, if you received a shipment of tokens.
Note: Each shipment of RSA SecurID tokens contains token seed records, but the token seed records are not shipped in the same package as the RSA Authentication Manager.
A machine that meets all the hardware, disk space, memory, and platform requirements described earlier in this chapter.
Local administrator privileges on the machine.
You must know
The language and locale used by the Windows 2003 or Windows 2000 machine and the language you want to use. For information about supported languages, see the Administrator’s Guide.
The number of Replicas allowed by your license.
If you have an RSA Authentication Manager Base license, you can install one Replica. If you have an RSA Authentication Manager Advanced license, you can install up to 10 Replicas.
The name and IP address of any Replica you plan to install.
You specify Replicas after the Primary installation. To add Replicas, use the Replica Management utility described in Appendix D, “Database Utilities.”
You must
Make backup copies of the license files before beginning an installation. Store the original license files and the token seed records in a secure place.
Determine whether to perform a standard or silent installation, in which you specify configuration parameters from the command line.
14 1: RSA Authentication Manager Requirements

RSA Authentication Manager 6.1 for Windows Installation Guide
2 Installing the RSA Authentication ManagerThis chapter describes how to install a new Primary and one or more Replicas.
Installing a New Primary
Important: The name of each machine must be a fully-qualified domain name on the network.
To install RSA Authentication Manager on a new Primary:
1. Log on to the machine as a local administrator, and insert the RSA Authentication Manager 6.1 CD into the CD drive.
2. In the aceserv\windows directory on the RSA Authentication Manager CD, double-click setup.exe.
3. Follow the prompts until the Select Installation Type dialog box opens. Select Primary RSA Authentication Manager.
4. Follow the prompts to complete the installation.
5. Make backup copies of your license files (sdti.cer, server.cer, server.key, and license.rec), and store them on a CD.
Important: During the installation, the license files are modified. Therefore, if the license files in the directory become lost or corrupted, you need the modified license files to regain access.
6. Start the RSA Authentication Manager processes. For instructions, see “Starting and Stopping RSA Authentication Manager Processes” on page 16.
To install RSA Authentication Manager on a new Primary in silent mode:
1. Log on to the machine as a local administrator, and insert the RSA Authentication Manager 6.1 CD into the CD drive.
2. The command to start the installation is setup.exe /s /v"/q /l* log file TYPE=PRIMARY LICPATH=path to license file [LANG=language] [INSTALLDIR=installation directory]”
where log file is the fully-qualified path to your log file and the italicized words represent values you supply.
2: Installing the RSA Authentication Manager 15

RSA Authentication Manager 6.1 for Windows Installation Guide
Note: Make sure you include the necessary quotation marks in the command.
The arguments in brackets are optional. If you do not supply them, the installation uses the defaults.
For example, to install a new Primary using the defaults, type:setup.exe /s /v"/q /l* c:\log.txt TYPE=PRIMARY LICPATH=d:\license_files”
3. Make backup copies of your license files (sdti.cer, server.cer, server.key, and license.rec), and store them on a CD.
Important: During the installation, the license files are modified. Therefore, if the license files in the directory become lost or corrupted, you need the modified license files to regain access.
4. Start the RSA Authentication Manager processes. For instructions, see “Starting and Stopping RSA Authentication Manager Processes” on page 16.
Starting and Stopping RSA Authentication Manager Processes Start and stop all RSA Authentication Manager processes through the RSA Authentication Manager Control Panel.
To start or stop all RSA Authentication Manager processes on the Primary:
1. Click Start > Programs > RSA Security > RSA Authentication Manager Control Panel.
2. In the Control Panel menu, click Start & Stop RSA Authentication Manager Services.
3. Under Start Services
• To start all services, click Start All.
• To stop all services, click Stop All.
Optional Property Possible Values Default Value
LANG ENG, SPA, TCH, and so on. ENG
INSTALLDIR Fully-qualified path to the installation directory
Program Files > RSA Security > RSA Authentication Manager
16 2: Installing the RSA Authentication Manager
RSA Authentication Manager 6.1 for Windows Installation Guide
Adding Token Seed Records to the DatabaseIf you have performed a new installation of the RSA Authentication Manager on the Primary, the database does not contain any token seed records, and the administrator who installed the software is the only user in the database.
If you import the token seed records now, you can create user records for your administrators and assign tokens to them. Otherwise, only the user who installed the software is able to administer the database, and then only locally on the machine that contains the Primary.
For more information about importing token seed records and adding users to the database, see the RSA Authentication Manager Help.
To add token seed records to the RSA Authentication Manager database:
1. On the Primary, log on as a local administrator.
2. Insert the token seed records media into the appropriate drive.
3. Click Start > Programs > RSA Security > RSA Authentication Manager Host Mode.
4. From the Token menu, select Import Tokens.
5. Enter the path and filename of the token record file, or click Open to browse to the location.
6. Click OK.
7. Click OK to close the dialog box. The new token records are added to the sdserv database.
To verify that the tokens were imported successfully:
1. Click Token > List Tokens.
2. In the List Tokens dialog box, select List to Screen, List All Tokens, All Algorithms, and click OK.The Token Report lists all tokens in the database.
3. To close the Token Report, click Exit.
Pushing the Initial Database to the Replicas using Push DBPush DB provides an automated method of distributing RSA Authentication Manager database files to Replicas.
• If Push DB is enabled on the Primary, you must copy the ACEDATA\replica_package\license\ directory to the Replica machine. After you install and start the Replica, the Primary pushes the database files to the Replica.
• If Push DB is disabled on the Primary, you must copy the contents of the ACEDATA\replica_package\ directory to the Replica machine.
2: Installing the RSA Authentication Manager 17

RSA Authentication Manager 6.1 for Windows Installation Guide
By default, Push DB is enabled. To disable Push DB, use the following procedure. Otherwise, go to the following section, “Adding and Installing a New Replica.”
To disable Push DB:
1. Start the RSA Authentication Manager Database Administration application.
2. Click System > System Configuration > Edit System Parameters.
3. Clear Allow Push DB Assisted Recovery.
4. Click OK.
By reversing step 3, you can enable Push DB at any time.
Go to the following section, “Adding and Installing a New Replica.”
Adding and Installing a New Replica
To add and install a new Replica:
1. From the RSA Authentication Manager Control Panel on the Primary, stop all services. For instructions, see “Starting and Stopping RSA Authentication Manager Processes” on page 16.
2. On the Primary, start the Replica Management utility by clicking Start > Programs > RSA Security > RSA Authentication Manager Configuration Tools > RSA Authentication Manager Replica Management.
Note: If you are running a Replica or did not shut down the database brokers, the Details button is the only active button, and “READ ONLY Access to database” appears above the list of Servers.
3. Add the Replica to the Primary database. For instructions, see the Help topic “Adding a Replica to the Database.”
4. Create the Replica Package on the Primary. The Replica Package contains the license and database files that the Replica installation requires. For instructions, see the Help topic “Creating a Replica Package.”
5. Do one of the following:
• If Push DB is enabled on the Primary, copy the ACEDATA\replica_package\license directory to the Replica machine.
• If Push DB is disabled on the Primary, copy the ACEDATA\replica_package directory to the Replica machine.
6. Start the Primary using the RSA Authentication Manager Control Panel.
18 2: Installing the RSA Authentication Manager
RSA Authentication Manager 6.1 for Windows Installation Guide
7. Install the Replica. For instructions, see the following procedure “To install the RSA Authentication Manager software on the Replica:”
8. Start the Replica using the RSA Authentication Manager Control Panel.
Important: Make sure that the Primary is running so that the initial connection between the Primary and Replica occurs and the Primary verifies that the Replica has the correct database.
To install the RSA Authentication Manager software on the Replica:
Important: The name of each Server machine must be a fully-qualified computer on the network, and the name must be all lowercase.
1. Log on to the machine as a local administrator, and insert the RSA Authentication Manager 6.1 CD into the CD drive.
2. In the \aceserv\windows directory on the RSA Authentication Manager CD, double-click setup.exe.
3. Follow the prompts until the Select Installation Type dialog box opens. Select New Replica RSA Authentication Manager, and click Next.
4. When prompted, browse to the Replica Package you copied from the Primary, and click Next.
5. Follow the prompts to complete the installation.
Repeat this procedure for each Replica you want to install.
To install the RSA Authentication Manager software on the Replica in silent mode:
Important: The name of each Server machine must be a fully-qualified computer on the network, and the name must be all lowercase.
1. Log on to the machine as a local administrator, and insert the RSA Authentication Manager 6.1 CD into the CD drive.
2. The command to start the installation is setup.exe /s /v"/q /l* log file TYPE=REPLICA LICPATH=path to Replica Package [INSTALLDIR=installation directory]”
where log file is the fully-qualified path to your log file and the italicized words represent values you supply.
Note: Make sure you include the necessary quotation marks in the command.
2: Installing the RSA Authentication Manager 19

RSA Authentication Manager 6.1 for Windows Installation Guide
The INSTALLDIR argument is optional. If you do not supply a directory path, the installation installs to Program Files > RSA Security > RSA Authentication Manager.For example, to install a new Replica using the defaults, type:
setup.exe /s /v"/q /l* c:\log.txt TYPE=REPLICA LICPATH=c:\replica_package”
3. Repeat this procedure for each Replica you want to install.
Next Steps• To install or upgrade Remote Administration, see Chapter 3, “Installing and
Upgrading Remote Administration Software.”
• To install or upgrade the Quick Admin browser-based administration application, see Chapter 8, “Installing the Quick Admin Software.”
20 2: Installing the RSA Authentication Manager

RSA Authentication Manager 6.1 for Windows Installation Guide
3 Installing and Upgrading Remote Administration SoftwareUse the Remote Administration software to administer the RSA Authentication Manager database from a remote location. You can run the Database Administration application from the Primary, a Replica, or other machines that run the RSA Authentication Manager Remote Administration software.
Note: With the Remote Administration application, you can modify the database on the Primary only. When you connect to the database on a Replica, the connection is read-only. You can run reports, run the log monitor, and view database information, but you cannot make administrative changes to the Replica database.
Installation/Upgrade ChecklistBefore you begin, use this checklist to verify that you have all the hardware, software, and information you need to upgrade the RSA Authentication Manager software.
A machine with an Intel Pentium processor running Windows 2000 Professional Server, or Advanced Server (Service Pack 4), Windows XP Pro, or Windows 2003 Server. For more information on hardware, disk space, and memory requirements, see Chapter 1, “RSA Authentication Manager Requirements.”
A supported version of the RSA Authentication Manager software installed on a Primary.
The version of the RSA Authentication Manager software must match the version of the Remote Administration software you are installing.
The language and locale used by the Windows machine and the language you want to use.
Local administrator privileges on the remote machine.
Access to the sdconf.rec and server.cer files on the Primary.
In addition, determine whether to perform a standard or silent installation, in which you specify configuration parameters from the command line.
3: Installing and Upgrading Remote Administration Software 21
RSA Authentication Manager 6.1 for Windows Installation Guide
Installing Remote Administration for the First Time
Note: The Remote Administration software is installed by default on your Primary or Replica as part of an RSA Authentication Manager 6.1 installation or upgrade. However, a remote administration connection to a Replica database is read-only.
To install the Remote Administration software:
1. Log on as a local administrator, and insert the CD labeled “RSA Authentication Manager 6.1” into the CD drive.
2. In the \aceserv\windows directory on the RSA Authentication Manager CD, double-click setup.exe.
3. Follow the prompts until the Select Installation Type dialog box opens. Select New Remote Administration Client, and click Next.
4. Browse to the directory containing the sdconf.rec and server.cer files, and click Next.
5. Follow the prompts to complete the installation.
6. If you are not using DNS, add the name and IP address of the server to the hosts file on the Remote Administration machine.On a Windows 2000 or 2003 machine, the hosts file is in %SystemRoot%\System32\drivers\etc\.
When the installation is complete, for instructions on configuring the Primary to allow Remote Administration, see the chapter “Remote Administration” in the Administrator’s Guide.
To install the Remote Administration software in silent mode:
1. Log on as a local administrator, and insert the CD labeled “RSA Authentication Manager 6.1” into the CD drive.
2. The command to start the installation is setup.exe /s /v"/q /l* log file TYPE=REMOTE LICPATH=path to server.cer and sdconf.rec”
where log file is the fully-qualified path to your log file and the italicized words represent values you supply.
Note: Make sure you include the necessary quotation marks in the command.
For example, to install Remote Admin, type:setup.exe /s /v"/q /l* c:\log.txt TYPE=REMOTE LICPATH=c:\license_files”
3. If you are not using DNS, add the name and IP address of the server to the hosts file on the Remote Administration machine.On a Windows 2000 or Windows 2003 machine, the hosts file is in %SystemRoot%\System32\drivers\etc\.
22 3: Installing and Upgrading Remote Administration Software

RSA Authentication Manager 6.1 for Windows Installation Guide
When the installation is complete, for instructions on configuring the Primary to allow Remote Administration, see the chapter “Remote Administration” in the Administrator’s Guide.
Upgrading Remote Administration
To upgrade the Remote Administration software:
1. Log on as a local administrator, and insert the CD labeled “RSA Authentication Manager 6.1” into the CD drive.
2. In the \aceserv\windows\ directory on the RSA Authentication Manager CD, double-click setup.exe.
3. Follow the prompts until the Upgrade dialog box opens. Select Upgrade this installation, and click Next.
4. Follow the prompts to complete the installation.
To upgrade the Remote Administration software in silent mode:
1. Log on as a local administrator, and insert the CD labeled “RSA Authentication Manager 6.1” into the CD drive.
2. The command to start the upgrade is setup.exe /s /v"/q /l* log file TYPE=REMOTE LICPATH=path to server.cer and sdconf.rec UPGRADE=1”
where log file is the fully-qualified path to your log file and the italicized words represent values you supply.
Note: Make sure you include the necessary quotation marks in the command.
For example, to upgrade Remote Administration, type:setup.exe /s /v"/q /l* c:\log.txt TYPE=REMOTE LICPATH=c:\license_files UPGRADE=1”
3: Installing and Upgrading Remote Administration Software 23

RSA Authentication Manager 6.1 for Windows Installation Guide
Adding a Server to Administer RemotelyIf you need to administer additional databases from a machine running the Remote Administration software, you can add a server for Remote Administration.
During the procedure, you are prompted for the location of the server.cer and sdconf.rec files from the Primary.
To add a server for Remote Administration:
1. Click Start > Programs > RSA Security> RSA Authentication Manager Control Panel.
2. In the RSA Authentication Manager Control Panel menu, click Add & Remove Remote Administration.
3. In the right-hand panel, click Add.
4. Specify the location of the sdconf.rec and server.cer files, and click OK.
5. If you are not using DNS, add the name and IP address of the server to the hosts file on the Remote Administration machine and the Primary. On a Windows 2000 or Windows 2003 machine, the hosts file is in %SystemRoot%\System32\drivers\etc\.
Note: To remove a server from the Remote Administration list, stop all administrative sessions for that realm, and then, at step 3, highlight the server you want to remove, and click Remove.
To remove a server from Remote Administration:
1. Shut down all administrative sessions on the applicable realm.
2. Click Start > Programs > RSA Security > RSA Authentication Manager Control Panel.
3. In the RSA Authentication Manager Control Panel menu, click Add & Remove Remote Administration.
In the right-hand panel, select the server you want to remove, and click Remove.
24 3: Installing and Upgrading Remote Administration Software
RSA Authentication Manager 6.1 for Windows Installation Guide
Configuring Remote Administration PortsRemote administration uses TCP, which opens two ports for each remote administration session running on your RSA Authentication Manager. You can limit the number of ports that can be opened at the same time, thereby limiting the number of remote administration sessions that can run at the same time, by specifying a range of port numbers used for remote administration connections.
You must specify the same range of port numbers for all servers in the realm you are administering remotely.
To specify a range of port numbers:
1. Using the RSA Authentication Manager Control Panel, stop the RSA Authentication Manager and database brokers.
2. In the ace\rdbms32 directory, make a backup copy of the startup.pf file. Name it startup.old.
3. In a text editor, open the startup.pf file, and add the following lines to the end of the file:
-minport minimum port number-maxport maximum port number
The first port that TCP uses is always one greater than the minimum port number you specify, so the range must always include one more port than you need. If you have 10 remote connections, you need 20 ports and must specify a range of 21 ports. For example, to use ports 3001 through 3020, specify:
-minport 3000-maxport 3020
Make sure the range does not include port numbers used by other services.
Note: For Windows systems, the minimum port number cannot be less than 3000.
If you use the Progress Software Development Toolkit, your system may be using a startup.pf other than the one that shipped with RSA Authentication Manager 6.1. In this case, RSA Security recommends that you edit both startup.pf files according to this procedure.
4. Restart the RSA Authentication Manager.
3: Installing and Upgrading Remote Administration Software 25

RSA Authentication Manager 6.1 for Windows Installation Guide
4 Upgrading to RSA Authentication Manager 6.1 You can upgrade to RSA Authentication Manager 6.1 from RSA ACE/Server 5.1 or later, and RSA Authentication Manager 6.0 or later.
Pre-Upgrade Checklist
Important: If you use the RSA RADIUS Server in your current installation and want to migrate to RSA RADIUS 6.1, see Appendix A, “Migrating Your RSA RADIUS Server” before you upgrade your Primary and Replica Servers.
You must have
A machine that meets all the hardware, disk space, memory, and platform requirements described in Chapter 1, “RSA Authentication Manager Requirements.”
A supported version of the RSA Authentication Manager software installed on a system.
Sufficient disk space, preferably on another system, to create backup copies of the existing Primary sdserv and sdlog database files.
Note: Stop all RSA Authentication Manager Services before you create backup copies of the database files. For instructions, see “Starting and Stopping RSA ACE/Server 5.1 or 5.2 or RSA Authentication Manager 6.0 Services” on page 31.
Local administrator privileges on the Primarys and Replicas.
The RSA Authentication Manager 6.1 CD or download.
The license files from your existing Primary, or, if you have purchased a new license, the new license files.
You must know
The name and IP address of any Replica you want to add.
The number of Replicas allowed by your license.
If you have an RSA Authentication Manager Base license, you can install 1 Replica. If you have an RSA Authentication Manager Advanced license, you can install up to 10 Replicas.
In addition, determine whether to perform a standard or silent upgrade, in which you specify configuration parameters from the command line.
4: Upgrading to RSA Authentication Manager 6.1 27

RSA Authentication Manager 6.1 for Windows Installation Guide
Pre-Upgrade Tasks for the Primary
Important: Before upgrading, turn off local access protection on the Primary and Replica Servers. Failure to do so may result in you being locked out of your machines. For instructions, see your RSA Authentication Agent documentation.
To prepare for the Primary upgrade:
1. Stop the RSA ACE/Server Services on the 5.1 or 5.2 Primary Server or the RSA Authentication Manager 6.0 Primary Server. For instructions, see “Starting and Stopping RSA ACE/Server 5.1 or 5.2 or RSA Authentication Manager 6.0 Services” on page 31. You cannot upgrade the software while services are running on the Server you want to upgrade. In addition, you must clear Automatic RSA ACE/Server startup.
2. After stopping all RSA ACE/Server or RSA Authentication Manager processes, create backup copies of the database files, license files, and the configuration file by copying the ACEDATA directory.
Note: To back up the RADIUS accounting files, copy all directories in the ACEDATA\radacct or user-specified directory.
For more information on backing up data, see the chapter “Database Maintenance (Windows)” in the Administrator’s Guide.
3. Restart the machine.
Once you have restarted the machine, you are ready to upgrade the Primary.
Upgrading the Primary
Note: You cannot install RSA Authentication Manager 6.1 in the same location as previous versions of RSA ACE/Server. The new default location is <drive>:\Program Files\RSA Security\RSA Authentication Manager.
To upgrade the Primary:
1. On the Primary, log on to the machine as a local administrator, and insert the RSA Authentication Manager 6.1 CD into the CD drive.
2. In the aceserv\windows\ directory, double-click setup.exe.
3. Follow the prompts until the Upgrade dialog box opens. Select Upgrade this installation, and click Next.
4. Follow the prompts to complete the installation.
28 4: Upgrading to RSA Authentication Manager 6.1

RSA Authentication Manager 6.1 for Windows Installation Guide
5. Start the RSA Authentication Manager Services from the RSA Authentication Manager Control Panel on the Primary only if you do not plan to add any additional Replicas.
The Primary upgrade is complete.
To upgrade the Primary in silent mode:
1. On the Primary, log on to the machine as a local administrator, and insert the RSA Authentication Manager 6.1 CD into the CD drive.
2. The command to start the upgrade is setup.exe /s /v"/q /l* log file TYPE=PRIMARY LICPATH=path to license files UPGRADE=1”
where log file is the fully-qualified path to your log file and the italicized words represent values you supply.
Note: Make sure you include the necessary quotation marks in the command.
For example, to upgrade a Primary, type:setup.exe /s /v"/q /l* c:\log.txt TYPE=PRIMARY LICPATH=d:\license_files UPGRADE=1”
3. Restart the machine.
4. Start the RSA Authentication Manager Services from the RSA Authentication Manager Control Panel on the Primary only if you do not plan to add any additional Replicas.
The Primary upgrade is complete.
Pre-Upgrade Tasks for the Replica
To prepare for the Replica upgrade:
1. Copy the Replica Package from the Primary to the Replica.
2. Copy the ACEDATA\replica_package\ directory to a directory outside of ACEDATA on the Replica machine.
Note: If Push DB is enabled on the Primary, you must copy the ACEDATA\replica_package\license directory to a directory outside of ACEDATA on the Replica machine. After you install and start the Replica, the Primary pushes the database files to the Replica.
3. Stop all RSA ACE/Server or RSA Authentication Manager Services on the Replica. For instructions, see “Starting and Stopping RSA ACE/Server 5.1 or 5.2 or RSA Authentication Manager 6.0 Services” on page 31. You cannot upgrade the software while the services are running on the Server you want to upgrade. In addition, you must clear Automatic RSA ACE/Server startup.
4: Upgrading to RSA Authentication Manager 6.1 29

RSA Authentication Manager 6.1 for Windows Installation Guide
4. Create backup copies of the database files, license files, and the configuration file by copying the ACEDATA directory.
Note: To back up the RADIUS accounting files, copy all directories in the ACEDATA\radacct or user-specified directory.
For more information on backing up RSA Authentication Manager data, see the chapter “Database Maintenance (Windows)” in the Administrator’s Guide.
Upgrading a Replica
To upgrade a Replica:
1. On the Replica, log on to the machine as a local administrator, and insert the RSA Authentication Manager 6.1 CD into the CD drive.
2. In the \aceserv\windows\ directory on the RSA Authentication Manager CD, double-click setup.exe.
3. Follow the prompts until the Upgrade dialog box opens. Select Upgrade this installation, and click Next.
4. Specify the location of the Replica Package, and click Next.
5. Follow the prompts to complete the installation.
6. Restart the RSA Authentication Manager Services on the Replica.
Note: When the Replica starts, if Push DB is enabled, the Primary pushes the database to the Replica.
The Replica upgrade is complete.
To upgrade a Replica in silent mode:
1. On the Replica, log on to the machine as a local administrator, and insert the RSA Authentication Manager 6.1 CD into the CD drive.
2. The command to start the upgrade is setup.exe /s /v"/q /l* log file TYPE=REPLICA LICPATH=path to Replica Package UPGRADE=1”
where log file is the fully-qualified path to your log file and the italicized words represent values you supply.
Note: Make sure you include the necessary quotation marks in the command.
For example, to upgrade a Replica, type:setup.exe /s /v"/q /l* c:\log.txt TYPE=REPLICA LICPATH=c:\replica_package UPGRADE=1”
30 4: Upgrading to RSA Authentication Manager 6.1

RSA Authentication Manager 6.1 for Windows Installation Guide
3. Restart the RSA Authentication Manager Services on the Replica.
Note: When the Replica starts, if Push DB is enabled, the Primary pushes the database to the Replica.
The Replica upgrade is complete.
Starting and Stopping RSA ACE/Server 5.1 or 5.2 or RSA Authentication Manager 6.0 Services
To stop all RSA ACE/Server 5.1 or 5.2 or RSA Authentication Manager 6.0 services on the Primary:
Important: Notify any remote administrators of the impending shutdown.
1. Click Start > Settings > Control Panel, and double-click the RSA Authentication Manager icon.
2. Under RSA ACE/Server, click Stop.
3. When the Broker service stopped message appears, click OK.
4. If the Broker Connections dialog box opens, click Yes.
If Automatic RSA ACE/Server startup is selected, clear it.
4: Upgrading to RSA Authentication Manager 6.1 31

RSA Authentication Manager 6.1 for Windows Installation Guide
8 Installing the Quick Admin SoftwareThis chapter describes how to install the RSA Authentication Manager Quick Admin software. This software enables a system or Help Desk administrator to use a web browser to view and modify user, token, and extension record data in the RSA Authentication Manager Primary database.
For more information about Quick Admin, see the Administrator’s Guide and the Quick Admin Help.
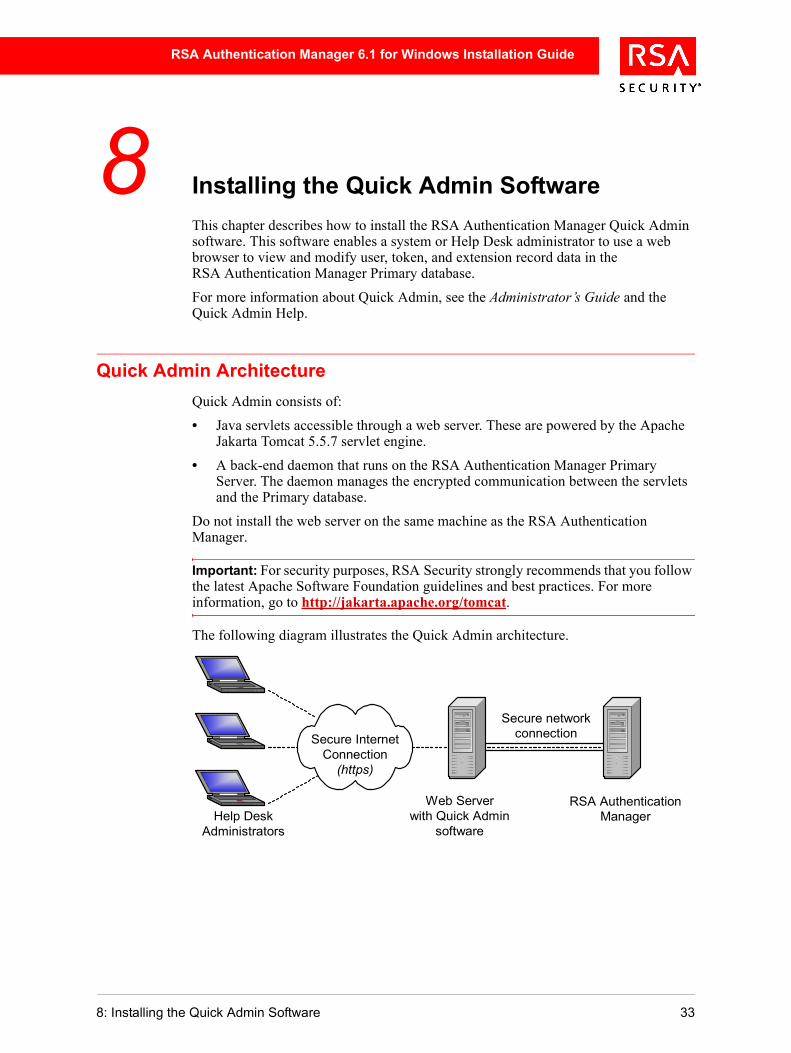
Quick Admin ArchitectureQuick Admin consists of:
• Java servlets accessible through a web server. These are powered by the Apache Jakarta Tomcat 5.5.7 servlet engine.
• A back-end daemon that runs on the RSA Authentication Manager Primary Server. The daemon manages the encrypted communication between the servlets and the Primary database.
Do not install the web server on the same machine as the RSA Authentication Manager.
Important: For security purposes, RSA Security strongly recommends that you follow the latest Apache Software Foundation guidelines and best practices. For more information, go to http://jakarta.apache.org/tomcat.
The following diagram illustrates the Quick Admin architecture.
Secure networkconnectionSecure Internet
Connection(https)
Help DeskAdministrators
RSA AuthenticationManager
Web Serverwith Quick Admin
software
8: Installing the Quick Admin Software 33

RSA Authentication Manager 6.1 for Windows Installation Guide
System RequirementsQuick Admin users must have Internet Explorer 5.5 (Service Pack 1) or later or Netscape Communicator 6.22 or 7.1 installed on their systems, and the screen resolution must be set to 800 x 600 or higher. In addition, RSA Security recommends that you turn off page caching in the browser.
Windows 2000 and Windows 2003The following table lists the requirements for installing Quick Admin on Windows 2000 and Windows 2003 machines.
RSA Security strongly recommends that you
• Use a secure connection (HTTPS) to prevent user names and passwords from being sent in clear text.
• Secure the web server host according to the latest Microsoft guidelines and best practices. For more information about securing IIS, go to Microsoft TechNet at www.microsoft.com/technet/.
SolarisInstall Quick Admin only on an UltraSparc system running Solaris 9 with the Java System 6.1 web server (JavaScript-enabled).
RSA Security also strongly recommends that you:
• Use a secure connection (HTTPS) to prevent user names and passwords from being sent in clear text.
• Secure your web server host according to the latest Sun Microsystems guidelines and best practices. For more information, go to http://docs.sun.com/db/prod/s1websrv.
Windows 2000 Windows 2003
Web Server(Must be JavaScript-enabled)
Internet Information Server (IIS) 5.0
Internet Information Server (IIS) 6.0
Service Pack Service Pack 4 N/A
34 8: Installing the Quick Admin Software
RSA Authentication Manager 6.1 for Windows Installation Guide
Pre-Installation Checklist and TasksChecklistBefore you begin installing the RSA Authentication Manager Quick Admin software, make sure you have the following files and information:
A copy of the server.cer file from the RSA Authentication Manager\data directory of your RSA Authentication Manager Primary.
A copy of the sdti.cer file from the RSA Authentication Manager\data directory of your Primary.
The fully qualified DNS name of your Primary.
The IP address of your Primary.
The port number on which your Quick Admin daemon (sdcommd) is running. The default port is 5570. To change the port assignment, edit the sdcommdconfig.txt file (sdcommd.conf on Solaris) in the RSA Authentication Manager\prog directory.
TasksComplete the following tasks on the RSA Authentication Manager Primary host. For more information about these tasks, see the Administrator’s Guide.
Add the following entries to the hosts.conf file in the RSA Authentication Manager\prog directory: the Quick Admin web server’s fully-qualified (DNS) name and IP address, and the host name and IP address. For example,
test.rsasecurity.com, 10.1.2.3test, 10.1.2.3
Note: You must restart the RSA Authentication Manager for the changes to take effect.
Set the Administrative Role of each Quick Admin user to Administrator and assign the necessary task list.
Set the RSA Authentication Manager System Parameters to allow Remote Administration.
Verify that the RSA Authentication Manager Quick Admin Daemon is running on the Primary by clicking Start > Settings > Control Panel > Administrative Tools > Services.
8: Installing the Quick Admin Software 35

RSA Authentication Manager 6.1 for Windows Installation Guide
Installing and Configuring Quick Admin on WindowsTo run Quick Admin on a Windows 2000 or Windows 2003 system, you must install the Quick Admin software and configure your Microsoft Internet Information Services (IIS) as described in this section.
Before you begin, make sure that you have installed a supported Microsoft IIS version on your web server host system. Also, verify that no other products using Tomcat are currently installed on the web server host system.
Note: If your web server host has an older version of Quick Admin, you must uninstall the older version before installing the new version. For more information, see “Upgrading to Quick Admin 6.1 from a Previous Version” on page 41. If you want to install both RSA Quick Admin 6.1 and RSA SecurID WebExpress 1.3 on the same web server host, see “Installing Quick Admin and Web Express On the Same System” on page 41. In this case, both products share the same Tomcat servlet engine.
To install the Quick Admin software on Windows 2000 or Windows 2003:
1. Stop the World Wide Web Publishing Service on the web server host. For instructions, see your Internet Information Server (IIS) documentation.
2. Insert the CD that contains the Quick Admin software into the CD drive of the web server host, and browse to the QuickAdmin\Windows directory on the CD.
3. Double-click the quickadmin.exe icon.The Quick Admin Setup Wizard opens.
4. Follow the prompts through the Setup Wizard, and then click Finish.During setup, note that a Windows service named “RSA Web Service” is installed.
5. Depending on your Microsoft IIS version (5 or 6), complete the appropriate IIS configuration procedure in this section.
To configure Microsoft IIS 5 with the Tomcat servlet engine:
1. From the Windows Control Panel, click Administrative Tools > Internet Information Services (IIS) Manager.
2. In the IIS window, in the left navigation pane, expand the local computer entry to display the default web site.
3. For the default web site, specify a virtual directory to the Quick Admin application.
• In the IIS Manager window, in the left navigation pane, right-click the default web site. From the context menu, select New > Virtual Directory. This opens the Virtual Directory Creation Wizard.
• Click Next.
• In the Alias text box, enter “tomcat” as the value, and click Next.
36 8: Installing the Quick Admin Software
RSA Authentication Manager 6.1 for Windows Installation Guide
• Browse to the Quick Admin installation directory\Tomcat\conf directory, and click Next.
• Select the Read, Run scripts, and Execute options, and click Next.
• Click Finish.
4. Add the Quick Admin ISAPI Redirector to the default web site.
• Right-click the default web site and select Properties from the context menu.
• Select the ISAPI Filters tab, and click Add.
• Enter “tomcat” as the filter name.
• Browse to the Quick Admin installation directory\Tomcat\conf directory, select the isapi_redirector.dll file, and click Open.
• Click OK to close the Properties dialog box.
5. Start the necessary services on the web server host.
• From the Windows Control Panel, click Administrative Tools > Services.
• In the Services window, make sure that these three services are started:
– IIS Admin Service
– World Wide Web Publishing Service
– RSA Web Service
• If any of the three services are stopped, start them.
To configure Microsoft IIS 6 with the Tomcat servlet engine:
1. From the Windows Control Panel, click Administrative Tools > Internet Information Services (IIS) Manager.
2. In the IIS window, in the left navigation pane, expand the local computer entry to display the default web site.
3. For the default web site, specify a virtual directory to the Quick Admin application.
• In the IIS Manager window, in the left navigation pane, right-click the default web site. From the context menu, select New > Virtual Directory.
• Click Next in the Virtual Directory Creation Wizard.
• In the Alias text box, enter “tomcat” as the value, and click Next.
• Browse to the Quick Admin installation directory\Tomcat\conf directory, and click Next.
• Select the Read, Run scripts, and Execute permissions, and click Next.
• Click Finish.
4. Add the Quick Admin ISAPI Redirector to the default web site.
• Right-click the default web site and select Properties from the context menu.
• Select the ISAPI Filters tab, and click Add.
8: Installing the Quick Admin Software 37
RSA Authentication Manager 6.1 for Windows Installation Guide
• Enter “tomcat” as the filter name.
• Browse to the Quick Admin installation directory\Tomcat\conf directory, select the isapi_redirector.dll file, and click Open.
• Select the Home Directory tab, and click Configuration.
• In the Application Configuration dialog box, click Add.
• Browse to the Quick Admin installation directory\Tomcat\conf directory, select the isapi_redirector.dll file, and click Open.
• In the Extension text box, type:jsp
and click OK.
• Click OK to close the Configuration dialog box.
• Click OK again to close the Properties dialog box.
5. Add Tomcat as a web server extension.
• In the IIS Manager window, in the left navigation pane, right-click Web Service Extensions, and select Add a new Web service extension from the context menu.
• In the Extension name text box, enter “tomcat” as the value, and click Add.
• Browse to the Quick Admin installation directory\Tomcat\conf directory, select the isapi_redirector.dll file, and click Open.
• Click OK in the Add File dialog box.
• Select the Set extension status to Allowed option.
• Click OK.
6. Start the necessary services on the web server host.
• From the Windows Control Panel, click Administrative Tools > Services.
• In the Services window, locate these three services:
– IIS Admin Service
– World Wide Web Publishing Service
– RSA Web Service
• If any of the three services are not running, start them.
After you finish configuring Microsoft IIS, the RSA Authentication Manager Quick Admin application is ready to use.
To log on to Quick Admin, point your web browser to https://servername/quickadmin/, where servername is the name of the web server host.
Important: For security purposes, RSA Security strongly recommends that you follow the latest Apache Software Foundation guidelines and best practices. For more information, go to http://jakarta.apache.org/tomcat.
38 8: Installing the Quick Admin Software
RSA Authentication Manager 6.1 for Windows Installation Guide
Installing and Configuring Quick Admin on SolarisTo run Quick Admin on a Solaris 9 system, you must install the Quick Admin software and configure your Sun Java Systems web server as described in this section.
Before you begin, make sure that you have installed a supported Sun Java Systems web server on your web server host system. Also, verify that no other products using the Tomcat servlet engine are currently installed on the web server host system.
Note: If your web server host has an older version of Quick Admin, you must uninstall the older version before installing the new version. For more information, see “Upgrading to Quick Admin 6.1 from a Previous Version” on page 41. If you want to install both RSA Quick Admin 6.1 and RSA SecurID WebExpress 1.3 on the same web server host, see “Installing Quick Admin and Web Express On the Same System” on page 41. In this case, both products share the same Tomcat servlet engine.
To install Quick Admin on Solaris:
1. Stop all web services on the web server.
2. Insert the CD that contains the Quick Admin software into the CD drive of the web server host.
3. Change to the following directory on the CD./cdrom/cd_name/QuickAdmin/UNIX
4. Type:./quickadmin.sh
The Quick Admin setup script starts.
5. Follow the instructions on your screen.
6. After the installation script finishes, you must configure your web server with Tomcat as described in the following procedure.
To configure the Java System (SunOne) 6.1 web server for Quick Admin:
1. Change to the web server installation directory/https-hostname/config directory.
2. Using a text editor, open the magnus.conf file, and enter the following lines of data at the end of the file:
Init fn="load-modules" funcs="jk_init,jk_service" shlib="Quick Admin Install Dir/Tomcat/conf/nsapi_redirector.so"
Init fn="jk_init" worker_file="Quick Admin Install Dir/ Tomcat/conf/workers.properties" log_level="error" log_file="Quick Admin Install Dir/Tomcat/logs/nsapi.log"
3. Save the changes and close the magnus.conf file.
8: Installing the Quick Admin Software 39

RSA Authentication Manager 6.1 for Windows Installation Guide
4. Open the obj.conf file, and enter the following lines of data immediately after the tag <Object name="default">:
NameTrans fn="assign-name" from="/quickadmin" name="rsaweb"
NameTrans fn="assign-name" from="/quickadmin/*" name="rsaweb"
NameTrans fn="assign-name" from="/jsp-examples" name="rsaweb"
NameTrans fn="assign-name" from="/jsp-examples/*" name="rsaweb"
NameTrans fn="assign-name" from="/servlets-examples" name="rsaweb"
NameTrans fn="assign-name" from="/servlets-examples/*" name="rsaweb"
5. At the end of obj.conf file, add the following lines:<Object name="rsaweb">
ObjectType fn=force-type type=text/plain
Service fn="jk_service" worker="RSAWorker"
</Object>
6. Save the changes and close the obj.conf file.
7. Change to the Quick Admin installation directory/Tomcat/bin directory, and start Tomcat with following command:
./startup.sh
8. Start your Java Systems (SunOne) web server.
The RSA Authentication Manager Quick Admin is now installed and configured on your Solaris web server host.
To log on to Quick Admin, browse to https://servername/quickadmin/, where servername is the name of the web server host.
Important: For security purposes, RSA Security strongly recommends that you follow the latest Apache Software Foundation guidelines and best practices. For more information, go to http://jakarta.apache.org/tomcat. Also, RSA Security strongly recommends that, if you need to stop and restart Tomcat, you also stop and restart the Java Systems (SunOne) web server.
40 8: Installing the Quick Admin Software

RSA Authentication Manager 6.1 for Windows Installation Guide
Upgrading to Quick Admin 6.1 from a Previous VersionDepending on your platform, use one of the following procedures to upgrade from Quick Admin 5.2 or 6.0 to Quick Admin 6.1.
On a Windows MachineTo upgrade Quick Admin on a Windows machine:
Note: Make sure no administrators are using the Quick Admin directories while you perform the upgrade.
1. Uninstall Quick Admin 5.2 or 6.0 completely from your web server host.RSA Security recommends that you stop all services related to Quick Admin before uninstalling. For complete instructions, see the RSA ACE/Server 5.2 for Windows Installation Guide or RSA Authentication Manager 6.0 for Windows Installation Guide.
2. Install Quick Admin 6.1 as described in “Installing and Configuring Quick Admin on Windows” on page 36.
On a Solaris MachineTo upgrade Quick Admin on a Solaris machine:
Note: Make sure no administrators are using the Quick Admin directories while you perform the upgrade.
1. Uninstall Quick Admin 5.2 or 6.0 from your web server host.RSA Security recommends that you stop all services related to Quick Admin before uninstalling. For complete instructions, see the RSA ACE/Server 5.2 for UNIX Installation Guide or RSA Authentication Manager 6.0 for UNIX Installation Guide.
2. Install Quick Admin 6.1 as described in “Installing and Configuring Quick Admin on Solaris” on page 39.
Installing Quick Admin and Web Express On the Same SystemBoth Quick Admin 6.1 and Web Express 1.3 use the Apache Software Foundation Tomcat 5.5.7 servlet engine, and can run on the same web server host. When running on the same host, these applications share the same version of Tomcat.
For information about installing and configuring Web Express 1.3, see the RSA Web Express 1.3 Installation and Configuration Guide for your platform.
8: Installing the Quick Admin Software 41
RSA Authentication Manager 6.1 for Windows Installation Guide
Important: Earlier versions of Quick Admin and Web Express use the Macromedia Inc. JRun servlet engine and are incompatible with the new Tomcat-based versions. Make sure to uninstall older versions of Quick Admin and Web Express from the web server host before you install the new versions. For information about uninstalling older versions of Quick Admin, see the RSA ACE/Server 5.2 Installation Guide or RSA Authentication Manager 6.0 Installation Guide for your platform. For information about uninstalling older versions of Web Express, see the RSA Web Express Installation and Configuration Guide for your platform and version.
Depending on your platform, use one of the following procedures to install Quick Admin 6.1.
On a Windows Machine
To install Quick Admin 6.1 on Windows when Web Express 1.3 is already installed:
1. From the Windows Control Panel, click Administrative Tools > Services, and stop the following services on the web server host:
• World Wide Web Publishing Service
• RSA Web Service
2. Insert the CD that contains the Quick Admin software into the CD drive of the web server host, and browse to the QuickAdmin\Windows directory on the CD.
3. Double-click the quickadmin.exe icon.The Quick Admin Setup Wizard opens.
4. Follow the prompts through the Setup Wizard, and then click Finish.
5. From the Windows Control Panel, click Administrative Tools > Services, and restart the following services on the web server host:
• World Wide Web Publishing Service
• RSA Web Service
On a Solaris Machine
To install Quick Admin 6.1 on Solaris when Web Express 1.3 is already installed:
1. Stop all web services on the web server.
2. Insert the CD that contains the Quick Admin software into the CD drive of the web server host.
3. Change to the following directory on the CD./cdrom/cd_name/QuickAdmin/UNIX
4. Type: ./quickadmin.sh
The Quick Admin setup script starts.
42 8: Installing the Quick Admin Software

RSA Authentication Manager 6.1 for Windows Installation Guide
5. Follow the instructions on your screen.
6. Restart all web services on the web server.
Changing Quick Admin Configuration SettingsIf you need to make changes to your Quick Admin environment, you must edit the quickadminconfig.properties file. By default, this file resides in the Quick Admin installation directory\Tomcat\webapps\quickadmin\WEB-INF\properties directory.
The following tables summarize the parameters that you can modify. Many of these values were set during installation and should be modified with caution. In addition, RSA Security strongly recommends against modifying parameters in the ##DO NOT MODIFY## section of the properties file.
Directory paths in the tables are relative to the Quick Admin installation directory\Tomcat\webapps\quickadmin directory.
Note: If you make changes to the quickadminconfig.properties file, you must stop and restart RSA Web Services (Tomcat) for the changes to take effect.
Quick Admin Configuration Settings
Parameter Value
ACE_SERVER The fully qualified name of the RSA Authentication Manager Primary.
ACE_IP The IP address of the RSA Authentication Manager Primary.
CERT_PATH The directory path that contains copies of the sdti.cer and server.cer files from your RSA Authentication Manager Primary.The default path is certs/.For instructions on adding certificates from more than one Primary, see “Administering Multiple Primary Servers” on page 49.
ACE_PORT The Primary TCP port on which the RSA Authentication Manager Quick Admin daemon is listening.The default port is 5570.
REPORT_PATH The directory path where Quick Admin writes report files.The default path is reports/.
Important: Because each report generates a new text file, RSA Security recommends that you clean out the reports directory periodically to conserve disk space.
PROP_PATH The directory path that contains the quickadminconfig.properties file.The default path is properties/.
8: Installing the Quick Admin Software 43

RSA Authentication Manager 6.1 for Windows Installation Guide
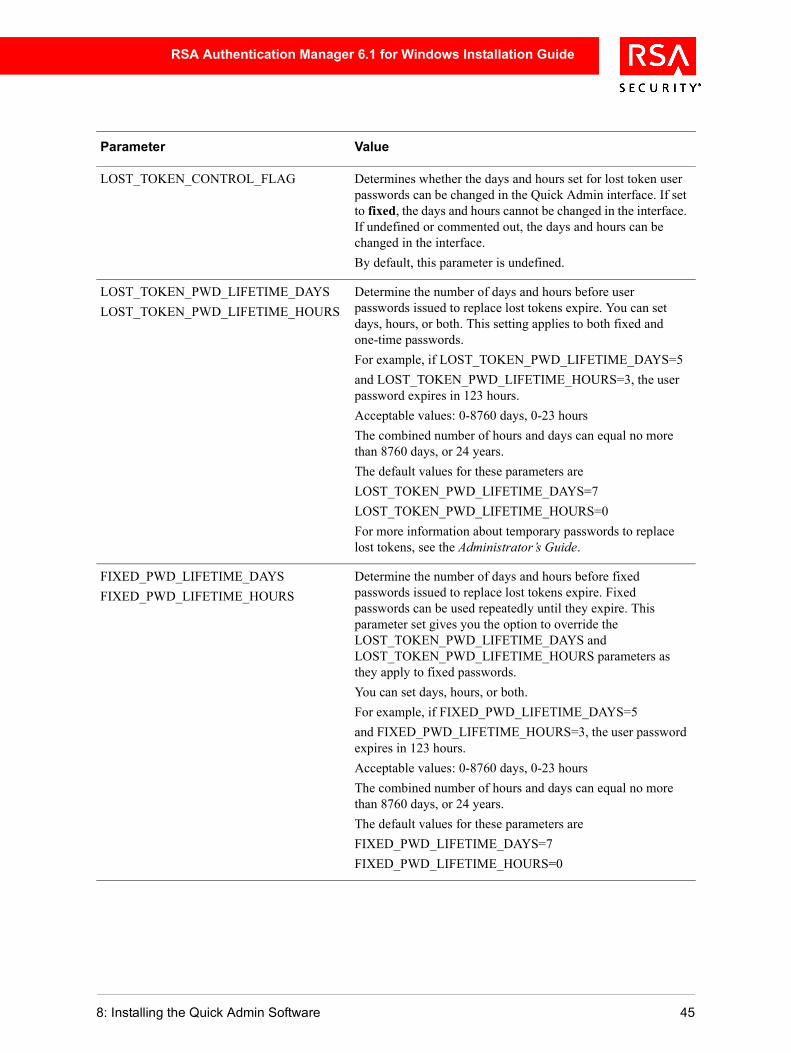
Password Token Lifetimes Settings
Note: The value you set for each password parameter can change the meaning of the values you set for other password parameters. For more information, see “How Password Token Lifetime Settings Affect Each Other” on page 46.
MAX_SEARCH The maximum number of objects (user records, token records, and so on) that are returned when a user searches the RSA Authentication Manager database.This value greatly affects the performance of the Quick Admin application while users are searching. If the value is set very high, the application performs poorly.The default value for this parameter is 150.
MAX_REPORT The maximum number of objects (user records, token records, and so on) that are returned when a user generates a report.This value greatly affects the performance of the Quick Admin application while users are generating reports. If the value is set very high, the application performs poorly.The default value for this parameter is 300.
HTML_SRC The directory path that contains the HTML templates that the Quick Admin application uses to create the forms that users see.The default path is quickadmin/.
Note: quickadmin/ is not relative to the Quick Admin installation directory\Tomcat\webapps\quickadmin directory.
Parameter Value
Parameter Value
USER_PWD_LIFETIME_DAYS USER_PWD_LIFETIME_HOURS
Determine the number of days and hours before user passwords expire. You can set days, hours, or both. For example, if USER_PWD_LIFETIME_DAYS=5and USER_PWD_LIFETIME_HOURS=3, the user password expires in 123 hours.Acceptable values: 0-8760 days, 0-23 hoursThe combined number of hours and days can equal no more than 8760 days, or 24 years. The default values for these parameters areUSER_PWD_LIFETIME_DAYS=30USER_PWD_LIFETIME_HOURS=0
44 8: Installing the Quick Admin Software
RSA Authentication Manager 6.1 for Windows Installation Guide
LOST_TOKEN_CONTROL_FLAG Determines whether the days and hours set for lost token user passwords can be changed in the Quick Admin interface. If set to fixed, the days and hours cannot be changed in the interface. If undefined or commented out, the days and hours can be changed in the interface. By default, this parameter is undefined.
LOST_TOKEN_PWD_LIFETIME_DAYSLOST_TOKEN_PWD_LIFETIME_HOURS
Determine the number of days and hours before user passwords issued to replace lost tokens expire. You can set days, hours, or both. This setting applies to both fixed and one-time passwords.For example, if LOST_TOKEN_PWD_LIFETIME_DAYS=5and LOST_TOKEN_PWD_LIFETIME_HOURS=3, the user password expires in 123 hours. Acceptable values: 0-8760 days, 0-23 hoursThe combined number of hours and days can equal no more than 8760 days, or 24 years. The default values for these parameters areLOST_TOKEN_PWD_LIFETIME_DAYS=7LOST_TOKEN_PWD_LIFETIME_HOURS=0For more information about temporary passwords to replace lost tokens, see the Administrator’s Guide.
FIXED_PWD_LIFETIME_DAYSFIXED_PWD_LIFETIME_HOURS
Determine the number of days and hours before fixed passwords issued to replace lost tokens expire. Fixed passwords can be used repeatedly until they expire. This parameter set gives you the option to override the LOST_TOKEN_PWD_LIFETIME_DAYS and LOST_TOKEN_PWD_LIFETIME_HOURS parameters as they apply to fixed passwords.You can set days, hours, or both. For example, if FIXED_PWD_LIFETIME_DAYS=5and FIXED_PWD_LIFETIME_HOURS=3, the user password expires in 123 hours. Acceptable values: 0-8760 days, 0-23 hoursThe combined number of hours and days can equal no more than 8760 days, or 24 years. The default values for these parameters areFIXED_PWD_LIFETIME_DAYS=7FIXED_PWD_LIFETIME_HOURS=0
Parameter Value
8: Installing the Quick Admin Software 45

RSA Authentication Manager 6.1 for Windows Installation Guide
How Password Token Lifetime Settings Affect Each OtherThe value you set for each password parameter can change the meaning of the values you set for other password parameters. The following table describes how the settings for each password parameter affect each other.
OTP_PWD_LIFETIME_DAYSOTP_PWD_LIFETIME_HOURS
Determine the number of days and hours before one-time password (OTP) sets issued to replace lost tokens expire. One-time passwords can be used only one time each and expire on a specified date. You can set days, hours, or both. This parameter set gives you the option to override the LOST_TOKEN_PWD_LIFETIME_DAYS and LOST_TOKEN_PWD_LIFETIME_HOURS parameters as they apply to OTP.For example, if OTP_PWD_LIFETIME_DAYS=5and OTP_PWD_LIFETIME_HOURS=3, the user password expires in 123 hours. Acceptable values: 0-8760 days, 0-23 hoursThe combined number of hours and days can equal no more than 8760 days, or 24 years. The default values for these parameters areOTP_PWD_LIFETIME_DAYS=7OTP_PWD_LIFETIME_HOURS=0
Parameter Value
Which parameters are defined LOST_TOKEN_CONTROL_FLAGset to FIXED
LOST_TOKEN_CONTROL_FLAGundefined
None Default values apply Default values apply
LOST Values defined for LOST apply to FIXED and OTP
Values defined for LOST apply to FIXED and OTP
LOSTFIXED
Values defined for LOST apply to OTP
Values defined for FIXED apply to OTP
LOSTOTP
Values defined for LOST apply to FIXED
Values defined for LOST apply to FIXED and OTP
LOSTFIXEDOTP
Values defined for FIXED and OTP override values defined for LOST
Values defined for FIXED apply to OTP
FIXED Default values apply to OTP Values defined for FIXED apply to OTP
OTP Default values apply to FIXED Default values for LOST apply to FIXED and OTP
46 8: Installing the Quick Admin Software
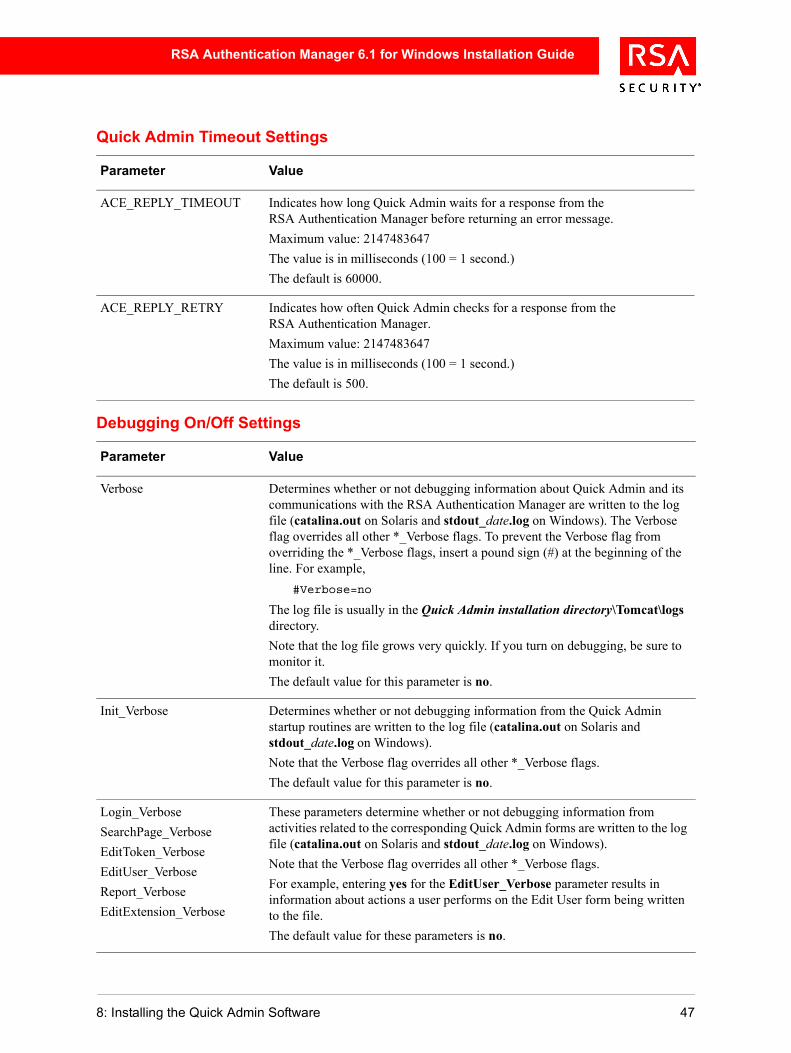
RSA Authentication Manager 6.1 for Windows Installation Guide
Quick Admin Timeout Settings
Debugging On/Off Settings
Parameter Value
ACE_REPLY_TIMEOUT Indicates how long Quick Admin waits for a response from the RSA Authentication Manager before returning an error message. Maximum value: 2147483647The value is in milliseconds (100 = 1 second.) The default is 60000.
ACE_REPLY_RETRY Indicates how often Quick Admin checks for a response from the RSA Authentication Manager.Maximum value: 2147483647The value is in milliseconds (100 = 1 second.)The default is 500.
Parameter Value
Verbose Determines whether or not debugging information about Quick Admin and its communications with the RSA Authentication Manager are written to the log file (catalina.out on Solaris and stdout_date.log on Windows). The Verbose flag overrides all other *_Verbose flags. To prevent the Verbose flag from overriding the *_Verbose flags, insert a pound sign (#) at the beginning of the line. For example,
#Verbose=no
The log file is usually in the Quick Admin installation directory\Tomcat\logs directory. Note that the log file grows very quickly. If you turn on debugging, be sure to monitor it. The default value for this parameter is no.
Init_Verbose Determines whether or not debugging information from the Quick Admin startup routines are written to the log file (catalina.out on Solaris and stdout_date.log on Windows).Note that the Verbose flag overrides all other *_Verbose flags. The default value for this parameter is no.
Login_VerboseSearchPage_VerboseEditToken_VerboseEditUser_VerboseReport_VerboseEditExtension_Verbose
These parameters determine whether or not debugging information from activities related to the corresponding Quick Admin forms are written to the log file (catalina.out on Solaris and stdout_date.log on Windows).Note that the Verbose flag overrides all other *_Verbose flags. For example, entering yes for the EditUser_Verbose parameter results in information about actions a user performs on the Edit User form being written to the file.The default value for these parameters is no.
8: Installing the Quick Admin Software 47

RSA Authentication Manager 6.1 for Windows Installation Guide
Changing RSA Authentication Manager Communication SettingsCommunication between the RSA Authentication Manager Primary and the Quick Admin server is controlled by settings in a configuration file on the Primary.
• If your RSA Authentication Manager Primary is running on Windows, the settings are in the RSA Authentication Manager\prog\sdcommdconfig.txt file.
• If your RSA Authentication Manager Primary is running on UNIX, the settings are in the RSA Authentication Manager/prog/sdcommd.conf file.
The following table explains the settings in the configuration file.
Parameter Value
Windows port(TCP Port on UNIX installations)
TCP port on which the RSA Authentication Manager Quick Admin Daemon is running on the Primary.The default value is 5570.
Verbose Determines whether or not detailed logging messages are written to the Windows Event Viewer or UNIX syslog.The default value is no.
Inactivity TimeOut Controls the time-out for Quick Admin sessions. If a user leaves a Quick Admin session open for the specified duration, the session is closed automatically. The inactivity parameter must be specified in minutes.The default value is 15.
Important: The Inactivity TimeOut value must be larger than the Tomcat session time-out value. You set the session time-out value in the Quick Admin installation directory\Tomcat\conf\web.xml file or in the Quick Admin installation directory\Tomcat\webapps\quickadmin\WEB-INF\web.xml file. (If you insert a session time-out value in both files, and they are different, preference is given to the setting in the second file.) Setting a session time-out value ensures that the session times out before the RSA Authentication Manager Quick Admin daemon on the Primary Server. Without a session time-out, Quick Admin users can experience terminated sessions.
48 8: Installing the Quick Admin Software
RSA Authentication Manager 6.1 for Windows Installation Guide
Administering Multiple Primary ServersQuick Admin supports administering more than one RSA Authentication Manager Primary through a single Quick Admin server.
To use Quick Admin with multiple Primary Servers:
1. Create a new subdirectory for each Server under the Quick Admin installation directory\Tomcat\webapps\quickadmin\WEB-INF\certs directory. You must create a subdirectory for each Primary you want to administer.The subdirectories must have the same name as the Primary host name. For example, to enable Quick Admin for Servers cassatt and vermeer, create subdirectories named cassatt and vermeer.
2. Obtain copies of the sdti.cer and server.cer certificate files from the RSA Authentication Manager\data directory of each Server, and place them in the appropriate subdirectories under certs. For example, certificate files from Server cassatt must be copied into the cassatt subdirectory.
3. When you log on to Quick Admin, enter the Server name in the Realm box of the logon page.Quick Admin connects to the Primary you specified. If you do not specify a Primary, Quick Admin connects to the Primary that you specified during the Quick Admin installation.
Uninstalling Quick AdminDepending on your platform, to uninstall Quick Admin, refer to one of the following sections.
From a Windows Machine
To remove the Quick Admin software from a Windows machine:
1. From the Windows Control Panel, double-click Add/Remove Programs.
2. Select RSA Quick Admin 6.1, and click Remove.The Quick Admin Setup Wizard opens.
3. Select Complete Uninstall, and click Next.
Important: If Web Express 1.3 is installed, and you do not want it uninstalled during this process, select Undeploy RSA Quick Admin 6.1 instead of Complete Uninstall.
4. Follow the prompts through the Setup Wizard, then click Finish.
5. Restart the system.
8: Installing the Quick Admin Software 49

RSA Authentication Manager 6.1 for Windows Installation Guide
To remove Quick Admin entries from IIS:
Important: If you want Web Express 1.3 to remain installed on this web server, do not perform this procedure.
1. From the Windows Control Panel, click Administrative Tools > Internet Information Services (IIS) Manager.
2. In the IIS window, in the left navigation pane, expand the local computer entry to display the default web site, and click the default web site to expand it.
3. Under the default web site, right-click the tomcat item, and select Delete from the context menu.
4. In the IIS window, in the left navigation pane, right-click the default web site, and select Properties from the context menu.
5. Select the ISAPI Filters tab.
6. Select the tomcat filter in the list, and click Remove.
7. Click OK.
8. Close the Internet Information Services Manager.
From a Solaris Machine
To remove the Quick Admin software from a Solaris machine:
1. Stop the Tomcat servlet engine.
• Change to the directory Quick Admin installation directory/Tomcat/bin.
• Type:./shutdown.sh
2. Remove Quick Admin.
• Change to the parent directory above the Quick Admin installation directory.
• Type:rm -rf Quick Admin installation directory
50 8: Installing the Quick Admin Software

RSA Authentication Manager 6.1 for Windows Installation Guide
A Migrating Your RSA RADIUS ServerThis appendix describes how to
• Migrate from previous versions of RSA RADIUS Server to RSA RADIUS Server 6.1 as part of the upgrade to RSA Authentication Manager 6.1
• Convert existing RSA RADIUS user extension data to the RSA RADIUS Server 6.1 format
Migrating to RSA RADIUS Server 6.1This section lists the tasks you need to perform to migrate your pre-6.1 RSA RADIUS Server to RSA RADIUS Server 6.1 as part of an upgrade to RSA Authentication Manager 6.1.
To migrate to RSA RADIUS 6.1:
1. If you have user extension data associated with your RSA RADIUS users, run a test conversion on the Primary. For instructions, see “Running a Test Conversion” on page 52.
2. If you have configured prompts for the RSA RADIUS Server, back up the appropriate ACEDATA\radius.cfg file.
3. Upgrade the Primary. For instructions, see “Upgrading the Primary” on page 28.
4. Copy the radius.cfg file into the ACEDATA directory on the Primary.
5. If you have user extension data associated with your RSA RADIUS users, run a full conversion on the Primary. For instructions, see “Running a Full Conversion” on page 53.
6. Upgrade the Replica or Replicas. For instructions, see “Pre-Upgrade Tasks for the Replica” on page 29 and then “Upgrading a Replica” on page 30.
7. Install RSA RADIUS Server 6.1. For instructions, see the RSA RADIUS Server 6.1 Administrator’s Guide.
A: Migrating Your RSA RADIUS Server 51

RSA Authentication Manager 6.1 for Windows Installation Guide
Converting Your RSA RADIUS User Extension DataExtension records enable you to define and manage additional database information that is useful to your organization but is not required to run Authentication Manager programs. This customer-defined information is called extension data.
RSA RADIUS Server 6.1 requires a format for user extension data that differs from previous versions of the RSA RADIUS Server. Previously, the key portion of the user extension data could be any string. In 6.1, the key must be in the following format:
ATTR<valid attribute number>_<unique identifier>
For more information about the new format, see the Help.
If you have RADIUS-specific user extension data that you want to migrate to RSA RADIUS 6.1, you must convert the data format using the rsaextconv program. The rsaextconv program is a command line utility that
• Creates new extension keys based on the keys in your current installation
• Points the profile links to the new extension keys
• Removes the old extension keys
Running a Test ConversionThe test conversion shows you the changes that will be made to the user extension information in your database without actually making the changes. This enables you to manually resolve any existing issues.
Important: RSA Security strongly recommends that you perform a test conversion on your existing user extension data before you upgrade to RSA Authentication Manager 6.1. Once you upgrade to RSA Authentication Manager 6.1, you do not have the ability to edit attribute-value pairs in RADIUS Server profiles.
In addition, running the test conversion gives you an idea of how much downtime to plan for your RADIUS users after you upgrade to RSA Authentication Manager 6.1.
To run a test conversion:
1. Log on to the machine as a local administrator, and insert the RSA Authentication Manager 6.1 CD into the CD drive.
2. In your pre-6.1 Primary Database Administration application, click File > Run Custom 4GL.
3. Browse to <CD drive>:\aceserv\windows\rsaextconv.p, and click OK.
The sample results of the test conversion are logged in ACEPROG\progui\rsaextconv.log. When you are satisfied with the results, upgrade to RSA Authentication Manager 6.1, after which you can perform a full conversion.
52 A: Migrating Your RSA RADIUS Server

RSA Authentication Manager 6.1 for Windows Installation Guide
Running a Full Conversion After you have upgraded to RSA Authentication Manager 6.1, but before you install RSA RADIUS Server 6.1, perform a full conversion by running the rsaextconv program.
Note: If you did not perform a test conversion before upgrading to RSA Authentication Manager 6.1, you can perform one using the following command:
ACEPROG/rsaextconv -f -d
The sample results are logged in ACEPROG\rsaextconv.log. Note that once you upgrade to RSA Authentication Manager 6.1, you no longer have the ability to edit attribute-value pairs in RADIUS Server profiles.
To run a full conversion on RSA Authentication Manager 6.1:
The command to run a full conversion isACEPROG/rsaextconv -f -e
The sample results are logged in ACEPROG\rsaextconv.log.
TroubleshootingThe following table provides possible solutions for the four categories of error messages you might encounter when running the rsaextconv program.
Error Message Topic Possible Solutions
Database-related • Make sure a connection to the database exists through a database broker. On Windows, click Start > Programs > RSA Security > RSA Authentication Manager Control Panel, and from the left-hand menu, click Start & Stop RSA Authentication Manager Services. On UNIX, run sdconnect start.
• Check your network connection. If neither solution helps, you may be experiencing database corruption. Contact RSA Security Customer Support.
Parameter-related Review the instructions in “Running a Full Conversion”on page 53, and run the program again.
Server Identity-related Verify that the Server information matches in the following areas:• Network identity• Replica Table• Configuration Record
Log File-related • Make sure the disk is not full• Make sure you have the correct permissions
A: Migrating Your RSA RADIUS Server 53


RSA Authentication Manager 6.1 for Windows Installation Guide
B Transferring the RSA Authentication Manager from UNIX to Windows To transfer the RSA Authentication Manager from UNIX to Windows:
1. Perform a new installation of the RSA Authentication Manager on a Windows machine. For instructions, see “Installing a New Primary” on page 15. After installation, the database on the Windows machine contains one record, which is a user record for the administrator who installed the RSA Authentication Manager software.
2. On the existing UNIX Primary, stop the aceserver by typing:./aceserver stop./sdconnect stop
3. Create a dump file for the Server database. Type:./sddump -s
A file named sdserv.dmp is created in the current directory.
4. Create a \dump directory on your Windows system.
5. Copy the sdserv.dmp and license.rec files from the UNIX system running the RSA Authentication Manager to the \dump directory. If you use ftp to transfer the files, copy them in binary mode.
Note: Do not copy these files to the RSA Authentication Manager\data directory on the Primary.
Your Windows system now contains the dump files. You are ready to load the dump files.
To load the dump files:
1. Verify that no RSA Authentication Manager processes are running on the Primary:
• Click Start > Programs > RSA Security > RSA Authentication Manager Control Panel.
• In the Control Panel menu, click Start & Stop RSA Authentication Manager Services.
• Under Start Services, click Stop All.
2. Click Start > RSA Security > RSA Authentication Manager Database Tools > Load (or, in the RSA Authentication Manager\prog directory, double-click sdload.exe).The Database Load dialog box opens.
3. Select the Server Database box to indicate that you want to load a Server dump file.
B: Transferring the RSA Authentication Manager from UNIX to Windows 55

RSA Authentication Manager 6.1 for Windows Installation Guide
4. In the Path of server dump file field, either specify the path for the dump file and license.rec file, or browse to their location.
5. Under server Database Load Options, select Server dump file has a different license record than the current database and Merge records from server dump file with records in current database.
Important: RSA Security strongly recommends that you back up your current database before performing a Database Load in Merge mode. For more information about the Merge option, see “Merge Logic” on page 62.
6. Click OK.The sdload.exe program loads the dump files into the RSA Authentication Manager 6.1 database.
7. Click Close.
Note: The RSA Authentication Manager UNIX machine is automatically added to the RSA Authentication Manager Windows machine as a Replica. To delete it, go to Start > Programs > RSA Security > RSA Authentication Manager Configuration Tools > RSA Authentication Manager Replication Management.
56 B: Transferring the RSA Authentication Manager from UNIX to Windows

RSA Authentication Manager 6.1 for Windows Installation Guide
C Windows 2003 Server Minimum System RequirementsThis appendix specifies the minimum Windows 2003 Server components required for the RSA Authentication Manager to function properly. Before you minimize your system, review “Important Installation Guidelines” for RSA Authentication Manager on page 12.
Note: For information about RSA Authentication Manager services and processes, see the Administrator’s Guide.
To ensure that your system is properly minimized, RSA Security recommends that you perform a new installation of Windows 2003 Server. During the installation, when you set up the network interface card (NIC), do the following:
• Use Custom Settings.
• Uninstall all settings except Internet Protocol (TCP/IP).
When you configure DNS and WINS on the NIC, do the following:
• If DNS is not supported in your environment, disable Register This Connection’s Address in DNS.
• Disable Enable LMHOSTS lookup.
• On the WINS tab, select Disable NetBIOS Over TCP/IP.
• Ensure that the system is part of a self-contained workgroup.
When you complete the installation, you must configure the services.
Configuring Windows 2003 Server Services for Minimization After you install the operating system, set the following services to Automatic and make sure they are started:
• DNS Client• Event Log• Logical Disk Manager• Network Connections • Plug & Play• Protected Storage• Remote Procedure Call• Removable Storage• Secondary Login Service• Security Accounts Manager• Windows Management Instrumentation
C: Windows 2003 Server Minimum System Requirements 57

RSA Authentication Manager 6.1 for Windows Installation Guide
Set the following services to Manual, and make sure they are stopped:
• Uninterrupted Power Supplies
• Windows Installer
• Windows Time
Disable all other services.
Windows 2003 Server Service PacksOnce you have installed and minimized Windows 2003 Server, you may install the appropriate service packs and hot fixes. Note that RSA Security may not yet have verified RSA Authentication Manager 6.1 against recently released hot fixes. Therefore, you should consult RSA Security Customer Support prior to installing any recent hot fixes.
58 C: Windows 2003 Server Minimum System Requirements

RSA Authentication Manager 6.1 for Windows Installation Guide
D Database UtilitiesThis appendix describes the installation and administration-related database utilities. The utilities are:
The database dump and load utilities include interface and command line versions. The command line versions of the dump and load utilities can be run from a DOS prompt. These versions contain additional functionality that allows you to dump and load specific database tables. For more information, see “Using the Dump and Load Utilities in DOS” on page 62.
Note: This appendix does not cover the Replica Management (sdrepmgmt_nt) utility, which performs a number of important functions related to Replicas. With this utility, you can add and delete Replicas, mark Replicas as requiring a new database, create Replica Packages, and promote a Replica to the Primary. For information, see the Administrator’s Guide.
Dumping the Database
To dump the database:
1. Click Start > Programs > RSA Security > RSA Authentication Manager Database Tools > Dump.The Authentication Manager Database Dump dialog box opens.
2. Under Select Databases to dump, select Dump Log Database and Dump Server Database.
Utility Purpose
Database dump (sddump.exe)
Dumps the contents of the Server database and the log database to separate dump files (sdserv.dmp and sdlog.dmp).
Database creation (sdnewdb.exe)
Creates a new, empty database, which is required before you can load the dump files.
Database load (sdload.exe)
Loads the dump files into a new database.
Database dump reader(dumpreader.exe)
Outputs the contents of a dump file to any of several industry-standard text formats (CSV, HTML, XML, TXT).
D: Database Utilities 59

RSA Authentication Manager 6.1 for Windows Installation Guide
3. Under Options, select Include delta tables in dump file to dump all associated delta information. Allow database connections in multi-user mode allows you to perform the dump while the database is active. If you have stopped all RSA Authentication Manager Services, you can select the box to enable this option. If you have not stopped all RSA Authentication Manager services, the option is enabled by default.
Note: A dump file generated from an active database usually contains temporary records resulting from other administrative activity. Multiuser mode is recommended only when you are creating dump files for examining the contents of a database for other preload testing purposes.
4. Under Selective Dump, you can use the radio buttons to specify different categories of data. Choose• By Group to dump a specific group. Enter the name of a group.• By User to dump a specific user. Enter a default user name.• By Token to dump a specific token. Enter a serial number.
5. Under Disk Space Requirements, verify that the amount of disk space available exceeds the amount of space required. In the Output Directory box, specify the directory path where you want to create the dump files.Specify a path that is outside of the directory that contains the RSA Authentication Manager software (usually ace). If you create the dump files in the default directory location, you must copy them to another directory before uninstalling the RSA Authentication Manager software.
6. Click OK.The RSA Authentication Manager Database Dump dialog box displays the status of the dump process.
7. Do one of the following:• Click Close when the dump process is done.• If you want to save the status report of the dump process, click Save As,
specify a file name and a directory, click Save, and then click Close.The directory you specified in the Output Directory box now contains the dump files sdserv.dmp and sdlog.dmp. The database load process, described in “Loading Dump Files” on page 61, requires these dump files and the license.rec file you copied from the RSA Authentication Manager\data directory.
The dump process is complete.
60 D: Database Utilities

RSA Authentication Manager 6.1 for Windows Installation Guide
Creating a New DatabaseCreating a new database overwrites all records in the existing database. Make sure that any dump file you load into the new database contains at least one local administrator record.
To create a new database:
1. Make sure that no RSA Authentication Manager processes are running.2. In the RSA Authentication Manager\prog directory, double-click sdnewdb.exe. 3. To create a new, empty RSA Authentication Manager database, select the Log
Database and Server database boxes.4. Click OK.
When the program is complete, you are asked to confirm the creation of the new database.
Loading Dump FilesTo load the dump files:
1. Make sure that no RSA Authentication Manager processes are running.
2. Copy the dump files to the RSA Authentication Manager\data directory.
3. In the RSA Authentication Manager\prog directory, double-click sdload.exe.
4. Select the Server and Log boxes to indicate that you want to load Server and log dump files.
5. In the Path of server dump file, enter the location of the Server dump file, and the license.rec file if you are merging a database from another realm, or click Browse to select the location.
6. In the Path of log dump file, enter the location of the log dump file or click Browse to select the location.
7. In the Server Database Load Options box, specify the criteria to use in the load operation by selecting one or a combination of the following:• Server dump file has a different license record than the current database
to load dump files from a different installation of the RSA Authentication Manager, or to merge dump files from different realms into an RSA Authentication Manager 6.1 database.
• Load delta records to load a dump file and associated delta records. • Commit loaded records only if all records are loaded successfully to
commit the records to the database only when the dump file loads successfully. If the dump file does not load successfully, no changes are committed to the database.
• Merge records from server dump file with records in current database to insert data from a Server dump file into the database. For more information, see the following section, “Merge Logic.”
8. To load the dump files into the database, click OK.
D: Database Utilities 61
RSA Authentication Manager 6.1 for Windows Installation Guide
Merge LogicWhen you select Merge records from server dump file with records in current database, information in the database is preserved. If the dump file contains information that conflicts with information in the database, such as a duplicate user or group name, the conflicting information is rejected in favor of the existing information in the database. Note that system records from the dump file are not loaded into the new database.
Important: RSA Security strongly recommends that you back up your current database before performing a Database Load in Merge mode.
Selecting Commit loaded records only if all records are loaded successfully merges information only when there are no conflicts. Use this option to see the conflicts between the dump file and the database before you commit any changes to the database.
Using the Dump and Load Utilities in DOSThe database dump and load utilities include DOS command line versions that allow you to dump specific tables from the Server database or load specific tables into the Server database from a dump file. This section describes the four command line dump and load utilities.
sdloadsrvThe sdloadsrv utility allows you to load a Server dump file to the database using the DOS command line. There is additional functionality in this command line version that is not available using the interface version of the load utility (sdload.exe). This additional functionality includes the ability to selectively load tables from Server dump files.
The following table describes the sdloadsrv options and arguments:
Option Argument Description
-d database name Specifies database filename. If not specified,defaults to RSA Authentication Manager\data\sdserv.
-f filename Specifies load filename. This option is required.
-a None Compression mode. Loading compresses thedatabase file. Retains all delta records.
-m None Merges Server dump files (from any version) into the Primary database.
-u None Loads a version 4.1 or earlier dump file in upgrade mode, which creates the Replica table in the new database and adds the current system as the Primary. When used with a 6.1 dump file, this option behaves like the -r option.
62 D: Database Utilities

RSA Authentication Manager 6.1 for Windows Installation Guide
Option -t is only valid if merge mode (-m) is enabled.Options -a, -m, -u, and -r are mutually exclusive.
sddumpsrvThe sddumpsrv utility allows you to create a dump file from the database using the DOS command line. There is additional functionality in this command line version that is not available using the interface version of the dump utility (sddump.exe). This additional functionality includes the ability to selectively dump tables from the Server database.
The following table describes the sddumpsrv options and arguments:
-t table_list Specifies a list of tables containing associated data for each record to be read from the dump file.
-r None Makes the current system the Primary. Use this option only when you are attempting to recover a failed database or Server. When used with a 4.1 or earlier dump file, this option behaves like the -u option.
-l licensefile Specifies a license file.
-c None Commits changes to the database only when the dump file loads successfully. If the dump file does not load successfully, no changes are committed to the database.
-v None Provides detailed output information.
Option Argument Description
Option Argument Description
-d database name Specifies database filename.
-f filename Specifies dump filename.
-t table list Specifies a list of tables containing associated data for each record to be read from the dump file.
-p None Dumps required parent tables.
-r None Dumps replica (delta) records.
-m None Allows you to dump the database in multiuser mode (while the database brokers are running).
-g None Dumps group, group members, users, and their tokens.
-u login Dumps a user record and tokens by associated default login.
-l login Same as -u.
D: Database Utilities 63

RSA Authentication Manager 6.1 for Windows Installation Guide
The -p option is only valid if selective dump mode (-t) is used.Options -t, -g, -u, and -a are mutually exclusive.
sdloadlogThe sdloadlog utility allows you to load a log dump file to the database using the DOS command line.
The following table describes the sdloadlog options and arguments:
sddumplogThe sddumplog utility allows you to dump a log database using the DOS command line.
The following table describes the sddumplog options and arguments:
-a serial number Dumps a single token, specified by the serial number.
-v None Provides detailed output information.
Option Argument Description
Option Argument Description
-d database name Specifies a database filename.
-f filename Specifies a load filename.
Option Argument Description
-d dbname Specifies a database filename.
-f filename Specifies a load filename.
-m None Allows you to dump the database in multiuser mode while the database brokers are running.
64 D: Database Utilities

RSA Authentication Manager 6.1 for Windows Installation Guide
Using the Dumpreader UtilityWith the Dumpreader utility, you can view the RSA Authentication Manager data in a dump file. This is useful, for example, when you:
• Have multiple dump files and want to check their contents before importing them into your current RSA Authentication Manager database.
• Want to create a report from the data contained in the dump file, using a third-party tool. The Dumpreader utility supports output to files in CSV, HTML, XML, and TXT formats.
Running Dumpreader from DOSThe Dumpreader utility can be run only from a DOS command prompt.
Note: A version of the Dumpreader utility is also available for UNIX platforms. For information, refer to the RSA Authentication Manager 6.1 for UNIX Installation Guide.
To list the dumpreader command syntax and options on your screen, type:dumpreader
The syntax of the dumpreader command is as follows: dumpreader dumpfile format [parameter] [-c]
The following table describes the options and arguments of dumpreader:
Option Argument Description
None dumpfile Required. Specifies the name of the dump file, typically either sdserv.dmp or sdlog.dmp.
None format Required. Specifies the file format to which the dump file data is written:
• CSV – Comma-separated values; can be imported into Microsoft Excel or some other third-party reporting format.
• HTML – Hypertext Markup Language; can be viewed in a web browser.
• XML – Extended Markup Language; can be imported into a third-party reporting application.
Note: For CSV, HTML, and XML, one file is created for each table in the database.
• XML2 – Similar to XML, except that it uses a different document type definition (DTD), and all output is collected in one file.
• TXT – Structured text format; can be viewed in a text editor. All output is collected in one file.
D: Database Utilities 65

RSA Authentication Manager 6.1 for Windows Installation Guide
Dumpreader Output FormatsThe Dumpreader utility offers five output options: CSV, HTML, TXT, XML, and XML2.
HTMLTo view dump file data in your web browser, use the HTML argument in the dumpreader command. For example:
dumpreader sdserv.dmp HTML dumpoutput
In the example, a dump file, sdserv.dmp, is output in HTML format to a subdirectory named dumpoutput located in the current directory (the one from which the command was run).
The output folder contains multiple HTML files, including a summary file and one file for each database table in the dump file. If you list the directory contents, the summary file name will be similar to:
dump_summary_04.01.03_11.40.37.html
This means that the output was created on April 1, 2003 at 11:40:37 a.m.
The other files are identified by the table name in the database schema of RSA Authentication Manager, followed by the same date, time, and extension. For example:
SDUser_04.01.03_11.40.37.html
None parameter Optional. For CSV, HTML, and XML, specifies the directory name to which multiple files, each containing a table of the database, are written. If you do not specify this parameter, the output files are written to the current directory.For XML2 and TXT, specifies the name of the file to which the output is written. If no parameter is provided, the output is written to stderr (the console). If the parameter is empty but surrounded by double-quotes ("), the output is to stdout, which is also typically the console.
-c None Consolidate option for dump files that you create by running the Export Tokens by User and Export Tokens commands from the Administration program. These dump files have a different internal structure from dump files that you create with the Dump utilities. Different parts of one table can be mixed with parts of another table. Each time a part of a different table is found, the Dumpreader creates a new output file. Using the -c option reduces the number of files that are output by consolidating all parts of the same table, and then sending the consolidated table to one file.Tables generated by the -c option are listed in alphabetical order instead of their order in the dump file.
Option Argument Description
66 D: Database Utilities

RSA Authentication Manager 6.1 for Windows Installation Guide
The summary file contains links to all the database tables in the dump file. You can view these files in your browser by clicking their related link in the summary file. Alternatively, you can open any of these files directly in your browser (or other HTML-capable application).
Note: In HTML output, the schema version of the data in the dump file is also shown, indicating the release of RSA Authentication Manager from which the file was created. For more information, see “Schema Versions in RSA Authentication Manager Releases” on page 69.
With HTML output, the Dumpreader utility parses special characters in the field names and data and performs these substitutions:
CSVTo format dump file data for a third-party program such as Microsoft Excel, use the CSV argument in the dumpreader command. For example:
dumpreader sdserv.dmp CSV dumpoutput
In the example, a dump file, sdserv.dmp, is output in CSV format to a subdirectory named dumpoutput located in the current directory (the one from which the command was run).
The output folder contains a summary file and one file for each database table in the dump file. For example:
dump_summary_04.01.03_11.40.37.csvSDAdministrativeRole_04.01.03_11.40.37.csvSDAdministrator_04.01.03_11.40.37.csv...
With CSV output, the Dumpreader utility parses special characters in the data and substitutes a space for any comma or symbol with an ASCII code below that of the space character (decimal 32).
Character Replaced by
> >
< <
& &
" "
[space]  
D: Database Utilities 67

RSA Authentication Manager 6.1 for Windows Installation Guide
XMLTo format dump file data for third-party reporting programs (for example, Crystal Reports from Crystal Decisions), use the XML argument in the dumpreader command. For example:
dumpreader sdserv.dmp XML dumpoutput -c
In the example, a dump file, sdserv.dmp is output to multiple text files with embedded XML codes. These files are saved in a subdirectory named dumpoutput located in the current directory (the one from which the command was run).
The output folder contains a summary file and one file for each database table in the dump file. For example:
dump_summary_04.01.03_11.40.37.xmlSDAdministrativeRole_04.01.03_11.40.37.xmlSDAdministrator_04.01.03_11.40.37.xml...
Filenames include a base name and a timestamp that indicates the exact date and time the files were created. This prevents files from being overwritten if you run the Dumpreader utility again.
With XML output, the Dumpreader utility parses special characters in the field names and data and performs these substitutions:
XML2Use the XML2 option to place the contents of the dump file in one XML-encoded output file. For example:
dumpreader sdserv.dmp XML2 sdserv.xml -c
In the example, the output file, sdserv.xml, contains XML-encoded database tables and the records they contain. Because the -c option was used, the tables are consolidated and placed in alphabetical order within the XML file.
For XML2 output, the Dumpreader performs no parsing of special characters. They are output as found in the dump file data.
Character Replaced by
> >
< <
& &
68 D: Database Utilities

RSA Authentication Manager 6.1 for Windows Installation Guide
TXTUse the TXT option to place the contents of the dump file in a structured text file. For example:
dumpreader sdserv.dmp TXT sdserv.txt -c
In the example, the data in the output file, sdserv.txt, is straight text, formatted for viewing in a text editor (for example, Notepad). With the -c option, the tables are consolidated and placed in alphabetical order within the text file.
For TXT output, the Dumpreader performs no parsing of special characters. They are output as found in the dump file data.
Schema Field Name DifferencesTo use output from the Dumpreader utility, you need to understand the RSA Authentication Manager database schema (the database tables and the records they contain).
You can find complete information about the database schema, including dump file differences, in the Help and in the Administration Toolkit Reference Guide.
Note: Some database field names in dump files are different from their counterparts in the actual database schema.This is necessary to maintain backward compatibility with earlier versions of the dump files. For more information, see the following section, “Schema Versions in RSA Authentication Manager Releases.”
Schema Versions in RSA Authentication Manager ReleasesRSA Authentication Manager database schema has changed over the product’s life cycle. The possible versions of the schema that a dump file could contain are listed in the following table.
Server Version Schema Version
6.1 20.00.00
5.2 19.00.00
5.1 18.00.00
5.0 17.00.00
4.1 16.00.00
4.0 14.00.00
3.31 12.00.00
3.2 12.00.00
3.1 11.00.00
3.0.1 10.00.00
D: Database Utilities 69

RSA Authentication Manager 6.1 for Windows Installation Guide
Troubleshooting the Dumpreader UtilityThe Dumpreader utility detects dump file, user input, and other problems, and can generate a variety of error messages. This section lists and describes Dumpreader error messages in alphabetical order.
Note: For details about the Dumpreader utility command syntax, see “Using the Dumpreader Utility” on page 65. Also, to view a complete usage summary on your screen, run the dumpreader command without arguments.
Invalid number of parameters. See the usage summary.The command line has less than two or more than four arguments.
Invalid command line parameter. See the usage summary.There are three or four arguments but the third or fourth argument is not -c.
Invalid format. See the usage summary.The format parameter is not one of the following:
CSVHTMLXMLXML2TXT
Could not open dump file.The specified dump file could not be opened. You may have misspelled the dump file name, the dump file could be corrupted, or you may not have appropriate permissions to open the file.
Could not read schema version from the dump file.The version information could not be read from the dump file. The dump file may be corrupted.
Could not consolidate table information.The Dumpreader has run out of memory while attempting to consolidate the output of a large dump file. Use a machine with more memory or more swap space, or run the dumpreader command without the -c option.
Invalid file format.The dump file could not be read. It may be corrupted, or another file type may erroneously have a .dmp file extension.
Could not open output file.The specified output format is XML2 or TXT, and the output file or pathname is write-protected, or the disk may be full.
70 D: Database Utilities

RSA Authentication Manager 6.1 for Windows Installation Guide
Could not write tag into the output file.The specified output format is XML2 or TXT, and the output file could not be written because the disk is full, was removed, or is damaged.
Could not read field from dump file.The Dumpreader could not read information from the dump file. The file may be corrupted, or the media on which it is stored could be faulty.
Could not create output file for the table <table name>.The CSV, HTML, or XML output file could not be written. The output directory does not exist or is write-protected, or the disk was removed or is full.
Could not write table name into the output file.In the case of XML2 or TXT formats, the Dumpreader could not write a table name to the output file. The disk may be full or faulty, or was removed.
Could not write the close record tag into the output file.The Dumpreader could not write to the XML2 or TXT output file. The disk may be full or faulty, or was removed.
Internal error. Dump file might be corrupt.The Dumpreader utility has encountered unexpected data in the dump file. The dump file may be corrupted.
Could not add field to the table.The Dumpreader failed to define a new field in a table in the XML, HTML, or CSV output file. This is typically a memory issue. Free up memory or swap space, and try again.
Could not write the open record tag into the output file.The Dumpreader failed to write information to an XML2 or TXT output file. The disk may be full or faulty, or was removed.
Could not write field data into the output file.The Dumpreader failed to write information to the output file (any format). The disk may be full or faulty, or was removed.
D: Database Utilities 71


RSA Authentication Manager 6.1 for Windows Installation Guide
E Creating User Records from a SAM DatabaseThis appendix describes two utilities you can use to move user information from an existing Security Accounts Manager (SAM) database on a Windows NT system to the RSA Authentication Manager database on Windows 2000 Server or Windows 2003 Server.
It is not possible to automate the transfer process completely. Windows NT does not provide separate first name and last name fields in the SAM database. Instead, it provides a single full name field and imposes no restrictions on how you use this field. You can use an argument to tell dumpsamusers whether to expect the first or the last name to come first. However, some inconsistencies are likely to occur, and you have to edit the output file manually to eliminate these before loadsamusers can work properly.
Extracting SAM User Records with dumpsamusers.exeRun the dumpsamusers utility from a command prompt.
Syntax dumpsamusers [server(s)...] -lf | -fl outfile
Arguments
Utility Purpose
dumpsamusers.exe(Windows NT only)
Reads user records from one or more SAM databases and writes them to a comma-separated text file. Each record contains the login, first name, and last name of a single user.
loadsamusers.exe(Windows 2000 and Windows 2003 only)
Reads and parses the text file. For each user in the file, creates a record in the RSA Authentication Manager database containing the three pieces of data for that user.
[server(s)...] Names one or more network servers, separated by spaces and each preceded by two backslashes (for example, \\system1 \\system2). Optional: If omitted, the command affects only the system where the utility is run.
-lf or -fl Specifies the order in which user names are found in the SAM database: “last, first” (assumes that a comma separates the two names) or “first last” (assumes no comma).
outfile Specifies the output file to which the user records must be written.
E: Creating User Records from a SAM Database 73
RSA Authentication Manager 6.1 for Windows Installation Guide
Editing the Output Filedumpsamusers parses names according to these rules:
• When the order is “last, first,” whatever precedes the comma is parsed as the last name, and whatever follows the comma is parsed as the first name.
• When the order is “first last,” whatever follows the last space is parsed as the last name, and everything before the comma is parsed as the first name.
If middle initials are used, dumpsamusers classifies them as part of the first name. Anomalies can occur with two-part surnames, with qualifiers that follow a surname, and with entries consisting of descriptions rather than names. The following examples are based on “first last” order.
Problems may be less frequent with “last, first” order, but they can occur—for example, when a comma is used before a qualifier, so that “Brown, Thomas G., Sr.” is parsed as “First name: Brown, Thomas G.; last name: Sr.” Descriptions such as “Development Group” are equally anomalous regardless of which order is being used.
Because the utility cannot distinguish and accommodate all possible deviations from the simple “last, first” and “first last” patterns, you must review and edit the dumpsamusers output file before running loadsamusers. The file is in ASCII format, and all fields are labeled. Under most circumstances, only a small proportion of the records need to be changed.
Name as found in record Name as parsedFirst Last
Anne Van Ostkamp Anne Van Ostkamp
Robert F. Martin III Robert F. Martin III
John Daly Jr. John Daly Jr.
Development Group Development Group
74 E: Creating User Records from a SAM Database

RSA Authentication Manager 6.1 for Windows Installation Guide
Creating RSA Authentication Manager User Records with loadsamusers.exeRun the loadsamusers utility from a Windows 2000 or Windows 2003 command prompt. Because it employs functions that are part of the RSA Authentication Manager Administration Toolkit, you must invoke this utility from a directory that also contains the apidemon.exe program, and the database broker must be running when the utility is invoked.
Syntaxloadsamusers infile [-i | -b] [outfile] [-g group]
Arguments
loadsamusers is designed to exit when it encounters a fatal error—that is, a record that it cannot load. Users loaded up to that point remain in the RSA Authentication Manager database.
infile Specifies the input file—that is, the dumpsamusers output file.
-i or -b Indicates whether the utility is invoked as an interactive or batch process. Optional: The default is interactive mode, in which the user is prompted for a replacement string when any record contains invalid characters. In batch mode, these records are not imported, but a list is displayed. Nonfatal errors such as duplicate logins are also displayed or, if an output file is specified (see the next argument), written to that file.
outfile Specifies an output file to which the list of records with nonfatal errors (see the previous argument) is to be written. Optional: If omitted, the list of records is displayed on the screen.
-g group Specifies an RSA Authentication Manager group to which all users added through this command are to be assigned. If no such group exists, RSA Authentication Manager creates it. Optional: If omitted, users are not assigned to a group.Note: This argument is case sensitive.
E: Creating User Records from a SAM Database 75


RSA Authentication Manager 6.1 for Windows Installation Guide
F Uninstalling the RSA Authentication Manager Before uninstalling the software, back up all RSA Authentication Manager files. For information on backing up RSA Authentication Manager data, see the chapter “Database Maintenance (Windows),” in the Administrator’s Guide.
To uninstall the RSA Authentication Manager:
1. Shut down all RSA Authentication Manager processes on the Primary. For instructions, see “Starting and Stopping RSA Authentication Manager Processes” on page 16.
2. Click Start > Settings > Control Panel > Add/Remove Programs.
3. In the list of currently installed programs, select RSA Authentication Manager, and click Change/Remove.
4. Select Uninstall, and click Next.
5. Follow the prompts until the uninstallation process is complete, and click OK.
F: Uninstalling the RSA Authentication Manager 77


RSA Authentication Manager 6.1 for Windows Installation Guide
Glossary
Administration ToolkitA toolkit for creating custom administration applications in C or Tcl. The Administration Toolkit, also called the API Toolkit, consists of functions and executables that can be read from or written to the RSA Authentication Manager databases.
Agent HostA computer or another device that is running RSA Authentication Agent software and is protected by the RSA Authentication Manager to prevent unauthorized access. Agent Hosts include devices running RSA Authentication Agent software, as well as third-party devices that integrate RSA Authentication Agent software (for example, communication servers, firewalls, and routers).
Configuration Management ApplicationThe application used on the Primary or a Replica to display and edit information in the system configuration record file (sdconf.rec). This application also displays license information.
Database Administration ApplicationThe application used to administer the RSA Authentication Manager database.
Database BrokerA process that provides a connection between one of the RSA Authentication Manager databases and the RSA Authentication Manager programs that access the databases.
license.recThe file that contains site-specific information, such as the license type and the number of users in the license.
PrimaryThe RSA Authentication Manager on which administration can be performed. The Primary also replicates database changes to the Replica.
RADIUS ProfileA list of requirements that must be met before the RSA Authentication Manager software challenges a RADIUS user for a passcode. Users who authenticate through a RADIUS server must have a profile in the RSA Authentication Manager database.
RealmAn RSA Authentication Manager Primary and one or more Replicas, along with the Primary’s databases, Agent Hosts, users, and tokens.
Remote Administration ApplicationThe application that makes it possible to administer an RSA Authentication Manager database through a remote connection.
ReplicaThe RSA Authentication Manager whose main function is to perform RSA SecurID authentication.
Glossary 79

RSA Authentication Manager 6.1 for Windows Installation Guide
RSA Authentication AgentA product developed by RSA Security that is installed on a computer or another device and works with the RSA Authentication Manager to prevent unauthorized access. Designated users of this computer or device must provide a valid RSA SecurID passcode in order to gain access.
sdconf.recThe configuration file created by the installation program.
sdlog DatabaseThe database that stores records for each authentication attempt and for actions taken through the RSA Authentication Manager Database Administration application. It is also called the log database.
sdserv DatabaseThe database that contains information such as system parameters, token and user records, and Agent Host information. It is also called the Server database.
%SystemRoot%The root directory of the Windows operating system, for example, \winnt.
TokenUsually refers to a physical device, such as an RSA SecurID standard card, key fob, or PINPad, that displays a tokencode. User passwords, RSA SecurID smart cards, and software tokens are token types with individual characteristics. The token is one of the factors in the RSA SecurID authentication system. The other factor is the user’s PIN.
80 Glossary

RSA Authentication Manager 6.1 for Windows Installation Guide
IndexAACEDATA
defined, 7ACEDOC
defined, 7ACEPROG
defined, 7adding
Servers to administer remotely, 24Administration toolkit, 79Advanced license, 11Agent Hosts, 79architecture
Quick Admin, 33audience
for installation guide, 7
BBase license, 11broke. See database broker, 79
CCoordinated Universal Time, 13customer support information, 9
Ddatabase
pushing to Replica, 17Database Administration Application, 79database broker, 79database files
copying from Primary to Replica, 29database schema version, 67database utilities
create new database, 61DOS versions, 62dump database, 59load dump files, 61merge logic, 62
directory names, 7disk space requirements, 12documentation
for the RSA Authentication Manager, 7dump file, 65
dump utilitiesDOS versions, 62dump database, 59load dump files, 61merge logic, 62
Dumpreader utility, 59, 65supported output formats, 66troubleshooting, 70
dumpreader.exe, 59, 65dumpsamusers.exe, 73
extracting SAM user records with, 73
Hhardware requirements, 12
Iinstallation
guidelines, 12new Primary, 15new Replica, 18preparations, 14Remote Administration software, 22requirements, 11upgrading Primary, 28upgrading Remote Administration
software, 23installing
new Replica, 19
Llicense
types, 11license files
copying from Primary to Replica, 29license.rec, 79licensing options
Advanced license, 11Base license, 11
loadsamusers.exe, 73creating user records with, 75
Oonline distribution, 8
Index 81

RSA Authentication Manager 6.1 for Windows Installation Guide
Pplatforms supported by RSA Authentication
Manager, 11Primary
preparing to upgrade, 28silent installation, 15upgrading in silent mode, 29
Primary Serveradministering multiple with Quick
Admin, 49Push DB
description of, 17disabling, 17
QQuick Admin
administering multiple Primary Servers, 49
and Web Express, 41Architecture, 33changing settings, 43, 48installing on UNIX, 39installing on Windows, 36installing with Web Express, 41logging, 48overview, 33pre-installation checklist, 35pre-installation tasks, 35properties file, 43session timeout settings, 48system requirements, 34system requirements (UNIX), 34system requirements (Windows), 34uninstalling, 49upgrading, 41
Rrealms
merging multiple, 13Remote Administration
adding a Server, 24configuring ports, 25install/upgrade checklist, 21installing, 22preparations for installing/
upgrading, 21silent installation, 22upgrading, 23
Replicaadding new, 18installing a new, 19preparing to upgrade, 29silent install, 19starting, 18, 19upgrading, 30upgrading in silent mode, 30
Replica Packagecopying from Primary to Replica, 29creating, 18
Replica Serverfunction of, 79
requirementsdisk space, 12
requirements for installation, 11RSA Authentication Manager
documentation, 7installation guide audience, 7
RSA Authentication Manager Services, 28stopping on the Replica, 29
RSA RADIUS Serverconverting user extension data, 52migrating, 51running a full conversion, 53running a test conversion, 52troubleshooting the conversion, 53
RSA Authentication ManagerDatabase Administration
Application, 79database schema versions, 67licensing options, 11minimum system requirements on
Windows 2003 Server, 57online distribution, 8Remote Administration Application, 79transferring from UNIX to
Windows, 55uninstalling, 77
RSA Authentication Manager databaseoutputting to other formats, 65
RSA Authentication Manager processesstarting and stopping, 16
SSAM (Security Accounts Manager) database
creating user records from, 73schema versions, 67sdconf.rec, 80sddumplog utility, 64sddumpsrv utility, 63
82 Index

RSA Authentication Manager 6.1 for Windows Installation Guide
sdloadlog utility, 64sdloadsrv utility, 62sdlog database, 80sdserv database, 80sdsetup
command line arguments, 15, 19, 22, 23, 29, 30
Security Accounts Manager (SAM) databasecreating user records from, 73
service and support information, 9system requirements, 11
minimum, 57
Ttime
importance of maintaining accurate settings, 13
token, 80tokens
adding token records to database, 17
Uuninstalling RSA Authentication
Manager, 77UNIX
installing Quick Admin, 39transferring to from Windows, 55
UpgradingQuick Admin, 41
upgradingpreparing Primary, 28preparing Replica, 29prerequisites for, 27pre-upgrade checklist, 27Primary, 28Primary in silent mode, 29Remote Administration software, 23Replica, 30Replica in silent mode, 30RSA RADIUS Server, 51
user extension dataconverting, 52running a full conversion, 53running a test conversion, 52troubleshooting the conversion, 53
user recordscreating from SAM database on
Windows NT, 73UTC. See Coordinated Universal Time, 13utilities
database, 59sddumplog, 64sddumpsrv, 63sdloadlog, 64sdloadsrv, 62
WWeb Express
and Quick Admin, 41Windows
installing Quick Admin, 36transferring from UNIX, 55
Windows 2003 Serverminimum system requirements, 57
Index 83


