Embed Size (px)
Citation preview

Copyright 2013. MLCS Woodworking. Page 1
Roll Top Bread Box
Items Used:
Tambour Router Bit Set #8593 (#8596 includes Tambour Router Bit Set and Cable Kit)Tambour Door Cable Kit #20593/8” Rabbeting Router Bit #5391 / #76913/8” Straight Router Bit #5472 / #77721/8” Radius Round Over Router Bit #6350 / #86505/32” Radius Roman Ogee Router Bit #6360 / #86601/2” Flush Trim Router Bit #7805 / #78073/4” Top Mounted Bearing Dish Cutter #5516 / #7816 (Optional - For making the finger pull in the bottom rail of the tambour door when not using a surface mount handle or knob)1/2” O.D. Template Guide Bushing #9674 (9pc. Template Guide Bushing Kit)3/8” Forstner Bit #92031/2” Forstner Bit #92051” Forstner Bit #9213H (Optional - For making the finger pull template for the bottom rail of the tambour door when not using a surface mount handle or knob)Double Sided Tape #9489 / #9493 / #9386 / #9387Wood Glue(6 pieces) #8 x 1-1/4” long Wood Screws(2) 3/8” Wood Dowels - each 1-1/2” long

Copyright 2013. MLCS Woodworking. Page 2
Getting Started:
From 1/2” to 3/4” Plywood or MDF, use the paper templates to create the templates for cuttingthe shaped ends of the bread box and the tambour track slot required on the inside face of thebread box ends. Use a band saw or jig saw to cut the radius and then use a sander or file tosmooth out the curve.
Making the Bread Box Carcass:
The sides of the bread box will be made using 3/4” thick stock. Cut the two bread box ends to alength of 10” and a width of 7-3/16”. Use double sided tape to temporarily tape the two breadbox side blanks together to cut the radius on the front side of them. Then tape the template tothose two blanks. Use a band saw or jig saw to cut the radius on the corner to within 1/16” to1/8” of the outside of the template (see Figure A). Use the guide bearing on the 1/2” flush trimbit to follow the perimeter of the template to insure that both side pieces are identically shaped(see Figure B). Remove the template and separate the two sides.
Figure A Figure B
Making the slot for the tambour door to track in is next. It is important to mark which faces ofthe bread box sides will be the inside faces of the box as these faces will be the ones to get thetrack cut into them. Use double sided tape to attach the template to the inside face of the breadbox side. Align the template with the bottom and back edges of the bread box side (see FigureC). Install the 1/2” O.D. template guide bushing in your router base or router table insert. Installthe 3/8” straight router bit into the router. The slot will need to be cut to a depth of 7/16”. Forbest results, make the slot in two or three passes changing the cutting depth between passes untilyou reach the full 7/16” depth. It is imperative that you keep constant pressure from the templateon the template guide bushing through the entire cut. Start the cut at the bottom of the bread boxside following the template around both radii of the template and stopping the slot when thetemplate guide hits the step on the back edge of the template (see Figure D).Caution: Do not continue and cut the slot past where it bottoms out vertically on the templateand do not continue horizontally out through the back edge of the breadbox side. If you do,that will leave a visible notch in the back face of the bread box.

Copyright 2013. MLCS Woodworking. Page 3
Figure C Figure D
The outside face of each side piece needs to have the front, top and back edges cut with the 1/8”radius round over bit to relieve the edge of its sharp corners. The inside face is also routed butonly do the front edge and top. The back edge is left untreated. It will mate flush with the backpanel.
To make the pieces that will make up the top and back of the bread box, machine stock to afinished thickness of 1/2”. The back is cut to a finished length of 16-3/8” by 6-5/8” wide. The toppiece is cut to a finished length of 16-3/8” by 6-7/8” wide. The edge of the top piece that willbecome the front leading edge needs to have a 1/8” round over profile routed on both the top andbottom edge to relive the corners. The back is glued in between the two side pieces of the breadbox. The bottom edge of the back should be flush with the bottom and back edge of the sidepieces (see Figure E). Temporarily place the top between the two side pieces to stabilize thecarcass while you secure the clamps in place and allow it to stay there until the glue has driedand you are ready to remove the clamps. The top is added next. It is glued to the top of the backand to each side piece. The top will sit just below the round over profile that was routed alongthe inner edge of the side pieces. (see Figure F). Again, apply clamps until the glue has dried.The upper part of the carcass for the bread box is now complete. The base will be added to thebox after the tambour has been made and installed in the slot cut to act as the tambour track.
Figure E Figure F
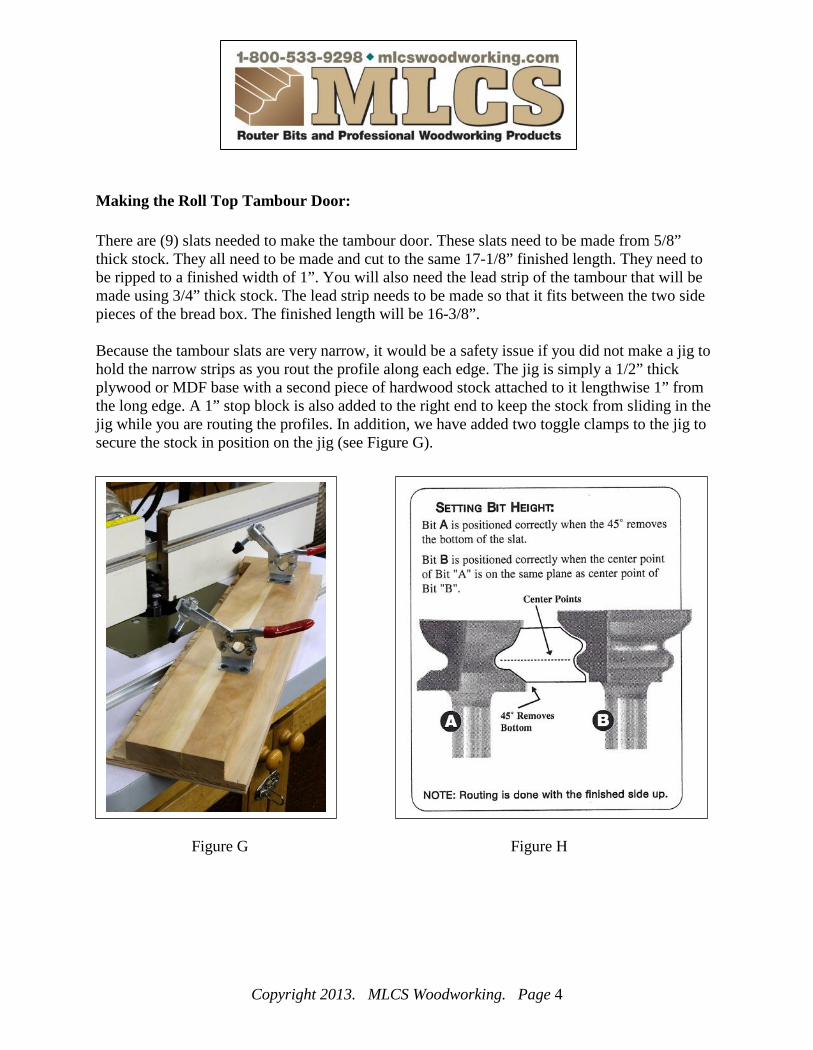
Copyright 2013. MLCS Woodworking. Page 4
Making the Roll Top Tambour Door:
There are (9) slats needed to make the tambour door. These slats need to be made from 5/8”thick stock. They all need to be made and cut to the same 17-1/8” finished length. They need tobe ripped to a finished width of 1”. You will also need the lead strip of the tambour that will bemade using 3/4” thick stock. The lead strip needs to be made so that it fits between the two sidepieces of the bread box. The finished length will be 16-3/8”.
Because the tambour slats are very narrow, it would be a safety issue if you did not make a jig tohold the narrow strips as you rout the profile along each edge. The jig is simply a 1/2” thickplywood or MDF base with a second piece of hardwood stock attached to it lengthwise 1” fromthe long edge. A 1” stop block is also added to the right end to keep the stock from sliding in thejig while you are routing the profiles. In addition, we have added two toggle clamps to the jig tosecure the stock in position on the jig (see Figure G).
Figure G Figure H

Copyright 2013. MLCS Woodworking. Page 5
Set the height of bit “A” as shown in Figure H and rout the top edge of each slat and also rout thetop edge of the lead strip (see Figure I). Rout with the finished side up. Set the height of bit “B”as shown in Figure H and rout the opposite, bottom edge of each slat (see Figure J).
Figure I Figure J
The lead strip is next to get the tambour profile routed on the top edge only as that will mate upto the bottom tambour slat. Using bit “B”, rout the profile on the lead strip with the finished sidefacing upward. Do not rout the bottom edge of the lead strip. That is left with a square edge (seeFigure K).
Figure K Figure L
Cut the lead strip to the finished length. (16-3/8”) Cut the slats to their finished length(17-1/8”). Drill 1/8” diameter holes through each slat for the cable (see Figure L). Werecommend placing the holes for the outer cables 3-1/2 to 4” from the ends of the slats. The leadstrip requires the same 1/8” diameter cable hole drilled to a depth to intersect a 1/2” diameterhole drilled to a 3/8” depth, in the middle of the back face of the lead strip to hide the crimpsleeves on the ends of the cables (see Figures M & N).

Copyright 2013. MLCS Woodworking. Page 6
Figure M
These 1/2” diameter holes get drilled in the back face of the lead strip (see Figure N). Make sureto drill the holes in the correct locations to match the slats, as the lead strip is narrower than theslats. You will need to compensate for that difference when locating and drilling the holes in thelead strip. You can add optional 1/2” diameter wood plugs to cover the 1/2” holes drilled in theback face of the lead strip.
Figure N Figure O
Use a 3/8” Rabbeting bit or stacked dado blade in a table saw to remove material on each slat toleave a 3/8” deep, 1/4” wide tenon that will be held in the 3/8” wide by 7/16” deep groove (seeFigure O).

Copyright 2013. MLCS Woodworking. Page 7
The lead strip is held in the 3/8” groove using a dowel. Using a doweling jig for accuracy, drill a3/8” diameter hole, 1-1/8” deep in each end of the lead strip. The dowel holes need to be aligneddirectly in-line with the tenons on the slats when the tambour is assembled. Glue a 3/8” diameterby 1-1/2” long dowel in the hole in each end of the lead strip (see Figure P).
Figure P
You will need to decide if you are going to use a surface mounted pull/knob or rout a finger pullrecess in the face of the lead strip to aid in opening and closing the tambour door. A template caneasily be made for a 3/4” dish cutter router bit with top mounted bearing to make the finger pullrecess. The finger pull recess in our bread box was made using a template with a 1” wide by 4”long opening in it (see Figures Q & R). Use a 1” diameter Forstner bit to cut the round ends ofthe 4” long recess. A jig saw is then used to connect the two 1” end holes to create the templateopening. You may need to file the straight cuts to remove any undulations on the opening of thetemplate or they will create a wavy recess if left rough.
Figure Q Figure R

Copyright 2013. MLCS Woodworking. Page 8
Cut the support wire for the tambour to a rough length of 24”. Assemble the tambour bycrimping a sleeve on one end of the support wire. Feed the opposite end of the support wirethrough the lead strip of the tambour, by inserting it first into the 1/2” recessed hole in the backof the lead strip and going through the 1/8” diameter hole until it comes out of the top of the leadstrip. Repeat for the other side. Thread the support through the tambour slats making sure to keepthem all facing the same direction, as there is a front and back side to them. When you have thesupport threaded through all (9) slats, pull the tambour support wire tight and crimp anothersleeve on the wire so the sleeve is tight against the top slat. Cut off the excess support wire (seeFigure S).
Figure S
Installing the Tambour Door into the Carcass:
Turn the bread box carcass upside down. Slide the tenons on the tambour slot into the tambourdoor track slot from the bottom of the bread box side pieces. The tenons will slide in the 3/8”wide slot, which acts as the track for the tambour. Continue until the dowel embedded in the endof the lead strip is also inserted in the slot. Turn the assembly over and check that the tambourwill slide correctly in the slot and the door will slide open and closed without needing anyexcessive force (see Figure T).
Figure T

Copyright 2013. MLCS Woodworking. Page 9
Making and Installing the Carcass to the Base:
The base of the bread box is made from 3/4” thick stock. If you are unable to find a full 12” wideboard, then gluing one up from narrower stock will be necessary and is actually preferred as youcan decrease the risk of your base cupping across the grain by alternating the grow rings of eachnarrower board. Once you have glued up your blank for making the base, cross cut it to afinished length of 18-7/8” and rip it to a final width of 11-5/8”. Using the 5/32” radius romanogee router bit, rout the decorative profile along both of the ends and just the front edge of thebase. The back edge will be left untouched (see Figure U).
Figure U Figure V
With the breadboard carcass, with the tambour door installed in it, upside down on the workbench, align the back edge of the carcass and base. Make sure that you have the base positionedso that your overhang of the carcass is identical on each end. Countersink three holes in thebottom of the base where they will intersect the center of the bread box sides, at the followingdistances from the back edge of the base:1”, 4-1/2” , and 8”. Use (6) #8 wood screws to attachthe bread box carcass assembly to the base (see Figure V).

Copyright 2013. MLCS Woodworking. Page 10
Cut List:
Part: Qty: Dimensions:
Sides 2 10” long x 7-3/16” wide x 3/4” thick
Top 1 16-3/8” long x 6-7/8” wide x 1/2” thick
Back 1 16-3/8” long x 6-5/8” wide x 1/2” thick
Base 1 18-7/8” long x 11-5/8” wide x 3/4” thick
Lead Strip 1 16-3/8” long x 1-3/4” wide x 3/4” thick
Tambour Slats 9 17-1/8” long x 1” wide x 5/8” thick
Dowel Rod 2 3/8” diameter x 1-1/2” long

Copyright 2013. MLCS Woodworking. Page 11

Copyright 2013. MLCS Woodworking. Page 12