Embed Size (px)
Citation preview
Rochester Institute of Technology Oracle Training: Preparing Requisitions in the Oracle Applications
Oracle Training: Preparing Requisitions in the Oracle Applications Revised April 2008 - 1 -

Table of Contents Introduction Lesson 1: Create a Requisition Lesson 2: Find a Requisition Lesson 3: View Action History Lesson 4: Modifying a Requisition Lesson 5: Deleting an Incomplete Requisition Lesson 6: Canceling a Rejected Requisition Lesson 7: Running/Printing a Report
Oracle Training: Preparing Requisitions in the Oracle Applications Revised April 2008 - 2 -
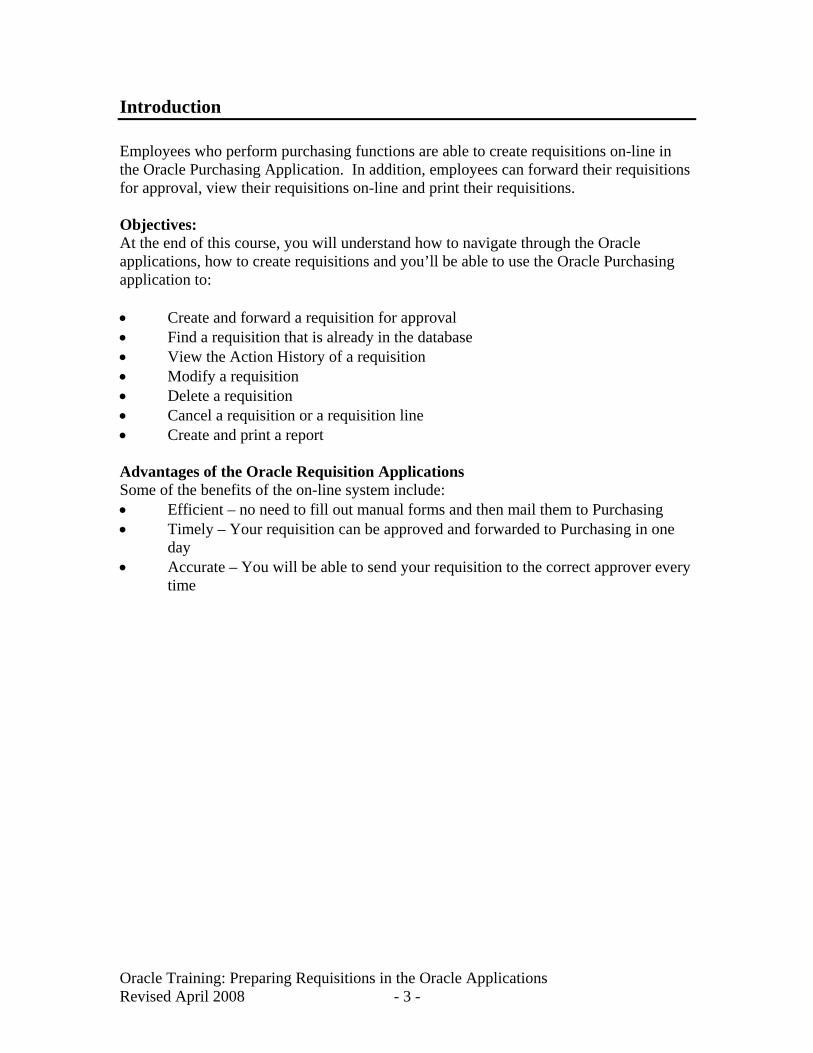
Introduction Employees who perform purchasing functions are able to create requisitions on-line in the Oracle Purchasing Application. In addition, employees can forward their requisitions for approval, view their requisitions on-line and print their requisitions. Objectives: At the end of this course, you will understand how to navigate through the Oracle applications, how to create requisitions and you’ll be able to use the Oracle Purchasing application to: • Create and forward a requisition for approval • Find a requisition that is already in the database • View the Action History of a requisition • Modify a requisition • Delete a requisition • Cancel a requisition or a requisition line • Create and print a report Advantages of the Oracle Requisition Applications Some of the benefits of the on-line system include: • Efficient – no need to fill out manual forms and then mail them to Purchasing • Timely – Your requisition can be approved and forwarded to Purchasing in one
day • Accurate – You will be able to send your requisition to the correct approver every
time
Oracle Training: Preparing Requisitions in the Oracle Applications Revised April 2008 - 3 -
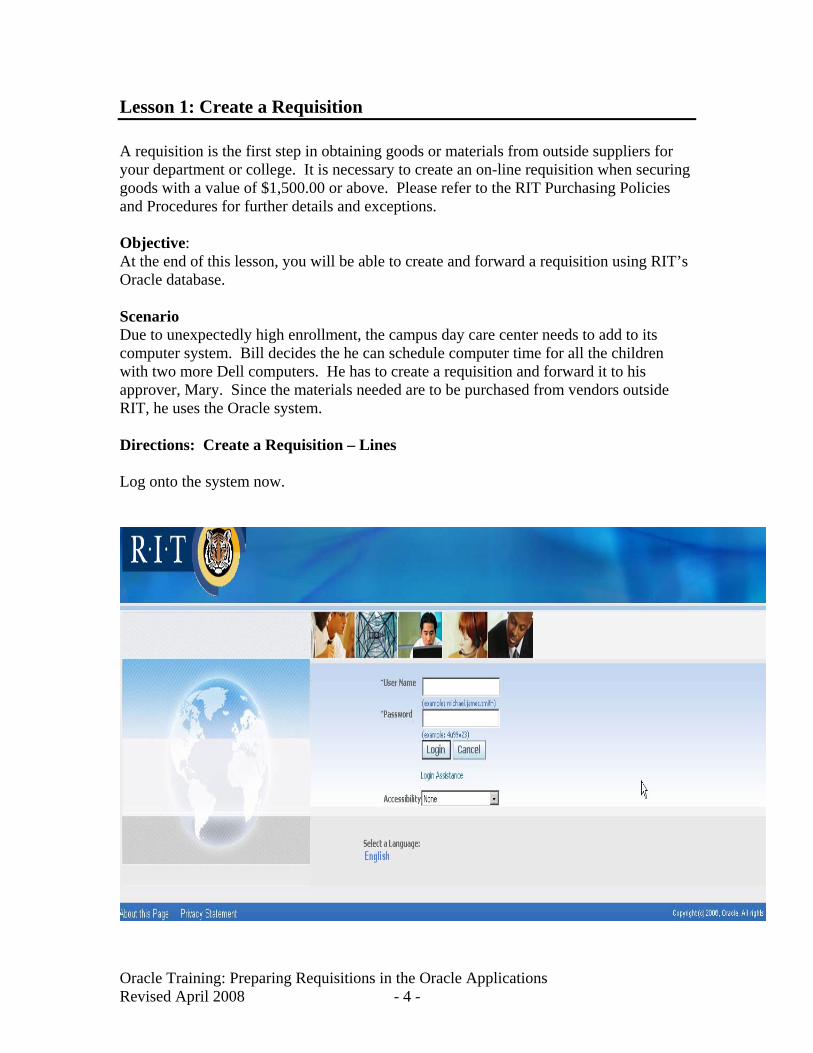
Lesson 1: Create a Requisition A requisition is the first step in obtaining goods or materials from outside suppliers for your department or college. It is necessary to create an on-line requisition when securing goods with a value of $1,500.00 or above. Please refer to the RIT Purchasing Policies and Procedures for further details and exceptions. Objective: At the end of this lesson, you will be able to create and forward a requisition using RIT’s Oracle database. Scenario Due to unexpectedly high enrollment, the campus day care center needs to add to its computer system. Bill decides the he can schedule computer time for all the children with two more Dell computers. He has to create a requisition and forward it to his approver, Mary. Since the materials needed are to be purchased from vendors outside RIT, he uses the Oracle system. Directions: Create a Requisition – Lines Log onto the system now.
Oracle Training: Preparing Requisitions in the Oracle Applications Revised April 2008 - 4 -
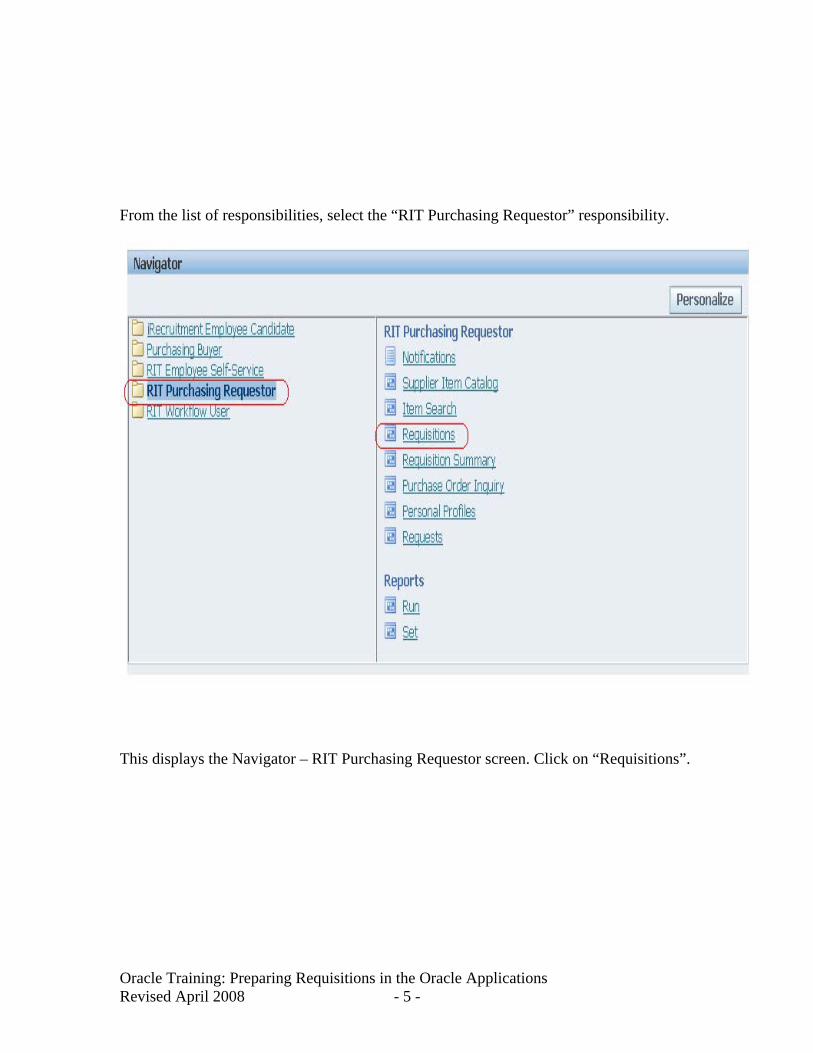
From the list of responsibilities, select the “RIT Purchasing Requestor” responsibility.
This displays the Navigator – RIT Purchasing Requestor screen. Click on “Requisitions”.
Oracle Training: Preparing Requisitions in the Oracle Applications Revised April 2008 - 5 -
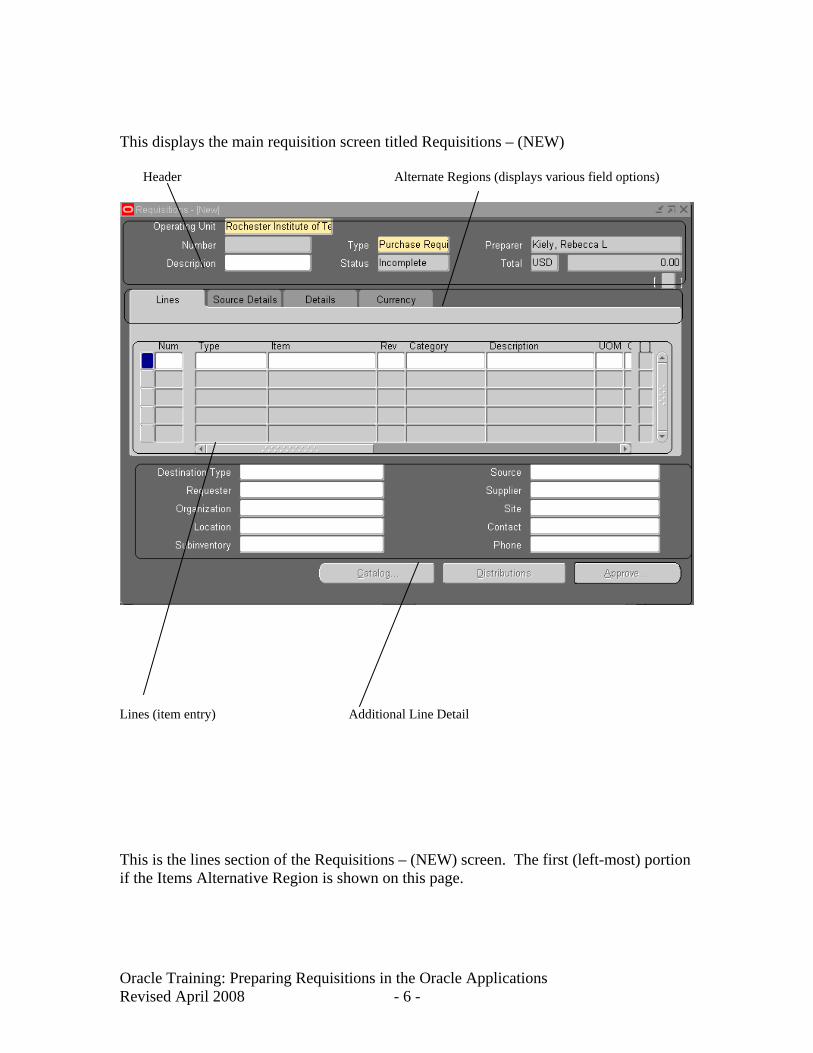
This displays the main requisition screen titled Requisitions – (NEW) Header Alternate Regions (displays various field options)
Lines (item entry) Additional Line Detail This is the lines section of the Requisitions – (NEW) screen. The first (left-most) portion if the Items Alternative Region is shown on this page.
Oracle Training: Preparing Requisitions in the Oracle Applications Revised April 2008 - 6 -
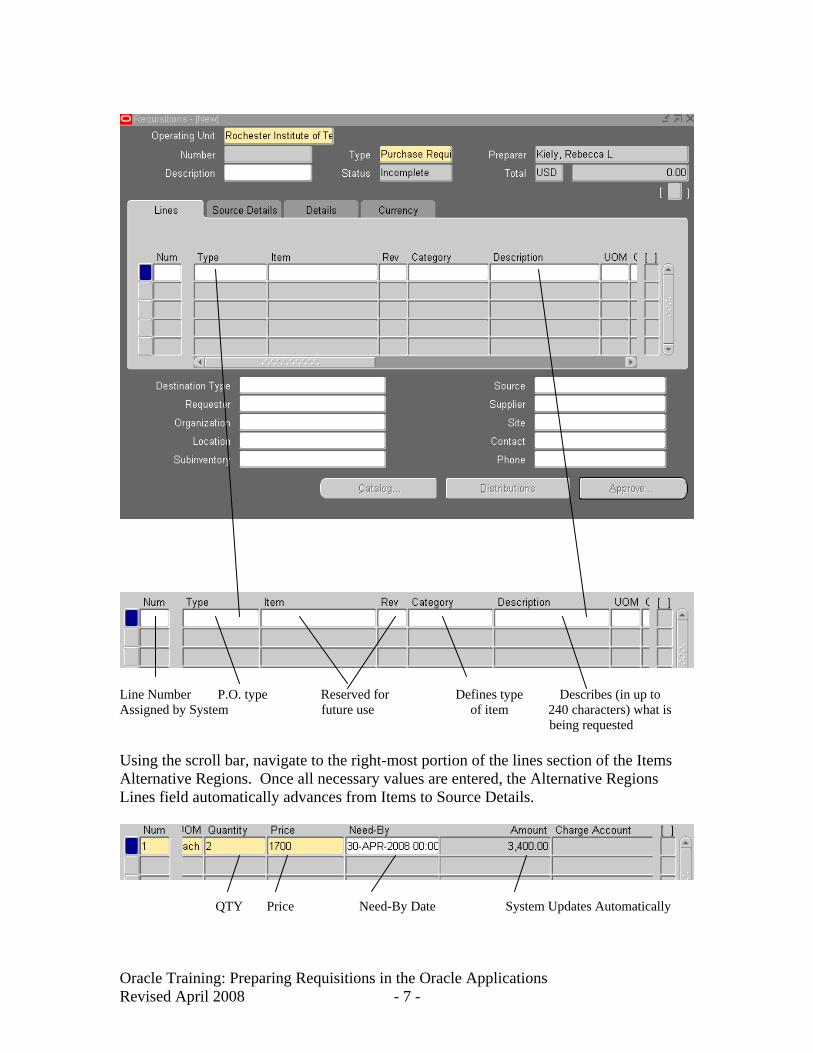
Line Number P.O. type Reserved for Defines type Describes (in up to Assigned by System future use of item 240 characters) what is being requested Using the scroll bar, navigate to the right-most portion of the lines section of the Items Alternative Regions. Once all necessary values are entered, the Alternative Regions Lines field automatically advances from Items to Source Details.
QTY Price Need-By Date System Updates Automatically
Oracle Training: Preparing Requisitions in the Oracle Applications Revised April 2008 - 7 -
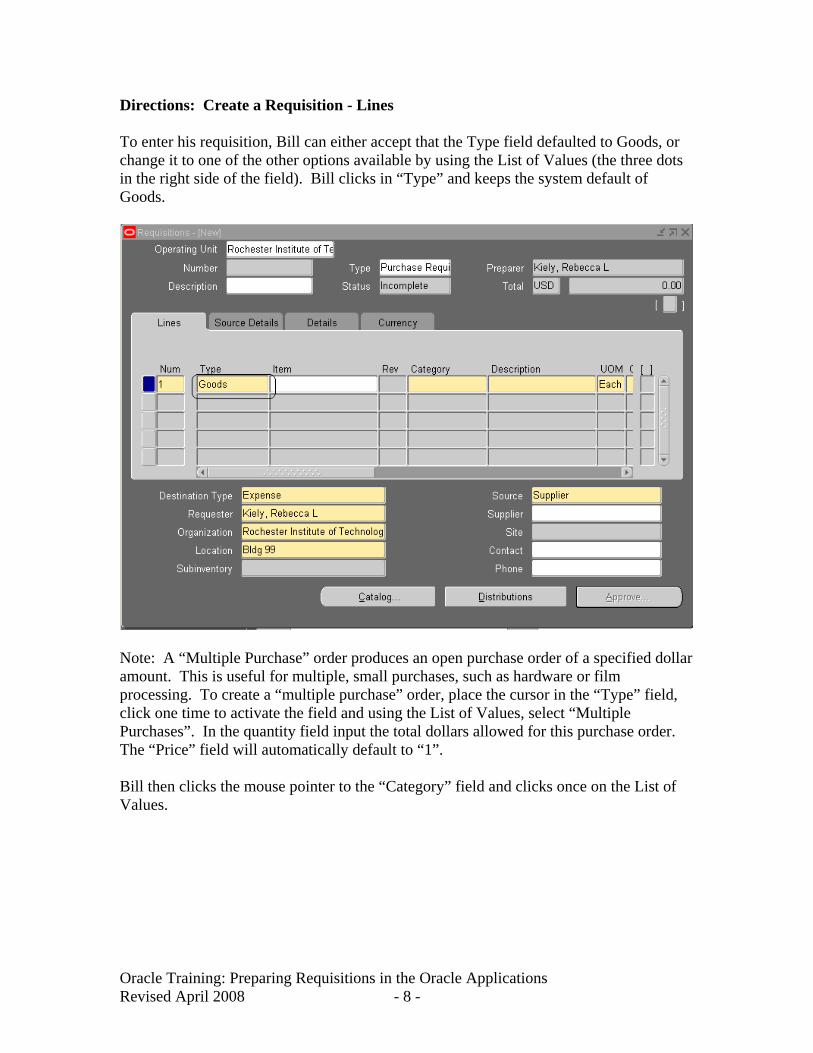
Directions: Create a Requisition - Lines To enter his requisition, Bill can either accept that the Type field defaulted to Goods, or change it to one of the other options available by using the List of Values (the three dots in the right side of the field). Bill clicks in “Type” and keeps the system default of Goods.
Note: A “Multiple Purchase” order produces an open purchase order of a specified dollar amount. This is useful for multiple, small purchases, such as hardware or film processing. To create a “multiple purchase” order, place the cursor in the “Type” field, click one time to activate the field and using the List of Values, select “Multiple Purchases”. In the quantity field input the total dollars allowed for this purchase order. The “Price” field will automatically default to “1”. Bill then clicks the mouse pointer to the “Category” field and clicks once on the List of Values.
Oracle Training: Preparing Requisitions in the Oracle Applications Revised April 2008 - 8 -
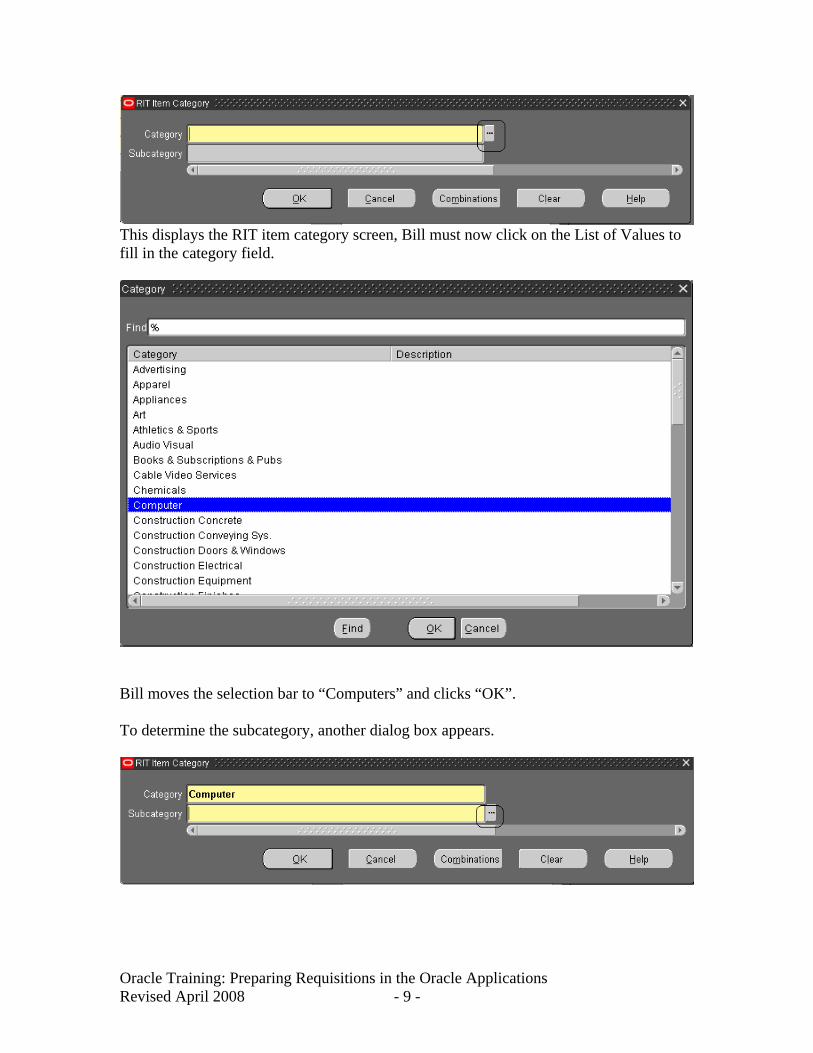
This displays the RIT item category screen, Bill must now click on the List of Values to fill in the category field.
Bill moves the selection bar to “Computers” and clicks “OK”. To determine the subcategory, another dialog box appears.
Oracle Training: Preparing Requisitions in the Oracle Applications Revised April 2008 - 9 -
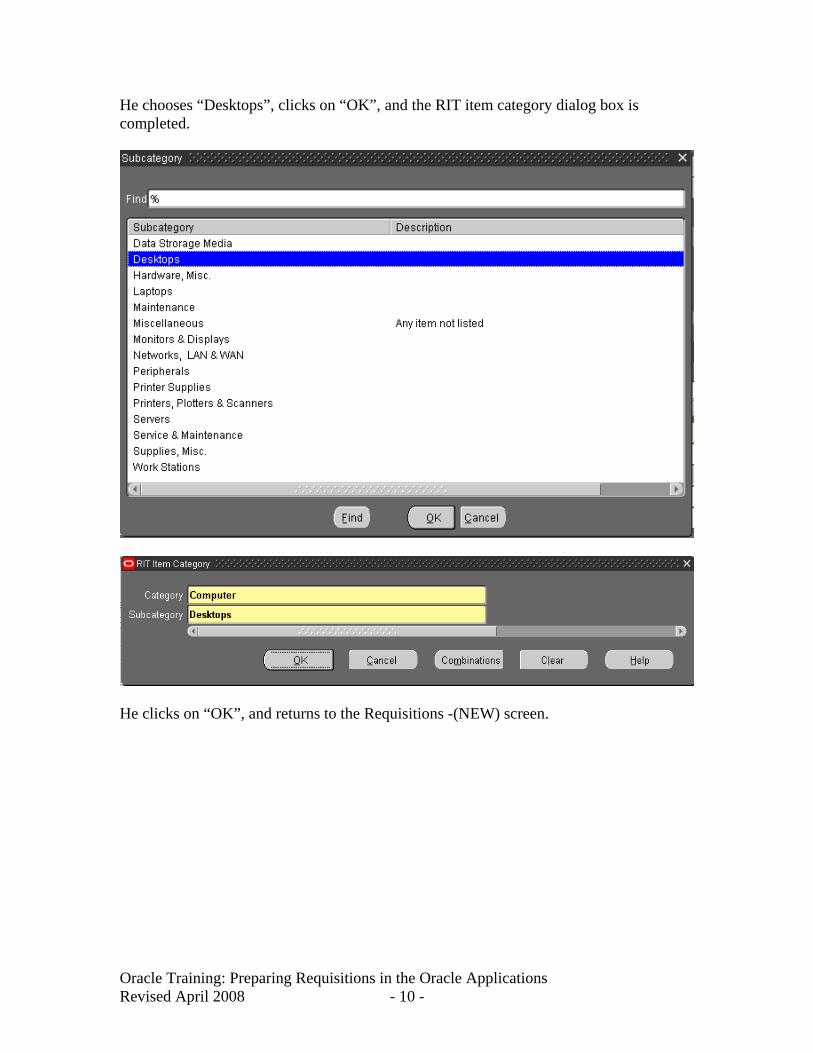
He chooses “Desktops”, clicks on “OK”, and the RIT item category dialog box is completed.
He clicks on “OK”, and returns to the Requisitions -(NEW) screen.
Oracle Training: Preparing Requisitions in the Oracle Applications Revised April 2008 - 10 -
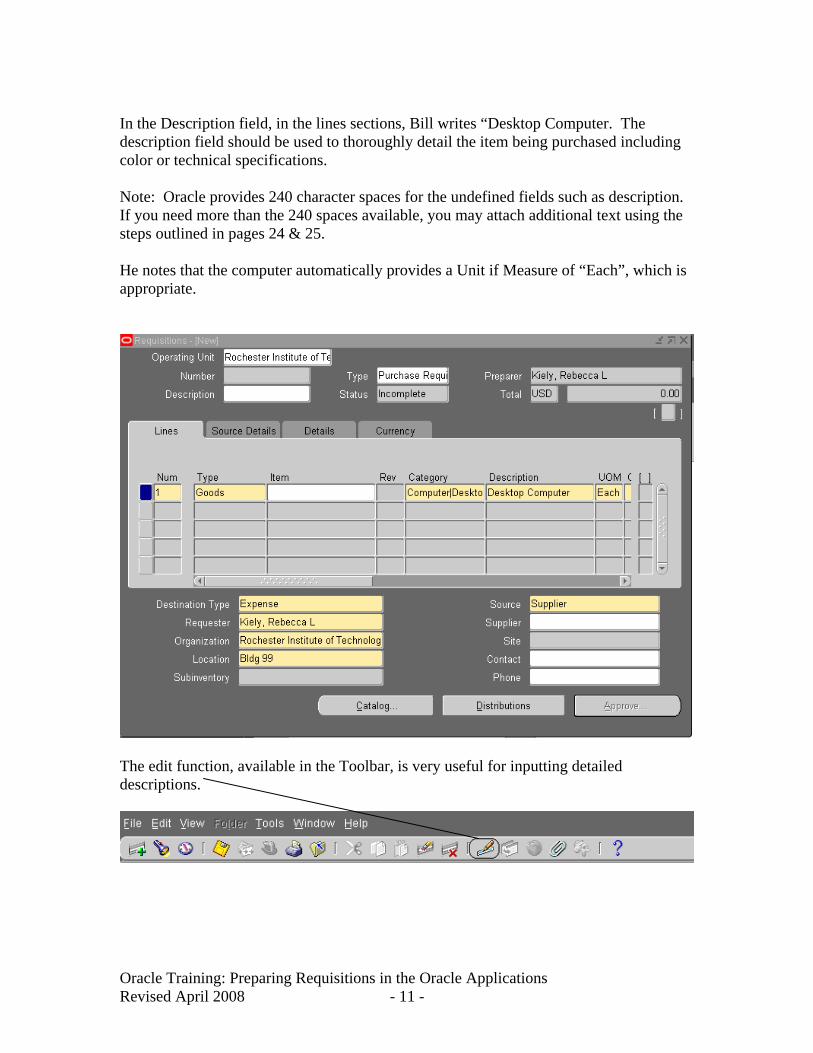
In the Description field, in the lines sections, Bill writes “Desktop Computer. The description field should be used to thoroughly detail the item being purchased including color or technical specifications. Note: Oracle provides 240 character spaces for the undefined fields such as description. If you need more than the 240 spaces available, you may attach additional text using the steps outlined in pages 24 & 25. He notes that the computer automatically provides a Unit if Measure of “Each”, which is appropriate.
The edit function, available in the Toolbar, is very useful for inputting detailed descriptions.
Oracle Training: Preparing Requisitions in the Oracle Applications Revised April 2008 - 11 -
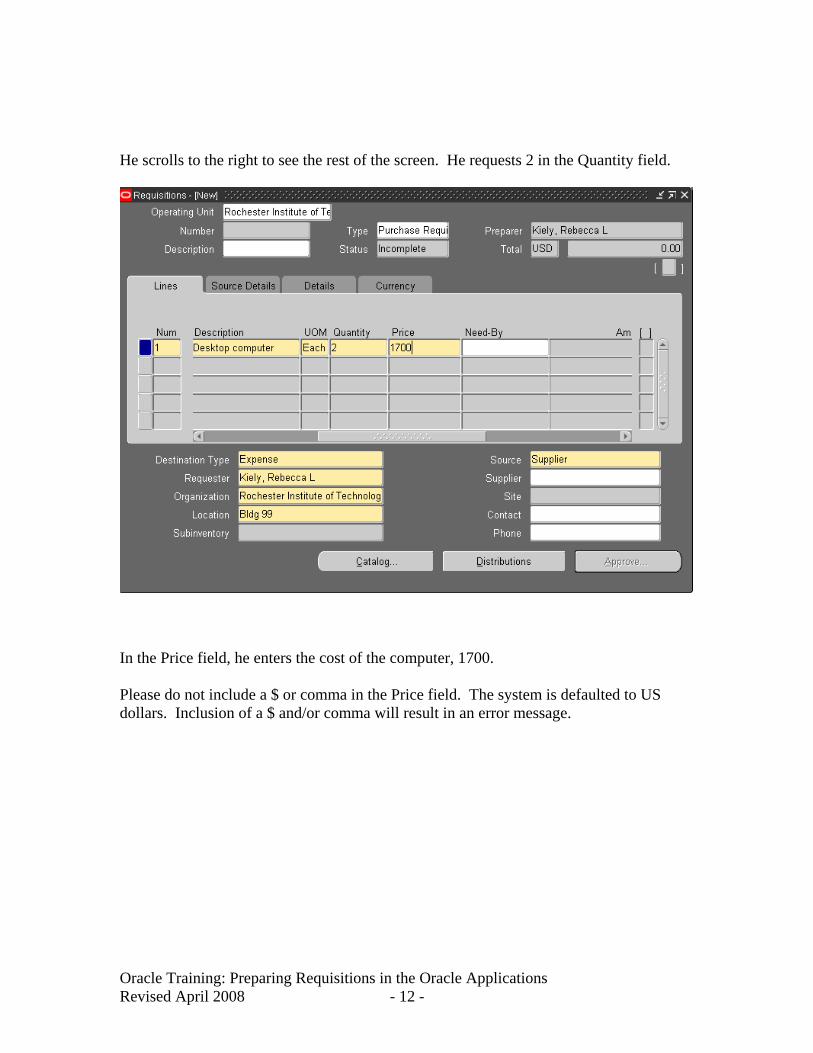
He scrolls to the right to see the rest of the screen. He requests 2 in the Quantity field.
In the Price field, he enters the cost of the computer, 1700. Please do not include a $ or comma in the Price field. The system is defaulted to US dollars. Inclusion of a $ and/or comma will result in an error message.
Oracle Training: Preparing Requisitions in the Oracle Applications Revised April 2008 - 12 -
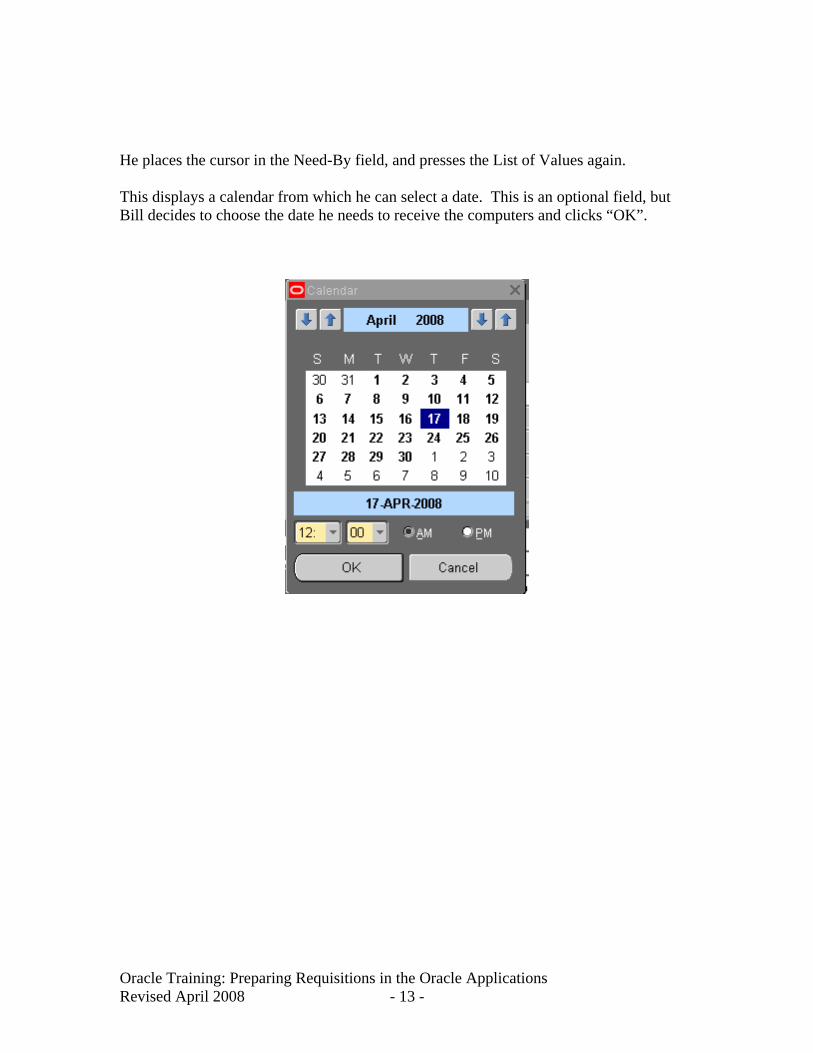
He places the cursor in the Need-By field, and presses the List of Values again. This displays a calendar from which he can select a date. This is an optional field, but Bill decides to choose the date he needs to receive the computers and clicks “OK”.
Oracle Training: Preparing Requisitions in the Oracle Applications Revised April 2008 - 13 -
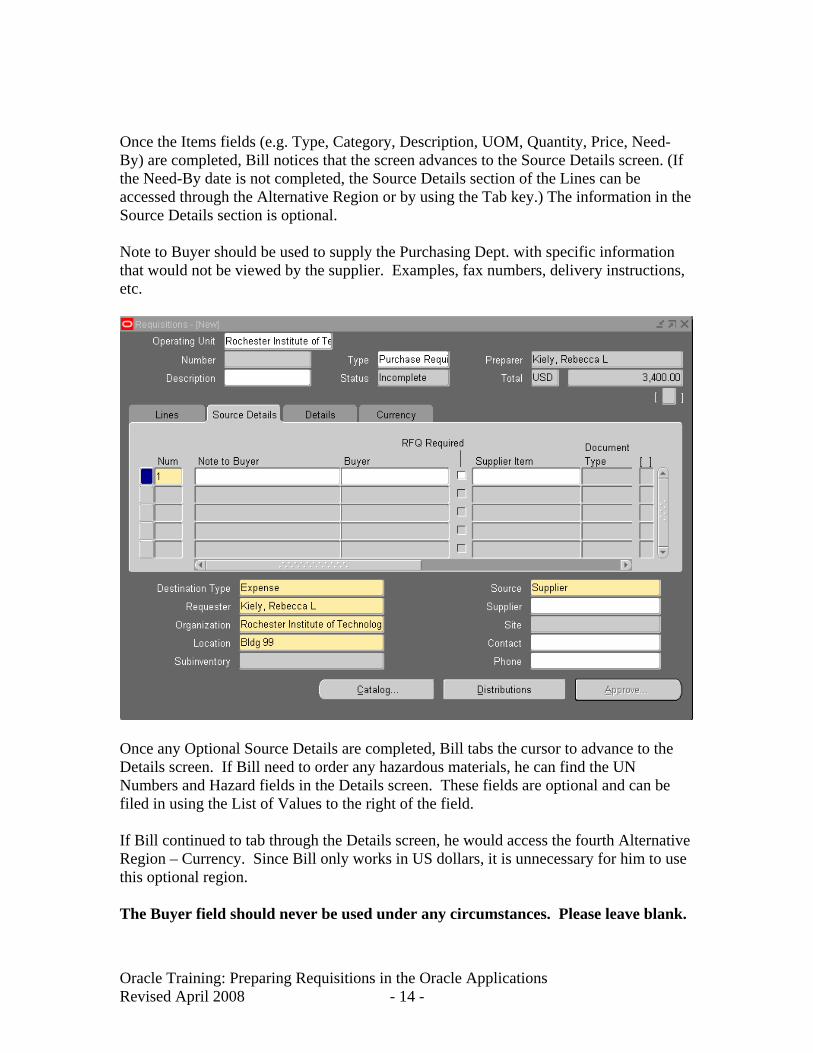
Once the Items fields (e.g. Type, Category, Description, UOM, Quantity, Price, Need-By) are completed, Bill notices that the screen advances to the Source Details screen. (If the Need-By date is not completed, the Source Details section of the Lines can be accessed through the Alternative Region or by using the Tab key.) The information in the Source Details section is optional. Note to Buyer should be used to supply the Purchasing Dept. with specific information that would not be viewed by the supplier. Examples, fax numbers, delivery instructions, etc.
Once any Optional Source Details are completed, Bill tabs the cursor to advance to the Details screen. If Bill need to order any hazardous materials, he can find the UN Numbers and Hazard fields in the Details screen. These fields are optional and can be filed in using the List of Values to the right of the field. If Bill continued to tab through the Details screen, he would access the fourth Alternative Region – Currency. Since Bill only works in US dollars, it is unnecessary for him to use this optional region. The Buyer field should never be used under any circumstances. Please leave blank.
Oracle Training: Preparing Requisitions in the Oracle Applications Revised April 2008 - 14 -
Summary of Steps to Create a Requisition – Lines
1. Access Oracle Applications. 2. Select Requisitions on the Navigator – RIT – Purchasing Requestor screen. 3. Create preferences as needed. (optional – see page 21) 4. Place the cursor in the Category Field and click once. 5. Select the LOV to display the Category dialog box. 6. In the Category dialog box, select the LOV. 7. Click on the item to request and click OK. 8. In the Category dialog box, with the cursor in the second Subcategory field (it
should be there already), select the LOV again. 9. Click to choose the Subcategory Item and click on OK. 10. Both Category fields in the dialog box should be completed. Click OK. 11. Place the cursor in the Description field and type in the description of the item
being requested. Tab to the Unit of Measure field. 12. Verify that the Unit of Measure is correct. (Use the LOV to change the unit of
measure if necessary.) 13. In the Quantity field, enter the number of items being requested. Tab to the Price
field. 14. In the Price field, enter the unit price of the item being requested. 15. Place the cursor in the Need-by field (optional field). 16. Select the LOV. 17. Double-click on the calendar date that the item is needed by. 18. Complete any optional information in the Source Details screen by typing in the
information. 19. If necessary, complete any optional information in the Details screen by clicking
in the UN number and Hazard field and selecting the appropriate entries using the LOV.
Directions: Create a Requisition – Additional Line Items At the lower third of the Requisition (RIT)-(New) screen, many of the Additional Line Detail fields are automatically completed. Bill notices that he needs to complete the remaining (optional) Supplier fields. He places the cursor in each of the following blank fields: •Supplier •Site •Contact •Phone
Bill uses the LOV which displays a list of options. Bill selects the appropriate option for each blank field. When all of the fields contain values, he saves the requisition by clicking on the Save icon in the Toolbar.
Oracle Training: Preparing Requisitions in the Oracle Applications Revised April 2008 - 15 -
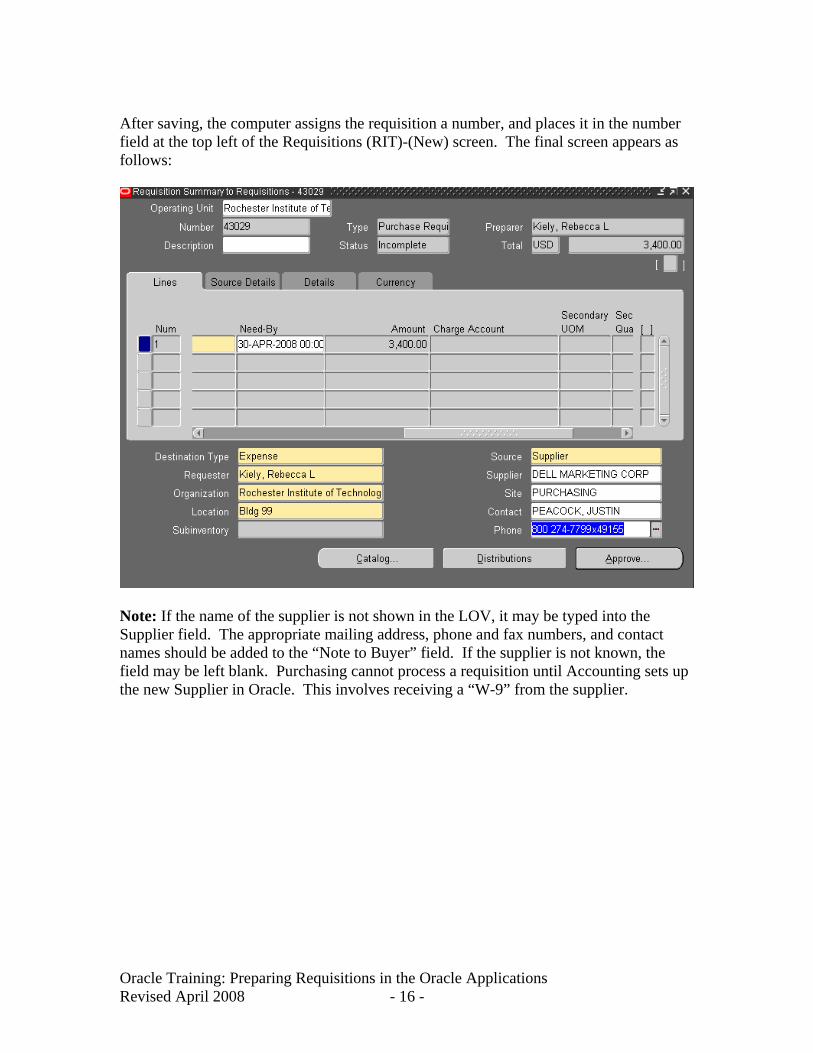
After saving, the computer assigns the requisition a number, and places it in the number field at the top left of the Requisitions (RIT)-(New) screen. The final screen appears as follows:
Note: If the name of the supplier is not shown in the LOV, it may be typed into the Supplier field. The appropriate mailing address, phone and fax numbers, and contact names should be added to the “Note to Buyer” field. If the supplier is not known, the field may be left blank. Purchasing cannot process a requisition until Accounting sets up the new Supplier in Oracle. This involves receiving a “W-9” from the supplier.
Oracle Training: Preparing Requisitions in the Oracle Applications Revised April 2008 - 16 -

Directions: Create a Requisition – Distribution The charge account information for this requisition is still needed. To complete the requisition, Bill selects the “Distributions” button at the bottom of the Requisitions -(New) screen. See below.
Oracle Training: Preparing Requisitions in the Oracle Applications Revised April 2008 - 17 -
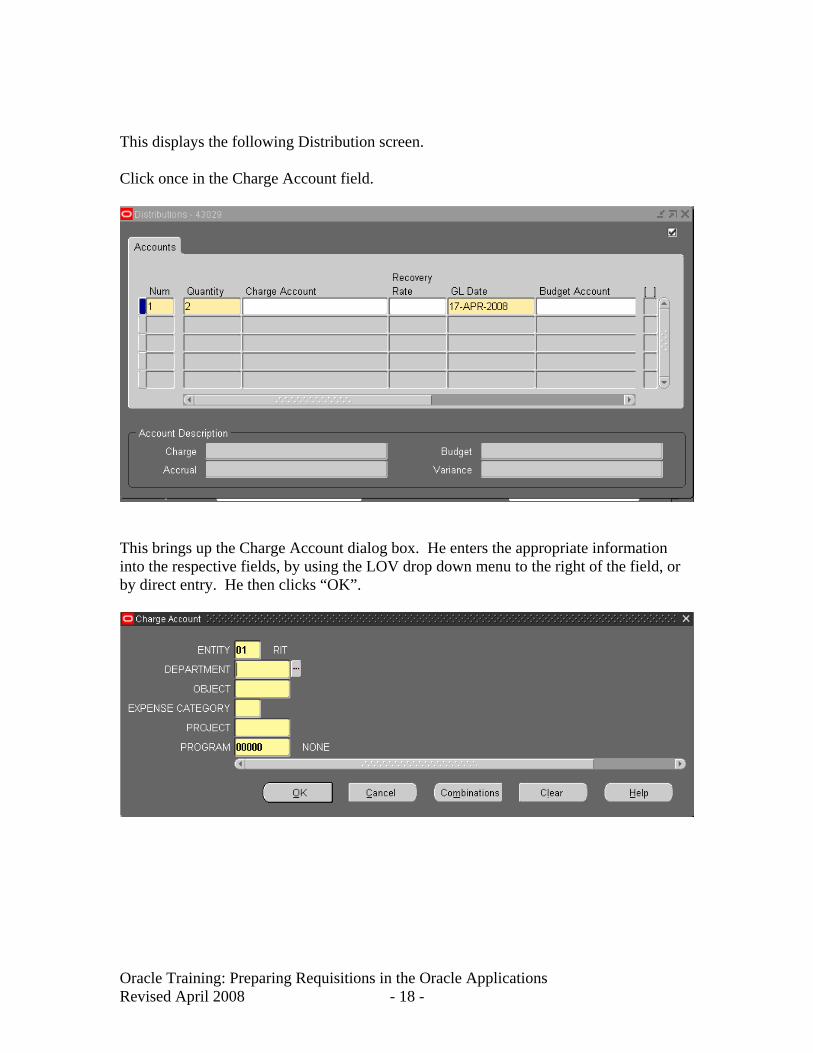
This displays the following Distribution screen. Click once in the Charge Account field.
This brings up the Charge Account dialog box. He enters the appropriate information into the respective fields, by using the LOV drop down menu to the right of the field, or by direct entry. He then clicks “OK”.
Oracle Training: Preparing Requisitions in the Oracle Applications Revised April 2008 - 18 -
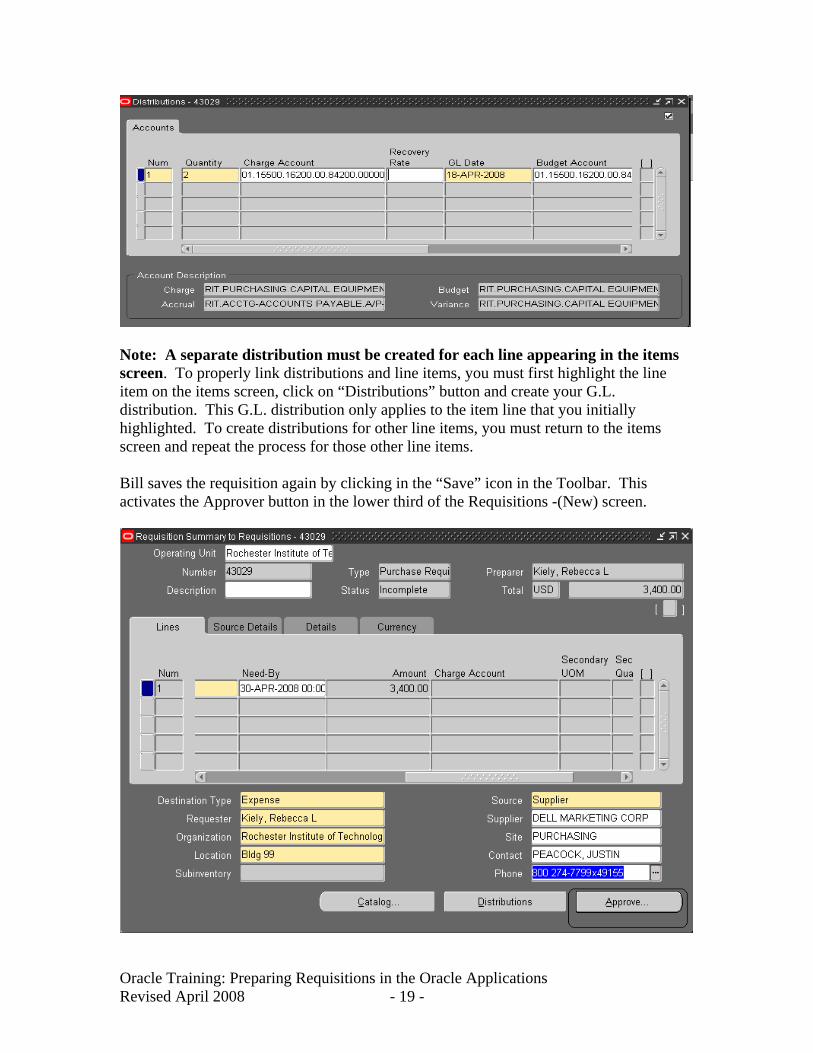
Note: A separate distribution must be created for each line appearing in the items screen. To properly link distributions and line items, you must first highlight the line item on the items screen, click on “Distributions” button and create your G.L. distribution. This G.L. distribution only applies to the item line that you initially highlighted. To create distributions for other line items, you must return to the items screen and repeat the process for those other line items. Bill saves the requisition again by clicking in the “Save” icon in the Toolbar. This activates the Approver button in the lower third of the Requisitions -(New) screen.
Oracle Training: Preparing Requisitions in the Oracle Applications Revised April 2008 - 19 -
Summary of Steps to Create a Requisition – Distribution:
1. Click the Distributions button on the bottom of the Requisitions -(New) screen once.
2. Place the cursor in the Charge Account field and click once 3. In the charge account dialog box, enter the appropriate information in the
blank fields. When done, click the OK button once. 4. Save the requisition by clicking the Save icon in the Toolbar.
Oracle Training: Preparing Requisitions in the Oracle Applications Revised April 2008 - 20 -
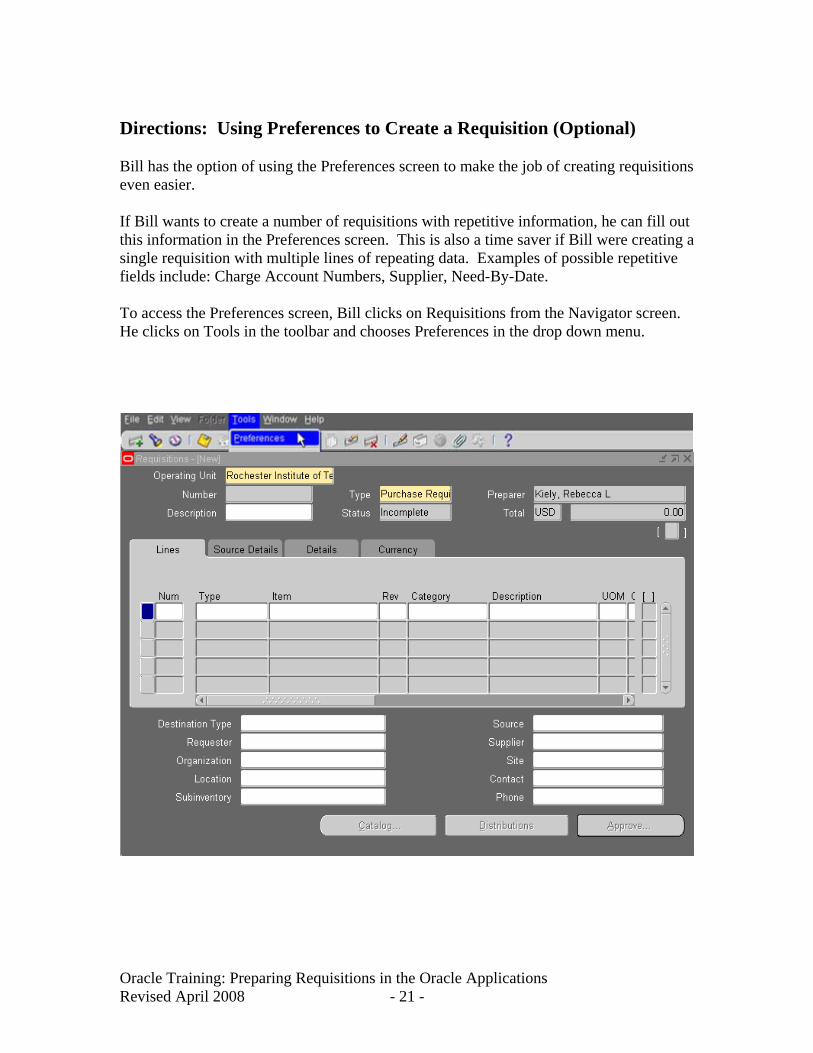
Directions: Using Preferences to Create a Requisition (Optional) Bill has the option of using the Preferences screen to make the job of creating requisitions even easier. If Bill wants to create a number of requisitions with repetitive information, he can fill out this information in the Preferences screen. This is also a time saver if Bill were creating a single requisition with multiple lines of repeating data. Examples of possible repetitive fields include: Charge Account Numbers, Supplier, Need-By-Date. To access the Preferences screen, Bill clicks on Requisitions from the Navigator screen. He clicks on Tools in the toolbar and chooses Preferences in the drop down menu.
Oracle Training: Preparing Requisitions in the Oracle Applications Revised April 2008 - 21 -
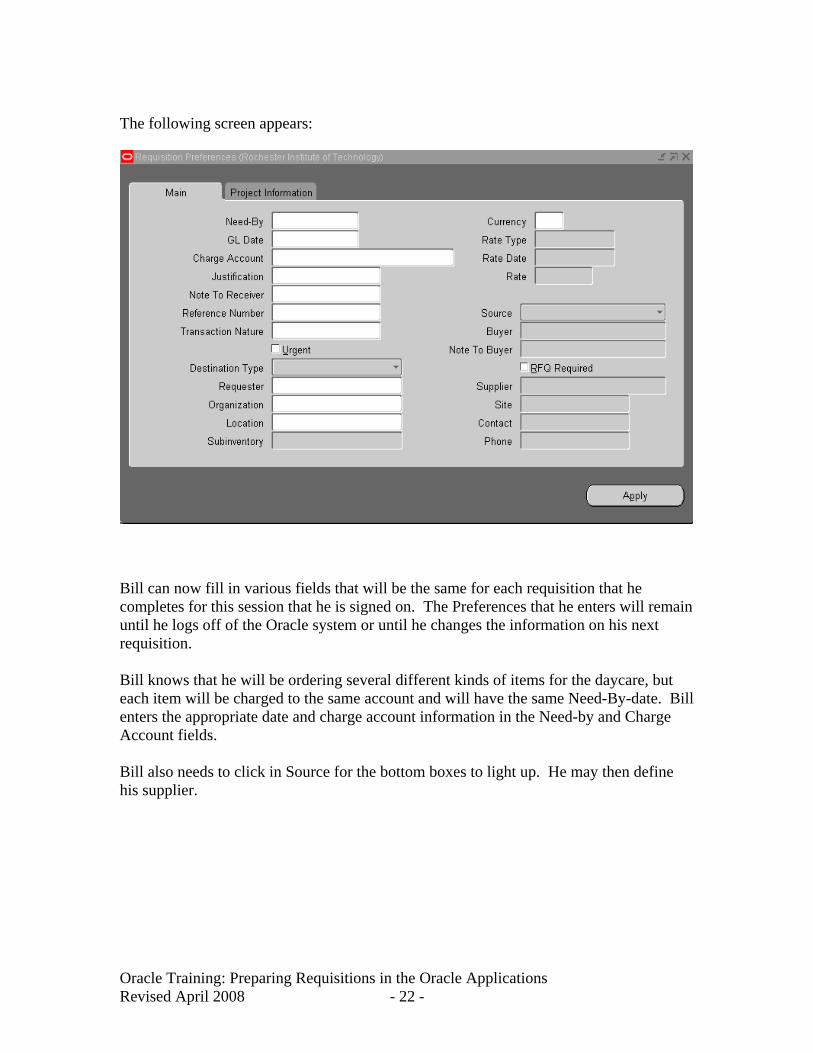
The following screen appears:
Bill can now fill in various fields that will be the same for each requisition that he completes for this session that he is signed on. The Preferences that he enters will remain until he logs off of the Oracle system or until he changes the information on his next requisition. Bill knows that he will be ordering several different kinds of items for the daycare, but each item will be charged to the same account and will have the same Need-By-date. Bill enters the appropriate date and charge account information in the Need-by and Charge Account fields. Bill also needs to click in Source for the bottom boxes to light up. He may then define his supplier.
Oracle Training: Preparing Requisitions in the Oracle Applications Revised April 2008 - 22 -
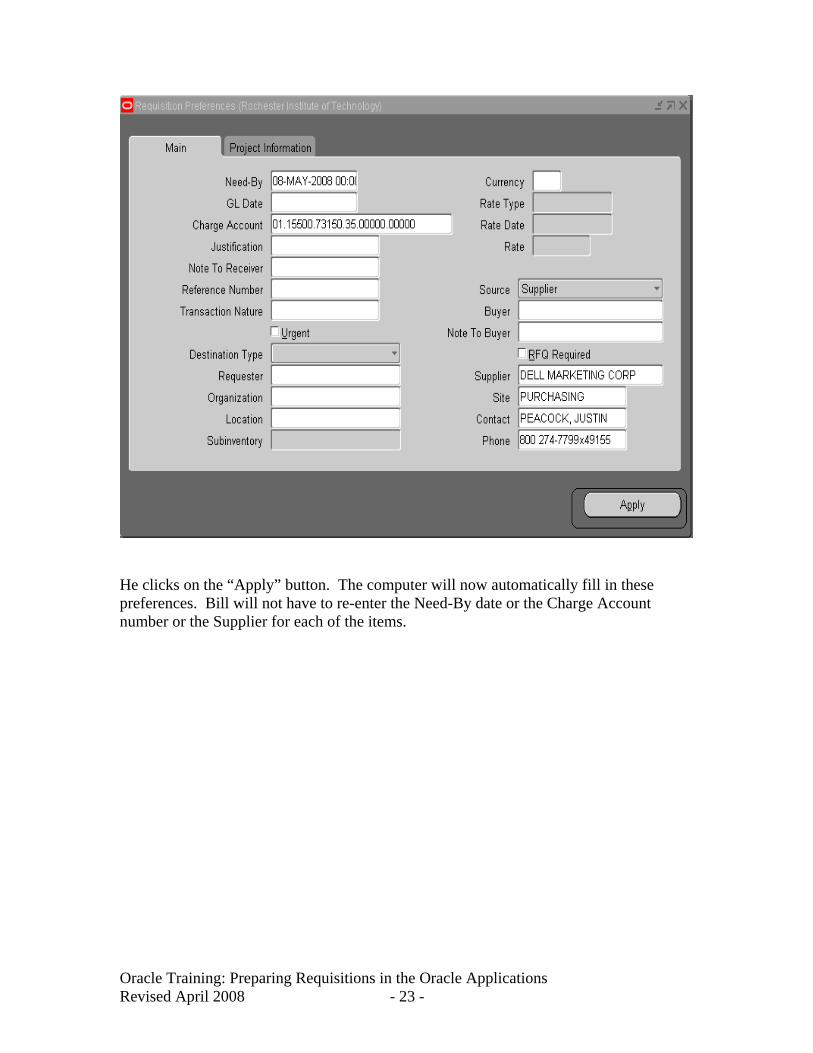
He clicks on the “Apply” button. The computer will now automatically fill in these preferences. Bill will not have to re-enter the Need-By date or the Charge Account number or the Supplier for each of the items.
Oracle Training: Preparing Requisitions in the Oracle Applications Revised April 2008 - 23 -
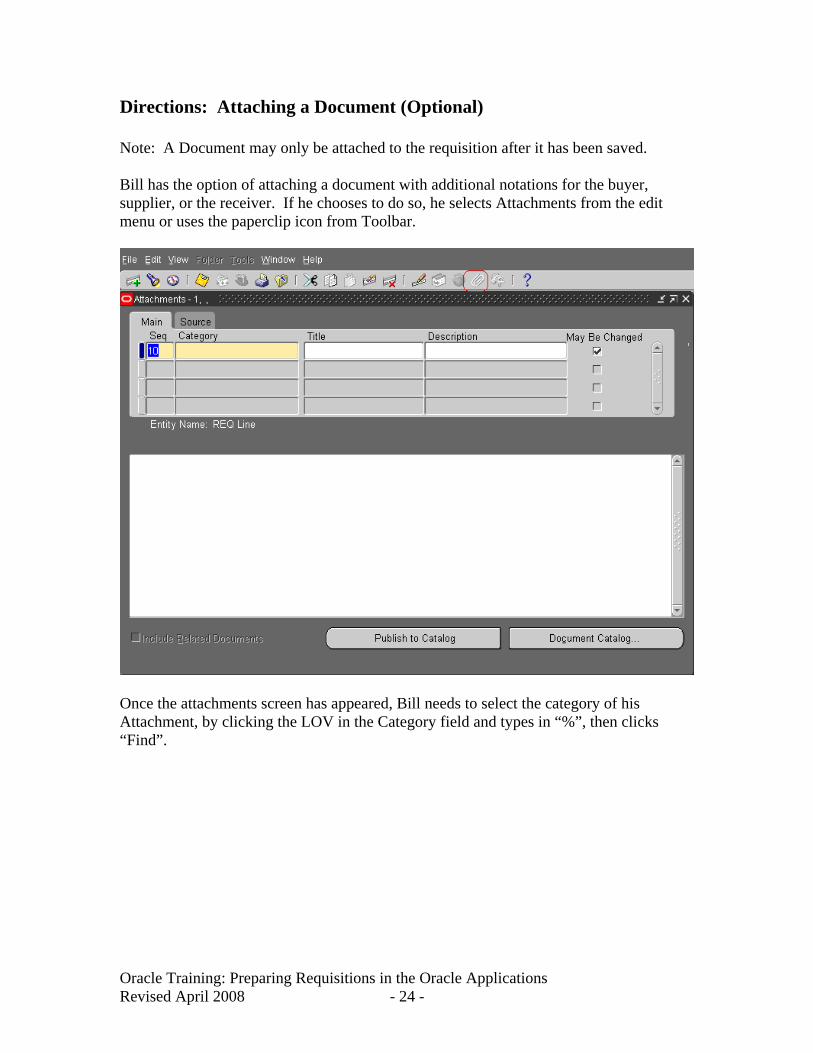
Directions: Attaching a Document (Optional) Note: A Document may only be attached to the requisition after it has been saved. Bill has the option of attaching a document with additional notations for the buyer, supplier, or the receiver. If he chooses to do so, he selects Attachments from the edit menu or uses the paperclip icon from Toolbar.
Once the attachments screen has appeared, Bill needs to select the category of his Attachment, by clicking the LOV in the Category field and types in “%”, then clicks “Find”.
Oracle Training: Preparing Requisitions in the Oracle Applications Revised April 2008 - 24 -
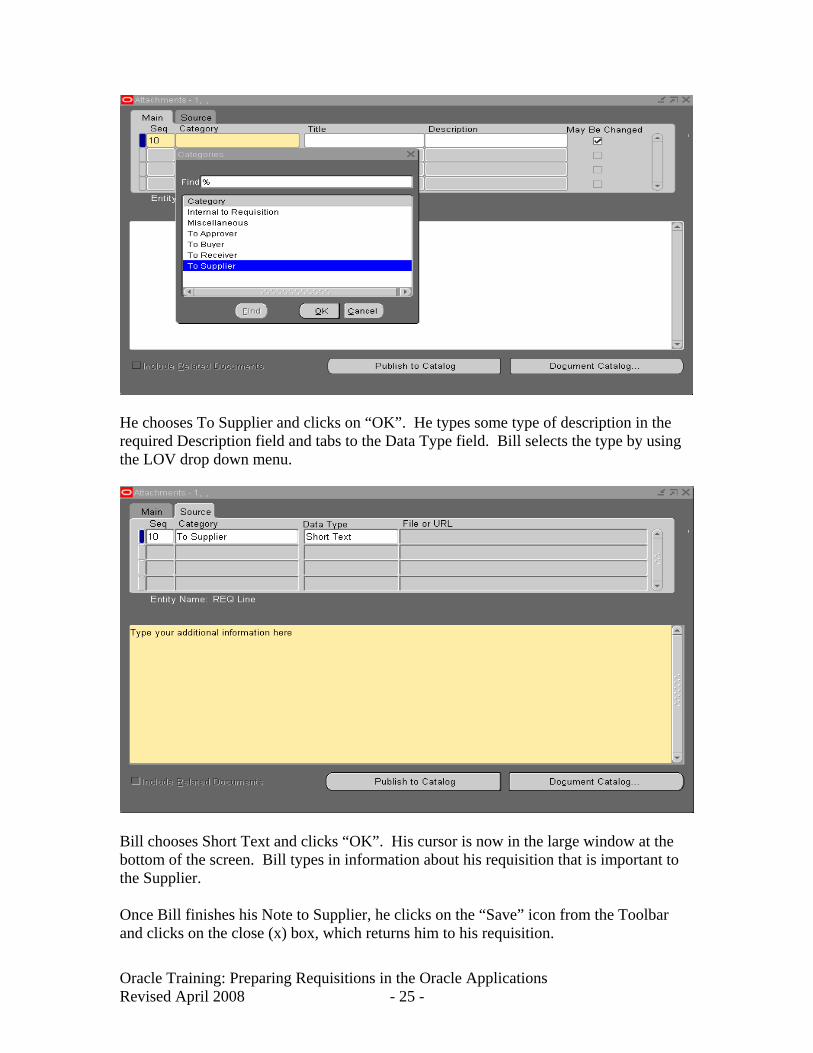
He chooses To Supplier and clicks on “OK”. He types some type of description in the required Description field and tabs to the Data Type field. Bill selects the type by using the LOV drop down menu.
Bill chooses Short Text and clicks “OK”. His cursor is now in the large window at the bottom of the screen. Bill types in information about his requisition that is important to the Supplier. Once Bill finishes his Note to Supplier, he clicks on the “Save” icon from the Toolbar and clicks on the close (x) box, which returns him to his requisition.
Oracle Training: Preparing Requisitions in the Oracle Applications Revised April 2008 - 25 -
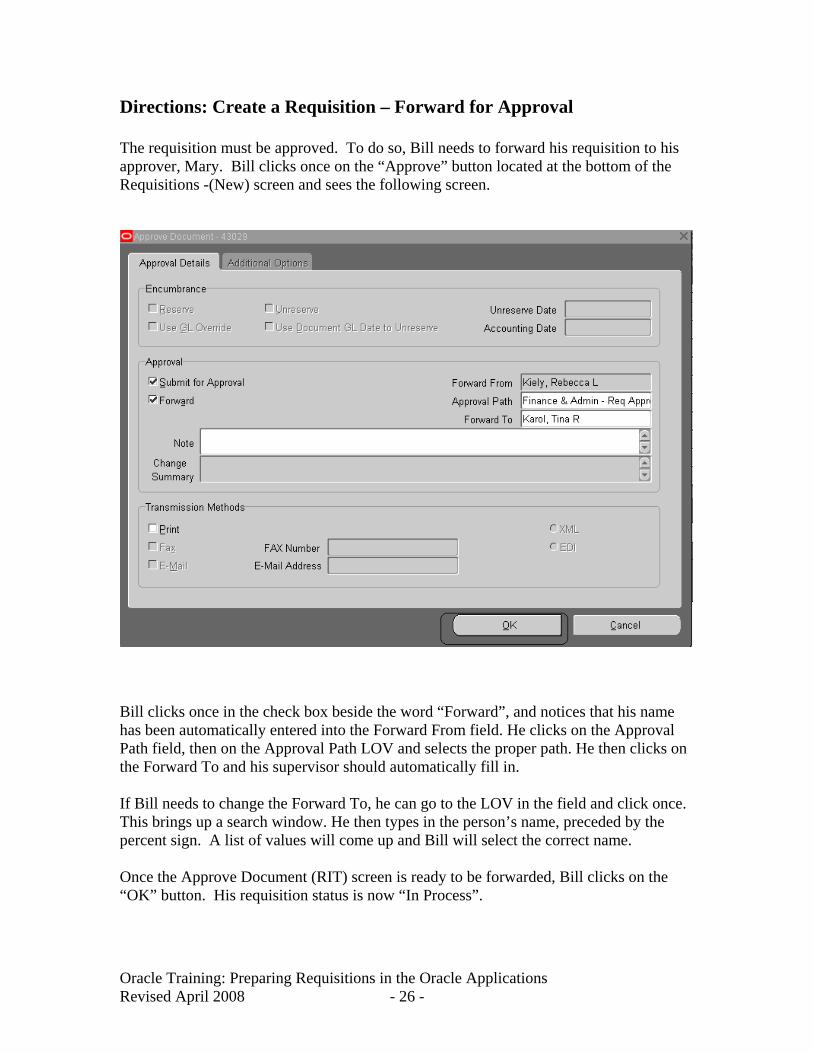
Directions: Create a Requisition – Forward for Approval The requisition must be approved. To do so, Bill needs to forward his requisition to his approver, Mary. Bill clicks once on the “Approve” button located at the bottom of the Requisitions -(New) screen and sees the following screen.
Bill clicks once in the check box beside the word “Forward”, and notices that his name has been automatically entered into the Forward From field. He clicks on the Approval Path field, then on the Approval Path LOV and selects the proper path. He then clicks on the Forward To and his supervisor should automatically fill in. If Bill needs to change the Forward To, he can go to the LOV in the field and click once. This brings up a search window. He then types in the person’s name, preceded by the percent sign. A list of values will come up and Bill will select the correct name. Once the Approve Document (RIT) screen is ready to be forwarded, Bill clicks on the “OK” button. His requisition status is now “In Process”.
Oracle Training: Preparing Requisitions in the Oracle Applications Revised April 2008 - 26 -
Summary of Steps to Create a Requisition and Forward for Approval:
1. Click the Approve button on the Requisition – (New) screen. 2. Click once in the check box beside the word Forward. 3. Click once on the Approval Path field, then click once on the Approval Path LOV button. 4. Select the proper Approval Path and a new box labeled “Employees” pops up. Look at the Forward To field. If your approver is correct, click the “X” or “Cancel” on the Employees box. If you need to change the person in the field, type in their last name preceded by a percent sign. Select their name from the list of values and click ok. 5. Add a Note to Approver if you wish. 6. Click Ok
Oracle Training: Preparing Requisitions in the Oracle Applications Revised April 2008 - 27 -
Master Summary A. Summary of Steps to Create a Requisition – Lines portion:
1. Access Oracle Applications. 2. Select Requisitions on the Navigator – RIT – Purchasing Requestor screen. 3. Create preferences as needed. (Optional-see page 21) 4. Place the cursor in the Category Field and click once. 5. Select the LOV to display the Category dialog box. 6. In the Category dialog box, select the LOV. 7. Click on the item to request and click OK. 8. In the Category dialog box, with the cursor in the second Subcategory field (it
should be there already), select the LOV again. 9. Click to choose the Subcategory Item and click on OK. 10. Both Category fields in the dialog box should be completed. Click OK. 11. Place the cursor in the Description field and type in the description of the item
being requested. Tab to the Unit if Measure field. 12. Verify that the Unit of Measure is correct. (Use the LOV to change the unit of
measure if necessary.) 13. In the Quantity field, enter the number of items being requested. Tab to the Price
field. 14. In the Price field, enter the unit price of the time being requested. 15. Place the cursor in the Need-by field (optional field). 16. Select the LOV. 17. Double-click on the calendar date that the item is needed by. 18. Complete any optional information in the Source Details screen by typing in the
information. 19. If necessary, complete any optional information in the Details screen by clicking
in the UN number and Hazard field and selecting the appropriate entries using the LOV.
Oracle Training: Preparing Requisitions in the Oracle Applications Revised April 2008 - 28 -
B. Summary of Steps to Create a Requisition – Additional Line Details portion:
1. Place the cursor in the supplier field in the lower third of the Requisition -(New) screen.
2. Select the LOV for the drop down menu. 3. Double-click the appropriate option from the LOV to choose the Supplier. 4. If the cursor has not already advanced to the Site field, place the cursor in the
next blank field. 5. Select the LOV drop down menu in the right side of the field. 6. Double-click the appropriate site for the Supplier. 7. Repeat steps 4-6 for each remaining blank fields in the additional line details
section on the bottom of the Requisitions -(New) screen. 8. When all the fields are completed, click on the Save icon in the Toolbar to
establish a requisition number in the Number field at the top left. C. Summary of Steps to Create a Requisition – Distribution portion:
1. Click the Distributions button on the bottom of the Requisitions (RIT)-(New) screen once.
2. Place the cursor in the Charge Account field. 3. In the charge account dialog box, enter the appropriate information in the blank
fields. When done, click the OK button once. 4. Save the requisition by clicking the Save icon in the Toolbar.
D. Summary of Steps to Create a Requisition – Forward for Approval portion:
1. Click the Approve button on the Requisition – (New) screen. 2. Click once in the check box beside the word Forward. 3. Click once on the Approval Path field, then click once on the LOV button 4. Select the proper Approval Path and a new box labeled “Employees” pops up. Look at the Forward To field. If the name is correct, click the “X” or Cancel button on the Employees box. If you need to change the approver, type in their last name preceded by the percent sign and click Find. Select their name from the list of values and click ok. 5. Add a Note to Approver, if necessary. 6. Click OK
Oracle Training: Preparing Requisitions in the Oracle Applications Revised April 2008 - 29 -
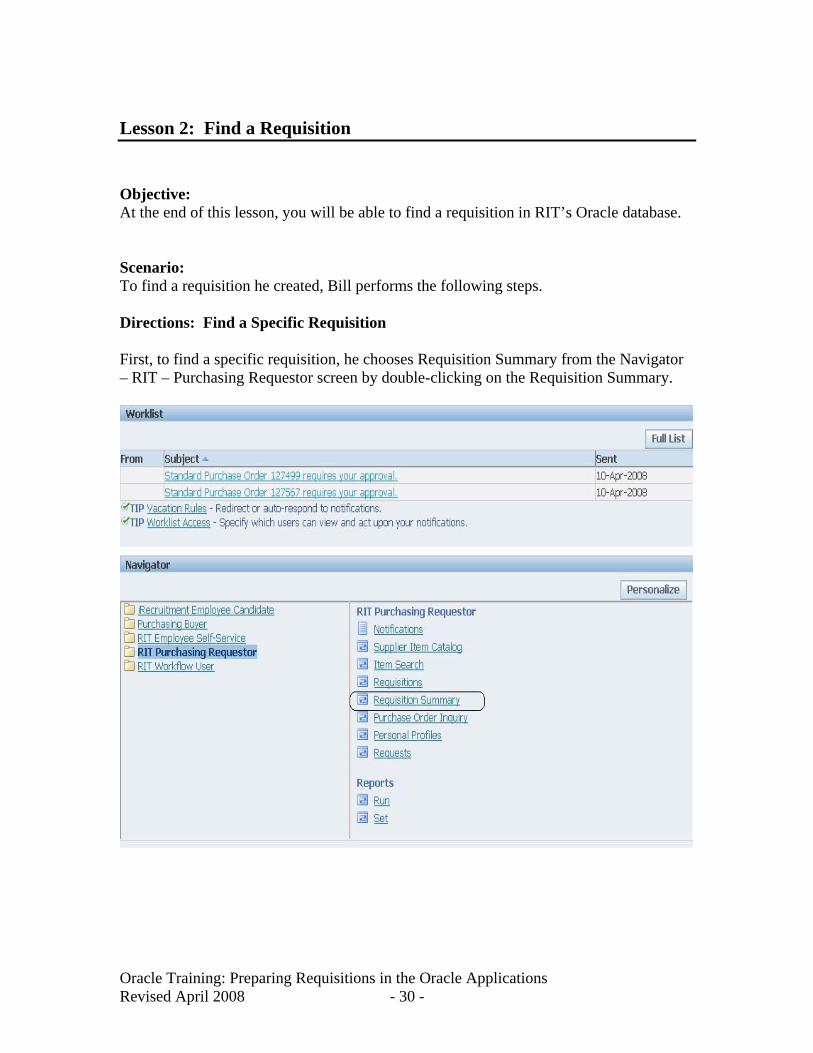
Lesson 2: Find a Requisition Objective: At the end of this lesson, you will be able to find a requisition in RIT’s Oracle database. Scenario: To find a requisition he created, Bill performs the following steps. Directions: Find a Specific Requisition First, to find a specific requisition, he chooses Requisition Summary from the Navigator – RIT – Purchasing Requestor screen by double-clicking on the Requisition Summary.
Oracle Training: Preparing Requisitions in the Oracle Applications Revised April 2008 - 30 -
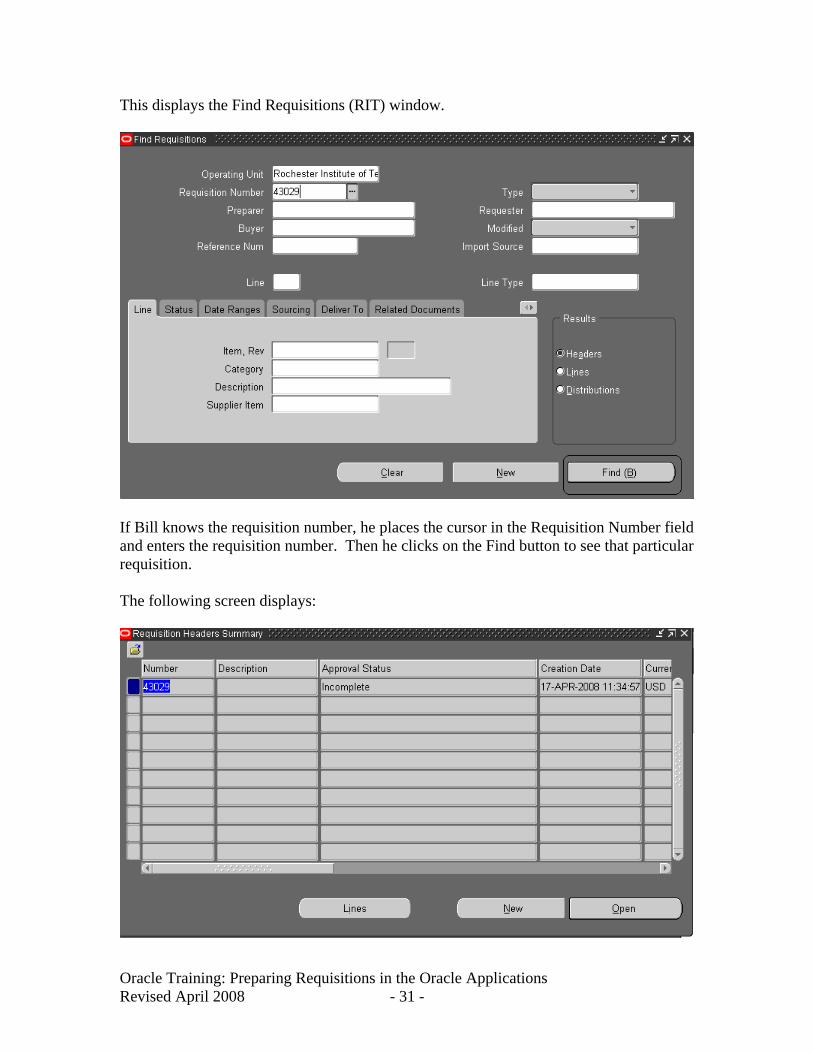
This displays the Find Requisitions (RIT) window.
If Bill knows the requisition number, he places the cursor in the Requisition Number field and enters the requisition number. Then he clicks on the Find button to see that particular requisition. The following screen displays:
Oracle Training: Preparing Requisitions in the Oracle Applications Revised April 2008 - 31 -
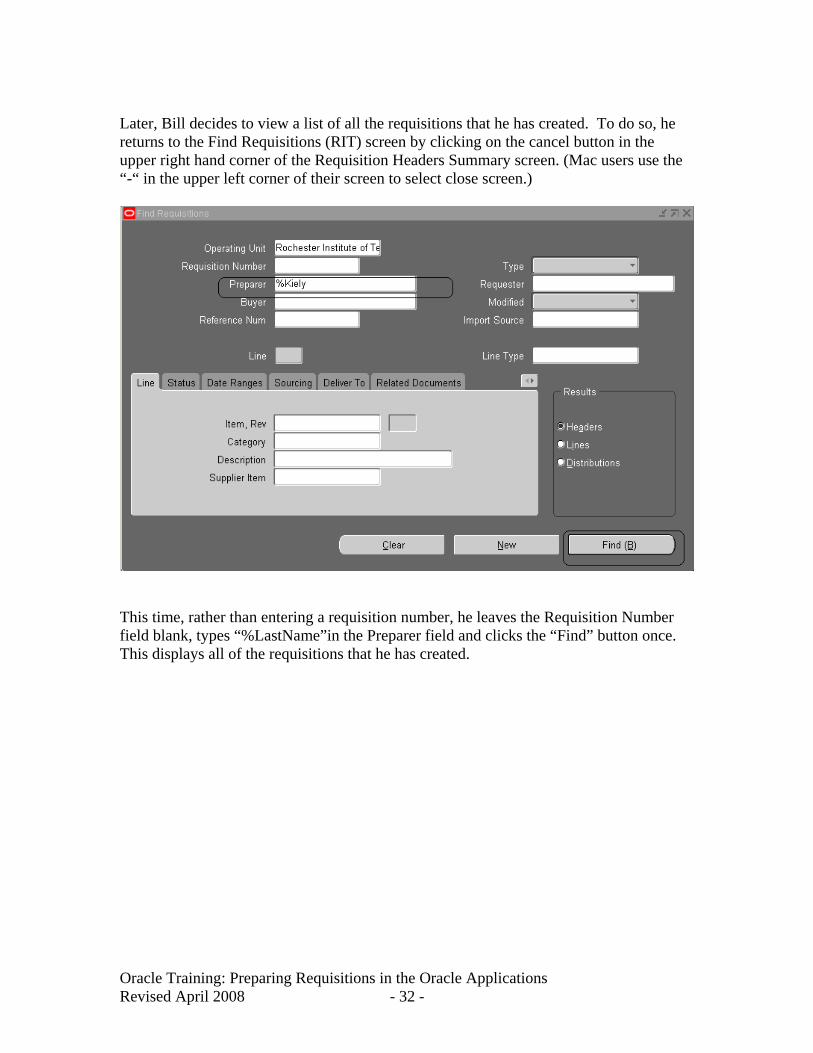
Later, Bill decides to view a list of all the requisitions that he has created. To do so, he returns to the Find Requisitions (RIT) screen by clicking on the cancel button in the upper right hand corner of the Requisition Headers Summary screen. (Mac users use the “-“ in the upper left corner of their screen to select close screen.)
This time, rather than entering a requisition number, he leaves the Requisition Number field blank, types “%LastName”in the Preparer field and clicks the “Find” button once. This displays all of the requisitions that he has created.
Oracle Training: Preparing Requisitions in the Oracle Applications Revised April 2008 - 32 -
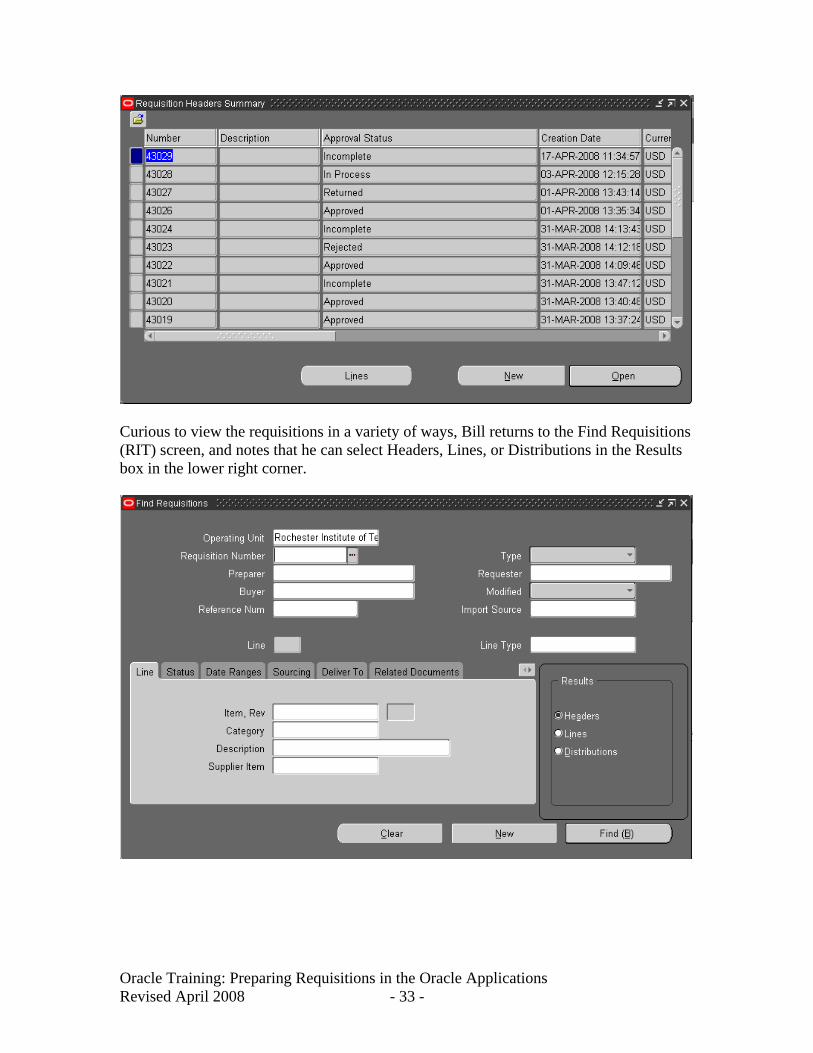
Curious to view the requisitions in a variety of ways, Bill returns to the Find Requisitions (RIT) screen, and notes that he can select Headers, Lines, or Distributions in the Results box in the lower right corner.
Oracle Training: Preparing Requisitions in the Oracle Applications Revised April 2008 - 33 -
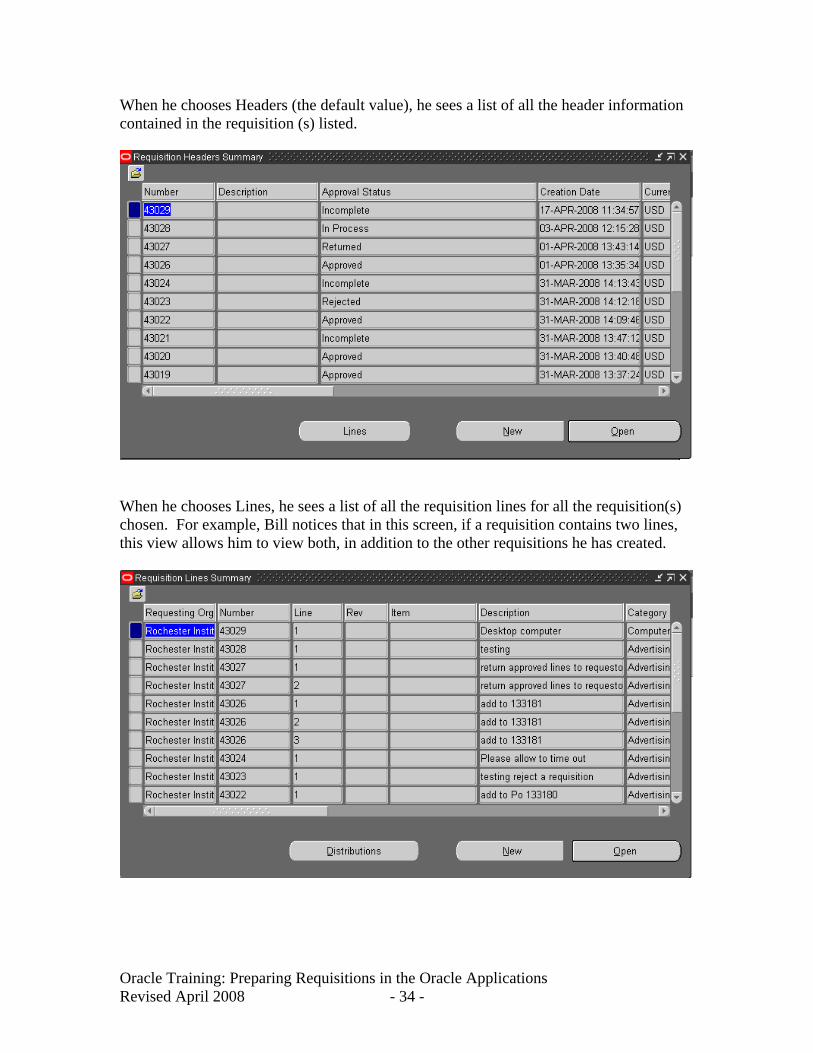
When he chooses Headers (the default value), he sees a list of all the header information contained in the requisition (s) listed.
When he chooses Lines, he sees a list of all the requisition lines for all the requisition(s) chosen. For example, Bill notices that in this screen, if a requisition contains two lines, this view allows him to view both, in addition to the other requisitions he has created.
Oracle Training: Preparing Requisitions in the Oracle Applications Revised April 2008 - 34 -
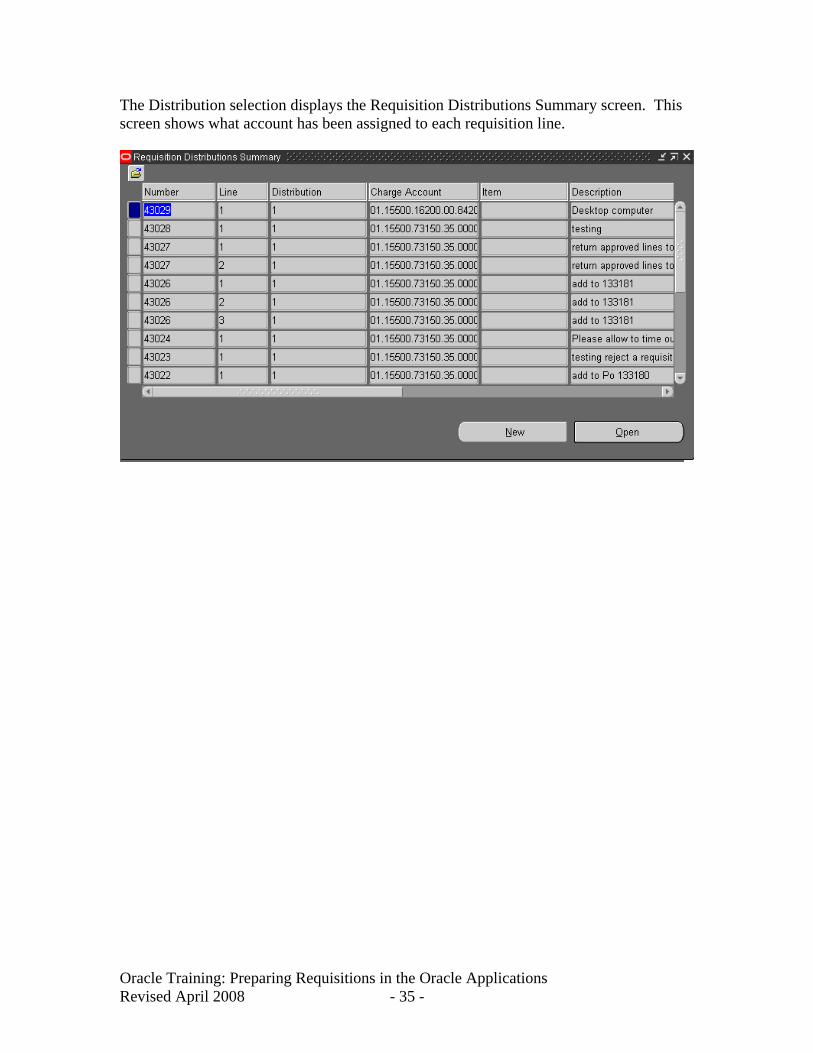
The Distribution selection displays the Requisition Distributions Summary screen. This screen shows what account has been assigned to each requisition line.
Oracle Training: Preparing Requisitions in the Oracle Applications Revised April 2008 - 35 -

Summary of Steps to Find a Requisition: To Find a Specific Requisition:
1. Double-click on Requisition Summary from the Navigator-RIT-Purchasing Requestor screen.
2. Place the cursor in the Requisition Number field and enter the requisition number. 3. Click on the Find button at the bottom of the screen.
To Find all Requisitions by a Preparer:
1. Double-click on Requisition Summary from the Navigator-RIT-Purchasing Requestor screen. 2. Do not enter a requisition number. 3. Type “%LastName” in the Preparer field. 4. Click the find button at the bottom of the screen.
To View Headers, Lines, or Distributions of a Requisition:
1. Double-click on Requisition Summary from the Navigator-RIT-Purchasing Requestor screen.
2. Select Headers, Lines, or Distributions from the Results box in the lower right corner of the Find Requisitions (RIT) screen.
a. If Headers is chosen, the Requisition Header screen appears. The status of
the Requisition can be viewed from this screen. b. If Lines is chosen, the Requisition Lines Summary screen is displayed.
Once a purchase order number is issued for a requisition, it can be viewed in this window under Order Number.
c. If Distributions is selected from the Results box, the Requisition Distributions Summary screen appears.
Oracle Training: Preparing Requisitions in the Oracle Applications Revised April 2008 - 36 -
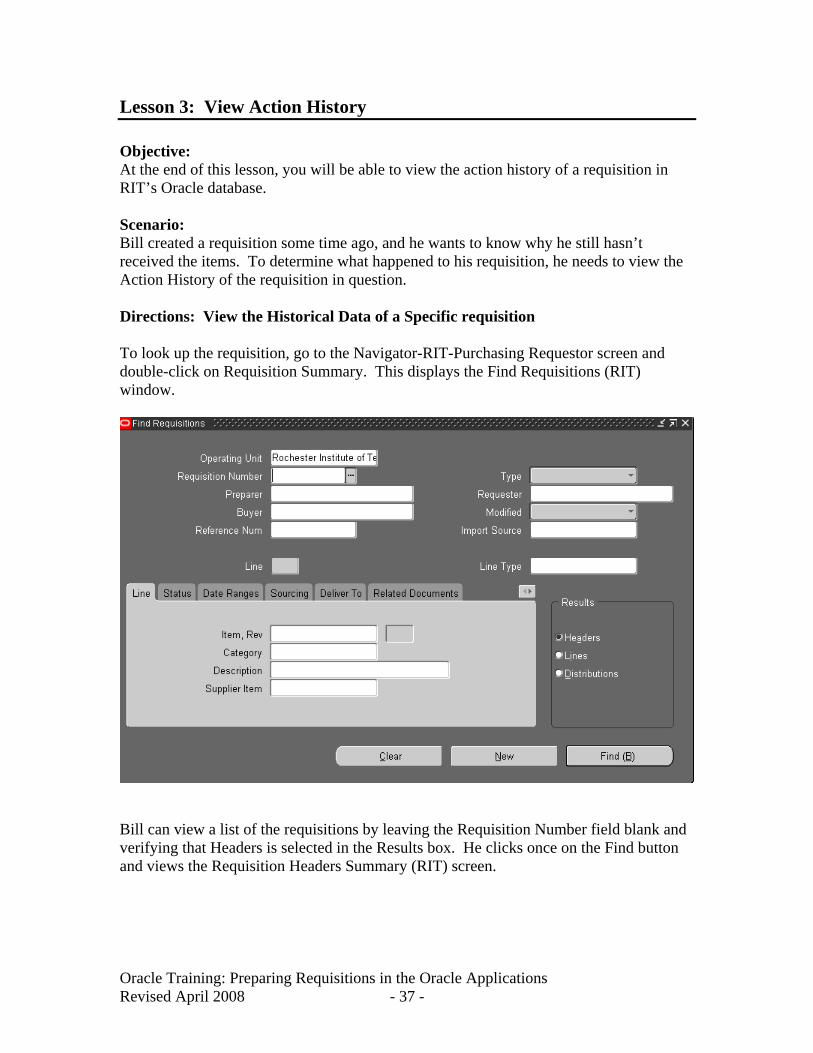
Lesson 3: View Action History Objective: At the end of this lesson, you will be able to view the action history of a requisition in RIT’s Oracle database. Scenario: Bill created a requisition some time ago, and he wants to know why he still hasn’t received the items. To determine what happened to his requisition, he needs to view the Action History of the requisition in question. Directions: View the Historical Data of a Specific requisition To look up the requisition, go to the Navigator-RIT-Purchasing Requestor screen and double-click on Requisition Summary. This displays the Find Requisitions (RIT) window.
Bill can view a list of the requisitions by leaving the Requisition Number field blank and verifying that Headers is selected in the Results box. He clicks once on the Find button and views the Requisition Headers Summary (RIT) screen.
Oracle Training: Preparing Requisitions in the Oracle Applications Revised April 2008 - 37 -
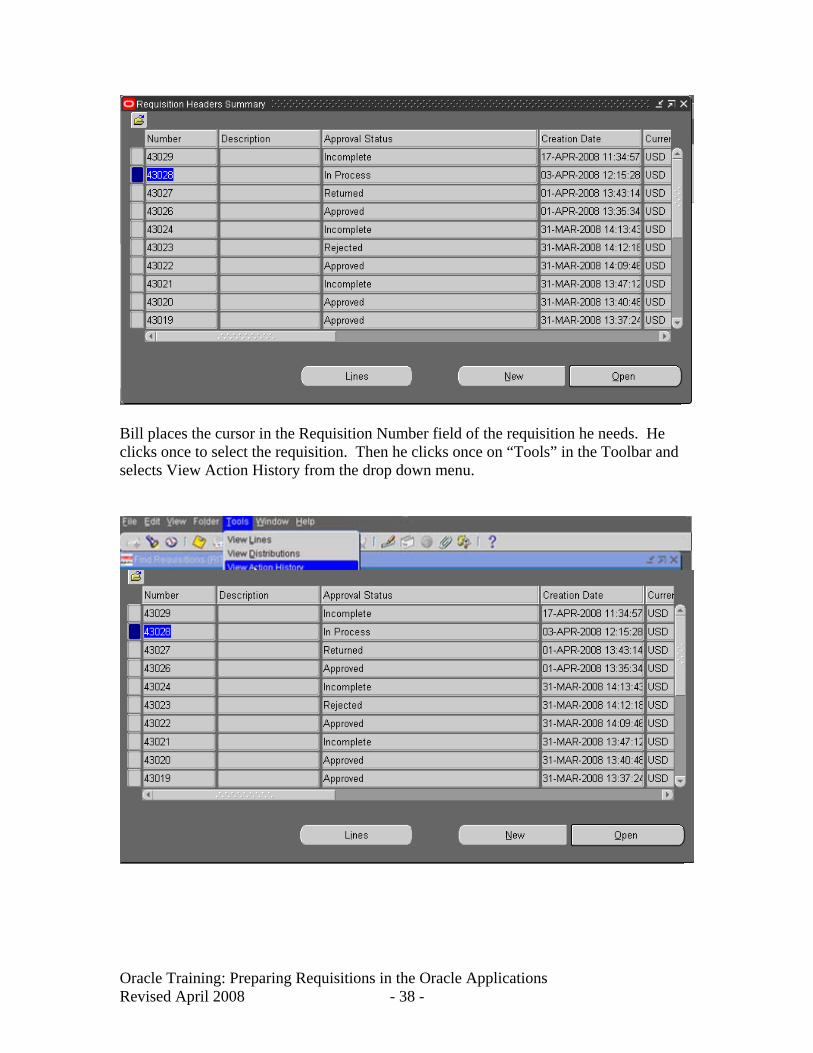
Bill places the cursor in the Requisition Number field of the requisition he needs. He clicks once to select the requisition. Then he clicks once on “Tools” in the Toolbar and selects View Action History from the drop down menu.
Oracle Training: Preparing Requisitions in the Oracle Applications Revised April 2008 - 38 -
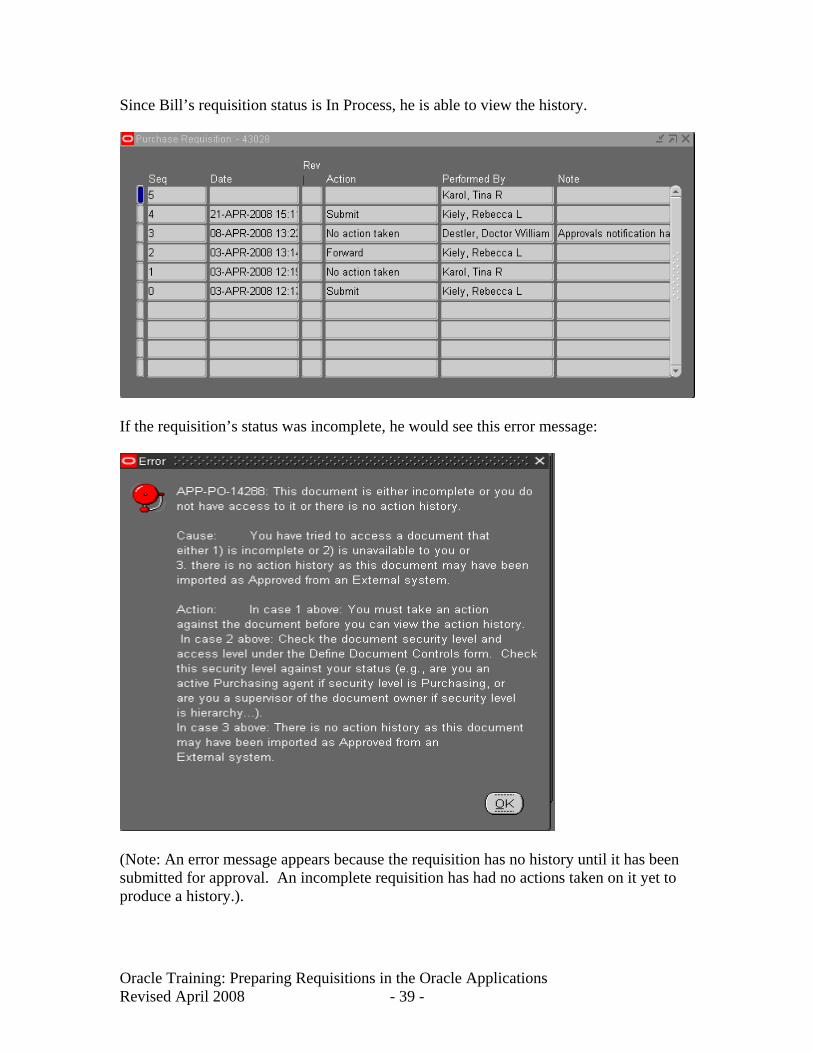
Since Bill’s requisition status is In Process, he is able to view the history.
If the requisition’s status was incomplete, he would see this error message:
(Note: An error message appears because the requisition has no history until it has been submitted for approval. An incomplete requisition has had no actions taken on it yet to produce a history.).
Oracle Training: Preparing Requisitions in the Oracle Applications Revised April 2008 - 39 -

Summary of Steps to View Action History:
1. Double-click on Requisition Summary from the Navigator-RIT-Purchsing Requestor screen.
2. Choose Headers in the Results box located in the lower right had corner of the find Requisition (RIT) screen.
3. Click the Find button at the bottom of the screen. 4. Place the cursor in the field directly to the left of the requisition needed. 5. Select Tools from the Tool bar. 6. Click View Action History from the drop down menu.
Oracle Training: Preparing Requisitions in the Oracle Applications Revised April 2008 - 40 -
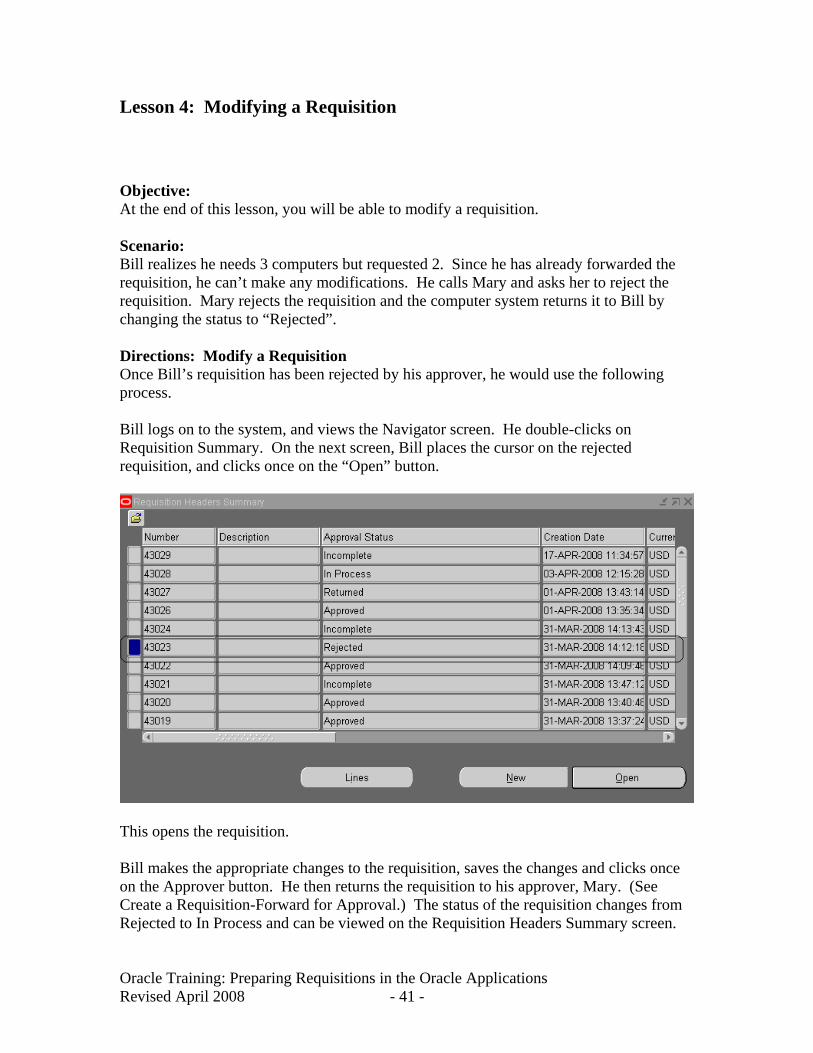
Lesson 4: Modifying a Requisition Objective: At the end of this lesson, you will be able to modify a requisition. Scenario: Bill realizes he needs 3 computers but requested 2. Since he has already forwarded the requisition, he can’t make any modifications. He calls Mary and asks her to reject the requisition. Mary rejects the requisition and the computer system returns it to Bill by changing the status to “Rejected”. Directions: Modify a Requisition Once Bill’s requisition has been rejected by his approver, he would use the following process. Bill logs on to the system, and views the Navigator screen. He double-clicks on Requisition Summary. On the next screen, Bill places the cursor on the rejected requisition, and clicks once on the “Open” button.
This opens the requisition. Bill makes the appropriate changes to the requisition, saves the changes and clicks once on the Approver button. He then returns the requisition to his approver, Mary. (See Create a Requisition-Forward for Approval.) The status of the requisition changes from Rejected to In Process and can be viewed on the Requisition Headers Summary screen.
Oracle Training: Preparing Requisitions in the Oracle Applications Revised April 2008 - 41 -
Summary of Steps to Modify a Requisition
1. Double-click on Requisition Summary on the Navigator (RIT) Purchasing Requisition screen and click Find.
2. Place the cursor in the Number field of the requisition to be modified. 3. Click on the Open button located at the bottom of the screen. 4. Make necessary changes to the rejected requisition, (e.g. Quantity, price.) 5. Save the changes. 6. Click the Approve button located at the bottom of the screen. 7. Return the requisition for Approval (See Create a Requisition-Forward for
Approval.)
Oracle Training: Preparing Requisitions in the Oracle Applications Revised April 2008 - 42 -
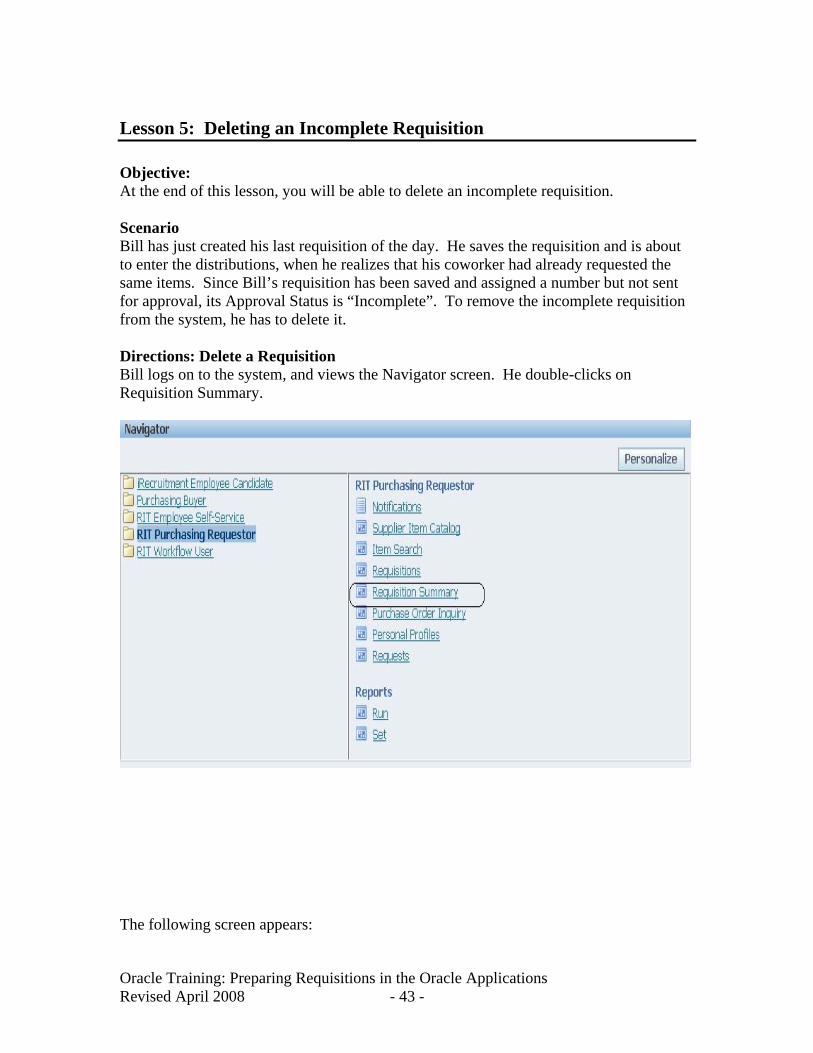
Lesson 5: Deleting an Incomplete Requisition Objective:
f this lesson, you will be able to delete an incomplete requisition.
st created his last requisition of the day. He saves the requisition and is about
s the Navigator screen. He double-clicks on
At the end o
cenario SBill has juto enter the distributions, when he realizes that his coworker had already requested the same items. Since Bill’s requisition has been saved and assigned a number but not sent for approval, its Approval Status is “Incomplete”. To remove the incomplete requisitionfrom the system, he has to delete it.
irections: Delete a Requisition DBill logs on to the system, and viewRequisition Summary.
T
he following screen appears:
Oracle Training: Preparing Requisitions in the Oracle Applications Revised April 2008 - 43 -
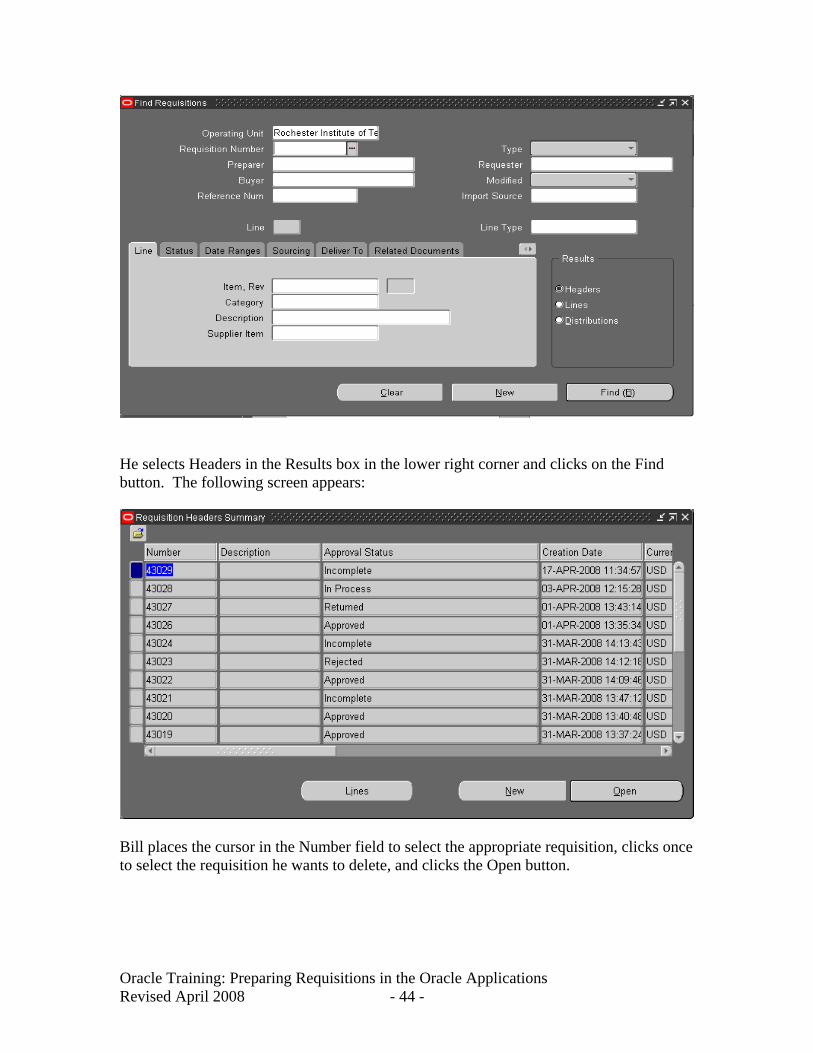
He selects Headers in the Results box in the lower right corner and clicks on the Find utton. The following screen appears: b
Bill places the cursor in the Number field to select the appropriate requisition, clicks once to select the requisition he wants to delete, and clicks the Open button.
Oracle Training: Preparing Requisitions in the Oracle Applications Revised April 2008 - 44 -
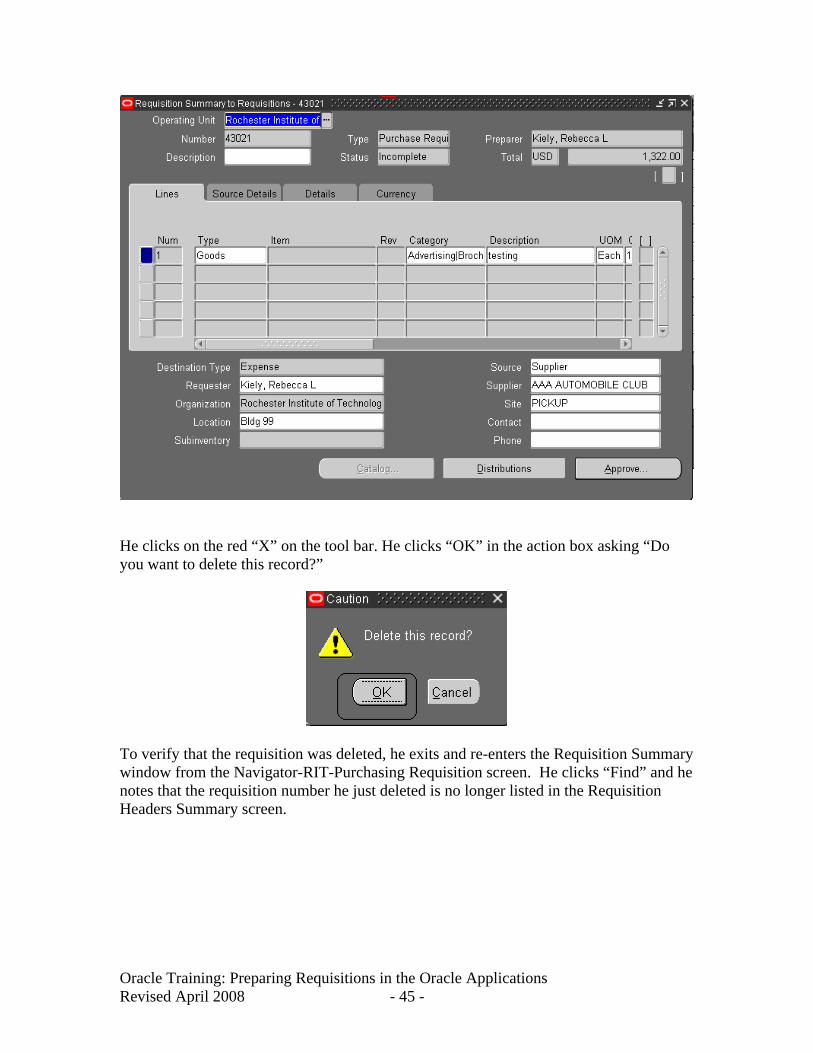
He clicks on the red “X” on the tool bar. He clicks “OK” in the action box asking “Do you want to delete this record?”
To verify that the requisition was deleted, he exits and re-enters the Requisition Summary window from the Navigator-RIT-Purchasing Requisition screen. He clicks “Find” and he notes that the requisition number he just deleted is no longer listed in the Requisition Headers Summary screen.
Oracle Training: Preparing Requisitions in the Oracle Applications Revised April 2008 - 45 -
Summary of Steps to Delete a Requisition:
1. Double-click on Requisition Summary from the Navigator-RIT-Purchasing Requestor screen.
2. Click on Headers in the Results box located in the lower corner of the Find Requisitions (RIT) screen.
3. Click on the Find button. 4. Place the cursor in the Number field of the appropriate requisition number. 5. Click the Open button. 6. Click on the red “X” on the tool bar. 7. Click “OK” in the action box asking if you want to delete this record 8. Save your changes by using the Save icon on the Toolbar.
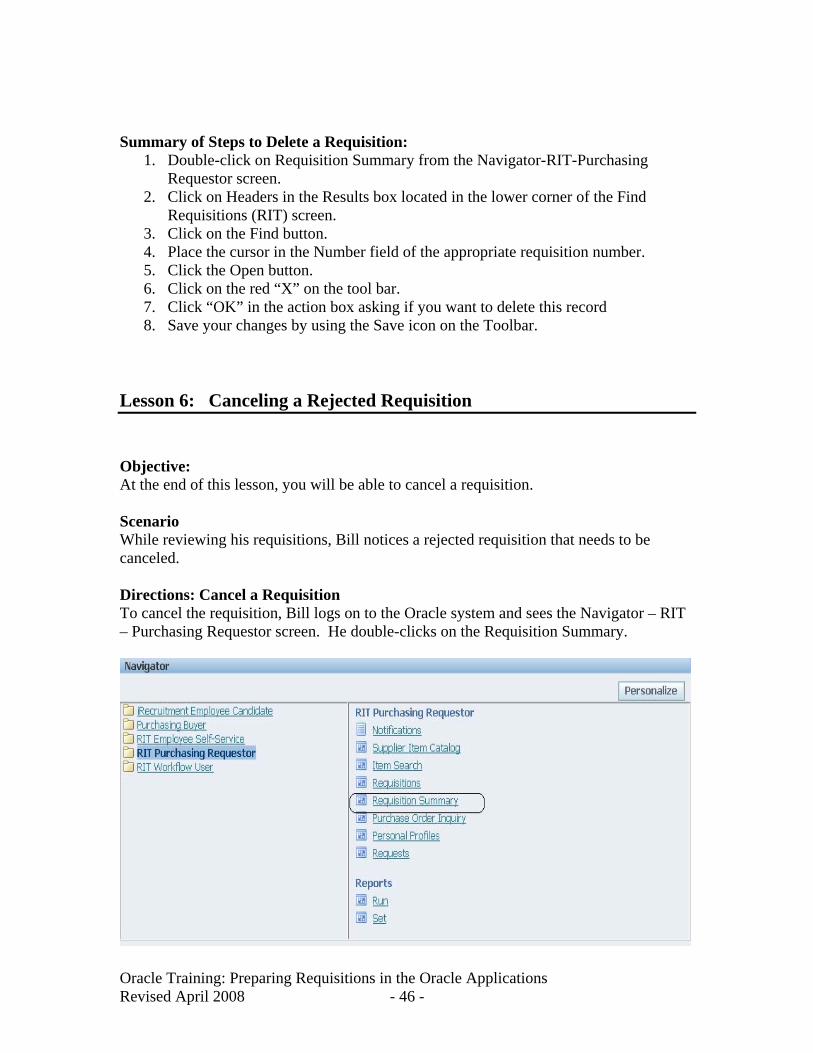
Lesson 6: Canceling a Rejected Requisition Objective: At the end of this lesson, you will be able to cancel a requisition. Scenario While reviewing his requisitions, Bill notices a rejected requisition that needs to be canceled. Directions: Cancel a Requisition To cancel the requisition, Bill logs on to the Oracle system and sees the Navigator – RIT – Purchasing Requestor screen. He double-clicks on the Requisition Summary.
Oracle Training: Preparing Requisitions in the Oracle Applications Revised April 2008 - 46 -
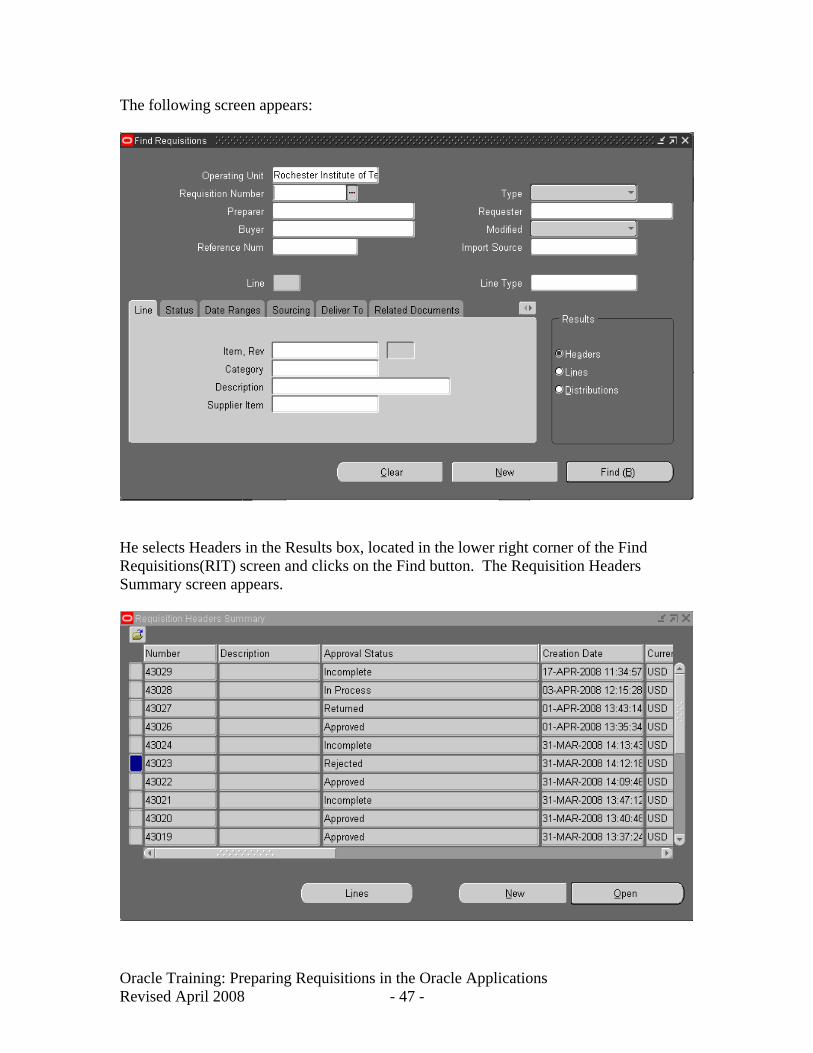
The following screen appears:
He selects Headers in the Results box, located in the lower right corner of the Find Requisitions(RIT) screen and clicks on the Find button. The Requisition Headers Summary screen appears.
Oracle Training: Preparing Requisitions in the Oracle Applications Revised April 2008 - 47 -
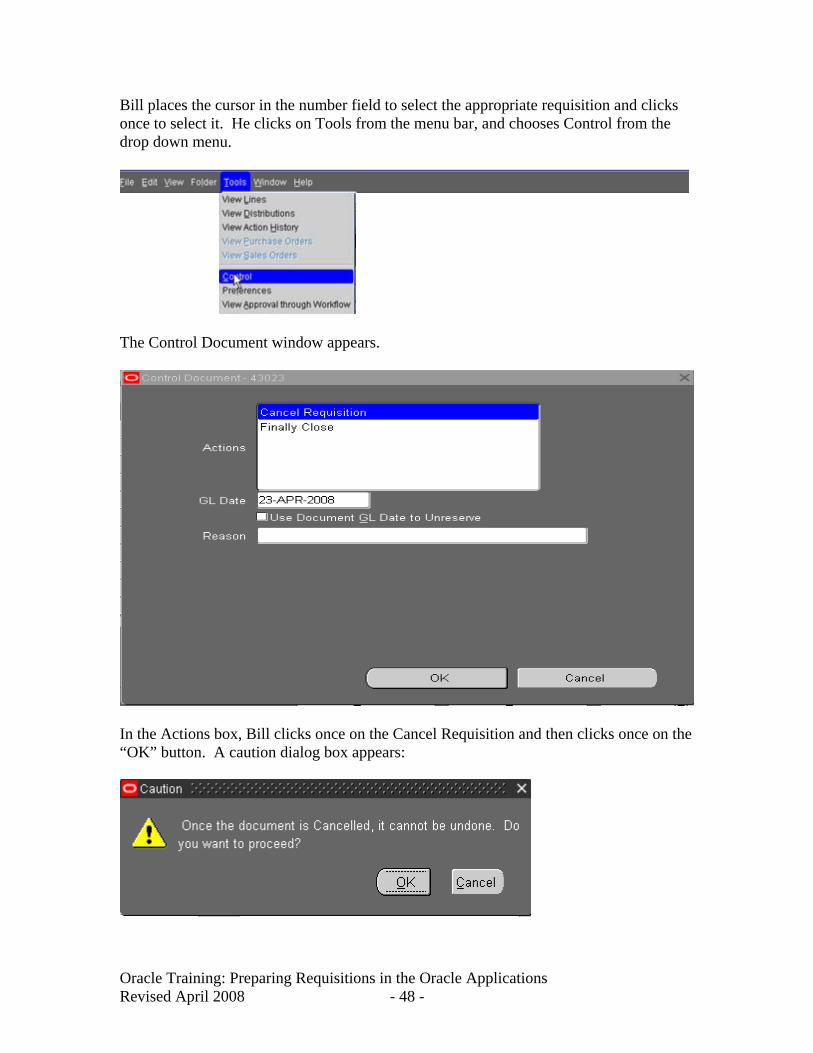
Bill places the cursor in the number field to select the appropriate requisition and clicks once to select it. He clicks on Tools from the menu bar, and chooses Control from the drop down menu.
The Control Document window appears.
In the Actions box, Bill clicks once on the Cancel Requisition and then clicks once on the “OK” button. A caution dialog box appears:
Oracle Training: Preparing Requisitions in the Oracle Applications Revised April 2008 - 48 -
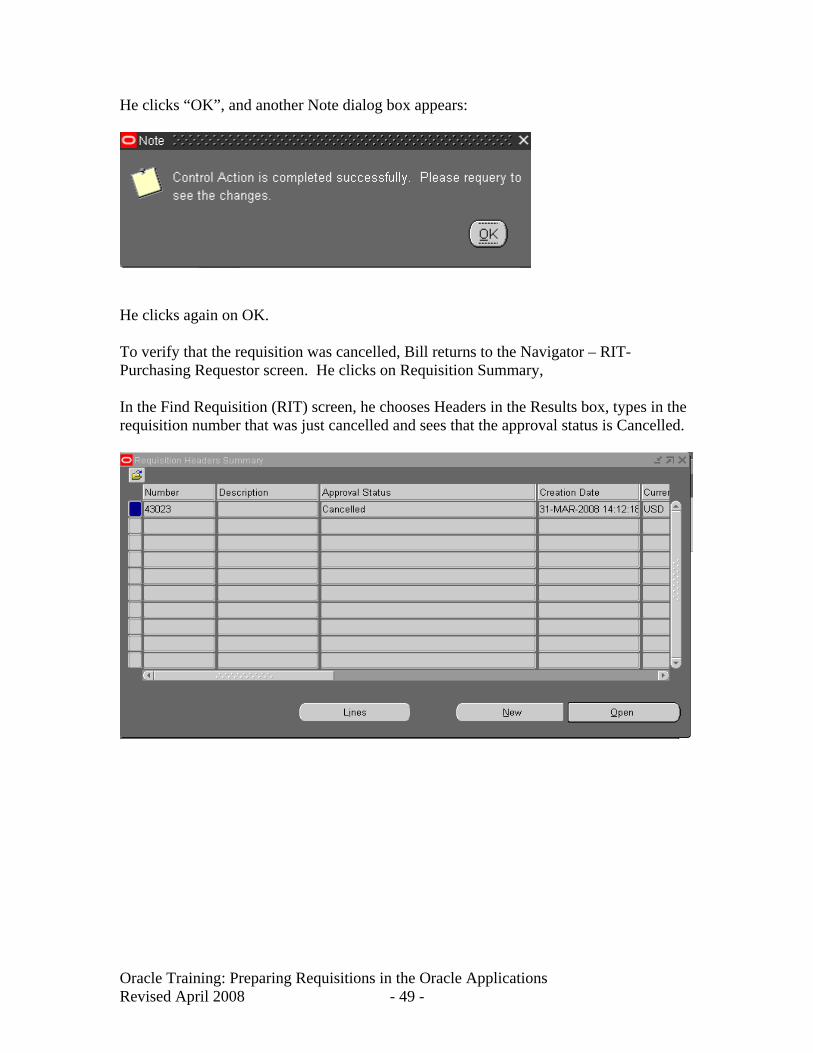
He clicks “OK”, and another Note dialog box appears:
He clicks again on OK. To verify that the requisition was cancelled, Bill returns to the Navigator – RIT- Purchasing Requestor screen. He clicks on Requisition Summary, In the Find Requisition (RIT) screen, he chooses Headers in the Results box, types in the requisition number that was just cancelled and sees that the approval status is Cancelled.
Oracle Training: Preparing Requisitions in the Oracle Applications Revised April 2008 - 49 -
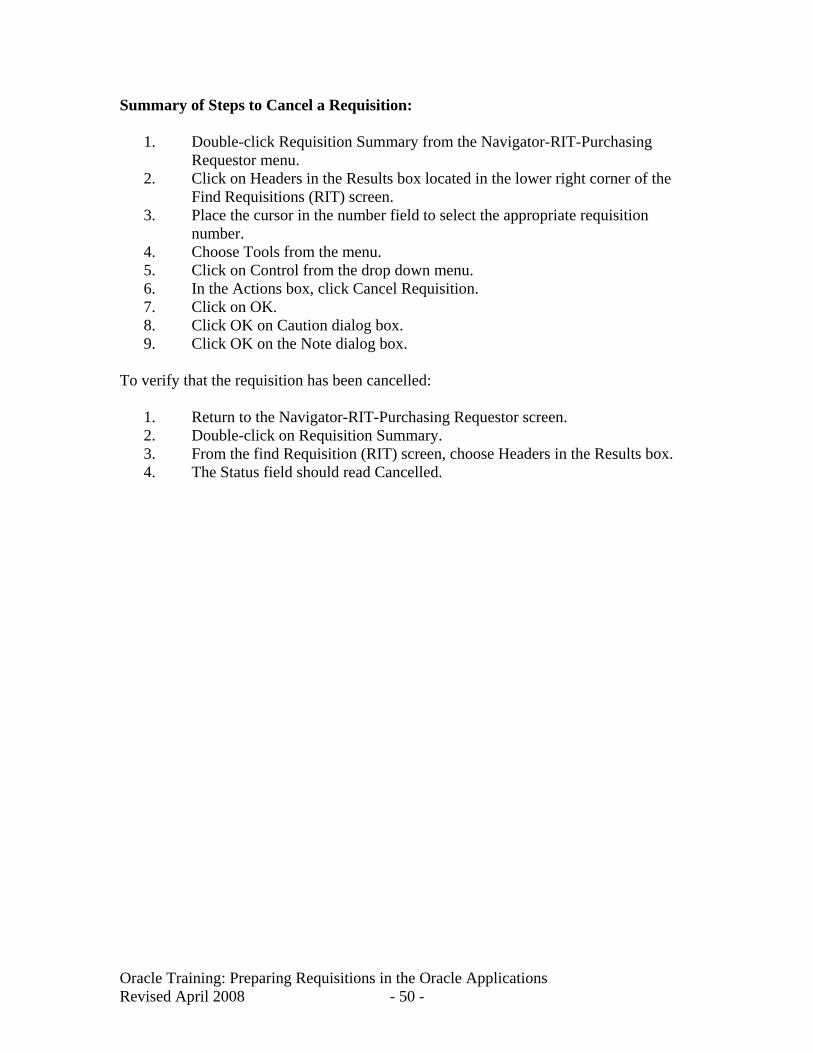
Summary of Steps to Cancel a Requisition:
1. Double-click Requisition Summary from the Navigator-RIT-Purchasing Requestor menu.
2. Click on Headers in the Results box located in the lower right corner of the Find Requisitions (RIT) screen.
3. Place the cursor in the number field to select the appropriate requisition number.
4. Choose Tools from the menu. 5. Click on Control from the drop down menu. 6. In the Actions box, click Cancel Requisition. 7. Click on OK. 8. Click OK on Caution dialog box. 9. Click OK on the Note dialog box.
To verify that the requisition has been cancelled:
1. Return to the Navigator-RIT-Purchasing Requestor screen. 2. Double-click on Requisition Summary. 3. From the find Requisition (RIT) screen, choose Headers in the Results box. 4. The Status field should read Cancelled.
Oracle Training: Preparing Requisitions in the Oracle Applications Revised April 2008 - 50 -
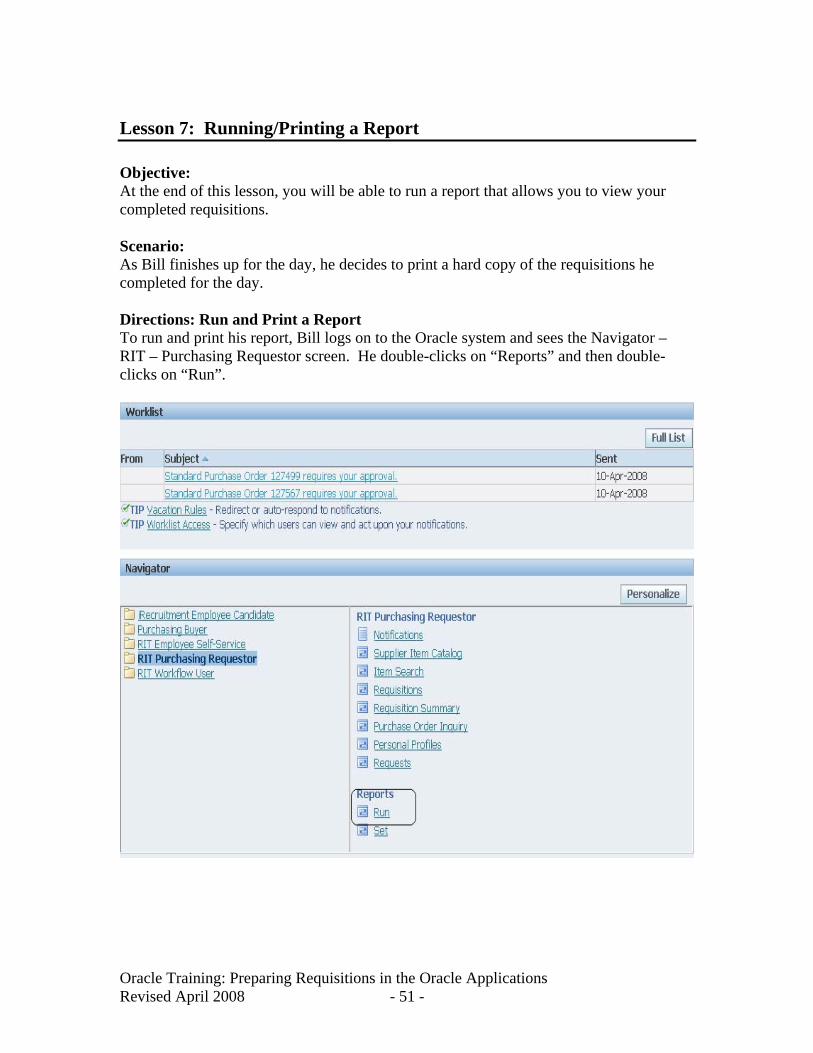
Lesson 7: Running/Printing a Report Objective: At the end of this lesson, you will be able to run a report that allows you to view your completed requisitions. Scenario: As Bill finishes up for the day, he decides to print a hard copy of the requisitions he completed for the day. Directions: Run and Print a Report To run and print his report, Bill logs on to the Oracle system and sees the Navigator – RIT – Purchasing Requestor screen. He double-clicks on “Reports” and then double-clicks on “Run”.
Oracle Training: Preparing Requisitions in the Oracle Applications Revised April 2008 - 51 -
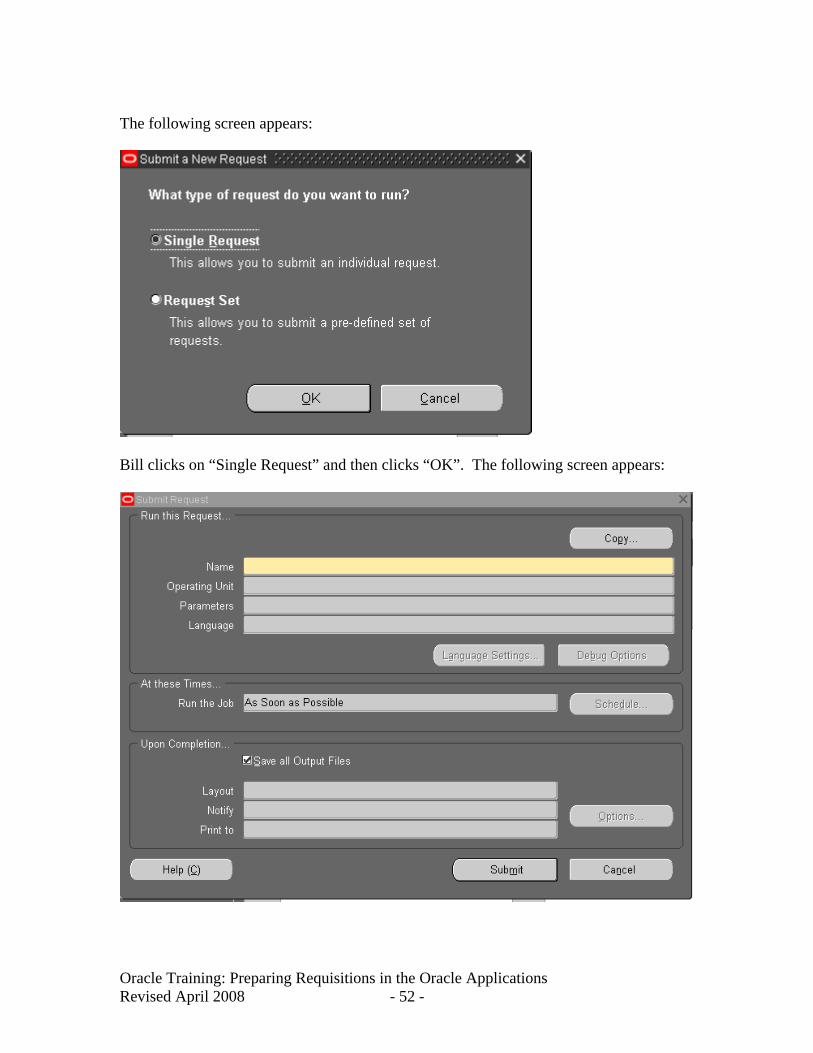
The following screen appears:
Bill clicks on “Single Request” and then clicks “OK”. The following screen appears:
Oracle Training: Preparing Requisitions in the Oracle Applications Revised April 2008 - 52 -
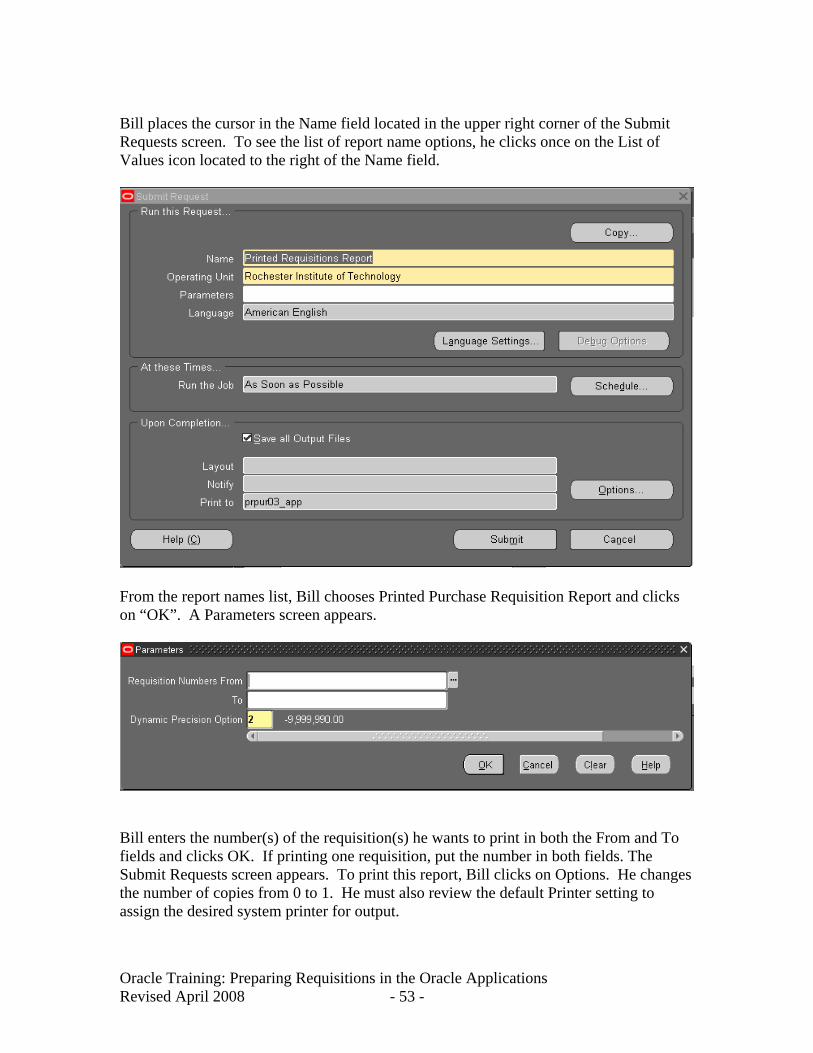
Bill places the cursor in the Name field located in the upper right corner of the Submit Requests screen. To see the list of report name options, he clicks once on the List of Values icon located to the right of the Name field.
From the report names list, Bill chooses Printed Purchase Requisition Report and clicks on “OK”. A Parameters screen appears.
Bill enters the number(s) of the requisition(s) he wants to print in both the From and To fields and clicks OK. If printing one requisition, put the number in both fields. The Submit Requests screen appears. To print this report, Bill clicks on Options. He changes the number of copies from 0 to 1. He must also review the default Printer setting to assign the desired system printer for output.
Oracle Training: Preparing Requisitions in the Oracle Applications Revised April 2008 - 53 -
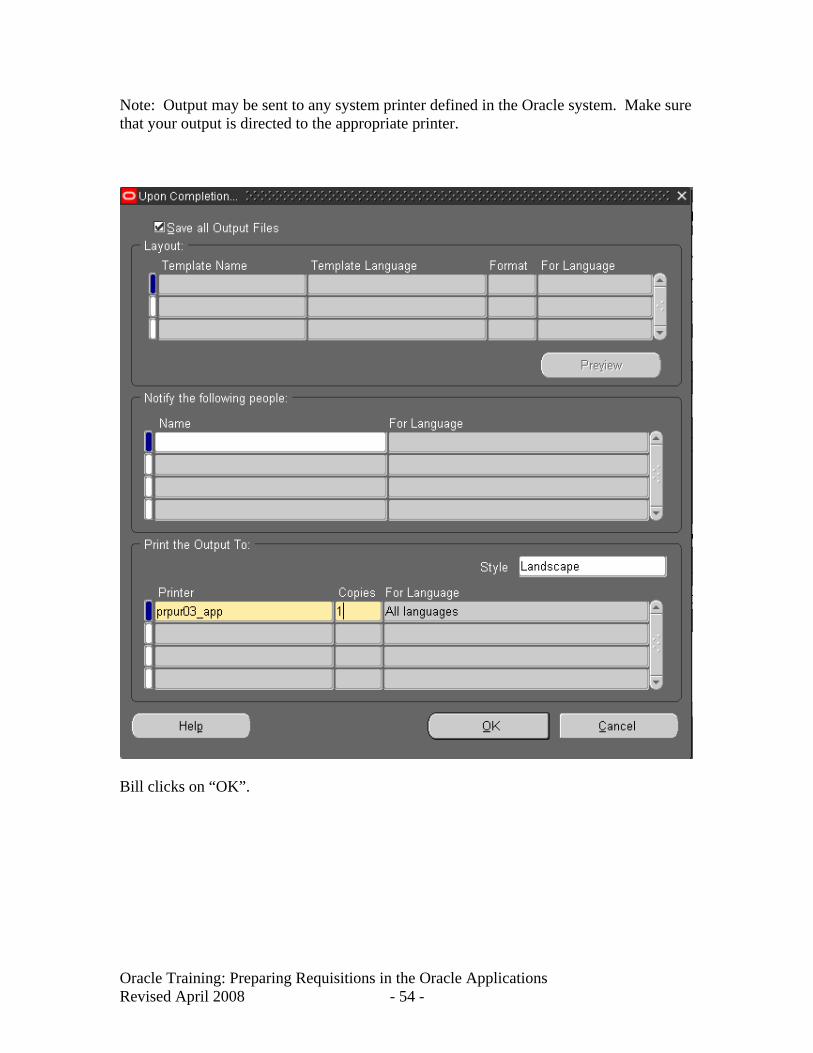
Note: Output may be sent to any system printer defined in the Oracle system. Make sure that your output is directed to the appropriate printer.
Bill clicks on “OK”.
Oracle Training: Preparing Requisitions in the Oracle Applications Revised April 2008 - 54 -
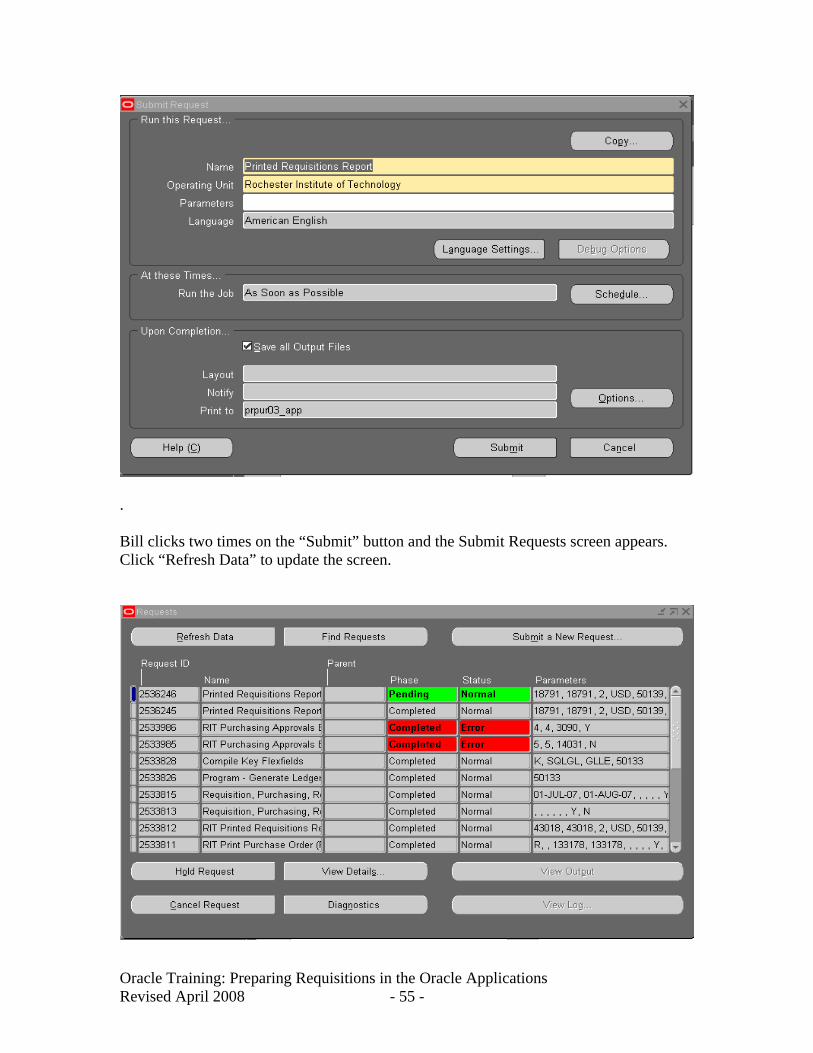
. Bill clicks two times on the “Submit” button and the Submit Requests screen appears. Click “Refresh Data” to update the screen.
Oracle Training: Preparing Requisitions in the Oracle Applications Revised April 2008 - 55 -
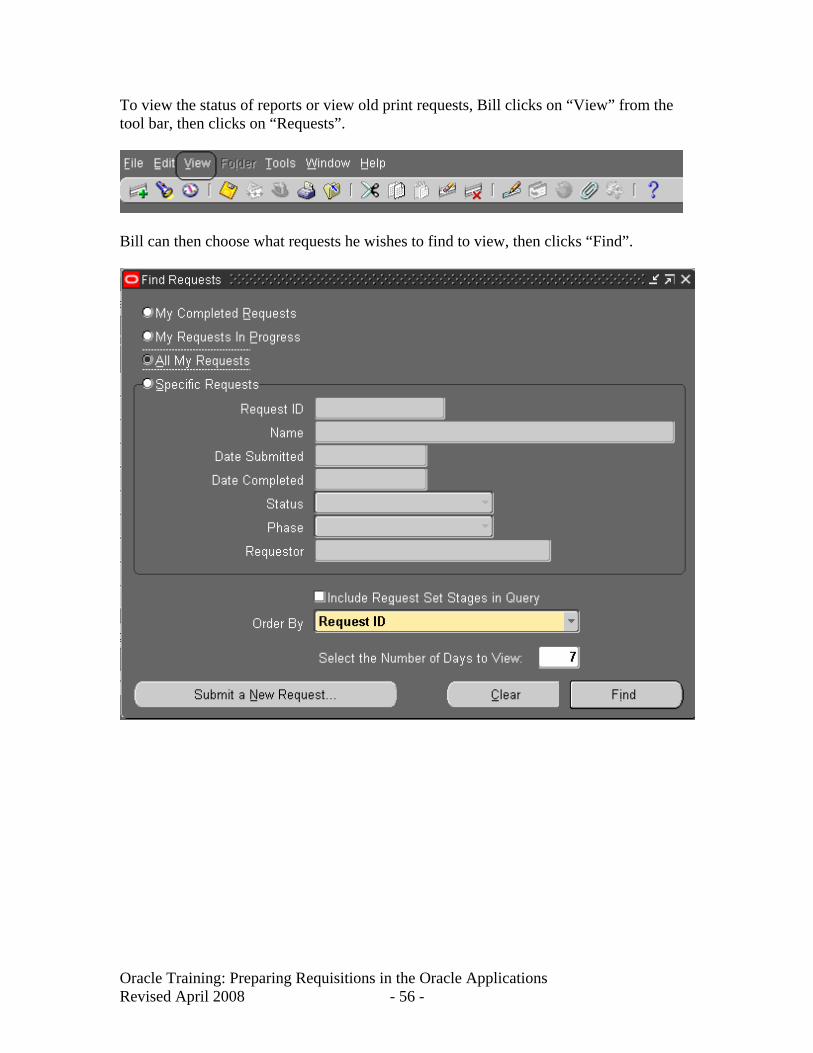
To view the status of reports or view old print requests, Bill clicks on “View” from the tool bar, then clicks on “Requests”.
Bill can then choose what requests he wishes to find to view, then clicks “Find”.
Oracle Training: Preparing Requisitions in the Oracle Applications Revised April 2008 - 56 -
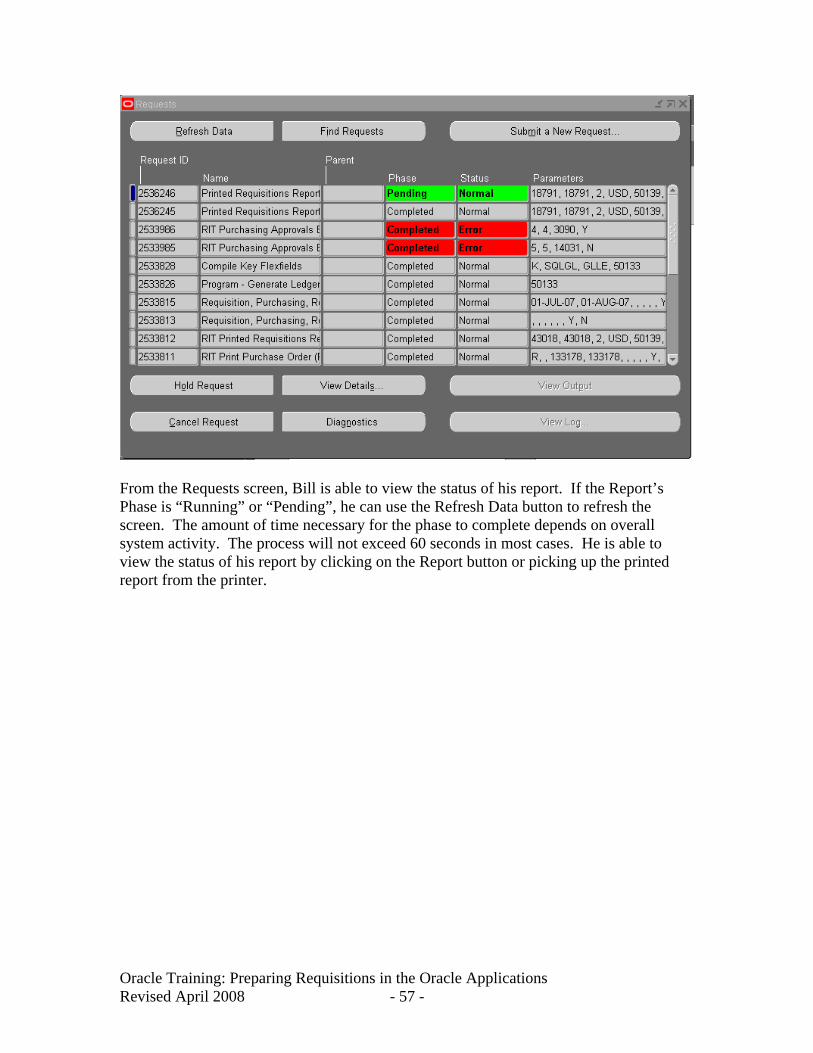
From the Requests screen, Bill is able to view the status of his report. If the Report’s Phase is “Running” or “Pending”, he can use the Refresh Data button to refresh the screen. The amount of time necessary for the phase to complete depends on overall system activity. The process will not exceed 60 seconds in most cases. He is able to view the status of his report by clicking on the Report button or picking up the printed report from the printer.
Oracle Training: Preparing Requisitions in the Oracle Applications Revised April 2008 - 57 -
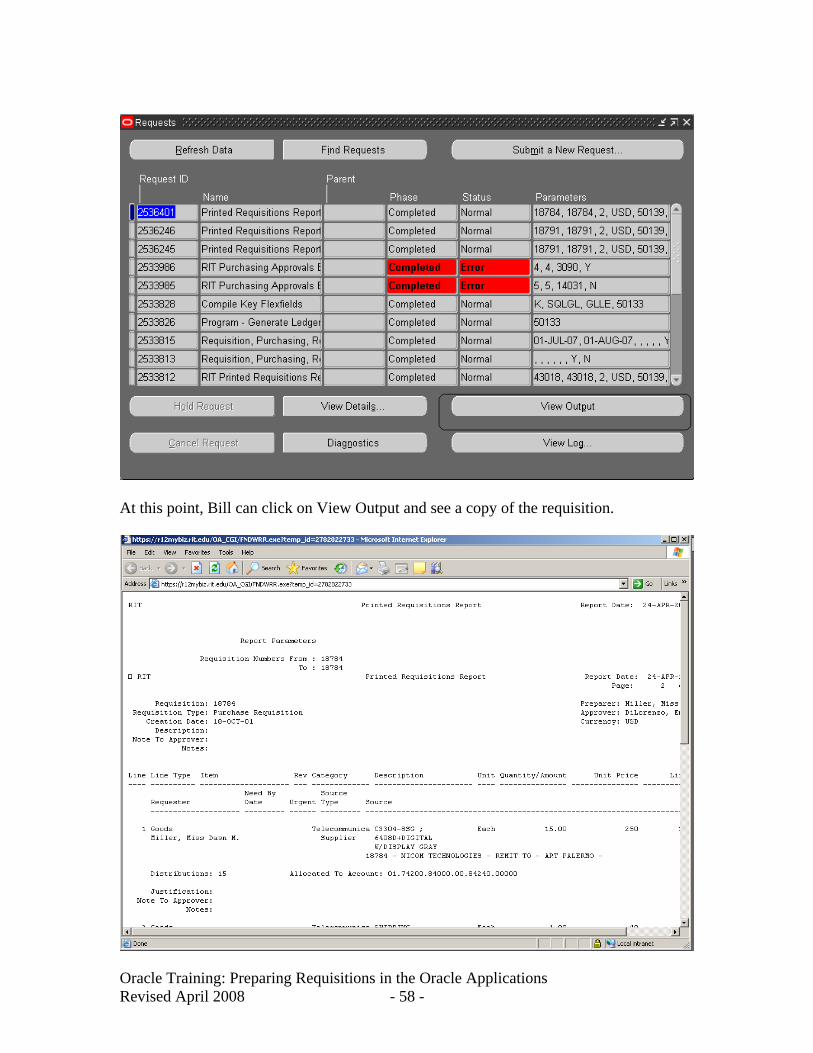
At this point, Bill can click on View Output and see a copy of the requisition.
Oracle Training: Preparing Requisitions in the Oracle Applications Revised April 2008 - 58 -
Summary of Steps to Run/Print a Report:
1. Double-click Reports from the Navigator-RIT-Purchasing Requestor menu. 2. Double-click on Run 3. Place the cursor in the Name field located in the upper right corner of the
Submit Requests screen. 4. To view a list of report options, click on the List of Values 5. Highlight the appropriate report and click on OK. 6. Click on options and change the 0 in the Copies field to 1 to print a copy of
your report and select your printer from the List of Values. Leave the value in the Copies field at 0 to view your request online.
7. Click on the Submit button to run the report and print a copy.
Oracle Training: Preparing Requisitions in the Oracle Applications Revised April 2008 - 59 -
Frequently Asked Questions
Oracle Purchasing
How can I view a requisition once it’s sent for approval?
From your navigator, click requisition summary, type in the requisition number and click
find. Once the requisition comes up, you can click “Lines” and view them from that
window. You will not be able to open the requisition, only to view the lines and/or
distributions.
Once I’ve sent a requisition for approval, how can I make changes to it?
If it has not been approved, have your approver reject it. Then, you can open it up from
requisition summary, make the needed changes and resubmit it for approval. If it has
been approved, contact Purchasing. We can return it to you. Once you make the changes,
resubmit for approval as you normally would.
Can I print a Purchase Order myself?
No, only the Purchasing Dept can print PO’s. Feel free to call us or to put a note in “Note
to Buyer” on your requisition asking that we fax you a copy.
What happens to a requisition if I choose the wrong approver?
If the approver you select is NOT authorized to approve for the department number you
used, you will get an email saying that no approver could be found and the requisition
will remain in the “incomplete” status until you send it to the correct approver. If the
approver you selected can approve for that department, but you want the requisition
approved by someone else who is authorized, contact Purchasing and we will redirect the
document for you. Please note that forwarding a requisition or Purchase Order from one
approver to another could take up to an hour.
What happens to a requisition if my approver doesn’t approve the document?
After 4 days, the requisition will be returned to you and you will have to resubmit it.
Oracle Training: Preparing Requisitions in the Oracle Applications Revised April 2008 - 60 -
How can I remove an encumbrance?
If all goods have been received and paid for, you can contact Purchasing and we can final
close the order. Please be aware that a final close is final, so if further invoices are
received against that Purchase Order, you will have to begin the process again by
submitting a requisition to replace the closed Purchase Order.
If I have a Purchase Order number, how can I find the associated requisition number?
You can do this by going into Requisition Summary. In the middle of the “find” window,
click the tab that says “Related D…..”. This brings up the related documents window.
Enter the Purchase Order number and click find and the related requisition will come up,
if you were the creator of the document.
How can I split distributions between more than one budget line?
The quantity from the item line carries over to the distribution line. To split the
distribution, change the quantity and put in the account number. The next line will
automatically put the balance in quantity. For 2 distributions on one item, change the
quantity on the first distribution line to .5 and fill in the account number. The next line’s
quantity will automatically fill in as .5.
I’ve completed five requisition lines, but I need more-how can I add them?
Once you’ve completed your fifth line, you can either click the green “plus” sign on the
tool bar or use the down arrow on your keyboard.
How can I check the status of a requisition?
Go into Requisition Summary, type in the requisition number and click find. Or, to view
all of your requisitions, just click find without putting in any information. From there
you can see if the requisition is incomplete, in process or approved. If it’s in process and
you’d like to know where it is, just click “Tools” on the tool bar then click “View Action
Oracle Training: Preparing Requisitions in the Oracle Applications Revised April 2008 - 61 -
History”. If the requisition is approved, you can click “lines” on the bottom of the form
then scroll to the right until you see the field marked “Order number”. The number in that
field is the Purchase Order number.
I have to create a requisition of many lines. Do I have to enter the same information over
and over again?
No. You can set preferences for repeat information, including charge account, need by
date, requestor and organization. The supplier only need be filled in for the first line, as
you can’t do multiple vendors per document. To access preferences, when you open your
blank requisition form, just click “tools” and “preferences”. You must, however, be sure
to clear the preferences when you are done as they will be saved until you end your
Oracle session.
My approver just received an Oracle notification saying that a requisition has been
cancelled-why?
The requisition has not been cancelled, the notification has been. When you submit a
requisition for approval, the approver receives an email notification. The next day, if the
requisition has not been approved, that NOTIFICATION is cancelled and Oracle.
Oracle Training: Preparing Requisitions in the Oracle Applications Revised April 2008 - 62 -