Embed Size (px)
Citation preview

Robix™ RascalProject Book
This Document may be Copied and Printed as Desired
Feedback: [email protected] Home: www.Robix.com
Last Modified: 2005-02-21
Page 1 of 48

SAFETY ISSUES WITH ROBIX ROBOTSPLEASE PRINT AND POST
The Robix™ Rascal is not intended for use by children under 12 years of age unlesssupervised by an adult. Also, groups of two or more children aged 12 and over may still require
adult supervision since children in groups may be more playful and incautious than the samechildren are individually.
The main hazard which we have so far identified in using the Rascal is the potential forsomeone to be poked in the eye if their face is too close to a powered robot. Below we discusshow eye-poke accidents might happen, and provide simple Safety Rules to help prevent them.
Other hazards exist and are generally identifiable by common-senseexamination of your robotic setup.
All users, both children and adults, must bear in mind that
*** ROBOTS MAY MOVE SUDDENLY AND WITHOUT WARNING ***(even if they have been not done so before)
That is, robots which appear to be stopped may suddenly start moving, and robots which appearto be moving in a consistent pattern may suddenly change their motion pattern sharply. Suddenmotion happens routinely when the robot starts up, and from intentional or unintentionalprogramming of the robot, and can also happen from equipment malfunction.
You should demonstrate sudden motion to yourself and your students or children. Sudden motionoccurs for instance when the robot is first powered up. The robot will move sharply to its startingposition. For emphasis, repeat the demonstration with a few objects in the robot's path which itknocks over as it moves.
KEEP YOUR FACE CLEAR OF POWERED ROBOTS. SAFETY GOGGLES OFFERUSEFUL BUT ONLY INCOMPLETE PROTECTION IF AN OPERATOR HAS THEIRFACE CLOSE TO A POWERED ROBOT, SINCE THE ROBOT COULD DISLODGETHE GOGGLES AND POKE THE EYE IN A SINGLE MOTION.
MARK SAFETY BOUNDARIES WITH “CAUTION” TAPE AT A GENEROUSDISTANCE AROUND A ROBOT'S WORKING AREA BEFORE POWERING UP. To maintain safety, use common sense and observe these rules:
IMPORTANT SAFETY RULES FOR ALL RASCAL USERS: ALWAYS KEEP YOUR FACE OUTSIDE ROBOT SAFETYBOUNDARIES WHEN WORKING WITH A POWERED ROBOT, ANDWEAR SAFETY GOGGLES AS PROTECTION IF YOU REACH ACROSSSAFETY BOUNDARIES TO HANDLE YOUR POWERED ROBOT. NEVER CROSS SAFETY BOUNDARIES OF SOMEONE ELSE'S ROBOT.
NEVER HAVE A ROBOT THROW ANYTHING EXCEPT A TABLE-TENNIS BALL OR A SOFTER, LIGHTER OBJECT. ESPECIALLYDON'T THROW MARBLES OR ROCKS.
Page 2 of 48

Table of Contents
SAFETY ISSUES WITH ROBIX ROBOTS...................................................................................2Requirements................................................................................................................................... 4Introduction......................................................................................................................................5Snake Project................................................................................................................................... 6Chemist Project................................................................................................................................9Fingers Project............................................................................................................................... 12Golfer Project.................................................................................................................................17Coffee Maker Project..................................................................................................................... 21Bubbler Project.............................................................................................................................. 25Strider Project................................................................................................................................ 28Dancer Project................................................................................................................................33Thrower Project............................................................................................................................. 38Draw-Bot Project........................................................................................................................... 423-Legs Project................................................................................................................................ 45
Page 3 of 48

RequirementsPlease be sure you have gone through at least the Software Tutorial Quick Start and have aworking knowledge of Teach mode before beginning these projects.
We also strongly recommend watching and building along with the 30 minute ConstructionTechniques Video which shows Assembly and Programming of an Arm. This video isavailable at www.robix.com or on the CD that came with your Rascal set.
Use the Classic configuration, ID: 1, in the Usbor controller and use the first 6 servo positionsin pin group A (see below) for the servos in these projects.
Open Pod1 in the Nexway to control these projects.
Page 4 of 48

IntroductionThe Rascal "Example Projects" video, available on the CD or at the website, shows 11 differentrobot projects that can be constructed with the Rascal set. In some cases inexpensive pieces havebeen added as props or parts of the robot, as noted in the text. As appropriate for each project,there are tips for building and experimenting.
Most robots have example scripts which show modular scripting strategy as well as fine points ofthe particular construction. In most cases, these scripts are not intended to be copied exactly butinstead are intended as guides or starting points for your own interactive programming.
Each construction description shows the parts used. Because practically any construction uses thecable bundling parts (spiral wrap and wire twist ties) included in the Rascal, these are notmentioned in the parts list.
The link sizes range from 2 to 6 holes. The 6-link with side holes in it is called 6h. If links formsimple chains such as on the snake or on an arm, then the chain can be described (partially) by asequence of link sizes, which might be 6h, (2), 6, (2), 4, 3. The (2)'s in parentheses are 2-linkswhich are used on the face of a servo to provide a bearing surface but do not act as parts of thechain itself.
It’s often useful to weight or clamp the robot base (if there is one) to keep the project fromjumping or walking.
Never build or operate robots on good furniture as it is likely that the worksurface will be scratched or nicked occasionally
Always put safety (“CAUTION”) tape around the robot's working area. This bright yellow non-adhesive plastic tape, supplied with the Rascal, should be held down with a few pieces of othertape such as masking tape or cellophane tape.
Feel free to use other everyday items to help out. For example binder clips (shown enlargedbelow) come in handy for clamping:
Encourage students to use their imaginations about “auxiliary” parts or variations on our“standard” projects.
Page 5 of 48

Snake ProjectThis project demonstrates an intriguing snake-like motion, and introduces the concept of a simpleand instructive procedure or "algorithm" to do the motion.
Rascal parts:6 servos.Breadboard base.Link (tail to head): 3, 4, 5, 4, 5, 4, 4.Safety marking tape, as always, around the robot's working area.
User supplied parts:None.
Page 6 of 48

Snake Construction
Page 7 of 48

Programming Notes for Snake# servo 1 is tail of snake, servo 6 is head.
# make commands more symmetric for this robot:
invert all off; # clear any left-over settings
invert 1,2,3 on
# users can expand min/max pos past defaults of -1400/1400
# for a wider range of motion but should then check
# to make sure no servos are reaching their internal stops
# and buzzing while pushing against max/min points.
minpos all -1500; maxpos all 1500; # watch for buzzing at minpos, maxpos
# The macro slither does one cycle of snake-like motion
macro slither
move 6 to minpos, 4 to 0, 2 to maxpos;
move 5 to minpos, 3 to 0, 1 to maxpos;
move 4 to minpos, 2 to 0, 6 to 0;
move 3 to minpos, 1 to 0, 5 to 0;
move 2 to minpos, 6 to maxpos, 4 to 0;
move 1 to minpos, 5 to maxpos, 3 to 0;
move 6 to 0, 4 to maxpos, 2 to 0;
move 5 to 0, 3 to maxpos, 1 to 0;
end;
# The macro sleep curls the snake up
macro sleep; move 1 to -1160, 2 to -1000, 3 to -1240, 4 to -1080, 5 to -1360, 6 to minpos; end;
# demonstration
maxspd all 4# very slow speed
move all to 0 # straighten out
sleep # curl up
wait 30 # sleep for 3 seconds
maxspd all 6# slow speed
slither 0 # do the snake motion indefinitely
Page 8 of 48

Chemist ProjectThis project shows the repeatability of the system. The test tubes shown in the video are .3” (8mm) in inner diameter.
Some of the servo oscillation that is seen in the video can be "tuned" out by adjustingaccelerations, speeds, and joint tightness. However, we did not do this in the video so that theviewer could see that this oscillation does indeed happen in many servo systems. Once theoscillation dies down, however, it does not usually affect the positional accuracy of the robot.
Rascal parts:6 servosPivot post base, diagonal link (with wheel)Links, listed from pivot post outward: 6h, (2), 6, (2), 3, 3, gripperSafety marking tape, as always, around the robot's working area
User-supplied parts:Glassware/plasticwarePlastic pipetteLiquidsStand
Page 9 of 48

Chemist Construction
Page 10 of 48

Programming Notes for ChemistWhen programming the lifting and lowering motion to insert the pipette (it's like a large eyedropper) into the flask and pick up some liquid, the user will be tempted to just raise and lowerservo 3 or servo 4 individually. Since these motions rotate the pipette, however, the it will tend tobump the sides of a narrow opening of the flask and will not go straight in.
Moving servos 3 and 4 together can keep the pipette vertical as it moves up and down, but therewill still be side to side motion, so this is an incomplete solution.
The way to raise and lower the pipette, keeping it vertical with very little side-to-side motion isto move servos 1, 2, 3 and 4 in a single move. Do this by teaching the top point of the motion andthen the bottom point, with axes 1-4.
Even teaching the top and bottom point will probably still leave enough side-to-side motion to bea problem. This can be reduced further by adding one or more additional points between the topand bottom points. You will need to move to each point on the way down, unsqueeze thedropper, and then move to each point, in reverse order, on the way up again. You may want tomake the points into macros for convenience. Then the dipping and squeezing code might looklike this:
macro TOP; move 1 to xxx, 2 to xxx, 3 to xxx, 4 to xxx; end;
macro MID; move 1 to xxx, 2 to xxx, 3 to xxx, 4 to xxx; end;
macro BOT; move 1 to xxx, 2 to xxx, 3 to xxx, 4 to xxx; end;
macro SQZ; move 6 to xxx; end;
macro OPN; move 6 to xxx; end;
macro DIP; TOP; MID; BOT; SQZ; OPN; MID; TOP; end;
where the xxx's are the numbers automatically generated while teaching the robot.
Page 11 of 48

Fingers ProjectIf you put your two palms together, then put the table-tennis ball between your two index("pointer") fingers, you'll be able to roll it back forth with several different motions. Your fingerjoints can usually only bend forward by about 90 degrees for each joint, and not backward verymuch at all just using your finger muscles. And you'll notice that usually the last two joints oneach finger bend at the same time.
By contrast, the robot joints can also bend backwards by 90 degrees, and can move fullyindependently of each other.
The main trick to making this project work well is to program the motions so that a light pressureis maintained on the ball all the time. Your first experiments will probably drop the ball at certainpoints in your motion. When this happens it's tempting to just make the grip tighter all throughthe motion, but this can make it too tight at some points and needlessly strain the servos. Instead,try adding an intermediate position or two around where the ball is dropped. Also try to seepositions where servos seem to squeeze excessively and ease pressure there.
Page 12 of 48

Rascal parts:6 servos Breadboard base, 2 breadboard clampsLink for each finger, from base: (2), 3, 3, 5Rubber bands on 5-links for gripping surfaceTable-tennis ballSafety marking tape, as always, around the robot's working area
User-supplied parts:None
Fingers Construction
Page 13 of 48

For clarity only one finger is shown; other is identical.
Page 14 of 48

Programming Notes for Fingers# This script is provided for reference and is not expected to work well
# if typed in as-is. The numbers will all change for the robot you build.
# You can generate your own scripts by using Teach mode to create the moves
# then using those lines in macros.
# Fingers are composed of servos 1, 2, 3 and 4, 5, 6.
# We invert one finger for symmetric programming of servos 1&4, 2&5, 3&6.
invert 1, 2, 3 on; invert 4, 5, 6 off
# High accel, moderate speed gives crisp motion with light loads.
accdec all 200; maxspd all 25;
# Users can sometimes get an expanded swing range, but must
# remember not to leave servos pressing against internal stops, as
# this overheats them and reduces their life.
minpos all -1500; maxpos all 1500; # check for buzzing at limits
macro zpos; move all to 0; end # stands fingers straight up.
macro top; move 1, 4 to -280, 2, 5 to 100, 3, 6 to 250; end;
macro mid; move 1, 4 to 200, 2, 5 to 1100, 3, 6 to 750; end;
macro bot; move 1, 4 to 735, 2, 5 to maxpos, 3, 6 to 1000; end;
macro squat; top; mid; bot; mid; end;
# Macros for squatting action
macro rrub; move 1 to -280, 2 to 100, 3 to 250, 4 to 735, 5 to maxpos, 6 to 1000; end;
macro lrub; move 1 to 735, 2 to maxpos, 3 to 1000, 4 to -280, 5 to 100, 6 to 250; end;
macro rub; rrub; lrub; end;
Page 15 of 48
# Side to side motions
macro rrock; move 1 to 1335, 2 to maxpos, 3 to maxpos, 4 to -578, 5 to -118, 6 to -1096; end;
macro lrock; move 1 to -578, 2 to -118, 3 to -1096, 4 to -1335, 5 to maxpos, 6 to maxpos; end;
macro rlean; move 1 to 1019, 2 to 94, 3 to 241, 4 to -1328, 5 to 94, 6 to 244; end;
macro llean; move 1 to -1328, 2 to 94, 3 to 244, 4 to 1019, 5 to 94, 6 to 241; end;
# Show grip on ball by holding it from top.
macro aframe;
move 1, 4 to 450, 2, 5 to 660, 3, 6 to -403; wait 3
move 1, 4 to 650, 2, 5 to 860, 3, 6 to -603; wait 10
move 1, 4 to 850, 2, 5 to 1060, 3, 6 to -803;
end;
macro manipulate;
squat 3; rub 3; mid; rrock; mid; lrock; mid;
top; llean; top; rlean; mid; aframe;
end;
zpos # straight up, in position to insert ball by hand
wait 20 # wait approx. two seconds while operator inserts ball
top # close on ball
wait 10 # wait one second while operator lets go of ball
manipulate # twiddle the ball
Page 16 of 48
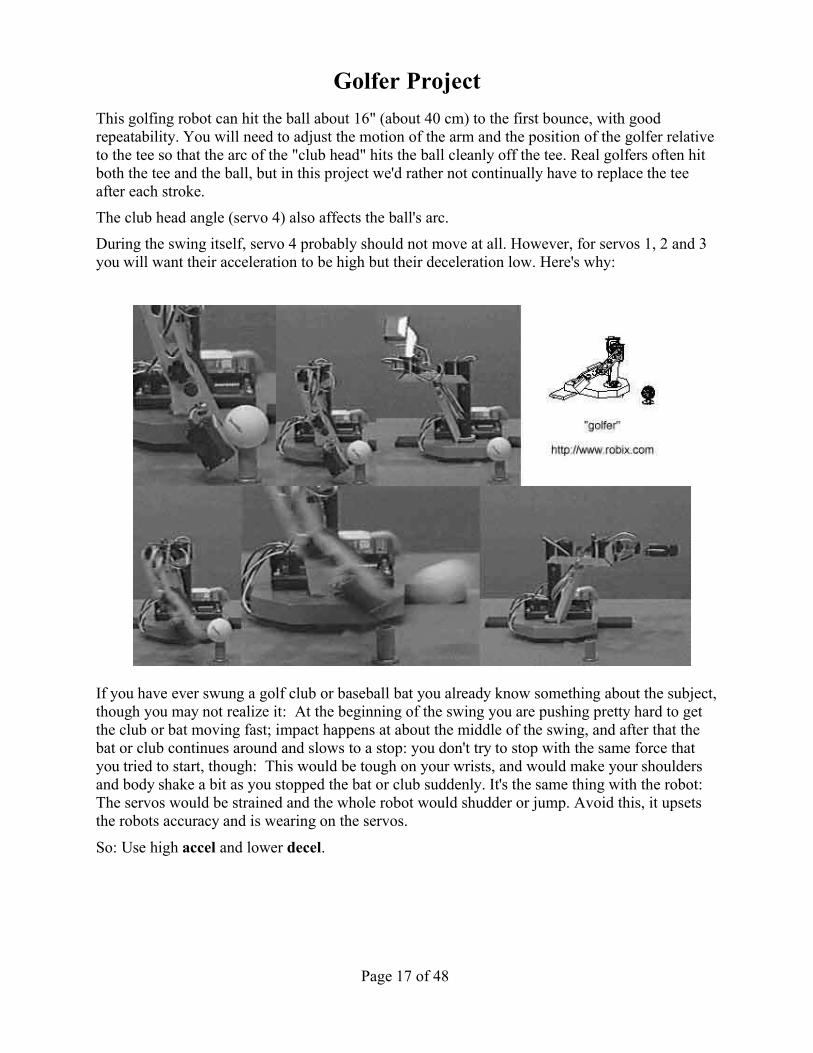
Golfer ProjectThis golfing robot can hit the ball about 16" (about 40 cm) to the first bounce, with goodrepeatability. You will need to adjust the motion of the arm and the position of the golfer relativeto the tee so that the arc of the "club head" hits the ball cleanly off the tee. Real golfers often hitboth the tee and the ball, but in this project we'd rather not continually have to replace the teeafter each stroke.
The club head angle (servo 4) also affects the ball's arc.
During the swing itself, servo 4 probably should not move at all. However, for servos 1, 2 and 3you will want their acceleration to be high but their deceleration low. Here's why:
If you have ever swung a golf club or baseball bat you already know something about the subject,though you may not realize it: At the beginning of the swing you are pushing pretty hard to getthe club or bat moving fast; impact happens at about the middle of the swing, and after that thebat or club continues around and slows to a stop: you don't try to stop with the same force thatyou tried to start, though: This would be tough on your wrists, and would make your shouldersand body shake a bit as you stopped the bat or club suddenly. It's the same thing with the robot:The servos would be strained and the whole robot would shudder or jump. Avoid this, it upsetsthe robots accuracy and is wearing on the servos.
So: Use high accel and lower decel.
Page 17 of 48
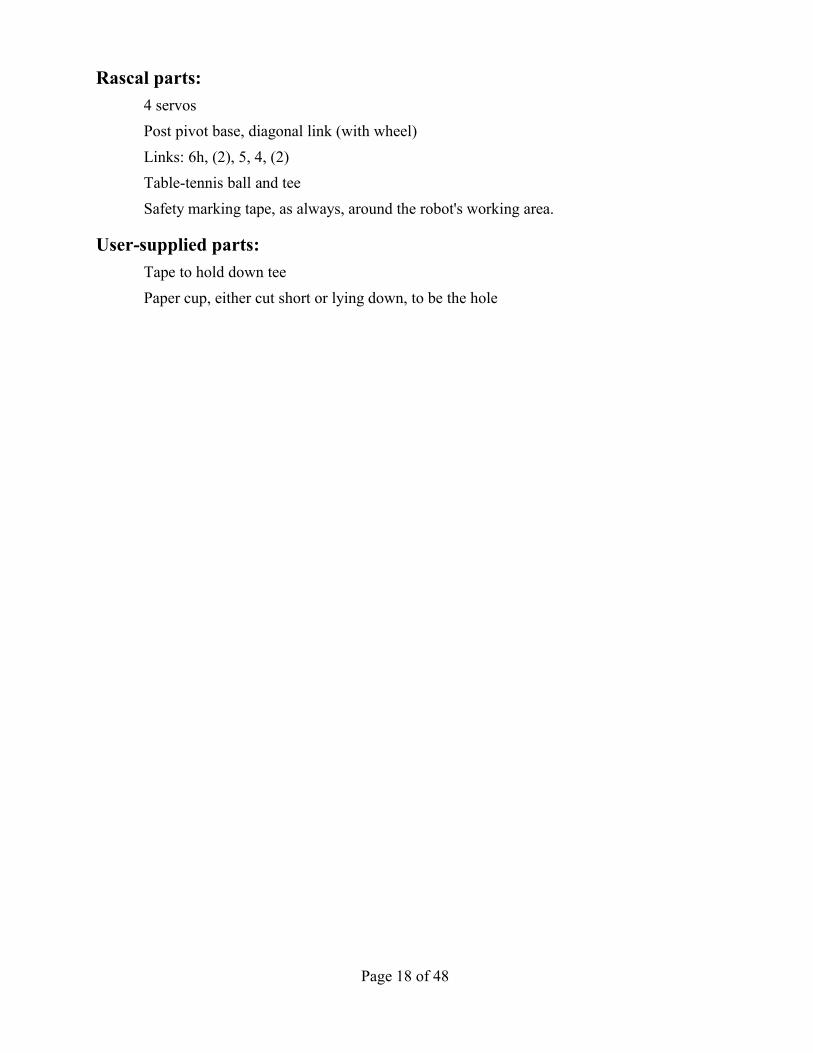
Rascal parts:4 servosPost pivot base, diagonal link (with wheel)Links: 6h, (2), 5, 4, (2)Table-tennis ball and teeSafety marking tape, as always, around the robot's working area.
User-supplied parts:Tape to hold down teePaper cup, either cut short or lying down, to be the hole
Page 18 of 48

Golfer Construction
Page 19 of 48

Programming Notes for Golfer# Tune your values until you get a pleasing swing without
# the tee or ball present. Then move the ball and tee into place.
invert all off # clear any left-over settings
invert 1, 2 on # then set invert to simplify scripting
move 4 to 711 # choose the club head angle
macro swing
accdec 1, 2, 3 10;
maxspd 1, 2, 3 30;
move 1 to minpos;
move 2, 3 to minpos;
wait 25 # wait to let operator load a ball and get clear
accel 1, 2, 3 500; # start hard,
decel 1, 2, 3 20; # and stop easy
maxspd 1, 2, 3 200; # use high max speed
move 1, 2, 3 to maxpos;
end;
swing 0 # swing indefinitely
Page 20 of 48

Coffee Maker Project
NOTE: Hot water is NOT recommended for use in a robotics classroom.
With complete freedom in placing the coffee, sugar, cream, and cup, this robot could be madewith just 4 servos.
Sometimes, however, a robot needs to work with preexisting setups or “fixtures”which it is impractical to modify. In these cases the robot needs increasedflexibility. Robots that do spray-painting are a good example of this situation:The robots have to reach around inside car bodies, let's say, on an assembly line.The shape of the car cannot be changed suit the robots, so the robots have beengiven more axes to allow them adjust to "reach around" situations.
Page 21 of 48

This project as shown in the video is messy for a classroom or lab, of course. However, if for theinstant coffee, sugar, and cream you substitute a pie pan full of dried white beans, then you cando the exercise without the mess. You can also use uncooked rice which is sometimes easier tospoon than beans but is a bit more work to clean up when it scatters.
Try building the project first with only 4 axes. You can start with the Golfer, as follows. The verylast link on the Golfer is a (2)-link which just provides a bearing surface between servos. Replacethis (2)-link with a 5-link instead, and use some rubber bands to attach the spoon to it. You cannow dig into the suggested a pie pan of beans and spoon them into a cup. When you've playedwith the 4-axis spooner, you can experiment with adding another axis to see how this helps withgetting to the spots you want and at the angles you want.
Rascal parts:4 to 6 servos depending on construction.Pivot post base, diagonal link with wheel.Links: 6h, (2), 5, (2), 4, (2), 5, 4, 4 to build as shown, or...Links: 6h, (2), 5, 4, 5 to extend Golfer into a 4-axis SpoonerPlastic spoon.Safety marking tape, as always, around the robot's working area.
User-supplied parts:Sugar, instant coffee, creamer, cup with warm water, jar stands, etc., or...Pie pan filled with 2 pounds/1 kg of dried beans, or rice, and a cup into which tospoon themRubber band or medium (3/4”, 20mm) binder clips, to hold spoon in place
Binder clips, enlarged:
Page 22 of 48
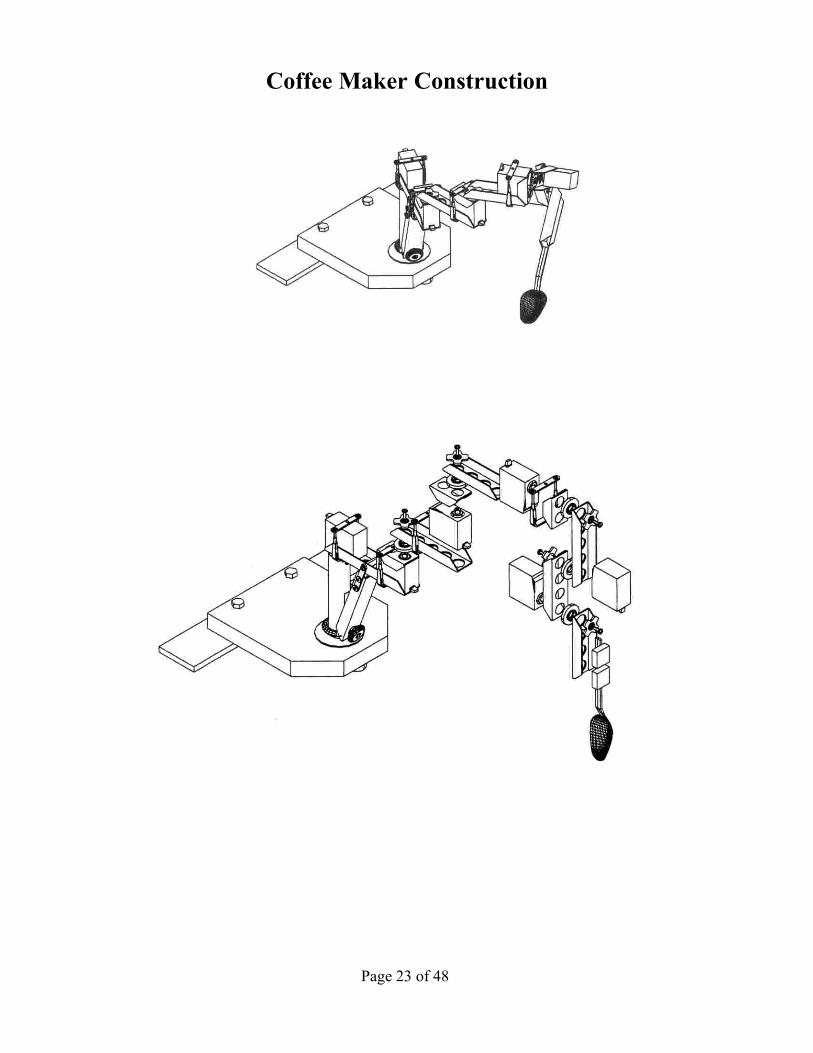
Coffee Maker Construction
Page 23 of 48

Programming Notes for Coffee Maker and “Spooners” in GeneralThe small variations in construction and the wide choice for placement of “pickup” and“delivery” locations in the work area make it difficult to even approximate the program you willneed. Just remember to use lower speeds and acceleration when carrying the liquid, beans, rice,etc.
Depending on your construction, you will probably want to do some inverting of axes so that inteach mode similar axes respond similarly. For instance, if you extend the Golfer into a Spooner,you will probably benefit from having the following lines at the top of your script:
invert all off; # clear any left-over settings
invert 3 on # set lift axis 3 in same direction as 2 and 4
macro shake; # for getting last bit out of spoon
jump 3, 4 by 30
wait 2
jump 3, 4 by -30
wait 2
end;
shake 3 # do three of these shakes
At times you will want to empty the spoon but may not be able to tip if far enough over at theparticular drop-off point you are using. You can adjust the position of the robot and drop-offpoint, of course; or you can "cheat" by shaking the spoon slightly, using relative jumps as in themacro shake, above.
Note the use of jump, by, and wait. Jump is like move with very high accel, decel and maxspd.A small wait is needed after a jump, otherwise the next motion could start before the jumpphysically gets to where it is going. (With hobby servos, the computer can't tell if the servo hasyet gotten to where it was told to go.) The by means that this is a relative jump, which movesby a certain amount rather than to a certain location. To complete the shake there is acompensating jump ... by ... wait ... with a negative amount, which brings the spoon back towhere it was before the shake.
Page 24 of 48

Bubbler ProjectThis project can be messy but it can be worthwhile for its surprising repeatability. In the video,the robot makes 2 sweeps in each direction, 4 in all. Each sweep makes two bubbles with thesecond bubble floating to the backdrop and breaking in nearly the same place each time. Therobot can do this many more times in succession. If you try the same feat by hand you'll betterappreciate its difficulty for a non-robot.
If you decide to try this project, prove out your bubble-making capability before building therobot. Start by finding some bubble solution specifically made for large bubbles. If your toy storehas this it will typically come in large containers (1 gallon/4 liters) and should be inexpensive.Also get some solid malleable wire from a craft store or florist, in diameters 1/16" and 1/32" (1.6mm and .8 mm). Don't use wire from a wire clothes hanger as it is too thick and stiff.
Make the wand. A simple hoop did not hold enough bubble solution at the edge to make goodbubbles for us; this is why the smaller wire is spiraled around the larger, as shown in the video.These spirals imitate the "fringes" found on bubble wands. The wand in the video about 3.5" (9cm) in diameter wand was secured to the last link with electrical tape.
Try the wand out by hand with the bubble solution. We found that stirring the solution to make itfroth a bit helped to produce more consistent bubbles, though we don't know why.
If the bubbles are acceptable, go ahead and build the robot. You will need to clear and mark off alarge area to accommodate the reach of this robot, which is about 20" (about 50 cm). Since thisrobot can flail around, be generous when marking the robot's working area with the safetyboundary tape.
You may also need weight of some sort to hold down the base so it does not tip when the armextends fully. Don't use a book, however, as it will get water- and soap-damaged.
Page 25 of 48
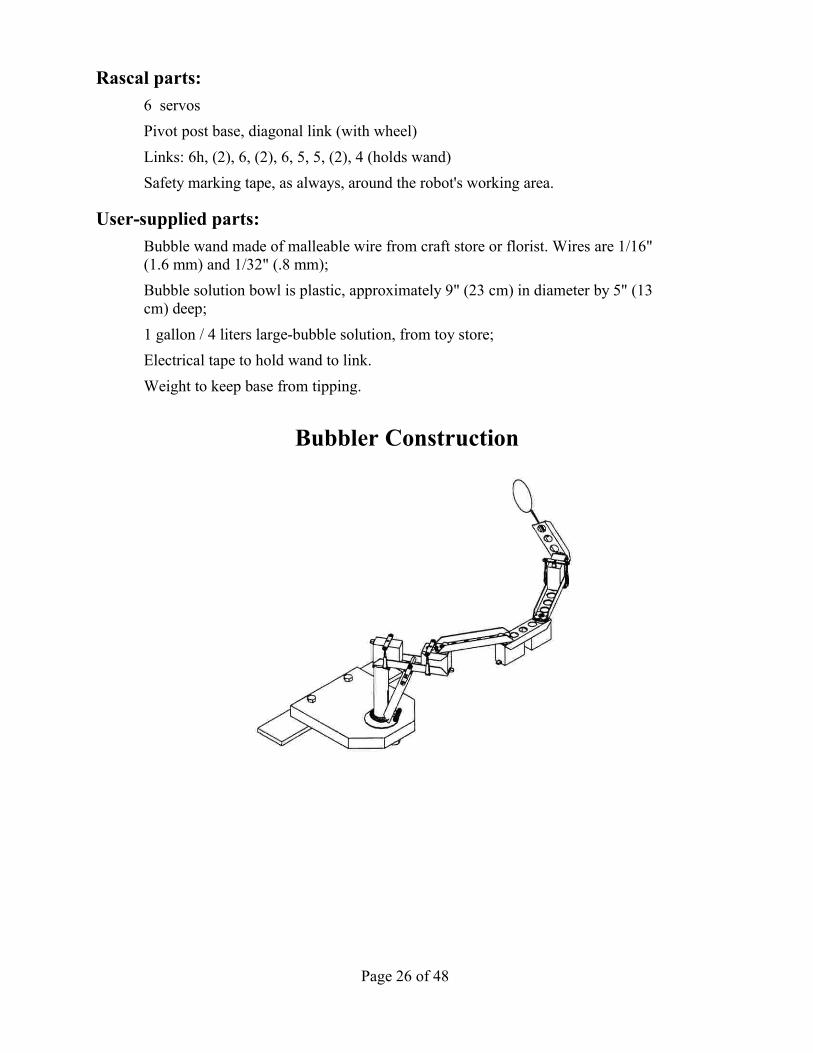
Rascal parts:6 servosPivot post base, diagonal link (with wheel)Links: 6h, (2), 6, (2), 6, 5, 5, (2), 4 (holds wand)Safety marking tape, as always, around the robot's working area.
User-supplied parts:Bubble wand made of malleable wire from craft store or florist. Wires are 1/16"(1.6 mm) and 1/32" (.8 mm);Bubble solution bowl is plastic, approximately 9" (23 cm) in diameter by 5" (13cm) deep;1 gallon / 4 liters large-bubble solution, from toy store;Electrical tape to hold wand to link.Weight to keep base from tipping.
Bubbler Construction
Page 26 of 48

(Diagram shows bubble with one less link than video --try this way first)
Programming Notes for BubblerAvoid overstraining the servos with quick stops of this arm, as doing so can reduce servo gearlife or can break a gear outright.
To minimize splashing of soap solution, program the dipping and sweeping actions with anempty bowl. Use the full bowl when these are right.
The dipping action of this robot, as built, involves not just a single axis but several at the sametime, as shown in the video. This dipping position is not necessarily the same as the startingposition for the sweeping motion that produces the bubbles.
Start with these accel/decel and maxspd settings, then experiment for better bubbles. Since theextended arm has considerable momentum for servos 1 and 2 to control, use the lowest values ofaccel/decel that give good performance.accdec all 4; maxspd all 35
Page 27 of 48
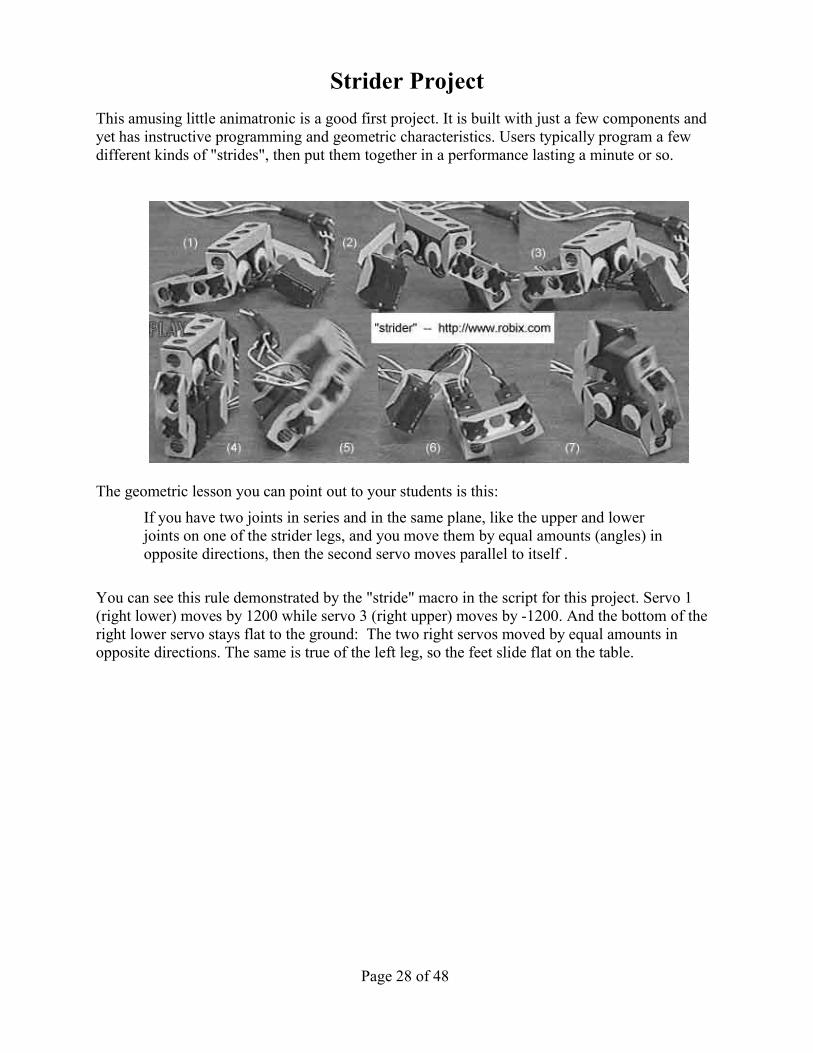
Strider ProjectThis amusing little animatronic is a good first project. It is built with just a few components andyet has instructive programming and geometric characteristics. Users typically program a fewdifferent kinds of "strides", then put them together in a performance lasting a minute or so.
The geometric lesson you can point out to your students is this:
If you have two joints in series and in the same plane, like the upper and lowerjoints on one of the strider legs, and you move them by equal amounts (angles) inopposite directions, then the second servo moves parallel to itself .
You can see this rule demonstrated by the "stride" macro in the script for this project. Servo 1(right lower) moves by 1200 while servo 3 (right upper) moves by -1200. And the bottom of theright lower servo stays flat to the ground: The two right servos moved by equal amounts inopposite directions. The same is true of the left leg, so the feet slide flat on the table.
Page 28 of 48

Rascal parts:4 servosTop link: 4; servos press in, no clamps
Leg links, from top down: (2), 3, (2);Safety marking tape, as always, around the robot's working area.
User-supplied:Movable "doll eyes", if desired, available at craft stores for about three dollars fora bag full. Or you can use masking tape and markers to create eyes.
Strider Construction
Page 29 of 48

Page 30 of 48

Programming Notes for Strider# If you wire the robot as described below, and copy and paste (or type in) the script commands
# of this file and then touch up the definition of the stand macro to be right for your
# construction, then you'll be able to execute the script and see the dance.
# As usual, when you assemble the servos, divide the 180 degrees of travel
# evenly between the two directions, so that putting the servos at the middle of their
# travel will extend the legs straight out..
# These program notes assume that the robot is wired as follows:
# Servos are 1:right lower 2:left lower 3:right upper 3:left upper.
# Left and right are "anatomical": That is, assuming the robot has an
# "anatomy" and a "face", then left and right refer
# to the robot's own left and right, as it would refer to them.
# Use these inversions also. They give conceptual convenience to the
# motions of the joints and will allow your results to (nearly) match ours.. invert all off; # clear any inversions left over from prior robot runs
invert 2, 3 on; # make feet/hips move in same direction
# To use this project as a teaching tool, first let the students play with
# programming various strides without any help. After some work they will
# have had varied successes, lots of falls by the strider, and some ideas to share.
# And you can provide guidance as shown below .macro slow; maxspd all 50; accdec all 8; end; # handy speed setting
macro fast; maxspd all 100; accdec all 20; end; # handy speed setting
# Set the Strider on its head with legs in the air, then in Teach mode
# get the legs precisely straight, and click the teach button to get this position
# into the script. If moves for servos 5 and 6 show up accidentally, edit them out.
# Make this move a macro called "stand". It might look like this:macro stand; # users adjust these values so robot stands * straight * up
move 1 to 75, 2 to -144, 3 to 168, 4 to 174; # adjust values for your robot
end;
Page 31 of 48

# Now, using * relative * moves (move by), we define the macros stride, shuffle, flop,
# tantrum, headstand, and then a whole show using them:
macro stride;stand; move 1, 4 by 1200, 2, 3 by -1200;
stand; move 1, 4 by -1200, 2, 3 by 1200;
end;
# a “setup” macro called preshuf which prepares the robot to shuffle:macro preshuf; stand; jump 1, 4 by -150, 2, 3 by 150; wait 1; end;
macro shuffle;jump 1, 4 by 300, 2, 3 by -300; wait 1;
jump 1, 4 by -300, 2, 3 by 300; wait 1;
end;
macro flop;stand;
move 1, 2, 3, 4 by 600;
move 1, 2, 3, 4 by -600;
end;
macro tantrum;jump 1 by -400, 2 by 400; wait 2;
jump 1 by 400, 2 by -400; wait 2;
end;
macro headstand;
stand; move 1, 3 to maxpos; move 2, 4 to minpos;
wait 5; stand;
end;
slow; stride 2;
fast; stride 2;
preshuf; shuffle 15;
fast; flop; tantrum 8; headstand;
preshuf; shuffle 0; # end with a continuous flailing of the legs
Page 32 of 48

Dancer ProjectThe servos stacked together on the breadboard base allow the top of this animatronic to spin twofull revolutions from one extreme twist to the other. You can easily program other "dance" stepsusing absolute and relative moves. The sample scripts below help get you started.
When building the project, mount servo 1 facing upward on the breadboard, and mount servos 2,3 and 4 in a vertical stack, mounting them in an alternating fashion out-and-in from servo 1'soutput shaft. Keep lots of slack in the cables to allow for the spinning action.
Note that servo 1 gets a 4-link on top of it, which is used as a bearing surface. This 4-link ismarked with ()'s in the parts list for the project to indicate the bearing surface function. Normally,of course, this would just be a 2-link, but the construction uses all of the 2-links on other servos.
Since there is not much force on the Dancer structure, you may find that the servos 2, 3, 4 and 5will almost sit in their 3-links by friction, without the need for servo clamps. If the constructionpulls apart, just add the clamps.
Page 33 of 48

Rascal Parts:5 servosBreadboard base and one breadboard clampLinks, from base upward: (4), 3, (2), 3, (2), 3, (2), 3, (2), 5Safety marking tape as always around the robot's working area
User-Supplied parts:SockColored glue attaching eyes and painting mouthHair and eyes from craft shop (or use yarn for hair and paint the eyes)Light-weight fabric sample for the gownRubber bands to hold gown in place
Dancer Construction
Page 34 of 48

Page 35 of 48

Programming Notes for Dancerinvert all off # since servos 1-4 have same orientation
macro slow; # handy speed settings
maxspd all 30; accdec all 8;
end;
macro fast; # handy speed settings
maxspd all 75; accdec all 20;
end;
macro zpos; # handy centering command
move 1, 2, 3, 4, 5 to 0;
end;
macro spin # spin all the way in one direction and then the other
move 1, 2, 3, 4, 5 to minpos; move 1, 2, 3, 4, 5 to maxpos;
end;
# test out the spins, slow then fast
slow; zpos;
spin 2; fast; spin 2;
zpos;
# define some more macros that move in small lurches
macro jog_pos;
jump 1, 2, 3, 4, 5 by 50; wait 1;
end;
macro jog_neg;
jump 1, 2, 3, 4, 5 by -50; wait 1;
end;
Page 36 of 48
# jog back and forth
jog_pos 20;
jog_neg 35;
jog_pos 25;
jog_neg 10;
# define a macro that nods the head side to side, then run it
macro nod;
move 5 to 0;
move 5 to -500;
move 5 to 500;
move 5 to 0;
end;
nod;
# macros that "lean" left and right
macro lean_left;
move 1, 2 to maxpos; move 3, 4 to minpos;
end;
macro lean_right;
move 1, 2 to minpos;
move 3, 4 to maxpos;
end;
macro side_to_side;
lean_left; nod; lean_right; nod;
end;
fast; zpos; side_to_side 2; zpos; nod;
Page 37 of 48
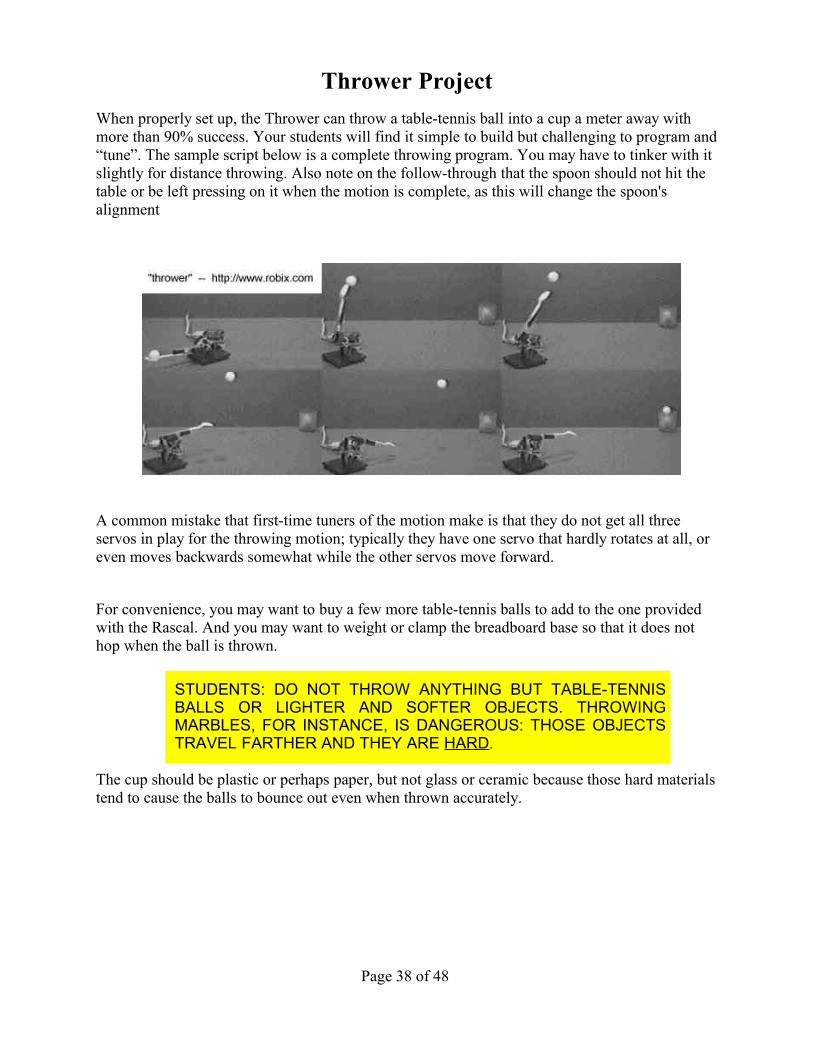
Thrower ProjectWhen properly set up, the Thrower can throw a table-tennis ball into a cup a meter away withmore than 90% success. Your students will find it simple to build but challenging to program and“tune”. The sample script below is a complete throwing program. You may have to tinker with itslightly for distance throwing. Also note on the follow-through that the spoon should not hit thetable or be left pressing on it when the motion is complete, as this will change the spoon'salignment
A common mistake that first-time tuners of the motion make is that they do not get all threeservos in play for the throwing motion; typically they have one servo that hardly rotates at all, oreven moves backwards somewhat while the other servos move forward.
For convenience, you may want to buy a few more table-tennis balls to add to the one providedwith the Rascal. And you may want to weight or clamp the breadboard base so that it does nothop when the ball is thrown.
STUDENTS: DO NOT THROW ANYTHING BUT TABLE-TENNISBALLS OR LIGHTER AND SOFTER OBJECTS. THROWINGMARBLES, FOR INSTANCE, IS DANGEROUS: THOSE OBJECTSTRAVEL FARTHER AND THEY ARE HARD.
The cup should be plastic or perhaps paper, but not glass or ceramic because those hard materialstend to cause the balls to bounce out even when thrown accurately.
Page 38 of 48
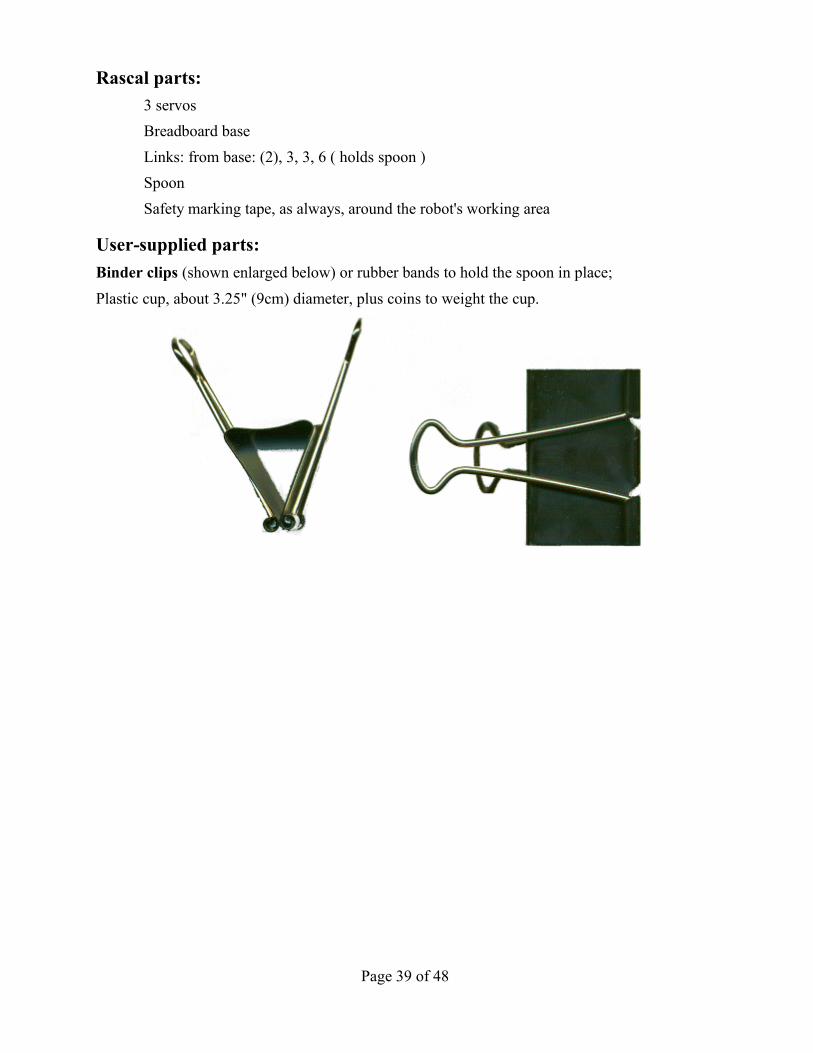
Rascal parts:3 servosBreadboard baseLinks: from base: (2), 3, 3, 6 ( holds spoon )SpoonSafety marking tape, as always, around the robot's working area
User-supplied parts:Binder clips (shown enlarged below) or rubber bands to hold the spoon in place;
Plastic cup, about 3.25" (9cm) diameter, plus coins to weight the cup.
Page 39 of 48

Thrower Construction
Page 40 of 48

Programming Notes for Thrower# As usual, the numbers in the move the commands are illustrative # and won’t work well if just copied in as-is, though they can provide a good starting point.
# The physical setup of thrower is such that the script command
# move 1, 2, 3 to 0
# points the spoon straight up over the servos .
invert all off # cancel any previous settings
invert 2 on # invert so teach keys suggest right motions
macro throw;
maxspd 1, 2, 3 25; # come back at low speed
accdec all 4;
move 1 to -957, 2 to -507, 3 to -541; # tune these positions
wait 25 # wait while operator loads ball
maxspd 1, 2, 3 500; # throw at high speed
accdec all 200;
move 1 to 554, 2 to 1121, 3 to 729; # tune these positions
wait 10 # wait for visual effect
end;
throw 0 # continuous throws
Page 41 of 48

Draw-Bot ProjectThis robot ends in a point (a pen point), so please remember:
ROBOTS MAY MOVE SUDDENLY
AND WITHOUT WARNING
Please review and follow the Safety Precautions listed at the front of this manual.
For this project you may have to tilt the clipboard and pad so that the pen stays in contact withthe paper throughout the drawing. Or you may adjust the pressure for different regions of thedrawing, as we do in our sample script below.
Rascal Parts:3 servosPivot post base and diagonal link (with wheel)Links, from post : 6h, 5, (2), 5, 62 wide servo clampsSafety marking tape, as always, around the robot's working area
User-supplied parts:Ball-point pen;2 Rubber bands: One to hold end of pen to 6-link, one to provide thin rubber strip.
The construction uses 2 wide servo clamps. The first attaches servo 3 to the first 5-link. Thesecond wide clamp fastens the final 6-link back-to-back to the 5-link that comes just before it. Athin rubber strip from a user-supplied rubber band goes between the 6-link and 5-link to preventslippage;
The pen is fastened to the 6-link at the lower (pointed) and upper ends. At the lower end the penis held with a rubber-band. The upper end of the pen is captured by the same wide clamp whichholds the 6-link and 5-link together.
Page 42 of 48

Draw-Bot Construction
Page 43 of 48

Programming Notes for Draw-Bot# This script is provided as a sample. Use if for guidance rather than
# depending on it to work “as-is”. The move commands below were all created using
# Teach mode, which is also the easiest way for you to proceed.
# Sketch a straight-line figure, such as a star, on a pad of paper, then
# define macro pendown for your robot and execute it.
# Next, teach your robot the figure by moving in succession to each of the points.
# Since axes 1, 2 in our robot did not move perfectly parallel to the table, pen pressure
# was increased through part of the drawing where the line was faint and he
# the pen was wiggling. Adding pressure damped the servo wiggle and darkened the line.
invert all off # clear any left-over invert settings
invert 1, 2 on # invert axes to make teach-mode keys more intuitive
maxspd all 12 # low speed,
accdec all 20 # moderate acceleration
macro penup; move 3 to 0; end; # pen up
macro pendown; move 3 to -375; end; # pen down
macro start; move 1 to -979, 2 to 1400 end
macro star;
start;
move 1 to -499, 2 to 1261; move 1 to -154 , 2 to 1240
move 1 to -226, 2 to 937;
move 1 to 173, 2 to 286, 3 by -50 # increase pen pressure slightly
move 1 to -298, 2 to 739; move 1 to -106 , 2 to 202
move 1 to -532, 2 to 796
move 1 to -859, 2 to 883, 3 by 50 # ease off pen pressure
move 1 to -745, 2 to 1111
end
penup; start # don't make a line moving to start
pendown; star 0 # pen down then cycle continuously through the figure
Page 44 of 48

3-Legs ProjectThis walker is somewhat advanced from both a construction and programming point of view.Since the robot can also walk right off the table and break a servo, we recommend that thisproject only be assigned to thoughtful and talented students. The student should find it interestingto compose walking and turning macros as well as other kinds of activities.
The "galloping" stride shown in the video, where the robot charges toward the camera (and fallsoff the table) tends to pound on the front servos and so the use of this type of stride should belimited to short demonstrations.
This robot probably won't work well on a rug.
Page 45 of 48

Rascal parts:6 servosBreadboard, plus rubber bands to hold the Adapter onto itLinks, from breadboard down each leg: (2), 5, (4), 3Safety marking tape, as always, around the robot's working area
User-supplied parts:3 pink erasers, Eberhard-Faber #100 "Pink Pearl" erasers, made in USA. If notavailable, a similar eraser may be used, and may have to be cut to fit tightly intothe end of the 5-links.
The erasers press into the ends of the 5-links, while the second servo on each leg is clamped intothe middle of the 5-link.
At the end of the 3-link the circular plastic glide is attached. These glides are white nylon, andhave a screw, washer, and wing nut to hold them in place in the last hole of the link.
3-Legs Construction
Page 46 of 48

(for clarity, front leg not shown: build same as right rear)
Page 47 of 48

Programming Notes for 3-Legs# We suggest that you wire the servos so that 1 is the lower front, 2 is# upper front, 3 is lower left, 4 is upper left, 5 is lower right, 6 is # upper right, though other sequences may be more "intuitive" for you. We # also suggest using invert commands, such as
invert all off # clear any left-over settings invert 1, 2, 5, 6 on # joints are positive-forward
# Note how the robot moves: Each foot alternates between gliding and # gripping, depending on whether the glide (plastic disc)# or the rubber eraser is on the table.
Page 48 of 48
![[ROBIX] Naruto 457](https://img.dokumen.tips/doc/110x75/568bf47d1a28ab89339e3afd/robix-naruto-457.jpg)

![[ROBIX] Naruto 471](https://img.dokumen.tips/doc/110x75/568bf1011a28ab893391aa77/robix-naruto-471.jpg)
![[ROBIX] Naruto 476](https://img.dokumen.tips/doc/110x75/568bd9471a28ab2034a6749c/robix-naruto-476.jpg)
![[ROBIX] Naruto 491](https://img.dokumen.tips/doc/110x75/568bf3fd1a28ab89339c5d74/robix-naruto-491.jpg)


![[ROBIX] Naruto 475](https://img.dokumen.tips/doc/110x75/568c3b831a28ab0235aa70c1/robix-naruto-475.jpg)
![[ROBIX] Naruto 466](https://img.dokumen.tips/doc/110x75/568bd7391a28ab20349ef5b3/robix-naruto-466.jpg)
![[ROBIX] Naruto 440](https://img.dokumen.tips/doc/110x75/568c37a11a28ab02359c3d9f/robix-naruto-440.jpg)

![[ROBIX] Naruto 498](https://img.dokumen.tips/doc/110x75/568c48911a28ab491690ae07/robix-naruto-498.jpg)
![[ROBIX] Naruto 453](https://img.dokumen.tips/doc/110x75/568c4afb1a28ab49169a6a01/robix-naruto-453.jpg)
![[ROBIX] Naruto 473](https://img.dokumen.tips/doc/110x75/568bdbae1a28ab2034af6b2d/robix-naruto-473.jpg)
![[ROBIX] Naruto 463](https://img.dokumen.tips/doc/110x75/568bdb141a28ab2034ad28db/robix-naruto-463.jpg)
![[ROBIX] Naruto 499](https://img.dokumen.tips/doc/110x75/568c4e951a28ab4916a87db2/robix-naruto-499.jpg)
![[ROBIX] Naruto 485](https://img.dokumen.tips/doc/110x75/568bef791a28ab89338c5094/robix-naruto-485.jpg)

![[ROBIX] Naruto 489](https://img.dokumen.tips/doc/110x75/568bd9fc1a28ab2034a916b7/robix-naruto-489.jpg)
![[ROBIX] Naruto 490](https://img.dokumen.tips/doc/110x75/568bdd001a28ab2034b441fd/robix-naruto-490.jpg)
![[ROBIX] Naruto 459](https://img.dokumen.tips/doc/110x75/568befa91a28ab89338cf3e1/robix-naruto-459.jpg)
![[ROBIX] Naruto 468](https://img.dokumen.tips/doc/110x75/568bf20b1a28ab89339542eb/robix-naruto-468.jpg)

![[ROBIX] Naruto 460](https://img.dokumen.tips/doc/110x75/568c4a9f1a28ab491698e8e4/robix-naruto-460.jpg)
![[ROBIX] Naruto 467](https://img.dokumen.tips/doc/110x75/568c4e561a28ab4916a785fa/robix-naruto-467.jpg)
![[ROBIX] Naruto 496](https://img.dokumen.tips/doc/110x75/568bf4671a28ab89339deb78/robix-naruto-496.jpg)
![[ROBIX] Naruto 462](https://img.dokumen.tips/doc/110x75/568bd6d71a28ab20349d8827/robix-naruto-462.jpg)
![[ROBIX] Naruto 478](https://img.dokumen.tips/doc/110x75/568c4d5c1a28ab4916a3a645/robix-naruto-478.jpg)