Embed Size (px)
Citation preview

RobecoSAM AG
Josefstrasse 218 - 8005 Zurich - Switzerland - www.robecosam.com - Phone +41 44 653 10 10 - Fax +41 44 653 10 80
RobecoSAM Corporate Sustainability Assessment – Online Assessment Interface Guide
May 2017

2 / 13
Table of Contents
Table of Contents .................................................................................................. …………….. …………2
1. Introduction ........................................................................................ ……………… …………3
2. Questionnaire Interface ....................................................................... ……………… …………4
2.1 General Navigation 4
2.1.1 Changing a question status and using prefilling with last year’s information 4
2.1.2 Submission 5
3. Questionnaire Content ........................................................................ ………………. …………7
3.1 Working on a question 7
3.2 Saving a question 8
3.3 Unit converter 8
3.4 Info button 8
3.5 Warning messages 9
3.6 Adding references 9
4. Other Account Functionalities ........................................................ …………………….. ………..11
4.1 Documents tab 11 4.2 Reports tab 11 4.3 Account tab 12
4.4 Help tab 13

3 / 13
1. Introduction
This document provides a quick overview of the main features of RobecoSAMs’ Online Assessment Interface. For further details, please visit our resource center. All functionalities can be accessed under the various tabs on top of the interface.
Figure 1: Overview of tabs in the assessment interface
The Questionnaires tab is arguably the one you will spend the most time working with. It contains this year's assessment as well as access to all questionnaires that your company has submitted in the previous years. We will start by explaining the features in this tab.

4 / 13
2. Questionnaire Interface
2.1 General Navigation
All content is displayed in a tree structure. There are three dimensions: Economic, Environmental and Social, and sub-levels called criteria that contain questions of the same topic.
Figure 2: Questionnaire tree structure
For small screen sizes you may collapse the right and left panes by clicking the double arrows on the border. The colored progress squares indicate the status at which the questions, criteria and dimensions are at any given moment. The administrator can set these statuses on the top right, to signal content as complete, or prevent unwanted changes by users after a question has been deemed approved. Please see the Help tab which gives you a detailed breakdown.
2.1.1 Changing a question status and using prefilling with last year’s information
In case edits must be made, the administrator can reset every status. Users may revert a question from “completed” status, and only the administrator can revert questions to “approved.” Several other buttons appear alongside on the upper right corner. Hovering over all these icons will show tooltips explaining their functionality.

5 / 13
For one, you can generate a .pdf of the questionnaire, with or without your answers. This is merely meant as a representation of the actual questionnaire and can be used for printing or for sending a read-only version to any internal stakeholders of your choosing. Please note that we are not able to offer a Microsoft Word document of the questionnaire. Additionally, if your company has submitted an assessment last year, then prefill icons will appear. They allow the administrator to automatically enter last year's answers into this year's questions. This is available both for individual questions as well as for the entire questionnaire, which allows cutting the workload significantly for all the parts that contain mostly unchanged or repeated information. The icons are shown in the screenshots below.
Figure 3: Overview of relevant question level buttons
Figure 4: Reopening the question
Figure 5: The pop-up when you want to overwrite a current answer with the last years prefill
2.1.2 Submission
The administrator can submit the completed questionnaire, thus finalizing the assessment. Clicking the button shown below will present you with a final confirmation popup that includes the approval form. If you do not accept the conditions, you will not be able to submit your answers.
Figure 6: Submission button

6 / 13
Figure 7: Submission and Approval Form pop-up

7 / 13
3. Questionnaire Content
3.1 Working on a question
The questionnaire itself is laid out with several recurring types of tick boxes, input fields, document attachments and comments. In addition to that, each question always has not known and not applicable options. For each question there is an introductory text, giving context and specifying what is being asked for. Inactive input elements will be greyed out. The corresponding section must be ticked to activate it and enable input. Active parts will be highlighted green.
Figure 8: Example of question layout 1

8 / 13
Figure 9: Example of question layout 2
3.2 Saving a question
When you’ve finished filling out the question you will want to save the answer on our assessment server. Rest assured: this is done automatically every time you switch between questions, but for further control, we provide a save button at the bottom of the question, along with the ability to cancel your current changes, or to reset the question completely to its empty status.
3.3 Unit converter
Several input fields request data in specified units. Clicking on the green icons with a calculator (see figure above) will open a zoomed in view with a unit converter, allowing you to convert data from a predefined set of metrics. The conversion factors used can be found in the 2017 FAQ document.
Figure 10: Unit conversion example
3.4 Info button
For more definitions of some key words, as well as details about the question rationale and data requirements, please use the green info button. We recommend consulting the info button before answering a question.

9 / 13
Figure 11: Example of an info button
These info sections should make every question self-contained. Should you still have some questions, you can reach us at our CSA Helpline clarify further methodological subtleties.
3.5 Warning messages
The interface has a feature that performs basic data level checks on your input for some questions. Some ensure that you haven't mistakenly pasted the wrong number or added a digit; others inform you that we need more data (e.g. in a time series). A warning message will pop up when you try to save the question. If the data you entered is in fact correct, you may choose to ignore the warning message.
Figure 12: Example of a warning message
In addition to the warning message, the fields in question will be highlighted. In the example below it can be visually hard to catch the fact that the data for the third year has been entered in the wrong order of magnitude (a tenth of the other values), which is probably due to having typed a zero too little. In this case, the largest and smallest values are highlighted for you to review.
Figure 13: Example of in-question warnings
3.6 Adding references
Some questions require supporting documents. Wherever applicable, it is both mentioned in the question text and displayed as a paperclip icon.
Figure 14: Reference clip
10 / 13
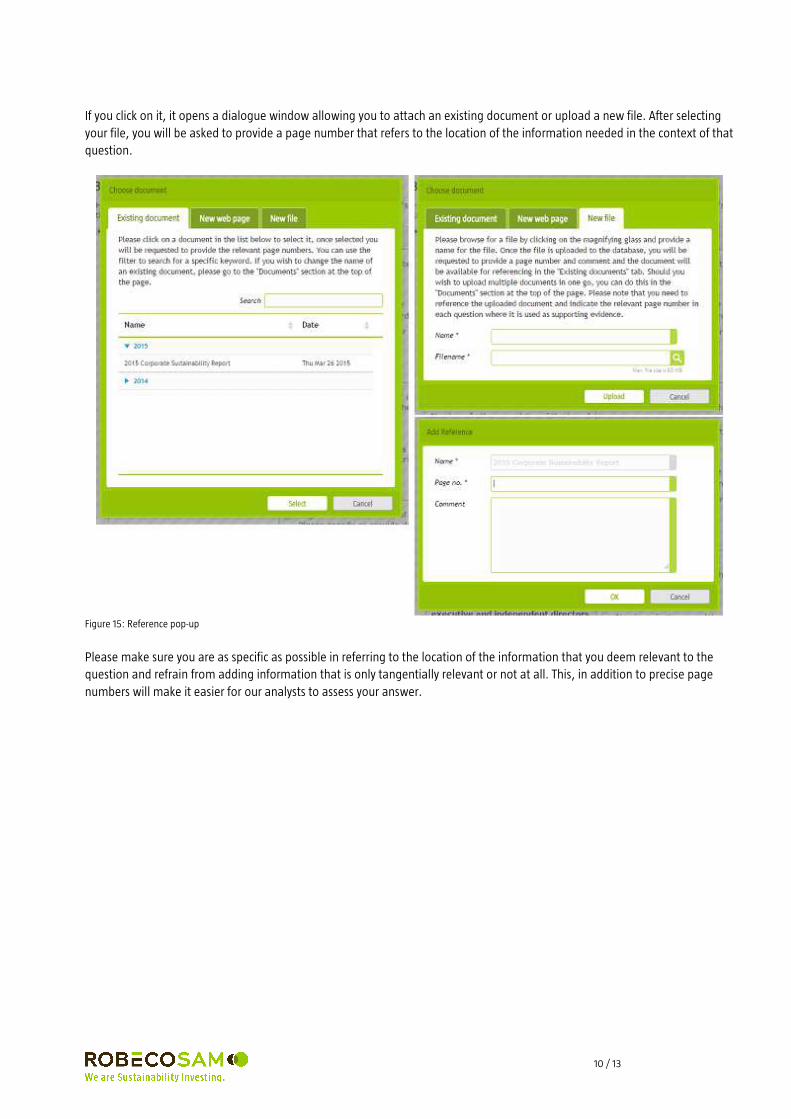
If you click on it, it opens a dialogue window allowing you to attach an existing document or upload a new file. After selecting your file, you will be asked to provide a page number that refers to the location of the information needed in the context of that question.
Figure 15: Reference pop-up
Please make sure you are as specific as possible in referring to the location of the information that you deem relevant to the question and refrain from adding information that is only tangentially relevant or not at all. This, in addition to precise page numbers will make it easier for our analysts to assess your answer.
11 / 13
4. Other Account Functionalities
The entire collection of attached documents, both past and present can be managed in a separate interface tab “Documents”.
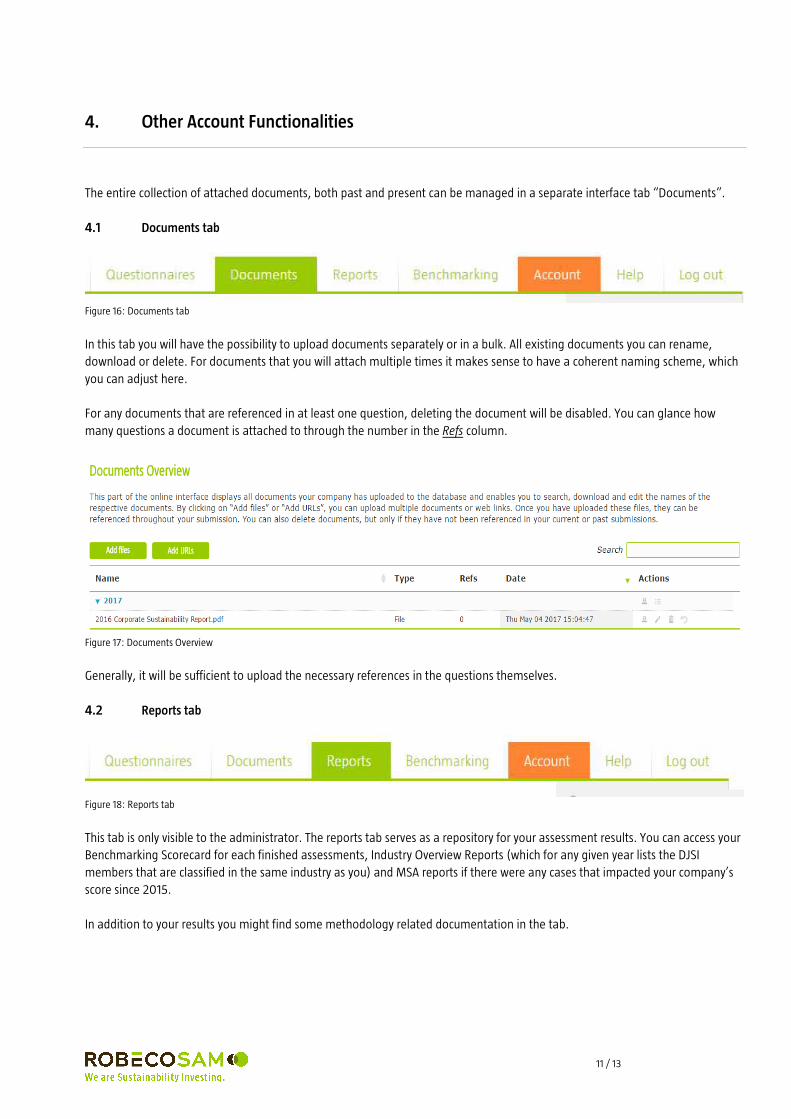
4.1 Documents tab
Figure 16: Documents tab
In this tab you will have the possibility to upload documents separately or in a bulk. All existing documents you can rename, download or delete. For documents that you will attach multiple times it makes sense to have a coherent naming scheme, which you can adjust here. For any documents that are referenced in at least one question, deleting the document will be disabled. You can glance how many questions a document is attached to through the number in the Refs column.
Figure 17: Documents Overview
Generally, it will be sufficient to upload the necessary references in the questions themselves.
4.2 Reports tab
Figure 18: Reports tab
This tab is only visible to the administrator. The reports tab serves as a repository for your assessment results. You can access your Benchmarking Scorecard for each finished assessments, Industry Overview Reports (which for any given year lists the DJSI members that are classified in the same industry as you) and MSA reports if there were any cases that impacted your company’s score since 2015. In addition to your results you might find some methodology related documentation in the tab.

12 / 13
4.3 Account tab
Figure 19: Account tab
The Account tab enables you to manage your company information. Please fill out all the details, as this allows us to stay in touch with you and make sure that the results mailing as well as next year's invitation reaches you. The comment field functions for you to add a back-up contact (for example when a key contributor is on maternity leave) or leave another relevant comment related to the contact details.
Figure 20: Edit your contact details
In addition to providing contact information, you may enable an additional user account (standard user) meant for collaboration amongst several of your co-workers. Multiple people can login with the same user account at the same time. This account has restricted access rights. Namely, it is not possible for users to manage account details, prefill the full questionnaire, request deadline extensions, set questions to the approved status, view reports and submit the questionnaire.

13 / 13
Figure 21: Quick menu in the side bar
The technical user is a relatively new feature. This user will only be needed when your company chooses a third party software vendor which enables you to interface your internal data and knowledge management system with our assessment. Essentially, in such cases it is possible to prefill parts of the questionnaire directly with your data. Currently there is initial collaboration with selected software vendors, and the functionality is expected to become relevant for more companies in the future.
Figure 22: Manage user accounts
4.4 Help tab
Figure 23: Help tab
The help tab should be your next stop should you need an overview of the meaning of various interface elements.