Embed Size (px)
Citation preview

RivaEngine.com
Administrators Guide to Riva Cloud Edition
R I VA C LO U D E D I T I O N v 0 4 .16 . 2 019

P a g e | 2
www.RivaEngine.com
Contents Forward ........................................................................................................................................... 4
Setup and Configure a Riva Cloud Account .......................................................................................... 5
Register for a Riva Cloud Account ..................................................................................................... 5
Choose your Riva Cloud Mode ........................................................................................................... 7
Company OR Single user mode ..................................................................................................... 7
Corporate mode ...................................................................................................................... 8
Connection and Policy Configuration .................................................................................................. 9
Step 1: Create your CRM Connection ................................................................................................ 9
Step 2: Create your Email Connection ............................................................................................ 10
Configure an Exchange OR IBM Notes Policy .................................................................................. 11
Step 1: Configure the Historic Item Filtering ............................................................................... 11
Step 2: Configure Sync Intervals .................................................................................................. 12
Step 3: Sync Configuration .......................................................................................................... 13
Category ............................................................................................................................. 13
Address Book Modules ............................................................................................................ 14
Calendaring Module ................................................................................................................. 16
Folder Modules .................................................................................................................. 16
Step 4: Configure Email Smart Convert ....................................................................................... 17
Step 5: Configure Email AssignTo ................................................................................................ 20
Step 6: Configure Email Sent and Email Inbox Options .............................................................. 21
Step 7: Enable the Synchronization Policy ................................................................................. 23
Manage your Riva Cloud Account ....................................................................................................... 24
View Account Summary .................................................................................................................. 24
View Contact Information ............................................................................................................... 25
Change the Riva Cloud Admin User Password ......................................................................... 26
Reset a Forgotten Password ................................................................................................. 27
View the Audit Summary ................................................................................................................. 28
View and Edit Billing Details ............................................................................................................ 30
Manage Online Payment Options ............................................................................................... 30
Add a payment method ..................................................................................................... 30
Set the default credit card ................................................................................................. 31
P a g e | 3
www.RivaEngine.com
Update a credit card .......................................................................................................... 32
View Account Invoices ................................................................................................................. 32
Increase the number of licensed users ................................................................................. 33
Decrease the number of licensed users ................................................................................ 33
Cancel Subscription .............................................................................................................. 34
Manage Users in Riva Cloud ................................................................................................................ 35
Add one or more target users to Riva Cloud Corporate ............................................................ 35
Edit a user in Riva Cloud .................................................................................................................. 36
Enable or disable a user(s) ........................................................................................................ 37
Remove a user ........................................................................................................................... 38
Manage the Connections .............................................................................................................. 39
Edit a Riva Cloud Corporate Connection ........................................................................................ 39
Test the current connection password .................................................................................... 39
Change the connection password ............................................................................................ 40
Manage the Sync Policy ....................................................................................................................... 42
Enable or disable the sync policy .............................................................................................. 42
Change the historic item filter start date .................................................................................. 43
Change the sync category or contact folder name ................................................................... 44
Request a sync cycle ................................................................................................................. 44
View the sync logs ............................................................................................................................ 45
Common Errors ............................................................................................................................ 47
Connection Errors ..................................................................................................................... 47
Delete Safety Error ........................................................................................................................... 48
Delete Safety Threshold ........................................................................................................ 48
Solutions for Delete Safety Errors ......................................................................................... 48
Allow Deletions blocked by Delete Safety ................................................................................... 49
Unable to Match User to Impersonate ...................................................................................... 51
Synchronization Failed Due to CRM ID Conflict .............................................................................. 51
Previous Folder ID does not match Current Folder ID .............................................................. 52
Requesting Support ..................................................................................................................... 53
Riva Cloud Form .............................................................................................................................. 53
Riva Website Form ........................................................................................................................... 53
P a g e | 4
www.RivaEngine.com
By Email ........................................................................................................................................... 54
Appendix ....................................................................................................................................... 55

P a g e | 5
www.RivaEngine.com
Forward
Welcome to Riva's "Riva Cloud Management Guide for Administrators." At Riva, we are proud of our clients, and we are invested in your success.
The purpose of this guide is to provide Riva Cloud Administrators the ability to efficiently manage their Riva Cloud accounts and have the tools you need to be effective.
Each section of this guide is laid out with detailed steps. Each section's headings are hyperlinked to relevant or corresponding Knowledge Base Articles that can be found on our website, and you will find additional links throughout this guide to further assist you.
At the end of this guide, you will find an Appendix that lists all the relevant Knowledge Base Articles.
Finally, I would add that this is only meant as a guide. If you are experiencing an issue or have any questions regarding the contents contained within this guide, please reach out to our Client Success Team.
The information contained within this document is confidential and should not be shared with external parties. Content within this document is subject to change.

P a g e | 6
www.RivaEngine.com
Setup and Configure a Riva Cloud Account
Register for a Riva Cloud Account
To register for a new Riva Cloud free trial subscription account:
• In a browser, go to https://www.rivacloud.com, and select FREE TRIAL.
You are redirected to the registration page.
• Complete the necessary verification, information, and select your data residency:
• Riva Cloud provides geographic data residency, business continuity, and disaster recovery.
To maintain reliability and high availability, Service Data is replicated in at least two geographically distinct locations in the selected region. Service Data will be replicated only in your selected region. This includes all the connection details, synchronization policies, metadata, and synchronization log history. All backups and instance snapshots are also stored in the same region.

P a g e | 7
www.RivaEngine.com
Major Area Name Region
United States
USE1 AWS – United States, North Virginia
Europe1 EUW1 AWS – Europe, Ireland
Canada2 CAN1 AWS – Canada, Montreal
Australia2 AUS1 AWS – Australia, Sydney
• Create a username:
• Option 1: Username Builder: Optionally select the "type" of account, and the Username Builder incorporates it in a username that you can edit. This username includes your company domain name.
• Option 2: Build Your Own: Create your username in email format in any way you like.
• Enter a secure password, read the Terms and conditions of use, select the check box, and select COMPLETE.
Your free trial account is created, and the Get Started page appears.
Note: When selecting a username, it is often best to choose a generic admin username, for example, [email protected]. This username does not need to have a mailbox associated with it; however, it helps keeps your account organized. In a Corporate account the connections are ‘nested’ under this username and it cannot be changed.

P a g e | 8
www.RivaEngine.com
Choose your Riva Cloud Mode
There are two basic modes you can choose from Company or Corporate. Depending on the business requirements, one of these modes might be more suitable than the other.
Company OR Single user
mode Each user has:
▪ an individual email connection,
▪ an individual CRM connection, and
▪ an individual Riva sync policy.
This is great for small teams, 1-10 users, who require unique sync capabilities.

P a g e | 9
www.RivaEngine.com
Corporate mode
Applies to all users:
▪ one email connection,
▪ one CRM connection, and
▪ one Riva sync policy
This single sync policy defines the sync behavior for all users in this mode. A service account for CRM and the Email platform will be used to impersonate the individual syncing users in their respective platforms.

P a g e | 10
www.RivaEngine.com
Connection and Policy Configuration
Now that you have your Riva Cloud trial account setup, you can begin configuring your connections and policy.
Step 1: Create your CRM Connection
1. On the Get Started page, select Configure your CRM.
2. Select the logo for your CRM to start the corresponding CRM connection wizard:
NOTE: Have you already synced data by using the Outlook CRM plug-in or manually copied CRM calendar or contact data into Exchange? If so, to avoid duplicate entries, see Preventing duplicates: Dealing with Outlook plug-ins before using Riva Cloud.
You can also run into duplicated data problems if you test Riva Cloud and Riva On-Premise against the same email or CRM users at the same time. If your user account has been configured in Riva Cloud or Riva On-Premise before, see Do not run Riva twice against the same user. Please contact the Riva Success Team to assist you with this.

P a g e | 11
www.RivaEngine.com
Depending on the CRM, you choose to integrate the information you need to input will be different. In general, you will need the username, password, and endpoint.
See below for a link to specific instructions for each CRM:
▪ Create a Microsoft Dynamics CRM on Office 365 connection - Hosted on Office 365.
▪ Create a Microsoft Dynamics CRM 2011 connection - For Microsoft Dynamics 2011 Rollup 10+. (Available soon).
▪ Create a Microsoft Dynamics CRM 4 connection - For Microsoft Dynamics CRM 4 or 2011 (pre-Rollup 10), which use the legacy connection. (Available soon).
▪ Create an Oracle CRM On Demand connection.
▪ Create a Salesforce connection - NOTE: To use Riva with Salesforce, you must be running Salesforce Professional, Enterprise, or Unlimited.
▪ Create a Sugar, info@hand, or intelecrm connection. IMPORTANT NOTE: Sugar 6.3.2, 6.4.0 and 6.4.1 are supported by Riva Cloud, but some configuration adjustments are required for the Sugar server.
▪ Create a NetSuite CRM connection.
▪ Create a Sage CRM connection.
▪ Create an SAP C4C CRM connection.
A connection wizard is also available for the following technology preview and beta connector:
▪ Create an Oracle Sales Cloud connection.
Step 2: Create your Email Connection
To create your email connection:
1. On the Get Started page, select Configure your email.
2. Select the logo for your email system.

P a g e | 12
www.RivaEngine.com
▪ Connect a G Suite account (paid subscription).
▪ Create an Exchange connection - For Exchange Web Services. (Exchange 2003 is not supported by Riva Cloud.)
▪ Create a GroupWise connection - For GroupWise 2012 and GroupWise 8.
Configure an Exchange OR IBM Notes Policy
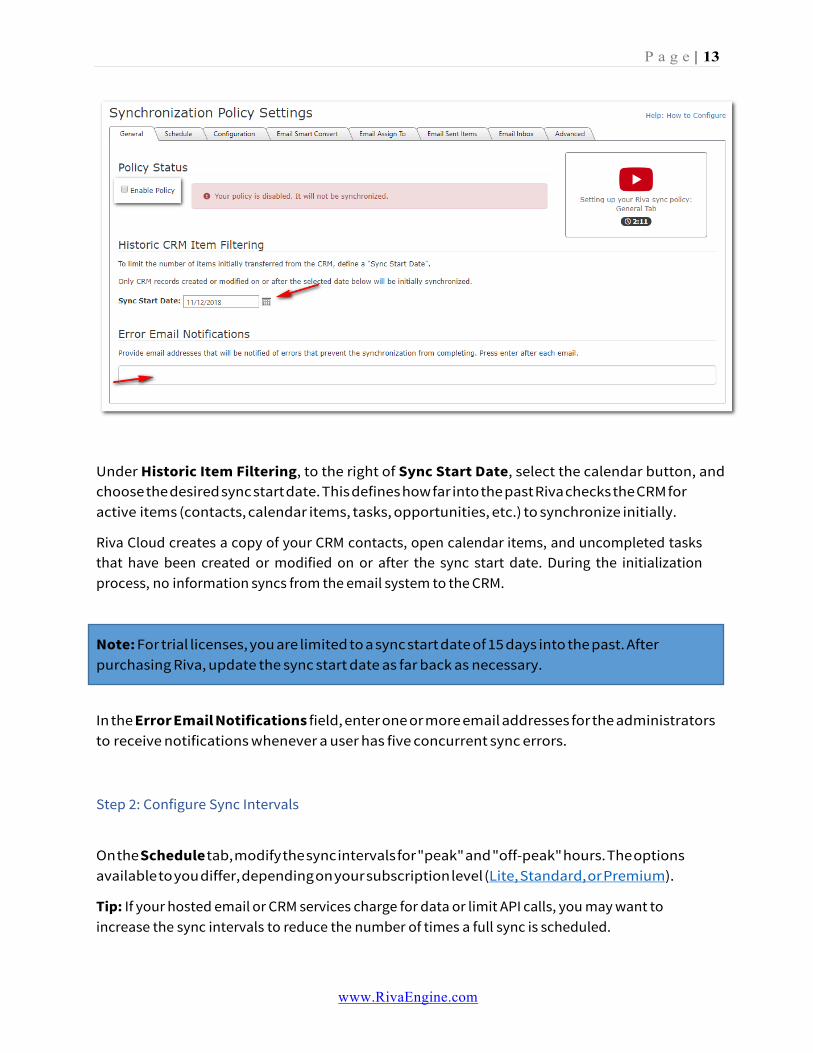
Step 1: Configure the Historic Item Filtering
On the General tab, ensure that the Enabled check box is not selected. You need to leave the policy disabled until you have completed the full configuration.
P a g e | 13
www.RivaEngine.com
Under Historic Item Filtering, to the right of Sync Start Date, select the calendar button, and choose the desired sync start date. This defines how far into the past Riva checks the CRM for active items (contacts, calendar items, tasks, opportunities, etc.) to synchronize initially.
Riva Cloud creates a copy of your CRM contacts, open calendar items, and uncompleted tasks that have been created or modified on or after the sync start date. During the initialization process, no information syncs from the email system to the CRM.
In the Error Email Notifications field, enter one or more email addresses for the administrators to receive notifications whenever a user has five concurrent sync errors.
Step 2: Configure Sync Intervals
On the Schedule tab, modify the sync intervals for "peak" and "off-peak" hours. The options available to you differ, depending on your subscription level (Lite, Standard, or Premium).
Tip: If your hosted email or CRM services charge for data or limit API calls, you may want to increase the sync intervals to reduce the number of times a full sync is scheduled.
Note: For trial licenses, you are limited to a sync start date of 15 days into the past. After purchasing Riva, update the sync start date as far back as necessary.

P a g e | 14
www.RivaEngine.com
Step 3: Sync
Configuration Category
Category name is used to identify items that originate from the CRM and/or need to be synchronized from the email system to the CRM. In the email system, contacts are added to the default contact list and assigned the CRM category name; for example, Company CRM. Leads are added as contacts with the category of Company CRM Leads. Appointments, phone calls, and tasks are added to your calendar and assigned the appropriate category and color. The category name is used to create the parent folder in the user's mailbox for email sync; see SmartConvert. Once the policy has been saved, the Category name cannot be changed without contacting the Riva Success Team.
For Exchange: Category Colour can be selected from the drop-down list and is assigned to the Riva-generated categories in the Exchange Master Category List.
For Exchange: Create Separate Contact Folder is used to indicate if you want Riva to create a subfolder in your personal address book. If you select this, a contact folder that uses the Category Name is created, for example, "Company CRM." This will be the only folder that Riva uses to synchronize contacts and leads. If you clear this check box, Riva syncs contacts and leads to the default Exchange Contacts folder. We recommend selecting this option as the best practice.
Auto-synchronize new items is used to control when Riva syncs new items to the CRM:
▪ If Auto-synchronize new items and Create Separate Contact Folder are both selected when you create a new contact in the Company CRM contacts folder, Riva auto-syncs that contact to the CRM. If contacts are created in My Contacts, Riva does not sync them to the CRM.
▪ If Auto-synchronize new items is selected and Create Separate Contact Folder not selected when you create a contact in My Contacts, Riva auto-syncs the new contact to the CRM.
Notes:
▪ Blackout times are designed to prevent wasting resource usage during non-working hours
(API Calls). If your business runs 24 hours per day or operates in multiple time zones
around the world, contact the Riva Success Team to have this option adjusted accordingly.
▪ All sync policies created in Riva Cloud 2017.5 or higher are configured by default to detect
every individual user's time zone setting in the CRM. That individual setting is used to
determine the peak, off-peak, and blackout times for that individual's sync. To request the
change for existing sync policies, contact the Riva Success Team.

P a g e | 15
www.RivaEngine.com
▪ If Auto-synchronize new items is cleared, Riva does not auto-sync the new contacts, tasks, or calendar items to the CRM unless the user manually assigns the Company CRM category to the new contacts, tasks, or calendar items (or assigns the Company CRM Lead category to new contacts to sync them to the CRM as leads).
▪ Select the modules for which you want to enable data sync. Items are synced as follows:
▪ Object Filter: Address books (contacts and leads) and advanced modules (opportunities, cases, etc.) can be filtered:
▪ Must be owner: (Default.) Uses ownership or assignment of the item. In this case, only the contacts that the user owns or contacts that are assigned to the user in the CRM are synced to the user's email system address book (even if the user can see the contact in the CRM).
▪ All visible: Uses CRM's security rules. If the user can see an item in the CRM, the item is synced to the user's mailbox if the modification date is after the Sync Start Date. If the user can modify the item in the CRM, a change to the item in the user's mailbox syncs back to the CRM.
▪ Sync Direction: Can be set to one-way sync from the CRM to the user's mailbox for contacts, leads, calendar items, and tasks.
Address Book Modules
Address Book: Replace Outlook contact website with Contact web-link to view the record in the CRM. If selected, Riva-synced CRM contacts include a view in CRM link. This link replaces whatever was previously in the Website field.

P a g e | 16
www.RivaEngine.com
▪ Address Book: Limit total record count: If the option is selected, the value can be set. This option limits the total number of Riva-synced CRM contacts created in the user's mailbox address book. The most current (based on the date/time last saved) is copied. If the maximum value is reached, Riva removes older Riva-synced CRM contacts from Outlook to sync newer CRM contacts. Use this option to prevent mobile devices from locking up due to an excessive number of contacts being synced.

P a g e | 17
www.RivaEngine.com
Calendaring Module
▪ Calendar: Append a list of attendee contact info to the body of the appointment. If this option is enabled, Riva appends a list of the CRM attendees' contact information (email address and associated account) to the body of the appointment in the email system.
▪ Calendar: Disable Reminder Synchronization feature. For more information, see Disable alarm and reminder synchronization.
▪ Calendar: Synchronize recurring appointments from mailbox to CRM. See Synchronize Exchange recurring appointments. This option enables "sync series" so that each recurring appointment in the series is created in the CRM as a separate appointment.
▪ Calendar: Skip appointments tagged as 'Private' in the mailbox calendar. By default, Riva syncs these appointments, but their contents are not visible to other users. Selecting this option disables their synchronization to CRM completely.
Folder Modules
The options selected here dictate which modules sync, depending on the other settings you select on the Email AssignTo tab.
Note: Depending on the CRM you have configured, different options may be available.

P a g e | 18
www.RivaEngine.com
Best Practices:
▪ Do not select data that you do not want to sync to your user's mailbox.
▪ Do not select modules that are not enabled in the CRM for the users.
▪ You can change any of the module selection settings later.
▪ If you clear the check box of an advanced module (opportunities, cases, etc.), folders related to that item type are removed from the user's mailbox.
Step 4: Configure Email Smart Convert
On the SmartConvert tab, enable and configure the ability to create new CRM objects by moving or copying an email item to a corresponding "- Create New" folder; that object is created and synced to CRM.
▪ Create an opportunity, case, project, or quote by using the source email as the subject and content of the new CRM object.
▪ Use the email domain name to check if the account exists for each email address in the email.
▪ Use the email address to check if the contact exists for each email address in the email.
Select Enable SmartConvert to turn this feature on.
Note: This step applies to Standard and Premium subscriptions only.

P a g e | 19
www.RivaEngine.com
Options. Riva first reads the addressees in the header of the email. For each email address, Riva attempts to find a matching CRM user (referred to as the "system user" in the Riva logs), contact, and/or lead in the CRM. Syncing the email into the CRM is handled in accordance with the contact and account/organization (and email item handling) option settings. Select or clear any of the following options:
▪ Must match or create at least one Contact or Lead: If this option is selected, Riva must find at least one email address in the CRM as a contact or lead, or it must create a contact or lead if no matches are discovered by Riva in the CRM.
▪ Do not match against recipients listed in CC and BCC fields: When Riva examines the addressees of an email, it ignores all CC and BCC email addresses. Emails copied to the CRM are not linked to those contacts.
▪ If no Contact is matched, match against Leads: When Riva attempts to match email addresses against contacts and cannot find a matching contact, Riva attempts to match against CRM leads.
P a g e | 20
www.RivaEngine.com
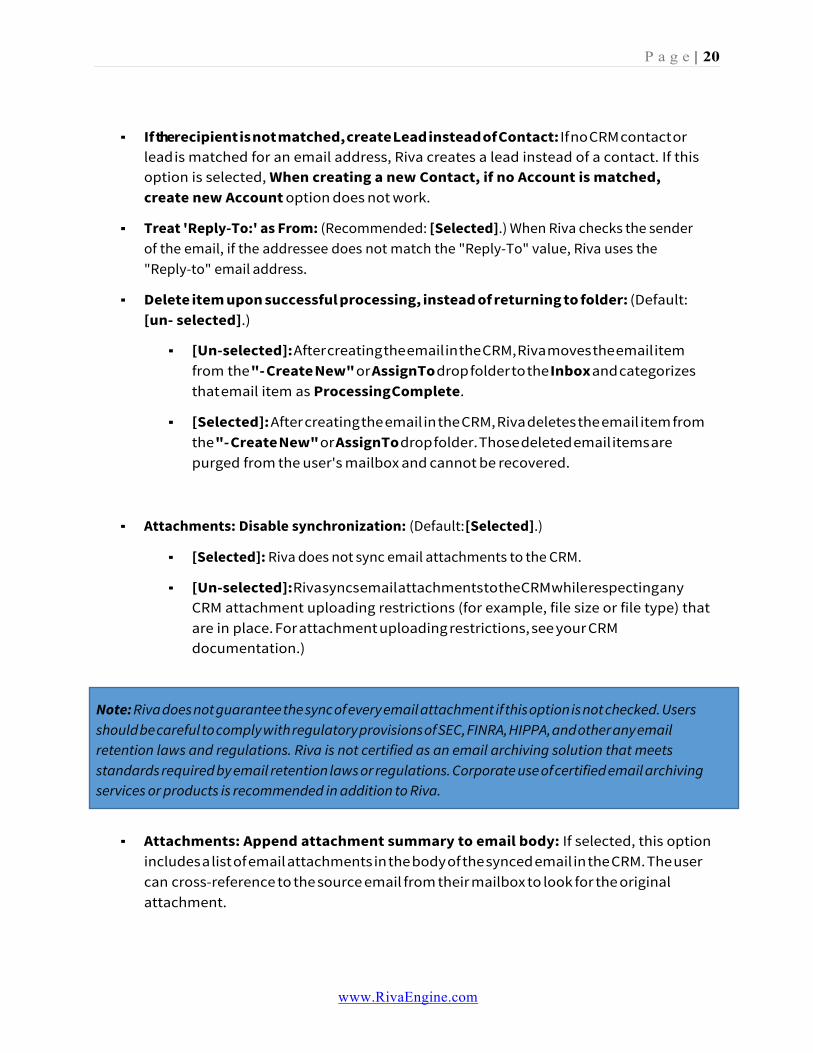
▪ If the recipient is not matched, create Lead instead of Contact: If no CRM contact or lead is matched for an email address, Riva creates a lead instead of a contact. If this option is selected, When creating a new Contact, if no Account is matched, create new Account option does not work.
▪ Treat 'Reply-To:' as From: (Recommended: [Selected].) When Riva checks the sender of the email, if the addressee does not match the "Reply-To" value, Riva uses the "Reply-to" email address.
▪ Delete item upon successful processing, instead of returning to folder: (Default: [un- selected].)
▪ [Un-selected]: After creating the email in the CRM, Riva moves the email item from the "- Create New" or AssignTo drop folder to the Inbox and categorizes that email item as Processing Complete.
▪ [Selected]: After creating the email in the CRM, Riva deletes the email item from the "- Create New" or AssignTo drop folder. Those deleted email items are purged from the user's mailbox and cannot be recovered.
▪ Attachments: Disable synchronization: (Default: [Selected].)
▪ [Selected]: Riva does not sync email attachments to the CRM.
▪ [Un-selected]: Riva syncs email attachments to the CRM while respecting any CRM attachment uploading restrictions (for example, file size or file type) that are in place. For attachment uploading restrictions, see your CRM documentation.)
▪ Attachments: Append attachment summary to email body: If selected, this option includes a list of email attachments in the body of the synced email in the CRM. The user can cross-reference to the source email from their mailbox to look for the original attachment.
Note: Riva does not guarantee the sync of every email attachment if this option is not checked. Users should be careful to comply with regulatory provisions of SEC, FINRA, HIPPA, and other any email retention laws and regulations. Riva is not certified as an email archiving solution that meets standards required by email retention laws or regulations. Corporate use of certified email archiving services or products is recommended in addition to Riva.

P a g e | 21
www.RivaEngine.com
Additional creation filters exist:
• Select Disable all contacts and account creation to prevent SmartConvert from creating new accounts, contacts, or leads if a match for the email address cannot be found in the CRM. In this case, the item is not created in the CRM. This forces the user to create the account, contact, or lead in the CRM manually.
▪ Add domain names for which you do not want Riva to automatically create new contacts and/or accounts in the CRM to the filter, for example, @gmail.com. This prevents the creation of accounts and contacts for any domains included in the filter. We recommend adding domain names of common generic online email services like Google Mail, Yahoo Mail, Live.com (Hotmail), and your own company email domain. This does not prevent Riva from archiving emails to these accounts based on the specific user email address.
Step 5: Configure Email AssignTo
The Assign To feature enables you to archive emails to "other" items like cases, opportunities, projects, or quotes.
On the Assign To tab, select the Enable Assign To option.
Note: This step applies to Premium subscriptions only.

P a g e | 22
www.RivaEngine.com
If enabled, the feature creates individual Assign To "drop folders" for the most current CRM objects (cases, opportunities, projects, and quotes), depending on the modules that you enabled on the Synchronization tab. (See Step 3 Sync Configuration – Folder Modules.) Three options manage those "drop folders":
▪ Maximum number of tracked items: Defines the maximum number of drop folders created. (Maximum allowed: 99 folders). If there are more current items than what is configured as the maximum (for example, you have 31 open cases but have set this value to 30), the oldest drop folder is removed from the user's mailbox and replaced with the newest or newest revised drop folder. This has no effect on the actual item in the CRM. An item's age is determined by the item's last modified (saved) date.
▪ Maximum age of tracked items: Defines the maximum age that an item can reach before Riva removes the drop folder from your Outlook client. (Maximum allowed: 99 days.) Even if you have not reached the maximum number of allowed drop folders, a drop folder is removed when it reaches the maximum age. Set this value to equal the average span for your sales cycle. For example, if your sales cycle is normally 45 days, set this value to 45. You can re-add a drop folder by opening the corresponding item in your CRM and saving it. That action modifies the last modified date for the item and restarts the age tracking for it. An item's age is determined by the item's last modified (saved) date.
▪ Sort Options: You can list drop folders of the same type by date modified or alphabetically.
Step 6: Configure Email Sent and Email Inbox Options
The Email Sent Items and Email Inbox tabs are for automatic email sync. Both tabs have the exact same options but respectively affect your Sent Items or Inbox folder separately. If you select this feature on either or both tabs, users do not have to manually move or copy email from respectively the Sent Items or Inbox folder to a "- Create New Email" folder to archive the email to the CRM.
Warning: Enabling this feature can significantly increase the amount of physical storage space used by the CRM to store archived email. Carefully consider CRM financial costs for data storage before enabling this feature.
To enable the feature, select the Enable Email Sent Items and/or Enable Email Inbox check box. The email processing and contact creation filters appear when the policy is enabled.
Note: This step applied to Premium subscriptions only.

P a g e | 23
www.RivaEngine.com
By default, Email Sent Items and Email Inbox are configured to archive only sent or inbox email items that can be matched to an existing CRM contact. This prevents archiving unwanted email and creating contacts in an uncontrolled manner.
The following options are automatically selected:
▪ Only detect items with required category: This requires that you assign the Riva-created category to any email items that you want to sync. If you want to clear this check box, which would enable automatic sync, contact the Riva Success Team.
▪ Must match or create at least one Contact or Lead: If you select this option, Riva must find at least one email address in the CRM as a contact or lead, or it must create a contact or lead if no matches are discovered by Riva in the CRM.
▪ Disable all contacts, leads, and account creation: (Recommended.) To prevent the creation of accounts or contacts if a match for the email address cannot be found in the CRM contacts. In this case, the item is not created in the CRM. This requires the user to create the account and contact in the CRM manually.
For an explanation of the different processing options available, see SmartConvert options.

P a g e | 24
www.RivaEngine.com
Step 7: Enable the Synchronization Policy
To enable the policy:
1. On the General tab, select the Enabled option, and select OK.
Your browser refreshes and shows that your policy has been enabled.
2. Wait for up to four hours for the initial synchronization to occur between your CRM
and your user's mailbox
3. To view the sync history, select ViewLogs.
Note: Before you enable the policy, we recommend that you review all the settings and options for all the tabs. Some settings cannot be changed once the policy has been enabled.
Note: The time it takes to complete the initial synchronization of your data can vary depending on the sync start date, the number of objects that needs to sync and the number of users.

P a g e | 25
www.RivaEngine.com
Manage your Riva Cloud Account
View Account Summary
To access the account summary for your Riva Cloud subscription:
▪ On the top menu bar, select My Account, and then choose My Account.
The account summary appears.
The account summary shows the policyholder, account number, billing information, data residency, configuration POD, and subscription type. When submitting a support tick to the Riva Success Team, providing this information will be helpful.

P a g e | 26
www.RivaEngine.com
View Contact Information
To access the contact information for your Riva Cloud subscription:
▪ On the top menu bar, select My Account, and then choose Contact Information.
Riva Cloud displays active contacts and all contacts. If you have permissions, you can modify the active contacts and add contacts in the All Contacts section.
Active Contacts:
▪ Billing Contact: Receives invoices and payment notifications.
▪ Technical Contact: Receives Riva Cloud release notices, maintenance alerts, and key product notices.
▪ Additional Billing Email Addresses: Additional email addresses to send invoices
to. Separate the addresses with commas.
All Contacts:
In the list of all contacts, the billing and technical contacts are respectively labeled Billing and Technical.
Note: The billing and technical contacts can be the same person.

P a g e | 27
www.RivaEngine.com
Change the Riva Cloud Admin User Password
To change the Riva Cloud admin user password:
1. On the top menu bar, select My Account and then choose Change password.
On the Change Password page that appears, follow the instructions to create a secure password, confirm it, and select Change Password.
Note: The password must contain at least eight (8) characters and include the following: [a-z], [A-Z], [0-9] and [!@#^&*()+_,.{}?- etc.].

P a g e | 28
www.RivaEngine.com
Reset a Forgotten Password
If you forget your Riva Cloud login password, you can request a verification code to access Riva Cloud and enter a new password.
1. At https://www.rivacloud.com, select Forgot Password.
2. Follow the instructions that appear and select Continue.
You will receive a verification code by email at the email address you entered as your Riva Cloud user name.
3. Follow the instructions that appear when you selected Continue.
4. In Riva Cloud, on the Change Password page, enter a new password. Use a secure password that is easy for you to remember. Confirm the password and select Change Password.
Note: The password must contain at least eight (8) characters and include the following: [a-z],
[A-Z], [0-9] and [!@#^&*()+_,.{}?- etc.].

P a g e | 29
www.RivaEngine.com
View the Audit Summary
The Riva Cloud Audit Summary lists security events, configuration adjustments, and/or subscription changes that have occurred or have been made up to six months ago. From the summary, you can drill down to the complete details and export the full logs to a .CSV file.
To access the audit summary:
1. On the menu bar, select My Account and then choose Audit Summary.
To view the complete details of a summary line: Hover the mouse cursor over the corresponding Detail column cell.
To export the full logs to a .CSV file: Near the bottom of the window, select Export.
Notes:
▪ The summary displays up to 50 results per page. At the bottom of the summary, you can page through the Audit Summary.
▪ You can select the start date up to a maximum of six months ago.
▪ To search for a specific text string, enter it in the Search field in the top left of the Audit Summary window.
▪ By default, all events are displayed. To view only Security, Configuration, or Subscription events, select the corresponding button at the top of the Audit Summary.
▪ To sort the data that is displayed, select any Audit Summary column header.
P a g e | 30
www.RivaEngine.com
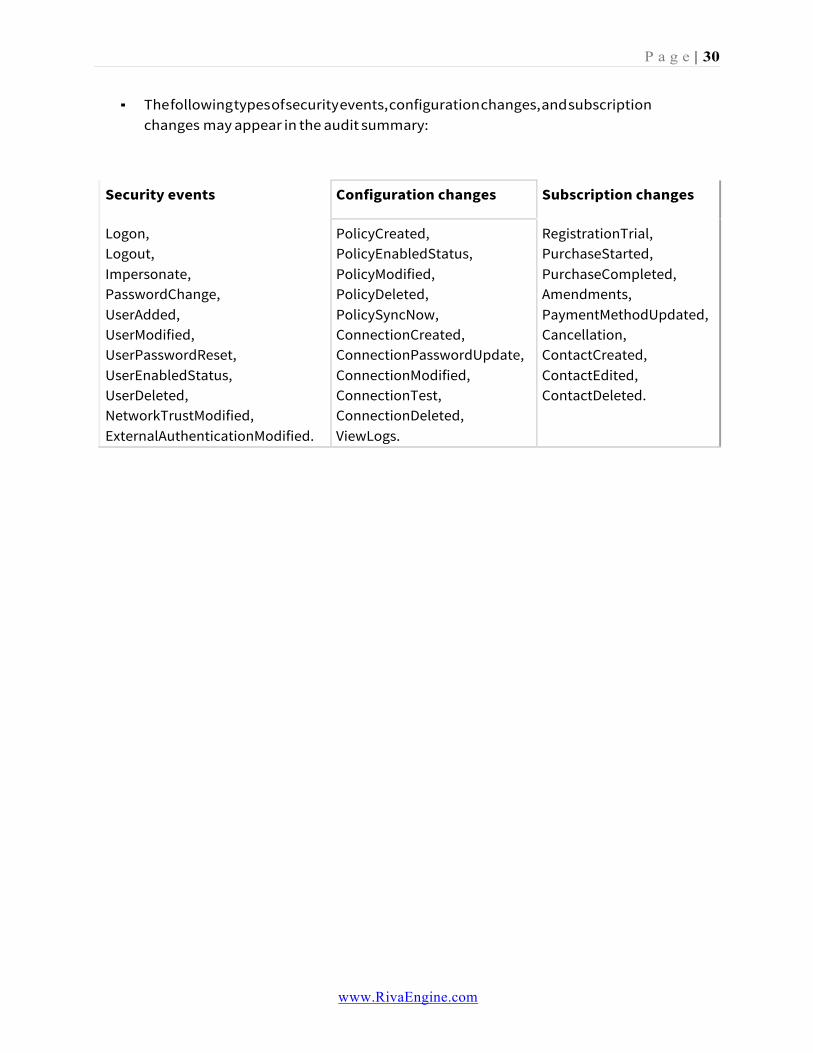
▪ The following types of security events, configuration changes, and subscription changes may appear in the audit summary:
Security events Configuration changes Subscription changes
Logon, Logout, Impersonate, PasswordChange, UserAdded, UserModified, UserPasswordReset, UserEnabledStatus, UserDeleted, NetworkTrustModified, ExternalAuthenticationModified.
PolicyCreated, PolicyEnabledStatus, PolicyModified, PolicyDeleted, PolicySyncNow, ConnectionCreated, ConnectionPasswordUpdate, ConnectionModified, ConnectionTest, ConnectionDeleted, ViewLogs.
RegistrationTrial, PurchaseStarted, PurchaseCompleted, Amendments, PaymentMethodUpdated, Cancellation, ContactCreated, ContactEdited, ContactDeleted.

P a g e | 31
www.RivaEngine.com
View and Edit Billing Details
Manage Online Payment Options
To manage online payment options:
1. On the menu bar, select My Account, and then choose Payment Method.
2. On the page that appears, enter a new payment method, select the current default payment method, and/or update an existing payment method.
Add a payment method
1. Select Credit Card, Bank Transfer (USD), or Cheque.

P a g e | 32
www.RivaEngine.com
2. Provide the information requested.
For example, for a credit card, select the type of card, and select Add New, and complete the form that appears. You can add two or more credit cards.
3. To add another payment method, repeat steps 1 and 2.
Set the default credit card
If there is only one credit card defined, the default payment is automatically set. As soon as a second credit card is added, you must define the default payment method to ensure that the correct credit card is billed.
To set the default credit card:
1. On the Payment Method page, select Credit Card.
2. On the list of credit cards, select a card, and select Set Default.
Note: The online billing system validates the payment method before adding it to the list of valid payment methods.

P a g e | 33
www.RivaEngine.com
Update a credit card
You may need to update the expiration date on a credit card.
To update a credit card:
1. On the Payment Method page, select Credit Card.
2. On the list of credit cards, select a card, and select Edit.
3. Edit any field, and select Submit.
The online billing system validates the credit card before updating it on the list of valid payment methods.
View Account Invoices
To view account invoices:
▪ On the My Account panel, select Payment History.
From this page, you see all the invoices issued since the initial subscription and the status of each invoice, and you can view an invoice as a PDF file so that you can save it or print it for your records.

P a g e | 34
www.RivaEngine.com
Increase the number of licensed users
To add licensed users to the Riva Cloud subscription:
1. On the My Account panel, select Change Subscription.
2. Specify the number of users to add.
3. Verify that the Total User Count after Change has increased to show the new value.
4. Select Add Users to Subscription.
Riva Cloud processes this change by calculating a pro-rated value for the number of users for the number of days remaining for the current billing period. The credit card specified in the Payment Method will be billed immediately. The next regular billing period will be modified to increase the monthly charge to include the additional users added.
Decrease the number of licensed users
Reducing your license count in My Account is currently not available.
To reduce the user count and corresponding billing, do one of the following:
▪ On the Riva Cloud page, select Contact Us, and either
▪ Lookup a phone number to call us, and select the Billing department to request the change; or
▪ Fill out the Contact the Riva Success Team form to request the change. Be sure to indicate the login user name of the admin user for the Riva Cloud

P a g e | 35
www.RivaEngine.com
subscription; or

P a g e | 36
www.RivaEngine.com
▪ Send an email to [email protected] to request the change. Be sure to indicate the login user name of the admin user for the Riva Cloud subscription.
Cancel Subscription
Important to know before you cancel:
▪ You will receive an email to confirm the cancellation.
▪ There are no refunds for partial months or for unused services.
▪ You can log in and administer your account up to the end of your subscription. During that time, your data will continue syncing.
▪ As of the cancellation date, you and your users will not be able to log in to https://www.rivacloud.com, data will cease syncing for all users in the subscription, and all user sync records will be removed.
▪ You are welcome to re-subscribe later, but you will not be eligible for another free trial of the service.
▪ If your payments are overdue, you need to contact Riva Billing to process your cancellation. If your payments are in good standing, you can cancel the subscription as per the following procedure.
To cancel a Riva Cloud subscription:
1. Log in to https://www.rivacloud.com as the admin user.
2. On the top navigation menu, select My Account.
3. In the right column, select Cancel Subscription.
4. On the Cancel Subscription page, read the cancellation terms and the effective date of your cancellation. If you are sure you would like to cancel, select Yes, Proceed with Cancellation.
5. On the next page, provide the details for the individual authorizing the cancellation, and select Next.
6. On the next page, please provide your reason for cancellation and optionally enter a comment, and select Proceed with Cancellation.
The next page displays a confirmation message.

P a g e | 37
www.RivaEngine.com
Manage Users in Riva Cloud
Add one or more target users to Riva Cloud Corporate
1. Near the top left corner of the User Manager, select Add User.
2. On the New User page, provide the details for the new user.

P a g e | 38
www.RivaEngine.com
3. Select Save.
The new user is added to the User Manager.
Edit a user in Riva Cloud
To edit a user, hover over to the username and select the pencil.
You can change user account details such as name, country, and time zone.
Note: If you are adding multiple users for production and do not want to add them one by one, you can provide the list of users to Client Success in a CSV files, in the following format: LastName,FirstName,EmaiAddress.

P a g e | 39
www.RivaEngine.com
Enable or disable a user(s)
Disabled users cannot log in to their Riva Cloud accounts, and their sync policies are
disabled. You can temporarily disable or re-enable target users.
1. Edit the target user.
2. Do one of the following:
▪ To enable the user account, select the Enable User Account check box.
▪ To disable the user account, clear the check box.
3. At the bottom of the page (not shown on the screenshot), select Update to update the target user account.
Note: To rename a user select the rename button beside the username and provide the username, your contact email and any additional notes. This will generate a request with the Riva Success Team who can assist you renaming the user.
P a g e | 40
www.RivaEngine.com
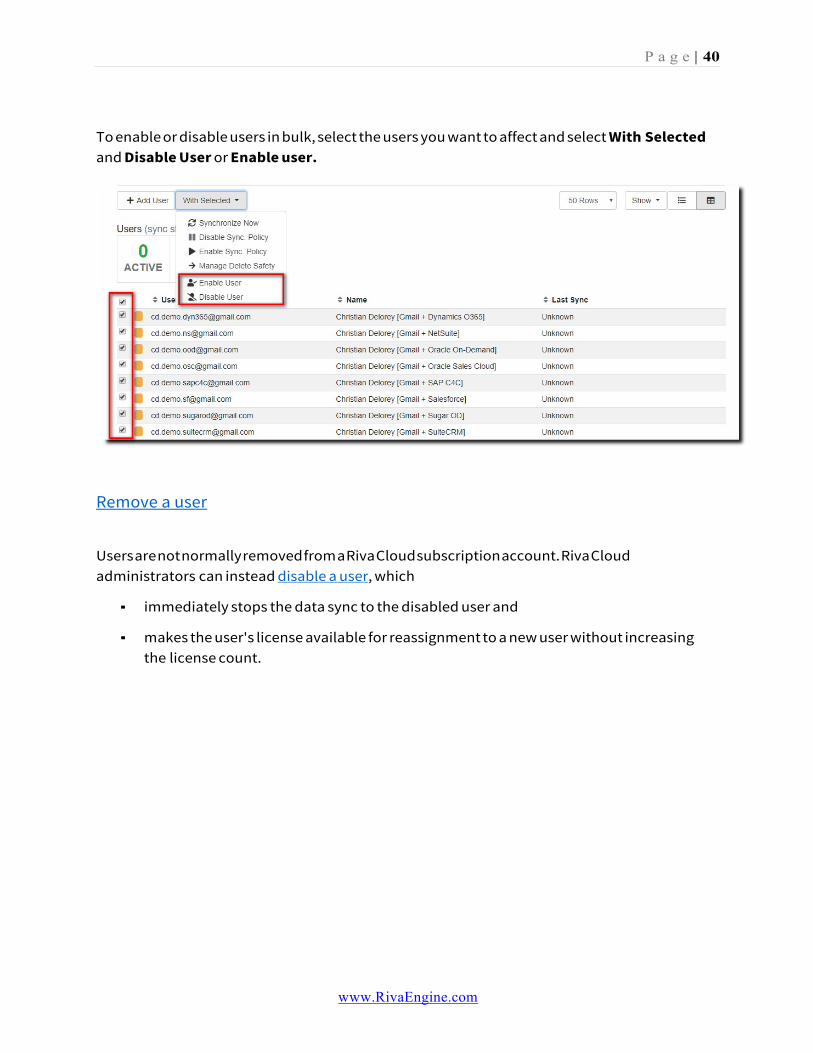
To enable or disable users in bulk, select the users you want to affect and select With Selected and Disable User or Enable user.
Remove a user
Users are not normally removed from a Riva Cloud subscription account. Riva Cloud administrators can instead disable a user, which
▪ immediately stops the data sync to the disabled user and
▪ makes the user's license available for reassignment to a new user without increasing the license count.
P a g e | 41
www.RivaEngine.com
Manage the Connections
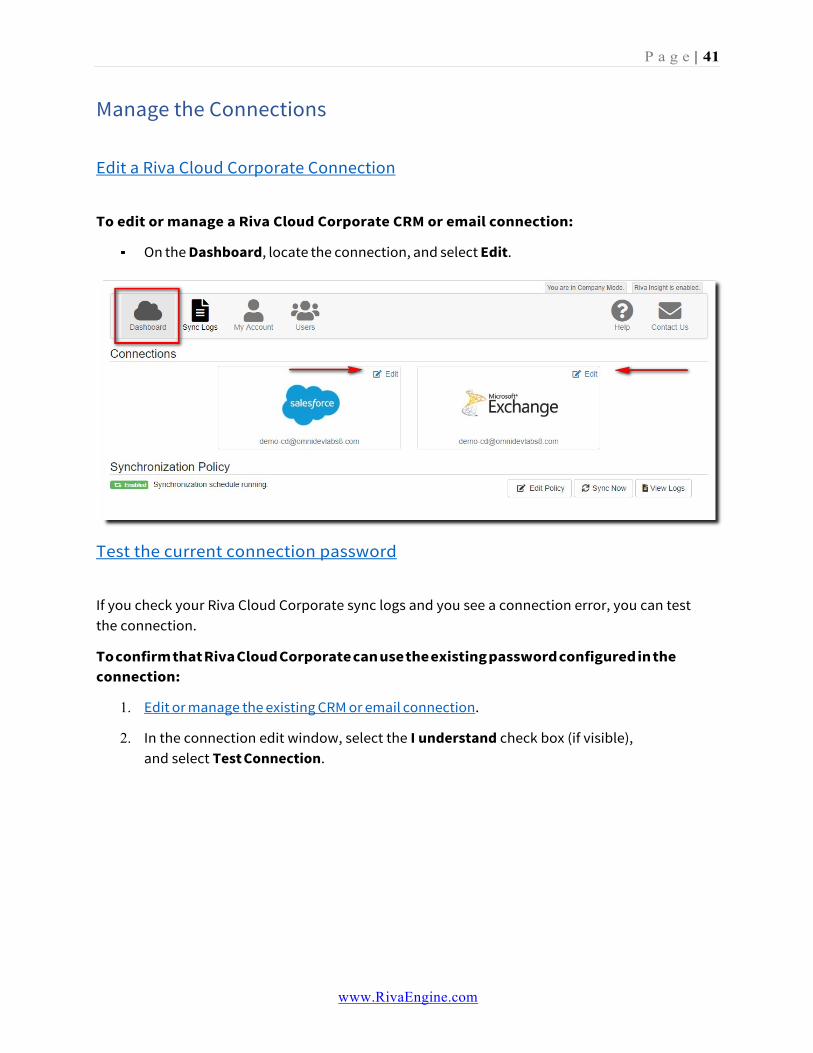
Edit a Riva Cloud Corporate Connection
To edit or manage a Riva Cloud Corporate CRM or email connection:
▪ On the Dashboard, locate the connection, and select Edit.
Test the current connection password
If you check your Riva Cloud Corporate sync logs and you see a connection error, you can test the connection.
To confirm that Riva Cloud Corporate can use the existing password configured in the connection:
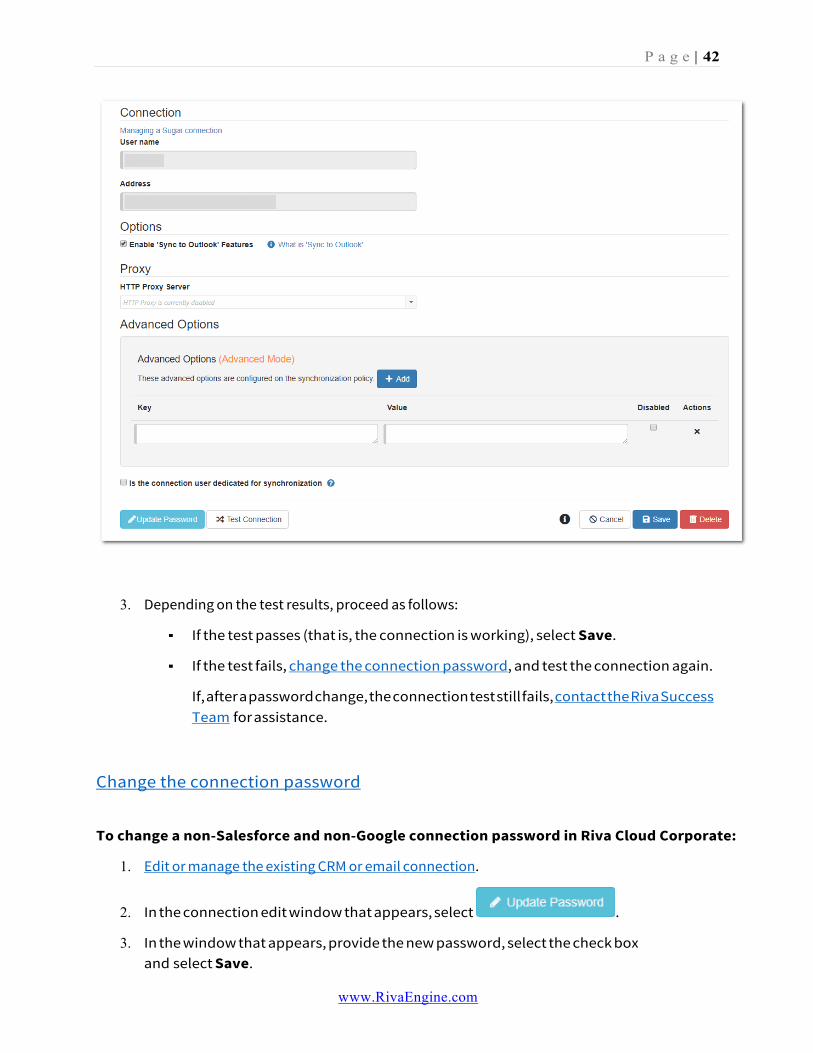
1. Edit or manage the existing CRM or email connection.
2. In the connection edit window, select the I understand check box (if visible), and select Test Connection.
P a g e | 42
www.RivaEngine.com
3. Depending on the test results, proceed as follows:
▪ If the test passes (that is, the connection is working), select Save.
▪ If the test fails, change the connection password, and test the connection again.
If, after a password change, the connection test still fails, contact the Riva Success Team for assistance.
Change the connection password
To change a non-Salesforce and non-Google connection password in Riva Cloud Corporate:
1. Edit or manage the existing CRM or email connection.
2. In the connection edit window that appears, select .
3. In the window that appears, provide the new password, select the check box and select Save.

P a g e | 43
www.RivaEngine.com
4. In the connection edit window, select the I understand check box (if visible), and select Test Connection.
5. If a message box displays Password updated successfully, select Close.
If, after a password change, the connection test still fails, contact the Riva Success Team for assistance.
To update the password for Salesforce or Google, click here for more information.
Note: If data was not synchronizing due to an incorrect password and the password is changed, Riva Cloud Corporate automatically starts to sync data during the next full sync cycle.

P a g e | 44
www.RivaEngine.com
Manage the Sync Policy
To modify the sync:
1. Log in to Riva Cloud.
2. On the Dashboard, select Edit policy.
Enable or disable the sync policy
To enable or disable a sync policy:
1. Edit the policy.
2. In the Synchronization Policy Settings window, select the General tab:
P a g e | 45
www.RivaEngine.com
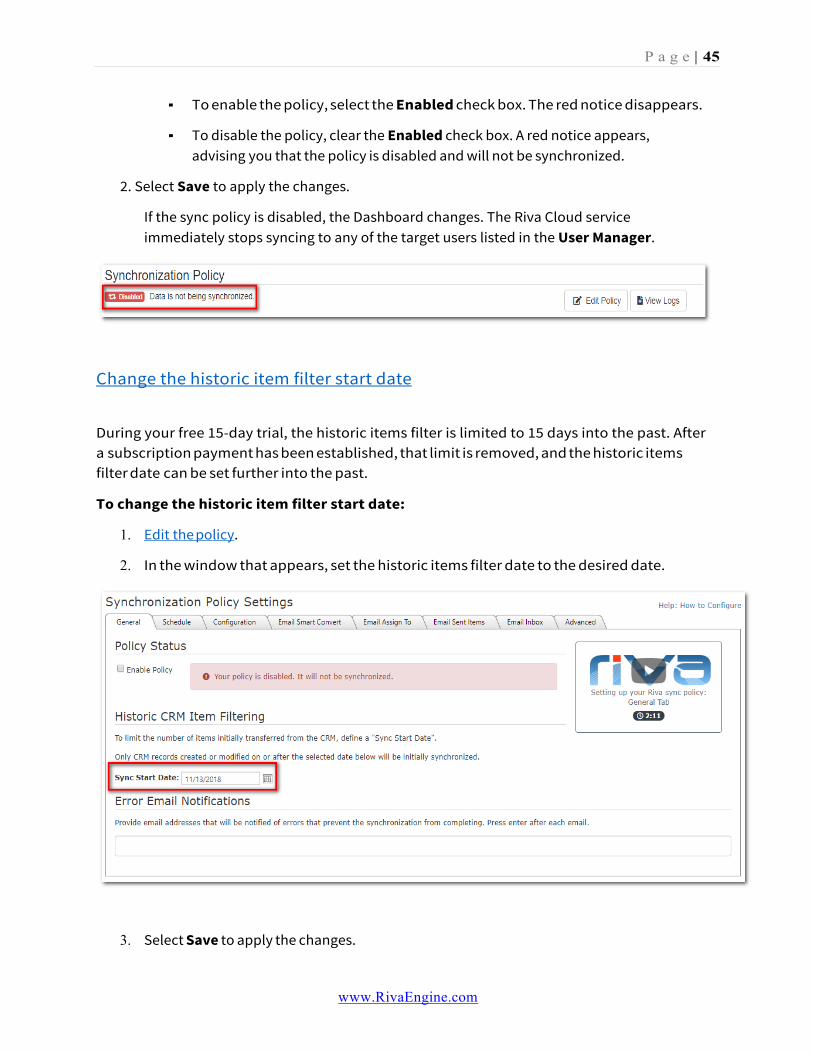
▪ To enable the policy, select the Enabled check box. The red notice disappears.
▪ To disable the policy, clear the Enabled check box. A red notice appears, advising you that the policy is disabled and will not be synchronized.
2. Select Save to apply the changes.
If the sync policy is disabled, the Dashboard changes. The Riva Cloud service immediately stops syncing to any of the target users listed in the User Manager.
Change the historic item filter start date
During your free 15-day trial, the historic items filter is limited to 15 days into the past. After a subscription payment has been established, that limit is removed, and the historic items filter date can be set further into the past.
To change the historic item filter start date:
1. Edit the policy.
2. In the window that appears, set the historic items filter date to the desired date.
3. Select Save to apply the changes.
P a g e | 46
www.RivaEngine.com
After the sync policy is saved, the Riva Cloud service repolls the CRM for all contacts, leads, calendar items, and tasks that fall into the scope of the new date and creates copies of those items in the user's address book, calendar, and task list. If the date is changed to a date closer to the current date, Riva Cloud removes previously synced items that now fall out of the filter's scope.
Change the sync category or contact folder name
After a sync policy is saved, the Riva category / contact folder name and the create separate contact folder options cannot be modified in the sync policy.
You can request a change to those options by contacting the Riva Success Team. Those changes will result in a full re-sync of all previously Riva-synced data for each user.
Changes in the category color can take up to 24 hours to take effect.
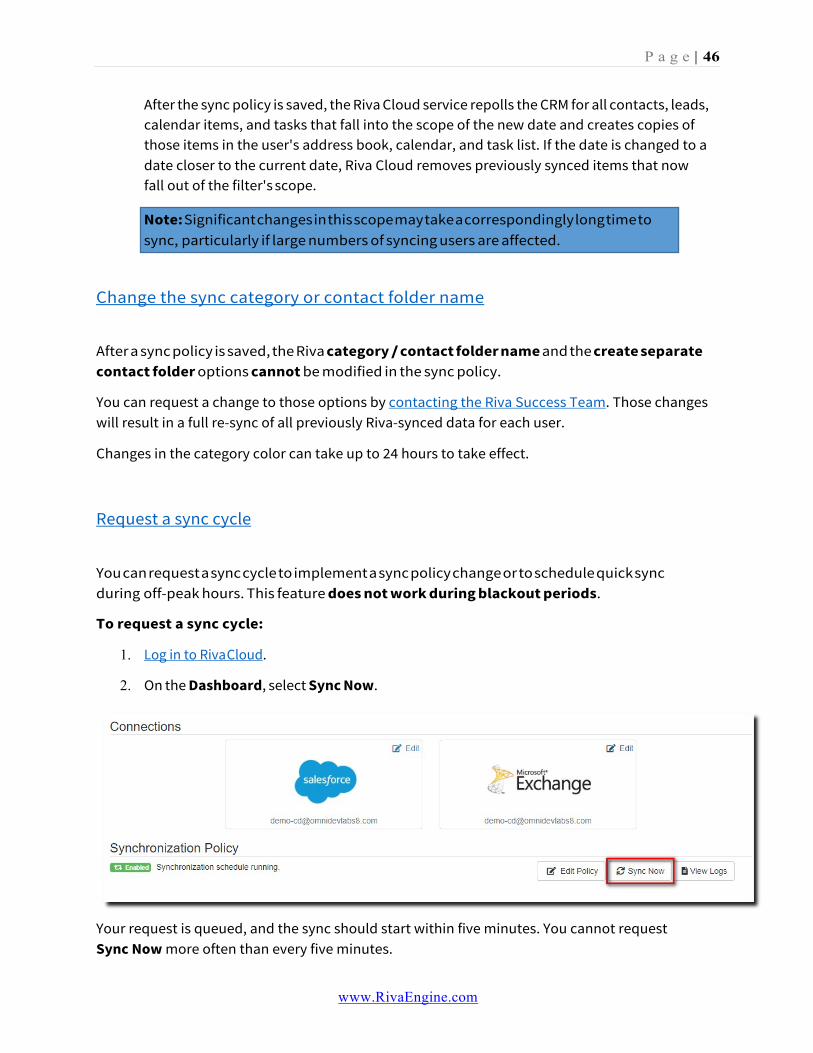
Request a sync cycle
You can request a sync cycle to implement a sync policy change or to schedule quick sync during off-peak hours. This feature does not work during blackout periods.
To request a sync cycle:
1. Log in to Riva Cloud.
2. On the Dashboard, select Sync Now.
Your request is queued, and the sync should start within five minutes. You cannot request Sync Now more often than every five minutes.
Note: Significant changes in this scope may take a correspondingly long time to sync, particularly if large numbers of syncing users are affected.

P a g e | 47
www.RivaEngine.com
View the sync logs
You can view the sync logs for each user.
1. On the Riva Cloud menu bar, select Sync Logs.
The log panel appears and displays the currently logged-in account.
2. If the admin account is a non-syncing user, select another user from the drop-down menu to see that user's sync logs.
3. If there are connection errors in the log file or if many of the data items fail to sync, contact the Riva Success Team and request help.
From this log-view,
▪ you can select Go Back to return to the Dashboard,
▪ you can select Refresh, and
▪ you can switch to a Detailed View for the same log.

P a g e | 48
www.RivaEngine.com

P a g e | 49
www.RivaEngine.com
Common Errors
Connection Errors
There are two common connection errors:
Cannot Connect to the Target System - System Not Available: This type of error indicates that the CRM or email system is not accessible to Riva Cloud Corporate. To confirm this issue, attempt to log in to the CRM or Outlook Web Access as any normal user. If the login screen is not available or all logins for any enabled users are denied, then there is an issue with the target system. To resolve the issue, contact the CRM, email system administrator, or host provider.
Cannot Connect to the Target System with Given Credentials: This error indicates that Riva Cloud Corporate cannot connect to the CRM or email system using the user credentials currently configured. To confirm this issue:
▪ Attempt to log in to the CRM or email system as the Riva Cloud connection user (service account). If the login is denied, then there is an issue with the Riva Cloud connection user. Contact the CRM or email administrator and confirm the login user name and password for the Riva Cloud Corporate connection user.
▪ If the user name and password have not changed: Test the existing Riva Cloud Corporate connection password.
▪ If the user name has not changed, but the password has changed: Update the Riva Cloud Corporate connection password.
▪ If the user name has changed: Disable the sync policy, and contact the Riva Success Team to reconfigure the connection.
▪ If the users have been moved to a different CRM or email system: Disable the sync policy, and contact the Riva Success Team.
P a g e | 50
www.RivaEngine.com
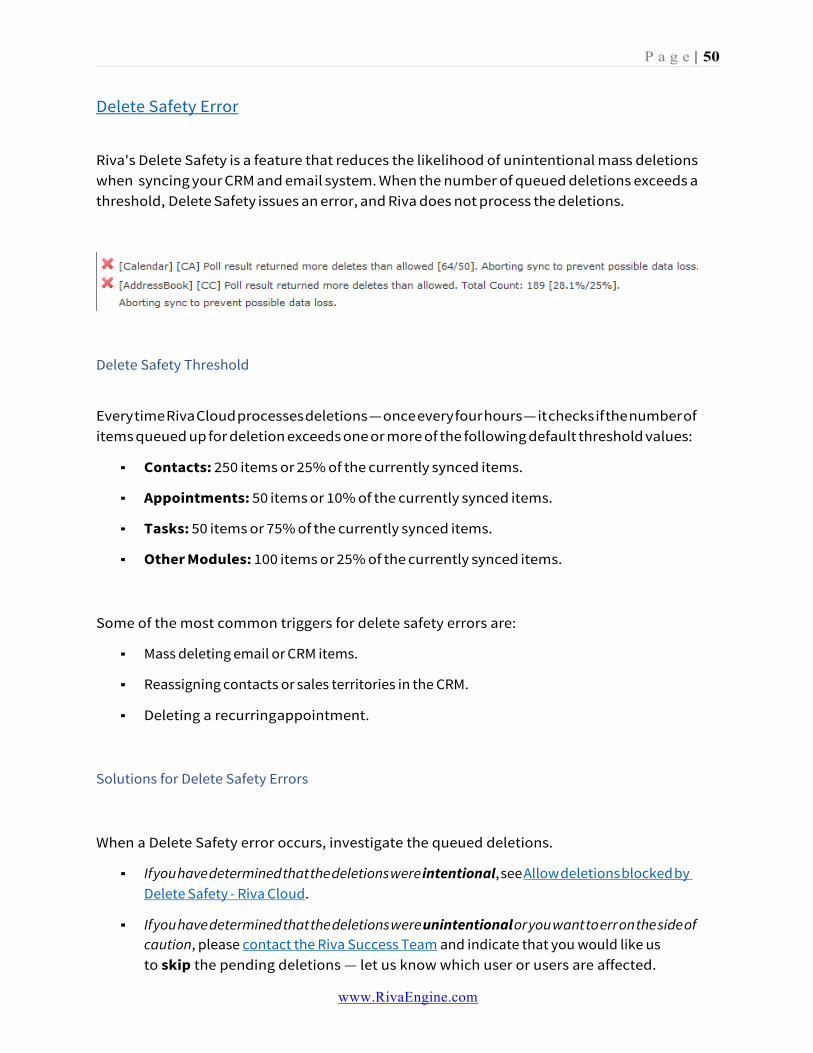
Delete Safety Error
Riva's Delete Safety is a feature that reduces the likelihood of unintentional mass deletions when syncing your CRM and email system. When the number of queued deletions exceeds a threshold, Delete Safety issues an error, and Riva does not process the deletions.
Delete Safety Threshold
Every time Riva Cloud processes deletions — once every four hours — it checks if the number of items queued up for deletion exceeds one or more of the following default threshold values:
▪ Contacts: 250 items or 25% of the currently synced items.
▪ Appointments: 50 items or 10% of the currently synced items.
▪ Tasks: 50 items or 75% of the currently synced items.
▪ Other Modules: 100 items or 25% of the currently synced items.
Some of the most common triggers for delete safety errors are:
▪ Mass deleting email or CRM items.
▪ Reassigning contacts or sales territories in the CRM.
▪ Deleting a recurring appointment.
Solutions for Delete Safety Errors
When a Delete Safety error occurs, investigate the queued deletions.
▪ If you have determined that the deletions were intentional, see Allow deletions blocked by Delete Safety - Riva Cloud.
▪ If you have determined that the deletions were unintentional or you want to err on the side of caution, please contact the Riva Success Team and indicate that you would like us to skip the pending deletions — let us know which user or users are affected.

P a g e | 51
www.RivaEngine.com
If you are uncertain where the deletions originated from, contact the Riva Success Team to request additional details. As per our company policy, Riva does not store client data; the information we can provide is limited. Generally, we can provide the CRM IDs of the first ten pending deletions per module; however, this is not guaranteed.
▪ If Delete Safety errors frequently occur and you consider increasing your Delete Safety thresholds, contact the Riva Success Team.
Allow Deletions blocked by Delete Safety
To allow INTENTIONAL deletions:
1. Log in to your account on Riva Cloud.
2. On the menu bar, select Sync Logs.
3. Below the menu bar, skim through the list of users, and see how many are experiencing a Delete Safety error.
BEST PRACTICE: If all the deletions of multiple users are intentional, do NOT process those users one by one. That is because Riva restarts the sync for all users, whether you process only one user or a group of them at a time. Restarting the sync for each error multiple times would most likely delay the sync for all users.
4. Choose the correct use case:
▪ If only one user has a Delete Safety error and all the deletions are intentional, perform these steps.
a. In the drop-down, select the user.
b. In the refreshed user's log, look for an error indicated by an "X" and click as instructed.
c. Go to step 5.
▪ If multiple users have Delete Safety errors and all their deletions are intentional, do as follows:
▪ In the User Manager, select the affected users. Click With Selected and choose Manage Delete Safety.

P a g e | 52
www.RivaEngine.com
5. On the Delete Safety page that appears, verify that the list displays the right user or users.
▪ If there is only one user, verify that the Module drop-down displays the correct module.
▪ If there are multiple users, then on the Module drop-down, select the module that you want to process.

P a g e | 53
www.RivaEngine.com
6. Under Allow deletions, select Continue, and watch the automatically triggered sync cycle on the Sync Logs page. Do not select Sync Now, and do not disable the sync policy until the sync cycle has completed and processed your Delete Safety deletions.
7. If you still encounter issues, contact the Riva Success Team.
Unable to Match User to Impersonate
Riva matches target users based on their email address in CRM. Riva requires matching mailbox primary SMTP address to the corresponding CRM user's email address.
If the system cannot find a unique match, then it is not possible to form a connection between the corresponding mailbox user and the CRM user. In that case, the sync cannot take place.
This can happen for a few reasons:
1. The system cannot locate a CRM user with a matching primary SMTP email address
2. The system located a CRM user account with a matching primary SMTP email address, but the CRM account is not active or is disabled
3. The system has located a CRM group object that is assigned the matching primary SMTP email address
4. The system has located two or more CRM users with the same email address
Solution: Modify the CRM user to ensure there is only one active CRM user account with the matching primary SMTP email address.
Synchronization Failed Due to CRM ID Conflict
Riva creates a relationship between the user ID and the user that is syncing. If that ID changes for any reason, the system will stop synchronization to prevent any type of data corruption. You will sometimes see this error if a user needs to be renamed (for example, surname change).
Solution: This can be fixed by contacting the Riva Success team and having them perform a Clear Mailbox ID Conflict. Before performing this reinitialization, it is best to understand the circumstances of the error; for example, was the user recently renamed.

P a g e | 54
www.RivaEngine.com
Previous Folder ID does not match Current Folder ID
Riva maintains a transaction record for each user that records the folder IDs in the user's mailbox where items are stored. These objects are assigned unique ID's. Rive uses those IS's to locate the objects and search for items to save them. If Riva discovers that the IDs do not match, it will report an error.
An example would look like this:
[XA] Previous folder ID does not match current folder ID. A reinitialization is required
The error indicates that the ID's for Exchange Appointments are different than the ones Riva has on file. The error is considered critical, and therefore, Riva stops sync to prevent any data integrity issues.
Solutions: This error can be resolved by contacting the Riva Success Team. They will perform a reinitialization to clear the error and allow sync to resume. Before performing the reinitialization, however, they will need to know some important information:
1. What changed with the user's mailbox? 1. Was there a migration or a mailbox rebuild?
2. If so, when did it occur?
Note: To prevent data integrity issues, the Riva Success team will potentially want to place a line in the sand in place. A line in the sand is a set of keys that tells Riva to only sync from a specified date onward. If for example a migration took place on October 23, a line in the sand might be placed to ensure only appointments created for modified after October 23 are synced by Riva.

P a g e | 55
www.RivaEngine.com
Requesting Support
There a few ways you can request support; they are listed below. When requesting support, it is important that as much information be provided as possible:
1. The policyholder 2. Affected module(s) 3. Affected users 4. Specific examples, i.e., contact names or subjects
Riva Cloud Form
To use the Contact Us form:
1. Log in to https://www.rivacloud.com.
2. On the menu bar, select CONTACT US.
3. Complete the Contact the Riva Success Team form.
Tips for the Message box:
▪ If you see an error, preferably copy and paste it from the Riva Cloud sync logs so that we receive the exact wording of the error.
▪ If your country has multiple time zones, please let us know in which time zone you are.
4. At the bottom of the form, select SEND MESSAGE.
Your submission is assigned to a sales or support agent who will reply by email.
Riva Website Form
This form comes in handy to request support if you cannot log in to Riva Cloud.
To use the Riva website form:
1. On http://www.rivaengine.com/, point to Resources, and select Help.

P a g e | 56
www.RivaEngine.com
2. Fill out the Support Request form, and select Send.
Your request is assigned to a sales or support agent who will reply by email.
By Email
You can also request support by sending an email to [email protected] with the following information:
▪ Your name.
▪ Your contact phone number.
▪ Your time zone.
▪ Priority: Use "Urgent", "High", "Normal", or "Low".
▪ Severity: Use "Critical: Service is failing or not syncing" or "Non-Critical: Some users are still syncing."
▪ Subject title of the support request.
▪ Email address of the Riva Cloud admin user.
▪ Email address of the user experiencing the sync issue.
▪ Description of the issue. If you see an error, copy and paste it from the Riva Cloud sync logs so that we receive the exact wording of the error. If there is a data sync issue, be specific about the nature of the sync challenge, who is affected, and the subject of the email (if you are trying to SmartConvert or AssignTo an email in a drop folder).
Please include screenshots of the email client or CRM item that is being affected.

P a g e | 57
www.RivaEngine.com
Appendix
Register for a Riva Cloud Account
secure password
Terms and conditions of use
Choose your Riva Cloud Mode
Preventing duplicates: Dealing with Outlook plug-
ins Do not run Riva twice against the same user
Create a Microsoft Dynamics CRM on Office 365 connection
Create a Microsoft Dynamics CRM 2011 connection
Create a Microsoft Dynamics CRM 4 connection
Create an Oracle CRM On Demand connection
Create a Salesforce connection
Create a Sugar, info@hand, or intelecrm
connection Create a NetSuite CRM connection
Create a Sage CRM connection
Create an SAP C4C CRM connection
Create an Oracle Sales Cloud connection
Connect a G Suite account (paid
subscription) Create an Exchange
connection
Create a GroupWise connection
Configure an Exchange OR IBM Notes Policy
Manage my account:
View the Account Summary
Change the Admin user
password Set or update the
payment method View account

P a g e | 58
www.RivaEngine.com
invoices;
Change your subscription to increase the number of licensed users
Change your subscription to reduce the number of licensed users
Cancel your subscription

P a g e | 59
www.RivaEngine.com
Return to the
Dashboard. Manage
users:
Add one or more target
users Edit a user:
Change the user login password
Enable or disable the user
account Change user account
details Disable/enable a user
Remove a user
Manage the connections:
Common connection errors
Test the current connection
password Change a connection
password
CRM or Exchange system changes
Manage the sync policy
Enable or disable the sync
policy Modify the sync policy
Change the historic item filter start date
Change the sync category name or contact folder
name Request a sync cycle
View the sync logs