Embed Size (px)
Citation preview

Ringmaster rangeindoor/outdoor switchgear
installation, operation and maintenanceinstructionsDecember 2001
Ringmaster Cover (Dec01) 7/12/01 4:03 pm Page 2

RINGMASTER (Dec01)-Text 7/12/01 3:59 pm Page 1

page
Ringmaster rangecontents
1MERLIN GERIN
Version 7 - Issue date December 2001Note: This manual covers ring main units produced from June 1999. Designation RN2c/RN6c/RE2c. For ring main units designated RN2/RN6 see earlier manual.Ref: Version 005/December 98.
generalgeneral descriptionweights and dimensionsstoragefloor preparation
Ringmaster C - ring main unitsoperationmain featuresmain switch / circuit breakercable earth switchcable testing - RN2ccable testing - RN6ccircuit breaker resetmotorpack circuit breaker resetmotorpack controlneon indicationearth fault flow indicatorinstallation of pilot cablesremoval of VIP relay standard cable connectiontransformer mounting
Ringmaster switches and circuit breakersoperationmain featuresmain switch / circuit breakertransformer earth switchcable testingactuator controlearth fault flow indicatorconnectionremoval of VIP relayinstallation of pilot cablestransformer mountinginstallation of MU2main cable connectionstandard main cable connectiontop cable entryangled cable entryaccessing VT’sdisconnection of solid link VTinstallationerection/connectionconnection of busbarsconnection of busbars metering
Protectionprotection systems - TFLoperationcommissioningintroductionphysical checksHV. withstand testcircuit breaker auxiliary testsC.T. testsTFL / DAT testsC.T. insulation test
maintenance
leakage of SF6 gas
fault operation graph
product support
2234
6789
10111112131314141515
171819202021
22222323232324242525
262627
2930
32323234343741
42
43
44
45
RINGMASTER (Dec01)-Text 7/12/01 3:59 pm Page 2

These instructions cover all operations concerning handling, installation, operation
and maintenance of the Ringmaster Range of equipment.
introduction
RN2c/RE2cRN6c
CN2 SN6 CE6 SE6 CE2 MU6+CE6/CE2/SE6
MU2 MU6
1510 1610hWI
average dimensions(mm) (packed)
unit(s)
approx. weight (kg)
771842350
1750520960280
1750520960280
1750520960280
1750520960280
1750520960280
175011001100520
1650520960240
1750520960240
Ringmaster rangegeneral description
the range comprises:-■ RN2c 630/200A non extensible compact ring main unit■ RN6c 630/630A non extensible compact ring main unit■ RE2c 630/200A extensible compact ring main unit■ CN2 200A non extensible circuit breaker ■ SN6 630A non extensible switch■ CE2 200A extensible circuit breaker ■ CE6 630A extensible circuit breaker ■ SE6 630A extensible switch■ MU2 200A feeder metering unit non-extensible units■ CE2/CE6/SE6 with metering unit
When fully installed the equipment is suitable for outdoor use . It may therefore be necessary to protect the equipment from the environment duringerection/commissioning. Please check equipment specification for clarification ofindoor/outdoor use. Should the busbar chamber or cable box become exposed tothe elements, they should be thoroughly cleaned prior to energising.
Compact non extensible composite ringmain unit ■ RN2c 630/200A■ RN6c 630/630A
2 MERLIN GERIN
weights and dimensions
Extensible circuit breakers and switches ■ CE2 200A■ CE6 630A■ SE6 630A
RINGMASTER (Dec01)-Text 7/12/01 3:59 pm Page 3

3MERLIN GERIN
outdoor unitsThese can be carried on open topped trucks or stored outside for short periods provided that all apertures are covered. Units should not be considered weatherproof until the paint work has been inspected and, if necessary any damageshould be re-touched.
indoor units Indoor units must not be left outdoors. They should be stored in a warm, dry, switchroom and protected against dust and debris.
off loadingAll units are delivered on pallets (secured by 4 x M8 screws and nuts) and fitted withlifting eyes, suitable for off loading by forklift truck or overhead crane.
ancillary kitsAncillary kits containing busbar, dyscon boots, glands, screws etc. are supplied loose with each unit or fastened to the panel leg or secured in the cable boxes.
prior to operationFollowing transportation ensure circuit breaker mechanism is reset prior to operation.
prior to energisingIt is recommended that prior to energising the unit all protection device are checked to ensure they are set correctly. For TFL units ensure fuses are fitted. VIP units mustbe set in accordance with the results of a protection co-ordination study.
storage
Ringmaster rangestorage
Non extensible circuit breaker and switch■ CN2 200A ■ SN6 630A
Non extensible metering unit■ MU2 200A
RINGMASTER (Dec01)-Text 7/12/01 3:59 pm Page 4

Please refer to the arrangement drawing for foundation details.floor preparation
Both non extensible units and switchboards can be directly bolted tothe concrete floor by use of 4 x 10mm(supplied) UNI-FIX or similar rag bolt fixings - see diagram. The floor tolerance for extensible switchboardsis ±1mm over 1 metre .
jigs supplied
channels grouted in
4170
position using setting
41
foot of unit
m10 channel fixing
in subfloorchannels made
channel nut
to + - 1mm with
spring loaded
foundation channel
note: floor level flush
Ringmaster rangegeneral
Where it is not possible to guaranteethat the floor is within the specified tolerance, we strongly recommend theuse of foundation channels, i.e. UnistrutP3270 or similar.
note: The floor must be 1mm below the top
of the Unistrut.
4 MERLIN GERIN
Check for any damaged paintwork.Damaged areas should be cleanedand re-coated as follows:
Rub down the area around the damagewith medium glass paper. Clean thedamaged area with emery paperensuring the surface is clean and freeof any corrosion. Apply one coat ofzinc-rich epoxy primer (a two-pack system is recommended), the coatingto be 35-45 microns thick. The recommended paint system is international Paints “Interzinc EPA 072and EPA 073”.
Leave to cure for 24 hours. then applytwo, 35-45 micron coats (ie 70-80microns in total) of two-packpolyurethane. Interphane PFR 764 isrecommended.
The standard colour employed is DarkAdmiralty Grey.
paintwork
RINGMASTER (Dec01)-Text 7/12/01 3:59 pm Page 5

Ringmaster Cring main units
Note: This manual covers ring main units produced from June 1999. Designation RN2c/RN6c/RE2c. For ring main units designated RN2/RN6 see earlier manual.Ref: Version 005/December 98.
5MERLIN GERIN
RN2c
RE2c
RN6c
RINGMASTER (Dec01)-Text 7/12/01 3:59 pm Page 6

Ringmaster CNon extensible/extensible ring main unit
operation
6 MERLIN GERIN
RN2c
facia MIMIC of RN2coperating handle
key
1 facia
2 operating handle (padlockable)
3 auxiliary/Protection LV compartment
4 test access key
5 data plate
6 main circuit label
7 gas pressure indicator
8 tripped on fault flag
9 main earth selector lever
note: The operating handle can be used in two positions:1. With the handle protruding outside the unit dimensions.2. With the handle within the constraints of the unit.
7
6
8
9
2
4
3
5
1
RINGMASTER (Dec01)-Text 7/12/01 3:59 pm Page 7

Ringmaster CNon extensible/extensible ring main unit
operation
7MERLIN GERIN
manual operation of main switch/circuit breaker RN2c, RE2c, RN6c
Lift up hinged door. Check that the gasindicator is in the green, "healthy condition". Check the facia diagram forthe service condition. Remove padlocks if fitted.
Move selector to "Main Switch/Circuitbreaker" position. To operate selectorslide padlock sleeve towards selectorpivot point and rotate selector torequired position.
Insert handle as shown, aligning handle profile and direction of operation (arrow) to unit operationalsocket, for direction of operation.Firmly operate, in a rotational movement, the operating handle untilthe circuit breaker/switch closes.
Padlock fitted to circuit breaker/mainswitch in the “close in service position”.To open, remove “closed in serviceposition” padlock, if fitted, rotate handlethrough 180° and reverse procedure.
The selector lever will be locked in the“main switch/circuit breaker” positionwhen in the “closed in service” position.
Padlock fitted to circuit breaker/mainswitch selector.
note: to operate to the “main on’ position the operating handle must be rotated in a clockwise direction for the circuit breaker/ right hand ring switch and in an anti-clock wise direction for the left hand ring switch (as marked on the unit facia).
note: the fitting of padlocks does not affect the electrical tripping of the unit.
RINGMASTER (Dec01)-Text 7/12/01 3:59 pm Page 8

8 MERLIN GERIN
Ringmaster CNon extensible/extensible ring main unit
operation
manual operation of earth switch RN2c, RE2c, RN6c
Lift up hinged door. Check that the gasindicator is in the green, "healthy condition". Check the facia diagram forthe “off” service condition. Remove padlocks if fitted. Move selector to“Earth Switch” position. To operateselector slide padlock sleeve towardsselector pivot point and rotate selectorto required position.
Insert handle as shown, aligning handle profile and direction of operation (arrow), to unit operationalsocket for direction of operation. Firmlyoperate, in a rotational movement, theoperating handle until the earth switchcloses.
The selector lever will be locked in the“earth switch” position when in the“closed in earth” position.
Padlock fitted to earth switch selector. Padlock fitted to earth switch in the“closed in earth position”. To open,remove “closed in earth position” padlock, if fitted, rotate handle through180° and reverse procedure.
note: to operate to the “earth on’ position the operating handle must be rotated in an anti-clockwise direction for the circuit breaker/ right hand ring switch and clockwise direction for the left hand ring switch (as marked on the unit facia).
note: the unit will not electrically trip if an earth is applied onto a fault.
RINGMASTER (Dec01)-Text 7/12/01 3:59 pm Page 9

9MERLIN GERIN
Ringmaster CNon extensible/extensible ring main unit
operation
cable testing - ring cables RN2c
Open LV compartment by depressinglever on lower edge of LV compartment. Remove padlock if fitted,at this point.
Ensure that the main earth switch is inthe “earth on” position. This will openthe key way.
Key way Insert test key (located inside LV cabinet)into key way.
The test access key will be locked inposition until the cover is firmly closed.Reverse procedure to return to servicecondition. Note:- ensure cables are discharged before touching bushings aftertesting.
Turn lever clockwise. Remove testaccess cover padlock if fitted.
Pull test access cover down, utilisingoperating handle, to remove cableearth and provide access to the testingbushings (marked with red, yellow andblue phase dots).
RINGMASTER (Dec01)-Text 7/12/01 3:59 pm Page 10

10 MERLIN GERIN
Ringmaster CNon extensible/extensible ring main unit
operation
cable testing - circuit breaker RN6c
Ensure that the CB earth switch is inthe “earth on” position.This will open the key way for the testkey.
key waytest key
The test key is located on the RN6cfascia as shown above. To remove the key, turn the black lever 90° anti-clockwise.
Insert the test key as shown and turnthe black lever 90° in a clockwise direction to lock in position.
Remove test access padlock (if fitted).Whilst holding black lever of test keydown, raise the CB test access cover.Note that some resistance will beencountered.
Lift CB test access cover clear of testcontacts. Note that the test key is nowlocked in position until the accesscover is firmly closed.Reverse procedure to return CB to service.
RINGMASTER (Dec01)-Text 7/12/01 3:59 pm Page 11

11MERLIN GERIN
Ringmaster CNon extensible/extensible ring main unit
operation
circuit breaker reset - electrical trip/tripped on fault RN2c, RE2c, RN6c
motorpack circuit breaker reset - electrical trip/tripped on fault
Following a circuit breaker electricaltrip/tripped on fault operation the tripping spring has to be reset prior to aclose operation. The orange tripped onfault flag (indicated with arrow) will bedisplayed following the electrical trip.
Insert handle as shown, aligning handle profile and direction of operation (arrow) to unit operationalsocket, for direction of operation.Firmly operate, in an anti-clockwiserotational movement, the operatinghandle until the orange tripped on faultflag changes to the white normal service condition, and the handlereaches the end stop.
On the resetting of the flag to whiteallow the operating handle to returnclockwise to the off position.To close the circuit breaker to the service/earth condition, refer to relevant section regarding manualoperation.
When a trip operation has occured, themotor intelligence will automaticallyreset the circuit breaker.
note: to manually reset circuit breaker remove motorpack and follow above procedure.
RINGMASTER (Dec01)-Text 7/12/01 3:59 pm Page 12

12 MERLIN GERIN
Ringmaster CNon extensible/extensible ring main unit
operation
motorpack control RN2c, RE2c RN6c
Prior to connecting the motorpackcheck the facia diagram for serviceconditions. The service selector padlock, if fitted, can remain fitted withthe application of the motorpack.Note: The motorpack can only be fittedwhen the main switch/circuit breaker position is selected and not when the earthposition is selected.
Align both the motorpack male driveshaft and the electrical connector withthe female switch operating socket andelectrical connector on the unit facia.Note: The motorpack can be removed andreplaced in both the “Main On” and “MainOff” service conditions.
Offer motorpack to unit until fullengagement of both the drive and electrical connection are achieved.
For electrical operation of the motorpack, refer to the Easergy T200E telecontrol manual.
The motorpack protection fuse is located at the bottom right hand corneras above when the motor is removed.
The motorpack is fitted with a manualdrive, to release mechanism springtension, should the motor fail duringelectrical operation. Remove allenscrews (indicated with arrows) onmotorpack cover to access manualdrive screw.
note: only manual operation of the earth switch can be undertaken. To operate earth switch remove motorpack and follow “manual operation of earth switch instructions.
RINGMASTER (Dec01)-Text 7/12/01 3:59 pm Page 13

13MERLIN GERIN
Ringmaster CNon extensible/extensible ring main unit
operation
neon indication
earth fault flow indicator
Neon indication can be fitted as anoptional item on the ring switches andcircuit breaker on the RN2c. The testsockets are located in the pilot cablebox.
A garter spring is fitted to the relevantcable bushing which forms a capacitivecoupling with the HV conductor, deriving the neon voltage.
Hand or self reset earth fault flow indicators can be fitted.Please refer to manufacturers instructions.
For C.T.’s mounted inside the cablebox, gland insulation is not required. for C.T.’s mounted outside the cablebox, gland insulation must be fitted.
Split core C.T.’s can be installed afterthe main cable has been made offinside or outside the cable box.However, please note gland insulationmust be fitted if mounted outside thecable box.Installation instructions for the units aresupplied with the accessory kits.
note: circuit breaker neons cannot be fitted to transformer mounted units.
RINGMASTER (Dec01)-Text 7/12/01 3:59 pm Page 14

14 MERLIN GERIN
Ringmaster CNon extensible/extensible ring main unit
connection
installation of pilot cables RN2c, RE2c, RN6c
removal of VIP relay
The universal gland plate at the rear ofthe LV compartment will accommodatepilot cable glands upto 25.5mm2.
To fit gland and cable remove 4 glandplate screws. Slide top section of glandplate forward.
Insert gland and cable replace topgland plate and 4 fixing screws.
Open cabinet door. Move shorting linkson terminal rail, short circuiting the CTSecondaries.Remove top cover 3 x M6 x 20 screws.
note: CT secondaries not shorted on aboveShort circuiting of the CT secondaries. To short circuit the protection currenttransformers loosen test terminals A, and move shorting link B upwards.
note: CT secondaries shorted on aboveSlide earthbar B to position above andtighten test terminals A.To isolate protection device from CT’sloosen screw C and slide link to lower position.
Open up relay cover. Loosen tworetaining bracket screws at top of VIPfacia.Withdraw relay and remove secondarywiring.
AA
BB
A
C
RINGMASTER (Dec01)-Text 7/12/01 3:59 pm Page 15

Ringmaster CNon extensible/extensible ring main unit
operation
774
30
761
600
967
536
413
40
1510
4 OFF M10*115RAWL THROUGHBOLTS
268 268
266.
526
3
105
387
569
1948
516
1320
936
387
105
ES
I35-
1 tr
ansf
orm
er
470
86 86 86 86 86
89
89216370 116
Dimensions of the EA transformer flange
General arrangement of a transformer mounted RN2c.
14 x M12 clearance holes
unit(s) boot type cable socket lug torquefixing (Nm)
RN2c/RE2c main right angled M12 stud 54
RN6c tee off right angled M12 stud 54
tee off straight M12 clearance hole in palm 54
RN2c/RE2c/RN6c cable connectioncable box venting fixings arrangement
The RN2c/RE2c/RN6c is suitable foraccepting 1 x 3 core or 3 x 1 corecable approaching from below - topentry available on request. Fit the gland plate and accessories inaccordance with the instructions supplied with the ancillary kit.
Ensure cable box cover screws areconfigured correctly as detailed oncable box cover label.
Standard RN2c/RE2c/RN6c cable box
15MERLIN GERIN
Adjust RMU stand height to suit. Underworkshop conditions remove transformer lid screws. Pump oil out tobelow HV pocket height. (Pump intoclean, dry drum).Remove blankingplate. Push units together. Insert bushing gasket and make firm connections on flanges and supportbrackets. Make off the 3 phase connections checking that these aretight and in the correct phasesequence, onto the M12 copper studsin the bushings. Pump clean oil back tothe cold oil fill level marked on thetransformer oil gauge. Re-fit tank coverensuring that there is no damage to thegasket. Touch up paint as necessary.
RINGMASTER (Dec01)-Text 7/12/01 4:01 pm Page 16

16 MERLIN GERIN
RingmasterNon extensible/extensible circuit breakers and switches
CN2
SN6
CE2
CE6
SE6
MU2
RINGMASTER (Dec01)-Text 7/12/01 4:01 pm Page 17

17MERLIN GERIN
Ringmaster Non extensible/extensible circuit breakers and switches
operation
CN2/SN6
CE2/CE6/SE6
8
8
7
10
9
10
1
2
5
1
3
4/6
key
1 facia
2 operating handle (padlockable)
3 auxiliary/Protection compartment
4 test access key (within LV pilot
box)
5 data plate/pilot box
6 main circuit label on pilot box
7 transformer earth switch
8 gas pressure indicator
9 tripped on fault flag
10 main selector lever
RINGMASTER (Dec01)-Text 7/12/01 4:01 pm Page 18

18 MERLIN GERIN
Ringmaster Non extensible/extensible circuit breakers and switches
operation
operation of main switch/circuit breaker CE6, CE2, SE6, CN2, SN6
operation of main earth CE6, CE2, SE6, CN2, SN6
Lift up hinged door. Check that the gasindicator is in the green, "healthy condition". Check the facia diagram forthe service condition. Remove padlocks if fitted.
Move select to "Main Switch" position.Insert handle as shown and pull downfirmly until the circuit breaker/switchcloses. The selector lever will belocked into the "main switch" position.Fit padlock into "CB closed in service"position if required.
note: that this does not affect electrical tripping of the unit.
To open, rotate the handle through 180° and reverse the procedure.
To open, rotate the handle through180° and reverse the procedure.
Lift up hinged door. Check that the gasindicator is in the green, "healthy condition". Check the facia diagram forthe service condition. Removepadlocks if fitted.
With the switch/circuit breaker in theopen position, move selector lever to"earth switch position". Insert handleas shown and pull down firmly until theswitch closes. The selector will belocked in the "earth switch" position.Fit padlock into "circuit breaker/switchmain cable earthed" if required.
note: that the unit will not trip on fault.
RINGMASTER (Dec01)-Text 7/12/01 4:01 pm Page 19

19MERLIN GERIN
Ringmaster Non extensible/extensible circuit breakers and switches
operation
transformer earth switch SN6 and CN2 only
opening earth switch
Open the main switch/circuit breaker.Move the selector lever (see page 10)to earth position. Do not re-close themain earth switch unless incomingcable earth is required. Move transformer earth selector lever asshown above.
Pull lever forwards as shown to closeearth switch. Push back to rest position. The main selector levershould be locked in the earth position.
The switch can be padlocked "on" asshown above.
The transformer earth can now be padlocked off as shown above. Themain selector lever is now free tomove.
Remove padlock if fitted. Move transformer earth selector lever asshown above.
Turn lever clockwise as shown aboveuntil flag show "off" and mechanism isreset. Turn lever back to the rest position.
closing earth switch
RINGMASTER (Dec01)-Text 7/12/01 4:01 pm Page 20

20 MERLIN GERIN
Ringmaster Non extensible/extensible circuit breakers and switches
operation
cable testing main cable - CE6, CE2, SE6, CN2, SN6 and ring cables
actuator control
Ensure that the main earth switch is"earth on". This will open the key way.
Insert test key (located in pilot cablebox compartment) into key way andturn lever anti-clockwise. Remove testaccess cover padlock if fitted.
Pull test access cover down to removecable earth and provide access to thetesting bushings, (marked with red, yellow and blue phase spots). The testaccess key will be locked in positionuntil the cover is firmly closed.Reverse procedure to return to servicecondition. note: ensure cables are discharged
before touching bushings after testing.
Rotate actuator mechanism anti-clockwise away from the handlesocket. Manual operation can be performed as normal. Reverse theprocedure to fit the actuator.
For electrical operation of the actuator,refer to the selection guide or the RTUsupplying the switchgear (eg EASERGY T200).To earth the main cable, the actuatormust be removed. With the switch/circuit breaker in the open position, disconnect the actuator supply.
Lift the lever on the connecting bracket.
RINGMASTER (Dec01)-Text 7/12/01 4:01 pm Page 21

Ringmaster Non extensible/extensible circuit breakers and switches
operation
21MERLIN GERIN
earth fault flow indicator
Hand or self reset earth fault flow indicators can be fitted. Please refer to manufacturers instructions.
For C.T.'s mounted inside the cablebox, gland insulation is not required.For C.T.'s fitted outside the cable boxgland insulation must be fitted.
Split core C.T.'s can be installed afterthe main cable has been made off outside the cable box. Howeverplease note gland insulation must befitted if mounted outside the cable box.Installation instructions for the units aresupplied with the ancillary kits.
RINGMASTER (Dec01)-Text 7/12/01 4:01 pm Page 22

22 MERLIN GERIN
Ringmaster Non extensible/extensible circuit breakers and switches
connection
installation of pilot cables
removal of VIP relay
on switch/circuit breaker.Remove VIP relay if fitted, knock outthe pre-punched gland plates from theinside as required. There is no need tore-touch with paint (the plates arestainless steel).
note: 20.5mm = 1x7 core / 1x9 core pilot gland25.5mm = 1x19 core pilot gland
on MU2Knock out the pre-punched glandplates from the inside as required.There is no need to re-touch with paint(the plates are stainless steel).
on feeder/busbar metering unitsKnock out the pre-punched glandplates from the inside as required.There is no need to re-touch with paint(the plates are stainless steel).
Remove the crimp terminals from thetop of the relay. Rotate the two faciascrews behind perspex window torelease clamps and withdraw relay.
Pull the relay cover forwards andremove.
Remove the 2 , M4 x 20mm pan headscrews and washers from the front ofthe relay cover and the M6 x 20 mmscrew from the top of the relay cover.
RINGMASTER (Dec01)-Text 7/12/01 4:01 pm Page 23

23MERLIN GERIN
Ringmaster Non extensible/extensible circuit breakers and switches
connection
transformer mounting on standard EA 35/1 transformers:
Adjust switch / CB stand height to suit.Under workshop conditions removetransformer lid screws. Pump oil out tobelow HV pocket height. (Pump intoclean, dry drum).Remove blankingplate. Push units together. Insert bushing gasket and make firm connections on flanges and supportbrackets. Make off the 3 phase connections checking that these aretight and in the correct phasesequence, onto the M12 copper studsin the bushings. Pump clean oil back tothe cold oil fill level marked on thetransformer oil gauge. Re-fit tank coverensuring that there is no damage to thegasket. Touch up paint as necessary.
General arrangement of a transformer mounted CN2.
installation of MU2
main cable connection
All units are fitted with dry type cableboxes suitable for accepting heatshrink termination kits. Accessory kitscontaining gland plates etc are available.
Please refer to the assembly instructions supplied with the units.
unit(s) boot type cable socket lug torquefixing (Nm)
CE6/CE2/SE6 straight M12 clearance hole in palm 54
CE2/CE6 feeder metering right angled M12 tapped hole 54
CN2/SN6 main straight M12 clearance hole in palm 54
outgoing right angled M12 tapped hole 54
CE2, CE6, SE6, CN2, SN6connection standard cable entry
On switches/circuit breaker panels,side sheets can be removed on bothsides of the cable box. For compositeswitchboards, 3 side covers can beremoved on inner panels, one at atime, for improved access. Suitable foraccepting 1 x 3 core / 3 x 1 core cableapproaching from below. Fit the glandplate and gland bonding in accordancewith the instructions supplied with theancillary kit.
note: Do not remove the rear cable box cover when only one or two panels are used. The rear cablebox cover is used to support the unit.
Standard CE2, CE6, SE6, CN2, SN6, cable box
568
RINGMASTER (Dec01)-Text 7/12/01 4:01 pm Page 24

24 MERLIN GERIN
Ringmaster Non extensible/extensible circuit breakers and switches
connection
CE2, CE6, SE6, CN2, SN6 top cable entry
CE2, CE6, SE6, CN2, SN6 angled cable entry
16675
7
1320
trenchmaincable
45
16675
7
1320
trench maincable
45O
CE2, CE6, SE6, CN2, SN6 with top entry cable box.
front entry rear entry
Top entry cable boxes can be fitted forbasement substation applications.
Angled gland plates can be providedon all units to the front or rear, in orderto simplify civil works.
Please refer to accessory kit instructions for
details.
RINGMASTER (Dec01)-Text 7/12/01 4:01 pm Page 25

25MERLIN GERIN
Ringmaster Non extensible/extensible circuit breakers and switches
VT connection/access
accessing VT’s
disconnection of solid link VT
Ensure that the main earth switch is
padlocked in its “earth on” position. If
the unit is busbar interconnected then
the bars must be earthed or completely
isolated.
See page 23 for operation instructions.
Remove the metering chamber H.V.
access cover, as indicated.
Pull back the V.T. insulating boot, and
loosen the top V.T. connection using an
6mm allen key as indicated.
Pull back the lower fuse link insulating
boot and disconnect the V.T. link.
RINGMASTER (Dec01)-Text 7/12/01 4:01 pm Page 26

26 MERLIN GERIN
Ringmaster Non extensible/extensible circuit breakers and switches
installation
erection/connection CE6, CE2, SE6.
Remove the top cover on each unitand bolt each panel to the adjacentone. Use the 16 x M6 screws aroundthe busbar aperture and the 2 x M8screws by the cable test access/auxiliary compartment.
The busbar end cap is secured with 16screws. Before fitting the end capapply a line of silicon compoundaround the busbar aperture.
Please refer to accessory kit instructionsfor full details.
Connect the busbars as shown below.Connect the earth bars at the back ofthe units. Connect the main substationearth to the equipment main earth bar.Fit the main gland plates (see ancillaryinstructions). Erect the first unit underclean, dry conditions either directly tothe floor, or on to the foundation channels.
connection of busbars CE6, CE2, SE6.refer to accessory kit instructions for full details
430 430
rain shieldpanel lid
sealing strip
rain shield
busb
ar e
nd c
ap
typical busbar run
Ensure that the environment is cleanand dry. Remove busbar chamber covers.
refer to accessory kit for full detailsRemove dyscon boots and clean bushings. Apply DC4 silicon grease toboots. Fit busbars into boots as shownabove.
RINGMASTER (Dec01)-Text 7/12/01 4:01 pm Page 27

27MERLIN GERIN
Ringmaster Non extensible/extensible circuit breakers and switches
installation
feeder meteringEnsure that the environment is cleanand dry. Remove busbar covers asshown above. Remove dyscon boots and clean bushings. Apply DC4, Dow Corning silicon grease to boots. Fit busbars intoboots as shown above.
busbar meteringEnsure that the environment is cleanand dry. Remove busbar covers asshown above. Remove dyscon boots and clean bushings. Apply DC4, Dow Corning silicon grease to boots. Fit busbars intoboots as shown above.
connection of busbars metering
busbar collarbusbar busbar
Torque busbar screw to 54 Nm. Fitdyscon dust caps. Degrease and cleanusing a lint free cloth. Replace busbarchamber covers taking care not todamage nylon inserts.
note: It is recommended prior to refitting busbar chamber covers that the busbars are tested - see page 32 for typical tests
busbarbusbar
RINGMASTER (Dec01)-Text 7/12/01 4:01 pm Page 28

MERLIN GERIN28
Ringmaster rangeprotection
Note: This section contains information for Ringmaster C equipment designationRN2c/RE2c/RN6c and Ringmaster range equipment disignation CN2/SN6/CE2/CE6/SE6.
Commissioning procedures for both ranges are given. Please check the panel type reference of the unit to be commissioned.
RINGMASTER (Dec01)-Text 7/12/01 4:01 pm Page 29

29MERLIN GERIN
Ringmaster rangeprotection
protection systems Time fuse link (TFL) protectionsummary
TFL selection
recommended Time fuse Link (TFL) settings to ESI 12 - 6
All circuit breakers can be fitted withvarious forms of protection system -
1.VIP self powered IDMT protection -refer to VIP user guides
VIP 30 - provides protection againstphase-to-phase faultsVIP 35 - provides protection againstphase-to-phase faults and earth faultsVIP 300 - three phase overcurrent and earth fault protection
2.Time fuse link (TFL) protection system to EA 41-26 (time fuse links toEA 12-6).
Time fuse link protection provides acost effective way of feeding a transformer of 1600kVA or less. It is arecognised method of protection andthe fuses are covered by EA 12-6(1973). The arrangements in theRingmaster range is of 2 phase overcurrent and earth fault.
Merlin Gerin recommend TFL sizes inaccordance with the table to the right.
The table also includes our recommendations for the maximum LVfuse size to ensure discrimination.Note that the size of this fuse is lessthan the full load current of the transformer, however, it would normallybe expected to have a number of LVfuses fed from the LV side of the transformer.
important note: Please ensure TFL
fuses are fitted prior to energising the
equipment.
3.3 10A - - - - - - TFL
(kV) 200 315 500 800 1000 1250 1600
150A - - - - - - LV fuse
6.6 5A 10A 15A - - - - TFL
150A 250A 400A - - - - LV fuse
11 3A 5A 10A 15A -
560A -
15A -
560A -
- -
- -
12.5A 15A
560A 560A
7.5A 10A 12.5A 15A
630A 630A
12.5A 15A
630A 630A
560A 630A
7.5A 10A
560A 630A
400A
10A
400A
15A
400A
7.5A
400A
- - TFL
200A 300A - - LV fuse
13.8 3A 5A - - TFL
200A 300A - - LV fuse
3.3 5A 10A - - TFL
150A 250A - - LV fuse
6.6 - 5A - - TFL
- 250A - - LV fuse
11 - - 5A TFL
- - 400A LV fuse
13.8 - - 5A TFL
- - 400A LV fuse
CT ratio = 50/5
voltage transformer rated power (kVA)
earth fault setting = 25A
(instantaneous trip)
CT ratio = 100/5
earth fault setting = 30A
(instantaneous trip)
RINGMASTER (Dec01)-Text 7/12/01 4:01 pm Page 30

30 MERLIN GERIN
Ringmaster rangeprotection
The circuit consists of 3 dual ratioC.T.'s, 2 Direct Acting Trip (DAT) solenoid type overcurrent coils connected in parallel with associatedTime Fuse Links (TFL's) and 1 instantaneous earthfault DAT solenoid Coil.
Under normal load conditions on, sayan 11000 volt 1000KVA transformer, 52amps will flow in the C.T. primaries(1000kVA(11kv/3). If the C.T. ratio isset on 50/5 Amp ratio, then approximately 5 Amps will flow in theC.T. Secondaries. As the overcurrentcoils are shorted out by the fuses, nocurrent will flow through the coils.Assuming that there was no earthleakage, the red, yellow and blue phases will balance, and no current willflow through the earth fault coil.
In the event of a phase to phase faultof, say, 500 Amps, 50Amps would flowthrough the C.T. secondaries. Thiswould blow the 15Amp fuse linksshunting all of the current through theDAT coils, which would operate andtrip the 3 phase circuit breaker. Thetripped on fault flag would operate, andthe CB would have to be re-set and thefuses replaced.
Two overcurrent coils are required tocover all phase fault combinations, i.e.for a R-Y phase fault, the CB will tripon the red phase coil. Under earthfault conditions, there will be an imbalance between the red, yellow andblue phases, and current will flow downthe residual path of the C.T.'s andthrough the earth fault coil. The unitwill trip instantaneously. If a TFL is fitted in parallel with the earthfault coilthen the tripping time will follow theTFL characteristics. Alternatively, thefuse can be removed.
operation
Removable Earth Link
Circuit breakercontacts
Removable Earth Link
Removable Test Link
50/5A Ratio
C250
C230
C210
C70
C150
C130
C110
100/5A Ratio
Rapid changeover link
Blue o/c coilS3
S2S1
Earth fault coil
Red o/c coil
Red phase TFL
Blue phase TFL
Earth fault TFL(if lifted)
Terminal block
C11
C31
C51
C70
C90
250
230
210
BREAKERCONTACTS
CIRCUIT
150
130
110
50/5A RATIO
C71
REMOVABLE TEST LINK
BLUE O/C COIL
RED O/C COIL
100/5A RATIO
RATIO CHANGEOVERLINK
C52
C32
C12(IF FITTED)
EARTH FAULT COIL
EARTH FAULT TFL
REMOVABLE EARTH LINK
P
PS
S
S2
70
31
11
51
C
C
C
C
C
C
C
C
C
C
11
32
R1
Y1
B1
Panel types CN/SN/CE/SE
Panel types RN2c/RE2c/RN6c
RINGMASTER (Dec01)-Text 7/12/01 4:02 pm Page 31

31MERLIN GERIN
Ringmaster rangeprotection
Close-up of C.T. links. Replacing the time fuse links.
Dual ratio 100/50/5Amp C.T.'s are fitted as standard, to the Ring MainUnits and 200 Amp circuit breakerswith TFL protection. Selection of theappropriate C.T. ratio can be easilyachieved by moving the auxiliary link inthe pilot cable box. Note that the circuit must be off load when changingratios.
RINGMASTER (Dec01)-Text 7/12/01 4:02 pm Page 32

32 MERLIN GERIN
Ringmaster rangecommissioning
commissioning physical checks functional checks
high voltage withstand test toBS5311.
All equipment is subject to stringentquality and operational checks prior todespatch. However it is the ownersresponsibility to ensure that commissioning tests have been completed to IEC694. The following isa resume of those tests.
Remove all packaging and transitlabels from the equipment. Check thedata plate details against the specification. Check the operation ofthe switches/circuit breaker, testaccess and various interlocks.
Check confirmation of auxiliary switchcontacts and remote indication inaccordance with the schematic diagram.Confirm the phase relationship of theneon indicator sockets.Check the pick up voltage of auxiliarycoils if fitted, a.c. coils should operatebetween 85% and 110% of the ratedvoltage, d.c. coils should operatebetween 70% and110% of the ratedvoltage.
note: All voltages should be applied instantaneously unless otherwise specified.
Connect the H.V. test set as shown inthe diagrams an carry out the withstand tests in accordance with thefollowing tables.
FRONT
RN2c
RN2c/RE2c/RN6c
CE2/CE6/SE6 or SN6/CN2
(enclosed in busbar chamber)
B1Y1R1
B2Y2R2 B3Y3R3
R1Y1B1
R2Y2B2
RINGMASTER (Dec01)-Text 7/12/01 4:02 pm Page 33

33MERLIN GERIN
Ringmaster rangecommissioning
H.V. withstand - contd.
test voltages
test connection - circuit breaker / switch - CE2 / CE6 / SN6
3.6 8 50 1 (AC) 15 (DC) 7.5
7.2 16 50 1 (AC) 15 (DC) 15
12 23 50 1 (AC) 15 (DC) 25
13.8 32 50 1 (AC) 15 (DC) 32
test number
1
2
3
4
5
6
CB / switch
closed
closed
closed
closed
open
open
live terminals
R, Y, B
R, Y
Y, B
B, R
R1, Y1, B1
R2, Y2, B2
earthed terminals
frame
B, frame
R, frame
Y, frame
R2, Y2, B2, frame
R1, Y1, B1, frame
rated voltage(kV)
a.c. test voltage(kV)
frequency(Hz)
duration(minutes)
(d.c. test voltage - current practice)
test connection - ring main unit - RN2c/RN6c
test number
1
2
3
4
5
6
ring switch 1 ring switch 2
closed closed closed
closed closed
closed open
closed open
open
open
closed
closed
closed
closed
closed
open
open
circuit breaker live terminals
R1, B1
Y1
R1, Y1 B1
R2, Y2, B2
R2, Y2, B2
R1, Y1, B1, R3, Y3, B3
earthed terminals
Y1, frame
R1, B1, frame
R2, Y2, B2, frame
R1, Y1, B1, frame
R1, Y1, B1, R3, Y3, B3 frame
R2, Y2, B2, frame
R1, Y1, B1
R2, Y2, B2
R3, Y3, B3
Diagram of connections - RN2
xR2, Y2, B2
R1, Y1, B1
Diagram of connections - circuit breaker / switch
o
note: ensure VT primary connections are isolated prior to HV pressure testing equipment.
RINGMASTER (Dec01)-Text 7/12/01 4:02 pm Page 34

34 MERLIN GERIN
Ringmaster rangecommissioning
Removable Earth Link
A
R1
Y1
B1
Circuit breakercontacts
50/100A a.c.
Select phase
Removable Earth Link
0 - 5A
Removable Test Link
50/5A Ratio
C250
C230
C210
C70
C150
C130
C110
100/5A Ratio
Rapid changeover link
Blue o/c coilS3
S2S1
Earth fault coil
Red o/c coil
Red phase TFL
Blue phase TFL
Earth fault TFL(if lifted)
R2 Y2 B2
Selectphase
Terminal block
C11
C31
C51
Selectphase
C70
circuit breaker auxiliary tests
C.T. ratio test1 remove test link2 select required C.T. ratio at changeover
link3 connect ammeter (0-5A a.c.) as shown 4 select R, Y or B phase to be tested 5 connect primary injection test equipment
as shown6 operate the circuit breaker (and
respective ring switch if applicable)mechanism to "Main On"
7 inject C.T. rated primary current (100A or50A) in each phase in turn (R1-R2), (Y1-Y2), (B1-B2)
8 note indicated current on ammeter during each test, at C.T. rated primary current ammeter should indicate 5A
All secondary wiring has been 2kVinsulation tested at our works. Wetherefore recommend that testing onsite is done with a 1,000 volt meggerand not re-stressed at 2kV.
The following tests have been conducted during manufacturing(except CT insulation test, magnetisation curve), and are to beused as a guide for commissioningpurposes.
Remove all earth connections and testthe wiring to earth. For units fitted witha VIP relay please refer to the VIP userguide.
Ringmaster circuit breakers
Panel types CN/CE
Ringmaster Cring main units
Panel types RN2c/RE2c/RN6c
RINGMASTER (Dec01)-Text 7/12/01 4:02 pm Page 35

35MERLIN GERIN
Ringmaster rangecommissioning
Ringmaster Cring main units
Ringmaster circuit breakers
Removable Earth Link
mA
R1
Y1
B1
Circuit breakercontacts
Switch 'S'
Select phase
Removable Earth Link
d.c. milliammeter
Removable Test Link
50/5A Ratio
C250
C230
C210
C70
C150
C130
C110
100/5A Ratio
Rapid changeover link
Blue o/c coilS3
S2S1
Earth fault coil
Red o/c coil
Red phase TFL
Blue phase TFL
Earth fault TFL(if lifted)
R2 Y2 B2
Selectphase
Terminal block
C11
C31
C51
Selectphase
6V - 12Vd.c.+ve
-ve
+ve-ve
C70
circuit breaker auxiliary tests
C.T. polarity test1 remove test link2 connect a d.c. analogue milliammeter
(centre scale "zero" preferred) as shown3 select, R, Y or B phase to be tested4 connect d.c. voltage source as shown
ensuring correct polarity5 operate the circuit breaker (and
respective ring switch if applicable) mechanism to "Main On"
6 close switch "S" and note positive direction of dc milliammeter movement. If negative direction is observed C.T.polarity is incorrect.
Panel types CN/CE
Panel types RN2c/RE2c/RN6c
RINGMASTER (Dec01)-Text 7/12/01 4:02 pm Page 36

36 MERLIN GERIN
Ringmaster rangecommissioning
Removable Earth Link
mA
R1
Y1
B1
Circuit breakercontacts
Select phase
Removable Earth Link
0 - 10mA a.c.
Removable Test Link
50/5A Ratio
C250
C230
C210
C70
C150
C130
C110
100/5A Ratio
Rapid changeover link
Blue o/c coilS3
S2S1
Earth fault coil
Red o/c coil
Temporary TFL Shorting Link
Earth fault TFL(if lifted)
R2 Y2 B2
Terminal block
C11
C31
C51
Three phaseshorting link(100A rated)
C70
50/100A a.c.
Temporary TFL Shorting Link
C.T. spill test1 remove test link2 select required C.T. ratio at changeover
link3 connect 3 phase short circuiting link
(100A rated) at R1, Y1 and B1 connections
4 replace R and B.T.F.L.'s for temporary shorting links as shown note: a shorting link in parallel withthe earth fault coil is not required
5 connect an a.c. milliammeter as shown 6 select R-Y, Y-B or R-B phases to be
tested7 connect primary current injection test
equipment as shown 8 operate the circuit breaker (and
respective ring switch if applicable) mechanism to "Main On"
9 inject C.T. rated primary current and note spill current indicated on ammeter
10 spill current to be less than 10mA during the test
11 repeat for remaining pairs of phases (and C.T. ratio if required)
Ringmaster circuit breakers
Ringmaster Cring main units
Panel types CN/CE
Panel types RN2c/RE2c/RN6c
RINGMASTER (Dec01)-Text 7/12/01 4:02 pm Page 37

37MERLIN GERIN
Ringmaster rangecommissioning
Ringmaster circuit breakers
Ringmaster Cring main units
Removable Earth Link
R1
Y1
B1
Circuit breakercontacts
Select phase
Removable Earth Link
Removable Test Link
50/5A Ratio
C250
C230
C210
C70
C150
C130
C110
100/5A Ratio
Rapid changeover link
Blue o/c coilS3
S2S1
Earth fault coil
Red o/c coil
Temporary TFL Shorting Link
Earth fault TFL(if lifted)
R2 Y2 B2
Terminal block
C11
C31
C51
Three phaseshorting link(100A rated)
C70
50/100A a.c.
Temporary TFL Shorting Link
T.F.L. /D.A.T. overcurrent tests -primary current injection1 ensure removable earth link is fitted2 select required C.T. ratio at changeover
link3 connect 3 phase short circuiting link
(100A rated) at R1, Y1 and B1 connections
4 replace R and B.T.F.L.'s for temporary shorting links as shownnote: a shorting link in parallel withthe earth fault coil is not required
5 select R-Y, Y-B or R-B phases to betested
6 connect primary current injection test equipment as shown
7 operate the circuit breaker (and respective ring switch if applicable) mechanism to "Main On"
8 inject C.T. rated primary current and remove the T.F.L. shorting links in accordance with the table below ensuring the correct action results
9 repeat for remaining parts of phases(and C.T. ratio if required)
10 note - with both R & B T.F.L. shortinglinks in circuit, the circuit breaker shouldnot trip during overcurrent testsnote: ensure test current does not reduce signification due to circuit impedance changes during this test
R - YR - YY - BY - BR - BR - B
RBBRRB
BRRBBR
no triptrip
no triptriptriptrip
phasesundertest In cct Out cct
T.F.L shorting link circuitbreakeraction
Panel types CN/CE
Panel types RN2c/RE2c/RN6c
RINGMASTER (Dec01)-Text 7/12/01 4:02 pm Page 38

38 MERLIN GERIN
Ringmaster rangecommissioning
R1
Y1
B1
Circuit breakercontacts
0-50A a.c.
Select phase
Removable Earth Link
Removable Test Link
50/5A Ratio
C250
C230
C210
C70
C150
C130
C110
100/5A Ratio
Rapid changeover link
Blue o/c coilS3
S2S1
Earth fault coil
Red o/c coil
Temporary TFL Shorting Link
Earth fault TFL(if lifted)
R2 Y2 B2
Terminal block
C11
C31
C51
Three phaseshorting link(100A rated)
C70
Temporary TFL Shorting Link
T.F.L. / D.A.T. earth fault tests - primary current injection1 ensure removable test link is fitted2 select required C.T. ratio at changeover
link3 connect 3 phase short circuiting link
(100A rated) at R1, Y1, and B1 connections
4 replace R and BT.F.L.'s for temporary shorting links as shownnote: a shorting link in parallel withthe earth fault coil is not to be fitted
5 select R, Y or B phase to be tested6 connect primary current injection test
equipment as shown7 operate the circuit breaker (and
respective ring switch if applicable) mechanism to "Main On"
8 inject a primary current instaneously(pulse) not gradually in accordancewith the table below ensuring the correct actions result and the tripping levels arewithin tolerance
9 repeat for remaining pairs of phases (and C.T. ratio if required)
RYB
RYB
50/5A50/5A50/5A
100/5A100/5A100/5A
20 - 26.5 A20 - 26.5 A20 - 26.5 A
25 - 31 A25 - 31 A25 - 31 A
triptriptrip
triptriptrip
Rangephasesundertest
C.T. ratio trip levelscircuit
breakeraction
RYB
RYB
50/5A50/5A50/5A
100/5A100/5A100/5A
19 - 28 A19 - 28 A19 - 28 A
24 - 33 A24 - 33 A24 - 33 A
triptriptrip
triptriptrip
RN2cphasesundertest
C.T. ratio trip levelscircuit
breakeraction
Ringmaster circuit breakers and switches
Ringmaster Cring main units
Panel types CN/SN/CE/SE
Panel types RN2c/RE2c/RN6c
RINGMASTER (Dec01)-Text 7/12/01 4:02 pm Page 39

39MERLIN GERIN
Ringmaster rangecommissioning
Removable Earth Link
R1
Y1
B1
Circuit breakercontacts
Removable Earth Link
Removable Test Link
50/5A Ratio
C250
C230
C210
C70
C150
C130
C110
100/5A Ratio
Rapid changeover link
Blue o/c coilS3
S2S1
Earth fault coil
Red o/c coil
Temporary TFL Shorting Link
Earth fault TFL(if lifted)
R2 Y2 B2
Terminal block
C11
C31
C51
C70
Select pairsof phases
0 - 5A a.c.
Temporary TFL Shorting Link
R - YR - YY - BY - BR - BR - B
RBBRRB
BRRBBR
no triptrip
no triptriptriptrip
phasesundertest In cct Out cct
T.F.L shorting link circuitbreakeraction
T.F.L. / D.A.T. overcurrent tests - secondary current injection1 ensure removable earth and test links
are fitted2 select required C.T. ratio at changeover
link3 replace R and BT.F.L.'s for temporary
shorting links as shownnote: a shorting link in parallel with the earth fault coil is not required
4 select R-Y, Y-B or R-B phases to betested
5 connect secondary current injection test equipment as shown
6 operate the circuit breaker mechanism to "Main On"
7 inject a secondary current of 5A andremove the T.F.L. shorting links in accordance with the table below ensuring the correct actions result
8 repeat for remaining phases(and C.T. ratio if required)note: ensure test current does not reduce significantly due to circuit impedance changes during this test
Ringmaster circuit breakers and switches
Ringmaster Cring main units
Panel types CN/SN/CE/SE
Panel types RN2c/RE2c/RN6c
RINGMASTER (Dec01)-Text 7/12/01 4:02 pm Page 40

40 MERLIN GERIN
Ringmaster rangecommissioning
Removable Earth Link
R1
Y1
B1
Circuit breakercontacts
0 - 5A a.c.
Removable Test Link
50/5A Ratio
C250
C230
C210
C70
C150
C130
C110
100/5A Ratio
Rapid changeover link
Blue o/c coilS3
S2S1
Earth fault coil
Red o/c coil
Temporary TFL Shorting Link
Earth fault TFL(if lifted)
R2 Y2 B2
Selectphase
Terminal block
C11
C31
C51
C70
Temporary TFL Shorting Link
RYB
RYB
50/5A50/5A50/5A
100/5A100/5A100/5A
2.0 - 2.65 A2.0 - 2.65 A2.0 - 2.65 A
1.25 - 1.55 A1.25 - 1.55 A1.25 - 1.55 A
triptriptrip
triptriptrip
rangephasesundertest
C.T. ratio trip levelscircuit
breakeraction
RYB
RYB
50/5A50/5A50/5A
100/5A100/5A100/5A
1.7 - 2.8 A1.7 - 2.8 A1.7 - 2.8 A
1.1 - 1.65 A1.1 - 1.65 A1.1 - 1.65 A
triptriptrip
triptriptrip
RN2cphasesundertest
C.T. ratio trip levelscircuit
breakeraction
T.F.L. / D.A.T. earth fault tests - secondary current injection1 ensure removable earth and test links
are fitted2 select required C.T. ratio at changeover
link3 replace R and BT.F.L.'s for temporary
shorting links as shownnote: a shorting link in parallel withthe earth fault coil is not to be fitted
4 select R, Y or B phase to be tested5 connect secondary current injection test
equipment as shown6 operate the circuit breaker mechanism
to "Main On"7 inject a secondary current instaneously
(pulse) not gradual increase in accordance with the table below ensuring the correct actions result andthe tripping levels are within tolerance
8 repeat for remaining phases (and C.T.ratio if required)
Ringmaster circuit breakers
Ringmaster Cring main units
Panel types CN/CE
Panel types RN2c/RE2c/RN6c
RINGMASTER (Dec01)-Text 7/12/01 4:02 pm Page 41

41MERLIN GERIN
Ringmaster rangecommissioning
current transformer insulationtest (magnetisation curve singlepoint test)
1 Remove C70 test link.2 Remove ratio link.3 Increase test voltage to 1.3 x the
knee point voltage.4 Decrease voltage to the appropriate
knee point voltage (detailed below) for the respective CT ratio under test.
Ratio Knee point Typicalvoltage magnetisation
current100/5A 9v 470mA50/5A 4.5v 940mA
5 Replace both the test and ratio links.
Ringmaster circuit breakers
Ringmaster Cring main units
Panel types CN/CE
Panel types RN2c/RE2c/RN6c
RINGMASTER (Dec01)-Text 7/12/01 4:02 pm Page 42

42 MERLIN GERIN
Ringmaster rangemaintenance
routine maintenance recommendations toBS6626:1985
environmental conditionsUnit installed and commissioned in accordance with the manufacturers instructionsIndoors, completely protected from the weather. Humidity below 40% and no dripping water. Minimal dust and air circulation. Ambient temperature between -5oC and +40oC. No contact with any chemical agents (eg. salt). No infestation of any animal life (eg. insects). No contact with any plant life (eg. mould). No earth movements. No damage to the unit of any kind.
operational conditionsNo mal-operation of any kind. No abnormally high number of operations - refer to the graph. No abnormally high number of faults - refer to the graph.. No over-voltage or over-current (above rating).
environmental conditionsUnit installed and commissioned in accordance with the manufacturer’s conditions. Humidity below 60%. Unit may be indoors or outdoors but must not be subjected to regular extremes of weather eg.heavy rain storms, dust storms, heavy snow and ice, flooding, temperature cycles greater than 40oC or less than -20oC, dense coastal fog or acid rain. No regular or thick covering of leaves or other debris. No contact with any chemical agents (eg. salt). No infestation of animal or plant life. No earth movements. No damage to the unit of any kind.
operational conditionsNo mal-operation of any kind. No abnormally high number of operations - refer to the graph. No abnormally high number of faults - refer to the graph. No over-voltage or over-current (above rating).
Any environmental or operational conditions which do not satisfy either of the above twodescriptions must be deemed aggressive.
ideal conditions
standard conditions
aggressive conditions
Routine maintenance will depend onthe conditions to which the unit is subjected and to the relevant codesand practice. Periodic inspection of the
substation and equipment will be necessary to establish the conditions to which the units are subjected to.
ideal conditions
gas enclosure
housing interior(mechos, etc.)
housing
protection system
standard conditions aggressive conditions
no attention no attention no attention
no attention
periodic inspection
periodic inspection
every 5 years
every 5 years
every 2 years
every 5 years every 5 years every 5 years
note: Local legislation may dictate maintenance be carried out with greater frequency, irrespective of site conditions. Please contact your local Merlin Gerin representative for further details.
RINGMASTER (Dec01)-Text 7/12/01 4:02 pm Page 43
43MERLIN GERIN
Ringmaster rangemaintenance/SF6 gas
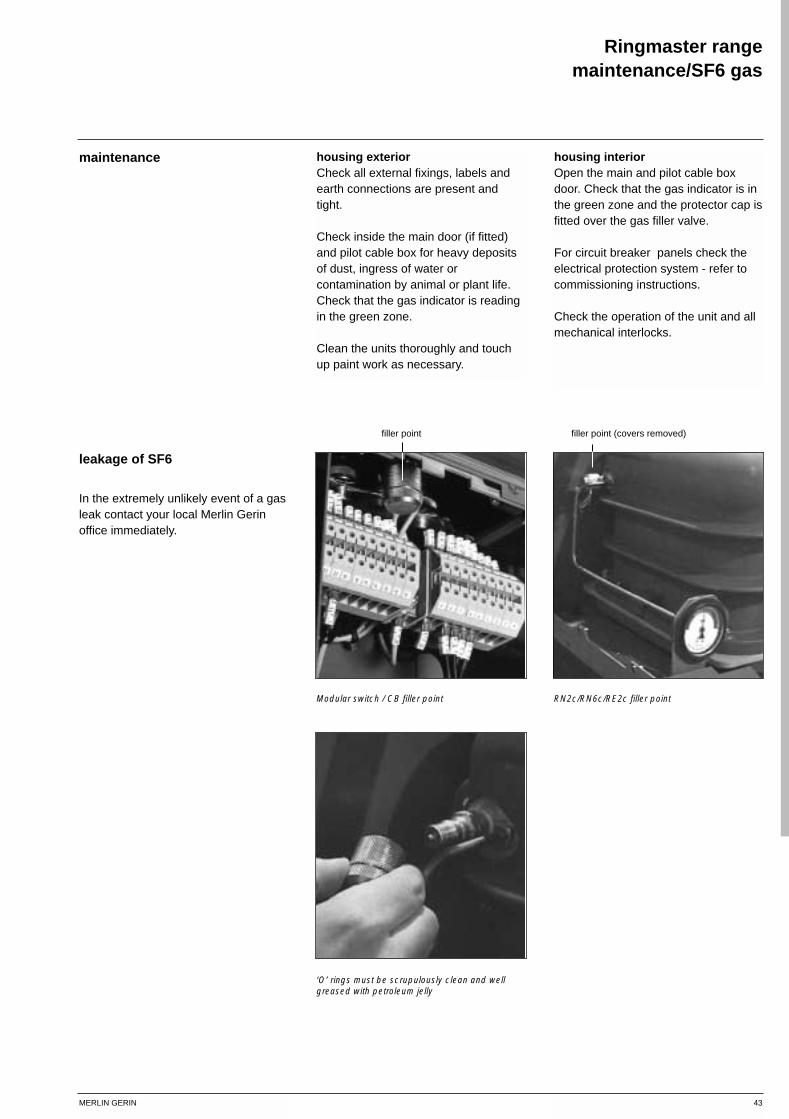
maintenance
In the extremely unlikely event of a gasleak contact your local Merlin Gerinoffice immediately.
leakage of SF6
‘O’ rings must be scrupulously clean and wellgreased with petroleum jelly
RN2c/RN6c/RE2c filler pointModular switch / CB filler point
housing exteriorCheck all external fixings, labels andearth connections are present andtight.
Check inside the main door (if fitted)and pilot cable box for heavy depositsof dust, ingress of water or contamination by animal or plant life.Check that the gas indicator is readingin the green zone.
Clean the units thoroughly and touchup paint work as necessary.
housing interiorOpen the main and pilot cable boxdoor. Check that the gas indicator is inthe green zone and the protector cap isfitted over the gas filler valve.
For circuit breaker panels check theelectrical protection system - refer to commissioning instructions.
Check the operation of the unit and allmechanical interlocks.
filler point (covers removed)filler point
RINGMASTER (Dec01)-Text 7/12/01 4:02 pm Page 44

44 MERLIN GERIN
Ringmaster rangefault operation graph
10000
1000
100
10
1
1 10 100 1000 10000 100000
current interrupted (amperes)
nu
mb
er o
f o
per
atio
ns
prospective interrupting capacity
RN2c/RN6c 16kA version RN2c/RN6c
21kA version
CE6 + CE2 + CN221kA version
RINGMASTER (Dec01)-Text 7/12/01 4:02 pm Page 45

MERLIN GERIN 45
product support
■ after sales
■ for products within warranty
please contact our Customer
Service department on
Tel: 0113 290 3500
Fax: 0113 290 3710
■ for products outside the
warranty please contact our
Services division on
Tel: 0113 284 8900
Fax: 0113 284 8910
■ Services division are also able
to offer
- full spare parts service
- maintenance contracts including
protection and testing
- erection and commissioning of
new equipment
- system design
- training
Ringmaster range
RINGMASTER (Dec01)-Text 7/12/01 4:02 pm Page 46

Merlin Gerin - Medium Voltage, 123 Jack Lane, Leeds LS10 1BS
Tel: 0113 290 3500 Fax: 0113 290 3710 Internet address: http://www.schneider.co.uk
Pub
licat
ion
No.
MV
1201
100
0 O
/S-B
P
Ringmaster Cover (Dec01) 7/12/01 4:03 pm Page 1