Embed Size (px)
Citation preview

62-60000001
Page 1 of 64
RINGDALE® UniPortUniPortUniPortUniPort Installation Manual & UserInstallation Manual & UserInstallation Manual & UserInstallation Manual & User Guide Guide Guide Guide Revision: 1.0Revision: 1.0Revision: 1.0Revision: 1.0 Date: Date: Date: Date: January 14, 2009January 14, 2009January 14, 2009January 14, 2009

62-60000001
Page 2 of 64
Table of ContentsTable of ContentsTable of ContentsTable of Contents Table of Contents ............................................................................................... 2 Copyright, Disclaimer and Trademarks ................................................................. 3 Introduction........................................................................................................ 4 Pre-Requisites ..................................................................................................... 4
Installation Steps .......................................................................................................................5 Part Numbers ...........................................................................................................................5
Step 1: Installing Software.................................................................................... 6 Step 2: Connect Optional Proximity Reader......................................................... 13 Step 3: Install Optional Fingerprint Reader .......................................................... 14 Step 4: Install the Optional Camera ................................................................... 19 Step 5: Start the UniPort Software ....................................................................... 20
Menu Bar Options ..................................................................................................................24 Step 6: Connect to the Database ....................................................................... 26 Step 7: Setup Admin Users ................................................................................ 28 Step 8: Configure Groups ................................................................................. 30 Step 9: Enroll Users........................................................................................... 34
Enrolling Users........................................................................................................................35 Enroll card .............................................................................................................................37 Enroll Fingerprints ...................................................................................................................38 Take Photo .............................................................................................................................43
Step 10: Register Software ................................................................................. 44 Menu Bar Options Details ................................................................................. 45
File Menu Options ..................................................................................................................45 Settings Menu Options ............................................................................................................46 Enrollment Options .................................................................................................................51 Help Options..........................................................................................................................51 View Options..........................................................................................................................51
Using the UniPort System................................................................................... 52 Logging in or out ....................................................................................................................52 User Found ............................................................................................................................54 Visitor button ..........................................................................................................................55 VISITOR BUTTON...................................................................................................................57 EVACUATION REPORT ...........................................................................................................60
Questions and Answers ..................................................................................... 61 Technical Support Contact Information ............................................................... 64
62-60000001
Page 3 of 64
Copyright, Disclaimer and TrademarksCopyright, Disclaimer and TrademarksCopyright, Disclaimer and TrademarksCopyright, Disclaimer and Trademarks
CopyrighCopyrighCopyrighCopyrightttt Copyright 1997-2009 © Ringdale Inc. All rights reserved. No part of this publication may be reproduced, transmitted, transcribed, stored in a retrieval system, or translated into any language or any computer language, in any form or by any third party, without prior permission of Ringdale Inc.
DisclaimerDisclaimerDisclaimerDisclaimer Ringdale Inc. reserves the right to revise this publication and to make changes from time to time to the contents hereof without obligation to notify any person or organisation of such revision or changes. Ringdale Inc. has endeavoured to ensure that the information in this publication is correct, but will not accept liability for any error or omission. Note:Note:Note:Note: Because of the fast pace of software development it is possible that there will be minor differences between the manual and the actual release of the program.
TrademarksTrademarksTrademarksTrademarks All trademarks are hereby acknowledged.

62-60000001
Page 4 of 64
Introduction
OverviewOverviewOverviewOverview The Installation Guide and User Manual provides complete instruction on how to install and use UniPort. UniPort is a Visitor Management and Self Enrollment Station. UniPort can also integrate with Ringdale’s Sentinel Server Authentication Software to provide a comprehensive access control package that can include an Electronic Visitor Book, and track In and Out times. Ringdale’s UniPort uses the latest in biometric fingerprint technology to provide a fast and effective way to enroll staff and visitors. If integrated with the Sentinel software, the adaptable system may be used as an electronic visitors book using biometrics instead of the normal pen and ink to register guests, log their arrival and departure, as well as provide a highly secure time and attendance system for staff. UniPort is an easy to use, intuitive software application for Windows PCs. It is Touch Screen compatible and available options include: Fingerprint and Face Biometrics, Proximity Reader, USB Camera, ID Badge Printer and a 15 inch touch panel display. UniPort provides visitor management and visitor ID badge printing in one system with Fargo or Zebra badge printer support, printers sold separately.
Pre-Requisites
Server Hardware PlatformServer Hardware PlatformServer Hardware PlatformServer Hardware Platform • CPU
o 1GHz or above o The CPU needs to be at least this speed
• Memory o 256MB or above o The memory available in the machine should be at least this amount
• Hard Disk Space o 10GB or above
Operating SystemOperating SystemOperating SystemOperating Systemssss
• Windows 2000
• Windows XP
• Windows 2003
• Windows Vista

62-60000001
Page 5 of 64
Installation Installation Installation Installation StepsStepsStepsSteps These are the main steps and the order in which to complete the basic installation:
1) Install the UniPort software. 2) Connect the optional Ringdale HID proximity reader if you have it. 3) Install the optional Ringdale fingerprint reader if you have it. 4) Install the optional Ringdale Web Camera if you have it. 5) Start the UniPort software. 6) Connect to the UniPort or Sentinel database and then restart the UniPort software. 7) Add Admin Users. 8) Configure two groups: Employees and Visitors. 9) Enroll Users.
10) Register the software.
Part NumberPart NumberPart NumberPart Numberssss 00-13-6000-0001 UniPort Self Enrollment Station
Optional ID Card PrinterOptional ID Card PrinterOptional ID Card PrinterOptional ID Card Printerssss:::: 00-34-0400-0120 (USA) 00-34-0400-0240 (UK)
62-60000001
Page 6 of 64
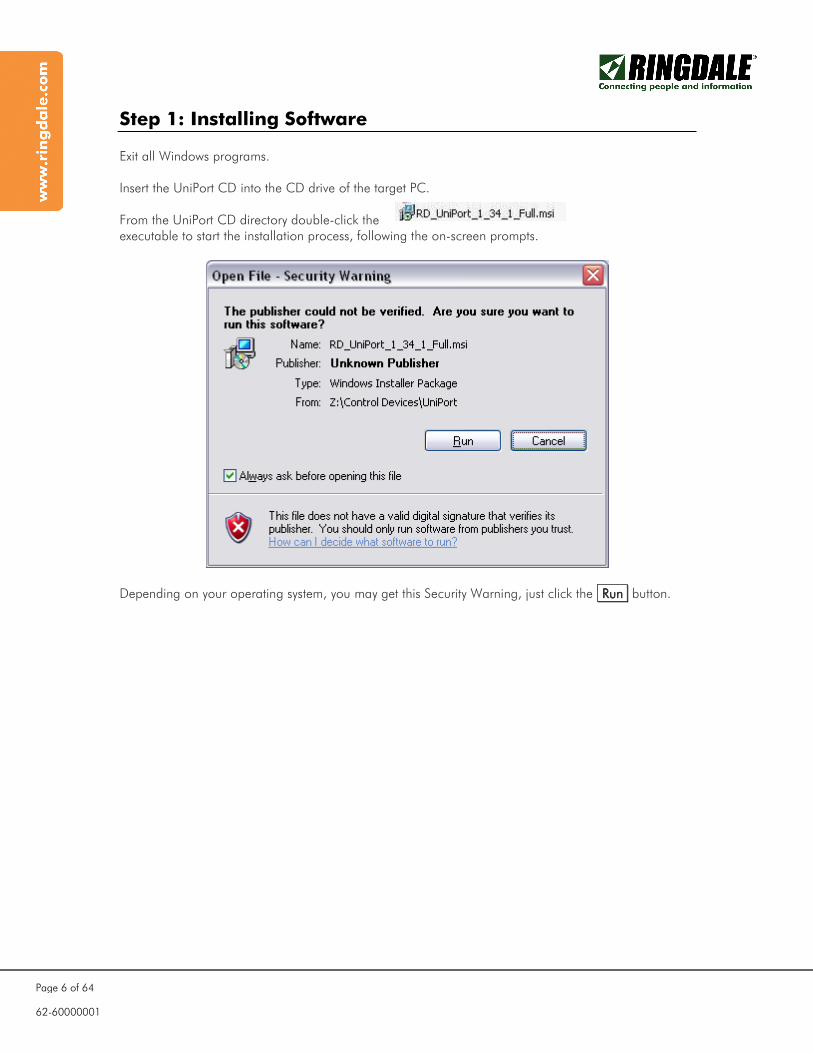
Step 1: Installing Software Exit all Windows programs. Insert the UniPort CD into the CD drive of the target PC. From the UniPort CD directory double-click the executable to start the installation process, following the on-screen prompts.
Depending on your operating system, you may get this Security Warning, just click the RunRunRunRun button.
62-60000001
Page 7 of 64
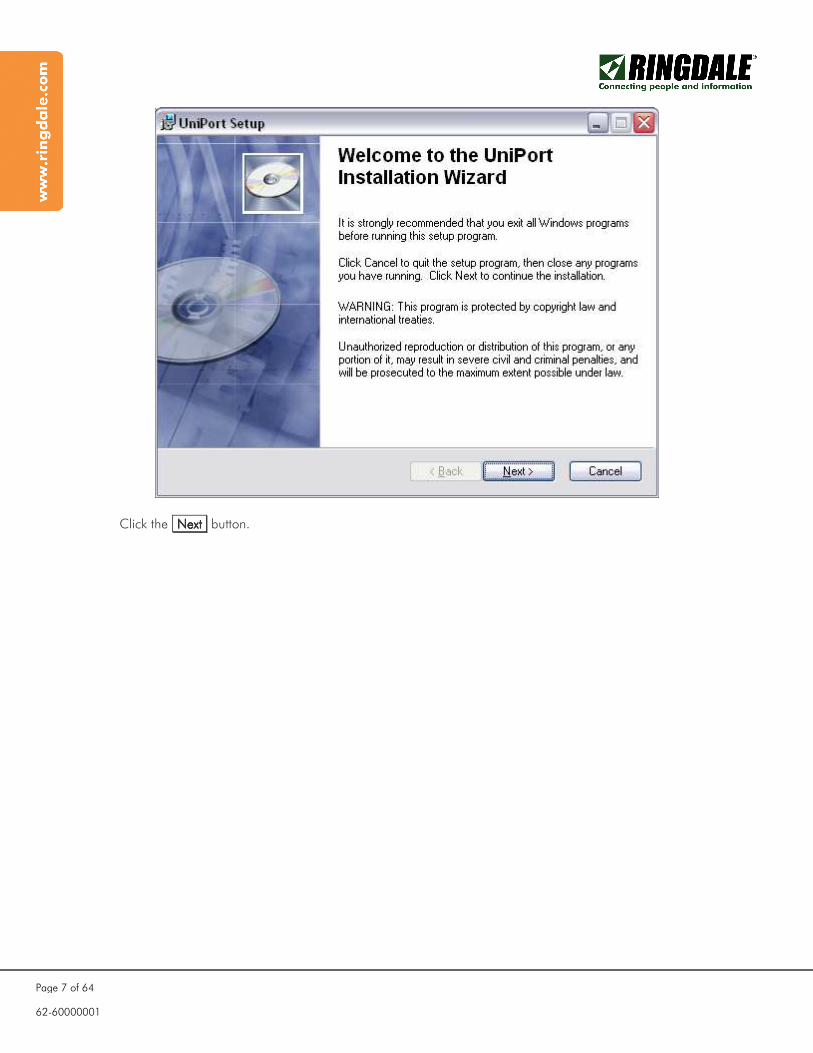
Click the NextNextNextNext button.
62-60000001
Page 8 of 64
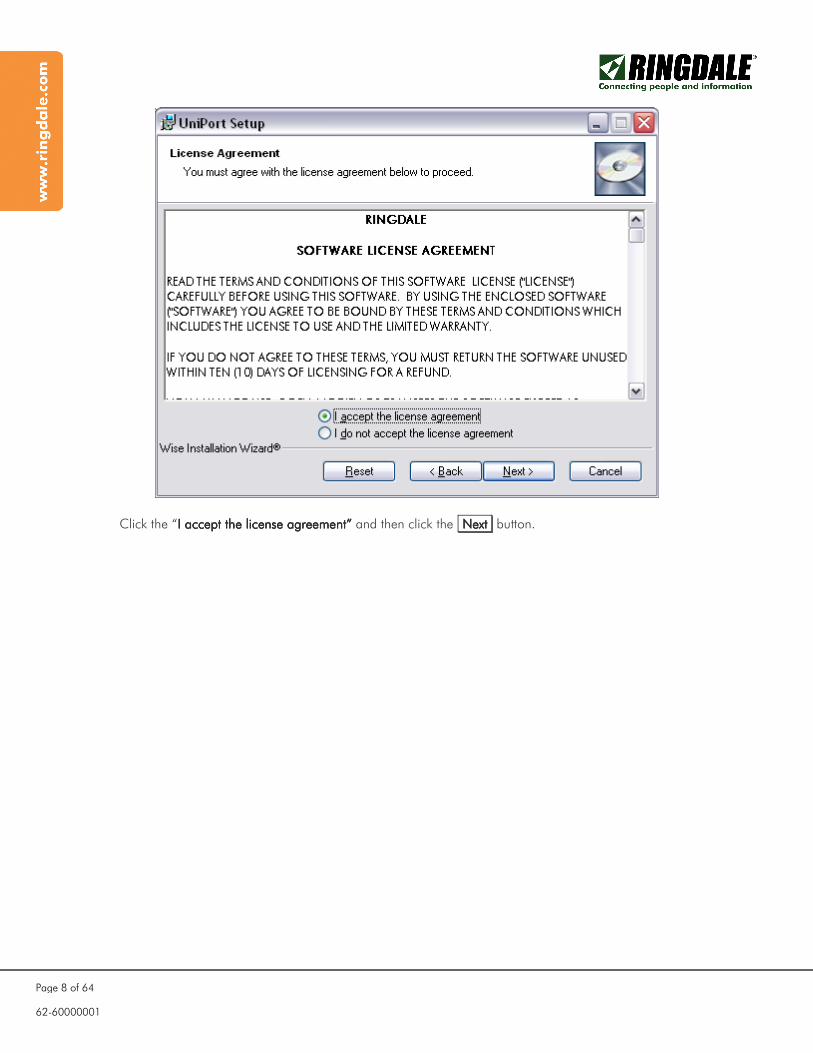
Click the “I accept the license agreement” I accept the license agreement” I accept the license agreement” I accept the license agreement” and then click the NextNextNextNext button.
62-60000001
Page 9 of 64
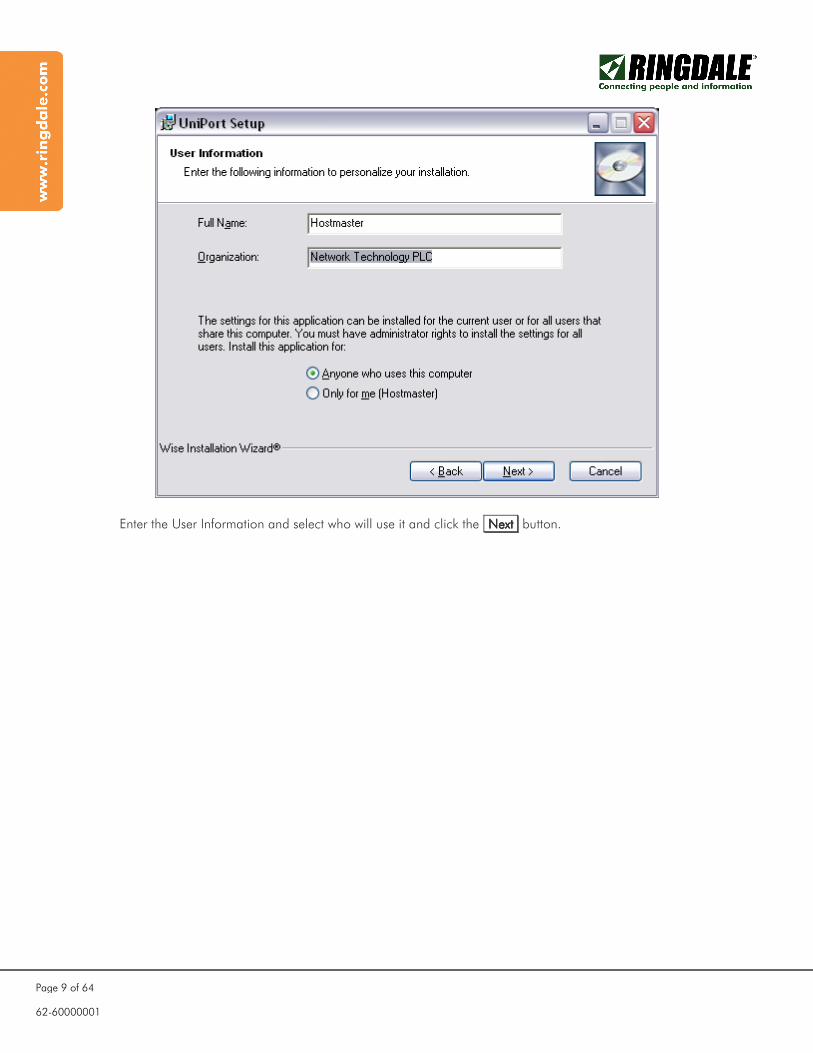
Enter the User Information and select who will use it and click the NextNextNextNext button.
62-60000001
Page 10 of 64
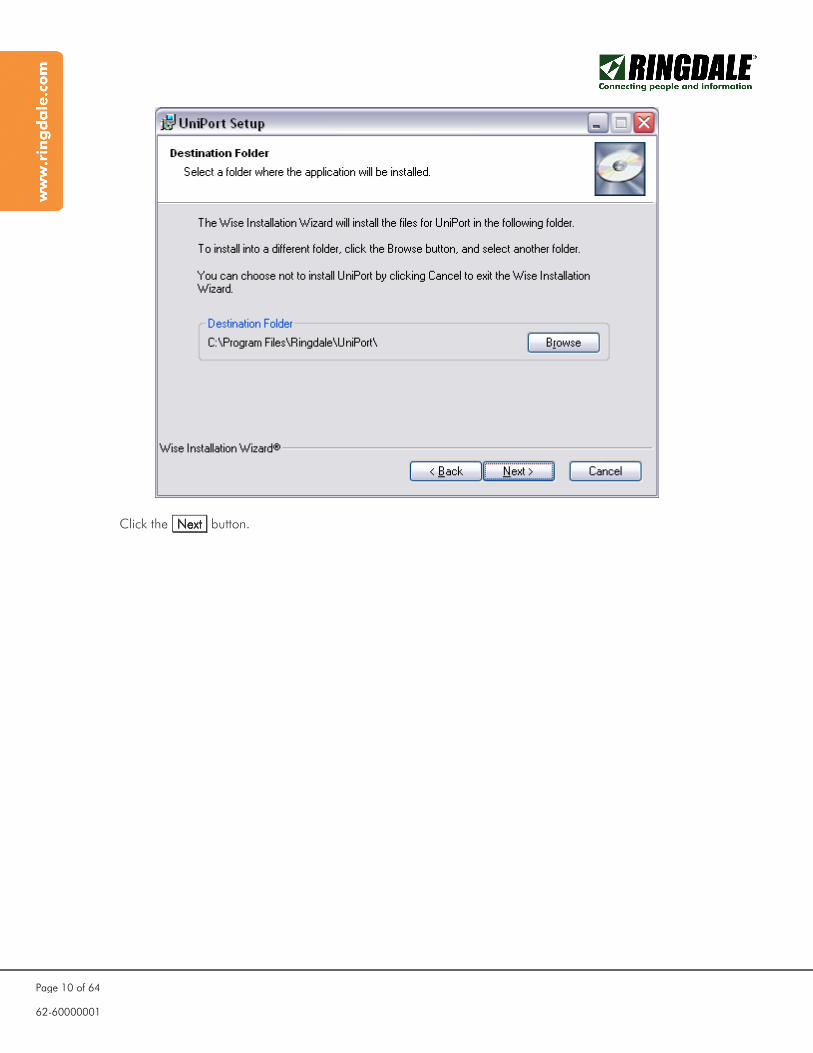
Click the NextNextNextNext button.
62-60000001
Page 11 of 64
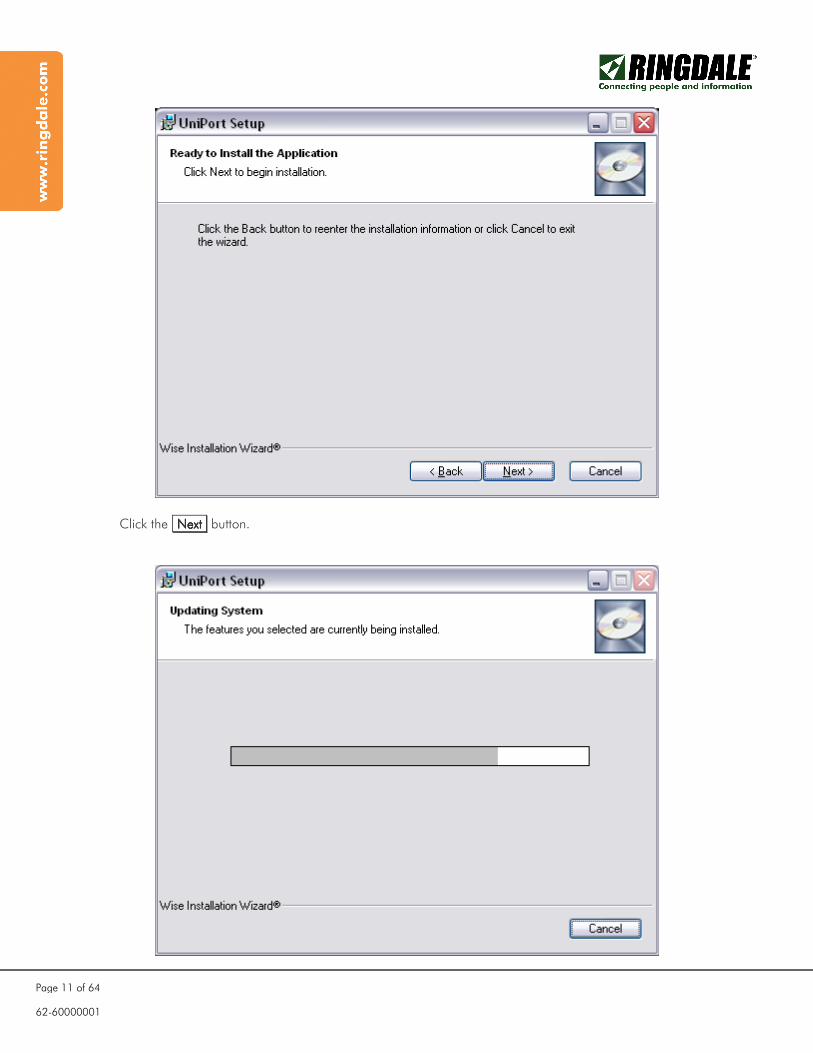
Click the NextNextNextNext button.

62-60000001
Page 12 of 64
Click the FinishFinishFinishFinish button.
After the UniPort software installation you will have a shortcut on your Desktop.

62-60000001
Page 13 of 64
Step 2: Connect Optional Proximity Reader If you are using the Ringdale HID Proximity Reader, please plug it into the USB port at this time.
62-60000001
Page 14 of 64
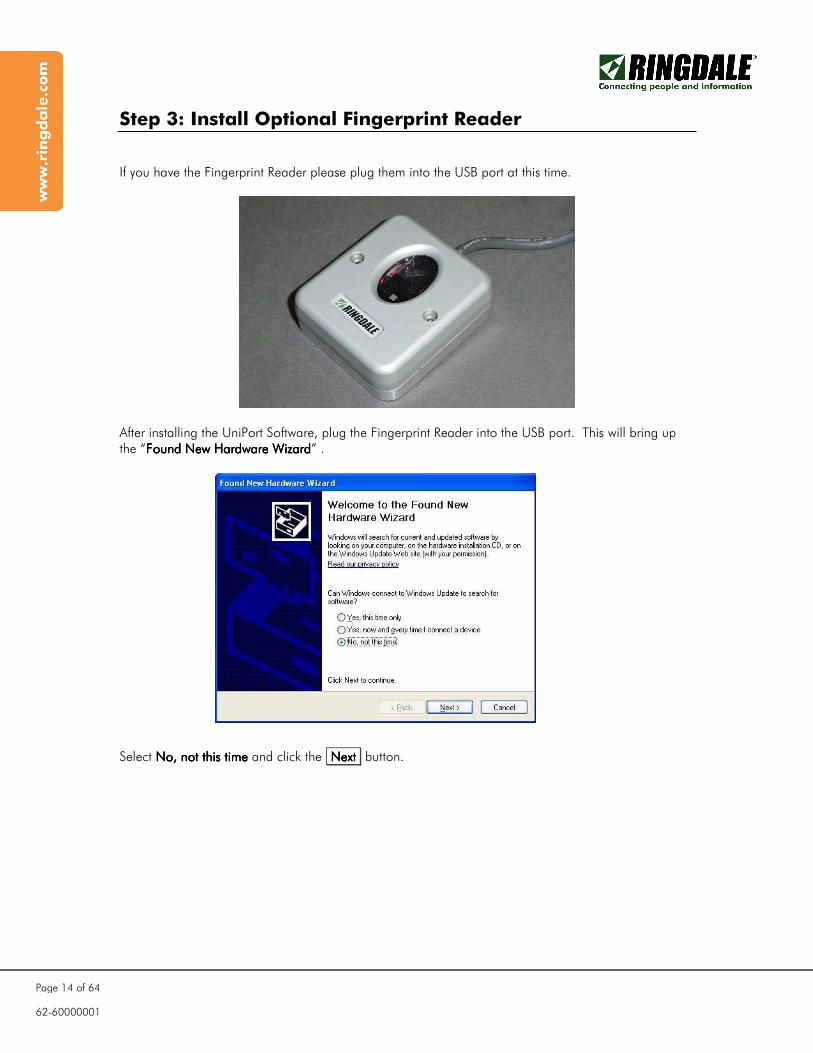
Step 3: Install Optional Fingerprint Reader If you have the Fingerprint Reader please plug them into the USB port at this time.
After installing the UniPort Software, plug the Fingerprint Reader into the USB port. This will bring up the “Found New Hardware WizardFound New Hardware WizardFound New Hardware WizardFound New Hardware Wizard” .
Select No, not this No, not this No, not this No, not this timetimetimetime and click the NextNextNextNext button.
(1)
62-60000001
Page 15 of 64
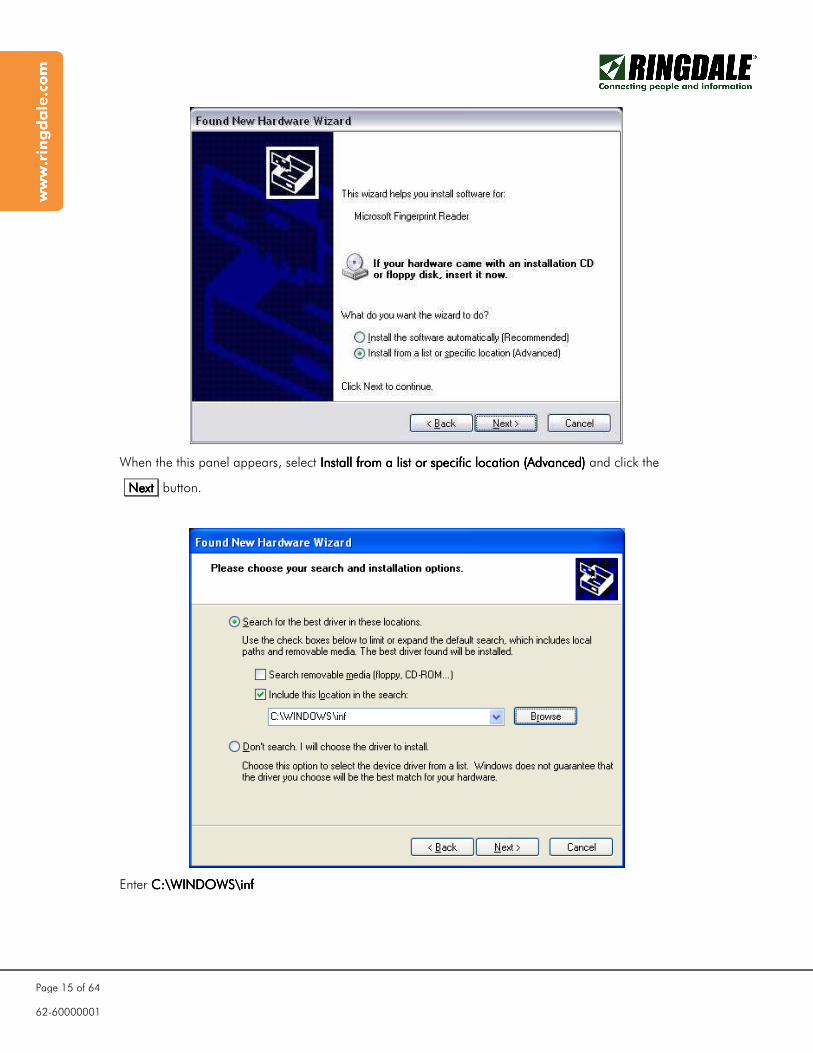
When the this panel appears, select Install fInstall fInstall fInstall from a list or rom a list or rom a list or rom a list or sssspecificpecificpecificpecific location (Advanced) location (Advanced) location (Advanced) location (Advanced) and click the
NextNextNextNext button.
Enter C:C:C:C:\\\\WINDOWSWINDOWSWINDOWSWINDOWS\\\\infinfinfinf
62-60000001
Page 16 of 64
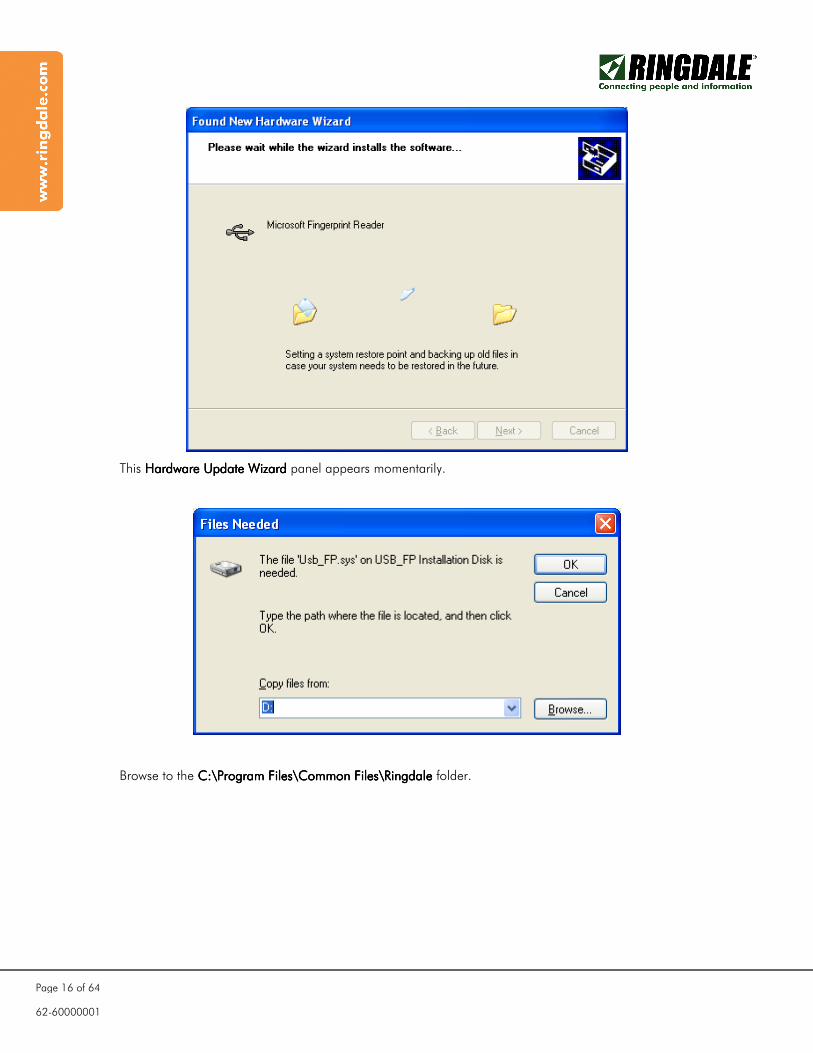
This Hardware Update WizardHardware Update WizardHardware Update WizardHardware Update Wizard panel appears momentarily.
Browse to the C:C:C:C:\\\\Program FilesProgram FilesProgram FilesProgram Files\\\\Common FilesCommon FilesCommon FilesCommon Files\\\\RingdaleRingdaleRingdaleRingdale folder.

62-60000001
Page 17 of 64
Click the OpenOpenOpenOpen button.
Depending upon what version of Windows is installed on the target PC, the Hardware Installation Hardware Installation Hardware Installation Hardware Installation ----
Security Warning Security Warning Security Warning Security Warning may or may not appear. Click the ContinueContinueContinueContinue AnywayAnywayAnywayAnyway button.
62-60000001
Page 18 of 64
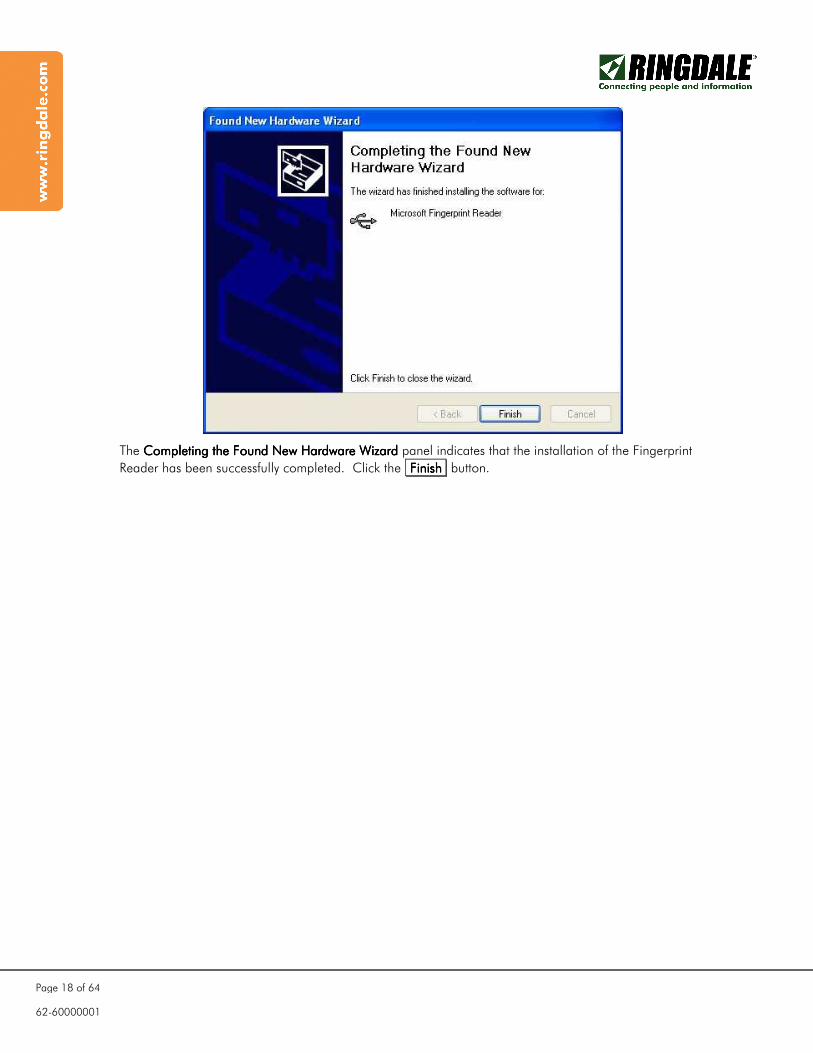
The Completing the Found New Hardware WizardCompleting the Found New Hardware WizardCompleting the Found New Hardware WizardCompleting the Found New Hardware Wizard panel indicates that the installation of the Fingerprint
Reader has been successfully completed. Click the FinishFinishFinishFinish button.

62-60000001
Page 19 of 64
Step 4: Install the Optional Camera Refer to the installation guide that comes with the camera software first. Install your camera software prior to plugging in the device. At the appropriate time, you will be prompted to plug in your webcam by the software installation. Insert the CD included with your camera. Install the camera software from the CD. Now choose your installation language and select the type of software to install and follow all of the on-screen steps for installing the camera software. During the installation you will be prompted to connect your camera to the PC. After connecting your camera, you may need to wait a few minutes before the software detects the presence of your new hardware. After your camera is detected, you will be shown a screen with a picture from your newly installed web camera. Next the installer will guide you through the configuration of the audio. Follow the on-screen wizard to configure the audio. After your webcam and software is installed and upon re-starting, the camera software will automatically launch and you can perform basic functions like taking photos and videos.
62-60000001
Page 20 of 64
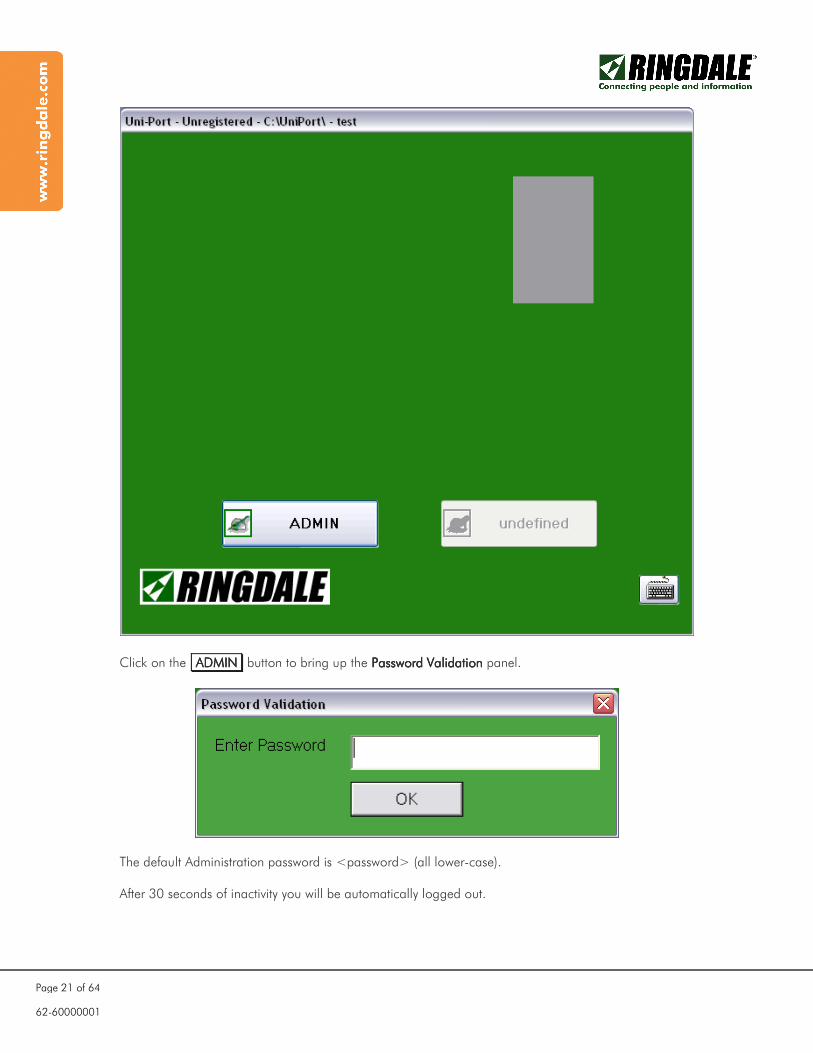
Step 5: Start the UniPort Software
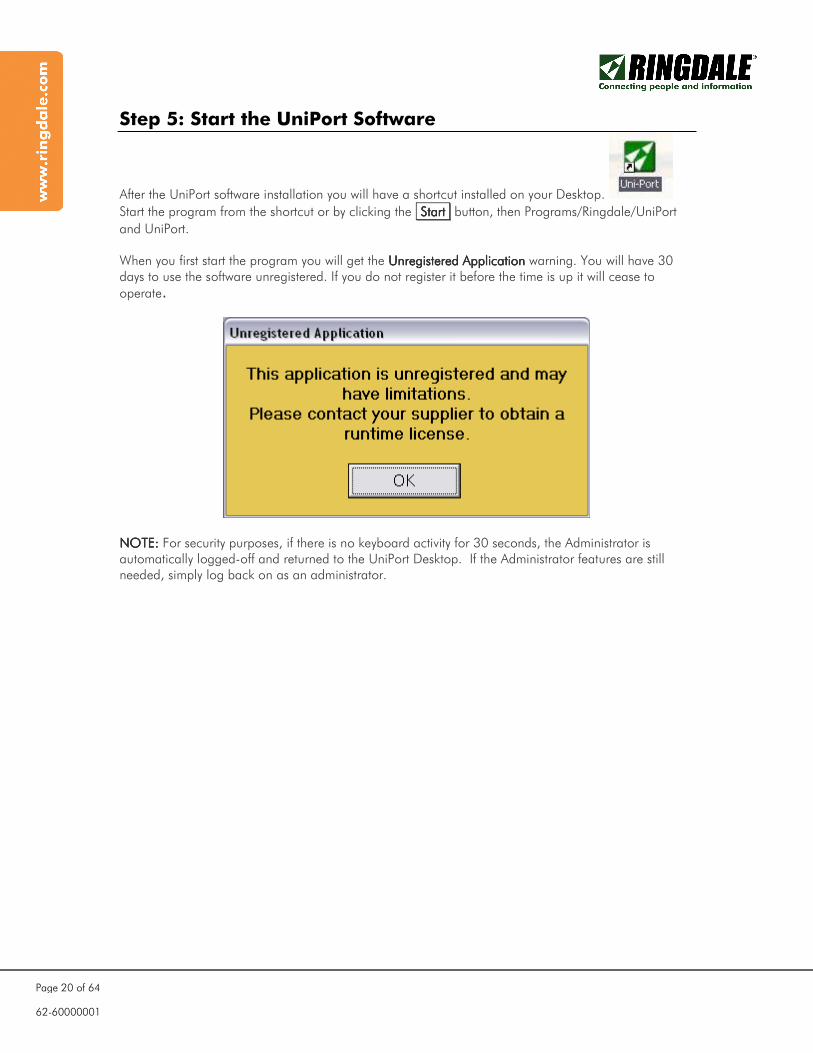
After the UniPort software installation you will have a shortcut installed on your Desktop.
Start the program from the shortcut or by clicking the StartStartStartStart button, then Programs/Ringdale/UniPort
and UniPort. When you first start the program you will get the Unregistered Application Unregistered Application Unregistered Application Unregistered Application warning. You will have 30 days to use the software unregistered. If you do not register it before the time is up it will cease to
operate.
NOTE:NOTE:NOTE:NOTE: For security purposes, if there is no keyboard activity for 30 seconds, the Administrator is automatically logged-off and returned to the UniPort Desktop. If the Administrator features are still needed, simply log back on as an administrator.
62-60000001
Page 21 of 64
Click on the ADMINADMINADMINADMIN button to bring up the Password ValiPassword ValiPassword ValiPassword Validationdationdationdation panel.
The default Administration password is <password> (all lower-case). After 30 seconds of inactivity you will be automatically logged out.
62-60000001
Page 22 of 64
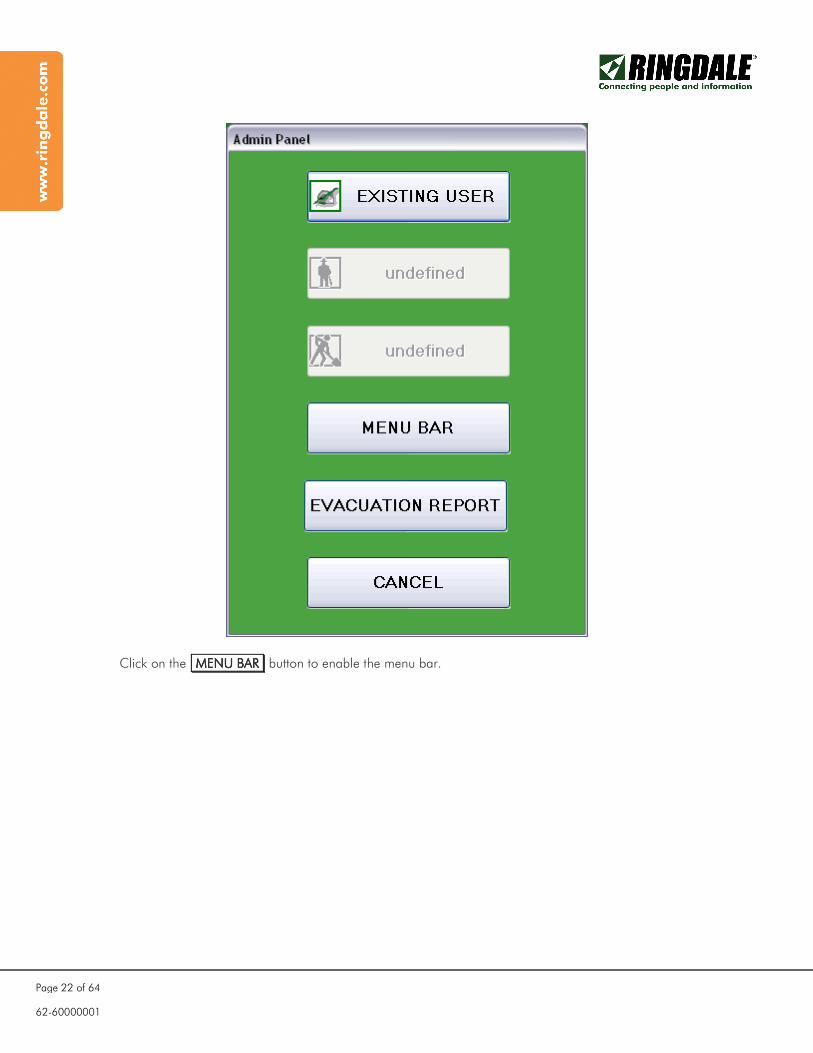
Click on the MENUMENUMENUMENU BARBARBARBAR button to enable the menu bar.
62-60000001
Page 23 of 64
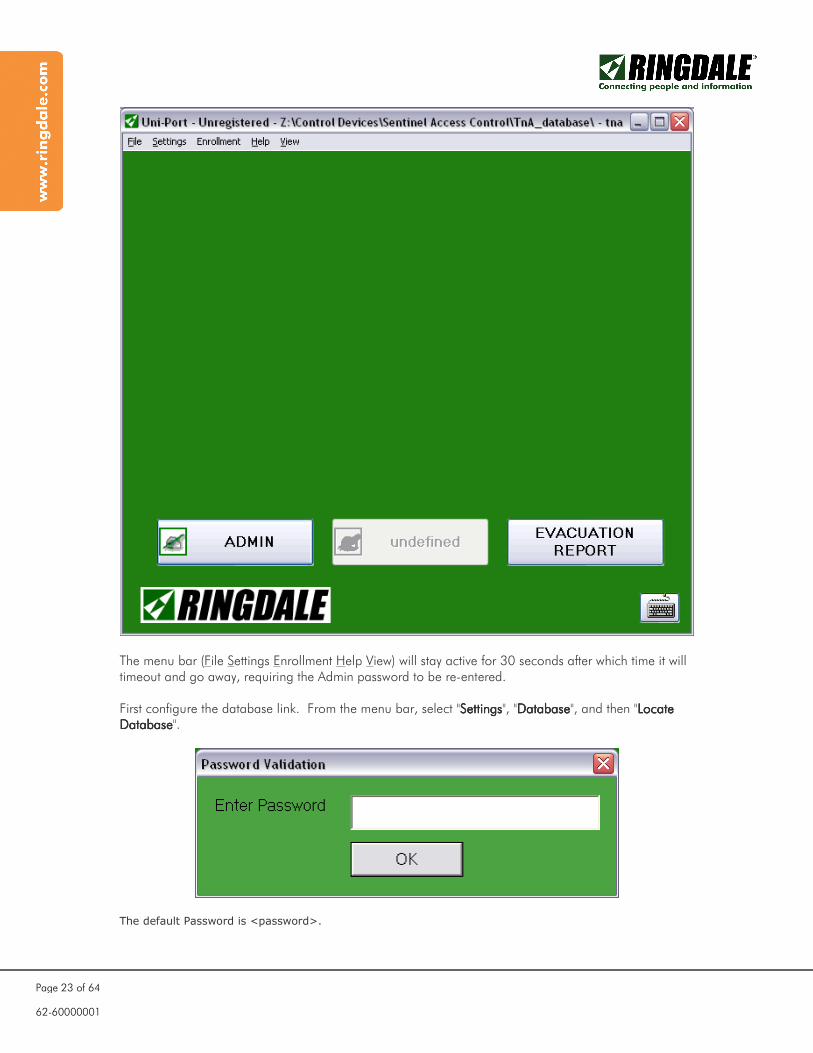
The menu bar (File Settings Enrollment Help View) will stay active for 30 seconds after which time it will timeout and go away, requiring the Admin password to be re-entered. First configure the database link. From the menu bar, select "SettingsSettingsSettingsSettings", "DatabaseDatabaseDatabaseDatabase", and then "Locate Locate Locate Locate DaDaDaDatabasetabasetabasetabase".
The default Password is <password>.

62-60000001
Page 24 of 64
Menu Bar OptionsMenu Bar OptionsMenu Bar OptionsMenu Bar Options The pictures below show the various menu options. Each will be covered in detail later. File Menu Options
Settings Options
Enrollment Options
Help Options

62-60000001
Page 25 of 64
View Options
62-60000001
Page 26 of 64
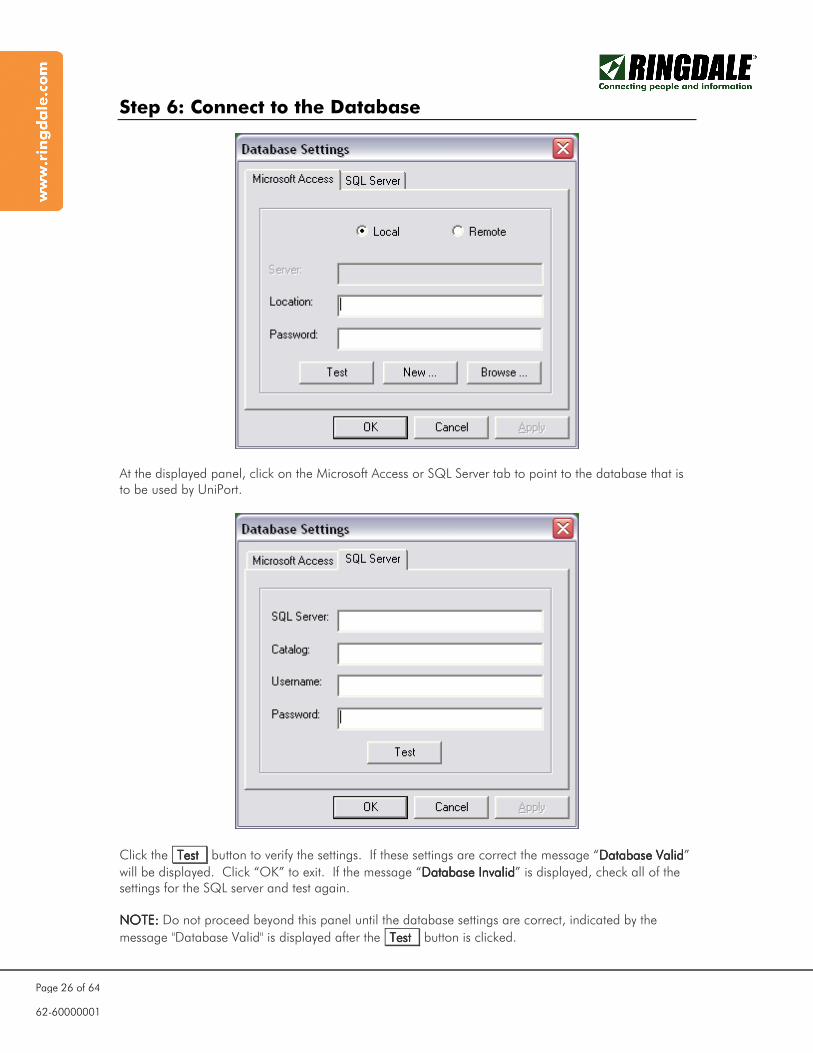
Step 6: Connect to the Database
At the displayed panel, click on the Microsoft Access or SQL Server tab to point to the database that is to be used by UniPort.
Click the TTTTestestestest button to verify the settings. If these settings are correct the message “Database ValidDatabase ValidDatabase ValidDatabase Valid”
will be displayed. Click “OK” to exit. If the message “Database InvalidDatabase InvalidDatabase InvalidDatabase Invalid” is displayed, check all of the settings for the SQL server and test again. NOTE:NOTE:NOTE:NOTE: Do not proceed beyond this panel until the database settings are correct, indicated by the
message "Database Valid" is displayed after the TestTestTestTest button is clicked.
62-60000001
Page 27 of 64
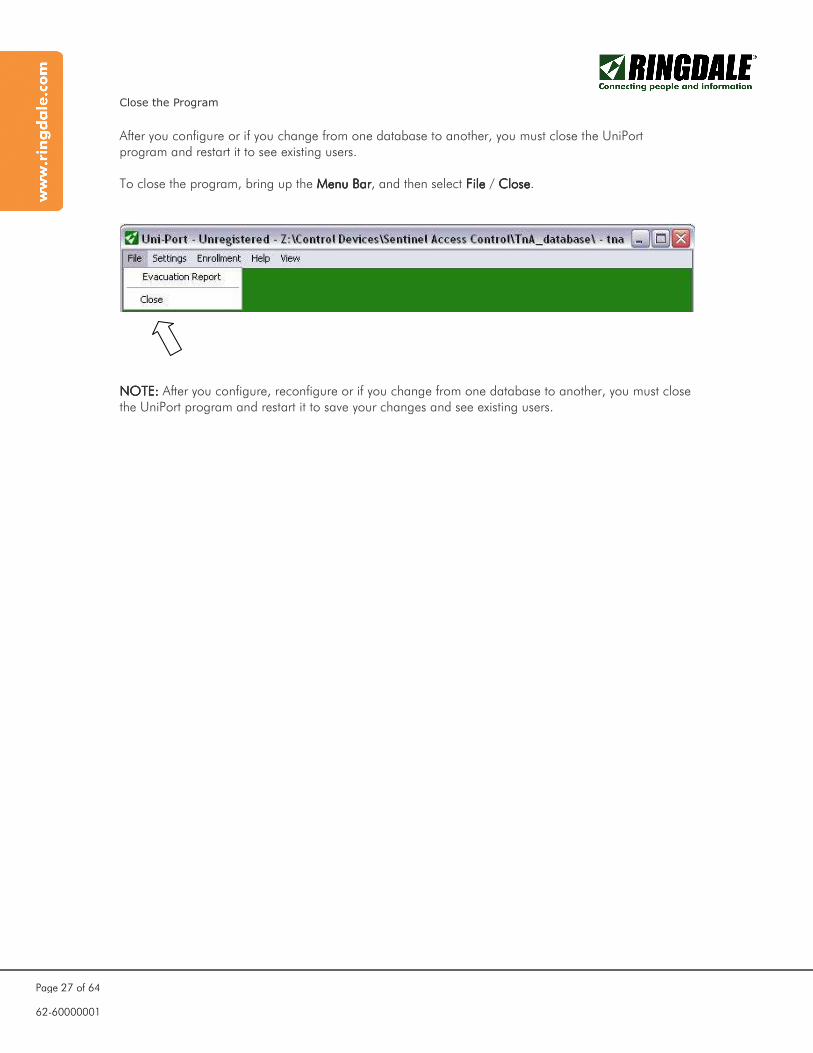
Close the Program
After you configure or if you change from one database to another, you must close the UniPort program and restart it to see existing users. To close the program, bring up the Menu BarMenu BarMenu BarMenu Bar, and then select FileFileFileFile / CloseCloseCloseClose.
NOTE:NOTE:NOTE:NOTE: After you configure, reconfigure or if you change from one database to another, you must close the UniPort program and restart it to save your changes and see existing users.
62-60000001
Page 28 of 64
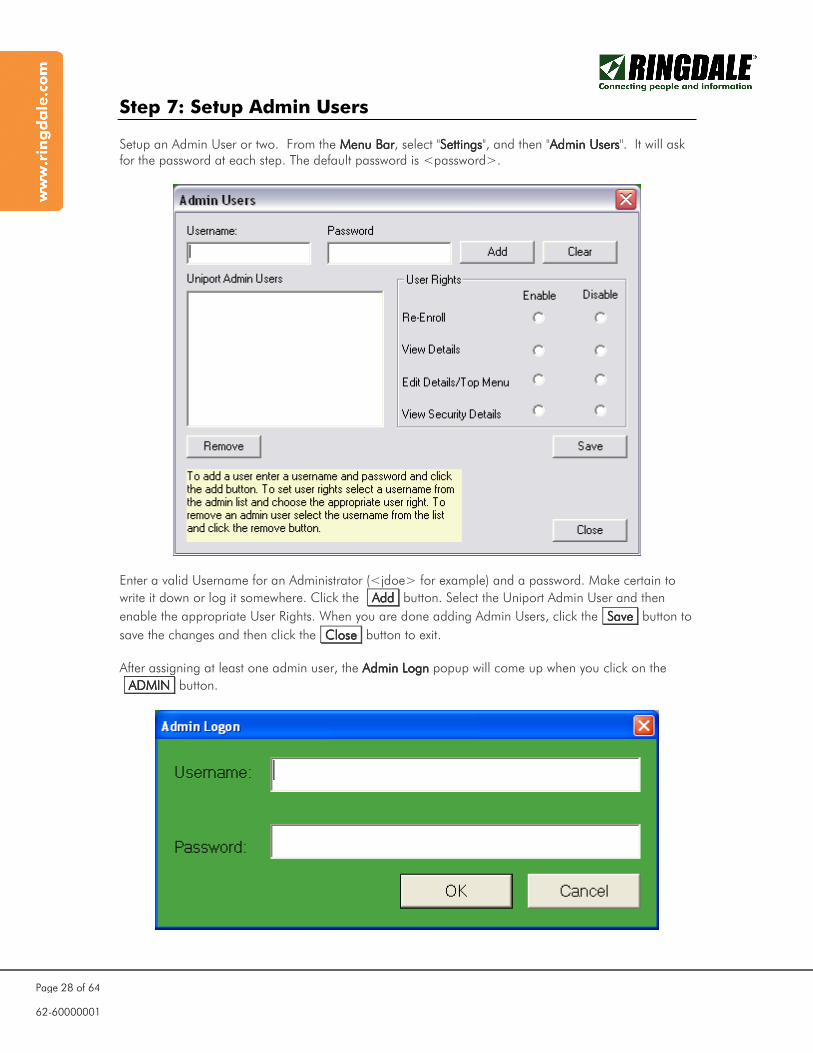
Step 7: Setup Admin Users Setup an Admin User or two. From the Menu BarMenu BarMenu BarMenu Bar, select "SettingsSettingsSettingsSettings", and then "Admin UsersAdmin UsersAdmin UsersAdmin Users". It will ask for the password at each step. The default password is <password>.
Enter a valid Username for an Administrator (<jdoe> for example) and a password. Make certain to
write it down or log it somewhere. Click the AddAddAddAdd button. Select the Uniport Admin User and then
enable the appropriate User Rights. When you are done adding Admin Users, click the SaveSaveSaveSave button to
save the changes and then click the CloseCloseCloseClose button to exit.
After assigning at least one admin user, the Admin LognAdmin LognAdmin LognAdmin Logn popup will come up when you click on the
ADMINADMINADMINADMIN button.
62-60000001
Page 29 of 64
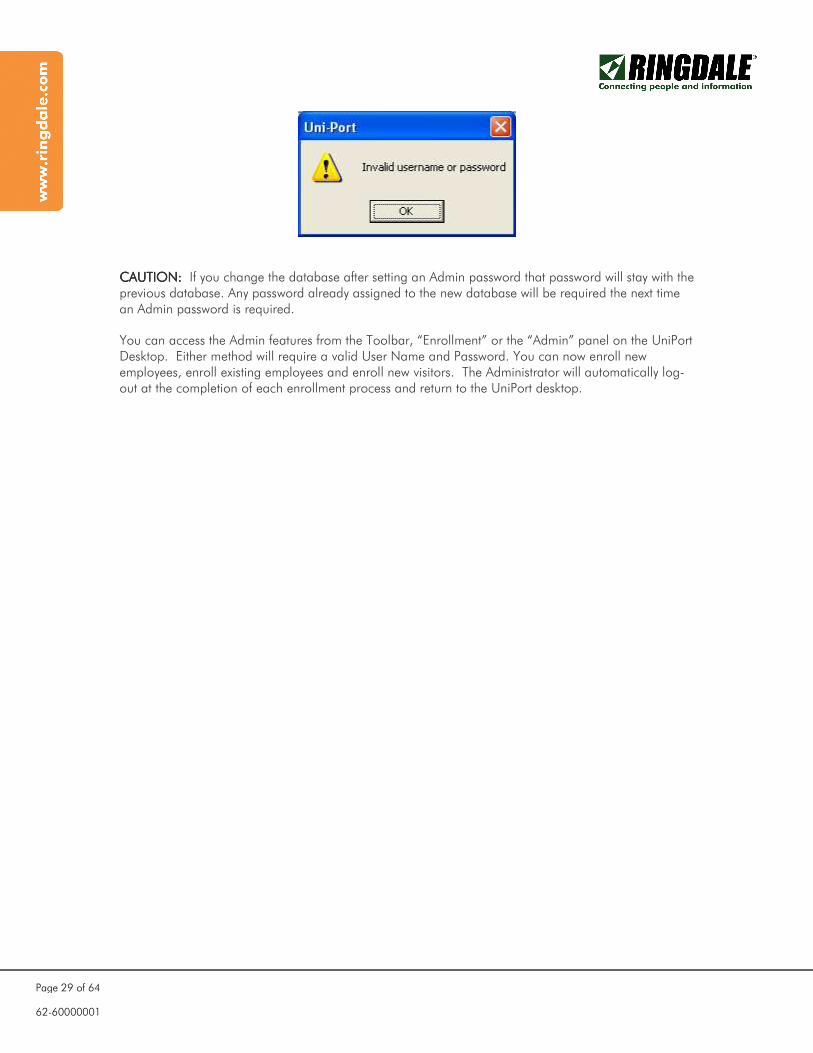
CAUTION:CAUTION:CAUTION:CAUTION: If you change the database after setting an Admin password that password will stay with the previous database. Any password already assigned to the new database will be required the next time an Admin password is required. You can access the Admin features from the Toolbar, “Enrollment” or the “Admin” panel on the UniPort Desktop. Either method will require a valid User Name and Password. You can now enroll new employees, enroll existing employees and enroll new visitors. The Administrator will automatically log-out at the completion of each enrollment process and return to the UniPort desktop.
62-60000001
Page 30 of 64
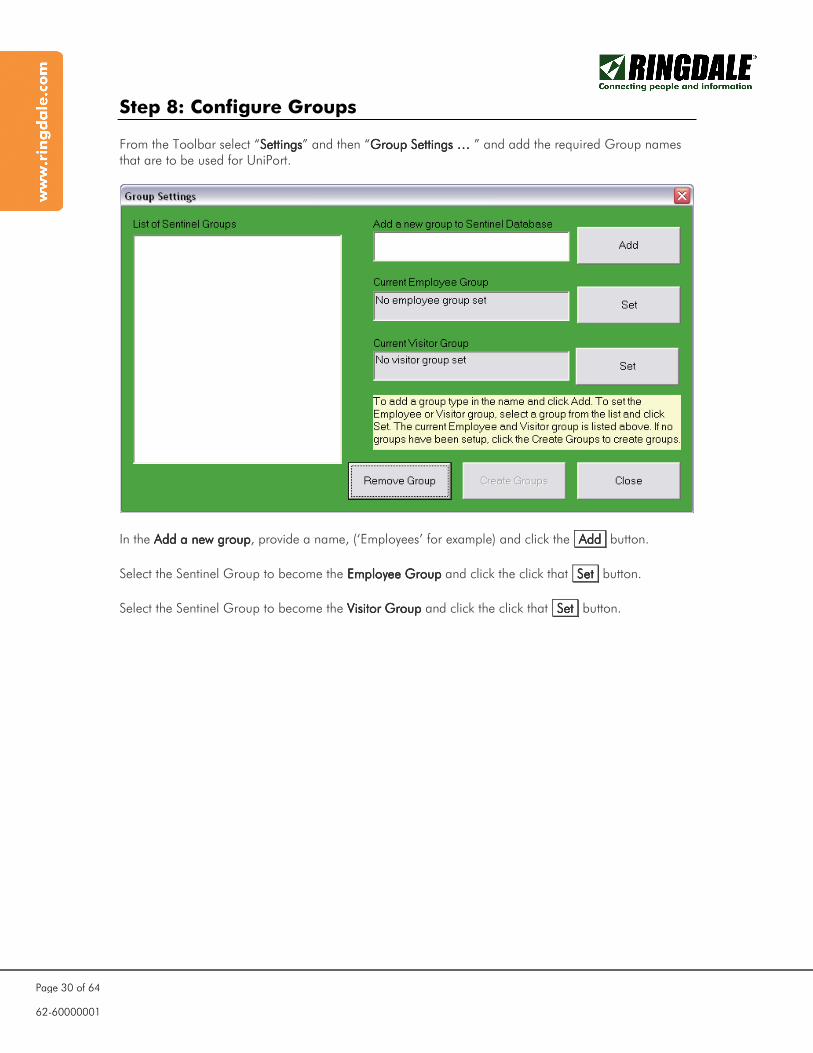
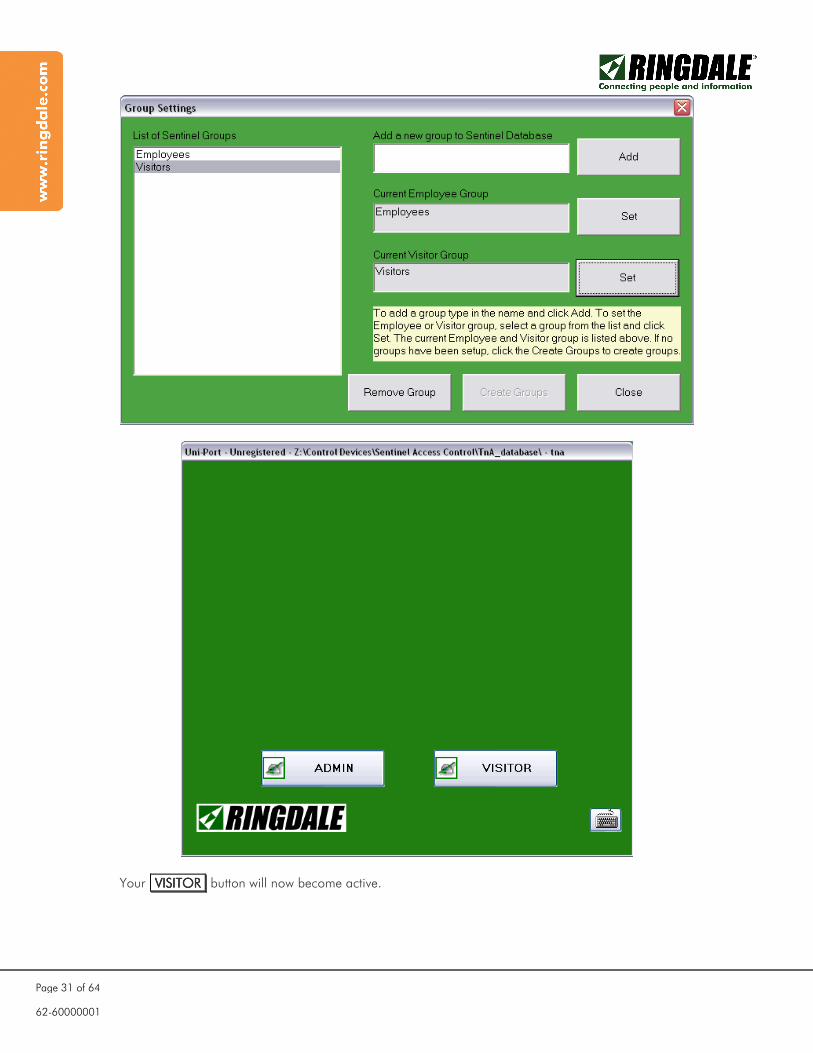
Step 8: Configure Groups From the Toolbar select “SettingsSettingsSettingsSettings” and then “Group Group Group Group Settings …Settings …Settings …Settings … ” and add the required Group names that are to be used for UniPort.
In the Add a new groupAdd a new groupAdd a new groupAdd a new group, provide a name, (‘Employees’ for example) and click the AddAddAddAdd button.
Select the Sentinel Group to become the Employee GroupEmployee GroupEmployee GroupEmployee Group and click the click that SetSetSetSet button.
Select the Sentinel Group to become the VisitorVisitorVisitorVisitor Group Group Group Group and click the click that SetSetSetSet button.
62-60000001
Page 31 of 64
Your VISITORVISITORVISITORVISITOR button will now become active.
62-60000001
Page 32 of 64
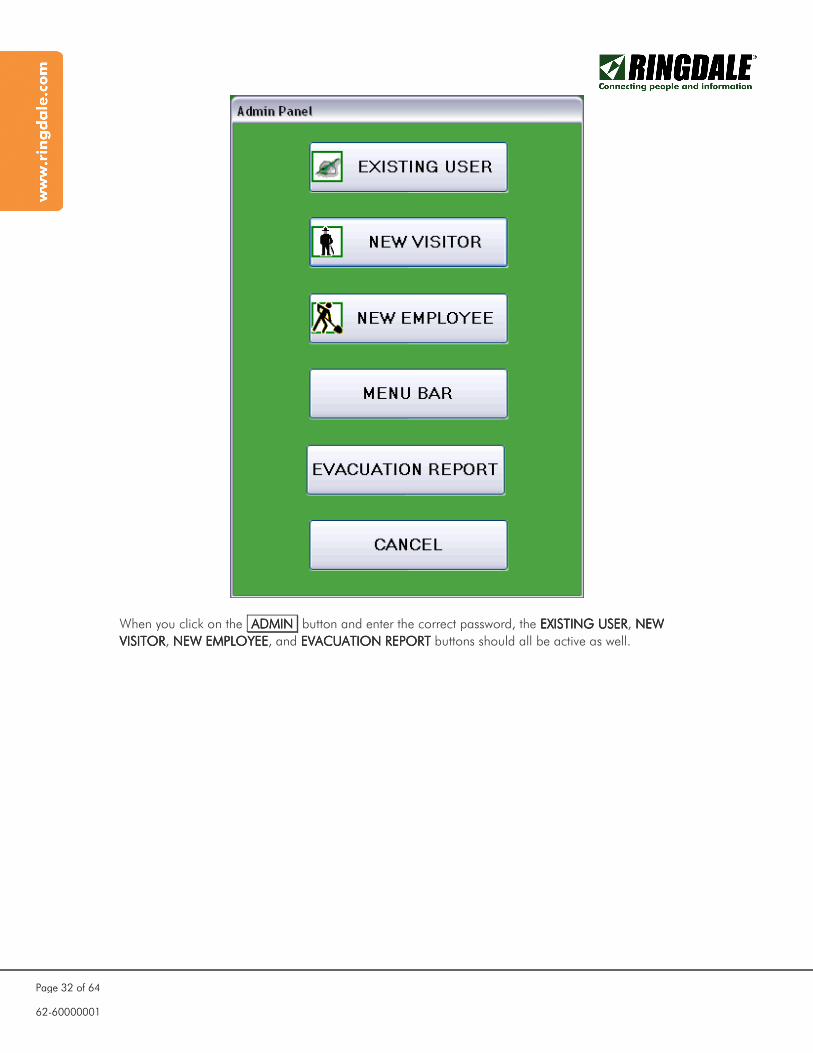
When you click on the ADMINADMINADMINADMIN button and enter the correct password, the EXISTING USEREXISTING USEREXISTING USEREXISTING USER, NEW NEW NEW NEW
VISITORVISITORVISITORVISITOR, NEW EMPLOYEENEW EMPLOYEENEW EMPLOYEENEW EMPLOYEE, and EVACUATION REPORTEVACUATION REPORTEVACUATION REPORTEVACUATION REPORT buttons should all be active as well.

62-60000001
Page 33 of 64
EXISTING USEREXISTING USEREXISTING USEREXISTING USER – This button is used to add biometrics for existing users. NEW VISITORNEW VISITORNEW VISITORNEW VISITOR – This button is used to enroll new company visitors. NEW EMPLOYEENEW EMPLOYEENEW EMPLOYEENEW EMPLOYEE – This button is used to enroll new staff members. MENU BARMENU BARMENU BARMENU BAR – This button is used to show the menu bar. EVACUATION REPORTEVACUATION REPORTEVACUATION REPORTEVACUATION REPORT – This button is used to show all users currently logged in. CANCELCANCELCANCELCANCEL – This button is used to close the dialog.
62-60000001
Page 34 of 64
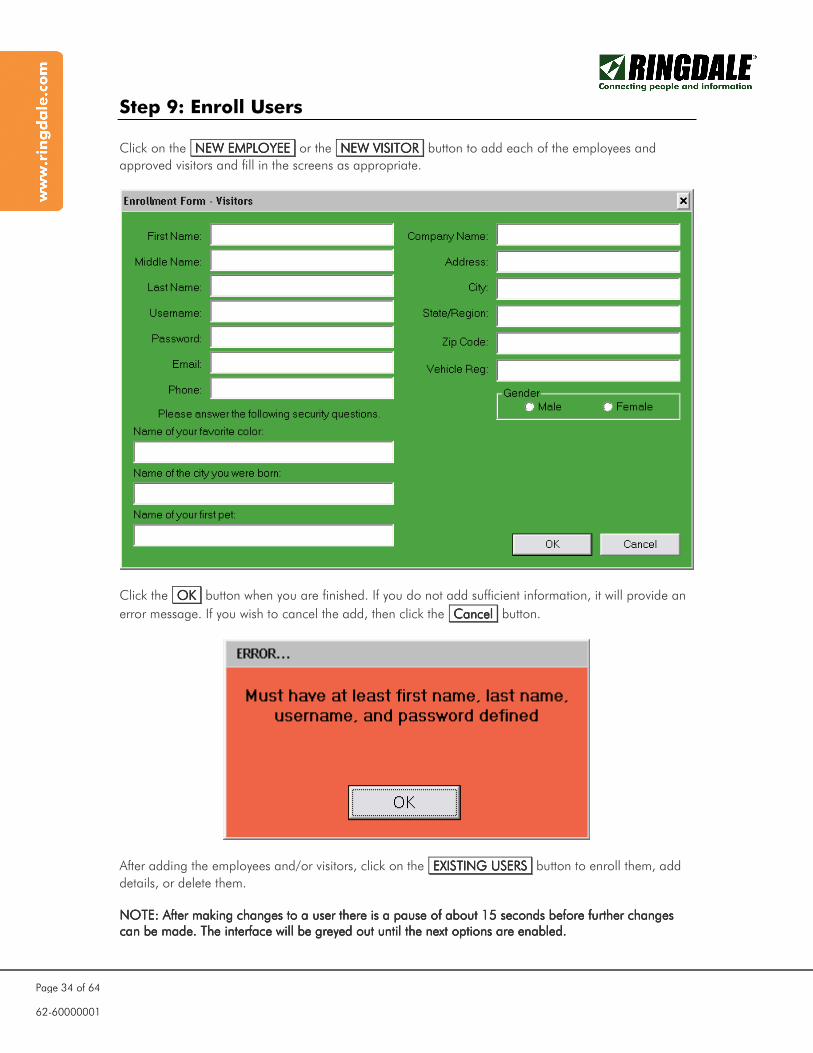
Step 9: Enroll Users Click on the NEWNEWNEWNEW EMPLOYEEEMPLOYEEEMPLOYEEEMPLOYEE or the NEWNEWNEWNEW VISITORVISITORVISITORVISITOR button to add each of the employees and
approved visitors and fill in the screens as appropriate.
Click the OKOKOKOK button when you are finished. If you do not add sufficient information, it will provide an
error message. If you wish to cancel the add, then click the CancelCancelCancelCancel button.
After adding the employees and/or visitors, click on the EXISTINGEXISTINGEXISTINGEXISTING USERSUSERSUSERSUSERS button to enroll them, add
details, or delete them. NOTE: NOTE: NOTE: NOTE: After making changes to a user there is a pause of about 15 seconds before further changes After making changes to a user there is a pause of about 15 seconds before further changes After making changes to a user there is a pause of about 15 seconds before further changes After making changes to a user there is a pause of about 15 seconds before further changes can be made. The interface will be greyed out until the next optican be made. The interface will be greyed out until the next optican be made. The interface will be greyed out until the next optican be made. The interface will be greyed out until the next options are enabled. ons are enabled. ons are enabled. ons are enabled.

62-60000001
Page 35 of 64
Enrolling UsersEnrolling UsersEnrolling UsersEnrolling Users Make certain that your fingerprint enrollment reader is plugged in. You should see a gray box in the upper right of your Admin panel if it is.
If the fingerprint enrollment reader is installed and showing on the Admin panel, click the ADMIADMIADMIADMINNNN
button and logon.
62-60000001
Page 36 of 64
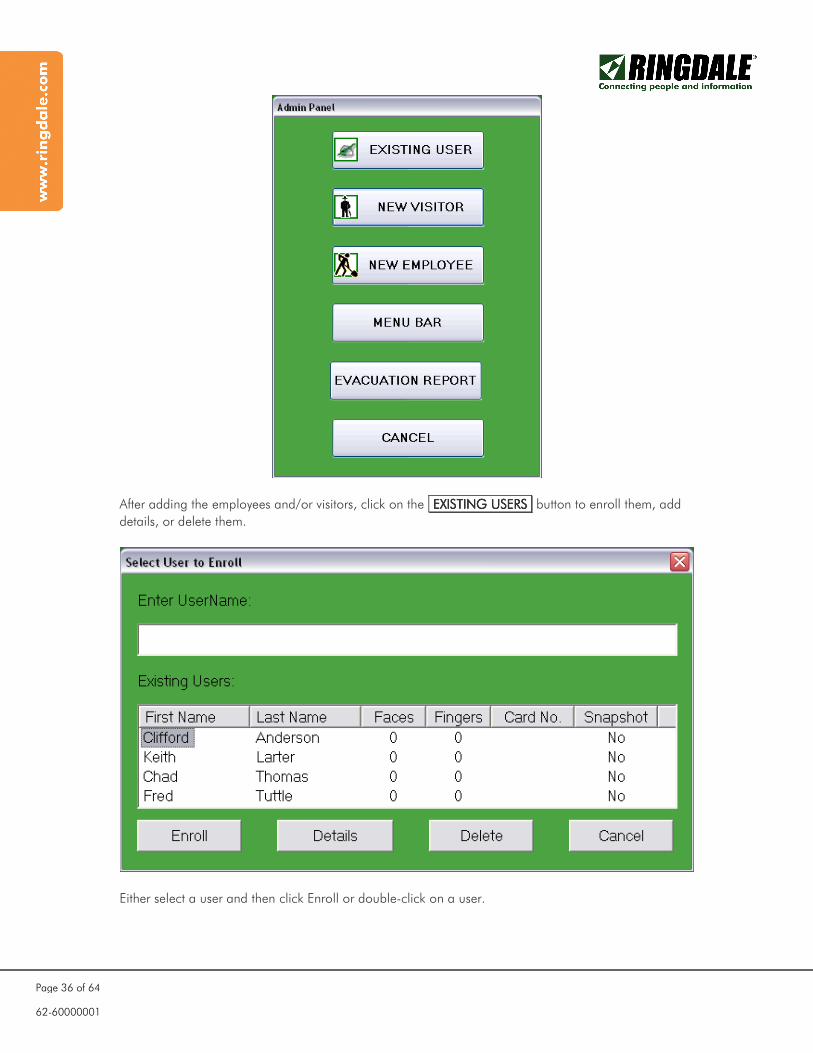
After adding the employees and/or visitors, click on the EXISTINGEXISTINGEXISTINGEXISTING USERSUSERSUSERSUSERS button to enroll them, add
details, or delete them.
Either select a user and then click Enroll or double-click on a user.
62-60000001
Page 37 of 64
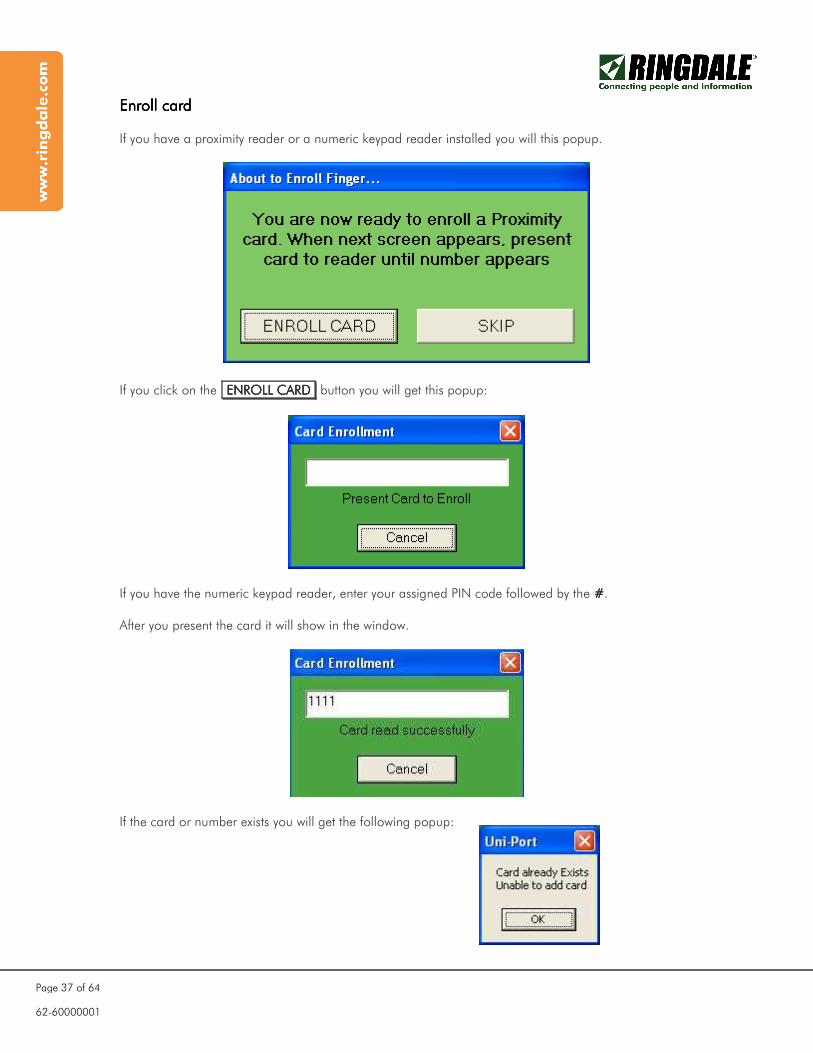
Enroll cardEnroll cardEnroll cardEnroll card If you have a proximity reader or a numeric keypad reader installed you will this popup.
If you click on the ENROLLENROLLENROLLENROLL CARDCARDCARDCARD button you will get this popup:
If you have the numeric keypad reader, enter your assigned PIN code followed by the ####.
After you present the card it will show in the window.
If the card or number exists you will get the following popup:
62-60000001
Page 38 of 64
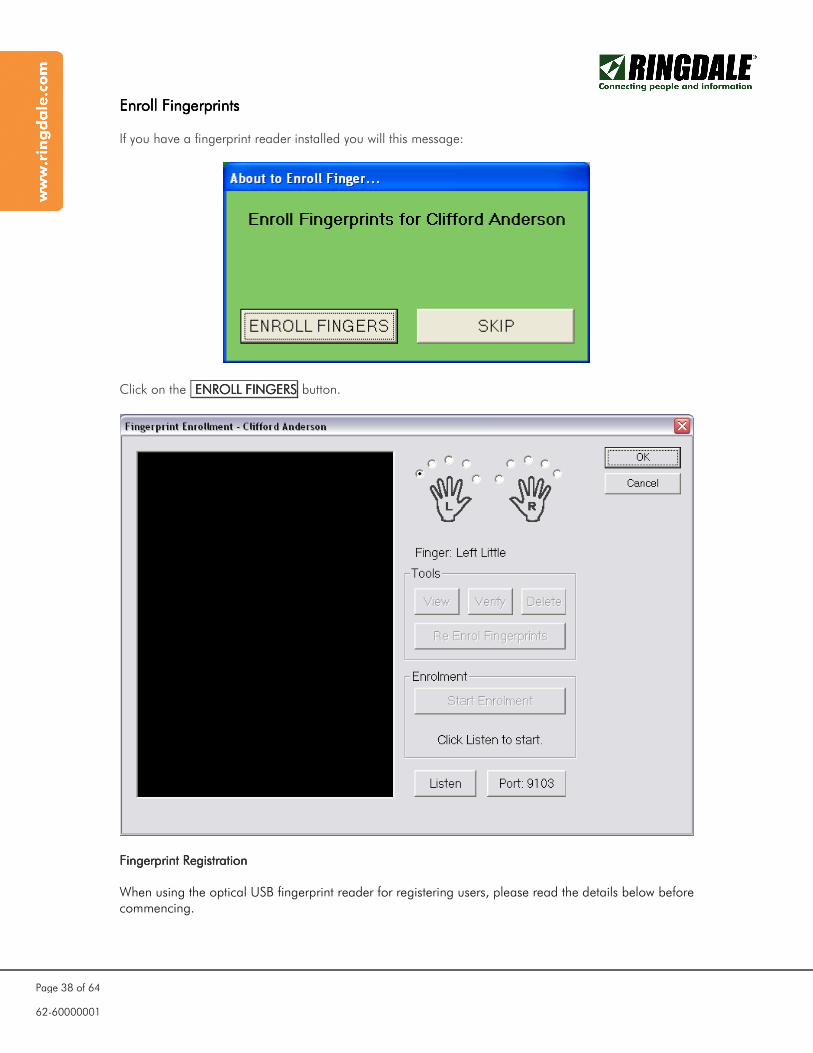
Enroll FingerprintsEnroll FingerprintsEnroll FingerprintsEnroll Fingerprints If you have a fingerprint reader installed you will this message:
Click on the ENROLLENROLLENROLLENROLL FINGERSFINGERSFINGERSFINGERS button.
Fingerprint RegistrationFingerprint RegistrationFingerprint RegistrationFingerprint Registration When using the optical USB fingerprint reader for registering users, please read the details below before commencing.
62-60000001
Page 39 of 64
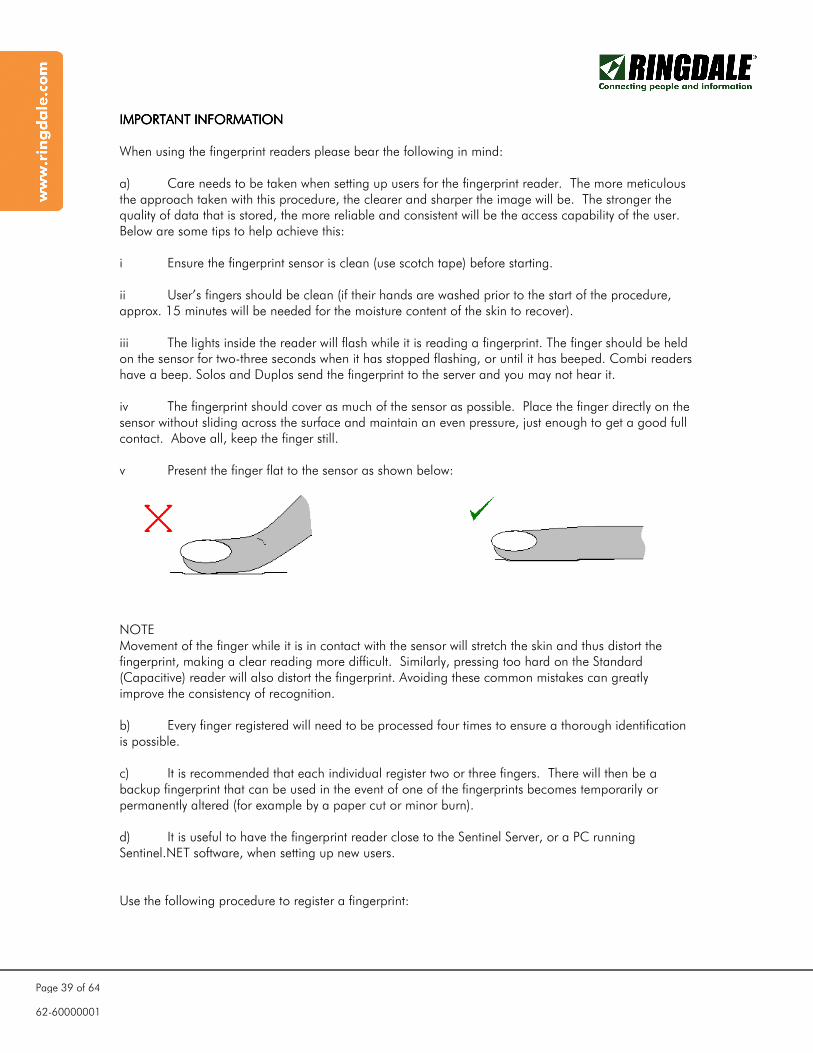
IMPORTANT IMPORTANT IMPORTANT IMPORTANT INFORMATION INFORMATION INFORMATION INFORMATION When using the fingerprint readers please bear the following in mind: a) Care needs to be taken when setting up users for the fingerprint reader. The more meticulous the approach taken with this procedure, the clearer and sharper the image will be. The stronger the quality of data that is stored, the more reliable and consistent will be the access capability of the user. Below are some tips to help achieve this: i Ensure the fingerprint sensor is clean (use scotch tape) before starting. ii User’s fingers should be clean (if their hands are washed prior to the start of the procedure, approx. 15 minutes will be needed for the moisture content of the skin to recover). iii The lights inside the reader will flash while it is reading a fingerprint. The finger should be held on the sensor for two-three seconds when it has stopped flashing, or until it has beeped. Combi readers have a beep. Solos and Duplos send the fingerprint to the server and you may not hear it. iv The fingerprint should cover as much of the sensor as possible. Place the finger directly on the sensor without sliding across the surface and maintain an even pressure, just enough to get a good full contact. Above all, keep the finger still. v Present the finger flat to the sensor as shown below: NOTE Movement of the finger while it is in contact with the sensor will stretch the skin and thus distort the fingerprint, making a clear reading more difficult. Similarly, pressing too hard on the Standard (Capacitive) reader will also distort the fingerprint. Avoiding these common mistakes can greatly improve the consistency of recognition. b) Every finger registered will need to be processed four times to ensure a thorough identification is possible. c) It is recommended that each individual register two or three fingers. There will then be a backup fingerprint that can be used in the event of one of the fingerprints becomes temporarily or permanently altered (for example by a paper cut or minor burn). d) It is useful to have the fingerprint reader close to the Sentinel Server, or a PC running Sentinel.NET software, when setting up new users. Use the following procedure to register a fingerprint:
62-60000001
Page 40 of 64
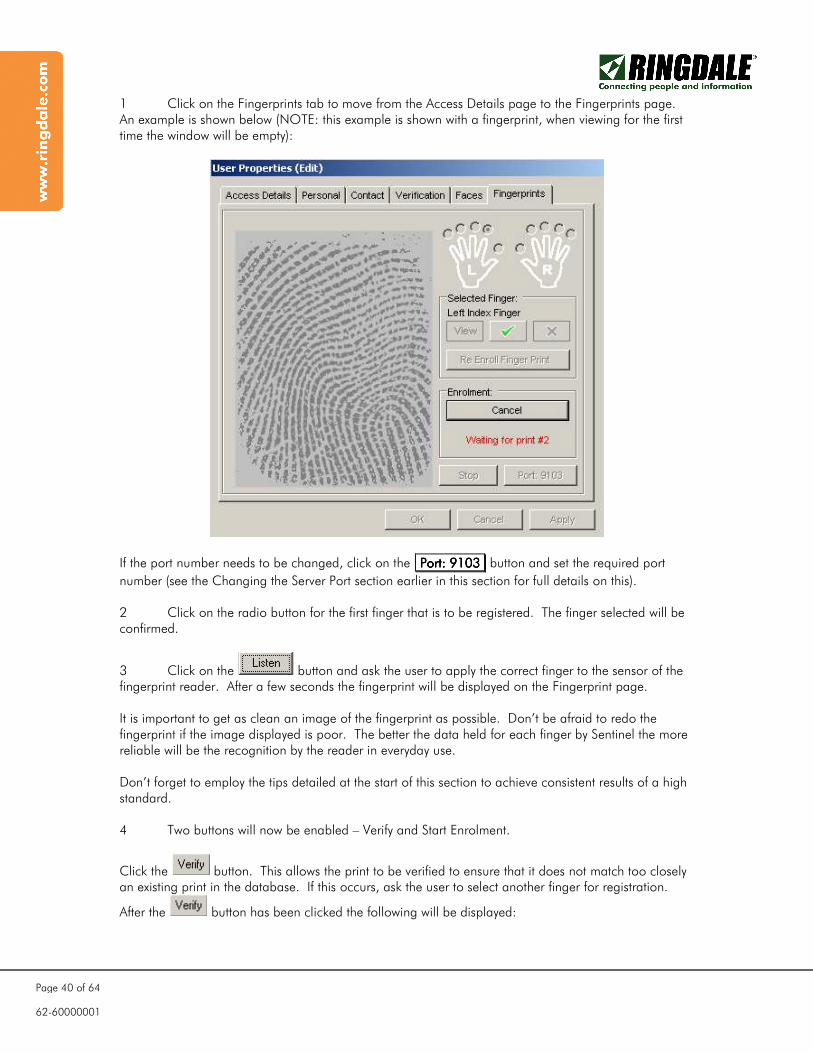
1 Click on the Fingerprints tab to move from the Access Details page to the Fingerprints page. An example is shown below (NOTE: this example is shown with a fingerprint, when viewing for the first time the window will be empty):
If the port number needs to be changed, click on the Port:Port:Port:Port: 9103910391039103 button and set the required port
number (see the Changing the Server Port section earlier in this section for full details on this). 2 Click on the radio button for the first finger that is to be registered. The finger selected will be confirmed.
3 Click on the button and ask the user to apply the correct finger to the sensor of the fingerprint reader. After a few seconds the fingerprint will be displayed on the Fingerprint page. It is important to get as clean an image of the fingerprint as possible. Don’t be afraid to redo the fingerprint if the image displayed is poor. The better the data held for each finger by Sentinel the more reliable will be the recognition by the reader in everyday use. Don’t forget to employ the tips detailed at the start of this section to achieve consistent results of a high standard. 4 Two buttons will now be enabled – Verify and Start Enrolment.
Click the button. This allows the print to be verified to ensure that it does not match too closely an existing print in the database. If this occurs, ask the user to select another finger for registration.
After the button has been clicked the following will be displayed:

62-60000001
Page 41 of 64
Click the OKOKOKOK button and if happy with the fingerprint click the StartStartStartStart EnrolmentEnrolmentEnrolmentEnrolment button to hold this
print as the first of the four that are needed for each finger that is to be registered. NOTE: The Same finger will need to be presented three additional times in total, and will be matched to the first fingerprint - this is to allow Sentinel to learn to recognize the fingerprint. 5 The page will now be displaying a message ‘Waiting for Print 2’. Ask the user to apply the
same finger to the sensor of the fingerprint reader again. Click the VerifyVerifyVerifyVerify button once more. This
time the following should be displayed:
If the fingerprint image is clear and precise enough, the software will display a score that is matched to the first fingerprint. The match score shows how successfully Sentinel is recognizing each fingerprint. Any score over 170 is very good. It is recommended that scores lower than 130 be rejected.
Click the OKOKOKOK button. If the score is unsatisfactory, click the CancelCancelCancelCancel button and restart the procedure
and click VerifyVerifyVerifyVerify again until a successful match is achieved. If happy with the score - as in the previous
example shown - then ask the user to present their fingerprint again. 6 Repeat the step five for the third and fourth fingerprints. After each stage check the finger diagram to ensure that the fingerprints are being matched to the correct finger.
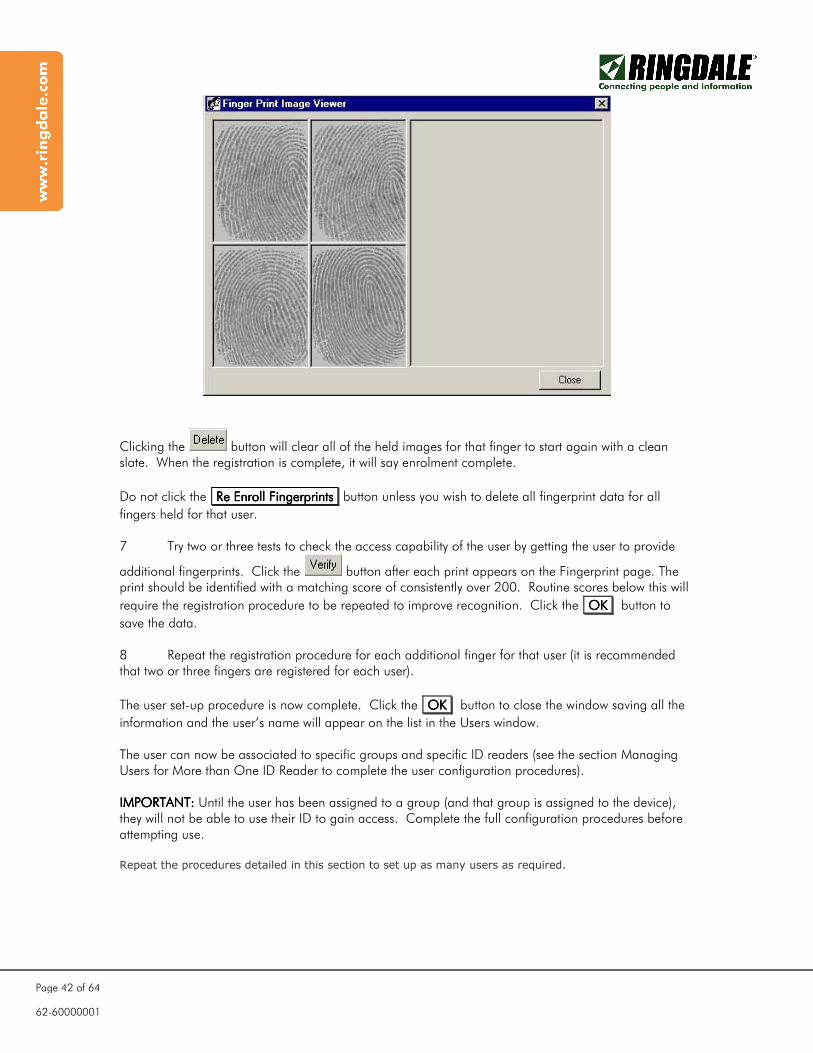
At the end of the procedure, the fingerprints can be viewed by clicking on the ViewViewViewView button. An
example of the Fingerprint Image Viewer window is shown following. If the quality of the images is not high, do not be afraid to start again.
62-60000001
Page 42 of 64
Clicking the button will clear all of the held images for that finger to start again with a clean slate. When the registration is complete, it will say enrolment complete.
Do not click the ReReReRe EnrollEnrollEnrollEnroll FingerprintsFingerprintsFingerprintsFingerprints button unless you wish to delete all fingerprint data for all
fingers held for that user. 7 Try two or three tests to check the access capability of the user by getting the user to provide
additional fingerprints. Click the button after each print appears on the Fingerprint page. The print should be identified with a matching score of consistently over 200. Routine scores below this will
require the registration procedure to be repeated to improve recognition. Click the OOOOKKKK button to
save the data. 8 Repeat the registration procedure for each additional finger for that user (it is recommended that two or three fingers are registered for each user).
The user set-up procedure is now complete. Click the OOOOKKKK button to close the window saving all the
information and the user’s name will appear on the list in the Users window. The user can now be associated to specific groups and specific ID readers (see the section Managing Users for More than One ID Reader to complete the user configuration procedures). IMPORTANT:IMPORTANT:IMPORTANT:IMPORTANT: Until the user has been assigned to a group (and that group is assigned to the device), they will not be able to use their ID to gain access. Complete the full configuration procedures before attempting use. Repeat the procedures detailed in this section to set up as many users as required.
62-60000001
Page 43 of 64
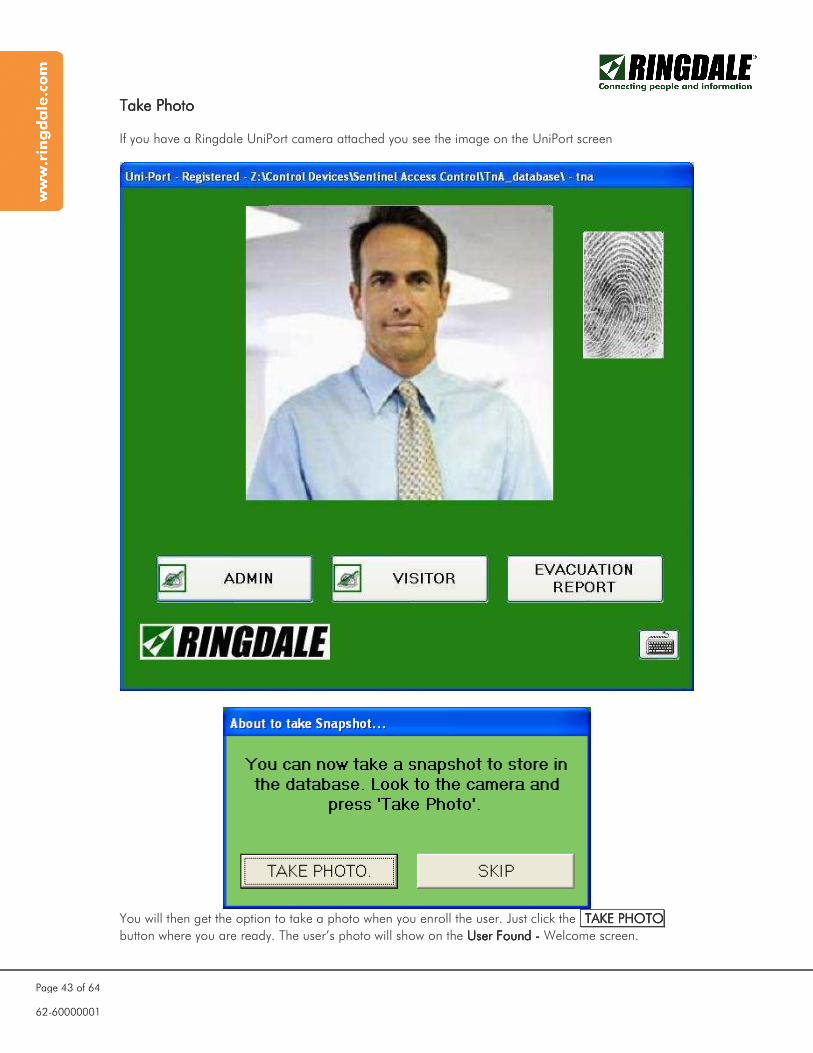
Take PhotoTake PhotoTake PhotoTake Photo If you have a Ringdale UniPort camera attached you see the image on the UniPort screen
You will then get the option to take a photo when you enroll the user. Just click the TTTTAKEAKEAKEAKE PHOTOPHOTOPHOTOPHOTO
button where you are ready. The user’s photo will show on the User Found User Found User Found User Found ---- Welcome screen.
62-60000001
Page 44 of 64
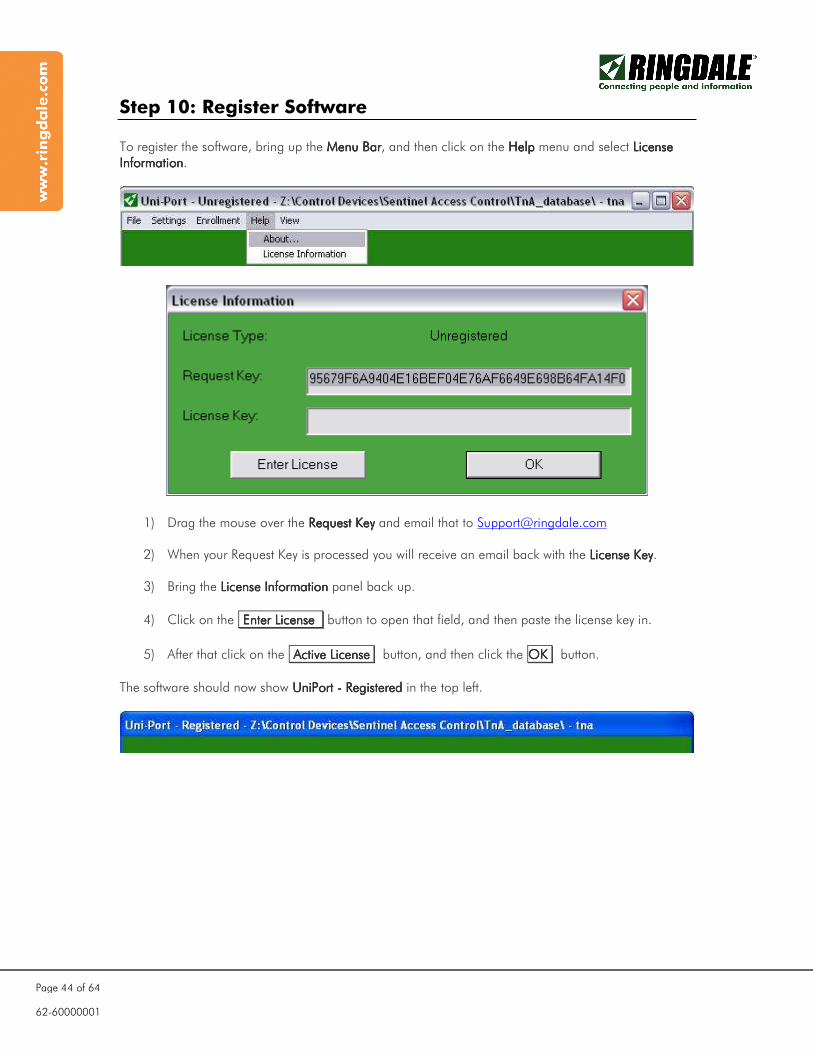
Step 10: Register Software To register the software, bring up the Menu BarMenu BarMenu BarMenu Bar, and then click on the HelpHelpHelpHelp menu and select License License License License InformationInformationInformationInformation.
1) Drag the mouse over the Request KeyRequest KeyRequest KeyRequest Key and email that to [email protected]
2) When your Request Key is processed you will receive an email back with the License KeyLicense KeyLicense KeyLicense Key.
3) Bring the License InformationLicense InformationLicense InformationLicense Information panel back up.
4) Click on the EnterEnterEnterEnter LicenseLicenseLicenseLicense button to open that field, and then paste the license key in.
5) After that click on the ActActActActiveiveiveive LicenseLicenseLicenseLicense button, and then click the OKOKOKOK button.
The software should now show UniPort UniPort UniPort UniPort ---- R R R Registeredegisteredegisteredegistered in the top left.

62-60000001
Page 45 of 64
Menu Bar Options Details The pictures below show the various menu options. Each will be covered in detail. File Menu OptionsFile Menu OptionsFile Menu OptionsFile Menu Options
Evacuation ReportEvacuation ReportEvacuation ReportEvacuation Report will generate a report that will show all users currently logged in. CloseCloseCloseClose will shut down the software.
62-60000001
Page 46 of 64
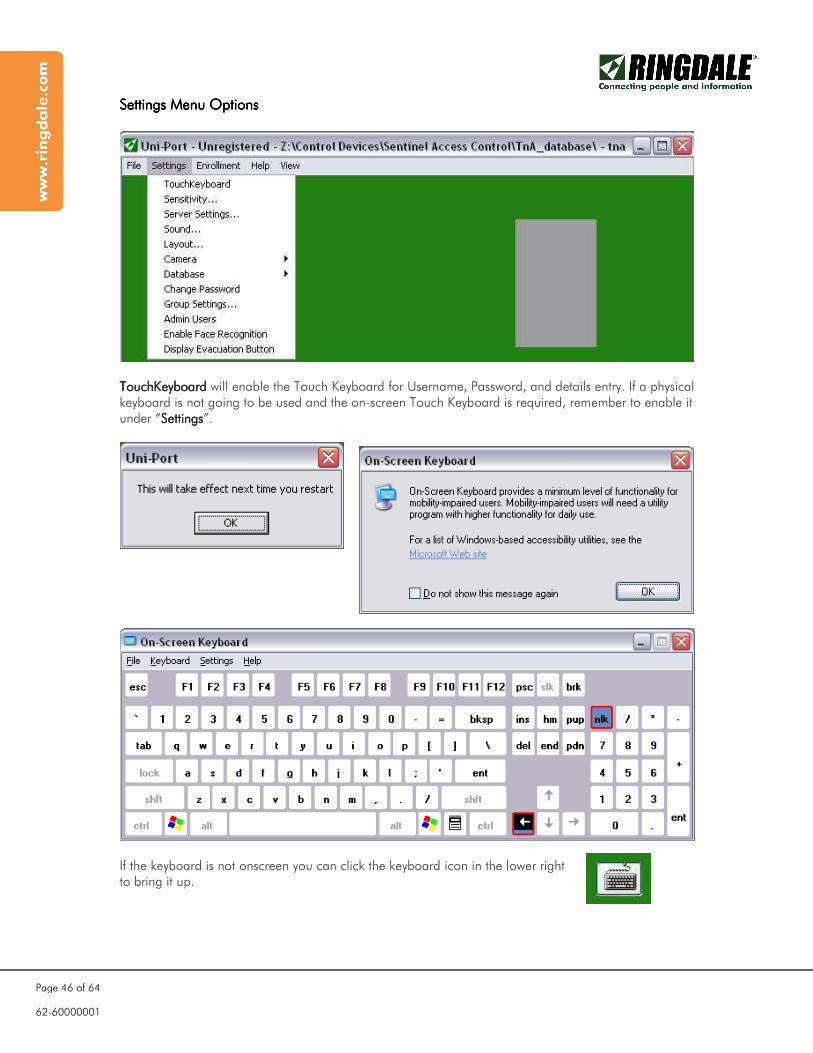
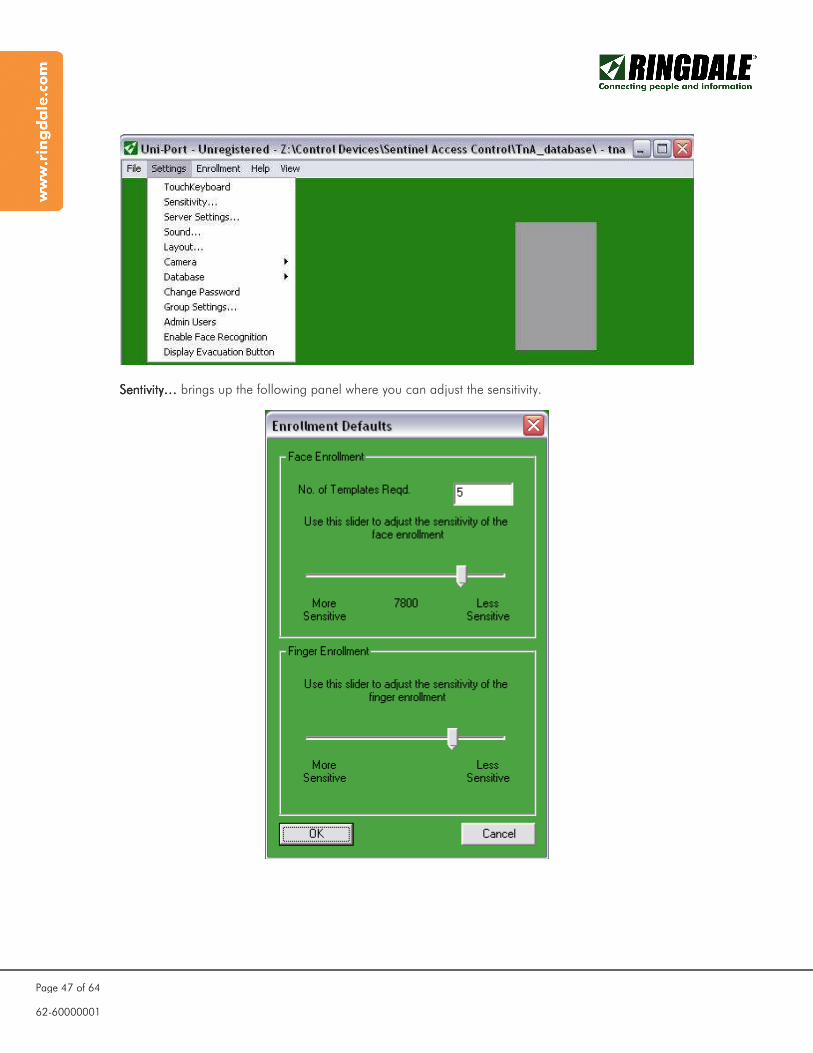
Settings Menu OptionsSettings Menu OptionsSettings Menu OptionsSettings Menu Options
TouchKeyboardTouchKeyboardTouchKeyboardTouchKeyboard will enable the Touch Keyboard for Username, Password, and details entry. If a physical keyboard is not going to be used and the on-screen Touch Keyboard is required, remember to enable it under “SettingsSettingsSettingsSettings”.
If the keyboard is not onscreen you can click the keyboard icon in the lower right to bring it up.
62-60000001
Page 47 of 64
Sentivity…Sentivity…Sentivity…Sentivity… brings up the following panel where you can adjust the sensitivity.
62-60000001
Page 48 of 64
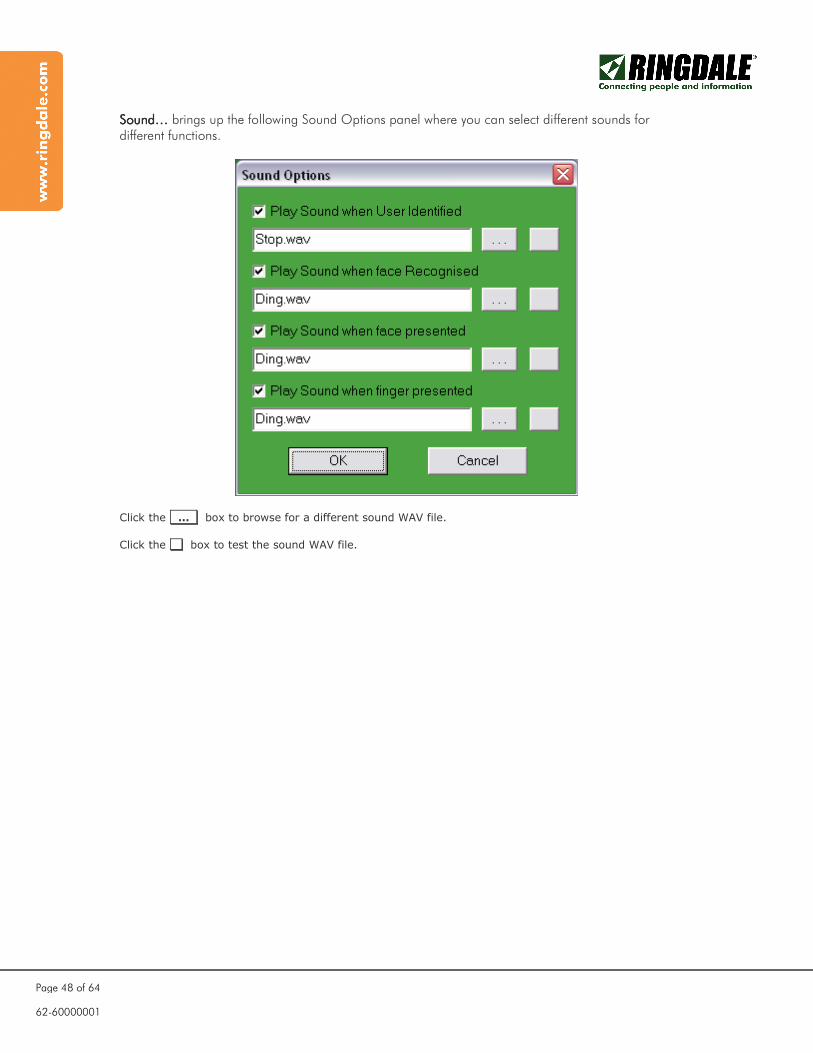
SSSSoundoundoundound………… brings up the following Sound Options panel where you can select different sounds for different functions.
Click the … box to browse for a different sound WAV file.
Click the box to test the sound WAV file.
62-60000001
Page 49 of 64
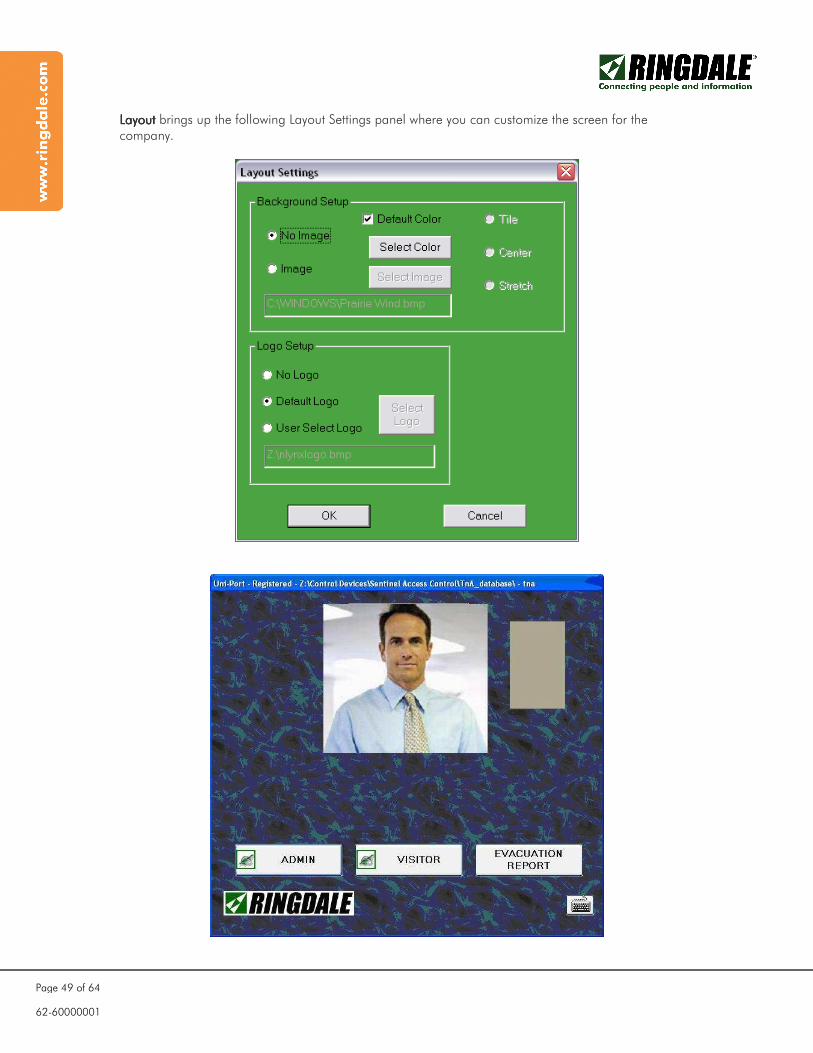
LayoutLayoutLayoutLayout brings up the following Layout Settings panel where you can customize the screen for the company.
62-60000001
Page 50 of 64
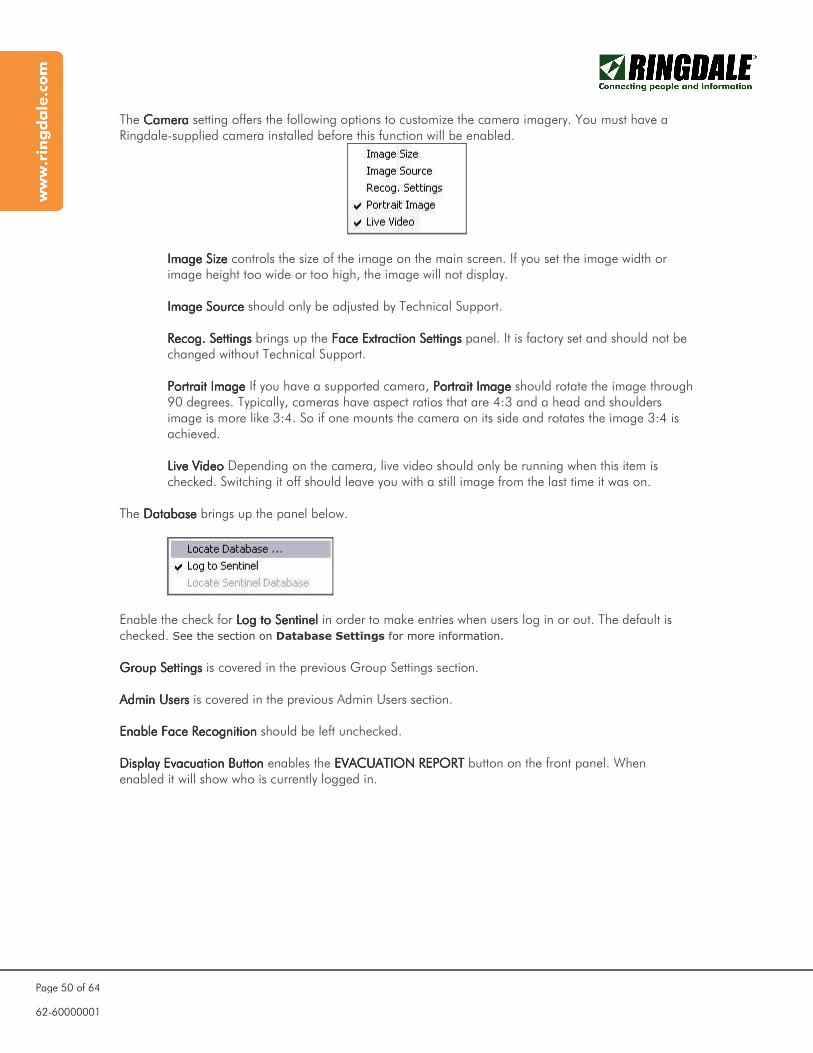
The CameraCameraCameraCamera setting offers the following options to customize the camera imagery. You must have a Ringdale-supplied camera installed before this function will be enabled.
Image Size Image Size Image Size Image Size controls the size of the image on the main screen. If you set the image width or image height too wide or too high, the image will not display. Image SourcImage SourcImage SourcImage Sourceeee should only be adjusted by Technical Support. Recog. SettingsRecog. SettingsRecog. SettingsRecog. Settings brings up the Face Extraction SettingsFace Extraction SettingsFace Extraction SettingsFace Extraction Settings panel. It is factory set and should not be changed without Technical Support. Portrait ImagePortrait ImagePortrait ImagePortrait Image If you have a supported camera, Portrait ImagePortrait ImagePortrait ImagePortrait Image should rotate the image through 90 degrees. Typically, cameras have aspect ratios that are 4:3 and a head and shoulders image is more like 3:4. So if one mounts the camera on its side and rotates the image 3:4 is achieved. Live Video Live Video Live Video Live Video Depending on the camera, live video should only be running when this item is checked. Switching it off should leave you with a still image from the last time it was on.
The DatabaseDatabaseDatabaseDatabase brings up the panel below.
Enable the check for Log to SentinelLog to SentinelLog to SentinelLog to Sentinel in order to make entries when users log in or out. The default is checked. See the section on Database Settings for more information. Group SettingsGroup SettingsGroup SettingsGroup Settings is covered in the previous Group Settings section. Admin UsersAdmin UsersAdmin UsersAdmin Users is covered in the previous Admin Users section. Enable Face RecognitionEnable Face RecognitionEnable Face RecognitionEnable Face Recognition should be left unchecked. Display Evacuation Button Display Evacuation Button Display Evacuation Button Display Evacuation Button enables the EVACUATION REPORTEVACUATION REPORTEVACUATION REPORTEVACUATION REPORT button on the front panel. When enabled it will show who is currently logged in.

62-60000001
Page 51 of 64
Enrollment OptionsEnrollment OptionsEnrollment OptionsEnrollment Options
These three options bring up the enrolling panels. See the EnrEnrEnrEnrolling Usersolling Usersolling Usersolling Users section for more information.
Help OptionsHelp OptionsHelp OptionsHelp Options
The AboutAboutAboutAbout………… option brings up the following panel containing information about the software version.
License InformationLicense InformationLicense InformationLicense Information brings the License InformationLicense InformationLicense InformationLicense Information panel. See the Register SoftwareRegister SoftwareRegister SoftwareRegister Software section for more information.
View OptionsView OptionsView OptionsView Options
Show Status enables the following status information at the bottom of the display when enabled: Camera Running Camera Running Camera Running Camera Running ---- X FP Connected X FP Connected X FP Connected X FP Connected ---- X Card Readers Connected X Card Readers Connected X Card Readers Connected X Card Readers Connected or No Camera Located No Camera Located No Camera Located No Camera Located ---- X FP Connected X FP Connected X FP Connected X FP Connected ---- X Card Reade X Card Reade X Card Reade X Card Readers Connectedrs Connectedrs Connectedrs Connected Where X = the number of finger print readers or card readers connected. Hide MenuHide MenuHide MenuHide Menu shuts down the Menu Bar immediately if you are leaving the area for example.

62-60000001
Page 52 of 64
Using the UniPort System
Logging in or outLogging in or outLogging in or outLogging in or out
Once the system is configured the user can either press a registered finger on the fingerprint reader, wave a proximity card over the reader, or key in their PIN code on a USB keypad (followed by the #) to bring up the User FoundUser FoundUser FoundUser Found screen.

62-60000001
Page 53 of 64
If the user is not recognized, you will get the User not recognized pop-up. Just try again, it will occasionally take a few tries. This is normal.
62-60000001
Page 54 of 64
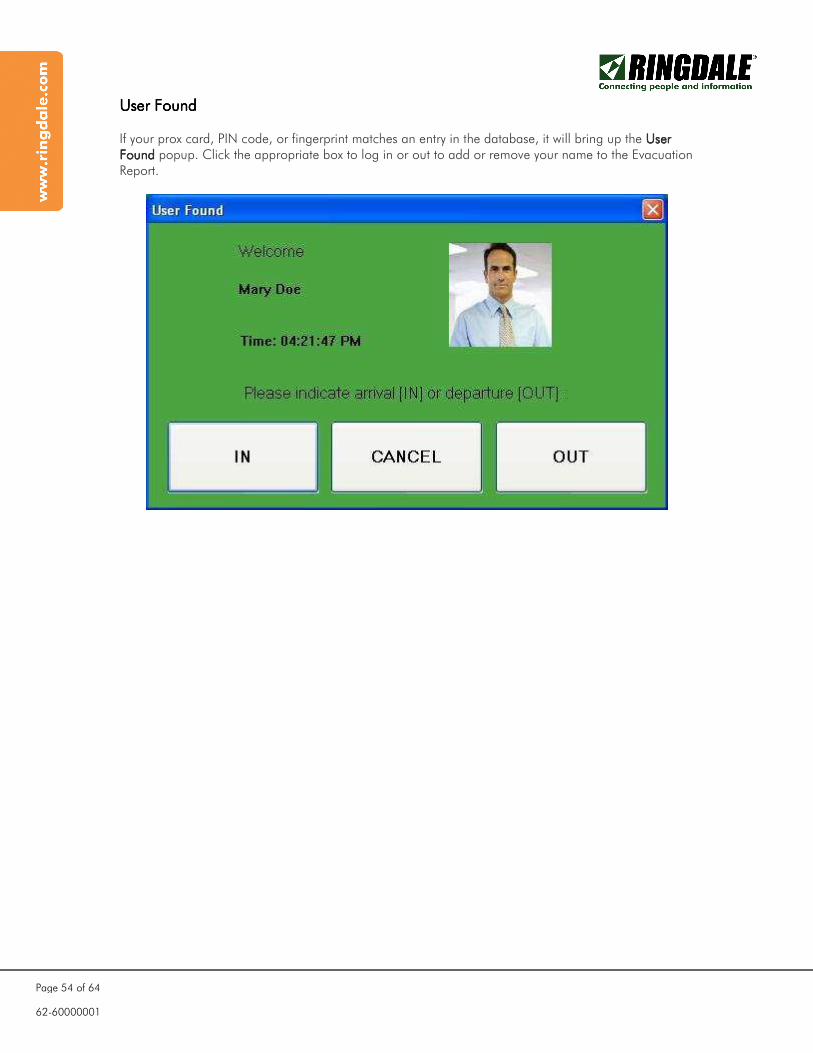
User FoundUser FoundUser FoundUser Found If your prox card, PIN code, or fingerprint matches an entry in the database, it will bring up the User User User User FoundFoundFoundFound popup. Click the appropriate box to log in or out to add or remove your name to the Evacuation Report.
62-60000001
Page 55 of 64
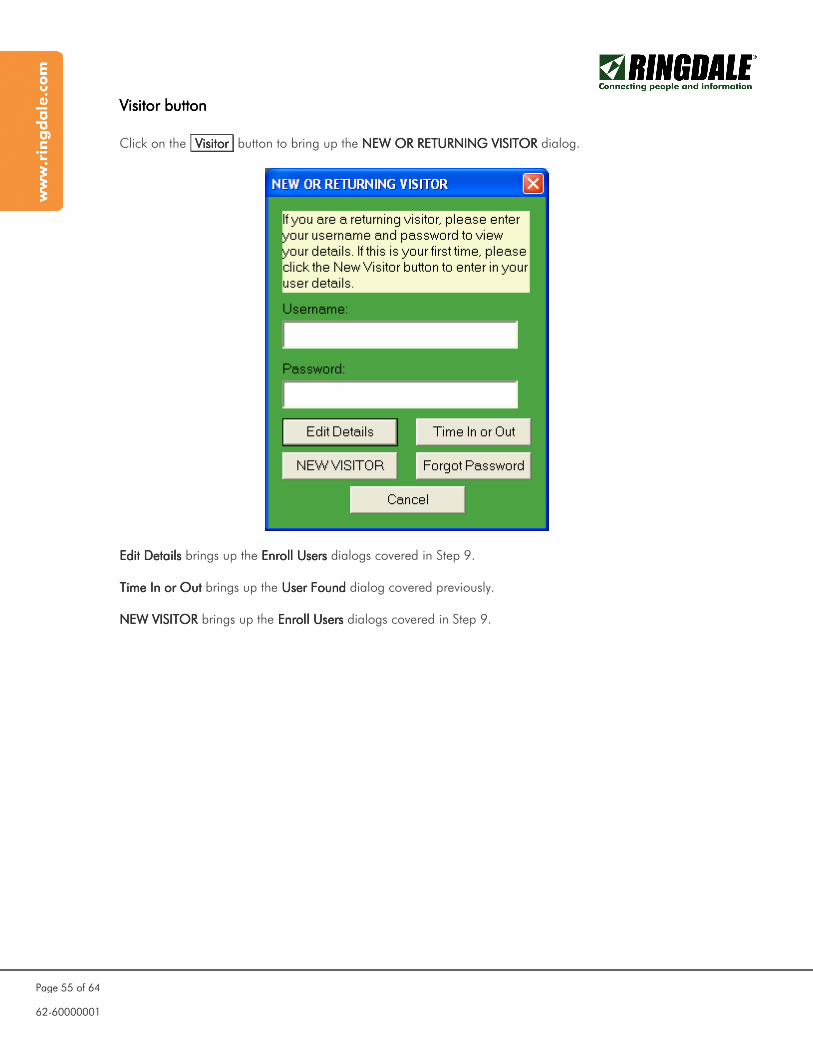
Visitor buttonVisitor buttonVisitor buttonVisitor button Click on the VisitorVisitorVisitorVisitor button to bring up the NEW OR RETURNING VISITORNEW OR RETURNING VISITORNEW OR RETURNING VISITORNEW OR RETURNING VISITOR dialog.
Edit DetailsEdit DetailsEdit DetailsEdit Details brings up the Enroll Users Enroll Users Enroll Users Enroll Users dialogs covered in Step 9. Time In or OutTime In or OutTime In or OutTime In or Out brings up the User Found User Found User Found User Found dialog covered previously. NEW VISITORNEW VISITORNEW VISITORNEW VISITOR brings up the Enroll Users Enroll Users Enroll Users Enroll Users dialogs covered in Step 9.
62-60000001
Page 56 of 64
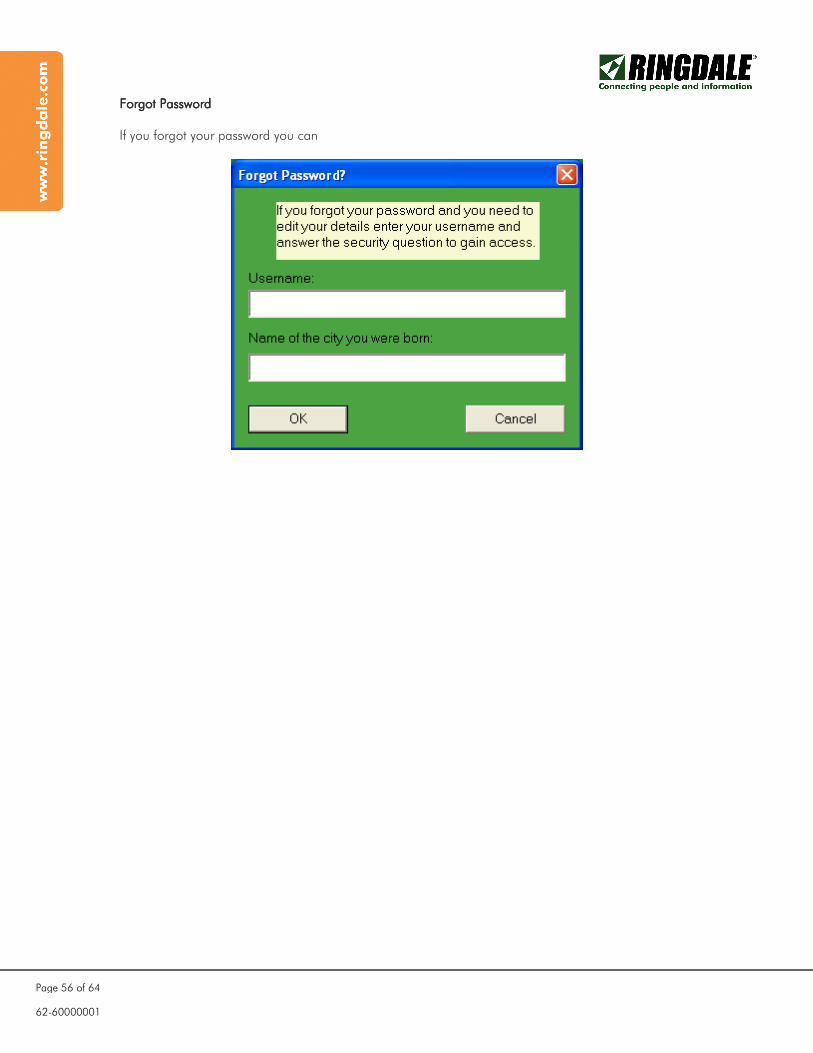
Forgot PasswordForgot PasswordForgot PasswordForgot Password If you forgot your password you can

62-60000001
Page 57 of 64
VISITOR BUTTONVISITOR BUTTONVISITOR BUTTONVISITOR BUTTON
If a visitor wants to change details in the database, click on the VISITORVISITORVISITORVISITOR button then enter the
username and password.
The user must be in the Visitor Group. All other users must access through the ADMINADMINADMINADMIN button and the
EXISTINGEXISTINGEXISTINGEXISTING USERSUSERSUSERSUSERS button.
Click on the DetailsDetailsDetailsDetails button or press Enter to bring up the User Details User Details User Details User Details –––– Edit Edit Edit Edit window.
Click on the Access DetailsAccess DetailsAccess DetailsAccess Details tab:

62-60000001
Page 58 of 64
Personal Details tab:

62-60000001
Page 59 of 64
Security Details tab:
62-60000001
Page 60 of 64
EVACUATION REPORTEVACUATION REPORTEVACUATION REPORTEVACUATION REPORT
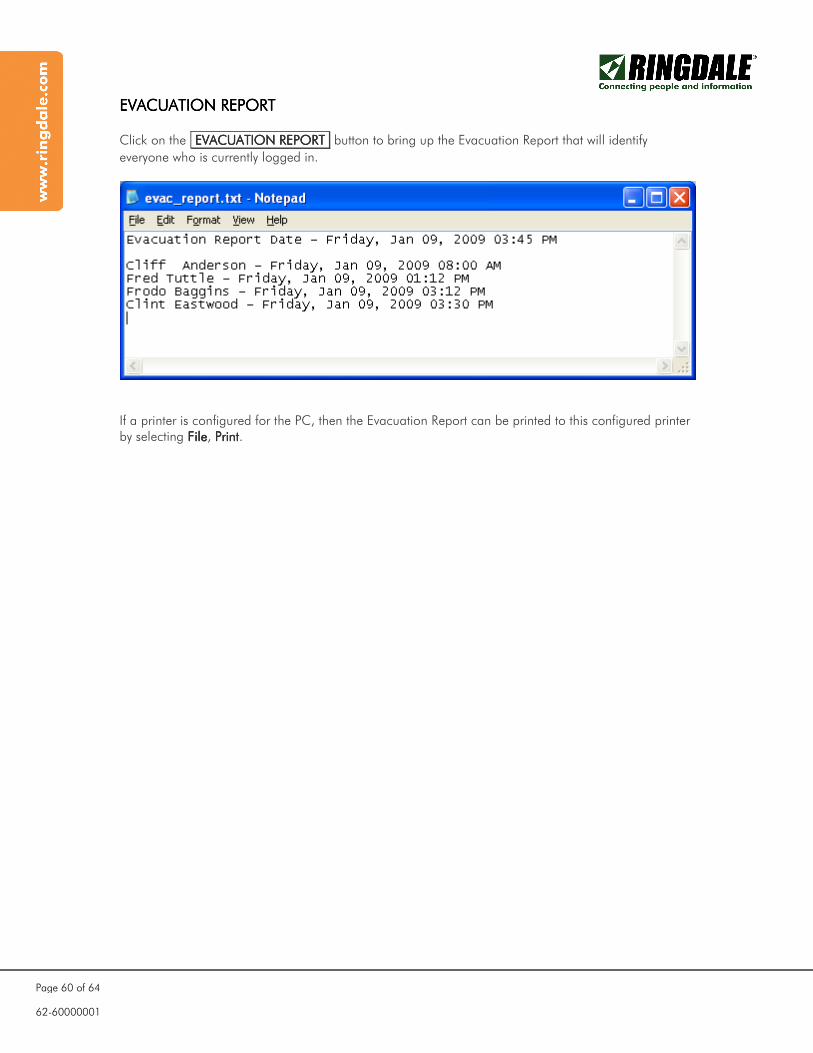
Click on the EVACUATIONEVACUATIONEVACUATIONEVACUATION REPORTREPORTREPORTREPORT button to bring up the Evacuation Report that will identify
everyone who is currently logged in.
If a printer is configured for the PC, then the Evacuation Report can be printed to this configured printer by selecting FileFileFileFile, PrintPrintPrintPrint.

62-60000001
Page 61 of 64
Questions and Answers QUESTIONQUESTIONQUESTIONQUESTION:::: I pointed to an existing Sentinel database, but it did not look like it sees the existing users in the database. CAUSE:CAUSE:CAUSE:CAUSE: You must restart the software to see the new database. SOLUTION:SOLUTION:SOLUTION:SOLUTION: Go to the Menu Bar and do File - Close. Then restart the software. QUESTION:QUESTION:QUESTION:QUESTION: Even though I pointed to my Access database, it still has Admin users that were in the SQL database. CAUSE:CAUSE:CAUSE:CAUSE: You must restart the software to see the new database. SOLUTION:SOLUTION:SOLUTION:SOLUTION: Go to the Menu Bar and do File - Close. Then restart the software. QUESTION:QUESTION:QUESTION:QUESTION: Why is the Evacuation Report button red? CAUSE:CAUSE:CAUSE:CAUSE: This is handled by the PC's display properties theme. SOLUTION:SOLUTION:SOLUTION:SOLUTION: Change your Display Properties - Appearance tab Windows and buttons setting from Windows classic Style to Windows XP Style. QUESTION:QUESTION:QUESTION:QUESTION: My Locate Sentinel Database is greyed out. How do I enable it? SOLUTION:SOLUTION:SOLUTION:SOLUTION: This function is no longer available and will be removed in a future version. QUESTION:QUESTION:QUESTION:QUESTION: When I click on Log to Sentinel nothing seems to happen. ANSWER:ANSWER:ANSWER:ANSWER: You should see the check next to Log to Sentinel. The action that is taken is to enable the log in to the SQL database when the software is restarted. QUESTION:QUESTION:QUESTION:QUESTION: Why do you have to log back in after every function that you complete? ANSWER:ANSWER:ANSWER:ANSWER: This is to be certain that the system is secure at every stage. QUESTION:QUESTION:QUESTION:QUESTION: Clicking on Evacuation Report does nothing. CAUSE:CAUSE:CAUSE:CAUSE: Either you have not restarted the software after setting the database up, entered users in groups, or you do not have people logged in. SOLUTION:SOLUTION:SOLUTION:SOLUTION: Restart the software, make certain that users are assigned to groups, and have some users log in.
62-60000001
Page 62 of 64
QUESTION:QUESTION:QUESTION:QUESTION: Why is there an UNDEFINED button on the first screen? CAUSE:CAUSE:CAUSE:CAUSE: Either you have not restarted the software after setting the database up, entered users in groups, or there are no staff and/or visitors logged in. SOLUTION:SOLUTION:SOLUTION:SOLUTION: Restart the software, make certain that users are assigned to groups, and have some users log in. QUESTION:QUESTION:QUESTION:QUESTION: Why does my Admin Panel have two UNDEFINED buttons? CAUSE:CAUSE:CAUSE:CAUSE: Either you have not restarted the software after setting the database up, entered users in groups, or you do not have people logged in. SOLUTION:SOLUTION:SOLUTION:SOLUTION: Restart the software, make certain that users are assigned to groups, and have some users log in. QUESTION:QUESTION:QUESTION:QUESTION: I am still in a menu doing things and it times out. Can the timeout be extended? CAUSE:CAUSE:CAUSE:CAUSE: It was determined that 30 seconds was the longest that an inactive Admin interface should be exposed. SOLUTION:SOLUTION:SOLUTION:SOLUTION: A future version will allow this to be configured. QUESTION:QUESTION:QUESTION:QUESTION: I cannot enroll a user. I click on Existing User from the Admin Panel but everything is greyed out. Likewise the Existing User is greyed in from the administration toolbar. I can get to the Enrollment Form - fill it out, click OK, but nothing happens, and nothing is saved. CAUSE:CAUSE:CAUSE:CAUSE: Either you have not restarted the software after setting the database up, entered users in groups, or you do not have people logged in. SOLUTION:SOLUTION:SOLUTION:SOLUTION: Restart the software, make certain that users are assigned to groups, and have some users log in. QUESTION:QUESTION:QUESTION:QUESTION: How do I get the code to register the software? ANSWER:ANSWER:ANSWER:ANSWER: See Step 7: Register Software for the procedure. QUESTION:QUESTION:QUESTION:QUESTION: There is a View - Show Status, but it does not seem to do anything... What status should it show? ANSWER:ANSWER:ANSWER:ANSWER: Once enabled, at the bottom of the main screen it will show Camera Running Camera Running Camera Running Camera Running ---- X FP X FP X FP X FP Connected Connected Connected Connected ---- X Card Readers Connected X Card Readers Connected X Card Readers Connected X Card Readers Connected or No Camera Located No Camera Located No Camera Located No Camera Located ---- X FP Connected X FP Connected X FP Connected X FP Connected ---- X Card Readers Connected X Card Readers Connected X Card Readers Connected X Card Readers Connected Where X = the number of finger print readers or card readers connected.
62-60000001
Page 63 of 64
QUESTION:QUESTION:QUESTION:QUESTION: There are a bunch of groups that are from the SQL database when I am pointing to the Access database. The group in my test Access database does not show up. CAUSE:CAUSE:CAUSE:CAUSE: Either you have not restarted the software after setting the database up, entered users in groups, or you do not have people logged in. SOLUTION:SOLUTION:SOLUTION:SOLUTION: Restart the software, make certain that users are assigned to groups, and have some users log in. QUESTION:QUESTION:QUESTION:QUESTION: When I install the UniPort software, the Fingerprint panel of the Sentinel software is rendered unusable. CAUSE:CAUSE:CAUSE:CAUSE: The DLL used by Sentinel is different from the one used by UniPort. For this reason you cannot install both on the same machine. SOLUTION:SOLUTION:SOLUTION:SOLUTION: Don't install Sentinel and Uniport on the same PC QUESTION:QUESTION:QUESTION:QUESTION: I click on the VISITOR button then try to open my account to edit my details, but it says "You do not have access to the Visitor group”. CAUSE:CAUSE:CAUSE:CAUSE: You must be in the Visitor group. If the user was added as an Employee they cannot change the parameters. SOLUTION:SOLUTION:SOLUTION:SOLUTION: This must be done by an Administrator. QUESTION:QUESTION:QUESTION:QUESTION: Can someone be in both groups? ANSWER:ANSWER:ANSWER:ANSWER: Yes, but you would have to use another tool (Sentinel, Microsoft Access or a SQL Administrator) to accomplish this. QUESTION:QUESTION:QUESTION:QUESTION: Where does an administrator see who is in each group? ANSWER:ANSWER:ANSWER:ANSWER: The Administrator would have to open the database with Sentinel, Microsoft Access or a SQL Administrator tool. QUESTION:QUESTION:QUESTION:QUESTION: Can I move a user from the visitor to the employee group? ANSWER:ANSWER:ANSWER:ANSWER: No, you must delete the user from one group before creating them in the other.

62-60000001
Page 64 of 64
Technical Support Contact Information
Ringdale, Inc. 101 Halmar Cove Georgetown Texas 78628 USA Toll-free: +1 888-288-9080 Phone: +1 512-288-9080 Fax: +1 512-288-7210 Web: www.ringdale.comwww.ringdale.comwww.ringdale.comwww.ringdale.com
Ringdale Japan Shinjuku Nomura Building 1-26-2 Nishi Shinjuku Shinjuku-ku Tokyo 163-0535 Japan Phone: +81 (3) 3345 2180 Fax: +81 (3) 3344 3949 Web: www.ringdalwww.ringdalwww.ringdalwww.ringdale.come.come.come.com
Ringdale, Inc. Sales Office 8303 N Mopac Expressway Suite 230 - Building C Austin Texas 78759 USA Toll-free: +1 888-288-9080 Phone: +1 512-241-0247 Fax: +1 512-288-7210 Web: www.ringdale.comwww.ringdale.comwww.ringdale.comwww.ringdale.com
Ringdale Singapore No.1 Sims Lane #04-06 Singapore 387355 Phone: +65 6749 2285 Fax: +65 6749 5095 Web: www.ringdale.comwww.ringdale.comwww.ringdale.comwww.ringdale.com
Ringdale (UK) Ltd. 26 Victoria Way Burgess Hill West Sussex RH15 9NF United Kingdom Freephone: 0800 214503 Phone: +44 (0) 1444 871349 Fax: +44 (0) 1444 870228 Web: www.ringdale.co.ukwww.ringdale.co.ukwww.ringdale.co.ukwww.ringdale.co.uk
Ringdale Hong Kong Suite No.6-7,10F,Tower1 Hong Kong City 33 Canton Rd. Tsimshatsui Kowloon, Hong Kong China Phone: +852-2865-5393 Fax: +852-2865-5376 Web: www.ringdale.comwww.ringdale.comwww.ringdale.comwww.ringdale.com
Ringdale Gesellschaft für Netzwerktechnik mbH Fabrikstationsstraße 43 A D-68163 Mannheim Germany Phone: +49 (0) 621 7186-0 Fax: +49 (0) 621 7186-20 Web: www.ringdale.dewww.ringdale.dewww.ringdale.dewww.ringdale.de