Embed Size (px)
Citation preview

1
RH
WC
2_IB
_RB
_FA
_120
917 ICE CREAM WAFFLE
CONE MAKER2 YEAR WARRANTY
RHWC2
INSTRUCTIONS & WARRANTY
Par
t No.
T22
-500
3943
2
IMPORTANT SAFEGUARDSWhen using this appliance, basic safety precautions should always be followed, including the following:Read all instructions before, and follow whilst using this appliance.1. To protect against electrical hazards do not immerse the power cord, plug or appliance in water or any other liquid.2. Do not use in the bathroom or near any source of water.3. Do not use outdoors.4. Always use the appliances handles as some parts will be hot. The temperature of accessible surfaces/parts may
become very hot when the appliance is operating.5. Do not touch the hot cooking surfaces.6. Allow the appliance to cool before attaching or removing any parts and before cleaning the appliance.7. This appliance is not intended for use by persons (including children) with reduced physical, sensory or mental
capabilities, or lack of experience and knowledge, unless they have been given supervision or instruction concerning use of the appliance by a person responsible for their safety.
8. Do not leave the appliance unattended when in use.9. Always turn off and unplug from the wall power outlet when not in use.10. Always turn off and unplug from the wall power outlet before cleaning the appliance.11. To disconnect, turn off the wall power outlet, then grasp the plug and remove from the wall power socket.
Never pull by the cord.12. Do not operate this appliance with a damaged cord or plug or after the appliance has malfunctioned, or been
dropped or damaged in any manner. Contact Customer service for replacement, examination, repair or adjustment.13. There are no user serviceable parts. If the power cord or appliance is damaged, it must be replaced or repaired by
the manufacturer or similarly qualified person in order to avoid a hazard.14. Do not use on an inclined plane or unstable surface.15. Do not move the appliance when in use.16. Do not cover the appliance when in use.17. Always take care when removing food after cooking as it is hot.18. Food may burn. Always monitor when using this appliance.19. Do not use the appliance near or below any curtains or other combustible materials.20. Do not place on or near any heat sources.21. Keep the appliance and the power cord away from the edge of tables or countertops and out of reach of children
and persons with reduced physical, sensory and mental capacities.22. Always clean the appliance after use. Cleaning or user maintenance shall not be carried out by children without the
supervision of a person responsible for their safety.23. Follow the instructions when cleaning this appliance.24. Do not attempt to fit accessories/components that have not been supplied with or are not specifically designed for
use with this appliance.25. Do not use appliance for other than its intended purpose.26. Misuse of the appliance may cause injury.27. This appliance is not a toy. Children should be supervised to ensure they do not play with the appliance.28. Do not leave the appliance unattended when in use or where it may be touched by children or persons with
disabilities.29. This appliance is not intended to be operated by means of an external timer or separate remote control system.30. For added safety, electrical appliances should be connected to a power outlet that is protected by a residual current
device (RCD / ‘Safety Switch’) having a rated residual operating current not exceeding30mA. Your switchboard may already incorporate an RCD. If unsure, call an electrician for verification and fitting if necessary.
This appliance is intended to be used in household and similar applications such as:- Staff kitchen areas in shops, offices and other working environments;- Farm houses;- By clients in hotels, motels, and other residential type environments;- Bed & breakfast type environments.
SAVE THESE INSTRUCTIONS.

3
Congratulations on the purchase of your Russell Hobbs appliance. Each unit is manufactured to ensure safety and reliability. Before using the appliance for the first time, please read the instruction booklet carefully and keep it for future reference. Pass it on if you pass on the appliance.
When using electrical appliances, basic safety precautions should always be followed.
1. Top Housing
2. Red Power Indicator Light
3. Green Ready Indicator Light
4. Temperature Knob
5. Bottom Housing
6. Top Cooking Plate
7. Bottom Cooking Plate
8. Cone Roller
8
1 2 3 4
7
6
5
4
BEFORE FIRST USE• Remove all promotional and packaging materials.• Clean the cooking plates with a damp cloth or sponge. • Slightly grease the cooking plates with a little cooking oil. • Take care to prevent water or any other liquid from running into the appliance. NOTE: When using your Ice Cream Waffle Cone Maker for the first time, the unit may emit a fine smoke vapour and scent. This is normal and is caused by the first heating of the new elements and new cooking plates.
GENERAL USENOTE: For best results, lightly spray the cooking plates with a cooking oil spray before using. This will assist in the removal of the waffle cone after cooking.
• Plug in the appliance and preheat with the top housing in the closed position. The red power indicator light will turn ON when the appliance is connected to power.
• Select your desired temperature setting using the temperature knob. NOTE: A higher temperature will result in a darker cone and a lower temperature will result in a paler cone that requires cooking for longer.
• The green ready indicator will turn ON when preheating and turn OFF once the cooking plates have reached set temperature.
• Allow your Ice Cream Waffle Cone Maker to preheat until the green ready indicator turns OFF.
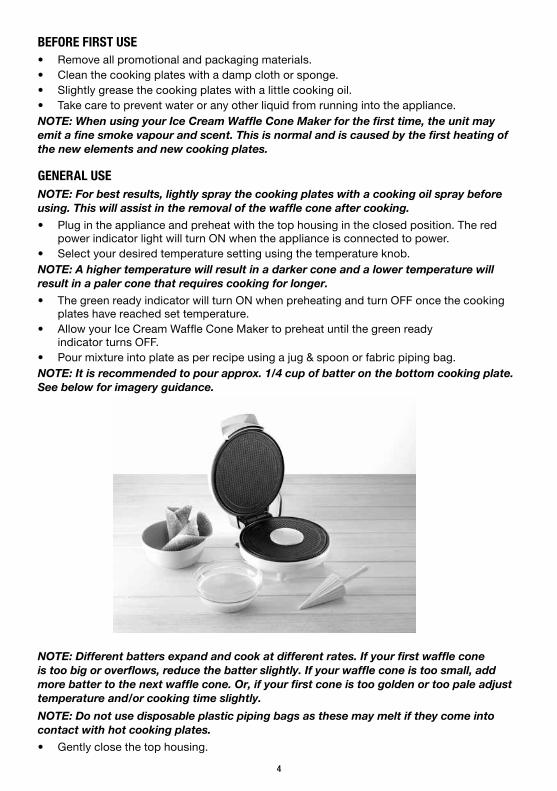
• Pour mixture into plate as per recipe using a jug & spoon or fabric piping bag.NOTE: It is recommended to pour approx. 1/4 cup of batter on the bottom cooking plate. See below for imagery guidance.
NOTE: Different batters expand and cook at different rates. If your first waffle cone is too big or overflows, reduce the batter slightly. If your waffle cone is too small, add more batter to the next waffle cone. Or, if your first cone is too golden or too pale adjust temperature and/or cooking time slightly.
NOTE: Do not use disposable plastic piping bags as these may melt if they come into contact with hot cooking plates.
• Gently close the top housing.
5
NOTE: Do not slam the top housing down as it may cause the mixture to run off the cooking plates.
NOTE: For a thinner cone, evenly press down on the cover latch when top housing is closed.
• Allow to cook for approximately 2 minutes or until golden.• To remove waffle cone, always use a plastic or wooden spatula or tongs. NOTE: Never use a sharp object or metal, as this will damage the non-stick surface of cooking plates.
• Gently roll the flat waffle cone around the plastic cone roller and hold into place for a few seconds to set.
NOTE: The waffle cone will be hot to handle, use paper towel or plastic tongs to assist in rolling waffle cone.
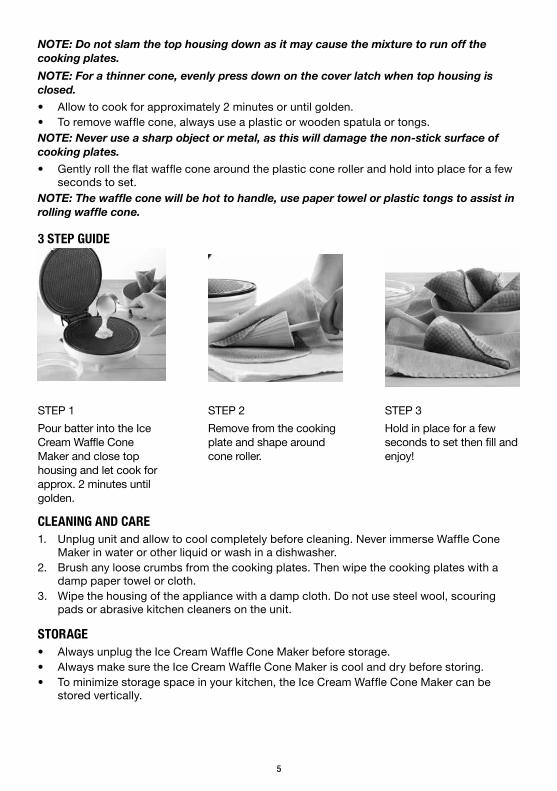
3 STEP GUIDE
CLEANING AND CARE 1. Unplug unit and allow to cool completely before cleaning. Never immerse Waffle Cone
Maker in water or other liquid or wash in a dishwasher.2. Brush any loose crumbs from the cooking plates. Then wipe the cooking plates with a
damp paper towel or cloth.3. Wipe the housing of the appliance with a damp cloth. Do not use steel wool, scouring
pads or abrasive kitchen cleaners on the unit.
STORAGE• Always unplug the Ice Cream Waffle Cone Maker before storage.• Always make sure the Ice Cream Waffle Cone Maker is cool and dry before storing.• To minimize storage space in your kitchen, the Ice Cream Waffle Cone Maker can be
stored vertically.
STEP 1
Pour batter into the Ice Cream Waffle Cone Maker and close top housing and let cook for approx. 2 minutes until golden.
STEP 2
Remove from the cooking plate and shape around cone roller.
STEP 3
Hold in place for a few seconds to set then fill and enjoy!
6
Spectrum Brands Australia Pty LtdLocked Bag 3004 BraesideVictoria 3195 Australia
Customer Service in AustraliaTollFree: 1800 623 118Email: [email protected]: www.spectrumbrands.com.au
Spectrum Brands New Zealand LtdPO Box 9817 NewmarketAuckland 1149 New Zealand
Customer Service in New ZealandTollFree: 0800 736 776Email: [email protected]: www.spectrumbrands.co.nz
Spectrum Brands Australia Pty Ltd and Spectrum Brands New Zealand LtdWarranty Against Defects
In this warranty:Australian Consumer Law means the Australian consumer law set out in Schedule 2 to the Competition and Consumer Act 2010;
CGA means the New Zealand Consumer Guarantees Act 1993;Goods means the product or equipment which was accompanied by this warranty and purchased in Australia or New Zealand, as the case may be;Manufacturer, We or us means:
1. for Goods purchased in Australia, Spectrum Brands Australia Pty Ltd ABN, 78 007 070 573; or2. for Goods purchased in New Zealand, Spectrum Brands New Zealand Ltd, as the case
may be, contact details as set out at the end of this warranty;
Supplier means the authorised distributor or retailer of the Goods that sold you the Goods in Australia or in New Zealand; andYou means you, the original end-user purchaser of the Goods.1. Our goods come with guarantees that cannot be excluded under the Australian Consumer
Law, or the CGA. You are entitled to a replacement or refund for a major failure and compensation for any other reasonably foreseeable loss or damage. You are also entitled to have the goods repaired or replaced if the goods fail to be of acceptable quality and the failure does not amount to a major failure.
2. The benefits provided by this Warranty are in addition to all other rights and remedies in respect of the Goods which the consumer has under either the Australian Consumer Law or the CGA. The original purchaser of the Goods is provided with the following Warranty subject to the Warranty Conditions:
3. We warrant the Goods for all parts defective in workmanship or materials from the date of purchase (Warranty Period), for the period of 2 years from the date of purchase (Warranty Period).
If the Goods prove defective within the Warranty Period by reason of improper workmanship or material, we may, at our own discretion, repair or replace the Goods without charge.
Warranty Conditions
4. The Goods must be used in accordance with the manufacturer’s instructions. This Warranty does not apply should the defect in or failure of the Goods be attributable to misuse, abuse, accident or non-observance of manufacturer’s instructions on the part of the user. As far as the law permits, the manufacturer does not accept liability for any direct or consequential loss, damage or other expense caused by or arising out of any failure to use the Goods in accordance with the manufacturer’s instructions.
5. Exhaustible components (such as batteries, filters and brushes) of the Goods are included under this Warranty only where there is a defect in workmanship or materials used.
6. The warranty granted under clause 3 is limited to repair or replacement only.
7. Any parts of the Goods replaced during repairs or any product replaced remain the property of the manufacturer. In the event of the Goods being replaced during the Warranty Period, the warranty on the replacement Goods will expire on the same date as for the Warranty Period on the original Goods which are replaced.
8. In order to claim under the warranty granted under clause 3 you must:(a) Retain this warranty with your receipt/proof of purchase; and(b) Return the Goods to us at the relevant address or to the Supplier by prepaid
freight within the Warranty Period accompanied with (i) the legible and unmodified original proof of purchase, which clearly indicates the name and address of the Supplier, the date and place of purchase, the product name or other product serial number and (ii) this warranty.
9. This warranty is immediately void if:(a) Any serial number or appliance plate is removed or defaced;(b) The Goods have been serviced or otherwise repaired by a person not authorised
to do so by us or where non approved replaced parts are used.
10. The Goods are designed for domestic use only. The Goods must be connected to the electrical voltage requirements as specified in the ratings label located on the Goods.
11. This warranty does not cover the cost of claiming under the warranty or transport of the Goods to and from the Supplier or us.
12. This warranty is only valid and enforceable in Australia against Spectrum Brands Australia Pty Ltd and in New Zealand against Spectrum Brands New Zealand Ltd.
Contact us or the Supplier for further details.
Register your product online
If you live in Australia please visit: www.spectrumbrands.com.au/warrantyIf you live in New Zealand Please visit: www.spectrumbrands.co.nz/warrantyRegistration of your warranty is not compulsory, it gives us a record of your purchase AND entitles you to receive these benefits: Product information; Hints and tips; Recipes and news; Information on special price offers and promotions.
Any questions? Please contact Customer Service for advice.
7
Spectrum Brands Australia Pty LtdLocked Bag 3004 BraesideVictoria 3195 Australia
Customer Service in AustraliaTollFree: 1800 623 118Email: [email protected]: www.spectrumbrands.com.au
Spectrum Brands New Zealand LtdPO Box 9817 NewmarketAuckland 1149 New Zealand
Customer Service in New ZealandTollFree: 0800 736 776Email: [email protected]: www.spectrumbrands.co.nz
Spectrum Brands Australia Pty Ltd and Spectrum Brands New Zealand LtdWarranty Against Defects
In this warranty:Australian Consumer Law means the Australian consumer law set out in Schedule 2 to the Competition and Consumer Act 2010;
CGA means the New Zealand Consumer Guarantees Act 1993;Goods means the product or equipment which was accompanied by this warranty and purchased in Australia or New Zealand, as the case may be;Manufacturer, We or us means:
1. for Goods purchased in Australia, Spectrum Brands Australia Pty Ltd ABN, 78 007 070 573; or2. for Goods purchased in New Zealand, Spectrum Brands New Zealand Ltd, as the case
may be, contact details as set out at the end of this warranty;
Supplier means the authorised distributor or retailer of the Goods that sold you the Goods in Australia or in New Zealand; andYou means you, the original end-user purchaser of the Goods.1. Our goods come with guarantees that cannot be excluded under the Australian Consumer
Law, or the CGA. You are entitled to a replacement or refund for a major failure and compensation for any other reasonably foreseeable loss or damage. You are also entitled to have the goods repaired or replaced if the goods fail to be of acceptable quality and the failure does not amount to a major failure.
2. The benefits provided by this Warranty are in addition to all other rights and remedies in respect of the Goods which the consumer has under either the Australian Consumer Law or the CGA. The original purchaser of the Goods is provided with the following Warranty subject to the Warranty Conditions:
3. We warrant the Goods for all parts defective in workmanship or materials from the date of purchase (Warranty Period), for the period of 2 years from the date of purchase (Warranty Period).
If the Goods prove defective within the Warranty Period by reason of improper workmanship or material, we may, at our own discretion, repair or replace the Goods without charge.
Warranty Conditions
4. The Goods must be used in accordance with the manufacturer’s instructions. This Warranty does not apply should the defect in or failure of the Goods be attributable to misuse, abuse, accident or non-observance of manufacturer’s instructions on the part of the user. As far as the law permits, the manufacturer does not accept liability for any direct or consequential loss, damage or other expense caused by or arising out of any failure to use the Goods in accordance with the manufacturer’s instructions.
5. Exhaustible components (such as batteries, filters and brushes) of the Goods are included under this Warranty only where there is a defect in workmanship or materials used.
6. The warranty granted under clause 3 is limited to repair or replacement only.
7. Any parts of the Goods replaced during repairs or any product replaced remain the property of the manufacturer. In the event of the Goods being replaced during the Warranty Period, the warranty on the replacement Goods will expire on the same date as for the Warranty Period on the original Goods which are replaced.
8. In order to claim under the warranty granted under clause 3 you must:(a) Retain this warranty with your receipt/proof of purchase; and(b) Return the Goods to us at the relevant address or to the Supplier by prepaid
freight within the Warranty Period accompanied with (i) the legible and unmodified original proof of purchase, which clearly indicates the name and address of the Supplier, the date and place of purchase, the product name or other product serial number and (ii) this warranty.
9. This warranty is immediately void if:(a) Any serial number or appliance plate is removed or defaced;(b) The Goods have been serviced or otherwise repaired by a person not authorised
to do so by us or where non approved replaced parts are used.
10. The Goods are designed for domestic use only. The Goods must be connected to the electrical voltage requirements as specified in the ratings label located on the Goods.
11. This warranty does not cover the cost of claiming under the warranty or transport of the Goods to and from the Supplier or us.
12. This warranty is only valid and enforceable in Australia against Spectrum Brands Australia Pty Ltd and in New Zealand against Spectrum Brands New Zealand Ltd.
Contact us or the Supplier for further details.
Register your product online
If you live in Australia please visit: www.spectrumbrands.com.au/warrantyIf you live in New Zealand Please visit: www.spectrumbrands.co.nz/warrantyRegistration of your warranty is not compulsory, it gives us a record of your purchase AND entitles you to receive these benefits: Product information; Hints and tips; Recipes and news; Information on special price offers and promotions.
Any questions? Please contact Customer Service for advice.
RECIPES
RECIPE BOOKICE CREAM WAFFLE CONE MAKER
RHWC2
2
RUSSELL HOBBS and logo are Trade Marks of Spectrum Brands, Inc., or one of its subsidiaries.©2017 Spectrum Brands, Inc.Recipes are to be used in conjunction with the RHWC2 Ice Cream Waffle Cone Maker. All rights reserved. No part of this publication may be reproduced, stored in a retrieval system or transmitted in any form or by any means, electronic, mechanical, photocopying, recording or otherwise, without prior permission of the copyright owner.
www.russellhobbs.com.au
www.russellhobbs.co.nz
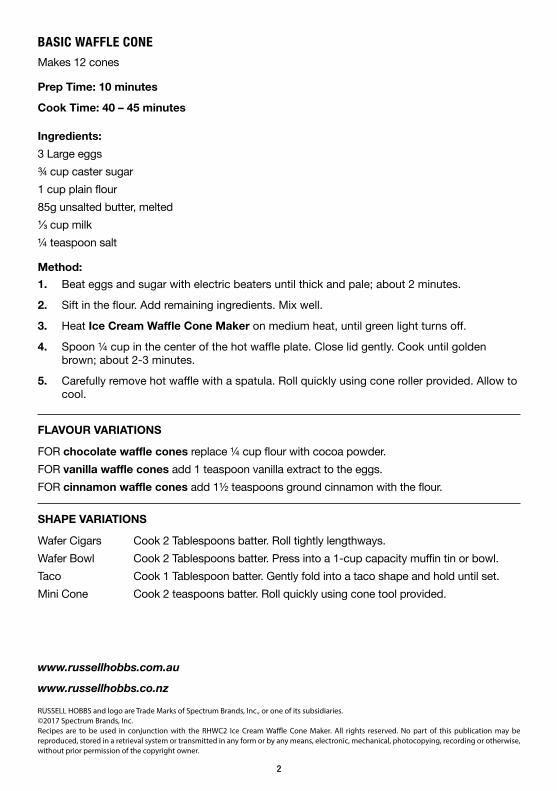
BASIC WAFFLE CONE Makes 12 cones
Prep Time: 10 minutes
Cook Time: 40 – 45 minutes
Ingredients:
3 Large eggs
¾ cup caster sugar
1 cup plain flour
85g unsalted butter, melted
⅓ cup milk
¼ teaspoon salt
Method:
1. Beat eggs and sugar with electric beaters until thick and pale; about 2 minutes.
2. Sift in the flour. Add remaining ingredients. Mix well.
3. Heat Ice Cream Waffle Cone Maker on medium heat, until green light turns off.
4. Spoon ¼ cup in the center of the hot waffle plate. Close lid gently. Cook until golden brown; about 2-3 minutes.
5. Carefully remove hot waffle with a spatula. Roll quickly using cone roller provided. Allow to cool.
FLAVOUR VARIATIONS
FOR chocolate waffle cones replace ¼ cup flour with cocoa powder.
FOR vanilla waffle cones add 1 teaspoon vanilla extract to the eggs.
FOR cinnamon waffle cones add 1½ teaspoons ground cinnamon with the flour.
SHAPE VARIATIONS
Wafer Cigars Cook 2 Tablespoons batter. Roll tightly lengthways.
Wafer Bowl Cook 2 Tablespoons batter. Press into a 1-cup capacity muffin tin or bowl.
Taco Cook 1 Tablespoon batter. Gently fold into a taco shape and hold until set.
Mini Cone Cook 2 teaspoons batter. Roll quickly using cone tool provided.
3
CORN WAFFLE CONE Makes 12 cones
Prep Time: 10 minutes
Cook Time: 40-45 minutes
Ingredients:
3 Large eggs
2 Tablespoons caster sugar
⅔ cup plain flour
⅓ cup polenta
85 g unsalted butter, melted
¼ cup milk
1 teaspoon salt
Method:
1. Beat eggs and sugar with electric beaters until thick and pale; about 2 minutes.
2. Sift in the flour. Add remaining ingredients. Mix well.
3. Heat Ice Cream Waffle Cone Maker on medium heat, until green light turns off.
4. Spoon ¼ cup in the center of the hot waffle plate. Close lid gently. Cook until golden brown; about 2-3 minutes.
5. Carefully remove hot waffle with a spatula. Roll quickly using cone roller provided. Allow to cool.
SERVING SUGGESTIONS
Fill with:
• your favourite flavoured popcorn;
• your favourite nacho ingredients OR taco fillings, such as; guacamole, fresh salsa, slaw, charred corn, black beans..

4
CARAMEL SANDWICH COOKIES Makes 12 cookies
Prep Time: 1 hour
Cook Time: 50 minutes
Ingredients:
1⅓ cup plain flour
100g unsalted butter, melted
⅓ cup caster sugar
2 Tablespoons lukewarm milk
1 Large egg
1 teaspoon active dry yeast
½ teaspoon ground cinnamon
Caramel Filling:
50g unsalted butter
1 cup firmly packed brown sugar
¼ cup thickened cream
½ teaspoon ground cinnamon
pinch of salt
Note: You can use a store-bought caramel for this recipe; about ½ cup.
Method:
1. For the cookies: Combine all ingredients in a bowl. Knead gently until dough comes together in a smooth ball. Cover and set aside in a warm place for 45 minutes.
2. For the caramel: Melt butter in a heavy-based pan over medium heat. Add sugar and stir with a rubber spatula until dissolved. Increase the heat and cook 5 minutes, stirring constantly until caramel becomes thick and dark in colour. Remove from heat.
3. Carefully whisk in cream all at once. Stir in cinnamon and salt. Set aside to cool.
4. Divide dough into 12 even pieces. Roll each into a ball.
5. Heat Ice Cream Waffle Cone Maker on high heat, until green light turns off.
6. Place a ball of dough in the center of the waffle plate. Close lid, pressing to flatten the dough. Cook 3-4 minutes, or until the cookie is dark golden.
7. Carefully remove hot waffle with a spatula. Slice in half through the centre; you should have 2 rounds. If desired, press with a round cookie cutter for an even edge.
8. Spread 2 teaspoons caramel filling over one half, then sandwich with the other half. Repeat with remaining dough and caramel.
5
WAFER CANNOLI (WITH RICOTTA CREAM)Makes 10 filled cannoli
Prep Time: 2 hours 15 minutes (+ overnight)
Cook Time: 30 minutes
Ingredients:
1 Large egg
¼ cup caster sugar
⅓ cup plain flour
¼ teaspoon ground cinnamon
30g unsalted butter, melted
1½ Tablespoons milk
pinch of salt
Ricotta Cream Filling:
375g tub fresh ricotta cheese, drained overnight
1 ¼ cup pure icing sugar, sifted (+ extra for dusting)
1 teaspoon vanilla extract
½ teaspoon lemon zest (optional)
1/3 cup thickened cream, whipped to firm peaks
Method:
1. For the ricotta filling: Combine drained ricotta, icing sugar, vanilla and lemon zest (if using). Beat with electric beaters until smooth and well combine; 1-2 minutes. Fold through the whipped cream. Cover and refrigerate until firm; 2 hours.
2. For the cannoli: Beat eggs and sugar with electric beaters until thick and pale; 2 minutes. Sift in the flour and cinnamon. Add remaining ingredients. Mix well.
3. Heat Ice Cream Waffle Cone Maker on medium heat, until green light turns off.
4. Spoon 1 tablespoon batter in the center on the hot waffle plate. Close lid gently. Cook until golden brown; about 2-3 minutes.
5. Carefully remove hot waffle with a spatula. Quickly roll into a tube shape. Allow to cool.
6. Pipe the ricotta filling evenly between the wafer cannoli shells. Decorate if desired. Dust with extra icing sugar to serve.
GARNISHES (optional)
Mix 2 tablespoons mini chocolate chips through ricotta filling.
Mix 1 tablespoon finely diced candied orange through ricotta filling.
Decorate ends with finely chopped pistachios OR grated chocolate.