Embed Size (px)
Citation preview
RH302
Leading the way in IT testing and certification tools, www.testking.com
- 1 -
RH302
RHCE (Redhat Certified Engineer) On Redhat Enterprise Linux 5
Version 12.0
RH302
Leading the way in IT testing and certification tools, www.testking.com
- 2 -
Important Note Please Read Carefully Study Tips This product will provide you questions and answers along with detailed explanations carefully compiled and written by our experts. Try to understand the concepts behind the questions instead of cramming the questions. Go through the entire document at least twice so that you make sure that you are not missing anything. Try out the labs! Further Material For this test TestKing also plan to provide: * Study Guide (Theoretical foundation) Latest Version We are constantly reviewing our products. New material is added and old material is revised. Free updates are available for 90 days after the purchase. You should check your member zone at TestKing an update 3-4 days before the scheduled exam date. Here is the procedure to get the latest version: Go to www.testking.com Click on Member zone/Log in The latest versions of all purchased products are downloadable from here. Just click the links. For most updates, it is enough just to print the new questions at the end of the new version, not the whole document. Feedback Feedback on specific questions should be send to [email protected]. You should state: Exam number and version, question number, and login ID. Our experts will answer your mail promptly. Copyright Each pdf file contains a unique serial number associated with your particular name and contact information for security purposes. So if we find out that a particular pdf file is being distributed by you, TestKing reserves the right to take legal action against you according to the International Copyright Laws.
RH302
Leading the way in IT testing and certification tools, www.testking.com
- 3 -
Table of contents
Introduction........................................................................................................................ 4 Lab Setup on RHCE Exam: ............................................................................................ 5 Topic 1, Debug Section (38 Questions)........................................................................ 5 Topic 2, RHCT Section, Installation and Configuration Section (60 Questions).. 28 Topic 3, RHCE Section, Installation and Configuration Section (75 Questions).. 60 Topic 4, Practice – Debug (37 Questions) ............................................................... 113 Topic 5, Practice - RHCT, Installation and Configuration (51 Questions)........... 136 Topic 6, Practice, RHCE, Installation and Configuration (69 Questions)............ 165
Total number of questions: 330

RH302
Leading the way in IT testing and certification tools, www.testking.com
- 4 -
Introduction Under Red Hat Enterprise Linux 4, the certification exam consists of two parts conducted in a single day. The exam is performance-based, meaning that candidates must perform tasks on a live system, rather than answering questions about how one might perform those tasks.
The two parts of the RHCE Exam consist of:
• Section I: Troubleshooting and System Maintenance (2.5 hours)
• Section II: Installation and Configuration (3 hours)
In order to pass the Red Hat Certified Engineer exam under Red Hat Enterprise Linux 4, you must meet all of the following requirements:
• a score of 80 or higher on Section I, consisting of five compulsory and five optionals problems;
• successful completion of the five Section I compulsory troubleshooting problems within one hour of that section's start time;
• 70 percent or more on the RHCT-level skills in Section II;
• 70 percent or more on the RHCE-level skills in Section II.
These last two requirements enable RHCEs to demonstrate that they possess both RHCT-level and RHCE-level skills, as well as enabling a person who only has RHCT level skills to earn RHCT if they pass the required competencies.
RH302
Leading the way in IT testing and certification tools, www.testking.com
- 5 -
Lab Setup on RHCE Exam: Remember the Key points of Lab Configuration:
1. Lab Configuration is on 192.168.0.0/24 or 172.24.0.0/16 for example.com domain and
172.25.0.0/16 or 192.168.1.0/24 for cracker.org domain. Where Your System is in
example.com domain.
2. DHCP Server is configured.
3. DNS Server is 172.24.254.254 or 192.168.0.254
Topic 1, Debug Section (38 Questions) QUESTION NO: 1 Change the root Password to redtophat Answer and Explanation:
1. Boot the system in Single user mode 2. Use the passwd command
QUESTION NO: 2 Dig Server1.example.com, Resolve to successfully through DNS Where DNS server is 172.24.254.254 Answer and Explanation: #vi /etc/resolv.conf nameserver 172.24.254.254 # dig server1.example.com #host server1.example.com DNS is the Domain Name System, which maintains a database that can help your computer translate domain names such as www.redhat.com to IP addresses such as 216.148.218.197. As no individual DNS server is large enough to keep a database for the entire Internet, they can refer requests to other DNS servers.
DNS is based on the named daemon, which is built on the BIND (Berkeley Internet Name Domain) package developed through the Internet Software Consortium Users wants to access by name so DNS will interpret the name into ip address. You need to specify the Address if DNS server in each and every client machine. In Redhat Enterprise Linux, you need to specify the DNS server into /etc/resolv.conf file.
RH302
Leading the way in IT testing and certification tools, www.testking.com
- 6 -
After Specifying the DNS server address, you can verify using host, dig and nslookup commands. QUESTION NO: 3 Create the partition having 100MB size and mount it on /mnt/neo Answer and Explanation: 1. Use fdisk /dev/hda To create new partition. 2. Type n For New partitions 3. It will ask for Logical or Primary Partitions. Press l for logical. 4. It will ask for the Starting Cylinder: Use the Default by pressing Enter Key. 5. Type the Size: +100M You can Specify either Last cylinder of Size here. 6. Press P to verify the partitions lists and remember the partitions name. 7. Press w to write on partitions table. 8. Either Reboot or use partprobe command. 9. Use mkfs –t ext3 /dev/hda? Where ? is your partition number 10. Or 11. mke2fs –j /dev/hda? To create ext3 filesystem. 12. mkdir /mnt/neo 13. vi /etc/fstab 14. Write: 15. /dev/hda? /mnt/neo ext3 defaults 1 2 16. Verify by mounting on current Sessions also: 17. mount /dev/hda? /mnt/neo QUESTION NO: 4 Your System is going use as a router for 172.24.0.0/16 and 172.25.0.0/16. Enable the IP Forwarding. Answer and Explanation: 1. echo “1” >/proc/sys/net/ipv4/ip_forward 2. vi /etc/sysctl.conf net.ipv4.ip_forward=1 /proc is the virtual filesystem, containing the information about the running kernel. To change the parameter of running kernel you should modify on /proc. From Next reboot the system, kernel will take the value from /etc/sysctl.conf. QUESTION NO: 5
RH302
Leading the way in IT testing and certification tools, www.testking.com
- 7 -
Some users home directory is shared from your system. Using showmount –e localhost command, the shared directory is not shown. Make access the shared users home directory. Answer and Explanation: 1. Verify the File whether Shared or not ? : cat /etc/exports 2. Start the nfs service: service nfs start 3. Start the portmap service: service portmap start 4. Make automatically start the nfs service on next reboot: chkconfig nfs on 5. Make automatically start the portmap service on next reboot: chkconfig portmap on 6. Verify either sharing or not: showmount –e localhost 7. Check that default firewall is running on system ? if running flush the iptables using iptables –F and stop the iptables service. QUESTION NO: 6 neo user tried by: dd if=/dev/zero of=/home/neo/somefile bs=1024 count=70 files created successfully. Again neo tried to create file having 70K using following command: dd if=/dev/zero of=/home/neo/somefile bs=1024 count=70 But he is unable to create the file. Make the user can create the file less then 70K. Answer and Explanation: Very Tricky question from redhat. Actually question is giving scenario to you to implement quota to neo user. You should apply the quota to neo user on /home that neo user shouldn’t occupied space more than 70K. 1. vi /etc/fstab LABEL=/home /home ext3 defaults,usrquota 0 0 To enable the quota on filesystem you should mount the filesystem with usrquota for user quota and grpquota for group quota. 2. touch /home/aquota.user Creating blank quota database file. 3. mount -o remount /home Remounting the /home with updated mount options. You can verify that /home is mounted with usrquota options or not using mount command. 4. quotacheck -u /home Initialization the quota on /home 5. edquota –u neo /home Quota Policy editor See the snapshot
Disk quotas for user neo (uid 500): Filesystem blocks soft hard inodes soft hard
/dev/mapper/vo-myvol 2 30 70 1 0 0
RH302
Leading the way in IT testing and certification tools, www.testking.com
- 8 -
Can you set the hard limit 70 and soft limit as you think like 30. Verify using the repquota /home command. QUESTION NO: 7 One Logical Volume is created named as myvol under vo volume group and is mounted. The Initial Size of that Logical Volume is 124MB. Make successfully that the size of Logical Volume 245MB without losing any data. The size of logical volume 240MB to 255MB will be acceptable. Answer and Explanation: 1. First check the size of Logical Volume: lvdisplay /dev/vo/myvol 2. Increase the Size of Logical Volume: lvextend -L+121M /dev/vo/myvol 3. Make Available the size on online: resize2fs /dev/vo/myvol 4. Verify the Size of Logical Volume: lvdisplay /dev/vo/myvol 5. Verify that the size comes in online or not: df -h We can extend the size of logical Volume using the lvextend command. As well as to decrease the size of Logical Volume, use the lvresize command. In LVM v2 we can extend the size of Logical Volume without unmount as well as we can bring the actual size of Logical Volume on online using ext2online command. QUESTION NO: 8 Quota is implemented on /data but not working properly. Find out the Problem and implement the quota to user1 to have a soft limit 60 inodes (files) and hard limit of 70 inodes (files). Answer and Explanation: Quotas are used to limit a user's or a group of users' ability to consume disk space. This prevents a small group of users from monopolizing disk capacity and potentially interfering with other users or the entire system. Disk quotas are commonly used by ISPs, by Web hosting companies, on FTP sites, and on corporate file servers to ensure continued availability of their systems.
Without quotas, one or more users can upload files on an FTP server to the point of filling a filesystem. Once the affected partition is full, other users are effectively denied upload access to the disk. This is also a reason to mount different filesystem directories on different partitions. For example, if you only had partitions for your root (/) directory and swap space, someone uploading to your computer could fill up all of the space in your root directory (/). Without at least a little free space in the root directory (/), your system could become unstable or even crash.
RH302
Leading the way in IT testing and certification tools, www.testking.com
- 9 -
You have two ways to set quotas for users. You can limit users by inodes or by kilobyte-sized disk blocks. Every Linux file requires an inode. Therefore, you can limit users by the number of files or by absolute space. You can set up different quotas for different filesystems. For example, you can set different quotas for users on the /home and /tmp directories if they are mounted on their own partitions.
Limits on disk blocks restrict the amount of disk space available to a user on your system. Older versions of Red Hat Linux included LinuxConf, which included a graphical tool to configure quotas. As of this writing, Red Hat no longer has a graphical quota configuration tool. Today, you can configure quotas on RHEL only through the command line interface. 1. vi /etc/fstab /dev/hda11 /data ext3 defaults,usrquota 1 2 2. Either Reboot the System or remount the partition. Mount –o remount /dev/hda11 /data 3. touch /data/aquota.user 4. quotacheck –ufm /data 5. quotaon -u /data 6. edquota –u user1 /data and Specified the Soft limit and hard limit on opened file. To verify either quota is working or not: Soft limit specify the limit to generate warnings to users and hard limit can’t cross by the user. Use the quota command or repquota command to monitor the quota information. QUESTION NO: 9 One Logical Volume named lv1 is created under vg0. The Initial Size of that Logical Volume is 100MB. Now you required the size 500MB. Make successfully the size of that Logical Volume 500M without losing any data. As well as size should be increased online. Answer and Explanation: The LVM system organizes hard disks into Logical Volume (LV) groups. Essentially, physical hard disk partitions (or possibly RAID arrays) are set up in a bunch of equal-

RH302
Leading the way in IT testing and certification tools, www.testking.com
- 10 -
sized chunks known as Physical Extents (PE). As there are several other concepts associated with the LVM system, let's start with some basic definitions:
• Physical Volume (PV) is the standard partition that you add to the LVM mix. Normally, a physical volume is a standard primary or logical partition. It can also be a RAID array.
• Physical Extent (PE) is a chunk of disk space. Every PV is divided into a number of equal sized PEs. Every PE in a LV group is the same size. Different LV groups can have different sized PEs.
• Logical Extent (LE) is also a chunk of disk space. Every LE is mapped to a specific PE.
• Logical Volume (LV) is composed of a group of LEs. You can mount a filesystem such as /home and /var on an LV.
• Volume Group (VG) is composed of a group of LVs. It is the organizational group for LVM. Most of the commands that you'll use apply to a specific VG.
1. Verify the size of Logical Volume: lvdisplay /dev/vg0/lv1 2. Verify the Size on mounted directory: df –h or df –h mounted directory name 3. Use : lvextend –L+400M /dev/vg0/lv1 4. resize2fs /dev/vg0/lv1 to bring extended size online. 5. Again Verify using lvdisplay and df –h command. QUESTION NO: 10 Create one partitions having size 100MB and mount it on /data. Answer and Explanation: 1. Use fdisk /dev/hda To create new partition. 2. Type n For New partitions 3. It will ask for Logical or Primary Partitions. Press l for logical. 4. It will ask for the Starting Cylinder: Use the Default by pressing Enter Key. 5. Type the Size: +100M You can Specify either Last cylinder of Size here. 6. Press P to verify the partitions lists and remember the partitions name. 7. Press w to write on partitions table. 8. Either Reboot or use partprobe command. 9. Use mkfs –t ext3 /dev/hda? Or mke2fs –j /dev/hda? To create ext3 filesystem. 10. vi /etc/fstab Write: /dev/hda? /data ext3 defaults 1 2 11. Verify by mounting on current Sessions also:
RH302
Leading the way in IT testing and certification tools, www.testking.com
- 11 -
mount /dev/hda? /data
QUESTION NO: 11 You are new System Administrator and from now you are going to handle the system and your main task is Network monitoring, Backup and Restore. But you don’t know the root password. Change the root password to redhat and login in default Runlevel. Answer and Explanation: When you Boot the System, it starts on default Runlevel specified in /etc/inittab: Id:?:initdefault: When System Successfully boot, it will ask for username and password. But you don’t know the root’s password. To change the root password you need to boot the system into single user mode. You can pass the kernel arguments from the boot loader. 1. Restart the System. 2. You will get the boot loader GRUB screen. 3. Press a and type 1 or s for single mode ro root=LABEL=/ rhgb queit s 4. System will boot on Single User mode. 5. Use passwd command to change. 6. Press ctrl+d
QUESTION NO: 12 There are more then 400 Computers in your Office. You are appointed as a System Administrator. But you don’t have Router. So, you are going to use your One Linux Server as a Router. How will you enable IP packets forward? Answer and Explanation: 1. /proc is the virtual filesystem, we use /proc to modify the kernel parameters at running time. # echo “1” >/proc/sys/net/ipv4/ip_forward 2. /etc/sysctl.conf when System Reboot on next time, /etc/rc.d/rc.sysinit scripts reads the file /etc/sysctl.conf. To enable the IP forwarding on next reboot also you need to set the parameter. net.ipv4.ip_forward=1 Here 0 means disable, 1 means enable.
RH302
Leading the way in IT testing and certification tools, www.testking.com
- 12 -
QUESTION NO: 13 You Completely Install the Redhat Enterprise Linux 5 on your System. While start the system, it’s giving error to load X window System. How will you fix that problem and make boot successfully run X Window System.
Answer and Explanation: Think while Problems occurred on booting System on Runlevel 5 (X Window). 1. /tmp is full or not 2. Quota is already reached 3. Video card or resolution or monitor is misconfigured. 4. xfs service is running or not. Do These: 1. df –h /tmp /tmp is full remove the unnecessary file 2. quota username if quota is already reached remove unnecessary file from home
directory. 3. Boot the System in runlevel 3. you can pass the Kernel Argument from boot
loader. 4. Use command: system-config-display It will display a dialog to configure the
monitor, Video card, resolution etc. 5. Set the Default Runlevel 5 in /etc/inittab id:5:initdefault: 6. Reboot the System you will get the GUI login Screen.
QUESTION NO: 14 There are two different networks, 192.168.0.0/24 and 192.168.1.0/24. Your System is in 192.168.0.0/24 Network. One RHEL 5 Installed System is going to use as a Router. All required configuration is already done on Linux Server. Where 192.168.0.254 and 192.168.1.254 IP Address are assigned on that Server. How will make successfully ping to 192.168.1.0/24 Network’s Host? Answer and Explanation: 1. vi /etc/sysconfig/network GATEWAY=192.168.0.254 OR vi /etc/sysconf/network-scripts/ifcfg-eth0 DEVICE=eth0 BOOTPROTO=static
RH302
Leading the way in IT testing and certification tools, www.testking.com
- 13 -
ONBOOT=yes IPADDR=192.168.0.? NETMASK=255.255.255.0 GATEWAY=192.168.0.254 2. service network restart Explanation: Gateway defines the way to exit the packets. According to question System working as a router for two networks have IP Address 192.168.0.254 and 192.168.1.254. To get the hosts on 192.168.1.0/24 should go through 192.168.0.254.
QUESTION NO: 15 Make a swap partition having 100MB. Make Automatically Usable at System Boot Time. Answer and Explanation: 1. Use fdisk /dev/hda To create new partition. 2. Type n For New partition 3. It will ask for Logical or Primary Partitions. Press l for logical. 4. It will ask for the Starting Cylinder: Use the Default by pressing Enter Key. 5. Type the Size: +100M You can Specify either Last cylinder of Size here. 6. Press P to verify the partitions lists and remember the partitions name. Default
System ID is 83 that means Linux Native. 7. Type t to change the System ID of partition. 8. Type Partition Number 9. Type 82 that means Linux Swap. 10. Press w to write on partitions table. 11. Either Reboot or use partprobe command. 12. mkswap /dev/hda? To create Swap File system on partition. 13. swapon /dev/hda? To enable the Swap space from partition. 14. free –m Verify Either Swap is enabled or not. 15. vi /etc/fstab /dev/hda? swap swap defaults 0 0 16. Reboot the System and verify that swap is automatically enabled or not.
QUESTION NO: 16 You are a System administrator. Using Log files very easy to monitor the system. Now there are 50 servers running as Mail, Web, Proxy, DNS services etc. You want
RH302
Leading the way in IT testing and certification tools, www.testking.com
- 14 -
to centralize the logs from all servers into on LOG Server. How will you configure the LOG Server to accept logs from remote host ? Answer and Explanation: By Default system accept the logs only generated from local host. To accept the Log from other host configure: 1. vi /etc/sysconfig/syslog
SYSLOGD_OPTIONS="-m 0 -r" Where -m 0 disables 'MARK' messages. -r enables logging from remote machines -x disables DNS lookups on messages recieved with -r
2. service syslog restart QUESTION NO: 17 You are giving the debug RHCT exam. The examiner told you that the password of root is redhat. When you tried to login displays the error message and redisplayed the login screen. You changed the root password, again unable to login as a root. How will you make Successfully Login as a root.
Answer and Explanation: When root unable to login into the system think: 1. Is password correct? 2. Is account expired? 3. Is terminal Blocked? Do these Steps:
• Boot the System on Single user mode. • Change the password • Check the account expire date by using chage –l root command.
If account is expired, set net expire date: chage –E “NEVER” root 1. Check the file /etc/securetty Which file blocked to root login from certain
terminal. 2. If terminal is deleted or commented write new or uncomment. 3. Reboot the system and login as a root.
QUESTION NO: 18 You are giving RHCT Exam and in your Exam paper there is a question written, make successfully ping to 192.168.0.254.
RH302
Leading the way in IT testing and certification tools, www.testking.com
- 15 -
Answer and Explanation: In Network problem thinks to check:
1. IP Configuration: use ifconfig command either IP is assigned to interface or not? 2. Default Gateway is set or not? 3. Hostname is set or not? 4. Routing problem is there? 5. Device Driver Module is loaded or not? 6. Device is activated or not? Check In this way: 1. use ifconfig command and identify which IP is assigned or not. 2. cat /etc/sysconfig/network What, What is written here. Actually here are these
parameters. NETWORKING=yes or no GATEWAY=x.x.x.x HOSTNAME=? NISDOMAIN=?
- Correct the file 3. Use vi /etc/sysconfig/network-scirpts/ifcfg-eth0 and check the proper options DEVICE=eth0 ONBOOT=yes BOOTPROTO=static IPADDR=x.x.x.x NETMAKS=x.x.x.x GATEWAY=x.x.x.x 4. Use service network restart or start command QUESTION NO: 19 Set the Hostname station?.example.com where ? is your Host IP Address. Answer and Explanation: 1. hostname station?.example.com This will set the host name only for current
session. To set hostname permanently. 2. vi /etc/sysconfig/network
HOSTNAME=station?.example.com 3. service network restart
QUESTION NO: 20
RH302
Leading the way in IT testing and certification tools, www.testking.com
- 16 -
The System you are using is for NFS (Network File Services). Some important data are shared from your system. Make automatically start the nfs and portmap services at boot time. Answer and Explanation: We can control the services for current session and for next boot time also. For current Session, we use service servicename start or restart or stop or status. For automatically on next reboot time:
1. chkconfig servicename on or off eg: chkconfig nfs on chkconfig portmap on or ntsysv Select the nfs and portmap services.
2. Reboot the system and identify whether services are running or not.
QUESTION NO: 21 There is one partition /dev/hda14 mounted on /data. The owner of /data is root user and root group. And Permission is full to owner user, read and execute to group member and no permission to others. Now you should give the full permission to user user1 without changing pervious permission.
Answer and Explanation: We know that every files/directories are owned by certain user and group. And Permissions are defines to owner user, owner group and other. -rwxr-x--- Full permission to owner user, read and write to owner group and no permission to others. According to question: We should give the full permission to user user1 without changing the previous permission. ACL (Access Control List), in ext3 file system we can give permission to certain user and certain group without changing previous permission. But that partition should mount using acl option. Follow the steps 1. vi /etc/fstab
/dev/hda14 /data ext3 defaults,acl 0 1 2. Either Reboot or use: mount –o remount /data 3. setfacl –m u:user1:rwx /data 4. Verify using: getfacl /data
QUESTION NO: 22 There are two different networks 192.168.0.0/24 and 192.168.1.0/24. Where 192.168.0.254 and 192.168.1.254 IP Address are assigned on Server. Verify your network settings by pinging 192.168.1.0/24 Network’s Host.
RH302
Leading the way in IT testing and certification tools, www.testking.com
- 17 -
Answer and Explanation: 1. vi /etc/sysconfing/network NETWORKING=yes HOSTNAME=station?.example.com GATEWAY=192.168.0.254 2. service network restart Or 1. vi /etc/sysconfig/network-scripts/ifcfg-eth0 DEVICE=eth0 ONBOOT=yes BOOTPROTO=static IPADDR=X.X.X.X NETMASK=X.X.X.X GATEWAY=192.168.0.254 2. ifdown eth0 3. ifup eth0 QUESTION NO: 23 Your system is giving error while booting on Runlevel 5 . Make successfully boot your system in runlevel 5. Answer and Explanation: While you load the X Window System, you will get the problem. To troubleshoot follow the following steps: 1. Check the /tmp is full ? 2. Check your quota, hard limit is already crossed ? 3. Check xfs service is running ? 4. Boot the system on runlevel 3 and execute the system-config-display command 5. Edit the /etc/inittab to set default runlevel 5. id:5:initdefault: QUESTION NO: 24 Your System is configured in 192.168.0.0/24 Network and your nameserver is 192.168.0.254. Make successfully resolve to server1.example.com. Answer and Explanation: Very Easy question, nameserver is specified in question, 1. vi /etc/resolv.conf
RH302
Leading the way in IT testing and certification tools, www.testking.com
- 18 -
nameserver 192.168.0.254 2. host server1.example.com Explanation:
DNS is the Domain Name System, which maintains a database that can help your computer translate domain names such as www.redhat.com to IP addresses such as 216.148.218.197. As no individual DNS server is large enough to keep a database for the entire Internet, they can refer requests to other DNS servers.
DNS is based on the named daemon, which is built on the BIND (Berkeley Internet Name Domain) package developed through the Internet Software Consortium Users wants to access by name so DNS will interpret the name into ip address. You need to specify the Address if DNS server in each and every client machine. In Redhat Enterprise Linux, you need to specify the DNS server into /etc/resolv.conf file. After Specifying the DNS server address, you can verify using host, dig and nslookup commands. #host server1.example.com QUESTION NO: 25 One Package named zsh is dump on ftp://server1.example.com under /pub/updates directory and your FTP server is 192.168.0.254. Install the package zsh. Answer and Explanation: 1. rpm –ivh ftp://server1/example.com/pub/updates/zsh-* or 1. Login to ftp server : ftp ftp://server1.example.com using anonymous user. 2. Change the directory: cd pub and cd updates 3. Download the package: mget zsh-* 4. Quit from the ftp prompt : bye 5. Install the package 6. rpm -ivh zsh-* 7. Verify either package is installed or not : rpm -q zsh QUESTION NO: 26 Add a new logical partition having size 100MB and create the /data which will be the mount point for the new partition. Answer and Explanation:
1. Use fdisk /dev/hda To create new partition. 2. Type n For New partitions
RH302
Leading the way in IT testing and certification tools, www.testking.com
- 19 -
3. It will ask for Logical or Primary Partitions. Press l for logical. 4. It will ask for the Starting Cylinder: Use the Default by pressing Enter Key. 5. Type the Size: +100M You can Specify either Last cylinder of Size here. 6. Press P to verify the partitions lists and remember the partitions name. 7. Press w to write on partitions table. 8. Either Reboot or use partprobe command. 9. Use mkfs –t ext3 /dev/hda? 10. Or 11. mke2fs –j /dev/hda? To create ext3 filesystem. 12. vi /etc/fstab 13. Write: 14. /dev/hda? /data ext3 defaults 0 0 11. Verify by mounting on current Sessions also: 15. mount /dev/hda? /data
QUESTION NO: 27 There is a server having 172.24.254.254 and 172.25.254.254. Your System lies on 172.24.0.0/16. Make successfully ping to 172.25.254.254 by Assigning following IP: 172.24.0.x Where x is your station number. Answer and Explanation: 1. vi /etc/sysconfig/network-scripts/ifcfg-eth0 DEVICE=eth0 BOOTPROTO=static ONBOOT=yes IPADDR=x.x.x.x NETMASK=x.x.x.x 2. Enter the IP Address as given station number by your examiner: example: 172.24.0.1 3. Enter Subnet Mask 4. Enter Default Gateway and primary name server 5. press on ok 6. ifdown eth0 7. ifup eth0 8. verify using ifconfig In the lab server is playing the role of router, IP forwarding is enabled. Just set the Correct IP and gateway, you can ping to 172.25.254.254. QUESTION NO: 28 Successfully resolv to server1.example.com where your DNS server is 172.24.254.254 Answer and Explanation: 1. vi /etc/resolv.conf
nameserver 172.24.254.254 2. host server1.example.com
RH302
Leading the way in IT testing and certification tools, www.testking.com
- 20 -
Explanation:
DNS is the Domain Name System, which maintains a database that can help your computer translate domain names such as www.redhat.com to IP addresses such as 216.148.218.197. As no individual DNS server is large enough to keep a database for the entire Internet, they can refer requests to other DNS servers.
DNS is based on the named daemon, which is built on the BIND (Berkeley Internet Name Domain) package developed through the Internet Software Consortium Users wants to access by name so DNS will interpret the name into ip address. You need to specify the Address if DNS server in each and every client machine. In Redhat Enterprise Linux, you need to specify the DNS server into /etc/resolv.conf file. After Specifying the DNS server address, you can verify using host, dig and nslookup commands. #host server1.example.com QUESTION NO: 29 Make Successfully Resolve to server1.example.com where DNS Server is 192.168.0.254. Answer: 1. vi /etc/resolv.conf Write : nameserver 192.168.0.254 Explanation:
DNS is the Domain Name System, which maintains a database that can help your computer translate domain names such as www.redhat.com to IP addresses such as 216.148.218.197. As no individual DNS server is large enough to keep a database for the entire Internet, they can refer requests to other DNS servers.
DNS is based on the named daemon, which is built on the BIND (Berkeley Internet Name Domain) package developed through the Internet Software Consortium Users wants to access by name so DNS will interpret the name into ip address. You need to specify the Address if DNS server in each and every client machine. In Redhat Enterprise Linux, you need to specify the DNS server into /etc/resolv.conf file. After Specifying the DNS server address, you can verify using host, dig and nslookup commands. #host server1.example.com QUESTION NO: 30

RH302
Leading the way in IT testing and certification tools, www.testking.com
- 21 -
One Logical Volume is created named as myvol under vo volume group and is mounted. The Initial Size of that Logical Volume is 400MB. Make successfully that the size of Logical Volume 200MB without losing any data. The size of logical volume 200MB to 210MB will be acceptable. Answer and Explanation: 1. First check the size of Logical Volume: lvdisplay /dev/vo/myvol 2. Make sure that the filesystem is in a consistent state before reducing: # fsck –f /dev/vo/myvol 3. Now reduce the filesystem by 200MB. # resize2fs /dev/vo/myvol 200M 4. It is now possible to reduce the logical volume. #lvreduce /dev/vo/myvol –L 200M 4. Verify the Size of Logical Volume: lvdisplay /dev/vo/myvol 5. Verify that the size comes in online or not: df -h QUESTION NO: 31 You are giving the RHCE exam. Now you should boot your System properly. When you started your System, You got one message that. INIT Entering runlevel 9 INIT: no more processes left in this runlevel How will you boot your System properly? Answer and Explanation: You should know about the /etc/inittab file, where default runlevel will define. And Much more runlevel specific Scripts are called here. Actually that problem will occur if you don’t specify the default runlevel.
1. Reboot the system 2. Boot the System on single user mode.
Except for a normal boot of Linux, single-user mode is the most commonly used option. This is the system maintenance mode for experienced Linux administrators. It allows you to perform clean backups and restores to any partitions as needed from local hardware. It also allows you to run administration commands, recover or repair password and shadow password files, run filesystem checks, and so forth.
3. vi /etc/inittab and Write
RH302
Leading the way in IT testing and certification tools, www.testking.com
- 22 -
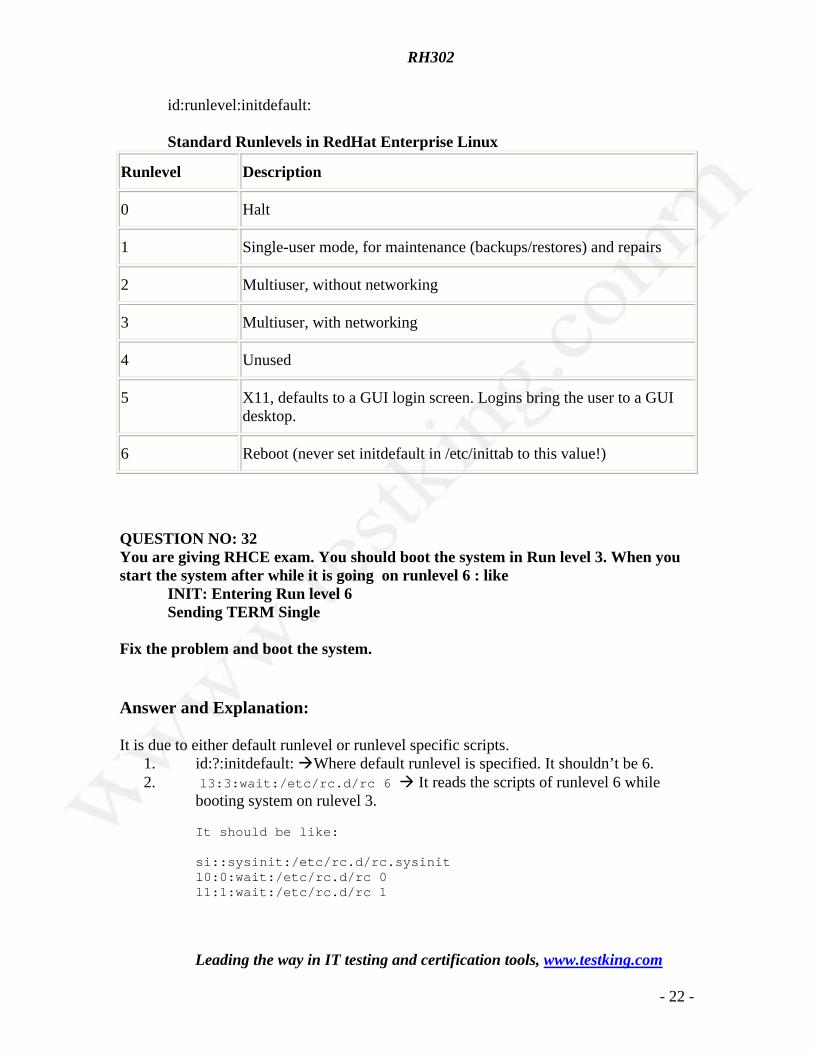
id:runlevel:initdefault: Standard Runlevels in RedHat Enterprise Linux
Runlevel Description
0 Halt
1 Single-user mode, for maintenance (backups/restores) and repairs
2 Multiuser, without networking
3 Multiuser, with networking
4 Unused
5 X11, defaults to a GUI login screen. Logins bring the user to a GUI desktop.
6 Reboot (never set initdefault in /etc/inittab to this value!)
QUESTION NO: 32 You are giving RHCE exam. You should boot the system in Run level 3. When you start the system after while it is going on runlevel 6 : like
INIT: Entering Run level 6 Sending TERM Single
Fix the problem and boot the system. Answer and Explanation: It is due to either default runlevel or runlevel specific scripts.
1. id:?:initdefault: Where default runlevel is specified. It shouldn’t be 6. 2. l3:3:wait:/etc/rc.d/rc 6 It reads the scripts of runlevel 6 while
booting system on rulevel 3. It should be like: si::sysinit:/etc/rc.d/rc.sysinit l0:0:wait:/etc/rc.d/rc 0 l1:1:wait:/etc/rc.d/rc 1
RH302
Leading the way in IT testing and certification tools, www.testking.com
- 23 -
l2:2:wait:/etc/rc.d/rc 2 l3:3:wait:/etc/rc.d/rc 3 Should be like this l4:4:wait:/etc/rc.d/rc 4 l5:5:wait:/etc/rc.d/rc 5 l6:6:wait:/etc/rc.d/rc 6
QUESTION NO: 33 You are giving RHCE exam. Examiner gave you the Boot related problem and told to you that make successfully boot the System. While booting system, you saw some error and stop the boot process by displaying some error messages. Kernel Panic – not syncing: Attempted to kill init! And no further boot process. What you will do to boot the system. Answer and Explanation: To understand the role of a boot loader, take a step back from Linux. When you boot your computer, the BIOS starts by detecting basic hardware, including your hard drives. Once it's done, it looks for the boot loader on the Master Boot Record of the first available disk. If you're working with an older PC, the BIOS can't find your boot loader unless it's located within the first 1,024 cylinders of the hard disk.
Newer BIOSes overcome this problem with Logical Block Addressing, which is also known as LBA mode. LBA mode reads 'logical' values for the cylinder, head, and sector, which allows the BIOS to 'see' a larger disk drive.
If you have multiple hard drives, there is one more caveat. If your drives are IDE hard drives, the /boot directory must be on a hard drive attached to the primary IDE controller. If your drives are all SCSI hard drives, the /boot directory must be located on a hard drive with SCSI ID 0 or ID 1. If you have a mix of hard drives, the /boot directory must be located on either the first IDE drive or a SCSI drive with ID 0. In other words, this is not an issue on the Red Hat exams unless the computer that you're tested on has more than two hard drives. And I believe that's less likely, as that would increase the cost of the exam. If you are getting the Kernel panic error, it means it is boot loader related problem. Redhat Enterprise Linux uses the GRUB boot loader. You can pass the kernel parameter from the boot loader as well as you can correct the kernel parameter passing from boot loader from GRUB screen at boot time. GRUB boot loader configuration file is: /etc/grub.conf And Correct Configuration is: default=0 timeout=5 splashimage=(hd0,0)/grub/splash.xpm.gz hiddenmenu
RH302
Leading the way in IT testing and certification tools, www.testking.com
- 24 -
title Red Hat Enterprise Linux ES (2.6.9-5.EL) root (hd0,0) kernel /vmlinuz-2.6.9-5.EL ro root=LABEL=/ rhgb quiet initrd /initrd-2.6.9-5.EL.img Probably miss-configured the boot loader, so giving this problem. You can pass the correct parameter from GRUB prompt:
Table 3-3: GRUB Editing Commands
Command Description
b Boot the currently listed operating system
d Delete the current line
e Edit the current line
o Create an empty line underneath the current line
O Create an empty line above the current line
If you know all parameters and sequence of the boot loader you can enter in command prompt also. Press c on GRUB screen. Grub> root (hd0,0) grub> kernel /vmlinuz-2.6.9-5.EL ro root=LABEL=/ rhgb quiet grub> initrd /initrd-2.6.9-5.EL.img grub>boot QUESTION NO: 34 You are giving RHCE exam. Examiner gave you the Boot related problem and told to you that make successfully boot the System. When you started the system, System automatically asking the root password for maintenance. How will you fix that problem? Answer and Explanation: Maintenance mode also known as emergency mode. System boots on emergency mode when file system error occurred. It is due to unknown partition, bad filesystem specified in /etc/fstab. To slove follow the steps 1. Give the Root password
RH302
Leading the way in IT testing and certification tools, www.testking.com
- 25 -
2. fdisk –l Verify the Number of parations. 3. Identify the Root partition, e2label /dev/hda1, e2label /dev/hda2….. 4. Remount the root partation on rw mode: mount –o remount,defaults /dev/hda6 / 5. vi /etc/fstab
Correct all partitions, mount point, mount options, file system etc. 6. Press ctrl+d QUESTION NO: 35 You are working as an Administrator. There is a common data shared (/data) from 192.168.0.254 to all users in your local LAN. When user’s system start, shared data should automatically mount on /common directory. Answer And Explanation: To automatically mount at boot time we use the /etc/fstab file. Because /etc/rc.d/rc.sysinit file reads and mount all file system specified in /etc/fstab. To mount Network Sharing Files also use the /etc/fstab but filesystem is nfs. 1. vi /etc/fstab
192.168.0.254:/data /common nfs defaults 0 0 2. reboot the system. QUESTION NO: 36 Boot your System Successfully on runlevel 3.
Answer and Explanation: This is boot related problem. There will be same questions repeated two times but problem is different. First When you restart the system you will get the Error: mount: error 15 mounting ext3 mount: error 2 mounting none switchroot: mount failed: 22 umount /initrd/dev/: 2 Kernel Panic: no syncing: Attempted to kill init ! This error occurred in your system before showing welcome redhat linux. That means problem in grub boot loader. Restart the System Check the grub boot loader configuration by pressing e shortcut key. You will see like: root (hd0,0)
RH302
Leading the way in IT testing and certification tools, www.testking.com
- 26 -
kernel /vmlinuz-2.6.9-5.EL ro root= / rhgb quiet initrd /initrd-2.6.9-5.EL.img OR root (hd0,0) kernel /vmlinuz-2.6.9-5.EL ro root=LABEL=/root rhgb quiet initrd /initrd-2.6.9-5.EL.img Then Edit Boot loader to make like root (hd0,0) kernel /vmlinuz-2.6.9-5.EL ro root=LABEL=/ rhgb quiet initrd /initrd-2.6.9-5.EL.img Check all lines and edit as same as above. Press b to boot the system After booting the system you should correct the /etc/grub.conf file. QUESTION NO: 37 Boot your System Successfully on run level 3. Answer and Explanation: After completing the Boot loader problem, you will boot the system, but it goes to emergency mode. Remember that if System boots on Emergency mode that means file system problem. You will get the Shell, remount the / filesystem with read and write mode. 1. First Find out the / filesystem using e2lable /dev/hda1, e2lable /dev/hda2 etc 2. mount –o remount,defaults /dev/hda? / 3. vi /etc/fstab You will get like: /root / ext3 defaults 1 1 or / /root ext3 defaults 1 1 4. Edit the file like:
/ / ext3 defaults 1 1 5. Configure the /etc/grub.conf file if just booting system by editing grub from grub prompt. 6. Reboot the system. QUESTION NO: 38 Boot your System Successfully on runlevel 3. (Next Question)
Answer and Explanation: This is boot related problem. There will be same questions repeated two times but problem is different.
RH302
Leading the way in IT testing and certification tools, www.testking.com
- 27 -
First When you restart the system you will get the Error: File Not Found mount: error 15 mounting ext3 mount: error 2 mounting none switchroot: mount failed: 22 umount /initrd/dev/: 2 Kernel Panic: no syncing: Attempted to kill init ! Restart the System Check the grub boot loader configuration by pressing e shortcut key. You will see like: root (hd0,0) kernel /vmlinuz-2.6.9-5.EL ro root= / rhgb quiet initrd /initrd-2.6.9-5.EL.img OR root (hd0,0) kernel /vmlinuz-2.6.9-5.EL ro root=LABEL=/root rhgb quiet initrd /initrd-2.6.9-5.EL.img Then Edit Boot loader to make like root (hd0,0) kernel /vmlinuz-2.6.9-5.EL ro root=LABEL=/ rhgb quiet initrd /initrd-2.6.9-5.EL.img Check all lines and edit as same as above. Press b to boot the system After booting the system you should correct the /etc/grub.conf file. If still you are getting Error like File not found, it seems that either kernel file or initrd file is missing. To troubleshoot with these problem, boot the system on rescue mode.
i. linux rescue ii. chroot /mnt/sysimage iii. Check the files on /boot, if not available install the kernel package from ftp or
nfs server iv. Create the initrd image file on boot using: mkinitrd initrd-2.6.9-5.EL.img
`uname –r`
RH302
Leading the way in IT testing and certification tools, www.testking.com
- 28 -
Topic 2, RHCT Section, Installation and Configuration Section (60 Questions) QUESTION NO: 1 Install the Redhat Linux RHEL 5 through NFS. Where your Server is server1.example.com having IP 172.24.254.254 and shared /var/ftp/pub. The size of the partitions are listed below: / 1048 /home 1028 /boot 512 /var 1028 /usr 2048 Swap -> 1.5 of RAM Size /storage configure the RAID Level 0 of remaining all free space. After completing the installation through NFS solve the following questions. There are two networks 172.24.0.0/16 and 172.25.0.0/16. As well as there are two domains example.com on 172.24.0.0/16 network and my133t.org on 172.25.0.0/16 network. Your system is based on example.com domain. SELinux should be in enforce mode. Answer and Explanation: 1. Insert the CD on CD-ROM and start the system. 2. In Boot: Prompt type linux askmethod 3. It will display the language, keyboard selection. 4. It will ask you for the installation method. 5. Select the NFS Image from the list 6. It will ask the IP Address, Net mask, Gateway and Name Server. Select Use Dynamic IP Configuration: because DHCP Server will be configured in your exam lab. 7. It will ask for the NFS Server Name and Redhat Enterprise Linux Directory. Specify the NFS Server: 172.24.254.254 Directory: /var/ftp/pub 8. After Connecting to the NFS Server Installation start in GUI. Go up to the partition screen by selecting the different Options. 9. Create the partition According to the Question because Size and what-what partition should you create at installation time is specified in your question 10. Create the two RAID partitions having equal size of remaining all free space. 11. Click on RAID button 12. Type mount point /data 13. Select RAID Level 0 14. Click on ok 15. Then select the MBR Options, time zone and go upto package selections.
RH302
Leading the way in IT testing and certification tools, www.testking.com
- 29 -
It is another Most Important Time of installation. Due to the time limit, you should care about the installation packages. At Exam time you these packages are enough. X-Window System GNOME Desktop (these two packages are generally not required) Administration Tools. System Tools Windows File Server FTP Servers Mail Servers Web Servers Network Servers Editors Text Based Internet Server Configuration Tools Base Printing Supports When installation will complete, your system will reboot. Jump for another Question. QUESTION NO: 2 Create the group named sysusers. Answer and Explanation 1. groupadd sysusers groupadd command is used to create the group and all group information is stored in /etc/group file. QUESTION NO: 3 Create the user named jeff, marion, harold Answer and Explanation: 1. useradd jeff 2. useradd marion 3. useradd harold useradd command is used to create the user. All user’s information stores in /etc/passwd and user;s shadow password stores in /etc/shadow. QUESTION NO: 4 Make Secondary belongs the jeff and marion users on sysusers group. But harold user should not belongs to sysusers group. Answer and Explanation:

RH302
Leading the way in IT testing and certification tools, www.testking.com
- 30 -
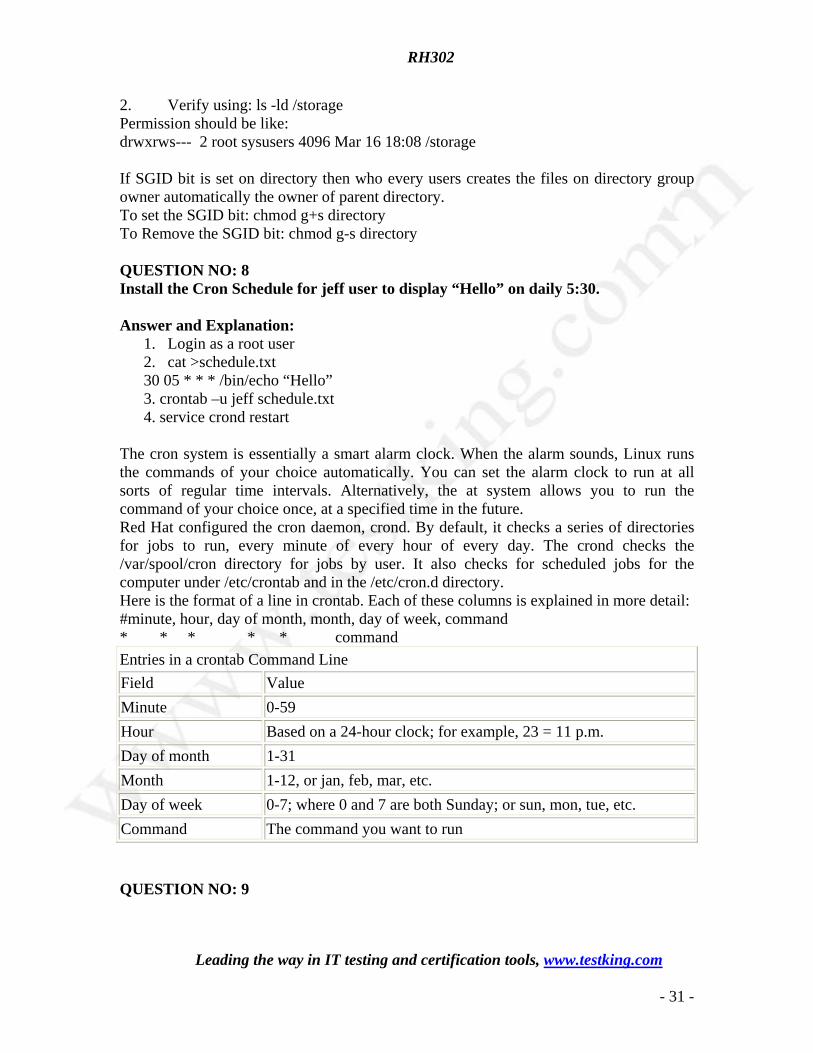
1. usermod -G sysusers jeff 2. usermod –G sysuser marion 3. Verify by reading /etc/group file Using usermod command we can make user belongs to different group. There are two types of group one primary and another is secondary. Primary group can be only one but user can belongs to more than one group as secondary. usermod -g groupname username To change the primary group of the user usermod -G groupname username To make user belongs to secondary group. QUESTION NO: 5 Create the directory /storage and group owner should be the sysusers group. Answer and Explanation: 1. chgrp sysusers /storage 2. Verify using ls -ld /storage command. You should get like drwxr-x--- 2 root sysusers 4096 Mar 16 17:59 /storage chgrp command is used to change the group ownership of particular files or directory. Another way you can use the chown command. chown root:sysusers /storage QUESTION NO: 6 Make on /storage directory that only the user owner and group owner member can fully access. Answer and Explanation: 1. chmod 770 /storage 2. Verify using : ls –ld /storage Preview should be like: drwxrwx--- 2 root sysusers 4096 Mar 16 18:08 /storage To change the permission on directory we use the chmod command. According to the question that only the owner user (root) and group member (sysusers) can fully access the directory so: chmod 770 /archive QUESTION NO: 7 Who ever creates the files/directories on /storage group owner should be automatically should be the same group owner of /storage. Answer and Explanation: 1. chmod g+s /storage
RH302
Leading the way in IT testing and certification tools, www.testking.com
- 31 -
2. Verify using: ls -ld /storage Permission should be like: drwxrws--- 2 root sysusers 4096 Mar 16 18:08 /storage If SGID bit is set on directory then who every users creates the files on directory group owner automatically the owner of parent directory. To set the SGID bit: chmod g+s directory To Remove the SGID bit: chmod g-s directory QUESTION NO: 8 Install the Cron Schedule for jeff user to display “Hello” on daily 5:30. Answer and Explanation:
1. Login as a root user 2. cat >schedule.txt 30 05 * * * /bin/echo “Hello” 3. crontab –u jeff schedule.txt 4. service crond restart
The cron system is essentially a smart alarm clock. When the alarm sounds, Linux runs the commands of your choice automatically. You can set the alarm clock to run at all sorts of regular time intervals. Alternatively, the at system allows you to run the command of your choice once, at a specified time in the future. Red Hat configured the cron daemon, crond. By default, it checks a series of directories for jobs to run, every minute of every hour of every day. The crond checks the /var/spool/cron directory for jobs by user. It also checks for scheduled jobs for the computer under /etc/crontab and in the /etc/cron.d directory. Here is the format of a line in crontab. Each of these columns is explained in more detail: #minute, hour, day of month, month, day of week, command * * * * * command Entries in a crontab Command Line Field Value Minute 0-59 Hour Based on a 24-hour clock; for example, 23 = 11 p.m. Day of month 1-31 Month 1-12, or jan, feb, mar, etc. Day of week 0-7; where 0 and 7 are both Sunday; or sun, mon, tue, etc. Command The command you want to run QUESTION NO: 9
RH302
Leading the way in IT testing and certification tools, www.testking.com
- 32 -
There is a NFS server 192.168.0.254 and all required packages are dumped in /var/ftp/pub of that server and the /var/ftp/pub directory is shared. Install the Redhat Enterprise Linux 5 by creating following partitions: / 1000 /boot 200 /home 1000 /var 1000 /usr 4000 swap 2X256 (RAM SIZE) Answer and Explanation: Note: Examiner will provide you the Installation startup CD. And here mentioned size may vary see on the exam paper. 1. Insert the CD on CD-ROM and start the system. 2. In Boot: Prompt type linux askmethod 3. It will display the language, keyboard selection. 4. It will ask you for the installation method. 5. Select the NFS Image from the list 6. It will ask the IP Address, Net mask, Gateway and Name Server. Select Use Dynamic IP Configuration: because DHCP Server will be configured in your exam lab. 7. It will ask for the NFS Server Name and Redhat Enterprise Linux Directory. Specify the NFS Server: 192.168.0.254 Directory: /var/ftp/pub 8. After Connecting to the NFS Server Installation start in GUI. Go up to the partition screen by selecting the different Options. 9. Create the partition According to the Question because Size and what-what partition should you create at installation time is specified in your question 10. Then select the MBR Options, time zone and go upto package selections. It is another Most Important Time of installation. Due to the time limit, you should care about the installation packages. At Exam time you these packages are enough. X-Window System GNOME Desktop (these two packages are generally not required) Administration Tools. System Tools Windows File Server FTP Servers Mail Servers Web Servers Network Servers Editors Text Based Internet
RH302
Leading the way in IT testing and certification tools, www.testking.com
- 33 -
Server Configuration Tools Printing Supports When installation will complete, your system will reboot. Jump for another Question. QUESTION NO: 10 There is a FTP server 192.168.0.254 and all required packages are dumped in /var/ftp/pub of that server and anonymous login is enabled. Install the Redhat Enterprise Linux 5 as an anonymous by creating following partitions: / 1000 /boot 200 /home 1000 /var 1000 /usr 4000 swap 2X256 (RAM SIZE) Answer: Note: Examiner will provide you the Installation startup CD. And here mentioned size may vary see on the exam paper. 1. Insert the CD on CD-ROM and start the system. 2. In Boot: Prompt type linux askmethod 3. It will display the Language, keyboard selection. 4. It will ask you for the installation method. 5. Select the FTP from the list 6. It will ask the IP Address, Net mask, Gateway and Name Server. Select Use Dynamic IP Configuration: because DHCP Server will be configured in your exam lab. 7. It will ask for the FTP site name and Redhat Enterprise Linux Directory. Specify the FTP Server: 192.168.0.254 Directory: pub Because anonymous login on /var/ftp. 8. After Connecting to the FTP Server Installation will start. Go up to the partition screen by selecting the different Options. 9. Create the partition According to the Question because Size and what-what partition should you create at installation time is specified in your question 10. Then select the MBR Options, time zone and go upto package selections. It is another Most Important Time of installation. Due to the time limit, you should be care about the installation packages. At Exam time you these packages are enough. X-Window System GNOME Desktop (these two packages are generally not required) Administration Tools. System Tools
RH302
Leading the way in IT testing and certification tools, www.testking.com
- 34 -
Windows File Server FTP Servers Mail Servers Web Servers Network Servers Editors Text Based Internet Server Configuration Tools Printing Supports When installation will complete, your system will reboot. Jump for another Question. QUESTION NO: 11 There is a HTTP server 192.168.0.254 and all required packages are dumped in /var/www/html/rhel5 of that server. Install the Redhat Enterprise Linux 5 by creating following partitions: / 1000 /boot 200 /home 1000 /var 1000 /usr 4000 swap 2X256 (RAM SIZE) Answer: Note: Examiner will provide you the Installation startup CD. And here mentioned size may vary see on the exam paper. 1. Insert the CD on CD-ROM and start the system. 2. In Boot: Prompt type linux askmethod 3. It will display the Language, keyboard selection. 4. It will ask you for the installation method. 5. Select the HTTP from the list 6. It will ask the IP Address, Net mask, Gateway and Name Server. Select Use Dynamic IP Configuration: because DHCP Server will be configured in your exam lab. 7. It will ask for the Web site name and Redhat Enterprise Linux Directory. Specify the HTTP Server: 192.168.0.254 Directory: rhel5 Because Default Directory for http is /var/www/html 8. After Connecting to the HTTP Server Installation start. Go upto the partition screen by selecting the different Options. 9. Create the partition According to the Question because Size and what-what partition should you create at installation time is specified in your question 10. Then select the MBR Options, time zone and go upto package selections. It is another Most Important Time of installation. Due to the time limit, you should be care about the installation packages. At Exam time you these packages are enough.
RH302
Leading the way in IT testing and certification tools, www.testking.com
- 35 -
X-Window System GNOME Desktop (these two packages are generally not required) Administration Tools. System Tools Windows File Server FTP Servers Mail Servers Web Servers Network Servers Editors Text Based Internet Server Configuration Tools Printing Supports When installation will complete, your system will reboot. Jump for another Question.
QUESTION NO: 12 Create a RAID Device /dev/md0 by creating equal two disks from available free space on your harddisk and mount it on /data.
Answer and Explanation: Redhat Enterprise Linux 5 Supports the RAID LEVEL 0, RAID LEVEL 1, RAID LEVEL 5 and RAID LEVEL 6 at installation time. You can create it at installation time later no need to type lots of commands for RAID. At Installation Time:
1. Create the partitions using diskdruid. 2. Create the Partitions having File system Type Software RAID. 3. Click on RAID button 4. Type the Mount Point 5. Select File system type 6. Select RAID Level 7. Select Partitions/disks as a member of RAID. 8. Click on ok
After Installation: We can create the RAID Device after Installation on command-line.
1. Create the Two partitions having equal size. (Specify the Size using Cylinder, find the remaining cylinder and divide by 2).
2. Change the Partition ID to fd (Linux raid Autodetect) by typing t. 3. Type w To write on partitions table. 4. Use partprobe command to synchronic the partition table. 5. Use: mdadm --create /dev/md0 --level=1 --raid-devices=2 /dev/hda?
/dev/hda?
RH302
Leading the way in IT testing and certification tools, www.testking.com
- 36 -
6. Verify the RAID: mdadm --detail /dev/md0 7. mkfs -t ext3 /dev/md0 8. mount /dev/md0 /data 9. vi /etc/fstab
/dev/md0 /data ext3 defaults 0 0 10. Verify mounting devices using mount command.
QUESTION NO: 13 Create the user named user1, user2, user3
Answer and Explanation: 1. useradd user1 2. useradd user2 3. useradd user3 4. passwd user1 5. passwd user2 6. passwd user3
We create the user using useradd command and we change the password of user using passwd command. If you want to set the blank password use: passwd -d username.
QUESTION NO: 14 Create the group named training Answer and Explanation: 1. groupadd training To create a group we use the groupadd command. Verify from: cat /etc/group whether group added or not?
QUESTION NO: 15 Make user1, user2 and user3 belongs to training group. Answer and Explanation: 1. usermod -G training user1 2. usermod -G training user2 3. usermod -G training user3 4. Verify from : cat /etc/group
RH302
Leading the way in IT testing and certification tools, www.testking.com
- 37 -
There are two types of group, I) primary group II) Secondary or supplementary group. 5. Primary Group: Primary group defines the files/directories and process owner
group there can be only one primary group of one user. 6. Secondary Group is used for permission. Where permission are defined for group
members, user can access by belonging to that group. Here user1, user2 and user3 belong as supplementary to training group. So these users get the permission of group member.
QUESTION NO: 16 Change the Group Owner of /data to training group. Answer and Explanation: chown or chgrp command is used to change the ownership. Syntax of chown: chown [-R] username:groupname file/directory Syntax of chgrp: chgrp [-R] groupname file/directory Whenever user creates the file or directory, the owner of that file/directory automatically will be that user and that user’s primary group name. To change group owner ship
1. chgrp training /data Which set the Group Ownership to training or chown root.training /data Which set the user owner to root and group owner to training group. Verify /data using: ls -ld /data You will get: drwxr-xr-x 2 root training …………..
QUESTION NO: 17 Give Full Permission to owner user and owner group member but no permission to others on /data. Answer and Explanation: We can change the permission of file/directory either character symbol method or numeric method. Permission: r-Read w-Write x-Execute Permission Category u- Owner User g- Owner Group o- Others
RH302
Leading the way in IT testing and certification tools, www.testking.com
- 38 -
Operators + Add the Permissions - Remove the Permissions = Assigns the Permissions Numeric Method: 4 Read 2 Write 1 Execute Total: 7, total for owner user, owner group member and for others : 777 1. chmod u+rwx /data 2. chmod g+rwx /data 3. chmod o-rwx /data or chmod 770 /data 4. Verify the /data : ls –ld /data 5. You will get drwxrwx--- QUESTION NO: 18 Whoever creates the file on /data make automatically owner group should be the group owner of /data directory. Answer and Explanation When user creates the file/directory, user owner will be user itself and group owner will be the primary group of the user. There is one Special Permission SGID , when you set the SGID bit on directory,When users creates the file/directory automatically owner group will be same as a parent. 1. chmod g+s /data 2. Verify using: ls -ld /data You will get: drwxrws--- QUESTION NO: 19 Make sure on /data that only the owner user can remove files/directories. Answer and Explanation: By default user1 can remove user2’s files due to directory permission to group member. We can prevent of deleting files from others users using Sticky Bits.
1. chmod o+t /data
RH302
Leading the way in IT testing and certification tools, www.testking.com
- 39 -
2. Verify /data: ls -ld /data You will get: drwxrwx—T
QUESTION NO: 20 Add a user named user4 and make primarily belongs to training group. As well account should expire on 30 days from today. Answer and Explanation: 1. useradd username 2. passwd username 3. usermod -e “date”
example: usermod -e “12 Feb 2006” user4 Verify: chage –l user4
QUESTION NO: 21 One New Kernel is released named kernel-hugemem. Kernel is available on ftp://server1.example.com under pub directory for anonymous. Install the Kernel and make previous new kernel is default to boot System. Answer and Explanation 1. rpm -ivh ftp://server1.example.com/pub/kernel-hugemem-* 2. vi /etc/grub.conf Set the default to new kernel default=0 Example of /etc/grub.conf default=0 timeout=5 splashimage=(hd0,0)/grub/splash.xpm.gz hiddenmenu title Red Hat Enterprise Linux ES (2.6.9-5.ELhugemem) root (hd0,0) kernel /vmlinuz-2.6.9-5.ELhugemem ro root=LABEL=/1 rhgb quiet initrd /initrd-2.6.9-5.ELhugemem.img title Red Hat Enterprise Linux ES (2.6.9-5.EL) root (hd0,0) kernel /vmlinuz-2.6.9-5.EL ro root=LABEL=/1 rhgb quiet initrd /initrd-2.6.9-5.EL.img rpm command is used to install, update and remove the rpm package. -ivh option is install, verbose, and display the hash mark.
RH302
Leading the way in IT testing and certification tools, www.testking.com
- 40 -
QUESTION NO: 22 One Package named zsh is dump on ftp://server1.example.com under pub directory. Install the package from ftp server. Answer and Explanation: 1. rpm –ivh ftp://server1.example.com/pub/zsh-* 2. Package will install rpm command is used to install, update and remove the package, -i means install, -v means verbose and -h means display the hash mark. QUESTION NO: 23 There are Mail servers, Web Servers, DNS Servers and Log Server. Log Server is already configured. You should configure the mail server, web server and dns server to send the logs to log server. Answer and Explanation: According to question, log server is already configured. We have to configure the mail, web and dns server for log redirection. In mail, web and dns server: 1. vi /etc/syslog.conf mail.* @logserveraddress 2. service syslog restart mail is the facility and * means the priority. It sends logs of mail services into log server. QUESTION NO: 24 Raw (Model) printer named printer1 is installed and shared on 192.168.0.254. You should install the shared printer on your PC to connect shared printer using IPP Protocols. Answer and Explanation:
RH302
Leading the way in IT testing and certification tools, www.testking.com
- 41 -
IPP( Internet Printing Protocol), allows administrator to manage printer through browser so CUPS is called Internet Printing Protocol based on HTTP. We can Install the printer either through: system-confing-printer tool or through Browser. 1. Open the browser and Type on address: http://localhost:631 CUPS (Common Unix Printing System) used the IPP protocol. CUPS use the 631 port. 2. Click on Manage Printer. 3. Click on Add Printer. 4. Type Printer name, Location, Description. 5. Select Device for bb. (Select IPP). 6. Device URL: ipp://192.168.0.254/ipp/ queue name Same printer name of shared printer. 7. Select Model/Driver RAW printer. 8. service cups restart QUESTION NO: 25 You are administrator of testking network. First time you are going to take the full backup of all user’s home directory. Take the full backup of /home on /tmp/back file. Answer and Explanation: 1. dump -0u –f /tmp/back /dev/hda4 dump is the standard backup utility. According to the questions, fullback should take. –0 means fullback, -u means update the /etc/dumpdates which maintains the backup record and -f means filename. If you are directly taking backup into other device, you can specify the device name. i.e dump -0u -f /dev/st0 /dev/hda4. Where hda4 is a separate partition mounted on /home. QUESTION NO: 26 You are working as a System Administrator at Testking. Your Linux Server crashed and you lost every data. But you had taken the full backup of user’s home directory and other System Files on /dev/st0, how will you restore from that device? Answer and Explanation: 1. Go to on that directory where you want to restore. 2. restore –rf /dev/st0 To restore from backup we use the restore command. Here backup will restore from /dev/st0 on current Directory.

RH302
Leading the way in IT testing and certification tools, www.testking.com
- 42 -
QUESTION NO: 27 Add a job on Cron schedule to display Hello World on every two Seconds in terminal 8. Answer and Explanation
1. cat >schedule */2 * * * * /bin/echo “Hello World” >/dev/tty8 2. crontab schedule 3. Verify using: crontab –l 4. service crond restart
Cron helps to schedule on recurring events. Pattern of Cron is: Minute Hour Day of Month Month Day of Week Commands 0-59 0-23 1-31 1-12 0-7 where 0 and 7 means Sunday. Note * means every. To execute the command on every two minutes */2. To add the scheduled file on cron job: crontab filename To List the Cron Shedule: crontab –l To Edit the Schedule: crontab –e To Remove the Schedule: crontab –r QUESTION NO: 28 Deny to all users except root to run cron schedule. Answer and Explanation 1. vi /etc/cron.allow root or vi /etc/cron.deny Write all user name to deny. /etc/cron.allow, /etc/cron.deny file is used to control users to allow or deny. If /etc/cron.allow file is created only that users are allowed to run cron schedule. Another way to deny to users is /etc/cron.deny write all user name on single line. QUESTION NO: 29 Add a cron schedule to take full backup of /home on every day at 5:30 pm to /dev/st0 device. Answer and Explanation: 1. vi /var/schedule
RH302
Leading the way in IT testing and certification tools, www.testking.com
- 43 -
30 17 * * * /sbin/dump -0u /dev/st0 /dev/hda7 2. crontab /var/schedule 3. service crond restart We can add the cron schedule either by specifying the scripts path on /etc/crontab file or by creating on text file on crontab pattern. cron helps to schedule on recurring events. Pattern of cron is: Minute Hour Day of Month Month Day of Week Commands 0-59 0-23 1-31 1-12 0-7 where 0 and 7 means Sunday. Note * means every. To execute the command on every two minutes */2. QUESTION NO: 30 One NIS Domain named rhce.com is configured in your lab, server is 192.168.0.254. rhce100, rhce200,rhce300 user are created on domain server. Make your system as a member of rhce.com domain. Make sure that when nis user login in your system home directory should get by them. Home directory is separately shared on server eg /home/stationx/ where x is you station number. Answer and Explanation: 1. use the authconfig --nisserver=192.168.0.254 --nisdomain=rhce.com --update or system-config-authentication 2. Click on Enable NIS 3. Type the NIS Domain: rhce.com 4. Type Server 192.168.0.254 then click on next and ok 5. You will get a ok message. 6. vi /etc/auto.master and write at the end of file
/home/stationx /etc/auto.home --timeout=60 7. vi /etc/auto.home and write * -rw,soft,intr 192.168.0.254:/home/stationx/& Note: please specify your station number in the place of x. 8. Service autofs restart 9. Login as the rhce1 or rhce2 or rhce3 on another terminal will be Success. According to question, rhce.com domain is already configured. We have to make a client of rhce.com domain and automatically mount the home directory on every client. To make a member of domain, we use the autheconfig or system-config-authentication command. There a are lots of authentication server i.e NIS, LDAB, SMB etc. NIS is a RPC related Services, no need to configure the DNS, we should specify the NIS server address.
Here Automount feature is available. When user tried to login, home directory will
RH302
Leading the way in IT testing and certification tools, www.testking.com
- 44 -
automatically mount. The automount service reads the configuration from /etc/auto.master file.
On /etc/auto.master file we specified the mount point the configuration file for mount point.
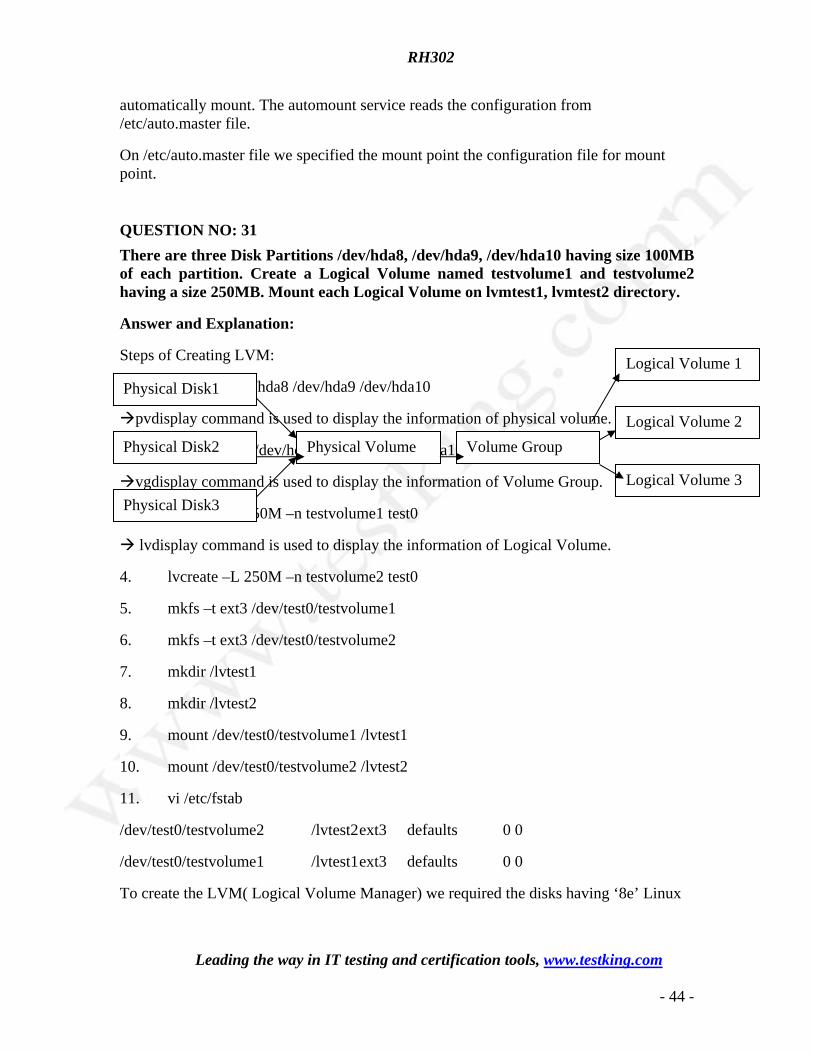
QUESTION NO: 31 There are three Disk Partitions /dev/hda8, /dev/hda9, /dev/hda10 having size 100MB of each partition. Create a Logical Volume named testvolume1 and testvolume2 having a size 250MB. Mount each Logical Volume on lvmtest1, lvmtest2 directory.
Answer and Explanation:
Steps of Creating LVM:
1. pvcreate /dev/hda8 /dev/hda9 /dev/hda10
pvdisplay command is used to display the information of physical volume.
2. vgceate test0 /dev/hda8 /dev/hda9 /dev/hda10
vgdisplay command is used to display the information of Volume Group.
3. lvcreate –L 250M –n testvolume1 test0
lvdisplay command is used to display the information of Logical Volume.
4. lvcreate –L 250M –n testvolume2 test0
5. mkfs –t ext3 /dev/test0/testvolume1
6. mkfs –t ext3 /dev/test0/testvolume2
7. mkdir /lvtest1
8. mkdir /lvtest2
9. mount /dev/test0/testvolume1 /lvtest1
10. mount /dev/test0/testvolume2 /lvtest2
11. vi /etc/fstab
/dev/test0/testvolume2 /lvtest2 ext3 defaults 0 0
/dev/test0/testvolume1 /lvtest1 ext3 defaults 0 0
To create the LVM( Logical Volume Manager) we required the disks having ‘8e’ Linux
Physical Disk1
Physical Disk2
Physical Disk3
Physical Volume Volume Group
Logical Volume 1
Logical Volume 2
Logical Volume 3
RH302
Leading the way in IT testing and certification tools, www.testking.com
- 45 -
LVM type. First we should create the physical Volume, then we can create the Volume group from disks belongs to physical Volume. lvcreate command is used to create the logical volume on volume group. We can specify the size of logical volume with –L option and name with -n option. QUESTION NO: 32 One Logical Volume named /dev/test0/testvolume1 is created. The initial Size of that disk is 100MB now you required more 200MB. Increase the size of Logical Volume, size should be increase on online.
Answer and Explanation:
1. lvextend –L+200M /dev/test0/testvolume1
Use lvdisplay /dev/test0/testvolume1)
2. ext2online –d /dev/test0/testvolume1
lvextend command is used the increase the size of Logical Volume. Other command lvresize command also here to resize. And to bring increased size on online we use the ext2online command.
QUESTION NO: 33 We are working on /data initially the size is 2GB. The /dev/test0/lvtestvolume is mount on /data. Now you required more space on /data but you already added all disks belong to physical volume. You saw that you have unallocated space around 5 GB on your harddisk. Increase the size of lvtestvolume by 5GB.
Answer and Explanation.
1. Create a partition having size 5 GB and change the syste id ‘8e’.
2. use partprobe command
3. pvcreate /dev/hda9 Suppose your partition number is hda9.
RH302
Leading the way in IT testing and certification tools, www.testking.com
- 46 -
4. vgextend test0 /dev/hda9 vgextend command add the physical disk on volume group.
5. lvextend –L+5120M /dev/test0/lvtestvolume
6. verify using lvdisplay /dev/test0/lvtestvolume. QUESTION NO: 34 Install the Redhat Linux RHEL 5 through NFS. Where your Server is server1.example.com having IP 192.168.0.254 and shared /var/ftp/pub. The size of the partitions are listed below: / 1048 /home 1028 /boot 512 /var 1028 /usr 2048 Swap -> 1.5 of RAM Size /data configure the RAID Level 0 of remaining all free space. After completing the installation through NFS solve the following questions. There are two networks 192.168.0.0/24 and 192.168.1.0/24. As well as there are two domains example.com on 192.168.0.0/24 network and cracker.org on 192.168.1.0/24 network. Your system is based on example.com domain. Answer and Explanation: 1. Insert the CD on CD-ROM and start the system. 2. In Boot: Prompt type linux askmethod 3. It will display the language, keyboard selection. 4. It will ask you for the installation method. 5. Select the NFS Image from the list 6. It will ask the IP Address, Net mask, Gateway and Name Server. Select Use Dynamic IP Configuration: because DHCP Server will be configured in your exam lab. 7. It will ask for the NFS Server Name and Redhat Enterprise Linux Directory. Specify the NFS Server: 192.168.0.254 Directory: /var/ftp/pub 8. After Connecting to the NFS Server Installation start in GUI. Go up to the partition screen by selecting the different Options. 9. Create the partition According to the Question because Size and what-what partition should you create at installation time is specified in your question 10. Create the two RAID partitions having equal size of remaining all free space. 11. Click on RAID button 12. Type mount point /data 13. Select RAID Level 0 14. Click on ok
RH302
Leading the way in IT testing and certification tools, www.testking.com
- 47 -
15. Then select the MBR Options, time zone and go upto package selections. It is another Most Important Time of installation. Due to the time limit, you should care about the installation packages. At Exam time you these packages are enough. X-Window System GNOME Desktop (these two packages are generally not required) Administration Tools. System Tools Windows File Server FTP Servers Mail Servers Web Servers Network Servers Editors Text Based Internet Server Configuration Tools Printing Supports When installation will complete, your system will reboot. Jump for another Question. QUESTION NO: 35 Fill up the Form through http://server1.example.com/form.php Answer and Explanation: 1. Open the Browser and type the above URL. 2. Fill the form as required all information. QUESTION NO: 36 One Domain RHCE is configured in your lab, your domain server is server1.example.com. nisuser2001, nisuser2002, nisuser2003 user are created on your server 192.168.0.254:/rhome/stationx/nisuser2001. Make sure that when NIS user login in your system automatically mount the home directory. Home directory is separately shared on server /rhome/stationx/ where x is your Station number. Answer and Explanation: 1. use the authconfig --nisserver=<NIS SERVER> --nisdomain=<NIS DOMAIN> --update
RH302
Leading the way in IT testing and certification tools, www.testking.com
- 48 -
Example: # authconfig --nisserver=192.168.0.254 --nisdomain=RHCE --update or system-config-authentication 2. Click on Enable NIS 3. Type the NIS Domain: RHCE 4. Type Server 192.168.0.254 then click on next and ok 5. You will get a ok message. 6. Create a Directory /rhome/stationx where x is your station number. 6. vi /etc/auto.master and write at the end of file /rhome/stationx /etc/auto.home --timeout=60 7. vi /etc/auto.home and write * -rw,soft,intr 192.168.0.254:/rhome/stationx/& Note: please specify your station number in the place of x. 8. Service autofs restart 9. Login as the nisuser2001 or nisuser2002 on another terminal will be Success. According to question, RHCE domain is already configured. We have to make a client of RHCE domain and automatically mount the home directory on your system. To make a member of domain, we use the authconfig with option or system-config-authentication command. There a are lots of authentication server i.e NIS, LDAB, SMB etc. NIS is a RPC related Services, no need to configure the DNS, we should specify the NIS server address.
Here Automount feature is available. When user tried to login, home directory will automatically mount. The automount service used the /etc/auto.master file. On /etc/auto.master file we specified the mount point the configuration file for mount point. QUESTION NO: 37 Create the group named sysadmin. Answer and Explanation 1. groupadd sysadmin groupadd command is used to create the group and all group information is stored in /etc/group file. QUESTION NO: 38 Create the user named jane and john. Answer and Explanation: 1. useradd jane 2. useradd john useradd command is used to create the user. All user’s information stores in /etc/passwd
RH302
Leading the way in IT testing and certification tools, www.testking.com
- 49 -
and user;s shadow password stores in /etc/shadow. QUESTION NO: 39 Raw printer named printerx where x is your station number is installed and shared on server1.example.com. Install the shared printer on your PC to connect shared printer using IPP Protocols. Your server is 192.168.0.254. Answer and Explanation: 1. Open the Browser either firefox or links 2. Type : http://localhost:631 3. Click on Manage Printer 4. Click on Add Printer 5. Type Queue name like stationx and click on continue 6. Type Device type or printing Protocol: i.e Internet printing Protocol 7. Click on Continue 8. Type Device URL: ipp://server1.example.com/printers/printerx 9. Click on Continue 10. Select RAW Model printer 11. Click on Continue 12. Test by sending the printing job QUESTION NO: 40 Make Secondary belongs the both users on sysadmin group. Answer and Explanation: 1. usermod -G sysadmin john 2. usermod –G sysadmin jane 3. Verify by reading /etc/group file Using usermod command we can make user belongs to different group. There are two types of group one primary and another is secondary. Primary group can be only one but user can belongs to more than one group as secondary. usermod -g groupname username To change the primary group of the user usermod -G groupname username To make user belongs to secondary group. QUESTION NO: 41 Create the user named eric but eric should not belong to the sysadmin group.

RH302
Leading the way in IT testing and certification tools, www.testking.com
- 50 -
Answer and Explanation: 1. useradd eric Very tricky question given to you that this user should not belongs to sysadmin group. QUESTION NO: 42 Create the directory /data and group owner should be the sysadmin group. Answer and Explanation: 1. chgrp sysadmin /data 2. Verify using ls -ld /data command. You should get like drwxr-x--- 2 root sysadmin 4096 Mar 16 17:59 /data chgrp command is used to change the group ownership of particular files or directory. Another way you can use the chown command. chown root:sysadmin /data QUESTION NO: 43 Make on /data that only the user owner and group owner member can fully access. Answer and Explanation: 1. chmod 770 /data 2. Verify using : ls –ld /data Preview should be like: drwxrwx--- 2 root sysadmin 4096 Mar 16 18:08 /data To change the permission on directory we use the chmod command. According to the question that only the owner user (root) and group member (sysadmin) can fully access the directory so: chmod 770 /data QUESTION NO: 44 Who ever creates the files/directories on /data group owner should be automatically should be the same group owner of /data. Answer and Explanation: 1. chmod g+s /data
RH302
Leading the way in IT testing and certification tools, www.testking.com
- 51 -
2. Verify using: ls -ld /data Permission should be like: drwxrws--- 2 root sysadmin 4096 Mar 16 18:08 /data If SGID bit is set on directory then who every users creates the files on directory group owner automatically the owner of parent directory. To set the SGID bit: chmod g+s directory To Remove the SGID bit: chmod g-s directory QUESTION NO: 45 Your System is going to use as a Router for two networks. One Network is 192.168.0.0/24 and Another Network is 192.168.1.0/24. Both network’s IP address has assigned. How will you forward the packets from one network to another network? Answer and Explanation: 1. echo “1” >/proc/sys/net/ipv4/ip_forward 2. vi /etc/sysctl.conf net.ipv4.ip_forward = 1 If you want to use the Linux System as a Router to make communication between different networks, you need enable the IP forwarding. To enable on running session just set value 1 to /proc/sys/net/ipv4/ip_forward. As well as automatically turn on the IP forwarding features on next boot set on /etc/sysctl.conf file. QUESTION NO: 46 One New Kernel is released named kernel-.2.6.19-11. Kernel is available on ftp://server1.example.com/pub/updates directory for anonymous. Install the Kernel and make the kernel-2.6.18-8 default. Answer and Explanation: 1. rpm -ivh ftp://server1.example.com/pub/updates/kernel-2.6.19-11.i686.rpm 2. vi /etc/grub.conf
default=1 Change this value to 1 timeout=5
splashimage=(hd0,0)/grub/splash.xpm.gz hiddenmenu title Red Hat Enterprise Linux ES (2.6.19-11) root (hd0,0) kernel /vmlinuz-2.6.19-11.EL ro root=LABEL=/ rhgb quiet initrd /initrd-2.6.19-11.EL.img
RH302
Leading the way in IT testing and certification tools, www.testking.com
- 52 -
title Red Hat Enterprise Linux ES (2.6.9-5.EL) root (hd0,0) kernel /vmlinuz-2.6.9-5.EL ro root=LABEL=/ rhgb quiet initrd /initrd-2.6.9-5.EL.img According question that kernel is available to anonymous user. You can directly install from the ftp server using rpm command. When you install the kernel, it will write on /etc/grub.conf file. You can set the default kernel by changing the default value. See on the output of /etc/grub.conf file that new kernel is on first title so it’s index is 0 and previous kernel’s index is 1. QUESTION NO: 47 Install the dialog-* Answer and Explanation: Questions asking you to install the dialog package from the server. In your Lab FTP server as well as NFS server are configured. You can install either through FTP or NFS. 1. Just Login to server1.example.com through FTP: ftp server1.example.com 2. Enter to pub directory: cd pub 3. Enter to RedHat/RPMS: cd RedHat/RPMS 4. Download the Package: mget dialog-* 5. Logout from the FTP server: bye 6. Install the package: rpm -ivh dialog-* 7. Verify the package either installed or not: rpm -q dialog QUESTION NO: 48 Install the Redhat Linux RHEL 5 through NFS. Where your Server is server1.example.com having IP 172.24.254.254 and shared /var/ftp/pub. The size of the partitions are listed below: / 1048 /home 1028 /boot 512 /var 1028 /usr 2048 Swap -> 1.5 of RAM Size /data configure the RAID Level 0 of remaining all free space. After completing the installation through NFS solve the following questions. There are two networks 172.24.0.0/16 and 172.25.0.0/16. As well as there are two domains example.com on 172.24.0.0/16 network and cracker.org on 172.25.0.0/16 network. Your system is based on example.com domain. SELinux should be in enforcing mode.
RH302
Leading the way in IT testing and certification tools, www.testking.com
- 53 -
Answer and Explanation: 1. Insert the CD on CD-ROM and start the system. 2. In Boot: Prompt type linux askmethod 3. It will display the language, keyboard selection. 4. It will ask you for the installation method. 5. Select the NFS Image from the list 6. It will ask the IP Address, Net mask, Gateway and Name Server. Select Use Dynamic IP Configuration: because DHCP Server will be configured in your exam lab. 7. It will ask for the NFS Server Name and Redhat Enterprise Linux Directory. Specify the NFS Server: 172.24.254.254 Directory: /var/ftp/pub 8. After Connecting to the NFS Server Installation start in GUI. Go up to the partition screen by selecting the different Options. 9. Create the partition According to the Question because Size and what-what partition should you create at installation time is specified in your question 10. Create the two RAID partitions having equal size of remaining all free space. 11. Click on RAID button 12. Type mount point /data 13. Select RAID Level 0 14. Click on ok 15. Then select the MBR Options, time zone and go upto package selections. It is another Most Important Time of installation. Due to the time limit, you should care about the installation packages. At Exam time you these packages are enough. X-Window System GNOME Desktop (these two packages are generally not required) Administration Tools. System Tools Windows File Server FTP Servers Mail Servers Web Servers Network Servers Editors Text Based Internet Server Configuration Tools Printing Supports When installation will complete, your system will reboot. Jump for another Question. QUESTION NO: 49 Create the user named eric and deny to interactive login. Answer and Explanation:
RH302
Leading the way in IT testing and certification tools, www.testking.com
- 54 -
1. useradd eric 2. passwd eric 3. vi /etc/passwd 4. eric:x:505:505::/home/eric:/sbin/nologin
Which shell or program should start at login time is specified in /etc/passwd file. By default Redhat Enterprise Linux assigns the /bin/bash shell to the users. To deny the interactive login, you should write /sbin/nologin or /bin/false instead of login shell. QUESTION NO: 50 /data Directory is shared from the server1.example.com server. Mount the shared directory that:
a. when user try to access, automatically should mount b. when user doesn’t use mounted directory should unmount
automatically after 50 seconds. c. Shared directory should mount on /mnt/data on your machine.
Answer and Explanation:
1. vi /etc/auto.master /mnt /etc/auto.misc --timeout=50
2. vi /etc/auto.misc 3. data -rw,soft,intr server1.example.com:/data 4. service autofs restart 5. chkconfig autofs on
When you mount the other filesystem, you should unmount the mounted filesystem, Automount feature of linux helps to mount at access time and after certain seconds, when user unaccess the mounted directory, automatically unmount the filesystem. /etc/auto.master is the master configuration file for autofs service. When you start the service, it reads the mount point as defined in /etc/auto.master.
QUESTION NO: 51 Install the Redhat Linux RHEL 5 through NFS. Where your Server is server1.example.com having IP 172.24.254.254 and shared /var/ftp/pub. The size of the partitions are listed below: / 1048 /home 1028 /boot 512 /var 1028 /usr 2048 Swap -> 1.5 of RAM Size /document configure the RAID Level 0 of remaining all free space. After completing the installation through NFS solve the following questions. There are two networks 172.24.0.0/16 and 172.25.0.0/16. As well as there are two domains example.com on 172.24.0.0/16 network and cracker.org on 172.25.0.0/16 network.
RH302
Leading the way in IT testing and certification tools, www.testking.com
- 55 -
Your system is based on example.com domain. SELinux Must be on enforcing mode. Answer and Explanation: 1. Insert the CD on CD-ROM and start the system. 2. In Boot: Prompt type linux askmethod 3. It will display the language, keyboard selection. 4. It will ask you for the installation method. 5. Select the NFS Image from the list 6. It will ask the IP Address, Net mask, Gateway and Name Server. Select Use Dynamic IP Configuration: because DHCP Server will be configured in your exam lab. 7. It will ask for the NFS Server Name and Redhat Enterprise Linux Directory. Specify the NFS Server: 172.24.254.254 Directory: /var/ftp/pub 8. After Connecting to the NFS Server Installation start in GUI. Go up to the partition screen by selecting the different Options. 9. Create the partition According to the Question because Size and what-what partition should you create at installation time is specified in your question 10. Create the two RAID partitions having equal size of remaining all free space. 11. Click on RAID button 12. Type mount point /document 13. Select RAID Level 0 14. Click on ok 15. Then select the MBR Options, time zone and go upto package selections. It is another Most Important Time of installation. Due to the time limit, you should care about the installation packages. At Exam time you these packages are enough. X-Window System GNOME Desktop (these two packages are generally not required) Administration Tools. System Tools Windows File Server FTP Servers Mail Servers Web Servers Network Servers Editors Text Based Internet Server Configuration Tools Printing Supports When installation will complete, your system will reboot. Jump for another Question. QUESTION NO: 52
RH302
Leading the way in IT testing and certification tools, www.testking.com
- 56 -
Install the Redhat Linux RHEL 5 through NFS. Where your Server is server1.example.com having IP 172.24.254.254 and shared /var/ftp/pub. The size of the partitions are listed below: / 1048 /home 1028 /boot 512 /var 1028 /usr 2048 Swap -> 1.5 of RAM Size /archive configure the RAID Level 0 of remaining all free space. After completing the installation through NFS solve the following questions. There are two networks 172.24.0.0/16 and 172.25.0.0/16. As well as there are two domains example.com on 172.24.0.0/16 network and my133t.org on 172.25.0.0/16 network. Your system is based on example.com domain. SELinux must be in enforcing mode. Answer and Explanation: 1. Insert the CD on CD-ROM and start the system. 2. In Boot: Prompt type linux askmethod 3. It will display the language, keyboard selection. 4. It will ask you for the installation method. 5. Select the NFS Image from the list 6. It will ask the IP Address, Net mask, Gateway and Name Server. Select Use Dynamic IP Configuration: because DHCP Server will be configured in your exam lab. 7. It will ask for the NFS Server Name and Redhat Enterprise Linux Directory. Specify the NFS Server: 172.24.254.254 Directory: /var/ftp/pub 8. After Connecting to the NFS Server Installation start in GUI. Go up to the partition screen by selecting the different Options. 9. Create the partition According to the Question because Size and what-what partition should you create at installation time is specified in your question 10. Create the two RAID partitions having equal size of remaining all free space. 11. Click on RAID button 12. Type mount point /archive 13. Select RAID Level 0 14. Click on ok 15. Then select the MBR Options, time zone and go upto package selections. It is another Most Important Time of installation. Due to the time limit, you should care about the installation packages. At Exam time you these packages are enough. X-Window System GNOME Desktop (these two packages are generally not required) Administration Tools. System Tools
RH302
Leading the way in IT testing and certification tools, www.testking.com
- 57 -
Windows File Server FTP Servers Mail Servers Web Servers Network Servers Editors Text Based Internet Server Configuration Tools Printing Supports When installation will complete, your system will reboot. Jump for another Question. QUESTION NO: 53 Create the group named sysuser. Answer and Explanation 1. groupadd sysuser groupadd command is used to create the group and all group information is stored in /etc/group file. QUESTION NO: 54 Create the user named jackie, curtin, david Answer and Explanation: 1. useradd jackie 2. useradd curtin 3. useradd david useradd command is used to create the user. All user’s information stores in /etc/passwd and user;s shadow password stores in /etc/shadow. QUESTION NO: 55 Make Secondary belongs the jackie and curtin users on sysuser group. But david user should not belongs to sysuser group. Answer and Explanation: 1. usermod -G sysuser jackie 2. usermod –G sysuser curtin 3. Verify by reading /etc/group file Using usermod command we can make user belongs to different group. There are two types of group one primary and another is secondary. Primary group can be only one but user can belongs to more than one group as secondary. usermod -g groupname username To change the primary group of the user

RH302
Leading the way in IT testing and certification tools, www.testking.com
- 58 -
usermod -G groupname username To make user belongs to secondary group. QUESTION NO: 56 Create the directory /archive and group owner should be the sysuser group. Answer and Explanation: 1. chgrp sysuser /archive 2. Verify using ls -ld /archive command. You should get like drwxr-x--- 2 root sysadmin 4096 Mar 16 17:59 /archive chgrp command is used to change the group ownership of particular files or directory. Another way you can use the chown command. chown root:sysuser /archive QUESTION NO: 57 Make on /archive directory that only the user owner and group owner member can fully access. Answer and Explanation: 1. chmod 770 /archive 2. Verify using : ls –ld /archive Preview should be like: drwxrwx--- 2 root sysuser 4096 Mar 16 18:08 /archive To change the permission on directory we use the chmod command. According to the question that only the owner user (root) and group member (sysuser) can fully access the directory so: chmod 770 /archive QUESTION NO: 58 Who ever creates the files/directories on /archive group owner should be automatically should be the same group owner of /archive. Answer and Explanation: 1. chmod g+s /archive 2. Verify using: ls -ld /archive Permission should be like: drwxrws--- 2 root sysuser 4096 Mar 16 18:08 /archive If SGID bit is set on directory then who every users creates the files on directory group owner automatically the owner of parent directory. To set the SGID bit: chmod g+s directory To Remove the SGID bit: chmod g-s directory
RH302
Leading the way in IT testing and certification tools, www.testking.com
- 59 -
QUESTION NO: 59 Install the Cron Schedule for david user to display “Hello” on daily 5:30. Answer and Explanation:
3. Login as a root user 4. cat >schedule.txt 30 05 * * * /bin/echo “Hello” 3. crontab –u david schedule.txt 4. service crond restart
The cron system is essentially a smart alarm clock. When the alarm sounds, Linux runs the commands of your choice automatically. You can set the alarm clock to run at all sorts of regular time intervals. Alternatively, the at system allows you to run the command of your choice once, at a specified time in the future. Red Hat configured the cron daemon, crond. By default, it checks a series of directories for jobs to run, every minute of every hour of every day. The crond checks the /var/spool/cron directory for jobs by user. It also checks for scheduled jobs for the computer under /etc/crontab and in the /etc/cron.d directory. Here is the format of a line in crontab. Each of these columns is explained in more detail: #minute, hour, day of month, month, day of week, command * * * * * command Entries in a crontab Command Line Field Value Minute 0-59 Hour Based on a 24-hour clock; for example, 23 = 11 p.m. Day of month 1-31 Month 1-12, or jan, feb, mar, etc. Day of week 0-7; where 0 and 7 are both Sunday; or sun, mon, tue, etc. Command The command you want to run QUESTION NO: 60 Backup of the Redhat Enterprise Linux 5 is on /var/ftp/pub, /var/www/html/pub on server named server1.example.com. You can install all required packages using yum by creating the repository file. Answer and Explanation: 1. Create the repository file
RH302
Leading the way in IT testing and certification tools, www.testking.com
- 60 -
#vi /etc/yum.repos.d/server1.repo [station?] name=station? baseurl=ftp://server1.example.com/pub/ enabled=1 gpgcheck=1
gpgkey=file:///etc/pki/rpm-gpg/RPM-GPG-KEY-redhat-release # yum install <packagename>
Topic 3, RHCE Section, Installation and Configuration Section (75 Questions) QUESTION NO: 1 Configure the DNS for example.com domain, where 192.100.0.20 is associated IP for www and NS is 192.100.0.X where X is your IP. Answer and Explanation: 1. rename the file named.caching-nameserver.conf into named.conf file located into /var/named/chroot/etc #mv /var/named/chroot/etc/named.caching-nameserver.conf /var/named/chroot/etc/named.conf 2. Check the permission and ownership as well as SELinux Context should be like as: -rw-r----- root named system_u:object_r:named_conf_t /var/named/chroot/etc/named.conf If selinux context is mismatch use the restorecon –R /var command 3. vi /var/named/chroot/etc/named.conf zone “example.com” IN { type master; file “example.com.zone”; }; /var/named/chroot/etc/named.conf file is used to register the zone as well as specify the global option for DNS server. There are two types of zone, i. Master, which contains the original data. ii. Slave, backup of master. Here is the example of master zone
RH302
Leading the way in IT testing and certification tools, www.testking.com
- 61 -
configuration. 4. vi /var/named/chroot/var/named/example.com.zone $TTL 345345 @ IN SOA @ webmaster.example.com.( 101; Serial Number 1H; Refresh Time 1M; Retry Time 1W; Expire Time 1D; Minimum Time to Live ) @ IN NS 192.100.0.X www IN A 192.100.0.20 5. Check the permission as well as SELinux Context should like this: -rw-r--r-- root named root:object_r:named_zone_t /var/named/chroot/var/named/example.com.zone If selinux context is mismatch use the restorecon –R /var command 6. service named start 7. rndc reload 8. chkconfig named on Zone file should create on /var/named/chroot/var/named. Default Directory Path is specified on /var/named/chroot/etc/named.conf file. $TTL Time To Live, How much seconds cache server stores the information about DNS. And Five Parameters specified Serial Number used by slave to synchronize with master server. Refresh and Retry Time used by slave server. NS is the Name (DNS) server where lookup the domain. A (Associated IP) for particular host. QUESTION NO: 2 You are an Administrator of example.com domain. You need to configure the DNS for www.example.com by providing the round-robin load balancing. You should load balance to 5 hosts for www having IP: 192.100.0.1, 192.100.0.2, 192.100.0.3, 192.100.0.4 and 192.100.0.5. Where DNS is 192.100.0.X (X is your DNS Server). Answer and Explanation: 1. Rename the file named.caching-nameserver.conf into named.conf file located into /var/named/chroot/etc #mv /var/named/chroot/etc/named.caching-nameserver.conf /var/named/chroot/etc/named.conf
RH302
Leading the way in IT testing and certification tools, www.testking.com
- 62 -
2. Check the permission and ownership as well as SELinux Context should be like as: -rw-r----- root named system_u:object_r:named_conf_t /var/named/chroot/etc/named.conf If selinux context is mismatch use the restorecon –R /var command 3. vi /etc/named.conf zone “example.com” IN { type master; file “example.com.zone”; }; /var/named/chroot/etc/named.conf file is used to register the zone as well as specify the global option for DNS server. There are two types of zone, i. Master, which contains the original data. ii. Slave, backup of master. Here is the example of master zone configuration. 4. vi /var/named/chroot/var/named/example.com.zone $TTL 345345 @ IN SOA @ webmaster.example.com.( 101; Serial Number 1H; Refresh Time 1M; Retry Time 1W; Expire Time 1D; Minimum Time to Live ) @ IN NS 192.100.0.X www 0 IN A 192.100.0.1 www 0 IN A 192.100.0.2 www 0 IN A 192.100.0.3 www 0 IN A 192.100.0.4 www 0 IN A 192.100.0.5 3. service named start 4. rndc reload 5. chkconfig named on 6. Check the permission as well as SELinux Context should like this: -rw-r--r-- root named root:object_r:named_zone_t /var/named/chroot/var/named/example.com.zone If selinux context is mismatch use the restorecon –R /var command 7. service named start 8. rndc reload 9. chkconfig named on Zone file should create on /var/named/chroot/var/named. Default Directory Path is specified on /var/named/chroot/etc/named.conf file.
RH302
Leading the way in IT testing and certification tools, www.testking.com
- 63 -
$TTL Time To Live, How much seconds cache server stores the information about DNS. And Five Parameters specified Serial Number used by slave to synchronize with master server. Refresh and Retry Time used by slave server. NS is the Name (DNS) server where lookup the domain. A (Associated IP) for particular host. QUESTION NO: 3 You are working as an administrator of example.com domain. There are five web servers( www), three mail servers(mail1, mail2, mail). Configure the DNS for www, mail, mail1, mail2 by specifying mail.example.com is the Primary Mail Server for example.com domain. Where 192.168.100.1-5 for www, 6,7,8 for mail, mail1, m ail2 and 192.168.0.X for DNS. Answer and Explanation: 1. Rename the file named.caching-nameserver.conf into named.conf file located into /var/named/chroot/etc #mv /var/named/chroot/etc/named.caching-nameserver.conf /var/named/chroot/etc/named.conf 2. Check the permission and ownership as well as SELinux Context should be like as: -rw-r----- root named system_u:object_r:named_conf_t /var/named/chroot/etc/named.conf If selinux context is mismatch use the restorecon –R /var command 3. vi /etc/named.conf zone “example.com” IN { type master; file “example.com.zone”; }; /var/named/chroot/etc/named.conf file is used to register the zone as well as specify the global option for DNS server. There are two types of zone, i. Master, which contains the original data. ii. Slave, backup of master. Here is the example of master zone configuration. 4. vi /var/named/chroot/var/named/example.com.zone $TTL 345345 @ IN SOA @ webmaster.example.com.( 101; Serial Number 1H; Refresh Time 1M; Retry Time 1W; Expire Time
RH302
Leading the way in IT testing and certification tools, www.testking.com
- 64 -
1D; Minimum Time to Live ) @ IN NS 192.100.0.X www 0 IN A 192.100.0.1 www 0 IN A 192.100.0.2 www 0 IN A 192.100.0.3 www 0 IN A 192.100.0.4 www 0 IN A 192.100.0.5 mail IN A 192.100.0.6 mail1 IN A 192.100.0.7 mail2 IN A 192.100.0.8 @ IN MX 5 mail.example.com. @ IN MX 8 mail1.example.com. @ IN MX 10 mail2.example.com. 3. service named start 4. rndc reload 5. chkconfig named on 6. Check the permission as well as SELinux Context should like this: -rw-r--r-- root named root:object_r:named_zone_t /var/named/chroot/var/named/example.com.zone If selinux context is mismatch use the restorecon –R /var command 7. service named start 8. rndc reload 9. chkconfig named on Zone file should create on /var/named/chroot/var/named. Default Directory Path is specified on /var/named/chroot/etc/named.conf file. $TTL Time To Live, How much seconds cache server stores the information about DNS. And Five Parameters specified Serial Number used by slave to synchronize with master server. Refresh and Retry Time used by slave server. NS is the Name (DNS) server where lookup the domain. A (Associated IP) for particular host. DNS has mechanism to load balance the request from clients. You can verify using host www.example.com command. MX resource records are used to define mail handler or exchanger for the domain. MX record must pass the positive integer value. This integer value is used by remote Mail Transport Agent (MTA) to determine, which host has delivery priority for the zone. The Lowest integer value will get the priority. QUESTION NO: 4 Configure the Slave DNS for example.com domain where master DNS is 192.100.0.254.
RH302
Leading the way in IT testing and certification tools, www.testking.com
- 65 -
Answer and Explanation: Slave DNS is the backup of master DNS. Automatically within a certain time slave DNS synchronizes with the Master DNS server. 1. vi /var/named/chroot/etc/named.conf zone “example.com” IN { type slave; masters { 192.100.0.254; }; file “example.com.zone”; }; named-checkconf command checks the syntax for /var/named/chroot/etc/named.conf file.
3. service named start | restart QUESTION NO: 5 Configure the caching only-name server for example.com where DNS server is 192.100.0.254.
Answer and Explanation: 1. vi /var/named/chroot/etc/named.conf
options { forwarders { 192.168.22.250; }; forward only; };
2. service named start | restart Caching-only name server forwards a request to another name server or to the root name servers in orders to determine the authoritative name server for the resolution. Once resolution has taken place, the caching-only name server stores the resolved information in a cache for the designated time to live period.
QUESTION NO: 6 Configure the DNS server by allowing query only from the 192.168.0.0/24 Local Network.
Answer and Explanation: 1. vi /var/named/chroot/etc/named.conf
acl localnet { 192.168.0.0/24; }; options {
allow-query { localnet; }; };
2. service named restart | start allow-query is a global option on /var/named/chroot/etc/named.conf, specifies an address
RH302
Leading the way in IT testing and certification tools, www.testking.com
- 66 -
match list of hosts allowed to query this server. If this option is not set, any host can query the server. QUESTION NO: 7 Configure the DHCP server by matching the following conditions:
• Subnet and netmask should be 192.168.0.0 255.255.255.0 • Gateway Should be 192.168.0.254 • DNS Sever Should be 192.168.0.254 • Domain Name should be example.com • Range from 192.168.0.10-50
Answer and Explanation: 1. vi /etc/dhcpd.conf ddns-update-style none; option routers 192.168.0.1; option domain-name “example.com”; option domain-name-servers 192.168.0.254; default-lease-time 21600; max-lease-time 43200; subnet 192.168.0.0 netmask 255.255.255.0 { range 192.168.0.10 192.168.0.50; } /etc/dhcpd.conf file is used to configure the DHCP. Some global options i.e Gateway, domainname, DNS server specified using option keyword. 2. Check the SELinux Context, should be like this: -rw-r--r-- root root system_u:object_r:dhcp_etc_t /etc/dhcpd.conf 3. If not use the restorecon –R /etc command to restore the selinux context of the file. 4. service dhcpd start | restart QUESTION NO: 8 You have DHCP server, which assigns the IP, gateway and DNS server ip to Clients. There are two DNS servers having MAC address (00:50:FC:98:8D:00, 00:50:FC:98:8C:00), in your LAN, But they always required fixed IP address
RH302
Leading the way in IT testing and certification tools, www.testking.com
- 67 -
(192.168.0.254, 192.168.0.253). Configure the DHCP server to assign the fixed IP address to DNS server. Answer and Explanation: 1. vi /etc/dhcpd.conf ddns-update-style none; option routers 192.168.0.1; option domain-name “example.com”; option domain-name-servers 192.168.0.254; default-lease-time 21600; max-lease-time 43200; subnet 192.168.0.0 netmask 255.255.255.0 { range 192.168.0.1 192.168.0.254; host dns1 { hardware ethernet 00:50:FC:98:8D:00; fixed-address 192.168.0.254; } host dns2 { hardware ethernet 00:50:FC:98:8C:00; fixed-address 192.168.0.253; } } /etc/dhcpd.conf file is used to configure the DHCP. Some global options i.e Gateway, domainname, DNS server specified using option keyword. To assign as static ip from dhcp server, required the mac address of interface. 2. Check the SELinux Context, should be like this: -rw-r--r-- root root system_u:object_r:dhcp_etc_t /etc/dhcpd.conf 3. Use the restorecon –R /etc command to restore the selinux context of the file. 4. service dhcpd start | restart QUESTION NO: 9 Share /data directory using NFS only to example.com members. These hosts should get read and write access on shared directory. Answer and Explanation: 1. vi /etc/exports /data *.example.com(rw,sync)
RH302
Leading the way in IT testing and certification tools, www.testking.com
- 68 -
Check the SELinux Context, should be like this: -rw-r--r-- root root system_u:object_r:exports_t /etc/exports Use the restorecon –R /etc command to restore the selinux context of the file. 2. service nfs start | restart 3. service portmap start | restart 4. chkconfig nfs on 5. chkconfig portmap on In Linux to share the data we use the /etc/exports file. Pattern is: Path client(permission) Shared Directory Path, Client can be single host or domain name or ip address. Permission should specify without space with client lists in parentheses. NFS is RPC service so portmapper service should restart after starting the nfs service. QUESTION NO: 10 You have a directory /local. You want to make available that directory to all the members of example.com and trusted.cracker.org. But directory should available in read and write to all the members of example.com domain and read only to cracker.org domain. Answer and Explanation: 1. vi /etc/exports /local *.example.com(rw,sync) trusted.cracker.org(ro,sync) Check the SELinux Context, should be like this: -rw-r--r-- root root system_u:object_r:exports_t /etc/exports Use the restorecon –R /etc command to restore the selinux context of the file. 2. service nfs start | restart 3. service portmap start | restart 4. chkconfig nfs on 5. chkconfig portmap on In Linux to share the data we use the /etc/exports file. Pattern is: Path client(permission) Shared Directory Path, Client can be single host or domain name or ip address. Permission should specify without space with client lists in parentheses. NFS is RPC service so portmapper service should restart after starting the nfs service. We can specify multiple clients’ list separating by space with different shared option.
RH302
Leading the way in IT testing and certification tools, www.testking.com
- 69 -
QUESTION NO: 11 You have ftp site named ftp.example.com. You want to deny login as an anonymous on your ftp site. Configure to deny the anonymous. Answer and Explanation: 1. vi /etc/vsftpd/vsftpd.conf anonymous_enable=no 2. service vsftpd restart /etc/vsftpd/vsftpd.conf file is used to allow or deny to anonymous or real user. To allow anonymous anonymous_enable=yes should be there. Sample configuration is like. # Allow anonymous FTP? (Beware - allowed by default if you comment this out). anonymous_enable=YES # # Uncomment this to allow local users to log in. local_enable=YES # # Uncomment this to enable any form of FTP write command. write_enable=YES # # Default umask for local users is 077. You may wish to change this to 022, # if your users expect that (022 is used by most other ftpd's) local_umask=022 # # Uncomment this to allow the anonymous FTP user to upload files. This only # has an effect if the above global write enable is activated. Also, you will # obviously need to create a directory writable by the FTP user. #anon_upload_enable=YES # # Uncomment this if you want the anonymous FTP user to be able to create # new directories. #anon_mkdir_write_enable=YES # # Activate directory messages - messages given to remote users when they # go into a certain directory. dirmessage_enable=YES # # Activate logging of uploads/downloads. xferlog_enable=YES # # Make sure PORT transfer connections originate from port 20 (ftp-data). connect_from_port_20=YES #
RH302
Leading the way in IT testing and certification tools, www.testking.com
- 70 -
# If you want, you can arrange for uploaded anonymous files to be owned by # a different user. Note! Using "root" for uploaded files is not # recommended! #chown_uploads=YES #chown_username=whoever # # You may override where the log file goes if you like. The default is shown # below. #xferlog_file=/var/log/vsftpd.log # # If you want, you can have your log file in standard ftpd xferlog format xferlog_std_format=YES # # You may change the default value for timing out an idle session. #idle_session_timeout=600 # # You may change the default value for timing out a data connection. #data_connection_timeout=120 # # It is recommended that you define on your system a unique user which the # ftp server can use as a totally isolated and unprivileged user. #nopriv_user=ftpsecure # # Enable this and the server will recognise asynchronous ABOR requests. Not # recommended for security (the code is non-trivial). Not enabling it, # however, may confuse older FTP clients. #async_abor_enable=YES # # By default the server will pretend to allow ASCII mode but in fact ignore # the request. Turn on the below options to have the server actually do ASCII # mangling on files when in ASCII mode. # Beware that turning on ascii_download_enable enables malicious remote parties # to consume your I/O resources, by issuing the command "SIZE /big/file" in # ASCII mode. # These ASCII options are split into upload and download because you may wish # to enable ASCII uploads (to prevent uploaded scripts etc. from breaking), # without the DoS risk of SIZE and ASCII downloads. ASCII mangling should be # on the client anyway.. #ascii_upload_enable=YES #ascii_download_enable=YES # # You may fully customise the login banner string:
RH302
Leading the way in IT testing and certification tools, www.testking.com
- 71 -
#ftpd_banner=Welcome to blah FTP service. # # You may specify a file of disallowed anonymous e-mail addresses. Apparently # useful for combatting certain DoS attacks. #deny_email_enable=YES # (default follows) #banned_email_file=/etc/vsftpd.banned_emails # # You may specify an explicit list of local users to chroot() to their home # directory. If chroot_local_user is YES, then this list becomes a list of # users to NOT chroot(). #chroot_list_enable=YES # (default follows) #chroot_list_file=/etc/vsftpd.chroot_list # # You may activate the "-R" option to the builtin ls. This is disabled by # default to avoid remote users being able to cause excessive I/O on large # sites. However, some broken FTP clients such as "ncftp" and "mirror" assume # the presence of the "-R" option, so there is a strong case for enabling it. #ls_recurse_enable=YES pam_service_name=vsftpd userlist_enable=YES #enable for standalone mode listen=YES tcp_wrappers=YES QUESTION NO: 12 You have ftp site named ftp.example.com. You want to allow anonymous users to upload files on you ftp site. Configure to allow anonymous to upload the files. Answer and Explanation: 1. vi /etc/vsftpd/vsftpd.conf anon_upload_enable=yes chown_uploads=yes chown_username=username 2. service vsftpd start| restart 3. directory owner should be ftp user: chown ftp directory path allowed to upload files. 4. Write permission should be set to owner user.
RH302
Leading the way in IT testing and certification tools, www.testking.com
- 72 -
By default anonymous user can only download files from the ftp. Should write anon_upload_enable=yes to enable anonymous upload files. Default Directory for anonymous is /var/ftp. QUESTION NO: 13 You want to deny to user1 and user2 users to access files via ftp. Configure to deny these users to access via ftp. Answer and Explanation: 1. vi /etc/vsftpd/ftpusers user1 user2 2. service vsftpd start| restart Using /etc/vsftpd/ftpusers file we can deny to certain users to access files via ftp. As well as there is another file named /etc/vsftpd.user_list can be used to allow or to deny to users. QUESTION NO: 14 There are mixed lots of System running on Linux and Windows OS. Some users are working on Windows Operating System. There is a /data directory on linux server should make available on windows to only user1 and user2 users with full access. Configure to make available. Answer and Explanation: 1. vi /etc/samba/smb.conf [global] netbios name=station? workgroup = mygroup server string=Share from Linux Server security=user smb passwd file=/etc/samba/smbpasswd encrypt passwords=yes [data] path=/data writable=yes public=no browsable=yes valid users=user1 user2 2. smbpasswd –a user1
RH302
Leading the way in IT testing and certification tools, www.testking.com
- 73 -
3. smbpasswd –a user2 4. service smb start | restart 5. chkconfig smb on Samba servers helps to share the data between linux and windows. Configuration file is /etc/samba/smb.conf. There are some pre-defined section, i. global use to define the global options, ii. Printers use to share the printers, iii. homes use the share the user’s home directory. Security=user validation by samba username and password. May be there are other users also. To allow certain share to certain user we should use valid users option. smbpasswd Helps to change user’s smb password. –a option specifies that the username following should be added to the local smbpasswd file. QUESTION NO: 15 There are mixed lots of System running on Linux and Windows OS. Some users are working on Windows Operating System. There is a /data directory on linux server should make available on windows to user1 and user2 users on read and write mode and read only to other samba users. Answer and Explanation: 1. vi /etc/samba/smb.conf [global] netbios name=station? workgroup = mygroup server string=Share from Linux Server security=user smb passwd file=/etc/samba/smbpasswd encrypt passwords=yes [data] path=/data writable=no public=no browsable=yes write list= user1 user2 2. smbpasswd –a user1 3. smbpasswd –a user2 …….. 4. service smb start | restart 5. chkconfig smb on
RH302
Leading the way in IT testing and certification tools, www.testking.com
- 74 -
Samba servers helps to share the data between linux and windows. Configuration file is /etc/samba/smb.conf. There are some pre-defined section, i. global use to define the global options, ii. Printers use to share the printers, iii. homes use the share the user’s home directory. Security=user validation by samba username and password. May be there are other users also. To allow certain share to certain user we should use valid users option. smbpasswd Helps to change user’s smb password. –a option specifies that the username following should be added to the local smbpasswd file. If any valid users option is not specified, then all samba users can access the shared data. By Default shared permission is on writable=no means read only sharing. Write list option is used to allow write access on shared directory to certain users or group members. QUESTION NO: 16 There are mixed lots of System running on Linux and Windows OS. Some users are working on Windows Operating System. You want to make available /data directory to samba users only from 192.168.0.0/24 network. Configure the samba server. Answer and Explanation: 1. vi /etc/samba/smb.conf [global] netbios name=station? workgroup = mygroup server string=Share from Linux Server security=user smb passwd file=/etc/samba/smbpasswd encrypt passwords=yes hosts allow=192.168.0. [data] path=/data writable=yes public=no browsable=yes 2. service smb start| restart 3. chkconfig smb on Samba servers helps to share the data between linux and windows. Configuration file is /etc/samba/smb.conf. There are some pre-defined section, i. global use to define the
RH302
Leading the way in IT testing and certification tools, www.testking.com
- 75 -
global options, ii. Printers use to share the printers, iii. homes use to share the user’s home directory. Security=user validation by samba username and password. May be there are other users also. To allow certain share to certain user we should use valid users option. smbpasswd Helps to change user’s smb password. –a option specifies that the username following should be added to the local smbpasswd file. If any valid users option is not specified, then all samba users can access the shared data. By Default shared permission is on writable=no means read only sharing. Write list option is used to allow write access on shared directory to certain users or group members. To allow access the shared directory only from certain network or hosts, there is a option hosts allow= host or network. If this option is applied on global option, then it will apply to all shared directory. QUESTION NO: 17 There are mixed lots of System running on Linux and Windows OS. Some users are working on Windows Operating System. Your printer is connected on linux server. You want to share the printer-using samba so that users working on windows also can print. Configure the samba server to share printer. Answer and Explanation 1. vi /etc/samba/smb.conf [global] netbios name=station? workgroup=linuxgroup security=share printcap name=/etc/printcap load printers=yes printing=cups
[printers] path=/var/spool/samba browsable=yes printable=yes guest ok=no writable=no
Samba servers helps to share the data between linux and windows. Configuration file is /etc/samba/smb.conf. There are some pre-defined section, i. global use to define the global options, ii. Printers use to share the printers, iii. homes use to share the user’s home directory.
RH302
Leading the way in IT testing and certification tools, www.testking.com
- 76 -
/etc/printcap file contains all installed printers name. Printing is print system used on server. QUESTION NO: 18 Your Local Domain is example.com. Configure the send mail server for you local LAN. Answer and Explanation: 1. vi /etc/mail/local-host-names example.com 2. vi /etc/mail/sendmail.mc dnl # DEAMON_OPTIONS(`Port=smtp,Addr=127.0.0.1,Name=MTA`)dnl 3. m4 /etc/mail/sendmail.mc >/etc/mail/sendmail.cf 4. vi /etc/mail/access example.com RELAY
192.168.0 RELAY 5. service sendmail start | restart 6. chkconfig sendmail on /etc/mail/local-host-names file contains the aliases to hostname. Mail server program reads the /etc/mail/sendmail.cf. To change the configuration on mail server, we should edit the /etc/mail/sendmail.mc file and should generate the sendmail.cf using m4 command. By default sendmail server allows to connect to local host only. So we should edit the /etc/mail/sendmail.mc file to allow connect to other hosts. By default sendmail server will not forward mail. we should specify on /etc/mail/access to relay or to block mail coming from domain or network or individual email address. QUESTION NO: 19 Your Local Domain is example.com. Configure the send mail server for you local LAN. As well as enable the pop and pop secured protocol. Answer and Explanation: 1. vi /etc/mail/local-host-names example.com 2. vi /etc/mail/sendmail.mc dnl # DEAMON_OPTIONS(`Port=smtp,Addr=127.0.0.1,Name=MTA`)dnl 3. m4 /etc/mail/sendmail.mc >/etc/mail/sendmail.cf 4. vi /etc/mail/access
192.168.0 RELAY
RH302
Leading the way in IT testing and certification tools, www.testking.com
- 77 -
example.com RELAY 5. service sendmail start | restart 6. chkconfig dovecot on 7. vi /etc/dovecot.conf protocols = pop3 pop3s 8. service dovecot start | restart 9. chkconfig dovecot on /etc/mail/local-host-names file contains the aliases to hostname. Mail server program reads the /etc/mail/sendmail.cf. To change the configuration on mail server, we should edit the /etc/mail/sendmail.mc file and should generate the sendmail.cf using m4 command. By default sendmail server allows to connect to local host only. So we should edit the /etc/mail/sendmail.mc file to allow connect to other hosts. By default sendmail server will not forward mail. we should specify on /etc/mail/access to relay or to block mail coming from domain or network or individual email address. By default dovecot service start only the imap protocol. To start pop protocol with dovecot, we should write in /etc/dovecot.conf file. QUESTION NO: 20 Your Local Domain is example.com. Configure the send mail server for you local LAN by following these conditions. i. Relay the mail from 192.168.0.0/24 Network ii. If any mail coming from cracker.org domain block all mails. iii. user5’s mail should be get by user2. Answer and Explanation: 1. vi /etc/mail/local-host-names example.com 2. vi /etc/mail/sendmail.mc dnl # DEAMON_OPTIONS(`Port=smtp,Addr=127.0.0.1,Name=MTA`)dnl 3. m4 /etc/mail/sendmail.mc >/etc/mail/sendmail.cf 4. vi /etc/mail/access 192.168.0 RELAY @cracker.org REJECT 5. service sendmail start | restart 6. chkconfig dovecot on 7. vi /etc/dovecot.conf protocols = pop3 pop3s imap imaps 8. service dovecot start | restart 9. chkconfig dovecot on 10. vi /etc/aliases
RH302
Leading the way in IT testing and certification tools, www.testking.com
- 78 -
user5: user2 11. newaliases /etc/mail/local-host-names file contains the aliases to hostname. Mail server program reads the /etc/mail/sendmail.cf. To change the configuration on mail server, we should edit the /etc/mail/sendmail.mc file and should generate the sendmail.cf using m4 command. By default sendmail server allows to connect to local host only. So we should edit the /etc/mail/sendmail.mc file to allow connect to other hosts. By default sendmail server will not forward mail. we should specify on /etc/mail/access to relay or to block mail coming from domain or network or individual email address. By default dovecot service start only the imap protocol. To start pop protocol with dovecot, we should write in /etc/dovecot.conf file. Using /etc/aliases file we can map the user name to send mail of one user to another user. To rebuild database we use the newaliases command. QUESTION NO: 21 Your Local Domain is example.com. Configure the send mail server for you local LAN by following these conditions. i. Any mail going from Local LAN should be masquerade to example.com ii. Any incoming mail for [email protected] virtual address should be mapped to [email protected] iii. All outgoing mail should be send via smtp.abc.com mail server. Answer and Explanation: 1. vi /etc/mail/local-host-names example.com 2. vi /etc/mail/sendmail.mc dnl # DEAMON_OPTIONS(`Port=smtp,Addr=127.0.0.1,Name=MTA`)dnl MASQUERADE_AS(`example.com')dnl
define(`SMART_HOST',`smtp.abc.com') 3. m4 /etc/mail/sendmail.mc >/etc/mail/sendmail.cf 4. vi /etc/mail/virtusertable [email protected] [email protected] 5. vi /etc/mail/access 192.168.0 RELAY /etc/mail/local-host-names file contains the aliases to hostname. Mail server program reads the /etc/mail/sendmail.cf. To change the configuration on mail server, we should edit the /etc/mail/sendmail.mc file and should generate the sendmail.cf using m4 command. By default sendmail server allows to connect to local host only. So we should edit the

RH302
Leading the way in IT testing and certification tools, www.testking.com
- 79 -
/etc/mail/sendmail.mc file to allow connect to other hosts. By default sendmail server will not forward mail. We should specify on /etc/mail/access to relay or to block mail coming from domain or network or individual email address. To masquerade the address, MASQUERADE_AS option is in /etc/mail/sendmail.mc. SMART_HOST deliver all local mail locally and outgoing mail through another mail server. /etc/mail/virtusertable file is used map virtual address to real address. Eg. [email protected] [email protected] [email protected] [email protected] QUESTION NO: 22 Download a index.html file from ftp.server1.example.com and set as default page for you station?.example.com where ? is your host number. Note file is anonymously available. Answer and Explanation: 1. ftp ftp://server1.example.com 2. Login as an anonymous and download the file. 3. Copy the file in /var/www/html if you downloaded in another location. 4. service httpd restart 5. Test using links: links http://station?.example.com Check the SELinux context of index.html file, should like this: -rw-r--r-- root root system_u:object_r:httpd_sys_content_t /var/www/html/index.html If SELinux Context is mismatched, use the restorecon –R /var command QUESTION NO: 23 There are two sites www.abc.com and www.example.com. Both sites are mappings to 192.100.0.X IP address where X is your Host address. Configure the Apache web server for these sites to make accessible on web. Answer and Explanation: 1. vi /etc/httpd/conf/httpd.conf NameVirtualHost 192.100.0.X
<VirtualHost www.abc.com> ServerName www.abc.com DocumentRoot /var/www/abc/ DirectoryIndex index.html ServerAdmin [email protected] ErrorLog logs/error_abc.logs

RH302
Leading the way in IT testing and certification tools, www.testking.com
- 80 -
CustomLog logs/custom_abc.logs common </VirtualHost> <VirtualHost www.example.com> ServerName www.example.com DocumentRoot /var/www/example/ DirectoryIndex index.html ServerAdmin [email protected] ErrorLog logs/error_example.logs CustomLog logs/custom_example.logs common </VirtualHost> 2. Create the directory and index page on specified path. (Index page can
download from ftp://server1.example.com at exam time)
Check the SELinux context of index page , should like this: -rw-r--r-- root root system_u:object_r:httpd_sys_content_t /var/www/html/index.html If SELinux Context is mismatched, use the restorecon –R /var command
3. service httpd start| restart 4. chkconfig httpd on 5. links http://www.abc.com 6. links http://www.example.com For Name based Virtual Hosting, we should specified the IP address on which we
are going to host the multiple sites using NameVirtualHost options. • ServerName means you FQDN, already lookup on DNS • DirectoryRoot path for web documents for this site. • DirectoryIndex default page for websites. QUESTION NO: 24 Configure the web server for www.abc.com associated IP address is 192.100.0.1 by allowing access to user5 and user6 httpusers. Answer and Explanation 1. vi /etc/httpd/conf/httpd.conf <VirtualHost 192.100.0.1>
ServerName www.abc.com DocumentRoot /var/www/abc/ <Directory /var/www/abc> AllowOverride authconfig </Directory> DirectoryIndex index.html ServerAdmin [email protected]
RH302
Leading the way in IT testing and certification tools, www.testking.com
- 81 -
ErrorLog logs/error_abc.logs CustomLog logs/custom_abc.logs common </VirtualHost> 2. Create the directory and index page on specified path. (Index page can
download from ftp://server1.example.com at exam time) Check the SELinux context of index.html file, should be like this: -rw-r--r-- root root system_u:object_r:httpd_sys_content_t /var/www/html/index.html If SELinux Context is mismatched, use the restorecon –R /var command
3. vi /var/www/abc/.htaccess AuthName “Only to Authorized Users” AuthType basic AuthUserFile /etc/httpd/conf/mypasswd require valid-user Check the SELinux Context, should like this: -rw-r--r-- root root root:object_r:httpd_sys_content_t .htaccess
3. htpasswd –c /etc/httpd/conf/mypasswd user5 4. htpasswd –m /etc/httpd/conf/mypasswd user6 5. chgrp apache /etc/httpd/conf/mypasswd 6. chmod g+r /etc/httpd/conf/mypasswd
Check the SELinux Context, should like this: -rw-r--r-- root root system_u:object_r:httpd_config_t /etc/httpd/conf/mypasswd Use restorecon command to restore the mismatched SELinux Context of the file.
7. service httpd restart 8. chkconfig httpd on
AllowOverride Authconfig is used to specify which and how much configuration can be overridden by directory specific .htaccess files. One of the most common tasks performed in users’ .htaccess files is adding authorization. Typically, a user will setup authorization for directories that hold sensitive information with a configuration. QUESTION NO: 25 Configure the web server for www.abc.com associated IP address is 192.100.0.1 by allowing access within your example.com domain. Answer and Explanation 1. vi /etc/httpd/conf/httpd.conf
<VirtualHost 192.100.0.1> ServerName www.abc.com
RH302
Leading the way in IT testing and certification tools, www.testking.com
- 82 -
DocumentRoot /var/www/abc/ <Directory /var/www/abc> Order Allow, Deny Allow from .example.com </Directory> DirectoryIndex index.html ServerAdmin [email protected] ErrorLog logs/error_abc.logs CustomLog logs/custom_abc.logs common </VirtualHost> 2. Create the directory and index page on specified path. (Index page can
download from ftp://server1.example.com at exam time) Check the SELinux context of index page , should like this: -rw-r--r-- root root system_u:object_r:httpd_sys_content_t /var/www/html/index.html If SELinux Context is mismatched, use the restorecon –R /var command
3. service httpd start|restart 4. chkconfig httpd on
Order allow, deny Allows explicitly allowed clients, denies everyone else; clients matched by both allow and deny are denied. Order deny, allow denies explicitly denied clients, allows everyone else, clients matched by both allow and deny are allowed. QUESTION NO: 26 You have a domain named www.rhce.com associated IP address is 192.100.0.2. Configure the Apache web server by implementing the SSL for encryption communication. Answer and Explanation 1. vi /etc/httpd/conf.d/ssl.conf <VirtualHost 192.100.0.2> ServerName www.rhce.com DocumentRoot /var/www/rhce DirectoryIndex index.html index.htm ServerAdmin [email protected] SSLEngine on SSLCertificateFile /etc/pki/tls/certs/localhost.crt SSLCertificateKeyFile /etc/pki/tls/private/localhost.key </VirtualHost> 2. cd /etc/httpd/conf
RH302
Leading the way in IT testing and certification tools, www.testking.com
- 83 -
3. make testcert 4. Create the directory and index page on specified path. (Index page can download from ftp://server1.example.com at exam time) Check the SELinux context of index page , should like this: -rw-r--r-- root root system_u:object_r:httpd_sys_content_t /var/www/html/index.html If SELinux Context is mismatched, use the restorecon –R /var command 5. service httpd start|restart 6. chkconfig httpd on Apache can provide encrypted communications using SSL (Secure Socket Layer). To make use of encrypted communication, a client must request to https protocol, which is uses port 443. For HTTPS protocol required the certificate file and key file. QUESTION NO: 27 Configure the Apache webserver for station?.example.com (associated IP is your host IP address) by downloading the index.html from ftp://server1.example.com. Answer and Explanation: 1. vi /etc/httpd/conf/httpd.conf <VirtualHost 192.168.0.?> ServerName station?.example.com DocumentRoot /var/www/station? DirectoryIndex index.html ServerAdmin [email protected] </VirtualHost>
2. Create the directory and index page on specified path. (Index page can download from ftp://server1.example.com at exam time) Check the SELinux context of index page , should like this: -rw-r--r-- root root system_u:object_r:httpd_sys_content_t /var/www/html/index.html If SELinux Context is mismatched, use the restorecon –R /var command
3. service httpd start|restart
4. chkconfig httpd on QUESTION NO: 28 Share the Internet using squid for your Local LAN. Proxy server should be run on 8080 port.
RH302
Leading the way in IT testing and certification tools, www.testking.com
- 84 -
Answer and Explanation:
1. vi /etc/squid/squid.conf #detault: http_port 8080
#Recommended minimum configuration: # Near the src acl src section acl mynet src 192.168.0.0/255.255.255.0 #Default: # http_access deny all
#Under Here http_access allow mynet
2. service squid start 3. chkconfig squid on squid is a proxy caching server, using squid we can share the internet, block the internet, to certain network. First we should define the port for squid, the standard port for squid is 3128. We can run squid on different port by specifying http_port portnumber. To block or allow the Internet access to hosts, we should create the acl (Access Control List). In this file we can specify only the IP address. Example: acl aclname src IP/Netmask After creating acl we can block or allow the internet to specified acl. http_access allow | deny alcname QUESTION NO: 29 Using squid block Internet to 192.168.1.0/24 Network and allow to 192.168.0.0/24 Network. Answer and Explanation: 1. vi /etc/squid/squid.conf
#detault: http_port 8080 #Recommended minimum configuration: # Near the src acl src section acl allownet src 192.168.0.0/255.255.255.0 acl denynet src 192.168.1.0/255.255.255.0 #Default:
RH302
Leading the way in IT testing and certification tools, www.testking.com
- 85 -
# http_access deny all #Under Here
http_access allow allownet http_access deny denynet
2. service squid start 3. chkconfig squid on squid is a proxy caching server, using squid we can share the internet, block the internet, to certain network. First we should define the port for squid, the standard port for squid is 3128. We can run squid on different port by specifying http_port portnumber. To block or allow the Internet access to hosts, we should create the acl (Access Control List). In this file we can specify only the IP address. Example: acl aclname src IP/Netmask After creating acl we can block or allow the internet to specified acl. http_access allow | deny alcname QUESTION NO: 30 Run the squid proxy server on port 8080 by allowing internet access to 192.168.0.0/24 and block msn.com site to access. Answer and Explanation: 1. vi /etc/squid/squid.conf
#detault: http_port 8080 #Recommended minimum configuration: # Near the src acl src section acl allownet src 192.168.0.0/255.255.255.0 acl msnnet dstdomain .msn.com #Default: # http_access deny all
#Under Here http_access deny msnnet http_access allow allownet
2. service squid start 3. chkconfig squid on squid is a proxy caching server, using squid we can share the internet, block the internet, to certain network. First we should define the port for squid, the standard port for squid is 3128. We can run squid on different port by specifying http_port portnumber.
RH302
Leading the way in IT testing and certification tools, www.testking.com
- 86 -
To block or allow the Internet access to hosts, we should create the acl (Access Control List). In this file we can specify only the IP address. Example: acl aclname src IP/Netmask After creating acl we can block or allow the Internet to specified acl. http_access allow | deny alcname QUESTION NO: 31 You are the administrator of example.com domain. Configure to deny local login to all normal users on your domain server. As well as allow to root login only on First Terminal. Answer and Explanation: 1. touch /etc/nologin 2. vi /etc/securetty comment all available terminall then first. If /etc/nologin file is created, then pam modules pan_nologin deny to all non-root users to
login locally. /etc/pam.d/login file calls the module. #%PAM-1.0 auth required pam_securetty.so auth required pam_stack.so service=system-auth auth required pam_nologin.so account required pam_stack.so service=system-auth password required pam_stack.so service=system-auth # pam_selinux.so close should be the first session rule session required pam_selinux.so close session required pam_stack.so service=system-auth session optional pam_console.so # pam_selinux.so open should be the last session rule session required pam_selinux.so multiple open pam_securetty modules checks the /etc/securetty file, which terminal are available to root. If terminal is not available in this file then pam_securetty module deny to login on unavailable terminal to root user. QUESTION NO: 32
RH302
Leading the way in IT testing and certification tools, www.testking.com
- 87 -
You are the Network Engineer of example.com domain. Configure to allow users user1, user2 and user3 to login only between 9am to 17pm on very day. Answer and Explanation: 1. vi /etc/security/time.conf login;*;user1|user2|user3;Al0900-1700 2. vi /etc/pam.d/login account required pam_time.so For Time based authentication, we should configured in /etc/security/time.conf Syntax of /etc/security/time.conf
services;ttys;users;times services is a logic list of PAM service names that the rule applies to. ttys is a logic list of terminal names that this rule applies to. users is a logic list of users to whom this rule applies. times the format here is a logic list of day/time-range entries the days are specified by a sequence of two character entries, MoTuSa for example is Monday Tuesday and Saturday. Note that repeated days are unset MoMo = no day, and MoWk = all weekdays bar Monday. The two character combinations accepted are Mo Tu We Th Fr Sa Su Wk Wd Al the last two being week-end days and all 7 days of the week respectively. As a final example, AlFr means all days except Friday. pam_time modules checks the file /etc/security/time.conf for authentication. So, we should call the pam_time modules in /etc/pam.d/login. QUESTION NO: 33
RH302
Leading the way in IT testing and certification tools, www.testking.com
- 88 -
There are some part-time staff in your office. And you gave the username user9 and user10 to them. Their Office time is 12-2pm on Sunday, Monday and Friday. Configure to login only on their office time. Answer and Explanation: 1. vi /etc/security/time.conf login;*;user9|user10;SuMoFri1200-1400 2. vi /etc/pam.d/login account required pam_time.so For Time based authentication, we should configured in /etc/security/time.conf Syntax of /etc/security/time.conf
services;ttys;users;times services is a logic list of PAM service names that the rule applies to. ttys is a logic list of terminal names that this rule applies to. users is a logic list of users to whom this rule applies. times the format here is a logic list of day/time-range entries the days are specified by a sequence of two character entries, MoTuSa for example is Monday Tuesday and Saturday. Note that repeated days are unset MoMo = no day, and MoWk = all weekdays bar Monday. The two character combinations accepted are Mo Tu We Th Fr Sa Su Wk Wd Al the last two being week-end days and all 7 days of the week respectively. As a final example, AlFr means all days except Friday. pam_time modules checks the file /etc/security/time.conf for authentication. So, we should call the pam_time modules in /etc/pam.d/login. QUESTION NO: 34
RH302
Leading the way in IT testing and certification tools, www.testking.com
- 89 -
Deny login to user15 and user16 on Saturday. Answer and Explanation: 1. vi /etc/security/time.conf login;*;user15|user16;Sa0000-2400 2. vi /etc/pam.d/login account required pam_time.so For Time based authentication, we should configured in /etc/security/time.conf Syntax of /etc/security/time.conf
services;ttys;users;times services is a logic list of PAM service names that the rule applies to. ttys is a logic list of terminal names that this rule applies to. users is a logic list of users to whom this rule applies. times the format here is a logic list of day/time-range entries the days are specified by a sequence of two character entries, MoTuSa for example is Monday Tuesday and Saturday. Note that repeated days are unset MoMo = no day, and MoWk = all weekdays bar Monday. The two character combinations accepted are Mo Tu We Th Fr Sa Su Wk Wd Al the last two being week-end days and all 7 days of the week respectively. As a final example, AlFr means all days except Friday. pam_time modules checks the file /etc/security/time.conf for authentication. So, we should call the pam_time modules in /etc/pam.d/login. QUESTION NO: 35
RH302
Leading the way in IT testing and certification tools, www.testking.com
- 90 -
You are working as a Network Engineer. Due to system processing, you want to limit the number of process to users. If then, configure that user1 and user2 should get one login at a time and all the members of training group can get total 5 logins. Answer and Explanation: 1. vi /etc/security/limits.conf user1,user2 - maxlogins 1 @training - maxlogins 5 2. vi /etc/pam.d/system-auth session required /lib/security/pam_limits.so To limit the number of process or number of logins, we should configure on /etc/security/limits.conf. First Columns contains the username separated by comma or @group name. Second column either hard or soft limits. Third columns called the item, maxloigns or nproc etc. To identify the session of users we should call the pam_limits module in /etc/pam.d/system-auth. QUESTION NO: 36 Now a days you are observing that your system being very slow. You observe the processes that one user named user1 running more than 50 processes. Configure to limit the number of processes that user1 couldn’t run more than 7 process. Answer and Explanation: 1. vi /etc/security/limits.conf user1 hard nproc 7 2. vi /etc/pam.d/system-auth session required /lib/security/pam_limits.so To limit the number of process or number of logins, we should configure on /etc/security/limits.conf. First Columns contains the username separated by comma or @group name. Second column either hard or soft limits. Third columns called the item, maxloigns or nproc etc. To identify the session of users we should call the pam_limits module in /etc/pam.d/system-auth.
RH302
Leading the way in IT testing and certification tools, www.testking.com
- 91 -
QUESTION NO: 37 Deny to john user login locally. Answer and Explanation: 1. vi /etc/security/access.conf -:john:LOCAL 2. vi /etc/pam.d/system-auth account required /lib/security/pam_access.so /etc/security/access.conf file helps to allow or deny login to users on the basis of origin. Syntax of /etc/security/access.conf permission : users : origins The first field should be a "+" (access granted) or "-" (access denied) character. The second field should be a list of one or more login names, group names, or ALL (always matches). A pattern of the form user@host is matched when the login name matches the "user" part, and when the "host" part matches the local machine name. The third field should be a list of one or more tty names (for non-networked logins), host names, domain names (begin with "."), host addresses, internet network numbers (end with "."), ALL (always matches) or LOCAL (matches any string that does not contain a "." character). In our example denied to john user to login locally. QUESTION NO: 38 You have a domain in your LAN example.com. Configure to allow login to jack only from station10.example.com. Answer and Explanation: 1. vi /etc/security/access.conf -:jack:ALL EXCEPT station10.example.com 2. vi /etc/pam.d/system-auth account required /lib/security/pam_access.so /etc/security/access.conf file helps to allow or deny login to users on the basis of origin. Syntax of /etc/security/access.conf permission : users : origins
RH302
Leading the way in IT testing and certification tools, www.testking.com
- 92 -
The first field should be a "+" (access granted) or "-" (access denied) character. The second field should be a list of one or more login names, group names, or ALL (always matches). A pattern of the form user@host is matched when the login name matches the "user" part, and when the "host" part matches the local machine name. The third field should be a list of one or more tty names (for non-networked logins), host names, domain names (begin with "."), host addresses, internet network numbers (end with "."), ALL (always matches) or LOCAL (matches any string that does not contain a "." character). The EXCEPT operator makes it possible to write very compact rules QUESTION NO: 39 One User named peter working with you as your assistance. His main responsibility is to manager users. Give the privilege to run useradd, passwd, groupadd, userdel, groupdel, usermod command using sudo. Answer and Explanation 1. visudo # User alias Specification User_alias LIMITEDTRUST=peter # Cmnd alias Specification Cmnd_alias MINIMUM=/usr/sbin/useradd, /usr/bin/passwd, /usr/sbin/groupadd, /usr/sbin/userdel, /usr/sbin/groupdel, /usr/sbin/usermod
# User Privilege Specification LIMITEDTRUST ALL=MINIMUM 2. Login as peter user and run sudo useradd username Using Sudo we can give root level privilege on commands. Visudo is the sudo editor. In user alias Specification we create the user alias and in Cmnd alias Specification, we create the command alias. In User Privilege Specification section, list the users, groups allowed to use the sudo. QUESTION NO: 40 You have a domain in your LAN named example.com. Allow the FTP connection only from local domain.
RH302
Leading the way in IT testing and certification tools, www.testking.com
- 93 -
Answer and Explanation: 1. vi /etc/hosts.deny vsftpd:ALL EXCEPT .example.com We can secure the services using tcp_wrappers. There are main two files, /etc/hosts.allow and /etc/hosts.deny. There will be three stage access checking -Is access explicitly permitted? Means permitted from /etc/hosts.allow? - Otherwise, Is access explicitly denied? Means denied from /etc/hosts.deny? - Otherwise, by default permit access if neither condition matched. To deny the services we can configure /etc/hosts.deny file using ALL and EXCEPT operation. Pattern of /etc/hosts.allow and /etc/hosts.deny file is: Demon_list:client_list:options In Client list can be either domain name or IP address. QUESTION NO: 41 Allow the NFS service only to example.com, trusted.cracker.org Answer and Explanation: 1. vi /etc/hosts.deny nfs,portmap:ALL EXCEPT .example.com, trusted.cracker.org We can secure the services using tcp_wrappers. There are main two files, /etc/hosts.allow and /etc/hosts.deny. There will be three stage access checking -Is access explicitly permitted? Means permitted from /etc/hosts.allow? - Otherwise, Is access explicitly denied? Means denied from /etc/hosts.deny? - Otherwise, by default permit access if neither condition matched. To deny the services we can configure /etc/hosts.deny file using ALL and EXCEPT operation. Pattern of /etc/hosts.allow and /etc/hosts.deny file is: Demon_list:client_list:options In Client list can be either domain name or IP address.
RH302
Leading the way in IT testing and certification tools, www.testking.com
- 94 -
QUESTION NO: 42 Configure to deny the pop and imap connection from outside local LAN as well as station20.example.com. Answer and Explanation: 1. vi /etc/hosts.deny dovecot:ALL EXCEPT .example.com EXCEPT station20.example.com We can secure the services using tcp_wrappers. There are main two files, /etc/hosts.allow and /etc/hosts.deny. There will be three stage access checking -Is access explicitly permitted? Means permitted from /etc/hosts.allow? - Otherwise, Is access explicitly denied? Means denied from /etc/hosts.deny? - Otherwise, by default permit access if neither condition matched. To deny the services we can configure /etc/hosts.deny file using ALL and EXCEPT operation. Pattern of /etc/hosts.allow and /etc/hosts.deny file is: Demon_list:client_list:options In Client list can be either domain name or IP address. QUESTION NO: 43 Deny the ALL services to the member of cracker.org but allow to trusted.cracker.org. Answer and Explanation: 1. vi /etc/hosts.deny ALL:.cracker.org EXCEPT trusted.cracker.org We can secure the services using tcp_wrappers. There are main two files, /etc/hosts.allow and /etc/hosts.deny. There will be three stage access checking -Is access explicitly permitted? Means permitted from /etc/hosts.allow? - Otherwise, Is access explicitly denied? Means denied from /etc/hosts.deny? - Otherwise, by default permit access if neither condition matched. To deny the services we can configure /etc/hosts.deny file using ALL and EXCEPT operation. Pattern of /etc/hosts.allow and /etc/hosts.deny file is:
RH302
Leading the way in IT testing and certification tools, www.testking.com
- 95 -
Demon_list:client_list:options In Client list can be either domain name or IP address. QUESTION NO: 44 Configure to allow the ssh service only from 192.168.0.0/24 except 192.168.0.4 Answer and Explanation: 1. vi /etc/hosts.deny sshd: 192.168.0. EXCEPT 192.168.0.4 We can secure the services using tcp_wrappers. There are main two files, /etc/hosts.allow and /etc/hosts.deny. There will be three stage access checking -Is access explicitly permitted? Means permitted from /etc/hosts.allow? - Otherwise, Is access explicitly denied? Means denied from /etc/hosts.deny? - Otherwise, by default permit access if neither condition matched. To deny the services we can configure /etc/hosts.deny file using ALL and EXCEPT operation. Pattern of /etc/hosts.allow and /etc/hosts.deny file is: Demon_list:client_list:options In Client list can be either domain name or IP address. QUESTION NO: 45 ssh service is enabled in your Server. Your LAN is connected to WAN also. Configure to match following conditions. i. Deny the ssh from outside the example.com domain members. ii. If any denied hosts tried for ssh then send the information through mail with client;s information. Answer and Explanation: 1. vi /etc/hosts.deny
RH302
Leading the way in IT testing and certification tools, www.testking.com
- 96 -
sshd:ALL EXCEPT .example.com: spawn echo “Loging attempt from %c to %s” | mail –s “Login from denied hosts” root We can secure the services using tcp_wrappers. There are main two files, /etc/hosts.allow and /etc/hosts.deny. There will be three stage access checking -Is access explicitly permitted? Means permitted from /etc/hosts.allow? - Otherwise, Is access explicitly denied? Means denied from /etc/hosts.deny? - Otherwise, by default permit access if neither condition matched. To deny the services we can configure /etc/hosts.deny file using ALL and EXCEPT operation. Pattern of /etc/hosts.allow and /etc/hosts.deny file is: Demon_list:client_list:options In Client list can be either domain name or IP address. QUESTION NO: 46. Your LAN is 192.168.0.0/24. Block the telnet connection from outside the LAN. Answer and Explanation 1. vi /etc/hosts.deny in.telnetd:ALL EXCEPT 192.168.0. We can secure the services using tcp_wrappers. There are main two files, /etc/hosts.allow and /etc/hosts.deny. There will be three stage access checking -Is access explicitly permitted? Means permitted from /etc/hosts.allow? - Otherwise, Is access explicitly denied? Means denied from /etc/hosts.deny? - Otherwise, by default permit access if neither condition matched. To deny the services we can configure /etc/hosts.deny file using ALL and EXCEPT operation. Pattern of /etc/hosts.allow and /etc/hosts.deny file is: Demon_list:client_list:options In Client list can be either domain name or IP address. Here in.telnetd is the telnet server program name. QUESTION NO: 47.
RH302
Leading the way in IT testing and certification tools, www.testking.com
- 97 -
Configure the telnet connection only from your local LAN (192.168.0.0/24) between 9-17pm. Answer and Explanation 1. vi /etc/xinetd.d/telnet service telnet {
only_from = 192.168.0.0/24 access_times = 09:00-17:00
} 2. chkconf telnet on 3. service xinetd restart xinetd based services can manage by specifying host and time parameters. Only_from means connection allowed network, remaining hosts explicitly deny. access_times specify when service is available. QUESTION NO: 48. You have a ftp server having IP address 192.168.0.254. Using iptables, allow the ftp connection only from the internal network where internal network is 192.168.0.0/24. Answer and Explanation 1. iptables –t filter –A INPUT –s ! 192.168.0.0/24 –p tcp –d 192.168.0.254 --dport 20 –j DROP 2. iptables –t filter –A INPUT –s ! 192.168.0.0/24 –p tcp –d 192.168.0.254 --dport 21 –j DROP iptables is the build-in firewall tools, used to filter the packets and for nat. By identifying Source Address, Destination Address, type of protocol, source and destination port we can filter the packets. -s Source Address -d Destination Address -p Layer 3 Protocol -d Destination Address --sport Source Prot --dport Destination Port -i Incoming Interface -o Outgoing Interface -t Table either filter or nat or mangle
RH302
Leading the way in IT testing and certification tools, www.testking.com
- 98 -
-A Chain can be either INPUT, OUTPUT, FORWARD, PREROUTING, POSTROUTING. QUESTION NO: 49. Your LAN is connected to WAN also. You want to deny the ssh coming from WAN. Configure using iptables to allow ssh connection only from the Local LAN where you LAN IP address is 192.168.0.0/24. Answer And Explanation 1. iptables –t filter –A INPUT –s ! 192.168.0.0/24 –p tcp --dport 22 –j DROP iptables is the build-in firewall tools, used to filter the packets and for nat. By identifying Source Address, Destination Address, type of protocol, source and destination port we can filter the packets. -s Source Address -d Destination Address -p Layer 3 Protocol -d Destination Address --sport Source Prot --dport Destination Port -i Incoming Interface -o Outgoing Interface -t Table either filter or nat or mangle -A Chain can be either INPUT, OUTPUT, FORWARD, PREROUTING, POSTROUTING. ssh service use the 22 port so we can block connection from outside the LAN. QUESTION NO: 50. You have a dedicated internet line in your LAN and IP from your ISP is 202.2.2.2. Your LAN is in 192.168.0.0/24. Configure the SNAT that allows all system in your LAN can access the Internet. Answer and Explanation 1. iptables -t nat -A POSTROUTING -s 192.168.0.0/24 -p tcp -j SNAT –to-source 202.2.2.2. POSTROUTING This filter point handles packets immediately prior leaving the system. When Packets leave the system all’s source address change to 202.2.2.2 and can access

RH302
Leading the way in IT testing and certification tools, www.testking.com
- 99 -
the internet. iptables is the build-in firewall tools, used to filter the packets and for nat. By identifying Source Address, Destination Address, type of protocol, source and destination port we can filter the packets. -s Source Address -d Destination Address -p Layer 3 Protocol -d Destination Address --sport Source Prot --dport Destination Port -i Incoming Interface -o Outgoing Interface -t Table either filter or nat or mangle -A Chain can be either INPUT, OUTPUT, FORWARD, PREROUTING, POSTROUTING. QUESTION NO: 51 ssh service is enabled in your Server. Configure to - Deny the ssh from cracker.org domain.
- Allow the ssh service only from example.com domain. Answer and Explanation: 1. vi /etc/hosts.deny sshd:ALL EXCEPT .example.com or 1. vi /etc/hosts.deny sshd:ALL 2. vi /etc/hosts.allow sshd:.example.com We can secure the services using tcp_wrappers. There are main two files, /etc/hosts.allow and /etc/hosts.deny. There will be three stage access checking - Is access explicitly permitted? Means permitted from /etc/hosts.allow? - Otherwise, Is access explicitly denied? Means denied from /etc/hosts.deny? - Otherwise, by default permit access if neither condition matched. To deny the services we can configure /etc/hosts.deny file using ALL and EXCEPT operation. Pattern of /etc/hosts.allow and /etc/hosts.deny file is: Demon_list:client_list:options In Client list can be either domain name or IP address.
RH302
Leading the way in IT testing and certification tools, www.testking.com
- 100 -
QUESTION NO: 52 You have a domain in your LAN named example.com and cracker.org. Allow the - Allow the FTP connection only from local domain.
- Deny the FTP connection from cracker.org Answer and Explanation: 1. vi /etc/hosts.deny vsftpd:ALL EXCEPT .example.com or 1. vi /etc/hosts.deny vsftpd:ALL 2. vi /etc/hosts.allow vsftpd:.example.com We can secure the services using tcp_wrappers. There are main two files, /etc/hosts.allow and /etc/hosts.deny. There will be three stage access checking - Is access explicitly permitted? Means permitted from /etc/hosts.allow? - Otherwise, Is access explicitly denied? Means denied from /etc/hosts.deny? - Otherwise, by default permit access if neither condition matched. To deny the services we can configure /etc/hosts.deny file using ALL and EXCEPT operation. Pattern of /etc/hosts.allow and /etc/hosts.deny file is: Demon_list:client_list:options In Client list can be either domain name or IP address. QUESTION NO: 53 Configure to allow the pop3 and imap connection from your domain example.com and cracker.org domain. Answer and Explanation: 1. vi /etc/hosts.deny
RH302
Leading the way in IT testing and certification tools, www.testking.com
- 101 -
dovecot:ALL EXCEPT .example.com, .cracker.org We can secure the services using tcp_wrappers. There are main two files, /etc/hosts.allow and /etc/hosts.deny. There will be three stage access checking - Is access explicitly permitted? Means permitted from /etc/hosts.allow? - Otherwise, Is access explicitly denied? Means denied from /etc/hosts.deny? - Otherwise, by default permit access if neither condition matched. To deny the services we can configure /etc/hosts.deny file using ALL and EXCEPT operation. Pattern of /etc/hosts.allow and /etc/hosts.deny file is: Demon_list:client_list:options In Client list can be either domain name or IP address. QUESTION NO: 54 Share the /data directory only to example.com members. These hosts should get read and write access on shared directory. Answer and Explanation: 1. vi /etc/exports /data *.example.com(rw,sync) 2. service nfs start 3. service portmap restart 4. chkconfig nfs on 5. chkconfig portmap on In Linux to share the data we use the /etc/exports file. Pattern is: Path client(permission) Shared Directory Path, Client can be single host or domain name or ip address. Permission should specify without space with client lists in parentheses. QUESTION NO: 55 /data directory on linux server should make available on windows to only john with full access but read only to other users and make sure that /data can access only within example.com domain. Configure to make available. Answer and Explanation: 1. vi /etc/samba/smb.conf [global]
RH302
Leading the way in IT testing and certification tools, www.testking.com
- 102 -
netbios name=station? workgroup=station? security=user smb passwd file=/etc/samba/smbpasswd encrypt passwords=yes hosts allow= .example.com [data] path=/data public=no writable=no write list=john browsable=yes 2. smbpasswd -a john 3. service smb start 4. chkconfig smb on /etc/samba/smb.conf. There are some pre-defined section, i. global use to define the global options, ii. Printers use to share the printers, iii. homes use the share the user’s home directory. Security=user validation by samba username and password. May be there are other users also. To allow certain share to certain user we should use valid users option. smbpasswd Helps to change user’s smb password. –a option specifies that the username following should be added to the local smbpasswd file. If any valid users option is not specified, then all samba users can access the shared data. By Default shared permission is on writable=no means read only sharing. Write list option is used to allow write access on shared directory to certain users or group members. QUESTION NO: 56 /data directory on linux server should make available on windows system that eric user should able to access on read only mode within example.com domain. Answer and Explanation: 1. vi /etc/samba/smb.conf [global] netbios name=station? workgroup=station? security=user smb passwd file=/etc/samba/smbpasswd encrypt passwords=yes hosts allow= .example.com
RH302
Leading the way in IT testing and certification tools, www.testking.com
- 103 -
[data] path=/data public=no writable=no browsable=yes 2. smbpasswd -a eric 3. service smb start 4. chkconfig smb on /etc/samba/smb.conf. There are some pre-defined section, i. global use to define the global options, ii. Printers use to share the printers, iii. homes use the share the user’s home directory. Security=user validation by samba username and password. May be there are other users also. To allow certain share to certain user we should use valid users option. smbpasswd Helps to change user’s smb password. –a option specifies that the username following should be added to the local smbpasswd file. QUESTION NO: 57 Configure the send mail server for your local LAN. As well as the mail of user john should get by the jane user. Answer and Explanation: Here your Local LAN means your domain named example.com. 1. vi /etc/mail/local-host-names example.com 2. vi /etc/mail/sendmail.mc dnl # DEAMON_OPTIONS(`Port=smtp,Addr=127.0.0.1,Name=MTA`)dnl 3. m4 /etc/mail/sendmail.mc >/etc/mail/sendmail.cf 4. vi /etc/mail/access 192.168.0 RELAY 5. service sendmail start | restart 6. chkconfig sendmail on /etc/mail/local-host-names file contains the aliases to hostname. Mail server program reads the /etc/mail/sendmail.cf. To change the configuration on mail server, we should edit the /etc/mail/sendmail.mc file and should generate the sendmail.cf using m4 command. By default sendmail server allows to connect to local host only. So we should edit the /etc/mail/sendmail.mc file to allow connect to other hosts. By default sendmail server will not forward mail. we should specify on /etc/mail/access to relay or to block mail coming from domain or network or individual email address. 7. vi /etc/aliases

RH302
Leading the way in IT testing and certification tools, www.testking.com
- 104 -
john: jane 8. newaliases We can redirect the mail of one user to another user using /etc/aliases file. In example all mail of john goes to jane user. QUESTION NO: 58 If any mail coming from outside of the local LAN block all mails. Answer and Explanation: Outside the LAN means cracker.org. All host on exam on example.com domain and outside domain means cracker.org. To block the mail coming from cracker.org 1. vi /etc/mail/access @cracker.rog REJECT 2. service sendmail start | restart 3. chkconfig sendmail on QUESTION NO: 59 If root sends the mail to jane, mail should be send to /var/spool/mail/jane. Answer and Explanation: By default all mails to user will send to user’s spool directory. Nothing to do. QUESTION NO: 60 All mails to cracker.org should get by eric user. Answer and explanation: 1. vi /etc/mail/virtusertable
@cracker.org eric 2. service sendmail restart /etc/mail/virtusertable file is used to send the mail coming for virtual user to real user. According to question, all mail to cracker.org should get by eric user so @cracker.org eric : Which sends all mail of cracker.org to eric user.
RH302
Leading the way in IT testing and certification tools, www.testking.com
- 105 -
QUESTION NO: 61 All mails to my133t.org should get by marion user. Answer and explanation: 3. vi /etc/mail/virtusertable
@my133t.org marion # service sendmail restart /etc/mail/virtusertable file is used to send the mail coming for virtual user to real user. According to question, all mail to cracker.org should get by eric user so @my133t.org eric : Which sends all mail of cracker.org to eric user. QUESTION NO: 62 If any mail coming from outside of the local LAN block all mails. Answer and Explanation: Outside the LAN means my133t.org. All host on exam on example.com domain and outside domain means cracker.org. To block the mail coming from cracker.org 1. vi /etc/mail/access @my133t.org REJECT 2. service sendmail start | restart 3. chkconfig sendmail on QUESTION NO: 63 Any mail coming for accountmanager should get by jeff user. Answer and Explanation: 1. vi /etc/mail/virtusertable accountmanager@ jeff 2. service sendmail restart QUESTION NO: 64 Your Machine Name is stationx.example.com, (x is your host IP address) which is already resolved. Set the default page for stationx.example.com by downloading www.html file from ftp.server1.example.com. Answer and Explanation:
RH302
Leading the way in IT testing and certification tools, www.testking.com
- 106 -
1. ftp ftp.server1.example.com a. Download the www.html
Check the SELinux context of index page , should like this: -rw-r--r-- root root system_u:object_r:httpd_sys_content_t /var/www/html/index.html If SELinux Context is mismatched, use the restorecon –R /var command
2. move the downloaded file into /var/www/html 3. Rename the file into index.html 4. Check using links http://stationx.example.com
/var/www/html is the default directory for httpd service. Index.html is the default directory index. To set the default page without configuring virtualhost copy the file as a index.html in /var/www/html. QUESTION NO: 65 Configure the webserver for your local domain. Download a www.html file from ftp.server1.example.com/pub/rhce and rename it as index.html. Answer and Explanation: Your local domain mean example.com domain. Lookup the example.com using host example.com you will get the IP address 192.168.0.254. 1. vi /etc/httpd/conf/httpd.conf <VirtualHost 192.168.0.254> ServerName sexample.com DocumentRoot /var/www/example DirectoryIndex index.html ServerAdmin [email protected] </VirtualHost> 2. mkdir /var/www/example 3. Download the index.html file from the ftp server specified in question 4. Rename the www.html file to index.html Check the SELinux context of index page , should like this: -rw-r--r-- root root system_u:object_r:httpd_sys_content_t /var/www/html/index.html If SELinux Context is mismatched, use the restorecon –R /var command
5. service httpd start|restart 6. chkconfig httpd on 7. check using: links http://example.com
RH302
Leading the way in IT testing and certification tools, www.testking.com
- 107 -
QUESTION NO: 66 Eric user should able to write on Document root directory. Answer and Explanation: Document directive is used in apache configuration file to specify the directory where all web site related documents are. According to question eric user should able to write into the Document root directory. Better set the permission using ACL (Access Control List), to apply the permission using acl needs to mount the filesystem with acl options. Example in above answer documentroot is in /var and /var is mounting separate file system so needs to mount the /var file system with acl option.
1. vi /etc/fstab LABEL=/var /var ext3 defaults 1 1 2. mount –o remount /var 3. setfacl –m u:eric:rwx /var/www/example 4. getfacl /var/www/example
getfacl and setfacl two commands used to maintain the permission through acl. setfacl is used to set the permission on file/directory, getfacl is used to display the permission of file/directory. QUESTION NO: 67 Port 8080 Configure the squid server to allow the Local Domain and deny to cracker.org domain. Answer and Explanation: At exam Lab example.com domain resides on 192.168.0.0/24 Network and cracker.org resides on 192.168.1.0/24 Network. 1. vi /etc/squid/squid.conf
#detault: http_port 8080 #Recommended minimum configuration: # Near the src acl src section acl allownet src 192.168.0.0/255.255.255.0 acl denynet src 192.168.1.0/255.255.255.0 #Default: # http_access deny all
#Under Here http_access allow allownet
RH302
Leading the way in IT testing and certification tools, www.testking.com
- 108 -
http_access deny denynet 2. service squid start 3. chkconfig squid on squid is a proxy caching server, using squid we can share the internet, block the internet, to certain network. First we should define the port for squid, the standard port for squid is 3128. We can run squid on different port by specifying http_port portnumber. QUESTION NO: 68 User jeff should able to access the mail using IMAP over SSL Answer and Explanation: IMAP is a very usefully protocol, but it lacks encryption. The dovecot package distributed with RHEL includes the ability to use IMAP over SSL, This requires the creation of a PEM format certificate.
1. cd /etc/pki/tls/ and remove the cert.pem. 2. Go the /etc/pki/tls/certs then use: 3. make dovecot.pem : Which generates the dovecot.pem certificate by reading
MakeFile 4. Enable the imaps with Certificate and Key file protocol from /etc/dovecot.conf vi /etc/dovecot.conf
protocols = imap imaps ssl_cert_file = /etc/pki/dovecot/certs/dovecot.pem ssl_key_file = /etc/pki/dovecot/private/dovecot.pem
5. service dovecot restart : Restart the Dovecot service
QUESTION NO: 69 ssh service is enabled in your Server. Configure to - Deny the ssh from my133t.org domain.
- Allow the ssh service only from example.com domain. Answer and Explanation: 1. vi /etc/hosts.deny sshd:ALL EXCEPT .example.com or 1. vi /etc/hosts.deny sshd:ALL 2. vi /etc/hosts.allow sshd:.example.com
RH302
Leading the way in IT testing and certification tools, www.testking.com
- 109 -
We can secure the services using tcp_wrappers. There are main two files, /etc/hosts.allow and /etc/hosts.deny. There will be three stage access checking - Is access explicitly permitted? Means permitted from /etc/hosts.allow? - Otherwise, Is access explicitly denied? Means denied from /etc/hosts.deny? - Otherwise, by default permit access if neither condition matched. To deny the services we can configure /etc/hosts.deny file using ALL and EXCEPT operation. Pattern of /etc/hosts.allow and /etc/hosts.deny file is: Demon_list:client_list:options In Client list can be either domain name or IP address. QUESTION NO: 70 You have a domain in your LAN named example.com and my133t.org. Allow the - Allow the FTP connection only from local domain.
- Deny the FTP connection from my133t.org Answer and Explanation: 1. vi /etc/hosts.deny vsftpd:ALL EXCEPT .example.com or 1. vi /etc/hosts.deny vsftpd:ALL 2. vi /etc/hosts.allow vsftpd:.example.com We can secure the services using tcp_wrappers. There are main two files, /etc/hosts.allow and /etc/hosts.deny. There will be three stage access checking - Is access explicitly permitted? Means permitted from /etc/hosts.allow? - Otherwise, Is access explicitly denied? Means denied from /etc/hosts.deny? - Otherwise, by default permit access if neither condition matched. To deny the services we can configure /etc/hosts.deny file using ALL and EXCEPT operation. Pattern of /etc/hosts.allow and /etc/hosts.deny file is: Demon_list:client_list:options In Client list can be either domain name or IP address. QUESTION NO: 71
RH302
Leading the way in IT testing and certification tools, www.testking.com
- 110 -
Configure to allow the pop3 and imap connection from your domain example.com and my133t.org domain. Answer and Explanation: 1. vi /etc/hosts.deny dovecot:ALL EXCEPT .example.com, .my133t.org We can secure the services using tcp_wrappers. There are main two files, /etc/hosts.allow and /etc/hosts.deny. There will be three stage access checking - Is access explicitly permitted? Means permitted from /etc/hosts.allow? - Otherwise, Is access explicitly denied? Means denied from /etc/hosts.deny? - Otherwise, by default permit access if neither condition matched. To deny the services we can configure /etc/hosts.deny file using ALL and EXCEPT operation. Pattern of /etc/hosts.allow and /etc/hosts.deny file is: Demon_list:client_list:options In Client list can be either domain name or IP address. QUESTION NO: 72 Port 8080 Configure the squid server to allow the Local Domain and deny to my133t.org domain. Answer and Explanation: At exam Lab example.com domain resides on 172.24.0.0/16 Network and my133t.org resides on 172.25.0.0/16 Network. 1. vi /etc/squid/squid.conf
#detault: http_port 8080 #Recommended minimum configuration: # Near the src acl src section acl allownet src 172.24.0.0/255.255.0.0 acl denynet src 172.25.0.0/255.255.0.0 #Default: # http_access deny all
#Under Here http_access allow allownet http_access deny denynet
2. service squid start
RH302
Leading the way in IT testing and certification tools, www.testking.com
- 111 -
3. chkconfig squid on squid is a proxy caching server, using squid we can share the internet, block the internet, to certain network. First we should define the port for squid, the standard port for squid is 3128. We can run squid on different port by specifying http_port portnumber. QUESTION NO: 73 /storage directory on linux server should make available on windows to only Harold with full access but read only to other users and make sure that /storage can access only within example.com domain. Configure to make available. Answer and Explanation: 1. vi /etc/samba/smb.conf [global] netbios name=station? workgroup=station? security=user smb passwd file=/etc/samba/smbpasswd encrypt passwords=yes hosts allow= .example.com [data] path=/storage public=no writable=no write list=harold browsable=yes 2. smbpasswd -a harold 3. service smb start 4. chkconfig smb on /etc/samba/smb.conf. There are some pre-defined section, i. global use to define the global options, ii. Printers use to share the printers, iii. homes use the share the user’s home directory. Security=user validation by samba username and password. May be there are other users also. To allow certain share to certain user we should use valid users option. smbpasswd Helps to change user’s smb password. –a option specifies that the username following should be added to the local smbpasswd file. If any valid users option is not specified, then all samba users can access the shared data. By Default shared permission is on writable=no means read only sharing. Write list option is used to allow write access on shared directory to certain users or group members.
RH302
Leading the way in IT testing and certification tools, www.testking.com
- 112 -
QUESTION NO: 74 /storage directory on linux server should make available on windows system that jeff user should able to access on read only mode within example.com domain. Answer and Explanation: 1. vi /etc/samba/smb.conf [global] netbios name=station? workgroup=station? security=user smb passwd file=/etc/samba/smbpasswd encrypt passwords=yes hosts allow= .example.com [data] path=/data public=no writable=no browsable=yes 2. smbpasswd -a jeff 3. service smb start 4. chkconfig smb on /etc/samba/smb.conf. There are some pre-defined section, i. global use to define the global options, ii. Printers use to share the printers, iii. homes use the share the user’s home directory. Security=user validation by samba username and password. May be there are other users also. To allow certain share to certain user we should use valid users option. smbpasswd Helps to change user’s smb password. –a option specifies that the username following should be added to the local smbpasswd file. QUESTION NO: 75 Share the /storage directory only to example.com members. These hosts should get read and write access on shared directory. Answer and Explanation: 1. vi /etc/exports /storage *.example.com(rw,sync) 2. service nfs start 3. service portmap restart 4. chkconfig nfs on

RH302
Leading the way in IT testing and certification tools, www.testking.com
- 113 -
5. chkconfig portmap on In Linux to share the data we use the /etc/exports file. Pattern is: Path client(permission) Shared Directory Path, Client can be single host or domain name or ip address. Permission should specify without space with client lists in parentheses. Topic 4, Practice – Debug (37 Questions) Use these questions to reinforce exam concepts. QUESTION NO: 1 Make Successfully Resolve to server1.example.com where DNS Server is 192.168.0.254. Answer: 1. vi /etc/resolv.conf Write : nameserver 192.168.0.254 Explanation:
DNS is the Domain Name System, which maintains a database that can help your computer translate domain names such as www.redhat.com to IP addresses such as 216.148.218.197. As no individual DNS server is large enough to keep a database for the entire Internet, they can refer requests to other DNS servers.
DNS is based on the named daemon, which is built on the BIND (Berkeley Internet Name Domain) package developed through the Internet Software Consortium Users wants to access by name so DNS will interpret the name into ip address. You need to specify the Address if DNS server in each and every client machine. In Redhat Enterprise Linux, you need to specify the DNS server into /etc/resolv.conf file. After Specifying the DNS server address, you can verify using host, dig and nslookup commands. #host server1.example.com QUESTION NO: 2 Quota is implemented on /data but not working properly. Find out the Problem and implement the quota to user1 to have a soft limit 60 inodes (files) and hard limit of 70 inodes (files). Answer and Explanation:
RH302
Leading the way in IT testing and certification tools, www.testking.com
- 114 -
Quotas are used to limit a user's or a group of users' ability to consume disk space. This prevents a small group of users from monopolizing disk capacity and potentially interfering with other users or the entire system. Disk quotas are commonly used by ISPs, by Web hosting companies, on FTP sites, and on corporate file servers to ensure continued availability of their systems.
Without quotas, one or more users can upload files on an FTP server to the point of filling a filesystem. Once the affected partition is full, other users are effectively denied upload access to the disk. This is also a reason to mount different filesystem directories on different partitions. For example, if you only had partitions for your root (/) directory and swap space, someone uploading to your computer could fill up all of the space in your root directory (/). Without at least a little free space in the root directory (/), your system could become unstable or even crash.
You have two ways to set quotas for users. You can limit users by inodes or by kilobyte-sized disk blocks. Every Linux file requires an inode. Therefore, you can limit users by the number of files or by absolute space. You can set up different quotas for different filesystems. For example, you can set different quotas for users on the /home and /tmp directories if they are mounted on their own partitions.
Limits on disk blocks restrict the amount of disk space available to a user on your system. Older versions of Red Hat Linux included LinuxConf, which included a graphical tool to configure quotas. As of this writing, Red Hat no longer has a graphical quota configuration tool. Today, you can configure quotas on RHEL only through the command line interface. 1. vi /etc/fstab /dev/hda11 /data ext3 defaults,usrquota 1 2 2. Either Reboot the System or remount the partition. Mount –o remount /dev/hda11 /data 3. touch /data/aquota.user 4. quotacheck –ufm /data 5. quotaon -u /data 6. edquota –u user1 /data and Specified the Soft limit and hard limit on opened file. To verify either quota is working or not: Soft limit specify the limit to generate warnings to users and hard limit can’t cross by the user. Use the quota command or repquota command to monitor the quota information. QUESTION NO: 3
RH302
Leading the way in IT testing and certification tools, www.testking.com
- 115 -
One Logical Volume named lv1 is created under vg0. The Initial Size of that Logical Volume is 100MB. Now you required the size 500MB. Make successfully the size of that Logical Volume 500M without losing any data. As well as size should be increased online. Answer and Explanation: The LVM system organizes hard disks into Logical Volume (LV) groups. Essentially, physical hard disk partitions (or possibly RAID arrays) are set up in a bunch of equal-sized chunks known as Physical Extents (PE). As there are several other concepts associated with the LVM system, let's start with some basic definitions:
• Physical Volume (PV) is the standard partition that you add to the LVM mix. Normally, a physical volume is a standard primary or logical partition. It can also be a RAID array.
• Physical Extent (PE) is a chunk of disk space. Every PV is divided into a number of equal sized PEs. Every PE in a LV group is the same size. Different LV groups can have different sized PEs.
• Logical Extent (LE) is also a chunk of disk space. Every LE is mapped to a specific PE.
• Logical Volume (LV) is composed of a group of LEs. You can mount a filesystem such as /home and /var on an LV.
• Volume Group (VG) is composed of a group of LVs. It is the organizational group for LVM. Most of the commands that you'll use apply to a specific VG.
1. Verify the size of Logical Volume: lvdisplay /dev/vg0/lv1 2. Verify the Size on mounted directory: df –h or df –h mounted directory name 3. Use : lvextend –L+400M /dev/vg0/lv1 4. ext2online –d /dev/vg0/lv1 to bring extended size online. 5. Again Verify using lvdisplay and df –h command. QUESTION NO: 4 Create one partitions having size 100MB and mount it on /data.
RH302
Leading the way in IT testing and certification tools, www.testking.com
- 116 -
Answer and Explanation: 12. Use fdisk /dev/hda To create new partition. 13. Type n For New partitions 14. It will ask for Logical or Primary Partitions. Press l for logical. 15. It will ask for the Starting Cylinder: Use the Default by pressing Enter Key. 16. Type the Size: +100M You can Specify either Last cylinder of Size here. 17. Press P to verify the partitions lists and remember the partitions name. 18. Press w to write on partitions table. 19. Either Reboot or use partprobe command. 20. Use mkfs –t ext3 /dev/hda? Or mke2fs –j /dev/hda? To create ext3 filesystem. 21. vi /etc/fstab Write: /dev/hda? /data ext3 defaults 0 0 11. Verify by mounting on current Sessions also: mount /dev/hda? /data
QUESTION NO: 5 You are new System Administrator and from now you are going to handle the system and your main task is Network monitoring, Backup and Restore. But you don’t know the root password. Change the root password to redhat and login in default Runlevel. Answer and Explanation: When you Boot the System, it starts on default Runlevel specified in /etc/inittab: Id:?:initdefault: When System Successfully boot, it will ask for username and password. But you don’t know the root’s password. To change the root password you need to boot the system into single user mode. You can pass the kernel arguments from the boot loader. 7. Restart the System. 8. You will get the boot loader GRUB screen. 9. Press a and type 1 or s for single mode ro root=LABEL=/ rhgb queit s 10. System will boot on Single User mode. 11. Use passwd command to change. 12. Press ctrl+d
RH302
Leading the way in IT testing and certification tools, www.testking.com
- 117 -
QUESTION NO: 6 There are more then 400 Computers in your Office. You are appointed as a System Administrator. But you don’t have Router. So, you are going to use your One Linux Server as a Router. How will you enable IP packets forward? Answer and Explanation: 1. /proc is the virtual filesystem, we use /proc to modify the kernel parameters at running time. # echo “1” >/proc/sys/net/ipv4/ip_forward 2. /etc/sysctl.conf when System Reboot on next time, /etc/rc.d/rc.sysinit scripts reads the file /etc/sysctl.conf. To enable the IP forwarding on next reboot also you need to set the parameter. net.ipv4.ip_forward=1 Here 0 means disable, 1 means enable.
QUESTION NO: 7 You Completely Install the Redhat Enterprise Linux ES 4 on your System. While start the system, it’s giving error to load X window System. How will you fix that problem and make boot successfully run X Window System.
Answer and Explanation: Think while Problems occurred on booting System on Runlevel 5 (X Window). 5. /tmp is full or not 6. Quota is already reached 7. Video card or resolution or monitor is misconfigured. 8. xfs service is running or not. Do These: 1. df –h /tmp /tmp is full remove the unnecessary file 6. quota username if quota is already reached remove unnecessary file from
home directory. 7. Boot the System in runlevel 3. you can pass the Kernel Argument from
boot loader. 8. Use command: system-config-display It will display a dialog to configure
the monitor, Video card, resolution etc. 9. Set the Default Runlevel 5 in /etc/inittab id:5:initdefault: 6. Reboot the System you will get the GUI login Screen.
RH302
Leading the way in IT testing and certification tools, www.testking.com
- 118 -
QUESTION NO: 8 There are two different networks, 192.168.0.0/24 and 192.168.1.0/24. Your System is in 192.168.0.0/24 Network. One RHEL 4 Installed System is going to use as a Router. All required configuration is already done on Linux Server. Where 192.168.0.254 and 192.168.1.254 IP Address are assigned on that Server. How will make successfully ping to 192.168.1.0/24 Network’s Host? Answer: 1. vi /etc/sysconfig/network GATEWAY=192.168.0.254 OR vi /etc/sysconf/network-scripts/ifcfg-eth0 DEVICE=eth0 BOOTPROTO=static ONBOOT=yes IPADDR=192.168.0.? NETMASK=255.255.255.0 GATEWAY=192.168.0.254 2. service network restart Explanation: Gateway defines the way to exit the packets. According to question System working as a router for two networks have IP Address 192.168.0.254 and 192.168.1.254. To get the hosts on 192.168.1.0/24 should go through 192.168.0.254.
QUESTION NO: 9 Make a swap partition having 100MB. Make Automatically Usable at System Boot Time. Answer and Explanation:
1. Use fdisk /dev/hda To create new partition. 17. Type n For New partition 18. It will ask for Logical or Primary Partitions. Press l for logical. 19. It will ask for the Starting Cylinder: Use the Default by pressing Enter Key. 20. Type the Size: +100M You can Specify either Last cylinder of Size here. 21. Press P to verify the partitions lists and remember the partitions name.
Default System ID is 83 that means Linux Native. 22. Type t to change the System ID of partition. 23. Type Partition Number 24. Type 82 that means Linux Swap. 25. Press w to write on partitions table.

RH302
Leading the way in IT testing and certification tools, www.testking.com
- 119 -
26. Either Reboot or use partprobe command. 27. mkswap /dev/hda? To create Swap File system on partition. 28. swapon /dev/hda? To enable the Swap space from partition. 29. free –m Verify Either Swap is enabled or not. 30. vi /etc/fstab /dev/hda? swap swap defaults 0 0 31. Reboot the System and verify using free command that swap is automatically
enabled or not.
QUESTION NO: 10 You are a System administrator. Using Log files very easy to monitor the system. Now there are 50 servers running as Mail, Web, Proxy, DNS services etc. You want to centralize the logs from all servers into on LOG Server. How will you configure the LOG Server to accept logs from remote host ? Answer and Explanation: By Default system accept the logs only generated from local host. To accept the Log from other host configure:
3. vi /etc/sysconfig/syslog SYSLOGD_OPTIONS="-m 0 -r"
Where -m 0 disables 'MARK' messages. -r enables logging from remote machines -x disables DNS lookups on messages recieved with -r
4. service syslog restart
QUESTION NO: 11 You are giving the debug RHCT exam. The examiner told you that the password of root is redhat. When you tried to login displays the error message and redisplayed the login screen. You changed the root password, again unable to login as a root. How will you make Successfully Login as a root.
Answer and Explanation:
When root unable to login into the system think: 4. Is password correct? 5. Is account expired? 6. Is terminal Blocked? Do these Steps:

RH302
Leading the way in IT testing and certification tools, www.testking.com
- 120 -
3. Boot the System on Single user mode. 4. Change the password 5. Check the account expire date by using chage –l root command. If account is expired, set net expire date: chage –E “NEVER” root 7. Check the file /etc/securetty Which file blocked to root login from
certain terminal. 8. If terminal is deleted or commented write new or uncomment. 9. Reboot the system and login as a root.
QUESTION NO: 12 You are giving RHCT Exam and in your Exam paper there is a question written, make successfully ping to 192.168.0.254.
Answer and Explanation:
In Network problem think to check: 7. IP Configuration: use ifconfig command either IP is assigned to interface or
not? 8. Default Gateway is set or not? 9. Hostname is set or not? 10. Routing problem is there? 11. Device Driver Module is loaded or not? 12. Device is activated or not? Check In this way: 5. use ifconfig command and identify which IP is assigned or not. 6. cat /etc/sysconfig/network What, What is written here. Actually here are
these parameters. NETWORKING=yes or no GATEWAY=x.x.x.x HOSTNAME=? NISDOMAIN=?
- Correct the file 7. Use netconfig command
- Either Select Automatically from DHCP or assign the static IP 8. Use service network restart or start command
Now try to ping it will work. QUESTION NO: 13 Set the Hostname station?.example.com where ? is your Host IP Address.

RH302
Leading the way in IT testing and certification tools, www.testking.com
- 121 -
Answer and Explanation: 4. hostname station?.example.com This will set the host name only for
current session. To set hostname permanently. 5. vi /etc/sysconfig/network
HOSTNAME=station?.example.com 6. service network restart
QUESTION NO: 14 The System you are using is for NFS (Network File Services). Some important data are shared from your system. Make automatically start the nfs and portmap services at boot time. Answer and Explanation: We can control the services for current session and for next reboot time. For current Session, we use service servicename start or restart or stop or status. For automatically at next reboot time:
3. chkconfig servicename on or off eg: chkconfig nfs on chkconfig portmap on or ntsysv Select the nfs and portmap services.
4. Reboot the system and identify whether services are running or not.
QUESTION NO: 15 There is one partition /dev/hda14 mounted on /data. The owner of /data is root user and root group. And Permission is full to owner user, read and execute to group member and no permission to others. Now you should give the full permission to user user1 without changing pervious permission.
Answer and Explanation: We know that every files/directories are owned by certain user and group. And Permissions are defines to owner user, owner group and other. -rwxr-x--- Full permission to owner user, read and write to owner group and no permission to others. According to question: We should give the full permission to user user1 without changing the previous permission.

RH302
Leading the way in IT testing and certification tools, www.testking.com
- 122 -
ACL (Access Control List), in ext3 file system we can give permission to certain user and certain group without changing previous permission. But that partition should mount using acl option. Follow the steps 5. vi /etc/fstab
/dev/hda14 /data ext3 defaults,acl 0 1 6. Either Reboot or use: mount –o remount /data 7. setfacl –m u:user1:rwx /data 8. Verify using: getfacl /data
QUESTION NO: 16 You are giving the RHCE exam. Now you should boot your System properly. When you started your System, You got one message that. INIT Entering runlevel 9 INIT: no more processes left in this runlevel How will you boot your System properly? Answer and Explanation: You should know about the /etc/inittab file, where default runlevel will define. And Much more runlevel specific Scripts are called here. Actually that problem will occur if you don’t specify the default runlevel.
4. Reboot the system 5. Boot the System on single user mode.
Except for a normal boot of Linux, single-user mode is the most commonly used option. This is the system maintenance mode for experienced Linux administrators. It allows you to perform clean backups and restores to any partitions as needed from local hardware. It also allows you to run administration commands, recover or repair password and shadow password files, run filesystem checks, and so forth.
6. vi /etc/inittab and Write
id:runlevel:initdefault: Standard Runlevels in RedHat Enterprise Linux
Runlevel Description
0 Halt
1 Single-user mode, for maintenance (backups/restores) and repairs
2 Multiuser, without networking
RH302
Leading the way in IT testing and certification tools, www.testking.com
- 123 -
Runlevel Description
3 Multiuser, with networking
4 Unused
5 X11, defaults to a GUI login screen. Logins bring the user to a GUI desktop.
6 Reboot (never set initdefault in /etc/inittab to this value!)
QUESTION NO: 17 You are giving RHCE exam. You should boot the system in Run level 3. When you start the system after while it is going on runlevel 6 : like
INIT: Entering Run level 6 Sending TERM Single
Fix the problem and boot the system. Answer and Explanation: It is due to either default runlevel or runlevel specific scripts.
3. id:?:initdefault: Where default runlevel is specified. It shouldn’t be 6. 4. l3:3:wait:/etc/rc.d/rc 6 It reads the scripts of runlevel 6 while
booting system on rulevel 3. It should be like: si::sysinit:/etc/rc.d/rc.sysinit l0:0:wait:/etc/rc.d/rc 0 l1:1:wait:/etc/rc.d/rc 1 l2:2:wait:/etc/rc.d/rc 2 l3:3:wait:/etc/rc.d/rc 3 Should be like this l4:4:wait:/etc/rc.d/rc 4 l5:5:wait:/etc/rc.d/rc 5 l6:6:wait:/etc/rc.d/rc 6
QUESTION NO: 18. You are giving RHCE exam. Examiner gave you the Boot related problem and told to you that make successfully boot the System. While booting system, you saw some error and stop the boot process by displaying some error messages.
RH302
Leading the way in IT testing and certification tools, www.testking.com
- 124 -
Kernel Panic – not syncing: Attempted to kill init! And no further boot process. What you will do to boot the system. Answer and Explanation: To understand the role of a boot loader, take a step back from Linux. When you boot your computer, the BIOS starts by detecting basic hardware, including your hard drives. Once it's done, it looks for the boot loader on the Master Boot Record of the first available disk. If you're working with an older PC, the BIOS can't find your boot loader unless it's located within the first 1,024 cylinders of the hard disk.
Newer BIOSes overcome this problem with Logical Block Addressing, which is also known as LBA mode. LBA mode reads 'logical' values for the cylinder, head, and sector, which allows the BIOS to 'see' a larger disk drive.
If you have multiple hard drives, there is one more caveat. If your drives are IDE hard drives, the /boot directory must be on a hard drive attached to the primary IDE controller. If your drives are all SCSI hard drives, the /boot directory must be located on a hard drive with SCSI ID 0 or ID 1. If you have a mix of hard drives, the /boot directory must be located on either the first IDE drive or a SCSI drive with ID 0. In other words, this is not an issue on the Red Hat exams unless the computer that you're tested on has more than two hard drives. And I believe that's less likely, as that would increase the cost of the exam. If you are getting the Kernel panic error, it means it is boot loader related problem. Redhat Enterprise Linux uses the GRUB boot loader. You can pass the kernel parameter from the boot loader as well as you can correct the kernel parameter passing from boot loader from GRUB screen at boot time. GRUB boot loader configuration file is: /etc/grub.conf And Correct Configuration is: default=0 timeout=5 splashimage=(hd0,0)/grub/splash.xpm.gz hiddenmenu title Red Hat Enterprise Linux ES (2.6.9-5.EL) root (hd0,0) kernel /vmlinuz-2.6.9-5.EL ro root=LABEL=/ rhgb quiet initrd /initrd-2.6.9-5.EL.img Probably miss-configured the boot loader, so giving this problem. You can pass the correct parameter from GRUB prompt:
Table 3-3: GRUB Editing Commands
Command Description
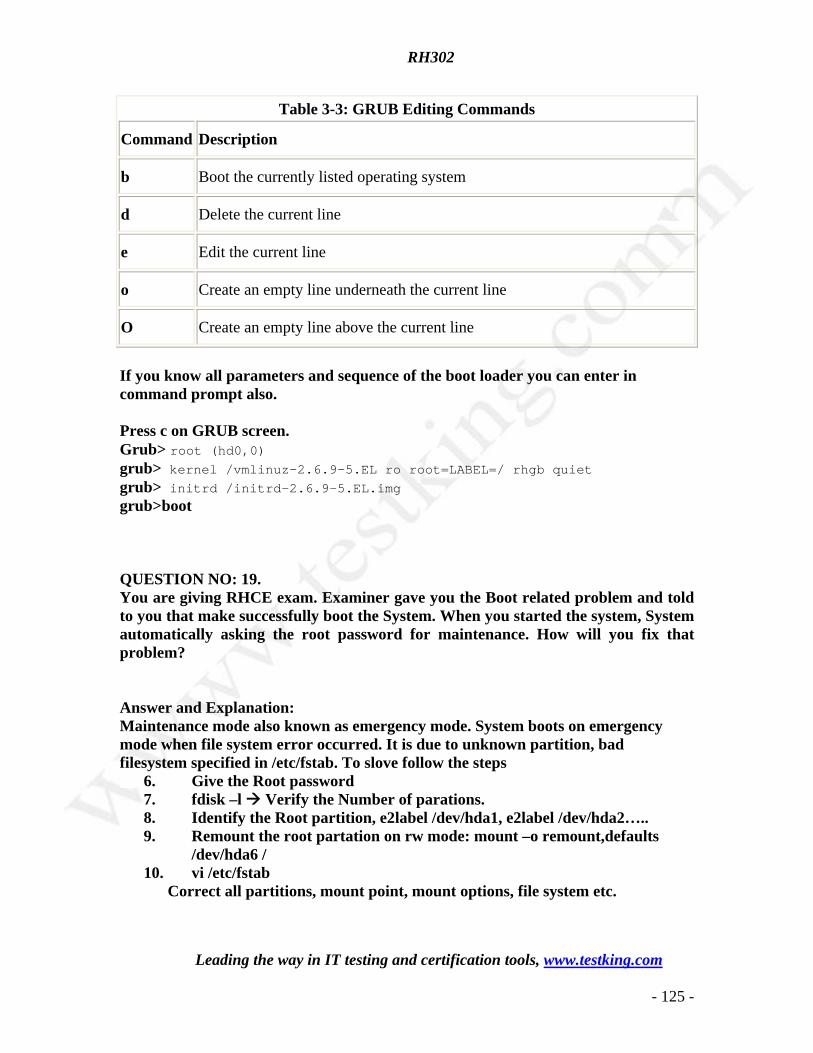
RH302
Leading the way in IT testing and certification tools, www.testking.com
- 125 -
Table 3-3: GRUB Editing Commands
Command Description
b Boot the currently listed operating system
d Delete the current line
e Edit the current line
o Create an empty line underneath the current line
O Create an empty line above the current line
If you know all parameters and sequence of the boot loader you can enter in command prompt also. Press c on GRUB screen. Grub> root (hd0,0) grub> kernel /vmlinuz-2.6.9-5.EL ro root=LABEL=/ rhgb quiet grub> initrd /initrd-2.6.9-5.EL.img grub>boot QUESTION NO: 19. You are giving RHCE exam. Examiner gave you the Boot related problem and told to you that make successfully boot the System. When you started the system, System automatically asking the root password for maintenance. How will you fix that problem? Answer and Explanation: Maintenance mode also known as emergency mode. System boots on emergency mode when file system error occurred. It is due to unknown partition, bad filesystem specified in /etc/fstab. To slove follow the steps
6. Give the Root password 7. fdisk –l Verify the Number of parations. 8. Identify the Root partition, e2label /dev/hda1, e2label /dev/hda2….. 9. Remount the root partation on rw mode: mount –o remount,defaults
/dev/hda6 / 10. vi /etc/fstab
Correct all partitions, mount point, mount options, file system etc.
RH302
Leading the way in IT testing and certification tools, www.testking.com
- 126 -
6. Press ctrl+d QUESTION NO: 20 You are working as an Administrator. There is a common data shared (/data) from 192.168.0.254 to all users in your local LAN. When user’s system start, shared data should automatically mount on /common directory. Answer And Explanation: To automatically mount at boot time we use the /etc/fstab file. Because /etc/rc.d/rc.sysinit file reads and mount all file system specified in /etc/fstab. To mount Network Sharing Files also use the /etc/fstab but filesystem is nfs.
3. vi /etc/fstab 192.168.0.254:/data /common nfs defaults 0 0
4. reboot the system. QUESTION NO: 21 One Logical Volume is created named as myvol under vo volume group and is mounted. The Initial Size of that Logical Volume is 124MB. Make successfully that the size of Logical Volume 245MB without losing any data. The size of logical volume 240MB to 255MB will be acceptable. Answer and Explanation: 1. First check the size of Logical Volume: lvdisplay /dev/vo/myvol 2. Increase the Size of Logical Volume: lvextend -L+121M /dev/vo/myvol 3. Make Available the size on online: ext2online /dev/vo/myvol 4. Verify the Size of Logical Volume: lvdisplay /dev/vo/myvol 5. Verify that the size comes in online or not: df -h We can extend the size of logical Volume using the lvextend command. As well as to decrease the size of Logical Volume, use the lvresize command. In LVM v2 we can extend the size of Logical Volume without unmount as well as we can bring the size of Logical Volume on online using ext2online command. QUESTION NO: 22
RH302
Leading the way in IT testing and certification tools, www.testking.com
- 127 -
There are two different networks 192.168.0.0/24 and 192.168.1.0/24. Where 192.168.0.254 and 192.168.1.254 IP Address are assigned on Server. Verify your network settings by pinging 192.168.1.0/24 Network’s Host. Answer and Explanation: At exam time read the Lab Scenario carefully. Actually there are two different networks one is 192.168.0.0/24 where your system resides know as example.com domain and another is 192.168.1.0/24 know as cracker.org domain. One server named sever1.example.com having 192.168.0.254 and 192.168.1.254 is running in your exam. If you make a gateway to that server, you will can ping because IP forwarding is enabled on that server. 1. vi /etc/sysconfing/network NETWORKING=yes HOSTNAME=station?.example.com GATEWAY=192.168.0.254 2. service network restart Or 1. vi /etc/sysconfig/network-scripts/ifcfg-eth0 DEVICE=eth0 ONBOOT=yes BOOTPROTO=static IPADDR=X.X.X.X NETMASK=X.X.X.X GATEWAY=192.168.0.254 2. ifdown eth0 3. ifup eth0 Note: If gateway is specified in both file, default gateway takes from interface specific file. QUESTION NO: 23 neo user tried by: dd if=/dev/zero of=/home/neo/somefile bs=1024 count=70 files created successfully. Again neo tried to create file having 70K using following command: dd if=/dev/zero of=/home/neo/somefile bs=1024 count=70 But he is unable to create the file. Make the user can create the file less then 70K.

RH302
Leading the way in IT testing and certification tools, www.testking.com
- 128 -
Answer and Explanation: Very Tricky question from redhat. Actually question is giving scenario to you to implement quota to neo user. You should apply the quota to neo user on /home that neo user shouldn’t occupied space more than 70K. 1. vi /etc/fstab LABEL=/home /home ext3 defaults,usrquota 0 0 To enable the quota on filesystem you should mount the filesystem with usrquota for user quota and grpquota for group quota. 2. touch /home/aquota.user Creating blank quota database file. 3. mount -o remount /home Remounting the /home with updated mount options. You can verify that /home is mounted with usrquota options or not using mount command. 4. quotacheck -u /home Initialization the quota on /home 5. edquota –u neo /home Quota Policy editor See the snapshot
1 Disk quotas for user neo (uid 500): 2 Filesystem blocks soft hard inodes soft hard
4 /dev/mapper/vo-myvol 2 30 70 1 0 0 Can you set the hard limit 70 and soft limit as you think like 30. QUESTION NO: 24 Your system is giving error to load X window System. Make successfully boot your system in runlevel5. Answer and Explanation: While you load the X Window System, you will get the problem. Problem may caused by different error. 1. Check the /tmp is full ? 2. Check your quota, hard limit is already crossed ? 3. Check xfs service is running ? 4. Configure the Video card, Resolution, monitor type using: system-config-display (Most Probably in Redhat exam) 5. Edit the /etc/inittab to set default runlevel 5. id:5:initdefault: QUESTION NO: 25 Your System is configured in 192.168.0.0/24 Network and your Domain nameserver is 192.168.0.254. Make successfully resolve to server1.example.com. Answer and Explanation:
RH302
Leading the way in IT testing and certification tools, www.testking.com
- 129 -
Very Easy question, nameserver is specified in question, 1. vi /etc/resolv.conf nameserver 192.168.0.254 2. host server1.example.com QUESTION NO: 26 One Package named zsh is dump on ftp://server1.example.com under /pub/updates directory and your FTP server is 192.168.0.254. Install the package zsh. Answer and Explanation: 1. rpm –ivh ftp://server1/example.com/pub/updates/zsh-* or 1. Login to ftp server : ftp ftp://server1.example.com using anonymous user. 2. Change the directory: cd pub and cd updates 3. Download the package: mget zsh-* 4. Quit from the ftp prompt : bye 5. Install the package 6. rpm -ivh zsh-* 7. Verify Either package installed or not : rpm -q zsh QUESTION NO: 27 Some users home directory is shared from your system. Using showmount –e localhost command, the shared directory is not shown. Make access the shared users home directory. Answer and Explanation: 1. Verify the File whether Shared or not ? : cat /etc/exports 2. Start the nfs service: service nfs start 3. Start the portmap service: service portmap start 4. Make automatically start the nfs service on next reboot: chkconfig nfs on 5. Make automatically start the portmap service on next reboot: chkconfig portmap on 6. Check default firewall is running in your system # service iptables status #iptables –F #service iptables stop #chkconfig iptables off 6. Verify Either sharing or not: showmount –e localhost
RH302
Leading the way in IT testing and certification tools, www.testking.com
- 130 -
You will see that some shared directory will display QUESTION NO: 28 Add a new logical partition having size 100MB and create the /data which will be the mount point for the new partition. Answer and Explanation:
16. Use fdisk /dev/hda To create new partition. 17. Type n For New partitions 18. It will ask for Logical or Primary Partitions. Press l for logical. 19. It will ask for the Starting Cylinder: Use the Default by pressing Enter Key. 20. Type the Size: +100M You can Specify either Last cylinder of Size here. 21. Press P to verify the partitions lists and remember the partitions name. 22. Press w to write on partitions table. 23. Either Reboot or use partprobe command. 24. Use mkfs –t ext3 /dev/hda? 25. Or 26. mke2fs –j /dev/hda? To create ext3 filesystem. 27. vi /etc/fstab 28. Write: 29. /dev/hda? /data ext3 defaults 0 0 22. Verify by mounting on current Sessions also: 30. mount /dev/hda? /data
QUESTION NO: 29 Boot your System Successfully on runlevel 3.
Answer and Explanation: This is boot related problem. There will be same questions repeated two times but problem is different. First When you restart the system you will get the Error: mount: error 15 mounting ext3 mount: error 2 mounting none switchroot: mount failed: 22 umount /initrd/dev/: 2 Kernel Panic: no syncing: Attempted to kill init ! This error occurred in your system before showing welcome redhat linux. That means problem in grub boot loader. Restart the System
RH302
Leading the way in IT testing and certification tools, www.testking.com
- 131 -
Check the grub boot loader configuration by pressing e shortcut key. You will see like: root (hd0,0) kernel /vmlinuz-2.6.9-5.EL ro root= / rhgb quiet initrd /initrd-2.6.9-5.EL.img OR root (hd0,0) kernel /vmlinuz-2.6.9-5.EL ro root=LABEL=/root rhgb quiet initrd /initrd-2.6.9-5.EL.img Then Edit Boot loader to make like root (hd0,0) kernel /vmlinuz-2.6.9-5.EL ro root=LABEL=/ rhgb quiet initrd /initrd-2.6.9-5.EL.img Check all lines and edit as same as above. Press b to boot the system After booting the system you should correct the /etc/grub.conf file. QUESTION NO: 30 Boot your System Successfully on run level 3. Answer and Explanation: After completing the Boot loader problem, you will boot the system, but it goes to emergency mode. Remember that if System boots on Emergency mode that means file system problem. You will get the Shell, remount the / filesystem with read and write mode. 1. First Find out the / filesystem using e2lable /dev/hda1, e2lable /dev/hda2 etc 2. mount –o remount,defaults /dev/hda? / 3. vi /etc/fstab You will get like: /root / ext3 defaults 1 1 or / /root ext3 defaults 1 1 4. Edit the file like:
/ / ext3 defaults 1 1 5. Configure the /etc/grub.conf file if just booting system by editing grub from grub prompt. 6. Reboot the system. QUESTION NO: 31 24. There is a server having 172.24.254.254 and 172.25.254.254. Your System lies on 172.24.0.0/16. Make successfully ping to 172.25.254.254 by Assigning following IP: 172.24.0.x Where x is your station number. Answer and Explanation:
RH302
Leading the way in IT testing and certification tools, www.testking.com
- 132 -
1. Use netconfig command 2. Enter the IP Address as given station number by your examiner: example: 172.24.0.1 3. Enter Subnet Mask 4. Enter Default Gateway and primary name server 5. press on ok 6. ifdown eth0 7. ifup eth0 8. verify using ifconfig
In the lab server is playing the role of router, IP forwarding is enabled. Just set the Correct IP and gateway, you can ping to 172.25.254.254. QUESTION NO: 32 Successfully resolv to server1.example.com where your DNS server is 172.24.254.254 Answer and Explanation: 1. vi /etc/resolv.conf nameserver 172.24.254.254 2. host server1.example.com
On every clients, DNS server is specified in /etc/resolv.conf. When you request by name it tries to resolve from DNS server. QUESTION NO: 33
Your System is going use as a router for 172.24.0.0/16 and 172.25.0.0/16. Enable the IP Forwarding.
i. echo “1” >/proc/sys/net/ipv4/ip_forward ii. vi /etc/sysctl.conf
net.ipv4.ip_forward=1 /proc is the virtual filesystem, containing the information about the running kernel. To change the parameter of running kernel in running state you should modify the /proc. From Next boot the system, kernel will take the value from /etc/sysctl.conf. If net.ipv4.ip_forward is 0, it disable the IP forwarding, if 1 then it enable the IP Forwarding. QUESTION NO: 34 Change the root Password to redtophat Answer and Explanation:
3. Boot the system in Single user mode 4. Use the passwd command
QUESTION NO: 35 Dig Server1.example.com, Resolve to successfully through DNS Where DNS server is 172.24.254.254
RH302
Leading the way in IT testing and certification tools, www.testking.com
- 133 -
Answer and Explanation: #vi /etc/resolv.conf nameserver 172.24.254.254 # dig server1.example.com #host server1.example.com DNS is the Domain Name System, which maintains a database that can help your computer translate domain names such as www.redhat.com to IP addresses such as 216.148.218.197. As no individual DNS server is large enough to keep a database for the entire Internet, they can refer requests to other DNS servers.
DNS is based on the named daemon, which is built on the BIND (Berkeley Internet Name Domain) package developed through the Internet Software Consortium Users wants to access by name so DNS will interpret the name into ip address. You need to specify the Address if DNS server in each and every client machine. In Redhat Enterprise Linux, you need to specify the DNS server into /etc/resolv.conf file. After Specifying the DNS server address, you can verify using host, dig and nslookup commands. QUESTION NO: 36 Create the partition having 100MB size and mount it on /mnt/neo Answer and Explanation:
18. Use fdisk /dev/hda To create new partition. 19. Type n For New partitions 20. It will ask for Logical or Primary Partitions. Press l for logical. 21. It will ask for the Starting Cylinder: Use the Default by pressing Enter
Key. 22. Type the Size: +100M You can Specify either Last cylinder of Size
here. 23. Press P to verify the partitions lists and remember the partitions name. 24. Press w to write on partitions table. 25. Either Reboot or use partprobe command. 26. Use mkfs –t ext3 /dev/hda? Where ? is your partition number 27. Or 28. mke2fs –j /dev/hda? To create ext3 filesystem. 29. mkdir /mnt/neo 30. vi /etc/fstab 31. Write: 32. /dev/hda? /mnt/neo ext3 defaults 1 2 33. Verify by mounting on current Sessions also: 34. mount /dev/hda? /mnt/neo
RH302
Leading the way in IT testing and certification tools, www.testking.com
- 134 -
QUESTION NO: 37 Boot your System Successfully on runlevel 3.
Answer and Explanation: This is boot related problem. There will be same questions repeated two times but problem is different. First When you restart the system you will get the Error: File Not Found mount: error 15 mounting ext3 mount: error 2 mounting none switchroot: mount failed: 22 umount /initrd/dev/: 2 Kernel Panic: no syncing: Attempted to kill init ! This error occurred in your system before showing welcome redhat linux. That means problem in grub boot loader. Restart the System Check the grub boot loader configuration by pressing e shortcut key. You will see like: root (hd0,0) kernel /vmlinuz-2.6.9-5.EL ro root= / rhgb quiet initrd /initrd-2.6.9-5.EL.img OR root (hd0,0) kernel /vmlinuz-2.6.9-5.EL ro root=LABEL=/root rhgb quiet initrd /initrd-2.6.9-5.EL.img Then Edit Boot loader to make like root (hd0,0) kernel /vmlinuz-2.6.9-5.EL ro root=LABEL=/ rhgb quiet initrd /initrd-2.6.9-5.EL.img Check all lines and edit as same as above. Press b to boot the system After booting the system you should correct the /etc/grub.conf file. If still you are getting Error like File not found, it seems that either kernel file or initrd file is missing. To troubleshoot with these problem, boot the system on rescue mode.
v. linux rescue vi. chroot /mnt/sysimage vii. Check the files on /boot, if not available install the kernel package from
ftp or nfs server

RH302
Leading the way in IT testing and certification tools, www.testking.com
- 135 -
viii. Create the initrd image file on boot using: mkinitrd initrd-2.6.9-5.EL.img `uname –r`
RH302
Leading the way in IT testing and certification tools, www.testking.com
- 136 -
Topic 5, Practice - RHCT, Installation and Configuration (51 Questions) Use these questions to reinforce exam concepts. Installation and Configuration Section, Introduction Lab Scenario:
There are two networks 172.24.0.0/16 and 172.25.0.0/16. As well as there are two domains example.com on 172.24.0.0/16 network and cracker.org on 172.25.0.0/16
network. Your system is based on example.com domain.
QUESTION NO: 1 There is a NFS server 192.168.0.254 and all required packages are dumped in /var/ftp/pub of that server and the /var/ftp/pub directory is shared. Install the Redhat Enterprise Linux 4 by creating following partitions: / 1000 /boot 200 /home 1000 /var 1000 /usr 4000 swap 2X256 (RAM SIZE) Answer: Note: Examiner will provide you the Installation startup CD. And size may vary see on the exam paper. 1. Insert the CD on CD-ROM and start the system. 2. In Boot: Prompt type linux askmethod 3. It will display the language, keyboard selection. 4. It will ask you for the installation method. 5. Select the NFS Image from the list 6. It will ask the IP Address, Net mask, Gateway and Name Server. Select Use Dynamic IP Configuration: because DHCP Server will be configured in your exam lab. 7. It will ask for the NFS Server Name and Redhat Enterprise Linux Directory. Specify the NFS Server: 192.168.0.254 Directory: /var/ftp/pub
RH302
Leading the way in IT testing and certification tools, www.testking.com
- 137 -
8. After Connecting to the NFS Server Installation start in GUI. Go up to the partition screen by selecting the different Options. 9. Create the partition According to the Question because Size and what-what partition should you create at installation time is specified in your question 10. Then select the MBR Options, time zone and go upto package selections. It is another Most Important Time of installation. Due to the time limit, you should care about the installation packages. At Exam time you these packages are enough. X-Window System GNOME Desktop (these two packages are generally not required) Administration Tools. System Tools Windows File Server FTP Servers Mail Servers Web Servers Network Servers Editors Text Based Internet Server Configuration Tools Printing Supports When installation will complete, your system will reboot. Jump for another Question. QUESTION NO: 2 There is a FTP server 192.168.0.254 and all required packages are dumped in /var/ftp/pub of that server and anonymous login is enabled. Install the Redhat Enterprise Linux 4 as an anonymous by creating following partitions: / 1000 /boot 200 /home 1000 /var 1000 /usr 4000 swap 2X256 (RAM SIZE) Answer: Note: Examiner will provide you the Installation startup CD. And here mentioned size may vary see on the exam paper. 1. Insert the CD on CD-ROM and start the system. 2. In Boot: Prompt type linux askmethod 3. It will display the Language, keyboard selection.
RH302
Leading the way in IT testing and certification tools, www.testking.com
- 138 -
4. It will ask you for the installation method. 5. Select the FTP from the list 6. It will ask the IP Address, Net mask, Gateway and Name Server. Select Use Dynamic IP Configuration: because DHCP Server will be configured in your exam lab. 7. It will ask for the FTP site name and Redhat Enterprise Linux Directory. Specify the FTP Server: 192.168.0.254 Directory: pub Because anonymous login on /var/ftp. 8. After Connecting to the FTP Server Installation will start. Go up to the partition screen by selecting the different Options. 9. Create the partition According to the Question because Size and what-what partition should you create at installation time is specified in your question 10. Then select the MBR Options, time zone and go upto package selections. It is another Most Important Time of installation. Due to the time limit, you should be care about the installation packages. At Exam time you these packages are enough. X-Window System GNOME Desktop (these two packages are generally not required) Administration Tools. System Tools Windows File Server FTP Servers Mail Servers Web Servers Network Servers Editors Text Based Internet Server Configuration Tools Printing Supports When installation will complete, your system will reboot. Jump for another Question. QUESTION NO: 3 There is a HTTP server 192.168.0.254 and all required packages are dumped in /var/www/html/rhel4 of that server. Install the Redhat Enterprise Linux 4 by creating following partitions: / 1000 /boot 200 /home 1000 /var 1000 /usr 4000 swap 2X256 (RAM SIZE)
RH302
Leading the way in IT testing and certification tools, www.testking.com
- 139 -
Answer: Note: Examiner will provide you the Installation startup CD. And here mentioned size may vary see on the exam paper. 1. Insert the CD on CD-ROM and start the system. 2. In Boot: Prompt type linux askmethod 3. It will display the Language, keyboard selection. 4. It will ask you for the installation method. 5. Select the HTTP from the list 6. It will ask the IP Address, Net mask, Gateway and Name Server. Select Use Dynamic IP Configuration: because DHCP Server will be configured in your exam lab. 7. It will ask for the Web site name and Redhat Enterprise Linux Directory. Specify the HTTP Server: 192.168.0.254 Directory: rhel4 Because Default Directory for http is /var/www/html 8. After Connecting to the HTTP Server Installation start. Go upto the partition screen by selecting the different Options. 9. Create the partition According to the Question because Size and what-what partition should you create at installation time is specified in your question 10. Then select the MBR Options, time zone and go upto package selections. It is another Most Important Time of installation. Due to the time limit, you should be care about the installation packages. At Exam time you these packages are enough. X-Window System GNOME Desktop (these two packages are generally not required) Administration Tools. System Tools Windows File Server FTP Servers Mail Servers Web Servers Network Servers Editors Text Based Internet Server Configuration Tools Printing Supports When installation will complete, your system will reboot. Jump for another Question.
QUESTION NO: 4 Create a RAID Device /dev/md0 by creating equal two disks from available free space on your harddisk and mount it on /data.
RH302
Leading the way in IT testing and certification tools, www.testking.com
- 140 -
Answer and Explanation: Redhat Enterprise Linux 4 Supports the RAID LEVEL 0, RAID LEVEL 1, RAID LEVEL 5 and RAID LEVEL 6 at installation time. You can create it at installation time later no need to type lots of commands for RAID. At Installation Time:
ii. Create the partitions using diskdruid. iii. Create the Partitions having File system Type Software
RAID. iv. Click on RAID button v. Type the Mount Point vi. Select File system type vii. Select RAID Level viii. Select Partitions/disks as a member of RAID. viii. Click on ok
After Installation: We can create the RAID Device after Installation on command-line.
11. Create the Two partitions having equal size. (Specify the Size using Cylinder, find the remaining cylinder and divide by 2).
12. Change the Partition ID to fd (Linux raid Autodetect) by typing t. 13. Type w To write on partitions table. 14. Use partprobe command to synchronic the partition table. 15. Use: mdadm --create /dev/md0 --level=1 --raid-devices=2 /dev/hda?
/dev/hda? 16. Verify the RAID: mdadm --detail /dev/md0 17. mkfs -t ext3 /dev/md0 18. mount /dev/md0 /data 19. vi /etc/fstab
/dev/md0 /data ext3 defaults 0 0 20. Verify mounting devices using mount command.
QUESTION NO: 5 Create the user named user1, user2, user3
Answer and Explanation:
2. useradd user1 3. useradd user2
RH302
Leading the way in IT testing and certification tools, www.testking.com
- 141 -
4. useradd user3 5. passwd user1 6. passwd user2 7. passwd user3
We create the user using useradd command and we change the password of user using passwd command. If you want to set the blank password use: passwd -d username.
QUESTION NO: 6 Create the group named training Answer and Explanation:
2. groupadd training To create a group we use the groupadd command. Verify from: cat /etc/group whether group added or not?
QUESTION NO: 7 Make user1, user2 and user3 belongs to training group. Answer and Explanation:
7. usermod -G training user1 8. usermod -G training user2 9. usermod -G training user3 10. Verify from : cat /etc/group
There are two types of group, I) primary group II) Secondary or supplementary group.
I) Primary Group: Primary group defines the files/directories and process owner group there can be only one primary group of one user.
II) Secondary Group is used for permission. Where permission are defined for group members, user can access by belonging to that group.
Here user1, user2 and user3 belong as supplementary to training group. So these users get the permission of group member.
RH302
Leading the way in IT testing and certification tools, www.testking.com
- 142 -
QUESTION NO: 8 Change the Group Owner of /data to training group. Answer and Explanation: chown or chgrp command is used to change the ownership. Syntax of chown: chown [-R] username:groupname file/directory Syntax of chgrp: chgrp [-R] groupname file/directory Whenever user creates the file or directory, the owner of that file/directory automatically will be that user and that user’s primary group name. To change group owner ship
6. chgrp training /data Which set the Group Ownership to training or chown root.training /data Which set the user owner to root and group owner to training group. Verify /data using: ls -ld /data You will get: drwxr-xr-x 2 root training …………..
QUESTION NO: 9 Give Full Permission to owner user and owner group member but no permission to others on /data. Answer and Explanation: We can change the permission of file/directory either character symbol method or numeric method. Permission: r-Read w-Write x-Execute Permission Category u- Owner User g- Owner Group o- Others Operators + Add the Permissions - Remove the Permissions = Assigns the Permissions Numeric Method: 4 Read 2 Write
RH302
Leading the way in IT testing and certification tools, www.testking.com
- 143 -
1 Execute Total: 7, total for owner user, owner group member and for others : 777
6. chmod u+rwx /data 7. chmod g+rwx /data 8. chmod o-rwx /data or chmod 770 /data 9. Verify the /data : ls –ld /data 10. You will get drwxrwx---
QUESTION NO: 10 Whoever creates the file on /data make automatically owner group should be the group owner of /data directory. Answer and Explanation When user creates the file/directory, user owner will be user itself and group owner will be the primary group of the user. There is one Special Permission SGID bit, when you set the SGID bit on directory,When users creates the file/directory automatically owner group will be same as a parent directory. 9. chmod g+s /data 10. Verify using: ls -ld /data You will get: drwxrws--- QUESTION NO: 11 Make sure on /data that only the owner user can remove files/directories.
Answer and Explanation: By default user1 can remove user2’s files due to directory permission to group member. We can prevent of deleting files from others users using Sticky Bits. 4. chmod o+t /data 5. Verify /data: ls -ld /data You will get: drwxrwx—T
QUESTION NO: 12 Add a user named user4 and make primarily belongs to training group. As well account should expire on 30 days from today.
RH302
Leading the way in IT testing and certification tools, www.testking.com
- 144 -
Answer and Explanation:
4. useradd username 5. passwd username 6. usermod -e “date”
example: usermod -e “12 Feb 2006” user4 Verify: chage –l user4
QUESTION NO: 13 One New Kernel is released named kernel-hugemem. Kernel is available on ftp://server1.example.com under pub directory for anonymous. Install the Kernel and make previous new kernel is default to boot System. Answer and Explanation
2. rpm -ivh ftp://server1.example.com/pub/kernel-hugemem-* 2. vi /etc/grub.conf Set the default to new kernel
default=0 Example of /etc/grub.conf
default=0 timeout=5 splashimage=(hd0,0)/grub/splash.xpm.gz hiddenmenu title Red Hat Enterprise Linux ES (2.6.9-5.ELhugemem) root (hd0,0) kernel /vmlinuz-2.6.9-5.ELhugemem ro root=LABEL=/1 rhgb quiet initrd /initrd-2.6.9-5.ELhugemem.img title Red Hat Enterprise Linux ES (2.6.9-5.EL) root (hd0,0) kernel /vmlinuz-2.6.9-5.EL ro root=LABEL=/1 rhgb quiet initrd /initrd-2.6.9-5.EL.img rpm command is used to install, update and remove the rpm package. -ivh option is install, verbose, and display the hash mark. QUESTION NO: 14 One Package named zsh is dump on ftp://server1.example.com under pub directory. Install the package from ftp server.
RH302
Leading the way in IT testing and certification tools, www.testking.com
- 145 -
Answer and Explanation: 1. rpm –ivh ftp://server1.example.com/pub/zsh-* 2. Package will install rpm command is used to install, update and remove the package, -i means install, -v means verbose and -h means display the hash mark. QUESTION NO: 15 There are Mail servers, Web Servers, DNS Servers and Log Server. Log Server is already configured. You should configure the mail server, web server and dns server to send the logs to log server. Answer and Explanation: According to question, log server is already configured. We have to configure the mail, web and dns server for log redirection. In mail, web and dns server:
1. vi /etc/syslog.conf mail.* @logserveraddress 2. service syslog restart
mail is the facility and * means the priority. It sends all logs of mail
service to mail into log server. QUESTION NO: 16 Raw (Model) printer named printer1 is installed and shared on 192.168.0.254. You should install the shared printer on your PC to connect shared printer using IPP Protocols. Answer and Explanation: IPP( Internet Printing Protocol), allows administrator to manage printer through browser so CUPS is called Internet Printing Protocol based on HTTP. We can Install the printer either through: system-confing-printer tool or through Browser. 1. Open the browser and Type on address: http://localhost:631 CUPS (Common Unix Printing System) used the IPP protocol. CUPS use the 631 port. 2. Click on Manage Printer. 3. Click on Add Printer. 4. Type Printer name, Location, Description. 5. Select Device for bb. (Select IPP).
RH302
Leading the way in IT testing and certification tools, www.testking.com
- 146 -
6. Device URL: ipp://192.168.0.254/ipp/ queue name Same printer name of shared printer. 7. Select Model/Driver RAW printer. 8. service cups restart QUESTION NO: 17 You are administrator of testking network. First time you are going to take the full backup of all user’s home directory. Take the full backup of /home on /tmp/back file. Answer and Explanation: 1. dump -0u –f /tmp/back /dev/hda4 dump is the standard backup utility. According to the questions, fullback should take. –0 means fullback, -u means update the /etc/dumpdates which maintains the backup record and -f means filename. If you are directly taking backup into other device, you can specify the device name. i.e dump -0u -f /dev/st0 /dev/hda4. Where hda4 is a separate partition mounted on /home. QUESTION NO: 18 You are working as a System Administrator at Testking. Your Linux Server crashed and you lost every data. But you had taken the full backup of user’s home directory and other System Files on /dev/st0, how will you restore from that device? Answer and Explanation: 1. Go to on that directory where you want to restore. 2. restore –rf /dev/st0 To restore from backup we use the restore command. Here backup will restore from /dev/st0 on current Directory. QUESTION NO: 19 Add a job on Cron schedule to display Hello World on every two Seconds in terminal 8. Answer and Explanation

RH302
Leading the way in IT testing and certification tools, www.testking.com
- 147 -
1. cat >schedule */2 * * * * /bin/echo “Hello World” >/dev/tty8
3. crontab schedule 4. Verify using: crontab –l 5. service crond restart
Cron helps to schedule on recurring events. Pattern of Cron is: Minute Hour Day of Month Month Day of Week Commands 0-59 0-23 1-31 1-12 0-7 where 0 and 7 means Sunday. Note * means every. To execute the command on every two minutes */2. To add the scheduled file on cron job: crontab filename To List the Cron Shedule: crontab –l To Edit the Schedule: crontab –e To Remove the Schedule: crontab –r QUESTION NO: 20 Deny to all users except root to run cron schedule. Answer and Explanation 1. vi /etc/cron.allow root or vi /etc/cron.deny Write all user name to deny. /etc/cron.allow, /etc/cron.deny file is used to control users to allow or deny. If /etc/cron.allow file is created only that users are allowed to run cron schedule. Another way to deny to users is /etc/cron.deny write all user name on single line. QUESTION NO: 21 Add a cron schedule to take full backup of /home on every day at 5:30 pm to /dev/st0 device. Answer and Explanation: 1. vi /var/schedule 30 17 * * * /sbin/dump -0u /dev/st0 /dev/hda7 2. crontab /var/schedule 3. service crond restart We can add the cron schedule either by specifying the scripts path on /etc/crontab file or by creating on text file on crontab pattern.
RH302
Leading the way in IT testing and certification tools, www.testking.com
- 148 -
cron helps to schedule on recurring events. Pattern of cron is: Minute Hour Day of Month Month Day of Week Commands 0-59 0-23 1-31 1-12 0-7 where 0 and 7 means Sunday. Note * means every. To execute the command on every two minutes */2. QUESTION NO: 22 One NIS Domain named rhce.com is configured in your lab, server is 192.168.0.254. rhce100, rhce200,rhce300 user are created on domain server. Make your system as a member of rhce.com domain. Make sure that when nis user login in your system home directory should get by them. Home directory is separately shared on server eg /home/stationx/ where x is you station number. Answer and Explanation: 1. use the authconfig or system-config-authentication 2. Select the [*] USE NIS 3. Type the NIS Domain: rhce.com 4. Type Server 192.168.0.254 then click on next and ok 5. You will get a ok message. 6. vi /etc/auto.master and write at the end of file
/home/stationx /etc/auto.home --timeout=60 7. vi /etc/auto.home and write * -rw,soft,intr 192.168.0.254:/home/stationx/& Note: please specify your station number in the place of x. 8. Service autofs restart 9. Login as the rhce1 or rhce2 or rhce3 on another terminal will be Success. According to question, rhce.com domain is already configured. We have to make a client of rhce.com domain and automatically mount the home directory on every client. To make a member of domain, we use the autheconfig or system-config-authentication command. There are lots of authentication server i.e NIS, LDAB, SMB etc. NIS is a RPC related Services, no need to configure the DNS, we should specify the NIS server address.
Here Automount feature is available. When user tried to login, home directory will automatically mount. The automount service reads the configuration from /etc/auto.master file.
On /etc/auto.master file we specified the mount point the configuration file for mount point.
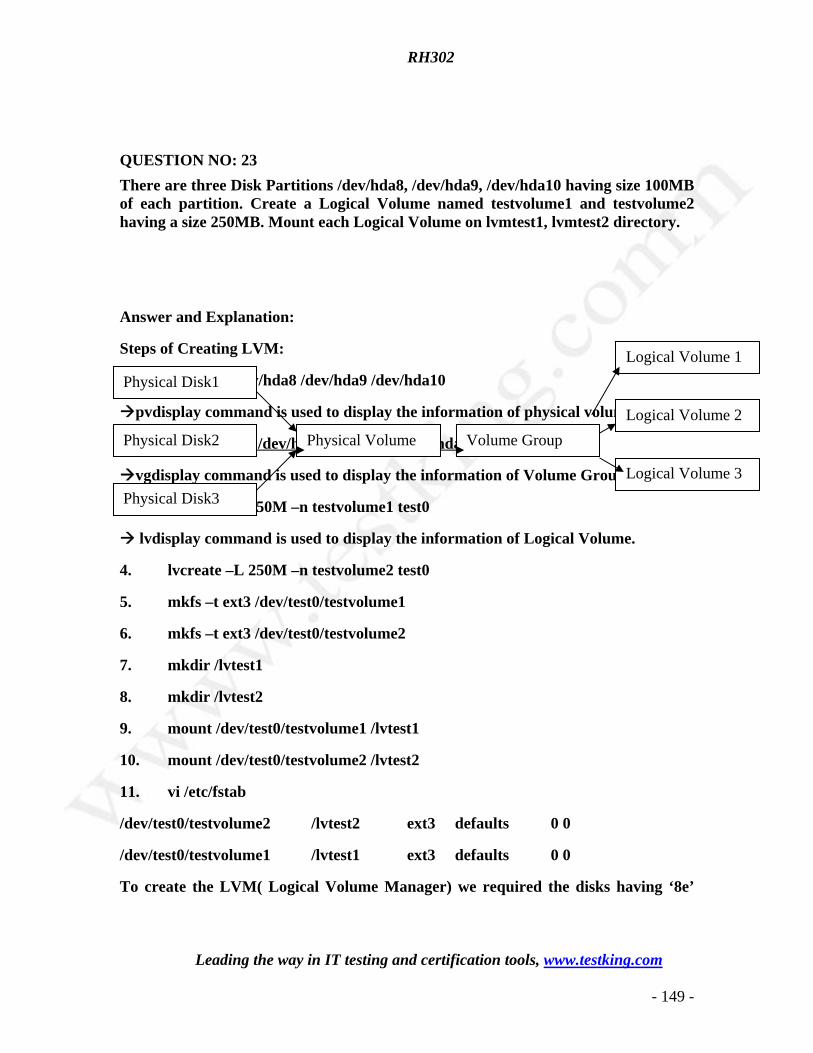
RH302
Leading the way in IT testing and certification tools, www.testking.com
- 149 -
QUESTION NO: 23 There are three Disk Partitions /dev/hda8, /dev/hda9, /dev/hda10 having size 100MB of each partition. Create a Logical Volume named testvolume1 and testvolume2 having a size 250MB. Mount each Logical Volume on lvmtest1, lvmtest2 directory.
Answer and Explanation:
Steps of Creating LVM:
1. pvcreate /dev/hda8 /dev/hda9 /dev/hda10
pvdisplay command is used to display the information of physical volume.
2. vgceate test0 /dev/hda8 /dev/hda9 /dev/hda10
vgdisplay command is used to display the information of Volume Group.
3. lvcreate –L 250M –n testvolume1 test0
lvdisplay command is used to display the information of Logical Volume.
4. lvcreate –L 250M –n testvolume2 test0
5. mkfs –t ext3 /dev/test0/testvolume1
6. mkfs –t ext3 /dev/test0/testvolume2
7. mkdir /lvtest1
8. mkdir /lvtest2
9. mount /dev/test0/testvolume1 /lvtest1
10. mount /dev/test0/testvolume2 /lvtest2
11. vi /etc/fstab
/dev/test0/testvolume2 /lvtest2 ext3 defaults 0 0
/dev/test0/testvolume1 /lvtest1 ext3 defaults 0 0
To create the LVM( Logical Volume Manager) we required the disks having ‘8e’
Physical Disk1
Physical Disk2
Physical Disk3
Physical Volume Volume Group
Logical Volume 1
Logical Volume 2
Logical Volume 3
RH302
Leading the way in IT testing and certification tools, www.testking.com
- 150 -
Linux LVM type. First we should create the physical Volume, then we can create the Volume group from disks belongs to physical Volume. lvcreate command is used to create the logical volume on volume group. We can specify the size of logical volume with –L option and name with -n option. QUESTION NO: 24 One Logical Volume named /dev/test0/testvolume1 is created. The initial Size of that disk is 100MB now you required more 200MB. Increase the size of Logical Volume, size should be increase on online.
Answer and Explanation:
1. lvextend –L+200M /dev/test0/testvolume1
Use lvdisplay /dev/test0/testvolume1)
2. ext2online –d /dev/test0/testvolume1
lvextend command is used the increase the size of Logical Volume. Other command lvresize command also here to resize. And to bring increased size on online we use the ext2online command.
QUESTION NO: 25 We are working on /data initially the size is 2GB. The /dev/test0/lvtestvolume is mount on /data. Now you required more space on /data but you already added all disks belong to physical volume. You saw that you have unallocated space around 5 GB on your harddisk. Increase the size of lvtestvolume by 5GB.
Answer and Explanation.
1. Create a partition having size 5 GB and change the syste id ‘8e’.
RH302
Leading the way in IT testing and certification tools, www.testking.com
- 151 -
2. use partprobe command
3. pvcreate /dev/hda9 Suppose your partition number is hda9.
4. vgextend test0 /dev/hda9 vgextend command add the physical disk on volume group.
5. lvextend –L+5120M /dev/test0/lvtestvolume
6. verify using lvdisplay /dev/test0/lvtestvolume. QUESTION NO: 26 Install the Redhat Linux RHEL 4 through NFS. Where your Server is server1.example.com having IP 192.168.0.254 and shared /var/ftp/pub. The size of the partitions are listed below: / 1048 /home 1028 /boot 512 /var 1028 /usr 2048 Swap -> 1.5 of RAM Size /data configure the RAID Level 0 of remaining all free space. After completing the installation through NFS solve the following questions. There are two networks 192.168.0.0/24 and 192.168.1.0/24. As well as there are two domains example.com on 192.168.0.0/24 network and cracker.org on 192.168.1.0/24 network. Your system is based on example.com domain. Answer and Explanation: 1. Insert the CD on CD-ROM and start the system. 2. In Boot: Prompt type linux askmethod 3. It will display the language, keyboard selection. 4. It will ask you for the installation method. 5. Select the NFS Image from the list 6. It will ask the IP Address, Net mask, Gateway and Name Server. Select Use Dynamic IP Configuration: because DHCP Server will be configured in your exam lab. 7. It will ask for the NFS Server Name and Redhat Enterprise Linux Directory. Specify the NFS Server: 192.168.0.254 Directory: /var/ftp/pub 8. After Connecting to the NFS Server Installation start in GUI. Go up to the partition screen by selecting the different Options. 9. Create the partition According to the Question because Size and what-what partition should you create at installation time is specified in your question 10. Create the two RAID partitions having equal size of remaining all free space. 11. Click on RAID button
RH302
Leading the way in IT testing and certification tools, www.testking.com
- 152 -
12. Type mount point /data 13. Select RAID Level 0 14. Click on ok 15. Then select the MBR Options, time zone and go upto package selections. It is another Most Important Time of installation. Due to the time limit, you should care about the installation packages. At Exam time you these packages are enough. X-Window System GNOME Desktop (these two packages are generally not required) Administration Tools. System Tools Windows File Server FTP Servers Mail Servers Web Servers Network Servers Editors Text Based Internet Server Configuration Tools Printing Supports When installation will complete, your system will reboot. Jump for another Question. QUESTION NO: 27 Fill up the Form through http://server1.example.com/form.php Answer and Explanation: 1. Open the Browser and type the above URL. 2. Fill the form as required all information. QUESTION NO: 28 One Domain RHCE is configured in your lab, your domain server is server1.example.com. nisuser2001, nisuser2002, nisuser2003 user are created on your server 192.168.0.254:/rhome/stationx/nisuser2001. Make sure that when NIS user login in your system automatically mount the home directory. Home directory is separately shared on server /rhome/stationx/ where x is your Station number.
RH302
Leading the way in IT testing and certification tools, www.testking.com
- 153 -
Answer and Explanation: 1. use the authconfig or system-config-authentication 2. Select the [*] USE NIS 3. Type the NIS Domain: RHCE 4. Type Server 192.168.0.254 then click on next and ok 5. You will get a ok message. 6. Create a Directory /rhome/stationx where x is your station number. 6. vi /etc/auto.master and write at the end of file /rhome/stationx /etc/auto.home --timeout=60 7. vi /etc/auto.home and write * -rw,soft,intr 192.168.0.254:/rhome/stationx/& Note: please specify your station number in the place of x. 8. Service autofs restart 9. Login as the nisuser2001 or nisuser2002 on another terminal will be Success. According to question, RHCE domain is already configured. We have to make a client of RHCE domain and automatically mount the home directory on your system. To make a member of domain, we use the authconfig or system-config-authentication command. There a are lots of authentication server i.e NIS, LDAB, SMB etc. NIS is a RPC related Services, no need to configure the DNS, we should specify the NIS server address.
Here Automount feature is available. When user tried to login, home directory will automatically mount. The automount service reads the configuration from /etc/auto.master file. On /etc/auto.master file we specified the mount point the configuration file for mount point. QUESTION NO: 29 Create the group named sysadmin. Answer and Explanation 1. groupadd sysadmin groupadd command is used to create the group and all group information is stored in /etc/group file. QUESTION NO: 30 Create the user named jane and john.
RH302
Leading the way in IT testing and certification tools, www.testking.com
- 154 -
Answer and Explanation: 1. useradd jane 2. useradd john useradd command is used to create the user. All user’s information stores in /etc/passwd and user;s shadow password stores in /etc/shadow. QUESTION NO: 31 Raw printer named printerx where x is your station number is installed and shared on server1.example.com. Install the shared printer on your PC to connect shared printer using IPP Protocols. Your server is 192.168.0.254. Answer and Explanation: 1. Open the Browser either firefox or links 2. Type : http://localhost:631 3. Click on Manage Printer 4. Click on Add Printer 5. Type Queue name like stationx and click on continue 6. Type Device type or printing Protocol: i.e Internet printing Protocol 7. Click on Continue 8. Type Device URL: ipp://server1.example.com/printers/printerx 9. Click on Continue 10. Select RAW Model printer 11. Click on Continue 12. Test by sending the printing job QUESTION NO: 32 Make Secondary belongs the both users on sysadmin group. Answer and Explanation: 1. usermod -G sysadmin john 2. usermod –G sysadmin jane 3. Verify by reading /etc/group file Using usermod command we can make user belongs to different group. There are
RH302
Leading the way in IT testing and certification tools, www.testking.com
- 155 -
two types of group one primary and another is secondary. Primary group can be only one but user can belongs to more than one group as secondary. usermod -g groupname username To change the primary group of the user usermod -G groupname username To make user belongs to secondary group. QUESTION NO: 33 Create the user named eric but eric should not belong to the sysadmin group. Answer and Explanation: 1. useradd eric Very tricky question given to you that this user should not belongs to sysadmin group. QUESTION NO: 34 Create the directory /data and group owner should be the sysadmin group. Answer and Explanation: 1. chgrp sysadmin /data 2. Verify using ls -ld /data command. You should get like drwxr-x--- 2 root sysadmin 4096 Mar 16 17:59 /data chgrp command is used to change the group ownership of particular files or directory. Another way you can use the chown command. chown root:sysadmin /data QUESTION NO: 35 Make on /data that only the user owner and group owner member can fully access. Answer and Explanation: 1. chmod 770 /data 2. Verify using : ls –ld /data Preview should be like:
RH302
Leading the way in IT testing and certification tools, www.testking.com
- 156 -
drwxrwx--- 2 root sysadmin 4096 Mar 16 18:08 /data To change the permission on directory we use the chmod command. According to the question that only the owner user (root) and group member (sysadmin) can fully access the directory so: chmod 770 /data QUESTION NO: 36 Who ever creates the files/directories on /data group owner should be automatically should be the same group owner of /data. Answer and Explanation: 1. chmod g+s /data 2. Verify using: ls -ld /data Permission should be like: drwxrws--- 2 root sysadmin 4096 Mar 16 18:08 /data If SGID bit is set on directory then who every users creates the files on directory group owner automatically the owner of parent directory. To set the SGID bit: chmod g+s directory To Remove the SGID bit: chmod g-s directory QUESTION NO: 37 Your System is going to use as a Router for two networks. One Network is 192.168.0.0/24 and Another Network is 192.168.1.0/24. Both network’s IP address has assigned. How will you forward the packets from one network to another network? Answer and Explanation: 1. echo “1” >/proc/sys/net/ipv4/ip_forward 2. vi /etc/sysctl.conf net.ipv4.ip_forward = 1 If you want to use the Linux System as a Router to make communication between different networks, you need enable the IP forwarding. To enable on running session just set value 1 to /proc/sys/net/ipv4/ip_forward. As well as automatically turn on the IP forwarding features on next boot set on /etc/sysctl.conf file. QUESTION NO: 38
RH302
Leading the way in IT testing and certification tools, www.testking.com
- 157 -
One New Kernel is released named kernel-.2.6.9-11. Kernel is available on ftp://server1.example.com/pub/updates directory for anonymous. Install the Kernel and make the kernel-2.6.9-5 default. Answer and Explanation: 1. rpm -ivh ftp://server1.example.com/pub/updates/kernel-2.6.9-11.i686.rpm 2. vi /etc/grub.conf
default=1 Change this value to 1 timeout=5
splashimage=(hd0,0)/grub/splash.xpm.gz hiddenmenu title Red Hat Enterprise Linux ES (2.6.9-11) root (hd0,0) kernel /vmlinuz-2.6.9-11.EL ro root=LABEL=/ rhgb quiet initrd /initrd-2.6.9-11.EL.img
title Red Hat Enterprise Linux ES (2.6.9-5.EL) root (hd0,0) kernel /vmlinuz-2.6.9-5.EL ro root=LABEL=/ rhgb quiet initrd /initrd-2.6.9-5.EL.img According question that kernel is available to anonymous user. You can directly install from the ftp server using rpm command. When you install the kernel, it will write on /etc/grub.conf file. You can set the default kernel by changing the default value. See on the output of /etc/grub.conf file that new kernel is on first title so it’s index is 0 and previous kernel’s index is 1. QUESTION NO: 39 Install the dialog-* Answer and Explanation: Questions asking you to install the dialog package from the server. In your Lab FTP server as well as NFS server are configured. You can install either through FTP or NFS. 1. Just Login to server1.example.com through FTP: ftp server1.example.com 2. Enter to pub directory: cd pub 3. Enter to RedHat/RPMS: cd RedHat/RPMS 4. Download the Package: mget dialog-* 5. Logout from the FTP server: bye 6. Install the package: rpm -ivh dialog-* 7. Verify the package either installed or not: rpm -q dialog
RH302
Leading the way in IT testing and certification tools, www.testking.com
- 158 -
QUESTION NO: 40 Install the Redhat Linux RHEL 4 through NFS. Where your Server is server1.example.com having IP 172.24.254.254 and shared /var/ftp/pub. The size of the partitions are listed below: / 1048 /home 1028 /boot 512 /var 1028 /usr 2048 Swap -> 1.5 of RAM Size /data configure the RAID Level 0 of remaining all free space. After completing the installation through NFS solve the following questions. There are two networks 172.24.0.0/16 and 172.25.0.0/16. As well as there are two domains example.com on 172.24.0.0/16 network and cracker.org on 172.25.0.0/16 network. Your system is based on example.com domain. Answer and Explanation: 1. Insert the CD on CD-ROM and start the system. 2. In Boot: Prompt type linux askmethod 3. It will display the language, keyboard selection. 4. It will ask you for the installation method. 5. Select the NFS Image from the list 6. It will ask the IP Address, Net mask, Gateway and Name Server. Select Use Dynamic IP Configuration: because DHCP Server will be configured in your exam lab. 7. It will ask for the NFS Server Name and Redhat Enterprise Linux Directory. Specify the NFS Server: 172.24.254.254 Directory: /var/ftp/pub 8. After Connecting to the NFS Server Installation start in GUI. Go up to the partition screen by selecting the different Options. 9. Create the partition According to the Question because Size and what-what partition should you create at installation time is specified in your question 10. Create the two RAID partitions having equal size of remaining all free space. 11. Click on RAID button 12. Type mount point /data 13. Select RAID Level 0 14. Click on ok 15. Then select the MBR Options, time zone and go upto package selections. It is another Most Important Time of installation. Due to the time limit, you should care about the installation packages. At Exam time you these packages are enough. X-Window System GNOME Desktop (these two packages are generally not required)
RH302
Leading the way in IT testing and certification tools, www.testking.com
- 159 -
Administration Tools. System Tools Windows File Server FTP Servers Mail Servers Web Servers Network Servers Editors Text Based Internet Server Configuration Tools Printing Supports When installation will complete, your system will reboot. Jump for another Question. QUESTION NO: 41 Create the user named eric and deny to interactive login. Answer and Explanation:
5. useradd eric 6. passwd eric 7. vi /etc/passwd 8. eric:x:505:505::/home/eric:/sbin/nologin
Which shell or program should start at login time is specified in /etc/passwd file. By default Redhat Enterprise Linux assigns the /bin/bash shell to the users. To deny the interactive login, you should write /sbin/nologin or /bin/false instead of login shell. QUESTION NO: 42 /data Directory is shared from the server1.example.com server. Mount the shared directory that:
d. when user try to access, automatically should mount e. when user doesn’t use mounted directory should unmount
automatically after 50 seconds. f. Shared directory should mount on /mnt/data on your machine.
Answer and Explanation:
6. vi /etc/auto.master /mnt /etc/auto.misc --timeout=50
7. vi /etc/auto.misc 8. data -rw,soft,intr server1.example.com:/data 9. service autofs restart 10. chkconfig autofs on
When you mount the other filesystem, you should unmount the mounted filesystem, Automount feature of linux helps to mount at access time and after certain seconds, when user unaccess the mounted directory, automatically unmount the filesystem. /etc/auto.master is the master configuration file for autofs service. When you start
RH302
Leading the way in IT testing and certification tools, www.testking.com
- 160 -
the service, it reads the mount point as defined in /etc/auto.master. QUESTION NO: 43 Install the Redhat Linux RHEL 4 through NFS. Where your Server is server1.example.com having IP 172.24.254.254 and shared /var/ftp/pub. The size of the partitions are listed below: / 1048 /home 1028 /boot 512 /var 1028 /usr 2048 Swap -> 1.5 of RAM Size /document configure the RAID Level 0 of remaining all free space. After completing the installation through NFS solve the following questions. There are two networks 172.24.0.0/16 and 172.25.0.0/16. As well as there are two domains example.com on 172.24.0.0/16 network and cracker.org on 172.25.0.0/16 network. Your system is based on example.com domain. Answer and Explanation: 1. Insert the CD on CD-ROM and start the system. 2. In Boot: Prompt type linux askmethod 3. It will display the language, keyboard selection. 4. It will ask you for the installation method. 5. Select the NFS Image from the list 6. It will ask the IP Address, Net mask, Gateway and Name Server. Select Use Dynamic IP Configuration: because DHCP Server will be configured in your exam lab. 7. It will ask for the NFS Server Name and Redhat Enterprise Linux Directory. Specify the NFS Server: 172.24.254.254 Directory: /var/ftp/pub 8. After Connecting to the NFS Server Installation start in GUI. Go up to the partition screen by selecting the different Options. 9. Create the partition According to the Question because Size and what-what partition should you create at installation time is specified in your question 10. Create the two RAID partitions having equal size of remaining all free space. 11. Click on RAID button 12. Type mount point /document 13. Select RAID Level 0 14. Click on ok 15. Then select the MBR Options, time zone and go upto package selections. It is another Most Important Time of installation. Due to the time limit, you should care about the installation packages. At Exam time you these packages are enough.
RH302
Leading the way in IT testing and certification tools, www.testking.com
- 161 -
X-Window System GNOME Desktop (these two packages are generally not required) Administration Tools. System Tools Windows File Server FTP Servers Mail Servers Web Servers Network Servers Editors Text Based Internet Server Configuration Tools Printing Supports When installation will complete, your system will reboot. Jump for another Question. QUESTION NO: 44 Install the Redhat Linux RHEL 4 through NFS. Where your Server is server1.example.com having IP 172.24.254.254 and shared /var/ftp/pub. The size of the partitions are listed below: / 1048 /home 1028 /boot 512 /var 1028 /usr 2048 Swap -> 1.5 of RAM Size /archive configure the RAID Level 0 of remaining all free space. After completing the installation through NFS solve the following questions. There are two networks 172.24.0.0/16 and 172.25.0.0/16. As well as there are two domains example.com on 172.24.0.0/16 network and my133t.org on 172.25.0.0/16 network. Your system is based on example.com domain. Answer and Explanation: 1. Insert the CD on CD-ROM and start the system. 2. In Boot: Prompt type linux askmethod 3. It will display the language, keyboard selection. 4. It will ask you for the installation method. 5. Select the NFS Image from the list 6. It will ask the IP Address, Net mask, Gateway and Name Server. Select Use Dynamic IP Configuration: because DHCP Server will be configured in your exam lab. 7. It will ask for the NFS Server Name and Redhat Enterprise Linux Directory.
RH302
Leading the way in IT testing and certification tools, www.testking.com
- 162 -
Specify the NFS Server: 172.24.254.254 Directory: /var/ftp/pub 8. After Connecting to the NFS Server Installation start in GUI. Go up to the partition screen by selecting the different Options. 9. Create the partition According to the Question because Size and what-what partition should you create at installation time is specified in your question 10. Create the two RAID partitions having equal size of remaining all free space. 11. Click on RAID button 12. Type mount point /archive 13. Select RAID Level 0 14. Click on ok 15. Then select the MBR Options, time zone and go upto package selections. It is another Most Important Time of installation. Due to the time limit, you should care about the installation packages. At Exam time you these packages are enough. X-Window System GNOME Desktop (these two packages are generally not required) Administration Tools. System Tools Windows File Server FTP Servers Mail Servers Web Servers Network Servers Editors Text Based Internet Server Configuration Tools Printing Supports When installation will complete, your system will reboot. Jump for another Question. QUESTION NO: 45 Create the group named sysuser. Answer and Explanation 1. groupadd sysuser groupadd command is used to create the group and all group information is stored in /etc/group file. QUESTION NO: 46 Create the user named jackie, curtin, david Answer and Explanation:

RH302
Leading the way in IT testing and certification tools, www.testking.com
- 163 -
1. useradd jackie 2. useradd curtin 3. useradd david useradd command is used to create the user. All user’s information stores in /etc/passwd and user;s shadow password stores in /etc/shadow. QUESTION NO: 47 Make Secondary belongs the jackie and curtin users on sysuser group. But david user should not belongs to sysuser group. Answer and Explanation: 1. usermod -G sysuser jackie 2. usermod –G sysuser curtin 3. Verify by reading /etc/group file Using usermod command we can make user belongs to different group. There are two types of group one primary and another is secondary. Primary group can be only one but user can belongs to more than one group as secondary. usermod -g groupname username To change the primary group of the user usermod -G groupname username To make user belongs to secondary group. QUESTION NO: 48 Create the directory /archive and group owner should be the sysuser group. Answer and Explanation: 1. chgrp sysuser /archive 2. Verify using ls -ld /archive command. You should get like drwxr-x--- 2 root sysadmin 4096 Mar 16 17:59 /archive chgrp command is used to change the group ownership of particular files or directory. Another way you can use the chown command. chown root:sysuser /archive QUESTION NO: 49 Make on /archive directory that only the user owner and group owner member can fully access. Answer and Explanation: 1. chmod 770 /archive 2. Verify using : ls –ld /archive Preview should be like: drwxrwx--- 2 root sysuser 4096 Mar 16 18:08 /archive
RH302
Leading the way in IT testing and certification tools, www.testking.com
- 164 -
To change the permission on directory we use the chmod command. According to the question that only the owner user (root) and group member (sysuser) can fully access the directory so: chmod 770 /archive QUESTION NO: 50 Who ever creates the files/directories on /archive group owner should be automatically should be the same group owner of /archive. Answer and Explanation: 1. chmod g+s /archive 2. Verify using: ls -ld /archive Permission should be like: drwxrws--- 2 root sysuser 4096 Mar 16 18:08 /archive If SGID bit is set on directory then who every users creates the files on directory group owner automatically the owner of parent directory. To set the SGID bit: chmod g+s directory To Remove the SGID bit: chmod g-s directory QUESTION NO: 51 Install the Cron Schedule for david user to display “Hello” on daily 5:30. Answer and Explanation:
5. Login as a root user 6. cat >schedule.txt 30 05 * * * /bin/echo “Hello” 3. crontab –u david schedule.txt 4. service crond restart
The cron system is essentially a smart alarm clock. When the alarm sounds, Linux runs the commands of your choice automatically. You can set the alarm clock to run at all sorts of regular time intervals. Alternatively, the at system allows you to run the command of your choice once, at a specified time in the future. Red Hat configured the cron daemon, crond. By default, it checks a series of directories for jobs to run, every minute of every hour of every day. The crond checks the /var/spool/cron directory for jobs by user. It also checks for scheduled jobs for the computer under /etc/crontab and in the /etc/cron.d directory. Here is the format of a line in crontab. Each of these columns is explained in more detail: #minute, hour, day of month, month, day of week, command * * * * * command Entries in a crontab Command Line
RH302
Leading the way in IT testing and certification tools, www.testking.com
- 165 -
Field Value Minute 0-59 Hour Based on a 24-hour clock; for example, 23 = 11 p.m. Day of month 1-31 Month 1-12, or jan, feb, mar, etc. Day of week 0-7; where 0 and 7 are both Sunday; or sun, mon, tue, etc. Command The command you want to run
Topic 6, Practice, RHCE, Installation and Configuration (69 Questions) Use these questions to reinforce exam concepts. QUESTION NO: 1 Configure the DNS for example.com domain, where 192.100.0.20 is associated IP for www and NS is 192.100.0.X where X is your IP. Answer and Explanation: 1. vi /etc/named.conf zone “example.com” IN { type master; file “example.com.zone”; }; /etc/named.conf file is used to register the zone as well as specify the global option for DNS. There are two types of zone, i. Master, which contains the original data. ii. Slave, backup of master. Here master zone is configured and file name is specified “example.com.zone”, which should be created in /var/named/chroot/var/named/ 2. vi /var/named/chroot/var/named/example.com.zone $TTL 345345 @ IN SOA @ webmaster.example.com.( 101; Serial Number 1H; Refresh Time 1M; Retry Time 1W; Expire Time 1D; Minimum Time to Live ) @ IN NS 192.100.0.X
RH302
Leading the way in IT testing and certification tools, www.testking.com
- 166 -
www IN A 192.100.0.20 3. service named start 4. rndc reload 5. chkconfig named on Zone file should create on /var/named/chroot/var/named. Default Directory Path is specified on /var/named.conf. $TTL Time To Live, How much seconds cache server stores the information about DNS. And Five Parameters specified Serial Number used by slave to synchronize with master server. Refresh and Retry Time used by slave server. NS is the Name (DNS) server where lookup the domain. A (Associated IP) for particular host. QUESTION NO: 2 You are an Administrator of example.com domain. You need to configure the DNS for www.example.com by providing the round-robin load balancing. You should load balance to 5 hosts for www having IP: 192.100.0.1, 192.100.0.2, 192.100.0.3, 192.100.0.4 and 192.100.0.5. Where DNS is 192.100.0.X (X is your DNS Server). Answer and Explanation: 1. vi /etc/named.conf zone “example.com” IN { type master; file “example.com.zone”; }; /etc/named.conf file is used to register the zone as well as specify the global option for DNS. There are two types of zone, i. Master, which contains the original data. ii. Slave, backup of master. Here master zone is configured and file name is specified “example.com.zone”, which should be created in /var/named/chroot/var/named/ 2. vi /var/named/chroot/var/named/example.com.zone $TTL 345345 @ IN SOA @ webmaster.example.com.( 101; Serial Number 1H; Refresh Time 1M; Retry Time 1W; Expire Time 1D; Minimum Time to Live ) @ IN NS 192.100.0.X www 0 IN A 192.100.0.1 www 0 IN A 192.100.0.2 www 0 IN A 192.100.0.3 www 0 IN A 192.100.0.4
RH302
Leading the way in IT testing and certification tools, www.testking.com
- 167 -
www 0 IN A 192.100.0.5 3. service named start 4. rndc reload 5. chkconfig named on Zone file should create on /var/named/chroot/var/named. Default Directory Path is specified on /var/named.conf. $TTL Time To Live, How much seconds cache server stores the information about DNS. And Five Parameters specified Serial Number used by slave to synchronize with master server. Refresh and Retry Time used by slave server. NS is the Name (DNS) server where lookup the domain. A (Associated IP) for particular host. DNS has mechanism to load balance the request from clients. You can verify using host www.example.com command. QUESTION NO: 3 You are working as an administrator of example.com domain. There are five web servers( www), three mail servers(mail1, mail2, mail). Configure the DNS for www, mail, mail1, mail2 by specifying mail.example.com is the Primary Mail Server for example.com domain. Where 192.168.100.1-5 for www, 6,7,8 for mail, mail1, m ail2 and 192.168.0.X for DNS. Answer and Explanation: 1. vi /etc/named.conf zone “example.com” IN { type master; file “example.com.zone”; }; /etc/named.conf file is used to register the zone as well as specify the global option for DNS. There are two types of zone, i. Master, which contains the original data. ii. Slave, backup of master. Here master zone is configured and file name is specified “example.com.zone”, which should be created in /var/named/chroot/var/named/ 2. vi /var/named/chroot/var/named/example.com.zone $TTL 345345 @ IN SOA @ webmaster.example.com.( 101; Serial Number 1H; Refresh Time 1M; Retry Time 1W; Expire Time 1D; Minimum Time to Live ) @ IN NS 192.100.0.X www 0 IN A 192.100.0.1
RH302
Leading the way in IT testing and certification tools, www.testking.com
- 168 -
www 0 IN A 192.100.0.2 www 0 IN A 192.100.0.3 www 0 IN A 192.100.0.4 www 0 IN A 192.100.0.5 mail IN A 192.100.0.6 mail1 IN A 192.100.0.7 mail2 IN A 192.100.0.8 @ IN MX 5 mail.example.com. @ IN MX 8 mail1.example.com. @ IN MX 10 mail2.example.com. 3. service named start 4. rndc reload 5. chkconfig named on Zone file should create on /var/named/chroot/var/named. Default Directory Path is specified on /var/named.conf. $TTL Time To Live, How much seconds cache server stores the information about DNS. And Five Parameters specified Serial Number used by slave to synchronize with master server. Refresh and Retry Time used by slave server. NS is the Name (DNS) server where lookup the domain. A (Associated IP) for particular host. DNS has mechanism to load balance the request from clients. You can verify using host www.example.com command. MX resource records are used to define mail handler or exchanger for the domain. MX record must pass the positive integer value. This integer value is used by remote Mail Transport Agent (MTA) to determine, which host has delivery priority for the zone. The Lowest integer value will get the priority. QUESTION NO: 4 Configure the Slave DNS for example.com domain where master DNS is 192.100.0.254. Answer and Explanation: Slave DNS is the backup of master DNS. Automatically within a certain time slave DNS synchronizes with the Master DNS server. 1. vi /etc/named.conf zone “example.com” IN { type slave; masters { 192.100.0.254; }; file “example.com.zone”; };
6. named-checkconf command checks the syntax for /etc/named.conf file. 7. service named start | restart
RH302
Leading the way in IT testing and certification tools, www.testking.com
- 169 -
QUESTION NO: 5 Configure the caching only-name server for example.com where DNS server is 192.100.0.254.
Answer and Explanation: 1. vi /etc/named.conf options {
forwarders { 192.168.22.250; }; forward only; };
2. service named start | restart Caching-only name server forwards a request to another name server or to the root name servers in orders to determine the authoritative name server for the resolution. Once resolution has taken place, the caching-only name server stores the resolved information in a cache for the designated time to live period.
QUESTION NO: 6 Configure the DNS server by allowing query only from the 192.168.0.0/24 Local Network.
Answer and Explanation: 1. vi /etc/named.conf
acl localnet { 192.168.0.0/24; }; options {
allow-query { localnet; }; }; 2. service named restart | start allow-query is a global option on /etc/named.conf, specifies an address match list of hosts allowed to query this server. If this option is not set, any host can query the server.
QUESTION NO: 7 Configure the DHCP server by matching the following conditions:
1. Subnet and netmask should be 192.168.0.0 255.255.255.0
2. Gateway Should be 192.168.0.254 3. DNS Sever Should be 192.168.0.254 4. Domain Name should be example.com 5. Range from 192.168.0.10-50
RH302
Leading the way in IT testing and certification tools, www.testking.com
- 170 -
Answer and Explanation: 1. vi /etc/dhcpd.conf ddns-update-style none; option routers 192.168.0.1; option domain-name “example.com”; option domain-name-servers 192.168.0.254; default-lease-time 21600; max-lease-time 43200; subnet 192.168.0.0 netmask 255.255.255.0 { range 192.168.0.10 192.168.0.50; } /etc/dhcpd.conf file is used to configure the DHCP. Some global options i.e Gateway, domainname, DNS server specified using option keyword.
11. service dhcpd start | restart QUESTION NO: 8 You have DHCP server, which assigns the IP, gateway and DNS server ip to
Clients. There are two DNS servers having MAC address (00:50:FC:98:8D:00, 00:50:FC:98:8C:00), in your LAN, But they always required fixed IP address (192.168.0.254, 192.168.0.253). Configure the DHCP server to assign the fixed IP address to DNS server.
Answer and Explanation: 1. vi /etc/dhcpd.conf ddns-update-style none; option routers 192.168.0.1; option domain-name “example.com”; option domain-name-servers 192.168.0.254; default-lease-time 21600; max-lease-time 43200; subnet 192.168.0.0 netmask 255.255.255.0 { range 192.168.0.1 192.168.0.254; host dns1 { hardware ethernet 00:50:FC:98:8D:00; fixed-address 192.168.0.254; } host dns2 { hardware ethernet 00:50:FC:98:8C:00;
RH302
Leading the way in IT testing and certification tools, www.testking.com
- 171 -
fixed-address 192.168.0.253; } } /etc/dhcpd.conf file is used to configure the DHCP. Some global options i.e Gateway, domainname, DNS server specified using option keyword. To assign as static ip from dhcp server, required the mac address of interface. 2. service dhcpd start | restart QUESTION NO: 9 Share /data directory using NFS only to example.com members. These hosts should get read and write access on shared directory. Answer and Explanation: 1. vi /etc/exports /data *.example.com(rw,sync) 2. service nfs start | restart 3. service portmap start | restart 4. chkconfig nfs on 5. chkconfig portmap on In Linux to share the data we use the /etc/exports file. Pattern is: Path client(permission) Shared Directory Path, Client can be single host or domain name or ip address. Permission should specify without space with client lists in parentheses. NFS is RPC service so portmapper service should restart after starting the nfs service. QUESTION NO: 10 You have a directory /local. You want to make available that directory to all the members of example.com and trusted.cracker.org. But directory should available in read and write to all the members of example.com domain and read only to cracker.org domain. Answer and Explanation:
1. vi /etc/exports /local *.example.com(rw,sync) trusted.cracker.org(ro,sync) 7. service nfs start | restart 8. service portmap start | restart 9. chkconfig nfs on 10. chkconfig portmap on
RH302
Leading the way in IT testing and certification tools, www.testking.com
- 172 -
In Linux to share the data we use the /etc/exports file. Pattern is: Path client(permission) Shared Directory Path, Client can be single host or domain name or ip address. Permission should specify without space with client lists in parentheses. NFS is RPC service so portmapper service should restart after starting the nfs service. We can specify multiple clients’ list separating by space with different shared option. QUESTION NO: 11 You have ftp site named ftp.example.com. You want to deny login as an anonymous on your ftp site. Configure to deny the anonymous. Answer and Explanation: 1. vi /etc/vsftpd/vsftpd.conf anonymous_enable=no 2. service vsftpd restart /etc/vsftpd/vsftpd.conf file is used to allow or deny to anonymous or real user. To allow anonymous anonymous_enable=yes should be there. Sample configuration is like. # Allow anonymous FTP? (Beware - allowed by default if you comment this out). anonymous_enable=YES # # Uncomment this to allow local users to log in. local_enable=YES # # Uncomment this to enable any form of FTP write command. write_enable=YES # # Default umask for local users is 077. You may wish to change this to 022, # if your users expect that (022 is used by most other ftpd's) local_umask=022 # # Uncomment this to allow the anonymous FTP user to upload files. This only # has an effect if the above global write enable is activated. Also, you will # obviously need to create a directory writable by the FTP user. #anon_upload_enable=YES # # Uncomment this if you want the anonymous FTP user to be able to create # new directories. #anon_mkdir_write_enable=YES #
RH302
Leading the way in IT testing and certification tools, www.testking.com
- 173 -
# Activate directory messages - messages given to remote users when they # go into a certain directory. dirmessage_enable=YES # # Activate logging of uploads/downloads. xferlog_enable=YES # # Make sure PORT transfer connections originate from port 20 (ftp-data). connect_from_port_20=YES # # If you want, you can arrange for uploaded anonymous files to be owned by # a different user. Note! Using "root" for uploaded files is not # recommended! #chown_uploads=YES #chown_username=whoever # # You may override where the log file goes if you like. The default is shown # below. #xferlog_file=/var/log/vsftpd.log # # If you want, you can have your log file in standard ftpd xferlog format xferlog_std_format=YES # # You may change the default value for timing out an idle session. #idle_session_timeout=600 # # You may change the default value for timing out a data connection. #data_connection_timeout=120 # # It is recommended that you define on your system a unique user which the # ftp server can use as a totally isolated and unprivileged user. #nopriv_user=ftpsecure # # Enable this and the server will recognise asynchronous ABOR requests. Not # recommended for security (the code is non-trivial). Not enabling it, # however, may confuse older FTP clients. #async_abor_enable=YES # # By default the server will pretend to allow ASCII mode but in fact ignore # the request. Turn on the below options to have the server actually do ASCII # mangling on files when in ASCII mode. # Beware that turning on ascii_download_enable enables malicious remote parties # to consume your I/O resources, by issuing the command "SIZE /big/file" in
RH302
Leading the way in IT testing and certification tools, www.testking.com
- 174 -
# ASCII mode. # These ASCII options are split into upload and download because you may wish # to enable ASCII uploads (to prevent uploaded scripts etc. from breaking), # without the DoS risk of SIZE and ASCII downloads. ASCII mangling should be # on the client anyway.. #ascii_upload_enable=YES #ascii_download_enable=YES # # You may fully customise the login banner string: #ftpd_banner=Welcome to blah FTP service. # # You may specify a file of disallowed anonymous e-mail addresses. Apparently # useful for combatting certain DoS attacks. #deny_email_enable=YES # (default follows) #banned_email_file=/etc/vsftpd.banned_emails # # You may specify an explicit list of local users to chroot() to their home # directory. If chroot_local_user is YES, then this list becomes a list of # users to NOT chroot(). #chroot_list_enable=YES # (default follows) #chroot_list_file=/etc/vsftpd.chroot_list # # You may activate the "-R" option to the builtin ls. This is disabled by # default to avoid remote users being able to cause excessive I/O on large # sites. However, some broken FTP clients such as "ncftp" and "mirror" assume # the presence of the "-R" option, so there is a strong case for enabling it. #ls_recurse_enable=YES pam_service_name=vsftpd userlist_enable=YES #enable for standalone mode listen=YES tcp_wrappers=YES QUESTION NO: 12 You have ftp site named ftp.example.com. You want to allow anonymous users to upload files on you ftp site. Configure to allow anonymous to upload the files.
RH302
Leading the way in IT testing and certification tools, www.testking.com
- 175 -
Answer and Explanation: 1. vi /etc/vsftpd/vsftpd.conf anon_upload_enable=yes chown_uploads=yes chown_username=username 2. service vsftpd start| restart 3. directory owner should be ftp user: chown ftp directory path allowed to upload files. 4. Write permission should be set to owner user. By default anonymous user can only download files from the ftp. Should write anon_upload_enable=yes to enable anonymous upload files. Default Directory for anonymous is /var/ftp. QUESTION NO: 13 You want to deny to user1 and user2 users to access files via ftp. Configure to deny these users to access via ftp. Answer and Explanation: 1. vi /etc/vsftpd.ftpusers user1 user2 2. service vsftpd start| restart Using /etc/vsftpd.ftpusers file we can deny to certain users to access files via ftp. As well as there is another file named /etc/vsftpd.user_list can be used to allow or to deny to users. QUESTION NO: 14 There are mixed lots of System running on Linux and Windows OS. Some users are working on Windows Operating System. There is a /data directory on linux server should make available on windows to only user1 and user2 users with full access. Configure to make available. Answer and Explanation: 1. vi /etc/samba/smb.conf [global] netbios name=station? workgroup = mygroup server string=Share from Linux Server security=user smb passwd file=/etc/samba/smbpasswd
RH302
Leading the way in IT testing and certification tools, www.testking.com
- 176 -
encrypt passwords=yes [data] path=/data writable=yes public=no browsable=yes valid users=user1 user2 2. smbpasswd –a user1 3. smbpasswd –a user2 4. service smb start | restart 5. chkconfig smb on Samba servers helps to share the data between linux and windows. Configuration file is /etc/samba/smb.conf. There are some pre-defined section, i. global use to define the global options, ii. Printers use to share the printers, iii. homes use the share the user’s home directory. Security=user validation by samba username and password. May be there are other users also. To allow certain share to certain user we should use valid users option. smbpasswd Helps to change user’s smb password. –a option specifies that the username following should be added to the local smbpasswd file. QUESTION NO: 15 There are mixed lots of System running on Linux and Windows OS. Some users are working on Windows Operating System. There is a /data directory on linux server should make available on windows to user1 and user2 users on read and write mode and read only to other samba users. Answer and Explanation: 1. vi /etc/samba/smb.conf [global] netbios name=station? workgroup = mygroup server string=Share from Linux Server security=user smb passwd file=/etc/samba/smbpasswd encrypt passwords=yes [data] path=/data writable=no public=no browsable=yes write list= user1 user2 2. smbpasswd –a user1 3. smbpasswd –a user2 ……..
RH302
Leading the way in IT testing and certification tools, www.testking.com
- 177 -
4. service smb start | restart 5. chkconfig smb on Samba servers helps to share the data between linux and windows. Configuration file is /etc/samba/smb.conf. There are some pre-defined section, i. global use to define the global options, ii. Printers use to share the printers, iii. homes use the share the user’s home directory. Security=user validation by samba username and password. May be there are other users also. To allow certain share to certain user we should use valid users option. smbpasswd Helps to change user’s smb password. –a option specifies that the username following should be added to the local smbpasswd file. If any valid users option is not specified, then all samba users can access the shared data. By Default shared permission is on writable=no means read only sharing. Write list option is used to allow write access on shared directory to certain users or group members. QUESTION NO: 16 There are mixed lots of System running on Linux and Windows OS. Some users are working on Windows Operating System. You want to make available /data directory to samba users only from 192.168.0.0/24 network. Configure the samba server. Answer and Explanation: 1. vi /etc/samba/smb.conf [global] netbios name=station? workgroup = mygroup server string=Share from Linux Server security=user smb passwd file=/etc/samba/smbpasswd encrypt passwords=yes hosts allow=192.168.0. [data] path=/data writable=yes public=no browsable=yes 2. service smb start| restart 3. chkconfig smb on Samba servers helps to share the data between linux and windows. Configuration file is /etc/samba/smb.conf. There are some pre-defined section, i. global use to define the global options, ii. Printers use to share the printers, iii. homes use to share the user’s home directory.
RH302
Leading the way in IT testing and certification tools, www.testking.com
- 178 -
Security=user validation by samba username and password. May be there are other users also. To allow certain share to certain user we should use valid users option. smbpasswd Helps to change user’s smb password. –a option specifies that the username following should be added to the local smbpasswd file. If any valid users option is not specified, then all samba users can access the shared data. By Default shared permission is on writable=no means read only sharing. Write list option is used to allow write access on shared directory to certain users or group members. To allow access the shared directory only from certain network or hosts, there is a option hosts allow= host or network. If this option is applied on global option, then it will apply to all shared directory. QUESTION NO: 17 There are mixed lots of System running on Linux and Windows OS. Some users are working on Windows Operating System. Your printer is connected on linux server. You want to share the printer-using samba so that users working on windows also can print. Configure the samba server to share printer. Answer and Explanation 1. vi /etc/samba/smb.conf [global] netbios name=station? workgroup=linuxgroup security=share printcap name=/etc/printcap load printers=yes printing=cups
[printers] path=/var/spool/samba browsable=yes printable=yes guest ok=no writable=no
Samba servers helps to share the data between linux and windows. Configuration file is /etc/samba/smb.conf. There are some pre-defined section, i. global use to define the global options, ii. Printers use to share the printers, iii. homes use to share the user’s home directory. /etc/printcap file contains all installed printers name. Printing is print system used on server. QUESTION NO: 18 Your Local Domain is example.com. Configure the send mail server for you local LAN.

RH302
Leading the way in IT testing and certification tools, www.testking.com
- 179 -
Answer and Explanation: 1. vi /etc/mail/local-host-names example.com 2. vi /etc/mail/sendmail.mc dnl # DEAMON_OPTIONS(`Port=smtp,Addr=127.0.0.1,Name=MTA`)dnl 3. m4 /etc/mail/sendmail.mc >/etc/mail/sendmail.cf 4. vi /etc/mail/access example.com RELAY
192.169.0 RELAY 5. service sendmail start | restart 6. chkconfig sendmail on /etc/mail/local-host-names file contains the aliases to hostname. Mail server program reads the /etc/mail/sendmail.cf. To change the configuration on mail server, we should edit the /etc/mail/sendmail.mc file and should generate the sendmail.cf using m4 command. By default sendmail server allows to connect to local host only. So we should edit the /etc/mail/sendmail.mc file to allow connect to other hosts. By default sendmail server will not forward mail. we should specify on /etc/mail/access to relay or to block mail coming from domain or network or individual email address. QUESTION NO: 19 Your Local Domain is example.com. Configure the send mail server for you local LAN. As well as enable the pop and pop secured protocol. Answer and Explanation: 1. vi /etc/mail/local-host-names example.com 2. vi /etc/mail/sendmail.mc dnl # DEAMON_OPTIONS(`Port=smtp,Addr=127.0.0.1,Name=MTA`)dnl 3. m4 /etc/mail/sendmail.mc >/etc/mail/sendmail.cf 4. vi /etc/mail/access
192.169.0 RELAY example.com RELAY
5. service sendmail start | restart 6. chkconfig dovecot on 7. vi /etc/dovecot.conf protocols = pop3 pop3s 8. service dovecot start | restart 9. chkconfig dovecot on
RH302
Leading the way in IT testing and certification tools, www.testking.com
- 180 -
/etc/mail/local-host-names file contains the aliases to hostname. Mail server program reads the /etc/mail/sendmail.cf. To change the configuration on mail server, we should edit the /etc/mail/sendmail.mc file and should generate the sendmail.cf using m4 command. By default sendmail server allows to connect to local host only. So we should edit the /etc/mail/sendmail.mc file to allow connect to other hosts. By default sendmail server will not forward mail. we should specify on /etc/mail/access to relay or to block mail coming from domain or network or individual email address. By default dovecot service start only the imap protocol. To start pop protocol with dovecot, we should write in /etc/dovecot.conf file. QUESTION NO: 20 Your Local Domain is example.com. Configure the send mail server for you local LAN by following these conditions. i. Relay the mail from 192.168.0.0/24 Network ii. If any mail coming from cracker.org domain block all mails. iii. user5’s mail should be get by user2. Answer and Explanation: 1. vi /etc/mail/local-host-names example.com 2. vi /etc/mail/sendmail.mc dnl # DEAMON_OPTIONS(`Port=smtp,Addr=127.0.0.1,Name=MTA`)dnl 3. m4 /etc/mail/sendmail.mc >/etc/mail/sendmail.cf 4. vi /etc/mail/access 192.168.0 RELAY @cracker.org REJECT 5. service sendmail start | restart 6. chkconfig dovecot on 7. vi /etc/dovecot.conf protocols = pop3 pop3s imap imaps 8. service dovecot start | restart 9. chkconfig dovecot on 10. vi /etc/aliases user5: user2 11. newaliases /etc/mail/local-host-names file contains the aliases to hostname. Mail server program reads the /etc/mail/sendmail.cf. To change the configuration on mail server, we should edit the /etc/mail/sendmail.mc file and should generate the sendmail.cf using m4 command.
RH302
Leading the way in IT testing and certification tools, www.testking.com
- 181 -
By default sendmail server allows to connect to local host only. So we should edit the /etc/mail/sendmail.mc file to allow connect to other hosts. By default sendmail server will not forward mail. we should specify on /etc/mail/access to relay or to block mail coming from domain or network or individual email address. By default dovecot service start only the imap protocol. To start pop protocol with dovecot, we should write in /etc/dovecot.conf file. Using /etc/aliases file we can map the user name to send mail of one user to another user. To rebuild database we use the newaliases command. QUESTION NO: 21 Your Local Domain is example.com. Configure the send mail server for you local LAN by following these conditions. i. Any mail going from Local LAN should be masquerade to example.com ii. Any incoming mail for [email protected] virtual address should be mapped to [email protected] iii. All outgoing mail should be send via smtp.abc.com mail server. Answer and Explanation: 1. vi /etc/mail/local-host-names example.com 2. vi /etc/mail/sendmail.mc dnl # DEAMON_OPTIONS(`Port=smtp,Addr=127.0.0.1,Name=MTA`)dnl MASQUERADE_AS(`example.com')dnl
define(`SMART_HOST',`smtp.abc.com') 3. m4 /etc/mail/sendmail.mc >/etc/mail/sendmail.cf 4. vi /etc/mail/virtusertable [email protected] [email protected] 5. vi /etc/mail/access 192.168.0 RELAY /etc/mail/local-host-names file contains the aliases to hostname. Mail server program reads the /etc/mail/sendmail.cf. To change the configuration on mail server, we should edit the /etc/mail/sendmail.mc file and should generate the sendmail.cf using m4 command. By default sendmail server allows to connect to local host only. So we should edit the /etc/mail/sendmail.mc file to allow connect to other hosts. By default sendmail server will not forward mail. We should specify on /etc/mail/access to relay or to block mail coming from domain or network or individual email address. To masquerade the address, MASQUERADE_AS option is in /etc/mail/sendmail.mc.
RH302
Leading the way in IT testing and certification tools, www.testking.com
- 182 -
SMART_HOST deliver all local mail locally and outgoing mail through another mail server. /etc/mail/virtusertable file is used map virtual address to real address. Eg. [email protected] [email protected] [email protected] [email protected] QUESTION NO: 22 Download a index.html file from ftp.server1.example.com and set as default page for you station?.example.com where ? is your host number. Note file is anonymously available. Answer and Explanation: 1. ftp ftp://server1.example.com 2. Login as an anonymous and download the file. 3. Copy the file in /var/www/html if you downloaded in another location. 4. service httpd restart 5. Test using links: links http://station?.example.com Note: In examination Lab DNS will configure for every stations. QUESTION NO: 23 There are two sites www.abc.com and www.example.com. Both sites are mappings to 192.100.0.X IP address where X is your Host address. Configure the Apache web server for these sites to make accessible on web. Answer and Explanation: 1. vi /etc/httpd/conf/httpd.conf NameVirtualHost 192.100.0.X
<VirtualHost www.abc.com> ServerName www.abc.com DocumentRoot /var/www/abc/ DirectoryIndex index.html ServerAdmin [email protected] ErrorLog logs/error_abc.logs CustomLog logs/custom_abc.logs common </VirtualHost> <VirtualHost www.example.com> ServerName www.example.com DocumentRoot /var/www/example/
RH302
Leading the way in IT testing and certification tools, www.testking.com
- 183 -
DirectoryIndex index.html ServerAdmin [email protected] ErrorLog logs/error_example.logs CustomLog logs/custom_example.logs common </VirtualHost> 2. Create the directory and index page on specified path. (Index page
can download from ftp://server1.example.com at exam time) 3. service httpd start| restart 4. chkconfig httpd on 5. links http://www.abc.com 6. links http://www.example.com For Name based Virtual Hosting, we should specified the IP address on
which we are going to host the multiple sites using NameVirtualHost options. • ServerName means you FQDN, already lookup on DNS • DirectoryRoot path for web documents for this site. • DirectoryIndex default page for websites. QUESTION NO: 24 Configure the web server for www.abc.com associated IP address is 192.100.0.1 by allowing access to user5 and user6 httpusers. Answer and Explanation 1. vi /etc/httpd/conf/httpd.conf <VirtualHost 192.100.0.1>
ServerName www.abc.com DocumentRoot /var/www/abc/ <Directory /var/www/abc> AllowOverride authconfig </Directory> DirectoryIndex index.html ServerAdmin [email protected] ErrorLog logs/error_abc.logs CustomLog logs/custom_abc.logs common </VirtualHost> 2. Create the directory and index page on specified path. (Index page
can download from ftp://server1.example.com at exam time)
3. vi /var/www/abc/.htaccess AuthName “Only to Authorized Users” AuthType basic AuthUserFile /etc/httpd/conf/mypasswd
RH302
Leading the way in IT testing and certification tools, www.testking.com
- 184 -
require valid-user 12. htpasswd –c /etc/httpd/conf/mypasswd user5 13. htpasswd –m /etc/httpd/conf/mypasswd user6 14. chgrp apache /etc/httpd/conf/mypasswd 15. chmod g+r /etc/httpd/conf/mypasswd 16. service httpd restart 17. chkconfig httpd on
AllowOverride Authconfig is used to specify which and how much configuration can be overridden by directory specific .htaccess files. One of the most common tasks performed in users’ .htaccess files is adding authorization. Typically, a user will setup authorization for directories that hold sensitive information with a configuration. QUESTION NO: 25 Configure the web server for www.abc.com associated IP address is 192.100.0.1 by allowing access within the your example.com domain. Answer and Explanation 1. vi /etc/httpd/conf/httpd.conf
<VirtualHost 192.100.0.1> ServerName www.abc.com DocumentRoot /var/www/abc/ <Directory /var/www/abc> Order Allow, Deny Allow from .example.com </Directory> DirectoryIndex index.html ServerAdmin [email protected] ErrorLog logs/error_abc.logs CustomLog logs/custom_abc.logs common </VirtualHost> 2. Create the directory and index page on specified path. (Index page
can download from ftp://server1.example.com at exam time) 3. service httpd start|restart
4. chkconfig httpd on Order allow, deny Allows explicitly allowed clients, denies everyone else; clients matched by both allow and deny are denied. Order deny, allow denies explicitly denied clients, allows everyone else, clients matched by both allow and deny are allowed.
RH302
Leading the way in IT testing and certification tools, www.testking.com
- 185 -
QUESTION NO: 26 You have a domain named www.rhce.com associated IP address is 192.100.0.2. Configure the Apache web server by implementing the SSL for encryption communication. Answer and Explanation 1. vi /etc/httpd/conf.d/ssl.conf <VirtualHost 192.100.0.2> ServerName www.rhce.com DocumentRoot /var/www/rhce DirectoryIndex index.html index.htm ServerAdmin [email protected] SSLEngine on SSLCertificateFile /etc/httpd/conf/ssl.crt/server.crt SSLCertificateKeyFile /etc/httpd/conf/ssl.key/server.key </VirtualHost> 2. cd /etc/httpd/conf 3. make testcert 4. Create the directory and index page on specified path. (Index page can download from ftp://server1.example.com at exam time) 5. service httpd start|restart 6. chkconfig httpd on Apache can provide encrypted communications using SSL (Secure Socket Layer). To make use of encrypted communication, a client must request to https protocol, which is uses port 443. For HTTPS protocol required the certificate file and key file. QUESTION NO: 27 Configure the Apache webserver for station?.example.com (associated IP is your host IP address) by downloading the index.html from ftp://server1.example.com. Answer and Explanation: 1. vi /etc/httpd/conf/httpd.conf <VirtualHost 192.168.0.?> ServerName station?.example.com DocumentRoot /var/www/station? DirectoryIndex index.html ServerAdmin [email protected] </VirtualHost>
RH302
Leading the way in IT testing and certification tools, www.testking.com
- 186 -
2. Create the directory and index page on specified path. (Index page can download from ftp://server1.example.com at exam time)
3. service httpd start|restart 4. chkconfig httpd on
QUESTION NO: 28 Share the Internet using squid for your Local LAN. Proxy server should be run on 8080 port.
Answer and Explanation: 1. vi /etc/squid/squid.conf #detault: http_port 8080 #Recommended minimum configuration: # Near the src acl src section acl mynet src 192.168.0.0/255.255.255.0 #Default: # http_access deny all
#Under Here http_access allow mynet
2. service squid start 3. chkconfig squid on squid is a proxy caching server, using squid we can share the internet, block the internet, to certain network. First we should define the port for squid, the standard port for squid is 3128. We can run squid on different port by specifying http_port portnumber. To block or allow the Internet access to hosts, we should create the acl (Access Control List). In this file we can specify only the IP address. Example: acl aclname src IP/Netmask After creating acl we can block or allow the internet to specified acl. http_access allow | deny alcname QUESTION NO: 29 Using squid block Internet to 192.168.1.0/24 Network and allow to 192.168.0.0/24 Network.
RH302
Leading the way in IT testing and certification tools, www.testking.com
- 187 -
Answer and Explanation: 1. vi /etc/squid/squid.conf
#detault: http_port 8080 #Recommended minimum configuration: # Near the src acl src section acl allownet src 192.168.0.0/255.255.255.0 acl denynet src 192.168.1.0/255.255.255.0 #Default: # http_access deny all
#Under Here http_access allow allownet http_access deny denynet
2. service squid start 3. chkconfig squid on squid is a proxy caching server, using squid we can share the internet, block the internet, to certain network. First we should define the port for squid, the standard port for squid is 3128. We can run squid on different port by specifying http_port portnumber. To block or allow the Internet access to hosts, we should create the acl (Access Control List). In this file we can specify only the IP address. Example: acl aclname src IP/Netmask After creating acl we can block or allow the internet to specified acl. http_access allow | deny alcname QUESTION NO: 30 Run the squid proxy server on port 8080 by allowing internet access to 192.168.0.0/24 and block msn.com site to access. Answer and Explanation: 1. vi /etc/squid/squid.conf
#detault: http_port 8080 #Recommended minimum configuration: # Near the src acl src section acl allownet src 192.168.0.0/255.255.255.0 acl msnnet dstdomain .msn.com #Default: # http_access deny all
RH302
Leading the way in IT testing and certification tools, www.testking.com
- 188 -
#Under Here http_access deny msnnet http_access allow allownet
2. service squid start 3. chkconfig squid on squid is a proxy caching server, using squid we can share the internet, block the internet, to certain network. First we should define the port for squid, the standard port for squid is 3128. We can run squid on different port by specifying http_port portnumber. To block or allow the Internet access to hosts, we should create the acl (Access Control List). In this file we can specify only the IP address. Example: acl aclname src IP/Netmask After creating acl we can block or allow the Internet to specified acl. http_access allow | deny alcname QUESTION NO: 31 You are the administrator of example.com domain. Configure to deny local login to all normal users on your domain server. As well as allow to root login only on First Terminal. Answer and Explanation: 1. touch /etc/nologin 2. vi /etc/securetty comment all available terminall then first. If /etc/nologin file is created, then pam modules pan_nologin deny to all non-root
users to login locally. /etc/pam.d/login file calls the module. #%PAM-1.0 auth required pam_securetty.so auth required pam_stack.so service=system-auth auth required pam_nologin.so account required pam_stack.so service=system-auth password required pam_stack.so service=system-auth # pam_selinux.so close should be the first session rule session required pam_selinux.so close session required pam_stack.so service=system-auth
RH302
Leading the way in IT testing and certification tools, www.testking.com
- 189 -
session optional pam_console.so # pam_selinux.so open should be the last session rule session required pam_selinux.so multiple open pam_securetty modules checks the /etc/securetty file, which terminal are available to root. If terminal is not available in this file then pam_securetty module deny to login on unavailable terminal to root user. QUESTION NO: 32 You are the Network Engineer of example.com domain. Configure to allow users user1, user2 and user3 to login only between 9am to 17pm on very day. Answer and Explanation: 1. vi /etc/security/time.conf login;*;user1|user2|user3;Al0900-1700 2. vi /etc/pam.d/login account required pam_time.so For Time based authentication, we should configured in /etc/security/time.conf Syntax of /etc/security/time.conf
services;ttys;users;times services is a logic list of PAM service names that the rule applies to. ttys is a logic list of terminal names that this rule applies to. users is a logic list of users to whom this rule applies. times the format here is a logic list of day/time-range entries the days are specified by a sequence of two character entries, MoTuSa for example is Monday Tuesday and Saturday. Note that repeated days are unset MoMo = no day, and MoWk = all weekdays bar Monday. The two character combinations accepted are
RH302
Leading the way in IT testing and certification tools, www.testking.com
- 190 -
Mo Tu We Th Fr Sa Su Wk Wd Al the last two being week-end days and all 7 days of the week respectively. As a final example, AlFr means all days except Friday. pam_time modules checks the file /etc/security/time.conf for authentication. So, we should call the pam_time modules in /etc/pam.d/login. QUESTION NO: 33 There are some part-time staff in your office. And you gave the username user9 and user10 to them. Their Office time is 12-2pm on Sunday, Monday and Friday. Configure to login only on their office time. Answer and Explanation: 1. vi /etc/security/time.conf login;*;user9|user10;SuMoFri1200-1400 2. vi /etc/pam.d/login account required pam_time.so For Time based authentication, we should configured in /etc/security/time.conf Syntax of /etc/security/time.conf
services;ttys;users;times services is a logic list of PAM service names that the rule applies to. ttys is a logic list of terminal names that this rule applies to. users is a logic list of users to whom this rule applies. times the format here is a logic list of day/time-range entries the days are specified by a sequence of two character entries, MoTuSa for example is Monday Tuesday and Saturday. Note that repeated days are unset MoMo = no day, and MoWk = all weekdays bar Monday. The two character combinations accepted are
RH302
Leading the way in IT testing and certification tools, www.testking.com
- 191 -
Mo Tu We Th Fr Sa Su Wk Wd Al the last two being week-end days and all 7 days of the week respectively. As a final example, AlFr means all days except Friday. pam_time modules checks the file /etc/security/time.conf for authentication. So, we should call the pam_time modules in /etc/pam.d/login. QUESTION NO: 34 Deny login to user15 and user16 on Saturday. Answer and Explanation: 1. vi /etc/security/time.conf login;*;user15|user16;Sa0000-2400 2. vi /etc/pam.d/login account required pam_time.so For Time based authentication, we should configured in /etc/security/time.conf Syntax of /etc/security/time.conf
services;ttys;users;times services is a logic list of PAM service names that the rule applies to. ttys is a logic list of terminal names that this rule applies to. users is a logic list of users to whom this rule applies. times the format here is a logic list of day/time-range entries the days are specified by a sequence of two character entries, MoTuSa for example is Monday Tuesday and Saturday. Note that repeated days are unset MoMo = no day, and MoWk = all weekdays bar Monday. The two character combinations accepted are Mo Tu We Th Fr Sa Su Wk Wd Al
RH302
Leading the way in IT testing and certification tools, www.testking.com
- 192 -
the last two being week-end days and all 7 days of the week respectively. As a final example, AlFr means all days except Friday. pam_time modules checks the file /etc/security/time.conf for authentication. So, we should call the pam_time modules in /etc/pam.d/login. QUESTION NO: 35 You are working as a Network Engineer. Due to system processing, you want to limit the number of process to users. If then, configure that user1 and user2 should get one login at a time and all the members of training group can get total 5 logins. Answer and Explanation: 1. vi /etc/security/limits.conf user1,user2 - maxlogins 1 @training - maxlogins 5 2. vi /etc/pam.d/system-auth session required /lib/security/pam_limits.so To limit the number of process or number of logins, we should configure on /etc/security/limits.conf. First Columns contains the username separated by comma or @group name. Second column either hard or soft limits. Third columns called the item, maxloigns or nproc etc. To identify the session of users we should call the pam_limits module in /etc/pam.d/system-auth. QUESTION NO: 36 Now a days you are observing that your system being very slow. You observe the processes that one user named user1 running more than 50 processes. Configure to limit the number of processes that user1 couldn’t run more than 7 process. Answer and Explanation: 1. vi /etc/security/limits.conf user1 hard nproc 7 2. vi /etc/pam.d/system-auth
RH302
Leading the way in IT testing and certification tools, www.testking.com
- 193 -
session required /lib/security/pam_limits.so To limit the number of process or number of logins, we should configure on /etc/security/limits.conf. First Columns contains the username separated by comma or @group name. Second column either hard or soft limits. Third columns called the item, maxloigns or nproc etc. To identify the session of users we should call the pam_limits module in /etc/pam.d/system-auth. QUESTION NO: 37 Deny to john user login locally. Answer and Explanation: 1. vi /etc/security/access.conf -:john:LOCAL 2. vi /etc/pam.d/system-auth account required /lib/security/pam_access.so /etc/security/access.conf file helps to allow or deny login to users on the basis of origin. Syntax of /etc/security/access.conf permission : users : origins The first field should be a "+" (access granted) or "-" (access denied) character. The second field should be a list of one or more login names, group names, or ALL (always matches). A pattern of the form user@host is matched when the login name matches the "user" part, and when the "host" part matches the local machine name. The third field should be a list of one or more tty names (for non-networked logins), host names, domain names (begin with "."), host addresses, internet network numbers (end with "."), ALL (always matches) or LOCAL (matches any string that does not contain a "." character). In our example denied to john user to login locally. QUESTION NO: 38 You have a domain in your LAN example.com. Configure to allow login to jack only from station10.example.com.
RH302
Leading the way in IT testing and certification tools, www.testking.com
- 194 -
Answer and Explanation: 1. vi /etc/security/access.conf -:jack:ALL EXCEPT station10.example.com 2. vi /etc/pam.d/system-auth account required /lib/security/pam_access.so /etc/security/access.conf file helps to allow or deny login to users on the basis of origin. Syntax of /etc/security/access.conf permission : users : origins The first field should be a "+" (access granted) or "-" (access denied) character. The second field should be a list of one or more login names, group names, or ALL (always matches). A pattern of the form user@host is matched when the login name matches the "user" part, and when the "host" part matches the local machine name. The third field should be a list of one or more tty names (for non-networked logins), host names, domain names (begin with "."), host addresses, internet network numbers (end with "."), ALL (always matches) or LOCAL (matches any string that does not contain a "." character). The EXCEPT operator makes it possible to write very compact rules QUESTION NO: 39 One User named peter working with you as your assistance. His main responsibility is to manager users. Give the privilege to run useradd, passwd, groupadd, userdel, groupdel, usermod command using sudo. Answer and Explanation 1. visudo # User alias Specification User_alias LIMITEDTRUST=peter # Cmnd alias Specification Cmnd_alias MINIMUM=/usr/sbin/useradd, /usr/bin/passwd, /usr/sbin/groupadd, /usr/sbin/userdel, /usr/sbin/groupdel, /usr/sbin/usermod
# User Privilege Specification LIMITEDTRUST ALL=MINIMUM 2. Login as peter user and run sudo useradd username
RH302
Leading the way in IT testing and certification tools, www.testking.com
- 195 -
Using Sudo we can give root level privilege on commands. Visudo is the sudo editor. In user alias Specification we create the user alias and in Cmnd alias Specification, we create the command alias. In User Privilege Specification section, list the users, groups allowed to use the sudo. QUESTION NO: 40 You have a domain in your LAN named example.com. Allow the FTP connection only from local domain. Answer and Explanation: 1. vi /etc/hosts.deny vsftpd:ALL EXCEPT .example.com We can secure the services using tcp_wrappers. There are main two files, /etc/hosts.allow and /etc/hosts.deny. There will be three stage access checking -Is access explicitly permitted? Means permitted from /etc/hosts.allow? - Otherwise, Is access explicitly denied? Means denied from /etc/hosts.deny? - Otherwise, by default permit access if neither condition matched. To deny the services we can configure /etc/hosts.deny file using ALL and EXCEPT operation. Pattern of /etc/hosts.allow and /etc/hosts.deny file is: Demon_list:client_list:options In Client list can be either domain name or IP address. QUESTION NO: 41 Allow the NFS service only to example.com, trusted.cracker.org Answer and Explanation: 1. vi /etc/hosts.deny nfs,portmap:ALL EXCEPT .example.com, trusted.cracker.org We can secure the services using tcp_wrappers. There are main two files, /etc/hosts.allow and /etc/hosts.deny. There will be three stage access checking
RH302
Leading the way in IT testing and certification tools, www.testking.com
- 196 -
-Is access explicitly permitted? Means permitted from /etc/hosts.allow? - Otherwise, Is access explicitly denied? Means denied from /etc/hosts.deny? - Otherwise, by default permit access if neither condition matched. To deny the services we can configure /etc/hosts.deny file using ALL and EXCEPT operation. Pattern of /etc/hosts.allow and /etc/hosts.deny file is: Demon_list:client_list:options In Client list can be either domain name or IP address. QUESTION NO: 42 Configure to deny the pop and imap connection from outside local LAN as well as station20.example.com. Answer and Explanation: 1. vi /etc/hosts.deny dovecot:ALL EXCEPT .example.com EXCEPT station20.example.com We can secure the services using tcp_wrappers. There are main two files, /etc/hosts.allow and /etc/hosts.deny. There will be three stage access checking -Is access explicitly permitted? Means permitted from /etc/hosts.allow? - Otherwise, Is access explicitly denied? Means denied from /etc/hosts.deny? - Otherwise, by default permit access if neither condition matched. To deny the services we can configure /etc/hosts.deny file using ALL and EXCEPT operation. Pattern of /etc/hosts.allow and /etc/hosts.deny file is: Demon_list:client_list:options In Client list can be either domain name or IP address. QUESTION NO: 43 Deny the ALL services to the member of cracker.org but allow to trusted.cracker.org. Answer and Explanation:

RH302
Leading the way in IT testing and certification tools, www.testking.com
- 197 -
1. vi /etc/hosts.deny ALL:.cracker.org EXCEPT trusted.cracker.org We can secure the services using tcp_wrappers. There are main two files, /etc/hosts.allow and /etc/hosts.deny. There will be three stage access checking -Is access explicitly permitted? Means permitted from /etc/hosts.allow? - Otherwise, Is access explicitly denied? Means denied from /etc/hosts.deny? - Otherwise, by default permit access if neither condition matched. To deny the services we can configure /etc/hosts.deny file using ALL and EXCEPT operation. Pattern of /etc/hosts.allow and /etc/hosts.deny file is: Demon_list:client_list:options In Client list can be either domain name or IP address. QUESTION NO: 44 Configure to allow the ssh service only from 192.168.0.0/24 except 192.168.0.4 Answer and Explanation: 1. vi /etc/hosts.deny sshd: 192.168.0. EXCEPT 192.168.0.4 We can secure the services using tcp_wrappers. There are main two files, /etc/hosts.allow and /etc/hosts.deny. There will be three stage access checking -Is access explicitly permitted? Means permitted from /etc/hosts.allow? - Otherwise, Is access explicitly denied? Means denied from /etc/hosts.deny? - Otherwise, by default permit access if neither condition matched. To deny the services we can configure /etc/hosts.deny file using ALL and EXCEPT operation. Pattern of /etc/hosts.allow and /etc/hosts.deny file is: Demon_list:client_list:options In Client list can be either domain name or IP address.
RH302
Leading the way in IT testing and certification tools, www.testking.com
- 198 -
QUESTION NO: 45 ssh service is enabled in your Server. Your LAN is connected to WAN also. Configure to match following conditions. i. Deny the ssh from outside the example.com domain members. ii. If any denied hosts tried for ssh then send the information through mail with client;s information. Answer and Explanation: 1. vi /etc/hosts.deny sshd:ALL EXCEPT .example.com: spawn echo “Loging attempt from %c to %s” | mail –s “Login from denied hosts” root We can secure the services using tcp_wrappers. There are main two files, /etc/hosts.allow and /etc/hosts.deny. There will be three stage access checking -Is access explicitly permitted? Means permitted from /etc/hosts.allow? - Otherwise, Is access explicitly denied? Means denied from /etc/hosts.deny? - Otherwise, by default permit access if neither condition matched. To deny the services we can configure /etc/hosts.deny file using ALL and EXCEPT operation. Pattern of /etc/hosts.allow and /etc/hosts.deny file is: Demon_list:client_list:options In Client list can be either domain name or IP address. QUESTION NO: 46. Your LAN is 192.168.0.0/24. Block the telnet connection from outside the LAN. Answer and Explanation 1. vi /etc/hosts.deny in.telnetd:ALL EXCEPT 192.168.0. We can secure the services using tcp_wrappers. There are main two files, /etc/hosts.allow and /etc/hosts.deny. There will be three stage access checking -Is access explicitly permitted? Means permitted from /etc/hosts.allow? - Otherwise, Is access explicitly denied? Means denied from /etc/hosts.deny?
RH302
Leading the way in IT testing and certification tools, www.testking.com
- 199 -
- Otherwise, by default permit access if neither condition matched. To deny the services we can configure /etc/hosts.deny file using ALL and EXCEPT operation. Pattern of /etc/hosts.allow and /etc/hosts.deny file is: Demon_list:client_list:options In Client list can be either domain name or IP address. Here in.telnetd is the telnet server program name. QUESTION NO: 47. Configure the telnet connection only from your local LAN (192.168.0.0/24) between 9-17pm. Answer and Explanation 1. vi /etc/xinetd.d/telnet service telnet {
only_from = 192.168.0.0/24 access_times = 09:00-17:00
} 2. chkconf telnet on 3. service xinetd restart xinetd based services can manage by specifying host and time parameters. Only_from means connection allowed network, remaining hosts explicitly deny. access_times specify when service is available. QUESTION NO: 48. You have a ftp server having IP address 192.168.0.254. Using iptables, allow the ftp connection only from the internal network where internal network is 192.168.0.0/24. Answer and Explanation 1. iptables –t filter –A INPUT –s ! 192.168.0.0/24 –p tcp –d 192.168.0.254 --dport 20 –j DROP 2. iptables –t filter –A INPUT –s ! 192.168.0.0/24 –p tcp –d 192.168.0.254 --dport 21 –j DROP
RH302
Leading the way in IT testing and certification tools, www.testking.com
- 200 -
iptables is the build-in firewall tools, used to filter the packets and for nat. By identifying Source Address, Destination Address, type of protocol, source and destination port we can filter the packets. -s Source Address -d Destination Address -p Layer 3 Protocol -d Destination Address --sport Source Prot --dport Destination Port -i Incoming Interface -o Outgoing Interface -t Table either filter or nat or mangle -A Chain can be either INPUT, OUTPUT, FORWARD, PREROUTING, POSTROUTING. QUESTION NO: 49. Your LAN is connected to WAN also. You want to deny the ssh coming from WAN. Configure using iptables to allow ssh connection only from the Local LAN where you LAN IP address is 192.168.0.0/24. Answer And Explanation 1. iptables –t filter –A INPUT –s ! 192.168.0.0/24 –p tcp --dport 22 –j DROP iptables is the build-in firewall tools, used to filter the packets and for nat. By identifying Source Address, Destination Address, type of protocol, source and destination port we can filter the packets. -s Source Address -d Destination Address -p Layer 3 Protocol -d Destination Address --sport Source Prot --dport Destination Port -i Incoming Interface -o Outgoing Interface -t Table either filter or nat or mangle -A Chain can be either INPUT, OUTPUT, FORWARD, PREROUTING, POSTROUTING. ssh service use the 22 port so we can block connection from outside the LAN.
RH302
Leading the way in IT testing and certification tools, www.testking.com
- 201 -
QUESTION NO: 50. You have a dedicated internet line in your LAN and IP from your ISP is 202.2.2.2. Your LAN is in 192.168.0.0/24. Configure the SNAT that allows all system in your LAN can access the Internet. Answer and Explanation 1. iptables -t nat -A POSTROUTING -s 192.168.0.0/24 -p tcp -j SNAT –to-source 202.2.2.2. POSTROUTING This filter point handles packets immediately prior leaving the system. When Packets leave the system all’s source address change to 202.2.2.2 and can access the internet. iptables is the build-in firewall tools, used to filter the packets and for nat. By identifying Source Address, Destination Address, type of protocol, source and destination port we can filter the packets. -s Source Address -d Destination Address -p Layer 3 Protocol -d Destination Address --sport Source Prot --dport Destination Port -i Incoming Interface -o Outgoing Interface -t Table either filter or nat or mangle -A Chain can be either INPUT, OUTPUT, FORWARD, PREROUTING, POSTROUTING. QUESTION NO: 51 ssh service is enabled in your Server. Configure to - Deny the ssh from cracker.org domain.
- Allow the ssh service only from example.com domain. Answer and Explanation: 1. vi /etc/hosts.deny sshd:ALL EXCEPT .example.com or 1. vi /etc/hosts.deny sshd:ALL 2. vi /etc/hosts.allow sshd:.example.com
RH302
Leading the way in IT testing and certification tools, www.testking.com
- 202 -
We can secure the services using tcp_wrappers. There are main two files, /etc/hosts.allow and /etc/hosts.deny. There will be three stage access checking - Is access explicitly permitted? Means permitted from /etc/hosts.allow? - Otherwise, Is access explicitly denied? Means denied from /etc/hosts.deny? - Otherwise, by default permit access if neither condition matched. To deny the services we can configure /etc/hosts.deny file using ALL and EXCEPT operation. Pattern of /etc/hosts.allow and /etc/hosts.deny file is: Demon_list:client_list:options In Client list can be either domain name or IP address. Note: In Exam Lab there will be two different domain example.com which is known as local domain and another is cracker.org which is called non trusted domain. So only from .example.com means allow only to example.com deny to every one. QUESTION NO: 52 You have a domain in your LAN named example.com and cracker.org. Allow the - Allow the FTP connection only from local domain.
- Deny the FTP connection from cracker.org Answer and Explanation: 1. vi /etc/hosts.deny vsftpd:ALL EXCEPT .example.com or 1. vi /etc/hosts.deny vsftpd:ALL 2. vi /etc/hosts.allow vsftpd:.example.com We can secure the services using tcp_wrappers. There are main two files, /etc/hosts.allow and /etc/hosts.deny. There will be three stage access checking - Is access explicitly permitted? Means permitted from /etc/hosts.allow? - Otherwise, Is access explicitly denied? Means denied from /etc/hosts.deny? - Otherwise, by default permit access if neither condition matched. To deny the services we can configure /etc/hosts.deny file using ALL and EXCEPT operation. Pattern of /etc/hosts.allow and /etc/hosts.deny file is:
RH302
Leading the way in IT testing and certification tools, www.testking.com
- 203 -
Demon_list:client_list:options In Client list can be either domain name or IP address. Note: In Exam Lab there will be two different domain example.com which is known as local domain and another is cracker.org which is called non trusted domain. So only from .example.com means allow only to example.com deny to every one. QUESTION NO: 53 Configure to allow the pop3 and imap connection from your domain example.com and cracker.org domain. Answer and Explanation: 1. vi /etc/hosts.deny dovecot:ALL EXCEPT .example.com, .cracker.org We can secure the services using tcp_wrappers. There are main two files, /etc/hosts.allow and /etc/hosts.deny. There will be three stage access checking - Is access explicitly permitted? Means permitted from /etc/hosts.allow? - Otherwise, Is access explicitly denied? Means denied from /etc/hosts.deny? - Otherwise, by default permit access if neither condition matched. To deny the services we can configure /etc/hosts.deny file using ALL and EXCEPT operation. Pattern of /etc/hosts.allow and /etc/hosts.deny file is: Demon_list:client_list:options In Client list can be either domain name or IP address. Note: In Exam Lab there will be two different domain example.com which is known as local domain and another is cracker.org which is called non trusted domain. So only from .example.com means allow only to example.com deny to every one. QUESTION NO: 54 Share the /data directory only to example.com members. These hosts should get read and write access on shared directory.
RH302
Leading the way in IT testing and certification tools, www.testking.com
- 204 -
Answer and Explanation: 1. vi /etc/exports /data *.example.com(rw,sync) 2. service nfs start 3. service portmap restart 4. chkconfig nfs on 5. chkconfig portmap on In Linux to share the data we use the /etc/exports file. Pattern is: Path client(permission) Shared Directory Path, Client can be single host or domain name or ip address. Permission should specify without space with client lists in parentheses. NFS is RPC service so, portmapper service should restart after starting the nfs service. QUESTION NO: 55 /data directory on linux server should make available on windows to only john with full access but read only to other users and make sure that /data can access only within example.com domain. Configure to make available. Answer and Explanation: 1. vi /etc/samba/smb.conf [global] netbios name=station? workgroup=station? security=user smb passwd file=/etc/samba/smbpasswd encrypt passwords=yes hosts allow= .example.com [data] path=/data public=no writable=no write list=john browsable=yes 2. smbpasswd -a john 3. service smb start 4. chkconfig smb on
RH302
Leading the way in IT testing and certification tools, www.testking.com
- 205 -
/etc/samba/smb.conf. There are some pre-defined section, i. global use to define the global options, ii. Printers use to share the printers, iii. homes use the share the user’s home directory. Security=user validation by samba username and password. May be there are other users also. To allow certain share to certain user we should use valid users option. smbpasswd Helps to change user’s smb password. –a option specifies that the username following should be added to the local smbpasswd file. If any valid users option is not specified, then all samba users can access the shared data. By Default shared permission is on writable=no means read only sharing. Write list option is used to allow write access on shared directory to certain users or group members. QUESTION NO: 56 /data directory on linux server should make available on windows system that eric user should able to access on read only mode within example.com domain. Answer and Explanation: 1. vi /etc/samba/smb.conf [global] netbios name=station? workgroup=station? security=user smb passwd file=/etc/samba/smbpasswd encrypt passwords=yes hosts allow= .example.com [data] path=/data public=no writable=no browsable=yes 2. smbpasswd -a eric 3. service smb start 4. chkconfig smb on /etc/samba/smb.conf. There are some pre-defined section, i. global use to define the global options, ii. Printers use to share the printers, iii. homes use the share the user’s home directory. Security=user validation by samba username and password. May be there are other users also. To allow certain share to certain user we should use valid users option. smbpasswd Helps to change user’s smb password. –a option specifies that the username following should be added to the local smbpasswd file.
RH302
Leading the way in IT testing and certification tools, www.testking.com
- 206 -
QUESTION NO: 57 Configure the send mail server for your local LAN. As well as the mail of user john should get by the jane user. Answer and Explanation: Here your Local LAN means your domain named example.com. 1. vi /etc/mail/local-host-names example.com 2. vi /etc/mail/sendmail.mc dnl # DEAMON_OPTIONS(`Port=smtp,Addr=127.0.0.1,Name=MTA`)dnl 3. m4 /etc/mail/sendmail.mc >/etc/mail/sendmail.cf 4. vi /etc/mail/access 192.168.0 RELAY 5. service sendmail start | restart 6. chkconfig sendmail on /etc/mail/local-host-names file contains the aliases to hostname. Mail server program reads the /etc/mail/sendmail.cf. To change the configuration on mail server, we should edit the /etc/mail/sendmail.mc file and should generate the sendmail.cf using m4 command. By default sendmail server allows to connect to local host only. So we should edit the /etc/mail/sendmail.mc file to allow connect to other hosts. By default sendmail server will not forward mail. we should specify on /etc/mail/access to relay or to block mail coming from domain or network or individual email address. 7. vi /etc/aliases john: jane 8. newaliases We can redirect the mail of one user to another user using /etc/aliases file. In example all mail of john goes to jane user. QUESTION NO: 58 If any mail coming from outside of the local LAN block all mails. Answer and Explanation: Outside the LAN means cracker.org. All host on exam on example.com domain and outside domain means cracker.org. To block the mail coming from cracker.org

RH302
Leading the way in IT testing and certification tools, www.testking.com
- 207 -
1. vi /etc/mail/access @cracker.rog REJECT 2. service sendmail start | restart 3. chkconfig sendmail on QUESTION NO: 59 If root sends the mail to jane, mail should be send to /var/spool/mail/jane. Answer and Explanation: 1. vi /etc/aliases john: jane 2. newaliases We can redirect the mail of one user to another user using /etc/aliases file. In example all mail of john goes to jane user. When you configure this line mail automatically goes to jane’s mail spooling directory. QUESTION NO: 60 All mails to cracker.org should get by eric user. Answer and explanation:
4. vi /etc/mail/virtusertable @cracker.org eric
5. service sendmail restart /etc/mail/virtusertable file is used to send the mail coming for virtual user to real user. According to question, all mail to cracker.org should get by eric user so @cracker.org eric : Which sends all mail of cracker.org to eric user.
QUESTION NO: 61 Your Machine Name is stationx.example.com, (x is your host IP address) which is already resolved. Set the default page for stationx.example.com by downloading www.html file from ftp.server1.example.com. Answer and Explanation:
5. ftp ftp.server1.example.com a. Download the www.html
RH302
Leading the way in IT testing and certification tools, www.testking.com
- 208 -
6. move the downloaded file into /var/www/html 7. Rename the file into index.html 8. Check using links http://stationx.example.com
/var/www/html is the default directory for httpd service. Index.html is the default directory index. To set the default page without configuring virtualhost copy the file as a index.html in /var/www/html. QUESTION NO: 62 Configure the webserver for your local domain. Download a www.html file from ftp.server1.example.com/pub/rhce and rename it as index.html. Answer and Explanation: Your local domain mean example.com domain. Lookup the example.com using host example.com you will get the IP address 192.168.0.254. 1. vi /etc/httpd/conf/httpd.conf <VirtualHost 192.168.0.254> ServerName sexample.com DocumentRoot /var/www/example DirectoryIndex index.html ServerAdmin [email protected] </VirtualHost>
2. mkdir /var/www/example 3. Download the index.html file from the ftp server specified in question 4. Rename the www.html file to index.html 5. service httpd start|restart
6. chkconfig httpd on 7. check using: links http://example.com QUESTION NO: 63 Eric user should able to write on Document root directory. Answer and Explanation: Document directive is used in apache configuration file to specify the directory where all web site related documents are. According to question eric user should able to write into the Document root directory. Better set the permission using ACL (Access Control List), to apply the permission using acl needs to mount the filesystem with acl options. Example in above answer
RH302
Leading the way in IT testing and certification tools, www.testking.com
- 209 -
documentroot is in /var and /var is mounting separate file system so needs to mount the /var file system with acl option.
5. vi /etc/fstab LABEL=/var /var ext3 defaults 1 1 6. mount –o remount /var 7. setfacl –m u:eric:rwx /var/www/example 8. getfacl /var/www/example
getfacl and setfacl two commands used to maintain the permission through acl. setfacl is used to set the permission on file/directory, getfacl is used to display the permission of file/directory. QUESTION NO: 64 Port 8080 Configure the squid server to allow the Local Domain and deny to cracker.org domain. Answer and Explanation: At exam Lab example.com domain resides on 192.168.0.0/24 Network and cracker.org resides on 192.168.1.0/24 Network. 1. vi /etc/squid/squid.conf
#detault: http_port 8080 #Recommended minimum configuration: # Near the src acl src section acl allownet src 192.168.0.0/255.255.255.0 acl denynet src 192.168.1.0/255.255.255.0 #Default: # http_access deny all
#Under Here http_access allow allownet http_access deny denynet
2. service squid start 3. chkconfig squid on squid is a proxy caching server, using squid we can share the internet, block the internet, to certain network. First we should define the port for squid, the standard port for squid is 3128. We can run squid on different port by specifying http_port portnumber. QUESTION NO: 65
RH302
Leading the way in IT testing and certification tools, www.testking.com
- 210 -
User eric should able to access the mail using IMAP over SSL Answer and Explanation: IMAP is a very usefully protocol, but it lacks encryption. The dovecot package distributed with RHEL includes the ability to use IMAP over SSL, This requires the creation of a PEM format certificate.
6. cd /usr/share/ssl/certs 7. make dovecot.pem : Which generates the dovecot.pem certificate by reading
MakeFile 8. Enable the imaps protocol from /etc/dovecot.conf vi /etc/dovecot.conf
protocols = imap imaps 9. service dovecot restart : Restart the Dovecot service
QUESTION NO: 66 ssh service is enabled in your Server. Configure to - Deny the ssh from my133t.org domain.
- Allow the ssh service only from example.com domain. Answer and Explanation: 1. vi /etc/hosts.deny sshd:ALL EXCEPT .example.com or 1. vi /etc/hosts.deny sshd:ALL 2. vi /etc/hosts.allow sshd:.example.com We can secure the services using tcp_wrappers. There are main two files, /etc/hosts.allow and /etc/hosts.deny. There will be three stage access checking - Is access explicitly permitted? Means permitted from /etc/hosts.allow? - Otherwise, Is access explicitly denied? Means denied from /etc/hosts.deny? - Otherwise, by default permit access if neither condition matched. To deny the services we can configure /etc/hosts.deny file using ALL and EXCEPT operation. Pattern of /etc/hosts.allow and /etc/hosts.deny file is: Demon_list:client_list:options In Client list can be either domain name or IP address.
RH302
Leading the way in IT testing and certification tools, www.testking.com
- 211 -
QUESTION NO: 67 You have a domain in your LAN named example.com and my133t.org. Allow the - Allow the FTP connection only from local domain.
- Deny the FTP connection from my133t.org Answer and Explanation: 1. vi /etc/hosts.deny vsftpd:ALL EXCEPT .example.com or 1. vi /etc/hosts.deny vsftpd:ALL 2. vi /etc/hosts.allow vsftpd:.example.com We can secure the services using tcp_wrappers. There are main two files, /etc/hosts.allow and /etc/hosts.deny. There will be three stage access checking - Is access explicitly permitted? Means permitted from /etc/hosts.allow? - Otherwise, Is access explicitly denied? Means denied from /etc/hosts.deny? - Otherwise, by default permit access if neither condition matched. To deny the services we can configure /etc/hosts.deny file using ALL and EXCEPT operation. Pattern of /etc/hosts.allow and /etc/hosts.deny file is: Demon_list:client_list:options In Client list can be either domain name or IP address. QUESTION NO: 68 Configure to allow the pop3 and imap connection from your domain example.com and my133t.org domain. Answer and Explanation: 1. vi /etc/hosts.deny dovecot:ALL EXCEPT .example.com, .my133t.org We can secure the services using tcp_wrappers. There are main two files, /etc/hosts.allow and /etc/hosts.deny. There will be three stage access checking - Is access explicitly permitted? Means permitted from /etc/hosts.allow? - Otherwise, Is access explicitly denied? Means denied from /etc/hosts.deny? - Otherwise, by default permit access if neither condition matched.
RH302
Leading the way in IT testing and certification tools, www.testking.com
- 212 -
To deny the services we can configure /etc/hosts.deny file using ALL and EXCEPT operation. Pattern of /etc/hosts.allow and /etc/hosts.deny file is: Demon_list:client_list:options In Client list can be either domain name or IP address. QUESTION NO: 69 Port 8080 Configure the squid server to allow the Local Domain and deny to my133t.org domain. Answer and Explanation: At exam Lab example.com domain resides on 172.24.0.0/16 Network and my133t.org resides on 172.25.0.0/16 Network. 1. vi /etc/squid/squid.conf
#detault: http_port 8080 #Recommended minimum configuration: # Near the src acl src section acl allownet src 172.24.0.0/255.255.0.0 acl denynet src 172.25.0.0/255.255.0.0 #Default: # http_access deny all
#Under Here http_access allow allownet http_access deny denynet
2. service squid start 3. chkconfig squid on squid is a proxy caching server, using squid we can share the internet, block the internet, to certain network. First we should define the port for squid, the standard port for squid is 3128. We can run squid on different port by specifying http_port portnumber.


![Rhce Notes[1]](https://img.dokumen.tips/doc/110x75/5526ef2c5503461c368b45e6/rhce-notes1.jpg)