Embed Size (px)
Citation preview

Rev 0

09351 - 5/30/2003 2:121
TANDEM VECTOR 2 OWNER’S MANUAL
Disclaimer - No WarrantyBecause of the unavoidable danger associated
with the use of this parachute system, themanufacturer makes no warranty, either expressedor implied. The rig is sold with all its faults and withoutany warranty of fitness for any purpose. Manufactureralso disclaims any liability in tort for damages, director consequential, including personal injuries, resultingfrom a malfunction or from a defect in design, material,workmanship, or manufacturing whether caused bynegligence on the part of the manufacturer orotherwise.
By using this rig, or allowing it to be used byothers, the buyer waives any liability for personalinjuries or other damages arising from such use.
If the buyer declines to waiver liability on thepart of the manufacturer, buyer may obtain a fullrefund of the purchase price by returning theparachute system, before it is used, to manufacturerwithin 30 days from the date of original purchase witha letter stating why it was returned.
WARNINGRead this information carefully andunderstand it completely. Any jump thatutilizes the Tandem Vector System isconsidered a �tandem jump�: Using thissystem outside the student/ Tan-demlnstructor training environments considereda violation of federal law (FAA exemp&onNo. 4943)
Examples of violations: demonstration jumps;stunt jumps; intentional water jumps; nightjumps; jumping with any student less than1 S years of age; any tandem jump that takesplace off of a designated drop zone. (Theserestrictions do not apply to military Tandemapplications).
Neon and fluorescent colored fabrics and tapesfade rapidly. Color brilliance may be lost within ayear of manufacture. The Relative Workshopassumes no respon-sibility for this condition.
Tandem Vector Owner�s ManualMarch, 1993
Rewrites and consultant: Rob LaidlawIllustrations / compilation: Sandra Williams
WARNINGSport parachuting is a hazardous activity
that can result in injury or death.Parachutes sometimes malfunction, even
when they are properly designed, built assembled,packed maintained and used. The results of suchmalfunctions are sometimes serious injury ordeath
The US Parachute Association estimatesthat there are about 30,000 skydivers in the U.S.,and these jumpers made approximately 2 millionjumps in 1989. The Association reported 36skydiving fatalities that year, meaning theprobabilityof dying on a skydive is approximately1 in 55,500. It also seems that the moreexperienced a skydiver is, the less likely he or sheis to be killed while jumping.
Experts estimate that hundreds of peopleare also injured. Some of these deaths and injuriesare the result of equipment malfunctions.
If you use your Vector Tandem System, or ifyou allow someone else to use it, you areacknowledging sport parachuting�s risks andaccepting the fact that the Vector or its componentsmay malfunction.
If you are not willing to accept the risks ofsport parachuting, or if you aren�t willing to acceptthe possibility that your Vector Tandem System orits components may malfunction or perhaps causeyou to be injured or killed, then you may returnyour Vector Tandem System for a full refundbeforeitisused. Details on how to do this areprinted below.
Rev 0

09351 - 5/30/2003 3:121
TANDEM VECTOR 2 OWNER’S MANUAL
double drogue release handle ......................... 34
Chapter 4: Installation of right-handdrogue release .............................. 35Conversion kit ........................................36Installing the housing and handle..........36Installing new drogue release riser ...... 38Installing the handle on the TandemInstructor�s harness ...............................39Installing the handle on the student harness .....................................41Disconnection after landing .................. 42If the student is to release drogue .......42
Chapter 5: Tandem Vector reservepacking instructions .................... 43Folding the reserve canopy ...................43Attaching the reservesteering toggles .....................................45Setting the brakes .................................45Attaching the reserve static line ..........49Placing the bag into the container .......50Closing the container ............................50
SECTION 3:Instructor Techniques -
Normal
Chapter 1: Preparation ........................55Criteria for Jumping ...............................55personal requirements....................................... 55geographical considerations ............................. 56Overview of the jump ............................56synopsis of the jump ...........................................56video and assumption of risk agreement .......56Fit harness to student ...........................57Briefing ....................................................57conducting a skills practice ...............................58briefing checklist ................................................. 58Pre-flight gear check ............................. 59student harness .................................................... 59tandem instructor harness and containers .... 59
SECTION 1: Introduction
Qualifications ......................................... 4Course requirements ............................ 4Course schedule/ activities ................... 4Probation, currency andrecertification requirements ................ 5
SECTION 2: Equipment
Chapter 1: Description ............... 7Harness and container .......................... 8Passenger Harness ................................9Main Canopy ...........................................10
Chapter 2: Operation ................. 11Reserve activation .................................11Main activation....................................... 13introduction to the drogue ............................... 13deploying drogue ................................................ 14releasing drogue.................................................. 15handles familiarization ....................................... 15Canopy brake and steering system ...... 16brake release ....................................................... 16double brake release system ............................ 17toggles familiarization ........................................ 17
Chapter 3: Main Packing ............ 18Preparation for packing ........................ 18stow bands ........................................................... 18double drogue release loop ............................. 19Inspection ...............................................19drogue inspection procedures ......................... 19canopy inspection ............................................... 23drogue release inspection................................. 23pin attachment point .......................................... 23sequence checklist .............................................. 23Packing sequence ...................................24folding the main ................................................... 24stowing the brakes ............................................. 24folding the nose ................................................... 26closing the container .......................................... 26drogue hook-up .................................................. 29setting the drogue ............................................... 30packing the drogue ............................................. 31
Rev 0

09351 - 5/30/2003 4:121
TANDEM VECTOR 2 OWNER’S MANUAL
Chapter 2: In-aircraft and exits ..........63In-aircraft gear check ............................ 63pre-exit preparation ........................................... 63pre-exit gear check ............................................ 63drogue handle check .......................................... 63Exits .........................................................63exit techniques .................................................... 63cessna exit ............................................................ 64divingexit .............................................................. 67backing out exit ................................................... 68exit tips ................................................................. 70exiting different aircraft ..................................... 70
Chapter 3: Freefall & Droguefall 71Altitude recommendations .................. 71exit aircraft above 7500 AGLdeploy drogue within 5 seconds of exitminimum exit altitude is 4500 AGLminimum main deployment altitudeis 4000 AGLreserve initiation altitude is 2000 AGLStability control .....................................72archanticipationmanipulationDeploy Drogue ....................................... 73exit aircraft above 7500ensure stability prior to deploymentdrogue deploymentDroguefall control techniques .............. 74Arm extension ....................................... 74Drogue release ....................................... 74
Chapter 4: Canopy control ........ 75Upon opening ......................................... 75canopy checkrelease togglesstow and check handles and harnesssit back drill for studentSteering the canopy...............................76Landing.................................................... 76landing preparationlanding techniqueafter landing
SECTION 4:Malfunctions &Emergencies
Chapter 1: Reserve procedures 78Emergency response sequence............ 78Reserve canopy procedures ................. 79
Chapter 2: In-aircraft ................. 79Aircraft emergencies ........................... 791,500' or below - engine out1,500' or below catastrophic aircraft failure1,500' - 2,500'2,500' - 4,000'Student refusal
Chapter 3: Freefall ............................... 82Accidental deployments ....................... 82Rapid Drogue Throw ............................ 82Untimely pulls ........................................ 82high ....................................................................... 82low ........................................................................ 83Freefall control problems .................... 83Drogue deployment problems ............ 83pulling the wrong handle .................................. 83unable to extract drogue.................................. 83uniflated drogue ................................................. 83entanglement with drogue ............................... 83entanglement with drogue bridle ................... 84non-collapsed drogue ....................................... 84drogue in tow ..................................................... 84drogue does not release when firsthandle pulled ...................................................... 85
Chapter 4: Canopy control ........ 86Malfunctions .......................................... 86drogue entanglement with main ..................... 86drogue detaches from main ............................. 86horseshoe malfunction ..................................... 87student feels sick under canopy ...................... 87
Rev 0

09351 - 5/30/2003 5:121
TANDEM VECTOR 2 OWNER’S MANUAL
SECTION 5:Student Techniques,
and Activities
Chapter 1: Student skills forthe first jump................................ 88Equipment .............................................. 88Student accessories ............................................ 88Student harness .................................................. 88Sit back drill ......................................................... 88Exit practice ......................................................... 89Freefall .................................................... 89droguefall positions ............................................ 89arm extension ...................................................... 89Canopy control ...................................... 90toggles ................................................................... 90steering ................................................................. 90flaring ..................................................................... 91landing ................................................................... 91Student Task List .................................. 91
Chapter 2: Progression............... 92Preparation ............................................ 92put on own harness ............................................ 92put on and set altimeter .................................... 92In-aircraft ................................................ 92assist spotting ....................................................... 92spot ........................................................................ 92Freefall .................................................... 92perform and improve mainactivation technique ........................................... 93monitor altitude and altimeter ......................... 93transition requirements for freefall training . 93Canopy control ...................................... 94perform a canopy check .................................... 94perform turns and spirals .................................. 94perform stalls and recovery .............................. 94identify running, holding, crabbing, and wind lineassess wind directions and strength ................ 95fly a pattern to set up for alanding approach ................................................. 95picking up gear .................................................... 95Unusual situations ............................................... 95respond to malfunction scenario ..................... 95
Chapter 3: Other activities ........ 95Relative work procedures ..................... 95Participant qualifications ................................... 95RW Tandem briefing ......................................... 96Briefing review .................................................... 96
CRW Procedures ................................... 96
APPENDICES
Tandem Vector reservehandle modification ............................... 98Stop tab installation .............................. 100Tandem water landingprocedures .............................................. 102Tandem fatality reports ........................ 103Tandem canopy line trim ...................... 105Mod to speed up openings ..................... 109Tandem test ........................................... 1103-Ring system ......................................... 1123-Ring assembly ...................................... 1133-Ring pre-jump inspection ................... 1153-Ring maintenance ............................... 116Recommended maintenance timeson component parts .............................. 117
Rev 0

09351 - 5/30/2003 6:121
TANDEM VECTOR 2 OWNER’S MANUAL
SECTION 1: Introduction
Applicant QualificationsCourse RequirementsCourse Schedule/ActivitiesProbationCurrency RequirementsRecertificationRecurrent Training
Applicant QualificationsBefore an applicant may attend a tandem certifica-tion, the following criteria must be met:
1) Currently possess, or at one time been issued, aUSPA static-line instructor, or USPA AFF jumpmasteror instructor rating. (Or the foreign equivalent)
2) Have logged at least 500 ram-air jumps.
3) Hold a current FAA Class I, II or III medicalcertificate. (Or foreign equivalent)
4) Hold a current USPA D license. (Or foreignequivalent)
5) Be at least 18 years of age.
6) Three years in sport.
Note: Each candidate has the responsibility toinspect the credentials of the Tandem examiner.Certification paperwork, filed by any examiner whois not a current Tandem Instructor, will be consid-ered invalid by the Relative Workshop. BE SUREYOUR EXAMINER IS HOLDING A VALID, CURRENTTANDEM EXAMINER LICENSE.
Course RequirementsEach candidate is required to bring the followingitems to a Tandem certification course:
* USPA Expert license or foreign equivalent-valid* Jumpmaster/instructor ratings
* FAA Medical certificate-valid* Logbooks* Jumpsuits (slow fall & fast fall)* Wrist altimeter* Goggles* Notepad and pen* Certification fee
In addition, it would be wise to bring along a fellowjumper who has at least 100 jumps experience to actas a Tandem passenger during some of the certifica-tion jumps.
Course Schedule/ ActivitiesA. Paperwork Time: 20 Min.Fill out the applicant data on the blue �RelativeWorkshop Tandem Instructor Rating Form� and theyellow �Tandem Vector Training Logbook� withthe required information.
B. Course FeePay the required course fee to the examiner. Thisfee generally includes: Classroom/theory; ground-training; jump costs for the examiner and staff; andthe rental of the gear to be used during the certifica-tion. The course fee does not include the candidatespersonal jumps or the cost of the experiencedpassenger who rides with the candidate during cer-tification.
C. Classroom/Theory Time: 3-4 HoursThis portion of the course will run approximatelyfour hours. The �Tandem Training Video� will beshown module by module with continued discussionafter each module.
D. Ground Training Time: 2-3 HoursGround training covers: Passenger harness fitting;gear check and donning the Tandem system; hook-ing up the passenger; practice climb-outs, control-ling the passenger�s movements; exits; throwing thedrogue; drogue-fall maneuvers; main canopy de-ployment; special features of the canopy�s togglesystem; landing procedures; and main canopy pack-ing.
Rev 0

09351 - 5/30/2003 7:121
TANDEM VECTOR 2 OWNER’S MANUAL
The logbook, when complete, must be verified by aTandem examiner or a Tandem rig owner. If theapplicant is a Tandem Vector owner, then he mustsubmit to the Relative Workshop a video tape of atleast 3 of the final 10 probationary jumps along withthe training logbook.
The TM must send the logbook and license fee to theRelative Workshop, whereupon an official TandemInstructor license will be issued.
CURRENCY REQUIREMENTSIn addition to yearly recertification, Tandem Instruc-tors are expected to maintain currency during theyearly recertification period.
A. If any currently rated Tandem Instructor has notmade a Tandem jump in the preceding 90 days, hemust make one Tandem jump with an experiencedjumper acting as a passenger before taking a studentpassenger. The experienced jumper/ passengermust first be briefed on how to respond to Tandememergencies.
B. If any currently rated Tandem Instructor has notmade a Tandem jump within the last 180 days, hemust complete recurrent training before taking astudent passenger.
E. Certification JumpsEach candidate will perform at least one solo jumpwith the Tandem system, or as many as necessary tobecome comfortable with the operation of the sys-tem. A minimum of four jumps will then be per-formed from the Tandem Instructor position. On atleast one of these jumps, the candidate must ride inthe passenger position, wither with theexaminer or an appointed Tandem evalu-ator.
The record of each certification jump willbe logged on the blue sheet and yellowlogbook. The examiner will observe/critique the packing of the main canopy,and issue the candidate instructions for thenext jump.
The number of certification jumps thatmust be made by each candidate during thecourse will depend entirely on the perfor-mance level during the first five jumps. It isup to the examiner�s discretion as towhether the candidate should make addi-tional jumps to qualify. In some situations,the examiner may recommend that the candidatewithdraw from the course due to poor perfor-mance/skills or bad judgment, etc..
If the candidate is successful and has completed thecertification course, the examiner will file the nec-essary paperwork with the Relative Workshop.The candidate will retain the yellow logbook andcontinue to log future jumps until the minimum 25probation jumps have been completed.
The course examiner will inform the Relative Work-shop of any candidate who fails to complete thecourse and the reasons for the failure.
PROBATIONAs outlined in the yellow �Tandem logbook,� theprobation period will be in effect for a minimum of25 jumps. The first 5 jumps are for certification. Theremaining 20 jumps are divided into 3 sections, eachwith its own special guidelines. Refer to the TandemVector Training Logbook for specific guidance.
Rev 0

09351 - 5/30/2003 8:121
TANDEM VECTOR 2 OWNER’S MANUAL
Recurrent Training consists of one solo droguejump and one Tandem drogue jump with an experi-enced passenger. During the Tandem drogue jump,the applicant must make a stable exit from at least10,500 feet, with drogue deployment within 10seconds and opening by 4,500 feet. Applicant mustdemonstrate the ability to control heading duringdrogue-fall by making at least two opposite 360-degree turns. Applicant must also perform dummyripcord pulls to both drogue release handles and thereserve ripcord. Landing must be stand-up (windpermitting) within 50 meters of the target.
These two jumps must be witnessed and signed offby a Relative Workshop Tandem rig owner orRelative Workshop Tandem Instructor Examiner.(If you are an owner or an examiner, you can signyourself off).
Foreign Tandem RatingsForeign tandem ratings alone are not valid in theUnited States of America. A foreign national wishingto perform tandem jumps in the USA must possessthe original Relative workshop tandem rating. In thefuture, USPA will also offer a tandem rating inconjunction with tandem manufacturers.
RECERTIFICATIONRenewal Procedures: Tandem Instructor ratingsmust be renewed every year.
To apply for the renewal of your Tandem Instructorrating, you must have made at least 25 Tandem jumpswithin the preceding 12 months, at least three ofwhich have been made within the preceding 90 days.
If you have fulfilled the above requirement,you need only:1) Have a Tandem Instructor Recertification formverified and signed by either a Relative WorkshopTandem Vector owner or Relative Workshop Tan-dem Examiner, and
2) Send the endorsed form and the license fee to theRelative Workshop. As soon as the applicant hasmailed the renewal form and the check to theRelative Workshop, the rating is considered re-newed; you do not have to wait for the response bythe company, though you are required to keep acopy of the form to prove your currency.
If you have not fulfilled the above requirements, youmust take recurrent training.Recurrent Training
Rev 0

09351 - 5/30/2003 9:121
TANDEM VECTOR 2 OWNER’S MANUAL
SECTION 2: Equipment
In this section the Tandem system and related com-ponents will be introduced. The following subjectswill be covered. Familiarize yourself with each ofthem:
DescriptionOperationMain PackingInstallation of secondary drogue releaseTandem Vector reserve packing instructio
#2/1-1
Chapter 1: DescriptionA detailed description of the Tandem system�s spe-cial components will be broken down into theseareas:
Harness and containerPassenger harnessMain Canopy
Drogue release handle:Left hand pull, bottom of maincontainer. Orange plastic handlewith velcro retainer and cable.Pull of approximately 6" will re-lease drogue.
Drogue deployment handle:Right hand pull, located on bottomof main container. Orange plastichandle attached to top of drogue.
Drogue pouch:Spandex construction, elastic re-inforced opening. Pouch holdsdrogue chute and Kevlar bridle
Rev 0

09351 - 5/30/2003 10:121
TANDEM VECTOR 2 OWNER’S MANUAL
#2/1-2
Harness andContainer
Auxiliary right hand drogue release handle:
Optional equipment. Right hand pull.Orange plastic handle which can beattached to either the student har-ness or the Tandem Instructor har-ness.
Auxiliary reserve ripcord/Reserve Static-lineLanyard (RSL) � Dual Purpose
A. Auxiliary reserve ripcord: Right hand pull. Ball handleon reserve static line next to 3-Ring on right hand side of rig. Tobe used if left hand is incapacitated in any way, and unable to pullreserve ripcord. Ball must be pulled straight up to release RSLconnection and initiate reserve activation.
B. Reserve Static-line Lanyard (RSL):RSL can be released prior to landing in the event of high groundwinds.
Top student attachment points:
Two D-rings mounted invertedunder the large harness ring onboth sides of the main lift web(MLW).
Reserve ripcord:Left hand pull. Either a webbingloop handle (or soft pillowhandle) attached firmly to theleft main lift web in an outboardposition. Handle color is red
Cutaway handle:Right hand pull. Soft pillowhandle (or loop-style handle)attached firmly in an outboardposition on right main lift web.Handle color is green.
Main lift web adjustment point:
Webbing is lengthened or shortenedthrough a pair of three bar adapters.Velcro covers are used to retain excesswebbing.
Bottom student attach-ment point:
Consists of two RW-7 ringsmounted sideways, threadedthrough each diagonal on the leftand right sides.
Rev 0

09351 - 5/30/2003 11:121
TANDEM VECTOR 2 OWNER’S MANUAL
#2/1-3
#2/1-4
#2/1-4a
Passenger Harness:
Top attachment points(snaps and safety pins).
Side attachment points(quick ejectors).
Adjustable telescopicleg pads.
Adjustable main lift webs, leg straps andrear diagonals, using spring-loaded, non-slip adjusters
Rev 0

09351 - 5/30/2003 12:121
TANDEM VECTOR 2 OWNER’S MANUAL
#2/1-5
The Main Canopy
Line group identificationSteering line identification:There are four steering lines on each side of thecanopy. Unlike most canopies, they are attached atthe full cell junctions, rather than at the half cellpoint.
Canopy TailD-Line
C-Line
B-LineA-Line
Standard Control Lines
ShortBlack Toggles
Long GoldToggles
Tandem Instructor Toggle
Student Toggle
Canopy Nose
Rev 0

09351 - 5/30/2003 13:121
TANDEM VECTOR 2 OWNER’S MANUAL
Chapter 2: OperationNOTE: This section will explain the special opera-tional requirements of the different components onthe Tandem Vector. The components which will beexplained are:
Main ActivationReserve activationCanopy brakes and steering system
The Tandem Vector is a very different system fromany sport skydiving system. There are more handleson the Tandem Vector, and they are all in differentplaces. In particular, the reserve and cutaway handlesare mounted outboard (otherwise they�d be blockedby the student). Because of this, no amount of jumpson solo sport gear will prepare a jumper for theTandem Vector.
Every Tandem Instructor, no matter the number ofjumps, must practice reaching for handles (especiallythe reserve) repeatedly on the ground and in the air.It is further recommended that the Tandem Instruc-tor reach in and touch both drogue release handlesand the reserve ripcord handle during droguefall oneach and every jump. This will help with memoriza-tion of exact locations and assist the Tandem In-structor in identifying problems while there is stillplenty of time to deal with them. (See fatality re-ports.)
#2/2-6
For an easy pull, the reserve and breakaway handlesmust be peeled upward and outward and THENpulled down. This technique MUST be practiced onthe ground so you will not be surprised in a realemergency.
Reserve activation:A. Cutaway and reserve handle practiceB. Reserve static line-reserve activationprocedures
A. Cutaway and reserve handle practice:The reserve and breakaway handles are in slightlydifferent positions and are more securely held inplace than on solo rigs. Therefore, it is mandatorythat each Tandem Instructor practice several handledisengagements on the ground. Please note that thehandles peel away easily in certain directions but aremuch harder to pull in others.
Rev 0

09351 - 5/30/2003 14:121
TANDEM VECTOR 2 OWNER’S MANUAL
The reserve handle/pocket configuration was cho-sen because conventional D-handles are easilyknocked out of their pockets; especially whenmounted out-board. While a floating handle on asolo rig may be fairly easy to find and pull, the sametask is considerably more difficult on a Tandem rig.In Tandem, the student�s body is directly in the way,meaning it is very difficult to see any handle, and evenharder to reach across for anything.
B. Reserve static-line/reserve activation procedures:Also note that the reserve static line lanyard willdouble as a right-hand-pull reserve ripcord. If aTandem Instructor's left arm were to be injured, orotherwise incapacitated, it would be very difficult topull the regular reserve ripcord - since it is on the leftside. The reserve static line lanyard is on the right,and thus serves both as a static line and a reserveripcord. To activate, pull the plastic ball straight uppast your head. Do not pull down; this puts thevelcro in shear and may be impossible to pull com-pletely.
#2/2-8
#2/2-7
1
2
Rev 0

09351 - 5/30/2003 15:121
TANDEM VECTOR 2 OWNER’S MANUAL
Main activation:A. Intro to the drogueB. Deploying the drogueC. Releasing the drogueD. Handles familiarization
A. Introduction to the drogue:Before discussing the procedures for using thedrogue, it helps to understand how the droguefunctions.
The purpose of the drogue is to reduce Tan-dem freefall velocity, not to aid in stability.When fully inflated, it provides enough dragto give a Tandem pair the terminal velocity ofan average solo jumper (120 mph). Without adrogue, a Tandem pair will accelerate in 18seconds to 170 mph, risking hard openingshocks and canopy damage, as well as makingfreefall photography difficult.
When using the drogue always keep this onepoint in mind:NO DROGUE - NO MAIN!!!
#2/2-9
Rev 0

09351 - 5/30/2003 16:121
TANDEM VECTOR 2 OWNER’S MANUAL
B. Deploying the Drogue1) Reach for the handle with palmforward and thumb out.
2) With the hand in the sameposition, take a firm grip onthe handle or drogue canopyjust below the handle. Becareful not to stick a fingerin the hole of the handle asyour thumb or finger may beinjured upon deployment.
Do NOT hold onto or wave off with thedrogue. The bridle is very long and maycause problems if allowed to deploy be-fore the drogue.
#2/2-10
#2/2-11
#2/2-12
4) Deploy the drogue with one continuous mo-tion of the arm: Pull the drogue out in a sweepingarc, as your arm reaches its fullest extension atshoulder height, throw the drogue at the finishof the arc.
As you aredeploying the drogue,turn your head slightlyto the right and watch itinflate. Full inflationtakes about 2-3 seconds.
3) The force required toextract the drogue canbe substantial, especially
when the pouch is new, so grip and pull firmly. Youmay need to place your elbow against the side of therig and use the leverage gained for added power.
Rev 0

09351 - 5/30/2003 17:121
TANDEM VECTOR 2 OWNER’S MANUAL
Yellow Kevlar Bridle(scrunched up after
drogue release)
DrogueDeployment
Handle
Stop Ring
MainClosing Pin
White TubularInner Bridle
Ring on Topof Canopy
D. Handles familiarization:
Prior to continuing, let�s stop here and practicelocating and pulling the handles.
Start by gearing up and practicing extracting thedrogue and releasing the drogue release handle.This should be done both in the standing and pronepositions. Alternate the use of both the left and rightdrogue release handles each time you throw thedrogue.
Practice the pulling of these handles with the main inthe container and the main OUT of the container.The sensations of locating and pulling the drogueand drogue release handles are slightly different inthese situations. If you ever experience an acciden-tal main container opening prior to either handlebeing released, the preparation of pulling thesehandles with the main out will be invaluable.
Deflated DrogueCanopy
#2/2-13
C. Releasing the drogue:
1) Left side release handle:Locate and pull drogue release handle with your lefthand. The handle releases easily with a travel ofabout 6 inches.
2) Right side release handle:Locate and pull drogue release handle with yourright hand. The handle will require slightly moreforce to pull than the left handle due to the length ofthe housing.
When either drogue release handle is pulled, thekevlar outer bridle is released, but the tubular nyloninner bridle remains attached to the curved lockingpin and your canopy. This causes the drogue topartially collapse by pulling its apex down to its base.In this partially collapsed configuration the drogueexerts enough drag to deploy the main canopy in anormal manner. (If the drogue was not partiallycollapsed, it would exert high loads on the main,possibly causing hard openings and canopy damage,as well as creating excessive drag behind the glidingcanopy.)
Rev 0

09351 - 5/30/2003 18:121
TANDEM VECTOR 2 OWNER’S MANUAL
pend the system using the extra pair of risers. Toprevent excessive wear of the Tandem system,order or produce your own training harness to beused exclusively for training and recurrency work.
Canopy brakes and steering system:A. Deployment brake releaseB. Double brake systemC. Toggles familiarization
A. Deployment brake release:
1) Grasp main steering toggles and pull outwardsaway from the riser, unsnapping the toggles. Use thestudent toggle position during brake release.
2) Pull toggles down to release the brakes. Do notpull on the small black flare toggle - leave it attachedto the riser.
Now let�s continue with the emergency systems.
NOTE: It may be helpful to substitute thehandles with mock handles or have a riggerplace temporary pins in to close the reserveso that both the reserve handle and auxiliaryreserve handle can be pulled during practice.
Perform a thorough emergency drill, locating thecutaway handle and reserve handles, pulling thecutaway and then pulling the reserve handle. Per-form this drill enough times to ensure that themovements become a natural reaction. Rememberto peel and pull the handles correctly (see pg 11reference to pulling handles up - not against velcro).
E. Vertical suspended harness drills:After you have performed the above describedemergency drills, have a partner act as a student andsuspend yourselves in a hanging Tandem harness.Repeat the emergency procedures enough times toensure that the movements become natural andinstinctive. Take note of the different positions ofthe handles while in a suspended mode. (Statisticshave shown that the Tandem Vector�s most com-mon malfunction mode is a typical main canopymalfunction where the control lines are entangledwith the rear riser lines with a possible slider hangup. This problem can be avoided by proper packing,maintaining good line tension throughout, and theuse of proper stow bands to prevent line dump.)
DO NOT TAKE THIS DRILL LIGHTLY. If youshould ever experience a malfunction, this practicewill give you the skills needed to deal with theproblem effectively.
Once you are comfortable with the normal reserveprocedures, perform the same exercise using theauxiliary reserve/RSL handle. Remember to pullstraight up with the ball. Be careful not to stretch thesmall ring. (see page 12).
By ordering an extra pair of Tandem main risers andtoggles, one can easily setup a training harness withan actual Tandem system. Remove the entire maincanopy assembly (from risers to drogue) and sus-
GoldTandemInstructor-student toggles
#2/2-14
Small blackflare toggles
Rev 0

09351 - 5/30/2003 19:121
TANDEM VECTOR 2 OWNER’S MANUAL
B. Double brake system for the Tandem Vec-tor canopy.The Relative Workshop Double Brake System is aninnovation in the steering line set up on Tandemsystems that provides reduced toggle pressure andfaster turns during normal flight while at the sametime producing extra stopping power in low windconditions.
As shown in Illustration #2/1-5 on page #10, thereare four steering lines (360 & 421 models) on eachside of the canopy, (and five steering lines on the 500model). Unlike most canopies, the lines are attachedat the full cell junctions, rather than at the half cellpoint. When so much of the canopy tail is pulleddown for landing, it makes for an exceptional flare,and therefore, a softer landing. For normal flight andturns, the inside lines are not needed. In fact, theyare a hindrance during turns, increasing toggle pres-sure, and slowing turn rate. To deal with this situa-tion, the double brake system has been set up so thatthe inside �extra� lines are used only during the flarefor landing.
C. Operation:During main canopy opening, reach up and grab theright and left gold, lower passenger toggles only (donot touch the black flaring toggle). Peel the togglesin a rearward direction for easy toggle and brakerelease. If toggles are pulled straight down, theirrelease will be difficult or impossible due to theamount of velcro and the additional snap holdingthem in place.
For normal flight, from opening altitude down toapproximately 300 feet, use only the gold toggles.Prior to landing, reach up and take the black flaringtoggles by inserting four fingers and closing yourgrip. Now you are ready to land. The black toggleslay flat and may be difficult to access quickly. We
recommend that sometime during main canopy flight,that the black toggles be peeled off the velcro andthen reattached so the loop opening is easier toaccess later when needed.
D. Toggles familiarization:Stop at this point and practice the release of thebrakes and the set up of the �Double Brake System�.Practice by releasing the toggles and brakes as wellas reassembling them. Do this with the rig out-stretched on the floor as well as with a suspendedharness if available.
T
#2/2-15
Rev 0

09351 - 5/30/2003 20:121
TANDEM VECTOR 2 OWNER’S MANUAL
Chapter 3: Main packingThis section will be broken down into the following:Preparation for packingInspectionPacking sequence (Refer to Relative WorkshopTandem main packing video.)
Preparation for packing:A. Stow bandsB. Double drogue release loopC. Drogue release handles repositioned
A. Selecting the Proper Stow BandsBand types for:1) All Dacron lined canopies:
#2/2-16
2) Line DumpDefinition: During bag lift-off, the rapid accelerationof the main bag can cause the entire line stow groupto fall off the bag due to loose or weak stow bands.
The stow bands used on the Tandem Vector are veryimportant. Even more so than sport rigs, as theTandem main bag is lifted out of the container at amore rapid rate. The Tandem Vector must have thesuspension lines securely stowed. Be cautious ofbands which are too weak or stretch too much asthey can cause deployment problems. Because ofthe increased weights involved in carrying twopeople, the forces on the bag at deployment time canbe enough to cause line dump if the bands are nottight enough. On the other hand bands that are tootight may cause problems disrupting the even se-quencing of the deployment.
Line dump can lead to partial malfunctions as theloose suspension lines quickly come under tension,and will at times form pressure knots, causing linesto entangle.
Stow band shown actual size
NOTE: If you run out of all specializedTandem rubber bands, it is possible to usetwo regular rubber bands for each linestow. Be sure the combined width of thetwo rubber bands does not exceed 3/4inch in width. Any substandard bandsshould be replaced with Tandem bands assoon as possible.
Rev 0

09351 - 5/30/2003 21:121
TANDEM VECTOR 2 OWNER’S MANUAL
B. Double drogue release closing loop specifi-cations:The Relative Workshop uses only type-2 sheathingwhen constructing the closing loop for the TandemVector equipped with the auxiliary right hand droguerelease. Use of any other material, or a different
3/4"
1-1/2" 2" 1-1/2"
2"
loop construction method could result in a drogue intow malfunction.
For the best results use only double drogue releaseclosing loops which have been manufactured andsupplied by the Relative Workshop. Certified rig-gers may construct their own loops.
#2/2-17
ATTENTION RIGGERS:Take note of this information.
A. Drogue inspection procedures:Consider the abuse a drogue takes on every jump. A4' drogue is thrown out with 400 lbs in tow andexpected to perform flawlessly for hundreds of
jumps. On each skydive, it buffets vio-lently as it is dragged through the air at120 mph.
The drogue is constructed as durably aspossible, considering that it must fit in asmall pouch and be easily deployable.Some owners have gotten well over500 jumps on a single drogue withoutmuch repair; however, because of theabuse the drogue takes, it will eventu-ally wear out. In most cases, the droguecanopy itself will wear out before thewhite tubular bridle, but if the droguecanopy is continually patched and re-furbished, the tubular may fail first.
Inspection:A. Drogue inspection proceduresB. Canopy inspectionC. Drogue release inspectionD. Pin attachment pointE. Sequence checklist
Inspect the drogue for wear each time you pack.
Rev 0

09351 - 5/30/2003 22:121
TANDEM VECTOR 2 OWNER’S MANUAL
Inflated DrogueCanopy
Main Closing Pin(rig is closed whendrogue is inflated)
13'4"
Drogue Deployment
Handle
Stop RingInside
Drogue
Stop Ring
Yellow KevlarOuter Bridle
WhiteTubularInner Bridle
Ring on Topof Canopy
BottomWear Point
#2/2-18
The drogue assembly - and particularly the tubularnylon inner bridle - should be inspected beforeevery jump. The best time to do this is duringpacking. There are three particular spots that haveproven vulnerable to excessive wear: bottom,middle, and top of the bridle. These must be checkedon every jump.
1) Bottom:The loop which connects the drogue bridle to themain canopy can fray as a result of being squeezedbetween the ring on the top of the canopy and thering at the top of the bag during bag lift-off.
a. The result:If this area of the white tubular fails, it will happenduring drogue release. The drogue canopy itself willdetach, and the main may or may not be pulled fromthe container. If the main does not come out, theTandem Instructor must then pull the reserve handlewith the sure knowledge that the main will fall out ofthe container during reserve deployment and maydeploy completely. Not a good situation.
b. How to check for signs of wear:The wear at this point is caused by abrasion, so thewhite tubular will fray considerably before failing.Before every pack job, check this point for signs offraying. If any exist, it is time to replace the whitetubular section of the drogue assembly.
Rev 0

09351 - 5/30/2003 23:121
TANDEM VECTOR 2 OWNER’S MANUAL
2) Middle:Another particular wear point is on the inner whitetubular bridle, specifically the section between 6'and 9' toward the drogue from the container closingpin. As the drogue is released, the yellow Kevlarouter bridle is scrunched up, resulting in frictionburns where it comes to rest on the white tubular.The effects are concentrated on this 2' or 3' span ofthe white tubular bridle.
a. The result:If this particular area of white tubular fails, it willhappen during drogue release. The drogue canopyitself will detach, and the main may or may not bepulled from the container. If the main does not comeout, then the Tandem Instructor must pull the re-serve knowing that the main will also deploy.
b. How to check for signs of wear:The white tubular will not fray before failing. Itremains in one piece, and then fails completely.However, there are definite signs that the bridle isweakened and should be replaced.
The white tubular changes color from white to tan.All of the tubular will become dirty with use. Theshade of dingy tan resulting from wear is not thesame as dirt. This can be distinguished by the yellowcolor code threads running down the middle of thetubular start to blend in with the background. Evenon a normally dirty piece of white tubular, theyellow lines are distinct. When serious wear takesplace, these same lines become faint and indistinct.
The texture of the tubular also changes. Normalwhite tubular, even if it is dirty, will feel smooth.Tubular that is worn will feel fuzzy to the touch. Ifyou run your fingers over the whole length of thewhite tubular, you�ll be able to feel the change intexture from smooth to fuzzy as you hit a worn spot.(Refer to the Tandem Training Video-module #2.)
The best time to check this critical area is before thedrogue is set. Start by running your hand along theentire length of the white tubular to check for a fuzzytexture while also performing a visual inspection.
DrogueDeployment
Handle
MainClosing Pin
Ring on Topof Canopy
WhiteTubularInner Bridle
Area of wear(6' - 9' above main
closing pin)
9'
Stop Ring
Yellow Kevlar Bridle(scrunched up after drogue
release)
Deflated DrogueCanopy
6'
#2/2-19
Rev 0

09351 - 5/30/2003 24:121
TANDEM VECTOR 2 OWNER’S MANUAL
3) Top:The other place to check for wear is where thewhite tubular bridle loops through the drogue de-ployment handle on the top of the drogue canopy.Wear in this area occurs far more quickly if yourdrogue has 900 lb. Dacron line as the handle attach-ment instead of white tubular.
a. The result:If this part of the white tubular or dacron line shouldfail, the result will be a very hard main canopyopening (the drogue won�t be collapsed during maindeployment).
4) Other places to check:Basically check all points on the drogue/ bridle set upthat might be subject to wear. These include: thestop ring at the bottom of the drogue; all Kevlarattachment points and the cotton buffer at the baseof the yellow kevlar bridle - just above large attach-ment ring.
Inflated DrogueCanopy
Main Closing Pin(rig is closed whendrogue is inflated)
13'4"
Drogue Deployment
Handle
Stop RingInside
Drogue
Yellow KevlarOuter Bridle
WhiteTubularInner Bridle
Ring on Topof Canopy
Stop Ringat Bottom of
Drogue
Cotton Buffer
TopWear Area
#2/2-20
Rev 0

09351 - 5/30/2003 25:121
TANDEM VECTOR 2 OWNER’S MANUAL
B. Canopy inspection:1) bridle attachment point on top and inside ofcanopyThe bridle attachment point at the top of the canopyis a very high wear pointand should be checked forany signs of damage occur-ring to the stitching bothon top and inside of thecanopy.
2) canopy cells, panelsand seamsAs you flake the canopy,take a good look at eachpanel for any tears, burnsor broken stitches. Afterevery 25 jumps inspect thecanopy more closely toinclude looking inside thecells as well as inspectingall of the reinforcing tapesthrough-out the canopy.
3) line condition and attachment pointsDuring the flaking of the canopy, take a look downthe length of the lines watching for any damage ordeformities. Every so often walk down the length ofthe lines inspecting all cascade points and looking forany burns or broken stitching.
4) steering lines, brake lock loops and toggleattachmentWhile inspecting the steering lines watch for dam-age especially at the brake lock loops, the toggleattachment points and at the attachment points atthe canopy.
5) slider conditionCheck the slider grommets for any wear (dings,nicks, sharp surfaces). Check the entire slider forholes, burns or fraying.
6) connector linksEnsure that the link protectors are secure. If no linkprotectors are present then check to ensure that theomission is intentional and that the connector linkbarrels have not loosened.
Rigger Note: Using �Mechanics Loc-Tite� on thebarrel threads, and marking the barrel and link witha brightly colored paint line may help to insure the
barrels tightness and speed up link inspection.
C. Drogue release inspection:1) release loopCheck the loop for fraying. If fraying has startedthen replace the loop.
2) 3-ring attachment.Check for webbing and hardware condition.
D. Pin attachment pointCheck the pin attachment point on the bridlefor any wear on the Dacron line both at the pinand bridle attachment.
E. Sequence checklist
Main Canopy Assembly Inspection Guide- drogue chute handle attachment- drogue chute fabric and seams- drogue chute tubular center line- drogue chute bridle attachment point- drogue kevlar bridle- drogue bridle/ canopy attachment point- main pin and attachment point- deployment bag- canopy fabric and seams (top, bottom, skin and ribs)- canopy reinforcement tapes- lines and cascades- steering lines and brake loops- slider and grommets- connector links- risers- 3-Ring release system
Rev 0

09351 - 5/30/2003 26:121
TANDEM VECTOR 2 OWNER’S MANUAL
Packing sequence for the main canopy:The main packing section is split into the followingsteps:
A. Folding the mainB. Stowing the brakesC. Folding the noseD. Closing the containerE. Drogue hook-upF. Setting the drogueG. Packing the drogueH. Using the double drogue release handle
A. Folding the main canopy: (Refer to TandemPacking Video)
FAA regulations require that the main canopybe packed either by the Tandem Instructorwho will be jumping the system, or a licensedrigger, or under the supervision of a licensedrigger. Anyone packing a Tandem canopymust have read and be familiar with all mate-rial in this manual and the Tandem TrainingVideo.
1) Check that the reserve canopy is in date. Inspectmain, perform thorough line check.
DeploymentBag
MainCanopy
Bag Stop
Stop TabYellow KevlarDrogue Bridle
White Tubular Nylon
Main Closing Pin
B. Stowing the brakes:3) The brake system consists of two sets of steeringlines, the set on the gold toggle are the primary linesand the set on the black toggle are the secondarylines. To set the brakes, pull all of the toggles andlines down at once, till the junction of the loops is atthe large guide ring on the riser. Thread the riserloop through the primary loop first and then thesecondary loop as shown in illustration #'s 2/3-22and #2/3-23. BE SURE THE RISER LOOP ISthreaded THROUGH BOTH LOOPS.
#2/3-21
2) Make sure that the white tubular nylon thatcomes out of the yellow kevlar bridle is fedthrough the grommet on the top of the bag and isattached to the canopy as any pilot chute wouldbe using a clove hitch knot as shown in illustra-tion #2/3-21.
Rev 0

09351 - 5/30/2003 27:121
TANDEM VECTOR 2 OWNER’S MANUAL
4) Thread the riser loop through the large guide ringas shown in illustration #2/3-24.
NOTE: When setting the brakes, it is possibleto either set the secondary lines, or to leavethem unstowed. Although initial tests indicatethat openings are the same whether the sec-ondary lines are set or not, the Relative Work-shop recommends that the secondary lines beset along with the others (heavy weight droptest were done with primary and secondarylines set). Taking the extra few moments to setthe secondary lines makes some packing meth-ods easier when flaking the canopy. SomeTandem Instructors have reported softer open-ings with the secondary lines set.
NOTE: If you pull the small toggle line throughthe ring, it might not release when you pull thelarge yellow handle to release the brakes. Itwould then be necessary to unvelcro the smallblack handle and pull it all the way down torelease it�s brake line - a lot of needless trouble.
5) Thread the top part of the large gold togglethrough the riser loop as shown in illustration #2/3-25. Attach the gold toggle to the riser with the snapfirst then mate the black velcro.
6) Next, attach the secondary toggle (black) to theriser so that the small ring on the top of the toggle isright up against the small guide ring on the riser withthe excess line pulled through and laid off to the sidefor stowing.
7) S-fold the two lines on either side of the riser asshown in illustration #2/3-26, and close the cover.
#2/3-25
#2/3-26
Rev 0

09351 - 5/30/2003 28:121
TANDEM VECTOR 2 OWNER’S MANUAL
8) Flake the canopy neatly on its side.
C. Folding the nose:9) On all 9 cell canopies, count offthe top five cellsand fold themback asshown in illus-tration #2/3-27.
Bottom Four Cells
Top Four Cells
Center Cell
10) Take the bottom four cells and roll them intowards the center as shown in illustration #2/3-28.
12) Take the top four cells androll them in towards the centeras shown in illustration #2/3-30.13) Fold the center cell in be-tween the two center cell halves.
#2/3-27
#2/3-28
#2/3-29
11) Pull the middle cell back to the center as shownin illustration #2/3-29.
#2/3-30
Rev 0

09351 - 5/30/2003 29:121
TANDEM VECTOR 2 OWNER’S MANUAL
stow bands are used - see page 18 for details).
19) Before placing bag in the container, install thedrogue release handle by threading the yellow droguerelease cable through the slot on the closed side ofthe pouch, then through the channel on the back ofthe drogue riser. (Refer to illustration 2/3-35).
Note: Installing the drogue release handles is much
harder to do once the container has been closed.
20) Place the bag into the main pack tray, with thelines at the bottom. Push the bottom corners of thebag deeply into the container. Place your knees ontop of the bag and push the top corners of the baginto the top of the main container.
SteeringLines
Tail
Stabilizers
Slider
RIGHT
WRONG
From the top of the canopy, this packing methodlooks like illustration #2/3-31, with both sides rolledand the center cell left loose, the canopycan now open in the more orderlymanner; from the middle out, instead offrom one side as with the old packingmethod with the nose rolled all to oneside.
14) Fold the canopy as per our Vec-tor Tandem Packing Video or by thetraditional method of stacking the "B"line group on top of the "A" line group,and then stack the 'C" line group ontop of the "B" line group, and so on.
15) Flake the tail and stabilizers neatly.
#2/3-33
#2/3-35
#2/3-31
#2/3-32
ing good line tension throughout.
18) Close the bag and stow the lines keeping about2" of lines beyond each rubber band or tube stow asshown in illustration #2/3-34. (Insure that proper
#2/3-34
16) pull up slider as shown in illustration#2/3-32
17) Stack, beginning as shown in illustration#2/3-33, put in bag and stow lines maintain-
Rev 0

09351 - 5/30/2003 30:121
TANDEM VECTOR 2 OWNER’S MANUAL
22) Close the right flap(flap #3), then the leftflap(flap#4),
23) Insert the closing pin from the bottom as shownin illustration #2/3-37. Tuck the pin connector cordfirmly under the right side flap as shown in illustra-tion #2/3-37a. Close pin protector flap.
#2/3-36
C. Closing the container:21) Check the condition of the main closing loop,then close the bottom flap first, then the top flap as
shown in illustration #2/3-36. Note that the whitetubular nylon bridle with pin is routed out thebottom on the right side. This is different from thebridle routing on a regular sport Vector.
#2/3-37
#2/3-37a
Rev 0

09351 - 5/30/2003 31:121
TANDEM VECTOR 2 OWNER’S MANUAL
E. Drogue hook-up (single release only)24) Attach the large ring on the Kevlar drogue bridleto the remaining two rings on the drogue riser asshown in illustration #2/3-38, using the white loopand yellow release cable as you would on any 3-Ring. Illustration #2/3-39 shows the 3-Ring properlyattached. The slot in the Kevlar bridle near the bigring must face the container system so that thetubular nylon bridle that comes out of it doesnot wrap around anything. Note that theend of the release cable goes into thesame slot in the Kevlar bridle whichholds the tubular nylon. Note: if rig isequipped with optional right handdrogue release handle, then refer toillustrations #2/3-52 and #2/3-53, be-ginning on page 34.
White TubularNylon
Yellow KevlarBridle
TapeChannels
DrogueRelease Cable
Drogue Riser
Drogue Release Handle
#2/3-38
#2/3-39
WARNING:If the main container is opened forany reason on the ground or before jumping, re-move drogue chute, release 3-ring and re-closecontainer from the beginning. The configuration ofthe tubular nylon bridle makes it possible to pack a�collapsed drogue chute in tow� malfunction if therig is popped open and re-closed hastily. It is best totake the few extra minutes and make sure the rig isclosed absolutely correctly.
Rev 0

09351 - 5/30/2003 32:121
TANDEM VECTOR 2 OWNER’S MANUAL
F. Setting the drogue:25) Ensure that the 3-Ring is hooked up prior to attempting to set the drogue. If the white tubular is twistedinside or outside the yellow Keflar bridle, then remove the twists before setting the drogue. Take theorange handle on the top of the drogue chute as shown in illustration #2/3-40, and walk away from the riguntil both the Kevlar bridle AND the drogue are fully extended as shown in illustration #2/3-40a. This�sets� the drogue. If using the secondary drogue release refer topage 34.
Before setting drogue, note 4 feet of excess white tubular.
WARNING: Drogue must be set after each use. If drogue is not set completely,a collapsed drogue could occur on the next jump.
#2/3-40
#2/3-40a
After drogue is set, note approximately 26 inches (62cm) of whitetubular is exposed between end of pin and stop tab.
Pull till stop tab is against yellow Kevlar, do not yank too hard. Thestop tab must be installed on all drogues. (Refer to Stop-Tab installa-
tion in Appendices section).WARNING: There should be approximately 26 inches (62 cm) of tubular nylonleft over between the 3-Ring and the curved locking pin. If there is considerablymore than 26 inches (62 cm) of tubular nylon left over (there will be about 4 feet(120cm) if the drogue has not been set), then the drogue is collapsed and willstreamer for 10 seconds or more after being deployed.
Rev 0

09351 - 5/30/2003 33:121
TANDEM VECTOR 2 OWNER’S MANUAL
G. Packing the drogue26) Fold the drogue riser over inside the pouch asshown in illustration #2/3-41. The end of the releasecable must not extend beyond the edge of the pouch.For this to work, the folded riser will have to bepushed to the left a little, making the fold slightlysharper than 90 degrees. Close the velcro flap on thetop of the pouch.
27) Lay the drogue chute out next to the tandemcontainer with the mesh facing up, and S-fold thebridle over the drogue chute as shown in illustration#2/3-42.
28) Fold the whole bridle back on itself in a stair-step pattern as shown. All the bridle should then liewithin the mesh circle of the drogue as shown inillustration #2/3-43.
29) Fold the drogue canopy in half over the foldedbridle as shown in illustration #2/3-44.
#2/3-41
#2/3-44
#2/3-42
#2/3-43
Rev 0

09351 - 5/30/2003 34:121
TANDEM VECTOR 2 OWNER’S MANUAL
30) Fold this half circle into thirds as shown inillustration #2/3-45.
31) Fold one corner of the triangle up to thedrogue handle, then the other as shown inillustration #2/3-46 and #2/3-47.
32) Roll the drogue from one side as shown inillustration #2/3-48.
33) At this point, leave the drogue on the floor and pound on thecenter of the Spandex pouch a few times with your fist. This willmake a concave dent in the bottom of the rig, leaving a little extraslack in the pouch, allowing for easy insertion of the drogue.
Fold and insert the drogue into the pouch as shown in illustration#2/3-49. Packing the drogue this way makes it easier to extract.It also helps the velcro on the pouch to last longer by keeping itfrom being pulled open each time the drogue is packed.
Packing the drogue correctly into its pouch will make it easier toextract in freefall.
WARNING: It is possible to pack the drogue so that it cannot beextracted in freefall.
#2/3-45
#2/3-46
#2/3-47
#2/3-48
#2/3-49
Rev 0

09351 - 5/30/2003 35:121
TANDEM VECTOR 2 OWNER’S MANUAL
34) Be sure the drogue and all of its componentsare packed as shown in illustration #2/3-50
(or #2/3-50 for systems with optional righthand drogue release handle) before
jumping the system.
3-Ring Release and L-Bar inback/inner section of pouch
Drogue Deployment handle
Drogue Chute and KevlarDrogue Bridle in frontspandex part of pouch.
Drogue Release Handle
NOTE: If rig is equipped with optionalright hand drogue release handle, thendrogue bridle should look like this whenpacked
#2/3-50
#2/3-50a
#2/3-51
Kevlar Drogue Bridle foldsaround from back of pouch tofront.
35) Tuck the remaining 12" of tubular nylonunder the right side flap as shown in illustra-tion #2/3-51.
36) Inspect the packed rig.
Rev 0

09351 - 5/30/2003 36:121
TANDEM VECTOR 2 OWNER’S MANUAL
H. If using Double Drogue release handles:If the system is equipped with the optional right handdrogue release handle, then the 3-Ring drogue bridleattachment will be slightly different. As shown inillustration #2/3-52, there will now be two cablesrunning up the back of the release riser. Both runthrough the same channels on the back of the riserand into the opening of the Kevlar drogue bridle.The slot in the Kevlar bridle near the big ringshould face the rig so that the tubular nylondoes not wrap around anything. Note thatboth of the release cables go into the sameslot in the Kevlar bridle which holds thetubular nylon.
Yellow KevlarBridle
White TubularNylon
Drogue Release Handle
TapeChannels
Drogue Riser
DrogueRelease Cable
White lockingloop
(each cable throughone loop end only)
Red Riser Loop(Both cables MUST gothrough this, or thedouble ended closingloop will be lost on ev-ery jump)
38) To attach the 3-Ring with the optionalright hand drogue release handle installed,first note that the new locking loop has twoopen ends and is not attached permanentlyto the riser. One end of the loop goesthrough the top grommet and is secured byone cable, the other end goes through thesmall ring and through the bottom grommetand is secured by the other cable as shown.It doesn�t matter which end of the loop goeswith which cable. Just be sure that eachcable goes through only one end of the loopas shown in illustration #2/3-53. If bothcables go through all locking loops, it may benecessary to pull both drogue releasehandles to release the drogue.
NOTE: If the system is equipped with theoptional right hand drogue release handle,then the drogue riser should look like thiswhen packed.
WARNING: Be sure that onlyone cable goes through eachend of the white double ended3-Ring locking loop.
#2/3-52
#2/3-53
Rev 0

09351 - 5/30/2003 37:121
TANDEM VECTOR 2 OWNER’S MANUAL
Chapter 4: Installation of the right hand drogue
release handle:
Conversion kitInstalling the housing and handleInstalling the new drogue release riserInstalling the handle on the Tandem Instructor'sharnessInstalling the handle on the students harnessDisconnection after landingIf the student is to release the drogue
For those who prefer, the Relative Workshop offersa right hand drogue handle for Tandem Vectors. Thesystem is intended mainly as a right hand droguerelease handle for the Tandem Instructor. With theaddition of this handle, the Tandem Vector systemwill have drogue release handles on both sides aswell as reserve ripcords on the right and left sides. Inother words, if either arm of the Tandem Instructoris incapacitated, he can still activate either the droguerelease or the reserve ripcord.
The handle can also be used as a training ripcord forthe student, or as a backup for passenger use duringTandem certifications. If the handle is to be given toa student, specific ground training must precede thejump to insure the student is aware of the purpose ofthe handle and its limitations. The handle should bepositioned as seen in Illustration 2/4-54.
#2/4-54
CAUTION: Use of this new handle carrieswith it new and greater responsibility for theTandem Instructor. . Read these warningscarefully before using the new right handdrogue release/ training ripcord on the Tan-dem Vector.
WARNING: Always attach the handle tothe Tandem Instructor's harness immediatelyafter each jump. Be sure the handle is at-tached to the harness before puting the sys-tem on your back.
WARNING: Use of this handle creates newmalfunction possibilities. Among these are:
1) Dangling housing and handle. If the handle isnot attached or attached incorrectly, it will trailbehind the jumpers, possibly to entangle withthe drogue, the main deployment or the reservedeployment.
2) If the release system is not attached properly,it may be necessary to pull BOTH drogue releasehandles in order to release the drogue. If you pullone drogue release handle and the drogue doesnot release, PULL THE OTHER HANDLEIMMEDIATELY.
Rev 0

09351 - 5/30/2003 38:121
TANDEM VECTOR 2 OWNER’S MANUAL
#2/4-55a (straight stitch, bartack or zig zag is fine). Ifyou use a sewing machine, you may have to unpackthe reserve to facilitate the work.
2) In the middle of the pocket is the base of therelease riser. There is space next to this riser for thehousing to fit, so no modification need be madedirectly on the pocket. On the backpad, undo thestitching on the backpad for about an inch just to theleft of the riser end as shown. Be careful once againnot to cut the stitching right on the binding tape. Oneend of the resulting opening should already bebackstitched and should not require reinforcement.To keep the stitching from coming undone anyfurther on the other side of the opening, tack the
Conversion kit:Included in this conversion kit are the fol-lowing items:1) Student release handle.2) Cable housing.3) New drogue release riser with fivedouble ended release loops (four spares).
This conversion can be performed with orwithout a sewing machine. If you elect notto use a sewing machine, you will needwaxed tacking cord.
Installing the housing and handle: The passen-ger handle housing will be threaded under the backpadand tacked in place inside the pouch. To achieve this,follow directions 1, 2, 3 and 4.
1) Remove the drogue from the pocket and the maincanopy from the container. Undo about 1 inch (2-3cm) of the backpad stitching just above the diago-nal. Be careful not to cut the stitching directly on thebinding tape. One side of the resulting hole shouldalready be backstitched and should not requirereinforcement. To keep the stitching from comingundone any further on the other side of the opening,tack the edge with waxed tacking cord, or sew itover with a sewing machine as shown in illustration
#2/4-55
#2/4-55a
#2/4-55b
Rev 0

09351 - 5/30/2003 39:121
TANDEM VECTOR 2 OWNER’S MANUAL
Housing
Stiff Wire
4) Tack the end of the cable onto the back of therelease riser end as shown in Illustration #2/4-57.Use six turns of waxed tacking cord. The end of thecable should be about half an inch below the L-bar.
edges with either waxed tacking cord or a sewingmachine, as shown in Illustration #2/4-55b.
3) Thread the cable through the twospaces in the back pad and into the pouchso that it is under the release riser. To dothis, you will need to use a piece of stiffwire (a straightened-out coat hangar witha rounded or taped end will work fine).Run the wire under the back pad from theriser to the diagonal. Slide the housing over thewire from the diagonal to the riser as shownin Illustration #2/4-56. Carefully remove thewire.
#2/4-56
#2/4-57
Rev 0

09351 - 5/30/2003 40:121
TANDEM VECTOR 2 OWNER’S MANUAL
Installing the new drogue release riser: Thenew drogue release riser is designed to accept aspecial double-ended loop and two drogue releasecables.
1) To install it, simply use a flat blade screwdriver toundo the L-bar inside the drogue pouch, and replacethe old riser with the new version. Be sure the ringson the riser face away from the rig as shown inIllustration 2/4-58.
2) There will now be two yellow cables running upthe back of the release riser; one for the left handdrogue release and one for the right hand droguerelease. Both cables run through the same channelson the back of the riser and into the opening of theKevlar drogue bridle.
Drogue Pocket
MainContainer
Release Loop(not attachedto riser)
Rings faceAWAY fromrig
Red Riser Loop(both cablesMUST gothrough this)
3) The new release loop has two open ends and isnot permanently attached to the riser. One end ofthe loop goes through the top grommet and issecured by one cable, the other end goes throughthe small ring and through the bottom grommet andis secured by the other cable as shown in Illustration2/4-59. It doesn�t matter which end of the loop goeswith which cable. Just be sure that each cable goesthrough only one end of the loop.
4) There is a red loop above the grommets on therelease riser. It is important that both yellow cablesgo through this loop. This will prevent the doubleended release loop from being lost when the drogueis released.
#2/4-58
#2/4-59
Rev 0

09351 - 5/30/2003 41:121
TANDEM VECTOR 2 OWNER’S MANUAL
Installing the handle on the Tandem Instructorsharness
Some Tandem Instructors prefer the student nothave access to any handle. In this situation, the righthand drogue release handle can be left attached tothe Tandem Instructor's harness. Listed below arefour recommended locations.
1) MLW Above Chest Strap:Route handle behind the right main lift web (MLW),under the chest strap in a gentle curve. Attach
#2/4-60
handle to MLW above chest strap, below the D-Ring, and next to the breakaway handle as shown inIllustration #2/4-60.
2) MLW Below Chest Strap:Route the handle from backpad directly to the rightmain lift web. Attach the handle to the MLW belowthe chest strap, and above the MLW adjustment.
Rev 0

09351 - 5/30/2003 42:121
TANDEM VECTOR 2 OWNER’S MANUAL
#2/4-62
#2/4-61
3) On the Chest Strap:Route the handle behind the right main lift web anddirectly up to the chest strap. Attach the handle asshown in illustration #2/4-61.
4) Upper Leg Strap:Route the handle behind the right MLW, and di-rectly down to the right upper leg strap as shown inillustration #2/4-62.
A NOTE ON USE OF THE SECOND-ARY DROGUE HANDLE: If the secondarydrogue release handle is installed, and is not tobe used by the student, the Tandem Instructorshould use it every other jump to open themain canopy. Frequent use will reinforce themuscle-memory reaction necessary to oper-ate this handle during an emergency.
Rev 0

09351 - 5/30/2003 43:121
TANDEM VECTOR 2 OWNER’S MANUAL
Fold upand Attach
Snaps
RIGHT: Domed ends of snaps arejust under the handle, on top ofmain lift webbing. Handle lays onmain lift web.
#2/4-63
#2/4-64a#2/4-64
Installing the handle on the student harnessThe secondary drogue release will be attached tothe student as you hook them up in the aircraft priorto the jump. Follow these steps for ease of hook-up:
1) Attach right lower quick ejector, thisallows freedom to move while connectingthe drogue release handle. This also en-sures that the student can not pull awayfrom you, preventing possible dam-age to the drogue release assem-bly.2) Attach handle to student har-ness as shown in Illustrations#2/4/63-64a.3) Complete the hookupprocess by attaching the leftside quick ejector, and bothtop snaps and locking pins.
Handle placement for AFF tran-sition
NOTE: When attaching handle tostudent harness, the housing MUSTbe routed UNDER the main liftweb of the Tandem Instructor asshown in #2/4-64. If it is routedto the outside of the MLW, thehousing could get in the way ofdrogue deployment.
WRONG: Domed side of snaps areon backside of main lift web. Handlesticks out beyond main lift web.WARNING: If pulled in this configu-ration, the whole handle set-up coulddetach from the main lift web.
Rev 0

09351 - 5/30/2003 44:121
TANDEM VECTOR 2 OWNER’S MANUAL
If the student is to release the drogue:The student must receive extensive ground trainingbefore allowing them access to the drogue releasehandle. The right hand drogue release can be anexcellent training aid for the student when usedproperly, and can be integrated into many differenttypes of training programs.
Warning: The student should not have accessto the drogue release handle if a videoman orrelative workers are present on the jump. If thestudent should release the drogue prematurely,while jumpers are above, the result could bedisastrous.
Disconnection after landing:After landing the drogue release handle must bedisconnected from the student harness prior todisconnecting the student. If the handle is not dis-connected and the student walks away, this will jerkthe handle assembly and put excess strain on thehousing and tacking which holds it in place. Follow-ing disconnection the Tandem Instructor shouldattach the housing and handle to his system, inone of the appropriate locations.
The secondary drogue release handle mustnever be left dangling, even when the system ispacked and sitting in the hangar. After everyjump, the Tandem Instructor should detach thestudent completely and then attach the handleto his own harness. Attach the handle in theappropriate location as soon as the jump iscompleted so that no changes will be necessaryif the handle is to be left with the TandemInstructor on the next jump.
This is very important. If the handle was to beleft loose inadvertently, or on the student asthey walk away, it could cause: A) damage tothe housing; B) a malfunction of the droguesystem; or C) entanglment with the main or thereserve.
Note: Read this section carefully beforeplacing the secondary drogue releasehandle within the reach of the student onany jump.
Note: If both handles (primary drogue andauxiliary drogue release handles) are pulled,the closing loop will be lost. For this reason,always assign your student an opening altitudehigher than your own.
Rev 0

09351 - 5/30/2003 45:121
TANDEM VECTOR 2 OWNER’S MANUAL
Chapter 5: Tandem Vector reserve packing instructionsNote: This section supplements the reserve packing video available throughRelative Workshop or its dealers.
Rigger must be thoroughly familiar with packing free-bag ram-air reserve systems
The reserve packing section is split into these groups of steps:
ToolsFolding the reserve canopyAttaching the reserve steering togglesSetting the brakesReserve steering systemInstalling the reserve static linePlacing the bag in the containerClosing the container
Folding the reservecanopy1) Flake canopy neatlyon its side, count offtop five cells and foldthem back as shown inIllustration 2/5-65.
2) Take the bottom four cells and roll them intoward the center as shown in Illustration 2/5-66.
3) Pull the middle cell back to the center as shownin illustration 2/5-67.
Bottom Four Cells
Top Four Cells
Center Cell
Center Cell
#2/5-66#2/5-67
#2/5-65
Rev 0

09351 - 5/30/2003 46:121
TANDEM VECTOR 2 OWNER’S MANUAL
5) Fold the center cell in betweenthe canopy halves.
6) From the top of the canopy, thispacking method looks like illustra-tion #2/5-69, with both sides rolledin towards the middle and the cen-ter cell tucked in between them.With both sides rolled inward andthe center cell left open, the canopycan now open in a more orderlymanner; from the middle out, in-stead of from one side as with theold packing method with the noserolled all to one side.
4) Take the top four cells and roll them in towardsthe center as shown in Illustration 2/5-68.
7) Stack canopy on top of itself in the normalmanner (S-folds).
8) Set deployment brakes by passing theriser loop through the two larger loops,and then through the riser ring as shownin Illustration #2/5-72 (see next page).Be sure to stow the extra brake lineand close the Velcro cover over theset brakes.
9) Flake the tail and stabilizers neatlyand pull up slider as shown in illustra-tion #2/5-70.
BottomCells
Center Cell
TopCells
CenterCell
Center of Tail
Flaked Tail
Stabilizer
Slider
SteeringLines
#2/5-68
#2/5-69
#2/5-70
Rev 0

09351 - 5/30/2003 47:121
TANDEM VECTOR 2 OWNER’S MANUAL
Attaching the reserve steeringtogglesPut loop on end of steering linethrough toggle grommet and thenput the BOTTOM of the togglethrough the loop as shown in Illus-tration #2/5-71.
#2/5-71
Reserve Steering SystemProper Brake Setting
#2/5-72
#2/5-73
If the end of the steering line does not have a loop,thread the end of the line through the grommet in afigure 8 pattern and tie off with a surgeons knot asshown in illustration #2/5-73.
Secure the steering/control lines to the respective L-barswith doubled Seal thread. This will reduce the possibilityof the lines catching under the corners of the L-bars.
Rev 0

09351 - 5/30/2003 48:121
TANDEM VECTOR 2 OWNER’S MANUAL
10) Pull the center of the tail down and wrap around canopy.dress canopy to a width 4" (10cm) wider than the bag (2" or5 cm on each side) as shown in Illustration 2/5-74.
11) Stack canopy on top of itself, making each foldno longer than the distance from the mouth of thebag to the grommets in the center of the bag asshown in Illustrations #2/5-75 through 78.
#2/5-78
#2/5-77
#2/5-74
#2/5-75
#2/5-76
Rev 0

09351 - 5/30/2003 49:121
TANDEM VECTOR 2 OWNER’S MANUAL
13) Dress each section neatly as shown in illustration2/5-80.
14) Insert one end of a pull-up cord through the grommetsin the top and bottom of the bag. Tie it to the other end soit won�t slip out during the rest of the packing procedure.
(Note: Some riggers prefer to use a T-barinstead of a pull-up cord, inserting it throughthe bag from the bottom). This pull-up cord orT-bar will be used later to pull the locking loop
through the bagged canopy.
12) After the canopy is stacked on itself, unfold thetop portion into two sections or �ears� as shown inIllustration 2/5-79.
15) Carefully slide the bag over the canopy as shownin Illustration 2/5-81, pushing each �ear� into the topcorners of the bag, filling the corners evenly andleaving a tapered shape.
#2/5-79
#2/5-80
#2/5-81
Rev 0

09351 - 5/30/2003 50:121
TANDEM VECTOR 2 OWNER’S MANUAL
NOTE: Illustration #2/5-82 showshow the canopy is stacked into the bag.
16) Lock the bag closed with two bytes of suspension lineas shown in Illustration #2/5-83. (A continuous nyloncovered elastic loop is used, NOT rubber bands).
17) Stow the remainder of the suspension lines intothe pouch on the underside of the bag using folds thatextend from one side of the pouch to the other asshown in Illustration #2/5-84. Be sure none of the linesare trapped between the Velcro at the mouth of thepouch.
#2/5-82
#2/5-83
#2/5-84
Rev 0

09351 - 5/30/2003 51:121
TANDEM VECTOR 2 OWNER’S MANUAL
Attaching the reserve static line18) Inspect the reserve lanyard (RSL) fordamage, and replace if necessary. Check thatthe snap shackle is operating smoothly and thatthe spring will retain the locking pin. Be sure theVelcro is clean and sufficiently tacky to retain thereserve lanyard.
Note: Carefully inspect the ring attached to the pin.Pulling on the ball-handle too often can stretch the ring,possibly causing it to separate from the pin, thus renderingthe shackle inoperative.
19) Route the pin-end of RSL through guide ring onflap #5. Mate the small yellow tab of Velcro on thereserve lanyard (about 1/2" (1.3cm) above the pin)to the yellow pile Velcro attached to flap #5 asshown in Illustration #2/5-85.
20) Route the reserve lanyard along its path next tothe right-hand riser up over the shoulder to justabove the reserve flap as shown in Illustration #2/5-86.
Note: The RSL snap shackle will be attached to theright main riser after the reserve is completelypacked into the container.
#2/5-85
#2/5-86
Rev 0

09351 - 5/30/2003 52:121
TANDEM VECTOR 2 OWNER’S MANUAL
#2/5-87
23) Place the bagged canopy in the pack tray, takingextra care to fill the lower corners. Then use thepull-up cord to pull the locking loop up through thebagged canopy. Secure it with a temporary lockingpin.
Closing the Container24) Close the inside bottom flap (flap#1), and securewith a temporary pin. Pack the first third of the bridlein the container by making long S-folds in the bridlefrom the top center of the bag to the bottom righthand corner of the reserve container as shown inIllustration #2/5-88.
Placing the bag into the Container21) Set the bagged canopy on the main container andposition the reserve risers in the reserve pack tray.Fan the links rather than stacking them on eachother, placing the rear links to the outside. Be sureto place the reserve risers far enough in the pack trayso they will lie flat over the shoulders.
22) Pass the second pull-up cord through the re-serve locking loop.
NOTE: Two (2) types of reserve closing loops areapproved in Vector Systems. The standard Type IIline sleeving, flattened and sized, 3/16" wide; or theCYPRES loop material, a Polyamide with 400 lb.tensile strength, 1.6mm wide.
If a T-bar was passed through the bag, thread theends of the pull-up cord through the hole in the endof the T-bar. Remove the T-bar from the baggedcanopy, pulling the locking loop and pull-up cordthrough it as shown in Illustration #2/5-87.
If a pull-up cord was passed through the bag, untie itand tie the end protruding from the underside of thebag around both ends of the pull-up cord that waspassed through the locking loop. Carefully pull onthe other end to draw the pull-up cord and lockingloop through the packedcanopy. Untie theother pull-up cordand set it aside.
#2/5-88
Rev 0

09351 - 5/30/2003 53:121
TANDEM VECTOR 2 OWNER’S MANUAL
25) Carefully tuck the bottom of the S-folded sec-tion under the inside bottom flap (flap #1) as shownin Illustration #2/5-89. Repeat the process on theleft side with the second third of the bridle, makingthe S-folds from the top center of the bag to thelower bottom left hand corner of the container andtucking the bottom sections under the inside bottomflap. When completed, close the top inside flap (flap#2). Make sure there is at least SIX feet (2 meters) ofbridle left loose between the left corner and thebase of the pilot chute.
NOTE: In the first few days after it is packed, thereserve will compress and the new closing loop willstretch. This may cause the pilot chute to �stand-up�slightly inside the closed pack. It may be necessary toopen the container and shorten the loop. To avoidthis, some riggers close the container with a veryshort loop WITHOUT the pilot chute, wait a day ortwo for the canopy to compress and the loop tostretch and then re-close the container WITH thepilot chute and seal it.
26) Pass the pull-up cord through the bot-tom of the pilot chute and out the top asshown in Illustration #2/5-90.
#2/5-89
#2/5-90
Rev 0

09351 - 5/30/2003 54:121
TANDEM VECTOR 2 OWNER’S MANUAL
28) Lay the fabric flat all around the pilotchute and fold it under in wide folds tothe center as shown in Illustration #2/5-92. Fold the top and bottom first,then the sides. Folding the fabric ratherthan stuffing it between the coils -reduces the bulk of the packed con-tainer.
29) Thread the pull-up cordthrough the side flaps (flaps#3 and #4) and close and se-cure with a temporary pin.Make sure that the folds in thepilot chute stay flat and neat.
WARNING: Do NOT tuck pilot chute fabricdown the sides of the free bag. Doing so couldimpede the launch of the pilot chute.
27) Making sure the base of the pilot chute iscentered over the loop, collapse the pilot chute andlock it with a temporary pin as shown in Illustration#2/5-91. Pull all the canopy fabric from between thespring.
After pulling the fabric from between the spring,check to make sure the pilot chute base is cen-tered under the crown.
Now fully collapse the spring to see how muchloop can be pulled through the top of the pilotchute. If you can pull more than 1/2 to 3/4 inchesthrough, the loop is too long. Now would be thebest time to open the container and shorten theloop. #2/5-91
#2/5-92
Rev 0

09351 - 5/30/2003 55:121
TANDEM VECTOR 2 OWNER’S MANUAL
30) Thread the pull-up cord through the topreserve flap (flap #5). Remove the temporarypin, pull the loop through and secure once againwith same temporary pin as shown in Illustration#2/5-93.
31) Thread the pull-up cord through the bot-tom reserve flap (flap #6) and insert sametemporary pin as shown in Illustration #2/5-94.
#2/5-93
#2/5-94
Rev 0

09351 - 5/30/2003 56:121
TANDEM VECTOR 2 OWNER’S MANUAL
34) Dress container, seal, sign, and log the pack job.
35) Count your tools.
36) Attach right main riser (the one with the RSLring) to the right side harness ring. Attach the RSLsnap shackle to the small RSL ring. Make sure thepile velcro on the lanyard is securely mated to thehook velcro on the comfort pad. Attach the yellowvelcro tab to the backside of the RSL to properlyposition ball handle as shown in illustration #2/5-96.
#2/5-95
#2/5-96
32) Check the container closing pin for damage. Itshould be curved from the eye to half way down itslength. The rest of the pin should be straight.
33) Be sure the container closing pin (on end ofreserve static line) is threaded through the guide ringon flap #5, then through the loop on the end of thereserve ripcord and then through the containerclosing loop. (BE SURE TO REMOVE THE TEMPO-RARY CLOSING PIN). The end of the reserve pinshould easily slide into the protective pocket on flap#6 as shown in Illustration #2/5-95.
Rev 0

09351 - 5/30/2003 57:121
TANDEM VECTOR 2 OWNER’S MANUAL
is 18. Warning: It is the responsibility of the dropzone and the Tandem Instructor to insure thestudent is of legal age.
2) Physical condition: There is very little thatprecludes someone making a Tandem jump. One ofthe great advantages of the Tandem program is thatpeople who would never have been able to skydivemay now enjoy the thrill of the sport. Basically, thestudent should be in fairly good shape, not be suffer-ing from extreme frailty or extreme old age, andhave no heart condition or other debilitating ail-ment.
3) Weight: This is an important consideration, andthere are a number of factors to be considered. First,the total combined weight of the Tandem Instructorand the student (not including gear) should notexceed 425 lbs. Tandem Instructors should increaseweights 15 pounds at a time while gaining experi-ence.
4) Size: There are two considerations here; In-structor/student size ratio and the aircraft beingused.
a) Instructor/student size ratio: Basic common sensedictates that a small Tandem Instructor should nottake a large student. Follow these criteria whenmatching Tandem Instructor and student:
* Tandem Instructor must be able to �handle� thestudent he/she is jumping with. Consider the levelof difficulty for the aircraft being used.
* The newly licensed Tandem Instructor should beequal to or greater than the student in size andstrength, and must be able to steer and flare thecanopy without the help of the student. Only afterconsiderable experience should a Tandem Instruc-tor attempt to take students larger than himself.
b) Aircraft: If a large Tandem Instructor is taking alarge student, it may be almost impossible for themto comfortably get out of a Cessna. However, thesame pair could exit easily out of a Skyvan, DC-3, orsimilar aircraft. Aircraft availability must be takeninto consideration when deciding if a student may
This section will better prepare you for your role asthe instructor. Your responsibilities will be pre-sented in the following stages of the jump:
PreparationIn-aircraft and exitsFreefall/Drogue-FallCanopy control
CHAPTER 1: PreparationThis section will cover the following:
Criteria for jumpingOverview of jumpFitting harness to studentBriefing the studentPre-flight gear check
Criteria for jumpingThe following is the minimum criteria to be fol-lowed and will be discussed under the headings of:A. PersonalB. Geographical
A. Personal requirements:AgePhysical conditionWeightSize
Before any Tandem jump, it is important to deter-mine that the student meets a few basic criteria.There are very few restrictions on who may jump,but the few guidelines put forth here must be fol-lowed carefully in order to protect yourself, thestudent, and the entire Tandem program. The fourstudent requirements are:
1) Age: The student must be considered an �adult�in the jurisdiction in which the jump is being made.In other words, the student must be able to legallyenter into a contract. In most cases, the age for this
SECTION 3 INSTRUCTOR TECHNIQUES -
NORMAL
Rev 0

09351 - 5/30/2003 58:121
TANDEM VECTOR 2 OWNER’S MANUAL
jump.
B. Geographical requirements:The following may play a part in how you decidewho to take on a given day or at a specific location.WeatherTerrain
1) Weather assessment:
a) Wind speeds:For Tandem jumping, the optimum range for windsis 5 - 20 mph. All jumpers should realize that veryhigh winds are unsafe to jump in. In the case ofTandem jumping, we need to realize that it may beequally unwise to jump in extremely low winds. It isa hard point to realize since sport jumping goes onin no wind conditions all the time, but it is a fact thatTandem jumping with heavy students in no windconditions can produce final approach ground speedswhich can make landings more difficult.
Heavy students with any physical malady which canprevent them from running or supporting their ownweight should not be jumped in no-wind conditions.
b) Temperatures:As the seasons change, the canopy's performancewill vary as the air becomes cooler or warmer.Cooler air is always more stable and dense so thecanopy's decent rate and flare performance is good.Warmer air is thinner and you may find that landingsbecome harder. This can be noticeable even duringthe course of a day as the temperature rises on a hotsummer day. The warmer air actually provides aneffect in which the field elevation can be thought ofas being barometrically higher than its geographicalelevation. This effect is referred to as �densityaltitude�. The hotter the day, the thinner the air, andthe higher the density altitude, in other words, on ahot humid day, the canopy may land as if the field isat perhaps 6,000' rather than sea level - a BIGdifference! On a very hot day, with a heavy student,density altitude is a factor you must take into ac-count. Common sense, good judgment, and cautionis often called for.
2) Terrain assessment:
a) Landing area selection:If you are planning a Tandem jump at an unfamiliarspot, check the area before you jump. Note wherethe obstacles are, and keep track of other large openalternate landing areas. Turbulence can effect canopyflight as much as 1/4 mile away from tall obstacles.Keep these things in mind when making a note ofwind direction and spotting. Think ahead and plancarefully!
b) Altitude:When jumping at locations well above sea level, youmust also take into account that the higher theground elevation, the less effective your flare willbe. If you find yourself making Tandem jumps at highfield altitudes, choose lighter students till you havea good feel for the different flare characteristics thecanopy will have at that location.
Overview of the jumpA) synopsis of the jumpB) video and assumption of risk agreement
A) Synopsis of the jump:Before the first jump, it is important that the studentunderstand what the jump will be like, and what isexpected of him or her. Before the first jump, thestudent should have the Tandem concept explainedby video, still photos, or direct observation. Informthem of the entire sequence and what to expect ateach stage of the jump. Information such as exitaltitude, length of freefall delay, and length of canopyride are all motivating points of interest.
B) Video and assumption of risk agreement:The student must view the waiver video and sign thewaiver. Be careful to abide by all provisions in theexemption, such as student�s age, etc... If the videomachine is out-of-order or the tape is lost, it is thesame as if the aircraft is inoperative. NO ONE maymake a Tandem jump without seeing the waivervideo and signing the waiver.
In the United States, Tandem jumping is now permit-ted under exemption #4047, #4047A, #4046B,
Rev 0

09351 - 5/30/2003 59:121
TANDEM VECTOR 2 OWNER’S MANUAL
#4047C, #4047D and #4943 to FAA part 105, forthe purpose of determining the benefits of Tandemjumping to the general public. You must explain theexperimental nature of this program to all studentsbefore allowing them to jump. Other countries treatTandem jumping differently. Take these differencesinto consideration when briefing the student.
Fit harness to passenger
1) Pre-size harness
Pre-adjust the harness so you will only have totighten each adjustment point several inches afterputting it on the student. With a little experience,it�s easy to figure about how tight tomake the harness before putting iton. If the student is a small woman,then all adjustment points will needto be taken in to shorten the har-ness. If the student is a large man,then loosen the adjustment pointsaccordingly.
2) Position upper attachmentpoints:For the average size student, theharness should be adjusted so theupper attachment snaps are 1- 3inches (3 - 8 cm) behind thecenterline of the student�s shoul-ders. During all phases of harnessadjustment, always refer back to thecorrect position of the upper snaps.
Larger students with hefty chest di-mensions may require the uppersnaps to be moved further behindthe centerline of the shoulder.Sometimes as much as 4-6 inches (10- 15 cm). By moving the snaps further back, lesspressure will be exerted over the main lift webduring the canopy flight. If the snaps are positionedtoo close to the centerline, the force of the overlytight MLW can cause some students to temporarilypass out. The MLW, in this scenario, is puttingpressure on blood circulation points which supplyblood to the brain. If this happens to your student,reach around front and loosen the chest strap ad-
When snugged down, your fistshould fit between the studentand the chest strap. Remindstudent not to over-tighten
anything on harness.
justment.
3) Placement of leg padsWhen adjusting the leg pads, make sure they coverthe inside of the thigh. One theory suggests thatsome students feel sick during Tandem jumps be-cause blood circulation is cut off at the inside of thethigh (the Femoral artery). Careful adjustment of theleg pads can help alleviate this problem.
4) Chest strap adjustDo not over tighten the chest strap. When snuggeddown, you should still be able to put a fist betweenthe chest strap and the student. Also, remind the
student not to tighten the chest strapor anything else on the harness whilein the aircraft. When sitting down,the harness will seem looser, and thestudent will have the urge to makethe chest strap very tight. A cheststrap that�s too tight will make thestudent very uncomfortable after thecanopy is open.
Briefing the student (for the firstTandem jump):One great advantage of Tandem firstjumps is that the student does notneed to know nearly as much as whenmaking the first solo jump. The stu-dent can therefore relax and enjoythe jump rather than worry aboutforgetting the hundreds of facts nec-essary to make a jump on his own.With the student more relaxed, hermind will be free to absorb the expe-rience and pick up specific skills im-possible to teach effectively in a class-room. If a picture is worth a thousand
words, a Tandem jump is worth hours of classroominstruction. In other words it is possible to overtrain a student before a first Tandem jump. Emphasisshould be on safety and awareness.
This section is broken into two sub-sections:
Rev 0

09351 - 5/30/2003 60:121
TANDEM VECTOR 2 OWNER’S MANUAL
* Obtain feedback from your student. This will letyou know if further explanation is needed, andwhether they are actually learning.* Practice until perfect, and remember:* What is performed on the ground will almostcertainly be performed in the air.
B. Briefing checklist:When performing a Tandem jump, your passengermust know the following information and drills priorto disembarking on their first jump. Completedetails of these topics and more can be found inSection 5 under Student Briefing. The following willinclude a summarized list of key points:
Freefall body position drillExit practice and hookup proceduresSit back drillSteering and flaring the canopyLanding practice
1) Freefall body position drill- Have student lie down to practice realistically.- Have the student grasp the harness in the elbowsback position.- The student's feet should be together with kneesbent at 90 degrees.- Practice arm extension, prone, if you intend yourstudent to do it.- Practice the signal, tap on the head, with the armextension drill.- NEVER REACH AROUND IN FRONT OFTHE STUDENT FOR ANY REASON.
2) Exit practice and hookup procedures:- Perform drill at the aircraft or aircraft mock-up.- Practice the proper hand and foot placement andset up for the exit launch.- Have student practice solo as well as hooked up forrealism.- Practice the whole sequence from exit.
3) Sit back drill: (For student comfort)- This drill must be practiced on the ground- Practice with the student�s harness attached toyour own to simulate tension.- Have student slide the harness down toward the
A. Conducting a skills practiceB. Briefing checklistOn subsequent Tandem jumps more time can bespent in preparation for the jump and the student canbe given more technical training under canopy.Remember, under this program, Tandem jumping isto be used as a student training aid, NOT for thepurpose of giving �joy rides� to the general public.
A. Conducting a skills practice:Your preparation of the student will make a greatdifference in how successful the jump is both in skill,performance and enjoyment. A well conducted prac-tice will help the student in the following ways:* Eliminate confusion, make the program clear. Thiswill make the experience an enjoyable one.* Increase the students confidence in the equipment,and in you, the Tandem Instructor.
Take note of the following tips. These will ensurethat the practice is effective:* Clearly explain what will happen.* Practice with realism.* Repetition of skills results in instinctive perfor-mance of skills.
Practice the entire hook-up and exitsequence at the aircraft.
Rev 0

09351 - 5/30/2003 61:121
TANDEM VECTOR 2 OWNER’S MANUAL
- Chest strap tension- Leg strap tension and dead-ends secured- Proper staging of side quick ejectorsB. Tandem Instructor equipment:
Prior to checking the system, selectyour jumpsuit, altimeter, goggles andany other accessory items you mayneed. When selecting a jumpsuitpick one that is looser in the arms andlegs to help give you extra drag. Thiswill enhance stability with light pas-sengers and help to eliminate rockingin droguefall. It is recommended thatyou use a wrist mount altimeter.Chest-mount altimeters positionedbetween you and the student willprobably not give an accurate read-ing.
Before putting on the Tandem Vec-tor, perform a thorough and system-atic gear check. Always start yourgear check at the same point andsystematically move from item to itemuntil completed. An example of thiswould be: start at the drogue pouchworking up the back of the rig thendown the front. When performingthe check you should cover the fol-lowing points:
Drogue handle/proper packing of drogue in pouchDrogue 3-Ring attachment and release handle/handlesMain pin, closing loop and bridle routingReserve pins and closing loop, RSL routing3 ring assembliesReserve static line shackle attachmentCutaway and reserve handlesMain lift web adjustment and symmetryPin protection flaps and riser covers
1) Drogue handles:Check to see that the drogue deployment and droguerelease handles are easily accessible.
knees 4-6 inches (10-15 cm).
4) Steering and flaring the canopy:- Display steering toggles to your student so theyunderstand what they areand how to grasp them.This would best be doneprior to the jump.- Explain how the canopyis steered. Explain howturns are initiated andstopped (no counteringnecessary), what positionis full flight as well aswhat flaring is and how itis performed. This maybe done during thecanopy flight.
5) Landing practice:- If the student is to assistwith the landing flare, in-air practice is a must. Werecommend at leastthree good repetitions.
Pre-flight gear check:A. Student equipment.B. Tandem Master har-ness and containers.
A. Student equipment:Start by checking to see that your student has aproper, tight fitting jumpsuit and any other itemsthey may need such as a leather helmet, goggles,altimeter and/or gloves. When selecting gogglesmake sure that they are adjusted to be very snug. Asstudents tend to leave them looser than practical.Students wearing contact lenses should use goggleswith as few air vents as possible.
Again, check the fitting of the students harness tomake sure nothing has loosened off and that allwebbing running ends are tucked in. Check in thefollowing order.
- Upper snap position
Practice proper hand and footplacement. Practice solo as well as
hooked up for realism.
Rev 0

09351 - 5/30/2003 62:121
TANDEM VECTOR 2 OWNER’S MANUAL
RIGHT!Drogue housing should bein a gentle "S" curve underthe backpad.
WRONG!A "pigtail" such as this isincorrect and could resultin an extremely hard pull.
#3/1-97
#3/1-98
#3/1-99
NOTE: If the secondary right hand drogue releasehandle is installed, be sure it it properly attachedeither to the student�s harness or the TandemInstructor's harness. DO NOT LEAVE DAN-
GLING. Check the housing�s position under thebackpad for the �pig-tail� twist as shown in illustra-tion #3/1-97.2) Drogue 3-Ring attachment and releasehandle:Open the back of the drogue pouch and check to besure that the 3-Ring drogue bridle attachment is
correctly secured. If you have the right-handdrogue release handle installed, note that thedouble cable set-up should look like Illustra-tion #3/1-98, with one cable through one endof the loop, and the other cable through the other
Rev 0

09351 - 5/30/2003 63:121
TANDEM VECTOR 2 OWNER’S MANUAL
#3/1-101
#3/1-100end. If your system has only the left-hand
drogue release, the drogue riser shouldlook like Illustration #3/1-99.3) Main pins, closing loop andbridle routing:What is commonly called a pin checkshould actually be called a bridle
routing check. Open the main pinflap and be sure the pin is seated cor-
rectly, and the condition of the main loop isgood. Check the bridle routing by following thewhite drogue inner bridle from the ring assembly
directly to the main pin. Illustration #3/1-100 showsthe proper position for the pin and bridle.
4) Reserve pin, closing loop, and RSL routing:Open the reserve flap and make sure the pin isproperly seated and that the condition of the closingloop is good. Don�t push the reserve pin too fardown into the loop (this will cause it to twist,making the eyelet of the pin stick up instead of lyingflat). Illustration #3/1-101 shows the pin correctlyseated.
Rev 0

09351 - 5/30/2003 64:121
TANDEM VECTOR 2 OWNER’S MANUAL
Yellow Cable
YellowVelcro Tab
RSL(Reserve Static Line)
#3/1-102
Check the RSL routing to be sure it passesthrough the guide ring on flap #5.
5) 3 ring assembly:Make sure the rings are hooked upin the proper sequence and that thelocking loops are not frayed. Theloop should pass through only the smallring, then through the riser grommet,and finally through the housing grom-met, which is secured with the yellowcable as shown in illustration #3/1-102.
6) Reserve static line:Check the routing of the reserve staticline and ensure that the static line ismated up to the velcro on the shoul-der pad. Check shackle attachmentto the main riser. Secure the yellowvelcro tab to the rear of the 1 inch(2.5cm) square weave lanyard forproper ball-handle placement.
7) Cutaway and reservehandles:Check that the handles are se-curely placed. The velcro attach-ing the handle should be fullymated, with the handle beingplaced up as close to the hous-ings as possible to prevent excess exposed cable.
8) Main Lift Web (MLW) symmetry:Adjust the MLW to the length that fits you best.Check both sides for symmetry.
9) Secure pin protector flaps on the main andreserve. Inspect the riser covers for proper velcromating.
WARNING: Riser covers perform a vital job.Leaving the risers unprotected could result in amain/reserve canopy entanglement if improperemergency procedures are used during a total mal-function. Unprotected risers can also be a dangerwhen moving around the cabin of small aircraft.
Rev 0

09351 - 5/30/2003 65:121
TANDEM VECTOR 2 OWNER’S MANUAL
Chapter 2: In-aircraft and exits
In-aircraft gear checkExits
In-aircraft gear check:This section is split into areas of safety checks:
A. Pre-exit preparationB. Pre-exit gear checkC. Drogue handle check
A. Pre-exit preparation:While in the aircraft (before jump altitude is reached),verbally acknowledge the hookup of each top snapas it is clicked into place and locking pins inserted.Make sure the waist attachment straps are secureand are comfortably tight. Make sure that student�schest strap is not overly tight.
B. Pre-exit gear check:Plan ahead of time and brief someone on your loadto do the final pin checks for main and reserve.Before exit, the Tandem Instructor should physi-cally check the following items:
1) All snaps and locking pins2) All handles in order of use3) Reserve static line4) Student�s chest strap, helmet, and goggles.
C. Drogue handle check:Because the drogue release handle is located on thebottom left corner of the rig, it can be dislodged bymovement in the aircraft or during exit as you passthrough the door. It is therefore recommended thatthe Tandem Instructor check the security of thehandle just before exit and then again just afterdrogue deployment on every jump. It is better torealize you have a floating handle at 10,000' ratherthan 5,500'.
Always follow this process:1) Check security of all handles.2) Move to exit position.3) Re-check security of the drogue, and droguerelease handles.
ExitsExact exit procedure varies with different aircraft,but the basics remain the same: you must maintaintotal control of the student during exit and freefall.This section will deal with:
A. Exit techniques(2)B. Exit tipsC. Exiting different aircraft
A. Exit techniques (2):Two exit procedures are shown in this manual. Thefirst, a poised exit, allows total control of the studentbody position during exit because the student as-sumes the correct freefall body position prior toexit. All the student has to do is stay put and you geta good exit almost every time. This poised exit canvary with different aircraft and door types. Thesimilarity is that you will leave in a head high positionafter leaving the aircraft whether you are exiting ina crouched or backed-out standing position. Thisposition can be done from a wheel-strut (C-182),tailgate (Casa), or a side door (DC-3).
The second procedure is a diving type exit. Thisrequires the student to change body position imme-diately upon exit. If the student cooperates, then theTandem Instructor's job is much easier. If thestudent gets into a less-than-ideal body position,then the Tandem Instructor will have to workharder to maintain stability. This exit can be donefrom kneeling, sitting or standing positions.
Rev 0

09351 - 5/30/2003 66:121
TANDEM VECTOR 2 OWNER’S MANUAL
1) Po
ised E
xit: Cessn
a with
Stru
t
FIGU
RE
1. Hook up in kneeling position before m
oving toward or
opening door. Move forw
ard in the door until both legs will fit
through door. (Illustration #3/2-103)
FIGU
RE
2. Place both right feet on step, with student�s foot to the
inside. (Illustration #3/2-104)
#3/2-103#3/2-104
Rev 0

09351 - 5/30/2003 67:121
TANDEM VECTOR 2 OWNER’S MANUAL
FIGU
RE
3. With student assisting, clim
b out onto step into poisedposition, w
ith student�s feet together and in between the T
andemInstructor�s feet. T
he student�s head is back. (Illustration #3/2-105)
FIGU
RE
4. On T
andem Instructor�s com
mand, student lifts feet from
step, arches body (feet together, knees bent), and then removes hands
from strut, grasping m
ain lift webs. (Illustration #3/2-106) #3/2-106
#3/2-105
Rev 0

09351 - 5/30/2003 68:121
TANDEM VECTOR 2 OWNER’S MANUAL
FIGU
RE
5. Tandem
Instructor moves outboard and hangs one leg.
Exit requires only a slight sideways m
otion. Fall away head high, on
aircraft heading. It helps to look back into aircraft on exit. Studentm
aintains this body position, including hand grips, until after canopyopening unless otherw
ise instructed by the Tandem
Instructor.(Illustration #3/2-107)
FIGU
RE
6. Side view of Figure 5. N
ote student�s leg position.(Illustration #3/2-108)
#3/2-107#3/2-108
Rev 0

09351 - 5/30/2003 69:121
TANDEM VECTOR 2 OWNER’S MANUAL
#3/2-109
2) Diving exit:
This technique, for m
any aircraft, is most preferred as it
limits the am
ount of time the T
andem pair spends at the
open doorway, or hanging outside the aircraft. T
here havebeen m
any accidental deployments in the past due to
student interference during climbout for poised or backout
exits.
The diving exit w
ill require a more intense arch by the
Tandem
Instructor to maintain stability. It�s recom
mended
that you spend a few extra m
inutes on the ground working
on the student�s body position as well. G
enerally, thestudent is w
alking out the door with you and is supporting
most of his ow
n weight during the exit. T
his means the
student will have to transition to the freefall body position
imm
ediately after the exit.
Illustration #3/2-109 shows the T
andem pair sitting at the
door edge of a Pilatus Porter with feet on the step, just prior
to diving out.
2) Divin
g Tan
dem
Exit
Rev 0

09351 - 5/30/2003 70:121
TANDEM VECTOR 2 OWNER’S MANUAL
FIGU
RE
1. Hook up and have student grasp m
ain lift webs before
approaching door. Grip top of door, turn around, and back out into
the position shown in Illustration #3/2-110. Student�s feet are to-
gether, between T
andem Instructor�s, and on door lip. Be careful to
stay low enough so that the student�s head does not strike the top of
the door.
FIGU
RE
2. On T
andem Instructor�s com
mand, student lifts feet from
door lip and arches body (head back, feet together, knees bent).T
andem Instructor then hangs the foot (the upw
ind side) and rotatesbody tow
ard aircraft flight direction as far as possible, without
releasing either door grip as shown in Illustration #3/2-111.
3) Backin
g O
ut Tan
dem
Exit
#3/2-110#3/2-111
Rev 0

09351 - 5/30/2003 71:121
TANDEM VECTOR 2 OWNER’S MANUAL
FIGU
RE
3. At this point, exit requires little
more than sim
ply letting go. Rotate into
propwash after letting go. (Illustration #3/2-
112) Fall away head high, on aircraft heading.
It helps to look back into the aircraft on exit.Student m
aintains this body position, includ-ing hand grips, until after opening unlesstrained to do otherw
ise.
#3/2-112
Rev 0

09351 - 5/30/2003 72:121
TANDEM VECTOR 2 OWNER’S MANUAL
C. Exiting different aircraft
Five classes of aircraft come to mind.1) Cessna with step and strut.2) Cessna, Piper, or Beech with small cargo door(one in which you can�t stand up - usually no outsidestep).3) DC-3 or Twin Otter with large cargo door.4) Skyvan, Casa, or other tailgate aircraft.5) Helicopter with side door.
Before taking a student out of an unfamiliar aircraftthe Tandem Instructor must first take an experi-enced jumper as passenger once or twice until he iscomfortable with the climbout and exit from that
aircraft.
It is difficult to over emphasizethe importance of a stable exiton EVERY Tandem jump.
Note: A Tandem jump doesnot proceed directly from exitto drogue fall. There is freefallin between the time you leavethe aircraft and the time thedrogue deploys. This is wherestability is gained from freefallbody position and easily main-tained without the drogue. Donot use the drogue to gain sta-bility. Documented proof thata Tandem Instructor routinelyuses the drogue to gain stabilitywill quickly result in his ratingbeing suspended.
The Student Briefing should include anexit practice at the aircraft, fully suited and
hooked up
B. Exit tips:
Ideally:1) Spend as little time as possible while hanging ontothe outside of the aircraft, or while near the door.The longer you spend there, the more you increasethe chance of something going wrong.2) The student must have a good grip on their ownmain lift web. A student with free hands can only getyou into trouble.3) The student�s head should be back, body arched,feet together, and weight totally supported by you,before exit.4) The actual exit should be so smooth that thestudent hardly notices the difference between hang-ing under you, outsidethe aircraft, or in freefall.5) The fall away fromthe aircraft should behead high and verystable. The more un-stable your exit and fallaway, the more likelythe student is to move,which will causetrouble.6) If exiting from a smallside door such as thatfound on Twin Beeches,Queen and King airs,etc... a kneeling, sittingor walkout exit is rec-ommended. Do not usea standing back-out exitas the likelihood of anaccidental activation ishigh.
Rev 0

09351 - 5/30/2003 73:121
TANDEM VECTOR 2 OWNER’S MANUAL
In other words, if you want to deploy the drogueafter Tandem terminal is reached, you must allowtwo thousand feet after deploying the drogue fordeceleration before pulling the drogue release handleand deploying the main. This is not to say that thesystem will not work if you release the drogueimmediately after deploying it at Tandem terminal. Itis to say that the faster you go, the harder theopenings, which will surely reduce the life of theparachute system.
Lastly, deploying the drogue approximately 5 sec-onds after exit will allow you time to assess a droguemalfunction situation, thus giving you ample time todeploy the reserve before Tandem terminal hasbeen reached.
C. Minimum exit altitude is 4500 AGL:For the same reasons stated in (A), this is theabsolute lowest you should exit. If you experiencedany problem from this altitude you would have torespond quickly and decisively to get the situationunder control and still leave sufficient time to re-spond to malfunction situations. These lower exitaltitudes should only be reserved for the most expe-rienced Tandem Instructors.
D. Minimum main deployment altitude is4,000 AGLThis is a recommendation that should be taken veryseriously. The added complexities of performingemergency actions as well as the speed with whichyou will pass through the remaining 4000 feet leavelittle time to deal with any other problem which mayarise, such as passenger interference. The Tandempair should always exit last due to this higher plannedopening altitude. This will help prevent any trafficproblems with other jumpers.
E. Reserve initiation altitude is 2,500 AGLFor all the reasons mentioned above, do not delaythe execution of reserve procedures. If the situationcalls for it, make a decision and carry it out.
Chapter 3: Freefall & Droguefall
This section will cover the following areas:
Altitude recommendationsStability controlDeployment of drogueDroguefall controlArm extensionDrogue release
Altitude and time recommendations:When performing tandem jumps the following alti-tude recommendations apply:
A. Exit above 7,500 AGL.B. Deploy drogue within 5 seconds after exit.C. Minimum exit altitude is 4,500 AGL (not appli-cable during training or probationary jumps).D. Minimum main deployment altitude is 4,000AGL.E. Reserve initiation altitude is 2,500 AGL.
A. Exit aircraft above 7500 AGL:It is important to exit with sufficient altitude torespond to a variety of situations.The speed and altitude lost during unstable freefallwithout the drogue is hard to imagine for the unini-tiated Tandem Instructor candidate. Unusual situa-tions such as a collapsed drogue, or drogue in towwill eat up your altitude faster than you can imagine.Refer to Section 4: Emergencies and Malfunctions,for details on the possible problems you may en-counter.
B. Deploy drogue within 5 seconds after exit:This gives the Tandem Instructor time to gain stabil-ity, but is before terminal velocity, saving wear andtear on the parachute system.
If the drogue is deployed during Tandem terminal(170+MPH), and functions properly it will take ap-proximately 10 seconds to reduce your terminalvelocity to normal (120 mph). Therefore, you shouldwait at least 10 seconds after deploying the droguein this situation before you deploy the main bypulling the drogue release handle.
Rev 0

09351 - 5/30/2003 74:121
TANDEM VECTOR 2 OWNER’S MANUAL
Tandem is no different. While everyone will �blow�an exit every now and then, it should be the rareexception, and not the norm.
Ironically, the smallest students can be the mostdifficult to control.
Example: When you hit a badminton birdie, theweighted end always ends up below. The same canhold with a Tandem pair. If a large Tandem Instruc-tor makes a poor exit with a small student, it is verypossible for them to end up back to earth (with theheavier of the pair below).
B. Anticipation:The key to keeping in control is being able torecognize a potential problem prior to it becominga real problem. Students sometimes do crazy thingsduring the first few seconds after exit. Usually, afterthe initial shock of freefall their eyes will reopen andthey will attain their body position assisting stability.Immediately following the exit launch, assess thestudent�s body position as you arch to maintainstability. If the student remains in the folded de-archposition of the diving exit or attains a de-archedposition after the exit launch, you may have to applyadditional control techniques to maintain headingand stability.
C. Manipulation:One such control technique is to physically manipu-late the students body into an arch. To do this reacharound with your arms and/or legs and pull him backinto the correct position. Grab the arms only be-tween the elbow and the wrist. This makes it hardfor the student to then grab you. Hold this inter-locked or bodylocked position until you have en-sured or regained stability. Manipulation shouldonly be used as a last resort if the Tandem Instructorshard arch is ineffective.
This technique must be used with caution as itincreases the possibility that the student will grabyour arms and prevent you from pulling. There issimply no telling what a student might do if pre-sented with an �earth-sky-earth-sky� situation onhis first jump.
DistanceCovered
in50 seconds
Stability control:A. ArchB. AnticipationC. Manipulation
A. Arch:What the Tandem Instructor does is more impor-tant than what the student does. The Tandem In-structor should concentrate on good training for thestudent in the proper body position, and then on hisown body position on the exit. If the Tandem In-structor attains a good arch right out the door, thenchances are the pair will gain stability easily.
Incredibly enough, many instability problems arecaused by a bad Tandem Instructor body position.Specifically, many problems start because the Tan-dem Instructor fails to throw a hard arch on exit.
While a poor exit resulting in instability is notinherently dangerous (except when it leads to un-stable drogue deployment), it is nonetheless unnec-essary and unacceptable. A poor exit is defined asany exit creating a combination of uncontrolledloops or rolls immediately after exit. It is not accept-able to loop an AFF exit, nor is it acceptable to loopan airplane on takeoff with a first time student, and
12,500'(3,810m)Freefall
8,400'(2,560m)Droguefall
The following chart (3/3-113) shows the differencebetween freefall and drogue fall. Notice the in-crease in speed and the decrease in available time.
#3/3-113
Rev 0

09351 - 5/30/2003 75:121
TANDEM VECTOR 2 OWNER’S MANUAL
Deploy drogue:The drogue may be deployed at any point during afreefall, from soon after exit to after Tandem termi-nal velocity (170 mph) is reached. It is recommendedthat if stable, the drogue be deployed in the first 5seconds of freefall.
Recommended drogue jump scenario:A. Exit aircraft above 7500' (2500m) AGL.B. Ensure stability prior to deployment.C. Drogue deployment.
A. Exit aircraft above 7,500' (2500m) AGL:It is important to exit with sufficient altitude to dealwith any potential problem ensuring main deploy-ment by 4,500' (1500m) AGL.
B. Ensure stability prior to deployment:Be stable and face to earth. Be sure that the student�sbody position is good enough to allow you to reachin and grab the drogue without losing stability. If thestudent�s body position remains so bad that it causesa problem, FIX IT before throwing the drogue.
We cannot emphasize this pointenough: DO NOT USE THEDROGUE TO GAIN STABIL-ITY. Be stable before the drogueis thrown (unless there is no otheralternative and altitude is gettinglow).
Using the drogue to get stableshould be used only as a last resortsince it is better than pulling thereserve while unstable.
NOTE: It is very important toretain stability throughout the exitsequence of every Tandem jump.In the past few years of the Tandemprogram, disturbing stories havecome forth of Tandem Instructorshaving difficulty making stable ex-its or of keeping drogue fall smooth.There are even cases of the Tan-dem Instructor routinely using thedrogue to gain stability after exit.The fact is, the ability to make a
stable exit should be a very basic one for everyTandem Instructor.
Therefore, any Tandem Instructor who throws thedrogue before being stable and face to earth shouldbe immediately grounded. This is a potentially dan-gerous practice which cannot be tolerated. Like-wise, anyone who witnesses such practices shouldimmediately report the Tandem Instructor to theRelative Workshop.
C. Drogue deployment:As practiced in the equipment operations section ofthis manual follow these steps:1) Locate drogue handle and grasp firmly usingproper technique.2) Pull drogue from pouch and throw to your side atfull arm extension.3) Release immediately once forward of the line ofyour shoulders.4) Watch drogue inflate.5) Once drogue is inflated immediately check thedrogue release, both primary and secondary, andreserve handle position.
"If the Tandem Instructor attains a good hard arch right out thedoor, then chances are the pair will gain stability easily"
Rev 0

09351 - 5/30/2003 76:121
TANDEM VECTOR 2 OWNER’S MANUAL
You may or may not feel the drogue deploy. Werecommend you glance over your shoulder just afteryou�ve thrown it so you�ll know it has deployed andinflated correctly.
Drogue fall control techniques:The drag of the drogue on your harness will placeyour body in a certain attitude in freefall. The droguewill resist your efforts to change this attitude. If youtry to change your pitch attitude (head high/headlow) too much, you will rock up and down. Exces-sive rocking may be uncomfortable, unnecessary,and if it becomes extreme, can actually open themain container while the drogue is still attached. Itcan also cause the passenger's feet to become en-tangled with the drogue bridle.
There are four things you can do to minimize rock-ing:
1. Tandem Instructor corrects body position. Thebest way to stop rocking is for the Tandem Instruc-tor to simply relax and lie still in freefall not movingthe legs back and forth.
2. Teach the student correct body position on theground (head back, hands on harness, back archedfrom shoulders to knees, and feet tucked up).
3. Wear a big, baggy jumpsuit and put a tight suit onyour students. The air hits the student first. If thebody position is not perfect, you cannot adequatelycontrol exit or drogue fall unless you wear a big suit.As you gain experience, suit size is much less critical.
4. Snug down the hip straps so they are comfortablytight. Straps that are too tight or too loose can causethe rocking action as well.
Arm extension: (Optional)Once the drogue is deployed, tap the student�s heador shoulder to indicate it is time for him to put hisarms out in normal freefall position. DO NOT reacharound and pull the students arms into position, asthis would give the student a chance to grab yourarms.
Drogue release:The drogue may be released at any time during�drogue fall.� To release the drogue (thus deployingthe main canopy), simply pull the orange droguerelease handle located at the bottom left-hand cor-ner of the main container. A pull of approximately 6inches will release the drogue, though it is manda-tory to pull the handle completely.
WARNING: If your rig is equipped with the sec-ondary right hand drogue release handle, pullingeither handle alone SHOULD release the drogue. Ifit does not, pull the other handle before doinganything else.
Note: If the exit is to be lower than 7500' (2500m)AGL do not pre-pull the drogue release handle priorto the deployment of the drogue. The handles,drogue and drogue release, must be pulled in theproper sequence to ensure a proper deployment.
When you pull the drogue release handle, you willfeel an immediate trap door effect. Meaning you willaccelerate momentarily until the main canopy startsto inflate. The now partially collapsed drogue acts asa pilot chute and pulls your canopy to line stretch inabout half a second. The canopy will streamer for asecond or two and then open slowly. (If you pull therelease handle completely and do not feel this sen-sation, your drogue has failedto release.)
This is a critical time for awareness. If anything majorgoes wrong, such as a partially collapsed drogue intow, a bag lock or streamer, your speed will pickupquickly. Maintain altitude awareness and exerciseemergency procedures promptly.
Rev 0

09351 - 5/30/2003 77:121
TANDEM VECTOR 2 OWNER’S MANUAL
Chapter 4: Canopy controlTandem canopy openings aregenerally quite comfortable andsmooth. The opening sequenceusually begins as a slightstreamer with the slider high.The fall rate of the Tandempair decreases steadilyfor several seconds inthis configuration. Thenthe slider quickly de-scends and the canopyopens to about 90% of itsnormal size, with end cellsopen and the slider downalmost to the links. SomeTandem main canopiesare set up to open in asteady-state, deepbrakes configuration.Others are adjusted toopen in a �rock androll� mode, meaningthe brakes must bereleased to producestable gliding flight.Canopy control willbe covered as follows:
Upon openingSteering the canopyLandings
Upon opening:A. Canopy check.B. Release toggles.C. Stow drogue release handle and check emer-gency handles and harness.D. Instruct student to sit back in the harness.
A. Perform canopy check:Watch the opening. Check canopy condition whilelocating the toggles. Release brakes using the lowerstudent toggles.
B. Release toggles:Using the student toggle position, hand the studentthe steering toggles while saying �grab the toggles
#3/4-115
#3/4-114
the same way I have them." After the student hasplaced their hands in the toggle loop, remove yourhands and pump down the slider and tell student tocheck the canopy. (Tandem Instructor is checkingsky for other canopies at this time.)
C. Stow and check handles and harness.1) Stow the drogue release handle as shown inillustration 3/4-114.2) Check the cutaway and reserve handles (touchthem to reinforce their location and security).3) Look at the back of the main riser and check to seethat the cables are routed properly and that theycontinue into the channel for a few inches as shownin illustration #3/4-115.4) Check the top student attachment snaps.5) Check the student harness for comfort.6) Loosen the student�s chest strap if it is too tight.7) Tell the student you will make the harness morecomfortable. Do not tell them that you accomplishthis by releasing the lowerattachment quick ejectors,pulling to loosen the web-bing, and re-attaching.8) If ground winds are high,release the reserve staticline shackle to avoid a dragsituation after landing.
D. Instruct student to sit back in the harness.Have student perform the sit back in harness drill asdescribed in student briefing in Section 5 of thismanual. Student should lift each leg and slide the legstrap and pad forward several inches (6-10cm) toalleviate the pressure on the inside of the thigh. If
Rev 0

09351 - 5/30/2003 78:121
TANDEM VECTOR 2 OWNER’S MANUAL
student complains about an overly tight main liftweb, push down on the MLW adjusters and theharness will easily loosen.
Steering the canopy:
A Tandem system is the ultimate suspended harness.With it you can give the student actual hands onexperience controlling a ram-air canopy. How muchcan be accomplished depends on the student�s apti-tude and previous training or experience. Not ev-erything can be covered on the first jump. Learningpoints that would be covered on the first jump arelisted in the first jump briefing in Section 5 of thismanual.
Once the student has a firm grip on the toggles,provide commands as to the direction that youwould like them to steer. Encourage them to pulldown part way initiating a slow flat turn and to pulldown all the way performing a full bank turn.
Demonstrate forward flight with hands all the wayup (this can be a difficult position for the student).As you set up for final approach explain what youare doing with reference to the target. If you planto have the student flare for landing then have thestudent perform 3-5 practice flares while at altitudewith feedback of their technique and overall perfor-mance.
NOTE: If student reports nausea at any time, keepturns to a minimum and tell student to look at thehorizon and breath normally. Have student adjustleg pads or perform sit back in harness drill again. Ifstudent�s fingers start to tingle, have him releasetoggles and drop hands to side. An overly tight MLWwill restrict upward arm and shoulder movement.Full flight arm position can be very tiring and difficultfor the student.
Landing:In this section you will cover:A. Prepare for landingB. LandingC. After landingA. Prepare for landing:
1) Landing position:At about 3,000', remind student about landing bodyposition and leg tension as shown in illustration #3/4-116. Emphasize that the feet and knees should betogether unless instructed otherwise.
On "feet up" command,student should lift legsfar enough so that theirtoes are visible tothe Tandem In-structor.
2) Enter landing approach pattern:At about 1,000', enter down wind leg of pattern.Assess the surface winds as you fly past the targetarea to make final alterations to your final approachset up. Be on the wind line high enough to makecorrections to your approach if you�ve mis-read thewinds. Hold the wind line to landing making what-ever glide angle adjustments are necessary. Try notto sit in a braked position for any length of time as itwill tire your arms out for the flare.
If the winds are high and there is no catcher present,it is permissible to release the reserve static line ata low altitude. With the reserve static line detached,
#3/4-116
Rev 0

09351 - 5/30/2003 79:121
TANDEM VECTOR 2 OWNER’S MANUAL
the most difficult and takes considerable studentpreparation. The lighter the wind, the more thestudent must raise the legs up and forward prior totouchdown. The Tandem Instructor must be able tosee the feet and knees when looking over thestudents shoulder. The Tandem Instructor can alsouse his feet to coax the student's feet into the properposition.
3. Sliding landing:When the wind is less than 5 mph, the day hot, thestudent heavy, and/or the field altitude high, a slidinglanding is probably the best choice. To prepare fora sliding landing, the student must lift his or her legsand put them well out in front prior to touch down.A good slide requires a good flare to almost zerorate of descent. The Tandem Instructor sits back inhis harness (thus pulling the student back as well) andis prepared to take the landing on his feet, butcontinues to sit back after initial ground contact to aslide on his butt with the student literally sitting in hislap. It is important that the Tandem Instructor sitback on landing so the student will not have atendency to lean forward at touchdown (which cancause the Tandem Instructor to roll over on top ofthe student.) Never try to take any vertical force onyour butt. Serious injury could result.
So, JUST before landing, remind the student aboutleg tension, make your decision about which landingyou are going to use based on ground speed andshout �stand-up� or �run� or �feet-up� into thestudent�s ear.
C. After landing:1) If using secondary drogue release handle, detachit from the student's harness prior to releasing thestudent attachment points. Immediately attach thesecondary drogue handle to your harness to secureit. Failure to do so may create deployment problemson the next jump.2) Release the student.3) After release,walk over and pick up the drogue.Don�t drag it towards you by the bridle or you�ll risktearing it.
you may cutaway the main after landing if you�rebeing dragged without activating the reserve.
3) Flare canopy:First-time students can cause a lot of trouble unlessthey are well prepared and rehearsed. DO NOTallow an untrained student to assist in the flare.* If student has received adequate ground trainingand is well rehearsed in the air, have him assist youas you turn base and final and assist the flare on yourcommand. A good command to use would be"Hands up, feet up and FLARE."
Note: Do not depend on the student to help with,or have the strength to assist with the flare. Alwayscount on doing the flare yourself. If the student hasproblems with the in -air flare practice DO NOT letthem help with the flare.
B. Landings:There are three kinds of Tandem landings:
1. Stand Up2. Running3. Sliding
1. Stand upWhen the wind is over 10 mph, a proper flare shouldyield a no forward speed stand up landing. All astudent has to do is keep enough leg tension tosupport his or her own weight.
When the wind is high, have a canopy catcherwaiting for you at the landing area. Hand ONE toggleto the catcher at touchdown and have him run intothe wind with it to collapse the canopy. Remind thestudent to let go of the toggle immediately aftertouchdown so that the catcher can do his job. Thisis one of the things you should rehearse with thestudent during flare practice under canopy.
2. Running landingWhen the wind is more than 5, but less than 10 mph,both Tandem Instructor and student must take a fewsteps after touchdown. If the student does not haveproper leg tension or does not take those few steps,he or she will fall down and pull the Tandem Instruc-tor down with them. This kind of landing is actually
Rev 0

09351 - 5/30/2003 80:121
TANDEM VECTOR 2 OWNER’S MANUAL
Malfunction and emergency situations which re-quire your immediate attention can occur at anytime throughout the jump sequence. For this reasonwe will present them in this order:
Reserve proceduresIn-aircraftFreefallCanopy control
Chapter 1: Reserve proceduresEmergency response sequenceReserve proceduresReserve canopy proceduresMalfunction chart
Emergency response sequence:It is very important to take the time to think out andrehearse how you would respond to different situ-ations before you are ever faced with them. Alwaysread the Tandem accident and incident reports tolearn from the mistake of others. Study this informa-tion as if your life depends on it, because it does!
Unusual or emergency situations while performingTandem jumps require quick assessment and deci-sion making with the proper reactions. You must befamiliar with all options available for both right andleft hand response. It is equally important to have acomplete understanding of the proper sequence ofactions needed should you experience a situationthat you do not fully understand. The addition of thedrogue system adds extra procedures which aredifferent than those you would perform when jump-ing solo. Refer to Malfunction Tree charts on pages80-81.
A. Reserve procedures:Out-of sequence deploymentsTotal malfunctions
Partial malfunctionsCanopy transfers
1) Out-of-sequence deployments:In the event of an out of sequence deployment orsomething occurring that you have not seen before,follow your normal sequence of deployment priorto second guessing what the problem may be. Thatsequence is:
* deploy the drogue* pull either the primary or secondary drogue re-lease handles, or both.* assess main canopy condition and cutaway* pull one of the reserve deployment systems (eitherthe reserve ripcord or the ball handle on the RSL.)
2) Total malfunctions:Do not deviate from this sequence unless you canclearly identify a problem that has not been coveredby this manual.
* deploy the drogue* pull the primary and the secondary drogue releasehandles* pull one of the reserve deployment systems
3) Partial malfunctions:* Ask student to assume freefall position. (Hands onharness, feet together, knees bent at 90 degrees andbody arched.)* Scissors students legs between yours.* PULL THE GREEN HANDLE (BREAKAWAY)with right hand. Insure a clean breakaway. PULLTHE RED RESERVE RIPCORD with the left hand.REMEMBER - GREEN FOR GO...RED FORSTOP.
NOTE: The reserve static line should pull thereserve pin, but never rely on it. It is possible torelease the reserve static line before breaking away.This will enable you to go back into freefall withoutactivating your reserve. As soon as you regain stabil-ity (no more than 5 seconds), PULL THE REDHANDLE. This procedure is rarely if ever indi-cated.
SECTION 4MALFUNCTIONS& EMERGENCIES
Rev 0

09351 - 5/30/2003 81:121
TANDEM VECTOR 2 OWNER’S MANUAL
disabled aircraft be made below 1500' AGL (500m).
There are different recommended procedures fordifferent altitudes. These guidelines are:
A. Below 1,500' or 500m (aircraft engine out):If the aircraft is stable and gliding, then stay with theaircraft. (This would be in the case of an engine out.)When the aircraft has descended through 500 feet(150m), unhook your student and instruct them toput on a seat belt. Doing this will facilitate the climbout after a bad landing.
B. Below 1,500' or 500m (catastrophic aircraftfailure):If the aircraft is on fire, or in a spin, or if the wing orsome other large control surface has come off, getout and pull the reserve ripcord. If death is assuredby staying in the aircraft, then leave. Some chance atsurvival is better than none.
C. 1,500' - 4,000': (500m-1200m)Exit the aircraft and pull the reserve ripcord.
D. Above 4,000': (above 1200m)Exit the aircraft, deploy the drogue, pull droguerelease handle at appropriate altitude. It is impor-tant to note here that not all Tandem systems workthe same way. On the Tandem Vector, the droguewill not fully inflate if the release handle is pulledfirst. In fact, if the drogue release handle is pulledfirst, and then the drogue thrown, a 10 second maincanopy deployment can be expected. Not a goodidea if you�re low. The correct procedure is tothrow the drogue, wait for it to inflate (1-2 seconds)and then immediately pull the drogue release handle.
The obvious advantage here? No mind games toplay, no tricky scenarios that require out-of-se-quence handle pulling. You must always operate thehandles in the same order each and every jump. Nomatter what the circumstance, pull the operatinghandles in the same order.
Student refusal:There are two different situations which may arise,these are: 1) The student refuses while still in theaircraft, or; 2) The student refuses once on the strut
4) Canopy transfers:A canopy transfer, where the reserve is deployedwithout first jettisoning the main, is not recom-mended with a ram-air reserve under normal cir-cumstances, nor is it recommended with Tandem.The reserve pilot chute may not have enough drag toextract the reserve freebag from its container. If itdoes, the resulting deployment will be unpredict-able.
Reserve canopy procedures
Steering the reserve parachute:The reserve is set up exactly the same as the main,except the toggles do not have the double loop forstudent assistance, but are set up for Tandem In-structor solo control.
Chapter 2: In-aircraft
Aircraft emergenciesStudent refusal
Aircraft emergencies:A. 1500 Feet, engine out (500m)B. 1500 Feet, catastrophic airframe failure (500m)C. 1500 - 2500 Feet>> (500m-900m)D. 2500 - 4000 Feet>> (900m-1200m)
PROBLEM: Aircraft emergency requiring exit atlower altitude than planned.
REACTION: Because of the steps required todeploy the drogue correctly, it may be better to pullyour reserve ripcord in the event of a low-altitudeemergency exit. Each Tandem Instructor shoulddevelop his own emergency exit procedures de-signed for the aircraft he jumps from.
ANALYSIS: Due to the high freefall velocities thatmust be dealt with in Tandem, the RelativeWorkshop�s Tandem canopies open a little slowerthan most square reserves. Otherwise, non-drogueTandem terminal openings (160-180 MPH or 300kph)would be hard and uncomfortable. It is recom-mended therefore, that no emergency exits from
Rev 0

09351 - 5/30/2003 82:121
TANDEM VECTOR 2 OWNER’S MANUAL
Stable Exit
Pull DrogueFrom Pocket
Pull Wrong Handle(drogue release handle
pulled first)Deploy Drogue Immediately
Drogue DeploysNormally
Bag LeavesContainer
Bag Stays inContainer
Pull DrogueRelease Handle
Pull Drogue ReleaseHandle
ProbableMalfunction
MainMalfunctions
Pull CutawayHandle
Pull ReserveHandle
Main DeploysNormally(Unlikely)
Main DeploysNormally
Container Opens DuringDroguefall
Main Deploys, butDrogue Becomes
Entangled with Canopy
Decide ifMalfunction isSafe to Land
If Not, PullCutaway Handle
Pull ReserveHandle
Main DeploysNormally
Pull CutawayHandle
PullReserveHandle
MainMalfunctions
MainDeploys
Pull PrimaryDrogue Release
Drogue Doesn't Release
Pull Secondary DrogueRelease handle
Drogue StillDoesn't Release
InflatedDrogue in Tow
If Still in Tow at3,000', pull
Reserve
CollapsedDrogue in Tow
PullReserve Handle
Note: This emergency tree was de-signed to demonstrate the complexi-ties of tandem emergencies, and is notto be used as a sole source of informa-tion about Tandem emergencies.Thoroughly study the emergency pro-cedures found on pages 78-87 for com-plete information.
Rev 0

09351 - 5/30/2003 83:121
TANDEM VECTOR 2 OWNER’S MANUAL
Unable to DeployDrogue
Pull Reserve Immediately
UninflatedDrogue
Pull DrogueRelease Handle
After 6-8 Seconds
Can't Find DrogueRelease Handle
Pull ReserveHandle
Pull ReserveHandle Above
3,000'
Drogue BridleBecomes Entangled with
Jumpers or Gear
Drogue CanopyBecomes Entangled with Jumpers
or Gear
Pull ReserveHandle
Pull Primary DrogueRelease Handle
Release Drogue withSecondary Drogue Release
Handle (right hand pull)
Main DeploysNormally
MainMalfunctions
Pull CutawayHandle
Pull Auxillary RightHand Reserve Handle
LEFT Arm Incapacitated Dueto Student
Interference or Dislocation
MainMalfunctions
Main DeploysNormally
Pull CutawayHandle
Pull ReserveHandle
Bite or Hit Student toFree Right Hand
If Unable to Free RightHand, Pull
Reserve Handle
RIGHT Arm IncapacitatedDue to Student
Interference or Dislocation
Rev 0

09351 - 5/30/2003 84:121
TANDEM VECTOR 2 OWNER’S MANUAL
Being a Tandem Instructor is rarely dull.
Chapter 3: Freefall:
Accidental deploymentsRapid drogue throwUntimely pullsFreefall control problemsDrogue deployment problemsMalfunctions
Accidental deployments:
Rapid drogue throw:
It is not necessary to deploy the drogue immediatelyupon exit. As a matter of fact, throwing the droguetoo soon after exit can be dangerous. There havebeen cases of Tandem Instructors throwing the
or outside of the aircraft. Fol-low the procedures below:
1. If the student verbally letsyou know they do not want tojump then you must bring themback into the aircraft unlessthe aircraft door is restrictivein a way that it would be dan-gerous to re-enter theaircraft(accidental deploymentof either parachute system).
2. Once back into the aircraftget student comfortable andask what the problem is. Donot assume that it is fright, as itcould be some physical dis-comfort.
3. Once you have establishedthe problem decide on whetherto make another attempt ornot. If it seems to be a psycho-logical problem, re-assure thestudent of the ease of tasks andreliability of doing Tandemjumps. If they still do not want to jump, descend withthe aircraft, accompanying them to the ground.
drogue directly into the tail of the aircraft. (Obvi-ously a dangerous situation since the drogue couldentangle with the aircraft - it has happened). There-fore: Exit, gain stability, and then throw the drogue.Untimely pulls:A. HighB. Low
A. High pull:Problem: Here is the scenario for the most com-mon complication that arises on Tandem jumpswhere the student has the handle within reach: TheTandem pair exits the aircraft. The student panicsand immediately pulls the drogue release handle.The Tandem Instructor deploys the drogue and themain deploys instantly.
This can endanger anyone exiting with the pair,above and in line with the relative wind, such as acameraman, since he may inadvertently be directlyover the pair as the main deploys unexpectedly.
Rev 0

09351 - 5/30/2003 85:121
TANDEM VECTOR 2 OWNER’S MANUAL
good body position from the Tandem Instructor willalmost always overcome the shortcomings of thestudent�s body position.
PROBLEM: Student grabs the Tandem Instructor'sright arm and is holding on tight.
REACTION: If he has the right arm, simply use theleft to release the drogue.
PROBLEM: Left arm is held.
REACTION: If he has your left arm, hit him on theside of his head as hard as you can; he�ll probably letgo. If you cannot free your left arm, pull the auxiliaryreserve ripcord/reserve static line ball handle withyour free right hand. (If you have a secondary righthand drogue release ripcord installed and a studenthas your left arm, reach under the student�s arm andpull with your right hand.)
PROBLEM: Both arms are held.
REACTION: If a student gets both arms, a quick,rearward extraction movement of both hands cangenerally free you at once. If unsuccessful, you stillhave your voice, your head, your teeth and yourknees to work with.
ANALYSIS: A student that panics is apt to doalmost anything. This type of incident has beenreported enough times for us to know that it can andwill happen again. The best course of action is apreventative one. Keep your arms away from thestudent in the first place.
NEVER PUT A WRIST MOUNTED ALTIM-ETER IN FRONT OF A STUDENTS FACE.This is an engraved invitation to grab your arm! (Seefatality report #6.)
Always tell the student during the pre-jump briefingnot to grab your arms at any time during the jump.Make it clear what the consequences might be. Tellthe student that you will both die an ugly death by
B. Low pull:Problem: This situation may occur when the stu-dent is assigned to pull the secondary drogue re-lease. Following the pull signal the student gropesand has difficulty in finding the secondary droguerelease handle. Meanwhile, the Tandem Instructorreaches back for the drogue release handle, butthinks that if they both pull their handles, he�ll losethe closing loop; and perhaps does not have another.So he waits, sure that the student will get it anysecond. Meanwhile, the delay causes the pair toopen below the planned altitude.
In the very worst case scenario, the Tandem Instruc-tor reaches back for the primary drogue releasehandle but cannot find it. He then deploys thereserve - just as the student finally finds the handleand deploys the main....
REACTION: On every jump, and especially whenthe secondary handle is installed, the Tandem In-structor should throw the drogue and perform prac-tice pulls to both drogue release handles, as well asthe reserve ripcord. This simple exercise can elimi-nate the above mentioned scenario.
ANALYSIS: Needless to say, when the secondarydrogue release handle is to be used, the student musthave sufficient ground training prior to the jump. Donot give the student the right-hand drogue releasehandle after a mere 15 minute briefing on their firstjump.
Freefall control problems:
PROBLEM: Instability following exit.
REACTION: Upon exit, the Tandem Instructormust assume the hard arch position, with arms andlegs fully extended.
ANALYSIS: If the student has the hands on theharness, and the legs are bent at the knees with anarched body position, the Tandem pair will be stablealmost instantly. If the Tandem Instructor fails toarch and the student�s arms are out with poor lowerbody control, the pair might never gain stability. A
Rev 0

09351 - 5/30/2003 86:121
TANDEM VECTOR 2 OWNER’S MANUAL
�sudden impact trauma� if he does interfere withyour ability to pull the operating handles.
Drogue deployment and release problems:
A. Pulling the wrong handleB. Unable to extract drogue from pouchC. Un-inflated drogueD. Entanglement with drogueE. Entanglement with the drogue bridleF. Non-collapsed drogueG. Drogue in TowH. Drogue does not release when first handlepulled.
A. Pulling the wrong handle:
PROBLEM: You have pulled the drogue releasehandle before deploying the drogue.
REACTION: Deploy the drogue immediately. Thiswill produce a slow, but otherwise normal maincanopy deployment.
ANALYSIS: If you don�t deploy the droguepromptly, you will of course continue to acceleratetowards 170 mph. Since pulling the release handleturns the drogue into a pilot chute, main canopydeployment follows immediately upondrogue deployment. Therefore, thelonger you wait, the higher your ve-locity will be when the main deploys.
B. Unable to extract drogue frompouch:
PROBLEM: You are unable to lo-cate the drogue deployment handleor are unable to extract the droguecompletely from its pouch.
REACTION: Pull the reserveripcord.
ANALYSIS: It is not necessary topull either the drogue release handle or thebreakaway handle first. In this situation, the reserve
#4/3-117
ripcord should be pulled promptly, before yourvelocity builds up. The longer you wait, the greaterthe reserve opening shock.
This malfunction can usually be avoided by packingthe drogue correctly and by practicing drogue de-ployment on the ground.
C. Un-inflated drogue:
PROBLEM: Drogue has been deployed and ispartially or completely uninflated.
REACTION: If the drogue does not inflate withinsix to eight seconds, pull one of the drogue releasehandles to initiate main canopy deployment.
ANALYSIS: An uninflated drogue has enough dragto deploy the main canopy although it will takelonger than normal to do so. If you wait longer, yourvelocity will increase. Higher velocities may pro-duce a higher opening shock.
D. Entanglement with drogue:(#4/3-117)
PROBLEM: The droguecanopy becomes en-tangled with you, yourpassenger or your gear,and does NOT inflate.
REACTION: Spend onlya few seconds trying toclear the entangled droguecanopy before pulling thereserve ripcord.
ANALYSIS: In this situ-ation, your velocity willincrease to 170 mph inabout 18 seconds. Thelonger you wait to deploythe reserve, the higher thereserve opening shock willbe.
Rev 0

09351 - 5/30/2003 87:121
TANDEM VECTOR 2 OWNER’S MANUAL
trailing behind the canopy (it will still be inflated),there is probably minimal damage to the top of thecanopy. A fully inflated drogue is not a problem, itjust adds extra drag, slowing your forward speed.
G. Drogue in tow:
PROBLEM: Drogue release handle is pulled,but the main does not deploy, even after a fewextra seconds (the time it would take for anuninflated drogue to deploy the main).
REACTION: For the complete release ofthe drogue to occur, two things must happen:1) The 3-ring must release the kevlar outerbridle when the drogue release handle ispulled. 2) The tubular inner bridle must in turnpull the container locking pin out, open thecontainer and lift the bag.
ANALYSIS: If step number one fails to oc-cur, you will have an INFLATED DROGUE INTOW. You will notice no trap door effectafter you pull the drogue release handle.
In this case, if the drogue is still in tow at 3,000ft. AGL, pull the reserve ripcord. It is notnecessary to first pull the main cutaway handle.
If step one occurs, but step 2 fails to occur, youwill have a COLLAPSED DROGUE IN TOW.In this case, the 3-ring will have released, butsomething (probably incorrect tubular bridlerouting) has stopped the container closing pinfrom being pulled.
In this case, you will feel the normal trap dooreffect when you pull the drogue release handle,but the main won�t come out. Instead, you�ll
keep accelerating towards 170 mph.
A collapsed drogue in tow is potentially more
#4/3-118
E. Entanglement with drogue bridle:(#4/3-118)
PROBLEM: The drogue bridle becomes entangledwith the jumpers or their gear, and the drogue is fullyinflated.
REACTION: If you sus-pect that the droguebridle is entangled witheither person or the gear,do NOT pull the droguerelease handle. Instead,deploy the reserve bypulling the reserveripcord to full extension.
ANALYSIS: Velocitywill not exceed approxi-mately 120 mph, givingthe Tandem Instructoradditional time to ana-lyze and correct the prob-lem. The force of the in-flated drogue may or maynot clear the entangle-ment.
F. Non collapseddrogue:
PROBLEM: You pull thedrogue handle, butdrogue does not collapse.The main canopy willprobably open very hard.
REACTION: Ascertainwhether the main canopy has been damaged byopening shock. If it has, decide whether is it control-lable and safe to land.
ANALYSIS: If the drogue is still attached and
Rev 0

09351 - 5/30/2003 88:121
TANDEM VECTOR 2 OWNER’S MANUAL
dangerous than an inflated drogue in tow becausethe increased freefall velocity gives you less time topull your reserve ripcord and subjects your reservecanopy to a higher opening speed. With a collapseddrogue in tow, time is of the essence. At 170 mph(tandem terminal, no drogue) 1,000' goes by in onlyfour seconds instead of the six seconds it takes to fall1000' at 120 mph (normal terminal, inflated drogue).PULL THE RESERVE RIPCORD QUICKLY.
A collapsed drogue in tow can almost always beavoided by following the packing instructions cor-rectly.
Do not confuse this malfunction with a simpleuninflated drogue which can be remedied by simplypulling the drogue release handle.
Once the reserve is open and you�re heading to-wards the landing area, reach back and reel in thetrailing drogue if altitude permits. If the main canopyshould begin to deploy, release the main risers bypulling the breakaway handle.
H) Drogue does not release when first handlepulled:
PROBLEM: Primary drogue release handle ispulled, but drogue does not release. This malfunc-tion is usually due to improper assembly of thedoubled-ended white closing loop when attachingand setting the drogue during packing.
REACTION: Pull the secondary drogue releasehandle. If the main still does not deploy, pull thereserve ripcord.
ANALYSIS: This malfunction is usually due toimproper assembly of the doubled-ended whiteclosing loop when attaching and setting the drogueduring packing. This problem can be avoided byperforming a simple check of the cable/loop set-up.Look for �one cable, one loop,� �one cable, oneloop.�
I) Hard or impossible pull on one or bothdrogue release handles:
Chapter 4: Canopy Control
Malfunctions:
A. Drogue entanglement with mainB. Drogue detaches from mainC. Horseshoe malfunction, drogue cannot be pulledD. Horseshoe malfunction, drogue can be pulled
A. Drogue entanglement with the main:
PROBLEM: The drogue becomes entangled withthe inflated main canopy. This may or may not createa problem.
REACTION: Ask yourself two questions: 1) Can Icontrol the canopy? and 2) can we land safely with-out injury? If you answer �No� to either question,then perform a breakaway by 2500 feet (750 meters).
ANALYSIS: If your main canopy opens in verydeep brakes, or opens in a near-stall configuration,there is always the chance the deflated droguecanopy will be thrown forward of the canopy�s noseand fall into the suspension lines. This problemrarely calls for a breakaway because the deflateddrogue creates very little drag.
PROBLEM: The drogue had been deployed butthe drogue release handles cannot be pulled.
REACTION: Pull the reserve ripcord or pull theball handle on the RSL to activate the reserve.
ANALYSIS: This malfunction is due to improperrigging of the 3-Ring assembly on the drogue releaseriser. Assembly of the rings in a configuration otherthan their intended configuration may result in heavyloads placed on the loop and cable assemblies. Sucha load can pull the release cables into the grommetsof the release riser and create an impossible pull.
Rev 0

09351 - 5/30/2003 89:121
TANDEM VECTOR 2 OWNER’S MANUAL
B. Drogue detaches when release handle ispulled:
PROBLEM: Drogue canopy detaches when droguerelease handle is pulled. The main may or may notdeploy.
REACTION: If the main does not deploy, pull thereserve. The main will almost surely then be re-leased and may deploy fully. As soon as the reserveis fully open, cutaway the main.
ANALYSIS: This can happen when the inner whitetubular bridle on the drogue assembly breaks. Thisbreak will occur either at the top of the canopy or ata section of the tubular 6'-9' above the closing pin.These two spots have proven to be points of notice-able wear. (Refer to Drogue Inspection procedures,Section 2, middle, page 21).
C. Horseshoe malfunction, drogue cannot bepulled.
PROBLEM: The main bag, for whatever reason,has deployed before the drogue has been thrown.Bag and lines are out.
REACTION: Immediately throw the drogue andpull one of the drogue release handles. The mainmay or may not deploy normally. If not, proceedwith emergency procedures. Be aware of youraltitude.
ANALYSIS: Study tandem fatality #10. Alwaysoperate the handles in the proper order.
D. Horseshoe malfunction, drogue cannot bepulled
PROBLEM: The main bag has somehow beendeployed from the container prior to the droguebeing thrown. The drogue however, cannot bethrown for whatever reason.
REACTION: Release the RSL shackle and pull thebreakaway handle. You may have to give the mainrisers a tug to assist their release. Then pull thereserve ripcord.
ANALYSIS: Either the main container closing pinwas accidentally dislodged, or the main closing loopbroke. Care should be taken when moving aroundinside any aircraft to protect the handles and theclosing pins.
Closing loops should be checked every jump. If theircondition is suspect, then change them immediately.(Refer to fatality report #10).
NOTE: Do not pull the reserve prior to getting therisers released. The horseshoe malfunction cancause the risers to cross over the reserve containerinhibiting the launch of the reserve pilot chute. TheRSL must be released prior to breakaway otherwisethe right main riser may interfere with the reservedeployment.
Student feels sick under the canopy:
PROBLEM: One theory suggests that the reasonsome Tandem students get sick or pass out undercanopy is that blood circulation is cut off at the innerthighs and the shoulders by the harness.
REACTION: Loosen the chest strap to alleviatethe problem, and have the student sit back in theharness and slide both leg pads forward severalinches for comfort.
NOTE: Students who are very nervous or frail areusually those who will feel sick. Very slim frailpeople have very little insulation of any kind on theinside of the thigh to shield the arteries from thepressure of the harness. When you get a studentwho fits this description, consider being open at4,000' instead of 5,000'. The canopy ride is whatmakes students ill, so keep spirals to a minimum andmake all turns as gentle as possible.
Top hook positioning is crucial for maximum stu-dent comfort. The farther behind the shouldercenter line the hooks are placed, the less the frontmain lift web will be pressing against the student�schest. Refer to the section on student harnessadjustment.
Rev 0

09351 - 5/30/2003 90:121
TANDEM VECTOR 2 OWNER’S MANUAL
tice on the following three items:A. Student accessoriesB. Student harnessC. Sit back drill
A. Student accessories: retrieve and display thefollowing items prior to gearing up: altimeter (op-tional), jumpsuit, soft helmet, and goggles are a must.Select a tight suit. This will reduce extra drag fromyour student, aiding stability after exit. A soft helmetis recommended as it is less of a risk if the TandemInstructor were to strike the student�s head duringthe jump.
B. Student harness: Due to the complexity ofproperly adjusting the student harness, never allowthe student to adjust their harness entirely on theirown. They certainly may step into the harness andfasten the chest strap, but the remainder of theadjusting should be done by the Tandem Instructor.Explain the problem of the blood flow being reducedat the legs and the shoulders and the importance ofproper harness adjustment. It is practically impos-sible for the student to do a good job adjusting theharness on his own.
C. Sit back drill: After harness is on the student,have them lift one knee up to the waist, and usingboth hands, slide that leg strap forward 2-4 inches (5-10cm) . Repeat on the other side. There is almost nochance a student will be willing or able to do thisunder canopy unless they have practiced it first onthe ground.
Exit practice:To complete the Stu
Student skills for the first jumpProgression skillsOther activities
Chapter 1: Student skills for the first jump
The following briefing points will be presented inlogical order as they would happen on a jump. Thebriefing points listed here are the minimum points tobe briefed. You may chose to include a few extrapoints from the progression list to fulfill your tar-geted learning objectives for freefall transition.
Order of presentation:EquipmentExit practiceFreefallCanopy controlStudent task list
Equipment:Provide a briefing and/or prac-
Original Position Move forward2-4" (5-10cm)
#5/1-119
#5/1-119a
SECTION 5STUDENT TECHNIQUES
AND ACTIVITIES
Rev 0

09351 - 5/30/2003 91:121
TANDEM VECTOR 2 OWNER’S MANUAL
dent Briefing, go to the plane early, and practiceinflight procedures. The inflight briefing shouldinclude: climbing into the aircraft and seating posi-tion, what to do on the way to altitude, the hook-upprocedures and the climb out and launch from theairplane. To practice, get into the plane and runthrough the whole jump sequence once or twice,including an exit with the student�s harness attachedand tightened down to yourself. Review the bodyposition the student should assume for the exitlaunch and freefall.
Freefall:A. Droguefall positionsB. Arm extension
A. Droguefall position: Start by deciding onwhich exit position the student will use on the jump.Demonstrate and explain the proper body positionfor exit and freefall to your student. Every stable exitand drogue deployment begins on the ground withthorough training of the student in the proper bodyposition. Have the student lie down and practice thecorrect freefall position. Several minutes of practicehere will make all the difference on exit and freefall.Exit requirements from aircraft to aircraft may causea variance in the position but the basics remain thesame.
Here are two common freefall positions:
1) Arms crossed:head back, archedtorso, feet crossed,and arms crossed inthe front and hold-ing onto their ownharness.
2) Elbows back: head back,torso arched, feet together, andhands holding onto the sameside of harness, el-bows back. Thislast position is
recommended but remember to emphasizethe importance of keeping the arms IN on exitto reduce the likelihood of door contact.
With arms crossed, students sometimes sticktheir elbows straight down, causing rocking.This may also tend to inhibit the arch. On theother hand, if the student does not put their
A student position of crossed legs and arm extensionduring extended drogue fall provides stability
#5/1-120
#5/1-121
Rev 0

09351 - 5/30/2003 92:121
TANDEM VECTOR 2 OWNER’S MANUAL
the brakes with mention of the increasing windspeed as the canopy approaches full flight. TheTandem Instructor should use the student toggleposition to release the brakes. Have the student sliptheir hands into the toggle and grasp firmly. Advisethem to follow your commands and assist in controlmaneuvers.
B. Steering the canopy:
While the student is assisting in controlling thecanopy, have them perform and identify the follow-ing flight modes:
1) Full flight: Most students tend to pull on thetoggles all the time. They must be taught to con-sciously leave the hands all the way up for full flight.
2) Turns: Have the student look in direction of theintended turn, checking for other canopies, and thenpick out a ground heading to turn to. Practice turnsin both directions. The student should try both flatand spiral turns to recognize the difference in speedand descent of the canopy. Inform the student that nocountering is necessary to stop a turn, simply return
elbows back, they might block the exit, or beinjured while exiting out of certain small dooraircraft. In the final analysis, whether the studentcrosses the arms or not depends on the size of thestudent, your size, and the aircraft being jumped.
Remember that it is far easier to control a studentwhose arms are close to the body. If the student hitsa hard reverse arch, with arms and legs out, whileyou are on your back, it may be difficult or impos-sible to turn back over and get stable.
B. Arm extension:This is simply a regular RW box body position withthe arms out and comfortably bent. It should also bepracticed in the prone position including the signalyou intend to give for release and attaining thisposition. The signal will be a tap on the head, and/or a shout in the ear. NEVER reach around in frontof the student for any reason. Reaching around infront of the student could give him the chance tograb your arms. (see fatality reports).
At some point during the briefing, tell the studentnever to grab your arms at any timeduring the jump. To drive the pointhome, explain the importance of youhaving both arms free, and end by sayingthat you will both die if your arms arehindered.
Canopy control:A. Location of steering togglesB. Steering the canopyC. Flaring the canopyD. Landing approach
A. Location of steering toggles:
After opening have the student look upto the risers and visually locate the steer-ing toggles. Demonstrate the release of
Rev 0

09351 - 5/30/2003 93:121
TANDEM VECTOR 2 OWNER’S MANUAL
Point out the direction of the wind and the expectedlanding point.
Student task list(first jump):- Get into harness with assistance.- Perform climbout with Tandem Instructor attached.- Attain the droguefall position prior to exit.- Perform arm extension upon Tandem Instructor'scommand.- Grasp steering toggles upon command.- Perform turns, braking, full flight and perhapsflaring upon Instructors command.- Prepare for landing on Tandem Instructor's com-mand.
the toggle to the same level as the opposite oneand wait for the turn to settle.
3) Braking: Have the student pull down onboth toggles from full flight position. Studentshould listen and feel the change in wind speedand noise. Mention that the canopy will slowdown a lot and that is why braking is done onlanding. Explain to the student the difference inbraking and flaring the canopy for landing.Gradual braking slows the canopy but with anincrease in descent, while flaring slows thecanopy with an increase in lift.
C. Flaring the canopy: Practice performedat 4000' - 1500'.Have the student practice flaring the canopyupon your command. The student shouldfollow these steps in flaring;- Have both arm raised all the way up in the full flightposition.- Start flare immediately upon Tandem Instructor'scommand.- Flare symmetrically and fully in one smoothmotion.- Flare by depressing the toggles to full arm exten-sion.- Hold flare position until landing or commandedotherwise.
This flare drill should be practiced 3-4 times toenable the student to get a good feel for it. Youshould inform the student to remain relaxed, yetready to respond to the flare commands you will begiving upon the landing approach. Let the studentknow that the approach speed may seem quick andreassure them that the canopy will slow down whenflared.
D. Landing approach:Discuss canopy approach to the landing area, pointout the pattern or flight path you intend to take andat what altitude you plan to be at each turning point.
Any cameraman accompanying a Tandem pair mustmeet all the qualifications for Relative Work, plus
have at least 100 camera jumps
Rev 0

09351 - 5/30/2003 94:121
TANDEM VECTOR 2 OWNER’S MANUAL
Chapter 2: Progression
Progression guidelines are set out by the variousNational Aero Clubs of each country and should befollowed. There are some useful opportunities inwhich skills can be developed. It should be known,however, that Tandem jumps and training do notfully replace the content and training of either theFirst Jump or Accelerated Freefall ground school.The Relative Workshop recommends that at leastone Tandem jump be done and that as many as 3Tandem jumps could be of benefit towards first jumpand freefall training. Skills which can be presentedand trained with Tandem will be listed under thefollowing headings:
PreparationIn-aircraftFreefallCanopy controlUnusual situations
Preparation (Instructor supervised)A. Put on and adjust own harnessB. Put on and set own altimeter
A. Put on and adjust own harness:After one Tandem jump the student should put onand adjust his own harness. The steps in doing thisare:- Straighten the harness out by holding the topshoulder snaps, then straightening any twists in themain lift webs or leg straps.- Loosen the leg straps if not already done.- Insert telescopic leg pads.- Slip legs into the harness.- Slip harness over the shoulders.- Loosen main lift webs if harness is too short.- Tighten the main lift webs until the snaps arelocated just low of center on the back of the shoul-der and the lift web - leg strap junction is at the hipjoint.- Tighten the leg straps.- Do up the chest strap tightening to the point ofpulling the main lift webs in line with the shoulders.- Tuck in all loose ends.
B. Put on and set own altimeterOn your second jump the student should start to usean altimeter if not already doing so.- Have the student slip the altimeter onto the cheststrap or wrist and secure strap.- Have student zero the altimeter prior to boardingthe aircraft.- Inform student of the limitations of the instrumentsuch as lagging when in a burble, etc....
In-aircraftA. Assist spottingB. Spotting
A. Assist spottingStarting with jump number two get the studentinvolved with spotting. Have your student followthese simple steps:- Have the student assist by getting their head out andlooking straight down out of the aircraft. Have thestudent take a horizon reference to judge how todetermine straight down. Also have your student tryto judge where the aircraft is headed. To allow timefor this exercise inform the pilot that you would likea longer jumprun.- On jump three, have your student line up theaircraft as well as give an OK for the exit whenovertop. You will assist them in giving confirmationof corrections and decisions to exit. Spotter - pilotsignals should be introduced for this jump so yourstudent can apply them. Introduce the signal for rightand left heading corrections, straight ahead or holdheading, and the signal and command for cutting theengine and locking the wheel brake.
B. Spotting:- On jump number three, have your student spot ontheir own giving correction signals directly to thepilot. You should intervene only if the student's spotis taking you outside of the spotting envelope.
FreefallA. Perform and improve main activation techniqueB. Monitor altitude with altimeterC. Transition requirements for freefall training
Rev 0

09351 - 5/30/2003 95:121
TANDEM VECTOR 2 OWNER’S MANUAL
A. Perform and improve main activation tech-nique
Training pulls:Training pulls can be introduced on the secondjump. Practice on the ground with a real dummyripcord so that the student will know exactly howthe handle will feel in the palm of his or her hand, andwhat it will feel like to pull. Use 10-12 repetitions atleast in order to eliminate confusion in handle loca-tion and pull technique during in air practice and pulltime. Teach the training pulls with this sequence:- Visually identify the handle by looking down side.- Reach for handle with right hand while counteringwith left arm out in front.- Positively grasp the handle.- pull the handle whilesimultaneously and sym-metrically returning to thearm extension position.- Relax a moment thenrepeat.
The student must be givena specific altitude at whichto pull. There should alsobe a signal from the Tan-dem Instructor to the stu-dent when it is time topull. The Tandem Instruc-tor can either tap the stu-dent on the head, and/oryell into their ear �pull,pull, pull�.
When the student hasaccess to the secondarydrogue release handle, itis important that the Tan-dem Instructor set rigidparameters for altitude.A student is likely togrope for the handle onthe first try, and may takesome time before pulling,or may never find it.
Training pulls can be introduced on thesecond jump. Use 10-12 practice
repetitions.
Give the signal to the student early, so that they mayhave some time to fumble. As soon as the �pull�signal is given to the student, the Tandem Instructorshould put his hand back on the drogue releasehandle and look at his altimeter. At the set altitude(between 4,000' - 5,000'), the Tandem Instructorshould pull the drogue release handle.
B. Monitor altitude with altimeterAltimeter operation:The use of the altimeter can begin on the first orsecond jump. Whether the altimeter is mounted onthe student�s wrist or chest strap, specifically runthrough the motions he or she must go through tolook at it. Discuss when the student should look thealtimeter, whether on a signal from the Tandem
Instructor, or on their own cue.Since to keep chest mount altim-eters visible would require an over-tight chest strap.
During the flight up note how al-timeter indicates altitude as youascend. Have the student periodi-cally check and read the altimeteron the way up. This will get thestudent comfortable with theworkings of the altimeter.
C. Transition requirementsfor freefall training:Regardless of the accumulatedfreefall experience, brief the stu-dent thoroughly on the pull tech-nique, freefall count, solo sensa-tions as well as all possible freefallemergency scenario�s. Rules suchas �Never sacrifice altitude for sta-bility�, �When in doubt, get it out�,and Try two times only, then gofor the reserve�, should all beemphasized. It�s better to takenothing for granted on the transi-tion to �solo� freefall.
Rev 0

09351 - 5/30/2003 96:121
TANDEM VECTOR 2 OWNER’S MANUAL
Solo: must complete a first jump (s/l) course prior toexiting the aircraft unassisted.AFF: must enter the program no later than Level 3utilizing two instructors. The Relative Workshoprecommends that at least one Tandem jump be madeprior to participating in the AFF program and that asmany as three Tandem jumps could be of benefit.
Canopy controlA. Perform canopy inspectionB. Perform turns and spiralsC. Perform stalls and recoveryD. Identify running, holding, crabbing, and windlineE. Assess wind directions and strengthF. Fly a pattern to set up for a landing approachG. Picking up gear
A. Perform canopy inspection:Canopy inspection can be introduced at the sametime as the training pulls or actual pull. The keypoints of inspection should be discussed on theground with the aid ofactual canopies inflight or the use of pic-tures and diagrams.The key points are:rectangular shape,straight orderly lines,and slider. An expla-nation of line twists,collapsed end cells,and slider up situationsand solutions shouldalso be discussed.Once the inspectionhas been completedin the air, the student should follow it up with acanopy flight check. The flight check should consistof flaring once followed by a turn in either direction.The check is simply answering the following ques-tions; �Can I flare the canopy?�, and �Can I turn thecanopy?�. Your student should verbally explain toyou what they are checking as they do it.
B. Perform turns and spirals:
Turning the canopy begins with the first jump andevery jump after. Spiraling the canopy might besomething that is left till the second jump when youknow how your student will react. Have the studentinitiate the spiral by starting with a slow turn from afull flight position then depressing the toggle to fullarms length making a spiral turn.
C. Perform stalls and recovery:This in-air task is a second or third jump drill. It isvery important if the student is assisting or actuallylanding the canopy. Begin by explaining the conceptof a stall to the student prior to the jump. Once in theair have the student gently pull the toggles all theway down, letting the canopy stall for several sec-onds. Gently let the toggles up so the canopy recov-ers slowly. Explain to the student the danger ofstalling the canopy upon landing approach. This isa good time for the student to practice their stallrecovery techniques for landing. The student shouldrecognize the feeling of the canopy entering a stalland return the toggles up no more than several
inches for a recovery withminimal surge.
D. Identify running, hold-ing, crabbing, and thewind line:On the second and thirdjumps, include explanationson the ground and during thecanopy�s flight on running,holding, crabbing and thewind line. Once undercanopy, turn down wind andexplain running. Ask studentwhere he thinks you will land
if you keep heading in this direction. Turn upwindand define holding. Ask the student for the probablelanding area in present direction. Turn 90 degrees tothe wind and define crabbing. Ask student for prob-able landing area if you keep heading in this direc-tion. When flying the base leg have the student tellyou where to turn onto the wind line for finalapproach.
"Identify crabbing, holding and the wind line"
Rev 0

09351 - 5/30/2003 97:121
TANDEM VECTOR 2 OWNER’S MANUAL
stressful time for a student and this drill should giveyou a good idea of how the student would handle areal emergency. Keep in mind while attempting toclear a malfunction (hard pull or no pull) that theyonly try twice then must go for the reserve ripcord.
Chapter 3: Other activities
Relative work procedures
Participants qualificationsRW Tandem briefingBriefing review
These guidelines are not optional. They must befollowed, or the Tandem Instructor and Tandem rigowner will be in violation of the User Agreementunder which Tandem jumping is operated and willconsequently no longer be allowed to legally per-form Tandem Tumps.
A. Participants qualificationsFor any relative worker to accompany a Tandempair, the following criteria must be met:
1) Relative worker must have a minimum of 500relative work skydives; or
2) Relative worker must be either a current TandemInstructor or a current AFF jumpmaster.
3) Relative worker must have made at least 100relative work jumps in the last year.
4) Cameramen must meet all the above guidelines,and in addition, must have at least 100 camera jumps.
E. Assess upper and ground wind directionsand strength:On the second and third jumps, point out ways to tellwind direction: how to read the wind sock, thelocation of flags, and the use of smoke, waves onwater, cloud shadows etc... Under canopy have yourstudent apply the information from these indicatorsto judge upper and ground wind directions. Com-bine this information with the use of crabbing in abraked configuration to assess wind speed to helpdecide how far back to turn onto the wind line forfinal.
F. Fly a pattern to set up for a landing approach:On the third jump, explain and have the student flya pattern to the landing area while performing upperdrift assessments and ground wind assessments.Allow the student to decide how far back to turnonto the wind line for final.
G. Picking up gear:After landing and student harness disconnectionhave the student pay attention to how the canopyshould be picked up and carried back, not draggingany part of the system.
Unusual situations:A. Respond to malfunction scenarios after opening
A. Respond to malfunction scenarios afteropening:Include this drill on the second and third jumps forrealistic assessment and reaction to malfunctionsituations. Prior to having the student perform thisdrill in the air they should receive a thorough groundbriefing on how to assess a malfunction situation anddecide the correct follow-up action. Have thestudent perform ground drills and test their decisionmaking ability prior to jumping. Remember, this maybe the only emergency training they will receive forthe rest of their skydiving career. If your studentharness is equipped with dummy cutaway and re-serve handles (they should match your student gear),you may wish to train your student to pull thecutaway followed by the reserve handle immedi-ately after opening and checking the canopy. Thetransition from drogue fall to canopy opening is a
Rev 0

09351 - 5/30/2003 98:121
TANDEM VECTOR 2 OWNER’S MANUAL
REMEMBER: If you delay drogue deployment, youeat up altitude at a much faster rate than when thedrogue is deployed. See Tandem freefall chart onpage 72.
Relative work with Tandem increases the possibilityof accident and injury. However, it can be done ifapproached with care. On every Tandem jump, theTandem Instructor is in charge. If Relative Work isbeing contemplated, the Tandem Instructor shouldhave personal knowledge of the relative worker andshould feel confident in their abilities.
WARNING:If the right hand drogue release handleis installed and is accessible to the stu-dent, then ALL RW IS POSITIVELYPROHIBITED. Here is what can happen: asolo jumper docks on a Tandem pair. Thestudent then pulls the right hand drogue re-lease handle prematurely. The Tandem pairdrops sharply and the solo jumper is pulleddown on top of them. As the canopy deploys,the Tandem pair is then hoisted up veryquickly and knocks the solo jumper uncon-scious. There is also the obvious danger ofthe student pulling at any time during thejump. Anyone overhead would be in serioustrouble. For this reason, any photographeraccompanying a Tandem pair with this handlemust plan the exit and dive so that he isNEVER above them.
CRW proceduresCRW IS POSITIVELY BANNED ON ALLTANDEM JUMPS UNDER ANY AND ALLCIRCUMSTANCES (see fatality section). Thisguideline is not optional. It must be followed or theTandem Instructor and Tandem rig owner will be inviolation of the User Agreement under which Tan-dem jumping is operated and will consequently nolonger be allowed to legally perform tandem jumps.
B. RW Tandem briefingIf the Tandem Instructor does decide to take arelative worker on a jump, a briefing must take placebefore the jump between Tandem Instructor andrelative worker which covers these points:
1) No one should ever pass directly over or underthe Tandem pair in freefall. On exit, the TandemInstructor needs room to deploy the drogue, and atany time after that, the drogue could suddenly be-come a deploying main canopy.
2) Once under the drogue, the Tandem pair has verylittle ability to change drogue fall velocity or to movehorizontally (track). This means they can�t get out ofthe way of someone who is closing too fast or ofsomeone sliding under them. Therefore, NEVER letanyone who is not a skilled relative worker accom-pany a Tandem pair on a dive (see fatality reportsection).
2B) If the grips are taken, take them on the passen-ger, not the Tandem Instructor.
3) Because the Tandem pair cannot track veryeffectively, they must obtain opening separation byopening higher than everyone else. Accompanyingrelative workers must not attempt to open theirmain canopies with the Tandem pair. A minimum of1000' vertical separation is required - to avoid colli-sion situations.
C. Briefing reviewTo review: when you dirt dive Tandem droguerelative work, tell the participants four things.
1) Give me room to deploy the drogue in the firstfive seconds after exit.
2) NEVER pass directly over or under us.
2B) Grip the passenger, NOT the Tandem Instruc-tor.
3) Approach slowly and dock gently.
4) Let me pull first at 4,000' or above, and give us atleast 1000' vertical separation.
Rev 0

09351 - 5/30/2003 99:121
TANDEM VECTOR 2 OWNER’S MANUAL
APPENDICESTandem Vector ReserveHandle Modification ............................ 98
Drogue Bridle "Stop Tab"Modification ........................................... 100
Tandem Water LandingProcedures ............................................. 102
Tandem Fatality Reports ..................... 103
Tandem Canopy LineTrim Lengths .......................................... 105
Tandem Modificationto Speed up Openings .......................... 108
Tandem Vector Test ............................ 109
3-Ring System ........................................ 111
3-Ring Assembly .................................... 112
3-Ring pre-Jump Inspection ................ 114
3-Ring Maintenance .............................. 115
Rev 0

09351 - 5/30/2003 100:121
TANDEM VECTOR 2 OWNER’S MANUAL
Illustration #1
Illustration #2 shows the handle from onend. Sew twice through the tackingpoints with the entry and exit points onthe back of the handle.
TANDEM VECTOR RESERVE HANDLE MODIFICATION
Tacking Points
Illustration #2
Some Tandem Vector owners havesuggested that they would prefer the softreserve handle to �stick out� from themain lift web at a sharper angle than itdoes now. For those who would preferthe handle to have a more pronouncedangle, these directions explain what to do.You will need waxed tacking cord and aneedle. You need not remove the handlecompletely from the rig to perform thismodification.
Lay the handle on a table so that the cableis on the right. Make two marks about aninch apart from each other in the centerof the handle and about 1/4" from theedge of the velcro. The other tackingentry point will be just inside the edge ofthe velcro as shown in illustration #1.
Tacking Points
Rev 0

09351 - 5/30/2003 101:121
TANDEM VECTOR 2 OWNER’S MANUAL
Secure the ends of the tacking cord witha surgeon�s knot. Repeat the processthrough the other tacking marks and tie.When you�re done, your handle shouldlook like illustration #4, with two secureknots on the back of the handle. Whenreattached to your rig, the handle willstand out from the harness.
When you tighten the tacking cords, you�llforce the handle to an angle as shown inillustration #3.
Illustration #4
Illustration #3
Rev 0

09351 - 5/30/2003 102:121
TANDEM VECTOR 2 OWNER’S MANUAL
kevlar. This will becalled your "SET"mark
3) One idea of thismodification is to give alittle extra slack in thewhite tubular betweenthe main pin and theyellow kevlar bridle. Toachieve this, make a NEWmark on the white tubular3" TOWARDS the drogueas shown in illustration#3. This is where thenew stop tab will besewn.
Illustration #3
SET MARK
NEW MARK
3"
DROGUE
CONTAINER
MARK WHITETUBULAR AT
EDGE OFYELLOWKEVLARBRIDLE
Illustration #2
WHITE TUBULAR
as shown in illustration#1
2) When drogue is set,mark the white tubularwith an indelible penright where it comesout of the yellow
Recently we�ve seen videos showing Tandem main containers open in drogue fall. This seems to be a resultof the white tubular bridle whipping back and forth inside the inflated drogue. Occasionally, this motion takesup all the slack between the bottom of the drogue bridle and the main pin - and every so often the main pinis pulled out of its loop as a result. In a great majority of cases, this causes no problem; the main stays in placeand deploys normally when the drogue release handle is pulled. In fact, the Tandem Master feels nothing.Apparently the secure attachment of the drogue bridle prevents the bag from falling out of the container.
This whole scenario occurs very rarely. However, rare as it is, it COULD have serious consequences. Manyoptions were researched, with the �stop tab� offering the best solution. It seems to eliminate the oldproblem without causing any new ones. We�d still like your input. Keep your eyes and video on itfor awhile and report any problems to the Relative Workshop.
1) The drogue bridle has two components: a yellow kevlar outer bridle, and awhite tubular inner piece. The white tubular should have a blue mark onit showing where it comes out of the yellow kevlar outerbridle. If your system does not have this mark onthe white tubular, begin by attachingand �setting� drogue toits full extension
Relative Workshop Tandem VectorDrogue Bridle "Stop Tab" Modification
Illustration #1
Rev 0

09351 - 5/30/2003 103:121
TANDEM VECTOR 2 OWNER’S MANUAL
7 51 37 51 3
2 8 4 6 2 8 4 6
9
Illustration #4
4) Fold the enclosed 7" piece of whitesquare weave in half, then fold theedges in towards the center as shown
four-point pattern as shownin illustration #5.
NOTE: The four point pat-tern must be sewn the longway on the stop tab. Followthe pattern shown here.
SETMARK
NEWMARK
Illustration #5
NOTE: After installation, itis important that the drogueis set carefully so that thenew stop tab is not dam-aged. Don�t pull so hard onthe orange handle that thetab is pulled up inside theyellow kevlar bridle or isdamaged. This stop tab waschosen in part because it willprobably never get in theway of the 3-Ring droguerelease. If treated carefully,the new stop tab should lastas long as the bridle.
Relative Workshop1645 Lexington Ave o DeLand, FL 32724 o (904) 736-7589 o FAX: (904) 734-7537
in illustration #4.
5) Center the new stop tab onthe bridle and secure with a
Rev 0

09351 - 5/30/2003 104:121
TANDEM VECTOR 2 OWNER’S MANUAL
Tandem Water Landing ProceduresA water landing is not a likely scenario for a Tandemjump, but it is a possibility. Below is a list of proce-dures to follow for a Tandem water landing. Since itis best to be prepared for every eventuality, practicethe sequence on the ground a few times to get used tothe order of events.
On any skydive (whether Tandem or sport) made inthe vicinity of water, water gear must be worn. If aTandem jump is made near water, BOTH the Instruc-tor and the student must wear approved water gear.
1) Release Reserve Static Line (RSL).
2) Disconnect student side attachment points.
3) Remove pins out of top student attachmentpoints.
4) Have student inflate LPU water gear.
5) Tandem Instructor undoes chest strap.
6) Flare and land into the wind.
7) If there is a great deal of wind, release main.
8) Release student top snaps.
9) Push student away.
10) Tandem Instructor swims out of harness.
11) Tandem Instructor inflates LPU water gear.
Rev 0

09351 - 5/30/2003 105:121
TANDEM VECTOR 2 OWNER’S MANUAL
#1 - Current Tandem Instructor2,400 jumps total - 70 tandem jumps.Exit Cessna 182, 6,000'. Tandem Instructor forgot tohook up right upper snap, and spent entire freefalltrying to hook it up (his hands were on it at impact).Drogue was in pouch. Drogue release ripcord was inpocket as well as reserve ripcord.
#2 - Current Tandem Instructor1349 jumps total - 62 tandem jumps.Second Tandem of day for Tandem Instructor. Pairexited Cessna 182 at 8,500'. Normal opening at4,000'. After opening, Tandem Instructor releasedboth side connectors; released reserve static line(stevens system) and pulled out both upper snapsafety pins. Then did CRW and had wrap at 3,000'.Other solo jumper cutaway - reserve OK. Tandemcutaway at 2,000'. Passenger and Tandem Masterseparated at lower connector points almost immedi-ately and went violently unstable until impact. Forfirst part of fall after cutaway, Tandem Master wasattempting to grapple with passenger to gain control.During latter part of fall, Tandem Master stopped allactivity as if trying to fall stable. No attempt to openreserve was observed.
#3 - Current Tandem Instructor2000 jumps total - 70 Tandem jumps.Pair exited Cessna 182 at 8,300'. Exit was stable anddrogue was deployed. Solo jumper with 200 jumpsfollowed Tandem pair and tracked into them about 10seconds into the dive. Tandem Instructor and possi-bly the student were knocked unconscious. TandemInstructor regained consciousness and pulled reserveat 200'. Reserve was pulling the pair upright onimpact.
#4 - Current Tandem Instructor1000 jumps total - 65 Tandem jumps.Tandem Instructor had made one tandem jump theday before the accident, and one other on the day ofthe accident. Pair exited at 9,000'. Drogue wasdeployed. Drogue release handle was pulled at4,000'. Packing error prevented the drogue frompulling pin and opening main container. Breakawayhandle was pulled, wasting valuable time. Reservehandle was pulled one second before impact. 16-19seconds had elapsed between drogue collapse (initialpulling of drogue release handle) and impact.
TANDEM FATALITY REPORTS#5 - Non current Tandem Instructor3750 jumps total - 10 tandem jumps.(Last Tandem jump made one year before). Passengerhad 2050 jumps. Tandem rig was received morning offatality. Tandem Master realized he was required tomake one solo jump followed by one jump with anexperienced jumper as passenger to get recurrent.Jumper elected not to make solo jump because of highwind. Pair exited Twin Otter at 12,500', and TandemInstructor deployed drogue. Other RW jumpersaccompanying pair broke off at 5,000. At 4,000',Tandem Master reached in with RIGHT hand torelease drogue (drogue release is on the LEFT side).Groped for 10 seconds, pulled breakaway handle andtransferred to left hand. Returned to groping withright hand. Photographer opened at 1000'. Reservewas pulled below 100' by either Tandem Master orpassenger.
#6 - Current Tandem Instructor1800 jumps total - 650 Tandem jumps.Pair exited Cessna 206 at 8,500'. Normal drogue fallto 4,000'. Tandem Instructor probably followed habitof showing the passenger his wrist mounted altimeterat 4,000'. Passenger apparently grabbed TandemMaster�s arms. Tandem Master got free and pulledreserve at treetop level. Drogue release handle wasstill in pocket.
#7 - Current Tandem Instructor1400 jumps total - 50+ Tandem jumps.Pair exited Cessna 206 at 10,500' Pilot saw droguedeployment. No one observed rest of jump. Prob-able scenario is that Tandem Master could not locatedrogue release handle. He pulled the reserve ripcordand his reserve pilot chute entangled with the trailingdrogue. He then located the drogue release handleand pulled it - and then pulled the breakaway handle.The drogue inner tubular bridle was halfhitched aroundthe reserve bag, preventing it from opening.
#8 - Current Tandem Instructor560 jumps - 34 Tandem jumps.Aircraft and exit altitudes unknown. Equipment checkwas performed on ground and in aircraft prior to exitby Tandem Instructor. Exit, drogue deployment andmain canopy deployment were normal. Main canopyopened at approximately 3500'. Shortly after open-ing, the main canopy started a slow turn, then beganto turn more rapidly. Breakaway from main canopyoccurred at about 1000' - 1200' with no
Rev 0
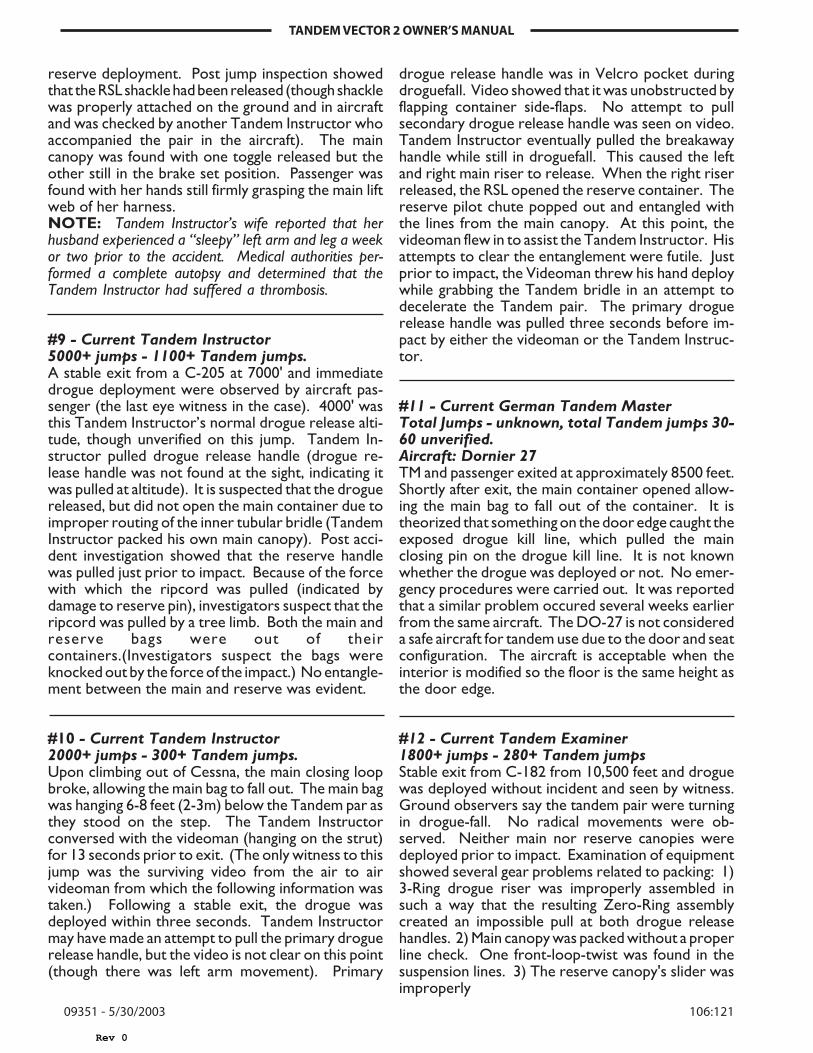
09351 - 5/30/2003 106:121
TANDEM VECTOR 2 OWNER’S MANUAL
drogue release handle was in Velcro pocket duringdroguefall. Video showed that it was unobstructed byflapping container side-flaps. No attempt to pullsecondary drogue release handle was seen on video.Tandem Instructor eventually pulled the breakawayhandle while still in droguefall. This caused the leftand right main riser to release. When the right riserreleased, the RSL opened the reserve container. Thereserve pilot chute popped out and entangled withthe lines from the main canopy. At this point, thevideoman flew in to assist the Tandem Instructor. Hisattempts to clear the entanglement were futile. Justprior to impact, the Videoman threw his hand deploywhile grabbing the Tandem bridle in an attempt todecelerate the Tandem pair. The primary droguerelease handle was pulled three seconds before im-pact by either the videoman or the Tandem Instruc-tor.
#11 - Current German Tandem MasterTotal Jumps - unknown, total Tandem jumps 30-60 unverified.Aircraft: Dornier 27TM and passenger exited at approximately 8500 feet.Shortly after exit, the main container opened allow-ing the main bag to fall out of the container. It istheorized that something on the door edge caught theexposed drogue kill line, which pulled the mainclosing pin on the drogue kill line. It is not knownwhether the drogue was deployed or not. No emer-gency procedures were carried out. It was reportedthat a similar problem occured several weeks earlierfrom the same aircraft. The DO-27 is not considereda safe aircraft for tandem use due to the door and seatconfiguration. The aircraft is acceptable when theinterior is modified so the floor is the same height asthe door edge.
#12 - Current Tandem Examiner1800+ jumps - 280+ Tandem jumpsStable exit from C-182 from 10,500 feet and droguewas deployed without incident and seen by witness.Ground observers say the tandem pair were turningin drogue-fall. No radical movements were ob-served. Neither main nor reserve canopies weredeployed prior to impact. Examination of equipmentshowed several gear problems related to packing: 1)3-Ring drogue riser was improperly assembled insuch a way that the resulting Zero-Ring assemblycreated an impossible pull at both drogue releasehandles. 2) Main canopy was packed without a properline check. One front-loop-twist was found in thesuspension lines. 3) The reserve canopy's slider wasimproperly
reserve deployment. Post jump inspection showedthat the RSL shackle had been released (though shacklewas properly attached on the ground and in aircraftand was checked by another Tandem Instructor whoaccompanied the pair in the aircraft). The maincanopy was found with one toggle released but theother still in the brake set position. Passenger wasfound with her hands still firmly grasping the main liftweb of her harness.NOTE: Tandem Instructor�s wife reported that herhusband experienced a �sleepy� left arm and leg a weekor two prior to the accident. Medical authorities per-formed a complete autopsy and determined that theTandem Instructor had suffered a thrombosis.
#9 - Current Tandem Instructor5000+ jumps - 1100+ Tandem jumps.A stable exit from a C-205 at 7000' and immediatedrogue deployment were observed by aircraft pas-senger (the last eye witness in the case). 4000' wasthis Tandem Instructor�s normal drogue release alti-tude, though unverified on this jump. Tandem In-structor pulled drogue release handle (drogue re-lease handle was not found at the sight, indicating itwas pulled at altitude). It is suspected that the droguereleased, but did not open the main container due toimproper routing of the inner tubular bridle (TandemInstructor packed his own main canopy). Post acci-dent investigation showed that the reserve handlewas pulled just prior to impact. Because of the forcewith which the ripcord was pulled (indicated bydamage to reserve pin), investigators suspect that theripcord was pulled by a tree limb. Both the main andreserve bags were out of theircontainers.(Investigators suspect the bags wereknocked out by the force of the impact.) No entangle-ment between the main and reserve was evident.
#10 - Current Tandem Instructor2000+ jumps - 300+ Tandem jumps.Upon climbing out of Cessna, the main closing loopbroke, allowing the main bag to fall out. The main bagwas hanging 6-8 feet (2-3m) below the Tandem par asthey stood on the step. The Tandem Instructorconversed with the videoman (hanging on the strut)for 13 seconds prior to exit. (The only witness to thisjump was the surviving video from the air to airvideoman from which the following information wastaken.) Following a stable exit, the drogue wasdeployed within three seconds. Tandem Instructormay have made an attempt to pull the primary droguerelease handle, but the video is not clear on this point(though there was left arm movement). Primary
Rev 0

09351 - 5/30/2003 107:121
TANDEM VECTOR 2 OWNER’S MANUAL
witness account of this jump. Investigators found thereserve pilot chute and bridle entangled in the main;the main was still connected to the harness at theDrogue attachment point. The risers had been re-leased and the reserve ripcord pulled. The baggedreserve was still in the pack tray. No evidence wasfound that an attempt was made to release the Drogue.The system was equipped with two drogue releasehandles. The right-hand Drogue release was attachedto the student�s main lift webbing. Neither handleappeared to have been pulled, and both were easilypulled on the ground.
#15 - Currency unknown (not rated by RelativeWorkshop)Used a non-standard Drogue release handle. Thecable�s outer sheathing cracked and jammed theDrogue release. No reserve pull.
#16 - Currency unknown ( not rated by RelativeWorkshop)Exit with videoman at 8200'. Threw Drogue in stableposition. Preformed a practice pull on drogue releasehandle. Appeared not to find the handle and got verynervous. (Video clearly shows the handle was in thecorrect location). Frantic arm movements began andhe pulled main bridle with right hand and opened themain container; main bag came out. He then pulledcutaway handle and manually pulled both main risersoff the rings. Then pulled the reserve ripcord. Re-serve pilot chute and freebag entangled with main.Drogue release handle was found still in its place andcould be easily removed during post-accident investi-gation.
stowed on the stabilizer "B" line, instead of the center"B" line. Only the right-hand drogue release handeshowed any signs of being pulled. All other handleswere found in their pockets. The Tandem Instructordid not pack his own system and the DZ had no wayof knowing who packed it. It is clear the TI did anincomplete gear check and failed to carry out knownemergency procedures. The autopsy was unable todetermine if a heart attack or stroke were contribu-tory.
#13 - Current Tandem master1650 Jumps - 265 Tandem JumpsExited Cessna 10,200'. The Tandem Instructor jumpmastered two students on the way up to altitude. TheTandem pair performed a dive exit and immediatelywent out of view from the pilot. No other witnesseswere present. Post accident investigation showed:The Drogue was deployed, left hand Drogue releasehad been pulled, cutaway had been pulled, reserveripcord still in its pocket, RSL shackle was broken, leftside connector undone and damaged, right side con-nector was extremely loose. The main canopy hadnot deployed, container was open and the bag wasfound intact and several line stows had come undone.Only one post-accident ground witness (older, expe-rienced jumper) was there at the scene prior toemergency personal. He stated that, �the KevlarDrogue bridle was wrapped around the leg/foot ofthe student when I first arrived there. I saw one of theEMT personal grab the Drogue chute and pull thebridle off the leg of the student�. The Kevlar bridlewas carefully inspected. Traces of hair and skin werefound six feet down from the Drogue canopy. Foren-sic investigators confirmed this finding. It is highlybelieved that a Drogue bridle entanglement causedthis accident as the container was opened but thecanopy did not deploy when the Drogue release waspulled. Whether the left side connector was hookedup in the A/C will never be known. The student was6�5" tall, weighing 225 pounds. Tandem instructorwas 6' weighing 190 pounds.
#14 - Current Tandem MasterTotal number of jumps unknown (estimatedat 500-700) - 15 Tandem JumpsAircraft: Cessna. While on the step of the Cessna, theTandem instructor noticed the main container wasopen. He attempted to climb back into the A/C, butwhen he turned, the bagged main fell out of thecontainer. He then exited quickly and cleanly de-ployed the Drogue. The pilot saw the first fewseconds of the jump and that was the extent of an eye-
Rev 0

09351 - 5/30/2003 108:121
TANDEM VECTOR 2 OWNER’S MANUAL
PD-360 Line Trim (Cascaded)
Total length A 180" (+-1")A>B 2 1/2" (+-1/2")A>C 12" (+-1")A>D 22" (+-1")A>tail, outboard brakes set (Primary) 9" (1,3,5) (+-1 1/2")A>tail, inboard brakes set (Secondary) 9 3/4" (7) (+-1 1/2")Brake to toggle, inboard & outboard 23"
PD-360 Line Trim (Reserve)
Total length A 182 3/4" (+-1")A>B 4" (+-1/2")A>C 11" (+-1")A>D 20 5/8" (+-1")A>tail, brakes set 4 1/2" (+-1 1/2")Brake to toggle 28"
421 Line Trim(labeled VTC IIIA after 10/22/91, built with 3/8" (9.5mm) guage bottom seams,
and 1/2" support tape on the nose.
Total length A 206 7/8" (+-1")A>B 2" (+-1/2")A>C 10" (+-1")A>D 27" (+-1")A>tail, outboard brakes set (Primary) 14 1/8" (1,3,5) (+-1 1/2")A>tail, inboard brakes set (Secondary) 13 1/8" (7) (+-1 1/2")Brake to toggle, inboard & outboard 19 3/4"
Tandem Canopy Line Trim
Rev 0

09351 - 5/30/2003 109:121
TANDEM VECTOR 2 OWNER’S MANUAL
PD-421 Line Trim(Labeled VTC III from 5/31/91 and 10/22/91, special trims used on canopies with 1/4" (6.35mm)
guage bottom seams and 3/4" support tape on the nose,exhibiting end-cell tuck.)
Total length A 209" (+-1")A>B -1/8" (+-1/2")A>C 7 7/8" (+-1")A>D 24 7/8" (+-1")A>tail, outboard brakes set (Primary) 12 1/4" (1,3,5) (+-1 1/2")A>tail, inboard brakes set (Secondary) 12 1/8" (7) (+-1 1/2")Brake to toggle, inboard & outboard 19 3/4"
PD-421 Line Trim (Reserve)
Total length A 206 7/8" (+-1")A>B 2" (+-1/2")A>C 10" (+-1")A>D 27" (+-1")A>tail, outboard brakes set (Primary) 14 1/4" (1,3,5,7) (+-1 1/2")Brake to toggle, inboard & outboard 19 3/4"
PD-500 Line Trim
Total length A (center 6 line groups) 222" (+-4")A>B (") 2 1/4" (+-1")A>C (") 10 3/4" (+-1")A>D (") 28 1/4" (+-1")A>tail, outboard brake set (Primary) 17" (1,3,5,6) (+-1 1/2")A>tail, inboard brake set (Secondary) 16" (8) (+-1 1/2")Brake to toggle, inboard & outboard 19" 3/4"
NOTE: The center 6 line groups are shorter than the outer line groupsbecause the wing span of the canopy is so great.
CONTINUED ON NEXT PAGE
Rev 0

09351 - 5/30/2003 110:121
TANDEM VECTOR 2 OWNER’S MANUAL
PD-500 ContinuedA center > A Outers +2 1/2" C center > C Outers + 1/2"B center > B Outers +1 1/2" D center > D Outers - 1/2"
Please compare your canopy with these specifications. Notice that the overall A line length of 222" couldbe as short as 218" or as long as 226" Adjust the trim of your PD-500 accordingly
PD-500 Line Trim (change as of 05/31/91)
Total length A (center 6 line groups) 222 3/8" (+-1")A>B (") -1/8" (+-1/2")A>C (") 10 3/4" (+-1")A>D (") 28 7/8" (+-1")A>tail, outboard brake set (Primary) 17 1/2" (1,3,5,6) (+-1 1/2")A>tail, inboard brake set (Secondary) 16 1/2" (8) (+-1 1/2")Brake to toggle, inboard & outboard 19 3/4"
NOTE: The center 6 line groups are shorter than the outer line groupsbecause the wing span of the canopy is so great.
A center > A Outers +2" C center > C Outers + 3/8"B center > B Outers +1 1/4" D center > D Outer - 1/2"
PD-500 Line Trim (Reserve)
Total length A 223 1/4" (+-1")A>B + 1/8" (+-1/2")A>C 9 7/8" (+-1")A>D 28 1/4" (+-1")A>tail, outboard brake set (Primary) 18" (1,3,5,6) (+-1 1/2")A>tail, inboard brake set (Secondary) 16 3/4" (8) (+-1 1/2")Brake to toggle, inboard & outboard 19 3/4"
Rev 0

09351 - 5/30/2003 111:121
TANDEM VECTOR 2 OWNER’S MANUAL
VS-384 Line TrimNOTE: See diagram below. An A3 line would be outboard most line
A2 next cell inboard. A-lines being the center cells.
A3 190" (+/- 2")A3-B3 3/8" (+/- 1/2")A3-C3 10" (+/- 1")A3-D3 20" (+/- 1")
A2 190 3/8" (+/- 2")A2-B2 3" (+/- 1/2")A2-C2 11 1/2" (+/- 1")A2-D2 23 1/2" (+/- 1")
A1 190 5/8" (+/- 2")A1-B1 3 1/4" (+/- 1/2")A1-C1 12 3/4" (+/- 1")A1-D1 25 7/8" (+/- 1")
A 190 3/4" (+/- 2")A-B 3 1/2" (+/- 1/2")A-C 13 7/8" (+/- 1")A-D 27 1/2" (+/- 1")
A3>tail - Primary (brake set)1) 20 1/2" (+/- 1-1/2")2) 17 3/4" (+/- 1-1/2")3) 15 1/2" (+/- 1-1/2")4) 11 1/4" (+/- 1-1/2")5) 11 1/4" (+/- 1-1/2")
A3>tail - Secondary (brake set)6) 15 3/4" (+/- 1-1/2")7) 19" (+/- 1-1/2")
Primary - brake to toggle - 21-1/2"Secondary - brake to toggle - 18"
1 2 3 4 5 6 7 8 9 9 8 7 6 5 4 3 2 1
A3A2 A1 A A A A A1 A2 A3
B3
C3
D3
B3
C3
D3
SteeringLines
Front
RearSteeringLines
Rev 0

09351 - 5/30/2003 112:121
TANDEM VECTOR 2 OWNER’S MANUAL
Tandem Canopy Modifications to Speed up Openingsfor the 360, 421 & 500
closed on both sides. Doing this will speed upopening times, and will make the canopy havea better landing flare.
NOTE: Do modification#1 first, and jump it severaltimes before trying modifi-cation #2.
2) Cut a 6" hole in theslider. First, sew some Type3 reinforcing tape aroundthe center area where youwill cut the hole. After thetape is sewn on, cut thehole. The hole may besquare or round, and thesize may be increased laterif 6" is not enough.
As Tandem canopies get older, they tend toopen more slowly. Keep in mind that Tandemcanopies are designed to open softly andwithstand an unstable, Tandem terminal(180mph+) opening withyour grandmother aspassenger! Naturally, asTandem canopies getmore jumps on them,they will tend to opena bit more slowly (asany canopy will). Theserecommended modi-fications should helprestore the perfor-mance of the canopiesto their prime.
1) Sew the stabilizers
Rev 0

09351 - 5/30/2003 113:121
TANDEM VECTOR 2 OWNER’S MANUAL
1) The minimum opening altitude for Tandem jumpsafter probation is__ ft.
2) The minimum exit altitude for Tandem jumps afterprobation is __ ft.
3) Normal droguefall terminal velocity (340 lbs) is____ mph.
4) Tandem freefall terminal velocity (340 lbs, NOdrogue) is ____ mph.
5) The number of seconds to fall 1,000' at terminalvelocity (340 lbs WITH drogue) is ____.
6) The number of seconds to fall 1,000' at terminalvelocity (340 lbs WITHOUT drogue) is _____.
7) After opening a good canopy, what can be done tothe student�s harness to make him more comfortable?
8) Describe the correct breakaway procedure from apartial malfunction.
9) Describe the correct response to an inflated droguein tow. What is your terminal velocity with thismalfunction?
10) Describe the correct response to a collapseddrogue in tow. What is your terminal velocity withthis malfunction?
11) Describe the correct aircraft emergency proce-dure below 1,500'.
12) Describe the correct aircraft emergency proce-dure between 1,500' and 2,500'.
13) Describe the correct aircraft emergency proce-dure above 2,500'.
14) You accidentally pull the drogue release handlebefore you deploy the drogue. What should you donext?
15) You can�t get the drogue out of the pocket afterseveral attempts. What should you do next?
16) You are tumbling when you deploy the drogueand the drogue bridle wraps around your legs. Whatshould you do next? What is your terminal velocitywith this malfunction?
Please write answers on a separate sheet of paperTANDEM VECTOR TEST
17) You are tumbling when you deploy the drogueand the drogue canopy entangles with you. Whatshould you do next? What is your terminal velocitywith this malfunction?
18) The drogue is entangled with your fully opencanopy. What should you do?
19) Under what circumstances is CRW permittedduring Tandem jumps with students?
20) Who may do RW with a Tandem pair? What fourthings must you tell all relative workers.
21) What requirements must a photographer meetbefore he can film Tandem?
22) What is the purpose of the drogue in Tandemjumping?
23) When should the drogue be deployed on anormal Tandem jump?
24) If a drogue is deployed after 20 seconds ofTandem freefall, how long will it take to slow youdown to 120 mph?
25) On a Tandem Vector, explain the sequence ofevents after the drogue release handle is pulled whiletrailing a normally inflated drogue.
26) Explain how to fold the nose of a Vector Tandemcanopy during a pack job.
27) Explain the use of the double brake system on theVector Tandem canopy.
28) What is proper student arm position on exit?
29) Why is it unwise to show a student your wristmounted altimeter in freefall?
30) Explain the correct way to pull your reserve orbreakaway handles free of their velcro pockets.
31) What would you do if your left shoulder wasdislocated and you needed to pull your reserve on aTandem Vector?
32) Explain the negative consequences of loose stu-dent waist straps.
Rev 0

09351 - 5/30/2003 114:121
TANDEM VECTOR 2 OWNER’S MANUAL
33) Give three causes of an unstable exit.
34) If a student�s knees are tucked up toward his chestin droguefall, what happens?
35) Why is it a bad idea to reach around in front of astudent to bring his arms out into a correct freefallposition?
36) What should you feel immediately upon pullingthe drogue release handle?
37) Under what condition is use of a canopy catcherwarranted?
38) When during the packing sequence is the 3-Ringdrogue release hooked up on a Vector Tandem rig?
39) What might happen if you hook up the 3-Ringdrogue release before closing the container?
40) How much white tubular nylon bridle is leftbetween the locking pin and the Kevlar bridle of aproperly set drogue?
41) What would happen if you deployed a droguewhich had not been properly set during packing?
42) What might happen if you hold on to the droguefor a second after pulling it out of the pouch, insteadof throwing it briskly to the side?
43) What is the minimum briefing you should give anystudent before a tandem jump?
44) What are some negative aspects of �over train-ing� a Tandem student?
45) What circumstances warrant extra landing train-ing for a student?
46) Why is a stable exit advisable on first Tandemjumps?
47) What is the minimum age for Tandem students?
48) Under the terms of the current Tandem waiver,what types of Tandem jumps are prohibited?
49) The current FAA Tandem waiver expires onwhat date?
50) List the causes of all Tandem fatalities to date.
51) What two administrative (non training) things
does the Relative Workshop require be done beforea first Tandem jump?
52) To renew a Tandem rating, an applicant musthave made___ Tandem jumps within the last ___months, of which ___ must have been made in the lastthree months.
53) Recurrent training consists of?
54) If a Tandem Instructor, after probation, has notmade a Tandem jump in the preceding 90 days, hemust do what?
55) If a Tandem Instructor, after probation, has notmade a Tandem jump within the preceding 180 dayshe must do what?
56) To be eligible to become a Relative WorkshopTandem Instructor, an applicant must have made ___ram-air jumps and possess 1)___, 2)___, 3)___.
57) The initial Relative Workshop Tandem Instruc-tor training course includes ____ jumps.
58) After the training course, a new TandemInstructor�s next five jumps must be made with ____as passengers.
59) Before receiving his Tandem Instructor card, anew Tandem Instructor must make ____ on proba-tion, after initial training.
60) How many total Tandem jumps must a newTandem Instructor make before a photographer isallowed on the load (including the five initial trainingjumps)?
61) What additional training must a student be givenif the right hand drogue release (secondary handle) isattached to his harness?
62) If one handle is pulled and the drogue does notrelease, what should you do next?
63) What packing error would cause failure to re-lease after one handle was pulled?
64) What are two hazards of leaving the right handdrogue release dangling when you put on the rig?
65) Under what circumstances is relative work per-mitted if the student has access to the drogue releasehandle?
Rev 0

09351 - 5/30/2003 115:121
TANDEM VECTOR 2 OWNER’S MANUAL
INTRODUCTION
The 3-Ring Release System was invented by theRelative Workshop in 1976. It was the first practicalrelease that allowed parachutists to jettison theirmain canopy in one motion by simply pulling a singlehandle.
Not only is the 3-Ring easier to operate than previouscanopy release systems, it is also more reliable.
Once the main is jettisoned, the only things left on heharness are two smooth rings that cannot snag adeploying reserve. Some other release systems can -and have - interfered with the deploying reserve.
MODIFYING THE 3-RING RELEASE
The great reliability of the 3-Ring system results fromthe proper functioning of its individual components.therefore, the owner should not modify the system inany way, nor should he replace genuine 3-Ring partswith others.
These modification (among others) may cause thesystem to not work properly:
o Substituting risers that don�t have Type 2 sheathingfor the locking loop. Do not use risers that have loopsmade of kevlar or solid cord.
o Not using a breakaway handle with cable with thespecial yellow coating. This Teflon-impregnatedcoating is important; other plastic coating may causethe cable to bind in the housing or loops. making itdifficult or impossible to jettison the risers.
o Using a breakaway handle with cables of the wronglength. The length of the cables is critical to insureeach riser releases in the proper sequence. Replace-ment handles are available from the Relative Work-shop.
GETTING TO KNOW THE 3-RING
Knowing how the 3-Ring release works will help youassemble and inspect it properly.
Begin by peeling the release handle from the Velcroon the harness. Peeling rather than pulling, makes iteasier to separate the handle from the webbing.
Look behind the risers near the harness and observethe movement of the yellow cable as you pull thehandle. When the cable clears the white loop, therelease is disengaged.
Now slowly pull one of the risers off the harness. Asyou pull, you�ll notice that the white loop gets pulledthrough the grommet by the action of the smallestring.
Each ring forms a lever with a ten-to-one mechanicaladvantage as it passes through the other. A force of1,000 pounds on the large harness ring exerts a forceof only 10 pounds on the white loop. (Opening shockusually totals about 1,000 pounds or 500 pounds oneach riser.)
Because of the mechanical advantage provided by the3-Ring design, only a force of approximately a poundon the top ring keeps the release together.
That is why it�s important to keep foreign matter likebits of grass and sticks out of the 3-Ring assembly. Asmall stick in the white loop could prevent a riserfrom releasing.
It is also important to understand one of the proper-ties of the nylon components of the system.
When nylon stays in the same position for a long time,it begins to conform to that position, or take a �set�.If the 3-Ring release system stays assembled for toolong, the nylon can become to stiff that the low dragfrom a malfunction (such as a streamer) won�t pull theriser off the ring.
The 3-Ring Release system must be disassembled,flexed and inspected every month. Procedures forthis are listed in the care and maintenance section
The 3-Ring Release System
Rev 0

09351 - 5/30/2003 116:121
TANDEM VECTOR 2 OWNER’S MANUAL
towards the canopy and risers.3) Thread the smallest ring through the middle ring inthe same way, but make sure it does not pass through
tioned as close to the ends of the housings as possibleso that no cable is exposed.
2) With the rings of the riser facing toward the floor,pass the middle ring on the end of the riser throughthe large harness ring from above. Fold it back
3-Ring Assembly
the large ring.
4) Bring the white loop over the small ring only andthen through the riser grommet so it pokes out theback of the riser.
Rev 0

09351 - 5/30/2003 117:121
TANDEM VECTOR 2 OWNER’S MANUAL
5) Continue threading the white loop through the grommet on theend of the cable housing. The flat side of the cable housing grommet
should be against the riser.
6) Thread the yellow cable through the white loop,making sure the loop isn�t twisted. Be careful with thecable so you don�t bend it too sharply or kink it. Insertthe free end in the channel on the back of the riser.
Rev 0

09351 - 5/30/2003 118:121
TANDEM VECTOR 2 OWNER’S MANUAL
3-Ring Pre Jump Inspection
Before jumping the Tandem Vector, check the 3-Ringrelease system for the following:
1) Each ring passes through only one other ring.
2) The white loop passes through only the small ring.
3) The white loop passes through the grommet on theend of the cable housing without twisting.
4) Nothing passes through the white loop except theyellow cable.
5) The 3-Ring release handle is securely stuck to theharness, and no cable is visible between the handleand the cable housing. If your release handle has atendency to hide itself under your main lift web, undothe Velcro and twist the handle in a clock-wise
rotation (when wearing rig) so the handlewill stick out and slightly forward for abetter grip.
NOTICEIf a Tandem Vector is fitted with 3-Ringrisers that were not built by the RelativeWorkshop, it is important that they bechecked for proper configuration. This sideview above shows a correctly built 3-Ringriser attached to the harness ring and putunder moderate tension. Note the follow-ing: (1) The rings overlap each other andmaintain metal to metal contact betweeneach other. (2) The rings are aligned inparallel planes. (3) the smallest ring is notpulled snug against the grommet; the whiteloop is long enough to give it some play. (4)The white locking loop goes straight throughthe center of the riser grommet on its way tothe cable housing end fitting; it does notextend past the edge of the grommet holeand then turn back upwards towards thehole. If your riser configuration does not
Rev 0

09351 - 5/30/2003 119:121
TANDEM VECTOR 2 OWNER’S MANUAL
Required Periodic Maintenance for the 3-RingThe Booth 3-Ring Release System has been in
use for many years with excellent results. Althoughthe system is as durable as the rest of the harness/container assembly, it requires periodic maintenanceand inspection to ensure proper operation.
Generally, it is NOT recommended that therisers be attached to the harness when new and�forgotten�. Like all skydiving gear, the 3-Ring Re-lease should be carefully inspected and operated on aregular basis.
The procedures below should be done atleast every month. This is especially important if therig has not been used for a month or more, such asduring the winter. Immediate inspection is requiredif it has been subjected to some abuse such as a dragacross the runway, a water landing or exposure to alot of dust or sand.
1) Every month, operate the 3-Ring Release Systemon the ground. Extract the cable completely from thehousings and disconnect the risers.
2) While the system is disassembled, closely inspectit for wear. Check the white locking loops (the onesthat pass over the smallest ring and through thegrommet) to be sure they are not frayed.
3) Check the Velcro on the breakaway handle andmain lift web to be sure it is clean and adequatelyholds the handle.
4) Check the cable ends for a smooth finish. The endsare finished at the factory to have a smooth taperedsurface. This prevents the cable from hanging up inthe loop. Check the cable ends and consult a riggeror the manufacturer if a burr or �hook� is present.
5) Check the stitching, including that which holds thelarge ring to the harness.
6) Pull downward on the housings. They should notmove downwards more than 1/2 inch (+-1cm), butshould be free to move upwards 1 to 2 inches (2.5 -5cm).
7) As shown at right, take each riser and vigorouslytwist and flex the webbing near where it passesthrough each ring. The idea is to remove any set ordeformation in the webbing. Do the same thing to thewhite loop.
8) Check the housings for dents or other obstruc-tions. Use the cable to do this.
9) Clean and lubricate the release cable with a light oilsuch as �3-in-1� brand. Put a few drops on a papertowel and firmly wipe the cable a few times. A thin,invisible film should remain - too much oil will attractgrit or dirt, or could become tacky in cold weather.Too much oil will cause more force to be used toextract the cable during a breakaway.
10) Inspect the fittings at the end of each housing. Ifone of these fittings were to come off the housing, ariser might release prematurely.
11) If any wear is found, consult the manufacturer ora rigger before using the Vector.
12) Reassemble the system. Double check it. Makesure the risers aren�t reversed.
The Relative Workshop appreciates any commentsfrom users that relate to the safety, operation ormaintenance of the 3-Ring Release.It is important to maintain the system even morefrequently in humid, muddy or freezing conditions. Ifthe Vector becomes immersed in mud or muddywater, clean the 3-Ring Release System with a mildsolution of soap and water. Any rusted componentsmust be replaced.
Rev 0

WARNINGRead this manual carefully and understandit completely. Any jump that utilizes theTandem Vector System is considered a �tan-dem jump�. Using this system outside thestudent/ Tandem Instructor training envi-ronment is considered a violation of fed-eral law (FAA exemption No. 4943)
Examples of violations: demonstrationjumps; stunt jumps; intentional waterjumps; night jumps; jumping with any stu-dent less than 18 years of age; any tandemjump that takes place off of a designateddropzone. (These restrictions do not applyto military Tandem applications).
Recommended Replacement times on Tandem Components:
Relative Workshop has established a recommendation of the "lifetime" ofTandem main canopies and other components:* Replace suspension lines every 200-300 jumps* Replace canopy every 600 jumps* Replace main risers every 600 jumps* Replace drogue centerline every 300 jumps* Replace drogue assembly every 600 jumps* Harness/ container inspection every 200 jumps* Reserve canopy limited to 20 usesThese recommendations are based on many years of observing Tandemmalfunctions and equipment failures.
Rev 0

This manual belongs to:
____________________________________________________________________________________
___________________________________________________________________________
____________________________________________________________________
________________________________________________________________
_______________________________________________________________________
Rev 0