Embed Size (px)
Citation preview

Restoration of Circa 1880 Müller Auto-Harp
Completed by Ron Cook
December 2012
For Cynthia Curry

History
Autoharps first became popular in the United States during the end of the 19th century and increased in popularity well into the 20th. After slow and halted manufacturing during the war years (WWI and WWII), the “folk revival” of the 1950s and 1960s brought the instrument back into full production (tens of thousands), and continues on a lesser scale today. The first American autoharp company was the Zimmermann Autoharp Company, which started in Philadelphia around 1880, and by 1885 set up shop in Dolgeville, New York. For the next 20 years, Zimmermann produced several models and made around 100,000. After Zimmermann passed away, Oscar Schmidt took his designs and continued producing similar models. Today, Oscar Schmidt is still producing, albeit in China, many different yet similar models. I mention this bit of American autoharp history because Zimmermann was often thought to have been the “inventor” of the autoharp. He was awarded patents for his designs. However, his designs were not original, nor did he invent the autoharp. The person who initially developed the autoharp was not American, but German. Müller began producing his autoharps in Dresden in the late 1870s based on the standard German zither body shape. In 1880, his “Erato auto-harp” design featured 12 sliding chord bars, each able to play 3 chords that could produce 36 different major, minor, 7th, and diminished chords. (A larger Erato-harp had 13 bars producing 39 chords.) This allowed a player to play in practically any key. Zimmermann copied this design for some of his smaller sliding chord bar models around 1880-1885. Even though Müller produced around a half dozen different models, from very large “concert” autoharps to much smaller “parlor” instruments, very few seem to have survived. The two Erato models show up occasionally on auction web sites.
The name Erato relates to the Greek muse of lyric poetry.

Valuation Müller Autoharps are extremely rare and very little information is available in print or on the internet. Most information from auction sites is descriptive, and none of it is historical. Müller’s company must not have lasted very long, and might have closed before World War I. At least four models, maybe more, were produced, the 36-chord Erato Auto-Harp, and the larger 39-chord Erato-Harfe (sic), the smaller 33-chord Orpheus, and a 3 chord, 3 bar autoharp similar to Zimmermann’s heavily produced Model 1. Because of the rarity of these models and the lack of information on the maker or the instruments, I assume Müller’s production was slow. Perhaps he had a small company with few craftsmen. C. F. Zimmermann had a large company with many craftsmen and made thousands of autoharps in the 1880s. Where there are very few Müller autoharps known to be in existence, there are still thousands of the Zimmermann autoharps around. For every one Müller autoharp up for auction, there are hundreds of Zimmermanns. As for value, a Müller autoharp in good condition, or very good restored condition, could be worth $750-$1000 or more to a collector. A similar autoharp, almost identical to the Erato Auto-Harp, made by Meinhold in Germany around 1880-1885 listed for $1500.

Day 1: Assessment
On the first day, I always look over an instrument to see how much work is needed to repair or restore it. This Erato Auto-Harp was going to require a lot of work. It looks to have been stored in a damp environment, or an area where it went from wet to dry on occasion. The body was bowed from string tension, and many areas where the hide glue had softened from moisture sections had come apart. The whole structure’s body and frame were compromised. Another damp/dry related problem was with the cover to the chord bars. It was badly warped, pulling a couple of the screws out and cracking the chord bar frames. The tail block had cracks running through it where the string tension had nearly pulled it apart. Fortunately, the top had no cracks, and the beautiful floral inlays were intact. Their colors were a little faded, but with cleaning and polishing, they would look much better. Another problem with the chord bar cover was the screen printed logos, especially the lower harp and wreath image. It must have been rubbed off at some time and someone tried to duplicate the image with gold paint. It was done very poorly, and with a brush that was too big. This was going to be a challenge to fix. The top logo “Müller’s Auto-Harp Erato, had been poorly touched up a little, but could be fixed much easier than the bottom part. Missing was the note card that spanned the strings on one side of the chord bar cover, and three of the four feet on the bottom. The Müller label on the chord bar frame was breaking apart from dryness and age, and would have to be duplicated and replaced.
Day 2: Removing Chord Box and Strings
On the second day, I began to dismantle the chord bar frame and took the strings off. The warped chord bar top was barely held in place with only two screws (out of six), and after taking it off noticed that part of the frame had broken off and a piece was missing. Like all European zithers of the late 19th and early 20th centuries, the tuning pins are reverse thread. They turn clockwise to loosen them, counter-clockwise to tighten.

Day 3: Removing Tuning Pins & Initial Cleaning
On Day 3 I removed the tuning pins. Having been stored for so long in a damp/dry environment, the tuning pins were very rusty. The rust went all the way down the pin’s threads and made some of them difficult to remove. It took over an hour just to remove the pins. Once I got all the tuning pins out, I used a sponge dampened with a water/dish soap solution to remove all the dust, grime, and rust flakes. Just this light cleaning made the top inlay start to look much better.
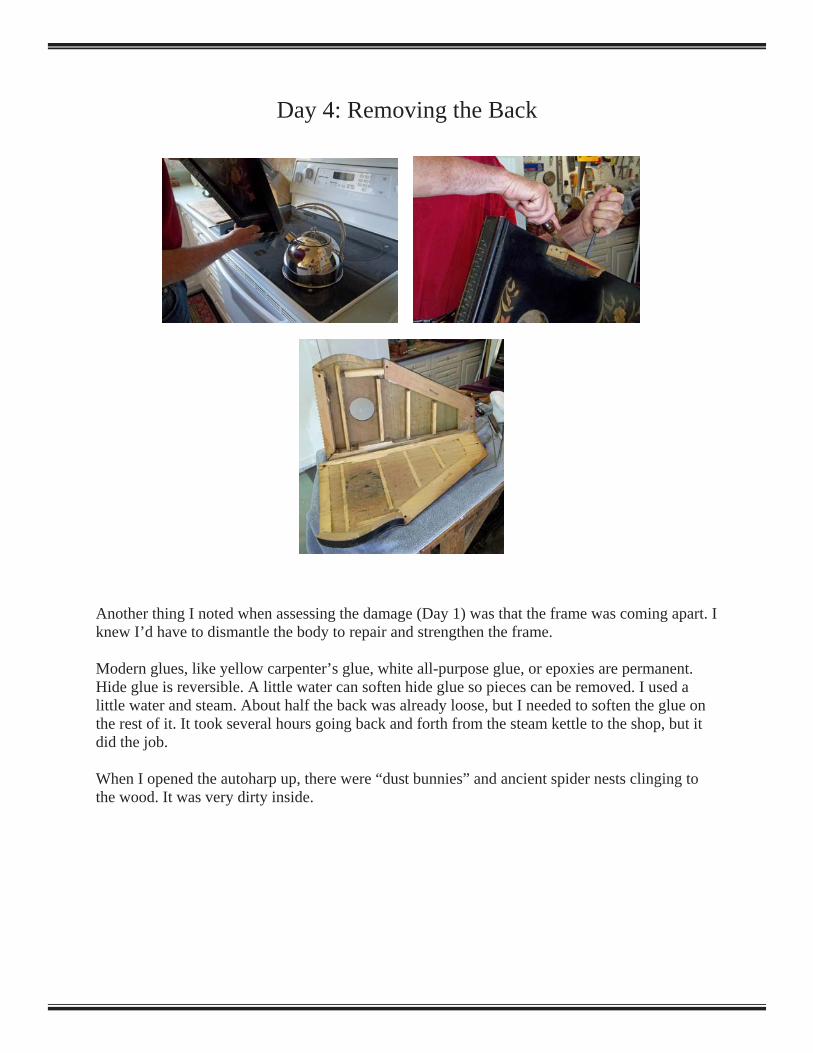
Day 4: Removing the Back
Another thing I noted when assessing the damage (Day 1) was that the frame was coming apart. I knew I’d have to dismantle the body to repair and strengthen the frame. Modern glues, like yellow carpenter’s glue, white all-purpose glue, or epoxies are permanent. Hide glue is reversible. A little water can soften hide glue so pieces can be removed. I used a little water and steam. About half the back was already loose, but I needed to soften the glue on the rest of it. It took several hours going back and forth from the steam kettle to the shop, but it did the job. When I opened the autoharp up, there were “dust bunnies” and ancient spider nests clinging to the wood. It was very dirty inside.

Day 5: Removing the Side Block and Bridge
Part of the frame, the curved side block, was already loose from the top and came off with the back. On Day 5 I had to fire up the kettle again to steam and remove that one piece so I could attach it back to the rest of the frame. The bridge was loose and the glue must have failed a long time ago, because someone nailed it back instead of re-gluing it. Two flat-head wire nails were driven through it into the pin block. I removed it and pulled out the nails. I patched the nail holes with an ebony wood filler.

Days 6 and 7: Repairing the Frame
I had to glue and strengthen the frame in stages. Some of the internal bracing was loose, so I worked on that first. The next day I glued up the long side and the ends of the frame.

Day 8: Re-gluing the Tuning Pin Block
After getting part of the frame together, I reattached the tuning pin block to the top.

Day 9: More Frame Repairs
On Day 9 I continued working on the frame. I glued the curved side block that I removed from the back days earlier on to the top and frame. The tail pin block was split lengthwise along the bottom row of pins. It was a ragged split and needed to be glued and squeezed shut. I used a special thin woodworking CA glue (like instant glue) and injected it into the cracks, then used my largest wood clamps to squeeze it together for 24 hours.

Day 10: Scraping Off Old Glue
The inside of the back had a lot of old hide glue drippings that needed cleaned off before I could glue it onto the frame. As I mentioned, the back was also quite dirty. Besides scraping off the old glue, I cleaned the inside of the back and sanded it with medium-grit sandpaper.

Day 11: Glue on Back
Several days later, on Day 11, I gathered up all my luthier’s clamps and glued the back on to the frame. This process took several hours for preparation and gluing.

Day 12: Scraping the Glue Joints
There’s always a little glue that squeezes out when clamping pieces together. Scraping and sanding takes this off and smoothes out the sides.

Day 13: Cleaning and Waxing the Top
Now that the body was back together, I did a more thorough cleaning of the top. The floral inlay was now starting to look much nicer. I breathed a sigh of relief that there were no cracks in the top and the inlay was intact.

Day 14: Cleaning the Hardware
It was time to clean the hardware. The tuning pins, as I said before, were quite rusted and corroded. I used a fine wire wheel on one of my electric rotary hand tool to clean and polish the old nickel silver. Nickel silver, also known as German silver, is a copper alloy with nickel and zinc. There’s no silver in it. It looks like silver when new. The two bridges have little channels with brass wire in them that the strings run over. Without these, the strings would cut into the wood bridges. These were also corroded, and a little elbow grease with 0000 (very fine) steel wool cleaned and polished them up nicely.

Days 15 through 18: Restoring the Finish on the Back
Applying any finish often takes many days because of the drying times involved. The back was quite worn with scratches, a couple fairly deep, rough edges, and some of the finish had worn off. I filled the deeper scratches and rough edges with an ebony colored wood filler, then, when it dried, sanded the back and sides with several grades of medium to extra fine sandpaper. After cleaning off the sanding dust, I used painter’s tape on the top to protect it from the black paint I used on the back and sides. I applied several coats, waiting 24 hours between coats.

Day 19: Making New Feet & Polishing Back
Only one of the original four wooden feet survived. I used this one as a template and turned several more on my lathe. I later ebonized them with a black water-based stain. Later that same day I began rubbing and polishing of the back and sides. A new finish often is slightly rough from brush strokes and dust specks. To smooth it out before polishing, I use ground pumice and rottenstone. Pumice is a light abrasive, and rottenstone is a very light abrasive. I sprinkle the powder on the back then rub it with a cotton pad soaked in mineral oil. After the rottenstone, the back is smooth and already half polished. A couple of coats of paste wax helps protect the back and gives it its final shine.
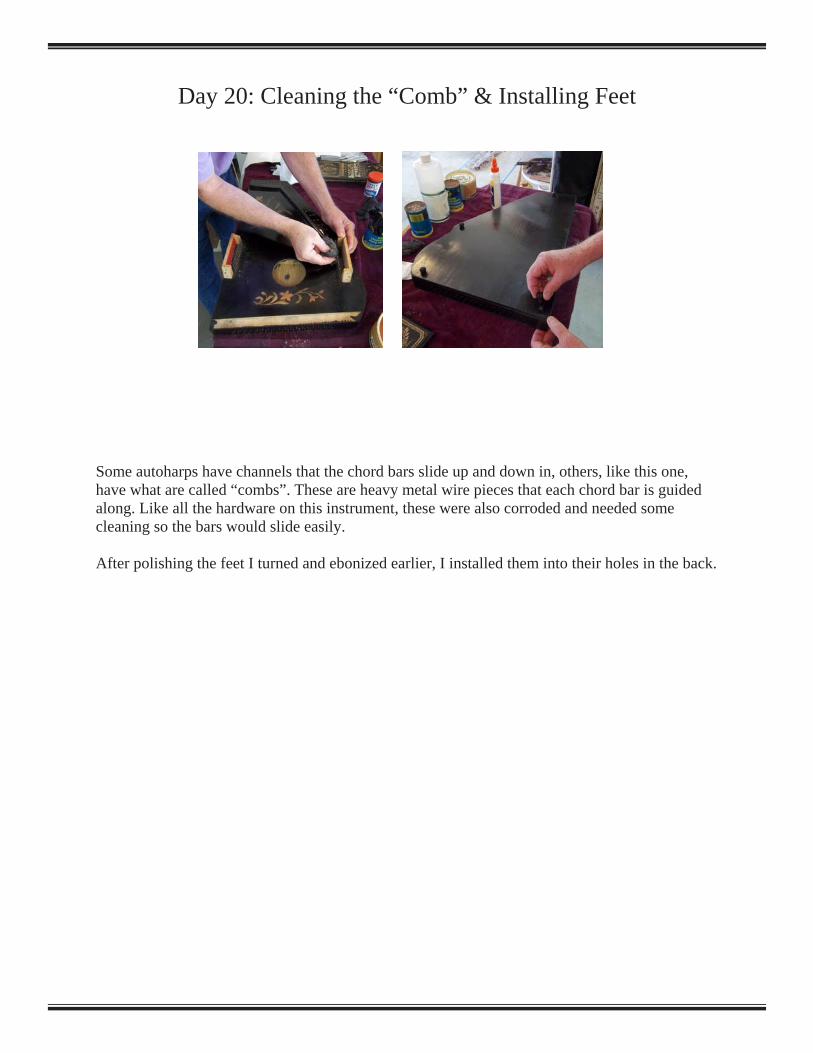
Day 20: Cleaning the “Comb” & Installing Feet
Some autoharps have channels that the chord bars slide up and down in, others, like this one, have what are called “combs”. These are heavy metal wire pieces that each chord bar is guided along. Like all the hardware on this instrument, these were also corroded and needed some cleaning so the bars would slide easily. After polishing the feet I turned and ebonized earlier, I installed them into their holes in the back.

Day 21: Gluing on the Bridge
On Day 21 I glued the bridge onto the autoharp. The blue tape is painter’s tape I put on so any glue that squeezed out would go on it and not on the finished top. The bridge is a light wood, either maple or birch, that is ebonized. After the glue dried, I re-ebonized the worn spots and later polished it.

Day 22: “Shrinking” the Tuning Pin Holes
I noticed when I removed the tuning pins that a few of them were very loose in their holes. So before reinstalling the tuning pins, I needed to apply a special liquid into each tuning pin hole that makes the wood expand. This will make a tighter fit for the cleaned tuning pins.

Day 23: Installing Tuning Pins
Installing tuning pins on zithers and autoharps is a fairly tiring job, and my wrists get sore from all the turning. I have to take breaks after every ten or so. But after a few hours, it got done.

Days 24 & 25: Stringing & Making Chart Template
Now that the body is back together and polished, I started stringing it up. With the number of strings, it took a couple of days to do it all, a few hours at a time. Once the strings were on, I cut a piece of paper to fit over all the strings and marked the positions of the strings. This would be my template to make a note card to replace the one that was missing.

Day 26: Removing Chord Bars & Polishing Brass Buttons
Up to now the chord bars were still attached to the chord bar top. The brass buttons were threaded and unscrewed so the bars would drop off. The felt on the bars was still good. Only one small piece had to be re-glued. The little buttons were a little corroded, so I took 0000 steel wool and polished them.

Day 27: Making a New Müller’s Label
Before I retired, I was working in the private sector as a technical writer and illustrator. I became an expert at using Adobe Illustrator and Photoshop. I scanned into Photoshop the cracked and broken Müller label, did some tweaking, then finished it up in Illustrator. I printed a new label on photo paper and cut it out, ready to apply.

Day 28: Chord Bar Cover Touchup
To touch up the logo on the top part of the chord bar cover, I first cleaned it then used a fine-point gold pen. I put painter’s tape on each side of the fine border lines and ran the pen along the small opening. A few spots on the name were rubbed off and I retouched them with the pen. Later that day, after the touchups had dried, I dampened the back and clamped it down, trying to get the warp out of it. After nearly two days of clamping, it still had a warp. Not as bad, but it was still there.

Day 29: Fixing Chord Bar Blocks
The two blocks that the chord bar top fastens to were cracked and one piece was broken and missing. I used a small chisel to square off the broken piece and glued in a small basswood replacement. At the same time I injected glue into the other cracks, where the screws had pulled out, and clamped them shut. Much later in the day after the glue set, I started shaving a small channel in the top of the block so the warped chord bar top would sit on the blocks much better.
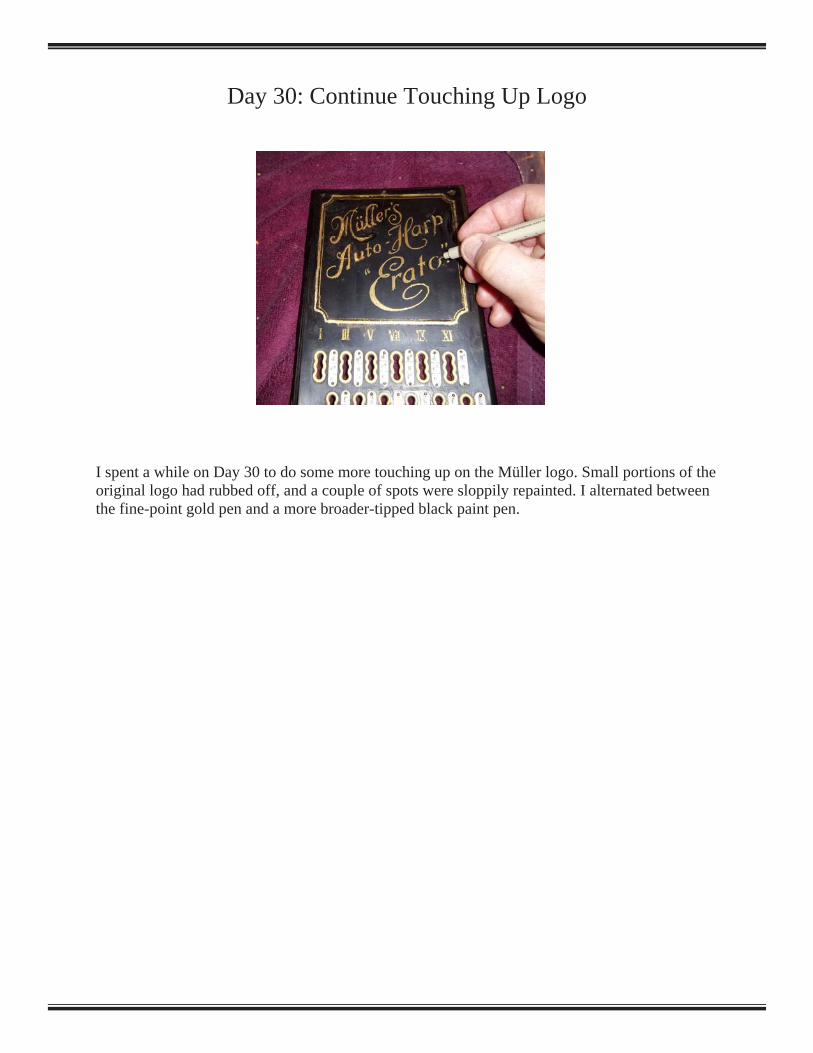
Day 30: Continue Touching Up Logo
I spent a while on Day 30 to do some more touching up on the Müller logo. Small portions of the original logo had rubbed off, and a couple of spots were sloppily repainted. I alternated between the fine-point gold pen and a more broader-tipped black paint pen.

Day 31: New Label, More Chord Bar Block Work, and Preparation for Note Label
On this day I glued on the new Müller Autoharp side label. I was very pleased with the way it turned out. One of the felt pieces that line the chord bar blocks was missing, so I cut a new piece of felt and glued it in. Because the chord bars shift back and forth, without the felt the wood bars would “clack” each time they moved. Also on this day I started to recreate the missing note card using a close up of one I found on the Internet and a listing of the notes I found on a Japanese web site.
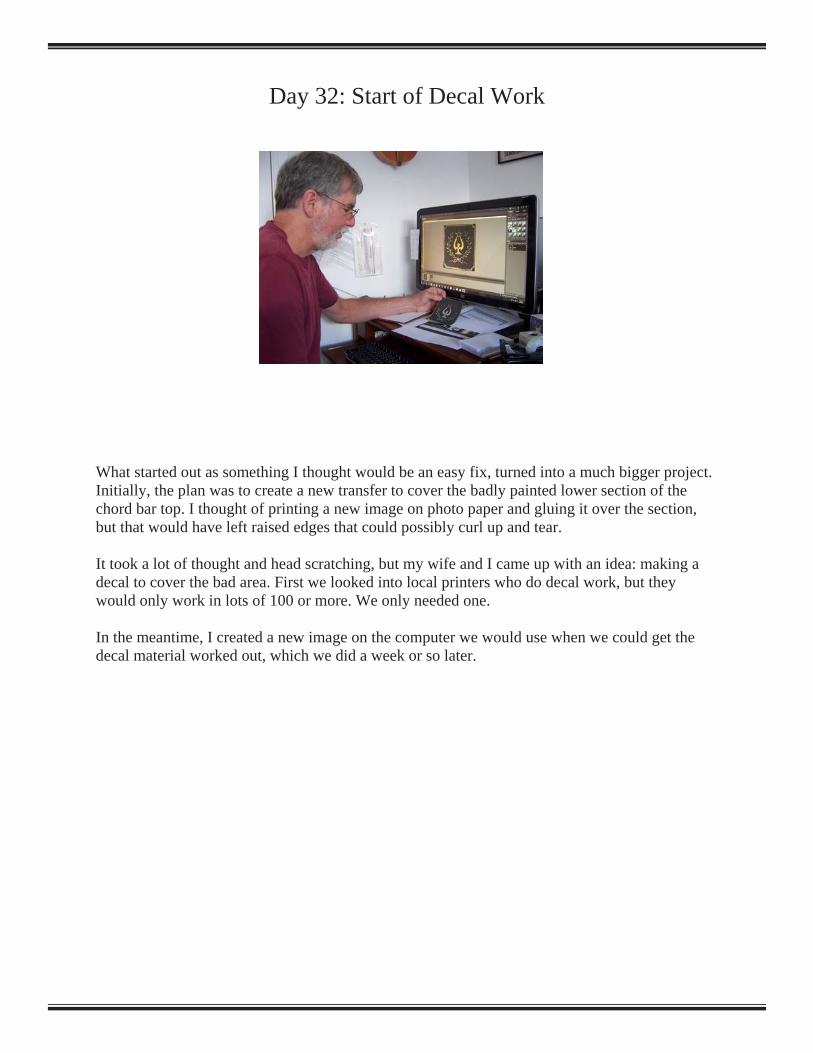
Day 32: Start of Decal Work
What started out as something I thought would be an easy fix, turned into a much bigger project. Initially, the plan was to create a new transfer to cover the badly painted lower section of the chord bar top. I thought of printing a new image on photo paper and gluing it over the section, but that would have left raised edges that could possibly curl up and tear. It took a lot of thought and head scratching, but my wife and I came up with an idea: making a decal to cover the bad area. First we looked into local printers who do decal work, but they would only work in lots of 100 or more. We only needed one. In the meantime, I created a new image on the computer we would use when we could get the decal material worked out, which we did a week or so later.

Day 33: Printing and Testing New Note Card
This little project took a quite some time to complete. I recreated the note card on the computer, and, like the Müller label I made for the side, printed it on heavy gloss photo paper. Once I cut it out, I tested the fit. Perfect!

Days 34 & 35: First Decal Test
My wife and I finally found a special paper on which you can make one-up decals. No local stationery stores carry this, so I had to order it on the Internet. We received the paper in about a week. You have to use an inkjet printer to print the image on the paper, then when the ink is dry, spray the whole paper with three or more coats of clear Krylon varnish. This took a couple of days, since it had to dry well before the next step. Then you cut out the image, soak it in luke warm water, and slide it off the paper on to the surface. I prepared several pieces of wood for testing. Our first test was on a black background, and the decal almost disappeared. You could only see it in the sunlight. Not good. Back to the drawing board.

Day 36: Gluing On New Note Label
The area on the chord bar frame that’s over the strings where the note card goes is not flat. Half of it is vertical and half is diagonal. To glue the card on, I applied a light coat of white glue on the card’s back and clamped it on the vertical using a smooth piece of wood and several spring clamps. This worked fine.

Day 37: Reassembling the Chord Bars
All the springs for the chord bars were still good. However, several of the paper “washers” that sit on top of the springs were broken, and a couple of them were missing. These washers are necessary for the bars to slide across when changing the chords on each single bar. I searched on the internet for small paper washers, thinking they would still be used in piano repair. I was partially right. Paper piano washers are too big. I could not find any of the tiny size needed for this autoharp. So, I made some. I first tried heavy paper, but it always ripped when trying to punch the tiny center hole. I came up with leather washers, using bellows leather that I had. A paper punch worked fine on the thin leather (smooth on one side), and I was able to drill a small hole in each washer to fit over the combs on top of the springs. Then I was able to reinstall the chord bars and fasten on the rest of the chord bar frame pieces.

Days 38 & 39: Second Decal Test
The reason the decal didn’t work on a black background is because the decal is partly translucent. The background washed out the design. For my second decal test I painted the background white. Again, I printed the image on the special decal paper, sprayed it with three coats of clear Krylon varnish, let it dry a day, then soaked the decal and slid it onto the white piece of wood. This looked good. I think it will work.

Days 40 to 44: Preparing Chord Bar Top for Decal and Decal Touchup
It always seems like the smaller jobs take longer to complete. Since the white background worked best for the decal, I started preparing the chord bar top to receive the decal by painting the section white. I used painters tape to make a perfectly square area for the white paint and put several coats on. I first used a brush, but that caused too many brush strokes that needed to be sanded down. The decal needs a perfectly flat surface or it could look lumpy. I ended up spraying a white paint on the area (after masking off the rest of the chord bar top). The spray paint worked much better. It took several days to apply the five coats, and another day to fully dry before applying the decal. One thing with printing using a color ink jet printer is that you can’t print metallic paint. It’s therefore very hard to match colors. The printed gold looked more yellow than gold, even though I used Photoshop to copy the color. My wife came to the rescue. She used four different sized brushes over four days to apply old gold colored acrylic metallic paint to the image. The process was tested on four different decals before we were satisfied that the color matched the autoharp’s original color.

Days 45 to 47: Decal Applied
With the design color matched, we applied the decal to the chord bar top. All that was left now was to do a little black touchup around the edges, then coat the entire top with clear Krylon spray varnish to seal it. (Note that the background on the decal is not as red as in this photo. The camera’s flash made it appear redder than it is.) The varnish spray needed time to dry between each coat, so this one little job took three days.

Day 48: Mounting Chord Bar Top
It was finally time to reinstall the chord bar top. Because the frame under the top had a new repair piece and the cracks were sealed I had to drill tiny pilot holes for the top’s six screws. Using the top as a template, I marked the areas to drill. Once done, I was able to easily screw on the top and then reinstall the chord bar buttons.

Day 49: Completion
On the final day, all I had to do was tune it up, and it was done. This turned out to be one of my more difficult restorations. It took much longer than anticipated, and because of the rarity of these old German instruments, every bit of research, from the string gauges, to the tuning, and to images of the name, harp, and note card took a lot of time. Hardly any close-ups of these instruments exist. I’m hoping my work and explanations can be a help to others attempting the restoration of a Müller Auto-Harp “Erato”. Even though it was a very difficult restoration job, it is very gratifying to be able to make such a beautiful looking and sounding antique instrument come alive again.