Embed Size (px)
Citation preview

Residential Refrigerator Installation Terry McKnight – 2010
Document created by Gary Brinck, with permission from Terry McKnight Page 1
Residential Refrigerator Install2005 Dutch StarTerry McKnight
December, 2010
I decided to remove my Norcold 1200 refrigerator and replace it with a newresidential refrigerator. The following applies to an installation in a 2005Newmar Dutch Star floor model 4015 that was originally constructed withthe Norcold installed over the rv furnace. Your experience may beconsiderably different than mine.
Why change?We ordered our motorhome new in 2005. Our Norcold worked acceptablywell but not great from day one. If we were sitting in a warm climate suchas Florida or Texas in the summer months the fridge had a hard timemaintaining an acceptable internal temperature. I consider a temperature ofless than 40 degrees to be acceptable with a temp of 36 degrees beingbetter. We found that if we had the motorhome parked in such a mannerthat the fridge was on the sunny side, the fridge would many times have atemp rise into the 42-45 degree range. When on the move the temp risewas worse. Often into the 48 to 50 degree range. These high temps occurredmostly after the 2nd year of use and got progressively worse. We did manyof the maintenance procedures that were recommended on this and otherwebsites as well as the Norcold recommended remedies with noimprovement. We even had Norcold authorized techs check it out with noimprovement.
Additionally, like many of you, I have been watching Norcold slowly inchingup their recalls to more recently made units. I knew it was only a matter oftime before our fridge would be included in a recall. My big disappointmentwith Norcold is that they were slow to get many of us into the recall therebyleaving us in a potentially dangerous situation should the heating unitsoverheat. My understanding is that the cooling unit has welds that were notup to snuff which is part of the potential fire hazard. The straw that brokethe camel’s back is the latest recall. This recall installs equipment thatdetects an overheat situation and shuts down your fridge. If you have ashutdown it is an indication that your cooling unit has to be replaced beforethe fridge can be used again. Even though this unsafe condition was theresult of inferior workmanship on Norcolds part, they will not help you withthe fix. It is your pocket that will have to buy the new cooling unit and haveit installed. You can pay about $1500 for the new Norcold cooling unit (Iwouldn’t) or about $1050 for one of the better built Amish units- which isthe one I would have used if I had kept the Norcold. If we used our rv forweekends and vacations I probably would have replaced the cooling unitwith the Amish unit. However, we part-time in our rv from mid May toNovember and then take shorter trips each month during the winter.Typically we spend a total of about 7 months each year in the motorhome.

Residential Refrigerator Installation Terry McKnight – 2010
Document created by Gary Brinck, with permission from Terry McKnight Page 2
Therefore we wanted a safer option than the latest Norcold recall provides aswell as better fridge performance.
The ProjectThe first step was to determine which residential refrigerator could be usedin our rv. If possible, I did not want to have to remove a windshield or otherwindow to get the new fridge into the rv. Therefore I had to take somecareful measurements and search for an appropriate sized fridge.I found that if I was going to use the door to the rv as our entry point, I hada maximum of 24 7/8 inches of width with which to work. The Norcold withthe doors removed was about 24 inches or slightly more in depth so it wouldcome out through the rv entry door.
Most residential refrigerators are deeper than 24 inches which wouldnecessitate the previously mentioned window removal. The only other optionwould be a counter depth residential model with a cabinet depth of about 24inches with the doors and hinges removed. I found one such model made byMaytag that fit the bill. This model is actually sold under several companiesthat are owned by Whirlpool. I bought the Maytag since it was on sale atHome Depot. The model I used is MCD2358WEB. It is a 23 cubic foot model.The down side to a counter depth model is the cost- they are considerablymore costly than the same size regular model. In my case the total deliveredcost was $1810. This includes an extended warranty for a total of 5 years. Ihad no labor costs but did have to buy wood, sealant, screws, more woodand casters to make a dolly, etc., so the total cost was about $2000complete. That makes this project about $500 more than replacing theNorcold cooling unit with a new Norcold cooling unit or about $950 more if Iused the Amish unit. This also assumes that I would be providing the laborto replace the cooling units.
This Maytag is about 5 ¾ inches taller than the Norcold it was going toreplace as well as about 3 ½ inches wider. In our rv this was going torequire cabinet modifications for the install. Additionally, I was going to haveto relocate or re-route a water drain line, hot & cold water lines, and thefurnace propane line that happens to run under the original fridge supportfloor and over top of the furnace. They would have to be moved so that thenew support floor could be lowered about 5 inches. Here’s the old Norcoldthat was removed.

Residential Refrigerator Installation Terry McKnight – 2010
Document created by Gary Brinck, with permission from Terry McKnight Page 3
The first step was to get the Norcold out. This picture shows the back of theNorcold as viewed through the outside access door.

Residential Refrigerator Installation Terry McKnight – 2010
Document created by Gary Brinck, with permission from Terry McKnight Page 4
I turned off all power to the rv, and then disconnected the 120v and 12vlines to the fridge. All other connections to the fridge control board werepulled, then the water line for the ice maker. Prior to disconnecting thepropane line, I closed the valve at the propane tank. Next 3 screws thatwere used to secure the Norcold to the support floor were removed to allowthe unit to be slid forward. Fortunately Newmar does not glue their fridgesdown like some manufactures so I did not have to struggle with breakingany glues.
Inside the rv I removed all the doors and hinges from the front of the fridge.I also took out all of the shelves, drawers, etc. Then with the help of myson-in-law, we removed the fridge from its cabinet and took it out the frontdoor. We left the cooling unit on the back of the fridge when we took it out.This made for a very tight fit going out the door. If I did this again, I wouldremove the cooling unit and anything else that I could from the back of thefridge prior to going out the door. I had removed the screen door from ourmotorhome to get maximum width for going through the door.
After the fridge was removed, I needed to remove the propane line thatsupplied the rv fridge. After identifying the correct line in the basement, I
Residential Refrigerator Installation Terry McKnight – 2010
Document created by Gary Brinck, with permission from Terry McKnight Page 5
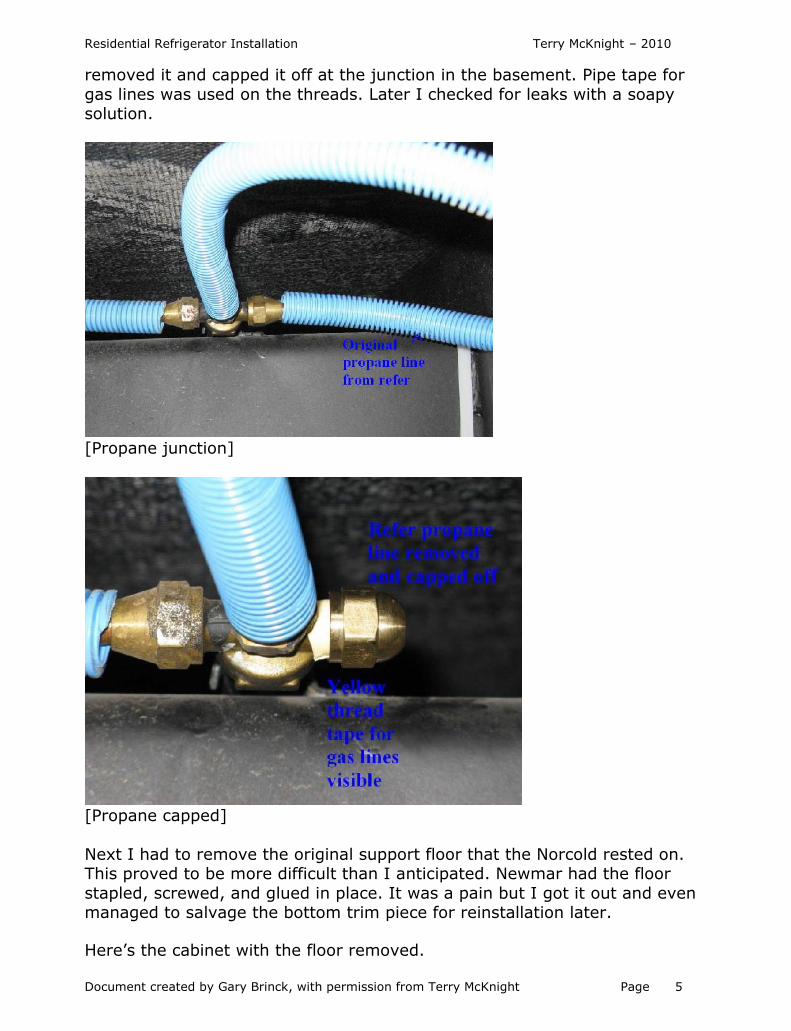
removed it and capped it off at the junction in the basement. Pipe tape forgas lines was used on the threads. Later I checked for leaks with a soapysolution.
[Propane junction]
[Propane capped]
Next I had to remove the original support floor that the Norcold rested on.This proved to be more difficult than I anticipated. Newmar had the floorstapled, screwed, and glued in place. It was a pain but I got it out and evenmanaged to salvage the bottom trim piece for reinstallation later.
Here’s the cabinet with the floor removed.

Residential Refrigerator Installation Terry McKnight – 2010
Document created by Gary Brinck, with permission from Terry McKnight Page 6
Before the new floor could be installed I had to move the drain line thatcomes from the kitchen sink and runs over top of the furnace. I also had toreduce the height of the hot and cold water lines and then carefullyreposition the copper propane line the feeds the furnace. All this wasnecessary to gain the needed clearance for the new lowered fridge supportfloor. Here’s a picture of the plumbing prior to relocation.

Residential Refrigerator Installation Terry McKnight – 2010
Document created by Gary Brinck, with permission from Terry McKnight Page 7
Here are the relocated lines. Unfortunately the photographer (me) did a poorjob on this photo. To gain the necessary clearance I had no choice but to runthe water drain pipe around the furnace.

Residential Refrigerator Installation Terry McKnight – 2010
Document created by Gary Brinck, with permission from Terry McKnight Page 8
The next picture shows the new support floor installed. I used additionalsupport around the perimeter and one vertical support under the floor placednear the furnace (near the center of the new floor) to give additionalstrength to the floor.
Not shown in the picture is the cover I placed over the hole in the back walland the sealant I used around everything along the back wall.
Next I fitted a piece of wood to close off the outside access door. This is toreduce weather and bug entry. The new cover is removable from theoutside. It is equipped with a ½ inch wide by 13 inch long screened vent toallow some venting. I’m going to enlarge this vent to allow more ventingbased on our 9 day trial run after this install was completed. The originaloverhead vent was left open.

Residential Refrigerator Installation Terry McKnight – 2010
Document created by Gary Brinck, with permission from Terry McKnight Page 9
The last step in the cabinet preparation was to trim the inside edge of thecabinet so that the wider and taller replacement fridge would fit. I measuredand marked the cabinet then used a reciprocating saw to cut the wood.Someone smarter than me might choose to use a router.
With the cabinet modifications complete, I was now ready for the new fridgeto be installed. However, I had one concern about the installation.Once we got the fridge into the motorhome we were going to have to lift itvertically 9 ½ inches before we could slide it into the cabinet. Due to limitedwork space only one person would be lifting on the one side of the fridge. Iwas worried about straining a back so I decided to build my own dolly forthis install.
The dolly was made to top out at exactly the same height as the new fridgesupport floor. It has casters on the bottom for ease of movement. The ideawas to place the fridge on the dolly with 4 people lifting and then move it upto the cabinet. This worked well. It was easy to roll the fridge into place inthe cabinet. No one had to strain anything for this install. By the way, sincethe dolly is essentially a box on wheels, I plan on turning it upside down inour motorhome basement and using it as a box. That way it will be with usall the time. Should I need to service the fridge in the future I can just rollthe fridge out on to the dolly and spin it around as necessary. Here is thedolly in place after the fridge was slid back into the cabinet.

Residential Refrigerator Installation Terry McKnight – 2010
Document created by Gary Brinck, with permission from Terry McKnight Page 10
Outside, working through the access door behind the fridge, the water linewas connected and the power cord inserted into the outlet. I also used acouple of brackets to attach to the back of the fridge to help hold it in place.I’m going to use some additional methods to secure the fridge, but I’ve notfigured out what I’m going to do.
Here’s a picture of the access door cover in place. The original outside coverfits in place and hides this cover.

Residential Refrigerator Installation Terry McKnight – 2010
Document created by Gary Brinck, with permission from Terry McKnight Page 11
Finally, here is the new refrigerator installed in the motorhome. There issome trim work to be done yet, but it is up and running.
A couple of notes concerning the new fridge. I’m starting out using onlyshore power or generator power to run the fridge. No additional batteries orinverter connection at this time. However, I will probably install a

Residential Refrigerator Installation Terry McKnight – 2010
Document created by Gary Brinck, with permission from Terry McKnight Page 12
refrigerator dedicated inverter in the future and see how the existing 4batteries handle the load.
The new fridge was delivered to my home 3 days prior to installation in themotorhome. During that time it was plugged in and running. I monitored itspower usage using a Kill A Watt P4400 meter. On compressor startup Iwould see up to 3.98 amps being pulled. That was the highest readingobserved. When running otherwise, I saw readings between .92 and about2.5 amps. The manual says that it can run as high as 7.2 amps but I’ve notseen that yet. Editor’s note: The icemaker will add a lot of amps when itgoes through its heating cycle, but that’s only for a minute or two.
The shelves in a residential refrigerator are not secured as in an rv fridge.Therefore, I used some white electrical ties to secure the rear of the shelvesto their brackets. I’m also planning to support the front edge of the shelveswith some of those self adhering hooks placed on the sidewall and under thefront of the shelf.
I also purchased several of those adjustable refrigerator bars that can beused to secure items on their shelves while the rv is moving. I sure do notwant the beer to be spilled!
Note on cooling:This unit has the cooling coils on the bottom of the fridge. The same as ourhome fridge. While I had the fridge running in my home, I noticed that therewas air exiting the front left grill area and rear left of the fridge. Also thefridge is not flush against the wall in the back. There is about a 2.5 inchspace from the wall to the back of the fridge. This area is the same as theNorcold had behind it. The roof vent was not modified. As you know, I didmodify the access door area. I'm going to modify the cover by enlarging thevent to allow more air to pass into the compartment. I'm doing this inresponse to seeing a 1 degree increase in the refrigerator side which mayindicate it is not cooling quite the same as when it was sitting in my home.Plus I left the original insulation in the cabinet on the sides of the fridge. Imay remove the insulation if needed. Since I have 12v and 120v available Icould also put a switched fan in the cabinet if necessary. I have severalwireless thermometers that I can place in various locations to see what ishappening. This is also the reason I kept my dolly. It’s a one man job to rollthe fridge in and out, so adjustments will be relatively easy. As I experimentwith this I'll get it right.__________________