Embed Size (px)
Citation preview

PENN MEDICINE RESARCH BILLING INITIATIVE
Research Lab Order Processes USER GUIDE
December 2, 2011
Version 1
Office of Human Research

Penn Medicine Research Billing Initiative Research Lab Order Processes
Page 2
Effective October 1, 2011, all laboratory research orders will have to be submitted electronically by departments in EPIC. The Laboratory will no longer accept paper requests. There are a few exceptions to this institutional standard; however prior approval is required. Additional information regarding exceptions will be communicated shortly. This guide covers the following:
1. Enrolling Patients into Research Studies………………………………………………………..…………….….3
2. Creating a Research Guarantor……………………………………………………………………….…………...6
3. Placing Orders for a Research Study from a Provider’s Schedule…………………………………..………..12
4. Creating Orders Only encounters and Placing the Orders…………………………………………..…………19
Access to EPIC Research Functionality EPIC Research functionality will be granted to staff after they complete the half-day training class. Dates and times of these classes are provided in Knowledge Link by searching under APM. Access to the EPIC Research functionality will only be granted after training was completed. High Level Summary Steps Step 1: Enroll your patient in the Research Study Step 2: Attach the Research Guarantor to your Patient’s Registration that includes the Guarantor Address (Your Department’s Business Office Address), Relationship to the Patient (Self).Steps 1 and 2 only have to be completed once per patient Step 3: Order the lab test you need from your location – please do not use Research Perlman or PAH they do not interface into the Cerner Laboratory System. For each test, select either Personal Family or Research, along with the appropriate diagnosis codes. All lab orders should be ordered as Research with a Status: Future and Class: Normal Step 3 needs to be completed for each test

Penn Medicine Research Billing Initiative Research Lab Order Processes
Page 3
Step 1: Enroll your patient into a Research Study
Click the Research Studies button on the Hyperspace toolbar to open up the Patient Lookup window.
Search for your patient
Select your patient Verify that the correct patient was selected, by comparing date of birth, address, and gender.
Research Study screen will appear
List of available studies

Penn Medicine Research Billing Initiative Research Lab Order Processes
Page 4
Input the Research Billing Number
and select the Add Button If your study does not appear in the available list, contact OHR at [email protected] Select the 910029693-NUVASIVE OSTEOCEL PLUS ACDF… Click Accept • The STUDY activity window opens
The study window will open and the study you selected will appear. Only studies that are not previously associated with the patient can be added. If there is a previous association between the patient and the study, you can only update the existing associations. The Study name field will display the name of the Research Study that you have selected.
The Active Start and End dates must be entered for every study. The Active end date should be an estimated date into the future. This future date will limit future appointments from being scheduled after the ‘projected’ end date. Research Appointments cannot be scheduled if this end date is a past date or is prior to the initial research appointment.
The enrollment status field is used to designate the research study status for the patient.

Penn Medicine Research Billing Initiative Research Lab Order Processes
Page 5
The patient is now associated with this research study, and the study will display in the Research Studies Activity. In a pale yellow box underneath of the study name, the principal investigator and a brief description of the study appear. This information is the same as the information listed in the related study administrative record. A details icon and hyperlink will also appear on this screen for any comments that may have been added when the patient was enrolled. The Research Active section will also appear in the patient’s header once the workspace has been closed and re-opened.
Don’t forget to enter a STOP Date when your patient has completed the Study, and change their STATUS from Enrolled to COMPLETED.

Penn Medicine Research Billing Initiative Research Lab Order Processes
Page 6
Step 2: Create a Research Guarantor for your Patient
Attach the Research Guarantor to your Patient’s Registration that includes the Guarantor Address (Your Department’s Business Office Address), Relationship to the Patient (Self).
Research Guarantor accounts are necessary for those studies which will have “billable” services charged to the research funding source. The subject needs the Research Guarantor Account (aka, RBN, family account 91#) indentified with the subject prior to any visits being scheduled If the research study is approved as routine care only, this step will be skipped.
Click Appts button. We are not making an appointment; we are only using the Appts button in the toolbar to open up the Patient’s Appt Desk activity in order to update their Registration. • The Patient Lookup window will appear. Select Recent Patients,
Select the Past tab, and highlight the existing appointment • The Past tab will hold ‘past’ appointments for the patient • Maggie’s initial appointment was already scheduled in Epic and that is when she was identified as being a potential participant for a Research Study. Appt Desk Past tab In order to make changes to a patient’s existing registration in Epic, users must choose a contact to get into the Registration activity.

Penn Medicine Research Billing Initiative Research Lab Order Processes
Page 7
Right click on appointment and Select the Reg Appointment Contact in the popup menu The Appt Desk options menu will appear
The patient’s Interactive Facesheet will display

Penn Medicine Research Billing Initiative Research Lab Order Processes
Page 8
Navigate to the Blue Guarantor Accounts folder Click on the Add Guarantor Account hyperlink

Penn Medicine Research Billing Initiative Research Lab Order Processes
Page 9
The Guarantor Account Questionnaire will open to the default information
When the Guarantor Account Questionnaire opens, it will automatically default to Personal/Family Guarantor information. This information must be changed for Research patients that are enrolled in a study. Navigate to the 2nd question in the questionnaire: ‘What type of guarantor account would you like to add to this patient?
Select Add’l Type radio button
When the Add’l Type radio button is selected, the additional type field will show as Required. Click on the Magnifying glass to open up the selections , select ‘Research’ and Click ‘Accept’

Penn Medicine Research Billing Initiative Research Lab Order Processes
Page 10
Research Guarantor Type When Research is chosen as the guarantor account type, ‘Other’ will default into the next question in the guarantor account questionnaire. Navigate to the Guarantor Information section and click inside the Name field. The Guarantor Information will be the responsible party. In the Guarantor Information section of the questionnaire, navigate to the Name/ID field and enter the name of the Research Study. The name of the study will always start with the 9100###### followed by a short description of the study.
Click ‘Find Existing Account’ button • A list of possible guarantor accounts will display. Highlight the Research Study Guarantor Name and Click Accept

Penn Medicine Research Billing Initiative Research Lab Order Processes
Page 11
Click Finish • The Guarantor Accounts for your patient will display. Clicking on plus sign (+) will show all details of guarantor account
The Red Dot indicates the Guarantor designated to bill for visit or test. The Research Guarantor will have to be added once. We suggest that you add the Research Guarantor after enrolling your patient into the study. EPIC added a new enhancement that allows assessing the patient’s Registration from the Patient Options link too.

Penn Medicine Research Billing Initiative Research Lab Order Processes
Page 12
Step 3: Placing Orders for a Research Study from a Provider’s Schedule
On the home workspace, open the appropriate department folder to see scheduled patient’s for today The schedule will display the schedule for every Provider in that department To see only a particular Provider’s schedule, click on the plus sign (+) to open up a list of every Provider for that department and select the appropriate Provider
Hematology Oncology Perelman 4 View
Your EPIC access has to allow you to view your Department and Provider.

Penn Medicine Research Billing Initiative Research Lab Order Processes
Page 13
Single Physician View
Highlight the patient on the schedule
Click the Orders Button in the Activity Toolbar to open up the Order Entry Activity for your patient
Orders Button / Activity Toolbar The Place Orders / Order Entry Activity will open
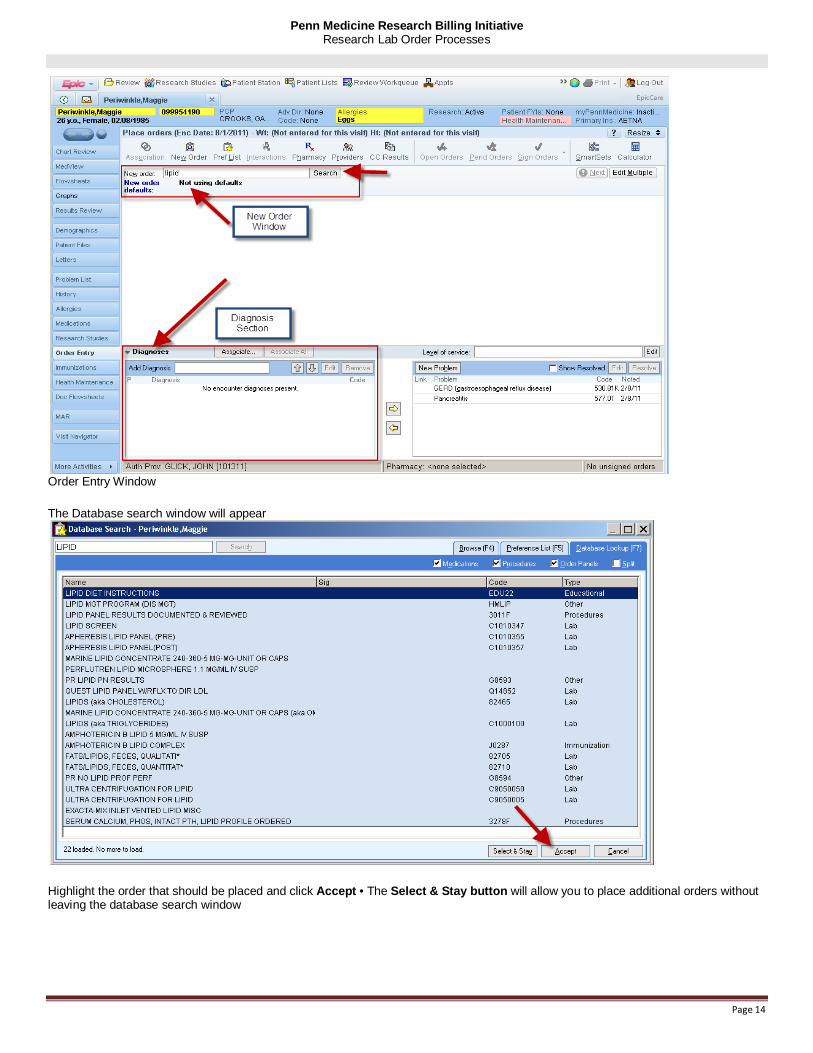
Type the first few letters of the order in the New Order window Click the Search button
Penn Medicine Research Billing Initiative Research Lab Order Processes
Page 14
Order Entry Window The Database search window will appear
Highlight the order that should be placed and click Accept • The Select & Stay button will allow you to place additional orders without leaving the database search window

Penn Medicine Research Billing Initiative Research Lab Order Processes
Page 15
After accepting the order, Epic will return back to the Order Entry screen to show recently placed orders
Placed Orders / Order Entry Window Click on the Order Entry Detail hyperlink to open up details regarding order
Order Details Hyperlink

Penn Medicine Research Billing Initiative Research Lab Order Processes
Page 16
The Order details window will open
Order Detail / Questions section Navigate down to the Questions section of the Order detail window There will be 2 Questions added to the Order Entry Details section
If the patient has already had their Research Registration information updated with the Research Guarantor Account and their visit has been associated with their Research Study (Research Study Checkbox), these fields will default with the appropriate Research information, if their Registration has not be updated, this information will need to be completed Select ‘Research’ button for Guarantor Account Type In the ‘Which Research Study?’ field, enter the 9100# for the appropriate Research Study or click on the magnifying glass to see a list of Research Studies

Penn Medicine Research Billing Initiative Research Lab Order Processes
Page 17
Click the Accept button once the questions have been completed
Order Entry / Order Details The Order details window will close and placed orders will display

Penn Medicine Research Billing Initiative Research Lab Order Processes
Page 18
Associating a Diagnosis with Placed Orders A diagnosis must be associated with every lab or procedure order that is placed in Epiccare. Use the diagnosis section in the Order Entry screen to associate a diagnosis with recently placed orders.
Order Entry / Diagnosis Section Click in the Diagnosis Window and type in the first few letters of a diagnosis If you know the diagnosis code, this can also be entered in the diagnosis field OR by entering the first few letters of the diagnosis, you can search the database for the correct diagnosis Type in ‘pancreas’ in the diagnosis field • The database matches window will appear
Database Matches Window Select ‘Pancreas Cancer’ and click Accept • The diagnosis code will now display in the diagnosis window in order entry

Penn Medicine Research Billing Initiative Research Lab Order Processes
Page 19
Associate All button / Diagnosis section To associate this one diagnosis with your orders, Click the ‘Associate All’ button right above the diagnosis box
Once the diagnosis has been associated with the order, a red and blue circle will appear next to the order on the order entry screen. Hovering over the red and blue circle will display the associated diagnosis
Associated Diagnosis *NOTE* If there are multiple diagnoses, click the ‘Associate…’button to open up the diagnosis associate grid. The grid will allow you to pick specific orders and associate them with a specific diagnosis
Once the orders have been associated with a diagnosis, they can be Pended. Click the Pended Orders button in the Activity Toolbar

Penn Medicine Research Billing Initiative Research Lab Order Processes
Page 20
Orders Only without an Appointment In the event there are not orders associated with the patient’s appointment the following steps will review how to create an Orders Only encounter and place the orders.
1. Click the Encounter button in the main toolbar. The patient lookup box opens 2. Search for your patient MRN 3. Once found, the Encounter Selection Box will appear. Click New 4. The New Encounter Window will appear. 5. Complete the following Fields:
Type: Orders Only Provider: Provider that is on the Order requisition Dept: If internal enter dept on requisition. If external, enter outside lab draw station for HUP:4061 PPMC: 5413 PAH: 4440
6. Click Accept: 7. Navigator will open. Click Order Entry on the Diagnosis and Orders form 8. Enter order in the New Order field. Possible matches to what you have entered will appear. 9. Select the appropriate match. The initial list may be the Preference List. Click on the Database tab to see a complete list of
orders that match what you entered. 10. Once selected, click Accept or Select and Stay if you are entering more than one order. Once all orders are selected, click
Accept. 11. Remove any incorrect order choices by clicking the Remove button next to the order. 12. Associate a diagnosis to the orders by clicking in the Add Diagnosis field at the bottom left of the order entry screen. 13. Type in the diagnosis or diagnosis code, then Enter on the keyboard. 14. Preference List matches appear, click on Database Lookup (lower left of screen) if your iagnosis is not found. 15. Click the Associate All button to link the diagnosis to the orders 16. Click Pend Orders in the activity tool bar. You will see a Blue and Red interlocking ring next to your orders. 17. Exit the workspace by clicking the X on the workspace tab
DO NOT RELEASE THE ORDERS FROM THIS ENCOUNTER