Embed Size (px)
Citation preview

Remote PC Guide Series - Volume 2
Installing and Configuring VMware vSphere 5.1
Please be aware that a more recent edition of the Remote PC Guide Series, Volume 2, Installation that is specific to VMware ESXi version 6.0 with vCenter is available.
Document Version: 2014-06-02
This guide covers features available in NETLAB+ version 2011.R2 and later. The details of this guide are specific to VMware ESXi version 5.1 with vCenter. Learn more about the Remote PC Guide Series or see the Documentation Library for a list of all NETLAB+ guides.
This guide will lead you through the process of adding remotely accessible PC or servers into your NETLAB+ equipment pods using the VMware ESXi and vCenter virtualization products. This guide is part of a multi-volume series, designed to provide you with the guidance needed to implement remote PCs on your NETLAB+ system Copyright © 2016 Network Development Group, Inc. www.netdevgroup.com NETLAB Academy Edition, NETLAB Professional Edition, and NETLAB+ are registered trademarks of Network Development Group, Inc. VMware is a registered trademark of VMware, Inc. Cisco, IOS, Cisco IOS, Networking Academy, CCNA, and CCNP are registered trademarks of Cisco Systems, Inc.

Remote PC Guide Series - Volume 2 Installing and Configuring VMware vSphere 5.1 for NETLAB+ Virtual Machine Infrastructure
2/1/2016 Copyright © 2016 Network Development Group, Inc. www.netdevgroup.com Page 2
1 Background ................................................................................................................. 3
2 VMware ESXi Planning ................................................................................................ 4
2.1 VMware ESXi Host Requirements ........................................................................ 4
2.2 Hardware Assisted Virtualization Technology ..................................................... 5
2.3 Obtaining VMware ESXi and Licenses for NDG Supported Servers – Dell R710 and R720 ......................................................................................................................... 5
2.3.1 Downloading ESXi software from Dell .......................................................... 6
2.3.2 Obtain licenses for VMware IT Academy Program (vITA) ............................ 6
2.3.3 Obtain licenses for VMware Academic Program (VMAP) ............................ 7
2.4 Obtaining VMware ESXi and Licenses for Non-Supported Servers.................... 11
3 VMware vCenter Planning ........................................................................................ 13
3.1 VMware vCenter Server Requirements ............................................................. 13
3.2 Obtaining VMware vCenter Server Appliance ................................................... 14
3.3 Obtaining VMware Licenses ............................................................................... 14
4 Network Planning...................................................................................................... 17
5 VMware ESXi Server Setup ....................................................................................... 19
5.1 Preparing the ESXi Server ................................................................................... 19
5.2 Installing ESXi on Host Server ............................................................................. 20
6 Basic Network Configuration .................................................................................... 23
7 Management Console ............................................................................................... 28
8 vCenter Server Appliance Deployment ..................................................................... 29
8.1 Installing the vSphere Client .............................................................................. 29
8.2 Deploying vCenter Server Appliance .................................................................. 31
8.3 Configuring Basic Network Connectivity ............................................................ 37
8.4 Creating NETLAB+ user on the vCenter Appliance ............................................. 40
8.5 Initial Configuration on the vCenter Appliance ................................................. 42
8.6 Setting the hostname and changing the root password .................................... 47
8.7 Configure Automatic Startup for vCenter .......................................................... 50
9 Datacenter Configuration ......................................................................................... 52
9.1 Create NETLAB+ datacenter in vCenter ............................................................. 52
9.2 Create a NETLAB+ role in vCenter ...................................................................... 54
9.3 Adding ESXi hosts to the NETLAB+ datacenter .................................................. 60
9.4 Allowing Remote PC Viewer sessions in ESXi firewall ........................................ 62
9.5 vSwitch Configuration ........................................................................................ 64
9.5.1 Verifying vSwitch0 Configuration ............................................................... 65
9.5.2 Inside Network Configuration ..................................................................... 66
9.5.3 Creating vSwitch1 and Binding to Physical NIC .......................................... 69
9.5.4 Increasing the Inside vSwitch Port Count ................................................... 73
9.5.5 Create a Safe Staging Network ................................................................... 76

Remote PC Guide Series - Volume 2 Installing and Configuring VMware vSphere 5.1 for NETLAB+ Virtual Machine Infrastructure
2/1/2016 Copyright © 2016 Network Development Group, Inc. www.netdevgroup.com Page 3
1 Background
NETLAB+ remote PCs and servers in a pod can be implemented using virtual machines running on VMware vSphere 5.1. This guide is designed to help you setup your virtual machine infrastructure for use with NETLAB+. This guide assumes you are familiar with the Remote PC concept behind NETLAB+. Please review the Remote PC Guide Series - Volume 1, Introduction and Planning for Remote PC Implementation with NETLAB+. This guide is designed to help you install and configure vSphere 5.1 for using with NETLAB+. You will be installing VMware ESXi 5.1 and VMware vCenter 5.1 Server Appliance. This guide also assumes that you have configured the NDG supported servers, the Dell R710, R720. Please refer to the appropriate model-specific guide:
Remote PC Guide Series - Volume 2a - Dell R710 BIOS and RAID Configuration
Remote PC Guide Series - Volume 2b - Dell R720 BIOS and RAID Configuration The basics of a NETLAB+ infrastructure consist of a NETLAB+ Appliance, Management Server, vCenter Appliance and ESXi Host Server. The following image illustrates how these all work together:
Remote PC Guide Series - Volume 2 Installing and Configuring VMware vSphere 5.1 for NETLAB+ Virtual Machine Infrastructure
2/1/2016 Copyright © 2016 Network Development Group, Inc. www.netdevgroup.com Page 4
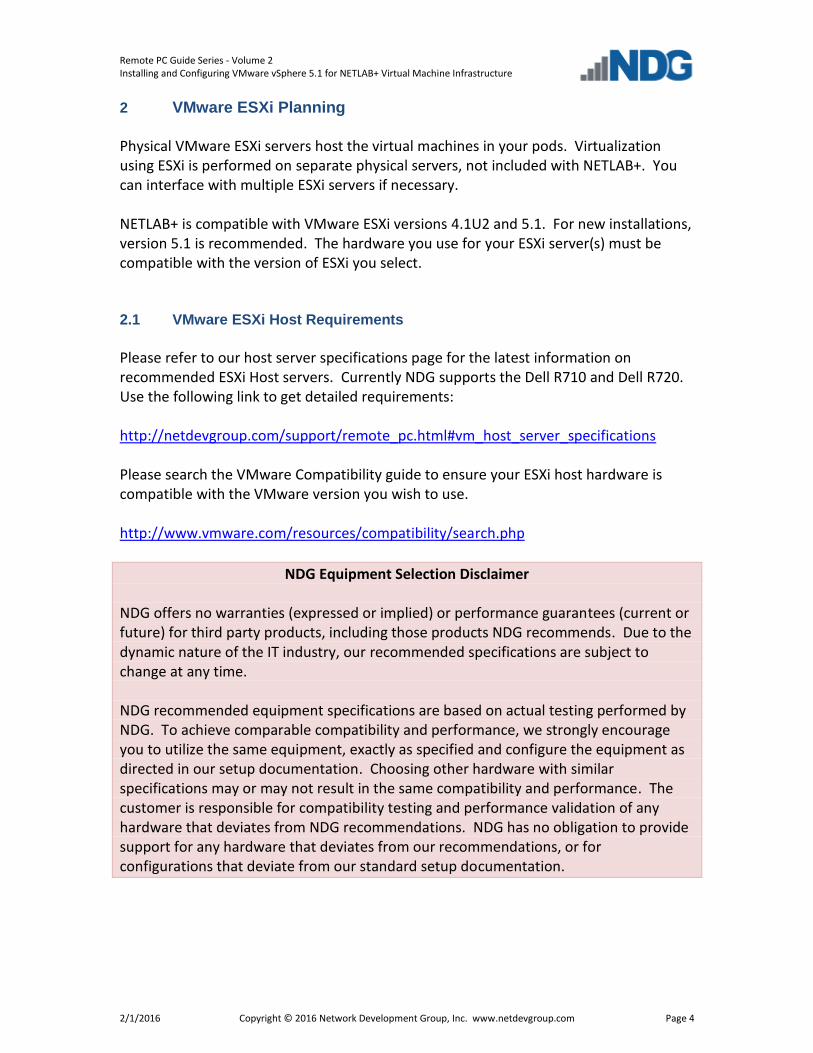
2 VMware ESXi Planning
Physical VMware ESXi servers host the virtual machines in your pods. Virtualization using ESXi is performed on separate physical servers, not included with NETLAB+. You can interface with multiple ESXi servers if necessary. NETLAB+ is compatible with VMware ESXi versions 4.1U2 and 5.1. For new installations, version 5.1 is recommended. The hardware you use for your ESXi server(s) must be compatible with the version of ESXi you select. 2.1 VMware ESXi Host Requirements
Please refer to our host server specifications page for the latest information on recommended ESXi Host servers. Currently NDG supports the Dell R710 and Dell R720. Use the following link to get detailed requirements: http://netdevgroup.com/support/remote_pc.html#vm_host_server_specifications Please search the VMware Compatibility guide to ensure your ESXi host hardware is compatible with the VMware version you wish to use.
http://www.vmware.com/resources/compatibility/search.php
NDG Equipment Selection Disclaimer NDG offers no warranties (expressed or implied) or performance guarantees (current or future) for third party products, including those products NDG recommends. Due to the dynamic nature of the IT industry, our recommended specifications are subject to change at any time. NDG recommended equipment specifications are based on actual testing performed by NDG. To achieve comparable compatibility and performance, we strongly encourage you to utilize the same equipment, exactly as specified and configure the equipment as directed in our setup documentation. Choosing other hardware with similar specifications may or may not result in the same compatibility and performance. The customer is responsible for compatibility testing and performance validation of any hardware that deviates from NDG recommendations. NDG has no obligation to provide support for any hardware that deviates from our recommendations, or for configurations that deviate from our standard setup documentation.

Remote PC Guide Series - Volume 2 Installing and Configuring VMware vSphere 5.1 for NETLAB+ Virtual Machine Infrastructure
2/1/2016 Copyright © 2016 Network Development Group, Inc. www.netdevgroup.com Page 5
2.2 Hardware Assisted Virtualization Technology
Hardware Assisted Virtualization (Intel VT-x) is REQUIRED on any host you use for the VMware IT Academy Install, Configure, Manage (ICM) course and many others.
Virtualization courses, such as the VMware IT Academy labs, have not been tested on AMD processors and are not supported on AMD processors. VMs available from CSSIA were created on the Intel platform. As such, they will not work correctly on an AMD processor. 2.3 Obtaining VMware ESXi and Licenses for NDG Supported Servers – Dell
R710 and R720
If you are not using the NDG recommended host servers, the Dell R710 and Dell R720, please skip to Section 2.4 for Obtaining VMware ESXi and Licenses for non-supported servers.
Guidance on navigating licensing is available on the VMware Product Licensing Through VMware Academic Subscription (VMAS) chart.
It is very important that you download the software from Dell, as they have customized the installer ISO with drivers for the server platform, including networking and storage adapters.

Remote PC Guide Series - Volume 2 Installing and Configuring VMware vSphere 5.1 for NETLAB+ Virtual Machine Infrastructure
2/1/2016 Copyright © 2016 Network Development Group, Inc. www.netdevgroup.com Page 6
2.3.1 Downloading ESXi software from Dell
The following procedure assumes you are using a Dell R710 or Dell R720 server:
1. Go to Dell’s website at http://www.dell.com. 2. Click on Technical Support in the upper-right hand corner. 3. The easiest way is to enter your Dell Service Tag, usually found on the front of
your Dell Server. It may be on a plastic pullout (Dell R720). Enter your service tag and click Submit.
4. If you cannot locate your Dell Service Tag, choose Servers, Storage & Networking under choose a product category. Select PowerEdge and select your server model, PowerEdge R710 or PowerEdge R720 respectively.
5. Click on Drivers and Downloads from the tabs listed in the middle. 6. Under Refine your results, change the Operating System to VMware ESXi 5.1. 7. In the list of categories below, select Enterprise Solutions (1). 8. Click on Download File on the right-hand side. 9. Click Continue to begin the download. 10. This should point you to the following link, however it is strongly recommended
that you use the steps above to make sure you are getting the latest copy: http://downloads-us.dell.com/FOLDER00953628M/1/VMware-VMvisor-Installer-5.1.0-799733.x86_64-Dell_Customized_RecoveryCD_A01.iso
2.3.2 Obtain licenses for VMware IT Academy Program (vITA)
Licensing considerations will vary, depending on your school's participation in the VMware IT Academy Program (VITA) program and/or the VMware Academic Subscription (VMAS) .
Guidance on navigating licensing is available on the VMware Product Licensing Through VMware Academic Subscription (VMAS) chart.
Remote PC Guide Series - Volume 2 Installing and Configuring VMware vSphere 5.1 for NETLAB+ Virtual Machine Infrastructure
2/1/2016 Copyright © 2016 Network Development Group, Inc. www.netdevgroup.com Page 7
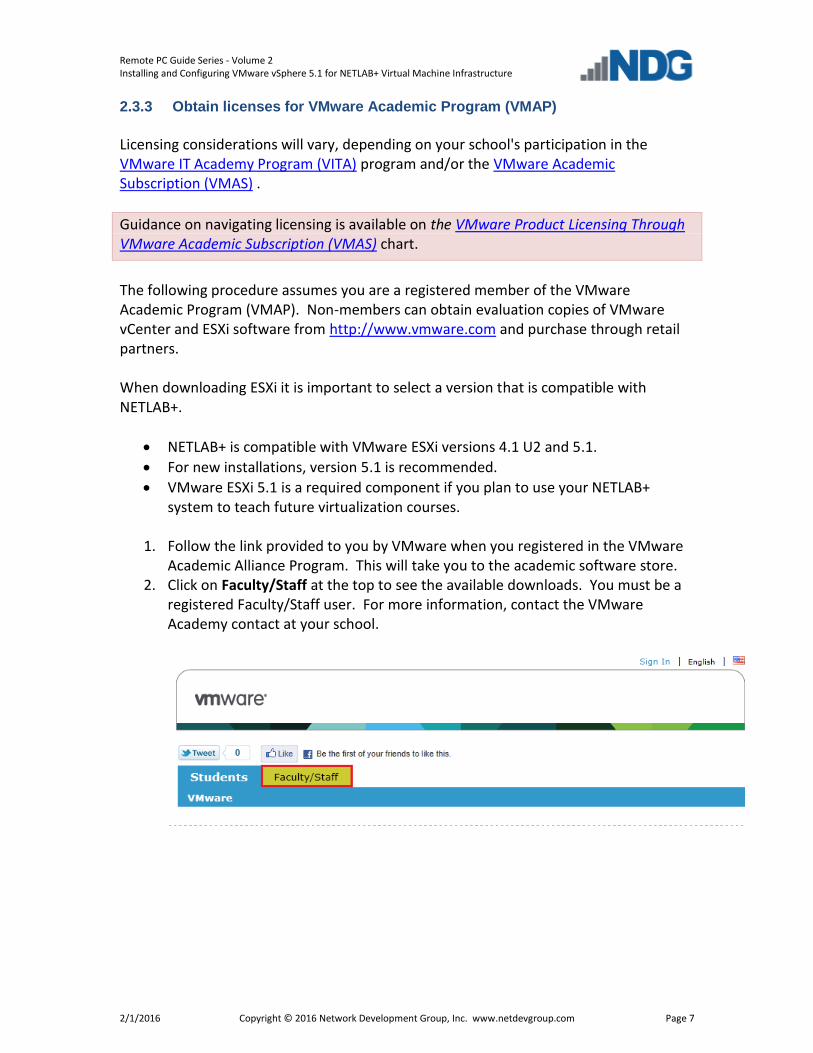
2.3.3 Obtain licenses for VMware Academic Program (VMAP)
Licensing considerations will vary, depending on your school's participation in the VMware IT Academy Program (VITA) program and/or the VMware Academic Subscription (VMAS) .
Guidance on navigating licensing is available on the VMware Product Licensing Through VMware Academic Subscription (VMAS) chart.
The following procedure assumes you are a registered member of the VMware Academic Program (VMAP). Non-members can obtain evaluation copies of VMware vCenter and ESXi software from http://www.vmware.com and purchase through retail partners. When downloading ESXi it is important to select a version that is compatible with NETLAB+.
NETLAB+ is compatible with VMware ESXi versions 4.1 U2 and 5.1.
For new installations, version 5.1 is recommended.
VMware ESXi 5.1 is a required component if you plan to use your NETLAB+ system to teach future virtualization courses.
1. Follow the link provided to you by VMware when you registered in the VMware
Academic Alliance Program. This will take you to the academic software store. 2. Click on Faculty/Staff at the top to see the available downloads. You must be a
registered Faculty/Staff user. For more information, contact the VMware Academy contact at your school.

Remote PC Guide Series - Volume 2 Installing and Configuring VMware vSphere 5.1 for NETLAB+ Virtual Machine Infrastructure
2/1/2016 Copyright © 2016 Network Development Group, Inc. www.netdevgroup.com Page 8
3. Click on VMware vSphere 5, which is marked with a red box in the picture below. This is the first of two software items you will obtain from the e-academy website. These items are marked with “Yes” in the picture below.

Remote PC Guide Series - Volume 2 Installing and Configuring VMware vSphere 5.1 for NETLAB+ Virtual Machine Infrastructure
2/1/2016 Copyright © 2016 Network Development Group, Inc. www.netdevgroup.com Page 9
4. Click on Add to Cart.
5. Sign in with your registered login if necessary. 6. Click on Check Out to continue.
7. Read and accept the EULA. 8. On the confirmation page, click on Proceed With Order.

Remote PC Guide Series - Volume 2 Installing and Configuring VMware vSphere 5.1 for NETLAB+ Virtual Machine Infrastructure
2/1/2016 Copyright © 2016 Network Development Group, Inc. www.netdevgroup.com Page 10
9. On the receipt page, record the serial number found under Items. You will need this serial number for the installation later.

Remote PC Guide Series - Volume 2 Installing and Configuring VMware vSphere 5.1 for NETLAB+ Virtual Machine Infrastructure
2/1/2016 Copyright © 2016 Network Development Group, Inc. www.netdevgroup.com Page 11
2.4 Obtaining VMware ESXi and Licenses for Non-Supported Servers
If you are using the NDG recommended host servers, the Dell R710 and Dell R720, please go to Section 2.3 for Obtaining VMware ESXi and Licenses for NDG Supported Servers – Dell R710 and R720.
If you are using servers other than NDG’s recommendation of Dell R710 and R720, it is strongly recommended you contact your vendor to find out if there is a customized version of VMware ESXi needed for your hardware. The following information will point you to the generic VMware ESXi installable ISO. If you are part of the VMware IT Academy Program (vITA), the keys provided on the community website are valid for VMware ESXi 5.1 installs. They also provide a link for obtaining VMware ESXi 5.1. If you are part of the VMware Academic Program (VMAP), please follow Section 2.3.3 for Obtaining Licenses for VMware Academic Program. That section will provide you with the key. Perform these additional steps to download a copy of the ISO:
1. You may download the ISO image by clicking on Start Download.

Remote PC Guide Series - Volume 2 Installing and Configuring VMware vSphere 5.1 for NETLAB+ Virtual Machine Infrastructure
2/1/2016 Copyright © 2016 Network Development Group, Inc. www.netdevgroup.com Page 12
2. Click the Download link for VMware ESXi 5.1 (CD ISO) Installable.

Remote PC Guide Series - Volume 2 Installing and Configuring VMware vSphere 5.1 for NETLAB+ Virtual Machine Infrastructure
2/1/2016 Copyright © 2016 Network Development Group, Inc. www.netdevgroup.com Page 13
3 VMware vCenter Planning
VMware vCenter Server enables you to manage the resources of multiple ESXi hosts and allows you to monitor and manage your physical and virtual infrastructure. Starting with software version 2011.R2, NETLAB+ integrates with VMware vCenter Server to assist the administrator with installing, replicating and configuring virtual machine pods. 3.1 VMware vCenter Server Requirements
As of vSphere 5.1, NDG only supports the VMware vCenter Appliance. The physical server on which vCenter resides should be a dedicated "management server" to provide ample compute power. It is strongly recommended you follow our server recommendations listed below to provide ample compute power now and in the future. http://www.netdevgroup.com/support/remote_pc.html#vcenter_server_specifications
NDG does not support configurations where vCenter is running on a heavily loaded ESXi host and/or an ESXi host that is also used to host virtual machines for NETLAB+ pods. Such configurations have exhibited poor performance, API timeouts, and sporadic errors in NETLAB+ operations.
The vCenter server must have network access to your ESXi servers. You will use the VMware vSphere Client to access vCenter Server. As of vSphere 5.1, there is a vSphere Web Client, however this is currently not used by NDG for setup and configuration. Below is a list of reasons why NDG will only support the VMware vCenter Server Appliance:
Starting with vCenter 5.1, the appliance now uses Postgres databases. This allows the appliance to be able to handle multiple VMs and multiple ESXi hosts compared to the 5 ESXi hosts and 50 VM limit that the vCenter 5.0 Appliance had.
The vCenter Appliance is a standalone VM that runs on SUSE Linux, instead of Microsoft Windows Server. This eliminates the need for Microsoft licensing for both Microsoft Windows Server and SQL Server.
The Windows version of vCenter 5.1 now requires multiple databases. It also requires an Active Directory setup in order to work with the VMware Single Sign-On feature that is embedded in the appliance. Because of the complexity of configuring an Active Directory and multiple databases, NDG no longer recommends nor supports the Windows version. Based on our research, VMware is migrating to the appliance version in the future.
The quick and easy deployment of the vCenter Appliance makes the infrastructure configuration much easier to deploy for NETLAB+ administrators.
NDG strongly recommends and only supports the use of the vCenter Appliance on a separate Management Server. NDG has Management Server
Remote PC Guide Series - Volume 2 Installing and Configuring VMware vSphere 5.1 for NETLAB+ Virtual Machine Infrastructure
2/1/2016 Copyright © 2016 Network Development Group, Inc. www.netdevgroup.com Page 14
recommendations that will not only support the vCenter Appliance but also future versions of the NETLAB+ software.
3.2 Obtaining VMware vCenter Server Appliance
Follow the instructions at the following link in order to obtain the NDG Optimized vCenter Server v5.1 Appliance OVA from CSSIA.org: http://www.netdevgroup.com/support/documentation/CSSIA%20Preconfigured%20Virtual%20Machine%20Requests.pdf When filling out the form, the "vCenter 5.1 Appliance NETLAB+ Optimized" entry is at the bottom of the page. Be sure to select the version for ESXi 5.1 hosts. The vCenter Server virtual appliance downloaded from VMware has a 5 host / 50 active VM limit. We applied changes to the default vCenter Server appliance to support a much larger 50 host / 500 VM limit, expanded the filesystem, and adjusted the RAM and CPU settings. This optimized version has been packaged as an OVA and given to CSSIA.org for distribution. Note, this 500 limit is active VMs and exceeds the limits of any one NETLAB AE (80 active VM) or PE (160 active VM) system. 3.3 Obtaining VMware Licenses
Please review the following flowchart that helps with VMware product licensing: VMware Product Licensing Through VMware Academic Subscription (VMAS) If you are part of the VMware IT Academy Program (vITA), the keys provided on the community website are valid for VMware vCenter Server 5 installs. They also provide a link for obtaining VMware vSphere 5 software. You will want to obtain an OVA file of the vCenter Server Appliance, not the ISO for installing on Windows. NDG no longer recommends installing on a Windows machine for vCenter Server. If you are a part of the VMware Academic Program the following procedure will assist you in obtaining the license key as well as downloading the OVA file. You will later deploy that image use VMware vSphere Client.
1. Follow the link provided to you by VMware when you registered the academy.
This will take you to the academic license software store.

Remote PC Guide Series - Volume 2 Installing and Configuring VMware vSphere 5.1 for NETLAB+ Virtual Machine Infrastructure
2/1/2016 Copyright © 2016 Network Development Group, Inc. www.netdevgroup.com Page 15
2. Click on Faculty/Staff at the top to see the available downloads. You must be a registered Faculty/Staff user. For more information, contact your VMware academy contact at your school.
3. Click on VMware vCenter Server 5 Standard, which is marked with a red box in
the picture below. This is the second of two software items you will obtain from the e-academy website. These items are marked with “Yes” in the picture below.

Remote PC Guide Series - Volume 2 Installing and Configuring VMware vSphere 5.1 for NETLAB+ Virtual Machine Infrastructure
2/1/2016 Copyright © 2016 Network Development Group, Inc. www.netdevgroup.com Page 16
4. Click on Add To Cart.
5. Sign in with your registered login. 6. Click on Check Out to continue.
7. Read and accept the EULA. 8. On the confirmation page, click on Proceed With Order. 9. On the receipt page, record the serial number found under Items next to
Activation Code. You will need this code for installation later.
10. You do not need to download the vCenter Server software from this screen. You
will use the key with the NDG Optimized vCenter Server Appliance you downloaded from CSSIA.org.

Remote PC Guide Series - Volume 2 Installing and Configuring VMware vSphere 5.1 for NETLAB+ Virtual Machine Infrastructure
2/1/2016 Copyright © 2016 Network Development Group, Inc. www.netdevgroup.com Page 17
4 Network Planning
This section is designed to help you plan your networking infrastructure. Please review the "Networking Models" section of the Remote PC Guide Series - Volume 1, Introduction and Planning for Remote PC Implementation with NETLAB+.
Remember, dual-homed is only necessary and required if you plan to use real physical lab devices, such as pods for the Cisco Networking Academy.
The IP addressing and DNS servers will be dictated by the model you select. Please fill out the appropriate table below to help assist you with configuration.
It is strongly recommended that you print out your table in order to have it available for easy reference throughout the installation and configuration of your Virtual Machine Infrastructure.
Single-Homed Model
vCenter Outside IP Address
ESXi Management Server Outside IP Address
ESXi Host Server 1 Outside IP Address
ESXi Host Server 2 Outside IP Address
ESXi Host Server 3 Outside IP Address
ESXi Host Server 4 Outside IP Address
Subnet Mask
Default Gateway
Primary DNS Server
Secondary DNS Server
NETLAB+ vCenter Appliance ESXi Management Server ESXi Host 1 Server
Outside Inside Outside Inside Outside Inside Outside Inside
IP Address Campus
Campus
Campus
Campus
Subnet Mask Campus
Campus
Campus
Campus
Gateway Campus
Campus
Campus
Campus
vSwitch
vSwitch0
vSwitch0
vSwitch0
Management Path
*
*
*

Remote PC Guide Series - Volume 2 Installing and Configuring VMware vSphere 5.1 for NETLAB+ Virtual Machine Infrastructure
2/1/2016 Copyright © 2016 Network Development Group, Inc. www.netdevgroup.com Page 18
Dual-Homed Model – Real Equipment Pods
vCenter Outside IP Address
ESXi Management Server Outside IP Address
ESXi Host Server 1 Outside IP Address
ESXi Host Server 1 Inside IP Address 169.254.0.241
ESXi Host Server 2 Outside IP Address
ESXi Host Server 2 Inside IP Address 169.254.0.242
ESXi Host Server 3 Outside IP Address
ESXi Host Server 3 Inside IP Address 169.254.0.243
ESXi Host Server 4 Outside IP Address
ESXi Host Server 4 Inside IP Address 169.254.0.244
Outside Subnet Mask
Inside Subnet Mask 255.255.255.0
Outside Default Gateway
Inside Default Gateway None
Primary DNS Server
Secondary DNS Server
NETLAB+ vCenter Appliance ESXi Management Server ESXi Host 1 Server
Outside Inside Outside Inside Outside Inside Outside Inside
IP Address Campus 169.254.0.254 Campus
Campus Campus 169.254.0.241
Subnet Mask Campus 255.255.255.0 Campus
Campus Campus 255.255.255.0
Gateway Campus not set Campus
Campus Campus not set
vSwitch
vSwitch0
vSwitch0 vSwitch0 vSwitch1
Management Path
*
*
*

Remote PC Guide Series - Volume 2 Installing and Configuring VMware vSphere 5.1 for NETLAB+ Virtual Machine Infrastructure
2/1/2016 Copyright © 2016 Network Development Group, Inc. www.netdevgroup.com Page 19
5 VMware ESXi Server Setup
This section describes the software installation on a VMware ESXi host server.
All tasks in this section are performed on separate dedicated physical servers that you provide. Do not perform any of the tasks in this section on the NETLAB+ server appliance, as this will delete the NETLAB+ software, requiring you to return it to NDG for re-installation.
There should be a minimum of two (2) ESXi host servers. One will be used for management, referred to, as the Management Server, and the other will be your ESXi Host Server, which will hold the virtual machines for the pods. You may have one or multiple ESXi Host servers depending on the courses you plan to teach. NDG supports the Dell R710 and the Dell R720 as a Management Server and as an ESXi Host Server. Please refer to the NDG requirements website for the latest supported server configurations: http://www.netdevgroup.com/support/remote_pc.html#vm_host_server_specifications 5.1 Preparing the ESXi Server
NDG recommends the Dell R710 and R720 server platforms. If you are using non-supported servers, please contact your vendor for assistance in configuring the BIOS and RAID options. Please refer to the appropriate guide for each respective server for instructions on BIOS and RAID configuration:
Remote PC Guide Series - Volume 2a - Dell R710 BIOS and RAID Configuration
Remote PC Guide Series - Volume 2b - Dell R720 BIOS and RAID Configuration
It is highly recommended that you read your server hardware section completely, prior to making changes to your system.

Remote PC Guide Series - Volume 2 Installing and Configuring VMware vSphere 5.1 for NETLAB+ Virtual Machine Infrastructure
2/1/2016 Copyright © 2016 Network Development Group, Inc. www.netdevgroup.com Page 20
5.2 Installing ESXi on Host Server
This section will walk you through installing VMware ESXi to your Management Server and to each ESXi Host Servers. Please note that the content in the images below will vary based on your system. The instructional steps are the same.
If you have not done so already, burn a copy of the ESXi 5.1 Installable ISO.
Instructions for installing ESXi:
1. Turn on or restart your system. 2. Insert your ESXi 5.1 media to install the ESXi Installable. 3. You are presented with the Installation screen below.
4. Press Enter to continue. 5. You are prompted with the User Agreement. Press F11 to Accept and Continue.

Remote PC Guide Series - Volume 2 Installing and Configuring VMware vSphere 5.1 for NETLAB+ Virtual Machine Infrastructure
2/1/2016 Copyright © 2016 Network Development Group, Inc. www.netdevgroup.com Page 21
6. On the Select a Disk screen, choose the available Dell PERC drive. The size will vary depending on your configuration and server. Press Enter to continue.
7. Make sure US Default is selected for keyboard layout and press Enter to continue.
8. You will be prompted to set the root password. Enter your custom password in the Root password and Confirm password fields.
Be sure to record this password in a safe place. You will need it to integrate the ESXi host with the vCenter Server.
9. Press F11 to begin the installation. Installation can take 1-10 minutes depending
on hardware. 10. When the Installation Complete window appears, press Enter to reboot the
machine.

Remote PC Guide Series - Volume 2 Installing and Configuring VMware vSphere 5.1 for NETLAB+ Virtual Machine Infrastructure
2/1/2016 Copyright © 2016 Network Development Group, Inc. www.netdevgroup.com Page 22
11. As stated before, you will need to complete these steps on your Management Server, and on all ESXi Host servers that will be used to host virtual machines for the pods.

Remote PC Guide Series - Volume 2 Installing and Configuring VMware vSphere 5.1 for NETLAB+ Virtual Machine Infrastructure
2/1/2016 Copyright © 2016 Network Development Group, Inc. www.netdevgroup.com Page 23
6 Basic Network Configuration
This section will assist you in the setup of basic network configuration on an ESXi host. This will need to be performed on the Management Server and on each ESXi Host Server.
1. When the ESXi host server is booted, you are prompted with the console screen. The information on this screen will vary based on your setup.
2. Press F2 to begin setting up the host. 3. When prompted with the login screen, make sure the username is root and
enter the password you created in Section 5.2.

Remote PC Guide Series - Volume 2 Installing and Configuring VMware vSphere 5.1 for NETLAB+ Virtual Machine Infrastructure
2/1/2016 Copyright © 2016 Network Development Group, Inc. www.netdevgroup.com Page 24
4. From the System Customization menu, select Configure Management Network and press Enter.
5. Select IP Configuration and press Enter.
6. Select Set Static IP address and network configuration and set IP Address, Subnet Mask and Default Gateway to an inside or outside IP configuration to fit your network configuration and model. Use the table you filled out in Section 10. Press Enter to save settings.
Remote PC Guide Series - Volume 2 Installing and Configuring VMware vSphere 5.1 for NETLAB+ Virtual Machine Infrastructure
2/1/2016 Copyright © 2016 Network Development Group, Inc. www.netdevgroup.com Page 25
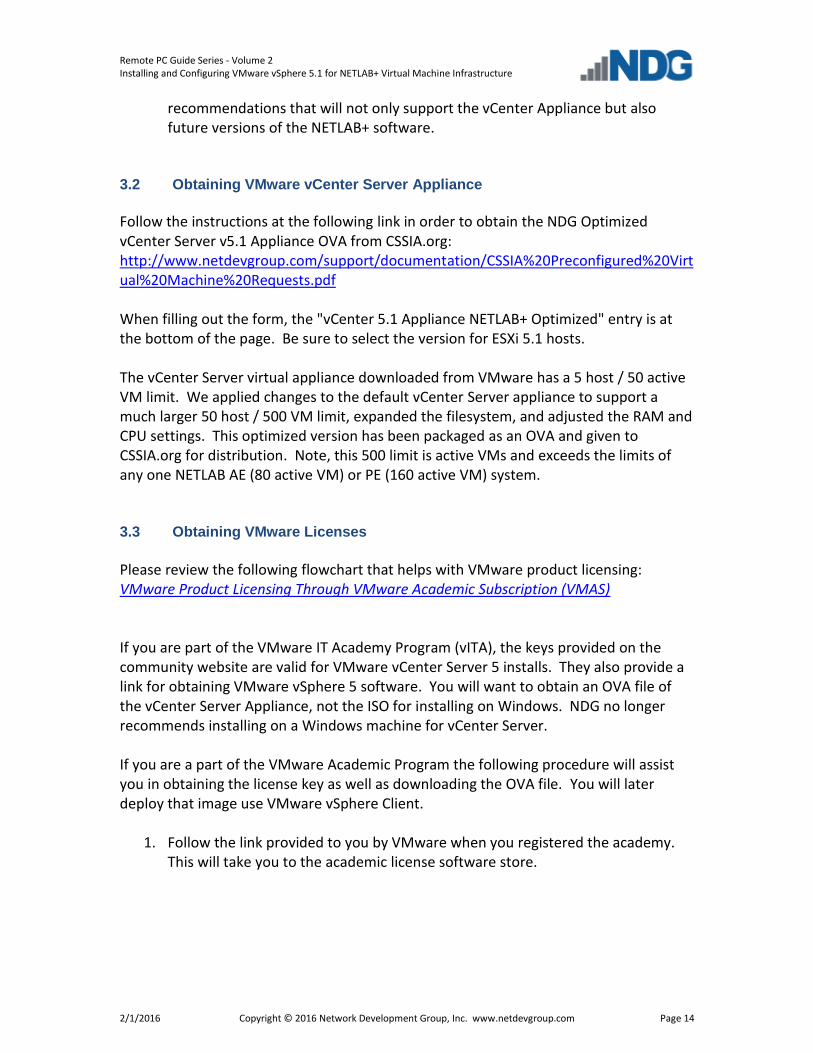
7. If you are not using IPv6, it is strongly recommended that you disable it to prevent possible networking issues in a production environment. Select IPv6 Configuration from the Configure Management Network menu.
8. Make sure Enable IPv6 (restart required) is highlighted and press the Spacebar to remove the X from the checkbox. Make sure the window matches the one below and then press Enter to save settings.

Remote PC Guide Series - Volume 2 Installing and Configuring VMware vSphere 5.1 for NETLAB+ Virtual Machine Infrastructure
2/1/2016 Copyright © 2016 Network Development Group, Inc. www.netdevgroup.com Page 26
9. Next, select DNS Configuration from the Configuration Management Network menu.
10. Set the appropriate Primary DNS Server, Alternate DNS Server, and Hostname
based on the table you filled out in Section 10. Press Enter to save settings.
11. Press Enter to confirm changes and return to the Configure Management Network window.

Remote PC Guide Series - Volume 2 Installing and Configuring VMware vSphere 5.1 for NETLAB+ Virtual Machine Infrastructure
2/1/2016 Copyright © 2016 Network Development Group, Inc. www.netdevgroup.com Page 27
12. Press ESC to exit. When prompted to Apply changes and restart management press Y to continue.

Remote PC Guide Series - Volume 2 Installing and Configuring VMware vSphere 5.1 for NETLAB+ Virtual Machine Infrastructure
2/1/2016 Copyright © 2016 Network Development Group, Inc. www.netdevgroup.com Page 28
7 Management Console
The VMware vCenter Server Appliance can be managed through any web browser or the vSphere client. This configuration requires a “management console” in order to configure the vCenter Server appliance, ESXi Host Servers and virtual machines. The management console can be a Windows Server or Windows Desktop operating system. The management console can be either a virtual machine or a physical host like a workstation or laptop. The management console will need to be on the same network as the ESXi hosts and vCenter Server appliance. NDG recommends deploying a Windows Server or Windows Desktop virtual machine on the Management Server. This virtual machine should be configured with one NIC regardless of your networking model choice. The management console will also be where you want to download any virtual machine images for pod deployment. As such, it is strongly recommended that you have plenty of storage available to this virtual machine.
Remote PC Guide Series - Volume 2 Installing and Configuring VMware vSphere 5.1 for NETLAB+ Virtual Machine Infrastructure
2/1/2016 Copyright © 2016 Network Development Group, Inc. www.netdevgroup.com Page 29
8 vCenter Server Appliance Deployment
In this section, you will deploy and configure the NDG Optimized vCenter Server Appliance. Starting with VMware ESXi 5.1, NDG strongly recommends using the NDG Optimized VMware vCenter Server Appliance. This appliance is a virtual machine that runs on ESXi 5.1. The physical server on which vCenter resides should be a dedicated "management server" to provide ample computing power.
NDG does not support configurations where vCenter is running on a heavily loaded ESXi host and/or an ESXi host that is also used to host virtual machines for NETLAB+ pods. Such configurations have exhibited poor performance, API timeouts, and sporadic errors in NETLAB+ operations.
8.1 Installing the vSphere Client
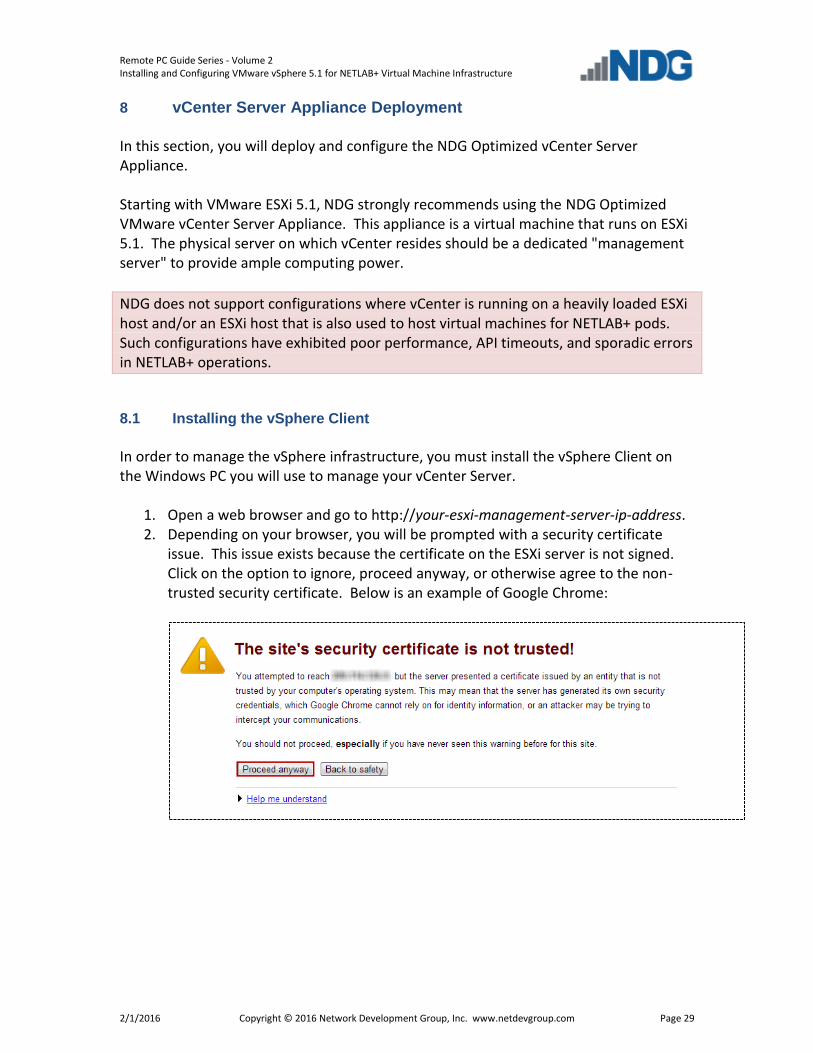
In order to manage the vSphere infrastructure, you must install the vSphere Client on the Windows PC you will use to manage your vCenter Server.
1. Open a web browser and go to http://your-esxi-management-server-ip-address. 2. Depending on your browser, you will be prompted with a security certificate
issue. This issue exists because the certificate on the ESXi server is not signed. Click on the option to ignore, proceed anyway, or otherwise agree to the non-trusted security certificate. Below is an example of Google Chrome:

Remote PC Guide Series - Volume 2 Installing and Configuring VMware vSphere 5.1 for NETLAB+ Virtual Machine Infrastructure
2/1/2016 Copyright © 2016 Network Development Group, Inc. www.netdevgroup.com Page 30
3. Click on the Download vSphere Client hyperlink.
4. Save the installer to your desktop. Once the file is saved, double-click the installer file to start the installation.
5. You may be prompted with a Security Warning. Click on Run to start the install.
6. The installer will begin extracting the setup files. When prompted, make sure English is selected and click OK.

Remote PC Guide Series - Volume 2 Installing and Configuring VMware vSphere 5.1 for NETLAB+ Virtual Machine Infrastructure
2/1/2016 Copyright © 2016 Network Development Group, Inc. www.netdevgroup.com Page 31
7. Click Next to continue. 8. Click Next to Accept the End-User Patent Agreement. 9. Click I agree to the terms in the license agreement and click Next to continue.
10. Click Next to accept the default Destination Folder. 11. Click Install to continue installation. 12. Click Finish to finish installation.
8.2 Deploying vCenter Server Appliance
In this section, you will be deploying the NDG Optimized vCenter Server Appliance on the ESXi Management Server. Make sure you have downloaded the NDG Optimized vCenter Server Appliance from Section 3 to your desktop.
1. Double-click the VMware vSphere Client shortcut on the desktop.

Remote PC Guide Series - Volume 2 Installing and Configuring VMware vSphere 5.1 for NETLAB+ Virtual Machine Infrastructure
2/1/2016 Copyright © 2016 Network Development Group, Inc. www.netdevgroup.com Page 32
2. Enter the IP address of your ESXi Management Server (use the table you filled out in Section 10, User Name is root, and the Password is the one you set during installation in Section 5.2.
3. If a Security Warning window appears, click the checkbox Install this certificate and do not display any security warnings for “yourserverip” and click Ignore.

Remote PC Guide Series - Volume 2 Installing and Configuring VMware vSphere 5.1 for NETLAB+ Virtual Machine Infrastructure
2/1/2016 Copyright © 2016 Network Development Group, Inc. www.netdevgroup.com Page 33
4. When prompted with the VMware Evaluation Notice click OK to continue.
5. Click the Inventory icon.
6. Make sure the ESXi host is highlighted on the left. Click File menu and select Deploy OVF Template…

Remote PC Guide Series - Volume 2 Installing and Configuring VMware vSphere 5.1 for NETLAB+ Virtual Machine Infrastructure
2/1/2016 Copyright © 2016 Network Development Group, Inc. www.netdevgroup.com Page 34
7. When the Source window appears, click on Browse…
8. In the Open window, click Desktop in the left pane, then click the OVA file you downloaded from Section 3. Click Open.

Remote PC Guide Series - Volume 2 Installing and Configuring VMware vSphere 5.1 for NETLAB+ Virtual Machine Infrastructure
2/1/2016 Copyright © 2016 Network Development Group, Inc. www.netdevgroup.com Page 35
9. Click Next to continue. 10. On the OVF Template Details window, review the information and click Next to
continue. 11. On the Name and Location window, in the Name field, enter VCENTER and click
Next.
12. On the Disk Format window, select Thin Provision and click Next.

Remote PC Guide Series - Volume 2 Installing and Configuring VMware vSphere 5.1 for NETLAB+ Virtual Machine Infrastructure
2/1/2016 Copyright © 2016 Network Development Group, Inc. www.netdevgroup.com Page 36
13. On the Ready to Complete window, click Finish to deploy the appliance. 14. Wait for the progress window to complete; this will take a few minutes. Click on
Close when it has completed.

Remote PC Guide Series - Volume 2 Installing and Configuring VMware vSphere 5.1 for NETLAB+ Virtual Machine Infrastructure
2/1/2016 Copyright © 2016 Network Development Group, Inc. www.netdevgroup.com Page 37
8.3 Configuring Basic Network Connectivity
In this section, you will be configuring the IP address via the console on VCENTER. By default, the appliance is set for DHCP. If you have DHCP running on your management network, the appliance will initially pull an IP address. NDG strongly recommends you use a static IP address. These steps will walk you through configuring an IP address.
1. In the vSphere Client, expand the ESXi host on the left to display the VCENTER
VM.
2. Right-click the VCENTER VM, and select Open Console.

Remote PC Guide Series - Volume 2 Installing and Configuring VMware vSphere 5.1 for NETLAB+ Virtual Machine Infrastructure
2/1/2016 Copyright © 2016 Network Development Group, Inc. www.netdevgroup.com Page 38
3. Click the Power On button in the toolbar to power on the VM.
4. When the appliance has finished loading you will see the following screen. This
screen may vary if you have DHCP enabled on your management network:
5. We must configure the network settings manually to set a static address. Make sure Login is selected and press Enter.

Remote PC Guide Series - Volume 2 Installing and Configuring VMware vSphere 5.1 for NETLAB+ Virtual Machine Infrastructure
2/1/2016 Copyright © 2016 Network Development Group, Inc. www.netdevgroup.com Page 39
6. Enter root for the username and enter vmware for the password.
7. Enter the following command: localhost:~# /opt/vmware/share/vami/vami_config_net
8. Type 6 and press Enter to set the IP Address Allocation for eth0. 9. When prompted to “Configure an IPv6 address for eth0?” press Enter to select
the default answer. 10. When prompted to “Configure an IPv4 address for eth0?” type y then press
Enter. 11. When prompted to “Use a DHCPv4 Server instead of a static IPv4 address?”
type n and press Enter. 12. Enter youripaddress for the IPv4 Address and press Enter. Please use your
table from Section 10 for reference. 13. Enter yoursubnetmask for the Netmask and press Enter. Please use your table
from Section 10 for reference. 14. When asked “Is this Correct?” press Enter to say yes.

Remote PC Guide Series - Volume 2 Installing and Configuring VMware vSphere 5.1 for NETLAB+ Virtual Machine Infrastructure
2/1/2016 Copyright © 2016 Network Development Group, Inc. www.netdevgroup.com Page 40
15. Type 2 and press Enter to set the Default Gateway. 16. When prompted to select the interface, press Enter to select the default. 17. Enter the IPv4 Default Gateway, yourdefaultgateway and press Enter. Please
use your table from Section 10 for reference. 18. Leave IPv6 Default Gateway blank and press Enter. 19. After the changes have been made, type 1 at the Main Menu then press Enter to
exit.
8.4 Creating NETLAB+ user on the vCenter Appliance
In this section, you will be creating a NETLAB+ user account and setting the password for NETLAB+ to access VCENTER.
1. While still in the command prompt of the vCenter Server Appliance, enter the following command to add the NETLAB+ user:
localhost:~# useradd –m NETLAB
2. Enter the following command to change the password: localhost:~# passwd NETLAB
3. Enter a password and retype the new password. It is important that you write
this information down, as it is needed when connecting NETLAB+ to your vSphere Infrastructure.
4. Enter the following command to change the user password expiry information: localhost:~# chage NETLAB

Remote PC Guide Series - Volume 2 Installing and Configuring VMware vSphere 5.1 for NETLAB+ Virtual Machine Infrastructure
2/1/2016 Copyright © 2016 Network Development Group, Inc. www.netdevgroup.com Page 41
5. Enter the following information:
6. Type exit and press Enter at the console to log out. localhost:~# exit
7. Press CTRL+ALT to release the mouse from the window. You may need to press
this a couple of times and move the mouse. When a mouse cursor appears, you can continue.
8. Click the File menu, and select Exit to close the console.

Remote PC Guide Series - Volume 2 Installing and Configuring VMware vSphere 5.1 for NETLAB+ Virtual Machine Infrastructure
2/1/2016 Copyright © 2016 Network Development Group, Inc. www.netdevgroup.com Page 42
8.5 Initial Configuration on the vCenter Appliance
For this section, you will be doing the initial configuration on the vCenter Appliance.
1. Open an Internet Browser. 2. In the address bar, enter https://yourvcenteripaddress:5480. When
prompted with a security warning, accept this certificate based on your browser. This error is because the default certificate for the vCenter appliance is not signed. Below is an example of Google Chrome:
3. Enter the default credentials, root for the username and vmware for the password and click Login.

Remote PC Guide Series - Volume 2 Installing and Configuring VMware vSphere 5.1 for NETLAB+ Virtual Machine Infrastructure
2/1/2016 Copyright © 2016 Network Development Group, Inc. www.netdevgroup.com Page 43
4. Click the checkbox to Accept license agreement and click Next.
Remote PC Guide Series - Volume 2 Installing and Configuring VMware vSphere 5.1 for NETLAB+ Virtual Machine Infrastructure
2/1/2016 Copyright © 2016 Network Development Group, Inc. www.netdevgroup.com Page 44
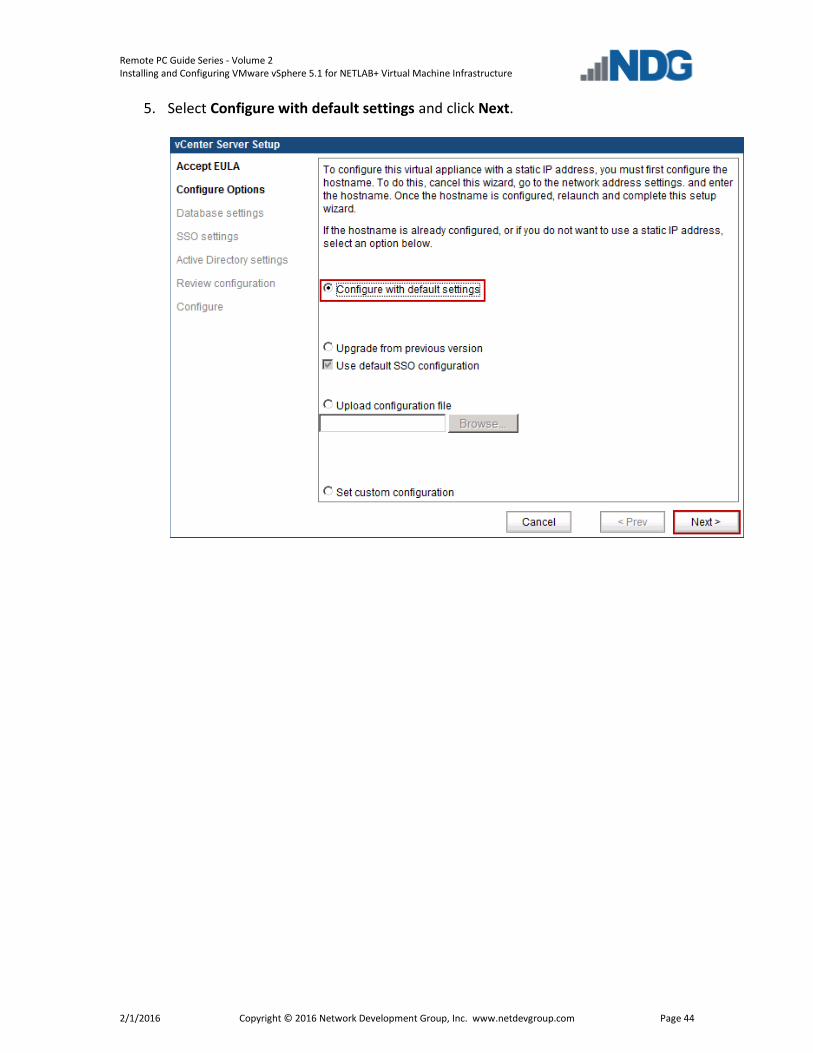
5. Select Configure with default settings and click Next.

Remote PC Guide Series - Volume 2 Installing and Configuring VMware vSphere 5.1 for NETLAB+ Virtual Machine Infrastructure
2/1/2016 Copyright © 2016 Network Development Group, Inc. www.netdevgroup.com Page 45
6. Review the information and click Start to configure vCenter with default settings. This may take a few minutes to complete as it configures the various databases and starts the services.
7. Click Close to finish vCenter Setup.

Remote PC Guide Series - Volume 2 Installing and Configuring VMware vSphere 5.1 for NETLAB+ Virtual Machine Infrastructure
2/1/2016 Copyright © 2016 Network Development Group, Inc. www.netdevgroup.com Page 46
8. You will be presented with the Summary screen. Wait until everything has loaded, all spinning wheels should disappear.

Remote PC Guide Series - Volume 2 Installing and Configuring VMware vSphere 5.1 for NETLAB+ Virtual Machine Infrastructure
2/1/2016 Copyright © 2016 Network Development Group, Inc. www.netdevgroup.com Page 47
8.6 Setting the hostname and changing the root password
For this section, we will be changing the hostname of the vCenter Appliance, enabling Certificate Regeneration, and changing the root password.
1. Click on the Network tab at the top. 2. Click on the Address tab below. 3. In the Hostname field, enter VCENTER. 4. Click Save Settings, under Actions on the right-hand side. You will get a
confirmation in green, “Network settings saved” above the Nameserver Source field.
5. Click on the Admin tab at the top.
The Admin tab does not display in some versions of Firefox. If you do not see the Admin tab, it may be necessary to use a different browser. The Admin tab displays properly in Internet Explorer 9.
6. Change the administrator password:
a. Type vmware in the Current administrator password field. b. Type yournewpassword in the New administrator password field and in the
Retype new administrator password field. This will be now new root password for the vCenter Appliance, so please write this down in a safe place.
c. Click on the Change password button on the right.

Remote PC Guide Series - Volume 2 Installing and Configuring VMware vSphere 5.1 for NETLAB+ Virtual Machine Infrastructure
2/1/2016 Copyright © 2016 Network Development Group, Inc. www.netdevgroup.com Page 48
7. Click on Toggle certificate setting to change the Certificate regeneration enabled option to yes. This will generate a new certificate after changing the hostname. You will notice that the Certification regeneration enabled option changed to yes and a green confirmation message “Operation was successful” will appear above the Current administrator password field.
8. Click Logout user root in the upper-right hand corner.
9. Close your browser and maximize vSphere Client. 10. Right-click VCENTER in the inventory list and select Open Console.
11. Click the Restart Guest button to restart the VCENTER VM.

Remote PC Guide Series - Volume 2 Installing and Configuring VMware vSphere 5.1 for NETLAB+ Virtual Machine Infrastructure
2/1/2016 Copyright © 2016 Network Development Group, Inc. www.netdevgroup.com Page 49
12. If a Confirm Reboot window pops up, click Yes.
13. Watch the console to VCENTER to monitor the reboot. This will take a few
minutes. After the VM has rebooted and you are prompted with the Summary screen, close the console and exit vSphere Client.

Remote PC Guide Series - Volume 2 Installing and Configuring VMware vSphere 5.1 for NETLAB+ Virtual Machine Infrastructure
2/1/2016 Copyright © 2016 Network Development Group, Inc. www.netdevgroup.com Page 50
8.7 Configure Automatic Startup for vCenter
For this section, you will configure vCenter to automatically start with the ESXi Management Server. This is important because if not set and the ESXi Management Server powers off or is rebooted, the vCenter Appliance will not start up causing NETLAB+ failure and possible loss of administration.
1. Click on your ESXi host in the left pane. 2. Click the Configuration tab at the top. 3. Under the software section click on Virtual Machine Startup/Shutdown.
4. Click on Properties in the upper right.

Remote PC Guide Series - Volume 2 Installing and Configuring VMware vSphere 5.1 for NETLAB+ Virtual Machine Infrastructure
2/1/2016 Copyright © 2016 Network Development Group, Inc. www.netdevgroup.com Page 51
5. Click the checkbox to Allow virtual machines to start and stop automatically with the system.
6. Select your vCenter VM in the list and click Move Up until it is under Automatic Startup.
7. Click OK.
8. Close vSphere client.

Remote PC Guide Series - Volume 2 Installing and Configuring VMware vSphere 5.1 for NETLAB+ Virtual Machine Infrastructure
2/1/2016 Copyright © 2016 Network Development Group, Inc. www.netdevgroup.com Page 52
9 Datacenter Configuration
In this section, you will be:
Setting up and configuring a NETLAB+ datacenter
Setting up and configuring a NETLAB+ role
Adding your ESXi Host Servers to the datacenter
Allowing Remote PC Viewer sessions in the ESXi firewall
vSwitch Configurations 9.1 Create NETLAB+ datacenter in vCenter
In this section, we will be creating a NETLAB+ datacenter on the vCenter.
1. Using vSphere client, log into the vCenter using the IP address you set in Section
8.3.
2. Right-click the vCenter host, localhost, on the left and select Rename.
3. Set the hostname to VCENTER and press Enter.

Remote PC Guide Series - Volume 2 Installing and Configuring VMware vSphere 5.1 for NETLAB+ Virtual Machine Infrastructure
2/1/2016 Copyright © 2016 Network Development Group, Inc. www.netdevgroup.com Page 53
4. Right-click on the VCENTER host and select New Datacenter.
5. Set the datacenter name to NETLAB and press Enter.

Remote PC Guide Series - Volume 2 Installing and Configuring VMware vSphere 5.1 for NETLAB+ Virtual Machine Infrastructure
2/1/2016 Copyright © 2016 Network Development Group, Inc. www.netdevgroup.com Page 54
9.2 Create a NETLAB+ role in vCenter
In this section, you will be creating a NETLAB+ role in vCenter to map to the NETLAB+ user you created in Section 8.4.
1. To create a vCenter role for NETLAB+, click on View > Administration > Roles
from the menu.
Remote PC Guide Series - Volume 2 Installing and Configuring VMware vSphere 5.1 for NETLAB+ Virtual Machine Infrastructure
2/1/2016 Copyright © 2016 Network Development Group, Inc. www.netdevgroup.com Page 55
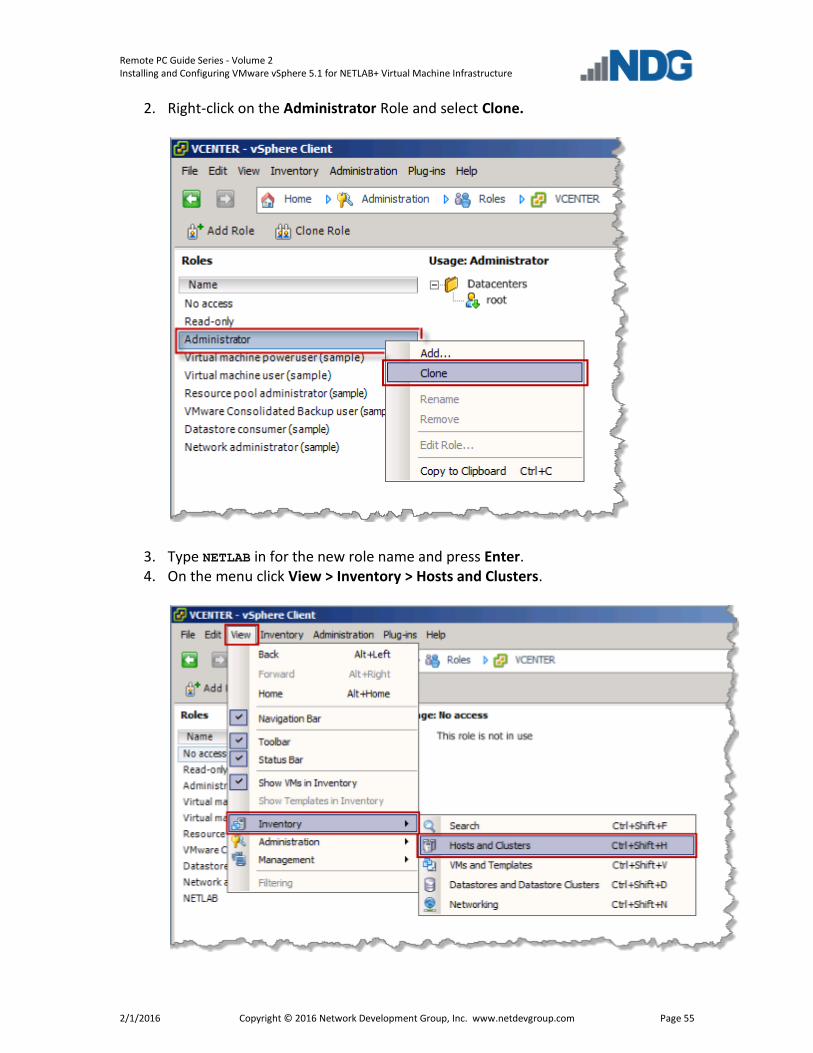
2. Right-click on the Administrator Role and select Clone.
3. Type NETLAB in for the new role name and press Enter. 4. On the menu click View > Inventory > Hosts and Clusters.
Remote PC Guide Series - Volume 2 Installing and Configuring VMware vSphere 5.1 for NETLAB+ Virtual Machine Infrastructure
2/1/2016 Copyright © 2016 Network Development Group, Inc. www.netdevgroup.com Page 56
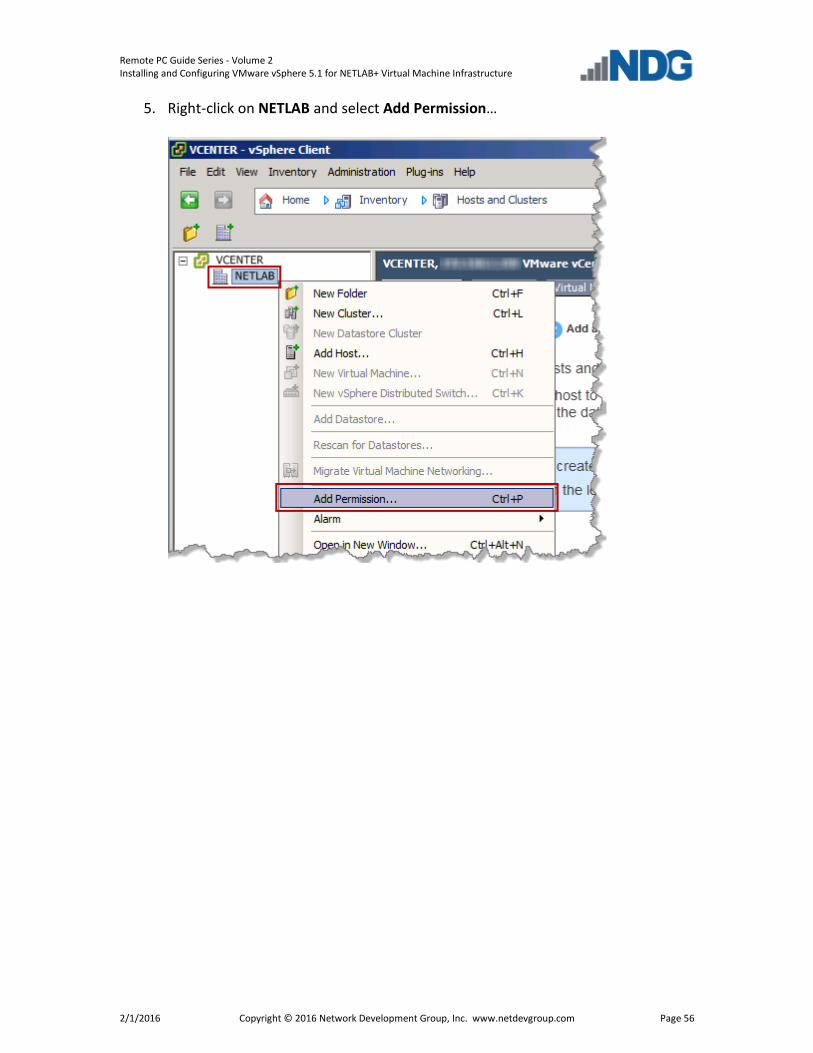
5. Right-click on NETLAB and select Add Permission…

Remote PC Guide Series - Volume 2 Installing and Configuring VMware vSphere 5.1 for NETLAB+ Virtual Machine Infrastructure
2/1/2016 Copyright © 2016 Network Development Group, Inc. www.netdevgroup.com Page 57
6. In the Assign Permissions window, click the Add… button.

Remote PC Guide Series - Volume 2 Installing and Configuring VMware vSphere 5.1 for NETLAB+ Virtual Machine Infrastructure
2/1/2016 Copyright © 2016 Network Development Group, Inc. www.netdevgroup.com Page 58
7. Select the NETLAB account in the user list and click Add then click OK.
Remote PC Guide Series - Volume 2 Installing and Configuring VMware vSphere 5.1 for NETLAB+ Virtual Machine Infrastructure
2/1/2016 Copyright © 2016 Network Development Group, Inc. www.netdevgroup.com Page 59
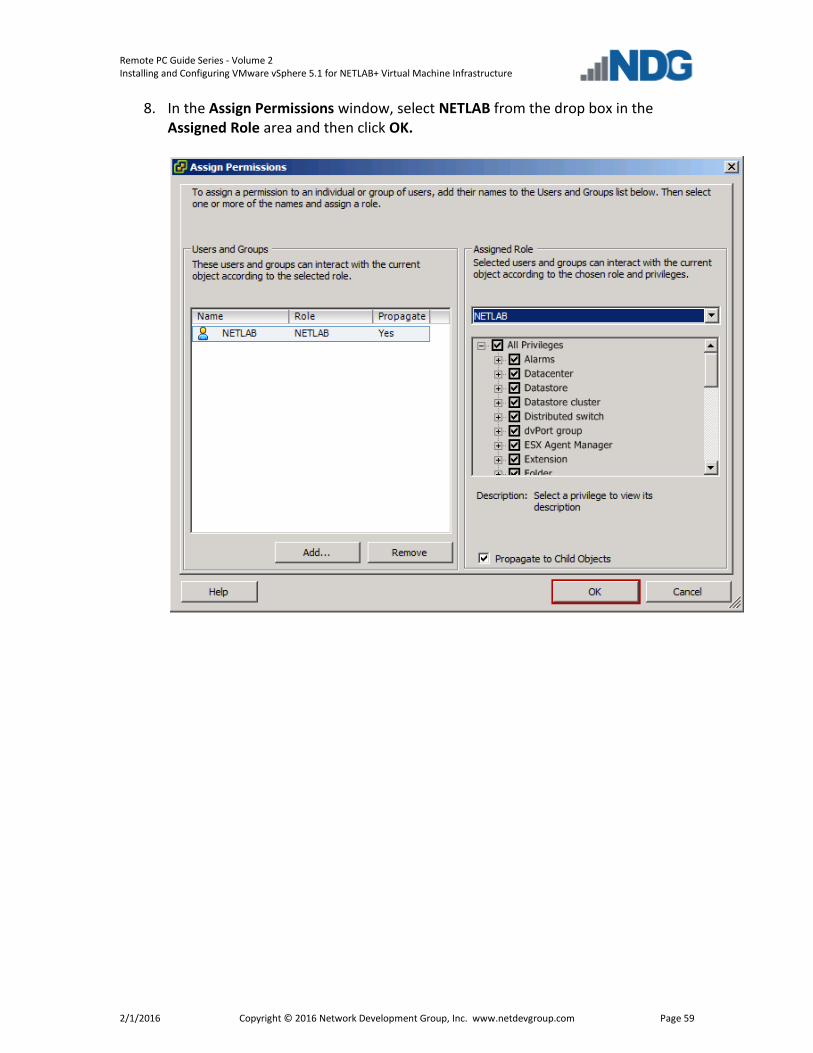
8. In the Assign Permissions window, select NETLAB from the drop box in the Assigned Role area and then click OK.

Remote PC Guide Series - Volume 2 Installing and Configuring VMware vSphere 5.1 for NETLAB+ Virtual Machine Infrastructure
2/1/2016 Copyright © 2016 Network Development Group, Inc. www.netdevgroup.com Page 60
9.3 Adding ESXi hosts to the NETLAB+ datacenter
In this section, you will be adding ESXi Host Servers to the NETLAB+ datacenter so that they may be managed by vCenter.
You will NOT add the Management Server to vCenter. You will only add your ESXi Host Servers that will house the virtual machines for the pods.
1. Right-click on the datacenter NETLAB, and select Add Host. The Add Host wizard
appears.
2. First, we are going to add your first ESXi-host, enter the IP address you from your table in Section 10.
3. Enter the username root and the password you setup in Section 5.2 and click Next.

Remote PC Guide Series - Volume 2 Installing and Configuring VMware vSphere 5.1 for NETLAB+ Virtual Machine Infrastructure
2/1/2016 Copyright © 2016 Network Development Group, Inc. www.netdevgroup.com Page 61
4. When prompted with a Security Alert window, click Yes to add the Host.
5. On the Host Summary page, review the information and click Next. 6. On the Assign License page, select Enter Key. 7. Enter the key you received from VMware in Section 2. 8. On the Lockdown mode page, leave the default settings and click Next. 9. On the Virtual Machine Location page, make sure NETLAB is selected and click
Next. 10. On the Ready to Complete page, review the information and click Finish. 11. Click the + sign next to the NETLAB datacenter on the left and wait for the IP
address of the host you entered to be added. Review the Recent Tasks pane at the bottom to make sure the status goes to Completed.
12. Repeat steps 1-10 to add any additional remaining hosts.

Remote PC Guide Series - Volume 2 Installing and Configuring VMware vSphere 5.1 for NETLAB+ Virtual Machine Infrastructure
2/1/2016 Copyright © 2016 Network Development Group, Inc. www.netdevgroup.com Page 62
9.4 Allowing Remote PC Viewer sessions in ESXi firewall
In this section, you will be enabling a specific port range in the ESXi firewall to allow Remote PC Viewer sessions to have access to the virtual machine console.
1. Select your first ESXi host in the Inventory pane on the left. 2. Click on the Configuration tab.
3. In the Software box click on Security Profile. Then click on the Properties… hyperlink to review the built-in ESXi firewall settings.

Remote PC Guide Series - Volume 2 Installing and Configuring VMware vSphere 5.1 for NETLAB+ Virtual Machine Infrastructure
2/1/2016 Copyright © 2016 Network Development Group, Inc. www.netdevgroup.com Page 63
4. In the Firewall Properties window, scroll to the bottom of the list and click the checkbox for VM serial port connected over net… Click OK to save settings.
5. Repeat Steps 1-4 for each ESXi host. 6. Close the vSphere client.

Remote PC Guide Series - Volume 2 Installing and Configuring VMware vSphere 5.1 for NETLAB+ Virtual Machine Infrastructure
2/1/2016 Copyright © 2016 Network Development Group, Inc. www.netdevgroup.com Page 64
9.5 vSwitch Configuration
This section is designed to configure the vSwitches on the ESXi Host Servers. To review, a virtual switch (vSwitch) on the physical ESXi host bridges between physical networks, virtual machines, and the ESXi host kernel. Each vSwitch is an internal LAN, implemented entirely in software by the ESXi kernel.
Your ESXi host(s) may connect to the outside network, inside network, or both depending on the network model you are using. The following table indicates which virtual switches are used for outside and inside connections.
Network Model OUTSIDE vSwitch INSIDE vSwitch
Single-Homed vSwitch0 ---
Dual-Homed vSwitch0 vSwitch1

Remote PC Guide Series - Volume 2 Installing and Configuring VMware vSphere 5.1 for NETLAB+ Virtual Machine Infrastructure
2/1/2016 Copyright © 2016 Network Development Group, Inc. www.netdevgroup.com Page 65
9.5.1 Verifying vSwitch0 Configuration
vSwitch0 is automatically created during the ESXi software installation (Section 5.2). Using vCenter, confirm that networking on vSwitch0 is properly configured (refer to the red numbered items in the screen below):
1. vSwitch0 is bound to the correct physical NIC (vmnic). 2. The physical NIC is connected and with correct speed/duplex. 3. The VMkernel port has the IP address you assigned when configuring your ESXi
host. The IP address should be a campus LAN address.
Remote PC Guide Series - Volume 2 Installing and Configuring VMware vSphere 5.1 for NETLAB+ Virtual Machine Infrastructure
2/1/2016 Copyright © 2016 Network Development Group, Inc. www.netdevgroup.com Page 66
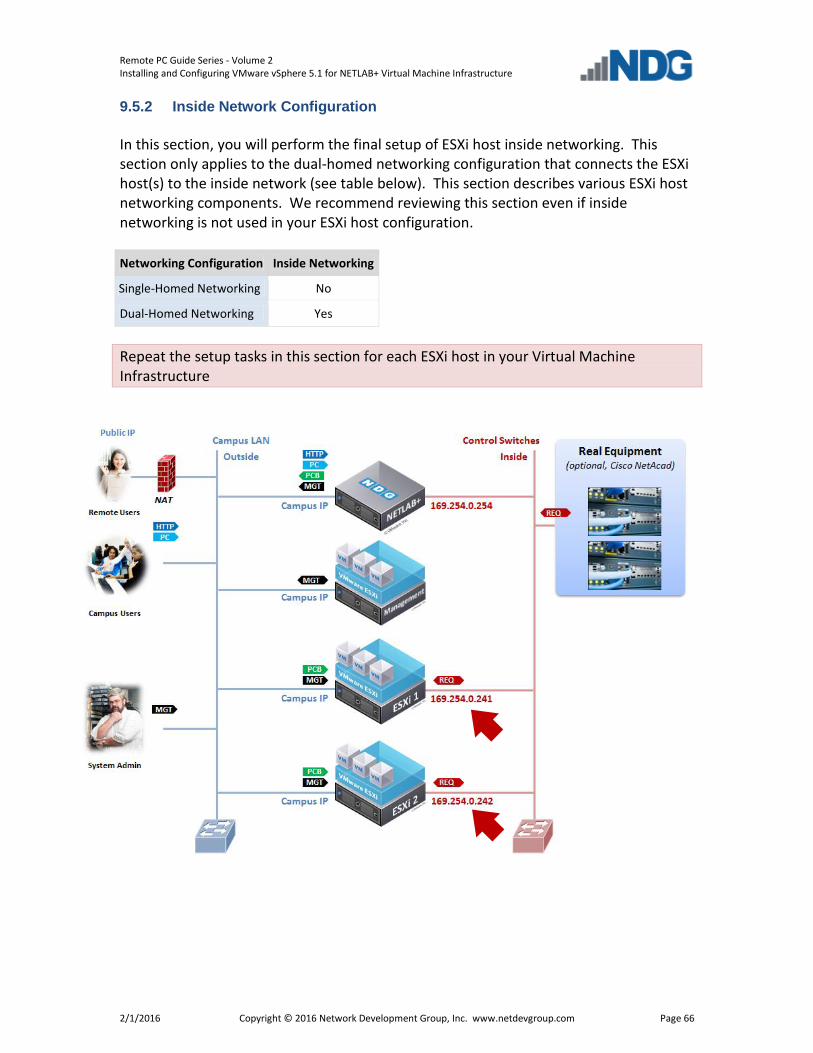
9.5.2 Inside Network Configuration
In this section, you will perform the final setup of ESXi host inside networking. This section only applies to the dual-homed networking configuration that connects the ESXi host(s) to the inside network (see table below). This section describes various ESXi host networking components. We recommend reviewing this section even if inside networking is not used in your ESXi host configuration.
Networking Configuration Inside Networking
Single-Homed Networking No
Dual-Homed Networking Yes
Repeat the setup tasks in this section for each ESXi host in your Virtual Machine Infrastructure

Remote PC Guide Series - Volume 2 Installing and Configuring VMware vSphere 5.1 for NETLAB+ Virtual Machine Infrastructure
2/1/2016 Copyright © 2016 Network Development Group, Inc. www.netdevgroup.com Page 67
There is only one type of network traffic can flow across the ESXi inside network connection, remote PC traffic between virtual machines and real equipment (VLANs 100 - 899).
The following diagram and table describes the various components of inside networking.
# Component Description
1 ESXi Host The physical server where, your virtual machines run.
2 Inside Physical NIC The physical network interface on the ESXi Host (1) that connects virtual machines to the inside physical network.
3 vSwitch A virtual switch on the physical ESXi host that bridges between physical networks (2,8,9), virtual machines (7), and the ESXi host kernel (4). Each vSwitch is an internal LAN, implemented entirely in software by the ESXi kernel.
4 Kernel Port A virtual network interface on the ESXi host (1) that provides connectivity between the ESXi host kernel and other components such as NETLAB+.
5 Virtual Network Adapter (vNIC) A virtualized networking adapter inside of a virtual machine that connects the virtual machine to a virtual switch.
6 Port Groups A template for creating virtual network switch ports with a particular set of specifications. A port group allows a virtual network adapter (5) to be placed in a particular virtual LAN (VLAN). Port groups with specific VLAN IDs to connect virtual machines to real equipment.

Remote PC Guide Series - Volume 2 Installing and Configuring VMware vSphere 5.1 for NETLAB+ Virtual Machine Infrastructure
2/1/2016 Copyright © 2016 Network Development Group, Inc. www.netdevgroup.com Page 68
7 Virtual Machines In NETLAB+, a virtual machine is a remote PC or remote server that runs on virtualized hardware. Although the hardware is virtualized, real operating systems and real application software can still be used.
8 Uplink / Trunk An uplink is a physical connection between ESXi Host (1,2) and a NETLAB+ control switch (9). If you are interfacing with real equipment pods (i.e. Cisco Networking Academy), your ESXi inside physical interface and the control switch port to which it is connected are configured in 802.1q trunk mode. Trunks allow multiple virtual LANs (VLANs) to exist on a single physical connection. VLAN assignments and the VLAN database on the control switch are managed by NETLAB+.
9 Control Switch A NETLAB+ control switch provides connectivity between the NETLAB+ server, ESXi host servers, asynchronous access servers, and switched outlet devices. Control switches are not accessed by lab users. There are three types of ports: reserved, assigned, and unassigned.
An NDG supported control switch is required. See the NDG website for a list of supported control switches.
10 NETLAB+ Inside Connection The NETLAB+ server inside interface connects to a designated reserved port on a control switch (9). The fixed addresses 169.254.0.254/24 and 169.254.1.1/24 are assigned to the inside interface (these cannot be changed).
802.1q trunk mode should NOT be enabled on the control switch
port for this connection.
11 Real Equipment Pods Real lab equipment (optional) is connected to one or more control switches (9).
12 Reserved Ports Reserved ports are ports on a control switch (9) that are reserved to provide connectivity between the NETLAB+ server, ESXi host servers, asynchronous access servers, and switched outlet devices.

Remote PC Guide Series - Volume 2 Installing and Configuring VMware vSphere 5.1 for NETLAB+ Virtual Machine Infrastructure
2/1/2016 Copyright © 2016 Network Development Group, Inc. www.netdevgroup.com Page 69
The following table summarizes the traffic types that will flow over the ESXi inside network.
Networking Configuration Management
Traffic (VLAN 1)
Remote Display
(VLAN 1)
802.1q Trunk
Single-Homed Networking n/a n/a n/a
Dual-Homed Networking No No Real Gear*
* ESXi interface and corresponding control port is configured as 802.1q trunk when interfacing with real equipment. 9.5.3 Creating vSwitch1 and Binding to Physical NIC
If your ESXi host is dual-homed (connected to both outside and inside networks), you must create an inside virtual switch (vSwitch 1), bind a physical NIC to vSwitch1, and create a VMkernel port for management traffic. These tasks are performed through vCenter.
1. Login to vCenter using the vSphere client. 2. Navigate to Home > Inventory > Hosts and Clusters. 3. Click on the ESXi host to configure in the left sidebar. 4. Click on the Configuration tab. 5. Click on Networking in the Hardware group box. 6. Click on the Virtual Switch view button if not already selected. 7. Click on Add Networking.

Remote PC Guide Series - Volume 2 Installing and Configuring VMware vSphere 5.1 for NETLAB+ Virtual Machine Infrastructure
2/1/2016 Copyright © 2016 Network Development Group, Inc. www.netdevgroup.com Page 70
8. Add a VMkernel port to allow the ESXi host kernel to communicate with the inside network. Select the VMkernel radio button, and then click Next.
9. Select the "Create a virtual switch" radio button. The new switch will be named vSwitch1.
10. Select the physical NIC that will connect vSwitch1 to the control switch. We recommend using vmnic1 for inside connections (vmnic0 should already be connected to the outside network).

Remote PC Guide Series - Volume 2 Installing and Configuring VMware vSphere 5.1 for NETLAB+ Virtual Machine Infrastructure
2/1/2016 Copyright © 2016 Network Development Group, Inc. www.netdevgroup.com Page 71
11. Enter the port group properties as shown above. a. Network Label: "NETLAB Inside" b. VLAN ID: None(0) (default) c. Check option "Use this port group for management traffic"
12. Click Next. 13. The VMkernel IP Connection Settings dialog appears.
14. Enter a unique inside IP address and subnet mask from the following table.
Inside Interface IP Address Subnet Mask
ESXi Server 1 Inside 169.254.0.241 255.255.255.0
ESXi Server 2 Inside 169.254.0.242 255.255.255.0
ESXi Server 3 Inside 169.254.0.243 255.255.255.0

Remote PC Guide Series - Volume 2 Installing and Configuring VMware vSphere 5.1 for NETLAB+ Virtual Machine Infrastructure
2/1/2016 Copyright © 2016 Network Development Group, Inc. www.netdevgroup.com Page 72
ESXi Server 4 Inside 169.254.0.244 255.255.255.0
ESXi Server 5 Inside 169.254.0.245 255.255.255.0
ESXi Server 6 Inside 169.254.0.246 255.255.255.0
ESXi Server 7 Inside 169.254.0.247 255.255.255.0
ESXi Server 8 Inside 169.254.0.248 255.255.255.0
ESXi Server 9 Inside 169.254.0.249 255.255.255.0
No changes to the VMkernel Default Gateway setting should be necessary. This should already be set to the default gateway on your campus LAN.
15. Click Next to continue. 16. Confirm that vSwitch1 appears as follows (IP varies for each host).
a. VMkernel port (vmk1) has correct IP address. b. vSwitch1 is bound to physical adapter (vmnic1) c. Physical adapter is up (speed and duplex are detected)
A mark displayed near the Physical Adapter indicates that the connection has not yet been physically cabled or the corresponding control switch port is shut down.

Remote PC Guide Series - Volume 2 Installing and Configuring VMware vSphere 5.1 for NETLAB+ Virtual Machine Infrastructure
2/1/2016 Copyright © 2016 Network Development Group, Inc. www.netdevgroup.com Page 73
9.5.4 Increasing the Inside vSwitch Port Count
By default, a vSwitch is provisioned with 56 virtual ports. This means that 56 virtual network adapters can be connected to the virtual switch, regardless of which port group the adapter is connected. For most NETLAB AE setups, this is sufficient for the inside vSwitch. For large NETLAB PE setups or systems with custom real equipment pods, you may need to increase this value to accommodate more virtual machine connections to the inside vSwitch.
This discussion applies to virtual machines that are part of real equipment pods. Pods that contain only virtual machines are usually placed on separate vSwitches that do not connect to the inside network / real equipment.
To calculate the number of inside vSwitch ports required on a particular ESXi host, add up the number of virtual machines in real equipment pods that are assigned to the host. This is the number of virtual ports required on the inside vSwitch (assuming one connection per VM). If this number exceeds 50, you should select the next highest port count setting (120). In special cases, an even higher setting may be required. Note: 50 is not an error; 6 extra ports were subtracted (from 56) to allow for VMkernel ports and other possible connections. Higher port count settings consume additional host resources, so you should set this value to the lowest possible setting that provides enough ports for every virtual machine connecting to the inside vSwitch.
There is no warning when the number of virtual ports is exceeded and the problem is not obvious. Some of the virtual machines will fail to communicate for no apparent reason. The only clue may be a disconnected network status from the guest operating system.
The following procedure is used to increase the number of virtual ports on the inside virtual switch. The same procedure can be used on any virtual switch should the need arise.
1. Login to vCenter using the vSphere client. 2. Navigate to Home > Inventory > Hosts and Clusters. 3. Click on the ESXi host where the pod's virtual machines will run. 4. Click on the Configuration tab. 5. Click on Networking in the Hardware group box. 6. Click on the Virtual Switch view button if not already selected.

Remote PC Guide Series - Volume 2 Installing and Configuring VMware vSphere 5.1 for NETLAB+ Virtual Machine Infrastructure
2/1/2016 Copyright © 2016 Network Development Group, Inc. www.netdevgroup.com Page 74
7. Click Properties on the INSIDE vSwitch. The inside vSwitch is the one that is connected to the control switch (vSwitch1).
8. Click on the vSwitch configuration item. 9. Click the Edit button.

Remote PC Guide Series - Volume 2 Installing and Configuring VMware vSphere 5.1 for NETLAB+ Virtual Machine Infrastructure
2/1/2016 Copyright © 2016 Network Development Group, Inc. www.netdevgroup.com Page 75
10. Increase the number of ports, but not higher than needed.
11. Click OK.
The ESXi host must be restarted for the change to take effect. Make sure there are no active NETLAB+ reservations that affect this host, or virtual machines running on this host as user work may be affected.
12. Right click on the ESXi host in the left sidebar to activate the context menu. 13. Select Reboot.

Remote PC Guide Series - Volume 2 Installing and Configuring VMware vSphere 5.1 for NETLAB+ Virtual Machine Infrastructure
2/1/2016 Copyright © 2016 Network Development Group, Inc. www.netdevgroup.com Page 76
9.5.5 Create a Safe Staging Network
In this section, you will be creating a Safe Staging Network called “safety net”, to temporarily connect our VMs. The Safe Staging Network consists of a virtual switch and a port group that is not connected to any other networks (virtual or real). Should the virtual machine be powered on, its traffic will be confined to the safety net. This ensures that the virtual machine will not pose a security risk to your campus LAN or interfere with other pods, until it is relocated to its final network via automatic or manual networking.
1. Select your first ESXi host in the Inventory pane on the left. 2. Click on the Configuration tab.
3. In the Hardware box click on Networking. Then click on the Add Networking…
hyperlink to create a new virtual switch.

Remote PC Guide Series - Volume 2 Installing and Configuring VMware vSphere 5.1 for NETLAB+ Virtual Machine Infrastructure
2/1/2016 Copyright © 2016 Network Development Group, Inc. www.netdevgroup.com Page 77
4. On the Connection Type page, select Virtual Machine and click Next.
5. On the Network Access page, select Create a vSphere standard switch and click
Next.
UNCHECK any vmnics under the radio button; this virtual switch should not be bound to any real network adapters on the ESXi host.

Remote PC Guide Series - Volume 2 Installing and Configuring VMware vSphere 5.1 for NETLAB+ Virtual Machine Infrastructure
2/1/2016 Copyright © 2016 Network Development Group, Inc. www.netdevgroup.com Page 78
6. On the Connection Settings page, enter SAFETY NET in the Port Group’s Network Label property and then click Next.
7. On the Summary page, review the information and click Finish. 8. Repeat steps 1-7 for each ESXi host server. SAFETY NET is now available for use as a safe temporary network location for new
virtual machines.
The safety network is an ideal place to bind the network interface(s) of master virtual machines. Automatic networking will the bind network interfaces of cloned VMs to their runtime networks when their respective pods are started.