Embed Size (px)
Citation preview

September 2008
Remedy 7 User Guide
techtraining.stanford.edu • 650.723.4391
http://www.stanford.edu/services/helpsu/internal •

Remedy 7 User Guide September 2008 Page 2 of 48
© 2008 Stanford University All rights reserved

Remedy 7 User Guide September 2008 Page 3 of 48
Table of Contents 1 Consoles ..........................................................................................................................5
The Overview Console View ......................................................................................6 The Personal Console View.........................................................................................7 The Selected Groups Console View...........................................................................7 The All My Groups Console View .............................................................................8
2 New Incidents ................................................................................................................9 Required Fields When Creating an Incident ..........................................................13 Understanding Status Values ...................................................................................14
3 Existing Incidents ........................................................................................................16 Quick Links..................................................................................................................17
Assign to Me............................................................................................................17 Select Template .......................................................................................................17
Functions......................................................................................................................18 Auto Assign.............................................................................................................18 Email System ...........................................................................................................18 View Audit Log.......................................................................................................21
4 Discovering Tabs .........................................................................................................22 The Customer Tab ......................................................................................................22 The Contact Tab ..........................................................................................................25 The Classification Tab ................................................................................................26 The Tasks Tab..............................................................................................................30 The Assignment Tab ..................................................................................................32 The Relationships Tab................................................................................................33 The Resolution Tab.....................................................................................................34 The SLM Tab ...............................................................................................................35 The Date System Tab..................................................................................................36 The WebEx Session Tab .............................................................................................37
5 Doing More With Remedy .........................................................................................38 Searching......................................................................................................................38 Re-route an Incident...................................................................................................38 Reclassify a Incident...................................................................................................39 Create Macros..............................................................................................................40
6 Reporting ......................................................................................................................41 Export to Excel ........................................................................................................42 Getting Reporting Help .........................................................................................43
7 Support Group Lead/Understanding Responsibilities and Capabilities of the SGL role......................................................................................................................44

Remedy 7 User Guide September 2008 Page 4 of 48
Responsibilities .......................................................................................................44 Special Capabilities.................................................................................................44 Functionality of the Templates Feature...............................................................45 User/Group Management ....................................................................................45 Favorites...................................................................................................................46 Group Aliases..........................................................................................................46
Appendix .........................................................................................................................47 Service Level Agreement...........................................................................................47

Remedy 7 User Guide September 2008 Page 5 of 48
1. Views in the Overview Console
Views provide different ways of viewing help Incidents. There are four views available in the Remedy 7 Overview Console.
The Overview Console The Overview Console allows you to leverage a variety of views into your Incident queue. This user guide focuses mainly on the Overview Console, where the most activity takes place. Personal Console View Your Personal View displays Incidents that are assigned to you. Selected Groups Console View The Selected Groups View displays all unresolved Remedy Incidents or all unassigned Incidents in the support groups of your choice to which you belong. All My Groups Console View The All My Groups Console displays all unresolved Remedy Incidents or all unassigned Incidents in all of the support groups to which you belong.

Remedy 7 User Guide September 2008 Page 6 of 48
The Overview Console View When you log in to Remedy, the Overview Console is displayed by default.
The Overview Console has a left navigation bar where you can select one of four different views, perform additional functions, and access other applications.
When you view an Incident, the left navigation bar changes and other functions become available such as Quick Links, Select Template, Auto Assign, Email System, and more. The Refresh button on the top right corner of the Overview Console, allows you to refresh the Assigned Work table. The Assigned Work table lists all unresolved Incidents in any of the groups of which you are a member. The Overview Console also displays record types other than Incident (the most common) so you may also see Tasks (with the TAS prefix), Problem Investigations (with the PBI prefix), and Known Errors (with the PKE prefix). Tasks, Problem Investigations and Known Errors are used principally by staff supporting information technology issues. Most Remedy users work with Incidents.

Remedy 7 User Guide September 2008 Page 7 of 48
The View button allows you to see an Incident you have selected/highlighted from the Assigned Work table. You can also view an Incident by double-clicking your mouse on it. The Create button is the starting point to create a new Incident. The Search button launches an Incident search window. The Broadcast area displays informative messages for all consultants that use Remedy. Among others, these messages may include system outages, upgrades, or networking issues. The Close button closes whatever Console or form you are working with.
The Personal Console View The Personal Console displays all Incidents that are assigned to you. You can create, update, reassign, reclassify, and mark Incidents resolved from this console. Closed Incidents will not appear. To view a closed Incident, perform a Search.
The Selected Groups Console View When you click Show All or Show Unassigned from Selected Groups, a pop-up box allows you to pick only those groups from which you have access. Select the groups you want to work with from this menu. If you are a member of only one Support Group, the pop-up box will not appear. Click Preferences to remove or add columns from this view. If you change your preferences, please be sure to save them. Click Refresh to return to the default view of this window.

Remedy 7 User Guide September 2008 Page 8 of 48
The All My Groups Console View Use All My Groups to either Show All or Show Unassigned Incidents in all of your groups. The Show All view can be useful when you need to check the status of all Incidents in your group, regardless of who they are assigned to. This allows you to see if the group is keeping current, or to reassign Incidents if a staff member is sick or on vacation.

Remedy 7 User Guide September 2008 Page 9 of 48
2. Creating New Incidents
As a Remedy user, you can create new Incidents from within the Remedy application or via the HelpSU web form: http://helpsu.stanford.edu. Steps to Create a New Incident
1. From the console view of your choice, click Create. The Select Request Type window opens:
In Remedy 7, by default, HelpSU requests are known as “Incidents.” Click Create. The following list appears in the Select Request Type window:
• Incident • Known Error • Problem Investigation • Purchase Requisition (I think we should hide this option forever) • Solution Database (I think we should hide this option for now)
Typically, most users select Incident. However, they are also encouraged to use the Problem Investigation option to track incidents associated with problems that may be the root cause of other incidents.
2. Choose Incident and click Select.

Remedy 7 User Guide September 2008 Page 10 of 48
The Incident window opens.
All required fields are in bold. (Refer to the Required Fields list at the end of this chapter.) The incident number is located at the top of the page in the Incident ID field. Usually, the incident ID is created the first time you save an incident.
3. Click the Summary field to enter a brief description of the problem. This is a required field. The summary can contain a maximum of 128 characters. When completed, you may press TAB or you may move your mouse and click into another field on the page. The summary you entered will be copied into the Description field. You can edit the Description field to include more details of the problem by clicking on the little page icon next to the field. This is recommended but not required.
4. The Status field defaults to New. When you save the incident, the status is updated to Assigned.
5. Impact and Urgency are auto-populated with a default Level 4. If the Incident you are logging has broad impact or needs to be dealt with urgency, change the Impact and Urgency values as appropriate. When you change Impact and Urgency, the system will calculate and change the Priority field as a result of these two values.

Remedy 7 User Guide September 2008 Page 11 of 48
6. In the Customer tab, type a SUNet ID or, enter the Last Name and/or First Name of the customer, and press ENTER. If the person is affiliated with Stanford, all demographic information, including affiliation will be auto-populated in the fields on the Customer tab. Note that if phone numbers are marked “Personal” in the Stanford Directory by students or others, the Phone number field will be displayed as ###.
7. (Optional) Click the Contact tab. The Contact tab is used if the consultant is instructed to work with someone other than the customer. If both the Contact tab and Customer tab contain data, the Contact tab will default to the foreground so the support analyst is alerted to work with a Contact instead of working with the Customer directly.
8. Click the Classification tab. There are two categories in which you may enter information: Operational Categorization or Product Categorization. For each incident, enter the data for one category or the other. The system does not allow you to complete both areas.
Operational Categorization–For the most part, the Operational Catalog contains business functions or operations that do not require or benefit from tracking the activity against Hardware or Software. The Operation itself is the focus. Tier 1 select the category (e.g., Administrative Support). Tier 2 select the type (e.g., Purchasing). Tier 3 select the item (e.g., Reimbursement). Product Categorization–The Product Catalog captures operations and business functions that relate directly to hardware and software. Tier 1 select the category (e.g., Desktop Hardware). Tier 2 select the product (e.g., System Laptop – Office). Tier 3 select the service (Setup/Configuration). Optional: Product Name–enter the product name if you have that information. Optional: Model/Version–enter the model and version number if that information applies
9. Click Work Info. This is where you can capture work notes, conversations with the customer, and other working information. You can add attachments on this tab by following these instructions:
a. In summary field, add some text. (e.g., “Receipts for Reimbursement”)
b. Click Add. Browse to the file you wish to attach. Note that the maximum size of each file is 4MB.
c. Click Save. The work log now includes the action.
Remedy 7 User Guide September 2008 Page 12 of 48
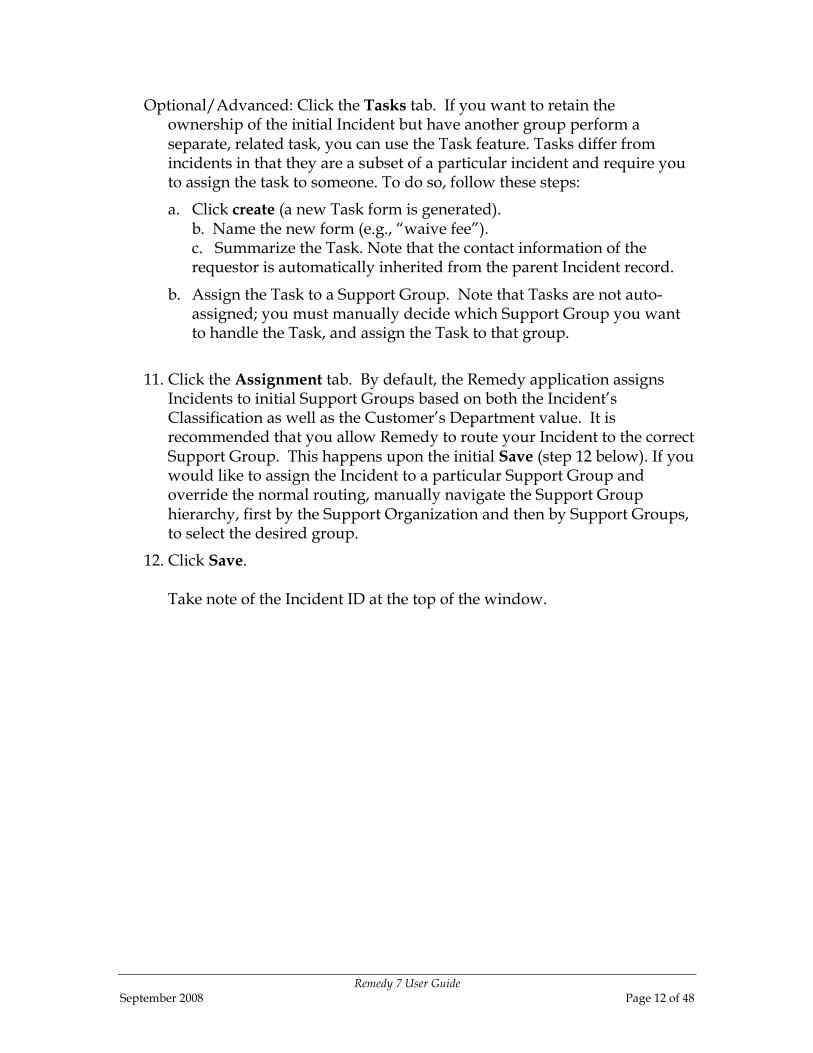
Optional/Advanced: Click the Tasks tab. If you want to retain the ownership of the initial Incident but have another group perform a separate, related task, you can use the Task feature. Tasks differ from incidents in that they are a subset of a particular incident and require you to assign the task to someone. To do so, follow these steps:
a. Click create (a new Task form is generated). b. Name the new form (e.g., “waive fee”). c. Summarize the Task. Note that the contact information of the requestor is automatically inherited from the parent Incident record.
b. Assign the Task to a Support Group. Note that Tasks are not auto-assigned; you must manually decide which Support Group you want to handle the Task, and assign the Task to that group.
11. Click the Assignment tab. By default, the Remedy application assigns Incidents to initial Support Groups based on both the Incident’s Classification as well as the Customer’s Department value. It is recommended that you allow Remedy to route your Incident to the correct Support Group. This happens upon the initial Save (step 12 below). If you would like to assign the Incident to a particular Support Group and override the normal routing, manually navigate the Support Group hierarchy, first by the Support Organization and then by Support Groups, to select the desired group.
12. Click Save. Take note of the Incident ID at the top of the window.

Remedy 7 User Guide September 2008 Page 13 of 48
Required Fields When Creating an Incident The following is a list of the fields that are required to complete a new Incident. Incident Request Information
Status–default value of New will change to Assigned upon Save Summary–short description of problem Impact–defaults to 4-Minor/Localized Urgency–defaults to Level 4-Low
Customer Tab
Last Name and First Name Phone Number
Classification Tab
Service Type Operational Categorization information
or Product Categorization information Assignment Tab
Support Organization Assigned Group

Remedy 7 User Guide September 2008 Page 14 of 48
Understanding Status Values
Incidents are New when they are in the process of being created.
When a specific Support Group has been assigned to the Incident, the Incident is immediately marked as Assigned after creation. Incidents are also Assigned when an individual takes responsibility for handling the request. They put their name on the Incident and commit to resolving it.
Incidents should be marked In Progress when the support staff begins active effort on the Incident.
Incidents should be put in Pending when work is awaiting client availability, a future scheduled visit, a hardware part, etc. Support staff can use the "Status Reason" field to clearly indicate why an incident is PENDING. Note that when Incidents are put in Pending status the Service Level Management (SLM) response and resolution time-clocks are suspended, so it is advisable to use the Pending status as appropriate.
Incidents should be marked Resolved when the Consultant has fixed the problem or advised the client of the answer to their question. Note that when Incidents are put in Resolved status the Service Level Management (SLM) response and resolution time-clocks take a final measurement, so it is important to set Incidents to Resolved as soon as possible after the actual resolution is achieved.
Incidents are automatically moved to Closed status 15 days after being marked Resolved. Once an incident is in Closed status, it cannot be re-opened by anyone, not even a Remedy system administrator. Closed Incidents are automatically moved to the Remedy archive form after 4

Remedy 7 User Guide September 2008 Page 15 of 48
months. Incidents in the Archive can be searched and reported on by any Remedy user.
Incidents can also be marked Cancelled if the client resolves the issue and no longer needs assistance.

Remedy 7 User Guide September 2008 Page 16 of 48
3. Existing Incidents
Users of Remedy will most often work with existing Incidents. These Incidents may have been submitted by a support analyst using the application or may come from the online HelpSU request form. When a client submits a request for help via HelpSU, the Incident is routed to the appropriate support group based on their department and the basic classification (Request Category and Request Type) they gave their request.
Overview Console Menu Open Incident Menu
When you open an Incident, the side menu bar options change. Notice the difference. Learn more about some of these options in the Doing More With Remedy section of this guide.

Remedy 7 User Guide September 2008 Page 17 of 48
Quick Links
The Quick Links menu is accessible when an Incident is being viewed.
Assign to Me To claim an Incident that is in the Assigned Work area:
1. Double-click the Incident item to open it. 2. Review the Summary and Description of the problem. Review the Work
Info tab to see if others worked on the Incident and what information exists. (Review the Work Info tab section of this document for further details)
3. If you want to assign the Incident to yourself, click Assign to Me. Note that if you are a member of multiple Support Groups, a window will pop up, from which you can select from your own Support Groups.
4. Click Save. You will see this Incident in your Personal Console.
Select Template Templates are a Remedy feature akin to “quick Incidents”, where various field values can be pre-set to speed either the creation of or resolution of Incidents. If your Support Group Lead has created templates for you to use, you can select that template from this menu and proceed to create the Incident using the defaults in that template. Only Support Group Leads have the necessary permissions to create Templates in Remedy.

Remedy 7 User Guide September 2008 Page 18 of 48
Functions
Auto Assign Auto Assign is the default function in Remedy. Incidents are set up to be auto assigned to work-groups.
Email System The Email System within Remedy allows you to email your customer without having to use a separate email client. An added advantage is that all email messages sent through this interface are stored with the Incident for audit purposes and if the Incident were to require re-assignment, the support analyst to whom the Incident were reassigned would be able to read the dialog that has already transpired with the Customer.

Remedy 7 User Guide September 2008 Page 19 of 48
Email By Person To look up information about a person in Remedy, use the Email by Person tab of the Email System. Enter the first name and last name or just the phone number and click Search. That person’s information will appear in the Results area below. By Default, the email address provided on the Customer Tab of the Incident is inserted in the email address field. You can search for alternate addresses and may also append additional addresses separated by a comma or semi-colon. Email Log To view a log of all email messages you sent to any customer, on any Incident, click the Email Log tab. The log contains a list of emails from the last 30 days. Email Information The Internet Email field already populates the client’s email address.
Remedy 7 User Guide September 2008 Page 20 of 48
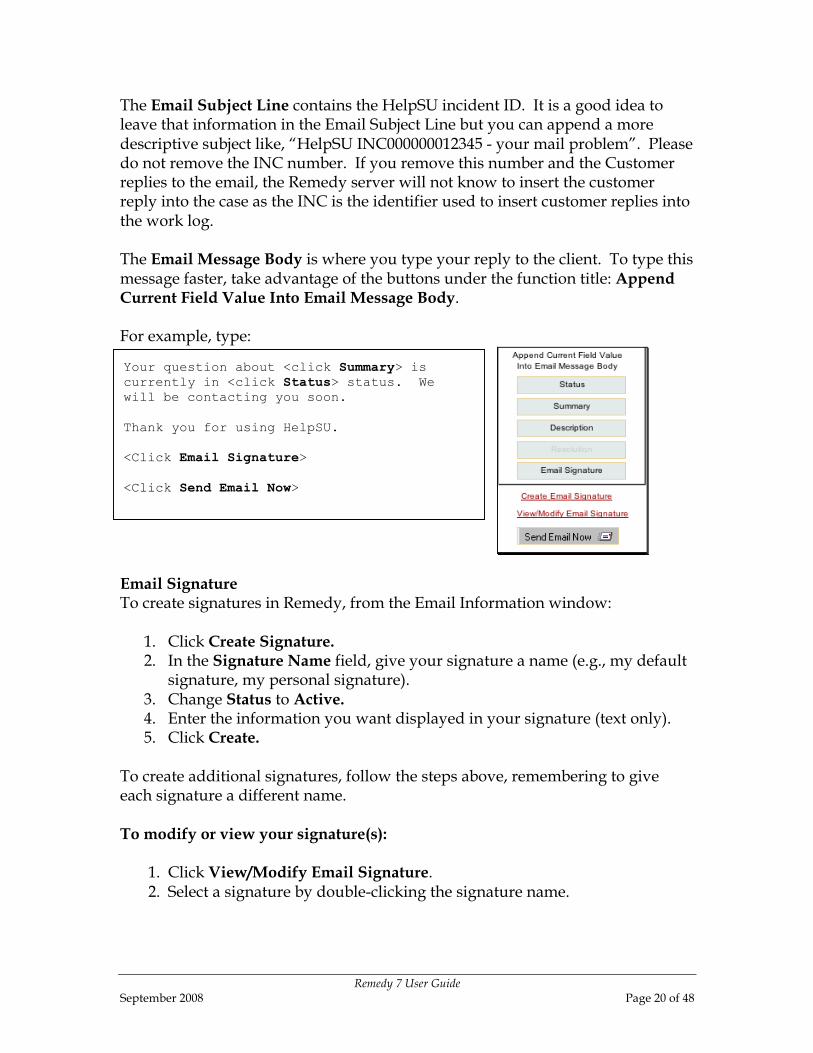
The Email Subject Line contains the HelpSU incident ID. It is a good idea to leave that information in the Email Subject Line but you can append a more descriptive subject like, “HelpSU INC000000012345 - your mail problem”. Please do not remove the INC number. If you remove this number and the Customer replies to the email, the Remedy server will not know to insert the customer reply into the case as the INC is the identifier used to insert customer replies into the work log. The Email Message Body is where you type your reply to the client. To type this message faster, take advantage of the buttons under the function title: Append Current Field Value Into Email Message Body. For example, type:
Email Signature To create signatures in Remedy, from the Email Information window:
1. Click Create Signature. 2. In the Signature Name field, give your signature a name (e.g., my default
signature, my personal signature). 3. Change Status to Active. 4. Enter the information you want displayed in your signature (text only). 5. Click Create.
To create additional signatures, follow the steps above, remembering to give each signature a different name. To modify or view your signature(s):
1. Click View/Modify Email Signature. 2. Select a signature by double-clicking the signature name.
Your question about <click Summary> is currently in <click Status> status. We will be contacting you soon. Thank you for using HelpSU. <Click Email Signature> <Click Send Email Now>

Remedy 7 User Guide September 2008 Page 21 of 48
3. Change the information and click Modify. Use Signature To add your signature to the message, click Email Signature from the button selection box to the right of the Email Message Body. Email Attachment To send an attachment with your email:
1. In the Email Attachment box, click once on the line that displays Email Attachment.
2. Click Add. 3. In the Add Attachment box, click Browse. 4. Find the attachment on your hard drive. 5. Click Open. 6. Click OK.
You can delete, display, or save attachments to disk from the Email Attachment box.
View Audit Log To see the history of an Incident, click View Audit Log.

Remedy 7 User Guide September 2008 Page 22 of 48
4. A Closer Look at Tabs
The Customer Tab
Customer Information The Customer tab contains information about the customer. Enter the client’s SUNet ID and press ENTER. All demographic data is auto-populated including the SU Affiliation (Faculty, Staff, Student). This is the quickest method to fill in all the pertinent information. Customer’s Open Incidents Once all demographic data is auto-populated (or manually populated), a history of the customer’s past incidents is displayed in the Customer’s Open Incidents box. These are incidents that have not yet been resolved. Note that this table is constructed based on the SUNet ID of the customer, so any Incidents that do not have the customer’s SUNet ID will not be displayed. View/Search To view a previous Incident click on it once, then click View, or double-click the incident item. In the web version (mid-tier), an additional browser window opens with the full contents of the Incident.

Remedy 7 User Guide September 2008 Page 23 of 48
Click the Search button to search all incidents for the client listed in the Customer tab.
Click Status and select from the desired status list.

Remedy 7 User Guide September 2008 Page 24 of 48
Select the Date range:
With the Status and Date ranges selected, the From and To fields will be auto-populated.
Double-click any incident to see the full Incident (or single-click an incident then click View).

Remedy 7 User Guide September 2008 Page 25 of 48
The Contact Tab
The Contact tab is used if a person other than the Customer is to be notified of the Incident handling and resolution. This is sometimes the case when faculty would rather have an assistant work directly with an IT professional on the issue. Enter the SUNet ID and press ENTER. The demographic information for the contact person will auto-populate the fields on the tab.
Remedy 7 User Guide September 2008 Page 26 of 48
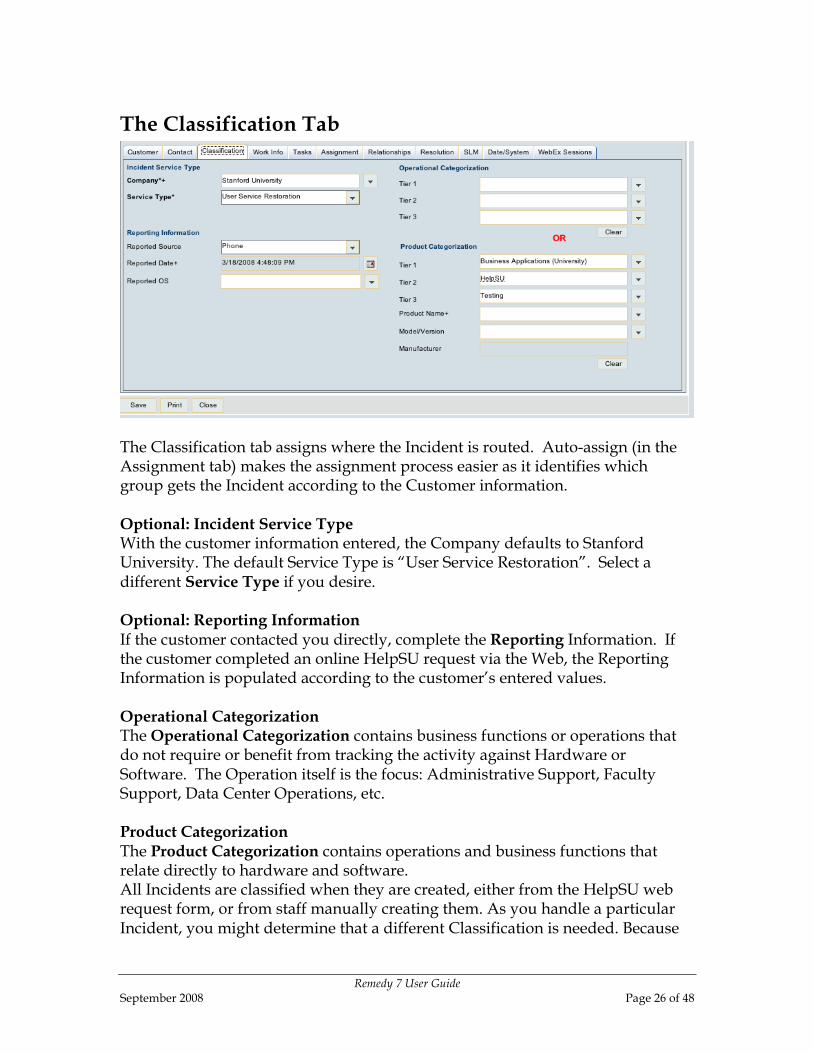
The Classification Tab
The Classification tab assigns where the Incident is routed. Auto-assign (in the Assignment tab) makes the assignment process easier as it identifies which group gets the Incident according to the Customer information. Optional: Incident Service Type With the customer information entered, the Company defaults to Stanford University. The default Service Type is “User Service Restoration”. Select a different Service Type if you desire. Optional: Reporting Information If the customer contacted you directly, complete the Reporting Information. If the customer completed an online HelpSU request via the Web, the Reporting Information is populated according to the customer’s entered values. Operational Categorization The Operational Categorization contains business functions or operations that do not require or benefit from tracking the activity against Hardware or Software. The Operation itself is the focus: Administrative Support, Faculty Support, Data Center Operations, etc. Product Categorization The Product Categorization contains operations and business functions that relate directly to hardware and software. All Incidents are classified when they are created, either from the HelpSU web request form, or from staff manually creating them. As you handle a particular Incident, you might determine that a different Classification is needed. Because
Remedy 7 User Guide September 2008 Page 27 of 48
Classification values are used for reporting and assignment purposes, it is important that they be as accurate as possible. Enter the Tier 1 category and work your way down to Tier 2 and Tier 3. If the description does not suit your needs in one categorization, try the other.

Remedy 7 User Guide September 2008 Page 28 of 48
The Work Info Tab
The Work Info tab contains more detailed information about an Incident, including emails to and from the customer. Entries in this field can record work completed to solve the Incident, or conversations with the customer. These Work Info entries are extremely helpful should the Incident need to be reassigned to another Support Group or individual, or if the customer calls the Service Desk for a status update. Each entry is time-stamped and added to the Work Info History table. Note that the only required field to create a Work Info entry is the Summary line, which allows for 255 characters --- great for brief updates. If you need to add more information, or paste in a customer email, for example, put a brief entry in the Summary line and add the rest of the text in the unlimited space Notes field. View Access With the View Access field set to Public, the customer can view the Work Info entry of their own Incident, on the Web at: http://helpsu.stanford.edu. From the web site, the customer clicks on the link, HelpSU Request Status where the status can be viewed, or where more information can be submitted back to the assignee of the Incident. When a customer submits an update, the assignee of the request will receive an email message that the Work Info History has been updated. Note that only those Work info entries marked Public are viewable by the customer on the web. If the Work Info table has 6 entries, but only 1 is marked Public, the customer will only see the 1 entry. Note that the default View Access is set to Internal, so you must explicitly decide that you want a customer to see a particular update entry.

Remedy 7 User Guide September 2008 Page 29 of 48
Notes: Only users who have SUNet IDs (who can authenticate themselves) will be
able to check the status of their own HelpSU requests. One cannot check on the status of other individual's HelpSU requests, only
one's own. Only Work Info entry items specifically set to "Public" visibility by the
Remedy support staff will be displayed in this interface. All Work Info entries marked "Internal" (the default) will remain viewable
only within the Remedy interface by Remedy support staff. The status of requests in "Secure Data Groups," e.g. Payroll, HR, Student
Financial Services, OOD, will *not* display online due to security concerns. To make this feature useful for customers, if you do have status updates that you would like the customer to see, in the Notes field, enter something like:
Your new laptop is scheduled to be shipped by Dell on May 22. Still waiting for your new software to arrive.
Add Attachments You can add attachments to the Incident from the Work Info tab by following these instructions:
1. In the Summary field, type a description of the attachment. 2. Click Add.
The maximum size of an attachment is 4MB. 3. Click Save. The work log adds the action.

Remedy 7 User Guide September 2008 Page 30 of 48
The Tasks Tab
If you want to retain the ownership of the initial Incident but have another group perform a separate, related task, you can use the Task feature. Tasks differ from Incidents in that they are a subset of a particular incident and require you to assign it to someone. For example, rather than reassigning the entire Incident to a workgroup, you may assign a task. Steps to create a task:
1. Click Create. A new Task form is generated in a separate window.
2. Give the task a name. (Example: “set up test account”).

Remedy 7 User Guide September 2008 Page 31 of 48
3. Add a summary of the task. (Example: “set up a test account for new member of QA team”).
4. In the Notes field, add any notes you want to be included with this Incident and task.
5. Go to Requester tab. (Customer information is pre-populated by default) 6. If a different person should be contacted, enter that information in the
Requested For fields.
7. Go to Assignment Dates.
8. Assign the task to the appropriate organization. Assign to a group. Do not assign the task to a specific person (unless instructed).
9. Click Save.

Remedy 7 User Guide September 2008 Page 32 of 48
The Assignment Tab
The Assignment tab identifies the group that is responsible for resolving the Incident. The group is auto-populated by logic driven from the entries made in the Operational or Product Categorization fields in the Classification tab AND the Organization and Department of the Customer. If the Incident needs to be handled by a different group, reassign the Incident using the Assignment tab. Change the Support Organization first then change the Assigned Group. Fun Tip! If the Incident needs to be handled by a specific individual and you don’t know to which group that person belongs to, you can leave the Support Organization and Assigned Group blank and just enter that individual’s SUNet ID in the Assignee field. Press ENTER. The Support Organization and Group will be automatically populated. If the assignee belongs to more than one group, select the appropriate group from the listed groups. To assign the Incident to yourself, go to the Quick Links menu (on the side bar) and select Assign to Me. When creating an incident and you enter an assignee different from yourself, the Incident can no longer be classified as New. The incident Status needs to be changed to Assigned. Time Spent: If your Support Group is tracking the time and effort expended to resolve Incidents, you can use the Time Spent field to do that. Time spent is entered by the assignee. Subsequent entries are added together, and can be reported upon later for metrics purposes.
Remedy 7 User Guide September 2008 Page 33 of 48
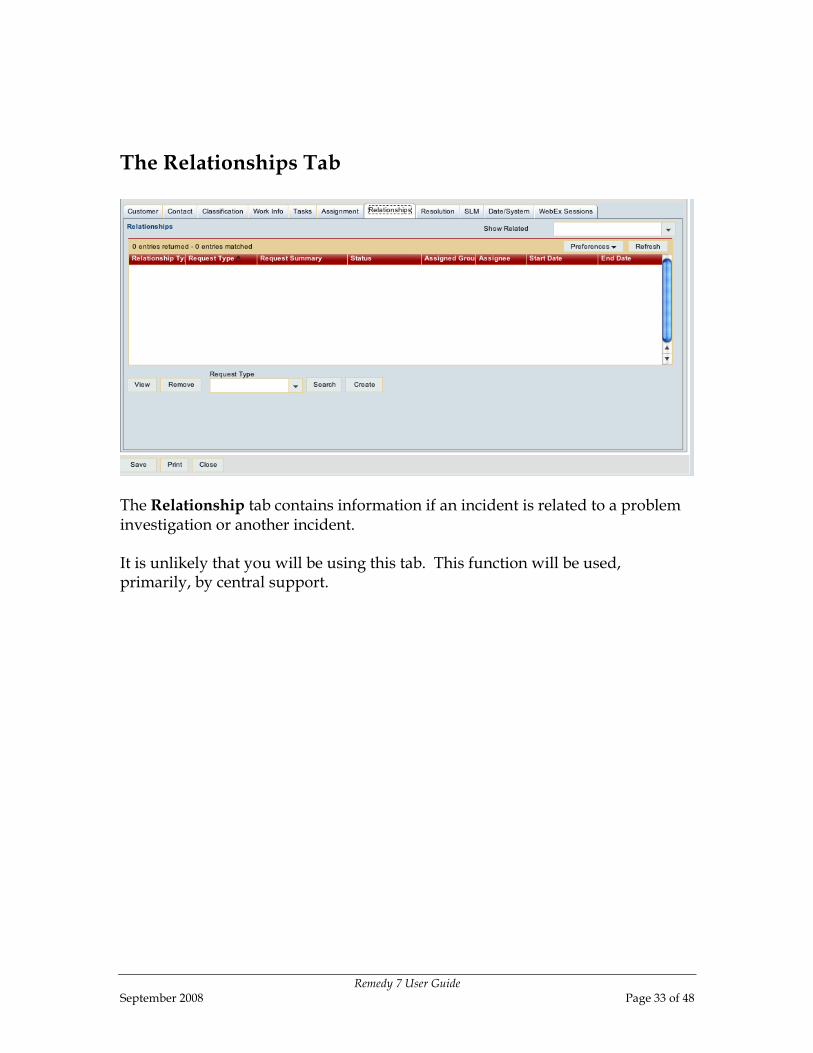
The Relationships Tab
The Relationship tab contains information if an incident is related to a problem investigation or another incident. It is unlikely that you will be using this tab. This function will be used, primarily, by central support.

Remedy 7 User Guide September 2008 Page 34 of 48
The Resolution Tab
The Resolution tab is where you enter the resolution of an Incident. The resolution always needs to be entered before you can change the Incident Status from In-Progress or Pending to Resolved. Keep in mind that the text entered into the Resolution tab is emailed automatically to the customer. So it should be composed with enough detail that the customer will understand the resolution. The only required field in this tab is the Resolution field itself. When the resolution is entered and the incident is saved, the Status Reason will default to No Further Action Required. If you need to change the Status Reason to something else, select one of the existing options from the drop-down menu. The customer will not see the Status Reason.
When you save the transaction, a confirmation appears that the customer received an email with the resolution.

Remedy 7 User Guide September 2008 Page 35 of 48
The SLM Tab
The SLM tab contains the Service Level Management information. Remedy users never need to interact with it. It verifies whether or not the incident was handled within the range of the agreement. See the Service Level Agreement section of this document in the Appendix for further information. Note: IT Services prepares a weekly “5 day Incident report.” All unresolved Incidents older than five days old are listed in the report. The reports are emailed weekly to Support Group Managers and the Remedy Advisory Group.

Remedy 7 User Guide September 2008 Page 36 of 48
The Date System Tab
The Date/System tab shows when incidents were created, who created them, when they were closed, and other date-related information. Incidents with the status of Resolved will automatically close after two weeks. Once an Incident is moved to the status of Closed, it cannot be moved back to any other status. If you need to “re-open” a Closed Incident, it’s just not possible: you must create a new Incident. The Date/System tab also includes four User Defined Fields. There are two text-based User Defined Fields, and two date/time Fields. Remedy users can use any or all of these fields to record information important to the Support Group but which aren’t specifically covered by another field in the application. For example, if the Registrar’s office wanted to record the date at which a student was cleared for graduation, they could use one of the Date/Time fields.

Remedy 7 User Guide September 2008 Page 37 of 48
COMING, BUT NOT YET RELEASED:
The WebEx Session Tab
Remedy users with WebEx licenses can use this tab to start a WebEx Support Center session with the client. The integration with WebEx will launch the Support Center session in the Remedy users browser, and provide the session-connection information that can be given to the customer over the phone or sent via email. With WebEx’s Support Center, Remedy users can see the client’s desktop and even take control of their mouse to assist them in resolve their issue. More information about WebEx options for the Stanford community is available at: http://www.stanford.edu/services/webex/.

Remedy 7 User Guide September 2008 Page 38 of 48
5. Doing More With Remedy
Searching The fastest way to search for an Incident is with the Incident ID. If you do not have that information, you can search by any of the fields on the Incident form.
1. From the Overview Console, click Search. 2. Enter the criteria you have in the corresponding field(s). 3. Click Search. 4. The results are listed at the top of the page. Double-click the Incident.
Re-route an Incident If an Incident is not in Closed status, you can re-route it to another work group from the Assignment tab. The Assignment Tab
Steps to re-route the Incident to a different work group:
1. Click the Assignment tab. 2. Choose the Support Organization. 3. Choose the Assigned Group. 4. Click Save.
Steps to re-route an Incident to an individual:

Remedy 7 User Guide September 2008 Page 39 of 48
1. In the Assignee field, enter the SUNet ID. 2. Press ENTER. 3. Click Save.
Reclassify a Incident
Sometimes, due to incorrect initial classifications given an Incident, or because the cause for the Incident changes as more troubleshooting is conducted, reclassification is necessary. Because the Classification of an Incident affects both routing, as well as reporting once the work is done, it is important that it be as accurate as possible. To re-classify the Incident to the correct group:
1. Open the Incident. 2. Click the Classification tab. 3. From within the appropriate group of categorizations, click Clear. 4. Enter the correct Operational or Product Categorization group tiers
information. 5. Click the Assignment tab. 6. From Set Assignment Using, clear the Incident Assignee information. 7. Click Auto Assign. 8. Click Save.

Remedy 7 User Guide September 2008 Page 40 of 48
Create Macros Macros have some limitations, and so are not recommended for broad usage. Macros can only be created and accessed from the Remedy client on a Windows machine. This feature is not available for use on the Macintosh operating system, nor is it available via Remedy’s Mid-Tier (web) environment. You can create macros to automate operations that you perform frequently. You can use menu commands to record and run macros, or you can display the macro bar and use its buttons. For step-by-step instructions creating macros, in the Remedy Client go to the Help Menu and select Contents and Index. From the Contents, select Recording and Using Macros. You can also submit a HelpSU request (Business Applications (University) >HelpSU) for assistance.

Remedy 7 User Guide September 2008 Page 41 of 48
6 Reporting
BMC Remedy provides two reporting options with its Remedy product suite: ad hoc reporting using the Remedy User thick-client; and “canned reporting” using report formats developed by BMC Remedy in Crystal Reports. The following information pertains to ad hoc reporting. Most staff doing reporting at Stanford have found the ad hoc reporting capability most flexible, and so have designed and saved various report formats. Such report formats are stored locally in the user’s ARCmds folder. With Remedy, there is also a fully functioning web interface, which BMC Remedy refers to as the “Mid Tier.” Ad hoc reporting is not supported with Remedy’s Mid-Tier (web) client. Those needing to do ad hoc reporting must use the Remedy User client software, either on a Windows machine, or on another operating system using some sort of virtualization software like Parallels or VMWare Fusion. Create a Report
1. Select Tools > Reporting.
2. On the Report Styles window, double click to select <<New Style>>.
3. In the Field list, identify how you want the report organized by selecting the fields to include in the report. To select multiple fields at the same time, hold down the CTRL key and click on each field.
4. Press the Add Before button to add the selected items to your report. Use the Add Before or Add After buttons to get new items.
To reorganize the fields you have selected, click once on the field to highlight it. Then use the up or down arrows to move the item. Use the Remove button to delete any field names you don’t want in the report.
Use the tabs at the top of the Properties <<New Style>> window to set up your report format. (Examples: Use Page Setup tab to indicate a Report Format of Column, a page format of Landscape, and a Characters per Line of 240.)
To preview your report, click once in the lower part of the <<New Style>> window entitled Style Preview. Then, click on the Preview icon (page with magnifying glass on it). You can then close the preview and continue revising the report format and then print from the Preview page if you wish.

Remedy 7 User Guide September 2008 Page 42 of 48
5. Click OK to view the Style Preview of the report you created.
6. If you wish to save this report format, click the Save icon (disk) to save. You’ll be prompted to name the report and save it.
It’s recommended you use the Comments field to enter the fields included in the report. If you do, they will appear in the description on the Report Styles window so you know which report to run.
7. Click OK and the new report template displays in the Report Style section.
Export to Excel
1. To export results to Excel, select the report.
2. Select Report>Export to…File
3. On the Report To file window, name the file, select the destination, and select the Save as type of .csv (comma separated field).
4. Press Save.
5. Open Excel.
6. Select File>Open. Navigate to where you saved the .csv file and be sure to select a File of type: of All Files (*.). Once you locate the text file, highlight it and press Open.
7. The report should autofill the Excel spreadsheet, and is now ready for formatting. If you did not save the file as a .csv, Excel will read it as a text file and the Import Wizard will open.
8. When formatting is done, select File>Save as to name the file and save it as an Excel spreadsheet.

Remedy 7 User Guide September 2008 Page 43 of 48
Getting Reporting Help Comprehensive reporting information and instructions are available in the Remedy client Help menu. 1. Select Help>Contents and Index. 2. On the Contents tab, click once on the + next to the Reports book to expand. 3. Locate the information you need by expanding sub-titles. 4. Or, submit a HelpSU request (Business Applications (University)>HelpSU)
for assistance.

Remedy 7 User Guide September 2008 Page 44 of 48
7. Support Group Lead/Understanding Responsibilities and Capabilities of the SGL role
Responsibilities Each Support Group in Remedy must name a Support Group Lead. The Support Group Lead is the primary contact for each support group in Remedy. The Support Group Lead assists with the oversight and management of unresolved case backlogs, acts as an approver for any routing rule changes or other Remedy system configurations affecting their support groups, and can add and remove individuals to the groups for which they have been defined as a Lead.
To facilitate the management of customer requests to resolution, IT Services will provide the Support Group Lead with a weekly report of unresolved HelpSU Incident Cases older than 5 business days. IT Services will work with the Support Group Lead to make sure such requests are actively worked and ultimately resolved.
Special Capabilities Support Group Lead functions are selected from the Group Lead Functions menu in the left sidebar of the Overview Console. The two areas in which they

Remedy 7 User Guide September 2008 Page 45 of 48
have special capabilities are in creating Templates, and in managing their Group membership and configuration.
Functionality of the Templates Feature Templates are an excellent way to populate a New Incident with standard information that is entered on a regular basis by any support group: a kind of "quick Incident.” Support Group Leads can create templates (as many as they want) for their groups that have prefilled fields (as many as the group feels are appropriate) to speed Incident creation. For example, Summary, and Description, Classification, Resolution, etc. can each be pre-defined for certain kinds of frequent requests, leaving only the Customer's contact information and specific problem details to be filled in by the support staff. Using templates allows the support staff to create and resolve Incidents in just a few clicks.
Creating Templates: Click on Templates in the Quick Links sidebar under Group Lead Functions while on the Overview Console or Incident Form, which opens up the Incident Template Selection:
1. Click Create to create a new template
2. Assign the Template a descriptive name
3. Set its status to Enabled
4. Step through each of the Incident form tabs, completing each with whatever fields you would like auto-filled with the use of the template.
5. List which group has authored the template on the Authored For Groups tab.
Note: One must have Support Group Lead permissions in each support group before attempting to author a template.
User/Group Management The Support Group Lead has the capability to configure users in their support groups, as well as some aspects of the group's support profile.
The Support Group Lead can manage the membership of the support group, adding and deleting users as appropriate, or marking members as Available or Unavailable, due to vacation or other leave.
Note: Support Group Leads cannot assign Remedy licenses to brand-new users, that must be done by IT Services staff via a HelpSU request
Remedy 7 User Guide September 2008 Page 46 of 48
Favorites The Support Group Lead sets favorites for everyone belonging to a group. It is used to provide quick access to frequently used reassignments. For example, if you belong to one group, and you frequently reassign your Incidents to another group, you can set up the favorite so that choosing from the Set Assignment using drop-down box can quickly access the new group.
Group Aliases The Support Group Lead and set up Group Aliases to identify a specific work group by the function they are requested to support. For example, if a work group is to work on Incidents, specifically related to spam email, instead of the name of the group Computer Resource Group, that group’s alias is Spam. To create the alias:
1. Under Group Lead Function, select User/Group Management. 2. Click to Refresh. 3. Select a group. 4. Click the Update button. 5. Create the Alias (e.g., Spam).
To use the function:
1. Select the Assignment tab. 2. From Assigned Group, select Spam. 3. Click OK.

Remedy 7 User Guide September 2008 Page 47 of 48
Appendix
Service Level Agreement HelpSU is Stanford University's online request tracking system, and is used by schools, departments and central offices as the principal way to track user service requests and service interruptions, as well as general questions. The application powering HelpSU is BMC Remedy's Service Desk 7.01 with its Incident Management, Problem Management, and Service Level Management modules. Remedy Help Desk Incidents are managed from the time a request is submitted by a client to the time the request is resolved. Definitions "Response Time" is the time it takes to acknowledge a customer's issue in a non-automated way. It is measured from the time an Incident record is created, either by the customer via a HelpSU web submission or by the IT Service Desk or other support group manually creating a record, until the time that the customer is advised their problem has been received and is being addressed. The customer should be contacted either by phone or email and the Incident marked "In Progress". Specifically, Response Time is measured from the time from Incident creation until the "In Progress" status update, measured during Stanford business hours (Monday through Friday, 8:00 a.m. to 5:00 p.m.) "Resolution Time" is the time it takes to resolve a customer's issue or answer their question. It is measured from the time an Incident record is created, either by the customer via a HelpSU web submission or by the IT Service Desk or other support group manually creating a record, until the time that the customer is advised their problem has been resolved. Specifically, Response Time is the time from Incident creation until the "Resolved" status update, measured during Stanford business hours (Monday through Friday, 8:00 a.m. to 5:00 p.m.)

Remedy 7 User Guide September 2008 Page 48 of 48
Customer Response Time Targets The following table shows response time targets coded into the HelpSU application. The Impact and Urgency field settings are used to automatically generate a calculated Priority, and the Priority value is used to generate the Response Time targets. For most Incidents generated through the HelpSU application, the Impact and Response time is as follows. For other response time targets, please refer to the table at: http://www.stanford.edu/services/helpsu/internal/sla.html
Impact Urgency Calculated Priority
Calculated Weight
Business Hours Response Time
Target
4-Minor/Localized 4-Low Low 0 6 hours Customer Resolution Time Targets The following table shows Resolution Time targets coded into the HelpSU application. The Impact and Urgency field settings are used to automatically generate a calculated Priority, and the Priority value is used to generate the Resolution Time targets. Note: Putting Incident records into status “Pending” suspends the Resolution Time “clock” so that status should be used appropriately. For most Incidents generated through the HelpSU application, the Impact and Resolution time is as follows. For other Resolution time targets, please refer to the table at: http://www.stanford.edu/services/helpsu/internal/sla.html
Impact Urgency Calculated Priority
Calculated Weight
Business Hours Resolution Time
Target
4-Minor/Localized 4-Low Low 0 12 hours