Embed Size (px)
Citation preview

RELEASE 12 : PAYABLES
Trading Community Architecture

Agenda
Suppliers
Bank’s
Retainage
Recoupment
Payments Manager
AP/AR Netting

Supplier’s
In R12
Supplier becomes as TCA Party.
Suppliers Sites as TCA Party Site for each distinct address.
Contacts for each supplier/address , it means Single supplier address and contact can be leveraged by multiple sites, for each OU
– A single change to an address can be seen instantly by all OUs
– No longer need to manually ‘push’ updates across OUs.This can be best understood by the figure below.
In 11i Suppliers defined in AP. Supplier contacts replicated for each supplier site.


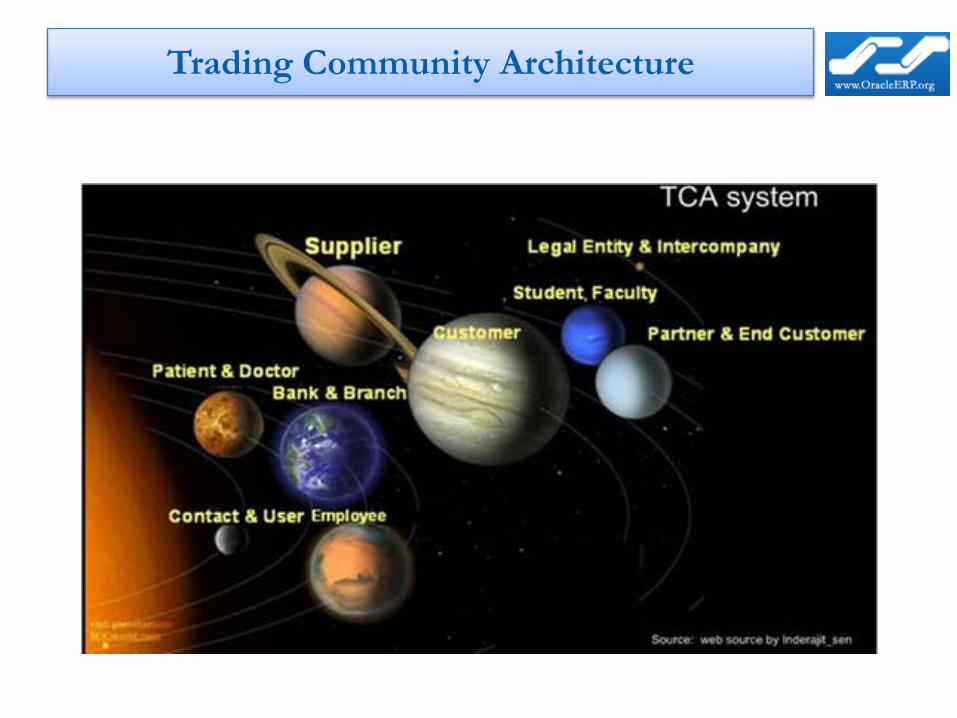
Creating Supplier
Creating Supplier
Select

Click Apply to continue
Enter Header Level Info
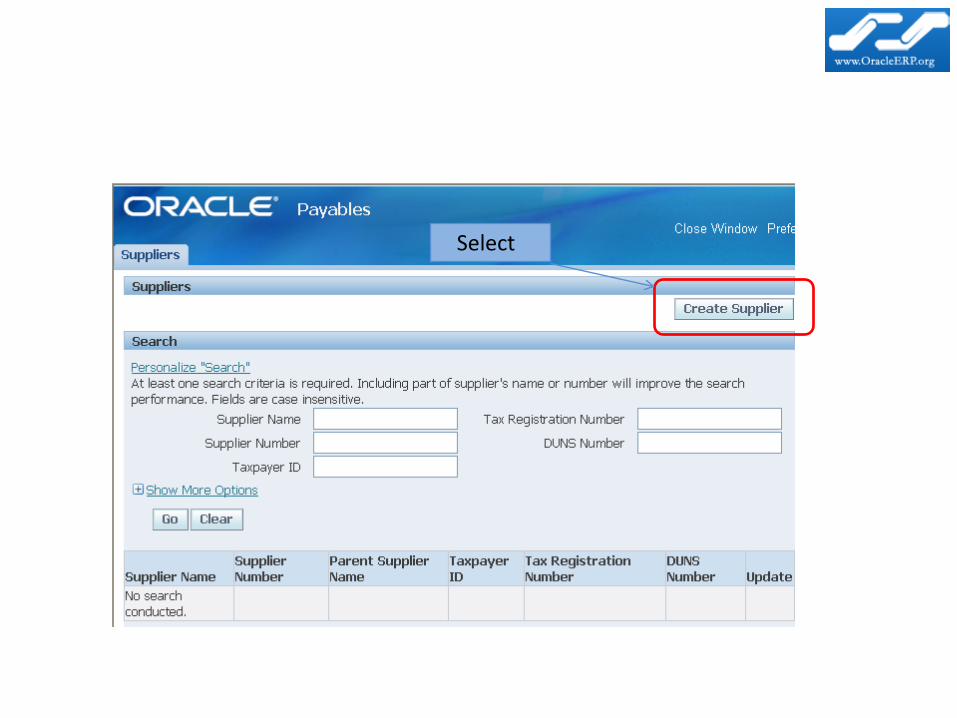
Select Address book to Insert Site Address

New Address

Site Name


Click on Create to Create a new Supplier Bank A/c


Banks and Bank Details
• The Bank Account model in R12 provides a single access point for defining and managing internal bank accounts for Oracle Payables, Oracle Receivables, Oracle Payroll, Oracle Cash Management, and Oracle Treasury.
• A single Legal Entity is granted ownership of each internal bank account. One or more Organizations are granted usage rights.


Ownership of internal bank account
• Each Legal Entity is granted ownership for each internal bank account.
• For Granting Access to the Legal Entities log In to Sys Admin
• Go to “User Management” Responsibility
• Click on “Roles & Role Inheritance”

Give Required Information
Click on Go

Click on Update

Select

Click on Run Wizard
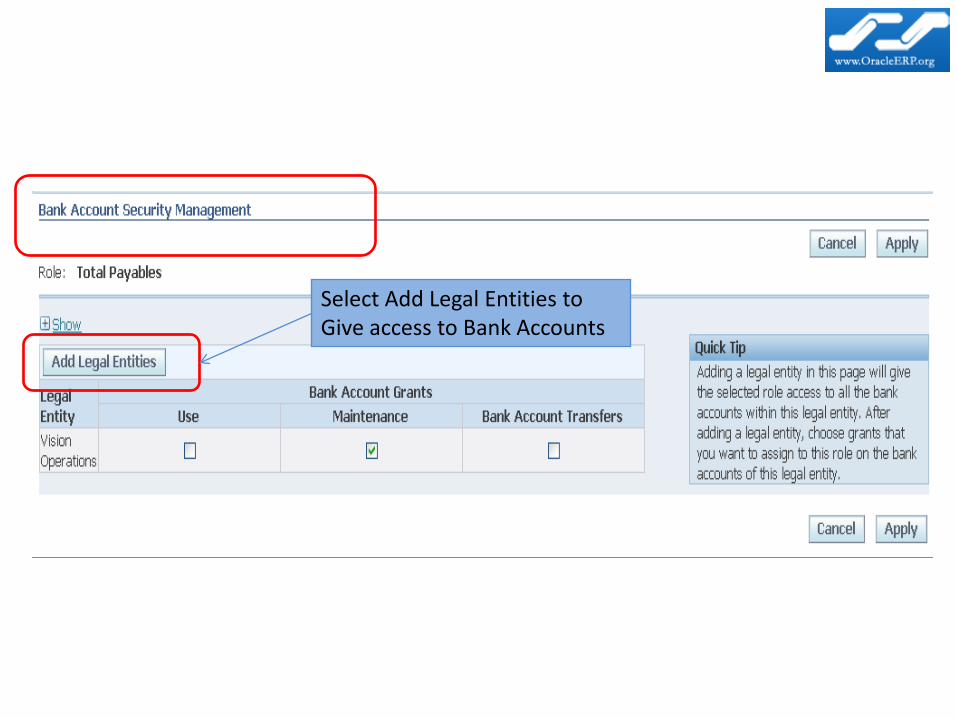
Select Add Legal Entities to Give access to Bank Accounts
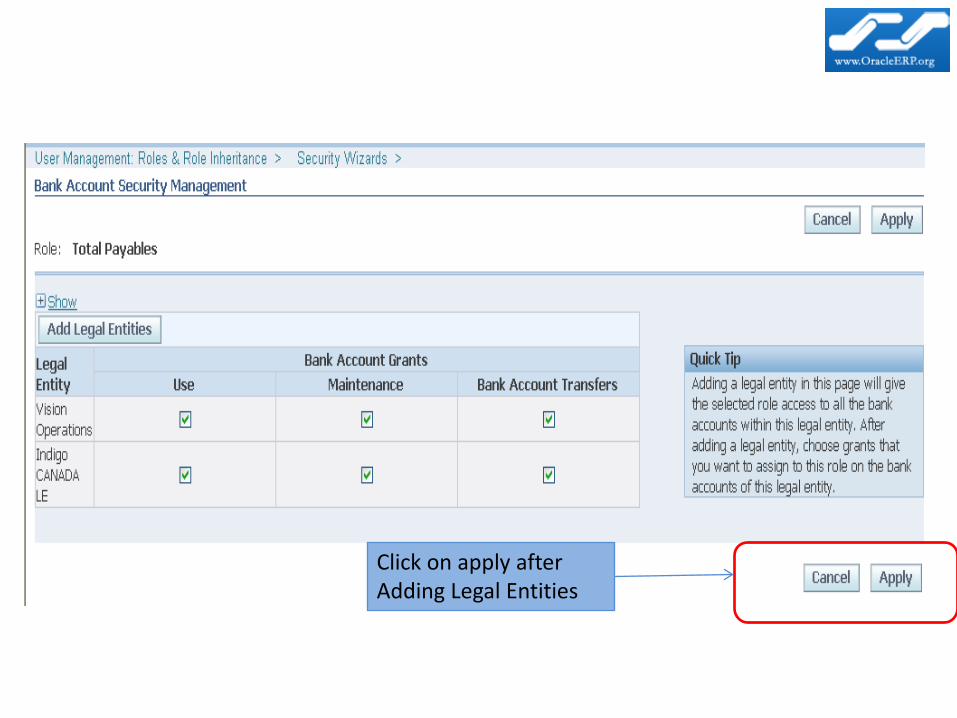
Click on apply after Adding Legal Entities

Creating Bank and Bank Branches in Payables
Navigation for Defining Banks
Select

Select

Click on Create

Enter Bank information
Select

Click on Create to Add Address

Click on Apply to Save the information entered

Click

Click on Create to enter a Contact info
Click Finish after entering contact info

Creating Bank Branches
Click on Bank Braches Tab
Create new Bank Branches

Enter Bank Name and Country
Click Continue

Enter Branch Information
Select Save and Next

Select Create to Fill Bank Branch Address

Enter Branch information
Click on Apply

Select

Click on Create Contact to add Contact
Click Finish after entering Contact’s

Creating Bank Account’s
Navigation
Select

Create New Bank Accounts

Enter Bank And Branch Name
Click Continue

Enter your Legal Entity in Bank
Account Owner
Note:- If Legal Entity Is not Granted Access at the Sys admin Level in “User Management” Responsibility, you can not View your Legal Entity in the above “Bank Account Owner” Field.
Select Next to Continue

Enter Bank Account Information
Select Save and Next to Continue

Enter Required Information rest all are Optional
Select Save and Next to Continue

Select to Grant Access to Operating Unit’s

Enter Account use and Operating Unit
Select Continue

Enter Payment Method and Category

Select Apply to continue

Click on Add Organization Access to Give bank account access to Multiple Operating Units Click Save and Next to
Continue

Click on Create Contact to enter Contact info of Bank account
Select Finish to Save your work

Select the Bank Account
Select

Select

Enter Required Information
Select Apply

Payment Doc got Created

Retainage and Retainage Release
• Retainage is the common practice of withholding a fixed amount / percentage of payment until all work under a contract is complete and accepted.
• Retainage is also called ‘retention’ or contractual withholds’.
• At the end of the project or when agreed events have occurred, the supplier requests the amount retained and payment is made to release it.
• Retainage comes under Complex Payments
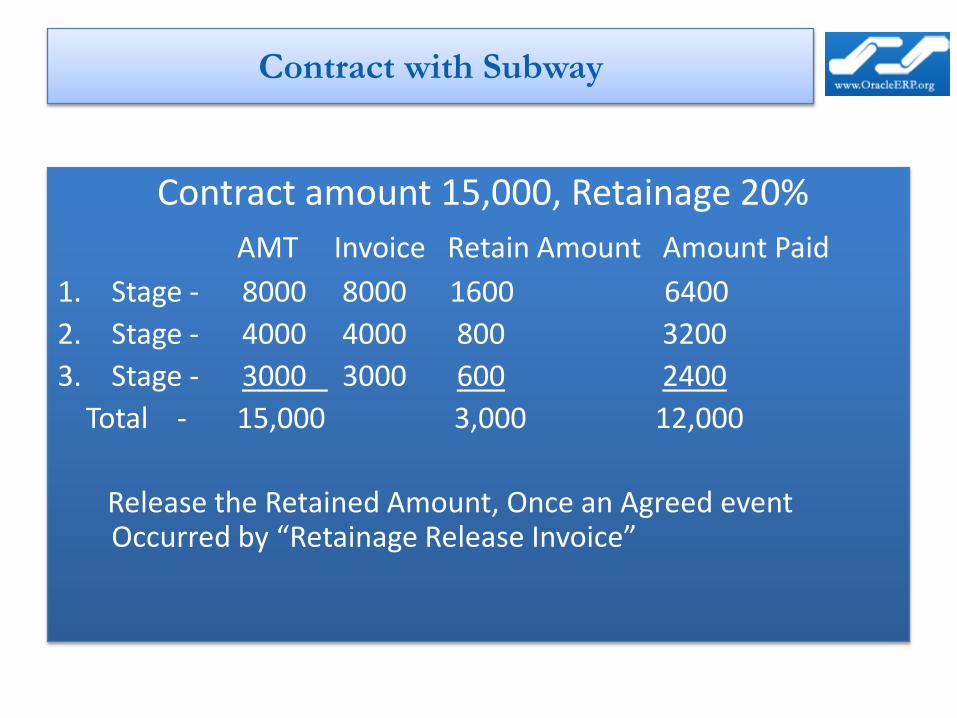
Contract with Subway
Contract amount 15,000, Retainage 20% AMT Invoice Retain Amount Amount Paid
1. Stage - 8000 8000 1600 64002. Stage - 4000 4000 800 3200 3. Stage - 3000 3000 600 2400
Total - 15,000 3,000 12,000
Release the Retained Amount, Once an Agreed event Occurred by “Retainage Release Invoice”

Required Setups
Enter Retainage A/c in Financial Options

1. Navigate to Supplier’s Window
2. Select
3. Select
4. Give Retainage Rate

Create Complex Service Agreement in Purchasing
Navigation
Select

Select “Complex Service Agreement” from list of Values
Click
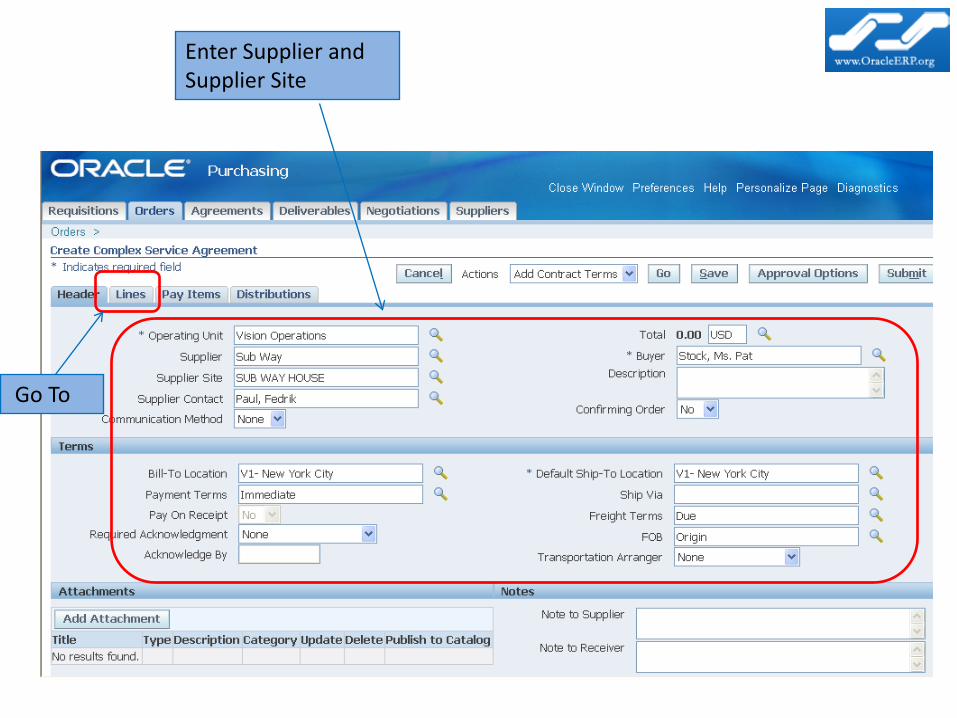
Enter Supplier and Supplier Site
Go To

Enter Type as Fixed Price Services
Enter Contract Amount
Enter Contract Need by Date
Click on Update
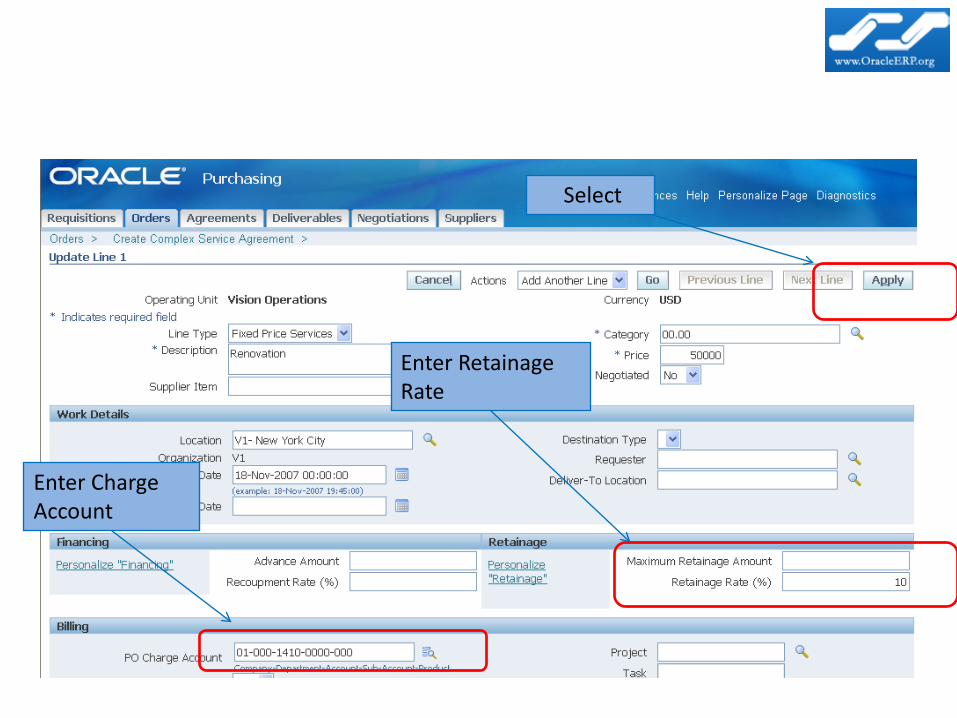
Enter Retainage Rate
Enter Charge Account
Select

Select

Select Split to Split the Contract into Stages

Split the Contract amt
Give the Need by Date
Enter Type as Lump Sum
After completion move to the Distributions Tab

After Completion select Submit

Complex Service Agreement has been Approved. Agreement NO is- 5546

Navigate to Invoice Workbench to Raise Invoice
Enter the Agreement NoEnter the Invoice Amt
Match Invoice with the Agreement

Select the Match Amount
Click on Match after Selecting

10 percent of the Total amt got automatically got Retained
Go to Actions and Pay the Invoice

Out of 25,000 invoice amt 2,500 got retained and amount paid to Supplier is 22,500

Retainage Release
Select Invoice Type as Retainage Release
Select PO Number
Enter Invoice Amt to be Released
Go to Match and Match the Agreement

Release the Amount
Select The Po line to be Matched
After Release go to Payment work Bench and Pay the Amount

Contract with Subway
Contract amount- 35000, Prepaid amount-7000Recoupment Rate 20%
Amount Invoice Pre’ment Applied Amount paid Stage 1 20,000 20,000 4,000 16,000 Stage 2 15000 15,000 3,000 12,000Total 35,000 7,000 28,000

Select “Complex Service Agreement” from list of Values
Click

Enter Supplier and Supplier Site
Go To

Enter Type as Fixed Price Services
Enter Contract Amount
Enter Contract Need by Date
Click on Update

Advance amount is Prepaid amt Paid to Supplier
Recoupment rate is 7000/35000*100
Select

Select

Split the Contract amt
Give the Need by Date
Enter Type as Lump Sum
After completion move to the Distributions Tab
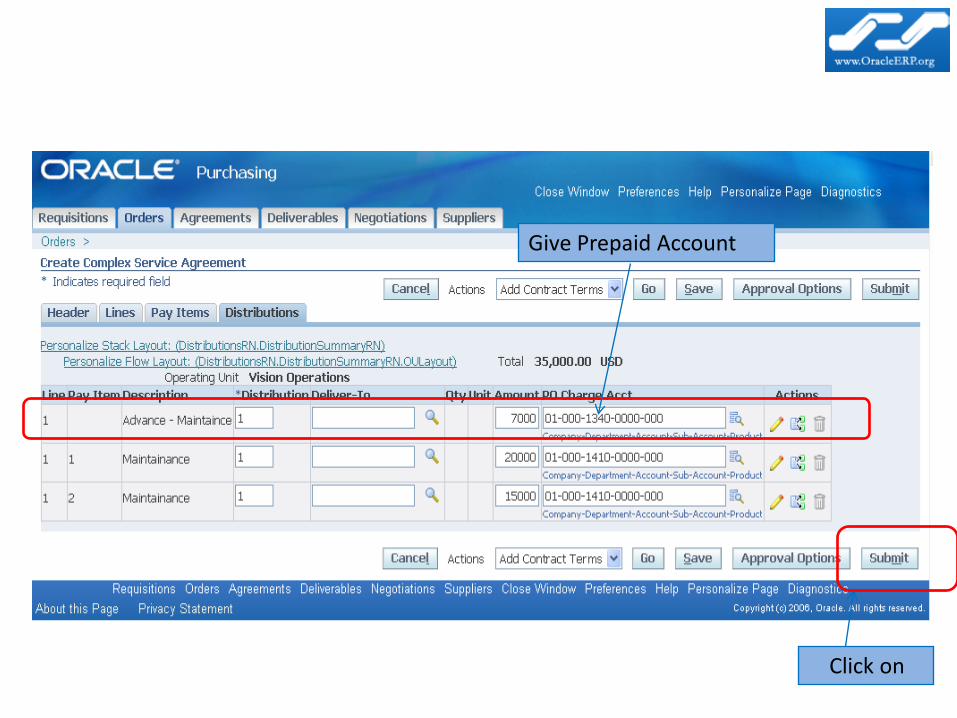
Give Prepaid Account
Click on

Complex Service Agreement has been Approved. Agreement NO is- 5547

Navigate to Invoice Workbench to Raise Prepaid Invoice
Enter the Agreement NoEnter the Invoice Amt
Match Invoice with the Agreement

Select the Match Amount
Click on Match after Selecting
After Matching Pay the Invoice

Raise a Standard invoice and match with Agreement
Enter the Agreement NoEnter the Invoice Amt
Match Invoice with the Agreement

Select the Match Amount
Click on Match after Selecting
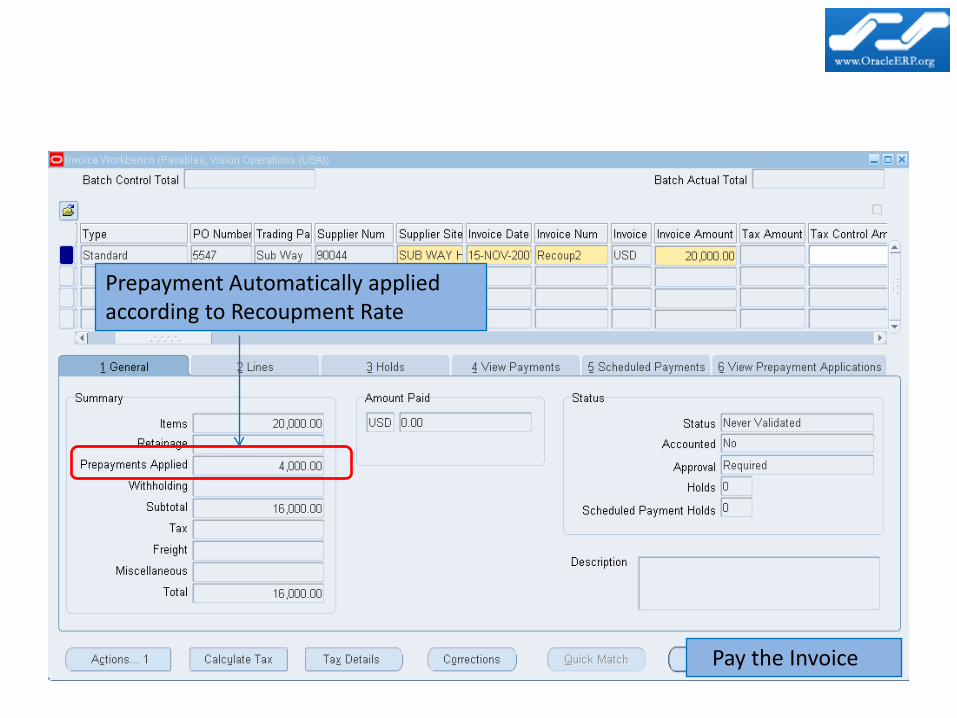
Prepayment Automatically applied according to Recoupment Rate
Pay the Invoice

Total amount paid to Supplier is 20,000
Payments Manager
• The Payments Manager enables you to complete a pay run from start to finish Payments.
• The Payments Manager is comprised of the following components:
Payments DashboardTemplatesPayment Process RequestsPayment InstructionsPayments

Creating Payments through Payment Manager
Navigation
Select

Select

Select to create a new template

Enter Template Name
Enter Supplier Name
Select Pay group
After Completion click on Payment Attributes Tab

Select Bank A/c and Exchange rate Type
After Completion click on Process Automation Tab

When “Initiate Payment Process Request is complete” is selected System will Automatically create Format for the Payments Selected
View
Select Apply

Go to
Select

Information gets defaulted from Template
Enter Request Name and Select Template from list of values
Select User Rates Tab

Enter exchange rateSelect Submit “Requests” gets Generated

Report Gets Generated

Go back to
Query the Process Request
Click on

Select to Add or Remove Payments
Click on submit Request gets generated

1. Query the Process Request
2. Status changes to Formatting
3. Go to Payment Instructions Tab to complete the Payment

Query by Process Request Name and Creation Date
Select

Select Continue the Apply

Go to
Query “Process Request Name”
Status got Confirmed

Navigate to Payments Overview to view Payments Made

AP/AR Netting
• The Payables and Receivables Netting feature enables the automatic netting of Payable and Receivable transactions within a business enterprise.
• You can predefine a netting agreement that incorporates the netting business rules and transaction criteria needed to run your tailored netting process.
• The netting process automatically creates the Payables payments and Receivables receipts required to clear a selected number of Payables and Receivables transactions.
Prerequisites for AP/AR Netting
• Define a netting control account in GL.
• Define a netting bank account.
• Associate the bank account with the AP/AR Netting receipt class.
• Enable the Allow Payment of Unrelated Transactions Receivables System Option.
• Define Document Sequence for Receipts and Payments.
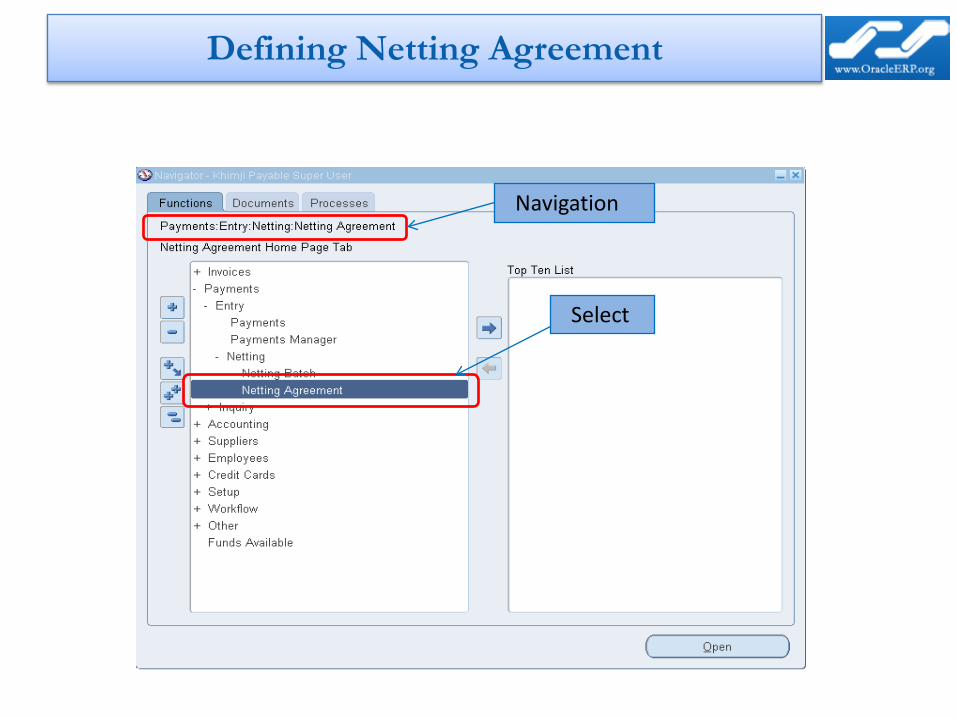
Defining Netting Agreement
Navigation
Select

Select

Enter Operating Unit And Agreement Name
Select Bank A/C name and Rules
Select Invoice and Transaction Types
Once Finished Click on Next

Select Supplier and Customer

Select Finish to Complete

Creating Netting Batch
Navigation
Select

Select

Select the Required Information and give the Batch Name
Once Finished Click on Submit
Once Submitted go back to Netting Batch window and Query the Netting Batch
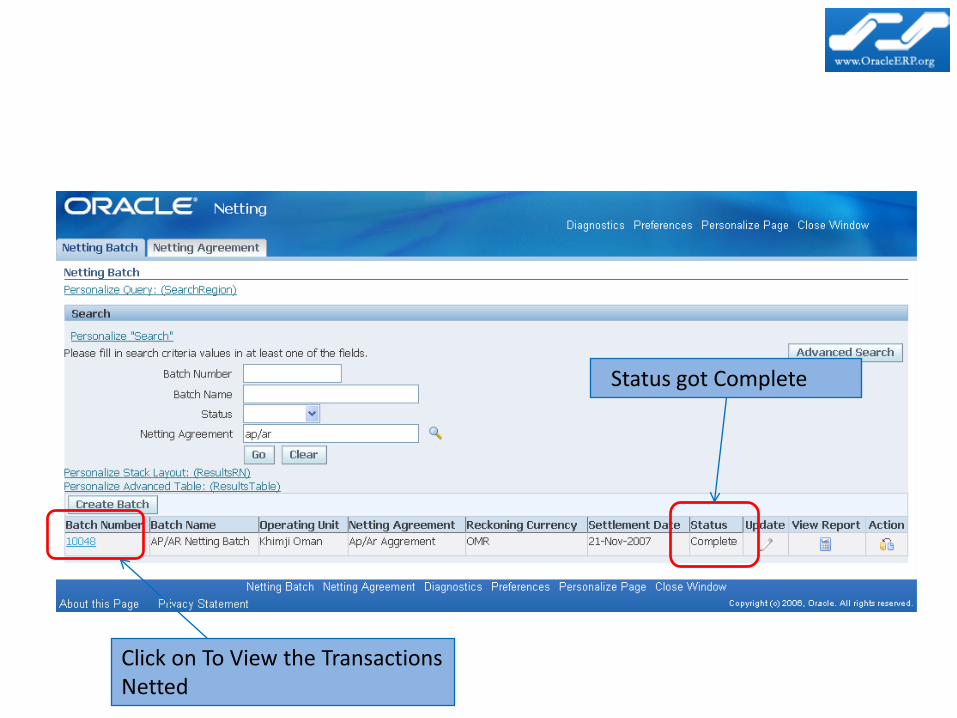
Status got Complete
Click on To View the Transactions Netted