Embed Size (px)
Citation preview

Admin Manualv6.9
January 7, 2011

Relativity | Admin Manual - 2
Table of Contents1 Overview 13
1.1 Changes to this Version 13
1.2 Before You Start 13
1.3 Standard Relativity Objects 13
1.4 Glossary 14
1.5 Relativity Dynamic Objects 15
2 Admin Mode Basics 15
2.1 Admin Mode Tabs 17
3 Clients 18
3.1 Adding a Client 18
3.2 Editing Client Information 20
4 Matters 20
4.1 Adding a Matter 21
4.2 Editing Matter Information 23
5 Users 23
5.1 Adding a User 24
5.2 Editing User Information 30
5.3 Reset Password 31
6 Groups 32
6.1 Adding a Group 32
6.2 Editing Group Information 34
6.3 Adding Users to Groups 34
6.4 Reviewing Group Information 35
6.5 System Groups 36
7 Workspaces 37
7.1 Adding aWorkspace 38

Relativity | Admin Manual - 3
7.1.1 Production Restrictions 41
7.2 Native Types Restricted from Imaging 42
7.3 Editing Workspaces 43
8 Tabs 44
8.1 Adding a Tab 45
8.2 Editing Tab Information 47
8.3 Nesting Tabs 48
9 Fields 49
9.1 Adding a Field 49
9.1.1 Object 50
9.1.2 Field Information 50
9.1.3 Adding HTML Alerts and Links 52
9.1.4 Field Types 55
9.1.5 Propagation 57
9.1.5.1 Applying Propagation to Documents in Multiple Groups 58
9.1.6 List Properties 60
9.1.7 Yes/No Field Display Values 64
9.1.8 Relational Field Properties 64
9.1.9 Keyboard Shortcut 65
9.1.10 Other 66
9.2 Editing Field Information 67
9.3 System Fields 67
9.3.1 Relativity Compare 68
10 Choices 68
10.1 Adding a Choice 69
10.2 Editing Choice Information 71
11 Relativity Keyboard Shortcuts 72
11.1 Keyboard Shortcut Legend 73

Relativity | Admin Manual - 4
11.2 Shortcuts for System Actions 74
11.3 User-Defined Shortcuts 75
11.3.1 Document Fields 76
11.3.2 Document Choices 77
11.4 Special Consideration 77
12 Relativity Utilities or Administration Tab 78
13 Importing 79
13.1 Importing a Load File 87
13.1.1 Field Matching 92
13.1.2 Overwrite | Overlay Identifier 93
13.1.3 Folder Info 94
13.1.4 Native File Behavior 95
13.1.5 Extracted Text 96
13.1.6 Loading 97
13.1.6.1 File Transfer Mode 99
13.1.6.2 SQL Insert Mode 99
13.1.7 Error Handling 99
13.1.8 Import Auditing 100
13.1.9 Saving Your Settings 100
13.2 Importing an Image File 101
13.3 Importing a Production File 104
13.4 Importing with Command Line Import 105
14 Transform Sets 106
14.1 Domain Parsing 106
14.1.1 Special Considerations 112
14.2 Conversation Index Parsing 113
15 Markup Sets 114
15.1 Adding a Markup Set 114

Relativity | Admin Manual - 5
15.1.1 Entering Highlight Terms 116
15.1.1.1 Entering Highlight Terms 117
15.1.1.2 Color-Coding Persistent Highlights 118
15.1.2 Using Highlight Fields 119
15.1.2.1 Searching Functionality and Persistent Highlighting 119
15.1.2.2 Creating a Markup Set with the Highlight Fields Option 119
15.2 Editing Markup Set Information 121
15.3 Selecting your Markup Set in the Viewer 121
16 Layouts 122
16.1 Adding a Layout 123
16.2 Adding Layout Content 125
16.2.1 Creating a New Category 126
16.2.2 Adding Fields 128
16.2.3 Adding Text to a Layout 131
16.3 Adding Child and Associative Objects 132
16.3.1 Adding an Associated Object List 132
16.3.2 Adding an Associated Object List 134
16.4 Editing Layout Information 135
16.4.1 Editing directly on a Layout 135
16.5 Inline Tagging 136
16.5.1 Adding a Tag to a Document 136
16.5.2 Viewing a Tag 138
16.5.3 Removing a Tag 138
16.6 Reviewer Layout Options 139
17 Views 140
17.1 Adding a View 141
17.1.1 Enter Basic Information (Step 1) 142
17.1.2 Select Fields (Step 2) 144

Relativity | Admin Manual - 6
17.1.3 Select Conditions (Step 3) 145
17.1.4 Select Sort (Step 4) 147
17.2 Editing View Information 148
17.3 Adding Tab Views 149
17.4 System Views 149
17.5 Indented List View 150
17.5.1 Conversation Index Indented List 154
17.5.2 Equivio Indented List 156
17.5.3 Numeric Indented List 156
18 Search Terms Reports 157
18.1 Creating a New Search Terms Report 157
18.2 Running a Search Terms Report 159
18.3 Search Terms Report Results 159
18.4 Search Terms Reports and Persistent Highlighting 161
18.4.1 Searching Functionality and Persistent Highlighting 161
18.4.2 Additional Guidelines for Persistent Highlighting 162
19 Summary Reports 164
19.1 Adding a Summary Report 165
19.2 Editing Summary Report Information 167
20 Pivot Profiles 168
21 Production Sets 172
21.1 Adding a Production Set 172
21.1.1 Production Information 172
21.1.2 Bates Numbering 173
21.1.2.1 Create New Image Numbers 174
21.1.2.2 Use Original Image Numbers 175
21.1.3 Headers and Footers 176
21.1.4 Bates Numbering Sort Order 178

Relativity | Admin Manual - 7
21.2 Adding Documents to Your Production 179
21.3 Running a Production 180
21.4 Editing a Production Set 182
22 Exporting 183
22.1 Exporting a Production Set 184
22.1.1 Data Source Tab 184
22.1.2 Destination Files Tab 185
22.1.3 Export Location 185
22.1.3.1 Physical File Export 185
22.1.3.2 Volume Information 186
22.1.3.3 Subdirectory Information 186
22.1.3.4 File Path 187
22.1.3.5 Native Load File Characters 187
22.1.3.6 Text and Native File Names 188
22.1.3.7 Image 188
22.1.3.8 Native 189
22.1.3.9Metadata 189
22.2 Exporting a Saved Search 192
22.2.1 Data Source Tab 192
22.2.2 Destination Files Tab 193
22.2.2.1 Export Location 194
22.2.2.2 Physical File Export 194
22.2.2.3 Volume Information 195
22.2.2.4 Subdirectory Information 195
22.2.2.5 File Path 196
22.2.2.6 Native Load File Characters 196
22.2.2.7 Text and Native File Names 197
22.2.2.8 Image 197

Relativity | Admin Manual - 8
22.2.2.9 Native 198
22.2.2.10Metadata 198
22.3 Exporting a Folder 200
22.4 Exporting a Folder and Subfolders 201
22.4.1 Data Source Tab 201
22.4.2 Destination Files Tab 202
22.4.2.1 Export Location 203
22.4.2.2 Physical File Export 203
22.4.2.3 Volume Information 204
22.4.2.4 Subdirectory Information 204
22.4.2.5 File Path 205
22.4.2.6 Native Load File Characters 205
22.4.2.7 Text and Native File Names 206
22.4.2.8 Image 206
22.4.2.9 Native 207
22.4.2.10Metadata 207
23 History 210
23.1 History View Fields 211
23.2 Searching History 212
24 Security Permissions 213
24.1Workspace Permissions 215
24.1.1 Security 216
24.1.2 Tab Visibility 223
24.1.3 Browsers 224
24.1.4Mass Actions 224
24.1.5 Admin Operations 226
24.2 Permissions for Individual Items (Object Level) 226
24.2.1 Adding the Security Field to a View (Padlock icon) 228

Relativity | Admin Manual - 9
25 Scripts 228
25.1 Creating a Script Tab 229
25.2 Adding a Script 229
25.2.1 Selecting from Script Library 231
25.2.2 Running a library script 232
25.3 Editing a Script 233
25.4 Script Library 234
25.4.1 Library Scripts 234
25.5 Script Compatibility and Updates 235
26 Search Indexes 235
26.1 Keyword Index 236
26.2 dtSearch 237
26.2.1 Creating ANew Search Index 238
26.2.2 Auto-Recognize Date, Email and Credit Card 243
26.2.2.1 Dates 244
26.2.2.2 Email Addresses 244
26.2.2.3 Credit Card Numbers 244
26.3 Dictionary 245
26.4 Relativity Analytics 245
26.4.1What is Conceptual Searching? 245
26.4.2 HowCan I Use Relativity Analytics? 245
26.4.3 Creating a Relativity Analytics Index 246
26.5 Adding NewDocuments to an Existing Search Index 253
26.5.1 Creating a Category Index 254
26.5.2 Defining Categories and Examples 261
26.5.3 Categorizing your Documents 261
26.5.4 Adding Documents to a Category Index 262
26.5.5 Adding NewCategories to a Category Index 263

Relativity | Admin Manual - 10
27 LiveNote Integration 263
28 Admin Mode Details 264
28.1 Views 265
28.1.1 System Views 265
28.2 Choices 266
28.3 Agents 266
28.3.1Workspace Statistics Manager 268
28.3.1.1Warning One -Persistent Messaging 268
28.3.1.2Warning Two - Email 268
28.4 Errors 269
28.5 Tabs 269
28.6 Image QueueManager 269
28.7 OCR QueueManager 270
28.8 Production QueueManager 272
28.9Message of the Day (MotD) 272
28.10 User Status 272
28.10.1 Send Messages 273
28.10.2 Force Users to Log Out 274
28.11 Script Library 275
28.12 Assemblies 275
28.13 Resource Groups 276
28.14 Servers 278
28.15 License Tab 279
28.15.1 License Expiration and Error Messages 279
29 Batching 279
29.1 Adding Batch Sets and Batches 280
29.2 Editing Batch Set Information 284
29.3 Deleting a Batch 284

Relativity | Admin Manual - 11
29.4 Checking Out Batches 285
29.5 Batch Fields 286
29.6 Building Views for Checked-Out Documents 287
30 Object Types 288
30.1What is a Dynamic Object? 288
30.2 Adding an Object Type 289
30.2.1 Object Type Details 292
30.3 Adding Information to Objects 294
31 Using OCR 294
31.1 Creating an OCR Profile 294
31.1.1 Editing OCR Profile Information 297
31.2 Creating OCR Set 297
31.3 Running an OCR Set 300
31.4 Editing an OCR Set 304
32 Using a Relativity Application 305
32.1 Creating an Application 306
32.1.1 Customizing an Application 306
32.2 Exporting an Application 307
32.2.1 Application Validation 309
32.3 Importing through the Relativity Desktop Client 310
32.4 Special Considerations for Existing Applications 312
32.5 Installing the Application Deployment System (If Required) 313
33 Appendix A: Mass Operations 315
33.1Mass Edit 315
33.2Mass Move 319
33.3Mass Delete 321
33.3.1 Enable/Disable Snapshot Auditing on Delete 322
33.4Mass Produce 323

Relativity | Admin Manual - 12
33.5Mass Replace 325
33.6Mass Image 326
33.7Mass Print Images 328
33.8 Tally/Sum/Average 330
33.9 Send to CaseMap 332
33.10 Export to File 339
33.11 Cluster 340
33.11.1 Create NewCluster 341
33.11.2 Deleting a Cluster 342
33.11.3 Replace Existing Cluster 343
33.12 Process Transcripts 343
33.13 CreateWord Index 344
34 Appendix B: Bandwidth Tester 345
35 Appendix C: Document Skip 349
35.1 Special Considerations 350
36 Appendix D: Additional Resources 350
36.1 Documentation 351
36.2 Extensibility Tools 351
36.3 Tutorials 352
37 Appendix E: Date Formats Recognized 353
38 Appendix F: Supported OCR Languages 354
39 Disclaimer 357

Relativity | Admin Manual - 13
1 OverviewRelativity is a flexible document review platform. This Admin Manual is intended to give you theknowledge to effectively manage Relativity’s flexibility and granular security rights, thus providing anintuitive interface for your users.
1.1 Changes to this Version
This version of the Relativity Admin Manual contains the following changes to reflect new functionality:
The Using a Relativity Application section provides information on how to create, customize,import, and export an application.
The Using OCR section provides information on creating OCR Profiles and Sets, running an OCRJob and viewing the results.
The Admin Mode Details section has been updated to include information on the License tab inAdmin mode.
1.2 Before You Start
To best understand this manual, it is necessary to have a basic understanding of Relativity. This can beaccomplished by reading the Relativity User Guide.
All Relativity printable documentation – including the User Guide andQuick Start Guide – can be found in the reference guides section of thekCura Support site:
www.kcura.com/relativity-manual
As you read through this manual, you may want to refer to the Relativity Quick Start Guide, whichprovides a basic explanation of the different areas of Relativity seen by a reviewer.
1.3 Standard Relativity Objects
The Relativity document review platform is a series of connected objects all centered on a workspace.Understanding these items and their connection is vital to your success as a Relativity Administrator.Below is a basic diagram of these objects and their connections.

Relativity | Admin Manual - 14
Relativity objects
1.4 Glossary
The table below defines themost commonly used object types in Relativity. It is important to becomefamiliar with these terms, as they are used throughout the study guide.
Object Type DefinitionClient Clients are companies or organizations. In Relativity, Clients are
linked with associated Users and Matters.Matter Matters are used to define different Cases, disputes, or consulting
instances that a firm may encounter with a Client. Within Relativity,a Matter can be associated with one or more workspace. Clients inRelativity may also be associated with one or moreMatters(mirroring the billing structure ofmost law firms).
User Users are individuals who have access to the Relativity environment.Group Relativity Users are organized by Groups and may be associated with
more than one at a time. Groups are added to Relativity workspaceswhere their permissions are set on a workspace-by-workspace basis.
Workspace Workspaces are data repositories used to store, display, search,organize and categorize documents or information related to aspecific Client.
Field Fields are used to store Document metadata or coding withinRelativity.
Choice Choices are predetermined values that are applied to Single and

Relativity | Admin Manual - 15
Object Type DefinitionMulti-Choice List fields.
View Views are customizable lists of items within Relativity. Essentially,anytime you see a list of items in Relativity, it is a View..
Layout Layouts are web-based coding forms that allowUsers to view and editDocument fields.
Document A Document is a record within a Relativity Workspace.
Relativity Glossary
1.5 Relativity Dynamic Objects
In addition to the above standard objects, Relativity allows you to create your own dynamic objects.These dynamic objects can be connected to documents, and to each other, allowing you to createpowerful extensions within your workspace. A common examplemight be a custodian object, whereyou could store information about the custodian, and connect the custodians to their documents.
For more information see the section Object Types.
2 Admin Mode BasicsWhen you first login to Relativity, you are presented with a list of workspaces that you have beengiven rights to see. The information available to you will depend on your group permissions.
Note that this guide is written for System Administrators. A System Administrator is a user with rightsto see every item within a Relativity environment. Administrators have access to Admin mode, whichallows them to create and edit new clients, matters, users, groups and views, among othercapabilities.
By selecting the greeting hyperlink in the upper right corner of the screen, you are presented with adrop-down box containing links to the various modes where you have permissions.
User Greeting
System Administrators see the options displayed below:

Relativity | Admin Manual - 16
Modes Drop-down
Themode drop-down options are:
Workspaces navigates to the workspace list view. Admin navigates to Admin Modes. Reset Password opens a pop-up that allows the user to change their password. My Settings opens a pop-up that allows the user to change their personal settings. Logout logs the user out of the Relativity Platform.
Users not designated as System Administrators will only see the areas they were granted permissionsfor.
The Accessible field indicates whether an upgrade to the workspacewas successful. If the field value is No, the Workspace cannot beopened.
If you do not have an Admin option available in your list of links, you are not a System Administrator.Only other Relativity Administrators can provide these rights.
Under themodes section are two additional links:
Support opens a newwindow containing the Technical Support page of the kCura website,where you can open a support ticket
About opens aWebpage Dialog box displaying the Relativity version number and licensingagreement information. Below these is the Credits-Icons link which opens a window displayingcredits for the icons used in the application, as well as the URL for more information on theseicons.

Relativity | Admin Manual - 17
About Dialog Box
Under the Support and About links is the logged in username. Below this is the Interface Modesettings, which consist of two radio buttons:
Data Focuso On- An adjusted interface that displays more data in the view by removing the work-
space name and white space from themain header.o Off- Relativity’s standard interface that displays the workspace name in the top left
corner.
2.1 Admin Mode Tabs
Clicking on the Admin link takes you into Relativity admin mode. This mode allows you to performsystem-level, non-workspace administrative functions. The following tabs are available in admin mode:
Clients – Covered in the section Clients Matters – Covered in the section Matters Users – Covered in the section Users Groups – Covered in the Section Groups Views – Covered in the section Admin Mode Details Choices – Covered in the section Admin Mode Details Agents – Covered in the section Admin Mode Details Errors – Covered in the section Admin Mode Details Tabs – Covered in the section Admin Mode Details MotD – Covered in the Section Admin Mode Details Production Queue – Covered in the section Admin Mode Details Imaging Queue – Covered in the section Admin Mode Details User status – Covered in the section Admin Mode Details
Relativity | Admin Manual - 18
Script Library – Covered in the sections Scripts & Admin Mode Details Assemblies – Covered in the sections Admin Mode Details [Custom] – Covered in the section Admin Mode Details Resource Groups – Covered in the section Admin Mode Details Servers – Covered in the section Admin Mode Details
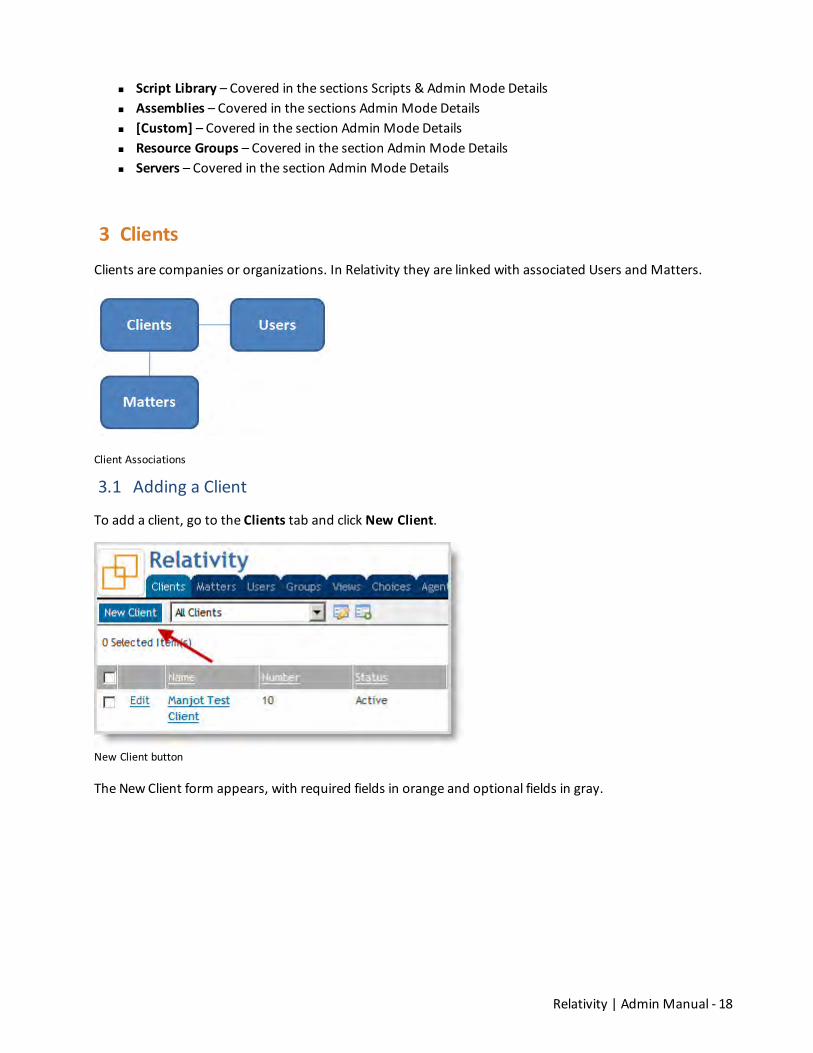
3 ClientsClients are companies or organizations. In Relativity they are linked with associated Users and Matters.
Client Associations
3.1 Adding a Client
To add a client, go to the Clients tab and click New Client.
New Client button
The NewClient form appears, with required fields in orange and optional fields in gray.

Relativity | Admin Manual - 19
New Client form
There are three fields of information required for every new client:
Client Information:
Name is the name of the client. Namemust be between 1 and 50 characters. Client Number is the billing number for the client. Client Number must be between 1 and 50
characters. Status is the current status of the client. The default options are active or inactive, but you can
add any status value. You can use the status value to organize and display lists of clients usingRelativity views.
For more information about using the Status field as an organizationaltool, see the section Admin Mode Details, Views.
Additionally, there are two optional fields where extra client information may be recorded. Commonuses of these fields include storing address or contact information.
Other:
n Keywordsn Notes
There are four buttons available at the top and bottom of the form:

Relativity | Admin Manual - 20
Save records the entered information and displays the Client Details page. This page outlinesthe saved information, plus any users or matters linked to the client. There are four buttonsavailable on the Client Details page:
o Edit allows you to edit the client information.o Delete removes the client from Relativity.o Back redirects you to the client list.o View audit displays the client's audit history.
Save and New records the entered information and launches a blank NewClient form. Save and Back records the entered information and redirects you to the client list. Cancel ends the client creation process and discards any entered information.
3.2 Editing Client Information
To edit a client, go to the Clients tab and locate the desired client. Click Edit next to the client name.
Edit client link
You may also edit client information by clicking the client’s name. This redirects you to the ClientDetails page as described above. Click the Edit button to access and change the client information.
If your Clients view list does not contain the Edit field you can add it.See the section Admin Mode Details.
4 MattersClients in Relativity are associated with one or morematters. This mirrors the billing structure at mostlaw firms. Matters are used to define the different cases, disputes or advising that a firm may beinvolved with for a client.
Within Relativity, a matter:

Relativity | Admin Manual - 21
Must be associated with an existing client May be associated with one or more workspace
Matter Association
4.1 Adding a Matter
To add a matter, go to theMatters tab and click New Matter.
New Matter button
The NewMatter form appears, with required fields in orange and optional fields in gray.

Relativity | Admin Manual - 22
New Matter form
There are four fields of information required for every newmatter.
Matter Information:
Name is thematter’s name. This field must be between 1 and 50 characters. Matter Number is thematter’s billing number. This field must be between 1 and 50 characters. Status is thematter’s current status. The default options are Active or Inactive, but any value
may be added. This field is useful when organizing and displaying lists ofmatters using Relativityviews.
For more information about using the Status field as an organizationaltool, see the section Admin Mode Details, Views.
Client is thematter’s associated client. Click the ellipsis (…) button to select from all availableclients.
If your client list is too large, click Show Filters to quickly narrow thelist by any available field criteria.
Items in the client list are set by a system view. Therefore, it ispossible you will only see a sub-set of items.
Additionally, there are two optional fields where extra matter information may be recorded.
Other:

Relativity | Admin Manual - 23
n Keywordsn Notes
There are four buttons available at the top and bottom of the form:
Save records the entered information and displays the Client Details page. This page outlinesthe saved information, plus any clients linked to thematter. There are four buttons available ontheMatter Details page:
o Edit allows you to edit thematter information.o Delete removes thematter from Relativity.o Back redirects you to thematter list.o View audit displays thematter’s audit history.
Save and New records the entered information and launches a blank NewMatter form. Save and Back records the entered information and redirects you to thematter list. Cancel ends thematter creation process and discards any entered information.
4.2 Editing Matter Information
Select theMatters tab and click the Edit link next to thematter name.
Edit matter
You may also edit matter information by clicking thematter’s name. This redirects you to theMatterDetails page as described above. Click the Edit button to access and change thematter information.
An Edit link may be added to your matter list view if it does not alreadyexist. See the section Admin Mode Details.
5 UsersUsers are individuals who have access to the Relativity environment. Users are directly associated toClients and Groups.

Relativity | Admin Manual - 24
User Associations
Users cannot be directly added to a workspace; they must first beadded to a group since workspace access is granted on a group basis.This process is covered in the section Groups.
5.1 Adding a User
To add a new user, go to theUsers tab, and click New User.
New User button
The NewUser form appears, with required fields in orange and optional fields in gray.

Relativity | Admin Manual - 25
New User form
There are several fields of information required for every new user.
User Information:
First Name is the user’s first name. This field must be between 1 and 50 characters. Last Name is the user’s last name. This field must be between 1 and 50 characters.
When a user is displayed in Relativity, it will be by <last name>, <firstname>.

Relativity | Admin Manual - 26
Email Address is the user’s email address. While this information will not be validated, it mustbe in entered in the following format: [email protected]. This is useful in email tasks.
Type is the user type. The default values are internal or external, but you can add any typevalue. Type is for reference purposes only and has no impact on access or billing.
Client is the client associated with the user. Click the ellipsis (…) button to select from availableclients.
Items on the select client list are set by a system view. It is possibleyou will see only a sub-set of items.
For more information on editing system views, see the section AdminMode Details.
Relativity Access is a drop-down that allows you to control the user’s access to Relativity.o Enabled is the default value. Enabled users will be:
Allowed to log into Relativity Counted and billed as a named user on your Relativity license
o Disabled users will not be: Not be allowed to access Relativity Not be counted or billed as a named user on your Relativity license
o When this feature is first deployed, Relativity will set the Relativity Accessfield for existing users.
If a user is in a group with rights to a workspace, their RelativityAccess will be set to Enabled.
If a user is not in a group with rights to a workspace, their RelativityAccess will be set to Disabled.
Relativity will only automatically set the values as described whenthis feature is first deployed. From that point on, the System Admin-istrators must manually manage the field.
By default, user license login information may not be used on twoseparate machines at the same time. However, this setting can bedeactivated for law firms only. Contact kCura Support for moreinformation: [email protected].
Document Skip is a drop-down that allows you to control whether or not the user has the abil-ity to skip documents during review that no longer meet the original conditions of a view, dueto propagation being enabled. See Appendix C for more information.
o Choices: Enabledwill enable the Skip function. Disabledwill disable the Skip function. Force Enabled will always enable the Skip function to that the user will be unable
to turn it off.o This user property is only available to System Administrators.

Relativity | Admin Manual - 27
Authentication Data allows a user to log in using one of several different authentication tech-nologies.
o RSA’s two-factor authentication technology. Enter RSA and then the user’s RSA login name. For more information on how to configure Relativity to use RSA, request a copy of
the Relativity RSA Integration Manual.o Client SSL’s authentication:
Enter clientsslcertification:<ISSUERCN>; <ISSUERCN> is the Certificate Authoritythat issues the certificates the web server expects.
For more on Client SSL, contact [email protected] Active Directory Authorization allows you to use Active Directory login information to
authenticate users. Contact [email protected] if you are interested in linking Relativityuser accounts to your Active Directory accounts.
Trusted IPs allows you to set a trusted IP addresses for users. If a user attempts to log in froman unauthorized IP address, authentication will fail.
o The format for the IP addresses is “###.###.###.###”o Multiple IP addresses can be entered. Separate each address with a carriage return.
Beta User should be used only when instructed by kCura Client Services. They will inform youhow to use this field.
Change Settings is a drop-down that allows users without system administrator rights tochange their settings depending on whether the drop-down is enable or disabled.
o First nameo Last nameo Email addresso Item list page lengtho Default selected file typeo Advanced search defaulto Enable or disable Native Viewer Cache Ahead
Change Password is a drop-down that allows users without system administrator rights tochange their password depending on whether the drop-down is enable or disabled. By default,this is enabled on a NewUser form. For more information, see the Relativity Configuration Tableguide.
Maximum Password Age is a whole number field used to designate the number of days a pass-word remains valid.
o If 0 or no value is entered, the password will never expireo If a whole number such as 5 is entered, the password will expire five days from the time
the password is set.o The default is driven by a Configuration Table value. For more information, see the Rel-
ativity Configuration Table guide.
If a password is set to expire, the counter starts when a password isset, and restarts when the password is reset.

Relativity | Admin Manual - 28
Keyboard Shortcuts allows you to choose a default setting for the keyboard shortcuts icon inthe core review interface. By default this property is set to Enabled. The default value for this isset in the Configuration table.
o Enable or Disable by toggling the icon from color version to a gray version.
Keyboard Shortcut Icon Enabled
User Login Details:
Invalid Login Attempts is a system field that increments every time a user attempts to log inwith the correct username but using an incorrect password. When the user reaches themax-imum number of Relativity failed login attempts, he or she will be locked out of Relativity. Log-ging in successfully will reset the count. If the account becomes locked, resetting the user’spassword will unlock the account.
o Themaximum number of failed attempts can be set in the environment configuration,outside of Relativity’s web interface. For more information, see the Relativity Con-figuration Table guide.
Password Expires is a read-only field that displays the number of days until the user’s pass-word expires.
User Settings:
Item List Page Length is a numeric field indicating the default list length for all views in Rel-ativity. It can be set from 1 to 200.
Default Selected File Type is the default viewer mode:o Viewero Nativeo Imageo Long Texto Production
Skip Default Preferenceo Skip advances a user to the next document in the queue when clicking Save and Next pro-
vided it meets the condition of the view.

Relativity | Admin Manual - 29
o Normal allows document review to operate normally, displaying all documents in thequeue.
Enforce Viewer Compatibility determines whether the user must upgrade the viewer for everyRelativity version upgrade or only major releases, for example from 6.x to 7.x. When set to Yes,the user must adhere to the Configuration value setting that determines the requirement forviewer upgrade. When set to No, the user is only forced to upgrade viewers on major releases.By default, the configuration value is Yes, which only forces viewer upgrades for major versionsof Relativity.
Advanced Search Public by Default drives the user's default search owner value. The prop-erty’s default value is configurable on a system level. Refer to the Relativity Configuration Tablefor more details.
Native Viewer Cache Ahead drop-down if enabled will pre-load the next native document inthe review queue once the active document is loaded.
To utilize Native Viewer Cache Ahead, you must have version 5.04 orgreater of the Viewer running on your computer. If this application isnot working properly, uninstall and reinstall your Viewer to ensurecompatibility.
Data Focus determines the default workspace view of the user. Data Focus on will remove theworkspace name from the top of the window.
Set Password:
Password is used to designate the required action on the user’s password. The choices are:o Use current passwordmakes no changes to the current password.
This is the default value when users are being edited, but it is not available whencreating a new user.
If this value is selected, the following fields are disabled:o Send new passwordo New/retype password
o Auto-generate password creates a new, Relativity-valid password. The default length of this field is 8, though it can be configured on a system level.
For more information, refer to the Relativity Configuration Table. If this value is selected, the Send NewPassword to” field is required. If this value is selected, the following fields are disabled: New / Retype password
o Manually set password allows you to type a specific password. Relativity requires thateach password contain at least:
8 characters 1 lowercase letter 1 uppercase letter 1 number 1 non-alphanumeric character

Relativity | Admin Manual - 30
If this value is selected, all options should be available, and the following fieldsshould be required:
User must change password on next login allows you to choose whether the user must resettheir password the next time they log in to Relativity.
o If the checkbox is not selected, the current password remains valid for the designatedperiod
o If the checkbox is selected, the user will be forced to reset their password the next timethey log in.
New Password is used to type the user’s new password. This field is only available ifManuallySet Password is selected.
Retype Password is used to type and verify the user’s new password. This field is only availableifManually Set Password is selected.
Send new password to allows the user’s new password to be sent to one of the following:o Me (email) sends an email to the logged in user
Themessage appearing in this option can be configured on a system level. Formore information, see the Relativity Configuration Table.
o This user (email) sends an email to the user on the form Themessage appearing in this option can be configured on a system level. For
more information, see the Relativity Configuration Table.o Popup sends the username and generated password to a pop-up box.
The pop-up will launch when this option is selected. This option is only available if Auto-generate Password is selected
Additionally, there are two optional fields where extra user information may be recorded:
n Keywordsn Notes
There are four buttons available at the top and bottom of the form:
Save records the entered information and displays the User Details page. Within this page,there are four buttons available:
o Edit allows you to edit the user information.o Delete removes the user from Relativity.o Back redirects you to the user list.o View audit displays the user’s audit history.
Save and New records the entered information and launches a blank NewUser form. Save and Back records the entered information and redirects you to the user list. Cancel aborts the user creation and discards any entered information.
5.2 Editing User Information
Select theUsers tab and click the Edit link next to a user name.

Relativity | Admin Manual - 31
Edit User Link
You may also edit user information by clicking the user’s name. This redirects you to the User Detailspage. Click the Edit button to access and change the user information.
An Edit link may be added to your user list view if it does not alreadyexist. See the section Admin Mode Details.
5.3 Reset Password
If a user forgets his/her password, as an Administrator you can reset it. Once a user has been created,the user details screen will display a Reset Password link. Click Reset Password, to reset the user’spassword. Edit the information.
Reset Password Link
The User New Password form opens, type in a new password and confirm. Click Save.
You may also edit user information by clicking the user’s name. This redirects you to the User Detailspage. Click the Edit button to access, scroll down to the password section and change.
A System Administrator can edit the configuration value"MaxPasswordHistory" to ensure that a user is not able to re-useprevious passwords. For example, if this value is changed from 0 to 5,the user can't re-use any of their previous 5 passwords when resettingtheir current password.

Relativity | Admin Manual - 32
6 GroupsRelativity users are organized by groups. A user can be a member ofmany groups. These groups arethen added to Relativity workspaces; permissions are set per group, on a workspace-by-workspacebasis.
Group Associations
6.1 Adding a Group
To add a group, go to theGroups tab and click New Group.
New Group button
The NewGroup form appears with required fields in orange and optional fields in gray.

Relativity | Admin Manual - 33
New Group form
There is only one required field for creating a new group.
Group Information:
Name is the group’s name. This field must be between 1 and 50 characters.
As your Relativity environment grows, arbitrary group names such as“Group 1” can produce a difficult administrative workflow.
Name each group according to their purpose and permission level; forexample: ACME Co. Reviewer and ABC Corp. Admins.
Additionally, there are two optional fields where extra group information may be recorded.
n Keywordsn Notes
There are four buttons available at the top of the form:
Save records the entered information and displays the Group Details page. Within this page,there are four buttons available:
o Edit allows you to edit the group information.o Delete removes the group from Relativity.o Back redirects you to the group list.o View Audit displays the group's audit history.
Save and New records the entered information and launches a blank NewGroup form. Save and Back records the entered information and redirects you to the group list. Cancel aborts the group creation and discards any entered information.

Relativity | Admin Manual - 34
Although permissions are granted on a group level, no rights were granted during initial groupcreation. All rights are granted when a group is added to a workspace. This process is covered in thesection Security Permissions.
6.2 Editing Group Information
To edit group information, select theGroups tab then locate the desired group. Click the Edit link nextto the group name.
Edit Group Link
You may also edit group information by clicking the group’s name. This redirects you to the GroupDetails page. Click the Edit button to access and change the group information.
An Edit link may be added to your group list view if it does not alreadyexist. See the section Admin Mode Details.
6.3 Adding Users to Groups
There are two different ways to add and/or remove users from groups:
From the Group Details page From the User Details page
To add users from the Group Details page, select theGroups tab and click the group’s Name link. Usethe Add and Remove buttons at the bottom of the page.

Relativity | Admin Manual - 35
Group Details Add and Remove buttons
To add users from the User Details page, select theUsers tab and click the user’s Name link. Use theAdd and Remove buttons at the bottom of the page.
6.4 Reviewing Group Information
After editing and saving group information, the Group Details page displays a list of added users withinthe group. In addition, group-accessible workspaces are displayed.

Relativity | Admin Manual - 36
Group User and Workspaces List
6.5 System Groups
There are three default system group settings:
Everyone: All users are a member of the everyone group. This group is only available in Adminmode. Within the Administration section, you can now easily manage the permissions all usershave on System level Views and Scripts.
System Administrators: users with rights to see every item within a Relativity environment.Administrators have access to Admin mode, which allows them to them to create and edit newclients, matters, users, groups and views, among other capabilities.
Relativity Script Administrators are part of a group that has permissions to preview, edit, andcreate scripts. Before a user can belong to this group, they must be granted Relativity Admin-

Relativity | Admin Manual - 37
istrator permissions, and then added as a Relativity Script Administrator. Relativity Admin-istrators are not automatically members of this group.
The table below represents the script permissions for each group.
LockedScript
LockedScript
UnlockedScript
UnlockedScript
View Run Edit Preview Edit Preview Write LinkScriptAdminSystemAdminStandardUser
* * **
* With view rights**With add rights
Regardless of permissions, System Administrators will not be able toedit locked scripts.
7 WorkspacesAworkspace within Relativity can be used for cases, or other document repositories for dynamicobject applications. They are used to:
Store Display Search Organize Categorize

Relativity | Admin Manual - 38
Workspace Associations
Rather than creating separate databases for different types of documents (productions, witnesstestimony, etc.), you can use one workspace to store all versions of the documents. This gives you theadvantage of being able to search in one place.
Within a workspace, document access may be granted or denied, providing security while still allowingusers to view an organized selection of documents for which they have been granted permissions.
7.1 Adding a Workspace
To add a newworkspace, click on New Workspace.
New Workspace button
This brings up the NewWorkspace form, with required fields in orange and optional fields in gray.

Relativity | Admin Manual - 39
Workspaces Details form
Complete the following to create a newworkspace:
Workspace Information
Name is the name used to identify the workspace. This must not exceed 50 characters. Matter is thematter you want to associate with the workspace. Click the ellipsis to select from
all available matters. TheMatters found in the picker list are determined by the conditions set ina system view called MattersOnPicker. For more information on editing system views, see theAdmin Mode Details section.
Template Workspace is the existing workspace structure you would like to use as a basis for theworkspace you are creating. All non-document objects in the template are copied to the newworkspace:
o Groups (and permissions)o Summary Reportso Markup Setso Fieldso Choiceso Viewso Layoutso Custom tabso Script kitso Dynamic Objectso Saved Searches not associated with a dtSearch or Analytics index
Status lists whether the workspace is Active or Inactive. This field is useful for identifying andorganizing workspaces in a view and has no impact on the functionality of the workspace. Forexample, even a workspace with a status of Inactive can still be accessed and edited.

Relativity | Admin Manual - 40
SQL Full Text Language helps SQL determine the correct stemming and word-break characters,which contributes to the accuracy of the full text index. The languages available in this drop-down are determined by your SQL server settings. You should select your workspace’s primarylanguage. If the language you need is not present here, contact your organization’s SQL admin-istrator. By default, this is set to English.
Resource Information
Resource Group lists sets of resources such as servers and file repositories to associate withyour workspace. Please refer to your System Administrator on what Resource Group to select.Resource Groups are configured in the Resource Group tab in Admin Mode. For more infor-mation on this tab, please see the Resource Groups section.
Default File Repository is the collection point of all files (images, documents, natives) asso-ciated with the database. The values in this drop-down are determined by the Resource Groupselected above.
Database Location is the SQL Server associated with the workspace you are creating. Like theFile Repository, the options for this field are determined by the Resource Group.
Download Handler URL lists the URL through which all downloaded files aremade available tothe Relativity user. This field is automatically populated and does not depend on any other fieldin the Resource Information section.
Other
These optional fields are helpful in further identifying the workspace you are creating, so that one canmore easily filter for it in a view.
Keywords allows you to attach terms of interest contained in the workspace. Notes allows you to attach a brief description of the workspace.
There are two buttons available at the top and bottom of the form:
Save records the entered information, creates the workspace and displays theWorkspaceDetails page. Depending on the size of the template workspace, this may take several minutes.During this time, Relativity creates the SQL database and the fulltext index for the workspace.
o TheWorkspace Details page shows the saved information and allows you to restrict cer-tain native file types from being imaged. From this page, there are four buttons availableat the top and bottom of the page:
Edit allows you to edit the workspace information. Delete removes the workspace from Relativity. Back takes you back to the list of workspaces. Edit Permissions allows you to set the workspace permissions. This is covered in
the section Security Permissions.
Cancel aborts the workspace creation and discards any entered information.

Relativity | Admin Manual - 41
Note that any files added to an EDDS folder, regardless of whether ornot they are associated with the database, will be deleted when theworkspace is deleted.
Newworkspaces will have no documents, only the structure of the selected template.
7.1.1 Production Restrictions
Production Restrictions provides a final quality control measure for a production set. It allows you toincorporate a saved search that evaluates against documents you do not want added to theproduction and gives you the option of removing them. This prevents accidental production ofdocuments such as privileged items.
Be sure to include family groups in your saved search so that all of thefamily items are kept together and all can be removed if the removerestrictions option is chosen.
A Production Restriction can be added to an existing workspace by clicking on theWorkspace Detailstab and selecting Edit. Note the additional field of Production Restrictions now displays.
Production Restrictions Field
Production Restrictions allows you to designate a saved search to define the properties of adocument you do not want added to a production. By default, this drop-down contains a valueof <no restriction>.
o Only System Admins with the Override Production Restrictions permission can overrideany Production Restriction set on theWorkspace Details page. For more information onthis permission, please see the section on Security Permissions.
o You can choose any saved search as a Production Restriction search.o You cannot delete a saved search that has been selected as the Production Restriction
search, as it is being referenced directly by the workspace details.o To see how Production Restrictions work, please see the section on Production Sets.
Note that dtSearch and Relativity Analytics search indexes don’t copyto new workspaces. When creating a new workspace if the templatecontains a saved search with Analytics or dtSearch the user will bedirected to a warning page containing two links:

Relativity | Admin Manual - 42
Select a New Production Restriction Continue With No Production Restriction
7.2 Native Types Restricted from Imaging
The bottom half of theWorkspace Details page allows you to control which file types are imaged byRelativity’s TIFF-on-the-fly functionality.
File types in the list are restricted from TIFFing in Relativity. If you would like to add items to therestricted list, click the Add button.
Native types restricted from imaging
A list appears, detailing all file types supported by the viewer. Select which file types you would like torestrict and click OK. This will add the selected file types to the restricted list.

Relativity | Admin Manual - 43
Select Native Types
If you would like to remove any file types from the restricted list, thus allowing TIFFing on those filetypes, select the checkbox next to the item and click the Remove button.
Remove File Type
7.3 Editing Workspaces
Go toWorkspacesmode and locate the desired workspace in the list. You can use the filters and/orview drop-down to assist you. Click Edit next to the workspace name.

Relativity | Admin Manual - 44
Edit Workspace Link
You may also edit you workspace information by clicking the workspace’s name. This redirects you totheDocuments tab, select theWorkspace Details tab. Click the Edit button to access and change anyinformation.
An Edit link may be added to your workspace list view if it does notalready exist. See the section Admin Mode Details.
8 TabsWhen a new case workspace is created in Relativity, the following tabs are created as well:
Documents is covered in the Relativity User Guide. Review Batches and Batch Set is covered in the section on Batching. Summary Reports is covered in the section on Summary Reports. Search Indexes is covered in the section on Search Indexes. User Status is covered in the section on User Status. Search Terms Reports is covered in section on Search Terms Reports. Transform Sets is covered in the section on Transform Sets and Domain Parsing. Workspace Details is covered in the sections –Permissions, Workspaces and Editing a Work-
space. Markup Sets is covered in the section on Markup Sets. Production Sets is covered in the section on Productions. Pivot Profiles tab is for editing and saving Pivot Profiles. Fields is covered in the section on Fields. Choices is covered in the section on Choices. Layouts is covered in the section on Layouts. Views is covered in the section on Views. Tabs is covered in the section on Tabs.

Relativity | Admin Manual - 45
Relativity Utilities allows you to download the Relativity Desktop Client and is covered in thesection on Importing and Exporting.
Relativity Applications allows you to create applications built on dynamic objects; this is cov-ered in the Relativity Applications section.
Scripts is covered in the section on scripts. History is covered in the section on History. Object Type is covered in the section on Object Type.n OCR Profiles is covered in the section on OCR Profiles.n OCR Sets is covered in the section on OCR Sets.
Depending on the template chosen, your workspacemay have one or more custom tabs. Custom tabsmay be created to link to any web address . You can add these custom tabs in both admin mode andworkspacemode.
8.1 Adding a Tab
To add a tab, go to the Tabs tab and click New Tab.
New Tab button
The New Tab form appears, with required fields in orange and optional fields in gray.

Relativity | Admin Manual - 46
New Tab form
There are five required fields when creating a new tab.
Tab Information:
Name is the tab’s name. This field must be between 1 and 50 characters. Be as concise as pos-sible when naming tabs.
Order represents the position of the tab by a numerical value. The lowest-numbered tab will bethe leftmost tab. The highest-numbered tab will be the rightmost tab. Items that share thesame value are sorted in alphanumeric order.
o Tab Order can be any integer (positive or negative). No decimals are allowed.
It’s always a good idea to set Tab Order by 10's, starting with 10, then20, then 30, etc.
Numbering in groups of 10 allows you to insert an item into anyposition later in the workspace, without the need to reorder (e.g., 10,20, 25, 30, 40).
View Orderwhen clicked displays a list of active tabs and their current order. Link Type determines the type of tab you would like to create:
o Object creates a tab for a non-document object in your workspace.o External allows you to link to any URL.o Parent establishes the tab as a parent tab. This allows existing tabs to be set as children
of the parent tab, thereby creating a drop-down tab structure. Parent allows the tab to be placed as a child tab in the drop-down list of any parent tab. Object Type determines which object’s information is displayed in the tab for those specified as
Link Type = Object.

Relativity | Admin Manual - 47
Object refers to dynamic objects within Relativity. Dynamic objectsallow you to create securable, custom, non-document objects withinyour case workspace. These objects can be linked to documents and toeach other, creating powerful custom applications.
Link, which is displayed only when the link type is set to External, is the web full address that islinked when the tab is clicked.
Is Default allows the tab to serve as the workspace’s default tab. Reviewers logging into theworkspace are taken to the default tab. If a reviewer does not have access to the default tab, heor she is directed to the Documents tab.
There are four action buttons available at the top and bottom of the form:
Save records the entered information and displays the Tab Details page. Within this page, thereare five buttons available:
o Edit allows you to edit the tab information.o Delete removes the tab from Relativity.o Back redirects you to the tab list.o Edit Permissions allows you to establish rights for the tab.o View Audit displays the tab’s audit history.
By clicking Edit Permissions, you are editing rights only for the selectedtab. By default the tab will be secured according to the workspaceslevel tab rights. More information on workspace permissions can befound in Section 18 – Permissions.
Save and New records the entered information and launches a blank New Tab form. Save and Back records the entered information and redirects you to the Tab list. Cancel aborts the tab creation and discards any entered information.
8.2 Editing Tab Information
To edit a tab select the Tabs tab and click Edit link next to the tab name.
Tab Edit Link
You may also edit tab information by clicking the tab’s name. This redirects you to the Tab Detailspage. Click the Edit button to access and change the tab information.

Relativity | Admin Manual - 48
An Edit link may be added to your tab list view if it does not alreadyexist. See the section: Admin Mode Details.
8.3 Nesting Tabs
You may prefer to nest several tabs within a parent to reduce clutter in your Relativity interface andmake tabs easier to locate. To do this, simply create a new tab with a Link Type of Parent or edit anexisting tab.
Click the Edit link next to the tab you want nested. Under the Parent drop-down, choose the parenttab name Click Save. Repeat for each tab you wish to nest. Any nested tabs will reside in the drop-down of the parent.
Parent Link Type
From the Tabs tab, click the Edit link next to the tab you want to nest. Under the Parent drop-down,choose the tab you've just created. Click Save.
Tab Info Parent Tab Selection
Do the same for every tab you wish to nest. The tab will disappear from the tab strip and reside belowthe new tab.
Relativity | Admin Manual - 49
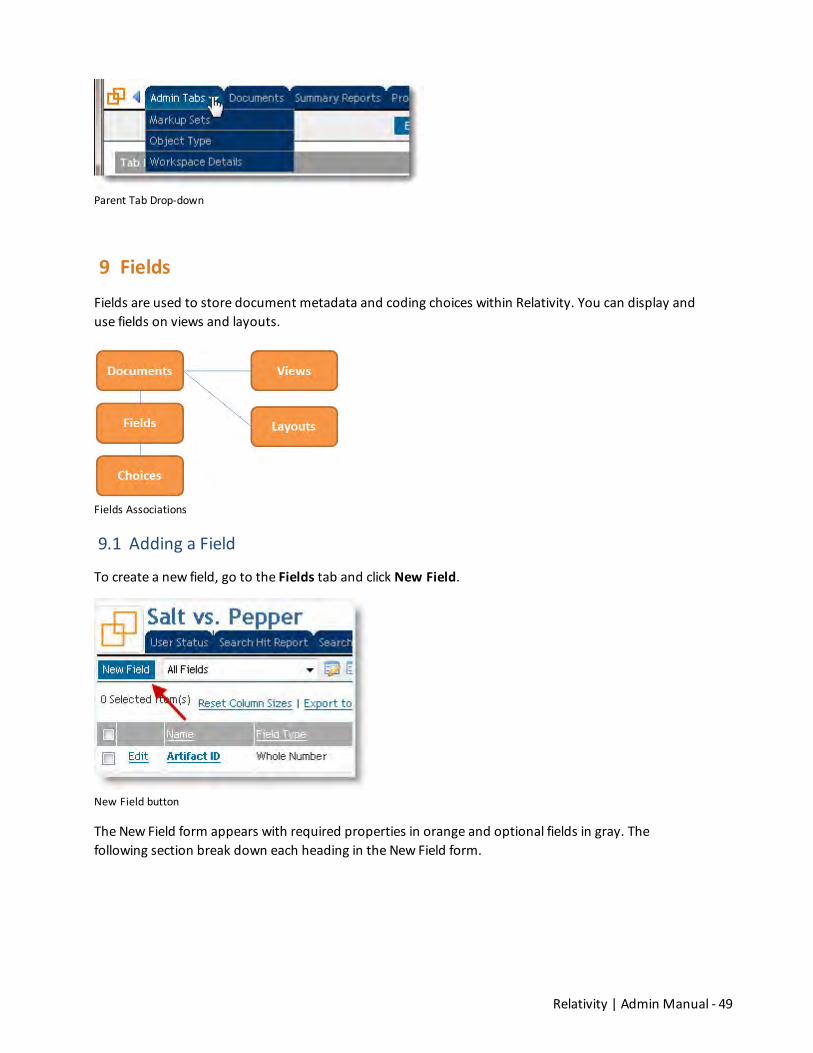
Parent Tab Drop-down
9 FieldsFields are used to store document metadata and coding choices within Relativity. You can display anduse fields on views and layouts.
Fields Associations
9.1 Adding a Field
To create a new field, go to the Fields tab and click New Field.
New Field button
The New Field form appears with required properties in orange and optional fields in gray. Thefollowing section break down each heading in the New Field form.

Relativity | Admin Manual - 50
9.1.1 Object
Object Type Drop-down
Object type determines what object the field is classified under.o Object types are created in the Object Type tab. For more information about object
types, please see the Object Types section.o If you are unsure what to select as the Object Type, ask yourself “What object do I want
to add information to?” The answer is your object type. For example, if you’d like yournew field to store information about a document, select Document.
Object can refer to a dynamic object within Relativity. Dynamic objectsallow you to create securable, custom, non-document objects withinyour workspace. These objects can be connected to documents, and toeach other, allowing you to create powerful custom applications withinyour workspace.
9.1.2 Field Information
Field Information Display
Name is the field’s name. This must be between 1 and 50 characters. Field Type determines the field’s functionality and presentation. For example, selecting a
Yes/No field typemeans that to edit this field, the reviewer will choose a value of either Yes orNo. Types within this list are outlined in the Field Types section.
Length is the length of a fixed-length text field.o The default length is 255 characters.o Themaximum length is 4,999 characters.

Relativity | Admin Manual - 51
Required determines whether the reviewer must populate the field with information in order tocontinue with the review process. This does not apply when loading workspace data; it onlyapplies when coding documents using layouts.
Include in Text Index adds the field values to the workspace’s SQL text index. Unicode allows foreign language characters. Unicode encoding must be enabled before loading
any Unicode data into the field. Identifier indicates if the field is the workspace’s unique identifier with a value of Yes or No. By
default, this drop-down is grayed out and cannot be edited. Relativity Applications allows you to associate this field with an application created in the Rel-
ativity Applications tab. Clicking the ellipsis brings up an item list from which you can select anexisting application. This is only available for those who have theManage Relativity Applicationspermission under Admin Operations.
Available in Viewer displays this field in the Viewer, allowing the reviewer to check text againstthe original document or image. This setting is only editable for long text fields with a Documentobject type. If this is set to Yes, the field is available in a drop-down on the Extracted Text settingin the viewer. This field is not available in the drop-down if is empty for the current document orif the reviewer does not have permissions to it. Copies of reflected fields are not available in thisdrop-down.
Formatting determines the field’s format and only applies to the following fields:o Date
Date format displays only the date. Date Time displays the date and time.
o Whole Number None displays the number as a string of numbers. Integer displays the number with commas separating each group of three digits.
Available in Field Tree places the field and its choices in the Field Tree browser. This option isavailable for single and multi-choice lists, as well as single object and multi-object fields.
o By default, this is set to No.o This field is only available for Document objects; for non-Document objects the Available
in Field Tree is set to No and is read-only. Field Tree View is a drop-down that allows you to select a view that determines which values
are displayed in which order in the Field Tree View.o This drop-down is blank and disabled if the Available in Field Tree setting above is set to
No.o If the Available in Field Tree setting is set to yes, the Field Tree Viewwill reflect the default
value of <All Items>.o To the right of the Field Tree View drop-down are two icons:
Edit View allows you to edit the view via a popup that takes you to the Con-ditions (Step 3 of 4) of the wizard.
Create View allows you to create a new view from step 1 of the wizard. The proc-ess of creating a new view is covered in the Views session of this document.
oo When a user-defined view is selected for the Field Tree View, the sort order of that view isrespected. If no sort order is defined in the user-defined view, the sort order will be

Relativity | Admin Manual - 52
Artifact ID.o If Search Terms Reports is chosen as the associated Object Type, and you are adding the
field to the Field Tree View, only search term report items with a status of Completed willappear in the Field Tree.
For the Field Tree View, you can select any view you have rights to see;however, you will receive a warning when attempting to save the fieldif the selected View is personal.In addition, if you edit the view that has been selected as the FieldTree View, you will receive a warning when attempting to save it as apersonal view.
Allow HTML is a yes/no field that allows HTML code to be executed within the field.o Selecting Yes executes the code when the field is displayed.o Selecting No displays the field as plain text.
Using “allow HTML,” you can configure Relativity to throw an alert:when the field is displayed in a view or layout.
See the section Adding HTML Alerts and Links.
Open to Associations determines whether an object field can display its information on anassociated object field. For example, say you have two associated objects: Custodian and Com-pany. If you add a field on the Company – its address – you might want to display that addresson a Custodian. To accomplish this, create an address field and mark it as Open to Associations:Yes.
o This action creates two fields: Address - a company object field Company address - a custodian field
9.1.3 Adding HTML Alerts and Links
If a field is created with the AllowHTML value set to Yes, Relativity can be configured to throw an alertwhen a document is opened. For example, you may want to alert a user that the document containscomments/tracked changes because to ensure the document is reviewed the in both its original andedited state.
When sending data out for processing you can request a yes/no fieldbe created to indicate if a document has comments or trackedchanges. This will allow you search for these documents in Relativity inorder to apply an alert message.
To add an HTML alert, create a New Fieldwith a field type of Long Textwith the Allow HTML field setto Yes.
Next add the newAlert field to an existing Layout. Select Add Field next to the layout name. Choosethe Alert field. Set Read Only to Yes. Leave all other fields as default. Click Save.

Relativity | Admin Manual - 53
Edit Field Layout
Locate the documents to which you want to add the HTML alert (these are the documents thatcontain comments or tracked changes, as indicated by your vendor). You may want to create a SavedSearch based on these documents. When you have your documents, go to theMass Operation bar. Inthe first drop-down select All and in the second select Replace. Click Go.
Mass Replace
TheMass Replace form displays. Select your field from the drop-down and then the action ReplaceEntire Field. In the Text box place the HTML alert; you may wish to use the example below.
<script>alert('Document contains tracked changes and comments. Please be sure to viewthe document with the native application.');</script>

Relativity | Admin Manual - 54
Mass Replace
Click Save. The field will now be replaced with the HTML text data alert, which will display when viewingthe document.
Example HTML Alert message
You can also use an AllowHTML enabled field on a layout to search through the active document for alloccurrences of a specific phrase. Add the field to the layout and then place in the following text:
<a class="DocumentFieldsLink"onclick="top.documentViewer.SearchForTerm('x');">x</a>
Replace x in the above statement with your term or phrase. Relativity will display your termhighlighted on the layout. Clicking on the term will cycle through the document, highlighting the hits.
The example below used the term “demo.”

Relativity | Admin Manual - 55
Layout Key Phrase Link
9.1.4 Field Types
The following field types are available in Relativity:
Fixed-length text is a text field with a limited length.o Maximum technical limitation of 4,999 characterso Examples: Email From, Email Subject
While a fixed-length text field can technically store up to 4,999characters, there are two major performance considerations:
o Fixed-length text fields larger than 500 characters are notoptimal.
o The sum of all fixed-length text fields should not be largerthan 8,060 characters.
o Go to the Object Type tab and select the Document object. TheControl Panel section contains a usage field showing howmany of your 8,060 characters are remaining.
Long text is a text field larger than 4,999 characters.o The technical limitation of a long text field is 2 GB, but Relativity is usually set to stream
only files smaller than 50MB. Themaximum file size is set in the configuration table. TheConfiguration Table document can be downloaded from the Customer Portal.
Date stores the date, or date and time.o Dates must be in a valid format. For example, 01/00/2000would not be accepted.
Attempting to load an invalid date will produce an error.

Relativity | Admin Manual - 56
o Many formats are accepted, including SQL-accepted formats that match your SQLserver’s regional settings. However, the date will display as mm/dd/yyyy for the US, ordd/mm/yyyy for the UK.
o Example: Email Sent Dateo When entering a date field you can use the picker to choose from a calendar or enter a
date directly in the field. Whole number is a numeric field that can store any natural numbers or their negatives.
o Maximum of 10 digitso Example: Page Count
Decimal is a numeric field that may include decimals.o Maximum of 15 digits before the decimal, 2 digits after the decimalo Example: Percentage
Currency is a numeric field in currency format. The format is set based on the settings of theSQL server hosting Relativity.
o Maximum of 10 digitso Example: Amount Sold
Yes/No is a field that will have one of two values. The default values are Yes and No.o The display values for Yes and No may be altered.o Example: Reviewedo Maximum of 2 GB of texto Examples: Email To, FullText.
A Single-Choice has a predetermined set of values called choices; only one valuemay bechosen.
o Example: Responsiveness AMultiple-Choice has a predetermined set of values called choices; more than one valuemay
be chosen.o Choices may be nestedo Example: Issues
User is a Relativity user with rights to the current workspace.o Example: Document Assigned To
File is a field allowing you to upload a file for an item of a non-document object. Single Object links the object the field is created on to the selected Dynamic Object. One item
from the selected object type can be associated to another object, making a one-to-many rela-tionship. For more information, see the section Object Types.
Multiple Object links two objects in a many-to-many relationship. For example, there are twoobject types in your workspace: Document and Custodian. If you add a document field with anobject type of Custodian, you will create an association between document and custodians.You could place a Custodians field on your Document layout, allowing you to assign a custodianto your document. You also could display associated documents on your custodian layout.
o Choosing either a Single or Multiple Object type field brings up additional requiredObject Type drop-down to the right of the Field Type.

Relativity | Admin Manual - 57
Object Type
In the Object Type drop-down, you must select an object to associate with the field. The valuesavailable depend on the selections made for the first Object Type and the Field Type. For example,Object Type and Production are available in the associative object type drop-down only if the field is aSingle Object Field created on any object other than the Document object. Various object types listedare system created objects. The functionality of these objects is limited.
9.1.5 Propagation
Propagation inside Relativity is used to automatically force a coding value to a specified group ofrelated items. For example, a user can tag a document as Responsive and have the value propagate tothat document’s family members.
The propagate to function is a valuable tool for enhancing workflow in the document review process,especially when implemented in a larger workspace, in that it saves the user time in coding relateddocuments.
Propagate To checkbox
First ensure you have checked the Propagate to checkbox. The available options are dependent on therelational fields set for the workspace. In the above screenshot you see Duplicates, Family, SimilarDocuments and Content Analyst Index - Similar Documents. Click Save.
When coding a document that has been identified as relational, the propagation function willautomatically code the related documents with the same value. In the example belowwe have codeddocument AS000005 as Not Responsive.
Document Layout

Relativity | Admin Manual - 58
On viewing the Family documents in the Related Items pane, we see that the responsiveness valueentered in the layout above has been applied to all documents contained in the family.
Family Documents View
Field propagation rules are applied when you click Save or Save and Next in a layout - once per editoperation. This means that a secondary propagation will not result from edits that propagate to familyor duplicate documents.
Note that Propagation does not cascade or cause chain reactions, meaning that only the documents inthe saved document’s groups will receive the propagated values.
For example, if a responsiveness field is created to propagate both family and duplicates, and a parentemail is coded as Responsive, these actions will occur:
Child email attachments will be coded as responsive (Family propagation) Duplicate emails of the parent will be coded as responsive (Duplicate propagation) Duplicates of the child attachments will not be coded as responsive (this would be Duplicate
propagation triggered by Family propagation)
9.1.5.1 Applying Propagation to Documents in Multiple Groups
When propagation is applied to multiple related items groups – for example, Duplicates and EmailFamilies – it is important to understand howdocuments will be coded in specific scenarios.
If the reviewer’s Skip function is enabled, documents where theconditions of the view is met and propagation was applied willautomatically be skipped. This helps expedite the review process.
For more information, please see the Users and Review Layout Optionssections.
The following scenarios break down howpropagation would be applied to a set of documents. Assumethat propagation is active for both Email Families and Duplicates. There are two email families:
AS000001 – AS000005 TS000007 – TS000011
Within these families, two documents are duplicates:

Relativity | Admin Manual - 59
AS000003 TS000009
Tagging AS000001 as Responsive would tag only the family – indicated in blue.
Tagging AS000003 as Responsive would tag the family, and the duplicate – indicated in blue.
Mass editing AS0000001 and AS000002would tag only the family – indicated in blue.

Relativity | Admin Manual - 60
Mass editing AS000002 and AS000003would tag the family, and the duplicate – indicated in blue.
Mass editing AS000003 and TS000009would tag all of the listed documents.
Propagation is a valuable feature but needs to be clearlycommunicated to all users. There is no warning to signal thatpropagation is being applied, so education is important.
You may want to add a textbox to any affected layouts advisingpropagation rules are being applied.
9.1.6 List Properties
List Properties control how an item is displayed in a view. Views are lists of items in Relativity and arecovered in the Views section.

Relativity | Admin Manual - 61
List Properties Display
Linked sets the field as a hyperlink.o In the example below, the Date field was set to linked: Yes. As a result, date is a hyperlink
in the view. Clicking the date entry launches the document AS000001 in the viewer. Sim-ilarly, clicking any link within the document will also launch the document in the viewer.
Date hyperlink
Filter Type determines which type of filter is available for the field. The filter types are:o None: disables filtering on the field.o List: displays a drop-down list of all the field’s values in the workspace. Users may select
only one of the values. There can be up to 255 items present in this type of filter, if this isexceeded, the filter type will downgrade to a textbox filter and write an error in the ErrorLog.
The List filter type should only be used for single-choice lists andyes/no fields.
Applying list filters to other fields may severely impact systemperformance.

Relativity | Admin Manual - 62
o TextBox displays a textbox that can be queried for text. Several Search operators can be used in the filter box. See the Relativity Searching
Manual.o Multi-List displays a list where one or more fields can be selected to filter on.o Boolean displays the Boolean choices for the field, allowing users to select one option.o CustomOnly (Advanced) allows you to search using the interface below, combining dif-
ferent search terms and operators. The operators below are used for a fixed-length textfields. Depending on the field type, you will see different operators.
Custom Only / Advanced Interface
o Popup displays a popup picker from which you can select multi-choice and multi-object valuesto use while filtering a list or modifying criteria in a saved search or view. You will be able toaccess this popup from the following:
Layouts Field Filters (via a Select…button) View Conditions Advanced Search conditions Mass Edit window
o This picker is accessed via the Check and Uncheck buttons next to the field name.For more information on how themulti-choice/object popup picker functions, seethe section Mass Edit.

Relativity | Admin Manual - 63
This filter is available for the following field types:o Single objecto Multiple Objecto Single Choiceo Multiple Choice
In the popup picker view drop-down, you can select any view you haverights to see; however, you will receive a warning when attempting tosave the field if the selected popup picker view is a personal view.
In addition, if you edit the view that has been selected as the popuppicker view, you will receive a warning when attempting to save it as apersonal view.
Multi-Choice/Object Popup Picker Filter
Popup Picker View allows you to define what items are available in the popup picker view.o This drop-down is only available if Popup is chosen as the filter type in the drop-down
above; if not, it is blank and disabled.o By default, <All Items> is the popup picker view condition.
Allow Sort/Tally allows you to sort document lists based on the field. Width is the width (in pixels) of the column in the view. This field may be left blank to accept Rel-
ativity’s default, or you may enter your own value. Wrapping:
o If you select Yes, wrapping includes all of a field’s text, displaying the contents on mul-tiple lines.

Relativity | Admin Manual - 64
o If you select No, the field spreads as far right as necessary within the width in order to dis-play the text.
Allow Group By - if set to yes, the field will be available to group by when using pivot. Allow Pivot - if set to yes, the field will be available to pivot on.
o For more information on the Pivot function, see the User Manual.
Note depending on the field type you are creating, only specific filters will be available for selection:
List - Fixed Text, Whole Number, Decimal, Currency, Single-Choice List, Multiple-Choice List,User
TextBox - Fixed Text, Long Text, Date, Whole Number, Decimal, Currency, Object Custom Only - Fixed Text, Date, Whole Number, Decimal, Currency Multi-List - Single Choice List, Multiple-Choice List Boolean - Yes / No
9.1.7 Yes/No Field Display Values
You can display different values for Yes/No fields in the database.
Yes/No Display Values
These display values may be edited at any time; previously-tagged items will update to the new value.
9.1.8 Relational Field Properties
Relational fields are used to identify groups of related documents in your workspace. Commonexamples of relational fields are email families, duplicates, and near duplicates. For example, to groupduplicates, set your duplicate field, such as MD5Hash, to Relational. Relational fields must be fixed-length text. A user can designate a fixed-length field as Relational while creating the field or editing thefield even if the field is empty.
Once theMD5Hash field has been set to Relational, documents that share the same hash value areestablished as duplicate groups.
Relational Field Properties

Relativity | Admin Manual - 65
A relational field cannot exceed 450 characters. This is because anindexed field cannot be more than 900 bytes. Each character, ifUnicode, would take up two bytes and as a result, that field cannot begreater than 450 characters.
Set Relational to Yes. Give the field a Friendly Name. For instance, most users will not knowwhat MD5Hash is.
Rename it to something familiar, such as Duplicates. Pane Icon is an icon used to display the field’s related items in the relational items pane. Icon
packs are available for download from the kCura Support site, www.kcura.com/support. Order is the order of the icon, from left to right, under the relational items pane. The item with
the lowest number is the furthest to the left. The item with the highest number is the furthestto the right. Items that share the same value are sorted in alphanumeric order.
o View Order allows you to see the order of your current fields in the Order Reference win-dow.
o Order can be any integer (positive or negative). No decimals are allowed.
It’s always a good idea to set tab order by 10's, starting with 10, then20, then 30, etc.
Numbering in groups of 10 allows you to insert an item into anyposition later in the workspace without the need to reorder all items(e.g., 10, 20, 25, 30, 40).
9.1.9 Keyboard Shortcut
In this section, you can specify a keyboard shortcut for the new field. The following field is optional:
Keyboard Shortcut allows you to define a keyboard shortcut for the document field you areediting or creating. This shortcut can then be used to code and edit documents in the corereviewer interface. This setting is only available for document fields and consists of the followingcheckboxes and drop-down:
o Ctrl designates the Control key to work in combination with the key you specify to triggerthe shortcut.
o Alt designates the Alt key to work in combination with the key you specify to trigger theshortcut.
o Shift designates the Shift key to work in combination with the key you specify to triggerthe shortcut.
o Key is a drop-down from which you select the letter or number to use in combinationwith the Ctrl, Alt, and/or Shift checkbox(es) you selected above.
Ctrl and/or Alt must be used or you will get an <Invalid Keyboard Shortcut> warn-ing next to the Key drop-down.
CTRL and/or Alt must be used or you will receive an <Invalid Keyboard Shortcut> warning next to theKey drop-down.
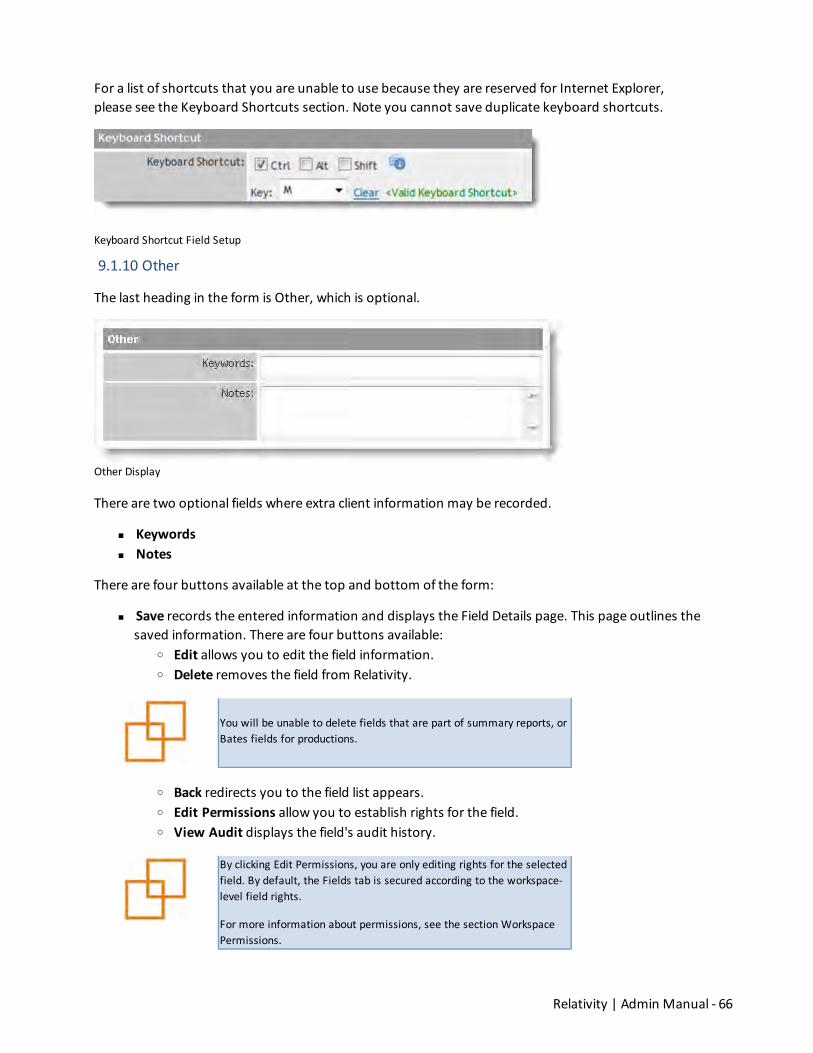
Relativity | Admin Manual - 66
For a list of shortcuts that you are unable to use because they are reserved for Internet Explorer,please see the Keyboard Shortcuts section. Note you cannot save duplicate keyboard shortcuts.
Keyboard Shortcut Field Setup
9.1.10 Other
The last heading in the form is Other, which is optional.
Other Display
There are two optional fields where extra client information may be recorded.
n Keywordsn Notes
There are four buttons available at the top and bottom of the form:
Save records the entered information and displays the Field Details page. This page outlines thesaved information. There are four buttons available:
o Edit allows you to edit the field information.o Delete removes the field from Relativity.
You will be unable to delete fields that are part of summary reports, orBates fields for productions.
o Back redirects you to the field list appears.o Edit Permissions allow you to establish rights for the field.o View Audit displays the field's audit history.
By clicking Edit Permissions, you are only editing rights for the selectedfield. By default, the Fields tab is secured according to the workspace-level field rights.
For more information about permissions, see the section WorkspacePermissions.

Relativity | Admin Manual - 67
Save and New records the entered information and launches a blank New Field form. Save and Back records the entered information and redirects you to the field list. Cancel aborts the field creation process and discards any entered information.
9.2 Editing Field Information
To edit a field, go to the Fields tab and then click the Edit link next to the desired field.
Edit Field
You may also edit field information by clicking the field’s name. This redirects you to the Field Detailspage. Click the Edit button to access and change the field information.
Note a field’s type cannot be changed once the field has been created.
An Edit link may be added to your choice list view if it does not alreadyexist. See the section Views.
9.3 System Fields
There are several system fields that will be in all Relativity workspaces.
Artifact ID is Relativity’s unique identifier for all database objects. Batch, Batch::Assigned to, Batch:: Batch Set, Batch:: Status are fields that store values related
to any document batches. For more information about batching, see the section Batching. Relativity Compare can be added to a view allowing you to compare the text of one document
to another . Control Number is the workspace identifier. You can rename this field. Extracted Text stores any FullText or OCR you load into Relativity. It is available as a radio but-
ton in the viewer and for searching. File Icon is an icon that represents the document’s Relativity Native File Type. Folder Name is the name of the folder where the document resides. Note that this is just the
location folder, not the full folder path. Has Images is a yes/no field that indicates whether a document has images. Has Natives is a yes/no field that indicates whether a document has natives.

Relativity | Admin Manual - 68
Has Inline Tags is a yes/no field that indicates whether a document has a right-click tag anno-tation.
Relativity Image Count stores the number of non-production images associated with a doc-ument.
Relativity Native Time Zone Offset is a numeric field that offsets how header dates and timesappear in the viewer for emails. If the value in this field is blank or 0 for a document, then thedate and time is displayed as GMT. You can enter a whole number in this field, positive or neg-ative, to offset the time from GMT to the local time zone. For example, if the document wasfrom US Central Time, you would enter “-6” in the field, because Central Time is GMT -6.
Relativity Native Type is the type of native file loaded into the system and is determined by thesystem.
Supported by Viewer is a yes/no field that indicates whether the native document is supportedby the viewer.
System Last Modified On represents the date and time the document was last modified. System Last Modified By represents the user who last modified the document. System Created On represents the date and time the document was created. System Created By represents the user who created the document. <Markup Set Name> is a field created when a markup set is created. Its values are:
o Blank when the document has no highlighting or redactions for themarkup seto Has Redactions when the document has redactions for themarkup set.o Has Annotations when the document has highlights for themarkup set.
<Production Name> is a field created when a production is created. This field stores how thedocument was added to a production. It will be blank, or contain Images Only, Natives Only, orImages and Natives.
Production Alerts is a yes/no field to warn of any production execution problems.
9.3.1 Relativity Compare
Relativity Compare is a system field that compares the extracted text of two specified documents,allowing you to understand the key differences. This is particularly useful when working with groups ofnear duplicates, or conceptually similar documents.
This field can be included in any view and will display the Relativity Compare icon. For moreinformation see the Relativity User Manual.
The comparison is based on the documents' extracted text.
10 ChoicesChoices are the pre-determined values that are applied to single and multi-choice list fields. Choices areused in coding fields to allow users to record decisions on a document. For example, a Responsiveness

Relativity | Admin Manual - 69
Field may have choices like Responsive, Not Responsive or Not Sure.
10.1 Adding a Choice
To create a new choice, go to the Choices tab and click New Choice.
New Choice button
The NewChoice form appears, with required field in orange and optional fields in gray.
New Choice Form

Relativity | Admin Manual - 70
The fields options for a choice are:
Field is a single or multi-choice list field in which the choice belongs. Name is the choice value. Choice names can be up to 200 characters. Order is a number that represents the position of the choice in relation to the field’s other
choices. The lower the number, the higher the position on the list. Items that share the samevalue are sorted in alphanumeric order.
o Pane order may be any integer positive or negative). No decimals are allowed.
It’s always a good idea to set tab order by 10's, starting with 10, then20, then 30, etc.
Numbering in groups of 10 allows you to insert an item into anyposition later in the workspace without the need to reorder all items(e.g., 10, 20, 25, 30, 40).
Parent choice allows you to select a parent choice belowwhich the current choice will nest.o Be aware that once you have set your family of choices and tagged values, editing a par-
ent choice will cause inconsistencies.
If you need to change a parent choice, create a new choice family,mass-edit the applicable documents, and then remove the old choice.
Highlight Color allows you to set the annotation for the choice. For more information aboutright-click tagging viewer text as a choice, see the Relativity User Guide.
Highlight color applies to multi-choice lists only and does not appear asan option in single-choice list forms.
Keyboard Shortcut designates a keyboard shortcut for the document choice you are editing orcreating. This can then be used to code and edit documents in the core reviewer interface. Youwill still need to be in edit mode before you can use keyboard shortcuts for choices. This settingis only available for document fields and consists of the following checkboxes and drop-down:
o Ctrl designates the Control key as part of the combination used to trigger the keyboardshortcut.
o Alt designates the Alt key as part of the combination used to trigger the keyboard short-cut.
o Shift designates the shift key as part of the combination used to trigger the keyboardshortcut.
o Key is a drop-down from which you can select the key you want to use in combinationwith key specified in one of the checkboxes above.
CTRL and/or Alt must be used or you will get an <Invalid Keyboard Shortcut> warn-ing next to the Key drop-down.

Relativity | Admin Manual - 71
For a list of shortcuts that you are unable to use because they are reserved for InternetExplorer, please see the Keyboard Shortcuts section of this document. The system willnot allow duplicate keyboard shortcuts.
Additionally, there are two optional fields where extra choice information may be recorded.
Keywords Notes
There are four buttons available at the top and bottom of the form:
Save records the entered information and displays the Choices Details page. This page outlinesthe saved information, plus any associated fields or parents. There are four buttons available onthe Choices Details page:
o Edit allows you to edit the choice information.o Delete removes the choice from Relativity.
You will be unable to delete choices that are part of summary reports,or that have been applied to any documents.
o Back redirects you to the choice list.o View Audit shows the history of the groupo Save and New records the entered information and launches a blank NewChoice
form.o Save and Back records the entered information and redirects you to the choice
list.o Cancel ends the choice creation process and discards any entered information.
10.2 Editing Choice Information
To edit a choice, go to the Choices tab and click Edit next to the desired choice.
Edit Choice Link
You may also edit choice information by clicking the choice’s name. This redirects you to the ChoicesDetails page as described above. Click the Edit button to access and change the choice information.

Relativity | Admin Manual - 72
An Edit link may be added to your choice list view if it does not alreadyexist. See the section Views.
11 Relativity Keyboard ShortcutsKeyboard shortcuts allow you to accelerate review by triggering edit and navigation actions in the CoreReviewer Interface, thus eliminating the need for multiple mouse-clicks. Keyboard shortcuts areenabled by default and can be used to change viewer modes, populate choices, save edits, cancel
edits, and move between and within documents. To disable shortcuts, click on the ( ) icon.
By default, standard user actions have been assigned system keyboard shortcuts, which are listed inthe shortcut legend along with those used by Internet Explorer. Users with permissions to edit fieldsand choices can create additional shortcuts via the Keyboard Shortcuts property on the Field and
Choice. The Shortcut legend is accessible via the ( ) icon; within the legend, you can sort, filter,Export to Excel, and print by right-clicking and choosing the Internet Explorer print option.
Keyboard Shortcut

Relativity | Admin Manual - 73
Keyboard Shortcuts are only available for Relativity Viewer 6.6 andhigher. If your Viewer does not automatically upgrade, you must re-install the 6.6 Viewer; otherwise the keyboard shortcut icons will notbe visible in the Core Reviewer Interface.
To check your current version of the Viewer, click the ( ) icon inthe Core Reviewer Interface.
11.1 Keyboard Shortcut Legend
Clicking the ( ) icon in the Core Reviewer Interface displays the Keyboard Shortcuts legend. Thislegend includes the following sortable columns:
Keyboard Shortcut is the key-combination used to execute the shortcut during documentreview.
Action is the action that results from using the keyboard shortcut. Viewer Mode lists the viewer mode for which each shortcut is available. Note that most of the
System category shortcuts can be used in all viewer modes. Category lists the shortcut type. Below, the legend displays only those shortcuts designated by
the System and Internet Explorer. If you configure additional shortcuts via Field and Choiceproperties, these will be displayed.
Note the following Keyboard Shortcut Tips listed above the legend:o Shortcuts only execute in the Core Reviewer Interface.o Shortcuts only execute in the Viewer Modes listed in the legend.o If the document viewer is undocked, shortcuts that move the cursor focus to a textbox
will only execute if Internet Explorer has a single tab open.

Relativity | Admin Manual - 74
Keyboard Shortcuts Legend
11.2 Shortcuts for System Actions
When reviewing a document, the user can execute the following shortcuts in the following areas of theCore Reviewer interface:
For viewer mode actions:
Alt+E – Switch to Extracted Text Alt+I – Switch to ImageMode Alt+N – Switch to NativeMode Alt+P – Switch to Productions Mode Alt+V – Switch to Viewer Mode Alt+M – ToggleModes (Draft, Normal, Preview)
For navigation within a document:

Relativity | Admin Manual - 75
Alt+Left Arrow – Page Up Alt+Right Arrow – Page Down Alt+Up Arrow – Previous Annotation Alt+Down Arrow – Next Annotation
For navigation in Imagemode:
Alt + Left Arrow – Previous Image Alt + Right Arrow – Next Image
For Layout actions:
Alt+Space – Edit Alt+S - Save Alt+Enter – Save and Next Alt+Z – Cancel
For navigation between documents:
Alt+Page Up – Previous Document Alt+Page Down – Next Document Alt+Home – First Document Alt+End – Last Document
The following key combinations are not available for user-defined shortcuts:
System Keyboard Shortcuts The following IE shortcuts:
o Ctrl+A - Select Allo Ctrl+C - Copyo Ctrl+F - Findo Ctrl+P - Printo Ctrl+Shift + T - Reopen Last Tabo Ctrl+T - New Tabo Ctrl+V - Pasteo Ctrl+X - Cut
11.3 User-Defined Shortcuts
Any user with permissions to create and/or edit a field or choice can create keyboard shortcuts.Shortcuts can only be configured for Document fields and their associated choices.
Shortcuts can be defined for most field types, but because the action that a shortcut triggers dependson the layout display type selected for the fields and choices, you should use the table below as areference. For example, a shortcut associated with a field or choice that uses a popup picker as itsdisplay type will trigger no action.

Relativity | Admin Manual - 76
You can configure user defined keyboard shortcuts on the Field and Choice pages. These propertiesare identical to each other. To configure a Field or Choice shortcut complete the following:
1. Click theNew Field button in the Fields tab.2. Give the New Field the following parameters:
Object Type: Document Name: < required shortcut name> Field Type: <data appropriate> Required: Yes Keyboard Shortcut:
o Check the Ctrl boxo Check the Alt boxo Choose S from the drop-downo If this shortcut is valid, you will receive a message saying: <Valid Key-
board Shortcut> Keyboard Shortcut Property
Keyboard Shortcut Section of Field Setup
3. Click Save4. Open a document in the Documents tab5. Click the Legend icon to make sure the field you created is included as a shortcut6. Edit any Layout and add the field you just created7. Execute the system shortcut for Edit – Alt + Space8. Execute the shortcut you just created – Ctrl + Alt + S; repeat the shortcut and note the changes inthe checkbox.
11.3.1 Document Fields
The following table outlines what Document Field types users can define shortcuts for and whatbehavior the shortcuts trigger:
Field TypeCan define short-
cut?Layout Display
TypeBehavior
Fixed Length Text Yes Text Focus jumps to textboxLong Text Yes Text Only
Rich Text
Focus jumps to textbox
NO ACTIONDate Yes Date Focus jumps to textboxWhole Number Yes Integer Focus jumps to textboxDecimal Yes Decimal Focus jumps to textbox

Relativity | Admin Manual - 77
Field TypeCan define short-
cut?Layout Display
TypeBehavior
Currency Yes Currency Focus jumps to textboxUser Yes Drop-down
Picker
Drop-down choices are toggled
NO ACTIONBoolean Yes Checkbox
Drop-down
Checkbox state is toggled
Drop-down choices are toggledSingle Choice NoMultiple Choice NoSingle Object NoMultiple Object NoFile
11.3.2 Document Choices
The following table outlines what Document Choices users can define shortcuts for and what behaviorthe shortcuts will trigger:
Choice TypeCan define short-
cut?Layout Display
TypeBehavior
Document SingleChoice Field
Yes Radio button
Drop-down
Choice is selected /deselected
Choice is selected /deselectedDocument MultipleChoice Field
Yes Checkbox
Popup picker
Choice is selected /deselected
NO ACTION
11.4 Special Consideration
Keep in mind the following when using or configuring keyboard shortcuts:
Keyboard shortcuts are active when:o Keyboard shortcuts are enabledo Focus is in the Core Reviewer Interfaceo The viewer is dockedo The viewer is undocked and IE only has one tab open
Keyboard shortcuts are not triggered when:o Keyboard shortcuts are disabledo Focus is not in the Core Reviewer Interfaceo The stand-alone document viewer is launchedo The viewer is undocked and IE has more than one tab open

Relativity | Admin Manual - 78
o Viewing a document in Nativemode If the shortcut overlaps with that of another open program, both shortcuts will be triggered.
For example, if a program installed on a user’s computer uses the CTRL-ALT-R shortcut, clickingCTRL-ALT-R will trigger that action regardless of whether a user is in the Core Reviewer Interface.To use keyboard shortcuts in this scenario, the user should exit out of the program that hasoverlapping shortcuts.
12 Relativity Utilities or Administration TabThe Administration tab now referred to as the Relativity Utilities tab in newer versions has two mainpurposes:
Allows you to download the Relativity Desktop Client, as referenced in the sections Importing,and Exporting.
Allows system administrators to view other users’ personal items.
Administration Tab Display
Clicking View Another User’s Personal Items allows you to select which users’ personal items you see.The left-side box shows workspace users whose personal items are not shown. The right-side boxshows workspace users whose personal items are shown. Move users between the boxes by selectingand double-clicking, or by using the arrows between the boxes.

Relativity | Admin Manual - 79
View Other's Personal Items Display
13 ImportingImporting into Relativity is done using the Relativity Desktop Client, a separate application that runson your local machine. To install the Relativity Desktop Client, go to the Relativity Utilities tab and clickDownload Relativity Desktop Client. On existing cases, this tab may be named Administration.
You have the option of downloading the 64-bit version of the desktop client or the 32-bit version. Theversion you choose depends upon your operating system. Note that the 64-bit version will not workon a machine running a 32-bit OS, while the 32-bit version will work on a machine running a 64-bit OS.You should notice significant speed improvement in desktop client functions with the 64-bit version.
Download Relativity Desktop Client button
Run the downloaded file to bring up the Desktop Client Setup Wizard. This will allow you to install theRelativity Desktop Client. In the first window of the setup wizard, click Next.

Relativity | Admin Manual - 80
Setup Wizard Welcome Screen
The next step offers three options for setup type:
n Typical installs themost common programs features.n Custom allows users to choose which program features will be installed and where.n Complete installs all program features.
Select your setup type and click Next.
Setup Type Options
While the Typical and Complete options take you to the final install window, the Custom button allowsyou to customize your installation selecting what is loaded.

Relativity | Admin Manual - 81
Custom Setup options
Here you can use the Reset button to reset your custom options. You can also use the Disk Usagebutton to look at the disk space required and available.
Disk Usage
Clicking either Next in the Custom Setup windowor choosing either the Typical or Complete setup typebrings you to the Install window.
Note that if you are installing the desktop client on a machine on which it is already installed, you willget the following three options:

Relativity | Admin Manual - 82
Change allows you to change the way features are installed. Repair attempts to fix errors in themost recent installation. Remove removes the desktop client from your machine.
Change, Repair, or Remove
The next step asks you to begin the installation. Click Install.
Ready to Install
You are prompted to allow the installation by the User Account Control. Click Yes.

Relativity | Admin Manual - 83
User Account Control
The next step allows you to exit the setup wizard. Click Finish.
Exit Setup Wizard
When the install is complete, the following icon appears on your desktop.
Relativity Desktop Client shortcut
Double-click the icon to run the Relativity Desktop Client. The first time you run the Desktop Client,you see the following settings:
Force Folder Preview Default allows you to enable or disable the force folder preview setting .This setting checks the first 1000 records of the load file and reports the number of folders

Relativity | Admin Manual - 84
created. If a larger number of folders than expected is going to be created you can stop the loadprocess and check your Folder Info field.
o This process is initiated when you send the import command in the Desktop Client.o By default this is set to Enabled.
WebService URL establishes how the Desktop Client connects to your server. Here you mustenter the appropriate URL path. If this path is entered incorrectly, you will be unable to connectthe Desktop Client to your database.
Options dialog box
Set your preferred Force Folder Preview default and enter theWebService URL provided by yourRelativity Administrator. These settings are retained in themachine registry and retained whenupgrading your Desktop Client software. Click OK. Next, enter your login and password. These are thesame credentials you use to log into Relativity.
Desktop Client Login
After logging in, you are presented with a list of workspaces you have rights to see. Use the filter bar tonarrow the list. Find your workspace and click OK to open the workspace in the Relativity DesktopClient.
By default, a wildcard is used to filter workspaces in the DesktopClient. For example, entering ELA would find a workspace named ELANand RELATIVITY.

Relativity | Admin Manual - 85
The folder structure of your workspace displays. If the workspace is new, there is only a root folder. Ifthere are subfolders click on the plus sign to see the subfolders.
Workspace Folder Structure
Above the workspace folder structure is themenu bar. This includes:
Fileo Open allows you to switch between different workspaces.o Exit closes the Desktop Client.o Refresh updates the folder browser.
Toolso Import
Image File imports images from a page-level load file. Document Load File imports native files, document metadata, and extracted text
from a document-level load file. Production File imports production data and images from a page-level load file. Application imports Relativity dynamic object applications from a load file. These
applications are available on the Relativity Customer Portal. Contact [email protected] if you do not have an account.
o Export is covered in the section Exporting. Production Set exports a production set. Saved Search exports from a saved search. Folder exports from a specific folder. Folder and Subfolders exports from a specific folder and its sub-folders.
Optionso Settings allow you to change the Force Folder Preview default and WebService URL.o Check Connectivity assists in troubleshooting any network and system configuration
errors that were encountered during imports and exports. Help
o About gives you information about the Desktop Client Version.

Relativity | Admin Manual - 86
In addition to themenu options above, you may right-click folders within the RelativityDesktop Client to build the workspace folder structure, or to import and/or export directly toand from the folder.
Workspace Folder Options
Select New Folder to create a subfolder. Type in the folder name then click OK. Folders created in theRelativity Desktop Client will be added to your workspace.
Add New Folder
To import to a specific folder, right-click on that folder and select Import. There are four importoptions:
Image file Document load file Production file Application
If you havemetadata, natives and images to load, run the load file import first, then the image fileimport.

Relativity | Admin Manual - 87
Import file
13.1 Importing a Load File
Load file importing allows you to use a document-level load file to import document metadata, nativefiles and extracted text.
Load File tab
File

Relativity | Admin Manual - 88
o Load field map recalls all settings saved from the previous load. You may choosethe settings saved in the “.kwe” file, or you may use another load file.
o Save field map saves the setting from your current load file for later use. The filecreated has a “.kwe” extension.
o Close shuts the import load file window.o Refresh reloads the application refreshing the view.o
File Menu
Importo Preview file displays the first 1000 documents in the load file. Only
matched fields are shown.o Preview error checks the entire file for potential loading errors.o Preview choices and folders is a pop-up that displays:
The number of folders you create in the browser. The number of choices you create by importing the records. Run this preview to ensure that you havematched the correct fields.
For instance, if you were expecting to create 20 or so folders in thebrowser during your import, but the preview shows 13,342, youknow you have selected the wrong field.
Import file loads the documents into the database. Send email notification upon completion will send an email to the logged in user
when the import is completed. If a check mark sits to the left, it is enabled. To ena-ble or disable, simply click on the setting once.
Force folder previewwill check the first 1000 records of the load file and reportthe number of folders created. It is initiated when you begin the import. If morefolders are going to be created than expected you might wish to cancel the importand verify your folder information field. Relativity does not allow for mass deletionof folders in the browser if they are incorrect.
If a check mark sits to the left, it is enabled. To enable or disable, simply click onthe setting once.

Relativity | Admin Manual - 89
Import Menu
To select your document level load file, click on the load file ellipsis.
Once you have selected your file, enter the correct settings for the load file. The Relativity defaults areshown below.
Load file defaults
Check the first line contains column names option if your load file has a header. Start Line is the line of the load file where the import process will begin. The default value is 0,
and will load the entire load file. Source Encoding is a drop-down containing themost common encodings for load files. Here,
you will pick the encoding for your file. This setting does not have a default value. If your file con-tains foreign languages, you may need to use one of Relativity’s Unicode options. If necessary,consult your processing vendor or department to determine the correct encoding option.

Relativity | Admin Manual - 90
Please note the following:o Relativity uses auto-detection when determining the encoding of your text files. If it finds
a different file type in your text files it will change to the appropriatemethod.o If you change the load file’s encoding, the change is applied immediately and displayed
in the column header preview.o You can audit the encoding of the load fileo When previewing your import file, you can also preview the encoding of the extracted
text files.o The ellipsis next to the encoding drop-down brings up a Pick Encoding window displaying
additional encoding types.
Pick Encoding Window
The question mark icon ( ) next to the Pick Encoding ellipsis provides additional informationon the different features and considerations of Unicode encoding.
Use the characters section to set your load files delimiters.o Column delimiter is the character used to separate columnso Quote is the character used as the text qualifiero Newline is the character used to indicate the end of a line in any extracted text or long
text field.o Multi-value delimiter is the character used to separate choices within a field.o Nested value is the character used to separate the different levels of a multi-choice hier-
archy.
Consider a field that is imported with the following values:“Hot\Really Hot\Super Hot; Look at Later”
With the multi-value delimiter set as “;” and the nested valuedelimiter set as “\"”, the choices would appear as:

Relativity | Admin Manual - 91
The File Column Headers section may display the following message when you first select the load file:
File Column Headers
Once the encoding is specified, the headers section displays the fields in the load file; this parsing isbased on the delimiters set. If your file columns headers are not lined up on top of each other in a listyou will see the delimiters in the file and the load delimiters need to be changed to match the load file.Check your load file and update your delimiters as needed.
The fields will be displayed in alphanumeric order. Each field has a numeric value in parentheses thatindicates the position on the field within the file. For example, in the above example, control number isthe first column; Application Name is the second.
When you have the load file tab settings correctly established, click on the field map tab. The fieldmap tab allows you to configure how your data is loaded into Relativity.

Relativity | Admin Manual - 92
Field Map tab
The field map tab is divided into different sections.
13.1.1 Field Matching
The field matching section determines which fields are loaded from your load file into your database,and which workspace fields they are loaded into.
Field Matching Display

Relativity | Admin Manual - 93
The Case Fields window (far left), contains all fields available in your workspace.
The Load File Fields window (far right), contains all fields available in the load file.
Note that each row has contrasting colors. This is intended to ease thematching process for large numbers of fields and has no impact onhow data appears in the workspace.
To select fields to import into the workspace, simply match them in the center windows. For instance,in the example below, Control Number in the file would be loaded into Control Number in theworkspace, and Date Sent from the file would be loaded into 1: Date in the workspace.
Field matching
Only fields matched in the center two sections are loaded into the workspace; the fields remaining inCase Fields and Load File Fields are ignored. Control Number or identifier field must bematched inevery load.
The order in which fields are matched has no impact on what fields auser sees, or in what order the fields are displayed.
Users see and interact with database fields through views and layouts;both are completely customizable.
13.1.2 Overwrite | Overlay Identifier
TheOverwrite section determines the type of load.

Relativity | Admin Manual - 94
Overwrite Drop-down
The three types are:
Append Only loads only new records. Overlay Only loads updates existing records only. You must include the workspace identifier in
an overlay load. This acts as a linking field and is necessary to ensure that Relativity knowswhere to import the data.
Append/Overlay adds new records and overlays data on existing records.
When performing an overlay, the Overlay Identifier section becomes available. The overlay identifierallows you to specify the field that links your overlay load file to the workspace.
The fields in the drop-down are fixed-length fields with a manually-applied SQL index. Note that this is NOT the same as adding the fieldto the full-text index.
Contact your SQL database administrator to apply an index to a field.
13.1.3 Folder Info
The Folder Info section, in the upper-left corner of the Field Map tab, is used to create the folderstructure for your workspace based on a field ofmetadata.
Folder info
If you have built, or plan to build your own folder structure that is not based on any metadata, leavethe folder info box unchecked. If the box is left unchecked, all documents are loaded directly into thefolder indicated by the import destination.
If you would like to use a field ofmetadata to build the folder structure for the workspace, check thebox in Folder Info. The drop-down below the checkbox will then become available, allowing you toselect any field from your load file.

Relativity | Admin Manual - 95
Relativity uses the selected field to build the folder structure. Traditionally, this field is a source orfolder path field. Relativity looks for backslashes to indicate a new sub-folder. All folders are built underthe Import Destination folder.
For example, if the selected field contained a value of “UB Impairment\Accounts\Bunk Accounts”,Relativity would build:
Folder structure
Before beginning your load, it’s a good idea to Preview Choices andFolders, as described above. This tool reports the number of foldersthat will be created by the load.
13.1.4 Native File Behavior
The Native File Behavior section determines whether native files are loaded along with the databaserecords.
Native File Behavior
If there are no native files to load, leave load native files unchecked.
If you have native files to load, click the Load native Files checkbox. When you check the box, theNative file paths contained in column drop-down becomes available. Select the field from your loadfile that contains a path (relative or absolute) to the native file.
If your files are on your desktop/laptop, or if you are a consulting partner loading data into the kCura’shosting environment, ignore the Repository section.
The Repository section should only be used if the native files for the workspace already reside in a validRelativity-accessible location.

Relativity | Admin Manual - 96
File Repository Preferences Display
The first option, Copy files from current location to selected document repository copies the filesfrom the location in the selected load file field to the selected document repository.
The second option is, Do not copy files to a Relativity document repository. Files already reside ina valid and Relativity-accessible location. This option should be used if the native files have alreadybeen copied to their final location, accessible by Relativity. This location must not be the Relativitydocument repository.
The default option can be set on an environment wide level. For more information, refer to theRelativity Configuration Table.
Using either option, the selected native file path field should point to the current location of the nativefiles.
13.1.5 Extracted Text
The Extracted Text section controls how the FullText or OCR is loaded into the database.
Extracted Text
If your extracted text is a field in your load file, leave Cell contains file location unchecked.
If your extracted text is in document-level text files, and your load file contains a path to those textfiles, check the Cell contains file location checkbox. Select the correct Encoding for undetectablefiles option from the drop-down, or click the ellipsis (…) button for additional language-specificoptions. Note that the question mark icon sits to the right of the ellipsis; this takes you to the sameUnicode information launched via the icon in the Load File tab.
Some of the Text File Encoding drop-down options are:
Western European (Windows) is windows standard encoding for English Unicode consists ofmore than 107,00 characters covering 90 scripts

Relativity | Admin Manual - 97
Unicode (Big-Endian) is the same as Unicode, except that the byte order is reversed Unicode (UTF-7) represents Unicode text using a stream of ASCII character. This guarantees
that the high bit will always be zero. Unicode (UTF-8)another system for storing a string of Unicode code points in memory using 8-
bit bytes
13.1.6 Loading
Once you have established the correct load settings, you can begin the loading process.
On the Import menu, click Preview File to preview the first 1,000 records of the file. Matched fields aredisplayed. Beforemoving forward, ensure that fields arematched correctly.
Preview File Display
On the Import menu, click Preview Errors to check the entire file for errors. If there are no errors, themessage below appears:
Preview errors
If you see any errors:

Relativity | Admin Manual - 98
Use the error report to correct the errors, and then re-add the file(s) to the Relativity DesktopClient.
Proceed with your load. As detailed in the error handling section below, Relativity will load only validrecords. Erroneous records will be skipped and can be exported for correction and reload.
Once you havemade your selection, click Import Files. A progress bar indicates the progress of theload.
Import Load File Progress Display
In addition to the default Summary tab, there are four other tabs:
Errors details any errors encountered during the load.
Only records with no errors will be imported into the workspace.
Progress is a detailed view of the load progress. Warnings notify you of any loading or connection issues. Report provides you the option to export the following:
o Error report, which is a summary of the errors.o Error file, which is a document-level load file of only erroneous records.
At the bottom of the import load file progress box, there will be an indication of two modes:

Relativity | Admin Manual - 99
13.1.6.1 File Transfer Mode
File transfermode is web or direct.
Web mode goes through the web server and is the standard. Direct mode is significantly faster, but requires a connection to the network hosting the data,
as well as specific Windows group permissions to be used. Contact your Relativity administratorfor more information about loading in direct mode.
13.1.6.2 SQL Insert Mode
SQL insert mode always shows Bulk.
13.1.7 Error Handling
If Relativity encounters an error during the loading process, it will skip the erroneous recordcompletely. After all correct records have been loaded, Relativity warns you that errors wereencountered.
Error Notification
Clicking OK in the error warning box creates a new document-level load file with only the erroneousrecords. You will be prompted to save these records to prevent any loss of data. Choose a path to saveyour error file and click OK.
Error File Path folder

Relativity | Admin Manual - 100
Once you have saved your error file, you can make any necessary corrections to those records, andthen perform an Append Load. A record of these errors is also available in the Errors tab, referencingthe workspace name and Artifact ID.
13.1.8 Import Auditing
Once you have imported your file, the Relativity Desktop Client records and audits this instance in theHistory tab, including the import’s settings and load file transfer rate.
History Tab - Import Audit
13.1.9 Saving Your Settings
It is common to work with your own internal processing tools or the same vendor.
Instead of going through all the steps above every time you perform a load, save your settings in a.kwe file, which contains Relativity Desktop Client settings for a load file import. Most settings will besaved. The following settings are not saved in a .kwe:
Selected destination path Advanced settings – copy files to repository
You can create a .kwe file by clicking Save Field Map.
Save Field Map
The next time you have an identically formatted load file, use your .kwe. When you open the kwe fileyou will be prompted to select the file being loaded or you update the path in the kwe file.
Below is the text of a .kwe file. Note that the fourth line contains an absolute path to the document-level load file to be loaded. Update this section to point to your new load file.
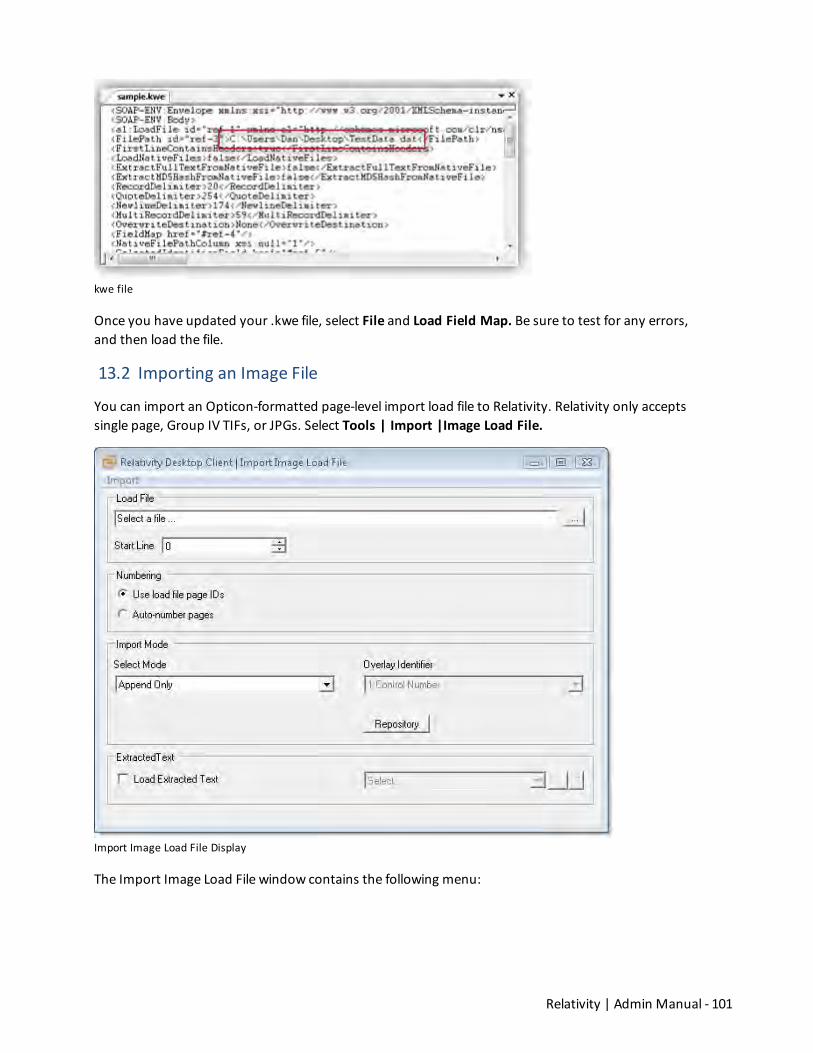
Relativity | Admin Manual - 101
kwe file
Once you have updated your .kwe file, select File and Load Field Map. Be sure to test for any errors,and then load the file.
13.2 Importing an Image File
You can import an Opticon-formatted page-level import load file to Relativity. Relativity only acceptssingle page, Group IV TIFs, or JPGs. Select Tools | Import |Image Load File.
Import Image Load File Display
The Import Image Load File window contains the following menu:

Relativity | Admin Manual - 102
Import:o Check Errors goes through your load file and checks for errors.o Import File imports the file into Relativity.o Send email notification on completion, when checked, sends an email to the address
you used to log into the Desktop Client when the image file has been loaded.o Save Settings saves your image load settings.o Load settings loads your previously saved image load settings.
Import Menu Options
Before you can import an image file you must complete the following properties in the Image Load Filewindow:
Load File provides an ellipsis with which you select an image file to load. Start Line is the line of the load file where the import process will begin. The default value is 0,
and will load the entire load file. Overwrite elects the type of load. There are three options:
o Append only loads only new records.o Overlay only updates existing records only.o Append/overlay adds new records and overlays images for existing records.
General | Support Image Auto-Numbering is to be used when you are importing a set of TIFFsthat share a page identifier for each record. For example:
Shared Page Identifier
Because the page identifiers are shared per document and thus are not unique - you need to selectSupport Image Auto-Numbering. This applies a .01, .02, and so on, to the page-level identifier, creatinga unique number per page. Use the load file ellipsis (…) button to browse to your page-level load file.Relativity accepts Opticon format image load files.
Extracted Text | Load Extract Text loads any extracted text into the database when checked.

Relativity | Admin Manual - 103
The text files must be:
.txt extension files Stored in the same directory as TIFF files Named in the sameway as the TIFF files
If your files are on your desktop/laptop, or if you are a consulting partner loading data into kPlex,ignore the Repository section. The default selection is to copy files from current location to the server.
Encoding for undetectable files is a drop-down that allows you to select an encoding for yourundetectable image files. The ellipsis next to the drop-down brings up a window containingmore encodings. The question mark icon takes you to more information on Unicode encoding.
The Repository section should only be used if the image files for the workspace already reside in avalid Relativity-accessible location.
File Repository Preferences Display
The first option, Copy files from current location to selected document repository copies the filesfrom the location in the selected load file field to the selected document repository.
The second option is, Do not copy files to a Relativity document repository. Files already reside ina valid and Relativity-accessible location. This option should be used if the native files have alreadybeen copied to their final location, accessible by Relativity.
The default option can be set on an environment wide level. For more information, refer to theRelativity Configuration Table.
Using either option, the selected native file path field should point to the current location of the nativefiles.
When performing an overlay, theOverlay Identifier section becomes available. The overlay identifierallows you to specify the field that links your overlay load file to the workspace.
The fields in the drop-down are fixed-length fields with a manually-applied SQL index. Note that this is NOT the same as adding the fieldto the full-text index.
Contact your SQL database administrator to apply an index to a field.

Relativity | Admin Manual - 104
13.3 Importing a Production File
Relativity allows you to import productions in order to use an external tool to execute yourproduction, but still use the results in your workspace. Here are the steps:
Create your production set in Relativity.
For more information about creating productions, see the sectionCreating a New Production Set.
Note that the Bates label setting in your imported production will notbe used. The numbering imported in your Opticon file becomes theBates numbering.
Run the production in your internal tool and generate two files:o A document-level control file that contains, at minimum:
An identifier field present in your workspace The newBates values
o A page-level Opticon file using the Bates numbering scheme Overlay the document-level load file into Relativity. Import in your Opticon load file according to the following steps. Select Tools | Import |Production Load File.
Import Production Load File dialog box
Themenu options are the same as in the standard image file import as described above.

Relativity | Admin Manual - 105
Click the load file ellipsis (…) button to browse to your page-level load file. Relativity acceptsOpticon format image load files.
Start Line is the line of the load file where the import process begins. The default value is 0, andwill load the entire load file.
Numbering defaults to use load file page IDs, however if page IDs in the production are notunique you may want to auto-number pages.
Select Mode is set to Overlay Only because you are overlaying production images onto existingdocuments.
Production is the Relativity production to which the images you are uploading corresponds.Only new, empty production sets appear in this list.
Overlay Identifier is where the field that stores overlaid document-level Bates information onthe document is set.
Repository button opens a separate dialog box with location of images.
File Repository Preferences Display
The first option, Copy files from current location to selected document repository copies thefiles from the location in the selected load file field to the selected document repository.
The second option is, Do not copy files to a Relativity document repository. Files alreadyreside in a valid and Relativity-accessible location. This option should be used if the nativefiles have already been copied to their final location, accessible by Relativity.
Extracted Textallows you to load new text for Production documents that might be revisedbased on redactions.
13.4 Importing with Command Line Import
You can use theWindows Command Line to import documents into Relativity. This allows you toautomate document importing along with other parts of your processing and integration process.
For more information, please see the Relativity Command Line Import Guide, found on the CustomerPortal.

Relativity | Admin Manual - 106
14 Transform SetsTransform Sets transform fielded data inputs based on rules called a handler. Handlers analyze aspecified source text field, extract text matches, and then write the results to a destination field.
14.1 Domain Parsing
Domain Parsing is a Relativity-defined handler that extracts email domains from email addresses in adocument set. For example, “[email protected]” will yield “kcura.com”. The domains returned arewritten to a destination field.
Domain parsing utilizes a new object to save domain information. Prior to creating a new TransformSet you will need to create a new object and field to hold the output, as well as a saved search to selectthe data that will be transformed.
Begin by creating an object. Click on theObject Type tab and select New Object Type.
New Object Creation Window
Object Type Information:
Name is the name of your new object, which will appear as a tab on your screen. For the pur-poses of this exercise name it Domains.
Parent Object Typewill remain the default Workspace. Enable Snapshot Auditing On Delete can also be left to default of Yes.
Next, create a new field to hold this data connected to your object. Go to the Fields tab and create anew field.

Relativity | Admin Manual - 107
New Object Field
Object Type is Document. Name can be whatever description you want for holding this data. For this example we use
Author Domain. Field Type isMultiple Object; the Object Type will be the Object you just created (Domains).
Next, create a saved search of the documents from which you will extract the data. For this exampleunder conditions, select documents in which the email author is set.
Now you can create a Domain Parsing transform set. Go to the Transform Sets tab and click theNewTransform Set button.
New Transform Sets Button
The New Transform Set form appears, with required fields in orange and optional fields in gray.

Relativity | Admin Manual - 108
New Transform Set Information
The following fields appear on the form:
Name is the name of the Transform Set. Data Source is the saved search on which the transform will run. You may have to create a new
saved search for the transform set, depending on your desired results. Handler is the handler on which the transform will run. There are currently two handlers avail-
able in this drop-down for a transform set:o Domain Parsing extracts email domains from email addresses in a document seto Conversation Index Parsing makes a relational field that groups all emails from the same
thread into a set.o Note that the Add link next to the Handler drop-down will be visible to System Admin-
istrators. Status is the status of the job after it has been run; the possible listings for this field are:
o Pendingo Processingo Completedo Completed with Errorso Stopped by User
Last Run Error lists the last error encountered if the job was completed with errors. Notes allows for additional information to be entered.
Clicking Save records and saves these settings.
In the example below, we have created a new transform set with the following settings:
Name: Email Domain Parsing Data Source: Email Domains (saved search) Handler: Domain Parsing

Relativity | Admin Manual - 109
Add New Transform Information
To add a transform to the Email Domain Parsing transform set, click theNew button.
Next you need to add a Transform action to the newly created Transform Set in order to specify sourceand destination fields for the email domains you hope to parse.
Clicking theNew button launches the Add Transform window.
Add Transform Options
All fields in the Add Transform window are required:
Transform Set is automatically populated with the transform set you just created. Name is the name of the transform you are adding. Source Field is the field that holds the data to be processed.
o A popup-picker displays all fields the user has rights to see, as well as the object type,field name and field type. The transform will only be saved if this field is a Documentobject Fixed Length or Long Text field.
o The source field must be a standard text field. No identifier, associative, relational, or sys-tem fields can be used.

Relativity | Admin Manual - 110
Destination Field is the field that holds the results of the process.o A popup-picker displays all fields. The transform will only be saved if the selected field is a
Multi-object field. For our example we have created a Multi-object field in the documentobject that points to the Domains object.
Destination Field Creation
If you use a Destination Field that is tied to an existing object you willoverwrite the field. You will be unable to add the results of new rec-ords without overwriting the existing data.
Click Save.
When saving the transform, keep in mind the following requirements:
The source field must be either fixed length or long text The destination field must be an object connected to the document If the user has field types other than fixed length or long text selected for either the source or
destination fields, an error message will display and the save will not complete.
Below, we have created a new transform designed to extract domains from all email authors in thedocument set. The transform was created with the following settings:
Transform Set: Email Domain Parsing Name: Author Source Field: Author Destination Field: Author Domain
Transformation Information
The saved transform is displayed on the Transform Set page with the following fields:

Relativity | Admin Manual - 111
Name Source Field Destination Field
Transform View
You run your transform set via the Transform Set Console in the top right corner of the window.
Transform Set Console
This console contains the following options:
Full Run wipes out all content in the Destination field and runs all transforms.o A confirmation message will appear that reads, “Performing a Full Run will erase all con-
tent in the selected Destination field(s). Are you sure?”o This is available when:
There is at least one transform There is no active job
Incremental Run runs the transform set on all documents that have not yet been run. Novalues are deleted. This is available when:
o This is available when: There is at least one transform There is no active job At least one document has gone through the transform process
Stop is active when a run has been submitted and is still running; this allows a user to stop theprocess.
Refresh Page refreshes the page to see the current processing status.

Relativity | Admin Manual - 112
Resolve Errors/ Retry attempts to re-run documents containing errors.o This is available when:
There is at least one document in error state. There is no active job
Show Errors shows the error documents.o This is available when:
At least one document is in error state
When the transform set is run, it will go through source fields, find email addresses and extract thedomains.
When the transform set has completed running, the Status field in the Transform Set Informationsetting will update to reflect the completion.
Upon completion of the run, the results populate with the author domain destination field specifiedduring the transform set creation. Below, a basic Author Domains view has been set up to include thisfield:
Author Domains Field
Use a dynamic object to store the domains and see a list of documentsthat correspond with the domain.
1. Create a new object.2. Create a multi object field that references the new object
from the document object.3. Change your new objects layout to include Associative objects.
14.1.1 Special Considerations
Consider the following when reviewing your returned domains:

Relativity | Admin Manual - 113
All output characters will be lower case. If there is no text in the source field, nothing will be written to the destination field. If the text is unidentifiable in the source field, nothing will be written to the destination field. If more than one domain is in a field more than one domain will be connected to the document.
14.2 Conversation Index Parsing
The Conversation Index transform handler parses theMicrosoft Exchange field Conversation Index toutilize the related items functionality in Relativity. Conversation Index Parsing follows a similarworkflow to that of Domain Parsing, in that a new fields and Transform Set must first be created. Thesettings for this new transform set are as follows:
Name: name of the Transform Set. Data Source: a Saved Search that returns fields that have the Conversation Index populated. Handler: Conversation Index Parsing
Below is an example of a saved Conversation Index Parsing Transform Set:
Parse Conversation Index
Like Domain Parsing, wemust add a transform before we can run this transform set. Keep in mind thefollowing, specific to Conversation Index Parsing:
The Source field will be the Conversation Index. The destination field will be the Relational Field that groups all of the emails in the thread
together. This field will have to be created before running the transform.
Items in your database other than emails will not have a conversationid. The transform process will not fill the destination field for theseitems.
Below is an example of a saved Parse Conversation Index transform:

Relativity | Admin Manual - 114
Parse Conversation Index Transform
Clicking Full Run in the Data Transform Console runs this transform set. When the run is completed,we can view our results in the destination field we specified while creating the transform set.
Below is a Conversation Parse view that includes the Conversation Index and Conversation IndexRelational fields:
Conversation Index Fields
Note that the Destination Field - Conversation Index Relational - contains the first 44 characters of theConversation Index. This character count is based on Microsoft's conversation tracking settings.
For more information on how Microsoft's conversation trackingtechnology works, see
http://msdn.microsoft.com/en-us/library/cc765583.asp
15 Markup SetsMarkup sets are securable sets of annotations, redactions and persistent word highlighting. Reviewersusemarkup sets to apply text redactions, and to view highlighted terms or phrases.
15.1 Adding a Markup Set
In Workspaces mode, select theMarkup Sets tab, and click New Markup Set.

Relativity | Admin Manual - 115
The NewMarkup Set form appears with required fields in orange and optional fields in gray.
New Markup Set Form
The fields available on the NewMarkup Set form include:
Name is the name of themarkup set. Order indicates the placement of themarkup set in theMarkup Set drop-down of the Relativity
Core Viewer. Use the following guidelines when ordering markup sets:o TheMarkup Set drop-down displays markup sets with low order numbers near the top
of the list. (The default markup set will have the lowest order number.)o Those sets with the same order number are sorted alphanumerically.o The order number can be any positive or negative integer. Do not enter a decimal as an
order number.
If you order markup sets by groups of 10 (such 10, 20, and 30), you caneasily insert another markup set without having to reorder the existingones.

Relativity | Admin Manual - 116
Redaction text entries are words or phrases that you can apply to a textbox redaction. Enter aterm or phrase, and press Enter. You can enter multiple terms but each onemust be on a sep-arate line.
Persistent Highlighting Source displays the following options to indicate how you will providelist of terms:
o Highlight Terms indicates that you will enter the terms for highlighting in theHighlightTerms box displayed on Markup Set form. See Entering Highlight Terms.
o Highlight Field indicates that you will create a search term report or dynamic object thatreferences a list of terms for highlighting. When you choose this option, the HighlightFields ellipsis is displayed, allowing you to select search terms reports or dynamicobjects. You can use this option for large numbers of persistently highlighted terms thatcause poor document loading speeds in the Relativity Core Viewer when used with theHighlight Terms option. See the section Using Highlight Fields.
Keywords text box provides you with the options to enter keywords associated with themarkup set.
Notes text box can be used for comments about themarkup set.
After you complete the fields on theMarkup Set form, you can use the buttons to perform thefollowing actions:
Save records the entered information and displays theMarkup Set Details page. Save and New records the entered information and launches a blank markup set form. Save and Back records the entered information and redirects you to themarkup list. Cancel aborts themarkup set creation and discards any entered information.
TheMarkup Set Details page is displayed after you save a newmarkup set, or when you display anexisting set from theMarkup Set tab. It displays the same fields as those on NewMarkup Set form, butthey are read-only.
The available Action buttons on this page include:
Edit allows you to edit themarkup set information. Delete removes themarkup set from Relativity. Back redirects you to themarkup list. Edit Permissions allows you to establish rights for themarkup set. View History displays themarkup sets audit history.
15.1.1 Entering Highlight Terms
You will see theHighlight Terms box displayed when you select the radio button of the same name asthe Persistent Highlighting Source. This text box is used to enter search terms and optional color-coding.

Relativity | Admin Manual - 117
Highlight Terms Radio Button and Text Box
Use the following guidelines when adding terms or phrases to theHighlight Terms box on theMarkupSet form:
Enter a term that you want highlighted, and press Enter. You can enter multiple terms but eachonemust be on a separate line.
Enter terms for persistent highlighting exactly as they appear in the document. Do not use quo-tation marks and connectors. For more information, see the sections Highlight Term Searchingand Color-Coding Persistent Highlights.
Quotation marks are not compatible with persistent highlighting,which automatically searches for an exact phrase. You do not need touse quotation marks, which will result in slower document loadingspeeds.
15.1.1.1 Entering Highlight Terms
Review the following information about the use of special characters, operators, and wildcards:
Non-alphanumeric characters in persistent highlighting are treated as special character wild-cards by Relativity. If you surround search terms with quotation marks, Relativity will match thequotation marks with any special character, such as $, &, ^, %, @, and others. For example, youenter the following search terms:
"The Phrase"

Relativity | Admin Manual - 118
Relativity will query on special characters to find matches like %The Phrase@, or &The Phrase$.The process of finding the special characters dramatically slows Viewer performance.
Operators, including “AND” or “OR”, are not utilized as in keyword searching. If used, Relativitywill look for the exact phrase including “AND” or “OR”. For example, you entered these searchterms:
Apple AND Banana
Relativity would highlight the entire phrase “apple and banana” in the document. Separateoccurrences of apple, and occurrences of banana would NOT be highlighted.
Wildcardsmay still be used as in this example:
appl*
This search term will highlight apple, application, applies, and so on. An excessive use ofwildcards will affect performance.
15.1.1.2 Color-Coding Persistent Highlights
When you enter a term in the Highlight Terms box, you can also specify the color for highlighting andtext. Use the following format to color-code your persistently highlighted text:
[highlight color];[text color];[term to be highlighted]
For example, enter 3;16;Relativity to highlight Relativity with dark green background and whitetext.The following table includes available color codes.
Color Number[Default] 0Black 1Dark red 2Dark green 3Dark yellow 4Dark blue 5Dark magenta 6Dark cyan 7Light gray 8Gray 9Red 10Green 11Yellow 12Blue 13Magenta 14Cyan 15White 16

Relativity | Admin Manual - 119
Persistent Highlighting Color Codes
Note: If you enter terms with no color-coding the background will bemagenta and the text black.
Default has different implications for text and background. The defaulthighlight color = white and the default text color = black.
15.1.2 Using Highlight Fields
Before you can create a markup set using the Highlight Fields option, you will need to create the searchterms reports or dynamic objects that you want to use as the source of your highlighted terms.
15.1.2.1 Searching Functionality and Persistent Highlighting
When you create a search terms report for persistent highlighting, avoid the use of advanced dtSearchfunctionality, including proximity, stemming, and fuzziness. Your terms will not be highlighted if youuse these advanced searching features, even though the Count column lists the number ofmatchingterms.
Persistent highlighting technology does not understand proximity searching. If you enter the phrase‘Relativity w/5 kCura’ as a search term, the search term report will use a dtSearch to find and tag alldocuments that meet these criteria. However, the persistent highlighting technology will functiondifferently than the dtSearch. It will look for the term Relativity, a space, the letter w, any specialcharacter (instead of “/”), the number 5, a space, and then the term kCura.
Similarly, the stemming character (~) is not understood by persistent highlighting technology. If youenter the term “apply~” as a search term, the search term report will find and tag all documents withthe word apply, or any document that stems from apply, including applied, applies, application, andso on. However, the persistent highlighting technology will look for the term apply followed by anyspecial character, so you will not see expected terms highlighted.
In a Search Terms Report, you can work around these limitations by using the Dictionary Search toidentify search terms using stemming or fuzziness. Copy the list of terms returned in this search. Pastethem in the Add Terms box on the Search Terms Report form. You will enhance your search term list,while avoiding errors due to special characters. For more information, see section Search TermsReports and Persistent Highlighting.
15.1.2.2 Creating a Markup Set with the Highlight Fields Option
On theMarkup Set form, you will see the Highlight Field ellipsis displayed when you select the radiobutton of the same name for the Persistent Highlighting Source.

Relativity | Admin Manual - 120
Highlight Field for Markup Set
When you click the ellipsis, the Select Items pop-up displays, allowing you to choose the search termsreports or dynamic objects that you want to use as the source of your search terms.
Selected Items - Highlight Field Popup
You can select the checkbox for a search term report or multiple object field. In addition, you can use acombination ofmultiple search terms reports and dynamic objects. Click Add to display it in theSelected Items section. Click Set. Your selection will display on the NewMarkup Set form.

Relativity | Admin Manual - 121
Search Term Report selected for Highlight Fields
To highlight terms using dynamic objects, create a fixed-length textfield for your dynamic object called Relativity Highlight Color. You canenter color-coding in this field using the format:[highlight color];[text color].
15.2 Editing Markup Set Information
Select theMarkup Set tab, and click an Edit link associated with a markup set. (You can also click onthe name ofmarkup set, and click Edit on the details page.)
Markup Set Edit Link
You also can click on themarkup set name, this redirects you to theMarkup Set Details page. FromtheMarkup Details page, you can click Edit.
15.3 Selecting your Markup Set in the Viewer
You can only use onemarkup set at a time. In the Relativity Core Viewer, select a markup set from thedrop-down box in the bottom left corner. You now view persistent highlighted terms and use the textredactions defined for themarkup set.

Relativity | Admin Manual - 122
Persistent highlighting created by using search terms reports ordynamic objects requires version 6.9 or higher of the Relativity webinterface and Viewer. Users will receive an error message indicatingthat persistent highlighting is unavailable if they are using anincompatible version of the Viewer.
If you changemarkup sets, you will see a different set of for text redactions, and terms highlighted inthe document.
Relativity Viewer - Markup Set Drop-down
Two users can redact the same document at the same time.
16 LayoutsLayouts are web-based coding forms that give users access to view and edit document fields.

Relativity | Admin Manual - 123
Each layout should correspond to a particular review task. That way, reviewers in the system will see alayout corresponding to a review task, and that layout will show the fields needed to complete thattask. This keeps the review process clean and intuitive.
16.1 Adding a Layout
To add a layout, go to the Layouts tab and then click New Layout.
New Layout Button
The New Layout Form appears, with required fields in orange and optional fields in gray.
New Layouts Form
New Layout form fields are:

Relativity | Admin Manual - 124
Owner sets the user(s) who can see the layout. If the owner is set to Public, all users with rightsto the layout will be able to see it. If the owner is set to a specific reviewer, the layout will be vis-ible only to that reviewer.
o Mewill set the owner to the logged in user.
System administrators also can set up a workspace so they’re able tosee certain users’ personal items.
For more information, see the section Administration Tab.
Object Type is the type of object for which you would like to create a layout. Order is a number that represents the position of the layouts in the layout selection drop-
down. The lower the number of the layout, the higher it appears on the drop-down. Items thatshare the same value will be sorted in alphanumeric order
o The lowest-ordered layout a group has access to will be its default layout.o Order can be any integer (positive or negative). No decimals are allowed.o Clicking on the ViewOrder button brings up a pop-up that displays the order of existing
items to determine where the new item should display. Overwrite Protection by default is set to enabled and does not allow users to save changes to a
document if another process has modified the document since the layout was opened.o This is only editable if the "AllowChangesToOverwriteProtection" configuration value is
set to False in the configuration table.o Careful consideration and detailed planning should be taken before changing the default
value.o Disabling this property results in a warning message: "Disabling overwrite protection
allows users to save changes to the document, even if other changes have been madesince they last loaded the document. Are you sure you would like to continue?"
Relativity Applications allows you to associate this layout with an application created in the Rel-ativity Applications tab. Clicking the ellipsis brings up an item list from which you can select anexisting application and make this layout available on that application. This is only for thosewho have theManage Relativity Applications permission under Admin Operations.
Additionally, there are two optional fields where extra client information may be recorded.
n Keywordsn Notes
There are four buttons available at the top of the form:
Save records the entered information and displays the Layout Details page. This page outlinesthe saved information. From the details page, the options are:
o Edit allows you to edit the layout information.o Delete removes the layout from Relativity.o Back redirects you to the layout list.o Edit Permissions allows you to establish rights for the layout.

Relativity | Admin Manual - 125
It’s always a good idea to Order by 10's, starting with 10, then 20, then30, etc.
Numbering in groups of 10 allows you to insert an item into anyposition later in the workspace, without the need to reorder all items.
o View Audit displays the layout audit history. Save and New records the entered information and launches a blank layout form. Save and Back records the entered information and redirects you to the layout list. Cancel aborts the layout creation and discards any entered information.
16.2 Adding Layout Content
Once the layout has been created, you can add any desired field/s or text to the layout by clicking theBuild Layout button in the Layout Management console.
Build Layout Button
Clicking the Build Layout button brings up the Building Layout window.
Build Layout Window
The Layout Tools console to the right, holds the following buttons:

Relativity | Admin Manual - 126
n New Categoryn Add Child Object Listn Add Associative Object List
Note that fields cannot be added directly to a layout. Fields must be added to a category. Add anyadditional fields to the category that a user might need to code or learn about the record.
Remember that the layout will be used in conjunction with the viewer.There usually is no need to include metadata fields containinginformation visible on the viewer.
16.2.1 Creating a New Category
Categories are sections of the layout. For end-users viewing a layout, categories are section headersthat visually divide the layout into different areas. For administrators, categories provide themeans toadd fields and text to the layout
You can havemany categories on a layout. If the task that corresponds to the layout has many sub-tasks, it may be useful to use a separate category for each sub-task.
By default, each document layout will begin with one category, containing the control number field –common to most layouts.
You should rename your category to something that corresponds to the rest of the information you’llplace on the category. Or, if you prefer, you can delete the category.
Ensure the layout is open, click the layout name link and then the Build button. Next click theNewCategory button on the Layout Tools console.
New Category Display
The Category Information Form appears, with required fields in orange and optional fields in gray.

Relativity | Admin Manual - 127
Category Information Display
There are two required fields that must be entered for each new category.
Title is the title of the category. On the layout, the title is the section header. Order is a number that represents the order of the category within the layout. The lower the
order number, the higher the category appears on the layout. Items that share the same valueare sorted in alphanumeric order.
o Order can be any integer (positive or negative). No decimals are allowed.
There are two buttons available on the new category form:
Save creates the category on the layout. Cancel aborts the creation of the category. Any information entered before you hit cancel is not
saved.
Once you save your category, it appears in the Building Layout window.
Saved Category
There are three category options available:
Add Field allows you to add a field to the category. Add Text allows you to add any text to the category. Delete allows you to delete the new category. The delete button is only available if no fields
have been added to the category. You must remove any existing fields before you can delete acategory.

Relativity | Admin Manual - 128
Note that the order of the category is shown to the left of the category name. In the above examplethe order is 10 and 20.
Note that you cannot delete a category if it contains a field. You mustdelete the fields first, then the category.
16.2.2 Adding Fields
To add a field to a Layout, ensure the layout is open (click name link) and then click the Add Fieldbutton under the category. The Add Field to Layout Form appears, with required fields in orange andoptional fields in gray.
Add Field to Layout Form
The add field to layout options are:
Category by defaulted displays the category where you choose to add the field. You can selectfrom all categories on the layout.
Field is the field to be added to the category. You can select from all available workspace fields.Each field can be added to each layout only once.
Read only sets whether the field can be edited:o Select Yes to make the field read-only.o Select No to make the field editable.
Order is the order of the field within the row (see below). Each row has its own order num-bering. The lower the number, the higher the position in the row. Items that share the samevalue are sorted in alphanumeric order.
o Order can be any integer (positive or negative). No decimals are allowed.

Relativity | Admin Manual - 129
It’s always a good idea to Order by 10's, starting with 10, then 20, then30, etc.
Numbering in groups of 10 allows you to insert an item into anyposition later in the workspace, without the need to reorder all items.
Column allows you to split the category into two columns.o Select Column 1 to add the field to the left half of the layout.o Select Column 2 to add the field to the right half of the layout.o Select Both Columns to have the field span across both columns.
Row is the order number within the column. All order rules apply to row as well.
Row works just like order and is the primary criterion for the positionof an item on a layout. Order is the secondary criterion, and indicatesposition within a row.
Category Organization
Display Type controls how the field is displayed on the layout. There are different optionsdepending on the field type. Display type is applicable only if the field is set to read-only = “no.”Read-only = “yes” fields will be displayed as text.
o Fixed length text is displayed as text.o Whole number is displayed as an integer.o Date is displayed as a date.o Yes/no has three values - blank, yes, or no. It can be displayed as a:
Drop-down Checkbox
o Long text is displayed as text.o Single-choice list can be displayed as a:
drop-down Radio button
o Decimal is displayed as a decimal.o Currency is displayed as currency.

Relativity | Admin Manual - 130
o Multiple-choice list can be displayed as: Checkbox list Pop-up picker
A pop-up picker shows the field label and a box containing the currentfield values. Reviewers click an ellipsis, which brings up a filterable listof field choices.
For more information on the pop-up picker, see the Relativity UserGuide.
o User can be displayed as a: Drop-down Picker
Show Column Name controls whether a label is displayed.o Leave the checkbox checked to display the label.o Uncheck the checkbox to hide the label.
Repeat Columns is a number that determines how single and multiple-choice lists appear on alayout. If you use this option on multiple-choice fields it will order left to right, top to bottom.
o Entering 0 or 1, or leaving repeat columns blank, results in the items being displayedvertically, in one column. See below:
Vertical Display
o Any value above 1 sets the number of columns used to display the choice valueso A value of 2 spreads the choices across two columns. See below:
Two-Column Display
o A value of 3 spreads the choices across three columns. See below:
Three-Column Display

Relativity | Admin Manual - 131
Rows (long text only) sets the number of visible lines in a long textbox (like “attorneycomments”).
Custom label allows you to enter your own label to be displayed in the place of the field name.Click the ellipsis to enter your custom label.
There are three buttons available at the top of the form:
Save records the entered information and displays the Layout Details page. This page outlinesthe saved information.
Save and New records the entered information and launches a blank new add field to layoutform.
Cancel aborts the add field creation and discards any entered information.
You can add as many fields as you’d like to a layout, but take care to ensure you’re adding only fieldsthat help your users accomplish their task.
16.2.3 Adding Text to a Layout
In addition to fielded data, you also can add any text to a layout.
To add text to a Layout, ensure the layout is open (click name link) and then click the Add Text buttonunder the category. The Add Text form appears, with required fields in orange and optional fields ingray.
Add Text Display
The add text to layout options are:
Categories is the category where the text appears. Select from any layout category. Row is the order number within the column. The lower the number, the higher the position in
the category.

Relativity | Admin Manual - 132
Column allows you to split the category into two columns.o Select Column 1 to add the field to the left half of the layout.o Select Column 2 to add the field to the right half of the layout.o Select Both Columns to have the field span across both columns.
Order is the order of the text within the row. Each row has its own order numbering. The lowerthe number, the higher the position in the row. Items that share the same value are sorted inalphanumeric order.
o Order can be any integer (positive or negative). No decimals are allowed.
It’s always a good idea to Order by 10s, starting with 10, then 20, then30, etc.
Numbering in groups of 10 allows you to insert an item into anyposition later in the workspace, without the need to reorder all items.
Custom text is the text you’d like to add to the layout. Click the ellipsis and enter the text in thetextbox.
There are three buttons available at the top of the form.
Save records the entered information and displays the Layout Details page. This page outlinesthe saved information.
Save and New records the entered information and launches a blank new add text form. Cancel aborts the add text creation and discards any entered information.
16.3 Adding Child and Associative Objects
When objects are created outside of the Document Object, other options are available on layouts toconnect to other objects. Objects field will link information between objects. The layout of thoseobjects allows for a display of linked items. The child and associative object items available on theconsole allow you to add this linked list to the layout. If no other objects have been created, theseoptions will not be available.
16.3.1 Adding an Associated Object List
First ensure the layout is open (click name link), and then click Build Layout. The click Add ChildObject Liston the Layout Tools console.
The Add child Object List window opens.
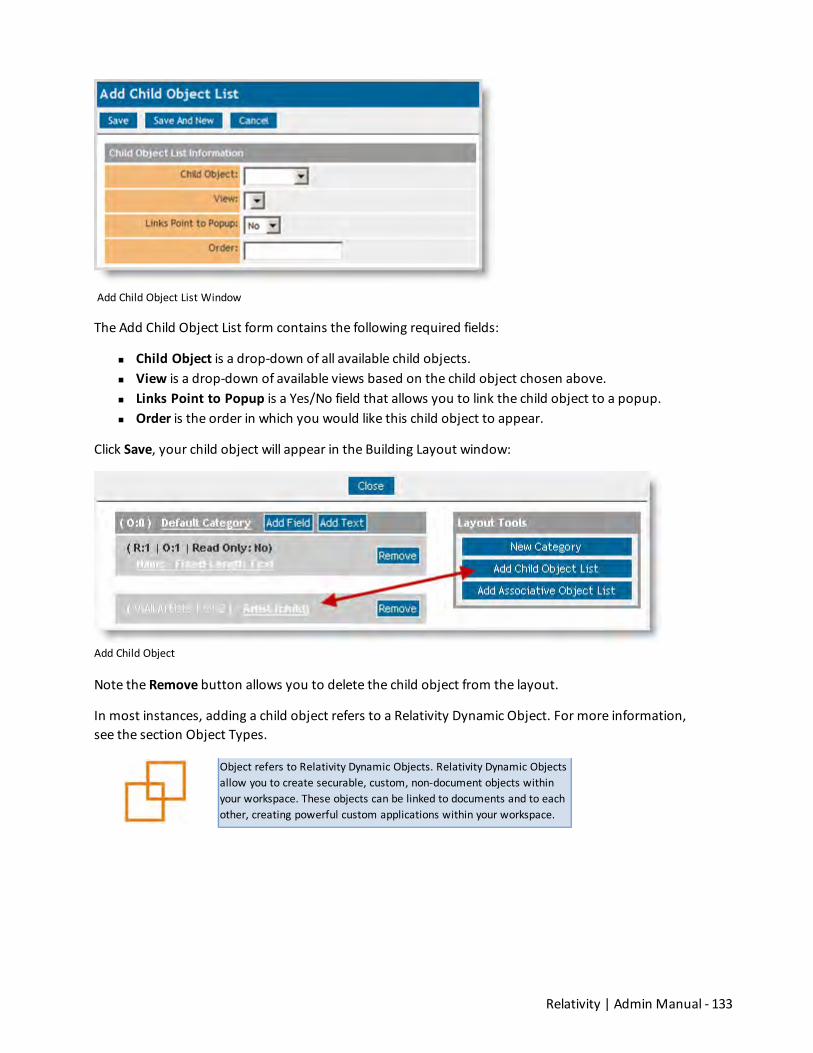
Relativity | Admin Manual - 133
Add Child Object List Window
The Add Child Object List form contains the following required fields:
Child Object is a drop-down of all available child objects. View is a drop-down of available views based on the child object chosen above. Links Point to Popup is a Yes/No field that allows you to link the child object to a popup. Order is the order in which you would like this child object to appear.
Click Save, your child object will appear in the Building Layout window:
Add Child Object
Note the Remove button allows you to delete the child object from the layout.
In most instances, adding a child object refers to a Relativity Dynamic Object. For more information,see the section Object Types.
Object refers to Relativity Dynamic Objects. Relativity Dynamic Objectsallow you to create securable, custom, non-document objects withinyour workspace. These objects can be linked to documents and to eachother, creating powerful custom applications within your workspace.

Relativity | Admin Manual - 134
16.3.2 Adding an Associated Object List
If your layout’s object has an associated object, you can add it to your layout. First ensure the layoutis open (click name link), and then click Add Associative Object List on the Layout Tools console.
The Add Associative Object List window opens.
Add Associative Objects List
The Add Associative Object List form contains the following required fields:
Associative Object is a drop-down of available associative objects. View is a drop-down of available views based on the child object chosen above. Links Point to Popup is a Yes/No field that allows you to link the child object to a popup. Order is the order in which you would like this child object to appear.
Click Save, your associative object will appear in the Building Layout window:
Associative Object Display
Note that, like child objects, you can click the Remove button to delete it from the form.
In most instances, adding an associative object refers to a Relativity Dynamic Object. For moreinformation, see the section Object Types.

Relativity | Admin Manual - 135
16.4 Editing Layout Information
To edit a layout’s name or order, go to the Layouts tab and click Edit next to the desired layout.
Edit Layout Link
Move to the required step of the wizard and edit your information.
To edit layout's content, click on the name of the layout, the layout details page opens. Click the BuildLayout button to bring up the options to add fields, text, new categories, child objects, and associativeobjects.
Edit Name Link
16.4.1 Editing directly on a Layout
When editing a document inside the viewer, you have the option of accessing the Building Layoutwindow. Click the Build Layout icon next to the drop-down.
Build Layout Icon

Relativity | Admin Manual - 136
The warning message is displayed. "Changing the layout will cause you to lose all unsaved changes.Continue?". Click OK to open the Build Layoutwindow.
16.5 Inline Tagging
If a record is large and covers many topics, it may be difficult to identify which part of the record relatesto which issue. Inline tagging allows users to tag highlighted sections of text within a document, whichcan be referenced through hyperlinks.
In order to use this feature, add a multi-choice field to the system Inline Tagging layout with yourdesired tag choices. For more information on layouts, refer to the section Adding Layout Content.
16.5.1 Adding a Tag to a Document
Once you have setup the Inline Tag layout you can begin tagging sections of text in a document. Openthe document in the Relativity Viewer. Select the text, right-click and select Tag.

Relativity | Admin Manual - 137
Inline Tag
The tag document dialog box displays. Here you can select any required choices, and if the field ispresent, add any additional notes or comments. Click Save.
Tag Document Dialog Box

Relativity | Admin Manual - 138
16.5.2 Viewing a Tag
To identify all the tags on a document, you can open the tag list by clicking the green tag icon in thelower-right corner of the viewer window. A hyperlink to each entry is displayed. Clicking on the linktakes you to the tagged section and highlights it.
Hyperlink Tag and Highlight
16.5.3 Removing a Tag
To remove a tag, right-click on the tag in the viewer. From themenu select Remove.

Relativity | Admin Manual - 139
Remove Tag
16.6 Reviewer Layout Options
The layout you create becomes available for use once the reviewer clicks on a document’s controlnumber and then clicks the Edit button next to the layout picked in the drop-down.
Edit Layout Button
The layout offers the reviewer the following options:
Save records the entered information and displays the Layout Details page. This page outlinesthe saved information.
Save and Next records the entered information and move to the next document in the queue. Cancel aborts the layout and discards any entered information. Layout drop-down allows users to select from a list of layouts they have permissions to view.

Relativity | Admin Manual - 140
Layout Options
In layouts, you can use the Tab key to highlight a checkbox in a Yes/Noor Multiple-Choice field. You can then press Enter to select or clear thehighlighted checkbox.
Reviewers for whom the Skip function has been enabled will see a drop-down at the bottom of thelayout.
Skip Drop-down
Normal allows document review to operate normally, moving through all documents in thequeue.
Skip advances a user to the next document in the queue that currently meets the condition ofthe viewwhen propagation is enabled. This feature helps in accelerating the review process.
The Skip drop-down will not appear at the bottom of the layout if the user's skip setting has been setto Disabled or Forced Enabled.
17 ViewsViews are customizable lists of items within Relativity. Essentially, any time you see a list of itemsdisplayed in Relativity, it’s a view.

Relativity | Admin Manual - 141
Views Associations
Views are effectively special saved queries that control three things:
The items displayed on the list, based on a set of criteria The fields of information returned relating to the displayed items The sort order of the items
There aremany different types of views, each corresponding with a Relativity object. For instance:
To create a custom list of documents to be displayed on the documents tab, create a new doc-ument view.
To create a custom list of fields to be displayed on the fields tab, create a new field view.
There are two ways to create a view:
From the views tab From the tab where the viewwill appear
17.1 Adding a View
To add a view, go to the Views tab and click New View.
New View button
The four steps to view creation are:

Relativity | Admin Manual - 142
1. Enter Name and type Information.2. Select Fields.3. Select Criteria.4. Select Sort.
17.1.1 Enter Basic Information (Step 1)
The first step of the new viewwizard is entering basic information.
Step 1 - Basic Information
The Basic Information options are:
Settings
Owner sets the user(s) who can see the view. If the owner is set to “public,” all users with rightsto the view are able to see it.
o If the owner is set to a specific reviewer, the view is visible only to that reviewer.o Clicking theMe button assigns the view to the logged user.
Name is the title of the view. Order sets where the view appears within the view drop-down list. Items that share the same
value are sorted in alphanumeric order.o Order can be any integer (positive or negative). No decimals are allowed.o The default order is “9999.”o In the screen below, for example, there are two field views. The viewAll Fields has a lower
order than Required Fields, so it appears higher on the drop-down.
It’s always a good idea to Order by 10's, starting with 10, then 20, then30, etc.
Numbering in groups of 10 allows you to insert an item into anyposition later in the workspace, without the need to reorder all items.

Relativity | Admin Manual - 143
Available in Object Tabmakes the view available in the selected object type's tab.
Advanced Settings
Query Hint is used to optimize views. Only use the query hint if instructed by the kCura ClientServices team.Object Type is the type of view to be created:
o Batchmakes a list of batches, which appears on the Review Batch tab.o Batch setmakes a list of batch sets, which appears on the Batch Set tab.o Choicemakes a list of choices, which appears on the Choices tab.o Documentmakes a list of documents, which appears on the Documents tab.o Fieldmakes a list of fields, which appears on the Fields tab.o Historymakes a list of audit items, which appears on the history tab.o Layoutmakes a list of layouts, which appears on the layouts tab.o Markup Setmakes a list ofmarkup sets, which appears on themarkup sets tab.o Object Typemakes a list of object types, which appears on the object type tab.o Productionmakes a list of productions, which appears on the productions tab.o Reportmakes a list of summary reports, which appears on the summary reports tab.o Search Term Resultsmakes a list of search results, which appears on the Search Term
Results tab.o Tabmakes a list of tabs, which appears on the tabs tab.o Transform Setmakes a list of transforms, which appears on the Transform Sets tab.o Viewmakes a list of all workspace views, which appears on the views tab.
Object Type can be tricky when you’re first getting started.
A good way to determine the correct document type: Ask yourself“What do I want to make a list of?” The answer is your object type.
Visualization Typewill either display items in the standard format or as indented lists for emailconversation visualization.
Relativity Applications allows you to associate this viewwith an application created in the Rel-ativity Applications tab. Clicking the ellipsis brings up an item list from which you can select anexisting application. This is only available for those who have theManage Relativity Applicationspermission under Admin Operations.
There are two buttons available at the top and bottom of the wizard:
Next saves the information on the form and takes you to the next step of the wizard. Cancel aborts the creation of the view. No information entered in the wizard is saved.
Note that while editing Document Views available in the Related Items pane, the Visualization Typeproperty displays underneath Object Type in Advanced Settings. This property is only editable onsystem-created views associated with Relational Fields. Otherwise this field is set to Standard List andis read-only.

Relativity | Admin Manual - 144
Visualization Type
When editable, this field offers an additional option – Indented List. This allows you set up an IndentedList in the Related Items pane, which is covered later in this chapter.
17.1.2 Select Fields (Step 2)
The second step of the wizard, Select Fields, allows you to select the fields that appear on your view.
Step 2 - Fields Display

Relativity | Admin Manual - 145
All potentially available fields will be displayed in the left box, available fields. Move any fields youwould like in your view to the right box, Selected Fields. You can move fields between boxes by:
Double-clicking the field name Using the arrows between the boxes Hold Shift and click or drag to select a range of items, which can then bemoved using the
arrows
Available fields will be sorted in alphanumeric order. If you move a field back to available fields fromselected fields, it will move to the bottom of the list.
Choose the fields for your view carefully. Depending on the field type,you will be able to get only a few fields visible on the screen.
Select only those fields a user will need to see, filter on, or sort by.
There are several special system fields, unique to views that you can add to a view:
Edit is a hyperlinked field that opens the item in edit format. File icon is unique to document views and displays an icon representing the document’s Rel-
ativity native file type. Security is a hyperlinked field that opens the item’s security console.
Fields are ordered according to their position in the selected fields box. The topmost fields in the boxare the leftmost field on the view. The bottommost fields in the box are the rightmost field on theview. To reorder the fields, use the up and down arrows to the right of the selected fields box.
There are four buttons at the top of the wizard:
Cancel aborts the creation of the view. No information entered in the wizard is saved. Back takes you back to the previous step of the wizard. Next saves the information on the form and takes you to the next step of the wizard. Save records the information on the form and completes the creation of the view.
17.1.3 Select Conditions (Step 3)
The third step of the wizard, Conditions, allows you to determine which items are returned in yourview. A field condition can contain up to 4000 characters.
The select criteria section works in exactly the same way as theadvanced and saved searches “conditions” areas.
For more information on the options available, see the RelativitySearching Manual.

Relativity | Admin Manual - 146
Step 3 - Conditions Display
Each row of the conditions builder represents a separate criterion. Each box of the row represents adifferent part of the criterion.
The first box, Criteria, allows you to select a single, double or triple parenthesis. This allowscomplex levels of grouping between different criteria.
The second box, Field, allows you to select any available field in your workspace. The types offields present will differ based on the type of view you are creating.
The third box, Operator, allows you to select your search operator. Available operators differdepending on the type of field being searched.
The fourth box, Value, allows you to select the value to be searched. The fifth box allows you to close any parenthetical opened in the first box. The sixth box and last box allows you to connect each criterion with an “AND” or “OR” oper-
ator.
Depending on the field type and operator the value/s may be chosen from a popup picker. A popuppicker is available for selecting choices and objects that provide the following operators:
n Any of thesen None of thesen All of these (only for multi-object fields)n Not all of these (only for multi-object fields)
Upon clicking the ellipsis accompanying any of these operators, the following will come up:

Relativity | Admin Manual - 147
Available Items Popup
Checking any item in the Available Items list at the top and clicking the Add button will put that iteminto the Selected Items list below. Clicking the Set button will add the Selected Item as a condition inthe view.
Likewise, checking any item in the Selected Items list and clicking Removewill place the item back intothe Available Items list. Clicking Set then removes the item from the view condition.
Note that this Available Items popup picker is also available when setting advanced search conditionsand when performing a mass edit.
There are two additional buttons on the form:
View Order brings up a pop-up that displays the order of existing items to determine where thenew item should display.
Add Conditions displays a new conditions rowwhere additional conditions can be set.
There are four buttons at the top and bottom of the wizard:
Cancel aborts the creation of the view. No information entered in the wizard is saved. Back takes you back to the previous step of the wizard. Next saves the information on the form and takes you to the next step of the wizard. Save records the information on the form and completes the creation of the view.
17.1.4 Select Sort (Step 4)
The fourth and final step of the wizard, Select Sort, allows you to define the default sort order of theview. If no sort criterion is selected, the view is sorted by the identifier. Users are able to temporarily

Relativity | Admin Manual - 148
sort the view by any field included on the view.
Step 4 - Sort Display
Each row represents a sort criterion. The first box of the row allows you to select the desired sort field.The second box sets whether the sort should run ascending or descending. The sorts are applied innested order.
Cancel aborts the creation of the view. No information entered in the wizard is saved. Back takes you back to the previous step of the wizard. Save records the information on the form and completes the creation of the view.
17.2 Editing View Information
There are several ways to edit a view:
From any tab edit the active view by clicking the Edit View icon in the view bar and movingthrough the four-step wizard.
From the Views tab by clicking Edit next to the desired view or using the view bar icon. Movethrough the four step wizard.

Relativity | Admin Manual - 149
Edit View Options
17.3 Adding Tab Views
Each tab that can contain views will have a view bar. The view bar contains icons to create or edit aview, outlined red in the screenshot below.
Create / Edit View Icons
The icons are:
The Edit View icon launches the four-step viewwizard, allowing you to edit the active view. The Create View icon launches the four-step viewwizard, allowing you to add the new view.
17.4 System Views
There are several workspace system views. These views are used to display lists of items in speciallocations throughout the workspace. System views are found on the views tab by filtering for Visible isNo. They include:
<Relational Field Friendly Name> documents control which fields are displayed in the relateditems pane for relational field groups. Common examples are:
o Family documents controls for which fields are displayed in the related items pane whenviewing family groups.
o Duplicate documents controls for which fields are displayed in the related items panewhen viewing duplicate groups.
Search Results Pane view controls which fields are visible in the related items pane when youright-click in the viewer to run a Relativity Analytics search for similar documents.
History Pop-up controls which fields are displayed when clicking details from the related itemspane document history.

Relativity | Admin Manual - 150
Production Documents controls which fields are displayed for documents included on a pro-duction details page.
Include the fields you use to qualify a document for production in the production documents view.This will allow you to filter the list for disqualifying field values, providing a final QC step in theproduction process.
Production Picker view controls the fields displayed on the production picker. The productionpicker is used to mass-add documents to a production. For more information on the pro-duction picker see Appendix A –Mass Operations –Mass Produce.
CaseMap Fields view controls which fields are included in mass-sends to CaseMap. For moreinformation on the production picker, see Appendix A –Mass Operations – Send to CaseMap.
Markup History Details controls which fields are displayed when you launch a document’s his-tory details from the related items pane.
Default Search view controls which fields are returned, by default, on an advanced or savedsearch. You can always include additional fields from the advanced or saved search field selec-tor. This view also controls the sort order of these fields as well. For more information see theRelativity Searching Manual.
Linked controls which fields are shown in the pop-up allowing you to link to a document in theviewer.
Link Pane view controls which fields are shown in the related items pane showing the linkeddocuments.
Batch Set Batches controls which fields are shown for the list of batches displayed at the bot-tom of the batch sets tab.
Document Batches (default) controls the pop-up for searching batches on a view or anadvanced or saved search.
For more information on searching for Batch fields, see the RelativitySearching Manual.
17.5 Indented List View
Indented Lists provide additional information to users by displaying levels within a relationship such asemail conversation thread. Viewing a list in the indented hierarchy allows for easier understanding ofthe email order in the family. Indented lists are available in the document item list or in the relateditems pane. The indented items are aligned with dots indicating levels between the initial record andsubsequent records. The example below shows emails and their replies or forwards.
Email Thread Hierarchy
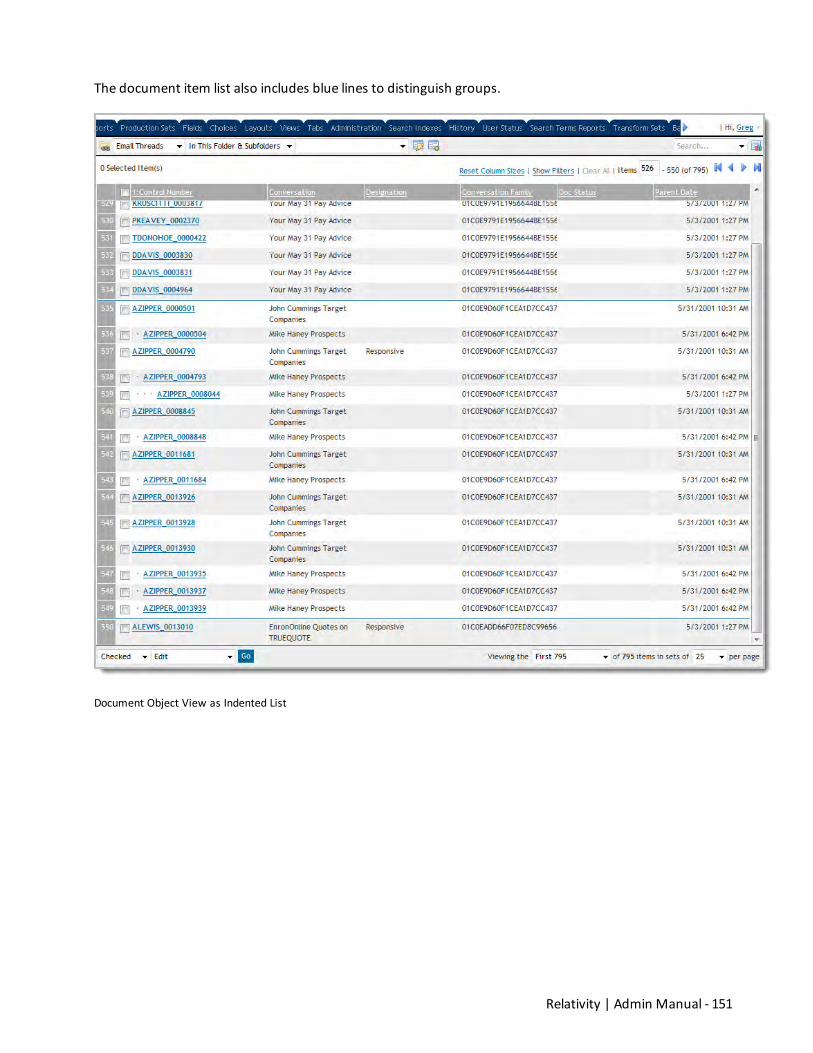
Relativity | Admin Manual - 151
The document item list also includes blue lines to distinguish groups.
Document Object View as Indented List

Relativity | Admin Manual - 152
Related Items Pane View as Indented List
While indented lists can be defined based on any related items field, the examples in this documentdescribe indented lists in the context of setting up an Email Thread view that shows Reply and Forwardemails nested under the parent.
For system-created views associated with Relational Fields, the object is Document by default andcannot be changed. When creating a new view you will need to choose the Document Object in orderto have indented lists. The Visualization Type field offers two options:

Relativity | Admin Manual - 153
Visualization Type
Standard List is the default setting for all existing - and new - views; when this is the Vis-ualization Type value, the viewwill display as a flat list with no indented values.
Indented List allows you to define views that indent child items under their parent items. Whenapplied to emails, this gives users the ability to visualize an email in the context of its email con-versation thread.
Choosing Indented List brings up additional required fields, which will define the logic to drive the fieldindentation:
Indentation List Fields
Group Definition is the field that is identical across the email group. This is the related itemsfield.
Indentation Method allows you to set themethod by which you will indent your list. This drop-down contains three options:
o Conversation Index indicates that the Definition Field that you will select contains theMicrosoft Outlook Conversation Index. You should select this method if your importeddata contains these values.

Relativity | Admin Manual - 154
o Equivio indicates that the Definition Field that you will select contains the Equivio-gen-erated EquiThread value. For more information go to www.Equivio .com and/or the Rel-ativity Equivio Manual.
o Numeric indicates that the Definition Field that you will select contains a simple count ofindentations. You should use this method if you wish to implement custom logic to showlevels of hierarchy.
Indentation Definition Field is the field that drives the indentation logic. All non-system doc-ument object fields of fixed length or long text type, as well as non-system whole number fieldsare available in this drop-down:
o If Conversation Index is set as themethod, you should select the Conversation Indexfield as the definition.
o If Equivio is set as themethod, you should select the EquiThread field as the definition.o If Numeric is set as themethod, you should select a field that has been populated with
the desired number of indentations for the document. A value of “0” or null will result in no indentation A value of “1” will result in one level of indentation A value of "2" will result in two levels of indentation, etc
Display Field is the field that will reflect the indentations defined by the Indentation DefinitionField. All document object fields with the exception ofmulti-choice, multi-object and file iconfields are available in this drop-down.
Be sure to sort the documents in this view based on the Indentation Definition Field so that the familyitems are together. Changing the sort while filtering will remove all indentation and sort based on theselected field.
The following sections outline how to setup each of the available Indentation Methods for theindented list.
17.5.1 Conversation Index Indented List
While the Conversation Index indented list is set up in the View settings, it will not be functional unlessthe user has first done the following:
Imported Conversation Index field values into Relativity Made a relational field to group all emails from the same email thread into a set. This can be
done by using a Transform Set to parse the Conversation Index. For more information on pars-ing the Conversation Index, please see the section on Transform Sets.
Once emails have been grouped into threads, you can build a view using Conversation Index to indentthe email thread.
1. For Visualization Type, select Indented List.2. For Indentation Method, select Conversation Index.3. For Indentation Definition Field, select the Relativity field that contains the imported Con-
versation Index values.

Relativity | Admin Manual - 155
4. For Display Field select which document field you want to be indented. In the example shownbelow, we selected Control Number as the Display Field.
5. On the second step of the Viewwizard, choose which columns to display in the view.6. If you selected Control Number as the Display field, you will need to add it as a Selected Field in
order for it to display in the View.o On the third step of the Viewwizard, set the view conditions.
7. On the fourth step, set the sort order to Conversation Index ascending and click Save.
The display field won't display in the view unless it is a selected field.
Note that the sort order must be set to Conversation Index in ascending order for the indentation ofthe emails to accurately reflect the email relationships. Because indentation logic requires that itemsare sorted correctly, if an end user changes the sort order from what is defined in the view, the Displaycolumns will be flattened out and the indentation will be lost; it will be restored when the view isrefreshed to the view-defined sort.
Below is an example of a Conversation Index indented list in the related items pane:
Conversation Index Indented List
When the Display Field is rendered in the item list, the number of indentations on the document willbe reflected in the number of dots preceding the value of the display field. For example, the initialemail in a thread will have no indentation (zero dots); a reply to that email will have one level ofindentation (one dot).

Relativity | Admin Manual - 156
17.5.2 Equivio Indented List
Before creating an Equivio indented list, the user must make a relational field to group all emails andattachments from the same thread into a set by defining EmailSetID as a relational field.
Once emails and attachments have been grouped into threads, the user can set the indentationmethod as Equivio.
1. For Visualization Type, select Indented List.2. For Indentation Method, select Equivio.3. For Indentation Definition Field, select the Relativity field that contains Equivio’s EquiThread
data.4. For Display Field select which document field you want to be indented, for example Control
Number.5. On the second step of the wizard, chose which columns to display in the view.
o If you selected Control Number as the Display field, make sure it is selected here.o If you selected Email Subject as the Display field, make sure you select it here.
6. On the third step of the wizard, set the conditions of the view.7. On the fourth step of the wizard, set the Sort Order.
o This must be set to EquiSort Attach in ascending order for the indentation of theemails to reflect the proper relationships between documents in the email thread.Because indentation logic requires that items are sorted correctly, if an end userchanges the sort order from what is defined in the view, the Display columns willbe flattened out and the indentation lost; it will be restored when the view isrefreshed to the view-defined sort.
8. Click Save.
17.5.3 Numeric Indented List
Once you make a relational field to group all documents into a set, you can build an indented list viewusing a numeric field.
1. For Visualization Type, select Indented List.2. For Indentation Method, select Numeric.3. For Indentation Definition Field, select a field that contains the indentation defined per doc-
ument.4. For Display Field select which document field you want to be indented.5. On the second step of the wizard, chose which columns to display in the view.
o If you selected Control Number as the Display field, you will want to make sure it isselected here, too.
o If you selected Email Subject as the Display field, make sure you select it here, too.o The Display field won’t display in the view unless it is a selected field.
6. On the third step of the wizard, set the conditions of the view.7. On the fourth step of the wizard, set the Sort Order.8. Click Save.

Relativity | Admin Manual - 157
18 Search Terms ReportsThe Search Terms Report simplifies the process of identifying documents that contain a specific groupof keywords. Instead of running complicated queries, you can use the Search Terms Report to enter alist of terms or phrases, and then generate a report listing their frequencies in a set of documents. Youcan determine the output of the report by selecting one of the following Type options:
Report Only: Creates a report that includes the number of hits for each term or phrase. (A hitindicates one or more uses of the term or phrase in a document.)
Report and Tag: Creates a report that includes the number of hits for each term or phrase, andtags the documents that contain them.
You can also use the reports created with the Report and Tag option in your markup sets. When youselect a search terms report for use with a markup set, the report determines which terms or phrasesare highlighted in the documents viewed through the Core Reviewer Interface.
18.1 Creating a New Search Terms Report
In Workspaces mode, select the Search Terms Report tab and click New Search Terms Report todisplay the Search Terms Report form.
You must have permissions to see the Search Terms Report tab in a workspace, and to create reports.If you do not see the tab, contact your system administrator for information about updating yourpermissions.
New Search Terms Report button
The Search Terms Report form displays required fields in orange and optional fields in gray.

Relativity | Admin Manual - 158
New Search Terms Report Form
The following list includes descriptions of the form fields:
Name is the search term report’s name. Index is the desired index utilized to create the report. Select only dtSearch indexes. Type options Include:
o Report Only is used to create a report that includes the number of hits for eachterm or phrase.
o Report and Tag is used to create a report that includes the number of hits foreach term or phrase, and tags the documents that contain them.
Note: The Add link displayed next to the Type field does not build a newreport type.
Searchable Set is a saved search, which includes a group of documents to search. Only doc-uments in the saved searched will used to create the report.
Add Terms box is used to enter the search terms for a report. When the report will be ref-erenced by a markup set for persistent highlighting, you can add optional color-coding forsearch terms in this box. See the section Search Terms Report and Persistent Highlighting formore information.
Each line of Add Terms is treated as an individual dtSearch query. Formore information about dtSearch, see the Relativity Searching Manual.
Dictionary link displays the Dictionary Search pop-up, where you can perform searches usingfuzziness levels and stemming. Click Copy to Clipboard to copy the search results, which youcan paste into the Add Terms box.
Status is an auto generated status of the report. It will be Completed, Pending or Error. Last Run Error lists the last error encountered if the report was completed with errors. Note allows you to enter additional information about the report.

Relativity | Admin Manual - 159
After you complete the fields on the New Search Terms Report form, you can perform the followingactions with the buttons located at the top of the form:
Save records the entered information. When you click this button, the details page is displayedwith the Search Terms Report Console. See the section Running a Search Term Report.
Save and New records the entered information and launches a blank New Search TermsReports form.
Save and Back records the entered information and redirects you to the search terms ReportDetails Page.
Cancel ends the report creation process and redirects you to the Search Terms Reports Page.
18.2 Running a Search Terms Report
You generate a Search Terms Report by using the options available in the Search Terms ReportConsole. The console is available after you saved a search terms report, or when you display anexisting report from the Search Terms Report tab.
The console includes the following options:
Run All Terms is used to generate counts for each term. Use this option if you are generatingthe report for the first time, or if you want to regenerate counts for all terms in the report. Seethe section Search Terms Report Results.
Run Pending Terms is used to update an existing report. It runs a report on only those termswith the status of Pending.
Refresh Page is used to update the information displayed on the page. Resolve Alerts attempts to regenerate the report for search terms that returned error mes-
sages.
18.3 Search Terms Report Results
On Search Terms Report Details page, Relativity displays the report results, listing each term and thenumber of documents that were tagged.

Relativity | Admin Manual - 160
Search Terms Report Details Page
The Search Terms Results section displays the following data:
Name is a linked search term. Each link corresponds to a search term entered in the Add Termsbox, located in the New Search Term Reports form.
Relativity Highlight Color lists the color-coding assigned to search terms. When a search termsreport is referenced by a markup set, terms will be persistently highlighted according to thesecolor codes. See the section Search Terms Report and Persistent Highlighting for more infor-mation.
Count is the number of documents containing the search term.
Count is not security aware and is thus not influenced by permissions.This means that it includes even those documents the user is unable toview in a basic search will be counted.
For example, a user performs a dtSearch that returns a total of fivedocuments, two of which are inaccessible. Even though only three hitsare available in the view, the search terms count still includes all fivedocuments originally tagged with the search term.
Status is the current progress of the report. This field will contain one of three values: Pending,Completed or Error.
Error Message displays any errors encountered during processing.
Be aware that the search terms report results appear as they areprocessed. Refer to the Status field of each search term to check itsprogress.
The Search Terms Reports Details page also allows you to perform the various tasks. The buttonsdisplayed at the top of the page include:

Relativity | Admin Manual - 161
Edit allows you to edit the search terms report information opening the Search Terms ReportsDetails page.
Delete removes the Search Terms Report from Relativity. Back redirects you to the search terms report list. Edit Permissions allows you to set the search terms report permissions. These permissions
determine which groups have access to the report. View Audit displays the search terms report audit history.
To remove a Search Term Report from the system:
Delete the Multiple Object Field created with the Search TermReport name.
Delete the Search Term Report Results. Delete the Search Term Report.
In the Search Terms Result section, you also have features that allow you add terms and work withyour results:
New allows you to add new terms to the report. The Add Search Terms Result pop-up allowsyou to enter a new term, and an optional highlight color code. You can then Run Pending Termsin the console. See the section Running a Search Terms Report.
Deletewill allow you to remove checked terms from the report. Filter, sort, and page search results. These features function similarly to those available on
views. Export search results to Excel.
18.4 Search Terms Reports and Persistent Highlighting
When you can search term reports for use with markup sets, you should follow the searching andsetup guidelines outlined in this section.
18.4.1 Searching Functionality and Persistent Highlighting
When you create a search terms report for persistent highlighting, avoid the use of advanced dtSearchfunctionality, including proximity, stemming, and fuzziness. Your terms will not be highlighted if youuse these advanced searching features, even though the Count column lists the number ofmatchingterms.
Persistent highlighting technology does not understand proximity searching. If you enter the phrase‘Relativity w/5 kCura’ as a search term, the search term report will use a dtSearch to find and tag alldocuments that meet these criteria. However, the persistent highlighting technology will functiondifferently than the dtSearch. It will look for the term Relativity, a space, the letter w, any specialcharacter (instead of “/”), the number 5, a space, and then the term kCura.
Similarly, the stemming character (~) is not understood by persistent highlighting technology. If youenter the term “apply~” as a search term, the search term report will find and tag all documents withthe word apply, or any document that stems from apply, including applied, applies, application, and

Relativity | Admin Manual - 162
so on. However, the persistent highlighting technology will look for the term apply followed by anyspecial character, so you will not see expected terms highlighted.
In a Search Terms Report, you can work around these limitations by using the Dictionary Search toidentify search terms using stemming or fuzziness. Copy the list of terms returned in this search. Pastethem in the Add Terms box on the Search Terms Report form. You will enhance your search term list,while avoiding errors due to special characters.
While you should not use advanced dtSearch operators, you can use wildcards in your search terms,such as test*. SeeMarkup Sets for a general discussion of supported search features used in persistenthighlighting.
18.4.2 Additional Guidelines for Persistent Highlighting
Use the following guidelines to ensure that your search terms report is setup properly and highlightsthe required terms appropriately:
Define a Saved Search using conditions that will return the required group of documents for theSearchable Set. Persistent highlighting will be applied only to documents in the searchable set.
Confirm that the dtSearch used for the search terms report has been used to index all the doc-uments in the Searchable Set.
Select Report and Tag in the Type drop-down box for the report. If you do not select thisoption, a multiple object field is not created for the search terms report, and you will not beable to select it in theHighlight Fields option when you create a markup set.
In the Add Terms box, use the following format to enter optional color coding:
[highlight color];[text color ];[term to be highlighted]
For example, enter 3;16;Relativity to highlight Relativity with dark green background and whitetext.
Color Coding Format for Search Terms Report
The following table includes available color codes.

Relativity | Admin Manual - 163
Color Number[Default] 0Black 1Dark red 2Dark green 3Dark yellow 4Dark blue 5Dark magenta 6Dark cyan 7Light gray 8Gray 9Red 10Green 11Yellow 12Blue 13Magenta 14Cyan 15White 16
Persistent Highlighting Color Codes
Note: If you enter terms with no color coding the background will bemagenta and the textblack.
In the Add Search Terms Result form, use the following format for color coding:
[highlight color];[text color]
Add Search Term Result
After the search terms results are generated, you cannot edit theName or Relativity HighlightColor of a term.

Relativity | Admin Manual - 164
When you use search terms reports for persistent highlights, markupsets highlight only the terms in documents associated with the currentreports. If you add new search terms to the reports, or add newdocuments to the workspace, you will need to follow the generalprocesses used for these types of updates, such as running pendingterms.
19 Summary ReportsSummary Reports provide aggregate tallies of field values. Field types available for reporting arelimited to the following:
Multiple-choice list Single-choice list User Yes/No
The reports are based on an optional grouping criterion (the vertical axis) and the fields to be tallied(the horizontal axis).
For example, below is a summary report. The grouping criterion is custodian, and the field to be talliedis responsiveness. The below report shows howmany documents have been tagged with eachresponsiveness value per custodian.
Summary Report Display

Relativity | Admin Manual - 165
19.1 Adding a Summary Report
To create a summary report, go to the Summary Report tab and click New Report.
New Report Button
The NewReport Form appears, with required fields in orange and optional fields in gray.
New Report Form
The options for creating a report are:
Folders, running along the left side of the form, allow you to report on the entire case work-space, or only on specific folders and subfolders.
Name is the title of the summary report.

Relativity | Admin Manual - 166
Group By is an optional field that allows you to select a grouping criterion for the report. Group-ing criteria are displayed as rows on the report.
o Leave the group by field blank to display only a summary with no grouping.o Click on the ellipsis to select your grouping condition.o Note that you can use filters to quickly find your field.
Pick Field to Group Report Display
Report on subfolders is a yes/no field that allows you to report on just a folder, or a folder andits subfolders. The yes value, which reports on folders and their subfolders, is the default value.
Columns allow you to select which fields are tallied. Selected fields are displayed as columns onthe report.
To add your columns, click on the Add Columns button and check the box for all fields you would liketo tally. Note that you can use filters to quickly find the desired fields. Only multi-choice list, single-choice list, user and yes /no fields can be reported on.

Relativity | Admin Manual - 167
Pick Report Columns
Add Columns allows you to add columns to the report. Click the button, the check the box forall fields you wish to include in your column selection.
Remove selected columns allows you to remove fields from your columns section.
There are four buttons at the top and bottom of the new report form.
Save records the entered information and runs the report. From a summary report, there arefive options:
o Edit allows you to edit the report information.o Delete removes the report from Relativity.o Back redirects you to the Summary Reports list.o Edit Permissions allows you to establish rights for the summary report.o View Audit displays the report audit history.
Save and New records the entered information and launches a blank new add report form. Save and Back records the entered information and returns you to the Summary Reports list. Cancel aborts the creation of the report and discards any entered information.
19.2 Editing Summary Report Information
To edit a report, go to the Summary Reports tab and click Edit next to the desired report.

Relativity | Admin Manual - 168
Edit Report Link
You also can click on the name of the report, this will redirect you to the report details page. From thereport details page, click Edit.
20 Pivot ProfilesPivot Profiles allow you to create, save, and edit custom Pivot settings to be used at any timewhileusing Pivot in the data set. Once saved, these profiles are accessible via a drop-down in the upper leftcorner of the item list.
Pivot Profile Drop-Down
Selecting a profile automatically applies the settings it contains to the active dataset, thus eliminatingthe need to individually specify Group By, Pivot On, Chart Type, etc. Edits can bemade to an activeprofile and saved to a new name using the Save As button. If no profile has been selected and a Pivothas been created, click on Save to make the active settings a Profile. The Pivot Profile does not savethe documents associated with it.
Pivot Profile Save and Save As Buttons

Relativity | Admin Manual - 169
You can also access and edit all Pivot Profiles from the Pivot Profiles tab. Once on the Pivot Profiles Tabclick New Pivot Profile.
New Pivot Profile
This brings up the Pivot Profile form. Fields in orange are required for you to save the profile. Note thatonly fields that have been Pivot-enabled will be available for selection in this form. For moreinformation on enabling fields for Pivot, please see the Fields section.

Relativity | Admin Manual - 170
Pivot Profile form
Complete the following to create a new Pivot Profile.
Pivot Profile Information
Name is the identifier under which you would like to save the profile. You may want the nameto reflect fields on which you pivoted.
Object Type the object type you would like this profile to appear under.

Relativity | Admin Manual - 171
Display provides three checkboxes to specify which of the three possible Pivot display typesyou want to be used to represent your profile in the item list:
o Pivot Grid designates the grid as part of the profile display.o Pivot Chart designates the chart as part of the profile display.o List designates the list as part of the profile display.
Group By is a list from which you select the field you want to act as your Group By value in yourprofile. Only fields that have been Pivot-enabled on the Field page are available in this list.
Group By Date is a drop-down providing the three date values for the Group By field:o Date displays the date, with day, month, and year.o Year displays only a year value.o YearMonth displays the year and month values.
Pivot On is the Pivot On field in your profile. Only fields that have been Pivot-enabled on theField page are available in this list.
Pivot On Date provides the same three dates for the Pivot On field as found above on GroupBy, with the addition of the following:
o Month displays only a month value. Month is only available in Pivot On if your Group Byfield is also a date.
Page Size determines the number of sets per page in Pivot chart and/or graph. Depending onthe display specifications you set, you may want to make this value low.
Chart Options
Chart Type determines what kind of chart will be used to represent the profile in the item list:o Bar represents values in bar form.o Pie represents values in pie form.o Line represents values in line form.
Chart Orientation determines how the chart is positioned. There are two options:o Horizontal arranges values horizontally.o Vertical arranges values vertically.
Sort By determines the basis on which the chart information is sorted. There are two options:o Grand Total sorts by the total.o Group By Field sorts by the Group By field you specified.
Sort Direction determines the order in which records are sorted. There are two options:o Ascending sorts starting with the last record and ending with the first.o Descending sorts starting with the first record and ending with the last.
Toggles allows you to configure additional chart instructions. The options in this drop-downare:
Show Grand Total toggles the display of grand total in the Pivot Chart. This value can help addcontext, but may throw off the scale of the Pivot Chart and reduce readability.
Show Legend toggles the display of the Pivot Chart legend. This information can often beintuited from looking at the chart. If not, it can be added.
Rotate Labels rotates the group by labels at a 45 degree angle. This can help readability in fieldswith many values.

Relativity | Admin Manual - 172
Stagger Labels is another option to improve readability of group by values. Stagger labels variesthe horizontal position of the labels to improve readability.
Show Labels toggles the value count labels on Pivot Charts.
Other
The following optional fields may be helpful in further distinguishing a profile from others in the sameview.
Keywords allows you to attach keywords to the profile. Notes allows you to attach notes to the profile.
The System Created On and System Last Modified By fields under the Record History heading areautomatically populated upon saving the new profile.
21 Production SetsProduction sets allow you to produce your case workspace documents. Once produced, productionsets are accessible via the production radio button in the Relativity Viewer. If more than oneproduction version of a document exists a drop-down will allow you to select the desired productionview.
21.1 Adding a Production Set
To create a new production, go to the Production Set tab and click New Production Set.
New Production Button
This brings up the Production Set form, with required fields in orange and optional fields in gray. Thereare five subsections of information to be entered for a production.
21.1.1 Production Information
The first section is Production Information.

Relativity | Admin Manual - 173
Production Information Section
The options for the production information section are:
Name is the name of the production. Markup Set allows you to set which markup set’s redactions to apply to the production. Burn Redactions sets whether redactions are applied to the documents. Add Image Placeholder is for image and native productions. When documents with no image
are encountered in an image and native production, a placeholder (slip sheet) included.o The placeholder is branded according to the production settings.o The image includes a message that there was no record for the document.
Date Produced is the date the documents were produced. This date is not automatically setwhen you run a production. You can select any date.
Warning/Error Alert Flag is a field that notes whether any errors or warnings occurred duringthe production process. Use the system production alerts field.
Email Notification Recipients allows you to send email notifications when your productionfails or completes. Enter the email address(es) of the recipient(s).
o If you would like to send the email to multiple recipients, separate the entries with a sem-icolon.
Branding Font Size is the font size for any branding to be done on the page. Arial is used as thefont.
21.1.2 Bates Numbering
The second section is the Bates Label settings.
Bates Label Settings Section
The options for the Bates Label section are:
Bates Numbering determines what image numbers will be used to generate your production.Select one of the radio buttons: Create New Image Numbers or Use Original Image Numbers.

Relativity | Admin Manual - 174
21.1.2.1 Create New Image Numbers
Create New Image Numbers allows you to create Bates numbers and brand those numbers to thedocuments.
Prefix is the initial portion of the Bates number. Suffix is an optional text-only suffix that is applied to every Bates number. Suffix is a static, non-
incremental text string. Begin Bates Field is the field that is written to and stores produced documents’ Begin Bates
values. Select from workspace fixed length text fields. Make sure the fixed-length text fieldselected is long enough to accommodate the prefix, number and suffix values.
End Bates Field selects the field that stores produced documents’ End Bates values. Selectfrom workspace fixed length text fields.Make sure the fixed-length text fields selected is longenough to accommodate the prefix, number and suffix values.
Start Number is the first number to be used in the Bates number. Number of Digits sets the number of digits in your Bates number. The number of #s is the
number of digits in the Bates number. By default, this number is set to seven (7) characters. Attachment Relational Field is a relational field that specifies the family groups of documents
referenced by the Begin and End Attachment fields. Selecting a value from this drop-downmakes the Begin and End Attachment fields required. Updating attachment numbers is notrequired for production.
Begin Attachment Field is a user created fixed length field that stores the Begin Attachmentvalue based on the attachment relation field selected; this field is required if the AttachmentRelational Field has been populated.
End Attachment Field is a user created fixed length text field that stores the End Attachmentvalue; this field is required if the Attachment Relational Field has been populated.
The attachment number field will repeat the begin and end numbers for all documents in the relatedgroup.
Create New Numbers for Bates
The Bates numbers and attachment numbers will be applied to whichever fields you select. If Bates orattachment data already exists in the field it will be overwritten.

Relativity | Admin Manual - 175
Repeated Attachment Numbers
Make sure that the prefix plus the specified number of digits is notlarger than the length of your selected beginning Bates field (e.g., aprefix of RK plus value of six digits, “000001” combines to be 8characters.
This would not fit into a Bates field of 7 digits. If this occurs, you willbe unable to save your production until after increasing the Batesnumber length.
21.1.2.2 Use Original Image Numbers
Use Original Image Numbers allows you to populate the original unique id into the database Batesand Attachment fields. If you make this selection, the fields for Create New Image Numbers will behidden from view. Using original numbers no longer requires you to choose a Prefix, Start Number,Suffix or the number of digits for new numbering.
Use Original Image Number if you have documents loaded as images with Bates numbers alreadyassigned. This uses the assigned numbers of the unique identifier field to create end Bates andattachment numbers. This will overwrite all Bates fields selected. These fixed-length text fields must bea minimum of 100 characters.
If you need to number images from natives keeping the original number in the system, you can usethe Unique Identifier in the database as a Bates. Use Original Image Numbers for documents TIFF'd inRelativity will use the Unique Doc ID appended with a page number and then the unique TIFF IDcreated when those images are created in Relativity.

Relativity | Admin Manual - 176
Using Original IDs and unique identifiers as Bates numbers
Use Original Image Numbers Options
Begin Bates Field is the field selected to hold the begin number. This will be created from theimage ID number. This will overwrite the fixed length text field chosen with the image id thatbecomes the Bates number.
End Bates Field is the field selected to hold the end Bates number. Attachment Relational Field is an option to have the attachment begin and end numbers
updated in the database during the production. Select the relational field indicating familygroup.
Begin Attachment Fieldstores the beginning attachment number for the production. End Attachment Field stores the ending attachment number for the production.
21.1.3 Headers and Footers
The third section, Headers and Footers allows you to brand information in six different positions; LeftHeader, Center Header, Right Header, Left Footer, Center Footer and Right Footer.
Left Header Display
Each of the six areas has the same options:

Relativity | Admin Manual - 177
Type allows you to select what will be branded:o Production Bates number will brand each page’s Bates number.
Fieldwill brand the value of the selected field for each document onto all pages of the doc-ument.
Text allows you to enter carriage returns to lower the location of the header or raise the loca-tion of the footer. It also allows you to brand any desired text. Using tokens, you also caninclude fielded data within this test.
o To include the production number within the free text, use: {!PRODNUM!}
o To include any field of data, use: {!FIELD:ARTIFACT ID!} For example – {!FIELD:1034471!} To find a field’s artifact ID, go to the field detail page and look in the URL as shown
in the screenshot below.
Field Artifact ID
Original Image Numberwill brand the images with the original Relativity page ido If the pages were imported using a page-level load file, the load file’s numbering will be
applied.o If the pages were created using Relativity’s TIFF –on-the-fly functionality, the numbering
will consist of the document id, a page id and a Relativity-generated system ID.

Relativity | Admin Manual - 178
Branded Unique ID of Original Image number
21.1.4 Bates Numbering Sort Order
The final section is where you set the Bates Numbering Sort Order. By default the sort order is ArtifactID, this is the order the documents were loaded in.
Note that when you sort, family groups are not kept together.
Bates Numbering Sort Order
Fields to Sort by allows you to sort your production set by any field.
Additionally, there are two optional fields where extra production information may be recorded:
n Keywordsn Notes
There are four buttons available at the top and bottom of the form:
Save records the entered information and displays the Production Details page. This pageshows the saved information and any documents that have been added to the production.Within this page, there are four buttons available:
o Edit allows you to edit the production information.o Delete removes the production from Relativity.o Back redirects you to the productions list.o Produce executes the production. Produce is only available once documents have been
added to the production.

Relativity | Admin Manual - 179
o Preview shows a sample TIFF with any branding applied.o Resolve Alerts/Retry reruns any problematic documents that produced alerts.o Edit Permissions allow you to establish right for the production.
By clicking edit permissions, you are editing rights only for the selectedproduction. By default, the tab will be secured according to theworkspace-level production rights.
More information on workspace permissions can be found in thesection Security Permissions.
o View Audit displays the history for the production. View audit displays the group’s audit history. Save and New records the entered information and launches a blank New Production form. Save and Back records the entered information and redirects you to the Productions list. Cancel aborts the group creation and discards any entered information
Upon saving the production set, two additional properties come up:
Restriction Override Bywill display the name of the user who clicked the Override and Con-tinue button in order to Produce documents without first removing conflicts; this is dependentupon the user having the Override Production Restrictions permission.
Restriction Override Onwill list the date and time at which the production restrictions wereoverridden.
21.2 Adding Documents to Your Production
Once you have entered all your settings, you can add documents to the production. For informationabout adding documents to a production see Appendix A –Mass Operations.
A list of documents added to a production is available at the bottom of the production details screen.
Adding Document Display

Relativity | Admin Manual - 180
Remove allows you to remove selected document from a production. Check the required doc-ument then click on the remove button.
The fields displayed on this list are controlled by a system view called production documents. For moreinformation on system views see the section Views | System Views.
It is useful to include in this view the fields your firm uses to qualify adocument for a production.
This allows you to filter the document list by those fields as a final QCcheck.
21.3 Running a Production
Once you have added documents to the production, three buttons on the Production Consolebecome available.
Production Console
Preview allows you to preview the production by bringing up an image of a document with theheader and footer settings specified when you created the production set.
o The header and footer are in Arial font as per the below example.

Relativity | Admin Manual - 181
Production Preview - Header and Footer
Conflict Check allows you to check the production for conflicts that may exist based on thesaved search set in the Production Restrictions field on the workspace details page. While con-flicts can be based on any conditions in a saved search, a common conflict could be privilegeddocuments and their families.
o If a saved search was used to restrict a production, then the Conflict Check button willbring up a warning:
Production Restriction Warning

Relativity | Admin Manual - 182
o Remove Conflicts will remove those documents designated as conflicts by the pro-duction restrictions setting; if all documents are conflicts, clicking remove will take theconflict documents out of the production set and the Production Console will offer onlythe Preview button.
o Cancel will abort the conflict check and return you to the production page.
In order to find the documents removed from the production use thehistory tab and filter on the action "Production – Remove Document".
Producewill produce the production set; if there are conflicts that have not yet been removed,the above warning will come up when the Produce button is clicked. System Admins willreceived the following options:
o Override and Continue allows you to continue with the production without removingthe conflicts based on the Override Production Restrictions permission.
o Cancel will abort the Produce action.
Click Produce. The productions status goes through the following stages:
Waiting indicates Relativity has not started producing the documents. Producing indicates Relativity is assigning Bates numbers to the documents. Branding indicates Relativity is branding the TIFFs. Produced indicates the production is now complete and can be exported. For more information
about exporting productions, see the section Exporting. Any produced TIFFs are available as anewmode of the viewer, productions. Users are able to see a version of the images exactly asthey were produced.
To ensure quality record processing, the “resolve alerts/retry” button isnot active until your production is complete.
21.4 Editing a Production Set
To edit a production, go to the Production Set tab and click Edit next to the desired production.

Relativity | Admin Manual - 183
Edit Production Set
While editing a production is allowed technically, changes madewill not update any produceddocuments.
You can also click on the production name, this will display the Production Details page. Click Edit.
Note that if you are importing your production, using the stepsdescribed in the section Importing, many of the settings will not beused:
The pages numbering will be set by the imported Opticon file.
The images will be produced exactly as imported – your markup setselection, branding, etc, will be irrelevant.
22 ExportingTo export documents from Relativity, you need to use the Desktop Client. For information oninstallation or opening your workspace in the Desktop Client please refer to the beginning of theImporting section.
Once you have selected your workspace, you will be able to export. From the Toolsmenu, selectExport. There are four export options:
Production sets exports the contents of a production set. Saved search exports the current results of a saved search. Folder exports the contents of a folder. Folder and subfolders exports the content of a folder and its subfolders.
When performing an export, the Relativity Desktop Client will automatically create top level folders forimages, text and natives.

Relativity | Admin Manual - 184
Folder structure of Export
22.1 Exporting a Production Set
Exporting a production set is divided into two tabs; Data Source and Destination Files.
22.1.1 Data Source Tab
The Data Source tab allows you to define the data for your export.
Start Export Display
The Productions drop-down allows you to select which production to export. The Selected Columns section defines which fields you’d like to export for that search. These
boxes work in the sameway as adding a field to a view in Relativity. All available fields are in theright-side box. Fields on the left will be exported.

Relativity | Admin Manual - 185
The Start Export at Document # section allows you to identify which record begins your exportby selecting its document number.
22.1.2 Destination Files Tab
The destination files tab allows you to set themanner in which the files are exported.
Destination Files Tab Display
The tab is divided into subsections as outlined below:
22.1.3 Export Location
Export Location allows you to select the target window directory for the export. Click the ... ellipsis tobrowse and select the location.
Export Location Display
Select Overwrite Files to overwrite any existing files of the same name in the target export direc-tory.
22.1.3.1 Physical File Export
Physical File Export controls whether the files will be copied from the Relativity file repository.

Relativity | Admin Manual - 186
Physical File Export Display
Copy Files From Repositoryo If the box is checked (default) the files will be copied from the file server to the specified
export location.o If the box is unchecked, the files will not be copied to the export location. Instead, the
exported load files will reference the files’ repository location.
22.1.3.2 Volume Information
Volume Information controls the naming and size of the volume identifier.
Volume Information Display
Prefix is the volume identifier’s alpha prefix. Start # is the first number used for the numeric section of the volume identifier. If multiple vol-
umes are created during the export, the number will increment, creating unique volume iden-tifiers.
# of Digits represents the amount of numerals attached to the prefix (e.g., if 2 were selected,the output would be VOL001, VOL002.)
Max size is themaximum size allowed for each volume in MBs.
22.1.3.3 Subdirectory Information
The Subdirectory Information controls the naming and size of volume subfolders.

Relativity | Admin Manual - 187
Subdirectory Information Display
Image Prefix is the alpha prefix for the subdirectory used to store exported images. Native Prefix is the alpha prefix for the subdirectory used to store exported native files. Text Prefix is the alpha prefix for the subdirectory used to store exported extracted text files. Start # sets the starting number for the subdirectories. # of Digits represents the amount of numerals attached to the subdirectory prefix (e.g., if 3
were selected, the output would be IMG001, IMG002, etc.) Max Files sets the number of files that will be stored in each subdirectory.
22.1.3.4 File Path
The File Path section controls the paths used to reference exported files.
File Path Display
Use absolute paths exports out paths to exported files as absolute paths.o C:\ Desktop\VOL001\NATIVE001\AS000001.msg
Use relative paths exports out paths to exported files as relative paths.o .\VOL001\NATIVE001\AS000001.msg
Use prefix allows you to add a prefix to the relative path, such as a cd drive letter.o D:\VOL001\NATIVE001\AS000001.msg
22.1.3.5 Native Load File Characters
Native Load File Characters controls which delimiters are used when exporting a document-level loadfile where the Data File Format is set to Custom. For more information on Data File Formats see that

Relativity | Admin Manual - 188
section.
Native Load File Characters Display
The Column delimiter separates columns in the load file. TheQuote delimiter qualifies the text in each field on the load file. TheNewline delimiter signifies the end of any extracted text or long text field in the load file. TheMulti-Value delimiter separates different choices within a choice field. TheNested Value delimiter shows the hierarchy of choices within a choice field.
22.1.3.6 Text and Native File Names
Text and Native File Names determines how exported native and extracted text files will be named.
Text and Native File Names Display
Check append original file name to append the file’s original name to the end of the exportedfile’s name.
Named after sets the naming convention for the exported files.o Select identifier to name the files after your workspace’s identifier.o Select beginning Bates to name the files after the production’s Bates number
22.1.3.7 Image
Image sets whether images are exported, and if so, how the export is formatted.

Relativity | Admin Manual - 189
Export Images Checkbox
Check Export Images if images are included in the export. Date File Format is the format of the image-level load file. Select from:
o Opticono IPROo IPRO (FullText)
File Type is the type of images that are exported.o Single-page TIF/JPGwill export out the files as they were loaded or created in Relativity.o Multi-page TIF will export out the files as multi-page TIFs, with one file per document.
Documents with only black and white images will use Group IV compression. Documents that include color images will contain LZW compression.
o PDF will export out the files as multi-page PDFs, with one file per document. The PDFs are not searchable. Color pages will remain in color.
22.1.3.8 Native
Native determines if native files are exported.
Export Native Files Checkbox
Export Native Files if checked, exports the natives.
22.1.3.9Metadata
Metadata determines how the document-level load file and extracted text are exported.

Relativity | Admin Manual - 190
Metadata Options
Data File Format determines the document-level load file format.o Comma separated (.csv) exports out a load file in csv format.o Tab Delimited (.txt) exports out a load file in tab delimited format.o Concordance exports out a load file with the standard Concordance delimiters.o Custom allows you to set your own custom delimiters, which you can set in the native
load file characters section, found above.o HTML exports out an HTML load file with hyperlinks to launch any exported files.
Data File Encoding is the encoding of the document-level load file. Export Text Field as files is a checkbox that indicates how the extracted text or OCR will be
exported.o If the box is checked, the files are exported as individual document-level text files, with
one file per document.o If the box is not checked, the text is included as part of your load file.
Text File Encoding is the encoding of the document-level text files. Text Field allows you to select which field you’d like to export.
o If you leave the box blank, extracted text contents are exported.o If you select one of your workspaces’ long text fields, that field is exported.
The text field export is used to export a secondary OCR field. Thissecondary OCR field might store the OCR for the redacted version of animage.
Export Multiple-Choice Fields as Nestedmaintains the hierarchy of Relativity multiple-choicelists, when applicable. Child choices are separated by the nested value delimiter, a backslash bydefault.
For example, say a document was tagged with the following issue fieldvalues:

Relativity | Admin Manual - 191
When exported, the doc would show as “Hot\Really Hot\Super Hot;Look at Later”
Once you have chosen your export settings, select File and click Run.
Run Export Display
Note: If you aremissing any information needed to successfully perform the export, a warning dialogbox appears outlining the issue.
Export Warning

Relativity | Admin Manual - 192
Click OK. Return to your export dialog box to make the necessary adjustments, then select File andclick Run to complete the export.
22.2 Exporting a Saved Search
Once you have created your Advanced Search, open the desktop client. From the Toolsmenu, selectExport | Saved Search. For more information on Saved and Advanced Searches refer to the SearchingManual.
The Exporting a Saved Search set window is divided into two tabs; Data Source Tab and DestinationFiles Tab.
22.2.1 Data Source Tab
The Data Source tab allows you to define the data for your export.
Data Source Tab
The Searches drop-down allows you to select the search you’d like to export. Select from adrop-down of available saved searches. The documents in the selected views are exported. Ifyour saved search references a dtSearch or Relativity Analytics index, that indexmust be active.
The Selected Columns section defines which fields you’d like to export for that search. Theseboxes work in the sameway as adding a field to a view in Relativity. All available fields are in theright-side box. Fields on the left are exported.
The Production Precedence section allows you to set which, if any, produced version of theproduced documents is exported in place of the original image. Click the ... ellipsis in the pro-duction precedence section to make your selection.

Relativity | Admin Manual - 193
Pick Production Precedence
Original Images exports only the original, non-produced images. Produced Images exports a produced version of the images. Click Include Original… to include original versions of images for documents that are not in a
specified production.o Move productions from Available to Selected to define productions eligible for export.
Use the up and down arrows to the right of the selected productions box to set the prec-edence.
Note that only one version of each document will be produced. If the document isin the top selected production, that version is exported. If not, Relativity will lookto the second production and so on. If the document is not a part of any of theselected productions, then the original document is produced – if the Include Orig-inal box is checked.
22.2.2 Destination Files Tab
The Destination Files tab allows you to set themanner in which the files are exported.

Relativity | Admin Manual - 194
Destination Files Tab
The tab is divided into subsections as outlined below:
22.2.2.1 Export Location
Export Location allows you to select the target window directory for the export. Click the ... ellipsis tobrowse and select the location.
Export Location Display
Select Overwrite Files to overwrite any existing files of the same name in the target export direc-tory.
22.2.2.2 Physical File Export
Physical File Export controls whether the files will be copied from the Relativity file repository.
Physical File Export Display

Relativity | Admin Manual - 195
Copy Files From Repositoryo If the box is checked (default) the files will be copied from the file server to the specified
export location.o If the box is unchecked, the files will not be copied to the export location. Instead, the
exported load files will reference the files’ repository location.
22.2.2.3 Volume Information
Volume Information controls the naming and size of the volume identifier.
Volume Information Display
Prefix is the volume identifier’s alpha prefix. Start # is the first number used for the numeric section of the volume identifier. If multiple vol-
umes are created during the export, the number will increment, creating unique volume iden-tifiers.
# of Digits represents the amount of numerals attached to the prefix (e.g., if 2 were selected,the output would be VOL001, VOL002.)
Max size is themaximum size allowed for each volume in MBs.
22.2.2.4 Subdirectory Information
The Subdirectory Information controls the naming and size of volume subfolders.
Subdirectory Information Display
Image Prefix is the alpha prefix for the subdirectory used to store exported images. Native Prefix is the alpha prefix for the subdirectory used to store exported native files.

Relativity | Admin Manual - 196
Text Prefix is the alpha prefix for the subdirectory used to store exported extracted text files. Start # sets the starting number for the subdirectories. # of Digits represents the amount of numerals attached to the subdirectory prefix (e.g., if 3
were selected, the output would be IMG001, IMG002, etc.) Max Files sets the number of files that will be stored in each subdirectory.
22.2.2.5 File Path
The File Path section controls the paths used to reference exported files.
File Path Display
Use absolute paths exports out paths to exported files as absolute paths.o C:\ Desktop\VOL001\NATIVE001\AS000001.msg
Use relative paths exports out paths to exported files as relative paths.o .\VOL001\NATIVE001\AS000001.msg
Use prefix allows you to add a prefix to the relative path, such as a cd drive letter.o D:\VOL001\NATIVE001\AS000001.msg
22.2.2.6 Native Load File Characters
Native Load File Characters controls which delimiters are used when exporting a document-level loadfile where the Data File Format is set to Custom. For more information on Data File Formats see thatsection.
Native Load File Characters Display

Relativity | Admin Manual - 197
The Column delimiter separates columns in the load file. TheQuote delimiter qualifies the text in each field on the load file. TheNewline delimiter signifies the end of any extracted text or long text field in the load file. TheMulti-Value delimiter separates different choices within a choice field. TheNested Value delimiter shows the hierarchy of choices within a choice field.
22.2.2.7 Text and Native File Names
Text and Native File Names determines how exported native and extracted text files will be named.
Text and Native File Names Display
Check append original file name to append the file’s original name to the end of the exportedfile’s name.
22.2.2.8 Image
Image sets whether images are exported, and if so, how the export is formatted.
Export Images Checkbox
Check Export Images if images are included in the export. Date File Format is the format of the image-level load file. Select from:
o Opticon Opticono IPROo IPRO (FullText)
File Type is the type of images that are exported.o Single-page TIF/JPGwill export out the files as they were loaded or created in Relativity.o Multi-page TIF will export out the files as multi-page TIFs, with one file per document.
Documents with only black and white images will use Group IV compression. Documents that include color images will contain LZW compression.

Relativity | Admin Manual - 198
o PDF will export out the files as multi-page PDFs, with one file per document. The PDFs are not searchable. Color pages will remain in color.
22.2.2.9 Native
Native Load File Characters determines if native files are exported.
Export Native Files Checkbox
Export Native Files if checked, exports the natives.
22.2.2.10Metadata
Metadata determines how the document-level load file and extracted text are exported.
Metadata Options
Data File Format determines the document-level load file format.o Comma separated (.csv) exports out a load file in csv format.o Tab Delimited (.txt) exports out a load file in tab delimited format.o Concordance exports out a load file with the standard Concordance delimiters.o Custom allows you to set your own custom delimiters, which you can set in the native
load file characters section, found above.o HTML exports out an HTML load file with hyperlinks to launch any exported files.
Data File Encoding is the encoding of the document-level load file. Export Text Field as files is a checkbox that indicates how the extracted text or OCR will be
exported.o If the box is checked, the files are exported as individual document-level text files, with
one file per document.

Relativity | Admin Manual - 199
o If the box is not checked, the text is included as part of your load file. Text File Encoding is the encoding of the document-level text files. Text Field allows you to select which field you’d like to export.
o If you leave the box blank, extracted text contents are exported.o If you select one of your workspaces’ long text fields, that field is exported.
The text field export is used to export a secondary OCR field. Thissecondary OCR field might store the OCR for the redacted version of animage.
Export Multiple-Choice Fields as Nestedmaintains the hierarchy of Relativity multiple-choicelists, when applicable. Child choices are separated by the nested value delimiter, a backslash bydefault.
For example, say a document was tagged with the following issue fieldvalues:
When exported, the doc would show as “Hot\Really Hot\Super Hot;Look at Later”
Once you have chosen your export settings, select File and click Run.
Run Export Display
Note: If you aremissing any information needed to successfully perform the export, a warning dialogbox appears outlining the issue.

Relativity | Admin Manual - 200
Export Warning
Click OK. Return to your export dialog box to make the necessary adjustments, then select File andclick Run to complete the export.
22.3 Exporting a Folder
Exporting a folder allows you to export the contents of an entire workspace folder. Right-click on thefolder in the browser, select Export, and then Folder.
Note that you are exporting only the contents of the folder, not a folder and its subfolders. Exportingthe contents of a folder and its subfolders is covered in the next section. The setup options are thesame.
Once you have chosen your export settings, select File and click Run.
Run Export Folder Display
If you aremissing any information needed to successfully perform the export, a warning dialog boxappears.

Relativity | Admin Manual - 201
Export Folder Warning Display
Click OK. Return to your export dialog box to make the necessary adjustments, then select File andRun to complete the export.
22.4 Exporting a Folder and Subfolders
To export the entire workspace, highlight the root folder of the workspace, go to the tools menu,select Tools | Export, then Folder and Subfolders.
The same can be accomplished by right-clicking on the root folder of the workspace and selectingExport, then Folder and Subfolders.
Exporting a folder and subfolders is divided into two tabs; Data Source and Destination Files.
22.4.1 Data Source Tab
TheData Source tab allows you to define the data for your export.

Relativity | Admin Manual - 202
Data Source Display
The Views drop-down allows you to select the view you'd like to export. The Selected Columns section defines which fields you’d like to export for that search. These
boxes work in the sameway as adding a field to a view in Relativity. All available fields are in theright-side box. Fields on the left will be exported.
The Start Export at Record # section allows you to identify which record begins your export byselecting its document number.
The Production Precedence section allows you to set which, if any, produced version of theproduced documents is exported in place of the original image. Click the ... ellipsis in the pro-duction precedence section to make your selection.
22.4.2 Destination Files Tab
TheDestination Files tab allows you to set themanner in which the files are exported.

Relativity | Admin Manual - 203
Destination Files Tab
The tab is divided into subsections as outlined below:
22.4.2.1 Export Location
Export Location allows you to select the target window directory for the export. Click the ... ellipsis tobrowse and select the location.
Export Location Display
Select Overwrite Files to overwrite any existing files of the same name in the target export direc-tory.
22.4.2.2 Physical File Export
Physical File Export controls whether the files will be copied from the Relativity file repository.
Physical File Export Display

Relativity | Admin Manual - 204
Copy Files From Repositoryo If the box is checked (default) the files will be copied from the file server to the specified
export location.o If the box is unchecked, the files will not be copied to the export location. Instead, the
exported load files will reference the files’ repository location.
22.4.2.3 Volume Information
Volume Information controls the naming and size of the volume identifier.
Volume Information Display
Prefix is the volume identifier’s alpha prefix. Start # is the first number used for the numeric section of the volume identifier. If multiple vol-
umes are created during the export, the number will increment, creating unique volume iden-tifiers.
# of Digits represents the amount of numerals attached to the prefix (e.g., if 2 were selected,the output would be VOL001, VOL002.)
Max size is themaximum size allowed for each volume in MBs.
22.4.2.4 Subdirectory Information
The Subdirectory Information controls the naming and size of volume subfolders.
Subdirectory Information Display
Image Prefix is the alpha prefix for the subdirectory used to store exported images. Native Prefix is the alpha prefix for the subdirectory used to store exported native files.

Relativity | Admin Manual - 205
Text Prefix is the alpha prefix for the subdirectory used to store exported extracted text files. Start # sets the starting number for the subdirectories. # of Digits represents the amount of numerals attached to the subdirectory prefix (e.g., if 3
were selected, the output would be IMG001, IMG002, etc.) Max Files sets the number of files that will be stored in each subdirectory.
22.4.2.5 File Path
The File Path section controls the paths used to reference exported files.
File Path Display
Use absolute paths exports out paths to exported files as absolute paths.o C:\ Desktop\VOL001\NATIVE001\AS000001.msg
Use relative paths exports out paths to exported files as relative paths.o .\VOL001\NATIVE001\AS000001.msg
Use prefix allows you to add a prefix to the relative path, such as a cd drive letter.o D:\VOL001\NATIVE001\AS000001.msg
22.4.2.6 Native Load File Characters
Native Load File Characters controls which delimiters are used when exporting a document-level loadfile where the Data File Format is set to Custom. For more information on Data File Formats se e thatsection.

Relativity | Admin Manual - 206
Native Load File Characters Display
The Column delimiter separates columns in the load file. TheQuote delimiter qualifies the text in each field on the load file. TheNewline delimiter signifies the end of any extracted text or long text field in the load file. TheMulti-Value delimiter separates different choices within a choice field. TheNested Value delimiter shows the hierarchy of choices within a choice field.
22.4.2.7 Text and Native File Names
Text and Native File Names determines how exported native and extracted text files will be named.
Text and Native File Names Display
Check Append original filenameto append the file’s original name to the end of the exportedfile’s name.
Named after sets the naming convention for the exported files.o Select identifier to name the files after your workspace’s identifier.o Select beginning Bates to name the files after the production’s Bates number
22.4.2.8 Image
Image sets whether images are exported, and if so, how the export is formatted.

Relativity | Admin Manual - 207
Export Images Checkbox
Check Export Images if images are included in the export. Date File Format is the format of the image-level load file. Select from:
o Opticon Opticono IPROo IPRO (FullText)
File Type is the type of images that are exported.o Single-page TIF/JPGwill export out the files as they were loaded or created in Relativity.o Multi-page TIF will export out the files as multi-page TIFs, with one file per document.
Documents with only black and white images will use Group IV compression. Documents that include color images will contain LZW compression.
o PDF will export out the files as multi-page PDFs, with one file per document. The PDFs are not searchable. Color pages will remain in color.
22.4.2.9 Native
Native Load File Characters determines if native files are exported.
Export Native Files Checkbox
Export Native Files if checked, exports the natives.
22.4.2.10Metadata
Metadata determines how the document-level load file and extracted text are exported.

Relativity | Admin Manual - 208
Metadata Options
Data File Format determines the document-level load file format.o Comma separated (.csv) exports out a load file in csv format.o Tab Delimited (.txt) exports out a load file in tab delimited format.o Concordance exports out a load file with the standard Concordance delimiters.o Custom allows you to set your own custom delimiters, which you can set in the native
load file characters section, found above.o HTML exports out an HTML load file with hyperlinks to launch any exported files.
Data File Encoding is the encoding of the document-level load file. Export Text Field as files is a checkbox that indicates how the extracted text or OCR will be
exported.o If the box is checked, the files are exported as individual document-level text files, with
one file per document.o If the box is not checked, the text is included as part of your load file.
Text File Encoding is the encoding of the document-level text files. Text Field allows you to select which field you’d like to export.
o If you leave the box blank, extracted text contents are exported.o If you select one of your workspaces' long text fields, that field is exported.
The text field export is used to export a secondary OCR field. Thissecondary OCR field might store the OCR for the redacted version of animage.
Export Multiple-Choice Fields as Nestedmaintains the hierarchy of Relativity multiple-choicelists, when applicable. Child choices are separated by the nested value delimiter, a backslash bydefault.
For example, say a document was tagged with the following issue fieldvalues:

Relativity | Admin Manual - 209
When exported, the doc would show as “Hot\Really Hot\Super Hot;Look at Later”
Original Images exports only the original, non-produced images. Produced Images exports a produced version of the images. Click Include Original… to include original versions of images for documents that are not in a
specified production.o Move productions from Available to Selected to define productions eligible for export.
Use the up and down arrows to the right of the selected productions box to set the prec-edence.
Note that only one version of each document will be produced. If the document isin the top selected production, that version is exported. If not, Relativity will lookto the second production and so on. If the document is not a part of any of theselected productions, then the original document is produced – if the Include Orig-inal box is checked.
Once you have chosen your export settings, select File and click Run.

Relativity | Admin Manual - 210
Run Export Display
Note: If you aremissing any information needed to successfully perform the export, a warning dialogbox appears outlining the issue.
Export Warning
Click OK. Return to your export dialog box to make the necessary adjustments, then select File andRun to complete the export.
23 HistoryRelativity’s audit system contains a rich set of functionality for tracking users’ actions throughout theworkspace.
The tracked actions, including who performed the action and when, are:
CaseMap add document – when a document is sent to CaseMap CaseMap add fact – when a selection of text from the viewer is sent to CaseMap as a fact Create – when an item is created Delete – when an item is deleted Document query – when a query is run Images created – when images are created Images created for production – when images corresponding to a production outside of Rel-
ativity are imported into the system Images deleted – when images are deleted Markup image created – when redactions or highlights are added to an image Markup image deleted – when redactions or highlights are removed from an image

Relativity | Admin Manual - 211
Markup image modified – when redactions or highlights aremoved, resized or edited on animage
Markup native created – when redactions or highlights are placed on a native Markup native deleted – when redactions or highlights are removed from a native Move – when a document is moved from one folder to another Native created – when a native file is loaded into Relativity Native deleted – when a native file is removed from Relativity Print – when a document is printed Production add document – when a document is added to a production Production remove document – when a document is removed from a production Search cache table creation – when a search cache table is created. Search cache tables are
created the first time you search for a term or phrase using dtSearch or Relativity Analytics Security – when security rights are assigned or changed Update – when a document’s metadata is updated on a single-document basis Update mass edit – when a document’s metadata is updated on a mass basis Update mass replace – when a document’s metadata is edited using a text mass replacement Update propagation – when a document’s metadata is edited according to a propagation rule View – when a document is viewed
You can access this history from the History tab. Like other tabs, the history tab displays views. Thehistory views, while visually different, act in the sameway. For information on how to build a view, seethe Section Views.
Additionally, when viewing a document in the Core Reviewer Interface, you can access its history in therelated item pane’s documents history context.
23.1 History View Fields
The fields available to add are:
Action is the action that was recorded. Artifact ID is the Artifact id of the item. Execution Time is the time taken for a document query, in milliseconds. ID is an identifier for the audit item. Each tracked action has its own unique identifier. Name is the name of the object. Object type describes the type of object. Record Origination is the server that sent the request. Request Origination is the connection details for the user that sent the change request. Username is the user that initiated the action. Timestamp is when the action took place. Details describes the action that was taken

Relativity | Admin Manual - 212
23.2 Searching History
From the History tab you can search history views using filters, just like any other view in Relativity.For more information on using filters to search views, see the Relativity Searching Manual.
There is one special requirement for searching choice values in the details field. Actions related to fieldchoices are recorded using Artifact ID. For example as shown below.
Choice Field Update
If you would like to filter for the Issue choice "Really Hot", you must use the Artifact ID 2881180. Thename is for reference purposes only.
Click the Choice Legend icon in the view bar to see the choice values for all choice fields. The choicelegend displays all choices in the workspace, their artifact IDs and the fields with which they areassociated.
Choice Legend Display
Within the History tab you can also filter for:

Relativity | Admin Manual - 213
Long running queries by Execution Time Import job to view the settings used, field mapped etc
24 Security PermissionsRelativity’s security rights are highly customizable. Each group you add to a workspace can have vastlydifferent permissions than others. You can also copy an existing group’s permissions to save time onconfiguring the security console.
You set group permissions when you add a group to workspace, but these permissions can bechanged at any time via theWorkspace Details page.
To add a group or edit an already-attached group’s permissions, click the Edit Permissions button:
Edit Permissions Button
This brings up the Security ofWorkspace console. From here you can change the workspace security.

Relativity | Admin Manual - 214
Change Security Console
The workspace security console options are:
Back returns you back to the workspace details page. Add Group allows you to add a group to a workspace. Remove Selected Group allows you to remove a group from the workspace. Change Group Permissions allows you to change the group’s workspace rights. Copy Group's Full Permissions allows you to apply an existing group's security settings to a
new group or another existing group; this means that you do not have to define each group'sspecific permissions each time you add or modify groups. Clicking this button brings up a SelectGroup window containing other groups from which security can be copied. Once a group isselected, its security is applied to the current workspace. This copies all security down to individ-ual items and documents. This only takes the permissions this one time and does not updatedynamically if changes occur in the original group.

Relativity | Admin Manual - 215
Group selection to copy permissions from
Selecting the radio button of a group and clicking OK will apply that group's permissions to the grouphighlighted in the list above the console. Note that selecting to copy the System Administrator group'spermissions will apply every permission available in the console to the highlighted group, as SystemAdministrators have the highest level of permissions.
The groups with rights to the workspace are displayed in the box on the upper-left of the console. Theselected group’s permissions are detailed belowwhen selected. All members of the selected group arelisted, by name, next to the rights detail box.
24.1 Workspace Permissions
To add a group to a workspace, go to theWorkspace Details tab and click Edit Permissions. Next onthe Security Console click Add Group. Select the desired group by clicking on the radio button next tothe group name. If necessary, use the filters to quickly find your group.
Add Group Button
Click Set Permissions to bring up the permissions form.

Relativity | Admin Manual - 216
Permissions Form
The permissions are divided into sections:
n Securityn Tab Visibilityn Browsersn Mass Actionsn Admin Operations
24.1.1 Security
The group permissions area allows you to set object-level permissions. They follow a basic pattern,with some variation. The rights are:
View allows users to view and is theminimal permission. Edit allows users to edit and view. Delete allows users to delete, edit and view. Add allows users to add new instances of the object. Edit security allows users to edit the security for instances of the object.
Security rights work jointly with corresponding tab visibility or browser permission.

Relativity | Admin Manual - 217
For example, a user with all the rights listed above for fields would only be able to add, edit, delete oredit security for fields if he/she had access to the fields tab as well. This pattern follows for mostworkspace objects.
There is a separate security section for each Relativity object:
Workspace sets the group’s permissions for the workspace.o View is theminimum permission level and allows the group members to see the work-
space.o Edit allows the group members to see the workspace and edit the workspace details.
Editing the workspace requires access to the workspace details tab.o Delete allows the group members to see the workspace, edit the workspace details and
delete the workspace. Editing or deleting the workspace requires access to the workspace details tab.
o Edit security allows the group members to access and edit the workspace security. Accessing the security console
Folders sets the group’s permissions for the folder browser. The group members also musthave permission to view the folder browser, set in the browser permissions section.
o View allows group members to view the folder browser.o Edit allows group members to edit the folder names and view the folders.o Delete allows the group to delete folders, edit the folder names and view the folders.o Add allows the group to add folders to the workspace.o Edit security allows group members to edit folders' security.
Document sets the group's permissions for the documents.o View allows group members to view documents.o Edit allows group members to view and edit documents
The edit document permission is the permission that allows groupsmembers to tag documents with workspace coding values usinglayouts.
It is a common mistake to assign coding users rights to edit fields oredit layouts. The edit fields permission (in concert with access to thefields tab) allows users to edit field properties, such as changing afixed length text field from 255 to 320 characters.
o Delete allows group members to view, edit and delete documents.o Add allows group members to add new documents.o Edit security allows group members to secure documents.o Print allows group members to print individual documents from Relativity.o Local Access allows group members to open the file in its native application, to copy text
from the viewer, or to perform a print screen.o Redact Document allows group members to place stamp or textbox redactions on a doc-
ument.o Annotate Document allows group members to place a highlight on a document.

Relativity | Admin Manual - 218
o Add Image allows group members to use Relativity’s TIFF on-the-fly functionality.o Delete Image allows group members to delete TIFFs present in Relativity.
Reports sets group permissions for summary reports. All of the below permissions requireaccess to the summary report tab.
o View allows group members to view summary reports.o Edit allows group members to view and edit summary reports.o Delete allows group members to view, edit and delete summary reports.o Add allows group members to add new summary reports.o Edit Security allows group members to edit the security of summary reports.
Fields sets group permissions for fields.o View allows group members to view fields.o Edit allows group members to view and edit fields
Editing fields requires access to the fields tab.o Delete allows group members to view, edit and delete fields.
Deleting fields requires access to the fields tab.o Add allows group members to add new fields.
Adding fields requires access to the fields tab.o Edit Security allows group members to edit field security.
Editing security for a field requires access to the fields tab.o Add Field Choice by Link allows users to add a choice to the field from a layout.
Layouts sets group permissions for layouts.o View allows group members to view layouts.o Edit allows group members to view and edit layouts.
o Editing a layout requires access to the layouts tab. Delete allows group membersto view, edit and delete layouts.
o Delete allows group members to view, edit and delete layouts Deleting layouts requires access to the layouts tab.
o Add allows group members to add new layouts. Adding new layouts requires access to the layouts tab.
o Edit Security allows group members to edit layout security. Editing security for a layout requires access to the layouts tab.
Production sets group permissions for production sets. This is the only default live text box.o View allows group members to view production sets.o Edit allows group members to view and edit production sets.
Editing production sets requires access to the production sets tab.o Delete allows group members to view, edit and delete production sets.
Deleting production sets requires access to the production sets tab.o Add allows group members to add new production sets.
Adding production sets requires access to the production sets tab.o Edit Security allows group members to edit production sets’ permissions.
Editing security for a production set requires access to the production sets tab.

Relativity | Admin Manual - 219
Note that the checkbox for productions is the only live checkbox.
There are no permissions for specific viewer options, so if you’d like torestrict productions from appearing in the viewer for a certain group,you can de-select the box.
View sets group permissions for views.o View allows group members to view views.
Viewing any views besides document views requires access to the view object’stab.
o Edit allows group members to view and edit views. Editing any views besides document views requires access to the view object’s tab
or the views tab.o Delete allows group members to delete views.
Deleting views requires access to the views tab.o Add allows group members to add a view.
o With add view rights, group members can add views for any tabs they have rightsto see.
o Edit security allows group members the rights to edit view security. Editing security for a view requires access to the views tab.
Search Folder sets group permission for advanced and saved search folders.o View allows group members to view search folders.
Viewing search folders requires access to the advanced and saved searchesbrowser.
o Edit allows group members to view and edit saved search folders. Editing saved search folders requires access to the advanced and saved searches
browser.o Delete allows group members to view, edit and delete saved search folders.
Deleting saved search folders requires access to the advanced and saved searchesbrowser.
oo Add allows group members to add new saved search folders. Adding advanced and saved searches requires access to the advanced and saved
searches browser.o Edit Security allows group members to edit saved search security.
Editing Security for saved searches requires access to the advanced and savedsearches browser.
Search Sets group permissions for advanced and saved searches.o View allows group members to view the results of saved searches.
Viewing saved searches requires access to the advanced and saved searchesbrowser.
o Edit allows group member to view and edit saved searches. Editing saved searches requires access to the advanced and saved searches
browser.o Delete allows group member to view, edit and delete searches.
Deleting searches requires access to the advanced and saved searches browser.
Relativity | Admin Manual - 220
o Add allows group members to add new searches. New searches can be added from the advanced and saved searches browser.
o Edit Security allows group members to edit choice security. Editing security for a searches requires access to the advanced and saved searches
browser. Choice sets the group permissions for choices.
o View allows group members to view choiceso Edit allows group member to view and edit choices.
Editing choices requires access to the choices tab.o Delete allows group member to view, edit and delete choices.
Deleting choices requires access to the choices tab.o Add allows group members to add new choices.
New choices can be added from the choices tab, or directly from layouts.o Edit Security allows group members to edit choice security.
Editing security for a choice requires access to the choices tab Markup Set sets group permissions for markup sets.
o View allows group member to viewmarkup sets.o Edit allows group members to view and edit markup sets.
Editing Markup sets requires access to themarkup sets tab.o Delete allows group members to view, edit and deletemarkup sets.
Deleting markup sets requires access to themarkup sets tab.o Add allows group members to add newmarkup sets.
Adding newmarkup sets requires access to themarkup sets tab.o Edit Security allows group members to edit markup set security.
Editing security for a markup set requires access to themarkup sets tab. Tab sets group permissions for tabs.
o View allows group members to view tabs.o Edit allows group members to view and edit tabs.
Editing tabs requires access to the tabs tab.o Delete allows group members to view, edit and delete tabs.
Deleting tabs requires access to the tabs tab.o Add allows group members to add new tabs.
Adding new tabs requires access to the tabs tab.o Edit Security for a tab allows group members to edit tab security.
Editing security for tabs requires access to the tabs tab. Batch Set sets group permissions for batch sets.
o View allows group members to see batch sets.o Edit allows group members to view and edit batch sets.
Editing batch sets requires access to the batch sets tab.o Delete allows users to view, edit and delete batch sets.
Deleting batch sets requires access to the batch sets tab.

Relativity | Admin Manual - 221
o Add allows group members to add new batch sets. Adding new batch sets requires access to the batch sets tab.
o Edit Security allows group members to edit the security of existing batch sets. Editing the security of existing batch sets requires access to the batch Sets tab.
Batch sets group permissions for batches.o View allows group members to see batches.o Edit allows group members to view, check-out and edit batches.
Editing batch sets requires access to the batches tab.o Delete allows users to view, edit and delete batches.
Deleting batches requires access to the batches tab.o Add allows group members to add new batch sets.
Adding new batch sets requires access to the batch sets tab.o Edit Security allows group members to edit the security of existing batch sets.
Editing the security of existing batch sets requires access to the batch sets tab. Object Type sets group permissions for object types.
o View allows group members to see object types.o Edit allows group members to view and edit object types.
Editing object types requires access to the object types tab.o Delete allows group members to view, edit and delete object types.
Deleting object types requires access to the object types tab.o Add allows group members to add new object types.
Adding object types requires access to the object types tab.o Edit security allows group members to edit the security of existing object types.
Editing the security of object types requires access to the object types tab. Relativity Script sets group permissions for scripts.
o View allows group members to see Relativity scripts.o Edit allows group members to view and edit any non locked scripts.
Editing scripts requires the user to be a member of the Script Admin group.o Delete allows group members to delete scripts.
Deleting scripts requires the user to be a member of the Script Admin group.o Add allows group members to add new scripts.o Edit Security allows group members to edit the security of existing scripts.
Editing security on scripts requires the user to be a member of the Script Admingroup.
Search Index sets group permissions for search indexes.o View allows group members to see search indexes.o Edit allows group members to edit search indexes.
Editing search indexes requires access to the search indexes tab.o Delete allows group members to delete search indexes.
Deleting search indexes requires access to the search index tab.o Add allows group members to add search indexes.
Adding search indexes requires access to the search index tab.

Relativity | Admin Manual - 222
o Edit Security allows group members to edit search indexes. Editing search indexes requires access to the search index tab.
o Dictionary Access allows group member to see the dictionary function when searchingwith a dtSearch index.
Transform Set sets groups permissions for transform sets.o View allows group members to see transform sets.o Edit allows group members to edit transform sets.o Delete allows group members to delete transform sets.o Add allows group members to add transform sets.o Edit Security allows group members to edit the security of existing transform sets.
Transform sets group permissions for the transforms that are added to transform sets.o View allows group members to see transforms.o Edit allows group members to see transforms.o Delete allows group members to delete transforms.o Add allows group members to add transforms.o Edit Security allows group members to edit the security of existing transforms.
Search Terms Report sets group permissions for search terms reports.o View allows group members to view search terms reports.o Edit allows group members to edit search terms reports.o Delete allows group members to delete search terms reports.o Add allows group members to add search terms reports.o Edit Security allows group members to edit the security of existing search terms reports.
Search Terms Result sets the group permissions for search terms results.o View allows group members to view search terms results.o Edit allows group members to edit search terms results.o Delete allows group members to delete search terms results.o Add allows group members to add search terms results.o Edit Security allows group members to edit the security of existing search terms results.
Pivot Profiles sets the group's permissions for pivot profiles.o View allows group members to view pivot profiles.o Edit allows group members to edit pivot profiles.o Delete allows group members to delete pivot profiles.o Add allows group members to add pivot profiles.o Edit Security allows group members to edit the security of existing pivot profiles.
Relativity Applications sets the group permissions for applications.o View allows group members to view applications.o Edit allows group members to edit applications.o Delete allows group members to delete applications.o Add allows group members to add applications.o Edit Security allows group members to edit the security of existing applications.

Relativity | Admin Manual - 223
OCR Profileso View allows group members to viewOCR Profiles.o Edit allows group members to edit OCR Profiles.o Delete allows group members to delete OCR Profiles.o Add allows group members to add OCR Profiles.o Edit Security allows group members to edit the security of existing OCR Profiles
OCR Sets View allows group members to viewOCR Sets. Edit allows group members to edit OCR Sets. Delete allows group members to delete OCR Sets. Add allows group members to add OCR Sets. Edit Security allows group members to edit the security of existing OCR Sets.
24.1.2 Tab Visibility
The Tab Visibility section allows you to grant group rights to view tabs. As described above, you needto combine sets of rights and tab visibility to give users the tools they need to complete their tasks.Check the box next to a tab to make it visible for the group.
Tab Visibility Permissions
The tabs available for checking include the following:
Documents Workspace Details Summary Reports Markup Sets Production Sets

Relativity | Admin Manual - 224
Fields Choices Layouts Views Administration Tabs History Batch Sets Object Types Review Batches Search Indexes User Status Transform Sets Search Terms Reports Script Relativity Applications OCR OCR Sets OCR Profiles <Custom> - custom tabs will be listed individually
24.1.3 Browsers
The Browsers section allows you to control which browser options are visible to the group. Check thebox next to the browser type to make it visible for the group.
Browser Permissions
Groups with rights to no browsers simply see their views with the documents area spanning the wholescreen.
Clusters Workspace Folders Advanced and Saved Searches Field Tree
24.1.4 Mass Actions
TheMass Actions section allows you to control which types ofmass action rights the group can access.Put a check next to theMass Action you want group members to have access to.

Relativity | Admin Manual - 225
Mass Actions Permissions
The following Mass Actions are available for checking:
Cluster gives group members the rights to cluster documents using Relativity Analytics clus-tering.
Process Transcript allows group members to process imported transcripts for viewing in Rel-ativity.
Create Word Index gives group members the rights to create word indexes on selected doc-uments.
Mass Copy gives group members the rights to copy securable objects such as views, layoutsand summary reports.
Mass Edit gives group members the rights to use their layouts to simultaneously edit doc-ument field values for multiple documents.
Mass Move gives group members the right to simultaneously move documents from one ormore folders to one target folder.
o Mass Move also requires add and delete document rights. Mass Delete allows group members to mass-delete documents.
o Mass delete also requires the rights to delete documents. Mass Produce gives group members the right to simultaneously add multiple documents to a
production set. Mass Replace allows group members to perform a replace operation on multiple documents.
Examples include:o Copying the contents of one text field to another.o Adding a set string to the beginning or end of an existing field.o Merging the values of a source field with the values of a target field.
Mass Image allows group members to simultaneously send image requests for multiple nativefiles.
Mass Print image gives group members the right to simultaneously print images from multipledocuments.
Tally/Sum/Average allows group members to tally, sum and average the values of any numericfields. This action is recorded under the document history.
Send to CaseMap allows group members to send multiple documents to CaseMap. Export to File gives group members the right to export the contents of a view to a .csv, .xls or
.dat file.
For more information about mass operations, see the appendix on Mass Operations.

Relativity | Admin Manual - 226
24.1.5 Admin Operations
There are several admin operations that can be separately secured. Put a check next to the operationyou want group members to have access to.
Admin Operations Permissions
The following operations are available for checking:
Assign Batches allows group members to check out batches to other reviewers. Manage Object Types allows group members to add and edit object types. Use Pivot/Chart allows group members to use the pivot grid and chart functions. View Workspace Details allows group members to use the pivot grid and chart functions. View User Status allows group members to access the User Status tab. View Relativity Utilities allows group members to access the Download Relativity Desktop
Client button on the Administration tab. Override Production Restrictions allows group members to override the Production Restric-
tions setting in Workspace Details and thus produce documents that contain conflicts based onthese restrictions.
Manage Relativity Applications allows group members to associate objects to applications bymaking the Relativity Applications field available on create and edit pages for Field, Layout,View, Script, Object Types, and all other objects compatible with applications.
View all Audits allows group members to view audits of workspace components (e.g., doc-uments, markup sets, dynamic objects, fields, etc.).
View Batch Pane allows group members to view the batches associated with a document in therelated items pane.
24.2 Permissions for Individual Items (Object Level)
Individual items inherit the rights of their objects. For instance, a group’s rights to an individual fieldare determined by their workspace-wide field rights.
However, it is often necessary to further secure workspace items. For instance, you may have a groupdoing contract review. You want the group to be able to see the custodian fields but not edit it.
To secure individual items, go to that item’s details page and click Edit Permissions.

Relativity | Admin Manual - 227
Edit Permissions Button
The security console for the individual item is launched.
Change Security Options
The Change Security form appears with the following options:

Relativity | Admin Manual - 228
Overwrite Inherited Security overrides, or trumps, the workspace level settings. Inherit Security is the default, and leaves the item open to inherit security settings from its
object (i.e., case workspace).
Altering security permissions from Overwrite Inherited Security toInherit Security and vice-versa may involve a wait time for 50,000records or more. If this occurs, a notification will appear to inform youof the change’s impact.
Add Group allows groups to be granted access to the item. Remove Selected Group removes group access to the item. Change Group Permissions allows individual groups’ permissions to be edited.
24.2.1 Adding the Security Field to a View (Padlock icon)
To easily secure individual objects, you can add the Security field to any view. The security field icon isa padlock you can click to open the item’s security screen.
Adding Security Field
When the item is secured beyond the object-level permissions, the padlock is closed. If the padlock isopen, the item still is secured according to the object-level permissions, and it inherits thosepermissions.
25 ScriptsRelativity scripts allow for the creation and execution of flexible SQL-based scripts that can be used tocustomize and augment Relativity functionality. Scripts are Relativity artifacts. This means they havethe same features as standard Relativity objects, allowing them to be secured and audited.
Scripts may also be called through a SQL Stored Procedure, allowing them to be scheduled and run ata specific time.
Scripts can only be written by Script Administrators, a special Relativity group who must also haveSystem Administrator permission. Relativity Script Administrators are part of a group that haspermissions to preview, edit, and create scripts. Before a user can belong to this group, they must begranted Relativity Administrator permissions, and then added as a Relativity Script Administrator.Relativity Administrators are not automatically members of this group.
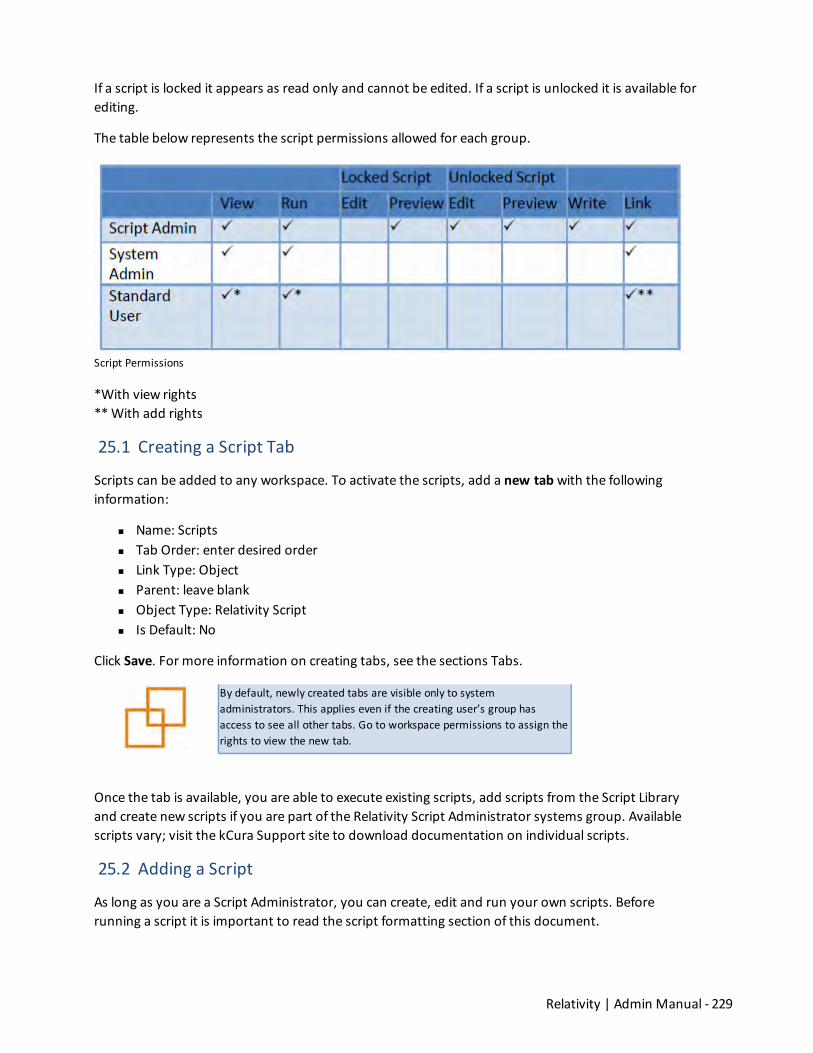
Relativity | Admin Manual - 229
If a script is locked it appears as read only and cannot be edited. If a script is unlocked it is available forediting.
The table below represents the script permissions allowed for each group.
Script Permissions
*With view rights**With add rights
25.1 Creating a Script Tab
Scripts can be added to any workspace. To activate the scripts, add a new tabwith the followinginformation:
Name: Scripts Tab Order: enter desired order Link Type: Object Parent: leave blank Object Type: Relativity Script Is Default: No
Click Save. For more information on creating tabs, see the sections Tabs.
By default, newly created tabs are visible only to systemadministrators. This applies even if the creating user’s group hasaccess to see all other tabs. Go to workspace permissions to assign therights to view the new tab.
Once the tab is available, you are able to execute existing scripts, add scripts from the Script Libraryand create new scripts if you are part of the Relativity Script Administrator systems group. Availablescripts vary; visit the kCura Support site to download documentation on individual scripts.
25.2 Adding a Script
As long as you are a Script Administrator, you can create, edit and run your own scripts. Beforerunning a script it is important to read the script formatting section of this document.

Relativity | Admin Manual - 230
Due to the complexity and impact a script can have, they should only be created, and run by expertusers of Relativity, SQL and XML.
It is recommended that you read the Relativity Script Guide beforerunning your own scripts.
To add a script, go to the Script tab and then click New Script.
New Script Button
Clicking New Script brings up the new script form. Properties in orange are required.
New Script Form
There are two script options available:

Relativity | Admin Manual - 231
Create New Workspace Script allows you to create and edit your own environment and work-space scripts via the Script tab.
Select from Script Library allows you to choose from a list of predefined Relativity scripts. TheScript Library tab is created when Relativity is deployed.
Relativity Applications associates the script with an application created in the Relativity Appli-cations tab. All existing applications are available when you click the ellipsis. This is only availablefor those who have theManage Relativity Applications permission under Admin Operations.For information on applications, please see the Relativity Applications section.
Enter or paste the required script into the script body section. To refer to a help file that outlines howto write scripts, click the question mark button.
There are four buttons appearing at the top of the form:
Save establishes the script in Relativity and displays the Script Information page. Save and New establishes the selected script in Relativity and displays a new script page. Save and Back establishes the selected script in Relativity and takes you to the script list. Cancel aborts the selected script creation. All entered information is discarded.
25.2.1 Selecting from Script Library
To add a script, go to the Script tab and click New Script. In the script type, choose Select from ScriptLibrary and click the ellipsis ... button.
Select from Script Library Option
The Select Script dialog box appears. Select your script from the list and click OK.

Relativity | Admin Manual - 232
Select Script Display
The script is populated in the Script type section. There are four buttons appearing at the top andbottom of the form:
Save establishes the selected script in Relativity and displays the Script Information page. Save and New establishes the selected script in Relativity and displays a new script page. Save and Back establishes the selected script in Relativity and takes you to the script list. Cancel aborts the selected script
For more information about writing scripts and the script library refer to the Relativity Script Guide.
25.2.2 Running a library script
Go to the Script Tab and click on the desired Script Name. If necessary you can use the Show Filters tolocate your script.
The Script Information details page appears. A script may have required inputs, if necessary enterthese.
Additionally, there are five buttons appearing at the top of the form:
Edit allows you to edit the script information. Delete removes the script from Relativity. Back redirects you to the script list.

Relativity | Admin Manual - 233
Edit Permissions allows you to establish rights for the script. View Audit displays the layout audit history.
To execute the script, click Run on the Script Console.
Once the script is run you will be able to:
Preview displays a pop-up allowing you to view the SQL script. Run allows you to execute the script again.
You can also export the script results from theMass Operations bar.
25.3 Editing a Script
To edit a script go to the Script tab and click Edit next to the desired script.
Edit Script Link
You may also edit group information by clicking the group’s name. This redirects you to the GroupDetails page. Click the Edit button to access and change the group information.
To Copy or Delete script, select the checkbox next to the script. In theMass Operations Bar select therequired action from the drop-down, and then click Go.

Relativity | Admin Manual - 234
Script Mass Operations
25.4 Script Library
Within Relativity there is a library of commonly used scripts that can be run at any time. It is importantto note depending on your Relativity version, certain scripts may not be available to you.
By default all Relativity scripts are secured and are not available for editing.
25.4.1 Library Scripts
Below is a list of standard Relativity scripts available from the library. Note this list may be subject tochange in different versions of Relativity.
Environmental Scripts:
User Billing Statistics reports on all users who had access to the workspace at any time duringthemonth, except where the email address contains @kcura.com.
Case Workspace Billing Statistics reports on peak billable data for all workspaces in a Relativityenvironment; it can be used in environments where the auto emailed statistics feature is notpossible.
Long Running Query Audit is an environment script that reports on all long running queries forthe last 14 days. Long Running Queries are SQL queries that take several seconds or more tocomplete.
Index Optimize Audit is an environment script that reports on the history of indexes optimizedover the last two weeks; the index optimize is a schedule task to eliminate index fragmentationin SQL.
Transaction Log Truncation Shrink is an environment script that truncates and shrinks the LDFfile for a database to theminimum possible size.
Workspace Scripts:
Get Index Fragmentation Levels gathers current index fragmentation levels for a workspace onindexes with more than 10 percent fragmentation, and above 50 page count; if all indexes in aworkspace have less than 10% fragmentation and under 50 pages, they will not be reported on.

Relativity | Admin Manual - 235
Script Propagate Sent Date to Family Documents sets all email families documents to thesame sent date as their parent documents in a workspace; allows for chronological sortingwithin all documents.
Set Duplicate Flag Field identifies and sets a Yes/No field on all workspace documents to indi-cate a duplicate or master; where the field’s value is empty; master documents are the doc-uments with the lowest artifact ID in a set of duplicates, or documents that do not have anyduplicates.
Set Extracted Text Size Field stores a document's extracted text data length (in Kilobytes) in adecimal field; used for documents in a workspace where the field’s value is empty.
Set Production Beg/End Bates Field is an action script that populates the production begin-ning and end attachment range fields for each workspace document included in a productionand utilizes the Family Identifier field, which must be present and valid.
Set Relativity Folder Path Field is a workspace script that stores the current Relativity folderpath of each document in a long text field; allows you to see the full path structure of a folderfor example, Custodian / J Smith / Inbox; this script will populate the new long text field with thecurrent workspace folder structure.
Script DBCC Clean Table allows you to reclaim free space from dropped variable-length col-umns in tables or indexed views of a workspace; you may wish to run this script after any majorcleanup of fixed length text fields in a workspace.
Script Identify Max Character Length for All Case Workspace Fields reports on all fixed lengthtext fields in a workspace and returns the current set length value, and the required maximumcharacter length to determine the field’s minimum requirement without worrying about trun-cating data; when determining the new field length, you will want to create it slightly larger thanthe field's value returned in the Relativity Script.
25.5 Script Compatibility and Updates
To improve system performance, architecture improvements are often applied to Relativity’s SQLtables for new versions.
When upgrading, your personally created existing scripts must be tested and revalidated before theyare run. The only exception to this is Relativity Library scripts, which are automatically updated withany changes affecting the new version.
When upgrading your environment, the unique script key is referenced to determine if an update isrequired. If so, this is performed automatically.
26 Search IndexesRelativity’s searching options provide a powerful way ofmanaging a document set by allowing you toisolate individual terms within individual documents.
There are threemain indexes in Relativity, all found in the Search Indexes tab:

Relativity | Admin Manual - 236
Keyword Search dtSearch Relativity Analytics
The Search Indexes tab allows you to perform the following actions:
New dtSearch Index button allows you to create a new dtSearch index. New Analytics Index button allows you to create a newRelativity Analytics index. Export to Excel allows you to export the contents of the current list to Excel. Reset Column Size allows you to reset the columns in the view. Show Filters allows you to apply a filter on any field in the list. Clear All clears any applied filters. Sort is available by clicking any of the column headers. Copy selected indexes. Delete selected indexes.
Search Index Display
26.1 Keyword Index
Keyword Search is Relativity’s default search engine. While it does not have as many available optionsas other types of searching, it has the advantage of being an automatically populated index. Thisreduces maintenance and ensures your searches are running on all documents.
Your Keyword Search index appears in your Search Indexes tab by default. Click the Keyword Searchlink.

Relativity | Admin Manual - 237
Keyword Search Link
The Keyword Search Index Details Page appears.
Keyword Search Index Details
Name is the name of the keyword search index. The name is used as the display name for theindex in the documents tab search with drop-down.
Order is a number that represents the position of the index in the list. The lowest-numberedindex will be at the top. The highest-numbered index is at the bottom. Items that share thesame value are sorted in alphanumeric order.
o Index order can be any integer (positive or negative). No decimals are allowed.
The IndexManagement console appears on the right side of the screen. This console allows you todeactivate and/or activate the index.
There are five buttons available at the top and bottom of the form:
Edit allows you to edit the index information. Delete removes the index from Relativity. Back redirects you to the index list. Edit Permissions allows you to establish rights for the index. View Audit displays the index’s audit history.
26.2 dtSearch
In addition to Relativity’s keyword search, you can use dtSearch technology. Like Keyword Search,dtSearch allows you to search document content, but dtSearch’s advanced functionality goes a step

Relativity | Admin Manual - 238
further by allowing you to perform proximity searches, stemming, and other advanced keywordsearching operations not available in keyword search.
Unlike Keyword Search, dtSearch contains fully managed indexes to support its extended operations;you must update the index every time data is added, removed, or edited.
26.2.1 Creating A New Search Index
To create new index, go to the Search Index tab and click New dtSearch Index.
New dtSearch Index Button
The NewdtSearch Index form appears with required fields in orange and optional fields in gray.
Creating a dtSearch Index
Name is the name of the dtSearch index. The name is used as the display name for the index inthe documents tab search with drop-down.

Relativity | Admin Manual - 239
Order is the number that represents the position of the index in the list. The lowest-numberedindex is at the top. The highest-numbered index is at the bottom. Items that share the samevalue will be sorted in alphanumeric order.
o Index order can be any integer (positive or negative). No decimals are allowed. Searchable Set is the set of documents to be indexed. Select all documents in the workspace, or
choose from any workspace-saved search.o If you select all documents in your workspace, the fields where add to FullText is yes will
be indexed.o If you select a saved search
The documents returned by the search will be indexed. The fields returned for hit records will be indexed. It may use a dtSearch or Relativity Analytics index. Make sure the index is active.
Index Share is populated by default. Your Relativity administrator will inform you if you need tochange the entry.
Auto Recognize Date, Email, and CC’s is a yes/no field and is described in the next section. Send Email Notification upon Completion or Failure to allows you to send email notifications
when your index population fails or completes. Enter the email address(es) of the recipient(s)o If you would like to send the email to multiple recipients, separate the entries with a sem-
icolon. TheNoise Words box allows you to edit the list of words to be ignored during indexing. The Alphabet box allows you to edit the index’s alphabet file.
o The alphabet file determines which characters are treated as text, which cause a wordbreak, and which are ignored. The categories of items in the alphabet file are:
Lettero A searchable character. All of the characters in the alphabet (a-z and A-Z)
and all of the digits (0-9) should be classified as letters. Hyphen
o Hyphens are removed when creating indexes. First-Level will become twoseparate words in a dtSearch index. Relativity does not currently supportallowing the hyphen to be removed and FirstLevel to become oneword inan index.
Spaceo A character that causes a word break. For example, if you classify the period
(".") as a space character, then dtSearch would process U.S.A. as three sep-arate words: U, S and A.
Ignoreo A character that is disregarded in processing text. For example, if you clas-
sify the period as ignore instead of space, then dtSearch would processU.S.A. as one word: USA.
There are three buttons available at the top of the form:
Save establishes the index in Relativity using the entered settings and takes you to the searchindex details page.

Relativity | Admin Manual - 240
Save and Back establishes the index in Relativity using the entered settings and takes you toindex list.
Cancel aborts the creation of the index. All entered information will be discarded.
One you have entered your settings, click Save to bring up the Index Details page.
Index Details Page
There are six buttons available at the top and bottom of the form:
Edit allows you to edit the index information. Delete removes the index from Relativity. Back redirects you to the index list. Refresh updates the page. Edit Permissions allows you to establish rights for the index. View Audit displays the index’s audit history.
In addition, the Search Index Console comes up on the right side of the screen when you click Save.

Relativity | Admin Manual - 241
Search Index Console
This console allows you to:
Perform a Full Build to create an index for documents Perform an Incremental Build to add new documents to the index.
o This is done when new documents are added to the workspace and must be indexed.o If you remove indexed documents from the workspace, the index will not be updated.
However, only documents still in the workspace will be returned as hits. To clean up doc-uments removed from the index you should choose the option to compress the indexwhich removes references to these removed documents in the dictionary.
Stop a full or incremental build by clicking Stop Build. This button will:o Change the index status to Stopping Build.o Abort the indexing thread, which leaves the index in an unstable state. The index is given
an Inactive status and deleted from the population table. A user cannot search againstthis index and the only way to use it again is to run a full build.
Refresh the page during an index build or compress by clicking Refresh Page. Resolve any errors during the build by clicking Resolve Errors/Retry. Compress an index by clicking Compress Index. This button will:
o Change the index status to Compressing Index.
Activate the index Deactivate the index
Click Full Build or Incremental Build to build your index. A pop-up displays to verify your build. It alsohas a checkbox that allows the index to be automatically activated upon completion. Indexes must beactive in order to search them. Inactive indexes will not be usable during the search process.
If the dtSearch agent encounters a network-related error during thebuild process, it will execute up to three retry attempts at 20 secondintervals.

Relativity | Admin Manual - 242
Full Build Option
Activate this index upon completion if checked will activate the index once created. Compress this index upon completion if checked will compress the index once it has been
created.
When you reindex a new version of a document that you had previously indexed, dtSearch marks theinformation about the old version of the document as obsolete but does not remove it from the index.Compressing an index removes this obsolete information and also optimizes the index for fastersearching.
If you compress the index outside of Relativity it cannot be used inRelativity versions 6 and greater.
Use the compression function available in Relativity to perform thistask.
Click OK to build your index. If you did not select the checkbox in the build pop-up, click Activate in theSearch Index Console. The index will not activate if there are errors. By clicking Activate the indexbecomes available in the Search drop-down.
Search Index Console

Relativity | Admin Manual - 243
Once an index has been activated, you can deactivate it by clicking Deactivate. This will remove theindex from the Search list drop-down but not remove it from the database.
Index Deactivate
Clicking Compress Index brings up the following message:
Compress Index
n Activate this index upon completion when checked will activate the index when the com-pressing process is complete.
26.2.2 Auto-Recognize Date, Email and Credit Card
The Auto-Recognize Date, Email and CC’s yes/no option on the dtSearch index reads documents andinterprets within the data various formats of dates, email addresses and credit card numbers. Thisallows you to find variations on these formats.
Auto-Recognize is a powerful tool, but please note that enabling this feature will impact the speed ofthe creation or updating of an index.

Relativity | Admin Manual - 244
26.2.2.1 Dates
Date recognition looks for anything that appears to be a date, using English-languagemonths(including common abbreviations) and numerical formats. Examples of date formats that arerecognized include:
January 15, 2006 15 Jan 06 2006/01/15 1/15/06 1-15-06 The fifteenth of January, two thousand six
To search for a date, put "date()" around the date expression or range.
26.2.2.2 Email Addresses
Email address recognition looks for text that follows the syntax for a valid email address (example:[email protected]). This makes it possible to search for a specific email address regardless of thealphabet settings for the@ and . characters, as well as any other punctuation that may be present inan email address. Also, this makes it possible to use the word listing functions in dtSearch toenumerate all email addresses in a document collection.
To search for an email address, put "mail()" around the address. The * and ? wildcard expressions aresupported inside the () marks. Examples:
mail([email protected]) mail(sa*@dtsearch.com)
26.2.2.3 Credit Card Numbers
Credit card number recognition looks for any sequence of numbers that appears to satisfy the criteriafor a valid credit card number issued by one of themajor credit card issuers. Credit card numbers arerecognized regardless of the pattern of spaces or punctuation embedded in the number. Examples:
1234-5678-1234-5678 1234567812345678 1234 5678 1234 5678
Numerical tests used by credit card issuers for card validity are used to exclude sequences of numbersthat are not credit card numbers. However, these tests are not perfect, and thus the credit cardnumber recognition featuremay pick up some numbers that are not really credit card numbers.
To search for a credit card number, put "creditcard()" around the number. Example:
creditcard(1234*)

Relativity | Admin Manual - 245
26.3 Dictionary
After building your dtSearch index, a Dictionary Search option is available. The Dictionary Searchallows you to search the index for a specific term, see the total occurrences of the term and thenumber of documents containing it.
To launch the Dictionary Search, click theDictionary link next to the Keywords textbox.
Dictionary Link
For more information, refer to the Relativity Searching Manual.
26.4 Relativity Analytics
Relativity offers conceptual searching functionality through Relativity Analytics.
26.4.1 What is Conceptual Searching?
Conceptual searching works with concepts instead of keywords. Unlike traditional search engines,indexing is based on co-occurrences of words and recognizes ideas and concepts between documents.The supporting technology is themathematically based latent semantic indexing (LSI).
There are no pre-established word lists, dictionaries or linguistic techniques such as sentencestructures. Relativity Analytics is language-independent and self-training. The search technology“learns” all it requires from material selected for searching. Not only can it identify, classify and sortinformation rapidly, it can find relevant documents that other search techniques miss.
26.4.2 How Can I Use Relativity Analytics?
There are several ways to use Relativity Analytics:
Conceptual term searching allows you to enter a block of text and return conceptually cor-related records.
Keyword expansion shows words that are conceptually correlated to a submitted word or high-lighted text.
Similar document detection identifies groups of highly correlated documents and displaysthem as related items in Relativity.
Submit selected concepts returns conceptually correlated documents based on a selection oftext.
Find similar documents returns conceptually correlated documents based on an entire doc-ument.
Categorization finds similar documents based on a set of example documents. Clustering groups conceptually similar documents, without the need for example documents.

Relativity | Admin Manual - 246
These tools are documented in the Relativity Searching Manual and theRelativity Analytics Manual.
26.4.3 Creating a Relativity Analytics Index
There are two types of Relativity Analytics indexes:
Search Indexes can be used to search for keywords and concepts, and to find related doc-uments based on words, phrases or entire documents. Search indexes are also used for clus-tering, which is the automated method of document categorizing by concept.
Category Indexes are used to categorize large groups of documents based on a fewmanuallychosen examples that represent that concept.
To create a new index, go to the Search Index tab and click New Analytics Index.
New Analytics Index button
The New Search Index Form appears, with required fields in orange and optional fields in gray.

Relativity | Admin Manual - 247
Search Index Options
Name is the search index name. This is used as the display name in the search drop-down orwhen right clicking on the document viewer.
Order is the number that represents the position of the index in the search index drop-down.The lowest-numbered index is at the top. Items that share the same value are sorted in alpha-numeric order.
Index Type determines what type of index you create: Search or Category. By default, this is setto Search.
Maximum Conceptual Highlight Terms controls howmany conceptually related terms are high-lighted on each hit document, by default this is set to 10. Recommended range is between 1and 100.
o Only terms with a 50% or higher correlation are highlighted Dimensions determines the dimensions of the concept space into which documents will be
mapped when the index is built; more dimensions increase the conceptual values applied to doc-uments and refine the relationships between documents.
A larger number of dimensions can lead to more nuances due to moresubtle correlations that the system detects between documents.However, the trade-off is that higher dimensionality requires moreresources from the Relativity Analytics server, especially RAM memory.Based on our research, higher dimensionality has a diminishing returnon results once you exceed 300 or more dimensions.
The default setting is 100 dimensions.
Number of Processes is the number of processors on the Relativity Analytics server that will beused to create the index.

Relativity | Admin Manual - 248
Number of processes should not surpass the number of processors onthe Analytics server. Always take advantage of multiple processes
when indexing more than 1,000,000 documents.
Batch Size is the number of documents inserted into the Analytics search or categorizationengine at a time. The default value is 1000.
Send Email Notification upon Completion or Failure allows you to send email notificationswhen your index population fails or completes; here you will enter the email address(es) of therecipient(s)
o If you would like to send the email to multiple recipients, separate the entries with a sem-icolon.
Training Set is the document set from which the Relativity Analytics engine will learn word rela-tionships to create the index. Select any public saved search. It is recommended that you onlyreturn the Full Text field in the search. The default search is <Default Training Set>. This searchwill return only the extracted text field of all documents where the size of the field is greater than0mb and less than 2mb. This ensures that empty documents and documents that might havemany concepts are not included in training set. Documents without text cannot be indexed. Doc-uments that havemultiple concepts can distort search results.
Searchable Set is the document set that will be searched using the index. Select from any work-space saved search. The default is <Default Searchable Set> which returns only extracted text forall documents.
Minimum Coherence Score is the setting that is used when determining similar documents forthe related items pane. Increasing this number requires that documents in the related itemssimilar pane have a close similarity. Decreasing this number allows for a wider range of con-ceptually similar documents.
Concept Stop Words determines the stop words for the conceptual index. The stop words aredisplayed in a textbox. You can add or remove stop words from the list.
dtSearch Noise Words determines the noise words for the index’s keyword dtSearch index. Thenoise words are displayed in a textbox. You can add or remove noise words from the list.
There are three buttons available at the top and bottom of the form:
Save records the index in Relativity using the entered settings and takes you to the SearchIndex Details Page.
Save and Back establishes the index in Relativity using the entered settings and takes you toindex list.
Cancel aborts the creation of the index. All entered information will be discarded.
Once you have entered your settings, click Save to bring up the Index Details page.

Relativity | Admin Manual - 249
Index Details Page
There are six buttons available at the top and bottom of the form:
Edit allows you to edit the index information. Delete removes the index from Relativity. Back redirects you to the index list. Refresh updates the page. Edit Permissions allows you to establish rights for the index. View Audit displays the index’s audit history.
TheManage link is also available in the Advanced Options section. This link redirects you to theContent Analyst indexmanagement application. Please visit their documentation to understand thefeatures and functionality. The only options that should be edited are filters.
The index has been established, but not populated or ready for use. From the Search Index DetailsPage, you will be able to manage the index through the search index console.

Relativity | Admin Manual - 250
Search Index Console
The initial options in the search index console will be:
Full Population adds all documents from the training set and searchable set to the ready-to-index list.
Refresh Page refreshes the page, allowing you to check the status of the population.
Upon clicking the Full Population button, the red Stop Population button becomes available inthe console.
Stop Population Available
Stop Population stops a full or incremental population. After the Stop button is click, any doc-ument with a status of Populated is indexed. After that operation completes, the process stops.A partial index is not able usable. To repair your index, perform a Full Population to purge theexisting data. You can also delete the index from Relativity entirely. Resolve any errors duringthe population by clicking Resolve Errors
Only one index can be populated at a time. If you submit more than
one index for population, they will be processed in order of submission.

Relativity | Admin Manual - 251
Population Status display
When the documents have populated the list, the status is listed as Population: Populated. This maytake some time, depending on the size of the training set. You can occasionally hit Refresh to updatethe status and see the number of items still pending.
After the population is complete, the console provides two newoptions:
Build Index Available
Incremental Populationadds any new documents from the training set and searchable set tothe ready-to-index list.
Build Index takes the documents on the ready-to-index list and indexes them. The processgoes through the following stages:
o STARTINGo COPYING_ITEM_DATAo FEATURE_WEIGHTINGo COMPUTING_CORRELATIONS

Relativity | Admin Manual - 252
o INITIALIZING_VECTOR_SPACESo UPDATING_SEARCHABLE_ITEMSo OPTIMIZING_VECTOR_SPACE_QUERIESo FINALIZING
Once the index has been built, there is a new option available:
Enable Queries Options
Enable Queries loads the index to server memory and prepares it for use.
If the Relativity Analytics server is restarted, you need to re-enable
queries.
After you have enabled queries for the workspace, you will need to activate it.
Activatemakes the index available for users. Specifically, it adds the index to the Search Withdrop-down on the Documents tab and the right-click menu in the viewer. Relativity Analyticsindexes must be active in order to be searchable.
After activating the index, you will have three new options:

Relativity | Admin Manual - 253
New Console Options
Disable Queries will make the index inaccessible to users. Identify Similar Documents is an automated process that analyzes all the documents in the
searchable set of the index and identifies groups of conceptually similar documents. The level ofsimilarity required is based on theMinimum coherence score set in the index information page.These similar documents then appear in the related items pane with the icon. To indicatethese similar documents three fields are created. Removing these fields from the database willremove the icon from the related items pane. These fields are:
o <Index Name>-IsMain is a Yes/No field to indicate the Yes on themain conceptual doc-ument in a similar group. The coherence score indicates similarity to this document.
o <Index Name>-Score is a decimal field that indicates the coherence value to themain doc-ument. The higher the number themore conceptually related the document is to themain document. The related items pane defaults to show the higher coherence scoreditems at the top of the list. The score of 1.00 is an exact duplicate and .95 is the default forthe lowest score.
o <Index Name>-SimilarDocs is a fixed-length field populated with the document identifierof themain document for the group. This repeated document id is the related value forthe group.
Detailed Status will display a more in-depth index details. This information can be helpful whenfinding issues with an index.
26.5 Adding New Documents to an Existing Search Index
If you add new documents to the training or searchable set used to create your search index, youmust update your index to include these new documents.
Go to the search’s index console.

Relativity | Admin Manual - 254
Search Index Console
Click Incremental Population to add the new documents to the ready-to-index list. After thedocuments all have been populated, click Disable Queries, then Build Index to re-index thedocuments, then Enable Queries.
26.5.1 Creating a Category Index
In addition to creating search indexes, you also can create category indexes. Category indexes are usedto categorize large groups of documents based on a few examples that represent that concept.
For example, early in your review you may not know all the documents in your workspace. However,you may understand the key concepts of the workspace and can find a few representative examples ofthese concepts. The categorization process takes these example documents and finds conceptuallycorrelated documents in the rest of your workspace.
If you have little knowledge of your workspace data and would likeRelativity Analytics to examine your data and define categories itself –
without examples – use the search index’s clustering feature.
Before creating your category index, you need a few fields. The field names below are just a suggestion– you can name your fields something more appropriate to your case.
Categorization exampleo Type = yes/noo Purpose – to establish the document as an exemplar of a category
Categorization conceptso Type =multiple-choice listo Purpose – to display the key concepts of your workspace; populate the choices in this
field. Make sure you have selected only one category per document.

Relativity | Admin Manual - 255
Categorization ranko Type = decimalo Purpose – to show how correlated a hit document is to the category’s example
Once you’ve created your categorization fields and coded information in the example and conceptfields, you can create your index. To create new category index, click theNew Analytics Index button.
New Analytics Index Button
To create a search index, select Category from the Index Type drop-down.
The NewAnalytics Form appears, with required fields in orange and optional fields in gray.
New Analytics Form
Name is the index’s name. Index Type is the type of index to create. Select Category to create a category index.

Relativity | Admin Manual - 256
Dimensions is the number of dimensions used to build the index.
A larger number of dimensions can lead to more nuanced results dueto more subtle correlations that the system detects betweendocuments.
However, the trade-off is that higher dimensionality requires moreresources from the Relativity Analytics server, especially RAM memory.Based on our research, higher dimensionality has a diminishing returnon results once you exceed 400 or more dimensions.
The default setting for dimensionality is 100 dimensions.
Number of Processes is the number of processors on the Relativity Analytics server used tocreate the index. Generally this should remain the default of 1.
Number of processes should not surpass the number of processors onthe Analytics server. Always take advantage of multiple processeswhen indexing more than 1,000,000 documents.
Batch Size is the number of documents inserted into the Analytics search or categorizationengine at a time. The default value is 1000.
Send Email Notification upon Completion or Failure to allows you to send email notificationswhen your index population fails or completes. Enter the email address(es) of the recipient(s)
o If you would like to send the email to multiple recipients, separate the entries with a sem-icolon
Training Set is the document set from which the Relativity Analytics engine will learn word rela-tionships to create the index. Select any saved search. It is recommended that you only returnthe Full Text field in the search. The default search is <Default Training Set>. This search willreturn only the extracted text field of all documents where the size of the field is greater than 0mb and less than 2mb. This ensures that empty documents and documents that might havemany concepts are not included in index. Documents without text cannot be indexed. Doc-uments that havemultiple concepts can taint search results.
Searchable Set is the document set that will be searched using the index. Select from any work-space saved searches. The default is <Default Searchable Set> which returns only extracted textfield for all documents.
Example Indicator Field is the field that will mark a document as an exemplar of a category.Choose your example field created above.
Category Field is a field that contains the desired conceptual categories. Choose your multiple-choice list created above. A document can have only one category selected.
Category Rank Field is a field that shows the correlation of conceptual hit to its example.Choose your decimal field created above.
Minimum Score is theminimum percentage a document must have to the exemplar in order tobe categorized.

Relativity | Admin Manual - 257
Maximum Categories/document determines howmany categories a document can appear inconcurrently.
o In someworkspaces, a document may meet the criteria to be included in more than themaximum number of categories. If that maximum is exceeded, the document is cat-egorized in themost conceptually relevant categories.
Concept Stop Words determine the noise words for the conceptual index. The stop words aredisplayed in a textbox. You can add or remove stop words from the list.
There are three buttons available at the top and bottom of the form:
Save establishes the index in Relativity using the entered settings and takes you to the searchindex details page.
Save and Back establishes the index in Relativity using the entered settings and takes you toindex list.
Cancel aborts the creation of the index. All entered information is discarded.
Once you have entered your settings, click Save to bring up the Index Details page.
Index Details Page
There are six buttons available at the top and bottom of the form:
Edit allows you to edit the index information. Delete removes the index from Relativity. Back redirects you to the index list.
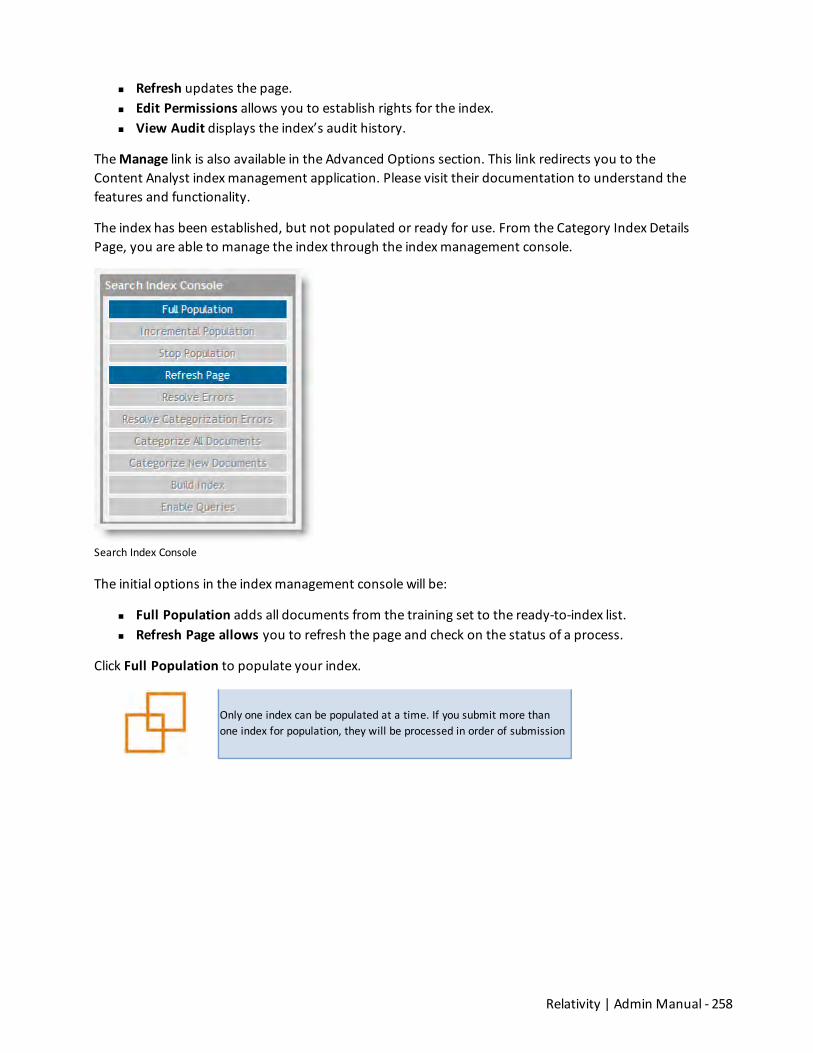
Relativity | Admin Manual - 258
Refresh updates the page. Edit Permissions allows you to establish rights for the index. View Audit displays the index’s audit history.
TheManage link is also available in the Advanced Options section. This link redirects you to theContent Analyst indexmanagement application. Please visit their documentation to understand thefeatures and functionality.
The index has been established, but not populated or ready for use. From the Category Index DetailsPage, you are able to manage the index through the indexmanagement console.
Search Index Console
The initial options in the indexmanagement console will be:
Full Population adds all documents from the training set to the ready-to-index list.n Refresh Page allows you to refresh the page and check on the status of a process.
Click Full Population to populate your index.
Only one index can be populated at a time. If you submit more thanone index for population, they will be processed in order of submission

Relativity | Admin Manual - 259
Populated Index Display
When the documents have populated the list, the status is listed as Population: Populated. This maytake some time, depending on the size of the training set. You can occasionally hit Refresh to updatethe status. The Population process is complete when the Total number equals the Populated number.
Build Index Option
Note the options for resolving errors:
Resolve Errors attempts to resolve errors encountered during the index building process. Resolving Categorization Errors attempts to resolve an errors encountered during the cat-
egorization process.
After populating the items to the ready-to-index list, there is a new option:

Relativity | Admin Manual - 260
Build Index takes the documents on the ready-to-index list and indexes them. The processgoes through the following stages:
o STARTINGo COPYING_ITEM_DATAo FEATURE_WEIGHTINGo COMPUTING_CORRELATIONSo INITIALIZING_VECTOR_SPACESo UPDATING_SEARCHABLE_ITEMSo OPTIMIZING_VECTOR_SPACE_QUERIESo FINALIZING
Enable Queries Option
Once the index has been built, there is a new option available:
Enable Queries allows you to categorize the documents.

Relativity | Admin Manual - 261
Categorize Document Options
Enabling queries opens four new options:
Categorize All Documents categorizes all documents in a searchable set based on the taggingof examples and categories in the training set.
Categorize New Documents categorizes any new documents added using incremental pop-ulation.
Disable Queries disables categorization features. Detailed Status displays a more in-depth index status.
26.5.2 Defining Categories and Examples
Start utilizing categorization by defining your categories and example documents. To work with thesefields, build a Categorization Layout. For more information on building layouts, see the sectionLayouts.
The results of the categorization process are only as good as the categories and example documentsyou choose. Categories should represent a specific workspace issue or workspace designation.
The best example documents are concise, clearly representing a single aspect of their category.Extremely short documents are poor examples, because they generally do not contain enoughinformation to act upon. Long and broad documents are equally poor. A broad and unfocusedexample leads to broad and unfocused categorization hits. Redundant examples are unnecessary.
26.5.3 Categorizing your Documents
Once you have defined your categories and examples, go to the categorization index’s indexmanagement console.

Relativity | Admin Manual - 262
Categorize All Documents Options
If you are categorizing your documents for the first time, select Categorize All Documents.
Once the documents have been categorized, the resulting related documents can be accessed byclicking on the category in the choice tree, or by searching for the choice value. It might also be helpfulto setup a view of Categorized documents and their results.
For more information on viewing categorization results, see the Relativity Searching Manual. You canfind the Relativity Searching Manual on the kCura Support site (www.kcura.com/support) or byclicking the “?” button on the documents tab.
Relativity Searching Manual
26.5.4 Adding Documents to a Category Index
If you have added documents to your searchable set, you can simply click Categorize All Documents.
If you have added new documents to your training set, your steps are:
1. Run an incremental population2. Disable queries3. Build the index4. Enable queries5. Categorize all documents

Relativity | Admin Manual - 263
If you’re not sure your new documents are in the searchable set, training set, both, or neither, use thefollowing steps:
1. Run a full population2. Disable queries3. Build the index4. Enable queries5. Categorize all documents
26.5.5 Adding New Categories to a Category Index
If you add new categories, you can re-categorize your documents to include these changes. With newcategories added and exemplars tagged, take the following steps:
1. Run an incremental population2. Disable queries3. Build the index4. Enable queries5. Categorize all documents
Re-categorizing all documents will delete all existing categorizationresults.
27 LiveNote IntegrationRelativity is able to link with a LiveNote web database to view LiveNote case workspace transcripts. Youwill need LiveNote’s viewer software installed to view transcripts.
To add your transcripts to your workspace, you first must create a new external tab. For moreinformation about creating a tab, see the section Tabs.
Enter information:
Name = LiveNote Tab Order = the desired order Link Type = external Link = contact Support at [email protected] for the correct URL
By default, newly created tabs are visible only to systemadministrators. This applies even if the creating user’s group hasaccess to see all other tabs. Go to workspace permissions to assign therights to view the new tab.
Once you have correctly created your link to LiveNote, you are able to view all workspace transcripts.

Relativity | Admin Manual - 264
LiveNote Transcript Display
Clicking on a transcript name launches that transcript in the LiveNote viewer.
Live Note Transcript Viewer
28 Admin Mode DetailsThe first four tabs of the admin mode (Client, Matters, Users, and Groups) were covered in earliersections of this document. The remaining admin mode tabs are:

Relativity | Admin Manual - 265
Views Choices Agents Errors Tabs Image QueueManager OCR QueueManager Production QueueManager MotD User Status Relativity Script Library Assemblies Resource Groups Servers License
28.1 Views
Views work the sameway in admin mode as they do in workspaces. They are customizable lists ofitems within Relativity – essentially saved queries that control three things:
The items displayed on the list, based on a set of criteria The fields of information returned relating to the displayed items The sort order of the items
To work with admin mode views, go to the views tab in admin mode.
The types of admin mode views are:
User creates a list of users. Group creates a group of lists. View creates a list of admin mode views. Client creates a list of client views. Matter creates a list ofmatter views. Choice creates a list of admin mode choices. Workspace creates a list of workspaces. Error creates a list of errors. Tab creates a list of admin mode tabs.
These views are built in the sameway as workspace views. For more information about views, see thesection Views.
28.1.1 System Views
Any time you see a list of items in Relativity, it is a view. There are several system views. Admin modesystem views can be divided into two categories:
Page detail views:

Relativity | Admin Manual - 266
MattersOnClientPage controls which linked matters’ fields are displayed on the client detailspage.
UsersOnClientPage controls which linked users’ fields are displayed on the client details page. UserViewRenderer controls which users fields are displayed on the group details page. GroupViewRenderer controls which group fields are displayed on the user details page.
Pickers:
Pickers have special restricting functionality within Relativity. You canuse picker views’ criteria to control which items are available on thepicker. For example, you can set up Relativity so that only clients withan active status are available for linking to users and matters. Toaccomplish this, edit the criteria for the “ClientsOnPicker” view toinclude status = active.
ClientsOnPicker controls which client fields are displayed when selecting a client on the picker.o The client picker is available from the newmatter or new user form.
UsersOnPicker controls which user fields are displayed when adding a user to a group.o The user picker is available from the group details page.
GroupsOnPicker controls which group fields are displayed when adding groups for a user.o The group picker is available from the user details page.
WorkspacesOnPicker controls which workspace fields are displayed when selecting a templateworkspace on the newworkspace form.
MattersOnPicker controls which matter fields are displayed when selecting a matter on the newworkspace form.
28.2 ChoicesChoices, in admin mode, are predetermined values applied to pre-workspace objects. To workwith admin mode choices, go to the choices tab in admin mode.
The types of admin mode choices are:
Workspace status Client status File location Matter status User type
These choices work the sameway as workspace choices. For more information on how choices work,see the section Choices.
28.3 Agents
Agents are process managers that run in the background of Relativity. The Agents tab (Admin Mode)allows you to see which agents are running in your environment and the status of those agents.

Relativity | Admin Manual - 267
Agents Display
You can click on an agent name to disable the agent or change the interval at which it runs, inmilliseconds. You may also activate disabled agents by clicking the Restart Disabled Agents button.
Or click on the Agent name link for more options: Click Stop to disable the agent or Start to restart it.In the settings area, you can change the agent interval.

Relativity | Admin Manual - 268
start Agents Display
Start allows you to restart the agent. Stop allows you to disable the agent. Save allows you to save any changes made to the agent. Cancel aborts any changes. All entered information will be discarded. Interval allows you to change the agent interval (milliseconds).
28.3.1 Workspace Statistics Manager
One special agent worth noting is theWorkspace Statistics Manager.
TheWorkspace Statistics Manager agent must be enabled for accurate billing information to becollected. Accordingly, if theWorkspace Statistics Manager has been disabled for 7 concurrent days,Relativity access becomes restricted.
Once access has been restricted, only System Administrators are able to access the system. Otherusers are locked out. This limited access allows SAs to log into Relativity and enable the agent.
Once the agent has been enabled and billing data begins recording, access returns to normal.
Given the dramatic impact of this feature, many steps are taken to clearly present the situation toSystem Administrators.
28.3.1.1Warning One -Persistent Messaging
If theWorkspace Statistics Manager is disabled for more than 24 hours concurrently, SystemAdministrators are presented with a persistent message at the bottom of their Relativity window:
“TheWorkspace Statistics Manager agent has been disabled for more than 24 hours. You haveless than <x> days to enable the agent before Relativity access will be disabled.”
The value of <x> represents the number of days until Relativity becomes inaccessible.
28.3.1.2Warning Two - Email
To ensure that there is no ambiguity, kCura sends a warning email 48 hours before the systembecomes unavailable and again 24 hours before the system becomes unavailable. Themessage goesto:

Relativity | Admin Manual - 269
Relativity Sales ([email protected]) Billing contacts at your organization
o Contact [email protected] to set or update your billing contact
28.4 Errors
The Errors tab (Admin Mode) shows errors that have occurred in the Relativity environment. The fieldsare filterable, so you can find specific types of errors quickly and efficiently.
Note that the errors tab is view-driven, so you should customize the tab in any way that is beneficialfor your team.
The fields available for the errors view are:
Artifact ID is the identifier of the error. Each error gets its own identifier. Message describes the error and is themessage the user receives. Timestamp is when the error occurred. Created By is the user who received the error. Error Source is the section of the application where the error occurred. Server is the server on which the error occurred. URL is the URL the user was at when the error occurred.
28.5 Tabs
The tabs tab in admin mode controls admin mode tabs. The functionality of the tabs tab is the same asworkspacemode tabs. For more information, see the section Tabs.
28.6 Image QueueManager
The Image Queue shows all current imaging jobs running in your environment. To access, click on theImage Queue tab in Admin Mode.
Image Queue Display
All active imaging jobs are displayed.
At the bottom of the list, there are two options:

Relativity | Admin Manual - 270
Remove Imaging Request cancels the imaging job. Change Priority changes the priority of the imaging job. The options are high or low. High-prior-
ity jobs run before low-priority jobs. Within priority status, jobs are run in the order they weresubmitted.
Imaging Options
28.7 OCR QueueManager
The OCR QueueManager tab allows you to view all submitted OCR jobs in the environment to checktheir status, priority and the workspace they can be found in. The OCR QueueManager tab isaccessible only in Admin mode.
Selecting this tab brings you to the default OCR Queue view. This list displays all OCR jobs that havebeen submitted and have not yet been successfully completed.
OCR Queue Manager Tab
You can view the following fields:
Workspace is the name of the workspace containing the OCR set. OCR Set Name is the name of the OCR set that has a job running. Artifact ID is the OCR set’s artifact ID. Status displays the status of the submitted job; this field will be updated as the OCR job prog-
resses. Priority is the priority of the OCR set job. This is set to 100 by default.

Relativity | Admin Manual - 271
Submitted Date is the date and time at which one of the two actions was taken:o Run was clicked on the OCR Set consoleo Resolve Errors was clicked on the OCR Set console when the set was completed with
errors.
The order in which jobs are sent to the OCR engine is first by priority, then by submitted date. You canchange the priority of the OCR job by clicking the Change Priority button in the bottom left of theview.
Change OCR Priority
Clicking this button allows you to specify the new priority for an OCR job in the queuemanager.Entering a new value in the Priority field and clicking the Update button changes the priority in thequeue.

Relativity | Admin Manual - 272
28.8 Production QueueManager
The production queue shows all current production jobs running in your environment. To access theproduction queue, click on the Production Queue tab in Admin Mode.
Production Queue Display
The Production Queue tab displays any in-progress productions. If there are several productionsqueued, you can use the Change Priority button to set a production’s priority level. Only oneproduction is run at a time.
28.9 Message of the Day (MotD)
Themessage of the day is a message (MotD) displayed to all users when they log into Relativity. MotDis most commonly used to inform users of planned system maintenance.
To activate or change themessage of the day, click on theMotD tab. To edit the text of themessage,click Edit. Enter your message and click Save.
Click the checkbox ShowMessage of the Day? to activate theMotD.
MotD Display
28.10 User Status
You can obtain information about users currently logged in to Relativity from the User Status tab,which is available in both Admin and Workspacemodes. Themode determines the functionality andinformation available on the User Status tab as follows:
Admin Mode: The tab lists users currently logged into Relativity. In this mode, you can sendweb pagemessages, and email messages to users listed on the tab. You can also force the logout of these users from the system.
Workspace Mode: The tab lists the subset of users who are accessing the current workspace. Inthis mode, you can send web pagemessages, and email messages to users listed on the tab.

Relativity | Admin Manual - 273
28.10.1 Send Messages
In both Admin and Workspacemodes, you can send web pagemessages to one or more users withthemass send message feature. Use the following steps to send a message:
Select the checkbox next to the names of the recipients.
User Status Page
At the bottom of the page, select Send message from the drop-down box, and click Go. TheWeb Page dialog box is displayed.
Web Page Dialog Box
Enter the text of your message in the popup, and click Send message. The user will receive aweb pagemessage that contains your text as illustrated below.

Relativity | Admin Manual - 274
Web Page Message
You can also send an email message to a single recipient by clicking the email address link. Your nativeemail application will open, so you can enter the text for your message.
Note: You are identified as the sender of the email messages based on your login information.
28.10.2 Force Users to Log Out
In Admin mode, you can force users to log out of Relativity from the User Status tab.
Note: Any unsaved changes made by users will be lost, when you use the Force Log Out option toterminate their sessions.
Use the following steps to log users out:
Select the checkbox next to one or more user names.
User Status Tab
At the bottom of the page, select Force Log Out from the drop-down box, and click Go. Click OK on the confirmation message. The users will be logged out of Relativity.

Relativity | Admin Manual - 275
28.11 Script Library
Within Relativity there is a library of commonly used scripts that can be run at any time. By defaultthese scripts are secured and are not available for editing.
For more information on scripts and the library, see the section Scripts.
28.12 Assemblies
Assemblies, also known as event handlers and syncs, are used to apply special rules to coding forms .These work similar to scripts, as in once loaded they can be checked out and attached to either usercreated dynamic objects or documents within a workspace.
To add a new assembly, click the Assembly tab in Admin Mode and then click New Assembly.
New Assembly Button
The NewAssembly Information form appears, with required fields in orange and optional fields in gray.
New Assembly Details
The NewAssembly from fields are:
Assembly File is used to reference the file to be uploaded to Relativity.o The assembly file is stored in the database central repository.o An assembly can be added to a workspace document or user created dynamic object via
the object type. The action will be executed on either a Save or Save and Next.

Relativity | Admin Manual - 276
There are two optional fields you can populate with any beneficial information.
Keywords Notes
There are four buttons appearing at the top of the form:
Save establishes the assembly in Relativity and displays the assembly information page. Save and New establishes the assembly in Relativity and displays a new assembly page. Save and Back establishes the assembly in Relativity and takes you to the assembly page. Cancel aborts the assembly creation. All entered information is discarded.
28.13 Resource Groups
Resource Groups allow you to create a set of resources such as file repositories and servers toassociate with your workspace. You can create a group for any purpose - to group resources based onlitigation matter or location; for example, you may have aWest Coast and East Coast group set up tomanage resources specific to these regions.
To create a Resource Group click New Resource Group.
There are four buttons at the top of the form:
Save establishes the Resource Group in Relativity and displays the Resource Group on the infor-mation page.
Save and New establishes the Resource Group in Relativity and displays a newResource Grouppage.
Save and Back establishes the Resource Group in Relativity and takes you back to the savedResource Group page.
Cancel aborts Resource Group creation. All entered information is discarded.
New Resource Group Information
Complete the following to create a newResource Group:
Resource Group information

Relativity | Admin Manual - 277
Name is the name of the Resource Group. For identification purposes, this should reflect thebasis on which the group was created. This must not exceed 50 characters.
Other
The following optional fields are useful in further identifying the group and allowing you to morequickly filter for it in a view.
n Keywordsn Notes
A group is not available for association with a workspace until you add resources to it. Clicking Save onyour newResource Group modifies the page to include new settings for adding these resources.
Resource Group Tab
Add the following to make your group functional:
n Agent Serversn SQL Serversn File Repositories
Please note the following:

Relativity | Admin Manual - 278
The Primary SQL Server is added to all Resource Groups upon first time upgrade and on firsttime installation.
On Workspace creation, only the SQL Servers associated with the selected Resource Group areavailable for Database Location field.
You are unable to remove a SQL Server from a Resource Group if the SQL Server is associatedwith aWorkspace in that Resource Group.
You cannot change the SQL Server Database Location associated with aWorkspace once it iscreated.
You cannot change the Resource Group associated with aWorkspace unless the currentlyselected SQL Server is associated with the newResource Group.
When selecting a Resource Group on theWorkspace Details Page, only Resource Groups thathave at least one File Repository and one SQL Server are available.
28.14 Servers
This tab shows you a list of all instances of web servers, agent servers, and SQL servers available on thenetwork through an auto-registering agent. All servers in this view are available to add to a ResourceGroup.
Servers View
Note that the following project types all register themselves to the Servers table upon startup:
Agent Distributed Web Web API Services API
For more information on web server registration, please contact Support at [email protected].

Relativity | Admin Manual - 279
28.15 License Tab
The License tab provides you with the functionality required to obtain or renew your Relativity license.This process involves generating a license request that you send to kCura Client Services, and thenapplying the activation key for your official Relativity license. The License tab also displays informationabout your current license, including the instance name, expiration date, number of seats, and type.
License Details
See the Relativity Client Licensing Guide for information about requesting and activating a license keyfor your installation.
Note: If you are deploying a new instance or upgrading to version 6.9, Relativity activates a 7-day triallicense that you can temporarily use until obtaining your official license key.
28.15.1 License Expiration and Error Messages
As a system administrator, you will be notified by email and alerts, when your license is going to expire.Relativity will begin sending daily email notifications 30 days prior to the expiration date of yourlicense, and it will display alerts during that same timeframe.
License Alert
You enter a grace period if you have not renewed your Relativity before the expiration date. Itprovides you with an additional 7 days to complete the renewal process. In Relativity, the License tabwill display the expiration date for the grace period, as well as your contractual seating and license typeinformation.
After the expiration date for your trial or grace period, Relativity will display an error message whenusers attempt to access the system. Administrators will have access only to the License tab, whichprovides functionality for obtaining an activation key.
29 BatchingRelativity’s batching feature is intended to bring structure to the often-complex task ofmanaging alarge-scale document reviewwith multiple reviewers. Batches can automatically generated or be

Relativity | Admin Manual - 280
created manually.
Relativity can split a static set of documents into batches based on administrator-set criteria, and thenallow users to check out these batches, assigning themselves documents.
This automated document assignment reduces the chances of accidental redundancy in the reviewprocess, increases review organization, and improves progress tracking.
29.1 Adding Batch Sets and Batches
To add a new batch set, go to the Batch Sets tab and click New Batch Set.
New Batch Set Button
The NewBatch Set Information form appears, with required fields in orange and optional fields in gray.

Relativity | Admin Manual - 281
New Batch Set Form
There are four required fields to create a batch set.
Batch Set Information:
Name is the name of the batch set.
If you are performing a multi-stage review with multiple batch sets perphase, be sure to include the phase name in the batch set name. Thishelps you search for information within a specific phase. Searchingbatch fields is covered later in this Section and in the RelativitySearching Manual.
Maximum Batch Size is themaximum number of documents in one batch. Batch Prefix sets the prefix for the batch numbering. Batch Data Source is the saved search whose documents you would like to batch. If the saved
search references a dtSearch or Relativity Analytics index, that indexmust be active. Batch Unit Field is an optional grouping mechanism, allowing you to group similar documents
in the same batch. Documents with different values in a batch unit field are not included in thesame batch.

Relativity | Admin Manual - 282
Family Field allows you to select your workspace group identifier. Documents in a family groupare not split across batches.
Reviewed Field is an optional yes/no field that allows you to select from any Yes/No, Single-Choice, or Multi-Choice field from the drop-down. Based on your selection, a tally is kept of howmany documents in the batch have been reviewed. The Batch Set monitors the field you specifyas the Reviewed field and increments a count for each document in the batch that has beencoded with a value for that field.
A common batch unit field is custodian however any non-system singlechoice, multi-choice or fixed length text field may be used.
Auto Batching:
Auto Batch enables the system to automatically generate batches.o Disabled is the default, and allows for standard manual batch processing.o Enabledwill automatically generate batches according to the below settings.
Minimum Batch Size is only available if Auto Batch is set to enabled. This is the smallest pos-sible number of documents in a batch.
Auto Create Rate is only available if Auto Batch is set to enabled. This represent how often (inminutes) the system will attempt to create batches.
There are two optional fields you can populate with any beneficial information:
Other:
Keywords Notes
There are four action buttons available at the top and bottom of the form:
Save establishes the entered information and displays the batch set details page. The batch setdetails page shows the saved information. From the details page, there are seven options:
o Edit allows you to edit the batch information.o Delete removes the batch set from Relativity.o Back takes you back to the Batch Sets tabs.o Edit Permissions allows you to establish rights for the Batch Set.o View Audit displays the Batch Set audit history.
Save and New establishes the entered information and launches a newBatch Set form. Save and Back saves the entered information and brings you back to the Batch Set list. Cancel aborts the creation of the batches. Any information entered before you hit cancel is not
saved.
The new batches are shown on the batch sets. Any reviewers with theability to see the batches tab - and rights to the batch set - are able to
see the batches.

Relativity | Admin Manual - 283
Batch Set Display
Batch Management Consoleo Create Batches creates the batches based on the entered settings. Created batches
shows on the bottom half of batch set’s details page.o Purge Batches deletes any batches associated with the batch set.
By clicking edit permissions, you are editing rights only for the selectedbatch set. By default, the tab is secured according to the caseworkspace-level batch set rights.More information on workspace permissions can be found in the
section Security Permissions.
Status: Status displays the current status of the batch; Pending, Processing, Error or finished
once a Batch Set has been Documents to be Batched is the remaining documents that do not meet theminimum
batch size. You will need to manually create a batch for these remaining documents. Last Successful Run is the date and time stamp of when the last successful batch was
run. Last Error Reported is the date and time stamp of when the last error was created.

Relativity | Admin Manual - 284
29.2 Editing Batch Set Information
To edit a batch set, go to the Batch Set tab. Click Edit next to the desired batch set.
Edit Batch Set Information
You also can click on the batch set name from the batch sets tab. Click on the batch set name, andthen click Edit to alter any batch set information.
Note that while you can make changes to a batch set at any time,created batches are not updated to include the new properties.
For example, say you have created batches with a batch size of 500,but reviewers found that too large. You would have to purge theexisting values, make any changes, then re-create the batches.
Any existing data in the original batch set would be lost when those
batches were purged.
29.3 Deleting a Batch
To delete a batch, go to the Batch Set tab. Select the checkbox next to the batch you want to delete.

Relativity | Admin Manual - 285
Batch Delete
In themass operations bar select Delete from the drop-down, and then click Go. A pop-upconfirmation message displays, click OK.
29.4 Checking Out Batches
All existing batches are shown on the Review Batches tab.
There are several ways to control which reviewers see which batches:
You can apply any views to the batches tab, creating any list of batches you’d like to see. Theseviews can be restricted.
Batch sets can be secured, allowing you to assign permissions to all batches in a batch set. Individual batches can be secured.
Conversely, you can keep the batches tab restricted so only workspacemanagers and administratorscan see the batches tab. In this model, an administrator or user with assign batch permissions wouldneed to check out batches to reviewers as needed.
There is a special permission found in the admin operations section ofthe security console called Assign Batches. Reviewers with this per-mission can assign batches to other reviewers. Reviewers without thispermission can only check out batches for themselves.
To check out batches, go to the Review Batches tab, find the batch you are interested in checking outand click Edit.

Relativity | Admin Manual - 286
Edit Batch Link
As an Administrator you will see the options below:
Admin Batch Options
Check In As Pending allows you to check the batch as pending for the assigned user. Check In As Completed allows you to check the batch in as completed for the assigned user. Reassign To allows you to assign the batch to another user.
Note that a System Administrator cannot check out batches using theMe link.
Reviewers with permissions to assign batches see the screen below and can only check out batches tothemselves. Clicking Check Out assigns the documents in the batch to the set reviewer. The Batch::Assigned To field contains that reviewer’s name.
Check Out Batch
29.5 Batch Fields
There are several fields that store values related to batches:

Relativity | Admin Manual - 287
Batch Set is the batch set to which the batch belongs. Batch is the batch name. Batch Status is the status of the batch. A batch may be:
o Blanko In progress, which means the batch has been checked outo Completed, which means the batch has been checked in as completed
Batch Unit is the optional grouping condition on the batch. Assigned To is the reviewer to whom the batch is checked out. Reviewed is whether the batch is reviewed. Batch Size is howmany records are in the batch.
29.6 Building Views for Checked-Out Documents
You can build views for a reviewer to access his or her checked-out documents.
For more details about creating a view, see the section Views.
In step 3 of creating a new view, conditions select Batch followed by the operator and then click theellipsis.
Ellipses Button
Clicking the ellipsis brings up the Batch Criteria Selector.
The fields available are:
Batch Batch::batch set Batch::assigned to Batch::status

Relativity | Admin Manual - 288
To create a simple view that shows the reviewer his or her checked-out documents, you could createthe following conditions:
Field = Batch::Assigned To Operator = is logged in user
Select Batch Criteria Display
However, you can make your conditions as simple or complex as your workspace’s workflow requires.
30 Object TypesThe Object Type tab allows you to add Relativity Dynamic Objects to your Relativity workspace.
30.1 What is a Dynamic Object?
Relativity Dynamic Objects are securable, custom, non-document objects within your workspace.These objects can be linked to documents and to each other – creating powerful custom applicationswithin your workspace.
For example, a custodian is a commonly tracked piece of information about a document. It istraditionally stored as one ofmany pieces of information about the document. Document AS00001has a custodian of John Smith – just like it has an email sent date of 06/09/09.
Document Object Display

Relativity | Admin Manual - 289
However, when you’re really working with a case, there’s a lot of information to remember about acustodian. What company did he or she work for? What was his or her role at that company? Did heor she havemore than one role? How involved is he or she in the case? Using Relativity’s dynamicobjects, you can create an object for custodians, tracking whatever information you would like foreach custodian.
Custodian Object Display
You can also connect the custodian object with the document object, so you can show the custodianinformation on a document.
You could even create another object for companies and connect it to custodians.
This is just one example of objects you can build in the system. You also could build objects to trackhow documents were processed, key dates within the system, depositions whatever else helps yourteam organize its data.
For more information see the Relativity Dynamic Objects workbook.
30.2 Adding an Object Type
To create an object type, switch to Admin Mode then go to theObject Type tab and click New ObjectType.

Relativity | Admin Manual - 290
New Object Type Button
The NewObject Types form appears, with required fields in orange and optional fields in gray.
New Object Type Form
There are two required fields for adding an object:
Name is the name of the object. Parent Object Type allows you to select the object type under which this object falls.
o Workspace sets the object as a child of the workspace. You still can connect this object toother objects. Child objects of workspaces have a tab in the workspace.
o <Object> sets the object as a child of another Relativity Object. Child objects of other Rel-ativity Dynamic Objects do not have a tab in the workspace.
A child object inherits permissions from its parent.

Relativity | Admin Manual - 291
Two objects do not need to have a parent/child relationship to beconnected.
Child objects inherit security permissions from their parent object.Items that are connected via an association can be separately secured.
For more information on connecting object types, see the sectionsFields, and Layouts..
Dynamic sets the object as dynamic and is set to Yes by default. This field is read only. Enable Snapshot Auditing on Delete is set to Yes by default.
o If it is set to Yes, when deleting items from the object, Relativity captures a snapshot ofthe items current field values. This increases the size of the delete audit for the record,but may be useful when querying the workspace history.
o If this is set to No when deleting items from the object, Relativity deletes the item with-out capturing its field values.
Pivot allows you to enable or disable Pivot functionality on the object. By default, this drop-down is set to Enabled which will add the Pivot icon to the object tab. Pivot in the object tabfunctions as it does on the document list but instead Pivots only on the object fields. Settingthis to Disabled removes the Pivot Icon from the object tab.
Relativity Applications allows you to associate this object type with an application created inthe Relativity Applications tab. Clicking the ellipsis brings up an item list from which you canselect an existing application. This is only available for those who have theManage RelativityApplications permission under Admin Operations.
There are two optional fields you can populate with any beneficial information:
n Keywordsn Notes
There are four action buttons available at the top and bottom of the form:
Save establishes the entered information and displays the batch set details page. The batch setdetails page shows the saved information. From the details page, there are seven options:
o Edit allows you to edit the tab information.o Delete removes the tab from Relativity.o Back takes you back to the list of tabs.o Edit Permissions allows you to establish rights for the tab.
By clicking edit permissions, you are editing rights only for the selectedobject type. By default, the object type will be secured according to theworkspace-level object type rights. More information on workspacepermissions can be found in the section Security Permissions.
Save and New establishes the entered information and launches a blank new tab form. Save and Back saves the entered information and brings you back to the list of all tabs. Cancel aborts the creation of the tab. Any information entered before you hit cancel is not
saved.

Relativity | Admin Manual - 292
30.2.1 Object Type Details
The object type details page has two special options; Event Handlers and Rules.
Object Type Details Display
Event Handlers also known as syncs add special functionality or conditions to your layouts. Formore information contact [email protected].
Rules allow you to control which layouts reviewers see based on set event conditions. Click Addto add a new rule. There are two types of rules:
o Default Layout allows you to determine which layout reviewers see by default – or at all –based on a set field value.

Relativity | Admin Manual - 293
Add New Rule Display
The Add NewRule form fields are:
Rule Type allow you to select the layout Field is the field that contains the value that drives the rule. Value is the value that drives the rule. Action is the layout that appears based on the rule. User can select another layoutwhich determines what layouts the reviewers can see if the rule
condition is met:o If the box is checked, reviewers see the layout selected in the action field by default, but
they are not able to move to another field.o If the box is not checked, reviewers are locked into using only the layout selection in the
action field.
In the above screenshot, the following rule has been established: Whenthe First Pass Review Complete field is equal to yes for a document,the reviewer is taken to the Second Level Review layout and is able tosee only that layout..
The Rule Type, Default Layout on New allows you to determine which layout a reviewer sees for newdocuments.
Action is the layout reviewers see on new records.

Relativity | Admin Manual - 294
30.3 Adding Information to Objects
You can add information to Relativity Dynamic Objects in the sameway you add information todocuments in Relativity. In addition, the Relativity Desktop Client allows this information to beexported to an external file for further review.
In the above screenshot, the following rule has been established: Whenthe First Pass Review Complete field is equal to yes for a document,the reviewer is taken to the Second Level Review layout and is able tosee only that layout..
A newobject has default fields, a default view and a default layout.
You can add fields to the Relativity Dynamic Objects and place those fields on layouts and views. Formore information on adding information to dynamic objects, see the sections Fields, Layouts, andViews.
For more information refer to the Relativity Dynamic Objects Workbook.
31 Using OCROptical character recognition (OCR) translates images of text, such as scanned and redacteddocuments, into actual text characters. This allows you to view and search on text that is normallylocked inside images. OCR works using pattern recognition to identify individual text characters on apage, such as letters, numbers, punctuation marks, spaces, and ends of lines.
There are two main steps involved in OCRing documents:
Defining a production or saved search that contains the documents you want to OCR. Using the OCR Profiles and OCR Sets tabs to run an OCR job on your pre-defined documents.
Relativity allows you to perform OCR translation through the tabs mentioned above without having togo outside your workspace to another application. The following sections outline how to use each ofthese tabs to manage and execute OCR.
31.1 Creating an OCR Profile
An OCR Profile is a saved, reusable set of parameters that you use when creating an OCR Set. To run anOCR job, you must first create an OCR Profile. If no Profiles have been created, you are unable to saveor run an OCR Set.
Note that you are not required to create a Profile for every OCR Set you create; you have the option ofusing only one Profile for all sets. However, you may wish to havemultiple Profiles saved with differentaccuracy or language settings to use for different document sets you plan to OCR.
Under the OCR Profiles tab in your workspace you can find theNew OCR Profile button.

Relativity | Admin Manual - 295
OCR Profiles Tab/Button
Clicking theNew OCR Profile button brings up the OCR Profile form.
New OCR Profile Form
Complete the following to create a newOCR Profile. Properties in orange are required.
OCR Profile Information
Name is the name of the Profile. Preprocess Images enhances the images to get rid of distortions before OCRing. If you set this
to Yes, the preprocess will take place before the OCR engine attempts to recognize characters.Note that this improves the accuracy of the results while significantly slowing down job com-pletion. Setting this to Yes arranges for any or all of the following sub-processes:
o Resolution Enhancement yields a pixel density 1.5 to 2 times than that found in the orig-inal image to improve visibility.
o Text line straightening removes distortion when capturing book pages that cannot bemade completely flat.

Relativity | Admin Manual - 296
o Removing parallax distortion assists in situations in which the camera is not per-pendicular to the page and the image is flawed as a result; for best results, the imageshould contain at least six lines of justified text.
o Deskewing corrects documents that became slanted during scanning. Auto-Rotate Imagesmakes the OCR engine detect page positioning and then reposition the
page accordingly. Note that this can potentially impact the accuracy of OCR results. Languages is the language(s) you want the OCR engine to recognize while running the job. Click
the ellipsis to choose from a list of languages. If the saved search or production you plan to useas your document set contains multiple languages, you may want to select more than one fromthis list. Note, however, that selecting more than onemay decrease accuracy. For a completelist of available languages see the Supported OCR Languages appendix.
Accuracy determines the desired accuracy of your OCR results and the speed with which youwant the job completed. This drop-down contains three options:
o High (Slowest Speed) runs the OCR job with the highest accuracy and the slowest speed.o Medium (Average Speed) runs the OCR job with medium accuracy and average speed.o Low (Fastest Speed) runs the OCR job with the lowest accuracy and fastest speed.
On Partial Error determines the behavior when the OCR engine encounters an error on animage:
Leave Empty records no results if an error is encountered in a document; even images without errors areexcluded from being written. For example, if one document contains five images and one of the imageserrors, no results are written for that document.
o Write Partial Results records all text that was successfully OCRed while excluding textfrom errored images. This allows you to see potentially relevant text that would not bevisible if you chose to leave the results of documents containing errored images empty.Note that this option runs the risk of excluding potentially relevant text.
Image Timeout (Seconds) determines themaximum number of seconds per image before theOCR engine times out; if the job does not complete in this amount of time, it errors on thatimage. The default value for this is 60 seconds.
Other
Keywords Notes
Once saved, the Profile provides the following options. These are the same options available on thesaved OCR Set layout:
Edit: Edit the Profile’s information. Delete: Remove the Profile from Relativity. You cannot delete a Profile if it is being referenced
by an existing OCR Set. Back: Redirect to the OCR Profiles list. Edit Permissions: Set the OCR Profile’s permissions. These permissions determine which
groups have access to this Profile. View Audit: View the Profile’s audit history.

Relativity | Admin Manual - 297
31.1.1 Editing OCR Profile Information
To edit an OCR Profile, go to the OCR Profiles tab. Click Edit next to the desired OCR Profile.
Edit OCR Profile
You can also click the Edit button on the OCR Profile layout. All properties are editable on the editProfile page.
Edit OCR Profile
If you edit an OCR Profile that is referenced by an OCR Set that has already been run, these changeswill not have an impact until that Set is run again.
31.2 Creating OCR Set
The OCR Sets tab in your workspace allows you to submit groups of documents defined by a datasource or production to be OCRed based on the settings defined by the OCR Profile. The results arethen written to a Destination Field.
You will find the NewOCR Set button in the OCR Sets tab.

Relativity | Admin Manual - 298
OCR Sets Tab/Button
On the default OCR Set list, you will notice that the Image Completionfield contains no values for any of the sets, even if those sets areprocessing or completed. The Image Completion value is only visiblewhen clicking the OCR Set and entering its view or edit page.
Clicking the NewOCR Set button brings up the OCR Set form.
New OCR Set Form
Complete the following to create a newOCR Set. Properties in orange are required.
OCR Set Information
Name is the name of the OCR Set.

Relativity | Admin Manual - 299
OCR Document Set
You must complete either one or the other of the following in order to save the OCR Set:
Data Source selects the saved search containing the appropriate set of documents you plan toOCR.
o If the list you see in the Saved Search Picker on OCR Set view does not contain the appro-priate search, you will need to create it.
o Choosing a data source will OCR only the original image and not redactions (unless thereare redactions on the image itself).
o The OCR engine only processes files that have been tiffed in Relativity or uploaded asimage files.
o You cannot use a production as your data source. Production selects the production set containing the documents you plan to OCR.
o The Production Picker on OCR Set view you see when clicking the ellipsis displays all pro-duction sets with a status of Produced that you have access to.
o The engine will OCR all burned-in redactions, branding, headers and footers, and text.o All documents with images in the production are OCRed, not only those with redactions.
OCR Settings
OCR Profile selects the OCR Profile that contains the parameters you want to run when youexecute the OCR Set. Clicking the ellipsis brings up the OCR Profile Picker on OCR Set view, whichlists Profiles that have already been created in the OCR Profiles tab.
Destination Field specifies the field where you want the OCR text to reside after you run theOCR.
o Clicking the ellipsis brings up the Field Picker on OCR Set view, which lists all documentlong text fields you have access to.
o If you selected non-Western European languages in your OCR Profile, the destinationfield should be Unicode-enabled.
o This field is overwritten each time a document is OCRed with that destination fieldselected.
OCR Status
The following are read-only:
Status allows you to viewwhere the OCR Set is in the process of running. Upon saving the set,this field shows a value of Staging until you click the Run button in the OCR Set Console. The fol-lowing statuses occur after you click Run in the console:
o Waitingo Processing – Building Tableso Processing – Inserting Recordso Processing – OCRingo Processing – Compiling Resultso Completed (if no errors occurred)

Relativity | Admin Manual - 300
If errors occurred or the job was canceled for any reason, the following statuses are possible:
o Error – Job Failedo Completed With Errorso Stoppingo Stopped by User
Image Completion allows you to view the count of images completed in the OCR Set, thenumber of images with errors, and the number of images left to be OCRed. Any errors are dis-played in red.
Last Run Error allows you to view the last job error that occurred in the running of the OCR Set.
Other
n Keywordsn Notes
Clicking Save saves the OCR Set and brings up the OCR Set Console, which you will use to execute theOCR job.
If you copy an OCR Set, every current setting in that Set is copied over.This includes the status the original Set is currently in, as well as allitems in the Documents (OCR Results) list.
For this reason, it is recommended that you only copy those sets thathave not yet been run and that have a status of Staging to avoidpotential issues with copied-over results from original OCR sets.
31.3 Running an OCR Set
A saved OCR Set presents a console on the right side of the layout that you will use to run the OCR job.

Relativity | Admin Manual - 301
OCR Set Console
The OCR Set Console provides the following action buttons:
Run starts the OCR job. This will process all images in the selected data source or production.o If the job was stopped by the user, completed with errors, or failed, clicking Runwill start
the job again.o If there are documents in the OCR Results list, these will not be immediately cleared
when the Run button is clicked on the console. These are only cleared when the job goesinto processing, which is reflected in the Status when you click the Refresh page button.
Only existing images are OCRed when Run is clicked – documents inthe process of being tiffed and images that are currently being loadedwill NOT be OCRed if those images are added after Run is clicked.
Changes made to an OCR Profile that is referenced by an OCR Set willnot be reflected until Run is clicked on that Set.
Stop terminates the running OCR job. Once stopped, a job cannot be resumed from the pointat which it was stopped; you must click Run to begin the job over again.
Refresh Page updates the Status and Image Completion fields while the Set is running. Clickingthis button reloads the page and may reflect different values in those fields, depending on whathas happened during the OCR job.
Resolve Errors allows you to attempt to re-run a job with errors:o Selecting this for a job with a status of Error-Job Failed will run the job from the point at
which it failed.

Relativity | Admin Manual - 302
o Selecting this for a job with a status of Completed with Errors will attempt to run thoseimages in the OCR Set that previously resulted in errors. Only errored documents will beprocessed during error resolution.
Show Errors displays all image-level errors encountered during the OCR job. This button is onlyenabled if image-level errors occur. Clicking Show Errors brings up a filterable errors item list.Note the error fields displayed:
o Document IDo Control Numbero Page Numbero Message
Show Errors List
Upon completion of the OCR run, if you want to be able to search onthe OCR text, you must either build a search index based on thoseresults only or integrate those results an existing search index.
Once the OCR job is completed, the Document (OCR Results) list displays all documents successfullyOCRed. The fields in this view are Control Number and File Icon.
Themost effective way of viewing your OCR text is through the following steps:
1. Click the Control Number of a document to launch the core reviewer interface.2. Change the viewer mode to either Image or Production, depending on what you have OCRed.3. Launch the Stand Alone Viewer via the ( ) icon.4. Click the Unsynced icon to sync the Stand Alone Viewer with themain window.

Relativity | Admin Manual - 303
5. Change themode of the Stand Alone Viewer to the long text drop-down. Select the destinationfield you created for the results of the OCR set. Note: If this field is not visible in the drop-down,then you must edit that field to make the Available in Viewer value Yes.
6. Compare the OCR text to that of the document’s original or produced image.
Below is an example of an image-OCR text comparison in synced viewers.
In Production mode:
Production Mode
In OCR Text (long text) mode:

Relativity | Admin Manual - 304
OCR Text Mode
Comparing the two panes, you can see that the OCRed text has omitted the redacted text displayed inProduction mode, as noted by the red boxes above.
31.4 Editing an OCR Set
To edit an OCR Set, go to the OCR Sets tab. Click the Edit link next to the desired OCR set.

Relativity | Admin Manual - 305
Edit OCR Set
You can also click Edit on the OCR Set layout.
Edit OCR Set
All properties are editable on the edit OCR set page but changing these properties won’t affect an OCRset until Run is clicked to execute the job.
32 Using a Relativity ApplicationA Relativity Application is a reusable set of objects (Fields, Object Types, Views, Layouts, etc.) createdto perform a customized workflowwithin your Relativity environment. This workflow can take theform of anything that enhances and expands your ability to use Relativity. Applications are based onthe same RDO logic found in Transform Sets, Search Terms Reports, and Method.
Relativity defines applications by the following characteristics:
Contains standard Relativity objectso Object Typeo Fieldso Tabso Layoutso Viewso Scriptso Choiceso Assemblies
Scoped to a workspace: It is accessible through a single workspace and cannot occur across sev-eral workspaces.
Created in Relativity Upgradable
Once you create an application, you can export it from your workspace and later import into another.

Relativity | Admin Manual - 306
32.1 Creating an Application
To create a new application, click New Relativity Application in the upper left corner of the RelativityApplications tab.
New Relativity Application
You will see the NewApplication form displayed.
New Application Form
Name is the name of the application.
After naming the application, click Save to save it. The new application is then available to beassociated with the standard Relativity parts mentioned above.
32.1.1 Customizing an Application
To customize your Relativity Application layout and quickly add items to it, perform the followingsteps:
1. Click the Build Layout icon ( ) to the right of the layout drop-down.2. Click the Add Associative Object List button in the Layout Tools console.3. Select the Associative Object you would like to add. Common choices include Object Type,
View, Field, and Tab.4. In the View field, select the view you want the object to appear in.5. In the Link View field, select the view you want to be available when the user clicks the Link but-
ton of that Associative Object.6. If editable, set the Links to Popup value to either Yes or No.7. Specify theOrder in which you want this Associative Object List to display on the layout.8. Click Save.9. Repeat Steps 2 – 8 to add additional Associative Object Lists to the layout.

Relativity | Admin Manual - 307
10. Associate any Relativity items under the associative objects by selecting the Link button on theobject of your choice.
Below is an example of a Relativity Application layout that includes associative object lists.
Application-Associative Object List
32.2 Exporting an Application
Exporting an application is done through the Applications Console on the right side of the layout.
Applications Console

Relativity | Admin Manual - 308
Click the Export button on the console to begin exporting the application. Clicking this brings up thefollowing file download prompt:
Application Download
Click Save to save the application to a location outside of Relativity. Specify the location for the file andthen click Save again on the Save As window. The application has now been exported out of Relativity.
If errors occur during the export, you can view them via the Show Errors button on the console.
Show Errors Button
Clicking Show Errors brings up the following window:
Application Errors List

Relativity | Admin Manual - 309
The error text displayed above is based on the requirements for application validation listed in the nextsection.
Note that clicking the Help button on the console brings up this document.
32.2.1 Application Validation
An application is considered valid if all Fields, Scripts, Layouts, Views, Object Types, and Tabs areexportable. If any of the requirements below are not met, an error message will display and you willnot be able to export the application.
Field Exportability Requirements
A field is considered exportable if all of the following conditions aremet:
The Object Type owning the field is included in the application or is Document. Single/Multiple Object fields have their Associated Object Type included in the application or
are Document. Fields with a filter type of popup picker with a specific view (any view other than <All Items>)
have the view included in the application. Single/Multiple Object Fields included in the Field Tree with a specific view (any view other than
<All Items>) have the view included in the application. Relational fields are not exportable. Document System fields are not exportable.
Layout Exportability Requirements
A layout is considered exportable if all of these conditions aremet:
The Object Type owning the layout is included in the application or is Document. All fields included in the layout are included in the application. Views referenced by Associative or Child lists are included in the application.
View Exportability Requirements
A view is considered exportable if all of these conditions aremet:
The Object Type owning the view is included in the application or is Document All fields included in the view are included in the application Indented List views require a relational field, so they are not exportable. Views may not contain conditions.
Tab Exportability Requirements
A tab is considered exportable if all of these conditions aremet:
Parent tabs are always exportable. All tabs that have a parent tab must have their parent tab included in the application. Object Type tabs must have their associated object type included in the application.

Relativity | Admin Manual - 310
External tabs are exportable, but the URL associated with them may become invalid uponimporting. Use at your own risk.
Relativity Script Exportability Requirements
A Relativity Script is considered exportable if all of these conditions aremet:
A Relativity Script defined in theWorkspace is always exportable . A Relativity Script checked out from the Script Library is exportable, but will be imported as a
Workspace Script.
Object Type Exportability Requirements
An Object Type is considered exportable if all of these conditions aremet:
An Object typemust have an identifier field included in the application. A child Object Typemust have its parent object type included in the application (or have a par-
ent of Document orWorkspace). All Layouts referenced by Object Rules must be included in the application. All Choice Fields referenced by Object Rules must be included in the application. All Choices referenced by Object Rules must be included in the application.
32.3 Importing through the Relativity Desktop Client
Like productions and document load files, you can use the Relativity Desktop Client (RDC) to import anapplication into a new or existing workspace. Only Script Administrators can import Applicationsthrough the RDC.
Once you are logged in to the RDC, you must select the workspace you want to import into and specifythe object you want to import. Select Relativity Application from the drop-down.
Application Object in RDC
Next, select the Tools tab, and then Import. The Import sub tab offers two options for importing.Select Application. Note: you cannot import an application through the Relativity Application Load Fileoption.

Relativity | Admin Manual - 311
Application Import
Select the application by clicking the ellipsis on the right side of the Application File box.
Select an Application File
Upon selecting the application, all associated Object Types and Tabs display in their respective read-only Application Artifacts sections.
Select the Import | Import Application option in the upper left corner.

Relativity | Admin Manual - 312
Import Application
This brings up the Application Deployment System window, which displays a message stating,“Installation successful” when the application has been imported into the specified workspace.
Installation Successful Message
Check the Relativity Applications tab in your workspace to confirm that the application you imported isincluded in the list. Note that the application’s layout is not displayed when you view or edit theapplication. Although all associated items have been imported, you must rebuild the layout if youwant it to display them.
32.4 Special Considerations for Existing Applications
If you have an application from an earlier version of Relativity than 6.9, please note the following whenpreparing to import and export:
If you have exported the application once before, you must use the external ADS utility toimport/export the application.
If you have never exported the existing application before and the application shares an objectwith another application that was exported before, you must use the external ADS utility toimport/export the application.
If the existing application has never been exported and does not share an object with anotherapplication, you should use the ADS utility built into Relativity and accessible through theExport button on the Applications Console to export it.
The diagram below illustrates the considerations above, as well as those involving export failure:

Relativity | Admin Manual - 313
Application Flowchart
32.5 Installing the Application Deployment System (If Required)
If you need to use the ADS desktop utility due to the circumstances outlined in the diagram above,you will have to perform the steps below.
If you do not have a copy of the ApplicationDeploymentSystem folderavailable, please contact [email protected].

Relativity | Admin Manual - 314
Note: Applications can only be transferred between environments with the same version of Relativity.Because Relativity objects may undergo changes with each new version, transferring an applicationthat is built upon those objects across even one version will lead to functional issues.
The ADS requires a connection to the local SQL instance and therefore needs to be deployed to amachine in the same domain as the environment’s SQL server.
1. Download the ADS installer file named kCura.TemplateManager.Setup from the client packagefolder formsAuth\EDDS\WinEDDSInstaller or from the HTTP link at http://SER-VERNAME/Relativity/wineddsinstaller/kcura.templatemanager.setup.msi in your productionenvironment. Make sure to specify your server name in this link. Click Run to install ADS. ClickSave to save themsi.
2. Test connectivity to SQL environment by double-clicking on kCura.EDDS.T-emplateManager.WinForm.exe
a. Click on the Toolsmenu, then Export Template.b. Check -Do not use windows authentication.
i. If your environment is configured to useWindows Authentication then leave thisunchecked.
c. Enter your Relativity username and password.d. Click Next.e. If you receive an error, review the steps above and confirm that all values are correct.
If you are successful logging in, the initial Relativity Application Deployment System screen will beavailable.
ADS Main Screen
In order to move an application between workspaces you need to create an export. Exporting is anoption under the Toolsmenu. Follow the steps below to create an export of objects.
1. Select Tools, and then choose Export Template.2. The login screen appears.
Log in using Relativity Credentials.
b. If the Relativity environment uses Windows Authentication uncheck the box "Do not usewindows authentication."
3. Click Next for the system to recognize your login.4. Select the Case name from the drop-down list.
Relativity | Admin Manual - 315
5. Click Next.6. A new drop-down becomes available. All available Objects appear in drop-down along with the
option for NewApplication. Selecting NewApplication allows you to pick more than one objectfor exporting. Select New Application to see the available options. Click Next.
7. All objects in the system are available for export individually or together. Check the boxes of allthe items that belong in the export. Click Next.
8. Tabs are now available for export. Select any tabs you would like to export. Click Next.9. Next choose a location and name the XML file. You can also apply a name and version for the
application. Click Next.
33 Appendix A: Mass OperationsAlthough most user-level functionality is covered in the Relativity User Manual, many mass operationsare primarily administrative functions. Access to each of thesemass operations can be grantedindividually.
33.1 Mass Edit
Mass Edit allows you to edit field and coding values for multiple documents at once. You can use anylayout to which you have access.
On the document list, choose whether you’d like to edit All searchable items, Checked items or Theseitems in the current returned set.
For a full explanation of the searchable set and returned set, pleasesee the Relativity User Guide.
Next select Edit in the drop-down, and then click Go.

Relativity | Admin Manual - 316
Mass Edit Option
TheMass Edit form will display. Using the drop-down, you can select from all layouts you have rightsto see.
Mass Edit Form
You must check any fields you’d like to edit. Options set in unchecked fields are not applied.
There are three options for multiple-choice field values, know as a tri-state check box:

Relativity | Admin Manual - 317
Blank (Wrongful Termination or Theft), as shown on the Personal choice, removes the valuefrom any of the selected documents.
Shaded (Hot) leaves any values on the selected documents as-is. Checked (Employee Dispute) applied the option to all selected documents.
Once you havemade your changes, click Save to apply.
In themass edit window there are two options for editing multi-choice fields - a checkbox or a pop-uppicker. When the pop-up picker has been selected as the display type during the layout build, thereare two options to edit the field; Check and Uncheck. For information see the Layouts section.
Multi-Choice Mass Edit
On Mass Edit form, you can use the Tab key to highlight a checkbox in aYes/No or Multiple-Choice field in the layout. You can then press Enterto select or clear the highlighted checkbox.
Clicking the Check button allows you to create a list of items to add to the field. Uncheck allows you tocreate a list of items to remove from the field. Items not selected will remain unchanged. Clicking eitherCheck or Uncheck opens the Available Items window.

Relativity | Admin Manual - 318
Available Items Window
From the Available Items list, you can move choices and objects into the Selected Items list below.Select the check box next to the desired selection and click Add. This will build a list in the bottomwindowof selected items. To remove something from this list select it and click Remove. Click Set toproceed with the action to Check or Uncheck the items from the field. Cancel stops any action. Itemsnot selected will remain unchanged.
Set/Cancel Buttons
Below, themass edit form reflects checked and unchecked objects and choices.

Relativity | Admin Manual - 319
Multi choice Mass Edit Set
Once values have been set, a Clear link appears next to the Check and/or Un-Check buttons. Thisallows you to clear the set values without having to return to the Items to Check window and removethem. Note also the Add link in the bottom right corner of the field setting. This allows you to add anew choice to a multi-choice field.
Clicking Save at the top of the form will save the edits you made.
33.2 Mass Move
Mass Move allows you to move selected documents to a new folder.
On the document list, choose whether you’d like to move All searchable items, Checked items orThese items in the current returned set.
For a full explanation of the searchable set and returned set, pleasesee the Relativity User Guide.
Next selectMove in the drop-down, and then click Go.

Relativity | Admin Manual - 320
Mass Move Option
Themass move select folder form displays. Select the target location and click OK. Note that alldocuments aremoved to the target directory. The subdirectory structure of the source document ismaintained.
Select Folder Display
If you mass move any documents, any custom security applied to those documents is lost. Thedocument inherits the rights of the new parent folder.

Relativity | Admin Manual - 321
33.3 Mass Delete
Mass Delete allows you to remove entire documents or specified document components in oneaction. In addition to deleting the specified items from the workspace, these actions also delete theassociated files from the file servers. This action cannot be undone. Accordingly, please use great carewhen performing a mass delete.
On the document list, choose whether you’d like to delete All searchable items, Checked items, orThese - items in the current returned set.
For a full explanation of the searchable set and returned set, pleasesee the Relativity User Guide.
Next select Delete in the drop-down and then click Go.
Mass Delete Option
You are prompted to choose and confirm which document attributes and/or whole documents youwould like to delete.

Relativity | Admin Manual - 322
Delete Details Form
The following options are available when performing a Mass Delete:
Delete documents and all associated files delete the entirety of all selected documents. Thisincludes images, natives, and field values.
Delete only images from selected documents deletes only the images from selected doc-uments, leaving the natives and documents’ field values in place.
Delete only natives from selected documents deletes only the natives from selected doc-uments, leaving the images and documents’ field values in place.
Delete only images and natives from selected documents deletes only the images and nativesfrom selected documents, leaving the documents’ field values in place.
Force a delete even if Redactions, Annotations, Links, or Tags are present allows theMassDelete to successfully complete, even if the selected documents contain these additions.
o If this box is not checked, and redactions, annotations, links, or tags are present, sec-tions of themass delete are not complete. Awarning is generated.
o Deleting is done in batches and if an error occurs the remaining item in that batch will beleft and the system will continue to the next batch.
o If this box is checked, any redactions, annotations, links or tags are deleted along withthe designated items.
Click OK to proceed. This operation is final and cannot be undone.
33.3.1 Enable/Disable Snapshot Auditing on Delete
When performing a delete, you have the option of creating a snapshot of the current field values ofthe deleted record. This data is stored in the history for the workspace. While enabling this propertycan be useful when searching the workspace history, it can also significantly increase the size of yourcase workspace's audit table.

Relativity | Admin Manual - 323
To enable or disable, edit the Document object type on the Object Type tab. For more information,see Section Object Types.
33.4 Mass Produce
Mass Produce allows you to add documents to an open production and to set themanner in whichthose items are produced.
For example, you could run a search for all items you’d like to produce and then filter for Exceldocuments. You could add those to your production as native only. You could then find the remainingrecords you’d like to produce and add them to your production as images only.
On the document list, choose whether you’d like to produce All searchable items, Checked items orThese items in the current returned set.
For a full explanation of the searchable set and returned set, pleasesee the Relativity User Guide.
Next select Produce in the drop-down, and then click Go.

Relativity | Admin Manual - 324
Mass Produce Option
Themass produce form displays.
Mass Produce Form

Relativity | Admin Manual - 325
Select your production from all open productions. Production sets that have been produced will notbe available.
Files to Produce allows you to select which versions of each document will be produced.o Images and Natives includes both natives and images for the selected records.
If you are producing images and natives, ensure that you are notincluding natives for images with redactions. There is no way to redactthe exported natives, so exporting natives with redacted images wouldexpose the information behind the redactions.
o Images Only includes only images for the selected records.o Natives Only includes only natives for the selected records.
Slipsheets can be included when producing natives.
The fields available on this form are set by a system view. For more information on editing this view,see the section Views – Editing a View – System Views.
33.5 Mass Replace
Mass Replace allows you to replace existing field text with new text.
On the document list, choose whether you’d like to replace text in all searchable items, checked itemsor items in the current returned set.
Next select Replace in the drop-down and then click Go.
Mass Replace Option
TheMass Replace form displays.

Relativity | Admin Manual - 326
Mass Replace Form
TheMass Replace from fields are:
Field is the field you would like to update. Select from workspace fixed length or long text fields. Action sets the action to be performed:
o Replace Entire Field replaces the field entirely.o Append to End adds the new value to the end of the field.
A delimiter option appears – enter a character to separate the existing andappended values.
oo Insert at Beginning adds the new value to the beginning of the field. A delimiter option appears – enter a character to separate the existing and pre-
pended values.oo Search For allows you to search (and thus replace) only selected text in the field instead
of the entire field. A new text option appears, allowing you to enter the text to be replaced.
Update With sets what you would like to apply to the field.o Text allows you to add text to the field.o Field allows you to add another field’s value to the field set above.
Click Add Another Field at the top of the form to add an additional replacement action to theform.
Click Save to execute themass replace.
33.6 Mass Image
Mass Image creates TIFF images for selected documents. On the document list, choose whether you’dlike to image All searchable items, Checked items or These - items in the current returned set.

Relativity | Admin Manual - 327
For a full explanation of the searchable set and returned set, pleasesee the Relativity User Guide.
Next select Image in the drop-down and then click Go.
Mass Operation to Image
A pop-up prompt displays asking you to confirm the imaging of TIFFs. Click OK to create the TIFFs.Depending on the number of TIFFs being created, this may take some time. Please note that TIFF on-the-fly jobs take precedence over batch TIFF jobs.
Image Confirmation Display

Relativity | Admin Manual - 328
The mass image operation uses the same technology as the Relativitynative file viewer.
For a full listing of the known issues with the viewer, see the ViewerDetails document.
33.7 Mass Print Images
Mass Print Image allows you to batch-print document TIFF images. On the document list, choosewhether you’d like to print All searchable items, Checked items or These items in the current returnedset.
Mass Print Images Option'
Next select Print Images and then click Go. The print options pop-up displays allowing you to set yourprint settings.

Relativity | Admin Manual - 329
Print Setting Display
Printer
Name drop-down allows you to select any local printers. Send each document individuallymakes each document print as a separate print job. Send all
documents as one print job will combine all documents into one print job. Send all documents as one print job (only for PDF Printers) - This is only intended for PDF
creation using a PDF print driver and will create one PDF from all the documents selected. Inorder to use this option you need to verify your viewer is version 5.08 or later.
o Note sending all documents as one print job to a physical printer is not recommended.Depending on your printer setup it can cause issues with your print queue.
Image set options:
Select Original if you’d like to print non-produced versions of the documents. Select Produced Images if you’d like to print produced versions.
o If you select produced documents, you can select which version of the document you’dlike to print by clicking modify production order.
o If a document was not part of the selected production, you can check Include originalimages for documents that haven’t been produced to include the original instead.
o Modify Production Order allows you to see a list of production in our workspace. Fromhere you can set which version of the document is included in the print set.
The print job will first look at the production set at the top of the list. If it isincluded in this production, that version will be printed. If not, the print job will

Relativity | Admin Manual - 330
check if the document is in the next production, if it is, that version will be printed,if not it moves to the next production and so on.
Print Options
Print Annotations includes any highlighting on original image Print Redactions includes any text or stamp redactions. Slipsheets includes a slipsheet between documents. Your slipsheet can be:
o Blank page) includes a blank page.o (Stamp identifier) includes a page with the document identifier stamped.o <Document layouts> includes a slipsheet with the fields from any document layout. The
values for the proceeding document are shown for those fields. Stamp identifier allows you to select whether you’d like to print any identifier value on the
pages.o None does not include any identifier.o Document identifier includes the images’ document identifier.o Page identifier includes the images’ page identifier.
Stamp location allows you to designate where the identifier is stamped. Select from:o Top lefto Top centero Top righto Bottom lefto Bottom centero Bottom right
Markup Set allows you to select which markup set’s redactions and annotations are applied.This option is present only if there are two or moremarkup sets on the workspace that youhave rights to see.
33.8 Tally/Sum/Average
Tally/Sum/Average allows you to tally, sum and average the values of any numeric fields. This action isrecorded under the document history. This is commonly used to determine the number of pages in aprint job or production.
On the document list, choose whether you’d like to tally/sum/average All searchable items, Checkeditems or These items on in the current returned set.
For a full explanation of the searchable set and returned set, pleasesee the Relativity User Guide.
Next select Tally/Sum/Average in the drop-down, and then click Go.

Relativity | Admin Manual - 331
Tally/Sum/Average
The Tally/Sum/Average form is displayed to make your selection.
The fields are:
Field is the field to be calculated. Function is the function to be performed:
o Tally provides a list of unique items and their total number based on the items selected.o Sum tallies all selected documents’ values for any number field.o Average finds the average values of all selected documents’ values for the specified field.
Tally/Sum/Average Form

Relativity | Admin Manual - 332
The result of a tally is similar to a summary report; it outlines the values of a field and the count foreach. After receiving your results, the following actions may be performed:
Filter the results Clear All filter text Browse through the results using the blue arrows Sort the results Export results to an external file
33.9 Send to CaseMap
You can use the Send to CaseMap feature to bulk-send items to your CaseMap database, versions 7and above. To perform the bulk send, you need to have CaseMap installed and open to the correctworkspace.
There is a Relativity system view called CaseMap fields that controls which fields are sent to CaseMap.See the section Views for more information about editing views.
On the document list, choose whether you’d like to export All searchable items, Checked items orThese items in the current returned set. Next select Send to CaseMap in the drop-down and click Go.
Mass Operation Items
You may be prompted to open or save a file, CaseMapSend.cmbulk. If so, click Open.

Relativity | Admin Manual - 333
Open or Save File Display
Clicking Openwill launch the Bulk Send to CaseMap Wizard. Click Next on themain screen.
Bulk Send to CaseMap Wizard
If you do not have CaseMap open, you are prompted to launch the application. Once CaseMap isopen, the wizard prompts you to switch to the application. Click the Switch to CaseMap button, thenclick Next.

Relativity | Admin Manual - 334
Open a CaseMap Case Display
The wizard asks you to confirm that the case workspace you have open is the correct targetworkspace. If the workspace listed is the correct target, click Next.

Relativity | Admin Manual - 335
Destination CaseMap Case Display
Clicking Next brings up the View/Edit Field Mappings section, allowing you to map the Relativity fields(set in the CaseMap fields view) to CaseMap fields. The first time you go through this process, youneed to map the fields. ClickModify to set the correct field mapping. CaseMap should automaticallypopulate thematches on subsequent bulk sends.
View/Edit Field Mapping Display
Clicking Modify brings up the field mapping section of the wizard.

Relativity | Admin Manual - 336
Field Mapping Display
You can use the options to preview any of the data, reset themappings, load mapping settings from aprevious load or save your current mappings.
Mapping Options
To map your fields, go to theDocument Spreadsheets field and double-click on the field you’d like tomap.

Relativity | Admin Manual - 337
Document Spreadsheet Display
Double-clicking themapping opens the New Item box. Select the Relativity field from the Select aSource Data Field box and click OK.
New Item Display
Repeat the above for all fields you would like to map, then click OK in the Bulk Send to CaseMap

Relativity | Admin Manual - 338
wizard. Clicking OK brings you back to the second screen of the wizard. Review thematches, then clickNext.
Bulk Send to CaseMap Wizard Display
Clicking Next presents a final confirmation screen. Click Finish to complete the send.

Relativity | Admin Manual - 339
Send Confirmation Display
33.10 Export to File
Export to File, (previously known as Export to Excel) allows you to export the contents of the currentlist to a file. Any items and fields in the current view or report are exported. Unicode characters areallowed.
On the document list, choose whether you’d like to export All searchable items, Checked items orThese - items in the current returned set.
For a full explanation of the searchable set and returned set, pleasesee the Relativity User Guide.
Next select Export to File in the drop-down and click Go.

Relativity | Admin Manual - 340
Export to File Options
Format:o Excel spreadsheet via HTML (.xls) creates an Excel file.o Comma Separated Values (.csv) creates a comma delimited text file.o Concordance DAT Format (.dat) creates a DAT text file with the standard Concordance
delimiters. Encoding
o Select the desired encoding for the output file.
To export the file, click Run. To cancel the export, click Cancel.
33.11 Cluster
Clustering allows you to use an existing Relativity Analytics index to identify conceptual groups withinan entire workspace or sub-set of data. These conceptual groups form a Cluster and can be viewed inthe cluster browser. Unlike other uses of Relativity Analytics, clustering does not require you to submitan example to the index – only a set of documents you would like clustered.
For more information on building a Relativity Analytics indextechnology behind it, see the section Relativity Analytics.
On the document list, choose whether you’d like to cluster All searchable items, Checked items orThese items in the current returned set.
Next select Cluster in the drop-down and click Go. The Cluster Documents form displays.

Relativity | Admin Manual - 341
Clustering Options
First, select your Cluster Option by clicking on the appropriate radio button:
Create New Cluster creates a new cluster set. Replace Existing Cluster creates a new cluster set and replaces it with an existing one.
33.11.1 Create New Cluster
Selecting Create New Cluster brings up the options to create a new cluster set.
New Cluster Options
Name is the name of the cluster set. This is used to display the cluster set on the clusterbrowser.
Content Analyst Index allows you to select which Relativity Analytics index you would like touse to cluster your documents.

Relativity | Admin Manual - 342
Advanced options can be accessed by clicking +.
Title Format sets how the clusters are named.o Outline and Title show outline number, plus the cluster name.o Title Only shows only the title
In the example below, “Enron.com, Pm”o Outline Only shows only the outline numbering.
In the example below, “1”, “1.1”, etc.
Maximum Hierarchy Depth sets howmany levels deep the cluster hierarchy can go. Thedefault is 4 levels. A value of 1 creates only top-level clusters.
Minimum Coherence is how conceptually correlated the items must be to be included in thesame cluster.
Generality is themeasure of how general the cluster will be, with 0 as themost general and 1themost specific. The higher the generality setting, the fewer top-level settings will be created.
When you create a new cluster, a pair of new fields are automatically created:
AMultiple-Choice List named “Cluster :: clusterName”o Stores cluster node names
ADecimal Field named “Cluster :: clusterName :: Score”o Stores cluster score values
These fields allow you to query for documents contained in a certain cluster and/or set criteria for ascore threshold when making advanced searches or Views. Themulti-choice field also allows for thecluster to be added to the choice tree.
33.11.2 Deleting a Cluster
To delete a cluster go to the index information page from which the cluster was created. Check the boxnext to the cluster you wish to delete from the cluster list at the bottom of the window and then selectdelete.
When attempting to delete a cluster, you are presented with the option of deleting the fieldsassociated with it. This option allows you to keep field information in your workspace even if you nolonger want to keep the cluster data itself. Doing this would allow you to keep the index size slightlysmaller while still maintaining the cluster relationships via these fields.

Relativity | Admin Manual - 343
Delete Cluster Options
Note that deleting or not deleting these associated fields has no impact on your workspace or yourfuture ability to cluster. Keeping the checkbox unchecked will merely preserve the documentrelationships identified by the cluster once the cluster has been deleted.
33.11.3 Replace Existing Cluster
Replace Existing Cluster is the same as Create a NewCluster Set, except the results will replace existingclustering options. When you select Replace Existing Cluster, you are prompted to select the existingcluster set you would like to replace.
33.12 Process Transcripts
To work with transcripts, first load the transcripts into Relativity as you would any other type of nativefile. Relativity accepts only ASCII text transcripts.
For organizational purposes, you may find it beneficial to create afolder called Transcripts at the root of your workspace. You can storeyour transcripts in this folder. Additionally, you can add any subfolderoptions you would like
Processing of a transcript will read the ASCII text file, identify page breaks and parse out the content ofthe transcript into a hyperlinked word index for fast searching of the content. More information ontranscripts can be found in the Relativity User Manual.
For more information about using transcripts, see the Relativity UserGuide.
On the document list, choose whether you’d like to process All searchable items, Checked items orThese items in the current returned set.
For a full explanation of the searchable set and returned set, pleasesee the Relativity User Guide.
Go to themass operations bar, select Process Transcripts in the drop-down, and then click Go.

Relativity | Admin Manual - 344
Process Transcripts Display
There are four options when processing a transcript, to control how the transcript appears in theviewer:
Header to Add allows you to add text to the header of each page. Added headers only shows inviewer previewmode and on printed versions of a transcript.
Footer to Add allows you to add text to the footer of each page. Added footers only shows inviewer previewmode and on printed versions of a transcript.
Header to Remove allows you to remove any existing headers. Footer to Remove allows you to remove any existing footers.
Court reporters often put a header or footer on each page of thetranscript. This is an example of a header or footer that you mightwant to remove.
33.13 CreateWord Index
CreateWord Index creates a document-level, hyperlinked index of all words in a specific document.This functionality is available for the following document types:
.MSG .EML .TXT .XLS .XLSX .DOC .DOCX .PPT .PPTX .RTF

Relativity | Admin Manual - 345
.XML .PDF
On the document list, choose whether you’d like to process All searchable items, Checked items, orThese items in the current returned set.
For more information about using transcripts, see the Relativity UserGuide.
Next select Create Word Index, and the click Go.
You will be presented with a confirmation prompt.
Create Word Indexes Confirmation
Click Run to create the word indexes. Depending on the number of documents submitted and theirsize, this operation may take some time.
34 Appendix B: Bandwidth TesterThe Bandwidth Tester is designed to test the capacity of a network connection. This function can beexecuted at any time and is especially valuable as a troubleshooting tool for users whose viewer issuesmay be explained by a lack of data rate support from a network connection.
To launch the Bandwidth Tester, click the Launch Bandwidth Tester icon in the bottom right corner ofthe viewer (to the left of the Layout or Related Items pane).
Launch Bandwidth Tester Display
Click Launch Bandwidth Tester icon. The Bandwidth Testing Tool window opens.

Relativity | Admin Manual - 346
Bandwidth Testing Tool
There are three types of testing that can be performed through this tool:
Execute Latency Test: measures the elapsed time for a single byte to reach its destination Execute Download Test: measures the time it takes to receive data to a local system from a
remote system Execute Upload Test: measures the time it takes to send data from a local system to a remote
system
Latency is a measure of the time delay in processing network traffic. It is the total time for a networkpacket to travel from the application on one server, through the network adapter, over the wire,through the second adapter and into an application on another server.
Another name for a latency test is a Ping test. Ping is a utility used totest whether a particular host is reachable across an IP network and tomeasure the round-trip time for packets sent from the local host to adestination computer, including the local host's own interfaces. Thus,ping is a way to measure round-trip latency.
Choose the Number of Tests you wish to run and set the Test Delay. Then click Execute Latency Test.

Relativity | Admin Manual - 347
Execute Latency Test
Once this button is clicked a request is sent to theWebAPI to measure network speed. If the request isaccepted, latency is measured from themoment the request was received to when the ping isreturned.
Latency is measured in milliseconds, as shown in the test results that populate the box below the ClearOutput button. Note that, while the above screenshot shows a roundtrip time of 0milliseconds, testresults will vary drastically per user, even from test to test in the same environment. This is becauselatency is affected by several factors:
Distance between you and the server Operating system Protocol overhead
o This refers to characteristics of computer communications schemes; an application thattransfers data across a network cannot expect to use the full bandwidth of the com-munications medium, since some data is necessary for routing themessage, describingthe information content of themessage, and other protocol needs. This extra data isreferred to as overhead, since it does not contribute to the information in the content ofthemessage. Thus, protocol overhead, expressed as a percentage, is the number of non-application bytes divided by the total number of bytes in themessage.
Number and characteristics of the devices the data must pass through, including networkadapters, switches, and so on
Additional load or congestion on the network
The second button runs a download test. To do so, first specify the Number of Tests you wish to runand choose a Payload Size of 1, 5, 10, or 50 from the drop-down. Click Execute Download Test.

Relativity | Admin Manual - 348
Execute Download Test
When the Execute button is clicked, the request is sent to the EDDS. Distributed virtual directory,where it is either accepted or rejected. If accepted, the EDDS. Distributed directory generates data totransfer to the client. The data is then streamed to the client via HTTP. If the data send is completed,latency is measured from the when the request was sent to when the data was received.
The box again populates with the test results. Here, one download test has been run on onemegabyte. The download was executed at a rate of 9.09megabits per second.
Clicking the Clear Output button empties the screen of the previous test’s results. To run an Uploadtest, again specify the Number of Tests you would like to run and the Payload Size. Click ExecuteUpload Test.

Relativity | Admin Manual - 349
Execute Upload Test
When the Execute button is clicked, a request is sent to theWebAPI virtual directory. If the request isaccepted by WebAPI, latency is then measured from when the request was sent to when the data wasreceived. The box populates with the test results. In the screenshot above, one test has been run ononemegabyte, and the download was executed at a rate of 4megabits per second. Like latency, thedownload and upload test results will vary per user and test.
35 Appendix C: Document SkipDuring document review, if the skip function is enabled, and the user clicks the Save & Next button,any documents after the current document that do not already meet the view or Saved Search criteriaare skipped until a document that does meet the criteria is found.
Skip Drop-down setting
Document skipping will not occur if any of the following occurs:

Relativity | Admin Manual - 350
The skip drop-down is set to Normal The user clicks Save The user clicks Cancel The user clicks any of the document record navigators
The illustration below exhibits basic Skip functionality:
35.1 Special Considerations
Document skip is available whether browsing the results of a view or a saved search. Any combination of skip permissions can be set for a user:
o If you do not want a user to have the option to skip, disable the user property.o If you want to force a user to have skip enable, select the “Force Enable” property.o If you want a user to set their own skip mode, enable the user property.
The user can change the Document Skipping indicator between documents. However, if theuser leaves the document review and then returns, the document skip indicator is set to theuser’s default.
Skip does not function based on propagation alone; if another user changes a document thatmakes it no longer part of the queue, it will be skipped.
If a user clicks Save and Next and none of the documents remaining in the queue still meet theconditions, the user will receive a message.
36 Appendix D: Additional ResourcesThe following additional resources can be found on the kCura Website and Customer Portal:

Relativity | Admin Manual - 351
36.1 Documentation
Relativity Admin Manual - This document details the Administrative functions within Rel-ativity.
Relativity Best Practices Tiffing - This document details the best practices and considerationswhen using the imaging tools in Relativity.
Relativity Certified Admin Workbook - This document helps you prepare for the Relativity Cer-tified Admin exam. Additionally, new admins can use the document's tutorial to becomemorefamiliar with the administrative functionality of Relativity.
Relativity Command Line Import Manual - Documents the use of theWindows Command Lineto import documents into Relativity.
Relativity Configuration Table - This document lists the names, default values, and purposesof the configurations found in Relativity.
Relativity Dynamic Objects Workbook - This document outlines the securable, customizableobjects within your workspace in Relativity.
Relativity Environment Optimization Manual - This manual outlines the best practices formaintaining and optimizing a Relativity environment.
Relativity Load File Specifications - This document outlines the requirements for loading filesin Relativity.
Relativity Quick Start – A two-page PDF that highlights the different screen areas and icons inthe Relativity interface.
Relativity System Requirements - This document outlines the recommended server setup forrunning a Relativity 6.2 environment.
Relativity Upgrade Considerations – Outlines the system requirement changes, general con-siderations, and timeline to note when making preparations for the upgrade from Relativity 5.0to Relativity 6.0.
Relativity User Manual - This document details the user-level functionality of Relativity. Relativity Viewer Detail - This document details all known issues with the viewer, and lists all of
its supported file types. Relativity Viewer Supported File Types - Lists the file types supported by the native file viewer
in Relativity. Relativity Workstation Configuration - Outlines the requirements for workstations used to
review documents with Relativity.
36.2 Extensibility Tools
Relativity offers the following API extensions:
Import API - Allows developers to write a custom utility to import processed data into a casewithout the need for the desktop client or a load file. This utility is used to import documentsand metadata using a relational data source, which allows a client to expedite the documentimport process and potentially avoid those errors that occur during the creation and facilitationof a load file.
Services API - enables developers to write custom code that manipulates Relativity objectsdirectly. The Services API is a set of web services one can use to programmatically create, read,

Relativity | Admin Manual - 352
update, delete and query some of themost commonly used Relativity object/artifact types inthe Relativity environment.
36.3 Tutorials
Getting started in Relativity- Just getting started in Relativity? This tutorial will introduce youto the application; logging in, editing personal settings, changing your password, and opening acase.
Navigating case documents - This tutorial illustrates how to navigate the CaseWorkspace,allowing you to browse, sort, and view case documents.
Checking documents in and out - Are you required to “check out” documents before begin-ning your review? In this lesson you will learn to work with batches of documents.
Viewing your documents - Ready to start viewing your documents? Learn how to use the CoreReviewer Interface to see all the versions of your document.
Adding redactions and annotations - Need to redact or annotate a document? This tutorialexplains Relativity’s markup sets, and how to apply redactions and annotations.
Coding and tagging - documents Ready to code your documents? Learn how to work with lay-outs to code and tag you documents in this tutorial.
Tagging sections of a document - Looking to mark a few important lines in a large document?This tutorial outlines how to tag sections of documents.
Working with related items -Howdoes a document you’re viewing in Relativity connect toother documents in your case? In this lesson, you will learn how to work with a document’srelated items.
Using the word index - Do you need to perform a detailed search within an individual doc-ument? This tutorial will demonstrate the use of the document word index.
Performing mass operations - Looking to perform an action on a group of documents? Thistutorial teaches you how to perform a mass operation.
Creating keyword searches - In this lesson you will learn how to run a keyword search, andfilter your results.
Creating a dtSearch- Do you need more detailed searching options than keyword searchallows? This tutorial teaches you about dtSearch capabilities.
Creating and running advanced searches - Looking to combine different Relativity searchingtechniques in one step? This lesson outlines how to create, edit, and run an advanced search,and filter your results.
Printing case documents- Do you need to print documents? This tutorial will show you how toprint a single document, or a group of images.
Using the Customer Portal – Don’t wait for support, find solutions to common issues. Thistutorial demonstrates how to create, manage and report on ticket, submit and vote on ideas,get documentation and more.

Relativity | Admin Manual - 353
37 Appendix E: Date Formats RecognizedThe table below lists the date formats recognized by Relativity’s importing tool, WinEDDS. This listcontains both valid and invalid date formats:
Entry in Load File Object Type Definition12/31/9999 12/31/9999 0:00Monday January 4 2010 1/4/2010 0:00
5.08:40 PM 6/30/2009 17:08 The current year will be entered ifthe year is missing.
17:08:33 6/30/2009 17:08 The current year will be entered ifthe year is missing.
17:08 6/30/2009 17:08 The current year will be entered ifthe year is missing.
5:08 PM 6/30/2009 17:08 The current year will be entered ifthe year is missing.
14-Apr 4/14/2009 0:00 The current year will be entered ifthe year is missing.
9-Apr 4/9/2009 0:00 The current year will be entered ifthe year is missing.
14-Mar 3/14/2009 0:00 The current year will be entered ifthe year is missing.
1-Mar 3/1/2009 0:00 The current year will be entered ifthe year is missing.
22-Feb 2/22/2009 0:00 The current year will be entered ifthe year is missing.
20080420 4/20/2008 0:0020080420 2:22:00 AM 4/20/2008 0:004/9/2008 16:13 4/9/2008 16:134/9/2008 8:49 4/9/2008 8:499-Apr-08 4/9/2008 0:00Apr. 9, 08 4/9/2008 0:004.9.2008 4/9/2008 0:004.9.08 4/9/2008 0:004/9/2008 4/9/2008 0:004;9;2008 4/9/2008 0:00Wednesday, 09 April 2008 4/9/2008 0:0012-31-1753 12/31/1753 12:00 AM4/9/08 13:30 PM Results in an error2008-044-09 Results in an error4/9/2008 10:22:00 a.m. Results in an error

Relativity | Admin Manual - 354
38 Appendix F: Supported OCR LanguagesThe following languages are supported by Relativity’s OCR engine and are available for selection whencreating an OCR Profile:
English Afrikaans Albanian Aymara Basque Bemba Blackfoot Breton Bugotu Bulgarian (Cyrillic) Byelorussian (Cyrillic) Catalan Chamorro Chechen Chinese (Simplified) Chinese (Traditional) Chuana or Tswana Corsican Croatian Crow Czech Danish Dutch Eskimo Esperanto Estonian Faroese Fijian Finnish French Frisian Friulian Gaelic Irish Gaelic Scottish Galician Ganda or Luganda German Greek

Relativity | Admin Manual - 355
Guarani Hani Hawaiian Hungarian Icelandic Ido Indonesian Interlingua Italian Japanese Kabardian Kashubian Kawa KikuyuKongo Korean Kpelle Kurdish Latin Latvian Lithuanian Luba Lule Sami Luxembourgian Macedonian (Cyrillic) Malagasy Malay Malinke Maltese Maori Mayan Miao Minankabaw Mohawk Moldavian (Cyrillic) Nahuatl Northern Sami Norwegian Nyanja Occidental Ojibway Papiamento Pidgin English

Relativity | Admin Manual - 356
Polish Portuguese Provencal Quechua Rhaetic Romanian Romany Ruanda Rundi Russian (Cyrillic) Sami Samoan Sardinian Serbian (Cyrillic) Serbian (Latin) Shona Sioux Slovak Slovenian Somali Sotho, Suto, or Sesuto Southern Sami Spanish Sundanese Swahili Swazi Swedish Tagalog Tahitian Tinpo Tongan Tun Turkish Ukrainian (Cyrillic) Visayan Welsh Wend or Sorbian Wolof Xhosa Zapotec Zulu

Relativity | Admin Manual - 357
39 DisclaimerThis documentation is proprietary information of kCura Corporation and may bemodified, altered, orrepurposed only in accordance with written consent from kCura.
© 2011. All rights reserved.


![[Admin Manual V.1.4] - Somansa Techsomansatech.com/Somansa_Manual_Admin_Privacy-i.pdf · Admin/User Manual 1 Admin Manual Software License Certificate 1 License Certificate to allow](https://img.dokumen.tips/doc/110x75/5bc6b53c09d3f218038c707a/admin-manual-v14-somansa-adminuser-manual-1-admin-manual-software-license.jpg)