Embed Size (px)
DESCRIPTION
lab report
Citation preview

ABSTRACT/ SUMMARY
INTRODUCTION
Refrigeration cycle is a sequence of thermodynamic process whereby heat is
withdrawn from a cold body and move to hot body. It is a reverse heat engine cycle. In
general word, refrigeration is a process of removing the heat from the enclosed space, or
from substances to lowering its temperature. The primary device that can do the process
is called the refrigerator and the working fluid used in the cycle process is called
refrigerant. A refrigerator uses the evaporation of liquid to absorb heat. The liquid that
is the refrigerant used the refrigerator evaporates at low temperature creating cooling or
freezing temperature inside the refrigerator.
Evaporators and condenser of the system is used for the absorption and rejection
of heat respectively involve the field of heat transmission. Steady state are involve in
the determination process cooling load requirement. The job of the refrigeration cycle is
to remove unwanted heat from one place and discharge it into another. To accomplish
this, the refrigerant is pumped through a closed refrigeration system. If the system was
not closed, it would be using up the refrigerant by dissipating it into the surrounding
media; because it is closed, the same refrigerant is used over and over again, as it passes
through the cycle removing some heat and discharging it.
The closed cycle serves other purposes as well; it keeps the refrigerant from
becoming contaminated and controls its flow, for it is a liquid in some parts of the cycle
and a gas or vapor in other phases.During the simple refrigeration cycle, and major
components of which it is made: two different pressures exist in the cycle. The
evaporating or low pressure in the low side and the condensing, or high pressure, in the
high side. These pressure areas are separated by two dividing points; one is the metering
device where the refrigerant flow is controlled, and the other is at the compressor, where
vapor is compressed. The metering device is a point where we will start the trip through
the cycle. This may be a thermal expansion valve, a capillary tube, or any other device
to control the flow of refrigerant into the evaporator, or cooling coil, as a low-pressure,
low-temperature refrigerant. The expanding refrigerant evaporates as it goes through the
evaporator, where it removes the heat from the substance or space in which the
evaporator is located. Heat will travel from the warmer substance to the evaporator
cooled by the evaporation of the refrigerant within the system, causing the refrigerant to
boil and evaporate, changing it to a vapor. This is similar to the change that occurs when

a pail of water is boiled on the stove and the water changes to steam, except that the
refrigerant boils at a much lower temperature. Now this low-pressure, low-temperature
vapor is drawn to the compressor where it is compressed into a high-temperature, high-
pressure vapor.
The compressor discharges it to the condenser, so that it can give up the heat that
it picked up in the evaporator. The refrigerant vapor is at a higher temperature than the
air passing across the condenser or water passing through the condenser therefore that is
transferred from the warmer refrigerant vapor to the cooler air or water. In this process,
as heat is removed from the vapor, a change of state takes place and the vapor is
condensed back into a liquid, at a high-pressure and high-temperature. The liquid
refrigerant travels now to the metering device where it passes through a small opening
or orifice where a drop in pressure and temperature occurs, and then it enters into the
evaporator or cooling coil. As the refrigerant makes its way into the large opening of the
evaporator tubing or coil, it vaporizes, ready to start another cycle through the system.
The refrigeration system requires some means of connecting the basic major
components - evaporator, compressor, condenser, and metering device - just as roads
connect communities.
Tubing or lines make the system complete so that the refrigerant will not leak
out into the atmosphere. The suction line connects the evaporator or cooling coil to the
compressor, the hot gas or discharge line connects the compressor to the condenser, and
the liquid line is the connecting tubing between the condenser and the metering device
that is the thermal valve. Some systems will have a receiver immediately after the
condenser and before the metering device, where the refrigerant is stored until it is
needed for heat removal in the evaporator.

OBJECTIVES
Experiment 1: Determination of power input, heat output and coefficient of
performance
To determine the power input, heat output and coefficient of performance of a
vapour compression heat pump system.
Experiment 2: Production of heat pump performance curves over a range of
source and delivery temperatures
To produce the performance of heat pump over a range of source and delivery
temperatures.
Experiment 3: Production of vapour compression cycle on p-h diagram and energy
balance study
To plot the vapour compression cycle on the p-h diagram and compare with the
ideal cycle.
To perform energy balances for the condenser and compressor.
Experiment 4: Production of heat pump performance curves over a range of
evaporating and condensation temperatures
To plot the performance of heat pump over a range of evaporating and
condensation temperatures which are the saturation temperature at condensing
pressure.
Experiment 5: Estimation of the effect of compressor pressure ratio on volumetric
efficiency
To determine the compression ratio and volumetric efficiency

T HEORY
When enough heat is released from a glass of water, the water will freeze to
ice. When that heat is absorbed by the ice, the ice will melt. Heat has its own laws,
called the laws of thermodynamics. One of those laws is that heat will move from a
place that has a lot of heat to a place that has less heat, or another way to put it is that
heat will move from a place of higher intensity to a place of lower intensity. From
refrigeration theory, air conditioning and refrigeration equipment is designed to create
a cold area that acts as a "heat sponge" that will soak up heat from air or food. The
heat is then moved to a place where it can be released safely and efficiently. The
second point is to understand about refrigeration theory has to do with why we use
evaporators and condensers. When a liquid like water or refrigerant absorbs enough
heat to start boiling, what's happening is that the added heat energy causes the
vibration of the liquid's molecules to speed up to the point where they move far apart
from each other. When the molecules of liquid reach a certain distance from each
other, the liquid changes into a vapor. This is called boiling, evaporating, or vaporizing.
A liquid absorbs some levels of heat as it changes state to a vapor and air conditioning
and refrigeration equipment is designed to use this point of refrigeration theory by
keeping a constant flow of refrigerant vaporizing and absorbing heat in the evaporator.
The evaporator is the "heat sponge" area, and the refrigerant vaporizing inside of it is
absorbing the heat. When vapor cools and releases enough heat energy, it's molecules
will slow down and move closer together to the point where the vapor changes into a
liquid. This is called condensation, and it's also a change of state. To condense, a vapor
must release the same level of heat that it absorbed when it vaporized. Air
conditioning and refrigeration uses this point of refrigeration theory by causing
refrigerant to cool and condense in the condensing unit. The refrigerant repeats this
cycle continuously, absorbing heat in the evaporator and releasing it in the condenser.

APPARATUS
1. R-134-A Compressor
2. Evaporator
3. Water inlet and water outlet
4. Filter dryer
5. Power supply
6. Water
7. Valve
PROCEDURES
General Start-up Procedures
1. Both of the water source and the drain were checked before being connected,
then water supply is opened and the flow rate of cooling water was set to be at
1.0 LPM.
2. Checked that the drain hose at the condensate collector is connected.
3. The power supply is connected and switched on the main power follows by main
switch at the control panel.
4. Then switched on the refrigerant compressor until the pressure and temperature
were in stabilizing condition.
General Shut-down Procedures
1. Turned off the compressor, followed by main switch and power supply.
2. Closed the water supply and make sure that there is no water left running.
Experiment 1: Determination of power input, heat output and coefficient of
performance
1. Set up the apparatus.
2. The flow rate of cooling water was adjusted to 40%.
3. The system was run for 15 minutes.
4. Recorded all the data into the experimental data sheet.
Experiment 2: Production of heat pump performance curves over a range of

source and delivery temperatures
1. By continuing the steps in experiment 1, we adjusted the cooling water
flow rate to 60%.
2. The data was recorded.
3. The experiment was repeated with reducing water flowrate so that the
cooling.
water outlet temperature increases by about 3°C.
4. Repeated similar steps until the compressor delivery pressure reaches
around 14.0 bars.
5. All the steps were repeated by different ambient temperature.
Experiment 3: Production of vapour compression cycle on p-h diagram and energy
balance study
1. Followed the general start-up steps.
2. The flow rate of cooling water is adjusted to 40% and let the system run
for 15 minutes.
3. Recorded all data in the experiment.
Experiment 4: Production of heat pump performance curves over a range of
evaporating and condensation temperatures
1. The general start-up procedures are handled.
2. Adjusted the cooling water flow rate to 60% and allowed the experiment
for 15 minutes.
3. All data are recorded.
4. The experiment was repeated with increasing the compressor delivery
pressure about 0.6 bars with reducing the water flow rate. Maintained the
evaporating temperature (TT4) by covering part of the evaporator.
5. Similar steps were repeated with a different water flow rate that must be
more than 20%. Make sure that the compressor delivery pressure does not
exceed 14.0 bars.
6. The experiment is repeated with another constant evaporating temperature
(TT4).
Experiment 5: Estimation of the effect of compressor pressure ratio on volumetric

efficiency
1. Followed the general start-up steps.
2. Adjusted the cooling water flow rate to 40% and let the system run for 15
minutes.
3. All the data is recorded.
4. Repeated the experiments by using different compressor delivery
pressure.

RESULT :
1. Experiment 1 : Determination of power input, heat output and coefficient
of perfomance
Cooling water flow rate, FT1 % 40
Cooling water flow rate, FT1 LPM 2.0
Cooling water inlet temperature, TT5 °C 29.8
Cooling water outlet temperature, TT6 °C 31.0
Compressor power inlet W 162
2. Experiment 2 : Production of heat pump perfomance curves over a range of
source and delivery temperatures
Test 1 2 3
Cooling water fow rate, FT1 % 60 40 20
Cooling water flow rate, FT1 LPM 3.0 2.0 1.0
Cooling water inlet temperature, TT5 °C 30.0 29.8 29.6
Cooling water outlet temperature, TT6 °C 31.0 31.0 32.2
Compressor power input W 160 162 160
Heat output W
COPH

3. Experiment 3 : Production of vapor compression cycle on p-h diagram and
energy balance study
Refrigerant flow rate, FT2 % 40
Refrigerant flow rate, FT2 LPM 0.5
Refrigerant pressure (low), P1 Bar (abs) 1.9
Refrigerant pressure (high), P2 Bar (abs) 7.0
Refgirant temperature, TT1 °C 27.5
Refrigerant temperature, TT2 °C 65.5
Refrigerant temperature, TT3 °C 29.9
Refrigerant temperature, TT4 °C 23.1
Cooling water flow rate, FT1 % 40.3
Cooling water flow rate, FT1 LPM 2.0
Cooling water inlet temperature, TT5 °C 29.8
Cooling water inlet temperature, TT6 °C 31.0
Compressor power input W 162

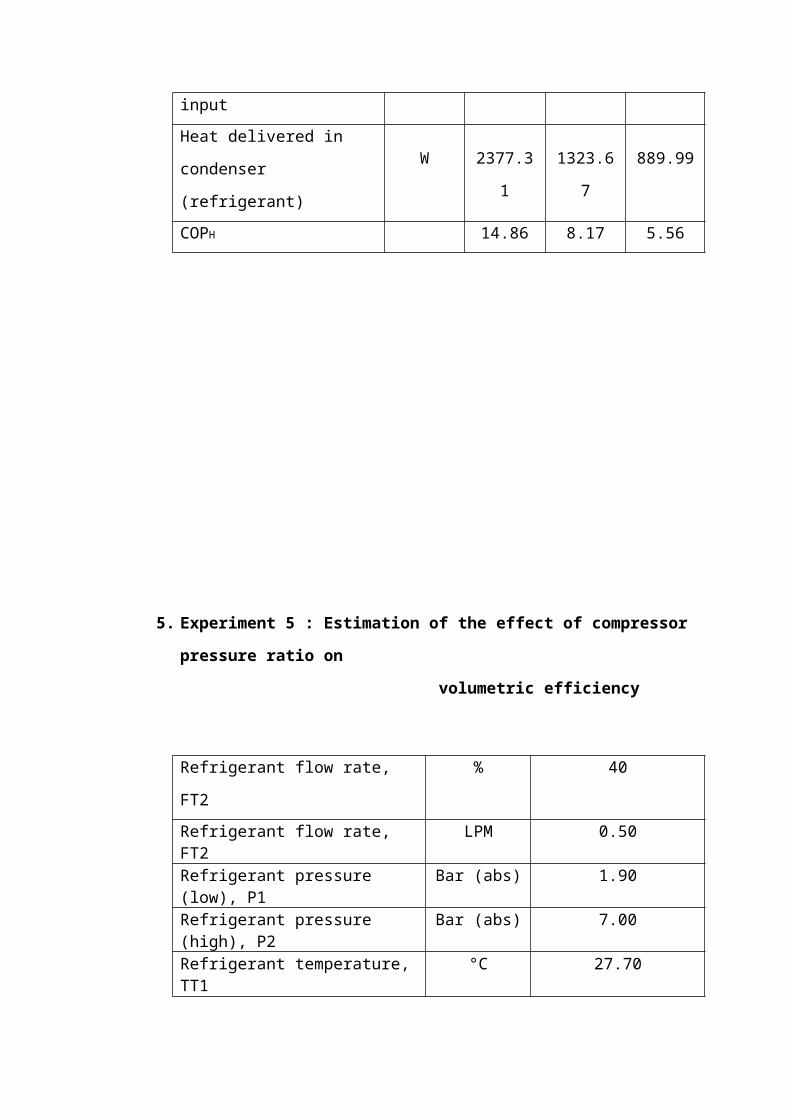
4. Experiment 4 : Production of heat pump perfomance curve over a range of
evaporating and condensation temperatures
Test 1 2 3
Refrigerant flow rate, FT2 % 60 40 20
Refrigerant flow rate, FT2 LPM 0.76 0.50 0.25
Refigerant pressure (low), P1 Bar (abs) 2.00 2.00 2.40
Refigerant pressure (high), P2 Bar (abs) 7.10 7.00 7.20
Refrigerant temperature, TT1 °C 28.00 27.50 28.10
Refrigerant temperature, TT2 °C 72.90 65.50 79.20
Refrigerant temperature, TT3 °C 30.00 29.90 31.40
Refrigerant temperature, TT4 °C 23.30 23.10 22.70
Enthalpy 1 (P1,TT1) kJ/kg 276.63 276.71 277.24
Enthalpy 2 (P2,TT2) kJ/kg 311.22 303.87 317.48
Enthalpy 3 (P2,TT3) kJ/kg 268.45 268.45 269.87
Evaporating temperature
(TT4)
°C 23.30 23.10 22.70
Condensing temperature °C 25.0 23.0 22.5
Compressor power input W 160 162 160
Heat delivered in condenser
(refrigerant)W 2377.31 1323.67 889.99
COPH 14.86 8.17 5.56

5. Experiment 5 : Estimation of the effect of compressor pressure ratio on
volumetric efficiency
Refrigerant flow rate, FT2 % 40
Refrigerant flow rate, FT2 LPM 0.50
Refrigerant pressure (low), P1 Bar (abs) 1.90
Refrigerant pressure (high), P2 Bar (abs) 7.00
Refrigerant temperature, TT1 °C 27.70

CALCULATIONS
1. Cooling water flow rate, Cfr (LPM) =
2. Refrigerant flow rate, Rfr (LPM) =
For experiment 1,
Cfr = 2.0 LPM
i. Power input = 162 W
ii. Heat output = Cfr x specific heat capacity x ∆T
=
= 167.2 W
iii. Coefficient of performance, COPH
COPH =
=
= 1.03
For experiment 2

i. Heat Output:
1. For 60 %
Heat Output =
= 69.67W
2. For 40 %
Heat Output =
= 83.8 W
3. For 20 %
Heat Output =
= 181.13 W
ii. COPH =
1. For 60 %

COPH =
= 0.435
2. For 40 %
COPH =
= 0.517
3. For 20 %
COPH =
= 1.133
For experiment 3
i. Energy balance on the condenser

Heat transfer from the refrigerant.
Heat transfer to the cooling water
ii. Energy balance on the compressor
Power input in the experiment = 162 W
Heat transfer to the refrigerant
For experiment 5
Compressor pressure ratio
=
=
= 3.68
Refrigerant mass flow rate
= x x x
= 0.00956
Volumetric flow rate of refrigerant at the compressor suction,V1
=Refrigerant mass flow rate x specific volume of refrigerant at compressor suction
= 0.00956 x 0.059
=0.000564
Compressor swept volume
= 2800 x x
=
Volumetric Efficiency =
= x 100%
= 136.56%
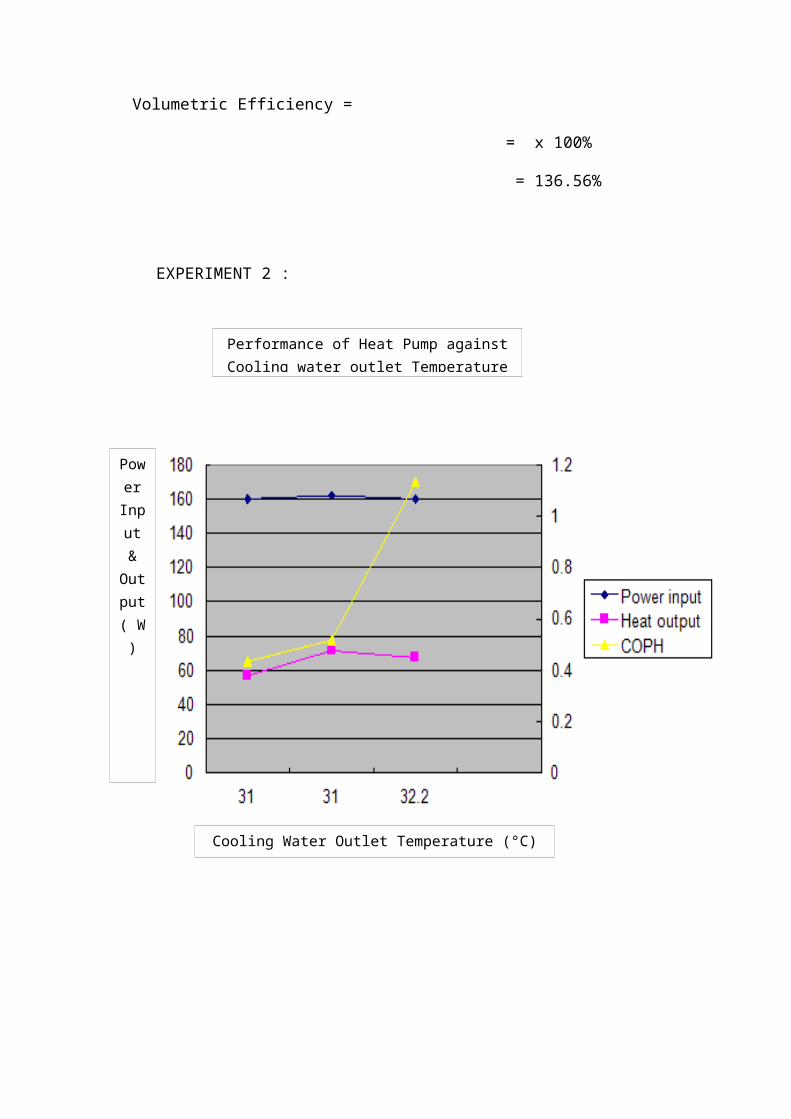
EXPERIMENT 2 :
Performance of Heat Pump against Cooling water outlet Temperature

EXPERIMENT 3:
Power
Input & Output ( W
)
Cooling Water Outlet Temperature (°C)
COPH

EXPERIMENT 4 :

DISCUSSION

Generally, this experiment involved the increasing amount of clearance volume
is a way of decreasing the capacity of compressor. Capacity control of the compressor is
achieved in reciprocating type compressor by varying speed in engine driven units
through fuel flow control. But speed reduction is limited to 40% of the top speed to
provide constant torque. Capacity control for screw type compressor is done with
variable speed and variable compressor displacement. Then, a slide valve is positioned
in the casing that directs a portion of the compressed air to the suction valve when the
capacity is reduced.
In experiment 1, the purpose of the experiment was the determination of power
input, heat output and coefficient of performance (COP). COP for heat pump is the ratio
of the energy tranferred for heating to the input electric energy used in the process.
Based on the theory, ideal COP should be greater than 1 and higher the COPs equate to
lower operating costs. From the data, approved that our COP value is 1.03 which is
greater than 1. Absolutely proved that the power input is inversely propotional to the
coefficient of performance.
For experiment 2, we can know the value of cooling outlet temperature, cooling
inlet temperature and compressor power. The data will be taken by the change of flow
rate water that is 20%, 40% and 60%. The 80% of flow rate water cannot be applied
because of the compressor cannot achieve it.
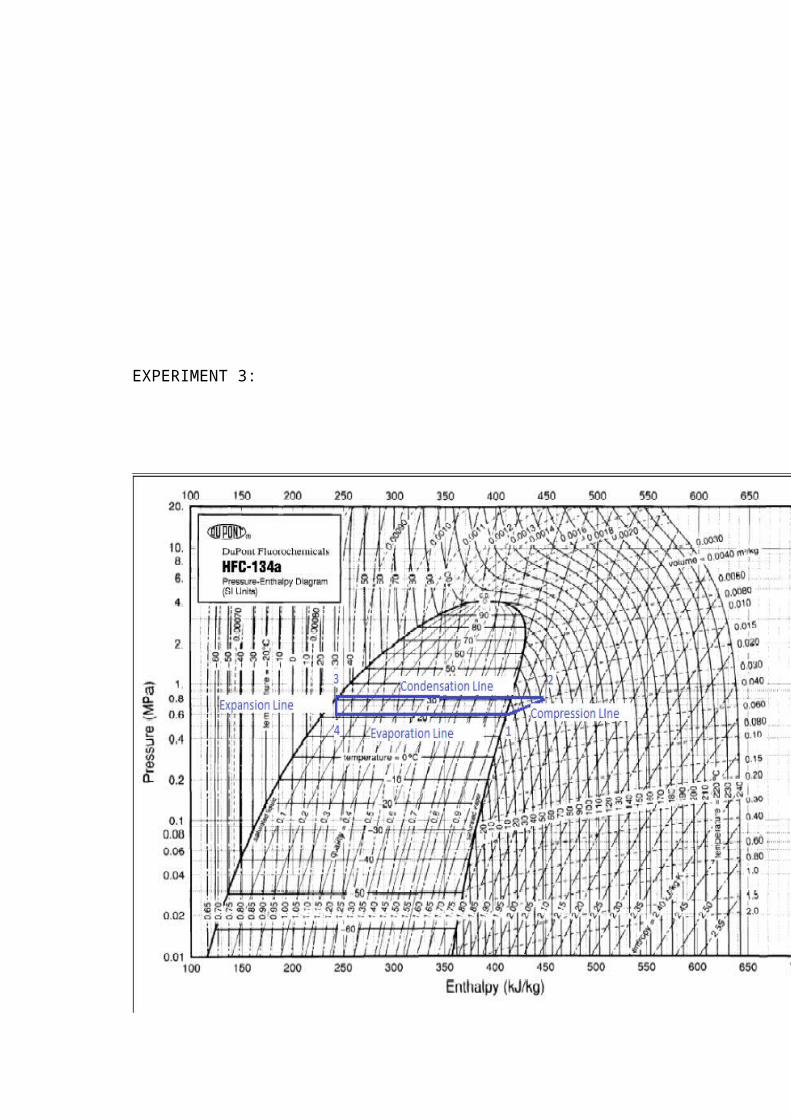
Based on the p-h diagram of the refrigeration of the R-134a in experiment 3,
there is a process that undergoes when running the experiment that being called as a
vapor compression cycle. In the vapor compression cycle process, the process starts
with the vaporization of the refrigerant in the evaporator. The process continues with the
compression that is used to raise the pressure of the refrigerant so that it can condense at
a higher temperature. When all the vapor has condensed, the pressure is reduced in an
expansion device, and the refrigerant returns to its original condition. The expansion is a
constant enthalpy process. It is drawn as a vertical line on the P-h diagram. No heat is
absorbed or rejected during this expansion, the liquid just passes through a valve
because the liquid is saturated at the start of expansion by the end of the process it is
partly vapor. On the other hand, the compression process is shown as a curve. It is not a
constant enthalpy process. The energy used to compress the vapor turns into heat, and
increases its temperature. This tends to raise the temperature of the vapor, making it to
move further and further into the superheated part of the diagram as compression

progresses. It takes a lot of heat to evaporate liquid. In other words a small amount of
liquid circulating in a refrigerator can perform a large amount of cooling. This is one
reason why the vapor compression cycle is widely used. The refrigeration system can be
small and compact. Also from a practical point of view heat exchange is much better
when using change of state - evaporation and condensation. However the expansion of
the high pressure liquid, the vapour compression cycle is non- reversible.
While for experiment 4, based on the graph the value of COPh for evaporating
and condensation were different. For evaporating conditions, COPh is increased directly
proportional to evaporation temperature. Furthermore, on condensation state, shows a
decrease in cup with a decreasing condensation temperature. Basically, the cap
decreases with an increase in temperature difference between condensation and
evaporation. Based on theory, the value of COPh line must be lower than power input.
However, our result was quietly different from the theory value. It may be the cause of
some errors while handling the experiment.
In experiment 5, we have to calculate the compressor pressure ratio and the
volumetric efficiency. First of all, the refrigerant flow rate was set at 40% and we take
the reading of the pressure low, P1 and high, P2. So we can calculate the compressor
pressure ratio. The compressor pressure ratio is 3.68. For the volumetric efficiency is
136.56%. The result show bigger number and this may be due to some reading errors
that we get during experiment. We can prevent this error by check the reading multiple
time or repeat the experiment several times to get the average reading.
Conclusion

The cooling water and refrigerant flow rate display is in percentage (%).The formula to
convert cooling water and refrigerant flow rate to LPM is :
Cooling water flow rate, Cfr (LPM) =
Refrigerant flow rate, Rfr (LPM) =
The Coefficient of Performance is calculated by using the formula :
COPh =
while for heat output is calculated by using the formula:
Heat output = Cfr x specific heat capacity x ∆T
From all the experiment, we can conclude that, the higher flow rate of water, the lower
the coefficient of performance. For the temperature, the lower the flow rate, the higher
the temperature of refrigerator. The power input is constant for all water flow rates that
is around 160W to 162W. All objective is achieved.
RECOMMENDATION
1. Repeat the experiment a few times to get more accurate readings
2. Before the experiment begin, ensure that the mechanical heat pump should run
and warm up early for 15 minutes. It should be notice that, surrounding in the
laboratory also affect the result, thus it hard to get an accurate reading.
REFERENCES
APPENDICES
Set up apparatus
Water inlet and outlet Compressor of refrigerant

(R-134-A)