Embed Size (px)
Citation preview

Ref: HVBTR1200-002D OLIN Product: HVBTR-1200 Upgrading firmware with USB stick. WARNING: The upgrade by USB feature is built-in for updating the functions on the HVBTR-1200. Be aware that any power down or other interruption in the upgrading process on any device may result in a unit malfunction that is not recoverable. If you have any doubts about carrying out this process on your HVBT-1200, we would encourage you to ring and discuss the issues with the Olin Technical Support group. Firmware history - HVBTR-1200-v1.10 2010-2-3 - original firmware - HVBTR-1200-v1.10 2010-3-10 – Fixes issues with not saving some settings and losing channel settings - HVBTR-1200_V.3 2010-7-8 – adds support for Western Digital My Passport Essential (WDBAAAx series)
– adds saving of previous Timer Service and Duration settings in System Settings / Timer Settings (see Appendix 1)
Preparation – Download the file HVBTR1200-FW201078.zip from www.olinlivenow.com.au to your PC. Unzip and copy the file HVBTR1200-FW201078.abs directly onto your USB stick (ie to the root directory). Do not copy to a folder or sub-directory on your USB stick.
Confirming Firmware version on HVBTR-1200 1. Menu button
2. Choose Tools with PR- button

HVBTR1200‐002D 2 | P a g e
3. button highlights Information
4. OK button to display Information. Earlier version software can be identified as maincode HVBTR-1200 - v1.10 2010-2-3
Or Earlier version software can be identified as maincode HVBTR-1200-v1.10 2010-3-10.

HVBTR1200‐002D 3 | P a g e
Updating the firmware
5. Exit button to Tools menu
6. Plug the USB stick into the USB slot behind the front cover of the HVBTR-1200.
7. HVBTR-1200 should recognise USB stick.
8. Upgrade By USB should now be active and be selectable. button and PR- button to select Upgrade By USB.
HVBTR1200‐002D 4 | P a g e
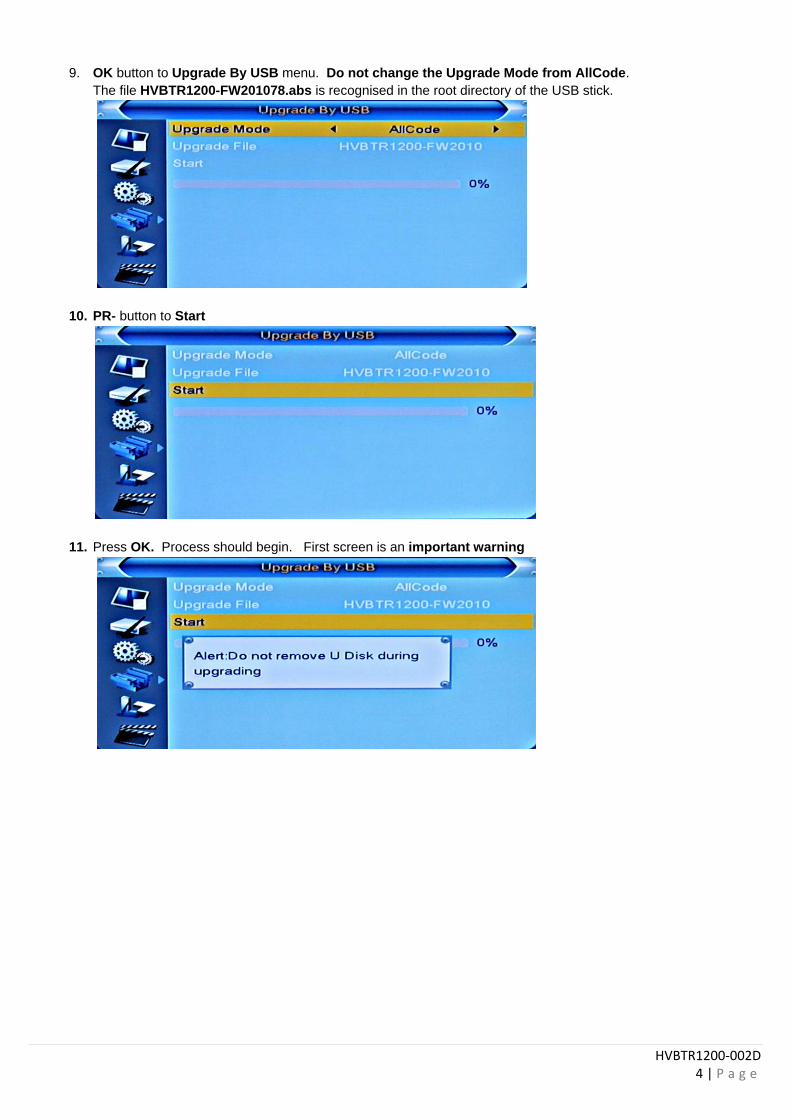
9. OK button to Upgrade By USB menu. Do not change the Upgrade Mode from AllCode.
The file HVBTR1200-FW201078.abs is recognised in the root directory of the USB stick.
10. PR- button to Start
11. Press OK. Process should begin. First screen is an important warning

HVBTR1200‐002D 5 | P a g e
12. OK for YES to begin upgrade. NOTE: This is the last time you can exit the upgrade process.
13. Upgrade process starts writing data to the HVBTR-1200. Note progress bar and warning Do not power off:
System Reboot and Auto Scan
14. On 100% completion the HVBTR-1200 unit will reboot:
15. Initial setup screen will appear. Make sure Australia is selected.
16. PR- button and OK button to set.

HVBTR1200‐002D 6 | P a g e
17. Auto Scan will begin:
18. When Auto Scan is 100% complete, OK button and it should go to a program:

HVBTR1200‐002D 7 | P a g e
Confirming successful upgrade
19. Menu button
20. Choose Tools with PR- button
21. button highlights Information
22. OK button to display Information. Later version software can be identified as maincode HVBTR-1200-V.3 2010-7-8. Indicates a successful upgrade.

HVBTR1200‐002D 8 | P a g e
Removing USB Stick
23. Press exit button to return to Tools menu. PR- to Remove USB device safely:
24. OK button:
25. OK button and remove the USB stick from the front of the HVBTR-1200. Close the front panel. Exit button until picture appears.

HVBTR1200‐002D 9 | P a g e
Appendix 1 – Firmware upgrade HVBTR-1200_V.3 2010-7-8
Adds saving of previous Timer Service and Duration settings in System Settings / Timer Settings
1. Default settings Menu / System Settings / Timer Settings Timer Service = Channel and Duration = 01:00
2. Change Settings. Example Channel to Record and Duration from 01:00 to 00:30
3. Save the settings. Open the recording again and set Timer Mode = Off. Save again. Next time you go to the settings the Timer Service and Duration defaults will be the last set. NOTE: This applies individually to each of the 8 recording slots.