Embed Size (px)
Citation preview

Red Hat Enterprise Linux 7
Desktop Migration and Administration Guide
GNOME 3 desktop migration planning, deployment, configuration, and administrationin RHEL 7
Last Updated: 2019-08-19


Red Hat Enterprise Linux 7 Desktop Migration and Administration Guide
GNOME 3 desktop migration planning, deployment, configuration, and administration in RHEL 7
Marie DoleželováRed Hat Customer Content [email protected]
Petr KovářRed Hat Customer Content [email protected]
Jana HevesRed Hat Customer Content Services

Legal Notice
Copyright © 2018 Red Hat, Inc.
This document is licensed by Red Hat under the Creative Commons Attribution-ShareAlike 3.0Unported License. If you distribute this document, or a modified version of it, you must provideattribution to Red Hat, Inc. and provide a link to the original. If the document is modified, all Red Hattrademarks must be removed.
Red Hat, as the licensor of this document, waives the right to enforce, and agrees not to assert,Section 4d of CC-BY-SA to the fullest extent permitted by applicable law.
Red Hat, Red Hat Enterprise Linux, the Shadowman logo, the Red Hat logo, JBoss, OpenShift,Fedora, the Infinity logo, and RHCE are trademarks of Red Hat, Inc., registered in the United Statesand other countries.
Linux ® is the registered trademark of Linus Torvalds in the United States and other countries.
Java ® is a registered trademark of Oracle and/or its affiliates.
XFS ® is a trademark of Silicon Graphics International Corp. or its subsidiaries in the United Statesand/or other countries.
MySQL ® is a registered trademark of MySQL AB in the United States, the European Union andother countries.
Node.js ® is an official trademark of Joyent. Red Hat is not formally related to or endorsed by theofficial Joyent Node.js open source or commercial project.
The OpenStack ® Word Mark and OpenStack logo are either registered trademarks/service marksor trademarks/service marks of the OpenStack Foundation, in the United States and othercountries and are used with the OpenStack Foundation's permission. We are not affiliated with,endorsed or sponsored by the OpenStack Foundation, or the OpenStack community.
All other trademarks are the property of their respective owners.
Abstract
The Desktop Migration and Administration Guide documents the GNOME 3 Desktop migrationplanning, deployment, configuration, and administration on Red Hat Enterprise Linux 7. It is orientedtowards system administrators with a basic understanding of the Red Hat Enterprise Linux system.

. . . . . . . . . . . . . . . . . . . . . . . . . . . . . . . . . . . . . . . . . . . . . . . . . . . . . . . . . . . . . . . . . . . . . . . . . . . . . . . . . . . . . . . . . . . . . . . . . . . . . . . . . . . . . . . . . . . . . . . . . . . . . . . . . . . . . . . . . . . . . . . . . . . . . . . . . . . . . . . . . . . . . . . . . . . . . . . . . . . . . . . . . . . . . . . . . . . . . . . . . . . . . . . . . . . . . . . . . . . . . . . . . . . . . . . . . . . . . . . . . . . . . . . . . . . . . . . . . . . . . . . . . . . . . . . . . . . . . . . .
. . . . . . . . . . . . . . . . . . . . . . . . . . . . . . . . . . . . . . . . . . . . . . . . . . . . . . . . . . . . . . . . . . . . . . . . . . . . . . . . . . . . . . . . . . . . . . . . . . . . . . . . . . . . . . . . . . . . . . . . . . . . . . . . . . . . . . . . . . . . . . . . . . . . . . . . . . . . . . . . . . . . . . . . . . . . . . . . . . . . . . . . . . . . . . . . . . . . . . . . . . . . . . . . . . . . . . . . . . . . . . . . . . . . . . . . . . . . . . . . . . . . . . . . . . . . . . . . . . . . . . . . . . . . . . . . . . . . . . . .
. . . . . . . . . . . . . . . . . . . . . . . . . . . . . . . . . . . . . . . . . . . . . . . . . . . . . . . . . . . . . . . . . . . . . . . . . . . . . . . . . . . . . . . . . . . . . . . . . . . . . . . . . . . . . . . . . . . . . . . . . . . . . . . . . . . . . . . . . . . . . . . . . . . . . . . . . . . . . . . . . . . . . . . . . . . . . . . . . . . . . . . . . . . . . . . . . . . . . . . . . . . . . . . . . . . . . . . . . . . . . . . . . . . . . . . . . . . . . . . . . . . . . . . . . . . . . . . . . . . . . . . . . . . . . . . . . . . . . . . .
. . . . . . . . . . . . . . . . . . . . . . . . . . . . . . . . . . . . . . . . . . . . . . . . . . . . . . . . . . . . . . . . . . . . . . . . . . . . . . . . . . . . . . . . . . . . . . . . . . . . . . . . . . . . . . . . . . . . . . . . . . . . . . . . . . . . . . . . . . . . . . . . . . . . . . . . . . . . . . . . . . . . . . . . . . . . . . . . . . . . . . . . . . . . . . . . . . . . . . . . . . . . . . . . . . . . . . . . . . . . . . . . . . . . . . . . . . . . . . . . . . . . . . . . . . . . . . . . . . . . . . . . . . . . . . . . . . . . . . . .
. . . . . . . . . . . . . . . . . . . . . . . . . . . . . . . . . . . . . . . . . . . . . . . . . . . . . . . . . . . . . . . . . . . . . . . . . . . . . . . . . . . . . . . . . . . . . . . . . . . . . . . . . . . . . . . . . . . . . . . . . . . . . . . . . . . . . . . . . . . . . . . . . . . . . . . . . . . . . . . . . . . . . . . . . . . . . . . . . . . . . . . . . . . . . . . . . . . . . . . . . . . . . . . . . . . . . . . . . . . . . . . . . . . . . . . . . . . . . . . . . . . . . . . . . . . . . . . . . . . . . . . . . . . . . . . . . . . . . . . .
. . . . . . . . . . . . . . . . . . . . . . . . . . . . . . . . . . . . . . . . . . . . . . . . . . . . . . . . . . . . . . . . . . . . . . . . . . . . . . . . . . . . . . . . . . . . . . . . . . . . . . . . . . . . . . . . . . . . . . . . . . . . . . . . . . . . . . . . . . . . . . . . . . . . . . . . . . . . . . . . . . . . . . . . . . . . . . . . . . . . . . . . . . . . . . . . . . . . . . . . . . . . . . . . . . . . . . . . . . . . . . . . . . . . . . . . . . . . . . . . . . . . . . . . . . . . . . . . . . . . . . . . . . . . . . . . . . . . . . . .
. . . . . . . . . . . . . . . . . . . . . . . . . . . . . . . . . . . . . . . . . . . . . . . . . . . . . . . . . . . . . . . . . . . . . . . . . . . . . . . . . . . . . . . . . . . . . . . . . . . . . . . . . . . . . . . . . . . . . . . . . . . . . . . . . . . . . . . . . . . . . . . . . . . . . . . . . . . . . . . . . . . . . . . . . . . . . . . . . . . . . . . . . . . . . . . . . . . . . . . . . . . . . . . . . . . . . . . . . . . . . . . . . . . . . . . . . . . . . . . . . . . . . . . . . . . . . . . . . . . . . . . . . . . . . . . . . . . . . . . .
. . . . . . . . . . . . . . . . . . . . . . . . . . . . . . . . . . . . . . . . . . . . . . . . . . . . . . . . . . . . . . . . . . . . . . . . . . . . . . . . . . . . . . . . . . . . . . . . . . . . . . . . . . . . . . . . . . . . . . . . . . . . . . . . . . . . . . . . . . . . . . . . . . . . . . . . . . . . . . . . . . . . . . . . . . . . . . . . . . . . . . . . . . . . . . . . . . . . . . . . . . . . . . . . . . . . . . . . . . . . . . . . . . . . . . . . . . . . . . . . . . . . . . . . . . . . . . . . . . . . . . . . . . . . . . . . . . . . . . . .
. . . . . . . . . . . . . . . . . . . . . . . . . . . . . . . . . . . . . . . . . . . . . . . . . . . . . . . . . . . . . . . . . . . . . . . . . . . . . . . . . . . . . . . . . . . . . . . . . . . . . . . . . . . . . . . . . . . . . . . . . . . . . . . . . . . . . . . . . . . . . . . . . . . . . . . . . . . . . . . . . . . . . . . . . . . . . . . . . . . . . . . . . . . . . . . . . . . . . . . . . . . . . . . . . . . . . . . . . . . . . . . . . . . . . . . . . . . . . . . . . . . . . . . . . . . . . . . . . . . . . . . . . . . . . . . . . . . . . . . .
. . . . . . . . . . . . . . . . . . . . . . . . . . . . . . . . . . . . . . . . . . . . . . . . . . . . . . . . . . . . . . . . . . . . . . . . . . . . . . . . . . . . . . . . . . . . . . . . . . . . . . . . . . . . . . . . . . . . . . . . . . . . . . . . . . . . . . . . . . . . . . . . . . . . . . . . . . . . . . . . . . . . . . . . . . . . . . . . . . . . . . . . . . . . . . . . . . . . . . . . . . . . . . . . . . . . . . . . . . . . . . . . . . . . . . . . . . . . . . . . . . . . . . . . . . . . . . . . . . . . . . . . . . . . . . . . . . . . . . . .
. . . . . . . . . . . . . . . . . . . . . . . . . . . . . . . . . . . . . . . . . . . . . . . . . . . . . . . . . . . . . . . . . . . . . . . . . . . . . . . . . . . . . . . . . . . . . . . . . . . . . . . . . . . . . . . . . . . . . . . . . . . . . . . . . . . . . . . . . . . . . . . . . . . . . . . . . . . . . . . . . . . . . . . . . . . . . . . . . . . . . . . . . . . . . . . . . . . . . . . . . . . . . . . . . . . . . . . . . . . . . . . . . . . . . . . . . . . . . . . . . . . . . . . . . . . . . . . . . . . . . . . . . . . . . . . . . . . . . . . .
. . . . . . . . . . . . . . . . . . . . . . . . . . . . . . . . . . . . . . . . . . . . . . . . . . . . . . . . . . . . . . . . . . . . . . . . . . . . . . . . . . . . . . . . . . . . . . . . . . . . . . . . . . . . . . . . . . . . . . . . . . . . . . . . . . . . . . . . . . . . . . . . . . . . . . . . . . . . . . . . . . . . . . . . . . . . . . . . . . . . . . . . . . . . . . . . . . . . . . . . . . . . . . . . . . . . . . . . . . . . . . . . . . . . . . . . . . . . . . . . . . . . . . . . . . . . . . . . . . . . . . . . . . . . . . . . . . . . . . . .
. . . . . . . . . . . . . . . . . . . . . . . . . . . . . . . . . . . . . . . . . . . . . . . . . . . . . . . . . . . . . . . . . . . . . . . . . . . . . . . . . . . . . . . . . . . . . . . . . . . . . . . . . . . . . . . . . . . . . . . . . . . . . . . . . . . . . . . . . . . . . . . . . . . . . . . . . . . . . . . . . . . . . . . . . . . . . . . . . . . . . . . . . . . . . . . . . . . . . . . . . . . . . . . . . . . . . . . . . . . . . . . . . . . . . . . . . . . . . . . . . . . . . . . . . . . . . . . . . . . . . . . . . . . . . . . . . . . . . . . .
Table of Contents
CHAPTER 1. INTRODUCING THE GNOME 3 DESKTOP1.1. WHAT IS GNOME 3?1.2. WHAT IS GNOME SHELL?1.3. WHAT IS GNOME CLASSIC?1.4. NOTE ON ACCESSIBILITY
PART I. MIGRATION PLANNING
CHAPTER 2. LOGINDGETTING MORE INFORMATION
CHAPTER 3. GSETTINGS AND DCONFGETTING MORE INFORMATION
CHAPTER 4. POLICYKIT4.1. POLICY CONFIGURATION4.2. DEFAULT POLICY4.3. CHECKING PERMISSIONS FROM SCRIPTS4.4. EXTENDING POLKIT CONFIGURATION
CHAPTER 5. GDMGETTING MORE INFORMATION
CHAPTER 6. GNOME SHELL EXTENSIONS6.1. REPLACEMENT FOR THE CLOCK APPLET
CHAPTER 7. GNOME-SESSIONGETTING MORE INFORMATION
CHAPTER 8. INTERNATIONALIZATION8.1. INPUT METHODS8.2. CHANGED FILE LOCATIONS
PART II. CONFIGURATION AND ADMINISTRATION
CHAPTER 9. CONFIGURING DESKTOP WITH GSETTINGS AND DCONF9.1. TERMINOLOGY EXPLAINED: GSETTINGS, GSETTINGS, AND DCONF9.2. USER AND SYSTEM SETTINGS9.3. BROWSING GSETTINGS VALUES FOR DESKTOP APPLICATIONS9.4. WHAT ARE DCONF PROFILES?9.5. CONFIGURING CUSTOM DEFAULT VALUES9.6. GSETTINGS KEYS PROPERTIES9.7. STORING USER SETTINGS OVER NFS
CHAPTER 10. DEFAULT APPEARANCE10.1. BRANDING ANACONDA10.2. BOOT LOADER SCREEN10.3. PLYMOUTH10.4. CUSTOMIZING THE LOGIN SCREEN10.5. CUSTOMIZING DESKTOP BACKGROUNDS10.6. CONFIGURING FONTS
CHAPTER 11. GNOME SHELL EXTENSIONS11.1. WHAT ARE GNOME SHELL EXTENSIONS?11.2. ENABLING MACHINE-WIDE EXTENSIONS
44568
10
1112
1313
1414141515
1616
1717
1818
191919
20
2121212122232526
2727272931
3437
444445
Table of Contents
1

. . . . . . . . . . . . . . . . . . . . . . . . . . . . . . . . . . . . . . . . . . . . . . . . . . . . . . . . . . . . . . . . . . . . . . . . . . . . . . . . . . . . . . . . . . . . . . . . . . . . . . . . . . . . . . . . . . . . . . . . . . . . . . . . . . . . . . . . . . . . . . . . . . . . . . . . . . . . . . . . . . . . . . . . . . . . . . . . . . . . . . . . . . . . . . . . . . . . . . . . . . . . . . . . . . . . . . . . . . . . . . . . . . . . . . . . . . . . . . . . . . . . . . . . . . . . . . . . . . . . . . . . . . . . . . . . . . . . . . . .
. . . . . . . . . . . . . . . . . . . . . . . . . . . . . . . . . . . . . . . . . . . . . . . . . . . . . . . . . . . . . . . . . . . . . . . . . . . . . . . . . . . . . . . . . . . . . . . . . . . . . . . . . . . . . . . . . . . . . . . . . . . . . . . . . . . . . . . . . . . . . . . . . . . . . . . . . . . . . . . . . . . . . . . . . . . . . . . . . . . . . . . . . . . . . . . . . . . . . . . . . . . . . . . . . . . . . . . . . . . . . . . . . . . . . . . . . . . . . . . . . . . . . . . . . . . . . . . . . . . . . . . . . . . . . . . . . . . . . . . .
. . . . . . . . . . . . . . . . . . . . . . . . . . . . . . . . . . . . . . . . . . . . . . . . . . . . . . . . . . . . . . . . . . . . . . . . . . . . . . . . . . . . . . . . . . . . . . . . . . . . . . . . . . . . . . . . . . . . . . . . . . . . . . . . . . . . . . . . . . . . . . . . . . . . . . . . . . . . . . . . . . . . . . . . . . . . . . . . . . . . . . . . . . . . . . . . . . . . . . . . . . . . . . . . . . . . . . . . . . . . . . . . . . . . . . . . . . . . . . . . . . . . . . . . . . . . . . . . . . . . . . . . . . . . . . . . . . . . . . . .
. . . . . . . . . . . . . . . . . . . . . . . . . . . . . . . . . . . . . . . . . . . . . . . . . . . . . . . . . . . . . . . . . . . . . . . . . . . . . . . . . . . . . . . . . . . . . . . . . . . . . . . . . . . . . . . . . . . . . . . . . . . . . . . . . . . . . . . . . . . . . . . . . . . . . . . . . . . . . . . . . . . . . . . . . . . . . . . . . . . . . . . . . . . . . . . . . . . . . . . . . . . . . . . . . . . . . . . . . . . . . . . . . . . . . . . . . . . . . . . . . . . . . . . . . . . . . . . . . . . . . . . . . . . . . . . . . . . . . . . .
. . . . . . . . . . . . . . . . . . . . . . . . . . . . . . . . . . . . . . . . . . . . . . . . . . . . . . . . . . . . . . . . . . . . . . . . . . . . . . . . . . . . . . . . . . . . . . . . . . . . . . . . . . . . . . . . . . . . . . . . . . . . . . . . . . . . . . . . . . . . . . . . . . . . . . . . . . . . . . . . . . . . . . . . . . . . . . . . . . . . . . . . . . . . . . . . . . . . . . . . . . . . . . . . . . . . . . . . . . . . . . . . . . . . . . . . . . . . . . . . . . . . . . . . . . . . . . . . . . . . . . . . . . . . . . . . . . . . . . . .
. . . . . . . . . . . . . . . . . . . . . . . . . . . . . . . . . . . . . . . . . . . . . . . . . . . . . . . . . . . . . . . . . . . . . . . . . . . . . . . . . . . . . . . . . . . . . . . . . . . . . . . . . . . . . . . . . . . . . . . . . . . . . . . . . . . . . . . . . . . . . . . . . . . . . . . . . . . . . . . . . . . . . . . . . . . . . . . . . . . . . . . . . . . . . . . . . . . . . . . . . . . . . . . . . . . . . . . . . . . . . . . . . . . . . . . . . . . . . . . . . . . . . . . . . . . . . . . . . . . . . . . . . . . . . . . . . . . . . . . .
. . . . . . . . . . . . . . . . . . . . . . . . . . . . . . . . . . . . . . . . . . . . . . . . . . . . . . . . . . . . . . . . . . . . . . . . . . . . . . . . . . . . . . . . . . . . . . . . . . . . . . . . . . . . . . . . . . . . . . . . . . . . . . . . . . . . . . . . . . . . . . . . . . . . . . . . . . . . . . . . . . . . . . . . . . . . . . . . . . . . . . . . . . . . . . . . . . . . . . . . . . . . . . . . . . . . . . . . . . . . . . . . . . . . . . . . . . . . . . . . . . . . . . . . . . . . . . . . . . . . . . . . . . . . . . . . . . . . . . . .
. . . . . . . . . . . . . . . . . . . . . . . . . . . . . . . . . . . . . . . . . . . . . . . . . . . . . . . . . . . . . . . . . . . . . . . . . . . . . . . . . . . . . . . . . . . . . . . . . . . . . . . . . . . . . . . . . . . . . . . . . . . . . . . . . . . . . . . . . . . . . . . . . . . . . . . . . . . . . . . . . . . . . . . . . . . . . . . . . . . . . . . . . . . . . . . . . . . . . . . . . . . . . . . . . . . . . . . . . . . . . . . . . . . . . . . . . . . . . . . . . . . . . . . . . . . . . . . . . . . . . . . . . . . . . . . . . . . . . . . .
. . . . . . . . . . . . . . . . . . . . . . . . . . . . . . . . . . . . . . . . . . . . . . . . . . . . . . . . . . . . . . . . . . . . . . . . . . . . . . . . . . . . . . . . . . . . . . . . . . . . . . . . . . . . . . . . . . . . . . . . . . . . . . . . . . . . . . . . . . . . . . . . . . . . . . . . . . . . . . . . . . . . . . . . . . . . . . . . . . . . . . . . . . . . . . . . . . . . . . . . . . . . . . . . . . . . . . . . . . . . . . . . . . . . . . . . . . . . . . . . . . . . . . . . . . . . . . . . . . . . . . . . . . . . . . . . . . . . . . . .
11.3. LOCKING DOWN ENABLED EXTENSIONS11.4. SETTING UP MANDATORY EXTENSIONS
CHAPTER 12. INTEGRATING APPLICATIONS12.1. CUSTOMIZING MENUS12.2. CUSTOMIZING DEFAULT FAVORITE APPLICATIONS12.3. CONFIGURING FILE ASSOCIATIONS
CHAPTER 13. CUSTOMIZING GNOME DESKTOP FEATURES13.1. ALLOWING AND DISALLOWING ONLINE ACCOUNTS13.2. ENABLING THE CTRL+ALT+BACKSPACE SHORTCUT13.3. ENABLING THE COMPOSE KEY13.4. DISABLING COMMAND-LINE ACCESS13.5. LOCKING DOWN PRINTING13.6. LOCKING FILE SAVING ON DISK13.7. LOCKING REPARTITIONING13.8. LOCKING DOWN USER LOGOUT AND USER SWITCHING13.9. SINGLE-APPLICATION MODE13.10. PREVENTING THE COMPUTER FROM SUSPENDING WHEN CLOSING THE LID13.11. CHANGING BEHAVIOR WHEN PRESSING THE POWER BUTTON IN GRAPHICAL TARGET MODE
CHAPTER 14. SESSION MANAGEMENT14.1. WHAT IS GDM?14.2. AUTHENTICATION14.3. USER SESSIONS
CHAPTER 15. VIRTUAL FILE SYSTEMS AND DISK MANAGEMENT15.1. GVFS15.2. BACK ENDS FOR GVFS15.3. MOUNTING, UNMOUNTING AND EJECTING15.4. MANAGING BOOKMARKS15.5. CONFIGURING A DEFAULT SERVER LIST15.6. EXPOSING GNOME VIRTUAL FILE SYSTEMS TO ALL OTHER APPLICATIONS15.7. PASSWORD MANAGEMENT OF GVFS MOUNTS15.8. GVFS TOOLS AND XDG-UTILS IN GNOME15.9. USING GVFS METADATA15.10. TROUBLESHOOTING
CHAPTER 16. HARDWARE CONFIGURATION16.1. TABLETS
APPENDIX A. KDE PLASMA WORKSPACES
APPENDIX B. ACCESSING RED HAT DOCUMENTATIONB.1. PRODUCT DOCUMENTATIONB.2. RED HAT ACCESS GUI
APPENDIX C. ACKNOWLEDGEMENTS
APPENDIX D. REVISION HISTORY
4646
48485253
606061
626264646566676970
72727275
8383838485868787888990
9393
96
979797
98
99
Desktop Migration and Administration Guide
2
Table of Contents
3

CHAPTER 1. INTRODUCING THE GNOME 3 DESKTOP
1.1. WHAT IS GNOME 3?
In Red Hat Enterprise Linux 7, GNOME 3 is the default desktop environment. It is the next major versionof the GNOME Desktop, which introduces a new user interface and substantial feature improvementsover the previous GNOME 2 Desktop shipped with Red Hat Enterprise Linux 5 and 6.
Figure 1.1. The GNOME 3 Desktop (GNOME Classic)
GNOME 3 provides a focused working environment that encourages productivity. A powerful searchfeature lets you access all your work from one place. For example, you can turn off notifications whenyou need to concentrate on the task in hand. GNOME 3 is built on a number of powerful components:
GNOME Shell
GNOME Shell is a modern and intuitive graphical user interface. It provides quality user experience,including visual effects and hardware acceleration support. For more information, see Section 1.2,“What Is GNOME Shell?”.
GNOME Classic
GNOME Classic combines old and new; it keeps the familiar look and feel of GNOME 2, but adds thepowerful new features and 3-D capabilities of GNOME Shell. GNOME Classic is the default GNOMEsession and GNOME Shell mode in Red Hat Enterprise Linux 7. For more information, read thesection Section 1.3, “What Is GNOME Classic?” .
GSettings
Desktop Migration and Administration Guide
4

GSettings is a configuration storage system, replacing GConf found in older GNOME versions. Formore information about the transition from GConf to GSettings, see Chapter 3, GSettings anddconf. To learn more about configuring your desktop with GSettings, read Chapter 9, ConfiguringDesktop with GSettings and dconf.
GVFS
GVFS provides complete virtual file system infrastructure and handles storage in the GNOMEDesktop in general. Through GVFS, GNOME 3 integrates well with online document-storageservices, calendars, and contact lists, so all your data can be accessed from the same place. Readmore about GVFS in Chapter 15, Virtual File Systems and Disk Management .
GTK+
GTK+, a multi-platform toolkit for creating graphical user interfaces, provides a highly-usablefeature-rich API. Thanks to GTK+, GNOME 3 is able to change the look of an application or providesmooth appearance of graphics. In addition, GTK+ contains a number of features such as object-oriented programming support (GObject), wide support of international character sets and textlayouts (Pango), or a set of accessibility interfaces (ATK).
1.2. WHAT IS GNOME SHELL?
GNOME Shell is the user interface of the GNOME Desktop, the crucial technology of GNOME 3. Itprovides basic user interface functions such as switching windows, launching applications, or displayingnotifications.
GNOME Shell introduces innovative user interface concepts to provide quality user experience,including hardware acceleration on systems with modern graphics hardware.
Some of the major components of the GNOME Shell user interface include:
The top bar.
The horizontal bar at the top of the screen provides access to some of the basic functions ofGNOME Shell, such as the Activities Overview, clock and calendar, system status icons, and thesystem menu at the top-left corner of the screen.
The system menu.
The system menu is in the top right corner. You can update some of your settings, find informationabout your Wi-Fi connection, switch user, log out, and turn off your computer from this menu.
The Activities Overview.
The Activities Overview features windows and applications views that let the user run applicationsand windows and switch between them.
The search entry at the top allows for searching various items available on the desktop, includingapplications, documents, files, and configuration tools.
The vertical bar on the left side is called dash, and it contains a list of favorite and runningapplications.
The workspace list is displayed on the right side, and allows the user to switch between multipleworkspaces, or move applications and windows from one workspace to another.
The message tray.
CHAPTER 1. INTRODUCING THE GNOME 3 DESKTOP
5

The message tray is a horizontal bar near the bottom of the screen, and shows when the userpresses Super+M. It provides access to pending notifications.
Components specific to GNOME Classic.
GNOME Classic is the default GNOME Shell mode in Red Hat Enterprise Linux 7. It changes some ofthe aspects of GNOME Shell behavior as well as the GNOME Shell appearance. That includes thebottom bar with the window list, and the Applications and Places menus on the top bar. For detailedinformation on GNOME Classic, see Section 1.3, “What Is GNOME Classic?” .
1.2.1. Hardware Acceleration and Software Rendering
GNOME Shell features visual effects and makes use of hardware acceleration support provided by Clutter, an OpenGL-based graphics library.
For hardware acceleration to function properly, the graphics driver has to support GL 1.2 and the multi-texturing extension, or GL 1.3. Alternatively, the driver has to provide support for GLES 1.1 or GLES 2.0.Keep in mind that many GPU models and drivers do not properly implement support for GL or GLES, sohardware acceleration on systems with those GPUs and drivers may not be available.
On systems, including virtual machines, that do not meet the GPU and driver requirements, softwarerendering is used to provide the GNOME 3 user experience identical to that with supported hardwareacceleration. Software rendering is provided by the llvmpipe driver.
To determine whether the system is using software rendering and the llvmpipe driver, you can run the glxinfo command:
$ glxinfo | grep rendererOpenGL renderer string: Gallium 0.4 on llvmpipe (LVVM 3.3, 128 bits)
Note that because the software renderer does not provide a fully compliant OpenGL implementation,some programs may not function properly if they rely on the X server having a consistent view of GLXstate across applications. Consider upgrading your hardware, or run these programs on systems withGPUs and drivers that fully support hardware acceleration.
1.3. WHAT IS GNOME CLASSIC?
GNOME Classic is a GNOME Shell feature and mode for users who prefer a more traditional desktopexperience. While GNOME Classic is based on GNOME 3 technologies, it provides a number of changesto the user interface:
The Applications and Places menus.
The Applications menu is displayed at the top left of the screen. It gives the user access toapplications organized into categories. The user can also open the Activities Overview from thatmenu.
The Places menu is displayed next to the Applications menu on the top bar . It gives the user quickaccess to important folders, for example Downloads or Pictures.
The taskbar.
The taskbar is displayed at the bottom of the screen, and features:
a window list,
Desktop Migration and Administration Guide
6
a notification icon displayed next to the window list,
a short identifier for the current workspace and total number of available workspacesdisplayed next to the notification icon.
Four available workspaces.
In GNOME Classic, the number of workspaces available to the user is by default set to 4.
Minimize and maximize buttons.
Window titlebars in GNOME Classic feature the minimize and maximize buttons that let the userquickly minimize the windows to the window list, or maximize them to take up all of the space on thedesktop.
A traditional Super+Tab window switcher.
In GNOME Classic, windows in the Super+Tab window switcher are not grouped by application.
The system menu.
The system menu is in the top right corner. You can update some of your settings, find informationabout your Wi-Fi connection, switch user, log out, and turn off your computer from this menu.
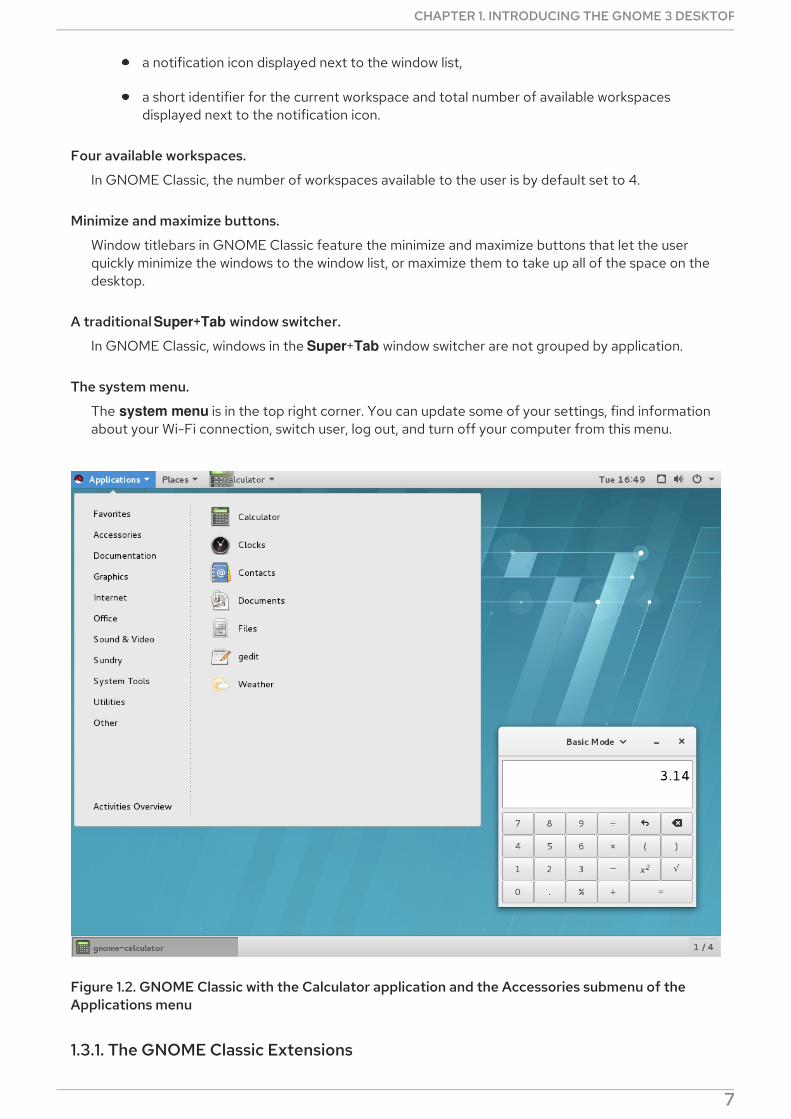
Figure 1.2. GNOME Classic with the Calculator application and the Accessories submenu of theApplications menu
1.3.1. The GNOME Classic Extensions
CHAPTER 1. INTRODUCING THE GNOME 3 DESKTOP
7

GNOME Classic is distributed as a set of GNOME Shell extensions . The GNOME Classic extensions areinstalled as dependencies of the gnome-classic-session package, which provides components requiredto run a GNOME Classic session. Because the GNOME Classic extensions are enabled by default onRed Hat Enterprise Linux 7, GNOME Classic is the default Red Hat Enterprise Linux 7 desktop userinterface.
AlternateTab ([email protected]),
Applications Menu ([email protected]),
Launch new instance ([email protected]),
Places Status Indicator ([email protected]),
Window List ([email protected]).
1.3.2. Switching from GNOME Classic to GNOME and Back
The user can switch from GNOME Classic to GNOME by logging out and clicking on the cogwheel nextto Sign In. The cogwheel opens a drop-down menu, which contains GNOME Classic.
To switch from GNOME Classic to GNOME from within the user session, run the following command:
$ gnome-shell --mode=user -r &
To switch back to GNOME Classic from within the same user session, run the following command:
$ gnome-shell --mode=classic -r &
1.3.3. Disabling GNOME Classic as the Default Session
For all newly created users on Red Hat Enterprise Linux 7, GNOME Classic is set as the default session.To override that setting for a specific user, you need to modify the user's account service in the /var/lib/AccountsService/users/username file. See Section 14.3.2, “Configuring a User DefaultSession” for details on how to do that.
Getting More InformationUsers can find more information on using GNOME 3, GNOME Shell, or GNOME Classic in GNOME Help,which is provided by the gnome-user-docs package. To access GNOME Help, press the Super key toenter the Activities Overview, type help, and then press Enter.
1.4. NOTE ON ACCESSIBILITY
The GNOME desktop includes assistive technologies to support users with various impairments andspecial needs, and to interact with common assistive devices. The Universal access menu provides aquick set up for users with various disabilities. The icon is placed on the top bar and looks like a personsurrounded by a circle:
All the accessibility features are documented in GNOME Help, which can be easily accessed by openingthe Activities overview and typing help. From the GNOME Help menu, select Universal access.
NOTE
Desktop Migration and Administration Guide
8

NOTE
To access GNOME as a visually impaired person, press the Super+Alt+S keycombination, which switches on the screen reader. You can find more details on usingOrca screen reader on its help page.
CHAPTER 1. INTRODUCING THE GNOME 3 DESKTOP
9

PART I. MIGRATION PLANNING
Migration Planning focuses on the shift of the default Red Hat Enterprise Linux desktop environmentfrom GNOME 2, shipped with Red Hat Enterprise Linux 5 and 6, to GNOME 3. One by one, this part ofthe guide briefly mentions the changes certain components have gone through and describes the newfeatures the components possess.
This guide only refers to changes to the GNOME Desktop environment. For changes to the other partsof Red Hat Enterprise Linux 7 refer to:
Red Hat Enterprise Linux 7 System Administrator's Guide , for components such as the GRUB 2boot loader, package management, systemd, or printer configuration.
Red Hat Enterprise Linux 7 Migration Planning Guide for an overview of major changes inbehavior and compatibility between Red Hat Enterprise Linux 6 and Red Hat Enterprise Linux 7.The Migration Planning Guide also introduces the tools provided by Red Hat to assist withupgrades to Red Hat Enterprise Linux 7.
Red Hat Enterprise Linux 7 Installation Guide for detailed information about installing Red HatEnterprise Linux 7 and using the Anaconda installer.
These documents can be found athttp://access.redhat.com/site/documentation/Red_Hat_Enterprise_Linux/.
Desktop Migration and Administration Guide
10
CHAPTER 2. LOGINDlogind (or more specifically systemd-logind) is a system service that manages user logins. This serviceis responsible for the following:
keeping track of users and sessions, their processes and their idle states,
creating control groups for user processes,
providing PolicyKit-based access for users to operations such as system shutdown or sleep,
implementing a shutdown/sleep inhibition logic for applications,
handling of power/sleep hardware keys,
multi-seat management, session switch management, and device access management for users,
automatic spawning of text logins (gettys) on virtual terminal (console) activation and userruntime directory management.
The logind service is deeply integrated with systemd, the new initialization system in Red HatEnterprise Linux 7, and replaces the upstart initialization system from Red Hat Enterprise Linux 6. Withthis change comes a number of new features and functions. The following is a summary of those mostsignificant:
ConsoleKit
The ConsoleKit framework is deprecated in Red Hat Enterprise Linux 7. Equivalent functionality isnow provided by systemd. Both ConsoleKit and logind are services for tracking the currentlyrunning user sessions.
NOTE
ConsoleKit had the ability to run arbitrary shell scripts any time the active session onthe system changed (using virtual terminal switching). This functionality is no longerprovided.
the /var/log/ConsoleKit/history file
Previously, ConsoleKit was sending log files to /var/log/ConsoleKit/history, which the present logind does not support. The file has been replaced by the traditional wtmp and utmp files whichnow keep track of all logins and logouts on the system. /var/log/ConsoleKit/history provided similarinformation as the wtmp file, though in a different format. Given the overlap in functionality, logindonly adopted the wtmp file's role.
seat.d scripts
Since ConsoleKit is no longer in use, seat.d scripts no longer complement the ConsoleKitframework, and have been replaced by systemd-logind.
the ck-list-sessions command
ConsoleKit provided the ck-list-sessions command, which returned extended information aboutrecent users, not only regular users but also GUI access with GDM. The comparable result can nowbe reached by running the loginctl command:
$ loginctl list-sessions
CHAPTER 2. LOGIND
11

multi-seat support
logind along with GDM provide the multi-seat feature with which the user can attach anothermonitor, mouse, or keyboard to their machine. Doing so, an additional login screen appears and theuser can log in as if they were using another machine.
To list seats that are available on the system, run the following command:
$ loginctl list-seats
To show the status of a specific seat on the system, run the following command:
$ loginctl seat-status seat
where seat is the name of the seat, for example seat0.
To assign specific hardware to a particular seat, run the following command:
# loginctl attach seat device
where seat is the name of the seat, for example seat1, and device is the device name specified withthe /sys device path, for example /sys/devices/pci0000:00/0000:00:02.0/drm/card0.
To change the assignment, assign the hardware to a different seat, or use the loginctl flush-devicescommand.
GETTING MORE INFORMATIONsystemd-logind.service(8) – The man page for logind provides more information on the logind usageand features. It also covers the APIs systemd-logind provides (logind D-Bus API documentation).
logind.conf(5) – The man page for logind.conf discusses the login manager configuration file.
loginctl(1) – The man page for the systemd login manager includes more information on the multi-seatfeature.
Desktop Migration and Administration Guide
12

CHAPTER 3. GSETTINGS AND DCONFOne of the major changes in Red Hat Enterprise Linux 7 is the transition from GConf (for storing userpreferences) to the combination of the GSettings high-level configuration system and the dconf backend.
GConf
As mentioned above, the GConf configuration system has been replaced by two systems:
the GSettings API, and
the dconf back end which serves as a low-level configuration system and program thatcollects system hardware and software configuration details in a single compact binaryformat.
Both the gsettings command-line tool and the dconf utility are used to view and change usersettings. The gsettings utility does so directly in the terminal, while the dconf utility uses the dconf-editor GUI for editing a configuration database. See Chapter 9, Configuring Desktop with GSettingsand dconf for more information on dconf-editor and the gsettings utility.
gconftool
The gconftool-2 tool has been replaced by gsettings and dconf. Likewise, gconf-editor has beenreplaced by dconf-editor.
Overriding
The concept of keyfiles has been introduced in Red Hat Enterprise Linux 7: the dconf utility allowsthe system administrator to override the default settings by directly installing defaults overrides. Forexample, setting the default background for all users is now executed by using a dconf overrideplaced in a keyfile in the keyfile directory, such as /etc/dconf/db/local.d/). To learn more aboutdefault values and overriding, see Section 9.5, “Configuring Custom Default Values” .
Locking the Settings
The dconf system now allows individual settings or entire settings subpaths to be locked down toprevent user customization. For more information on how to lock settings, see Section 9.5.1, “LockingDown Specific Settings”.
NFS and dconf
Using the dconf utility on home directories shared over NFS requires additional configuration. SeeSection 9.7, “Storing User Settings Over NFS” for information on this topic.
GETTING MORE INFORMATIONSee Chapter 9, Configuring Desktop with GSettings and dconf for more information on using GSettingsand dconf to configure user settings.
CHAPTER 3. GSETTINGS AND DCONF
13

CHAPTER 4. POLICYKITThe PolicyKit utility is a framework that provides an authorization API used by privileged programs (alsocalled mechanisms) offering services to unprivileged programs (also called subjects). The following aredetails on the changes PolicyKit, or its system name polkit, has undergone.
4.1. POLICY CONFIGURATION
As far as the new features are concerned, authorization rules are now defined in JavaScript .rules files.This means that the same files are used for defining both the rules and the administrator status.Previously, this information was stored in two different file types - *.pkla and *.conf, which usedkey/value pairs to define additional local authorizations.
These new .rules files are stored in two locations; whereas polkit rules for local customization are storedin the /etc/polkit-1/rules.d/ directory, the third party packages are stored in /usr/share/polkit-1/rules.d/.
The existing .conf and .pkla configuration files have been preserved and exist side by side with .rulesfiles. polkit has been upgraded for Red Hat Enterprise Linux 7 with the compatibility issue in mind.
The logic in precedence in rules has changed. polkitd now reads .rules files in lexicographic order fromthe /etc/polkit-1/rules.d and /usr/share/polkit-1/rules.d directories. If two files are named identically,files in /etc are processed before files in /usr. In addition, existing rules are applied by the /etc/polkit-1/rules.d/49-polkit-pkla-compat.rules file. They can therefore be overridden by .rules files in either /usror /etc with a name that comes before 49-polkit-pkla-compat in lexicographic order. The simplest wayto ensure that your old rules are not overridden is to begin the name of all other .rules files with anumber higher than 49.
Here is an example of a .rules file. It creates a rule that allows mounting a file system on a system devicefor the storage group. The rule is stored in the /etc/polkit-1/rules.d/10-enable-mount.rules file:
Example 4.1. Allow Mounting a File system on a System device
For more information, see:
polkit(8) – The man page for the description of the JavaScript rules and the precedence rules.
pkla-admin-identities(8) and pkla-check-authorization(8) – The man pages fordocumentation of the .conf and .pkla file formats, respectively.
4.2. DEFAULT POLICY
The default configuration now allows members of the wheel group to authenticate for administrativeactions using their own password instead of asking for the root password. The default policy is defined in/etc/polkit-1/rules.d/50-default.rules.
In the users panel of GNOME Settings, you can configure an account to an Administrator. When you
polkit.addRule(function(action, subject) { if (action.id == "org.freedesktop.udisks2.filesystem-mount-system" && subject.isInGroup("storage")) { return polkit.Result.YES; }});
Desktop Migration and Administration Guide
14

In the users panel of GNOME Settings, you can configure an account to an Administrator. When youfirst create the user during the GNOME Initial Setup, by default, you will create an Administratoraccount (a member of the wheel group).
NOTE
While sudo users are allowed to run programs with the security privileges of another user,Administrator is a member of the wheel group providing additional special systemprivileges that empower a user to execute restricted commands.
4.3. CHECKING PERMISSIONS FROM SCRIPTS
The pkcheck utility, which checks whether a process is authorized for action, now supports a new formatfor parameters specified by the --process option. This makes running pkcheck safer by avoiding a racecondition. The new format looks as follows:
$ pkcheck --process pid,start-time,uid
IMPORTANT
Do not use the bare pid or pid,start-time formats for the --process option. All scriptsthat invoke pkcheck need to use the new format pid,start-time,uid to avoid a racecondition.
For more information, see the pkcheck(1) man page.
4.4. EXTENDING POLKIT CONFIGURATION
Support for replacing the back-end authority implementation has been removed. A similar level offlexibility can be achieved by writing a JavaScript .rules file that calls an external program.
Support for replacing the PolkitBackendActionLookup implementation (the interface used to providedata to authentication dialogs) has also been removed from polkit in Red Hat Enterprise Linux 7.
For more information on polkit, see the polkit(8) man page.
CHAPTER 4. POLICYKIT
15

CHAPTER 5. GDMGDM is the GNOME Display Manager, which provides a graphical login environment. After thetransition from GNOME 2 to GNOME 3, configuring GDM is only possible through systemd as it nolonger supports other init systems.
the gdm package
The gdm package has replaced xorg-x11-xdm, which provided a legacy display login manager for theX Window System. As mentioned before, the gdm package provides the graphical login screen,shown shortly after boot up, log out, and when user-switching.
GDM and logind
GDM now uses logind for defining and tracking users. For more information, see Chapter 2, logind.System administrators can also set up automatic login manually in the GDM custom configurationfile: /etc/gdm/custom.conf.
custom.conf
GDM configuration is now found in /etc/gdm/custom.conf. However for backwards compatibility, if /etc/gdm/gdm.conf is found it will be used instead of custom.conf. When upgrading, Red Hatrecommends removing your old gdm.conf file and migrating any custom configuration to custom.conf.
GETTING MORE INFORMATIONFor more information on GDM, see Section 14.1, “What Is GDM?” .
For information on configuring and managing user sessions, see Section 14.3, “User Sessions” .
For information on customizing the login screen appearance, see Section 10.4, “Customizing the LoginScreen”.
Desktop Migration and Administration Guide
16

CHAPTER 6. GNOME SHELL EXTENSIONSGNOME Shell in Red Hat Enterprise Linux 7 does not support applets, which were used to customize thedefault GNOME 2 interface in Red Hat Enterprise Linux 5 and 6. GNOME 3 replaces applets withGNOME Shell extensions. Extensions can modify the default GNOME Shell interface and its parts, suchas window management and application launching.
6.1. REPLACEMENT FOR THE CLOCK APPLET
GNOME 2 in Red Hat Enterprise Linux 5 and 6 featured the Clock applet, which provided access to thedate, time, and calendar from the GNOME 2 Panel. In Red Hat Enterprise Linux 7, that applet is replacedby the Clocks application, which is provided by the gnome-clocks package. The user can access thatapplication by clicking the calendar on GNOME Shell's top bar and selecting Open Clocks.
Figure 6.1. Open Clocks
Getting More InformationSee Section 11.1, “What Are GNOME Shell Extensions?” for more detailed information on what GNOMEShell extensions are and how to configure and manage them.
CHAPTER 6. GNOME SHELL EXTENSIONS
17

CHAPTER 7. GNOME-SESSIONThe gnome-session program has also been updated in Red Hat Enterprise Linux 7. It starts theGNOME Desktop as it used to; nonetheless, some of its components have changed.
gnome-session-properties
The gnome-session-properties application is still part of the gnome-session package. However, itsfunctionality has been limited to managing startup programs for individual users, and saving currentlyrunning applications when logging out. The latter functionality has been kept from Red HatEnterprise Linux 6.
named session
The Save now button is able to save a session in a specific time and to name it. The saved sessionsare restored on login. When you click Automatically remember running applications when logging out in gnome-session-properties, the list of saved applications is shown on login as well.
With this update, it is also possible to create multiple layouts and rename them, or to be able toselect multiple user sessions for one user account.
GETTING MORE INFORMATIONFor detailed information on session management, see Chapter 14, Session Management.
For information on how to manage startup (autostart) applications for all users, see Section 14.3.5,“Adding an Autostart Application for All Users”.
Desktop Migration and Administration Guide
18
CHAPTER 8. INTERNATIONALIZATION
8.1. INPUT METHODS
The default input framework for the GNOME Desktop in Red Hat Enterprise Linux 7 is IBus (IntelligentInput Bus). It integrates with GNOME 3 and includes a user interface for input method selection.
8.1.1. Configuring and Switching Input Methods
Users can use the Region & Language panel in the GNOME Settings to configure their input methods.More information on using input methods can be found in GNOME Help. To access it, press the Superkey to enter the Activities Overview, type help, and then press Enter.
For non-GNOME sessions, IBus can configure both XKB layouts and input methods in the ibus-setuptool and switch them with a shortcut.
The default shortcut to switch input sources is Super+Space. In Red Hat Enterprise Linux 6, theshortcut was Ctrl+Space.
8.1.2. Predictive Input Method for IBus
ibus-typing-booster is a predictive input method for the IBus platform. It predicts complete wordsbased on partial input, allowing for faster and more accurate text input. Users can select the requiredword from a list of suggestions. ibus-typing-booster can also use Hunspell dictionaries to makesuggestions for a language.
8.1.3. IBus in the GNOME Desktop Replaces im-chooser
Because IBus is now integrated with the GNOME Desktop, im-chooser is deprecated except for usingnon-IBus input methods.
8.2. CHANGED FILE LOCATIONS
In Red Hat Enterprise Linux 7, the following changes have been made to the location of the inputmethod and font configuration files, and directories:
The .xinputrc file has been moved from the user's home directory to the ~/.config/imsettings/directory.
The .imsettings.log file has been moved from the user's home directory and can now be foundin ~/.cache/imsettings/log.
The ~/.fonts.conf file has been deprecated. Users are encouraged to move the file to the ~/.config/fontconfig/ directory.
The ~/.fonts.conf.d directory has been deprecated. Users are encouraged to move thedirectory to the ~/.config/fontconfig/ directory.
All disabled fontconfig configuration files in the /etc/fonts/conf.avail/ directory have beenmoved to the /usr/share/fontconfig/conf.avail/ directory. If you have any local symbolic linkspointing to the old location, remember to update them.
CHAPTER 8. INTERNATIONALIZATION
19
PART II. CONFIGURATION AND ADMINISTRATION
The second part of Red Hat Enterprise Linux 7 Desktop Migration and Administration Guide describesand explains various ways the GNOME Desktop can be configured and administered.
Desktop Migration and Administration Guide
20

CHAPTER 9. CONFIGURING DESKTOP WITH GSETTINGS ANDDCONF
9.1. TERMINOLOGY EXPLAINED: GSETTINGS, GSETTINGS, ANDDCONF
This section defines several terms that are easily confused.
dconf
dconf is a key-based configuration system which manages user settings. It is the back end for GSettings used in Red Hat Enterprise Linux 7. dconf manages a range of different settings, includingGDM, application, and proxy settings.
dconf
The dconf command-line utility is used for reading and writing individual values or entire directoriesfrom and to a dconf database.
GSettings
GSettings is a high-level API for application settings, front end for dconf.
gsettings
The gsettings command-line tool is used to view and change user settings.
9.2. USER AND SYSTEM SETTINGS
dconf allows system administrators and users several levels of control over configuration.
Administrators can define default settings that apply to all users.
Users can override the defaults with their own settings.
Optionally, administrators can also lock settings to prevent users from overriding them. Formore information, see Section 9.5.1, “Locking Down Specific Settings” .
9.3. BROWSING GSETTINGS VALUES FOR DESKTOP APPLICATIONS
There are two tools you can use to view and edit GSettings values:
The dconf-editor GUI tool.
The gsettings command-line utility.
NOTE
You may not have dconf-editor installed on the system by default. To install it, run thefollowing command:
# yum install dconf-editor
CHAPTER 9. CONFIGURING DESKTOP WITH GSETTINGS AND DCONF
21

Both dconf-editor and the gsettings utility let you browse and change options for system andapplication preferences. You can even use them to change preferences that do not exist in the graphicaluser interface.
dconf-editor provides a GUI for the browsing and editing of settings. It presents the hierarchy ofsettings in a tree-view and also displays additional information about each setting, including thedescription, type and default value. gsettings can be used to display and set dconf values. It alsoincludes Bash completion for commands and settings. gsettings can be used to automate configurationin shell scripts.
Note that both dconf-editor and the gsettings utility are intended to browse and modify the currentuser's GSettings database. This means that you should always run these tools as a normal user.
Figure 9.1. dconf-editor showing org.gnome.destop.background GSettings Keys
Getting More InformationFor more information on the dconf-editor tool, see the dconf-editor(1) man page.
For more information on the gsettings utility, see the gsettings(1) man page.
9.4. WHAT ARE DCONF PROFILES?
A profile is a list of system's hardware and software configuration databases, which the dconf systemcollects. dconf profiles allow you to compare identical systems to troubleshoot hardware or softwareproblems.
The dconf system stores its profiles in text files. The $DCONF_PROFILE environment variable can
Desktop Migration and Administration Guide
22

The dconf system stores its profiles in text files. The $DCONF_PROFILE environment variable canspecify a relative path to the file from the /etc/dconf/profile/ directory, or an absolute path, such as in auser's home directory.
Key pairs which are set in a dconf profile will override the default settings unless there is a problem withthe value that you have set.
9.4.1. Selecting a dconf Profile
On startup, dconf consults the $DCONF_PROFILE environment variable whether the variable is set. Ifset, dconf attempts to open the named profile and aborts if this step fails.
As long as the environment variable is not set, dconf attempts to open the profile named user. Providedthis step still fails, dconf falls back to an internal hard-wired configuration.
Each line in a profile specifies one dconf database. The first line indicates the database used to writechanges whereas the remaining lines show read-only databases. The following is a sample profile storedin /etc/dconf/profile/user:
user-db:usersystem-db:localsystem-db:site
This sample profile specifies three databases: user is the name of the user database which can normallybe found in ~/.config/dconf, and local and site are system databases, located in /etc/dconf/db/.
IMPORTANT
The dconf profile for a session is determined at login, so users will have to log out and login to apply a new dconf user profile to their session.
9.5. CONFIGURING CUSTOM DEFAULT VALUES
Machine-wide default settings can be set by providing a default for a key in a dconf profile. Thesedefaults can be overridden by the user.
To set a default for a key, the user profile must exist and the value for the key must be added to a dconf database.
Example 9.1. Set the Default Background
1. If it does not already exist, create the user profile in /etc/dconf/profile/user:
user-db:usersystem-db:local
where local is the name of a dconf database.
2. Create a keyfile for the local database in /etc/dconf/db/local.d/01-background, whichcontains the following default settings:
# dconf path[org/gnome/desktop/background]
CHAPTER 9. CONFIGURING DESKTOP WITH GSETTINGS AND DCONF
23

# GSettings key names and their corresponding valuespicture-uri='file:///usr/local/share/backgrounds/wallpaper.jpg'picture-options='scaled'primary-color='000000'secondary-color='FFFFFF'
In the default setting of the keyfile, the following GSettings keys are used:
Table 9.1. org.gnome.desktop.background schemas GSettings Keys
Key Name Possible Values Description
picture-options
"none", "wallpaper","centered", "scaled","stretched", "zoom","spanned"
Determines how the image set bywallpaper_filename is rendered.
picture-uri filename with the path URI to use for the background image. Notethat the backend only supports local (file://)URIs.
primary-color default: 000000 Left or Top color when drawing gradients, orthe solid color.
secondary-color
default: FFFFFF Right or Bottom color when drawing gradients,not used for solid color.
3. Edit the keyfile according to your preferences. For more information, see Section 9.3,“Browsing GSettings Values for Desktop Applications”.
4. Update the system databases:
# dconf update
IMPORTANT
When the user profile is created or changed, the user will need to log out and log in againbefore the changes will be applied.
If you want to avoid creating a user profile, you can use the dconf command-line utility to read andwrite individual values or entire directories from and to a dconf database. For more information, see the dconf(1) man page.
9.5.1. Locking Down Specific Settings
The lockdown mode in dconf is a useful tool for preventing users from changing specific settings.
To lock down a GSettings key, you will need to create a locks subdirectory in the keyfile directory (forinstance, /etc/dconf/db/local.d/locks/). The files inside this directory contain a list of keys to lock, andyou may add any number of files to this directory.
Desktop Migration and Administration Guide
24

IMPORTANT
If you do not enforce the system settings using a lockdown, users can easily override thesystem settings with their own. Any settings users have made will take precedence overthe system settings unless there is a lockdown enforcing the system settings.
The example below demonstrates how to lock settings for the default wallpaper. Follow the procedurefor any other setting you need to lock.
Example 9.2. Locking Down the Default Wallpaper
1. Set a default wallpaper by following steps in Section 10.5.1, “Customizing the DefaultDesktop Background”.
2. Create a new directory named /etc/dconf/db/local.d/locks/.
3. Create a new file in /etc/dconf/db/local.d/locks/00-default-wallpaper with the followingcontents, listing one key per line:
# Prevent users from changing values for the following keys:/org/gnome/desktop/background/picture-uri/org/gnome/desktop/background/picture-options/org/gnome/desktop/background/primary-color/org/gnome/desktop/background/secondary-color
4. Update the system databases:
# dconf update
9.6. GSETTINGS KEYS PROPERTIES
You can set a GSettings key in a dconf database only once. If you set the same key to different values indifferent places in the dconf database, only one of them will take effect. In other words, you will overrideone key setting with another.
In each dconf system database, each key can only have one value. Values for some keys are of an arraytype. For this value type, the value can be specified as a list of multiple elements separated by a comma.An example of an array value is shown below:
Example 9.3. The org.gnome.desktop.input-sources.xkb-options GSettings Key
Setting the org.gnome.desktop.input-sources.xkb-options GSettings key works as follows. It canonly be set once, so if you want two elements in the value you need to specify them in the sameconfiguration file. Since this value is an array type, it can have several elements:
[org/gnome/desktop/input-sources]# Enable Ctrl-Alt-Backspace for all users# Set the Right Alt key as the Compose key and enable itxkb-options=['terminate:ctrl_alt_bksp', 'compose:ralt']
key=['option1', 'option2']
CHAPTER 9. CONFIGURING DESKTOP WITH GSETTINGS AND DCONF
25
9.7. STORING USER SETTINGS OVER NFS
For dconf to work correctly when using Network File System (NFS) home directories, the dconf keyfileback end must be used.
Note that the glib2-fam package must be installed on the system when using the dconf keyfile back end.Otherwise notifications on configuration changes made on remote machines will not work properly.
Procedure 9.1. Setting the dconf Keyfile Back End
1. Verify that the glib2-fam package is installed on the system.
a. The system must be subscribed to the Optional channel. To learn how to subscribe thesystem to the Optional channel, read this resource: How to access Optional andSupplementary channels, and -devel packages using Red Hat Subscription Management(RHSM)?
b. Install the glib2-fam package by running the following command:
# yum install glib2-fam
2. Create or edit the /etc/dconf/profile/user file on every client.
3. At the very beginning of this file, add the following line:
The dconf keyfile back end will only take effect the next time that the user logs in. It polls the keyfile todetermine whether updates have been made, so settings may not be updated immediately.
service-db:keyfile/user
Desktop Migration and Administration Guide
26

CHAPTER 10. DEFAULT APPEARANCEThe appearance and functionality of the GNOME 3 Desktop can be customized both by individual usersand by system administrators for all users. System administrators can provide a customized defaultdesktop configuration to all users and even lock down those features to prevent user changes.
This chapter describes how to customize the installation program (Anaconda), the system boot utilities(GRUB, Plymouth), the login screen, fonts, keyboard layouts, the screen shield, and desktopbackgrounds.
10.1. BRANDING ANACONDA
If you are building your own customized distribution at your company, you can change the brandgraphics and product name used in the Red Hat Enterprise Linux 7 installer, Anaconda.
For more information on changing the Anaconda graphics and product name, see the AnacondaCustomization Guide for Red Hat Enterprise Linux 7.
10.2. BOOT LOADER SCREEN
The Red Hat Enterprise Linux 7 boot loader is GRUB 2. You can change several parts of GRUB 2'sappearance. The following sections show you how to change the distribution name, menu colors, andand the background image.
10.2.1. Distribution Name
By default, GRUB 2 displays a title containing the distribution name. You can change the title bycustomizing the GRUB_DISTRIBUTOR variable in the /etc/default/grub file.
Procedure 10.1. Setting the Distribution Name
1. As root, open the /etc/default/grub file.
2. Use the GRUB_DISTRIBUTOR variable to specify your own distribution name. The following isthe excerpt of the /etc/default/grub file. Update the second line with the GRUB_DISTRIBUTOR variable:
GRUB_TIMEOUT=5GRUB_DISTRIBUTOR=Our Corporate Distro V1.2GRUB_DEFAULT=savedGRUB_DISABLE_SUBMENU=true...
3. Run the following command as root to ensure the changes take effect:
grub2-mkconfig -o /boot/grub2/grub.cfg
NOTE
You need to update the /etc/default/grub directory after every change you makein there.
Also, you can change the colors or the font of the text displayed at the GRUB 2 screen by modifying the
CHAPTER 10. DEFAULT APPEARANCE
27

Also, you can change the colors or the font of the text displayed at the GRUB 2 screen by modifying the /etc/grub.d/40_custom plain text file or by adding another file in the /etc/grub.d/ directory. You canchoose from the following directives:
set color_normal=foreground/background
set color_highlight=foreground/background
set menu_color_normal=foreground/background
set menu_color_highlight=foreground/background
See the grub(8) man page for more information on the semantics and accepted values for thesevariables.
10.2.2. GRUB 2 Background
There is no GRUB background configured in the default setup. Nevertheless, it is possible to add animage to the boot loader screen.
Before you configure a background image for GRUB 2, it is necessary to have a GRUB 2 Unicode fontinstalled for the gfxterm graphical terminal. No font is provided by default, so the prerequisite is toconvert an existing TTF or OTF file to the PF2 format used by GRUB 2:
By running the grub2-mkfont command, convert an existing TTF or OTF file to the PF2 format. Namethe output file unicode.pf2 to work correctly with the default configuration as written by grub2-mkconfig.
Example 10.1. Converting a TTF File to PF2 Format
This example demonstrates the conversion from the LiberationSerif-Bold.ttf to the .pf2 format. Thenew .pf2 format file is called unicode2 so as not to be confused with the existing unicode.pf2 in the /grub2/fonts/ directory.
grub2-mkfont --output=/boot/grub2/fonts/unicode2.pf2 --size=24 /usr/share/fonts/liberation/LiberationSerif-Bold.ttf
Now, you can configure a background image for GRUB 2. The image file can reside outside of the boot/directory.
Procedure 10.2. Adding an Image to the Boot Loader Screen
1. Open the /etc/default/grub file as root.
2. Edit the following configuration variables in the file:
GRUB_TERMINAL=gfxtermGRUB_BACKGROUND=path_to_the_image.png
Supported formats are PNG, JPG, JPEG, and TGA.
3. Create a new configuration file with a background image:
grub2-mkconfig -o /boot/grub2/grub.cfg
Desktop Migration and Administration Guide
28

4. Reboot your system.
If necessary, the image will be scaled to fit the screen.
10.3. PLYMOUTH
Plymouth is a graphical boot system and logger for Red Hat Enterprise Linux 7, which makes use of thekernel-based mode setting (KMS) and Direct Rendering Manager (DRM). Plymouth also handles userinteraction during boot.
You can customize the boot screen appearance by choosing from various static or animated graphicalthemes. New themes can be created based on the existing ones.
10.3.1. Branding the Theme
Each theme for Plymouth is composed of a theme data file and a compiled splash plugin module . Thedata file has a .plymouth extension, and is installed in the /usr/share/plymouth/themes/ directory.
The configuration data is specified under the [Plymouth Theme] section, in the key-value format. Validkeys for this group are Name, Description, and ModuleName. While the first two keys are self-explanatory, the third specifies the name of a Plymouth splash plugin module. Different plugins providedifferent animations at boot time and the underlying implementation of the various themes:
Example 10.2. A .plymouth File Specimen
Procedure 10.3. Changing the Plymouth Theme
1. Search for the existing Plymouth themes and choose the most preferable one. Run thefollowing command:
# yum search plymouth-theme
Or run the plymouth-set-default-theme --list command to view the installed themes.
You can also install all the themes when installing all the plymouth packages. However, you willinstall a number of unnecessary packages as well.
# yum install plymouth\*
2. Set the new theme as default with the plymouth-set-default-theme theme_name command.
Example 10.3. Set "spinfinity" as the Default Theme
You have chosen the spinfinity theme, so you run:
[Plymouth Theme]Name=ChargeDescription=A theme that features the shadowy hull of my logo charge up and finally burst into full form.ModuleName=two-step
CHAPTER 10. DEFAULT APPEARANCE
29

3. Rebuild the initrd daemon after editing otherwise your theme will not show in the boot screen.Do so by running:
# dracut -f
10.3.2. Creating a New Plymouth Theme
If you do not want to choose from the given list of themes, you can create your own. The easiest way isto copy an existing theme and modify it.
Procedure 10.4. Creating Your Own Theme from an Existing Theme
1. Copy an entire content of a plymouth/ directory. As a template directory, use, for example, thedefault theme for Red Hat Enterprise Linux 7, /usr/share/plymouth/themes/charge/charge.plymouth, which uses a two-step splash plugin(two-step is a popular boot load feature of a two phased boot process that starts with aprogressing animation synced to boot time and finishes with a short, fast one-shot animation):
[Plymouth Theme]Name=ChargeDescription=A theme that features the shadowy hull of my logo charge up and finally burst into full form.ModuleName=two-step
[two-step]ImageDir=/usr/share/plymouth/themes/chargeHorizontalAlignment=.5VerticalAlignment=.5Transition=noneTransitionDuration=0.0BackgroundStartColor=0x202020BackgroundEndColor=0x202020
2. Save the charge.plymouth file with a new name in the /usr/share/plymouth/themes/newtheme/ directory, in the following format:
newtheme.plymouth
3. Update the settings in your /usr/share/plymouth/themes/newtheme/newtheme.plymouth fileaccording to your preferences, changing color, alignment, or transition.
4. Set your newtheme as default by running the following command:
# plymouth-set-default-theme newtheme
5. Rebuild the initrd daemon after changing the theme by running the command below:
# dracut -f
# plymouth-set-default-theme spinfinity
Desktop Migration and Administration Guide
30

10.3.2.1. Using Branded Logo
Some of the plugins show a branded logo as part of the splash animation. If you wish to add your ownlogo into your theme, follow the short procedure below.
IMPORTANT
Keep in mind that the image format of your branded logo must be of the .png format.
Procedure 10.5. Add Your Logo to the Theme
1. Create an image file named logo.png with your logo.
2. Edit the /usr/share/plymouth/themes/newtheme.plymouth file by updating the ImageDir keyto point to the directory with the logo.png image file you created in step 1:
For more information on Plymouth, see the plymouth(8) man page.
10.4. CUSTOMIZING THE LOGIN SCREEN
The GNOME Login Screen has several elements that can be customized. These changes can only beperformed by a system administrator and affect all users. This section describes how to customize thegreeter text, logo, keyboard layout, and user list.
10.4.1. Adding a Greeter Logo
The greeter logo on the login screen is controlled by the org.gnome.login-screen.logo GSettings key.Since GDM uses its own dconf profile, you can add a greeter logo by changing the settings in thatprofile.
For more information about GSettings and dconf, see Chapter 9, Configuring Desktop with GSettingsand dconf.
When choosing an appropriate picture for the logo to your login screen, consider the following picturerequirements:
All the major formats are supported: ANI, BPM, GIF, ICNS, ICO, JPEG, JPEG 2000, PCX, PNM,PBM, PGM, PPM, GTIFF, RAS, TGA, TIFF, XBM, WBMP, XPM, and SVG.
The size of the picture scales proportionally to the height of 48 pixels. So, if you set the logo to1920x1080, for example, it changes into an 85x48 thumbnail of the original picture.
Procedure 10.6. Adding a logo to the login screen
1. Create or edit the gdm profile in /etc/dconf/profile/gdm which contains the following lines:
gdm is the name of a dconf database.
ImageDir=/usr/share/plymouth/themes/newtheme
user-db:usersystem-db:gdmfile-db:/usr/share/gdm/greeter-dconf-defaults
CHAPTER 10. DEFAULT APPEARANCE
31
2. Create a gdm database for machine-wide settings in /etc/dconf/db/gdm.d/01-logo:
Replace /usr/share/pixmaps/logo/greeter-logo.png with the path to the image file you want touse as the greeter logo.
3. Update the system databases:
# dconf update
Next time you log in, the screen will show with the new login logo.
NOTE
What if the Logo Does Not Update?
Make sure that you have run the dconf update command as root to update the systemdatabases. In case the logo does not update, try restarting GDM. For more information,see Section 14.1.1, “Restarting GDM”.
10.4.2. Displaying a Text Banner
The text banner on the login screen is controlled by the following GSettings keys (for more informationabout GSettings, see Chapter 9, Configuring Desktop with GSettings and dconf ):
org.gnome.login-screen.banner-message-enable
enables showing the banner message.
org.gnome.login-screen.banner-message-text
shows the text banner message in the login window.
Note that since GDM uses its own dconf profile, you can configure the text banner by changing thesettings in that profile.
Procedure 10.7. Displaying a Text Banner on the Login Screen
1. Create or edit the gdm profile in /etc/dconf/profile/gdm which contains the following lines:
gdm is the name of a dconf database.
2. Create a gdm database for machine-wide settings in /etc/dconf/db/gdm.d/01-banner-message:
[org/gnome/login-screen]banner-message-enable=truebanner-message-text='Type the banner message here'
[org/gnome/login-screen]logo='/usr/share/pixmaps/logo/greeter-logo.png'
user-db:usersystem-db:gdmfile-db:/usr/share/gdm/greeter-dconf-defaults
Desktop Migration and Administration Guide
32

NOTE
There is no character limit for the banner message. GNOME Shell autodetectslonger stretches of text and enters two column mode. However, the bannermessage text cannot be read from an external file.
3. Update the system databases:
# dconf update
The banner text appears when you have selected yourself from the user list or when you start typing intothe box. The next time you log in you will see the text when inserting the password.
10.4.2.1. What if the Banner Message Does Not Update?
If the banner message does not show, make sure you have run the dconf update command.
In case the banner message does not update, try restarting GDM. For more information, seeSection 14.1.1, “Restarting GDM”.
10.4.3. Displaying Multiple Keyboard Layouts
You can add alternative keyboard layouts for users to chose from on the login screen.
This can be helpful for users who normally use different keyboard layouts from the default and who wantto have those keyboard layouts available at the login screen. Nevertheless, the selection only applieswhen using the login screen. Once you are logged in your own user settings take over.
Procedure 10.8. Changing the System Keyboard Layout Settings
1. Find the codes of the required language layouts in the /usr/share/X11/xkb/rules/base.lst fileunder the section named ! layout.
2. Use the localectl tool to change the system keyboard layout settings as follows:
$ localectl set-x11-keymap layout
You can specify multiple layouts as a comma-separated list. For example, to set es as thedefault layout, and us as the secondary layout, run the following command:
$ localectl set-x11-keymap es,us
3. Log out to find that the defined layouts are available at the top bar on the login screen.
Note that you can also use the localectl tool to specify the machine-wide default keyboard model,variant, and options. See the localectl(1) man page for more information.
10.4.4. Disabling the Login Screen User List
You can disable the user list shown on the login screen by setting the org.gnome.login-screen.disable-user-list GSettings key.
CHAPTER 10. DEFAULT APPEARANCE
33

When the user list is disabled, users need to type their user name and password at the prompt to log in.
Procedure 10.9. Setting the org.gnome.login-screen.disable-user-list Key
1. Create or edit the gdm profile in /etc/dconf/profile/gdm which contains the following lines:
gdm is the name of a dconf database.
2. Create a gdm database for machine-wide settings in /etc/dconf/db/gdm.d/00-login-screen:
3. Update the system databases by updating the dconf utility:
# dconf update
10.5. CUSTOMIZING DESKTOP BACKGROUNDS
Using the dconf utility, you can configure the default background, add extra backgrounds, or addmultiple backgrounds.
If the users of the system will not be permitted to change these settings from the defaults, then systemadministrators need to lock the settings using the locks directory. Otherwise each user will be able tocustomize the setting to suit their own preferences. For more information, see Section 9.5.1, “LockingDown Specific Settings”.
10.5.1. Customizing the Default Desktop Background
You can configure the default desktop background and its appearance by setting the relevantGSettings keys in the org.gnome.desktop.background schema.
For more information about GSettings, see Chapter 9, Configuring Desktop with GSettings and dconf .
Procedure 10.10. Setting the Default Background
1. Create a local database for machine-wide settings in /etc/dconf/db/local.d/00-background:
user-db:usersystem-db:gdmfile-db:/usr/share/gdm/greeter-dconf-defaults
[org/gnome/login-screen]# Do not show the user listdisable-user-list=true
# Specify the dconf path[org/gnome/desktop/background]
# Specify the path to the desktop background image filepicture-uri='file:///usr/local/share/backgrounds/wallpaper.jpg'# Specify one of the rendering options for the background image:# 'none', 'wallpaper', 'centered', 'scaled', 'stretched', 'zoom', 'spanned'picture-options='scaled'# Specify the left or top color when drawing gradients or the solid color
Desktop Migration and Administration Guide
34

2. Override the user's setting to prevent the user from changing it in /etc/dconf/db/local.d/locks/background:
For more information, see Section 9.5.1, “Locking Down Specific Settings” .
3. Update the system databases:
# dconf update
4. Users must log out and back in again before the system-wide settings take effect.
10.5.2. Adding Extra Backgrounds
You can make extra backgrounds available to users on your system.
1. Create a filename.xml file (there are no requirements for file names) specifying your extrabackground's appearance using the org.gnome.desktop.background schemas . Here is a list of themost frequently used schemas:
Table 10.1. org.gnome.desktop.background schemas GSettings Keys
Key Name Possible Values Description
picture-options
"none", "wallpaper","centered", "scaled","stretched", "zoom", "spanned"
Determines how the image set bywallpaper_filename is rendered.
color-shading-type
"horizontal", "vertical", and"solid"
How to shade the background color.
primary-color default: #023c88 Left or Top color when drawing gradients, or thesolid color.
secondary-color
default: #5789ca Right or Bottom color when drawing gradients,not used for solid color.
The full range of options is to be found in the dconf-editor GUI or gsettings command-lineutility. For more information, see Section 9.3, “Browsing GSettings Values for DesktopApplications”.
2. Store the filename.xml file in the /usr/share/gnome-background-properties/ directory.
When the user clicks their name in the top right corner, chooses Settings, and in the Personal section
primary-color='000000'# Specify the right or bottom color when drawing gradientssecondary-color='FFFFFF'
# List the keys used to configure the desktop background/org/gnome/desktop/background/picture-uri/org/gnome/desktop/background/picture-options/org/gnome/desktop/background/primary-color/org/gnome/desktop/background/secondary-color
CHAPTER 10. DEFAULT APPEARANCE
35

When the user clicks their name in the top right corner, chooses Settings, and in the Personal sectionof the table selects Background, they will see the new background available.
Look at the example and see how org.gnome.desktop.background GSettings keys are implementedpractically:
Example 10.4. Extra Backgrounds File
In one configuration file, you can specify multiple <wallpaper> elements to add more backgrounds.
See the following example which shows an .xml file with two <wallpaper> elements, adding twodifferent backgrounds:
Example 10.5. Extra Backgrounds File with Two Wallpaper Elements
<?xml version="1.0" encoding="UTF-8"?><!DOCTYPE wallpapers SYSTEM "gnome-wp-list.dtd"><wallpapers> <wallpaper deleted="false"> <name>Company Background</name> <name xml:lang="de">Firmenhintergrund</name> <filename>/usr/local/share/backgrounds/company-wallpaper.jpg</filename> <options>zoom</options> <shade_type>solid</shade_type> <pcolor>#ffffff</pcolor> <scolor>#000000</scolor> </wallpaper></wallpapers>
<?xml version="1.0" encoding="UTF-8"?><!DOCTYPE wallpapers SYSTEM "gnome-wp-list.dtd"><wallpapers> <wallpaper deleted="false"> <name>Company Background</name> <name xml:lang="de">Firmenhintergrund</name> <filename>/usr/local/share/backgrounds/company-wallpaper.jpg</filename> <options>zoom</options> <shade_type>solid</shade_type> <pcolor>#ffffff</pcolor> <scolor>#000000</scolor> </wallpaper> <wallpaper deleted="false"> <name>Company Background 2</name> <name xml:lang="de">Firmenhintergrund 2</name> <filename>/usr/local/share/backgrounds/company-wallpaper-2.jpg</filename> <options>zoom</options> <shade_type>solid</shade_type> <pcolor>#ff0000</pcolor> <scolor>#00ffff</scolor> </wallpaper></wallpapers>
Desktop Migration and Administration Guide
36

10.5.3. Setting the Screen Shield
Screen Shield is the screen that quickly slides down when the system is locked. It is controlled by the org.gnome.desktop.screensaver.picture-uri GSettings key. Since GDM uses its own dconf profile,you can set the default background by changing the settings in that profile.
For more information about GSettings and dconf, see Chapter 9, Configuring Desktop with GSettingsand dconf.
Procedure 10.11. Adding a Logo to the Screen Shield
1. Create a gdm database for machine-wide settings in /etc/dconf/db/gdm.d/01-screensaver:
Replace /opt/corp/background.jpg with the path to the image file you want to use as the ScreenShield.
Supported formats are PNG, JPG, JPEG, and TGA. The image will be scaled if necessary to fitthe screen.
2. Update the system databases:
# dconf update
3. You must log out before the system-wide settings take effect.
Next time you lock the screen, the new Screen Shield will show in the background. In the foreground,time, date and the current day of the week will be displayed.
10.5.3.1. What If the Screen Shield Does Not Update?
Make sure that you have run the dconf update command as root to update the system databases.
In case the background does not update, try restarting GDM. For more information, see Section 14.1.1,“Restarting GDM”.
10.6. CONFIGURING FONTS
Red Hat Enterprise Linux 7 uses the fontconfig utility for font management and customization. fontconfig simplifies font management and provides display features, such as anti-aliasing. This sectiondescribes the following font management tasks:
adding new fonts (both for one user and for all users)
specifying fonts to use in place of missing fonts
configuring font aliases
defining font preferences per language
customizing font properties
To compile a list of fonts available on the system, fontconfig searches directories that are by default
[org/gnome/desktop/screensaver]picture-uri='file:///opt/corp/background.jpg'
CHAPTER 10. DEFAULT APPEARANCE
37

To compile a list of fonts available on the system, fontconfig searches directories that are by defaultlisted in the /etc/fonts/fonts.conf configuration file.
To list all fonts installed on the system that are known to fontconfig, you can use the fc-list command:
$ fc-list : file
For more information on fc-list, see the fc-list(1) man page.
For more information on fontconfig and its configuration, see the fonts-conf(5) man page.
10.6.1. Adding Extra Fonts for All Users
You can install an extra font which will be available to users in applications that use fontconfig for fonthandling.
Procedure 10.12. Installing an Extra Font
1. To install the font, copy it to the /usr/local/share/fonts/ directory. If that directory does notexist, create it.
2. Create a subdirectory for each font-family you are installing as some fonts have multiple files forbold, italic, and so on.
3. Make sure that the font cache is updated by running the following command:
$ fc-cache /usr/local/share/fonts/
IMPORTANT
fontconfig will detect the new fonts and make them available. Unlike user sessions, someapplications might need to be restarted before they will allow you to use the new fonts,though.
Using Alternative DirectoriesAlternatively, you can also install fonts in another system directory than /usr/local/share/fonts/ if thatdirectory is listed in the /etc/fonts/fonts.conf file. If it is not, then you need to create your own machine-wide configuration file in /etc/fonts/local.conf containing the directory you want to use. See the fonts-conf(5) man page for more information.
If you are using an alternative directory, remember to specify the directory name when updating the fontcache with the fc-cache command:
$ fc-cache directory_name
10.6.2. Adding Extra Fonts for Individual Users
You can install an extra font which will be available to a specific user on your system in applications thatuse fontconfig for font handling.
Procedure 10.13. Installing an Extra Font
1. Copy the font to the ~/.local/share/fonts/ directory to install it.
Desktop Migration and Administration Guide
38

2. Make sure that the font cache is updated by running the following command:
$ fc-cache ~/.local/share/fonts
IMPORTANT
fontconfig will detect the new fonts and make them available. You may need to restartrunning applications to see the changes. User sessions do not need to be restarted.
10.6.3. Substituting Fonts
When an application requests a font that is not available on the system, fontconfig reads the /etc/fonts/fonts.conf configuration file to determine the most similar available font to substitute for therequested font. Individual characters can also be substituted if they are not present in the requestedfont.
To configure a font substitution for a specific font, you can use the Fonts Tweak Tool. Note that thetool can only be used for per-user configuration.
Figure 10.1. Substituting Fonts with Fonts Tweak Tool
Fonts Tweak Tool may not be installed by default on the system, to install it, run the followingcommand:
# yum install fonts-tweak-tool
CHAPTER 10. DEFAULT APPEARANCE
39
Procedure 10.14. Substituting a Font
1. Start the Fonts Tweak Tool by pressing the Super key to enter the Activities Overview, type Fonts Tweak Tool, and then press Enter.
2. Click the Font Substitutions tab.
3. Click the + button at the bottom left of the left pane, select or type the name of the font youwant to substitute, and then click Add.
4. Click the + button at the bottom left of the right pane, select the name of the font you want touse to substitute for the first font, and then click Add.
5. Click Close.
Now, you have substituted an old font with your favourite which is now available to you.
10.6.4. Configuring Font Aliases
For each locale, Fonts Tweak Tool allows the individual users to configure different font aliases:
Sans Serif,
Serif,
Monospace,
Cursive, and
Fantasy.
These aliases are used to represent common types of fonts, such as the serif and monospace types.Applications as well as users can then refer to these aliases instead of having to specify a particular fontinstalled on the system.
Users can override system default fonts by selecting a custom font for each of these aliases.
Fonts Tweak Tool may not be installed by default on the system, to install it, run the followingcommand:
# yum install fonts-tweak-tool
Desktop Migration and Administration Guide
40
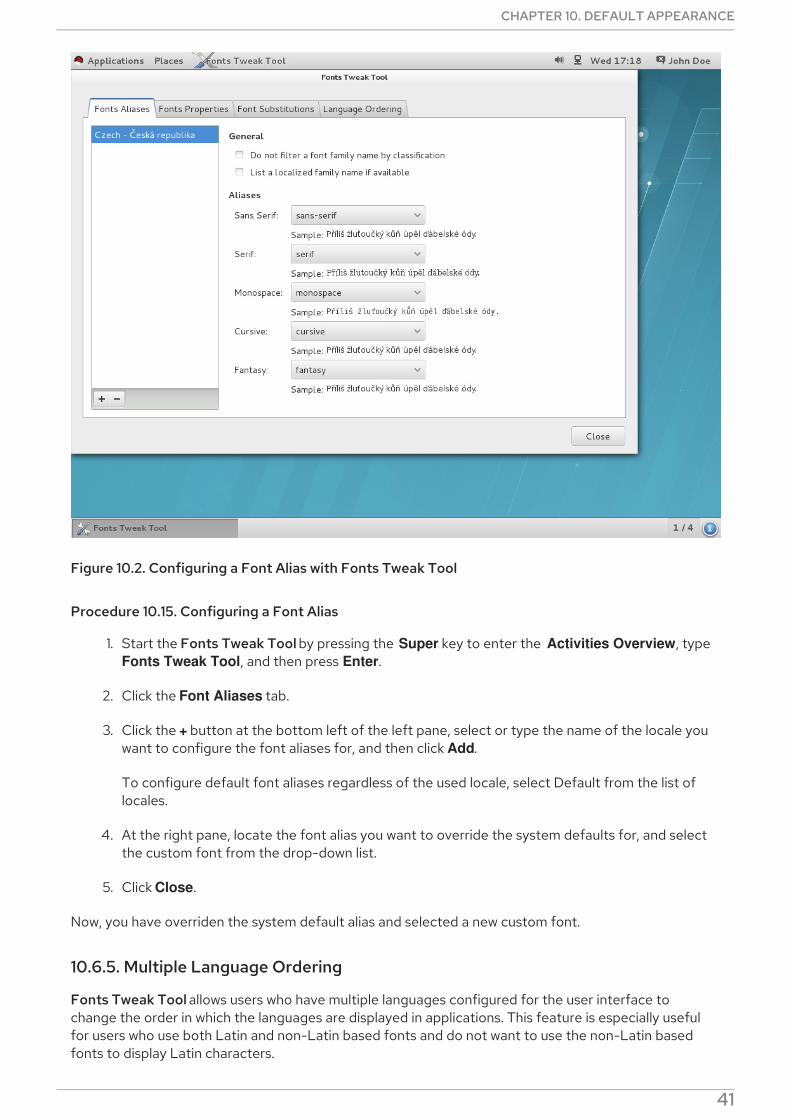
Figure 10.2. Configuring a Font Alias with Fonts Tweak Tool
Procedure 10.15. Configuring a Font Alias
1. Start the Fonts Tweak Tool by pressing the Super key to enter the Activities Overview, type Fonts Tweak Tool, and then press Enter.
2. Click the Font Aliases tab.
3. Click the + button at the bottom left of the left pane, select or type the name of the locale youwant to configure the font aliases for, and then click Add.
To configure default font aliases regardless of the used locale, select Default from the list oflocales.
4. At the right pane, locate the font alias you want to override the system defaults for, and selectthe custom font from the drop-down list.
5. Click Close.
Now, you have overriden the system default alias and selected a new custom font.
10.6.5. Multiple Language Ordering
Fonts Tweak Tool allows users who have multiple languages configured for the user interface tochange the order in which the languages are displayed in applications. This feature is especially usefulfor users who use both Latin and non-Latin based fonts and do not want to use the non-Latin basedfonts to display Latin characters.
CHAPTER 10. DEFAULT APPEARANCE
41

For example, if you have Japanese and English configured as your languages, and you want to avoiddisplaying English Latin characters with your Japanese non-Latin based fonts, configure English as theprimary language, and Japanese as secondary. The Latin-based fonts will then be used to displayEnglish characters, and the non-Latin based fonts will only be used to display Japanese characters.
Fonts Tweak Tool may not be installed by default on the system, to install it, run the followingcommand:
# yum install fonts-tweak-tool
Procedure 10.16. Configuring Multiple Languages
1. Start the Fonts Tweak Tool by pressing the Super key to enter the Activities Overview, type Fonts Tweak Tool, and then press Enter.
2. Click the Language Ordering tab.
3. Click the + button at the bottom left of the window, select or type the name of the languageyou want to configure as primary, and then click Add.
4. To add another language, click the + button at the bottom left of the window, select the nameof the language you want to configure as secondary, and then click Add.
Repeat this step to add more languages.
5. Click Close.
IMPORTANT
For the user interface, you have now set your preferences in the order in which thelanguages are displayed in applications.
When multiple languages are configured, some applications (such as xterm and other Xftapplications) may not display all characters for the user's languages properly. This is dueto the lack of support for fallback fonts in those applications, or in the rendering librariesthe applications are using.
10.6.6. Configuring Font Properties
Fonts Tweak Tool lets users change various font properties, allowing for fine-grained per-user fontconfiguration.
Fonts Tweak Tool may not be installed by default on the system, to install it, run the followingcommand:
# yum install fonts-tweak-tool
Procedure 10.17. Changing the Font Properties
1. Start the Fonts Tweak Tool by pressing the Super key to enter the Activities Overview, type Fonts Tweak Tool, and then press Enter.
2. Click the Fonts Properties tab.
3. Click the + button at the bottom left of the window, select or type the name of the font you
Desktop Migration and Administration Guide
42

3. Click the + button at the bottom left of the window, select or type the name of the font youwant to change the properties for, and then click Add.
Repeat this step to add more fonts.
4. Change the font properties as needed.
5. Click Close.
Depending on the added font, some of the font properties that the user can configure in the Fonts Properties tab include:
Use the embedded bitmap font if available.
This is useful for users who prefer bitmap fonts over outline fonts. To use the embedded bitmapfont, add a suitable font and click Use embedded bitmap font if any.
Use the JIS X 2013:2004 glyphs.
To use Japanese glyphs from the JIS X 2013:2004 standard, rather than from JIS X 2013:2000 orolder, add a font that supports JIS X 2013:2004, and then click on jp04 in the Features list.
CHAPTER 10. DEFAULT APPEARANCE
43
CHAPTER 11. GNOME SHELL EXTENSIONSThis chapter introduces system-wide configuration of GNOME Shell Extensions. You will learn how toview the extensions, how to enable them, how to lock a list of enabled extensions or how to set upseveral extensions as mandatory for the users of the system.
You will be using dconf when configuring GNOME Shell Extensions, setting the following two GSettingskeys:
org.gnome.shell.enabled-extensions
org.gnome.shell.development-tools
For more information on dconf and GSettings, see Chapter 9, Configuring Desktop with GSettings anddconf.
11.1. WHAT ARE GNOME SHELL EXTENSIONS?
GNOME Shell extensions allow for the customization of the default GNOME Shell interface and itsparts, such as window management and application launching.
Each GNOME Shell extension is identified by a unique identifier, the uuid. The uuid is also used for thename of the directory where an extension is installed. You can either install the extension per-user in ~/.local/share/gnome-shell/extensions/uuid, or machine-wide in /usr/share/gnome-shell/extensions/uuid.
The uuid identifier is globally-unique. When choosing it, remember that the uuid must possess thefollowing properties to prevent certain attacks:
Your uuid must not contain Unicode characters.
Your uuid must not contain the gnome.org ending as it must not appear to be affiliated with theGNOME Project.
Your uuid must contain only alphanumerical characters, the period (.), the at symbol (@), andthe underscore (_).
IMPORTANT
Before deploying third-party GNOME Shell extensions on Red Hat Enterprise Linux,make sure to read the following document to learn about the Red Hat support policy forthird-party software:
How does Red Hat Global Support Services handle third-party software, drivers,and/or uncertified hardware/hypervisors?
To view installed extensions, you can use Looking Glass, GNOME Shell's integrated debugger andinspector tool.
Procedure 11.1. View installed extensions
1. Press Alt+F2.
2. Type in lg and press Enter to open Looking Glass.
Desktop Migration and Administration Guide
44

3. On the top bar of Looking Glass, click Extensions to open the list of installed extensions.
Figure 11.1. Viewing Installed extensions with Looking Glass
11.2. ENABLING MACHINE-WIDE EXTENSIONS
To make extensions available to all users on the system, install them in the /usr/share/gnome-shell/extensions directory.
You need to set the org.gnome.shell.enabled-extensions key in order to set the default enabledextensions. However, there is currently no way to enable additional extensions for users who havealready logged in. This does not apply for existing users who have installed and enabled their ownGNOME extensions.
Procedure 11.2. Enabling machine-wide extensions
1. Create a local database file for machine-wide settings in /etc/dconf/db/local.d/00-extensions:
The enabled-extensions key specifies the enabled extensions using the extensions' uuid([email protected] and [email protected]).
2. Update the system databases:
[org/gnome/shell]# List all extensions that you want to have enabled for all usersenabled-extensions=['[email protected]', '[email protected]']
CHAPTER 11. GNOME SHELL EXTENSIONS
45
# dconf update
3. Users must log out and back in again before the system-wide settings take effect.
11.3. LOCKING DOWN ENABLED EXTENSIONS
In GNOME Shell, you can prevent the user from enabling or disabling extensions by locking down the org.gnome.shell.enabled-extensions and org.gnome.shell.development-tools keys.
Locking down the org.gnome.shell.development-tools key ensures that the user cannot use GNOMEShell's integrated debugger and inspector tool (Looking Glass) to disable any mandatory extensions.
Procedure 11.3. Locking down enabled extensions
1. Create a local database file for machine-wide settings in /etc/dconf/db/local.d/00-extensions:
The enabled-extensions key specifies the enabled extensions using the extensions' uuid([email protected] and [email protected]).
The development-tools key is set to false to disable access to Looking Glass.
2. Override the user's setting and prevent the user from changing it in /etc/dconf/db/local.d/locks/extensions:
3. Update the system databases:
# dconf update
4. Users must log out and back in again before the system-wide settings take effect.
After locking down the org.gnome.shell.enabled-extensions and org.gnome.shell.development-tools keys, any extensions installed in ~/.local/share/gnome-shell/extensions or /usr/share/gnome-shell/extensions that are not listed in the org.gnome.shell.enabled-extensions key will not be loadedby GNOME Shell, thus preventing the user from using them.
11.4. SETTING UP MANDATORY EXTENSIONS
In GNOME Shell, you can provide a set of extensions that the user has to use. To do so, install theextensions in the /usr/share/gnome-shell/extensions directory and then lock down the org.gnome.shell.enabled-extensions and org.gnome.shell.development-tools keys.
Locking down the org.gnome.shell.development-tools key ensures that the user cannot use GNOME
[org/gnome/shell]# List all extensions that you want to have enabled for all usersenabled-extensions=['[email protected]', '[email protected]']# Disable access to Looking Glassdevelopment-tools=false
# Lock the list of mandatory extensions and access to Looking Glass/org/gnome/shell/enabled-extensions/org/gnome/shell/development-tools
Desktop Migration and Administration Guide
46

Locking down the org.gnome.shell.development-tools key ensures that the user cannot use GNOMEShell's integrated debugger and inspector tool (Looking Glass) to disable any mandatory extensions.
Procedure 11.4. Setting up mandatory extensions
1. Create a local database file for machine-wide settings in /etc/dconf/db/local.d/00-extensions-mandatory:
The enabled-extensions key specifies the enabled extensions using the extensions' uuid([email protected] and [email protected]).
The development-tools key is set to false to disable access to Looking Glass.
2. Override the user's setting and prevent the user from changing it in /etc/dconf/db/local.d/locks/extensions-mandatory:
3. Update the system databases:
# dconf update
4. Users must log out and back in again before the system-wide settings take effect.
[org/gnome/shell]# List all mandatory extensionsenabled-extensions=['[email protected]', '[email protected]']# Disable access to Looking Glassdevelopment-tools=false
# Lock the list of mandatory extensions and access to Looking Glass/org/gnome/shell/enabled-extensions/org/gnome/shell/development-tools
CHAPTER 11. GNOME SHELL EXTENSIONS
47

CHAPTER 12. INTEGRATING APPLICATIONSWhen integrating an application with the GNOME Desktop, the system administrator usually performstasks related to customizing the Applications menu structure, and MIME types, such as:
Add or modify a menu item for the application, or customize the Applications menu structureby creating or modifying submenus. See Section 12.1, “Customizing Menus” for more informationon menu customization.
Customize the default favorite applications visible on the GNOME Shell dash in the Activities Overview. See Section 12.2, “Customizing Default Favorite Applications” for more informationon how to do that.
Add or modify a MIME type for the application, and associate the application with a specificMIME type. See Section 12.3, “Configuring File Associations” for more information onconfiguring MIME types.
12.1. CUSTOMIZING MENUS
The GNOME menu system is based on the freedesktop.org Desktop Menu Specification and consists ofthree major sets of configuration and data files:
Desktop Entry Files (.desktop)
The .desktop files provide data about each menu item such as its name, command to run, and itsicon. The .desktop entry files also specify the location of the menu item in the menu hierarchy, andkeywords used for application search in the Activities Overview.
The system .desktop files are located in the /usr/share/applications/ directory. User-specific .desktop files are located in the ~/.local/share/applications/ directory.
The following is a sample .desktop file named ~/.local/share/applications/myapplication1.desktop:
The file above specifies the application's name (My Application 1), the application's icon(myapplication1), and the command to run the application ( myapplication1). It also places theapplication in a specified category (Network;WebBrowser;), and associates the application with the application/x-newtype MIME type.
Menu Definition Files (.menu)
The .menu files are XML configuration files that specify the order, hierarchy, and merging of bothmenus and menu items.
The machine-wide .menu files are located in the /etc/xdg/menus/ directory. User-specific .menufiles are located in the ~/.config/menus/ directory and can be used to override the values specified inthe machine-wide .menu files.
In particular, the /etc/xdg/menus/applications.menu file contains the definition of the Applications
[Desktop Entry]Type=ApplicationName=My Application 1Icon=myapplication1Exec=myapplication1Categories=Network;WebBrowser;MimeType=application/x-newtype
Desktop Migration and Administration Guide
48

In particular, the /etc/xdg/menus/applications.menu file contains the definition of the Applicationsmenu layout.
Directory Entry Files (.directory)
The .directory files provide data about each menu such as its name, and are located in the /usr/share/desktop-directories/.
Getting More InformationFor more information describing the Desktop Entry Files, see the Desktop Entry Specification located atthe freedesktop.org website:
http://freedesktop.org/wiki/Specifications/desktop-entry-spec
For detailed information describing the implementation of the GNOME menus system, see the DesktopMenu Specification located at the freedesktop.org website:
http://standards.freedesktop.org/menu-spec/latest
12.1.1. Removing a Menu Item for Individual Users
The Applications menu customization for a given user is by default stored in the ~/.config/menus/gnome-applications.menu definition file. The location of that file can be overriddenby setting the $XDG_DATA_HOME environment variable.
To override the Applications menu defaults, you first need to create a gnome-applications.menu file.Note that removing an item from the Applications menu and its submenus also removes it from theApplications view in the Activities Overview, thus preventing the user from searching for that itemfrom within the Activities Overview.
Procedure 12.1. Example: Remove the Calculator menu item from the Accessories submenu
1. Consult the contents of the /usr/share/applications/ directory and determine a .desktop filethat corresponds to the menu item you want to remove:
$ grep -r "Name=Calculator" /usr/share/applications//usr/share/applications/gcalctool.desktop:Name=Calculator
As shown above, the Calculator menu item corresponds to the /usr/share/applications/gcalctool.desktop file.
2. Create a ~/.config/menus/gnome-applications.menu file:
<!DOCTYPE Menu PUBLIC "-//freedesktop//DTD Menu 1.0//EN""http://www.freedesktop.org/standards/menu-spec/1.0/menu.dtd">
<Menu> <Name>Applications</Name> <MergeFile type="parent">/etc/xdg/menus/gnome-applications.menu</MergeFile>
<!-- Removes the Calculator from the Accessories submenu --> <Menu> <Name>Accessories</Name> <Exclude> <Filename>gcalctool.desktop</Filename>
CHAPTER 12. INTEGRATING APPLICATIONS
49

As shown above, the file contains a <Menu> section that specifies the name of the submenu(Accessories), the name of the .desktop file (gcalctool.desktop), and includes the <Exclude>element.
12.1.2. Removing a Menu Item for All Users
The Applications menu customization for all users is by default stored in the /etc/xdg/menus/applications.menu definition file. The location of that file can be overridden by settingthe $XDG_CONFIG_DIRS environment variable.
To override the Applications menu defaults, you need to edit that .menu file. Note that removing anitem from the Applications menu and its submenus also removes it from the Applications view in the Activities Overview, thus preventing the user from searching for that item from within the Activities Overview.
Procedure 12.2. Example: Remove the Calculator menu item from the Accessories submenu
1. Consult the contents of the /usr/share/applications/ directory and determine a .desktop filethat corresponds to the menu item you want to remove:
$ grep -r "Name=Calculator" /usr/share/applications//usr/share/applications/gcalctool.desktop:Name=Calculator
As shown above, the Calculator menu item corresponds to the /usr/share/applications/gcalctool.desktop file.
2. Edit the /etc/xdg/menus/applications.menu file and add a new <Menu> section before thefinal </Menu> tag at the end of that .menu file using the <Exclude> element as shown below:
12.1.3. Removing a Submenu for Individual Users
The Applications menu customization for a given user is by default stored in the ~/.config/menus/gnome-applications.menu definition file. The location of that file can be overriddenby setting the $XDG_DATA_HOME environment variable.
To override the Applications menu defaults, you first need to create a gnome-applications.menu file.
</Exclude> </Menu><!-- END of Calculator removal content -->
</Menu>
<!-- Removes the Calculator from the Accessories submenu -->
<Menu> <Name>Accessories</Name> <Exclude> <Filename>gcalctool.desktop</Filename> </Exclude> </Menu>
<!-- END of Calculator removal content -->
</Menu> <!-- End Applications -->
Desktop Migration and Administration Guide
50

To override the Applications menu defaults, you first need to create a gnome-applications.menu file.Note that removing a submenu from the Applications menu also removes all menu items containedwithin that submenu from the Applications view in the Activities Overview, thus preventing the userfrom searching for those items from within the Activities Overview.
Example 12.1. Remove the System Tools submenu from the Applications menu
Create a ~/.config/menus/gnome-applications.menu file:
As shown above, the file contains a <Menu> section that specifies the name of the submenu ( SystemTools), and includes the <Deleted/> tag.
12.1.4. Removing a Submenu for All Users
The Applications menu customization for all users is by default stored in the /etc/xdg/menus/applications.menu definition file. The location of that file can be overridden by settingthe $XDG_CONFIG_DIRS environment variable.
To override the Applications menu defaults, you need to edit that .menu file. Note that removing asubmenu from the Applications menu also removes all menu items contained within that submenu fromthe Applications view in the Activities Overview, thus preventing the user from searching for thoseitems from within the Activities Overview.
Example 12.2. Remove the System Tools submenu from the Applications menu
Edit a /etc/xdg/menus/applications.menu file and add a new <Menu> section before the final </Menu> tag at the end of that .menu file using the <Deleted/> element as shown below:
<!DOCTYPE Menu PUBLIC "-//freedesktop//DTD Menu 1.0//EN""http://www.freedesktop.org/standards/menu-spec/1.0/menu.dtd">
<Menu> <Name>Applications</Name> <MergeFile type="parent">/etc/xdg/menus/gnome-applications.menu</MergeFile>
<!-- Removes the System Tools submenu from the Applications menu-->
<Menu> <Name>System Tools</Name> <Deleted/> </Menu>
<!-- END of System Tools removal content -->
</Menu>
<!-- Removes the System Tools submenu from the Applications menu-->
<Menu> <Name>System Tools</Name> <Deleted/> </Menu>
CHAPTER 12. INTEGRATING APPLICATIONS
51

12.2. CUSTOMIZING DEFAULT FAVORITE APPLICATIONS
Favorite applications are those visible on the GNOME Shell dash in the Activities Overview. You canuse dconf to set the favorite applications for an individual user, or to set the same favorite applicationsfor all users.
12.2.1. Setting Different Favorite Applications for Individual Users
You can set the default favorite applications for an individual user by modifying their user database filefound in ~/.config/dconf/user. The following sample uses dconf to set gedit, Terminal, and Nautilus asthe default favorites for a user. The example code allows users to modify the list later, if they wish to doso.
Example 12.3. Contents of /etc/dconf/profile:
Example 12.4. Contents of ~/.config/dconf/user:
NOTE
You can also lock down the above settings to prevent users from changing them. SeeSection 9.5.1, “Locking Down Specific Settings” for more information.
12.2.2. Setting the Same Favorite Applications for All Users
In order to have the same favorites for all users, you must modify system database files using dconfkeyfiles. The following sample edits the dconf profile and then create a keyfile to set the defaultfavorite applications for all employees in the first floor of an organization.
Example 12.5. Contents of /etc/dconf/profile:
NOTE
<!-- END of System Tools removal content -->
</Menu>
# This line allows the user to change the default favorites lateruser-db:user
# Set gedit, terminal and nautilus as default favorites[org/gnome/shell]favorite-apps = ['gedit.desktop', 'gnome-terminal.desktop', 'nautilus.desktop']
user-db:user
# This line defines a system database called first_floorsystem-db:first_floor
Desktop Migration and Administration Guide
52

NOTE
Settings from the user database file will take precedence over the settings in the first_floor database file, but locks introduced in the first_floor database file will takepriority over those present in user. For more information about locks, see Section 9.5.1,“Locking Down Specific Settings”.
Example 12.6. Contents of /etc/dconf/db/first_floor.d/00_floor1_settings:
Incorporate your changes into the system databases by running the dconf update command.
Users must log out and back in again before the system-wide settings take effect.
12.3. CONFIGURING FILE ASSOCIATIONS
12.3.1. What Are MIME Types?
In GNOME, MIME (Multipurpose Internet Mail Extension) types are used to identify the format of a file.The GNOME Desktop uses MIME types to:
Determine which application should open a specific file format by default.
Register other applications that can also open a specific file format.
Provide a string describing the type of a file, for example, in a file properties dialog of the Filesapplication.
Provide an icon representing a specific file format, for example, in a file properties dialog of theFiles application.
MIME type names follow a given format:
media-type/subtype-identifier
Example 12.7. MIME Types Format
image/jpeg is an example of a MIME type where image is the media type, and jpeg is the subtypeidentifier.
GNOME follows the freedesktop.org Shared MIME Info specification to determine:
The machine-wide and user-specific location to store all MIME type specification files.
How to register a MIME type so that the desktop environment knows which applications can beused to open a specific file format.
# This sample sets gedit, terminal and nautilus as default favorites# for all users in the first floor[org/gnome/shell]favorite-apps = ['gedit.desktop', 'gnome-terminal.desktop', 'nautilus.desktop']
CHAPTER 12. INTEGRATING APPLICATIONS
53

How the user can change which applications should open what file formats.
12.3.1.1. What Is the MIME Database?
The MIME database is a collection of all MIME type specification files that GNOME uses to storeinformation about known MIME types.
The most important part of the MIME database from the system administrator's point of view is the /usr/share/mime/packages/ directory where the MIME type related files specifying information onknown MIME types are stored. One example of such a file is /usr/share/mime/packages/freedesktop.org.xml, specifying information about the standard MIMEtypes available on the system by default. That file is provided by the shared-mime-info package.
Getting More InformationFor detailed information describing the MIME type system, see the freedesktop.org Shared MIME Infospecification located at the freedesktop.org website:
http://www.freedesktop.org/wiki/Specifications/shared-mime-info-spec/
12.3.2. Adding a Custom MIME Type for All Users
To add a custom MIME type for all users on the system and register a default application for that MIMEtype, you need to create a new MIME type specification file in the /usr/share/mime/packages/ directoryand a .desktop file in the /usr/share/applications/ directory.
Procedure 12.3. Adding a Custom application/x-newtype MIME Type for All Users
1. Create the /usr/share/mime/packages/application-x-newtype.xml file:
The sample application-x-newtype.xml file above defines a new MIME type application/x-newtype and assigns file names with the .xyz extension to that MIME type.
2. Create a new .desktop file named, for example, myapplication1.desktop, and place it in the /usr/share/applications/ directory:
The sample myapplication1.desktop file above associates the application/x-newtype MIMEtype with an application named My Application 1, which is run by a command myapplication1.
3. As root, update the MIME database for your changes to take effect:
<?xml version="1.0" encoding="UTF-8"?>
<mime-info xmlns="http://www.freedesktop.org/standards/shared-mime-info"> <mime-type type="application/x-newtype"> <comment>new mime type</comment> <glob pattern="*.xyz"/> </mime-type></mime-info>
[Desktop Entry]Type=ApplicationMimeType=application/x-newtypeName=My Application 1Exec=myapplication1
Desktop Migration and Administration Guide
54
# update-mime-database /usr/share/mime
4. As root, update the application database:
# update-desktop-database /usr/share/applications
5. To verify that you have successfully associated *.xyz files with the application/x-newtypeMIME type, first create an empty file, for example test.xyz:
$ touch test.xyz
Then run the gvfs-info command:
$ gvfs-info test.xyz | grep "standard::content-type" standard::content-type: application/x-newtype
6. To verify that myapplication1.desktop has been correctly set as the default registeredapplication for the application/x-newtype MIME type, run the gvfs-mime --query command:
$ gvfs-mime --query application/x-newtypeDefault application for 'application/x-newtype': myapplication1.desktopRegistered applications: myapplication1.desktopRecommended applications: myapplication1.desktop
12.3.3. Adding a Custom MIME Type for Individual Users
To add a custom MIME type for individual users and register a default application for that MIME type,you need to create a new MIME type specification file in the ~/.local/share/mime/packages/ directoryand a .desktop file in the ~/.local/share/applications/ directory.
Procedure 12.4. Adding a Custom application/x-newtype MIME Type for Individual Users
1. Create the ~/.local/share/mime/packages/application-x-newtype.xml file:
The sample application-x-newtype.xml file above defines a new MIME type application/x-newtype and assigns file names with the .xyz extension to that MIME type.
2. Create a new .desktop file named, for example, myapplication1.desktop, and place it in the ~/.local/share/applications/ directory:
<?xml version="1.0" encoding="UTF-8"?><mime-info xmlns="http://www.freedesktop.org/standards/shared-mime-info"> <mime-type type="application/x-newtype"> <comment>new mime type</comment> <glob pattern="*.xyz"/> </mime-type></mime-info>
[Desktop Entry]Type=Application
CHAPTER 12. INTEGRATING APPLICATIONS
55

The sample myapplication1.desktop file above associates the application/x-newtype MIMEtype with an application named My Application 1, which is run by a command myapplication1.
3. Update the MIME database for your changes to take effect:
$ update-mime-database ~/.local/share/mime
4. Update the application database:
$ update-desktop-database ~/.local/share/applications
5. To verify that you have successfully associated *.xyz files with the application/x-newtypeMIME type, first create an empty file, for example test.xyz:
$ touch test.xyz
Then run the gvfs-info command:
$ gvfs-info test.xyz | grep "standard::content-type" standard::content-type: application/x-newtype
6. To verify that myapplication1.desktop has been correctly set as the default registeredapplication for the application/x-newtype MIME type, run the gvfs-mime --query command:
$ gvfs-mime --query application/x-newtypeDefault application for 'application/x-newtype': myapplication1.desktopRegistered applications: myapplication1.desktopRecommended applications: myapplication1.desktop
12.3.4. Overriding the Default Registered Application for All Users
The /usr/share/applications/mimeapps.list and /usr/share/applications/[desktop environment name]-mimeapps.list file are the package-installed defaults, which specify which application isregistered to open specific MIME types by default.
To override the system defaults for all users on the system, system administrators need to create the /etc/xdg/mimeapps.list or /etc/xdg/[desktop environment name]-mimeapps.list file with a list ofMIME types for which they want to override the default registered application.
The order in which the configurations are applied is as follows:
1. /usr/share/applications/
2. /etc/xdg/
Within a particular location, the configurations are applied in this order:
MimeType=application/x-newtypeName=My Application 1Exec=myapplication1
Desktop Migration and Administration Guide
56
1. mimeapps.list
2. [desktop environment name]-mimeapps.list
System administrator's configuration thus takes precedence over package configuration. And withineach, desktop-specific configuration takes precedence over the configuration that does not specify thedesktop environment.
NOTE
Red Hat Enterprise Linux versions prior to 7.5 used the defaults.list file instead of the mimeapps.list file.
Procedure 12.5. Overriding the Default Registered Application for All Users
1. Consult the /usr/share/applications/mimeapps.list file to determine the MIME types for whichyou want to change the default registered application. For example, the following sample of themimeapps.list file specifies the default registered application for the text/html and application/xhtml+xml MIME types:
The default application (Firefox) is defined by specifying its corresponding .desktop file(firefox.desktop). The default location for other applications' .desktop files is /usr/share/applications/.
2. Create the /etc/xdg/mimeapps.list file. In the file, specify the MIME types and theircorresponding default registered applications:
This sets the default registered application for the text/html MIME type to myapplication1.desktop, and the default registered application for the application/xhtml+xmlMIME type to myapplication2.desktop.
For these settings to function properly, ensure that both the myapplication1.desktop and myapplication2.desktop files are placed in the /usr/share/applications/ directory.
3. You can use the gvfs-mime query command to verify that the default registered applicationhas been set correctly:
$gvfs-mime query text/htmlDefault application for 'text/html': myapplication1.desktopRegistered applications: myapplication1.desktop firefox.desktopRecommended applications: myapplication1.desktop firefox.desktop
[Default Applications]text/html=firefox.desktopapplication/xhtml+xml=firefox.desktop
[Default Applications]text/html=myapplication1.desktopapplication/xhtml+xml=myapplication2.desktop
CHAPTER 12. INTEGRATING APPLICATIONS
57

12.3.5. Overriding the Default Registered Application for Individual Users
The /usr/share/applications/mimeapps.list and /usr/share/applications/[desktop environment name]-mimeapps.list file are the package-installed defaults, which specify which application isregistered to open specific MIME types by default.
To override the system defaults for individual users, you need to create the ~/.local/share/applications/mimeapps.list or ~/.local/share/applications/[desktop environment id]-mimeapps.list file with a list of MIME types for which you want to override the default registeredapplication.
The order in which the configurations are applied is as follows:
1. /usr/share/applications/
2. /etc/xdg/
3. ~/.local/share/application/
Within a particular location, the configurations are applied in this order:
1. mimeapps.list
2. [desktop environment name]-mimeapps.list
User's configuration thus takes precedence over system administrator's configuration, and systemadministrator's configuration takes precedence over package configuration. And within each, desktop-specific configuration takes precedence over the configuration that does not specify the desktopenvironment.
NOTE
Red Hat Enterprise Linux versions prior to 7.5 used the defaults.list file instead of the mimeapps.list file.
Procedure 12.6. Overriding the Default Registered Application for Individual Users
1. Consult the /usr/share/applications/mimeapps.list file to determine the MIME types for whichyou want to change the default registered application. For example, the following sample of themimeapps.list file specifies the default registered application for the text/html and application/xhtml+xml MIME types:
The default application (Firefox) is defined by specifying its corresponding .desktop file(firefox.desktop). The system default location for other applications' .desktop files is /usr/share/applications/. Individual users' .desktop files can be stored in ~/.local/share/applications/.
2. Create the ~/.local/share/applications/mimeapps.list file. In the file, specify the MIME typesand their corresponding default registered applications:
[Default Applications]text/html=firefox.desktopapplication/xhtml+xml=firefox.desktop
Desktop Migration and Administration Guide
58
This sets the default registered application for the text/html MIME type to myapplication1.desktop, and the default registered application for the application/xhtml+xmlMIME type to myapplication2.desktop.
For these settings to function properly, ensure that both the myapplication1.desktop and myapplication2.desktop files are placed in the /usr/share/applications/ directory.
3. You can use the gvfs-mime --query command to verify that the default registered applicationhas been set correctly:
$gvfs-mime --query text/htmlDefault application for 'text/html': myapplication1.desktopRegistered applications: myapplication1.desktop firefox.desktopRecommended applications: myapplication1.desktop firefox.desktop
[Default Applications]text/html=myapplication1.desktopapplication/xhtml+xml=myapplication2.desktop
CHAPTER 12. INTEGRATING APPLICATIONS
59
CHAPTER 13. CUSTOMIZING GNOME DESKTOP FEATURESThis chapter mentions three key desktop features. After reading, you will know how to quickly terminatethe X server by default for all users, how to enable the Compose key or how to disable command lineaccess for the users.
To make sure the changes you have made take effect, you need to update the dconf utility. The userswill experience the difference when they log out and log in again.
13.1. ALLOWING AND DISALLOWING ONLINE ACCOUNTS
The GNOME Online Accounts (GOA) are used for setting personal network accounts which are thenautomatically integrated with the GNOME Desktop and applications. The user can add their onlineaccounts, such as Google, Facebook, Flickr, ownCloud, and others using the Online Accountsapplication.
As a system administrator, you can
enable all online accounts;
selectively enable a few online accounts;
disable all online accounts.
Procedure 13.1. Configuring Online Accounts
1. If you do not have the gnome-online-accounts package on your system, install it by running thefollowing command as root:
# yum install gnome-online-accounts
2. Create a keyfile for the local database in /etc/dconf/db/local.d/goa, which contains thefollowing configuration:
For selectively enabling a few providers only:
[org/gnome/online-accounts]whitelisted-providers= ['google', 'facebook']
For disabling all providers:
[org/gnome/online-accounts]whitelisted-providers= ['']
For allowing all available providers:
[org/gnome/online-accounts]whitelisted-providers= ['all']
3. Lock down the settings to prevent users from overriding them.
a. If it does not exist, create a new directory named /etc/dconf/db/local.d/locks/.
Desktop Migration and Administration Guide
60
b. Create a new file in /etc/dconf/db/local.d/locks/goa with the following contents:
# Prevent users from changing values for the following key:/org/gnome/online-accounts
4. Update the system databases for the changes to take effect:
# dconf update
5. Users must log out and back in again before the system-wide settings take effect.
13.2. ENABLING THE CTRL+ALT+BACKSPACE SHORTCUT
The Ctrl+Alt+Backspace shortcut key combination is used for terminating the X server. You might wantto terminate the X server especially when:
a program caused the X server to stop working.
you need to switch from your logged-in session quickly.
you have launched a program that failed.
you cannot operate in the current session for various reason.
your screen freezes.
To enable the Ctrl+Alt+Backspace shortcut to forcibly terminate the X server by default for all users,you need to set the org.gnome.desktop.input-sources.xkb-options GSettings key. (For moreinformation on GSettings keys, see Section 9.6, “GSettings Keys Properties” .)
Procedure 13.2. Enabling the Ctrl-Alt-Backspace Shortcut
1. Create a local database for machine-wide settings in /etc/dconf/db/local.d/00-input-sources:
2. Override the user's setting and prevent the user from changing it in /etc/dconf/db/local.d/locks/input-sources:
3. Update the system databases for the changes to take effect:
# dconf update
4. Users must log out and back in again before the system-wide settings take effect.
The Ctrl+Alt+Backspace key combination is now enabled. All users can terminate the X server quicklyand easily and doing so bring themselves back to the login prompt.
[org/gnome/desktop/input-sources]# Enable Ctrl-Alt-Backspace for all usersxkb-options=['terminate:ctrl_alt_bksp']
# Lock the list of enabled XKB options/org/gnome/desktop/input-sources/xkb-options
CHAPTER 13. CUSTOMIZING GNOME DESKTOP FEATURES
61

13.3. ENABLING THE COMPOSE KEY
The Compose key is a feature that enables you to type special symbols or characters not found on yourkeyboard. In GNOME Desktop, you can define one of the existing keys on your keyboard as the Compose key. The Compose key is used in combination with other keys, known as Compose keysequences, to enter special characters you type frequently.
Example 13.1. Using Compose Key
If you press and release the Compose key, then type AE (in capitals), you will get "Æ". If you type theletters in lower case, you get "æ".
To enable the Compose key and configure a certain key on your keyboard as the Compose key, setthe org.gnome.desktop.input-sources.xkb-options GSettings key. That way, the setting will beenabled by default for all users on your system. (For more information on GSettings keys, seeSection 9.6, “GSettings Keys Properties” .)
Procedure 13.3. Setting the Right Alt Key as the Compose Key
1. Create a local database for machine-wide settings in /etc/dconf/db/local.d/00-input-sources:
If you want to set a different key than Right Alt, replace ralt with the name of that key asspecified in the xkeyboard-config(7) man page, section Compose key position .
2. Override the user's setting and prevent the user from changing it in /etc/dconf/db/local.d/locks/input-sources:
3. Update the system databases for the changes to take effect:
# dconf update
4. Users must log out and back in again before the system-wide settings take effect.
Now, you can start using the Right Alt key as the Compose key. Just press and release the Compose key and then type the key combination to get the specific symbol.
NOTE
If you, as a system administrator, set the lock on after editing the local database, userswill not be able to add other xkb options. The lock prevents users from setting a keycombination like Alt+Shift to switch keyboard layouts.
13.4. DISABLING COMMAND-LINE ACCESS
To disable command-line access for your desktop user, you need to make configuration changes in a
[org/gnome/desktop/input-sources]# Set the Right Alt key as the Compose key and enable itxkb-options=['compose:ralt']
# Lock the list of enabled XKB options/org/gnome/desktop/input-sources/xkb-options
Desktop Migration and Administration Guide
62

number of different contexts. Bear in mind that the following steps do not remove the desktop user'spermissions to access a command line, but rather remove the ways that the desktop user could accesscommand line.
Set the org.gnome.desktop.lockdown.disable-command-line GSettings key, which preventsthe user from accessing the terminal or specifying a command line to be executed (the Alt+F2command prompt).
Disable switching to virtual terminals (VTs) with the Ctrl+Alt+function key shortcuts bymodifying the X server configuration.
Remove Terminal and any other application that provides access to the terminal from theApplications menu and Activities Overview in GNOME Shell. This is done by removing menuitems for those applications. For detailed information on how to remove a menu item, seeSection 12.1.2, “Removing a Menu Item for All Users” .
13.4.1. Setting the org.gnome.desktop.lockdown.disable-command-line Key
1. Create a local database for machine-wide settings in /etc/dconf/db/local.d/00-lockdown:
2. Override the user's setting and prevent the user from changing it in /etc/dconf/db/local.d/locks/lockdown:
3. Update the system databases:
# dconf update
4. Users must log out and back in again before the system-wide settings take effect.
13.4.2. Disabling Virtual Terminal Switching
Users can normally use the Ctrl+Alt+function key shortcuts (for example Ctrl+Alt+F2) to switch fromthe GNOME Desktop and X server to a virtual terminal. You can disable access to all virtual terminals byadding a DontVTSwitch option to the Serverflags section in an X configuration file in the /etc/X11/xorg.conf.d/ directory.
Procedure 13.4. Disabling Access to Virtual Terminals
1. Create or edit an X configuration file in the /etc/X11/xorg.conf.d/ directory:
NOTE
By convention, these host-specific configuration file names start with two digitsand a hyphen and always have the .conf extension. Thus, the following file namecan be /etc/X11/xorg.conf.d/10-xorg.conf.
[org/gnome/desktop/lockdown]# Disable command-line accessdisable-command-line=true
# Lock the disabled command-line access/org/gnome/desktop/lockdown
CHAPTER 13. CUSTOMIZING GNOME DESKTOP FEATURES
63

2. Restart the X server for your changes to take effect.
13.5. LOCKING DOWN PRINTING
You can disable the print dialog from being shown to users. This can be useful if you are givingtemporary access to a user or you do not want the user to print to network printers.
IMPORTANT
This feature will only work in applications which support it. Not all GNOME and third partyapplications have this feature enabled. These changes will have no effect on applicationswhich do not support this feature.
You prevent applications from printing by locking down the org.gnome.desktop.lockdown.disable-printing key. Follow the procedure.
Procedure 13.5. Locking Down the org.gnome.desktop.lockdown.disable-printing Key
1. Create the user profile if it already does not exist (/etc/dconf/profile/user):
user-db:usersystem-db:local
2. Create a local database for machine-wide settings in etc/dconf/db/local.d/00-lockdown:
[org/gnome/desktop/lockdown] # Prevent applications from printingdisable-printing=true
3. Override the user's setting and prevent the user from changing it in /etc/dconf/db/local.d/locks/lockdown:
# List the keys used to configure lockdown/org/gnome/desktop/lockdown/disable-printing
4. Update the system databases by running
# dconf update
Having followed these steps, applications supporting this lockdown key will disable printing. Among suchapplications there are Evolution, Evince, Eye of GNOME, Epiphany, and Gedit.
13.6. LOCKING FILE SAVING ON DISK
Section "Serverflags"
Option "DontVTSwitch" "yes"
EndSection
Desktop Migration and Administration Guide
64

You can disable the Save and Save As dialogs. This can be useful if you are giving temporary access toa user or you do not want the user to save files to the computer.
IMPORTANT
This feature will only work in applications which support it. Not all GNOME and third partyapplications have this feature enabled. These changes will have no effect on applicationswhich do not support this feature.
You prevent applications from file saving by locking down the org.gnome.desktop.lockdown.disable-save-to-disk key. Follow the procedure:
Procedure 13.6. Locking Down the org.gnome.desktop.lockdown.disable-save-to-disk Key
1. Create the user profile in /etc/dconf/profile/user unless it already exists:
user-db:usersystem-db:local
2. Create a local database for machine-wide settings in the /etc/dconf/db/local.d/00-lockdownfile.
[org/gnome/desktop/lockdown]
# Prevent the user from saving files on diskdisable-save-to-disk=true
3. Override the user's setting and prevent the user from changing it in /etc/dconf/db/local.d/locks/lockdown:
# Lock this key to disable saving files on disk/org/gnome/desktop/lockdown/disable-save-to-disk
4. Update the system databases by running
# dconf update
Having followed these steps, applications supporting this lockdown key, for example Videos, ImageViewer, Evolution, Document Viewer, or GNOME Shell will disable their "Save As" dialogs.
13.7. LOCKING REPARTITIONING
polkit enables you to set permissions for individual operations. For udisks2, the utility for diskmanagement services, the configuration is located at /usr/share/polkit-1/actions/org.freedesktop.udisks2.policy. This file contains a set of actions and default values, whichcan be overridden by system administrator.
IMPORTANT
Remember that polkit configuration stored in /etc overrides the configuration shipped bypackages in /usr/share/.
CHAPTER 13. CUSTOMIZING GNOME DESKTOP FEATURES
65

Procedure 13.7. To Prevent Users from Changing Disks Settings
1. Create a file with the same content as in /usr/share/polkit-1/actions/org.freedesktop.udisks2.policy.
Do not change the /usr/share/polkit-1/actions/org.freedesktop.udisks2.policy file, yourchanges will be overwritten by the next package update.
2. Delete the action you do not need and add the following lines to the /etc/polkit-1/actions/org.freedesktop.udisks2.policy file:
<action id="org.freedesktop.udisks2.modify-device"> <message>Authentication is required to modify the disks settings</message> <defaults> <allow_any>no</allow_any> <allow_inactive>no</allow_inactive> <allow_active>yes</allow_active> </defaults> </action>
Replace no by auth_admin if you want to ensure only the root user is able to carry out theaction.
3. Save the changes.
When the user tries to change the disks settings, the following message is returned:
13.8. LOCKING DOWN USER LOGOUT AND USER SWITCHING
Follow these steps to prevent the user from logging out.
1. Create the /etc/dconf/profile/user profile which contains the following lines:
user-db:usersystem-db:local
local is the name of a dconf database.
2. Create the directory /etc/dconf/db/local.d/ if it does not already exist.
3. Create the key file /etc/dconf/db/local.d/00-logout to provide information for the localdatabase:
[org/gnome/desktop/lockdown]# Prevent the user from user switchingdisable-log-out=true
4. Override the user's setting and prevent the user from changing it in /etc/dconf/db/local.d/locks/lockdown:
cp /usr/share/polkit-1/actions/org.freedesktop.udisks2.policy /etc/share/polkit-1/actions/org.freedesktop.udisks2.policy
Authentication is required to modify the disks settings
Desktop Migration and Administration Guide
66

# Lock this key to disable user logout/org/gnome/desktop/lockdown/disable-log-out
5. Update the system databases:
# dconf update
6. Users must log out and back in again before the system-wide settings take effect.
IMPORTANT
Users can evade the logout lockdown by switching to a different user, which can thwartsystem administrator's intentions. That is the reason why it is recommended to disable"user switching" as well to prevent this scenario from occurring.
Procedure 13.8. Prevent the User form Switching to a Different User Account
1. Create the /etc/dconf/profile/user profile which contains the following lines:
user-db:usersystem-db:local
local is the name of a dconf database.
2. Create the directory /etc/dconf/db/local.d/ if it does not already exist.
3. Create the key file /etc/dconf/db/local.d/00-user-switching to provide information for the local database:
[org/gnome/desktop/lockdown]# Prevent the user from user switchingdisable-user-switching=true
4. Override the user's setting and prevent the user from changing it in /etc/dconf/db/local.d/locks/lockdown:
# Lock this key to disable user switching/org/gnome/desktop/lockdown/disable-user-switching
5. Update the system databases:
# dconf update
6. Users must log out and back in again before the system-wide settings take effect.
13.9. SINGLE-APPLICATION MODE
Single-application mode is a modified shell which reconfigures the shell into an interactive kiosk. Theadministrator locks down some behavior to make the standard desktop more restrictive for the user,letting them focus on selected features.
Set up single-application mode for a wide range of functions in a number of fields (from communication
CHAPTER 13. CUSTOMIZING GNOME DESKTOP FEATURES
67

Set up single-application mode for a wide range of functions in a number of fields (from communicationto entertainment or education) and use it as a self-serve machine, event manager, registration point,etc.
Procedure 13.9. Set Up Single-application Mode
1. Lock down settings to prevent printing, terminal access, and so on. See:
Section 13.4, “Disabling Command-Line Access”
Section 13.5, “Locking Down Printing”
Section 13.6, “Locking File Saving on Disk”
Section 13.7, “Locking Repartitioning”
2. Configure automatic login in the /etc/gdm/custom.conf file for the user.
See Section 14.3.6, “Configuring Automatic Login”.
3. Create a new user with a name, which follows typical naming conventions (no space or specialcharacters, do not start with a digit or a dash). Also, make sure the user name matches with therelated names, such as when referring to a session. A good example is kiosk-user.
4. Create a session with a name matching your user name (for example, for our kiosk-user, kiosk isa good match) by writing a /usr/share/xsessions/kiosk.desktop file and setting the Exec lineto be:
Exec=gnome-session --session kiosk
5. Set the default session for kiosk-user by adding the following line to the /var/lib/AccountsService/users/kiosk-user file.
XSession=kiosk
6. Define the kiosk session by writing a custom session definition, containing the following line:
RequiredComponents=kiosk-app;gnome-settings-daemon;kiosk-shell;
This creates a session that runs three programs: kiosk-app (a sample application), gnome-settings-daemon (standard component in the GNOME session), and kiosk-shell (which is acustomized version of gnome-shell).
7. Create a desktop file for kiosk-shell, /usr/share/applications/kiosk-shell.desktop, which willcontain:
Exec=gnome-shell --mode=kiosk
8. Create a mode definition called /usr/share/gnome-shell/modes/kiosk.json. This is a small jsonfile defining the available GNOME Shell UI. (Look at classic.json and initial-setup.json in thesame directory as the starting point.)
13.10. PREVENTING THE COMPUTER FROM SUSPENDING WHEN
Desktop Migration and Administration Guide
68
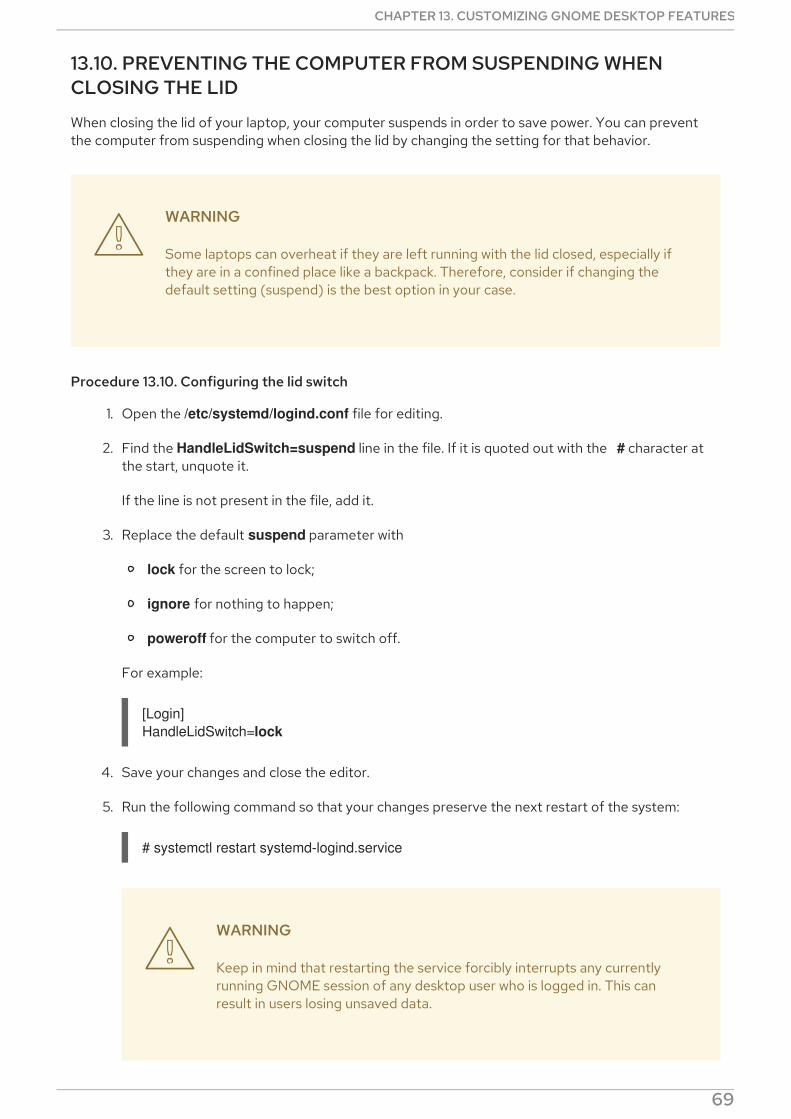
13.10. PREVENTING THE COMPUTER FROM SUSPENDING WHENCLOSING THE LID
When closing the lid of your laptop, your computer suspends in order to save power. You can preventthe computer from suspending when closing the lid by changing the setting for that behavior.
WARNING
Some laptops can overheat if they are left running with the lid closed, especially ifthey are in a confined place like a backpack. Therefore, consider if changing thedefault setting (suspend) is the best option in your case.
Procedure 13.10. Configuring the lid switch
1. Open the /etc/systemd/logind.conf file for editing.
2. Find the HandleLidSwitch=suspend line in the file. If it is quoted out with the # character atthe start, unquote it.
If the line is not present in the file, add it.
3. Replace the default suspend parameter with
lock for the screen to lock;
ignore for nothing to happen;
poweroff for the computer to switch off.
For example:
4. Save your changes and close the editor.
5. Run the following command so that your changes preserve the next restart of the system:
# systemctl restart systemd-logind.service
WARNING
Keep in mind that restarting the service forcibly interrupts any currentlyrunning GNOME session of any desktop user who is logged in. This canresult in users losing unsaved data.
[Login]HandleLidSwitch=lock
CHAPTER 13. CUSTOMIZING GNOME DESKTOP FEATURES
69

For more information on the /etc/systemd/logind.conf file, see the logind.conf(5) man page.
13.11. CHANGING BEHAVIOR WHEN PRESSING THE POWER BUTTONIN GRAPHICAL TARGET MODE
When the machine is booted to a graphical login screen or user session, hitting the power button makesthe machine suspend by default. This happens both in cases when the user presses the power buttonphysically or when pressing a virtual power button from a remote console. To achieve a differentbehavior when pressing the power button, set the function of this button with dconf.
For example, if you want the system to shutdown after pressing the power button, use the followingprocedure:
Procedure 13.11. Using dconf to configure the system to shutdown after pressing the power button
1. Create a local database for system-wide settings in the /etc/dconf/db/local.d/01-power file:
[org/gnome/settings-daemon/plugins/power]power-button-action='interactive'
2. Override the user's setting and prevent the user from changing it in the /etc/dconf/db/local.d/locks/01-power file:
/org/gnome/settings-daemon/plugins/power/power-button-action
3. Update the system databases:
# dconf update
4. Log out and back in again before the system-wide settings take effect.
This configuration initiates a system shutdown after pressing the power button. To configure thesystem differently, you can set the behavior of particular buttons.
Options for particular buttons
nothing
does nothing
suspend
suspends the system
hibernate
hibernates the system
interactive
shows a pop-up query asking the user what to do
With interactive mode, the system powers off automatically after 60 seconds when hitting the powerbutton.
Desktop Migration and Administration Guide
70

However, you can choose a different behavior from the pop-up query as shown in the figure below.
Figure 13.1. Pop-up query for interactive mode
CHAPTER 13. CUSTOMIZING GNOME DESKTOP FEATURES
71
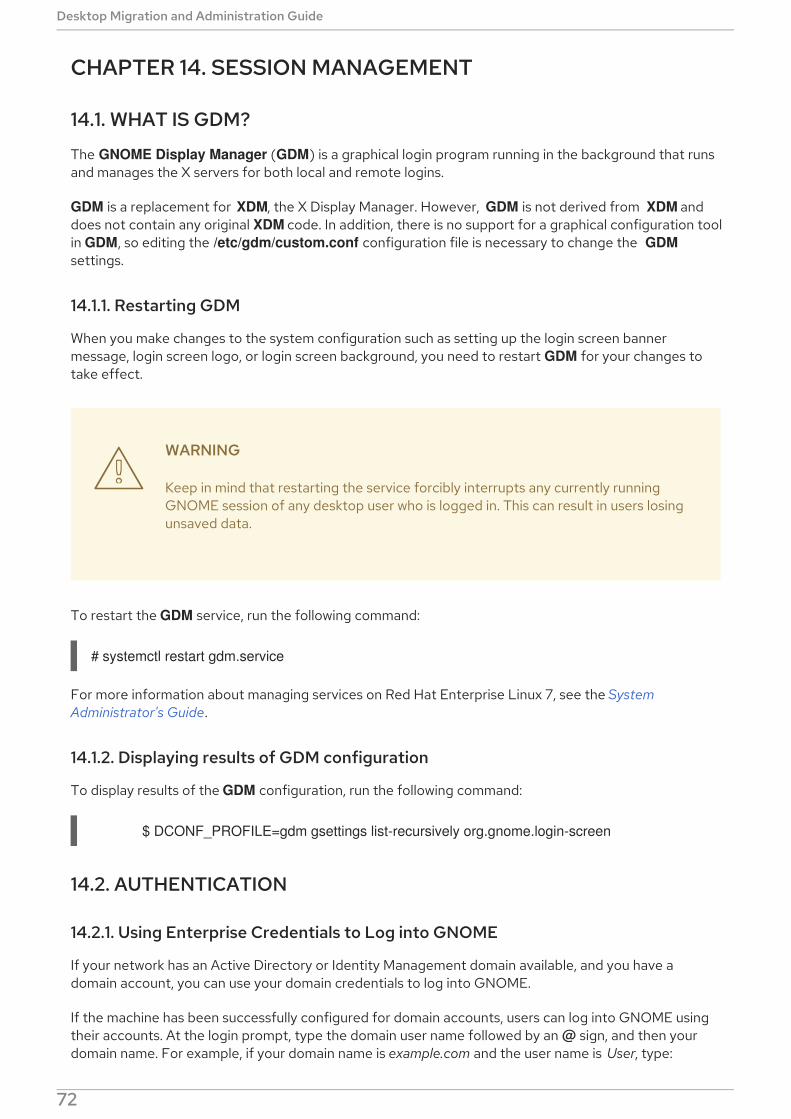
CHAPTER 14. SESSION MANAGEMENT
14.1. WHAT IS GDM?
The GNOME Display Manager (GDM) is a graphical login program running in the background that runsand manages the X servers for both local and remote logins.
GDM is a replacement for XDM, the X Display Manager. However, GDM is not derived from XDM anddoes not contain any original XDM code. In addition, there is no support for a graphical configuration toolin GDM, so editing the /etc/gdm/custom.conf configuration file is necessary to change the GDMsettings.
14.1.1. Restarting GDM
When you make changes to the system configuration such as setting up the login screen bannermessage, login screen logo, or login screen background, you need to restart GDM for your changes totake effect.
WARNING
Keep in mind that restarting the service forcibly interrupts any currently runningGNOME session of any desktop user who is logged in. This can result in users losingunsaved data.
To restart the GDM service, run the following command:
# systemctl restart gdm.service
For more information about managing services on Red Hat Enterprise Linux 7, see the SystemAdministrator's Guide.
14.1.2. Displaying results of GDM configuration
To display results of the GDM configuration, run the following command:
$ DCONF_PROFILE=gdm gsettings list-recursively org.gnome.login-screen
14.2. AUTHENTICATION
14.2.1. Using Enterprise Credentials to Log into GNOME
If your network has an Active Directory or Identity Management domain available, and you have adomain account, you can use your domain credentials to log into GNOME.
If the machine has been successfully configured for domain accounts, users can log into GNOME usingtheir accounts. At the login prompt, type the domain user name followed by an @ sign, and then yourdomain name. For example, if your domain name is example.com and the user name is User, type:
Desktop Migration and Administration Guide
72

In cases where the machine is already configured for domain accounts, you should see a helpful hintdescribing the login format.
14.2.1.1. Choosing to Use Enterprise Credentials During Welcome Screens
If you have not yet configured the machine for enterprise credentials, you can do so at the Welcomescreens that are part of the GNOME Initial Setup program.
Procedure 14.1. Configuring Enterprise Credentials
1. At the Login welcome screen, choose Use Enterprise Login.
2. Type the name of your domain in the Domain field if it is not already prefilled.
3. Type your domain account user and password in the relevant fields.
4. Click Next.
Depending on how the domain is configured, a prompt may show up asking for the domainadministrator's name and password in order to proceed.
14.2.1.2. Changing to Use Enterprise Credentials to Log into GNOME
If you have already completed initial setup, and wish to start a domain account to log into GNOME, thenyou can accomplish this from the Users panel in the GNOME Settings.
Procedure 14.2. Configuring Enterprise Credentials
1. Click your name on the top bar and select Settings from the menu.
2. From the list of items, select Users.
3. Click the Unlock button and type the computer administrator's password.
4. Click the + button in the lower left of the window.
5. Select the Enterprise Login pane.
6. Enter the domain, user, and password for your Enterprise account, and click Add.
Depending on how your domain is configured, a prompt may show up asking for the domainadministrator's name and password in order to proceed.
14.2.1.3. Troubleshooting and Advanced Setup
The realm command and its various subcommands can be used to troubleshoot the enterprise loginfeature. For example, to see whether the machine has been configured for enterprise logins, run thefollowing command:
$ realm list
Network administrators are encouraged to pre-join workstations to a relevant domain. This can be doneusing the kickstart realm join command, or running realm join in an automated fashion from a script.
CHAPTER 14. SESSION MANAGEMENT
73

Getting More InformationRed Hat Enterprise Linux 7 Windows Integration Guide – The Windows Integration Guide for Red HatEnterprise Linux 7 provides more detailed information about using realmd to connect to an ActiveDirectory domain.
14.2.2. Enabling Smart Card Authentication
Enabling smart card authentication requires two consecutive steps:
1. Configuration of GDM to allow prompting for smart cards
2. Configuration of the operating system to allow using smart cards to login
1.Configuration of GDM to allow prompting for smart cardsYou can use two ways to configure the GDM to allow prompting for smart card authentication:
dconf editor GUI
Procedure 14.3. Enabling smart card authentication using dconf editor GUI
1. Uncheck the box for the org.gnome.login-screen enable-password-authentication dcof key.
2. Check the box for the org.gnome.login-screen enable-smartcard-authentication dcof key.
dconf-tool
Procedure 14.4. Enabling smart card authentication using dconf-tool
1. Create a keyfile in the /etc/dconf/db/gdm.d directory.
2. Add the following content to this keyfile:
[org/gnome/login-screen]enable-password-authentication='false'enable-smartcard-authentication='true'
3. Update the system dconf databases:
# dconf update
2.Configuration of the operating system to allow using smart cards to loginAfter GDM has been configured for smart card authentication, use the system-config-authenticationtool to configure the system to allow users to use smart cards, making their use available to GDM as avalid authentication method for the graphical environment. The tool is provided by the authconfig-gtkpackage.
To learn more about configuring the system to allow smart card authentication, and to learn more aboutthe system-config-authentication tool, see the Red Hat Enterprise Linux 7 System-LevelAuthentication Guide.
14.2.3. Enabling Fingerprint Authentication
To allow users to log in using their enrolled fingerprints, use the system-config-authentication tool toenable fingerprint authentication. The tool is provided by the authconfig-gtk package.
Desktop Migration and Administration Guide
74

To learn more about fingerprint authentication and the system-config-authentication tool, see theRed Hat Enterprise Linux 7 System-Level Authentication Guide .
14.3. USER SESSIONS
14.3.1. What Are Typical Processes in User Sessions?
In a stock GNOME session, programs called daemons run on the system as background processes. Youshould find the following daemons running by default:
dbus-daemon
The dbus-daemon provides a message bus daemon which programs can use to exchange messageswith one another. dbus-daemon is implemented with the D-Bus library which provides one-to-onecommunication between any two applications.
For extended information, see the dbus-daemon(1) man page.
gnome-keyring-daemon
Credentials such as user name and password for various programs and websites are stored securelyusing the gnome-keyring-daemon. This information is written into an encrypted file called thekeyring file and saved in the user's home directory.
For extended information, see the gnome-keyring-daemon(1) man page.
gnome-session
The gnome-session program is responsible for running the GNOME Desktop environment with helpof a display manager, such as GDM. The default session for the user is set at the time of systeminstallation by the system administrator. gnome-session typically loads the last session that ransuccessfully on the system.
For extended information, see the gnome-session(1) man page.
gnome-settings-daemon
The gnome-settings-daemon handles settings for a GNOME session and for all programs that arerun within the session.
For extended information, see the gnome-settings-daemon(1) man page.
gnome-shell
gnome-shell provides the core user interface functionality for GNOME, such as launching programs,browsing directories, viewing files and so on.
For extended information, see the gnome-shell(1) man page.
pulseaudio
PulseAudio is a sound server for Red Hat Enterprise Linux that lets programs output audio using thePulseaudio daemon.
For extended information, see the pulseaudio(1) man page.
Depending on the user's setup, you may also see some of the following, among others:
CHAPTER 14. SESSION MANAGEMENT
75
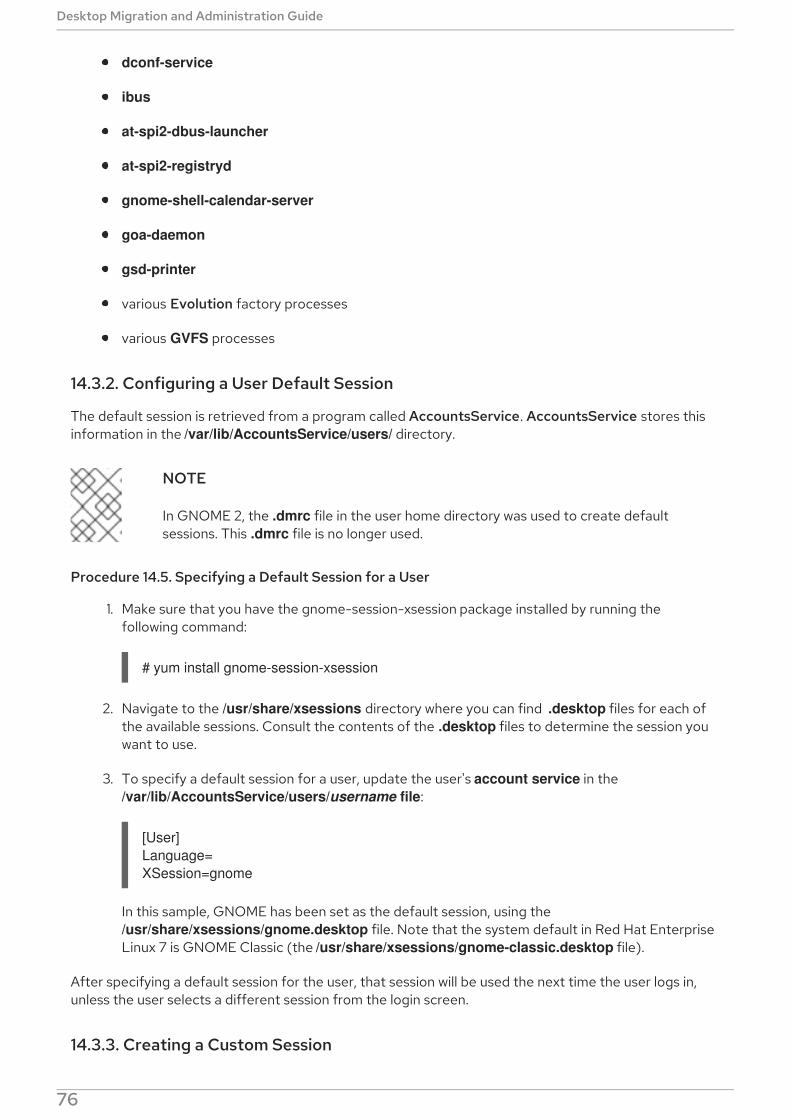
dconf-service
ibus
at-spi2-dbus-launcher
at-spi2-registryd
gnome-shell-calendar-server
goa-daemon
gsd-printer
various Evolution factory processes
various GVFS processes
14.3.2. Configuring a User Default Session
The default session is retrieved from a program called AccountsService. AccountsService stores thisinformation in the /var/lib/AccountsService/users/ directory.
NOTE
In GNOME 2, the .dmrc file in the user home directory was used to create defaultsessions. This .dmrc file is no longer used.
Procedure 14.5. Specifying a Default Session for a User
1. Make sure that you have the gnome-session-xsession package installed by running thefollowing command:
# yum install gnome-session-xsession
2. Navigate to the /usr/share/xsessions directory where you can find .desktop files for each ofthe available sessions. Consult the contents of the .desktop files to determine the session youwant to use.
3. To specify a default session for a user, update the user's account service in the /var/lib/AccountsService/users/username file:
In this sample, GNOME has been set as the default session, using the /usr/share/xsessions/gnome.desktop file. Note that the system default in Red Hat EnterpriseLinux 7 is GNOME Classic (the /usr/share/xsessions/gnome-classic.desktop file).
After specifying a default session for the user, that session will be used the next time the user logs in,unless the user selects a different session from the login screen.
14.3.3. Creating a Custom Session
[User]Language=XSession=gnome
Desktop Migration and Administration Guide
76

To create your own session with customized configuration, follow these steps:
1. Create a .desktop file in /etc/X11/sessions/new-session.desktop. Make sure that the filespecifies the following entries:
The Exec entry specifies the command, possibly with arguments, to execute. You can run thecustom session with the gnome-session --session=new-session command.
For more information on the parameters that you can use with gnome-session, see the gnome-session(1) man page.
2. Create a custom session file in /usr/share/gnome-session/sessions/new-session.sessionwhere you can specify the name and required components for the session:
Note that any item that you specify in RequiredComponents needs to have its corresponding .desktop file in /usr/share/applications/.
After configuring the custom session files, the new session will be available in the session list on the GDMlogin screen.
14.3.4. Viewing User Session Logs
If you want to find more information about a problem in a user session, you can view the systemdjournal. Because Red Hat Enterprise Linux 7 is a systemd-based system, the user session log data isstored directly in the systemd journal in a binary format.
NOTE
In Red Hat Enterprise Linux 6, the user session log data was stored in the ~/.xsession-errors file, which is no longer used.
Procedure 14.6. Viewing User Session Logs
1. Determine your user ID (uid) by running the following command:
$ id --user1000
2. View the journal logs for the user ID determined above:
$ journalctl _UID=1000
[Desktop Entry]Encoding=UTF-8Type=ApplicationName=Custom SessionComment=This is our custom sessionExec=gnome-session --session=new-session
[GNOME Session]Name=Custom SessionRequiredComponents=gnome-shell-classic;gnome-settings-daemon;
CHAPTER 14. SESSION MANAGEMENT
77

Getting More InformationThe journalctl(1) man page provides more information on the systemd journal usage.
For further information about using the systemd journal on Red Hat Enterprise Linux 7, see the Red HatEnterprise Linux 7 System-Level Authentication Guide.
14.3.5. Adding an Autostart Application for All Users
To start an application automatically when the user logs in, you need to create a .desktop file for thatapplication in the /etc/xdg/autostart/ directory.
To manage autostart (startup) applications for individual users, use the gnome-session-propertiesapplication.
Procedure 14.7. Adding an Autostart (Startup) Application for All Users
1. Create a .desktop file in the /etc/xdg/autostart/ directory:
2. Replace Files with the name of the application.
3. Replace nautilus -n with the command you wish to use to run the application.
4. You can use the AutostartCondition key to check for a value of a GSettings key.
The session manager runs the application automatically if the key's value is true. If the key'svalue changes in the running session, the session manager starts or stops the application,depending on what the previous value for the key was.
14.3.6. Configuring Automatic Login
A user with an Administrator account type can enable Automatic Login from the Users panel in theGNOME Settings. System administrators can also set up automatic login manually in the GDM customconfiguration file, as follows.
Example 14.1. Configuring Automatic Login for a user john
Edit the /etc/gdm/custom.conf file and make sure that the [daemon] section in the file specifies thefollowing:
Replace john with the user that you want to be automatically logged in.
14.3.7. Configuring Automatic Logout
[Desktop Entry]Type=ApplicationName=FilesExec=nautilus -nOnlyShowIn=GNOME;AutostartCondition=GSettings org.gnome.desktop.background show-desktop-icons
[daemon]AutomaticLoginEnable=TrueAutomaticLogin=john
Desktop Migration and Administration Guide
78
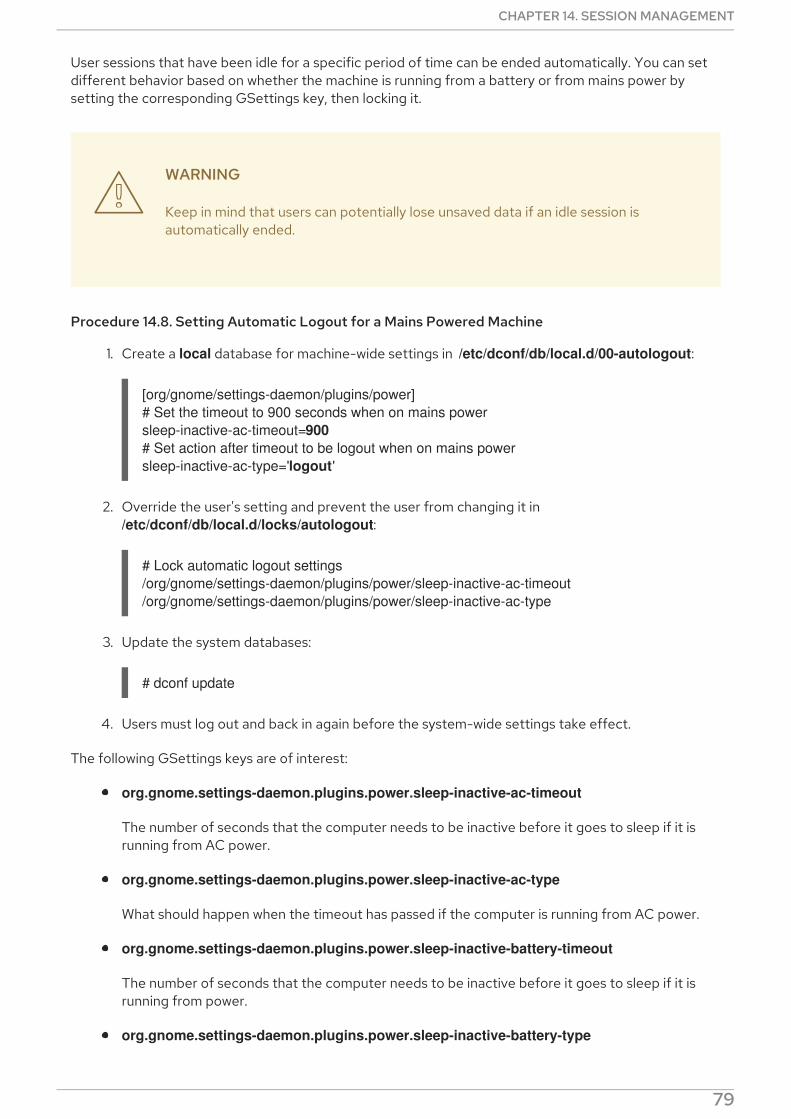
User sessions that have been idle for a specific period of time can be ended automatically. You can setdifferent behavior based on whether the machine is running from a battery or from mains power bysetting the corresponding GSettings key, then locking it.
WARNING
Keep in mind that users can potentially lose unsaved data if an idle session isautomatically ended.
Procedure 14.8. Setting Automatic Logout for a Mains Powered Machine
1. Create a local database for machine-wide settings in /etc/dconf/db/local.d/00-autologout:
2. Override the user's setting and prevent the user from changing it in /etc/dconf/db/local.d/locks/autologout:
# Lock automatic logout settings/org/gnome/settings-daemon/plugins/power/sleep-inactive-ac-timeout/org/gnome/settings-daemon/plugins/power/sleep-inactive-ac-type
3. Update the system databases:
# dconf update
4. Users must log out and back in again before the system-wide settings take effect.
The following GSettings keys are of interest:
org.gnome.settings-daemon.plugins.power.sleep-inactive-ac-timeout
The number of seconds that the computer needs to be inactive before it goes to sleep if it isrunning from AC power.
org.gnome.settings-daemon.plugins.power.sleep-inactive-ac-type
What should happen when the timeout has passed if the computer is running from AC power.
org.gnome.settings-daemon.plugins.power.sleep-inactive-battery-timeout
The number of seconds that the computer needs to be inactive before it goes to sleep if it isrunning from power.
org.gnome.settings-daemon.plugins.power.sleep-inactive-battery-type
[org/gnome/settings-daemon/plugins/power]# Set the timeout to 900 seconds when on mains powersleep-inactive-ac-timeout=900# Set action after timeout to be logout when on mains powersleep-inactive-ac-type='logout'
CHAPTER 14. SESSION MANAGEMENT
79

What should happen when the timeout has passed if the computer is running from batterypower.
You can run the gsettings range command on a key for a list of values which you can use. For example:
$ gsettings range org.gnome.settings-daemon.plugins.power sleep-inactive-ac-typeenum'blank''suspend''shutdown''hibernate''interactive''nothing''logout'
14.3.8. Setting Screen Brightness and Idle Time
By setting the following GSettings keys, you can configure the drop in the brightness level, and setbrightness level and idle time.
Example 14.2. Setting the Drop in the Brightness Level
To set the drop in the brightness level when the device has been idle for some time, create a localdatabase for machine-wide settings in /etc/dconf/db/local.d/00-power, as in the following example:
Example 14.3. Setting Brightness Level
To change the brightness level, create a local database for machine-wide settings in /etc/dconf/db/local.d/00-power, as in the following example, and replace 30 with the integer valueyou want to use:
Example 14.4. Setting Idle Time
To set the idle time after which the screen must be blanked and the default screensaver displayed,create a local database for machine-wide settings in /etc/dconf/db/local.d/00-session, as in thefollowing example, and replace 900 with the integer value you want to use:
You must include the uint32 along with the integer value as shown.
Incorporate your changes into the system databases by running the dconf update command as root.
[org/gnome/settings-daemon/plugins/power]idle-dim=true
[org/gnome/settings-daemon/plugins/power]idle-brightness=30
[org/gnome/desktop/session]idle-delay=uint32 900
Desktop Migration and Administration Guide
80

Users must log out and back in again before the system-wide settings take effect.
NOTE
You can also lock down the above settings to prevent users from changing them. Formore information about locks, see Section 9.5.1, “Locking Down Specific Settings” .
14.3.9. Locking the Screen When the User Is Idle
If you want to enable the screensaver and make the screen lock automatically when the user is idle, youneed to create a dconf profile, set the GSettings key pairs and then lock it to prevent users from editingit.
Procedure 14.9. Enabling the Screensaver and Locking the Screen
1. Create a local database for system-wide settings in /etc/dconf/db/local.d/00-screensaver:
[org/gnome/desktop/session]# Set the lock time out to 180 seconds before the session is considered idleidle-delay=uint32 180[org/gnome/desktop/screensaver]# Set this to true to lock the screen when the screensaver activateslock-enabled=true# Set the lock timeout to 180 seconds after the screensaver has been activatedlock-delay=uint32 180
You must include the uint32 along with the integer key values as shown.
2. Override the user's setting and prevent the user from changing it in the /etc/dconf/db/local.d/locks/screensaver file:
# Lock desktop screensaver settings/org/gnome/desktop/session/idle-delay/org/gnome/desktop/screensaver/lock-enabled/org/gnome/desktop/screensaver/lock-delay
3. Update the system databases:
# dconf update
4. Users must log out and back in again before the system-wide settings take effect.
14.3.10. Screencast Recording
GNOME Shell features a built-in screencast recorder that allows users to record desktop or applicationactivity during their session and distribute the recordings as high-resolution video files in the webmformat.
Procedure 14.10. Making a Screencast
1. To start the recording, press Ctrl+Alt+Shift+R.
When the recorder is capturing the screen activity, it displays a red circle in the bottom-right
CHAPTER 14. SESSION MANAGEMENT
81

When the recorder is capturing the screen activity, it displays a red circle in the bottom-rightcorner of the screen.
2. To stop the recording, press Ctrl+Alt+Shift+R. The red circle in the bottom-right corner of thescreen disappears.
3. Navigate to the ~/Videos folder where you can find the recorded video with a file name thatstarts with Screencast and includes the date and time of the recording.
Note that the built-in recorder always captures the entire screen, including all monitors in multi-monitorsetups.
Desktop Migration and Administration Guide
82

CHAPTER 15. VIRTUAL FILE SYSTEMS AND DISKMANAGEMENT
15.1. GVFS
GVFS (GNOME Virtual File System) is an extension of the virtual file system interface provided by thelibraries the GNOME Desktop is built on. GVFS provides complete virtual file system infrastructure andhandles storage in the GNOME Desktop.
GVFS uses addresses for full identification based on the URI (Uniform Resource Identifier) standard,syntactically similar to URL addresses used in web browsers. These addresses in form ofschema://user@server/path are the key information determining the kind of service.
15.2. BACK ENDS FOR GVFS
There is a number of back ends in GVFS, which provide access to a specific type of resource. Thefollowing is a list of available GVFS back ends and their specifications:
Table 15.1. Available Back Ends
Back end Description
afc Similar to MTP (Media Transfer Protocol), exposes files on your Apple iDevice(connected through USB).
afp Apple Filing Protocol (AFP) client to access file services of Mac operation system X andoriginal Mac operation system.
archive Handles various archiving files (ZIP, TAR) in read-only way.
burn A virtual back end used by burning applications as a temporary storage for newCD/DVD/BD medium contents.
cdda Exposes Audio CD through separate Waveform Audio File Format (WAV) files.
computer Virtual back end consolidating active mounts and physical volumes. Acts similarly to asignpost. Previously used by Nautilus for its Computer view.
dav, davs WebDAV client, including secure variant. Authentication is possible only during mount,does not support later re-authentication on per-folder basis.
dns-sd DNS Service Discovery – Avahi client, used during network browsing, forms persistentURIs to discovered services.
ftp A fully featured FTP (File Transfer Protocol) client, without FTPS support for the timebeing. Supports passive transfers by default.
gphoto2 A Picture Transfer Protocol (PTP) client to access your camera attached by USB orFireWire.
CHAPTER 15. VIRTUAL FILE SYSTEMS AND DISK MANAGEMENT
83

http Handles all HTTP requests; useful for easy downloading files from web in clientapplications.
locatest Simple testing back end proxying file:/// URI.; with error injection support.
mtp Media Transfer Protocol back end for accessing media player and smart phonesmemory.
network For browsing the network, showing nearby Avahi and Samba servers.
obexftp A Bluetooth client.
recent A back end used in GtkFileChooser to list recent files used by GNOME applications.
sftp A fully-featured SFTP (SSH File Transfer Protocol) client.
smb Access Samba and Windows shares.
trash A trash back end which allows to restore deleted files.
Back end Description
NOTE
Some back ends are packaged separately and not installed by default. For installingadditional back ends, use the yum package manager.
To use services of a back end, an URI string must be formed. This string is a basic identifier used in GVFS, which carries all necessary information needed for unique identification, such as type of service(back end ID), absolute path and user name if needed. You can see this information in the Nautilusaddress bar and GTK+ open or save file dialogs.
The example below is a very basic form of the URI string and points to a root directory (/) of the FTP(File Transfer Protocol) server running at ftp.myserver.net domain:
Example 15.1. URI String Pointing to the Root Directory
The following example points to a text file in a specified path using authentication:
Example 15.2. URI String Pointing to a Text File
15.3. MOUNTING, UNMOUNTING AND EJECTING
ftp://ftp.myserver.net/
ssh://[email protected]/home/joe/todo.txt
Desktop Migration and Administration Guide
84
In virtual file systems, particular resources are set to be mounted automatically, but a most common wayis to trigger mounts manually.
Procedure 15.1. Manual Mounting
1. Open a file in Nautilus (that is, the Files application).
2. In the location bar at the top of your screen, enter a well-formed URI string. If the location bardoes not display, press Ctrl+L.
Alternatively, Nautilus provides Connect to server dialog, which you find by going into Files →Connect to server.
3. When asked for login credentials, type your name and password into the relevant entry boxes.
4. Once the mounting process is finished, your are allowed to work with files.
When you need to unmount the resource, follow the simple procedure below.
Procedure 15.2. Unmounting
1. Click the eject icon on the chosen mount.
2. Wait until the mount disappears or notification about safe removal is displayed.
IMPORTANT
Data may be cached or being slowly written in the background for performance reasons.To deliver the data safely on the device or remote resource, never unplug or disconnectthe device or remote resource.
Mounts are shared between applications and are tracked globally within the running desktop session,which means that even if you quit an application that triggered the mount, it continues to be available forany other application. The same way multiple applications may access the mount at the same time,unless it was limited by a back end (some protocols permit only single channel due to their design).
IMPORTANT
GVFS mounts, (and physical volumes as well, are restricted to their owner only, no otheruser is permitted to exploit your privacy.
15.4. MANAGING BOOKMARKS
You can save a reference to a location by bookmarking it.
Procedure 15.3. To bookmark a Location:
1. Select the folder or file you want to bookmark.
2. Press Ctrl+D.
The first time a bookmark is activated, the GVFS subsystem looks for existing mounts and spawns a newone if not already present. This way you are able to authenticate even within the open or save dialog.
CHAPTER 15. VIRTUAL FILE SYSTEMS AND DISK MANAGEMENT
85

Bookmarks are well integrated in GTK+ and the GNOME Desktop: every application that presents astandard GTK+ open or save dialog (technically called GtkFileChooser) lists bookmarks in the left panelof the dialog. Also Nautilus and its clones present bookmarks in a sidebar or, more universally, in the Files menu.
NOTE
If you have no pages bookmarked yet, the Bookmarks label does not display.
Besides Bookmarks, all other available GVFS volumes and mounts are listed in the GtkFileChoosersidebar. Sometimes a bookmark and a GVFS volume combine into a single item to prevent duplicationand confusion. Bookmarks then can have eject icon just like GVFS mounts.
Bookmarks are located in the ~/.config/gtk-3.0/bookmarks file. In the example below, the bookmarkedlocations are ~/Music, ~/Pictures, ~/Videos, ~/Downloads, and ~/bin, so the content of the ~/.config/gtk-3.0/bookmarks file looks as follows:
Example 15.3. The ~/.config/gtk-3.0/bookmarks File
file:///home/username/Musicfile:///home/username/Picturesfile:///home/username/Videosfile:///home/username/Downloadsfile:///home/username/bin
Replace username with the user name you want to use.
Procedure 15.4. To edit Bookmarks:
1. Open the Files menu on the top bar.
2. Click Bookmark to open the bookmark editor.
15.5. CONFIGURING A DEFAULT SERVER LIST
From the system administrator's point of view, it is not possible to set a group of bookmarks for all usersat once. Nevertheless, the system administrator can allow access to file shares for their users.
Nautilus stores a list of file-sharing servers in the ~/.config/nautilus/servers file in the XBEL format. Itis possible to add the list of file-sharing servers to that file to make file shares easily accessible to yourusers.
NOTE
XBEL (XML Bookmark Exchange Language) is an XML standard that lets you share URIs(Uniform Resource Identifiers). In GNOME, XBEL is used to share desktop bookmarks inapplications such as Nautilus.
In the example below, Nautilus creates a bookmark titled GNOME FTP with the URI ftp://ftp.gnome.org/ in the ~/.config/nautilus/servers file.
Desktop Migration and Administration Guide
86

Example 15.4. The ~/.config/nautilus/servers File
15.6. EXPOSING GNOME VIRTUAL FILE SYSTEMS TO ALL OTHERAPPLICATIONS
In addition to applications built with the GIO library being able to access GVFS mounts, GVFS alsoprovides a FUSE daemon which exposes active GVFS mounts. This means that any application canaccess active GVFS mounts using the standard POSIX APIs as though they were regular filesystems.
Nevertheless, there are applications in which additional library dependency and new VFS subsystemspecifics may be unsuitable or too complex. For such reasons and to boost compatibility, GVFSprovides a FUSE (Filesystem in Userspace) daemon, which exposes active mounts through its mountfor standard POSIX (Portable Operating System Interface) access. This daemon transparentlytranslates incoming requests to imitate a local file system for applications.
IMPORTANT
The translation coming from the different design is not 100% feature-compatible and youmay experience difficulties with certain combinations of applications and GVFS backends.
The FUSE daemon starts automatically with the GVFS master daemon and places its mount either inthe /run/user/UID/gvfs or ~/.gvfs files as a fallback. Manual browsing shows that there individualdirectories for each GVFS mount. When you are opening documents from GVFS locations with non-native applications, a transformed path is passed as an argument. Note that native GIO applicationsautomatically translate this path back to a native URI.
15.7. PASSWORD MANAGEMENT OF GVFS MOUNTS
A typical GVFS mount asks for credentials on its activation unless the resource allows anonymousauthentication or does not require any at all. Presented in a standard GTK+ dialog, the user is able tochoose whether the password should be saved or not.
Procedure 15.5. Example: Authenticated Mount Process
1. Open Files and activate the address bar by pressing Ctrl+L.
2. Enter a well-formed URI string of a service that needs authentication (for example, sftp://localhost/).
3. The credentials dialog is displayed, asking for a user name, password and password storeoptions.
<?xml version="1.0" encoding="UTF-8"?><xbel version="1.0" xmlns:bookmark="http://www.freedesktop.org/standards/desktop-bookmarks" xmlns:mime="http://www.freedesktop.org/standards/shared-mime-info"> <bookmark href="<input>ftp://ftp.gnome.org/</input>"> <title><input>GNOME FTP</input></title> </bookmark></xbel>
CHAPTER 15. VIRTUAL FILE SYSTEMS AND DISK MANAGEMENT
87

4. Fill in the credentials and confirm.
In case the persistent storage is selected, the password is saved in the user keyring. GNOME Keyring isa central place for secrets storage. It is encrypted and automatically unlocked on desktop session startusing the password provided on login by default. If it is protected by a different password, the passwordis set at the first use.
To manage the stored password and GNOME Keyring itself, the Seahorse application is provided. Itallows individual records to be removed or passwords changed. For more information on Seahorse,consult the help manual for Seahorse embedded directly in the desktop.
15.8. GVFS TOOLS AND XDG-UTILS IN GNOME
GVFS ships with several commands that may come useful for scripting or testing. A set of POSIXcommands counterparts is offered:
gvfs-cat
gvfs-less
gvfs-mkdir
gvfs-mount
gvfs-rename
gvfs-set-attribute
gvfs-copy
gvfs-ls
gvfs-move
gvfs-rm
gvfs-trash
gvfs-info
gvfs-save
gvfs-tree
Some more additional commands are provided for more control of GVFS specifics:
gvfs-monitor-dir
gvfs-monitor-file
gvfs-mime
gvfs-open
All these commands are native GIO clients, there is no need for the fallback FUSE daemon to berunning. Their purpose is not to be drop-in replacements for POSIX commands, in fact, a very littlerange of switches is supported. In their basic form, an URI string (instead of a local path) is taken as an
Desktop Migration and Administration Guide
88

argument.
This all allows GNOME to be well-supported within xdg-tools (a freedesktop.org interoperabilityproject). For example, the commonly used xdg-open actually calls gvfs-open when a running GNOMEsession is detected, reading file type associations from the correct location.
The following are a few examples of the GVFS commands usage:
To lists all files in /tmp on a local file system, execute:
The command below lists contents of a text file from a remote machine:
To copy the referenced text file to a local /tmp directory, run:
NOTE
For user convenience, bash completion is provided as a part of the package.
15.9. USING GVFS METADATA
GVFS has its metadata storage implemented as a set of simple key/value pairs information bound to aparticular file. Thus, there is a tool for a user or application to save small data designed for runtimeinformation such as icon position, last-played location, position in a document, emblems, notes, and soon.
Whenever a file or directory is moved, metadata is moved accordingly so that it stays connected to therespective file. GVFS stores all metadata privately so it is available only on the machine. However, GVFSmounts and removable media are tracked as well.
NOTE
Removable media are now mounted in the /run/media/ instead of the /media directory.
To view and manipulate with metadata, you can use:
the gvfs-info command;
the gvfs-set-attribute command;
or any other native GIO way of working with attributes.
In the following example, a custom metadata attribute is set. Notice the differences between particular gvfs-info calls and data persistence after a move or rename (note the gvfs-info command output):
Example 15.5. Setting Custom Metadata Attribute
$ gvfs-ls file:///tmp
$ gvfs-cat ssh://[email protected]/home/joe/todo.txt
$ gvfs-copy ssh://[email protected]/home/joe/todo.txt /tmp/
CHAPTER 15. VIRTUAL FILE SYSTEMS AND DISK MANAGEMENT
89
15.10. TROUBLESHOOTING
15.10.1. Active VFS Mounts Are Invisible
If your active VFS mounts are invisible, it means that your application is not a native GIO client. NativeGIO clients are typically all GNOME applications using GNOME libraries (glib, gio). There is a service, gvfs-fuse, provided as a fallback for non-GIO clients.
To find the cause of an active but invisible VFS mount, check whether the gvfs-fuse process is running.Since gvfs-fuse runs automatically and it is not recommended to start it by yourself, try logging out andlogging in as a first option.
Alternatively, you can start the VFS compatibility mount manually in the terminal:
1. Find the UID (system user ID) for the /run/user/UID/gvfs/ path by running the id command (thegvfsd-fuse daemon requires a path it is supposed to expose its services at).
Or, when the /run/user/UID/gvfs/ path is unavailable, gvfsd-fuse uses a .gvfs path in your homedirectory.
2. Start the gvfsd-fuse daemon by running the /usr/libexec/gvfsd-fuse -f /run/user/UID/gvfscommand.
3. Now, the VFS mount is available and you can manually browse for the path in your application.
15.10.2. Connected USB Disk Is Invisible
Under certain circumstances, when you connect a flash drive, the GNOME Desktop may not display it. Ifthe drive is invisible, it means that:
You cannot see the device in the Disks application.
You have run the udisksctl dump command, which lists the current state of the udisksdaemon and shows information about all objects, but your flash drive is not among them.
You have run the dmesg command. Towards the end of the log, there are messages related toUSB device detection and a list of detected partitions, but your flash drive is not among them.
If your flash drive is not visible, you can attempt to set the Show in user interface flag in Disks:
1. Open Disks by pressing the Super key to enter the Activities Overview, typing Disks, and
$ touch /tmp/myfile$ gvfs-info -a 'metadata::*' /tmp/myfileattributes:$ gvfs-set-attribute -t string /tmp/myfile 'metadata::mynote' 'Please remember to delete this file!'$ gvfs-info -a 'metadata::*' /tmp/myfileattributes: metadata::mynote: Please remember to delete this file!$ gvfs-move /tmp/myfile /tmp/newfile$ gvfs-info -a 'metadata::*' /tmp/newfileattributes: metadata::mynote: Please remember to delete this file!
Desktop Migration and Administration Guide
90
1. Open Disks by pressing the Super key to enter the Activities Overview, typing Disks, andthen pressing Enter.
2. In the Volumes actions menu, click Edit Mount Options....
3. Click Show in user interface.
4. Confirm by clicking OK.
If the flash drive is still not visible, you may try to remove the drive and try connecting it again.
For more information about the storage, see the . .
15.10.3. Nautilus Shows Unknown or Unwanted Partitions
Check whether the device is listed in the /etc/fstab file as the devices are not shown in the userinterface by default. The /etc/fstab file typically lists disk partitions that are intended to be used in theoperating system, and indicates how they are mounted. Certain mount options may allow or preventdisplaying the volume in the user interface.
One of the solutions to hide a volume is to uncheck Show in user interface in the Mount Optionswindow in the Disks application:
1. Open Disks by pressing the Super key to enter the Activities Overview, typing Disks, andthen pressing Enter.
2. In the Volumes actions menu, click Edit Mount Options....
3. Uncheck Show in user interface and confirm by clicking OK.
15.10.4. Connection to Remote File System Is Unavailable
There is a number of situations in which the client is unexpectedly and unwillingly disconnected from avirtual file system (or a remote disk) mount, afterwards is not reconnected automatically, and errormessages are returned. Several causes trigger these situations:
The connection is interrupted (for example, your laptop is disconnected from the Wi-Fi).
The user is inactive for some time and is disconnected by the server (idle timeout).
The computer is resumed from sleeping mode.
The solution is to unmount and mount again the file system, which reconnects the resource.
NOTE
Should the connection be disabled more often, check the settings in the Network panel inthe GNOME Settings.
15.10.5. What to Do If the Disk Is Busy?
If you receive a notification about your disk being busy, determine the programs that are accessing thedisk. Then, you may regularly end the programs you are running. Or, you can use the System Monitor tokill the programs forcefully.
CHAPTER 15. VIRTUAL FILE SYSTEMS AND DISK MANAGEMENT
91

Where and How to View System Processes?
Run the lsof command to get the list of open files alongside with processes. If lsof is notavailable, run the ps ax command that also provides the list of running processes.
Alternatively, you can use the System Monitor application to display the running processes in aGUI.
Make sure that you have iotop installed by running the following command:
# yum install iotop
Then run iotop as root to view the system processes.
When you have determined the programs, end or kill them as follows:
On the command line, execute the kill command.
In the System Monitor, right-click the line with the program process name, and click the EndProcess or Kill Process drop-down menu item.
Desktop Migration and Administration Guide
92

CHAPTER 16. HARDWARE CONFIGURATION
16.1. TABLETS
16.1.1. Adding Support for a New Tablet
libwacom is a tablet information client library storing data about Wacom models. This library is used byboth the gnome-settings-daemon component and the Wacom Tablet settings panel in GNOME.
To add support for a new tablet into libwacom, a new tablet definition file must be created. Tabletdefinition files are included in the libwacom-data package. If this package is installed, the tabletdefinition files are then locally available in the /usr/share/libwacom/ directory.
To use the screen mapping correctly, support for your tablet must be included in the libwacomdatabase and udev rules file.
IMPORTANT
A common indicator that a device is not supported by libwacom is that it works normallyin a GNOME session, but the device is not correctly mapped to the screen.
Procedure 16.1. How to add tablet descriptions
1. Use the libwacom-list-local-devices tool to list all local devices recognized by libwacom.
If your device is not listed, but it is available as an event device in the kernel (see /proc/bus/input/devices) and in the X session (see xinput list), the device is missing from libwacom's database.
2. Create a new tablet definition file. Use data/wacom.example below and edit the respective lines.
NOTE
The new .tablet file may already be available, so check the upstream repositoryfirst at https://sourceforge.net/p/linuxwacom/libwacom/ci/master/tree/. If youfind your tablet model on the list, it is sufficient to copy the file to the localmachine.
# Example model file description for a tablet[Device]
# The product is the product name announced by the kernelProduct=Intuos 4 WL 6x9
# Vendor name of this tabletVendor=Wacom
# DeviceMatch includes the bus (usb, serial), the vendor ID and the actual# product ID DeviceMatch=usb:056a:00bc
# Class of the tablet. Valid classes include Intuos3, Intuos4, Graphire, Bamboo, CintiqClass=Intuos4
CHAPTER 16. HARDWARE CONFIGURATION
93

# Exact model of the tablet, not including the size.Model=Intuos 4 Wireless
# Width in inches, as advertised by the manufacturerWidth=9
# Height in inches, as advertised by the manufacturerHeight=6
# Optional features that this tablet supports# Some features are dependent on the actual tool used, e.g. not all styli# have an eraser and some styli have additional custom axes (e.g. the# airbrush pen). These features describe those available on the tablet.## Features not set in a file default to false/0
[Features]# This tablet supports styli (and erasers, if present on the actual stylus)Stylus=true
# This tablet supports touch.Touch=false
# This tablet has a touch ring (Intuos4 and Cintiq 24HD)Ring=true# This tablet has a second touch ring (Cintiq 24HD)Ring2=false
# This tablet has a vertical/horizontal scroll stripVStrip=falseHStrip=false
# Number of buttons on the tabletButtons=9
# This tablet is built-in (most serial tablets, Cintiqs) BuiltIn=false
3. Add and install the new file with the .tablet suffix:
cp the-new-file.tablet /usr/share/libwacom/
Once installed, the tablet is part of libwacom's database. The tablet is then available through libwacom-list-local-devices.
4. Create a new file /etc/udev/rules/99-libwacom-override.rules with the following content sothat your settings are not overwritten:
ACTION!="add|change", GOTO="libwacom_end"KERNEL!="event[0-9]*", GOTO="libwacom_end"
[new tablet match entries go here]
LABEL="libwacom_end"
Desktop Migration and Administration Guide
94

5. Reboot your system.
16.1.2. Where Is the Wacom Tablet Configuration Stored?
Configuration for your Wacom tablet is stored in GSettings in the /org/gnome/settings-daemon/peripherals/wacom/machine-id-device-id key, where machine-id is a D-Bus machine ID, anddevice-id is a tablet device ID. The configuration schema for the tablet is org.gnome.settings-daemon.peripherals.wacom.
Similarly, stylus configuration is stored in the /org/gnome/settings-daemon/peripherals/wacom/device-id/tool-id key, where tool-id is the identifier for the stylus used forprofessional ranges. For the consumer ranges with no support for tool-id, a generic identifier is usedinstead. The configuration schema for the stylus is org.gnome.settings-daemon.peripherals.wacom.stylus, and for the eraser org.gnome.settings-daemon.peripherals.wacom.eraser.
To get the full list of tablet configuration paths used on a particular machine, you can use the gsd-list-wacom tool, which is provided by the gnome-settings-daemon-devel package.
To verify that the gnome-settings-daemon-devel package is installed on the system, make sure that thesystem is subscribed to the Optional channel, and run the following command:
# yum install gnome-settings-daemon-devel
To learn how to subscribe the system to the Optional channel, read the following resource:
https://access.redhat.com/solutions/392003
After verifying that the package is installed, run the following command:
$ /usr/libexec/gsd-list-wacom
Note that using machine-id, device-id, and tool-id in configuration paths allows for shared homedirectories with independent tablet configuration per machine.
16.1.3. When Sharing Home Directories Between Machines, the Wacom SettingsOnly Apply to One Machine
This is because the D-Bus machine ID (machine-id) for your Wacom tablet is included in theconfiguration path of the /org/gnome/settings-daemon/peripherals/wacom/machine-id-device-idGSettings key, which stores your tablet settings.
CHAPTER 16. HARDWARE CONFIGURATION
95
APPENDIX A. KDE PLASMA WORKSPACESAs an alternative to the default GNOME desktop environment, Red Hat Enterprise Linux 7 providesversion 4 of KDE Plasma Workspaces (previously known as K Desktop Environment) to match differentwork styles and preferences.
Refer to the Red Hat Enterprise Linux 7 Installation Guide on setting KDE Plasma Workspaces as thedefault desktop during the installation process or changing your current desktop environment to KDEPlasma Workspaces. For more information on KDE Plasma Workspaces, see its upstream websites,such as https://www.kde.org/ and https://docs.kde.org/.
Desktop Migration and Administration Guide
96
APPENDIX B. ACCESSING RED HAT DOCUMENTATION
B.1. PRODUCT DOCUMENTATION
Red Hat Product Documentation located at https://access.redhat.com/site/documentation/ serves asa central source of information. It is currently translated in 22 languages and for each product, itprovides different kinds of books from release and technical notes to installation, user, and referenceguides in HTML, PDF, and EPUB formats.
The following is a brief list of documents that are directly or indirectly relevant to this book:
The Red Hat Enterprise Linux 7 System Administrator's Guide , available fromhttps://access.redhat.com/documentation/en-US/Red_Hat_Enterprise_Linux/7/html-single/System_Administrators_Guide/index.html, contains detailed information about varioussystem components, for instance the GRUB 2 boot loader, package management, systemd, orprinter configuration.
The Red Hat Enterprise Linux 7 Installation Guide , available fromhttps://access.redhat.com/documentation/en-US/Red_Hat_Enterprise_Linux/7/html/Installation_Guide/index.html, contains detailedinformation about installing Red Hat Enterprise Linux 7 and using the Anaconda installer.
The Red Hat Enterprise Linux 7 Migration Planning Guide , available fromhttps://access.redhat.com/documentation/en-US/Red_Hat_Enterprise_Linux/7/html-single/Migration_Planning_Guide/index.html, contains an overview of major changes in behaviorand compatibility between Red Hat Enterprise Linux 6 and Red Hat Enterprise Linux 7. TheMigration Planning Guide also introduces the tools provided by Red Hat to assist with upgradesto Red Hat Enterprise Linux 7.
The Red Hat Enterprise Linux 7 Networking Guide , available fromhttps://access.redhat.com/documentation/en-US/Red_Hat_Enterprise_Linux/7/html-single/Networking_Guide/index.html, contains information about configuration andadministration of networking for Red Hat Enterprise Linux 7.
The Red Hat Enterprise Linux 7 Virtualization Deployment and Administration Guide , availablefrom https://access.redhat.com/documentation/en-US/Red_Hat_Enterprise_Linux/7/html/Virtualization_Deployment_and_Administration_Guide/,contains information about installing, configuring, and managing Red Hat Enterprise Linuxvirtualization.
B.2. RED HAT ACCESS GUI
Another highly recommended source of information is a desktop application Red Hat Access GUI, whichlets you find help, answers, and utilize diagnostic services using Red Hat Knowledgebase, resources, andfunctionality. If you have an active account on the Red Hat Customer Portal , you can access additionalinformation and tips of the Knowledgebase easily browsable by keywords. Red Hat Access GUI isalready installed if you select to have the GNOME Desktop installed.
For more information on the benefits, installation, and usage of this tool, see Red Hat Access GUI .
APPENDIX B. ACCESSING RED HAT DOCUMENTATION
97
APPENDIX C. ACKNOWLEDGEMENTSCertain portions of this text first appeared in the GNOME Desktop System Administration Guide .Copyright © 2014 The GNOME Project, Michael Hill, Jim Campbell, Jeremy Bicha, EkaterinaGerasimova, minnie_eg, Aruna Sankaranarayanan, Sindhu S, Shobha Tyagi, Shaun McCance, David King,and others. Licensed under a Creative Commons Attribution-ShareAlike 3.0 Unported License.
The editors of the Red Hat Enterprise Linux 7 Desktop Migration and Administration Guide would like tothank the GNOME community members for their valuable contributions to the GNOME Desktop SystemAdministration Guide.
Desktop Migration and Administration Guide
98
APPENDIX D. REVISION HISTORY
Revision 0.1-95 Mon Aug 05 2018 Marie DoleželováVersion for 7.7 GA publication.
Revision 0.1-87 Wed Jul 26 2017 Jana HevesVersion for 7.4 GA publication.
Revision 0.1-86 Mon Oct 17 2016 Marie DoleželováVersion for 7.3 GA publication.
Revision 0.1-85 Mon Oct 17 2016 Marie DoleželováVersion for 7.3 GA publication.
Revision 0.1-84 Wed 17 Aug 2016 Marie DoleželováRed Hat Enterprise Linux 7.3 Beta release of the book.
Revision 0.1-83 Fri 01 Apr 2016 Jana HevesRepublish reflecting the rebase of GNOME to version 3.14.
Revision 0.1-82 Wed 11 Nov 2015 Jana HevesRed Hat Enterprise Linux 7.2 release of the book.
Revision 0.1-80 Wed 24 Jun 2015 Petr KovářAdded a link to the Anaconda Customization Guide for Red Hat Enterprise Linux 7.
Revision 0.1-78 Tue 07 Apr 2015 Petr KovářAdded section Allowing and Disallowing Online Accounts.
Revision 0.1-76 Tue 17 Feb 2015 Petr KovářRed Hat Enterprise Linux 7.1 release of the book.
Revision 0.1-74 Thu 04 Dec 2014 Petr KovářRed Hat Enterprise Linux 7.1 Beta release of the book.
Revision 0.1-69 Mon 02 Jun 2014 Petr KovářRed Hat Enterprise Linux 7.0 release of the book.
Revision 0.1-35 Wed 11 Dec 2013 Petr KovářRed Hat Enterprise Linux 7.0 Beta release of the book.
APPENDIX D. REVISION HISTORY
99