Embed Size (px)
Citation preview

Plan. Operate. Optimize. Monetize.
Planet 6.2
Workflows for Using Data Manager

Copyright © 2017
InfoVista S.A.S. All rights reserved.
Notice
This document contains confidential and proprietary information of InfoVista S.A.S. andmay not be copied, transmitted, stored in a retrieval system, or reproduced in any formator media, in whole or in part, without the prior written consent of InfoVista S.A.S.Information contained in this document supersedes that found in any previous manuals,guides, specifications data sheets, or other information that may have been provided ormade available to the user. This document is provided for informational purposes only, andInfoVista S.A.S. does not warrant or guarantee the accuracy, adequacy, quality, validity,completeness or suitability for any purpose the information contained in this document.INFOVISTA S.A.S. may update, improve, and enhance this document and the products towhich it relates at any time without prior notice to the user. INFOVISTA S.A.S. MAKES NOWARRANTIES, EXPRESSED OR IMPLIED, INCLUDING, WITHOUT LIMITATION, THOSE OFMERCHANTABILITY AND FITNESS FOR A PARTICULAR PURPOSE, WITH RESPECT TO THISDOCUMENT OR THE INFORMATION CONTAINED HEREIN.
Trademark Acknowledgement
Mentum, Mentum Planet, Mentum Ellipse, Mentum Fusion, Mentum CellPlanner, andMentum LinkPlanner are registered trademarks owned by InfoVista S.A.S. MapInfoProfessional and the Spectrum Suite are registered trademarks of Pitney Bowes SoftwareInc. Map data copyright OpenStreetMap contributors, CC BY-SA. RF-vu is a trademarkowned by iBwave. This document may contain other trademarks, trade names, or servicemarks of other organizations, each of which is the property of its respective owner.
Last updated January 17, 2017
Recommended workflows for using Data ManagerApplication Note
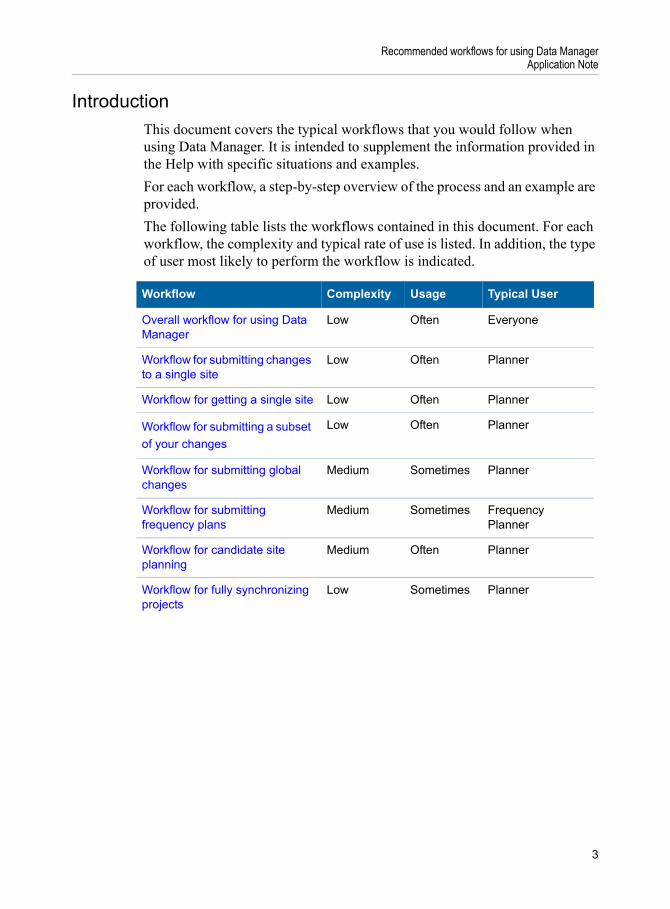
IntroductionThis document covers the typical workflows that you would follow when using Data Manager. It is intended to supplement the information provided in the Help with specific situations and examples.For each workflow, a step-by-step overview of the process and an example are provided.The following table lists the workflows contained in this document. For each workflow, the complexity and typical rate of use is listed. In addition, the type of user most likely to perform the workflow is indicated.
Workflow Complexity Usage Typical User
Overall workflow for using Data Manager
Low Often Everyone
Workflow for submitting changes to a single site
Low Often Planner
Workflow for getting a single site Low Often Planner
Workflow for submitting a subset of your changes
Low Often Planner
Workflow for submitting global changes
Medium Sometimes Planner
Workflow for submitting frequency plans
Medium Sometimes Frequency Planner
Workflow for candidate site planning
Medium Often Planner
Workflow for fully synchronizing projects
Low Sometimes Planner
3
Application Note
DocumentationPlanet includes an extensive array of resources that will help you use the software effectively. This includes user guides, technical notes, “What's this?” Help, “How to” Help, and a comprehensive glossary. For complete details, refer to the Resource Roadmap accessible from the online Help.You can access Help from within Planet in two ways:
■ Click the ? button in the upper right corner of the application window ■ Press the F1 key from within any Planet dialog box.
All tasks and information required by the RF engineer to plan and optimize a network using Planet is contained in the online Help. Online Help is available from all dialog boxes as well as from the Help menu.
Getting helpIf you have any questions or concerns, contact our Customer Support Centers.
4
Recommended workflows for using Data ManagerApplication Note
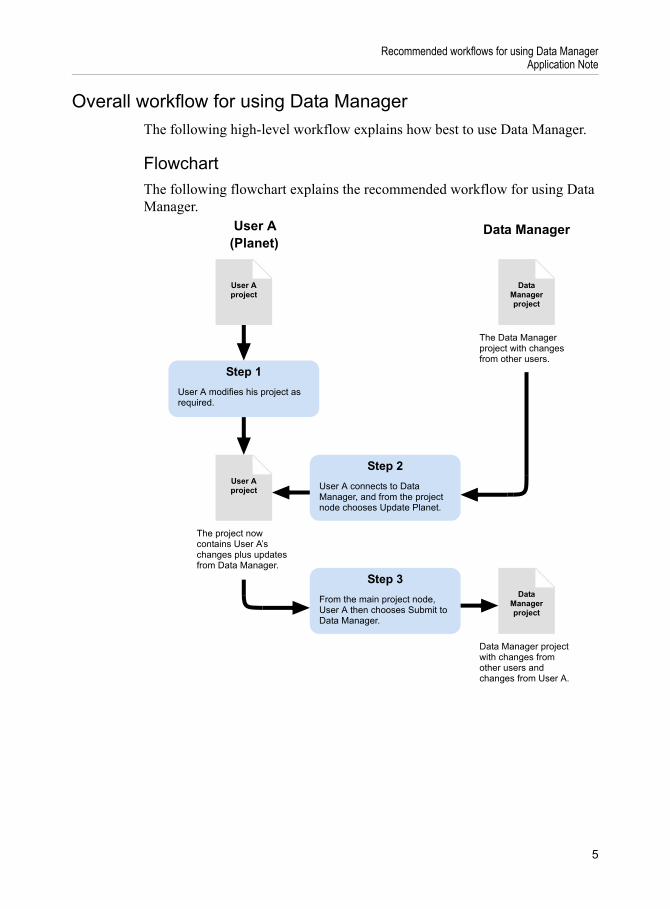
Overall workflow for using Data ManagerThe following high-level workflow explains how best to use Data Manager.
FlowchartThe following flowchart explains the recommended workflow for using Data Manager.
User A modifies his project as required.
Step 1
User A project
User A connects to Data Manager, and from the project node chooses Update Planet.
Step 2
From the main project node, User A then chooses Submit to Data Manager.
Step 3
User A (Planet)
Data Manager project
Data Manager
User A project
The project now contains User A’s changes plus updates from Data Manager.
The Data Manager project with changes from other users.
Data Manager project
Data Manager project with changes from other users and changes from User A.
5
Application Note
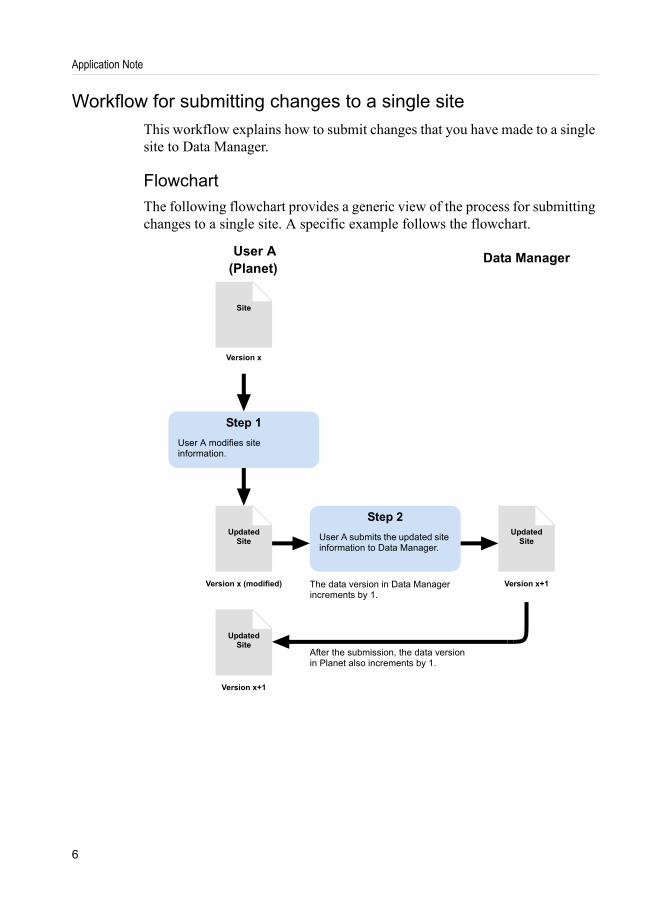
Workflow for submitting changes to a single siteThis workflow explains how to submit changes that you have made to a single site to Data Manager.
FlowchartThe following flowchart provides a generic view of the process for submitting changes to a single site. A specific example follows the flowchart.
User A modifies site information.
Step 1
Site
The data version in Data Manager increments by 1.
User A submits the updated site information to Data Manager.
Step 2
User A (Planet)
Data Manager
Updated Site
Version x
Updated Site
After the submission, the data version in Planet also increments by 1.
Version x (modified) Version x+1
Updated Site
Version x+1
6

Recommended workflows for using Data ManagerApplication Note
ExampleIn this example, the project already exists in Data Manager and User A is submitting changes that he made to Site 2. No other users have made changes so there are no conflicts to resolve.
1 User A opens the project in Planet and logs on to Data Manager.
The Data Manager window opens. The Sites node and Site 2 are displayed in blue, indicating that they have been changed in Planet.
2 User A right-clicks Site 1, and chooses Submit to Data Manager.
The Submit to Data Manager dialog box is displayed, showing the items that will be modified.
7
Application Note
3 User A clicks OK.
User A’s changes are submitted and an information dialog box is displayed, indicating that his changes have been submitted.
4 In the information dialog box, User A clicks OK, and then he closes the Data Manager window.
8

Recommended workflows for using Data ManagerApplication Note
Workflow for getting a single siteThis workflow explains how to get a single site that has been updated in Data Manager.
FlowchartThe following flowchart provides a generic view of the process for getting a single site. A specific example follows the flowchart.
ExampleIn this example, the project already exists in Data Manager and User A knows that another user has modified the height of all sectors at Site 1. User A has not made any changes to his Planet project, so there are no conflicts to resolve.
1 User A opens his project in Planet and logs on to Data Manager.
The Data Manager window opens. Because another user has made changes to Site 1, it is shown in blue.
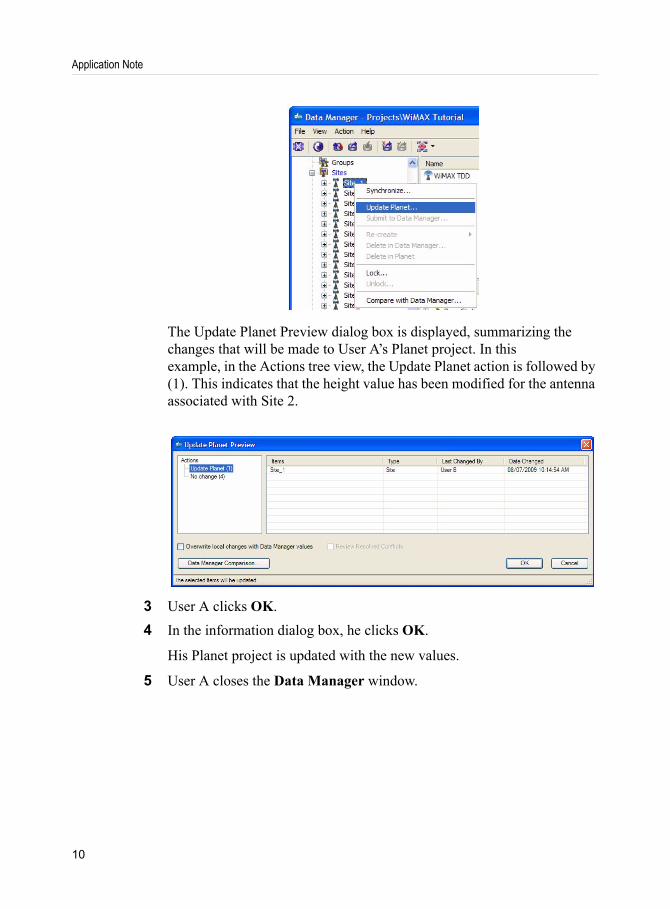
2 User A right-clicks Site 1 and chooses Update Planet.
User A gets an updated site from Data Manager.
Step 1Updated
Site
User A (Planet)
Updated Site
Data Manager
Version xThe data version in Planet is the same as the data version in Data Manager.
Version x
9
Application Note
The Update Planet Preview dialog box is displayed, summarizing the changes that will be made to User A’s Planet project. In this example, in the Actions tree view, the Update Planet action is followed by (1). This indicates that the height value has been modified for the antenna associated with Site 2.
3 User A clicks OK.4 In the information dialog box, he clicks OK.
His Planet project is updated with the new values.
5 User A closes the Data Manager window.
10

Recommended workflows for using Data ManagerApplication Note
Workflow for submitting a subset of your changesThis workflow explains how to submit only some of the changes that you have made. If you have made a number of changes and do not want to submit them all, you can choose a subset of the changes to submit.
FlowchartThe following flowchart provides a generic view of the process for submitting a subset of your changes. A specific example follows the flowchart.
User AData Manager (Planet)
User A modifies information for five sites.
Step 1
Sites
Version x
The data version in Data Manager for those three sites increments by 1. The data version for the other two sites remains the same.
User A submits updates for only three sites to Data Manager.
Step 2Updated
Sites
After the submission, the Planet version for the three sites also increments by 1. The data version for the other two sites remains the same.
Version x (modified)
Version x+1
Sites (updates
submitted)
Version x
Sites (updates not submitted)
Version x+1
Sites (updates
submitted)
Version x (modified)
Sites (updates not submitted)
11
Application Note
ExampleIn this example, User A has been working with a number of sites and wants to submit only the changes that he made to Site 1, Site 2, and Site 4.
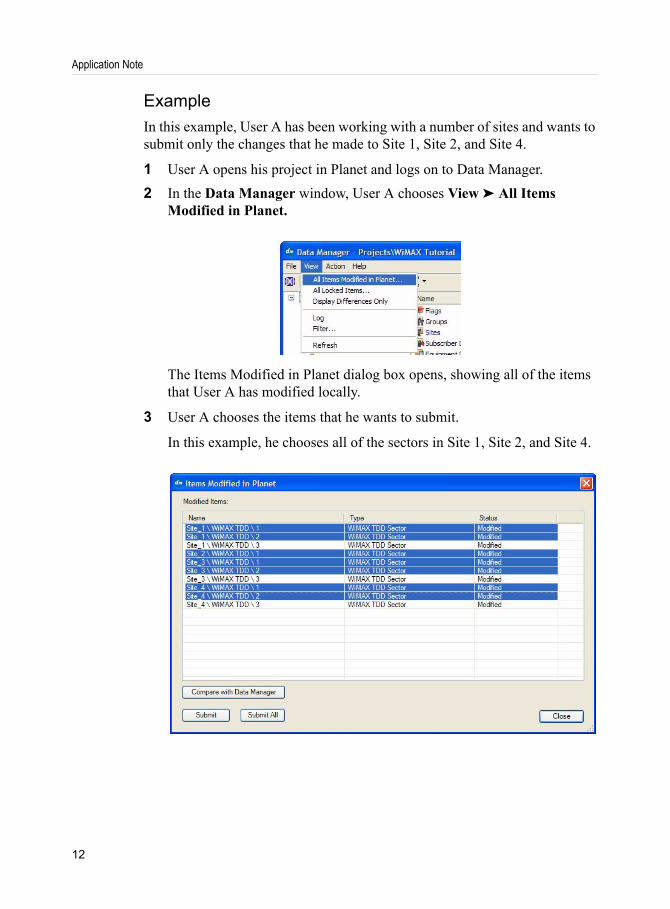
1 User A opens his project in Planet and logs on to Data Manager.2 In the Data Manager window, User A chooses View ➤ All Items
Modified in Planet.
The Items Modified in Planet dialog box opens, showing all of the items that User A has modified locally.
3 User A chooses the items that he wants to submit.
In this example, he chooses all of the sectors in Site 1, Site 2, and Site 4.
12

Recommended workflows for using Data ManagerApplication Note
4 User A clicks Submit and then in the Submit to Data Manager dialog box, he clicks OK.
The items that he chose are submitted and an information dialog box is displayed, indicating that his changes have been submitted.
5 In the information dialog box, User A clicks OK.6 In the Items Modified in Planet dialog box, User A clicks Close, and
then he closes the Data Manager window.
13

Application Note
Workflow for submitting global changesThis workflow explains how to submit global changes that you have made. It explains how to submit changes that you have made only to a specific parameter. If you submit all sites that you have globally changed, then any other values that you changed will also be submitted. If you want to submit only the global changes, you must get any updates from Data Manager first.
FlowchartThe following flowchart provides a generic view of the process for submitting global changes. A specific example follows the flowchart.
Sites
After the update, the Planet version increments by 1 to match the Data Manager version.
User A updates the Planet project with the latest site information from Data Manager.
Step 1
User A (Planet) Data Manager
Sites
Version x
Version x+1
Sites
Version x+1
No change is made to either version.
User A locks the sites in Data Manager.
Step 2 (optional)Sites
Version x+1 (locked)
See next page
14

Recommended workflows for using Data ManagerApplication Note
ExampleIn this example, User A wants to globally change the height for the sectors in his project and wants to submit the updated values. He wants to ensure that he submits only the global change to the height values.
1 User A opens his project in Planet and logs on to Data Manager.2 In the Data Manager window, User A right-clicks the top-level project
node and chooses Update Planet.
Data Manager
From previous page
After the submission, the Planet version also increments by 1.
User A (Planet)
After the submission, the data version in Data Manager increments by 1.
User A submits the updated site information to Data Manager.
Step 4Sites
Version x+1 (modified)
Sites
Version x+2 (locked)
Sites
Version x+2
No change is made to either version.
User A unlocks the sites in Data Manager.
Step 5 (optional)Sites
Version x+2
User A globally modifies site information.
Step 3
15
Application Note
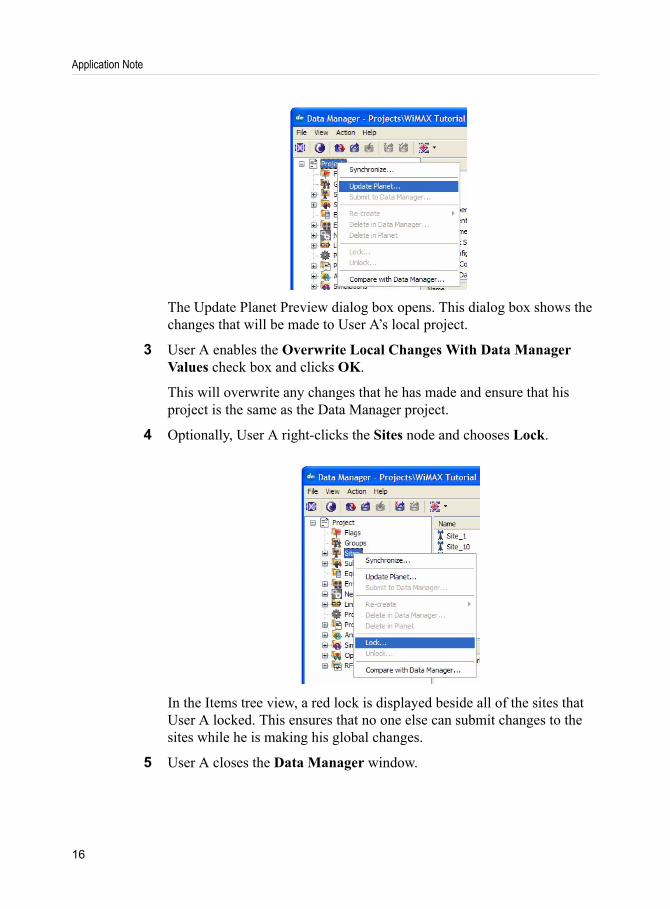
The Update Planet Preview dialog box opens. This dialog box shows the changes that will be made to User A’s local project.
3 User A enables the Overwrite Local Changes With Data Manager Values check box and clicks OK.
This will overwrite any changes that he has made and ensure that his project is the same as the Data Manager project.
4 Optionally, User A right-clicks the Sites node and chooses Lock.
In the Items tree view, a red lock is displayed beside all of the sites that User A locked. This ensures that no one else can submit changes to the sites while he is making his global changes.
5 User A closes the Data Manager window.
16

Recommended workflows for using Data ManagerApplication Note
6 Using the Tabular Editor, User A globally edits the sites. See “Using Tabular Edit” for the technology you are using.
7 User A logs on to Data Manager.8 In the Data Manager window, User A right-clicks the top-level project
node and chooses Submit to Data Manager, and then in the Submit to Data Manager dialog box, he clicks OK.
An information dialog box is displayed, indicating that his changes have been submitted.
9 In the information dialog box, User A clicks OK.
He can now unlock the sites so that other users can modify them.
10 If the Sites were locked in Step 4, User A right-clicks the Sites node and chooses Unlock.
11 User A closes the Data Manager window.
17

Application Note
Workflow for submitting frequency plansThis workflow explains how to submit frequency plans.Before you create and apply a frequency plan, you should get the latest information from Data Manager. Because applying a frequency plan updates the sites for which you are generating the plan, you should lock sites to avoid conflicts when you submit the plan.
FlowchartThe following flowchart provides a generic view of the process for submitting frequency plans. A specific example follows the flowchart.
Projectdata
After the update, the Planet version increments by 1 to match the Data Manager version.
User A updates the Planet project with the latest site information from Data Manager.
Step 1
User A (Planet) Data Manager
Projectdata
Version x
Version x+1
Projectdata
Version x+1
No change is made to either version.
User A locks the sites to be planned in Data Manager.
Step 2Sites to be
planned
Version x+1 (locked)
See next page
18

Recommended workflows for using Data ManagerApplication Note
ExampleIn this example, User A is generating and applying a frequency plan for the Plan_01 group of sites. To avoid possible conflicts with other users, User A locks the sites for which he is generating the frequency plan and the network settings.
1 User A opens his project in Planet and logs on to Data Manager.2 In the Data Manager window, User A right-clicks the top-level project
node and chooses Update Planet.
Updated sites
Data Manager
From previous page
After the submission, the Planet version also increments by 1.
User A (Planet)
The data version in Data Manager increments by 1.
User A submits the updated sites to Data Manager.
Step 4Updated sites and network settings
Version x+1 (modified) Version x+2 (locked)
Updated sites
Version x+2
No change is made to either version.
User A unlocks the sites in Data Manager.
Step 5Updated
sites
Version x+2
User A generates and applies a frequency plan.
Step 3
19

Application Note
The Update Planet Preview dialog box opens. This dialog box shows the changes that will be made to his local project.
3 User A enables the Overwrite Local Changes With Data Manager values check box and clicks OK.
This will overwrite any local changes that he has made and ensure that his project is the same as the Data Manager project.
4 User A locks all of the sites in the group to which he wants to apply a frequency plan by doing the following:■ In the Items tree view, he chooses the Sites node.■ In the Status section, he chooses all of the sites in the Plan_01
group.■ He right-clicks and chooses Lock.
In the Items tree view, a red lock is displayed beside all of the sites that User A locked. This ensures that no one else can submit changes to the sites in the group while he is generating and applying the frequency plan.
5 User A closes the Data Manager window.6 User A generates and applies a frequency plan (named Plan_01.fpp). See
“Generating Frequency, Preamble, and Perm Base Plans Automatically” in the Help.
7 User A logs on to Data Manager.
20

Recommended workflows for using Data ManagerApplication Note
8 User A submits all of the sites in the Plan_01 group to which he applied the frequency plan by doing the following in the Data Manager window:■ In the Items tree view, he expands the Sites node and, in the
Status section, chooses the sites to which he applied the frequency plan.
■ He chooses Action ➤ Submit to Data Manager.■ In the Submit to Data Manager dialog box, he clicks OK.■ In the information dialog box, he clicks OK.
9 User A unlocks all of the sites in the group to which he applied the frequency plan by doing the following:■ In the Items tree view, he chooses the Sites node.■ In the Status section, he chooses all of the sites in the Plan_01
group.■ He chooses Action ➤ Unlock.
10 User A submits the frequency plan by doing the following:■ In the Items tree view, he expands the RF Data node, and then
expands the Frequency Plans node.■ He right-clicks Plan_01.fpp and chooses Submit to Data
Manager.
21

Application Note
■ In the Submit To Data Manager dialog box, he clicks OK.■ In the information dialog box, he clicks OK.
11 User A closes the Data Manager window.
22
Recommended workflows for using Data ManagerApplication Note
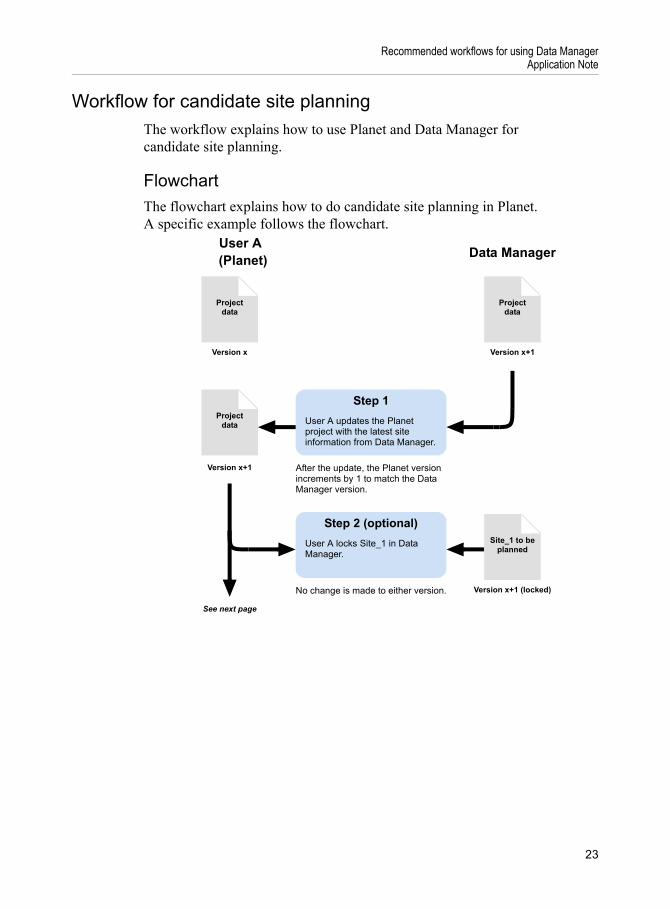
Workflow for candidate site planningThe workflow explains how to use Planet and Data Manager for candidate site planning.
FlowchartThe flowchart explains how to do candidate site planning in Planet. A specific example follows the flowchart.
Projectdata
After the update, the Planet version increments by 1 to match the Data Manager version.
User A updates the Planet project with the latest site information from Data Manager.
Step 1
User A (Planet) Data Manager
Projectdata
Version x
Version x+1
Projectdata
Version x+1
No change is made to either version.
User A locks Site_1 in Data Manager.
Step 2 (optional)Site_1 to be
planned
Version x+1 (locked)
See next page
23

Application Note
Updated Site_1
Data Manager
From previous page
The Planet version also increments by 1.
User A (Planet)
The data version in Data Manager increments by 1.
User A submits the updated sites and network settings to Data Manager.
Step 5Updated Site_1
Version x+1 (modified) Version x+2 (locked)
Updated Site_1
Version x+2
No change is made to either version.
User A unlocks Site_1 in Data Manager.
Step 6 (optional)Updated Site_1
Version x+2
User A places a copy of Site_1 and tweaks the parameters of Site_1 (official site) and Site_1_1 (candidate site) in order to analyze which is the best location and configuration.
Step 3
User A decides to promote the candidate site and swaps site and sector parameters.
Step 4
24
Recommended workflows for using Data ManagerApplication Note
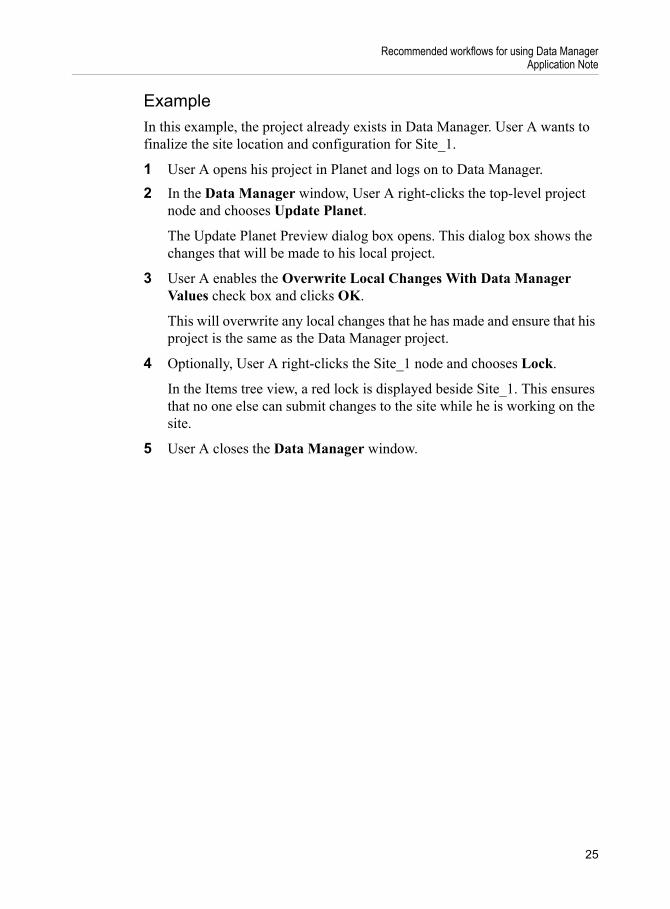
ExampleIn this example, the project already exists in Data Manager. User A wants to finalize the site location and configuration for Site_1.
1 User A opens his project in Planet and logs on to Data Manager.2 In the Data Manager window, User A right-clicks the top-level project
node and chooses Update Planet.
The Update Planet Preview dialog box opens. This dialog box shows the changes that will be made to his local project.
3 User A enables the Overwrite Local Changes With Data Manager Values check box and clicks OK.
This will overwrite any local changes that he has made and ensure that his project is the same as the Data Manager project.
4 Optionally, User A right-clicks the Site_1 node and chooses Lock.
In the Items tree view, a red lock is displayed beside Site_1. This ensures that no one else can submit changes to the site while he is working on the site.
5 User A closes the Data Manager window.
25
Application Note
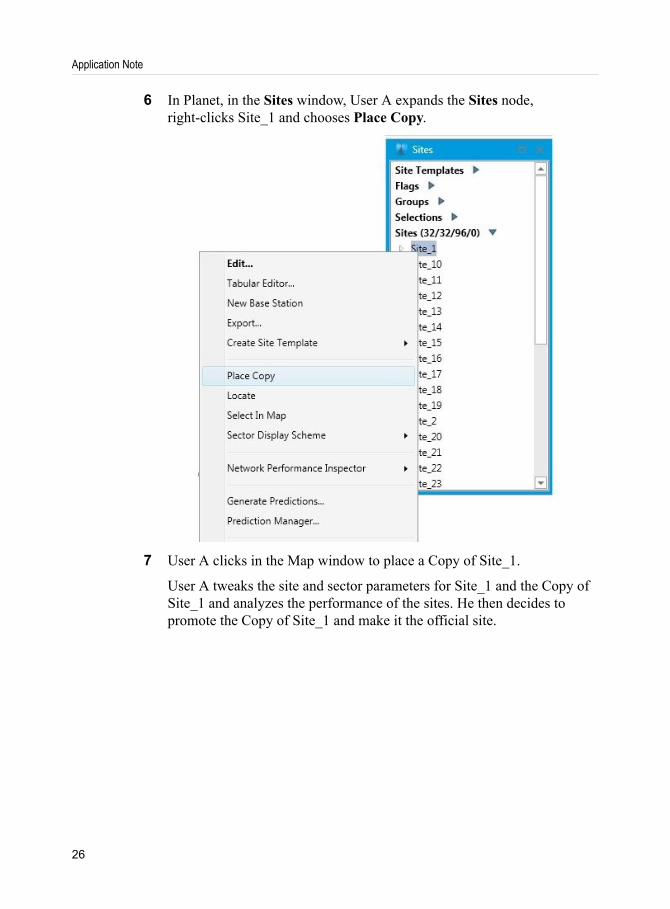
6 In Planet, in the Sites window, User A expands the Sites node, right-clicks Site_1 and chooses Place Copy.
7 User A clicks in the Map window to place a Copy of Site_1.
User A tweaks the site and sector parameters for Site_1 and the Copy of Site_1 and analyzes the performance of the sites. He then decides to promote the Copy of Site_1 and make it the official site.
26

Recommended workflows for using Data ManagerApplication Note
8 In the Sites window, User A chooses both Site_1 and Copy of Site_1, right-clicks and chooses Swap Sites.
The site and sector parameters for Site_1, including group assignments and flag conditions, are replaced with those from the Copy of Site_1 and vice versa.
9 User A connects and logs on to Data Manager.10 In the Data Manager window, User A right-clicks the Site_1 node and
chooses Submit to Data Manager.
By submitting only the changes to Site_1, only Site_1, the promoted candidate site, will be available to other Data Manager users.
11 In the Submit to Data Manager dialog box, User A reviews the changes, and clicks OK.
12 In the Information dialog box, User A clicks OK.
He can now unlock the site so that other users can modify it if required.
27

Application Note
13 If Site_1 was locked in Step 4, User A right-clicks the Site_1 node and chooses Unlock.
14 User A exits from Data Manager.15 In Planet, User A chooses File ➤ Save Project.
28

Recommended workflows for using Data ManagerApplication Note
Workflow for fully synchronizing projectsThe goal of synchronizing your project with a project in Data Manager is to make sure that the two projects are the same.Synchronizing projects is the equivalent of getting a project without overwriting your changes and then submitting your changes. When you synchronize projects, you must resolve all conflicts.The workflow outlined in this section shows the order of steps required to synchronize projects. This workflow assumes that you or someone else has already checked the project in to Data Manager and that you have a copy of the project that you have been working on in Planet. It also assumes that you know how to log on to Data Manager.
FlowchartThe following flowchart provides a generic view of the process for fully synchronizing projects. A specific example follows the flowchart.
29
Application Note
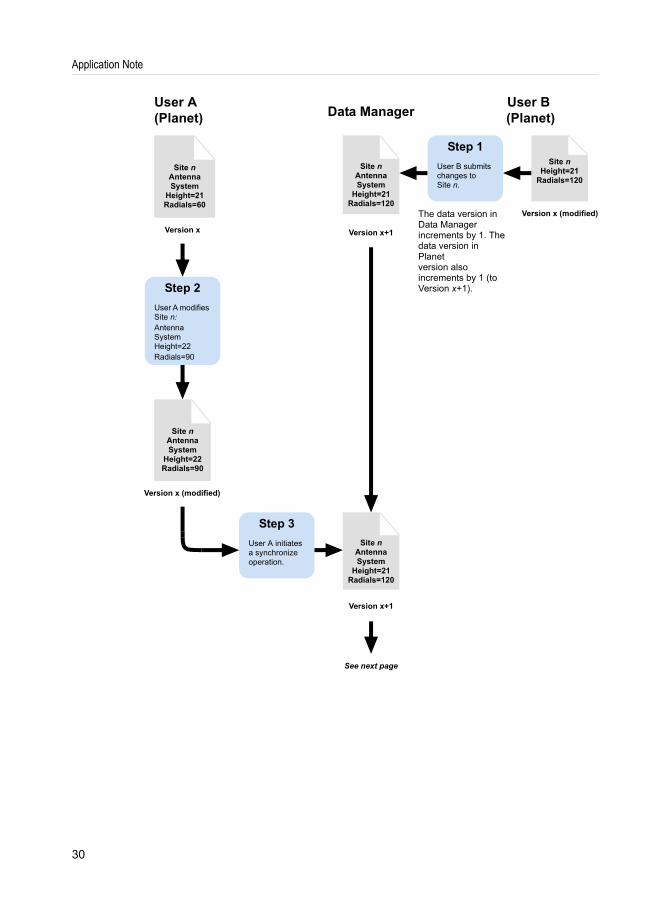
User A(Planet) Data Manager
Site nAntennaSystem
Height=21Radials=60
Site nAntenna System
Height=21Radials=120
Site nHeight=21
Radials=120
User B (Planet)
User B submits changes to Site n.
Step 1
Version x Version x+1
Version x (modified)The data version in Data Manager increments by 1. The data version in Planet version also increments by 1 (to Version x+1).
User A modifies Site n:Antenna System Height=22Radials=90
Step 2
Site nAntenna System
Height=22Radials=90
Version x (modified)
User A initiates a synchronize operation.
Step 3Site n
Antenna System
Height=21Radials=120
Version x+1
See next page
30
Recommended workflows for using Data ManagerApplication Note
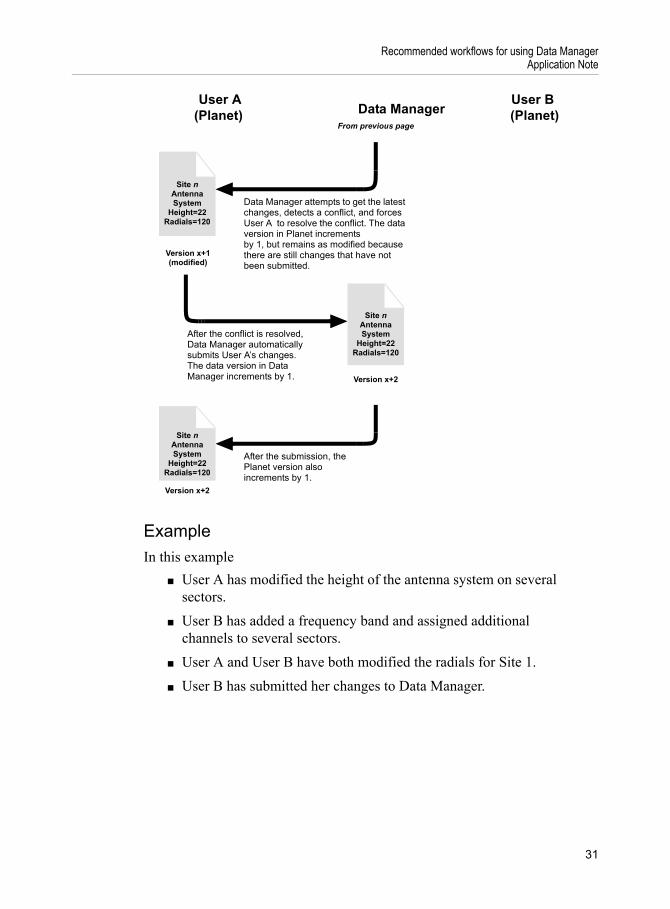
ExampleIn this example
■ User A has modified the height of the antenna system on several sectors.
■ User B has added a frequency band and assigned additional channels to several sectors.
■ User A and User B have both modified the radials for Site 1.■ User B has submitted her changes to Data Manager.
User A (Planet) Data Manager
User B (Planet)
From previous page
Site nAntenna System
Height=22Radials=120
Version x+1 (modified)
Data Manager attempts to get the latest changes, detects a conflict, and forces User A to resolve the conflict. The data version in Planet increments by 1, but remains as modified because there are still changes that have not been submitted.
Site nAntenna System
Height=22Radials=120
Version x+2
After the conflict is resolved, Data Manager automatically submits User A’s changes. The data version in Data Manager increments by 1.
Site nAntenna System
Height=22Radials=120
Version x+2
After the submission, the Planet version also increments by 1.
31

Application Note
User A logs on to Data Manager
1 User A opens his project in Planet and logs on to Data Manager.
The Data Manager window opens. Items that User A has modified are shown in blue. In this example, the Sites node, Site 11, Site 12, and Site 13 are blue.
User A synchronizes the project
2 User A right-clicks the top-level project node and chooses Synchronize.
Because both User A and User B have made changes to the same items, User A must resolve conflicts. An information message is displayed, indicating that user A must resolve conflicts.
3 User A clicks OK in the information dialog box.
The Update Merge dialog box opens. It provides details about the changes made in Planet and Data Manager and enables User A to choose which values to keep. One page is provided for each item (for example, each sector occupies one page). Information about the item currently displayed is shown in the Current Item box.
Unresolved conflicts are shown in yellow. Resolved conflicts are shown in green.
32

Recommended workflows for using Data ManagerApplication Note
In this example
■ The Radials value shows a conflict (because both User A and User B modified it). User A will need to choose which value to keep.
■ The Height is shown as resolved because User A modified it and User B did not, so Data Manager uses User A’s changes. User A can override this choice if he wants to.
■ The WiMAX TDD Transceiver value is also shown as resolved because User B modified it by adding a channel and User A did not, so Data Manager uses User B’s changes. User A can override this choice if he wants to.
User A resolves conflicts
User A must resolve all conflicts before he can complete the synchronization.4 For the Radials value, User A double-clicks the Planet Value column to
keep his own changes (not User B’s).
The Selected value column updates to show the Planet value, and the Planet Value field turns green, indicating the conflicts have been resolved.
33
Application Note
5 Because User A wants to keep all of his own changes, he clicks Apply Planet Value for All Radials Conflicts.
This will keep all of the updates that User A made to radials in Planet.
6 In the Resolve Conflicts dialog box, User A enables the Apply Planet Values to Unresolved Conflicts Only option and clicks OK.
7 In the Update Merge dialog box, User A clicks Update.
User A’s project will be updated with User B’s new band and carriers, however, his Planet project will still retain the values that he modified for Height and Radials. These are submitted automatically. User A’s project and the Data Manager project are now synchronized.
8 In the confirmation dialog box, User A clicks OK.9 User A closes the Data Manager window.
34