Embed Size (px)
Citation preview

6ml 367867-6x144 EXP 2016-03 17489
NO.
Clo
tPL
US
VAC
6ml 367867-6x144 EXP 2016-03 17489
WARDHOSP.NO.
DATEPM
K2E
DTA
PLU
SVA
C
6ml 367867-6x144 EXP 2016-03 17489
WARDHOSP.NO.
DATEPM
LITH
IUM
PLU
SVA
C
PEEL TO OPEN
NON WOVEN SWABS10cm X 10cm 4PLY
STERILE R
REF1870
QTY5
20088
CONTENTS STERILE UNTIL PACK IS OPENED,DAMAGED OR WET Airstrip
Airstrip
Airstrip
Airstrip6ml 367867-6x144 EXP 2016-03 17489
NO.
Clo
tPL
US
VAC
6ml 367867-6x144 EXP 2016-03 17489
WARDHOSP.NO.
TIME DATEPM
K2E
DTA
PLU
SVA
C
6ml 367867-6x144 EXP 2016-03 17489
WARDHOSP.NO.
TIME DATEPM
LITH
IUM
PLU
SVA
C
Vacuumed blood collection tube with appropriate colour (diagnostic) top
Plastic needle holder, with 21G multiple sample safety needle. Smaller sizes (e.g., 23G) should be used in small, fragile veins
2
Adhesive plasterLow-linting swabs
Cleansing agent, such as 2% chlorhexidine in 70% alcohol, or a pre-prepared 70% isopropyl alcohol swab
Gloves
Disposable tourniquet
Disposable Disinfection Wipes
70% v/v Isopropyl alcohol and
2%w/v Chlorhexidine gluconate
for Medical Devices
0086
22024/08
LOT 1225720
Page 1 of 5
Cephalic vein
Basilic vein
Mediancubital vein
Medianbasilic vein
Accessory cephalic vein
Cephalic veinBasilicvein
Dorsal venous network
Dorsal metacarpal veins
VenepunctureAdults
Venepuncture using a needle and holder
Rebecca Craig, Senior Lecturer, School of Heath Sciences, University of Brighton
©2021 Clinical Skills Limited. All rights reserved
Anatomy
Do not undertake or attempt any procedure unless you are, or have supervision from, a properly trained, experienced and competent person.Always first explain the procedure to the patient and obtain their consent, in line with the policies of your employer or educational institution.
Transport the equipment according to local policy, using either a clean cardboard tray or clean plastic tray. You will also need non-sterile gloves, an apron (optional according to local policy) and a sharps container in a transport tray, if venepuncture will be undertaken in an area where a sharps container is not immediately available. Check that all packaging is intact and expiry dates have not passed. Clean a trolley or tray according to local policy.
Equipment
Venepuncture is a commonly performed procedure but can still evoke anxiety in the patient. By approaching the patient in a confident manner and explaining the procedure, the healthcare professional can reduce anxiety and ensure the patient understands and can give a valid verbal consent (Dougherty, 2012; Hyde, 2011).
It is important to discuss the potential complications of venepuncture, such as bruising, haematoma and pain, with the patient. The healthcare professional may, where appropriate, also need to explain the consequences that may result from having blood tests, such as the need to start certain treatments. In some cases, such as genetic testing, or testing for antibodies to the human immunodeficiency virus (HIV), you may need to obtain the patient’s written consent to the test.
Check with the patient if they have had surgery under the arm or have any preferences such as which arm to use, or any problems that may have been experienced with previous venepunctures. Avoid using the side that has been affected by a stroke, or where the patient has lymphoedema following treatment for breast cancer, or where the patient has an arteriovenous fistula (Witt, 2011).
The veins most commonly used for venepuncture are the superficial veins of the upper extremities—that is, the median veins in the antecubital fossa (basilic, median cubital and cephalic veins) because of their size and ease of access. There are two main steps to locating a vein—visual inspection and palpation. When feeling for a vein, it should be soft, bouncy and refill on palpation. Avoid veins that are fibrosed, inflamed or fragile (Witt, 2011).
There is some controversy about whether skin cleansing of the venepuncture site is necessary (Skarparis & Ford, 2018). If local policy requires, in order to reduce the risk from the patient’s skin flora, clean the venepuncture site in line with local policy (RCN, 2016); this may involve firm and prolonged rubbing with an alcohol-based solution (Dimech et al., 2020). If performing venepuncture for blood cultures, however, you should use a skin disinfectant applicator with 2% chlorhexidine in 70% alcohol (Loveday et al., 2014; DH, 2011). See the clinicalskills.net procedure, “Blood cultures: using the winged blood collection method in adults” for more information. Follow standard precautions throughout.
All needles should have a safety feature (RCN, 2013; European Council, 2010). This guideline begins by showing how to use vacuumed blood collection tubes; page 5 then shows how to use a convertible syringe/vacuumed collection tube.
ColdHot Pack2
Venepuncture
Adults
Venepuncture using a needle and holder Page 2
Check the identity of the patient Help the patient into position
Apply a tourniquet Identify a vein (a)
(b) (c)
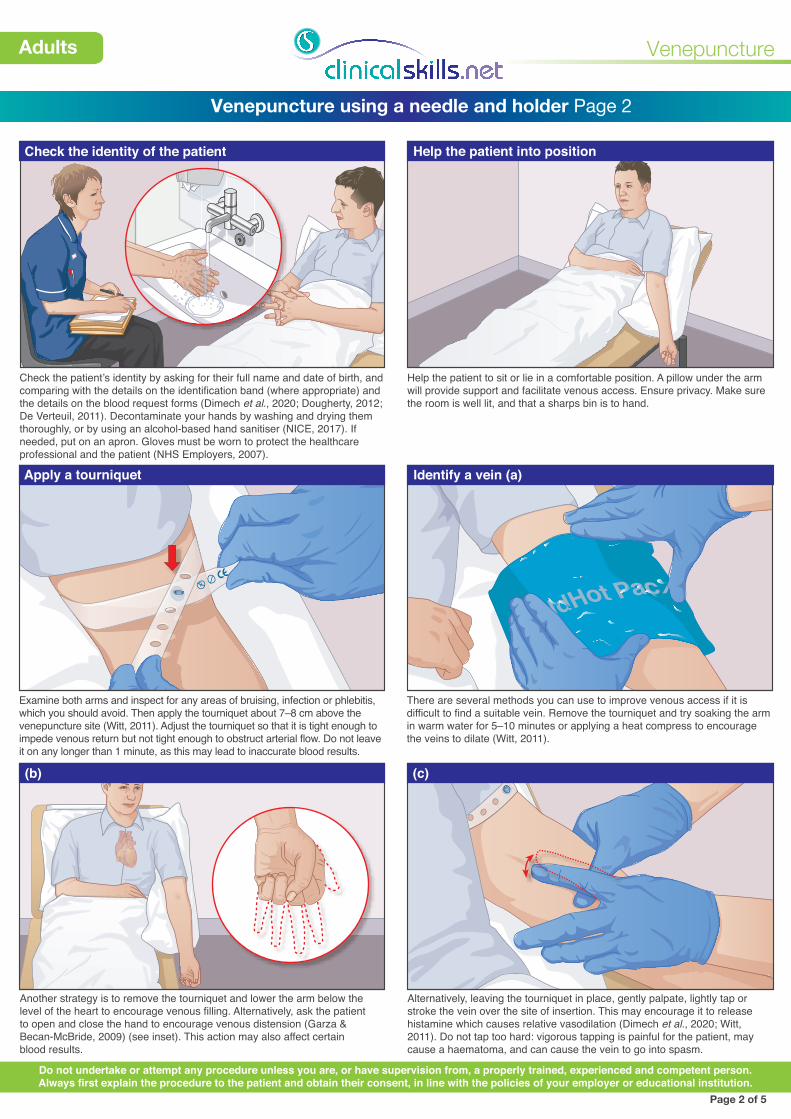
Check the patient’s identity by asking for their full name and date of birth, and comparing with the details on the identification band (where appropriate) and the details on the blood request forms (Dimech et al., 2020; Dougherty, 2012; De Verteuil, 2011). Decontaminate your hands by washing and drying them thoroughly, or by using an alcohol-based hand sanitiser (NICE, 2017). If needed, put on an apron. Gloves must be worn to protect the healthcare professional and the patient (NHS Employers, 2007).
Help the patient to sit or lie in a comfortable position. A pillow under the arm will provide support and facilitate venous access. Ensure privacy. Make sure the room is well lit, and that a sharps bin is to hand.
Examine both arms and inspect for any areas of bruising, infection or phlebitis, which you should avoid. Then apply the tourniquet about 7–8 cm above the venepuncture site (Witt, 2011). Adjust the tourniquet so that it is tight enough to impede venous return but not tight enough to obstruct arterial flow. Do not leave it on any longer than 1 minute, as this may lead to inaccurate blood results.
There are several methods you can use to improve venous access if it is difficult to find a suitable vein. Remove the tourniquet and try soaking the arm in warm water for 5–10 minutes or applying a heat compress to encourage the veins to dilate (Witt, 2011).
Another strategy is to remove the tourniquet and lower the arm below the level of the heart to encourage venous filling. Alternatively, ask the patient to open and close the hand to encourage venous distension (Garza & Becan-McBride, 2009) (see inset). This action may also affect certain blood results.
Alternatively, leaving the tourniquet in place, gently palpate, lightly tap or stroke the vein over the site of insertion. This may encourage it to release histamine which causes relative vasodilation (Dimech et al., 2020; Witt, 2011). Do not tap too hard: vigorous tapping is painful for the patient, may cause a haematoma, and can cause the vein to go into spasm.
Page 2 of 5
Do not undertake or attempt any procedure unless you are, or have supervision from, a properly trained, experienced and competent person.Always first explain the procedure to the patient and obtain their consent, in line with the policies of your employer or educational institution.
AlisonRae
Senior Practice
Development Nurse
The Royal Beckham and Victoria Hospitals
NHS

10–30°
Adults
Venepuncture using a needle and holder Page 3
Cleanse the skin, if necessary Stabilise the area
Insert the needle Introduce the vacuum tube into the holder (a)
(b) Remove the collection tube
Release the tourniquet (if still applied). Follow local policy on skin cleansing. Using your chosen cleaning solution or device, clean the area over the selected vein. Then allow the skin to air dry until the cleansing solution has completely evaporated; during this time, be careful not to touch the skin or repalpate the area (Dougherty, 2012). It is important to use an aseptic non-touch technique in order to reduce the risk of cross-contamination and maintain asepsis (absence of microorganisms) at the site of venepuncture.
Reapply the tourniquet. It is important to stabilise the skin, as superficial veins may roll. Anchor the vein by applying traction to the side of the insertion site or below it. Either use the thumb of one hand (usually your non-dominant hand) to stretch the skin downwards, or stretch the vein between your forefinger and thumb (Dougherty, 2012). Unsheath the needle and, holding the plastic needle holder between the thumb and index finger of one hand (usually your dominant hand), position the needle over the vein.
Smoothly insert the needle, bevel up, into the vein, at an angle of approximately 10–30 degrees (De Verteuil, 2011). The exact angle you use will depend on the depth and size of the vein. Advance the needle until it is securely in the vein. The presence of the needle in the vein will stabilise it.
While steadying the plastic holder and needle, use one hand (usually your non-dominant hand) to advance the vacuumed blood collection tube into the plastic holder. Gently push the collection tube home (inset). Keep the plastic holder steady and avoid advancing the needle further into the patient’s vein.
Once the collection tube is in the correct position in the holder, the vacuum in the tube will withdraw the blood into the collection tube (De Verteuil, 2011). Fill the tube to the required level following the manufacturer's guidance.
Page 3 of 5
Do not undertake or attempt any procedure unless you are, or have supervision from, a properly trained, experienced and competent person.Always first explain the procedure to the patient and obtain their consent, in line with the policies of your employer or educational institution.
Once you have obtained the required amount of blood, remove the collection tube from the holder. Maintain the needle in position by keeping a firm hold on the plastic holder. Use other collection tubes in the appropriate order, depending on what tests the patient is having (Dojcinovska, 2011).
Venepuncture
THE ROYAL VICTORIA AND BECKHAM HOSPITAL, LONDONHOSPITAL No. WARD DIAGNOSIS.
SURNAME DATE OF SPECIMEN
FORENAMES TIME OF SPECIMEN CLINICAL DETAILS
SEX DATE OF BIRTH CONSULTANT
FLAG
WBC Neut %
Hb Lymph %
Plat Mono %
Eos %
Baso %
Myelo %Blast %
COMMENT
Film Reported by:.................................................................................
HA
EMA
TOLO
GY
BIO
HA
ZAR
DB
IOH
AZA
RD
PRES
S FI
RM
LY O
N E
ACH
EN
DTO
EN
SUR
E A
LEAK
PRO
OF
SPEC
IMEN
CAR
RIE
R
HAV
E YO
U L
ABEL
LED
TH
E SP
ECIM
EN C
OR
ECTL
Y?PL
EASE
DO
NO
T U
SE L
ABEL
SON
FO
RM
OR
SAM
PLE
M F
FBC
DIFF
ESR
RETIC
RBC FRAGS
DAT D - DIMER Req’d by........................................Bleep No.........................................
.................../.................../................... DRUG TRIAL No. ............................................................................
COAG TEST (please specify) OTHER TESTS (please specify)
............................................................................. ..............................................................................................................
DV DN DNN PT secs (10 - 13)
INR
APTT secs (20 - 32)
APTR
Fib g / L (1.7 - 4.0)
D-Dimer mg / L (<0.25)
Telephoned Results
Phoned to: Time
By:
K_ 346_364ANDERSON, STUART75 CHATSWORTH ROADLONDON SW4 2NYDR A REID4209
Adults
Venepuncture using a needle and holder Page 4
Invert the collection tube
Undo the tourniquet
Remove gloves and apron; fill in blood request form
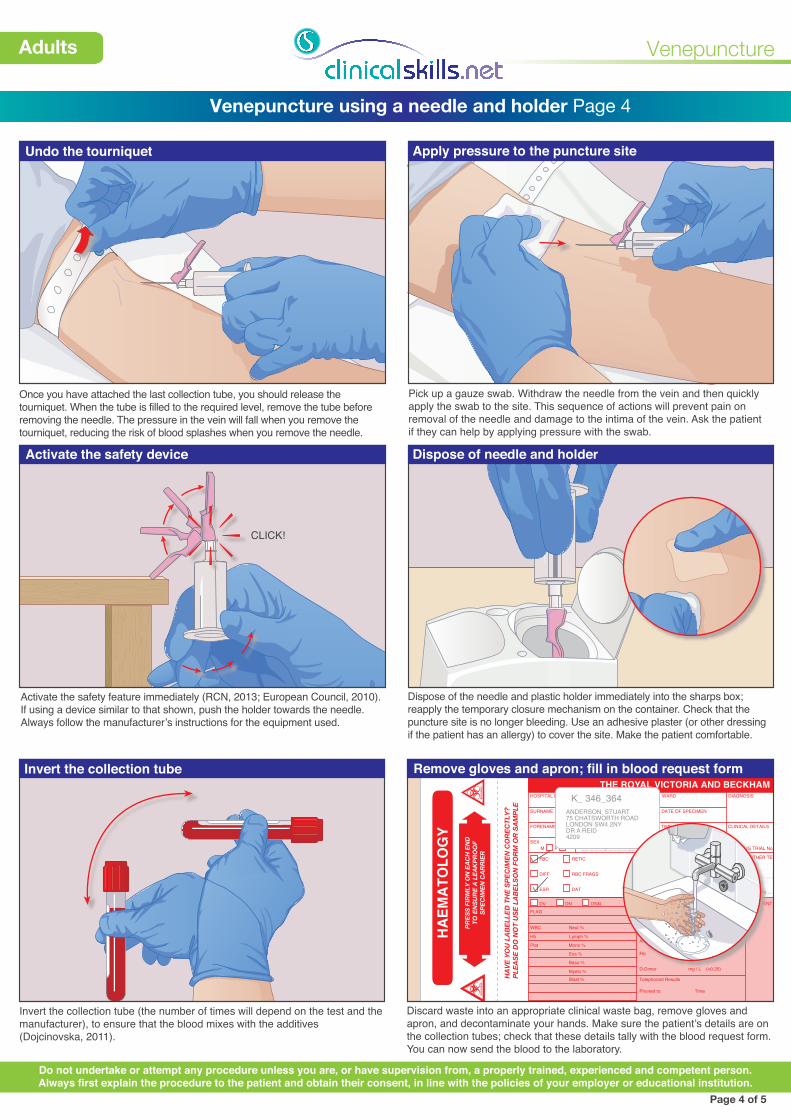
Invert the collection tube (the number of times will depend on the test and the manufacturer), to ensure that the blood mixes with the additives (Dojcinovska, 2011).
Once you have attached the last collection tube, you should release the tourniquet. When the tube is filled to the required level, remove the tube before removing the needle. The pressure in the vein will fall when you remove the tourniquet, reducing the risk of blood splashes when you remove the needle.
Discard waste into an appropriate clinical waste bag, remove gloves and apron, and decontaminate your hands. Make sure the patient’s details are on the collection tubes; check that these details tally with the blood request form. You can now send the blood to the laboratory.
Page 4 of 5
Do not undertake or attempt any procedure unless you are, or have supervision from, a properly trained, experienced and competent person.Always first explain the procedure to the patient and obtain their consent, in line with the policies of your employer or educational institution.
Activate the safety feature immediately (RCN, 2013; European Council, 2010). If using a device similar to that shown, push the holder towards the needle. Always follow the manufacturer’s instructions for the equipment used.
CLICK!
Activate the safety device
Venepuncture
AlisonRae
Senior Practice
Development Nurse
The Royal Beckham and Victoria Hospitals
NHS
Apply pressure to the puncture site
Dispose of needle and holder
Dispose of the needle and plastic holder immediately into the sharps box; reapply the temporary closure mechanism on the container. Check that the puncture site is no longer bleeding. Use an adhesive plaster (or other dressing if the patient has an allergy) to cover the site. Make the patient comfortable.
Pick up a gauze swab. Withdraw the needle from the vein and then quickly apply the swab to the site. This sequence of actions will prevent pain on removal of the needle and damage to the intima of the vein. Ask the patient if they can help by applying pressure with the swab.

21G needle with safety feature. Smaller sizes (e.g., 23G) should be used in small, fragile veins
PEEL TO OPEN
NON WOVEN SWABS10cm X 10cm 4PLY
STERILE R
REF1870
QTY5
20088
CONTENTS STERILE UNTIL PACK IS OPENED,DAMAGED OR WET
Airstrip
Airstrip
Airstrip
Airstrip
Convertible syringe/vacuumed blood collection tubes with appropriate colour (diagnostic) tops
2
Adhesive plaster
Low-linting swabsCleansing agent, such as 2% chlorhexidine in 70% alcohol, or a pre-prepared 70% isopropyl alcohol swab
GlovesDisposable tourniquet
Disposable Disinfection Wipes
70% v/v Isopropyl alcohol and
2%w/v Chlorhexidine gluconate
for Medical Devices
0086
22018
LOT 1225720
STE
DT
NameGlucose FE/4.9 ml
STE
DT
NameSerum Gel Z KE/4.9 ml
STE
DT
NameEDTA KE/4.9 ml
STE
DT
NameGlucose FE/4.9 ml
STE
DT
NameSerum Gel Z KE/4.9 ml
STE
DT
NameEDTA KE/4.9 ml
Transport the equipment according to local policy, using either a clean cardboard tray or clean plastic tray. You will also need non-sterile gloves, an apron (depending on local policy) and a sharps container in a transport tray, if venepuncture will be undertaken in an area where a sharps container is not immediately available.
Equipment: when using convertible syringe/vacuumed blood collection tubes
ST
EDT
NameEDTA KE/4.9 ml
Prepare equipment
Date
LOT 3032801
2020-01
Time
Ward
4.9
M
ix w
ell
Date
LOT 3032801 2020-01
Time Ward
4.9
M
ix w
ell
Adults
Venepuncture using a needle and holder Page 5
Using the device as a vacuumed tube Introduce the vacuumed tube into the adaptor
If you are confident that blood is flowing freely, you can convert the syringe/tube to a vacuumed tube by withdrawing the plunger of the empty syringe before use. Follow the manufacturer’s instructions.
Use other collection tubes in the appropriate order, depending on what tests the patient is having. Follow the remaining steps of the procedure, as detailed on previous pages.
Page 5 of 5
Do not undertake or attempt any procedure unless you are, or have supervision from, a properly trained, experienced and competent person.Always first explain the procedure to the patient and obtain their consent, in line with the policies of your employer or educational institution.
Connect the needle, with an appropriate adaptor, to the convertible syringe/tube. Follow the manufacturer’s instructions. You may prefer to use the device as a syringe if the patient has small or fragile veins, or for the initial collection, to allow you to confirm that there is adequate blood flow, before using subsequent tubes with a vacuum.
Prepare the patient and select a vein then remove the plastic needle cover and insert the needle, as described on pages 1 to 3. Gently withdraw the plunger until you have obtained the required amount of blood, then remove the tube from the adaptor and snap off the plunger (see inset), following the manufacturer’s instructions.
Date
LOT3032801
2020-01
Time
Ward
4
.9
M
ix w
ell
Using the device to aspirate blood
Venepuncture
2017-01
TimeWard
M
ix w
ell
2017-01
TimeWard
M
ix w
ell