Embed Size (px)
Citation preview

S T A N L E Y M A N U F A C T U R E D A C C E S
U P G R A D I N G F R O M B O S C H R E A D Y K E Y X
CON™READYKEY X X™
3.1
.us.boschsecuritywwwAll Rights ReservedBosch Security Systems© 2006.
Inve
ersion rogram V V Peartwation Sof ftwdministrAy X eReadyk
S C O N T R O L
V 3 . 1
NVERSION
e
nted for life

1
Upgrading Bosch Readykey X v3.1 to Stanley PAC v3.3
V1.2 June 2009
Introduction This document describes the process for upgrading an existing Bosch Readykey X system to Stanley PAC v3.3. It is important to understand that these two products are different brands of the same basic product. However this change of brand does mean there are some extra steps of which you need to be aware. These involve database backup, product licensing and controller downloads.
Please read these instructions carefully before you attempt the upgrade For full details of the changes in this release, see the document ‘Stanley PAC 3.3 Release Notes’.
Before You Start Before attempting this upgrade make sure you have everything you need. It may be difficult to go back to v3.1 once you have started to install v3.3.
Some of the processes involved in the upgrade may take some time. In particular the upgrade of the SQL database engine from MSDE to SQL Express can take several minutes to complete.
You will also have to download all the controllers in the system. This is due to the database having to be restored into the new version. In a large system this could take some time and cause some brief disruption.
PC and Operating System In most cases you will be upgrading the existing v3.1 on the same PC. The existing PC should be adequate to run the new version.
• Stanley PAC v3.3 does NOT run on Windows 2000.
• It now supports MS Windows Vista (Business, Enterprise and Ultimate editions only).
Licensing and Registration Once you have installed Stanley PAC v3.3 you will need to enter new License Codes. The codes used when Readykey X was installed are not valid for this brand. There is no charge for these codes and they can be obtained immediately if you call during working hours.
Call: (800) 414 3038, select Option 1 E-mail: [email protected]
Provided you are upgrading on the same PC, then the ‘fingerprint’ used to generate the codes will remain the same. Because of this you may consider calling in advance to obtain the new codes and quoting either the original fingerprint or the name of the installation.

2 1.2
Outline of Upgrade Process This is a brief outline to give you some idea of what is involved.
1. Ensure any Client PCs are not running Readykey X.
2. Make a backup of the existing Readykey X database including the Events table.
3. Make another backup to another location.
4. Delete the existing licenses.
5. Close the Readykey X application.
6. Start the Stanley PAC v3.3 CD – you will be prompted to remove the existing Readykey X v3.1.
7. After the removal of Readykey X the PC will re-boot.
8. After the re-boot, start the Stanley PAC v3.3 CD again.
9. Most of the components are already in place, but MS SQL 2005 Express will be installed, replacing MSDE.
10. The existing database will be removed at this point.
11. Continue to install Stanley PAC v3.3.
12. Login to the new Stanley PAC system.
13. Enter new license codes for Stanley PAC.
14. Restore the original database.
15. Download each controller in the system.
16. Repeat the software installation on any client PCs.
That completes the process.

1.2 3
Upgrade Process As outlined above there are several stages to this process.
It is essential that you make a backup of the datab ase before you start.
Backup the Existing Database
Make two backups of the existing Readykey X database. It is suggested one backup is made to the Windows Desktop, the other to a removable device such as a CD or memory stick. Make sure you backup the Events table on each occasion.
To make a backup from within Readykey X, click on the Backup button in the Toolbar.
If you want to change the backup location from the default, click the ‘…’ button.
Make sure you check the box to ‘Backup Events Table’
Type in name for the backup, and click Backup .
When the backup is complete, click OK

4 1.2
Delete the Existing License
This is done to prevent ‘Invalid License’ errors from being generated once you restore the database in Stanley PAC.
Click on the Tools menu and select Upgrade License .
You will now see the license keys that are currently installed.
Click on the first license, and then click Delete .
You will be prompted to confirm.
Click Yes to confirm.
Repeat until all licenses are removed. The click Close .
You will almost certainly get a message that you have exceeded your license limits. This is expected.
Click Close .
Close down Readykey X.

1.2 5
Removing Readykey X v3.1
Insert the Stanley PAC v3.3 CD into the CD drive.
You will get a prompt to remove Readykey X v3.1.
Click Yes
You will see a progress bar as the existing software is removed.
When it has finished you will be prompted to restart the PC.
Click Yes. The PC will re-boot.
Installing Stanley PAC v3.3
Restart the Stanley PAC v3.3 CD.
You will now see the following choices:
Select ‘Install Stanley PAC’ . If you have any client PCs on the system you will select the ‘Client Only’ when you have completed this installation.
If you are installing on the same PC then the required components will have been installed when Readykey X was originally installed. The only item now will be the upgrade of the database from MSDE to SQL Express 2005.
If you are installing on a different PC then you will probably observe some or all of the components being installed. This process is automatic and requires no intervention – but may take a few minutes.

6 1.2
This process is automatic but may take several minutes to complete. You will progress screens like this:
When the database upgrade is complete you will be prompted to remove the existing database.
Click Yes
You will now install the Stanley PAC software itself. This is very similar to the installation of the original Readykey X software.
Click Next
The License Agreement is then presented.
Select ‘I accept the license agreement’, and then click Next
1.2 7
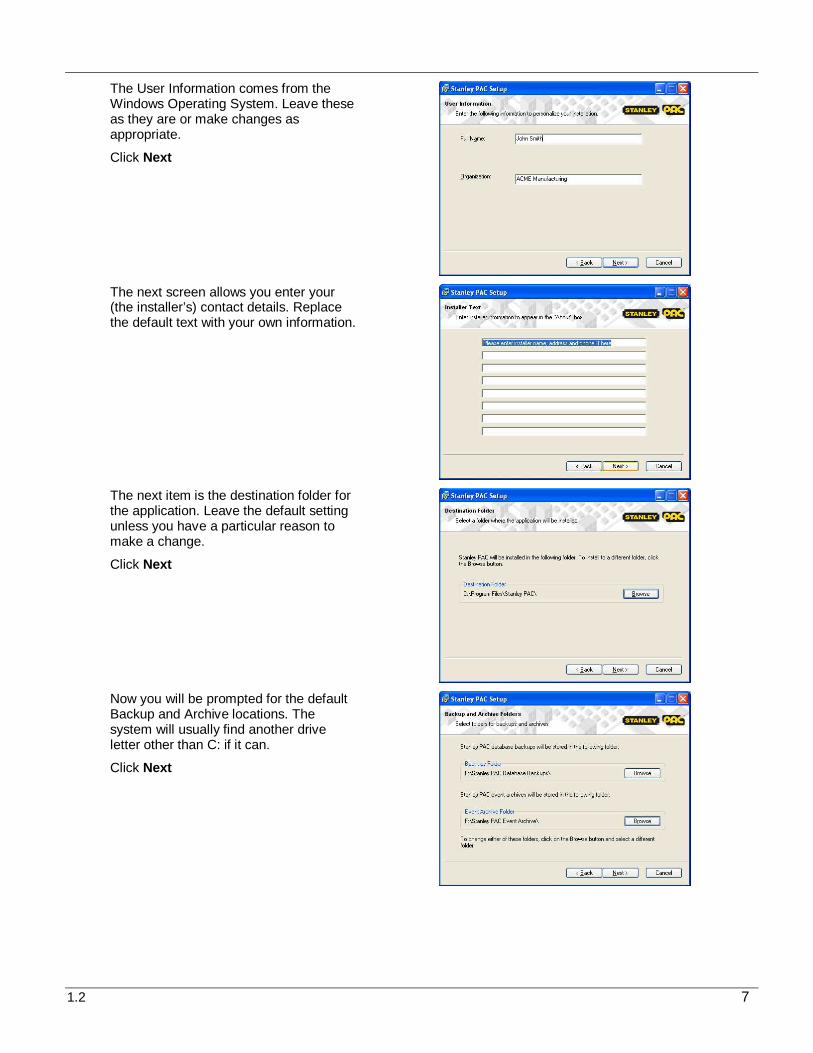
The User Information comes from the Windows Operating System. Leave these as they are or make changes as appropriate.
Click Next
The next screen allows you enter your (the installer’s) contact details. Replace the default text with your own information.
The next item is the destination folder for the application. Leave the default setting unless you have a particular reason to make a change.
Click Next
Now you will be prompted for the default Backup and Archive locations. The system will usually find another drive letter other than C: if it can.
Click Next

8 1.2
You will now be prompted to allow client access. Even if you do not have client PCs in the system now, you may in the future. Check the box now to allow client access.
Click Next
Do NOT load the sample database. Leave the box unchecked.
Click Next
You are now ready to install
Click Next or go back to make changes.
You will see some progress screens.

1.2 9
You will see a screen when the installation is complete.
Click Finish
The final step is to initialize the database.
When that has finished you will see:
Click OK
Stanley PAC v3.3 is now installed.

10 1.2
License Stanley PAC v3.3
You should now start Stanley PAC for the first time.
You are starting with an empty database so you should login with a user name of Installer and leave the password blank. Click Log on .
You will be prompted to create a password.
Click OK.
Enter and then confirm a password of at least six characters. This is just temporary as you will soon restore the database with the original log on information.
Click OK.
The new password is set.
Click OK.
Click on the Tools menu and select Upgrade License .

1.2 11
If you have not done so already, contact Stanley PAC and obtain the new license codes.
The ‘Fingerprint’ number is shown on the screen.
If you have the codes, click New License .
Enter the license key you have been given, including the dash characters, as shown.
If you have more than one code to enter, click New License again for each code.
When all the codes are entered click Close .
Shut down Stanley PAC.
Restoring the Database
The next stage is to restore the database. If you made a backup to the desktop you should see two icons something like this:
To restore the database, double-click on the ‘ekb’ file. Do not click on the log file (‘ekl’ or with a name ending in ‘_Log’)
Make sure the ‘Restore Event Log’ box is checked.
Click Restore
The Engine will be stopped then the data files are restored. You may notice that there is an extra ‘Upgrade’ process that occurs before the files are restored. This is all automatic.

12 1.2
When complete, you will be prompted:
Click OK
Then click Exit
The database is now restored and ready for use.
You can now log on to Stanley PAC again. This time use the name and password you used under Readykey X.
Download to each Channel
This process is necessary and required every time you restore a database. It is the only way to ensure that the database on the PC matches the data in the door controllers. If this process does not occur there is the possibility that invalid cards could remain in the controllers.
Go to the Hardware selection in the Navigator.
You should see all your channels with yellow triangles next to each controller. This means they are communicating, but need to be downloaded.
Right-click on a channel and select Download Channel Database…
Click OK to confirm.
If there is more than one channel, repeat the download for each one.

Technical Support 1-800-414-3038
Innovation in Access Control
S