Embed Size (px)
Citation preview

Re Keying R1200RT CasesRe Keying R1200RT R1200ST K1200GT Cases
Created 29/01/2007 - Amended 04/09/2012 This walkthrough describes re-keying the large 49L top case for the BMW R1200RT / ST &K1200GT, but the methods described below should also also suit the panniers and the smaller 28Ltop case. Tools:Paper clip.Long thin screwdriver.Coin (to remove the access bung).A sheet of white A4 paper to work on while changing wafers.And a very small torch to light the way (a torch bulb on a wire would be great). Pictured below, my home made lock barrel extractor. It's only a paper clip straightened out andtaped tightly to the end of an electrician's screwdriver. Note the end is not bent over exactly 90degrees, it's angled down slightly. Don't snip off the end of the paper clip to shorten it as it alsosharpens the end of the wire making it difficult to move over the lock surfaces. The Maglite Solitairetorch is actually a poor substitute for a bulb on the end of a wire (which is what I used to take thethird picture down with).
Lock barrel removal:Remove the lock access bung by turning it a quarter turn and lifting it out with a small screwdriver(a piece of insulating tape stuck to it works well too).
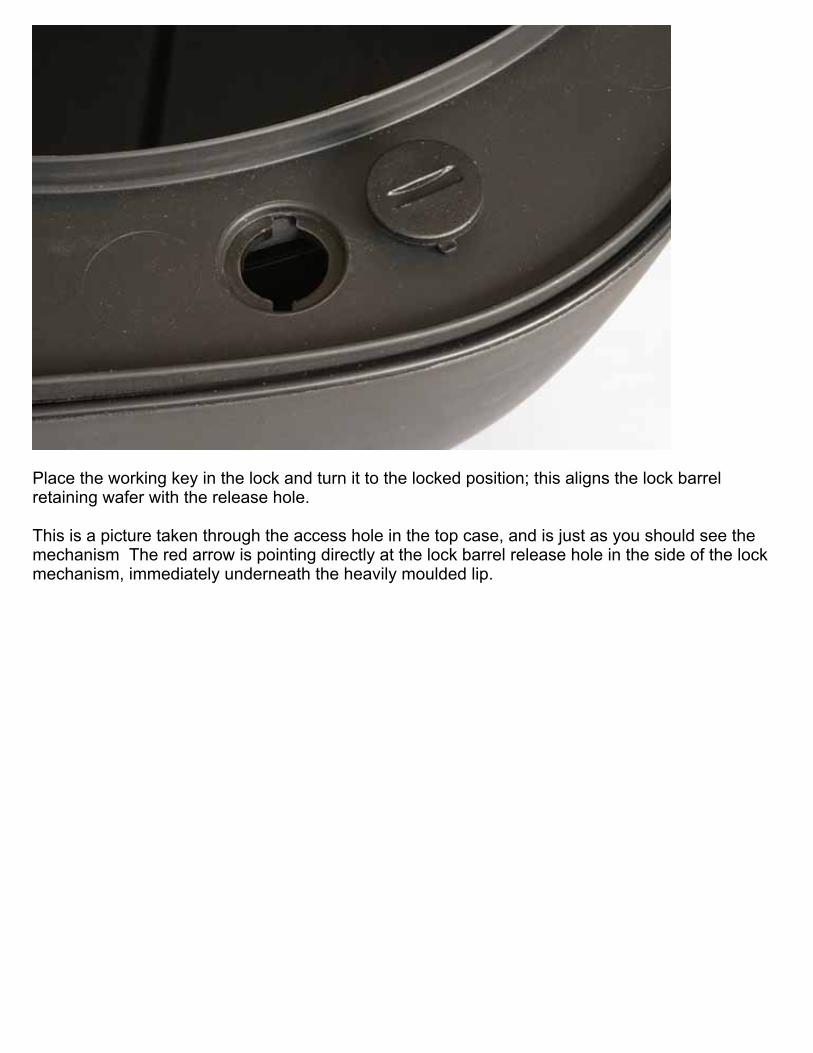
Place the working key in the lock and turn it to the locked position; this aligns the lock barrelretaining wafer with the release hole. This is a picture taken through the access hole in the top case, and is just as you should see themechanism The red arrow is pointing directly at the lock barrel release hole in the side of the lockmechanism, immediately underneath the heavily moulded lip.

'This is gonna need some patience...!'Shine a very small torch through to illuminate the lock mechanism and probe around for the releasehole gently. Once the probe drops in to the release hole, almost no pressure is needed to depressthe lock retaining wafer and release the lock barrel. Use the key to pull the lock barrel out, but becareful as the lock retaining wafer and its spring are free to drop out. All the other lock wafers willbe held in place by the key. To help guide you to the release hole, here's a side view of a partially disassembled lock from oneof my panniers. The blue line represents the outer shell of the case, the orange arrow is pointingdirectly at the release hole and its also the direction you will be viewing the lock through the accesshole.

Update 4th Sept 2012I've received information from Conrad in Australia the lock access has been changed, there is nowa cover over the lock with a slot in it. The release hole in the lock barrel is some 20mm behind theslotted cover, you will probably need a longer probe on the end of your screwdriver for this type oflock. This animated picture should help you aligned your probe.


Pannier locks:If you want to Re Key a pannier you need to know the lock mechanism is rotated 180 degrees inthe case, so instead of probing below the heavy moulding to release the lock barrel, you need toprobe above it.
It's not easy, but with patience you should be able to release the lock barrel, if you have the lock in

your hand now, it's time to move on to re keying. Re Keying Lock Barrel: Type 1The lock is a Wafer Tumbler type, with the key removed the wafers are free to be changed.counting from the key end there are 6 lock wafers, 3 in the top and 3 in the bottom - plus a lockretaining wafer in the last slot.
Pictured below are the 4 different wafers. Top row are the lock wafers, all numbered. Bottom row isthe lock retaining wafer and spring.

Hold the lock barrel gently between fingers and thumb so the wafers both top and bottom are heldin place and pull out the key. As the key comes out you will feel the wafers riding up and downbetween your fingers - DO NOT LET GO. Now, put your normal ignition key in to the lock barrel.Once its fully home you can safely let the lock barrel go again. Take a close look at the 6 wafers inthe barrel (there is no seventh wafer, do not fit one!) at the end of the lock barrel is the lock pawl, itwas this you pressed in to release the lock barrel from the case) correct wafers will be laidcompletely level top and bottom with the lock barrel, incorrect wafers will be slightly proud, eithersticking up or down from the lock barrel, these obviously are the ones to change.

With the correct lock wafers in place, all lay even both top and bottom.
You have options modifying the lock to suit your key:1, You can buy BMW's Lock Repair Kit. Part No: 51 25 7 698 204 to obtain spare wafers andsprings.

2, You can try swapping around the incorrect wafers in the lock barrel as they can be correct whenplaced in another position.3, You could leave out wafers and spring that you cannot correct (don't leave out too many as thisreduces security)4, After swapping wafers around to obtain the best fit, remaining incorrect wafers could be groundoff flush (which I don't recommend!) Re Keying Lock Barrel: Type 2This lock is the same Wafer Tumbler type as above, but, with the key removed the wafers are stillretained by a pin through the length of the lock barrel.To access the pin you need to remove the stainless steel cap from the key end of the lock barrel. Carefully prise the edges of the cap away from the lock barrel where they are crimped in with asmall screwdriver or other suitable tool.
Under the cap you will find the the rain guards and springs, remove them carefully, don't loose thesprings!

Under the rain guards is the retaining pin (arrowed in red). With the pin removed, the wafers arefree to be changed.
After changing the lock wafers to suit your key, as described in the section above, replace the pin,rain guards and springs. Replace the cap and re crimp it to the lock barrel with a small screwdriver

or punch and hammer.
My thanks to Jim VonBaden for above pictures and descriptions of the 'Type 2 Pinned Lock Barrel',and to all those who contributed to the project on this thread from the BMW Sport Touring forum ReKeying. I recommend you read it for Jim's and others experiences of re keying their cases.Thank You. Lock replacement:Offer the lock barrel up to the lock mechanism with the lock retaining wafer facing the 'Release'position, note there is a 'lead in' arrowed in red to ease the lock retaining wafer down. gently pushthe lock barrel in until it stops, turn it 90 degrees clockwise while still pushing gently and the lockbarrel will drop in to place with a click.

All you need to do now is test the lock, if all's well replace the access bung, and you're done! Lubrication:You may want to re-lubricate the lock and parts during assembly, I used a light coating of silicongrease obtained quite cheaply from a plumbers' merchants. Lock barrel removal without a key:I get lots of emails from people who have purchased cases but don't have the keys wondering ifthey can still change the locks, here's what you can and cannot do. If the case lid is OPEN and the lock barrel is in the LOCKED POSITION but you don't have thecorrect key.You can still remove the lock barrel using the procedure shown above, just use a key that will fit thelock (even if it won't turn or unlock) or any hook tool that will pull the lock barrel from the case onceits been released. If the case lid is OPEN but the lock barrel is in the UNLOCKED position.orIf the case lid is CLOSED and the lock barrel is in the LOCKED position.You can't remove the lock barrel using the procedure shown above. You could try a lock smith toremove the lock barrel or you could drill the lock barrel out.

Buying a used case without a key:If you are considering buying a used case without a key all I can suggest is you ask the seller tosend the case to you locked, with the release handle pushed in and the lid open. Something placedbetween the lid and the case will help prevent damage to the lock mechanisms while in transit. Notes:The BMW 1200 series locks share a very similar construction to the 1100/1150 series bikes, sixlock wafers and one lock retaining wafer. the main difference with the lock itself is that the lockwafers read their position from the track cut in to the sides of the key instead of the saw toothprofile on the top and bottom of a more traditional key. This is Wikpedia's description of a wafertumbler lock.
At the time of writing, the price of the Lock Repair Kit ('Lock rep kit' part No: 51 25 7 698 204) is£16.72 + vat, I obtained my kit from UK supplier Motorworks

According to the BMW ETK parts DVD, the above repair kit also suits:-K40 K1200SK43 K1200RK44 K1200GTK25 R1200GSK26 R1200RTK28 R1200ST It's highly likely the K1200 machines listed above share a similar lock layout, so this guide couldhelp these owners too.
DisclaimerThis page is offered as a guide only
Any work you carry out on your motorcycle you do so entirely at your own risk