Embed Size (px)
Citation preview

SIGNALLING SYSTEMS
RATO 6
Draft version 14.5.2012
This document is the English translation of the RATO Part 6 “Signalling Systems”, accepted in May 2012. It deals with the design, construction and maintenance of signalling systems used on the rail network governed by the Finnish Transport Agency. RATO is an abbreviation from the Finnish words “Ratatekniset ohjeet”. RATO is a set of technical guidelines by the Finnish Transport Agency. It is applied to work performed on the state rail network. In case of conflicts between the Finnish and English versions, the original Finnish version is valid.

2 RATO 6 / 05-2012
CONTENTS
6 SIGNALLING SYSTEMS ........................................................................................... 6
6.1 DEFINITIONS, SYMBOLS AND ABBREVIATIONS .......................................... 6
6.1.1 Symbols ............................................................................................................... 17
6.1.2 Abbreviations ...................................................................................................... 17
6.2 BASIC PRINCIPLES OF SIGNALLING SYSTEMS ......................................... 18
6.2.1 General ................................................................................................................ 18 6.2.1.1 Engineering configuration requirements for signalling systems planning ................................................................................................................ 18 6.2.1.2 Effect of maximum track speed in signalling systems planning .... 19 6.2.1.3 Signalling apparatus code ................................................................... 19
6.2.2 Interlocking system ............................................................................................ 19 6.2.2.1 Computerised interlocking system ..................................................... 19 6.2.2.2 Relay interlocking system .................................................................... 19 6.2.2.3 Mechanical interlocking system .......................................................... 20 6.2.2.4 Area key lock system with signals ...................................................... 20 6.2.2.5 Area key lock system ............................................................................ 21
6.2.3 Signals and signal aspects ............................................................................... 21 6.2.3.1 Main signal aspects .............................................................................. 24 6.2.3.2 Block signal aspects ............................................................................. 24 6.2.3.3 Distant signal aspects .......................................................................... 24 6.2.3.4 Shunting signal aspects ....................................................................... 25 6.2.3.5 Combined signal .................................................................................... 25 6.2.3.6 Signal aspects of other signals ........................................................... 26 6.2.3.7 Radio signal operation .......................................................................... 26 6.2.3.8 Aspect abbreviations ............................................................................ 26 6.2.3.9 Control lines in a new interlocking system ........................................ 27 6.2.3.10 Control lines in interlocking system to be modified ....................... 32 6.2.3.11 Fictive aspects in a centralized ATP control ................................... 37
6.2.4 Track vacancy proving ...................................................................................... 41
6.2.5 Line block ............................................................................................................ 41
6.2.6 Connecting a point to signalling apparatuses ............................................... 41
6.2.7 Route track .......................................................................................................... 43
6.2.8 Main route ........................................................................................................... 44 6.2.8.1 Main route overlap ................................................................................ 45
6.2.9 Shunting route .................................................................................................... 45
6.2.10 Level crossing system ..................................................................................... 46
6.2.11 Signalling system commands and indications ............................................ 46 6.2.11.1 Commands ........................................................................................... 46 6.2.11.2 Indications ............................................................................................ 46
6.2.12 User manual ..................................................................................................... 47

3
RATO 6 / 05-2012
6.3 INTERLOCKING SYSTEM .................................................................................. 49
6.3.1 General ................................................................................................................ 49
6.3.2 Track section ...................................................................................................... 49
6.3.3 Signal ................................................................................................................... 49
6.3.4 Point, derailer and stopping device ................................................................. 50 6.3.4.1 Powered point ........................................................................................ 51 6.3.4.2 Point equipped with a hand lever ....................................................... 53 6.3.4.3 Free of fouling restrictions ................................................................... 54 6.3.4.4 Powered derailer and stopping device .............................................. 55 6.3.4.5 Derailer and stopping device equipped with a hand lever .............. 55 6.3.4.6 Standard diamond crossing ................................................................. 56 6.3.4.7 Key box ................................................................................................... 56
6.3.5 Main route ........................................................................................................... 57 6.3.5.1 Setting a main route .............................................................................. 58 6.3.5.2 Releasing a main route ........................................................................ 69 6.3.5.3 Cancelling a main route ....................................................................... 69 6.3.5.4 Emergency releasing of a main route ................................................ 71 6.3.5.5 Functions of a main signal connected to shunting signals on a main route ............................................................................................................ 71
6.3.6 Shunting route .................................................................................................... 71 6.3.6.1 Setting a shunting route ....................................................................... 71 6.3.6.2 Releasing a shunting route .................................................................. 72 6.3.6.3 Cancelling a shunting route ................................................................. 73
6.3.7 Automatic functions of the route ...................................................................... 73
6.3.8 Line ....................................................................................................................... 74 6.3.8.1 Block conditions .................................................................................... 74 6.3.8.2 Line point monitoring ............................................................................ 76
6.3.9 Local point operation permission ..................................................................... 77 6.3.9.1 Local point operation permission monitoring .................................... 77 6.3.9.2 Forming and protecting a local point operation group ..................... 78 6.3.9.3 Returning local point operation permission ....................................... 82 6.3.9.4 Local point operation buttons .............................................................. 83
6.3.10 Level crossing system connected to the interlocking ................................. 83
6.3.11 User interface ................................................................................................... 84
6.4 POSITIONING OF SIGNALLING APPARATUSES ......................................... 85
6.4.1 General positioning requirements ................................................................... 85
6.4.2 Signal positioning and sighting distance requirements ................................ 85 6.4.2.1 General signal positioning requirements ........................................... 85 6.4.2.2 Signal sighting distance requirement ................................................. 88
6.4.3 Track layout numbering .................................................................................... 89
6.4.4 Main signal .......................................................................................................... 93 6.4.4.1 Main signal code ................................................................................... 94 6.4.4.2 Main signal positioning ......................................................................... 94

4 RATO 6 / 05-2012
6.4.4.3 Effect of capacity requirements on main signal positioning ......... 101 6.4.4.4 Effect of other signalling systems planning on main signal positioning .......................................................................................................... 103 6.4.4.5 Main signal connected to shunting signals. .................................... 104 6.4.4.6 Effect of a line point on main signal positioning ............................. 104
6.4.5 Block signal ....................................................................................................... 105 6.4.5.1 Block signal code ................................................................................ 105 6.4.5.2 Positioning a block signal .................................................................. 105 6.4.5.3 Line block entry signal ........................................................................ 106
6.4.6 Distant signal .................................................................................................... 107 6.4.6.1 Distant signal code .............................................................................. 107 6.4.6.2 Distant signal positioning ................................................................... 107
6.4.7 Shunting signal ................................................................................................. 109 6.4.7.1 Shunting signal code .......................................................................... 111 6.4.7.2 Shunting signal positioning ................................................................ 111 6.4.7.3 Effect of other signalling systems planning on shunting signal positioning .......................................................................................................... 114 6.4.7.4 Shunting signal as the main route exit signal ................................. 116 6.4.7.5 Shunting signal connected to a main signal ................................... 116
6.4.8 Other signals ..................................................................................................... 116 6.4.8.1 Locking signal ...................................................................................... 116 6.4.8.2 Level crossing signal .......................................................................... 117 6.4.8.3 Marshalling signal ............................................................................... 118 6.4.8.4 Repeater signal ................................................................................... 118
6.4.9 Radio Signal ..................................................................................................... 118 6.4.9.1 Radio Signal Code .............................................................................. 119 6.4.9.2 Radio signal positioning ..................................................................... 119
6.4.10 Signalling apparatuses of a point ................................................................ 119 6.4.10.1 Point code .......................................................................................... 120 6.4.10.2 Track section of a powered point ................................................... 120 6.4.10.3 Local operation button and local operation return button ........... 122
6.4.11 Derailer ............................................................................................................ 122 6.4.11.1 Derailer code ..................................................................................... 123 6.4.11.2 Derailer positioning ........................................................................... 124 6.4.12 Stopping device ................................................................................... 125
6.4.13 Track section .................................................................................................. 126 6.4.13.1 Track section code ............................................................................ 127 6.4.13.2 Track section positioning ................................................................. 127
6.4.14 Key box ........................................................................................................... 130
6.4.15 Key lock ........................................................................................................... 130 6.4.15.1 Key lock code .................................................................................... 131 6.4.15.2 Key lock operation key and spare key ........................................... 131 6.4.15.3 Concatenating key lock operation keys ......................................... 131 6.4.15.4 Area key lock system of the loading area ..................................... 133
6.4.16 ‘End of main route' indicator ........................................................................ 134

5
RATO 6 / 05-2012
6.5 OTHER SYSTEMS ............................................................................................. 135
6.5.1 Remote Control System .................................................................................. 135
6.5.2 Hump ................................................................................................................. 136
6.5.3 Level crossing system ..................................................................................... 137 6.5.3.1 Level crossing system types ............................................................. 137 6.5.3.2 Level crossing system functions ....................................................... 138 6.5.3.3 Level crossing system function dependency on other signalling systems .............................................................................................................. 144 6.5.3.4 Level crossing system equipment .................................................... 146 6.5.3.5 Level crossing system with alarm section based on the measurement of the speed of the train ......................................................... 153 6.5.3.6 Level crossing system connected to traffic lights ........................... 154
6.5.4 Maintenance road protection system ............................................................ 154
6.5.5 Swing bridge protection system ..................................................................... 154
6.5.6 Rolling stock monitoring devices ................................................................... 155 6.5.7 Separate control for stopping device .................................................. 156
6.6 TECHNICAL SECTION ...................................................................................... 157
6.6.1 Mechanical parts of the signalling system ................................................... 157 6.6.1.1 Installing the signalling apparatus .................................................... 157 6.6.1.2 Locking .................................................................................................. 158
6.6.2 Electrical parts of the signalling systems ..................................................... 158 6.6.2.1 Signal lamp .......................................................................................... 159 6.6.2.2 Track circuit .......................................................................................... 159 6.6.2.3 Axle counters ....................................................................................... 161
6.6.3 Point devices .................................................................................................... 162
6.6.4 Derailer devices ............................................................................................... 162 6.6.5 Stopping device ..................................................................................... 162
6.6.6 Key box .............................................................................................................. 162
6.6.7 Point machine ................................................................................................... 163
6.6.8 Power supply .................................................................................................... 163
6.6.9 Equipment room of the signalling systems .................................................. 164
6.6.10 Signalling systems cabling and earthing .................................................... 164
6.6.11 Building signalling systems .......................................................................... 165
6.6.12 Signalling system commissioning and temporary removal from use .... 166
6.6.13 Signalling system maintenance ................................................................... 168
REFERENCES ........................................................................................................... 169 APPENDIX Appendix 1 Graphical symbols for signalling plans Appendix 2 Conditions for definition of main route overlap Appendix 3 Determining the signal code in a new signalling system

6 RATO 6 / 05-2012
6 SIGNALLING SYSTEMS
RATO is a set of guidelines by the Finnish Transport Agency. It is applied to work issued by the Finnish Transport Agency and performed on the state rail network governed by the Finnish Transport Agency. All contracting parties to the Finnish Transport Agency must follow RATO according to their contract, when offering services stated in a contract between the parties. The Finnish Transport Agency is responsible for ensuring that the regulations are not in conflict with the law, national regulations in compliance with the law or technical specifications for interoperability enforced in Finland. Special permission by the Finnish Transport Agency for departing from RATO guidelines can be granted in cases where it does not conflict with the law, regulations or the technical specifications for interoperability. RATO part 6 ’Signalling Systems’ deals with the design, construction and maintenance of signalling systems. This part of RATO must be applied to the design and construction of new signalling systems and the maintenance of signalling systems on the state rail network. In addition, it must be applied when making modifications to existing signalling systems or their operations as concerned. This part of RATO uses terms already established in signalling systems technology. The terms may differ from the terms used in other parts of RATO or regulations concerning traffic. When the term definition is applied only to this part of RATO, it is so indicated in the term definition.
6.1 DEFINITIONS, SYMBOLS AND ABBREVIATIONS
Alarm section An alarm section is a track section or consecutive track sections, which are coupled in order to control the level crossing system from one direction. A road section is not an alarm section. Approach zone An approach zone is the track section or sections in rear of a signal, which must be vacant in order that a set main route can be cancelled. Automatic level crossing system An automatic level crossing system is a level crossing system, which cannot be controlled by an interlocking system. Point automatics Point automatics is the automatic point operation between hump and sorting tracks. Automatic Train Protection (ATP) Automatic train protection is a system monitoring the maximum speed of a train. Basic command A basic command is a command whose preconditions for realization are the fulfilment of safety requirements set for the actions according to the command, and which does not require the user confirmation.

7
RATO 6 / 05-2012
Block section A block section is a section between the main route entry and exit points on a main signalled track. A block section may include several track sections. Block travel direction Block travel direction is the direction of the line in which the routes or block sections can be set. Centralized ATP control A centralized ATP control is an arrangement, where the information of set routes is transmitted to the trackside ATP devices without using signal aspects and control lines. Characteristic gradient A characteristic gradient is a gradient value calculated for the 1800m distance in rear of a main or block signal using a 1200m distance sample. Combined signal A combined signal is a signal which can display the aspects main, distant and shunting signals when needed, Command In this part of RATO, a command is a command given to a signalling system to control the signalling system functions. Control line A control line is a circuit, corresponding to signal lamp circuit, which is used to transmit the interlocking system controls, without visible aspect, to an encoder measuring the power consumption. A control line can transmit additional information of the signal aspect, consecutive set routes, points on the set consecutive routes, set overlap, route exit signal, route to an occupied track or point position. Critical command A critical command is a command that has to be confirmed by the user. Danger point distance Danger point distance is the distance in advance of the signal marking the route end where a stopping train passing the signal does not endanger the traffic on adjacent tracks. The danger point distance is not proved vacant in the signalling system logic unless the track section on the danger point distance is a route overlap.
Data transfer distance Data transfer distance is the distance to the point of target where ATP must receive the data about the point of target at the latest. The data transfer distance is 2400m or 3600m. Distributed ATP-control A distributed ATP control is an arrangement, where the connection of the interlocking and ATP is realized with encoders measuring the power consumption.

8 RATO 6 / 05-2012
Distributed interlocking A distributed interlocking is an interlocking system where the satellite interlockings are not operating as independent interlocking systems. A central interlocking for the distributed interlocking controls route setting. In this part of RATO, the satellite interlocking is considered equal to interlocking. Emergency command An emergency command is a command, the conditions of which do not meet all the safety requirements set for interlocking functions. An emergency command must be a critical command. Engineering configuration requirements Engineering configuration requirements refers to individual project documents concerning technical solutions and operation methods approved by the Finnish Transport Agency. Entry point An entry point is the first point when approaching the railway operating location. Facing point A facing point is the point layout direction seen from the point blade tips towards the blade base. Fictive signal aspect A fictive signal aspect is a status information indication sent to ATP in centralized ATP. A fictive signal aspect may indicate additional information of the signal aspect, information about consecutive set routes, points on such routes, a route exit signal or a main route to an occupied track. Flank protection Flank protection is an element that protects the locked route or local point operation group with given local point operation permission from any other train movement.
Fouling sign point A fouling sign point is the location, up to which the track can be run without interfering with the movements on the adjacent track. Fouling sign point of a point A fouling sign point of a point is a fouling sign point associated with a point. Free of fouling restrictions Free of fouling restrictions is a characteristic of a point or a standard diamond crossing branch, which describes the position of a track section boundary in relation to a fouling sign point. The branch of a point or crossing is free of fouling restrictions when the point track section extends up to the distance defined in 6.3.4.3 from a fouling sign point of a point or crossing. The branch of a point or crossing is not free of fouling restrictions when the track section of a point or crossing does not extend up to the distance defined in 6.3.4.3 from fouling sign point of a point or crossing.

9
RATO 6 / 05-2012
In advance of signal In advance of signal is the area in line with the tracks in the direction from which the signal lamps cannot be viewed. Indication An indication is state information about the signalling element displayed by a signalling system. In rear of signal In rear of signal is the area in line with the tracks in the direction from which the signal lamps can be viewed. Interlocking system An interlocking system is a system used for route setting. Interlocking ensures that the route conditions are met in route setting and implements the actions associated with route setting. Key box permission Key box permission is an interlocking control for the key box enabling the removing of the key from the key box. Key box permission can be given as a separate command or it can be associated with local point operation permission. Key lock The key lock is the lock, which can be used for locking the points, derailers, stopping devices or equivalent in a certain position. The key lock can be locked only when the element to be locked is in a certain position and the key lock key can only be removable from the key lock when the key lock is locked. Level crossing In this part of RATO, a level crossing refers to a railway level crossing. Level crossing barrier system A level crossing barrier system is a system that warns about a train moving on the track at a level crossing. A level crossing barrier system is equipped with barriers, road signals and warning bells. Level crossing light and audible system A level crossing light and audible system is a system that warns about a train moving on the track at a level crossing. A level crossing light and audible system is equipped with road signals and alarm bells. Level crossing light system A level crossing light system is a system used for warning about a train moving on the track at a level crossing. A level crossing light system is equipped with road signals. Level crossing protecting signal A level crossing protecting signal is either a main, block or shunting signal located on the alarm section of a level crossing system and displaying aspects for the trains moving towards a level crossing. A signal is not a level crossing protecting signal if the alarm section starts on the track section in advance of the signal. A signal is a level
10 RATO 6 / 05-2012
crossing protecting signal if a road section starts on a track section in advance of the signal.
Level crossing system A level crossing system is a level crossing barrier system, level crossing light and audible system, level crossing light system or a station crossing system. Line In this part of RATO, line refers to a track or tracks between the station entry signals of two consecutive interlockings or two satellite interlockings of a distributed interlocking system. Line block A line block is an entity containing a number of functions that ensure the block conditions for the line in respect to the interlocking route conditions. A line block can be implemented with a separate line block system or an equivalent operation can be implemented by the route conditions of the signals controlled by an interlocking system. Line block entry signal A line block entry signal is a block signal that is located in the interface of the interlocking system and the line equipped with a line block system and has the first block section in advance of that signal. A line block entry signal cannot be a route exit signal. Line block system A line block system is a separate system from an interlocking system that controls the running of trains and prevents the setting of a route against the block travel direction on the line. The system does not function on the principle of route conditions as the interlocking system does, but it is based on block conditions that allow only one train on a block section at any given time. Conditions are considered equal with route conditions as applicable. Line main signal A line main signal is the main signal located on the line. The main signal located by the station entry signal and displaying signals in the opposite direction is the line main signal. Line point In this part of RATO, line point refers to a point located on the line. Line point protecting signal A line point protecting signal is either a main signal or block signal, which is at the start of a block section containing a line point. The line point protecting signal can be a station exit signal, a line main signal or a block signal. Local control Local control means controlling the interlocking system from its own user interface.

11
RATO 6 / 05-2012
Local point operation In this part of RATO, local point operation refers to an interlocking state that enables the operating of points stopping devices and derailers included in the local point operation group with a local operation button and the use of key boxes included in the local point operation group. Local point operation group A local point operation group is a group of determined points, stopping devices and derailers which can be operated by local operation buttons and key boxes where the key can be removed when that particular local point operation group has permission for local point operation. A local point operation group includes the points, derailers, stopping deveices and key boxes designated to the local point operation group. Signalling elements providing flank protection for the local point operation group and the track sections determined to the local point operation group in question are associated with the local point operation group.
Long point Long point is a set of points where the maximum running speed to the diverging track can be over 40kph, due to the construction of the points. Main route In this part of RATO, main route refers to a set route that fulfils the main route conditions. Main route to an occupied track A main route to an occupied track is a main route where the track section or sections in rear of the route exit signal are occupied. Main route track A main route track is a track with track sections, which may be part of the main route. Main signalled track In this part of RATO, main signalled track refers to main route tracks with track vacancy proving and traffic control with visible aspects from one block section to the next. Maximum track speed In this part of RATO, maximum track speed refers to the maximum speed limit on the track section in question. Overlap An overlap is the track section or sections in advance of the signal ending the set main route, which is locked and proved vacant in the conditions of a set route. Overlap 0 An overlap 0 is a state information of the overlap associated with the main route, set in interlocking system logic, with no corresponding track section set. The state information about locked overlap 0 is considered equivalent to a set overlap in the route conditions.
12 RATO 6 / 05-2012
Platform track A platform track is a track next to a passenger or loading platform. Point A point is a rail junction, where traffic can be directed from one track to another. Front and end joints mark the boundaries of the point. Point branch The point branch of a point is the track leading away from the point until the end of the rail joint, when viewed from the point blade tips. The point position is determined according to which branch the point is leading to, when viewed from the blade tips. Point free of fouling restrictions Point free of fouling restrictions is a point whose track section extends at least to the required distance from the fouling sign point, seen from the direction of the point. Point machine In this part of RATO, point machine refers to an electrically operated point machine.
Point speed information Point speed information is a fictive signal aspect that enables the increasing of the ‘Proceed 35’ aspect points-based speed limit, according to the points on the route. Point track section The point track section is the track section the point is included in. Positioning distance Positioning distance is the longest distance possible between an interlocking element and an element control module. Powered point A powered point is a point, which can also be operated by other methods than local manual operation. Presignalling distance Presignalling distance is the distance between a distant signal and either a main or block signal or a shunting signal marking the end of the main route which is presignalled by the distant signal. A distant signal located in connection with a main signal may hold several presignalling distances according to the choice of routes, if a block section started by a main signal has route points. Protecting signal A protecting signal is a main, block, shunting or locking signal, which, when displaying the ‘Stop’ aspect, prevents train movements from the direction of the signal to the route, local point operation group with local point operation permission, points, level crossing, bridge or equivalent in advance of the signal.

13
RATO 6 / 05-2012
Radio signal In this part of RATO, a radio signal refers to a main route exit location, which is equipped with balises and which functions in a signalling system in the same way as a main signal but without visible aspects. Radio signal is also a signalling element, which functions in a signalling system in the same way as a main signal but without visible aspects. Radio signal has a state information corresponding with the main signal aspect. ‘In rear of radio signal’ refers to the area of the direction in which the code of the radio signal (=track sign, end of main route) is visible. In advance of the radio signal refers to the area of the direction in which the code of the radio signal is not visible. Release speed Release speed is the speed level to which the braking curves calculated to the location of a signal displaying 'Stop' aspect are monitored. ATP allows the approach of the signal displaying 'Stop' aspect at most with the release speed, starting from the point, where the starting curve of the service braking intersects the limit of over speed monitoring of the release speed, if ATP is not simultaneously monitoring a lower speed limit. The speed can be higher than the release speed by the signal only when ATP has received the information about the signal aspect permitting driving. Remote control In this part of RATO, remote control refers to controlling of the interlocking with the user interface of the remote control separate from the interlocking. Remote control system A remote control system is a separate controlling system from interlocking system, enabling the control of one or more interlocking systems. Road section A road section is a track section or sections interlinked with the operation of a level crossing system where the road and the track cross each other at a level crossing equipped with a level crossing system. Road signal A road signal is a signal, which uses lights on a level crossing to warn the traffic crossing the railway about rolling stock on the tracks. Route In this part of RATO, a route refers to a train path between a route entry and exit point, which is locked by a signalling system. The signals, points, derailers, stopping devices and track sections on the route are included as parts of the route. Possible elements of flank protection or overlap are associated with the route. A route can be set on the conditions of a main or shunting route. A block section locked within a line block system is considered a locked route. Route condition Route condition is a condition, which is checked during route setting. The route conditions have to be met to enable the route setting. Route conditions include route basic, locking and monitoring conditions. Route entry signal A route entry signal is a signal in rear of the first track section included in the route.

14 RATO 6 / 05-2012
Route exit signal A route exit signal is a signal in advance of the last track section included in the route. The overlap possibly associated with the route is located in advance of the route exit signal. Route point A route point is a point on the route through which the main route or the shunting route can be set to both point branches. Route track A route track is a track consisting of track sections which may be part of a main or shunting route. Short point Short point is a point where the maximum running speed to the diverging track is 40kph, due to the structure of the point. Shunting route In this part of RATO, a shunting route is a route locked by shunting route conditions. Shunting route track A shunting route track is a track with track sections which can be part of a shunting route. Sighting distance The sighting distance is the distance from the track centre, 2000 ± 1000mm above the upper surface of the rail where the signal or sign is visible. When estimating the sighting distance, it must be presumed that the tracks on both sides are occupied with obstructing train units. Sighting distance requirement The sighting distance requirement is the required sighting distance for an individual signal or sign. The sighting distance requirements for signals are stated in this part of RATO. The sighting distance requirements for railway signs are stated in RATO part 17 ‘Railway Signs’. Signal In this part of RATO, signal refers to a signalling element, which can display a visible aspect. A signal includes the control logic associated with it. Signal aspect In this part of RATO, signal aspect refers to a visible signal aspect displayed by a signal. Signalling apparatus In this part of RATO, signalling apparatus refers to a single apparatus associated with the operation of a signalling system.

15
RATO 6 / 05-2012
Signalling element A signalling element is a signalling apparatus or a group of signalling apparatuses with corresponding logic state information in an interlocking system, line block system or systems associated with them. Signalling system A signalling system is a system formed by one or more interlockings or signalling apparatuses (even if they do not form an interlocking system), which protects traffic movements. Speed limit In this part of RATO, the speed limit means the maximum speed on a specified distance, determined to all units or to units with certain properties. The determined maximum speed may be based on the properties of the train or track. Station crossing system A station crossing system is a system that warns the station crossing or passage about train moving on the track. The station crossing system is equipped with road signals and alarm bells. Station entry signal The station entry signal is the first main signal seen from the direction of the line that can function as the route entry signal regardless of the block travel direction. Station exit signal A station exit signal is a main signal that can start a main route from the railway operating location tracks in the direction of the line. Stopping device A stopping device is a device, when turned onto the rails, stays in front and below the first wheels of the unit colliding with the device and stops the unit based on the friction created between the device and the rails. Through track A through track is a track or consecutive tracks, which can be run inside a railway operating location from one railway operating location boundary to the next through points turned to lead to a straight track. Track In this part of RATO, track refers to a track section or consecutive track sections, which share the first three numbers. A route point or a signal mark the track boundaries. Track blocking Track blocking is a state set up on a track section or centralized point within an interlocking system, which prevents route setting by a basic route command on the track section or centralized point in question.

16 RATO 6 / 05-2012
Track section
A track section is a section of rails bounded to one unit by rail insulation or axle counters. A track section can include one or more points. A track section forms an entity, which is track vacancy proved.
Track section boundary The track section boundary is the site where the rail insulation or axle counter head ending the track section is located. Track Vacancy Proving Track vacancy proving is a system that ensures that the track section is free from rolling stock. Track vacancy proving can be carried out with axle counter system or track circuits. Trailed Trailed is a state of a point in an interlocking system beginning when the point is trailed (‘run through’) and ending with the operation command of the trailed point. The state of the point must be trailed, when at least one point machine is detected as trailed. Trailing (a set of points) In this part of RATO, trailing refers to an action where a powered point blade in the end position, not leaning against a stock rail in the position in question, moves without operating the point and is removed from monitoring. Moreover, trailing refers to an action where the end position of the nose of the crossing is removed from monitoring without operating the nose. Trailing point A trailing point is a point layout direction seen from the point blade base towards the tips.
Train A train is a train or other rolling stock on the track, connected in one train. Train control system A train control system is a signalling system, control unit of a signalling system or a system protecting traffic movements. Trap point A trap point is a point with the single function of providing flank protection. In addition to a trap point, another point may also be used for providing flank protection.

17
RATO 6 / 05-2012
6.1.1 Symbols
Graphical symbols for signalling plans are presented in appendix 1. 6.1.2 Abbreviations ATU Structure Gauge CENELEC European Committee for Electrotechnical Standardization DIN Deutsches Institut für Normung e.V. EEA European Economic Area ATP Automatic Train Protection RATO Railway Engineering Guidelines SIL Safety Integrity Level UPS Uninterruptible Power Supply TSI Technical Specification for Interoperability

18 RATO 6 / 05-2012
6.2 BASIC PRINCIPLES OF SIGNALLING SYSTEMS
6.2.1 General
Signalling systems are apparatuses associated with interlocking systems, line block systems, level crossing systems as well as Automatic Train Protection (ATP), remote control and hump systems. The train control system consisting of signalling systems secures safe railway traffic together with the regulations on traffic movements and forms the traffic capacity of the track. A new train control system has to comply with the safety level requirements of signalling systems defined by the Finnish Transport Agency according to European CENELEC standards. The train control system has to be secured in such a way that a single failure in a train control system directs the train control system system controllably into a safe state. 6.2.1.1 Engineering configuration requirements for signalling systems planning The engineering configuration requirements for signalling systems planning has to define, in the scope necessary for the project, – the signalling system technology to be used and the required safety level, – the maximum positioning distance used in planning, – the type of track vacancy proving, – the usage of the combined signals – the principle of the track numbering – local control needs for interlocking system and the location of local control, – tracks that must have main routes planned, enabled by signalling system, – tracks that must have the possibility of being set as a main route to an occupied
track, – the signals in rear of the track which has no passenger platform and for which an
overlap 0 must be defined when the requirements set for overlap 0 are fulfilled, – tracks that must have shunting routes planned, enabled by signalling system, – the track capacity requirements for train traffic, – the track capacity requirements for shunting work, – the point up to which shunting work must be possible from the railway operating
location tracks in the line direction regardless of the set routes or block sections on the line,
– railway operating locations which are equipped with station entry signals and which will be equipped with radio signals instead of visible station exit signals,
– lines, which have line points, and for which main route setting must be enabled simultaneously from both directions,
– the need for local operation of points and the division to local point operation groups,
– level crossings, which are equipped with a level crossing system and the interdependency between the level crossing system operation and the interlocking or line block system,
– level crossing systems that are equipped with double barriers, – station crossings and passages that are equipped with level crossing systems, – maintenance road level crossings and other level crossings, which are equipped
with a maintenance road protection system, – objects that are protected with locking signals, – the need to duplicate the data transfer connection of the remote control system, – the remote control system interfaces to systems external to signalling systems
and – the equipping of signalling systems with accumulators or diesel generators for
reserve power.

19
RATO 6 / 05-2012
In projects, which do not have engineering configuration requirements for signalling systems planning drawn and which include signalling systems planning, the above listed information must be defined in writing in the scope required. 6.2.1.2 Effect of maximum track speed in signalling systems planning
In determining the maximum track speed that affects signalling systems planning, the following must be considered; – the track maximum speed on the railway section, – the speed limits caused by permanent geometry, points and other track structures
affecting the maximum track speed – other planned projects affecting the maximum track speed on the line. The signalling system must be planned in such a way that the planning does not prevent the raising of the maximum speed when other preconditions for raising the speed are met. Dimensioning associated with a level crossing system must be done applying to speeds not exceeding 140kph. 6.2.1.3 Signalling apparatus code A signalling apparatus must have a code, which identifies the signalling apparatus in an interlocking or other train control system the signalling apparatus is associated with. The code must consist of Arabic numerals and letters attached before and/or after the numerical part.
6.2.2 Interlocking system
The interlocking must secure the technical interdependencies associated with the operation of signalling systems in such a manner that the set safety requirements are met. The operation of the new interlocking must meet the requirements stated in part 6.3. Modifications to an interlocking must meet the requirements stated in part 6.3 considering the exceptions made for the interlocking type in question in part 6.2.2 and the operation and safety requirements of the interlocking in question, required during the construction. The signal aspects controlled by an interlocking system must comply with the regulations for traffic movements. 6.2.2.1 Computerised interlocking system A new computerised interlocking system operation must meet the operation requirements for interlocking system operation stated in Chapter 6.3. The interlocking system operation is described in more detail in the functional requirements for interlocking system published by the Finnish Transport Agency. 6.2.2.2 Relay interlocking system
In relay interlocking, lamps other than the main or block signal ‘Stop’ aspect lamp do not need to be a double filament lamp. Main route cancellation does not need to be possible in a relay interlocking system. The automatic cancellation of an unused part of shunting route does not need to be possible in a relay interlocking system.

20 RATO 6 / 05-2012
The setting of opposing or intersecting routes on a set main route must be prevented if the relay interlocking system is not able to set the main route overlap according to the overlap requirements stated in Chapter 6.3.5.1.4. The user interface of a relay interlocking system may be a control or indication board. A signal that has displayed an aspect permitting driving must display an aspect permitting driving after an interruption of less than 3s in the power supply of the signal, if the conditions for displaying an aspect permitting driving are valid when the power supply is recovered.
6.2.2.3 Mechanical interlocking system
In mechanical interlocking system, lamps other than the main or block signal ‘Stop’ aspect lamp do not need to be a double filament lamp. The signal controlled by mechanical interlocking system does not need to have a track section in advance of the signal, controlling the ‘Stop’ aspect of the signal. Two main signals associated with mechanical interlocking system and displaying aspects in opposing directions must not show an aspect permitting driving simultaneously when the interlocking system is in a manned operation mode. The route setting must meet the following conditions in a mechanical interlocking system: – An intersecting route for the route has not been set. – An opposing route for the route has not been set, unless the route is set in
unmanned operation. – The points on the route are locked in a position according to the route. – The points on the route providing flank protection are locked in a position
protecting the route. – The derailer providing flank protection for the route is locked on the rail. The automatic release of a set main route does not need to be possible in a mechanical interlocking system. The powered point associated with mechanical interlocking system must be equipped with a mechanical interlocking system point machine. The powered point associated with mechanical interlocking may be equipped with a track circuit and electric lock. A track associated with mechanical interlocking system may be left without track vacancy proving. The operation of the powered point associated with mechanical interlocking system must be prevented while the track section of the point in question is occupied. The interlocking system mechanism and the control and indication board associated with it may be the mechanical interlocking system user interface. In mechanical interlocking system, a contact device or a key lock may monitor the operation key for the key lock of a point or derailer protecting a route track.
6.2.2.4 Area key lock system with signals
In an area key lock system with signals, lamps other than the main or block signal ‘Stop’ aspect do not need to be double filament lamps. The signal controlled by an area key lock system with signals does not need to have a track section in advance of the signal controlling the ‘Stop’ aspect of the signal.

21
RATO 6 / 05-2012
Two main signals associated with an area key lock system with signals and showing aspects in opposing directions must not show an aspect permitting driving simultaneously when the interlocking system is in a manned operation mode. Route setting in an area key lock system with signals must meet the following conditions: – An intersecting route for the route has not been set. – An opposing route for the route has not been set, unless the route is set in
unmanned operation . – The points on the route are locked in a position according to the route. – The points on the route providing flank protection are locked in a position
protecting the route. – The derailer providing flank protection for the route is locked on the rail. The automatic release of a set main route does not need to be possible in an area key lock system with signals. A track associated with an area key lock system with signals may be left without track vacancy proving. An area key lock system with signals must not have powered points. The user interface of an area key lock system with signals may be an indication board. A contact device or a key switch may monitor the operation key for the key lock of a point or derailer protecting a route track in an area key lock system with signals. The user manual of the area key lock system with signals may be a 1:10 000 scale schematic representation of the signalling apparatuses in a basic state and the routes associated with an area key lock system with signals. 6.2.2.5 Area key lock system
The area key lock system operation must ensure that the point, associated with a area key lock system, is in the position determined in the user manual and that traffic movements to a track determined in the user manual are prevented by derailers or points locked in the trap point position while the area key lock system is in a basic state. The operation key of the area key lock system may be locked to a key box while the area key lock system is in a basic state. The user manual for a area key lock system may be a 1:10 000 scale schematic representation of the signalling apparatuses in a basic state associated with area key lock system.
6.2.3 Signals and signal aspects
The purpose of an aspect is stated in the regulations concerning traffic. The signal aspect must fulfil the requirements as stated below. The aspect displayed by the signal must be monitored. A main, block or shunting signal must be set to display the ‘Stop’ aspect if the signal has a fault preventing the display of an aspect permitting driving. A distant signal must be set to display the ‘Expect stop’ aspect if the signal has a fault preventing the display of the ‘Expect proceed’ or ‘Expect proceed 35’ aspect. A main signal in a combination of a main and distant signal must be set to display the ‘Stop’ aspect, if the distant signal in the combination has a fault preventing the display of the ‘Expect stop’ aspect in a situation where the distant signal should be displaying the ‘Expect stop’ aspect. The route entry signal must not display an aspect permitting driving if the route exit signal cannot display the ‘Stop’ aspect or the route exit signal is not monitored.

22 RATO 6 / 05-2012
The main and block signal must be set to automatically display the ‘Stop’ aspect after a delay time when the track section in advance of the signal becomes occupied. The delay time must be at least 2 seconds and not more than 3 seconds. The signal must be able to be set by a command without a delay to display the ‘Stop’ aspect. The positioning of the signal must be planned in such a way that the requirements for the signal sighting distance are met as stated in Chapter 6.4. Distant signal information of a main or block signal aspect must be given if the signal can act as a main route exit signal. Distant signal information of a shunting signal ‘Stop’ aspect must be given according to the same principles as the main signal ‘Stop’ aspect if the shunting signal can act as the main route exit signal. A combined signal can act as main route entry signal, shunting route entry signal, signal associated with a local point operation group, distant signal, signal providing only flank protection and/or a combination of the previous. The guidelines for controlling and positioning the combined signal are given in Table 6.2:1.

23
RATO 6 / 05-2012
Table 6.2:1 The possible combinations of the combined signal and the requirements for controlling and positioning the combined signal.
Concerning the controlling and
positioning the signal one has to follow the requirements dealing
with
mai
n si
gnal
shun
ting
sign
al
dist
ant s
igna
l
Main route entry signal, shunting route entry signal, signal associated with the local point operation group and distant signal.
X X X
Main route entry signal, shunting route entry signal and signal associated with the local point operation group.
X X -
Main route entry signal, signal associated with the local point operation group and distant signal.
X X X
Main route entry signal and signal associated with the local point operation group.
X X -
Main route entry signal, shunting route entry signal, and distant signal.
X X X
Main route entry signal and shunting route entry signal. X X -
Main route entry signal and distant signal. X - X
Main route entry signal. X - -
Shunting route entry signal and signal associated with the local point operation group.
- X -
Shunting route entry signal. - X -
Distant signal. - - X
Signal associated with the local point operation group and giving only flank protection.
- X -
Signal giving only flank protection. - X -
The code of the combined signal must be according to the requirements presented for the main signal code, if the requirements presented for the main signal are valid for the combined signal. The code of the combined signal must be according to the requirements presented for the shunting signal code, if only the requirements presented for the shunting signal are valid for the combined signal. The code of the combined

24 RATO 6 / 05-2012
signal must be according to the requirements presented for the distant signal code, if only the requirements presented for the distant signal are valid for the combined signal. A station exit signal may be replaced with a radio signal following the requirements stated in Chapter 6.4.9. 6.2.3.1 Main signal aspects The main signal must display an aspect permitting driving, when the main signal is the main route entry signal for the set route. In any other case, the main signal shall display a ‘Stop’ aspect. The main signal must be set to display a ‘Stop’ aspect, when any one of the route conditions is not met. The main signal starting a set main route must display the ’Proceed 35’ aspect as the aspect permitting driving, when – there is a short point on the route, which is turned to a position leading to a
diverging track – there is a long point on the route, which is turned to a position leading to a
diverging track and the speed limit of the diverging track is lower than the speed limit on the straight track of the point,
– the route is a main route to an occupied track, – there are short points on the route and the speed limit on the straight track is a
maximum of 35kph or – the route ends in a radio signal, which is or may be the route entry signal for a
route leading to a diverging track of a short point. In any other case, the main signal must display the ‘Proceed’ aspect as the aspect permitting driving and the speed limit must be marked according to the requirements in RATO part 17 ‘Track Signs’. 6.2.3.2 Block signal aspects
The block signal must display an aspect permitting driving when block conditions on the block section in advance of the signal are met. In any other case, the block signal must display a ‘Stop’ aspect. The block signal aspect permitting driving must be the ‘Proceed, Expect stop’ aspect when the next main or block signal displays the ‘Stop’ aspect. In any other case, the block signal aspect permitting driving must be the ‘Proceed’ aspect. 6.2.3.3 Distant signal aspects The distant signal must display the ‘Expect stop’ aspect when – a main signal, which the distant signal is referring to, is displaying the ‘Stop’
aspect, – a shunting signal ending a main route is displaying the ‘Stop’ aspect, – the distance signal is in the same mast with a main signal which displays a drive
permitting aspect and starts a main route to an occupied track, – the main route ends on a track with ‘End of main route’ indicator or rail buffer, or
on a track which is not main signalled – the signal aspect ending a main route does not send the information to the distant
signal or – the distant signal is not able to display the aspect permitting driving. The distant signal must display the aspect ‘Expect Proceed 35’ when the main signal that the distant signal is referring to is displaying ‘Proceed 35’. The distant signal must display the ’Expect Proceed’ aspect when

25
RATO 6 / 05-2012
– the main signal that the distant signal is referring to displays the ‘Proceed’ aspect
or – the block signal that the distant signal is referring to displays the ‘Proceed’ or
‘Proceed, Expect stop’ aspect. The distant signal must display the ’Expect stop’ aspect when the main route has been set up to a shunting signal connected to the main signal and the shunting signal ending the main route or the main signal connected to it is displaying the ‘Stop’ aspect. The distant signal must display an aspect in accordance with the main signal it is referring to when the main route is set to the shunting signal connected to the main signal and the shunting signal ending the main route and the main signal connected to it are displaying the aspect permitting driving. The distant signal located in the main signal mast, below the main signal, must be switched off when the main signal is displaying the ‘Stop’ aspect. 6.2.3.4 Shunting signal aspects
A shunting signal must display ‘Proceed with caution’ when the shunting signal is the route entry signal for a shunting or main route or the shunting signal is on a set main route. The shunting signal must display the ‘No aspects’ aspect if there are track sections associated with a local point operation group with local point operation permission given in rear and in advance of the signal in question. In any other case, the shunting signal must be set to display the ‘Stop’ aspect. A shunting signal on the main route must be set to display the ’Stop’ aspect when the track section in advance of the shunting signal becomes occupied or when some other monitoring condition is not met between the shunting signal and the route exit signal. A shunting signal on a shunting route must be set to display the ’Stop’ aspect when – a vacant track section on the route becomes occupied, – an occupied track section on the route becomes vacant or – some other route monitoring condition is not met. A shunting signal associated with a local point operation group shall display the ’No aspects’ aspect when a local point operation permission is given to the local point operation group in question. A shunting signal displaying the ’No aspects’ aspect must not function as a route entry or exit signal. It must be possible to set a shunting signal displaying the ’No aspects’ aspect to display the ’Stop’ aspect. It must be possible for the shunting signal set to display the ’Stop’ aspect to be a shunting route exit signal. It must be possible to set a shunting signal to display the ’No aspects’ aspect if the local point operation group, which the shunting signal is associated with, has been given local point operation permission. A shunting signal must be set to display the ’Stop’ aspect when local point operation permission is given if the local point operation conditions are not met. A shunting signal must be returned to display the ’No aspects’ aspect when local point operation permission is given if the local point operation conditions are met. 6.2.3.5 Combined signal
The combined signal acting as main route entry signal must display 'Proceed 35' or 'Proceed' aspect, when the signal is the entry signal of a set main route and the route monitoring conditions are fulfilled. The requirements for displaying 'Proceed 35' and 'Proceed' aspects are presented in Chapter 6.2.3.1. The combined signal acting as shunting route entry signal must display 'Proceed with caution', when
the signal is the entry signal of a set shunting route and the route monitoring conditions are fulfilled or

26 RATO 6 / 05-2012
the signal is a sub-route signal between the main route entry and exit
signals. The combined signal acting as distant signal must display 'Expect stop', 'Expect proceed 35' or 'Expect proceed' aspect, when the signal is acting only as a distant signal. The combined signal acting as distant signal must display 'Expect stop', 'Expect proceed 35' or 'Expert proceed' aspect, when the signal is also a main route entry signal and the signal displays 'Proceed 35' or 'Proceed' aspect. The distant signal aspect must be the same as the aspect of the next main route entry signal. The combined signal must display 'No aspects', when the track sections in rear and in advance of the signal are associated with a local point operation group, which has the local point operation permission given., or
The combined signal must display 'Stop' aspect , when the requirements given above for displaying a drive permitting aspect or 'No aspects' aspect are not fulfilled and when the signal is not giving only distant signal information. A combined signal acting as station entry signal must not display 'Proceed with caution' aspect or 'No aspects' aspect. A combined signal acting as a line signal must not display 'Proceed with caution' or 'No aspects' aspect.
6.2.3.6 Signal aspects of other signals A locking signal must display the ’No aspects’ aspect when a swing bridge is locked for railway traffic or when a device equipped with a locking signal is monitored in a position where it does not prevent the traffic movements on the track. In any other case, the locking signal must display the ’Stop’ aspect. A locking signal must not have interdependencies with any other device or system than with the device connected to the locking signal, although the device connected to the locking signal has interdependency with the rest of the train control system. A level crossing signal must display ’No aspects’ aspect when the level crossing system has given an alarm for the required alarm period and the level crossing system has no critical faults. In any other case, a level crossing signal shall display ’Approach with caution’ aspect. 6.2.3.7 Radio signal operation The radio signal state information corresponding to the information of the main signal ‘Stop’ aspect and the needed drive permitting aspects must be transmitted to the radio signal balises. The state information of the radio signal transmitted to the balises must meet the requirements of a main signal aspect. A radio signal can provide flank protection when the information corresponding to the main signal ‘Stop’ aspect is transmitted to the balises of the radio signal. 6.2.3.8 Aspect abbreviations The abbreviations stated in Table 6.2:2 must be used for signal aspects. Table 6.2:2 Aspect Abbreviations.

27
RATO 6 / 05-2012
Signal Aspect Increased
point speed Aspect abbreviation
Main signal Stop - Po0
Proceed - Po1
Proceed 35 - Po2
Proceed 35 1 Po3
Proceed 35 2 Po4
Dark - Po- Distant Signal Expect Stop - Eo0
Expect Proceed - Eo1 Expect Proceed 35 - Eo2 Expect Proceed 35 1 Eo3 Expect Proceed 35 2 Eo4
Dark - Eo- Block Signal Stop - Po0
Proceed Expect Stop - Po1/Eo0
Proceed - Po1/Eo1
Dark - Po- Shunting Signal Stop - Ro0
Proceed with caution - Ro1
No aspects - Ro2
Dark - Ro- Locking Signal Stop - Lo0
No aspects - Lo1
Dark - Lo-
Level crossing signal
Approach with caution - To0
No aspects - To1
Dark - To- 6.2.3.9 Control lines in a new interlocking system
This chapter presents the requirements for the control line functions in a new interlocking system. The control lines needed within a signal must be according to the requirements presented in RATO 10 Junien kulunvalvonta JKV (Automatic Train Protection ATP). It must be possible to transmit the information of a drive permitting aspect of a signal to the encoder measuring power consumption by the green lamp circuit of the main and/or distant signal. In addition to the aspect of the signal also the information of the activity of the control lines associated to the signal in question have to be transmitted. The control lines in a new interlocking system are

28 RATO 6 / 05-2012
– 'JKV-Po1', 'JKV-Po3', 'JKV-Po4' (additional information of the main signal drive
permitting aspect), – 'JKV-Eo1', 'JKV-Eo3', 'JKV-Eo4' (additional information of the distant signal drive
permitting aspect), – 'JKV0' (information of the overlap), – 'JKV1' - 'JKV4' (route length and the point speed limit), – 'JKV5' (route to a vacant track from a signal, which can be the entry signal of
main route to an occupied track) and – 'JKV6' - 'JKV9' (the track to which the route is set It must be possible to transmit the information of the point position to the encoder measuring power consumption. The information of the point position must be transmitted continuously, when the point is in the defined position. The main signal must be controlled to display 'Stop' aspect, if the control line ('JKV-Po1','JKV-Po3' or 'JKV-Po4') associated with the drive permitting aspect of the signal, which should be active, is not activated. The distant signal must be controlled to display 'Expect stop' aspect, if the control line ('JKV-Eo1', 'JKV-Eo3' or 'JKV-Eo4') associated with the drive permitting aspect of the signal, which should be active, is not activated. The fault of the control line ('JKV0' - 'JKV9') must be indicated, if the control line, which should be active, is not activated. The main signal must be controlled to display 'Stop' aspect, if a control line associated with the signal in question, which should be passive, is active. The distant signal must be controlled to display 'Expect stop' aspect, if a control associated with the signal in question, which should be passive, is active. The fault of a control line for point position information must be indicated. The control line circuit must be monitored according to the requirements set for the monitoring of a signal lamp circuit, given in Chapter 6.3.3. The control line 'JKV-Po1' associated with the main signal aspect must be active, when – the signal in question can display 'Proceed' and 'Proceed 35' aspects and – the signal in question is displaying 'Proceed' aspect. The control line 'JKV-Po3' or 'JKV-Po4' associated with the main signal aspect must be active, when – the signal in question is displaying 'Proceed 35' aspect – the control line in question has been defined for the route started with the signal
(Figure 6.2:1)
301
303
304
Track Speed limit on the divergingtrack of the point
Speed limit on the track
Main signal’s
Visible aspect
Aspectabbreviation
Control line
301 - > 80kph Aja Po1 JKV-Po1
302 80kph 80kph Aja 35 Po4 JKV-Po4
303 60kph 60kph Aja 35 Po3 JKV-Po3
304 35kph 35kph Aja 35 Po2 -
Figure 6.2:1 Example of using control lines 'JKV-Po1', 'JKV-Po3' and 'JKV-Po4'.

29
RATO 6 / 05-2012
The control line 'JKV-Eo1' associated with the distant signal aspect must be active, when – the signal in question can display 'Expect proceed' and 'Expect proceed 35'
aspects and – the signal in question is displaying 'Expect proceed' aspect. The control line 'JKV-Eo3' or 'JKv-Eo4' associated with the distant signal aspect must be active, when – the signal in question is displaying 'Expect proceed 35' aspect and – the control line in question has been defined for route started with the main signal
associated with the distant signal. The control line 'JKV0' associated with the signal must be active, when – the station entry signal is displaying 'Stop' aspect, – the track section or sections between the station entry signal and entry point are
vacant, – there is no set route on the track section or sections between the station entry
signal and entry point and – the local point operation permission associated with the track section or sections
between the station entry signal and entry point is not given. The control line 'JKV1', 'JKV2', 'JKV3' and 'JKV4' associated with the signal must be activated, when the conditions presented in Table 6.2:3 are realized and signal is displaying a drive permitting aspect. Examples on the control line activation are presented in Figures 6.2:2, 6.2:3, 6.2:4 and 6.2:5.

30 RATO 6 / 05-2012
Table 6.2:3 Conditions for activation of the control line in a new interlocking system.
Eo2 Eo3 Eo4
X o - - - Eo1 - 6.2:2 (1)
o X - - - - JKV1 6.2:2 (2)
X o X o o Eo2 - 6.2:3 (1)
X o X X o Eo3 - 6.2:3 (2)
X o X X X Eo4 - 6.2:3 (3)
o X - - - - JKV2 6.2:3 (4)
X o - - - Eo1 JKV1 6.2:4 (1)
X o X o o Eo2 JKV2 6.2:4 (2)
X o X X o Eo3 JKV2 6.2:4 (3)
X o X X X Eo4 JKV2 6.2:4 (4)
o X - - - - JKV3 6.2:4 (5)
X o - - - Eo1 JKV2 6.2:5 (1)
X o X o o Eo2 JKV1 6.2:5 (2)
X o X X o Eo3 JKV1 6.2:5 (3)
X o X X X Eo4 JKV1 6.2:5 (4)
o X - - - - JKV4 6.2:5 (5)
- = Condition is not examined
X = Condition is realized
Con
trol
line
whi
ch m
ust b
e ac
tivat
ed b
y th
e si
gnal
in q
uest
ion
Conditions for activation of the control line
Exa
mpl
e in
Fig
ure
(poi
nt)
Distant signal in advance of the signal
in question can display aspects
Asp
ect
disp
laye
d by
the
dist
ant s
igna
l in
adv
ance
of t
he s
igna
l in
ques
tion
Act
ive
cont
rol l
ine
at t
he s
igna
l in
adva
nce
of th
e si
gnal
in q
uest
ionSignal in advance of
the signal in question
Sep
arat
e di
stan
t sig
nal o
r a
com
bina
tion
of m
ain
and
dist
ant s
igna
ls
Sep
arat
e m
ain
sign
al
JKV4
JKV3
JKV2
JKV1
o = Condition is not realized
JKV1 JKV1
1
2
JKV1 Eo1
Figure 6.2:2 Examples of activation of control line 'JKV1'. The types of the signals may vary.

31
RATO 6 / 05-2012
JKV2 Eo2
JKV2 JKV2
JKV2 Eo3
JKV2 Eo4
1
2
3
4
Figure 6.2:3 Examples of activation of control line 'JKV2'. The types of the signals may vary.
JKV3
JKV3 JKV3
JKV3 Eo2, JKV2
JKV3 Eo3, JKV2
1
2
3
5
Eo1, JKV1
JKV3 Eo4, JKV2
4
Figure 6.2:4 Examples of activation of control loine 'JKV3'. The types of the signals may vary.

32 RATO 6 / 05-2012
JKV4
JKV4 JKV4
JKV4 Eo2, JKV1
JKV4 Eo3, JKV1
1
2
3
5
Eo1, JKV2
JKV4 Eo4, JKV1
4
Figure 6.2:5 Examples of activation of control line 'JKV4'. The types of the signals may vary. It must be possible to determine the combined control line JKV1+JKV2 instead of separate control lines JKV1 and JKV2. The control line JKV1+JKV2 must be active, when the conditions of control line JKV1 or JKV2 are realized. It must be possible to determine the combined control line JKV3+JKV4 instead of separate control lines JKV3 and JKV4. The control line JKV3+JKV4 must be active, when the conditions of control line JKV3 or JKV4 are realized. The control line 'JK5' must be active, when – the route is set to a vacant track and – the distant signal in the same mast with the route entry signal is displaying 'Eo0'
aspect. The control line 'JKV6', 'JKV7', 'JKV8' or 'JKV9' must be active, when – the signal is displaying drive permitting aspect – the route corresponding to the control line is set.
6.2.3.10 Control lines in interlocking system to be modified This chapter presents the requirements for the functions of the control lines in an interlocking system to be modified. The control lines needed with a signal must be defined according to the requirements presented in RATO's part 10 "Automatic train protection ATP". In addition to the information of the signal aspect it must be possible to transmit to the encoder measuring power consumption the information of the activity of the control lines associated with the signal in question. The control lines in an interlocking system to be modified are – point speed information, – S36 or Ssn (route length), – Sv1 or Sv2 (speed limit due to points), – Skl (track to which a route has been set), – Svr (main route to an occupied track) and – Sov (overlap information).

33
RATO 6 / 05-2012
It must be possible to transmit the information on the point position to the encoder measuring power. The information on the point position must be transmitted continuously, when the point is in the defined position. The main signal must be set to display the ’Stop’ aspect and the distant signal ‘Expect stop’ aspect if, in the point speed information of the signal in question, a fault is detected preventing the transmitting of the point speed information to ATP. The control line circuit must be monitored according to the requirements in Chapter 6.3.3 for signal lamp circuit monitoring. A main signal-associated control line for point speed information must be active when – the main signal is displaying the ‘Proceed 35’ aspect, – the track with a set route or the diverging track of the points leading to the track in
question has a speed limit of over 35kph and – the main signal in question may be a route entry signal of the route, which has a
speed limit of 35kph maximum on the track or the diverging track of the point leading to the track (Figure 6.2:6).
302
301
303
304
Track Speed limit on the divergingtrack of the point
Speed limiton the track
Main signal aspect and pointspeed information
301 - > 80kph Proceed
302 80kph 80kph Proceed 35 + point speedinformation 2
303 60kph 60kph Proceed 35 + point speedinformation 1
304 35kph 35kph Proceed 35
Figure 6.2:6 Main signal-associated fictive aspect point speed information. Distant signal-associated point speed information control line must be active when the control line for the point speed information of the main signal the distant signal is referring to is active. The control line 'S36', 'Ssn', 'Sv1' and 'Sv2' associated with the signal must be activated when the conditions presented in Table 6.2:4 are fulfilled and the signal is displaying a drive permitting aspect. Examples on the control line activation are presented in Figures 6.2:7, 6.2:8, 6.2:9 and 6.2:10.

34 RATO 6 / 05-2012
Table 6.2:4 Activation conditions of the control line in an interlocking system to be modified.
Eo2 Eo3 Eo4
X o - - - Eo1 - - 6.2:7 (1)
o X - - - - X - 6.2:7 (2)
X o - - - Eo1 - S36 6.2:8 (1)
X o X o o Eo2 - S36 6.2:8 (2)
X o X X o Eo3 - S36 6.2:8 (3)
X o X X X Eo4 - S36 6.2:8 (4)
o X - - - - X S36 6.2:8 (5)
X o X o o Eo1 - Ssn 6.2:8 (1)
X o X o o Eo2 - Ssn 6.2:8 (2)
X o X X o Eo3 - Ssn 6.2:8 (3)
X o X X X Eo4 - Ssn 6.2:8 (4)
o X - - - - X Ssn 6.2:8 (5)
X o X o o Eo2 - - 6.2:9 (1)
X o X X o Eo3 - - 6.2:9 (2)
X o X X X Eo4 - - 6.2:9 (3)
X o - - - Eo1 - Sv1 6.2:10 (1)
X o X o o Eo2 - Sv1 6.2:10 (2)
X o X X o Eo3 - Sv1 6.2:10 (3)
X o X X X Eo4 - Sv1 6.2:10 (4)
o X - - - - X Sv1 6.2:10 (5)
Con
trol
line
whi
ch m
ust b
e ac
tivat
ed b
y th
e si
gnal
in
ques
tion
Conditions for activation of the control line
Exa
mpl
e in
Fig
ure
(poi
nt)
Signal in advance of the signal in
question
Distant signal in advance of the signal
in question can display aspects
Asp
ect d
ispl
ayed
by
the
dist
ant s
igna
l in
adva
nce
of th
e si
gnal
in q
uest
ion
Act
ive
cont
rol l
ine
at th
e si
gnal
in a
dvan
ce o
f the
si
gnal
in q
uest
ion
Sep
arat
e di
stan
t sig
nal o
r a
com
bina
tion
of m
ain
and
dist
ant s
igna
ls
Sep
arat
e m
ain
sign
al
Sep
arat
e m
ain
sign
al in
adv
ance
of t
he s
igna
l in
ques
tion
is d
ispl
ayin
g dr
ive
perm
ittin
g as
pect
- = Condition is not examined
o = Condition is not realized
S36
Ssn
Sv1
Sv2
X = Condition is realized

35
RATO 6 / 05-2012
S36 Eo1
S36 Drive permitting aspect
1
2
Figure 6.2:7 Examples of activation of control line 'S36'. The types of the signals may vary.
Ssn Eo1, S36 or Ssn
Ssn
Ssn Eo2, S36 or Ssn
Ssn Eo3, S36 or Ssn
1
2
3
4
Eo4, S36 or Ssn
Ssn
5
S36 or Ssn
Figure 6.2:8 Examples of activation of control line 'Ssn'. The types of the signals may vary.
Sv1 Eo2
Sv1
Sv1
Eo3
1
2
3
Eo4
Figure 6.2:9 Examples of activation of control line 'Sv1'. The types of the signals may vary.

36 RATO 6 / 05-2012
Sv2 Eo1, Sv1
Sv2
Sv2 Eo2, Sv1
Sv2 Eo3, Sv1
1
2
3
4
Eo4, Sv1
Sv2
5
Sv1
Figure 6.2:10 Examples of activation of control line 'Sv2'. The types of the signals may vary. The control lines 'Sv1' and 'Sv2' must be able to be active simultaneously. It must be possible to determine a combined control line S36+Ssn instead of the separate control lines S36 and Ssn. The control line S36+Ssn must be active, when the conditions of the control line S36 or Ssn are realized. It must be possible to determine a combined control line S36+Ssn instead of the separate control lines S36 and Sv1. The control line S36+Sv1 must be active, when the conditions of the control line S36 or Sv1 are realized. It must be possible to determine a combined control line S36+Ssn+Sv1 instead of the separate control lines S36, Ssn and Sv1. The control line S36+Ssn+Sv1 must be active, when the conditions of the control line S36, Ssn or Sv1 are realized. It must be possible to determine a combined control line Ssn+Sv2 instead of the separate control lines Ssn and Sv2. The control line Ssn+Sv2 must be active, when the conditions of the control line Ssn or Sv2 are realized. The control line 'Svr' must be active, when – the route is set to a vacant track and – the distant signal in the same mast with main signal starting the route displays
'Eo0' aspect. The control line 'Skl' associated with the signal must be active, when – the signal is displaying a drive permitting aspect and – the route corresponding to the control line is set.
The control line 'Sov' must be active, when – the station entry signal is displaying 'Stop' aspect, – the track section or sections between the station entry signal and entry point are
vacant, – there are no route lockings on the track section or sections between the station
entry signal and entry point and – local point operation permission associated with the track section or sections
between the station entry signal and entry point is not given.

37
RATO 6 / 05-2012
6.2.3.11 Fictive aspects in a centralized ATP control This chapter gives the requirements for the functions of the fictive aspects in a centralized ATP control. The fictive aspects needed in association with a signal must be defined according to the requirements presented in RATO's part 10 'Automatic train protection ATP'. It must be possible to transmit, in addition to signal aspect information, the fictive aspects associated with the signal in question to ATP. The fictive aspects in a centralized ATP control are – S, S36 or Ssn (route length), – Ssr, Sv1 or Sv2 (speed limit due to points), – Skl (track to which a route has been set) and – Svr (main route to an occupied track). The fictive aspect must be transmitted to the ATP, when the conditions for the fictive aspect in question are fulfilled. The fictive aspect 'S36, 'Ssn', 'Sv1' and 'Sv2' associated with the signal must be transmitted to the ATP, when the conditions presented in Table 6.2:5 are fulfilled and the signal is displaying a drive permitting aspect. Examples on the control line activation are presented in Figures 6.2:11, 6.2:12, 6.2:13 and 6.2:14.

38 RATO 6 / 05-2012
Table 6.2:5 Transmitting the fictive aspect to the ATP in a centralized ATP control.
Eo2 Eo3 Eo4 S36 Ssn Sv1 Sv2
X o - - - Eo1 - o o o o 6.2:11 (1)
X o X o o Eo2 - o o o o 6.2:11 (2)
X o X X o Eo3 - o o o o 6.2:11 (3)
X o X X X Eo4 - o o o o 6.2:11 (4)
o X - - - - X o o o o 6.2:11 (5)
X o - - - Eo1 - X - - - 6.2:12 (1)
X o X o o Eo2 - X - - - 6.2:12 (2)
X o X X o Eo3 - X - - - 6.2:12 (3)
X o X X X Eo4 - X - - - 6.2:12 (4)
o X - - - - X X - - - 6.2:12 (5)
X o - - - Eo1 - - X - - 6.2:12 (1)
X o X o o Eo2 - - X - - 6.2:12 (2)
X o X X o Eo3 - - X - - 6.2:12 (3)
X o X X X Eo4 - - X - - 6.2:12 (4)
o X - - - - X - X - - 6.2:12 (5)
X o X o o Eo2 - - - - - 6.2:13 (1)
X o X X o Eo3 - - - - - 6.2:13 (2)
X o X X X Eo4 - - - - - 6.2:13 (3)
X o - - - Eo1 - - - X - 6.2:14 (1)
X o X o o Eo2 - - - X - 6.2:14 (2)
X o X X o Eo3 - - - X - 6.2:14 (3)
X o X X X Eo4 - - - X - 6.2:14 (4)
o X - - - - X - - X - 6.2:14 (5)
Exa
mpl
e in
Fig
ure
(poi
nt)
Signal in advance of the
signal in question
Distant signal in advance of the
signal in question can display
aspects
Asp
ect d
ispl
ayed
by
the
dist
ant s
igna
l in
adva
nce
of th
e si
gnal
in q
uest
ion
Active fictive aspect of the signal in advance of
the signal in question
Sep
arat
e di
stan
t sig
nal o
r a
com
bina
tion
of m
ain
and
dist
ant s
igna
ls
Sep
arat
e m
ain
sign
al
Conditions for activation of fictive aspect
Sv2
Sep
arat
e m
ain
sign
al in
adv
ance
of t
he
sign
al in
que
stio
n is
dis
play
ing
driv
e pe
rmitt
ing
aspe
ct
o = Condition is not realized
X = Condition is realized
- = Condition is not examined
Fic
tive
aspe
ct w
hich
mus
t be
activ
ated
by
the
sign
al in
que
stio
n
S36
Ssn
Sv1

39
RATO 6 / 05-2012
S36 Eo1
S36
S36 Eo2
S36 Eo3
1
2
3
4
Eo4
S36
5
Drive permitting aspect
Figure 6.2:11 Examples of transmitting the fictive aspect 'S36' to ATP. The types of the signals may vary.
Ssn Eo1, S36 or Ssn
Ssn
Ssn Eo2, S36 or Ssn
Ssn Eo3, S36 or Ssn
1
2
3
4
Eo4, S36 or Ssn
Ssn
5
S36 or Ssn
Figure 6.2:12 Examples of transmitting the fictive aspect 'Ssn' to ATP. The types of the signals may vary.

40 RATO 6 / 05-2012
Sv1
Sv1 Eo2
Sv1 Eo3
1
2
3
Eo4
Figure 6.2:13 Examples of transmitting the fictive aspect 'Sv1' to ATP. The types of the signals may vary.
Sv2 Eo1, Sv1
Sv2
Sv2 Eo2, Sv1
Sv2 Eo3, Sv1
1
2
3
4
Eo4, Sv1
Sv2 Sv1
5
Figure 6.2:14 Examples of transmitting the fictive signal 'Sv2' to ATP. The types of the signals may vary. A fictive aspect ‘S-‘ associated with the signal shall be transmitted to ATP when fictive aspects ‘S36’, ‘Ssn’ or ‘Skl’, associated with the signal in question, are not transmitted to ATP. A fictive aspect ‘Ssr‘ associated with the signal shall be transmitted to ATP, when fictive aspects ‘Sv1’, ‘Sv2’ or ‘Svr’, associated with the signal in question, are not transmitted to ATP. It must be possible to transmit the fictive aspects 'Sv1' and 'Sv2' to the ATP simultaneously. The fictive aspect 'Svr' associated with the signal must be transmitted to the ATP, when – the signal is displaying a drive permitting aspect and – the route is the main route to an occupied track. The fictive aspect 'Skl' associated with the signal must be active, when – the signal is displaying a drive permitting aspect and – the route corresponding to the fictive aspect is set.
41
RATO 6 / 05-2012
6.2.4 Track vacancy proving
The tracks associated with an interlocking or line block system must be equipped with track vacancy proving. Track vacancy proving on the tracks that are equipped with track vacancy proving must continue uninterrupted from one track section to the next. The route conditions for a main route must monitor the vacancy of the track sections on a set route and the track sections becoming occupied and vacant in the correct order according to the route direction. Exceptions to this are – mechanical interlocking and the area key lock system with signals without track
vacancy proving, – setting a main route to a track without track vacancy proving and – main route to an occupied track. In the route conditions, for a main route to be set on a track without track vacancy proving, the vacancy of track sections for the part of the route with track vacancy proving must be monitored. Setting a main route on a track without track vacancy proving can be possible with a critical command, or a separate command must be required for displaying a drive permitting aspect with a route entry signal. In the route conditions of a shunting route, the correct order of the track sections becoming occupied and vacant according to the route direction must be monitored. In track vacancy proving implemented by axle counters, each track leading away from the axle counter section must be equipped with an axle counter, even if the track is not a route track Track vacancy proving at a point shall be implemented so that both branches of the point are proven free of fouling restrictions according to the requirements in Chapter 6.3.4.3.
6.2.5 Line block
The line block must monitor the block travel direction on the line and the vacancy of a set block section as block conditions. The route requirements apply to the set block section between two consecutive signals on the line as applicable. The line block can be implemented with a separate line block system covering the line or the operations corresponding to the line block shall be implemented in an interlocking system. The interlocking or remote control may have functions associated with automatic route setting only for a main signalled track.
6.2.6 Connecting a point to signalling apparatuses
The route point or the trap point on a route track has to be powered and equipped with a point machine or machines. A point on a route track, which is not a route point has to be equipped with a key lock and point detector, which secures the point position in the direction of the route track.

42 RATO 6 / 05-2012
A point can be locked – electrically, in which case the interlocking prevents the implementation of
commands requiring point moving in the interlocking logic and the operation of the point machine by switching off the operating voltage of the point machine,
– mechanically, in which case the point machine locked in the end position or the locked key lock prevents the moving of point blades or
– with blade locks, in which case the blade locks prevent the moving of point blades.
The position of a single point must be determined so that the point is in the “+” position while the point is in the position leading to the right when viewed from the direction of the front joint and in the “–” position while the point is in the position leading to the left when viewed from the direction of the front joint. The position of a double diamond crossing with slips and a single diamond crossing with slips must be determined as the positions of the point machines. The position of a point machine of a double diamond crossing with slips must be determined so that the point machine is in the “+” position when the pair of switches operated by the point machine in question is in a position that enables the traffic movements to the right branch, when viewed from the point machine over the double diamond crossing with slips. The position of a point machine of a double diamond crossing with slips is in “–“ position when the pair of switches operated by the point machine in question is in a position that enables traffic movements to the left branch, when viewed from the point machine over the double diamond crossing with slips. The double diamond crossing with slips must be managed as two single points in signalling (Figure 6:2:15). The positions of the point machines of a double diamond crossing with slips and the corresponding route paths are shown in Table 6.2:6.
A
C
a d
A C
a
d
Track kilometres
Figure 6.2:15 The point machines of a double diamond crossing with slips and the management of the point as two simple points in the signalling system logic. Table 6.2:6 The positions of the point machines of a double diamond crossing with slips and the corresponding route paths. Point machine C Point machine A Route path of a double diamond
crossing with slips + + a–d + b–d b–c + a–c

43
RATO 6 / 05-2012
A single diamond crossing with slips (Figure 6.2:16 and Tables 6.2:7 and 6.2:8) must be managed in the signaling system logic as a double diamond crossing with slips which does not allow the other route path through the diverging track of the crossing.
A C
a
d
Track kilometres
Figure 6.2:16 The point machines and route paths of a single diamond crossing with slips. Table 6.2:7 The point machine positions of a single diamond crossing with slips and the corresponding route paths when the crossing does not allow the route path a-c. Point machine C Point machine A Route path of a single diamond
crossing with slips + + a–d + b–d b–c
Table 6.2:8 The point machine positions of a single diamond crossing with slips and the corresponding route paths when the crossing does not allow the route path b-d. Point machine C Point machine A Route path of a single diamond
crossing with slips + + a–d + a–c b–c
The prerequisite of operating a point machine of a single diamond crossing with slips must be the monitoring of the position of the other point machine of the crossing in the way that operating the point machine into a prohibited position is prevented. The point position in a modifiable train control system has to be determined according to the determining logic used in the train control system in question. The diamond crossing with slips and a standard diamond crossing must be regarded as trailing points. The diamond crossing with slips and a standard diamond crossing have four end joints.
6.2.7 Route track The track layout of a railway operating location consists of route tracks and tracks that are not route tracks. The route tracks associated with an interlocking or line block system must form a continuous entity of tracks. The route track must be protected from the direction of the branch leading away from the point on the route track with a point, stopping device ora derailer, if the point on the route track is not a route point.

44 RATO 6 / 05-2012
The track section of a route track must continue to the derailer protecting the route track, viewed from the direction of the point on the route track according to the requirements for the positioning of the derailer given in Chapter 6.4.11 (Figure 6.2:17). The track section of a route track must, according to the requirements for positioning of stopping device given in Chapter 6.4.12, seen from the direction of the point on the route track, continue to the stopping device giving flank protection to the route track. The track section of a route track, viewed from the direction of the point on the route track, which is not a route point, must continue at least 5m from the fouling sign point of the point in question and at least to the end joint of the point protecting the route track (Figure 6.2:17). The track section of a route track, viewed from the direction of the point on the route track, which is not a route point, should continue, if possible, as far as possible to the point protecting the route track. The traffic on the point protecting the route track while the point is in a position protecting the route track, shall not cause the track section of the route track to become occupied.
End joint
Route track
Not a route track
Figure 6.2:17 Protecting of a point on the route track. The track associated with the route point must be equipped with a signal protecting the route point. There must be a track section in rear of the signal protecting the route point, whose length meets the requirements for track sections in Chapter 6.4.13. The track section in rear of signal must be continued to both branches of the point in rear of signal in order to meet the requirements for the track section length (Figure 6.2:18) if the point is not a route point.
≥ 30m
≥ 30mRoute track
Not a route track
Figure 6.2:18 Track vacancy proving of a track associated with route point.
6.2.8 Main route
The main route must be planned – for a track with a maximum speed of over 35kph, – for a track defined in the engineering configuration requirements, – for a track used for passenger traffic and – for a track, which is used or can be used for traffic similar to train traffic.

45
RATO 6 / 05-2012
The main route to an occupied track can only be planned to a track, which has a passenger platform and which has the possibility of connecting train units in such a way that the latter of the trains arriving on the track operate as train traffic. Overlap and flank protection shall be monitored in the main route conditions. The track vacancy proving of the track sections included in the main route are controlled in the main route conditions with the exception of occupied track sections on main route to an occupied track. 6.2.8.1 Main route overlap The overlap is the track section or sections in advance of the route exit signal of a set main route which are locked and vacancy proved in the conditions of set route. The overlap information associated with the station entry signal can be transmitted to ATP when the following conditions are fulfilled: – The specified track section or sections in advance of the main route exit signal
are vacant. – The specified track section or sections in advance of the main route exit signal
are not set as part of an intersecting or opposing route. – The local point operation permission of the local point operation group associated
with a specified track section or sections in advance of the main route exit signal is not given.
The above conditions must act as preconditions for displaying the drive permitting aspect of the signal in rear of the station entry signal, if it is not possible to transmit the overlap information associated with the station entry signal to ATP. Route setting through the track section in advance of the main route exit signal must be prevented (Figure 6.2:19), if – the interlocking system logic does not support the setting of the overlap, – the route entry signal of the route to be set is not the route exit signal for the set
main route, and – the track section on the route to be set should be an overlap for the route set
according to the overlap requirements.
① Set main route② Main route which can be set③ Main route setting must be prevented④ Track section which should be an overlap according to the overlap requirements
① ②③ ④
Figure 6.2:19 Preventing simultaneous setting of routes.
6.2.9 Shunting route
The shunting route must be planned on the tracks specified in the engineering configuration requirements. The overlap or flank protection conditions must not be monitored in the route conditions for a shunting route. The basic conditions for a shunting route must not monitor the vacancy of the track sections included in the route except for separately specified track sections.

46 RATO 6 / 05-2012
6.2.10 Level crossing system
The level crossing system operation must be taken into account in changing the speed limit on the alarm section. The speed limit on the alarm section has to be changed, if it is not otherwise possible to provide the level crossing system with an alarm of sufficient length. A level crossing system with an alarm section, which is not sufficient in length to meet the requirements stated in Chapter 6.5.3.2.2 , may be equipped with a level crossing signal, if the requirements presented in Chapter 6.4.8.2 are fulfilled.
6.2.11 Signalling system commands and indications
6.2.11.1 Commands
The signalling systems are controlled with commands given via the user interface. The command must be unambiguously identifiable from other commands. A critical command must not lead to control measures before it is confirmed. The following commands must be critical commands: – commands associated with the emergency release of a main route and overlap – commands associated with the releasing of a set block section or sections – the emergency release of the line or a track section on the line back to a basic
state. – the release of blocking the change of the line block travel direction. – the emergency release of the axle counter section back to a basic state. – the emergency operation of the point while the point track section is occupied or
trailed. – the emergency giving and returning of local point operation and key box
permission – the release of track blocking on a track section or a powered point – the setting of a shunting route to a track with track blocking – route setting from a track with a contact line power to a track without a contact
line or contact line without power – setting a main route to a track which is not a main signalled track – setting a main route to an occupied track – ending the level crossing system alarm on a particular track – the command releasing the monitoring of the level crossing system barriers and
the horizontal position of barriers from the route conditions – the emergency switch over to local control and remote control A command which is not required to be a critical command must be a normal command. 6.2.11.2 Indications The train control system user interface must indicate – the tracks and signalling elements associated with the train control system, – signalling element state information, – the routes and overlaps that are set, are about to be set or released, – local point operation groups state information, – line block state information, – route setting automation state information, – level crossing system state information – the train control system power supply, signal lamp current and point heating state
information and – contact line power status by track sections.

47
RATO 6 / 05-2012
It must be possible for the train control system user interface to display more indications according to the scope of the area displayed or when given a command controlling indications. The train control system user interface must not display track layout external to the train control systems. The following colours must be used in the user interface of a new train control system: – Normal state of the signalling element: permanent white – Unmonitored state of the signalling element: magenta, flashing magenta or
flashing white – Faulty state of the signalling element: flashing red – Disorder of the signalling element: flashing yellow. – Occupied track section: red – Set main route: green – Set shunting route: yellow – ‘Stop' aspect of a signal: red – Drive permitting aspect of a main signal: green – Drive permitting aspect of a shunting signal: yellow – ‘No aspects’ aspect of a shunting signal: magenta – Local point operation: magenta – Individual locking of the point: blue – Tracks with no contact line or contact line without power: blue – A device that is not connected to the train control system: grey or black – Display background colour: grey When transferring an indication from a train control system to a system external to the train control system, the transfer of the indication must be carried out in such way that a fault in the system external to the train control system does not cause distortion of the indication in the train control system or affect the train control system operation. It shall be possible to transmit an indication about the state of the signalling element from the train control system to a system external to the train control system. When using an indication provided by a train control system to control a system external to the train control system, the reliability of the indication must be estimated according to the operational requirements of the external system.
6.2.12 User manual
The train control system in use must have a user manual approved by the Finnish Transport Agency. The approved user manual must be available for the users of the train control system before the train control system or a modification of the system is commissioned. The user manual is distributed according to the list maintained by the Finnish Transport Agency to: – the Finnish Transport Agency's extranet service for railway data – the Rail Traffic Control Centre of the Finnish Transport Agency, – the regional traffic managers of the Finnish Transport Agency, – the regional traffic control, – the Finnish Transport Agency's archive for signalling systems user manuals, – the maintainer of the signalling system, – the manager of the Finnish Transport Agency, responsible for the area where the
signalling system is located, – the Finnish Transport Agency's archive for signalling systems user manuals the
equipment room of the signalling system.

48 RATO 6 / 05-2012
During commissioning, the train control system commissioner must ensure the accuracy of the user manual and the attached drawings and ensure that traffic the control centre is using a valid user manual. In the train control system drawings, the track layout associated with the train control system must be presented in a uniform way. The interlocking user manual must be accompanied by the following attachments: – the signalling apparatuses in a 1:10 000 scale scheme plan representation, if they
are not presented in the remote control user manual, – the signalling apparatuses according to the track geometry in 1:1000 scale
drawings, – the drawings for the interlocking system user interface, – contol tables of the signalling system, – the branches of single points, diamond crossing with slips and standard diamond
crossings, which are not free of fouling restrictions, – the local point operation groups, – grouping of the point heating and – ATP tables, if they are not presented in the remote control user manual. The remote control user manual must be accompanied by a 1:10 000 scale scheme plan of the signalling apparatuses associated with the system and the ATP tables. The train control system user manual, other than the level crossing system user manual, must present in the attached drawings all the signalling apparatuses, which are located on the tracks presented in the drawing. The signalling apparatuses associated with the level crossing system or its operation presented in 1:10 000 scale scheme plan and the track geometry in 1:1000 scale drawings and the level crossing system operation tables must be attached to the level crossing system user manual.
49
RATO 6 / 05-2012
6.3 INTERLOCKING SYSTEM 6.3.1 General
A new interlocking system must fulfil the requirements given in Chapter 6.3. The interlocking system must monitor the logical state information of the signalling elements connected to the system. The interlocking system must enable the electrical locking of the signalling element in a desired state. The lockings must be independent of each other if the signalling element is simultaneously locked more than once in the same state. The interlocking system functions must comply with the safety requirements for the interlocking system stated in the engineering configuration requirements and expressed as SIL levels /1/ according to EN50126, EN50128, EN50129 and EN50159 standards. It must be possible to operate the interlocking system by local control and/or remote control.
6.3.2 Track section Track vacancy proving must be implemented by an axle counter or track circuit. The interlocking system must allow the following functions to be associated with the track sections: – track vacancy proving of the track section, – track section locking as part of the route or route overlap – setting track blocking on the track section and – the train’s passage control monitoring on consecutive track sections. Track vacancy proving of the track section must function in such a way that the train’s movement from one track section to another can be monitored so it takes place in the correct order regardless of the train’s length and speed. Locking the track section as part of the route or overlap must prevent the use of the track section in question as part of another parallel route or route overlap unless it is – - a route started by the route exit signal or – a route ending at the route entry signal.
Track blocking set on the track section must prevent main route setting via the track section in question and its use as a main route overlap. Track blocking set on the track section must not prevent shunting route setting via the track section in question, if the shunting route is set by a command overriding the track blocking. It must be possible to set the track blocking when the track section is vacant or occupied and it must be possible to set it on a track section with a set route. The setting of track blocking must not affect the set route.
6.3.3 Signal Signals must display the signal aspects according to traffic regulations. Signal aspect display conditions must fulfil the requirements stated in Chapter 6.2.3. The signal lamp must be an LED unit or double filament lamp. The signal lamp state must be monitored. The double filament lamp monitoring must be carried out according to the following requirements:

50 RATO 6 / 05-2012
– The main and auxiliary filament must be monitored separately. – The lamp must not be lit with a detectable light, if the lamp is monitored while it is
being switched off. – An indication about a lamp failure of the lamp must be given if a fault is detected
in the main and spare filament of the lamp. – An indication about a lamp filament fault must be given if a fault is detected in the
main or spare filament of the lamp. – An indication differing from the lamp failure indication must be given for a fault
preventing the display of a 'Stop' aspect. – In case of main filament breakdown, when using a double filament lamp, the
voltage must switch to the spare filament immediately. The LED unit monitoring must be carried out according to the following requirements: – The LED unit must not be lit with a detectable light if the unit is monitored while
the LED unit is being switched off. – An indication about a lamp failure must be given for an LED unit fault preventing
the display of an aspect. – An indication differing from the lamp failure must be given for an LED unit fault
preventing the display of a 'Stop' aspect. The signal lamp and LED unit circuit must be monitored in such a way that it is possible to detect: – the increase of current in the circuit or a voltage drop, – the breaking of the circuit conductor – a short circuit of the circuit or double filament lamp wire, – the circuit earth-fault, – a short circuit of the circuit with an external voltage and – an interference voltage induced into the circuit conductor. The lamps of the aspects displayed by the signal must be under continuous monitoring. Monitoring that takes place in not more than 0.4s intervals fulfils the requirements for continuous monitoring. The signal must be controlled to display the ‘Stop' or ‘Expect stop’ aspect, if a fault preventing the display of an aspect is detected in the lamp of the aspect permitting driving. A main or block signal, which has a fault preventing the display of the ‘Stop' aspect may not display an aspect permitting driving. The shunting signal, which is included in a shunting route and has a fault preventing the display of a ‘Stop' aspect may not display an aspect permitting driving. The route entry signal must be directed to display a ‘Stop' aspect if a fault preventing the display of a ‘Stop' or ‘Expect stop’ aspect is detected in the route exit signal or the distant signal referring to the route exit signal. The signal lamp must be operable with both day and night voltage. It must be possible to change the signals’ power supply voltage to both day and night voltage by command or automatically by a light sensitive diode. It must be possible to connect ATP to the circuit of the main, block, distant or shunting signal lamp or to transmit the state information about the signal aspect to ATP. It must be possible to transmit the fictive aspect and control line state information to ATP.
6.3.4 Point, derailer and stopping device A point connected to an interlocking system and included in its route interdependencies is – a route point equipped with a point machine, – a trap point equipped with a point machine or

51
RATO 6 / 05-2012
– a point equipped with a points hand lever and locked in the direction of the route
in the basic position. A point located on a set route must be locked in a position according to the route and its operation must be prevented. The points operation must be possible only with an emergency operation command if the point track section is occupied. The operation of powered points must be controlled in such a manner that the points are operated one point at a time if the interlocking is running on reserve power. It must be possible to control the heating of the points group by group, controlling each heating group automatically by a thermostat or by manual command in periods not exceeding two hours. 6.3.4.1 Powered point
A powered point is operated by a point machine. One point may have several point machines. The point machine locks the point mechanically when the point reaches its end position. A powered point must belong to a track section. A track section may include several powered points. The track blocking set to a powered point shall prevent setting a main route through the point in question and usage of the point in question as main route overlap. The track blocking set to a powered point must not prevent setting a shunting route through the point in question, if the shunting route is set by using a command overriding the track blocking. It must be possible to set the track blocking when the track section of the point is vacant or occupied and it must be possible to set the track blocking to a point, through which there is set route. Setting the track blocking must not affect a set route. 6.3.4.1.1 Controlling and monitoring of a powered point The controlling and monitoring of a powered point must fulfil the following requirements: – The operation of the powered point must be prevented by a basic operation
command if the point track section is occupied. – It must be possible to operate the point by an emergency operation command
when the point track section is occupied. – It must be possible to operate the point by a local operation button when local
point operation permission is given to the local point operation group, which the point is included in, the point track section being vacant or occupied.
– An indication about trailing the points must be given. – An indication about the end position of the points must be given when the point
blades and the possible movable point frog are in the end position corresponding to the indication.
– The monitoring of the point must be constant and it must break off when an interference or fault is detected in the point monitoring circuit.
– A fault in the point that is not detected when the point has been turned to a specified position must be detected, at the latest when operating the point.
– It must be possible to operate the point from a end or intermediate position to another position.
– The point must not move unintentionally when the line voltage is recovered after a line break down.
– The operating voltage of the point machine must be switched off and an indication about a points fault must be given if the point is unable to move to its end position in the time required for point machines, however within 10 seconds at the latest.

52 RATO 6 / 05-2012
It must be possible to give an operation command to a point and the point machine must operate the point regardless of a point fault indication given by the point. The point machines of a point, which has several point machines, must be controlled to be operated in a staggered way as simultaneously as possible with not more than 200ms interval between each other. A point, which has more than two point machines in the switches, must begin operating first from the point machines on the side of the point base and after that the point machine must begin to be operated in order, counting from the points blades. The point machines of a movable point frog can begin to turn with an interval of over 200ms in relation to the point machines of the switches. In a point, which has several point machines, all point machines must turn to their end position after the first point machine has begun to be operated, even if the point track section becomes occupied during the operating of the point. 6.3.4.1.2 Automatic point operation – A powered point, which is located on the route, overlap or acting as flank
protection must move automatically to the position according to the route or flank protection when setting the route, if automatic point operation is switched on,
– the point track section is vacant, – the point is not locked as part of the route or overlap or as flank protection, – the point is not locked individually, – the point is not included in the local point operation group, with local point
operation permission given and – the point is not trailed. The automatic operation of the powered points must be staggered in such a way that the points are controlled to be operated one by one in intervals of at least 50ms and at the most 100ms. Several powered points can be turned in a group to positions according to a determined path. The conditions for group operation of a point are the same as for automatic point operation. 6.3.4.1.3 Individual point operation It must be possible to operate a powered point individually. A powered point may be operated by a basic operation command for a individual point when: – the point track section is vacant, – the point is not locked as part of the route or overlap or as flank protection, – the point is not locked individually, – the point is not included in the local point operation group, with local point
operation permission given and – the point is not trailed. A powered point may be operated by an emergency operation command for a individual point when – the point track section is occupied, – the point is not locked as part of the route or overlap or as flank protection, – the point is not locked individually, – the point is not included in the local point operation group, with local point
operation permission given and – the point has not been trailed.

53
RATO 6 / 05-2012
6.3.4.1.4 Point operation by a local operation button A powered point must be equipped with a local operation button, if the point is included in a local point operation group. It must be possible to operate a powered point with a command given by a local operation button when local point operation permission is given. A powered point must be operated by a continuous, at least one second long operation command given by a local operation button when: – the point is included in the local point operation group, with local point operation
permission given, – the point is not locked individually and – the point has not been trailed. An operation command given by a local operation button of a powered point must not be realized and the operation command must not be stored in the memory if the point cannot be operated immediately when giving the operation command. The individual and automatic point operation must be prevented while the local point operation permission is given to the local point operation group which the point is included in. 6.3.4.1.5 Trailed point An indication about a trailed point must be given. The operation of a trailed point by a command other than the emergency operation command for a trailed point must be prevented. A trailed point may be operated with an emergency operation command for a single trailed point when: – the point has been trailed, – the point is not locked as part of the route or overlap or as flank protection, – the point is not locked individually and – the point is not included in the local point operation group, with local point
operation permission given. 6.3.4.2 Point equipped with a hand lever A point on the route track, equipped with a hand lever, must be locked in the direction of the route track in a basic state and the point position must be monitored with a point detector. The operation key for a key lock of a point on the route track equipped with a hand lever must be, in a basic state, locked to the double key lock of the point or to the key lock of a derailer or stopping device protecting the route track from the direction of the point branch, which is not parallel in the direction of the route track. A point on the route track equipped with a hand lever must be in a position in the direction of the route track, and the key box associated with the point must be in a basic state when the point track section in question is locked as part of the route or overlap. A point, equipped with a hand lever and protecting the route track must be, in a basic state, locked in a position protecting the route track. The operation key for a key lock of a point protecting the route track equipped with a hand lever must be, in a basic state, locked to the key box of the point in question.

54 RATO 6 / 05-2012
6.3.4.3 Free of fouling restrictions
The requirements stated in this section apply, in addition to point branches, to tracks leading away from a standard diamond crossing. The point branch is free of fouling restrictions when the point track section boundary is at least 5m distance from the fouling sign point in the point branch in question, when viewed from the direction of the point (Figure 6.3:1).
≥ 5m
Figure 6.3:1 The location of the track section boundary in a point branch free of fouling restrictions. All the branches of a single point, a diamond crossing with slips and a standard diamond crossing must be determined free or not free of fouling restrictions. An effort should be made to position the point track section boundary at a distance of at least 5m from the fouling sign point in all point branches. The point branch does not need to be free of fouling restrictions if point track section is followed by the track section of another point or standard diamond crossing in such a way that the track section boundary cannot be located more than 5m from the fouling sign points of both points. In such cases, an effort should be made to design the branch of the point, which has a higher speed limit on the tracks that run through it, free of fouling restrictions. If a point has a branch, which is not free of fouling restrictions, the point track section must be occupied in the interlocking system logic even if the track vacancy proving of a point track section in question does not indicate it as occupied, if the point branch not free of fouling restrictions is followed by an occupied track section and the point branch not free of fouling restrictions cannot be proven vacant with track vacancy proving of the point in question. In Figures 6.3:2 and 6.3:3, the point V511 right branch is not free of fouling restrictions, because the track section ErV511 does not extend far enough to the point branch in question. Both branches of the point V513 are free of fouling restrictions. The track section ErV511 must be vacant when both point track sections are vacant or the track section ErV513 is occupied or becomes occupied when the point V513 is in the position leading to the left. Track section ErV511 must become occupied or stay occupied in the interlocking system logic when – the track vacancy proving of a track section ErV511 indicates the track section as
occupied, – the track section ErV513 is occupied and the point V513 is in the position leading
to the right or – the point V513 is operated while being occupied, regardless of the point position
prior to operating.

55
RATO 6 / 05-2012
The track section ErV511 can become vacant only after the track vacancy proving indicates that the track sections ErV511 and ErV513 are vacant, if the track section ErV513 becoming occupied has controlled the track section ErV511 to an occupied state in the interlocking system logic.
ErV511
ErV513V513
V511
Figure 6.3:2 Track vacancy proving of points, one of which is not free of fouling restrictions. In Figure the point V511 is not free of fouling restrictions and the point V513 is free of fouling restrictions.
ErV511
ErV513
V513V511
Figure 6.3:3 Track vacancy proving of a point, which is not free of fouling restrictions. The points must be included in the same track section if the interlocking system logic does not make it possible to fulfil the requirements for free of fouling restrictions and the requirements presented in Chapter 6.4.10.2 about the powered points included in the same track section are realized. The points can be included in different track sections if the information provided by the track vacancy proving of the track sections is treated according to the requirements about free of fouling restrictions presented in this chapter. 6.3.4.4 Powered derailer and stopping device
A derailer on a shunting route track must be equipped with a point machine. A stopping device on a route track must be equipped with a point machine. The functioning of the derailer or the stopping device equipped with a point machine must be equivalent to the point equipped with a point machine except that vacancy of the track section, which the derailer or the stopping device is included in, must only be proven when turning the derailer or the stopping device onto the rail. Breaking off of the stopping device's monitoring must be indicated.
6.3.4.5 Derailer and stopping device equipped with a hand lever
A derailer or a stopping device equipped with a hand lever must be, in a basic state, locked on a rail.

56 RATO 6 / 05-2012
The operation key of a key lock of a derailer or a stopping device equipped with a hand lever must be locked to a key box in a basic state if one derailer or stopping device is protecting the route track. The operation keys for the derailers or stopping devices equipped with a hand lever must be linked in such a way that the locking of the operation keys for all derailers or stopping devices is secured when the key box is in a basic state if more than one derailer or stopping device is protecting the route track. 6.3.4.6 Standard diamond crossing
The standard diamond crossing must have the state information in the interlocking system logic indicating the available path when the standard diamond crossing track section is occupied or set as part of the route. Only one of the standard diamond crossing paths is allowed to be available at one time. It must be possible to determine the state information of the standard diamond crossing with a command if the standard diamond crossing track section is occupied when the interlocking system is started. The standard diamond crossing must function as a point does, in respect to the requirements for the setting, releasing, cancelling and emergency cancelling of the route, as stated in Chapter 6.3. 6.3.4.7 Key box
In a basic state, the key box must prevent the removing of the operation key from the key box. An operation key for a point or a derailer equipped with a key lock, which cannot be linked to be locked to the key lock of another point or derailer must be, in a basic state, locked to the key box. A maintenance road protection system can be locked with an operation key, which is locked, in a basic state, to a key box. It must be possible to remove the key from the key box when key box permission has been given to the key box. The key box must return to a basic state when local point operation permission is returned while the key is in its place in the key box and the monitoring conditions associated with the key box are fulfilled. The key box must return to a basic state when the key is put back in the key box and the monitoring conditions associated with the key box are fulfilled, when the key box permission has been given as a separate command from the local point operation permission. The key box must be associated in the interlocking system logic with the track section on the route track, to which the track, where the point, stopping device or derailer, locked with a key box, is located. In Figure 6.3:4 the key box ASp515 must be associated with the point track section of the point V513, the key box ASp516 must be associated with the point track section of the point V514 and the key box ASp519 must be associated with the track section of the track 501.

57
RATO 6 / 05-2012
V511 V512
Sp515
Sp519
Sp516
ASp519
ASp516ASp515
V514V513
V517
501
504
502
503
Figure 6.3:4 Determining key box permission for the key box. The key box must be determined as included in a local point operation group and/or it must be possible to give key box permission to the key box. The key box must be determined as included in a local point operation group and it must not be possible to give the key box key box permission separate from the local point permission if there is no signal, point or derailer protecting the route point between the route track, which is protected by a point or a derailer locked with a key box and a key lock, and the route point associated with the route track. It must be possible to give key box permission when the track section associated with the key box is not locked as part of the set route or overlap and there is a route track protecting signal, point or derailer between the track section associated with the key box and the set route. In figure 6.3:4, it must not be possible to give the key box of the derailers Sp515 and Sp516 key box permission separate from the local point operation permission because there is no signal, point or derailer protecting the route point between the derailers and the route points. The key box ASp515 must be determined as included in the same local point operation group with point V511 and the key box ASp516 must be determined as included in the same local point operation group with point V512. Key box permission, separate from the local point operation permissions may be determined for the key box ASp519, and in addition, the key box ASp519 may be determined as included in the same local point operation group with point V511.
6.3.5 Main route A main route is a set route, which fulfils the main route conditions. The main route entry signal must be a main signal or a shunting signal connected to the main signal. The main route must end in – a main signal displaying aspects in the direction of the route, – a block signal displaying aspects in the direction of the route,, – a shunting signal displaying aspects in the direction of the route, – a track equipped with a line block system, – a track section of the track equipped with buffer stop or – a track which is not a main signalled track, leading away from a railway operating
location or from a part of it. The main route includes – the main route entry signal, – the track sections and points on the main route, – the main route exit signal or the track section where the main route ends, – the signals on the main route, which are in the direction of the main route and – other signalling elements on the main route.

58 RATO 6 / 05-2012
The signalling elements, which provide overlap or flank protection are associated with the main route. A primary route must be determined for the main route, if the route points between the main route entry and exit signals provide several path options for the main route. The main route must be set through the primary path with a basic command. The alternative path options of the route must be determined as alternative routes, if the requirements for determining an alternative route are fulfilled. The necessary intermediate points, which are used for determining the path of the alternative route when setting a main route, must be determined for the alternative route path. The determining of an alternative route for the main route must be avoided. The alternative route must be determined, if the alternative route enables an alternative path to the primary route through long points turned to lead to a diverging track (paths 1 and 2 in Figure 6.3:5) or the alternative route enables the simultaneous setting of such a route, which the primary route doesn’t enable (paths 2 and 3 in Figure 6.3:5). The primary route must be determined according to the path that is more frequently used. An effort should be made to determine the primary route through the path with a higher speed limit (route paths 1 and 2 in Figure 6.3:5).
① Primary route② Alternative route③ Route crossing the primary route
①
②
③
figure 6.3:5 Determining an alternative route. 6.3.5.1 Setting a main route
The interlocking system must check the basic conditions when starting to set the main route. The main route basic conditions are: – It is possible to lock the points on the main route or overlap for the use of the
main route into positions the route requires. – Local point operation permission for the powered points on the main route or
overlap is not given. – It is possible to turn off the rail a stopping device on the main route – Key box permission for the key boxes associated with the track sections on the
main route or overlap is not given. – Local point operation permission for a powered point included in the track section
in advance of the route exit signal for a main route, which is to be set with overlap 0, is not given.
– Key box permission for a key box associated with the track section in advance of the exit signal for a main route, which is to be set with overlap 0, is not given.
– The track sections on the main route and overlap are not locked or they are not about to be locked for the use of another route, except the situations, where the track sections are locked for a main route starting from a main route exit signal or for a main route ending at a main route entry signal.
– The track sections on the main route or overlap are not included in the local point operation group, which has been given local point operation permission.
59
RATO 6 / 05-2012
– There must be at least one occupied track section on the track in rear to the main
route exit signal, when the main route to an occupied track is set. – The block travel direction must be correct or it must be possible to change the
block travel direction, if the main route is set to a line. – The route command must correspond to the status in the interlocking system
about the electrification of the tracks and the contact line power on the main route.
– There is no track blocking on the main route, overlap or on the track section or point in advance of main route exit signal .
– The main route exit signal is not a route entry signal for a shunting route, which is set or about to be set.
The checking phase of the basic conditions must be implemented in 5s. The route command must be released, if the checking phase of the basic commands is not implemented in the required time. The setting of the main route must be continued with the route locking, if the basic conditions are fulfilled. In the main route locking phase: – The block travel direction of the line must be changed and locked in the direction
required by the main route. – The track sections on the main route or overlap must be locked for the use of the
main route. – The points on the main route, on the overlap and providing flank protection must
be turned and locked into positions according to the route. – The stopping device on the main route must be turned off the rail. – The local point operation permission must be prevented for the points on the
main route, on the overlap and providing flank protection. – Key box permission for the key boxes associated with the track sections on the
main route or overlap must be prevented. The conditions for displaying an aspect permitting driving of signals included in the main route after the locking phase must be the fulfilling of the monitoring conditions for the main route. The main route monitoring conditions are: – The track sections on the main route and overlap, and the track sections between
the signalling element providing flank protection and the main route must be vacant, except the occupied track section on the main route to to an occupied track.
– The points on the main route and overlap as well as the points providing flank protection must be locked and monitored in position according to the route.
– The stopping devices on the main route path are monitored off the rail. – The operation keys for the key boxes associated with the track sections on the
main route and overlap must be monitored in their correct places. – The main route entry signal and other signals on the main route in the direction of
the main route must display a monitored aspect permitting driving. – The signals providing flank protection for the main route must display a monitored
'Stop' aspect. – The main route exit signal must display a monitored aspect and the signal must
not have a fault preventing the display of the 'Stop' aspect. – The shunting signal ending the main route must display ‘Stop’ aspect, when the
main route ends at the shunting signal or the shunting signal ending the main route must display ‘Proceed with caution’ aspect, when the main route ends at the shunting signal connected with the main signal which is the entry signal for a set main route.
– The operation of the level crossing system associated with the main route must fulfil the conditions stated in Chapter 6.5.3.3.
– The block conditions must be fulfilled, if the main route ends in a block section.

60 RATO 6 / 05-2012
– The line block entry signal must display an aspect permitting driving, if the main
route ends in a line, which has a line block entry signal at the beginning. The signals included in the main route must be controlled to display a ‘Stop’ aspect in 2s, if one of the monitoring conditions is not fulfilled. The fulfilling of monitoring conditions must be under constant monitoring while the main route is locked. A short break in the mains voltage must not cause the aspect of a signal included in the main route to change to a ‘Stop’ aspect. After the mains voltage is returned, the aspect of a signal included in the main route displaying a ‘Stop’ aspect must change to an aspect permitting driving, if the conditions for an aspect permitting driving are still valid. Setting a main route from a track with a power on the contact line to a non- electrified track or to a track with no power on the contact line, must be possible only with a special command. Consecutive main routes can be defined as to be set with a route command of a combined main route. It must be possible to set a main route across the interlocking system boundary in such a way that the main route entry and exit signals are controlled by different train control systems. 6.3.5.1.1 Disabling block conditions It must be possible to disable the line block conditions associated with the main route manually with a coupling. An indication about disabling the block conditions must be given. The interlocking system must prevent the changing of the block travel direction when the block conditions are disabled from the route conditions. It must be possible to lock the block travel direction to the line from the interlocking system, where the block conditions are disabled with a coupling. 6.3.5.1.2 Main route to an occupied track.
It must be possible to set a main route by a route to an occupied track – command, to a track determined in the engineering configuration requirements while the track is occupied. When setting a main route to an occupied track, the main route conditions must be monitored with the following exceptions: – At least one of the track sections of the track, which may be occupied on the main
route to an occupied track, in rear of the route exit signal, must be occupied when setting a route.
– The main route to an occupied track doesn't have an overlap. – The main route entry signal of a main route to an occupied track must display a
‘Proceed 35' aspect, the distant signal on the same mast with the main signal must display a ‘Expect stop’ aspect and the information about the main route to an occupied track must be transmitted to ATP.
– The route exit signal of a main route to an occupied track or a shunting signal positioned in the same place in relation to track sections cannot be a route entry signal before the main route to an occupied track is released.
– The main route entry signal of a main route to an occupied track must be controlled to display a ‘Stop’ aspect, if a track section, which was occupied when the main route was set, becomes vacant or a vacant track section becomes occupied.
A track, to which it is possible to set a main route to an occupied track, may have several track sections. In the conditions for a main route to an occupied track it can be required that the determined track sections of the track in rear of the route exit signal
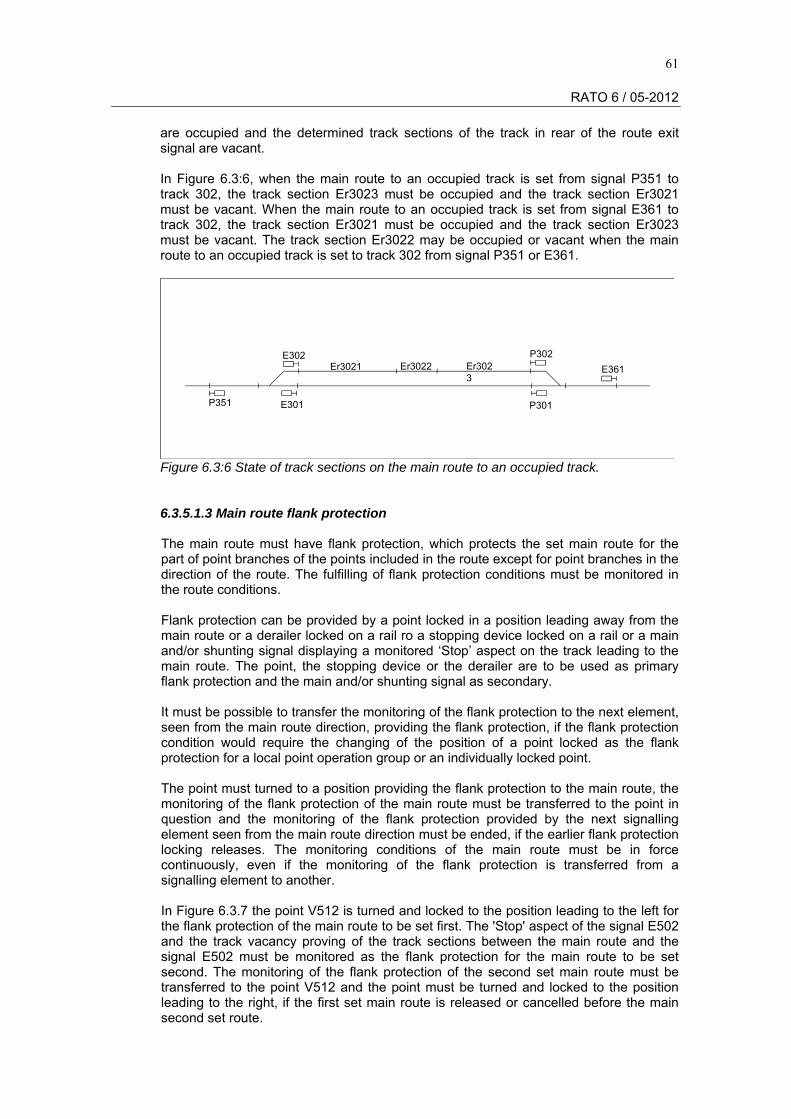
61
RATO 6 / 05-2012
are occupied and the determined track sections of the track in rear of the route exit signal are vacant. In Figure 6.3:6, when the main route to an occupied track is set from signal P351 to track 302, the track section Er3023 must be occupied and the track section Er3021 must be vacant. When the main route to an occupied track is set from signal E361 to track 302, the track section Er3021 must be occupied and the track section Er3023 must be vacant. The track section Er3022 may be occupied or vacant when the main route to an occupied track is set to track 302 from signal P351 or E361.
Er3021 Er3022 Er3023
E361
P351 E301
E302
P301
P302
Figure 6.3:6 State of track sections on the main route to an occupied track. 6.3.5.1.3 Main route flank protection
The main route must have flank protection, which protects the set main route for the part of point branches of the points included in the route except for point branches in the direction of the route. The fulfilling of flank protection conditions must be monitored in the route conditions. Flank protection can be provided by a point locked in a position leading away from the main route or a derailer locked on a rail ro a stopping device locked on a rail or a main and/or shunting signal displaying a monitored ‘Stop’ aspect on the track leading to the main route. The point, the stopping device or the derailer are to be used as primary flank protection and the main and/or shunting signal as secondary. It must be possible to transfer the monitoring of the flank protection to the next element, seen from the main route direction, providing the flank protection, if the flank protection condition would require the changing of the position of a point locked as the flank protection for a local point operation group or an individually locked point. The point must turned to a position providing the flank protection to the main route, the monitoring of the flank protection of the main route must be transferred to the point in question and the monitoring of the flank protection provided by the next signalling element seen from the main route direction must be ended, if the earlier flank protection locking releases. The monitoring conditions of the main route must be in force continuously, even if the monitoring of the flank protection is transferred from a signalling element to another. In Figure 6.3.7 the point V512 is turned and locked to the position leading to the left for the flank protection of the main route to be set first. The 'Stop' aspect of the signal E502 and the track vacancy proving of the track sections between the main route and the signal E502 must be monitored as the flank protection for the main route to be set second. The monitoring of the flank protection of the second set main route must be transferred to the point V512 and the point must be turned and locked to the position leading to the right, if the first set main route is released or cancelled before the main second set route.

62 RATO 6 / 05-2012
① The main route to be set first ② The main route to be set second
③ The point to be turned and locked to the position leading to the left for the flank protection of the first main
route ④ The signal which is monitored as the flank protection of the main route to be set second
①
②
③ ④V512
E502
Figure 6.3:7 Monitoring of the flank protection, when the point providing the flank protection cannot be turned to the position required by the main route flank protection. It must be possible to determine the flank protection required for the main route in such a way that, when viewed from the direction of the main route, the first possible flank protection element is not approved as flank protection, but the flank protection conditions must be fulfilled in all situations by some other element. The absence of monitoring of the signalling element providing flank protection or the track section between the main route and the signalling element providing flank protection becoming occupied, must cause the signals included in the main route to display a ‘Stop’ aspect. 6.3.5.1.4 Main route overlap For a main route an overlap must be set according to the route command. The conditions for setting an overlap are the same as the conditions for setting a main route. The overlap locking must prevent crossing and opposing routes to the set main route through the track section on the overlap. The overlaps of the opposing main routes may be on the same track section. The overlap lockings must be released or stay locked according to the requirements for releasing an overlap regardless of whether the main route is released. A main route locked by a basic route command must have the primary overlap set. It must be possible to choose one of the two secondary overlaps or overlap 0 to be set by the route command determining the overlap, if the possibility of the overlap in question is determined for the main route.
The track sections included in the overlap must be vacant. No flank protection can be set for the overlap. When setting an overlap to a powered trailing point, which is a long point and which is not in the position according to the overlap, included in the track section of the overlap, an operating command must be given. The point must be locked in the position required by the overlap, if the point reaches the end position or if the point is in the end position. When setting an overlap for a powered trailing point, which is a short single point, included in the track section of the overlap, and the point machine of a powered diamond crossing with slips, which is not the point machine operating the point blades located on the side of the route exit signal, an operating command may be given, if the point is not in the position according to the overlap. An operating command may not be given, if the interlocking system logic makes it possible that no operating command is given.

63
RATO 6 / 05-2012
A powered trailing point, which is a short, single point, on the track section of the overlap, and the point machine of the powered diamond crossing with slips, which is not the point machine operating the point blades located on the side of the route exit signal, must be locked in the position required by the overlap if the operating command has been given and the point has reached the end position or if the point is in the end position. A single facing point on the track section of a set overlap, and the point machine of the powered diamond crossing with slips operating the point blades located on the side of the route exit signal, must be locked in the position required by the overlap. The operation key of the key box associated with the track section that is included in the overlap must be monitored. When using an overlap 0, the local point operation permission for the point included in the track section in advance of the route exit signal must not be given. The overlap must be released according to the given requirements for releasing a main route while a train moves along the set main route via the track section of the overlap. It must be possible to determine the overlap to be released automatically 60s after the release delay. The overlap release delay must begin when the entire train has completely arrived at the track in rear of the route exit signal. The overlap must not be released, if the track section on the overlap becomes occupied. It must be possible to release the overlap by an emergency command, after the main route is released. The releasing of a main route starting from a route exit signal must not release the overlap of the main route the signal ends. The overlap must be released together with the main route emergency release. The overlap for a main route to an occupied track must not be set. Determining of the main route overlap, when the main route exit signal is located in the railway operating location in the area between the station entry signals Only an overlap 0 must be defined for the main route (Figure 6.3:8), when on the track section in advance of the route exit signal there is a trap point and there is no route point between route exit signal and the trap point.
Figure 6.3:8 Only the overlap 0 on the route.

64 RATO 6 / 05-2012
For a main route an overlap 0 and a primary overlap which includes the closest track section in advance of the route exit signal must be defined (Figure 6.3:98), when – the track section in advance of the route exit signal includes a route point, – the route point is a trailing point seen from the direction of the signal, – the distance between the route exit signal and the fouling sign point of the route
point in advance of the signal is at least 60m, – there is a passenger platform on the track in rear of the signal or an overlap 0 is
required for the signal in the engineering configuration requirements and – the average gradient of the track on the course of the usage length of the track or
within 200m length in rear of the route exit signal in the direction of the route is at least -2,5‰.
≥ 60 m
The average rail gradient of the track is at least -2,5‰ on the course the usage length of the track or within 200m length in rear of the route exit signal in the direction of the route
Figure 6.3:9 Overlap 0 and primary overlap on the route. For the main route only the primary overlap including the closest track section in advance of the route exit signal must be defined (Figure 6.3.10), when – there is a route point on the track section in advance of the route exit signal, – the route point is a trailing point seen from the direction of the signal, – -the distance between the route exit signal and the fouling point of the route point
in advance of the signal is at least 60m, – there is no passenger platform in rear of the signal and overlap 0 is not required
in the engineering configuration requirements and – the average rail gradient on the course of the usage length of the rack or within
200m length in rear of the route exit signal in the direction of the route is at least -2,5‰.
≥ 60m
The average rail gradient of the track is at least -2,5‰ on the course the usage length of the track or within 200m length in rear of the route exit signal in the direction of the route
Figure 6.3:10 Only the primary overlap on the route. For a main route only a primary overlap must be defined, which includes the closest track section in advance of the route exit signal (Figure 6.3:11), when

65
RATO 6 / 05-2012
– there is a route point on the track section in advance of the route exit signal, – the route point is a trailing point seen from the direction of the signal and – the average rail gradient of the track on the course of the usage length of the
track or within 200m length in rear of the route exit signal in the direction of the route is below -2,5‰.
The average gradient of the track is below -2,5‰ on the course the usage lentgh of the track or within 200m length in rear of the routeexit signal in the direction of the route
Figure 6.3:11 Only the primary overlap on the route. For a main route only a primary overlap must be defined, which includes the closest track section in advance of the route exit signal (Figure 6.3:12), when – there is a route point on the track section in advance of the route exit signal, – the route point is a trailing point seen from the direction of the signal and – the distance between the route exit signal and the fouling sign point of the route
point in advance of the signal is less than 60m.
– -
< 60m
Figure 6.3:12 Only the primary overlap on the route. For a main route only a primary overlap must be defined, which includes the closest track section in advance of the route exit signal (Figure 6.3:13), when – there is no powered point on the track section in advance of the route exit signal
and – the distance between the route exit signal and the fouling sign point of the route
point in advance of the signal, which is a trailing point, is at least 60m.

66 RATO 6 / 05-2012
≥ 60m
Figure 6.3:13 Only the primary overlap on the route.
For a main route only a primary overlap must be defined, which includes two closest track sections in advance of the route exit signal (Figure 6.3:14), when – there is no powered point on the track section in advance of the route exit signal
and – the distance between the route exit signal and the fouling sign point of the route
point in advance of the signal, which is a trailing point, is less than 60m.
< 60m
Figure 6.3:14 Only the primary overlap on the route. An overlap 0, a primary overlap and one or two secondary overlaps must be defined for a main route (Figure 6.3:15), when – the closest powered point in advance of the route exit signal is a route point,
which is a facing point, – the distance between the route entry signal and the fouling sign point of route
point in advance of signal is at least 60m and – the route point is located on the track section in advance of the route exit signal.
≥ 60m
Figure 6.3:15 The route has the overlap 0, primary overlap and secondary overlap.

67
RATO 6 / 05-2012
A primary overlap and one or two secondary overlaps must be defined for a main route (Figure 6.3:16), when – the closest powered point in advance of the route exit signal is a route point,
which is a facing point – the distance between the route exit signal and the fouling sign point of route point
in advance of the signal is less than 60m and – the route point is located on the track section in advance of the route exit signal.
< 60m
Figure 6.3:16 The route has the primary overlap and the secondary overlap. The conditions for definition of the main route overlap, presented above, are collected in Appendix 2. The following conditions must be fulfilled, when the closest powered point in advance of the route exit signal is a facing point(Figure 6.3:17): – The primary overlap must include only the closest track section in advance of the
signal. – An effort must be made to determine the position of the route point on the overlap
in such a way that the set overlap prevents as little as possible the setting of other routes and that the point is in the position leading to the more used route path.
– The secondary overlap must include the closest track section in advance of the signal and as the position of the route point on the overlap must be determined other than the position on the primary overlap.
– Two secondary overlaps can be defined, if on the track section in advance of the route exit signal there are two route points, which are facing points.
Overlap 1Overlap 2
Overlap 3
Figure 6.3:17 An example of the determining of the primary overlap and the secondary overlaps. There has to be a track section in advance of the signal, acting as a primary overlap, if there is a powered point in advance of the signal and the distance between the signal and the powered point in advance of the signal is more than 100m.

68 RATO 6 / 05-2012
A track section of the length of 60 - 100m acting as a primary overlap must be build in advance of the signal (Figure 6.3:18), if there is no powered point on the block section in advance of the signal and – the length of the track section in advance of the signal is more than ¼ from the
line block length started by the signal or – the length of the track section in advance of the signal is more than 500m.
d
d = the length of the block section
> ¼d
> 500m
Figure 6.3:18 The situations, where a track section in advance of the signal, acting as an overlap, has to be built . Determining of the main route overlap, when the main route is being set to the line An overlap must not be defined for a route to be set to the line. It must be possible to add to the conditions of a drive permitting aspect of the main or block signal or the station exit signal starting the block section the vacancy of the track section in advance of the signal ending the block section. The track section in advance of the signal ending the block section must be vacancy proved in the conditions of the drive permitting aspect of the signal starting the block section, if there is a passenger platform in advance of the signal ending the block section closer than 350m from the signal ending the block section or a release speed of over 35kphhas to be obtained for the signal ending the block section. Determining of the main route overlap, when the main route is being set to a track which is not a main signalled track An overlap must not be determined for a route to be set to a track which is not a main signalled track. Monitoring of the track section or track sections in advance of the station entry signal The monitoring of the track section or track sections in advance of the station entry signal must be primarily realized with a possibility to transmit the overlap information to the ATP. The monitoring has to be realized for the track section or the track sections, whose distance from the station entry signal is at most 350m. It is possible not to realize the monitoring, if the distance of the signal in rear of the station entry signal is at most 3km. The overlap information can be transmitted to the ATP, when the conditions presented in Chapter 6.2.8.1 are fulfilled. The conditions presented in Chapter 6.2.8.1 must be the conditions for the signal in rear of the station entry signal to display a drive permitting aspect, if it is not possible to transmit the overlap information associated with the station entry signal to the ATP.

69
RATO 6 / 05-2012
6.3.5.2 Releasing a main route
A set main route must be released automatically as the track sections on the route become occupied and vacant according to the occupancy sequence of the route. The signal included in the main route must be controlled to display a 'Stop' aspect before lockings of the route are released. The route locking of a main route track section must be released, when the track section in question and the previous track section have become occupied and vacant and the track section following has become occupied according to the occupancy sequence corresponding with the main route direction. The route locking of a main route track section may not be released, if the first one of consecutive track sections becomes vacant before the latter track section becomes occupied. The route locking of the track sections of the track in rear of the main route exit signal or the track section ending a main route must be released when the track section in question becomes occupied and the route locking of the previous track section is released, if the track section is not associated with other lockable signalling elements controlled by the interlocking system. The route locking of the track in rear of the route exit signal or the track section ending a main route must be released when the track section in question becomes occupied and vacant, the following track section becomes occupied and the route locking of the previous track section is released, if the track section is associated with other lockable signalling elements controlled by the interlocking system. The point locking on the route or overlap must be released when the locking of the point track section is released. The flank protection locking of the point providing route flank protection must be released when the locking of the track section, which the point is providing flank protection for, becomes released. The releasing of the main route must also function reliably when a short and fast train is using the main route.
A break in the interlocking power supply must not cause the unintentional release of the main route. 6.3.5.3 Cancelling a main route It must be possible to cancel a part of a set main route, if main route setting is interrupted and the main route entry signal is not controlled to display an aspect permitting driving. A set main route can be cancelled if the track sections on the signal approach zone that have a route or routes set up to the route entry signal of the main route about to be cancelled are vacant (Figure 6.3:19).
Signal approach zone, where track sections must be vacant
① Set main routes ② Main route about to be cancelled
②①

70 RATO 6 / 05-2012
Figure 6.3:19 The track sections to be monitored vacant as the condition for cancelling a set main route, if there is a set main route to the main route entry signal of the main route to be cancelled. A set main route can be cancelled, if the track section or sections considered, in rear of the route entry signal of the main route about to be cancelled, have not been set as part of a main route ended by the route entry signal (in question) and the track sections in question are vacant (Figure 6.3:20). The track sections considered include the track section or consecutive track sections, in rear of the route entry signal of the route about to be cancelled, which do not include route points and which do not have a combined length exceeding 1200m.
Track section to beconsidered
① Main route to be cancelled
①
Figure 6.3:20 Track sections to be proved vacant as a condition for cancelling a set main route, if there is no set main route to the route entry signal of main route to be cancelled. 6.3.5.3.1 Signal approach zone The signal approach zone must be determined so that the consecutive track sections will be included in it, starting from the track section in rear of the signal to track section to be determined in the following order (Figure 6.3:21): 1. The track section, whose boundary is at least 300m from a main or block signal,
from which there is at least the ATP data transfer distance defined according to the requirements given in RATO's part 10 to the signal considered.
2. The track section located by the distant signal, from which there is at least the ATP data transfer distance required to the signal considered, if the track section boundary is at least 300m from the distant signal.
3. The track section in rear of a main signal, from which the only route path to the signal considered goes through a short point leading to a diverging track.
4. The track section where the track vacancy proving ends.
≥ ATP data transfer distance
≥ ATP data transfer distance
No track vacancy proving Short
pointLong point
≥ 300m
≥ 300m
③
②
①
④
Figure 6.3:21 Signal approach zone. The numbers refer to the above-mentioned requirements.

71
RATO 6 / 05-2012
6.3.5.4 Emergency releasing of a main route
It must be possible to release a set main route or a part that has remained unreleased by an emergency command, if the main route cannot be cancelled. The signals included in the route must be controlled to display a ‘Stop’ aspect after the emergency route release command has been accepted. The lockings included in the route and its overlap must be released after a 60s delay, when the signals included in the route have been controlled to display a 'Stop' aspect. 6.3.5.5 Functions of a main signal connected to shunting signals on a main route A main signal on a main route can be connected to function connected to shunting signals if, in respect of track sections, none of the shunting signals connected to the main signal are located at the same location as the main signal and the main signal cannot be a main route entry or exit signal. The signal starting the main route must be a shunting signal, to which the main signal is connected. The signal ending the main route must be a shunting signal, to which the main signal is connected. Setting the main route in the same direction from any other shunting signal than the route exit signal must be prevented. A main signal connected to shunting signals must be controlled to display an aspect permitting driving, when the main route has been set and – the track section in advance of the shunting signal which starts the main route is
vacant, if the distance between the shunting signal, which is closest to the main signal connected to shunting signals and the main signal is at least 300m,
– the track section in advance of the shunting signal which starts the main route becomes occupied, if the distance between the shunting signal, which is closest to the main signal connected to shunting signals and the main signal is a distance of less than 300m, or
– the track section in advance of the shunting signal which starts the main route is vacant, if the main signal connected to shunting signals cannot be seen from any of the shunting signals connected to the main signal in question.
6.3.6 Shunting route
6.3.6.1 Setting a shunting route It must be possible to set a shunting route between two consecutive shunting signals through all paths made possible by the route points between the shunting signals in question. The shunting route conditions are the same as the main route conditions exclusive of the exceptions stated here. The shunting route must end at – a main signal, – a block signal, – a shunting signal, – a track equipped with a line block system on the line, – a track section where the track vacancy proving ends, or – a track section, at whose boundary a board limiting the shunting work will be
positioned. A shunting route must be set without flank protection. A shunting route must be set without overlap.
72 RATO 6 / 05-2012
A powered derailer on the shunting route must be turned off the rail and monitored according the requirements set for the stopping device in the conditions for setting the main route. The shunting route must become set, even if its track sections are occupied. It must be possible to determine the track vacancy proving of specified track sections in the basic shunting route conditions. Setting a shunting route in such a way that the route entry signal of the shunting route to be set is the route exit signal of a set main route, must be prevented during the checking of the basic route conditions. The track blocking set to a track section or point must not prevent the setting of a shunting route via the track section or point in question, if the shunting route is set with a command overriding the track blocking. The displaying of an aspect permitting driving of signals included in the shunting route must be on condition that the locking and monitoring conditions for a shunting route are fulfilled. A shunting signal ending a shunting route must display a ‘Stop’ or 'Proceed with caution’ aspect. It must be possible to determine the setting of opposing shunting routes to the same track in the interlocking system. The opposing shunting routes to the same track can be realized only when the track section of the track in rear of the route exit signals is occupied. The shunting route exit signal can be a shunting signal displaying an ‘No aspects’ aspect, which is controlled to display a ‘Stop' aspect. A shunting signal can be determined as the shunting signal, which can be controlled to display a 'Stop' aspect instead of ‘No aspects’ aspect, when it ends a shunting route that does not include points included in the same local point operation group as the shunting signal. Consecutive shunting routes can be determined to be set with a combined shunting route command. 6.3.6.2 Releasing a shunting route A set shunting route must be released automatically as the track sections on the route become occupied and vacant according to the sequence of the route. The signal included in the shunting route must be controlled to display a 'Stop' aspect before route lockings are released. The route locking of the shunting route track section must be released, when the track section in question and the previous track section have become occupied and vacant and the track section following has become occupied according to the sequence corresponding to the shunting route direction. The route locking of the track in rear of the shunting route exit signal or the track section ending a shunting route, must be released when the track section in question becomes occupied and the route locking of the previous track section is released, if the track section is not associated with other lockable signalling elements controlled by the interlocking system. The route locking of the track in rear of the route exit signal or the track section ending a shunting route must be released when the track section in question becomes occupied and vacant, the following track section becomes occupied and the route locking of the previous track section is released, if the track section is associated with other lockable signalling elements controlled by the interlocking system.

73
RATO 6 / 05-2012
The point locking on the shunting route must be released when the locking of the point track section is released. 6.3.6.2.1 Automatic release of an unused shunting route The unused part of a shunting route must be released automatically when (Figure 6.3:22) – a main or shunting route is set from the occupied track section in the opposite
direction to the original shunting route, – the track section in advance of the entry signal of a main or shunting route, which
is set in the opposite direction becomes occupied and the track section in rear becomes vacant and
– the track sections between the entry signal of the main or shunting route set in the opposite direction and the signal ending the original shunting route are vacant.
① Original route② Opposite route to the original route③ Track sections, which are occupied when setting the opposite route④Track sections, whose route locking is released automatically
③④
①
②
Figure 6.3:22 Automatic release of an unused shunting route. 6.3.6.3 Cancelling a shunting route
It must be possible to cancel a shunting route either in whole or for the unreleased part of the route. The signal included in the shunting route must be controlled to display a ‘Stop’ aspect after the route cancellation command has been accepted.
6.3.7 Automatic functions of the route It must be possible to determine a route to be set automatically guided by the track section becoming occupied. The route may not be set automatically again, if the automatically set route is cancelled or released. The automatic route setting must switch off by itself when the interlocking system is in remote control and the data transfer between the interlocking system and remote control is cut-off for over a minute. The automatic route setting may only switch on by a command for that particular function. It must be possible to switch the automatic route setting off and back on individually on each signal. The automatic route setting may not switch on automatically when the interlocking system switches on. The interlocking may have the following functions for automatic route setting:

74 RATO 6 / 05-2012
– Automatic system pass through, which sets the route through the determined
track of the railway operating location for a train approaching the railway operating location.
– Automatic encounter, which sets the routes for the trains approaching the railway operating location from different directions. It sets the route to a track other than the railway operating location through track for the first train, the route through the railway operating location for the latter through the determined track and, finally, the route to the line for the train that arrived first to the railway operating location.
– Automatic overtake, which sets the routes for the trains approaching the railway operating location from the same direction. It sets the route to a track other than the railway operating location through track for the first train, the route through the railway operating location for the latter train through the determined track and, finally, the route to the line for the train that arrived first to the railway operating location.
The impulse for automatic route setting must primarily be given by the track sections on the signal approach zone in such a way that the route setting starts with the track section furthest away on the approach zone becoming occupied, when viewed from the direction of the signal. The route setting may start after a determined time delay after the track section has become occupied. Automatic command must be prevented, if the command – is a critical command, – sets a route, which has a radio signal as the route entry signal – sets a route, which includes a point through which there has not been a route set
after the operation command of a trailed point, – sets a main route, which has an occupied track section, – sets a main route, which has an occupied track section on its overlap or – sets a route, which has an elimination function switched on, on a track section
included in the route.
6.3.8 Line
6.3.8.1 Block conditions
A line block system can be used to set a block section on the line. It must be possible to simultaneously set opposite routes to the line if the line has a line point and the distance between route exit signals is at least 350m (Figure 6.3:23) The section between the route exit signals must have a single piece of information about the block travel direction. The operation must be implemented on the line determined in the engineering configuration requirements.
≥ 350m
Line point
Figure 6.3:23 The main signals of the line simultaneously functioning as the route exit signals of opposing routes. The line is in a basic state, when – the track sections of the line are vacant, – the direction of the line has not been locked,

75
RATO 6 / 05-2012
– no route is set to the line and – the line is not in a faulty state. The line is in a faulty state, when – the signal on the line is not displaying a monitored aspect, – the line point is not monitored, – the track sections of the line have become occupied and vacant in the sequence
other than the block travel direction or – the track section in advance of the main or block signal has become occupied
when the signal is displaying a ‘Stop' aspect. The block conditions are: – The block section must be vacant. – The block travel direction of the line is the same as the direction of the block
section. – The block section and the following block section must become occupied in the
sequence according to the block travel direction. – The line point on the block section and the key box associated with the block
section must be monitored. – The block section exit signal has been displaying an aspect permitting driving as
the track section in advance of the signal in question has become occupied. The main or block signal starting a set block section must be controlled to display a 'Stop' aspect after a 3s delay, when – the block section in advance of the signal becomes occupied, – a fault preventing the display of a ‘Stop' aspect is detected in the main or block
signal in advance of the signal starting a block section, – a fault preventing the display of an ‘Expect stop' aspect is detected in the distant
signal in advance of the signal starting a block section, – the overlap in advance of the station entry signal, which ends the block section
becomes occupied. The main line or block signal of the line displaying an aspect permitting driving must be controlled to display a 'Stop' aspect immediately, when the signal is individually controlled to display a ‘Stop' aspect or the block travel direction of the line begins to reverse. It must be possible to add the vacancy of the track section in advance of the signal ending the block section to the conditions for an aspect permitting driving of the line main or block signal starting the block section or the station exit signal. The track section in advance of the signal ending the block section must be proved vacant in the conditions for an aspect permitting driving of the signal starting the block section, if there is a passenger platform in advance of the signal ending the block section in a distance less than 350m away from the signal ending the block section or the signal ending the block section must get a release speed of over 35kph. The block travel direction of the line must start to be reversed, when the conditions for reversing the block travel direction are fulfilled and the block travel direction is not the same as the direction of the route to be set to the line or the command for reversing the block travel direction is accepted. The conditions for reversing the block travel direction: – The line is not in a faulty state, unless the line’s faulty state is only caused by the
line signal displaying an unmonitored aspect. – All the block sections of the line are vacant. – The track sections between the station entry signal and the entry point are vacant
in the railway operating location from which the block travel direction before the changing of the direction is outwards.
– An opposing main route has not been set or is not being set for the line, if the engineering configuration requirements do not require opposing routes to be implemented to the line.

76 RATO 6 / 05-2012
– The monitoring conditions for the line point on the line must be fulfilled. – There has been no command given preventing the reverse of the line’s block
travel direction.
When the conditions for reversing the block travel direction are fulfilled, the block travel direction must be reversed. The main and block signals of the line must be controlled to display a 'Stop' aspect while the locking for the block travel direction is released. After the line’s block travel direction is locked in the reverse direction, the signal in the block travel direction must be controlled to display an aspect permitting driving, if other conditions for the signal displaying the aspect permitting driving are fulfilled. It must be possible to return the line to the basic state for the part of the conditions for displaying an aspect permitting driving by an emergency command. The interlocking system may have special commands for setting a route to a line point or from a line point to a station entry signal. The conditions for the route, which has been set by the command in question, must be monitored to the signal in advance of the line point, viewed in the block travel direction. In addition to the block conditions for the aspect permitting driving of the line block entry signal, there must be a condition that ensures that there is a set main route from one of the station exit signals to the line past the line block entry signal. The line block can be implemented in the interlocking system. 6.3.8.2 Line point monitoring
The key box permission command given to the key box associated with the track section of the line point must control the line point protecting signal to display a ‘Stop' aspect and prevent the reversing of the block travel direction, if the conditions for starting a time delay for key box permission of the line point are fulfilled. The time delay for the key box permission of the key box associated with the line point track section must be started after the key box permission command has been given, if – the line is not in a faulty state, – there is no set route from the station exit signal to the line, when the line point is
located on the first block section with respect to the block travel direction (Figures 6.3:24 and 6.3:25) and
– the track sections of the line between the line point protecting signal and the line point are vacant when viewed according to the block travel direction when the line point track section is vacant (Figures 6.3: 24 and 6.3:25).
Track section which is vacancy proved when the tracksection in which the line point is included is vacant
Block traveldirection Not a set route
Line point track section
Figure 6.3:24 The conditions for the key box permission of the line point when the line point is located on the first block section with respect to the block travel direction.

77
RATO 6 / 05-2012
Track section which is vacancy proved when the tracksection in which the line point is included is vacant
Block traveldirection
Track section line point
Figure 6.3:25 The conditions for the key box permission of the line point when the line point is located elsewhere than on the first block section with respect to the block travel direction. The giving of key box permission must be interrupted if the above conditions are not fulfilled for the length of the time delay or the vacant track section becomes occupied, viewed from the block travel direction when the line point track section between the line point protecting signal and the line point are vacant as the time delay starts. The block travel direction must become released and the line point protecting signals must be controlled to display an aspect permitting driving when other conditions for an aspect permitting driving are realized if the giving of the key box permission of the line point is interrupted. The key box permission must be given if the conditions for the key box permission of the line point are fulfilled for the length of the 60s time delay . The key box permission must be given automatically after the 60s time delay when the line point track section becomes occupied, if the route has been set by a special command to the line point. It must be possible to give key box permission to the key box associated with the line point by an emergency command, which bypasses the conditions for the key box permission of the line point. The emergency key box permission of the line point must be given after the 60s time delay.
6.3.9 Local point operation permission
Points, which must be able to be operated by a local operation button, and the key boxes must be divided into the local point operation groups.
6.3.9.1 Local point operation permission monitoring The local point operation conditions must be realized before local point operation permission is given to the local point operation group. The following conditions must be fulfilled when giving the local point operation permission: – The point track section included in the local point operation group is not on a set
route, overlap or acting as flank protection of a main route. – The point track section included in the local point operation group is not located in
advance of the route exit signal, which ends a main route set with overlap 0. – A point included in a local point operation group is not locked individually. – No track blocking has been set on a track section associated with or a point
included in a local point operation group. – The conditions for flank protection associated with the local point operation group
are fulfilled. – The shunting signal associated with a local point operation group does not have a
fault preventing the display of an ‘No aspects’ aspect.

78 RATO 6 / 05-2012
– None of the local operation buttons of the local point operation group are out of
the basic state. The realization of the following conditions must be continuously monitored, when the local operation permission is given: – The flank protection conditions associated with the local point operation group are
realized. – There is no fault in a shunting signal associated with the local point operation
group preventing to display ‘No aspects’ aspect. – None of the local operation buttons is out of is basic position uninterruptedly
longer than 5s. The point operation by a local operation button must be prevented, if the local point operation conditions for the point in question are not realized. The point operation must be possible without a separate command when the local point operation conditions are realized again while the local point operation permission is still given. It must be possible to give local point operation permission to a local point operation group by an emergency command, when – a point, derailer or stopping device included in the local point operation group is
locked individually or – track blocking has been set on the track section or a point associated with local
point operation permission. The points protecting the local point operation group must be locked in a position protecting the local point operation group while local point operation permission is given to the local point operation group. The signals protecting the local point operation group must display a monitored ‘Stop' aspect while local point operation permission is given to the local point operation group. Local point operation permission must prevent route setting through a track associated with a local point operation group. 6.3.9.2 Forming and protecting a local point operation group
A local point operation group can only be formed for shunting.
The local point operation group must form a functional entity, which can be used for shunting. The points on different ends of the railway operation location’s track layout must be included in different local point operation groups. The points at one end of the railway operating location must be divided into different local point operation groups if using points, not included in a local point operation group to protect the local point operation group enables route setting through points and tracks associated with them that are outside of the local point operation group. The primary flank protection for a local point operation group must be a point and the secondary must be a signal. The point, which is providing flank protection for the local point operation group must be chosen in such a way that it prevents the traffic to the points included in the local point operation permission and track sections associated with them. The signal, which is providing flank protection for the local point operation group must be chosen in such a way that the signal is at least a distance of 100m from the nearest point which is included in the local point operation group and the route cannot be set through points included in the local point operation group. In Figure 6.3:26 the local point operation group 1, formed by the points V515 and V517, must be protected from the direction of track 551 by turning and locking the points V511

79
RATO 6 / 05-2012
and V513 in the position leading to the right. The local point operation group 1 must be protected from the direction of tracks 552 and 581 by preventing route setting from the signals P552 and E581 to tracks 502, 503 or 504. The local point operation group 2 must be protected by preventing route setting from signals P551, P552 and E581.
E503
551
552
504
503
502
501531
532
581561
V511
V513
V517
V515 V512V514
V516
12
P552
P551
E502
E501
P503
P502
P501
E581
E504
P504
The signalling elements inside the dashed linesare included in the local point operation group
Figure 6.3:26 Protecting local point operation by a point and signal. The track sections, which allow traffic from the direction of the local point operation group while local point operation permission is given, are associated with the local point operation group are connected to the local point operation group. The track sections associated with the local point operation group must be limited as viewed from the direction of the points included in the local point operation group, by – a derailer or a stopping device, which is not included in the local point operation
group, – a signal, which is displaying a ‘Stop' aspect to a train approaching from the
direction of the points included in the local point operation group, – a board marking the limits of shunting work, – a station entry signal, – a track section, where the track vacancy proving ends or – a signal providing flank protection for the local point operation group. The shunting signal must display a monitored ‘No aspects' aspect, if the track sections in rear and in advance are associated with the local point operation group, which has been given local point operation permission. In Figure 6.3:27 the points of the railway operating location are divided into three local point operation groups. The local point operation group 1 is formed by the functional entity of points at the left end of the railway operating location, the local point operation group 2 is formed by the points at the right end of the railway operating location and local point operation group 3 is formed by the point at the left end, which can be separated into its own functional unit. When the local point operation groups 1 and 3 have local point operation permission simultaneously given, the points between the points V511 and V513 included in the local point operation groups are included in the local point operation permission.
V511
V512O542
E503
551
552
504
503
502
501531
532
581561
542V513
V517V515
Sp519
V514
V516
Sp5181
2
1 and 3
P552
P551
E502 P503
P502
P501
E581
T542O532
O531
ASp518ASp519
3506V523
Sp525
E501T506
The signalling elements inside the dashed linesare included in the local point operation group
Figure 6.3:27 Forming a local point operation group.

80 RATO 6 / 05-2012
In Figure 6.3:28, point V515 and key box ASp519 are included in local point operation group 1 and track sections Er532, ErV513, ErV515/517, Er502 and Er503 are associated with it. When the local point operation permission is given, – shunting signal O532 is displaying an ‘No aspects’ aspect, – signals P552 and T542 as well as point V511 provide flank protection for the local
point operation group, – main routes 551-502, 551-503, 552-502, 552-503, 502-551, 502-552, 503-551,
503-552, 581-502 and 581-503 are prevented, – shunting routes 531-502, 531-503, 532-502, 532-503, 542-502 and 542-503 are
prevented, – points V511 and V513 are locked in position leading to the right, – it is possible to set main routes 551-501, 501-581, 502-581, 503-581, 501-551
and 581-501, – it is possible to set shunting routes 531-501, 531-506, 506-531 and 542-561 and – track section Er532 cannot be set as overlap on the route ended by signal P552.
V511
V512O542
E503
551
552
504
503
502
501531
532
581561
542V513
V517V515
V514
V516
1
P552
P551
E502 P503
P502
P501
E581
T542O532
O531
Sp519 Sp518 ASp518ASp519
506V523
Sp525
E501T506
The signalling elements inside the dashed linesare included in the local point operation group
Figure 6.3:28 A local point operation group. The codes of the signalling element included in local point operation group, track sections associated with local point operation group and the code of the shunting signal displaying an ’No aspects' aspect are in boldface.
In Figure 6.3:29, points V512, V514 and key box ASp518 are included in local point operation group 2, and track sections Er501, Er502, Er503, ErV514/516, Er542, ErV512 and Er561 are associated with it. When the local point operation permission is given, – shunting signals T542 and O542 are displaying an ‘No aspects’ aspect, – signals P552 and E581 and point V523 provide flank protection for the local point
operation group, – main routes 551-501, 551-502, 551-503, 552-502, 552-503, 501-551, 501-581,
502-581, 503-581, 581-501, 581-502 and 581-503 are prevented, – shunting routes 531-501, 531-532, 531-503, 532-502, 532-503, 542-561, 542-502
and 542-503 are prevented, – point V523 is locked in position leading to the right – it is possible to set main routes 502-551, 502-552, 503-551 and 503-552, – it is possible to set shunting routes 531-506 and 506-531 and – track section Er561 cannot be set as overlap on the route ended by signal E581. –

81
RATO 6 / 05-2012
V511
V512O542
E503
551
552
504
503
502
501531
532
581561
542V513
V517V515
V514
V516
2
P552
P551
E502 P503
P502
P501
E581
T542O532
O531
Sp519 Sp518 ASp518
ASp519
506V523
Sp525
E501T506
The signalling elements inside the dashed linesare included in the local point operation group
Figure 6.3:29 A local point operation group. The codes of the signalling elements included in the local point operation group, track sections associated with local point operation group and the codes of the shunting signals displaying an ’No aspects' aspect are in boldface. In Figure 6.3:30 and points V512 and V523 and derailer Sp525 are included in local point operation group 3 and track sections Er531, ErV511 and Er501 are associated with it. When the local point operation permission is given, – shunting signals O531 and T506 are displaying an ‘No aspects’ aspect, – signal P551 as well as point V513 provide flank protection for the local point
operation group, – main routes 551-501, 551-502, 551-503, 501-551, 502-551, 503-551, 501-581
and 581-501 are prevented, – shunting routes 531-501, 531-502, 531-503, 531-506 and 506-531 are prevented, – points V511, V512 and V513 are locked in position leading to the right, – It is possible to set main routes 552-502, 552-503, 502-581, 503-581, 502-552,
503-552, 581-502 and 581-503, – it is possible to set shunting routes 532-502, 532-503, 542-561, 542-502 and 542-
503 and – track section Er531 cannot be set as overlap on the route ended by signal P551.
V511
V512O542
E503
551
552
504
503
502
501531
532
581561
542V513
V517V515
V514
V516
3
P552
P551
E502 P503
P502
P501
E581
T542O532
O531
Sp519 Sp518 ASp518ASp519
506V523
Sp525
E501T506
The signalling elements inside the dashed linesare included in the local point operation group
Figure 6.3:30 A local point operation group. The codes of the signalling elements included in the local point operation group, track sections associated with the local point operation group and the codes of the shunting signals displaying an ’No aspects' aspect are in boldface. In Figure 6.3:31, in a situation where local point operation permissions 1 and 3 are given simultaneously, points V511 and V513 are included in the local point operation group in addition to points and key boxes included in local point operation groups 1 and 3. When the local point operation permission is given, – shunting signals O531, O532 and T506 display an ‘No aspects’ aspect, – signals P551, P552 and E581 provide flank protection for the local point operation
group, – main routes 551-501, 551-502, 551-503, 552-502, 552-503, 501-551, 502-551,
502-552, 503-551, 503-552, 581-501, 581-502 and 581-503 are prevented,

82 RATO 6 / 05-2012
– shunting routes 531-501, 531-502, 531-503, 531-506, 532-502, 532-503, 506-
531,542-502 and 542-503 are prevented, – it is possible to set main routes 501-581, 502-581 and 503-581, – it is possible to set shunting route 542-561 and – track section Er531 and Er532 cannot be set as overlap on the route ended by
signals P551 and P552.
V515O532
V511
V512O542
E503
551
552
504
503
502
501531
532
581561
542V513
V517
V514
V516
1 and 3
P552
P551
E502 P503
P502
P501
E581
T542
O531
Sp519 Sp518 ASp518ASp519
506V523
Sp525
E501T506
The signalling elements inside the dashed linesare included in the local point operation group
Figure 6.3:31 A local point operation group. The codes of the signalling elements included in local point operation group, track sections associated with local point operation group and the codes of the shunting signals displaying an ’No aspects' aspect are in boldface. In Figure 6.3:32, in a situation where local point operation permissions 1, 2 and 3 are given simultaneously, all points, key boxes and track sections within the boundaries of the railway operating location are included in the local point operation group. When the local point operation permission is given, – shunting signals O531, O532,T506, T542 and O542 are displaying an ‘No
aspects’ aspect, – signals P551, P552 and E581 provide flank protection for the local point operation
group, – all the routes are prevented and – track sections Er531, Er532 and Er561 cannot be set as overlap on the routes
ended by signals P551, P552 and E581.
V511
V512O542
E503
551
552
504
503
502
501531
532
581561
542V513
V517V515
V514
V516
2
1 and 3
P552
P551
E502 P503
P502
P501
E581
T542O532
O531
Sp519 Sp518 ASp518
ASp519
506V523
Sp525
E501T506
The signalling elements inside the dashed linesare included in the local point operation group
Figure 6.3:32 Local point operation group. The codes of the signalling elements included in the local point operation group, track sections associated with to the local point operation group and the codes of the shunting signals displaying an ’No aspects' aspect are in boldface.
6.3.9.3 Returning local point operation permission It must be possible to return the local point operation permission by the local operation return button. It must be possible to return the local point operation permission, even if the powered point included in the local point operation is not monitored.

83
RATO 6 / 05-2012
Using the local operation return button must return that particular local point operation permission of the local point operation group, which the button is for. Local point operation permission can only be returned if the operation keys for the key boxes included in local point operation permission have been returned to the key boxes. It must be possible to return the local point operation permission by an emergency command from the interlocking system. The returning of local point operation permission by an emergency command from the interlocking system must be possible even if the operation key for the key box included in the local point operation permission has not been returned to the key box. It must be possible to cancel the local point operation permission by a command from the interlocking system, if the local point operation conditions have not been fulfilled. 6.3.9.4 Local point operation buttons The local point operation button must have a white fixed light when it is possible to operate the point by local operation command given by the local point operation button and the point is in the end position. The local point operation button must have a white flashing light when it is possible to operate the point by local operation command given by the local point operation button and the point is not in the end position. The flashing aspect of the local point operation button must use a 2–10Hz frequency. The local point operation button must not have a light when it is not possible to operate the point by a local point operation button. The local operation return button must have a fixed, white light when local point operation permission is given for the local point operation group, which the button in question returns. The local operation return button must have a flashing, white light, when the local point operation permission is given for the local point operation group, which the button in question returns and the local point operation permission conditions are not met.
6.3.10 Level crossing system connected to the interlocking
It must be possible to connect the level crossing system to the interlocking system functions, if the alarm section has a level crossing protecting signal. The level crossing system must start an alarm in the absence of control information. The interlocking system must control the level crossing system alarm according to the requirements stated in Chapters 6.5.3.2.3 and 6.5.3.3. It must be possible to give the interlocking commands conformable to requirements stated in Chapter 6.5.3.2.4 as well as a command to eliminate the effects of the track sections of a track, to which the command is given, on the level crossing system functions. It must be possible to connect the buttons and switches needed for the level crossing system operation to the level crossing system connected to interlocking system functions. In the conditions for a set route, the absence of a critical fault in the level crossing system on the route must be monitored. A critical fault must cause the signal protecting the level crossing to display a ‘Stop' aspect. It must be possible to set blocking for the automatic operation of the level crossing system. When the blocking for automatic operation is on, the route to be set via the level crossing must be set without an alarm from the level crossing system and the level crossing protecting signal must display a 'Stop' aspect. The level crossing system alarm must begin while the route is set, when the blocking for automatic operation is removed. The level crossing protecting signal must be controlled to display an aspect permitting
84 RATO 6 / 05-2012
driving when the route is set and the level crossing system has given an alarm of sufficient length. The barrier monitoring circuit must be monitored in the route conditions, if the route is being set via a level crossing barrier system. The lowering of barriers to a horizontal position within 12s in the level crossing half-barrier system and within 20s in the level crossing full-barrier system from the ending of the pre-alarm signal must be monitored. The signal protecting a level crossing must display a 'Stop' aspect, if the barrier monitoring circuit is not monitored or the monitoring of the lowering of barriers to a horizontal position is not realized within the required time from the ending of the pre-alarm signal. It must be possible to ignore the barrier monitoring circuit and the monitoring of the lowering of barriers to a horizontal position in the conditions for the route to be set by using a command to remove the monitoring of the lowering of barriers to a horizontal position. The use of the operation switch (KK) or substitution switch must remove the level crossing system conditions from the route conditions, remove the level crossing system fault signals and control the level crossing system to the basic state. Termination of the use of the operation switch or substitution switch must give the level crossing system fault indications to the interlocking and control the level crossing system to turn on the alarm, if the conditions for the alarm are fulfilled. For each level crossing system, the interlocking system user interface must indicate the information about – the alarm and the actions causing the alarm, – the state of road signals and barriers, – critical and non-critical faults, – the blocking for automatic operation, – track-specific use of the elimination command, – use of the operation or substitution switch. – a fault in the level crossing system setting device and – information transfer faults between the interlocking system and the level crossing
system.
6.3.11 User interface
It must be possible to control the interlocking from a graphic user interface.
The user interface must indicate that the information updates, flashing functions and colours are functioning. The interlocking system actions and alarms must be indicated on the visual display unit and recorded and saved. The interlocking system actions must be recorded and saved for at least one month. It must be possible to transfer the saved actions to another system electronically. The comment text set for the signalling element in the user interface must stop the process of the command. The comment text must be confirmed before the command is processed.

85
RATO 6 / 05-2012
6.4 POSITIONING OF SIGNALLING APPARATUSES
6.4.1 General positioning requirements The signalling apparatus must be positioned in such a way that it can be installed fulfilling both the appropriate installation and maintenance tolerances stated in Chapter 6.6.1.1 and the requirements given in other chapters outside the structure gauge (ATU). The structure gauge and its possible extensions must be taken into consideration according to the requirements stated in RATO part 2, “Track Geometry”.
6.4.2 Signal positioning and sighting distance requirements 6.4.2.1 General signal positioning requirements
The maximum positioning distance required in the engineering configuration requirements must be taken into consideration when positioning the signal.
6.4.2.1.1 Signal positioning in the track cross-section The requirements given in this chapter concerning the positioning of the edge of the signal back plate are valid concerning the edge of the signal LED unit case of the combined signal. The edge of the signal back plate, which is closer to the track, must be positioned in the sideward direction at a distance of at least 1600mm, and the edge of the signal back plate further away from the track a distance of at the most 5000mm from the centre line of the track that the signal is referring to. To fulfil the sighting distance requirements on the line, the edge of the signal back plate further away from the track can be positioned in the sideward direction further than a distance of 5000mm from the centre line of the track that the signal is referring to, but not more than 8000mm. There can be no other track, platform, road or other passage between the signal and the track that the signal is referring to. The signal between tracks must be positioned primarily closer to the track it is referring to. An effort should be made to position the signal mast side closest to the track a distance of at least 2500mm from the centre line of the track. The side of the signal bridge and cantilever signal bridge base, which is closest to the track must be at a distance of at least 2500mm from the centre line of the track on the railway operating location tracks and on other tracks a distance of at least 2750mm from the centre line of the track. The side of the signal bridge and cantilever signal bridge base, which is closest to the track must primarily be positioned at a distance of at least 3100mm from the centre line of the track. The lower edge of a main, block or distant signal back plate or main and distant signal combination back plates must be at least 2000mm above the upper surface of the rail closest to the track that the signal is referring to. The upper edge of the back plate or plates must not be more than 8500mm above the upper surface of the rail closest to the track that the signal is referring to. The lower edge of the back plate of a shunting signal must be at least 600mm and the upper edge of the back plate at most 3500mm above the upper surface of the rail closest to the track that the signal is referring to. The LEd unit case of the combined signal must be at least 300mm above the upper surface of the rail closest to the track that the signal is referring to. An attempt has to be made to position the combined signal in such a way that the LED unit case is be at least 600mm above the upper surface of the rail closest to the track that the signal is referring to. The LED unit case of the combined signal must not be more than 4500mm above the upper surface of the rail closest to the track that the signal is referring to, when the signal is located on the mast. The LED unit case of the combined signal must not be more than

86 RATO 6 / 05-2012
8500mm above the upper surface of the rail closest to the track that the signal is referring to, when the signal is located on a signal bridge or cantilever signal bridge. The lower edge of the back plates of the other signals must be at least 500mm and the upper surface not more than 3500 mm above the upper surface of the rail closest to the track that the signal is referring to. The signal location in the longitudinal direction of the track is in the centre of the signal mast, when the signal is located on the mast. The signal location in the longitudinal direction of the track is in the centre of cantilever of the signal bridge or cantilever signal bridge, when the signal is located on the signal bridge or cantilever signal bridge. The signal must be positioned primarily mounted on the mast on the right of the track the signal is referring to. The signal must be mounted on the signal bridge or cantilever signal bridge on the right of the track, if the signal cannot be positioned on the mast on the right of the track and the signal cannot be positioned on the mast on the left of the track according to the requirements for positioning a signal on the left of the track. The signal can be mounted on the tunnel wall or on a corresponding structure. In such a case in positioning the signal the requirements presented for positioning a signal on the mast must be followed when applicable. An effort should be made to position the signal of the leftmost track of a railway operating location other than the station entry signal to the right of the track. The signal for the leftmost track of the railway operating location can be positioned to the left of the track (Figure 6.4:1), when there are no other tracks within 15m distance to the left of the track that the signal is referring to and there are no signals in the same direction on the adjacent track gauge of the track the signal is referring to.
Figure 6.4:1 Positioning the signal of the leftmost track of a railway operating location to the left of the track. The signal of the leftmost track of a multiple-rail track line and the station entry signal of the leftmost track of a multiple-rail track railway operating location must be positioned to the left of the track, when there are no other tracks within at most 15m distance to the left of the leftmost track and the sighting distance requirement can be fulfilled when the signal is positioned on left side of the track (Figure 6.4:2).

87
RATO 6 / 05-2012
Line
Figure 6.4:2 Positioning signals to the left side of the leftmost track on the line. The signal on the single-rail track line or the station entry signal of a single-rail track line can be positioned on the left side of the track to fulfil the sighting requirements (Figure 6.4:3).
Figure 6.4:3 Positioning signals on a single-track line. In respect to the track sections, the main and shunting signals at the same location must be on the same side of the track they are referring to (Figure 6.4:4).
E502T502
E501T501
Figure 6.4:4 Positioning the main and shunting signals at the same location in respect to the track sections. The signals, which have been positioned on the left side of the track must be equipped with a direction arrow according to the requirements in RATO part 17 “Track Signs”. An effort should be made to position the signals on all tracks on the line of a track section of three or more tracks at the same location on the track cross-section, if the signals are positioned on the signal bridge or cantilever signal bridge. An effort should be made to position the signals of the opposite direction at the same location, if the signals are positioned on the signal bridge or cantilever signal bridge. The required sighting distance and the desired length of the block section must primarily determine the signals’ positioning.

88 RATO 6 / 05-2012
6.4.2.1.2 Signal positioning at a point A signal may not be positioned at a route point. Positioning a signal at a point, other than a route point, must be avoided. To obtain a sufficient working length, the signal can be positioned at a point other than a route point only if – the signal is positioned at not more than a distance of 5m from the front joint, – the signal only refers to that branch of the point that it has been positioned on the
right side of, – the signal only refers to that branch of the point that it has been positioned on the
left side of, equipped with a direction arrow (Figure 6.4:5).
Positioning a signal referring to the left branch allowed
Positioning a signal referring to the right branch allowed
No restriction
No restriction
0 - 5m
Front jointEnd joint
End joint
Figure 6.4:5 Positioning a signal at a point other than a route point. 6.4.2.1.3 Signal distance from electrified railway structures in the track cross-section The minimum distances from the pantograph and electrified railway structures required by regulations on electrical safety must be taken into account when positioning the signal. Accounting for the electric railway is described in more detail in the requirements and guidelines on electric railways, which are published by the Finnish Transport Agency. 6.4.2.2 Signal sighting distance requirement The signal type and the maximum track speed at the signal determine the signal sighting distance requirement. An effort should made to make the sighting distance as long as possible. The signal must be visible from the distance of the sighting distance requirement or on the stretch which starts at a distance increased by 10 % of the sighting distance requirement from the signal and stops at the distance of the sighting distance requirement from the signal. The signal must be visible without obstructions immediately in rear of the signal on the stretch which is at least one fourth of the sighting distance requirement of the signal, disregarding catenary supports and other corresponding obstructions. When determining the sighting distance, it must be assumed that the adjacent tracks are occupied with solid rolling stock.

89
RATO 6 / 05-2012
The sighting may be interrupted because of an obstruction, which is at most 10% of the sighting. The sighting altogether has to be more than a half of the required sighting distance. The realization of the signal sighting distance must be checked and documented together with the planning of the signal positioning. In case of unfinished track structures, the planned future structures must be taken into account when estimating the sighting distance. The realization of the signal sighting distance must be checked during the commissioning. The realization of the signal sighting distance, any interruption in the sighting on the required distance and the planned speed limit must be documented in connection with the commissioning.
6.4.3 Track layout numbering
A track section, point, standard diamond crossing, stopping device and derailer must all have an individual code on the railway operating location. A track section, point, standard diamond crossing, stopping device and derailer must all have an individual code on the section of a railway, if possible. The code of a track section, point, stopping device and derailer must consist of an alphabetical character part as stated in the requirements in Chapter 6.4 as well as a numerical part, for which the requirements are stated in this chapter. The code of a standard diamond crossing must consist of letters Rr and a numerical part. Arabic numbers must be used for track layout numbering . The track associated with the interlocking system or line block system must be limited by a main, block or shunting signal, route point or a standard diamond crossing on a route track. There must be a track between two route points, if the track has a separate track section from the route point track sections. The track associated with the interlocking system or line block system is limited to the boundary of the track section, if the track vacancy proving ends in the track section in question. A track must have a three-digit number. The numerical part of the code of the track’s track section must be the track number if the track has only one track section. The first three digits in the numerical part of the code of the track’s track section must be the track number and it must be supplemented with a number expressing the order of the track section towards greater track kilometres of the track in question, if there is more than one track section (Figure 6.4:7). A track on the line and a line point must be numbered according to the numbering of the interlocking system of the railway operating location, whose track vacancy proving they are included in. Alternatively, the line point or railway stop tracks must have individual numbering, which is associated with the numbering of the tracks of consecutive railway operating locations. A track on the line with a line block system must be numbered according to the track layout numbering of the nearest railway operating location. A track on the train control systems' interfaces must be numbered according to the track layout numbering of the consecutive railway operating locations in such a way that the track number refers to both railway operating locations. The track number must be represented by two track numbers separated with a slash (Figure 6.4.6).

90 RATO 6 / 05-2012
Ak281/371 Ak355Ak265
P371
E281
Track 281/371 Track 355Track 265
Figure 6.4:6 The numbering of tracks and track sections on the train control systems’ interfaces. In Figure 6.4:7 the tracks are limited by main and shunting signals as well as route points. Track 501 has two track sections. Track 542 is limited by shunting signals. There is a track between points V512 and V514, because between the points there is a track section separate from the points’ track sections.
V511
V512O542
E503
551
552
503
502
501
531
532
581561
542V513 V515
V514
P552
P551
E502
E501
P503
P502
P501
E581
T542
Er5011 Er5012
Figure 6.4:7 The numbering of tracks and points and signalling apparatus codes. Tracks, points, stopping devices, derailers and standard diamond crossings must be numbered in such a way that one section of railway does not consist of two identical track, point, derailer and/or standard diamond crossing numbers. An effort should be made to number the points in such a way that the points of the track layout located on the minor track kilometres’ side have odd numbers and the points located on the greater track kilometres’ side have even numbers. The points should be numbered in such a way that their second digit of the number part of the code differs from the second digit of the track numbers of the track layout. Derailers, stopping devices and standard diamond crossings must be numbered according to the same principle as the points in such a way that derailers, stopping devices and standard diamond crossings do not have identical numbers to points. An effort should be made to number the track layout of a railway operating location in such a way that the first digit of the railway operating location tracks, points and derailers is identical. A railway operating location, which has several track layouts, must have an identical first digit on each track layout for the tracks, points, stopping devices, derailers and standard diamond crossings and on consecutive or adjacent track layout the tracks, points, stopping devices, derailers and standard diamond crossings may have a different number for the first digit of the code. On consecutive railway operating location the tracks, points, stopping devices, derailers and standard diamond crossings can be numbered to start with an identical number. Railway operating location track layout managed by the Finnish Transport Agency must be numbered completely together with the numbering of track layout associated with signalling systems. The part of the track layout, which do not have track sections, must

91
RATO 6 / 05-2012
have a section between two points and/or standard diamond crossings, with a minimum length of 100m numbered as a track. The tracks associated with the line point must be numbered in the same number series as the line point. An effort should be made that the track layout of a railway operating location is numbered as follows: 1. The tracks, which do not end, have a number that grows in one direction in the
lateral direction of the track layout. 2. The track with a passenger platform has a number as small as possible. 3. The track, which does not end has a number as small as possible. 4. The through track has a number as small as possible. 5. The outermost track located on the railway operating location building side, which
does not end or has a passenger platform, has a number as small as possible.
The numbering of the railway operating location tracks must be started in the order below from (Figure 6.4:8): 1. The outermost track with a passenger platform. 2. The outermost track, which does not end and is nearest to the track equipped with a
passenger platform. 3. The through track, which is the outermost track of the track layout. 4. The outermost track, which does not end and is nearest to the through track.
102103104
101
105
201202203
204302301
303304
402401
403404
406
405
Figure 6.4:8 The numbering of tracks. The tracks should be numbered in such a way that the track numbers of consecutive railway operating locations grow in the same direction in the lateral direction of the tracks (Figure 6.4:9).
302303
301402403
401202203
201
Figure 6.4:9 The numbering of track layout on consecutive railway operating locations. The code presented at the passenger platform or passenger information must be identical to the latter part of the track number (Figure 6.4:10).

92 RATO 6 / 05-2012
503
502501
504
505
32
32
Figure 6.4:10 The number presented at the passenger platform and the track number. An effort should be made that the tracks of the consecutive railway operating locations should be numbered in such a way that the last digit of through track numbers are the same (Figure 6.4:11).
202203
201302
303
301282281
352351
Figure 6.4:11 The numbering of through tracks of consecutive railway operating locations. An effort should be made that the railway operating location tracks are numbered in such a way that the consecutive tracks that have a connection without points or through points positioned to lead to a straight track have two identical digits (Figure 6.4:8 tracks 551, 531 and 501 as well as 552, 532, 502 and 542). The railway operating location tracks and points must be numbered according to the principles stated in Table 6.4:1, if the numbers in the table are sufficient for the numbering of the railway operating location tracks. The columns in italics may be used, if the numbers in other columns are not sufficient for the numbering of the railway operating location tracks and points.

93
RATO 6 / 05-2012
Table 6.4:1 The principle of numbering of railway operating location tracks and points. Interface Track Track Track Track Point Track Point Track Track Track Track Interface
281/ 371
355 351 335 331 V311 301 V312 341 345 361 365 381/ 471
282/ 372
356 352 336 332 V313 302 V314 342 346 362 366 382/ 472
283/ 373
357 353 337 333 V315 303 V316 343 347 363 367 383/ 473
284/ 374
358 354 338 334 V317 304 V318 344 348 364 368 384/ 474
V319 305 V320
V321 306 V322
V323 307 V324
V325 308 V326
V327 309 V328
V329 310 V330
6.4.4 Main signal
The track associated with the route point must be equipped with a main signal, which protects the point, if there is a need to set a main route from that track in the direction of the route point. In Figure 6.4:12 tracks 501, 502, 503 and 561 must be equipped with main signals, which are protecting route points V512 and V514, because it must be possible to set a main route from these tracks in the direction of points V512 and V514. Points V511 and V513 are not protected with main signals, because there is no need to set a main route through the points in the case shown in the Figure. Points V515, V516 and V518 are not protected with main signals, because they are not route points.
Route track
Not a route track
501502
505
503504
V511
V513
V515
V512
V514V516
V518
561551
Figure 6.4:12 Protecting points with main signals. The track left between the main signals, which are protecting the route points must be divided into block sections according to capacity requirements within the allowed limits of the positioning distance determined in the engineering configuration requirements. Advance information about a main signal ‘Stop' aspect must be given by the distant or block signal aspect when the main signal is the main route exit signal or the main signal protecting the railway operating location or a part of it. An approach sign must be used, if the distant or block signal providing the advance information is temporarily out of use.

94 RATO 6 / 05-2012
6.4.4.1 Main signal code
The main signal code must consist of an alphabetical character and three numbers all written together. Letter P must be used in the direction presented in Appendix 3 and letter E must be used in the opposite direction. The numerical part of the main signal must be the track number in rear of the main signal (Figure 6.4:6). The main signal code must be marked in the plate attached to the signal according to RATO part 17 “Track Signs”.
The letter in the main signal codes must be determined same in the same direction within the area of one interlocking. The change of direction in determining the letter part of the signal code described in Appendix 3 must be carried out in the train control systems’ interface. The direction of determining the letter of the Y-track signal code must not be changed on a track, which is a side of the Y-track (Figure 6.4:13).
Direction P determined in Appendix 3
Direction P determined in Appendix 3
361 365 381
382E382
E381
P361
E365P365
P3
67
E361
P381
P382
Figure 6.4:13 The letter of the signal code on a Y-track.
6.4.4.2 Main signal positioning
A main signal must be positioned in a lateral direction to the track as stated in the general requirements for signal positioning in Chapter 6.4.2.1.
6.4.4.2.1 Main signal sighting distance requirement The sighting distance requirement for the main signal is – 100m, when the speed limit on the stretch according to the sighting distance
requirement in rear of the signal is at most 35kph – 150m, when the speed limit on the stretch according to the sighting distance
requirement in rear of the signal is at most 50kph – 250m, when the speed limit on the stretch according to the sighting distance
requirement in rear of the signal is over 50kph An effort should be made to achieve the sighting distance of at least 400m when the speed limit is over 80kph. 6.4.4.2.2 Main signal positioning in respect to track sections The track section boundary of the track which the main signal is referring to, must not be in rear of the main signal. A main signal must be positioned as near as possible to the axle counter or rail insulation, which ends the track section. The distance from the main signal to the axle counter, which ends the track section can be no more than 2m (Figure 6.4:14).

95
RATO 6 / 05-2012
P571
Ak571
0 - 2m
Ak551
Figure 6.4:14 Positioning a main signal in respect to the axle counter. The distance from the main signal to the rail insulation, which ends the track section may be a maximum of 3m when the speed limit is a maximum of 50kph and a maximum of 5m, when the speed limit is over 50kph (Figure 6.4:15).
E552
Er552
0 - 3m
E551
Er551
0 - 5m
Er572
Er571
Maximum speed of the track ≤ 50km/h
Maximum speed of the track > 50km/h
Figure 6.4:15 Positioning a main signal in respect to rail insulation. The distance from the main signal to the axle counter or rail insulation, which ends the track section, may be a maximum of 7m on the line, when the axle counter or rail insulation is located between two main signals of different directions positioned on the same location in respect to the track sections (Figure 6.4:16).
E551
P571
Ak571 Ak551
0 - 7m
0 - 7m
Figure 6.4:16 Positioning a main signal in respect to the track section boundary. The distance between the main signal and the axle counter ending the track section can be a maximum of 7m, when the track vacancy proving in rear of the signal is realized with axle counters and the track vacancy proving in advance of the signal is realized with track circuit. 6.4.4.2.3 Danger point distance and main signal positioning in respect to a point
The danger point distance is formed by positioning the main signal at the distance determined in this chapter from the front joint of the point, fouling sign point or other characteristic danger point (Figures 6.4:17 and 6.4: 20).

96 RATO 6 / 05-2012
The main signal must be positioned at least at 60m distance from the fouling sign point of a route point, which is trailing and is located in advance of the main signal, if the signalling system’s planning is done according to the track geometry which is to be changed (Figure 6.4:17). An effort should be made that the main signal is positioned 60m distance from the fouling sign point, if the signalling systems planning is done according to existing track geometry and the next route point in advance of the main signal is trailing. The danger point distance may be shortened, if the signalling systems planning is done according to existing track geometry and the required usage length of track is not met otherwise. The danger point distance must, nevertheless, be at least 20m (Figure 6.4:17). The main signal may be positioned at a distance of under 20m from the fouling sign point of the route point in advance of the signal, if the point is trailing and the main signal cannot act as the main route exit signal. In such a case, the distance from the main signal to the fouling sign point of a route point in advance of it, must be at least 5m (Figure 6.4:17).
≥ d
d [m] Condition
5 Main signal not ending the main route
20 Existing track layout
60 New track layout or track layout to be changed
Figure 6.4:17 The main signal distance from the fouling sign point of a route point in advance of the signal. The danger point distance must be at least 60m, when it is possible to use overlap 0 on the routes ended by the main signal (Figure 6.4:18).
≥ 60m≥ 60m
≥ 60m≥ 60m
Figure 6.4:18 Setting simultaneous routes with overlap 0, when the danger point distance of the route exit signals are at least 60m. The distance between the fouling sign point of a route point, which is an extension of the route track with a speed limit of over 140kph, and the main signal providing flank protection must be at a minimum of 60m regardless of the danger point distance, when the flank protection for the route is provided by the main signal (Figure 6.4:19).

97
RATO 6 / 05-2012
≥ 60m
Speed limit > 140km/h
Danger pointdistance
Figure 6.4:19 Main signal location dependence on the maximum track speed. The main signal must be positioned at least at 10m distance from the front joint of a route point, which is a short facing point in advance of the main signal (Figure 6.4:20). The main signal must be positioned at least at 35m distance from the front joint of a route point, which is a long facing point in advance of the main signal (Figure 6.4:20). The main signal must be positioned at least at 5m distance from the front joint of a trap point, which is in advance of a main signal (Figure 6.4:20).
≥ d d [m] Condition
5 Trap point
10 Short point
35 Long pointFront joint
Figure 6.4:20 Positioning a main signal in respect to the axle counter. The main signal prior to the entry point must be positioned as close as possible to the entry point, but in any event at a distance of at least 350m from the entry point. The main signal prior to the entry point must be positioned in such a way that there is room for shunting train between the track section, which acts as an overlap for the main signal and the point used in shunting work (Figure 6.4:21), if it is required in the engineering configuration requirements and the line main signal of the line is not prior to the station entry signal closer than 3km. The length of the shunting train must not be taken into account in positioning the station entry signal, if the main signal of the line is prior to the station entry signal closer than 3km (Figure 6.4:22). There is a determined boundary in the engineering configuration requirements, up to which it must be possible to do shunting from the railway operating location in the line direction, regardless of the set routes to the line or block sections.

98 RATO 6 / 05-2012
②Shunting
≥ 350m Length of the shunting train
Point used in shunting
①Boundary up to which shuntingmust be possible
Figure 6.4:21 The effect of the shunting train length on positioning of a station entry signal.
≥ 350m< 3km
The length of the shunting train does not affect the positioning of the station entry signal
Figure 6.4:22 The effect of the line signal prior to the station entry signal on positioning the main signal. The main signal prior to the entry point must be positioned not more than 1200m distance from the entry point. To fulfil the sighting distance requirements or when a level crossing, bridge or tunnel prevents the positioning, the main signal may be positioned further than 1200m distance from the entry point, but no more than 3km distance.
6.4.4.2.4 Effect of electrified railway structures on main signal positioning
In positioning a main signal, it must be taken into account that an electrically driven train does not have to stop because of the main signal aspect in the vicinity of a neutral section or draining transformer. A main signal must not be positioned closer to the neutral section than the distance stated in Table 6.4:2 (Figure 6.4:23). In positioning the signal, the mean gradient of the track and the smallest radius of curvature of the distance, which begins 1200m prior to the projected position of the main signal and ends in the neutral section, must be taken into account. The main signal should be positioned as far as possible in rear of the neutral section, so that the train, which has stopped by the main signal prior to the neutral section has time to accelerate to the highest speed possible when entering the neutral section. The distances in Table 6.4:2 can be deviated from with permission from the Finnish Transport Agency, if the test run or simulation indicate that the train, which has stopped by the signal is able to coast past the neutral section for a distance of approx 100m without traction. Changes in weather conditions and the train’s ability to roll must be taken into account when assessing the results of the pilot run or simulation. The main signal distance from the neutral section in rear of the main signal must be greater than 320m (Figure 6.4:23). The main signal should be positioned at least 500m distance from the neutral section in rear of the main signal.

99
RATO 6 / 05-2012
> 320m, recommendation > 500m
Distance accordingto Table 6.4:2
1200m
Distance, whose mean gradient and lowest radius of curvature are taken into account
Figure 6.4:23 The effect of the neutral section on the main signal positioning. Table 6.4:2 Shortest distance from the main signal to the neutral section in advance of it.
Smallest radius of curvature between main signal and neutral section
Maximum mean gradient
< 1000m 1000 - 3000m > 3000m
- 3‰ 100m 100m 100m - 2‰ 130m 100m 100m - 1‰ 180m 100m 100m 0‰ 260m 130m 100m + 1‰ 380m 180m 140m + 2‰ 580m 260m 190m + 3‰ 910m 380m 290m + 4‰ 1670m 580m 420m + 5‰ 4150m 920m 670m + 6‰ 5000m 1700m 1120m Over 6‰ 5000m 4320m 2360m
The main signal must be positioned in such a way that the distance to the first catenary support of the insulated overlap in advance of the main signal is over 5m (Figure 6.4: 24). The main signal must be positioned in such a way that the distance to the first catenary support of the insulated overlap in rear of the main signal is over 320m (Figure 6.4: 24).
> 320m> 5m Insulatedoverlap
Catenarysupport
Catenarysupport
Figure 6.4:24 Positioning a main signal in the vicinity of an insulated overlap. A main signal must be positioned at such a distance, parallel to the track, from the catenary support or catenary bridge cantilever that the main signal does not hinder the cantilever’s movement. The main signal should be positioned at least 5m distance from the catenary support or catenary bridge cantilever in the direction of the track.

100 RATO 6 / 05-2012
6.4.4.2.5 Effect of signal balises on main signal positioning A main signal must primarily be positioned in such a way that the railway structures do not prevent the signal balises from being positioned at a 10m and 13m distance, in rear of the main signal. A main signal must not be positioned in such a way that the railway structures cause the signal balises to be positioned further than 10m and 13m away from the main signal. The main signal may be positioned in such a way that the signal balises are positioned closer than 10m and 13m away from the main signal, if the following requirements are fulfilled (Figure 6.4:25): – The balise closest to the main signal is at least 10m from the boundary of the
track section, which controls the main signal to display a ‘Stop' aspect. – The balise closest to the main signal is further from the front joint of the point or
fouling sign point, which determines the signal location than the requirement presented in Chapter 6.4.4.2.3 for danger point distance plus an additional 9m.
≥10m
≥ distance requirement for the signal + 10m
-
Figure 6.4:25 The effect of signal balises on main signal positioning.
6.4.4.2.6 Effect of rail gradient on main signal positioning A main signal may not be positioned where the rail gradient is over 15‰. Positioning a main signal where the rail gradient is over 7‰ must be avoided. When considering the rail gradient, the steepest rail gradient must be taken into account in both directions on a 1000m section starting 500m before and ending 500m after the main signal.
6.4.4.2.7: Effect of a passenger platform on main signal positioning
A main signal must not be positioned at the passenger platform on the platform track. When the passenger platform is located in rear of the main signal, an effort should be made that the main signal is positioned at least 40m distance from the end of the passenger platform (Figure 6.4:26).

101
RATO 6 / 05-2012
Recommendation≥ 40m
Passenger platform
Recommendation≥ 40m
501
No main signals referringto track 501
Figure 6.4:26 Positioning a main signal in such a way that the passenger platform is in rear of the main signal. An effort should be made that a main signal is positioned at least 350m distance from the passenger platform in advance of the main signal (Figure 6.4:27).
Passenger platform
Recommendation ≥ 350m
Figure 6.4:28 Positioning a main signal in such a way that the passenger platform is in advance of the main signal. The vacancy of the track sections in advance of the line main signal, on a stretch of 350m, or between the signal and the furthest end of the passenger platform, viewed from the direction of the signal, must be the condition for the main or block signal prior to the signal to display an aspect permitting driving, if the passenger platform is less than 350m distance from the signal, in advance of the signal. The combined length of the track sections, which should be vacant as a condition for displaying an aspect permitting driving may be max. 500m.
6.4.4.2.8 Effect of a level crossing on main signal positioning A main signal should be positioned in such a way that the train stopping at the main signal does not obstruct road traffic at the level crossing. An effort should be made to avoid the positioning a main signal on an alarm section. When controlling a main signal, the requirements for a level crossing protecting signal, stated in Chapter 6.5.3.3.1, must be taken into account if the main signal is located on the alarm section in such a way that the level crossing system is in advance of the main signal. An effort should be made to position the main signal in such a way that the train is not left on the alarm section following the level crossing system, in respect to the direction of the train’s movement.
6.4.4.3 Effect of capacity requirements on main signal positioning The track between the route point protecting main signals must be divided into block sections according to capacity requirements. The track may be divided into several

102 RATO 6 / 05-2012
block sections, if the block sections make up at least the length of the required presignalling distance (Figure 6.4:28).
≥ d ≥ d
≥ d ≥ d
d = required presignalling distance
Figure 6.4:28 Dividing the track into sections between route point protecting main signals. The planning of block section length should be carried out according to the following requirements: – Consecutive block sections, where the signal beginning or ending the block
section is not a station entry signal or a signal on the track layout of the railway operating location, are implemented so that a train using the maximum track speed uses an equal length of time on consecutive block sections (Figure 6.4:29).
– The block section in rear of the station entry signal and in advance of the signal on the track layout of the railway operating location, which leads from the track layout into the line direction, is shorter than block sections of the line (Figure 6.4:29).
– The block sections on the track layout of the railway operating location are designed primarily according to the requirements that the route points set and secondarily so that the block sections on the track layout of the railway operating location are, as much as possible, of similar length.
< d1
d = block section lengthv = mean maximum speed of track on a block section
d1 d2 < d2
(v1) (v2)d1/v1 ≈ d2/v2
Figure 6.4:29 The length of consecutive block sections on the line. In positioning a main signal, the effect of the requirements given for overlap on the distance of two consecutive moving trains must be taken into account (Figure 6.4:30). Overlap lengthens the required distance between two consecutive moving trains because, in addition to the block section, the track section or sections acting as overlap must also be vacant before the signal prior to the block section may display an aspect permitting driving.

103
RATO 6 / 05-2012
The distance between two consecutive moving trains
Block section
Overlap
Figure 6.4:30 The effect of overlap on the distance of two consecutive moving trains. In positioning a main signal, it must be taken into account that the release speed of the main signal is such that the typical traffic on the track the signal is referring to enables the capacity requirements stated in the engineering configuration requirements to be fulfilled. When positioning a main signal and planning its overlaps, an effort should be made to make it possible that the calculated release speed can be used primarily and the fixed release speed 35kph secondarily for the main signal. An effort should be made that a main signal is positioned in such a way that the release speed of the main signal is such that the typical traffic on the track the signal is referring to is at least 20kph. In positioning a main signal it must be taken into account that the track sections between the point and the main signal must be vacant before an intersecting route is set through the point, if the main signal is providing flank protection for the route that is to be set. To fulfil the capacity requirements, other signalling elements than a main signal may be used for flank protection, if the distance between the main signal and point is great. 6.4.4.4 Effect of other signalling systems planning on main signal positioning
In positioning a main signal, it must be taken into account that the positioning of the main signal affects the positioning and planning of other signalling elements. In positioning a main signal, it must be taken into account that the signal transmitting the distant signal information of the main signal can be positioned according to the requirements for positioning the signal in question. A distant signal referring to the next main or block signal may be positioned on the same mast with a main signal. The presignalling distance can be a maximum of 2.5km (Figure 6.4:31).
≤ 2,5km
Figure 6.4:31 Presignalling distance The distance between the main signal and separate distant signal, which refers to the next main or block signal in advance of the main signal, must be at least 500m or the distant signal, which refers to the next main or block signal, may not be visible from the
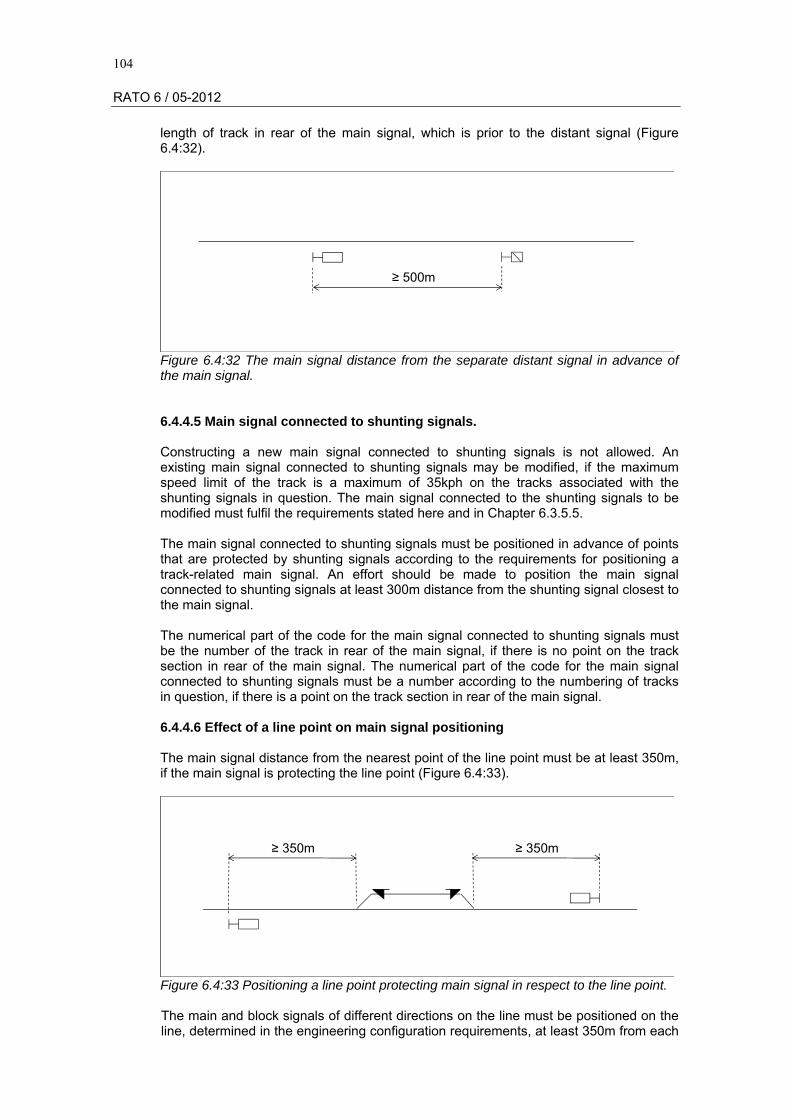
104 RATO 6 / 05-2012
length of track in rear of the main signal, which is prior to the distant signal (Figure 6.4:32).
≥ 500m
Figure 6.4:32 The main signal distance from the separate distant signal in advance of the main signal.
6.4.4.5 Main signal connected to shunting signals.
Constructing a new main signal connected to shunting signals is not allowed. An existing main signal connected to shunting signals may be modified, if the maximum speed limit of the track is a maximum of 35kph on the tracks associated with the shunting signals in question. The main signal connected to the shunting signals to be modified must fulfil the requirements stated here and in Chapter 6.3.5.5. The main signal connected to shunting signals must be positioned in advance of points that are protected by shunting signals according to the requirements for positioning a track-related main signal. An effort should be made to position the main signal connected to shunting signals at least 300m distance from the shunting signal closest to the main signal. The numerical part of the code for the main signal connected to shunting signals must be the number of the track in rear of the main signal, if there is no point on the track section in rear of the main signal. The numerical part of the code for the main signal connected to shunting signals must be a number according to the numbering of tracks in question, if there is a point on the track section in rear of the main signal. 6.4.4.6 Effect of a line point on main signal positioning
The main signal distance from the nearest point of the line point must be at least 350m, if the main signal is protecting the line point (Figure 6.4:33).
≥ 350m ≥ 350m
Figure 6.4:33 Positioning a line point protecting main signal in respect to the line point. The main and block signals of different directions on the line must be positioned on the line, determined in the engineering configuration requirements, at least 350m from each

105
RATO 6 / 05-2012
other, if there is no line point between the signals in question, but there is a line point on the block section started by one or both signals (Figure 6.4:34).
≥ 350m
Line point
Figure 6.4:34 The distance between main signals of different directions on the line, when there is a line point on the block section started by one or both main signals.
6.4.5 Block signal
A block signal may be used instead of a main signal in a line block system, which applies relay technology, when there are no route points on the block section in advance of the block signal and the signal ending the block section is a block signal or main signal that has only one aspect permitting driving; 'Proceed’. The block signal can give advance notice about a ‘Stop' aspect of the following main or block signal. Advance notice about a ‘Stop' aspect of a block signal must be given by a main or block signal aspect. An approach sign must be used, if the distant or block signal providing the advance notice is temporarily out of use. 6.4.5.1 Block signal code
The block signal code must consist of three numbers and alphabetical characters all written together. The letter p must be used in the direction presented in Appendix 3 and the letter e must be used in the opposite direction. The numerical part of the block signal code must be the track number in rear of the block signal. The block signal code must be marked on the plate attached to the signal as in RATO part 17 “Track Signs”. 6.4.5.2 Positioning a block signal
A block signal must be positioned in the lateral direction of the track as stated in the requirements in Chapter 6.4.2.1.
6.4.5.2.1 General block signal positioning requirements
Any other block signal than the line block entry signal must be positioned in the same way as the main signal for the part of the following requirements: – The sighting distance requirement. – The positioning in relation to track sections. – The effect of electrified railway structures. – The effect of signal balises. – The effect of rail gradient. – The effect of a passenger platform. – The effect of a level crossing. – The positioning in relation to the line point. The line block entry signal must be positioned in the same way as the main signal for the part of the following requirements: – The sighting distance requirement.

106 RATO 6 / 05-2012
– The effect of signal balises. – The effect of a level crossing.
A block signal must not be positioned at a point. A block signal must be positioned at such a distance, in the direction to the track, from the catenary support or catenary bridge cantilever, that the block signal does not prevent the cantilever from moving. An effort should be made to position a block signal parallel to the track at least 5m distance from the catenary support or catenary bridge cantilever.
A block signal must be positioned in the same way as a distant signal for the part of the requirements for presignalling distance. 6.4.5.2.2 Effect of other signalling systems planning on block signal positioning In positioning a block signal, it must be taken into account that the positioning of the block signal affects the positioning and planning of other signalling elements. In positioning a block signal, it must be taken into account that the signal displaying the distant signal information of the block signal can be positioned according to the requirements for positioning the signal in question. A block signal may be the signal displaying the distant signal information of the next main or block signal. The presignalling distance may be a maximum of 2.5km. The distance between the block signal and separate distant signal, which refers to the next main or block signal, must be at least 500m or the distant signal, which refers to the next main or block signal, may not be visible from the length of track in rear of the block signal, which is prior to the distant signal. In positioning a block signal, it must be taken into account that the release speed of the main signal is such that the typical traffic on the track the signal is referring to, enables the capacity requirements stated in the engineering configuration requirements to be fulfilled. An effort should be made to position a block signal and plan its overlaps to make it possible primarily the use of the calculated release speed and secondly the fixed release speed of 35kph. An effort should be made to position a block signal so that the block signal release speed is at least 20kph for the typical traffic on the track the signal is referring to. In positioning a block signal, the effect of the requirements given for overlap on the distance of two consecutive moving trains must be taken into account. A track section, which acts as overlap lengthens the required distance between two consecutive moving trains because, in addition to the block section, the track section or sections acting as overlap must also be vacant before the signal prior to the block section may display an aspect permitting driving. 6.4.5.3 Line block entry signal A line block entry signal may be used for displaying distant signal information, when the line is equipped with a line block system and the line block signal ending the first block section, viewed from the direction of the interlocking system, does not have a distant signal. A line block entry signal must be positioned by the track section in advance of the station entry signal, as close as possible to the station entry signal. A line block entry signal does not have a distant signal. A route may not end at a line block entry signal.

107
RATO 6 / 05-2012
6.4.6 Distant signal
A distant signal must display advance notice about a shunting signal ‘Stop' aspect, which ends a main route, an ‘End of main route’ indicator or a buffer. A distant signal must display advance notice about a main or block signal ‘Stop' aspect, which ends a main route, if the advance notice is not given by a block signal. A distant signal must be positioned at the required distance from the signal it refers to. A distant signal can be located in the same mast with a previous main signal.
6.4.6.1 Distant signal code
The code of a distant signal on a mast of its own must consist of the letters Eo and the code of the main signal the distant signal refers to, all written together. The distant signal code must be marked on the plate attached to the signal as in RATO part 17 “Track Signs”. The code of a distant signal on the same mast with the main signal must consist of the letters Eoy and the code of the main signal, all written together. The signal code of a distant signal on the same mast with the main signal is not marked on the signal.
6.4.6.2 Distant signal positioning
A distant signal must be positioned in the lateral direction of the track as stated in the general positioning requirements for signals. A distant signal must be positioned at such a distance, in the direction of the track, from the catenary support or catenary bridge cantilever that the distant signal does not prevent the cantilever from moving. An effort should be made to position the distant signal in the direction of the track at least 5m distance from the catenary support or catenary bridge cantilever. A distant signal may be positioned together with the previous main signal. The distant signal for main route exit signal for a route to an occupied track must be positioned on the mast of the main route entry signal for the route to the occupied track. An effort should be made to position only one distant signal instead of several distant signals positioned together with the station exit signals (Figure 6.4:35).
Figure 6.4:35 Positioning only one distant signal instead of four distant signals positioned together with main signals. A distant signal should primarily be positioned in such a way that the railway structures do not prevent the signal balises being positioned at 10m and 13m distance in rear of the distant signal.

108 RATO 6 / 05-2012
6.4.6.2.1 Distant signal sighting distance requirement
The sighting distance requirement for the distant signal is – 100m, when the speed limit on the stretch according to the sighting distance
requirement in rear of the signal is at most 35kph – 150m, when the speed limit on the stretch according to the sighting distance
requirement in rear of the signal is at most 50kph and – 250m, when the speed limit on the stretch according to the sighting distance
requirement in rear of the signal is over 50kph 6.4.6.2.2 Presignalling distance
The required presignalling distance must be determined according to the maximum track speed on the distance considered in rear of the main signal the distant signal refers to. The presignalling distance must be in accordance with Table 6.4:3 (Figure 6.4:36). The presignalling distance can be a maximum of 2.5km. Table 6.4:3 The required presignalling distance. Required presignalling distance
Maximum track speed on the distance considered
The distance considered in rear of the main signal the distant signal refers to
≥ 1200m - - ≥ 800m ≤ 50kph 800m ≥ 500m ≤ 35kph 500m
Presignalling distance d1
Maximum track speed v over a distance d2
d1 v d2
≥ 1200m - -
≥ 800m ≤ 50km/h 800m
≥ 500m ≤ 35km/h 500m
Figure 6.4:36 The required presignalling distance. The 1800m distance in rear of the main or block signal the distant signal refers to must be inspected for the characteristic gradient to calculate the maximum decline by a 1200m measurement base into the direction of the signal when the presignalling distance is at least 1200m (Figure 6.4:37).
Area to be inspected: 1800m
Figure 6.4:37 Determining the characteristic gradient for the signal.

109
RATO 6 / 05-2012
The presignalling distance added with 600m in rear of the main or block signal the distant signal refers to must be inspected for the characteristic gradient to calculate the maximum decline by a measurement base of the presignalling distance into the direction of the signal when the presignalling distance is less than 1200m The distance according to Table 6.4:4 must be added to the presignalling distance requirement stated in Table 6.4:3 based on the calculation of characteristic gradient made for the signal. Table 6.4:4 The presignalling distance dependency on characteristic gradient. The decline of the characteristic gradient The distance to be added to the
presignalling distance ≤ 5‰ 0m ≤ 7.5‰ 150m ≤ 10‰ 300m > 10‰ 800m
Despite of the characteristic gradient at least 800m presignalling distance can be used with permission from the Finnish Transport Agency on the track part Helsinki - Pasila and on the tracks used by the commuter traffic on the track parts Pasila - Savio and Pasila - Kirkkonummi, when the gradient between the distant signal and the main signal is at least -12,5‰. 6.4.6.2.3 Distant signal positioning in respect to a point
There may not be a route point between the distant signal on a mast of its own and the main signal it refers to.
6.4.7 Shunting signal
A shunting signal can act as – a shunting route entry signal, – a shunting route exit signal, – a main route entry signal if the requirements in Chapter 6.4.4.5 are fulfilled – a main route exit signal if the requirements in Chapter 6.4.7.4 are fulfilled – a signal providing flank protection. The track associated with the route point must be equipped with a point protecting shunting signal, if there is a need to set a shunting route from that track in the direction of the route point. In Figure 6.4:38 the tracks 532, 502, 503 and 504 associated with route points V513, V515 and V517 are equipped with shunting signals because it must be possible to set a shunting route from these tracks in the direction of the points in question. It is not possible to set a shunting route from tracks 531 and 501, so these tracks are not equipped with shunting signals.
532
504
503
502
501531551
V511
V513V515
V517
Figure 6.4:38 Equipping tracks with shunting signals.

110 RATO 6 / 05-2012
The track capacity requirement in shunting stated in the engineering configuration requirements must be fulfilled in positioning shunting signals in such a way that more than one train can perform shunting on the same track layout, if necessary. The track between route point protecting shunting may be divided by shunting signals into sections required by shunting. In Figure 6.4:39, there are shunting signals between tracks 441 and 531, so that setting a shunting route simultaneously between tracks 401-402 and 441 as well as between tracks 531 and 501-504 is possible.
504
503
502
501531441
402
401
Figure 6.4:39 The shunting signals enabling simultaneous shunting routes. In Figure 6.4:40, track 532 is equipped with a shunting signal, so that setting a shunting route simultaneously between tracks 552 and 501 as well as between tracks 532 and 502-504 is possible.
532
504
503
502
501531551
552
Figure 6.4:40 The shunting signals enabling simultaneous shunting routes. The track leading away from the tracks connected to the interlocking system must be divided into two sections, if there is a need for simultaneous traffic from the direction of the track connected to the interlocking system and the opposite direction. In Figure 6.4:41, shunting signals T532 and O552 make simultaneous traffic on tracks 532 and 552 possible. The tracks on the left side of track 552 are not connected to the interlocking system.

111
RATO 6 / 05-2012
552 532
T532
O532
O552
Figure 6.4:41 Positioning a shunting signal on a track leading away from the track layout, that is connected to the interlocking system. Advance notice about a shunting signal 'Stop' aspect must be given by the distant signal aspect when the shunting signal is a main route exit signal. An approach board must be used if the distant or block signal providing the advance notice is temporarily out of use.
6.4.7.1 Shunting signal code
The shunting signal code must consist of an alphabetical character and three numbers all written together. The letter O must be used in the direction presented in Appendix 3 and the letter T must be used in the opposite direction. The numerical part of the shunting signal code must be the track number in rear of the shunting signal. The shunting signal code must be marked on the plate attached to the signal as in RATO part 17 “Track Signs”. The same letter must be determined for the shunting signal codes in the same directions within the area of one interlocking system. The change of direction in determining the letter part of the signal code described in Appendix 3 must be done in the train control systems’ interface. The direction of determining the letter of the signal codes on Y-track may not be changed in the middle of the track, which is a side of the Y-track. The numerical parts of the main and shunting signals must be the same, if the shunting signal is located at the same place in respect to track sections, as the main signal. 6.4.7.2 Shunting signal positioning
A shunting signal must be positioned in the lateral direction of the track as stated in the general signal positioning requirements. 6.4.7.2.1 Shunting signal sighting distance requirement
The sighting distance requirement for the shunting signal is – 70m, when the speed limit on the stretch according to the sighting distance
requirement in rear of the signal is at most 30kph – 100m, when the speed limit on the stretch according to the sighting distance
requirement in rear of the signal is at most 35kph – 150m, when the speed limit on the stretch according to the sighting distance
requirement in rear of the signal is over 35kph
6.4.7.2.2 Shunting signal positioning in respect to track sections
The track section boundary of the track which the shunting signal is referring to, must not be in rear of the shunting signal. A shunting signal must be positioned as near as possible to the axle counter or rail insulation, which ends the track section.

112 RATO 6 / 05-2012
The distance from the shunting signal to the axle counter, which ends the track section must be no more than 2m (Figure 6.4:42).
O551
Ak551
0 - 2m
Ak531
Figure 6.4:42 Positioning a shunting signal in respect to an axle counter. The distance from the shunting signal to the rail insulation, which ends the track section may be a maximum of 3m when the maximum track speed is 50kph and a maximum of 5m, when the maximum track speed is over 50kph (Figure 6.4:43).
T531Er551 Er531
0 - 3m
T532Er552 Er532
0 - 5m
Maximum track speed ≤ 50kph
Maximum track speed > 50kph
Figure 6.4:43 Positioning a shunting signal in respect to rail insulation.
6.4.7.2.3 Shunting signal positioning in respect to the main signal
The shunting signal must be positioned 0–2m in rear of the main signal, if the shunting signal is located at the same place in respect to track sections as the main signal (Figure 6.4:44).
T532Er532
0 - 2m
E532
Figure 6.4:44 Shunting signal at the same place as the main signal in respect to track sections.

113
RATO 6 / 05-2012
6.4.7.2.4 Danger point distance and shunting signal positioning in respect to a point
The danger point distance is formed by positioning the shunting signal at the distance determined in this chapter from the front joint of the point, fouling sign point or characteristic danger point (Figures 6.4:45 and 6.4:46).
The shunting signal must be positioned at least 20m distance from the fouling sign point of a route point, which is trailing and is located in advance of the shunting signal, if – the shunting signal may act as the main route exit signal (Figure 6.4:45) or – the shunting signal is located between the route point and the route point
protecting main signal and may act as a signalling element providing flank protection for the route instead of a main signal (Figure 6.4:50).
The shunting signal must be positioned at least 5m distance from the fouling sign point of a route point, which is trailing and is located in advance of the shunting signal, if the shunting signal may not act as the main route exit signal (Figure 6.4:45).
≥ d
d [m] Condition
5 Not a main route exit signal
20 Main route exit signal
20 A signal giving flank protection, situatingbetween the route point and the routepoint protecting main signal
Figure 6.4:45 Positioning a shunting signal in respect to the fouling sign point of the route point. The shunting signal must be positioned at least 5m distance from the front joint of a trap point, which is in advance of the shunting signal (Figure 6.4:46). The shunting signal must be positioned at least 10m distance from the front joint of a route point, which is a short facing point in advance of the shunting signal (Figure 6.4:46). The shunting signal must be positioned at least 35m distance from the front joint of a route point, which is a long facing point in advance of the shunting signal (Figure 6.4:46).
Front joint
≥ d d [m] Condition
5 Trap point
10 Short point
35 Long point
Figure 6.4:46 Positioning a shunting signal in respect to the front joint of a route point.

114 RATO 6 / 05-2012
6.4.7.2.5 Effect of electrified railway structures on shunting signal positioning A track section must be positioned as the main signal in respect to a neutral section when the neutral section is located in rear of the shunting signal. The shunting signal, which can act as the main route entry or exit signal or shunting route entry signal, must be positioned in the same way as the main signal in respect to a neutral section when the neutral section is in advance of the shunting signal. The shunting signal, which cannot act as the main route entry or exit signal or shunting route entry signal, may be positioned without restrictions in respect to the neutral section, when the neutral section is in advance of the shunting signal (Figure 6.4:47). A shunting signal must be positioned in the same way as the main signal in respect to the draining transformer.
No distance requirement
Figure 6.4:47 Positioning a shunting signal in rear of the neutral section, when the shunting signal cannot act as the main route entry or exit signal or shunting route entry signal. 6.4.7.2.6: Effect of a passenger platform on shunting signal positioning
A shunting signal may not be positioned by the passenger platform on the platform track. An effort should be made to position the shunting signal at least 40m distance from the end of the passenger platform, when the passenger platform is located in rear of the shunting signal. 6.4.7.2.7 Effect of a level crossing on shunting signal positioning An effort should be made to position the shunting signal in such a way that – shunting can be performed without crossing a level crossing, – a train stopping at a shunting signal does not prevent road traffic at the level
crossing and – a train stopping at a shunting signal does not cause an unnecessary level
crossing system alarm The level crossing system functions must be dependent on the shunting signal aspect, if the shunting signal is the level crossing protecting signal . The shunting signal may be the level crossing protecting signal only in the case where a main or shunting route can be set over the level crossing.
6.4.7.3 Effect of other signalling systems planning on shunting signal positioning
A shunting signal can be used for protecting the track section that is functioning as overlap, when it must be possible to set a shunting route towards the track section that is functioning as overlap.

115
RATO 6 / 05-2012
In Figure 6.4:48 the shunting signal T531 enables the setting of the shunting route from tracks 501-503 to track 531 simultaneously with the main signal P571 functioning as a main route exit signal and track section 551 functioning as overlap.
503
502
501531551571
P571
T531
Figure 6.4:48 Using a shunting signal for protecting the track section that is functioning as overlap. A shunting signal can be used for fulfilling the track capacity requirements by positioning the shunting signal in such a way that it fulfils the flank protection condition on intersecting main routes. In Figure 6.4:49, it is possible to set the route from signal E561, when a train using the route that has been set from signal P551 to track section Er562, has released track section ErV511. It is possible to set the route from signal E562, when a train using the route that has been set from signal P551 to track section Er561, has released track section Er541.
P551
E562E561
T542
Er541 Er561
ErV511
Figure 6.4:49 The effect of flank protection requirements on shunting signal positioning. A shunting signal can be used to extend the working length of the track by positioning the shunting signal between the route point and the route point protecting main signal as a signalling element providing flank protection. In Figure 6.4:50 the shunting signal T232 provides the flank protection for a route, which is set through the track section Er201, when a train, which has arrived from the left and stopped at the main signal P202 occupies the track section Er232. The shunting signal O242 provides the flank protection for the a route, which has been set through the track section Er201, when a train, which has arrived from the right and stopped at the main signal E202 occupies the track section Er242.

116 RATO 6 / 05-2012
E202 P202T232 O242Er202
Er201
Er242Er232
Figure 6.4:50 Using the shunting signal to extend the working length. A shunting signal can be used as the signal limiting the local point operation group. In Figure 6.4:51, the route between tracks 552 and 501 is not possible while local point operation permission has been given to the local point operation group, which points V519 and V521 are included in, if there is no signal T532 limiting the local point operation group.
532
504
503
502
501531551
552
T532V519
V521
Set route
Track sections associatedwith the local point operationgroup
Figure 6.4:51 Shunting signals, which enable simultaneous shunting route and local point operation permission.
6.4.7.4 Shunting signal as the main route exit signal
A shunting signal can function as the main route exit signal when advance notice about the shunting signal 'Stop' aspect is given according to the requirements for the main signal ‘Stop’ aspect stated in Chapter 6.4.4. 6.4.7.5 Shunting signal connected to a main signal
The requirements for a shunting signal connected to the main signal are stated in Chapters 6.3.5.5 and 6.4.4.5.
6.4.8 Other signals
6.4.8.1 Locking signal
A locking signal cannot function as the route entry or exit signal. A swing bridge must be equipped with a locking signal, which cannot be positioned more than 100m distance from the swing bridge. The following devices may be equipped with a locking signal

117
RATO 6 / 05-2012
– a turntable, – a barrier, gate or door preventing traffic movements on the track, – a loading or unloading device preventing traffic movements on the track, – other device preventing traffic movements on the track. The locking signal code must consist of the letter L and one or two numbers all written together. The number must specify the locking signals on the same railway operating location or locking signals not more than 5km distance from each other. The locking signal code must be marked in the plate attached to the signal according to RATO part 17 “Track Signs”.
A locking signal must not be equipped with balises. A locking signal must be positioned in the lateral direction of the track as stated in the general positioning requirements. The sighting distance requirement for the locking signal is – 50m, when the speed limit on the stretch according to the sighting distance
requirement in rear of the signal is at most 20kph, – 100m, when the speed limit on the stretch according to the sighting distance
requirement in rear of the signal is at most 35kph, – 150m, when the speed limit on the stretch according to the sighting distance
requirement in rear of the signal is over 35kph and – 250m, when a swing bridge is equipped with the locking signal. 6.4.8.2 Level crossing signal A level crossing system must be equipped with a level crossing signal, if – the warning time of the level crossing system does not fulfill the requirements
presented in Chapter 6.5.3.2.2, before a train using the maximum track speed arrives at the level crossing,
– the track is not used for train traffic, – the maximum track speed on the alarm section is at most 35 kph and – it is not possible to set a route through the track. A level crossing signal must not be the route entry or exit signal. The level crossing signal code must consist of the letter R and one or two numbers all written together. The number must specify the level crossing signals of level crossing systems on the same railway operating location or level crossing signals not more than 5km distance from each other. The level crossing signal code must be marked on the plate attached to the signal according to RATO part 17 “Track Signs”. A level crossing signal must be positioned in the lateral direction of the track as stated in the general signal positioning requirements. The level crossing signal sighting distance requirement is 50m. An effort should be made to have a level crossing signal sighting distance of 150m. A level crossing signal must be positioned in the longitudinal direction of the track at the level crossing system alarm section, as near as possible to the rail insulation or axle counter ending the alarm section (Figure 6.4:52). An effort should be made to position the level crossing signal at least 50m distance from the rail insulation or axle counter starting the alarm section.

118 RATO 6 / 05-2012
≥ 50m
Alarm section
Distance, as short as possible
Figure 6.4:52 Positioning a level crossing signal. A level crossing signal must be positioned outside the road section as near as possible to the level crossing, if the level crossing system does not have an alarm section in the direction of the level crossing signal to be positioned (Figure 6.4:53).
Figure 6.4:53 Positioning a level crossing signal when the level crossing system does not have an alarm section. 6.4.8.3 Marshalling signal Constructing a new marshalling signal is not allowed. The marshalling signal must be dismounted, if the existing marshalling signal should be modified. 6.4.8.4 Repeater signal Constructing a new repeater signal is not allowed. The repeater signal must be dismounted, if the existing repeater signal should be modified.
6.4.9 Radio Signal
A radio signal can be used instead of a station exit signal in the railway operating location, mentioned in the engineering configuration requirements and equipped with station entry signals, according to the requirements for main signals in Chapter 6.4.4. A radio signal may not be used instead of a station exit signal, if the requirements in this chapter are not fulfilled. A radio signal may not be used on a track, where there is a signal displaying a visible aspect. The distance from the radio signal to the point in advance of the radio signal can be a maximum of 200m, if any of the routes that start from the radio signal have a short point leading to a diverging track (Figure 6.4:54). The mutual distance between consecutive short points leading to diverging tracks on a route starting from the radio signal can be a maximum of 200m (Figure 6.4:54).
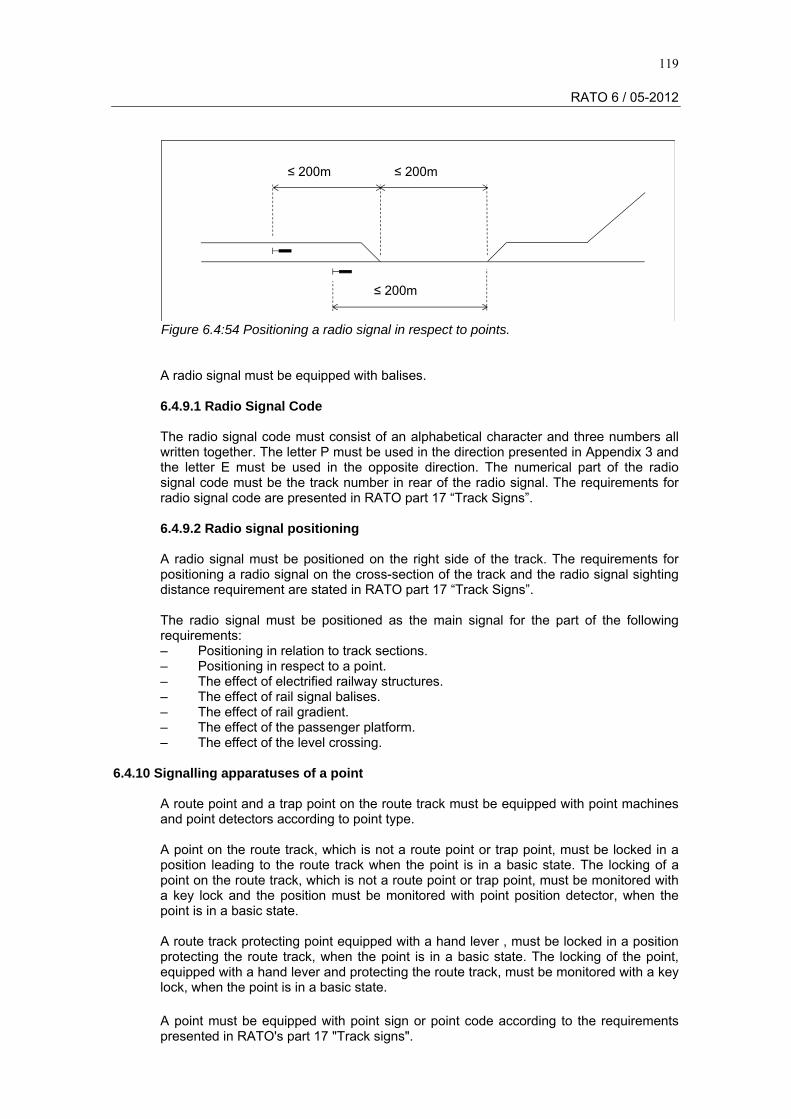
119
RATO 6 / 05-2012
≤ 200m ≤ 200m
≤ 200m
Figure 6.4:54 Positioning a radio signal in respect to points. A radio signal must be equipped with balises. 6.4.9.1 Radio Signal Code The radio signal code must consist of an alphabetical character and three numbers all written together. The letter P must be used in the direction presented in Appendix 3 and the letter E must be used in the opposite direction. The numerical part of the radio signal code must be the track number in rear of the radio signal. The requirements for radio signal code are presented in RATO part 17 “Track Signs”. 6.4.9.2 Radio signal positioning A radio signal must be positioned on the right side of the track. The requirements for positioning a radio signal on the cross-section of the track and the radio signal sighting distance requirement are stated in RATO part 17 “Track Signs”. The radio signal must be positioned as the main signal for the part of the following requirements: – Positioning in relation to track sections. – Positioning in respect to a point. – The effect of electrified railway structures. – The effect of rail signal balises. – The effect of rail gradient. – The effect of the passenger platform. – The effect of the level crossing.
6.4.10 Signalling apparatuses of a point
A route point and a trap point on the route track must be equipped with point machines and point detectors according to point type. A point on the route track, which is not a route point or trap point, must be locked in a position leading to the route track when the point is in a basic state. The locking of a point on the route track, which is not a route point or trap point, must be monitored with a key lock and the position must be monitored with point position detector, when the point is in a basic state. A route track protecting point equipped with a hand lever , must be locked in a position protecting the route track, when the point is in a basic state. The locking of the point, equipped with a hand lever and protecting the route track, must be monitored with a key lock, when the point is in a basic state.
A point must be equipped with point sign or point code according to the requirements presented in RATO's part 17 "Track signs".

120 RATO 6 / 05-2012
6.4.10.1 Point code
The point code must consist of the letter V and three numbers all written together. The requirements for determining the numerical part of the code are stated in Chapter 6.4.3.
6.4.10.2 Track section of a powered point
A powered point must be included in a track section. A track section may include several points. The distance between a powered point and the boundary of the track section of the point in question may be a maximum of 100m, when there is no powered point between the powered point and the boundary of the track section in question. The distance between the point and the boundary of the track section of the point in question may be a maximum of 200m, when there is a powered point or points between the point and the boundary of the track section (Figure 6.4:55). The distance between the point and the boundary of the track section must be measured from the front joint or the fouling sign point of the point closest to the track section boundary.
≤ d1 ≤ d1≤ d1
≤ d2 ≤ d1
Front jointTrack sectionboundary
≤ d1≤ d2
d1 = 100m
d2 = 200m
Figure 6.4:55 The location of the powered point and the track section boundary of the point in question in respect to the point. When viewed from the direction of the point, between the track section boundary of the point and the front joint of a powered point, there must be a distance of at least (Figure 6.4:56) – 5m, if the point is a trap point, – 10m, if the point is a short route point and – 35m, if the point is a long route point. An effort should be made, to position the track section boundary of the point at a distance of at least 5m from the fouling sign point of a powered point, when viewed from the direction of the point (Figure 6.4:56).
≥ d m
d Condition
5 Trap point
10 Short point
35 Long point
≥ 5m
Front joint
Figure 6.4:56 The distance between the point and the track section boundary of a powered point.

121
RATO 6 / 05-2012
The point is free of fouling restrictions, when the track section boundary of the point is at least 5m distance in advance of the fouling point, when viewed from the direction of the point. The points presented in Figure 6.4:57 are not free of fouling restrictions.
Figure 6.4:57 Points that are not free of fouling restrictions. An effort should be made to make one of two consecutive powered points free of fouling restrictions, if both points cannot be free of fouling restrictions. The point through which the track with a higher speed limit runs must be made free of fouling restrictions, if the location of fouling points allows only one of the points to be made free of fouling restrictions. In Figure 6.4:58 the track that runs through point V411 has a higher speed limit than the track that runs through point V413, so point V411 must be made free of fouling restrictions, if the location of fouling points allows only one of the points to be made free of fouling restrictions.
V411
V413Maximum track speed = v
Maximum track speed > v
Figure 6.4:58 The effect of the maximum track speed on positioning a track section boundary. Consecutive powered points may be included in the same track section, when it is not possible to simultaneously set two different routes through the points and the requirements stated on the location of the track section boundary of the point are fulfilled by each point which is included in the same track section. An effort should be made to position consecutive powered points on different track sections, if being included in the same track section prevents the simultaneous setting of routes available to the track layout. It is possible to simultaneously set the routes presented in Figure 6.4:59, if points V511 and V513 as well as points V512 and V514 are included in different track sections.

122 RATO 6 / 05-2012
V514V511
V513
V512
ErV514 as an overlap
ErV513 as an overlap
Figure 6.4:59 Taking simultaneous routes into account in positioning point track sections.
6.4.10.3 Local operation button and local operation return button
A powered point must have a local operation button, if it is included in a local point operation group. The local operation button must be positioned inside a local point control box. The local point control box may contain local operation buttons for several points. The local point control box must have local operation return buttons for those local point operation groups that have local operation buttons of points included in them in the local point control box in question. The local point control box must be positioned in such a way that – the point controlled by the local operation button and the point code are visible
from the direction of local operation button usage, – the local point control box is a maximum of 75m distance from the points, which
have their local operation buttons in the local point control box and – There is at least 1000mm of unobstructed space left in front of the local point
control box, on the side of the buttons, when taking into account the structure gauge of the adjacent tracks (Figure 6.4:60).
≥ 1000mm Local point control box,direction of button usage
Structure gauge
Adjacent track
Figure 6.4:60 The location of the local point control box.
6.4.11 Derailer
A point branch of a point on the route track, which is not a route point and leads away from the route track, must be equipped with a derailer, if the route track is not protected by a trap point (Figure 6.4:61) A derailer must be positioned so that it guides the derailed rolling stock – away from the adjacent track, if there is a track only on one side of the track
equipped with the derailer, – away from the main track, if there are tracks on both sides of the track equipped
with the derailer and one of the tracks is the main track or,

123
RATO 6 / 05-2012
– away from the narrower track gauge, if there are tracks on both sides of the track
equipped with a derailer and both tracks are main tracks or both are side tracks.
Route track
Not a route track
Figure 6.4:61 Protecting a route track with a derailer. A maintenance, storage and loading track, which is a shunting route track must be equipped with a derailer protecting the route track, which is not a maintenance, storage or loading track, if the route track is not protected with a trap point (Figure 6.4:62). The derailer protecting the route track from the direction of the maintenance, storage or loading track may be track-related (alternative 1 in Figure 6.4:62) or the derailer may be positioned in the point lane leading from the maintenance, storage or loading track to the route track (alternative 2 in Figure 6.4:62).
Maintenance, storage or loading track
Alternative 2
Alternative 1
Figure 6.4:62 Equipping maintenance, storage or loading tracks with a derailer. A derailer must not be positioned on a main route track. A derailer must be equipped with a point machine, when the derailer is located on a shunting route track. A derailer equipped with a hand lever must be equipped with two key locks, when the derailer is protecting a point on the route track. The key locks must be mounted so that one key lock locks the derailer on the rail and the other locks it off the rail. A stopping device can be used instead of the derailer, if the conditions for using a stopping device, given in Chapter 6.4.12, are fulfilled. 6.4.11.1 Derailer code
The derailer code must consist of the letters Sp and three numbers all written together. The requirements for determining the numerical part of the code are stated in Chapter 6.4.3.

124 RATO 6 / 05-2012
6.4.11.2 Derailer positioning A derailer may be positioned at a rail or point. The derailer at a point must prevent traffic movements through both point branches. A double derailer may be used at the point. 6.4.11.2.1 Derailer positioning in respect to a fouling sign point A derailer must be positioned at least 5m distance from the fouling point sign of the point leading to the track to be protected (Figure 6.4:63).
≥ 5m
Figure 6.4:63 Positioning a derailer. 6.4.11.2.2 Derailer positioning in respect to the track section A derailer equipped with a hand lever must be positioned in such a way that – the derailer is not located on the track section of a point it protects, – the derailer does not interfere with the track circuit or axle counter functions and – the derailer is located at a maximum distance of 2m in advance of the track
section boundary, when viewed from the direction of the protected track (Figure 6.4:64).
≤ 2m
Figure 6.4:64 Positioning a derailer equipped with a hand lever in respect to the track section of the point to be protected. A derailer equipped with a point machine must be positioned on the track section in such a way that track can be proved vacant with the help of the track section, when the derailer is turned onto the rail. The track section boundary must be positioned at a distance of 1–2m in advance of the derailer, when viewed from the direction of the track to be protected (Figure 6.4:65).

125
RATO 6 / 05-2012
1-2m
Figure 6.4:65 Positioning a derailer equipped with a point machine in respect to the track section of the point to be protected.
6.4.12 Stopping device
A stopping device can be positioned on a main route to protect another main route, if – there is the permission to use the stopping device, given by the Finnish Transport
Agency – other requirements don't necessitate the use of a point as the protecting element
and – the distance from the stopping device to the closest point or to the level crossing
deck into the stopping direction of the device is at least 60m. The stopping device can be used instead of the derailer, if the distance from the stopping device to the closest point or level crossing deck into the stopping direction of the device is at least 60m. 6.4.12.1 Stopping device code
The code of the stopping device must consist of letters Pla and three numbers all written together. The requirements for determining the numerical part of the code are stated in Chapter 6.4.3. 6.4.12.2 Positioning of the stopping device in respect to the track section The powered stopping device must be positioned on the track section of the point. The border of the track section must be positioned at 1 - 2m distance from the stopping device and at least at 15m distance from the fouling point sign of the point leading to the track to be protected (Figure 6.4:66).
1-2m
End joint
≥ 60m
≥ 15m
Figure 6.4:66 Positioning a powered stopping device in respect to a point and the border of the point track section The stopping device equipped with the hand lever must be positioned in such a way that the stopping device is not situating on the track section of the point it is protecting. The border of the track section must be positioned at most at 2m distance from the stopping

126 RATO 6 / 05-2012
device and at least at 15m distance from the fouling point sign of the point leading to the track to be protected (Figure 6.4:67).
end joint
≥ 60m
≥ 15m
≤ 2m
Figure 6.4:67 Positioning of a stopping device equipped with a hand lever in respect to a point and the border of the point track section
6.4.13 Track section
A track section must be equipped with track vacancy proving. Track vacancy proving can be carried out by an axle counter or track circuit system. The track sections on the track equipped with track vacancy proving must be positioned so that track vacancy proving continues uninterrupted from one track section to the next. Two track sections may be at the same location only – in the case of an interface of two train control systems, where both systems have
a separate indication of vacancy from the same track section. – in the case of an interface of an axle counter and track circuit system, – if the level crossing system has separate alarm sections from other train control
systems or – if a system exterior to the train control system has a separate track vacancy
proving system from the train control system. The interface of two train control systems must have two separate track sections at the same location, if information on the track section state cannot be transmitted between the train control systems. An effort should be made to lay track sections of equal length in both train control systems at the interface of two train control systems (Figure 6.4:68).
Track vacancy proving based on axle counter system
Track vacancy proving based on track circuits
Ak531
Er531
Ak551
ErV511
Er502
Er501
Figure 6.4:68 Track vacancy proving at the train control system’s interface. The track sections may be overlapping a maximum of 3m at the interface of an axle counter and track circuit system (Figure 6.4:69). An effort should be made to position the track section boundaries as close as possible to each other.

127
RATO 6 / 05-2012
Ak591 Er571
≤ 3m
Figure 6.4:69 The location of track section boundaries at the interface of axle counter and track circuit systems. The length of a track section must be at least 30m. The requirements for the length of a track section must be fulfilled for the part of all point branches and all tracks of the standard diamond crossings located on the track section. The length of a track section equipped with track circuits may not exceed the maximum length determined for the track circuit type in question.
6.4.13.1 Track section code
The track section code must consist of alphabetical characters and numbers according to the track vacancy proving system code and the code of the track or point, where the track section is located. The two first letters of the track section code must be Er at a track circuit section, Ak at an axle counter section and Ks at an audio frequency track circuit section. The numerical part of the track section code must be the number of the track, at which the track section is located, if there is no powered point on the track section. A fourth number, which describes the sequence of the track sections of the track from the direction of lesser track kilometres, must be added to the track section code if there are several track sections on the track (Figure 6.4:70). The final part of the track section code must be the letter V and the number of the point that is located on the track section, if there is a powered point on the track section. The track section code must contain the letter V as well as the lowest and highest numbers, separated by a slash, from the codes of the powered points belonging to the track section, when several points are included in the track section (Figure 6.4:70).
V516ErV513/517
Er504
Er503
Er502
Er5011Er531
Er532
Er541V511
V513
V517
V515 V512V514Er5012
ErV511
ErV514/516
ErV512
Figure 6.4:70 Determining track section codes. 6.4.13.2 Track section positioning
Track vacancy proving must be carried out by as few track sections as possible.

128 RATO 6 / 05-2012
The track section boundary, where an ‘End of main route’ indicator will be positioned, must be positioned at such a place that the ‘End of main route’ indicator can be positioned according to the requirements stated in RATO part 17 “Track Signs”. 6.4.13.2.1 Track section positioning in respect to a signal The track section boundary must be positioned at a signal or in advance of the signal according to the requirements stated in Chapters 6.4.4–6.4.7. An effort should be made to position the track section boundary at a signal or as close to it as possible. An effort should be made to position the track section boundary on the line at a catenery support, if the location in question is used for positioning the main and/or block signals for both directions. There must be a separate track section on the stretch between the route exit signal and the route point in advance of it, if there is more than 100m from the signal to the front joint of the route point in question if the point is facing, and to the fouling sign point, if the point is trailing. 6.4.13.2.2 Track section positioning in respect to a point
The track section boundary must be positioned, in respect to the point, according to the requirements stated in Chapters 6.4.10. Any other point than a powered point must be included in the track section of the track associated with the point in question or the track section of the powered point.
Any other point than the powered point affects the positioning of the track section boundary in the case that the point structure prevents the positioning of the track section boundary at the place, where the track section boundary would be positioned otherwise. The requirements stated in Chapters 6.4.4–6.4.7 for positioning a signal determine the location of the track section boundary in respect to the powered point, if there is a signal positioned at the track section boundary. In Figure 6.4:71, the location of the signal E502 is determined primarily by the fouling sign point of the point V511. The signal E502 must be positioned at a place, which fulfils the requirements stated in Chapter 6.4.4 for the distance from the fouling sign point of the point V511 and to which the structure of point V513 makes it possible to position an axle counter or rail insulation.
Required signaldistance
V511, poweredpoint V513,
Other thanpowered point
E502
Figure 6.4:71 The effect of a point, other than a powered point, on positioning a track section boundary.

129
RATO 6 / 05-2012
A line point must be included in a track section, whose boundary is at least 100m and a maximum of 500m distance from the line point, if there is no other line point between the line point and track section boundary. A line point must be included in a track section, whose boundary is at most 1500m distance from the line point, if there is another line point or line points between the line point in question and track section boundary (Figure 6.4:72).
100 - 500m ≤ 1500m
100 - 500m≤ 1500m
Figure 6.4:72 The line point track section location in respect to the line point. 6.4.13.2.3 Track section positioning in respect to a standard diamond crossing The track section boundary must be positioned at least 5m distance from the fouling sign point of a standard diamond crossing, viewed from the direction of the standard diamond crossing, if a point associated with the standard diamond crossing does not prevent the positioning of the track section boundary at a distance of at least 5m from the fouling sign point of the standard diamond crossing. An effort should be made to position the track section boundary as close as possible to the standard diamond crossing. The length of the track section of the standard diamond crossing must be at least 30m in both traffic directions from the standard diamond crossing. An effort must be made to associate the standard diamond crossing as part of the track section of the route point or route points, if the point or points are at a distance of at most 100m from the standard diamond crossing and it is not possible to set two simultaneous routes through the standard diamond crossing and point or points. The track section boundary of a scissors crossing must be on the same side of the crossing in respect to the fouling sign points of the crossing (Figure 6.4:73).
Figure 6.4:73 The track sections of a scissors crossing. 6.4.13.2.4 Track section positioning in respect to a level crossing deck The track section boundary must be positioned at least 5m distance from the level crossing deck.

130 RATO 6 / 05-2012
6.4.13.2.5: Effect of the track superstructure on track section positioning In positioning rail insulation, the requirements for the length of a rail part presented in RATO 19 “CWR” (continuously welded rail) tracks and points must be taken into account. In positioning an axle counter, the requirements presented in RATO part 11 “Track Superstructure” for drilling mounting holes into the rail must be taken into account. The track section boundary must be moved or the rail must be changed to the required length, if the track superstructure prevents the positioning of the track section boundary at the planned location.
6.4.14 Key box
The key lock operation key of a point, stopping device or derailer protecting the route track must be monitored with a key box. The key box must be positioned as close as possible to the object, whose key lock operation key is monitored by the key box. The distance from the key box to the object, whose key lock operation key is monitored by the key box can be a maximum of 100m (Figure 6.4:74).
AV521 k1/k2
k2
V521
V519
K1
≤ 100m
Figure 6.4:74 The distance from the key box to the object, whose key lock operation key is monitored by the key box.
The key box must be positioned inside a lockable box. The type of the key of the key box must be selected in such a way that there are no two similar keys for key box in the same railway operating location. The key box code must consist of a letter A and the code of the object, whose key lock operation key is monitored by the key box, all written together. The distance from the key box to the local operation return button of the local point operation group, which the key box is included in, can be a maximum of 100m.
6.4.15 Key lock
A point on the route track, equipped with a hand lever must be equipped with a key lock. A derailer and stopping device, equipped with a hand lever protecting the route track must be equipped with two key locks so that the derailer or stopping device can be locked in both positions. A point, equipped with a hand lever, protecting the route track must be equipped with a double key lock.

131
RATO 6 / 05-2012
The key lock must prevent the turning of the point or derailer, when the key lock is locked in a basic state. The double key lock must prevent the turning of the point, which is equipped with the double key lock and the removal of the operation key of another point, which is locked to the double key lock, when the key lock is locked in a basic state. The double key lock can be lockable only when the point equipped with the double key lock is in a basic position and the operation key of another point is locked to the double key lock. The key lock must prevent the removal of the key lock operation key from the lock, when the key lock is not locked in a basic state. An effort should be made to choose the model of the key lock key in such a way that, in the area of the signalling system the key lock is associated with, and the adjacent signalling systems of the system in question, there are no two identical key lock operation keys. 6.4.15.1 Key lock code
The key lock code must consist of a letter K and the number describing the key lock operation key model, all written together. The double key lock code must consist of the key lock codes written together and separated with a slash. The numerical part of the key lock code must be written in subindex, if the key lock does not have a key in a basic state, and in superscript, if the key lock has a key in the basic state.
6.4.15.2 Key lock operation key and spare key
The key lock operation key must be locked in a basic state to the key box or key lock. The operation key of a key lock, which is not associated with an interlocking or line block system, must be locked in a basic state in the key box, key lock or double key lock or it must be kept in a lockable space determined in the user manual of the signalling system. The key lock operation key code must consist of the letter K and the number describing the model, all written together. An effort must be made to select the key of the key lock in such a way that there are no two similar keys of key lock in a railway operating location. There must be a spare key for the key lock. The key lock spare key must be positioned primarily at a manned traffic control point. The key lock spare key can be positioned electrically monitored in a lockable space or box close to the area where the key lock spare key is used. The key lock spare key, which is not electrically monitored, must be sealed in its location in such a way that the extra key can be easily removed only by breaking the seal. 6.4.15.3 Concatenating key lock operation keys The operation key of a point on the route track, equipped with a key lock and a hand lever, must be locked in the double key lock of the point, which is equipped with a hand lever and protecting the route track. The double key lock operation key must be locked in the key box.

132 RATO 6 / 05-2012
In Figure 6.4:75, the operation key K1 of point V521 is locked in the key box AV521. The operation key K1 can be removed from the key box, when the key box has key box permission. The operation key K1 can be used to open the double key lock of point V521 and release the operation key K2, which can be used to open the key lock of point V519.
AV521
k1/k2
k2
V521
V519
K1
Figure 6.4:75 Concatenating the key lock operation keys. The operation key of a point on the route track, equipped with a key lock and a hand lever, must be locked in the key lock of the route track protecting derailer, which is equipped with a hand lever the and can be locked when the derailer is off the rail. The key lock operation key of a derailer, which can be locked when the derailer is on the rail, must be locked in the key box. In Figure 6.4:76, the key lock operation key K1 of a derailer Sp504, which can be locked when the derailer is on the rail, is locked in the key box ASp504. The operation key K1 can be removed from the key box, when the key box has key box permission. The operation key K1 can be used to open the key lock of the derailer Sp504. The key lock operation key K2 of the point V502 can be released from the key lock k2 of the derailer Sp504 by locking the derailer in the position where it is off the rail. The operation key K2 can be used to open the key lock of the point V502.
ASp504
k2
Sp504
k1, k2K1
V502
Figure 6.4:76 Concatenating the key lock operation keys. The operation keys must be concatenated in such a way that the locking of the operation keys for all derailers is secured when the key box is in a basic state, if more than one derailer is protecting the route track. In Figure 6.4:77 – the operation key K1 of the derailer Sp525 is locked in the key box ASp525 in a
basic state, – the key lock K2 operation key of the derailer Sp523 is, in a basic state, locked in
the key lock of the derailer Sp525, which can be locked when the derailer is off the rail and
– the key lock operation key K3 of the point V519 is, in a basic state, locked in the key lock of the derailer Sp523, which can be locked when the derailer is off the rail.

133
RATO 6 / 05-2012
ASp525k1, k2
k3
V521
Sp525
Sp523K2, k3
K1
V519
Figure 6.4:77 Concatenating the key lock operation keys, when two derailers protect the route track. 6.4.15.4 Area key lock system of the loading area
A loading area can be protected by two derailers, equipped with key locks and located at least 20m distance from each other, preventing traffic movements to and from the loading area, when on the rail. The derailers of an area key lock system in a loading area can be used to protect a route track, if – the operation keys have been concatenated with the loading equipment and the
area key box connected with the signalling system – the distance requirement for the loading area presented in this chapter is fulfilled
and – the distance requirement presented in Chapter 6.4.11.2.1 for the fouling sign
point of the route track to be protected is fulfilled.
The operation key of the derailer, which prevents traffic movements to the loading area must, in a basic state, be locked in the key lock of the derailer, which prevents traffic movements away from the loading area and can be locked when the derailer preventing traffic movements away from the loading area is off the rail. The key lock operation key of the derailer, which prevents traffic movements away from the loading area must, in a basic state, be locked to the key box. The key box must be connected to the loading equipment in such a way that the operation key can be removed only when the loading equipment is in a state, which enables traffic movements (Figure 6.4:78). In addition to the loading equipment the area key lock system must be connected to the interlocking system or to other signalling system according to the requirements presented for area key lock system, if the derailer is used for protecting the route track.
ASp511
Sp511k1 k2
K1
Loading area
k2 Sp513
≥ 20m
Figure 6.4:78 Protecting the loading area with derailers. The derailer of the loading area signalling system, which prevents traffic movement away from the loading area, is not needed if there is a rising rail gradient all the way

134 RATO 6 / 05-2012
from the loading area to the derailer, which prevents traffic movement away from the loading area.
6.4.16 ‘End of main route' indicator
The main or shunting signal ending the main route can be replaced with an ‘End of main route’ indicator on a track, which cannot be used for setting a main or shunting route forward and the maximum allowed speed of which is at most 50kph (Figure 6.4:79).
Main route track
Not a main route track
Figure 6.4:79 Replacing a main or shunting signal by an 'End of main route’ indicator. An ‘End of main route' indicator may not be equipped with balises. Advance notice must be given about the 'End of main route' indicator by a distant signal 'Expect stop’ aspect, when the main route can end in an 'End of main route' indicator. The ‘End of main route’ indicator must be positioned, in respect to the track section boundary, according to the requirements given for positioning a main signal in respect to the track section boundary. The 'End of main route' indicator must be positioned at least at a distance of 20m from the fouling point sign of the point in advance of the indicator. The point in advance of the 'End of main route' indicator must be equipped with track vacancy proving. The point in advance of the 'End of main route' indicator, which is equipped with track vacancy proving must be monitored as the condition for a drive permitting aspect of the route entry signal of the route ended by the 'End of main route' indicator. The overlap 0 must be defined for a main route ended by the 'End of main route' indicator. Setting simultaneously two main routes, ending at the 'End of main route' indicators, must be prevented, if there is the same point in advance of the 'End of main route' indicators ending the main routes in question. act as overlap for the main route ended by the ‘End of main route' indicator. The position and locking of the point in advance of the 'End of main route' indicator, which is not a route point, does not need to be monitored as overlap conditions deviating from the requirements presented in Chapter 6.3.5.1.4.
135
RATO 6 / 05-2012
6.5 OTHER SYSTEMS 6.5.1 Remote Control System
The remote control system must enable the interlocking system functions, which can be used when the interlocking system is under local control, to be used in remote control. The conditions, stated in Chapter 6.3, which secure the safety of implementing a command given by the remote control system, must be checked in an interlocking system. The remote control system must monitor the confirming of a critical command, if the confirming of the critical command in question has not taken place in the interlocking system. The remote control system command may differ from the equivalent local control command of the interlocking system. The remote control system does not need to fulfil the train control system requirement that a single fault in the train control system leads the train control system controllably into a safe state. The remote control system must be configured in such a way that it is possible to control one interlocking system or part of an interlocking system only from one user interface at a time. There may be several user interfaces in one remote control system. Giving any other commands by the remote control system than those associated with switching to remote control must be prevented in local control. Giving any other commands by the interlocking system than those associated with switching to local control must be prevented in remote control. Controlling a signal to display a ‘Stop' aspect may be possible by an interlocking system command when the interlocking is in remote control and by a remote control command when the interlocking system is in local control. The remote control system indication must correspond to the interlocking system indication. The remote control system provides additional information to the interlocking system indication. The remote control system data communication lines must be duplicated, if the requirement for the duplicated data communication line is stated in the engineering configuration requirements. The remote control system must have train number automatics , which enables the automatic route setting for a train on the basis of the programmed train number and the track section becoming occupied. The impulse for automatic route setting must primarily be given by the track sections on the signal approach zone in such a way that the route setting starts with the track section furthest away on the approach zone becoming occupied, when viewed from the direction of the signal. The route setting may start after a determined time delay after the track has become occupied. The route may not be set automatically again, if the automatically set route is cancelled or released. Automatic route setting may only switch on by command for that particular function. It must be possible to switch automatic route setting off and back on individually for each signal.

136 RATO 6 / 05-2012
Automatic route setting must not switch on automatically when the interlocking system or remote control starts up. Automatic route setting must switch off by itself when the data transfer between the interlocking system and remote control is cut-off for over a minute. Giving a command automatically must be prevented, if the command – is a critical command, – sets a route, which includes a point through which there has not been a route set
after the operation command for a trailedpoint – sets a main route, on which a track section is occupied – sets a main route , on the overlap of which a track section is occupied or – sets a route, which has an elimination function switched on, on one of the track
sections included in it. It must be possible to associated the remote control system with the passenger information, electrified railway’s remote control, fire or burglar alarm and other systems determined in the engineering configuration requirements.
6.5.2 Hump
In addition to the normal interlocking system functions, it must be possible to control the interlocking system controlled points between the hump and the sorting tracks by point automatics. The shunting signals protecting the points between the hump and the sorting tracks from the direction of the hump must be controlled to display an 'No aspects' aspect when the points in question are controlled by point automatics. The signals protecting the points between the hump and the sorting tracks from the direction of the sorting tracks must be controlled to display a monitored ‘Stop' aspect when the points in question are controlled by point automatics, if in between the signal in question and the hump, there is no point that is locked in a position providing flank protection (Figure 6.5:1).
Hump
Sorting tracks
Figure 6.5:1 The shunting signals protecting the points between the hump and the sorting tracks. Main routes must be determined for the sorting tracks according to the requirements stated in Chapter 6.2.7. A main route must not be determined for a track running through the hump. Shunting routes must be determined for the hump track layout according to the requirements stated in Chapter 6.2.8. The track vacancy proving of the tracks between the hump and the sorting tracks can be implemented deviating from the requirements stated in Chapter 6.4.10.2 in such a way that the interlocking system and the point automatics have independent track sections from each other on the points in question.

137
RATO 6 / 05-2012
The track sections used by point automatics can be dimensioned departing from the requirements stated in Chapter 6.4.10 in such a way that – the point track section extends to at least such a distance from the front joint of
the point, viewed from the direction of the point, that the point has time to turn to the end position before the train arrives at the point, if the train occupies the point track section immediately after the point starts to turn,
– the point track section extends to a distance of at least 5m from the fouling sign point of the point and
– the point track section boundary is positioned as close as possible to the point. The point track section must be occupied in the interlocking system logic even if the track vacancy proving of the point’s track section in question does not indicate it as occupied, when the point is controlled by point automatics and the track section, which is following the point track section in question, is occupied in the direction, where the point track section does not fulfil the requirements stated in Chapter 6.4.10.2 in respect to the point. The track vacancy proving of the points between the hump and the sorting tracks can be implemented deviating from the requirements stated in Chapter 6.4.10.2 in such a way that in dimensioning the point track sections, the turning of the points as fast as possible controlled by the point automatics is taken into account. The point automatics control must prevent the collisions of wagons or groups of wagons by turning the points, if the speed of the wagon or group of wagons further back rises so high, that it reaches the wagon or group of wagons in front of it between the hump and the sorting tracks. Faster point machines than the ones for ordinary points must be used for the point machines of the points between the hump and the sorting tracks, in order to turn the points in the time required by the hump functions.
6.5.3 Level crossing system A level crossing system is a system in a level crossing or station crossing, which is used to warn about rolling stock on the track. The level crossing system operation is dependent on the interlocking system functions or the level crossing system is an automatic level crossing system. The requirements for equipping a level crossing system with a level crossing signal are stated in Chapter 6.4.8.2. 6.5.3.1 Level crossing system types 6.5.3.1.1 Level crossing barrier system A level crossing barrier system must be equipped with barriers, road signals and alarm bells. The barriers can be full, half or double barriers. The level crossing barrier system must be used in the level crossing determined in the engineering configuration requirements. 6.5.3.1.2 Level crossing light and audible system A level crossing light and audible system must be equipped with road signals and alarm bells. The level crossing light and audible system must be used in the level crossing determined in the engineering configuration requirements.

138 RATO 6 / 05-2012
6.5.3.1.3 Level crossing light system
A level crossing light system must be equipped with road signals. The level crossing light system must be used in the level crossing determined in the engineering configuration requirements. 6.5.3.1.4 Station crossing system
A station crossing system must be equipped with road signals and an alarm bell. The station crossing system operation must be in accordance with the requirements given for level crossing light and audible system when the level crossing system gives an alarm. The station crossing system must be used in the level crossing determined in the engineering configuration requirements. 6.5.3.2 Level crossing system functions The activation of the level crossing system alarm may be controlled by many different conditions. The alarm must not end if any one of the conditions is still valid. The alarm of a multi-track level crossing must not end if any one of the conditions for the alarm is still valid for any one of the tracks. 6.5.3.2.1 Basic state The level crossing system must not give an alarm when the level crossing system is in a basic state. Barriers of the level crossing system, other than the station crossing system, must be in the vertical position, the road signals must display a slow flashing white light and the alarm bells must not ring, when the level crossing system is not giving an alarm. 6.5.3.2.2 Alarm The level crossing system must give an alarm for at least the minimum time required for the level crossing system type before a train driving at the speed limit or limits of the alarm section arrives at the level crossing. The length of the alarm and the sequence of the level crossing system functions must be according to Table 6.5:1 for the level crossing barrier system. An extra 1s must be added to the pre-alarm time for each metre that the mutual distance of the barriers on opposite sides of the track in the direction of the road exceeds 10m.

139
RATO 6 / 05-2012
Table 6.5:1 The length of the alarm and the sequence of the barrier level crossing system functions before a train driving the speed of the track speed limit arrives at the level crossing. Function Required
time Note
1. Pre-alarm time ≥ 10s Note the mutual distance of the barriers
2. Time reserved for the barriers to lower to horizontal position
10s
3. Time reserved for the barrier, which closes the lane leading away from the level crossing, to lower to a horizontal position.
8s Only for level crossing system equipped with double barriers
4. Safety time 10s The barriers of the lanes leading to the level crossing of the level crossing system, which is equipped with double barriers, must be controlled to lower to a horizontal position after the pre-alarm time. The barriers of the lanes leading away from the level crossing must be instructed to lower to a horizontal position 10s after the barriers of the lanes leading to the level crossing have begun to lower. The alarm length in a level crossing system, which is not equipped with barriers, must be at least 20s before a train driving at the speed limit or limits of the alarm section arrives at the level crossing. The road signals must display a red, fast flashing light during the alarm. The road signals must be controlled to display a slowly flashing white light when the alarm ends or when the barriers of a level crossing system equipped with barriers have risen over a 60˚ angle with respect to the horizontal plane. The road signals of the station crossing system must not display any lights, when the level crossing system is not giving an alarm. The barriers must be controlled to lower after the pre-alarm time and they must remain down in the horizontal position during the alarm. The barriers must be controlled to rise when the alarm ends. The lights in the barriers must display a slow flashing light when the barriers start to lower and they must keep on displaying it until the barriers have, after the alarm ends, risen to over a 60˚ angle with respect to the horizontal plane. The alarm bell must begin to ring when the level crossing system activates the alarm. The ringing of the level crossing barrier system warning bell must be cut off as the road section becomes occupied. 6.5.3.2.3 Automatic operation The level crossing system is in a state of automatic operation, when – the track sections on the alarm sections and the road section control the alarm
according to the conditions determined in the level crossing system functions table,
– the level crossing system has not been set manually to give an alarm – the level crossing system automatic operation is not prevented for the part of one
or more tracks by an interlocking system command and – there is no fault in the level crossing system preventing the automatic operation of
the level crossing system. The level crossing system must be controlled to give an alarm when the alarm section becomes occupied, if the conditions for activating the alarm are met. The alarm start can be delayed if the required times for the level crossing system alarms in Table 6.5:1 are exceeded before a train driving at the speed limit or limits of the alarm section arrives at the level crossing.

140 RATO 6 / 05-2012
The alarm start must be delayed if the required times for the level crossing system alarms in Table 6.5:1 are exceeded by more than 10s before a train driving at the speed limit or limits of the alarm section arrives at the level crossing. The alarm time delay must be determined in such a way that the alarm started by the train driving at the speed limit or limits of the alarm section fulfils the requirements stated in Table 6.5:1 for alarm length. The alarm must continue for 40s after the alarm section becomes vacant, if the alarm section has been occupied and the track sections on the alarm sections and the road section do not become occupied and vacant in the sequence of the train's movement direction. The alarm must not end, if one of the preconditions of the alarm becomes fulfilled during the 40s time delay. The alarm caused by the alarm section becoming occupied must end when the track sections of the alarm section and the road section become occupied and vacant in the sequence of the train's movement direction. The alarm of the level crossing system, which does not have a road section, must end 5s after the track sections of the first alarm section, in respect to the train’s movement direction, become vacant. The level crossing system must be controlled to activate the alarm again if, in respect to the movement direction of the train driving through the level crossing, the alarm section after the level crossing does not become vacant within 5min. The reactivation of the alarm must be prevented at the automatic level crossing system for the part of those track sections included in the alarm section that can remain occupied as the train driven through the level crossing has stopped at the signal. The effect of the alarm sections becoming occupied on the level crossing system functions can be controlled by the information about a set route or point position. 6.5.3.2.4 Manual operation Use of the alarm switch (TK) must start the alarm. The alarm caused by using the alarm switch in the equipment room or on the outside wall may end only by using the switch in question again. The alarm caused by any other alarm switch than the one in the equipment room or the outside wall must end by using any other alarm switch but not the one in the equipment room or on the outside wall. Use of the track-based alarm button (TR ON) must start an alarm. The alarm caused by using the alarm button must end by using the TR EI button of the track in question, which is a track-based button for ending the alarm caused by using the alarm button. The alarm caused by using the alarm button must end, in addition to ending by using the TR EI button, according to the principles of the level crossing system automatic functions for the track in question. It must be possible to disable the level crossing system by using the operation switch (KK). When disabling the level crossing system, the road signal lights must turn off, the road barriers must rise and the alarm bells must stop ringing. Using the operation switch prevents or ends the alarm. The level crossing system must be controlled to activate the alarm, if any one of the conditions for starting the alarm are met when the level crossing system is returned to use by the operation switch. Use of the return button (PAL) must eliminate the long alarm fault.

141
RATO 6 / 05-2012
The level crossing system can be equipped with track-based remote control, which starts the alarm. The level crossing equipped with remote control must be equipped with level crossing signals. The track-based alarm activated by remote control must end when the road section becomes occupied and vacant or by giving a remote control command ending the track-based alarm. 6.5.3.2.5 Elimination function Use of the elimination button (PP) must prevent or end the alarm caused by a determined track section or sections becoming occupied, unless some other condition for activating or continuing the alarm is in force or comes into force. The elimination function must not be used for the track section included in the alarm section that is located in rear of the level crossing protecting signal at a level crossing equipped with a level crossing system. The level crossing system must have an elimination function on the track sections where there is a need to store rolling stock or do shunting, which does not reach the level crossing. In Figure 6.5:2 the track sections Er501, ErV512 and Er5411, must have the elimination function if they are included in the alarm section. The elimination function must enable shunting, which does not reach the level crossing, without a level crossing system alarm.
ErV514Er503
Er502
Er5411
V512V514Er501
ErV512
Er5412Er5413
Figure 6.5:2 The elimination function on track sections. The level crossing system must have an elimination function on those track sections included in the alarm section, where the train, which has driven over the level crossing and is stopping at the alarm section, needs to stop for over 5min without reactivating the alarm, if the need to stop is not caused by stopping at the signal. In Figure 6.5:3 the track section Er6513 must have an elimination function so that the train can stop at the passenger platform for over 5min without reactivating the alarm.
Er6512Er6513Er6511 Er631
Figure 6.5:3 The elimination function on track sections. The elimination function must end, if

142 RATO 6 / 05-2012
– the PP EI button is used, – a route is set through the level crossing and the track section, which has the
elimination function on, – the track section, which has the elimination function on, becomes vacant or – the track section, which has the elimination function on and was vacant when the
elimination function started, does not become occupied within 5 min of the start of the elimination function.
A multi-track level crossing can be equipped with a track-based elimination switch. Using the elimination switch must eliminate the effects of the alarm sections and road section of the track in question on the level crossing system function. 6.5.3.2.6 Level crossing system faults and fault indications
The level crossing system faults are divided into critical faults and non-critical faults. A critical fault in the level crossing system must cause the level crossing protecting signal to display a ‘Stop’ aspect or the level crossing signal to display “Approach with caution” aspect. A critical fault in the level crossing system must prevent the realization of the required alarm time. The counting of the required alarm time must be started from the beginning as the level crossing system alarm is on when the critical fault has disappeared. Information about faults in the level crossing system connected to an interlocking system must be transmitted to the traffic control centre through the interlocking system. Information about faults in the automatic level crossing system must be transmitted to the traffic control centre controlling the line or to a location determined by the Finnish Transport Agency. The critical faults of the level crossing system are – a reliability fault, – a system fault, – a barrier fault, – an earthing fault – a long alarm fault and – a barrier position monitoring fault and – a road signal fault. The non-critical faults are – a low-voltage alarm, – a lamp fault and – an operation fault. – Reliability fault A reliability fault is detected in the level crossing system, when the alarm does not activate or the barriers do not lower to a horizontal position, when the conditions for the alarm or lowering of barriers to a horizontal position are met. System fault A system fault is a situation, in which the fault in the control system of the level crossing system prevents the level crossing system function. Barrier fault A barrier fault is a situation, in which the monitoring of the barrier staying in place is not carried out because of a fault indicated by the barrier monitoring circuit.

143
RATO 6 / 05-2012
Earthing fault An earthing fault is a situation , where a circuit, isolated from the earth potential, contacts the earth potential. Long alarm fault A long alarm fault is a situation, in which the level crossing system alarm activates in a state of automatic operation for over 10min in such a way that the road section has not become occupied after the start of the alarm or the road section is occupied while the alarm sections are vacant. The long alarm fault is not monitored, if the level crossing system alarm is controlled manually. The time monitoring of the long alarm must start again if another train arriving in the alarm section causes the alarm, which was previously started by another train, to continue. The long alarm fault is not monitored for the track section or sections in rear of the signal protecting the level crossing. During the long alarm fault the level crossing barrier system barriers must rise to a position that corresponds with the position of the non-voltage state of the barrier motor, excluding the level crossing double barrier system, where the barriers of the lanes used by road vehicles must remain in a horizontal position. The barriers of a level crossing system for several tracks, which is in the state of the long alarm fault, must lower to horizontal position, if the alarm conditions are fulfilled on a track other than the track, which caused the long alarm fault. The level crossing system must return to the state of the long alarm fault, if the conditions of the long alarm fault are in force, when the alarm caused by the other track than the track, which caused the long alarm fault, ends. The level crossing signal must be controlled to display an ‘Approach with caution' aspect, when a long alarm fault is detected in the level crossing system. The alarm of the level crossing system equipped with level crossing signals must end 20s after the level crossing signal has been controlled to display a ‘Approach with caution” aspect because of a long alarm. Barrier position monitoring fault A barrier position monitoring fault is a situation, in which the barrier does not reach the horizontal position in the determined time from when the barriers are controlled to lower to a horizontal position. Road signal fault A road signal fault is a situation, in which the road signal is unable to display red light. Low-voltage alarm A low-voltage alarm is a situation, in which the voltage of the level crossing system accumulators is low. Lamp fault A lamp fault is a situation, in which – a main or spare filament fault is detected in the road signal, – a fault preventing the display of a white light is detected in the road signal, – a fault preventing the display of a red light with one red light is detected in the
road signal, but the red light can be displayed by the other red light of the road signal or
– a main and/or spare filament fault is detected in the level crossing signal.

144 RATO 6 / 05-2012
Operation fault An operation fault is a situation where the level crossing system alarm activates in such a way that none of the conditions for the alarm are met. 6.5.3.3 Level crossing system function dependency on other signalling systems The level crossing system must be connected to the interlocking system or line block system functions, if there is a main, block or shunting signal on the alarm section in such a way that the level crossing is located in advance of the signal in question. The level crossing system connected to an interlocking system must transmit information to the interlocking system about – the alarm and the actions causing the alarm, – the state of road signals and barriers, – critical and non-critical faults and – use of the operation switch. 6.5.3.3.1 Level crossing protecting signal The level crossing protecting signal is a main, block or shunting signal, which is located on the alarm section of the level crossing system and is displaying aspects for the trains driving towards the level crossing. A main, block or shunting signal located at the alarm section boundary is a level crossing protecting signal, if the road section begins at the track section in advance of the signal. A main, block or shunting signal located at the alarm section boundary is not a level crossing protecting signal, if the alarm section begins at the track section in advance of the signal. The shunting signal must not be used as the level crossing protecting signal, if a shunting route cannot be set over the level crossing. The effect of a track section, located between the level crossing protecting signal and the level crossing system, becoming occupied on the level crossing system function must be determined according to the requirements stated in Chapter 6.5.3.2.2 by using 50kph as the speed limit of the alarm section. The level crossing system alarm may not start when the track section on the alarm section becomes occupied, when there is a level crossing protecting signal displaying a ‘Stop’ aspect in between the track section in question and the road section. In Figure 6.5:4, signal E651 is the level crossing protecting signal, because it is located on the alarm section of the level crossing system in such a way that the level crossing system is in advance of the signal. The track section Er6713 becoming occupied must activate the alarm when the level crossing system is in a state of automatic operation, if the elimination function is not switched on, on the track section in question. The track section Er6511 becoming occupied must activate the alarm only when the level crossing system is in a state of automatic operation and the signal E651 displays an aspect permitting driving.

145
RATO 6 / 05-2012
Er6712Er6713Er6711 Er6511
E651
Er6512
Alarmstarts
Figure 6.5:4 Level crossing protecting signal The level crossing protecting signal displaying a ‘Stop’ aspect must switch to display an aspect permitting driving delayed, if – the preceding track section in rear of the signal is occupied, – there is no other level crossing protecting signal displaying a ‘Stop' aspect
between the level crossing protecting signal and the level crossing and – the result of quation 6.5.1 is positive. The delay must be carried out in such a way that the level crossing system has time to give an alarm for the time required in Chapter 6.5.3.2.2 after the route has been set before an aspect permitting driving is displayed. The time delay must be calculated with Equation 6.5.1.
a
stt aladel (6.5.1)
where tdel time delay [s] tala The time required, according to Chapter 6.5.3.2.2, for which the level crossing
system alarm must be on before a train driving the track speed limit arrives at the level crossing [s]
s signal distance from the level crossing [m] a the maximum acceleration of the train, for which the value 1.0 m/s2 [m/s2] must be
used A time delay of less than 5s must always be carried out as a 5s time delay. The level crossing system alarm must be monitored in the conditions for the aspect permitting driving of the level crossing protecting signal in such a way that a critical fault in the level crossing system causes the 'Stop' aspect to be displayed. The horizontal position of the barriers must be continuously monitored in the conditions for the aspect permitting driving of the level crossing protecting signal, starting 12s after the pre-alarm time ends. 6.5.3.3.2 Conditions for the level crossing system alarm The level crossing system alarm may not start when the track section on the alarm section becomes occupied, when there is a level crossing protecting signal displaying a ‘Stop’ aspect in between the track section in question and the road section and there is no set route through the level crossing. Occupying of the track section, which is included in the alarm section, on a set route through the level crossing, must control the level crossing system to activate the alarm in such a way that the level crossing system alarm is on for the time required in Chapter

146 RATO 6 / 05-2012
6.5.3.2.2 before a train driving the maximum speed of the route arrives at the level crossing. In designing the required alarm time, the speed limit or limits of the alarm section must be used as the speed of the route. However, for the shunting route it should be a maximum of 50kph. The activation of the alarm caused by a track section on the alarm section becoming occupied may have the following additional conditions: – The level crossing system must be controlled to activate the alarm after the
determined time delay from when the track section becomes occupied. – The level crossing system must activate the alarm when the track section is
occupied and a main route is set through the track section in question and the level crossing.
– The level crossing system must activate the alarm when the track section is occupied and a shunting route is set through the track section in question and the level crossing.
– The level crossing system must activate the alarm when the track section is occupied if local point operation permission, which the track section is associated with, has not been given.
– The level crossing system alarm must be activated when the track section is occupied, if the point on the alarm section is not in a position, which does not lead to the level crossing from the occupied track section.
– The level crossing system alarm must not start when the track section is occupied if the elimination function of the track section is used.
The level crossing system must set itself to a basic state when the substitution switch is used. The substitution switch must remove the interlocking system conditions associated with the level crossing system function. 6.5.3.4 Level crossing system equipment 6.5.3.4.1 Road signals
A level crossing system must be equipped with road signals. The road signal must display a red, fast flashing light during the level crossing system alarm. The road signal must display a slowly flashing white light when the level crossing system alarm is not activated and the barriers of a level crossing system equipped with barriers have risen up to a 60° angle with respect to the horizontal plane after the alarm ends. The road signals must display a fixed red light if the barrier for parallel driving lanes or for the light traffic lane, which are associated with a road signal, is at an angle of less than 60˚ with respect to the horizontal plane in the situation, where the barrier should be in the vertical position. The road signal of the level crossing barrier or light and audible system must have one red and one white light, if the road signal is meant for the light traffic lane or the road signal is situated on the same mast with another road signal. In any other case, the road signal of the level crossing barrier or light and audible system must have two red and one white lights. It must be possible to display a red and white light with the road signal of the level crossing system. One unit of light can be used as the road signal of the level crossing system. The road signal of the station crossing system must have at least one red light. The road signal of the station crossing system must not have any other light colours than red. The level crossing barrier and light and audible system must be equipped with road signals at least as follows: – One road signal for each vehicle lane leading to the level crossing (parts A and B
in Figure 6.5:5).

147
RATO 6 / 05-2012
– One road signal for both sides of the level crossing for each light traffic lane (part
C in Figure 6.5:5). – One road signal for each road leading to the level crossing, if the road branches
from a road going through the level crossing to a distance of less than 30m from the closest barrier (part D in Figure 6.5:5).
A B C D
< 30m
Figure 6.5:5 Number of road signals. An effort should be made to align the road signals of the level crossing barrier and light and audible systems in such away that the road signal is visible for at least 10s when approaching the level crossing according to the maximum permitted speed of the road traffic from the straight vehicle lanes leading to the level crossing. The road signal alignment of a level crossing barrier and light and audible system should be such that the road signal is visible for a distance of at least 30m from all the turning lanes of the road lanes or light traffic lanes leading to the level crossing. To ensure sufficient visibility, the level crossing half barrier or light and audible system can be equipped with a signal preceding the level crossing road signal, which displays a fast flashing yellow light while the road signal displays a red flashing light. In other cases the signal preceding the road signal must be dark. The red lights of a triple-light road signal or road signals with two lights located in the same mast, must flash alternately during the alarm. The road signal must have a level crossing system-based identifying code. The road signal code must consist of the letter T, one or two numbers and, in the case of several road signals on the same mast, of letters a, b or c. Figure 6.5:6 presents an example of the road signal codes. The road signal must be positioned in the level crossing barrier system in such a way that it is located on the front side of the barrier mechanism, when viewed towards the track. The numerical part of the road signal code must be defined the same as the numerical part of the code of the barrier closing the road traffic lane or the light traffic lane in advance of the road signal. The numerical part of the road signal code must be defined from the numbers left free after the numbering of the barriers according to the requirements given for the numbering of the barriers, if there is no barrier closing the road traffic lane or light traffic lane in advance of the road signal. In the level crossing light and audible system the numerical part of the road signal code must be determined as mast-based for the road signals as follows: – The numbering starts from number 1. – When viewed in the direction of greater track kilometres, the road signals on the
left side of the track have odd numbers.

148 RATO 6 / 05-2012
– The numbering starts from the road signals on the side of the lesser track
kilometres of the road traffic lanes and continues into the direction of the growing kilometres.
– After numbering the road signals for road traffic lanes the road signals for the light traffic lane or lanes will be numbered into the direction of the growing kilometres
The letters a, b or c are added to the road signal codes when there are several road signals on the same mast. The letters must be determined in such a way that, when viewed from the direction of the road, the leftmost road signal must have a letter a added, the next road signal must have letter b and the one after that letter c.
TrackkilometresT1 T3
T2 T4a T4b
T5
T6
Figure 6.5:6 Road signal codes. In the level crossing light and audible system the road signal must be positioned on the right side of the right lane or on the right side of the light traffic lane at a distance of at least 4.5m from the centre line of the closest track, as close as possible to the track. The road signal must be positioned at the distance of 5 -7m from the closest rail, if a sign concerning the road traffic is mounted on the same mast with the road signal. 6.5.3.4.2 Barriers The barrier must have a level crossing system-based identifying code. The barrier code must consist of the letters Tp and one or two numbers. The numerical part of the barrier code must be determined for each barrier as follows: – The numbering starts from the number 1. – The barriers on the left side of the track, when viewed to the direction of the
growing kilometres of the track, have odd numbers. – The numbering starts from barriers of the road traffic lanes on the side of the
smaller kilometres and continues into the direction of the growing kilometres. – After the numbering of the barriers of the road traffic lanes the barriers for the
light traffic lane or lanes will be numbered into the direction of the growing kilometres.
Figure 6.5:7 presents an example of the barrier codes.

149
RATO 6 / 05-2012
Track
kilometresT1
T2Tp2
Tp1T3
Tp3
Tp4T6 T4
Figure 6.5:7 Barrier codes. Monitoring information about the barrier position must be acquired in the vertical and horizontal position of the barrier as well as when the barrier passes the 60° angle with respect to the horizontal plane. The barrier staying in place must be monitored. The barrier must lower to a 60° angle with respect to the horizontal plane when the barrier machine voltage is cut off. The barrier must be mounted onto the barrier machine with compressive bolts in such a way that the fastening yields under a force of 50N. The barrier must be positioned as perpendicular as possible in respect to the lane closed by the barrier. The barrier must be dimensioned in such a way that it closes one road lane or light traffic lane. Full barriers Full barriers close down the lane intersecting with the track completely (part C in Figure 6.5:8). Full barriers must be used for closing down a light traffic lane in the level crossing barrier system. In a new level crossing system an effort must be made to positioning the full barriers as a whole at least 6,8m from the centre line of the track closest to the barriers, but as close as possible to the track. In special cases, e.g. because of closeness of a road parallel with the track, the distance can be shorter, anyway always at least 4,5m from the centre line of the track closest to the barrier. Half barriers Half barriers close down the lane intersecting with the track for the part of the lanes leading to the level crossing (parts A, B and C in Figure 6.5:8). Half barriers must be used in the level crossing barrier system for closing a vehicle lane, when the engineering configuration requirements does not require double barriers. In a new level crossing system an effort must be made to positioning the half barriers as a whole at least 6,8m from the centre line of the track closest to the barriers, but as close as possible to the track. In special cases, e.g. because of closeness of a road parallel with the track, the distance can be shorter, anyway always at least 4,5m from the centre line of the track closest to the barrier.

150 RATO 6 / 05-2012
Double Barriers Double barriers close down the lane intersecting with the track for both the parts of the lanes leading to and away from the level crossing (part D in Figure 6.5:8). Double barriers must be used in the level crossing barrier system for closing a vehicle lane, when the engineering configuration requirements requires double barriers. Double barriers must be positioned as a whole at least 9m from the centre line of the track closest to the barrier, but as close as possible to the track.
A B C D
Figure 6.5:8 Number of barriers.
6.5.3.4.3 Alarm bells The sound of the alarm bell or bells of the level crossing system must be audible on all the roads crossing the track on the level crossing. Any level crossing system except the station crossing system must be equipped with alarm bells as follows: – Two alarm bells positioned by the road traffic lanes on different sides of the track,
when there is no light traffic lane running through the level crossing equipped with a level crossing system.
– Two alarm bells positioned by the light traffic lane on different sides of the track, when there is one light traffic lane running through the level crossing equipped with a level crossing system.
– Two alarm bells positioned by each light traffic lane on different sides of the track, when there is more than one light traffic lane running through the level crossing equipped with a level crossing system.
A station crossing system must be equipped with at least one alarm bell. The sound of the alarm bell must be audible in both directions on the station crossing. The alarm bell must be positioned on the road signal mast, above the road signal. The alarm bell must ring when the level crossing system gives an alarm. The ringing of the alarm bell must be cut off when the road section becomes occupied. The alarm bell must be reactivated if the conditions for an alarm are met as the road section becomes vacant. A directional alarm bell must be directed in such a way that the sound is audible primarily to the light traffic lane and secondarily to the road traffic lane. An effort should be made to direct the alarm bell in such a way that the sound disturbs the environment as little as possible. The alarm bell must have a level crossing system-based identifying code. The alarm bell code must consist of the letter S and one or two numbers.

151
RATO 6 / 05-2012
The numerical part of the alarm bell code must be determined to be the same as the numerical part of the road signal code on the same mast. 6.5.3.4.4 Track sections associated with the level crossing system functions The length of the alarm section must be determined as track based in such a way that the alarm lasts for at least the time presented in Table 6.5:1 and no more than 20s longer than the times presented in Table 6.5:1, before a train driving at the speed according to the alarm section speed limit reaches the level crossing. An alarm section can consist of several track sections. The occupancy of the track sections connected to the alarm section must activate the alarm, if – the level crossing system is in an automatic operation mode, – the elimination function of the occupied track is not on and – there is no level crossing protecting signal displaying a ‘Stop' aspect between the
occupied track section and the level crossing. An effort should be made to use the track section or sections of some other train control system as the alarm section of the level crossing system. The activating of the alarm, initiated by a track section becoming occupied, must be delayed if the track section, which is used as the alarm section, is needlessly long in comparison with the required length of the alarm section. A separate track section must be built for the level crossing system alarm section if it is not possible to use the track sections of another train control system or if the alarm start must be delayed for over 30s from when the track section, which is used as the alarm section, becomes occupied. A road section must be positioned so that it is located at the level crossing. The length of the road section must be at least 30m. The length of the road section can be a maximum of 60m. The road section must continue at least 5m distance from the level crossing deck. A level crossing light system and a level crossing system based on the measurement of the speed of the train may be equipped with two alarm sections without a road section. The rail insulation or axle counter in between the two alarm sections of the level crossing light system equipped with two alarm sections must be positioned at least 5m but not more than 10m distance from the level crossing deck (Figure 6.5:9).
Ak3801 Ak3802
5 -10m
Level crossingdeck
Figure 6.5:9 Level crossing light system without a road section. The track sections associated with the level crossing system functions must have an identifying code. The track section code used in the interlocking system must be used for the track section code if the track section is a track section of the interlocking system. The alarm and road section code of an automatic level crossing system must consist of two alphabetical characters and four or five numbers. The alphabetical characters of the

152 RATO 6 / 05-2012
code must be Ak at an axle counter section, Er at a track circuit section and H at the track section of a level crossing system based on the measurement of the speed according to Chapter 6.5.3.5. The three or four first numbers of the numerical part must be determined according to the lesser track kilometres at the alarm section. The numerical part determined according to the track kilometres must have at least three numbers. The last number of the track section code must be determined according to the sequence of the track sections associated with the automatic level crossing systems on the same track kilometre towards the greater track kilometres. Figure 6.5:10 presents an example of the numbering of the automatic level crossing system track sections. The track sections of consecutive automatic level crossing systems must have identifying codes, unless the track sections are associated with both automatic level crossing systems functions.
Er4262Er4263Er4251
Er4271Er4273Er4261 Er4272
Km 427Km 426 Km 428
Figure 6.5:10 Track section codes of consecutive automatic level crossing systems. The track sections associated with the level crossing system must not be axle counter sections if it must be possible to do shunting on the level crossing system track sections and the level crossing system has separate track sections from the interlocking system. The border of the alarm section of the automatic level crossing system must be marked on the track side according to the requirements presented in RATO part 17 ” Track signs”. 6.5.3.4.5 Buttons and switches The buttons and switches associated with the level crossing system operation, must be positioned outside the level crossing system equipment room in a box, which is locked by a triangle key, unless there are other requirements for the positioning of the button or switch. The level crossing system must be equipped with at least two alarm switches (TK), one of which must be positioned in the level crossing system equipment room and one in such a way that it is located in the box on the outside wall of the level crossing equipment room. The level crossing system can be equipped with several alarm switches if there is a need for manual operation of the level crossing system during shunting to ensure the sufficient length of the alarm. The alarm switch intended to be used during shunting must be positioned in such a way that it can be accessed easily in the area where the shunting crew is moving. The alarm switch box must have an alarm switch operation indication. The level crossing system must be equipped with a track based alarm button (TR ON) if there is a need to manually control the level crossing system to activate the alarm in such a way that the alarm ends automatically after the train has passed the level crossing. The alarm button must be positioned in such a way that it can be accessed easily in the area where the shunting crew is moving. The alarm switch box must have an alarm button operation indication and a track-based button (TR EI) which ends an alarm.

153
RATO 6 / 05-2012
A level crossing system must be equipped with an operation switch (KK). The operation switch must be positioned in such a way that it is located in the box on the outside wall of the level crossing equipment room in the box, where the TK switch is located. The level crossing system must be equipped with an elimination button (PP) for the part of those track sections on the alarm section, which must allow shunting without activating an alarm. The elimination switch must be positioned in such a way that it can be accessed easily in the area where the shunting crew moves, as close as possible to the track section, whose effect on the level crossing system functions the elimination button eliminates. There must be a PP EI button and an elimination indication next to the elimination button. A multi-track level crossing can be equipped with a track-based elimination switch (P). The elimination switch must be positioned in such a way that it is located in the box on the outside wall of the level crossing equipment room or, if there is no separate equipment room, it must be located near the level crossing. A level crossing system equipped with level crossing signals must be equipped with a return button (PAL), if it must be possible to carry out shunting work on the level crossing system alarm section. The return button must be positioned in such a way that it is located near the level crossing signal. There must be an indication concerning long alarm fault next to the return button. The level crossing system must be equipped with a substitution switch if the level crossing system functions are connected to the interlocking system functions. The substitution switch must be positioned in the level crossing system equipment room. 6.5.3.4.6 Equipment room
The level crossing system devices must be positioned in the equipment room of the other signalling systems if the equipment room is near the level crossing. The level crossing system equipment room must be positioned in such a way that it is not in the level crossing sighting area. The level crossing system equipment room must be locked with a signalling systems key. 6.5.3.5 Level crossing system with alarm section based on the measurement of the speed of the train A level crossing system can be realized without alarm and road sections based on axle counting or track circuits, when the functioning of the level crossing system is based on the measurement of the speed of the train on the alarm section. The level crossing system must detect the occupation of the track section, calculate the speed of the train approaching the level crossing and its arrival time to the level crossing based on the change of the track impedance and based on the calculation start the alarm. The alarm section must be dimensioned in such a way that the requirements for warning times presented in Chapter 6.5.3.2.2 are realized, when a train approaching the level crossing is driving at the speed limit or limits of the alarm section. The functioning of the level crossing system must follow the requirements presented in Chapter 6.5.3. A level crossing system with alarm section based on the measurement of the speed of the train can be realized without the road section.

154 RATO 6 / 05-2012
6.5.3.6 Level crossing system connected to traffic lights
A possible road junction equipped with traffic lights near the level crossing must be taken into account in signalling systems planning and the traffic light operation must be connected to the level crossing system operation, if necessary. The guidelines given on traffic lights must be taken into account in the planning of the level crossing system, which is connected to the traffic lights. The level crossing system connected to traffic lights does not have to be equipped with road signals for the part of the road traffic lanes. The white light of the road signal may not be displayed if the traffic light on the same mast with the road signal is in operation.
The traffic light control must be implemented in such a way that the traffic lights and the possible road signals guiding the traffic in the direction of the level crossing display a red light when the level crossing system is giving an alarm. The level crossing system must control the traffic lights guiding the traffic in the direction of the level crossing to display red also in the case, where there is a fault preventing the normal operation of the traffic lights in the traffic light control logic. A fault indication about a traffic light fault must be given to the level crossing system, if it is connected to the traffic light functions. The level crossing system, connected traffic lights, their codes and functions must be presented in the level crossing system user manual.
6.5.4 Maintenance road protection system A maintenance road level crossing must be equipped with a maintenance road protection system if the track speed limit at the maintenance road level crossing is over 120kph. A level crossing other than a maintenance road level crossing mentioned in the engineering configuration requirements can be equipped with a protection system according to the requirements for the maintenance road protection system. The barriers or gates on both sides of the level crossing are included in the maintenance road protection system, preventing the use of the maintenance road level crossing, when no permission for use has been given. The maintenance road protection system must be connected to the interlocking system in such a way that permission to use the maintenance road protection system is given through the interlocking system and the interlocking system monitors the locking and the horizontal position of the barriers or gates. Setting a route through the maintenance road level crossing must be prevented if the barriers or gates are not closed and locked or the permission to use the maintenance road protection system has been given.
6.5.5 Swing bridge protection system
Swing bridge must be equipped with a protection system, which prevents the opening of the bridge locking when a route has been set over the bridge. Setting a route over the swing bridge must be prevented, when the bridge is not locked for railway traffic. Swing bridge must be equipped with locking signals according to Chapter 6.4.8.1. The bridge locking information must control the locking signals. Swing bridge must be equipped with bridge protecting main signals. The main signals may be substituted by block signals if the bridge is located on a track with a line block system.

155
RATO 6 / 05-2012
The main or block signals protecting a swing bridge must have a distance of at least 500m and not more than 2km from the bridge (Figure 6.5:11).
Swing bridge
Lockingsignal
Lockingsignal
500m - 2km500m - 2km
≤ 100m ≤ 100m
Figure 6.5:11 Main and locking signals of a swing bridge. The permission, which makes it possible to release the locking of a swing bridge protected with main or block signals, but not trap points, can be given when the main or block signals protecting the bridge display a ‘Stop' aspect and the track sections between the main or block signals protecting the bridge are vacant. The point functioning as a trap point must be locked in a position leading away from the swing bridge before giving permission, which enables the bridge locking to be removed if there is a point between the bridge protecting signal and the bridge, which can function as the trap point. The permission, which makes it possible to remove the locking of a swing bridge protected with trap points can be given when the main or block signals protecting the bridge display a ‘Stop' aspect and the track sections between the trap points protecting the bridge are vacant. The locking of a swing bridge can be opened, when the permission that enables the locking to be removed has been given for one minute and the conditions for giving the permission are in force. It must be possible to return the permission enabling the swing bridge locking to be removed by the return button of the bridge protection system when the bridge is locked, as well as by the system, which gives the permission. A function that enables the emergency removal of the swing bridge locking without the monitoring conditions being fulfilled can be added to the swing bridge protection system. The emergency removal of the locking must control the swing bridge protecting main or block signals to display a 'Stop' aspect and enable the bridge locking to be removed with a delay of at least one minute after the emergency function has been used. The swing bridge protection system must give an indication to the interlocking or line block system that the bridge protection system is connected to, about the state of the bridge locking and the state of the permission, which enables the bridge locking to be removed.
6.5.6 Rolling stock monitoring devices
An effort should be made to position the rolling stock monitoring devices in such a way that their location makes it possible to stop the faulty train in a place, where it is possible to check the train and the train interferes with the rest of the traffic as little as possible. The rolling stock monitoring device may have a separate track section or track sections from the rest of the track vacancy proving.

156 RATO 6 / 05-2012
The rolling stock monitoring device must make it possible to monitor the train driving at the maximum track speed. The rolling stock monitoring device must give an indication to the traffic control centre about exceeding the limit values set for the monitoring device. The rolling stock monitoring device must have the diagnostics, which monitor the system and transmit a fault indication, if necessary, to the traffic control centre or to a place defined by the Finnish Transport Agency. The hotbox detector measures the bearing temperature of a set of wheels of rolling stock. On the track that has a maximum speed of over 160kph, the rolling stock must be monitored with a hotbox detector. The wheel force detector measures the static and dynamic load on the track from the sets of wheels of the rolling stock to detect wheel faults, overload and unbalanced loading. The pantograph indicator indicates the raising force and the contact strip wear of the pantograph.
6.5.7 Separate control for stopping device The control of a powered stopping device can be realized separately from the interlocking system based on the decision of the Finnish Transport Agency. Setting of a route must be prevented through the track section, where the stopping device is located, when the stopping device control system is not in its basic state and/or the stopping device is not monitored off the rails.

157
RATO 6 / 05-2012
6.6 TECHNICAL SECTION
A structural subsystem to be used in the railway system must have commissioning approval issued by the Finnish Transport Safety Agency. A structural factor in use, associated with signalling elements or signalling systems must have approval or permission for field test issued by the Finnish Transport Agency. The requirements of the signalling systems manufacturer must be taken into account when installing the signalling system and planning the installation.
6.6.1 Mechanical parts of the signalling system
The signal or signal lamp unit must be directable. The signal or the signal lamp unit must be directed in such a way that the signal aspect is visible from the signal for the distance according to the signal sighting requirement, as well as in rear of the signal for as long as possible over the distance that begins at the signal and ends at the distance of the sighting distance requirement from the signal (Figure 6.6:1).
Signal aspect must be visible at somepoint on this stretch
Required sighting distance
Signal aspect must be visible altogether at least on half of thisstretch and on as long part as possible
¼ of the requiredsighting distance
Aspect must bevisible on thisstretch
10% of the required sighting distance
Figure 6.6:1 The visibility of the signal aspect on the distance according to the sighting distance requirement. 6.6.1.1 Installing the signalling apparatus
The signalling apparatus must be installed outside the structure gauge (ATU) of the track that the signalling apparatus is installed on and the adjacent track in such a way that the signalling apparatus with its installation tolerance is located outside the ATU. In relation to the main track, the main track ATU must be used, the side track ATU must be used for the side track and the broad-gauge track ATU must be used for the broad-gauge track. When installing a signalling apparatus on a broad-gauge track or next to it, the ATU of the main or side track of the broad-gauge track in question can be used if the signalling apparatus is positioned inside the broad-gauge track ATU, and the signalling apparatus can be easily removed or transferred outside the broad-gauge track ATU. The ATU and its possible gauge widenings must be taken into consideration according to the requirements stated in RATO part 2, “Track Geometry”. The installation tolerance stated by the manufacturer of the signalling apparatus or approved in the type approval must be followed when installing the signalling apparatus. The regulations, requirements and guidelines on track structures associated with the signalling apparatus to be installed must be taken into consideration if the installing causes changes in the track structures. The signalling apparatus must be installed in such a way that it and the associated structures do not cause disturbance or damage to other structures of the track or traffic and that they interfere with the work performed on the track superstructure as little as possible. The signalling apparatus must be within the installation and maintenance tolerance required for the signalling apparatus in question.

158 RATO 6 / 05-2012
The installation tolerance of the signalling apparatus, which is installed at a certain location determined in the track kilometres, is 1m in the longitudinal direction of the track. An effort should be made to position the signalling apparatus according to the vertical axis. The installation and maintenance tolerance of the signal mast, signal bridge and cantilever signal bridge regarding the vertical axis is a horizontal deviation of 1cm from the signal mast, signal bridge or cantilever signal bridge centre line to the vertical axis over a 1m distance. The installation and maintenance tolerance regarding the vertical axis of another signalling apparatus, which is taller than 500mm and is not a signal mast, signal bridge or cantilever signal bridge, is a horizontal deviation of 2cm from the signal mast, signal bridge or cantilever signal bridge centre line of the vertical axis over a 1m distance. A signalling apparatus, located in the railway operating location in the area between the entry points, over 1000mm and less than 3000mm distance from the centre line of the track and at the height of less than 3000mm, must be marked with a yellow reflecting warning mark if there are no other reflecting surfaces on the signalling apparatus. The signalling apparatus must be installed in such a way that its location fulfils the regulations and requirements for electrical safety. 6.6.1.2 Locking
A box must be locked with a lock that can be opened with the triangle key used on railways if it contains the following devices – a local operation button, – a local point operation permission return button, – a key box, – a PP button, – a PP EI button, – an elimination switch – a TR ON button, – a TR EI button, – a TK switch – a PAL button.
The KK switch box must be locked with a lock that can be opened with the master key. The premises, booths and cabinets containing signalling apparatuses must be locked with a lock that can be opened with a signalling systems key.
The lock used must be type approved by the Finnish Transport Agency.
6.6.2 Electrical parts of the signalling systems The train control system installation must be implemented in such a way that a single fault in the installation of a train control leads the system controllably to a safe state either immediately or during the next operation concerning the part of the train control system in question.

159
RATO 6 / 05-2012
The circuits of the train control system control and monitoring devices must be planned in such a way that a short circuit, earth-fault, break or foreign voltage in them does not compromise the safety of the traffic. The relays, track circuits, signal lamps, point motors and the circuits of the buttons associated with the local point operation permission as well as the power supply of the ATP track equipment must be isolated from the earth potential. The circuits separated from the earth potential must be monitored for earth-faults. 6.6.2.1 Signal lamp
It must be possible to adjust the voltage of the signal lamp circuit separately for day and night use. It must be possible to connect an ATP encoder to the signal lamp circuit or to the control line circuit. The power level of the signal lamp circuit or the control line circuit, to which the ATP encoder is connected, must be greater than 5W while the signal lamp is lit or the control line is active. The ATP encoder must be connected to the signal lamp circuit in such a way that the ATP encoder can be bypassed by using jumpers. The lamp circuits of the aspect permitting driving and ‘No aspects' aspect must be implemented in such a way that a short circuit or foreign voltage in the lamp circuit wire does not cause the lamp to light up unintentionally. The signal lamp must be a double filament lamp or an LED unit. The power level of both filaments of the shunting signal’s double filament lamp must be 10W and the power level of both filaments of other signals’ double filament lamps must be 20W. The glass bulb of the double filament lamp must be clear. The signal lamp light coming through coloured glass and the light of the LED unit must be /2/ according to the DIN standard 6163. 6.6.2.2 Track circuit
The track circuit must be direct (DC) or alternating current (AC) or an audio frequency circuit. The track circuit can be centre-fed or fed from the extremities and insulated on one or two rails. Track vacancy proving must continue uninterrupted from one track section to the next. The track vacancy proving must continue coherently at the interface of a track section equipped with a track circuit and the track section equipped with an axle counter in such a way that the track sections overlap each other for no more than 3m. The polarity of the direct current track circuit must be chosen in such a way that a short circuit in the rail insulation causes at least one of the consecutive sections to become occupied. The phases used alternative current track circuits must be chosen in such a way that a short circuit in the rail insulation causes at least one of the consecutive sections to become occupied. The rails of a point must be connected in series in the track circuit with the help of rail insulations and wiring connecting the rails in such a way that switch element, middle part element or elements and crossing element are part of the track circuit and a missing of an element is detected and interpreted as the track section becoming occupied. The track circuit of the point must primarily be implemented in such a way that the point crossing is not insulated.

160 RATO 6 / 05-2012
In a location, where the track vacancy proving is realized with track circuits, the rails must be short cut with a wire outside the track circuit at a distance of at least 1m and at most 2m from the rail insulation in order to detect the longitudinal short cut in the rail insulation of the track circuit (Figures 6.6:2 and 6.6:3).
Ak591 Er571
1-2m
Figure 6.6:2 Short cut of the rails on the axle counting section, when the track vacancy proving realized with track circuits ends
No track vacancy proving
Er571
1-2m
Figure 6.6:3 Short cut of the rails outside the track vacancy proving, when the track vacancy proving realized with track circuits ends. The track circuit must function reliably by the following values: – leak resistance on a track section 1.5/km, – overhead contact-line voltage 25kV 50Hz, – maximum return current on a track 650A, – maximum distance between draining transformers 2.6km, – maximum distance between the return conductor access points to the rail 2.6km, – catenary support earthing is done directly to another rail and the earth resistance
of the catenary support is at least 10 and – there is a maximum of one earthing inductor per kilometre on a two rail insulated
section. The requirements stated in RATO parts 5 “Electrified Railway”, 11 “Track Superstructure” and 19 “CWR Tracks and Points” must be taken into account when making track circuit associated rail insulations and connecting conductors to the rail. 6.6.2.2.1 Functional requirements of the track circuit The track circuit must be adjustable in such a way that when the track relay is de-energized the voltage between rails is at least 1.0V. The track circuit is considered energized only after being energized for 2s. The track circuit is considered de-energized, immediately after it has been de-energized.

161
RATO 6 / 05-2012
The track circuit functions must be checked in the interlocking or line block system functions in such a way that the track relay is monitored for not being de-energized at all or being energized too soon. The track relay must be monitored for not being de-energized at all or being energized too soon, so that the route is not released or the line block does not return to a basic state when the train drives on the track sections included in the route. The correct sequence of functioning of subsequent track sections must be monitored on the track sections in question, regardless of the train length and speed. When the voltage is recovered after a voltage break of the track circuit power supply network, the random order of energizing of the track circuits must not cause a route to be released. Slowness in changing the state of a track relay must not cause interference in the interlocking or line block system functions. An intermediate position of a track relay is interpreted as a situation corresponding with an occupied track section. The intermediate position of the track relay must not result in releasing the route.
6.6.2.3 Axle counters
The requirements in RATO part 11 "Track Superstructure" must be taken into account when drilling the mounting holes for the axle counter detectors. A plough protection must be installed on the track at the location of an axle counter. The code of the axle counter, which locates elsewhere than in a line point branch leading outside the axle counting of the line point axle counting section, must consist of the letters AL and the track section and point numbers of the tracks associated with the axle counter in such a way that (Figure 6.6:4) – the alphabetical part of the code is written together with the numerical part, – the numbers in the numerical part are separated with a slash from each other and – the first number in the numerical part of the code is the number of the track
section or point of the track on the side of the lesser kilometres.
AkV513/517
Ak504
Ak503
Ak502
Ak5011Ak531
Ak532
AkV511
V513
Ak5012
V515
V517
V511
Track kilometres
① AL532/513② AL531/511③ AL511/513
③②
①
⑤
④ ⑧
⑥⑦
④ AL511/5011⑤ AL517/504⑥ AL517/503
⑦ AL515/502⑧ AL5011/5012
Figure 6.6:4 Composing the axle counter code.
The code of the axle counter, which locates in a line point branch leading outside the axle counting of the line point axle counting section, must consist of the letters AL and the track section and point numbers of the tracks associated with the axle counter in such a way that (Figure 6.6:5) – the alphabetical part of the code is written together with the numerical part – the numbers in the numerical part are separated with a slash from each other and – the first number in the numerical part of the code is the number of the track
section associated with the axle counter and the second number is the number of the point associated with the axle counter.

162 RATO 6 / 05-2012
Ak501Ak481
V512
Ak671
V511
① AL481/501② AL501/511
③
②
①④
③ AL501/513④ AL501/512
⑤ AL501/671
⑤V513
Figure 6.6:5 Composing the code of the axle counter associated with the line point.
6.6.3 Point devices
A route point and a trap point on the route track must be equipped with a point machine or machines according to point type. The structure of the point machine used for short point must tolerate the trailing of the point. The powered points must be equipped with stock rail heating. The points mentioned in the engineering configuration requirements must be equipped, in addition to the stock rail heating, with point blade heating and/or heating of the sleeper space, where the point rods and inspection rods are located. The points equipped with heating must be divided into heating groups.
6.6.4 Derailer devices A derailer on a shunting route track must be equipped with a point machine. A derailer on a track, other than a route track, must be equipped with a hand lever. The turning of the derailer onto the rail must be lightened by a spring, if the derailer equipped with a hand lever has more than one derailer shoe.
6.6.5 Stopping device
A stopping device on a route track must be equipped with a point machine. A stopping device on other than a route track must be equipped with a point machine or a hand lever. The rail on the location of the stopping device must be equipped with heating and a powered stopping device must be equipped with heating of the ….. The stopping devices equipped with heating must be divided into heating groups with the point equipped with heating. The braking shoe of the stopping device equipped with point machine must be connected with the monitoring circuit of the stopping device in such a way that the breaking off the braking shoe causes the breaking off of the monitoring circuit of the stopping device.
6.6.6 Key box
It must be possible to remove the key from the key box when key box permission has been given to the key box and the release button of the key is pushed. The key box must have an indication for when it is possible to release the key.

163
RATO 6 / 05-2012
A point detector can be connected to the key box monitoring circuit.
6.6.7 Point machine The point machine must lock the point blades mechanically when the point reaches its end position. The point machine must monitor the end position of the point. It must be possible to connect not more than two point detectors to the point machine circuit. The point is considered to be in a monitored end position only when all the point machines and detectors give the information about the end position and the point state information in the interlocking system corresponds with the information on the point’s end position. The point machine circuit must be implemented in such a way that a break, short circuit or earth-fault in the point machine circuit does not cause unnecessary turning of the point or a wrong indication about the point position. The point machine must transmit the following indications to the interlocking system: – monitored point position leading to the right, – monitored point position leading to the left, – point is trailed and – point not in end position It must be possible to use the point machine motor with 400V 50Hz three-phase current. The point machine must be operable by a crank handle. Use of the crank handle must disconnect the control and monitoring circuits of the point machine. Plough protection must be installed at the location of the point machine.
6.6.8 Power supply The power supply equipment of the train control system is a system, by which the electrical energy is converted according to the requirements of the signalling systems. The electricity is supplied for the signalling systems reaffirmed by UPS-equipment, a converter with battery back-up and/or a diesel generator. A new signalling system must be equipped with a UPS system. Systems, which are not related to the train control systems, may not be connected to the train control systems power supply. There must be a set of accumulators which enable six hours of use or a diesel generator and a set of accumulators for two hours of use as determined in the engineering configuration requirements for reserve power of the train control system power supply. It must be possible to connect a portable generator, which is equivalent to the system load, to the main distribution board. The reserve power must switch on in such a way that there is no break in the computerised interlocking system power supply or control circuits of other interlocking system than the computerised interlocking system as the power supply of the network shuts off. The outdoor equipment power supply of any other interlocking system than the computerised interlocking system, may have a break of maximum 3s as the reserve power is connected. A fixed diesel generator of the train control system power supply must switch on automatically as the power supply of the network disconnects.

164 RATO 6 / 05-2012
The power supply and reserve power of the interlocking system must be dimensioned according to the maximum load possible and the number of point machines operating simultaneously. The interlocking system reserve power must be implemented in such a way that using the reserve power does not restrict the interlocking system functions in any other way than by restricting the number of points turning simultaneously. The battery charger must be dimensioned in such a way that it is able to simultaneously charge a discharged accumulator up to at least 80% of the nominal capacity during 24h while it is supplying in a maximum load state. The power supply system must be implemented in such a way that it fulfils the regulations and requirements on electrical safety. The equipments and devices used in the power supply system must be inspected by an authority having jurisdiction in the EEA and approved by the Finnish Transport Agency . The power supply system must fulfil the requirements for immunity of disturbance and compliance determined in the electrical device standards. The power supply system must be protected against an overload in such a way that in the case of an overload, as small a part as possible of the power supply system is de-energized. The functionally earthed TN-S system must be used as the main power supply supplying the signalling systems’ power supply. The internal power supply of the train control system must be implemented by using protecting isolation transformers at which time the direct galvanic connection of the circuit to the supplying network is shut off. A system isolated from the earth must be monitored by isolation monitoring devices and their circuits must be equipped with a separate functional earthing switch. The circuits of the train control system, which have contacts for the devices located outside, must be supplied with a minimum of 48V voltages.
6.6.9 Equipment room of the signalling systems
The guidelines given for the security of the equipment room must be taken into account in building up the equipment room of the signalling systems and in dimensioning the structures. The cooling and heating of the equipment room of the signalling systems must be dimensioned in such a way that the temperature of the equipment room stays in all weather conditions in the operating temperature range of the devices placed in the equipment room. The cooling capacity of the equipment room of the signaling systems must be reconsidered when new devices are placed in the equipment room.
6.6.10 Signalling systems cabling and earthing
Cable types approved by the Finnish Transport Agency must be used for the signalling systems cabling. Cables with wires that are identified by numbers must be used for signalling systems main line cabling. The cabling must follow the Finnish Transport Infrastructure Agency guidelines on cabling.

165
RATO 6 / 05-2012
Any other cable except for the inward cable, in the lateral direction of the track, of the signalling system connected with the track in question or the adjacent track, or the cable positioned in the duct, must not be positioned in the track cross-section within an area that is at the most 1.4m under the height line of the track and, at the most 2.7m distance from the centre line of the track. A cable, which is not positioned in the duct, must be at a distance of at least 3.0m from the centre line of the track. The top surface of a cable, which is not positioned in the duct, must be at least – 1.4m deep from the height line of the track in the track undershoot, – 0.8m deep in the road undershoot, – 0.4m deep when the cable is in a trench, loose dirt or bed of rock and – 0.3m deep when the cable is in a trench cut into rock. In any other case than those mentioned above, the top surface of a cable, which is not positioned in the duct, must be at least 0.6m deep. A duct must be positioned elsewhere than on a bridge at a distance of at least 2.7m from the centre line of the track adjacent to the duct. A duct must be positioned on a bridge at a distance of at least 2.3m from the centre line of the track adjacent to the duct. An effort should be made to position the duct on the bridge at a distance of at least 2.7m from the centre line of the track adjacent to the duct. The upper surface of the duct lid must be – on the track layout of the railway operation location, on the same level with the
upper surface of the sleeper on the track adjacent to the duct, or lower, – outside the track layout of the railway operating location, elsewhere than in the
inner curve at least 300mm under the height line of the track adjacent to the duct and
– outside the track layout of the railway operating location, in the inner curve at least 400mm under the height line of the track adjacent to the duct.
The duct must be at a distance of at least 30m from the track buffer, when the duct is located in advance of the buffer. The signalling systems cable distance to the conductor, which is parallel with the cable and has the nominal voltage of at least 110kV, must be at least 20m. The signalling systems cable distance to the conductor, which has the nominal voltage of at least 110kV and leads under the track vertically, must be at least 130cm. The signalling apparatus and the signalling apparatus cable must be earthed. The electrified railway’s return current flowing through the cable sheath must be prevented. The signalling apparatus cable must be protected in such a way that there is no interference voltage induced in the cable disturbing the signalling systems functions.
6.6.11 Building signalling systems
A new signal, which has not been taken into use, and a signal, which has permanently been taken out of use, must be covered in such a way that the light units, the code and the border of the back plate of the signal are not visible in front of the signal from the direction of the track. The signal doesn’t have to be covered, if the signal is turned or turned over in such a way that the light units and the code of the signal cannot be seen when looking at the signal from the direction of the track. A signal on a signal bridge or cantilever signal bridge, which is not in use, must be, in addition, lifted as far up as possible. The light units of a signal, which is temporarily not in use, must be covered and the signal must be equipped with a ‘Not in use’ board or boards according to the

166 RATO 6 / 05-2012
requirements presented in RATO part 17 “Track signs”. The border of the back plate and the code of a signal, which is temporarily not in use, must be visible, when looking at the signal in front of the signal from the direction of the track. The point rod and inspection rod of the point positioned on the route track must be adjusted before traffic movements over the point. The point positioned on the route track, which is not connected to the signalling system, must be locked by point locks that lock all the point blades, when the traffic on the track uses a set route. The maximum track speed by the point located on the route track, which is not connected to the signalling system, may be a maximum of 80kph. The route track must be protected from the direction of the branch of the point on the route track, leading away from the point on the route track, which is not connected to the signalling system, with a derailer or point, which is locked in position leading away from the route track. An effort should be made to continue the track vacancy proving of the route track to the route track protecting derailer or point according to the requirements stated in Chapter 6.2.7, when viewed from the direction of the point on the route track, which is not connected to the signalling system. When making modifications to a signalling system in use, it must be ensured that the modifications do not affect the signalling system part used by traffic, and the signalling system functions must be checked for the part of the modifications according to the requirements for signalling system commissioning stated in Chapter 6.6.11 before allowing the modified part to be used by traffic. Before the commissioning of the signalling system begins, it must be checked and documented that the location of the signalling apparatus meets the requirements stated in Chapter 6.4. The modification of the signalling apparatus must be documented.
6.6.12 Signalling system commissioning and temporary removal from use
The Finnish Transport Agency must approve the starting of the signalling system commissioning. The user manual of the signalling system must be updated for the necessary parts and distributed for the signalling system users before the commissioning of a signalling system, part of the signalling system or signalling system modification. The new signalling system must be checked for the proper performance of all signalling system functions before it is commissioned. The signalling system to be modified must be checked for the part of those functions, which are affected or might be affected by the modification. The signalling system commissioning is described in more detail in the signalling system commissioning guidelines, published by the Finnish Transport Infrastructure Agency, Railway Department. The signalling apparatus commissioning and removal from use must be implemented according to the regulations on traffic. The signalling apparatus commissioning must be planned and phased in such a way that the signalling apparatus is out of use for as short a period as possible. An approach board must be positioned on the block section ended by a main, block or shunting signal ending the main route or an ‘End of main route' indicator at the location

167
RATO 6 / 05-2012
according to the requirements for distant signal positioning in Chapter 6.4, if the distant signal referring to the signal ending the main route or ‘End of main route’ indicator is temporarily out of use. The maximum track speed between the approach board and the signal ending the main route or 'End of main route’ indicator may be 80kph at the most. The maximum track speed on a main signalled track may be 120kph at the most, when the line block is temporarily out of use. The maximum track speed by the point on a route track may be 30kph at the most, when the point protecting signal is temporarily out of use. The requirement covers also the situation where the signal protecting the point has been removed permanently and a new signal protecting the point has not yet been taken into use. In connection with commissioning a new signalling system or new signalling apparatus, the following matters associated with the signalling system or signalling apparatus in question must be checked and documented: – The location of the equipment outdoors corresponds with the location presented
in the user interface and the documents associated with the user manual. – The signal sighting distance requirements correspond with the requirements
stated in Chapter 6.4.2.2 and the signals are directed according to the requirements in Chapter 6.6.1.
– The functions of the computerised interlocking system correspond with the requirements stated in Chapter 6.3.
– The functions of another signalling system than the computerised interlocking system correspond with the requirements stated in Chapter 6.2.
– The signalling system user interface corresponds with the requirements stated in Chapters 6.2.11 and 6.3.11.
– The functions of the equipment outdoors are checked according to the requirements stated in this chapter.
– Checking the functioning of the emergency stop buttons and earth-fault monitoring, which shut off the signalling system power supply.
– Checking the proper performance of the inner and inter system data transfer. – The functioning of the power supply equipment of the signalling system
corresponds to the requirements presented in Chapter 6.6.8. – Checking the functioning of the system interfaces between the signalling system
or signalling apparatus and other train control systems. A plan must be drawn to check the basic functions of the signalling system. The basic functions of the signalling system are checked and documented for the part of all functions and signalling apparatuses according to this plan. The structure of the signalling system and its software must be taken into account in the plan for checking the signalling system functions. The scope of the basic function checking can be reduced if the structure of the signalling system and its software ensures that a certain function or signalling apparatus functions is precisely the same way in different situations. The basic functions may be checked in a simulator modelling the interlocking or other signalling system. In connection with checking the basic functions of an interlocking or another signalling system, at least the following matters associated with the logic of the interlocking or signalling system must be checked: – Track section operation. – Signal operation. – The operation of points, powered derailers stopping devices associated with the
signalling system. – The operation of basic, locking and monitoring conditions of the route. – Release, cancelling and releasing routes. – Automatic functions of the routes. – Functioning of the line and line points.

168 RATO 6 / 05-2012
– Functioning of the local point operation conditions of the local point operation
group and key box permission conditions of the key box. – Functioning of the level crossing system connected to the signalling system. – User interface commands and indications. At least the following equipment outdoors, associated with the signalling system, and their functions must be checked and documented: – Signalling apparatus codes and their equivalence with the codes presented in the
user interface. – Track circuit operation. – Operation of axle counters and track sections equipped with them. – All the signal aspects and control lines and their equivalence in respect to the set
routes. To be able to check all distant signal aspects and control lines, several consecutive routes must be set, if necessary.
– Signal sighting distance. – Detection of signal lamp or wire faults and controlling the aspects in a wire or
lamp fault situation. – Signal operation on day and night voltage – Powered points operation and monitoring in different end positions and in trailing
the points. – Equivalence of the mutual locations of point track section boundaries and fouling
sign points with the interlocking system information on free of fouling restrictions. – Functioning of the points' and stopping devices' heating and the equivalence of
the heating groups with the heating groups presented in the user interface. – De-energized contact wire at a track section corresponds with the signalling
system information about de-energized contact wire. – Functioning of buttons, switches and other equipment outdoors associated with
the signalling system. – Functioning of key locks, double key locks and key boxes, key models and
markings. The signalling apparatus adjustments must be checked and documented during or before the commissioning. It must be ensured that all signal lamps are visible in commissioning a signal. The level crossing system functions must be checked and documented in such a way that fulfilling the requirements stated in Chapter 6.5.3 and in the function table of the level crossing system in question is secured. Together with checking the level crossing system functions, it must be checked that the level crossing system is connected to the fault indication system and, if necessary, to traffic lights, an interlocking or other signalling system.
6.6.13 Signalling system maintenance
The maintenance requirements for signalling systems are described in more detail in the signalling system service manual given by the Finnish Transport Agency. The maintenance work performed on the signalling system must be checked according to the requirements for commissioning signalling systems stated in Chapter 6.6.12. The maintenance work on the signalling system must be documented.

169
RATO 6 / 05-2012
REFERENCES /1/ European Standard EN 50129, Railway applications - Communication, signalling and processing systems - Safety related electronic systems for signalling /2/ DIN 6163, Farben und Farbgrenzen für Signallichter


RATO 6 / 05-2012 / Appendix 1 / 1 (22)
Appendix 1 Graphical symbols for signalling plans TRACKS AND POINTS
Point symbols presented in 1:10 000 scale scheme plan
Graphical symbols to be used in 1:1000 scale drawings X 1:10 000 scale scheme plan
1:9 point The point has no key lock
1:9 point The point has a key lock (a key lock and/or point control switch)
1:9 point Powered point
1:11,1/1:14 point (60km/h) Powered point
1:15,5/1:18 point (80km/h) Powered point
Point longer than 1:18 (over 80km/h) The point speed is presented in parentheses Powered point

RATO 6 / 05-2012 / Appendix 1 / 2 (22)
TRACKS AND POINTS
Point equipments
Graphical symbols to be used in X 1:1000 scale drawings 1:10 000 scale scheme plan
The point has no key lock
The point has a key lock (a key lock and/or point control switch)
YV54-200-1:9 Powered point
YV60-300-1:9 Powered point
YV60-500-1:11,1 Powered point
YV60-500-1:14 Powered point
YV60-900-1:15,5 Powered point
YV60-900-1:18 Powered point
YV54-1600-1:20,5 Powered point
YV60-5000/2500-1:26 Powered point
KRV54-200-1:9 Powered point
SRR60-2x1:9-4,8 Powered points
SRR54-2x1:9-6,0 Powered points

RATO 6 / 05-2012 / Appendix 1 / 3 (22)
TRACKS AND POINTS
Point equipments
Graphical symbols to be used in X 1:1000 scale drawings 1:10 000 scale scheme plan
Point switch blade YV54-200-1:9
Point switch blade YV60-300-1:9
Point switch blade YV60-500-1:11,1
Point switch blade YV60-500-1:14
Point switch blade YV60-900-1:15,5
Point switch blade YV60-900-1:18
Point switch blade YV54-1600-1:20,5
Point switch blade YV60-5000/2500-1:26
Fouling point sign
Sign of a point/derailer
Point machine
Point machine + sign of a point/derailer
Point machine (a special case)
A point with heating (stock rail and/or switch blade heating)
Rail contact
Point control switch

RATO 6 / 05-2012 / Appendix 1 / 4 (22)
TRACKS AND POINTS
Point equipments: Examples
Graphical symbols to be used in X 1:1000 scale drawings 1:10 000 scale scheme plan
An example of the equipment of an YV54--200-1:9 point The point machine must be drawn on the side it is located. The point switch blade of a powered point must be drawn such that the tip of the point switch blade points to the direct track of the point
An example of the equipment of an YV60-500-1:14 point The point machine must be drawn on the side it is located. The point is equipped with the point sign.
An example of the equipment of an YV60-900-1:18 point The point machine must be drawn on the side it is located
An example of the equipment of an YV54-200-1.9 point The point control switch must be drawn on the side it is located The point switch blade of a point which is not powered must be drawn such that the tip of the point switch blade points to the track where the point leads in its basic position (in the example to the direct track). The point is equipped with the point sign.

RATO 6 / 05-2012 / Appendix 1 / 5 (22)
TRACKS AND POINTS
Point equipments
KILOMETER POLE
Graphical symbols to be used in X 1:1000 scale drawings X 1:10 000 scale scheme plan
Derailer (derails a train approaching from the left to the left seen from the travel direction of the train)
Double derailer (derails a train approaching from the left to the left seen from the travel direction of the train)
Stopping device, centralized (stops the unit approaching from the right)
Stopping device, non-powered, non-centralized (stops the unit approaching from the left)
Stopping device, centralized (stops the units approaching from both directions)
Button group + box (local operation/ready -button)
Key lock
Key box
Double key lock (The key in position in basic state when the lock is black)
Two single key locks (The key in position in basic state when the lock is black)
Buffer stop
Graphical symbols to be used in X 1:1000 scale drawings X 1:10 000 scale scheme plan
Track kilometer

RATO 6 / 05-2012 / Appendix 1 / 6 (22)
TRACK SIGNS
Graphical symbols to be used in X 1:1000 scale drawings X 1:10 000 scale scheme plan
Approach sign
Railway operating location boarder -sign on the mast or mounted on other structure The abbreviation of the railway operating location must be presented with the symbol
Railway operating location shunting boarder -sign on the mast or mounted on other structure The abbreviation of the railway operating location must be presented with the symbol
Railway operating location boarder- and railway operating location shunting boarder -signs against each other on a signal
Speed limit -sign for special object (speed and reason for limit shall be stated with text on the index line)
Area border -sign (name of the area shall be stated with text on the index line)
Line point -sign on the mast or mounted on other structure The abbreviation of the line point must be presented with the symbol

RATO 6 / 05-2012 / Appendix 1 / 7 (22)
TRACK SIGNS
Graphical symbols to be used in X 1:1000 scale drawings X 1:10 000 scale scheme plan
Passing forbidden for locomotives -sign
Stop sign
Automatic train protection (ATP) -sign, ATP begins
Automatic train protection (ATP) -sign, ATP ends
Automatic train protection (ATP) -sign, ATP construction area begins
Automatic train protection (ATP) -sign, ATP construction area ends
Marked speed limit ends
ATP speed
Warning sign for speed limit (shall be completed with a figure indicating the speed)
Warning sign for speed limit + track specifying arrow (shall be completed with a figure indicating the speed)
Speed limit -sign (shall be completed with a figure indicating the speed)
Speed limit -sign + track specifying arrow

RATO 6 / 05-2012 / Appendix 1 / 8 (22)
TRACK SIGNS
Graphical symbols to be used in X 1:1000 scale drawings X 1:10 000 scale scheme plan
Balise group -sign (to be used at fictive and repeater balise groups)
Balise group -sign + track specifying arrow
Stop board
Additional sign indicating distance
Warning sign for passenger platform The abbreviation of the railway operating location, where the platform is situated, shall be presented with the sign
Rail insulation -sign
Border sign for state railway net
General warning -sign

RATO 6 / 05-2012 / Appendix 1 / 9 (22)
TRACK VACANCY PROVING
Graphical symbols to be used in X 1:1000 scale drawings 1:10 000 scale scheme plan
Track circuit feeding end
Track circuit relay end
Track circuit cabling
Insulated rail joint on both rails to the right
Insulated rail joint on one rail to the right
Insulated rail joint on one rail to the left
Insulated rail joints on one rail to the left and right
Insulated rail joints on one rail to the left and right (signalling systems - and electrified track return current change rails)
Insulated rail joints on two rails to the right and on one rail to the left
Insulated rail joints on two rails to the left and right
Boundary of audio frequency track circuit
End loop of audio frequency track circuit
Short circuit coupling
Middle-feeded loop

RATO 6 / 05-2012 / Appendix 1 / 10 (22)
TRACK VACANCY PROVING
Graphical symbols to be used in X 1:1000 scale drawings 1:10 000 scale scheme plan
Induction loop
Constant-set loop
Polarity mark of track circuit
Rail connection of return conductor (PKL)
Earthing isolator
Relay end of track circuit impedance bond
Feeding end of track circuit impedance bond
Transmitter
Receiver
Intermediate receiver
Z-coupling
Coupling for securing

RATO 6 / 05-2012 / Appendix 1 / 11 (22)
TRACK VACANCY PROVING
ATP EQUIPMENTS
Graphical symbols to be used in 1:1000 scale drawings X 1:10 000 scale scheme plan
Rail insulation, location of rail insulation
Graphical symbols to be used in X 1:1000 scale drawings X 1:10 000 scale scheme plan
Axle counter
Axle counter section begins or ends (axle counter section on the left)
Axle counter section begins or ends (axle counter section on the right)
Graphical symbols to be used in X 1:1000 scale drawings X 1:10 000 scale scheme plan
Balise group for ATP, both balises controlled
Balise group for ATP, one balise controlled, one with fixed information
Balise group for ATP, both balises with fixed information (primary direction of operation from the left to the right)
Explanation of balise group information

RATO 6 / 05-2012 / Appendix 1 / 12 (22)
LEVEL CROSSING EQUIPMENTS
Graphical symbols to be used in X 1:1000 scale drawings 1:10 000 scale scheme plan
Control switch (level crossing, manual use)
Road signal, three light units
Road signal, two light units
Road barrier
Traffic signal (used as road signal of level crossing, two light units)
Traffic signal (used as road signal of level crossing, three light units)
Level crossing signal
Light house
Road signal with LEDs
Traffic signal, three light units

RATO 6 / 05-2012 / Appendix 1 / 13 (22)
LEVEL CROSSING EQUIPMENTS Two-rail presentation (1:200)
Alarm sections of a level crossing with audio frequency track vacancy proving
Graphical symbols to be used in 1:1000 scale drawings X 1:10 000 scale scheme plan
Level crossing with level crossing system
Unguarded level crossing
Graphical symbols to be used in X 1:1000 scale drawings X 1:10 000 scale scheme plan
Alarm section begins -sign
Button
Level crossing alarm sections based on axle counters (axle counters are not included in the interlocking)
Level crossing alarm section based on axle counters begins or ends (axle counters are not included in the interlocking)
Level crossing alarm sections based on one axle counter (axle counter ís not included in the interlocking)
Level crossing alarm sections with audio frequency track vacancy proving

RATO 6 / 05-2012 / Appendix 1 / 14 (22)
OTHER GRAPHICAL SYMBOLS
Graphical symbols to be used in X 1:1000 scale drawings X 1:10 000 scale scheme plan
Passenger platform
Cabinet
Cabin
Equipment room
Insulator section
Draining transformer
Overpass
Underpass
Tunnel
Direction of influence

RATO 6 / 05-2012 / Appendix 1 / 15 (22)
OTHER GRAPHICAL SYMBOLS
Graphical symbols to be used in 1:1000 scale drawings X 1:10 000 scale drawings
Graphical symbols to be used in X 1:1000 scale drawings 1:10 000 scale drawings
Graphical symbols to be used in X 1:1000 scale drawings X 1:10 000 scale scheme plan
Electrified track
Non-electrified track
Track bridge
Door closing the track
Draining transformer
Draining transformer on the mast in an insulated overlap (also the insulated overlap and catenary supports must be presented with this symbol)
Draining transformer on its own mast at the insulated overlap

RATO 6 / 05-2012 / Appendix 1 / 16 (22)
SIGNALS
Graphical symbols to be used in X 1:1000 scale drawings X 1:10 000 scale scheme plan
Main signal, two light units
Main signal with distant signal, main signal with two light units
Main signal, three light units
Main signal with distant signal, main signal with three light units
Distant signal

RATO 6 / 05-2012 / Appendix 1 / 17 (22)
SIGNALS
Graphical symbols to be used in X 1:1000 scale drawings X 1:10 000 scale scheme plan
Not in use -sign, for example
Shunting signal which can display Stop- and Proceed with caution -aspects
Shunting signal with End of main route -indicator
Shunting signal which can display Stop- and No aspects -aspects
Shunting signal which can display Stop-, Proceed with caution- and No aspects -aspects
Shunting signal with End of main route indicator. Shunting signal can display Stop-, Proceed with caution- and No aspects -aspects
End of main route indicator

RATO 6 / 05-2012 / Appendix 1 / 18 (22)
SIGNALS
Graphical symbols to be used in X 1:1000 scale drawings X 1:10 000 scale scheme plan
Track specifying arrow (E.g. signal on the left side of the track in respect to the travel direction)
Signal bridge, cantilever signal bridge (base)
Radio signal
Locking signal
Fictive point speed information, not used in new plans. In new plans the symbol is replaced by the 'signal aspect' symbol. (E.g. Fictive point speed information associated with main and distant signal combination.)

RATO 6 / 05-2012 / Appendix 1 / 19 (22)
SIGNALS
Combined signal The symbol of combined signal must be attached with the abbreviation describing the type of the signal
Additional information in combined signal: Examples
Graphical symbols to be used in X 1:1000 scale drawings X 1:10 000 scale scheme plan
Narrow signal Signal in the lower corner of structure gauge
Signal in cantilever signal bridge
Signal mounted on tunnel wall
Combined signal
Additional information in combined signal: signal is protecting points which may belong to local point operation group.
Narrow signal
Signal in the lower corner of structure gauge
Signal in cantilever signal bridge
Signal mounted on tunnel wall
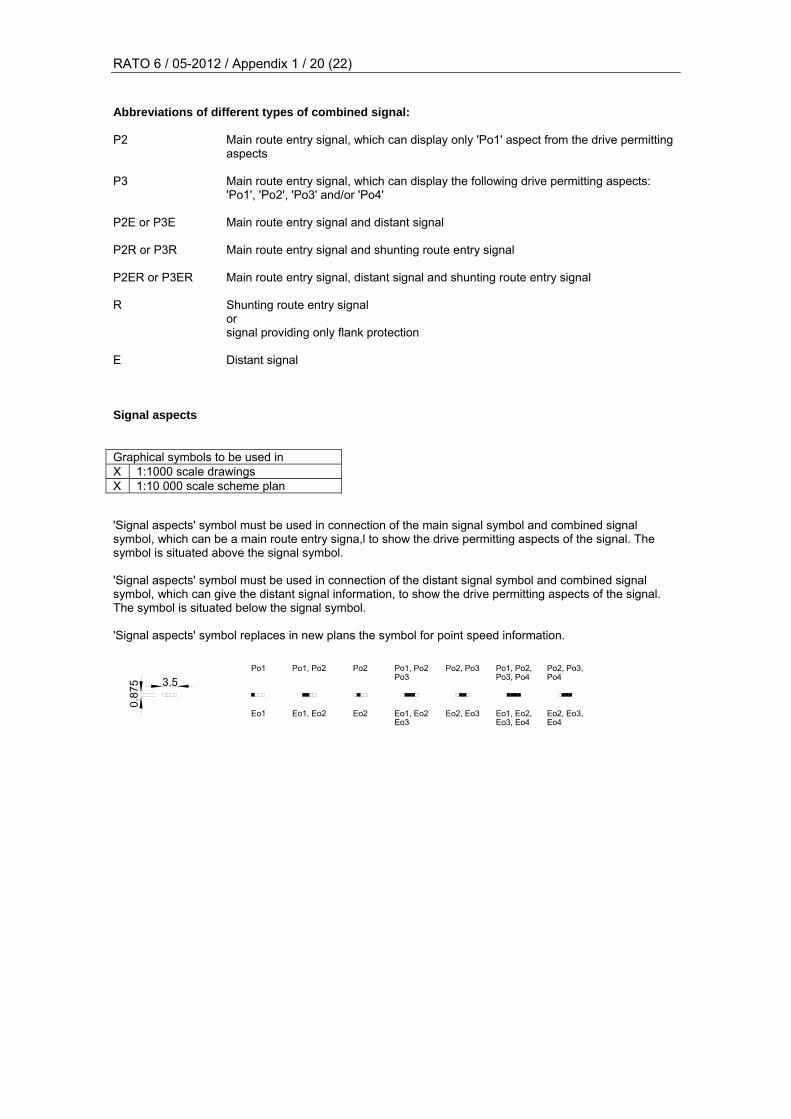
RATO 6 / 05-2012 / Appendix 1 / 20 (22)
Abbreviations of different types of combined signal: P2 Main route entry signal, which can display only 'Po1' aspect from the drive permitting
aspects P3 Main route entry signal, which can display the following drive permitting aspects:
'Po1', 'Po2', 'Po3' and/or 'Po4' P2E or P3E Main route entry signal and distant signal P2R or P3R Main route entry signal and shunting route entry signal P2ER or P3ER Main route entry signal, distant signal and shunting route entry signal R Shunting route entry signal or signal providing only flank protection E Distant signal Signal aspects
'Signal aspects' symbol must be used in connection of the main signal symbol and combined signal symbol, which can be a main route entry signa,l to show the drive permitting aspects of the signal. The symbol is situated above the signal symbol. 'Signal aspects' symbol must be used in connection of the distant signal symbol and combined signal symbol, which can give the distant signal information, to show the drive permitting aspects of the signal. The symbol is situated below the signal symbol. 'Signal aspects' symbol replaces in new plans the symbol for point speed information.
Graphical symbols to be used in X 1:1000 scale drawings X 1:10 000 scale scheme plan

RATO 6 / 05-2012 / Appendix 1 / 21 (22)
Main and distant signal : Examples
Combined signal: Examples
Signal can display the drive permitting aspects of distant signal Eo1 ja Eo2.
Signal can display main signal drive permitting aspect Po1 and distant signal drive permitting aspect Eo1.
Signal can display the drive permitting aspects Po1, Po2 and Po3 of main signal.
Signal can display the drive permitting aspects Eo1, Eo2 and Eo3
Signal can display the drive permitting aspect Po1
Signal can display the drive permitting aspects Po1, Po2, Po3 ja Po4
Signal can display the drive permitting aspects Po1, Po2, Po3, Eo1 and Eo2

RATO 6 / 05-2012 / Appendix 1 / 22 (22)
Old signalling system
Graphical symbols to be used in X 1:1000 scale drawings X 1:10 000 scale scheme plan
Main signal, two light units (old system)
Main signal, three light units (old system)
Distant signal, two light units (old system)
Block signal (old system)
Marshalling signal
Marshalling signal

RATO 6 / 05-2012 / Appendix 2 / 1 (1)
APPENDIX 2
ther
e is
a r
oute
poi
nt,
whi
ch is
a
trai
ling
poin
t se
en f
rom
the
dire
ctio
n of
the
sig
nal
ther
e is
rou
te p
oint
, w
hich
is a
fac
ing
poin
t se
en f
rom
the
dire
ctio
n of
the
si
gnal
the
re is
no
rout
e po
int
Overlap 0 X - - - - - - - - - 6.3:8
Overlap 0 and primary overlap
including the closest track section in
advance of the route exit signal
o X o o X o X o X o 6.3:9
o X o o X o o X X o 6.3:10
o X o o - - - - o X 6.3:11
o X o o o X - - - - 6.3:12
o o o X X o - - - - 6.3:13
Primary overlap including two closest
track sections in advance of the route
exit signal
o o o X o X - - - - 6.3:14
Overlap 0, primary overlap and
secondary overlap or secondary overlaps
o o X o o X - - - - 6.3:15
Primary overlap and secondary overlap or secondary overlaps
o o X o X o - - - - 6.3:16
X = Condition is realized
o = Condition is not realized
- = Condition is not examined
Conditions for definition of main route overlap
Primary overlap including the closest
track section in advance of the route
exit signal
Exa
mpl
e in
Fig
ure
On the track section in advance of the route exit
signal
dist
ance
bet
wee
n th
e ro
ute
exit
sign
al a
nd
the
foul
ing
poin
t of
the
ro
ute
poin
t in
adv
ance
of
the
sign
al is
at
leas
t 60
m
dist
ance
bet
wee
n th
e ro
ute
exit
sign
al a
nd t
he f
oulin
g po
int
of t
he r
oute
po
int
is le
ss t
han
60m
ther
e is
a p
asse
nger
pla
tfor
m o
n th
e tr
ack
in r
ear
of t
he s
igna
l or
over
lap
0 is
req
uire
d fo
r th
e si
gnal
in t
he e
ngin
eerin
g co
nfig
urat
ion
requ
irem
ents
ther
e is
no
pass
enge
r pl
atfo
rm o
n th
e tr
ack
in r
ear
of s
igna
l and
ov
erla
p 0
is n
ot r
equi
red
for
the
sign
al in
the
eng
inee
ring
conf
igur
atio
n re
quire
men
ts
aver
age
grad
ient
of
the
trac
k on
the
cou
rse
of t
he u
sage
leng
th o
r on
th
e co
urse
of
200m
in r
ear
of t
he r
oute
exi
t si
gnal
in t
he d
irect
ion
of t
he
rout
e is
at
leas
t 2,
5 ‰
aver
age
grad
ient
of
the
tra
ck o
n th
e co
urse
of
the
usag
e le
ngth
of
the
trac
k or
on
the
cour
se o
f 20
0m in
rea
r of
the
rou
te e
xit
sign
al in
the
di
rect
ion
of t
he r
oute
is le
ss t
han
2,5
‰
Ove
rlan
or o
verla
ps t
o be
def
ined
Tra
p po
int
in a
dvan
ce o
f th
e ro
ute
exit
sign
al a
nd n
o ro
ute
poin
t be
twee
n th
e ro
ute
exit
sign
al a
nd t
he t
rap
poin
t
Conditions for definition of overlap


RATO 6 / 05-2012 / Appendix 3 / 1 (1) APPENDIX 3 DETERMINING THE SIGNAL CODE IN A NEW SAFETY SYSTEM The presented direction is - main signal P-direction, - block signal p-direction and - shunting signal O-direction.
Joensuu
Helsinki
Tampere
Siilinjärvi
Turku
Seinäjoki
Lahti
Imatra
Haapamäki
Kouvola
Hanko
Pieksämäki
Oulu
Laurila
Kontiomäki
Ylivieska
Iisalmi
Toijala
Riihimäki
Karjaa
ParikkalaOrivesi
Jyväskylä
Viinijärvi
Huutokoski
Kerava
Kokemäki
Pasila
Huopalahti
Tikkurila
Helsinki