Embed Size (px)
Citation preview

Raspberry Pi Camera Training
Mike Davis – Truman College1/13/2015

Goals for Today
• Plug in and access your Raspberry Pi• Connect the camera and see that it works• Determine the IP address of the Raspberry Pi• Write a command that will tell the Raspberry Pi to take pictures with
the camera repeatedly.• Get the pictures off the Raspberry Pi on to another computer.• String the pictures into a time lapse movie.

The End Product

First things first – Plug in the Raspberry Pi• Connect• Monitor• Keyboard• Mouse• Camera• Power (in that order)
Place for camera.

Helpful Video for Plugging in the Camera
• Lift up the small black guide by the Ethernet port.• The small electrical contacts on
the ribbon face the end with the power cord.• Avoid any kind of static or
sparks.• Plug in, turn on the Rasberry Pi
after it is connected.

Configure the Camera
• You may need to configure the camera.
sudo raspi-config
Select Enable Camera and then Finish.
• You will be asked to reboot. Go ahead.
• This only needs to be done once.
• Camera Specs• 5 M Pixel• Video Mode – 1080p30, 720p60,
and 640x480p60/90• Full Frame SLR Lens Eq. – 35mm• Fixed Focus – 1m to infinity• F-Stop – 2.9• Focal length – 3.60mm• Can do up to 90 frames/second
Full Specs

Lets take a selfie.
• From the command line use this script
raspistill –o picture.jpg
• This tells the computer to use a program called raspistill and output (o) a file called picture.jpg• With the default settings this will
be a 2.4MB file.

Raspistill has a lot of customizable commandsEffect Command Default
Preview -p TRUE
No Preview -n FALSE
Sharpness -sh 0
Contrast -co 0
Brightness -br 0
Horizontal Flip -hf FALSE
Vertical Flip -vf FALSE
Shutter Speed -ss N/AUp to 6s
Sample commands• Flips the image• raspistill –vf-hf –o picture.jpg
• Increase the contrast• raspistill –co 50 –o picture.jpg
Complete list

File management – Prepare to take pictures• You may want to set up a folder to store the pictures you are taking.
• If the goal is to take a picture and put it in file, that goes in to the command.
raspistill –o /home/pi/camera/picture.jpg
Command Effect Example
pwd Present working directory, where you currently are.
mkdir Make a new folder mkdir camera
cd Change directory cd camera
cd .. Return to previous directory cd ..
cd /home/pi/camera Go to a specific directory cd /home/pi/camera
ls List contents ls

How to do time lapse photos
1. Make sure you have a folder you want to save everything to.2. Type the command
raspistill –o /home/pi/camera/picture%03.jpg –tl 10000 –t 120000
Program Output destination and file name.
3 digit number to appear after camera (001, 002, 003, etc)
Time lapse in milliseconds between pictures
Total time in milliseconds for all pictures

Things to think about with time lapse projects• What is something that will change slowly but dramatically?• Seedlings• Crystals• Bacterial growth• Decay
• How often will you need to take pictures?• How much space will you need for those pictures?• What can I control?• Lights• Power

Now lets get those pictures
On your Raspberry Pi• Determine the IP addresssudo ifconfig
On your preferred computer• Make sure you are on the same
network as the Raspberry Pi.• Download WinSCP• This is a program that will enable
File Transfer Protocol between your computer and the Pi.• Very user friendly interface.
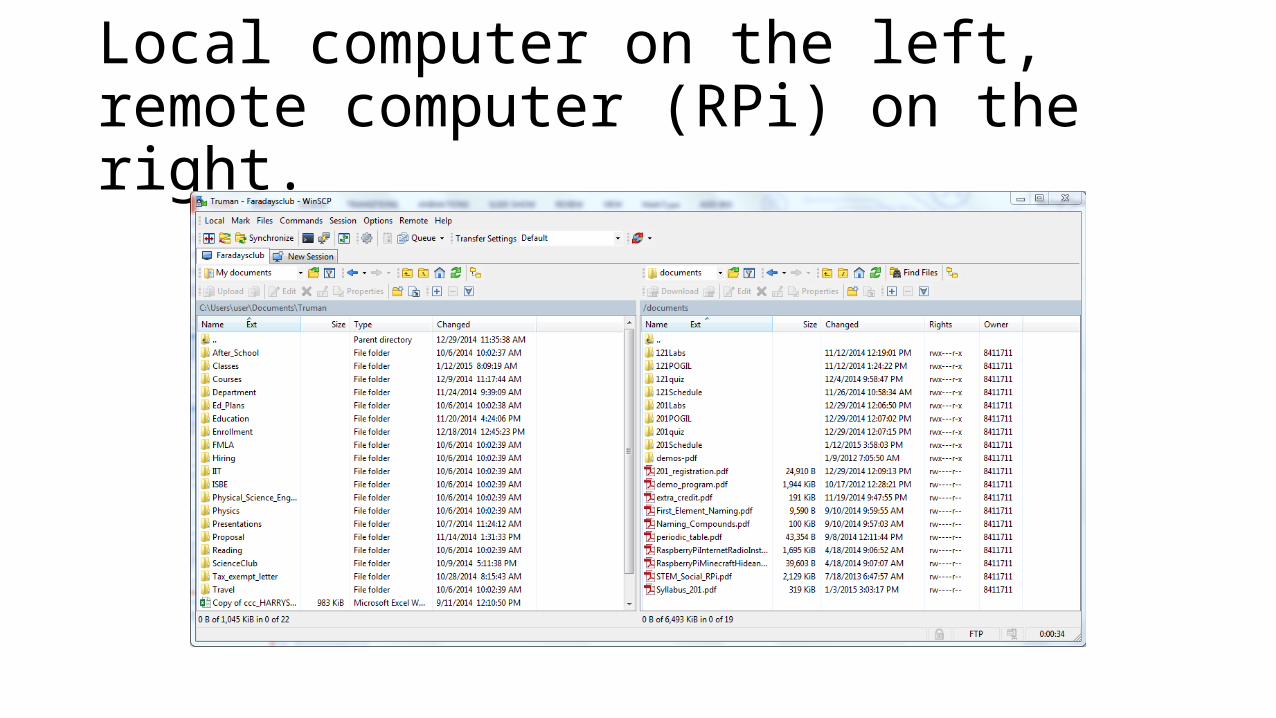
Local computer on the left, remote computer (RPi) on the right.

Got a lot of photos, how do I make a time lapse movie?
Download Cineform – GoPro Studio Light, free video editing• Import all photos.• Since they are ordered
sequentially, they will be in time order.
• Go on to step 2, and step 3.• Export as a AVI or MP4 or…• Enjoy your movie!

Get clever
Use other things as lenses Dye them
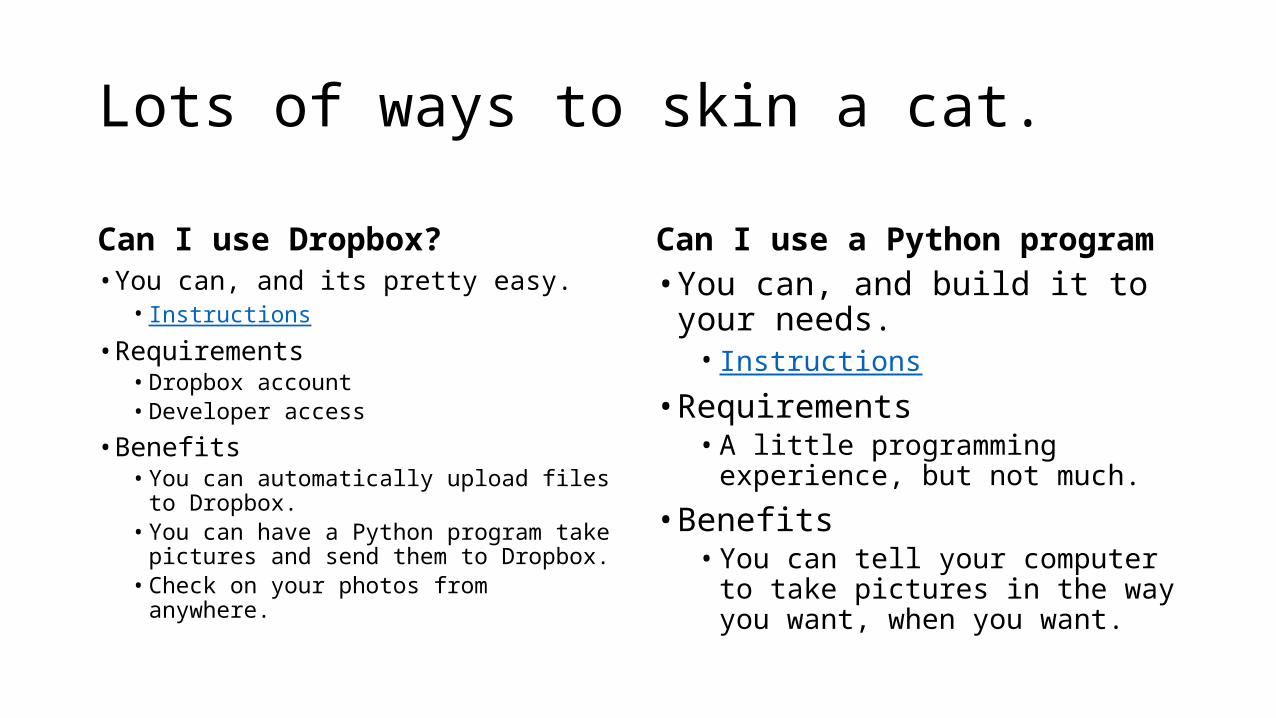
Lots of ways to skin a cat.
Can I use Dropbox?• You can, and its pretty easy.
• Instructions
• Requirements• Dropbox account• Developer access
• Benefits• You can automatically upload files to
Dropbox.• You can have a Python program take
pictures and send them to Dropbox.• Check on your photos from anywhere.
Can I use a Python program• You can, and build it to your needs.• Instructions
• Requirements• A little programming experience, but
not much.
• Benefits• You can tell your computer to take
pictures in the way you want, when you want.

Potential Projects / Asks
• Make a Photobooth that will take a picture when a button is pushed, and email it to the user.• Example
• Take a picture of something at the same time everyday.• Start taking time lapse photos at the same time everyday and upload them to
Dropbox or a remote server at the end of the day.• Take video with the Raspberry Pi Camera
• Example
• Control the Raspberry Pi Camera from another computer.• Example
• Control the Raspberry Pi Camera from your phone.• Example