Embed Size (px)
Citation preview
Rapid Composer by bitorbit
v1.0.5
Thank you for purchasing Rapid Composer!
If you have any questions regarding this document or Rapid Composer plugin contact us at [email protected].
1/14
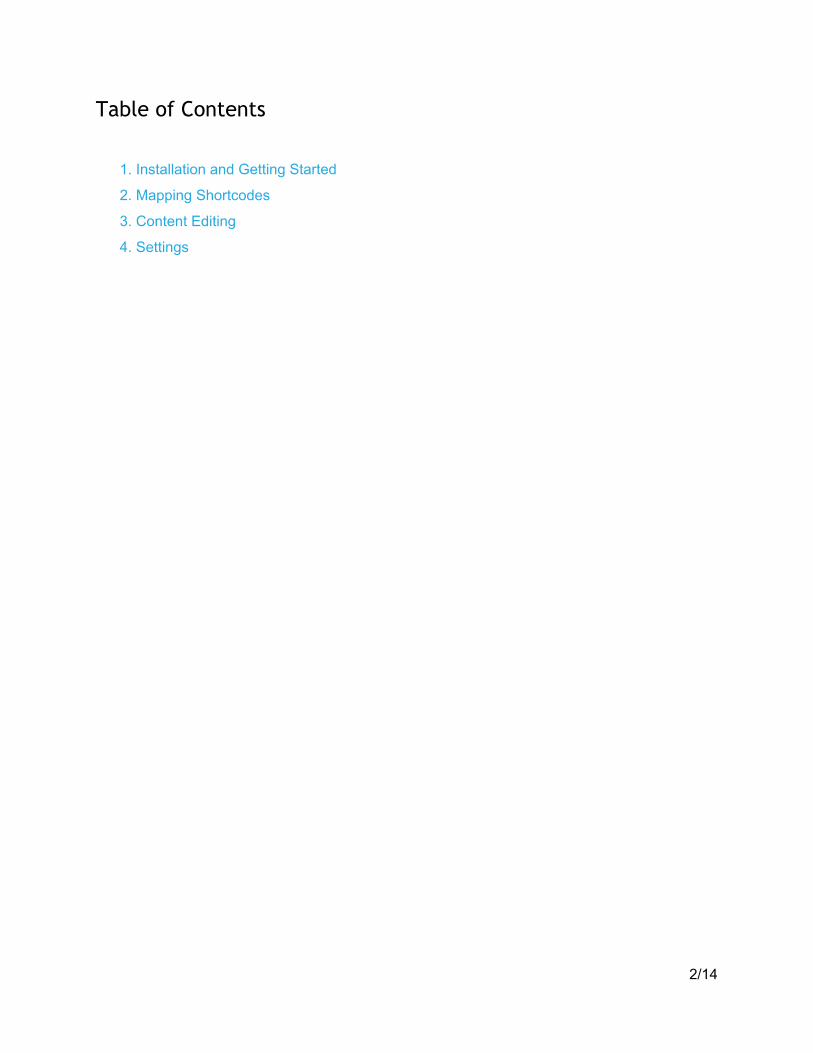
Table of Contents
1. Installation and Getting Started
2. Mapping Shortcodes
3. Content Editing
4. Settings
2/14

1. Installation and Getting Started
Rapid Composer (RC) is installed like any other WordPress plugin:
1. Extract rapid_composer folder from downloaded zip archive
2. With your FTP client application, upload rapid_composer folder to the wpcontent/plugins
folder in your WordPress directory online.
3. Go to Plugins screen and look for the newly uploaded Rapid Composer in the list.
4. Click Activate to activate it.
After plugin is activated you may continue with mapping of shortcodes (next chapter).
3/14

2. Mapping Shortcodes
If you already have some content entered with Visual Composer (VC) or with any other content
editor which uses some kind of shortcode based grid system, you will be able to see the
content, even without mapping and even do some basic content editing.
However, to be able to use advanced editing options and to edit individual shortcode attributes,
you must create a mapping.
Unmapped shortcode tags are displayed in red color. Here you can see simple content created
with Visual Composer with unmapped shortcodes:
There are two levels of mapping primary (using php function bt_rc_map) and secondary
(manual mapping using builtin mapping interface).
Secondary mapping can override primary mapping. You will learn more about that later.
To create shortcode mappings with bt_rc_map php function in your theme or plugin use the
bt_rc_map function like this:
4/14

function my_mapping_function() if ( function_exists( 'bt_rc_map' ) )
$params_row = array(...); bt_rc_map( 'vc_row', $params_row ); $params_col = array(...); bt_rc_map( 'vc_column', $params_col ); /* add more mappings... */
add_action( 'plugins_loaded', 'my_mapping_function' );
So, the first argument is shortcode tag name and second is php associative array. For vc_row,
the associative array might look like this:
$params_row = array(
'name' => __( Row, 'txtdomain' ), 'description' => __( 'Just a row', 'txtdomain' ), 'root' => true, 'container' => 'horizontal', 'toggle' => true, 'show_settings_on_create' => false, 'accept' => array( 'vc_column' => true, 'vc_row' => false ), 'accept_all' => false, 'params' => array(
array( 'param_name' => 'full_width', 'type' => 'dropdown', 'heading' => 'Row stretch', 'value' => array(
'Default' => '', 'Stretch row' => 'stretch_row', 'Stretch row and content' => 'stretch_row_content', 'Stretch row and content (no paddings)' => 'stretch_row_content_no_spaces'
) ), array(
'param_name' => 'parallax', 'type' => 'dropdown', /* more options for parallax param... */
), /* more params... */
) );
5/14
Here is the list of all parameters:
Name Type Description
name string Name of shortcode.
description string Description of shortcode.
root boolean Set to true if it is root element.
container string Can be 'horizontal' or 'vertical', e.g. vc_row is horizontal container because it contains columns (vc_column).
toggle boolean Set to true if you want to toggle element in Rapid Composer
show_settings_on_create boolean Set to false if you do not want to show settings when element is added.
width_param string Parameter from params array which defines width of element. Used for elements which are contained in horizontal containers, e.g. vc_column which goes to vc_row will have width_param => 'width'.
accept array Array of elements which can be contained by the current element. Special one is '_content' which represents standard WP editor content wrapped by shortcode tag. If element accepts '_content' then it can not accept other elements. In RC interface it is a node marked by ]...[.
accept_all boolean Set to true if you want to contain all elements; accept param will override this.
params array Array of mappings for shortcode attributes; see next table.
base string Not required for bt_rc_map, but required in JSON used in secondary mapping.
Most important parameter within basic array is params which contains mappings for shortcode
attributes. It is array of arrays, each holding mapping options for specific shortcode attribute.
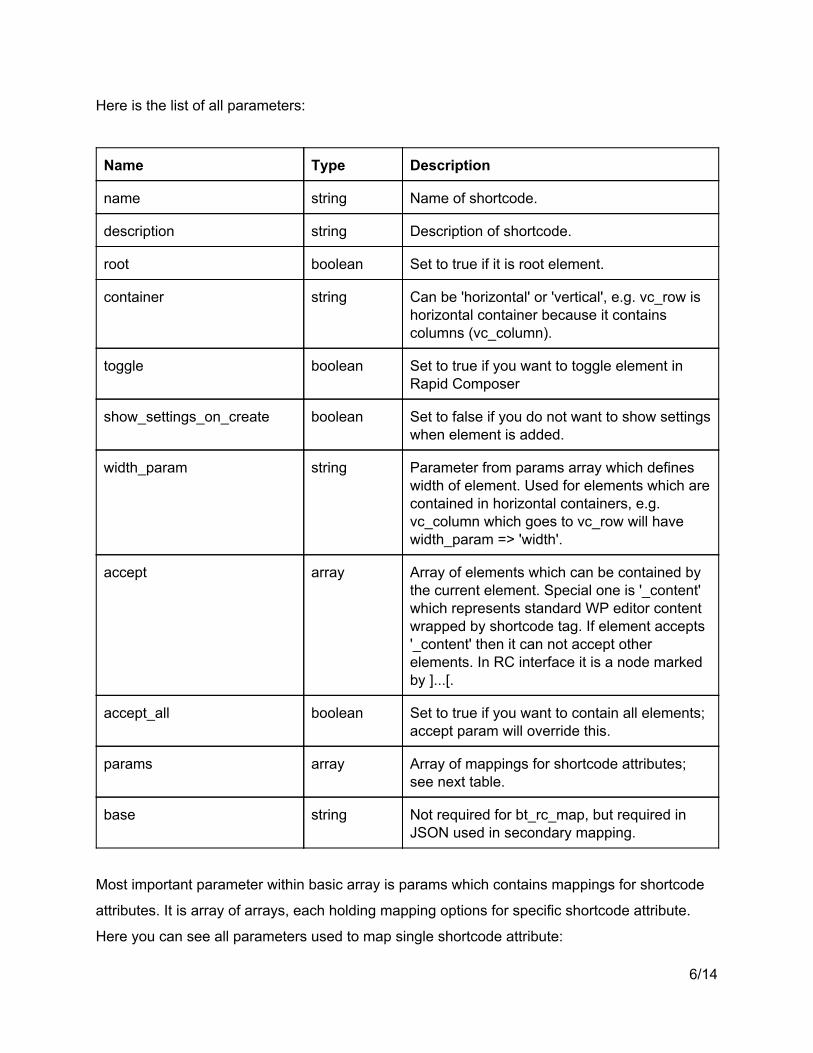
Here you can see all parameters used to map single shortcode attribute:
6/14
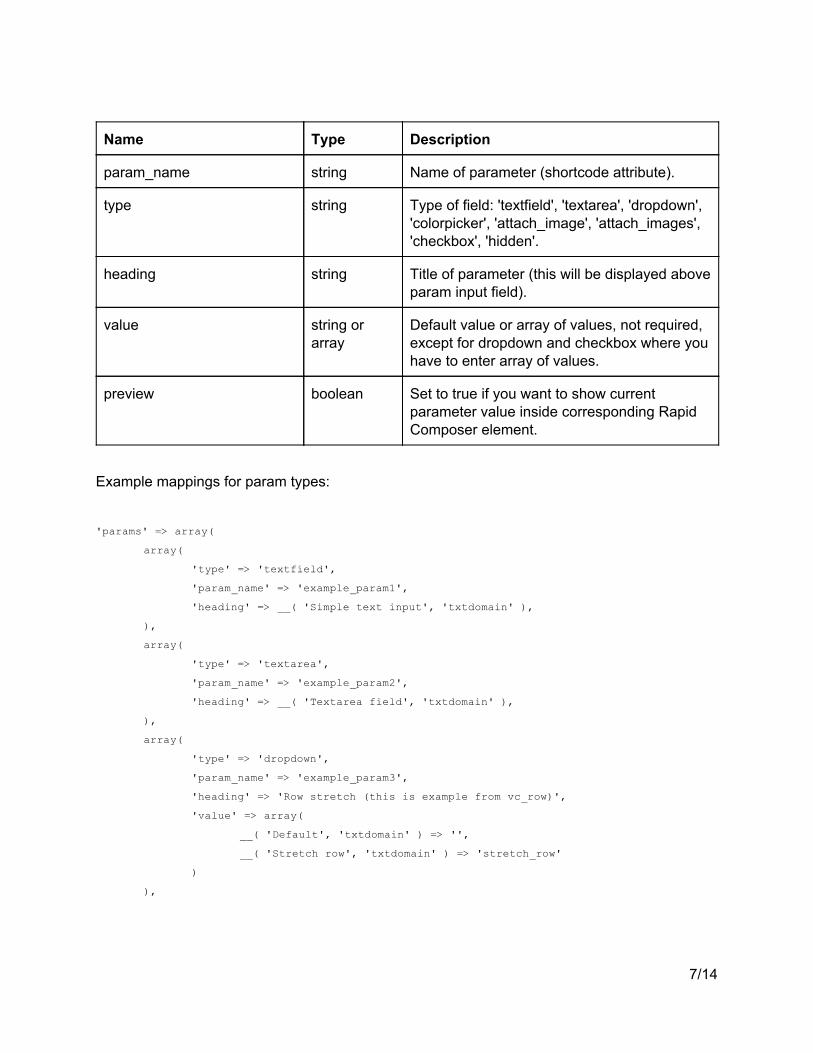
Name Type Description
param_name string Name of parameter (shortcode attribute).
type string Type of field: 'textfield', 'textarea', 'dropdown', 'colorpicker', 'attach_image', 'attach_images', 'checkbox', 'hidden'.
heading string Title of parameter (this will be displayed above param input field).
value string or array
Default value or array of values, not required, except for dropdown and checkbox where you have to enter array of values.
preview boolean Set to true if you want to show current parameter value inside corresponding Rapid Composer element.
Example mappings for param types:
'params' => array(
array( 'type' => 'textfield', 'param_name' => 'example_param1', 'heading' => __( 'Simple text input', 'txtdomain' ),
), array(
'type' => 'textarea', 'param_name' => 'example_param2', 'heading' => __( 'Textarea field', 'txtdomain' ),
), array(
'type' => 'dropdown', 'param_name' => 'example_param3', 'heading' => 'Row stretch (this is example from vc_row)', 'value' => array(
__( 'Default', 'txtdomain' ) => '', __( 'Stretch row', 'txtdomain' ) => 'stretch_row'
) ),
7/14

array( 'type' => 'colorpicker', 'param_name' => 'example_param4', 'heading' => __( 'Pick a color', 'txtdomain' ),
), array(
'type' => 'attach_image', 'param_name' => 'example_param5', 'heading' => __( 'Select one image', 'txtdomain' ),
), array(
'type' => 'attach_images', 'param_name' => 'example_param6', 'heading' => __( 'Select one or more images', 'txtdomain' ),
), array(
'type' => 'checkbox', 'param_name' => 'example_param7', 'heading' => __( 'VALUE IS REQUIRED!', 'txtdomain' ), 'value' => array( __( 'Click me!', 'txtdomain' ) => 'yes' )
) )
To create secondary mapping click Shortcode Mapper icon ( [...] ) on the toolbar which you will
see at the lower part of screen. You will see a dialog with list of shortcodes. Unmapped
shortcodes are displayed in red color.
If shortcode has primary mapping it will have /p suffix and if it has secondary mapping it will
have /s suffix. If there is primary mapping and secondary you will see /p /s. It means that
secondary mapping is overriding primary mapping.
To create secondary mapping, click shortcode you want and then click Insert Mapping button.
You will see JSON mapping inserted in textarea. It corresponds to bt_rc_map function, except
for 'base' parameter which you must enter here, but you do not have to enter in bt_rc_map
params array.
If shortcode is already mapped with Visual Composer, mapper will generate suggested JSON
template with most of VC mapped properties automatically picked and transformed in Rapid
Composer format.
8/14

Please note that in most cases it is not enough to just insert VC mapping. You need to manually
check params and tune them according to your needs.
if there is primary mapping, it will be displayed as JSON allowing you to quickly modify it and
save it as secondary mapping which will override primary mapping.
if there is no VC mapping and no primary RC mapping, only basic JSON template will be
inserted allowing you to quickly continue with manual mapping.
When you are done with mapping click Save to save secondary mapping. Click Delete if you
want to delete secondary mapping.
9/14

3. Content Editing
Click big '+' button to add root element to root. More than one type of root element is allowed.
Here you can see unmapped VC element vc_row and mapped element called Section which
contains another element called Row (this is NOT vc_row, only name is similar). Place mouse
over gradient area to show element toolbar. Click '+' to add element inside current one.
In the case of horizontal container you will see dialog with predefined layouts and also you can
enter your own layout. You can have up to 12 horizontal elements (columns). Param which
holds width is defined by width_param parameter. Width is defined similar to VC columns, e.g.
1/2 means first column is half of full width. If you need only one column it is just 1/1. Three equal
columns will be defined like this: 1/3+1/3+1/3.
After you select predefined layout, it will be inserted in the field below. Just hit enter to insert
elements. To change layout, click '+' again and change it as you want. You can also clone and
drag & drop columns which may lead to improper number and/or width of columns.
That is why after clone or drag & drop columns are automatically resized and if there is improper
number of columns parent element is marked with red border.
10/14
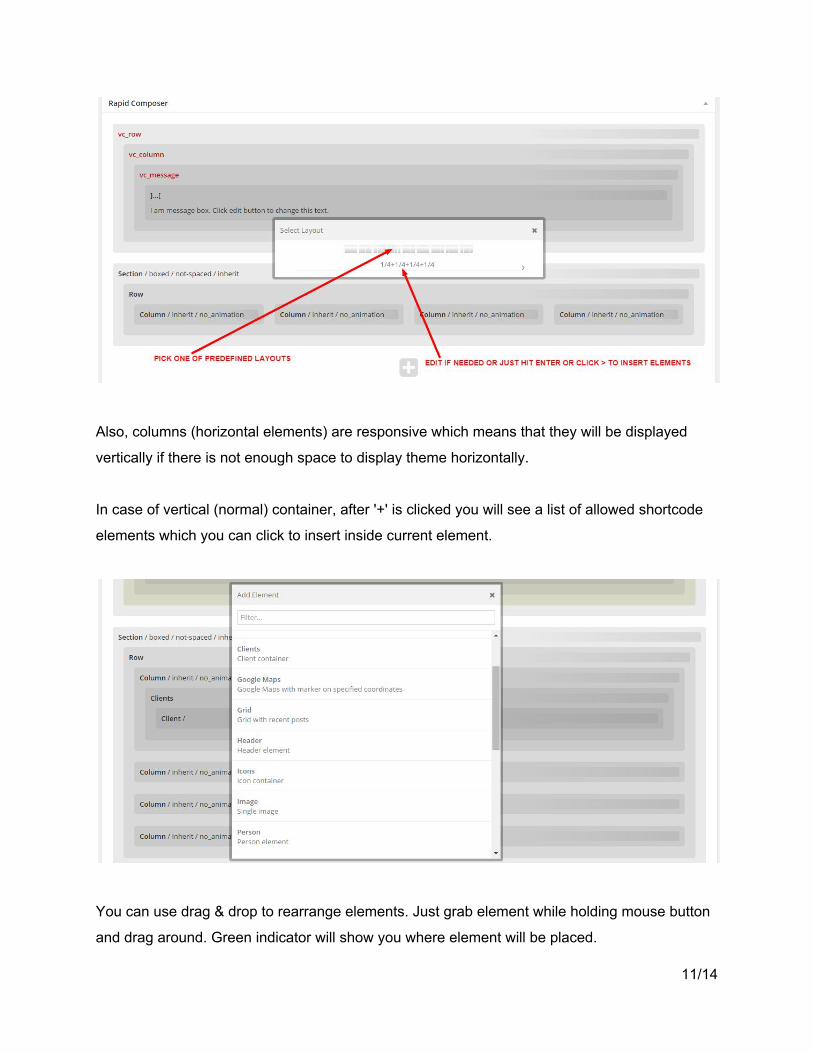
Also, columns (horizontal elements) are responsive which means that they will be displayed
vertically if there is not enough space to display theme horizontally.
In case of vertical (normal) container, after '+' is clicked you will see a list of allowed shortcode
elements which you can click to insert inside current element.
You can use drag & drop to rearrange elements. Just grab element while holding mouse button
and drag around. Green indicator will show you where element will be placed.
11/14

Other element toolbar commands are Toggle, Edit, Clone, Delete and clipboard commands
(Copy, Copy + and Paste). Click Toggle to toggle element. Click Edit to edit element params
(shortcode attributes). Here you can see example of Edit dialog:
Clone will create a copy of current element and place it below current element. Delete will delete
the element.
Clipboard commands are used to copy and paste elements or stacks of elements. You can copy and paste on the same page/post or across pages/posts. Click 'C' to copy element to clipboard. Click 'C+' to add another element to clipboard (create stack). Click 'P' to paste inside or after the element (depending on type of elements in clipboard). To create new stack, just click 'C' again. Mixing different element types on stack is limited, e.g. you can not mix root elements with other elements. Also, pasting is limited, e.g. you can not paste root element inside some other element, or element inside any element which does not accept it (check accept and accept_all params). To paste on (empty) page/post use toolbar Paste command (used to paste root elements):
12/14
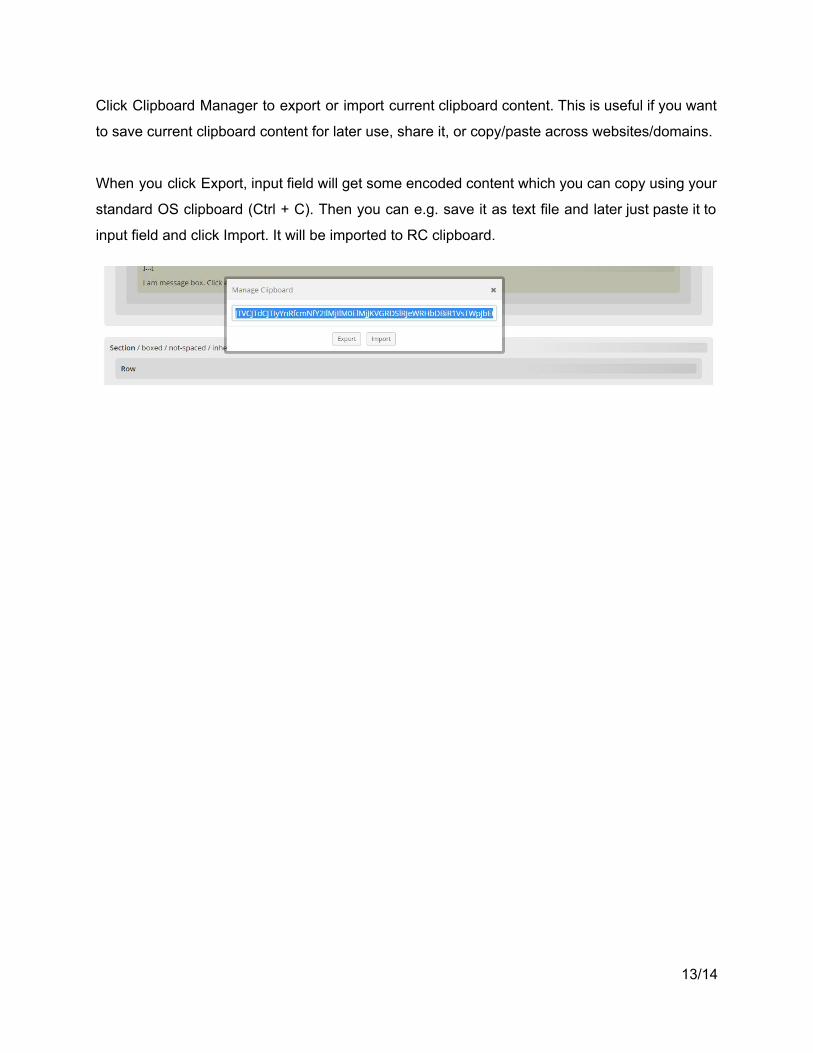
Click Clipboard Manager to export or import current clipboard content. This is useful if you want
to save current clipboard content for later use, share it, or copy/paste across websites/domains.
When you click Export, input field will get some encoded content which you can copy using your
standard OS clipboard (Ctrl + C). Then you can e.g. save it as text file and later just paste it to
input field and click Import. It will be imported to RC clipboard.
13/14
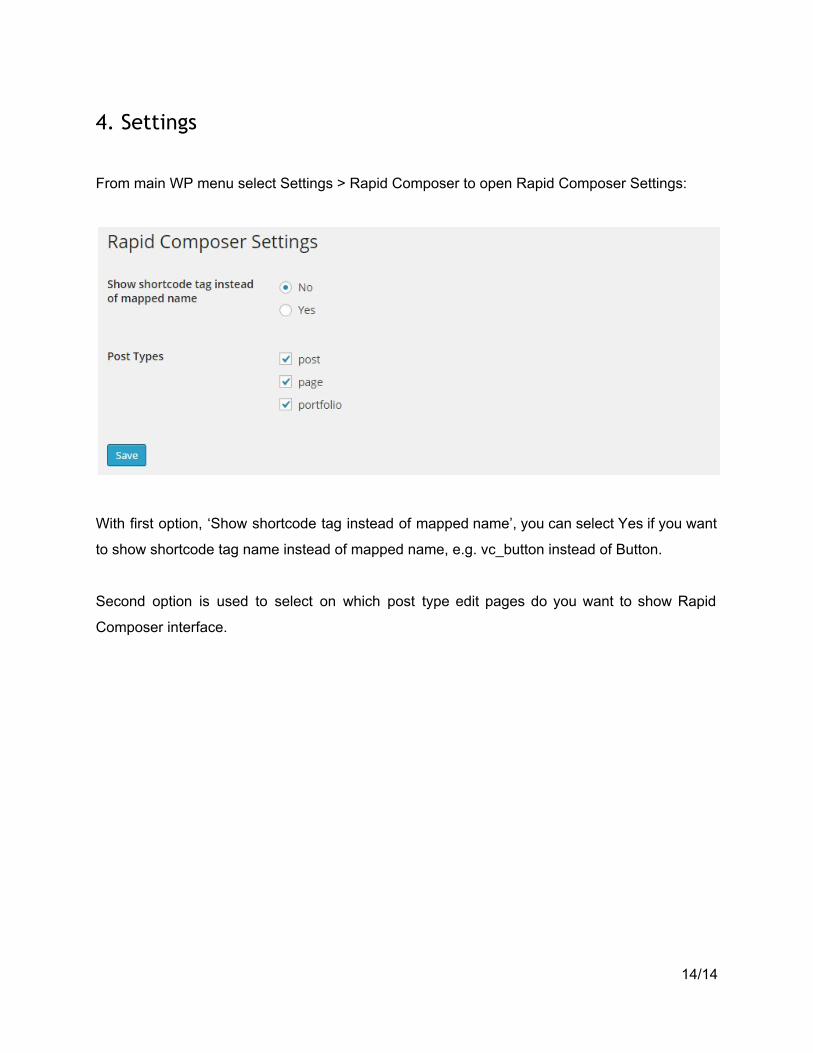
4. Settings
From main WP menu select Settings > Rapid Composer to open Rapid Composer Settings:
With first option, ‘Show shortcode tag instead of mapped name’, you can select Yes if you want
to show shortcode tag name instead of mapped name, e.g. vc_button instead of Button.
Second option is used to select on which post type edit pages do you want to show Rapid
Composer interface.
14/14