Embed Size (px)
Citation preview
7/28/2019 Raised Planter Bed From Pallets
http://slidepdf.com/reader/full/raised-planter-bed-from-pallets 1/12
http://www.instructables.com/id/Raised-Planter-Bed-from-Pallets/
Food Living Outside Play Technology Workshop
Raised Planter Bed from Palletsby elco_chan on November 7, 2011
Table of Contents
Raised Planter Bed from Pallets ...................................................................................................
Intro: Raised Planter Bed from Pallets ...........................................................................................
Step 1: Materials and Notes ..................................................................................................
Step 2: Prepping the Wood/Pallets .............................................................................................
Step 3: Building the Legs .....................................................................................................
Step 4: Angled Sides and Supports .............................................................................................
Step 5: End Caps ..........................................................................................................
Step 6: The Liner ..........................................................................................................
Step 7: Finishing Touches ....................................................................................................
Step 8: Final Notes and Future Plans ............................................................................................ 1
Related Instructables ........................................................................................................ 1
Advertisements ............................................................................................................... 1

7/28/2019 Raised Planter Bed From Pallets
http://slidepdf.com/reader/full/raised-planter-bed-from-pallets 2/12
http://www.instructables.com/id/Raised-Planter-Bed-from-Pallets/
Intro: Raised Planter Bed from PalletsI recently saw a picture of a raised planter bed and though it was a really neat idea. I though this would be the solution for keeping rabbits out of my garden, only probwas they wanted $250 for it.
After looking at the picture for a few minutes I was able to construct it in my head, only problem was getting the wood for it would be costly. I was thinking about it whiwas at work and saw a co-worker toss a pallet into a dumpster, it occurred to me that I had just found a source of free wood for this project.
It took me about 6 hours in total to build the raised planter bed and I was able to make it for about 10% of what it retailed for.
Step 1:Materials and NotesYou will need the following for this project:
3 to 4 Pallets - depends on the size of the pallets, you'll also want them similar in size.HammerVice GripsPry bar/CrowbarDrillStaple Gun - 3/8 inch staplesSkill saw, jig saw, or preferably a miter saw (something that will make 90º cuts and 45º cuts)Screws; I used 3 different lengths of wood screws: 1 inch, 1 1/4 inch, and 1 3/4 inchLandscaping FabricAdditional treated wood from a lumber store, unless you have planks that are the total length of the bed.
Additional note:
The Pallet wood you will need to use will need to be heat t reated. All pallets will have some marking or stamp on them indicating how they have been treated. You willneed to get some that have a HT (Heat Treated) stamped on them to make this safe for uses with a garden. Steer clear of pallets with MB stamped on them, they havbeen treated with Methyl Bromide and can be dangerous if used for this project, since plants will be in contact with the wood and any chemicals in it.
7/28/2019 Raised Planter Bed From Pallets
http://slidepdf.com/reader/full/raised-planter-bed-from-pallets 3/12
http://www.instructables.com/id/Raised-Planter-Bed-from-Pallets/
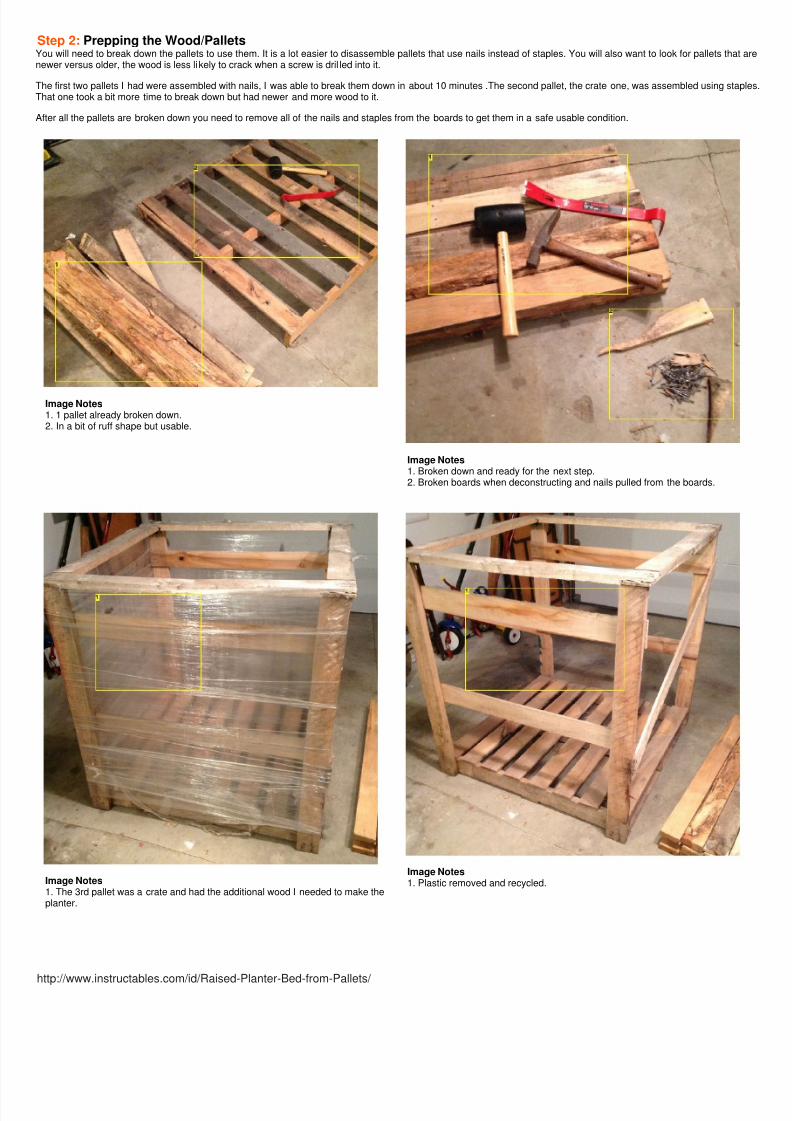
Step 2:Prepping the Wood/PalletsYou will need to break down the pallets to use them. It is a lot easier to disassemble pallets that use nails instead of staples. You will also want to look for pallets that anewer versus older, the wood is less likely to crack when a screw is dril led into it.
The first two pallets I had were assembled with nails, I was able to break them down in about 10 minutes .The second pallet, the crate one, was assembled using stapThat one took a bit more time to break down but had newer and more wood to it.
After all the pallets are broken down you need to remove all of the nails and staples from the boards to get them in a safe usable condition.
Image Notes1. 1 pallet already broken down.2. In a bit of ruff shape but usable.
Image Notes1. Broken down and ready for the next step.2. Broken boards when deconstructing and nails pulled from the boards.
Image Notes1. The 3rd pallet was a crate and had the additional wood I needed to make theplanter.
Image Notes1. Plastic removed and recycled.

7/28/2019 Raised Planter Bed From Pallets
http://slidepdf.com/reader/full/raised-planter-bed-from-pallets 4/12
http://www.instructables.com/id/Raised-Planter-Bed-from-Pallets/
Image Notes1. The crate part of the pallet.2. New wood for the pallet but had staples in it instead of nails.
Image Notes1. Deconstructed, now just needs the staples removed.2. Broken pieces from deconstruction, the staples caused a lot of the boards tobreak.
Step 3:Building the LegsFor the legs of the raised planter we are going to use the 2 x 4's that were used to hold the pallets together.
First I lined up 8 of the best looking 2 x 4's and cut them to length of 3 feet. I used a roofers square tool to get a 90º angle on all of the boards, and cut them to1.length.Once all the boards have been cut will need to combine two of the boards to make two sets of 4 x 4's. These will be our center legs.2.Once you have the 4 x 4's created will use a thin board to make part of the sides.3.One side will consist of a 2 x 4, a thin board, a 4 x 4, another thin board, and a final 2 x 4. The fifth image shows what it should look like once completed.4.Now just repeat step 4 for the other side.5.
Image Notes1. Laid out in order to see what I have to work with.
Image Notes1. Roofers square2. 3 foot mark, try to cut off the bad portion of the boards.
7/28/2019 Raised Planter Bed From Pallets
http://slidepdf.com/reader/full/raised-planter-bed-from-pallets 5/12
http://www.instructables.com/id/Raised-Planter-Bed-from-Pallets/
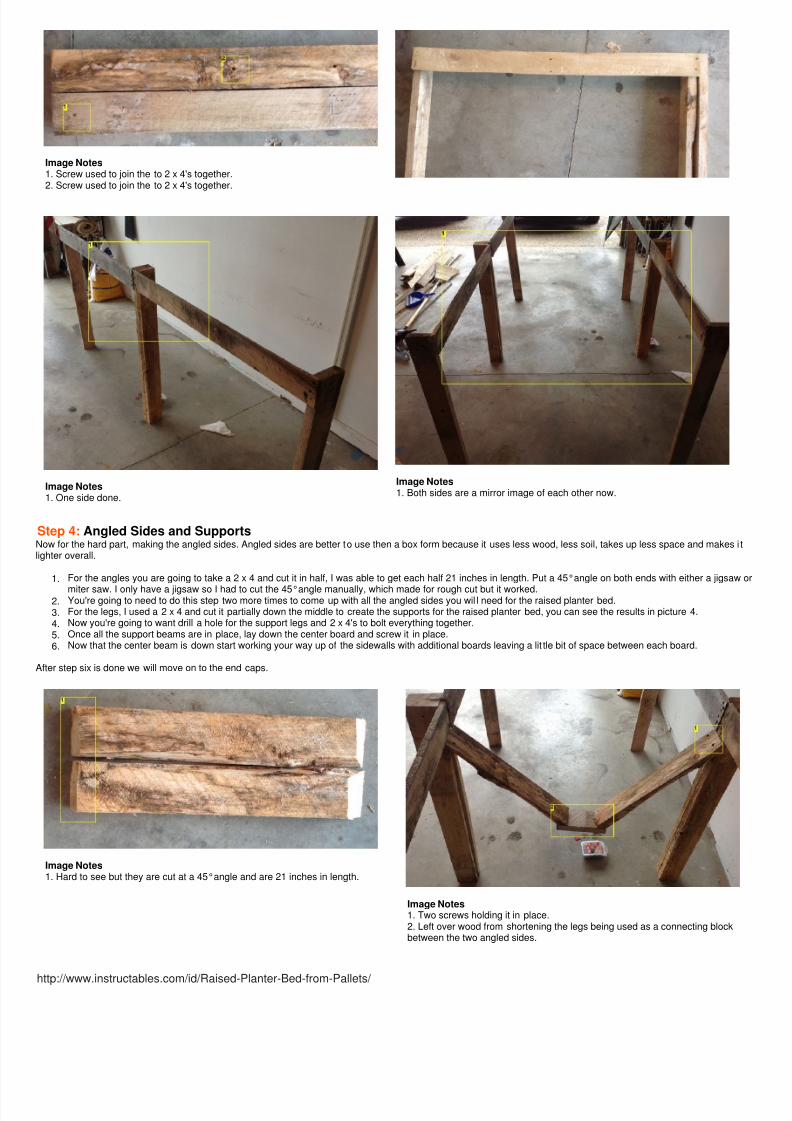
Image Notes1. Screw used to join the to 2 x 4's together.2. Screw used to join the to 2 x 4's together.
Image Notes1. One side done.
Image Notes1. Both sides are a mirror image of each other now.
Step 4:Angled Sides and SupportsNow for the hard part, making the angled sides. Angled sides are better to use then a box form because it uses less wood, less soil, takes up less space and makes i tlighter overall.
For the angles you are going to take a 2 x 4 and cut it in half, I was able to get each half 21 inches in length. Put a 45°angle on both ends with either a jigsaw 1.
miter saw. I only have a jigsaw so I had to cut the 45°angle manually, which made for rough cut but it worked.You're going to need to do this step two more times to come up with all the angled sides you wil l need for the raised planter bed.2.For the legs, I used a 2 x 4 and cut it partially down the middle to create the supports for the raised planter bed, you can see the results in picture 4.3.Now you're going to want drill a hole for the support legs and 2 x 4's to bolt everything together.4.Once all the support beams are in place, lay down the center board and screw it in place.5.Now that the center beam is down start working your way up of the sidewalls with additional boards leaving a lit tle bit of space between each board.6.
After step six is done we will move on to the end caps.
Image Notes1. Hard to see but they are cut at a 45°angle and are 21 inches in length.
Image Notes1. Two screws holding it in place.2. Left over wood from shortening the legs being used as a connecting blockbetween the two angled sides.
7/28/2019 Raised Planter Bed From Pallets
http://slidepdf.com/reader/full/raised-planter-bed-from-pallets 6/12
http://www.instructables.com/id/Raised-Planter-Bed-from-Pallets/
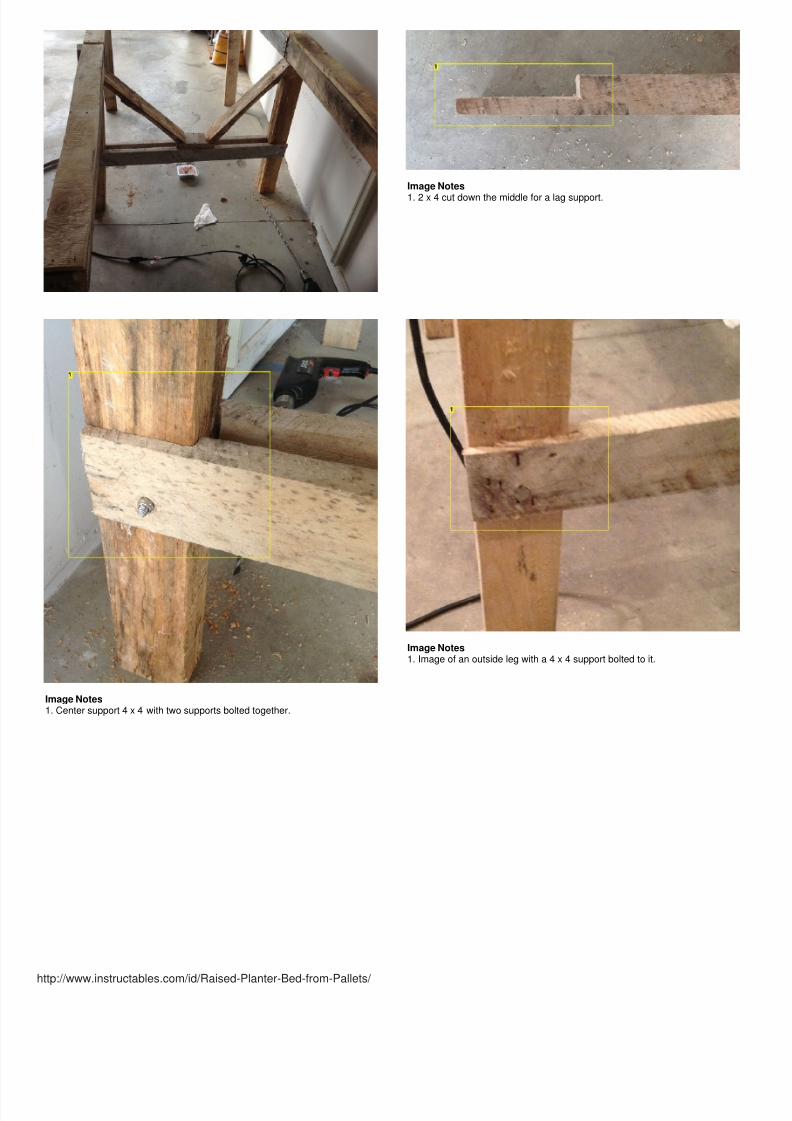
Image Notes
1. 2 x 4 cut down the middle for a lag support.
Image Notes1. Center support 4 x 4 with two supports bolted together.
Image Notes1. Image of an outside leg with a 4 x 4 support bolted to it.

7/28/2019 Raised Planter Bed From Pallets
http://slidepdf.com/reader/full/raised-planter-bed-from-pallets 7/12
http://www.instructables.com/id/Raised-Planter-Bed-from-Pallets/
Image Notes1. Support beam added underneath the connecting block and boards laid downstart the angled side walls and bottom.
Image Notes1. Starting to add the sidewalls, you will want to leave a little bit of betweeneach board.
Image Notes1. sidewalls installed next step will will be working on the end caps.
Image Notes1. About an inch of space between boards.
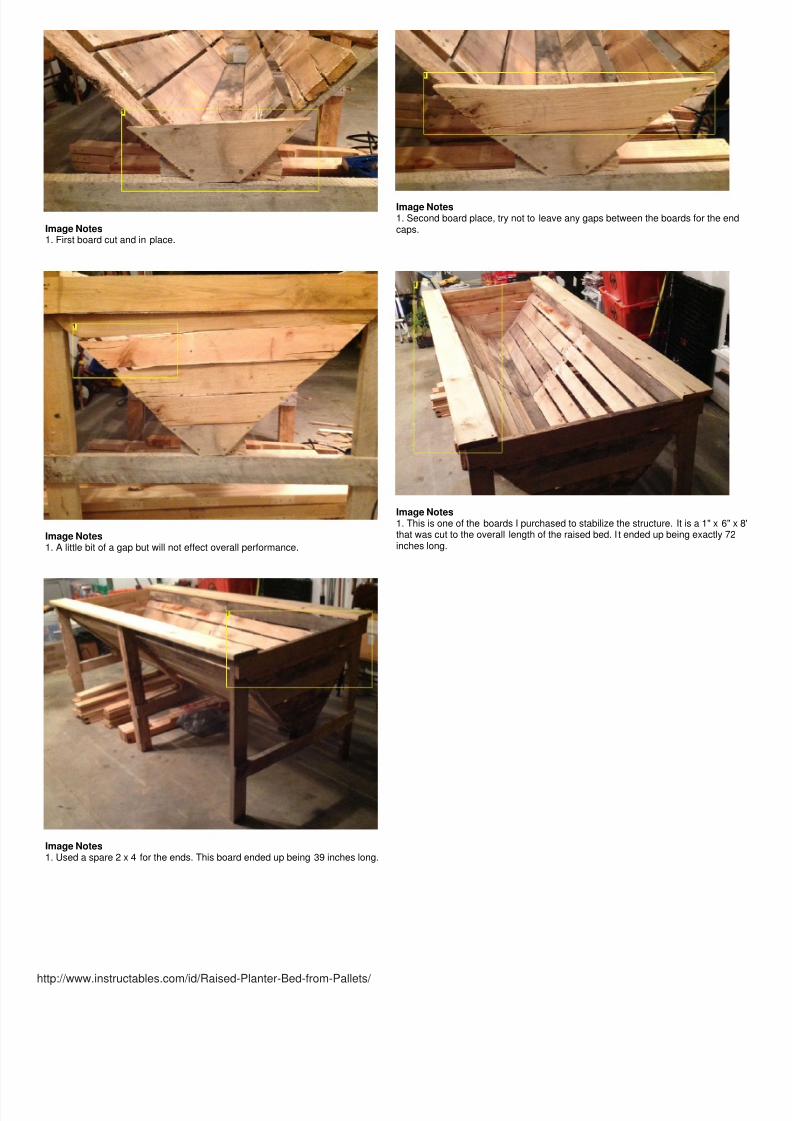
Step 5:End CapsFor the in caps it is a good idea to use the scrap pieces that were not good enough to be used for the angled sidewalls.The easiest way to make the in caps is to place the board directly against the and of the angled walls and use the roofers square to market a 45°angle and make a cuon that line. Just repeat the process until you get to the top of the angled walls.
7/28/2019 Raised Planter Bed From Pallets
http://slidepdf.com/reader/full/raised-planter-bed-from-pallets 8/12
http://www.instructables.com/id/Raised-Planter-Bed-from-Pallets/
Image Notes1. First board cut and in place.
Image Notes1. Second board place, try not to leave any gaps between the boards for the endcaps.
Image Notes1. A little bit of a gap but will not effect overall performance.
Image Notes1. This is one of the boards I purchased to stabilize the structure. It is a 1" x 6" x 8that was cut to the overall length of the raised bed. I t ended up being exactly 72inches long.
Image Notes1. Used a spare 2 x 4 for the ends. This board ended up being 39 inches long.
7/28/2019 Raised Planter Bed From Pallets
http://slidepdf.com/reader/full/raised-planter-bed-from-pallets 9/12
http://www.instructables.com/id/Raised-Planter-Bed-from-Pallets/
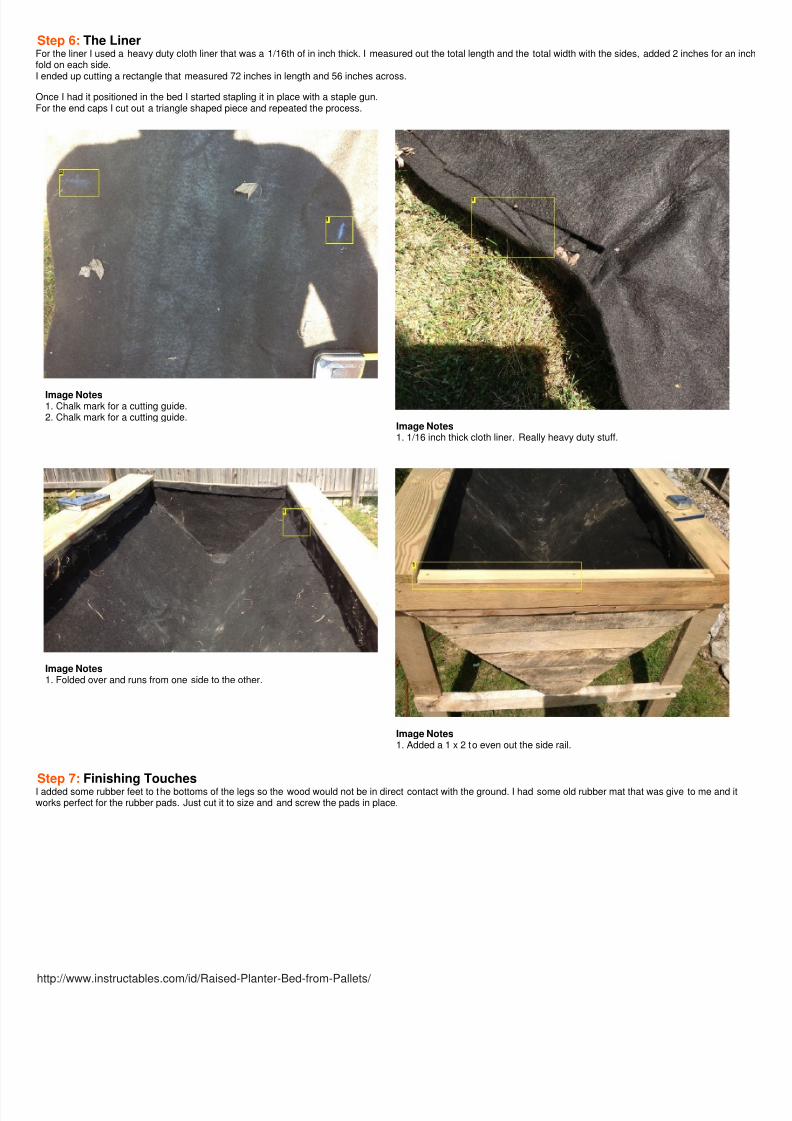
Step 6:The LinerFor the liner I used a heavy duty cloth liner that was a 1/16th of in inch thick. I measured out the total length and the total width with the sides, added 2 inches for an infold on each side.I ended up cutting a rectangle that measured 72 inches in length and 56 inches across.
Once I had it positioned in the bed I started stapling it in place with a staple gun.For the end caps I cut out a triangle shaped piece and repeated the process.
Image Notes1. Chalk mark for a cutting guide.2. Chalk mark for a cutting guide.
Image Notes1. 1/16 inch thick cloth liner. Really heavy duty stuff.
Image Notes1. Folded over and runs from one side to the other.
Image Notes1. Added a 1 x 2 to even out the side rail.
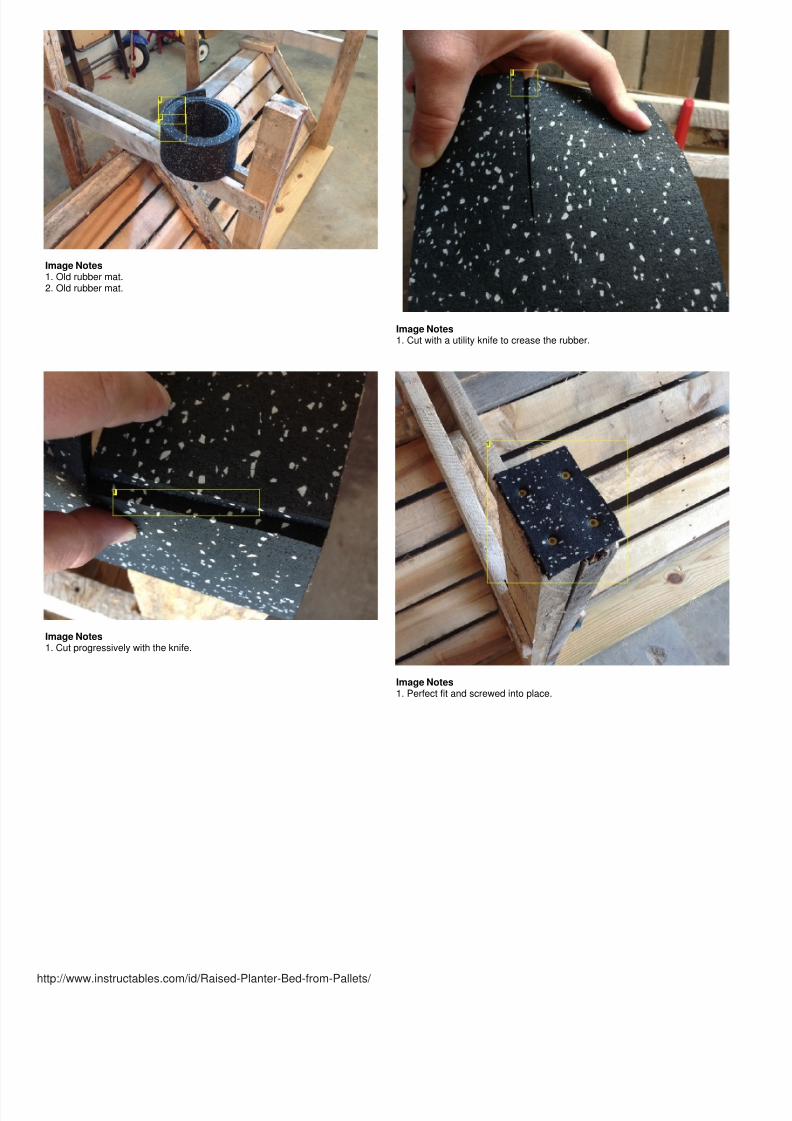
Step 7:Finishing TouchesI added some rubber feet to the bottoms of the legs so the wood would not be in direct contact with the ground. I had some old rubber mat that was give to me and itworks perfect for the rubber pads. Just cut it to size and and screw the pads in place.
7/28/2019 Raised Planter Bed From Pallets
http://slidepdf.com/reader/full/raised-planter-bed-from-pallets 10/12
http://www.instructables.com/id/Raised-Planter-Bed-from-Pallets/
Image Notes1. Old rubber mat.2. Old rubber mat.
Image Notes1. Cut with a utility knife to crease the rubber.
Image Notes1. Cut progressively with the knife.
Image Notes1. Perfect fit and screwed into place.
7/28/2019 Raised Planter Bed From Pallets
http://slidepdf.com/reader/full/raised-planter-bed-from-pallets 11/12
http://www.instructables.com/id/Raised-Planter-Bed-from-Pallets/
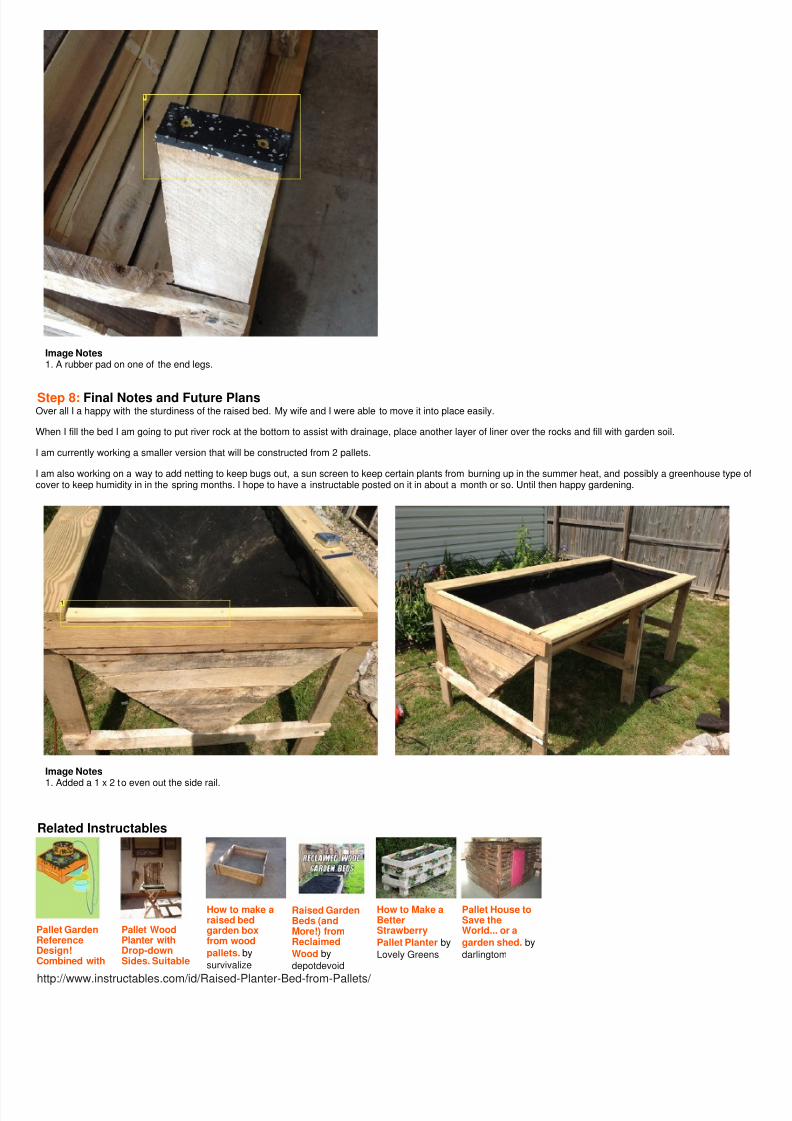
Image Notes1. A rubber pad on one of the end legs.
Step 8:Final Notes and Future PlansOver all I a happy with the sturdiness of the raised bed. My wife and I were able to move it into place easily.
When I fill the bed I am going to put river rock at the bottom to assist with drainage, place another layer of liner over the rocks and fill with garden soil.
I am currently working a smaller version that will be constructed from 2 pallets.
I am also working on a way to add netting to keep bugs out, a sun screen to keep certain plants from burning up in the summer heat, and possibly a greenhouse type cover to keep humidity in in the spring months. I hope to have a instructable posted on it in about a month or so. Until then happy gardening.
Image Notes
1. Added a 1 x 2 to even out the side rail.
Related Instructables
Pallet GardenReferenceDesign!Combined with
Pallet WoodPlanter withDrop-downSides. Suitable
How to make araised bedgarden boxfrom wood
pallets. by
survivalize
Raised GardenBeds (andMore!) fromReclaimed
Wood by
depotdevoid
How to Make aBetterStrawberry
Pallet Planter by
Lovely Greens
Pallet House toSave theWorld... or a
garden shed. by
darlingtom

7/28/2019 Raised Planter Bed From Pallets
http://slidepdf.com/reader/full/raised-planter-bed-from-pallets 12/12
htt // i t t bl /id/R i d Pl t B d f P ll t /
verticalgardening andwater recycling!
(video) by
gaiatechnician
fortransplantingplants, bushesand treeswithout rootdisturbance.Brico-Ecolo-RapidoJardiniere
(video) by
Organikmechanic
Advertisements