Embed Size (px)
Citation preview

Smart Machine Smart Decision
R700_User Guide_V1.05 2016-11-28 1
R700_User Guide_V1.05

Smart Machine Smart Decision
R700_User Guide_V1.05 2016-11-28 2
Document Title R700_User Guide
Version 1.05
Date 2016-11-28
Status Released
Document Control ID R700_User Guide_V1.05
General Notes
SIMCom offers this information as a service to its customers, to support application and
engineering efforts that use the products designed by SIMCom. The information provided is based
upon requirements specifically provided to SIMCom by the customers. SIMCom has not
undertaken any independent search for additional relevant information, including any information
that may be in the customer’s possession. Furthermore, system validation of this product designed
by SIMCom within a larger electronic system remains the responsibility of the customer or the
customer’s system integrator. All specifications supplied herein are subject to change.
Copyright
This document contains proprietary technical information which is the property of Shanghai
SIMCom Wireless Solutions Ltd, copying of this document and giving it to others and the using or
communication of the contents thereof, are forbidden without express authority. Offenders are
liable to the payment of damages. All rights reserved in the event of grant of a patent or the
registration of a utility model or design. All specification supplied herein are subject to change
without notice at any time.
Copyright © Shanghai SIMCom Wireless Solutions Ltd. 2016

Smart Machine Smart Decision
R700_User Guide_V1.05 2016-11-28 3
Contents
1 Installation ......................................................................................................... 5 1.1 Overview ................................................................................................................... 5
1.2 Package list ............................................................................................................... 5
1.3 Dimension and installation hole ................................................................................ 6
1.4 Adapter and Antenna ................................................................................................. 6
1.5 Indication LED .......................................................................................................... 7
2 Configuration ..................................................................................................... 8 2.1 Setup ......................................................................................................................... 8
2.2 Configuration ............................................................................................................ 9
2.2.1 IP address setting............................................................................................... 9
2.2.2 Configuration page ............................................................................................ 9
2.3 Management and Configuration ................................................................................ 9
2.3.1 Operation Mode ................................................................................................ 9
2.3.2 Internet settings ............................................................................................... 11
2.3.3 Wireless settings.............................................................................................. 27
2.3.4 Firewall ........................................................................................................... 36
2.3.5 SMS Setting .................................................................................................... 47
2.3.6 Administration................................................................................................. 51

Smart Machine Smart Decision
R700_User Guide_V1.05 2016-11-28 4
Version History
Date Version What is new Author
2015-01-16 1.00 Original version Wenjie.lai
2015-4-17 1.01
Replace new graphic interface Wenjie.lai
Modify the LED indication Dingfen.zhu
2015-8-17 1.02 Replace new graphic interface Wenjie.lai
2015-11-27 1.03 Replace new graphic interface Wenjie.lai
2016-02-01 1.04 Replace new graphic interface Wenjie.lai
2016-11-28 1.05 Chapter Upload Firmware Wenjie.lai
Scope
This document describes how to connect the router and set relative parameters. After configure
successfully, you can connect the internet through the router.

Smart Machine Smart Decision
R700_User Guide_V1.05 2016-11-28 5
1 Installation
1.1 Overview
R700 should be installed correctly to get good performance. Generally, the installation should be
guided with the help of our engineer.
Figure 1-1 Router overview
Note:
Don’t install Router device with power on.
1.2 Package list
Recommend you reserve the package box, in order to re-use when transfer. The box is
environment protected material.
※ R700, 1 unit
※ 4G antenna, 2 units
※ WIFI antenna, 1 unit
※ 6V/2A adapter, 1 unit

Smart Machine Smart Decision
R700_User Guide_V1.05 2016-11-28 6
1.3 Dimension and installation hole
Figure 1-2 Router dimension
1.4 Adapter and Antenna
Adapter in box is 6V/2A. But customer could choose different one according to the wide range of
R700 router, the input range is from DC5V to DC24V, 2A peak.
R700 router requires 2 units of 4G antenna, standard female SMA connector, 50 ohm impedance;
WIFI 2.4G antenna, standard male SMA connector, 50 ohm impedance.
Figure 1-3 Router adapters

Smart Machine Smart Decision
R700_User Guide_V1.05 2016-11-28 7
1.5 Indication LED
Please refer to following description for status of LED.
LED Status Description
Power On Normal
Off Power off or problem
System Every 200 milliseconds on Normal
Off Problem
NET
Always on Registered
Every 1 second on PPP connected without data transmission
Every 200 milliseconds on PPP connected with data transmission
Off Un-registration
LAN
Always on Device available
Every 500 milliseconds on Data is on transmission
Off Device is not available
WAN
Always on WAN port normal
Every 500 milliseconds on Data transmission
Off WAN port disconnection
WIFI
Always on WIFI on
Every 100 milliseconds on WIFI on With data transmission
Off WIFI off

Smart Machine Smart Decision
R700_User Guide_V1.05 2016-11-28 8
2 Configuration
2.1 Setup
Insert the SIM card into the SIM card slot beneath the R700. Press carefully until it ‘clicks’ into
place.
Figure 2-1 Insert the SIM card
Plug the power adapter into the AC mains and plug the DC cable firmly into the 5V DC input of
the R700. Power light is working. It will start to work automatically.
Before configuration, R700 should be connected to PC via Ethernet cable or Wi-Fi network.
1) With Ethernet cable. One end of cable insert to one of “Local Network” ports (named
“LAN” port), another end connects to PC Ethernet port.
2) With Wi-Fi network. SSID of R700 is “SIMCOM” default without password.
Figure 2-2 Router connect PC

Smart Machine Smart Decision
R700_User Guide_V1.05 2016-11-28 9
2.2 Configuration
2.2.1 IP address setting
Figure 2-3 IP address setting
2.2.2 Configuration page
PC could access the configuration pages after connect to R700 router via IE explorer or other
browser tools.
There have 11 pages for setting, antenna, service, VPN, security, access limit, NAT, QoS,
application, management and Status pages. You can get detail for each page.
Default user name is admin and the default password is admin.
2.3 Management and Configuration
2.3.1 Operation Mode
There have two modes such as bridge and gateway to configure the work mode of wireless router.

Smart Machine Smart Decision
R700_User Guide_V1.05 2016-11-28 10
The default value is gateway mode.
Figure 2-4 Gateway Mode setting
But, you also can set the operation mode to bridge.
Figure 2-5 Bridge Mode setting
Smart Machine Smart Decision
R700_User Guide_V1.05 2016-11-28 11
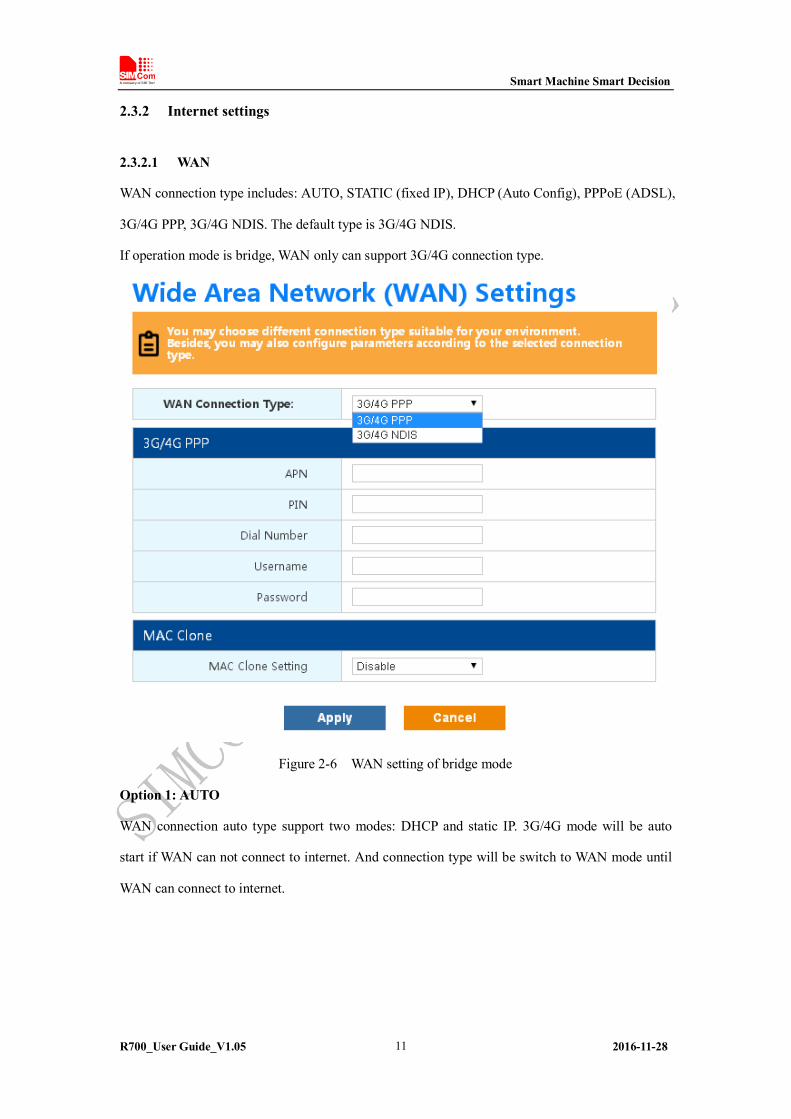
2.3.2 Internet settings
2.3.2.1 WAN
WAN connection type includes: AUTO, STATIC (fixed IP), DHCP (Auto Config), PPPoE (ADSL),
3G/4G PPP, 3G/4G NDIS. The default type is 3G/4G NDIS.
If operation mode is bridge, WAN only can support 3G/4G connection type.
Figure 2-6 WAN setting of bridge mode
Option 1: AUTO
WAN connection auto type support two modes: DHCP and static IP. 3G/4G mode will be auto
start if WAN can not connect to internet. And connection type will be switch to WAN mode until
WAN can connect to internet.

Smart Machine Smart Decision
R700_User Guide_V1.05 2016-11-28 12
Figure 2-7 WAN AUTO setting
Option 2: STATIC
Normally fiber-optic network will use this option. Service provider will provide IP address, subnet
mask, gateway and DNS info. These parameters should be configured same on R700.

Smart Machine Smart Decision
R700_User Guide_V1.05 2016-11-28 13
Figure 2-8 WAN static setting
IP Address:User owner IP address.
Subnet Mask:User owner subnet mask.
Default Gateway:User owner gateway.
Option 3: DHCP
DHCP type is mainly used to assign dynamic IP addresses for the network client. These address
collection are reserved in advance by DHCP server and generally continuous.
Connect Ethernet cable to WAN port, configure as following.

Smart Machine Smart Decision
R700_User Guide_V1.05 2016-11-28 14
Figure 2-9 WAN DHCP setting
Router uses this dynamic IP as WAN connection type.
Option 4: PPPoE
Usually ADSL service from China telecom and China Netcom will use this option. PPPoE
connection requires username, password, provider name from ISP for router configuration.

Smart Machine Smart Decision
R700_User Guide_V1.05 2016-11-28 15
Figure 2-10 WAN PPPoE setting
User Name: User name for log in internet
Password: User password for log in internet
Option 7: 3G/4G PPP
Using SIM7100/SIM5360 module inside, Router could do PPP protocol with APN and dial
number (like *99#).

Smart Machine Smart Decision
R700_User Guide_V1.05 2016-11-28 16
Figure 2-11 WAN 3G/4G PPP setting
Option 8: 3G/4G NDIS
NDIS is network driver interface specification.

Smart Machine Smart Decision
R700_User Guide_V1.05 2016-11-28 17
Figure 2-12 WAN 3G/4G NDIS setting
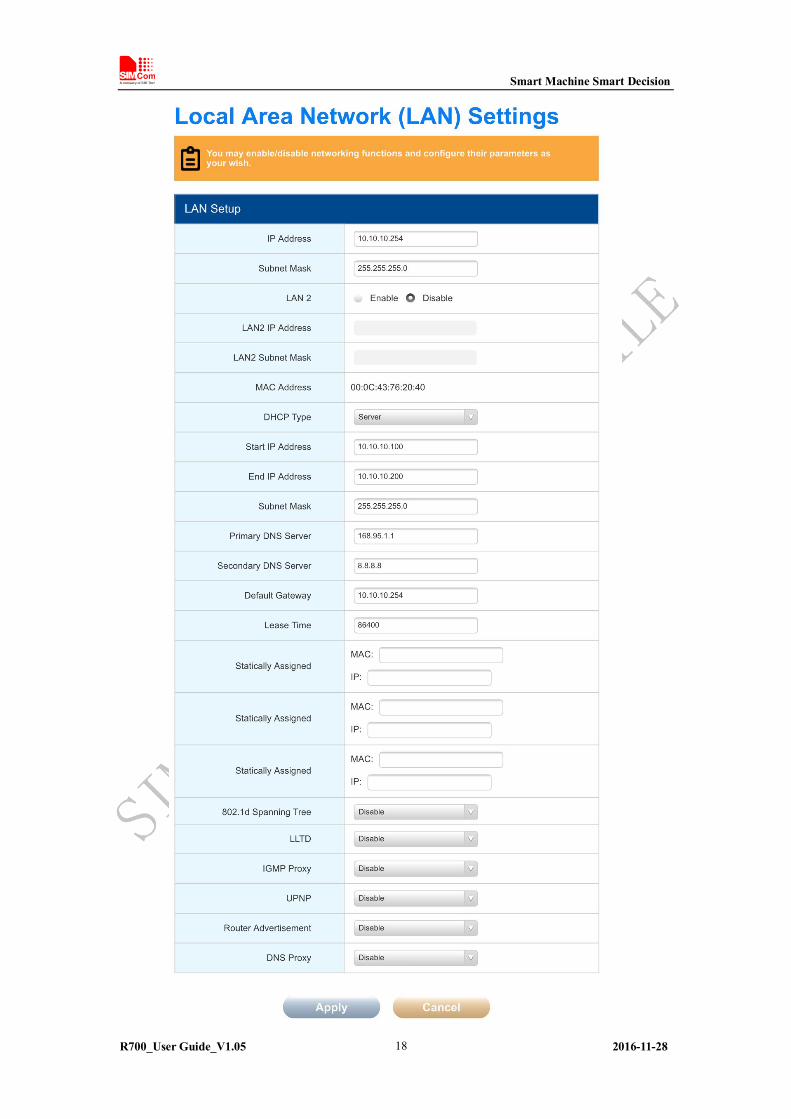
2.3.2.2 LAN
IP address, subnet, etc could be configured as following.
Smart Machine Smart Decision
R700_User Guide_V1.05 2016-11-28 18

Smart Machine Smart Decision
R700_User Guide_V1.05 2016-11-28 19
Figure 2-13 LAN setting
Local IP: the IP address in local.
Subnet mask: local subnet mask.
Gateway: router internal gateway.
2.3.2.3 DHCP clients
All clients connected are list here, including Wi-Fi network and LAN cable. Router could be a
DHCP server which could assign different IP address for each station. If DHCP server option
enabled, then all station could be configured with IP and DNS auto mode, ensure there has no
other DHCP server in the network.
Figure 2-14 DHCP clients
2.3.2.4 VPN
A virtual private network (VPN) extends a private network across a public network, such as the
Internet. It enables a computer or Wi-Fi-enabled device to send and receive data across shared or
public networks as if it were directly connected to the private network, while benefiting from the
functionality, security and management policies of the private network. A VPN is created by
establishing a virtual point-to-point connection through the use of dedicated connections, virtual
tunneling protocols, or traffic encryptions.
A VPN connection across the Internet is similar to a wide area network (WAN) link between
websites. From a user perspective, the extended network resources are accessed in the same way

Smart Machine Smart Decision
R700_User Guide_V1.05 2016-11-28 20
as resources available within the private network.
VPN supports IPsec, PPTP and L2TP passthrough.
Figure 2-15 VPN passthrough

Smart Machine Smart Decision
R700_User Guide_V1.05 2016-11-28 21
Figure 2-16 L2TP VPN settings

Smart Machine Smart Decision
R700_User Guide_V1.05 2016-11-28 22
Figure 2-17 PPTP VPN settings
2.3.2.5 Advanced Routing
Only static mode is available. In order to set static router between router device and other network,
please configure host as following.

Smart Machine Smart Decision
R700_User Guide_V1.05 2016-11-28 23
Figure 2-18 Advanced routing
2.3.2.6 IPv6

Smart Machine Smart Decision
R700_User Guide_V1.05 2016-11-28 24
Figure 2-19 IPv6 disable
Figure 2-20 IPv6 enable
2.3.2.7 DTU
The DTU functionality allows R700 to connect to a TCP server. The data can be received and

Smart Machine Smart Decision
R700_User Guide_V1.05 2016-11-28 25
transmitted via the serial console port.
To launch the DTU service, the parameters of the serial console and the TCP server must be set.
The parameters to be set include the baud rate, the parity, the data bits and the stop bits of the
serial console, the IP address and the port number of the TCP server.

Smart Machine Smart Decision
R700_User Guide_V1.05 2016-11-28 26

Smart Machine Smart Decision
R700_User Guide_V1.05 2016-11-28 27
Figure 2-21 DTU
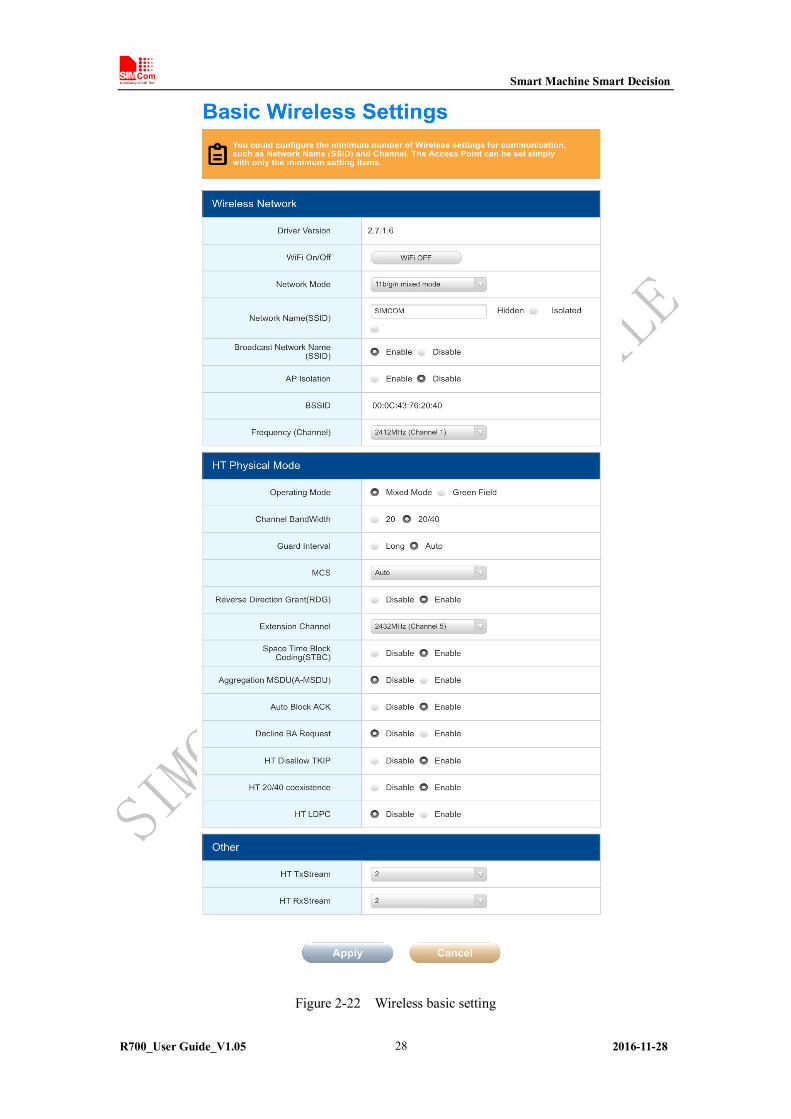
2.3.3 Wireless settings
2.3.3.1 Basic
Wi-Fi general setting items could be configured here as following.
Mixed-mode: supports 802.11b, 802.11g and 802.11n standards.
BG-mode: support s 802.11b and 802.11g standards.
B-mode only: supports 802.11b standard only.
G-mode only: supports 802.11g standard only.
NG-mode: supports 802.11g and 802.11n standards.
N-mode only: supports 802.11n standard.
SSID: the WIFI device name for users. This is unique name which consists of number and letter,
case sensitive, the length is less than 32 characters.
Channel: ID from 1 to 14. In multiple wireless networks, recommend different channel.
Smart Machine Smart Decision
R700_User Guide_V1.05 2016-11-28 28
Figure 2-22 Wireless basic setting

Smart Machine Smart Decision
R700_User Guide_V1.05 2016-11-28 29
2.3.3.2 Advanced

Smart Machine Smart Decision
R700_User Guide_V1.05 2016-11-28 30

Smart Machine Smart Decision
R700_User Guide_V1.05 2016-11-28 31
Figure 2-23 Wireless advanced setting
2.3.3.3 Security
There have openwep, wpa, wpa-psk, wpa2, etc encryption way.
Figure 2-24 Disable wireless security setting
Default security mode is disable, but you can choose the security mode as the encryption mode for further safety.

Smart Machine Smart Decision
R700_User Guide_V1.05 2016-11-28 32
Figure 2-25 Enable wireless security setting
SSID: Set Identification Service, a wireless network in which there is a unique name for the device to share. All devices in the wireless network must be consistent with the SSID.
2.3.3.4 WPS

Smart Machine Smart Decision
R700_User Guide_V1.05 2016-11-28 33
Figure 2-26 WPS disable

Smart Machine Smart Decision
R700_User Guide_V1.05 2016-11-28 34

Smart Machine Smart Decision
R700_User Guide_V1.05 2016-11-28 35
Figure 2-27 WPS enable
2.3.3.5 Station list
You can see current clients in the list.
Figure 2-28 Station list
2.3.3.6 Statistics
AP Wireless Statistics includes transmit statistics, receive statistics and SNR information.

Smart Machine Smart Decision
R700_User Guide_V1.05 2016-11-28 36
Figure 2-29 Wireless statistics
2.3.4 Firewall
2.3.4.1 MAC/IP/Port Filtering
You may setup firmware rules to protect your network from virus, worm and malicious activity on
the internet.
By default, all IP packets from LAN are allowed to pass, and all IP packets from WAN are
forbidden to pass, but some IP packets are also set to filter out or allow the pass.
On this page, you can disable or enable MAC, IP or port filtering.

Smart Machine Smart Decision
R700_User Guide_V1.05 2016-11-28 37
You can add the MAC address of the local area network device to which you need to filter the
specified local area network.
You can choose whether to enable IP address filtering and setting the filter mode.
Note: IP address filtering is enabled when there is a network connection.
Related parameters as below:
Protocol: Protocol need to filter
Source MAC address: Source MAC address of internet package
Dest IP address: Destination IP address range of internet package
Source IP address: Source IP address range of internet package
Dest port range: Destination port range of internet package
Source port range: Source port range of internet package

Smart Machine Smart Decision
R700_User Guide_V1.05 2016-11-28 38

Smart Machine Smart Decision
R700_User Guide_V1.05 2016-11-28 39
Figure 2-30 MAC/IP/Port Filtering
2.3.4.2 System Security
You may configure the system firewall to protect router from attacking.
Figure 2-31 System Security
Remote management (via WAN): Deny or Allow
Host IP: Remote host IP

Smart Machine Smart Decision
R700_User Guide_V1.05 2016-11-28 40
Port: Port opened by router, it must be not used.
For example, the router WAN IP can been got from status page when connected type is 3G/4G
PPP.

Smart Machine Smart Decision
R700_User Guide_V1.05 2016-11-28 41

Smart Machine Smart Decision
R700_User Guide_V1.05 2016-11-28 42
Then start your web browser and type in the default address http://10.86.107.146:1100 in the
address field of the browser.
2.3.4.3 Content Filtering
Content filtering can configure to filter plug-in unit and http head with specified URL or keyword.

Smart Machine Smart Decision
R700_User Guide_V1.05 2016-11-28 43

Smart Machine Smart Decision
R700_User Guide_V1.05 2016-11-28 44
Figure 2-32 Content Filter
2.3.4.4 Port Forwarding
Port transfer is for public service on network, such as web server, ftp server or other internet
application.

Smart Machine Smart Decision
R700_User Guide_V1.05 2016-11-28 45

Smart Machine Smart Decision
R700_User Guide_V1.05 2016-11-28 46
Figure 2-33 Port forwarding
2.3.4.5 Port Trigger
When a application specify a certain port (trigger port) to setup connection, router will transfer
external connection to internal specified port (transfer port), the range is from 5000 to 6000.
Figure 2-34 Port trigger
2.3.4.6 DMZ
A DMZ or demilitarized zone (sometimes referred to as a perimeter network) is a physical or
logical sub-network that contains and exposes an organization's external-facing services to a larger

Smart Machine Smart Decision
R700_User Guide_V1.05 2016-11-28 47
and entrusted network, usually the Internet. The purpose of a DMZ is to add an additional layer of
security to an organization's local area network (LAN); an external attacker only has direct access
to equipment in the DMZ, rather than any other part of the network. The name is derived from the
term "demilitarized zone", an area between nation states in which military operation is not
permitted.
Figure 2-35 DMZ
2.3.5 SMS Setting
2.3.5.1 SMS Inbox
You can check all the short messages received by the SIM card.

Smart Machine Smart Decision
R700_User Guide_V1.05 2016-11-28 48
Figure 2-36 SMS Inbox
2.3.5.2 Send Message
You can send short messages by the SIM card.
Figure 2-37 Send Message

Smart Machine Smart Decision
R700_User Guide_V1.05 2016-11-28 49
2.3.5.3 Advanced
You can set SMS auto report and control command parameters.
Figure 2-38 Advanced Setting disable

Smart Machine Smart Decision
R700_User Guide_V1.05 2016-11-28 50

Smart Machine Smart Decision
R700_User Guide_V1.05 2016-11-28 51
Figure 2-39 Advanced Setting enable
2.3.6 Administration
2.3.6.1 Management
Web page language, log username and password, network time could be configured here.

Smart Machine Smart Decision
R700_User Guide_V1.05 2016-11-28 52

Smart Machine Smart Decision
R700_User Guide_V1.05 2016-11-28 53
Figure 2-40 Administration management
2.3.6.2 Upload Firmware
Figure 2-41 Upload firmware
Upgrade Way: there have two upgrade modes such as Local Upgrade and Remote Upgrade.
Local Upgrade and Remote Upgrade
Update Firmware: Update root_uImage of platform.
Update Bootloader: Update uboot.bin of platform.
Upload File: Upload file to router. The max file length must less than half of the router’s free
space.
The root_uImage and uboot.bin files can be got from release version for customer.

Smart Machine Smart Decision
R700_User Guide_V1.05 2016-11-28 54
Figure 2-42 Remote manual upload firmware
Remote config URL: URL format must be http://xxxxx. #IP# indicate extern IP, #MC# indicate MAC address of localhost WIFI, #SN# indicates SN of device. For example, http://upgrade.com/config?ip=#ip#&mac=#MC#&sn=#SN#. Report Email Address: This item is selectable. It will send notification if there has any update information or update processing.
If update mode is manual, Query Latest Version will query latest version from configured remote
URL. So Remote Config URL must be set correctly.
If Latest version has got successfully and selected, Upgrade will upgrade firmware.

Smart Machine Smart Decision
R700_User Guide_V1.05 2016-11-28 55
Figure 2-43 Remote automatic upload firmware
Checking cycle: Every Sunday, Every Monday, Every Tuesday, Every Wednesday, Every Thursday, Every Friday, Every Saturday, Every Day. Default value is Every Day. Checking Time(0-23): When start to check update. Default value is 0.
2.3.6.3 Settings management
Export: Output current platform settings as .bat file to PC. Parameters will be SSID, users,
password, connection type, etc.
Import: Import a bat file to configure platform parameter’s value.
Reload factory setting: Make all settings return factory default values.

Smart Machine Smart Decision
R700_User Guide_V1.05 2016-11-28 56
Figure 2-44 Setting management
2.3.6.4 Status
Platform status includes system info, Internet configuration and LAN info, etc.

Smart Machine Smart Decision
R700_User Guide_V1.05 2016-11-28 57
Figure 2-45 Administration status

Smart Machine Smart Decision
R700_User Guide_V1.05 2016-11-28 58
2.3.6.5 Statistics
Figure 2-46 Administration statistic

Smart Machine Smart Decision
R700_User Guide_V1.05 2016-11-28 59
2.3.6.6 System command
This is used to operate system file.
2.3.6.7 System log
In this page, system log will be shown for you.
2.3.6.8 Version History
Check current version of Router.

Smart Machine Smart Decision
R700_User Guide_V1.05 2016-11-28 60
Contact us:
Shanghai SIMCom Wireless Solutions Co.,Ltd.
Address: Building A, SIM Technology Building, No. 633, Jinzhong Road, Shanghai,
P. R. China 200335
Tel: +86 21 3252 3300
Fax: +86 21 3252 3020
URL: www.simcomm2m.com