Embed Size (px)
Citation preview

Quilted Boxy Pouch Pattern
By Lindsay Conner, www.lindsaysews.com
Have you ever sewn a quilted zipper pouch? They are not as tricky as you might think! This quilted pouch tutorial will teach you how to make a very basic, unlined zipper bag with boxed corners. If you prefer, you can leave the corners flat for a totally different look.
Materials: - Main fabric: 15 1/2" x 15" - Lining fabric: 15 1/2" x 15" - Batting: 15 1/2" x 15" - 14" all-purpose zipper

Instructions:
1. Layer the batting between the main fabric and lining fabric to make a quilt sandwich. Baste as desired (spray basting is quick and easy). Quilt the layers together in any design you'd like. I chose a whimsical clamshell free-motion quilting pattern. Trim the quilted panel to 14 1/2" x 14". Since there won't be a separate lining, you can choose to serge or zig zag stitch the edges for a cleaner, finished look inside.
2. Place the zipper right side down on one 14 1/2" side of the main fabric (floral). The lining fabric (pink) will be face down.

3. Stitch the zipper to the quilted fabric panel along the left side. (Example is shown with white contrasting thread, but you'll want to use a matching thread.) Fold the fabric in half so the unstitched edge of the zipper is face down on the right edge of the main fabric. Stitch the zipper in place along the right edge to make the fabric panel into a tube.
4. This is what the tube will look like after you've sewn the zipper.
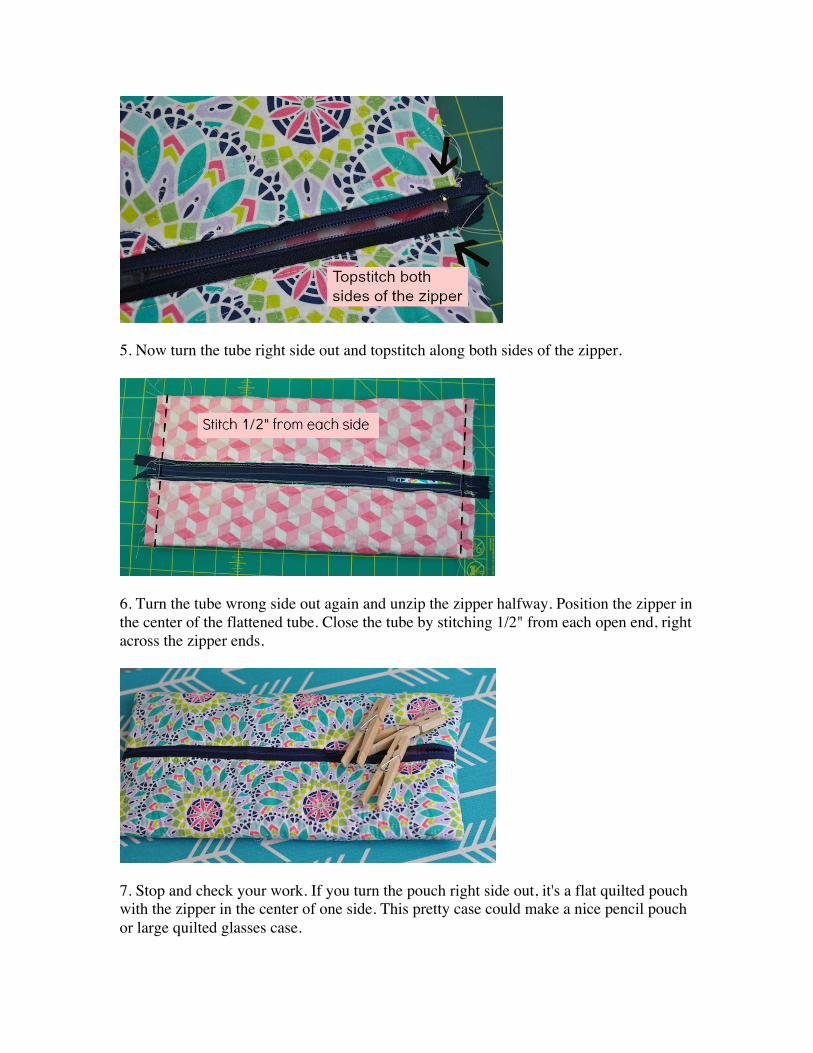
5. Now turn the tube right side out and topstitch along both sides of the zipper.
6. Turn the tube wrong side out again and unzip the zipper halfway. Position the zipper in the center of the flattened tube. Close the tube by stitching 1/2" from each open end, right across the zipper ends.
7. Stop and check your work. If you turn the pouch right side out, it's a flat quilted pouch with the zipper in the center of one side. This pretty case could make a nice pencil pouch or large quilted glasses case.

8. To make the boxed corners, once again turn the pouch wrong side out. Flatten and pinch each corner as shown, with the seam pressed open. Use a sewing pin to hold each corner in place.
9. Imagine or draw a line 2 1/2" long across this corner where your pin is. This is the line you will stitch across each corner.

10. Trim off the corners with pinking shears, or use regular scissors and finish with a zig zag stitch. Also, trim off any excess zipper ends inside the pouch.
11. Turn the quilted pouch right side out and it's finished! You can alter the dimensions to make different sizes of boxy quilted pouches. Just make sure that one side of the quilted fabric panel is 1/2" longer than your zipper.
This quilted pouch is the perfect size to stash rotary cutters, scissors or other sewing notions. It could also be used a makeup bag or for a variety of other creative uses!
!