Embed Size (px)
Citation preview
QuickStart for Elsevier Online Testing
This document assumes that you have been given instructor access to a class in the Elsevier Online Testing (EOT) environment. You can begin by logging into EOT and accessing your Class Homepage. From there you can try a number of things:
• Take an Assignment
• View a Gradebook Report
• Create an Assignment
• Add New Questions (Optional)
Take an Assignment
With your instructor account you can take an assignment just like a student would.
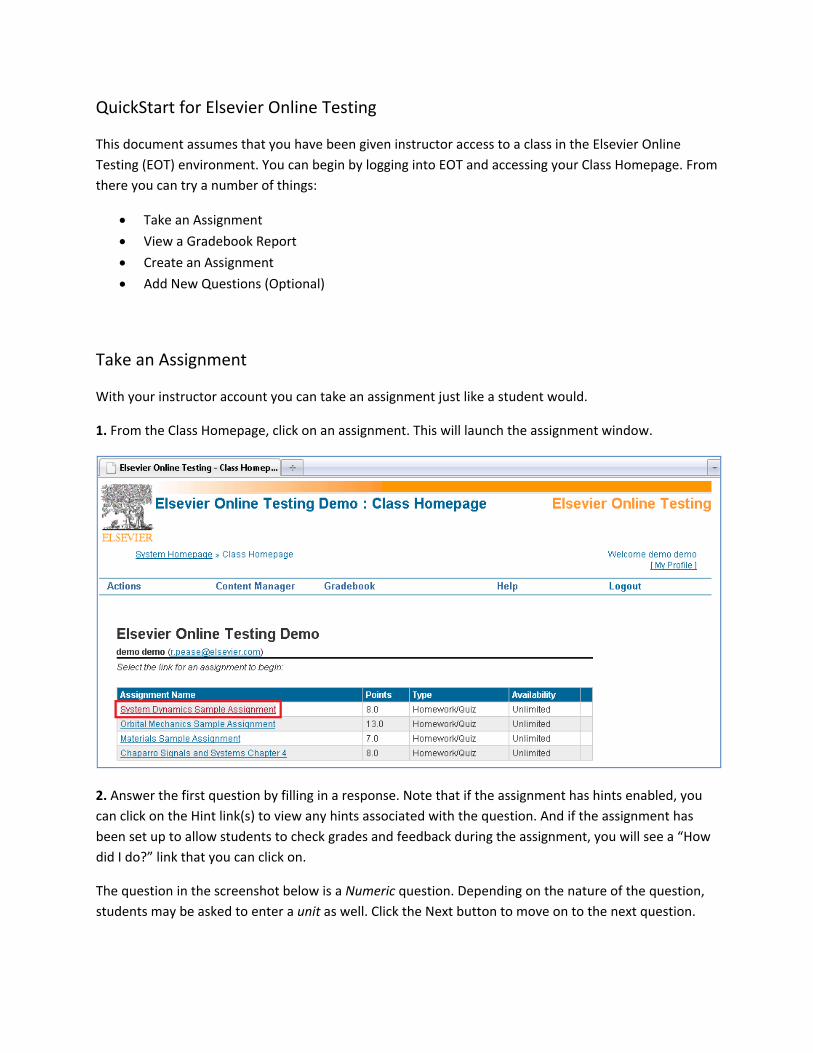
1. From the Class Homepage, click on an assignment. This will launch the assignment window.
2. Answer the first question by filling in a response. Note that if the assignment has hints enabled, you can click on the Hint link(s) to view any hints associated with the question. And if the assignment has been set up to allow students to check grades and feedback during the assignment, you will see a “How did I do?” link that you can click on.
The question in the screenshot below is a Numeric question. Depending on the nature of the question, students may be asked to enter a unit as well. Click the Next button to move on to the next question.
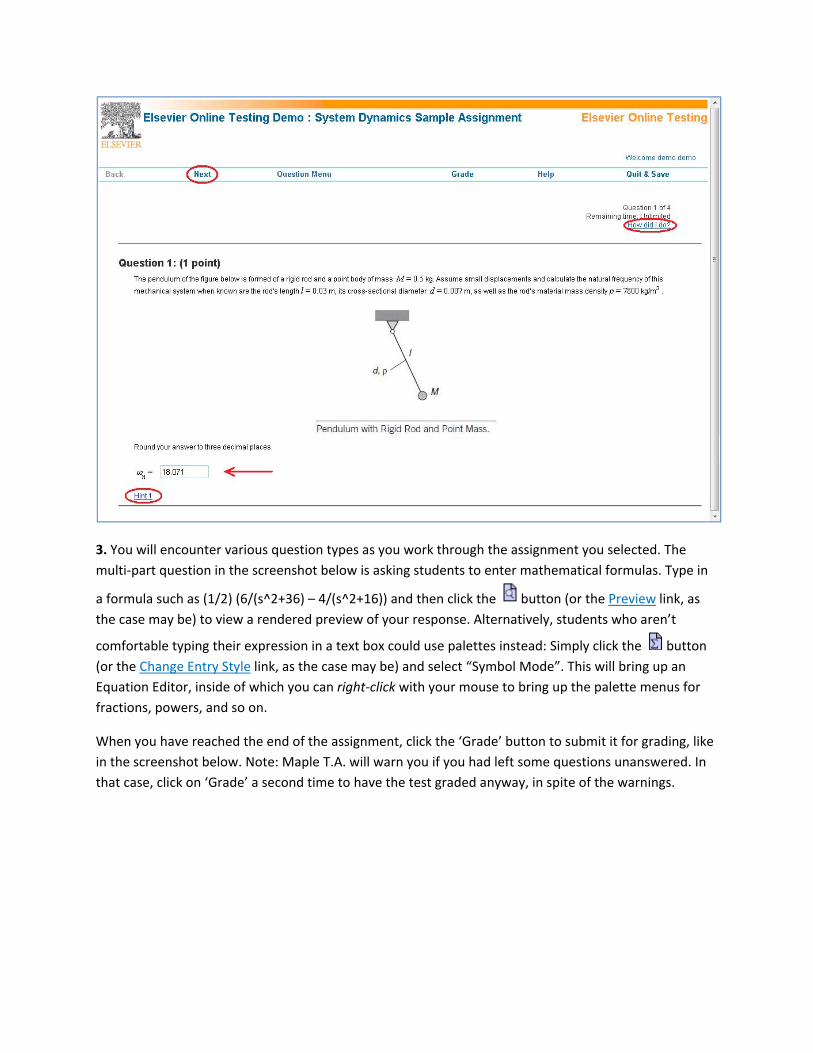
3. You will encounter various question types as you work through the assignment you selected. The multi‐part question in the screenshot below is asking students to enter mathematical formulas. Type in
a formula such as (1/2) (6/(s^2+36) – 4/(s^2+16)) and then click the button (or the Preview link, as the case may be) to view a rendered preview of your response. Alternatively, students who aren’t
comfortable typing their expression in a text box could use palettes instead: Simply click the button (or the Change Entry Style link, as the case may be) and select “Symbol Mode”. This will bring up an Equation Editor, inside of which you can right‐click with your mouse to bring up the palette menus for fractions, powers, and so on.
When you have reached the end of the assignment, click the ‘Grade’ button to submit it for grading, like in the screenshot below. Note: Maple T.A. will warn you if you had left some questions unanswered. In that case, click on ‘Grade’ a second time to have the test graded anyway, in spite of the warnings.
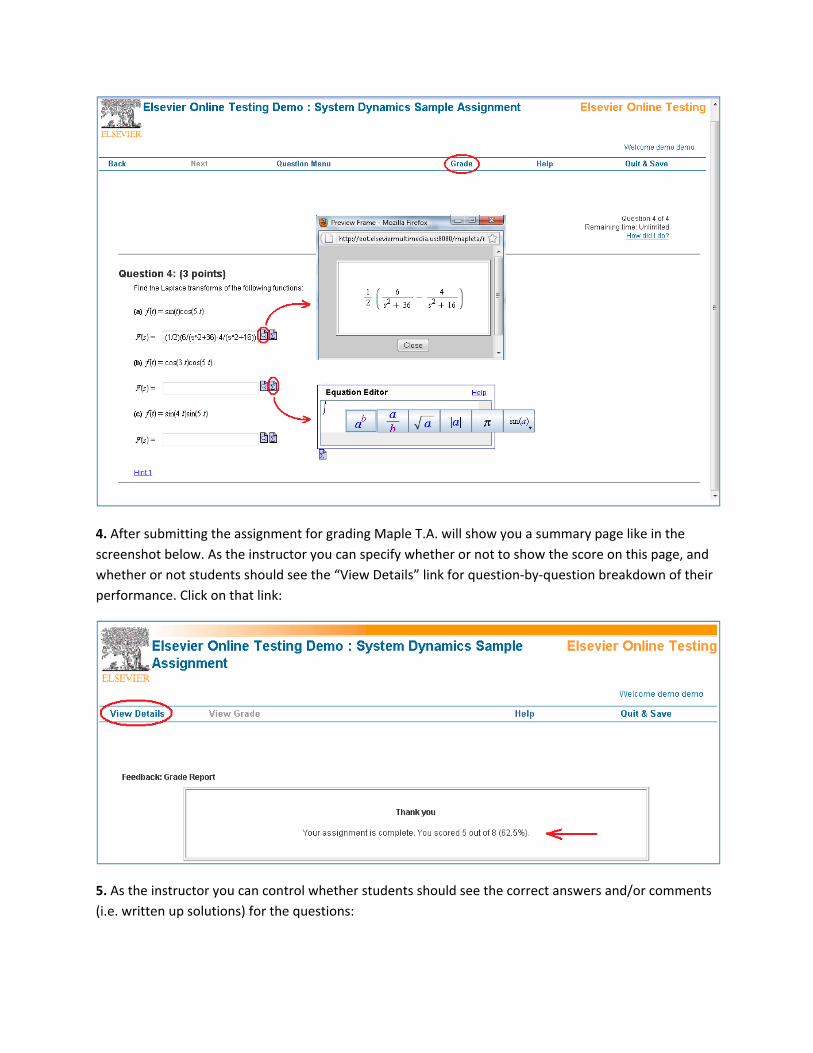
4. After submitting the assignment for grading Maple T.A. will show you a summary page like in the screenshot below. As the instructor you can specify whether or not to show the score on this page, and whether or not students should see the “View Details” link for question‐by‐question breakdown of their performance. Click on that link:
5. As the instructor you can control whether students should see the correct answers and/or comments (i.e. written up solutions) for the questions:
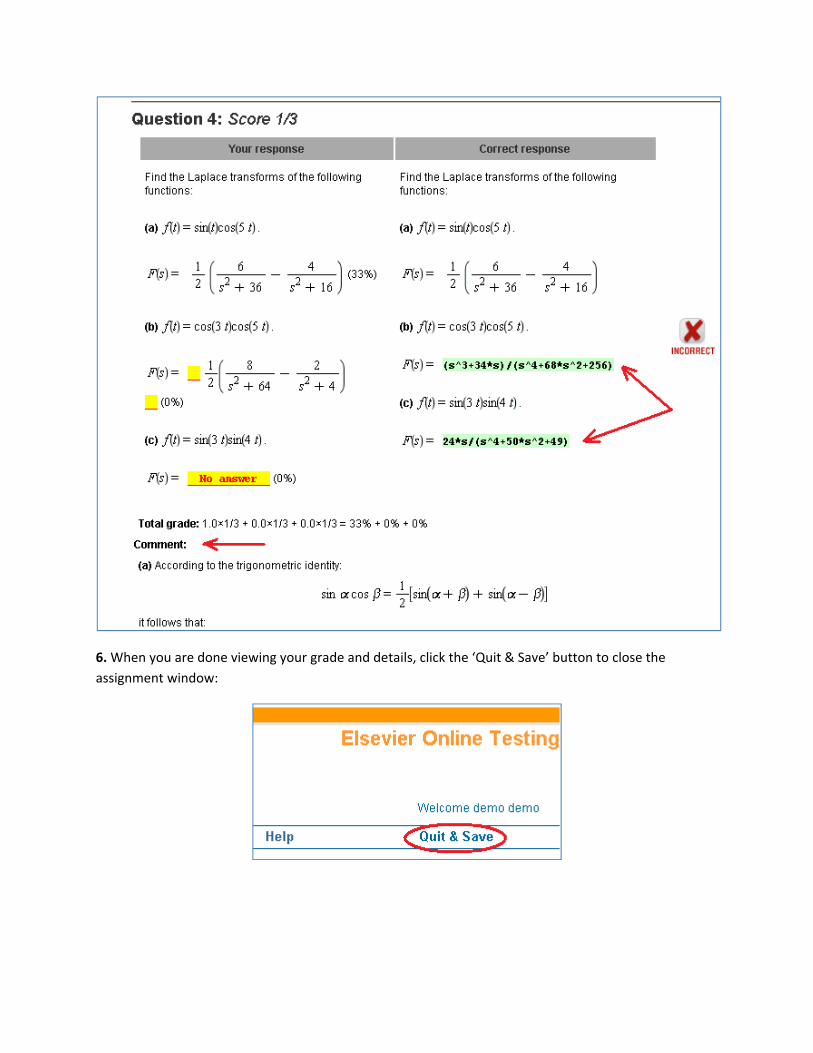
6. When you are done viewing your grade and details, click the ‘Quit & Save’ button to close the assignment window:
View a Gradebook Report
With the exception of “Practice” and “Study Session” assignment types, students’ scores on assignments are recorded in the class gradebook.
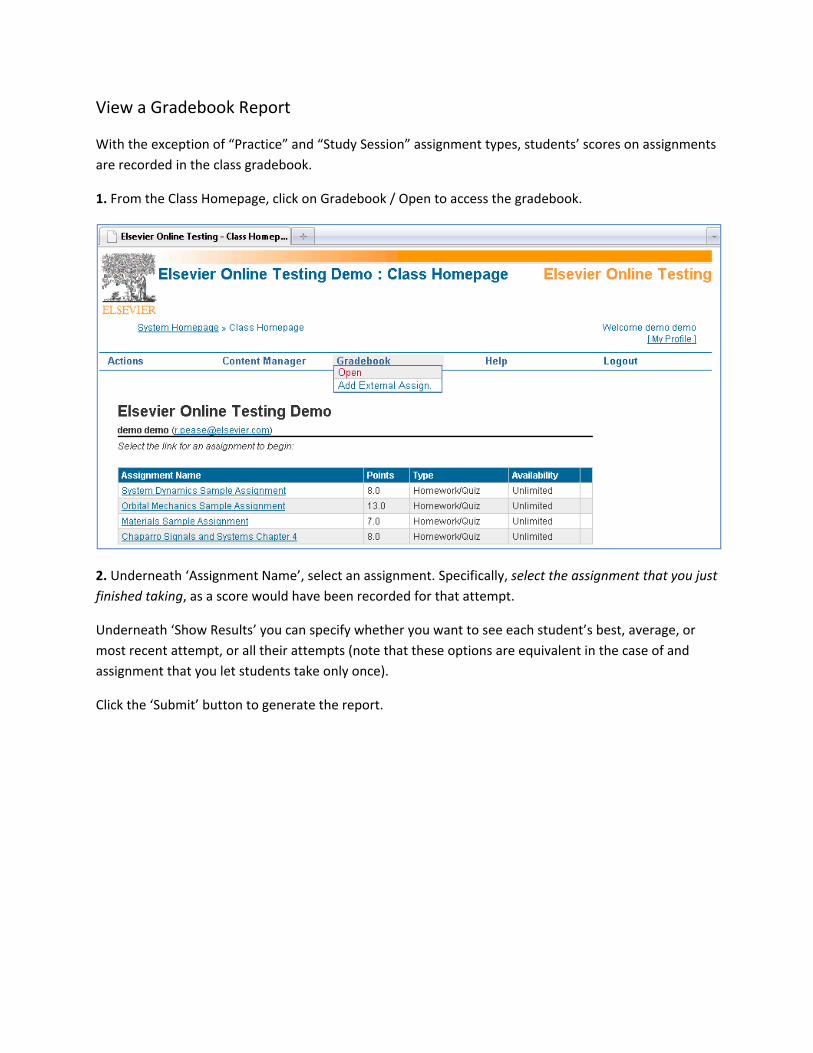
1. From the Class Homepage, click on Gradebook / Open to access the gradebook.
2. Underneath ‘Assignment Name’, select an assignment. Specifically, select the assignment that you just finished taking, as a score would have been recorded for that attempt.
Underneath ‘Show Results’ you can specify whether you want to see each student’s best, average, or most recent attempt, or all their attempts (note that these options are equivalent in the case of and assignment that you let students take only once).
Click the ‘Submit’ button to generate the report.
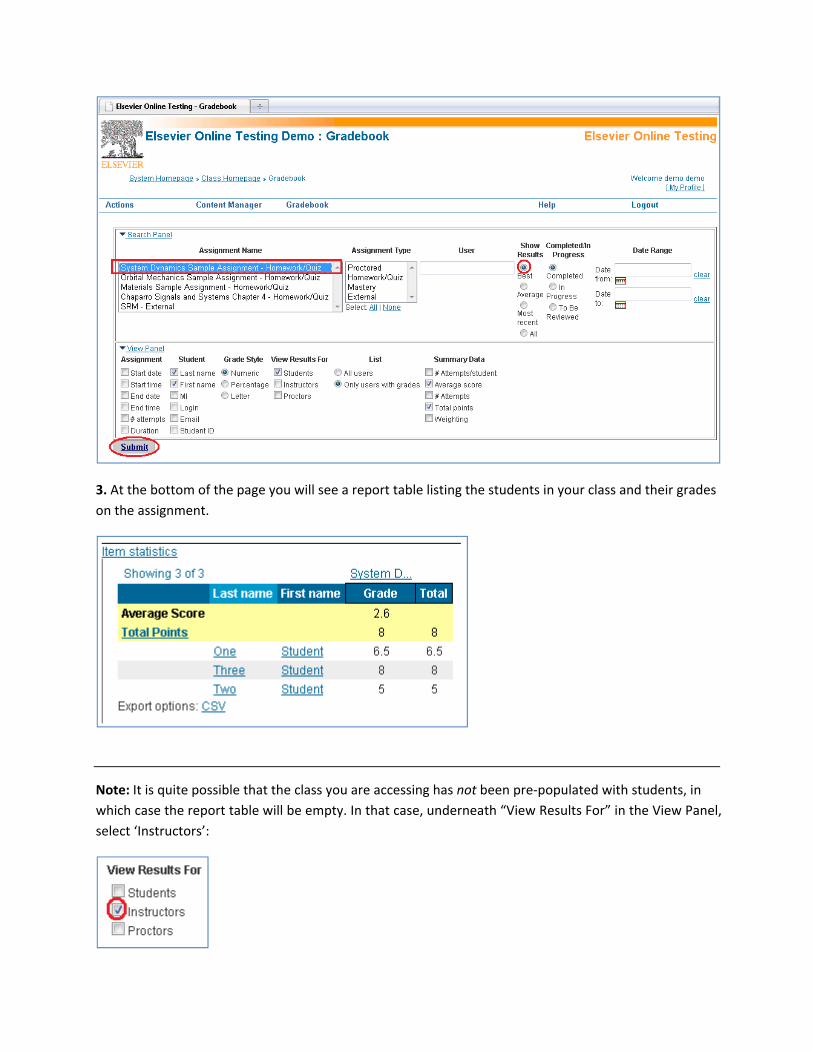
3. At the bottom of the page you will see a report table listing the students in your class and their grades on the assignment.
Note: It is quite possible that the class you are accessing has not been pre‐populated with students, in which case the report table will be empty. In that case, underneath “View Results For” in the View Panel, select ‘Instructors’:
Then click the ‘Submit’ button again and the report table should no longer be empty; specifically, there will be a row corresponding to the attempt that you, yourself, made on the assignment earlier.
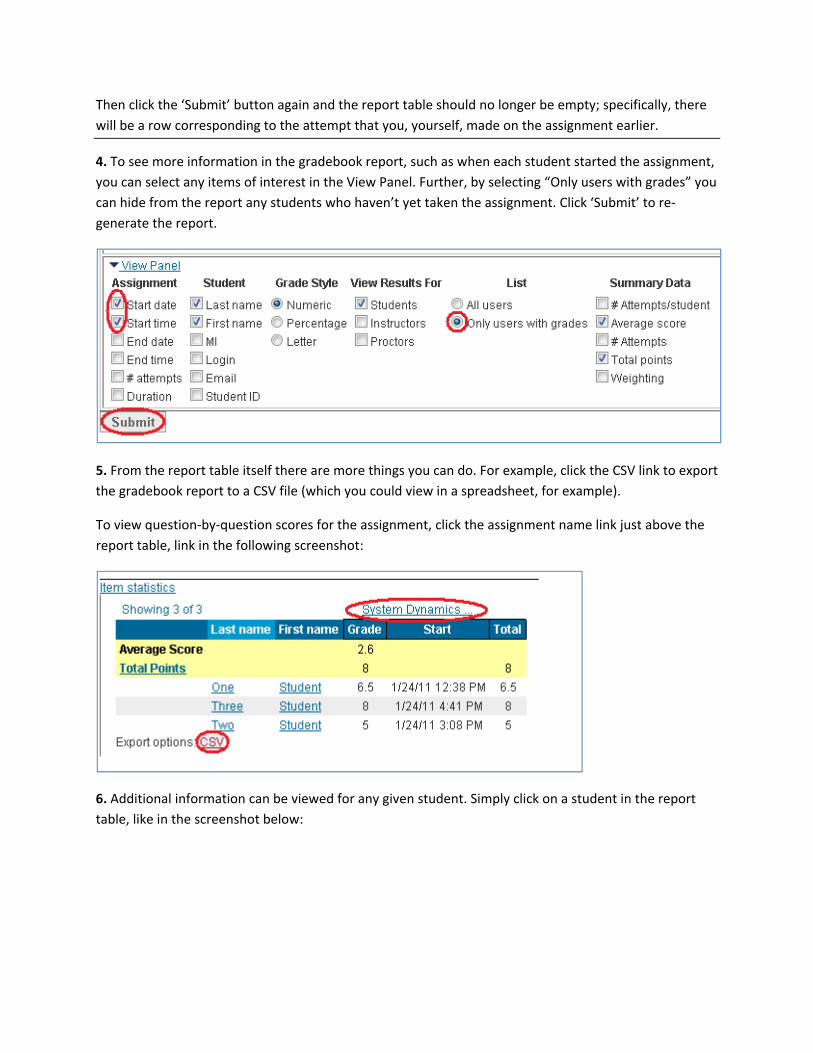
4. To see more information in the gradebook report, such as when each student started the assignment, you can select any items of interest in the View Panel. Further, by selecting “Only users with grades” you can hide from the report any students who haven’t yet taken the assignment. Click ‘Submit’ to re‐generate the report.
5. From the report table itself there are more things you can do. For example, click the CSV link to export the gradebook report to a CSV file (which you could view in a spreadsheet, for example).
To view question‐by‐question scores for the assignment, click the assignment name link just above the report table, link in the following screenshot:
6. Additional information can be viewed for any given student. Simply click on a student in the report table, like in the screenshot below:
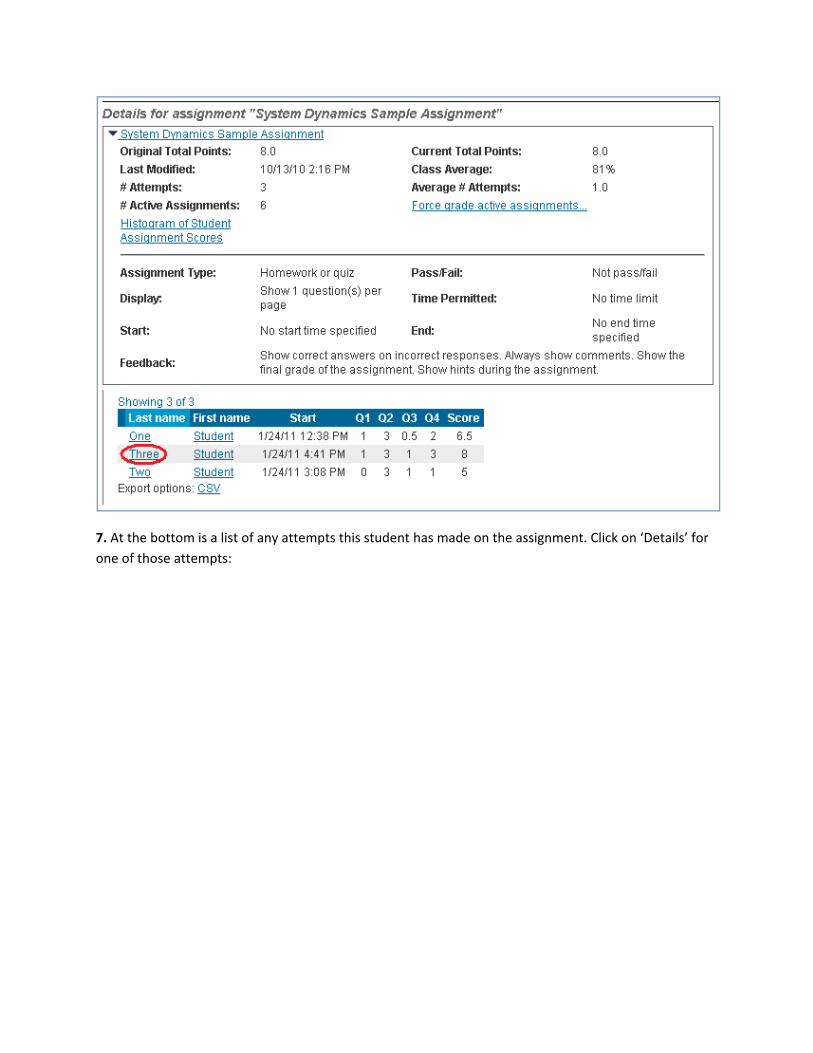
7. At the bottom is a list of any attempts this student has made on the assignment. Click on ‘Details’ for one of those attempts:
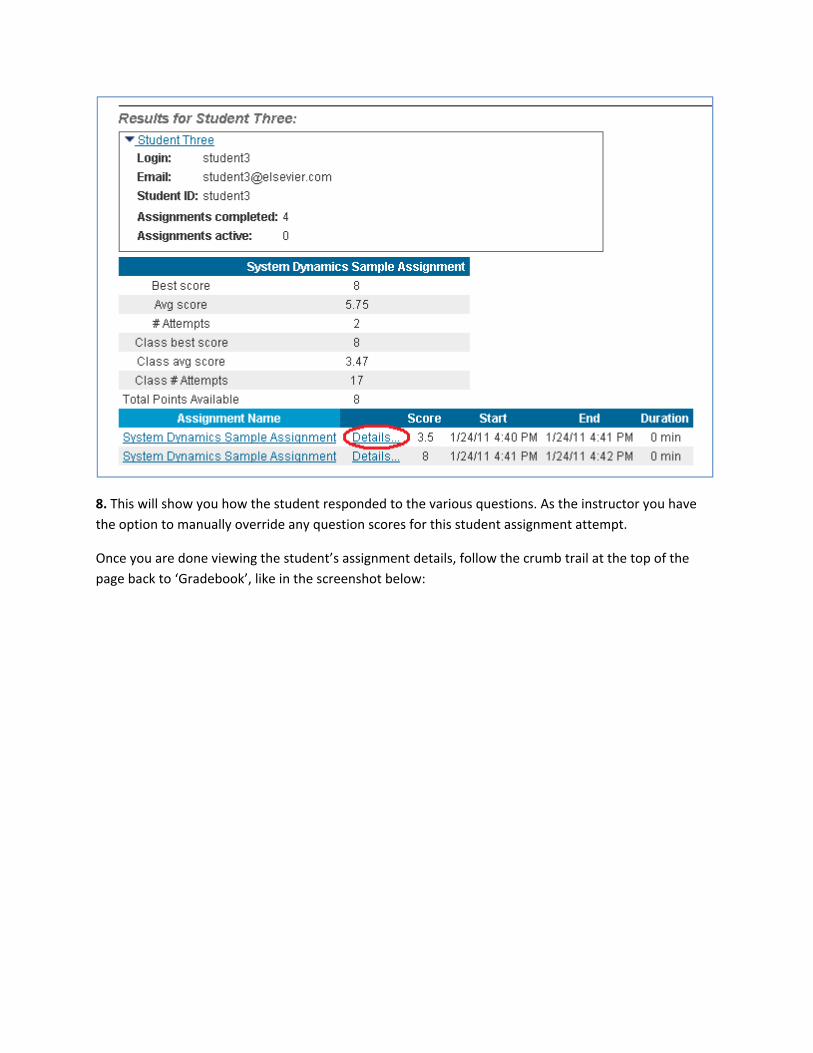
8. This will show you how the student responded to the various questions. As the instructor you have the option to manually override any question scores for this student assignment attempt.
Once you are done viewing the student’s assignment details, follow the crumb trail at the top of the page back to ‘Gradebook’, like in the screenshot below:
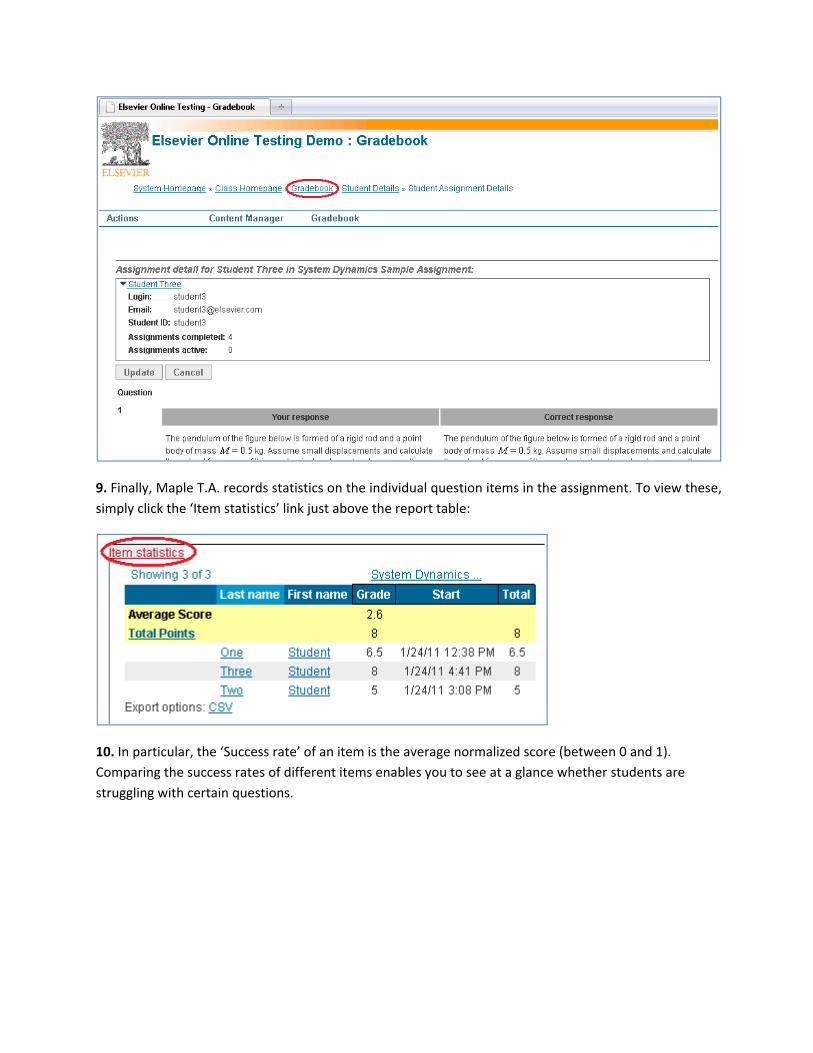
9. Finally, Maple T.A. records statistics on the individual question items in the assignment. To view these, simply click the ‘Item statistics’ link just above the report table:
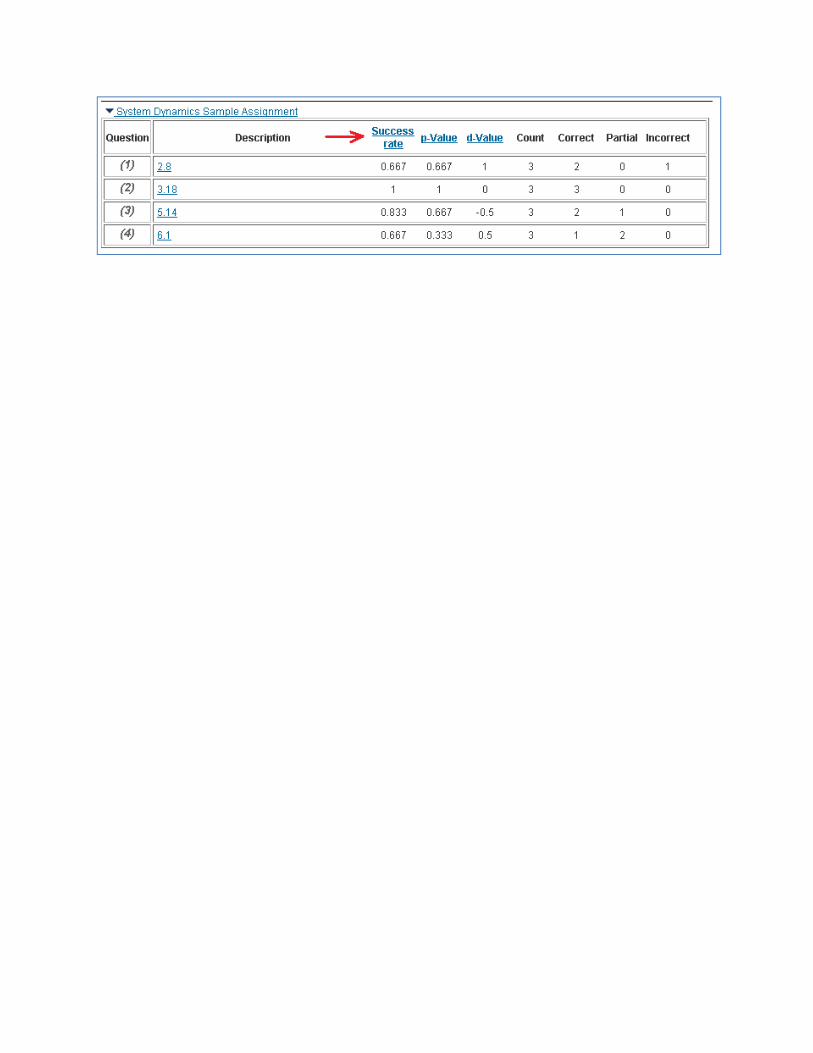
10. In particular, the ‘Success rate’ of an item is the average normalized score (between 0 and 1). Comparing the success rates of different items enables you to see at a glance whether students are struggling with certain questions.
Create an Assignment
Your demo class has been populated with sample questions, and you are able to build assignments around those questions.
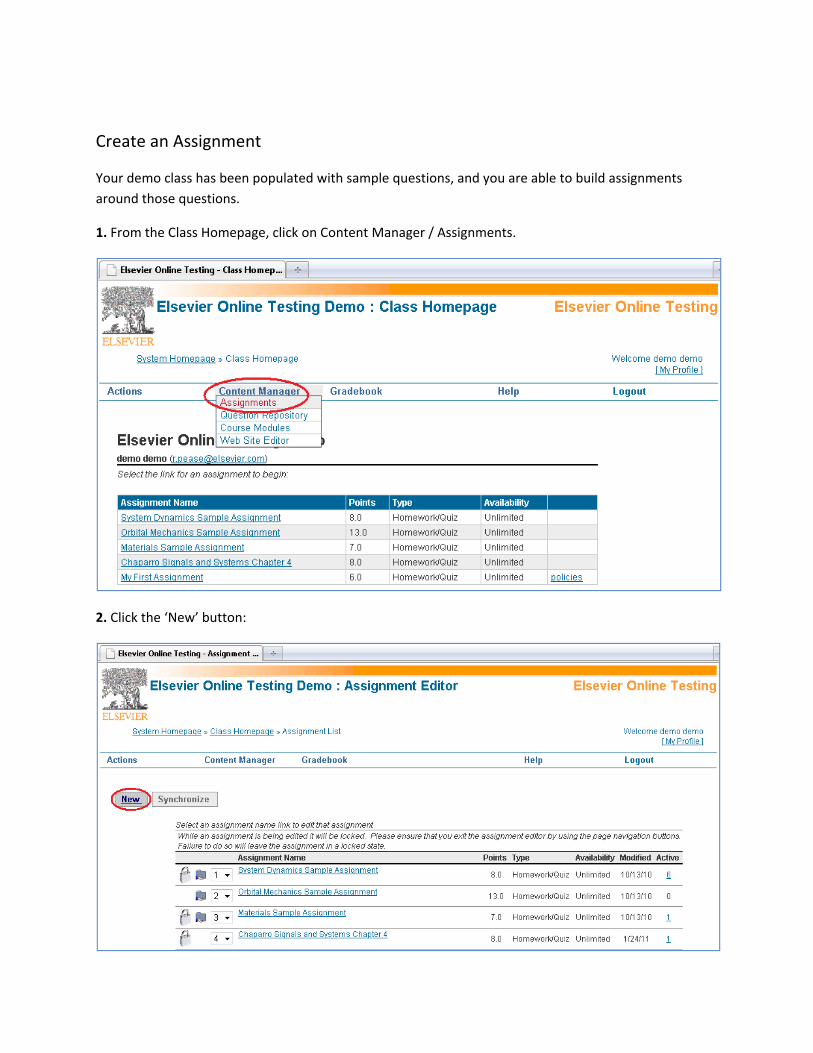
1. From the Class Homepage, click on Content Manager / Assignments.
2. Click the ‘New’ button:
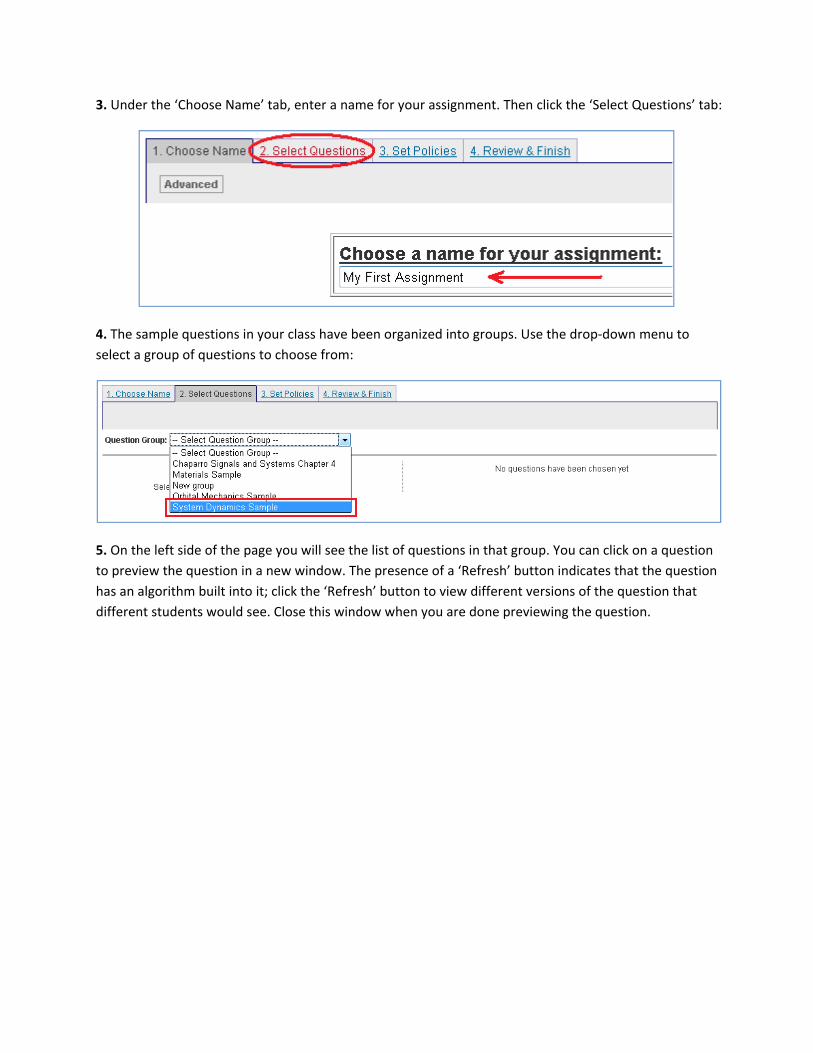
3. Under the ‘Choose Name’ tab, enter a name for your assignment. Then click the ‘Select Questions’ tab:
4. The sample questions in your class have been organized into groups. Use the drop‐down menu to select a group of questions to choose from:
5. On the left side of the page you will see the list of questions in that group. You can click on a question to preview the question in a new window. The presence of a ‘Refresh’ button indicates that the question has an algorithm built into it; click the ‘Refresh’ button to view different versions of the question that different students would see. Close this window when you are done previewing the question.
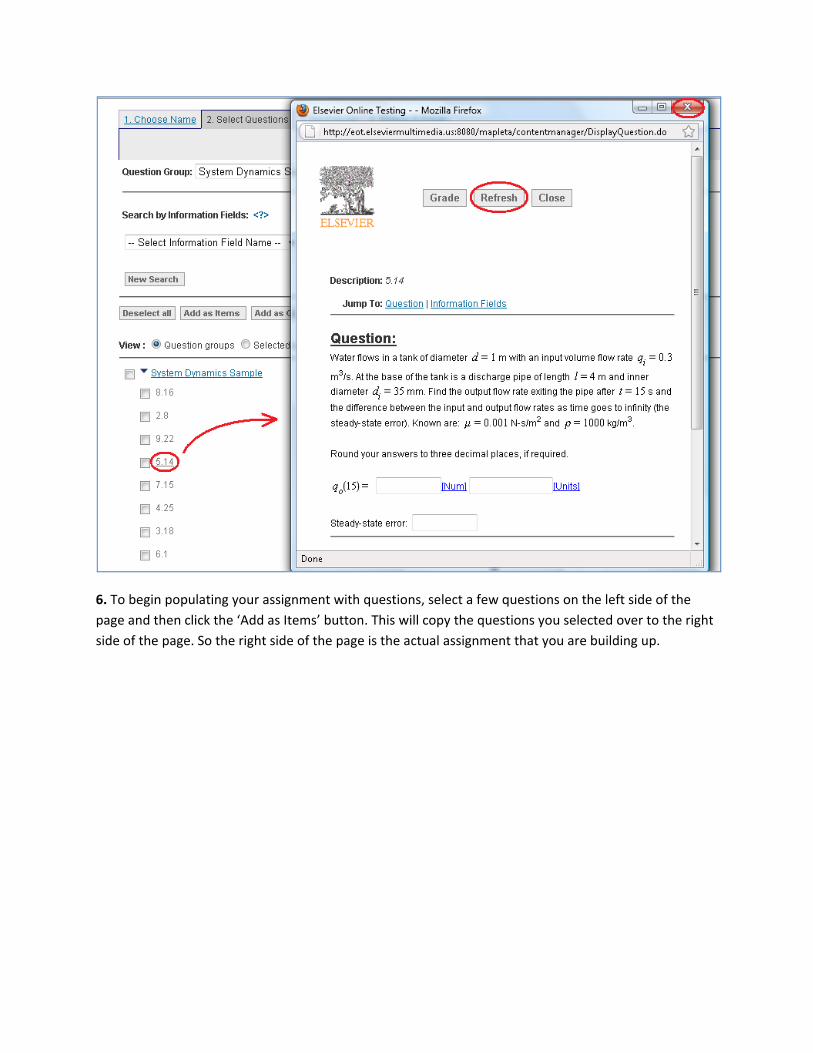
6. To begin populating your assignment with questions, select a few questions on the left side of the page and then click the ‘Add as Items’ button. This will copy the questions you selected over to the right side of the page. So the right side of the page is the actual assignment that you are building up.
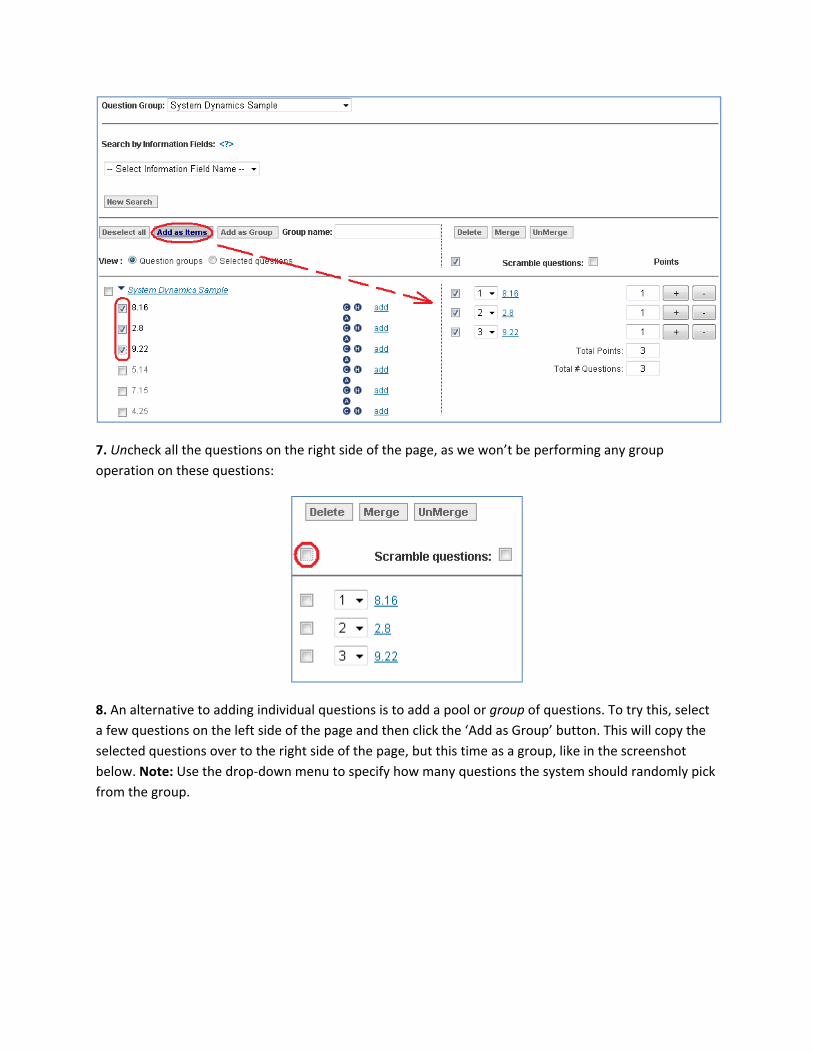
7. Uncheck all the questions on the right side of the page, as we won’t be performing any group operation on these questions:
8. An alternative to adding individual questions is to add a pool or group of questions. To try this, select a few questions on the left side of the page and then click the ‘Add as Group’ button. This will copy the selected questions over to the right side of the page, but this time as a group, like in the screenshot below. Note: Use the drop‐down menu to specify how many questions the system should randomly pick from the group.
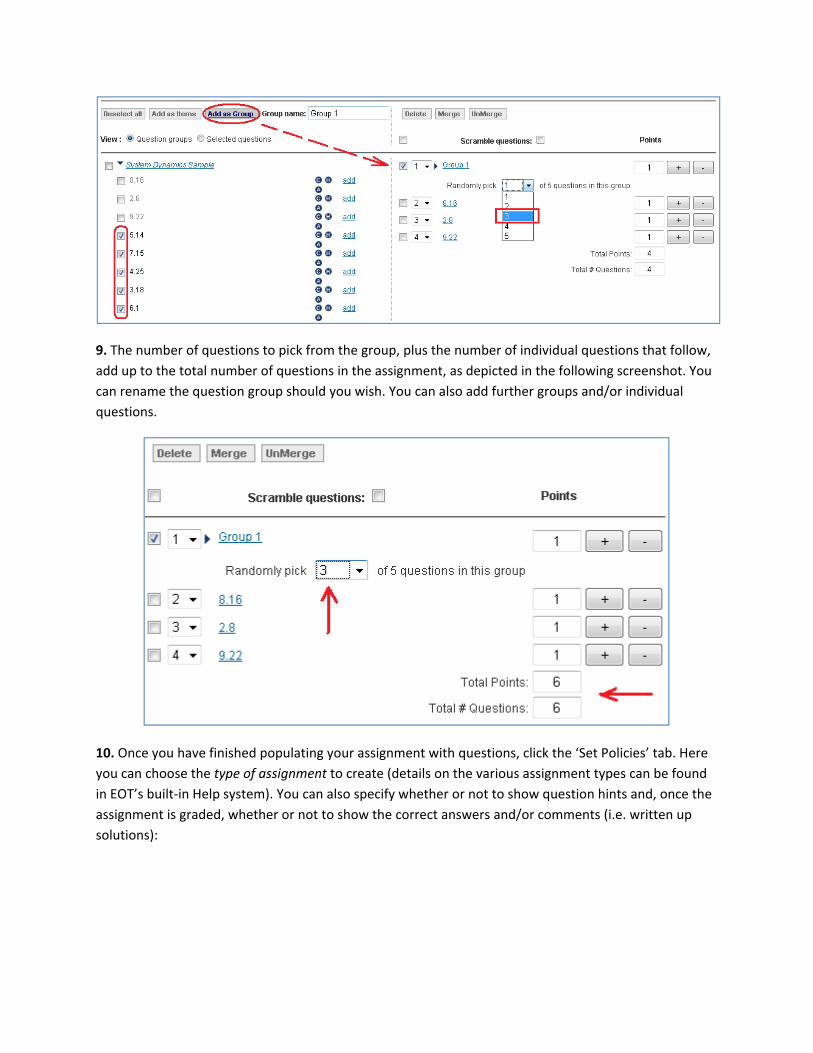
9. The number of questions to pick from the group, plus the number of individual questions that follow, add up to the total number of questions in the assignment, as depicted in the following screenshot. You can rename the question group should you wish. You can also add further groups and/or individual questions.
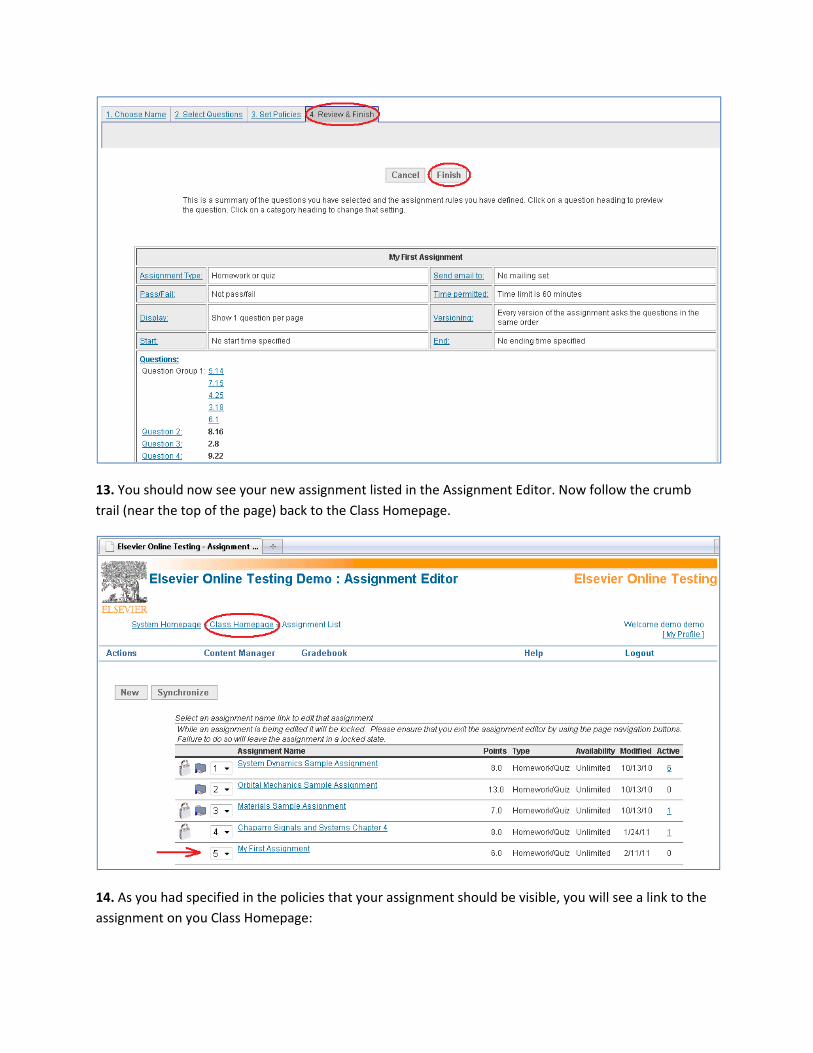
10. Once you have finished populating your assignment with questions, click the ‘Set Policies’ tab. Here you can choose the type of assignment to create (details on the various assignment types can be found in EOT’s built‐in Help system). You can also specify whether or not to show question hints and, once the assignment is graded, whether or not to show the correct answers and/or comments (i.e. written up solutions):
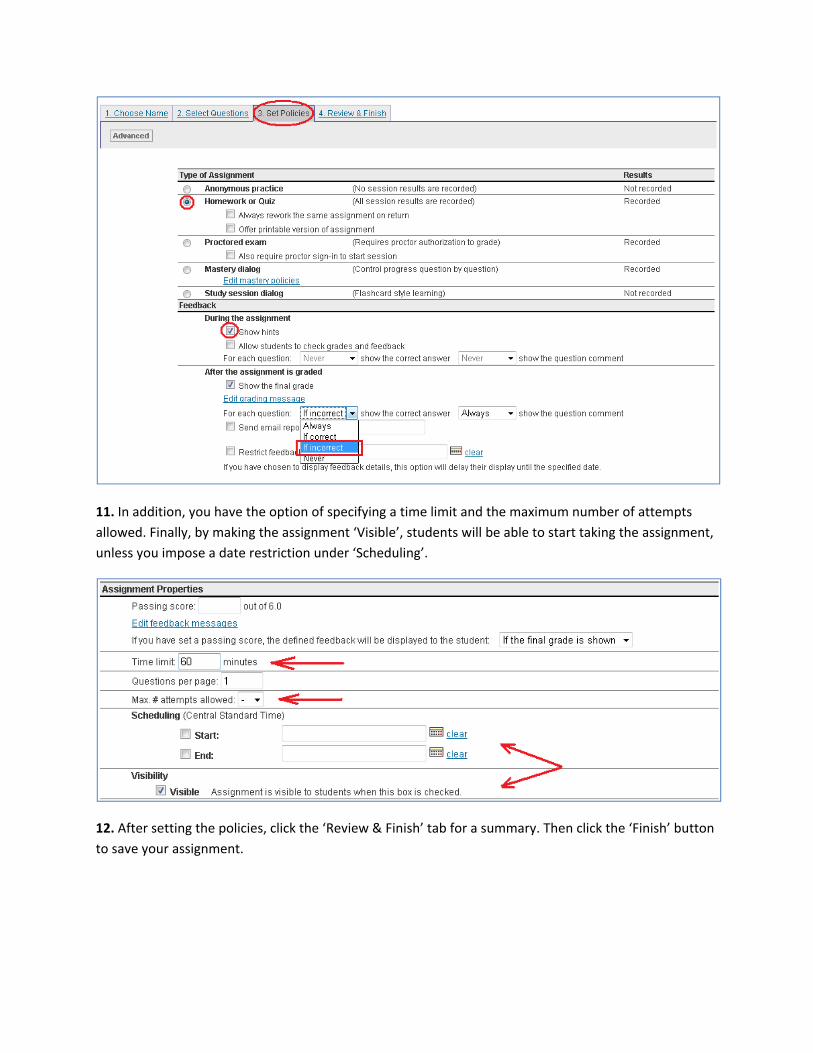
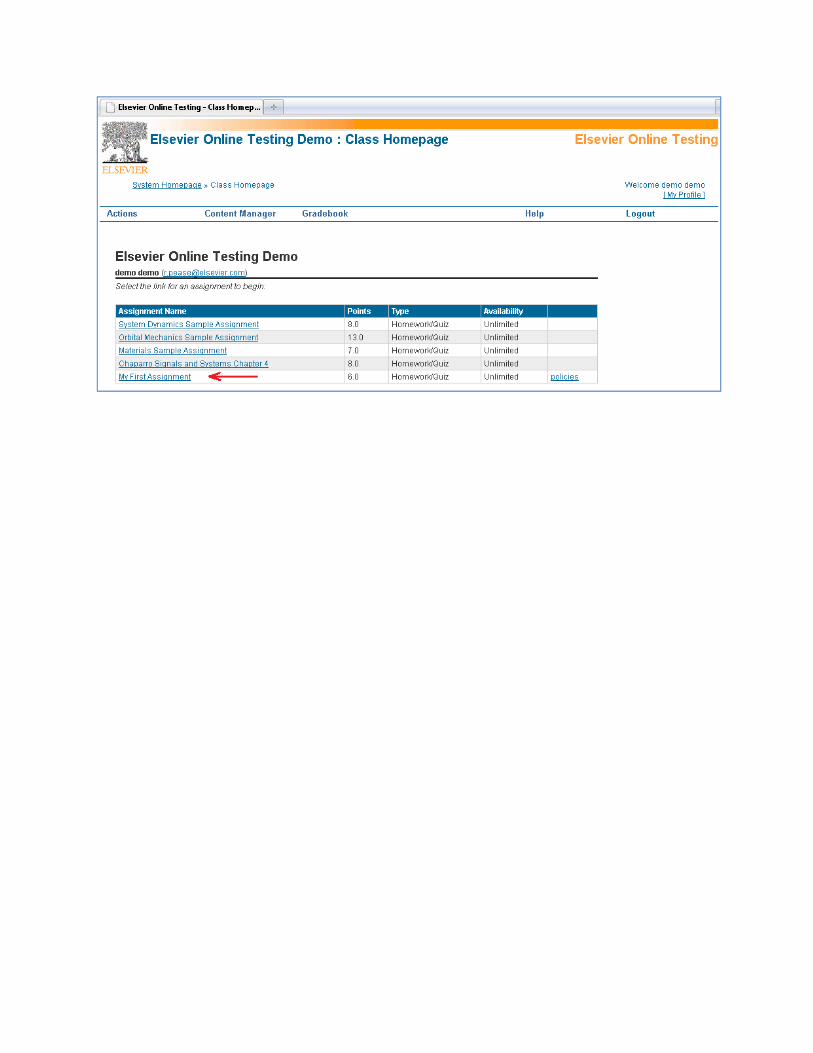
11. In addition, you have the option of specifying a time limit and the maximum number of attempts allowed. Finally, by making the assignment ‘Visible’, students will be able to start taking the assignment, unless you impose a date restriction under ‘Scheduling’.
12. After setting the policies, click the ‘Review & Finish’ tab for a summary. Then click the ‘Finish’ button to save your assignment.
13. You should now see your new assignment listed in the Assignment Editor. Now follow the crumb trail (near the top of the page) back to the Class Homepage.
14. As you had specified in the policies that your assignment should be visible, you will see a link to the assignment on you Class Homepage:
Add New Questions (Optional)
You have seen how to build an assignment around existing, sample questions in your demo class. Should you choose to adopt Elsevier Online Testing (EOT) for your course, your EOT class would be populated questions from your textbook (note: check with Elsevier for the available titles), and many of those questions would have algorithms built in so that different students would typically see different versions of the questions. Now, in the event that you may wish to supplement these pre‐built questions with some additional questions of your own, or if you simply would like to better understand how questions are created in EOT, then this section is for you.
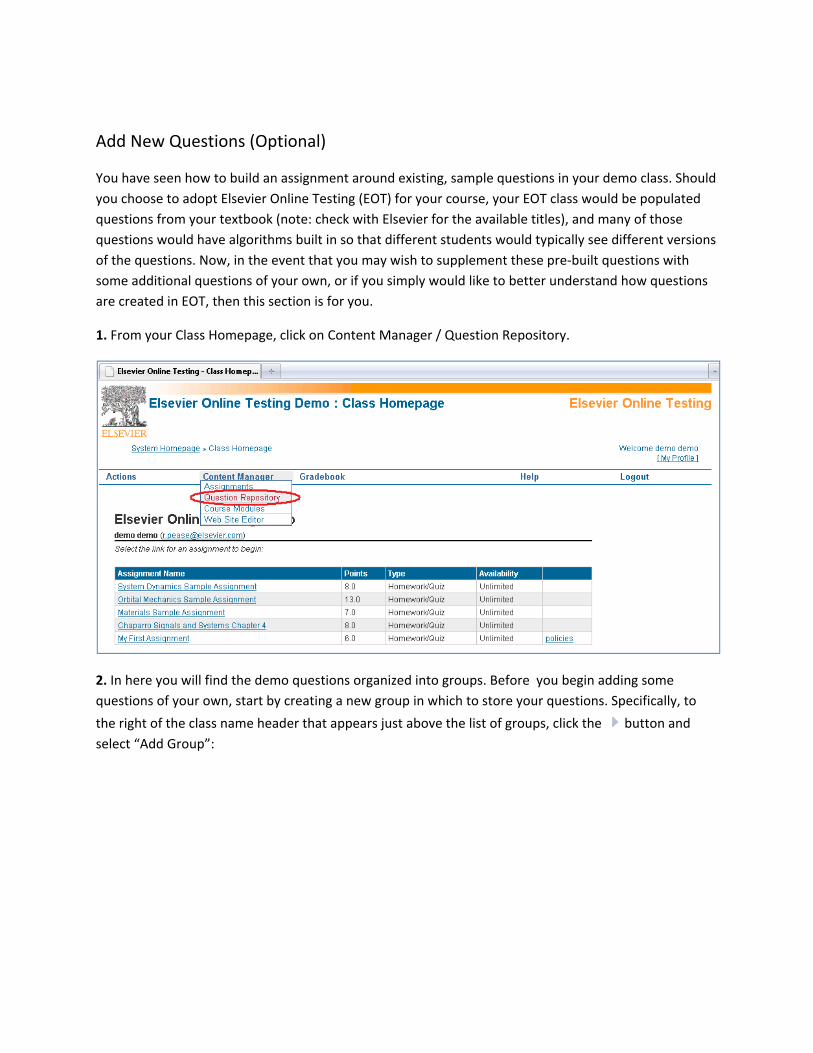
1. From your Class Homepage, click on Content Manager / Question Repository.
2. In here you will find the demo questions organized into groups. Before you begin adding some questions of your own, start by creating a new group in which to store your questions. Specifically, to
the right of the class name header that appears just above the list of groups, click the button and select “Add Group”:
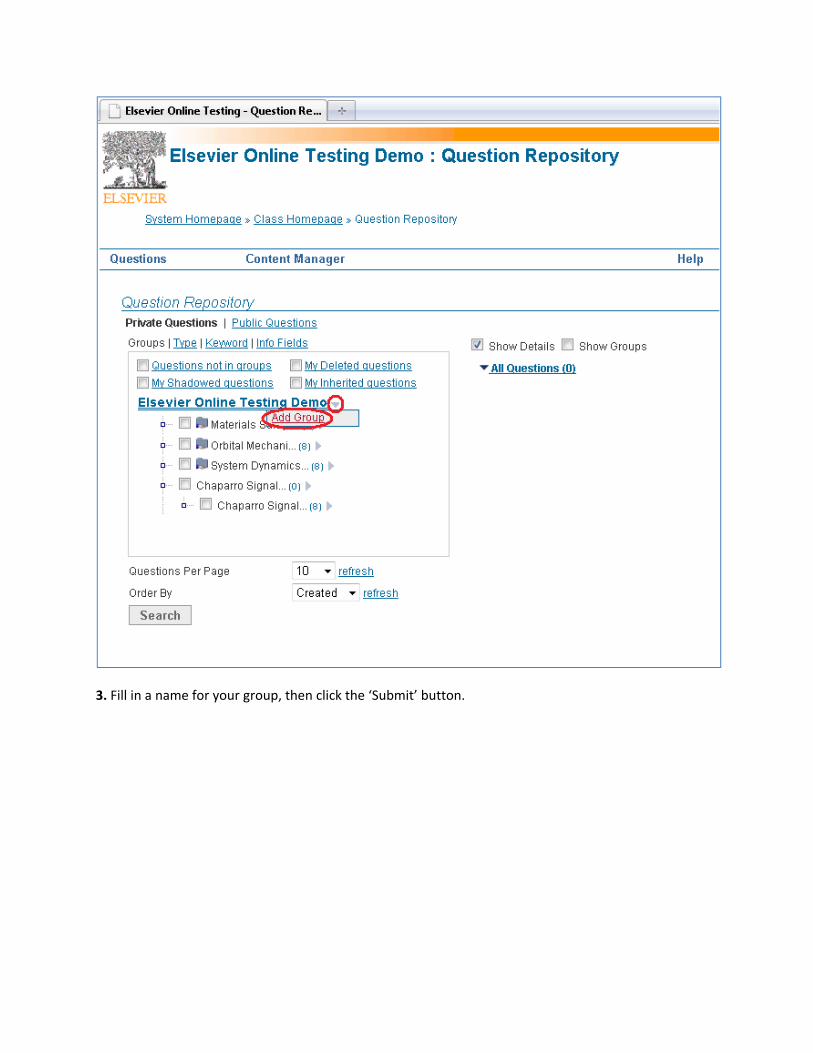
3. Fill in a name for your group, then click the ‘Submit’ button.
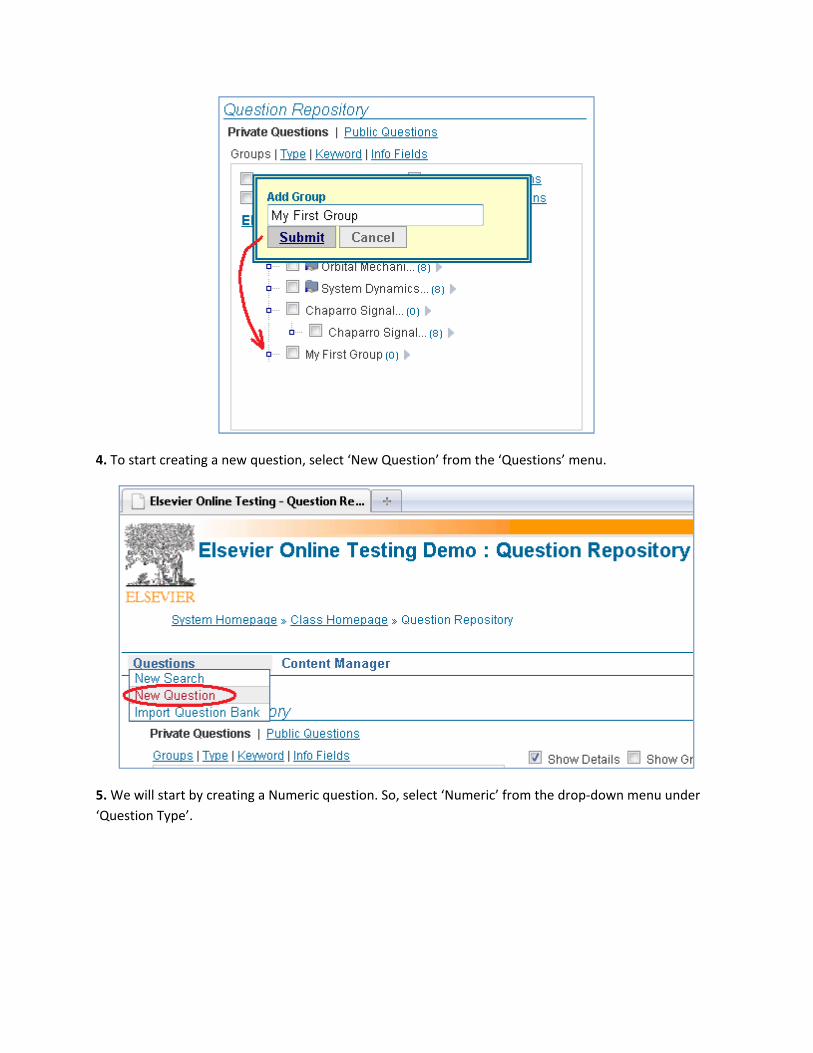
4. To start creating a new question, select ‘New Question’ from the ‘Questions’ menu.
5. We will start by creating a Numeric question. So, select ‘Numeric’ from the drop‐down menu under ‘Question Type’.
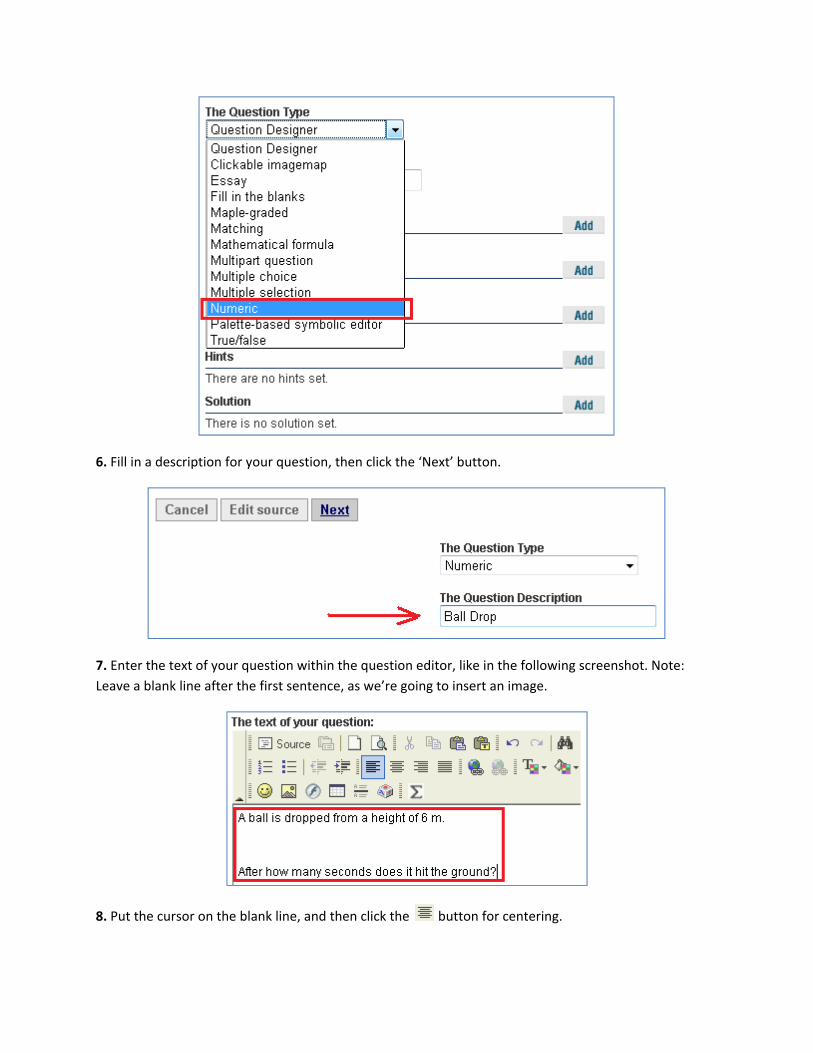
6. Fill in a description for your question, then click the ‘Next’ button.
7. Enter the text of your question within the question editor, like in the following screenshot. Note: Leave a blank line after the first sentence, as we’re going to insert an image.
8. Put the cursor on the blank line, and then click the button for centering.
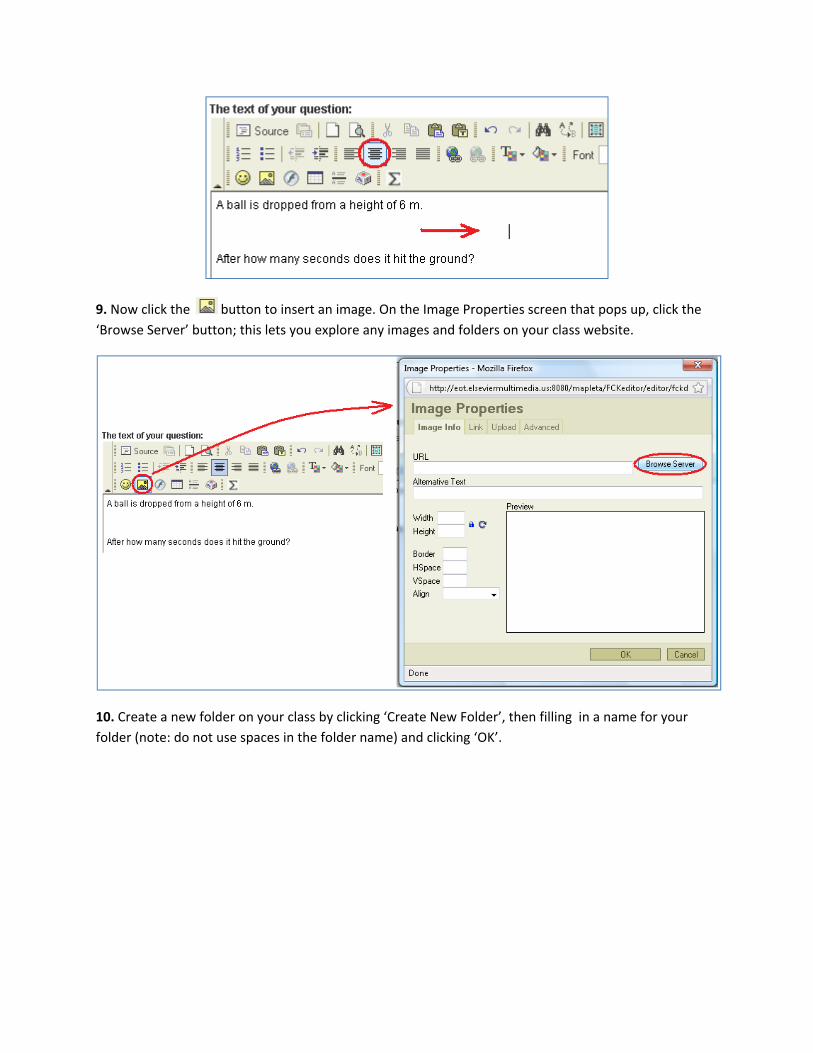
9. Now click the button to insert an image. On the Image Properties screen that pops up, click the ‘Browse Server’ button; this lets you explore any images and folders on your class website.
10. Create a new folder on your class by clicking ‘Create New Folder’, then filling in a name for your folder (note: do not use spaces in the folder name) and clicking ‘OK’.
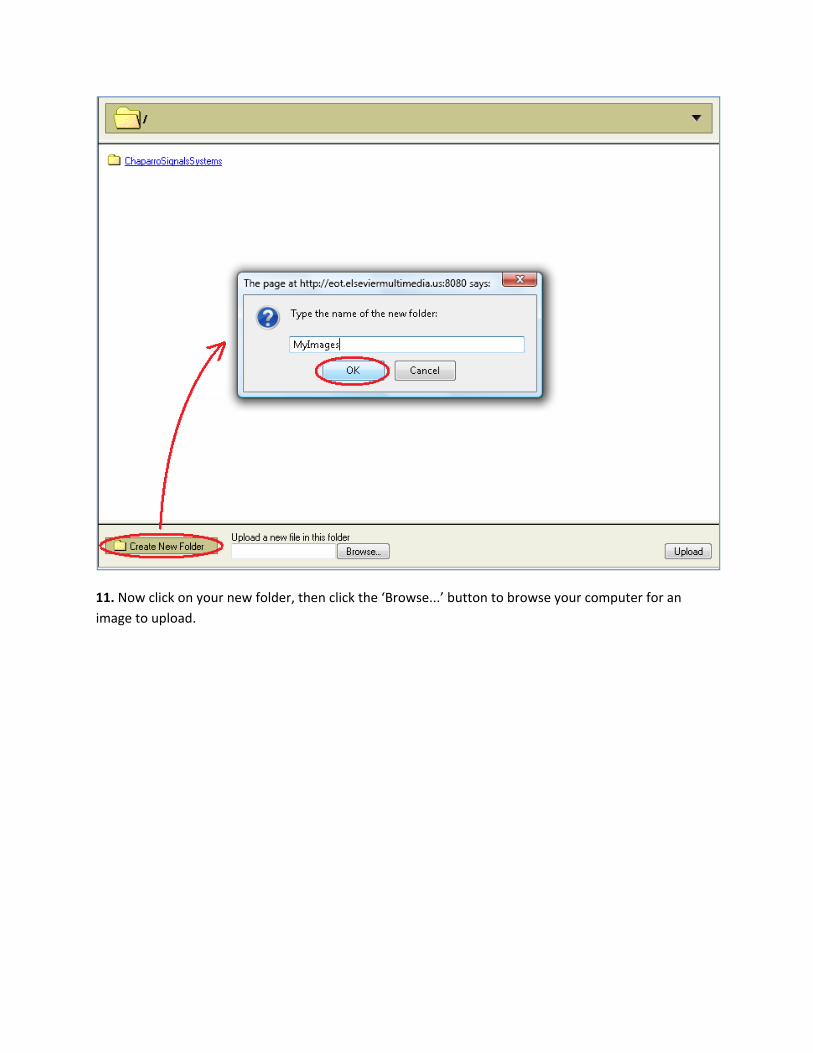
11. Now click on your new folder, then click the ‘Browse...’ button to browse your computer for an image to upload.
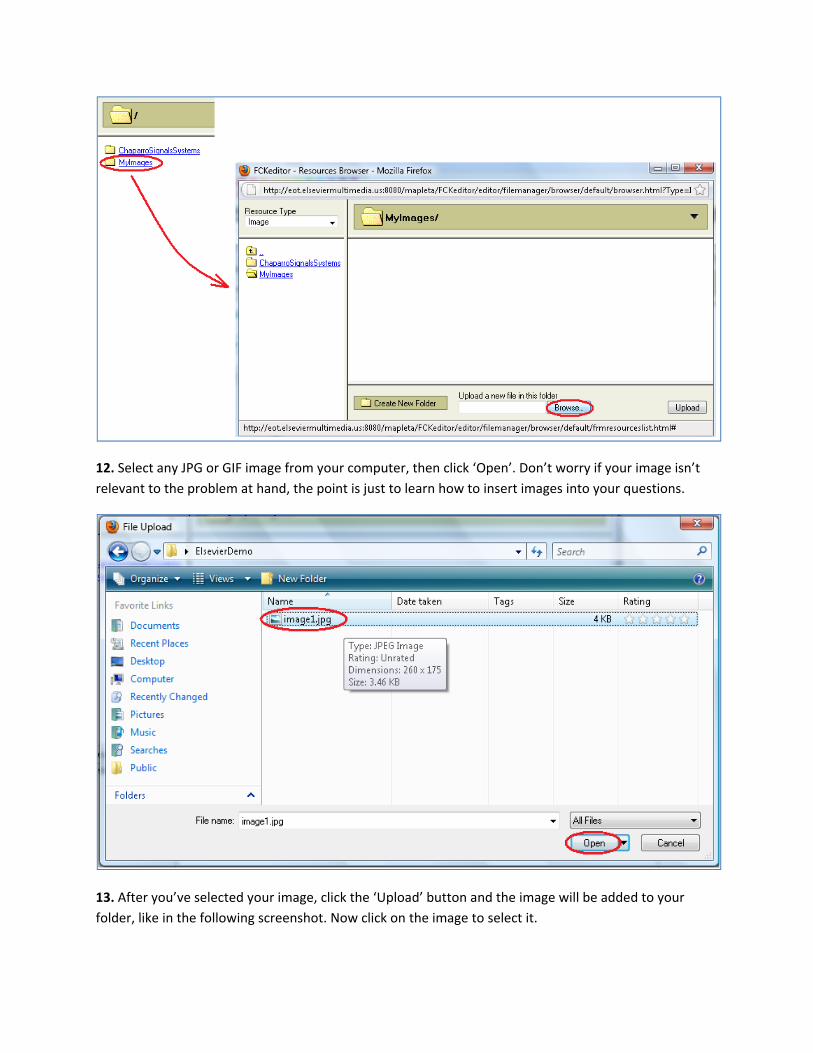
12. Select any JPG or GIF image from your computer, then click ‘Open’. Don’t worry if your image isn’t relevant to the problem at hand, the point is just to learn how to insert images into your questions.
13. After you’ve selected your image, click the ‘Upload’ button and the image will be added to your folder, like in the following screenshot. Now click on the image to select it.
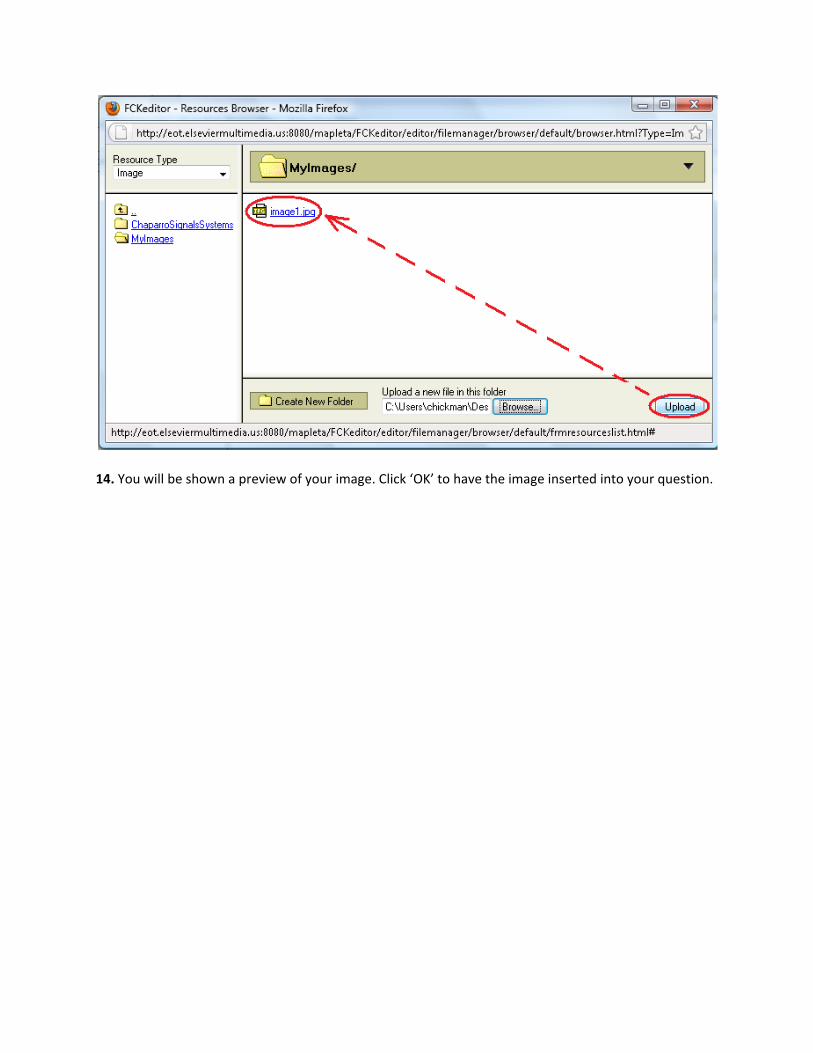
14. You will be shown a preview of your image. Click ‘OK’ to have the image inserted into your question.
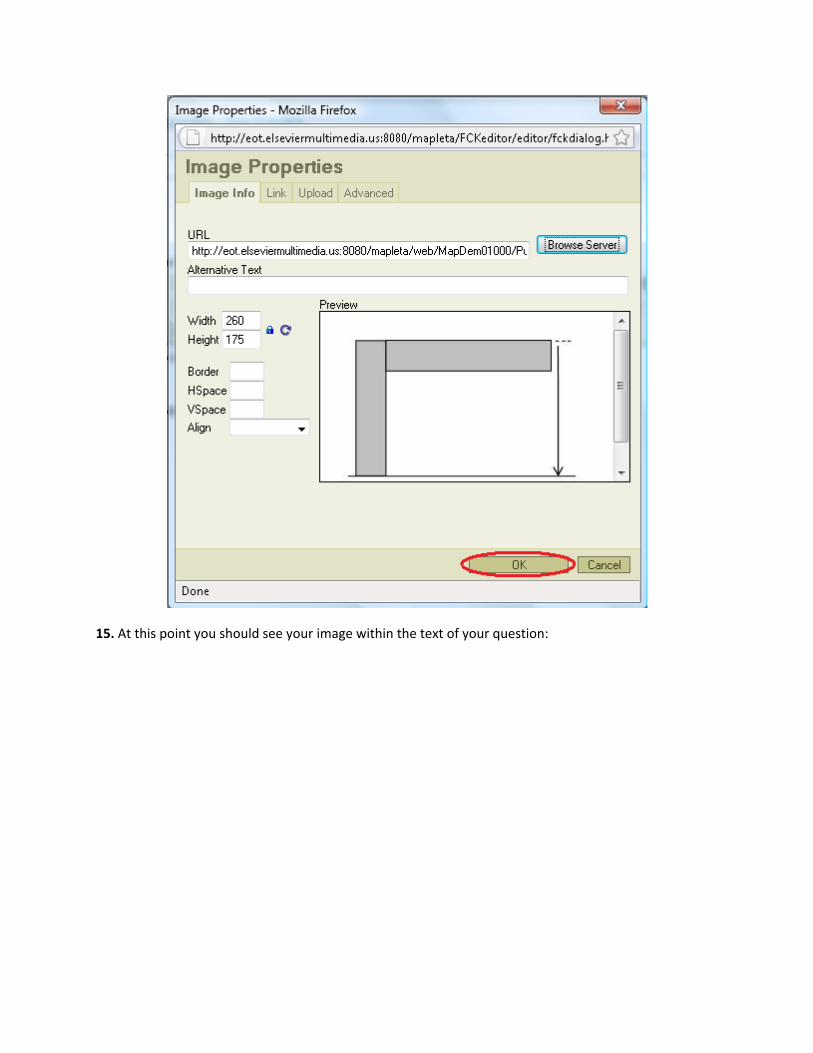
15. At this point you should see your image within the text of your question:
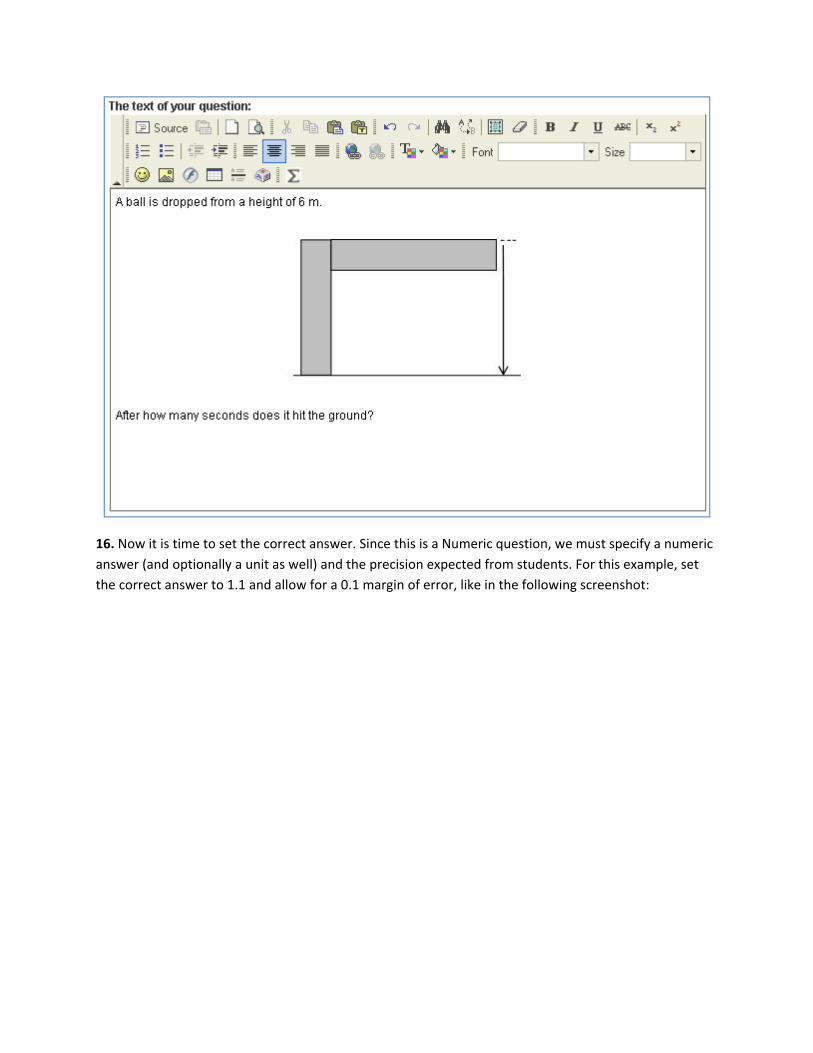
16. Now it is time to set the correct answer. Since this is a Numeric question, we must specify a numeric answer (and optionally a unit as well) and the precision expected from students. For this example, set the correct answer to 1.1 and allow for a 0.1 margin of error, like in the following screenshot:
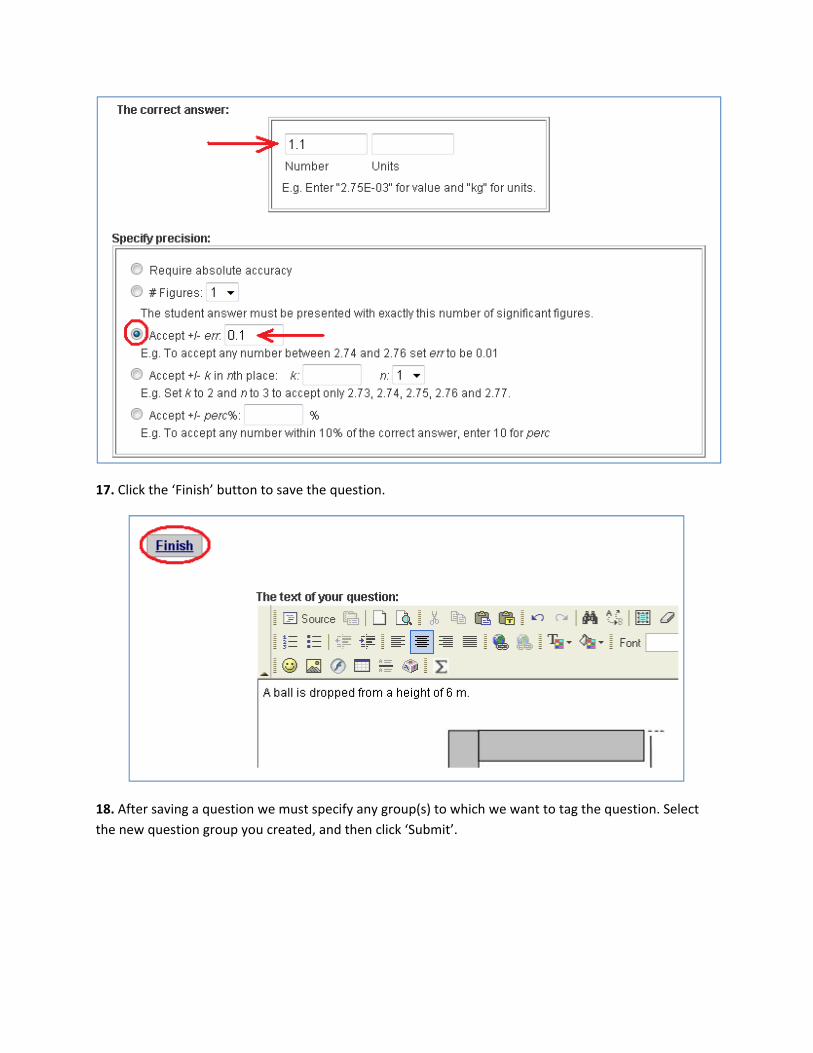
17. Click the ‘Finish’ button to save the question.
18. After saving a question we must specify any group(s) to which we want to tag the question. Select the new question group you created, and then click ‘Submit’.

19. You will now see a preview of your question. Test it out by entering a response and clicking ‘Grade’.
20. Notice how the system displays the correct answer as 1.1 ± 0.1, due to how we had specified the precision. Nothing is displayed in the ‘Comment’ area, as we haven’t yet supplied any solution to the problem. Click ‘OK’.
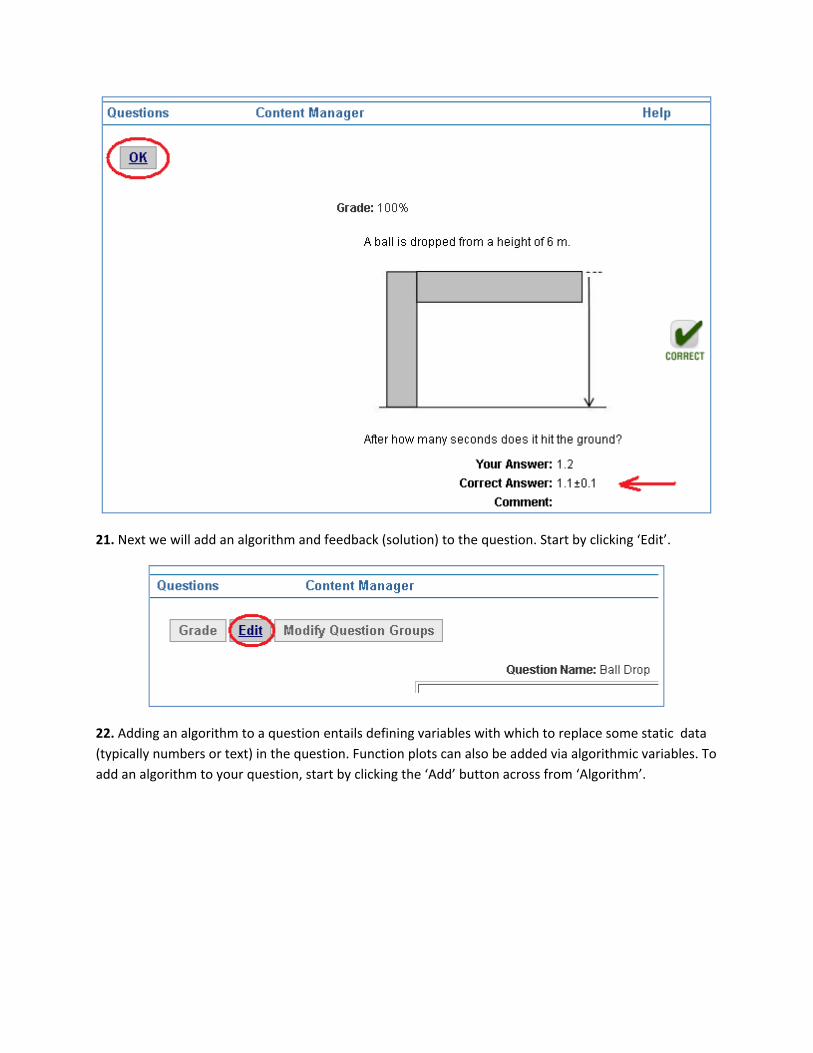
21. Next we will add an algorithm and feedback (solution) to the question. Start by clicking ‘Edit’.
22. Adding an algorithm to a question entails defining variables with which to replace some static data (typically numbers or text) in the question. Function plots can also be added via algorithmic variables. To add an algorithm to your question, start by clicking the ‘Add’ button across from ‘Algorithm’.
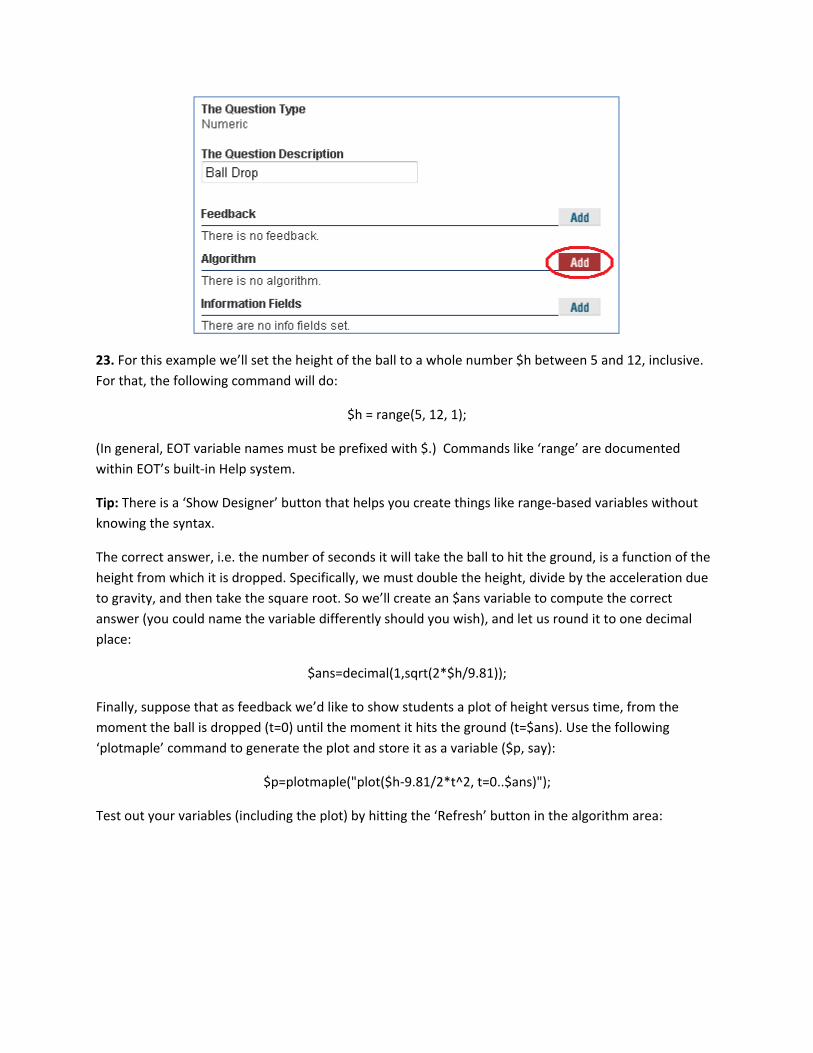
23. For this example we’ll set the height of the ball to a whole number $h between 5 and 12, inclusive. For that, the following command will do:
$h = range(5, 12, 1);
(In general, EOT variable names must be prefixed with $.) Commands like ‘range’ are documented within EOT’s built‐in Help system.
Tip: There is a ‘Show Designer’ button that helps you create things like range‐based variables without knowing the syntax.
The correct answer, i.e. the number of seconds it will take the ball to hit the ground, is a function of the height from which it is dropped. Specifically, we must double the height, divide by the acceleration due to gravity, and then take the square root. So we’ll create an $ans variable to compute the correct answer (you could name the variable differently should you wish), and let us round it to one decimal place:
$ans=decimal(1,sqrt(2*$h/9.81));
Finally, suppose that as feedback we’d like to show students a plot of height versus time, from the moment the ball is dropped (t=0) until the moment it hits the ground (t=$ans). Use the following ‘plotmaple’ command to generate the plot and store it as a variable ($p, say):
$p=plotmaple("plot($h‐9.81/2*t^2, t=0..$ans)");
Test out your variables (including the plot) by hitting the ‘Refresh’ button in the algorithm area:
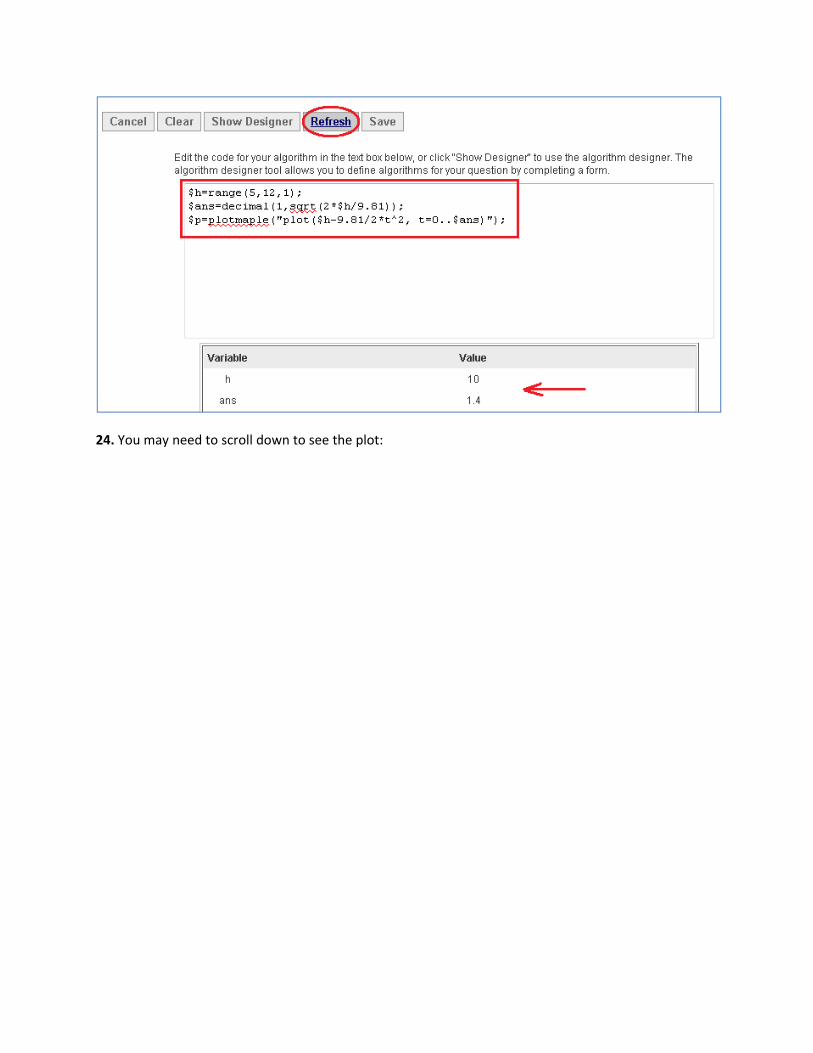
24. You may need to scroll down to see the plot:
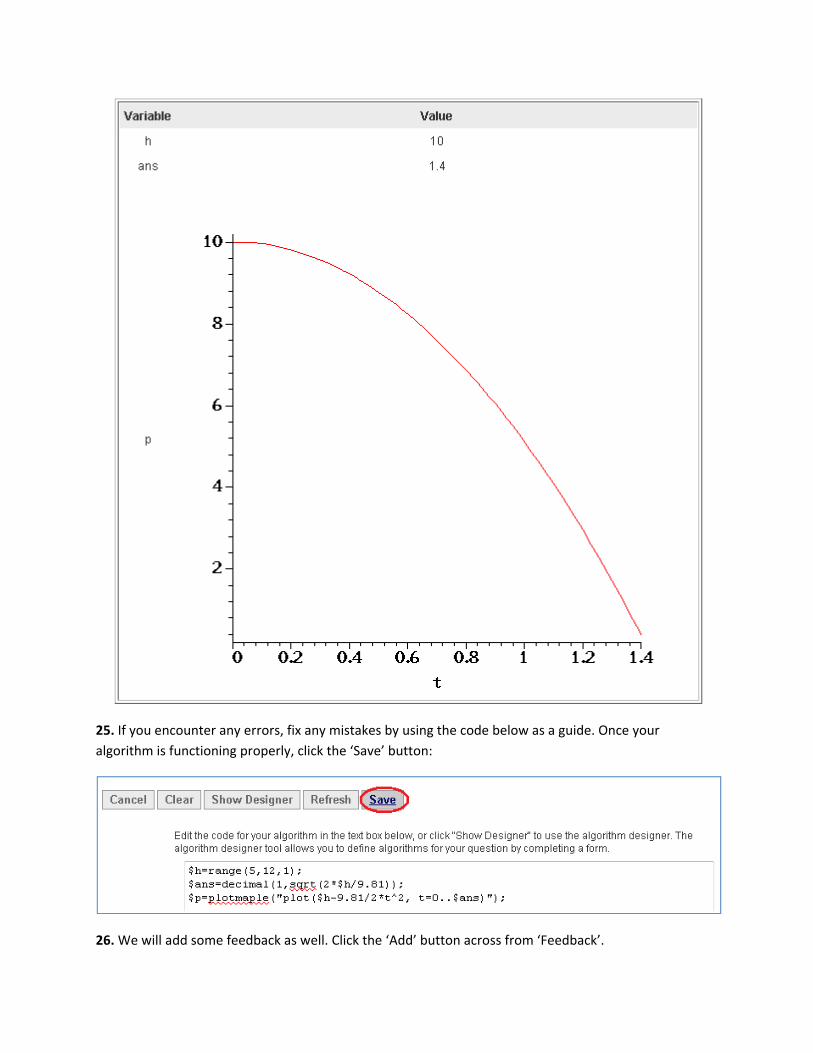
25. If you encounter any errors, fix any mistakes by using the code below as a guide. Once your algorithm is functioning properly, click the ‘Save’ button:
26. We will add some feedback as well. Click the ‘Add’ button across from ‘Feedback’.
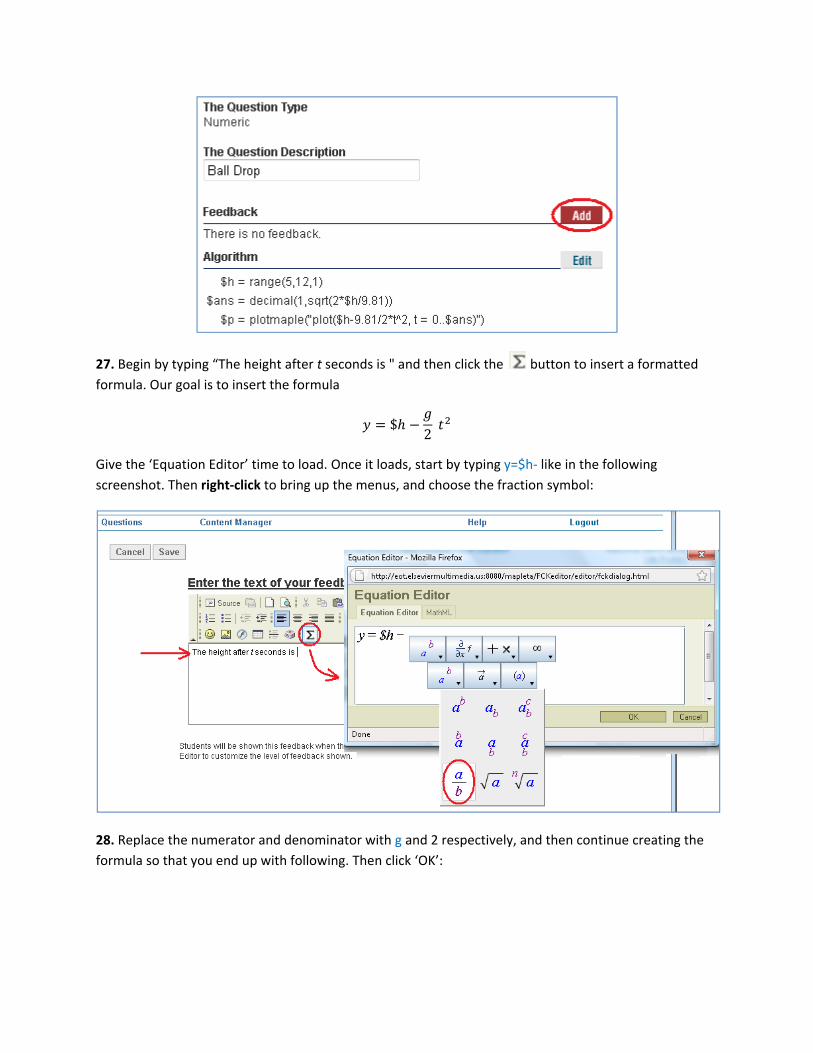
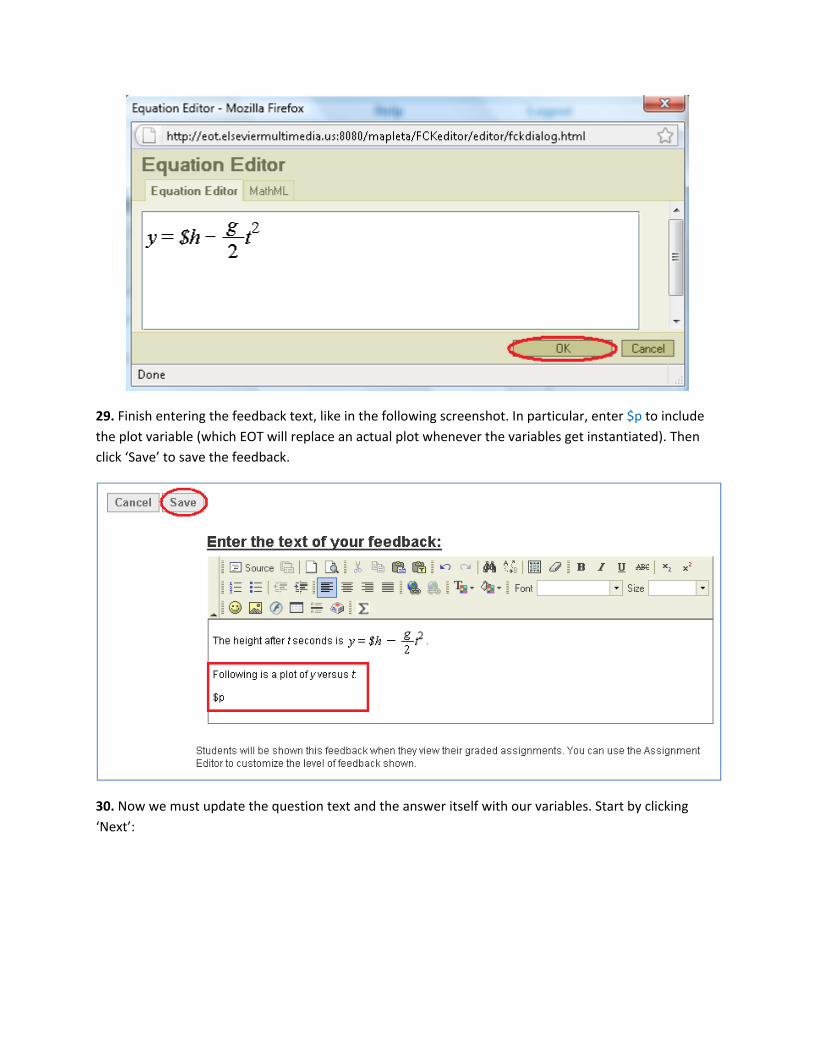
27. Begin by typing “The height after t seconds is " and then click the button to insert a formatted formula. Our goal is to insert the formula
$2
Give the ‘Equation Editor’ time to load. Once it loads, start by typing y=$h‐ like in the following screenshot. Then right‐click to bring up the menus, and choose the fraction symbol:
28. Replace the numerator and denominator with g and 2 respectively, and then continue creating the formula so that you end up with following. Then click ‘OK’:
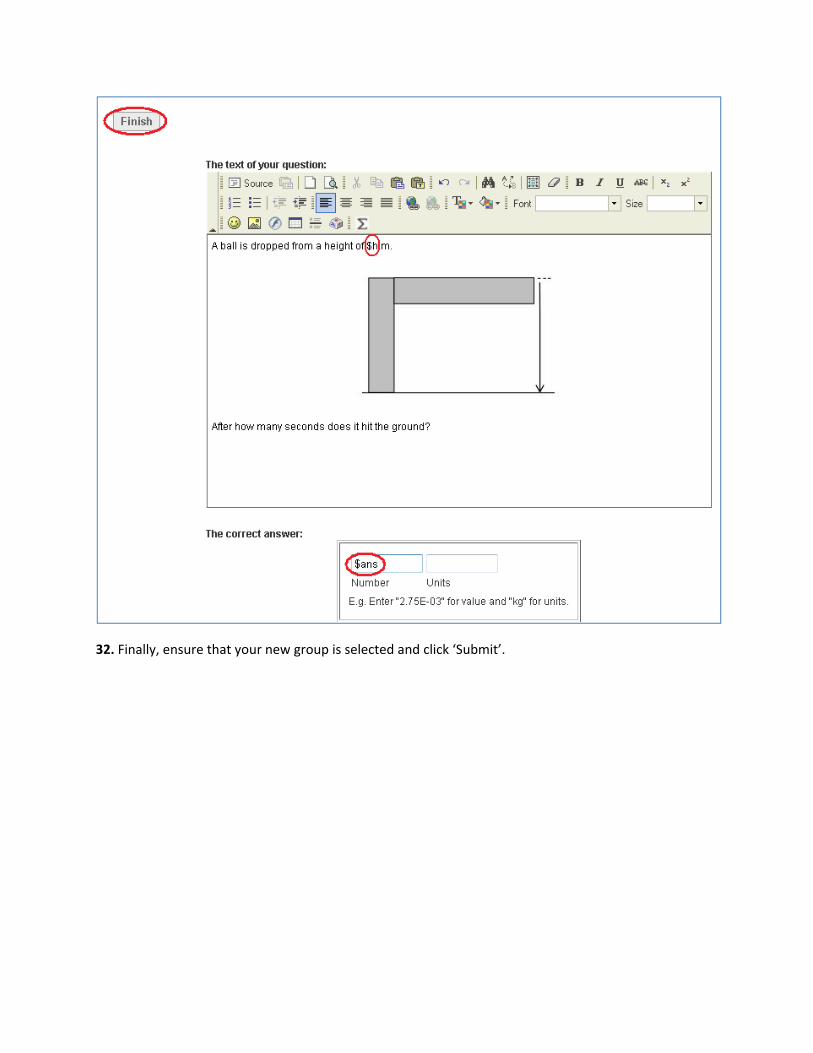
29. Finish entering the feedback text, like in the following screenshot. In particular, enter $p to include the plot variable (which EOT will replace an actual plot whenever the variables get instantiated). Then click ‘Save’ to save the feedback.
30. Now we must update the question text and the answer itself with our variables. Start by clicking ‘Next’:

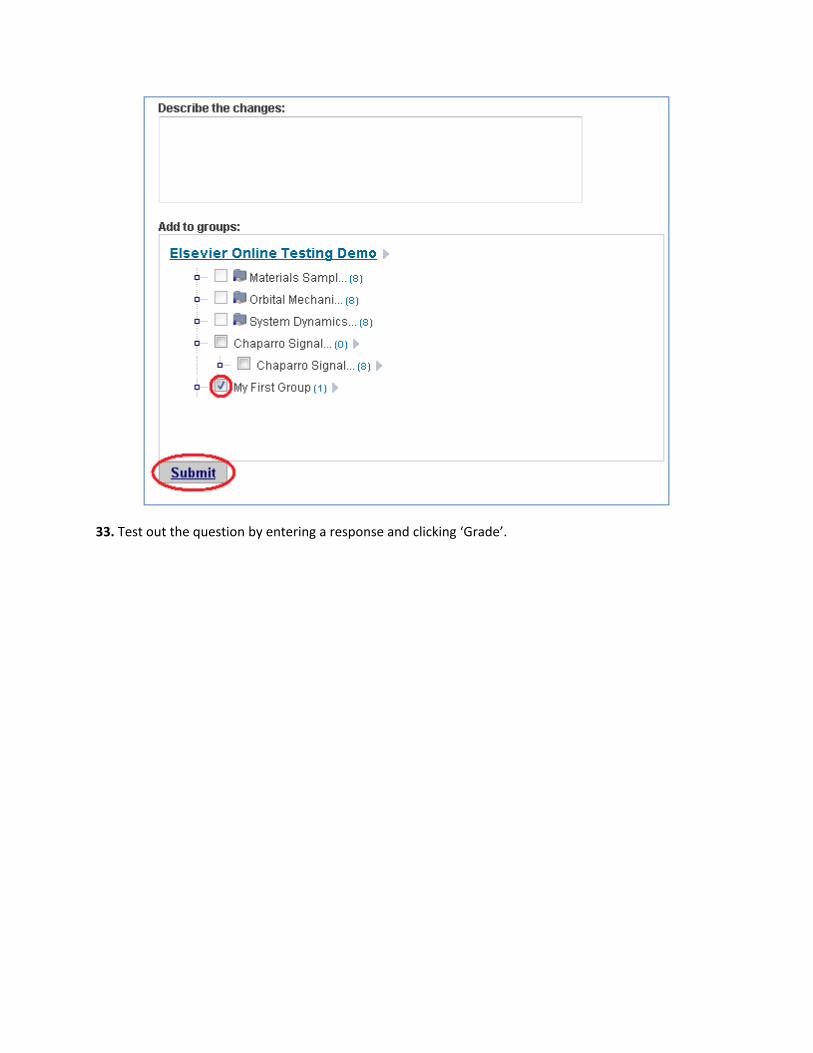
31. Then replace the number 6 in the question text with $h, and change the correct answer from 1.2 to $ans. Then click ‘Finish’ to save the changes.
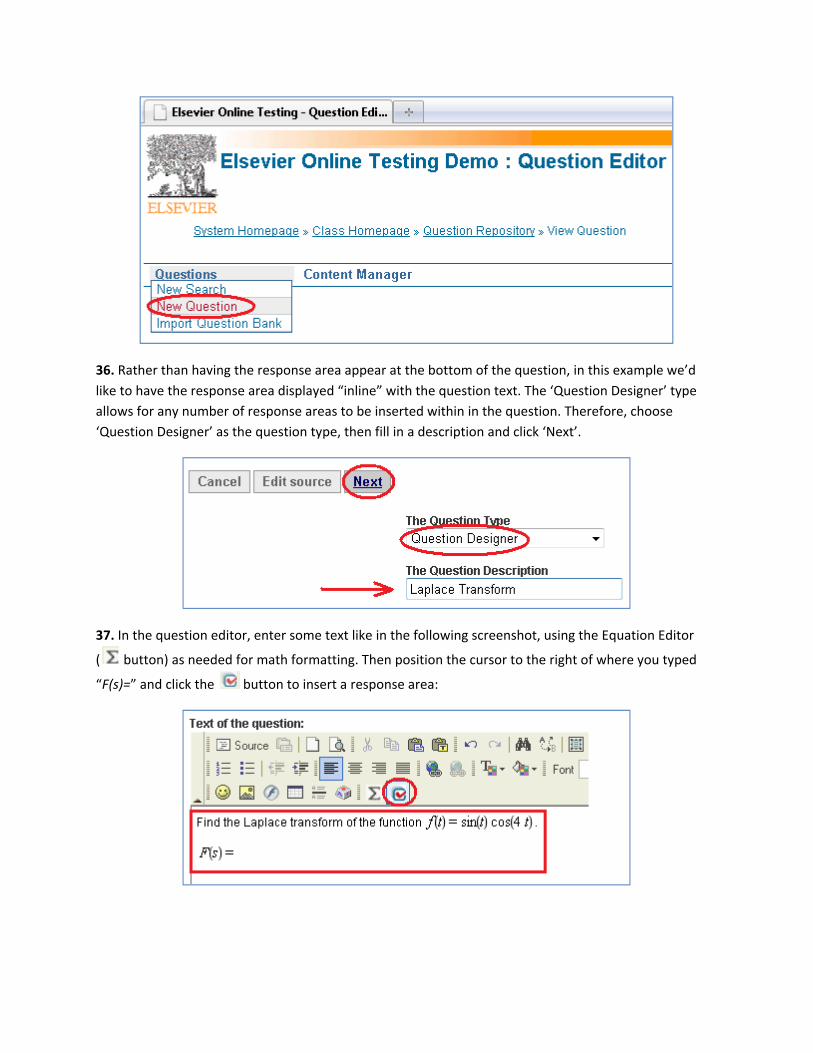
32. Finally, ensure that your new group is selected and click ‘Submit’.
33. Test out the question by entering a response and clicking ‘Grade’.

34. Notice how the ‘Comment’ area contains the feedback we added, including the plot.

35. In addition to being able to grade numeric responses, EOT is also able to grade symbolic mathematical expressions. As before, in the Question Repository start by clicking on ‘Questions / New Question’.
36. Rather than having the response area appear at the bottom of the question, in this example we’d like to have the response area displayed “inline” with the question text. The ‘Question Designer’ type allows for any number of response areas to be inserted within in the question. Therefore, choose ‘Question Designer’ as the question type, then fill in a description and click ‘Next’.
37. In the question editor, enter some text like in the following screenshot, using the Equation Editor
( button) as needed for math formatting. Then position the cursor to the right of where you typed
“F(s)=” and click the button to insert a response area:
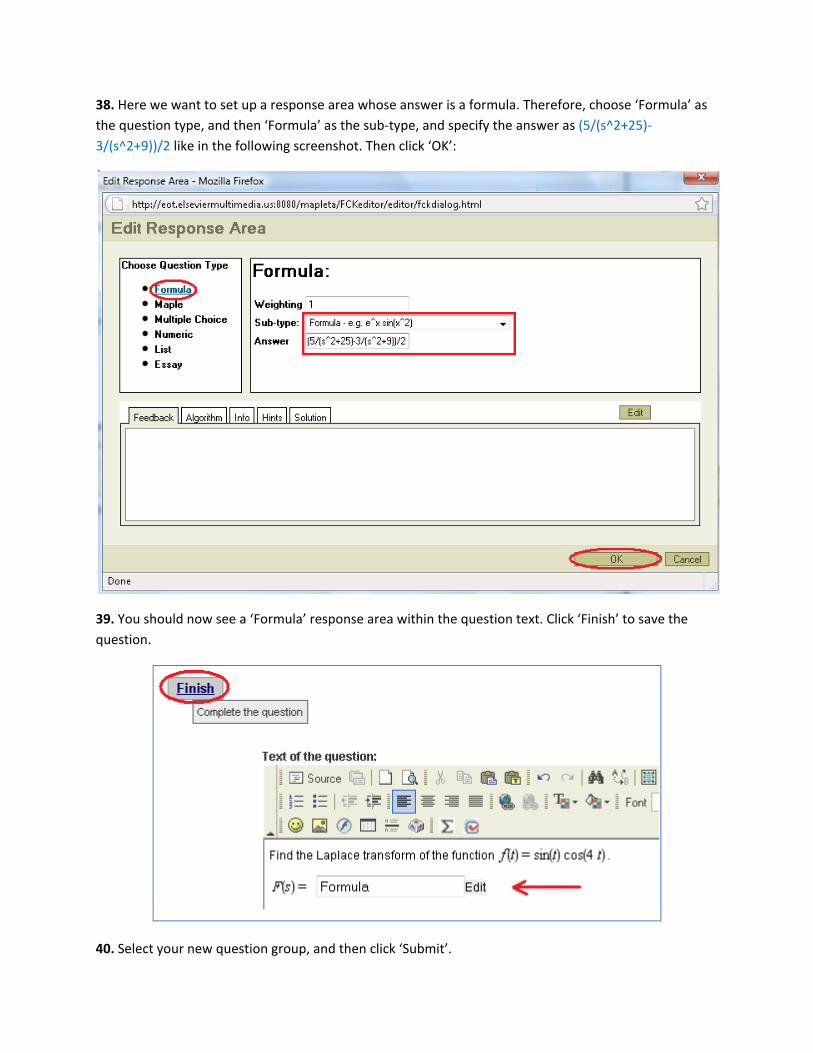
38. Here we want to set up a response area whose answer is a formula. Therefore, choose ‘Formula’ as the question type, and then ‘Formula’ as the sub‐type, and specify the answer as (5/(s^2+25)‐3/(s^2+9))/2 like in the following screenshot. Then click ‘OK’:
39. You should now see a ‘Formula’ response area within the question text. Click ‘Finish’ to save the question.
40. Select your new question group, and then click ‘Submit’.
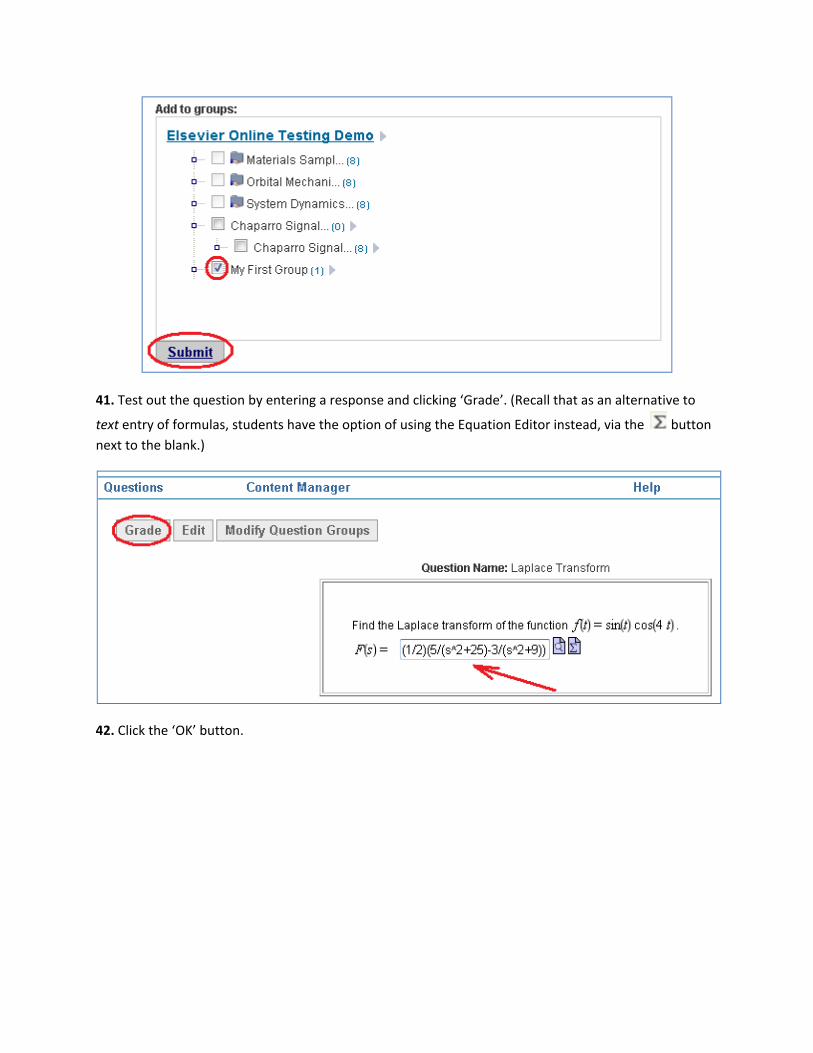
41. Test out the question by entering a response and clicking ‘Grade’. (Recall that as an alternative to
text entry of formulas, students have the option of using the Equation Editor instead, via the button next to the blank.)
42. Click the ‘OK’ button.
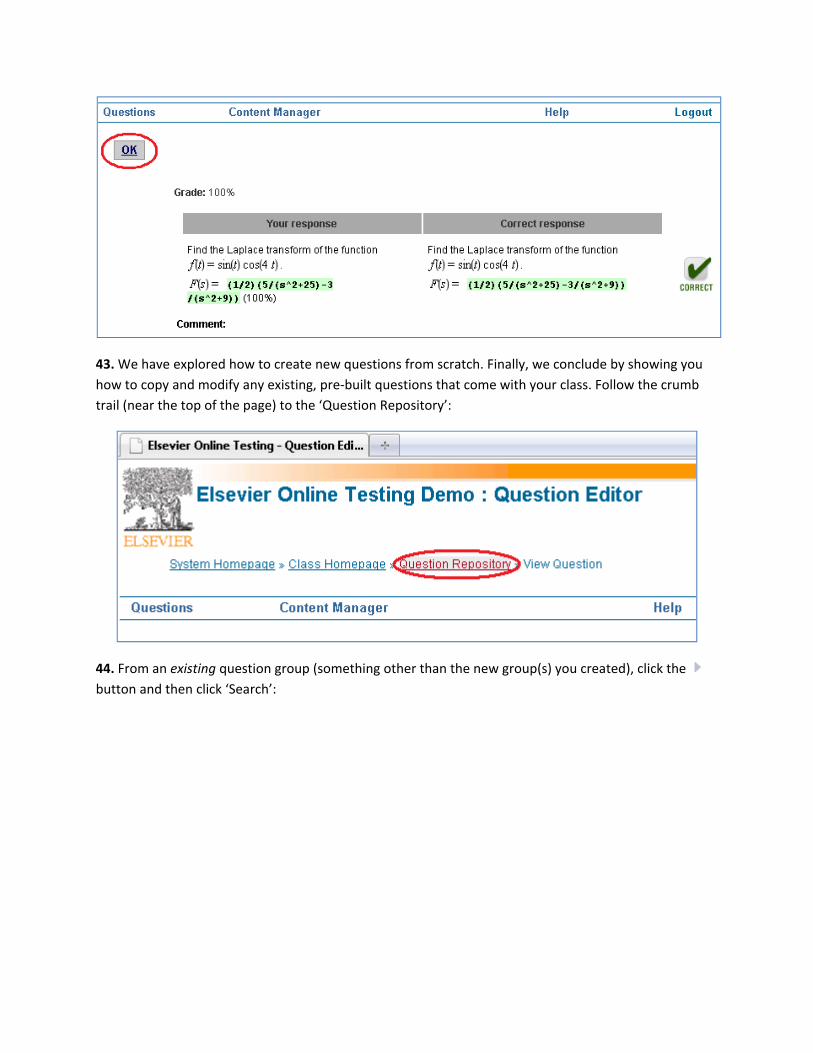
43. We have explored how to create new questions from scratch. Finally, we conclude by showing you how to copy and modify any existing, pre‐built questions that come with your class. Follow the crumb trail (near the top of the page) to the ‘Question Repository’:
44. From an existing question group (something other than the new group(s) you created), click the button and then click ‘Search’:

45. On the right side of the page you see the list of questions in the group. Across from a question, click
the icon to preview it.
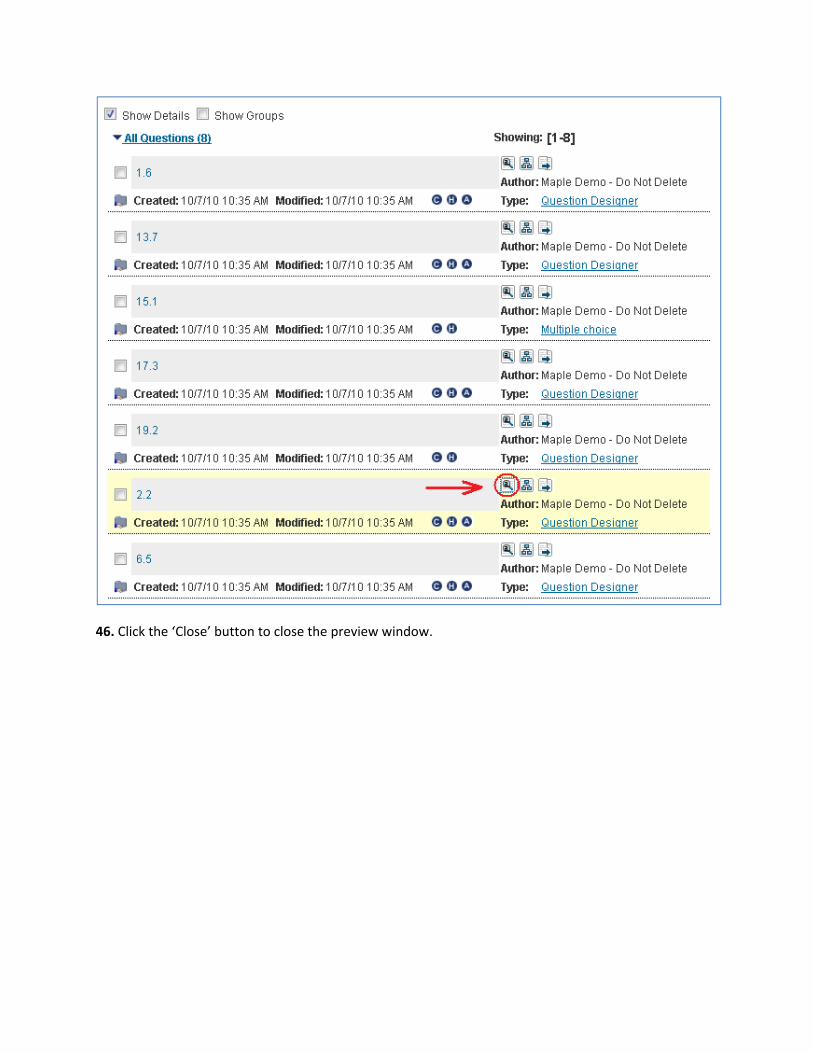
46. Click the ‘Close’ button to close the preview window.
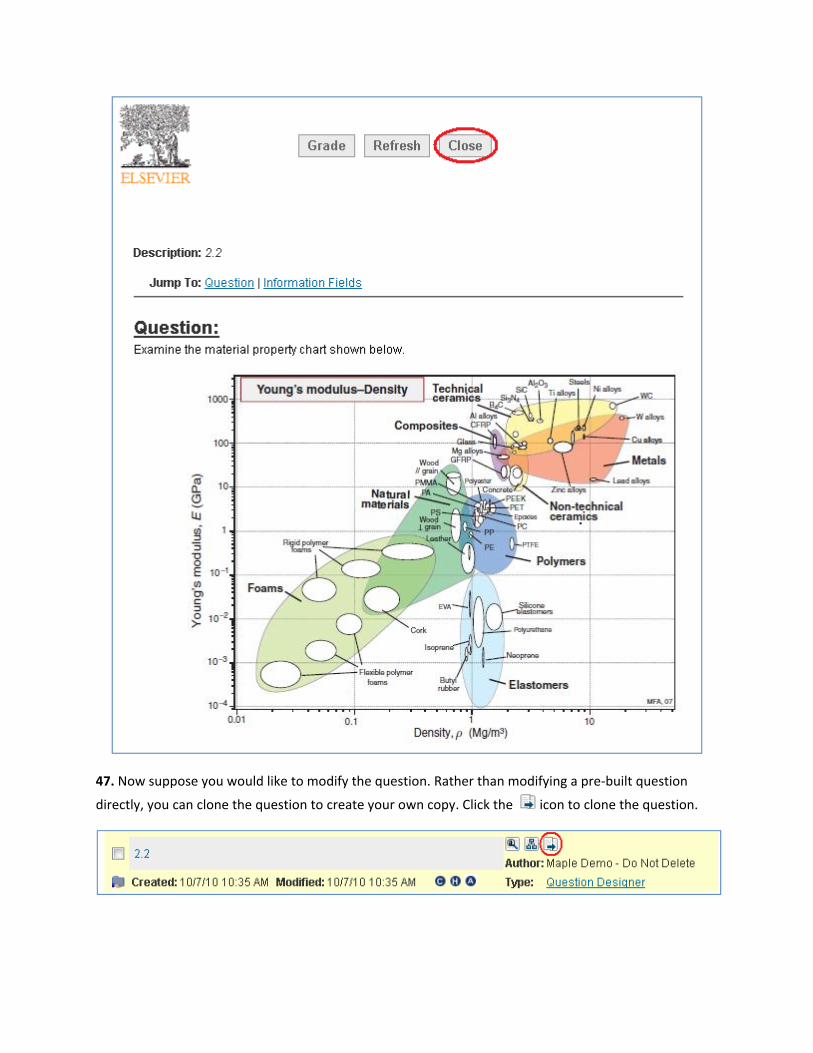
47. Now suppose you would like to modify the question. Rather than modifying a pre‐built question
directly, you can clone the question to create your own copy. Click the icon to clone the question.

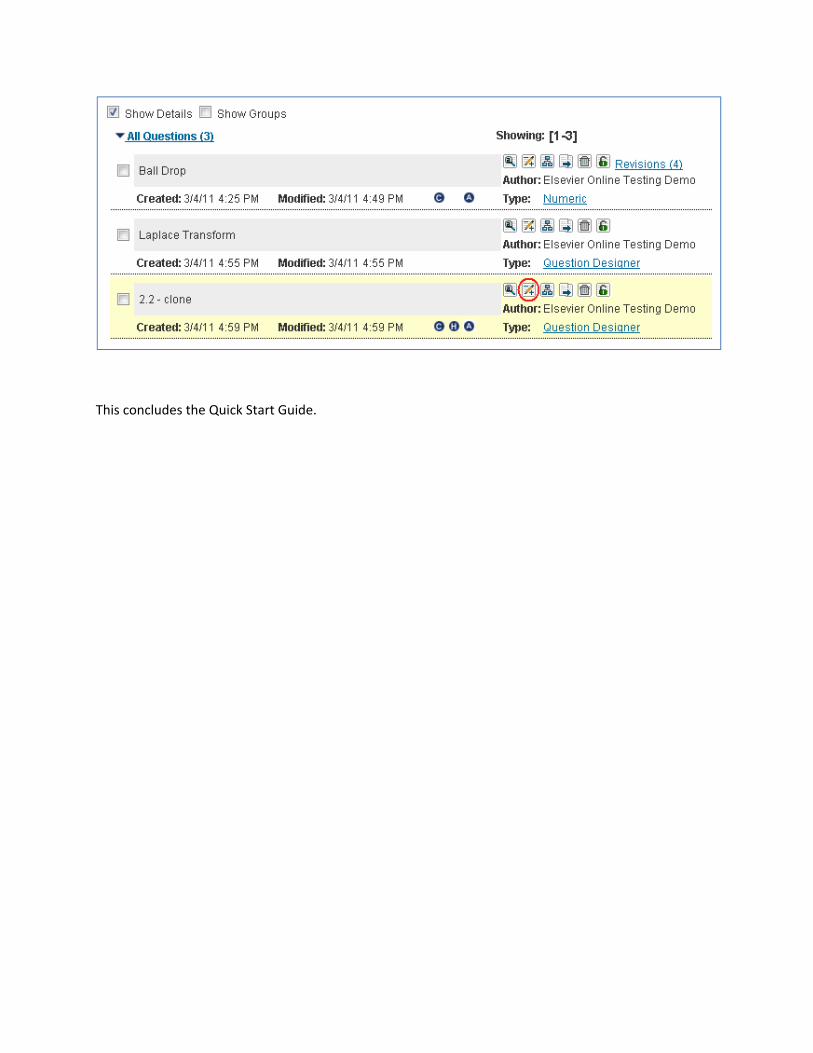
48. The copy question doesn’t yet belong to any particular group, so click the ‘Questions not in groups’ link to find the question; the question name will be suffixed with “‐ clone”. Now you can put the
question into your new group. Across from the question, click the icon.
49. Then select your new group and click ‘Submit’.
50. This will place the copy question into your group. From there you can edit the question by clicking
the icon and modifying the question as you wish.
This concludes the Quick Start Guide.