Embed Size (px)
Citation preview
Quick Guide: SABRO/FF (IVR) CAP voice-text Version 1.0
Quick Reference Guide:Voice-Text (IVR) CAP Messaging with
SABRO and Freedom Fone
PurposeThe aim of this quick guide is to provide instructions and operating procedures for alerting first-responders. Following an incident the HIH needs to alert Hazard Information Hub Operators (HIHOs) and Community Emergency Response Team (CERT) members. The HIHO and CERT are authorized personnel that exchange crisis information between the HIH and the field. We use the Common Alerting Protocol (CAP) Emergency Data Exchange Language (EDXL) -enabled Sahana Alerting Broker (SABRO)
Objectives1) Inform the HIHO to report for duty at the Hazard Information Hub (HIH)2) Inform the CERT members to respond to the hazard event
Operating Procedures1) Create a CAP message with SABRO2) Produce a voice-text message in SABRO3) Record localized audio with Audacity (.mp3 or .wav)4) Upload audio file to FF5) Upload audio file to SABRO6) Issue short-text SMS from SABRO7) View acknowledgement reports in FF
About the Software● Sahana Common Alerting Protocol-enabled Alerting module is a module of the Sahana
Alerting and Messaging and Alerting Broker: http :// www . scdmc . lk / dokuwiki ● Freedom Fone is an interactive voice response system: http :// www . freedomfone . org /
Tharaka Wilfred (www.lirneasia.net) 2011-November-30 1 of 24
Quick Guide: SABRO/FF (IVR) CAP voice-text Version 1.0
Click the Table of Content hyperlink to jump right to the required functionPurposeObjectivesOperating Procedures About the Software 1) Create a CAP message with SABRO
1.1) Accessing Sahana 1.2) Open SABRO application 1.3) Start a new message 1.4) Select the message template 1.5) Complete Alert segment 1.6) Complete Information segment 1.7) Complete Area segment 1.8) Save the SABRO CAP message
2) Produce voice - text message with SABRO 2.1) Start to create IVR message 2.2) Select IVR check box 2.3) Save created IVR message 2.4) Successful message 2.5) Select completed IVR message 2.6) View the IVR voice - text content
3) Record localized Audio with Audacity 3.1) Open the Audacity 3.2) Ready mic to record the message 3.3) Mic is ready to use 3.4) Record a message on audacity 3.5) Save the audio file
4) Upload Audio File to Freedom Fone 4.1) Accessing FreedomFone Adding new Content 4.2) Customizing the content
5) Upload audio file to SABRO 5.1) Select Update button 5.2) Complete data in Resource tab 5.3) Saved and Issue Alert
6) Issue Short - Text SMS alert in SABRO 6.1) Select the targeted recipient list 6.2) Select the Delivery type as SMS 6.3) Converted CAP Output 6.4) Submission Successful message
7) View acknowledgement report in FF
Tharaka Wilfred (www.lirneasia.net) 2011-November-30 2 of 24
Quick Guide: SABRO/FF (IVR) CAP voice-text Version 1.0
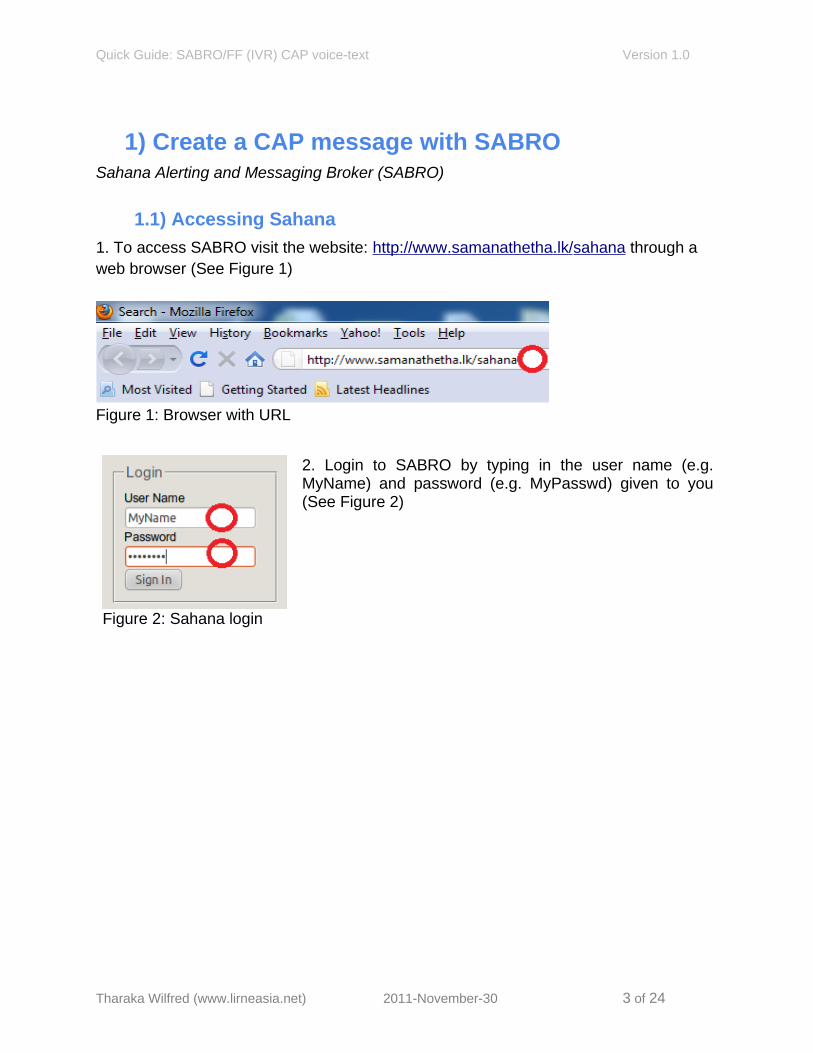
1) Create a CAP message with SABROSahana Alerting and Messaging Broker (SABRO)
1.1) Accessing Sahana
1. To access SABRO visit the website: http :// www . samanathetha . lk / sahana through a web browser (See Figure 1)
Figure 1: Browser with URL
Figure 2: Sahana login
2. Login to SABRO by typing in the user name (e.g. MyName) and password (e.g. MyPasswd) given to you (See Figure 2)
Tharaka Wilfred (www.lirneasia.net) 2011-November-30 3 of 24
Quick Guide: SABRO/FF (IVR) CAP voice-text Version 1.0
1.2) Open SABRO application
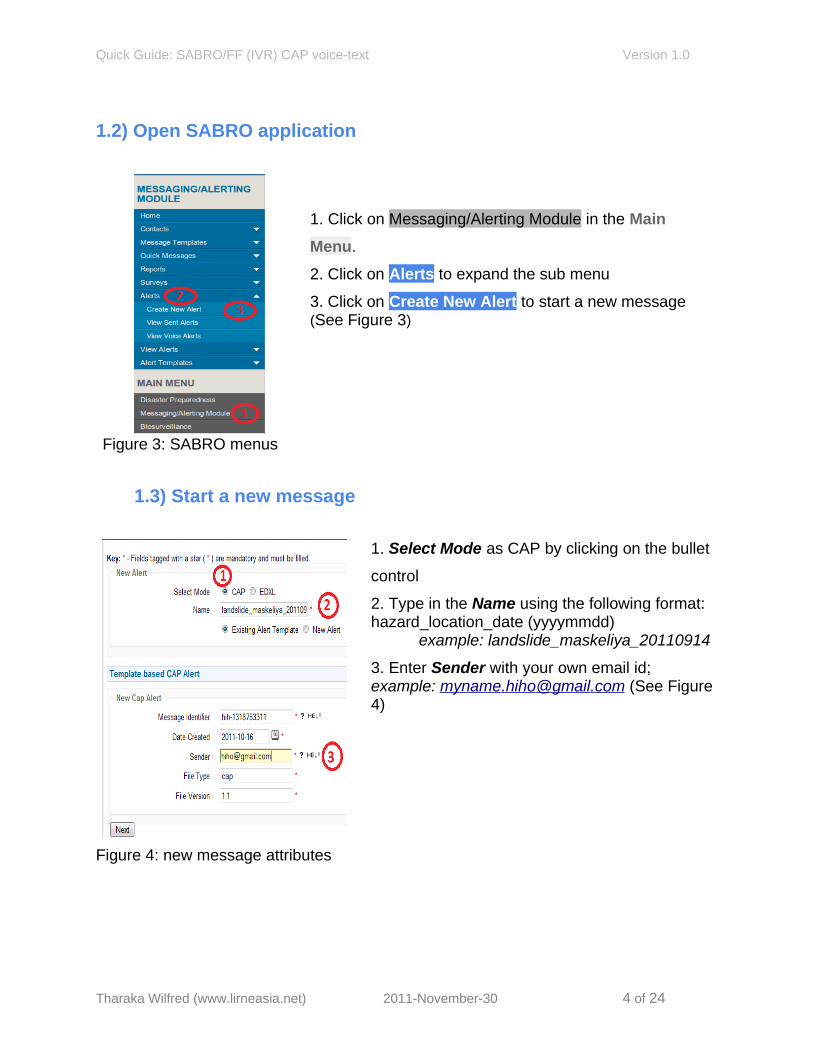
Figure 3: SABRO menus
1. Click on Messaging/Alerting Module in the Main
Menu.
2. Click on Alerts to expand the sub menu
3. Click on Create New Alert to start a new message(See Figure 3)
1.3) Start a new message
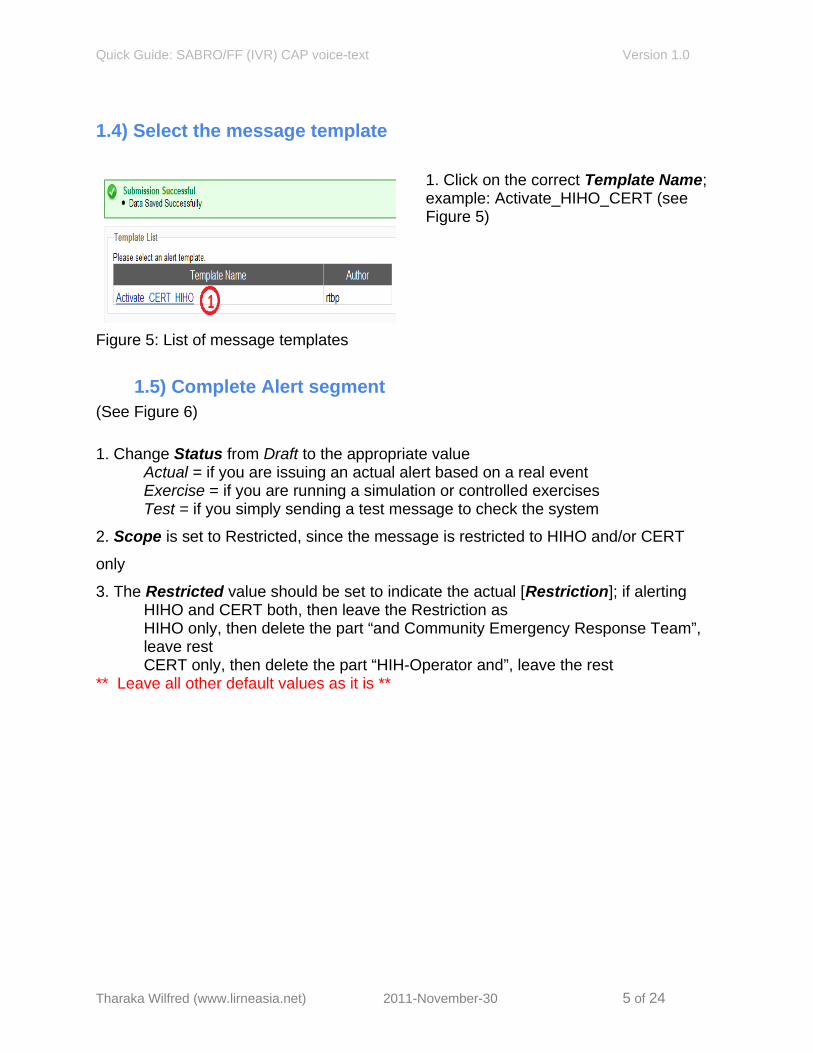
1. Select Mode as CAP by clicking on the bullet
control
2. Type in the Name using the following format: hazard_location_date (yyyymmdd)
example: landslide_maskeliya_20110914
3. Enter Sender with your own email id; example: myname . hiho @ gmail . com (See Figure 4)
Figure 4: new message attributes
Tharaka Wilfred (www.lirneasia.net) 2011-November-30 4 of 24
Quick Guide: SABRO/FF (IVR) CAP voice-text Version 1.0
1.4) Select the message template
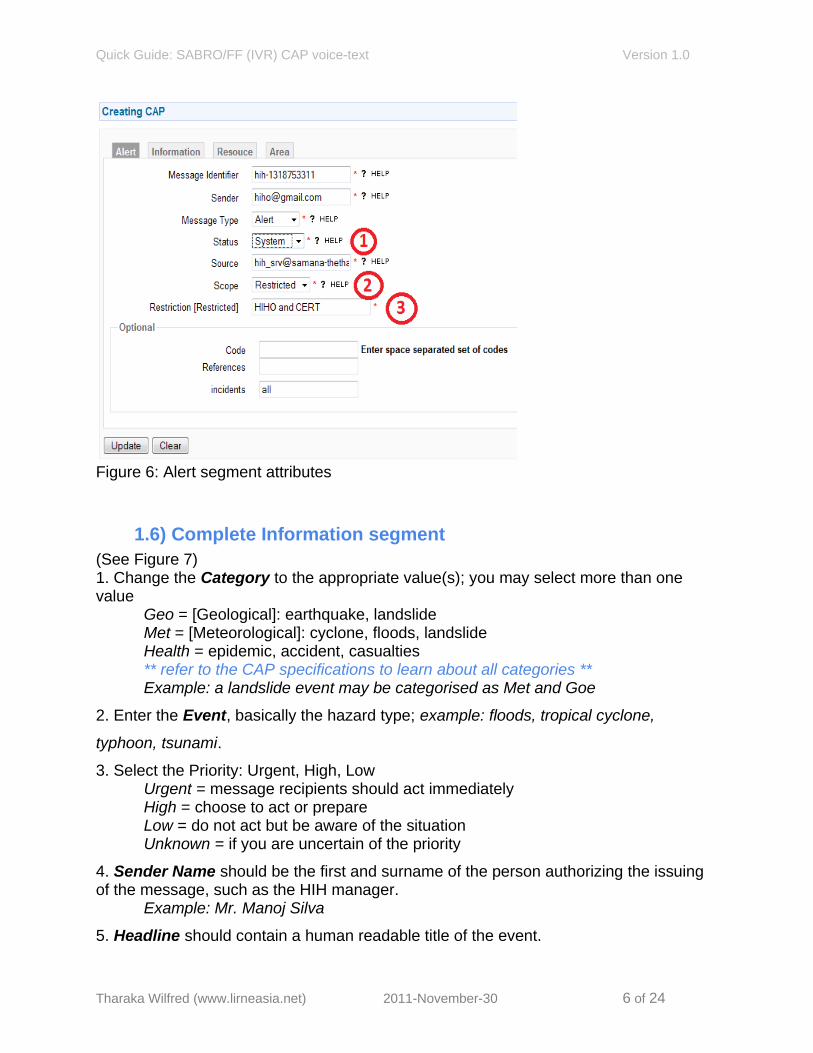
1. Click on the correct Template Name; example: Activate_HIHO_CERT (see Figure 5)
Figure 5: List of message templates
1.5) Complete Alert segment(See Figure 6)
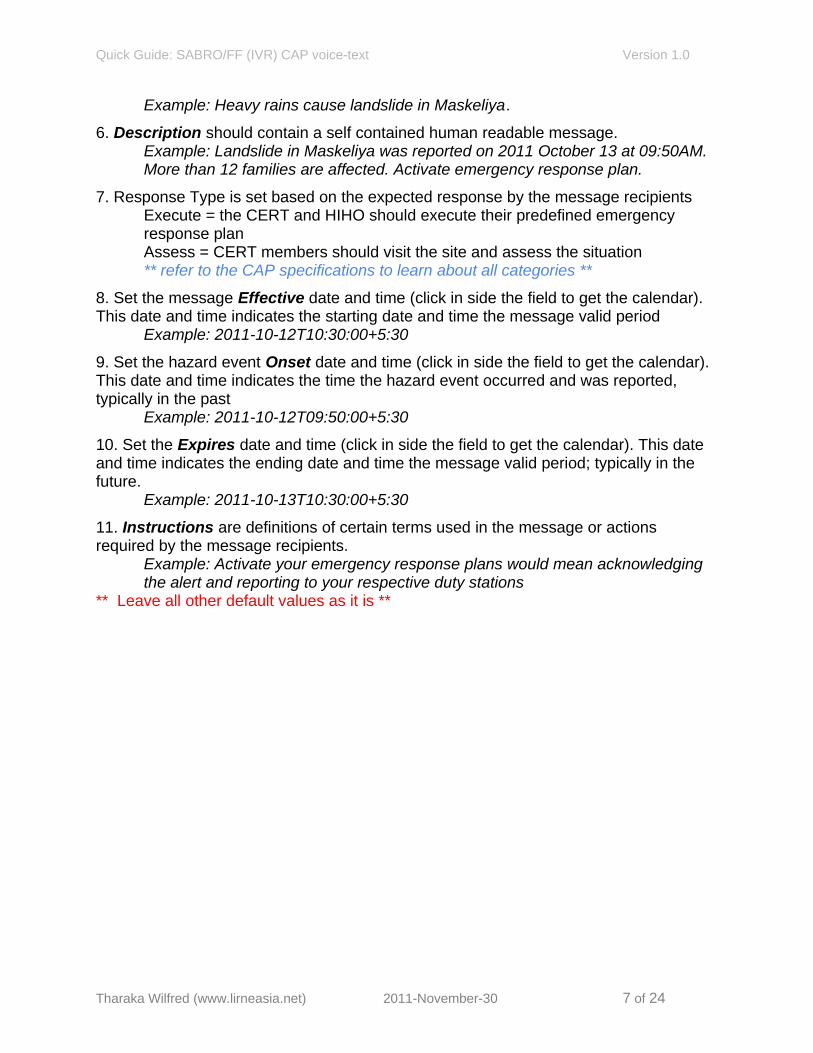
1. Change Status from Draft to the appropriate valueActual = if you are issuing an actual alert based on a real eventExercise = if you are running a simulation or controlled exercisesTest = if you simply sending a test message to check the system
2. Scope is set to Restricted, since the message is restricted to HIHO and/or CERT
only
3. The Restricted value should be set to indicate the actual [Restriction]; if alertingHIHO and CERT both, then leave the Restriction asHIHO only, then delete the part “and Community Emergency Response Team”, leave restCERT only, then delete the part “HIH-Operator and”, leave the rest
** Leave all other default values as it is **
Tharaka Wilfred (www.lirneasia.net) 2011-November-30 5 of 24
Quick Guide: SABRO/FF (IVR) CAP voice-text Version 1.0
Figure 6: Alert segment attributes
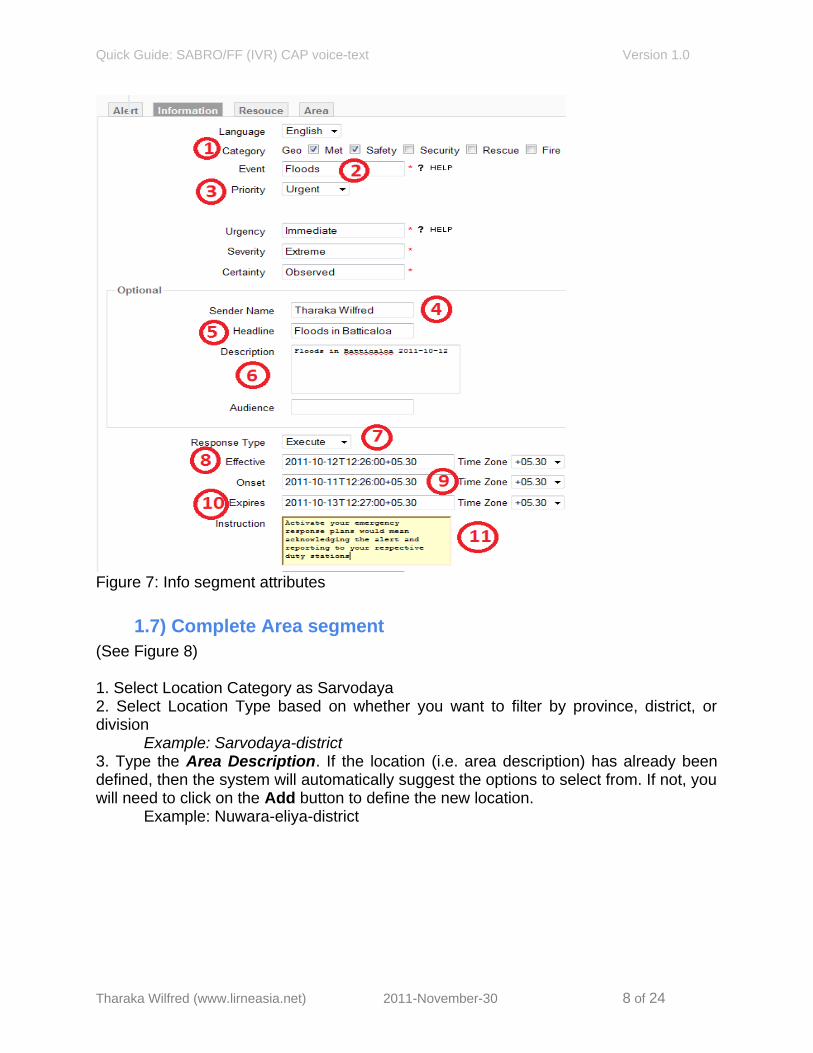
1.6) Complete Information segment(See Figure 7)1. Change the Category to the appropriate value(s); you may select more than one value
Geo = [Geological]: earthquake, landslideMet = [Meteorological]: cyclone, floods, landslideHealth = epidemic, accident, casualties** refer to the CAP specifications to learn about all categories **Example: a landslide event may be categorised as Met and Goe
2. Enter the Event, basically the hazard type; example: floods, tropical cyclone,
typhoon, tsunami.
3. Select the Priority: Urgent, High, LowUrgent = message recipients should act immediatelyHigh = choose to act or prepareLow = do not act but be aware of the situationUnknown = if you are uncertain of the priority
4. Sender Name should be the first and surname of the person authorizing the issuing of the message, such as the HIH manager.
Example: Mr. Manoj Silva
5. Headline should contain a human readable title of the event.
Tharaka Wilfred (www.lirneasia.net) 2011-November-30 6 of 24
Quick Guide: SABRO/FF (IVR) CAP voice-text Version 1.0
Example: Heavy rains cause landslide in Maskeliya.
6. Description should contain a self contained human readable message.Example: Landslide in Maskeliya was reported on 2011 October 13 at 09:50AM. More than 12 families are affected. Activate emergency response plan.
7. Response Type is set based on the expected response by the message recipientsExecute = the CERT and HIHO should execute their predefined emergency response planAssess = CERT members should visit the site and assess the situation** refer to the CAP specifications to learn about all categories **
8. Set the message Effective date and time (click in side the field to get the calendar). This date and time indicates the starting date and time the message valid period
Example: 2011-10-12T10:30:00+5:30
9. Set the hazard event Onset date and time (click in side the field to get the calendar). This date and time indicates the time the hazard event occurred and was reported, typically in the past
Example: 2011-10-12T09:50:00+5:30
10. Set the Expires date and time (click in side the field to get the calendar). This date and time indicates the ending date and time the message valid period; typically in the future.
Example: 2011-10-13T10:30:00+5:30
11. Instructions are definitions of certain terms used in the message or actions required by the message recipients.
Example: Activate your emergency response plans would mean acknowledging the alert and reporting to your respective duty stations
** Leave all other default values as it is **
Tharaka Wilfred (www.lirneasia.net) 2011-November-30 7 of 24
Quick Guide: SABRO/FF (IVR) CAP voice-text Version 1.0
Figure 7: Info segment attributes
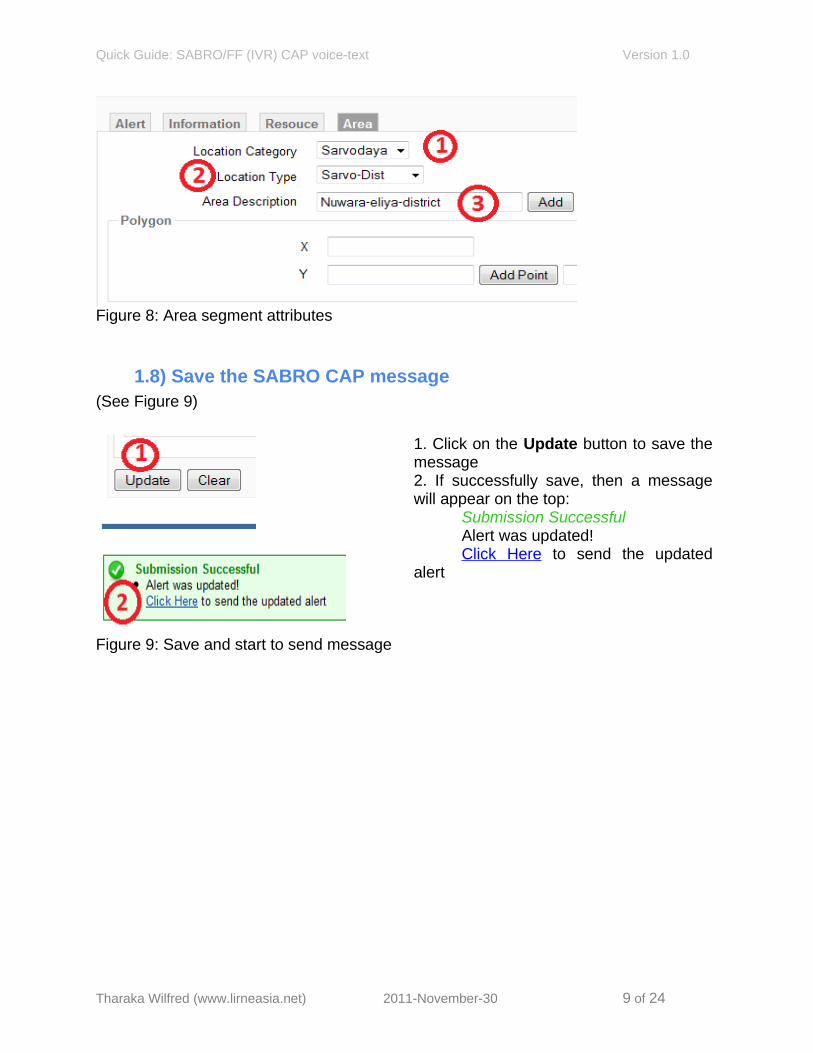
1.7) Complete Area segment(See Figure 8)
1. Select Location Category as Sarvodaya2. Select Location Type based on whether you want to filter by province, district, or division
Example: Sarvodaya-district3. Type the Area Description. If the location (i.e. area description) has already been defined, then the system will automatically suggest the options to select from. If not, you will need to click on the Add button to define the new location.
Example: Nuwara-eliya-district
Tharaka Wilfred (www.lirneasia.net) 2011-November-30 8 of 24
Quick Guide: SABRO/FF (IVR) CAP voice-text Version 1.0
Figure 8: Area segment attributes
1.8) Save the SABRO CAP message(See Figure 9)
1. Click on the Update button to save the message2. If successfully save, then a message will appear on the top:
Submission SuccessfulAlert was updated!Click Here to send the updated
alert
Figure 9: Save and start to send message
Tharaka Wilfred (www.lirneasia.net) 2011-November-30 9 of 24
Quick Guide: SABRO/FF (IVR) CAP voice-text Version 1.0
2) Produce voice-text message with SABRO
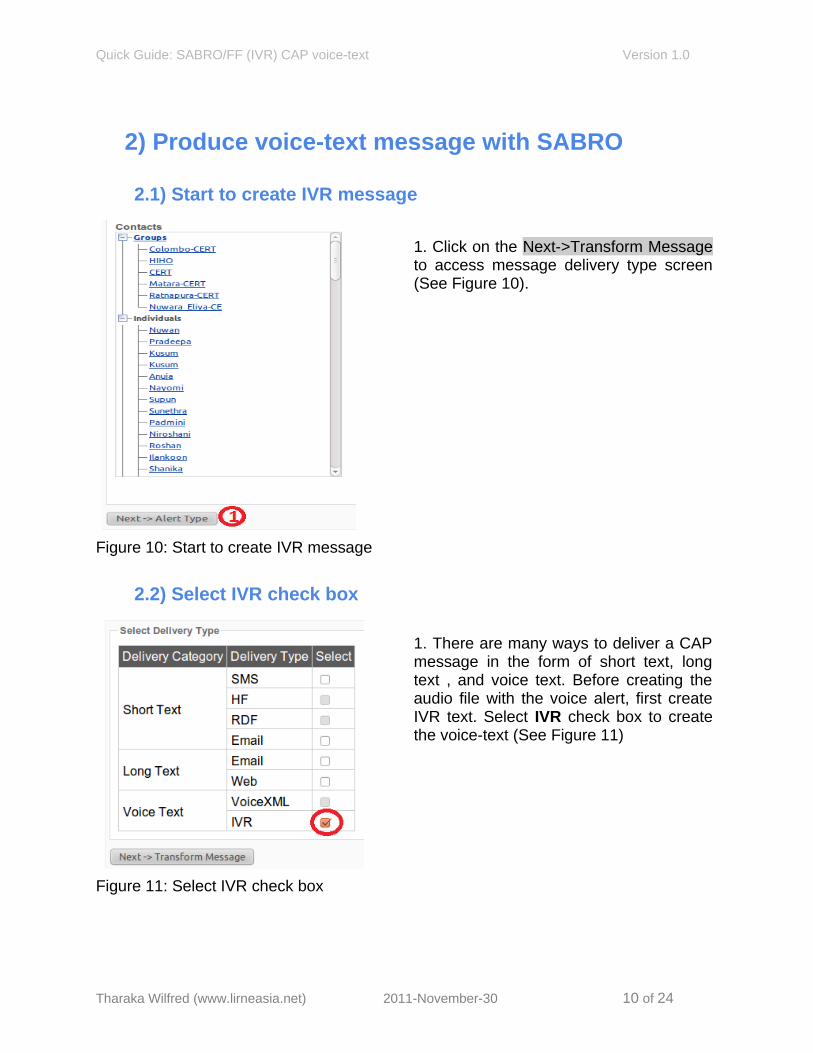
2.1) Start to create IVR message
1. Click on the Next->Transform Message to access message delivery type screen (See Figure 10).
Figure 10: Start to create IVR message
2.2) Select IVR check box
1. There are many ways to deliver a CAP message in the form of short text, long text , and voice text. Before creating the audio file with the voice alert, first create IVR text. Select IVR check box to create the voice-text (See Figure 11)
Figure 11: Select IVR check box
Tharaka Wilfred (www.lirneasia.net) 2011-November-30 10 of 24
Quick Guide: SABRO/FF (IVR) CAP voice-text Version 1.0
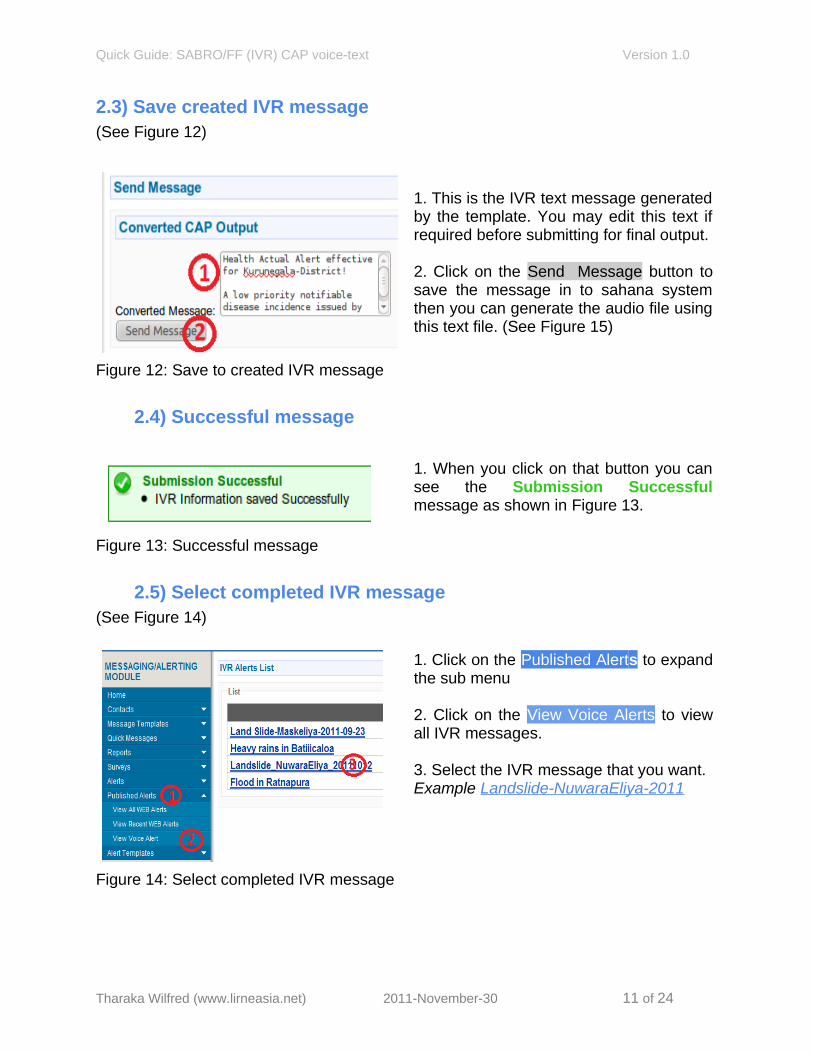
2.3) Save created IVR message(See Figure 12)
1. This is the IVR text message generated by the template. You may edit this text if required before submitting for final output.
2. Click on the Send Message button to save the message in to sahana system then you can generate the audio file using this text file. (See Figure 15)
Figure 12: Save to created IVR message
2.4) Successful message
1. When you click on that button you can see the Submission Successful message as shown in Figure 13.
Figure 13: Successful message
2.5) Select completed IVR message(See Figure 14)
1. Click on the Published Alerts to expand the sub menu
2. Click on the View Voice Alerts to view all IVR messages.
3. Select the IVR message that you want.Example Landslide-NuwaraEliya-2011
Figure 14: Select completed IVR message
Tharaka Wilfred (www.lirneasia.net) 2011-November-30 11 of 24
Quick Guide: SABRO/FF (IVR) CAP voice-text Version 1.0
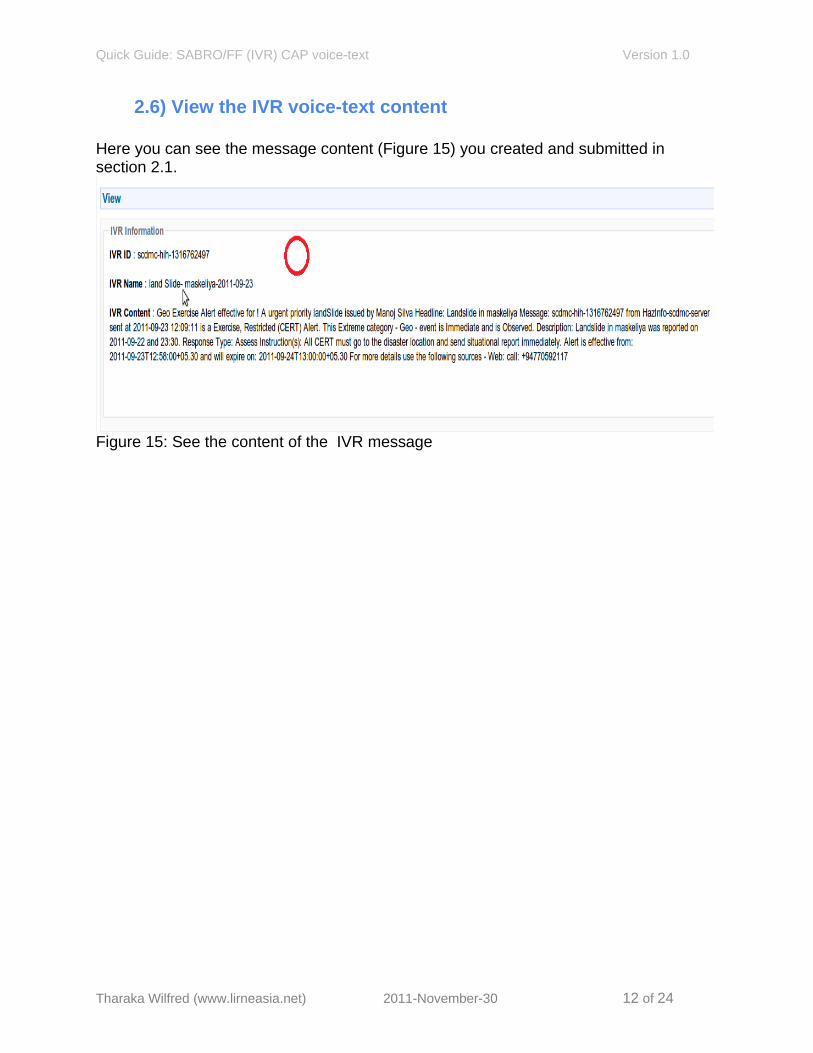
2.6) View the IVR voice-text content
Here you can see the message content (Figure 15) you created and submitted in section 2.1.
Figure 15: See the content of the IVR message
Tharaka Wilfred (www.lirneasia.net) 2011-November-30 12 of 24
Quick Guide: SABRO/FF (IVR) CAP voice-text Version 1.0
3) Record localized Audio with Audacity
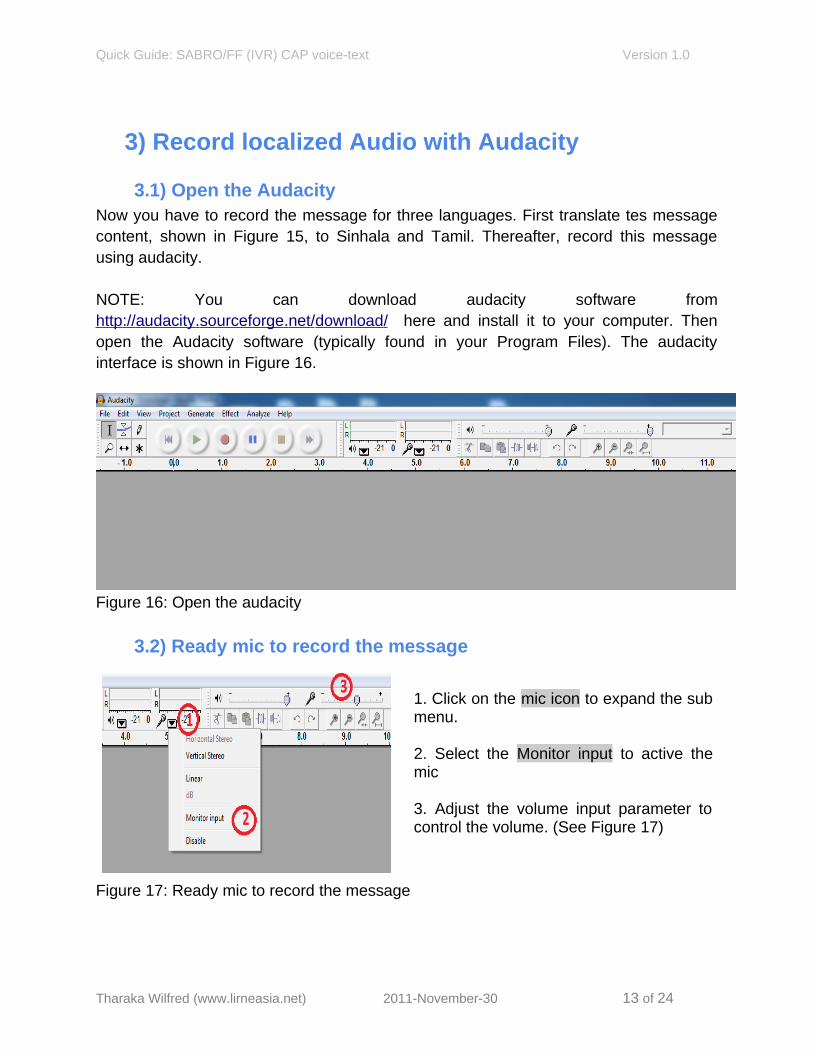
3.1) Open the AudacityNow you have to record the message for three languages. First translate tes message content, shown in Figure 15, to Sinhala and Tamil. Thereafter, record this message using audacity.
NOTE: You can download audacity software from http :// audacity . sourceforge . net / download / here and install it to your computer. Then open the Audacity software (typically found in your Program Files). The audacity interface is shown in Figure 16.
Figure 16: Open the audacity
3.2) Ready mic to record the message
1. Click on the mic icon to expand the sub menu.
2. Select the Monitor input to active the mic
3. Adjust the volume input parameter to control the volume. (See Figure 17)
Figure 17: Ready mic to record the message
Tharaka Wilfred (www.lirneasia.net) 2011-November-30 13 of 24
Quick Guide: SABRO/FF (IVR) CAP voice-text Version 1.0
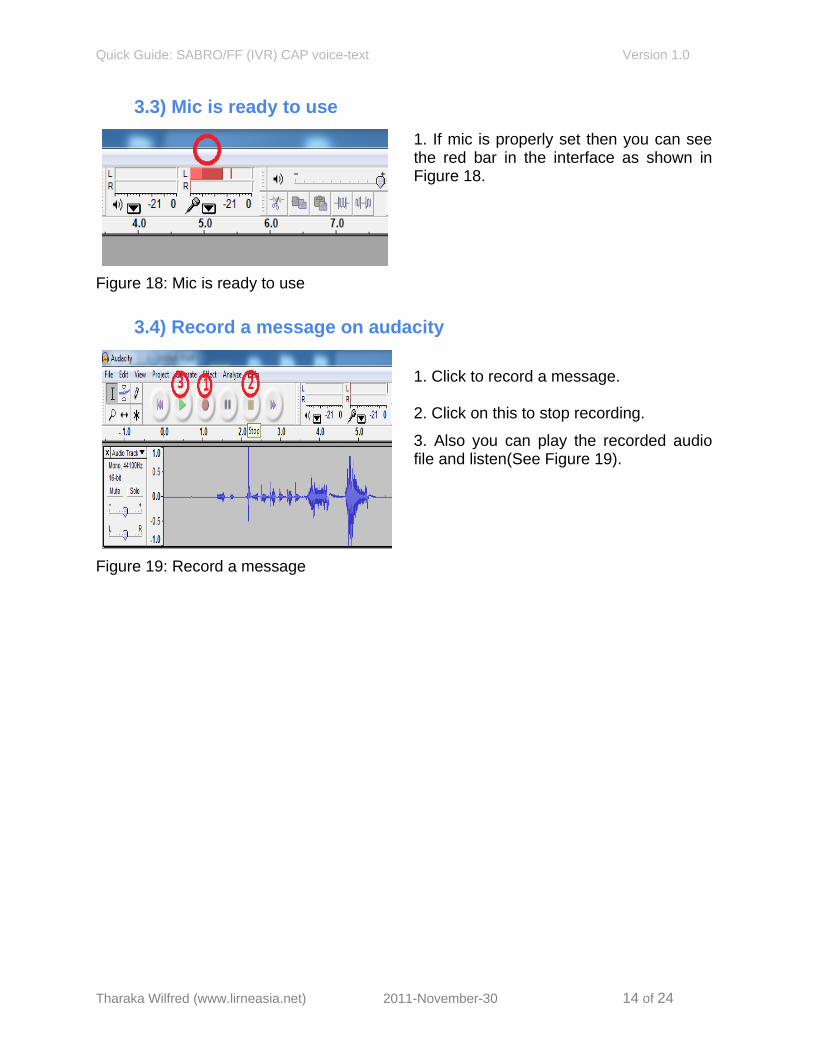
3.3) Mic is ready to use
1. If mic is properly set then you can see the red bar in the interface as shown in Figure 18.
Figure 18: Mic is ready to use
3.4) Record a message on audacity
1. Click to record a message.
2. Click on this to stop recording.
3. Also you can play the recorded audio file and listen(See Figure 19).
Figure 19: Record a message
Tharaka Wilfred (www.lirneasia.net) 2011-November-30 14 of 24
Quick Guide: SABRO/FF (IVR) CAP voice-text Version 1.0
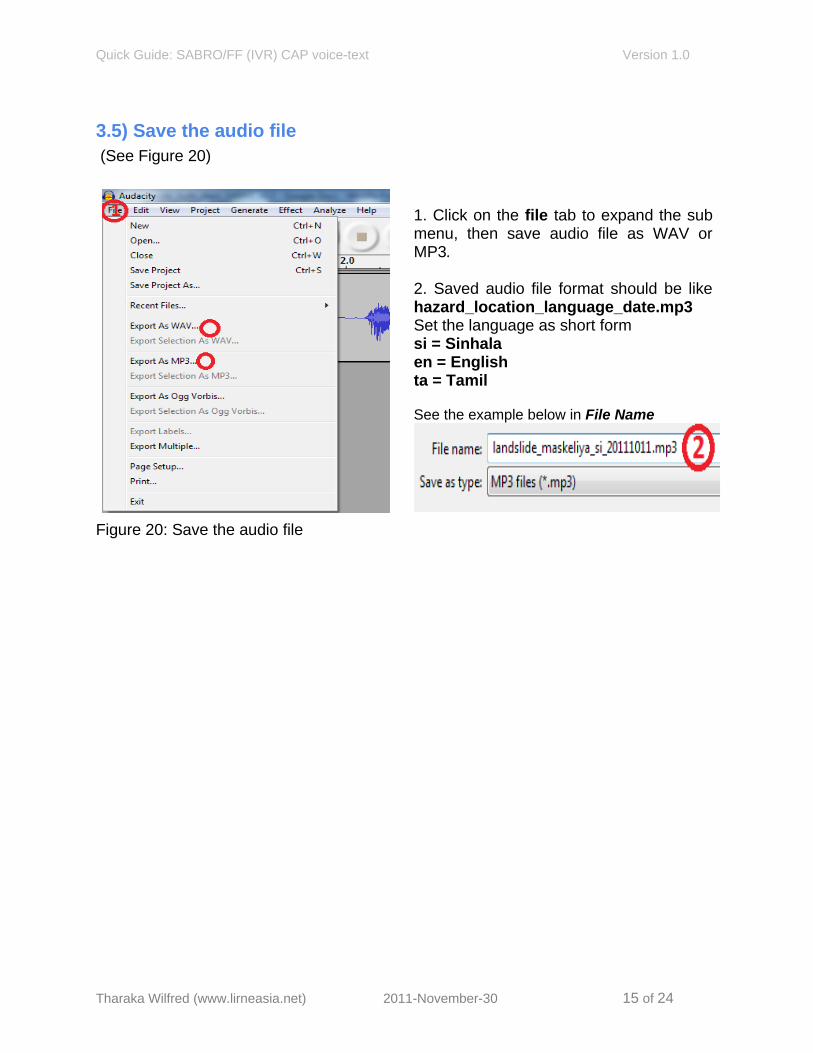
3.5) Save the audio file (See Figure 20)
1. Click on the file tab to expand the sub menu, then save audio file as WAV or MP3.
2. Saved audio file format should be like hazard_location_language_date.mp3Set the language as short form si = Sinhalaen = Englishta = Tamil
See the example below in File Name
Figure 20: Save the audio file
Tharaka Wilfred (www.lirneasia.net) 2011-November-30 15 of 24
Quick Guide: SABRO/FF (IVR) CAP voice-text Version 1.0
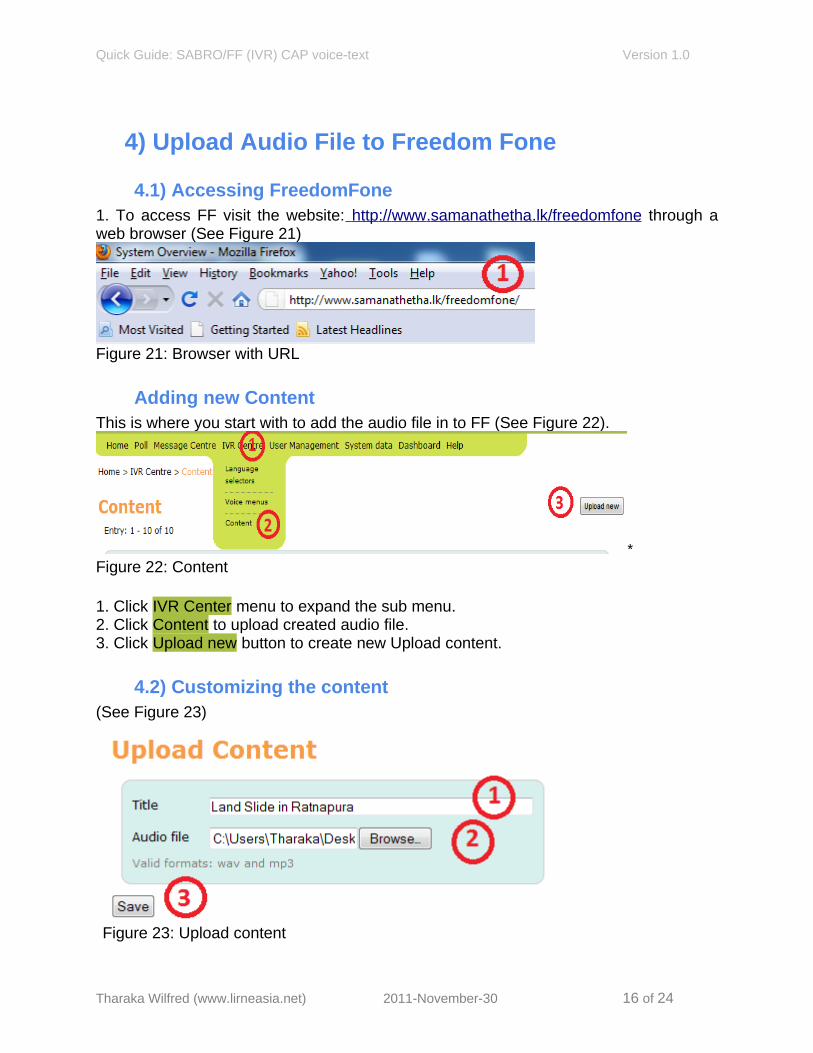
4) Upload Audio File to Freedom Fone
4.1) Accessing FreedomFone1. To access FF visit the website: http :// www . samanathetha . lk / freedomfone through a web browser (See Figure 21)
Figure 21: Browser with URL
Adding new ContentThis is where you start with to add the audio file in to FF (See Figure 22).
*Figure 22: Content
1. Click IVR Center menu to expand the sub menu.2. Click Content to upload created audio file.3. Click Upload new button to create new Upload content.
4.2) Customizing the content(See Figure 23)
Figure 23: Upload content
Tharaka Wilfred (www.lirneasia.net) 2011-November-30 16 of 24
Quick Guide: SABRO/FF (IVR) CAP voice-text Version 1.0
1. Set the Title same as the “headline” value in the SABRO created CAP message.2. Browse the, incident related, audio alert file (.wav or .mp3) from the directory.3. Click Save button to upload the audio file.
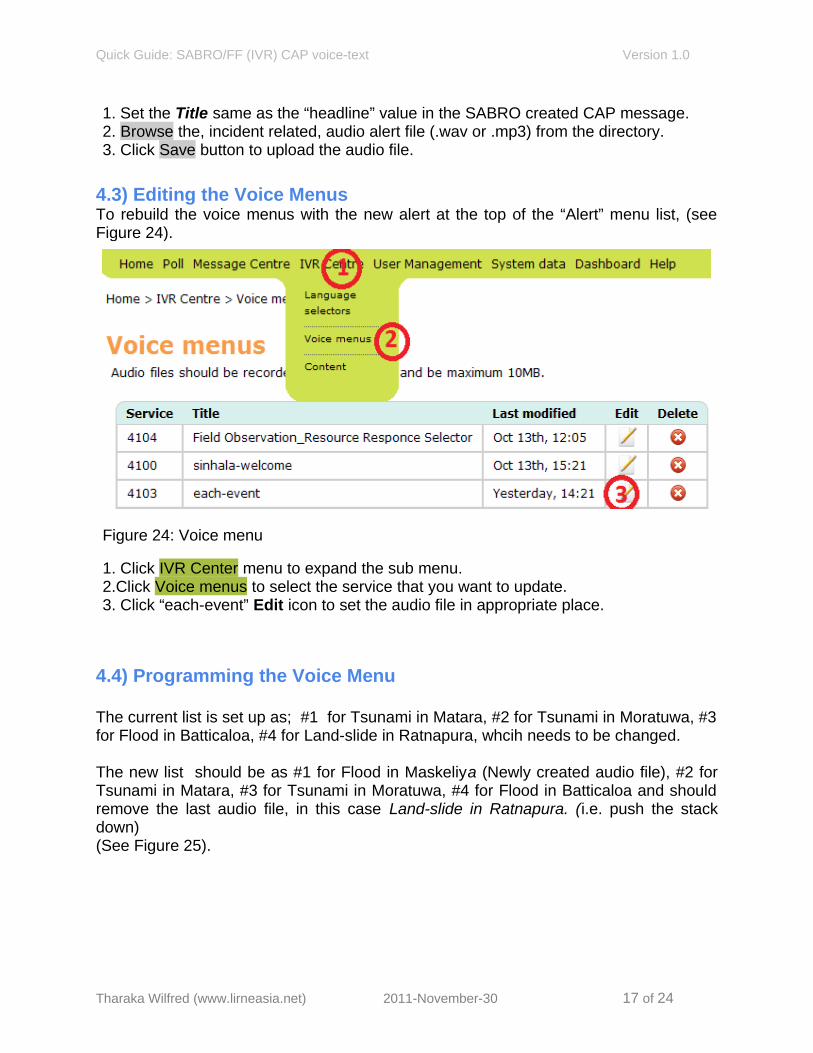
4.3) Editing the Voice MenusTo rebuild the voice menus with the new alert at the top of the “Alert” menu list, (see Figure 24).
Figure 24: Voice menu
1. Click IVR Center menu to expand the sub menu.2.Click Voice menus to select the service that you want to update.3. Click “each-event” Edit icon to set the audio file in appropriate place.
4.4) Programming the Voice Menu
The current list is set up as; #1 for Tsunami in Matara, #2 for Tsunami in Moratuwa, #3 for Flood in Batticaloa, #4 for Land-slide in Ratnapura, whcih needs to be changed.
The new list should be as #1 for Flood in Maskeliya (Newly created audio file), #2 for Tsunami in Matara, #3 for Tsunami in Moratuwa, #4 for Flood in Batticaloa and should remove the last audio file, in this case Land-slide in Ratnapura. (i.e. push the stack down)(See Figure 25).
Tharaka Wilfred (www.lirneasia.net) 2011-November-30 17 of 24
Quick Guide: SABRO/FF (IVR) CAP voice-text Version 1.0
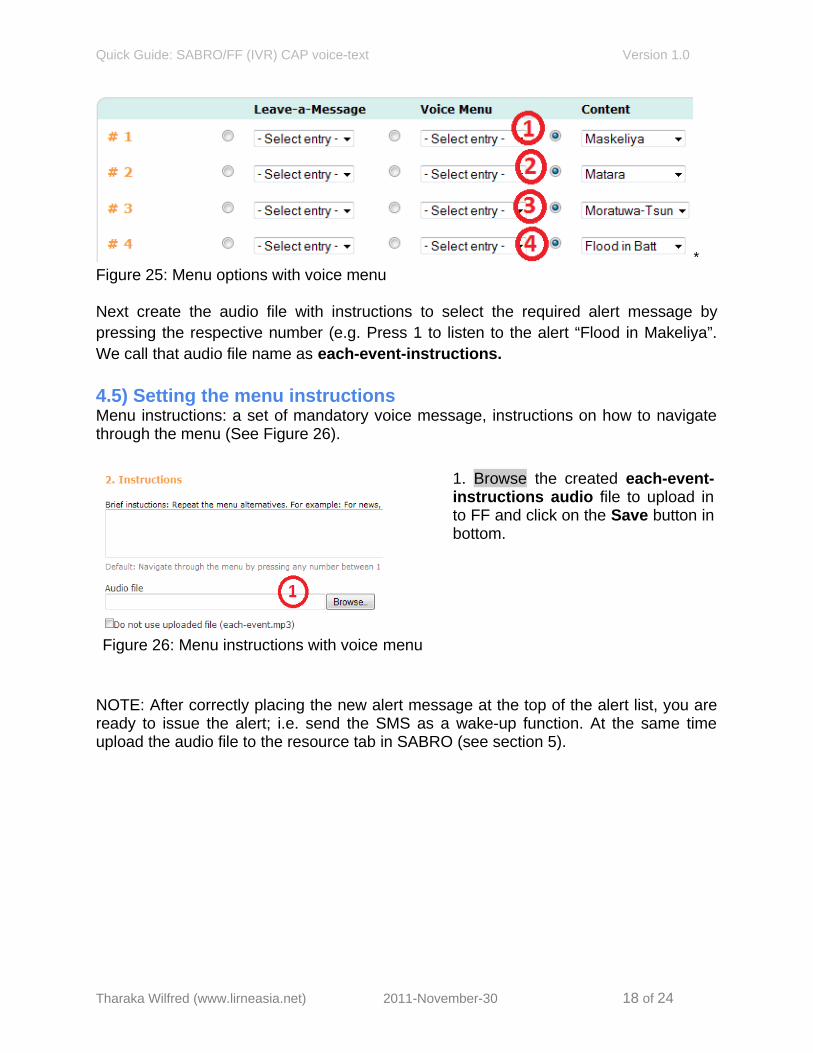
*Figure 25: Menu options with voice menu
Next create the audio file with instructions to select the required alert message by pressing the respective number (e.g. Press 1 to listen to the alert “Flood in Makeliya”. We call that audio file name as each-event-instructions.
4.5) Setting the menu instructions Menu instructions: a set of mandatory voice message, instructions on how to navigate through the menu (See Figure 26).
Figure 26: Menu instructions with voice menu
1. Browse the created each-event-instructions audio file to upload in to FF and click on the Save button in bottom.
NOTE: After correctly placing the new alert message at the top of the alert list, you are ready to issue the alert; i.e. send the SMS as a wake-up function. At the same time upload the audio file to the resource tab in SABRO (see section 5).
Tharaka Wilfred (www.lirneasia.net) 2011-November-30 18 of 24
Quick Guide: SABRO/FF (IVR) CAP voice-text Version 1.0
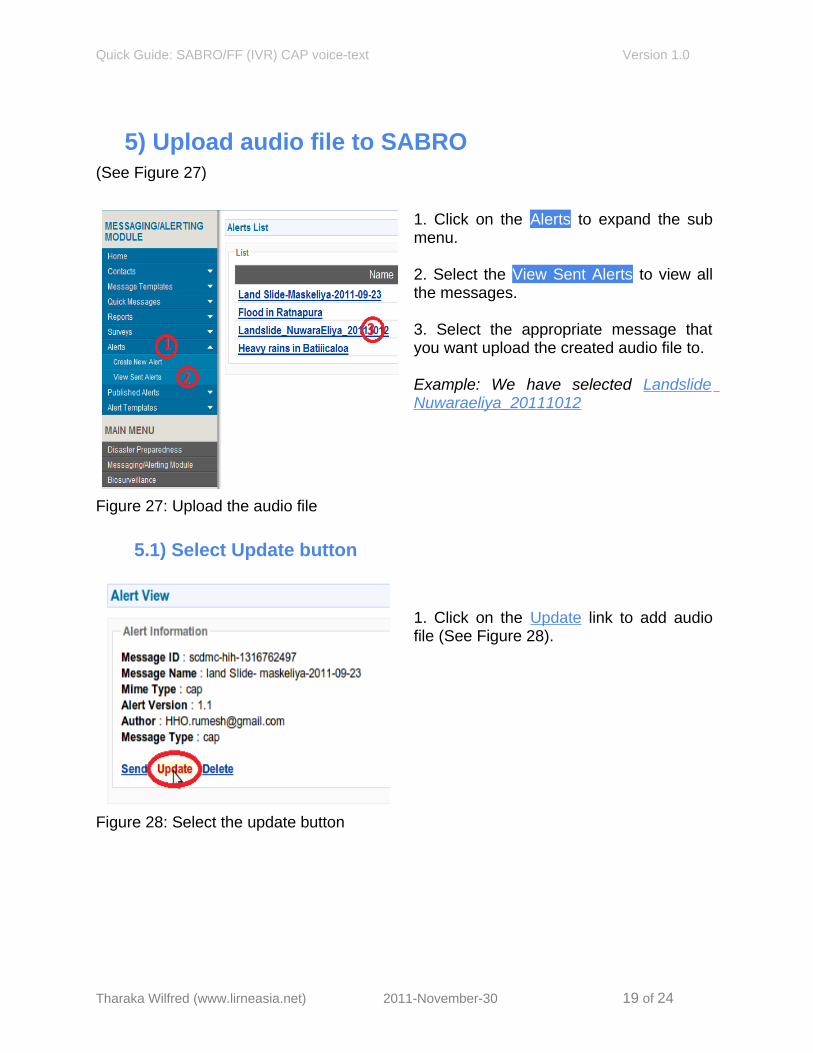
5) Upload audio file to SABRO(See Figure 27)
1. Click on the Alerts to expand the sub menu.
2. Select the View Sent Alerts to view all the messages.
3. Select the appropriate message that you want upload the created audio file to.
Example: We have selected Landslide Nuwaraeliya_20111012
Figure 27: Upload the audio file
5.1) Select Update button
1. Click on the Update link to add audio file (See Figure 28).
Figure 28: Select the update button
Tharaka Wilfred (www.lirneasia.net) 2011-November-30 19 of 24
Quick Guide: SABRO/FF (IVR) CAP voice-text Version 1.0
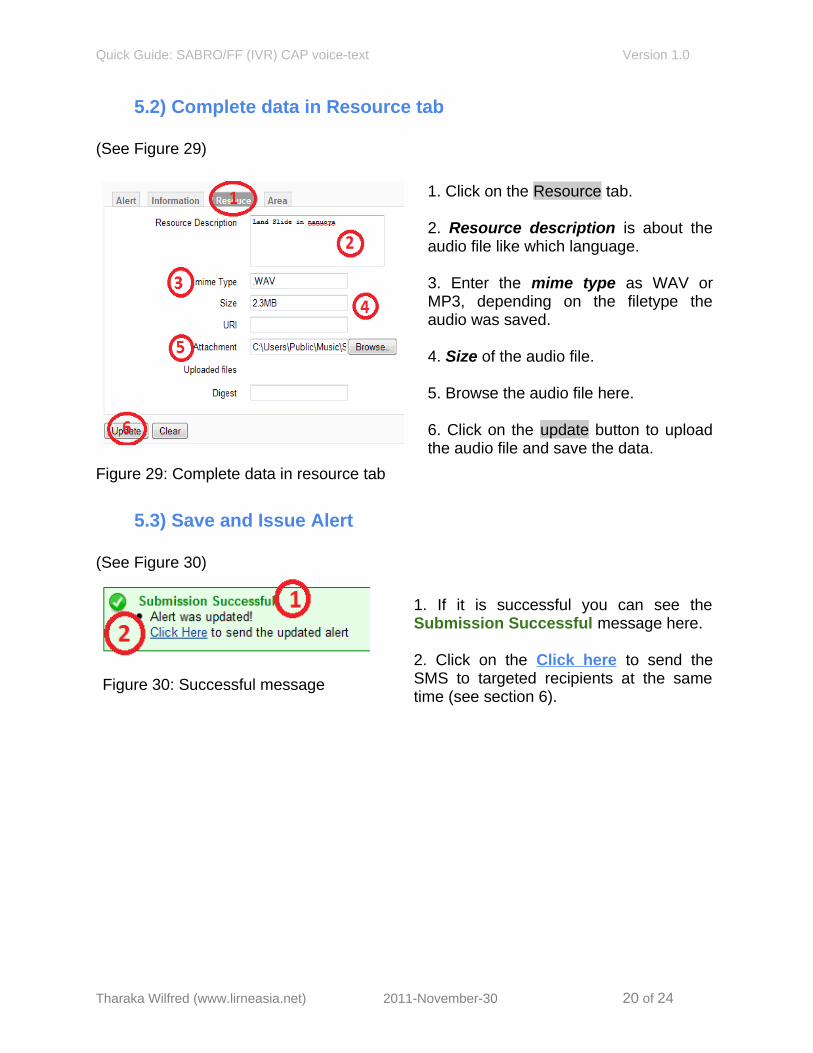
5.2) Complete data in Resource tab
(See Figure 29)
1. Click on the Resource tab.
2. Resource description is about the audio file like which language.
3. Enter the mime type as WAV or MP3, depending on the filetype the audio was saved.
4. Size of the audio file.
5. Browse the audio file here.
6. Click on the update button to upload the audio file and save the data.
Figure 29: Complete data in resource tab
5.3) Save and Issue Alert
(See Figure 30)
Figure 30: Successful message
1. If it is successful you can see the Submission Successful message here.
2. Click on the Click here to send the SMS to targeted recipients at the same time (see section 6).
Tharaka Wilfred (www.lirneasia.net) 2011-November-30 20 of 24
Quick Guide: SABRO/FF (IVR) CAP voice-text Version 1.0
6) Issue Short-Text SMS alert with SABRO
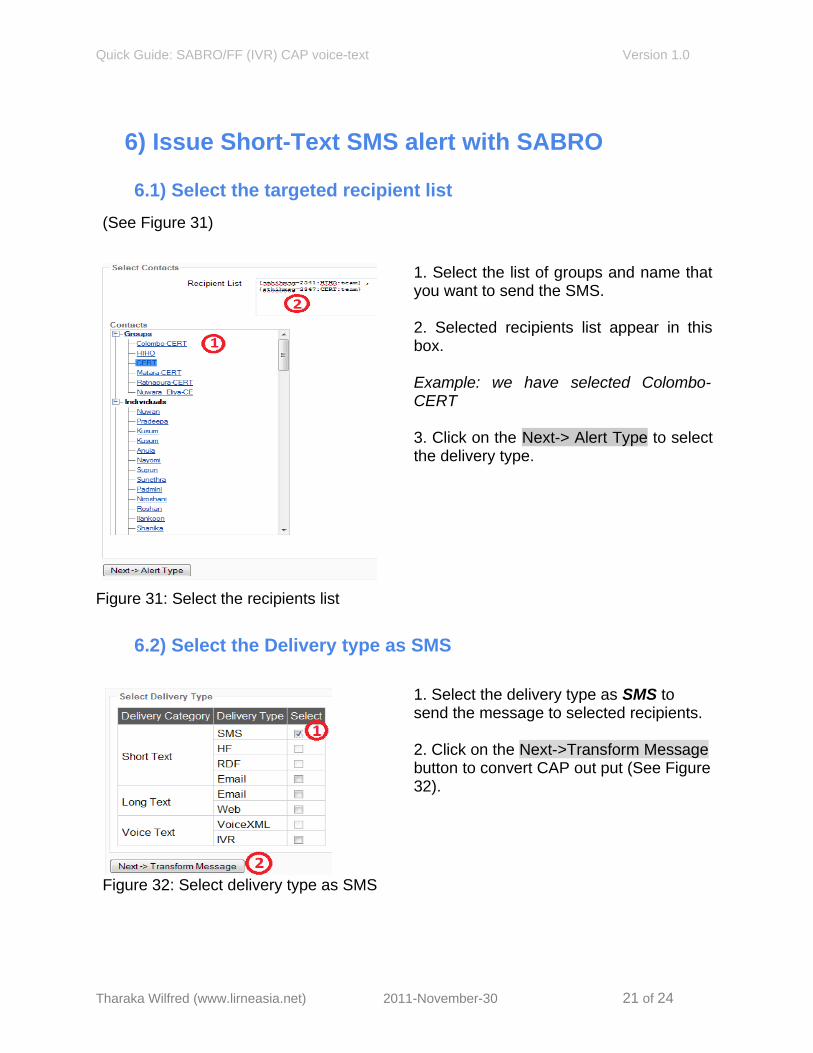
6.1) Select the targeted recipient list (See Figure 31)
1. Select the list of groups and name that you want to send the SMS.
2. Selected recipients list appear in this box.
Example: we have selected Colombo-CERT
3. Click on the Next-> Alert Type to select the delivery type.
Figure 31: Select the recipients list
6.2) Select the Delivery type as SMS
Figure 32: Select delivery type as SMS
1. Select the delivery type as SMS to send the message to selected recipients.
2. Click on the Next->Transform Message button to convert CAP out put (See Figure 32).
Tharaka Wilfred (www.lirneasia.net) 2011-November-30 21 of 24
Quick Guide: SABRO/FF (IVR) CAP voice-text Version 1.0
6.3) Converted CAP Output
(See Figure 33)
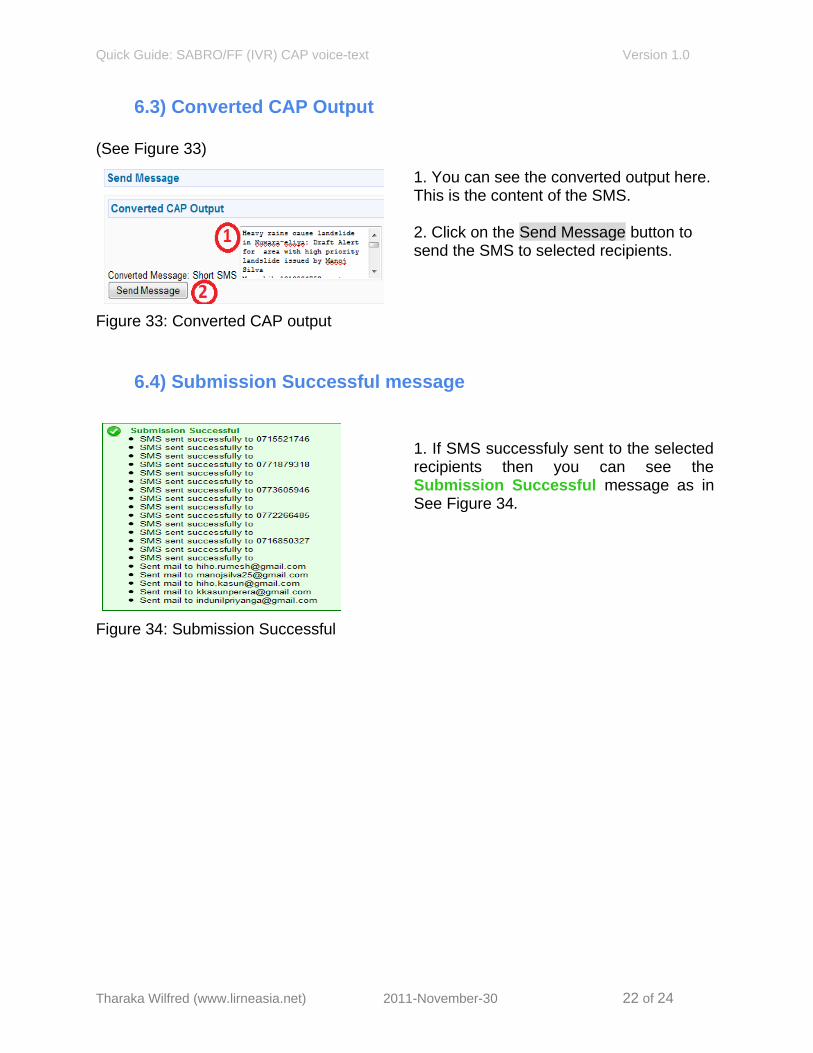
1. You can see the converted output here. This is the content of the SMS.
2. Click on the Send Message button to send the SMS to selected recipients.
Figure 33: Converted CAP output
6.4) Submission Successful message
1. If SMS successfuly sent to the selected recipients then you can see the Submission Successful message as in See Figure 34.
Figure 34: Submission Successful
Tharaka Wilfred (www.lirneasia.net) 2011-November-30 22 of 24
Quick Guide: SABRO/FF (IVR) CAP voice-text Version 1.0
7) View acknowledgement report in FFThe procedure is such that alert recipients, aftrer listening to the voice alert in FF, should acknowledge message receipt and acceptance. This is done by sending an SMS to the Hazard Information Hub with a text “ack yes” or “ack no”, implying, yes they do or no they don’t acknowledge.
71.) View Polls
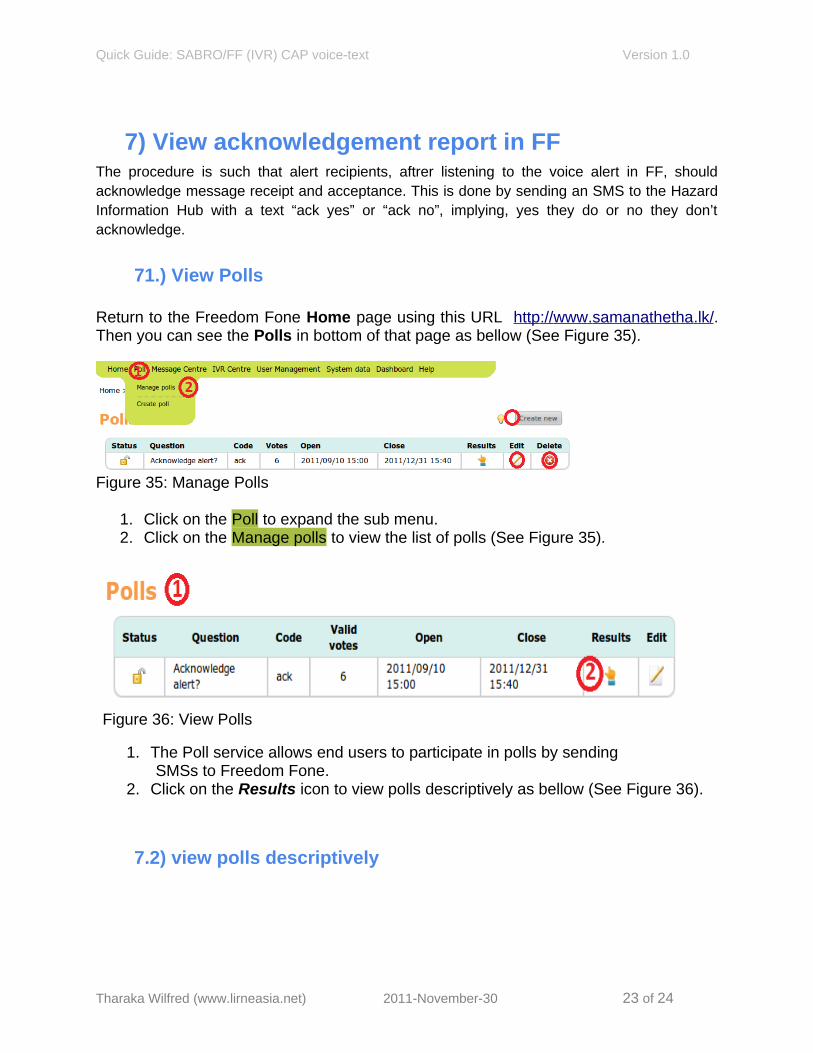
Return to the Freedom Fone Home page using this URL http :// www . samanathetha . lk / . Then you can see the Polls in bottom of that page as bellow (See Figure 35).
Figure 35: Manage Polls
1. Click on the Poll to expand the sub menu.2. Click on the Manage polls to view the list of polls (See Figure 35).
Figure 36: View Polls
1. The Poll service allows end users to participate in polls by sending SMSs to Freedom Fone.
2. Click on the Results icon to view polls descriptively as bellow (See Figure 36).
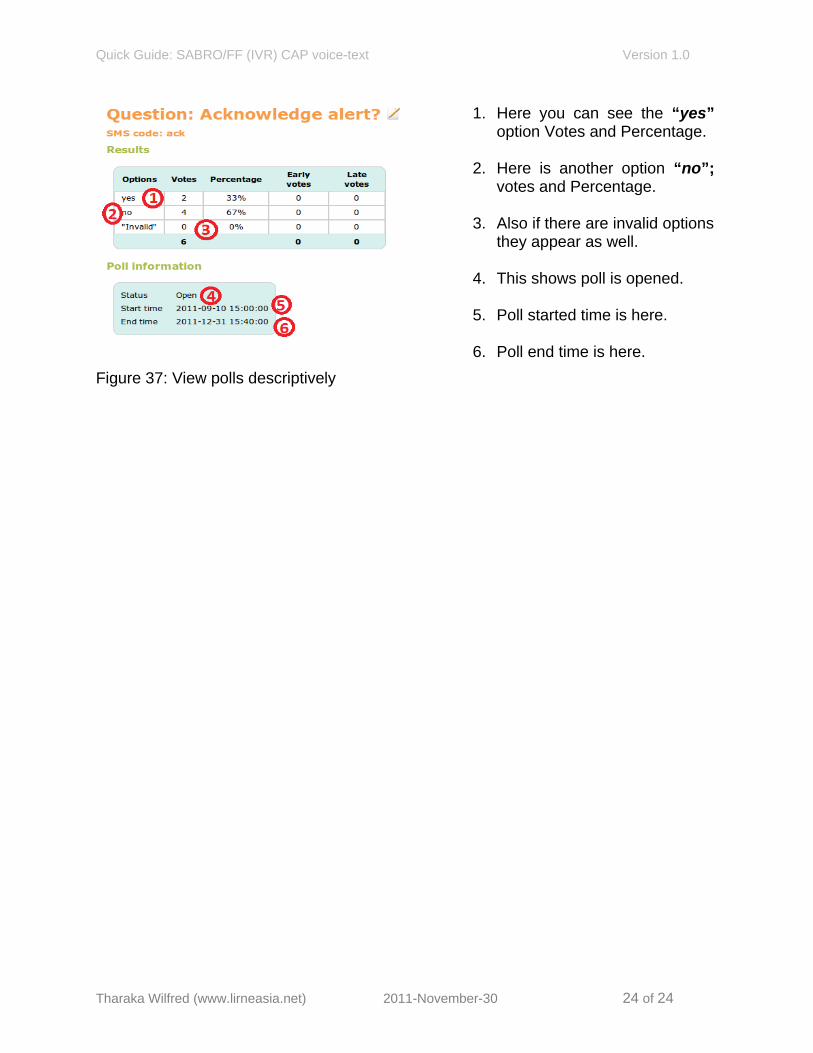
7.2) view polls descriptively
Tharaka Wilfred (www.lirneasia.net) 2011-November-30 23 of 24
Quick Guide: SABRO/FF (IVR) CAP voice-text Version 1.0
1. Here you can see the “yes” option Votes and Percentage.
2. Here is another option “no”; votes and Percentage.
3. Also if there are invalid options they appear as well.
4. This shows poll is opened.
5. Poll started time is here.
6. Poll end time is here.
Figure 37: View polls descriptively
Tharaka Wilfred (www.lirneasia.net) 2011-November-30 24 of 24