Embed Size (px)
Citation preview
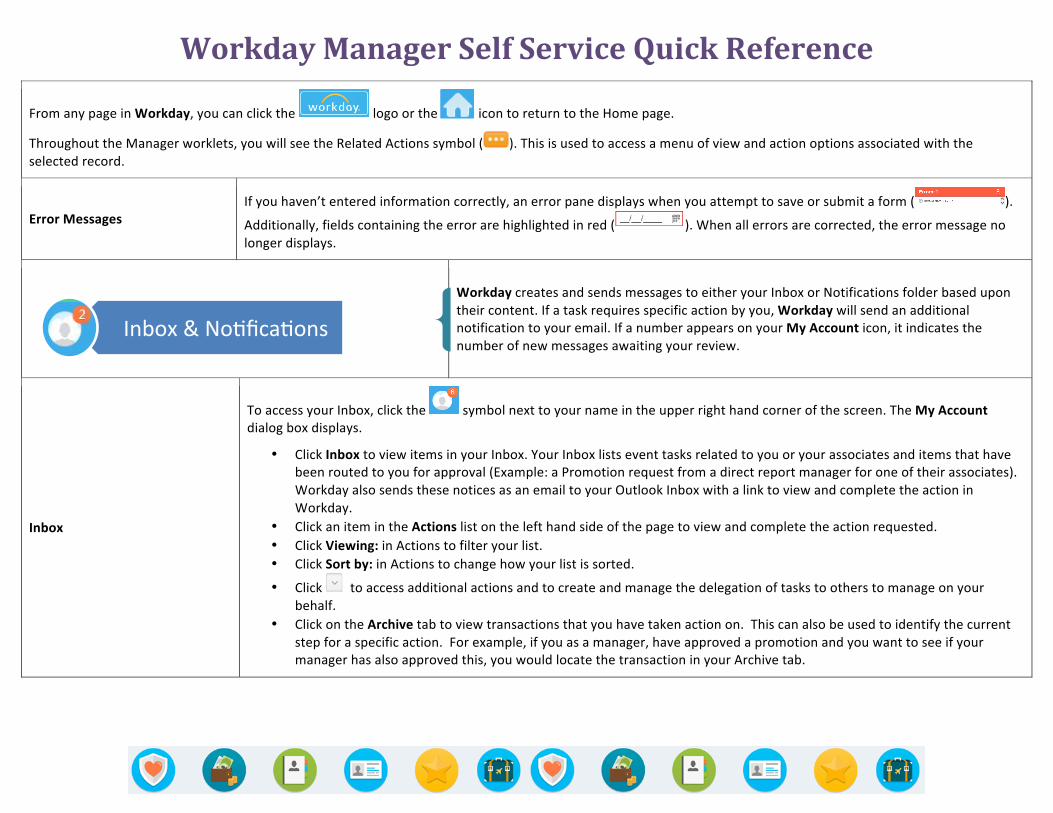
Workday Manager Self Service Quick Reference
From any page in Workday, you can click the logo or the icon to return to the Home page.
Throughout the Manager worklets, you will see the Related Actions symbol ( ). This is used to access a menu of view and action options associated with the selected record.
Error Messages If you haven’t entered information correctly, an error pane displays when you attempt to save or submit a form ( ).
Additionally, fields containing the error are highlighted in red ( ). When all errors are corrected, the error message no longer displays.
Workday creates and sends messages to either your Inbox or Notifications folder based upon their content. If a task requires specific action by you, Workday will send an additional notification to your email. If a number appears on your My Account icon, it indicates the number of new messages awaiting your review.
Inbox
To access your Inbox, click the symbol next to your name in the upper right hand corner of the screen. The My Account dialog box displays.
• Click Inbox to view items in your Inbox. Your Inbox lists event tasks related to you or your associates and items that have been routed to you for approval (Example: a Promotion request from a direct report manager for one of their associates). Workday also sends these notices as an email to your Outlook Inbox with a link to view and complete the action in Workday.
• Click an item in the Actions list on the left hand side of the page to view and complete the action requested. • Click Viewing: in Actions to filter your list. • Click Sort by: in Actions to change how your list is sorted.
• Click to access additional actions and to create and manage the delegation of tasks to others to manage on your behalf.
• Click on the Archive tab to view transactions that you have taken action on. This can also be used to identify the current step for a specific action. For example, if you as a manager, have approved a promotion and you want to see if your manager has also approved this, you would locate the transaction in your Archive tab.
Inbox & NoOficaOons

Workday Manager Self Service Quick Reference
Notifications
To access your Notifications, click the symbol next to your name in the upper right hand corner of the screen. The My Account dialog box displays.
• Click Notifications to view notifications. A list of events related to you and/or your associates that have been routed to you for information purposes only displays. Items in this list do not require action and are not automatically routed to your Outlook Inbox.
• Click on an item in the Notifications list to view additional detail. • Click Viewing: in the Actions section to filter your list. • Click Sort by: in the Actions section to change how your list is sorted.
• Click on the down arrow symbol to find actions such as Mark All as Read.
The My Team worklet of Workday allows a manager to view and modify information about their associates including: Org Chart, Head Count, Active Associates, Terminate, Edit Job, and Edit Position. The My Team worklet is especially useful when you are viewing and taking actions for several members of your team at the same time.
View Information
To view information about your team, click the My Team worklet. The My Team screen displays. The right hand portion of the screen contains the following viewing options.
• Click My Org Chart to view your current direct reports. Click the gray or yellow arrow buttons ( ) to view or print organizational charts above or below your organizational chart. You can also access information on an individual associate by clicking on their name.
• Click Timeline to search for an associate and view a timeline of events for their current position. • Click Headcount to create a report of the number of associates and their status as of a user specified date. • Click Organization Directory to search for an associate from a specified organization. • Click My Leadership Roles to view a list of roles assigned to you within particular parts of the organization. • Click More to access additional viewing options including Organization, Organizations I belong to, Org Charts, Compare
Team, Location Directory, All Locations, Active Associates, FTE Report, My Management, Management Hierarchy, Management Chain, Job Family, Job Family Group, Job Profile, Matrix Assignments, Matrix Organization, Membership Rules, Part-‐time Workers, Positions & FTE and Time-‐Off & Leave Calendar.
My Team

Workday Manager Self Service Quick Reference
Change Information
To modify information about your team, click the My Team worklet. The My Team screen displays. The left pane Actions contains options for editing information about your associates.
• Click Terminate to end the employment of an individual on your team. • Click Business Title Change to edit a business job title. • Click Edit Job to make changes to a specific job. • Click Edit Position to make changes to the position of an associate such as FTE, location, job profile, scheduled hours, etc. • Click Add Job to add an additional job on the profile of an associate. • Click End Additional Job to remove an additional job from the profile of an associate. • Click Change Organizations to change the organization of one or more of your associates.
Related Activities and Preview Pane
To view information about your team, click the My Team worklet. The My Team screen displays. A list of all of your direct reports displays under My Team at the bottom of the screen. If you hover over the name of an associate, the Related Actions and Preview ( ) link displays. Click on this link to display the Available Actions popup for the associate.
• Hover over Compensation to display Compensation View and Action options such as Request Compensation Change, Request Grade Change, and View Compensation History.
• Hover over Job Change to display Job Change View and Action options such as Transfer, Promote, and Change Job or Add Job.
• Hover over Organization to access Change Organization Assignment. • Hover over Personal Data to edit photo. • Hover over Time and Leave to access functions such as View Time Off Balance (for CoreSource and HealthFitness only) • Hover over Worker History to access functions such as View Employee History and View Manager History. • Hover over Favorite to add an associate to your Favorite list. • Hover over Security Profile to access View Support Roles. This option provides you with a listing of roles in the system and
who is filling the role as it relates to actions that you might take. For example, if you initiate a compensation change for one of your associates, it will likely be reviewed by someone with a Compensation Partner role. The Support Roles view allows you to determine which member of the Compensation team has been assigned this role for your team.
• Hover over Additional Data to view all additional data on the associate. This option may be blank if additional information does not exist.

Workday Manager Self Service Quick Reference
Request Compensation Change
There are several ways to access the Request Compensation Change task. Access via Related Actions and Preview ( ) is shown here.
Step 1: Click on My Team. The My Team worklet displays.
Step 2: Locate the associate whose compensation requires adjustment.
Request Compensation Change (continued)
Step 3: Hover over the associates name and click on the when it appears. The Available Actions popup screen displays.
Step 4: Hover over Compensation. The Compensation menu displays.
Step 5: Click Request Compensation Change. The Request Compensation Change page displays.
Step 6: Initiate the request. Fields required by Workday are shown with a red asterisk ( ).
• Effective Date: Date when the change to compensation will be effective. Best practice is to use beginning of a pay period. • Use Next Pay Period: Checkbox indicating if new compensation package should be used by payroll in the next pay period.
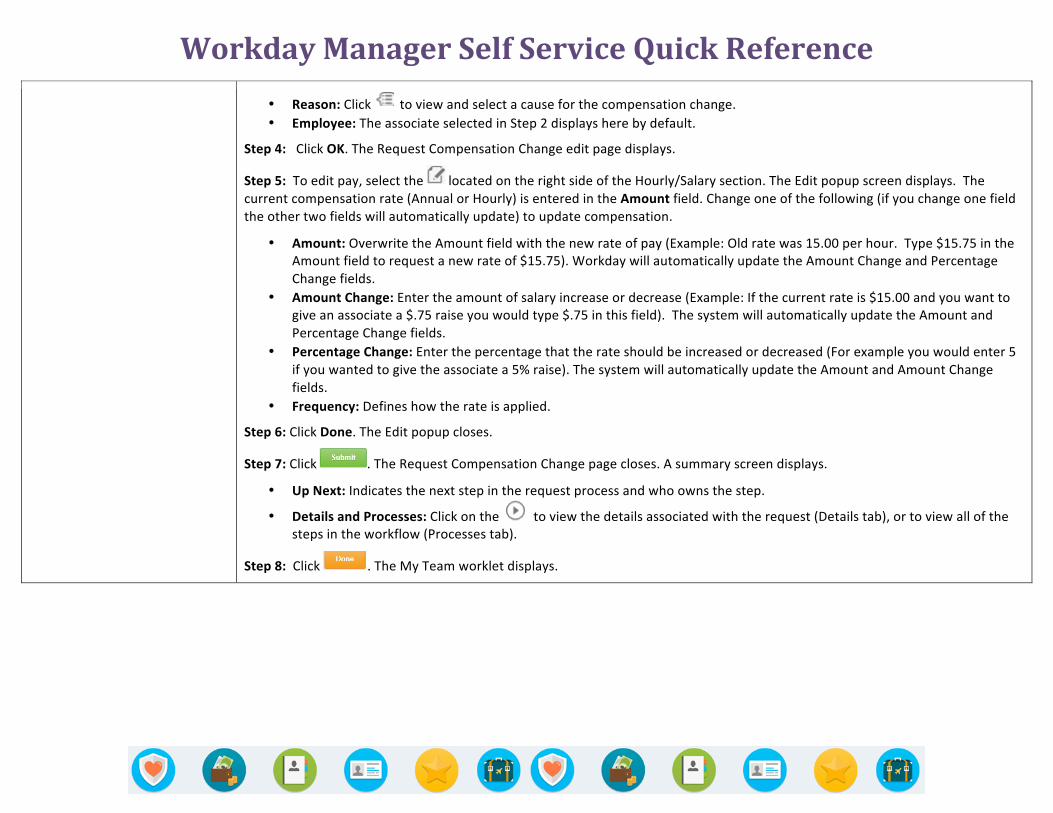
Workday Manager Self Service Quick Reference
• Reason: Click to view and select a cause for the compensation change. • Employee: The associate selected in Step 2 displays here by default.
Step 4: Click OK. The Request Compensation Change edit page displays.
Step 5: To edit pay, select the located on the right side of the Hourly/Salary section. The Edit popup screen displays. The current compensation rate (Annual or Hourly) is entered in the Amount field. Change one of the following (if you change one field the other two fields will automatically update) to update compensation.
• Amount: Overwrite the Amount field with the new rate of pay (Example: Old rate was 15.00 per hour. Type $15.75 in the Amount field to request a new rate of $15.75). Workday will automatically update the Amount Change and Percentage Change fields.
• Amount Change: Enter the amount of salary increase or decrease (Example: If the current rate is $15.00 and you want to give an associate a $.75 raise you would type $.75 in this field). The system will automatically update the Amount and Percentage Change fields.
• Percentage Change: Enter the percentage that the rate should be increased or decreased (For example you would enter 5 if you wanted to give the associate a 5% raise). The system will automatically update the Amount and Amount Change fields.
• Frequency: Defines how the rate is applied.
Step 6: Click Done. The Edit popup closes.
Step 7: Click . The Request Compensation Change page closes. A summary screen displays.
• Up Next: Indicates the next step in the request process and who owns the step.
• Details and Processes: Click on the to view the details associated with the request (Details tab), or to view all of the steps in the workflow (Processes tab).
Step 8: Click . The My Team worklet displays.

Workday Manager Self Service Quick Reference
Request One-‐Time Payment
There are several ways to access the Request One-‐Time Payment task. Access via Related Actions and Preview ( ) is shown here.
Step 1: Click on My Team. The My Team worklet displays.
Step 2: Locate the associate who requires a payment.
Step 3: Hover over the associate’s name and click on the when it appears. The Available Actions popup screen displays.
Step 4: Hover over Compensation. The Compensation menu displays.
Step 5: Click on Request One Time Payment. The Request One Time Payment page displays.
Step 6: Initiate the request. Fields required by Workday are shown with a red asterisk ( ).
• Effective Date: Date when the change to compensation is effective. Best practice is to use beginning of a pay period. Employee: The associate selected in Step 2 displays here by default.
• One-‐Time Payment Plan: Click to view and select a plan.
Workday Manager Self Service Quick Reference
Step 7: Click OK. The Request One-‐Time Payment detail page displays.
Step 8: Complete the form. Fields required by Workday are shown with a red asterisk ( ).
• Effective Date: Date when the change to compensation is active.
• Reason: Click to view and select a cause for the payment.
• One-‐Time Payment Plan: Click to view and select a plan. • Amount: Indicate the amount of the payment. Note: Payments over $1,000 will be routed for executive approval. • Send to Payroll: Checkbox indicating if new payment should be included in the next pay period. • Additional Information: Text field used to enter additional information and/or justification for the payment. • Comments: Text field available as a part of the workflow.
Step 9: Click . The Request One-‐Time Payment detail page closes. A summary screen displays.
• Up Next: Indicates the next step in the request process and who owns the step.
• Details and Processes: Click on the to view the details associated with the request (Details tab), or to view all of the steps in the workflow (Processes tab).
Step 10: Click . The My Team worklet displays.

Workday Manager Self Service Quick Reference
Workday Manager Self Service Quick Reference
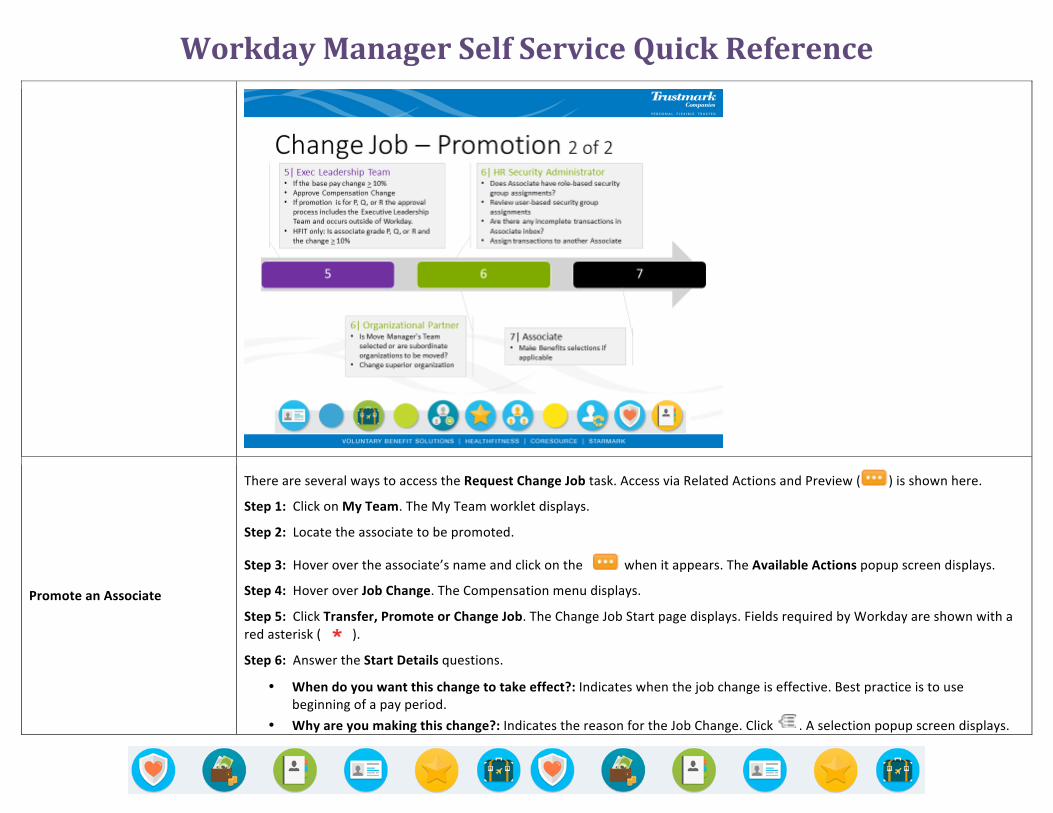
Promote an Associate
There are several ways to access the Request Change Job task. Access via Related Actions and Preview ( ) is shown here.
Step 1: Click on My Team. The My Team worklet displays.
Step 2: Locate the associate to be promoted.
Step 3: Hover over the associate’s name and click on the when it appears. The Available Actions popup screen displays.
Step 4: Hover over Job Change. The Compensation menu displays.
Step 5: Click Transfer, Promote or Change Job. The Change Job Start page displays. Fields required by Workday are shown with a red asterisk ( ).
Step 6: Answer the Start Details questions.
• When do you want this change to take effect?: Indicates when the job change is effective. Best practice is to use beginning of a pay period.
• Why are you making this change?: Indicates the reason for the Job Change. Click . A selection popup screen displays.
Workday Manager Self Service Quick Reference
Select Promotion. • Who will be the manager after this change?: This field indicates the manager that the associate reports to and defaults to
the current manager. It can be modified if necessary. • Which team will this person be on after this change?: This field defines supervisory organization of the associate and
defaults to the associate’s current location. It can be modified if necessary. • Where will this person be located after this change?: This field indicates the geographic (office) location and defaults to
the associates current location. It can be modified if necessary.
Workday Manager Self Service Quick Reference
Promote an Associate (continued)
Start 7: Click . The Change Job (Job tab) page displays. Click on to the right of each Job area that needs to be updated.
• Position: This section defines the new position for the associate and how the associate’s current position will be handled once the promotion is complete.
o Position: Click . The Position popup displays. If an open position exists for the promotion, click the to the
right of Search to view and select the open position. Then click . OR If an open position doesn’t exist,
select the Do you want to create a new position? checkbox. Then click . o Close the Current Position: Select this checkbox if the current position will not be backfilled. Leave the checkbox
blank if the position will be backfilled. WARNING: Selecting the checkbox closes the current position once the promotion is complete. Once closed it can’t be reopened.
• Job Profile: This section defines the new Job Profile (job description) and the new official Job Title for the associate. o Job Profile: This field defines the Job Profile for the associate. The Job Profile is used to group job description
information. This field defaults to the current Job profile but can be modified. o Job Title: This is a text field that contains the associate’s official title. This field defaults based on the Job Profile
selected and should not be modified. • Business Title: This section defines the associate’s title as it should appear on a business card or used when introducing
the associate outside of the organization. In most cases the Job Title and the Business Title are the same.
Step 8: When the Job tab is complete, click . The Location tab displays.
Step 9: Review and if needed, update Location information. Information for the associate’s current location displays. This information can be modified. NOTE: Work Space is not being used by Trustmark at this time.
Step 10: When the Location tab is complete, click . The Details tab displays.
Step 11: Review and if needed, update Details information. Details for the associate’s current position including additional Job Classifications and Administrative information display. This information can be modified.
• Employee Type: Indicates associate category (On-‐Call, Paid Intern (Trainee), Regular, Temporary, Unpaid Intern) • Time Type: Indicates whether associate is Full time or Part time. • Pay Rate Type: Indicates if associate is paid an Hourly or Salary rate. • Default Weekly Hours: Indicates the number of hours in a standard work week. • There are several fields that will default based on previously enterer information (FTE, Job Exempt, Job Classifications, ,
Workers’ Compensation Code from Job Profile, Workers’ Compensation Code Override, End Employment Date, First Day of Work). Accept the default values for these fields.
• Notify By: This field indicates the date by which the associate should be notified of their promotion.
Workday Manager Self Service Quick Reference
Promote an Associate (continued)
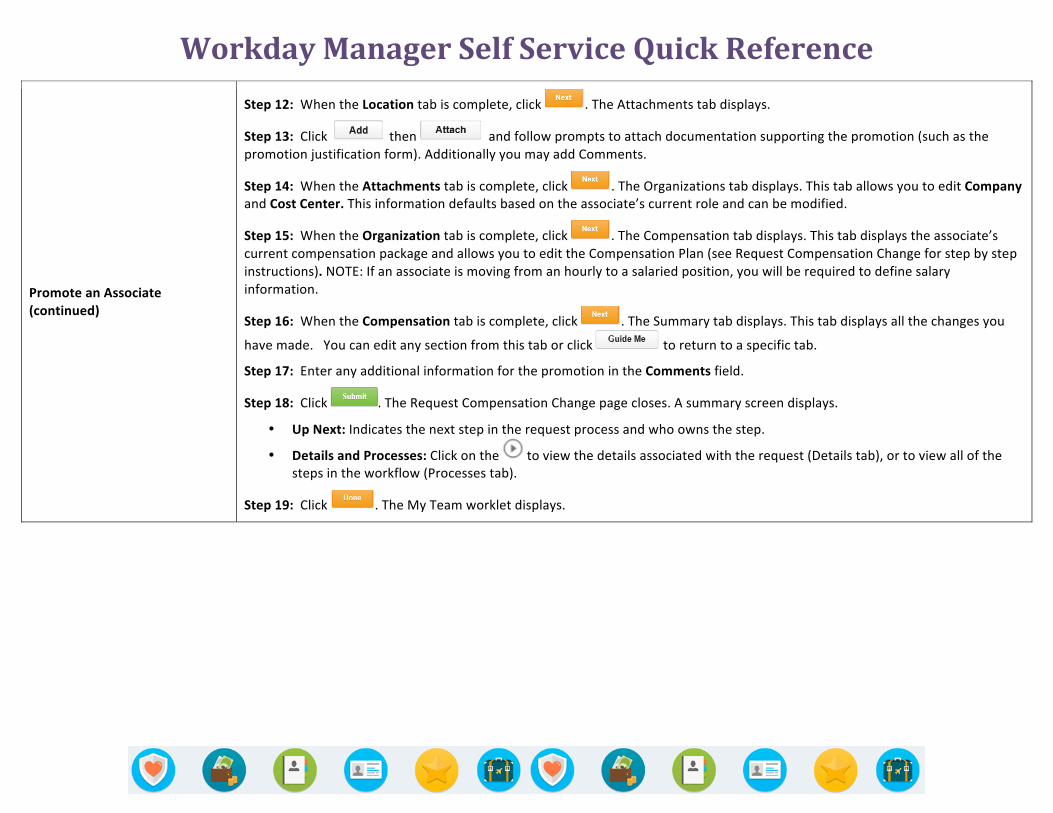
Step 12: When the Location tab is complete, click . The Attachments tab displays.
Step 13: Click then and follow prompts to attach documentation supporting the promotion (such as the promotion justification form). Additionally you may add Comments.
Step 14: When the Attachments tab is complete, click . The Organizations tab displays. This tab allows you to edit Company and Cost Center. This information defaults based on the associate’s current role and can be modified.
Step 15: When the Organization tab is complete, click . The Compensation tab displays. This tab displays the associate’s current compensation package and allows you to edit the Compensation Plan (see Request Compensation Change for step by step instructions). NOTE: If an associate is moving from an hourly to a salaried position, you will be required to define salary information.
Step 16: When the Compensation tab is complete, click . The Summary tab displays. This tab displays all the changes you
have made. You can edit any section from this tab or click to return to a specific tab.
Step 17: Enter any additional information for the promotion in the Comments field.
Step 18: Click . The Request Compensation Change page closes. A summary screen displays.
• Up Next: Indicates the next step in the request process and who owns the step.
• Details and Processes: Click on the to view the details associated with the request (Details tab), or to view all of the steps in the workflow (Processes tab).
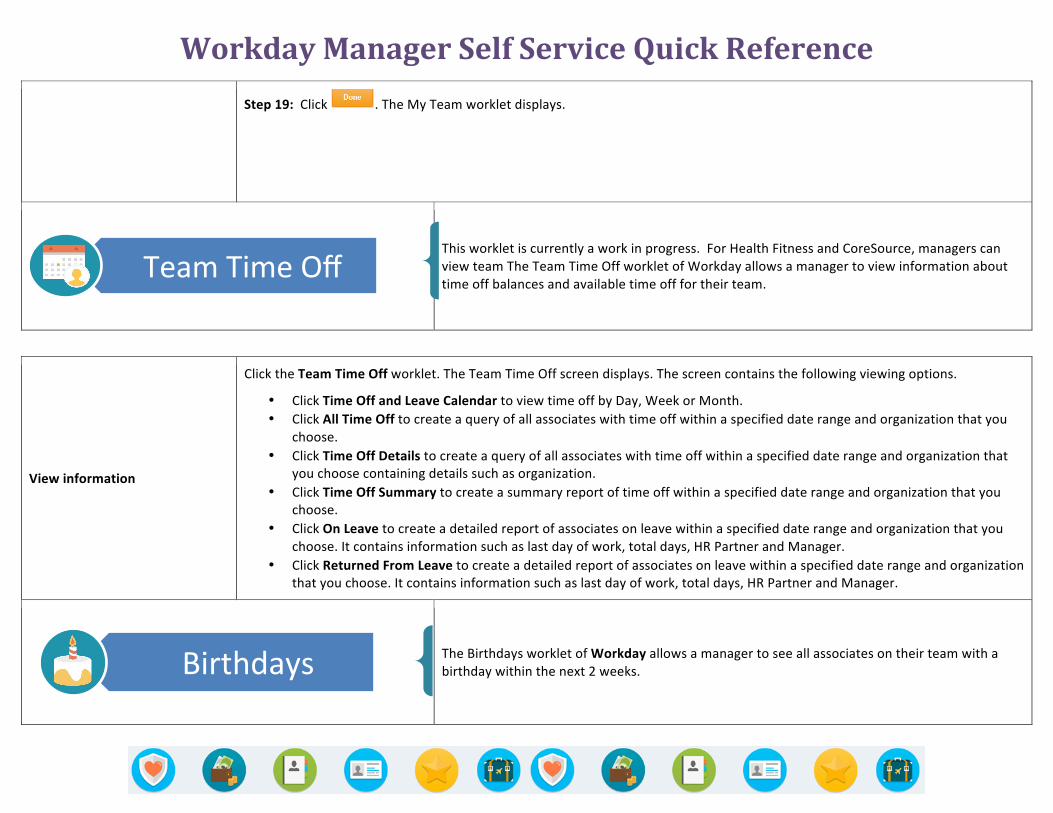
Step 19: Click . The My Team worklet displays.

Workday Manager Self Service Quick Reference
Terminate an Associate -‐ Voluntary
Step 1: Click on My Team. The My Team worklet displays.
Step 2: Locate the associate to be terminated.
Step 3: Hover over the associate’s name and click on the when it appears. The Available Actions popup screen displays.
Step 4: Hover over Job Change. The Job Change menu displays.
Step 5: Select Terminate Employee. The Terminate Employee detail page displays. Fields required by Workday are shown with a red asterisk ( ). NOTE: You can’t terminate an employee if there are existing pending or completed actions for the worker that would conflict with the termination.
Step 6: Enter the Termination Date. This is the system effective date for the termination. Note the system will not allow you to terminate an associate if the associate has active additional jobs. Additional jobs must be ended before termination can continue.
Step 7: Define the termination Reason.
• Click the to view and select a Reason for the termination. The Search popup displays.

Workday Manager Self Service Quick Reference
• Select . A list of voluntary termination reasons displays. • Select the appropriate termination reason.
Step 8: Indicate if position will be backfilled or closed.
• If position is to be closed, select the Close Position checkbox. Remember that once a position is closed it, can’t be reopened.
• If the position is to be backfilled, leave the Close Position checkbox blank.
Step 9: Define Additional Information.
• Secondary Reasons: Additional reasons why an employee is being terminated. This field is entered by HR. • Last Day of Work: Indicates that last physical day that the associate will complete work. • Pay Through Date: Indicates that last day of work that the associate should be paid for. • Resignation Date: Indicates the actual date that the employee tendered their resignation. • Notify By: (Used by exception) If termination is involuntary this field indicates the day by which the associate should be
informed about the termination. • Regrettable: If selected, this checkbox indicates that the associate is leaving on good terms and is eligible for rehire.
Step 10: Click on the then select and follow prompts to attach supporting documentation (i.e. letter of resignation).
Step 11: Enter additional Comments.
Step 12: Click . The Request Terminate Employee page closes. A summary screen displays.
• Up Next: Indicates the next step in the request process and who owns the step.
• Details and Processes: Click on the to view the details associated with the request (Details tab), or to view all of the steps in the workflow (Processes tab).
Step 13: Under Up Next, Click . The Offboarding Procedure page displays.
Step 14: Review offboarding tasks, and if needed print the page.
Step 15: Click . The Offboarding Procedure page closes. A summary screen displays.
• Up Next: Indicates the next step in the request process and who owns the step.
• Details and Processes: Click on the to view the details associated with the request (Details tab), or to view all of the steps in the workflow (Processes tab).
Workday Manager Self Service Quick Reference
Step 19: Click . The My Team worklet displays.
This worklet is currently a work in progress. For Health Fitness and CoreSource, managers can view team The Team Time Off worklet of Workday allows a manager to view information about time off balances and available time off for their team.
View information
Click the Team Time Off worklet. The Team Time Off screen displays. The screen contains the following viewing options.
• Click Time Off and Leave Calendar to view time off by Day, Week or Month. • Click All Time Off to create a query of all associates with time off within a specified date range and organization that you
choose. • Click Time Off Details to create a query of all associates with time off within a specified date range and organization that
you choose containing details such as organization. • Click Time Off Summary to create a summary report of time off within a specified date range and organization that you
choose. • Click On Leave to create a detailed report of associates on leave within a specified date range and organization that you
choose. It contains information such as last day of work, total days, HR Partner and Manager. • Click Returned From Leave to create a detailed report of associates on leave within a specified date range and organization
that you choose. It contains information such as last day of work, total days, HR Partner and Manager.
The Birthdays worklet of Workday allows a manager to see all associates on their team with a birthday within the next 2 weeks.
Team Time Off
Birthdays
Workday Manager Self Service Quick Reference
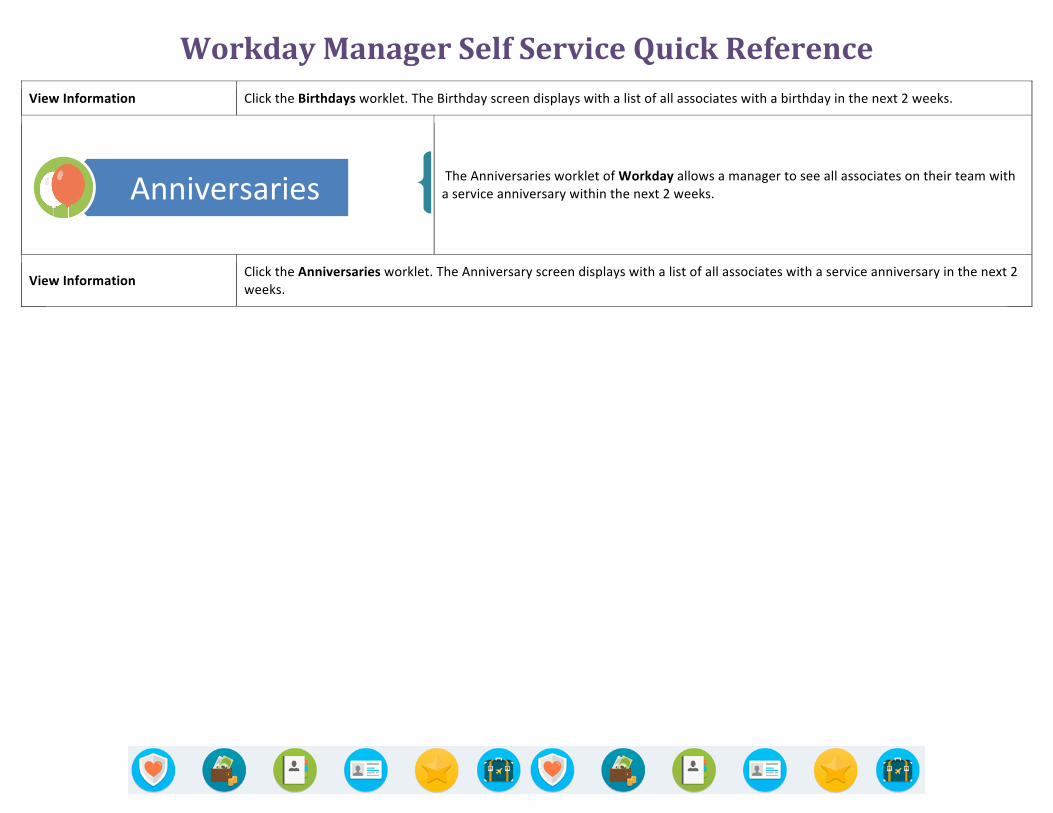
View Information Click the Birthdays worklet. The Birthday screen displays with a list of all associates with a birthday in the next 2 weeks.
The Anniversaries worklet of Workday allows a manager to see all associates on their team with a service anniversary within the next 2 weeks.
View Information Click the Anniversaries worklet. The Anniversary screen displays with a list of all associates with a service anniversary in the next 2 weeks.
Anniversaries