Embed Size (px)
Citation preview
Mark
SPEED
LED/FLIP
RESET
PAIR
▲ F
◀ L
POWER
▶ R
▼ B
When pressed short
Change speed
Change LED color
Trim Pitch +
Trim Roll -
Trim Roll +
Trim Pitch -
When pressed long
Take-off / Landing
Roll or pitch with pressing button, drone rotates 360°
Reset sensor(gyro bias, reset trim)
Pairing
HEADLESS ON
MODE 1
Turn on / off
MODE 2
HEADLESS OFF
LED turned on LED dimming
Disconnected
Blinking LED twice briefly
Connected Headless - Normal Connected Headless - Headless
* If there is no battery in the drone,
the buzzer will sound and the LED
on the drone will flash.
1. This product is recommended for use by users over 8 years old
It is recommended that first-time users understand the manual and use it through sufficient practice.
2. The propeller of a drone rotates very fast, so it always requires attention and can cause physical and
property damage. Always maintain a certain distance from the drone for your safety.
3. Manufacturers and vendors are not responsible for accidents caused by poor manipulation.
4. Fly under normal weather conditions between 10°C and 50°C.
5. If you have any questions about operation and repair, please contact your place of purchase.
- Make sure the battery is fully charged.
- Make sure the propeller is correctly installed.
- Make sure that the controller and drone are connected properly.
- Make sure that there are no obstructions around.
- Practice the take-off, landing and emergency stop functions first
- Use the drone more than 2 meters away from the user
1. Disconnect the battery from the drone. Charge using the included USB charger.
2. During charging, the indicator lights up, and when charging is complete, the indicator turns off.
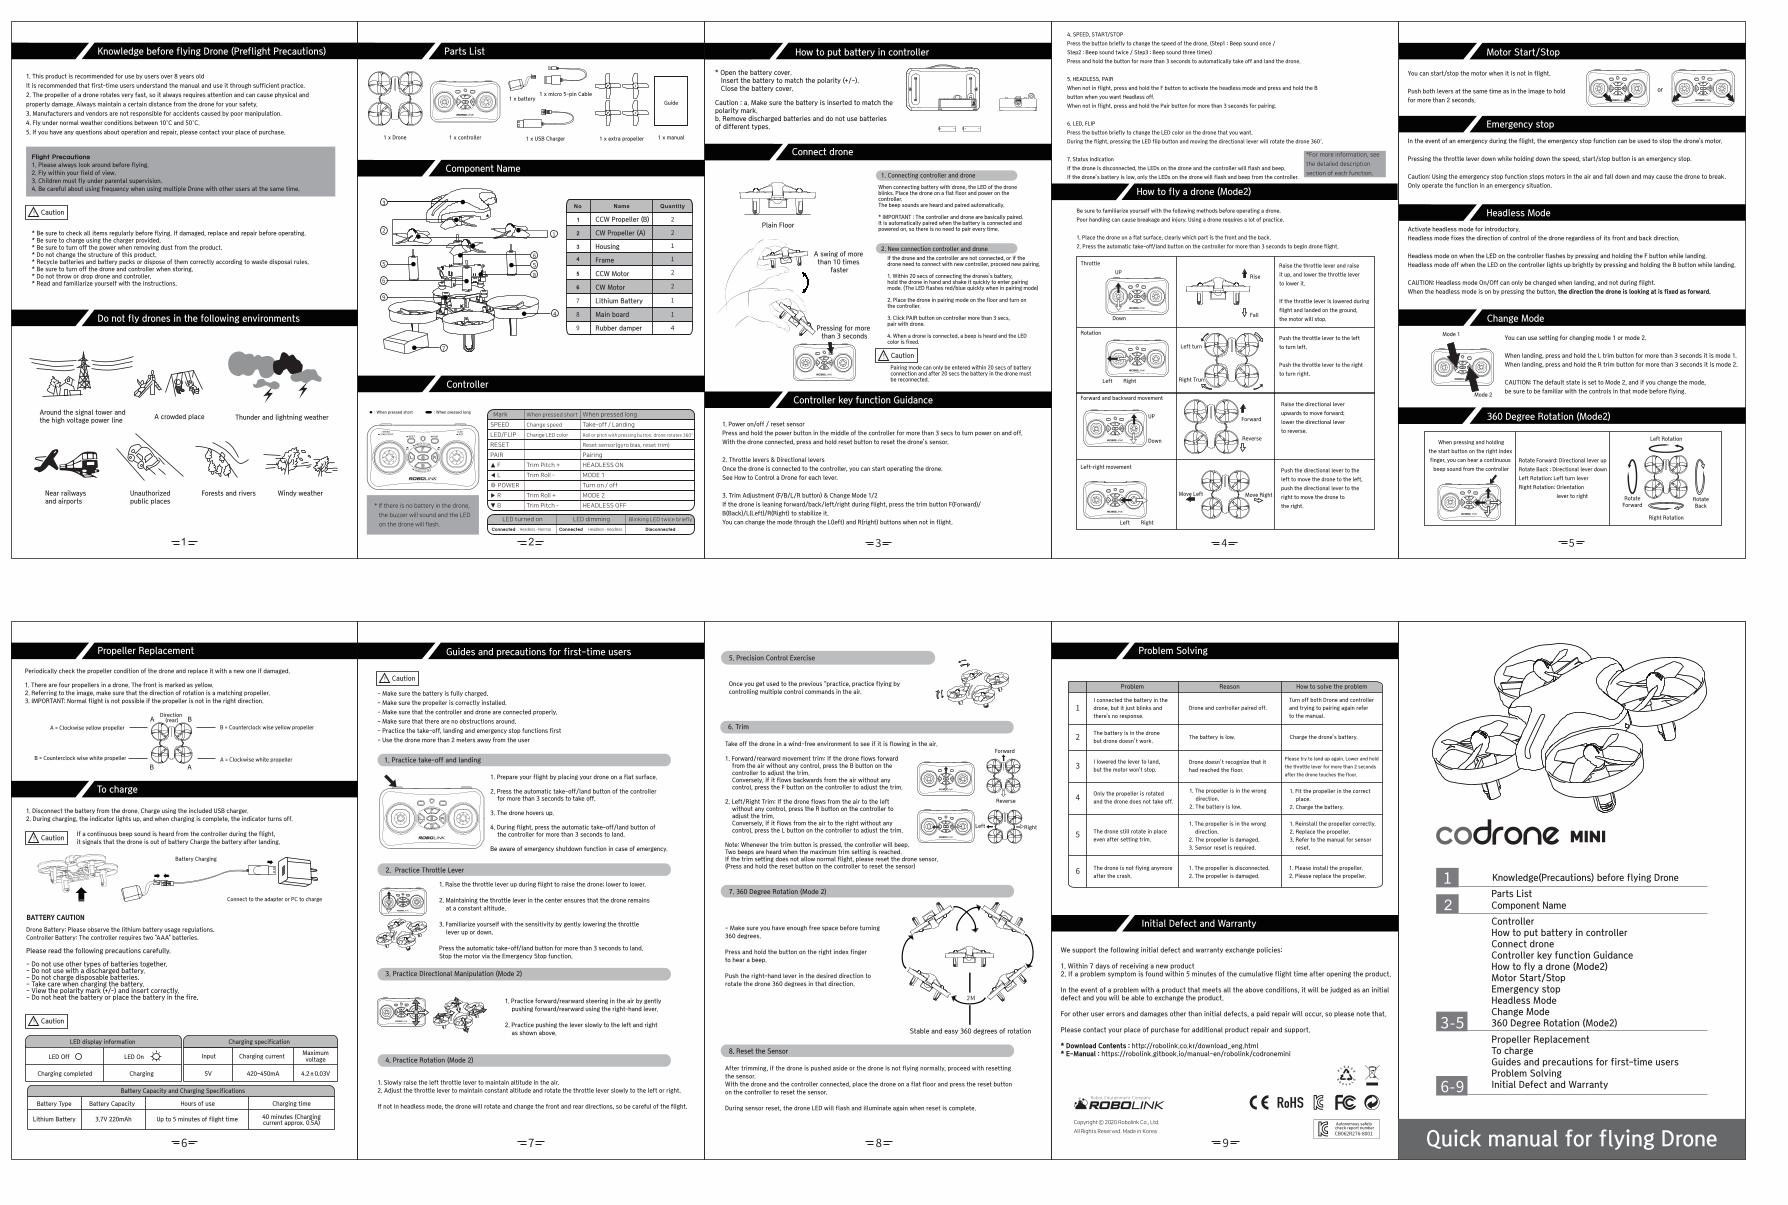
1. Power on/off / reset sensor
Press and hold the power button in the middle of the controller for more than 3 secs to turn power on and off.
With the drone connected, press and hold reset button to reset the drone’s sensor.
2. Throttle levers & Directional levers
Once the drone is connected to the controller, you can start operating the drone.
See How to Control a Drone for each lever.
3. Trim Adjustment (F/B/L/R button) & Change Mode 1/2
If the drone is leaning forward/back/left/right during flight, press the trim button F(Forward)/
B(Back)/L(Left)/R(Right) to stabilize it.
You can change the mode through the L(left) and R(right) buttons when not in flight.
4. SPEED, START/STOP
Press the button briefly to change the speed of the drone. (Step1 : Beep sound once /
Step2 : Beep sound twice / Step3 : Beep sound three times)
Press and hold the button for more than 3 seconds to automatically take off and land the drone.
5. HEADLESS, PAIR
When not in flight, press and hold the F button to activate the headless mode and press and hold the B
button when you want Headless off.
When not in flight, press and hold the Pair button for more than 3 seconds for pairing.
6. LED, FLIP
Press the button briefly to change the LED color on the drone that you want.
During the flight, pressing the LED flip button and moving the directional lever will rotate the drone 360°.
7. Status Indication
If the drone is disconnected, the LEDs on the drone and the controller will flash and beep.
If the drone’s battery is low, only the LEDs on the drone will flash and beep from the controller.
*For more information, see
the detailed description
section of each function.
Activate headless mode for introductory.
Headless mode fixes the direction of control of the drone regardless of its front and back direction.
Headless mode on when the LED on the controller flashes by pressing and holding the F button while landing.
Headless mode off when the LED on the controller lights up brightly by pressing and holding the B button while landing.
CAUTION: Headless mode On/Off can only be changed when landing, and not during flight.
When the headless mode is on by pressing the button, the direction the drone is looking at is fixed as forward.
You can use setting for changing mode 1 or mode 2.
When landing, press and hold the L trim button for more than 3 seconds it is mode 1.
When landing, press and hold the R trim button for more than 3 seconds it is mode 2.
CAUTION: The default state is set to Mode 2, and if you change the mode,
be sure to be familiar with the controls in that mode before flying.
You can start/stop the motor when it is not in flight.
Push both levers at the same time as in the image to hold
for more than 2 seconds.
In the event of an emergency during the flight, the emergency stop function can be used to stop the drone's motor.
Pressing the throttle lever down while holding down the speed, start/stop button is an emergency stop.
Caution: Using the emergency stop function stops motors in the air and fall down and may cause the drone to break.
Only operate the function in an emergency situation.
Be sure to familiarize yourself with the following methods before operating a drone.
Poor handling can cause breakage and injury. Using a drone requires a lot of practice.
1. Place the drone on a flat surface, clearly which part is the front and the back.
2. Press the automatic take-off/land button on the controller for more than 3 seconds to begin drone flight.
- Make sure you have enough free space before turning
360 degrees.
Press and hold the button on the right index finger
to hear a beep.
Push the right-hand lever in the desired direction to
rotate the drone 360 degrees in that direction.
After trimming, if the drone is pushed aside or the drone is not flying normally, proceed with resetting
the sensor.
With the drone and the controller connected, place the drone on a flat floor and press the reset button
on the controller to reset the sensor.
During sensor reset, the drone LED will flash and illuminate again when reset is complete.
When pressing and holding
the start button on the right index
finger, you can hear a continuous
beep sound from the controller
1. Raise the throttle lever up during flight to raise the drone; lower to lower.
2. Maintaining the throttle lever in the center ensures that the drone remains
at a constant altitude.
3. Familiarize yourself with the sensitivity by gently lowering the throttle
lever up or down.
Press the automatic take-off/land button for more than 3 seconds to land.
Stop the motor via the Emergency Stop function.
1. Practice forward/rearward steering in the air by gently
pushing forward/rearward using the right-hand lever.
2. Practice pushing the lever slowly to the left and right
as shown above.
1. Slowly raise the left throttle lever to maintain altitude in the air.
2. Adjust the throttle lever to maintain constant altitude and rotate the throttle lever slowly to the left or right.
If not in headless mode, the drone will rotate and change the front and rear directions, so be careful of the flight.
Once you get used to the previous “practice, practice flying by
controlling multiple control commands in the air.
Flight Precautions
1. Please always look around before flying.
2. Fly within your field of view.
3. Children must fly under parental supervision.
4. Be careful about using frequency when using multiple Drone with other users at the same time.
* Be sure to check all items regularly before flying. If damaged, replace and repair before operating.* Be sure to charge using the charger provided.* Be sure to turn off the power when removing dust from the product.* Do not change the structure of this product.* Recycle batteries and battery packs or dispose of them correctly according to waste disposal rules.* Be sure to turn off the drone and controller when storing.* Do not throw or drop drone and controller.* Read and familiarize yourself with the instructions.
Caution
Knowledge before flying Drone (Preflight Precautions)
Do not fly drones in the following environments
Around the signal tower and the high voltage power line
A crowded place Thunder and lightning weather
Near railways and airports
Unauthorized public places
Forests and rivers Windy weather
1 x Drone 1 x controller
1 x battery
1 x USB Charger
1 x micro 5-pin Cable
1 x extra propeller
Guide
1 x manual
Parts List
Component Name
CCW Propeller (B)
CW Propeller (A)
Housing
Frame
CCW Motor
CW Motor
Lithium Battery
Main board
Rubber damper
Controller
: When pressed short : When pressed long
How to put battery in controller
* Open the battery cover. Insert the battery to match the polarity (+/-). Close the battery cover.
Caution : a. Make sure the battery is inserted to match the polarity mark.b. Remove discharged batteries and do not use batteries of different types.
Connect drone
Plain Floor
A swing of more than 10 times
faster
Pressing for more than 3 seconds
1. Connecting controller and drone
When connecting battery with drone, the LED of the drone blinks. Place the drone on a flat floor and power on the controller.The beep sounds are heard and paired automatically.
* IMPORTANT : The controller and drone are basically paired. It is automatically paired when the battery is connected and powered on, so there is no need to pair every time.
2. New connection controller and drone
If the drone and the controller are not connected, or if the drone need to connect with new controller, proceed new pairing.
1. Within 20 secs of connecting the drones’s battery, hold the drone in hand and shake it quickly to enter pairingmode. (The LED flashes red/blue quickly when in pairing mode)
2. Place the drone in pairing mode on the floor and turn on the controller.
3. Click PAIR button on controller more than 3 secs, pair with drone.
4. When a drone is connected, a beep is heard and the LED color is fixed.
Pairing mode can only be entered within 20 secs of battery connection and after 20 secs the battery in the drone must be reconnected.
Controller key function Guidance
How to fly a drone (Mode2)
Throttle
Rotation
Forward and backward movement
UP
Down
Left Right
UP
Down
Left-right movement
Left Right
Rise
Fall
Left turn
Right Trun
Forward
Reverse
Move Left Move Right
Raise the throttle lever and raise
it up, and lower the throttle lever
to lower it.
If the throttle lever is lowered during
flight and landed on the ground,
the motor will stop.
Push the throttle lever to the left
to turn left.
Push the throttle lever to the right
to turn right.
Raise the directional lever
upwards to move forward;
lower the directional lever
to reverse.
Push the directional lever to the
left to move the drone to the left,
push the directional lever to the
right to move the drone to
the right.
Motor Start/Stop
or
Emergency stop
Headless Mode
Change Mode
Mode 1
Mode 2
360 Degree Rotation (Mode2)
Rotate Forward: Directional lever up
Rotate Back : Directional lever down
Left Rotation: Left turn lever
Right Rotation: Orientation
lever to right
Left Rotation
Right Rotation
RotateForward
RotateBack
Propeller Replacement
Battery Charging
A = Clockwise yellow propeller
Direction (rear)
B = Counterclock wise white propeller
B = Counterclock wise yellow propeller
A = Clockwise white propeller
To charge
If a continuous beep sound is heard from the controller during the flight,
it signals that the drone is out of battery Charge the battery after landing.
BATTERY CAUTION
Connect to the adapter or PC to charge
Drone Battery: Please observe the lithium battery usage regulations.
Controller Battery: The controller requires two "AAA" batteries.
Please read the following precautions carefully.
- Do not use other types of batteries together.- Do not use with a discharged battery.- Do not charge disposable batteries.- Take care when charging the battery.- View the polarity mark (+/-) and insert correctly.- Do not heat the battery or place the battery in the fire.
LED display information Charging specification
LED Off LED On
Charging completed Charging 5V 420~450mA 4.2±0.03V
Input Charging currentMaximumvoltage
Battery Capacity and Charging Specifications
Battery Type Battery Capacity
Lithium Battery 3.7V 220mAh
Hours of use
Up to 5 minutes of flight time
Charging time
40 minutes (Chargingcurrent approx. 0.5A)
Guides and precautions for first-time users
1. Practice take-off and landing
2. Practice Throttle Lever
1. Prepare your flight by placing your drone on a flat surface.
2. Press the automatic take-off/land button of the controller for more than 3 seconds to take off.
3. The drone hovers up.
4. During flight, press the automatic take-off/land button of the controller for more than 3 seconds to land.
Be aware of emergency shutdown function in case of emergency.
3. Practice Directional Manipulation (Mode 2)
4. Practice Rotation (Mode 2)
5. Precision Control Exercise
6. Trim
Take off the drone in a wind-free environment to see if it is flowing in the air.
1. Forward/rearward movement trim: If the drone flows forward from the air without any control, press the B button on the controller to adjust the trim. Conversely, if it flows backwards from the air without any control, press the F button on the controller to adjust the trim.
2. Left/Right Trim: If the drone flows from the air to the left without any control, press the R button on the controller to adjust the trim. Conversely, if it flows from the air to the right without any control, press the L button on the controller to adjust the trim.
Note: Whenever the trim button is pressed, the controller will beep.Two beeps are heard when the maximum trim setting is reached.If the trim setting does not allow normal flight, please reset the drone sensor.(Press and hold the reset button on the controller to reset the sensor)
Forward
Reverse
Left Right
7. 360 Degree Rotation (Mode 2)
Stable and easy 360 degrees of rotation
8. Reset the Sensor
Knowledge(Precautions) before flying Drone
Parts List
Component Name
Periodically check the propeller condition of the drone and replace it with a new one if damaged.
1. There are four propellers in a drone. The front is marked as yellow.
2. Referring to the image, make sure that the direction of rotation is a matching propeller.
3. IMPORTANT: Normal flight is not possible if the propeller is not in the right direction.
Problem Solving
Initial Defect and Warranty
We support the following initial defect and warranty exchange policies:
1. Within 7 days of receiving a new product2. If a problem symptom is found within 5 minutes of the cumulative flight time after opening the product.
In the event of a problem with a product that meets all the above conditions, it will be judged as an initial defect and you will be able to exchange the product.
For other user errors and damages other than initial defects, a paid repair will occur, so please note that.
Please contact your place of purchase for additional product repair and support.
* Download Contents : http://robolink.co.kr/download_eng.html* E-Manual : https://robolink.gitbook.io/manual-en/robolink/codronemini
Problem Reason How to solve the problem
I connected the battery in the
drone, but it just blinks and
there's no response.
Drone and controller paired off.
The battery is in the drone
but drone doesn’t work.
I lowered the lever to land,
but the motor won't stop.
Only the propeller is rotated
and the drone does not take off.
The drone still rotate in place
even after setting trim.
The drone is not flying anymore
after the crash.
The battery is low.
Drone doesn’t recognize that it
had reached the floor.
1. The propeller is in the wrong
direction.
2. The battery is low.
1. The propeller is in the wrong
direction.
2. The propeller is damaged.
3. Sensor reset is required.
1. The propeller is disconnected.
2. The propeller is damaged.
Turn off both Drone and controller
and trying to pairing again refer
to the manual.
Charge the drone’s battery.
Please try to land up again. Lower and hold
the throttle lever for more than 2 seconds
after the drone touches the floor.
1. Fit the propeller in the correct
place.
2. Charge the battery.
1. Reinstall the propeller correctly.
2. Replace the propeller.
3. Refer to the manual for sensor
reset.
1. Please install the propeller.
2. Please replace the propeller.
Autonomous safety check report number
Quick manual for flying Drone
Caution
Caution
Caution
Caution
ControllerHow to put battery in controllerConnect droneController key function GuidanceHow to fly a drone (Mode2)Motor Start/StopEmergency stopHeadless ModeChange Mode360 Degree Rotation (Mode2)
Propeller ReplacementTo chargeGuides and precautions for first-time usersProblem SolvingInitial Defect and Warranty