Embed Size (px)
Citation preview

QUICK GUIDEStart your first outbound campaign
or setup a service linein 15 minutes

READ ME FIRST: BASIC REQUIREMENTS
1
3
4
Computers
Accounts
Internet
• Admin can use any browser (Firefox and Chrome recommended)• All Windows (XP, Vista, 7, 8) computers, Macs and Linux computers
ok for agents• However, some features are only available for Windows users
(e.g., GSM calling, live whisper)
• Ask LeadDesk Support to open admin account – you can then open each agent account yourself
• Agent computers- Windows users need a small LeadDesk program installed- Mac and Linux users access via browser (Chrome or Firefox)
• Bandwidth requirement depends on telephony option• With GSM calling, 1MBs for 20 users is easily enough• With VoIP calling, 10MBs for 20 users is recommended
5 Other • If you have any special requirements (e.g., own PBX, complex inbound), as LeadDesk Support for help
• Also ask Support if you require to use our API or fully customizable reporting
2 Headsets • Headsets need to be plugged-in to the computers• USB headsets recommended (analog also ok for most models)
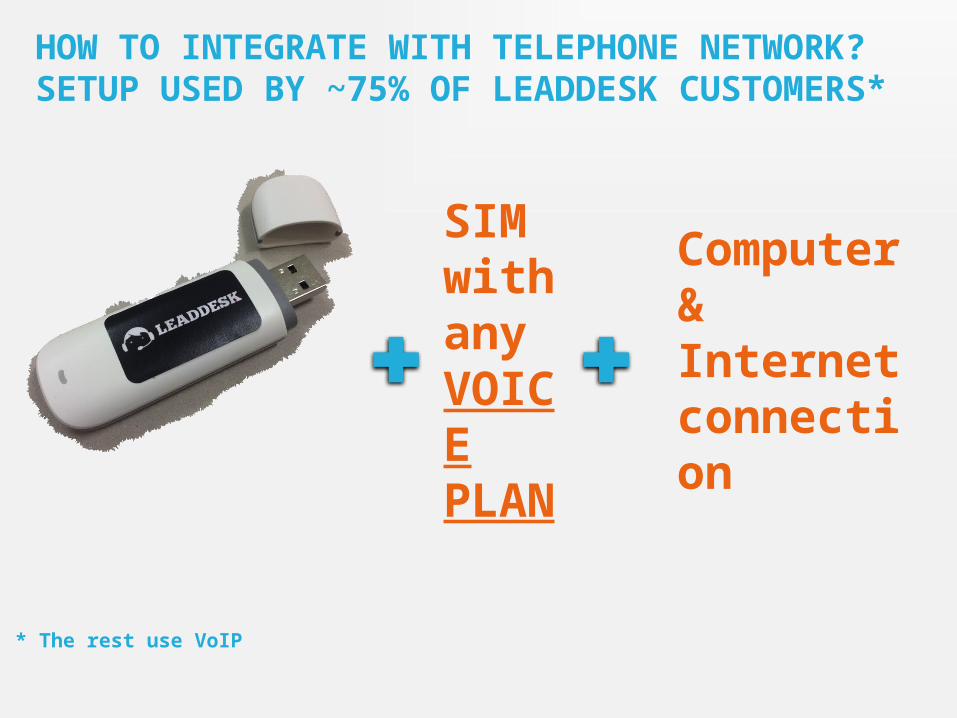
SIM with any VOICE PLAN
HOW TO INTEGRATE WITH TELEPHONE NETWORK? SETUP USED BY ~75% OF LEADDESK CUSTOMERS*
* The rest use VoIP
Computer & Internet connection

MANAGERAGENTTEAM

STEPS TO START YOUR FIRST CAMPAIGN
1
2
3
4
Take a look at your new ADMIN DASHBOARD – get comfortable with what is where
Create first AGENT ACCOUNTS
Upload the CONTACT LIST you want to start calling to
Setup CAMPAIGN SETTINGS, including what different call outcomes there are
5 Track results from real-time WIDGETS, TEAM SCREEN, and REPORTING
6 If you want, optimize GENERAL SETTINGS, AUTOMATIC EMAIL/SMS, INBOUND QUEUES, PRODUCTS, COMMISSION MANAGEMENT etc. …
This is when AGENTS can login in their interface and start calling!

1. GO LOGIN.LEADDESK.COM TO ACCESS DASHBOARD
Everything under Overview helps to manage daily operations
Here you can Chat with others in your team
Use Reports to review development over time & show it to stakeholders
Use these tabs to setup your operations overall & specific campaigns
This is where you Log out
Select logic for each Campaign
Define Agentsand roles
Upload Contact lists
Add products and other Objectives
Setting for complex B2B campaigns
Manage IVR, otherinbound features at Queues
Rest in General Settings
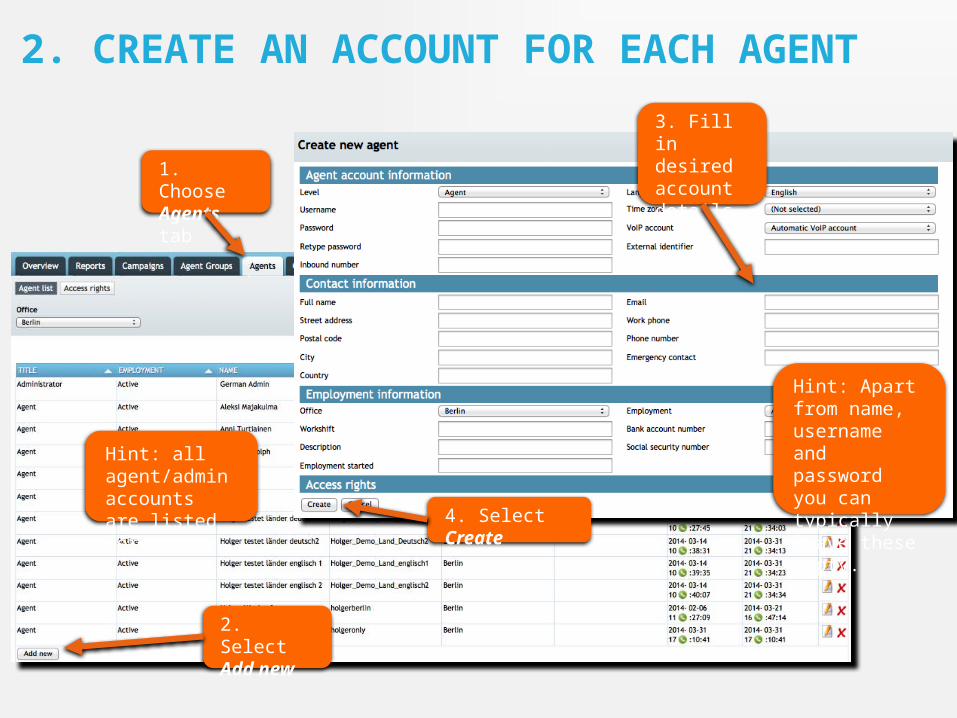
2. CREATE AN ACCOUNT FOR EACH AGENT
1. Choose Agents tab
2. Select Add new
Hint: all agent/admin accounts are listed here
3. Fill in desired account details
4. Select Create
Hint: Apart from name, username and password you can typically leave these empty.

2. LATER, MANAGE AGENT/CAMPAIGN ALLOCATIONS
Hint: Click on the cell to add/remove rights
Green check-mark indicates rights given for specific agents/campaign
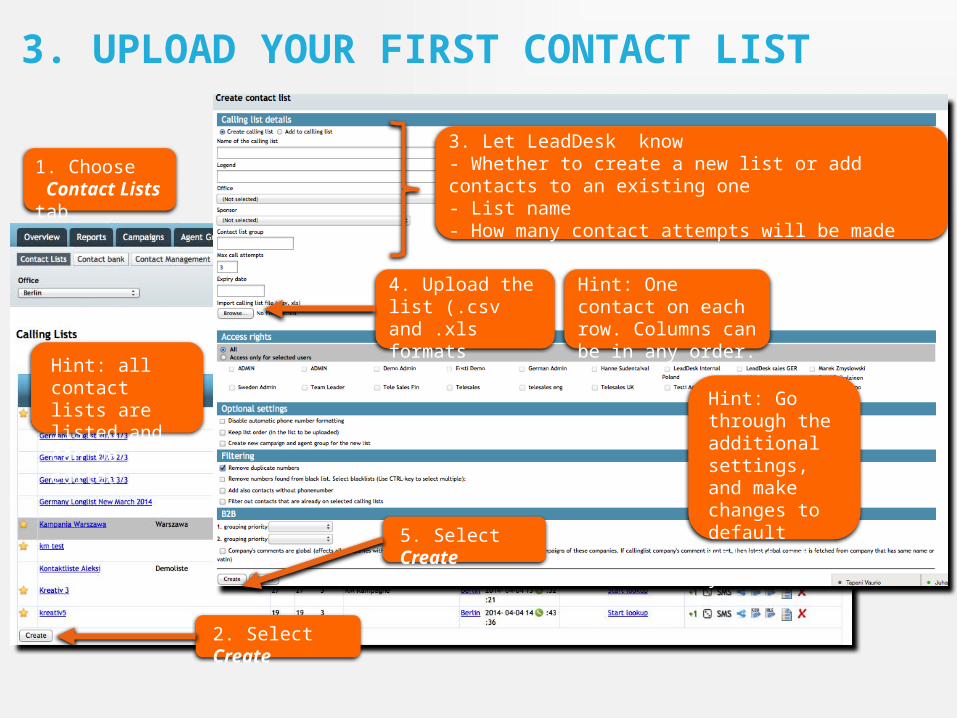
3. UPLOAD YOUR FIRST CONTACT LIST
1. Choose Contact Lists tab
2. Select Create
Hint: all contact lists are listed and can be edited
4. Upload the list (.csv and .xls formats supported)
5. Select Create
Hint: Go through the additional settings, and make changes to default values if you want
3. Let LeadDesk know- Whether to create a new list or add contacts to an existing one- List name- How many contact attempts will be made
Hint: One contact on each row. Columns can be in any order.

4. CREATE A CAMPAIGN FOR THE CONTACT LIST
1. Choose Campaigns tab
2. Select Add new
Hint: all campaigns are listed here and can be edited
3. Define Call results for that campaign, and what is the desired next step after each, e.g.- Removed and kept on
the contact list- Desired waiting period
before possible next call- Automatic message to
be sent
Note: there are several additional settings you can alter if you want. Free feel to explore the advanced sections.
Finally, select Create from the page bottom.
4. Select Calling methods – if you take several, agents can choose among them

5. TRACK CALL AND RESULTS IN REAL TIMEUse Overview and its many sub-tabs to see what is happening your call center right now.
Use Reports to draw picture into development over time or, e.g., collect all orders to be reported forward.

6. ADVANCED FEATURES PERHAPS FOR LATER USECalling methods• Six methods (incl. B2B
predictive, powerdial)• Light interface for click-to-
call from browser
Agent management• Activity log and
revenue/cost per hour• Work time approvals• Company chat
API• Interface to lists & calls• Also instant callbacks• Some CRM integrations
readily available
Reporting• 200+ templates available• DIY report template
creation tool• Live reporting to clients
Telephony options• VoIP• GSM• Operator services• Also: own PBX/landline
User rights• Multiple levels• Individual campaigns can
be blocked• Offices & shifts
Campaign/list CRM• Contact bank and DNC• Order and contact stages• “Genius mode” to link best
agents with each lead
Objectives/products• Product fields• Manuscript tool• Meeting calendar• Commissions
Inbound• “PBX in the cloud”• IVR, skills• Service level monitoring• Call forwarding
Messaging• SMS send and receive• Email send• Link to call results or send
out message blast
Contact capabilities• Number live activity check• B2B/B2C contact sources• Link to product owner
CRM/contact banks
Monitoring• Live widgets• Call monitoring options
(full call recoding, call receipt, live listen/whisper)

MANAGERAGENTTEAM

WHERE DO AGENTS LOG IN?
• Windows users: a small program installed on the hard drive (ask LeadDesk Support for the installation packge)
• Mac and Linux users: via web browser (Chrome and Firefox recommended)
Note: agree with LeadDesk Support which version to be used.
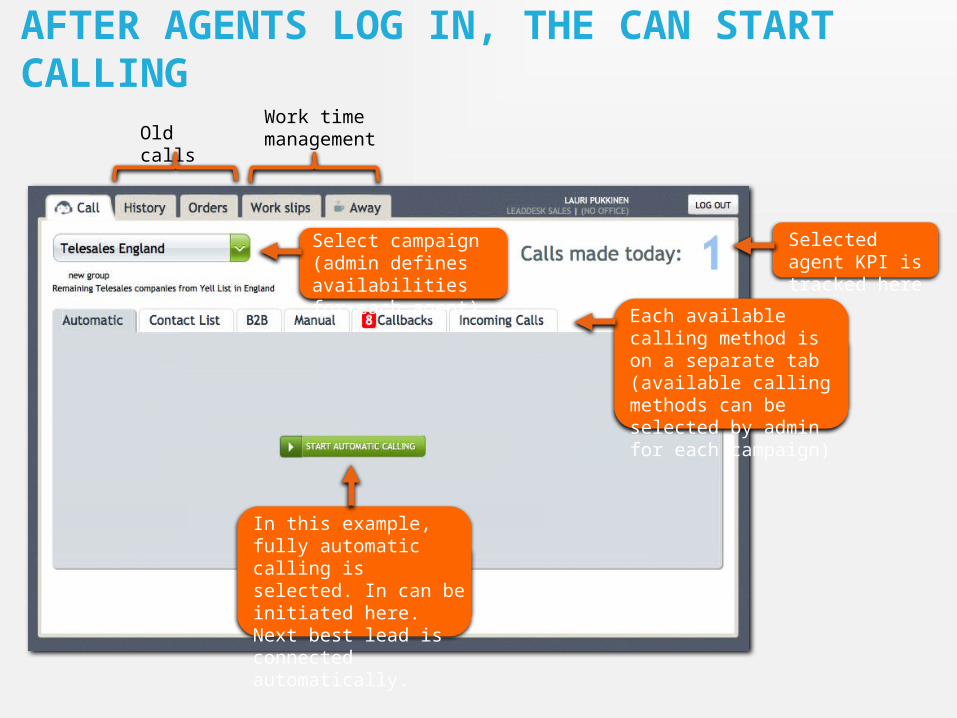
AFTER AGENTS LOG IN, THE CAN START CALLING
Old callsWork time management
Select campaign (admin defines availabilitiesfor each agent)
Each available calling method is on a separate tab (available calling methods can be selected by admin for each campaign)
In this example, fully automatic calling is selected. In can be initiated here. Next best lead is connected automatically.
Selected agent KPI is tracked here

ONCE ANSWERED, A CALL WINDOW POPS UPContact information is under these tabs. It can be edited and saved.
Before ending the call, agent selects a call result. Then LeadDesk knows what to do with the contact next.
Here the agent can confirm or modify the order. He can also define a delivery different from invoicing address
Additional features, such as putting contact to “do not call” list, are under this dropdown menu
Under this tab a specific callback time can be set
If agent reaches his objective – e.g., setting up appointment, selling a product – he can fill in the details here. Selecting the objective collapses the order form.

MANAGERAGENTTEAM

SET LEADDESK SCREEN FOR THE WHOLE TEAM TO SEE
Go screen.leaddesk.com, and select the different visuals to be circulated on team screen. There are 30+ visuals to choose from.
Visuals are automatically updated, and are optimized for full-HD screens.

THANK YOU FOR YOUR INTEREST. LET’S BE IN TOUCH!
Support Center
Web site [email protected]
GlobalLeadDesk GmbHPappelallee 78/79, BerlinHotline: +358 942891826 (Mon-Sat, 8am – 8pm CET)
Germany PolandLeadDesk GmbHLeadDesk branch office PolandPappelallee 78/79 ul. Smulikowskiego 1/3Berlin , Germany Warsaw, PolandHotline: +49 3030806357 Hotline: +48 223073921
Denmark/Sweden/Norway Finland & Baltic countriesLeadDesk ABLeadDesk OyHornsgatan 15Hämeentie 19AStockholm, Sweden Helsinki, FinlandHotline: +46 852503941 Hotline: +358 942891826
Sales
First point of contactMr. Lauri Pukkinen+49 151 [email protected]