Embed Size (px)
Citation preview


Headlight Installation Guide - English P. 03
Headlight Installation Guide - Spanish P. 12
Registration Card - English P. 17
Registration Card - Spanish P. 18
Table of Contents
QUICK GUIDE
Please contact Spyder Auto for troubleshootPlease have the Part Number before calling
Please contact your vendor for return
Toll Free Number: (866) 845-6608email: [email protected]
Spyder Auto19395 E. Walnut Dr. NorthCity of Industry, CA 91748
Office HoursMon- Fri 8:00 AM-5:30 PM PSTwww.spyderauto.com
is a registered trademark, Copyright © 2016 all rights reserved
3
4 5
Safety Goggles
Wire Crimper Screwdriver
SUGGESTED INSTALLATION TOOLS(Please use safe pre-cautions)
Safety Gloves
Soldering Iron
Socket Wrench
Soft Towel
12v Test Light Volt Meter
Storage Tray / Box
Electrical TapeQuick Connector
Panel Popper
(lay out over work area) (prevent missing parts)
Installation Tips:• Always wear eye protection and safety gloves to avoid any possible injuries.• DO NOT cut or connect any wires without identifying them to avoid any possible electrical shortage.• Do not touch bulbs with bare hands. oil and grease will shorten the bulb’s life.• Spyder Auto recommends soldering each wire connection for optimal connectivity.• Please check to ensure no electrical connection is exposed after installation To prevent damage to the product or vehicle, please use electrical tape or zip ties to organize loose wires.
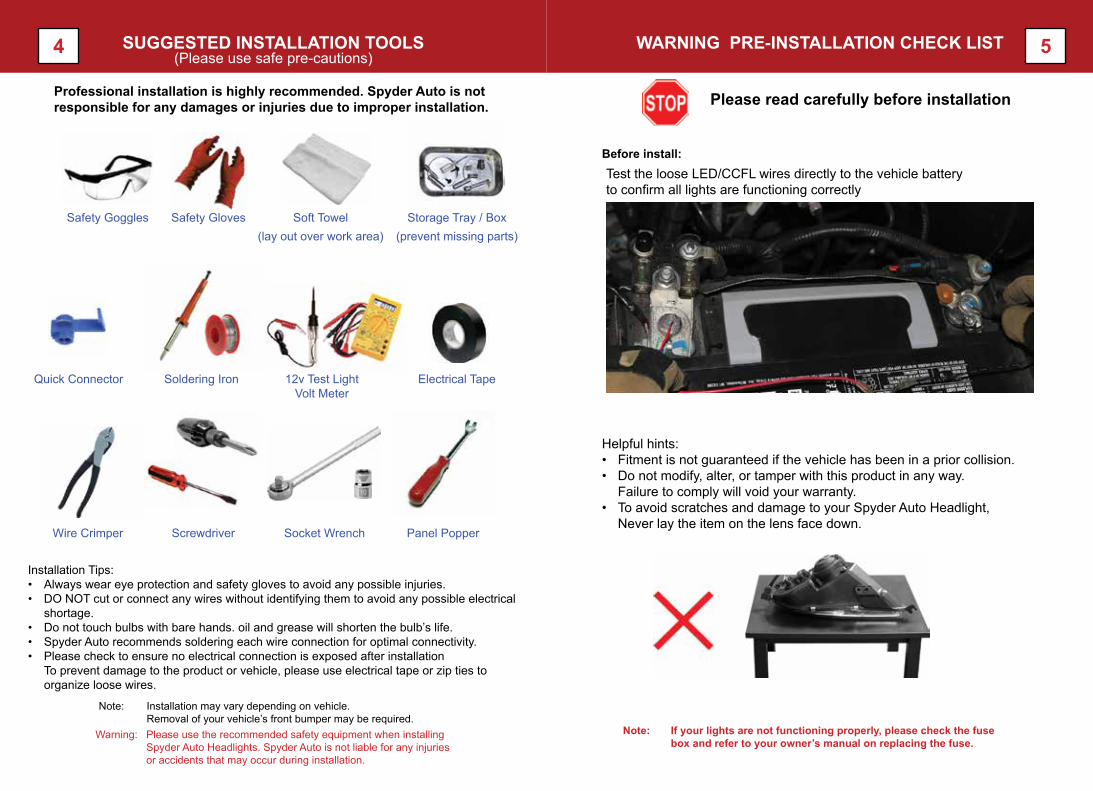
Before install:Test the loose LED/CCFL wires directly to the vehicle battery to confirm all lights are functioning correctly
Note: Installation may vary depending on vehicle. Removal of your vehicle’s front bumper may be required.
Warning: Please use the recommended safety equipment when installing Spyder Auto Headlights. Spyder Auto is not liable for any injuries or accidents that may occur during installation.
WARNING PRE-INSTALLATION CHECK LIST
Please read carefully before installationProfessional installation is highly recommended. Spyder Auto is not responsible for any damages or injuries due to improper installation.
Note: If your lights are not functioning properly, please check the fuse box and refer to your owner’s manual on replacing the fuse.
Helpful hints:• Fitment is not guaranteed if the vehicle has been in a prior collision. • Do not modify, alter, or tamper with this product in any way. Failure to comply will void your warranty.• To avoid scratches and damage to your Spyder Auto Headlight, Never lay the item on the lens face down.

6 7CONDENSATION
Condensation Vs. Water Leak
Manufacturers note: Condensation is a common problem that all lighting manufacturers encounter. As climate changes, the humidity in the headlights can cause the lens to fog up. Once the headlights are turned on, the heat produced from the bulb will evaporate and cause condensation.
Warning: Do not attempt to ope, re-seal, bake or rinse your headlights out. This can cause damage to your headlights and its internal electronic components and void your warranty.
Slight fog or light condensation is normal. If this happens, park your vehicle in the sun to alleviate the condensation. Then reaseat all gaskets and caps to ensure they are tightly sealed.
This is a image of an actual water leak. If this occurs please refer to your warranty guide either found in your packaging or please visit our website for more information.
A.
B.
A. B.
Lens Fog build up Water Leak
HEADLIGHT ADJUSTEMENT
There are many factors involved when you are adjusting your headlights; ride height, age, and of course general wear and tear. It’s no secret that headlights are the most important factor when talking about safety on your vehicle. This is a handy guide to adjusting your headlights for an optimal beam pattern and vision line. Our projector headlights are preadjusted with stock height of the vehicle. manual adjustment may be required for modified vehicles.
First, locate your headlight adjustment knobs. There are four different types of adjusters which are located behind your headlight. Identify which adjuster your product is equipped with and use the correct tool for adjustments.
Phillips Screw 6mm, 7mm, or 8mm socket
Clip on frame, 4mm socket6mm Allen Key
To prevent condensation please check that all rubber gaskets, seals and o-rings are tightly sealed and secured.

8 9BEAM ADJUSTMENT BEAM ADJUSTMENT
Look at the light pattern on the wall. Vertical aim: The top of the most intense part of the beam should be at or below the centerline of the headlamp horizontal tapeline. Horizontal aim: Most of the intense part of the beam should be to the right of the vertical centerline of the headlamp assembly.
Please check with your state and local laws for the specific placement of your headlight beams. There should be very little “kickup” after your adjustment. The most intense part of the light (middle) shouldn’t have much bleeding from the light – the idea is to be able to pick up road signs and pedestrians while still be considerate of oncoming traffic.
Below is an actual picture of what your projector cutoff line should look like.
Here is a picture of what the headlights should look like in comparison to the wall.
Next locate the tools that will be needed to adjust your headlamps. Note: Please do not ever use power tools on your adjusters this may cause severe damage to the internals of your lights.
Next, on a level surface, back your vehicle 25 feet away from a wall. Check your owners manual to see what their optimal distance may be. For example – Toyota suggests you should be 10 feet away from a wall and Chrysler suggests for you to be 33 feet away from a wall. This is for your STOCK headlight system, Spyder Auto recommends that you are 25 feet away.
Make sure you are doing this at night with a passenger inside of the vehicle. To test east side of the light cover it up with a jacket or stand in front of it. Make sure not to do it for too long, you don’t want the headlight to retain an excess amount of heat.
Disclaimer: Spyder Auto will not be held responsible for any incidents that may occur as a direct result of improper headlight adjustments.
Note: Please do not use any power tools on adjusters, Spyder Auto will not warranty any damages caused by over tightening or improperly adjusting your headlights.
Turn knob to raise light beam output
Turn the opposite direction to lower the beam.

10 11LED HALO/ DRL LED
Red DotPositive (+)
Black will always be a ground wire, any colored wire including white is a power wire and will be hooked up to running lights
Most headlights feature individual LEDs to add an extra accent to enhance the appearance of your vehicle.
Some of these LEDs are replaceable, if any wereto burn out you can replace them easily.
Spyder Auto headlights utilize a T10 LED bulb. Here are some directions on how to replace the bulbs:
Spyder Auto does not recommend self installation for any electrical wiring. We recommend highly trained professionals to properly connect your electrical components. Spyder Auto is not liable for any damages or injuries due to improper installation.
Warning:
Note: Image displayed are for instructional purpose only, actual product may vary.
CCFL HALO (Cold Cathode Fluorescent Lighting)
1. Locate the CCFL Power inverter and then find the corresponding plugs from the headlights and clip them together.2. Once connected, heat the shrink tube to ensure the connection is secured
Connect to parking lights
Black Wire Ground (-)Red Wire Postive (+)
Note: Image displayed are for instructional purpose only, actual product may vary.CCFL halo ring is sealed inside the product and it’s non replaceable.
for more infomation on how to connect LED/CCFL Halos, visit our website or youtube channel
CCFL Halo operational temperature is from -40˚c to 80˚c.Some cold area may take longer to warm up
LED halo ring is sealed inside the product and it’s non replaceable.
CCFL power inverter installation / replacement
brand new products may have already been installed
DOES NOT REQUIRE INVERTER
12 13
Returns:• All returns require an RMA (returned merchandise authorization) number authorized by SPYDER AUTO through your reseller.
All authorized returns will be made on a freight-prepaid basis, including insurance, by the customer and will be subject to a 20% restocking fee.
• Returns must be made within 14 days of receipt. All returns will be issued as credit, no refunds. Non-defective items are not eligible for return or exchange after the 14 day period. NO EXCEPTIONS.
• RMA number must clearly be displayed on the return label or box.
• Items returned without an approved RMA number will be refused and returned to sender.
• Items to be returned must be received by SPYDER AUTO within 30 days from issue of an RMA number. After 30 days, the RMA is void.
• An account must be current to be eligible for returns.
• Item must be in original packaging and in new resalable condition.
• Any item that was used or fully/partially installed is non-returnable.
• Shipping fees are non-refundable. Customer is responsible for shipping charges incurred to and from SPYDER AUTO.
• Returned items must be boxed and shipped in their original packaging and in a manner so as not to be damaged in transit. Damage to boxes or product due to packaging will result in a re-box charge or loss of credit for that product.
• Authorized returnable products should be shipped prepaid to SPYDER AUTO. SPYDER AUTO does not accept collect shipments for any returns.
• Any overages of product received but not listed on the RMA will not be credited.
• Product that is returned and determined to be non SPYDER AUTO product will not be credited, nor returned to the point of origin. Parts will be scrapped.
• Any items containing manufacture defects or mislabeled items (missing parts, incorrect color, same side items, etc) must be reported to your assigned sales representative within 14 days from day of receipt. SPYDER AUTO will only issue a return label within the 14 day period. Items reported after the 14 day period will be shipped back at customer’s expense.
Warranties/Defective Items:• Any SPYDER AUTO products that are found to be defective are covered for a period of 1 year (If purchased after 03/01/2015) following
the original purchase date.
• Please register your product by mailing in your product registration form or by going online at www.spyderauto.com/registration
• Please use the bulbs provided with our products to complete installation. If bulbs are not provided, please transfer your OEM bulbs. Installing aftermarket bulbs such as; LED’s or HID’s will void the warranty on our product.
• SPYDER AUTO is not responsible for damage caused by bulbs not supplied with the units.
• All warranty claims must be accompanied by the original proof of purchase and the original packaging. Please keep all boxes, warranties and owner’s manuals when you receive them. They are very important in the event the merchandise is damaged, defective or needs to be returned.
• SPYDER AUTO will warrant that your product will be free of defects in materials and workmanship under normal use by the original consumer purchaser for ninety (90) days from the original purchase date. This limited warranty does not cover any damage caused by improper installation, road hazard, accident, racing, misuse, alteration or normal wear and tear. This limited warranty does not cover vehicles used in racing or competition or vehicles with settings other than those set forth in the original manufacturer’s specifications.
• Cost of installation and labor is not covered in the warranty. SPYDER AUTO shall not be held liable for any incidental or consequential damages and/or injuries from the result of use of its parts.
• Any item that is returned as defective, and found to be non-defective will have no credit issued and will be returned at sender’s expense.
• SPYDER AUTO reserves the right to send replacement components for warranty/defective items in the field.
• All defective items returned to SPYDER AUTO and verified to be defective will receive credit for the item. Please note that manufacturing defects are subject to the terms and conditions of SPYDER AUTO’s warranties.
• Items found to be defective within 30 days will have a return label issued by SPYDER AUTO. Any items found to be defective after 30 days will be shipped at the customer’s expense. RMA number must be displayed on return label or box. Warranty items returned without an approved RMA number will be refused and returned to sender.
Troubleshooting:• Tech Support is available Mon-Fri 8:30am to 5:30pm PST by calling (866) 845-6608 or by emailing [email protected]
• Please have your part number and original receipt available before calling.
• For products with CCFL rings, please allow time for the rings to reach normal operating temperatures.
• Halo and CCFL rings are not replaceable.
Light Bulb Types Terms
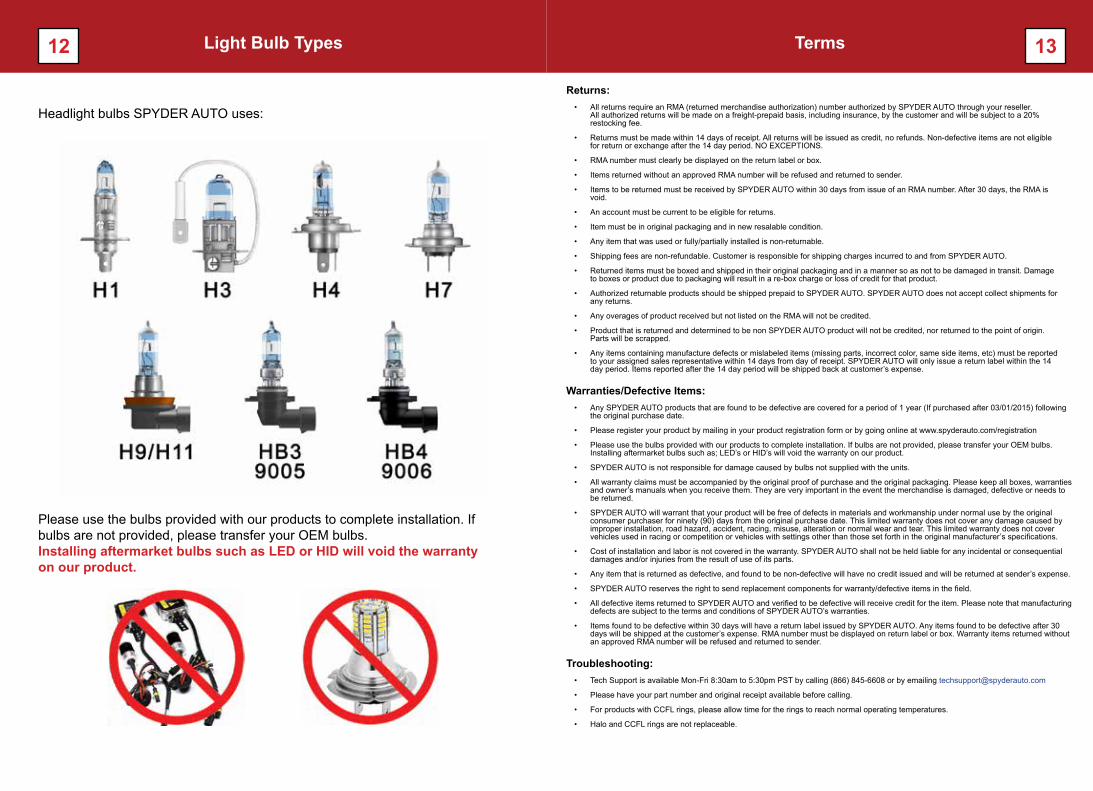
Headlight bulbs SPYDER AUTO uses:
Please use the bulbs provided with our products to complete installation. If bulbs are not provided, please transfer your OEM bulbs. Installing aftermarket bulbs such as LED or HID will void the warranty on our product.