Embed Size (px)
Citation preview

© 2016 SMANOS HOLDING LTD. All Rights Reserved. Ver: PT-180-UM-ML-V1.0Printed in China
QUICK GUIDE
Instruction Manual
UFO Camera

Contents1. Things to Note before Getting Started …………………………………………………………………3
1.1 High-speed WiFi Internet Connection ……………………………………………………………3
1.2 SSID and Password ………………………………………………………………………………………… 3
1.3 Operating System Requirements …………………………………………………………………3
2. Get to Know Your UFO Camera ………………………………………………………………………… 4
2.1 UFO Overview …………………………………………………………………………………………………4
2.2 Light Indicators …………………………………………………………………………………………………5
3. Getting Started ……………………………………………………………………………………………………6
3.1 Downloading the “smanos home” App …………………………………………………………6
3.2 Signing Up/In …………………………………………………………………………………………………6
3.3 Adding Device ………………………………………………………………………………………………6
4. Setting Up Your UFO ………………………………………………………………………………………………7
5. App Operation …………………………………………………………………………………………………10
5.1 Main Page ……………………………………………………………………………………………………10
5.2 Account Management …………………………………………………………………………………12
6. App Control ………………………………………………………………………………………………………15
6.1 Live Video Page ……………………………………………………………………………………………15
6.2 Alerts Page ……………………………………………………………………………………………………17
6.3 Records Page ………………………………………………………………………………………………18
6.4 Settings Page…………………………………………………………………………………………………19
7. Installation …………………………………………………………………………………………………………26
7.1 Ceiling or Wall- Mounted ……………………………………………………………………………26
7.2 Desk or Any Flat Surface ………………………………………………………………………………27
8. Specifications ……………………………………………………………………………………………………29

3
1. Things to Note before Getting Started1.1 High-speed WiFi Internet Connection- One critical factor affecting the performance of your UFO camera is the relative positions of your home WiFi router and the UFO. Set up your UFO in an open space (DO NOT place it directly on the floor); the closer the camera is to the router, the stronger the WiFi signal will be, and the better the footage on your smartphone will be.
- A slow network speed will also affect the performance of your UFO camera. It is recommended that you have an upload speed of at least 2Mbps or higher per camera. You can easily test your network’s upload and download speeds @ www.speedtest.net or get the speedtest app.
- This UFO does support WiFi of 2.4G & 5GHz band.
1.2 SSID and Password- Have your WiFi network name and password handy. The WiFi network name is normally referred to as the SSID. The password or security ID is normally the next line or two down from the WiFi/SSID network name.
These can be easily found on your WiFi router if you do not change them when you first install the WiFi router, for example:
- WiFi/SSID Network Name: XXXX
- WiFi/SSID Network Password/Security Key: XXXXX
1.3 Operating System Requirements- iOS 8.0 or above with iPhone 5 or newer;
- Android 5.0 or newer

4
2. Get to Know Your UFO Camera2.1 UFO Overview
Night vision IR lights
Microphone
Speaker
PIR motion sensor
Configuration buttonmicroSD card slot
Day/Night sensor
Indicator lights
Speaker
Power port
1080p full HD camera
microSD card slot power port
TM
TM
microSD™ Card (Not included)
Support up to a 32GB microSD™ card; please do not insert the card after the camera is powered on.
The video recorded at the earliest will be replaced with the most recent recording if the microSD™ card is full.
Note: If you are inserting a previously used microSD™ card, please format the card before inserting.
5
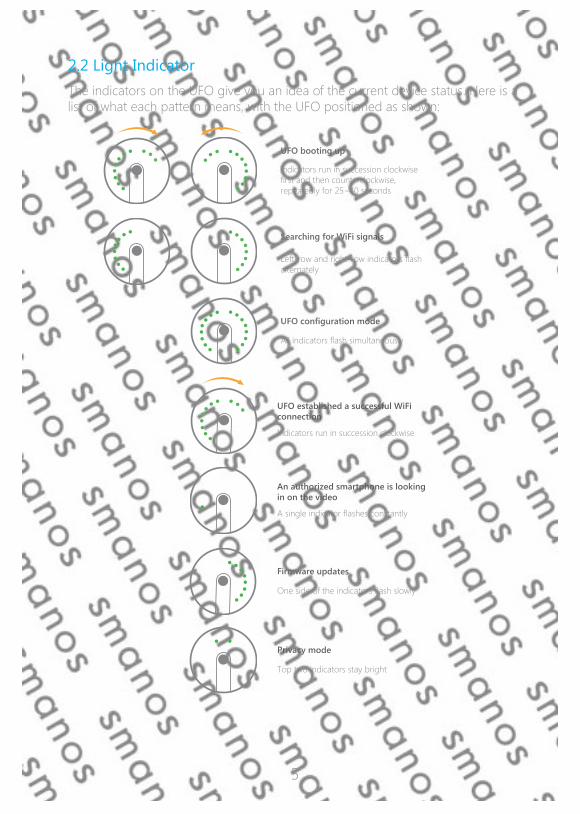
2.2 Light IndicatorThe indicators on the UFO give you an idea of the current device status. Here is a list of what each pattern means, with the UFO positioned as shown:
Light IndicatorsThe indicators on the UFO give you an idea of the current device status. Here is a list of what each pattern means, with the UFO positioned as shown:
UFO booting up
Searching for WiFi signals
UFO configuration mode
Firmware updates
Indicators run in succession clockwise first and then counterclockwise, repeatedly for 25~40 seconds
Left-row and right-row indicators flash alternately
All indicators flash simultaneously
UFO established a successful WiFi connection
Indicators run in succession clockwise
An authorized smartphone is looking in on the video
A single indicator flashes constantly
One side of the indicators flash slowly
Privacy mode
Top two indicators stay bright

6
3. Getting Started3.1 Downloading the “smanos home” AppSearch for “smanos home” in App Store/Google Play, then download and install the App.
3.2 Signing Up/InIf you have not registered an account with smanos, please press “Sign up” just below the “Sign in” icon on the App, and follow the instructions to create your account first.
* If you do not receive an account verification code in your email inbox during the registration process, please remember to check your spam/junk folder and make sure the notice has not been blocked by your service provider.
Once you have an account with us, please select the “Sign in” icon and enter your email address and password to log in.
3.3 Adding DevicePress the [ + ] button on the main page.
Tap on [UFO Camera], then follow the configuration steps to set up your UFO with your home WiFi.

7
4. Setting Up Your UFO ① Waiting for the UFO to Boot Up
Plug the power adapter into a wall socket and the UFO camera will boot up in 25 to 40 seconds. During this time, you will see indicators run in succession clockwise and then counterclockwise.
Light IndicatorsThe indicators on the UFO give you an idea of the current device status. Here is a list of what each pattern means, with the UFO positioned as shown:
UFO booting up
Searching for WiFi signals
UFO configuration mode
Firmware updates
Indicators run in succession clockwise first and then counterclockwise, repeatedly for 25~40 seconds
Left-row and right-row indicators flash alternately
All indicators flash simultaneously
UFO established a successful WiFi connection
Indicators run in succession clockwise
An authorized smartphone is looking in on the video
A single indicator flashes constantly
One side of the indicators flash slowly
Privacy mode
Top two indicators stay bright
Once the UFO camera is ready to launch, the indicators will flash on the right then on the left as a row, which means it is searching for viable WiFi signals.
Light IndicatorsThe indicators on the UFO give you an idea of the current device status. Here is a list of what each pattern means, with the UFO positioned as shown:
UFO booting up
Searching for WiFi signals
UFO configuration mode
Firmware updates
Indicators run in succession clockwise first and then counterclockwise, repeatedly for 25~40 seconds
Left-row and right-row indicators flash alternately
All indicators flash simultaneously
UFO established a successful WiFi connection
Indicators run in succession clockwise
An authorized smartphone is looking in on the video
A single indicator flashes constantly
One side of the indicators flash slowly
Privacy mode
Top two indicators stay bright

8
② Putting the UFO into WiFi Configuration Mode
Press and hold the Configuration Button on the side for 5 seconds, and you will hear a tone which indicates that the UFO has switched into the WiFi Configuration Mode.
Note: Please wait until you see all indicators flash simultaneously.
Light IndicatorsThe indicators on the UFO give you an idea of the current device status. Here is a list of what each pattern means, with the UFO positioned as shown:
UFO booting up
Searching for WiFi signals
UFO configuration mode
Firmware updates
Indicators run in succession clockwise first and then counterclockwise, repeatedly for 25~40 seconds
Left-row and right-row indicators flash alternately
All indicators flash simultaneously
UFO established a successful WiFi connection
Indicators run in succession clockwise
An authorized smartphone is looking in on the video
A single indicator flashes constantly
One side of the indicators flash slowly
Privacy mode
Top two indicators stay bright

9
③ Connecting the UFO to Your Smartphone
Go to your smartphone’s WiFi list, and select “smanos UFO” to connect to the camera. Now, your smartphone is the control center of your UFO.
④ Entering WiFi Details for Your UFO Camera
Pick your home WiFi network from the display listed for your UFO camera, and enter the WiFi network password. The UFO will connect to the selected WiFi network. This binding process should take about one minute.
Note: If your WiFi network is not listed, please choose "Others" and input WiFi name and password manually.

10
⑤ Enjoying the UFO Camera
When a successful connection is established, the indicators will run in succession in a clockwise fashion.
Now, your UFO is ready for a spin!
5. App Operation5.1 Main PageCheck device status after set up
Edit the device(s)
When the status bar turns into teal, it means the device is ONLINE and available.If it's gray, it means the deviceis OFFLINE and cannot be accessed.
If this icon appears in the left of your device, it means the device is shared from your family or friends to you.

11
Edit your device(s) as you wish
Delete DeviceTap on the Edit Button [ ], press the Delete Button [ ] and choose [ ].
SortingTap on the Edit Button [ ], press and hold the Sort Button [ ], drag it up or down to the position where you want it to be located.
Sorting Button

12
5.2 Account Management
Editting AccountTap on [ ] on the main page to enter the account management.
Tap on the picture, and you can add or replace your account image by taking a picture or choosing a picture from your phone’s album.
If you want to change your account name, just tap on the [ ] button and enter a new name.
Changing your password can also be done on this page.

13
My SharesSharing camera(s) with family or friends
It means the device has been successfully shared to your family
or friends.
By choosing “My shares” on the menu and pressing the [ + ] Add Button, you can share access to your camera(s) with other registered smanos accounts.
Enter the email address and nickname of the account you want to share with, and then select the camera(s).
Admin (Full Access)
The accounts who receive the shared camera(s) only can not re-share the device(s) to others.
User (Read Only)
The user who receives the shared camera(s) can only edit the name of the camera(s) and receive alerts for motion detection; re-sharing the camera(s) to other users or changing the settings are not permitted.
It is highly recommended that you set access limits to those who you may share your camera(s) with. Without doing so, you grant your family members or friends have continual access to the camera(s) you have shared.

14
① By week days (repeatedly)
Select the day(s) and each day's routine you want the camera(s) to be
accessible to the account you share with.
② By dates
The family and/or friend(s) you share with would have access to your
camera(s) during the entire chosen time period.
Stop sharing
If you don’t want people have continuous access to the device you shared, tap stop sharing, then tap “√” on the top right to save.

15
6. App Control6.1 Live Video Page
1. Viewing Modes
For Ceiling Mounting, you can enjoy 6 different viewing modes: Bird’s Eye, Panorama, Hemisphere, Two Halves, Triple View and Quad View
For Wall/Desk Mounting, you can enjoy 3 different viewing modes: Bird’s Eye, Panorama and Hemisphere
Once you select a viewing mode, motion-triggered alerts and 24/7 video (requires a microSD™ card) that are saved under Alerts and Records (From Memory Card) will be recorded in the selected mode.
180° panoramic view
Dual 180° panoramic view
180° hemisphere view
Dual 90° view and one 180° panoramic view
360° birds eye
90° quad view

16
2. Signal Strength
Indicate the signal strength between the WiFi network and the connected devices.
Note: Another critical factor affecting video quality is the upload speed of your chosen WiFi network.
3. Microphone (left) / Listen in (right)
Press and hold the microphone button, talk, then release the button when you finish talking. Anyone in the vicinity of your UFO camera will hear you.
If you want to listen in on the surrounding area of your UFO, all you need to do is tap on the Listen In button.
4. Auto Panning
The Auto Panning function broadens your view angle when you are viewing the live video on your phone. Just click the button to pan, click again to stop and the live video resume to normal.
*Auto Panning is not working under Bird's Eye and Hemisphere mode.
5. Snapshot (left) / Video Recording (right)
Real-time screenshots and video clips can be recorded directly in your phone. Tap on-[Records]-[Saved] to view.
6. Privacy Mode
The UFO respects your privacy. When the camera is turned off, NO video will be recorded and the top two indicators will stay bright.

17
6.2 Alerts Page
Motion-triggered alerts can be reviewed from this History page, if a microSD™ card was inserted.
Tap on [ ] to pick a specific day to facilitate your search of an alert of interest.
Note: Only the most recent 200 alerts will be shown. New alerts will overwrite the oldest ones.
24/7 continuous recording, with motion alerts in redYou can view your video clips of triggered motions on the cloud after purchasing a smanos cloud plan.Manually saved video clips and snapshots on your phone

18
6.3 Records Page① From Memory Card - 24/7 Continuous Recording
★ While you review the continuous recording saved to the memory card, you can also manually save snapshots and/or video clips of interest directly to your phone. All the saved snapshots and video clips are accessible under [Records]-[Saved].
② Saved - Video Clips and Snapshots
On this page, all the manually saved video clips and snapshots that you have stored on your phone can be found. You can also edit and share them as you wish.
Motion alert: motion was detected in this interval.
Pause button
microSD™ / Cloud switch
Current time
No recording
Timeline: slide back and forth to select a time, and play the corresponding video.
Snapshot (left) / Video recording (right) ★
19
Delete Video(s) or Snapshot(s)
Tap on edit icon [ ] and then press the shown [ ] to delete video clip(s) or snapshot(s).
Share Video(s) or Snapshot(s)
Tap on edit icon [ ], and then press the shown [ ] to share the video clips or snapshots of interest.
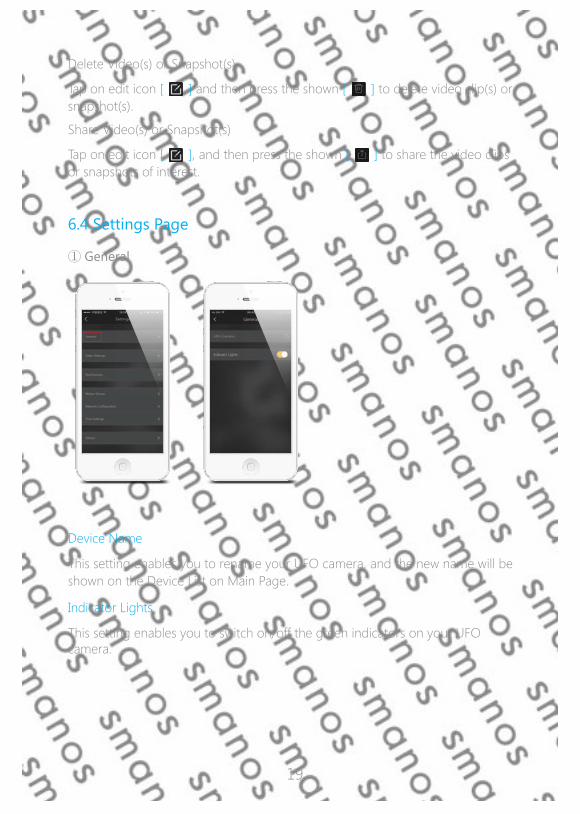
6.4 Settings Page
① General
Device Name
This setting enables you to rename your UFO camera, and the new name will be shown on the Device List on Main Page.
Indicator Lights
This setting enables you to switch on/off the green indicators on your UFO camera.

20
② Video Settings
This setting enables you to choose different view modes of the real-time play and adjust angles of the six modes.
Bird’s eye, Panorama, Hemisphere
You may reverse or mirror the view by press[ ] and [ ] to adjust angle of each mode.
Quad view, Two halves, Triple view
You may adjust the view by pressing [ ], choose one of the zones and slide up, down, left or right, the chosen view enters the Auto Panning mode, wait until the view move to the wanted angle then tap “√” on the top right to stop the adjustment and save.

21
③ Notifications
Alert Tone
This setting enables you to select a ringtone for alarm notifications.
This setting enables you to add email addresses to receive alarm notifications.

22
④ Motion Sensor
On/Off
When the motion sensor is turned on, you will receive a push notification whenever motion is detected.
Timing
This is useful if you installed the UFO in a busy room or area in your home where foot traffic is frequent. Define a timeframe during which you wish to receive motion alerts.
Sensitivity
This setting enables you to adjust the sensitivity of the motion sensor on your UFO.

23
⑤ Network Configuration
Switching between Networks
This setting enables you to connect your UFO camera with another nearby WiFi network, without repeating the camera-phone binding process.
Reconfiguration
This setting enables you to reconfigure your UFO when a network issue has arisen. All settings and records will NOT be cleared.

24
⑥ Time Setting
Synchronize Time
This setting enables you to synchronize the time zone of UFO with your smartphone, to make sure the time stamp on the recorded video is correct.
When motion is detected, you will receive a push notification: (for example) Activity detected by [UFO camera name] at 08:20:00 GMT+2 Or Activity detected by [UFO camera name] at 07:20:00 GMT+1 DST during Daylight Saving Time.
Date Format
This setting enables you to change the format of the date shown on your smanos home app.

25
⑦ Others
Firmware Update
This setting enables you to update your UFO camera to the latest firmware if necessary. WHEN AN UPDATE IS TAKING PLACE, FORCED TERMINATION WILL CAUSE SERIOUS DAMAGE TO YOUR UFO. It is highly recommended that you keep your UFO plugged in at all times, and DO NOT SWITCH THE DEVICE OFF BEFORE AN UPDATE IS COMPLETED.
Update steps: tap on [Firmware Update], and you will see one row of the indicators flash slowly. Upon hearing a short beep, you will know the update has started. A long beep indicates that the download and update have been successfully completed. Two beeps indicate that the update has not been completed; please try again later.
Wipe & Format microSD™ Card
This setting will wipe clean all the recordings on your memory card. When video is not being recorded to your memory card, you may try reformatting it.
This process is irreversible, so please do perform with caution.

26
7. InstallationThe PIR motion sensor should always be positioned vertically so that the sensor is pointing to the ground/desk when it is mounted on the wall or sitting on the desk bracket.
Recommended Mounting Height
Mount Type Mounting Height
Ceiling 3m (10 ft)
Wall 2m (6.6 ft)
Desk or Any Flat Surface 1m (3.3 ft)
7.1 Ceiling or Wall- Mounted
1. Unlock the base from your camera.
4. Make sure the PIR motion sensor is pointing vertically to the ground.
1
2
90°
3. Lock your camera into position onto the base.
UP ↑
2. Place the base on the wall, in the angle and relative position shown above; use the provided tool set to install it properly.
UP ↑wall orceiling
Wall-Mounted:
Bird Eye Panorama
Ceiling-Mounted:
Bird Eye Quad ViewHemisphere
Double BroadTriple View Panorama

27
1. Unlock the base from your camera.
4. Make sure the PIR motion sensor is pointing vertically to the ground.
1
2
90°
3. Lock your camera into position onto the base.
UP ↑
2. Place the base on the wall, in the angle and relative position shown above; use the provided tool set to install it properly.
UP ↑wall orceiling
Wall-Mounted:
Bird Eye Panorama
Ceiling-Mounted:
Bird Eye Quad ViewHemisphere
Double BroadTriple View Panorama
7.2 Desk or Any Flat Surface
28
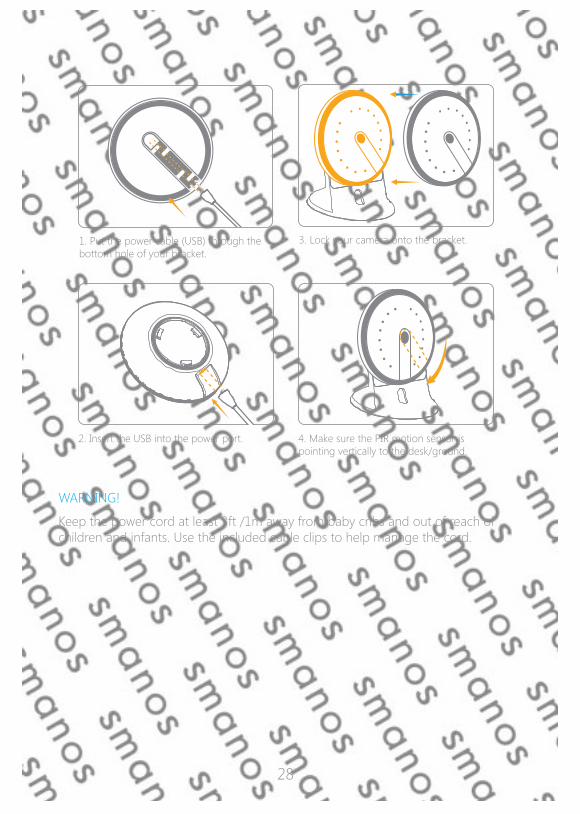
1. Put the power cable (USB) through the bottom hole of your bracket.
4. Make sure the PIR motion sensor is pointing vertically to the desk/ground.
2. Insert the USB into the power port.
3. Lock your camera onto the bracket.
WARNING!
Keep the power cord at least 3ft /1m away from baby cribs and out of reach of children and infants. Use the included cable clips to help manage the cord.

29
8. SpecificationsModel: PT-180H
Power: DC 5V 1A
Camera: full HD 1080p
Field of view: horizontal 180°, vertical 180°
Video compression: H.264/MJPEG
Video resolution:
birds eye mode 1280x1280;
panorama mode 1920x1080;
quad view mode 1280x960;
hemisphere mode 1920x1080;
two halves mode 1920x1080;
triple view mode 1920x1080
Night vision: yes, auto IR-cut filter
WiFi: 802.11 ac/b/g/n with WEP/WPA/WPA2 encryption
On-site storage: microSD™ card up to 32GB
Operating conditions: 0-50°C, humidity < 95% RH (non-condensing)
Dimensions (L x W x H): 106 X 106 X 36mm