Embed Size (px)
Citation preview
Q
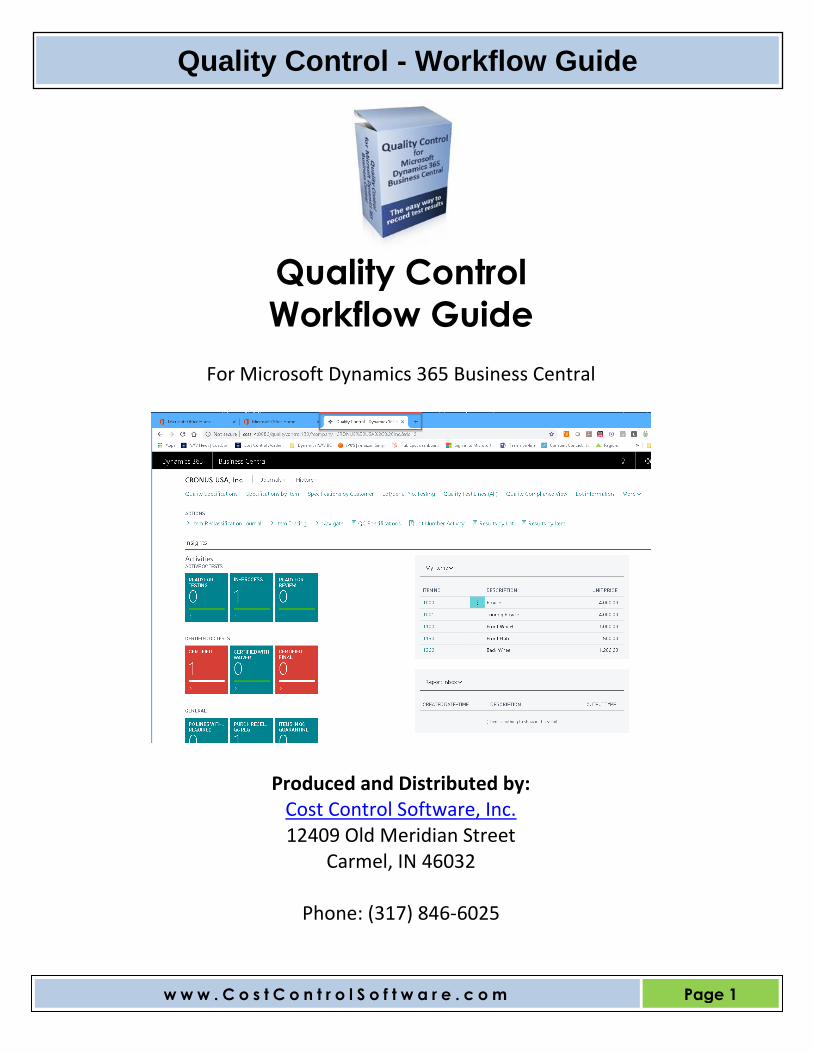
Quality Control - Workflow Guide
w w w . C o s t C o n t r o l S o f t w a r e . c o m
Page 1
Quality Control
Workflow Guide
For Microsoft Dynamics 365 Business Central
Produced and Distributed by: Cost Control Software, Inc. 12409 Old Meridian Street
Carmel, IN 46032
Phone: (317) 846-6025
Q
Quality Control - Workflow Guide
w w w . C o s t C o n t r o l S o f t w a r e . c o m
Page 2
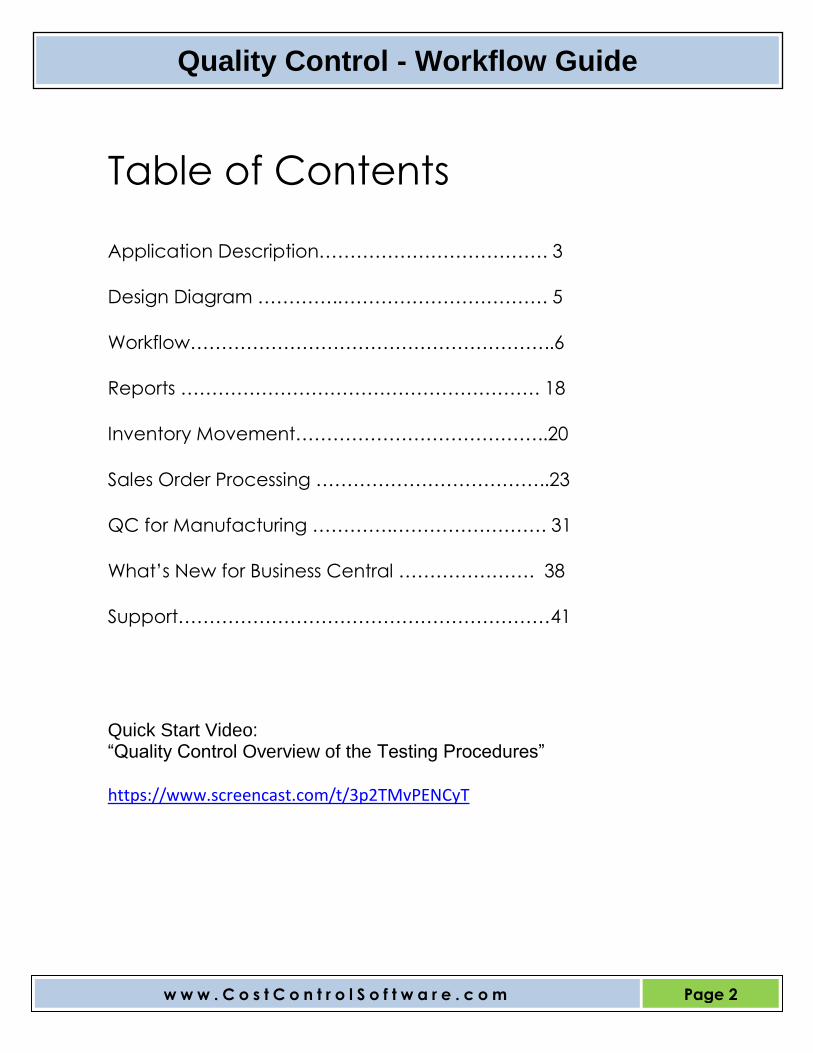
Table of Contents
Application Description………………………………. 3
Design Diagram ………….……………………………. 5
Workflow…………………………………………………..6
Reports …………………………………………………. 18
Inventory Movement…………………………………..20
Sales Order Processing ………………………………..23
QC for Manufacturing ………….……………………. 31
What’s New for Business Central …………………. 38
Support……………………………………………………41
Quick Start Video: “Quality Control Overview of the Testing Procedures” https://www.screencast.com/t/3p2TMvPENCyT
Q
Quality Control - Workflow Guide
w w w . C o s t C o n t r o l S o f t w a r e . c o m
Page 3
Application Description Quality Control is designed for Microsoft Dynamics 365 Business Central. Quality Control enables testing of incoming Raw Materials with Lot or Serial Number or Finished Goods with Lot or Serial Numbers placed into Inventory. For each Inventory Item to be tested, you will first set up your Item’s Quality Specifications for both Measures and Methods. Actual Test results will be entered into a test results Page, which enables you to compare your Low and High Limits to the Target Test Results. Non-Conforming test results will be flagged as exceptions. Quality Control is built around Dynamics 365 Business Central’s Item Tracking Granule. Item Tracking enables Lot Number Tracking on either Finished Goods or Raw Materials. (Purchased Items or Produced Items) Quality Control is designed to enable Customer Specific Specifications on each Item. The Item Specifications will also hold multiple Versions and Effective Dates on each Version. (Similar to a Production Bill of Materials) This way a Customer can notify you of future Specification Requirements prior to your Production Cycles. When a Lot is tested it is tested against your internal specifications. A Certificate of Analysis can be generated after the test is certified. When Lot items are shipped, it is possible to print a Certificate of Analysis for that specific Lot Number. The Shipment’s Certificate of Analysis can be printed showing your company’s Specifications or your Customer’s Specifications. Any Non-Conformance Lines will be indicated. Lot Numbers are typically selected by the Customer Service Representatives to assure conformance to a Customer’s Specified Quality Measures. The Shipment Document has been modified to display the desired Lot Numbers to pick and ship that meets that Customer’s Specifications. A fresh Certificate of Analysis can be generated directly from the Posted Shipment Document at any time. Actual Test Results can be printed immediately upon completion of a given test, or can be printed in Batch at the end of any time period. All test results are stored in a Testing Results Log for reporting and historical purposes. Dependencies: Item Tracking Granule, Location Codes (Recommended)
Q
Quality Control - Workflow Guide
w w w . C o s t C o n t r o l S o f t w a r e . c o m
Page 4
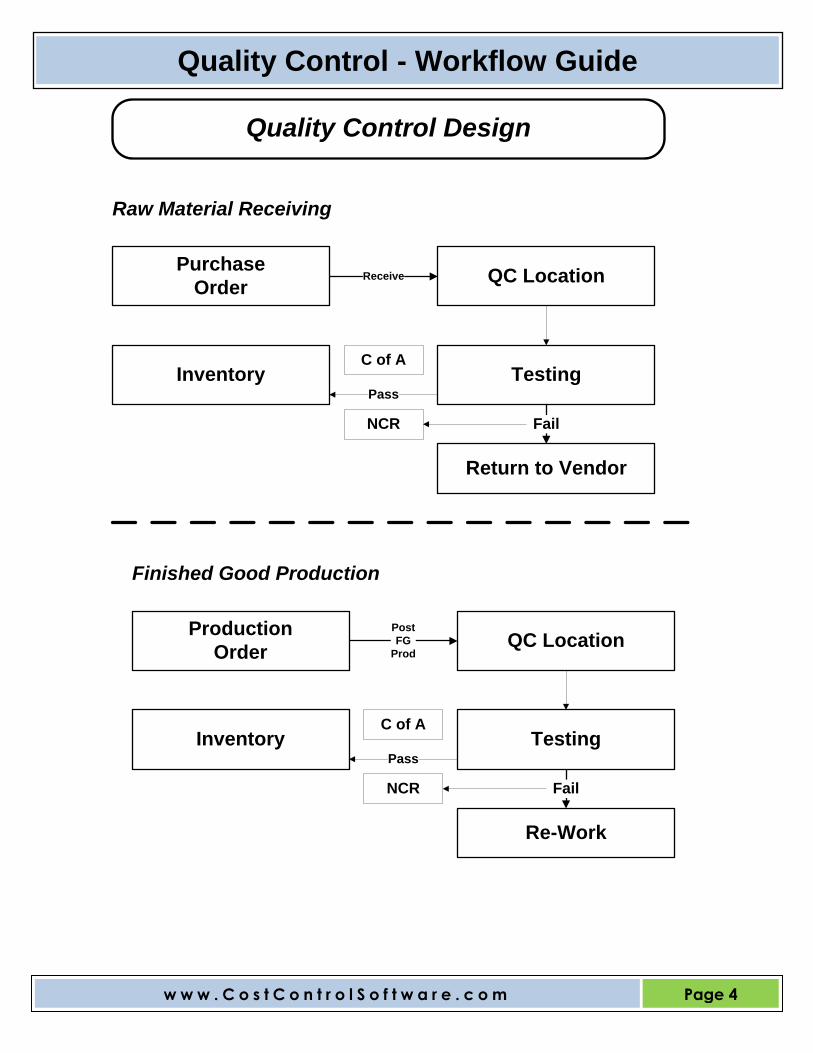
Quality Control Design
Receive QC LocationPurchase
Order
Inventory Testing
Return to Vendor
Raw Material Receiving
Fail
Pass
Post
FG
ProdQC Location
Production
Order
Inventory Testing
Re-Work
Finished Good Production
Fail
Pass
C of A
NCR
NCR
C of A

Q
Quality Control - Workflow Guide
w w w . C o s t C o n t r o l S o f t w a r e . c o m
Page 5
Workflow Quality Control was developed to allow users to enter LOT NUMBER “Test Results” and then compare the results to internal Company Quality Standards or Customer Specific Standards (Specifications). These Specifications are pre-defined for each Inventory Item that is to be tested. (See Page 14 of the “Setup Guide” for full instructions) This step should be completed before you start entering actual test results. We recommend you also have an Inventory Item with Lot Number information in that Item’s Ledger Entries before you begin.
Did you complete the Setup? If not, go back and do the setup first. Let’s Get Started: - Open up the Quality Control Role Center

Q
Quality Control - Workflow Guide
w w w . C o s t C o n t r o l S o f t w a r e . c o m
Page 6
Also, ensure you have an Inventory Item that is set to “Item Tracked”. I recommend you have received some Quantity On-hand of this item, with the Lot Number showing in the Item Ledger Entries too.

Q
Quality Control - Workflow Guide
w w w . C o s t C o n t r o l S o f t w a r e . c o m
Page 7
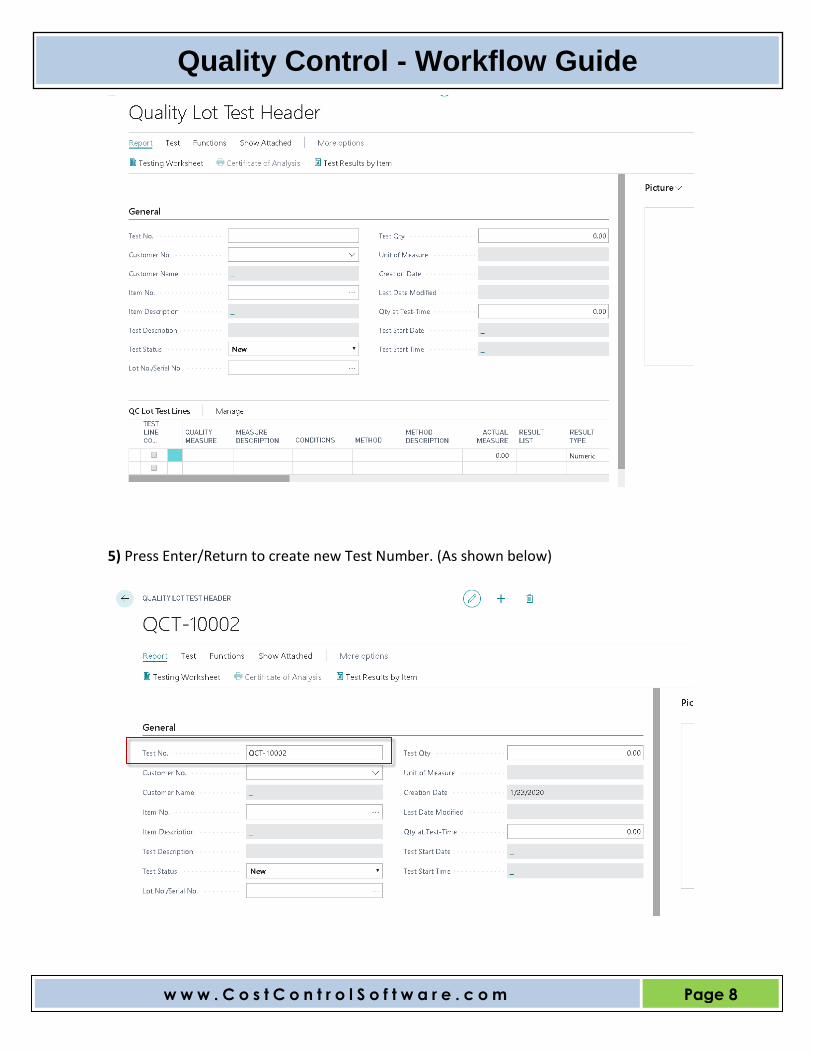
Let’s Walk Through your first QC Test of one of your Raw Material Items: Before you begin; be sure you have Quantity on Hand of a Lot Number to be tested. If you don’t, use the Business Central Purchase Order to Issue and Receive into your QC LOC one of your Inventory Items. Then you will be ready to test this item. 1) Open the Quality Control Profile Role Center 2) Select the Lot/Serial No. Testing Action
3) Start a New Test using the +New option:
4) You will be taken to the Quality Lot Test Card. Blank Card, ready for entry.
Q
Quality Control - Workflow Guide
w w w . C o s t C o n t r o l S o f t w a r e . c o m
Page 8
5) Press Enter/Return to create new Test Number. (As shown below)

Q
Quality Control - Workflow Guide
w w w . C o s t C o n t r o l S o f t w a r e . c o m
Page 9
From the QC Testing Card follow these steps to record a new Test: 1. If not done so already, select “New” to start the new test, the press “Enter” to get the next Test Number. 2. Select the Item Number to be tested. (Only Items with Certified Specifications will show)
3. Select the Lot Number to be tested. (Recommended, but optional) (see below image)

Q
Quality Control - Workflow Guide
w w w . C o s t C o n t r o l S o f t w a r e . c o m
Page 10
4. Run the Function to “Get Specifications”, from the ribbon, or manually add the Quality Measures.
The Sub-Form will be filled in with that Item’s Quality Specifications that were setup previously. (See Setup Guide) If there are multiple Versions, the system will pull in the most current and “Certified” Version. NOTE: Specifications MUST be setup for each item to be tested.

Q
Quality Control - Workflow Guide
w w w . C o s t C o n t r o l S o f t w a r e . c o m
Page 11
5. Optional: Print the Testing worksheet using ribbon choice. (Put on a clip board for the Lab Technician)
Put this report on your clip board and go get the test results!
Q
Quality Control - Workflow Guide
w w w . C o s t C o n t r o l S o f t w a r e . c o m
Page 12
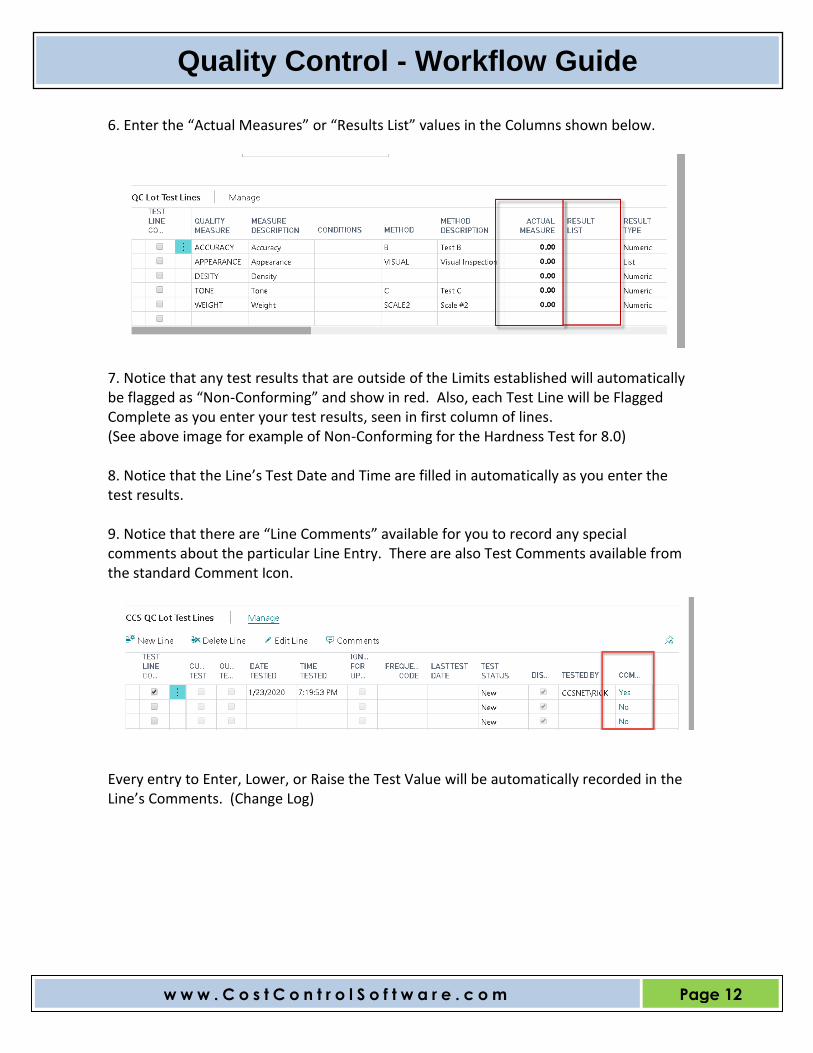
6. Enter the “Actual Measures” or “Results List” values in the Columns shown below.
7. Notice that any test results that are outside of the Limits established will automatically be flagged as “Non-Conforming” and show in red. Also, each Test Line will be Flagged Complete as you enter your test results, seen in first column of lines. (See above image for example of Non-Conforming for the Hardness Test for 8.0) 8. Notice that the Line’s Test Date and Time are filled in automatically as you enter the test results. 9. Notice that there are “Line Comments” available for you to record any special comments about the particular Line Entry. There are also Test Comments available from the standard Comment Icon.
Every entry to Enter, Lower, or Raise the Test Value will be automatically recorded in the Line’s Comments. (Change Log)

Q
Quality Control - Workflow Guide
w w w . C o s t C o n t r o l S o f t w a r e . c o m
Page 13
10. Optional Display Prefix.
Optional Display Prefix and Optional Display Value gives you the flexibility of reporting results within a “greater than” or “less than” value instead of a single fixed value. The printing of the test results is actually printing the Optional Display Prefix and Optional Display Value. The default is always “equals to” the Optional Display Value which defaults to the Actual test value. If the specifications only call for the test results to be greater than a value, then you can change the Optional Display Prefix to be the greater than sign (>). The system will default the Lower limit value into the Optional Display Value field. You may edit the optional display value as long as it stays within the specification limits or is accurate related to the actual value. The same process works using the less then (<) sign in the Optional Display Prefix.

Q
Quality Control - Workflow Guide
w w w . C o s t C o n t r o l S o f t w a r e . c o m
Page 14
11. Upon completion of entering your test results, set the status of the test to “Certified”
Typically, Test Status would be set to “Certified” or “Rejected”. Set Test Status to “In-Process” if you have to leave and come back later to finish the test results. You cannot edit test results in Certified or Rejected Status.

Q
Quality Control - Workflow Guide
w w w . C o s t C o n t r o l S o f t w a r e . c o m
Page 15
12. Option: Set to “Ready for Testing” if you are assigning a test to a Lab Technician.
Q
Quality Control - Workflow Guide
w w w . C o s t C o n t r o l S o f t w a r e . c o m
Page 16
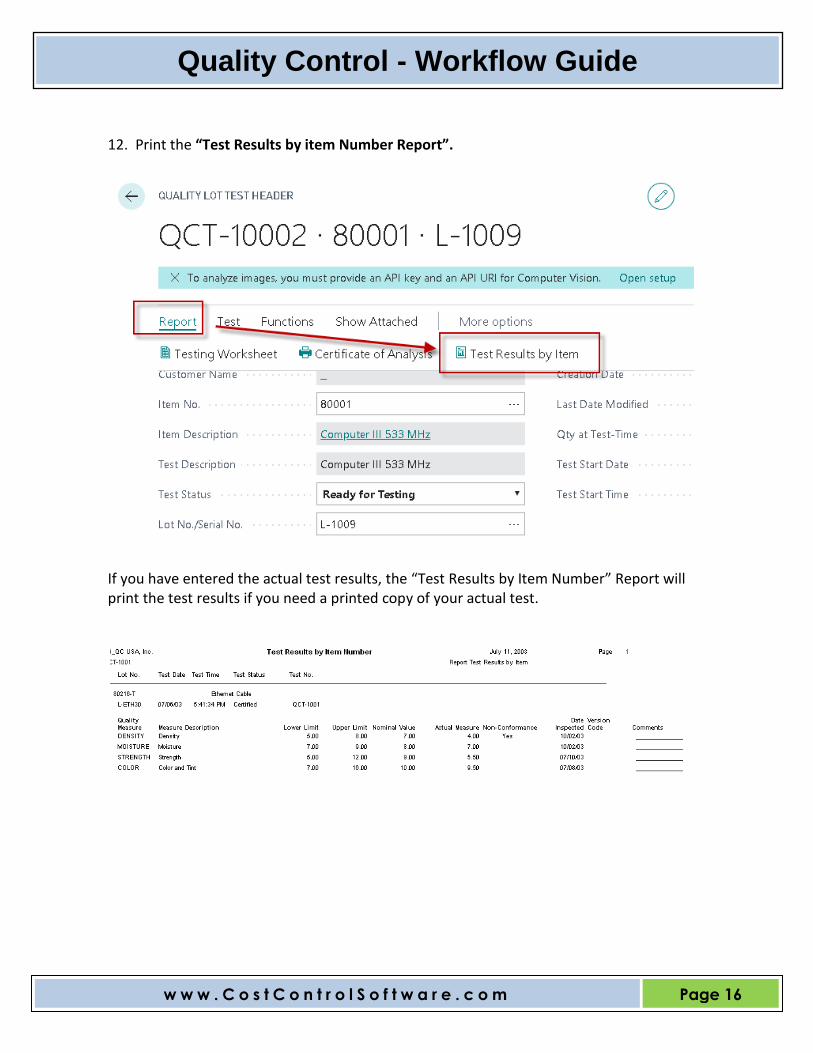
12. Print the “Test Results by item Number Report”.
If you have entered the actual test results, the “Test Results by Item Number” Report will print the test results if you need a printed copy of your actual test.

Q
Quality Control - Workflow Guide
w w w . C o s t C o n t r o l S o f t w a r e . c o m
Page 17
13. Certificate of Analysis
You may print a “Certificate of Analysis” Report at this stage to document the Test Results of this Lot Number’s Test. It is only available for “Certified” Tests. Many companies will include this report in with the shipment to the customer.

Q
Quality Control - Workflow Guide
w w w . C o s t C o n t r o l S o f t w a r e . c o m
Page 18
Quality Control Reports: Quality Control provides 4 pre-defined reports: 1. Print Quality Specifications
This is a print out of the Item’s or Customer’s MASTER Quality Measure Specifications.
Q
Quality Control - Workflow Guide
w w w . C o s t C o n t r o l S o f t w a r e . c o m
Page 19
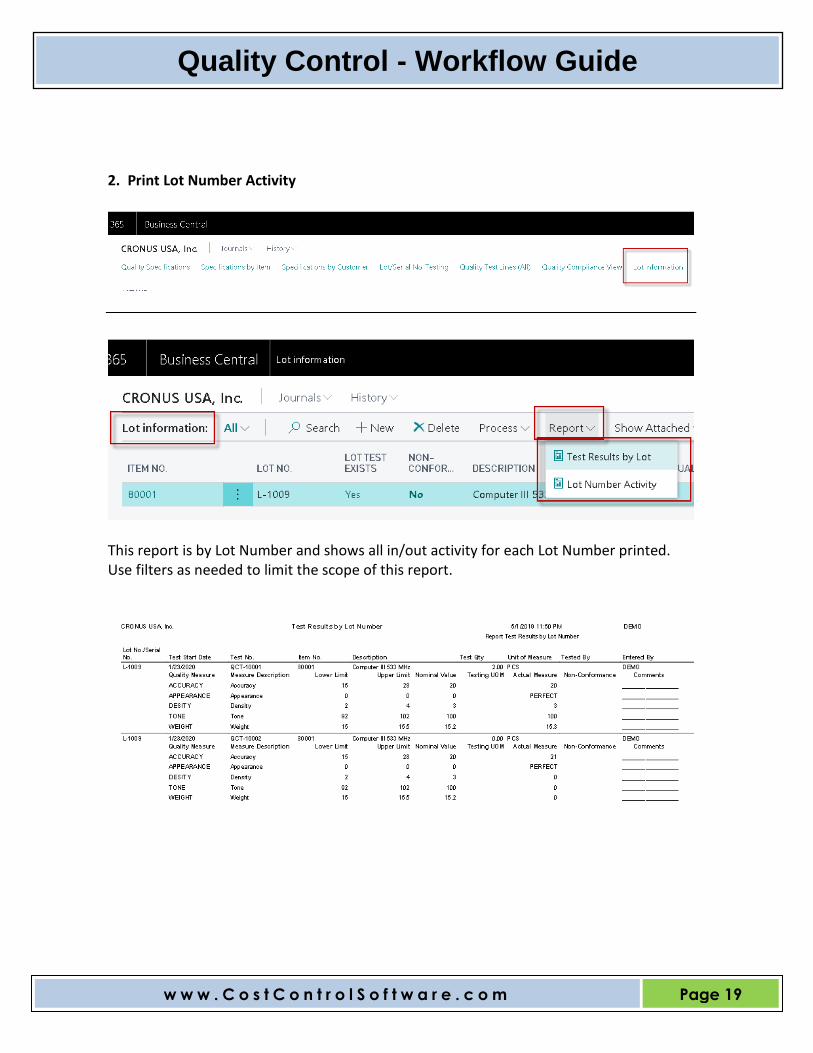
2. Print Lot Number Activity
This report is by Lot Number and shows all in/out activity for each Lot Number printed. Use filters as needed to limit the scope of this report.

Q
Quality Control - Workflow Guide
w w w . C o s t C o n t r o l S o f t w a r e . c o m
Page 20
3. Print Test Results by Lot Number Activity This report is a detailed print out of the Activity per Lot in the Item Ledger Entries. Use filters as needed to limit the scope of this report.

Q
Quality Control - Workflow Guide
w w w . C o s t C o n t r o l S o f t w a r e . c o m
Page 21
4. Test Results by Item Number
This report is a detailed print out on the test results of each Item Number’s Lots. Use filters as needed to limit the scope of this report.

Q
Quality Control - Workflow Guide
w w w . C o s t C o n t r o l S o f t w a r e . c o m
Page 22
Inventory Movement The Quality Control module works closely with Item Tracking & Location Codes. Some of the first decisions you need to make are related to where your inventory is to be located. Example: When you receive Raw Material, do you put it in in General Available Inventory or into “Quarantine” until it passes the QC inspection? If so, just receive to a LOC = QC until the testing is complete. We recommend you setup at least one “Location” to temporarily store your incoming items that need to be tested:
You could even have a Location Code for your Raw Materials and another Location Code for your Finished Goods that need to be tested. Upon completion of your Testing use the Transfer option to move from LOC = QC to LOC = BLUE.

Q
Quality Control - Workflow Guide
w w w . C o s t C o n t r o l S o f t w a r e . c o m
Page 23
Inventory that Passes Quality specification should go to the location code(s) from which you sell product. (IE: BLUE) Perhaps Inventory that does not pass will go back to your Vendor. Below is a Transfer Order from QC RM Q to BLUE Location.

Q
Quality Control - Workflow Guide
w w w . C o s t C o n t r o l S o f t w a r e . c o m
Page 24
Let’s review the above steps just to double check your workflow. Inbound Raw Material Workflow (Review):
1. You added a “new” Raw Material Item in Inventory or used an existing Inventory Item.
2. Check to be sure the Item’s Lot Tracking information is setup.
3. You then created the Item’s Quality Specifications that are to be tested. Be sure to set to “Certified”.
Q
Quality Control - Workflow Guide
w w w . C o s t C o n t r o l S o f t w a r e . c o m
Page 25
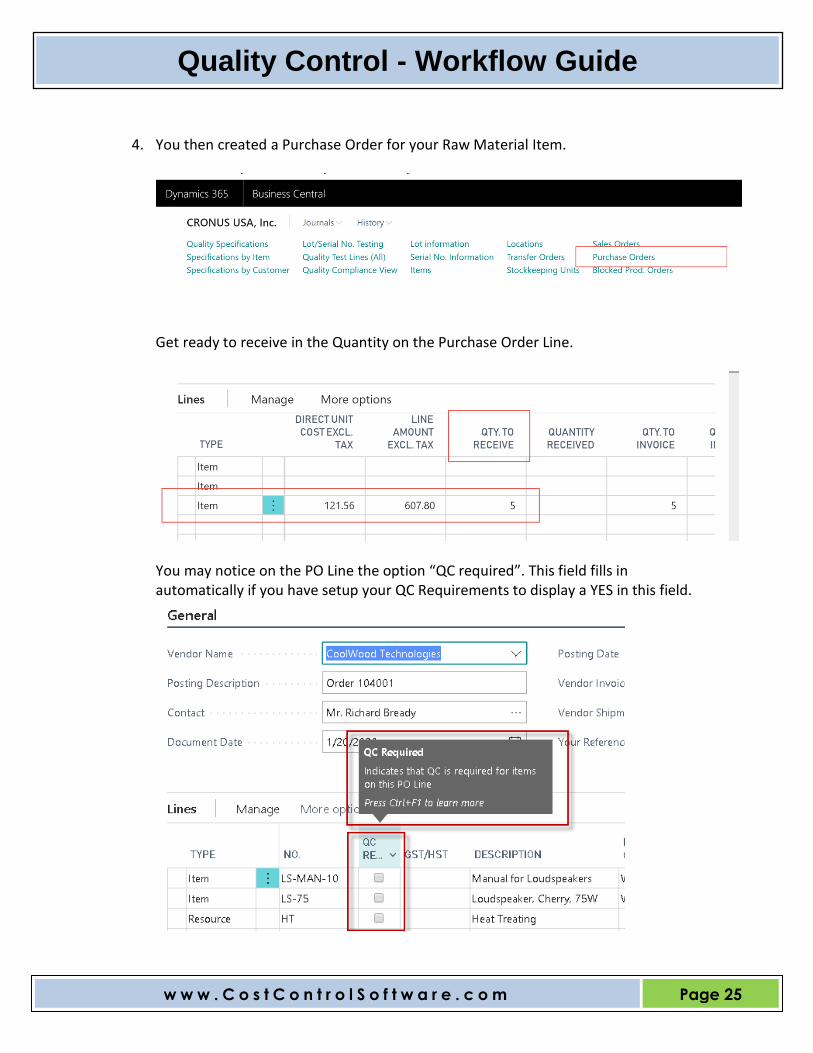
4. You then created a Purchase Order for your Raw Material Item.
Get ready to receive in the Quantity on the Purchase Order Line.
You may notice on the PO Line the option “QC required”. This field fills in automatically if you have setup your QC Requirements to display a YES in this field.
Q
Quality Control - Workflow Guide
w w w . C o s t C o n t r o l S o f t w a r e . c o m
Page 26
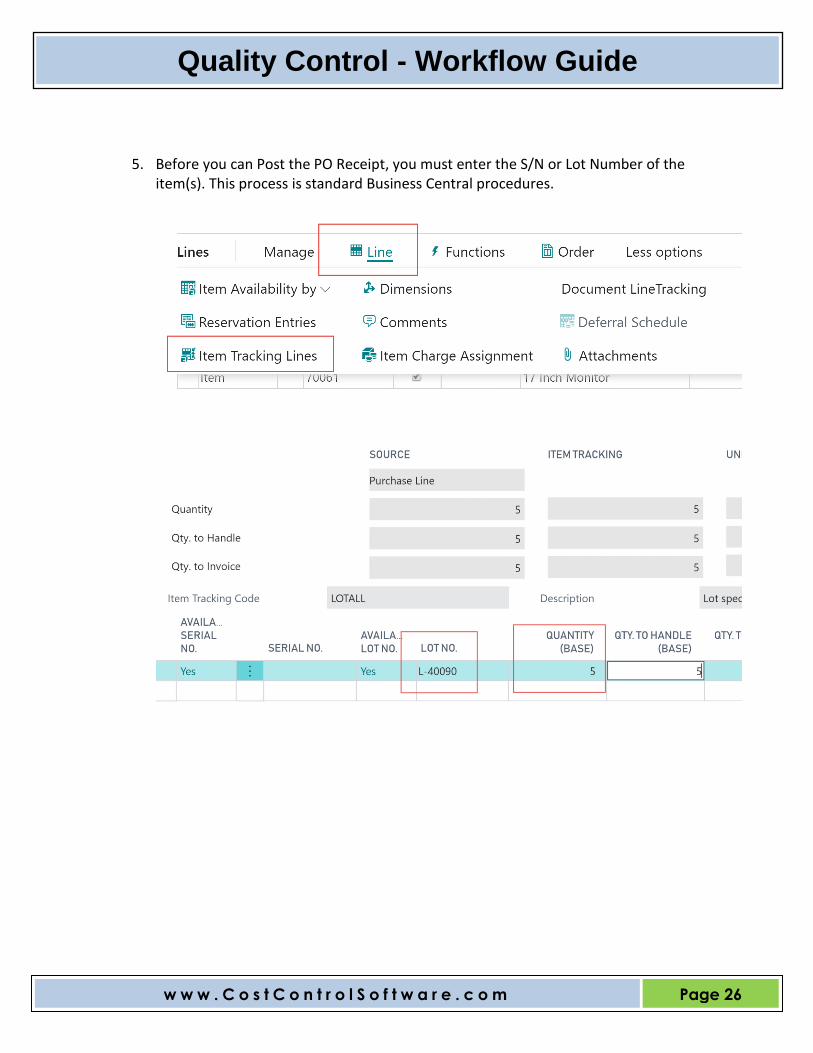
5. Before you can Post the PO Receipt, you must enter the S/N or Lot Number of the item(s). This process is standard Business Central procedures.

Q
Quality Control - Workflow Guide
w w w . C o s t C o n t r o l S o f t w a r e . c o m
Page 27
6. We suggest you receive your item to the “QC” location first. Put “QC” in the LOC CODE on the Purchase Order Line.
User Standard process to enter the Vendor’s Lot Number, or enter one of your own.
Complete your normal Item Receiving Process.
7. With your Item now in Stock and with the Lot Number showing on the Item Ledger Entries, you are ready to perform your “New” QC test. (In LOC= QC) Select “New” for New Quality Control Test.

Q
Quality Control - Workflow Guide
w w w . C o s t C o n t r o l S o f t w a r e . c o m
Page 28
Enter your Item Number to be tested and look up the Lot Number.
8. Pull in the testing Lines with “Get Specifications”. Enter your test line values.
8. If the Item passes inspection, transfer the inventory out of the temporary Location
(QC) and transfer to the selling location(s). (IE: LOC = BLUE)
Q
Quality Control - Workflow Guide
w w w . C o s t C o n t r o l S o f t w a r e . c o m
Page 29
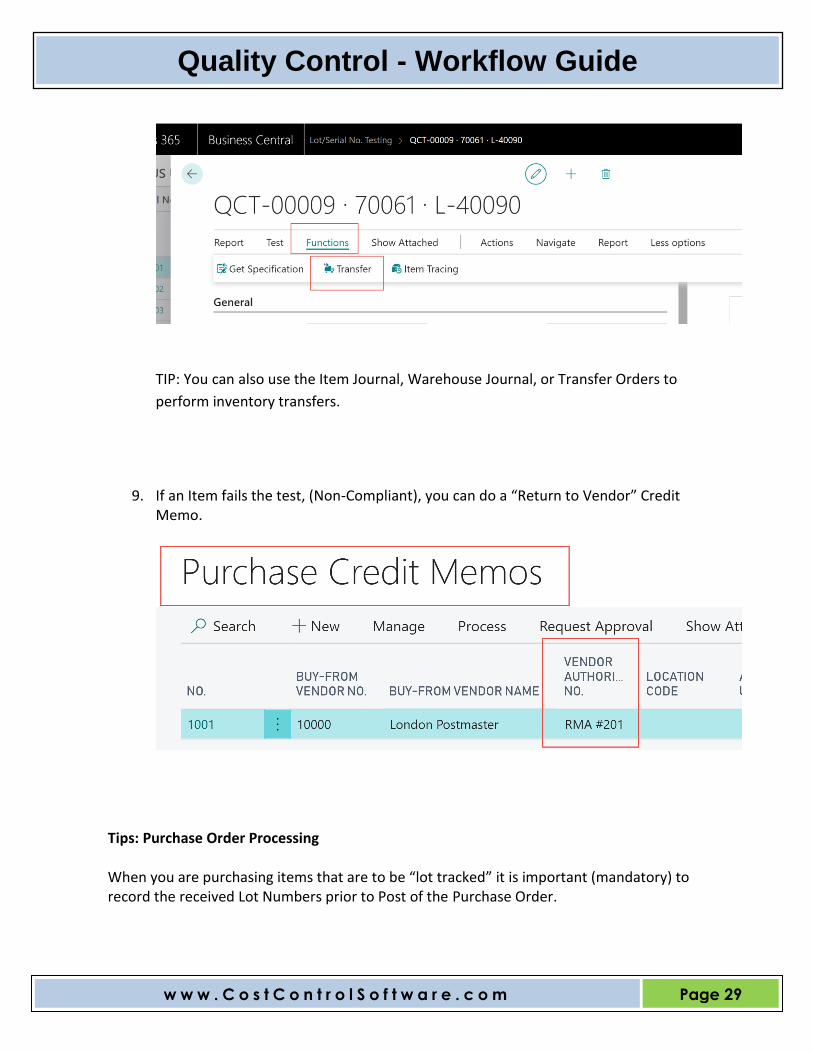
TIP: You can also use the Item Journal, Warehouse Journal, or Transfer Orders to
perform inventory transfers.
9. If an Item fails the test, (Non-Compliant), you can do a “Return to Vendor” Credit Memo.
Tips: Purchase Order Processing When you are purchasing items that are to be “lot tracked” it is important (mandatory) to record the received Lot Numbers prior to Post of the Purchase Order.

Q
Quality Control - Workflow Guide
w w w . C o s t C o n t r o l S o f t w a r e . c o m
Page 30
This entering of the Lot Number or Serial Number is done on each Line of each Purchase Order. Notice that you can receive multiple LOTS on one receiving Line. You will use the “Item Tracking Line” Window to enter the Vendor’s Lot Number and the Quantity of that Lot to receive. It is possible to let Microsoft Dynamics 365 Business Central assign the Lot Numbers, but we recommend you use the Vendor’s Number. Once the Lot Number and Quantities have been entered, just press OK to close this allocation window. You will return to the PO’s Line. Select the next Line or next PO to record the next Lot Number(s). We recommend you review this process carefully with your Receiving Department. Accuracy is very important for later Testing and Tracking of your Lot Numbers. Normal PO processing occurs from this point forward.

Q
Quality Control - Workflow Guide
w w w . C o s t C o n t r o l S o f t w a r e . c o m
Page 31
Sales Order Processing with Lot Numbers We will assume that your Item has now been tested. (FG or RM) This section focuses on Customer-Specific Specifications but applies to all the Lot-Picking process. In this example, there are several Lot Numbers in-stock for this Item. But, only some of the Lot Numbers have been tested against the Customer’s Specifications. But, now your Customer is placing an order for your Item. The challenge is to be sure the Lot Number that we ship matches this Customer’s Specifications. (which may be more, or less stringent than your own Item Specs.) With this new Customer Order we must be sure that we PICK a Lot that is in compliance with the Customer’s Specifications (assuming they Exist for this Customer). It becomes the job of the Customer Service Representatives to notify the Shipping Department which Lot Number to pull, so that the specifications comply. (Not just entering the Lot Number the picker pulls.) Let’s follow the steps:
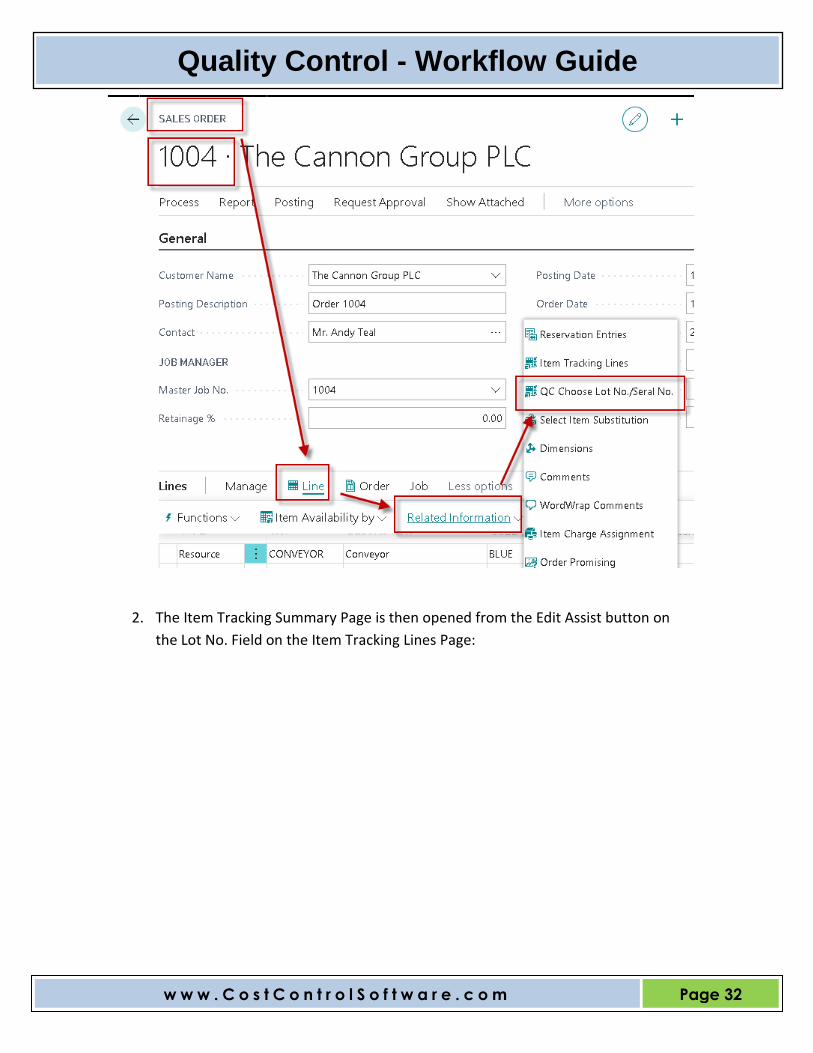
1. A special Page on the Sales Order Card, “Item Tracking Summary” Page, has been
designed to ensure you Pick the right Lot Numbered Item.
To reach this Page from the Sales Order Card, go to Related Information, then
Select the Sales Order Line with a Tracked Item, and choose “QC Choose Lot
No./Serial No.” from the Line Action. (Shown below)
Q
Quality Control - Workflow Guide
w w w . C o s t C o n t r o l S o f t w a r e . c o m
Page 32
2. The Item Tracking Summary Page is then opened from the Edit Assist button on
the Lot No. Field on the Item Tracking Lines Page:

Q
Quality Control - Workflow Guide
w w w . C o s t C o n t r o l S o f t w a r e . c o m
Page 33
3. Select the Lot Number you want to be “Picked” from the list.
4. From the above Item Tracking Summary Page, the Customer Service
Representative can see a comprehensive list showing the following for each and
every Lot of the Item:
1. Whether Item (our) and/or Customer Specifications Exist for the Item.
2. Whether Item and/or Customer Lot-Tests Exist for the Item.
3. Whether those Item and/or Customer Lot Tests are in Compliance.
4. “QC Conformance” Suggestions, providing an at-a-glance guidance as to which Lot(s) are fully in Compliance (“Yes”), which might require customer/supervisory “variance” approval (and why), and which are simply a “No”.
Note that the “Yes” Lot(s) are in Bold, further speeding the Lot-selection process.

Q
Quality Control - Workflow Guide
w w w . C o s t C o n t r o l S o f t w a r e . c o m
Page 34
Customer’s QC Compliance View 1. From the Role Center, select “Quality Compliance View”
This Compliance View will show the details of Actual Test Results compared against the Specifications. If an Item is out of Compliance the Customer could be notified for acceptance (“variance”) on this non-compliance test, or a different Lot Number could be selected that is compliant (a “Yes” Lot). From the Item Compliance Page, you can either:
• Press ESC to return to the Lot Number Selection Page.
• Click OK to select your desired Lot Number to ship. Then, Repeat this selection process for any other Sales Order Line Items. When finished, Ship and Invoice the product to the customer. (Follow normal Microsoft Dynamics 365 Business Central procedures)

Q
Quality Control - Workflow Guide
w w w . C o s t C o n t r o l S o f t w a r e . c o m
Page 35
Table of Conditions and Results for the “Item Tracking Summary” Page NOTE: “n/a” means that that condition (column) does not matter for that line (row). NOTE: To use the “Item Tracking Summary” Page (and this table of “Results”, for Orders to Customers that do not have Customer-Specific Specifications or Tests, simply refer to the Table Entries below where the “Customer No.” Column has an “N” in it (lower half of the table). Customer
No. Item Spec
Item Test
Cust Spec
Cust Test Item Non Compliance
Cust Non Compliance
QC Compliance
Y N n/a N n/a n/a n/a NO SPECS
Y Y N N n/a n/a n/a NO TESTS
Y Y Y N N N n/a YES
Y n/a n/a Y N n/a n/a NO CUST TEST
Y n/a n/a Y Y n/a Y NO
Y n/a n/a Y Y n/a N YES
Y Y Y Y Y Y Y NO
Y Y Y Y Y N Y FAILED CUST TEST
N N n/a N n/a n/a n/a NO SPECS
N Y N n/a n/a n/a n/a NO CO. TESTS
N Y Y N n/a N n/a YES
N N n/a n/a n/a n/a n/a NO SPECS
N N n/a n/a n/a n/a N NO SPECS
N N n/a n/a n/a n/a Y NO SPECS
N Y Y n/a n/a Y n/a NO
N Y Y n/a n/a N n/a YES

Q
Quality Control - Workflow Guide
w w w . C o s t C o n t r o l S o f t w a r e . c o m
Page 36
Posted Shipments
When a Sales Order is POSTED “Shipped”, the values in the Compliance View are also POSTED to a “QC Posted Compliance View” Table for audit purposes.
Let’s see this in action: 1. From a “Posted Sales Shipment”, select the "Line" and then Item Tracking Entries.

Q
Quality Control - Workflow Guide
w w w . C o s t C o n t r o l S o f t w a r e . c o m
Page 37
2. Now you see the Posted Item Tracking Lot or Serial Numbers selected for this shipment line.
3. From the “Process” option you can “View QC Results”. (Back Door to the View)

Q
Quality Control - Workflow Guide
w w w . C o s t C o n t r o l S o f t w a r e . c o m
Page 38
5. Notice you can Drill Down to the Original test and Re-Print the Certificate of Analysis

Q
Quality Control - Workflow Guide
w w w . C o s t C o n t r o l S o f t w a r e . c o m
Page 39
6. Since the Order Entry Department is driving the selection of the Lot Number to be
picked, it is suggested that you design and print a Picking List that will include the
desired Lot Number to be picked.
This document is only available if you have purchased our “Reports Pack” bundle
of 60 Reports.
Q
Quality Control - Workflow Guide
w w w . C o s t C o n t r o l S o f t w a r e . c o m
Page 40
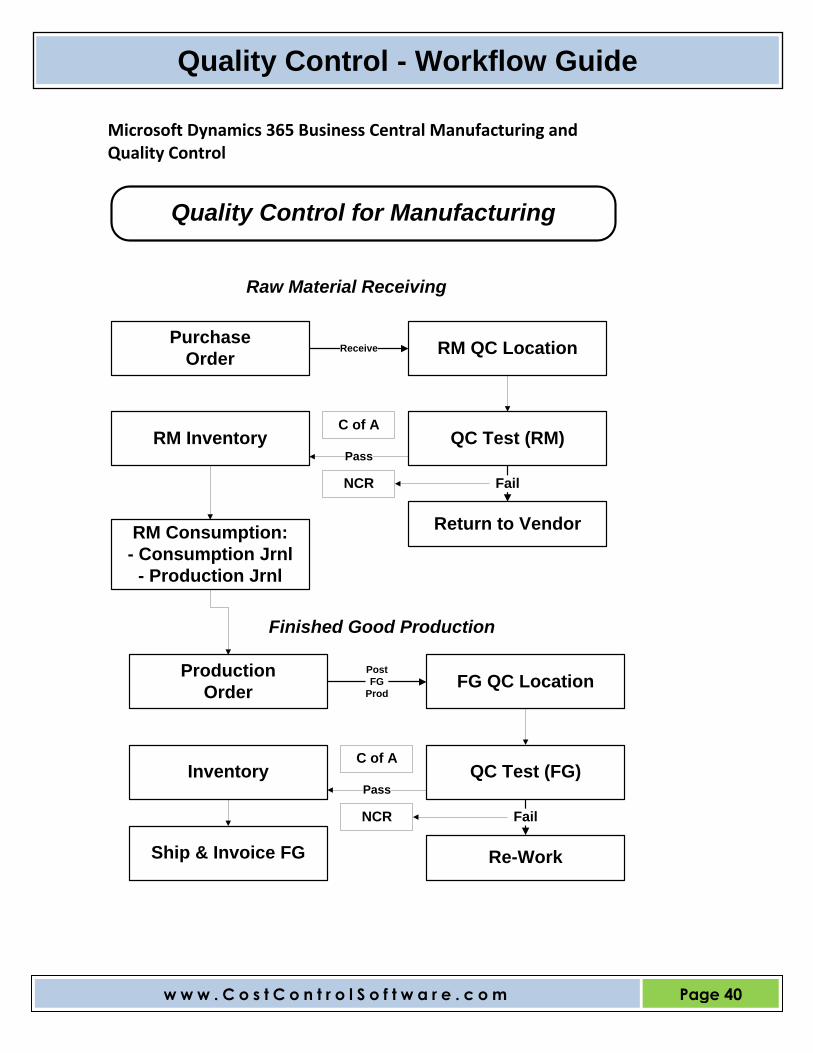
Microsoft Dynamics 365 Business Central Manufacturing and Quality Control
Quality Control for Manufacturing
Receive RM QC LocationPurchase
Order
RM Inventory QC Test (RM)
Return to Vendor
Raw Material Receiving
Fail
Pass
Post
FG
ProdFG QC Location
Production
Order
Inventory QC Test (FG)
Re-Work
Fail
Pass
C of A
NCR
NCR
C of A
RM Consumption:
- Consumption Jrnl
- Production Jrnl
Ship & Invoice FG
Finished Good Production

Q
Quality Control - Workflow Guide
w w w . C o s t C o n t r o l S o f t w a r e . c o m
Page 41
For Manufacturing Customer: (Premium Edition is Required)
Here are some additional comments for our “Manufacturing” type of customers. Let’s review the steps for Finished Goods that YOU are producing: Similar to Raw Material Receipts but you are MAKING, NOT BUYING. Three (3) Easy Steps - Production of Finished Goods Workflow (FG):
1. Use your “Production Journal” to Post Finished Good to the QC Location. (Follow your Manufacturing instructions for this process)
2. Now you have Quantity On-Hand of the FG Item with a Lot Number or S/N.
3. Follow the same procedures as shown above to perform a QC Test of the Item.
Production Order Processing Tip: Some companies will produce a Finished Good Item that is to be put into Finished Goods Inventory with a Lot Number. In this case the Company is assigning the Lot Number themselves to the Finished Good Item. The item must be produced into Finished Goods Inventory before Lot Number Testing can begin. Be sure to follow normal Manufacturing steps and record the Finished Good’s Lot Number in the Production Journal process. 1. During your recording of the Qty Produced in the Output Journal (or Production Journal), go to the “Item Tracking Lines” and enter the desired Lot Number to assign to your Finished Good Item. This will put your FG and Lot No. into the Item Ledger Entries.

Q
Quality Control - Workflow Guide
w w w . C o s t C o n t r o l S o f t w a r e . c o m
Page 42
2. Now enter the Lot Numbers. (Or let system Assign them)
Q
Quality Control - Workflow Guide
w w w . C o s t C o n t r o l S o f t w a r e . c o m
Page 43
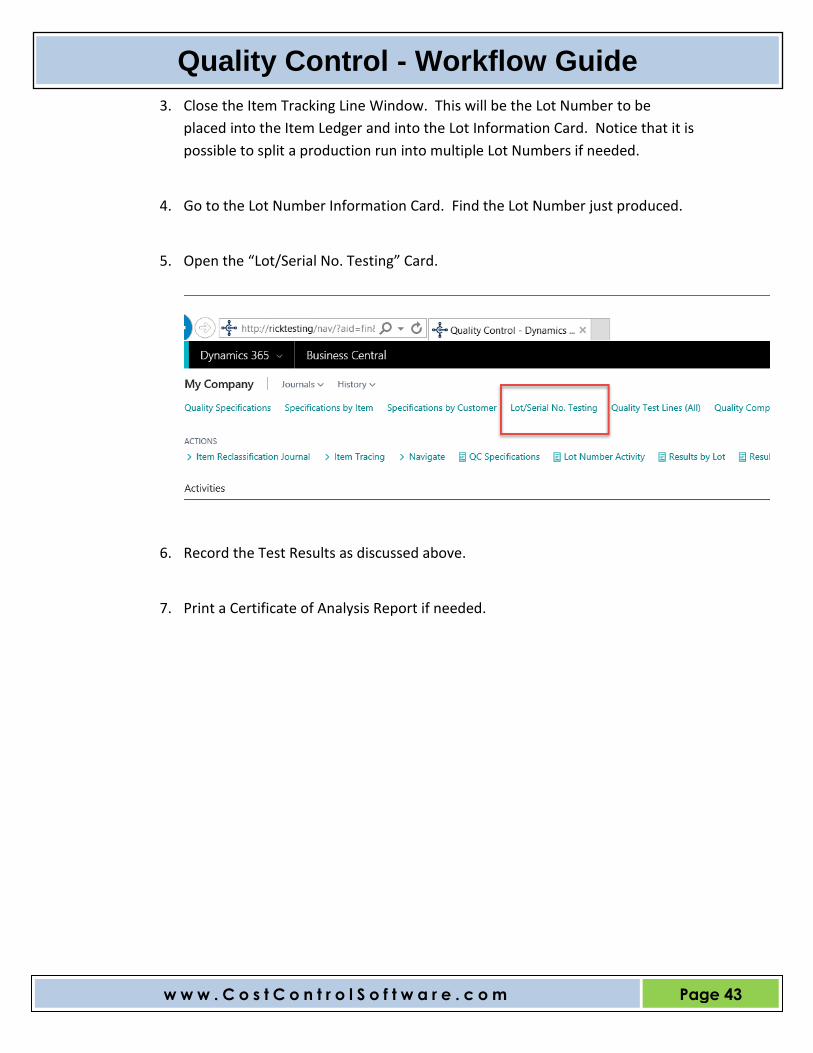
3. Close the Item Tracking Line Window. This will be the Lot Number to be
placed into the Item Ledger and into the Lot Information Card. Notice that it is
possible to split a production run into multiple Lot Numbers if needed.
4. Go to the Lot Number Information Card. Find the Lot Number just produced.
5. Open the “Lot/Serial No. Testing” Card.
6. Record the Test Results as discussed above.
7. Print a Certificate of Analysis Report if needed.
Q
Quality Control - Workflow Guide
w w w . C o s t C o n t r o l S o f t w a r e . c o m
Page 44
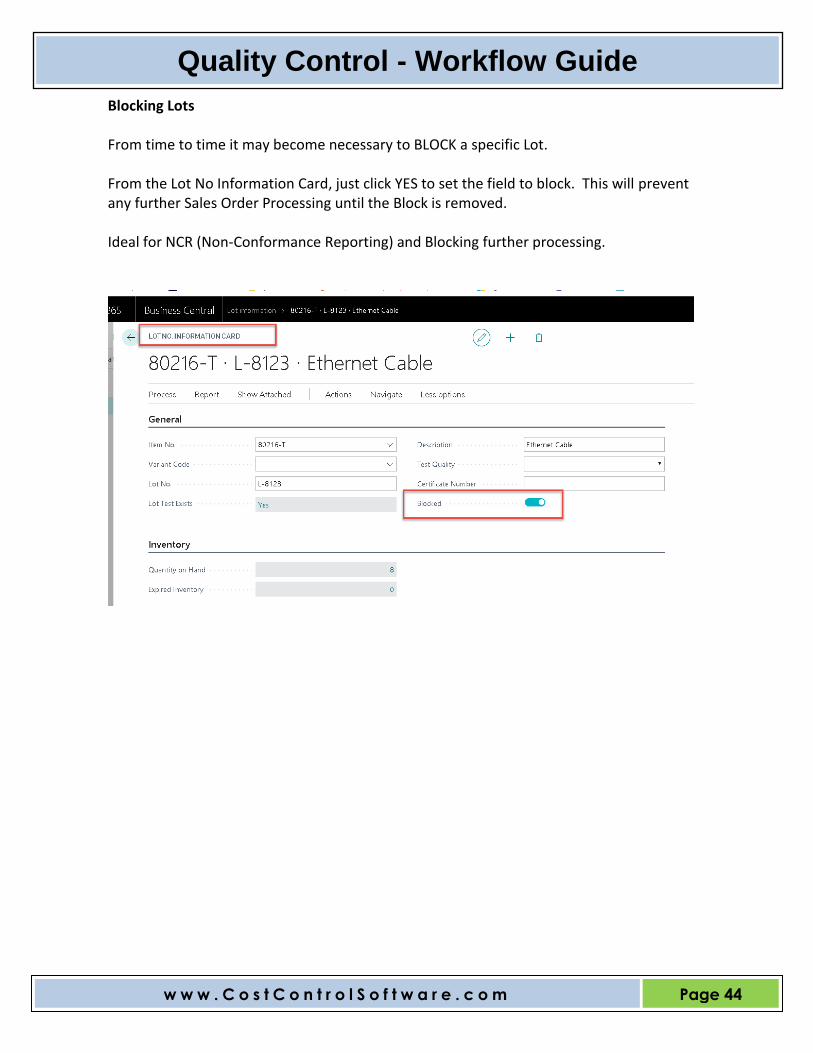
Blocking Lots From time to time it may become necessary to BLOCK a specific Lot. From the Lot No Information Card, just click YES to set the field to block. This will prevent any further Sales Order Processing until the Block is removed. Ideal for NCR (Non-Conformance Reporting) and Blocking further processing.

Q
Quality Control - Workflow Guide
w w w . C o s t C o n t r o l S o f t w a r e . c o m
Page 45
What’s New for Microsoft Dynamics 365 Business Central:
1. “Edit Line” controls at the QC Test Lines Level. “Test Line Complete” is a Toggle. Again, this is tied-in with the “QC Manager” concept. Un-Check the Completed Status to Edit the Test Results.
2. Increased Statuses We added “Ready for Testing” and “Ready for Review” for the QC Manager to assign a Test to a Lab Technician.

Q
Quality Control - Workflow Guide
w w w . C o s t C o n t r o l S o f t w a r e . c o m
Page 46
3. Change Status Logic This is the concept of who is allowed to change the status to Certified. If you want everyone to be able to certify a QC test then set all Users in User Setup to “Quality Manager”.
4. Auto-Creation of Test Header Comment upon Test Status Change There is a new option in QC Setup that automatically creates Test Line Comments.
5. Outside Testing: You can now mark a Specification Line to require an outside lab to do the testing.
Q
Quality Control - Workflow Guide
w w w . C o s t C o n t r o l S o f t w a r e . c o m
Page 47
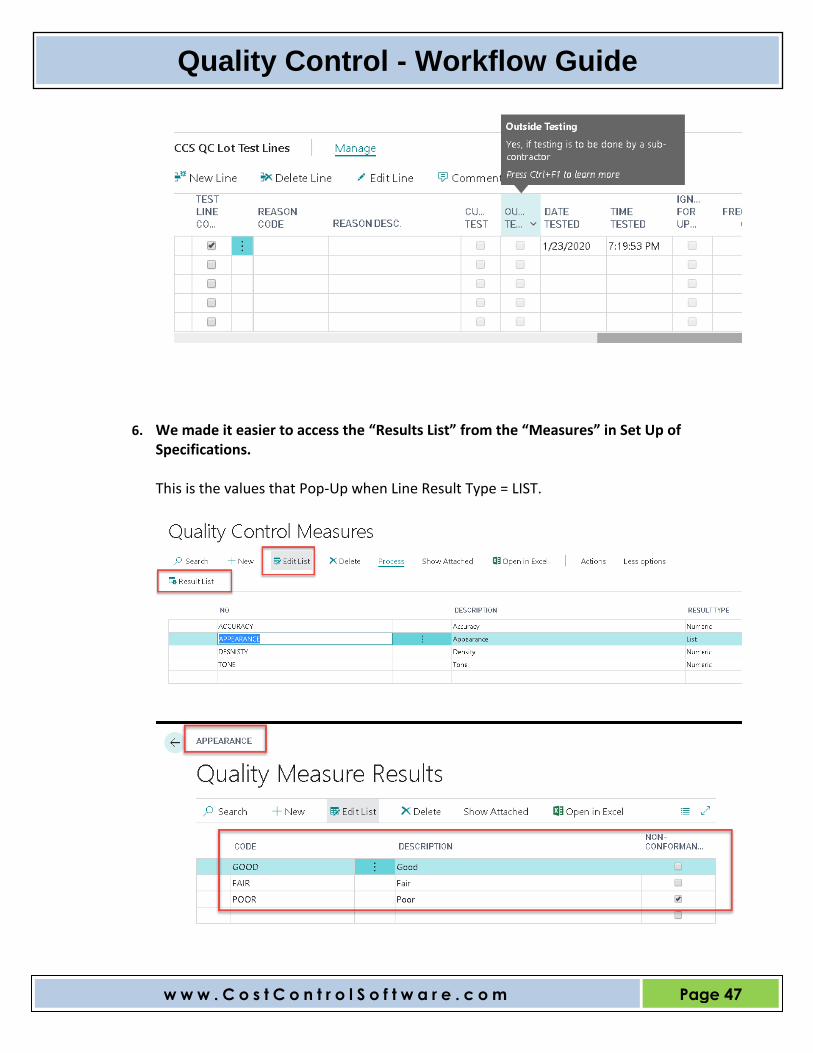
6. We made it easier to access the “Results List” from the “Measures” in Set Up of Specifications. This is the values that Pop-Up when Line Result Type = LIST.

Q
Quality Control - Workflow Guide
w w w . C o s t C o n t r o l S o f t w a r e . c o m
Page 48
7. The Ability to Add “Ad-Hoc” Test Lines You now have the ability to add additional Test Lines as needed. These are Test Lines that are NOT part of the “base Specification”. Note: You must be logged in as a QC Manager in User Setup.
8. Prevent the Printing of “CoA”s unless a certain Test Status is achieved There is a new QC Setup Boolean to control the “Certified-Class” Statuses that will allow Printing of a CoA.
9. There will only be ONE “Certified Final” Test per “Lot/SN”.
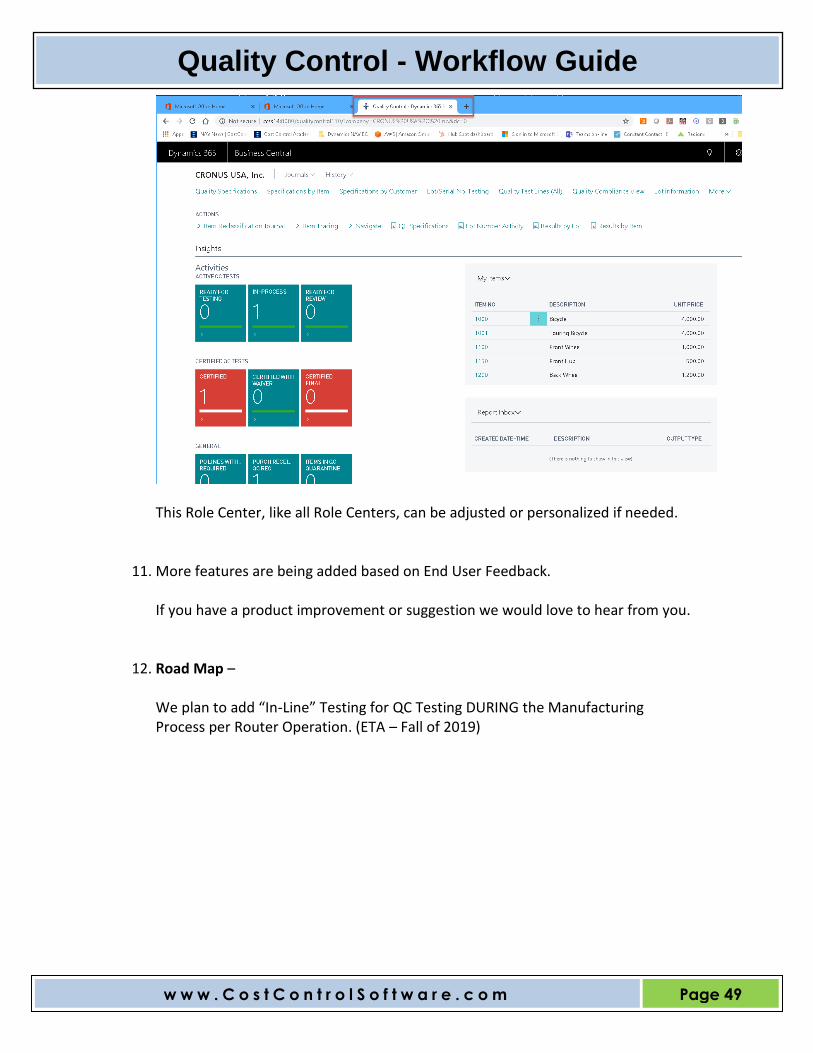
10. New in Microsoft Dynamics 365 Business Central – Quality Control Role Center Be sure to use this great Role Center.
Q
Quality Control - Workflow Guide
w w w . C o s t C o n t r o l S o f t w a r e . c o m
Page 49
This Role Center, like all Role Centers, can be adjusted or personalized if needed.
11. More features are being added based on End User Feedback. If you have a product improvement or suggestion we would love to hear from you.
12. Road Map – We plan to add “In-Line” Testing for QC Testing DURING the Manufacturing Process per Router Operation. (ETA – Fall of 2019)

Q
Quality Control - Workflow Guide
w w w . C o s t C o n t r o l S o f t w a r e . c o m
Page 50
Some additional comments on Quality Control If a lot is tested several times and there are several certified tests available for that lot, all the tests are stored. However, the lookup from the sales line will find the most current test per quality measure. If the most recent set of quality measurements are compliant then the lot will be flagged compliant. The Status “Certified” on a lot test does not mean totally compliant. It means the test is complete and it could possibly be acceptable to some customer for sale. If a lot is flagged non-compliant from the sales line that means at least one quality measure on the most recent measurements on the lot was out of compliance. The user can drill to a view of the most recent measurement tests to see which measurement was out of compliance and by how much.
Tip: You can adjust the Stop Light Indicators in Cue Setup.

Q
Quality Control - Workflow Guide
w w w . C o s t C o n t r o l S o f t w a r e . c o m
Page 51
SETUP AREAS WORKLOW No WMS is required to run QC.
Distribution:
PO Receive with
Lot Number
Manufacturing:
Post FG produced
in Output Jrnl
Job Costing:
Post FG produced
in Production
Jrnl. (under dev)
Lot Number
Master
Test and record
the results.
Item
specifications
with versions.
Certificate of
Analysis
Sales Order Select Lot #
Routine
Item Specs with
Versions
Customer Specs
w/ Versions
Print Sales Order
as Pick w/ Lot #
Post “Ship”
Post “Invoice”
Posted
Shipmnt
Ship Doc
with Lot #
Customer’s
CoA
Posted
Invoice Customer’s
CoA

Q
Quality Control - Workflow Guide
w w w . C o s t C o n t r o l S o f t w a r e . c o m
Page 52
Support
Congratulations on your purchase of Quality Control! We couldn’t be more thrilled for
you. Soon, you will be on your way to enjoying and utilizing the features and functionality
of this product.
Cost Control Software sincerely appreciates your trust in our products.
Should you have any questions or comments regarding our product, we encourage you to
contact us.
Cost Control Software provides many add-on products that may be just the solution you
were looking for. Ask for a Catalog of our products. You may also check out our website to
see available add-on products as well.
Visit: http://costcontrolsoftware.com/quality-control/ for more information.
Produced and Distributed by: Cost Control Software, Inc. 12409 Old Meridian Street
Carmel, IN 46032
Phone: (317) 846-6025