Embed Size (px)
Citation preview

Quality Assurance / Quality Control (QA/QC) Reference Manual
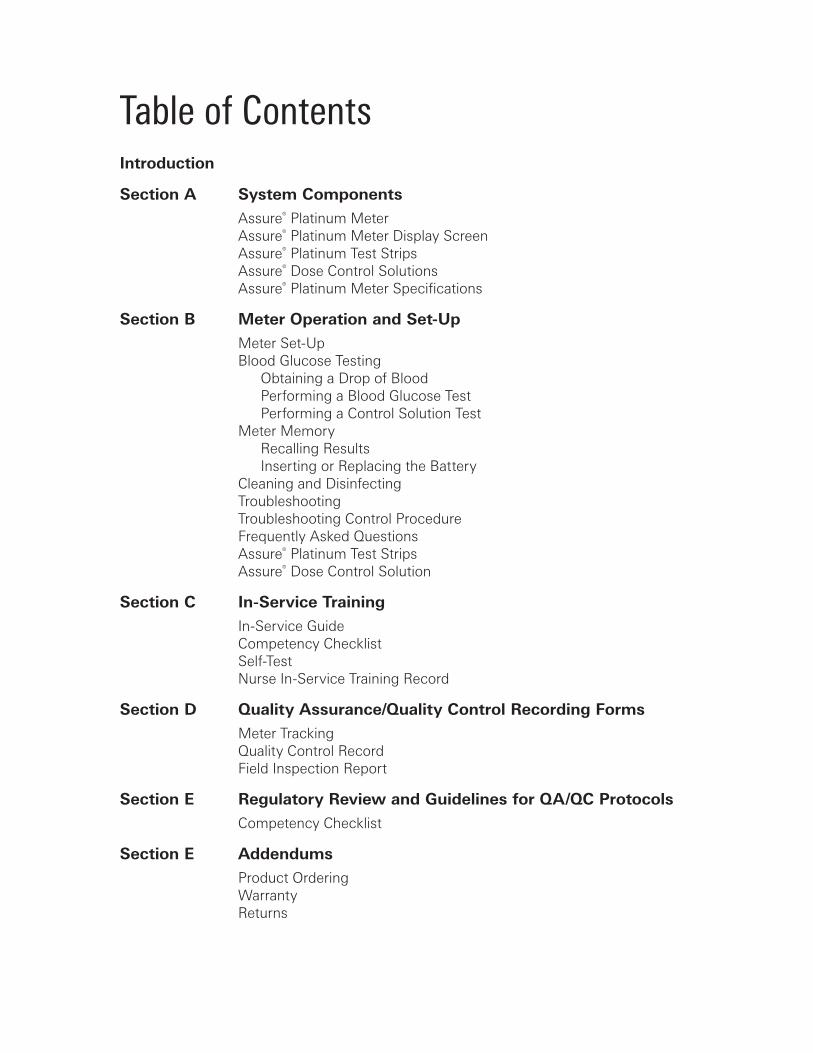
Table of ContentsIntroduction
Section A System Components Assure® Platinum Meter Assure® Platinum Meter Display Screen Assure® Platinum Test Strips Assure® Dose Control Solutions Assure® Platinum Meter Specifications
Section B Meter Operation and Set-Up Meter Set-Up Blood Glucose Testing Obtaining a Drop of Blood Performing a Blood Glucose Test Performing a Control Solution Test Meter Memory Recalling Results Inserting or Replacing the Battery Cleaning and Disinfecting Troubleshooting Troubleshooting Control Procedure Frequently Asked Questions Assure® Platinum Test Strips Assure® Dose Control Solution
Section C In-Service Training In-Service Guide Competency Checklist Self-Test Nurse In-Service Training Record
Section D Quality Assurance/Quality Control Recording Forms Meter Tracking Quality Control Record Field Inspection Report
Section E Regulatory Review and Guidelines for QA/QC Protocols Competency Checklist
Section E Addendums Product Ordering Warranty Returns
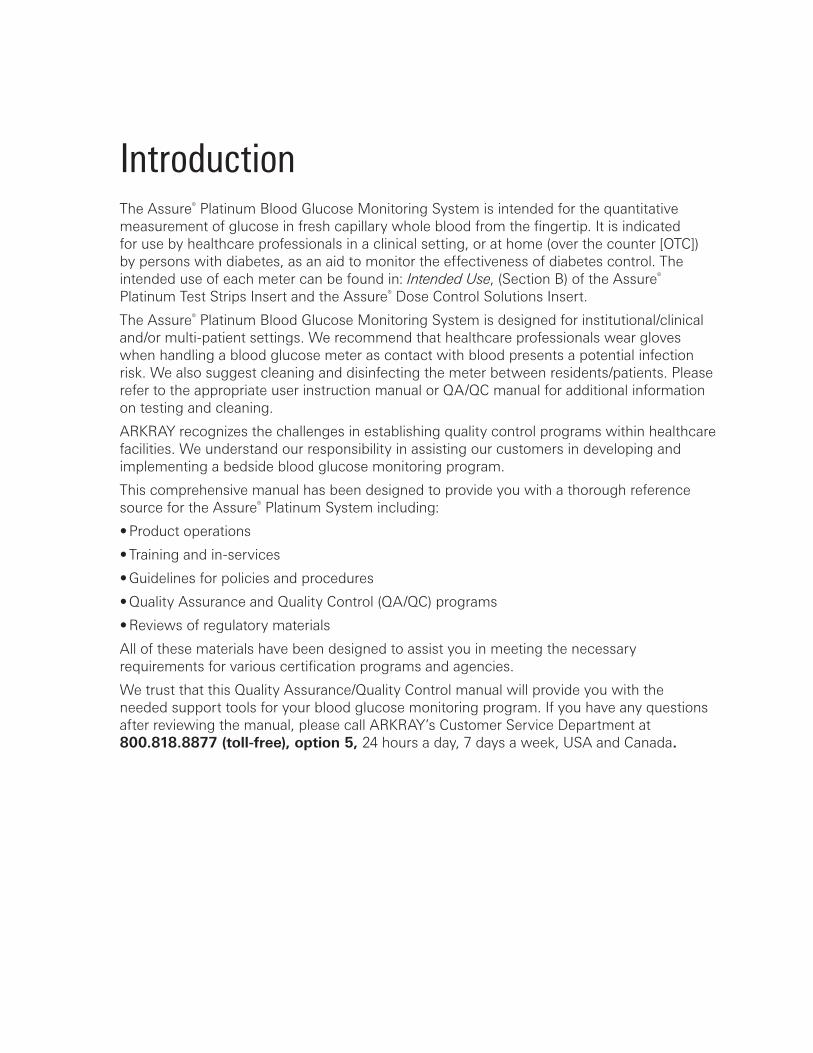
IntroductionThe Assure® Platinum Blood Glucose Monitoring System is intended for the quantitative measurement of glucose in fresh capillary whole blood from the fingertip. It is indicated for use by healthcare professionals in a clinical setting, or at home (over the counter [OTC]) by persons with diabetes, as an aid to monitor the effectiveness of diabetes control. The intended use of each meter can be found in: Intended Use, (Section B) of the Assure® Platinum Test Strips Insert and the Assure® Dose Control Solutions Insert.
The Assure® Platinum Blood Glucose Monitoring System is designed for institutional/clinical and/or multi-patient settings. We recommend that healthcare professionals wear gloves when handling a blood glucose meter as contact with blood presents a potential infection risk. We also suggest cleaning and disinfecting the meter between residents/patients. Please refer to the appropriate user instruction manual or QA/QC manual for additional information on testing and cleaning.
ARKRAY recognizes the challenges in establishing quality control programs within healthcare facilities. We understand our responsibility in assisting our customers in developing and implementing a bedside blood glucose monitoring program.
This comprehensive manual has been designed to provide you with a thorough reference source for the Assure® Platinum System including:
• Product operations
• Training and in-services
• Guidelines for policies and procedures
• Quality Assurance and Quality Control (QA/QC) programs
• Reviews of regulatory materials
All of these materials have been designed to assist you in meeting the necessary requirements for various certification programs and agencies.
We trust that this Quality Assurance/Quality Control manual will provide you with the needed support tools for your blood glucose monitoring program. If you have any questions after reviewing the manual, please call ARKRAY’s Customer Service Department at 800.818.8877 (toll-free), option 5, 24 hours a day, 7 days a week, USA and Canada.
SECTION
ASystem Components
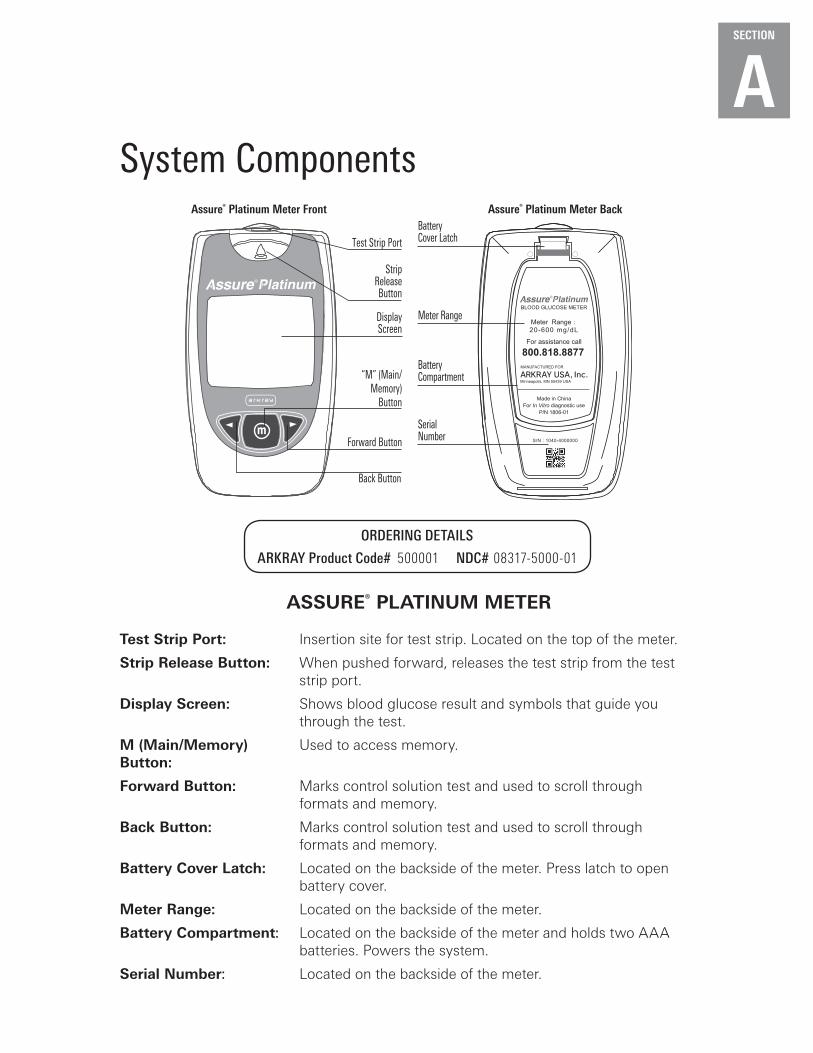
ASSURE® PlATInUM METER
Test Strip Port: Insertion site for test strip. Located on the top of the meter.
Strip Release Button: When pushed forward, releases the test strip from the test strip port.
Display Screen: Shows blood glucose result and symbols that guide you through the test.
M (Main/Memory) Used to access memory. Button:
Forward Button: Marks control solution test and used to scroll through formats and memory.
Back Button: Marks control solution test and used to scroll through formats and memory.
Battery Cover latch: Located on the backside of the meter. Press latch to open battery cover.
Meter Range: Located on the backside of the meter.
Battery Compartment: Located on the backside of the meter and holds two AAA batteries. Powers the system.
Serial number: Located on the backside of the meter.
S/N : 1040-4000000
BLOOD GLUCOSE METER
Meter Range
20-600 mg/dL
For assistance call
800.818.8877
Made in China
For In Vitro diagnostic use
P/N 1806-01
MANUFACTURED FOR
Assure® Platinum Meter Front Assure® Platinum Meter BackBattery Cover Latch
Meter Range
Battery Compartment
Display Screen
“M” (Main/Memory)
Button
Test Strip Port
Forward Button
SerialNumber
Strip Release Button
Back Button
ORDERING DETAILS
ARKRAY Product Code# 500001 NDC# 08317-5000-01

SECTION
A
The Assure® Platinum Test Strips come in a moisture-proof, light-protected bottle, and are designed to work with the Assure® Platinum meter. The test strips are sensitive to moisture and light, so it is important that you keep the bottle sealed until you are ready to use the strips. Do not leave any test strips outside the test strip bottle while not in use. Replace the cap tightly after a test strip is removed from the bottle.
These test strips require only 0.5 µL of blood. Apply the application tip to the blood sample. The strip draws in the blood by capillary action. The blood glucose reacts with the enzyme on the test strip. This produces a current proportional to the blood glucose level. The meter detects the current and converts it into a blood glucose reading. Assure® Platinum test strips use glucose oxidase chemistry.
ASSURE® PlATInUM METER DISPlAy SCREEn
ASSURE® PlATInUM TEST STRIPS
Full Display Screen Layout
mg/dL
MEMAVGDAYDSTd-m-d
HYPO
am pm
Date Format
Hypo Warning
Remove Test Strip
Test Result Flag Temperature Warning
Unit of MeasurementAudible Beep OffOn
Alarm
Control Solution Test
Low Battery
Time
Daylight Savings Time
Memory Mode
Date
Average Test Reading
Test Strip Contact Bars
Reaction SiteSample Application Tip(Apply blood to end of test strip. Capillary draw will pull blood to reaction site.)
Insert into meter
this way
ORDERING DETAILS
ARKRAY Product Code# NDC#Assure Platinum Test Strips 50-count 500050 08317-5000-50
Assure Platinum Test Strips 100-count 500100 08317-5001-00

SECTION
AASSURE® DOSE COnTROl SOlUTIOnS
High (Level 2)Control Solution
Normal (Level 1) Control Solution
Assure® Dose Control Solution
Normal
High (Level 2)Control Solution
Normal (Level 1) Control Solution
Assure® Dose Control Solution
High
ORDERING DETAILS
ARKRAY Product Code# NDC#Assure® Dose Control Solution 500006 08317-5000-06 (Normal and High)
ASSURE® PlATInUM METER SPECIFICATIOnSFor additional information refer to the Assure® Platinum User Manual.
Product SpecificationsTest strips Assure Platinum Test StripsResult range 20–600 mg/dL Calibration Plasma referencedSample size Minimum 0.5 µLBlood source Capillary whole bloodTest time 7 secondsAssay method Biosensor, Glucose oxidase (Aspergillus niger sourced)
and Hexaammineruthenium (III) chloridePower source Two 1.5V alkaline AAA batteriesBattery life More than 5,000 tests at 4 tests per dayDisplay type Liquid Crystal Display (LCD)
Memory 500 results with time and date stampAverage 7-, 14-, 30-, and 90-day averagingAutomatic shut off 2 minutes after last user actionSize 4.5” x 2.5” x 1.2”Weight 2.8 oz. (without batteries)
Operating RangesTemperature 50°F–104°F (10°C–40°C)Relative humidity 20%–80%Hematocrit 30%–55%Altitude 10,000 ft. (3,048 meters)Unit of measurement mg/dL
SECTION
BSECTION
BMeter Operation and Set-Up METER SET-UPBefore using the Assure® Platinum Meter for the first time, set the time and date. Do not perform a blood glucose test until you have performed meter set-up. In the set-up mode, there are menu options for audible beep, hypo warning, daylight savings time, time, date, backlight, and QC reminder.
Basic rules for meter set-up
Step 1: Press “M” button to turn meter on. The full screen layout will be briefly displayed followed by the memory.
Step 2: Press and hold the “M” button for two seconds. You have now entered set-up mode. The audible beep symbol appears at the bottom of the display screen.
Step 3: The current setting will be displayed for each menu option as you scroll through the menu. Use the Back and Forward buttons to change setting.
Step 4: Press “M” button briefly to accept the setting and move to the next option.
Step 5: To exit set-up mode at any time and save all settings, press and hold the “M” button for more than two seconds. This will return you to the memory screen.
Step 6: Press the “M” button to turn meter off.
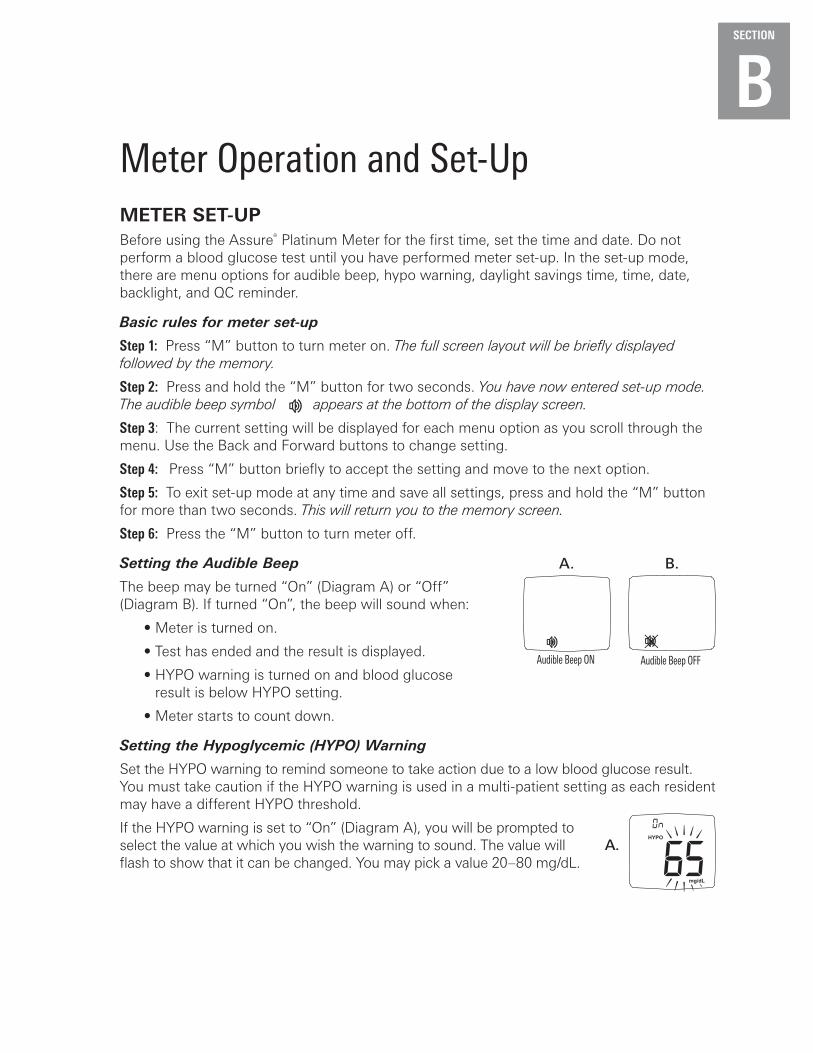
Setting the Audible Beep
The beep may be turned “On” (Diagram A) or “Off” (Diagram B). If turned “On”, the beep will sound when:
• Meter is turned on.
• Test has ended and the result is displayed.
• HYPO warning is turned on and blood glucose result is below HYPO setting.
• Meter starts to count down.
Setting the Hypoglycemic (HYPO) Warning
Set the HYPO warning to remind someone to take action due to a low blood glucose result. You must take caution if the HYPO warning is used in a multi-patient setting as each resident may have a different HYPO threshold.
If the HYPO warning is set to “On” (Diagram A), you will be prompted to select the value at which you wish the warning to sound. The value will flash to show that it can be changed. You may pick a value 20–80 mg/dL.
Audible Beep ON Audible Beep OFF
A. B.
mg/dL
HYPO
A.

SECTION
BSECTION
BSetting the Daylight Savings Time
This meter has the function of switching from standard time to daylight saving time (DST). “ON” (Diagram A) or “OFF” (Diagram B) will blink.
Setting the Time Format
The time can be displayed in either a 12-hour format (Diagram A) or a 24 hour format (military time) (Diagram B).
Setting the Time
The hour (Diagram 1A) and minute setting (Diagram 2A) will flash to indicate that it may be changed.
Setting the Date Format
The date can either be displayed in the month/day format (m-d) (Diagram A) or the international day/month format (d-m) (Diagram B).
Setting the Date
Set the month (Diagram A), day (Diagram B) and year (Diagram C).
Setting the Backlight Setting
To save the battery life, the backlight level is pre-set not to come on.
Select settings of “0,” “5,” “10,” “15,” and “100.”
0 .................. Backlight off. 5, 10, 15 ....... Backlight will stay on for 5, 10 or 15 seconds. 100 .............. Backlight will always stay on.
DST
am
DST
am
A. B.
A. B.
am
1A. 2A.
am
d-m-dd-m-d d-m-dd-m-d
A. B.
A. B. C.

SECTION
BBlOOD GlUCOSE TESTInGObtaining a Drop of Blood
note:• We recommend that healthcare professionals use any auto-disabling, single-use safety
lancet to obtain patient blood samples. These instructions are for the Assure® Lance Lockout Safety Lancet. Call Customer Service at 800.818.8877 (toll-free), option 5 to find a distributor.
• We advise healthcare professionals to wear gloves during blood testing.
• Meter system must be at room temperature for testing.
Step 1: Wash patient’s hands with soap and warm water.
Dry hands thoroughly. If alcohol wipes are used, make sure the area is dry before taking blood sample. Residual alcohol may lead to inaccurate readings.
Step 2: let the arm hang down for 10 to 15 seconds.
(Holding the arm below the heart and massaging the wrist, palm and finger makes it easier to obtain a blood drop).
Step 3: Choose a site on the side of a fingertip to minimize pain.
Step 4: Grasp the outer white edge of the Assure® lance lancet. Twist the protective cap 360° to remove.
Do not put your thumb on the top button while removing the cap; this prevents a misfire.
Step 5: Place lancet against side of fingertip. Press button firmly.
After use, discard in sharps container.
Setting the qcProGuard®/ QC Reminder
This can be set to remind someone to perform a control solution test. When set to “On” (Diagram A), the reminder will prompt you to do a control solution test every 24 hours. If a control test has not been performed within 24 hours of the previous test, PCS (Perform Control Solution test) will flash on the screen along with
am
(Diagram B). PCS will flash three times and then disappear. The
am
will stay on the screen and also mark a result in the memory mode.Note: If PCS flashes when inserting strip, then enter control solution mode by pressing either the Back or Forward button when the apply blood symbol appears on the screen. PCS will not be on the screen. You will see a control solution bottle at the top right of your screen.
360°
B.
A.

SECTION
BPerforming a Blood Glucose Test
Caution: To reduce the chance of infection Before performing a blood glucose test, observe the following safety precautions:
• All components that come into contact with blood samples should be considered to be biohazards capable of transmitting viral diseases between patients and healthcare professionals.
• A new pair of clean gloves should be worn by the user before testing each patient.
• Wash hands thoroughly with soap and water before putting on a new pair of gloves and performing the next patient test.
• Use only an auto-disabling, single-use lancing device for each patient.
• The meter should be cleaned and disinfected after use on each patient.
Caution: Failure to follow instructions may cause inaccurate results.
Step 1:
Remove Assure® Platinum Test Strip from the bottle. Immediately replace the bottle cap tightly.
Insert test strip as shown in the diagram. Meter will turn on automatically.
Verify that all symbols appear on the screen.
note: If both PCS and
am
appear on the screen, perform a control solution test (see next page).
The strip and flashing blood drop indicate the meter is ready for use.
Step 2
Obtain a blood sample. Touch the sample application tip at the end of the strip to the blood drop on your finger. Capillary action will pull the blood into the strip.
note: Blood sample. The meter will start to count down when it detects that blood has been applied. If meter does not start after adding the first blood drop, remove the test strip and test with a new test strip. Discard strip if meter does not start to count down.
Important: The minimum sample volume is 0.5 µL. Smaller samples may not start the meter or can start the meter count down and provide an E13 error message. Ensure blood completely fills the reaction site.
Enough Blood
Not Enough Blood
Too Much Blood
Insert contact bars into meter.
Sample Application Tip
Contact Bars

SECTION
BStep 3:
Meter will count down by showing “7”. The meter will show the result in 7 seconds.
Results will be shown in units of mg/dL. Results will not show a decimal point.
Option: Flagging Test Result in Memory
• Results may be marked with an “!” if you feel the result is incorrect or the test procedure was not followed correctly.
• Mark the test result with an “!” by pressing either the Forward or Back button after result is on screen. Marked results will not be included in the 7-, 14-, 30-, or 90–day averages.
Healthcare Professionals: Record test result in patient’s chart.
Step 4:
The flashing arrow reminds you to remove the test strip. Remove the test strip by holding the meter so that the test strip points down. Push the test strip release button forward. Dispose of test strip. The meter shuts off automatically when you remove the test strip.
mg/dL
am
mg/dL
am
mg/dL
SECTION
B
mg/dL mmol/L
MEM AVG DAY CODE d-m-d
HYPO
am pm
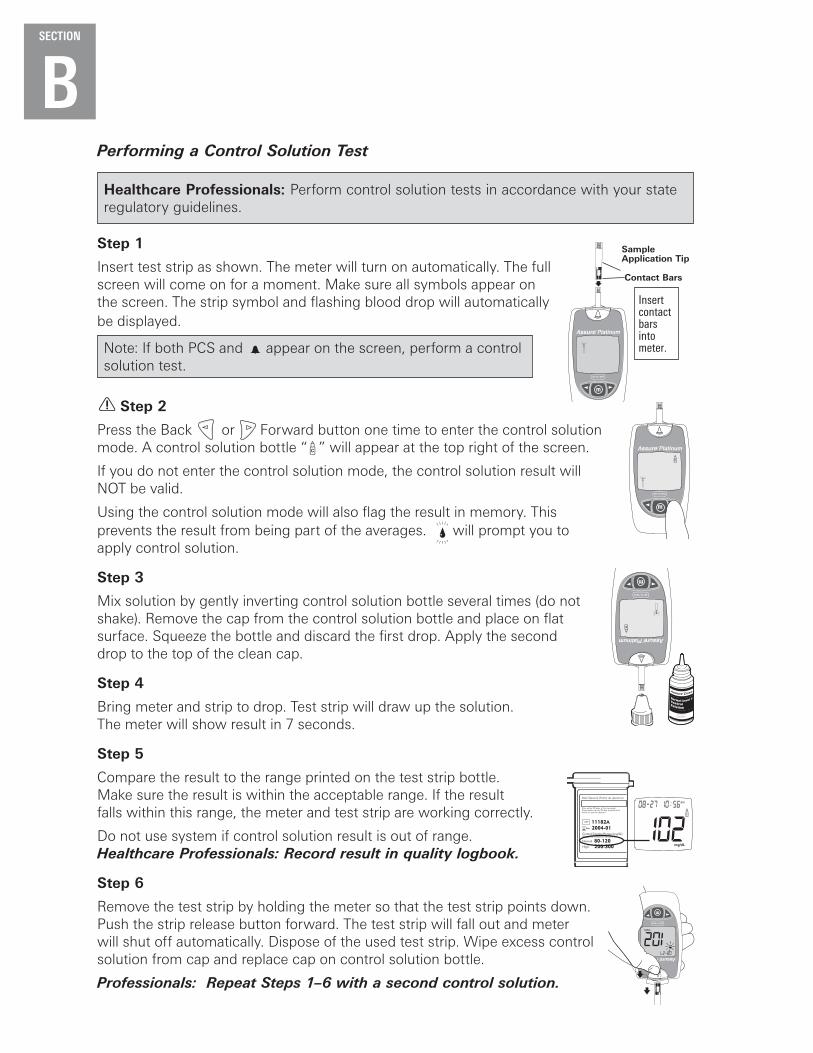
Performing a Control Solution Test
Healthcare Professionals: Perform control solution tests in accordance with your state regulatory guidelines.
Step 1
Insert test strip as shown. The meter will turn on automatically. The full screen will come on for a moment. Make sure all symbols appear on the screen. The strip symbol and flashing blood drop will automatically be displayed.
Note: If both PCS and
am
appear on the screen, perform a control solution test.
Step 2
Press the Back or Forward button one time to enter the control solution mode. A control solution bottle “
mg/dL mmol/L
MEM AVG DAY CODE d-m-d
HYPO
am pm
” will appear at the top right of the screen.
If you do not enter the control solution mode, the control solution result will NOT be valid.
Using the control solution mode will also flag the result in memory. This prevents the result from being part of the averages. will prompt you to apply control solution.
Step 3
Mix solution by gently inverting control solution bottle several times (do not shake). Remove the cap from the control solution bottle and place on flat surface. Squeeze the bottle and discard the first drop. Apply the second drop to the top of the clean cap.
Step 4
Bring meter and strip to drop. Test strip will draw up the solution. The meter will show result in 7 seconds.
Step 5
Compare the result to the range printed on the test strip bottle. Make sure the result is within the acceptable range. If the result falls within this range, the meter and test strip are working correctly.
Do not use system if control solution result is out of range.Healthcare Professionals: Record result in quality logbook.
Step 6
Remove the test strip by holding the meter so that the test strip points down. Push the strip release button forward. The test strip will fall out and meter will shut off automatically. Dispose of the used test strip. Wipe excess control solution from cap and replace cap on control solution bottle.
Professionals: Repeat Steps 1–6 with a second control solution.
Control Solution Range (mg/dL)(Rango de la solución de control)
Normal:
High:
11182A2004-01
80-120200-300
Date Opened (Fecha de Apertura)
(Use within 90 days of first opening) (Usar dentro de los 90 dias a partir de la fecha en que fue abierto)
Insert contact bars into meter.
Sample Application Tip
Contact Bars
mg/dL

SECTION
BMETER MEMORyThe Assure® Platinum stores up to 500 test results. When more than 500 test results have been performed, the meter drops the oldest result each time you add a new result. When you recall test results from Memory, the most recent test result is always shown first. Remove the test strip from meter before using Memory.
note: We do not recommend using the memory feature in a multi-patient setting. Results stored in the memory are not related to a specific patient.
Recalling ResultsStep 1: Press the “M” button. The last result in memory will be shown. MEM will be shown in the upper left side of the screen. This screen is a stored result.
The meter will show the date and result number position (for example 001 for last result (Diagram A), 002 for second to last result (Diagram B), etc.). It will then show the date and time. These will alternate until you press the Back or Forward button.
Step 2: Continue to press either the Forward or Backward button to scroll through memory.
Step 3: Press the “M” button to exit memory mode and turn meter off.
mg/dL
MEM
am
mg/dL
MEM
B.
A.
Inserting or Replacing the BatteryTo replace batteries:
1. Turn meter off.*
2. Press battery cover latch. Pull the battery cover up on the back of the meter.
3. Remove the two used batteries.
4. Insert two new AAA batteries.
5. Close battery cover.
6. E00 may be displayed. Check time and date.
7. Dispose of batteries as per guidelines.
*note: Failure to turn meter off during battery replacement will result in lost time
Battery life will decrease with backlighting. A flashing battery symbol means the battery is low. Replace batteries as soon as possible. Do not use rechargeable batteries.
Replace batteries within one minute to avoid losing the time and date setting.
note: To save battery power, the meter turns itself off two minutes after last use.
1
3
2
4

SECTION
B
Go to http://www.assureusa.com/cleandisinfect for the most up-to-date information on approved cleaning and disinfecting procedures and materials for ARKRAY blood glucose meters.
For wipes not listed, we recommend you create supporting documentation to justify your choice. Choosing a wipe not listed above could shorten use life or affect performance of the Assure® Platinum meter. If you experience any of these issues, please contact ARKRAY Technical Customer Service immediately to obtain a free replacement meter. ARKRAY recommends testing meters with control solution anytime you suspect the system is not functioning properly.
Please see the Assure® Platinum QA/QC Manual or User Instruction Manual for step-by-step instructions on how to clean and disinfect the Assure® Platinum Blood Glucose Meter.
Go to http://www.assureusa.com/cleandisinfect for the most up-to-date information on approved cleaning and disinfecting procedures and materials for ARKRAY blood glucose meters. If you have any questions, please contact our Technical Customer Service department at 800.818.8877, (toll-free) option 5, 24 hours a day, 7 days a week, USA and Canada.
ClEAnInG AnD DISInFECTInG
ARKRAY has made a good-faith effort to test the durability and functionality of the Assure®
Platinum meter with the most commonly used wipes. EPA registered wipes were used in the study. Our testing confirmed the following wipes will not damage the functionality or performance of the meter through 3,650 cleaning and disinfecting cycles.
Choosing a wipe not listed below could shorten use life or affect performance of the Assure® Platinum meter.
Manufacturer Disinfectant Brand name EPA#
Clorox
Dispatch® Hospital Cleaner Disinfectant with Bleach Clorox Healthcare™ Bleach Germicidal Wipes Clorox Healthcare™ Hydrogen Peroxide Cleaner Clinical Surface WipesEZ-Kill® Disinfectant/ Deodorizing/Cleaning Wipes
56392-867619-1267619-25
59894-10
Medline Micro-Kill Individual 3”x 3” Wipe 69687-1
Cambridge Sensors USA Microdot® Bleach Wipe 69687-1
Metrex CaviWipes™ 46781-8
Professional Disposables International, Inc. (PDI)
Super Sani-Cloth® Germicidal Disposable Wipes Sani-Cloth® Bleach Germicidal Disposable Wipe Sani Cloth® AF Germicidal Disposable Wipes
9480-49480-89480-5
Virox Technologies Accel TB Hydrogen Peroxide Cleaner/Disinfectant 74559-3

ClEAnInG AnD DISInFECTInG
Cleaning and Disinfecting FAQ If a blood glucose meter is assigned to an individual resident and not shared, does it still need to be cleaned and disinfected?
CMS guidelines read that blood glucose meters need to be cleaned and disinfected after each use. It is our interpretation that individually assigned meters need to be cleaned and disinfected. Each meter in use is subject to QC testing per the facility’s policy.
What can be used to clean a blood glucose meter?
Cleaning can be accomplished by wiping the meter down with soap and water or isopropyl alcohol, but will not disinfect a meter.
What can be used to disinfect a blood glucose meter?
Disinfecting can be accomplished with an EPA registered disinfectant detergent or germicide that is approved for healthcare settings or a solution of 1:10 concentration of sodium hypochlorite (bleach).
Go to www.assureusa.com/cleandisinfect for a list of wipes that have been tested on ARKRAY blood glucose meters.
Can cleaning and disinfecting be accomplished with one wipe?
Many wipes act as both a cleaner and disinfectant. If blood is visibly present on the meter, two wipes must be used; one wipe to clean and a second wipe to disinfect.
What will happen if a blood glucose meter is not cleaned and disinfected after use?
Per the CMS F-Tag 441 guideline, surveyors may issue a citation if they observe no cleaning and disinfecting of meters after a blood glucose test as they would not be in compliance with CMS F-Tag 441.
It is important that an LTC facility establish a program for infection control and identify a key individual responsible for the overall program oversight. The program should include addressing the cleaning and disinfection of blood glucose meters along with other equipment and environmental surfaces. The program should involve establishing goals and priorities, planning, strategy implementation, post-surveillance and more. Additionally, staff roles and responsibilities should be identified and training should be documented. It is also important to provide education on infection control and the proper use of products. More information on establishing a comprehensive infection prevention and control program can be found in the CMS Infection Control Guidance Document.
F-Tag 441
Infection Control Requirements for Blood Glucose Monitoring
What is the Centers for Medicare and Medicaid Services (CMS) F-Tag 441?
F-Tag 441 is an interpretive guideline for infection control programs in Long Term Care facilities. It is put in place to prevent, recognize and control the onset and spread of infection. F-Tag 441 is used for guidance by CMS Regional Offices and State Survey Agencies for [re-]certification and complaint investigations.
Does F-Tag 441 only apply to blood glucose meters?
No, F-Tag 441 applies to all resident care equipment and environmental surfaces, including blood glucose meters.
Why is Cleaning and Disinfecting of blood glucose meters such a high priority?
Blood glucose meters are at high risk of becoming contaminated with bloodborne pathogens such as Hepatitis B Virus (HBV), Hepatitis C Virus (HCV) and Human Immunodeficiency Virus (HIV). Transmission of these viruses from resident to resident has been documented due to contaminated blood glucose devices. According to the Centers for Disease Control and Prevention, cleaning and disinfecting of meters between resident use can prevent the transmission of these viruses through indirect contact.
How often do blood glucose meters need to be cleaned and disinfected?
Per CMS F-Tag 441 Transmittal 55 dated December 2, 2009, blood glucose meters need to be cleaned and disinfected after each use for individual resident care. Lancets for obtaining a blood sample need to be properly disposed of after one use.
More information is available at:
http://www.cms.gov/Regulations-and-Guidance/Guidance/Transmittals/index.htmlhttp://www.cdc.gov/injectionsafety/blood-glucose-monitoring.html or
www.fda.gov/MedicalDevices/Safety/AlertsandNotices/ucm224025.htm

SECTION
BTROUBlESHOOTInG
Display Screen
Please first read this section. If you still have questions, call Customer Service at 800.818.8877 (toll-free), option 5 (24 hours a day, 7 days a week, USA and Canada only). If outside the USA and Canada, contact your local ARKRAY distributor. Contact your healthcare professional if you cannot reach Customer Service. Do not send your meter to ARKRAY or your local dealer without first calling to get approval to do so.
HI and lo Messages
HI Message your blood glucose level is more than 600 mg/dl.
Repeat test with new test strip. If this message shows again, contact your healthcare professional immediately!
Lo Message your blood glucose level is less than 20 mg/dl.
Repeat test with new test strip. If this message shows again, contact your healthcare professional immediately!
Error Messages
The battery has been replaced.
Check that the time and date are set correctly. (The time and date will be flashing). With the meter turned off, press and hold “M” button for two seconds to enter “check meter settings mode.” Then confirm that the time and date are correct. If they are not correct, press and hold “M” button to enter set-up mode.
A used strip has been inserted. Or the meter is having a problem reading the strip.
Repeat test with new test strip.
Battery power is getting low.
There is enough power for about 100 tests. Replace batteries soon.
Battery power low.
There is enough power for about 20 tests. Replace batteries soon.
The battery power is too low for testing.
Replace batteries.
Thermometer symbol.
The meter temperature is outside acceptable range of 41ºF–113ºF (5ºC–45ºC). Allow the meter and test strips to warm up or cool down for at least 30 minutes to adjust to new temperature.
mg/dL
am
am
am
SECTION
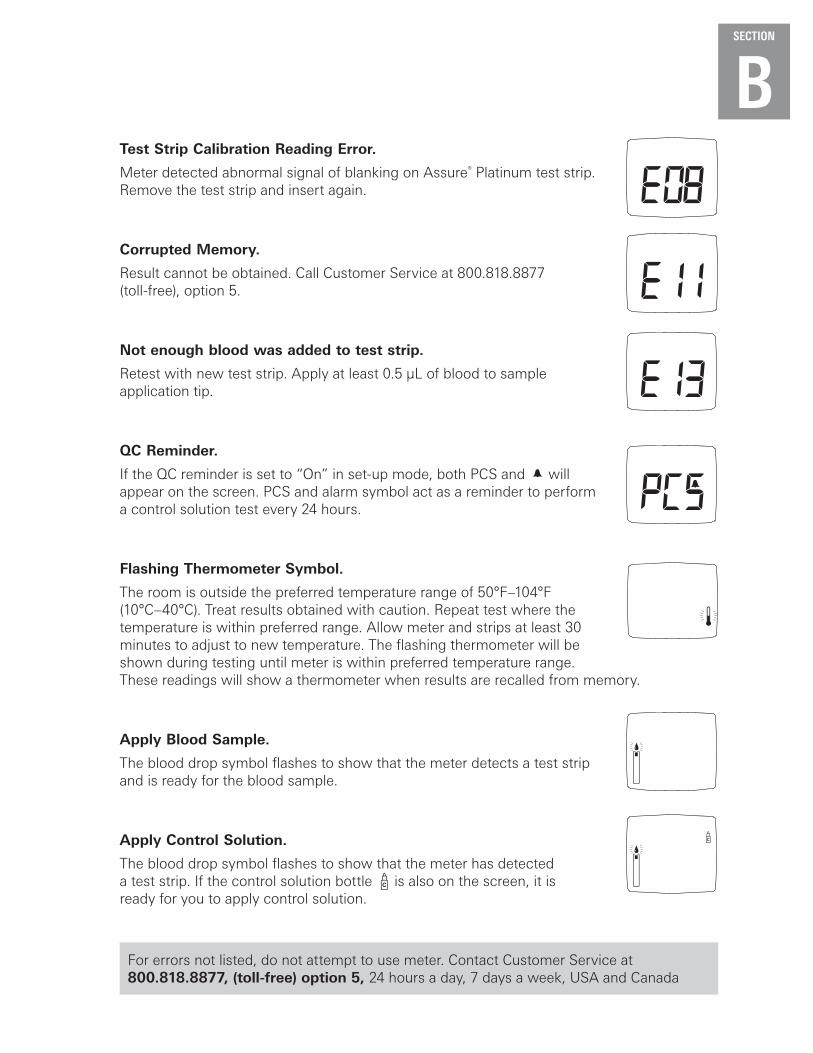
BTest Strip Calibration Reading Error.
Meter detected abnormal signal of blanking on Assure® Platinum test strip. Remove the test strip and insert again.
Corrupted Memory.
Result cannot be obtained. Call Customer Service at 800.818.8877 (toll-free), option 5.
not enough blood was added to test strip.
Retest with new test strip. Apply at least 0.5 µL of blood to sample application tip.
QC Reminder.
If the QC reminder is set to “On” in set-up mode, both PCS and
am
will appear on the screen. PCS and alarm symbol act as a reminder to perform a control solution test every 24 hours.
Flashing Thermometer Symbol.
The room is outside the preferred temperature range of 50°F–104°F (10°C–40°C). Treat results obtained with caution. Repeat test where the temperature is within preferred range. Allow meter and strips at least 30 minutes to adjust to new temperature. The flashing thermometer will be shown during testing until meter is within preferred temperature range. These readings will show a thermometer when results are recalled from memory.
Apply Blood Sample.
The blood drop symbol flashes to show that the meter detects a test strip and is ready for the blood sample.
Apply Control Solution.
The blood drop symbol flashes to show that the meter has detected a test strip. If the control solution bottle is also on the screen, it is ready for you to apply control solution.
For errors not listed, do not attempt to use meter. Contact Customer Service at 800.818.8877, (toll-free) option 5, 24 hours a day, 7 days a week, USA and Canada
SECTION
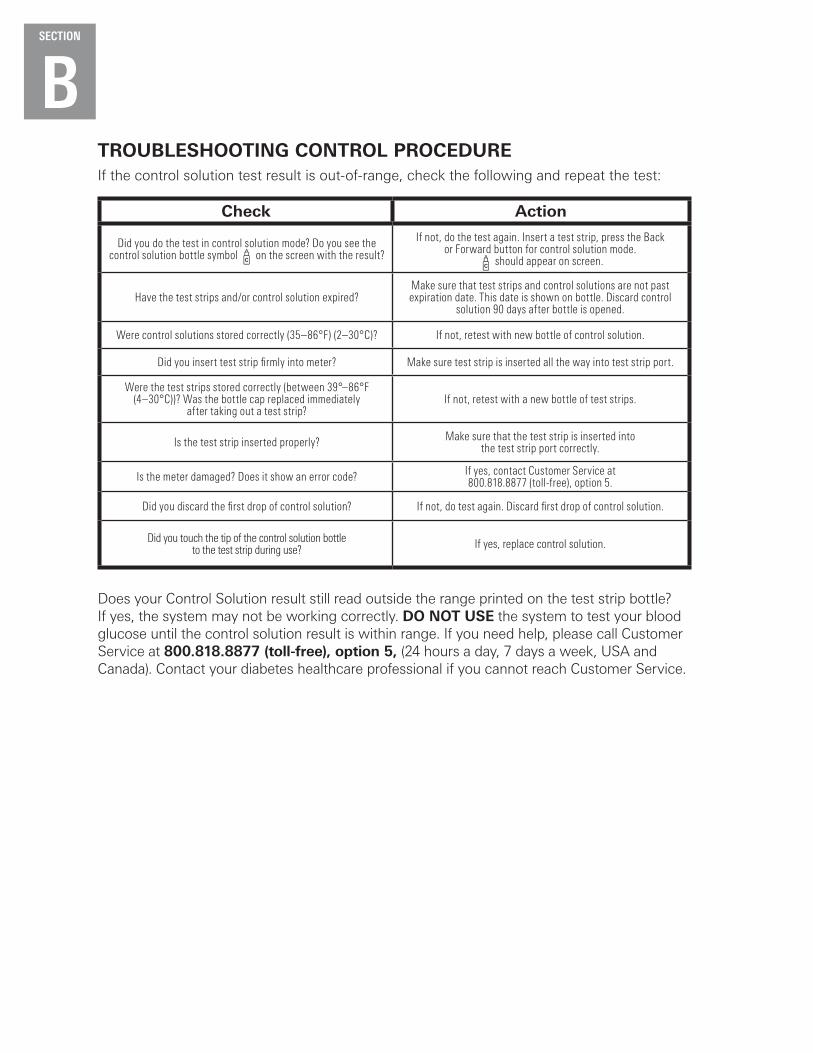
BTROUBlESHOOTInG COnTROl PROCEDUREIf the control solution test result is out-of-range, check the following and repeat the test:
Check Action
Did you do the test in control solution mode? Do you see the control solution bottle symbol on the screen with the result?
If not, do the test again. Insert a test strip, press the Back or Forward button for control solution mode.
should appear on screen.
Have the test strips and/or control solution expired?Make sure that test strips and control solutions are not past expiration date. This date is shown on bottle. Discard control
solution 90 days after bottle is opened.
Were control solutions stored correctly (35–86°F) (2–30°C)? If not, retest with new bottle of control solution.
Did you insert test strip firmly into meter? Make sure test strip is inserted all the way into test strip port.
Were the test strips stored correctly (between 39°–86°F (4–30°C))? Was the bottle cap replaced immediately
after taking out a test strip?If not, retest with a new bottle of test strips.
Is the test strip inserted properly? Make sure that the test strip is inserted into the test strip port correctly.
Is the meter damaged? Does it show an error code? If yes, contact Customer Service at 800.818.8877 (toll-free), option 5.
Did you discard the first drop of control solution? If not, do test again. Discard first drop of control solution.
Did you touch the tip of the control solution bottle to the test strip during use? If yes, replace control solution.
Does your Control Solution result still read outside the range printed on the test strip bottle? If yes, the system may not be working correctly. DO nOT USE the system to test your blood glucose until the control solution result is within range. If you need help, please call Customer Service at 800.818.8877 (toll-free), option 5, (24 hours a day, 7 days a week, USA and Canada). Contact your diabetes healthcare professional if you cannot reach Customer Service.

SECTION
BFREQUEnTly ASKED QUESTIOnS
1. Can results vary between meters in side-by-side tests?
yes. One meter is not a valid reference method for another meter. Readings would likely vary because of the many variables that can affect the reading including:
• The naturally uneven distribution of glucose in blood between sites
• The time that the blood drop is exposed to the environment
• Whether you had to apply extra pressure to obtain the blood sample
• Inherent 15 to 20% variability of BGMs from laboratory reference methods
• Size of sample
• User technique
Medical studies reveal that it is not uncommon to get differences between the same brand of test strips or between meters. Small variances are thought by many health professionals to be perfectly reasonable.¹
Solution: To confirm the accuracy of your meter, test results should be compared to those obtained from a laboratory.
2. Can the Assure® Platinum Meter results vary from the laboratory test results?
yes. The test result you get with your meter should fall within 15% of the laboratory result.¹ However, the difference might exceed 20% on rare occasions because of the following important variables:
a. Plasma versus whole blood
While blood glucose meters test whole blood, laboratory blood glucose measurements are made either from a whole blood sample or from a blood plasma sample (blood with the red cells removed). Both methods are widely used, and neither is more “correct” than the other. However, the very nature of these two sample types produces slightly different glucose measurements from the sample blood specimen. Plasma measurements are, on average, about 12% higher than their whole blood counterparts.²
Solution: The Assure® Platinum System is “plasma-referenced. ”Assure® Platinum results should fall within 15% to 20% of a laboratory result, which is based on testing a plasma sample. Although the Assure® Platinum uses a whole blood sample, we have adjusted its internal calibration so that it converts results to match a plasma-referenced result.Assure® Platinum results will be, on average, 12% higher than laboratory results based on whole blood testing. To compare Assure® Platinum results with a whole blood referenced laboratory result, first multiply the laboratory result by 1.12. Then Assure® Platinum results should fall within 15% to 20% of the adjusted laboratory result.
b. Capillary versus venous blood
The blood you use to test from the fingertip is capillary blood, while laboratories generally use venous blood. Unless the patient is in a fasting state, the blood sugar level of the capillary blood will be higher than that of the venous blood. Capillary blood glucose levels may be 20 to 70 mg/dL higher than venous blood glucose after food intake.³

SECTION
Bc. Time test was performed
If the meter test is not done within 30 minutes of the laboratory test, it will result in variations in the readings as blood glucose levels can change quickly.
For example: Glucose levels of whole blood can drop up to 7 mg/dL each hour because of glycolysis if the samples are left at room temperature.
Solution: Assure that the lab test is performed within 30 minutes of the blood being drawn.
3. If testing is performed in extreme temperatures will it affect the test results obtained from the meter?
yes. The meter is designed to be used within the following temperature range: 50°F–104°F (10°C–40°C). Tests will be accurate when performed within this range.
4. Can plasma or serum be used in the Assure® Platinum Meter?
no. The Assure® Platinum Meter is designed to work with whole blood samples and Assure® Dose Control Solutions only.
References:1. “Self Monitoring of Blood Glucose,” Diabetes Care, Volume 19, Supplement 1, Jan. 1996, pp. S562-S566.
2. Tietz NW. Fundamentals of Clinical Chemistry, 4th Edition; Burtisand Ashwood, 1996.
3. Caraway WT: Carbohydrates. In Teitz NW (ed.) Fundamentals of Clinical Chemistry. Philadelphia. WB Saunders Company.
SECTION
BAssure® Platinum Test Strips
IMPORTANT: Please read this insert and your Assure Platinum User Instruction Manual before testing.
INTENDED USE:Assure Platinum Test Strips are intended for the quantitative measurement of glucose in fresh capillary whole blood when used with the Assure Platinum Blood Glucose Meter. Testing is done outside the body (In Vitro Diagnostic Use). They are indicated for use at home (over the counter [OTC]) by persons with diabetes, or in clinical settings by healthcare professionals, as an aid to monitor the effectiveness of diabetes control. It is not intended for the diagnosis of or screening for diabetes mellitus, and is not intended for neonates.
TEST PRINCIPLE:Glucose in the blood sample mixes with chemicals on the test strip. This yields a small electrical current. The Assure Platinum Meter measures this current. It then shows the blood glucose result proportional to the current. This professional grade system measures blood glucose in capillary whole blood. Results shown as plasma values.
STORAGE AND HANDLING:• Store test strip container in a cool, dry place between 39°F-86°F (4°C-30°C).• Keep away from direct sunlight and heat. Do not freeze or refrigerate.• Do not store or transfer the Assure Platinum Test Strips outside of the original
bottle.• Do not bend, cut or alter an Assure Platinum Test Strip.• As soon as you have removed a test strip, replace the cap securely on the bottle.• When you first open the bottle, write the date on the bottle label. Use the
test strips within 3 months of first opening the bottle.• Do not use test strips beyond the expiration date ( ) on the label.• Always clean and dry hands before handling a test strip. Do not touch the
sample application tip of the test strip. • Do not re-use an Assure Platinum Test Strip.• Only use Assure Platinum Test Strips with an Assure Platinum Blood Glucose
Meter. Note: Healthcare Professionals should wear gloves when testing patient.
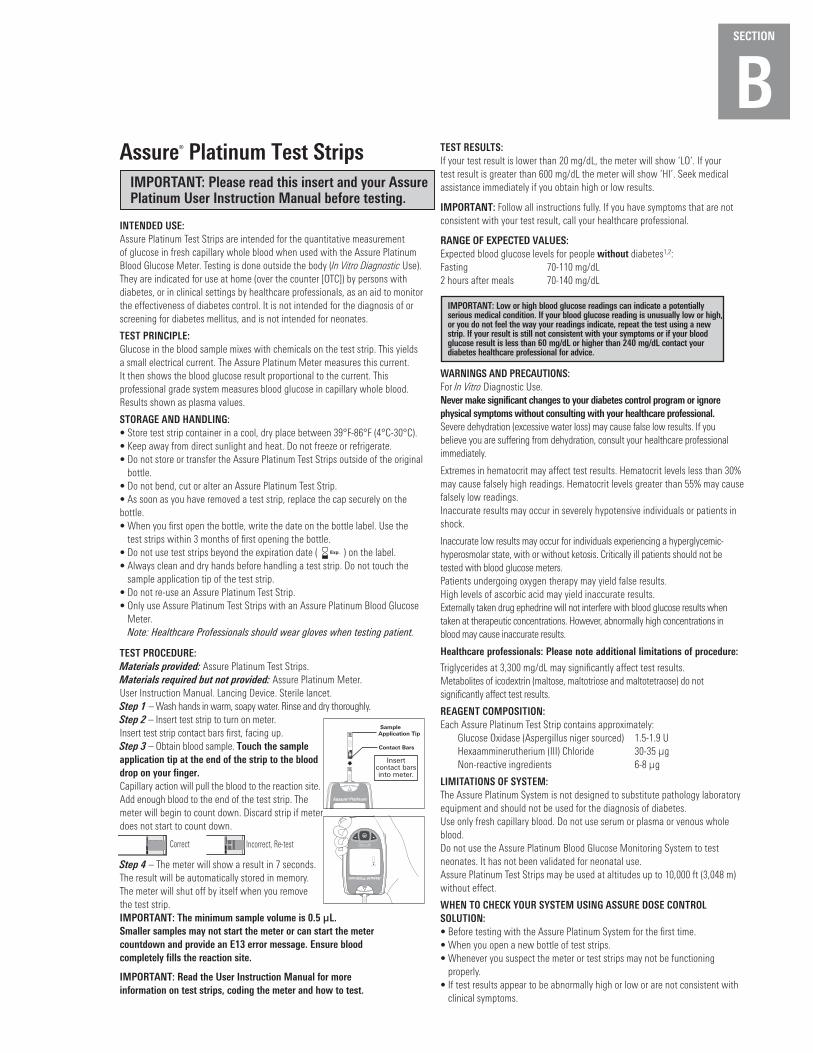
TEST PROCEDURE:Materials provided: Assure Platinum Test Strips.Materials required but not provided: Assure Platinum Meter. User Instruction Manual. Lancing Device. Sterile lancet.Step 1 – Wash hands in warm, soapy water. Rinse and dry thoroughly.Step 2 – Insert test strip to turn on meter. Insert test strip contact bars first, facing up. Step 3 – Obtain blood sample. Touch the sample application tip at the end of the strip to the blood drop on your finger. Capillary action will pull the blood to the reaction site. Add enough blood to the end of the test strip. The meter will begin to count down. Discard strip if meter does not start to count down.
Correct Incorrect, Re-test
Step 4 – The meter will show a result in 7 seconds. The result will be automatically stored in memory. The meter will shut off by itself when you remove the test strip.IMPORTANT: The minimum sample volume is 0.5 µL. Smaller samples may not start the meter or can start the meter countdown and provide an E13 error message. Ensure blood completely fills the reaction site.
IMPORTANT: Read the User Instruction Manual for more information on test strips, coding the meter and how to test.
TEST RESULTS:If your test result is lower than 20 mg/dL, the meter will show ‘LO’. If your test result is greater than 600 mg/dL the meter will show ‘HI’. Seek medical assistance immediately if you obtain high or low results.
IMPORTANT: Follow all instructions fully. If you have symptoms that are not consistent with your test result, call your healthcare professional.
RANGE OF EXPECTED VALUES:Expected blood glucose levels for people without diabetes1,2:Fasting 70-110 mg/dL2 hours after meals 70-140 mg/dL
IMPORTANT: Low or high blood glucose readings can indicate a potentially serious medical condition. If your blood glucose reading is unusually low or high, or you do not feel the way your readings indicate, repeat the test using a new strip. If your result is still not consistent with your symptoms or if your blood glucose result is less than 60 mg/dL or higher than 240 mg/dL contact your diabetes healthcare professional for advice.
WARNINGS AND PRECAUTIONS:For In Vitro Diagnostic Use.Never make significant changes to your diabetes control program or ignore physical symptoms without consulting with your healthcare professional.Severe dehydration (excessive water loss) may cause false low results. If you believe you are suffering from dehydration, consult your healthcare professional immediately.
Extremes in hematocrit may affect test results. Hematocrit levels less than 30% may cause falsely high readings. Hematocrit levels greater than 55% may cause falsely low readings.Inaccurate results may occur in severely hypotensive individuals or patients in shock.
Inaccurate low results may occur for individuals experiencing a hyperglycemic-hyperosmolar state, with or without ketosis. Critically ill patients should not be tested with blood glucose meters.Patients undergoing oxygen therapy may yield false results.High levels of ascorbic acid may yield inaccurate results.Externally taken drug ephedrine will not interfere with blood glucose results when taken at therapeutic concentrations. However, abnormally high concentrations in blood may cause inaccurate results.
Healthcare professionals: Please note additional limitations of procedure:
Triglycerides at 3,300 mg/dL may significantly affect test results. Metabolites of icodextrin (maltose, maltotriose and maltotetraose) do not significantly affect test results.
REAGENT COMPOSITION:Each Assure Platinum Test Strip contains approximately: Glucose Oxidase (Aspergillus niger sourced) 1.5-1.9 U Hexaamminerutherium (III) Chloride 30-35 µg Non-reactive ingredients 6-8 µg
LIMITATIONS OF SYSTEM:The Assure Platinum System is not designed to substitute pathology laboratory equipment and should not be used for the diagnosis of diabetes. Use only fresh capillary blood. Do not use serum or plasma or venous whole blood. Do not use the Assure Platinum Blood Glucose Monitoring System to test neonates. It has not been validated for neonatal use.Assure Platinum Test Strips may be used at altitudes up to 10,000 ft (3,048 m) without effect.
WHEN TO CHECK YOUR SYSTEM USING ASSURE DOSE CONTROL SOLUTION:• Before testing with the Assure Platinum System for the first time.• When you open a new bottle of test strips.• Whenever you suspect the meter or test strips may not be functioning
properly.• If test results appear to be abnormally high or low or are not consistent with
clinical symptoms.
Contact Bars
Insert contact bars into meter.
Sample Application Tip
SECTION
B• The test strip bottle has been left open or has been exposed to light,
temperatures below 39°F (4°C) or above 86°F (30°C), or humidity levels above 80%.
• To check your technique.• When the Assure Platinum Meter has been dropped or stored below 32°F (0°C)
or above 122°F (50°C).• Each time the batteries are changed.
HOW TO CHECK YOUR SYSTEM WITH ASSURE DOSE CONTROL SOLUTION:See Control Solution insert for more information.Step 1 – Insert a test strip into the meter. Be sure the contact bars go in first
and face up.Step 2 – Press the Back or Forward button one time to enter control solution
mode.Step 3 – Remove the cap from the control solution bottle. Place cap on a flat
surface. Squeeze the bottle and discard the first drop.Step 4 – Apply the second drop to the top the clean cap.Step 5 – Bring the meter and strip to drop.Step 6 – Compare the result to the range printed on the test strip bottle.
Healthcare Professionals: Repeat Steps 1-6 with a second control solution.
If the control solution results are out-of-range, repeat test. Results that fall outside the range may be caused by:• The meter was not placed in control solution mode before adding solution.
Refer to manual or test strip insert for more information.• The control solution is expired or contaminated.• The control solution was stored below 35°F (2°C) or above 86°F (30°C).• The test strip was not stored correctly.• The test strip was used after the expiration date on the bottle.• The test strip bottle was open for more than 3 months.• The test strip is inserted incorrectly. • The Assure Platinum Meter has been damaged or has malfunctioned.• The first drop of control solution was not discarded. • The control solution is contaminated as the tip of the control solution bottle
touched the test strip.
PLEASE NOTE:If your Assure Dose Control Solution result continues to read outside the acceptable range, the system may not be working correctly. DO NOT USE the system until the control solution result is within the acceptable range. If you are unable to solve the problem or need help, please call Customer Service at 800.818.8877 (24 hours a day, 7 days a week, USA and Canada). Contact your diabetes healthcare professional if you cannot reach Customer Service.
PERFORMANCE CHARACTERISTICS FOR CONSUMERS:Assure Platinum performance has been evaluated both in laboratory and clinical tests.Diabetes experts have suggested that glucose meters should agree within 15 mg/dL of a laboratory method and within 20% of a laboratory method when the glucose concentration is 75 mg/dL or higher. The chart below displays how often the Assure Platinum meter achieves this goal. The chart is based on a study done to see how well the Assure Platinum blood glucose meter compared to laboratory results.
FINGERTIP RESULTS - Participant
For glucose results lower than 75 mg/dL, the percent (and number) of meter results that match the laboratory method within 15 mg/dL:
100% 6/6
For glucose results at 75 mg/dL or higher, the percent (and number) of meter results that match the laboratory method within 20%:
97% 92/95
Total number of patients in the study: 101
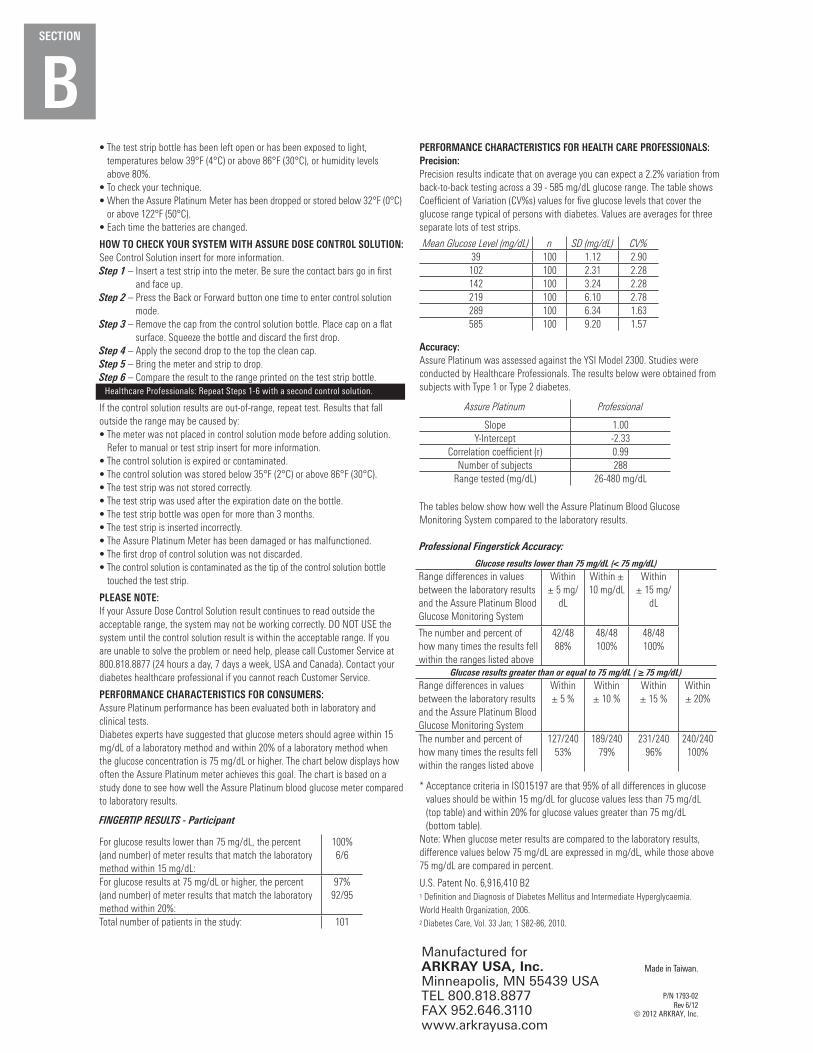
PERFORMANCE CHARACTERISTICS FOR HEALTH CARE PROFESSIONALS:Precision: Precision results indicate that on average you can expect a 2.2% variation from back-to-back testing across a 39 - 585 mg/dL glucose range. The table shows Coefficient of Variation (CV%s) values for five glucose levels that cover the glucose range typical of persons with diabetes. Values are averages for three separate lots of test strips.
Mean Glucose Level (mg/dL) n SD (mg/dL) CV%39 100 1.12 2.90
102 100 2.31 2.28142 100 3.24 2.28219 100 6.10 2.78289 100 6.34 1.63585 100 9.20 1.57
Accuracy: Assure Platinum was assessed against the YSI Model 2300. Studies were conducted by Healthcare Professionals. The results below were obtained from subjects with Type 1 or Type 2 diabetes.
Assure Platinum Professional
Slope 1.00Y-Intercept -2.33
Correlation coefficient (r) 0.99Number of subjects 288
Range tested (mg/dL) 26-480 mg/dL
The tables below show how well the Assure Platinum Blood Glucose Monitoring System compared to the laboratory results. Professional Fingerstick Accuracy:
* Acceptance criteria in ISO15197 are that 95% of all differences in glucose values should be within 15 mg/dL for glucose values less than 75 mg/dL (top table) and within 20% for glucose values greater than 75 mg/dL (bottom table).
Note: When glucose meter results are compared to the laboratory results, difference values below 75 mg/dL are expressed in mg/dL, while those above 75 mg/dL are compared in percent.
U.S. Patent No. 6,916,410 B21 Definition and Diagnosis of Diabetes Mellitus and Intermediate Hyperglycaemia.
World Health Organization, 2006.2 Diabetes Care, Vol. 33 Jan; 1 S82-86, 2010.
© 2012 ARKRAY, Inc.
P/N 1793-02Rev 6/12
Made in Taiwan.
Manufactured for ARKRAy USA, Inc. Minneapolis, MN 55439 USA TEL 800.818.8877 FAX 952.646.3110 www.arkrayusa.com
Glucose results lower than 75 mg/dL (< 75 mg/dL)Range differences in values between the laboratory results and the Assure Platinum Blood Glucose Monitoring System
Within ± 5 mg/
dL
Within ± 10 mg/dL
Within ± 15 mg/
dL
The number and percent of how many times the results fell within the ranges listed above
42/48 88%
48/48 100%
48/48 100%
Glucose results greater than or equal to 75 mg/dL ( ≥ 75 mg/dL)Range differences in values between the laboratory results and the Assure Platinum Blood Glucose Monitoring System
Within ± 5 %
Within ± 10 %
Within ± 15 %
Within ± 20%
The number and percent of how many times the results fell within the ranges listed above
127/240 53%
189/240 79%
231/240 96%
240/240 100%
SECTION
BAssure® Dose Control Solution
IMPORTANT INFORMATION:Please read this information and your Assure® Pro, PocketChem™ EZ, Assure® Platinum, GLUCOCARD® Vital™ or ReliOn® Prime Blood Glucose System User Instruction Manual before testing.
INTENDED USE:For use with Assure Pro, Assure Platinum, GLUCOCARD Vital or ReliOn® Prime Blood Glucose Meter and test strips as a quality control check to verify the accuracy of blood glucose test results.
SUMMARY:Assure Dose Control Solution contains a known amount of glucose that reacts with the test strips. Compare the control solution test result with the range printed on the test strip bottle label.
Materials required: Meter, Test Strips, Control Solution(s), and User Instruction Manual for reference.
USE CONTROL SOLUTION:• Before testing with the system for the first time.• When you open a new bottle of test strips.• Whenever you suspect the meter or test strips may not be functioning
properly.• If test results appear to be abnormally high or low or are not
consistent with clinical symptoms.• The test strip bottle has been left open or has been exposed to light,
temperatures below 39°F (4°C) or above 86°F (30°C), or humidity levels above 80%.
• To check your technique.• When the meter has been dropped or stored below 32°F (0°C) or
above 122°F (50°C).• Each time the batteries are changed.
REAGENT COMPOSITION:Normal (Level 1): ≈80 mg/dL glucose High (Level 2): ≈250 mg/dL glucose99% non-reactive ingredients 99% non-reactive ingredients
LIMITATIONS:Use only with Assure Pro, Assure Platinum, GLUCOCARD Vital or ReliOn® Prime Blood Glucose Meter and Test Strips.
WARNINGS AND PRECAUTIONS:For In Vitro Diagnostic Use.• Assure Dose Control Solution is not intended for human consumption.
Do not drink.• Only use with Assure Pro, Assure Platinum, GLUCOCARD Vital or ReliOn®
Prime Blood Glucose Meter and Test Strips.• To avoid contamination, NEVER touch tip of control solution bottle to
test strip!• Dye in control solution may stain clothing or surfaces.
STORAGE AND HANDLING:• Store the control solution between 35–86°F (2–30°C). • Keep away from direct sunlight and heat. Do not freeze.• Use before the expiration date printed on the bottle.• Use the control solution within 90 days (3 months) of first opening.
It is recommended that you write the date of opening on the control solution bottle label (“Date Opened”) as a reminder to dispose of the opened solution after 90 days.
• Always replace the cap immediately after use.• Assure Dose Control Solution is not a cleaning solution. Do not clean
your meter with Assure Dose Control Solution.
TEST PROCEDURE:Allow control solution to reach room temperature prior to use.
Follow these instructions and refer to the appropriate Blood Glucose System User Instruction Manual for additional information.
Step 1 – Insert a test strip. The meter will turn on automatically. The full screen will appear briefly. Make sure that all symbols appear on the screen.
Step 2 – Press the Back or Forward button one time to enter the control solution mode. A control solution bottle will appear at the top right of the screen.
Important: If you do not enter the control solution mode, the control solution result will NOT be valid. Using the control solution mode will also flag the result in memory. This prevents the result from being part of the averages.
will prompt you to apply the control solution.
Step 3 – Mix solution by gently inverting control solution bottle several times. Remove the cap from the control solution bottle. Place cap on flat surface. Squeeze the bottle and discard the first drop. Apply the second drop to the top of the clean cap.
Step 4 – Bring meter and strip to drop. Test strip will draw up the solution. The meter will show result.Step 5 – Compare the result to the range printed on the test strip bottle. Make sure the result is within acceptable range. If the result falls within this range, the meter and test strip are working correctly.
Healthcare Professionals: Record result in the quality logbook.
Step 6 – Remove the test strip and dispose.Healthcare Professionals: Repeat steps 1-6 with a second control solution.
EXPECTED VALUES:Refer to the test strip bottle for the acceptable range.
TROUBLESHOOTING:If the result is outside the range printed on the test strip bottle, repeat the test. One or more of the following may cause an out-of-range result:
• The meter was not placed in control solution mode before adding solution. Refer to manual or test strip insert for more information.
• The control solution is expired or contaminated.• The control solution was stored below 35°F (2°C) or above 86°F (30°C).• The test strip was not stored correctly.• The test strip was used after the expiration date on the bottle.• The test strip bottle was open for more than 90 days (3 months).• The test strip is inserted incorrectly. • The meter has been damaged or has malfunctioned.• The first drop of control solution was not discarded. • The control solution is contamination as the tip of the control solution
bottle touched the test strip.
Repeat the test, using new control solution or a new test strip, as appropriate. Compare the result with the range printed on the test strip bottle you are using.
PLEASE NOTE:If your Assure Dose Control Solution result continues to read outside the required range printed on the test strip label, the system may not be working correctly. DO NOT USE the system to test your blood glucose until the control solution result is within the accepta ble range. If you are unable to resolve the problem or need assistance, please call Customer Service at 800.818.8877 (24 hours a day, 7 days a week, USA and Canada). Contact your diabetes healthcare professional if you are unable to reach Customer Service.
P/N 1803-04Rev 03/14
SECTION
CSECTION
CName of facility:
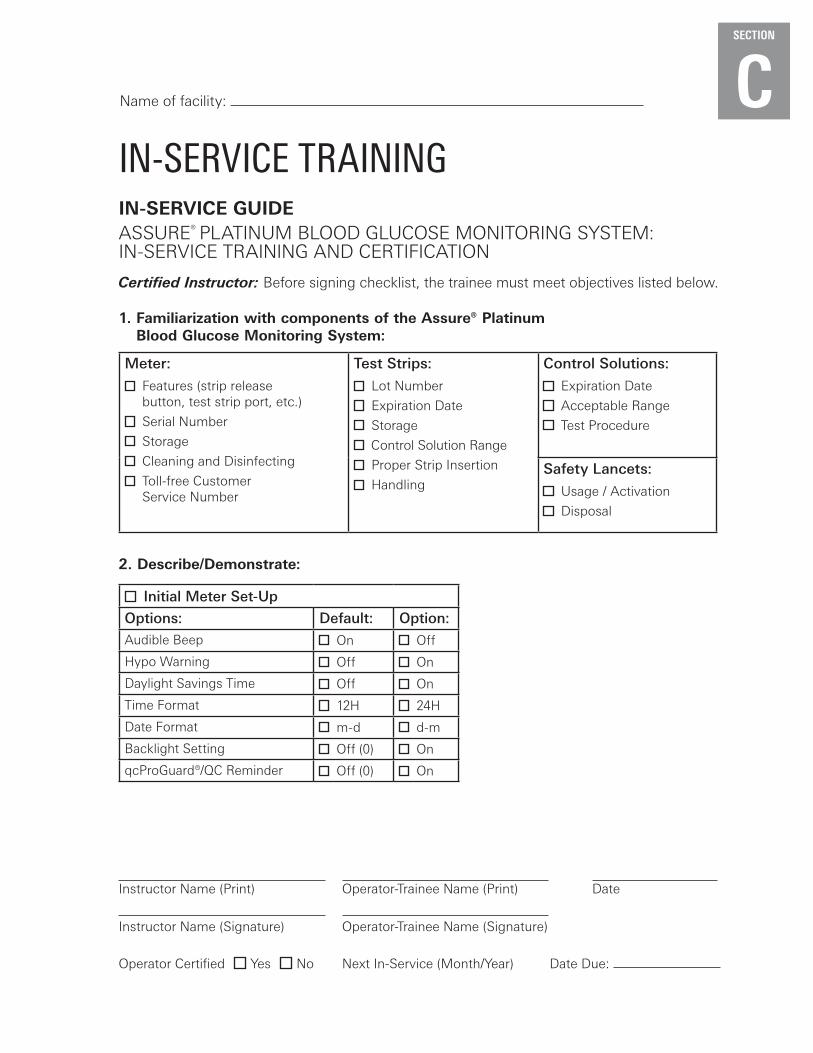
IN-SERVICE TRAINING In-SERvICE GUIDE ASSURE® PLATINUM BLOOD GLUCOSE MONITORING SYSTEM: IN-SERVICE TRAINING AND CERTIFICATION
Certified Instructor: Before signing checklist, the trainee must meet objectives listed below.
1. Familiarization with components of the Assure® Platinum Blood Glucose Monitoring System:
Meter:
Features (strip release button, test strip port, etc.)
Serial Number
Storage
Cleaning and Disinfecting
Toll-free Customer Service Number
Test Strips:
Lot Number
Expiration Date
Storage
Control Solution Range
Proper Strip Insertion
Handling
Control Solutions:
Expiration Date
Acceptable Range
Test Procedure
Safety Lancets:
Usage / Activation
Disposal
2. Describe/Demonstrate:
Initial Meter Set-Up
Options: Default: Option:Audible Beep On Off
Hypo Warning Off On
Daylight Savings Time Off On
Time Format 12H 24H
Date Format m-d d-m
Backlight Setting Off (0) On
qcProGuard®/QC Reminder Off (0) On
Instructor Name (Print) Operator-Trainee Name (Print) Date
Instructor Name (Signature) Operator-Trainee Name (Signature)
Operator Certified Yes No Next In-Service (Month/Year) Date Due:
SECTION
CName of facility:
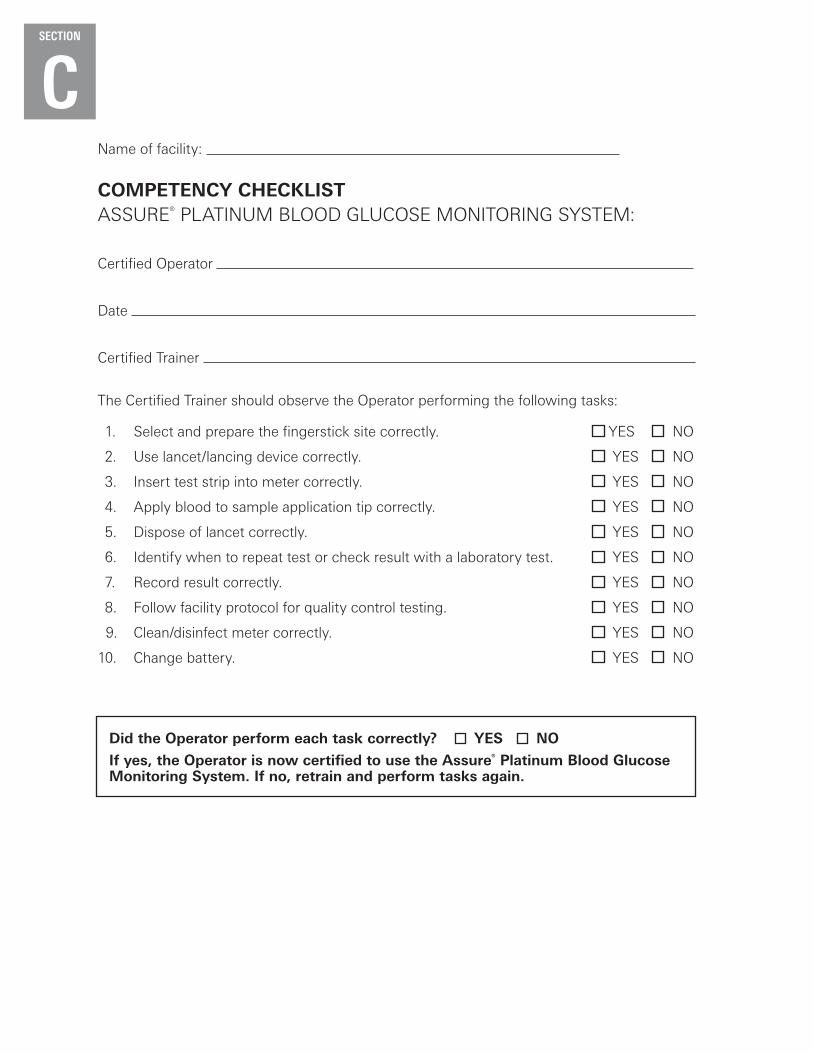
COMPETEnCy CHECKlIST ASSURE® PLATINUM BLOOD GLUCOSE MONITORING SYSTEM:
Certified Operator
Date
Certified Trainer
The Certified Trainer should observe the Operator performing the following tasks:
1. Select and prepare the fingerstick site correctly. YES NO
2. Use lancet/lancing device correctly. YES NO
3. Insert test strip into meter correctly. YES NO
4. Apply blood to sample application tip correctly. YES NO
5. Dispose of lancet correctly. YES NO
6. Identify when to repeat test or check result with a laboratory test. YES NO
7. Record result correctly. YES NO
8. Follow facility protocol for quality control testing. YES NO
9. Clean/disinfect meter correctly. YES NO
10. Change battery. YES NO
Did the Operator perform each task correctly? yES nO
If yes, the Operator is now certified to use the Assure® Platinum Blood Glucose Monitoring System. If no, retrain and perform tasks again.

SECTION
CSECTION
CName of facility:
SElF-TESTASSURE® PLATINUM BLOOD GLUCOSE MONITORING SYSTEM:
The following is a multiple choice self-test that is designed to test your proficiency in using the Assure® Platinum Meter. Answer the questions by circling the letter of the statement that is CORRECT. Check your answers against the correct answers, which are located at the end of the test. More than one answer may be acceptable on some questions.
If you respond incorrectly to any of the questions, make sure you study the section or talk to your certified instructor.
1. The Assure Platinum Meter
a. Uses reflectance technology
b. Uses biosensor technology
c. Stores up to 500 tests in memory
d. Can be used with any brand of test strips
2. The Assure Platinum Test Strips
a. Have a CODE chip that is packaged with every box of test strips
b. Can be used with other meters besides the Assure Platinum
c. Are not sensitive to light, moisture, and humidity
d. Do not require you to code the meter; they are auto-coding
3. When obtaining a blood sample
a. You should not wash the patient’s hand
b. Hang the patient’s arm down below their heart for 10 to 15 seconds to increase blood flow
c. You should lance the side of fingertip
d. You should use the same site selection of the fingertip each time
4. When performing a test with control solutions
a. Solutions should be applied to test strip before it is inserted into the meter
b. The test strip must be in the meter before solutions are applied
c. Use any brand of control solutions
d. Press the “M” Button to enter control solution mode prior to applying solution to the test strip

SECTION
C5. Assure Dose Control Solutions
a. Are for cleaning the meter
b. Are used to verify that the test strips are reacting properly
c. Are good for 90 days after opening
d. Should be used if strips have been exposed to extremes in temperature, light, or humidity
6. When applying blood to the Assure Platinum Test Strips
a. Smear the blood sample
b. Apply it to the reaction site of the test strip
c. Apply it to the sample application tip
d. If meter does not start after adding the first blood drop, you may apply a second drop.
7. The Assure Platinum can be used with
a. Whole blood
b. Serum or plasma
c. Neonatal blood samples
d. Venous blood
8. The Assure Platinum should be cleaned and disinfected between patient tests to avoid cross-contamination? ❏ True ❏ False
9. nurses who use the Assure Platinum meter to test patients should
a. Wear gloves when cleaning the meter
b. Test the meter with two control solutions
c. Not rely on the memory or average features as they are not related to a specific patient
d. Use a safety lancet, such as the Assure® Lance, to obtain a patient’s blood sample
Name:
Date:
Score:
SECTION
C

SECTION
C
1. b, c
2. d
3. b, c
4. b
5. b, c, d
6. c
7. a
8. True
9. a, b, c, d
Answer Key:
SElF-TESTASSURE® PLATINUM BLOOD GLUCOSE MONITORING SYSTEM

SECTION
CnURSE In-SERvICE TRAInInG RECORD ASSURE® PLATINUM BLOOD GLUCOSE MONITORING SYSTEM The healthcare professionals listed below have been trained to use the Assure® Platinum Blood Glucose Monitoring System.
Certified Trainer Name
To be used during the initial training on theAssure® Platinum Blood Glucose Monitoring System by an ARKRAY Representative or Certified Trainer within the facility.
To be kept on file in the Nursing Unit and updated by Certified Trainer.
Date Healthcare Professional’s Name Unit/Station Certified Trainer Initials
Name of facility:
SECTION
D
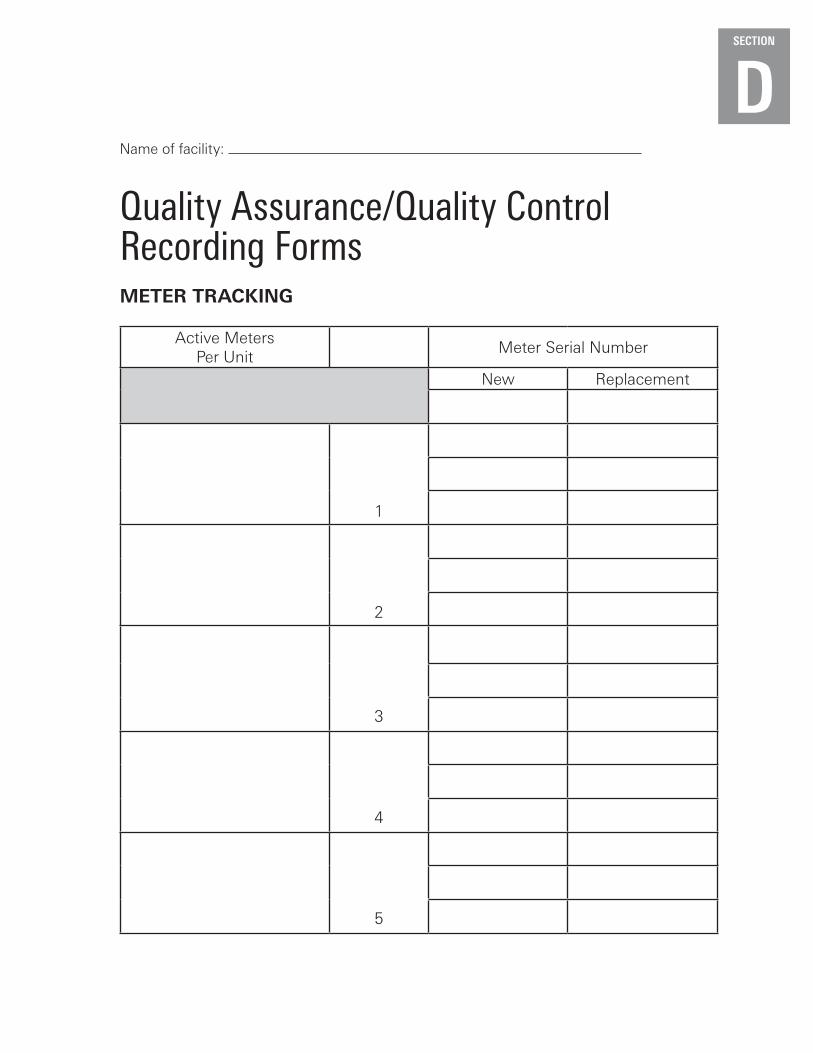
Quality Assurance/Quality Control Recording FormsMETER TRACKInG
Active Meters Per Unit
Meter Serial Number
New Replacement
1
2
3
4
5
Name of facility:
SECTION
DN
ame
of f
acili
ty:
Qua
lity
Con
trol
Rec
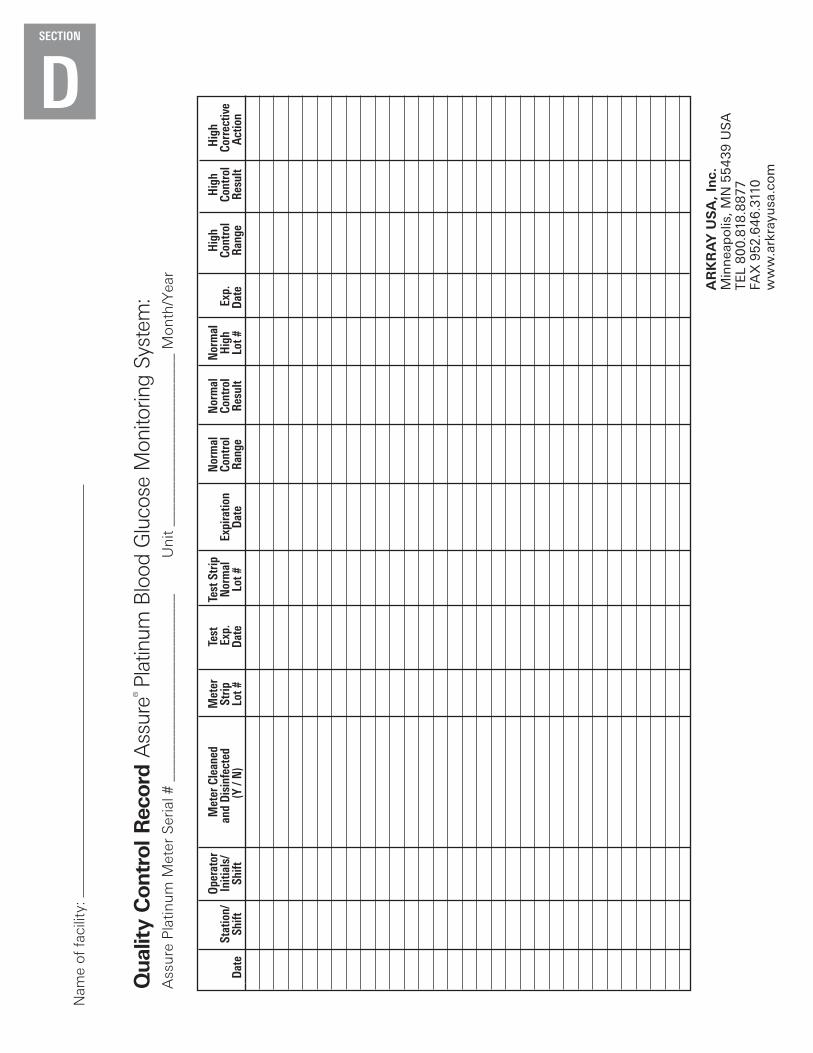
ord A
ssur
e® Pl
atin
um B
lood
Glu
cose
Mon
itorin
g Sy
stem
: A
ssur
e P
latin
um M
eter
Ser
ial #
___
____
____
____
____
____
__
Uni
t __
____
____
____
____
____
_ M
onth
/Yea
r
Op
erat
or
Met
er C
lean
ed
Met
er
Test
Te
st S
trip
Nor
mal
N
orm
al
Nor
mal
Hig
h H
igh
Hig
h
St
atio
n/
Initi
als/
an
d Di
sinf
ecte
d St
rip
Exp
. N
orm
al
Expi
ratio
n Co
ntro
l Co
ntro
l H
igh
Exp
. Co
ntro
l Co
ntro
l
Corr
ectiv
e D
ate
Shift
Sh
ift
(Y /
N)
Lo
t #
Date
Lo
t #
Date
Ra
nge
Resu
lt Lo
t #
Date
Ra
nge
Resu
lt
Act
ion
AR
KR
Ay
US
A,
Inc.
M
inn
eap
olis
, MN
55
43
9 U
SA
TE
L 8
00.
818.
887
7 FA
X 9
52.6
46.
3110
w
ww
.ark
rayu
sa.c
om

SECTION
DFi
eld Ins
pec
tion R
epor
t A
ssur
e® Pl
atin
um B
lood
Glu
cose
Mon
itorin
g Sy
stem
:
Faci
lity:
__
____
____
____
____
____
____
____
___
D
ate:
___
____
____
____
____
____
____
C
onta
ct:
____
____
____
____
____
____
___
Add
ress
: __
____
____
____
____
____
____
____
__
Tim
e: _
____
____
____
____
____
____
__
Pho
ne: _
____
____
____
____
____
____
____
___
____
____
____
____
____
____
____
__
AR
KR
AY
Rep
rese
ntat
ive
Sig
natu
re:
____
____
____
____
____
____
____
____
____
___
M
eter
Set t
o
Nor
mal
Con
trol
Sol
utio
n H
igh
Cont
rol S
olut
ion
Clea
ned
and
Disi
nfec
ted
Batte
ries
Corr
ect
St
atio
n M
eter
Ser
ial #
Ra
nge
Resu
lt Ra
nge
Resu
lt (Y
/N)
OK
Chan
ged
Setti
ngs
Com
men
ts
Com
men
ts:
____
____
____
____
____
____
____
____
____
____
____
____
____
____
____
____
____
____
____
____
____
____
____
____
____
___
____
____
____
____
____
____
____
____
____
____
____
____
____
____
____
____
____
____
____
____
____
____
____
____
____
____
____
____
__
____
____
____
____
____
____
____
____
____
____
____
____
____
____
____
____
____
____
____
____
____
____
____
____
____
____
____
____
__
____
____
____
____
____
____
____
____
____
____
____
____
____
____
____
____
____
____
____
____
____
____
____
____
____
____
____
____
__
AR
KR
Ay
US
A,
Inc.
M
inn
eap
olis
, MN
55
43
9 U
SA
TE
L 8
00.
818.
887
7 FA
X 9
52.6
46.
3110
w
ww
.ark
rayu
sa.c
om
Nam
e of
fac
ility
:
SECTION
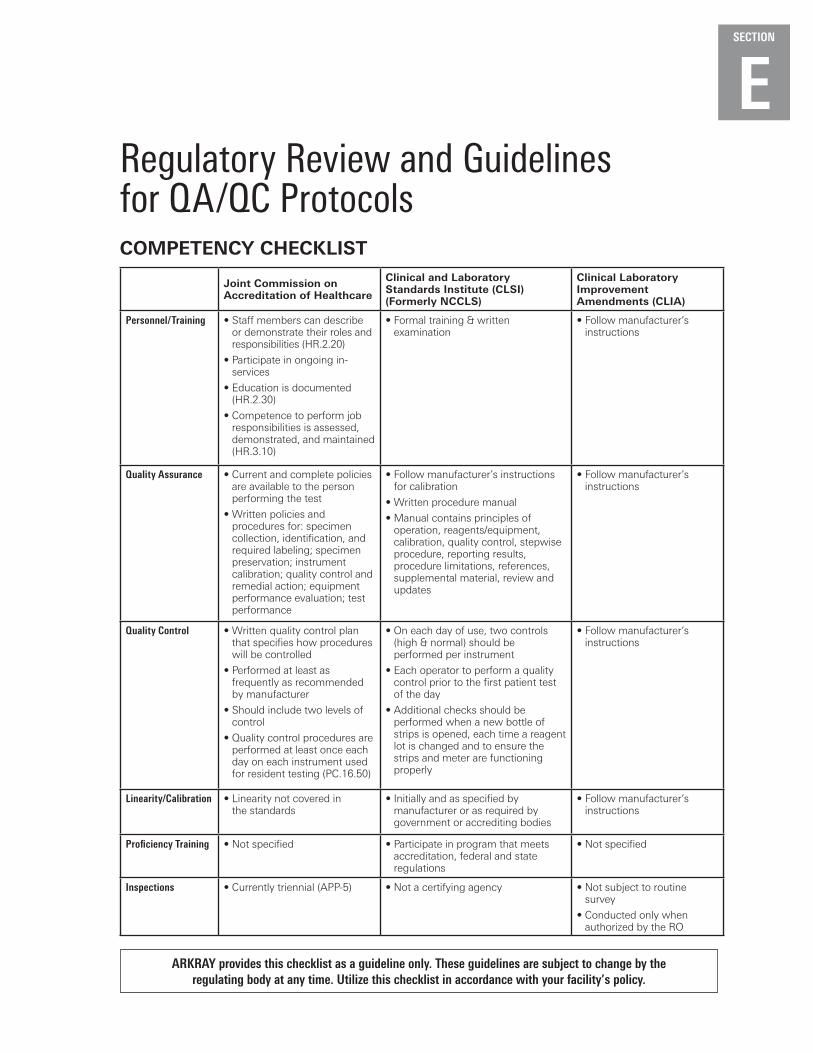
ERegulatory Review and Guidelines for QA/QC ProtocolsCOMPETEnCy CHECKlIST
Joint Commission on Accreditation of Healthcare
Clinical and laboratory Standards Institute (ClSI) (Formerly nCClS)
Clinical laboratory Improvement Amendments (ClIA)
Personnel/Training • Staff members can describe or demonstrate their roles and responsibilities (HR.2.20)
• Participate in ongoing in-services
• Education is documented (HR.2.30)
• Competence to perform job responsibilities is assessed, demonstrated, and maintained (HR.3.10)
• Formal training & written examination
• Follow manufacturer’s instructions
Quality Assurance • Current and complete policies are available to the person performing the test
• Written policies and procedures for: specimen collection, identification, and required labeling; specimen preservation; instrument calibration; quality control and remedial action; equipment performance evaluation; test performance
• Follow manufacturer’s instructions for calibration
• Written procedure manual
• Manual contains principles of operation, reagents/equipment, calibration, quality control, stepwise procedure, reporting results, procedure limitations, references, supplemental material, review and updates
• Follow manufacturer’s instructions
Quality Control • Written quality control plan that specifies how procedures will be controlled
• Performed at least as frequently as recommended by manufacturer
• Should include two levels of control
• Quality control procedures are performed at least once each day on each instrument used for resident testing (PC.16.50)
• On each day of use, two controls (high & normal) should be performed per instrument
• Each operator to perform a quality control prior to the first patient test of the day
• Additional checks should be performed when a new bottle of strips is opened, each time a reagent lot is changed and to ensure the strips and meter are functioning properly
• Follow manufacturer’s instructions
Linearity/Calibration • Linearity not covered in the standards
• Initially and as specified by manufacturer or as required by government or accrediting bodies
• Follow manufacturer’s instructions
Proficiency Training • Not specified • Participate in program that meets accreditation, federal and state regulations
• Not specified
Inspections • Currently triennial (APP-5) • Not a certifying agency • Not subject to routine survey
• Conducted only when authorized by the RO
ARKRAY provides this checklist as a guideline only. These guidelines are subject to change by the regulating body at any time. Utilize this checklist in accordance with your facility’s policy.
SECTION
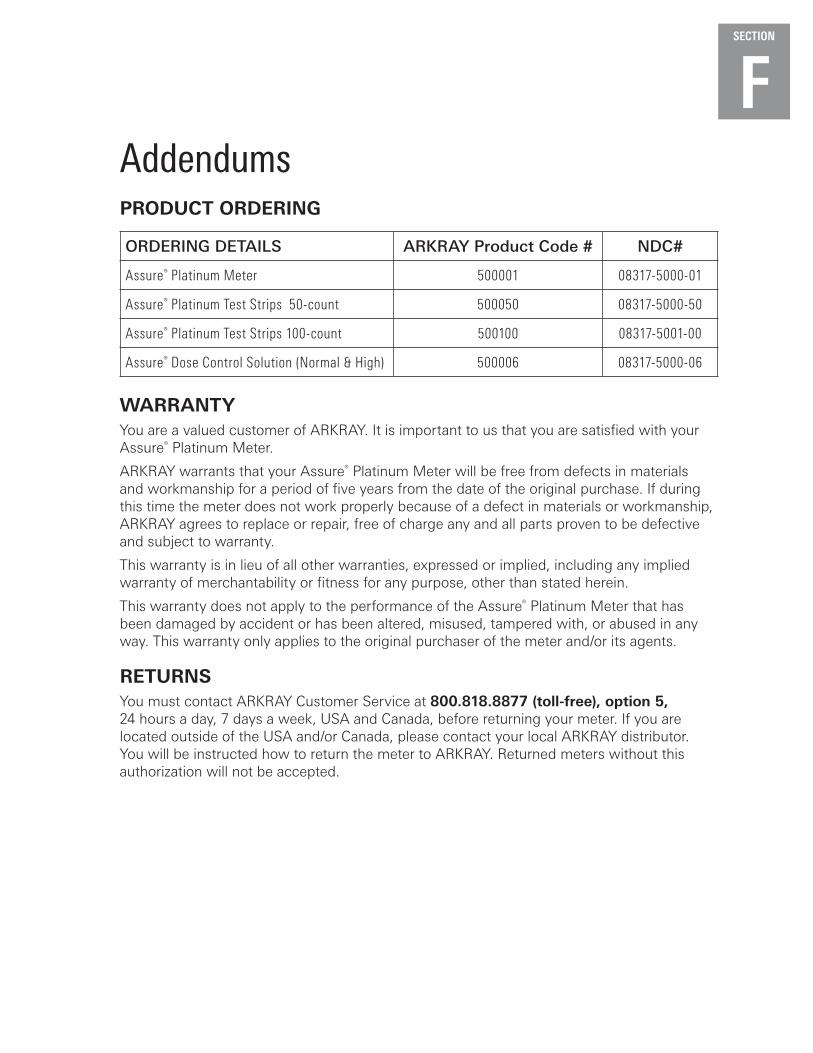
FAddendumsPRODUCT ORDERInG
ORDERING DETAILS ARKRAY Product Code # NDC#
Assure® Platinum Meter 500001 08317-5000-01
Assure® Platinum Test Strips 50-count 500050 08317-5000-50
Assure® Platinum Test Strips 100-count 500100 08317-5001-00
Assure® Dose Control Solution (Normal & High) 500006 08317-5000-06
WARRAnTyYou are a valued customer of ARKRAY. It is important to us that you are satisfied with your Assure® Platinum Meter.
ARKRAY warrants that your Assure® Platinum Meter will be free from defects in materials and workmanship for a period of five years from the date of the original purchase. If during this time the meter does not work properly because of a defect in materials or workmanship, ARKRAY agrees to replace or repair, free of charge any and all parts proven to be defective and subject to warranty.
This warranty is in lieu of all other warranties, expressed or implied, including any implied warranty of merchantability or fitness for any purpose, other than stated herein.
This warranty does not apply to the performance of the Assure® Platinum Meter that has been damaged by accident or has been altered, misused, tampered with, or abused in any way. This warranty only applies to the original purchaser of the meter and/or its agents.
RETURnSYou must contact ARKRAY Customer Service at 800.818.8877 (toll-free), option 5, 24 hours a day, 7 days a week, USA and Canada, before returning your meter. If you are located outside of the USA and/or Canada, please contact your local ARKRAY distributor. You will be instructed how to return the meter to ARKRAY. Returned meters without this authorization will not be accepted.

P/N 6368-04 REV 12/14
Customer Service, 800.818.887724 hours a day, 7 days a week, USA and Canada.
©ARKRAY USA, Inc.
Manufactured for
Minneapolis, MN 55439 USATEL 800.818.8877 www.arkrayusa.com